

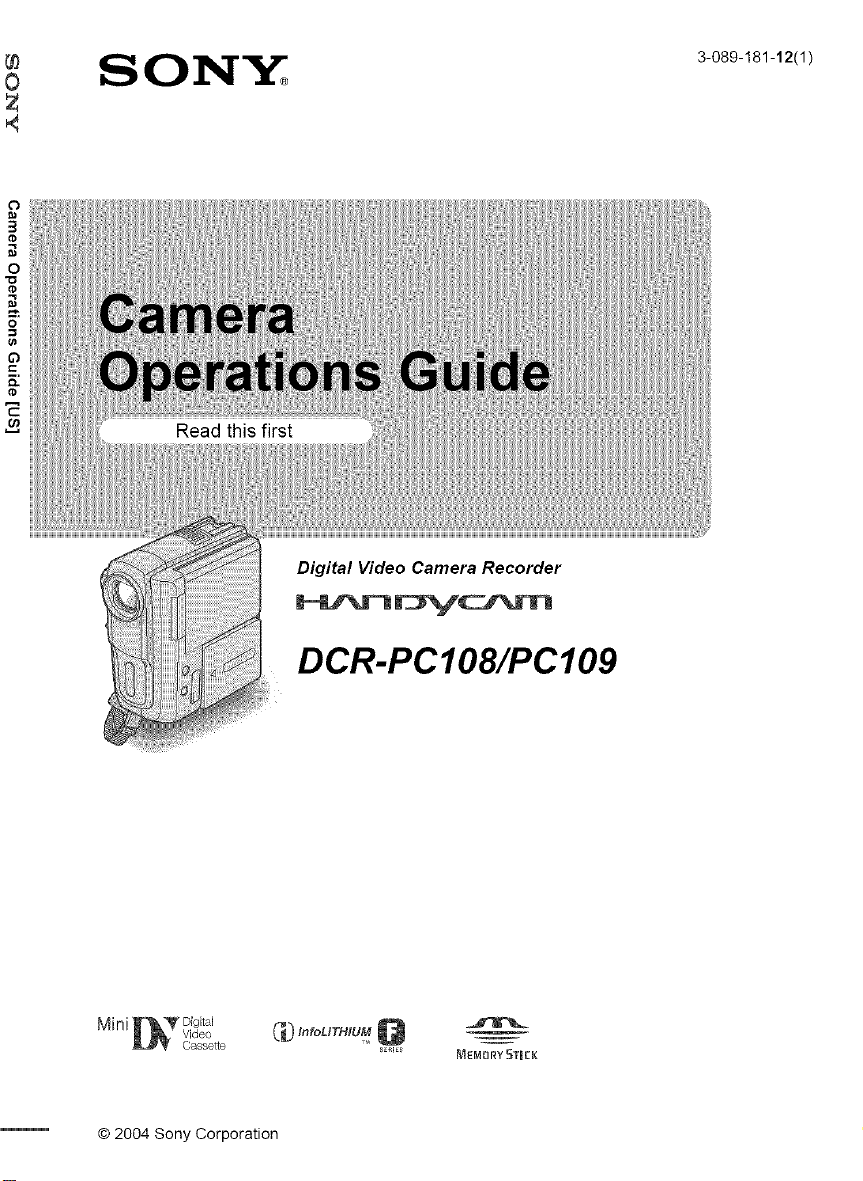
Sony DCR-PC109 Owner’s Manual
SO1N_ 3_o89_181_12/1_
Digital Video Camera Recorder
© 2004 Sony Corporation
DCR-PCIO8/PCI09
_'_ InroUTHlUMQ _
_i_ MEMORY 5TR[K
Read this first
Before operating the unit, please read this
manual thoroughly, and retain it lbr future
reference.
For customers in the U.S.A. and
CANADA
CAUTION
TO PREVENT ELECTRIC SHOCK, MATCH WIDE
BLADE OF PLUG TO WIDE SLOT FULLY
INSERT.
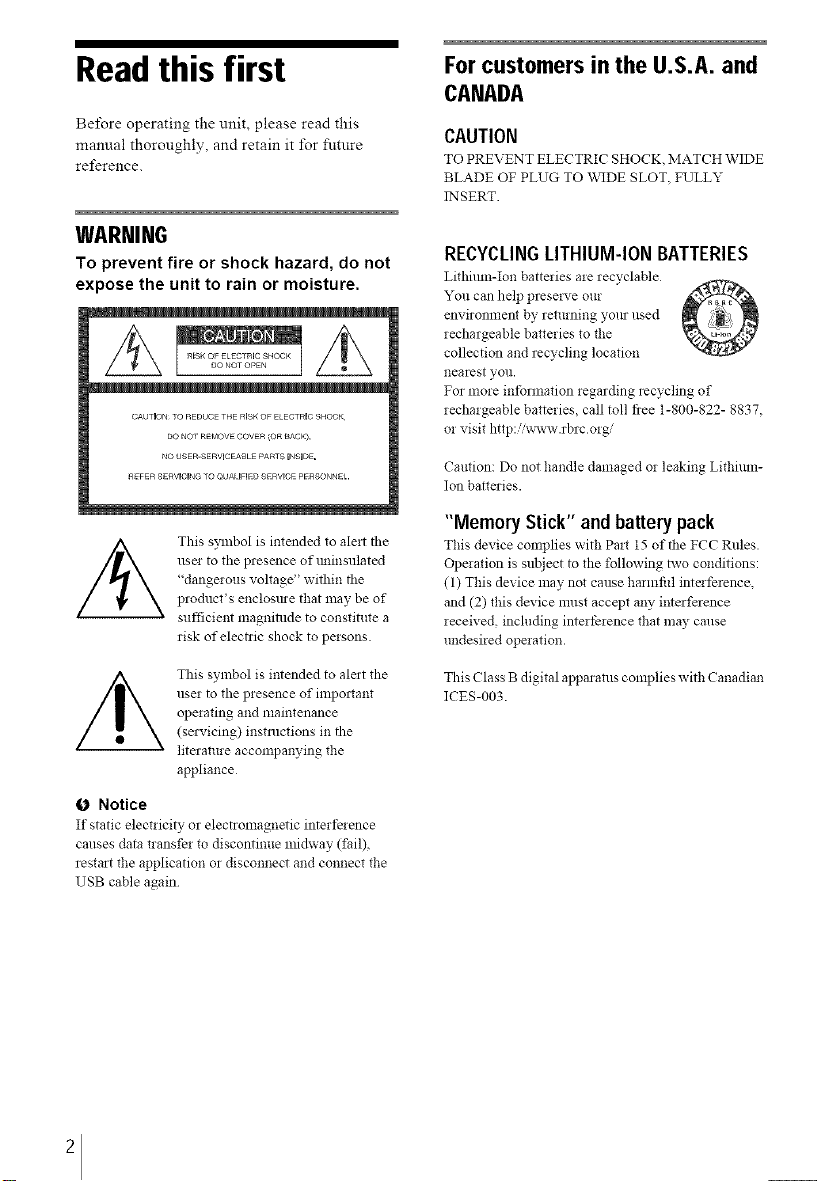
WARNING
To prevent fire or shock hazard, do not
expose the unit to rain or moisture.
CAUTION TO REDUCETHE RISKOF ELECTRICSHOO}<
DO NO_ REI_OV COVR(OR t_ACKL
t_o USER-SERVlCEAI_LE PARTS INSIDE,
REFER SERVlCIIqG TO QUALIFIED SERVlOE PERSON*qEI.
This symbol is intended to ale_t tile
usm to the presence of tminsulated
"dangerous voltage" within tile
product's enclosule that nmy be of
sufficient magnialde to constitute a
risk of electlic shock to persons.
This symbol is imended to Melt the
user to the presence of impoltant
operating and maintenance
(sels,icing) instructions in the
literature accompanying the
appliance
0 Notice
It"static electiicity or electromagnetic interfeience
canses data transfer to discontinue midway (fail),
restart the application or disconnect and connect the
USB cable again
RECYCLINGLITHIUM-IONBMTERIES
Lithimn-Ion batteries me _ecyclable
You can help presmwe our
environment by returning yore used
iechalgeable batteries to tlle
collection and recycling location
nearest VOll.
For more intbrmation regarding recycling of
rechargeable batteries, call toll flee 1-800-822- 8837,
or visit http:iix_avw.rbrc org/
Caution: Do not handle damaged o5 leaking Lithium-
Ion batteries.
"Memory Stick" andbatterypack
This device complies with Past 15 of the FCC Rules.
Operation is subject to the following hvo conditions:
(1) This device may not cause harmfifl intei_rence,
and (2) this device must accept any interference
received, including intert)rence that may cruise
undesired operation.
This Class B digital apparatus complies with Canadian
ICES-003.
2
For customers in the U.S.A.
If_u ha_e any _stions abort _is product, you may
call:
Sony Customel Inforlnation Center 1-800-222-$0NY
(7669).
The munber below is tbr the FCC related mattels only.
Regulatory Int)lma*ion
Declaration of Conformity
Trade Name: SONY
Model No.: DCR-PC 109
Responsible Pa*ty: Sony Electronics Inc.
Address: 16450 W. Bernardo Dr, San Diego, CA
92127 US.A
Telephone No.: 858-942-2230
This device complies with Part 15 of the FCC Rules.
Opeiation is subject to the following two conditions:
(t) This device may not cause harmfill interference,
and (2) this device nmst accept any interference
received, inchlding interference that may cruise
tmdesired operation.
0 Note:
DCR-PC 109 is to be used with Handycam Station
Model DCRA-C 111 and AC Power Adaptor Model
AC-L25AiL25B
Owner's Record
Tile model and serial nunlbe:s are located on tile
bottom. Record the serial nmrtber in the space
provided below Refer to these numbers whenever you
call upon your Sony dealer regarding this prodllct.
Model No.DCR-PC
Seiial No
Model No.AC-
Seiial No
CAUTION
You ale camioned that any changes or modifications
not expressly approved in this manual could void your
authority to operate this equipment
0 Note:
This equipnlent has been tested and found to comply
with the limits for a Class B digital device, purslmnt to
Pair 15 of the FCC Rules.
These limits are designed to provide reasonable
protection against harmfill interference in a residential
installation. This equipment generates, uses, and can
radiate radio frequency ener_, and, if not installed and
used in accordance with the instructions, may cause
harmfill interfelence to radio conmmnications
Howevel, there is no guarantee that interference will
not occur in a particular installation If this equipment
does cause harmfill interference to radio or television
reception, which can be determined by turning the
equipnlent offand on, the user is encoreaged to t!3' to
correct the interfelence by one or more of the
following measmes:
Reorient or relocate the receiving antenna
Increase the separation between the equipment and
receiver.
Connect the equipment to an outlet on a circuit
dift)rent fiom that to which the recei;;er is
connected.
Consult a Sony dealer or an expelienced radioiTV
technician for help
The supplied interface cable must be used with the
eqmpment in order to comply with the limits for a
digital device pursuant to Subpart B of Part 15 of FCC
Rules
Notes on use
Note on Cassette Memory
Your camcorde! is based on the DV tbnnat. You can
use only mini DV cassettes in yore camcorder Use of
mini DV cassettes with Cassette Memo!), is
recommended as you can use Title search (p. 61 ), Date
search (p. 62), [_TITLE] (p 8t), [_TAPE
TITLE] (p 83).
(assettes with Cassette Memory are marked
with (_l_.
Note on the type of "Memory Stick" you
can use in your camcorder
You can use only a "Memoir" Stick Duo" which is
about half the size of a standard "Melnory Stick," in
yotu- camcorder (p 128)
The MEMORYSTICK[_UOmark is indicated on the
"Memol 3, Stick Duo ."
=_continued
3
Notes on recording
• Betbre starting to lecold test the recolding fimction
to make stile the picture and sotmd are recorded
without any problems
• Compensation tbr the contents of recordings cannot
be provided, even if recording or playback is not
possible due to a malfimction of the camcorder,
storage media, etc
• TV color systems differ depending on the countries/
regions To view your recordings on a TV, you need
an NTSC system-based TV
• Television programs, fihns, video tapes, and mher
materials may be copyrighted Unauthorized
recording of such materials may be contrary to the
copylight laws
Notes on the LCD panel, viewfinder, and
lens
• The LCD screen and tile viewfinder are
manufactured using extremely high-precision
technology, so over 99.99% of the pixels are
operational for effective use
Howevel, there may be some tiny black points and/
or bright points (white, red, blue, or green in color)
that appear constantly on the LCD screen and the
viewfinder
These points are normal results of the manufacturing
process and do not affect the recording in any way.
• Exposing the LCD screen, the viewfinder, or the lens
to direct stmlight for long peliods of time may cause
malfimclions. Be careflll when placing the camera
near a window or outdoors.
• Do not aim at the sun Doing so might cause your
camcorder to malfimction. Take pictmes of the sun
only in low light conditions, such as at dusk.
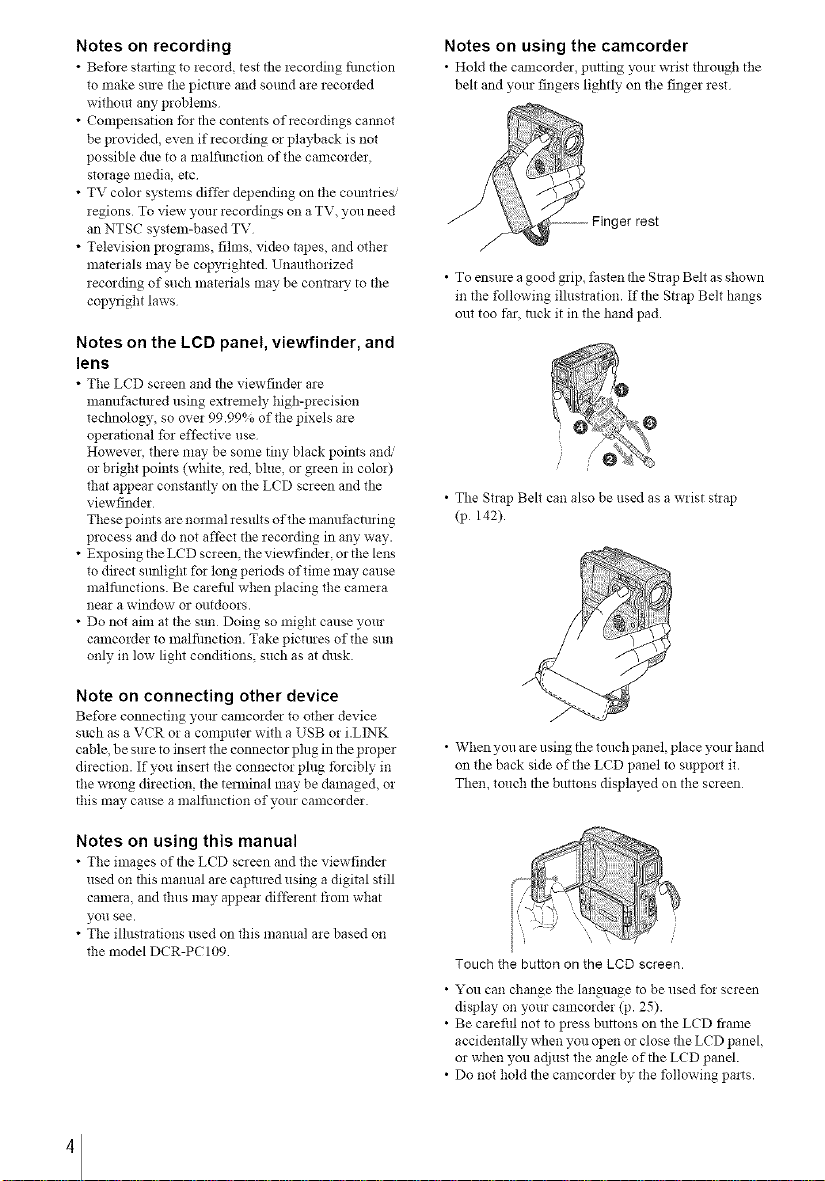
Notes on using the camcorder
• Hold the camcorder putting your wrist through the
belt and yore fingers lightly on the finger rest
rest
• To ensure a good grip, fasten the Strap Belt as shown
in the following illustration. If the Strap Belt hangs
out too tar, tuck it in the hand pad.
• The Strap Belt can also be used as a wrist stlap
(p 142).
Note on connecting other device
Before connecting your camcolder to other device
such as a VCR or a computer with a USB or i.LINK
cable, be sure to inselt the connector phlg in the proper
direction. If you inselt the connector phlg tbrcibly in
the wrong direction, the terminal may be damaged, or
this may cause a malfimction of your camcorder.
Notes on using this manual
• The images of the LCD screen and the viewfinder
used on this manual are captured using a digital still
camera, and thus may appear different from what
yoll see.
• The ilhlstrations used on this manual are based on
the model DCR-PC 109
4
• When you are using the touch panel, place yore hand
on the back side of the LCD panel to support it.
Then, touch tile buttons displayed on the scleen
Touch the button on the LCD screen.
• You can change the language to be used for screen
display on your camcorder (p. 25).
• Be carefifl not to press buttons on the LCD fiame
accidentally when you open or close the LCD panel,
or when you adjust the angle of tile LCD panel.
• Do not hold the camcorder by the following pa_ts.
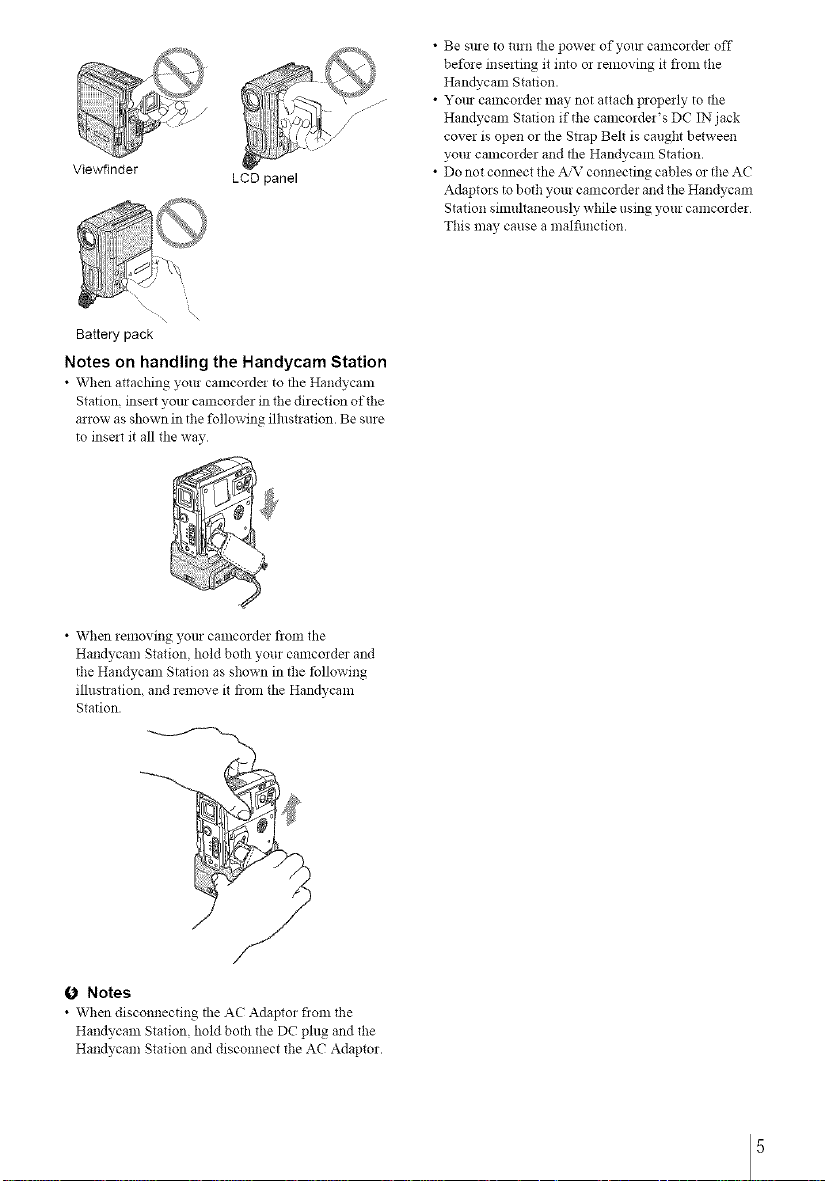
/
Viewfinder
• \
Battery pack
Notes on handling the Handycam Station
• When attaching your camcorde! to tile Handycam
Station insert yore camcolder in the direction of the
arrow as shown in the following illustlation. Be sure
to insat it all tile way
LCD panel
\
• Be sine to turn the power of yore camcorder off
before mse*ting it into or removing it flora the
Han@cam Station•
• Yore camcorder may not attach properly to the
Han@cam Station if the camcorder's DC IN jack
cover is open or the Strap Belt is caught between
yore camcorder and the Handycam Station.
• Do not cotmect the A,'N"connecting cables or the AC
Adaptors to both your camcorder and the Handycam
Station simultaneously while using your camcorder
This may cause a malfimction.
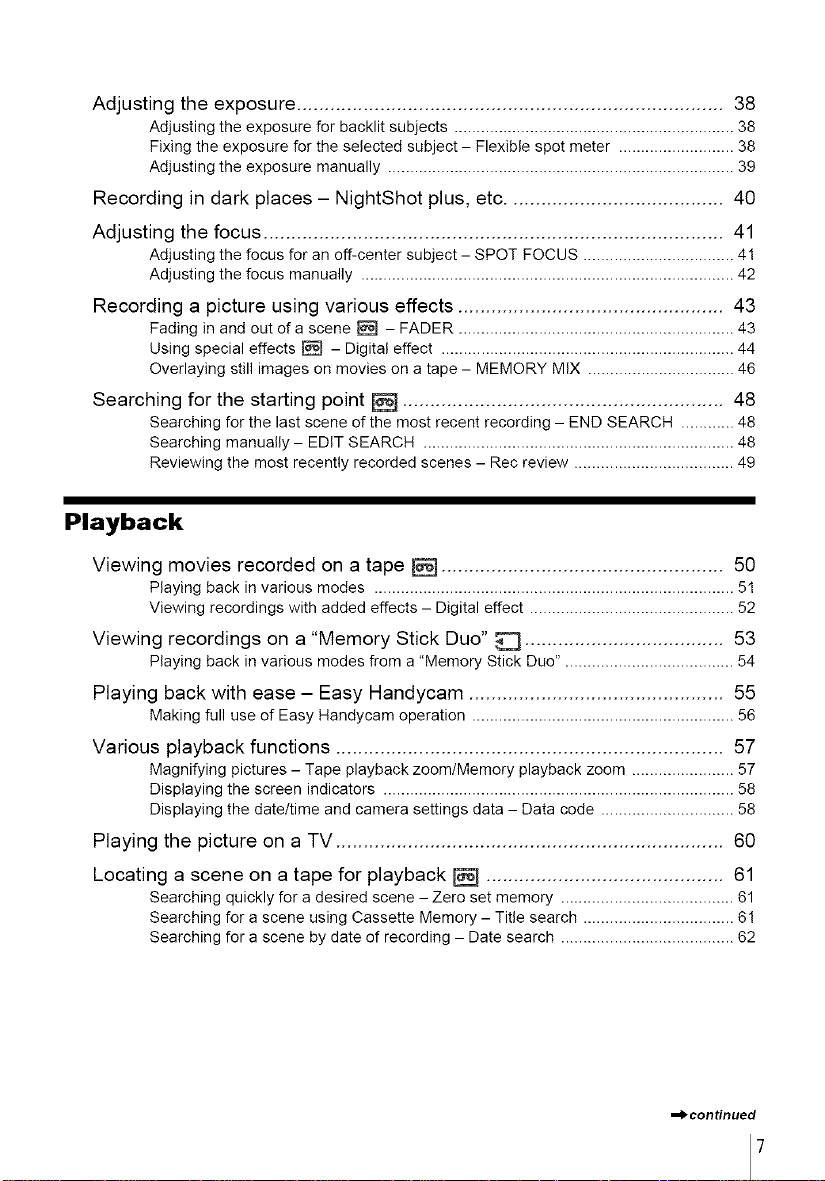
• When removing yore camcorder from the
Handycam Station, hold both your camcorder and
the Handycam Station as shown in the tbllowing
illusnation, and remove it from tile Han@cam
Station•
(J Notes
• When disconnecting the AC Adaptor flora the
Handycam Station, hold both the DC plug and the
Hart@cam Station and disconnect the AC Adaptor•
5
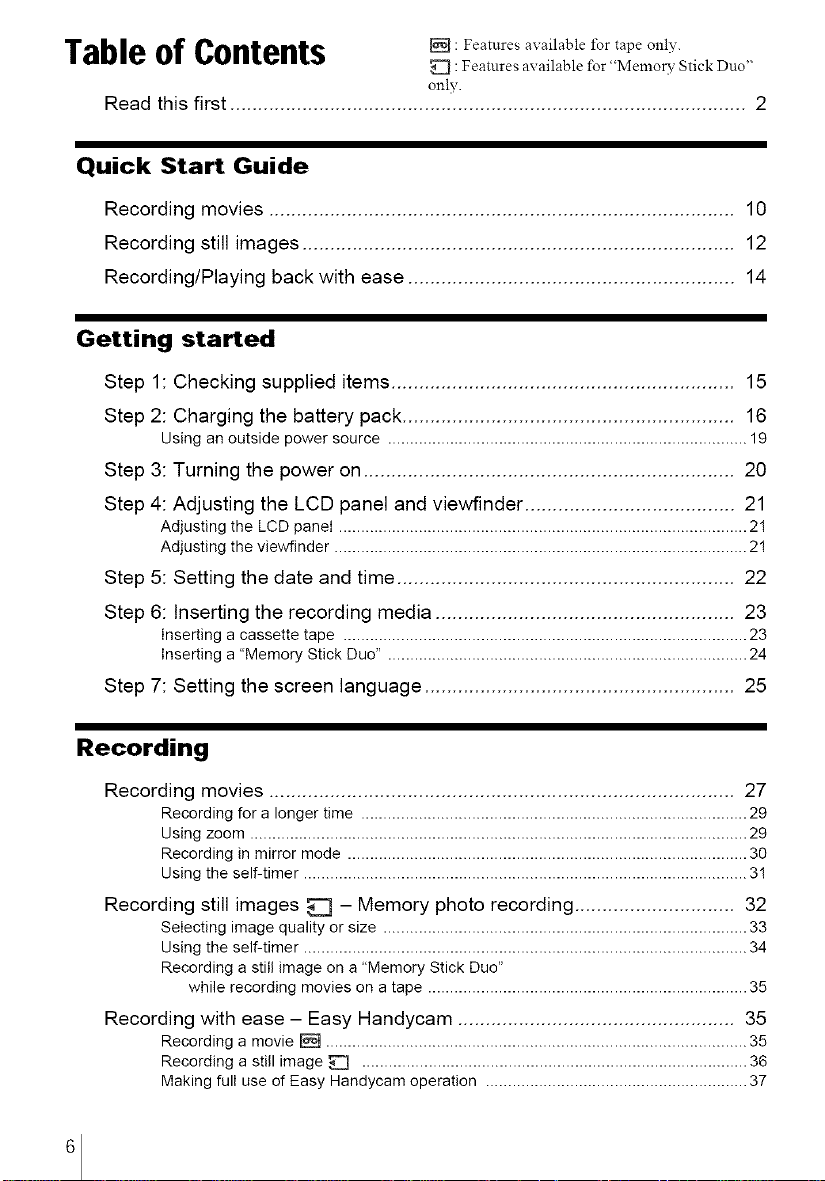
Table of Contents []: Features t peon,,,.
[] :Features available for "Memol T Stick Duo"
onlv.
Read this first ............................................................................................. 2
Quick Start Guide
Recording movies .................................................................................... 10
Recording still images .............................................................................. 12
Recording/Playing back with ease ........................................................... 14
Getting started
Step 1: Checking supplied items .............................................................. 15
Step 2: Charging the battery pack ............................................................ 16
Using an outside power source ................................................................................. 19
Step 3: Turning the power on ................................................................... 20
Step 4: Adjusting the LCD panel and viewfinder ...................................... 21
Adjusting the LCD panel ............................................................................................ 2!
Adjusting the viewfinder ............................................................................................. 2!
Step 5: Setting the date and time ............................................................. 22
Step 6: Inserting the recording media ...................................................... 23
Inserting a cassette tape ........................................................................................... 23
Inserting a "Memory Stick Duo" ................................................................................. 24
Step 7: Setting the screen language ........................................................ 25
Recording
Recording movies .................................................................................... 27
Recording for a longer time ....................................................................................... 29
Using zoom ................................................................................................................ 29
Recording in mirror mode .......................................................................................... 30
Using the self-timer .................................................................................................... 3!
Recording still images _[] - Memory photo recording ............................. 32
Selecting image quality or size .................................................................................. 33
Using the self-timer .................................................................................................... 34
Recording a still image on a "Memory Stick Duo"
while recording movies on a tape ........................................................................ 35
Recording with ease - Easy Handycam .................................................. 35
Recording a movie [] ............................................................................................... 35
Recording a still image _[] ....................................................................................... 36
Making full use of Easy Handycam operation ........................................................... 37
6
Adjustingtheexposure.............................................................................38
Adjusting the exposure for backlit subjects ............................................................... 38
Fixing the exposure for the selected subject - Flexible spot meter .......................... 38
Adjusting the exposure manually .............................................................................. 39
Recording in dark places - NightShot plus, etc....................................... 40
Adjusting the focus ................................................................................... 41
Adjusting the focus for an off-center subject - SPOT FOCUS .................................. 41
Adjusting the focus manually .................................................................................... 42
Recording a picture using various effects ................................................ 43
Fading in and out d a scene [_q - FADER .............................................................. 43
Using special effects _ - Digital effect .................................................................. 44
Overlaying still images on movies on a tape - MEMORY MIX ................................. 46
Searching for the starting point [] .......................................................... 48
Searching for the last scene of the most recent recording - END SEARCH ............ 48
Searching manually - EDIT SEARCH ...................................................................... 48
Reviewing the most recently recorded scenes - Rec review .................................... 49
Playback
Viewing movies recorded on a tape [] ................................................... 50
Playing back in various modes ................................................................................. 51
Viewing recordings with added effects - Digital effect .............................................. 52
Viewing recordings on a "Memory Stick Duo" _ .................................... 53
Playing back in various modes from a "Memory Stick Duo". ..................................... 54
Playing back with ease - Easy Handycam .............................................. 55
Making full use of Easy Handycam operation ........................................................... 56
Various playback functions ...................................................................... 57
Magnifying pictures - Tape playback zoom/Memory playback zoom ....................... 57
Displaying the screen indicators ............................................................................... 58
Displaying the date/time and camera settings data - Data code .............................. 58
Playing the picture on a TV ...................................................................... 60
Locating a scene on a tape for playback [] ........................................... 61
Searching quickly for a desired scene - Zero set memory ....................................... 61
Searching for a scene using Cassette Memory - Title search .................................. 6!
Searching for a scene by date of recording - Date search ....................................... 62
=bcontinued
7
Advanced operations
Using the Menu
Selecting menu items ........................ 63
Using the _(i} (CAMERA SET) menu
- PROGRAM AE/WHITE BAL.I16:9
WIDE, etc ..................................... 65
Using the (MEMORY SET) menu
- BURSTIQUALITY/IMAGE SIZE/
ALL ERASE/NEW FOLDER,
etc ................................................ 71
Using the _ (PICT. APPLI.) menu
- PICT. EFFECTISLIDE SHOW/
FRAME REC/INTERVAL REC/INT.
REC-STL, etc .............................. 75
Using the _.? (EDIT/PLAY) menu
- _£] TITLEI[_ TAPE TITLE, etc.
...................................................... 80
Using the (STANDARD SET) menu
- [_q REC MODE/MULTI-SOUND/
AUDIO MIX/USB-CAMERA,
etc ................................................ 84
Using the @_, (TIMEILANGU.) menu
- CLOCK SET/WORLD TIME,
etc ................................................ 89
Customizing Personal Menu .............. 90
Dubbing/Editing
Connecting to a VCR or TV ............... 93
Dubbing to another tape [] .............. 94
Recording pictures from a VCR or
TV ................................................ 95
Dubbing pictures from a tape to a
"Memory Stick Duo" ..................... 96
Dubbing still images from a "Memory
Stick Duo" to a tape ..................... 97
Dubbing selected scenes from a tape
- Digital program editing .............. 98
Dubbing sound to a recorded
tape [] ...................................... 105
Deleting recorded pictures [] ......... 107
Marking recorded images with specific
information _ - image protection/
Print mark ................................... 108
Printing recorded images (PictBridge
compliant printer) _Z] ................. 110
Troubleshooting
Troubleshooting ............................... 113
Warning indicators and messages ... 121
Additional Information
Using your camcorder abroad ......... 126
Usable cassette tapes ..................... 127
About the "Memory Stick" ................ 128
About the "InfoLITHIUM" battery
pack ............................................ 131
About i.LINK ..................................... 132
Maintenance and precautions .......... 133
Specification .................................... 136
Quick Reference
Identifying parts and controls ........... 139
index ................................................ 147
Refer also to other operating instructions supplied
with your camcorder:
• Editing images with yore computer
.¢Computer Applications Guide
8

9
Quick Start Guide
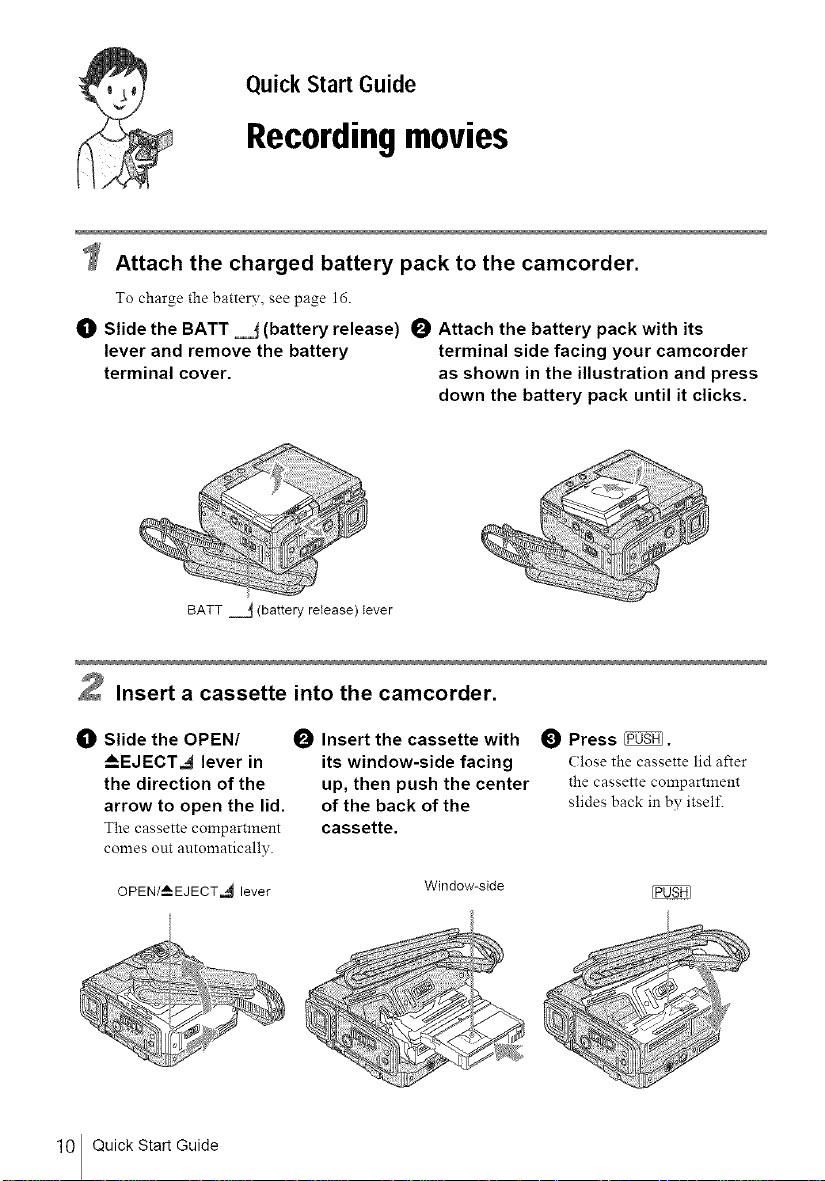
Recordingmovies
W Attach the charged battery pack to the camcorder.
To charge the battery, see page 16.
_]) Slide the BATT __ (battery release) O Attach the battery pack with its
lever and remove the battery terminal side facing your camcorder
terminal cover, as shown in the illustration and press
down the battery pack until it clicks.
BATT _=d (battery re;ease) lever
2 Insert a cassette into the camcorder.
_]) Slide the OPEN/
_--EJECT_I lever in
the direction of the
arrow to open the lid.
The cassette compartment
comes out automatically.
OPEN/_EJECT,_ lever
Insert the cassette with
its window-side facing
up, then push the center
of the back of the
cassette,
10 Quick Start Guide
I_ Press _.
(lose the cassette lid after
the cassette compartment
slides back in bv itself.
Window-side
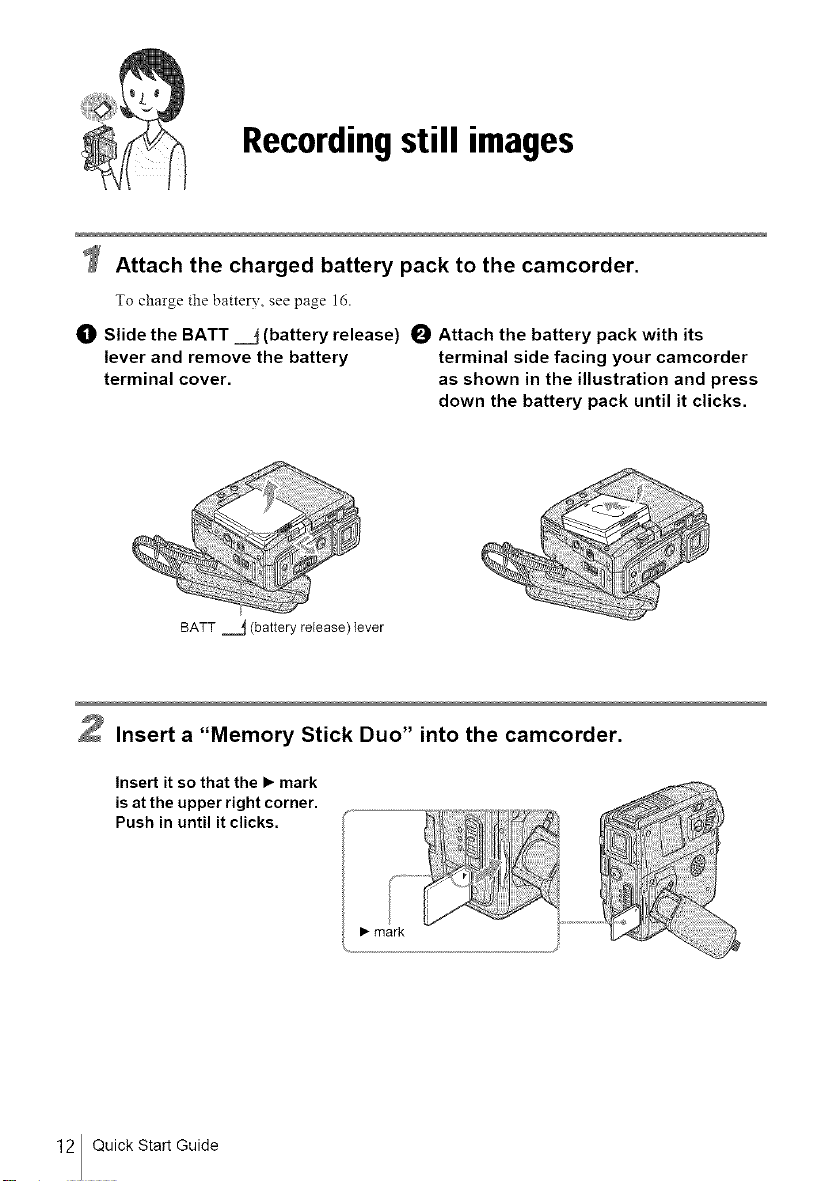
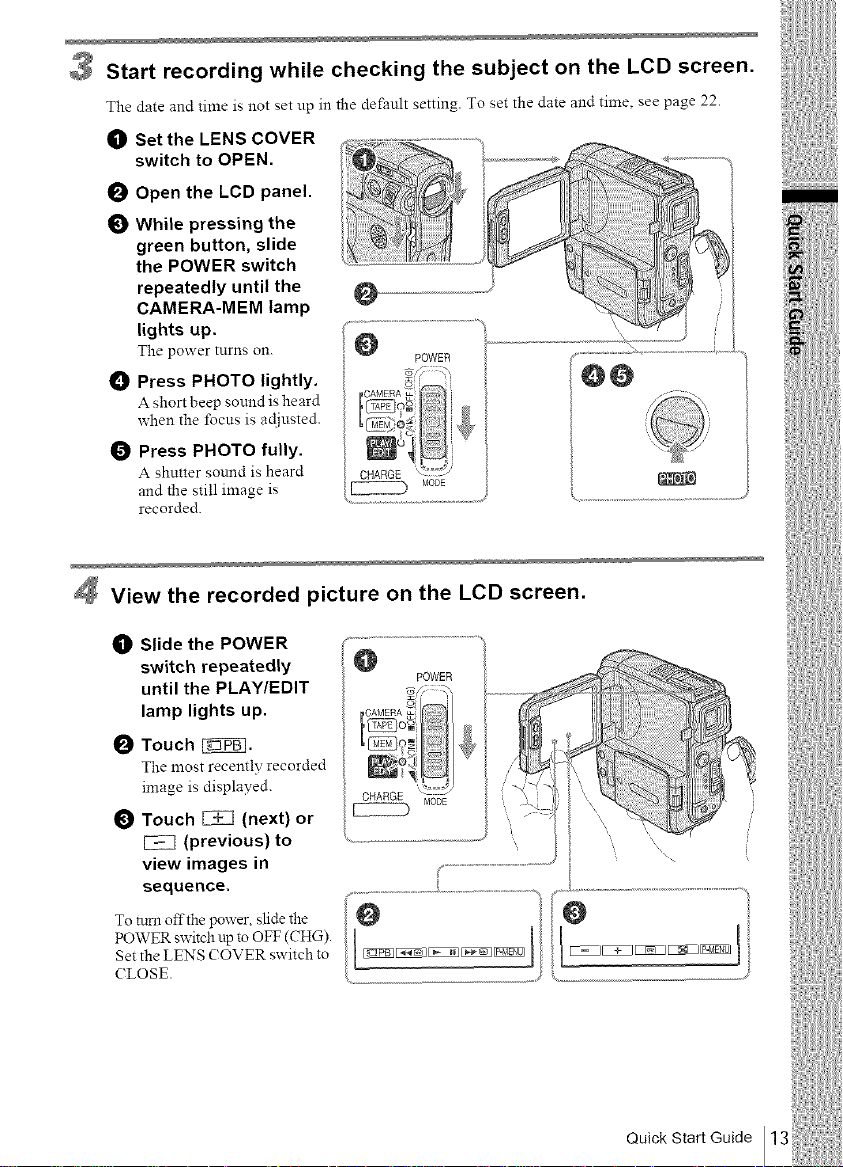
Recordingstill images
W Attach the charged battery pack to the camcorder.
To charge the battery, see page 16.
_]1 Slide the BATT ==j (battery release) O Attach the battery pack with its
lever and remove the battery terminal side facing your camcorder
terminal cover, as shown in the illustration and press
down the battery pack until it clicks.
.........._{_:_i;i!i!iii_iiii!iiiiii_!!!i_i__
BATT _ (battery release) {ever
2 Insert a "Memory Stick Duo" into the camcorder.
Insert it so that the I_ mark
is at the upper right corner.
Push in until it clicks.
• mark
12 Quick Start Guide
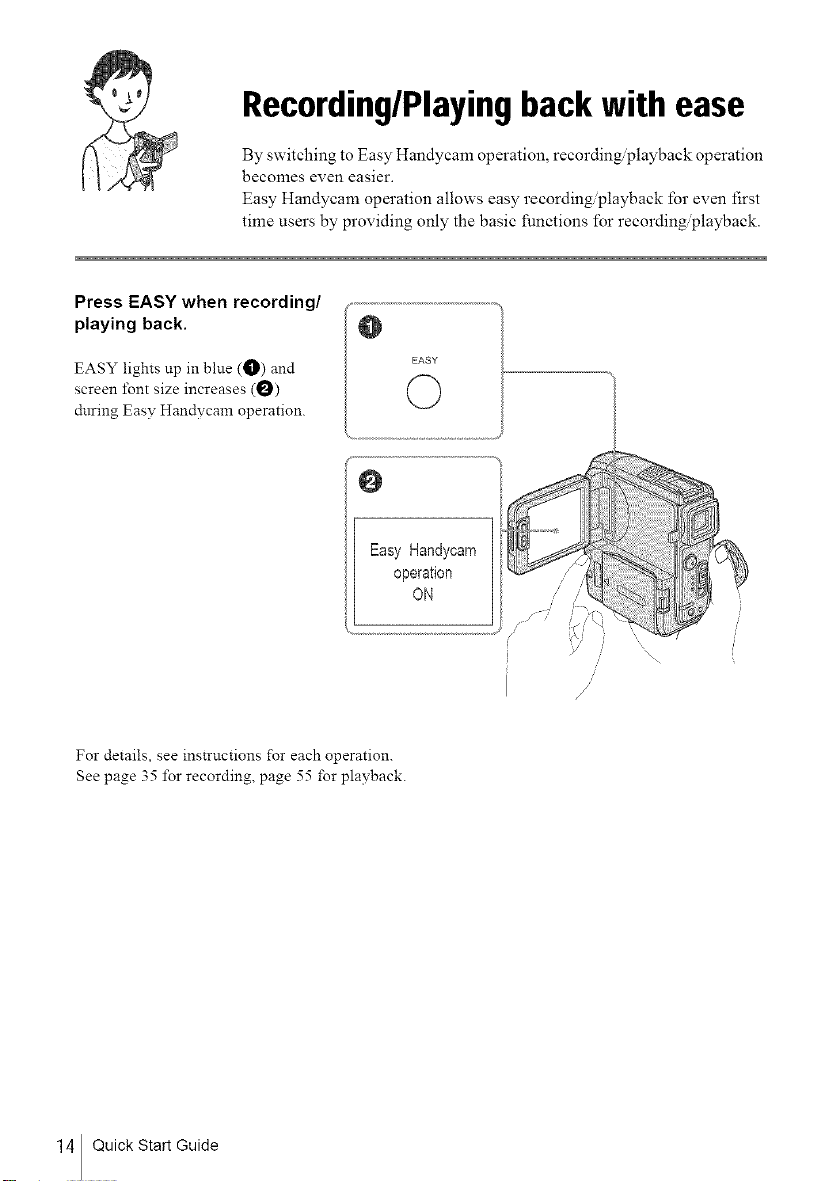
Recording/Playingback with ease
By switching to Easy Handycam operation, recording/playback operation
becomes even easier.
Easy Handycam operation allows easy recording/playback for even first
time users by providing only the basic functions for recording@layback.
Press EASY when recording/
playing back.
EASY lights up m blue (O) and
screen font size increases (0)
during Easy Handycam operation.
Easy Handycam
operation
ON
J
For details, see instructions for each operation.
See page 35 lbr recording, page 55 for playback.
14 Quick Start Guide
Gettingstarted
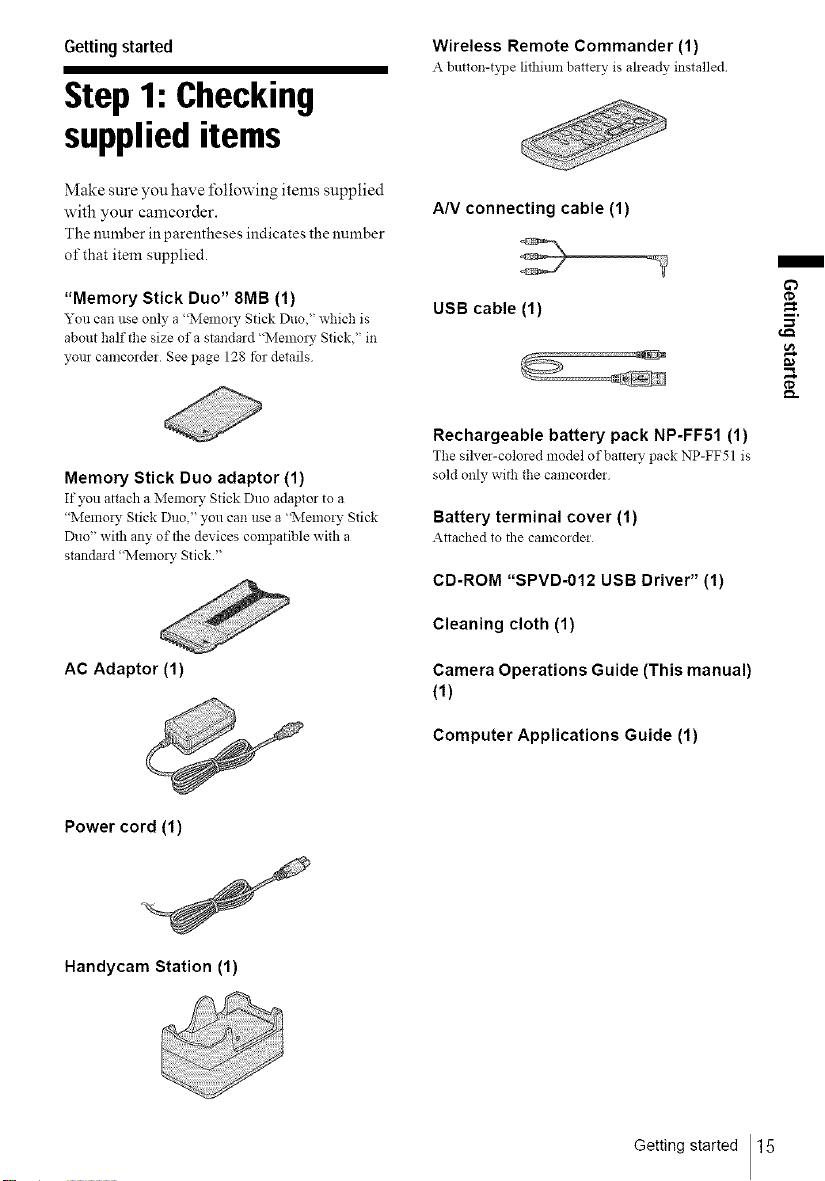
Step 1: Checking
supplieditems
Make sure you have following items supplied
with your camcorder.
The number in parentheses indicates the number
of that item supplied.
"Memory Stick Duo" 8MB (1)
You can use only a "Memo!), Stick Duo' which is
about half the size of a standard "Memo_7 Stick," in
your camcorder See page 128 tk_rdetails
Memory Stick Duo adaptor (1)
If you attach a Memo_, Stick Duo adaptor to a
"Memo! 7 Stick Duo," you can use a "Memory Stick
Duo" with any of the devices compatible with a
standard "Memo_), Stick."
Wireless Remote Commander (1)
A button-t_q)e lithium batte W is aheady installed
A/V connecting cable (1)
m
¢D
USB cable (1)
Rechargeabte battery pack NP-FF51 (1)
The silver-colored model ofbatte W pack NP-FF51 is
sold only with the camcoldei
Battery terminal cover (1)
Attached to the camco_dei
CD-ROM "SPVD-012 USB Driver" (1)
Cleaning cloth (1)
AC Adaptor (1)
Power cord (1)
Handycam Station (1)
Camera Operations Guide (This manual)
(1)
Computer Applications Guide (1)
Getting started 15
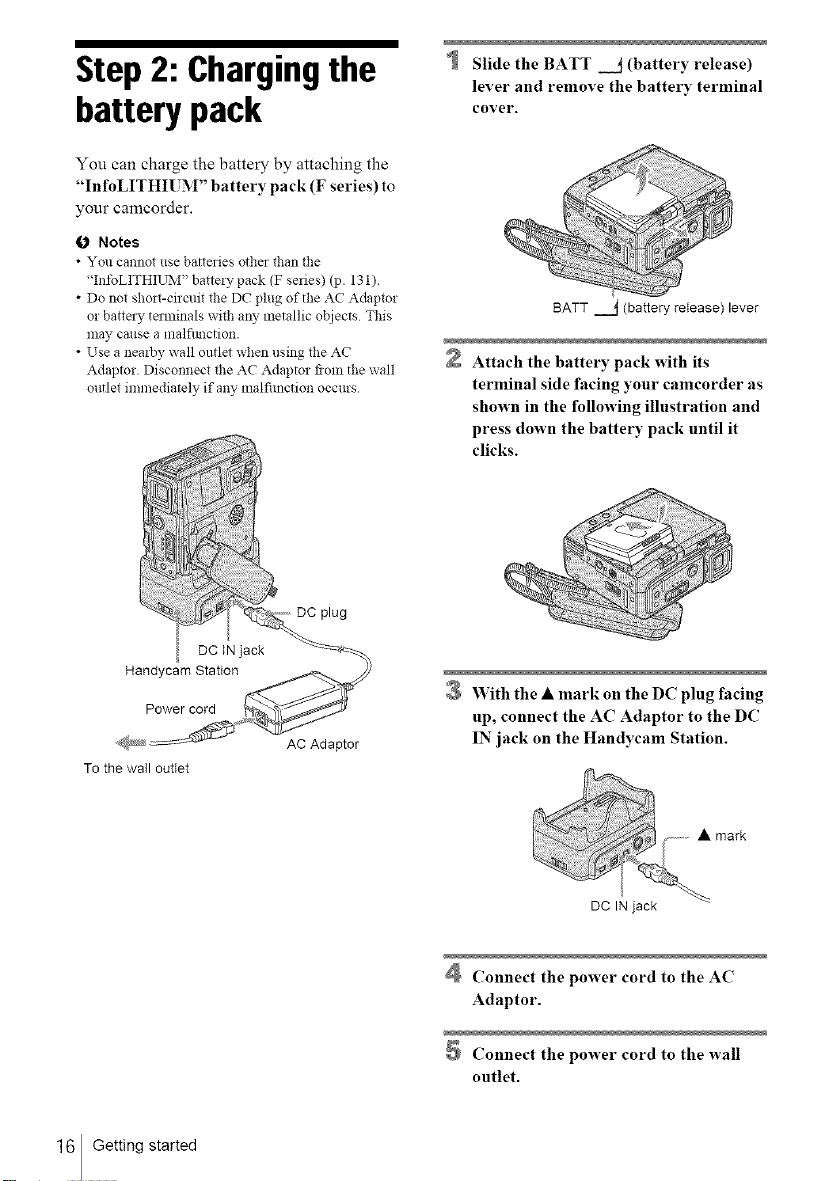
Step2: Chargingthe
battery pack
You can charge the battery by attaching the
"InfoLITHI[ M" battery pack (F series) to
your camcorder.
0 Notes
• You cannot use batteries other than the
"hffoLITHIUM" battery pack (Y series) (p. 131).
• Do not short-circuit the DC plug of the AC Adaptor
or batta), temlinals with any metallic objects This
may canse a malfimction.
• Use a nearby wall outlet when using tile AC
Adaptor. Disconnect the AC Adaptor flora the wall
outlet immediately if any malfimction occurs
Slide the BATT ___ (battery release)
lever and remove the battery terminal
Cover.
BATT .._ (battery release) lever
2 Attach the battery pack with its
terminal side facing your camcorder as
shown in the fonowing illustration and
press down the battery pack until it
clicks.
To the wall outlet
16 Gettingstarted
AC Adaptor
With the • mark on the DC plug facing
up, connect the AC Adaptor to the DC
IN jack on the Handycam Station.
DC IN jack
Connect the power cord to the AC
Adaptor.
Connect the power cord to the wall
outlet.
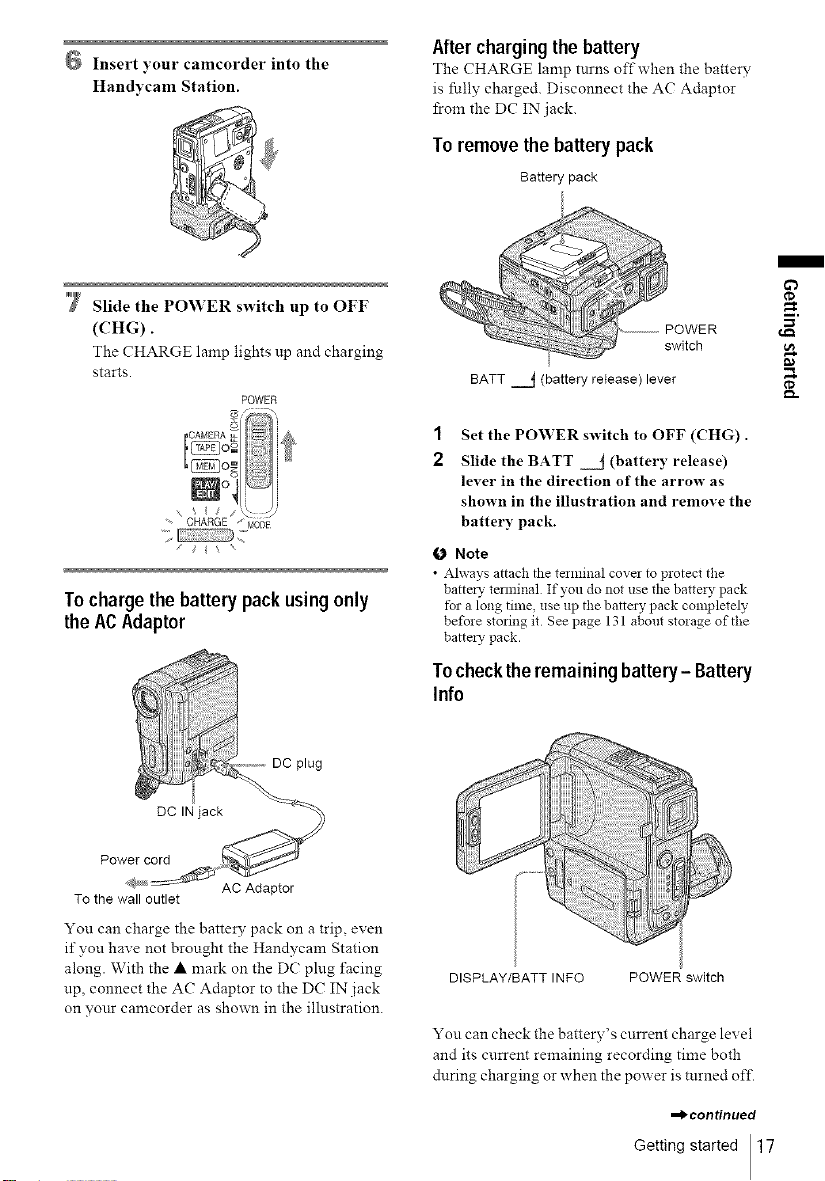
Handycam Station.
'7 Slide the POWER switch up to OFF
(('HG).
The CHARGE lamp lights np and charging
starts.
POWER
CHARGE ' MODE
;J
Tocharge the batterypack usingonly
theACAdaptor
Aftercharging the battery
The CHARGE lamp turns oft" when the battery
is fully charged. Disconnect the AC Adaptor
from the DC IN jack.
Toremove thebatterypack
Battery pack
POWER
switch
BATT =j (battery release) lever
1
Set the POWER switch to OFF (CHG).
2
Slide the BATT _j (battery release)
lever in the direction of the arrow as
shown in the illustration and remove the
battery pack.
fO Note
• Ahvays attach the tezminal covel to protect the
battel 7 telminal If you do not use the battel 3, pack
tbr a long time, use up the battel 3, pack cmupletely
before storing it See page 131 about storage of the
battel_" pack.
m
¢D
_D
To the wall outlet
AC Adaptor
You can charge the battery pack on a trip, even
if you have not brought the Handycam Station
along. With the • mark on the D( plug facing
up, connect the AC Adaptor to the DC IN jack
on your camcorder as shown in the illustration.
Tochecktheremaining battery- Battery
Info
DISPLAY/BATT INFO POWER switch
You can check the battery's cnrrent charge level
and its current remaining recording time both
during charging or when the power is turned off.
,_continued
Getting started 17
1
Set the PO_YER switch to OFF (CHG).
2
Open the LCD panel.
3
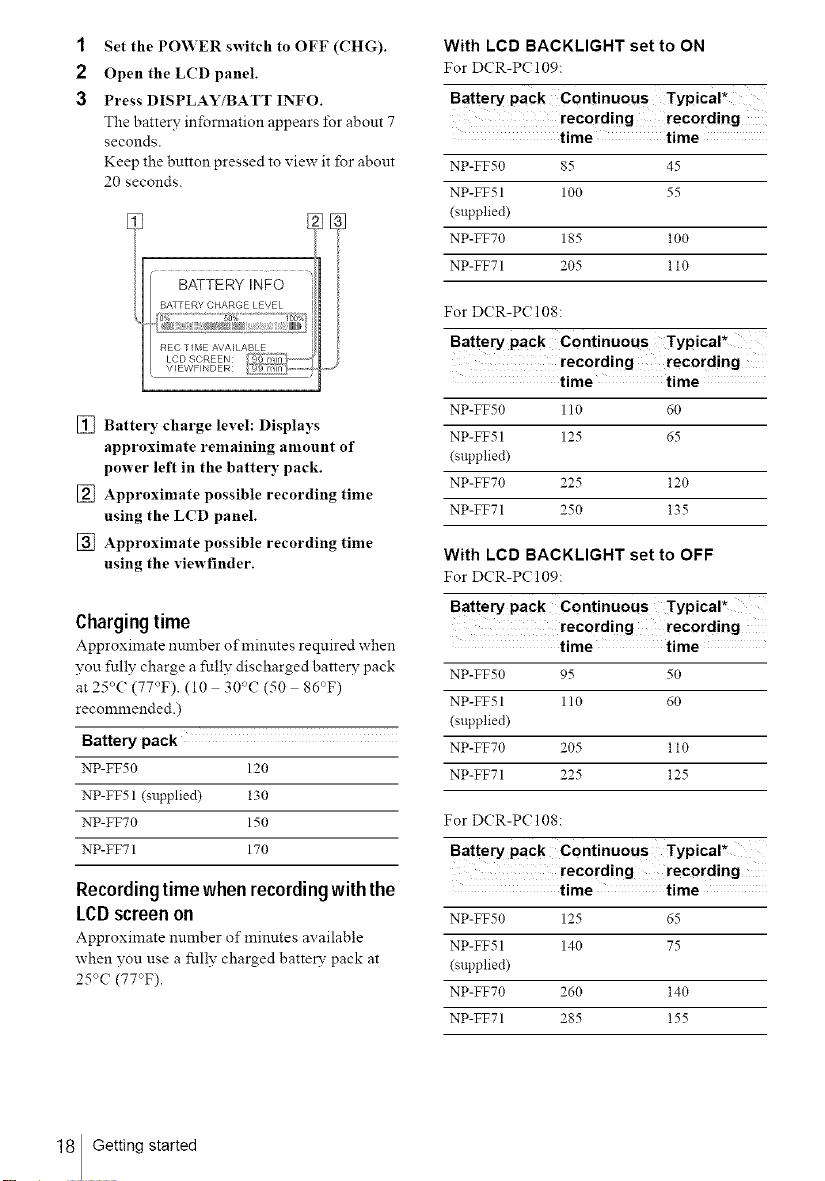
Press DISPLAY/BATT INFO.
The battery infornlation appears for about 7
seconds•
Keep the button pressed to view it for about
20 seconds.
BATTERY INFO
BATTERY CHARGE LEVEL
?% 5o% 1oo%
REC TIr, IE AVAILABLE
LCD SI REEN: *_J _rl i _...........
\/_EWFINDER: ..................
[] Battery charge level: Displays
approximate remaining amount of
power left in the battery pack.
[] Approximate possible recording time
using the LCD panel.
[] Approximate possible recording time
using the viewfinder.
Chargingtime
Approximate number of minutes reqnired when
you fully charge a fully discharged battery pack
at 25°(:(77°F). (10 30"C (50 86°F)
recommended.)
packBattery
NP-FF50 120
NP-FF51 (supplied) 130
NP-FF70 150
NP-FF71 170
Recordingtimewhenrecordingwiththe
LCDscreenon
Approximate number of minutes available
when you use a fully charged battery pack at
25°C (77"F).
With LCD BACKLIGHT set to ON
For DCR-P( 109:
Battery pack Continuous Typical*
recording recording
time time
NP-FF50 85 45
NP-FF51 100 55
(supplied)
NP-FFT0 185 100
NP-FF71 205 l l0
For DCR-P( 108:
Battery pack Continuous Typical*
recording recording
time time
NP-FF50 110 60
NP-FF51 125 65
(supplied)
NP-FFT0 225 120
NP-FF71 250 135
With LOB BACKLIGHT set to OFF
For D(R-P( 109:
Battery pack Continuous Typical*
recording recording
time time
NP-FF50 95 50
NP-FF51 110 60
(supplied)
NP-FFT0 205 l l0
NP-FF71 225 125
For DCR-PC 108:
Battery pack Continuous Typical*
recording recording
time time
NP-FF50 125 65
NP-FF 51 140 75
(supplied)
NP-FFT0 260 140
NP-FF71 285 155
18 Gettingstarted
Recordingtimewhenrecordingwith the
viewfinder
Approximate number of minutes available
when you use a fully charged batte W pack at
25'>((77°F).
For DCR-PC 109:
Battery PaCk Continuous Typical*
recording recording
time time
NP-FF50 95 50
NP-EE51 110 60
(supplied)
NP-FF70 205 110
NP-FF71 225 125
For DCR-PC 108:
Battery pack Continuous Typical*
recording recording
time time
NP-FF50 125 65
NP-FF51 140 75
(supplied)
NP-FF70 260 140
NP-FF71 285 155
* Approximate nmnber of minutes when recording
while you repeatedly record, start/stop, slide the
POWER switch to change the power :::ode, and
zoom The actual batte: T life :nay be sho:ter
For DCR-P( 108:
Battery pack LCD panel LCD panel
opened* closed
NP-FF50 125 145
NP-FF51 140 160
(supplied)
NP-FFT0 260 295
NP-FF71 285 325
* With LCD BACKLIGHT set toON
O Notes
• The powe: will :lot be supplied flora the batte: T pack
even when the power cord is disconnected from the
wall outlet in the following cases:
When the AC adaptor is connected to tile DC IN
jack of yore can:corder
When the AC adaptor is connected to the DC IN
jack of the Handycam Station and your camcorde:
is attached to the Handycanl Station
• The recording and playback time will be sho:ter
when you use yotu- camcorder ill lOW temperature.
• The CHARGE lamp flashes dming charging, or the
batte: T intbnnation will not be correctly displayed in
tbllowing conditions.
The batte:y pack is not attached conecfly
The batte:y pack is damaged.
The batte:y pack is fiflly discharged (For Batte: T
intbnnation only)
• With a lalge capacity batte:y pack (NP-FF70/FF71)
installed, your can:corder will be less balanced -
support it properly when placing your camcorder on
a table etc., in this case.
I
if}
¢D
Playing time
Approximate number of minutes available
when you use a fully charged batte W pack at
25°C (77°F).
For DCR-PC 109:
Battery PaCk LCD pane! LeD panel
opened* closed
NP-FF50 110 125
NP-FF51 125 140
(supplied)
NP-FF70 225 260
NP-FF71 250 285
You can use the AC Adaptor as the power
source when you do not want the battery to
run out. While you are using the AC Adaptor,
the battery pack will not lose its charge even
when it is attached to your camcorder.
PRECAUTION
Even if your camcorder is tnrned oft- AC power
(house cnrrent) is still snpplied to it while
connected to the wall outlet via the AC Adaptor.
Connect ),our camcorder as shown in
"Charging the batter), pack" (p. 16).
Getting started 19
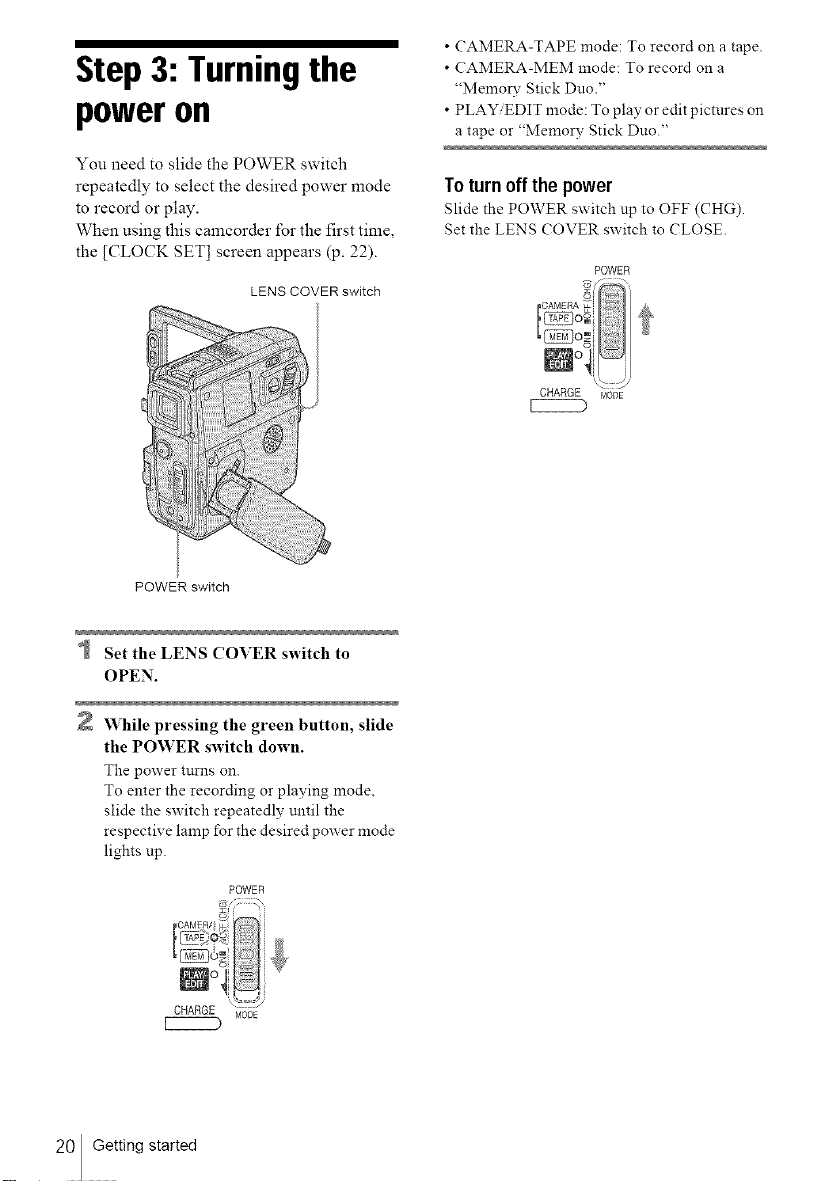
Step3: Turningthe
poweron
You need to slide the POWER switch
repeatedly to select the desired power mode
to record or play.
When using this camcorder for the first time,
the [CLOCK SET] screen appears (p. 22).
LENS COVER switch
POWER switch
• CAMERA-TAPE mode: To record on a tape.
• (AMERA-MEM mode: To record on a
"Memory Stick Duo."
• PLAY/EDIT mode: To play or edit pictures on
a tape or "Memory Stick Duo."
Toturn off the power
Slide the POWER switch up to OFF (CHG).
Set the LENS COVER switch to (?LOSE.
POWER
'Q2 ::::_/
CHARGE r,4ODE
Set the LENS COVER switch to
OPEN.
2 While pressing the green button, slide
the POWER switch down.
The power turns on.
To enter the recording or playing mode,
slide the switch repeatedly until the
respective lamp for the desired power mode
lights up.
POWER
20 Getting started
Step4: Adjustingthe
LCDpanel and
viewfinder
You can adjust the angle and brightness of
the LCD panel to meet various recording
situations.
Even when there are obstructions between you
and the su[ziect, you can check the subject on the
LCD screen during recording by adjusting the
angle of the LCD panel.
Maximum
180 degrees
3 Adjust the item with [_]/[_], then
touch [_l.
"_° Tips
• If you letate the LCD panel 180 degaees to the lens
side, you can close the LCD panel with tile LCD
screen t=acing out.
• If you are using tile battel 7 pack for power source,
you can adjust the brightness by selecting [LCD BL
LEVEL] from the [LCD_\'F SET] on the
(STANDARD SET) menu (p 85).
• When you use yore- camcorder in bright conditions,
press LCD BACKLIGHT to switch off the LCD
screen backlight (_C'_o_Fappears on the screen.). This
setting saves battel_" power
• Even if you adjust the LCD screen backlight, the
recorded pictme will not be affected.
• You can turn offthe operation confirmation beep by
setting [BEEP] in file _} (STANDARD SET)
menu to [OFF] qJ. 87).
You can view images using the viewfinder
when you close the LCD panel. Use the
viewfinder when the battery is running out, or
when the screen is hard to see.
/
¢D
Maximum
90 degrees
Open the LCD panel
LCD BACKLIGHT
Open the L('D panel 90 degrees to the
camcorder, then rotate it to the desired
position.
Toadjust thebrightnessofthe LCDscreen
1 Touch _.
2 Touch [LCD BRIGHT1.
If the item is not displayed on the screen,
touch If you cannot find it, touch
[MENU], (STANDARD SET) menu,
then tonch [LCD, VF SET] (p. 85).
Viewfinder lens
adjustment Iever
Extend the viewfinder until it clicks.
Adjust the viewfinder lens adjustment
lever until the picture is clear.
--bcontinued
Getting started 21
Tousetheviewfinderduringoperation
When you are recording on a tape or a "Memory
Stick Duo," you can ac_inst the exposure (p. 38)
and fader (p. 43) while checking the image on
the viewfinder. Have the L(D panel rotated 180
degrees and closed with the screen facing out.
1 Set the power mode to CAMERA-TAPE
or CAMERA-MEM (p. 20).
2 Extend the viewfinder, and close the
LCD panel with the screen facing out.
appears on the screen.
3 Touch _.
[Set LCD off?] appears on the screen.
4 Touch [YES].
The L(D screen is turned oft'.
5 Touch tile LCD screen while checking
the display in the viewfinder.
[EXPOSURE], etc. are displayed.
6 Touch tile button you want to set.
•[EXPOSURE]: Acliust with [ZZli[Z_I
and touch [_.
• [FADER]: Touch it repeatedly to select a
desired effect (only in the CAMERA-
TAPE mode).
• _ : The LCD screen lights up.
To hide the buttons on the LCD screen,
touch [_1.
"_°Tip
• To adjust the brightness of theviewfinder backlight,
select (STANDARD SET) menu, [LCDiVF
SET], then [VF B.LIGHT] (when you are using the
batte_T pack, p. 85)
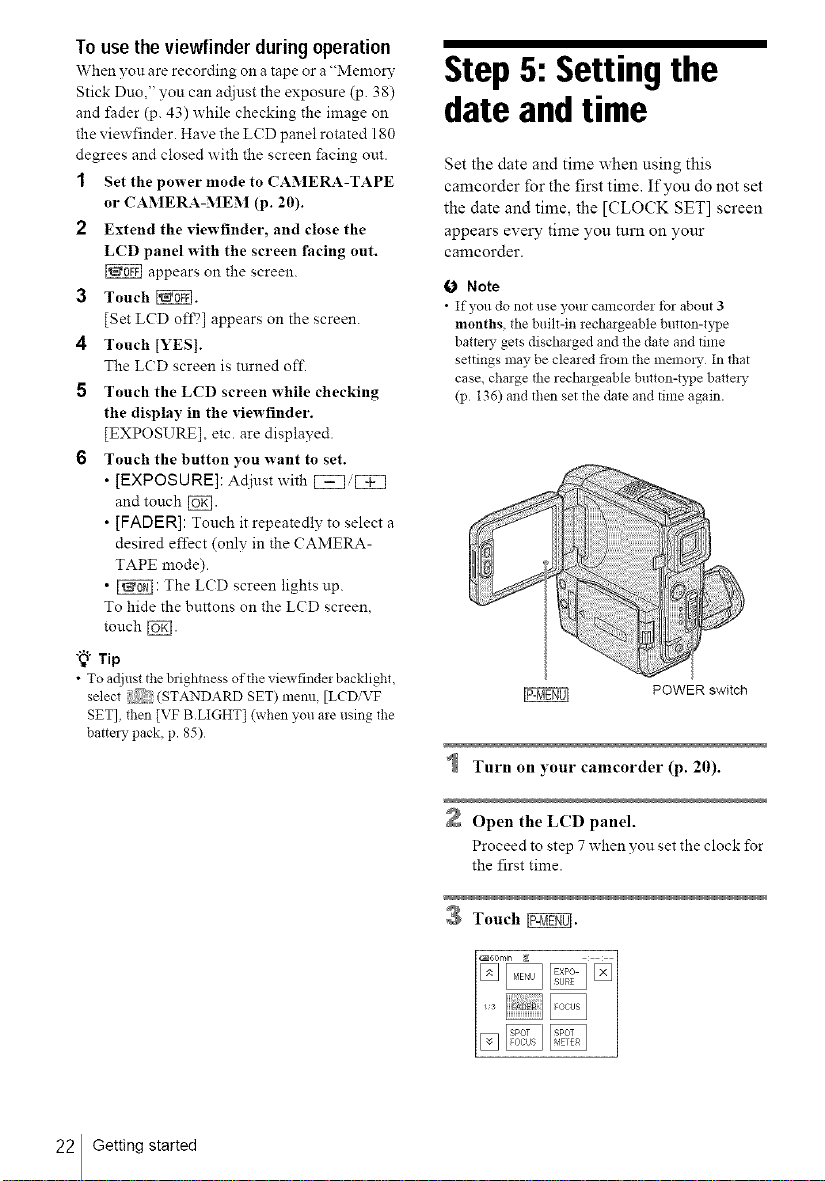
Step 5: Settingthe
date and time
Set the date and time when using this
camcorder for the first time. If you do not set
the date and time, the [CLOCK SET] screen
appears every time you turn on your
camcorder.
O Note
• If you do not use your camcozde! tbr about 3
months, the built-in rechargeable button-type
batte W gets discharged and the date and time
settings may be cleared fioln the memo W In that
case, charge the rechargeable button-type batte W
(p 136) and then set the date and time again.
POWER switch
22 Getting started
Open the LCD panel.
Proceed to step 7 when you set the clock for
the first time.
Touch _.
Touch [MEN[ ].
:)_ (TIMEiLANGU.) with
Select ,%_:;?
[_]/[2_], then touch [_].
Select [CLOCK SET] with [_]/[Z],
then touch [_.
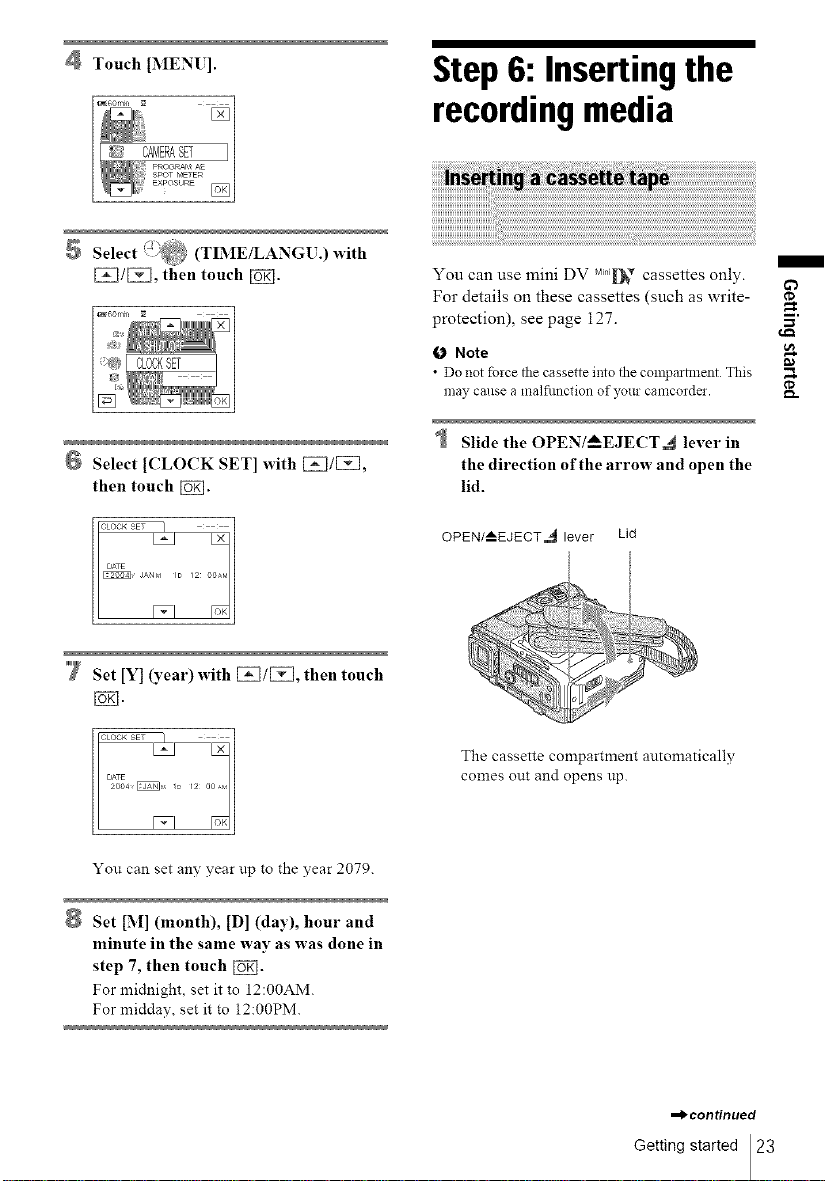
Step6: Insertingthe
recordingmedia
You can use mini DV MiFli_ cassettes only.
For details on these cassettes (such as write-
protection), see page 127.
O Note
• Do not fbzce tile cassette into the compartment This
may cause a malfimction of your camcordei.
Slide the OPEN/_--EJECT.4 lever in
the direction of the arrow and open the
lid.
OPEN/--AEJECT,_ lever Lid
m
Da
¢D
7 Set [Y] (year) with [2_]/[2_], then touch
You can set any year tip to the year 2079.
Set [M] (month), [D] (day), hour and
minute in the same way as was done in
step 7, then touch [_].
For midnight, set it to 12:00AM.
For midday, set it to 12:00PM.
The cassette compartment automatically
comes out and opens up.
,-bcontinued
Getting started 23
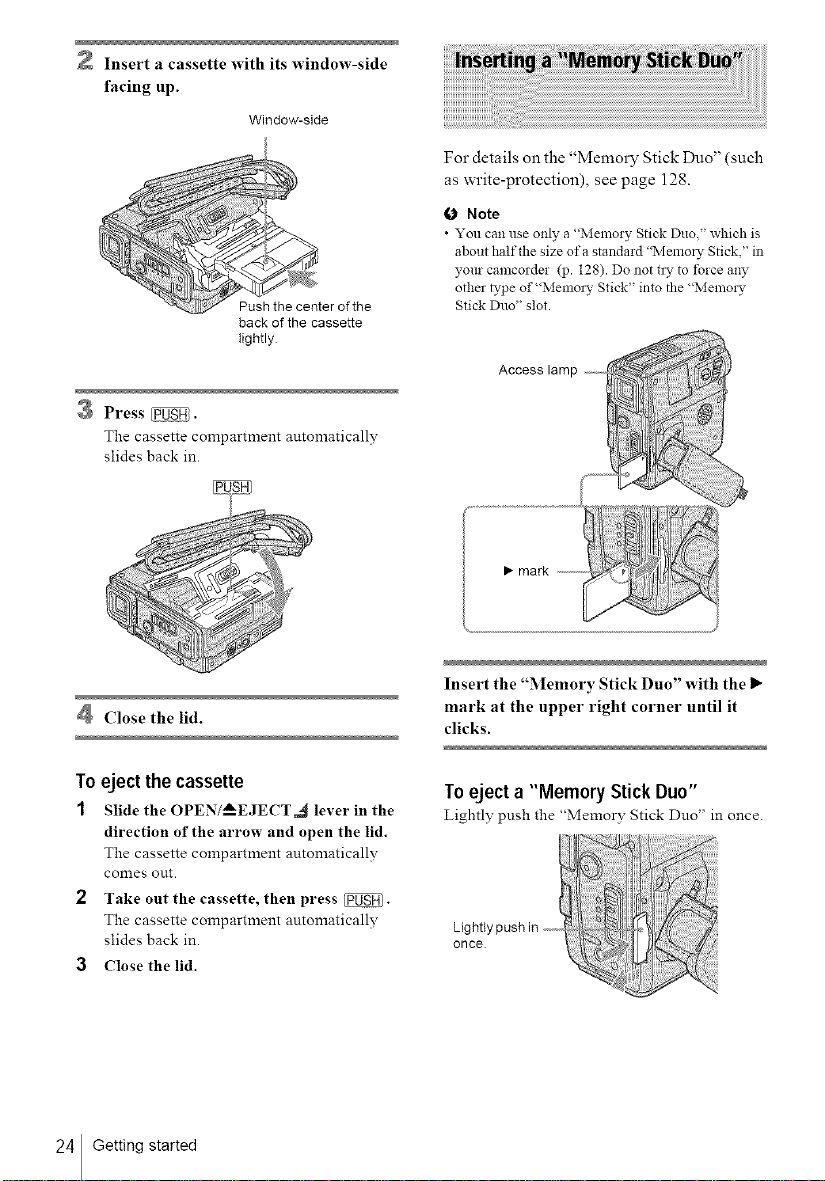
2 Insert a cassette with its window-side
facing up.
Window-side
Push the center of the
back of the cassette
tightly
Press _.
The cassette compartment atttomaticallv
slides back in.
For details on the "Memory Stick Duo" (such
as write-protection), see page 128.
0 Note
• You can use only a "Memory Stick Duo which is
about half the size of a standard "Menlol T Stick," in
your camcorder (p. 128). Do not tl? to tbrce any
other b,pe of"Memory Stick" into the "Memo!),
Stick Duo" slot.
Access
• mark
Close the lid.
To eject the cassette
1 Slide the OPEN/AEJECT,_ lever in the
direction of the arrow and open the lid.
The cassette compartment automatically
Con_ies out.
2 Take out the cassette, then press _.
The cassette compartment automatically
slides back in.
3 Close the lid.
24 Getting started
Insert the "Memory Stick Duo" with the I_
mark at the upper right corner until it
clicks.
Toeject a "Memory Stick Duo"
Lightly push the "Memor'¢ Stick Duo" in once.
Lightlypushin .......
once

Notes
• If you tbrce the "Menloz 7 Stick Duo" into the
"Memo! WStick Duo" slot in file wrong direction, the
"Memo! W Stick Duo" slot may be damaged.
• Do not insert anything other than a "Memory Stick
Duo" into the "Memoz WStick Duo" slot Doing so
may cause a malfimction of your camcorder.
• When the access lamp is lit or flashing, your
camcordel is reading/writing data froliYto the
"Memo! 7 Stick Duo." Do not shake or knock your
calncorder, turn the power oft', eject the "Memoz 7
Stick Duo," or remove the battezy pack. Otherwise,
image data may be damaged.
Step7:Settingthe
screenlanguage
You can select the language to be used on the
LCD screen.
/
-w
POWER switch
Open the LCD panel.
Touch _.
Touch [LANG[ AGE].
If the item is not displayed on the screen,
touch [_/[_. If you cannot find it, touch
[MENU], and select it from the /_)
(TIMEiLANGU.) menn (p. 89).
,_continued
Getting started 25

Select the desired language with [_/
[3Q, then touch [_].
"_° Tip
• Yore camcorder offers [ENG [SIMP]] (simplified
English) for when you caimot find your native
tongue among tile options
26 Getting started
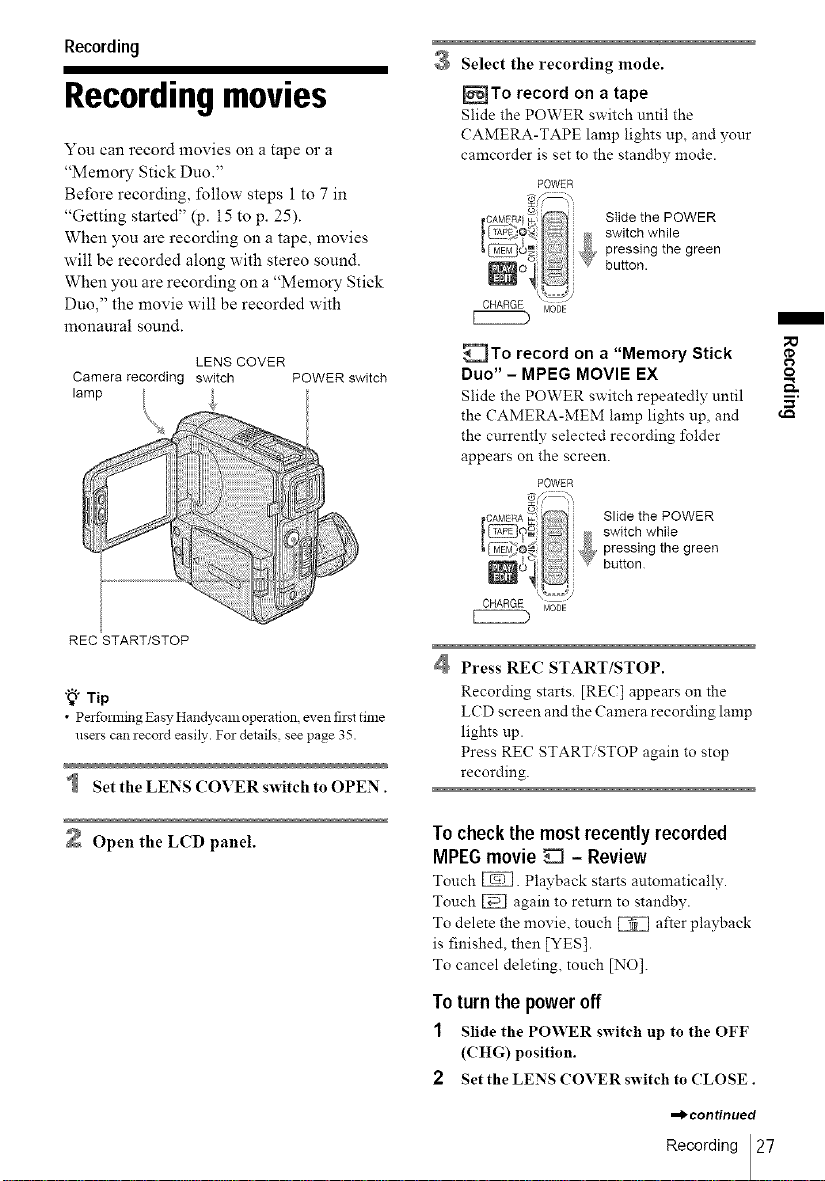
Recording
Recordingmovies
You can record movies on a tape or a
"Memory Stick Duo."
Before recording, follow steps 1 to 7 in
"Getting started" (p. 15 to p. 25).
When you are recording on a tape, movies
will be recorded along with stereo sound.
When you are recording on a "Memory Stick
Duo," the movie will be recorded with
monaural sound.
LENS COVER
Camera recording switch POWER switch
lamp
Select the recording mode.
_To record on a tape
Slide the POWER switch until the
CAMERA-TAPE lamp lights up, and your
camcorder is set to the standby mode.
POWER
Slide the POWER
switch while
pressing the green
button.
_To record on a "Memory Stick
Duo" - MPEG MOVIE EX
Slide the POWER switch repeatedly until
the CAMERA-MEM lamp lights up, and
the currently selected recording l_Ider
appears on the screen.
POWER
Slide the POWER
switch while
pressing the green
button
/
o
REC START/STOP
"_" Tip
• Pelfomfing Easy Handycanl operation even thst time
users can record easily. For details, see page 35.
Set the LENS COVER switch to OPEN.
Open the LCD panel.
Press RE(2 START/STOP.
Recording starts. [RE(;] appears on the
L(D screen and the Camera recording lamp
lights tip.
Press REC START/STOP again to stop
recording.
Tocheckthe mostrecently recorded
MPEGmovie _ - Review
Touch _. Playback starts automatically.
Touch _ again to return to standby.
To delete the movie, touch _ after playback
is finished, then [YES].
To cancel deleting, touch [NO].
Toturnthe power off
1 Slide the POWER switch up to the OFF
(CHG) position.
2 Set the LENS (?OVER switch to (?LOSE.
,_continued
Recording 27
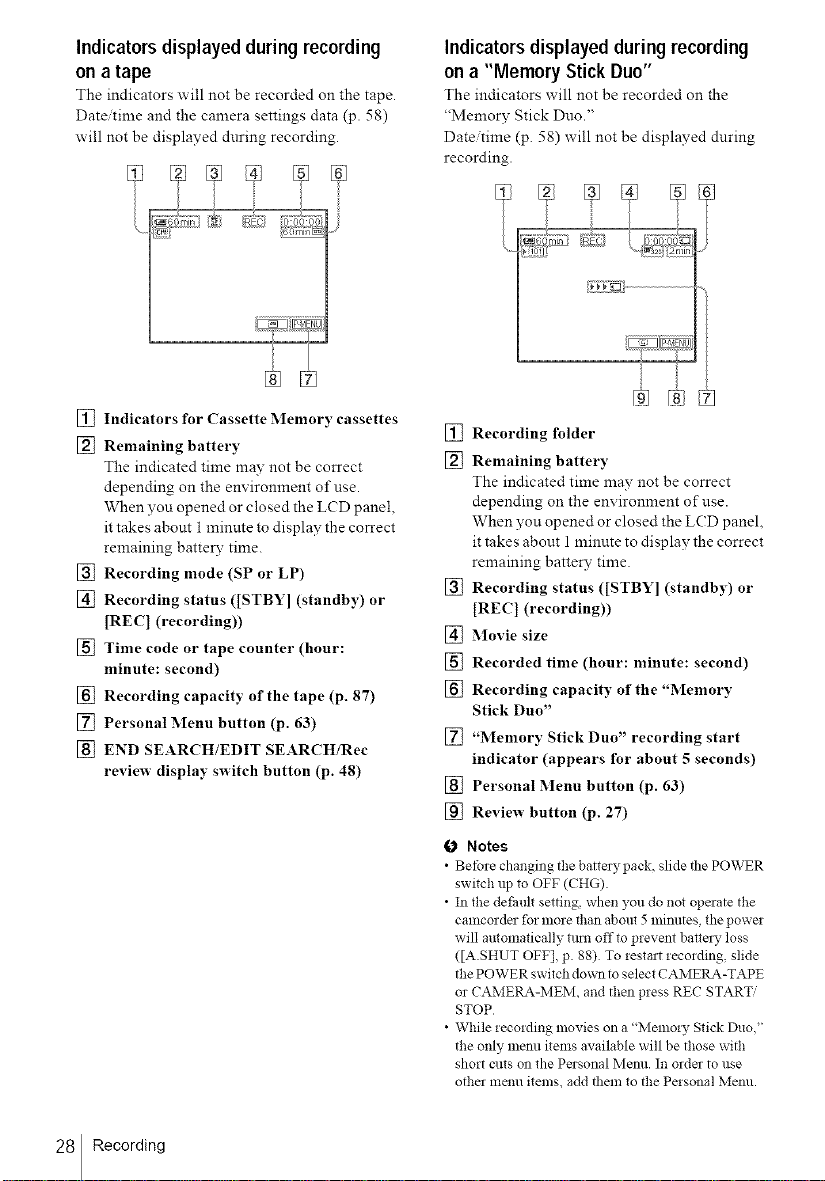
Indicatorsdisplayedduringrecording
ona tape
The indicators will not be recorded on the tape.
Date/time and the camera settings data (p. 58)
will not be displayed during recording.
% []
® %
[] Indicators for Cassette Memory cassettes
[] Remaining battery
The indicated time may not be correct
depending on the environment of use
When you opened or closed the L(D panel,
it takes about i minute to display the correct
remaining batter3: time.
[] Recording mode (SP or LP)
[] Recording status ([STBY] (standby) or
[REC 1 (recording))
[] Time code or tape counter (hour:
minute: second)
[] Recording capacity of the tape (p. 87)
[] Personal Menu button (p. 63)
[] END SEARCH/EDIT SEARCH/Rec
review display switch button (p. 48)
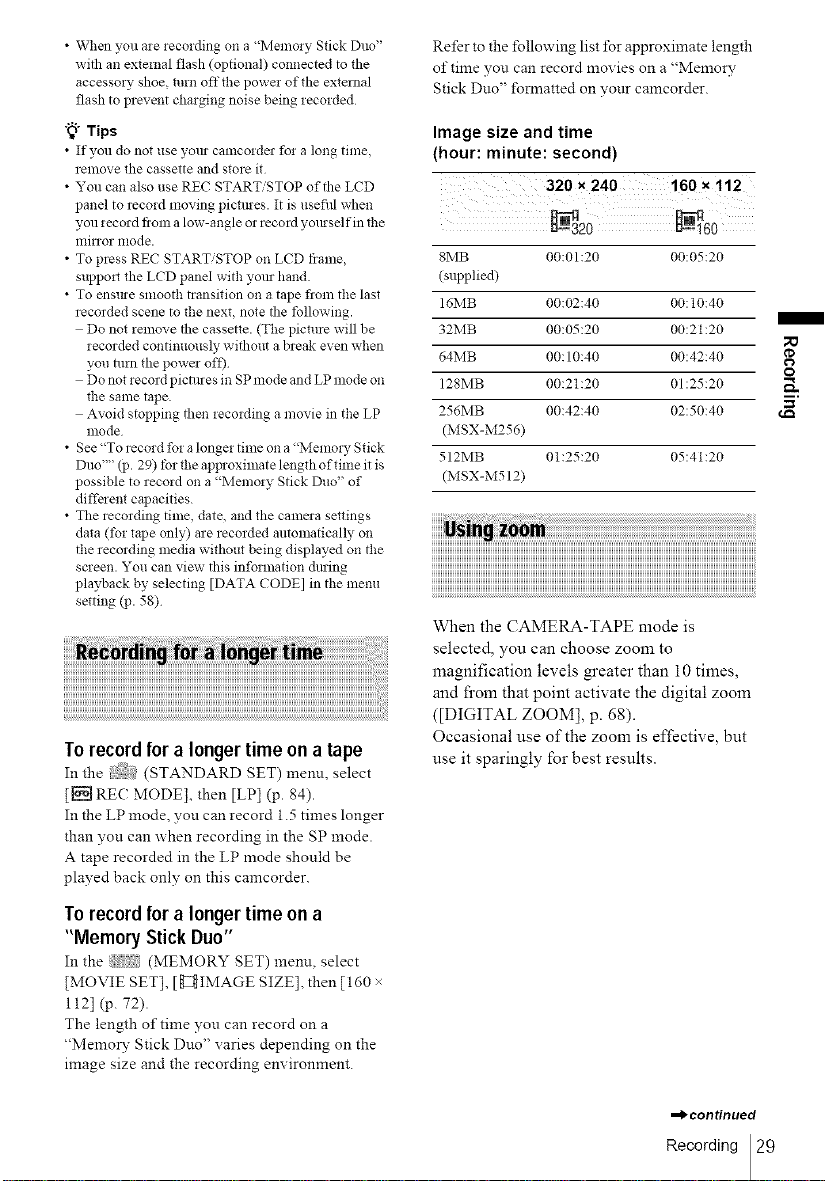
Indicatorsdisplayedduringrecording
ona "Memory StickDuo"
The indicators will not be recorded on the
"Memory Stick Duo."
Date/time (p. 58) will not be displayed during
recording.
%%
[] Recording folder
[] Remaining battery
The indicated time may not be correct
depending on the environment of use.
When you opened or closed the L(D panel,
it takes about 1 minute to display the correct
remaining battery time.
[] Recording status ([STBY] (standby) or
[RE(:] (recording))
[] _]ovie size
[] Recorded time (hour: minute: second)
[] Recording capacity of the "Memory
Stick Duo"
[] "Memory Stick Duo" recording start
indicator (appears for about 5 seconds)
[] Personal Menu button (p. 63)
[] Review button (p. 27)
0 Notes
• Betbre changing the battel 3, pack slide the POWER
switch up to OFF (CHG).
• In the defhult setting, when you do not operate the
camcorder for more than about 5 lnilnltes, the power
will automatically till!1 offto prevent barrel 3, loss
([A.SHUT OFF], p. 88) To restart recording, slide
the POWER switch down to select CAMERA-TAPE
or CAMERA-MEM, and then press REC START;
STOP
• While recording movies on a "Memory Stick Duo,"
the only lnenu items available will be those with
short cuts on the Personal Menu. In order to use
othel menu items, add them to the Personal Menu.
28 Recording
• When you are recording on a "Memory Stick Duo"
with an external flash (optional) connected to the
accessory shoe, turn offthe power of the external
flash to prevent charging noise being recorded
"_° Tips
• If you do not use yore camcoldm fo! a long time
remove the cassette and store it
• You can also use REC START/STOP of the LCD
panel to record moving pictmes. It is usefitl when
you iecord fiom a low-angle or record yoreself in the
mirror mode.
• To press REC START/STOP on LCD frame,
suppml the LCD panel with yore hand.
• To ensme smooth transition on a tape flora the last
recorded scene to the next, note the following.
Do not remove the cassette. (The picture will be
recorded continuously without a break even when
you turn the power off)
Do not record picmtes in SP mode and LP mode on
the same tape.
Avoid stopping then recording a movie in the LP
nlode
• See "To record for a longer time on a "Memm T Stick
Duo'"' (p. 29) tbr the approximate length of time it is
possible to record on a "Memory Stick Duo" of
diffe_ ent capacities.
• The recording time, date, and the calnera settings
data (tbr tape only) are recorded automatically on
the recording media without being displayed on the
screen. You can view this information chning
playback by selecting [DATA CODE] in the menu
setting qJ. 58).
Torecord for a longertime on a tape
In the (STANDARD SET) menn, select
[[_ REC MODE], then [LP] (p. 84).
In the LP mode, you can record 1.5 times longer
than you can when recording in the SP mode.
A tape recorded in the LP mode should be
played back only on this camcorder.
Refer to the following list for approximate length
of time you can record movies on a "Memor'¢
Stick Duo" fornaatted on your camcorder.
Image size and time
(hour: minute: second)
320 x 240 160 x 112
8MB 00:01:20 00:05:20
(supplied)
16MB 00:02:40 00:10:40
32MB 00:05:20 00:21:20
64MB 00:10:40 00:42:40
128MB 00:21:20 01:25:20 _,.
256MB 00:42:40 02:50:40
(MSX-M256)
512MB 01:25:20 05:41:20
(MSX-M512)
O
iiii iiiiiiiliiiiiiiiiiiiiiiiiiiiiiiliiiiiiiiiiiiiiiiiiiiiiiliiiiiiiiiiiiiiiiiiiiiiiliiiiiiiiiiiiiiiiiiiiiiiliiiiiiiiiiiiiiiiiiiiiiiliiiiiiiiiiiiiiiiiiiiiiiliiiiiiiiiiiiiiiiiiiiiiiliiiiiiiiiiiiiiiiiiiiiiiliiiiiiiiiiiiiiiiiiiiiiiliiiiiiiiiiiiiiiiiiiiiiiliiiiiiiiiiiiiiiiiiiiiiiliiiiiiiiiiiiiiiiiiiiiiiliiiiiiiiiiiiiiiiiiiiiiiiii: : : : i:i :' , ':'!
iiiiiiiiiiiiiiiiiiiiiiiiiiiiiiiiiiiiiiiiiiiiiiiiiiiiiiiiiiiiiiiiiiiiiiiiiiiiiiiiiiiiiiiiiiiiiiiiiiiiiiiiiiiiiiiiiiiiiiiiiiiiiiiiiiiiiiiiiiiiiiiiiiiiiiiiiiiiiiiiiiiiiiiiiiiiiiiiiiiiiiiiiiii
iiiiiiiiiiiiiiiiiiiiiiiiiiiiiiiiiiiiiiiiiiiiiiiiiiiiiiiiiiiiiiiiiiiiiiiiiiiiiiiiiiiiiiiiiiiiiiiiiiiiiiiiiiiiiiiiiiiiiiiiiiiiiiiiiiiiiiiiiiiiiiiiiiiiiiiiiiiiiiiiiiiiiiiiiiiiiiiiiiiiiiiii!{_
When the CAMERA-TAPE mode is
selected, you can choose zoom to
magnification levels ga'eater than 10 times,
and fl'om that point activate the digital zoom
([DIGITAL ZOOM[, p. 68).
Occasional use of the zoom is effective, but
use it sparingly for best results.
Torecord for a longertime on a
"Memory StickDuo"
In the _ (MEMORY SET) menn, select
[MOVIE SET], [g_]IMAGE SIZE], then [160 ×
112] (p. 72).
The length of time you can record on a
"Memo W Stick Duo" varies depending on the
image size and the recording environmem.
,_continued
Recording 29
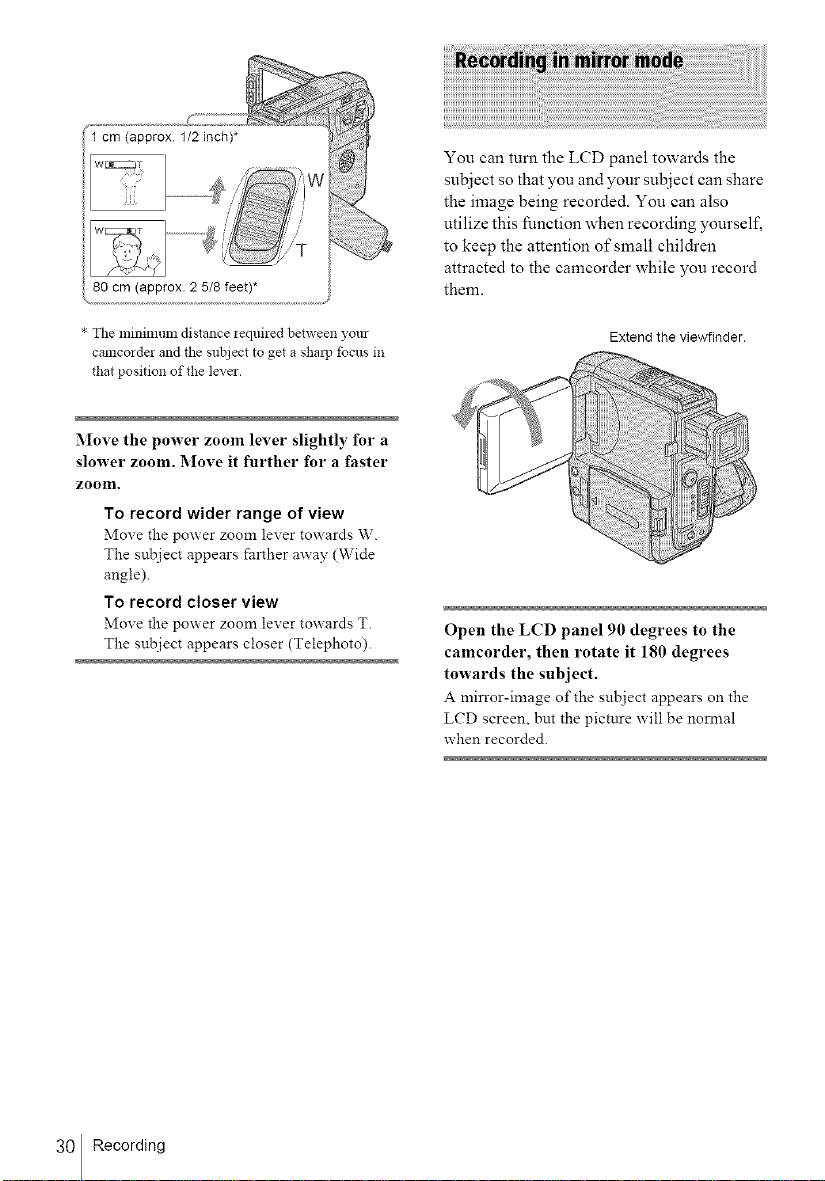
80cm(approx.25/8feet)*
You can turn the LCD panel towards the
subject so that you and your subject can share
the image being recorded. You can also
utilize this function when recording yourself,
to keep the attention of small chil&en
attracted to the camcorder while you record
them.
* The minimum distance iequired between yore
camcorder and the subject to get a shal]J focus in
that position of the lever.
Move the power zoom lever slightly for a
slower zoom. Move it further for a faster
zoom.
To record wider range of view
Move the power zoom lever towards W.
The subject appears farther away (Wide
angle).
To record closer view
Move the power zoom lever towards T.
The snbject appears closer (Telephoto).
Extend the viewfinder.
Open the LCD panel 90 degrees to the
camcorder, then rotate it 180 degrees
towards the subject.
A milror-image of the suhject appears on the
LCD screen, but the pictnre will be norn_al
when recorded.
30 Recording
 Loading...