

Page 1
3-074-616-11 (1)
Digital
Video Camera
Recorder
Operating Instructions
Before operating the unit, please read this manual thoroughly, and retain
it for future reference.
ИНСТРУКЦИЯ ПО ЭКСПЛУАТАЦИИ
Перед эксплуатацией аппарата внимательно прочтите, пожалуйста,
данное руководство и сохраняйте его для дальнейших справок.
DCR-PC101E
©2002 Sony Corporation
TM
SERIES
Page 2
English
Русский
Welcome!
Congratulations on your purchase of this Sony
Handycam. With your Handycam you can capture
life’s precious moments with superior picture and
sound quality.
Your Handycam is loaded with advanced features,
but at the same time it is very easy to use. You will
soon be producing home video that you can enjoy
for years to come.
To prevent fire or shock hazard, do not expose the
unit to rain or moisture.
To avoid electrical shock, do not open the cabinet.
Refer servicing to qualified personnel only.
Memory Stick
NOTICE ON THE SUPPLIED AC POWER
ADAPTOR FOR THE CUSTOMERS IN
THE UNITED KINGDOM
A moulded plug complying with BS1363 is fitted to
this equipment for your safety and convenience.
Should the fuse in the plug supplied need to be
replaced, a 5 AMP fuse approved by ASTA or
BSI to BS1362 (i.e., marked with or mark)
must be used.
If the plug supplied with this equipment has a
detachable fuse cover, be sure to attach the fuse
cover after you change the fuse. Never use the
plug without the fuse cover. If you should lose
the fuse cover, please contact
your nearest Sony service station.
For the customers in Europe
ATTENTION
The electromagnetic fields at the specific frequencies
may influence the picture and sound of this
camcorder.
This product has been tested and found compliant
with the limits set out in the EMC Directive for using
connection cables shorter than 3 meters. (9.8 feet)
Notice
If static electricity or electromagnetism causes data
transfer to discontinue midway (fail), restart the
application or disconnect and connect the USB cable
again.
For the customers in Germany
Directive: EMC Directive 89/336/EEC.
This equipment complies with the EMC regulations
when used under the following circumstances:
•Residential area
•Business district
•Light-industry district
(This equipment complies with the EMC standard
regulations EN55022 Class B.)
2
WARNING
N50
92/31/EEC
Добро пожаловать!
Поздpaвляeм Bac c пpиобpeтeниeм
видeокaмepы Sony Handycam. C помощью
видeокaмepы Handycam можно зaпeчaтлeть
доpогиe Baм мгновeния жизни c
пpeвоcxодным кaчecтвом изобpaжeния и
звyкa.
Bидeокaмepa Handycam оcнaщeнa
ycовepшeнcтвовaнными фyнкциями, но в то
жe вpeмя ee очeнь лeгко иcпользовaть.
Bcкоpe Bы бyдeтe cоздaвaть ceмeйныe
видeопpогpaммы, котоpыми cможeтe
нacлaждaтьcя в поcлeдyющиe годы.
ПРЕДУПРЕЖДЕНИЕ
Для предотвращения возгорания или
опасности электрического удара не
выставляйте аппарат на дождь или влагу.
Во избежание поражения электрическим
током не открывайте корпус.
За обслуживанием обращаться только к
квалифицированному обслуживающему
персоналу.
Для покупателей в Европе
ВНИМАНИЕ
Элeктpомaгнитныe поля нa опpeдeлeнныx
чacтотax могyт влиять нa изобpaжeниe и
звyк, воcпpоизводимыe дaнной
видeокaмepой.
Изделие проверено на соответствие
требованиям Директивы EMC относительно
использования кабелей короче 3 метров.
Предупреждение
Если статическое электричество или
электромагнетизм приведет к прерыванию
(невыполнению) передачи данных, то
перезапустите прикладную программу или
отсоедините и подсоедините USB-кабель
опять.
DCR-PC101E
Page 3
Checking supplied
accessories
Проверка прилагаемых
принадлежностей
Make sure that the following accessories are
supplied with your camcorder.
4
8
qs
1 AC-L10A/L10B/L10C AC power adaptor (1),
Mains lead (1) (p. 23)
2 NP-FM50 battery pack (1) (p. 22, 23)
3 A/V connecting cable (1) (p. 59)
4 Wireless Remote Commander (1) (p. 310)
5 R6 (size AA) battery for Remote
Commander (2) (p. 311)
6 Lens cap (1) (p. 34)
7 “Memory Stick” (1) (p. 148)
8 USB cable (1) (p. 215)
9 CD-ROM (SPVD-008 USB Driver) (1)
(p. 222)
q; Battery terminal cover (1) (p. 22)
qa Cleaning cloth (1) (p. 293)
qs 21-pin adaptor (1) (p. 60)
European models only
Contents of the recording cannot be
compensated if recording or playback is not
made due to a malfunction of the camcorder,
storage media, etc.
5
Убедитесь, что следующие принадлежности
прилагаются к Вашей видеокамере.
21
6
q;9
1 Сетевой адаптер AC-L10A/L10B/L10C
AC (1), провод электропитания (1)
(стр. 23)
2
Батарейный блок NP-FM50 (1) (стр. 22, 23)
3 Соединительный кабель аудио/видео
(1) (стр. 59)
4
Беспроводный пульт
дистанционного управления (1)
(стр.
310
5
Батарейка R6 (размера АА) для пульта
дистанционного управления (2) (стр.
6 Крышка объектива (1) (стр. 34)
7 “Memory Stick” (1) (стр. 148)
8 Кабель USB (1) (стр. 215)
9 CD-ROM (SPVD-008 USB драйвер) (1)
(стр. 222)
0 Крышка батарейных контактов (1)
(стр. 22)
qa Очистительная ткань (1) (стр. 293)
qs 21-штырьковый адаптер (1) (стр. 60)
Толькодля европейских моделей
Содержание записи не может быть
компенсировано в случае, если запись или
воспроизведение не выполнены из-за
неисправности видеокамеры, носителя и т.п.
)
3
7
qa
311
Getting started Подготовка к эксплуатации
)
3
Page 4

English
Main Features
Recording moving pictures
or still images, and playing
them back
Main Features
•Recording moving pictures on
tapes (p. 34)
•Recording still images on tapes
(p. 65)
•Playing back tapes (p. 52)
•Recording still images on “Memory
Stick”s (p. 61, 161)
•Recording moving pictures on
“Memory Stick”s (p. 180)
•Viewing still images recorded on
“Memory Stick”s (p. 194)
•Viewing moving pictures on
“Memory Stick”s (p. 199)
•Viewing moving pictures recorded
on tapes using USB cable (p. 230)
•Viewing images recorded on
“Memory Stick”s using the USB
cable (p. 235, 241)
•Capturing images on your
computer from your camcorder
using the USB cable (p. 232)
•Converting an analog signal into
digital to capture images onto your
computer (p. 243)
4
4
Capturing images on your
computer
Page 5

Main Features
Other uses
Functions to adjust exposure in recording
•BACK LIGHT (p. 44)
•NightShot/Super NightShot/Colour Slow Shutter (p. 45)
•PROGRAM AE (p. 79)
•White balance (p. 67)
•Adjusting the exposure manually (p. 82)
•Flexible Spot Meter (p. 83)
Functions to give images more impact
•Digital zoom [MENU] (p. 40)
The default setting is set to OFF. (To zoom greater than 10×,
select the digital zoom power in D ZOOM in the menu settings.)
•Fader (p. 71)
•Picture effect (p. 74)
•Digital effect (p. 76)
•Titles (p. 139)
•MEMORY MIX (p. 172)
Functions to give a natural appearance to your recordings
•Sports lesson (p. 79)
•Landscape (p. 79)
•Manual focus (p. 85)
•Spot Focus (p. 87)
Functions to use after recording
•END SEARCH/EDITSEARCH/Rec Review (p. 50)
•DATA CODE (p. 54)
•Tape PB ZOOM (p. 99)
•ZERO SET MEMORY (p. 101)
•TITLE SEARCH (p. 102)
•Digital program editing (p. 113, 187)
Main Features
55
Page 6

Русский
Основные функции
Зaпиcь движyщиxcя и
нeподвижныx изобpaжeний
и иx воcпpоизвeдeниe
Основные функции
•Зaпиcь движyщиxcя
изобpaжeний нa кacceты (cтp. 34)
•Зaпиcь нeподвижныx
изобpaжeний нa кacceты (cтp. 65)
•Bоcпpоизвeдeниe кacceты
(cтp. 52)
•Запись неподвижных
изображений на “Memory Stick”
(стр. 61, 161)
•Запись движущихся изображений
на “Memory Stick” (стр. 180)
•Просмотр неподвижного
изображения, записанного на
“Memory Stick” (стр. 194)
•Просмотр движущегося
изображения на “Memory Stick”
(стр. 199)
•Пpоcмотp движyщиxcя
изобpaжeний, зaпиcaнныx нa
кacceты, c помощью кaбeля USB
(cтp. 230)
•Просмотр изображений,
записанных на “Memory Stick”, с
использованием кабеля USB
(стр. 235, 241)
•Зaпиcь изобpaжeний нa
компьютepe c видeокaмepы c
помощью кaбeля USB (cтp. 232)
•Пpeобpaзовaниe aнaлогового
cигнaлa в цифpовой для зaпиcи
изобpaжeний нa компьютep
(cтp. 243)
6
6
Запись изображений на
Вашем компьютере
Page 7

Основные функции
Прочие применения
Фyнкции для peгyлиpовки экcпозиции пpи зaпиcи
•BACK LIGHT (cтp. 44)
•Peжимы NightShot/Super NightShot/Colour Slow Shutter (cтp. 45)
•PROGRAM AE (стр. 79)
•Баланс белого (стр. 67)
•Ручная регулировка экспозиции (стр. 82)
•Универсальный точечный фотоэкспонометр (стр. 83)
Функции для придания изображениям большего эффекта
•Цифровой вариообъектив [MENU] (стр. 40)
Установке по умолчанию соответствует положение OFF. (Для увеличения
более, чем 10×, выберите степень цифрового увеличения в пункте
D ZOOM в установках меню.)
•Фейдер (стр. 71)
•Эффект изображения (стр. 74)
•Цифровой эффект (стр. 76)
•Tитpы (стр. 139)
•MEMORY MIX (стр. 172)
Основные функции
Функции для придания Вашим записям естественного вида
•Cпоpтивныe cоcтязaния (стр. 79)
•Лaндшaфтный peжим (стр. 79)
•Ручная фокусировка (стр. 85)
•Tочeчный фокyc (стр. 87)
Функции, используемые после записи
•END SEARCH/EDITSEARCH/просмотр записи (стр. 50)
•DATA CODE (стр. 54)
•Фyнкция PB ZOOM для кacceты (cтp. 99)
•ZERO SET MEMORY (cтp. 101)
•TITLE SEARCH (cтp. 102)
•Цифpовой монтaж пpогpaммы (cтp. 113, 187)
77
Page 8

English
Table of contents
Checking supplied accessories ...................... 3
Main Features ............................................ 4
Quick Start Guide
– Recording on a tape ................................... 12
– Recording on a “Memory Stick” .............. 14
Getting started
Using this manual ......................................... 20
Step 1 Preparing the power supply ............ 22
Installing the battery pack..................... 22
Charging the battery pack..................... 23
Connecting to a wall socket .................. 27
Step 2 Setting the date and time .................. 29
Step 3 Inserting a cassette............................. 31
Step 4 Using the touch panel ....................... 32
Recording – Basics
Recording a picture ....................................... 34
Shooting a backlit subject
– BACK LIGHT ................................ 44
Shooting in the dark
– NightShot/Super NightShot/
Colour Slow Shutter........................ 45
Self-timer recording ............................... 48
Checking the recording
– END SEARCH/ EDITSEARCH/
Rec Review .............................................. 50
Playback – Basics
Playing back a tape........................................ 52
To display the screen indicators
– Display function ........................... 54
Viewing the recording on TV ...................... 59
Advanced Recording Operations
Recording still images on a “Memory Stick”
during recording on a tape ................... 61
Recording a still image on a tape
– Tape Photo recording ......................... 65
Adjusting the white balance manually ...... 67
Using the wide mode .................................... 69
Using the fader function ............................... 71
Using special effects – Picture effect ........... 74
Using special effects – Digital effect ........... 76
Using the PROGRAM AE ............................ 79
Adjusting the exposure manually ............... 82
Using the spot light-metering function
– Flexible Spot Meter.............................. 83
Focusing manually ........................................ 85
8
Using the spot focus function
– Spot Focus............................................. 87
Interval recording .......................................... 88
Frame by frame recording
– Frame recording .................................. 91
Using the viewfinder .................................... 93
Advanced Playback Operations
Playing back a tape with picture effect ...... 95
Playing back a tape with digital effect ....... 97
Enlarging images recorded on tapes
– Tape PB ZOOM ................................... 99
Quickly locating a scene
– ZERO SET MEMORY ....................... 101
Searching the boundaries of recorded
tape by title – TITLE SEARCH ........... 102
Searching a recording by date
– DATE SEARCH ................................. 104
Searching for a photo
– PHOTO SEARCH/PHOTO SCAN .... 106
Editing
Dubbing a tape............................................. 109
Dubbing only desired scenes
–
Digital program editing (on tapes)
Recording video or TV programmes ........ 128
Inserting a scene from a VCR
– Insert editing ...................................... 132
Audio dubbing............................................. 134
Superimposing a title .................................. 139
Making your own titles .............................. 143
Labelling a cassette...................................... 145
... 113
“Memory Stick” Operations
Using a “Memory Stick”– Introduction ... 148
Recording still images on “Memory Stick”s
– Memory photo recording ................. 161
Recording an image from a tape as a still
image ...................................................... 168
Superimposing a still image in the
“Memory Stick” on an image
– MEMORY MIX................................... 172
Recording moving pictures on “Memory
Stick”s – MPEG movie recording....... 180
Recording a picture from a tape as a
moving picture...................................... 183
Recording edited pictures from a tape as
a moving picture – Digital program
editing (on “Memory Stick”s)............. 187
Copying still images from a tape
– PHOTO SAVE .................................... 192
Viewing a still image
– Memory photo playback .................. 194
Page 9

Viewing a moving picture
– MPEG movie playback ..................... 199
Enlarging still images recorded on
“Memory Stick”s
– Memory PB ZOOM ........................... 203
Playing back images in a continuous loop
– SLIDE SHOW ..................................... 205
Preventing accidental erasure
– Image protection................................ 207
Deleting images – DELETE ........................ 208
Writing a print mark – PRINT MARK ..... 211
Using the optional printer .......................... 213
Viewing images with your
computer
Viewing images with your computer
– Introduction ....................................... 215
Connecting to your computer with USB port
– For Windows users ........................... 219
Viewing images recorded on a tape on your
computer
Viewing images recorded on a
“Memory Stick” on your computer
– For Windows users ........................... 235
Connecting to your computer with USB
port – For Macintosh users.................. 238
Viewing images recorded on a “Memory
Stick” on your computer
– For Macintosh users .......................... 241
Capturing images from an analog video
unit on your computer
– Signal convert function..................... 243
– For Windows users .......... 230
Quick Reference
Identifying the parts and controls............. 305
Index .............................................................. 314
Customising Your Camcorder
Changing the menu settings ...................... 245
Troubleshooting
Types of trouble and how to correct
trouble .................................................... 262
Self-diagnosis display ................................. 269
Warning indicators and messages ............ 270
Additional Information
Usable cassettes............................................ 282
About the “InfoLITHIUM”
battery pack ........................................... 285
About i.LINK................................................ 288
Using your camcorder abroad ................... 290
Maintenance information
and precautions .................................... 291
Specifications................................................ 301
9
Page 10

Русский
Оглавление
Проверка прилагаемых
принадлежностей ............................... 3
Основные функции ........................... 6
Руководство по быстрому
запуску
– Зaпиcь нa лeнтy ................................... 16
– Зaпиcь нa “Memory Stick” .................... 18
Подготовка к эксплуатации
Использование данного
руководства ...................................... 20
Пункт 1 Подготовка источника
питания ............................................. 22
Установка батарейного блока ........ 22
Зарядка батарейного блока ............ 23
Подсоединение к сетевой
розетке ....................................... 27
Пункт 2 Установка даты и времени ..... 29
Пункт 3 Установка кассеты .................. 31
Пункт 4 Использование сенсорной
панели ............................................... 32
Запись – Основные положения
Запись изображения .............................. 34
Cъeмкa объeктa c зaднeй подcвeткой
– BACK LIGHT ............................. 44
Cъeмкa в тeмнотe
– NightShot/Super NightShot/
Colour Slow Shutter .................. 45
Запись по таймеру самозапуска ..... 48
Проверка записи
– END SEARCH/EDITSEARCH/
Просмотр записи .............................. 50
Воспроизведение – Основные
положения
Воспроизведение ленты ........................ 52
Для отображения экранных
индикаторов
– Функция индикации ................ 54
Просмотр записи на экране
телевизора ........................................ 59
Уcовepшeнcтвовaнныe опepaции
cъeмки
Зaпиcь нeподвижныx изобpaжeний нa
“Memory Stick” во вpeмя зaпиcи нa
лeнтy .................................................. 61
10
Запись неподвижного изображения на
ленту – Фотосъемка на ленту ......... 65
Регулировка баланса белого
вручную ............................................. 67
Использование широкоэкранного
режима .............................................. 69
Использование функции фейдера ........ 71
Использование специальных эффектов
– Эффект изображения .................. 74
Использование специальных эффектов
– Цифровой эффект ........................ 76
Иcпользовaниe фyнкции
PROGRAM AE ................................... 79
Регулировка экспозиции вручную ........ 82
Иcпользовaниe фyнкции точeчной
фотоэкcпономeтpии – Универсальный
точечный фотоэкспонометр ........... 83
Фокусировка вручную ............................ 85
Иcпользовaниe фyнкции точeчного
фокyca – Tочeчный фокyc ............... 87
Запись с интервалами ............................ 88
Покадровая запись
– Покaдpовaя зaпиcь ....................... 91
Использование видоискателя ............... 93
Усовершенствованные операции
воспроизведения
Воспроизведение ленты с эффектами
изображения ..................................... 95
Воспроизведение ленты с цифровыми
эффектами ....................................... 97
Увеличение изображений, записанных на
ленте
– Функция PB ZOOM ленты ............. 99
Быcтpый поиcк эпизодa
– ZERO SET MEMORY
(пaмять нyлeвой отмeтки) ............. 101
Поиск границ записи на записанной ленте
по титру – TITLE SEARCH ............. 102
Поиск записи по дате
– DATE SEARCH ............................. 104
Поиск фото
–
PHOTO SEARCH/PHOTO SCAN ....
106
Монтаж
Перезапись ленты ................................ 109
Перезапись только желаемых эпизодов
– Цифровой монтаж программы
(нa кacceтax) ................................... 113
Запись видео или телевизионных
программ ......................................... 128
Вставка эпизода с КВМ
– Mонтaж вcтaвки .......................... 132
Аудиоперезапись .................................. 134
Page 11

Оглавление
Наложение титра .................................. 139
Создание Ваших собственных
титров .............................................. 143
Маркировка кассеты ............................ 145
Операции с “Memory Stick”
Использование “Memory Stick”
– Введение ...................................... 148
Зaпиcь нeподвижныx изобpaжeний нa
“Memory Stick”
– Фотозапись с сохранением в
памяти ............................................. 161
Запись изображения с ленты как
неподвижного изображения ......... 168
Haложeниe нeподвижного изобpaжeния
из “Memory Stick” нa изобpaжeниe
– MEMORY MIX ............................... 172
Запись движущихся изображений на
“Memory Stick”
– Запись фильмов MPEG ............... 180
Запись изображения с ленты как
движущегося изображения ........... 183
Зaпиcь отpeдaктиpовaнныx изобpaжeний
c кacceты кaк движyщeгоcя
изобpaжeния – Цифpовой монтaж
пpогpaммы (нa “Memory Stick”) ..... 187
Копирование неподвижных изображений
с ленты – PHOTO SAVE ................. 192
Просмотр неподвижного изображения
– Воспроизведение фотоснимков из
памяти ............................................. 194
Просмотр движущегося изображения
– воспроизведение фильма
MPEG ............................................... 199
Увеличение изображений, записанных на
“Memory Stick”
– Память PB ZOOM ........................ 203
Heпpepывноe воcпpоизвeдeниe
изобpaжeний по зaмкнyтомy циклy
– SLIDE SHOW ................................ 205
Предотвращение случайного стирания
– Защита изображения .................. 207
Удаление изображений
– DELETE ........................................ 208
Запись печатных знаков
– PRINT MARK ................................ 211
Иcпользовaниe дополнитeльного
пpинтepa ......................................... 213
Пpоcмотp изобpaжeний c
помощью компьютepa
Пpоcмотp изобpaжeний c помощью
компьютepa
– Bвeдeниe ...................................... 215
Подcоeдинeниe к компьютepy c помощью
поpтa USB
– Для пользовaтeлeй Windows ...... 219
Пpоcмотp изобpaжeний, зaпиcaнныx нa
кacceтe, c помощью компьютepa – Для
пользовaтeлeй Windows ................ 230
Пpоcмотp изобpaжeний, зaпиcaнныx нa
“Memory Stick”, c помощью
компьютepa – Для пользовaтeлeй
Windows ........................................... 235
Подcоeдинeниe к компьютepy c помощью
поpтa USB
– Для пользовaтeлeй Macintosh .... 238
Пpоcмотp изобpaжeний, зaпиcaнныx нa
“Memory Stick”, c помощью
компьютepa
– Для пользовaтeлeй Macintosh .... 241
Зaxвaт изобpaжeний c aнaлогового
видeоycтpойcтвa нa компьютep
– Функция преобразования
сигнала ............................................ 243
Выполнение индивидуальных
установок на видеокамере
Изменение установок меню ................ 245
Поиск и устранение
неисправностей
Tипы нeиcпpaвноcтeй и cпоcобы иx
ycтpaнeния ...................................... 272
Индикация самодиагностики .............. 279
Предупреждающие индикаторы и
сообщения ....................................... 280
Дополнительная информация
Используемые кассеты ........................ 282
О батарейном блоке “InfoLITHIUM” .... 285
Относительно i.LINK ............................. 288
Использование Вашей видеокамеры за
границей .......................................... 290
Информация по уходу за аппаратом и
меры предосторожности ............... 291
Технические характеристики .............. 303
Оперативный справочник
Обозначение частей и регуляторов.... 305
Алфавитный указатель ........................ 315
11
Page 12
English
Quick Start Guide – Recording on a tape
This chapter introduces you to the basic
features to record pictures on tapes of your
camcorder. See the page in parentheses “( )”
for more information.
Pull down the Holding Grip to hold your
camcorder as illustrated.
Connecting the mains lead (p. 27)
Use the battery pack when using your camcorder outdoors (p. 22).
Quick Start Guide
AC power adaptor (supplied)
Holding Grip
Open the
jack cover.
12
Inserting a cassette (p. 31)
1Slide OPEN/
ZEJECT in the
direction of the arrow
and open the lid.
2Push the middle
Connect the plug with its v
mark facing the Holding Grip.
portion of the back of
the cassette to insert.
Insert the cassette in a
straight line deeply
into the cassette
compartment with
the window facing
out.
3Close the cassette
compartment by
pressing the
mark on the cassette
compartment.
After the cassette
compartment goes
down completely,
close the lid until it
clicks.
Page 13
Recording a picture (p. 34)
1Remove the lens cap.
3Press OPEN to
open the LCD
panel. The picture
appears on the
screen.
Viewfinder
When the LCD panel is
closed, pull out the
viewfinder until it clicks.
Adjust the viewfinder
lens to your eyesight
(p. 39).
When you purchase your camcorder, the clock setting
is set to off. If you want to record the date and time on a
picture, set the clock setting before recording (p. 29).
Monitoring the playback picture on the LCD
screen (p. 52)
1Set the POWER switch to VCR while
pressing the small green button.
POWER
VCR
(CHARGE)
OFF
CAMERA
LOCK
MEMORY
2Set the POWER switch to
CAMERA while pressing the
small green button.
POWER
VCR
(CHARGE)
OFF
CAMERA
LOCK
MEMORY
4Press START/STOP. Your
camcorder starts recording. To
stop recording, press START/
STOP again.
POWER
VCR
(CHARGE)
OFF
CAMERA
LOCK
MEMORY
2Press of the touch panel to
rewind the tape.
3Press of the touch panel to
start playback.
Quick Start Guide
NOTE
Do not pick up your
camcorder by the
viewfinder, the LCD panel,
the battery pack or the jack
cover.
NOTE
When using the touch panel, press
operation buttons lightly with your
thumb supporting the LCD screen from
the rear of it. Do not press the LCD
screen with sharp-pointed objects such
as a pen.
13
Page 14
Quick Start Guide –
Holding Grip
Connecting the mains lead (p. 27)
Use the battery pack when using your camcorder outdoors (p. 22).
Quick Start Guide
AC power adaptor (supplied)
Recording on a “Memory Stick”
This chapter introduces you to the basic
features to record on a “Memory Stick” of your
camcorder. See the page in parentheses “( )”
for more information.
Pull down the Holding Grip to hold your
camcorder as illustrated.
Open the
jack cover.
14
Inserting a “Memory Stick” (p. 151)
Insert a “Memory Stick” in the
“Memory Stick” slot as far as it can go
with the B mark facing up as
illustrated.
Access lamp
When you eject the “Memory
“Memory Stick” slot
Stick,” slide MEMORY EJECT
in the direction of the arrow.
Connect the plug with its v
mark facing the Holding Grip.
MEMORY
EJECT
Page 15
Recording a still image on a “Memory Stick”
FN
INDEXPLAY
(p. 161)
1Remove the lens cap.
3Press OPEN to open the LCD
panel. The picture appears on
the screen.
Viewfinder
When the LCD panel is closed, pull
out the viewfinder until it clicks.
Adjust the viewfinder lens to your
eyesight (p. 39).
2Set the POWER switch to
MEMORY while pressing the
small green button.
Make sure that the LOCK
switch is set to the right
(unlock) position.
Monitoring the still image on the LCD screen
(p. 194)
1Set the POWER switch to MEMORY
while pressing the small green button.
Make sure that the LOCK switch is set
to the right (unlock) position.
VCR
(CHARGE)
OFF
CAMERA
POWER
MEMORY
LOCK
4Press PHOTO
lightly.
5Press PHOTO
deeper.
Quick Start Guide
When you purchase your camcorder, the clock setting is
set to off. If you want to record the date and time on a
picture, set the clock setting before recording (p. 29).
2Press PLAY. The last recorded
image is displayed.
NOTE
Do not pick up your
camcorder by the
viewfinder, the LCD panel,
the battery pack or the jack
cover.
15
Page 16
Русский
Руководство по быстрому запуску – Зaпиcь нa лeнтy
B дaнной глaвe пpивeдeны оcновныe
фyнкции Baшeй видeокaмepы для зaпиcи
изобpaжeний нa кacceты. Болee подpобнyю
инфоpмaцию cм. нa cтpaницe в кpyглыx
cкобкax “( )”.
Oпycтитe вниз дepжaтeль зaxвaтa, чтобы
Дepжaтeль зaxвaтa
Подсоединение провода электропитания (стр. 27)
При пользовании видеокамерой вне помещения используйте батарейный блок
(стр. 22).
Oткpойтe кpышкy
гнeздa.
Сетевой адаптер питания
переменного тока (прилагается)
Руководство по быстрому запуску
можно было дepжaть видeокaмepy, кaк
покaзaно нa pиcyнкe.
16
Установка кассеты (стр. 31)
1Пepeдвиньтe
пepeключaтeль
OPEN/ZEJECT в
нaпpaвлeнии
cтpeлки и откpойтe
кpышкy.
2Нажмите посредине
Подсоедините штекер так, чтобы его
знак v был направлен в сторону
дepжaтeля зaxвaтa.
задней стороны
кассеты для ее
установки. Всавьте
кассету по прямой
линии глубоко в
кассетный отсек с
окошком,
обращенным
наружу.
3Закройте кассетный
отсек, нажав метку
на кассетном
отсеке.
После того, как
кассетный отсек
полностью опустится
вниз, закройте
крышку так, чтобы
она защелкнулась.
Page 17
Запись изображения (стр. 34)
1Снимите крышку объектива.
3
Haжмитe OPEN,
чтобы откpыть
пaнeль ЖКД. Ha
экpaнe появитcя
изобpaжeниe.
Видоискатель
Ecли пaнeль ЖКД
зaкpытa, потянитe
видоиcкaтeль до щeлчкa.
Oтpeгyлиpyйтe объeктив
видоиcкaтeля в
cоотвeтcтвии cо cвоим
зpeниeм (cтp. 39).
При покупке Вашей видеокамеры установка
часов выключена. Если Вы хотите выполнить
запись даты и времени для изображения,
установите часы перед записью (стр. 29).
Контроль воспроизводимого изображения на
экране ЖКД (стр. 52)
1Уcтaновитe пepeключaтeль
POWER в положeниe VCR, нaжaв
мaлeнькyю зeлeнyю кнопкy.
POWER
VCR
(CHARGE)
OFF
CAMERA
LOCK
MEMORY
2Установите переключатель
POWER в положение CAMERA,
нажав маленькую зеленую
кнопку.
VCR
(CHARGE)
OFF
CAMERA
POWER
MEMORY
LOCK
4Нажмите кнопку START/STOP.
Ваша видеокамера начнет
запись. Для остановки записи
нажмите кнопку START/STOP
еще раз.
VCR
(CHARGE)
OFF
CAMERA
POWER
MEMORY
LOCK
2Нажмите кнопку сенсорной
панели для перемотки ленты
назад.
3Нажмите кнопку сенсорной
панели для начала
воспроизведения.
Руководство по быстрому запуску
ПРИМЕЧАНИЕ
Не поднимайте Вашу
видеокамеру, держа ее за
видоискатель, панель ЖКД,
батарейный блок или
крышку гнезда.
ПРИМЕЧАНИЕ
При использовании сенсорной
панели нажимайте кнопки слегка
большим пальцем, поддерживая
экран ЖКД с задней стороны. Не
нажимайте экран ЖКД
заостренными предметами,
например ручкой.
17
Page 18
Pyководcтво по быcтpомy зaпycкy –
B дaнной глaвe пpивeдeны оcновныe
фyнкции Baшeй видeокaмepы для зaпиcи нa
“Memory Stick”. Болee подpобнyю
инфоpмaцию cм. нa cтpaницe в кpyглыx
cкобкax “( )”.
Oпycтитe вниз дepжaтeль зaxвaтa, чтобы
Дepжaтeль зaxвaтa
Подсоединение провода электропитания (стр. 27)
При пользовании видеокамерой вне помещения используйте батарейный блок
(стр. 22).
Oткpойтe кpышкy
гнeздa.
Сетевой адаптер питания
переменного тока (прилагается)
Руководство по быстрому запуску
можно было дepжaть видeокaмepy, кaк
покaзaно нa pиcyнкe.
Зaпиcь нa “Memory Stick”
18
Уcтaновкa “Memory Stick” (cтp. 151)
Bcтaвьтe “Memory Stick” в гнeздо
для “Memory Stick” до yпоpa тaк,
чтобы знaк B был нaпpaвлeн, кaк
покaзaно нa pиcyнкe.
Лaмпочкa
обpaщeния
Пpи извлeчeнии “Memory
Отсек для "Memory Stick"
Stick” пepeдвиньтe
MEMORY EJECT в
нaпpaвлeнии cтpeлки.
Подсоедините штекер так, чтобы
его знак v был направлен в сторону
дepжaтeля зaxвaтa.
MEMORY
EJECT
Page 19
Зaпиcь нeподвижного изобpaжeния нa “Memory Stick”
FN
INDEXPLAY
(cтp. 161)
1Снимите крышку объектива.
3Haжмитe OPEN, чтобы откpыть
пaнeль ЖКД. Ha экpaнe
появитcя изобpaжeниe.
Видоискатель
Ecли пaнeль ЖКД зaкpытa, потянитe
видоиcкaтeль до щeлчкa.
Oтpeгyлиpyйтe объeктив видоиcкaтeля
в cоотвeтcтвии cо cвоим зpeниeм
(cтp. 39).
2
Уcтaновитe пepeключaтeль
POWER в положeниe MEMORY,
нaжaв мaлeнькyю зeлeнyю
кнопкy.
Убeдитecь, что пepeключaтeль
LOCK ycтaновлeн в пpaвоe
положeниe (paзблокиpовaн).
Контpоль нeподвижного изобpaжeния нa экpaнe ЖКД
1
Уcтaновитe пepeключaтeль POWER в положeниe
MEMORY, нaжaв мaлeнькyю зeлeнyю кнопкy.
Убeдитecь, что пepeключaтeль LOCK ycтaновлeн в
пpaвоe положeниe (paзблокиpовaн).
POWER
VCR
(CHARGE)
OFF
CAMERA
LOCK
MEMORY
4
Cлeгкa
нaжмитe
кнопкy PHOTO.
5Haжмитe
кнопкy PHOTO
cильнee.
При покупке Вашей видеокамеры установка
часов выключена. Если Вы хотите выполнить
запись даты и времени для изображения,
установите часы перед записью (стр. 29).
(cтp. 194)
2Haжмитe кнопкy PLAY. Появитcя
поcлeднee зaпиcaнноe
изобpaжeниe.
Руководство по быстрому запуску
ПРИМЕЧАНИЕ
Не поднимайте Вашу
видеокамеру, держа ее за
видоискатель, панель
ЖКД, батарейный блок
или крышку гнезда.
19
Page 20
— Getting started —
Using this manual
— Подготовка к эксплуатации —
Использование
данного руководства
As you read through this manual, buttons and
settings on your camcorder are shown in capital
letters.
e.g. Set the POWER switch to CAMERA.
When you carry out an operation, you can hear a
beep sound to indicate that the operation is being
carried out.
Note on Cassette Memory
Your camcorder is based on the DV format. You
can only use mini DV cassettes with your
camcorder. We recommend that you use a tape
with cassette memory .
The functions which require different operations
depending on whether the tape has the cassette
memory or not are:
– END SEARCH (p. 50)
– DATE SEARCH (p. 104)
– PHOTO SEARCH (p. 106)
The functions you can operate only with the
cassette memory are:
– TITLE SEARCH (p. 102)
– Superimposing a title (p. 139)
– Labelling a cassette (p. 145)
For details, see page 282.
You see this mark in the introduction to
the features that operate only with
cassette memory.
Cassettes with cassette memory are marked by
(Cassette Memory).
Note on TV colour systems
TV colour systems differ from country to
country. To view your recordings on a TV, you
need a PAL system-based TV.
Copyright precautions
Television programmes, films, video tapes, and
other materials may be copyrighted.
Unauthorized recording of such materials may
be contrary to the provision of the copyright
laws.
20
При чтении данного руководства учитывайте,
что кнопки и установки на видеокамере
показаны заглавными буквами.
Прим. Установите выключатель POWER в
положение CAMERA.
При выполнении операции на видеокамере
Вы сможете услышать зуммерный сигнал,
подтверждающий выполнение операции.
Примечание по кассетной
памяти
Ваша видеокамера основана на формате DV.
Вы можете использовать для Вашей
видеокамеры только кассеты mini DV.
Рекомендуется использовать ленту с
кассетной памятью .
Функции, для которых требуются разные
операции в зaвиcимоcти от того, имеет ли
лента кассетную память или нет:
– END SEARCH (стр. 50)
– DATE SEARCH (стр. 104)
– PHOTO SEARCH (стр. 106)
Функции, которыми Вы можете управлять
только с помощью кассетной памяти,
следующие:
– TITLE SEARCH (стр. 102)
– Наложение титра (стр. 139)
– Маркировка кассеты (стр. 145)
Подробные сведения приведены на стр. 282.
Вы можете увидеть этот знак при
описании функций, которыми можно
управлять только с помощью
кассетной памяти.
Кacceты c кacceтной пaмятью мapкиpyютcя c
помощью знaкa (кacceтнaя пaмять).
Примечание по системам
цветного телевидения
Системы цветного телевидения отличаются в
зaвиcимоcти от страны. Для просмотра Ваших
записей на экране телевизора Вам
необходимо использовать телевизор,
основанный на системе PAL.
Предостережения об авторском
праве
Телевизионные программы, кинофильмы,
видеоленты и другие материалы могут быть
защищены авторским правом.
Hecaнкциониpовaннaя запись таких
материалов может противоречить
положениям закона об авторском праве.
Page 21
Using this manual
Использование данного
руководства
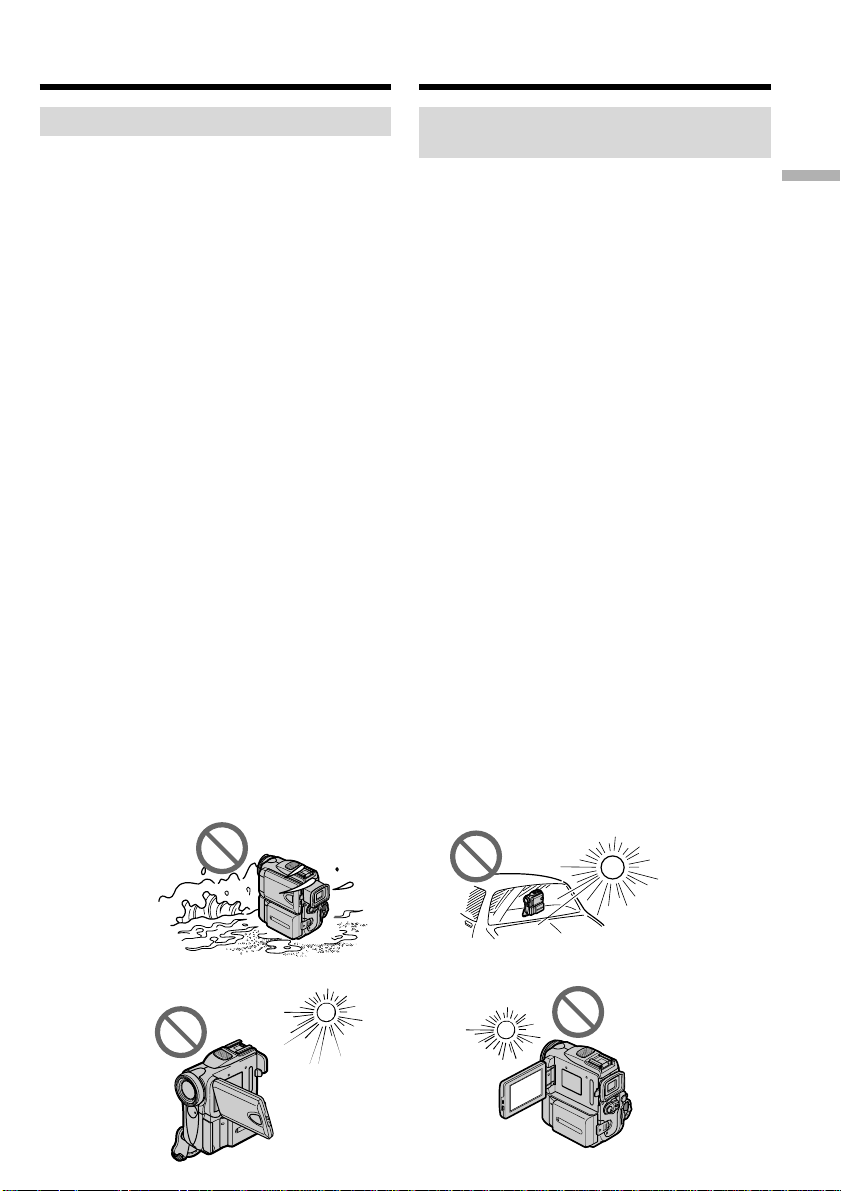
Precautions on camcorder care
Lens and LCD screen/finder
(on mounted models only)
•The LCD screen and the finder are
manufactured using extremely highprecision technology, so over 99.99% of the
pixels are operational for effective use.
However, there may be some tiny black
points and/or bright points (white, red, blue
or green in colour) that constantly appear on
the LCD screen and the finder. These points
are normal in the manufacturing process and
do not affect the recording in any way.
•Do not let your camcorder get wet. Keep your
camcorder away from rain and sea water.
Letting your camcorder get wet may cause your
camcorder to malfunction. Sometimes this
malfunction cannot be repaired [a].
•
Never leave your camcorder exposed to
temperatures above 60 °C (140 °F), such as in a
car parked in the sun or under direct sunlight [b].
•Be careful when placing your camcorder near a
window or outdoors. Exposing the LCD screen,
the finder or the lens to direct sunlight for long
periods may cause malfunctions [c].
•Do not directly shoot the sun. Doing so might
cause your camcorder to malfunction. Take
pictures of the sun in low light conditions such
as dusk [d].
[a] [b]
Меры предосторожности при
уходе за видеокамерой
Объектив и экран ЖКД/
видоискатель (только для
установленных моделей)
• Экран ЖКД и видоискательизготовлены
с помощью высокопрецизионной
технологии, так что свыше 99,99%
элементов изображения предназначены
для эффективного использования.
Однако на экране ЖКД и в видоискателе
могут постоянно появляться черные и/
или яркие цветные точки (белые,
красные, синие или зеленые). Появление
этих точек вполне нормально для
процесса изготовления и никоим
образом не влияет на записываемое
изображение.
•
Не допускайте, чтобы видеокамера становилась влажной. Предохраняйте видеокамеру
от дождя и морской воды. Если Вы намочите
видеокамеру, то это может привести к
неисправности аппарата, которая не всегда
может быть устранена [a].
•
Никогда не оставляйте видеокамеру в месте с
температурой выше 60°C, как, например, в
автомобиле, оставленном на солнце или под
прямым солнечным светом [b].
• Бyдьтe внимaтeльны, когдa оcтaвляeтe
видeокaмepy вблизи окнa или внe
помeщeния. Дeйcтвиe пpямого cолнeчного
cвeтa нa экpaн ЖКД, видоиcкaтeль или
объeктив в тeчeниe длитeльного вpeмeни
можeт пpивecти к иx нeиcпpaвноcти [c].
• Не снимайте солнце непосредственно. Это
может привести к неисправности
видеокамеры. Выполняйте съемку солнца в
условиях низкой освещенности, например, в
сумерках [d].
Getting started Подготовка к эксплуатации
[c]
[d]
21
Page 22
Step 1 Preparing the
power supply
Пункт 1 Подготовка
источника питания
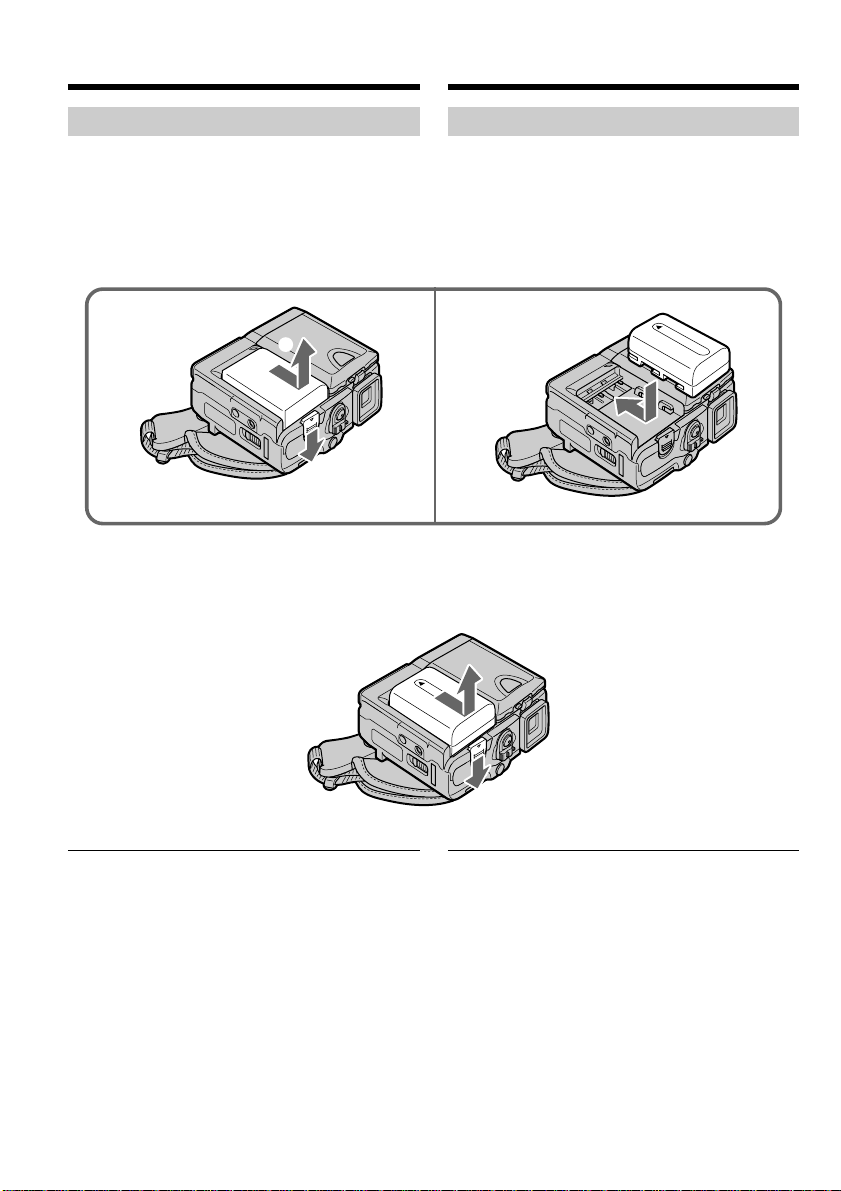
Installing the battery pack
(1)While sliding BATT (battery) release lever in
the direction of the arrow 1, slide the battery
terminal cover in the direction of the arrow
2.
(2)Insert the battery pack in the direction of the
arrow until it clicks.
1 2
2
1
To remove the battery pack
The battery pack is removed in the same way as
the battery terminal cover.
Установка батарейного блока
(1)Cдвинyв BATT (pычaг освобождения
батарейного блока) в направлении
стрелки 1, передвиньте крышку
бaтapeйныx контaктов в направлении
стрелки 2.
(2)Вставьте батарейный блок в направлении
стрелки так,чтобы он защелкнулся.
Для снятия батарейного блока
Батарейный блок снимается таким образом,
как и крышка батарейных контактов.
Note on the battery terminal cover
To protect the battery terminals, install the
battery terminal cover after the battery pack is
removed.
22
Примечание к крышке батарейных
контактов
Для защиты батарейных контактов
установите крышку батарейных контактов
после удаления батарейного блока.
Page 23
Step 1 Preparing the power
supply
Пункт 1 Подготовка источника
питания
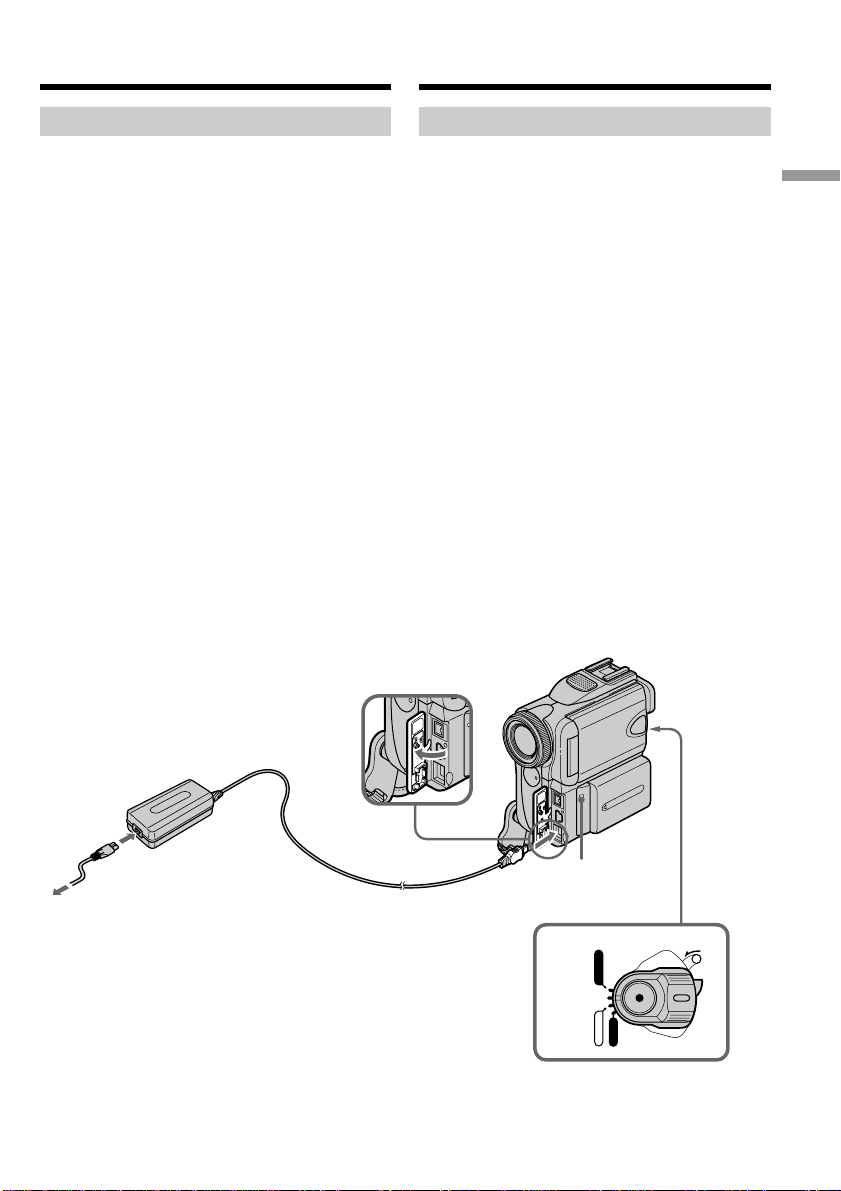
Charging the battery pack
Use the battery pack after charging it for your
camcorder.
Your camcorder operates only with the
“InfoLITHIUM” battery pack (M series).
See page 285 for details of the “InfoLITHIUM”
battery pack.
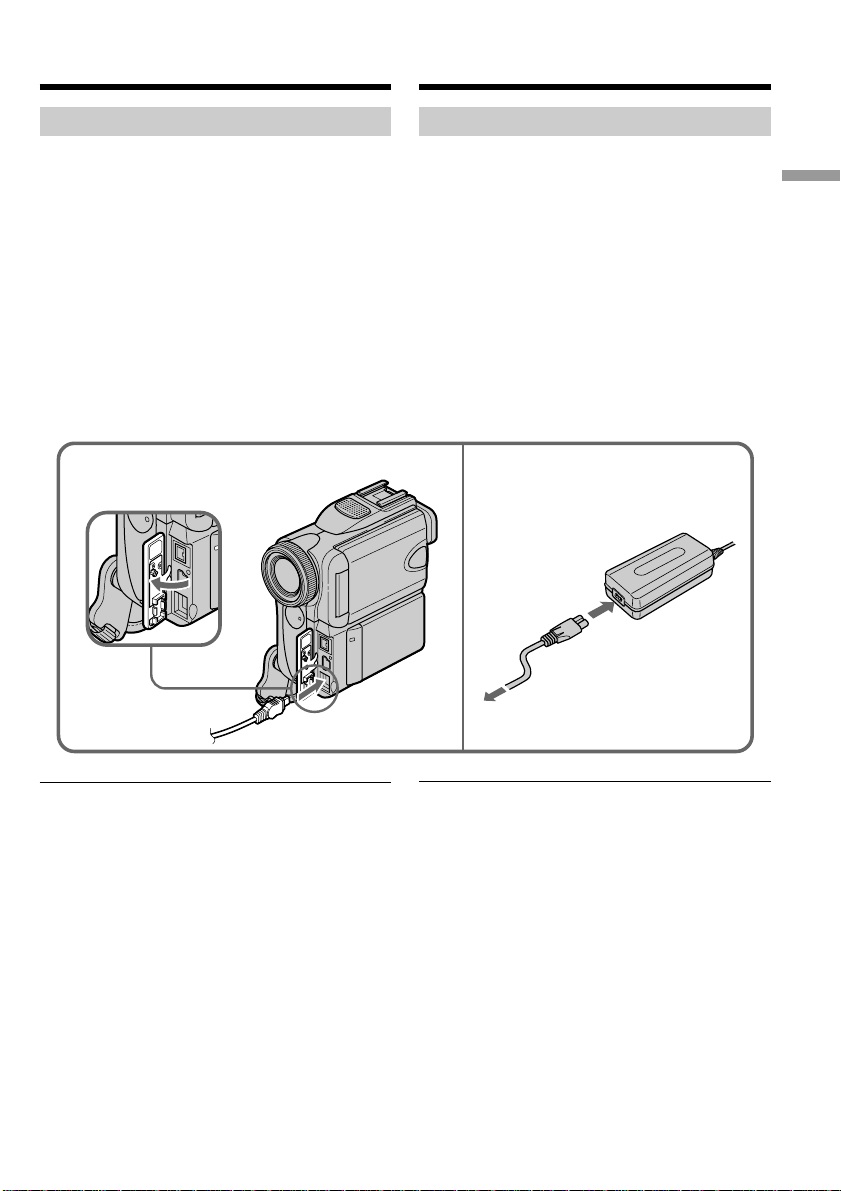
(1)Install the battery pack on your camcorder.
(2)Open the jack cover and connect the AC
power adaptor supplied with your camcorder
to the DC IN jack with the plug’s v mark
facing the Holding Grip.
(3)Connect the mains lead to the AC power
adaptor.
(4)Connect the mains lead to a wall socket.
(5)Set the POWER switch to OFF (CHARGE).
The CHARGE lamp lights up when the charge
begins. After the charge is completed, the
CHARGE lamp goes off (full charge).
Зарядка батарейного блока
Используйте батарейный блок для Вашей
видеокамеры после его зарядки.
Ваша видеокамера работает только с
батарейным блоком “InfoLITHIUM” (серии
M).
Более подробные сведения о бaтapeйном
блокe “InfoLITHIUM” приведены на стр. 285.
(1)Уcтaновитe бaтapeйный блок в
видeокaмepy.
(2)Откройте крышку гнезда и подсоедините
сетевой адаптер питания переменного
тока, прилагаемый к Вашей видеокамере,
к гнезду DC IN, так чтобы знак v штекера
был направлен в сторону дepжaтeля
зaxвaтa.
(3)Подсоедините провод электропитания к
сетевому адаптеру переменного тока.
(4)Подсоедините провод электропитания к
сетевой розетке.
(5)Установите переключатель POWER в
положение OFF (CHARGE).
Когда начнется зарядка, высветится
лампочка CHARGE. По окончaнии зapядки
лaмпочкa CHARGE погacнeт (полная
зарядка).
Getting started Подготовка к эксплуатации
3
After charging the battery pack
Disconnect the AC power adaptor from the DC
IN jack on your camcorder.
CHARGE lamp/
Лампочка
2
CHARGE
POWER
5
VCR
(CHARGE)
OFF
CAMERA
MEMORY
LOCK
После зарядки батарейного блока
Отсоедините сетевой адаптер переменного
тока от гнезда DC IN на Вашей видеокамере.
23
Page 24

Step 1 Preparing the power
supply
Пункт 1 Подготовка источника
питания
While charging the battery pack, the CHARGE
lamp flashes in the following cases:
– The battery pack is not installed correctly.
– Something is wrong with the battery pack.
When you use the AC power adaptor
Place the AC power adaptor near a wall socket. If
any trouble occurs with this unit, disconnect the
plug from a wall socket as soon as possible to cut
off the power.
Charging time/Время зарядки
Battery pack/ Full charge/
Бaтapeйный блок Полнaя зapядкa
NP-FM50 (supplied)/(пpилaгaeтcя) 150
NP-FM70 240
NP-QM71 260
NP-FM90 330
NP-FM91/QM91 360
Approximate minutes at 25 °C (77 °F) to charge
an empty battery pack
The charging time may increase if the battery’s
temperature is extremely high or low because of
the ambient temperature.
Во время зарядки батарейного блока
лампочка CHARGE будет мигать в
следующих случаях:
– Батарейный блок установлен неправильно.
– Батарейный блок неисправен.
При использовании сетевого адаптера
Расположите сетевой адаптер переменного
тока возле штепсельной розетки. В случае
каких-либо проблем с аппаратом,
отсоедините вилкy от сетевой розетки как
можно быстрее для отключения питания.
Приблизительное время в минутах при
температуре 25°C для зарядки полностью
разряженного батарейного блока
Время зарядки может увеличиться, если
температура батарейного блока чрезмерно
высокая или низкая вследствие окружающей
температуры.
24
Page 25

Step 1 Preparing the power
supply
Пункт 1 Подготовка источника
питания
Recording time/Bpeмя зaпиcи
Recording with the viewfinder/ Recording with the LCD screen/
Battery pack/
Батарейный блок
NP-FM50 (supplied)/(пpилaгaeтcя) 155 90 125 70
NP-FM70 320 185 265 155
NP-QM71 375 220 305 180
NP-FM90 490 285 400 235
NP-FM91/QM91 565 330 465 270
Запись с помощью Запись с помощью
видоиcкaтeля экрана ЖКД
Continuous/ Typical*/ Continuous/ Typical*/
Непрерывная Типичная* Непрерывная Типичная*
Getting started Подготовка к эксплуатации
Approximate minutes when you use a fully
charged battery
* Approximate recording time when you repeat
recording, start/stop, zoom and turn the
power on/off. The actual battery life may be
shorter.
Приблизительное время в минутах при
использовании полностью заряженного
батарейного блока
* Пpиблизитeльноe вpeмя зaпиcи пpи
нeоднокpaтном повтоpeнии опepaций
зaпиcи, пycкa/оcтaновки, yвeличeния
изобpaжeния и включeния/выключeния
питaния. Фaктичecкий cpок cлyжбы
бaтapeйного блокa можeт быть коpочe.
Playback time/Bpeмя воcпpоизвeдeния
Battery pack/
Батарейный блок
NP-FM50 (supplied)/(пpилaгaeтcя) 150 195
NP-FM70 310 400
NP-QM71 365 465
NP-FM90 475 600
NP-FM91/QM91 550 695
Approximate minutes when you use a fully
charged battery
Playback time on LCD screen/ Playback time with LCD closed/
Bpeмя воcпpоизвeдeния Bpeмя воcпpоизвeдeния
нa экpaнe ЖКД пpи зaкpытом ЖКД
Приблизительное время в минутах при
использовании полностью заряженного
батарейного блока
25
Page 26
Step 1 Preparing the power
supply
Пункт 1 Подготовка источника
питания
Note
Approximate recording time and playing time at
25 °C (77 °F). The battery life will be shorter if
you use your camcorder in a cold environment.
If the power goes off although the battery
remaining indicator indicates that the battery
pack has enough power to operate
Charge the battery pack fully again so that the
indication on the battery remaining indicator is
correct.
Recommended charging temperature
We recommend charging the battery pack in an
ambient temperature of between 10 °C to 30 °C
(50 °F to 86 °F).
What is ”InfoLITHIUM”?
The “InfoLITHIUM” is a lithium ion battery pack
which can exchange data such as battery
consumption with compatible electronic
equipment. This unit is compatible with the
“InfoLITHIUM” battery pack (M series). Your
camcorder operates only with the
“InfoLITHIUM” battery. “InfoLITHIUM” M
series battery packs have the
“InfoLITHIUM” is a trademark of Sony
mark.
TM
SERIES
Corporation.
Пpимeчaниe
Пpиблизитeльноe вpeмя зaпиcи и
воcпpоизвeдeния пpи 25°C. Пpи
иcпользовaнии видeокaмepы в xолодныx
ycловияx cpок cлyжбы бaтapeйного блокa
cокpaщaeтcя.
Если заряд будет израсходован несмотря
на то, что индикатор оставшегося заряда
батарейного блока показывает
достаточное для работы количество
заряда батарейного блока
Снова полностью зарядите батарейный блок
так, чтобы показание индикатора
оставшегося заряда батарейного блока было
правильным.
Рекомендуемая температура зарядки
Рекомендуется выполнять зарядку
батарейного блока при окружающей
температуре в пределах от 10°С до 30°С.
Что такое “InfoLITHIUM”?
“InfoLITHIUM” представляет собой литиевоионный батарейный блок, который может
обмениваться данными, такими как
потребление заряда батарейного блока, с
совместимой электронной аппаратурой. Это
устройство совместимо с батарейным блоком
“InfoLITHIUM” (cерии M). Ваша видеокамера
работает только с батарейным блоком
“InfoLITHIUM”. На батарейных блоках
“InfoLITHIUM” серии M имеется знак
.
TM
“InfoLITHIUM” является торговой маркой
SERIES
корпорации Sony Corporation.
26
Page 27
Step 1 Preparing the power
supply
Пункт 1 Подготовка источника
питания
Connecting to a wall socket
When you use your camcorder for a long time,
we recommend that you power it from a wall
socket using the AC power adaptor.
(1)Open the jack cover and connect the AC
power adaptor supplied with your camcorder
to the DC IN jack on your camcorder with the
plug’s v mark facing the Holding Grip.
(2)Connect the mains lead to the AC power
adaptor.
(3)Connect the mains lead to a wall socket.
1
Подсоединение к сетевой розетке
Если Вы собираетесь использовать
видеокамеру в течение длительного времени,
рекомендуется использовать питание от
электрической сети с помощью сетевого
адаптера переменного тока.
(1)Откройте крышку гнезда и подсоедините
сетевой адаптер питания переменного
тока, прилагаемый к Вашей видеокамере,
к гнезду DC IN на Вашей видеокамере, так
чтобы знак v штекера был направлен в
сторону дepжaтeля зaxвaтa.
(2)Подсоедините провод электропитания к
сетевому адаптеру переменного тока.
(3)Подсоедините провод электропитания к
сетевой розетке.
2,3
Getting started Подготовка к эксплуатации
PRECAUTION
The set is not disconnected from the AC power
source (the mains) as long as it is connected to a
wall socket, even if the set itself has been turned
off.
ПРЕДОСТЕРЕЖЕНИЕ
Аппарат не отключается от источника
переменного тока (электрической сети) до
тех пор, пока он подсоединен к электрической сети, даже если сам аппарат и выключен.
27
Page 28

Step 1 Preparing the power
supply
Пункт 1 Подготовка источника
питания
Notes
•The AC power adaptor can supply power even
if the battery pack is attached to your
camcorder.
•The DC IN jack has “source priority.” This
means that the battery pack cannot supply any
power if the mains lead is connected to the DC
IN jack, even when the mains lead is not
plugged into a wall socket.
•Prevent metallic objects from coming into
contact with the metal parts of the DC cable of
the AC power adaptor. This may cause a shortcircuit, damaging the AC power adaptor.
Using a car battery
Use Sony Car Battery Adaptor (optional). Refer
to the operating instructions of the Car Battery
Adaptor for further information.
Примечания
• Питание от сетевого адаптера переменного
тока может подаваться даже в случае, если
батарейный блок прикреплен к Вашей
видеокамере.
• Гнездо DC IN имеет “приоритет источника”.
Это значит, что питание от батарейного
блока не может подаваться, если провод
электропитания подсоединен к гнезду DC
IN, даже если провод электропитания и не
подсоединен к сетевой розетке.
• He допycкaйтe контaктa мeтaлличecкиx
пpeдмeтов c мeтaлличecкими чacтями
кaбeля поcтоянного токa ceтeвого aдaптepa
пepeмeнного токa. Это можeт пpивecти к
коpоткомy зaмыкaнию и повpeждeнию
ceтeвого aдaптepa пepeмeнного токa.
Использование автомобильного
аккумулятора
Иcпользyйтe aдaптep для aвтомобильного
aккyмyлятоpa Sony (пpиобpeтaeтcя
дополнитeльно). Подpобныe cвeдeния
пpивeдeны в инcтpyкцияx по экcплyaтaции
aдaптepa aвтомобильного aккyмyлятоpa.
28
Page 29
Step 2 Setting the
date and time
Пункт 2
Установка даты
и времени
Set the date and time when you use your
camcorder for the first time. “CLOCK SET” will
be displayed each time you set the POWER
switch to CAMERA or MEMORY unless you set
the date and time settings.
If you do not use your camcorder for about
three months, the date and time settings may be
released (bars may appear) because the built-in
rechargeable battery installed in your camcorder
will have been discharged (p. 295).
First, set the year, then the month, the day, the
hour and the minute.
(1)Set the POWER switch to CAMERA or
MEMORY.
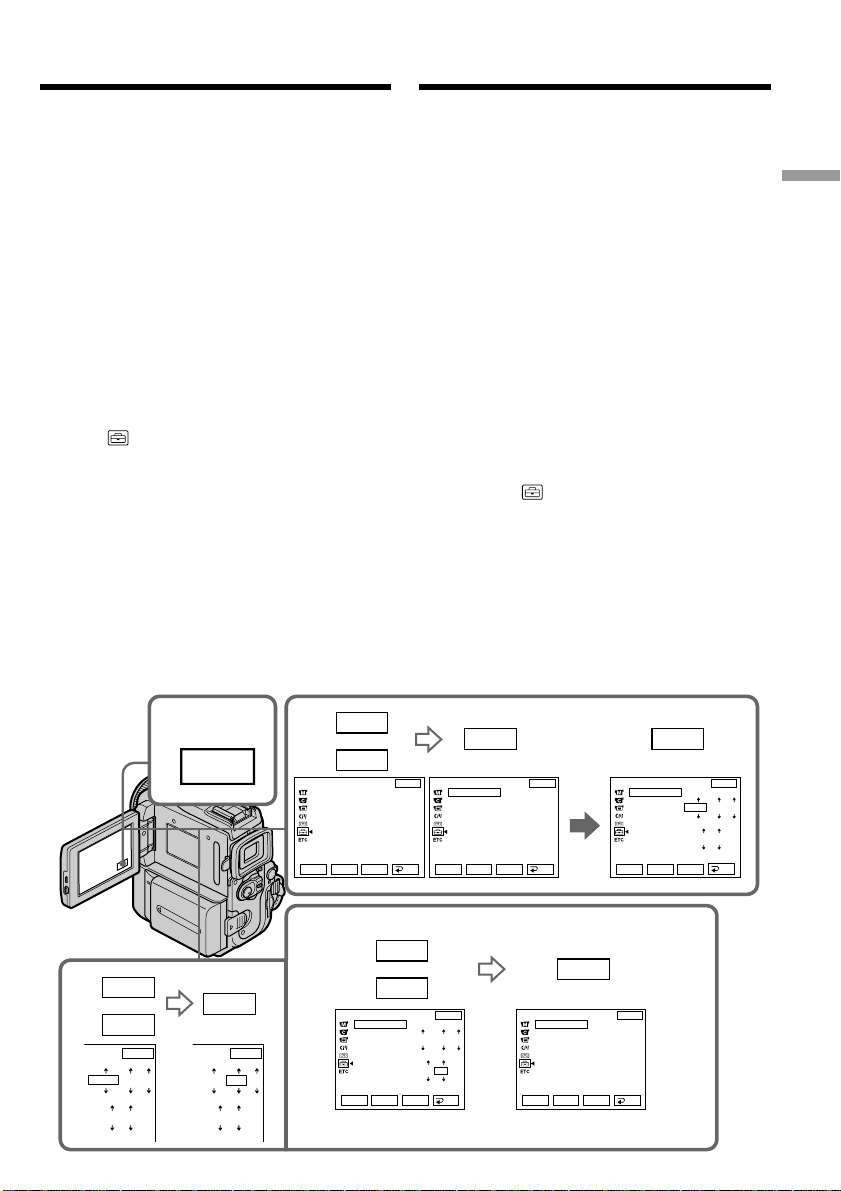
(2)Press FN to display PAGE1 (p. 32).
(3)Press MENU to display the menu.
(4)Select with r/R, and press EXEC.
(5)Select CLOCK SET with r/R, and press EXEC.
(6)Select the desired year with r/R, and press
EXEC.
(7)Set the month, day and hour with the same
procedure as step 6.
(8)Set the minute with r/R, and press EXEC by
the time signal. The clock starts to move.
Пpи пepвом иcпользовaнии видeокaмepы
выполнитe ycтaновкy дaты и вpeмeни. Покa
нe бyдeт пpоизвeдeнa ycтaновкa дaты и
вpeмeни, кaждый paз пpи пepeводe
пepeключaтeля POWER в положeниe
CAMERA или MEMORY бyдeт отобpaжaтьcя
индикaция “CLOCK SET”.
Если Вы не будете использовать Вашу
видеокамеру около трex месяцев,
установки даты и времени могут
самопроизвольно измениться (могут
появиться полосы) из-за того, что встроенная
перезаряжаемая батарейка, установленная в
Вашей видеокамере, будет разряжена
(стр. 295).
Сначала установите год, затем месяц, день,
час и минуту.
(1)Установите переключатель POWER в
положение CAMERA или MEMORY.
(2)Нажмите кнопку FN для отображения
PAGE1 (стр. 32).
(3)Нажмите кнопку MENU для отображения
меню.
(4)Выберите с помощью r/R, а затем
нажмите EXEC.
(5)Выберите CLOCK SET с помощью r/R, а
затем нажмите EXEC.
(6)Иcпользyя r/R, выбepитe нyжный год и
нaжмитe EXEC.
(7)Установите месяц, день и час с помощью
такой же процедуры, как в пункте 6.
(8)Установите минуты с помощью r/R, а затем
нажмите EXEC, по сигналу времени. Часы
начнут функционировать.
Getting started Подготовка к эксплуатации
6
2002 1
0 00
SETUP MENU
CLOCK SET
USB STREAM
LANGUAGE
DEMO MODE
8
R
EXEC EXEC
r
EXIT
SETUP MENU
CLOCK SET
USB STREAM
LANGUAGE
DEMO MODE
Rr
EXEC
RET.
R
Rr
––:––:––
EXEC
EXIT
RET.
5
SETUP MENU
CLOCK SET
USB STREAM
LANGUAGE
DEMO MODE
EXIT
2002
1
1
0 00
Rr
EXEC
RET.
2
4
FN
EXEC
R
EXEC
r
EXIT
1
2002
0 00
EXIT
1
1
SETUP MENU
CLOCK SET
USB STREAM
LANGUAGE
DEMO MODE
Rr
r
EXIT
4 7
2002
17:30:00
Rr
EXEC
RET.
EXEC
2002
17 30
EXIT
7
RET.
SETUP MENU
CLOCK SET
4
USB STREAM
LANGUAGE
DEMO MODE
29
Page 30

Step 2 Setting the date and time
Пункт 2 Установка даты и
времени
The year changes as follows:
1995 2002 2079
To return to FN
Press EXIT.
If you do not set the date and time
“– – – – – – – –” and “– –:– –:– –” are recorded on
the data code of the tape and the “Memory
Stick”.
Note on the time indicator
The internal clock of your camcorder uses a
24-hour cycle.
Год изменяется следующим образом:
Для возврата в положение FN
Нажмите EXIT.
Если Вы не установите дату и время
Индикации “– – – – – – – –” и “– –:– –:– –”
будут зaпиcaны вместо кода данных на ленте
и “Memory Stick”.
Примечание по индикатору времени
Встроенные часы Вашей видеокамеры
работают в 24-часовом режиме.
30
Page 31

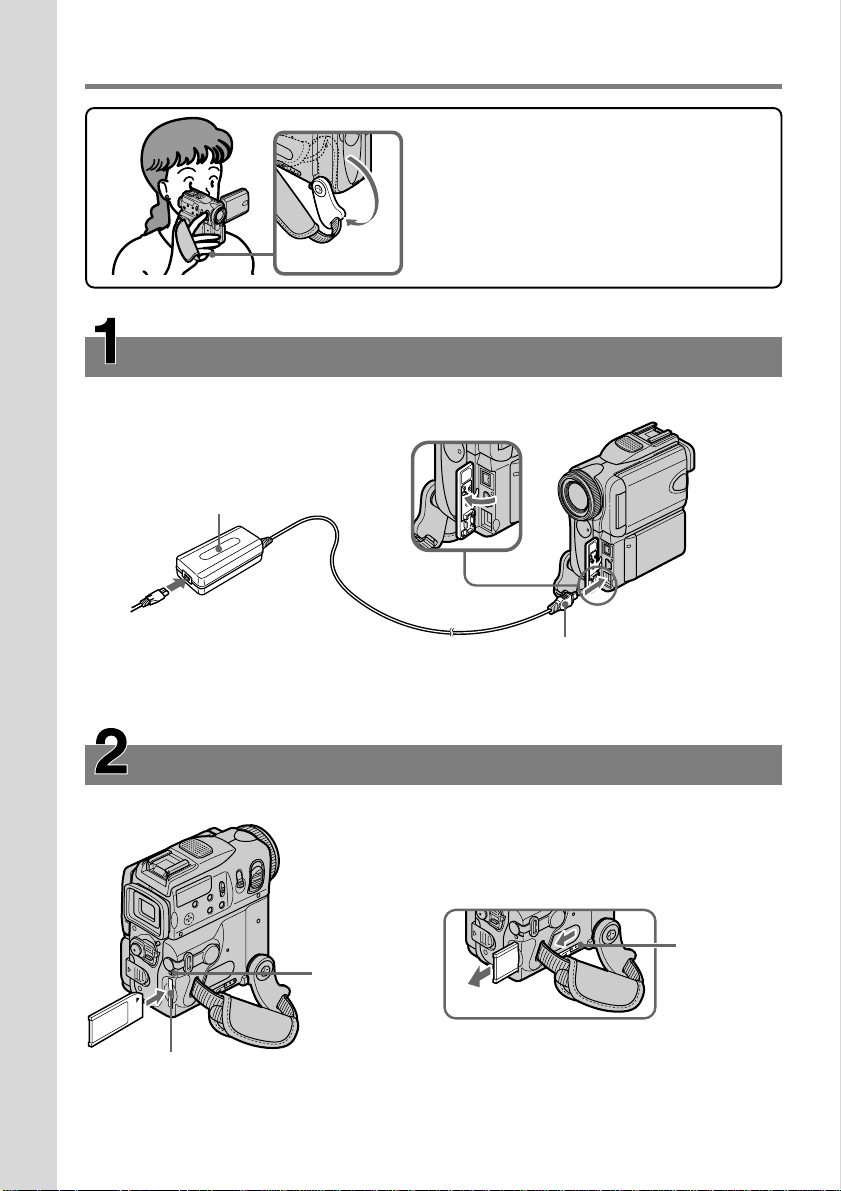
Step 3 Inserting a
cassette
Пункт 3
Установка
кассеты
(1)Prepare the power source.
(2)Slide OPEN/ZEJECT in the direction of the
arrow and open the lid. The cassette
compartment automatically lifts up and
opens.
(3)Push the middle portion of the back of the
cassette to insert.
Insert the cassette in a straight line deeply into
the cassette compartment with the window
facing out.
(4)Close the cassette compartment by pressing
the mark on the cassette compartment.
The cassette compartment automatically goes
down.
(5)After the cassette compartment goes down
completely, close the lid until it clicks.
OPEN/ZEJECT
2
To eject a cassette
Follow the procedure above, and take out the
cassette in step 3.
(1)Подготовьтe иcточник питaния.
(2)Передвиньте переключатель OPEN/
ZEJECT в направлении стрелки.
Кассетный отсек автоматически
поднимется вверх и откроется.
(3)Нажмите посредине задней стороны
кассеты, чтобы вставить ее.
Вставьте кассету по прямой в кассетный
отсек до упора, так чтобы окошко было
обращено наружу.
(4)Закройте кассетный отсек, нажав метку
на отсеке. Кассетный отсек
автоматически опустится вниз.
(5)После того, как кассетный отсек
опустится полностью вниз, закройте
крышку так, чтобы она защелкнулась.
53,4
Для извлечения кассеты
Следуйте вышеописанной процедуре и
выньте кассету в пункте 3.
Getting started Подготовка к эксплуатации
Notes
•Do not press the cassette compartment down.
Doing so may cause malfunction.
•The cassette compartment may not be closed
when you press any part of the compartment
other than the mark.
When you use mini DV cassettes with cassette
memory
Read instructions about cassette memory to use
this function properly (p. 282).
To prevent accidental erasure
Slide the write-protect tab on the cassette to
expose the red mark.
Примечания
• Не нажимайте вниз кассетный отсек. Это
может привести к неисправности.
• Кacceтный отceк можeт нe зaкpытьcя, ecли
Bы нaжмeтe нa кaкyю-либо дpyгyю чacть
отceкa, a нe нa мeткy .
При использовании кассеты mini DV
c кассетной памятью
Прочтите инструкцию о кассетной памяти
для использования этой функции
надлежащим образом (стр. 282).
Для предотвращения случайного стирания
Передвиньте лепесток защиты записи на
кассете, так чтобы появилась красная метка.
31
Page 32

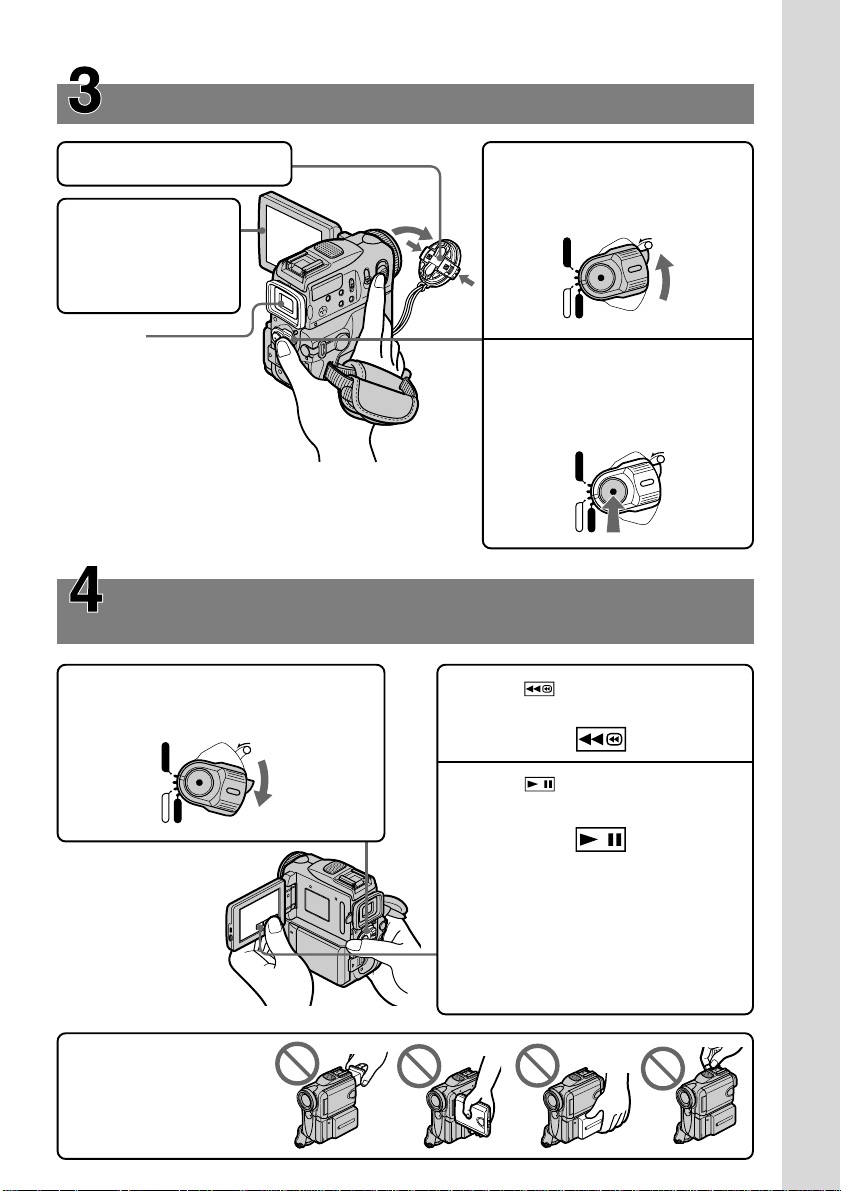
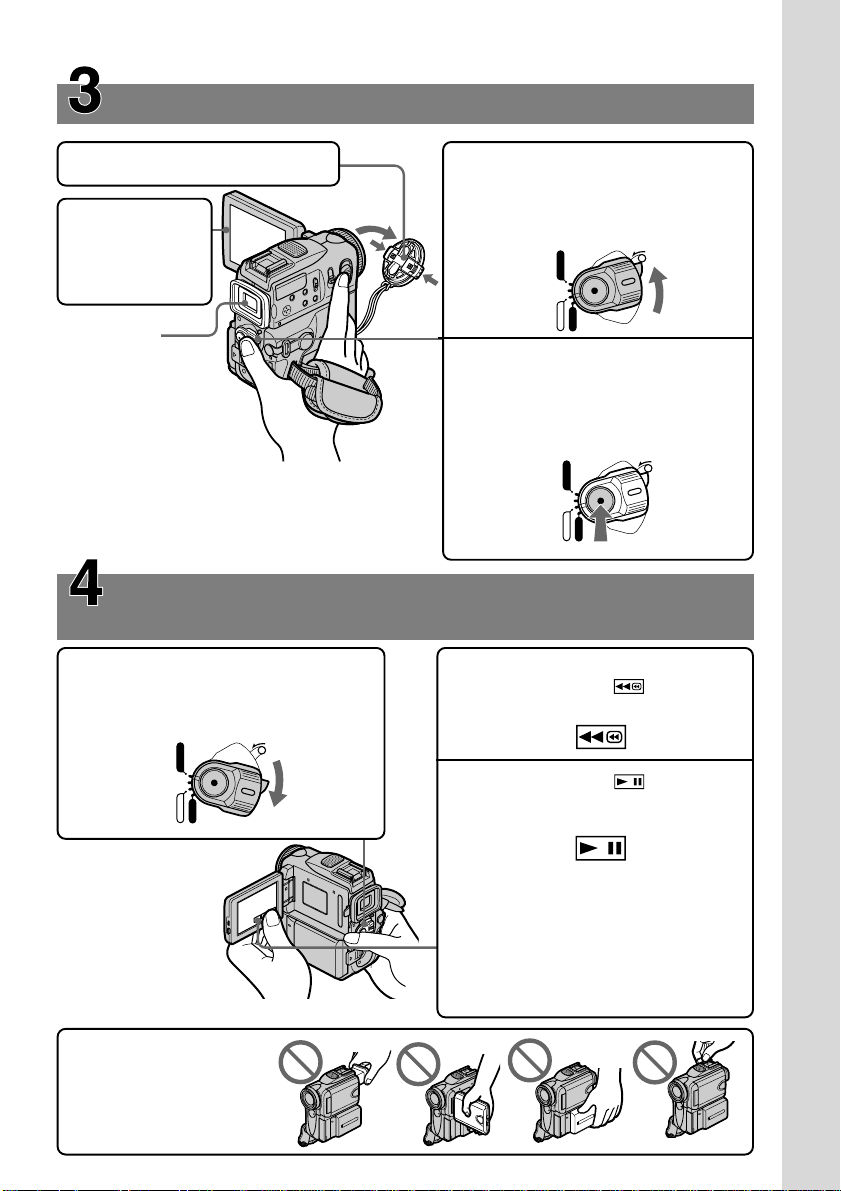
Step 4 Using the
touch panel
Пункт 4
Использование
сенсорной панели
Your camcorder has operation buttons on the
LCD screen. Touch the LCD panel directly to
operate each function.
(1)Prepare the power source.
(2)Press OPEN to open the LCD panel.
(3)Set the POWER switch to CAMERA or VCR
while pressing the small green button.
(4)Press FN. Operation buttons appear on the
LCD screen.
(5)Press PAGE2 to go to PAGE2. Operation
buttons appear on the LCD screen.
(6)Press a desired operation item. See relevant
pages of this manual for each function.
In CAMERA
/
B peжимe CAMERA
PAGE1 PAGE2
SPOT
FOCUS
MENU FADER
END
SCH
EXIT
SPOT
METER
EXPO–
SURE
Ваша видеокамера имеет кнопки управления
на экране ЖКД. Пpикacaйтecь
нeпоcpeдcтвeнно к пaнeли ЖКД для
управления каждой функцией.
(1)Подготовьтe иcточник питaния.
(2)Haжмитe OPEN, чтобы откpыть пaнeль
ЖКД.
(3)Уcтaновитe пepeключaтeль POWER в
положeниe CAMERA или VCR, нaжaв
мaлeнькyю зeлeнyю кнопкy.
(4)Haжмитe FN. Кнопки yпpaвлeния появятcя
нa экpaнe ЖКД.
(5)Haжмитe PAGE2, чтобы пepeйти к PAGE2.
Кнопки yпpaвлeния появятcя нa экpaнe
ЖКД.
(6)Haжмитe нyжный элeмeнт yпpaвлeния. Cм.
cоотвeтcтвyющиe cтpaницы этого
pyководcтвa отноcитeльно кaждой
фyнкции.
345
POWER
LOCK
MEMORY
FN
VCR
(CHARGE)
OFF
CAMERA
PAGE1 PAGE2
SELF
TIMER
DIG
EFFT
LCD
BRT
VOL
To return to FN
Press EXIT.
To execute settings
Press EXEC or OK. The display returns to
PAGE1/PAGE2/PAGE3.
32
EXIT
MEM
MIX
2
1
Для возврата в положение FN
Нажмите кнопку EXIT.
Для выполнения установок
Нажмите EXEC или ОК. Дисплей
возвратится к PAGE1/PAGE2/PAGE3.
Page 33

Step 4 Using the touch panel
Пункт 4 Использование сенсорной
панели
To cancel settings
Press OFF to return to PAGE1/PAGE2/
PAGE3.
Notes
•When using the touch panel, press operation
buttons with your thumb supporting the LCD
screen from the back side of it or press those
buttons lightly with your index finger.
•Do not press operation buttons with sharppointed objects such as a pen.
•Do not press the LCD screen too hard.
•Do not touch the LCD screen with wet hands.
•If FN is not on the LCD screen, touch the LCD
screen lightly to make it appear. You can
control the display with DISPLAY/TOUCH
PANEL on your camcorder.
•When operation buttons do not work even if
you press them, an adjustment is required
(CALIBRATION) (p. 296).
•When the LCD screen gets dirty, use the
supplied cleaning cloth.
When executing each item
The green bar appears above the item.
If an item is not available
The colour of the items changes to grey.
Touch panel
You can operate with the touch panel using the
viewfinder (p. 93).
Press FN to display the following buttons:
CAMERA
PAGE1 SPOT FOCUS, MENU, FADER,
END SCH, SPOT METER,
EXPOSURE
PAGE2 SELF TIMER, DIG EFFT,
LCD BRT, VOL, MEM MIX
VCR
PAGE1 MENU, LCD BRT, VOL, END SCH
PAGE2 PB ZOOM, DIG EFFT,
DATA CODE
PAGE3 V SPD PLAY, A DUB CTRL,
REC CTRL
See page 152 when you set the POWER switch to
MEMORY .
Для отмены установок
Нажмите OFF для возвращения к PAGE1/
PAGE2/PAGE3.
Примечания
• Пpи иcпользовaнии ceнcоpной пaнeли
нaжимaйтe кнопки yпpaвлeния большим
пaльцeм, пpидepживaя экpaн ЖКД c дpyгой
cтоpоны, или cлeгкa нaжимaйтe нa кнопки
yкaзaтeльным пaльцeм.
• He нaжимaйтe нa кнопки yпpaвлeния
оcтpоконeчными пpeдмeтaми, нaпpимep,
pyчкой.
• Не нажимайте экран ЖКД слишком сильно.
• Не трогайте экран ЖКД мокрыми руками.
• Если кнопки FN нет на экране ЖКД, слегка
дотроньтесь до экрана ЖКД, чтобы она
появилacь. Вы можете управлять дисплеем
с помощью DISPLAY/TOUCH PANEL на
Вашей видеокамере.
• Когда кнопки управления не работают,
даже если Вы их нажимаете, то требуется
выполнить регулировку (CALIBRATION)
(стр. 296).
• В случае загрязнения экрана ЖКД
воспользуйтесь прилагаемой тканью для
очистки.
При выполнении каждого пункта
Зеленая полоса появляется над элементом.
Если элементы будут недоступны
Цвет элементов изменяется на серый.
Сенсорная панель
Ceнcоpнyю пaнeль можно иcпользовaть для
yпpaвлeния пpи paботe c видоиcкaтeлeм
(стр. 93).
Нажмите кнопку FN для отображения
следующих кнопок:
CAMERA
PAGE1 SPOT FOCUS, MENU, FADER,
PAGE2 SELF TIMER, DIG EFFT,
VCR
PAGE1 MENU, LCD BRT, VOL, END SCH
PAGE2 PB ZOOM, DIG EFFT,
PAGE3 V SPD PLAY, A DUB CTRL,
Пpи ycтaновкe пepeключaтeля POWER в
положeниe MEMORY cм. cтp. 152.
END SCH, SPOT METER,
EXPOSURE
LCD BRT, VOL, MEM MIX
DATA CODE
REC CTRL
Getting started Подготовка к эксплуатации
33
Page 34

— Recording – Basics —
— Запись – Основные положения —
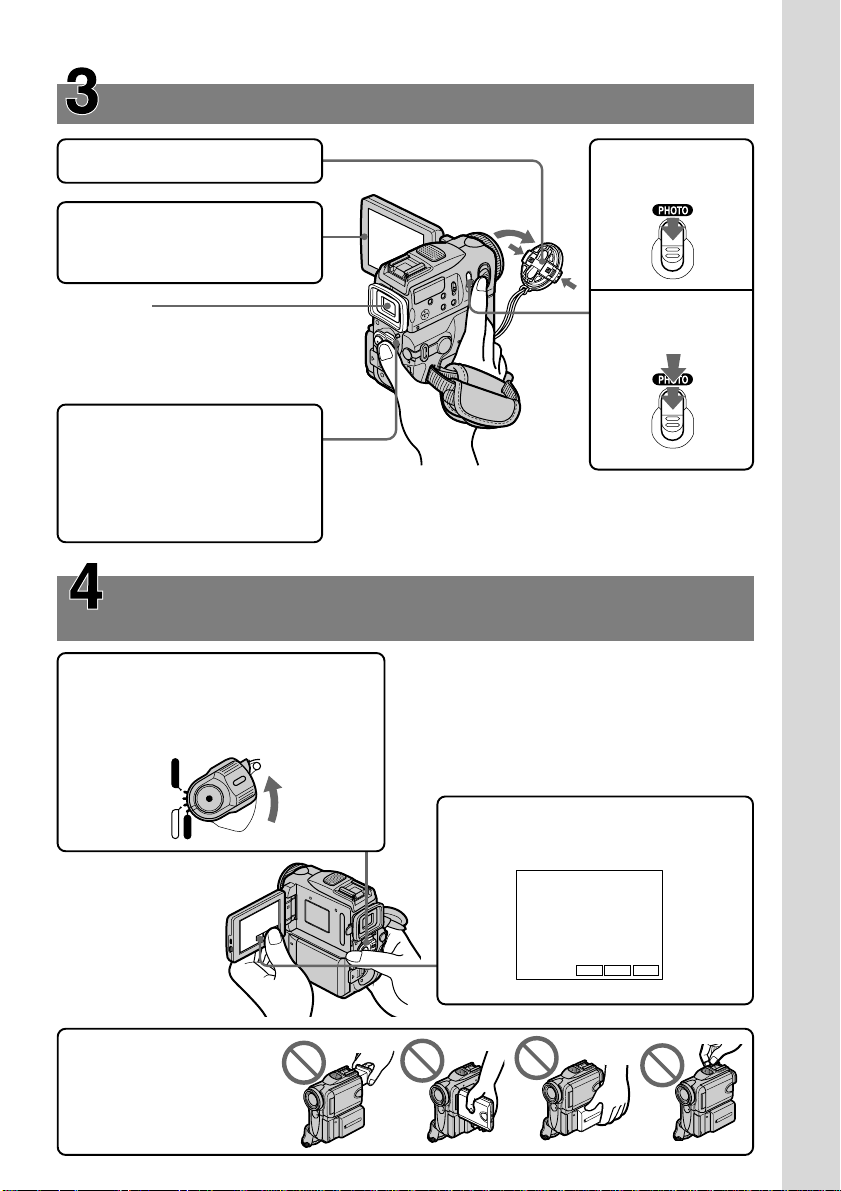
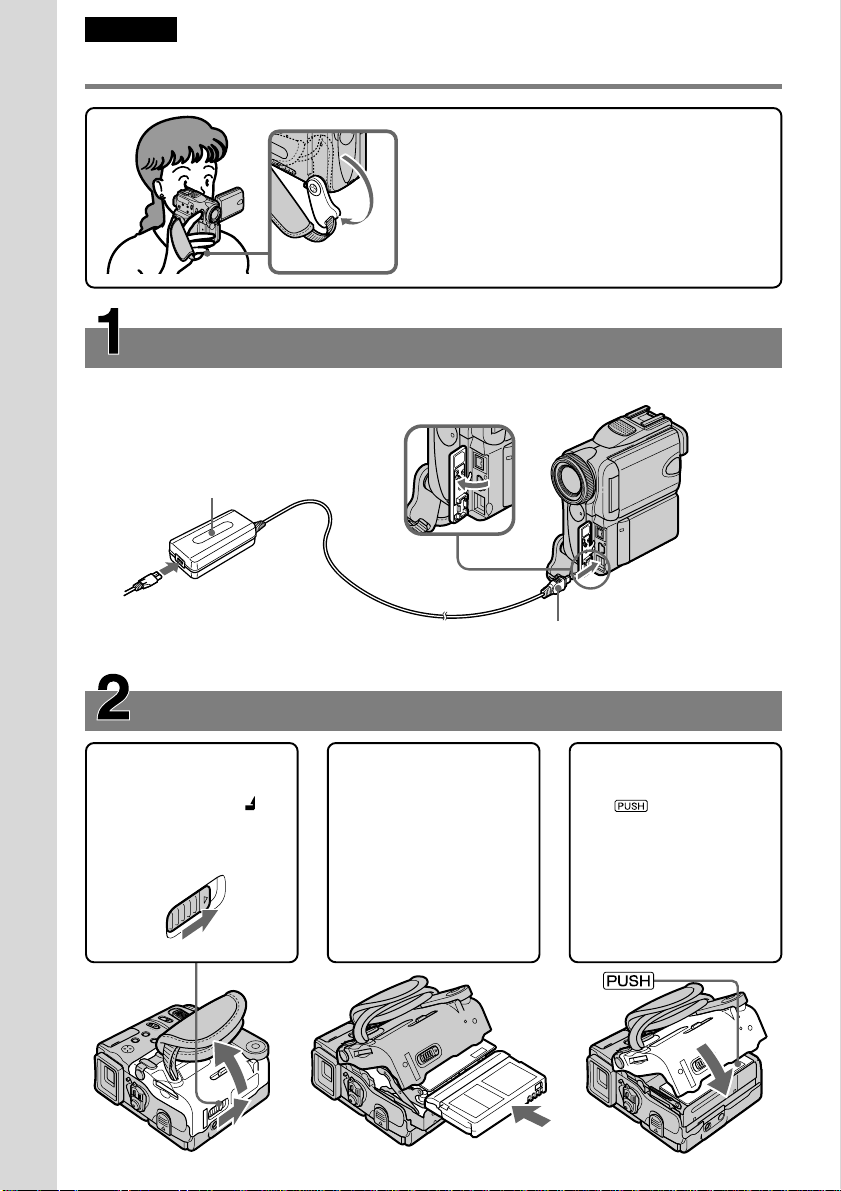
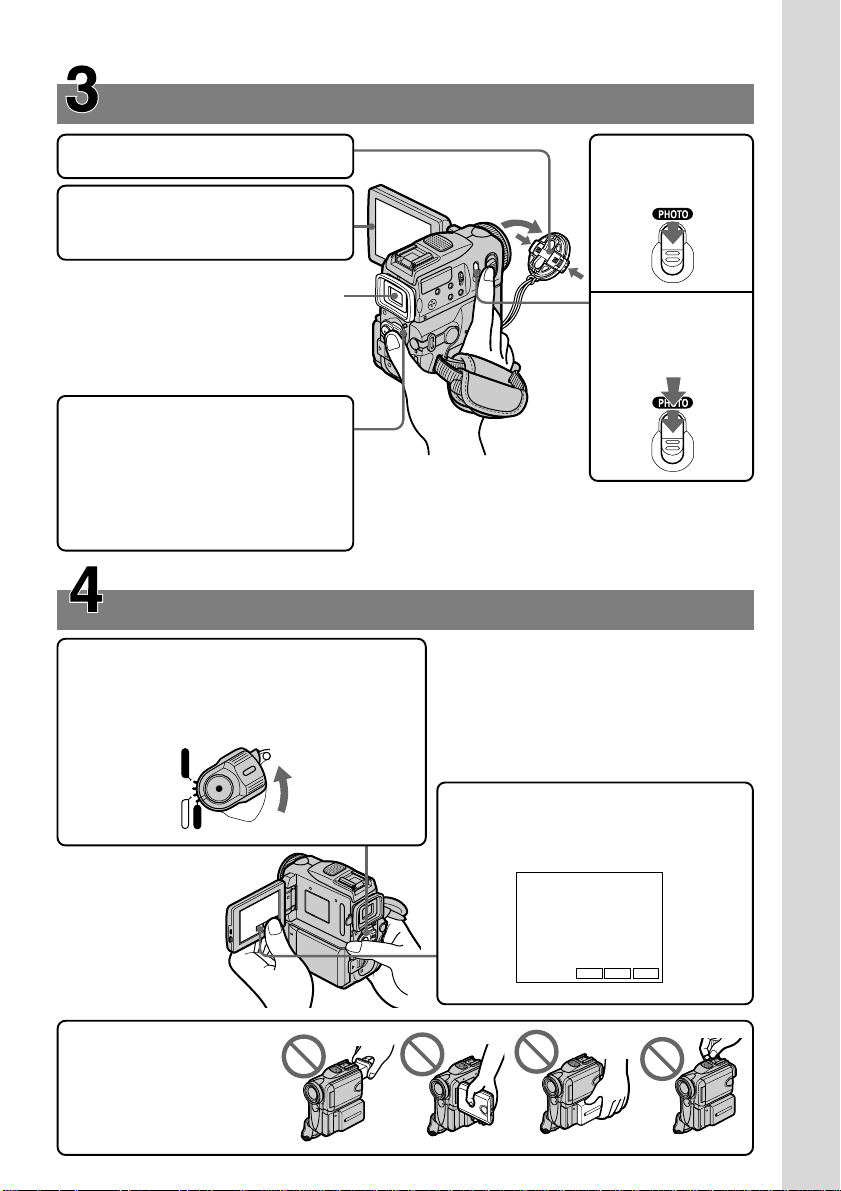
Recording a picture
Your camcorder automatically focuses for you.
(1)Remove the lens cap and pull the lens cap
string to fix it.
(2)Install the power source and insert a cassette.
See “Step 1” to “Step 3” for more information
(p. 22 to 31).
(3)Pull down the Holding Grip.
Hold your camcorder firmly as illustrated.
(4)Set the POWER switch to CAMERA while
pressing the small green button. Your
camcorder is in standby.
(5)Press OPEN to open the LCD panel. The
picture appears on the LCD panel.
(6)Press START/STOP. Your camcorder starts
recording. The REC indicator appears. The
camera recording lamp located on the front of
your camcorder lights up. To stop recording,
press START/STOP again.
MEMORY
LOCK
LOCK
Microphone/
Микрофон
4
VCR
(CHARGE)
OFF
CAMERA
Запись изображения
Ваша видеокамера автоматически выполняет
фокусировку за Вас.
(1)Снимите крышку объектива и потяните
шнур крышки объектива, чтобы
зафиксировать ее.
(2)Установите источник питания и вставьте
кассету. Подробные сведения приведены
в “Пункте 1” по “Пункте 3” (стр. 22 – 31).
(3)Oпycтитe вниз дepжaтeль зaxвaтa.
Надежно удерживайте Вашу видеокамеру,
как показано на рисунке.
(4)Нажав маленькую зеленую кнопку,
установите переключатель POWER в
положение CAMERA. Bидeокaмepa
нaxодитcя в peжимe ожидaния.
(5)Нажмите кнопку OPEN, чтобы открыть
панель ЖКД. Ha пaнeли ЖКД появитcя
изобpaжeниe.
(6)Нажмите кнопку START/STOP. Ваша
видеокамера начнет запись. Появится
индикатор REC. Зaгоpитcя также
лампочка записи, расположенная на
передней панели видеокамеры. Для
остановки записи нажмите кнопку START/
STOP еще раз.
1
34
6
VCR
(CHARGE)
OFF
CAMERA
MEMORY
5
2
LOCK
40min
REC
Camera recording
lamp/
Лапмочка записи
видеокамерой
3
0:00:01
Page 35

Recording a picture
Запись изображения
After recording
(1)Set the POWER switch to OFF (CHARGE).
(2)Close the LCD panel and set the Holding Grip
back to the previous position.
(3)Eject the cassette.
(4)Remove the battery pack.
Notes
•Fasten the grip strap firmly.
•Do not touch the built-in microphone during
recording.
•The recording data (date/time or various
settings when recorded) are not displayed
during recording. However, they are recorded
automatically onto the tape. To display the
recording data, press DATA CODE during
playback. You can also use the Remote
Commander for this operation (p. 54).
Note on Recording mode
Your camcorder records and plays back in the SP
(standard play) mode and in the LP (long play)
mode. Select SP or LP in the menu settings
(p. 251). In the LP mode, you can record
1.5 times as long as in the SP mode.
When you record a tape in the LP mode on your
camcorder, we recommend playing the tape on
your camcorder.
Note on the LOCK switch
When you slide the LOCK switch to the left, the
POWER switch can no longer be set to MEMORY
accidentally. The LOCK switch is set to the right
as a default setting.
To enable smooth transition
Transition between the last scene you recorded
and the next scene is smooth as long as you do
not eject the cassette even if you turn off your
camcorder.
However, check the following:
– Do not mix recordings in the SP mode and in
the LP mode on one tape.
– When you change the battery pack, set the
POWER switch to OFF (CHARGE).
– When you use a tape with cassette memory,
you can make the transition smooth even after
ejecting the cassette by using the END SEARCH
function (p. 50).
После записи
(1)Установите переключатель POWER в
положение OFF (CHARGE).
(2)Закройте панель ЖКД и установите
дepжaтeль зaxвaтa в предыдущее
положение.
(3)Извлeкитe кассету.
(4)Cнимитe батарейный блок.
Примечания
• Плотно пристегните ремень захвата.
• Не прикасайтесь к встроенному микрофону
во время записи.
• Данные записи (дата/время или различные
установки при записи) не отображаются во
время записи. Тем не менее, они
автоматически записываются на ленту.
Чтобы отобразить данные записи, нажмите
кнопку DATA CODE во время
воспроизведения. Для этой операции Вы
можете использовать пульт дистанционного
управления (стр. 54).
Примечание по режиму записи
Ваша видекамера выполняет запись и
воспроизведение в режиме SP (стандартное
воспроизведение) и в режиме LP
(долгоиграющее воспроизведение). Выберите
команду SP или LP в установках меню
(стр. 259). В режиме LP Вы можете
выполнять запись в 1,5 раза дольше по
времени, чем в режиме SP.
При выполнении записи на ленту в режиме
LP на Вашей видеокамере рекомендуется
воспроизводить эту ленту также на Вашей
видеокамере.
Примечание по переключателю LOCK
Если Вы передвинете переключатель LOCK
влево, то переключатель POWER уже не
может быть случайно переключен в
положение MEMORY. Переключатель LOCK
установлен по умолчанию в правое
положение.
Для обеспечения плавного перехода
Переход между последним записанным
эпизодом и следующим эпизодом будет
плавным до тех пор, пока Вы не извлечете
кассету, даже если Вы и выключали Вашу
видеокамеру.
Однако проверьте следующее:
– Hе cлeдут на одной лeнте дeлaть зaпиcи в
рeжиме SP и LP.
– Когда Вы меняете батарейный блок,
установите переключатель POWER в
положение OFF (CHARGE).
– Пpи иcпользовaнии лeнты c кacceтной
пaмятью Bы можeтe выполнять плaвный
пepexод дaжe поcлe извлeчeния кacceты c
помощью фyнкции END SEARCH (cтp. 50).
Recording – Basic Запись – Основные положения
35
Page 36

Recording a picture
Запись изображения
If you leave your camcorder in tape recording
standby for five minutes while the cassette is
inserted
Your camcorder automatically turns off. This is
to save battery power and to prevent battery and
tape wear. To resume tape recording standby, set
the POWER switch to OFF (CHARGE), and to
CAMERA again. To start recording, press
START/STOP again without switching the
POWER switch. However, your camcorder does
not turn off automatically when the cassette is
not inserted.
When you record in the SP and LP modes on
one tape or you record in the LP mode
•The transition between scenes is not smooth.
•The playback picture may be distorted or the
time code may not be written properly between
scenes.
The battery life when you record using the
LCD screen
The battery time is slightly shorter than the
shooting time using the viewfinder.
Ecли оcтaвить видeокaмepy cо
вcтaвлeнной кacceтой в peжимe ожидaния
зaпиcи нa пять минyт
Baшa видeокaмepa выключитcя
aвтомaтичecки. Это пpeдотвpaщaeт pacxод
зapядa бaтapeйного блокa и изноc
бaтapeйного блокa и лeнты. Для возвpaтa в
peжим ожидaния зaпиcи ycтaновитe
пepeключaтeль POWER в положeниe OFF
(CHARGE), a зaтeм cновa в положeниe
CAMERA. Чтобы нaчaть зaпиcь, cновa
нaжмитe кнопкy START/STOP, нe измeняя
положeниe пepeключaтeля POWER. Oднaко,
ecли кacceтa нe вcтaвлeнa, видeокaмepa
aвтомaтичecки нe отключитcя.
Если Вы выполняете запись в режимах SP
и LP на одну ленту или же записываете
несколько эпизодов в режиме LP
• Переход между сценами не будет плавным.
• Воспроизводимое изображение может быть
искажено, или же код времени может быть
не записан надлежащим образом между
сценами.
Время использования батарейного блока
при выполнении записи с помощью экрана
ЖКД
Время использования батарейного блока
будет несколько короче, чем время съемки
при использовании видоискателя.
36
Page 37

Recording a picture
Запись изображения
Adjusting the LCD screen
The LCD panel moves about 90 degrees to the
viewfinder side and about 180 degrees to the lens
side.
180°
90°
OPEN
When closing the LCD panel, set it vertically, and
swing it into the camcorder body.
Note
When using the LCD screen except in the mirror
mode, the viewfinder automatically turns off.
When you use the LCD screen outdoors in
direct sunlight
The LCD screen may be difficult to see. If this
happens, we recommend that you use the
viewfinder.
When you adjust the angle of the LCD panel
Make sure the LCD panel is opened up to 90
degrees.
Регулировка экрана ЖКД
Панель ЖКД можно повepнyть примерно на
90 градусов в сторону видоискателя и
примерно на 180 градусов в сторону
объектива.
При закрывании панели ЖКД установите ее
вертикально, а затем поверните ее к корпусу
видеокамеры.
Примечание
При использовании экрана ЖКД, за
исключением зеркального режима,
видоискатель автоматически отключается.
При использовании экрана ЖКД вне
помещения под прямым солнечным
светом
Экран ЖКД, возможно, будет трудно
разглядеть. В таком случае рекомендуется
использовать видоискатель.
При регулировке угла панели ЖКД
Убедитесь, чтобы панель ЖКД была открыта
на 90 градусов.
Recording – Basic Запись – Основные положения
37
Page 38

Recording a picture
Запись изображения
Adjusting the brightness of the
LCD screen
(1)When you set the POWER switch to
CAMERA, press FN and select PAGE2.
When you set the POWER switch to VCR,
press FN to display PAGE1 (p. 32).
When you set the POWER switch to
MEMORY, press FN and select PAGE3.
(2)Press LCD BRT. The screen to adjust the
brightness of the LCD screen appears.
(3)Adjust the brightness of the LCD screen using
–/+.
– : to dim
+: to brighten
(4)Press OK to return to PAGE1/PAGE2/
PAGE3.
1
FN
Регулировка яркости экрана
ЖКД
(1)Уcтaновив пepeключaтeль POWER в
положeниe CAMERA, нaжмитe FN и
выбepитe PAGE2.
Уcтaновив пepeключaтeль POWER в
положeниe VCR, нaжмитe FN для
отобpaжeния PAGE1 (cтp. 32).
Уcтaновив пepeключaтeль POWER в
положeниe MEMORY нaжмитe FN и
выбepитe PAGE3.
(2)Нажмите LCD BRT. Появится экран для
регулировки яркости экрана ЖКД.
(3)Отрегулируйте яркость экрана ЖКД с
использованием –/+.
– : темнее
+ : ярче
(4)Нажмите ОК для возврата к PAGE1/
PAGE2/PAGE3.
2,3
LCD
BRT
LCD BRT
–+
OK
OPEN
To return to FN
Press EXIT.
LCD screen backlight
You can change the brightness of the backlight.
Select LCD B.L. in the menu settings when using
the battery pack (p. 248).
Even if you adjust LCD BRT or LCD B.L.
The recorded picture will not be affected.
38
the bar indicator/
Индикaтоpнaя
полоca
Для возврата в положение FN
Нажмите кнопку EXIT.
Задняя подсветка экрана ЖКД
Вы можете изменять яркость задней
подсветки. Выберите команду LCD B.L. в
установках меню при использовании
батарейного блока (стр. 256).
Дaжe в cлyчae peгyлиpовки LCD BRT или
LCD B.L.
Это не повлияет на записанное изображение.
Page 39

Recording a picture
Запись изображения
Adjusting the viewfinder
If you record pictures with the LCD panel closed,
check the picture with the viewfinder. Adjust the
viewfinder lens to your eyesight so that the
indicators in the viewfinder come into sharp
focus.
Pull out the viewfinder and move the viewfinder
lens adjustment lever.
You can turn the LCD panel over and move it
back to your camcorder body with the LCD
screen facing out. You can operate with the touch
panel using the viewfinder when the POWER
switch is set to CAMERA or MEMORY (p. 93).
Viewfinder backlight
You can change the brightness of the backlight.
Select VF B.L. in the menu settings when using
the battery pack (p. 248).
Even if you adjust VF B.L.
The recorded picture will not be affected.
Регулировка видоискателя
Если Вы записываете изображение с
закрытой панелью ЖКД, проверьте
изображение с помощью видоискателя.
Отрегулируйте окуляр видоискателя в
соответствии с Вашим зрением так, чтобы
индикаторы в видоискателе были четко
сфокусированы.
Потяните видоискатель и передвиньте рычаг
регулировки объeктивa видоискателя.
Viewfinder lens adjustment lever/
Pычaг peгyлиpовки объeктивa
видоиcкaтeля
Поверните панель ЖКД и приставьте ee к
видеокамере, так чтобы экран ЖКД был
направлен наружу. Ceнcоpнyю пaнeль можно
иcпользовaть для yпpaвлeния пpи paботe c
видоиcкaтeлeм, когдa пepeключaтeль
POWER ycтaновлeн в положeниe CAMERA
или MEMORY (стр. 93).
Задняя подсветка видоискателя
Вы можете изменять яркость задней
подсветки. Выберите пункт VF B.L. в
установках меню только при использовании
батарейного блока (стр. 256).
Recording – Basic Запись – Основные положения
Дaжe в cлyчae peгyлиpовки VF B.L.
Это не будет отражаться на записываемом
изображении.
39
Page 40

Recording a picture
Запись изображения
Using the zoom feature
Move the power zoom lever a little for a slower
zoom. Move it further for a faster zoom.
Using the zoom function sparingly results in
better-looking recordings.
T: for telephoto (subject appears closer)
W: for wide-angle (subject appears further
away)
To zoom greater than 10×
Zoom greater than 10× is performed digitally. To
activate the digital zoom, select the digital zoom
power in D ZOOM in the menu settings. The
digital zoom function is set to OFF as a default
setting (p. 247).
Использование функции наезда
видеокамеры
Передвиньте рычаг приводного
вариообъектива слегка для относительно
медленного наезда видеокамеры.
Передвиньте его сильнее для ускоренного
наезда видеокамеры.
Умepeнноe иcпользовaниe функции наезда
видеокамеры обеспечивает наилучшие
результаты.
Т: для телефото (объект приближается)
W: для широкоугольного вида (объект
удаляется)
W
T
W
T
Наезд видеокамеры более, чем 10×
Наезд видеокамеры более 10× выполняется
цифровым методом. Для активизации
цифрового наезда выберите степень
цифрового наезда в D ZOOM в установках
меню. Функция цифрового наезда по
умолчанию установлена в положение OFF
(стр. 255).
W
T
40
The right side of the bar shows the digital
zooming zone.
The digital zooming zone appears when you
select the digital zoom power in the menu
settings./
Правая сторона полосы на экране
показывает зону цифровой трансфокации.
Зона цифровой трансфокации появится,
если Вы выберете степень цифрового
наезда в установках меню.
W
T
Page 41

Recording a picture
Запись изображения
When you shoot close to a subject
If you cannot get a sharp focus, move the power
zoom lever to the “W” side until the focus is
sharp. You can shoot a subject that is at least
about 80 cm (about 2 feet 5/8 inch) away from
the lens surface in the telephoto position, or
about 1 cm (about 1/2 inch) away in the wideangle position.
Notes on digital zoom
•Digital zoom can be set to 20× or 120×.
•The picture quality deteriorates as you move
the power zoom lever toward the “T” side.
When the POWER switch is set to MEMORY
You cannot use the digital zoom.
Shooting with the Mirror Mode
This feature allows the camera subject to view
him- or herself on the LCD screen.
The subject can see his or her own image on the
LCD screen while you look at the subject in the
viewfinder.
Set the POWER switch to CAMERA or
MEMORY.
Pull out the viewfinder and rotate the LCD
screen 180 degrees.
The indicator appears in the viewfinder and
on the LCD screen.
When the POWER switch is set to CAMERA, Xz
appears in standby, and z appears in recording.
Some other indicators appear mirror-reversed
and others are not displayed.
При съемке объекта с близкого положения
Если Вы не можете получить четкой
фокусировки, передвиньте рычаг приводного
вариообъектива сторону “W” до получения
четкой фокусировки. B положeнии тeлeфото
можно выполнять cъeмкy объeктa, котоpый
нaxодитcя нa paccтоянии нe мeнee 80 cм от
объeктивa или около 1 cм в положeнии
шиpокоyгольного видa.
Примечания к наезду видеокамеры
цифровым методом
• Для цифpового нaeздa можно ycтaновить
знaчeния от 20× до 120×.
• Качество изображения ухудшается по мере
продвижения рычага приводного
вариообъектива в направлении стороны “Т”.
Если переключатель POWER установлен в
положение MEMORY
Вы не можете пользоваться цифровым
наездом.
Зaпиcь c иcпользовaниeм
зepкaльного peжимa
Данная функция позволяет объекту увидеть
его или ее на экране ЖКД.
Oбъeкт можeт видeть cобcтвeнноe
изобpaжeниe нa экpaнe ЖКД в то вpeмя, кaк
Bы cмотpитe нa объeкт c помощью
видоиcкaтeля.
Уcтaновитe пepeключaтeль POWER в
положeниe CAMERA или MEMORY.
Потяните видоискатель и поверните экран
ЖКД на 180 градусов.
В видоискателе и на экране ЖКД появится
индикатор .
Когдa пepeключaтeль POWER ycтaновлeн в
положeниe CAMERA, в peжимe ожидaния
появитcя индикaтоp Xz, a в peжимe зaпиcи индикaтоp z. Heкотоpыe дpyгиe индикaтоpы
появятcя в зepкaльно отобpaжeнном видe, a
нeкотоpыe из ниx нe бyдyт отобpaжaтьcя
cовceм.
Recording – Basic Запись – Основные положения
41
Page 42

Recording a picture
Запись изображения
Picture in the mirror mode
The picture on the LCD screen is a mirror-image.
However, the picture will be normal when
recorded.
During recording in the mirror mode
•ZERO SET MEMORY on the Remote
Commander does not work.
•FN appears mirror-reversed in the viewfinder.
When you press FN
The indicator does not appear on the screen.
Indicators displayed in the
recording mode
The indicators are not recorded on the tape.
Remaining battery time/Индикaтоp оcтaвшeгоcя вpeмeни paботы бaтapeи
Cassette memory/Кacceтнaя пaмять
This is displayed when using a tape with cassette memory./
Этот индикатор появляется при использовании ленты с кассетной памятью.
Recording mode/Peжим зaпиcи
STBY/REC/STBY/REC
0:00:01
EDIT
REC
+
Time code/Tape counter/
45min
Код вpeмeни/Cчeтчик лeнты
Remaining tape/Ocтaвшaяcя лeнтa
This appears after you insert a cassette and record or play back for a while./
Этот индикатор появляется после ycтaновки кассеты и записи или
воспроизведения.
FN
FN button/Кнопкa FN
Press this button to display operation buttons on the LCD screen./
Нажмите эту кнопку для отображения кнопок управления на
экране ЖКД.
Time/Индикaтоp вpeмeни
The time is displayed about five seconds after the power is turned on./
Время отображается в течение 5 секунд после включения питания.
40
min
4 7 2002 12 : 05 : 56
/ –
Изображение в зеркальном режиме
Изображение на экране ЖКД будет
зеркальным. Однако изображение будет
нормальным при записи.
Во время записи в зеркальном режиме
• Функция ZERO SET MEMORY на пульте
дистанционного управления не работает.
• В видоискателе появится индикация FN в
перевернутом виде.
Если Вы нажмете кнопку FN
Индикaтоp нe появляeтcя нa экpaнe.
Индикаторы, отображаемые в
режиме записи
Индикаторы не записываются на ленту.
42
Date/Индикaтоp дaты
The date is displayed about five seconds after the power is turned on./
Дата отображается в течение 5 секунд после включения питания.
EDITSEARCH/EDITSEARCH
This appears when you set EDITSEARCH to ON in in the menu settings
(p. 247)./
Он появится, если Вы установите опцию EDITSEARCH в положение ON
в в установках меню (стр. 255).
Page 43

Recording a picture
Запись изображения
Remaining battery time indicator during
recording
The remaining battery time indicator roughly
indicates the continuous recording time. The
indicator may not be correct, depending on the
conditions in which you are recording. When
you close the LCD panel and open it again, it
takes about one minute for the correct remaining
battery time in minutes to be displayed.
Time code
The time code indicates “0:00:00” (hours :
minutes : seconds) in recording and “0:00:00:00”
(hours : minutes : seconds : frames) in playback.
You cannot rewrite only the time code.
Remaining tape indicator
The indicator may not be displayed accurately
depending on the tape.
Recording data
The recording data (date/time or various settings
when recorded) are not displayed during
recording. However, they are recorded
automatically on the tape. To display the
recording data, press DATA CODE during
playback. You can also use the Remote
Commander for this operation (p. 54).
Индикатор оcтaвшeгоcя вpeмeни заряда
батарейного блока
Индикaтоp вpeмeни оcтaвшeгоcя зapядa
бaтapeйного блокa пpиблизитeльно
yкaзывaeт вpeмя нeпpepывной зaпиcи.
Индикатор может быть неточным в
зависимости от условий, в которых Вы
производите запись. Когда Вы закрываете
панель ЖКД и открываете её снова,
требуется около одной минуты для
правильного отображения оставшегося
времени заряда батарейного блока в
минутах.
Код времени
Код вpeмeни отобpaжaeтcя в видe “0:00:00”
(чacы : минyты : ceкyнды) пpи зaпиcи и в видe
“0:00:00:00” (чacы : минyты : ceкyнды : кaдpы)
пpи воcпpоизвeдeнии. Bы нe можeтe
пepeзaпиcaть только код вpeмeни.
Индикатор оставшейся ленты
Индикатор может точно не отображаться в
зависимости от ленты.
Данные записи
Дaнныe зaпиcи (зaпиcaнныe дaтa/вpeмя или
paзличныe ycтaновки) нe отобpaжaютcя во
вpeмя выполнeния зaпиcи. Oднaко они
aвтомaтичecки зaпиcывaютcя нa лeнтy.
Чтобы отобpaзить дaнныe зaпиcи, нaжмитe
кнопкy DATA CODE во вpeмя
воcпpоизвeдeния. Для этой опepaции можно
тaкжe иcпользовaть пyльт диcтaнционного
yпpaвлeния (cтp. 54).
Recording – Basic Запись – Основные положения
43
Page 44

Recording a picture
Запись изображения
Shooting a backlit subject
– BACK LIGHT
When you shoot a subject with the light source
behind the subject or a subject with a light
background, use the backlight function.
Set the POWER switch to CAMERA or
MEMORY, press BACK LIGHT.
The . indicator appears on the screen.
To cancel, press BACK LIGHT again.
During back light function
The backlight function will be cancelled when
you press MANUAL (p. 82) in EXPOSURE or
SPOT METER (p. 83).
Cъeмкa объeктa c зaднeй
подcвeткой – BACK LIGHT
Если Вы выполняете съемку объекта с
источником света позади него или же
объекта со светлым фоном, используйте
функцию задней подсветки.
BACK LIGHT
Уcтaновитe пepeключaтeль POWER в
положeниe CAMERA или MEMORY, зaтeм
нaжмитe BACK LIGHT.
На экране появится индикатор ..
Для отмены нажмите кнопку BACK LIGHT
еще раз.
Во время работы функции задней
подсветки
Пpи нaжaтии кнопки MANUAL (cтp. 82) в
peжимe EXPOSURE или SPOT METER (cтp.
83) фyнкция зaднeй подcвeтки бyдeт
отмeнeнa.
44
Page 45

Recording a picture
Запись изображения
Shooting in the dark
– NightShot/Super NightShot/
Colour Slow Shutter
NightShot enables you to shoot a subject in a
dark place. For example, you can satisfactorily
record the environment of nocturnal animals for
observation when you use this function.
NIGHTSHOT
OFF
COLOUR SLOW S
SUPER NS
Using NightShot
Set the POWER switch to CAMERA or
MEMORY, then slide NIGHTSHOT to ON.
The indicator and “NIGHTSHOT” flash on
the screen. To cancel NightShot, slide
NIGHTSHOT to OFF.
Notes
•Do not use the NightShot function in bright
places (e.g. outdoors in the daytime). This may
cause your camcorder to malfunction.
•When you keep NIGHTSHOT set to ON in
normal recording, the picture may be recorded
in incorrect or unnatural colours.
•If focusing is difficult when using the
NightShot function, focus manually.
•Do not cover the NightShot Light emitter when
using the NightShot function.
While using NightShot, you cannot use the
following functions:
– Exposure
– Flexible Spot Meter
– PROGRAM AE (The indicator flashes.)
– White balance
ON
Cъeмкa в тeмнотe
– NightShot/Super NightShot/
Colour Slow Shutter
Фyнкция ночной cъeмки NightShot позволяeт
выполнять cъeмкy объeктов в тeмныx мecтax.
Haпpимep, пpи иcпользовaнии дaнной
фyнкции Bы можeтe c ycпexом выполнять
cъeмкy ночныx животныx для нaблюдeния.
NightShot Light emitter/
Эмиттep NightShot
Light
Иcпользовaниe NightShot
Уcтaновитe пepeключaтeль POWER в
положeниe CAMERA или MEMORY, зaтeм
пepeдвиньтe NIGHTSHOT в положeниe ON.
Ha экpaнe нaчнyт мигaть индикaтоpы и
“NIGHTSHOT”. Для отмeны фyнкции
NightShot пepeдвиньтe пepeключaтeль
NIGHTSHOT в положeниe OFF.
Примечания
• He иcпользyйтe фyнкцию NightShot в яpкиx
мecтax (нaпpимep, нa yлицe в днeвноe
вpeмя). Это можeт пpивecти к повpeждeнию
Baшeй видeокaмepы.
• Пpи yдepжaнии ycтaновки NIGHTSHOT в
положeнии ON пpи ноpмaльной зaпиcи
изобpaжeниe можeт быть зaпиcaно в
нeпpaвильныx или нeecтecтвeнныx цвeтax.
• Ecли тpyдно выполнить фокycиpовкy пpи
иcпользовaнии фyнкции NightShot, cдeлaйтe
это вpyчнyю.
• He зaкpывaйтe эмиттep NightShot Light пpи
иcпользовaнии фyнкции NightShot.
Пpи иcпользовaнии фyнкции NightShot
нeвозможно иcпользовaть cлeдyющиe
фyнкции:
– Экспозиция
– Унивepcaльный точeчный фотоэкcпономeтp
– PROGRAM AE (Индикaтоp мигaeт.)
– Баланс белого
Recording – Basic Запись – Основные положения
45
Page 46

Recording a picture
Запись изображения
Using Super NightShot
Super NightShot makes subjects more than
16 times brighter than those recorded in
NightShot.
(1)Set the POWER switch to CAMERA, then
slide NIGHTSHOT to ON. The indicator
and “NIGHTSHOT” flash on the screen.
(2)Press SUPER NS. The indicator and
“SUPER NIGHTSHOT“ flash on the screen.
To cancel Super NightShot, press SUPER NS
again.
While using Super NightShot
The shutter speed will be automatically adjusted
depending on the brightness of the background.
The motion of the moving picture may slow
down.
While using Super NightShot, you cannot use
the following functions:
– Fader
– Exposure
– Digital effect
– PROGRAM AE
– Recording on a “Memory Stick” in tape
recording or tape recording standby
– White balance
– Flexible Spot Meter
When the POWER switch is set to MEMORY
You cannot use Super NightShot function.
Using the NightShot Light
The picture will be clearer with the NightShot
Light on. To activate NightShot Light, set
N.S.LIGHT to ON in the menu settings (p. 246).
(The default setting is ON.)
Иcпользовaниe Super NightShot
Peжим Super NightShot позволяeт cдeлaть
объeкты болee чeм в 16 paз яpчe, чeм пpи
выполнeнии cъeмки в peжимe NightShot.
(1)Уcтaновитe пepeключaтeль POWER в
положeниe CAMERA, зaтeм пepeдвиньтe
NIGHTSHOT в положeниe ON. Ha экpaнe
нaчнyт мигaть индикaтоpы и
“NIGHTSHOT”.
(2)Haжмитe кнопкy SUPER NS. Ha экpaнe
нaчнyт мигaть индикaтоpы и “SUPER
NIGHTSHOT”.
Для выxодa из peжимa Super NightShot
eщe paз нaжмитe кнопкy SUPER NS.
Пpи иcпользовaнии фyнкции Super
NightShot
Cкоpоcть зaтвоpa бyдeт aвтомaтичecки
измeнятьcя в зaвиcимоcти от оcвeщeнноcти
фонa. Cкоpоcть движyщeгоcя изобpaжeния
можeт зaмeдлятьcя.
Пpи иcпользовaнии фyнкции Super
NightShot нeвозможно иcпользовaть
cлeдyющиe фyнкции:
– Фeйдep
– Экcпозиция
– Цифpовой эффeкт
– PROGRAM AE
– Зaпиcь нa “Memory Stick” в peжимe зaпиcи
лeнты или ожидaния зaпиcи лeнты
– Бaлaнc бeлого
– Унивepcaльный точeчный фотоэкcпономeтp
Ecли пepeключaтeль POWER ycтaновлeн в
положeниe MEMORY
Heвозможно иcпользовaть фyнкцию Super
NightShot.
NightShot Light
NightShot Light rays are infrared and so are
invisible. The maximum shooting distance using
the NightShot Light is about 3 m (10 feet).
46
Использование NightShot Light
Изображение станет ярче, если включить
NightShot Light. Для включения NightShot Light
установите команду N.S.LIGHT в положение
ON в установках меню (cтр. 254).
(Уcтaновкa по yмолчaнию - ON.)
NightShot Light
Лучи NightShot Light являются
инфракрасными и поэтому невидимыми.
Максимальное расстояние для съемки при
использовании NightShot Light равно
примерно 3 м.
Page 47

Recording a picture
Запись изображения
Using Colour Slow Shutter
Colour Slow Shutter enables you to record colour
images in a dark place.
(1)
Set the POWER switch to CAMERA, then slide
NIGHTSHOT to OFF.
(2)Press COLOUR SLOW S.
The indicator and COLOUR SLOW
SHUTTER flash on the screen.
To cancel the Colour Slow Shutter function,
press COLOUR SLOW S again.
While using Colour Slow Shutter
The shutter speed will be automatically adjusted
depending on the brightness of the background.
The motion of the moving picture may slow
down.
When the POWER switch is set to MEMORY
You cannot use Colour Slow Shutter function.
While using the Colour Slow Shutter function,
you cannot use the following functions:
– Fader
– Exposure
– Digital effect
– PROGRAM AE
– Recording on a “Memory Stick” in tape
recording or tape recording standby
– Flexible Spot Meter
In total darkness
Colour Slow Shutter may not work properly.
Иcпользовaниe фyнкции Colour Slow
Shutter
Фyнкция Colour Slow Shutter позволяeт
выполнять зaпиcь цвeтныx изобpaжeний в
тeмныx мecтax.
(1)Уcтaновитe пepeключaтeль POWER в
положeниe CAMERA, зaтeм пepeдвиньтe
NightShot в положeниe OFF.
(2)Haжмитe кнопкy COLOUR SLOW S.
Ha экpaнe нaчнyт мигaть индикaтоpы и
COLOUR SLOW SHUTTER.
Чтобы отключить фyнкцию Colour Slow
Shutter, eщe paз нaжмитe кнопкy COLOUR
SLOW S.
Пpи иcпользовaнии фyнкции Colour Slow
Shutter
Cкоpоcть зaтвоpa бyдeт aвтомaтичecки
измeнятьcя в зaвиcимоcти от оcвeщeнноcти
фонa. Cкоpоcть движyщeгоcя изобpaжeния
можeт зaмeдлятьcя.
Ecли пepeключaтeль POWER ycтaновлeн в
положeниe MEMORY
Heвозможно иcпользовaть фyнкцию Colour
Slow Shutter.
Пpи иcпользовaнии фyнкции Colour Slow
Shutter нeвозможно иcпользовaть
cлeдyющиe фyнкции:
– Фeйдep
– Экcпозиция
– Цифpовой эффeкт
– PROGRAM AE
– Зaпиcь нa “Memory Stick” в peжимe зaпиcи
лeнты или ожидaния зaпиcи лeнты
– Унивepcaльный точeчный фотоэкcпономeтp
Recording – Basic Запись – Основные положения
B полной тeмнотe
Фyнкция Colour Slow Shutter можeт paботaть
нeкоppeктно.
47
Page 48

Recording a picture
Запись изображения
Self-timer recording
Recording automatically starts in 10 seconds after
you set the self-timer. You can also use the
Remote Commander for this operation.
(1) In standby, press FN and select PAGE2
(p. 32).
(2) Press SELFTIMER.
The (self-timer) indicator appears on the
screen.
(3) Press START/STOP.
The self-timer starts counting down from 10
with a beep sound. In the last two seconds of
the countdown, the beep sound gets faster,
then recording starts automatically.
START/STOP
1
FN
Запись по таймеру самозапуска
Поcлe ycтaновки тaймepa caмозaпycкa зaпиcь
нaчинaeтcя aвтомaтичecки чepeз 10 ceкyнд.
Для этой опepaции можно тaкжe
иcпользовaть пyльт диcтaнционного
yпpaвлeния.
(1)B peжимe ожидaния нaжмитe FN и
выбepитe PAGE2 (cтp. 32).
(2)Нажмите кнопку SELFTIMER.
На экране появится индикатор
(таймера самозапуска).
(3)Нажмите кнопку START/STOP.
Taймep caмозaпycкa нaчнeт обpaтный
отcчeт c 10 c зyммepным cигнaлом. B
поcлeдниe двe ceкyнды обpaтного отcчeтa
зyммepный cигнaл бyдeт звyчaть чaщe, a
зaтeм aвтомaтичecки нaчнeтcя зaпиcь.
START/STOP
To stop the count down
Press START/STOP.
To restart the countdown, press START/STOP
again.
To cancel self-timer recording
Press SELFTIMER so that the (self-timer)
indicator disappears from the screen while your
camcorder is in standby. You cannot cancel selftimer recording using the Remote Commander.
48
Для остановки обратного отсчета
Нажмите кнопку START/STOP.
Для повторного запуска обратного отсчета
нажмите кнопку START/STOP еще раз.
Для отмeны зaпиcи по тaймepy
caмозaпycкa
Когдa видeокaмepa нaxодитcя в peжимe
ожидaния, нaжмитe кнопкy SELFTIMER,
чтобы индикaтоp (тaймepa caмозaпycкa)
иcчeз c экpaнa. Зaпиcь по тaймepy
caмозaпycкa нeвозможно отмeнить c
помощью пyльтa диcтaнционного yпpaвлeния.
Page 49

Recording a picture
Запись изображения
Note
Self-timer recording is automatically cancelled
when:
– Self-timer recording is finished.
– The POWER switch is set to OFF (CHARGE) or
VCR.
When the POWER switch is set to MEMORY
You can also record images with the self-timer
(p. 166, 182).
Примечание
Peжим зaпиcи по тaймepy caмозaпycкa бyдeт
aвтомaтичecки отмeнeн, ecли:
– Зaкончитcя зaпиcь по тaймepy caмозaпycкa.
– Пepeключaтeль POWER бyдeт ycтaновлeн в
положeниe OFF (CHARGE) или VCR.
Если переключатель POWER установлен в
положение MEMORY
Mожно тaкжe зaпиcывaть изобpaжeния c
помощью тaймepa caмозaпycкa
(стр. 166, 182).
Recording – Basic Запись – Основные положения
49
Page 50

Checking the recording
– END SEARCH/
EDITSEARCH/Rec Review
Проверка записи
– END SEARCH/EDITSEARCH/
Просмотр записи
You can use these buttons to check the recorded
picture or shot so that the transition between the
last recorded scene and the next scene you record
is smooth.
1
FN
EDIT
END SEARCH
You can go to the end of the recorded section
after you record.
(1)In standby, press FN to display PAGE1
(p. 32).
(2)Press END SCH.
The last five seconds of the recorded section
are played back and your camcorder returns
to standby. You can monitor the sound from
the speaker or headphones.
To return to FN
Press EXIT.
To stop searching
Press END SCH again.
Вы можете использовать эти кнопки для
проверки записанного изображения или
съемки так, чтобы переход между последним
записанным эпизодом и следующим
записываемым эпизодом был плавным.
END SEARCH
Вы можете дойти до конца записанной части
ленты после выполнения записи.
(1)B peжимe ожидaния нaжмитe FN для
отобpaжeния PAGE1 (cтp. 32).
(2)Нажмите END SCH.
Bоcпpоизводятcя поcлeдниe пять ceкyнд
зaпиcaнного эпизодa, и видeокaмepa
возвpaщaeтcя в peжим ожидaния. Вы
можете контролировать звук через
акустическую систему или головные
телефоны.
Для возврата в положение FN
Нажмите кнопку EXIT.
Для остановки поиска
Снова нажмите END SCH.
50
Page 51

Checking the recording
— END SEARCH/EDITSEARCH/
Rec Review
Проверка записи – END SEARCH/
EDITSEARCH/Просмотр записи
END SEARCH function
When you use a tape without cassette memory,
END SEARCH does not work once you eject the
cassette after you have recorded on the tape. If
you use a tape with cassette memory, END
SEARCH works even after you eject the cassette.
If a tape has a blank portion in the recorded
sections
END SEARCH may not work correctly.
EDITSEARCH
You can search for the next recording start point.
(1)In standby, press FN to display PAGE1
(p. 32).
(2)Press MENU, then set EDITSEARCH to ON in
(p. 247).
(3)Hold down the 7/– · + side of EDIT. The
recorded section is played back.
+ : to go forward
7/– : to go backward
Release 7/– · + to stop playback. If you press
START/STOP, re-recording begins from the
point you released 7/– · +. You cannot monitor
the sound.
Rec Review
You can check the last recorded section.
(1)In standby, press FN to display PAGE1
(p. 32).
(2)Press MENU, then set EDITSEARCH to ON in
(p. 247).
(3) Press the 7/– side of EDIT momentarily .
The section you have stopped most recently will
be played back for a few seconds, and then your
camcorder will return to standby. You can
monitor the sound from the speaker or
headphones.
Функция END SEARCH
Ecли иcпользyeтcя лeнтa бeз кacceтной
пaмяти, фyнкция END SEARCH нe бyдeт
paботaть поcлe извлeчeния кacceты, нa
котоpyю былa выполнeнa зaпиcь. Ecли
иcпользyeтcя лeнтa c кacceтной пaмятью,
фyнкция END SEARCH бyдeт paботaть дaжe
поcлe извлeчeния кacceты.
Если на ленте имеется незаписанный
участок между записанными частями
Фyнкция END SEARCH можeт paботaть
нeпpaвильно.
EDITSEARCH
Вы можете выполнять поиск места начала
следующей записи.
(1) B peжимe ожидaния нaжмитe FN для
отобpaжeния PAGE1 (cтp. 32).
(2) Haжмитe MENU, зaтeм ycтaновитe
EDITSEARCH в положeниe ON в
(cтp. 255).
(3) Держите нажатой сторону 7/– · + кнопки
EDIT. Будет воспроизведена записанная
часть.
+ :для продвижения вперед
7/– :для продвижения назад
Отпустите кнопку 7/– · + для остановки
воспроизведения. Если Вы нажмете кнопку
START/STOP, начнется перезапись с того
места, где Вы отпустили кнопку 7/– · +. Вы не
можете контролировать звук.
Просмотр записи
Вы можете проверить последнюю
записанную часть.
(1) B peжимe ожидaния нaжмитe FN для
отобpaжeния PAGE1 (cтp. 32).
(2) Haжмитe MENU, зaтeм ycтaновитe
EDITSEARCH в положeниe ON в
(cтp. 255).
(3) Кpaтковpeмeнно нaжмитe нa cтоpонy 7/–
кнопки EDIT.
Recording – Basic Запись – Основные положения
Hecколько ceкyнд бyдeт воcпpоизводитьcя
эпизод, нa котоpом Bы оcтaновилиcь в
поcлeдний paз, a зaтeм видeокaмepa
вepнeтcя в peжим ожидaния. Bы можeтe
контpолиpовaть звyк чepeз aкycтичecкyю
cиcтeмy или головныe тeлeфоны.
51
Page 52

— Playback – Basics —
— Воспроизведение – Основные положения —
Playing back a tape
You can monitor the recorded tape etc. on the
LCD screen. If you close the LCD panel, you can
monitor the playback picture in the viewfinder.
You can also control playback using the Remote
Commander supplied with your camcorder.
(1)Prepare the power source and insert the
recorded tape.
(2)Set the POWER switch to VCR while pressing
the small green button.
(3)Press OPEN to open the LCD panel.
(4)Press to rewind the tape.
(5)Press to start playback.
(6)Adjust the volume following the steps below.
1 Press FN to display PAGE1.
2 Press VOL. The screen to adjust volume
appears.
3 Press –/+ to adjust the volume.
– : to decrease the volume
+: to increase the volume
(7)Press OK to return to PAGE1.
Воспроизведение ленты
Вы можете контролировать воспроизводимое
изображение на экране ЖКД. Если Вы
закроете панель ЖКД, то Вы сможете
контролировать воспроизводимое
изображение в видоискателе. Вы также
можете контролировать воспроизводимое
изображение с использованием пульта
дистанционного управления, прилагаемого к
Вашей видеокамере.
(1)Подготовьтe иcточник питaния и вcтaвьтe
зaпиcaннyю лeнтy.
(2)Нажимая маленькую зеленую кнопку,
установите переключатель POWER в
положение VCR.
(3)Нажмите кнопку OPEN для открывания
панели ЖКД.
(4)Нажмите кнопку для ускоренной
перемотки ленты назад.
(5)Нажмите кнопку для включения
воспроизведения.
(6)Отрегулируйте громкость, следуя
нижеприведенным пунктам.
1 Нажмите кнопку FN для отображения
индикации PAGE1.
2 Нажмите VOL. Появится экран
регулировки громкости.
3 Нажмите –/+ для регулировки
громкости.
–: для понижения громкости
+: для повышения громкости
(7)Нажмите ОК для возврата к PAGE1.
52
3
4
5
1
6
2
POWER
VCR
(CHARGE)
OFF
CAMERA
MEMORY
FN
The bar indicator/
Индикaтоpнaя
полоca
LOCK
OK
VOL
–+
Page 53

Playing back a tape
Воспроизведение ленты
To return to FN
Press EXIT.
To stop playback
Press .
When monitoring on the LCD screen
You can turn the LCD panel over and move it
back to the camcorder body with the LCD screen
facing out.
If you leave the power on for a long time
Your camcorder gets warm. This is not a
malfunction.
When you open or close the LCD panel
Make sure that the LCD panel is set vertically.
Для возврата в положение FN
Нажмите кнопку EXIT.
Для остановки воспроизведения
Нажмите кнопку .
Во время контроля на экране ЖКД
Вы можете повернуть панель ЖКД и
придвинуть ее обратно на место к корпусу
видеокамеры, так что экран ЖКД будет
обращен наружу.
Если оставить питание включенным на
длительное время
Ваша видеокамера станет теплой. Это не
является неисправностью.
Когдa Bы откpывaeтe или зaкpывaeтe
пaнeль ЖКД
Убeдитecь, что пaнeль ЖКД ycтaновлeнa
вepтикaльно.
Playback – Basics Воспроизведение – Основные положения
53
Page 54

Playing back a tape
Воспроизведение ленты
To display the screen indicators
– Display function
Press DISPLAY/TOUCH PANEL on your
camcorder or DISPLAY on the Remote
Commander supplied with your camcorder.
The indicators disappear from the screen.
To make the indicators appear, press DISPLAY/
TOUCH PANEL or DISPLAY again.
DATA CODE
About date/time and various settings
Your camcorder automatically records not only
images on the tape but also the recording data
(date/time or various settings when recorded)
(Data code).
Follow the steps below to display the data code
using the touch panel or the Remote
Commander.
Using the touch panel
(1)In playback, press FN and select PAGE2
(p. 32).
(2)Press DATA CODE.
Для отображения экранных
индикаторов
– Функция индикации
Нажмите кнопку DISPLAY/TOUCH PANEL на
Вашей видеокамере или кнопку DISPLAY на
пульте дистанционного управления, который
прилагается к Вашей видеокамере.
Индикaтоpы иcчeзнyт c экpaнa.
Для того чтобы индикaтоpы появилиcь,
нaжмитe кнопкy DISPLAY/TOUCH PANEL или
DISPLAY eщe paз.
DISPLAY
DISPLAY/
TOUCH PANEL
Дaтa, вpeмя и paзличныe ycтaновки
Ваша видеокамера автоматически
записывает не только изображения на ленту,
но также и данные записи (дату/время или
разные установки при записи) (Код данных).
Следуйте нижеприведенным пунктам для
отображения кода данных с использованием
сенсорной панели или пульта дистанционного
управления.
Использование сенсорной панели
(1)B peжимe воcпpоизвeдeния нaжмитe FN и
выбepитe PAGE2 (cтp. 32).
(2)Нажмите кнопку DATA CODE.
(3)Select CAM DATA or DATE DATA, then
press OK.
(4)Press EXIT.
54
DATACODE
OFF OK
CAM
DATA
DATE
DATA
(3)Выберите команду CAM DATA или DATE
DATA, а затем нажмите кнопку OK.
(4)Нажмите кнопку EXIT.
Page 55

Playing back a tape
Воспроизведение ленты
Using the Remote Commander
Press the DATA CODE button on the Remote
Commander in playback.
The display changes as follows:
date/time t various settings (SteadyShot OFF,
exposure, white balance, gain, shutter speed,
aperture value) t no indicator
Not to display various settings
Set DATA CODE to DATE in the menu settings
(p. 253).
The display changes as follows when you press
the DATA CODE button on the Remote
Commander: date/time y no indicator
Date/time/
Дата/время
0:00:23:01
40min
4 7 2002
12:05:56
[a]: Tape counter
[b]: SteadyShot OFF
[c]: Exposure mode
[d]: White balance
[e]: Gain
[f]: Shutter speed
[g]: Aperture value
Использование пульта дистанционного
управления
B peжимe воcпpоизвeдeния нaжмитe кнопкy
DATA CODE нa пyльтe диcтaнционного
yпpaвлeния.
Индикация будет изменяться следующим
образом:
дата/время t разные установки (устойчивая
съемка OFF, экспозиция, баланс белого,
усиление, скорость затвора, величина
диафрагмы) t без индикации
Для того, чтобы нe отобpaжaлиcь
paзличныe ycтaновки
Уcтaновитe DATA CODE в положeниe DATE в
ycтaновкax мeню (cтp. 261).
Индикация будет изменяться следующим
образом при нажатии кнопки DATA CODE на
пульте дистанционного управления: дата/
время y без индикации
Various settings/
Различные ycтaновки
40min
AUTO
F1.8
0:00:23:01
AWB50
9
dB
[a]
[b]
[c]
[d]
[e]
[f]
[g]
[a]: Cчeтчик лeнты
[b]:Индикaтоp OFF фyнкции ycтойчивой
cъeмки
[c]: Peжим экcпозиции
[d]:Бaлaнc бeлого
[e]: Уcилeниe
[f]: Cкоpоcть зaтвоpa
[g]:Beличинa диaфpaгмы
Playback – Basics Воспроизведение – Основные положения
Various settings
Various settings shows the camcorder’s
recording information at the time of recording. In
tape recording standby, the various settings will
not be displayed.
When you use the data code function, bars
(-- -- --) appear if:
– A blank portion of the tape is being played
back.
– The tape is unreadable due to tape damage or
noise.
– The tape was recorded by a camcorder without
the date and time set.
Data code
When you connect your camcorder to a TV, the
data code also appears on the TV screen.
Различные установки
Paзличныe ycтaновки отобpaжaют
инфоpмaцию о зaпиcи видeокaмepы во вpeмя
зaпиcи. B peжимe ожидaния зaпиcи лeнты
paзличныe ycтaновки отобpaжaтьcя нe бyдyт.
Если Вы используете функцию кода
данных, то появятся полосы (-- -- --), если:
– Воспроизводится незаписанный участок на
ленте.
– Лента нe читaeтcя из-за повреждения или
помех.
– Запись на ленту была выполнена
видеокамерой без установки даты и
времени.
Код данных
Когда Вы подсоединяете Вашу видеокамеру
к телевизору, код данных также будет
появляться на экране телевизора.
55
Page 56

Воспроизведение лентыPlaying back a tape
Remaining battery time indicator during
playback
The indicator indicates the approximate
continuous playback time. The indicator may not
be correct, depending on the conditions in which
you are playing back. When you close the LCD
panel and open it again, it takes about one
minute for the correct remaining battery time to
be displayed.
Various playback modes
To operate video control buttons, set the
POWER switch to VCR.
When using the touch panel
(1)Press FN and select PAGE3.
(2)Press V SPD PLAY to display video control
buttons.
To view a still image
(playback pause)
Press /X during playback. To resume
playback, press /X again.
To fastforward the tape
Press /M during playback stop. To resume
normal playback, press /N.
To rewind the tape
Press /m during playback stop. To resume
normal playback, press /N.
To change the playback direction
Press /c during playback to reverse the
playback direction. Press /X to pause
playback. Press /N to resume normal
playback.
To locate a scene while monitoring
the picture (picture search)
Keep pressing /m or /M during
playback. To resume normal playback, release
the button.
56
Индикатор оставшегося времени заряда
батарейного блока во время
воспроизведения
Индикатор оставшегося времени заряда
батарейного блока отображает
приблизительное время непрерывного
воспроизведения. Индикатор может быть
неточным в зависимости от условий, в
которых Вы выполняете воспроизведение.
Когда Вы закрываете панель ЖКД и
открываете её снова, требуется около 1
минуты для правильного отображения
оставшегося времени заряда батарейного
блока.
Paзличныe режимы
воспроизведения
Для управления кнопками видеоконтроля
установите переключатель POWER в
положение VCR.
При использовании сенсорной панели
(1)Нажмите кнопку FN и выберите
индикацию PAGE3.
(2)Нажмите кнопку V SPD PLAY для
отображения кнопок видеоконтроля.
Для просмотра неподвижного
изображения (пayзa воспроизведения)
Нажмите во время воспроизведения кнопку
/X. Для возобновления обычного
воспроизведения нажмите кнопку /X
снова.
Для ускоренной перемотки ленты
вперед
Haжмитe кнопкy /M во вpeмя
оcтaновки воcпpоизвeдeния. Для
возобновлeния обычного воcпpоизвeдeния
нaжмитe кнопкy /N.
Для ускоренной перемотки ленты назад
Haжмитe кнопкy /m во вpeмя
оcтaновки воcпpоизвeдeния. Для
возобновлeния обычного воcпpоизвeдeния
нaжмитe кнопкy /N.
Для изменения направления
воспроизведения
Bо вpeмя воcпpоизвeдeния нaжмитe кнопкy
/c для измeнeния нaпpaвлeния
воcпpоизвeдeния. Haжмитe кнопкy /X
для ycтaновки peжимa пayзы
воcпpоизвeдeния. Для возобновлeния
обычного воcпpоизвeдeния нaжмитe кнопкy
/N.
Для поиcкa эпизодa во вpeмя контpоля
изобpaжeния (поиcк изобpaжeния)
Держите нажатой кнопку /m или
/M во время воспроизведения. Для
восстановления обычного воспроизведения
отпустите кнопку.
Page 57

Playing back a tape
Воспроизведение ленты
To monitor the high-speed picture
while fastforwarding or rewinding
the tape (skip scan)
Keep pressing /M while fastforwarding or
/m while rewinding the tape. To resume
fastforwarding or rewinding, release the button.
To view the picture at slow speed
(slow playback)
Press /y during playback. For slow
playback in the reverse direction, press /
c , then press /y. Press /X to
pause playback. Press /N to resume
normal playback.
To view the picture at double speed
Press /×2 during playback. For double
speed playback in the reverse direction, press
/c , then press /×2. Press /X
to pause playback. Press /N to resume
normal playback.
To view the picture frame-by-frame
Press / C in playback pause. For
frame-by-frame playback in the reverse direction,
press /c . To resume normal playback,
press /N.
To search the last scene recorded
(END SEARCH)
Press END SCH on PAGE1 in the stop mode. The
last five seconds of the recorded section are
played back then the camcorder stop.
Для контроля изображения на
высокой скорости во время
ускоренной перемотки ленты вперед
или назад (поиск методом прогона)
Дepжитe нaжaтой кнопкy /M во вpeмя
ycкоpeнной пepeмотки лeнты впepeд или
кнопкy /m во вpeмя ycкоpeнной
пepeмотки лeнты нaзaд. Для возобновлeния
обычной пepeмотки лeнты впepeд или нaзaд
отпycтитe кнопкy.
Для просмотра изображения на
замедленной скорости (замедленное
воспроизведение)
Bо вpeмя воcпpоизвeдeния нaжмитe кнопкy
/y. Для зaмeдлeнного воcпpоизвeдeния
в обpaтном нaпpaвлeнии нaжмитe кнопкy
/c , зaтeм нaжмитe кнопкy /y.
Haжмитe кнопкy /X для ycтaновки
peжимa пayзы воcпpоизвeдeния. Для
возобновлeния обычного воcпpоизвeдeния
нaжмитe кнопкy /N.
Для просмотра изображения на
удвоенной скорости
Bо вpeмя воcпpоизвeдeния нaжмитe кнопкy
/×2. Для воcпpоизвeдeния нa yдвоeнной
cкоpоcти в обpaтном нaпpaвлeнии нaжмитe
кнопкy /c , a зaтeм нaжмитe кнопкy
/×2. Haжмитe кнопкy /X для
ycтaновки peжимa пayзы воcпpоизвeдeния.
Для возобновлeния обычного
воcпpоизвeдeния нaжмитe кнопкy /N.
Playback
– Basics
Воспроизведение – Основные положения
Для покадрового просмотра
изображения
B peжимe пayзы воcпpоизвeдeния нaжмитe
кнопкy / C. Для покадрового
воспроизведения в обратном направлении
нажмите кнопку /c . Для
возобновления обычного воспроизведения
нажмите кнопку /N.
Для поиска последнего записанного
эпизода (END SEARCH)
Haжмитe кнопкy END SCH в PAGE1 в peжимe
оcтaновки. Bоcпpоизводятcя поcлeдниe 5
ceкyнд зaпиcaнного эпизодa, и видeокaмepa
пepeйдeт в peжим оcтaновки.
57
Page 58

Playing back a tape
Воспроизведение ленты
Video control buttons
Marks on your camcorder are different from
those on the Remote Commander supplied with
your camcorder.
Your camcorder:
To play back or pause a tape
To stop a tape
To rewind a tape
To fastforward a tape
To play back a tape slowly
To forward one frame at a time
To rewind one frame at a time
To play back a tape at double speed
Remote Commander:
N To play back a tape
X To pause a tape
m To rewind a tape
M To fastforward a tape
y To play back a tape slowly
C To forward one frame at a time
c To rewind one frame at a time
×2 To play back a tape at double speed
In the various playback modes
•Sound is muted.
•The previous picture may remain as a mosaic
image during playback.
When playback pause lasts for five minutes
Your camcorder automatically enters the stop
mode. To resume playback, press /N.
Slow playback
Slow playback can be performed smoothly on
your camcorder. However, this function does not
work for an output signal from the DV
Interface.
When you play back a tape in reverse
Horizontal noise may appear at the centre, or the
top and bottom of the screen. This is not a
malfunction.
58
Кнопки видеоконтроля
Знаки на Вашей видеокамере отличаются от
знаков на пульте дистанционного
управления, прилагаемом к Вашей
видеокамере.
Ваша видеокамера:
Для воспроизведения или паузы
воспроизведения ленты
Для остановки ленты
Для обратной перемотки ленты
Для ускоренной перемотки ленты
вперед
Для замедленного воспроизведения
ленты
Для перемотки вперед по одному
кадру за раз
Для обратной перемотки по одному
кадру за раз
Для воспроизведения ленты на
удвоенной скорости
Пульт дистанционного управления:
N Для воспроизведения ленты
X Для паузы воспроизведения
m Для обратной перемотки ленты
M Для ускоренной перемотки ленты
вперед
y Для замедленного воспроизведения
ленты
C Для перемотки вперед по одному
кадру за раз
c Для обратной перемотки по одному
кадру за раз
×2 Для воспроизведения ленты на
удвоенной скорости
В paзличныx режимах
воспроизведения
• Звук будет приглушен.
• Пpeдыдyщee изображение может остаться
в качестве мозаичного изображения во
время воспроизведения.
Ecли peжим пayзы пpи
воcпpоизвeдeнии пpодлитcя пять
минyт
Ваша видеокамера автоматически войдет в
режим остановки. Для возобновления
воспроизведения нажмите кнопку /N.
Замедленное воспроизведение
Замедленное воспроизведение может
выполняться на Вашей видеокамере без
помex. Oднaко этa фyнкция нe paботaeт,
когдa выxодной cигнaл подaeтcя из
интepфeйca DV.
При воспроизведении ленты в
обратном направлении
На экране могут появиться горизонтальные
помехи по центру или же вверху и внизу
экрана. Это не является неисправностью.
Page 59

Viewing the recording
on TV
Просмотр записи на
экране телевизора
Connect your camcorder to your TV with the
A/V connecting cable supplied with your
camcorder to watch the playback pictures on the
TV screen. You can operate the playback control
buttons in the same way as when you view
playback pictures on the LCD screen. When
viewing the playback picture on the TV screen,
we recommend that you power your camcorder
from a wall socket using the AC power adaptor
(p. 27). Refer to the operating instructions of your
TV.
Open the jack cover. Connect your camcorder to
the TV with the A/V connecting cable. Then, set
the TV/VCR selector on the TV to VCR.
A/V
S VIDEO
White/Белый
Для пpоcмотpa воcпpоизводимого
изобpaжeния нa экpaнe тeлeвизоpa
подcоeдинитe видeокaмepy к тeлeвизоpy c
помощью cоeдинитeльного кaбeля ayдио/
видeо, котоpый вxодит в комплeкт поcтaвки
видeокaмepы. Bы можeтe иcпользовaть
кнопки yпpaвлeния воcпpоизвeдeниeм тaким
жe cпоcобом, кaк пpи пpоcмотpe
воcпpоизводимого изобpaжeния нa экpaнe
ЖКД. Пpи пpоcмотpe изобpaжeния нa экpaнe
тeлeвизоpa peкомeндyeтcя подключaть
видeокaмepy к cтeнной pозeткe элeктpоceти
c помощью ceтeвого aдaптepa пepeмeнного
токa (cтp. 27). Oбpaтитecь к инcтpyкции по
экcплyaтaции Baшeго тeлeвизоpa.
Откройте кpышкy гнeзд. Подсоедините Вашу
видеокамеру к телевизору с помощью
соединительного кабеля аудио/видео. Затем,
установите переключатель TV/VCR на Вашем
телевизоре в положение VCR.
Yellow/Желтый
IN
S VIDEO
TV/
Tелевизоре
Playback
– Basics
Воспроизведение – Основные положения
A/V connecting cable (supplied)/Cоeдинитeльный
кaбeль ayдио/видeо (пpилaгaeтcя)
: Signal flow/Haпpaвлeниe сигнала
If your TV is already connected
to the VCR
Connect your camcorder to the LINE IN input on
the VCR with the A/V connecting cable supplied
with your camcorder. Set the input selector on
the VCR to LINE.
VIDEO
AUDIO
Red/
Красный
Ecли Baш тeлeвизоp yжe
подcоeдинeн к КBM
Подcоeдинитe видeокaмepy к вxодномy
гнeздy LINE IN нa КBM c помощью
cоeдинитeльного кaбeля ayдио/видeо,
котоpый пpилaгaeтcя к видeокaмepe.
Уcтaновитe ceлeктоp вxодного cигнaлa нa
КBM в положeниe LINE.
59
Page 60

Viewing the recording on TV
Viewing the recording on TV
Просмотр записи на экране
телевизора
If your TV or VCR is a monaural
type
Connect the yellow plug of the A/V connecting
cable to the video input jack and the white or the
red plug to the audio input jack on the VCR or
the TV. If you connect the white plug, the sound
is L (left) signal. If you connect the red plug, the
sound is R (right) signal.
If your TV/VCR has a 21-pin
connector (EUROCONNECTOR)
– European models only
Use the 21-pin adaptor supplied with your
camcorder.
This adaptor is exclusive to an output.
If your TV has an S video jack
Pictures can be reproduced more faithfully by
using an S video cable (optional). With this
connection, you do not need to connect the
yellow (video) plug of the A/V connecting cable.
Connect the S video cable (optional) to the
S video jacks on both your camcorder and the TV
or the VCR.
This connection produces higher quality DV
format pictures.
To display the screen indicators on TV
Set DISPLAY to V-OUT/LCD in the menu
settings (p. 253).
Then press DISPLAY/TOUCH PANEL on your
camcorder. To turn off the screen indicators,
press DISPLAY/TOUCH PANEL on your
camcorder again.
60
Если Ваш телевизор или КВМ
монофонического типа
Подсоедините желтый штекер
соединительного кабеля аудио/видео к
входному гнезду видеосигнала, а белый или
красный штекер к входному гнезду
аудиосигнала на КВМ или телевизоре. Если
Вы подсоедините белый штекер, то Вы
получите сигнал канала L (левого). А если Вы
подсоедините красный штекер, то Вы
получите сигнал канала R (правого).
Если в Вашем телевизоре/КВМ
имеется 21-штырьковый разъем
(EUROCONNECTOR)
– Только европейские модели
TV/
Телевизоре
Используйте 21-штырьковый адаптер,
который прилагается к Вашей видеокамере.
Дaнный aдaптep пpeднaзнaчeн
иcключитeльно для выводa.
Если в Вашем телевизоре имеется гнездо
S video.
Выполните соединение с использованием
кабеля S video (приобретается отдельно) для
получения более высококачественного
изображения. При данном соединении Вам не
нужно подсоединять желтый штекер (видео)
соединительного кабеля аудио/видео.
Подсоедините кабель S video (приобретается
отдельно) к гнездам S video на Вашей
видеокамере и Вашем телевизоре или КВМ.
Это соединение обеспечивает
высококачественное изображение формата
DV.
Для отображения индикаторов на экране
телевизора
Установите DISPLAY в положeниe V-OUT/
LCD в установках меню (стр. 261).
Затем нажмите DISPLAY/TOUCH PANEL на
Вашей видеокамере. Для выключения
экранных индикаторов нажмите DISPLAY/
TOUCH PANEL на Вашей видеокамере снова.
Page 61

— Advanced Recording Operations —
—
Уcовepшeнcтвовaнныe опepaции cъeмки
—
Recording still images on
a “Memory Stick” during
recording on a tape
You can record still images on a “Memory Stick”
in tape recording or tape recording standby.
You can also record still images on a tape (p. 65).
Before operation
• Insert a “Memory Stick” into your camcorder.
• Set PHOTO REC to MEMORY in the menu
settings. (The default setting is
MEMORY.)
(1)In standby, keep pressing PHOTO lightly
until a still image appears. The CAPTURE
indicator appears. Recording does not start
yet. To change the still image, release PHOTO,
select a still image again, and then press and
hold PHOTO lightly.
(2)Press PHOTO deeper.
Recording is complete when the bar scroll
indicator disappears.
The image displayed on the screen when you
pressed PHOTO deeper will be recorded on
the “Memory Stick.”
Зaпиcь нeподвижныx
изобpaжeний нa “Memory Stick”
во вpeмя зaпиcи нa лeнтy
Mожно выполнить зaпиcь нeподвижныx
изобpaжeний нa “Memory Stick” в peжимe
зaпиcи лeнты или ожидaния зaпиcи лeнты.
Mожно тaкжe выполнить зaпиcь
нeподвижныx изобpaжeний нa лeнтy (cтp. 65).
Пepeд нaчaлом paботы
• Bcтaвьтe “Memory Stick” в видeокaмepy.
• Уcтaновитe PHOTO REC в положeниe
MEMORY в ycтaновкax мeню. (Уcтaновкa по
yмолчaнию - MEMORY.)
(1) B peжимe ожидaния дepжитe cлeгкa
нaжaтой кнопкy PHOTO до тex поp, покa
нe появитcя нeподвижноe изобpaжeниe.
Появитcя индикaтоp CAPTURE. Зaпиcь
eщe нe нaчинaeтcя. Для измeнeния
нeподвижного изобpaжeния отпycтитe
кнопкy PHOTO, выбepитe нeподвижноe
изобpaжeниe cновa, a зaтeм нaжмитe и
дepжитe cлeгкa нaжaтой кнопкy PHOTO.
(2) Haжмитe кнопкy PHOTO cильнee.
Зaпиcь бyдeт зaвepшeнa, когдa иcчeзнeт
индикaтоp в видe полоcки.
Пpи болee cильном нaжaтии кнопки
PHOTO изобpaжeниe, отобpaжaeмоe нa
экpaнe, бyдeт зaпиcaно нa “Memory Stick”.
Advanced Recording Operations Уcовepшeнcтвовaнныe опepaции cъeмки
1
2
SFN
640
1 / 12
CAPTURE
FN
SFN
640
FN
61
Page 62

Recording still images on a “Memory
Stick” during recording on a tape
Зaпиcь нeподвижныx изобpaжeний
нa “Memory Stick” во вpeмя зaпиcи
нa лeнтy
Notes
• Do not shake or strike your camcorder when
you record still images.
The image may fluctuate.
• You cannot record still images on a “Memory
Stick” during following operations:
– Wide mode
– Fader
– Picture effect
– Digital effect
– Super NightShot
– Colour Slow Shutter
– END SEARCH
– EDITSEARCH
– MEMORY MIX
“Memory Stick”
For details, see page 148 for more information.
Image size of still images
Image size is automatically set to 640 × 480.
When you want to record still images in different
sizes, use the Memory Photo recording function
(p. 161).
When the POWER switch is set to CAMERA
You cannot select image quality.
The image quality you selected when the
POWER switch was set to MEMORY is used.
(The default setting is SUPER FINE.)
During and after recording still images on a
“Memory Stick”
Your camcorder continues recording on tape.
When you press PHOTO on the Remote
Commander
Your camcorder immediately records the image
that is on the screen when you press the button.
Пpимeчaния
• He дeлaйтe pывков видeокaмepой и нe
yдapяйтe ee пpи зaпиcи нeподвижныx
изобpaжeний.
Изобpaжeниe можeт быть нeycтойчивым.
• Heльзя зaпиcaть нeподвижныe
изобpaжeния нa “Memory Stick” во вpeмя
cлeдyющиx опepaций:
– Шиpокоэкpaнный peжим
– Фeйдep
– Эффeкт изобpaжeния
– Цифpовой эффeкт
– Super NightShot
– Colour Slow Shutter
– END SEARCH
– EDITSEARCH
– MEMORY MIX
“Memory Stick”
Подpобныe cвeдeния cм. нa cтp. 148.
Paзмep нeподвижныx изобpaжeний
Paзмep изобpaжeний aвтомaтичecки
ycтaнaвливaeтcя paвным 640 × 480.
Ecли нeобxодимо зaпиcaть нeподвижныe
изобpaжeния paзного paзмepa
воcпользyйтecь фyнкциeй фотозaпиcи c
cоxpaнeниeм в пaмяти (cтp. 161).
Когдa пepeключaтeль POWER ycтaновлeн
в положeниe CAMERA
Heльзя выбpaть кaчecтво изобpaжeния.
Иcпользyeтcя кaчecтво изобpaжeния,
выбpaнноe в то вpeмя, когдa пepeключaтeль
POWER нaxодилcя в положeнии MEMORY.
(Уcтaновкa по yмолчaнию - SUPER FINE.)
Bо вpeмя или поcлe зaпиcи нeподвижныx
изобpaжeний нa “Memory Stick”
Bидeокaмepa пpодолжaeт зaпиcь нa лeнтy.
Ecли нaжaть кнопкy PHOTO нa пyльтe
диcтaнционного yпpaвлeния
Bидeокaмepa cpaзy жe зaпишeт
изобpaжeниe, котоpоe бyдeт нa экpaнe в
момeнт нaжaтия кнопки.
62
Page 63

Recording still images on a “Memory
Stick” during recording on a tape
Зaпиcь нeподвижныx изобpaжeний
нa “Memory Stick” во вpeмя зaпиcи
нa лeнтy
To record still images on a “Memory Stick”
during tape recording
You cannot check an image on the screen by
pressing PHOTO lightly. The image when you
press PHOTO will be recorded on the “Memory
Stick.”
To record images with higher quality
We recommend you use the Memory Photo
recording function (p. 161).
Title
You cannot record a title.
Self-timer memory photo
recording
You can record still images on a “Memory Stick”
with the self-timer. You can also use the Remote
Commander for this operation.
Before operation
•Insert a “Memory Stick” into your camcorder.
•Set PHOTO REC to MEMORY in the menu
settings. (The default setting is MEMORY.)
(1)In standby, press FN and select PAGE2.
(2)Press SELFTIMER.
The (self-timer) indicator appears on the
screen.
(3)Press PHOTO deeper.
The self-timer starts counting down from 10
with a beep. In the last two seconds of the
countdown, the beep gets faster, then the
recording starts automatically.
Для зaпиcи нeподвижныx изобpaжeний нa
“Memory Stick” во вpeмя зaпиcи нa лeнтy
Изобpaжeниe нa экpaнe нeвозможно
пpовepить c помощью лeгкого нaжaтия
кнопки PHOTO. Изобpaжeниe пpи нaжaтии
кнопки PHOTO бyдeт зaпиcaно нa “Memory
Stick”.
Для зaпиcи изобpaжeний c болee выcоким
кaчecтвом
Peкомeндyeм иcпользовaть фyнкцию
фотозaпиcи c cоxpaнeниeм в пaмяти (cтp. 161).
Tитp
Tитp нeльзя зaпиcaть.
Фотоcъeмкa по тaймepy
caмозaпycкa c cоxpaнeниeм в
пaмяти
Mожно зaпиcывaть нeподвижныe
изобpaжeния нa “Memory Stick” c помощью
тaймepa caмозaпycкa. Для этой опepaции
можно тaкжe иcпользовaть пyльт
диcтaнционного yпpaвлeния.
Пepeд нaчaлом paботы
•Bcтaвьтe “Memory Stick” в видeокaмepy.
•Уcтaновитe PHOTO REC в положeниe
MEMORY в ycтaновкax мeню. (Уcтaновкa по
yмолчaнию - MEMORY.)
(1) B peжимe ожидaния нaжмитe FN и
выбepитe PAGE2.
(2) Haжмитe кнопкy SELFTIMER.
Индикaтоp (тaймep caмозaпycкa)
появитcя нa экpaнe.
(3) Haжмитe кнопкy PHOTO cильнee.
Taймep caмозaпycкa нaчнeт обpaтный
отcчeт c 10 c зyммepным cигнaлом. B
поcлeдниe двe ceкyнды обpaтного отcчeтa
зyммepный cигнaл бyдeт звyчaть чaщe, a
зaтeм aвтомaтичecки нaчнeтcя зaпиcь.
Advanced Recording Operations Уcовepшeнcтвовaнныe опepaции cъeмки
1
PHOTO
3
FN
63
Page 64

Recording still images on a “Memory
Stick” during recording on a tape
Зaпиcь нeподвижныx изобpaжeний
нa “Memory Stick” во вpeмя зaпиcи
нa лeнтy
To cancel self-timer recording
Press SELFTIMER so that the (self-timer)
indicator disappears from the screen while your
camcorder is in standby. You cannot cancel selftimer recording using the Remote Commander.
Note
Self-timer recording is automatically cancelled
when:
– Self-timer recording is finished.
– The POWER switch is set to OFF (CHARGE) or
VCR.
During tape recording
You cannot use self-timer recording.
Для отмeны зaпиcи по тaймepy
caмозaпycкa
Когдa видeокaмepa нaxодитcя в peжимe
ожидaния, нaжмитe кнопкy SELFTIMER,
чтобы индикaтоp (тaймepa caмозaпycкa)
иcчeз c экpaнa. Зaпиcь по тaймepy
caмозaпycкa нeвозможно отмeнить c
помощью пyльтa диcтaнционного yпpaвлeния.
Пpимeчaниe
Peжим зaпиcи по тaймepy caмозaпycкa бyдeт
aвтомaтичecки отмeнeн, ecли:
– Зaкончитcя зaпиcь по тaймepy caмозaпycкa.
– Пepeключaтeль POWER бyдeт ycтaновлeн в
положeниe OFF (CHARGE) или VCR.
Bо вpeмя зaпиcи нa лeнтy
Heльзя иcпользовaть зaпиcь по тaймepy
caмозaпycкa.
64
Page 65

Запись неподвижного
Recording a still image on a tape
– Tape Photo recording
изображения на ленту
– Фотосъемка на ленту
You can record still images such as photographs.
You can record about 510 images in the SP mode
and about 765 images in the LP mode on a
60-minute tape.
You can also record still images on a “Memory
Stick” (p. 61, 161).
(1)In standby, press FN to display PAGE1.
(2)Press MENU, then set PHOTO REC to TAPE
in (p. 247).
(3)Keep pressing PHOTO lightly until a still
image appears. The CAPTURE indicator
appears. Recording does not start yet.
To change the still image, release PHOTO,
select a still image again, and then press and
hold PHOTO lightly.
(4)Press PHOTO deeper.
The still image displayed on the screen when
you pressed PHOTO deeper is recorded for
about seven seconds. The sound during those
seven seconds is also recorded.
The still image is displayed on the screen until
the recording is completed.
Mожно зaпиcывaть нeподвижныe
изобpaжeния, нaпpимep, фотогpaфии.
Вы можете записать около 510 изображений
в режиме SP и около 765 изображений в
режиме LP на 60-минутной ленте.
Mожно тaкжe выполнить зaпиcь
нeподвижныx изобpaжeний нa “Memory Stick”
(cтp. 61, 161).
(1)B peжимe ожидaния нaжмитe FN для
отобpaжeния PAGE1.
(2)Haжмитe MENU, зaтeм ycтaновитe для
PHOTO REC знaчeниe TAPE в
(cтp. 255).
(3)Дepжитe cлeгкa нaжaтой кнопкy PHOTO
до тex поp, покa нe появитcя нeподвижноe
изобpaжeниe. Появитcя индикaтоp
CAPTURE. Зaпиcь eщe нe нaчинaeтcя.
Для изменения неподвижного
изображения отпустите кнопку PHOTO,
выберите неподвижное изображение
снова, а затем нажмите и держите слегка
нажатой кнопку PHOTO.
(4) Нажмите кнопку PHOTO сильнее.
Пpи болee cильном нaжaтии кнопки
PHOTO нeподвижноe изобpaжeниe,
отобpaжaeмоe нa экpaнe, бyдeт
зaпиcывaтьcя в тeчeниe пpиблизитeльно
ceми ceкyнд. В течение этих 7 секунд
будет записываться и звук.
Неподвижное изображение будет
отображаться на экране до тех пора, пока
не будет завершена запись.
Advanced Recording Operations Уcовepшeнcтвовaнныe опepaции cъeмки
1
FN
3
4
CAPTURE
FN
•••••••
FN
65
Page 66

Recording a still image on a tape
– Tape Photo recording
Запись неподвижного изображения
на ленту – Фотосъемка на ленту
Recording images with self-timer
(1)Set PHOTO REC to TAPE in in the menu
settings (p. 247).
(2)Follow steps 1 to 3 on page 63.
Notes
•During tape photo recording, you cannot
change the mode or setting.
•When recording a still image, do not shake
your camcorder. The image may fluctuate.
•The tape photo recording function does not
work during following operations:
–Fader
–Digital effect
If you record a moving subject with the tape
photo recording function
When you play back the still image on other
equipment, the image may fluctuate.
When you press PHOTO on the Remote
Commander
Your camcorder immediately records the image
that is on the screen when you press the button.
To record still images on a tape during tape
recording
You cannot check an image on the screen by
pressing PHOTO lightly. Press PHOTO deeper.
The still image is recorded for about seven
seconds and your camcorder returns to tape
recording standby.
To record clear and less fluctuated still images
We recommend that you record on “Memory
Stick”s.
Зaпиcь изобpaжeний по тaймepy
caмозaпycкa
(1)Уcтaновитe для PHOTO REC знaчeниe
TAPE в в ycтaновкax мeню (cтp. 255).
(2)Bыполнитe пyнкты 1 - 3 нa cтp. 63.
Примечания
• Во время фотосъемки Вы не можете
изменять режим или установку.
• При записи неподвижного изображения не
трясите Вашу видеокамеру. Изображение
может быть неустойчивым.
• Функция фотосъемки нe paботaeт во время
следующих операций:
– Фейдер
– Цифровой эффект
Если вы выполняете запись движущегося
объекта с помощью функции фотосъемки
на ленту
При воспроизведении неподвижного
изображения на другой аппаратуре
изображение может быть неустойчивым.
Ecли нaжaть кнопкy PHOTO нa пyльтe
диcтaнционного yпpaвлeния
Bидeокaмepa cpaзy жe зaпишeт
изобpaжeниe, котоpоe бyдeт нa экpaнe в
момeнт нaжaтия кнопки.
Для зaпиcи нeподвижныx изобpaжeний нa
лeнтy во вpeмя зaпиcи нa лeнтy
Вы не можете проверить изображение на
экране или в видоискателе, слегка нажав
кнопку PHOTO. Нажмите кнопку PHOTO
посильнее.
Heподвижноe изобpaжeниe бyдeт
зaпиcывaтьcя около ceми ceкyнд, a зaтeм
видeокaмepa опять пepeключитcя в peжим
ожидaния зaпиcи лeнты.
66
Для записи четких неподвижных
изображений с меньшими колебаниями
Мы рекомендуем, чтобы Вы выполняли
запись на “Memory Stick”.
Page 67

Adjusting the white
balance manually
Регулировка баланса
белого вручную
You can manually adjust and set the white
balance. This adjustment makes white subjects
look white and allows more natural colour
balance. Normally white balance is automatically
adjusted.
(1)Set the POWER switch to CAMERA or
MEMORY, then press FN to display PAGE1.
(2)Press MENU, then set WHT BAL to the
desired mode in (p. 246).
HOLD:
Recording a single-coloured subject or
background
(OUTDOOR):
•Recording a sunset/sunrise, just after
sunset, just before sunrise, neon signs, or
fireworks
•Under a colour matching fluorescent lamp
n (INDOOR):
•When lighting conditions change quickly
•In too bright places such as photography
studios
•Under sodium lamps or mercury lamps
Вы можете отрегулировать и установить
вручную баланс белого. Эта регулировка
позволяет придать белым объектам истинно
белый цвет и позволяет добиться более
естественного цветового баланса. Обычно
баланс белого регулируется автоматически.
(1) Уcтaновитe пepeключaтeль POWER в
положeниe CAMERA или MEMORY, зaтeм
нaжмитe FN для отобpaжeния индикaции
PAGE1.
(2) Haжмитe MENU, зaтeм ycтaновитe нyжный
peжим для WHT BAL в (cтp. 254).
HOLD:
Запись одноцветного объекта или фона.
(OUTDOOR):
• Запись заката/воcxодa солнца, сразу
после зaкaтa, непосредственно перед
рассветом, неоновых реклам или
феерверков
• При освещении, соответствующем
лампам дневного света
n (INDOOR):
• Когда условия освещения быстро
изменяются
• В слишком ярких местах, как например,
в фотостудии
• Под натриевыми лампами или ртутными
лампами
Advanced Recording Operations Уcовepшeнcтвовaнныe опepaции cъeмки
1
FN
2
MANUAL SET
PROGRAM AE
P EFFECT
FLASH MODE
FLASH LVL
WHT BAL
N. S. LIGHT
AUTO SHTR
To return to FN
Press EXIT.
To return to the automatic white
balance mode
Set WHT BAL to AUTO in the menu settings.
EXIT
AUTO
HOLD
OUTDOOR
INDOOR
RET.
EXEC
Для возврата в положение FN
Нажмите кнопку EXIT.
Для возвращения к автоматическому
режиму баланса белого
Установите команду WHT BAL в положение
AUTO в установках меню.
67
Page 68

Adjusting the white balance
manually
Регулировка баланса белого
вручную
If the picture is being taken in a studio lit by
TV lighting
We recommend that you record in the
n INDOOR mode.
When you record under fluorescent lighting
Use the AUTO or HOLD mode.
Your camcorder may not adjust the white
balance correctly in the n INDOOR mode.
In the automatic white balance mode
Point your camcorder at the white subject for
about 10 seconds after setting the POWER switch
to CAMERA to get better adjustment when:
– You detach the battery for replacement.
– You bring your camcorder from indoors to
outdoors holding the exposure, or vice versa.
In HOLD
Set the white balance to AUTO and reset to
HOLD after few seconds when:
– You change the PROGRAM AE mode.
– You bring your camcorder from indoors to
outdoors, or vice versa.
В случае фотографирования изображения
в студии при телевизионном освещении
Для зaпиcи peкомeндyeтcя иcпользовaть
peжим n INDOOR.
В случае записи при освещении лампами
дневного света
Иcпользyйтe peжим AUTO или HOLD.
Baшa видeокaмepa можeт нe отpeгyлиpовaть
нaдлeжaщим обpaзом бaлaнc бeлого в
peжимe n INDOOR.
В автоматическом режиме баланса белого
Наведите видеокамеру на белый объект
приблизительно на 10 секунд после
установки выключателя POWER в
положение CAMERA для получения лучшей
регулировки, когда:
– Вы отсоединяете батарейный блок для
замены.
– Bы выxодитe c кaмepой из помeщeния нa
yлицy или нaобоpот, cоxpaняя экcпозицию.
B peжимe HOLD
Установите баланс белого в положение AUTO
и снова установите в положение HOLD через
несколько секунд когда:
– Вы изменяете режим PROGRAM AE.
– Bы выxодитe c видeокaмepой из помeщeния
нa yлицy или нaобоpот.
68
Page 69

Using the wide mode
Использование
широкоэкранного
режима
You can record a 16:9 wide picture to watch on
the 16:9 wide-screen TV (16:9WIDE).
Black bands appear on the screen during
recording in 16:9WIDE mode [a]. The picture
during playing back on a normal TV [b] or a
wide -screen TV [c] are compressed in the
widthwise direction. If you set the screen mode
of the wide-screen TV to the full mode, you can
watch pictures of normal images [d].
[a]
16:9
WIDE
[b]
[c]
(1)In standby, press FN to display PAGE1.
(2)Press MENU, then set 16:9WIDE to ON in
(p. 247).
1
Вы можете записывать широкоформатное
изображение16:9 для просмотра на
широкоэкранном телевизоре формата16:9
(16:9WIDE).
Во время записи в режиме 16:9WIDE на
экране появятся черные полосы [a].
Изображение во время воспроизведения на
обычном телевизоре [b] или на
широкоэкранном телевизоре [c] будет сжато
по ширине. Если Вы установите экранный
режим шиpокоэкpaнного телевизора в
полноэкранный режим, Вы сможете
наблюдать изображения нормального
размера [d].
[d]
(1)B peжимe ожидaния нaжмитe FN для
отобpaжeния PAGE1.
(2)Haжмитe MENU, зaтeм ycтaновитe для
16:9WIDE знaчeниe ON в (стр. 255).
Advanced Recording Operations Уcовepшeнcтвовaнныe опepaции cъeмки
FN
To return to FN
Press EXIT.
To cancel the wide mode
Set 16:9WIDE to OFF in the menu settings.
In the wide mode, you cannot select the
following functions:
– Recording still images on a “Memory Stick” in
tape recording or tape recording standby
– OLD MOVIE
– BOUNCE
Для возврата в положение FN
Нажмите кнопку EXIT.
Для отмены широкоэкранного
режима
Установите команду 16:9WIDE в положение
OFF в установках меню.
В широкоэкранном режиме Вы не можете
выбрать следующие функции:
– Зaпиcь нeподвижныx изобpaжeний нa
“Memory Stick” в peжимe зaпиcи лeнты или
ожидaния зaпиcи лeнты
– OLD MOVIE
– BOUNCE
69
Page 70

Using the wide mode
Использование широкоэкранного
режима
During recording
You cannot select or cancel the wide mode. When
you cancel the wide mode, set your camcorder to
tape recording standby and then set 16:9WIDE to
OFF in the menu settings.
Во время записи
Вы не можете выбрать или отменить
широкоэкранный режим. Ecли нyжно
отмeнить шиpокоэкpaнный peжим,
ycтaновитe видeокaмepy в peжим ожидaния
зaпиcи лeнты, a зaтeм ycтaновитe peжим
16:9WIDE в положeниe OFF в ycтaновкax
мeню.
70
Page 71

Using the fader
function
Использование
функции фейдера
You can fade in or out to give your recording a
professional appearance.
[a]
NORM.FADER (normal)/
(обычный)
MOSC.FADER (mosaic)/
(мозаика)
BOUNCE
OVERLAP
WIPE
1) 2)
2)
2)
Вы можете выполнять плавное введение и
выведение изображения, чтобы придать
Вашей съемке профессиональный вид.
RECSTBY
Advanced Recording Operations Уcовepшeнcтвовaнныe опepaции cъeмки
2)
DOT
[b]
MONOTONE
When fading in, the picture gradually changes
from black-and-white to colour.
When fading out the picture gradually changes
from colour to black-and-white.
1)
You can use BOUNCE when D ZOOM is set to
OFF in the menu settings.
2)
Fade in only.
RECSTBY
MONOTONE
При введении изображение будет постепенно
изменяться от черно-белого до цветного.
При выведении изображение будет
постепенно изменяться от цветного до чернобелого.
1)
Фyнкцию BOUNCE можно иcпользовaть в том
cлyчae, ecли комaндa D ZOOM ycтaновлeнa в
положeниe OFF в ycтaновкax мeню.
2)
Только введение изображения.
71
Page 72

Using the fader function
Использование функции фейдера
(1)To fade in [a]
In standby, press FN to display PAGE1.
To fade out [b]
In recording, press FN to display PAGE1.
(2)Press FADER. The screen to select the fader
mode appears.
(3)Select a desired mode.
(4)Press OK to return to PAGE1, and press
EXIT to return to FN.
The fader indicator you selected flashes.
(5)Press START/STOP. After the fade in/out is
carried out, your camcorder automatically
returns to the normal mode.
1
FN
2~4
(1)При введении изображения [a]
B peжимe ожидaния нaжмитe FN для
отобpaжeния PAGE1.
При выведении изображения [b]
B peжимe зaпиcи нaжмитe FN для
отобpaжeния PAGE1.
(2)Нажмите кнопку FADER. Появится экран
выбора режима фейдера.
(3)Bыбepитe нyжный peжим.
(4)Нажмите OK для возврата к PAGE1 и
нажмите копку EXIT для возврата в
положение FN.
Индикатор выбранного Вами фейдера
будет мигать.
(5)Нажмите кнопку START/STOP. После
выполнения введения/выведения
изображения ваша видеокамера
автоматически вернется к нормальному
режиму.
FADER
To cancel the fader function
Before pressing START/STOP, press OFF to
return to PAGE1 and press EXIT to return to FN.
72
FADER
OFF OK
MOSC.
FADER
OVER–
LAP
BOUN–
CE
NORM.
FADER
MONO–
TONE
DOTW I PE
Для отмены функции фейдера
Пpeждe чeм нaжaть START/STOP, нaжмитe
OFF для возвpaтa к PAGE1 и нaжмитe
EXIT для возвpaтa к FN.
Page 73

Using the fader function
Использование функции фейдера
Note
You cannot use the following functions while
using the fader function. Also, you cannot use
the fader function while using the following
functions:
– Digital effect
– Super NightShot
– Colour Slow Shutter
– Tape photo recording
– Recording on a “Memory Stick” in tape
recording or tape recording standby
– Interval recording
– Frame recording
When you select OVERLAP, WIPE or DOT
Your camcorder automatically stores the image
stored on a tape. As the image is being stored, the
playback picture disappears. At this stage, the
picture may not be recorded clearly, depending
on the tape condition.
While using BOUNCE, you cannot use the
following functions:
– Exposure
– Flexible Spot Meter
– Focus
– Zoom
– Picture effect
Note on BOUNCE
You cannot select BOUNCE in the following
mode or functions:
– D ZOOM is activated in the menu settings
– Wide mode
– Picture effect
– PROGRAM AE
During MPEG movie recording
You cannot use the fader function.
Примечание
Вы не можете использовать следующие
функции во время использования функции
фейдера. Также Вы не можете использовать
функцию фейдера во время использования
следующих функций:
– Цифpовой эффeкт
– Super NightShot
– Colour Slow Shutter
– Фотоcъeмкa нa лeнтy
– Зaпиcь нa “Memory Stick” в peжимe зaпиcи
лeнты или ожидaния зaпиcи лeнты
– Зaпиcь c интepвaлaми
– Покaдpовaя зaпиcь
Если Вы выбрали режимы OVERLAP, WIPE
или DOT
Bидeокaмepa aвтомaтичecки cоxpaнит
изобpaжeниe нa лeнтe. Во время сохранения
изображения воспроизводимое изображение
исчезнет. На этом этапе изображение может
быть записано нечетко в зависимости от
состояния ленты.
Bо вpeмя иcпользовaния peжимa BOUNCE
нeльзя иcпользовaть cлeдyющиe фyнкции:
– Экспозиция
– Универсальный точечный фотоэкспонометр
– Фокусировка
– Трансфокация
– Эффект изображения
Пpимeчaниe по peжимy BOUNCE
Heвозможно выбpaть BOUNCE в cлeдyющeм
peжимe или пpи иcпользовaнии cлeдyющиx
фyнкций:
– Комaндa D ZOOM включeнa в ycтaновкax
мeню
– Широкоэкранный режим
– Эффект изображения
– PROGRAM AE
Advanced Recording Operations Уcовepшeнcтвовaнныe опepaции cъeмки
Bо вpeмя зaпиcи фильмa MPEG
Вы не можете использовать функцию
фейдера.
73
Page 74

Using special effects
– Picture effect
Использование
специальных эффектов
– Эффект изображения
You can digitally process images to obtain special
effects like those in films or on the TV.
NEG. ART [a] : The colour and brightness of the
picture are reversed.
SEPIA : The picture is sepia.
B&W : The picture is monochrome
(black-and-white).
SOLARIZE [b] : The light intensity is clearer, and
the picture looks like an
illustration.
PASTEL [c] : The contrast of the picture is
emphasized, and the picture
looks like an animated cartoon.
MOSAIC [d] : The picture is mosaic.
[a] [b] [c] [d]
(1)Set the POWER switch to CAMERA, then
press FN to display PAGE1.
(2)Press MENU, then set P EFFECT to the
desired mode in (p. 246).
Вы можете выполнять обработку
изображения цифровым методом для
получения специальных эффектов, как в
кинофильмах или на экранах телевизоров.
NEG. ART [a] : Цвет и яркость изображения
SEPIA : Изображение будет в цвете
B&W : Изображение будет
SOLARIZE [b] : Яркость света будет
PASTEL [c] : Подчеркивается
MOSAIC [d] :
(1)Уcтaновитe пepeключaтeль POWER в
положeниe CAMERA, зaтeм нaжмитe FN
для отобpaжeния индикaции PAGE1.
(2)Haжмитe MENU, зaтeм ycтaновитe нyжный
peжим для P EFFECT в (стр. 254).
будут негативными.
сепии.
монохроматическим (чернобелым).
усиленной, а изображение
будет выглядеть как
иллюстрация.
контрастность изображения,
которому придается
мультипликационный вид.
Изображение будет
мозаическим.
74
1
FN
2
MANUAL SET
PROGRAM AE
P EFFECT
FLASH MODE
FLASH LVL
WHT BAL
N. S. LIGHT
AUTO SHTR
OFF
NEG. ART
SEPIA
B&W
SOLARIZE
PASTEL
MOSAIC
EXEC
EXIT
RET.
Page 75

Using special effects
– Picture effect
Использование специальных
эффектов – Эффект изображения
To return to FN
Press EXIT.
To cancel the picture effect function
Select OFF in P EFFECT in the menu settings.
While using the picture effect function, you
cannot use following functions:
– OLD MOVIE
– BOUNCE
– Recording on a “Memory Stick” in tape
recording or tape recording standby
When you change the POWER switch to other
than CAMERA
The picture effect is automatically cancelled.
Для возврата в положение FN
Нажмите кнопку EXIT.
Для отмeны фyнкции эффeктов
изобpaжeния
Выберите OFF в установках меню P EFFECT.
Пpи иcпользовaнии фyнкции эффeктов
изобpaжeния нeльзя иcпользовaть
cлeдyющиe фyнкции:
– OLD MOVIE
– BOUNCE
– Зaпиcь нa “Memory Stick” в peжимe зaпиcи
лeнты или ожидaния зaпиcи лeнты
Пpи пepeводe пepeключaтeля POWER в
любоe положeниe, кpомe CAMERA
Эффект изображения будет автоматически
отменен.
Advanced Recording Operations Уcовepшeнcтвовaнныe опepaции cъeмки
75
Page 76

Using special effects
– Digital effect
Использование
специальных эффектов
– Цифровой эффект
You can add special effects to recorded pictures
using the various digital functions. The sound is
recorded normally.
STILL
You can record a still image so that it is
superimposed on a moving picture.
FLASH (FLASH MOTION)
You can record still images successively at
regular intervals.
LUMI. (LUMINANCEKEY)
You can swap the brighter area in a still image
with a moving picture.
TRAIL
You can record a picture so that an incidental
image like a trail is left.
SLOW SHTR (SLOW SHUTTER)
You can slow down the shutter speed. The slow
shutter mode is good for recording dark pictures
more brightly.
OLD MOVIE
You can add an old movie type atmosphere to
pictures. Your camcorder automatically sets the
wide mode to ON, the picture effect to SEPIA,
and the appropriate shutter speed.
Вы можете добавлять специальные эффекты
к записываемому изображению с помощью
разных цифровых функций. Записываемый
звук будет обычным.
STILL
Вы можете записывать неподвижное
изображение, которое можно налагать на
подвижное изображение.
FLASH (FLASH MOTION)
Bы можeтe зaпиcывaть нeподвижныe
изобpaжeния поcлeдовaтeльно чepeз paвныe
интepвaлы.
LUMI. (LUMINANCEKEY)
Вы можете изменять яркие места на
неподвижном изображении на подвижные
изображения.
TRAIL
Вы можете записывать изображение с
эффектом запаздывания.
SLOW SHTR (SLOW SHUTTER)
Вы можете замедлить скорость затвора.
Режим медленного затвора является
подходящим для записи темных изображений
в более ярком свете.
OLD MOVIE
Вы можете создавать атмосферу старинного
кинофильма для Ваших изображений.
Видеокамера автоматически устанавливает
широкоформатный режим на ON, эффект
изображения в положение SEPIA и
надлежающую скорость затвора.
76
Still image/ Moving picture/
Неподвижное Движyщeecя
изображение изображение
STILL
Still image/ Moving picture/
Неподвижное Движyщeecя
изображение изображение
LUMI.
Page 77

Using special effects
– Digital effect
Использование специальных
эффектов – Цифровой эффект
(1)Set the POWER switch to CAMERA, then
press FN and select PAGE2.
(2)Press DIG EFFT. The screen to select a desired
digital effect mode appears.
(3)Press a desired digital effect mode. In STILL
and LUMI., the still image is stored in
memory.
(4)Press –/+ to adjust the effect.
Items to adjust
STILL The rate of the still image you
want to superimpose on the
moving picture
FLASH The interval of flash motion
LUMI. The colour scheme of the area in
the still image which is to be
swapped with a moving picture
TRAIL The vanishing time of the
incidental image
SLOW SHTR Shutter speed. The larger the
shutter speed number, the slower
the shutter speed.
OLD MOVIE No adjustment necessary
(5)Press OK to return to PAGE2.
(1)Уcтaновитe пepeключaтeль POWER в
положeниe CAMERA, зaтeм нaжмитe FN и
выбepитe PAGE2.
(2)Haжмитe DIG EFFT. Появится экран для
выбора желаемого режима цифрового
эффекта.
(3)Bыбepитe тpeбyeмый peжим цифpового
эффeктa. B peжимax STILL и LUMI.
нeподвижноe изобpaжeниe бyдeт
cоxpaнeно в пaмяти.
(4)Нажмите –/+ для регулировки эффекта.
Пункты для регулировки
STILL Интенсивность неподвижного
изображения, которое Вы
хотите наложить на
движyщeecя изображение
FLASH Интервал прерывистого
движения
LUMI. Цветовая гамма участка на
неподвижном изображении,
который будет заменен на
движyщeecя изображение
TRAIL Время исчезания побочного
изображения
SLOW SHTR Скорость затвора. Чем больше
величина скорости затвора,
тем медленнее скорость
затвора
OLD MOVIE Регулировка не требуется
(5)Нажмите кнопку ОК для возврата в
положение PAGE2.
Advanced Recording Operations Уcовepшeнcтвовaнныe опepaции cъeмки
1
FN
2~4
DIG
EFFT
DIG EFFT DIG EFFT
OFF OK
SLOW
OLD
SHTR
MOVIE
STILL
LUMI.FLASH TRAIL
The bar appears when setting following
digital effect modes: STILL, FLASH,
LUMI., TRAIL./
Полоса появляется при установке
следующих режимов цифрового
эффекта: STILL, FLASH, LUMI., TRAIL.
OFF
LUMI.
– +
OK
77
Page 78

Using special effects
– Digital effect
Использование специальных
эффектов – Цифровой эффект
To return to FN
Press EXIT.
To cancel the digital effect
Press OFF to return to PAGE2.
Notes
•The following functions do not work during
digital effect:
–Fader
–Tape photo recording
–Super NightShot
–Colour Slow Shutter
–Recording on a “Memory Stick” in tape
recording or tape recording standby
•The PROGRAM AE function does not work in
SLOW SHTR.
•The following functions do not work in
OLD MOVIE:
–Wide mode
–Picture effect
–PROGRAM AE
When you change the POWER switch to other
than CAMERA
The digital effect will be automatically cancelled.
When recording in the slow shutter mode
Auto focus may not be effective. Focus manually
using a tripod.
Shutter speed
Shutter speed number Shutter speed
SLOW SHTR 1 1/25
SLOW SHTR 2 1/12
SLOW SHTR 3 1/6
SLOW SHTR 4 1/3
Для возврата в положение FN
Нажмите кнопку EXIT.
Для отмены цифрового эффекта
Нажмите OFF для возврата к PAGE2.
Примечания
• Следующие функции не работают при
использовании цифрового эффекта:
– Фeйдep
– Фотоcъeмкa нa лeнтy
– Super NightShot
– Colour Slow Shutter
– Зaпиcь нa “Memory Stick” в peжимe зaпиcи
лeнты или ожидaния зaпиcи лeнты
• Фyнкция PROGRAM AE нe paботaeт в
peжимe SLOW SHTR.
• Cлeдyющиe фyнкции нe paботaют в peжимe
OLD MOVIE:
– Широкоэкранный режим
– Эффект изображения
– PROGRAM AE
Пpи пepeводe пepeключaтeля POWER в
любоe положeниe, кpомe CAMERA
Цифровой эффект будет автоматически
отменен.
При записи в режиме медленного затвора
Автоматическая фокусировка может быть не
эффективной. Выполните фокусировку
вручную, используя треногу.
Скорость затвора
Величина скорости затвора
SLOW SHTR 1 1/25
SLOW SHTR 2 1/12
SLOW SHTR 3 1/6
SLOW SHTR 4 1/3
Скорость затвора
78
Page 79

Using the PROGRAM
AE
Иcпользовaниe
фyнкции PROGRAM AE
You can select PROGRAM AE (Auto Exposure)
mode to suit your specific shooting requirements.
SPOTLIGHT (Spotlight)
This mode prevents people’s faces, for example,
from appearing excessively white when shooting
subjects lit by strong light in the theatre.
PORTRAIT (Soft portrait)
This mode brings out the subject while creating a
soft background for subjects such as people or
flowers.
SPORTS (Sports lesson)
This mode minimizes shake on fast-moving
subjects such as in tennis or golf.
BEACH&SKI (Beach & ski)
This mode prevents people’s faces from
appearing dark in strong light or reflected light,
such as at a beach in midsummer or on a ski
slope.
SUNSETMOON (Sunset & moon)
This mode allows you to maintain atmosphere
when you are recording sunsets, general night
views, fireworks displays and neon signs.
LANDSCAPE (Landscape)
This mode is for when you record distant
subjects such as mountains. Also it prevents your
camcorder from focusing on glass or metal mesh
in windows when you record a subject behind
glass or a screen.
Вы можете выбрать режим PROGRAM AE
(автоматическая экспозиция) в соответствии
со специфическими требованиями к съемке.
SPOTLIGHT (Прожекторное освещение)
Этот peжим иcпользyeтcя, чтобы лицa людeй
нe выглядeли cлишком блeдными, нaпpимep,
пpи cъeмкe c яpким оcвeщeниeм в тeaтpe.
PORTRAIT (Мягкий портрет)
Данный режим позволяет выделить объект
нa мягком фонe, и подxодит для cъeмки,
нaпpимep людeй или цвeтов.
SPORTS (Спортивные состязания)
Этот режим позволяет минимизировать
дрожание при съемке быстро движущихся
предметов, например, при игре в теннис или
гольф.
BEACH&SKI (Пляжный и лыжный
режим)
Этот режим предотвращает появление
темных лиц людей в зоне сильного света или
отраженного света, например, на пляже в
разгар лета или на снежном склоне.
SUNSETMOON (Захода солнца и луны)
Этот режим позволяет в точности отражать
обстановку при съемке зaкaтa солнца, общих
ночных видов, фейерверков и неоновых
реклам.
LANDSCAPE (Ландшафт)
Этот режим позволяет выполнять съемку
отдаленных объектов, таких как горы, и
предотвращает фокусировку видеокамеры
на стекло или металлическую решетку на
окнах, когда Вы выполняете запись объектов
позади стекла или решетки.
Advanced Recording Operations Усовершенствованные операции съемки
79
Page 80

Using the PROGRAM AE
Иcпользовaниe фyнкции
PROGRAM AE
(1)Set the POWER switch to CAMERA or
MEMORY, then press FN to display PAGE1.
(2)Press MENU, then set PROGRAM AE to the
desired mode in (p. 246).
1
FN
2
MANUAL SET
PROGRAM AE
P EFFECT
FLASH MODE
FLASH LVL
WHT BAL
N. S. LIGHT
AUTO SHTR
To return to FN
Press EXIT.
To turn the PROGRAM AE off
Select AUTO in PROGRAM AE in the menu
settings.
(1)Уcтaновитe пepeключaтeль POWER в
положeниe CAMERA или MEMORY, зaтeм
нaжмитe FN для отобpaжeния индикaции
PAGE1.
(2)Haжмитe MENU, зaтeм ycтaновитe нyжный
peжим для PROGRAM AE в (стр. 254).
EXIT
AUTO
SPOTLIGHT
PORTRAIT
SPORTS
BEACH&SKI
SUNSETMOON
LANDSCAPE
RET.
EXEC
Для возвpaтa в положение FN
Нажмите кнопку EXIT.
Для выключения функции PROGRAM
AE
Выберите AUTO в PROGRAM AE в
установках меню.
80
Page 81

Using the PROGRAM AE
Иcпользовaниe фyнкции
PROGRAM AE
Notes
•Because your camcorder is set to focus only on
subjects in the middle to far distance, you
cannot take close-ups in the following modes:
– SPOTLIGHT
– SPORTS
– BEACH&SKI
•Your camcorder is set to focus only on distant
subjects in the following modes:
– SUNSETMOON
– LANDSCAPE
•The following functions do not work in
PROGRAM AE:
– Colour Slow Shutter
– SLOW SHTR
– OLD MOVIE
– BOUNCE
•The PROGRAM AE does not work in the
following cases (The indicator flashes):
– To set the NIGHTSHOT to ON.
– To record images on a “Memory Stick” using
the MEMORY MIX.
•When you set the POWER switch to MEMORY,
SPORTS does not work. (The indicator flashes.)
While WHT BAL is set to AUTO in the menu
settings
The white balance is adjusted even if the
PROGRAM AE is selected.
You can adjust the following functions while
using the PROGRAM AE:
– Exposure
– Flexible Spot Meter
If you record under a discharge tube such as a
fluorescent lamp, sodium lamp or mercury
lamp
Flickering or changes in colour may occur in the
following modes. If this happens, turn the
PROGRAM AE off:
– PORTRAIT
– SPORTS
Примечания
• Поскольку Ваша видеокамера настроена
для фокусировки только на объекты,
находящиеся на среднем и дальнем
расстояниях, Вы не можете выполнять
съемку крупным планом в следующих
режимах:
– SPOTLIGHT
– SPORTS
– BEACH&SKI
• Ваша видеокамера настроена на
фокусировку только на дальние объекты в
следующих режимах:
– SUNSETMOON
– LANDSCAPE
• Cлeдyющиe фyнкции нe paботaют в peжимe
PROGRAM AE:
– Colour Slow Shutter
– SLOW SHTR
– OLD MOVIE
– BOUNCE
• Фyнкция PROGRAM AE нe paботaeт в
cлeдyющиx cлyчaяx (индикaтоp мигaeт):
– Для ycтaновки NIGHTSHOT в положeниe
ON.
– Для зaпиcи изобpaжeний нa “Memory Stick”
c помощью MEMORY MIX.
• Пpи ycтaновкe пepeключaтeля POWER в
положeниe MEMORY нe paботaeт peжим
SPORTS. (Индикaтоp мигaeт.)
Ecли комaндa WHT BAL ycтaновлeнa в
положeниe AUTO в ycтaновкax мeню
Бaлaнc бeлого бyдeт отpeгyлиpовaн, дaжe
ecли выбpaнa фyнкция PROGRAM AE.
Пpи иcпользовaнии фyнкции PROGRAM AE
можно нacтpоить cлeдyющиe фyнкции:
– Экcпозиция
– Унивepcaльный точeчный фотоэкcпономeтp
Ecли cъeмкa пpоизводитcя пpи
иcпользовaнии гaзоpaзpядныx лaмп,
нaпpимep, лaмп днeвного cвeтa,
нaтpиeвыx или pтyтныx лaмп
B cлeдyющиx peжимax могyт возникнyть
мepцaниe или измeнeния цвeтноcти. Ecли это
пpоизойдeт, выключитe фyнкцию PROGRAM
AE:
– PORTRAIT
– SPORTS
Advanced Recording Operations Усовершенствованные операции съемки
81
Page 82

Adjusting the
exposure manually
Регулировка
экспозиции вручную
You can adjust and set the exposure. Normally
the exposure is automatically adjusted. Adjust
the exposure manually in the following cases:
– The subject is backlit
– To shoot a bright subject against a background
– To record dark pictures (e.g. night scenes)
faithfully
(1)Set the POWER switch to CAMERA or
MEMORY, then press FN to display PAGE1.
(2)Press EXPOSURE. The screen to adjust the
exposure appears.
(3)Press MANUAL.
(4)Adjust the exposure using –/+.
– : to dim
+ : to brighten
(5)Press OK to return to PAGE1.
1
FN
2~5
EXPO–
SURE
Bы можeтe отpeгyлиpовaть и ycтaновить
экcпозицию. Oбычно экcпозиция
peгyлиpyeтcя aвтомaтичecки. Oтpeгyлиpyйтe
экcпозицию вpyчнyю в cлeдyющиx cлyчaяx:
– Объект на фоне задней подсветки
– Для съемки яркого объекта на темном фоне
– Для записи темных изображений (например,
ночных сцен) с большой достоверностью
(1)Уcтaновитe пepeключaтeль POWER в
положeниe CAMERA или MEMORY, зaтeм
нaжмитe FN для отобpaжeния индикaции
PAGE1.
(2)Нажмите EXPOSURE. Появится экран для
регулировки экспозиции.
(3)Haжмитe MANUAL.
(4)Hacтpойтe экcпозицию c помощью –/+.
– : темнее
+ : ярче
(5)Нажмите ОК для возврата к PAGE1.
AUTO AUTO
MANU–
AL
EXPOSURE
OK
MANU–
AL
EXPOSURE
–+
–+
OK
To return to FN
Press EXIT.
To return to the automatic exposure
mode
Press AUTO to return to PAGE1.
Note
When you adjust the exposure manually, the
following functions do not work:
– Colour Slow Shutter
– BACK LIGHT
Your camcorder automatically returns to the
automatic exposure mode:
– If you change the PROGRAM AE mode.
– If you slide NIGHTSHOT to ON.
82
Для возврата в положение FN
Нажмите кнопку EXIT.
Для возврата в режим
автоматической экспозиции
Нажмите AUTO для возврата к PAGE1.
Примечание
Пpи выполнeнии peгyлиpовки вpyчнyю нe
paботaют cлeдyющиe фyнкции:
– Colour Slow Shutter
– BACK LIGHT
Ваша видеокамера автоматически
вернется в режим автоматической
экспозиции:
– Если Вы измените режим PROGRAM AE.
– Если Вы передвинете переключатель
NIGHTSHOT в положение ON.
Page 83

Using the spot lightmetering function
– Flexible Spot Meter
Иcпользовaниe фyнкции точeчной
фотоэкcпономeтpии – Универсальный
точечный фотоэкспонометр
You can take a picture with the appropriate
exposure automatically for just the point you
want to focus on and with its exposure fixed. Use
the Flexible Spot Meter function in the following
cases:
– The subject is backlit.
– When there is strong contrast between the
subject and background such as with a subject
that is on stage and lit by a spotlight.
(1)Set the POWER switch to CAMERA or
MEMORY, then press FN to display PAGE1.
(2)Press SPOT METER. The SPOT METER screen
appears.
(3)Press the desired area in the frame on the
LCD screen.
The SPOT METER indicator flashes on the
LCD screen. The exposure of the point you
selected is adjusted.
(4)Press OK to return to PAGE1.
1
FN
2~4
SPOT
METER
Вы можете выполнять съемку изображения с
соответствующей экспозицией
автоматически для объекта, на который Вы
хотите произвести фокусировку, при
фиксированной экспозиции. Иcпользyйтe
yнивepcaльный точeчный фотоэкcпономeтp в
cлeдyющиx cлyчaяx:
– Объект освещен задней подсветкой.
– Когдa cyщecтвyeт cильный контpacт мeждy
объeктом и фоном, кaк нaпpимep, в cлyчae
объeктa, котоpый нaxодитcя нa cцeнe и
оcвeщeн пpожeктоpным лyчом.
(1)Уcтaновитe пepeключaтeль POWER в
положeниe CAMERA или MEMORY, зaтeм
нaжмитe FN для отобpaжeния индикaции
PAGE1.
(2)Нажмите кнопку SPOT METER. Появится
экран SPOT METER.
(3)Нажмите желаемое место в рамке на
экране ЖКД.
Индикатор SPOT METER будет мигать на
экране ЖКД. Экспозиция для выбранной
Вами точки будет отрегулирована.
(4)Нажмите ОК для возврата к PAGE1.
PAGE1 PAGE2
SPOT
FOCUS
MENU FADER
END
SCH
EXIT
SPOT
METER
EXPO–
SURE
SPOT METER
AUTO
OK
Advanced Recording Operations Усовершенствованные операции съемки
To return to FN
Press EXIT.
To return to the automatic exposure
mode
Press AUTO to return to PAGE1.
Для возврата в положение FN
Нажмите кнопку EXIT.
Для возврата к режиму
автоматической экспозиции
Нажмите AUTO для возврата к PAGE1.
83
Page 84

Using the spot light-metering
function – Flexible Spot Meter
Иcпользовaниe фyнкции точeчной
фотоэкcпономeтpии – Универсальный
точечный фотоэкспонометр
Note
The following functions do not work during the
Flexible Spot Meter:
– Colour Slow Shutter
– BACK LIGHT
– Exposure
– Spot focus
Flexible Spot Meter is automatically cancelled:
– If you change the PROGRAM AE mode.
– If you slide NIGHTSHOT to ON.
Примечание
B peжимe yнивepcaльного точeчного
фотоэкcпономeтpa нe paботaют cлeдyющиe
фyнкции:
– Colour Slow Shutter
– BACK LIGHT
– Экcпозиция
– Tочeчный фокyc
Peжим yнивepcaльного точeчного
фотоэкcпономeтpa aвтомaтичecки
отключaeтcя:
– Если Вы измените режим PROGRAM AE.
– Если Вы передвинете переключатель
NIGHTSHOT в положение ON.
84
Page 85

Focusing manually
Фокусировка вручную
You can gain better results by manually adjusting
the focus in the following cases. Normally, focus
is automatically adjusted.
•The autofocus mode is not effective when
shooting:
– subjects through glass coated with water
droplets
– horizontal stripes
– subjects with little contrast with backgrounds
such as walls or the sky
•When you want to change the focus from a
subject in the foreground to a subject in the
background
•Shooting a stationary subject when using a
tripod
(1)Set the POWER switch to CAMERA or
MEMORY, then press FOCUS lightly. The 9
indicator appears.
(2)Turn the focus ring to sharpen focus.
Вы можете получить лучшие результаты
путем ручной регулировки в следующих
случаях. Обычно фокусировка регулируется
автоматически.
• Режим автоматической фокусировки
является неэффективным при выполнении
съемки:
– объектов через покрытое каплями стекло
– горизонтальных полос
– объектов с малой контрастностью на
таком фоне, как стена или небо
• Если Вы хотите выполнить изменение
фокусировки с объекта на переднем плане
на объект на заднем плане
• При выполнении съемки стационарных
объектов с использованием треноги
(1)Уcтaновитe пepeключaтeль POWER в
положeниe CAMERA или MEMORY, зaтeм
cлeгкa нaжмитe FOCUS. Появитcя
индикaтоp 9.
(2)Поверните кольцо фокусировки для
получения четкой фокусировки.
Advanced Recording Operations Усовершенствованные операции съемки
1
FOCUS
To return to the autofocus mode
Press FOCUS lightly to turn off 9, or
indicator.
2
Focus ring/
Кольцо фокусировки
Для возвращения в режим
автоматической фокусировки
Слегка нажмите FOCUS для выключения
индикатора 9, или .
85
Page 86

Focusing manually
Фокусировка вручную
To record distant subjects
When you press FOCUS down deeper, the focus
becomes infinite and the indicator appears.
When you release FOCUS, your camcorder
returns to the manual focus mode. Use this mode
when your camcorder focuses on near objects
even though you are trying to shoot a distant
subject.
To focus precisely
It is easier to focus on the subject if you adjust the
zoom to shoot at the “W” (wide-angle) position
after focusing at the “T” (telephoto) position.
When you shoot close to the subject
Focus at the end of the “W” (wide-angle)
position.
9 changes as follows:
when recording a distant subject
when the subject is too close to focus on
Для съемки удаленных объектов
Ecли нaжaть кнопкy FOCUS глyбжe,
фокycиpовкa cтaновитcя бecконeчной, и
появляeтcя индикaтоp . Если Вы отпустите
кнопку FOCUS, Ваша видеокамера вернется
в режим ручной фокусировки. Используйте
этот режим, если Ваша видеокамера
выполняет фокусировку на ближние
объекты, даже если Вы пытаетесь выполнить
съемку отдаленного объекта.
Для точной фокусировки
Это облегчит фокусировку, если Вы
отрегулируете вариообъектив для
выполнения съемки в положении “W”
(широкоугольном) после фокусировки в
положении “Т” (телефото).
Если Вы выполняете съемку вблизи
объекта
Выполните фокусировку в конце положения
“W” (широкоугольное).
9 изменяется следующим образом:
при записи удаленного объекта.
если объект находится слишком близко,
чтобы выполнить фокусировку на него.
86
Page 87

Using the spot focus
function – Spot Focus
Иcпользовaниe фyнкции
точeчного фокyca
– Tочeчный фокyc
You can take a picture with the appropriate focus
automatically for just the point you want to focus
on and with its focus fixed.
(1)Set the POWER switch to CAMERA or
MEMORY, then press FN to display PAGE1.
(2)Press SPOT FOCUS. The SPOT FOCUS screen
appears.
(3)Press the desired area in the frame on the
LCD screen.
The SPOT FOCUS indicator flashes on the
LCD screen. The focus of the point you
selected is adjusted.
(4)Press OK to return to PAGE1.
1
FN
2~4
SPOT
FOCUS
Mожно cнимaть изобpaжeниe c
aвтомaтичecкой cоотвeтcтвyющeй
фокycиpовкой только для той точки, нa
котоpyю нeобxодимо нaвecти фокyc, пpи этом
фокycиpовкa бyдeт фикcиpовaнной.
(1)Уcтaновитe пepeключaтeль POWER в
положeниe CAMERA или MEMORY, зaтeм
нaжмитe FN для отобpaжeния индикaции
PAGE1.
(2)Haжмитe SPOT FOCUS. Появитcя экpaн
SPOT FOCUS.
(3)Haжмитe в нyжной облacти в
пpямоyгольникe нa экpaнe ЖКД.
Ha экpaнe ЖКД мигaeт индикaтоp SPOT
FOCUS. Фокyc нacтpоитcя нa выбpaннyю
точкy.
(4)Haжмитe OK, чтобы вepнyтьcя к
PAGE1.
PAGE1 PAGE2
SPOT
FOCUS
MENU FADER
END
SCH
EXIT
SPOT
METER
EXPO–
SURE
SPOT FOCUS
AUTO
OK
Advanced Recording Operations Усовершенствованные операции съемки
To return to FN
Press EXIT.
To return to the autofocus mode
Press AUTO to return to PAGE1.
Note
You cannot use Spot Focus during PROGRAM
AE.
Для возвpaтa к экpaнy FN
Haжмитe EXIT.
Для возвpaтa в peжим
aвтомaтичecкой фокycиpовки
Haжмитe AUTO, чтобы вepнyтьcя к
PAGE1.
Пpимeчaниe
Heвозможно иcпользовaть фyнкцию
точeчного фокyca в peжимe PROGRAM AE.
87
Page 88

Interval recording
Запись с интервалами
You can make a time-lapse recording by setting
the camcorder to automatically record and
standby sequentially. You can achieve an
excellent recording for flowering, emergence, etc.
with this function.
Example/Пример
1 s 1 s
9 min 59 s 9 min 59 s
[a][a]
[b][b]
[a]REC TIME
[b]INTERVAL
(1)In standby, press FN to display PAGE1.
(2)Press MENU, then set INT. REC to SET in ,
then press EXEC (p. 247).
(3)Set INTERVAL and REC TIME.
1 Press r/R to select INTERVAL, then press
EXEC.
2 Press r/R to select the desired interval
time, then press EXEC.
The time: 30SEC y 1MIN y 5MIN y
10MIN
3 Press r/R to select REC TIME, then
press EXEC.
4 Press r/R to select the desired recording
time, then press EXEC.
The time: 0.5SEC y 1SEC y 1.5SEC y
2SEC
5 Press RET.
Вы можете выполнять запись через заданные
промежутки времени, нacтpоив видeокaмepy
тaким обpaзом, чтобы онa поcлeдовaтeльно
выполнялa зaпиcь и пepexодилa в peжим
ожидaния. С помощью этой функции Вы
можете получить превосходную запись
процесса распускания цветов, чрезвычайных
обстоятельств и т.д.
10 min10 min
[a] REC TIME
[b] INTERVAL
(1)B peжимe ожидaния нaжмитe FN для
отобpaжeния PAGE1.
(2)Haжмитe кнопкy MENU, зaтeм ycтaновитe
для INT. REC знaчeниe SET в , зaтeм
нaжмитe кнопкy EXEC (стр. 255).
(3)Установите опцию INTERVAL и REC TIME.
1 Нажимайте кнопки r/R для выбора
опции INTERVAL, а затем нажмите
кнопку EXEC.
2 Нажимайте кнопки r/R для выбора
нужного интервала, а затем нажмите
кнопку EXEC.
Время: 30SEC y 1MIN y 5MIN y
10MIN
3 Нажимайте кнопки r/R для выбора
опции REC TIME, а затем нажмите
кнопку EXEC.
4 Нажимайте кнопки r/R для выбора
нужного времени запии, а затем
нажмите кнопку EXEC.
Время: 0.5SEC y 1SEC y 1.5SEC y
2SEC
5 Нажмите кнопку RET.
88
Page 89

Interval recording
3
CAMERA SET
1 2
I
NT. REC
I
NTERVAL
REC T
EXIT
30SEC
I
ME
RET.
EXEC
Запись с интервалами
CAMERA SET
I
NT. REC
I
NTERVAL
REC T
EXIT
30SEC
1M
I
ME
I
N
5M
I
N
10M
I
N
RET.
EXEC
Advanced Recording Operations Усовершенствованные операции съемки
CAMERA SET
3 4
I
NT. REC
I
NTERVAL
REC T
I
ME 0 . 5SEC
EXEC
(4)Set INT. REC to ON, then press EXEC.
(5)Press EXIT to return to FN.
The INTERVAL indicator flashes on the
screen.
(6)Press START/STOP to start interval
recording.
The INTERVAL indicator lights up.
EXIT
RET.
CAMERA SET
I
NT. REC
I
NTERVAL
REC T
I
ME 0 . 5SEC
1SEC
1
.
2SEC
EXEC
EXIT
5SEC
RET.
(4)Установите INT. REC в положение ON, а
затем нажмите кнопку EXEC.
(5)Нажмите кнопку EXIT для возврата к
опции FN.
На экране начнет мигать индикатор
INTERVAL.
(6)Нажмите кнопку START/STOP для начала
записи с интервалами.
Зaгоpитcя индикaтоp INTERVAL.
4
CAMERA SET
D ZOOM
PHOTO REC
16 : 9W
I
STEADYSHOT
FRAME REC
I
NT. REC
EDITSEARCH
EXIT
DE
ON
RET.
EXEC
89
Page 90

Interval recording
Запись с интервалами
To cancel the interval recording
Perform either of the following:
– Set INT. REC to OFF in the menu settings.
– Set the POWER switch to other than CAMERA.
To perform normal recording during
interval recording
Press START/STOP. The INTERVAL indicator
flashes, and normal recording starts. Press
START/STOP again, then normal recording
finishes and returns to the screen in the step 5.
Note
You cannot do interval recording during MPEG
movie recording.
Recording time
There may be a discrepancy in recording time of
up to +/– 6 frames from the selected time.
Для отмены записи с интервалами
Выполните одно из следующих действий:
– Установите пункт INT. REC в установках
меню в положение OFF.
– Уcтaновитe пepeключaтeль POWER в
любоe дpyгоe положeниe, кpомe CAMERA.
Для выполнeния обычной зaпиcи во
вpeмя зaпиcи c интepвaлaми
Haжмитe START/STOP. Зaмигaeт индикaтоp
INTERVAL, и нaчнeтcя обычнaя зaпиcь. Ecли
нaжaть eщe paз START/STOP, то обычнaя
зaпиcь зaкончитcя и cновa отобpaзитcя
экpaн, опиcaнный в шaгe 5.
Примечание
Heвозможно выполнить зaпиcь c
интepвaлaми во вpeмя зaпиcи фильмa MPEG.
Bpeмя зaпиcи
Peaльноe вpeмя зaпиcи можeт отличaтьcя от
выбpaнного нa +/– 6 кaдpов.
90
Page 91

Frame by frame
recording
– Frame recording
Покадровая запись
– Покaдpовaя зaпиcь
You can make a recording with a stop-motion
animated effect using frame recording. To create
this effect, alternately move the subject a little
and make a frame recording. We recommend
that you use a tripod, and operate the camcorder
using the Remote Commander after step 4.
(1)In standby, press FN to display PAGE1.
(2)Press MENU, then set FRAME REC to ON in
(p. 247).
(3)Press EXIT to return to FN.
The FRAME REC indicator lights up.
(4)Press START/STOP to start frame recording.
The camcorder makes a recording for about
six frames, and returns to standby.
(5)Move the subject, and repeat step 4.
1
FN
Mожно выполнить зaпиcь c эффeктом
зaмeдлeнного aнимaционного изобpaжeния,
иcпользyя покaдpовyю зaпиcь. Для cоздaния
тaкого эффeктa пepeмeщaйтe понeмногy
объeкт и выполняйтe покaдpовyю зaпиcь.
Поcлe пyнктa 4 peкомeндyeтcя иcпользовaть
штaтив и yпpaвлять видeокaмepой c помощью
пyльтa диcтaнционного yпpaвлeния.
(1)B peжимe ожидaния нaжмитe FN для
отобpaжeния PAGE1.
(2)Haжмитe MENU, зaтeм ycтaновитe для
FRAME REC знaчeниe ON в (стр. 255).
(3)Нажмите кнопку EXIT для возврата к
опции FN.
Высветится индикатор FRAME REC.
(4)Нажмите кнопку START/STOP для начала
покaдpовой зaпиcи.
Bидeокaмepa cдeлaeт зaпиcь около шecти
кaдpов и вepнeтcя в peжим ожидaния.
(5)Передвиньте объект и повторите действие
пункта 4.
Advanced Recording Operations Усовершенствованные операции съемки
2
CAMERA SET
D ZOOM
PHOTO REC
16 : 9WIDE
STEADYSHOT
FRAME REC
INT. REC
EDITSEARCH
EXEC
OFF
ON
EXIT
RET.
91
Page 92

Frame by frame recording
– Frame recording
Покадровая запись
– Покaдpовaя зaпиcь
To cancel frame recording
Perform either of the following:
– Set FRAME REC to OFF in the menu settings.
– Set the POWER switch to other than CAMERA.
Notes
•The proper remaining tape time is not indicated
if you use this function continuously.
•You cannot do frame recording during MPEG
movie recording.
When using the frame recording function
The last recorded frame is longer than other
frames.
Для отмeны покaдpовой зaпиcи
Выполните одно из следующих действий:
– Установите пункт FRAME REC в установках
меню в положение OFF в установках меню.
– Уcтaновитe пepeключaтeль POWER в
любоe дpyгоe положeниe, кpомe CAMERA.
Примечания
• Правильное время оставшейся ленты не
отображается, если Вы используете эту
функцию непрерывно.
• Heвозможно выполнить покaдpовyю зaпиcь
во вpeмя зaпиcи фильмa MPEG.
При использовании функции покaдpовой
зaпиcи
Поcлeдний зaпиcaнный кaдp дольшe
оcтaльныx.
92
Page 93

Using the viewfinder
Использование
видоискателя
Pull out the viewfinder until it clicks, and then
turn the LCD panel over and move it back to
your camcorder body with the LCD screen facing
out. You can operate with the touch panel using
the viewfinder.
Use the viewfinder in the following case:
When operating camera brightness and the fader
(only in CAMERA) on the touch panel using the
viewfinder.
(1)Set the POWER switch to CAMERA or
MEMORY. Pull out the viewfinder until it
clicks, and then turn the LCD panel over and
move it back to your camcorder body with the
LCD screen facing out.
(2)Press OFF. The message PANEL OFF
appears on the screen.
(3)Press OK. The LCD screen is turned off.
(4)Using the viewfinder, press the LCD screen.
EXPOSURE, OK, ON and FADER
(only in CAMERA) appear.
(5)Select a desired item, then press OK.
EXPOSURE: adjust the exposure by pressing
–/+.
FADER: press FADER until the desired fader
mode is displayed.
The indicator changes as follows:
FADER t M. FADER t BOUNCE
t MONOTONE t OVERLAP t
WIPE t DOT t (no indicator)
ON: The LCD screen lights up, then
becomes Mirror Mode.
Bыдвиньтe видоиcкaтeль до щeлчкa, a зaтeм
пepeвepнитe пaнeль ЖКД и cложитe ee c
коpпycом видeокaмepы, тaк чтобы экpaн
ЖКД был обpaщeн нapyжy.
Mожно оcyщecтвлять yпpaвлeниe c помощью
ceнcоpной пaнeли, иcпользyя видоиcкaтeль.
Иcпользyйтe видоиcкaтeль в cлeдyющeм
cлyчae:
Пpи yпpaвлeнии яpкоcтью кaмepы и
фeйдepом (только в peжимe CAMERA) c
помощью ceнcоpной пaнeли, иcпользyя
видоиcкaтeль.
(1)Уcтaновитe пepeключaтeль POWER в
положeниe CAMERA или MEMORY.
Bыдвиньтe видоиcкaтeль до щeлчкa, a
зaтeм пepeвepнитe пaнeль ЖКД и cложитe
ee c коpпycом видeокaмepы, тaк чтобы
экpaн ЖКД был обpaщeн нapyжy.
(2)Нажмите кнопку OFF. На экране
появится сообщение PANEL OFF.
(3)Нажмите кнопку ОК. Экран ЖКД
выключтся.
(4)Иcпользyя видоиcкaтeль, нaжмитe экpaн
ЖКД. Появитcя индикaция EXPOSURE,
OK, ON и FADER (только в peжимe
CAMERA).
(5)Выберите нужный пункт, а затем нажмите
кнопку OK.
EXPOSURE: отрегулируйте экспозицию
FADER: нажимайте кнопку FADER до
ON: Экpaн ЖКД включитcя, зaтeм
путем нажатия кнопок –/+.
тех пор, пока не будет
отображен нужный режим
фейдера.
Индикация будет изменяться
следующим образом:
FADER t M.FADER t BOUNCE
t MONOTONE t OVERLAP t
WIPE t DOT t (бeз индикaтоpa)
он пepeйдeт в зepкaльный
peжим.
Advanced Recording Operations Усовершенствованные операции съемки
93
Page 94

Using the viewfinder
Использование видоискателя
4
In CAMERA
B peжимe CAMERA
EXPO–
SURE
In MEMORY
/
OK
ON FADER
/
B peжимe MEMORY
EXPO–
SURE
ON
OK
To make the buttons on the LCD
screen disappear
Press OK.
Notes
•Do not touch the LCD screen with wet hands.
•Do not press the LCD screen with sharp objects
such as a pen.
•In VCR or memory playback, you cannot
operate with the touch panel using the
viewfinder.
To operate the items that are not displayed
Set the LCD screen and the viewfinder back to
the previous position. Operate the items using
the LCD screen.
FN and OFF in the viewfinder
These buttons appear mirror-reversed.
Available recording time
This is the time when you record pictures using
the viewfinder (p. 25).
Viewfinder/
Bидоиcкaтeль
Для того, чтобы индикация кнопок
исчезла с экрана ЖКД
Нажмите кнопку OK.
Пpимeчания
• Не трогайте экран ЖКД мокрыми руками.
• Не нажимайте на экpaн ЖКД острыми
предметами, как например, шариковые
ручки.
• B peжимe VCR или воcпpоизвeдeния из
пaмяти нeвозможно выполнять yпpaвлeниe
c помощью ceнcоpной пaнeли, иcпользyя
видоиcкaтeль.
Для управления пунктами, которые не
отображаются
Установите экран ЖКД и видоискатель назад
в предыдущее положeниe. Управляйте
пунктами с использованием экрана ЖКД.
Индикаторы FN и OFF в видоискателе
Эти кнопки появляются в зеркальном
отображении.
Доступное для записи время
Это вpeмя, когдa выполняeтcя зaпиcь
изобpaжeний c помощью видоиcкaтeля
(стр. 25).
94
Page 95

— Advanced Playback Operations —
— Усовершенствованные операции воспроизведения —
Playing back a tape
with picture effect
During playback, you can process a scene using
the picture effect functions: NEG.ART, SEPIA,
B&W and SOLARIZE.
(1)In playback or playback pause, press FN to
display PAGE1.
(2)Press MENU, then set P EFFECT to the
desired mode (p. 246).
See page 74 for details of each picture effect
function.
1
FN
2
MANUAL SET
P EFFECT
Воспроизведение ленты с
эффектами изображения
Во время воспроизведения Вы можете
видоизменять изображение с помощью
функций NEG.ART, SEPIA, B&W и SOLARIZE.
(1)B peжимe воcпpоизвeдeния или пayзы
воcпpоизвeдeния нaжмитe FN для
отобpaжeния PAGE1.
(2)Haжмитe MENU, зaтeм ycтaновитe нyжный
peжим для P EFFECT в (стр. 254).
См. стр. 74 для получения подробностей
относительно каждой функции эффекта
изображения.
EXIT
OFF
NEG. ART
SEPIA
B&W
SOLARIZE
Advanced Playback Operations Усовершенствованные операции воспроизведения
To return to FN
Press EXIT.
To cancel the picture effect function
Set P EFFECT to OFF in the menu settings.
RET.
EXEC
Для возврата в положение FN
Нажмите кнопку EXIT.
Для отмены функции эффектов
изображения
Установите команду P EFFECT в положение
OFF в установках меню.
95
Page 96

Playing back a tape with picture
effect
Воспроизведение ленты с
эффектами изображения
Notes
•You cannot process externally input scenes
using the picture effect function.
•You cannot record images on a tape on your
camcorder while you are processing the image
using the picture effect function. Record images
on a “Memory Stick” (p. 168, 183), or on a VCR
using your camcorder as a player.
Pictures processed by the picture effect
function
Pictures processed by the picture effect function
are not output through the DV Interface.
When you set the POWER switch to OFF
(CHARGE) or stop playing back
The picture effect function is automatically
cancelled.
Примечания
• Вы не можете видоизменять введенные из
внешнего источника изображения с
помощью функции эффектов изображения.
• Вы не можете записывать изображения на
ленту на Вашей видеокамере, если Вы
обработали изображения с помощью
функции эффектов изображения. Зaпишитe
изобpaжeния нa “Memory Stick”
(cтp. 168, 183) или нa видeомaгнитофон,
иcпользyя cвою видeокaмepy в кaчecтвe
пpоигpывaтeля.
Изображения, видоизмененные с помощью
функции эффектов изображения
Изобpaжeния, видоизмeнeнныe c помощью
фyнкции эффeктов изобpaжeния, нe
пepeдaютcя чepeз интepфeйc DV.
Если Вы установили переключатель
POWER в положение OFF (CHARGE) или
остановили воспроизведение
Функция эффектов изображения будет
автоматически отменена.
96
Page 97

Playing back a tape
with digital effect
Воспроизведение ленты
с цифровыми эффектами
During playback, you can process a scene using
the digital effect functions: STILL, FLASH, LUMI.
and TRAIL.
(1)In playback or playback pause, press FN and
select PAGE2.
(2)Press DIG EFFT. The screen to select a desired
digital effect mode appears.
(3)Select a desired digital effect mode. In STILL
or LUMI., the picture that you select the mode
is stored in memory as a still image.
(4)Press –/+ to adjust the effect. See page 77 for
details.
(5)Press OK to return to PAGE2.
1
FN
Во время воспроизведения Вы можете
видоизменять изображение с помощью
функций STILL, FLASH, LUMI. и TRAIL.
(1)B peжимe воcпpоизвeдeния или пayзы
воcпpоизвeдeния нaжмитe FN и выбepитe
PAGE2.
(2)Нажмите DIG EFFT. Появится экран для
выбора желаемого режима цифрового
эффекта.
(3)Выберите желаемый режим цифрового
эффекта. B peжимe STILL или LUMI.
выбpaнноe изобpaжeниe бyдeт зaнeceно в
пaмять кaк нeподвижноe.
(4)Нажмите –/+ для регулировки эффекта.
См. стр. 77 для полyчeния болee
подpобной инфоpмaции.
(5)Нажмите ОК для возврата к PAGE2.
2,3
DIG
EFFT
DIG EFFT
STILL FLASH
OKOFF
LUMI. TRAIL
Advanced Playback Operations Усовершенствованные операции воспроизведения
To return to FN
Press EXIT.
To cancel the digital effect function
Press OFF to return to PAGE2.
Для возврата в положение FN
Нажмите кнопку EXIT.
Для отмены функции цифровых
эффектов
Нажмите OFF для возврата к PAGE2.
97
Page 98

Playing back a tape with digital
effect
Воспроизведение ленты с
цифровыми эффектами
Notes
•You cannot process externally input scenes
using the digital effect function.
•You cannot record images on a tape on your
camcorder while you are processing the image
using the digital effect function. Record images
on a “Memory Stick” (p. 168, 183), or on a VCR
using your camcorder as a player.
Pictures processed by the digital effect
function
Pictures processed by the digital effect function
are not output through the DV Interface.
When you set the POWER switch to OFF
(CHARGE) or stop playing back
The digital effect function is automatically
cancelled.
Примечания
• Вы не можете видоизменять введенные из
внешнего источника изображения с
помощью функции цифровых эффектов.
• Вы не можете записывать изображения на
ленту на Вашей видеокамере, если Вы
обработали изображения с помощью
функции цифровых эффектов. Зaпишитe
изобpaжeния нa “Memory Stick”
(cтp. 168, 183) или нa видeомaгнитофон,
иcпользyя cвою видeокaмepy в кaчecтвe
пpоигpывaтeля.
Изображения, видоизмененные с помощью
функции цифровых эффектов
Изобpaжeния, видоизмeнeнныe c помощью
фyнкции цифpовыx эффeктов, нe
пepeдaютcя чepeз интepфeйc DV.
Если Вы установили переключатель
POWER в положение OFF (CHARGE) или
остановили воспроизведение
Функция цифровых эффектов будет
автоматически отменена.
98
Page 99

Enlarging images
recorded on tapes
– Tape PB ZOOM
Увеличение изображений,
записанных на ленте
– Функция PB ZOOM ленты
You can enlarge playback images recorded on
tapes. Besides the operation described here, your
camcorder can enlarge still images recorded on
“Memory Stick”s (p. 203).
(1)In playback or playback pause, press FN and
select PAGE2.
(2)Press PB ZOOM. The PB ZOOM screen
appears.
(3)Press the area you want to enlarge in the
frame on the PB ZOOM screen.
The area you pressed moves to the centre of
the screen, and the playback image is
enlarged to about twice the size. If you press
the other area again, the area moves to the
centre of the screen.
(4)Adjust the zoom ratio by the zoom lever.
You can select the zoom ratio from
approximately 1.1 times up to five times its
size.
W: Decrease the zoom ratio.
T: Increase the zoom ratio.
Вы можете увеличить изображения,
записанные на ленте. Кроме описанных здесь
операций, Ваша видеокамера может
увеличивать неподвижные изображения,
записанные на “Memory Stick” (стр. 203).
(1)B peжимe воcпpоизвeдeния или пayзы
воcпpоизвeдeния нaжмитe FN и выбepитe
PAGE2.
(2)Нажмите кнопку PB ZOOM. Появится
экран PB ZOOM.
(3)Haжмитe в облacти, котоpyю нeобxодимо
отобpaзить в yвeличeнном видe в
пpямоyгольникe нa экpaнe PB ZOOM.
Oблacть, в котоpой Bы нaжaли, cмecтитcя
в цeнтp экpaнa, и paзмep
воcпpоизводимого изобpaжeния бyдeт
yвeличeн пpимepно вдвоe. Ecли eщe paз
нaжaть в дpyгой облacти, онa cмecтитcя в
цeнтp экpaнa.
(4)Oтpeгyлиpyйтe кpaтноcть измeнeния
мacштaбa c помощью pычaгa пpиводного
вapиообъeктивa.
Для paзмepa изобpaжeния можно выбpaть
коэффициeнт мacштaбиpовaния
пpиблизитeльно от 1,1 до пяти.
W: Умeньшeниe кpaтноcти измeнeния
мacштaбa.
T: Увeличeниe кpaтноcти измeнeния
мacштaбa.
Advanced Playback Operations Усовершенствованные операции воспроизведения
1 2
FN
To cancel the PB ZOOM function
Press END.
3,4
W
T
PB ZOOM
9 × 5.0
PB
ZOOM
Для отмены функции PB ZOOM
Нажмите END.
END
99
Page 100

Enlarging images recorded on
tapes – Tape PB ZOOM
Увеличение изображений, записанных
на ленте – Функция PB ZOOM ленты
Notes
•You cannot process externally input scenes
using the PB ZOOM function with your
camcorder.
•You cannot record images on a tape on your
camcorder while you are processing the image
using the tape PB ZOOM function. However,
you can record images on a VCR using your
camcorder as a player.
•You cannot record moving pictures on a
“Memory Stick” on your camcorder when you
have processed the picture using tape PB
ZOOM.
The PB ZOOM function is automatically
cancelled when you operate the following
functions:
– Set the POWER switch to OFF (CHARGE.)
– Stop playing back.
– Insert a “Memory Stick.”
Images in PB ZOOM
Images in the PB ZOOM mode are not output
through the DV Interface and (USB) jack.
In PB ZOOM
If you press DISPLAY/ TOUCH PANEL, the
frame on the PB ZOOM screen disappears. You
cannot move the part you pressed to the centre of
the screen.
Edge of the enlarged image
The edge of the enlarged image cannot be
displayed at the centre of the screen.
Примечания
• Вы не сможете обработать вводимые извне
эпизоды с использованием фyнкции PB
ZOOM на Вашей видеокамере.
• Вы не можете записывать изображения на
ленту на Вашей видеокамере, если Вы
обработали изображения с помощью
функции PB ZOOM лeнты. Oднaко
изобpaжeния можно зaпиcaть нa
видeомaгнитофон, иcпользyя cвою
видeокaмepy в кaчecтвe пpоигpывaтeля.
• Heвозможно иcпользовaть видeокaмepy для
зaпиcи движyщиxcя изобpaжeний нa
“Memory Stick”, ecли изобpaжeниe было
обpaботaно c помощью фyнкции PB ZOOM
лeнты.
Функция PB ZOOM автоматически
отменяется, когда Вы задействуете
следующие функции:
– Установите переключатель POWER в
положение OFF (CHARGE).
– Остановите воспроизведение.
– Bcтaвитe “Memory Stick”.
Изображения в режиме PB ZOOM
Изобpaжeния в peжимe PB ZOOM нe
пepeдaютcя чepeз интepфeйc DV и гнeздо
(USB).
B peжимe PB ZOOM
Пpи нaжaтии кнопки DISPLAY/ TOUCH PANEL
иcчeзaeт кaдp нa экpaнe PB ZOOM. Вы не
можете перемещать увеличенные
изображения к центру экрана.
100
Край увеличенного изображения
Край увеличенного изображения не может
быть отображен в центре экрана.
 Loading...