

Page 1

Computer
Applications Guide
3-084-946-12(1)
Digital Video Camera Recorder
© 2003 Sony Corporation
Page 2

Read this first
System requirements for using
ImageMixer Ver.1.5 for Sony
• For camera operations, read the separate
Camera Operations Guide supplied with
your camcorder.
• If your camcorder is a MICROMV format
model, read als o th e separate Movie Shaker
Application Guide supplied with your
camcorder.
On image capture/editor software
You can edit pictures recorded on a tape or
“Memory Stick” using the supplied CD-ROM
(image captur e/editor software). The softwa re
used differs depending on the picture to be
edited. See below.
This manual describes how to edit p ictures wi th
ImageMixer and Image Transfer*. If your
camcorder is a MICROMV format model, refer
to the separate MovieShaker Appl ication Guide
supplied with your camcorder.
If your camcorder is a DV format model
• When editing pictures on a tape: ImageMixer
1)
• When editing pictu re s on a “Memory Stick”:
ImageMixer
If your camcorder is a MICROMV fo rmat
model
• When editing pictu re s on a tape:
ImageMixer
• When editing pictu re s on a “Memory Stick”:
ImageMixer
1)
for Windows computer
2)
for Macintosh computer
* Use Image Transfer to copy still pictures from your
camcorder to a computer (Windows computer
only).
1) 2)
1)
, MovieShaker
1) 2)
1)
When viewing pictures recorded on a
tape on a computer
b Note
• When you connect your camcorder to a Macintosh
computer using a USB cable, you cannot view
pictures recorded on a tape on the comput er sc reen.
• OS: Microsoft Windows 98SE, Windows
2000 Profession al , W indows Millennium
Edition, Windows XP Home Edition or
Windows XP Professional
Standard installation is required.
Operation is not assured if the above OS has
been upgraded.
You cannot hear sound if your computer is
running Windows 98. You can only transfer
and view still images.
• CPU: Intel Pentium III 500 MHz or faster
(800 MHz or fa st er recommended)
• Application: DirectX 8.0a or later (This
product is based on DirectX technology. It is
necessary to have DirectX installed.)
• Sound system: 16 bit stereo sound car d and
stereo speakers
• Memory: 64 MB or more
• Hard disk:
Available memory required for installation:
250 MB or more
Available free hard disk space recommended:
1 GB or more (depending on the size of the
image files edited)
• Display: 4 MB VRAM video card, Mini mum
800 × 600 dots, High color (16 bit color,
65 000 colors), D irectDraw display driver
capability (this pr oduct will not operate
correctly at 800 × 6 00 dots or less, and 256
colors or less.)
• Others: USB port (this must be provided as
standard), DV Interface (to connect via an
i.LINK cable, DV format models only), disc
drive (you need a C D - R dr ive to create a
Video CD.)
2
Page 3

When playing pictures recorded on a
“Memory Stick” on a computer
Windows
• OS: Microsoft Windows 98, Windows 98SE,
Windows 2000 Pr of essional, Window s
Millennium Edition, Windows XP Home
Edition or Window s XP Professional
Standard installation is requir ed.
Operation is not assured if the above OS has
been upgraded.
• CPU: MMX Pentium 200 MHz or faster
• Application: Windows Media Player (this
must be installed to play back movies . )
• Others: USB port (this must be provided as
standard), disc drive
Macintosh
• OS: Ma c OS 8. 5. 1/ 8. 6/9 .0 /9 .1 /9. 2 or Mac OS
X (v10.0/v10.1 / v 10.2)
Standard installation is requir ed.
However, note that the computer should be
updated to Mac OS 9.0/9.1/9.2 if it is an
iBook, a Power Mac G4, or an iMac with a
slot loading type disc drive, with the Mac
OS 8.6 standard installation.
• Application: QuickTime 3.0 or later (this
must be installed to play back movies . )
• Others: USB port (this must be provided as
standard), disc drive
All other product names mentioned herein may
be the trademark s or registered trademarks of
their respective comp anies. Furthermore, “
and “
” are not mentioned in each case in th is
manual.
”
About this manual
The screens sho w n i n this manual are from a
Windows 2000 c omputer. Th e screens ma y vary
depending on the O S.
On trademarks
• “Memory St ic k” and are registered
trademarks of Sony Corporation.
• Microso ft and Windows are registered
trademarks of Microsoft Corporation in the
United States an d/ or other countries.
• Windows Media is a trademark of Microsoft
Corporation.
• Macintosh, iMac, Mac OS, iBook and Power
Mac are trademarks of Apple Computer, Inc.
• QuickTime and the QuickTime logo are
trademarks of A pple Computer, Inc .
• Pentium is a trade m ark or registered
trademark of Intel Corporation.
3
Page 4

Table of Contents
Read this first............................................................................................. 2
Connecting to a Windows computer
Introduction to editing pictures on a computer ........................................... 6
Features ......................................................................................................................6
Overview of the preparation ............................................................... .........................7
Step 1: Installing the USB driver on a computer........................................ 8
Step 2: Installing the image editor software
(ImageMixer Ver.1.5 for Sony).............................................................. 9
Step 3: Installing the image exchange software (Image Transfer)........... 11
Step 4: Connecting your camcorder to a computer.................................. 13
Connecting with the USB cable (supplied) ................................................................14
Connecting with an i.LINK cable (optional) (DV format models only) ........................16
Step 5: Checking the connection ............................................................. 17
Playing pictures recorded on a tape on your computer .............................................17
Viewing pictures recorded on a “Memory Stick” on your computer ...........................18
Managing pictures on a Wi ndows computer
Copying and viewing pictures recorded on a tape................................... 19
Copying movies onto your computer ................................................................... ......19
Copying still images extracted from a movie on your computer ................................21
Editing pictures on your computer .............. ...............................................................21
Viewing pictures on your computer via the USB port — USB Streaming ..................23
Creating Video CDs ................................................................................. 24
Copying and viewing pictures recorded on a “Memory Stick”.................. 26
Editing still images on your computer ........................................................................28
Copying pictures edited on ImageMixer Ver.1.5 for Sony to a “Memory Stick” .........29
Connecting to a Macintosh computer (“Memory
Stick” only)
Step 1: Installing the USB driver on a computer...................................... 31
Step 2: Connecting your camcorder to a computer.................................. 32
Copying pictures recorded on a “Memory Stick”...................................... 33
4
Page 5

Other functions
Creating DVDs (on Sony VAIO series computers only)........................... 34
Connecting an analog VCR to the computer via your camcorder
(DV format models only) — Digital convert function ........................... 37
Additional information
Troubleshooting ....................................................................................... 40
Index ........................................................................................................ 46
5
Page 6
Connecting to a Windows computer
Introduction to editing pictures on a computer
Features
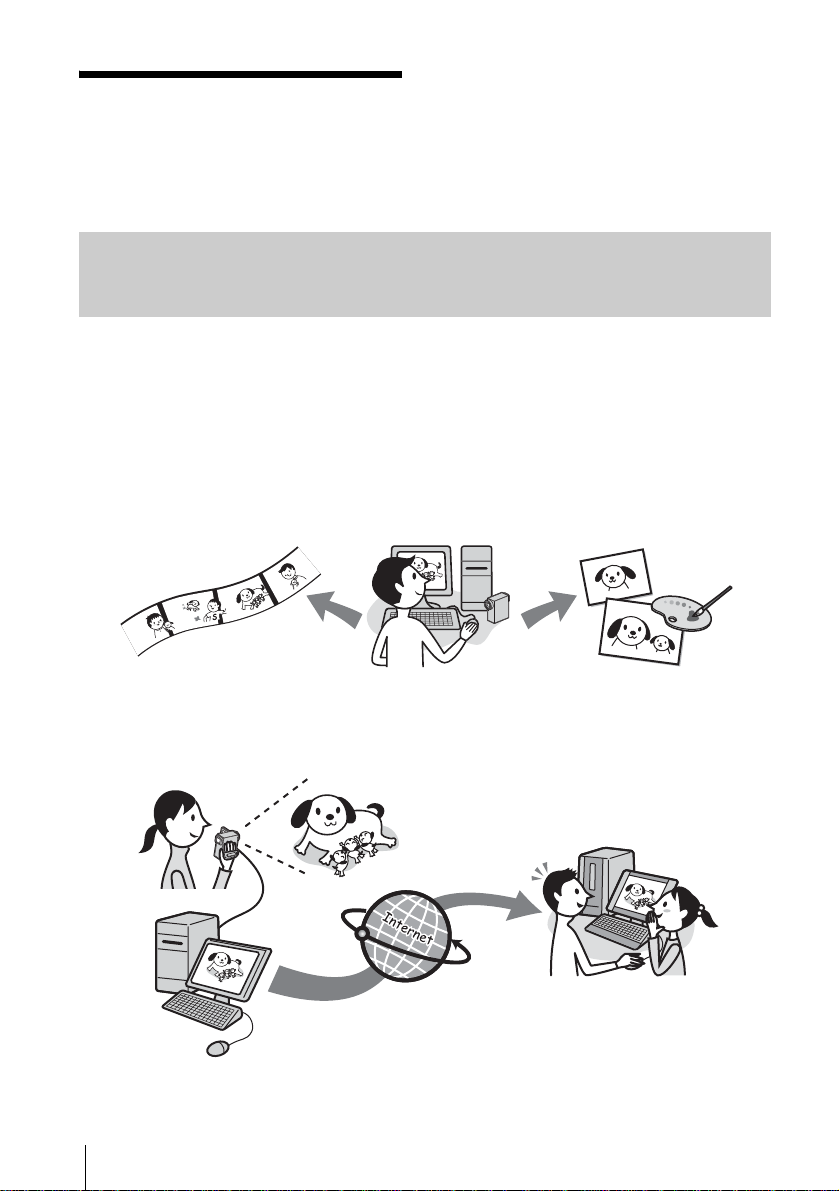
You can copy movies and still images recorded on your camcorder as digital data to your computer.
The copied pictu res can be edited to your preference.
Create your own original video
You can superimpose a title, cut out scenes, and
re-arrange the order on the movies that you have
recorded on a tape or a “Memory Stick.” Y ou
can also create Video CDs.
Distribute movies over the Internet via your computer (USB Streaming)
You can distribut e m ovies live on the Internet using your computer without storing data on your hard
disk.
Edit still images
You can add digital eff ects or superimpo se
words and illustrations on st ill images store d in
a “Memory Stick” or extracted from mo vi es
recorded on a tap e or a “Memory Stick.” Yo u
can create origi nal posters, post cards, etc.
Connecting to a Windows computer
6
Page 7
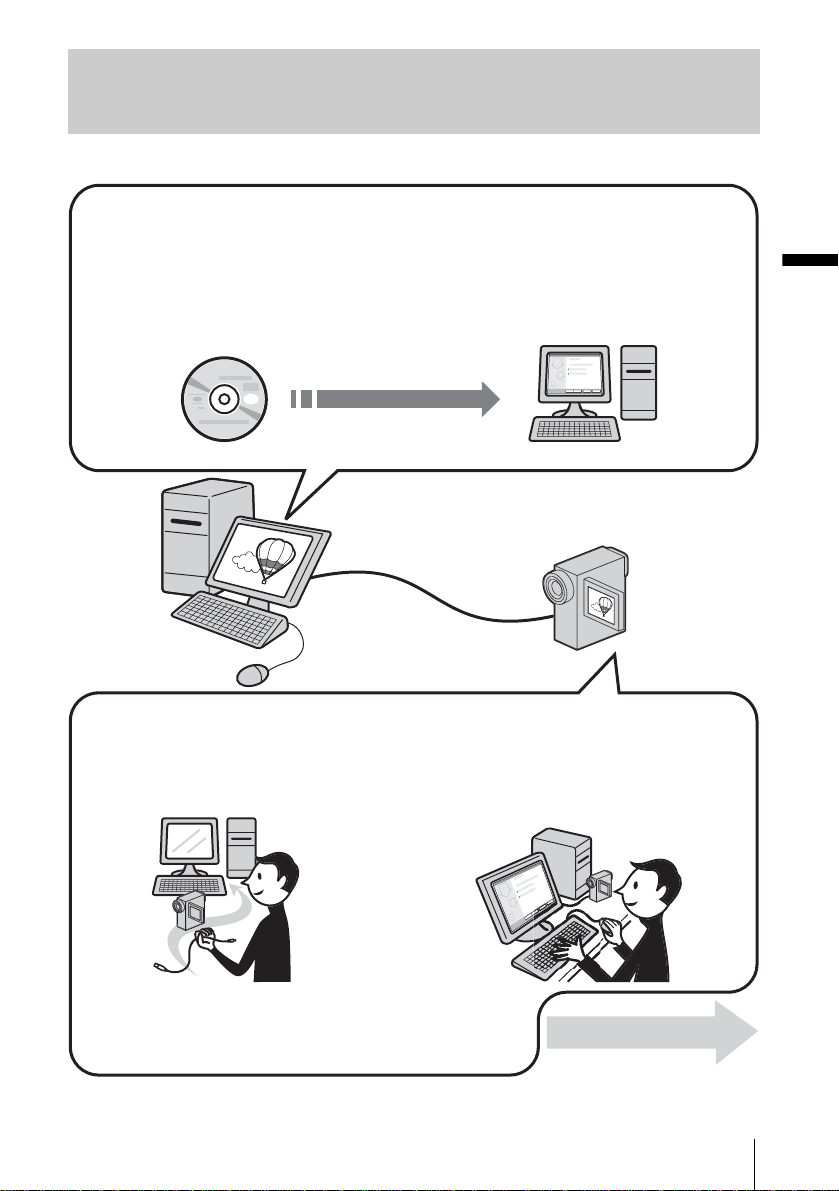
Overview of the preparation
Follow the steps below to complete the preparation.
On your computer (for the first time only)
* Instal l the se ite ms from the CD-ROM “SPVD-010 USB Driver” suppl ie d with your camcorder.
Step 1: Install the USB
driver on your
computer.*
CD-ROM (supplied)
Step 2: Install the image
editor software
(ImageMixer).*
Step 3: Install the image
exchange
software (I mage
Transfer).*
Connecting to a Windows computer
On your camcorder
Step 4: Connect your camcorder to a
computer.
There are two ways to connect your camcord er to a com put er.
• Connecting wit h a USB cabl e (supplied)
• Connecting wit h an i. LINK cable (optional)
See “Step 4: Connecting your camcor de r to a computer” (p. 13) for details.
Step 5: Check the connection between
the camcorder and the
computer.
Connecting to a Windows computer
Now, start from Step1 !
,continued
7
Page 8
Step 1: Installing the USB driver on a computer
You need to install the USB driver on your
computer to connect your camcorder via a
USB cable (supplied). The installation is
required only for the first time. From the
second time on, you only need to connect the
USB cable.
To transfer pictures with more precision, use
an i.LINK cable (optional) instead of the
USB cable (DV format models only).
In that case, operations in Step 1 are not
necessary.
For Windows 2000/Window s XP
Log on as Administrators.
b Note
• Do not connect the USB cable (supplied) before
installing the dr iver.
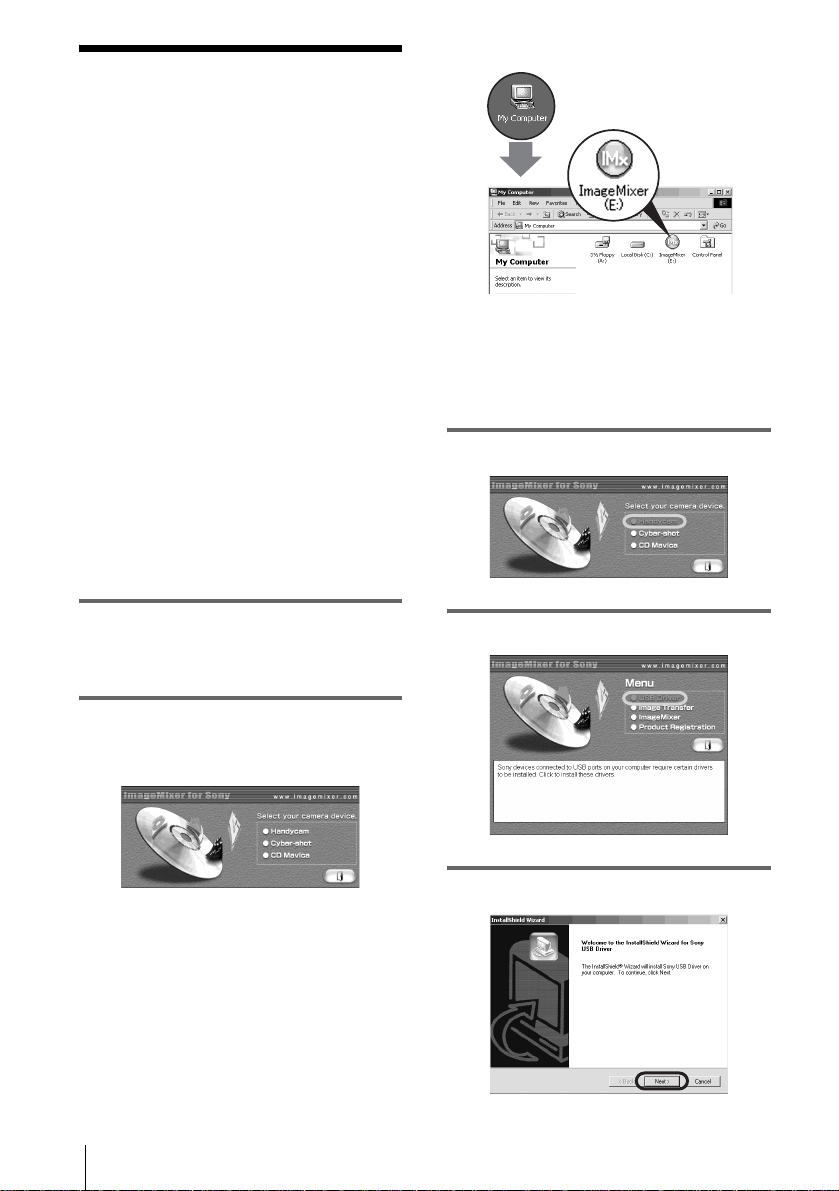
If the screen does not ap pear
1 Double-click [My Computer].
2 Double-click [ImageMixer] (Disc
drive)*.
* Drive na me s ( suc h as (E: )) ma y va r y
depending on the computer.
3 Click [Handycam].
1 St art up the co mputer.
Close down all applications runnin g on the
computer before installing the USB dr iv er.
2 Place the supplied CD-ROM in the
disc drive of your com puter.
The application software starts up.
Connecting to a Windows computer
8
4 Click [USB Driver].
5 Click [Next].
Page 9
6 Follow the on-screen instructions.
Read [Note on installing the USB driver],
then click [Next].
The driver installation starts.
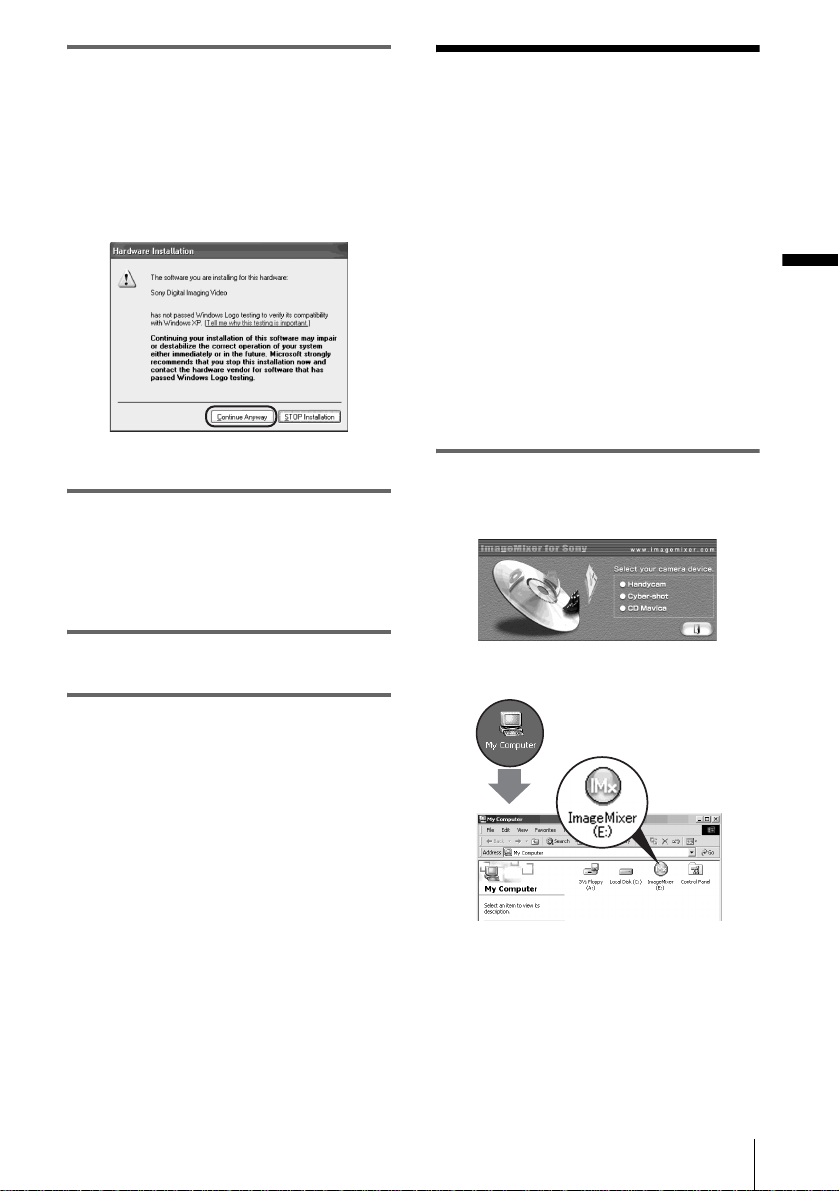
For Windows 2000/Windows XP
If a dialog box urging you to check the
digital signature appears, click [Yes] or
[Continue Anyway].
Step 2: Installing the image editor software (ImageMixer Ver.1.5 for Sony)
If you have any questions about
ImageMixer Ver.1.5 for Sony
ImageMixer Ve r.1.5 for Sony is a pr oduct of
PIXELA Corporation. For details, refer to the
operating instructions on the CD-ROM supplied
with your camc order.
For Windows 2000/Windows XP
Log on as Administrators.
Connecting to a Windows computer
Example: fo r Windows XP
7 Mak e su re [Yes, I want to restart my
computer now.] is checked, then click
[Finish].
The computer turns off once, then starts up
again automatically (Restart).
8 Re move the CD-ROM from the disc
drive of your computer.
1 Place th e supplied CD-ROM in the
disc drive of your computer.
The application sof tware starts up.
If the screen does not appear
1 Double-click [My Computer].
2 Double-click [ImageMixer] (Disc
drive)*.
* Drive nam e s (s uc h as (E:) ) ma y va ry
depending on the computer.
,continued
Connecting to a Windows computer
9
Page 10
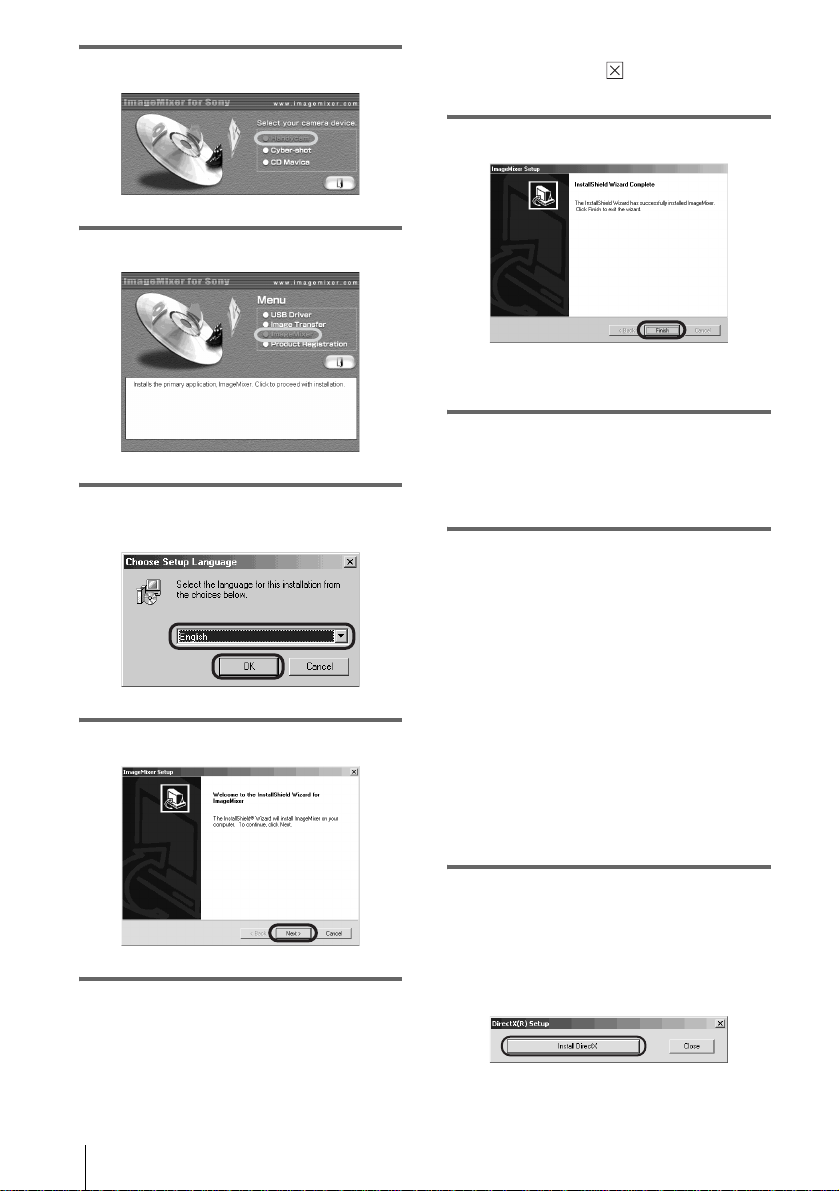
2 Click [Handycam].
3 Clic k [ImageMixer].
4 Select the language for the installation,
then click [OK].
5 Click [Next].
• Read the [Readme.txt] file ( Memo P ad) when it
appears, then click (Close) to close Memo
Pad.
7 Click [Finish].
The installation of ImageMixer is complet e.
8 Click [OK], then install WINASPI*
following the on-screen instructions.
* You nee d this software to copy the pictures
edited on your computer to a CD-R.
9 Click [End].
The installation for WINASPI is complete.
If DirectX 8.0a or a later version is not
installed on your computer
Go on to step 10 to install DirectX 8.0a.
If Windows XP, or DirectX 8.0a or a
later version is installed on your
computer
When [InstallShield Wizard Complete] is
displayed on the screen, cl ick [Finish], th en
[OK].
The computer restarts automatically. Then,
remove the CD-ROM. (You can skip the
rest of the procedur e. )
6 Follow the on-screen i nstructions.
z Tips
• If you use this sof tware personally, e nte r
[Personal] etc. for [Company Name].
Connecting to a Windows computer
10
10Click [OK] to continue the installation
of DirectX 8.0a.
1 Read [License Agreement], then click
[Yes].
2 Click [Install DirectX] (or [ReInstall]).
Page 11

3 Click [OK].
Step 3: Installing the
image exchange
software (Image
The computer restarts automaticall y, then a
short-cut icon for ImageMixer Ver.1.5 fo r
Sony appears on the desktop.
11Remove the CD-ROM from the disc
drive of your computer.
Transfer)
For Windows 2000/Windows XP
Log on as Administrators.
1 Place th e supplied CD-ROM in the
disc drive of your computer.
The application sof tware starts up.
If the screen does not appear
Connecting to a Windows computer
1 Double-click [My Computer].
2 Double-click [ImageMixer] (Disc
drive)*.
* Drive nam e s (s uc h as (E:) ) ma y va ry
depending on the computer.
2 Click [Handycam].
Connecting to a Windows computer
,continued
11
Page 12
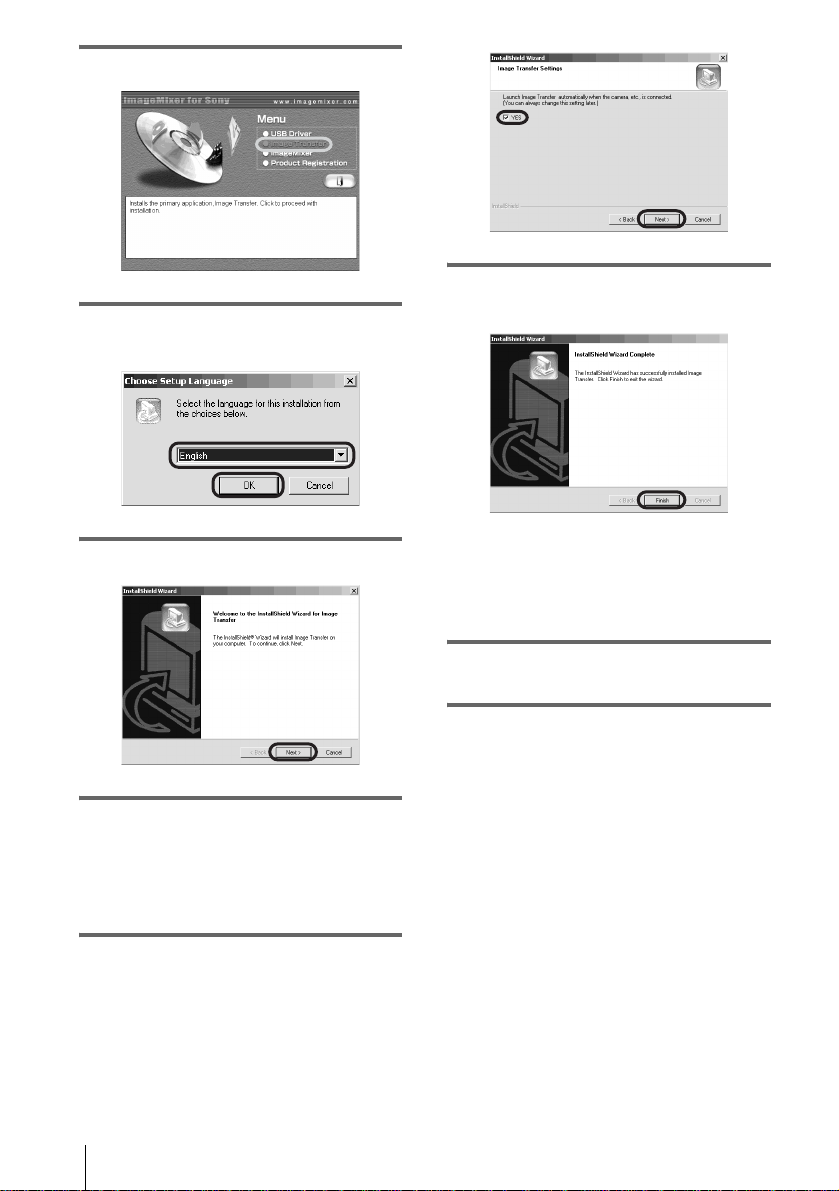
3 Clic k [Ima ge Transfer].
4 Select the language for the installation,
then click [OK].
8 Click [Finish] to complete the
installation of Image Transfer.
5 Click [Next].
6 Follow the on-screen i nstructions.
Make sure [Image Transfer] is indicated on
the program folder, then click [Next].
Normally, a new program folder [Image
Transfer] will be created.
7 Make sure that [YES] is checked for
[Launch Image Transfer
automatically when the camera, etc., is
connected.], then click [Next].
The installation screen is closed.
Short-cut icons for Image Transfer and the
Image Transfer folder appear on the
desktop.
9 Remov e the CD-ROM from the disc
drive of your comput er.
Connecting to a Windows computer
12
Page 13

Step 4: Connecting your camcorder to a computer
On connection
There are two ways to connect your camcorder
to a computer.
Connecting with a USB cable (supplied)
(p. 14)
• This meth od is good for copy in g files from a
“Memory Stick” to a computer for editing, and
copying files to a “Memory Stick.”
• You can view the image that your cam corder
is seeing on a computer, or play back pictures
and sound recorded on a tape and view them
on a computer. (PC C amera, Video
Streaming)
• You need to install the USB driver on your
computer be forehand (p. 8).
Connecting with an i.LINK cable
(optional) (p. 16)
• This method is good for copy in g and editing
pictures and so und recorded on a tape .
• Image data is transferred with more p recision
than with a USB cable.
• You cannot copy files from a “Memory Stick”
to a computer or copy files from a computer to
a “Memory Stick” in your camcorder.
If your computer has an i.LI N K
(IEEE1394) connector
,Connec t yo ur camcorder to your com puter
using an optional i.LINK cable. See
“Connecting with an i.LINK cable
(optional) (DV format models only)”
(p. 16). Image data are transferred with more
precision, and the installation of the USB
driver is not required with this type of
connection.
If your camcorder is a MICROMV format
model, refer also to the se parate
MovieShaker Application Guide supplied
with your camcor der.
To copy and edit pictures recorde d on a
“Memory Stick”
If your computer has a USB jack
,Connec t yo ur camcorder to your com puter
using the supplied USB cable. See
“Connecting with the USB cable (supplied)”
(p. 14).
If your computer has a M em ory Stick
slot
,Copy still im a ges or movies to a “Mem or y
Stick,” then insert it into the Memory Stick
slot on your computer. To check wh ere the
images are stored on a “Memory Stick,” see
page 27.
Connecting to a Windows computer
b Note
• When you are using a USB cable or an i .LINK cable
to connect your camcorder to a computer, make sure
you insert the connector in th e co rre c t direction. If
you insert the connector forci bly, it may be
damaged, and causes a malfun ction of your
camcorder.
To copy and edit pictures record ed on a
tape
If your comput er has a USB jack
,Connect your camcorder to your computer
using the supplied USB cable. See
“Connecting with the USB cable (supplied)”
(p. 14).
,continued
Connecting to a Windows computer
13
Page 14
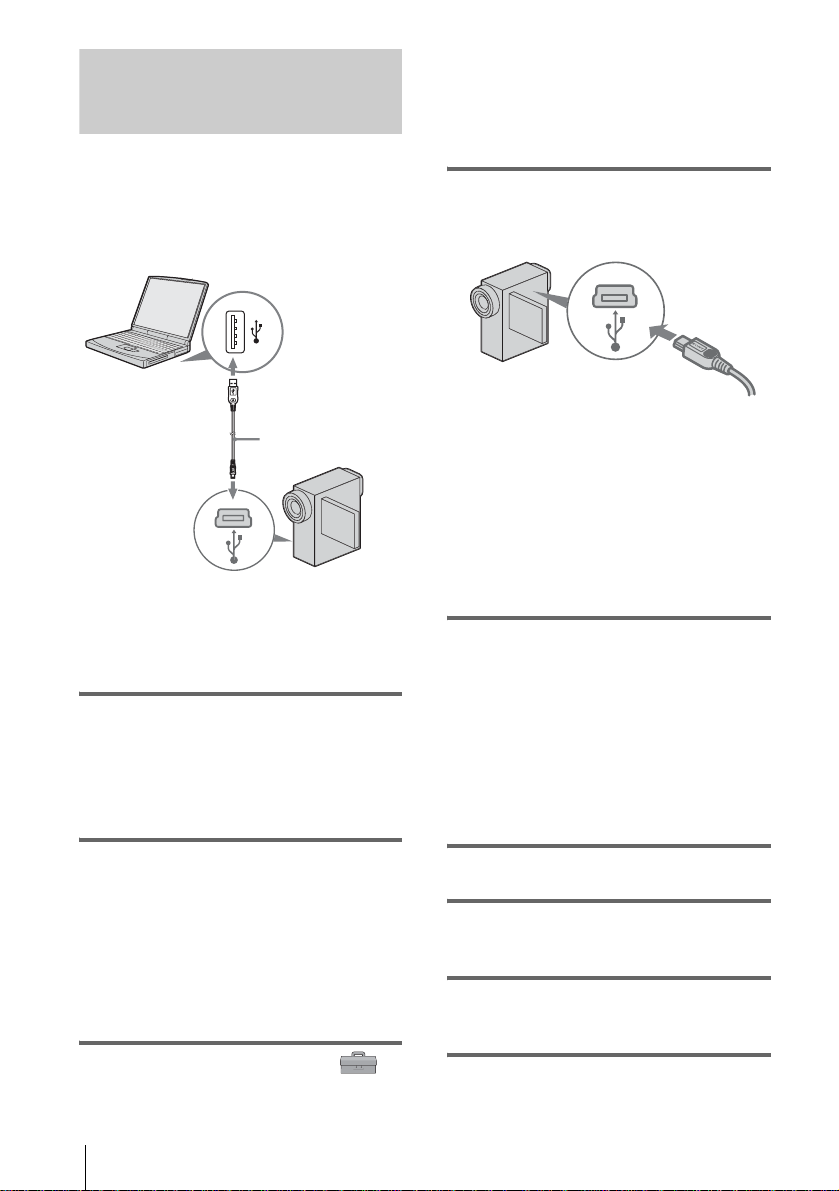
Connecting with the USB cable (supplied)
When connecting your ca m c or d er to yo ur
computer with the USB cable (supplied), you
must have the proper USB driver installed on
your computer (p. 8) before following the
steps below.
CAMERA], then touch to select [USB
STREAM].
For details on using the personal menu,
refer to the separate Camera Operations
Guide supplied with your camcorder.
4 Connect the USB cable (supplied) to
the USB jack on the camcorder.
to USB jack
USB cable
(supplied)
to USB jack
b Note
• Do not connect your camcorder to the computer
at this point.
1 St art up the co mputer.
Close down all applications runnin g on the
computer.
For Windows 2000/Windows XP
Log on as Administrators.
2 Prepare the power source for your
camcorder, then slide the POWER
switch to select the CAMERA-TAPE
mode.
Use the supplied AC Adaptor as the power
source. For detai ls , refer to the separate
Camera Operations Guide supplied with
your camcorder.
Fully insert.
The location of the U SB jack varies
depending on the m odel. Refer to the
separate Camera Operations Guide
supplied with your camcorder for the
location.
For the model that is supplied with the
Handycam Station, connect the USB cable
to the USB jack on the Handycam Station,
then set the USB ON/OFF switch to ON.
5 Connect the other end of the USB cable
to the USB jack on your computer.
It may take some time for the computer to
recognize the camcorder when you connect
the USB cable for the first time.
For Windows XP
If [Found New Hardwar e Wiza rd] ap pea rs ,
click [Continue Anyway] and complete th e
installation.
6 Turn off the power of your camc orde r.
7 Disconnect the USB cable from your
camcorder.
8 Insert a recorded “Memory S tick” in to
your camcorder.
3 Touch [P-MENU], [MENU], [
(STANDARD SET)] and [USB-
Connecting to a Windows computer
14
9 Slide the POWER switch repeatedly to
select the PLAY/EDIT mode.
Page 15
10Touch [P-MENU], [MENU], [
(STANDARD SET)] and [USB-PLY/
EDT], then touch to select [STD-USB].
3 Click [OK].
11Connect your camcorder to the
computer v ia t h e USB cable (p. 14).
[USB MODE] appears on the LCD screen
of your camcorde r and the computer starts
to recognize the camcorder.
It may take some time for the computer to
recognize the camcorder when you connect
the USB cable for the first time.
For Windows XP
If [Found New Hardware Wizard] appears,
click [Continue Anyway] and complete the
installation.
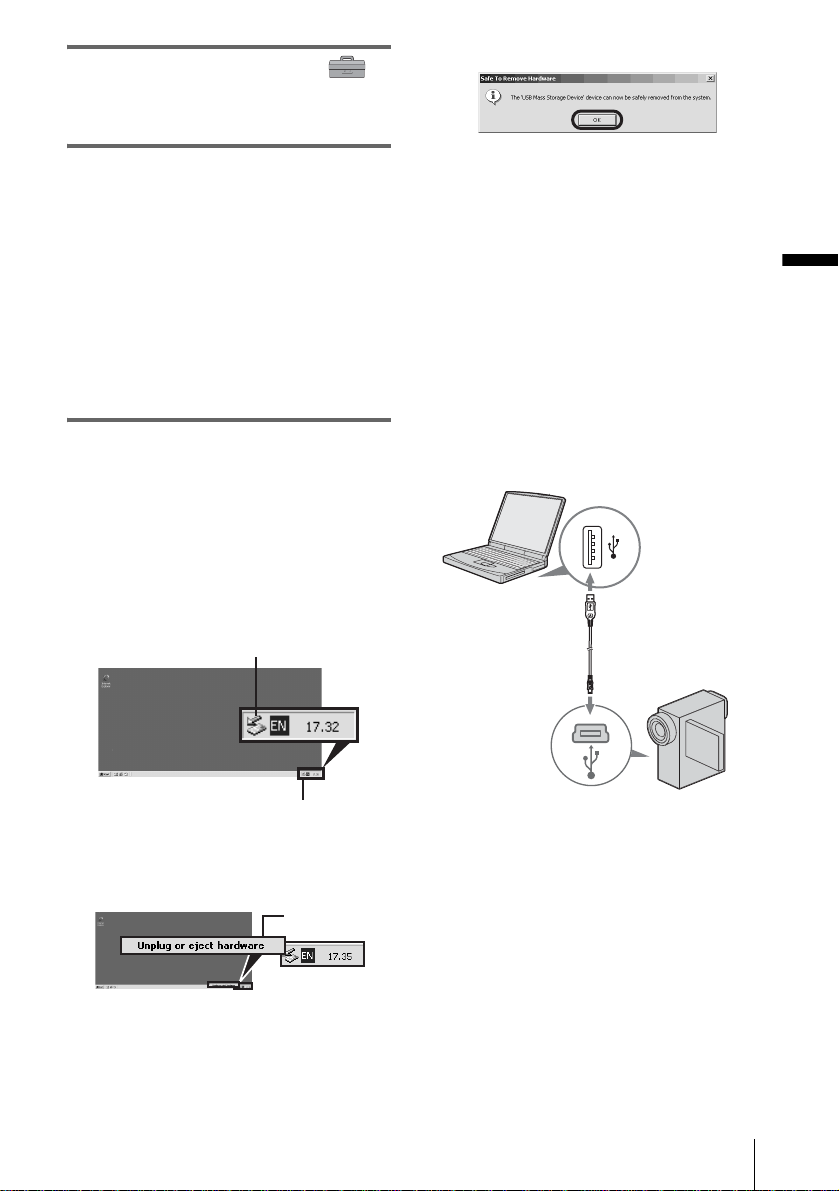
To disconnect the USB cable
For Windows 2000/Windows Me /
Windows XP
If [USB MODE] appears on the LCD scr een,
follow the procedure below to disconnect the
USB cable.
1 Click the [Un p l ug or eject hardware]
icon on the task tray.
Click this icon.
4 Disconnect the U SB cable from th e
camcorder and co m puter.
If [USB MODE] does not appear on the LCD
screen, do only ste p 4 above.
Connecting to a Windows computer
For Windows 98/Windows 98SE
Do only step 4 above.
Recommended connection
Connect as shown in the following illustrations
to operate the cam corder correctly.
• Connect the camcorder to a computer via the
USB cable (supplied). Make sure no ot her
USB devices are connected to the com put er.
task tray
2 Click [Unplug or eject hardware]
([Safely remove Sony Camcorder] in
Windows XP).
Click here.
,continued
Connecting to a Windows computer
15
Page 16

• If your computer has a USB keyboard and a
USB mouse as standard equipmen t, le ave
them connected and connect the camcorder to
an available USB jack with the USB cable
(supplied).
b Notes
• Operation is not gua r an teed if you connect two or
more USB devices to the computer.
• Operation is not guaranteed if you connect the USB
cable to the USB jack on a keyboard or USB hub.
Make sure to connect the cable to the USB jack on
the computer.
• Operation is not guaranteed on al l the recommen ded
environments.
The location of the DV Interface varies
depending on the m odel. Refer to the separ at e
Camera Operations Guide supplied with your
camcorder for the location.
To disconnect the i.LINK cable
Turn off the power of the camcorder and
disconnect the i.L IN K cable from the
camcorder and computer.
z Tip
• You can use other image editing software that can
read video signals to edit the re corde d pictures. For
details on the operation of other software, refer to the
help files or the operating instructions of that
software.
Connecting with an i.LINK cable (optional) (DV format model s only)
to i.LINK (IEEE1394)
connector
i.LINK cable
(optional)
to DV
Interface
Connecting to a Windows computer
16
Page 17

Step 5: Checking the connection
Playing pictures recorded on a tape on your computer
via an i.LINK cable (DV format
models only).
Before following the procedure below, start
up ImageMixer Ver.1.5 for Sony and check
the connect i on .
b Note
• Before following the procedure below, make sure
you remove the “Memory Stick” from the
camcorder.
1 Do uble-click [ImageMixer Ver.1.5 for
Sony] on the desktop.
2 Cli ck (Capture Environment).
Connecting to a Windows computer
4 Prepare the power source for your
camcorder, then slide the POWER
switch repeatedly to select the PLAY/
EDIT mode.
Use the supplied AC Adaptor as the power
source.
For details, refer to the separate Camera
Operations Guide supplied with your
camcorder.
5 Touch [P-MENU], [MENU], [
(STANDARD SET)] and [USB-PLY/
EDT], then touch to select [USB
STREAM].
For details, refer to the separate Camera
Operations Guide supplied with your
camcorder.
This operation is not ne cessary when
connecting the camcorder to the computer
via an i.LINK cable (p. 16).
6 Connect your camcorder to the
computer (p. 13).
3 Click (USB Device Capture
Mode) if you are conne cting vi a a USB
cable, or click (DV Camcorder
Capture Mode) if you are connecting
,continued
Connecting to a Windows computer
17
Page 18

7 Click (Playback) to see if the
picture appears on the preview screen
on your computer.
Preview screen
For details, refer to the separate Camera
Operations Guide supplied with your
camcorder.
4 Co nnect your camcorder to the
computer (p. 13), then see if Image
Transfer starts up automatically.
[USB MODE] ap pears on the LCD scree n
and the pictures st or ed i n t he “Memory
Stick” are copied to the computer. Then,
ImageMixer Ver.1.5 for Sony starts up
automatically and a list of pictures appear s
(p. 26).
It may take some time before it is d isplayed.
If the playback picture does not
appear on the screen
Check to see if the USB driver is correctly
installed on your computer (p. 41).
To cancel the operation
1
Click (Close) at the upper right-
hand corner of the screen on your
computer to quit ImageMixer Ver.1.5 for
Sony.
2 Turn off the camcorder, then disconnect
the cable.
Viewing pictures recorded on a “Memory Stick” on your computer
1 Insert the “Memory S tick” into your
camcorder.
2 Prepare the power source for your
camcorder, then slide the POWER
switch repeatedly to select the PLAY/
EDIT mode.
If Image Transfer does not start
See “Troubleshooting” (p. 44) for details.
3 Touch [P-MENU], [MENU], [
(STANDARD SET)] and [USB-PLY/
EDT], then touch to select [STD-USB].
Connecting to a Windows computer
18
Page 19

Managing pictures on a Windows computer
Copying and viewing pictures recorded on a tape
You can play or edit pictures on your
computer without connec ting the camcorder
each time, by copying the pi ctures recorded
on your tape to the computer.
If your camcorder is a MICROMV format
model, you can also edit the pictures with the
supplied CD-ROM (MovieShaker Ver.3.1
for MICROMV). For details, refer also to the
separate MovieShaker Application Guide
supplied with your camcorder.
For Windows 2000/Windows XP
Log on as Administrators.
2 Start up the computer, then double-
click [ImageMixer Ver.1.5 for Sony]
on the desktop.
3 Click (Capture Environment).
Managing pictures on a Windows computer
4 Cli ck (USB Device Capture
Mode) if you are connecting via a USB
cable, or click (DV Camcorder
Capture Mode) if you are connecting
via an i.LINK cable (DV format
models only).
Copying movies onto your computer
Before following the procedures below,
make sure you have installed ImageMixer
Ver.1.5 for Sony on your computer.
The maximum length of movies you can copy
on a computer varies from 10 to 20 minutes,
depending on the computer environment.
1 Prepare the power source for your
camcorder, then insert a cassette into
your camcorder.
5 On your camcorder, slide the P OWER
switch repeatedly to select the PLAY/
EDIT mode.
,continued
Managing pictures on a Windows computer
19
Page 20

6 Touch [P-MENU], [MENU], [
(STANDARD SET)] and [USB-PLY/
EDT], then touch to select [USB
STREAM].
For details, refer to the separate Camera
Operations Guide supplied with your
camcorder.
This operat ion is not necessary when
connecting the camcorder to the computer
via an i.LINK cable (p. 16).
7 Connect your camcorder to the
computer (p. 13).
8 Click (Motion Picture
Capture).
10Click (Playback) to play back
the tape.
11Click (Capture) at the point y ou
want to start copying.
(red) turn s to (black).
9 Click to sele ct an album to copy the
picture to.
Managing pictures on a Windows computer
20
12Click (Stop) at the point you
want to stop copying.
b Note
• (forward one frame at a time) and
(rewind one frame at a time) only function on the
DV format models. (These buttons do not appear on
other models.)
Page 21

z Tip
• When you copy a movie longer than the maximum
recording time allowed (10 to 20 minutes), the
playback stops automatically and the scenes up to
that point will be copied to the compute r .
Editing pictures on your computer
Copying still images extracted from a movie on your computer
1 Follow steps 1 to 7 on “Copying movies
onto your computer” (p. 19).
2 Click (Still Picture Capture).
3 Follow steps 9 and 10 on “Copying
movies onto yo ur computer” (p. 20).
4 Click (Capture) at the point
where you want to extract a still i mage
from the movie.
You can put together mul tiple pictures copied
onto your computer and create one movie.
Refer to the on-line help for details on this
operation (p. 22).
1 Start up the computer, then double-
click [ImageMixer Ver.1.5 for Sony]
on the desktop.
2 Click (Movie Editing
Environment).
Managing pictures on a Windows computer
3 Click (Movie Display). Select a
movie from the list, then drag and drop
it on the storyboard.
Storyboard
,continued
Managing pictures on a Windows computer
21
Page 22

4 Clic k [OK].
Click the desired size to change the
image size.
5 Select a movie from the list, then drag
and drop it on the storyboard
repeatedly to sort the order of the
images used in the movie.
To play back the movie while editing
—
Preview
Follow the steps below to play back the movie
while editing. It may take some time for the
preview picture to be di splayed.
1
6 Click (Save).
7 Name and save the movie in [My
Documents].
The created movie is also added to the
current album.
2
1 Click (Preview Mode).
2 Click (Playback).
To play back the edited movie
In the [My Documents] folder, double-cl ick the
icon of the movi e you created.
Windows Media Player* starts up, and the
playback starts.
* You need Windows Media Player installed on your
computer to play back the movie you c rea te d
(MPEG-format movie file).
b
Note
• The picture may f li cker whe n y ou vie w it on a
computer.
To use the on-line help
Refer to the on-line help for detailed operating
instructions fo r ImageMixer Ver.1.5 for Son y .
1 Click (Help) at the upper right-hand
corner of the scr een.
2 Search for the desi re d topic from the
table of contents.
To close the on-line hel p, click (Close)
at the upper right-hand corner of the Help
screen.
Managing pictures on a Windows computer
22
Page 23

Viewing pictures on your computer via the USB port — US B Streaming
When you connect your camcorder to a
computer via a USB cable (supplie d), you
can view a movie played on you r camcorder
on the computer screen. You d o not need to
store the data on the computer.
By using communi ca tio n software, you can
connect your computer to the Int ernet to
distribute the picture live via the Internet.
Before following the procedures below,
make sure you have installed ImageMixer
Ver.1.5 for Sony on your computer (p. 9).
Video Streaming
You can play a mov ie recorded on a tape on
your camcorder and view it on the computer
screen.
PC Camera
You can view the image that your camcorder is
currently seeing.
1 Start up the computer, then double-
click [ImageMixer Ver.1.5 for Sony]
on the desktop.
3 Cli ck (USB Device Capture
Mode).
4 Prepare the power source for your
camcorder, then slide the POWER
switch repeatedly to select the PLAY/
EDIT mode (for Video St reaming) or
CAMERA-TAPE mode (for the PC
Camera function).
Use the supplied AC Adaptor as the power
source.
5 F or Video Strea ming, touch [P-
MENU], [MENU], [
(STANDARD SET)] and [USB-PLY/
EDT], then touch to select [USB
STREAM].
For the PC Camera function, touch [PMENU], [MENU], [
(STANDARD SET)] and [USBCAMERA], then touch to select [USB
STREAM].
For details, refer to the separate Camera
Operations Guide supplied with your
camcorder.
Managing pictures on a Windows computer
2 Cli ck (Capture Environment).
6 Connect your camcorder to the
computer via the USB cable (supplied)
(p. 14).
,continued
Managing pictures on a Windows computer
23
Page 24

7 For Video Streaming, click
(Motion Picture Capture), then click
(Playback).
Creating Video CDs
You can creat e Video CDs us ing a c omp uter
equipped with a disc drive.
The following procedure describes how to
create a Video CD from a picture recorded on
a tape (maximum length of about one hour ).
You can also create a Video CD from the
images that your camcorder is currently
seeing.
Before starti ng the operation, mak e su r e yo u
have installed ImageMixer Ver.1.5 for Son y
on your computer (p. 9).
z Tip
• To create a Video CD from pictures edited on a
computer, start up ImageMixer Ver.1.5 for Sony,
then click
the on-line help for details on this oper at ion (p. 22).
1 Start up the computer, then double-
click [ImageMixer Ver.1.5 for Sony]
on the desktop.
(Video Disc Environment). Refer to
Managing pictures on a Windows computer
24
2 Click (EZ VIDEO CD).
3 Prepare the power source for your
camcorder, then slide the POWER
switch repeatedly to select the PLAY/
EDIT mode.
Page 25

Use the supplied AC Adaptor as the power
source.
4 Touch [P-MENU], [MENU], [
(STANDARD SET)] and [USB-PLY/
EDT], then touch to select [USB
STREAM].
For details, refer to the separate Camera
Operations Guide supplied with your
camcorder.
9 Click [Quit] after writing is finished.
5 Search for the point on the tape where
you want to start copying to the Video
CD.
z Tip
• You can also create a Video CD of the image
that the camcorder is curren tly s eein g when t he
POWER switch is se t to the CA MERA-TAPE
mode. Touch [P-MENU], [MENU] and [USBCAMERA], then touch to select [USB
STREAM].
6 Connect the camcorder to a computer
via the USB cable (supplied) (p. 14).
7 Pl ace a new CD-R in the disc drive.
You cannot use a CD- R W .
8 Click [Start].
The tape starts playing and the picture is
imported to the buffer via the HDD before
being written onto the CD-R automatically.
To cancel the operation, click [Stop]. In this
case, the picture played up to that point is
written on the CD-R.
To create another Video CD of the same
content, place a new CD-R in the disc drive,
then click [Star t] .
b Notes
• Do not press any buttons on the camcorder while
creating a Video CD.
• Select a hard disk that has enough space (more than
about 6GB) for the [Location of work folder] on the
[Option] screen.
• Once you have created a Video CD, you cannot add
images to the same CD-R.
• There may be a few second-break about every 10
minutes on the created Video CD. This is due to the
AVI format used to create the Video CD, which
divides a picture every 10 minutes (ab out 4GB ) to
write it on a CD-R.
• The picture be ing written onto the CD-R will not
appear on the computer screen.
Tip
z
• The importi ng of the pi ct ure st ops a u tomatically
when the tape is played to the end.
To play the Vi deo CD
You can play back the Video CD in one of the
followin g d evices. Re fer to the operating
instructions supplied with each player for
details.
– DVD player
– a computer equipp ed with a DVD drive and
software compatible with Video CDs
– a computer equipp ed with Windows Me di a
Player (You may not be able to play back the
Video CD depe nding on the comp ut er
environment, including such factors as the
operating sys te m or th e hard war e. The menu
functions of Win dows Media Player d o not
work.)
Managing pictures on a Windows computer
,continued
Managing pictures on a Windows computer
25
Page 26

The following procedure describes how to play
back a Video CD using Windows Media Player.
1 Place a Video CD in the disc drive of your
computer and start up Windows Media
Player.
For Windows XP
Click [Start ], [All Programs],
[Accessori es], [Entertainment], then
[Windows Media Player].
For other operating systems
Click [Start], [Programs], [Accessories],
[Enterta inment], then [Wind ows Media
Player].
2 Open [My Computer], [CD-R], then
[MPEGAV]. Then, drag a nd drop the
movie file [sss*.DAT] onto the
Windows Media Pla yer screen.
* sss indicates the actual file name.
Copying and viewing pictures recorded on a “Memory Stick”
You can play or edit pictures witho ut
connecting the computer to your camcorder
by copying the pictures recorded on a
“Memory Stick” to the comp uter.
Before starti ng the operation, mak e su r e yo u
have installed Image Transfer on your
computer (p. 11).
For Windows 2000/Windows XP
Log on as Administ rators.
b Notes
• Use the supplied AC Adap tor as the power sourc e ,
since the data on the “Memory Stic k” ma y be
destroyed if the power runs out during the operation.
• For details on the “Me mory Stick” that you can use
with the camcorder, refer to the separate Camera
Operations Guide supplied with your c am c or de r.
Managing pictures on a Windows computer
26
1 Insert a “Memory Stick” into your
camcorder.
2 St art up the computer, prepare the
power source for your camcorder,
then slide the POWER switch
repeatedly to select the PLAY/EDIT
mode.
3 Touch [P-MENU], [MENU], [
(STANDARD SET)] and [USB-PLY/
EDT], then touch to select [STD-USB].
Page 27

4 Co nnect the camcorder to the
computer via the USB cable (supplied)
(p. 14).
Image Transfer starts up aut o ma t ically and
the pictures recorded on the “Memory
Stick” are transferred to the computer.
Normally, the [Image Transfer ] and [Date]
folders are creat ed inside the [My
Documents] fol der, and all the pictures are
stored in those folders.
When the image transfer is complete,
ImageMixer starts up automatically and
displays a list of pictures.
For Windows XP
The automatic playback wizard s ta rt s up at the
default setting. Follow the steps below to
deactivate this setting. (From the second time
on, you can skip th e rest of the proced ure.)
1 Make sure you hav e connected your
camcorder to a comput er via a USB
cable.
2 Click [Start], then select [My Computer]
from the start menu.
3 Right-click [Sony Memo ry Stick], then
click [Properties].
4 Deactivate the setting.
A
B
DE
C
Managing pictures on a Windows computer
C
F
AClick the [Auto Play] tab .
BSelect [Pictures] for a content type.
CSelect [Action s], chec k [Sele ct an a ction
to perform], then select [Take no
action]. Click [Apply].
DSelect [ Video Files] for a content type.
Repeat step 3.
ESelect [Mixed content] for a content
type. Repeat step 3.
FClick [OK].
To change the Image Transfer settings
Right-click (Image Transfer icon) on the
task tray. Then, select [Open se ttings] to change
[Basic], [C opy], and [Delete].
Click [Restore defaults] to return to the d efault
setting.
On destination folders and file names
Pictures transferre d to th e computer
using Image Transfer
The pictures are copied to the [Image Transfer]
and [Date] folders created inside the [My
Documents] folder.
,continued
Managing pictures on a Windows computer
27
Page 28

Pictures on a “Memory Stick”
The pictures are stored in the [Removable disk]
or [Sony MemoryStick] folder displayed in [My
Computer].
1
2
3
A Folder containing image files recorded
using other camcorders without the
folder creation function (for playback
only)
B Folder containing image files recorded
with your camcorder
When no new fold er s have been created,
only [101MSDCF ] i s di splayed.
C Folder containing movie data re corded
using other camcorders without the
folder creation function (for playback
only)
Folder File Meaning
101 MSDCF
(up to 999
MSDCF)
DSCssss
s.JPG
MOVsss
ss.MPG
Still image
file
Movie file
Editing still images on your computer
You can edit the sti ll images copied from your
camcorder us i ng ImageMixer V er.1.5 for So ny
and save them on your computer.
1 Start up the computer, then double-
click [ImageMixer Ver.1.5 for Sony]
on the desktop.
2 Click (Album).
3 Click the still image that you want to
edit, then click (Edit).
Click and select an image.
sssss stands for any number between 00001 to
99999.
To copy pictures on the computer
without using Image Transfer
Double-click the [Removable disk] or [So ny
MemoryStick] icon displayed in [My
Computer]. Then, drag and drop a picture in the
folder onto the hard disk drive of your
computer.
Managing pictures on a Windows computer
28
Page 29

4 Click (Exit) after you finish
editing.
Click.
The edited still image is added to the a lbum.
z Tip
• Ref er to the on-line help for detailed opera ti ng
instructions on ImageMixer Ve r.1. 5 fo r Sony
(p. 22).
Copying pictures edited on ImageMixer Ver.1.5 for Sony to a “Memory Stick”
You can copy pictures edited on ImageMixer
Ver.1.5 for Sony to a “Memory Stick,” and
use them as materials for MEMORY MIX on
your camcorde r .
Refer to the separate Camera Operations
Guide supplied with yo ur ca m c or d er for
details on MEMORY MIX.
1 Insert a “Memory Stick” into your
camcorder.
For details, refer to the separate Camera
Operations Guide supplied with your
camcorder.
4 Start up the computer, then double-
click [ImageMixer Ver.1.5 for Sony]
on the desktop.
Managing pictures on a Windows computer
5 Click (Album).
6 Connect your camcorder to the
computer via the USB cable (supplied)
(p. 14).
Click [Cancel] if Image Transfer starts up
automatically.
7 Click the [MEMORY MIX] album.
2 Prepare the power source for your
camcorder, then slide the POWER
switch repeatedly to select the PLAY/
EDIT mode.
3 Touch [P-MENU], [MENU], [
(STANDARD SET)] and [USB-PLY/
EDT], then touch to select [STD-USB].
,continued
Managing pictures on a Windows computer
29
Page 30

8 Right-click the picture that you want
to copy, then click [Output to memory
card].
1
2
1 Right-click the desired picture.
2 Click [Output to memory card].
9 Click (“Memory Stick” Select) on
the title screen, then click
(Output) displayed at the bottom
right-hand corner of the screen.
1
1 Click (“Memory Stick” Select).
2 Click (Output).
3 Click (Refresh) to confirm the
picture that you have copied to the
“Memory Stick.”
The picture will be copied to the folder
selected as a destination folder . For
details, refer to the separate Camera
Operations Guide supplied with your
camcorder.
Managing pictures on a Windows computer
30
23
Page 31

Connecting to a Macintosh computer (“Memory Stick” only)
Step 1: Installing the
7 When a message appears, click [ OK].
The USB driver is installed on the
computer.
USB driver on a
computer
The installation of the USB driver is not
required for Mac OS 9.1/9.2 or Mac OS X
(v10.0/v10.1/v10.2 ). Skip this sectio n and go
on to “Step 2: Conn ecting your camco rder to
a computer” (p. 32).
1 Start up the computer.
2 Pl ace the supplied CD-ROM in the
disc drive of the computer.
A screen for selecting model names appears
after a while.
3 Click [Handycam].
4 Click [USB Driver].
5 Double-click the icon of the hard disk
drive which stores the operati ng
system. Then, double-click the [System
Folder] icon.
8 Close the [USB Driver] screen, and
eject the CD-ROM from the computer.
9 Restart the computer.
Connecting to a Macintosh computer (“Memory Stick” only)
6 Drag and drop the [Son y Camcorder
USB Driver] file and [Sony Camcorder
USB Shim] file to [System Folder].
Drag and drop
[USB Driver] folder [System Folder]
Connecting to a Macintosh computer (“Memory Stick” only)
31
Page 32

Step 2: Connecting
the correct direction. If y ou insert the con nector
forcibly, it may be damaged, and caus es a
malfunction of your camcorder.
your camcorder to a
computer
You must have the USB driver installed on
your computer before starting the following
operation (p. 31). However, the installation is
not required for Mac OS 9.1/9.2 or Mac OS
X (v10.0/v10.1/v10.2).
1 Insert the “Memory S tick” into your
camcorder.
2 Prepare the power source for your
camcorder, then slide the POWER
switch repeatedly to select the PLAY/
EDIT mode.
Use the supplied AC Adaptor as the power
source.
For details, refer to the separate Camera
Operations Guide supplied with your
camcorder.
3 Touch [P-MENU], [MENU], [
(STANDARD SET)] and [USB-PLY/
EDT], then touch to select [STD-USB].
For details, refer to the separate Camera
Operations Guide supplied with your
camcorder.
5 Connect the other end of the USB cable
to the USB jack on your computer.
[USB MODE] ap pears on the LCD scree n
of your camcorde r, and a “Memory Stick”
icon appears on the desktop.
For details on con n ecting your camcorder
to a computer, see “Connecting with the
USB cable (supplie d)” (p. 14).
To disconnect the USB cable/ To tur n off
the camcorder/To eject the “Memory
Stick”
For Mac OS X (v10.0)
Turn off your computer, disconnect the U SB
cable, then rem ove the “Memory Stick” from
the camcorder .
For Mac OS 8.5.1/8.6/ 9. 0/ 9.1/ 9. 2 or Mac
OS X (v10.1/v10.2)
1 Quit all application s running on the
computer.
2 Drag and drop the “M em ory Stick” or
drive icon on the desktop onto the
[Trash] icon.
4 Connect the USB cable (supplied) to
the USB jack on your camcorder.
The location of the USB jack varies
depending on the model. Refer to the
separate Camera Operations Guide
supplied with your camcorder for the
location.
For the model that is supplied with the
Handycam Station , connect the USB cabl e
to the USB jack on the Handycam Station,
then set the USB ON /OFF switc h to ON.
b Note
• When you connect your cam co rd er to a
computer, make sure you insert the connector in
Connecting to a Macintosh computer (“Memory Stick” only)
32
Page 33

Copying pictures recorded on a “Memory Stick”
To copy pictures recorded on a tape t o your
computer, copy the pictur es to a “Memory
Stick” on the camcorder first.
Double-click the “Memory Stick” icon.
Then, drag and drop the desired picture
file onto the hard disk icon.
To play back movies
You need QuickT ime 3.0 or a later version
installed on your computer.
The picture or sou nd m ay break up when you
directly pla y back a pic ture saved on a “Memory
Stick.” Make sure to copy th e pictu re file to the
hard disk before playing.
b Note
• You cannot copy pictures saved on a “Memory
Stick” to your computer using Image Transfer.
Connecting to a Macintosh computer (“Memory Stick” only)
Connecting to a Macintosh computer (“Memory Stick” only)
33
Page 34

Other functions
Creating DVDs (on Sony VAIO series computers only)
to i.LINK (IEEE1394)
connector
i.LINK cable
(optional)
to DV
Interface or
MICROMV
Interface
You can create DVDs when you connect your
camcorder to a Sony VAIO series computer*
that supports “Click to DVD” via an i.LINK
cable (optional). The picture will be
automatically copied and written to a DVD.
The following procedures describe how to
create a DVD from a picture recorded on a tape.
For system and operation requ irements, visit the
following URL:
* Note that you need a Sony VAIO computer
equipped with a DVD drive that can be used to
write DVDs. You also need the computer with a
compatible version of
original software) installed.
DV format model (Ver.1.2 or later)
MICROMV form at model (Visit the follow ing
URL.)
–U.S.A.
http://www.ita.sel.sony.com/support/
dvimag/
– Asia Pacific Regional
http://www.css.ap.sony.com/
–Korea
http://scs.sony.co.kr/
–Taiwan
http://www.sony.com.tw/cic/
– China
http://www.sonystyle.com.cn/vaio/
“Click to DVD” (Sony
–Thailand
http://www.sony.co.th/vaio/index.html
– United Kingdom
http://www.vaio-link.com/uk/info/
ctdvd_upd_13.shtm
–Germany
http://www.vaio-link.com/DE/info/
ctdvd_upd_13.shtm
–France
http://www.vaio-link.com/FR/info/
ctdvd_upd_13.shtm
–Spain
http://www.vaio-link.com/SP/info/
ctdvd_upd_13.shtm
Using the Direct Access to “Click to
DVD” function for the first time
The Direct Access to “Click to DVD” function
enables you to create DVDs easily if your
camcorder is connected to a computer. Before
operating the Direct Access to “Click to DVD”
functio n , follow th e steps be low to star t “ Click
to DVD Automatic Mode Launcher.”
1 Start up the computer.
2 Click the start menu, then select [All
Programs].
3 Select [Click to DVD] from t he programs
displayed, then click [Click to DVD
Automatic Mode Launcher].
[Click to DVD Automatic Mode Launcher]
starts up.
z Tips
• After you start up [Click to DVD Automatic Mode
Launcher] once, from then on it starts up
automatically when you turn on your com pute r .
• [Click to DVD Automatic Mode Launcher] is set up
for each Windows XP user.
1 St art up the computer.
Quit all applications running with i.LINK.
2 Prepare the power source for your
camcorder, then slide the POWER
switch repeatedly to select the PLAY/
EDIT mode.
Use the supplied AC Adaptor as the power
source since it takes a few hours to create a
DVD. For details, refer to the separate
Other functions
34
Page 35

Camera Operations Guide supplied with
your camcorder.
WRITING: The picture is being written
onto the DVD.
3 Insert a recorded cassette into your
camcorder.
4 Co nnect your camcorder to a
computer via an i.LINK cable
(optional).
b Note
• When you connect your camcorder to a
computer, make sure you insert the connector in
the correct direction. If you insert the co nnector
forcibly, it may be damaged, and cau se s a
malfunction of your camcorder.
5 Touch [P-MENU], [MENU] and
[ (EDIT/PLAY)], then touch to
select [BURN DVD].
“Click to DVD” starts up and the on -screen
instructions appear on your computer.
For details, refer to the separate Camera
Operations Guide supplied with your
camcorder.
6 Place a writable DVD in the disc drive
of the computer.
7 To uc h [EXEC] on the LCD screen of
your camcorder.
BURN DVD
START
CREATE DVD
EXEC CANCEL
The status of th e operation on your
computer is displayed on the LCD screen of
your camcorder.
CAPTURING: The picture recorded on
the tape is being copied to the computer.
CONVERTING: The picture is bein g
converted to the digital format.
0:00:00:00
?
z Tip
• If you use a DVD-RW/+RW which has other
data stored on it, the me ssage [This is a
recorded disc. Delete an d overwrite? ] appears
on the LCD screen of your camcorder. When
you touch [EXEC], the existing data is erase d
and new data will be written.
8 Touch [NO] after creating a DVD.
The disc tray comes out automatically.
BURN DVD
COMPLETED
Create another
Disctray opens.
YES NO
To create another DVD with the same
content, touch [Y ES]. The disc tray comes
out and place a new writable DVD in the
disc drive.
To cancel the operation
On your camcorder, touch [CANCEL] after step
5, or select [CANCEL], then touch [YES] in
step 7.
Note that you cannot cancel the operation after
[Finalizing DVD] is displayed on the LCD
screen.
b Notes
• Do not disconnect the i.LINK cable or set the
POWER switch to another mode on your camcorder
until the picture is completely copied to the
computer.
• The DVD will be created even if you disconnect the
i.LINK cable (optional) or turn off the power of your
camcorder while [WRITING] or [CONVERTING]
is displa yed.
• When any of the following occurs, copying of the
picture is canceled. A DVD containing the data up to
the point the operation was canceled will be created.
Refer to the help files of “Click to DVD Automatic
Mode” for details.
– When there is a blank portion of 10 sec onds or
longer on the tape.
0:00:00:00
copy?
,continued
Other functions
Other functions
35
Page 36

– When the data of the tape conta ins a dat e bef or e
the recording date o f th e later images.
– When normal and wide size picture s a re r ecor de d
on the same tape.
• You cannot operate your camcorder in the following
situations:
– While playing back a tape
– While recording images onto a “Memory Stick”
– When touching [P-MENU], [MENU], [
(STANDARD SET)] and [A/VtDV OUT], then
touch to select [ON]. (DV format models only)
– When “Click to DVD” is started up from the
computer
Other functions
36
Page 37

Connecting an analog
VCR to the computer
via your camcorder
(DV format models
only)
— Digital convert function
DV Interface
to i.LINK (IEEE1394)
connector
Other functions
i.LINK cable (optional)
A/V connecting cable
A/V (audio/video)
jack
: Signal flow
* The sup plie d A/V connecting cable has a video
plug and S video plug. You need to set which plug
to use depending on the equipment to be connected.
For details, refer to the separate Camera Operations
Guide supplied with your camcorder.
You can convert an analog signal output fr om
an analog device such as a VCR to a digital
signal and t ran sf er i t t o a di git al devi ce , s uc h as
a computer, via your camcorder.
Select [P-MENU], [MENU], [
(STANDARD SET)], [DISPLAY], then [LCD
PANEL] (default setting). For details, refer to
the separate Camera Operations Guide supplied
with your camcor der.
(supplied)
*
(White)
(Red)
AUDIO/VIDEO
jacks
VCR (analog)
To carry out this operation, you need a software
application (such as ImageMixer Ver.1.5 for
Sony) that can read a video signal installed on
your computer.
ImageMix er Ver.1.5 for Sony is used to
describe the operation in this secti on.
(Yellow)
S video
plug (Black)
,continued
Other functions
37
Page 38

1 St art up the co mputer, and double-
click [ImageMixer Ver.1.5 for Sony]
displayed on the desktop.
2 Click (Capture Environment).
3 Click (DV Camcorder Capture
Mode).
4 Cli ck (Preference), check
[Capture using DV Cam.] in [DVC
Capture settings], then click [OK].
5 Co nnect your camcorder to the
computer using an i.LINK cab le
(optional), then connect it to a VCR
(analog equipment) using the A/V
connecting cable (supplied).
b Note
• When you connect your camcorder to a
computer, make sure you insert the connector in
the correct direction. If y ou insert the con nector
forcibly, it may be damaged, and caus es a
malfunction of your camcorder.
6 Prepare the power source for your
camcorder, then slide the POWER
switch repeatedly to select the PLAY/
EDIT mode.
z Tip
• You can also use the USB cable to connect your
camcorder and computer for conve rt ing si gna ls.
Click (USB Device Capture Mode) in this case.
Other functions
38
7 Touch [P-MENU], [MENU], [
(STANDARD SET)]and [A/VtDV
OUT], then touch to select [ON].
For details, refer to the separate Camera
Operations Guide supplied with your
camcorder.
Page 39

8 Click (Motion Picture
Capture).
12Click (Stop) at the point you
want to stop copying.
9 Select an album to copy the picture to.
10Start the playback on the VCR (analog
equipment).
11Click (Capture) at the point you
want to start copying.
13Stop the playback on the VC R (ana log
equipment).
b Notes
• You may not be able to output the pictures correctly
depending on the condition of the analog video
signal input to your camcorder.
• You cannot transfer pictures with copyright
protection signals to a comput er.
• You can use a USB cable inst ead of an i.LINK ca ble
(optional) to transfer pictures to a computer. Note,
however, that the pictu r e displayed may lack the
smoothness.
• The location of the USB jack and the shape of the
cable v ary de pend ing o n th e mode l. F or det ails , re fer
to the separate Came r a Op e r ations Guide supplied
with your camcorder.
Other functions
(red) turns to (black).
Other functions
39
Page 40

Additional information
Troubleshooting
Symptom Cause and/or Corrective Actions
The comput er does not recogn ize
your camcorder.
You cannot view the pictures the
camcorder is s eei ng on the
computer.
You cannot view th e pic tures
recorded on a tape on the
computer.
You cannot view th e pic tures
recorded on a tape on the
Macintosh computer.
You cannot view th e pic tures
recorded on a “Memory Stick”
on the computer.
cDisconnect th e cable from the computer and camcorder, then
connect it again fi rm l y .
cFor the model that is supplied with the Handycam Station, set
the USB ON/OFF switch to ON.
cFor the model that is supplied with the Handycam Station,
connect the Handycam Station to the camcorder firmly.
cDisconnect the USB device other than the keyboard, the mouse,
and the camcorder from the computer.
cDisconnect the cable from the computer, turn on the camcorder,
then connect it again.
cSlide the POWER switch to select the CAMERA-TAPE mode,
touch [P-MENU], [MENU], [ (STANDARD SET)] and
[USB-CA MERA], th en touch to select [US B S T REAM].
cDisconnect the cable from the computer, turn on the camcorder,
then connect it again.
cSlide the POWER switch repeatedly to select the PLAY/EDIT
mode, touch [P-MENU], [MENU], [ (STANDARD SET)]
and [USB-PLY/EDT], then touch to select [USB STREAM].
cTo copy picture s re corded on a tape to your Macintosh
computer, copy the pictures to a “Mem or y St ic k” in your
camcorder first, then copy the pictures recorded on the
“Memory Stick” t o your computer.
cInsert the “Memory Stick ” firmly.
cYou cannot use an i.LINK cable. Connect the camcorder and the
computer usi ng the USB cable.
cSlide the POWER switch repeatedly to select the PLAY/EDIT
mode, touch [P-MENU], [MENU], [ (STANDARD SET)]
and [USB-PLY/EDT], then touch to select [STD-USB].
• The computer does not recognize the “Memory Stick” during
camcorder operation such as tape playback or editing.
cFinish camcorder operation before connecting th e camcorder
to the computer.
Additional information
40
Page 41

Symptom Cause and/or Corrective Actions
The image does not appear on
ImageMixer Ver.1.5 for Sony
when using the USB cable.
cThe USB driver has been registered incorrectly as the computer
was connected to your camcorder before the installation of the
USB driver was completed. Follow the procedure below to
install the USB driver correctly.
For Windows 98*/Windows 98SE/Windows Me
* Wh en copying or playing the pictures on a tape using a computer, the
operation is not guaranteed on Win dows 98.
1 Check that your camcorder is connected t o a computer.
2 Right-click [My Computer], then click [Properties].
The [System Properties] screen appears.
3 Click the [Device Manager] tab.
4 If other devi ces below are alread y i n stalled, right-click
them, then click [Remove] to delete the m .
For copying and viewing pictures recorde d on a
tape
• [USB Audio Device] in th e [Sound, video and gam e
controllers] folder
• [USB Device] i n the [Other devices ] f o l der
• [USB Composite Device] in the [Universal Serial Bus
Controller] fold er
For copying and viewing pictures recorde d on a
“Memory Stick”
• [? Sony Ha ndyc am] o r [? Sony D SC] w ith a “?” mark i n t he
[Other devices] folder
5 When the [Conf ir m D evice Removal] sc reen appears,
click [OK].
6 Turn off the power of your camcorder, disconnect the
USB cable, then res tart the computer .
7 Re-install the USB driver (p. 8).
Additional information
b Note
• Deleting anything other than [USB Audio Device], [USB Device], [USB
Composite Device], [? Sony Handycam] and [? So ny DSC] ma y caus e
malfunction of your compute r .
,continued,continued
Additional information
41
Page 42

Symptom Cause and/or Corrective Actions
The image does not appear on
ImageMixer Ver.1.5 for Sony
when using the USB cable.
(Continued from the previous
page)
For Windows 2000
Log on as Administrators.
1 Check that your camcorder is connected to a computer.
2 Right-click [My Computer], then click [Properties].
The [System Prope rt ies] screen appear s.
3 Click the [Hardwa re] tab.
4 Click [Device Manager].
5 Click [V iew], then c lick [Devices by type].
6 If other devices be low are already inst al l ed, ri ght-click
them, then c lick [Remove] to delete them.
For copying and viewing pictures recorded on a
tape
• [USB Composite Device] or [Sound, video and game
controllers] in the [Universal Serial Bus Controller] folder
• [Composite USB Device] in the [USB Audio Device] folder
• [Composite U SB D evice] in the [Oth er devices] folder
For copying and viewing pictures recorded on a
“Memory Stick”
• [? Sony Handycam] or [? Sony DSC] with a “?” mark in the
[Other devices] folder
7 When the [Conf irm Device Rem oval] screen appear s,
click [OK].
8 Turn off the power of your camcorder, disconnect the
USB cable, then restart the computer.
9 Re-install the USB dri v er (p. 8 ).
Additional information
42
b Note
• Deleting anythi ng other than [USB Composite Device], [Sound, video
and game controllers], [Composite USB De vic e ], [? Sony Han dyc a m]
and [? Sony DSC] may cause malfunction of your computer.
Page 43

Symptom Cause and/or Corrective Actions
The image does not appear on
ImageMixer Ver.1.5 for Sony
when using the USB cable.
(Continued from the previous
page)
For Windows XP
Log on as Administrators.
1 Check that your camcorder is connected t o a computer.
2 Click [Start].
3 Right-click [My Computer], then click [Properties].
The [System Properties] screen appears.
4 Click the [Hardware] tab.
5 Click [Device Manager].
6 Click [View], then click [Devices by type].
7 If other devi ces below are alread y i n stalled, right-click
them, then click [Remove] to delete the m .
For copying and viewing pictures recorde d on a
tape
• [USB Composite Device] in the [Universal Serial Bus
Controller] fold er
• [USB Audio Device] in th e [Sound, video and gam e
controllers] folder
• [USB Device] i n the [Other devices ] f o l der
For copying and viewing pictures recorde d on a
“Memory Stick”
• [? Sony Ha ndyc am] o r [? Sony D SC] w ith a “?” mark i n t he
[Other devices] folder
8 When the [Conf ir m D evice Removal] sc reen appears,
click [OK].
9 Turn off the power of your camcorder, disconnect the
USB cable, then res tart the computer .
10 Re-install the USB driver (p. 8).
Additional information
The “Memory Stick” icon
([Removable Disk] or [Sony
MemoryStick]) does not appear
on the computer screen.
b Note
• Deleting anything other than [USB Composite Device], [USB Audio
Device], [USB Device], [? Sony Handycam] and [? Sony DSC] may
cause malfunction of your compute r.
cSlide the POWER switch repeatedly to select the PLAY/EDIT
mode on your camcorder.
cInsert a “Mem or y St ick” into your camcorder.
cDisconnect the USB device other than the keyboard, the mouse,
and the camcord er from the computer (p. 15).
cTouch [P-MENU], [MENU], [ (STANDARD SET)] and
[USB-PLY/EDT], t h e n touch to s elect [STD -USB].
• The computer does not recognize the “M emory Stick” during
camcorder opera tion such as tape playback or editing.
cFinish camcorder operation before connecting the camcorder
to the computer.
,continued
Additional information
43
Page 44

Symptom Cause and/or Corrective Actions
ImageMixer Ver.1.5 for Sony
cClose ImageMi x er Ver.1.5 for Sony, then restart the computer.
does not function correctly.
An error message appears whi le
operating ImageMixer Ver.1.5
cClose ImageMixer Ver.1.5 for Sony first, then set the POWER
switch on your camcorder to another mode .
for Sony.
Image Transfer does not start up. cDisplay pictures recorded on a “Memory Stick” with the
following procedures.
1 Double-click [My Computer].
2 Double-click the icon for the newly recognized drive
[Removable D is k ( F :)] (For Window s XP, [Sony
MemoryStick]).
It may take some time until the drive is recognized. If the
computer does not recognize it, the US B driver may be
installed incorrectly.
For details, see “The image does not appear on ImageMixer
Ver.1.5 for Sony whe n using the USB cable.” (p. 41).
3 Double-click the desired image file.
z Tip
• Windows X P does not start up Image T r ansfer automatica lly at the
default setting even thou gh [Re movable Disk] appears in [My
Computer]. To deactivate the setting, see “For Windows XP” in
“Copying and viewing pictures recorded on a “Memory Stick”” (p. 27).
An error message appears when
you place t he sup plied CD-ROM
in your comput er.
[USB Streaming... This function
is not available.] appears on the
screen of your cam c order.
Video CDs canno t be created. • CD-RWs cannot be used.
cSet the computer display as follows:
Windows: 800 × 600 dots or more, High Color (16 bits, 65 000
colors) or more
Macintosh: 800 × 6 00 dots or more, 32 000 colors or more
cStart the operations for MEMORY MIX, recording or playing
back pictures recorded on a “Memory Stick” after
USB
Streaming is finished.
• WINASPI is not installed. To use the CD writing function in
ImageMixer, WINASPI should be installed on your computer
(p. 10).
Additional information
44
b Note
• Installing WINASPI may cause malfunction of your computer if another
writing software application ha s alrea dy be e n inst al le d.
Page 45

Symptom Cause and/or Corrective Actions
Images from analog equipment
are not displayed on the
computer screen whe n the si gn al
convert function i s be i ng used.
There is no sound w hen the
camcorder is co nnected to the
computer via a USB cable.
cClick (Prefe rence) at the upper ri ght-hand corner of th e
ImageMixer screen, check [C apture using DV C am .] in [DVC
Capture settings], then click [OK].
• Sound is not suppor te d on Windows 98.
cChange the settings for your computer environment as described
in the following pr ocedures:
1 Double-click [Im ageMixer Ver.1.5 for Sony] on the
desktop.
2 Click (Capture Environmen t ).
3 Click (USB Device Capture Mod e), then click
(Preference).
4 Select another device from the pull-down menu of [Sound
capture device], then click [OK].
5 Close ImageMi xer Ver.1.5 for Sony, then restart it.
If the problem is not solved, repeat the p rocedure above.
The image displayed on the
computer is distorted.
cAdjust the image quality with the slider to view images with a
large amount of data. Adjust ing the slid er to th e le ft re duces the
noise, but the imag e quality deteriorates.
Additional information
Slider
b Note
• The picture goes dark while the adjustment takes place after you click the
slider.
,continued
Additional information
45
Page 46

Index
P
PC Camera.......................... 23
Preview................................ 22
A
Album..................................28
AVI format.......................... 25
B
BURN DVD........................35
C
Capture ................................21
CD-R................................... 25
CD-ROM.....................8, 9, 11
CD-RW.........................25, 44
Click to DVD......................34
Copying and view i ng
pictures (on a “Me m or y
Stick”).....................26, 33
Copying and view ing pictures
recorded on a tape
.......19
D
Digital conver t function..... 37
DirectX 8.0a........................10
Drag and drop .....................21
DV Interface.................16, 34
DVD .................................... 34
H
Handycam Station ........14, 32
U
USB cable ........................... 14
USB driver............................ 8
USB Streaming................... 23
V
VAIO...................................3 4
Video CD............................ 24
Video Stream i n g................. 23
W
WINASPI............................ 10
Windows ......................... 3, 19
Windows Media Player.....26
Writable DVD .................... 35
I
i.LINK cable...........13, 16, 34
Image Transfer .............. 11, 26
ImageMixer Ver.1.5
for Sony
Install...........................8, 9, 11
.................... 9, 19
M
Macintosh........................3, 31
MEMORY MIX................. 29
“Memory Stick” .....26, 29, 33
MICROMV...........................2
O
On-line help........................22
Additional information
46
Page 47

Page 48

Printed on 100% recycled paper using
VOC (Volatile Organic Compound)-free
vegetable oil based ink.
Printed in Japan
 Loading...