

Page 1
DVD Home Theatre
ALL
MASTER VOLUME
System
Operating Instructions
©2010 Sony Corporation Printed in China
4-259-831-12(1)
WARNING
To reduce the risk of fire or electric shock, do
not expose this apparatus to dripping or
splashing, and do not place objects filled with
liquids, such as vases, on the apparatus.
To reduce the risk of fire, do not cover the
ventilation opening of the apparatus with
newspapers, tablecloths, curtains, etc.
Do not place the naked flame sources such as
lighted candles on the apparatus.
As the main plug is used to disconnect the
unit from the mains, connect the unit to an
easily accessible AC outlet. Should you notice
an abnormality in the unit, disconnect the
main plug from the AC outlet immediately.
The main plug is used to disconnect this
device from the AC outlet, so position this
device in a location where it can be easily
unplugged.
Do not install the appliance in a confined
space, such as a bookcase or built-in cabinet.
Do not expose batteries or apparatus with
battery-installed to excessive heat such as
sunshine, fire or the like.
The unit is not disconnected from the mains
as long as it is connected to the AC outlet,
even if the unit itself has been turned off.
To prevent injury, this apparatus must be
securely attached to the floor/wall in
accordance with the installation instructions.
Indoor use only.
CAUTION
The use of optical instruments with this
product will increase eye hazard.
For European and Mexican models:
Notice for customers: The following
information is only applicable to equipment
sold in countries applying EU Directives.
The manufacturer of this product is Sony
Corporation, 1-7-1 Konan Minato-ku Tokyo,
108-0075 Japan. The Authorized
Representative for EMC and product safety is
Sony Deutschland GmbH, Hedelfinger Strasse
61, 70327 Stuttgart, Germany. For any service
or guarantee matters please refer to the
addresses given in separate service or
guarantee documents.
This appliance
is classified as a
CLASS 1
LASER product.
This marking is
located on the
rear exterior of
unit.
For the customers in the USA
To reduce the risk of fire or electric shock, do
not expose this apparatus to rain or moisture.
This symbol is intended to alert the
user to the presence of uninsulated
“dangerous voltage” within the
product’s enclosure that may be of sufficient
magnitude to constitute a risk of electric
shock to persons.
This symbol is intended to alert the
user to the presence of important
operating and maintenance
(servicing) instructions in the literature
accompanying the appliance.
Owner’s Record
The model and serial numbers are located on
the rear exterior of the unit. Record the serial
number in the space provided below. Refer to
them whenever you call upon your Sony
dealer regarding this product.
Model No. DAV-TZ130
Serial No.______________
The following FCC statement applies only to
the version of this model manufactured for
sale in the USA. Other versions may not
comply with FCC technical regulations.
NOTE:
This equipment has been tested and found to
comply with the limits for a Class B digital
device, pursuant to Part 15 of the FCC Rules.
These limits are designed to provide
reasonable protection against harmful
interference in a residential installation. This
equipment generates, uses, and can radiate
radio frequency energy and, if not installed
and used in accordance with the instructions,
may cause harmful interference to radio
communications. However, there is no
guarantee that interference will not occur in a
particular installation. If this equipment does
cause harmful interference to radio or
television reception, which can be determined
by turning the equipment off and on, the user
is encouraged to try to correct the
interference by one or more of the following
measures:
Reorient or relocate the receiving antenna
(aerial).
Increase the separation between the
equipment and receiver.
Connect the equipment into an outlet on a
circuit different from that to which the
receiver is connected.
Consult the dealer or an experienced radio/
TV technician for help.
CAUTION
You are cautioned that any changes or
modifications not expressly approved in this
manual could void your authority to operate
this equipment.
Important Safety Instructions
1) Read these instructions.
2) Keep these instructions.
3) Heed all warnings.
4) Follow all instructions.
5) Do not use this apparatus near water.
6) Clean only with dry cloth.
7) Do not block any ventilation openings.
Install in accordance with the
manufacturer’s instructions.
8) Do not install near any heat sources such
as radiators, heat registers, stoves, or
other apparatus (including amplifiers)
that produce heat.
9) Do not defeat the safety purpose of the
polarized or grounding-type plug. A
polarized plug has two blades with one
wider than the other. A grounding type
plug has two blades and a third grounding
prong. The wide blade or the third prong
are provided for your safety. If the
provided plug does not fit into your
outlet, consult an electrician for
replacement of the obsolete outlet.
10) Protect the power cord from being
walked on or pinched particularly at
plugs, convenience receptacles, and the
point where they exit from the apparatus.
11) Only use attachments/accessories
specified by the manufacturer.
12) Use only with the cart, stand, tripod,
bracket, or table specified by the
manufacturer, or sold with the apparatus.
When a cart is used, use caution when
moving the cart/apparatus combination
to avoid injury from tip-over.
13) Unplug this apparatus during lightning
storms or when unused for long periods
of time.
14) Refer all servicing to qualified service
personnel. Servicing is required when the
apparatus has been damaged in any way,
such as power-supply cord or plug is
damaged, liquid has been spilled or
objects have fallen into the apparatus, the
apparatus has been exposed to rain or
moisture, does not operate normally, or
has been dropped.
For the customers in Europe
Disposal of Old Electrical &
Electronic Equipment
(Applicable in the European
Union and other European
countries with separate
collection systems)
This symbol on the product or
this product shall not be treated as household
waste. Instead it shall be handed over to the
applicable collection point for the recycling of
electrical and electronic equipment. By
ensuring this product is disposed of correctly,
you will help prevent potential negative
consequences for the environment and
human health, which could otherwise be
caused by inappropriate waste handling of
this product. The recycling of materials will
help to conserve natural resources. For more
detailed information about recycling of this
product, please contact your local Civic
Office, your household waste disposal service
or the shop where you purchased the product.
Applicable accessories: Remote Control.
on its packaging indicates that
Disposal of waste batteries
(applicable in the European
Union and other European
countries with separate
collection systems)
the packaging indicates that the battery
provided with this product shall not be
treated as household waste.
On certain batteries this symbol might be
used in combination with a chemical symbol.
The chemical symbols for mercury (Hg) or
lead (Pb) are added if the battery contains
more than 0.0005% mercury or 0.004% lead.
By ensuring these batteries are disposed of
correctly, you will help prevent potentially
negative consequences for the environment
and human health which could otherwise be
caused by inappropriate waste handing of the
battery. The recycling of the materials will
help to conserve natural resources. In case of
products that for safety, performance or data
integrity reasons require a permanent
connection with an incorporated battery, this
battery should be replaced by qualified
service staff only. To ensure that the battery
will be treated properly, hand over the
product at end-of -life to the applicable
collection point for the recycling of electrical
and electronic equipment. For all other
batteries, please view the section on how to
remove the battery from the product safely.
Hand the battery over to the applicable
collection point for the recycling of waste
batteries.
For more detailed information about
recycling of this product or battery, please
contact your local Civic Office, your
household waste disposal service or the shop
where you purchased the product.
This symbol on the battery or on
DAV-TZ130
Trademarks
This system incorporates with Dolby* Digital
and Dolby Pro Logic adaptive matrix
surround decoders.
* Manufactured under license from Dolby
Laboratories.
Dolby, Pro Logic, and the double-D
symbol are trademarks of Dolby
Laboratories.
This system incorporates High-Definition
Multimedia Interface (HDMI™) technology.
HDMI, the HDMI logo and High-Definition
Multimedia Interface are trademarks or
registered trademarks of HDMI Licensing
LLC.
“BRAVIA” is a trademark of Sony
Corporation.
MPEG Layer-3 audio coding technology and
patents licensed from Fraunhofer IIS and
Thomson.
Windows Media is a registered trademark of
Microsoft Corporation in the United States
and/or other countries.
ABOUT MPEG-4 VISUAL: THIS PRODUCT
IS LICENSED UNDER THE MPEG-4
VISUAL PATENT PORTFOLIO LICENSE
FOR THE PERSONAL AND
NONCOMMERCIAL USE OF A
CONSUMER FOR DECODING VIDEO IN
COMPLIANCE WITH THE MPEG-4
VISUAL STANDARD (“MPEG-4 VIDEO”)
THAT WAS ENCODED BY A CONSUMER
ENGAGED IN A PERSONAL AND
NONCOMMERCIAL ACTIVIT Y AND/OR
WAS OBTAINED FROM A VIDEO
PROVIDER LICENSED BY MPEG LA TO
PROVIDE MPEG-4 VIDEO.
GB
NO LICENSE IS GRANTED OR SHALL BE
IMPLIED FOR ANY OTHER USE.
ADDITIONAL INFORMATION
INCLUDING THAT RELATING TO
PROMOTIONAL, INTERNAL AND
COMMERCIAL USES AND LICENSING
MAY BE OBTAINED FROM MPEG LA,
LLC. SEE http://www.mpegla.com/
For non-US models:
ABOUT DIVX VIDEO: DivX® is a digital
video format created by DivX, Inc. This is an
official DivX Certified device that plays DivX
video. Visit www.divx.com for more
information and software tools to convert
your files into DivX video.
ABOUT DIVX VIDEO-ON-DEMAND: This
DivX Certified® device must be registered in
order to play DivX Video-on-Demand (VOD)
content. To generate the registration code,
locate the DivX VOD section in the device
setup menu. Go to vod.divx.com/ with this
code to complete the registration process and
learn more about DivX VOD.
DivX®, DivX Certified® and associated logos
are registered trademarks of DivX, Inc. and
are used under license.
About these Operating
Instructions
“DVD” may be used as a general term for a
DVD VIDEO, DVD+RW/DVD+R, and
DVD-RW/DVD-R.
The system enters standby mode
automatically.
When the system is in pause, stop, open, or
no disc mode, the system will enter standby
mode automatically after 30 minutes.
Playable Discs
DVD DVD-ROM
CD
A CD or DVD will not play if it has not been
correctly finalized. For more information,
refer to the operating instructions supplied
with the recording device.
Discs that cannot be played
Blu-ray Discs
HD DVDs
DVD-RAMs
DVD Audio discs
PHOTO CDs
Super Audio CDs
Data track of CD-Extras
Audio material side on DualDiscs
DVD-R/DVD-RW/DVD+R/DVD+RW in
VR (Video Recording) mode
CPRM (Content Protection for Recordable
Media)-compatible DVD-R/RW containing
content flagged as “Copy once.”
Notes on discs
This product is designed to playback discs
that conform to the Compact Disc (CD)
standard. DualDiscs and some music discs
encoded with copyright protection
technologies do not conform to the Compact
Disc (CD) standard. Therefore, these discs
may not be compatible with this product.
DVD-R/DVD-RW
DVD+R/DVD+RW
CD-DA (Music CD)
CD-ROM
CD-R/CD-RW
VIDEO CD
Super VCD
2 3 4
Note on playback operations of a DVD
Some playback operations of a DVD may be
intentionally restricted by software producers.
Since this system plays a DVD according to
the disc contents the software producers
designed, some playback features may not be
available.
Note about double-layer DVDs
The playback picture and sound may be
momentarily interrupted when the layers
switch.
Region code (DVD VIDEO only)
Your system has a region code printed on the
rear of the unit and will only play a DVD
VIDEO (playback only) labeled with an
identical region code or
Note about Multi Session CD
You cannot play all sessions of a multisession
disc.
.
Playable Types of Files
Video
File format Extensions
MPEG4 Video
DivX Video
Music
File format Extensions
MP3 (MPEG1 Audio
Layer 3)
WMA
AAC “.m4a”
Photo
File format Extensions
JPEG “.jpg,” “.jpeg”
1) AVC is not compatible.
2) Unavailable on US models.
3) MP3PRO format is not compatible.
4) WMA DRM,WMA Lossless or WMA
1)
2)
3)
4)
PRO format are not compatible.
“.mp4,” “.m4v”
“.avi,” “.divx”
“.mp3”
“.wma”
It may take time to read files in the
following cases:
there are many folders or files.
the memory capacity of the USB device
that you are using is very large.
the memory of the USB device that you
are using is fragmented.
Unpacking
Checking the supplied items
(The inclusion of a SCART adapter and HDMI cable varies depending on the area/model.)
Main unit (1)
Subwoofer (1)
SCART adapter (1)
Speakers (5)
FM wire antenna (aerial) (1)
or
Video cord (1)
Operating Instructions
(this manual)
Note
Some files may not play depending on the
format, the encoding, or recording
condition.
Some USB devices may not work with this
system.
The system supports ISO 9660 Level 1/
Level 2, or Joliet in DATA CD.
The system supports UDF (Universal Disk
Format) in DATA DVD.
The system supports FAT12, FAT16, and
FAT32 in USB device.
The system can recognize the following files
or folders in DATA DVD, DATA CD and
USB device:
up to 300 folders
up to 648 files
6 7 85
Preparing the remote control
Insert two R6 (size AA) batteries (supplied) by matching the and ends on the batteries to
the markings inside the compartment.
Remote commander
(remote) (1)
R6 (size AA) batteries (2)
Foot pads
(subwoofer) (1 set)
HDMI cable (1)
Connecting the Speakers
Caution
Do not use any speakers other than those
supplied with this system.
To attach the foot pads to the
subwoofer
Remove the foot pads from
the protective cover.
Note
Use caution when placing the speakers and/
or speaker stands attached to the speakers
on a specially treated (waxed, oiled,
polished, etc.) floor, as staining or
discoloration may result.
Insert the connectors of the speaker cords to match the color of the SPEAKERS jacks of
the unit until they click.
Rear panel of the main unit
FRONT RIGHT SPEAKER
(RED)
FRONT LEFT SPEAKER (WHITE)
SUBWOOFER
CENTER SPEAKER (GREEN)
SUBWOOFER (PURPLE)
SURROUND LEFT SPEAKER
(BLUE)
SURROUND RIGHT SPEAKER
(GRAY)
FRONT R
CENTER
FRONT L
Main unit
SUR R
Connecting your TV
Depending on the jacks on your TV or set-top box, select the video and audio connection
method.
Connecting your TV/set-top box
When connecting to a TV only When connecting to a TV and set-top box
Video
Video
Connecting the video to your TV
Depending on the jacks on your TV, select one of the connection methods.
Connecting the audio from your TV/set-top box
To listen to TV or set-top box sound via the system, you need to perform a connection with an
audio cord (not supplied).
Audio
Video
Method 1 (supplied)
This is the basic connection.
Method 2 (supplied only with certain models)
Picture quality will be improved compared to Method 1.
Audio
Tip
For European models, connect the video
cord (supplied) and an audio cord (not
supplied) to the TV via the SCART adapter.
Connecting the FM wire antenna
(aerial)
Tip
If you have poor FM reception, use a 75-
ohm coaxial cable (not supplied) to connect
the unit to an outdoor FM antenna (aerial).
When Installing the
Speakers on a Wall
Caution
Contact a screw shop or installer for
information regarding the wall material or
screws to be used.
Use screws that are suitable for the wall
material and strength. As a plaster board
wall is especially fragile, attach the screws
securely to a beam. Install the speakers on a
vertical and flat wall where reinforcement is
applied.
Sony is not responsible for accidents or
damage caused by improper installation,
insufficient wall strength or improper screw
installation, natural calamity, etc.
1 Prepare screws (not supplied) that are
suitable for the hole on the back of
each speaker. See the illustrations
below.
4 mm (3/16 inch)
30 mm (1 3/16 inches)
Hole on the back of the speaker
5 mm
(7/32 inch)
10 mm
(13/32 inch)
2 Fasten the screws to the wall, then
hang the speaker on the wall.
Depth of fastened screw
8 to 10 mm
(11/32 to 13/32 inch)
Color System Setup
1 Connect the AC power cord.
2 Turn on the power of the main unit
and TV.
/
/ (power)
3 Press FUNCTION repeatedly or DVD/
CD to switch the function to DVD/CD.
Playback starts automatically if a disc
with an auto playback function is loaded.
Press twice to stop playback.
4 Switch the input selector on your TV
to display “Home Theatre System.”
5 Press SETUP in stop mode.
The Setup Menu appears.
6 Press / repeatedly to select
[Preference Page], then press .
7 Press / repeatedly to select [TV
Type], then press .
8 Press / repeatedly to select [PAL]
or [NTSC] from the displayed list, then
press .
9 Press SETUP to turn off the Setup
Menu.
Note
The display on the TV screen may be
interrupted momentarily after changing the
color system as described above.
SUR L
Parts and Controls :
Front panel
/ (on/standby)
Turns on the unit, or sets it to standby
mode.
Play operation buttons
(open/close)
Opens or closes the disc tray.
(play)
Starts or re-starts playback (resume play).
(stop)
Stops playback and remembers the stop
point (resume point).
The resume point for a title/track is the
last point you played.
Rear panel
VIDEO OUT jack
HDMI OUT jack
TV/CABLE (AUDIO IN L/R) jacks
FUNCTION
Selects the playback source.
(USB) port
Used for connecting a USB device.
Front panel display
(remote sensor)
MASTER VOLUME control
Adjusts the system’s volume.
Disc tray
ANTENNA (FM COAXIAL 75Ω) jack
SPEAKERS jacks
10 11 129
Remote control
TV INPUT
Switches the TV’s input source between the
TV signal and other input sources.
BRAVIA Sync
ONE-TOUCH PLAY
Activates One-Touch Play.
TV I/ (on/standby)
Turns on the TV or sets it to standby mode.
Not supplied
/ (on/standby)
Turns on the system or sets it to standby
mode.
Function selection buttons
Select the playback source.
DVD/CD
FM
USB
TV/CABLE
FUNCTION
Selects the functions in sequence.
REPEAT
Activates repeat/shuffle playback mode.
SURROUND
Selects surround audio output mode.
EQ
Selects EQ mode.
AUDIO
Selects the audio format/track and the FM
mode.
SUBTITLE
Selects the subtitle language when
multilingual subtitles are available.
ANGLE
Switches to other viewing angles when multiangles are recorded on a DVD VIDEO.
Number buttons
Enter the title/chapter numbers, preset radio
stations, etc.
PROGRAM
Activates program play and presets radio
stations.
SLEEP
Sets the sleep timer.
DVD TOP MENU
Opens the DVD’s Top Menu.
DVD MENU
Opens or closes the DVD’s menu.
MUTING
Turns off the sound temporarily.
///
Moves the highlight to a displayed item.
(ENTER)
Enters the selected item.
VOLUME +/–
Adjusts the volume.
SETUP
Opens or closes the setup menu.
DISPLAY
Opens or closes the Display Menu.
TIME
Switches time information during playback.
Playback operation buttons
/ (previous/next)
/ (fast reverse/fast forward)
/ (slow)
Activates slow reverse/slow forward when
pressed in pause mode.
(play)
(pause)
(stop)
Radio operation buttons
PRESET +/–
TUNING +/–
SHIFT
Press and hold this button to use buttons with
pink text labels.
Note
AUDIO IN
This button does not work.
14 15 1613
Continued
Page 2
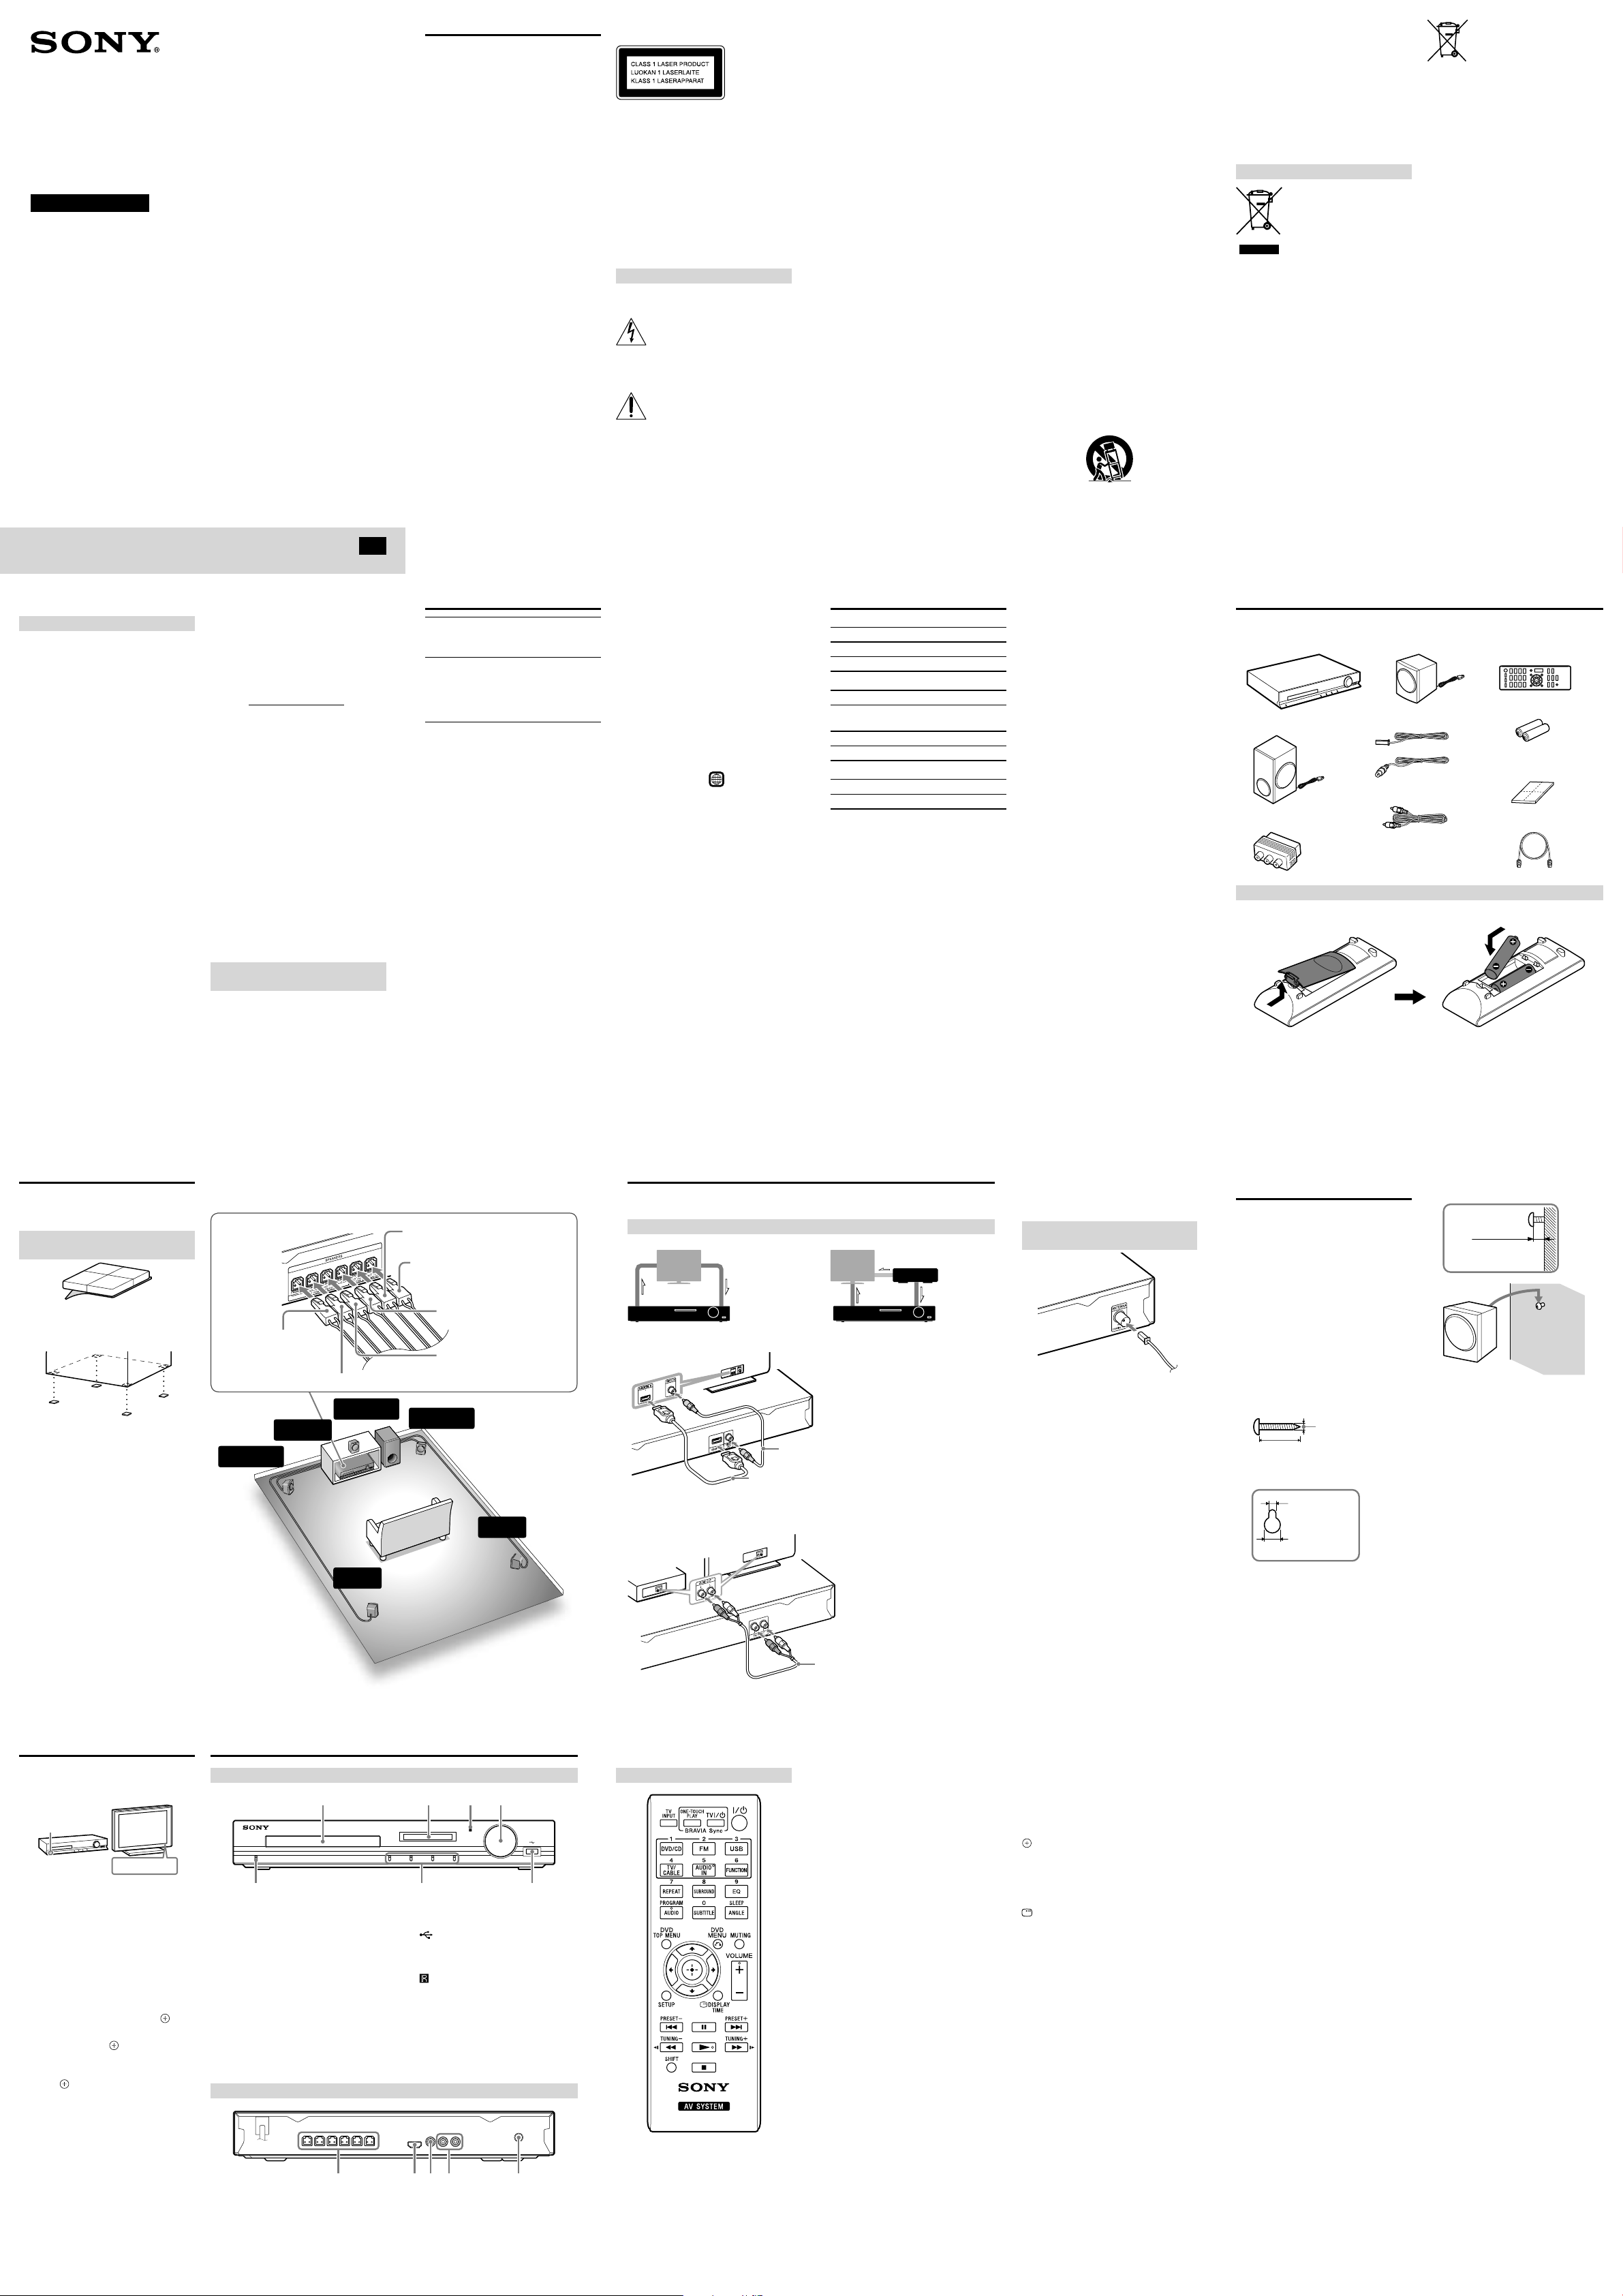
Playing a Disc
General Setup Page
TV Display
OSD Lang
Control for HDMI
16:9
ENG
On
4:3 Letter Box
16:9
4:3 Pan Scan
HDMI Audio
Screen Saver
Last Memory
Off
On
On
Auto Standby
On
--
--
1 Press DVD/CD.
You can also select this function by
pressing FUNCTION repeatedly.
2 Press to open the disc tray.
3 Place a disc on the tray, then press .
With the label side up.
4 Press to start playback.
5 Press VOLUME +/– to adjust the
volume.
Playing Files on a Disc/USB
Device
1 Press DVD/CD or USB.
DVD/CD: For a disc.
USB: For a USB device.
You can also select the function by
pressing FUNCTION repeatedly.
2 Load the source.
For a disc
Place a disc on the tray by pressing to
open/close the disc tray.
For a USB device
Connect a USB device to the (USB)
port.
USB device
3 Press / to select a folder, then
press and select a file.
4 Press to start playback.
5 Press VOLUME +/– to adjust the
volume.
Note
Do not remove the USB device during
operation. To avoid data corruption or
damage to the USB device, turn the system
off when connecting or removing the USB
device.
Other Playback Operations
To change angles
Press ANGLE during playback to select the
desired angle.
To display subtitles
Press SUBTITLE during playback to select
the desired subtitle language.
To change the sound
When the system is playing a DVD VIDEO,
DivX video file, or MPEG4 video file
recorded in multiple audio formats (PCM,
Dolby Digital, or MPEG audio), you can
change the audio format. If the DVD VIDEO
is recorded with multilingual tracks, you can
also change the language.
With a VIDEO CD or CD, you can select the
sound from the right or left channel and
listen to the sound of the selected channel
through both the right and left speakers.
Press AUDIO repeatedly during playback to
select the desired audio signal.
The selected audio signal format is displayed
on the TV screen.
To play a VIDEO CD with PBC
functions
When you start playing a VIDEO CD with
PBC (Playback control) functions, the menu
for your selection appears.
To play without using PBC
Press and hold SHIFT, then press the number
buttons to select the item number you want
in stop mode.
To search for a title/chapter/
track/scene, etc.
When playing a DVD/VCD
1 Press DISPLAY during play.
The Display Menu appears on the TV
screen.
2 Press / to select an option, then
press .
3 Press and hold SHIFT, then press the
number buttons to jump to the
desired option.
When playing a CD
1 Press DISPLAY during play.
The selection display appears on the TV
screen.
2 Press and hold SHIFT, then press the
number buttons to select the desired
track.
When playing an MP3/JPEG/DivX file
1 Press DISPLAY during play.
The selection display appears on the TV
screen.
2 Press and hold SHIFT, then press the
number buttons to select the desired
number.
To play in programmed order
Selects the tracks to play in the order you
want (only for CDs).
1 Press and hold SHIFT, then press
PROGRAM.
The Program Menu display appears on
the TV screen.
2 Press and hold SHIFT, then press the
number buttons to select the desired
track.
3 Press /// to select [Start] to play
the program.
To play repeatedly/shuffle, etc.
Press REPEAT repeatedly to select the
desired playback mode. The selected mode
appears in the front panel display.
“REP CHP”: Repeats the current chapter.
“REP TT”: Repeats the current title.
“REP ALL”: Repeats all titles.
“REP TRA”: Repeats the current track.
“REP OFF”: The system returns to normal
playback mode.
“SHUFFLE”: Plays the contents once in
random order until all the contents have
been played.
“SHUF REP”: Repeats shuffle play.
“FOLDER”: Plays the current folder.
“RANDOM”: Plays all files in random
order.
“SINGLE”: Plays the current file.
“REP ONE”: Repeats the current file.
“REP FLD”: Repeats the current folder.
Note
The selectable modes and their order differ
depending on the disc or file.
Selecting the Sound Effect
To select an equalizer setting
Press EQ repeatedly during playback until
the desired mode appears on the front panel
display.
“FLAT”: Flat and pure sound mode.
“CLASSIC”: Ideal for listening to classical
music and watching live concert DVDs.
“JAZZ”: Clear mid and high range.
Recreates the atmosphere of a live club with
the artist just in front of you. Good for jazz
music and watching dramas.
“ROCK”: Enhanced low and high range for
great sounding movie effects and
atmosphere. Great for action movies and
rock/pop music.
To select a surround setting
Press SURROUND repeatedly during
playback to select a surround audio output
mode. The selected mode appears in the
front panel display.
“MULTI” (A.F.D. MULTI): When the
source is 2 channel, sound is output from
all speakers.
“STANDARD” (A.F.D. STANDARD): The
system discriminates the sound format of
the source and presents sound as it was
recorded/encoded.
“DOLBY PL”(PRO LOGIC): Performs
Dolby Pro Logic decoding.
“2CH ST” (2CH STEREO): All formats are
downmixed to 2 channels.
Note
Depending on the playback stream, the
surround settings may not be effective.
Using a Tuner
To preset radio stations
You can preset 20 FM stations. You can then
tune in any of those stations simply by
selecting the corresponding preset number.
1 Press FM.
2 Press and hold TUNING +/– for 2
seconds to start tuning until you find
the desired radio station.
“SEARCH +” or “SEARCH –” appears in
the front panel display until a radio
station with sufficient signal strength is
found.
3 Press and hold SHIFT, then press
PROGRAM.
“P 01” flashes in the front panel display.
4 Press and hold SHIFT, then press the
number buttons to select a preset
number.
5 Press to store the station
frequency.
To select a preset radio station
1 Press FM.
2 Press PRESET +/- to select a preset
number.
You can also select a preset number by
pressing and holding SHIFT, then
pressing the number buttons.
If an FM program is noisy, you can select
monaural reception. There will be no stereo
effect, but reception will improve.
Press AUDIO.
“STEREO”: Stereo reception.
“MONO”: Monaural reception.
Convenient Functions
About the Control for HDMI
function (“BRAVIA” Sync)
You can control a TV compatible with the
Control for HDMI function by connecting it
to the system via an HDMI cable.
Available features
One-Touch Play
With one touch of ONE-TOUCH PLAY on
the remote control, the system and your
TV automatically turn on and the TV’s
input is switched to the system. Playback
starts automatically.
System-Power Off
When you turn the TV off by using the /
button on the TV’s remote control or TV
/ on the system’s remote control, the
system turns off automatically.
System Audio Control
You can switch the audio output to either
the TV speakers or this system’s speakers
via the TV’s menu.
Sleep timer
You can set the system to turn off at a preset
time, so you can fall asleep listening to music.
Press and hold SHIFT, then press SLEEP.
Each time you press this button, the minute
display (the remaining time) changes by 10
minutes.
A countdown of the last 20 seconds until the
unit turns off appears in the front panel
display.
To check the remaining time
Press and hold SHIFT and SLEEP for 3
seconds. The remaining time until the unit
turns off appears in the front panel display.
To cancel the sleep timer function
Press and hold SHIFT, then press SLEEP
repeatedly until “OFF” appears in the front
panel display.
To view information about the
disc
You can check the playing time and
remaining time of the current title, chapter,
or track.
Press and hold SHIFT, then press TIME
repeatedly.
Each time you press and hold SHIFT, then
press TIME while playing the disc, the
displayed item changes depending on the
disc.
Using the Setup Display
You can make various adjustments to items
such as picture and sound.
Displayed items vary depending on the
country model.
The default setting is underlined.
1 Press SETUP in stop mode.
The setup menu appears.
2 Press / to select one of the setup
menu categories, then press .
3 Press / to select a setup item, then
press or .
4 Select the option you wish to change
and press to confirm and go back
to the previously selected item.
5 Press SETUP to turn off the menu.
Selected category Setup categories
Selected setting Options
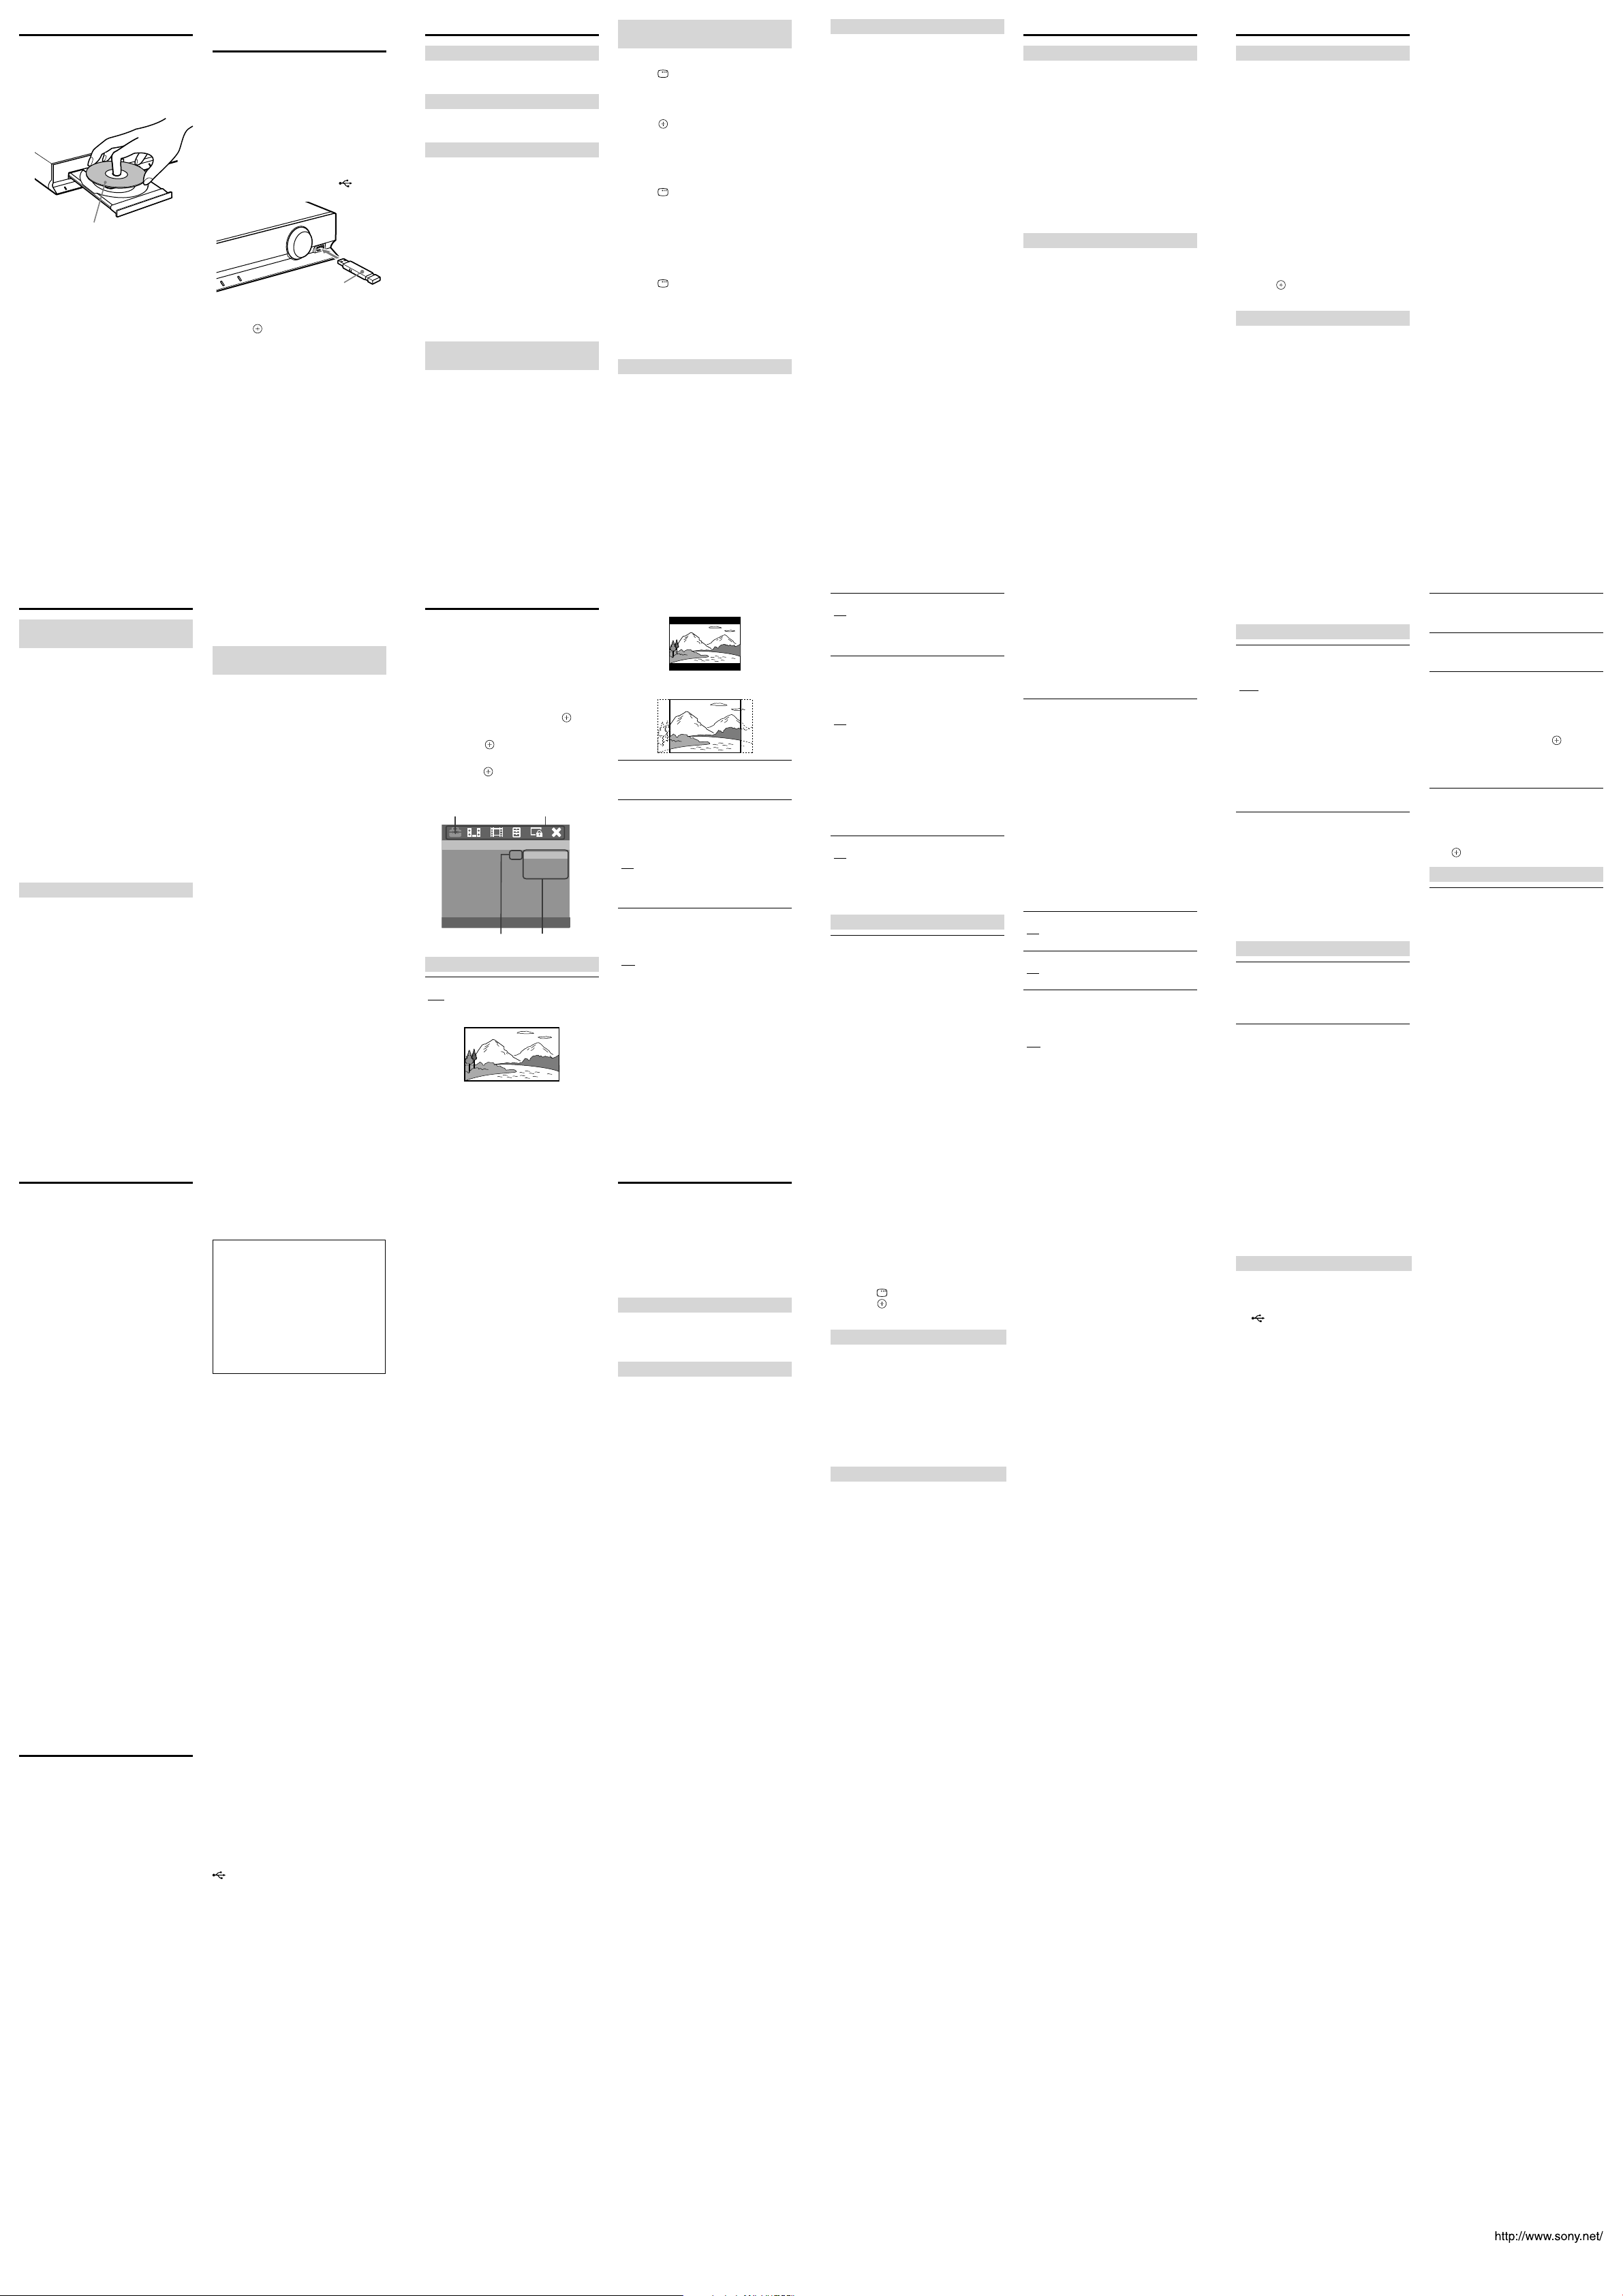
General Setup Page
[TV Display]
[16:9]: Select this when you connect a widescreen TV or a TV with a wide mode
function.
18 19 2017
[4:3 Letter Box]: Displays a wide picture with
black bands on the top and bottom.
[4:3 Pan Scan]: Displays a full-height picture
on the entire screen, with trimmed sides.
[OSD Lang] (On-Screen Display)
You can switch the display language on the
TV screen.
[Control for HDMI]
This function is available when you connect
the system and a TV that is compatible with
the Control for HDMI function via an HDMI
cable.
[On]: You can operate mutually between
components that are connected via an HDMI
cable.
[Off]: Off.
[HDMI Audio]
This setting is only required if you are using
the HDMI OUT jack for an audio
connection.
[Off]: Turns off HDMI audio output. You can
still enjoy sound output via the speaker
system.
[All]: The HDMI audio output format will be
same as the audio stream being played. If the
playback audio format is not supported, the
audio output will be changed to PCM
automatically.
[PCM]: HDMI audio output will be
downmixed to linear PCM (2-channel).
22 23 2421
[Screen Saver]
[On]: The screen saver image appears if you
do not operate the system for about 15
minutes.
[Off]: Off.
[Last Memory]
This system recalls the point where you
stopped the disc the last time it was played
and resumes playback from that point the
next time you insert the same disc.
[On]: The system stores the resume points in
memory.
[Off]: The system does not store the resume
points in memory. Playback restarts at the
resume point only for the current disc in the
unit.
Note
When the resume playback memory is full,
the resume playback point for the earliest
disc is deleted.
[Auto Standby]
[On]: Enters standby mode automatically
when in stop, pause, no disc, or eject mode
for more than 30 minutes.
[Off]: The unit does not enter standby mode
automatically.
Speaker Setup Page
[Level]
You can adjust the sound level of all the
speakers and the subwoofer.
[L]: Adjusts the sound level of left speaker. It
is possible to adjust the parameter from -6.0
dB to +0.0 dB.
[C]: Adjusts the sound level of center speaker.
It is possible to adjust the parameter from
-6.0 dB to +6.0 dB.
[R]: Adjusts the sound level of right speaker.
It is possible to adjust the parameter from
-6.0 dB to +0.0 dB.
[RS]: Adjusts the sound level of right
surround speaker. It is possible to adjust the
parameter from -6.0 dB to +6.0 dB.
[LS]: Adjusts the sound level of left surround
speaker. It is possible to adjust the parameter
from -6.0 dB to +6.0 dB.
[SW]: Adjusts the sound level of subwoofer. It
is possible to adjust the parameter from -6.0
dB to +6.0 dB.
[Distance]
If you move one of the speakers, be sure to
set the parameters of the distance from the
listening position to speakers.
[L/R]: Adjusts the distance of the left/right
speakers. It is possible to adjust the parameter
from 1.0 m to 7.0 m (3 to 23 ft).
[C]: Adjusts the distance of the center
speaker. It is possible to adjust the parameter
from (A) 1.6 m shorter than the setting of the
L/R channel to (B) the same setting of the L/
R channel ({L/R-5 ft} to L/R).
[Ls/Rs]: Adjusts the distance of the left/right
surround speaker. It is possible to adjust the
parameter from (A) 5.0 m shorter than the
setting of the L/R channel to (B) the same
setting of the L/R channel ({L/R-16 ft} to L/
R).
[Center Speaker]
[On]: Activates the center speaker.
[Off]: Deactivates the center speaker.
[Sur. Speaker]
[On]: Activates the surround speakers.
[Off]: Deactivates the surround speakers.
[Test Tone]
The speakers will emit a test tone to set the
Level.
[On]: The speakers emit the test tone.
[Off]: The speakers do not emit the test tone.
Tip
To adjust the volume of all speakers, turn
MASTER VOLUME on the unit or press
VOLUME +/- on the remote control.
Press /// repeatedly to select the
speaker and the desired level or distance.
Video Setup Page
[HDMI Resolution]
You can select the type of video signal that is
output from the HDMI OUT jack.
[Auto]: The system outputs the optimal video
signal for the connected TV.
[480p/576p]: The system outputs 720 × 480p*
or 720 × 576p* video signals.
[720p]: The system outputs 1280 × 720p*
video signals.
[1080i]: The system outputs 1920 × 1080i*
video signals.
[1080p]: The system outputs 1920 × 1080p*
video signals.
* i: interlace, p: progressive
For non-US models:
[DivX VOD]
[]: Displays the DivX® registration code.
Tip
Enter this unit’s DivX registration code
when you rent or purchase video from vod.
divx.com/. DivX videos rented or
purchased through the DivX® VOD (Video
On Demand) service can be played only on
the device to which they are registered.
Preference Page
[TV Type]
The TV type default setting varies depending
on the area.
[PAL]: For a PAL-system TV.
[NTSC]: For an NTSC-system TV.
[Audio]
Selects the preferred audio language for
DVDs with multiple sound tracks.
[Subtitle]
You can switch the language of the subtitles
recorded on a DVD VIDEO.
[Disc Menu]
You can switch the language for a disc’s
menu.
[Parental]
You can restrict playback of DVDs that have
ratings. Scenes may be blocked or replaced
with different scenes.
1 Press / to select a rating level from
1 to 8 or [Off], then press .
2 Press and hold SHIFT, then press the
number buttons to enter your 6-digit
password.
[Default]
This feature enables you to reset all the setup
menu options and your personal settings to
the factory defaults, except for your password
for the [Password] and [Parental] items.
Press to confirm the default reset.
Password Setup Page
[Password]
The default password is “000000.” To change
the password:
1 Press and hold SHIFT, then press the
number buttons to enter “000000” or
your last set 6-digit password in the
[Old Password] section.
2 Press and hold SHIFT, then press the
number buttons to enter a new 6digit password in the [New Password]
section.
3 Press and hold SHIFT, then press the
number buttons to enter the new 6digit password again in the [Confirm
PWD] section to confirm your entry.
4 Press [OK] to exit the menu.
Precautions
On placement
At high volume, over long periods of time,
the cabinet becomes hot to the touch. This
is not a malfunction. However, touching
the cabinet should be avoided. Do not place
the system in a confined space where
ventilation is poor as this may cause
overheating.
Do not install the system near heat sources
such as radiators or air ducts, or in a place
subject to direct sunlight, excessive dust,
mechanical vibration, or shock.
Do not install the system in an inclined
position. It is designed to be operated in a
horizontal position only.
Do not place heavy objects on the system.
On operation
If the system is brought directly from a cold
to a warm location, or is placed in a very
damp room, moisture may condense on the
lenses inside the unit. Should this occur,
the system may not operate properly. In
this case, remove the disc and leave the
system turned on for about half an hour
until the moisture evaporates.
If anything falls into the cabinet, unplug
the unit and have it checked by qualified
personnel before operating it any further.
On cleaning
Clean the cabinet, panel, and controls with
a soft cloth slightly moistened with a mild
detergent solution. Do not use any type of
abrasive pad, scouring powder, or solvent
such as alcohol or benzine.
If you have any questions or problems
concerning your system, please consult
your nearest Sony dealer.
On cleaning discs, disc/lens cleaners
Do not use cleaning discs or disc/lens
cleaners (including wet or spray types).
These may cause the apparatus to
malfunction.
On your TV’s color
IMPORTANT NOTICE
Caution: This system is capable of holding
a still video image or on-screen display
image on your television screen
indefinitely. If you leave the still video
image or on-screen display image
displayed on your TV for an extended
period of time you risk permanent
damage to your television screen.
Projection televisions are especially
susceptible to this.
On moving the system
Before moving the system, make sure that
there is no disc inserted, and remove the AC
power cord (mains lead) from the wall outlet
(mains).
On handling discs
To keep the disc clean, handle the disc by
its edge. Do not touch the surface.
Do not stick paper or tape on the disc.
Do not expose the disc to direct sunlight or
heat sources such as hot air ducts, or leave
it in a car parked in direct sunlight as the
temperature may rise considerably inside
the car.
On cleaning discs
Before playing, clean the disc with a
cleaning cloth.
Wipe the disc from the center out.
Do not use solvents such as benzine,
thinner, commercially available cleaners, or
anti-static spray intended for vinyl LPs.
This system can only play back a standard
circular disc. Using neither standard nor
circular discs (e.g., card, heart, or star shape)
may cause a malfunction.
Do not use a disc that has a commercially
available accessory attached, such as a label
or ring.
On heat radiation
Due to the slim type of main unit design, you
may feel some heat on the top of the unit.
This is normal. Please consult your nearest
Sony dealer if you have any questions.
Troubleshooting
If you experience any of the following
difficulties while using the system, use this
troubleshooting guide to help remedy the
problem before requesting repairs. Should
any problem persist, consult your nearest
Sony dealer.
Note that if service personnel changes some
parts during repair, these parts may be
retained.
Power
The power is not turned on.
Check that the AC power cord (mains
lead) is connected securely.
Picture
There is no picture.
The video connecting cords are not
connected securely.
The unit is not connected to the correct
TV input jack.
The system is not selected via the video
input of the TV.
Check the output method on your
system.
Even though you set the aspect ratio in
[TV Display] of [General Setup Page], the
picture does not fill the TV screen.
The aspect ratio on the disc is fixed.
Color irregularity occurs on the TV
screen.
The system’s speakers contain magnet
parts, so magnetic distortion may occur.
When color irregularity occurs on the
TV screen, check the following items.
Install the speakers at least 0.3 meters
(1.0 ft) from your TV set.
If the color irregularity persists, turn off
the TV set once, then turn it on after 15
to 30 minutes.
Reposition the speakers farther away
from your TV set.
The [TV Type] setting does not match
your TV.
[TV Type] can be reset according to the
following procedure:
1. Press
to take out the disc.
2. Press DISPLAY.
3. Press .
[TV Type] will be reset.
Sound
There is no sound. Severe hum or noise is
heard.
The speaker cords are not connected
securely.
Clean the disc.
The sound loses stereo effect when you
play a VIDEO CD or CD.
Set the audio setting to [Stereo] by
pressing AUDIO.
Operation
Radio stations cannot be tuned in.
Check that the antenna (aerial) is
connected securely. Adjust the antenna
(aerial) or connect an external antenna
(aerial) if necessary.
A disc does not play.
The region code on the DVD does not
match the system.
Moisture has condensed inside the unit
and may cause damage to the lenses.
Remove the disc and leave the unit turned
on for about half an hour.
A DATA CD/DATA DVD cannot be played.
The DATA CD is not recorded in ISO
9660 Level 1/Level 2, or Joliet.
The DATA DVD is not recorded in UDF
(Universal Disk Format).
A JPEG image file cannot be played.
It is larger than 2,048 (width) × 1,536
(height) in normal mode, or more than
2,000,000 pixels in progressive format
which is mainly used on Internet Web
sites.
A DivX video file cannot be played.
The DivX video file is larger than 720
(width) × 576 (height).
The name of a folder or file is not
displayed correctly.
The system can only display numbers and
letters of the alphabet. Other characters
are displayed as [_].
A disc does not start playing from the
beginning.
Resume Play has been selected.
During stop, press and then start
playback.
Program play has been selected. During
stop, press and then start playback.
Shuffle play has been selected. During
stop, press and then start playback.
A disc cannot be ejected and “LOCKED”
appears in the front panel display.
Contact your Sony dealer or local
authorized Sony service facility.
The system does not work normally.
Disconnect the AC power cord (mains
lead) from the wall outlet (mains), then
reconnect after several minutes.
The Control for HDMI function does not
work.
Set the [Control for HDMI] setting in
[General Setup Page] to [On].
Make sure that the connected component
is compatible with the [Control for
HDMI] function.
Check the connected component’s setting
for the Control for HDMI function. Refer
to the operating instructions supplied
with the component.
USB device
“OVERLOAD“ appears in the front panel
display.
Remove the USB device from the
(USB) port. Make sure there is no
problem with the USB device.
The USB device (audio file/JPEG image
file) cannot be played.
Files that are encrypted or protected by
passwords, etc., cannot be played.
There is no playable file in the USB
device.
Specifications
AUDIO POWER SPECIFICATIONS
for the U.S. models
POWER OUTPUT AND TOTAL
HARMONIC DISTORTION:
(FTC)
Front L + Front R With 3 ohms loads,
Amplifier Section
POWER OUTPUT (rated):
Front L + Front R 32 W + 32 W (at 3
POWER OUTPUT (reference):
Inputs
TV/CABLE : Pin jack
both channels driven,
from 180 - 15,000 Hz;
rated 23 watts per
channel minimum
RMS power, with no
more than 1% total
harmonic distortion
from 250 milli watts to
rated output.
ohms, 1 kHz, 1%
THD)
Front L/Front R/
Surround L/Surround
R: 43 watts (per
channel at 3 ohms, 1
kHz)
Center: 89 watts (per
channel at 6 ohms, 1
kHz)
Subwoofer: 89 watts (at
6 ohms, 100 Hz)
26 27 2825
CD/DVD System
Laser Diode Properties
* This output is the value measurement at a
distance of 200 mm from the objective lens
surface on the Optical Pick-up Block with
7 mm aperture.
USB Section
(USB) port:
Maximum current: 500 mA
Tuner Section
System PLL quartz-locked
Tuning range
North American and Brazilian models:
Other models: 87.5 MHz - 108.0 MHz
Antenna (aerial) terminals
Intermediate frequency
Video Section
Outputs VIDEO: Pin jack
HDMI OUT: HDMI
Speakers
Front
SS-TS107
Dimensions (approx.) 91 mm × 112 mm ×
Mass (approx.) 0.4 kg (15 oz)
Emission Duration:
Continuous
Laser Output*: Less
than 1,000 μW
digital synthesizer
87.5 MHz - 108.0 MHz
(100 kHz step)
(50 kHz step)
75 ohms, unbalanced
10.7 MHz
19-pin
101 mm (3 5/8 in ×
4 1/2 in × 4 in) (w/h/d)
incl. projecting parts
Center
SS-CT102
Dimensions (approx.) 91 mm × 112 mm ×
Mass (approx.) 0.5 kg (1 lb 2 oz)
Surround
SS-TS107
Dimensions (approx.) 91 mm × 112 mm ×
Mass (approx.) 0.4 kg (15 oz)
Subwoofer
SS-WS103
Dimensions (approx.) 190 mm × 345 mm ×
Mass (approx.) 3.5 kg (7 lb 12 oz)
General
Power requirements
North American and Mexican models:
Argentine models: 220 V - 240 V AC,
Brazilian models: 127 V - 240 V AC,
Latin American models:
Other models: 220 V - 240 V AC,
Power consumption On: 67 W
*
Valid when the system is in the following
status:
[Control for HDMI] is set to [Off].
101 mm (3 5/8 in ×
4 1/2 in × 4 in) (w/h/d)
incl. projecting parts
101 mm (3 5/8 in ×
4 1/2 in × 4 in) (w/h/d)
incl. projecting parts
225 mm (7 1/2 in ×
13 5/8 in × 8 7/8 in)
(w/h/d) incl. projecting
parts
120 V AC, 60 Hz
50/60 Hz
50/60 Hz
110 V - 240 V AC,
50/60 Hz
50/60 Hz
Standby: <1 W*
Dimensions (approx.) 360 mm × 56 mm ×
Mass (approx.) 2.6 kg (5 lb 12 oz)
Design and specifications are subject to
change without notice.
30 31 3229
342 mm (14 1/4 in ×
2 1/4 in × 13 1/2 in) (w/
h/d) incl. projecting
parts
 Loading...