

Sony CMT-SE9 User Manual

Micro Hi-Fi
Component
System
Operating Instructions
4-247-824-11(1)
CMT-SE9
©2004 Sony Corporation
WARNING
To prevent fire or shock hazard, do not
expose the unit to rain or mo ist u r e.
To prevent fire, do not cover the ventil at ion of the
apparatus with news papers, table-cloths, curtains, etc.
And don’t place lighted candle s on the apparatus.
To prevent fire or shock hazard, do not place obje c ts
filled with liquids, such as vases , on the ap pa ratus.
Do not install the appliance in a confined space,
such as a bookcase or built-in cabi ne t.
This appliance is
classified as a CLASS 1
LASER product. This
marking is locat ed on the
side exterior.
Don’t throw away the battery with
general house waste, dispose of it
correctly as chemical was te.
This system incorporates Dolby* Digital, Dolby Pro
Logic (II) adaptive matrix surround decode r , and the
DTS** Digital Surround System.
* Manufactured under license from Dolby
Laboratories.
“Dolby”, “Pro Logic” and the double-D symbol are
trademarks of Dolby Laboratories.
**Manufactured under license from Digital Theater
Systems, Inc. “DTS” and “DTS Digital Surround”
are registered tradema rk s of Digital Theater
Systems, Inc.
GB
2

Table of Contents
How to use this manual...........................5
Playable discs..........................................5
Getting Started
Hooking up the system............................8
Positioning the speakers........................11
Setting the clock....................................12
Selecting a language .............................13
DVD/VIDEO CD/CD/Super
Audio CD/MP3/JPEG – Play
Loading a disc........................ ... .... ........14
Playing a disc........................................14
— Normal Play/Shuffle Play
Playing DVDs using the menu..............17
Playing VIDEO CDs with PBC functions
(Ver. 2.0).........................................17
— PBC Play
Playing JPEG Image Files ....................18
Playing repeatedly.................................19
— Repeat Play
Creating your own program.................. 21
— Program Play
Searching for a title/chapter/track/i nd ex /
album/file........................................23
DVD – Various functions
Changing the sound/subtitle/
language.......................................... 25
Adjusting the angle/imag e....................29
Restricting disc playback......................31
— CUSTOM PARENTAL
CONTROL/PARENTAL
CONTROL
Speaker settings ....................................35
— SPEAKER SETUP
MD – Play
Loading an MD............................. .... ... .38
Playing an MD......................................38
— Normal Play/Shuffle Play/
Repeat Play
Programming MD tracks.......................39
— Program Play
Playing only the tracks in the desired
group...............................................40
MD – Recording
Before you start recording....................41
Recording tips.......................................43
Recording a CD on an MD...................43
— CD-MD Synchro Recording
Recording a tape on an MD..................44
— TAPE-MD Synchro Recording
Recording on an MD manually ............45
— Manual Recording
Starting recording with 6 seconds of
prestored audio data... .... ................46
— Time Machine Recording
Marking track numbers................ .... ... ..47
Making a space between tracks 3 seconds
long automatically..........................48
— Smart Space
Adjusting the recording level ............... 49
MD – Editing
Editing tips............................................ 50
Registering tracks in groups.................50
— Group Function
Labelling an MD/group/track............... 52
— Name Function
Creating a new group................... .........53
— Create Function
Releasing group registrations...............54
— Release Function
Erasing recordings....................... .... ..... 55
— Erase Function
Moving recorded tracks........................57
— Move Function
Combining recorded tracks...................58
— Combine Funct ion
Dividing recorded tracks ......................59
— Divide Function
Undoing the last edit.............................60
— Undo Function
Changing the recorded level after
recording......................................... 60
— S.F Edit Function
GB
3

Tuner
Presetting radio stations........................62
Listening to the radio............................63
— Preset Tuning
— Manual Tuning
Labelling the preset stations..................64
— Station Name
Using the Radio Data System (RDS)....65
Optional Personal Computer
Connecting a personal computer to the
system.............................................80
About the supplied M-crew..................81
Listening to audi o files on a personal
computer.........................................81
About the supplied SonicStage for Sony
Net MDs............................... .......... 83
Tape – Play
Loading a tape.......................................66
Playing a tape........................................66
Tape – Recording
Recording your favorite CD/MD tracks on
a tape...............................................67
— CD/MD-TAPE Synchro
Recording
Recording on a tape manually...............68
— Manual Recording
Sound Adjus t ment
Switching the speaker output................69
Selecting the surround effect................70
Adjusting the sound..............................71
Timer
Falling asleep to music......... .... .............72
— Sleep Timer
Waking up to music..............................72
— Play Timer
Timer recording radio programs...........74
Display
Turning off the display..........................75
— Power Saving Mode
Viewing information ab ou t th e d isc in the
display.............................................76
Viewing information ab ou t th e d isc in the
on-screen display............................78
Checking the date information..............79
(JPEG only)
Optional Components
Hooking up optional components.........84
Listening to audio from a connecte d
component......................................85
Recording audio from a connected
component......................................85
Troubleshooting
Problems and remedies.........................87
Self-diagnosis display...........................92
Messages............................................... 93
Additional Info rm at io n
Precautions ...........................................96
System limitations of MDs...................98
Specifications .......................................99
Language code list..............................102
List of items that can be displayed and
selected by disc type............. ... ..... 103
System setup item list......................... 104
Glossary.............................................. 105
List of button locations and reference
pages.............................................109
GB
4

How to use this manual
• This manual mainly explains operations u sing
the remote, but the same operations can also
be performed us in g t he buttons on the unit
having the same or similar names.
• The following symbols are used in this
manual.
Symbol Meaning
Functions that can be used with
DVD VIDEOs
Functions that can be used with
VIDEO CDs
Functions that can be used with
Audio CDs or Super Audio CDs
Functions that can be used with
MP3 audio tracks
Functions available for JPEG
files
Playable discs
Format of discs Disc logo
CD-R/CD-RW (audio
data/MP3/JPEG files)
The “DVD VIDEO” logo is a trademark.
Region code of DVDs you can
play on this system
Your system ha s a region code printe d on the
back of the unit and will only play DVDs
labelled with identical region code.
DVDs labelled will also be played on this
system.
If you try to play any ot her DVD, the message
“Playback prohibited by area limitations.” will
appear on the TV screen. Depending on the
DVD, no region code indication may be labelled
even though playing the DVD is prohibited by
area restrictions.
ALL
You can play back the following discs on this
system. Other discs cannot be playe d back.
List of playable discs
Format of discs Disc logo
DVD VIDEOs
VIDEO CDs
Audio CDs
Super Audio CDs
MD
Discs that this system ca nnot
play
• CD-ROMs (except for ext ension “.MP3” ,
“.JPG”, or “.JPEG”)
• CD-Rs/CD-RWs other than those record ed in
the following formats:
– music CD format
– video CD format
– MP3/JPEG format that conforms to
ISO9660
Session
• Data part of CD-EXTRAs
• EXTRA data part of S uper Audio CDs
• DVD-RWs in VR mode (DVD-RWs created
in VR (Video Recording) mode allow the
contents to be progr am m ed or edited.)
• DVD-ROMs, DVD-RAMs
• DVD Audio discs
• A DVD with a different region code
• A disc that has a non-standard sh ape (e.g.,
card, heart)
• A disc with paper or stickers on it
*1
level 1/level 2, Joliet or Multi
*2
continued
GB
5

• A disc that has the adhesive, cellophane tape,
or a sticker still left on it
• A disc that has commercially available
stickers, rings or other accessor i es attached
• An 8 cm disc conver ted to a standard disc
using an adaptor
*1
ISO9660 Format
The most common in te rnational standard for the
logical format of files and folders on a CD-ROM.
There are several specification levels. In level 1, file
names must be in the 8.3 format (n o more than eight
characters in the na me, no more t han three char acters
in the extension “.MP3” o r “.JP G”) and in capital
letters. Folder names can be no long er tha n e ight
characters. There can be no more than eight nested
folder levels. Level 2 specifications allow file names
and folder names up to 31 character s long. Each
folder can have up to 8 trees.
For Joliet in the expansion format (file and folder
names can have up to 64 characters) make sure of the
contents of the writing software, etc.
*2
Multi Session
Conventional CDs begin at a CD control area called
the Lead-in and end at an area called Lead-out. A
Multi Session CD is a CD having multiple sessions,
with each segment from Lead-in to Lead -o u t
regarded as a single session.
CD-EXTRA: This format records audio (audio CD
data) on the tracks in session 1 and data on the tracks
in session 2.
Notes on discs
• This system can play CD-R/CD-RW/DVD-R/
DVD-RW (Ver. 1.1)/DVD+R/DVD+RW
discs edited by the user (For DVD-R/
DVD-RW (Ver. 1.1)/DVD+R/DVD+RW
discs, this system can play only in video
mode.). However, note that playback of some
discs may not be possible depending on th e
recording device used for recording or the
disc condition.
• Discs recorded on CD-R/CD-RW driv es may
not be played ba ck be ca use o f sc rat che s, d irt ,
recording condition or the driver’s
characteristics.
• CD-R and CD-RW di scs that have not been
correctly fina lized (processing to al l ow pl ay
by a normal CD player) cannot be played.
• CD-R and CD-RW discs recorded in multisession that have not ended by “closing the
session” are not supported.
• The system may be unable to play MP3/JPEG
format files that do not have the extender
“.MP3”, “.JPG”, or “.JPEG”.
• Attempting to pl ay non-MP3/JPE G format
files that have the extender “.MP3”, “.J P G”,
or “.JPEG” may re sult in noise or
malfunction. Playback is possible up to 8
levels.
• An album that does not include an MP3 audio
track or JPEG file is skipped.
• Progressive JP EG format files cann ot be
played.
• JPEG images with one vertical dot cannot be
displayed.
• JPEG images wit h 4720 or more vertical o r
horizontal dots can not be displayed.
• The maximum number of albums is 99 (The
maximum number of tracks that can be
recorded in an MP 3 or JPEG album is 250 .)
• With formats other than ISO9660 level 1/
level 2, folder names or file names may not be
displayed correctly.
• The following discs take a lon ger time to start
playback.
– a disc recorded with complicat ed tree
structure
– a disc recorded in Multi Session
– a disc to which data can be added (no n-
finalized disc)
• Some CD-Rs, CD-RWs, DVD-Rs or DVDRWs (in video mode) (DVD-RWs created in
video mode have the same format as a DVD
VIDEO) cannot be played on this system
depending upon the recording quality or
physical condition of the disc, or the
characteristics of the recording device.
Furthermore, the disc will not play if it has no t
been correctly fi nalized. For more
information, see the operating instructions for
the recording de vi ce.
• A disc rec orded i n packet writ e format cannot
be played.
GB
6

Note on playback operations
of DVDs and VIDEO CDs
Some playback operations of DVDs and VIDEO
CDs may be intentionally set by software
producers. Since this system plays DVDs and
VIDEO CDs according to the disc contents the
software producers designed, some playback
features may not be available. Also, refer to the
instructions supplied with the DVDs or VIDEO
CDs.
Music discs encoded with
copyright pro tection
technologies
This product is designed to playback discs that
conform to the Compact Disc (CD) standard.
Recently, variou s m usic discs encoded with
copyright protection technologies are m ar keted
by some record companies . Plea se be awar e that
among those discs, there are some that do not
conform to the CD standard and may not be
playable by this prod uct.
Cautions when playing a disc
that is recorded in Multi
Session
Copyrights
This product inc or porates copyright prot ection
technology that is protecte d by U.S. p atents and
other in tellectua l p roperty ri g hts. Use o f this
copyright pr ot ection technology must be
authorized by Macrovision, and is intended for
home and other limited viewing uses onl y unless
otherwise authorized by Macrovision. Reverse
engineering or disassembly is prohibited.
• This system can play Multi Session CDs
when an MP3 audio track is contained in t he
first session. Any subsequent MP3 audio
tracks recorded in later sessions can also be
played back.
• This system can play Multi Session CDs
when a JPEG image file is contained in the
first session. Any subsequent JPEG image
files recorded in later sessions can also be
played back.
• If audio tracks and images in music CD
format or video CD format are recorded in the
first session, only the first sessio n will be
played back.
GB
7

Getting Started
Hooking up the system
Perform the following procedures 1 to 8 to hook up your syste m using the supplied co rds and
accessories.
AM loop antenna
FM lead antenna
DVD player/Tuner MD/Tape deck
To center speaker To front speaker (left)
To front speaker (right)
To surround speaker (right)
To surround speaker (left)
To subwoofer
Preparation
Place the compo ne nts as shown below.
– When stacked
DVD player/Tuner
– When placed side-by-side
MD/Tape deck DVD player/Tuner
MD/Tape deck
GB
8

1 Connect the speakers.
Be sure to match the appropriate speaker
cords from the speaker terminals to the
corresponding SPEAKER terminals on the
DVD player.
Connect Terminal
Front speakers SPEAKER FRONT
Surround
speakers
Center speaker SP EAKER CENTER (green)
Subwoofer SPEAKER WOOFER
Speakers
Black (#)
Black (#)
L (white)/R (red)
SPEAKER SURR L (blue)/
R (gray)
(purple)
Gray (3)
Gray (3)
2 Connect the FM and AM antennas.
Set up the AM loop antenna, then connect
it.
AM loop antenna
Extend the FM lead antenna horizontally
3 Connect the audio cords.
Connect to the corresponding le tter jack (A,
B) in the order indicat ed on the rear panel.
Match the jack and pl ug colors, and insert
the plugs firml y all the way.
4 Connect the digital optical cables.
Connect to the corresponding letter jack (C,
D) in the order indicated on the rear pane l.
5 Connect the system control cable to
the SYSTEM CONTROL connectors on
the DVD player.
Getting Started
Notes
• When inserting the speaker cor d plugs into the
SPEAKER terminals on the DVD player, press in the
plugs all the way until they click. When unplugging
the speaker cords, press the protrusions on the plugs
and pull out the plugs.
• Keep the speaker cords away from the an ten n as to
prevent noise.
• Do not place the surround speakers on top of a TV.
This may cause distortion of the colors in the TV
screen.
• Be sure to connect both left and right surro und
speakers. Otherwise, the sound will not be heard.
Tip
When positioning the front spea k e r s highe r tha n floor
level, using the speaker stand WS-MC1 (not supplied)
is convenient.
Note
The system cable is used to send signals and electricity
between the DVD player and MD deck for interlinked
operation.
Be sure to insert the co nnector unt il it click s into place.
Otherwise the system will not operate correctly.
continued
GB
9

6 Connect the t INPUT jack of your TV
to the T LINE-TV jack on the DVD
player with the SCART cord (not
supplied).
When you connect using the SCART cord,
check that th e TV conforms to S vi deo or
RGB signals. If the TV conforms to
S video, change the input mode of the TV to
RGB signals. Refer to the operating
instructions supplied with the TV to be
connected.
When using a TV
Turn on the TV and select the video input so that you
can view the pictures from this syste m.
When connecting a video deck
Connect the TV and the video deck using video and
audio cords (not supplied) as shown below.
7 Connect the mains lead on the DVD
player to mains on the MD deck.
8 Connect the mains lead on the MD deck
to mains.
If the plug does not fit your wall socket,
detach it from the pl ug (only for mode ls
equipped with an adapter).
To turn on the system , press
Note
When you turn on the system, the disc is not pulled into
the disc slot until “No Disc” appears in the display. Do
not attempt to push in the disc until “No Disc” appears,
as this may cause malfunction.
?/1.
To connect optional components
See page 84.
Inserting two size AA (R6)
batteries into the remote
10
TV
Video deck System
Do not connect
directly.
If you connect a video deck between this system and the
TV, you may experience video leakage when watching
the video signal from this system. Do not connect a
video deck between this system and the TV.
Note
Do not place the TV on this system.
Tip
To listen to TV, pre ss FUNCTION repeatedl y to s elect
“TV”.
GB
e
E
E
e
Notes
• If you do not use the remote for a long period of time,
remove the batteries to avoi d possible damage from
battery leakage and corrosion.
• See page 109 fo r th e loca ti on of the remot e sens or .
Tip
With normal use, the batteries should last for about six
months. When the remote no longer operates the
system, replace both ba tteries with new ones.
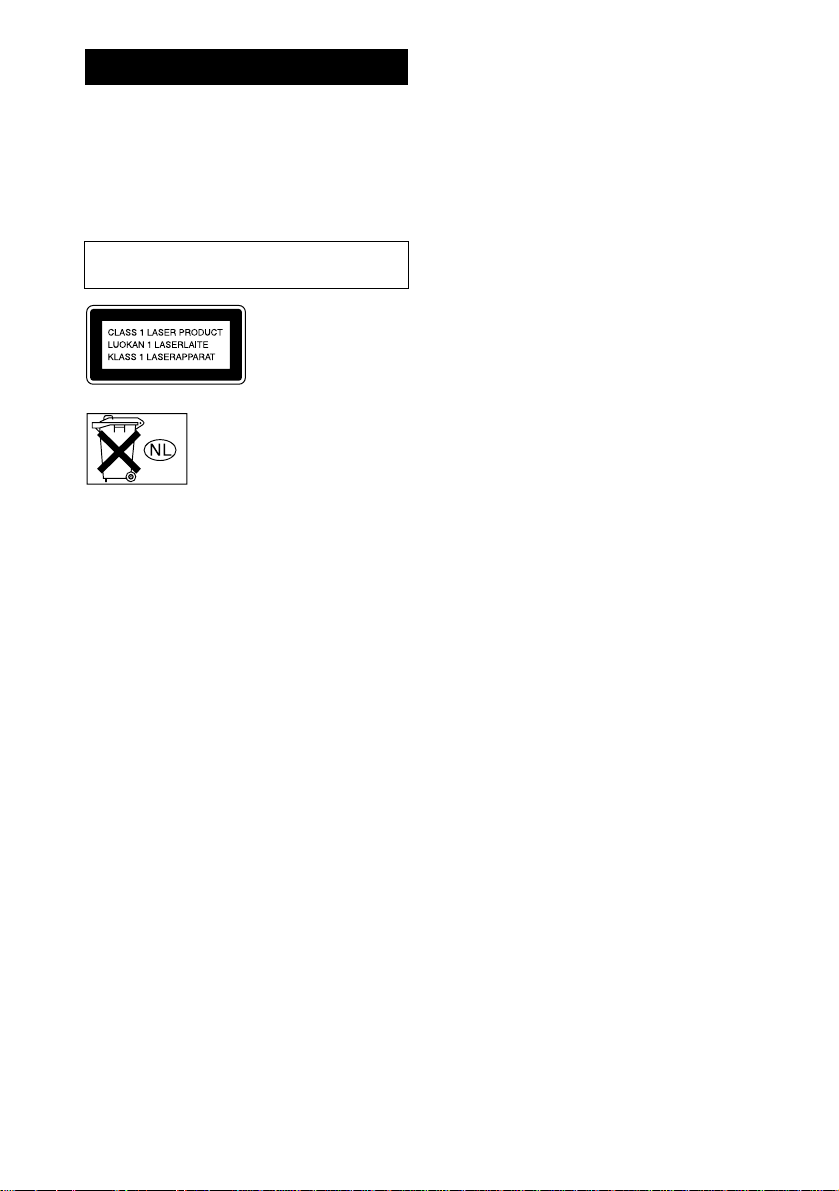
Using the remote control
• Select the item with v/V/b/B and press the
center to enter the selection.
In this operation manu al, the operation “press
the center to enter the selection” is expressed
as “press ENTER”.
• Normally operate the remote with the cover
closed. Open the cover only when operating
the buttons inside the cover.
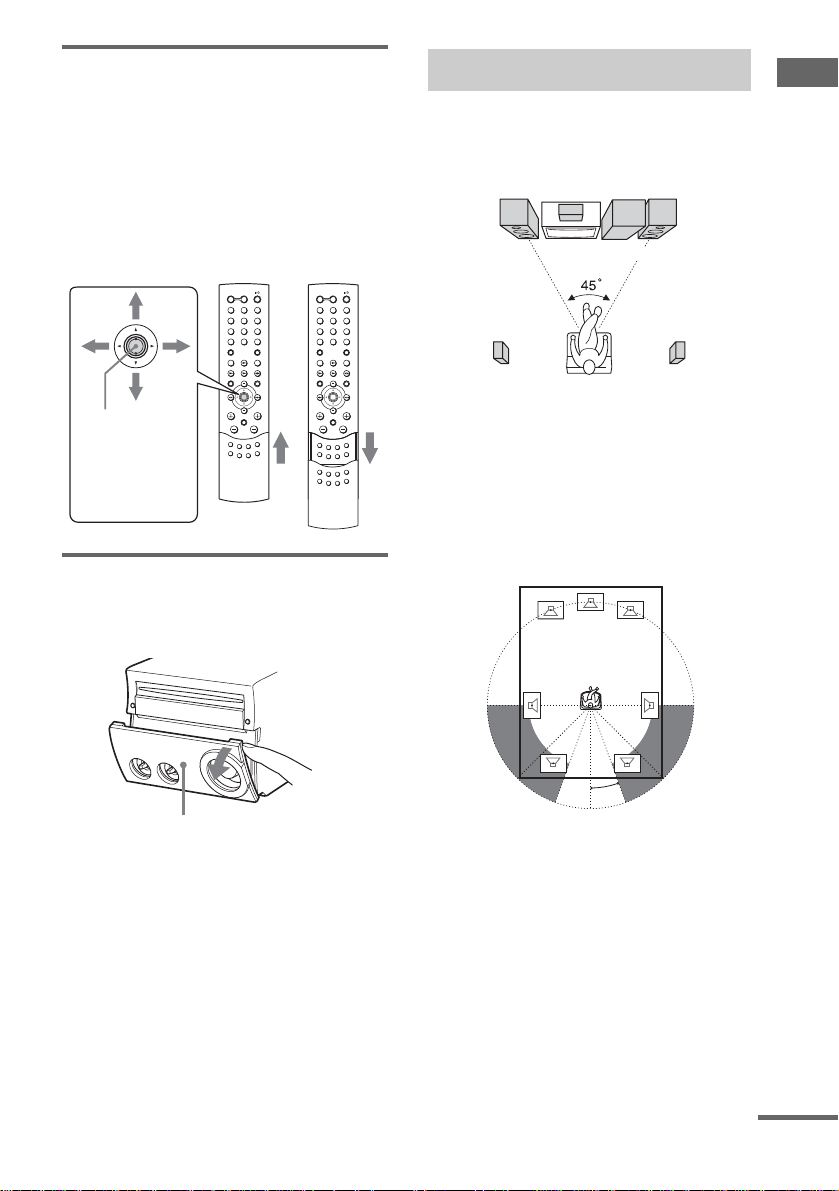
Positioning the speakers
1 Place the front speakers at an angle of
45 degrees from your listening
position.
Front
speaker
(L)
Center speaker
Subwoofer
Front
speaker
(R)
Getting Started
Press th e center
to enter the
selection (ENTER
button).
Opening the front cover
Pull down the upper right corner of th e fr ont
cover on the unit.
Front cover
Surround speaker
(L)
Surround speaker
(R)
2 Place the center speaker at about the
same height as the front speakers.
Align the center speaker with the front
speakers or place it sli ghtly behind the f ront
speakers.
3 Place the surround speakers.
20˚
Position the surround speakers wit hi n the
respective gray ranges.
Positioning bo th surround speake rs the
same distance from the listeni ng position is
effective.
continued
11
GB

4 Place the subwoofer.
To obtain a better bass reproducti on, we
recommend you t o pl ace the subwoofer on
a solid floor whe re reso na nce is un lik el y to
occur.
Notes
• Do not place the surround speak ers on top of a TV.
This may cause distor tion of the colors in the TV
screen.
• Always place the subwoofer vertically, keeping it a
few centimeters away from the wall.
• If the subwoofer is plac ed in the cent er of a room, the
bass could be extremely weak ened. This is due to the
influence of the standing wave of th e room . If th is
happens, move the subwoofer away fro m the c ent e r
of the room or eliminate the caus e of the sta nding
wave, by placing a bookshelf against the wall, etc.
Speaker settings
To enjoy DVDs, Super Audio CDs and other
discs with multi-channel sound and Dolby
surround effe ct s, the speakers need t o be
adjusted. Set the distance from the listening
position to the speakers, and the bala nce and
level. Then use the test tone to adjust the vo lume
of each speaker to the same level.
For details, see “Speaker settings ” on page 35.
Setting the clock
1 Press ?/1 to turn on the system.
2 Press CLOCK/TIMER SET.
3 Press . or > repeatedly to set the
day of the week.
4 Press ENTER or M.
5 Press . or > repeatedly to set the
hour.
6 Press ENTER or M.
7 Press . or > repeatedly to set the
minute.
8 Press ENTER.
The clock starts working.
To adjust the clock
1 Press CLOCK/TIMER SET.
2 Press . or > repeatedly to select
“CLOCK SET?”, then press ENTER.
3 Do the same procedures as step 3 to 8
above.
Note
The clock settings are cancelled when you disconnect
the mains lead or if a power fa ilure occurs.
12
GB

Selecting a language
You can change the on-screen display language.
1 Turn on your TV and select the video
input.
2 Press ?/1 to turn on the system.
3 Press FUNCTION to switch the function
to DVD.
4 Press DVD SETUP in stop mode.
5 Press v or V repeatedly to select
“LANGUAGE SETUP”, then press
ENTER.
6 Press v or V repeatedly to select
“OSD”, then press ENTER.
7 Press v or V repeatedly to select a
language from the displayed list, then
press ENTER.
Getting Started
13
GB

DVD/VIDEO CD/CD/Super Audio CD/ MP3/JPEG – Play
Loading a disc
Insert a disc in the disc slot with the label
side up.
When you play
a disc, insert it
with the label
side up.
Playing a disc
— Normal Play/Shuffle Play
Before playing a DVD or VIDEO CD, turn on
your TV and select the video input. Depending
on the DVD or VIDEO CD, some operations
may be different or restr icted. Refer to the
operating instructions supplied with the disc.
Example: When playing a DVD
Title number
Notes
• When you turn on the system, the disc is not
pulled into the disc slot until “No Disc”
appears in the display . Do not attempt to
push in the disc until “No Disc” appears.
• When pressing the Z DVD (eject) on the DVD
player and then re-inserting the disc that appears in
the disc slot, do not simply push in the disc. Remove
the disc from the disc slot and then re-i n s ert it.
• Do not use a disc with tape, seals or paste on it as this
may cause malfunction.
• Do not load an 8 cm disc with an adaptor. Doing so
may cause the system to malfunction.
• When you eject a disc, handle the disc by its edge. Do
not touch the surfac e.
• If you load a disc that is not playable by this system,
it will be ejected automatically.
Elapsed playing time
Example: When playing a CD or VIDEO CD
Track number
Elapsed playing time
1 Press FUNCTION repeatedly to switch
the function to DVD.
14
GB

2 Press PLAY MODE in stop mode
repeatedly until the mode you want
appears in the display.
Select To play
No display
(Normal Play)
ALBM
(Normal Play)
The tracks on the disc in
original order.
All MP3 audio tracks in the
album on the disc in original
order.
When playing a non-MP3
disc, Album Play performs
the same operation as
Normal Play (No display).
SHUF
(Shuffle Play)*
ALBM SHUF
(Shuffle Play)
All tracks on the disc in
random order.
The MP3 audio tracks in the
album on the disc in random
order.
When playing a non-MP3
disc, Album Shuffle Play
performs the same operation
as Shuffle Play (SHUF).
PGM
(Program Play)*
The tracks on the disc in the
order you want them to be
played (see “Creating your
own program” on page 21).
* You cannot perfor m Shuf f le Play a nd Program
Play with DVDs.
3 Press SA-CD/DVD N.
Tip
You can change the play mode using the on-screen
display as follows:
1 Press DVD DISPLAY in stop mode.
The Control Menu appears.
2 Press v or V to select “PLAY MODE”, then press
ENTER.
3 Press v or V to select desired play m ode, then press
ENTER.
Other operations
To Do this
Stop play Press x.
Pause Press X. Press X again to resume
Select a track or
chapter
Select an album
of MP3
Find a point in a
track (Search)
(except for MP3
audio tracks)
Locate a point
quickly in fast
forward or fast
reverse (Lock
*1*2
Search)
(except for MP3
audio tracks)
Watch frame by
frame
(Slow-motion
*2
Play)
(DVD and
VIDEO CD only)
Switch to DVD
function from
another source
Remove a disc Press Z DVD on the DVD player.
*1
During Search or Scan Play, no sound is output.
*2
Depending on the DVD or VIDEO CD, some
operations may be restricted. The playback speeds
that can be selected differ depending on th e dis c.
Slow-motion reverse play for DVD only.
*3
2 y/2 playback speed is slower than 1 y/1 .
*4
While the Net MD function is on, you cannot switch
the function.
play.
Press . or > repeatedly
during play or pause.
Press ALBUM + or – repeatedly
after step 2 .
Keep moving SA-CD/DVD lever
*1
on the DVD player to . or
> during playback and release
it at the desired point.
Press m or M during play.
Each time you press the button,
searching speed changes as
follows:
1 (slow) y 2 (faster than 1)
For CD or Super Audio CD,
searching speed does not chang e
(1 (slow) play).
To return to Normal Play, press
SA-CD/DVD N
During pause, press or
Each time you press the button, the
playback speed changes as
follows:
Playback direction
*3
y 1 y
2 y
Opposite direction (DVD only)
*3
y 1
2
To return to Normal Play, press
SA-CD/DVD N.
Press SA-CD/DVD N
(Automatic Source se lection).
*4
.
y.
*3
*3
DVD/VIDEO CD/CD/Super Audio CD/MP3/JPEG – Play
continued
15
GB

Notes
• If DVD playback is paused for approximately one
hour, the system automatically turns off.
• 2 channel sound is heard when using headphones.
• You cannot change the play mode du ring play.
• When you change the function, DVD indicator may
appear even if you do not load the disc.
• Some time may be needed to start playback of discs
recorded in complex configurations such as many
layers.
• This system can play Multi Session CDs when an
MP3 audio track is located in the first session. Any
subsequent MP3 audio tracks, recorded in the later
sessions, can also be played back .
• Maximum number of albums on a disc: 99 (The
maximum number of MP3 audio tracks that can be
contained on an album is 250.)
• An album that does not include an MP3 audio track
is skipped.
• If you put the extension “.MP3” to dat a not in MP 3
format, the system cannot recognize the data
properly and will generate a loud noise which could
damage your speaker system.
• The system can play to a depth of 8 direc tor ie s.
• When playing a VBR (Variable Bit Rate) MP3 disc,
the displayed playing time may differ from the actual
time.
Tip
When playing the data disc (CD-ROM /C D- R/
CD-RW) contained MP3 au dio tracks and JPEG im age
files, set to “MP3 ” in “DATA CD PRI O RITY”
(page 27).
Resuming playback from the
point you stopped the disc
— Resume Play
This system memor iz es the point where you
stopped the disc so you can resume from that
point. Resume Play is not cancelled whe n you
set Power Saving Mode.
1 While playing a disc, press x to stop
playback.
“RESUME” appears in the display. If
“RESUME” does not appear, Resume Play
is not available.
2 Press SA-CD/DVD N.
The player starts playback from the point
you stopped the disc in step 1.
Notes
• You cannot perform Resume Play during Shuffle
Play or Program Play.
• Depending on where you stopped the disc, the
system may resume playback from a different point.
• Resume play is cancelled when:
– you press x in stop mode.
– you disc onnect the mains lead.
– you remove a disc.
– you change the pla y mode.
– you change the settings using the DVD SETUP
button.
Playing a track by entering the
track number
Press the number button(s) to enter the track
number of the track y ou w ant to play during
Normal Play, then press ENTER to play the
track. (To enter t he MP3 audio track num ber,
press ALBUM + o r – r epeatedly to select th e
desired album before entering the number.)
To enter a track number over 10
1 Enter the corresponding digits.
To enter 0, press 10/0.
2 Press ENTER.
Example:
To play track number 30, press 3 and 10/0, th en press
ENTER.
To play MP3 track number 100, press 1, 10/ 0 and
10/0, then press ENTER.
16
GB

Playing DVDs using the
Playing VIDEO CDs with
menu
Some DVDs have menus to help you enjoy the
DVDs. You can play DVDs using these menus
on TV screen.
• Using the DVD top menu
A DVD is divided into long sections of a picture
or a music fe ature call ed “titl es”. When y ou play
a DVD which contains several titles, you can
select the title you want using the menu.
• Using the DVD menu
Some DVDs allow you to select the disc
contents using a menu. When you play these
DVDs, you can select items such as the language
for the subtitles and the language for the sound
using the DVD menu.
1 Press TOP MENU or DVD MENU.
The menu appear s on the TV screen. The
contents of the men u var y fro m dis c to disc .
2 Press v/V/b/B or the number buttons
to select the title or item you want to
play.
3 Press ENTER.
Note
If the DVD top menu or a DVD menu is displayed
during DVD playback for approximately one hour, the
system automatically turns off.
PBC functions (Ver. 2.0)
— PBC Play
You can use PBC* menus on your TV screen to
enjoy the disc’s interactive softwa re . The me nu
format and struc ture may differ depend in g on
each disc.
* PBC : Play bac k C ontr ol
1 Press SA-CD/DVD N to start playing a
VIDEO CD with PBC functions
(Ver. 2.0).
The PBC menu appears on the TV screen.
2 Press v/V or the number buttons to
select the item number you want.
3 Press ENTER.
4 Continue playback according to the
instructions on the menus to enjoy
interactive playback.
Refer to the operating instructio ns supplied
with the disc, as the operating procedure
may differ according to the VIDEO CD.
To go back to a previous menu
Press RETURN O.
Notes
• Depend in g on the VIDEO CD, “Press EN T E R” in
step 3 may appear as “Press SELECT” in the
operating instructions supplied with the disc. In this
case, press SA-CD/DVD N.
• You cannot perform Repeat Play during PBC
playback of VIDEO CDs.
Tip
You can cancel playback with PBC functions.
1 In stop mode , press ./> or the number
buttons to select a track.
2 Press SA-CD/DVD N or ENTER.
“Play without PBC” appears on the TV screen an d
playback starts from the sele cted track. Still im ages,
such as the menu screens, will not be shown.
To return to PBC playback, press x twice, then press
SA-CD/DVD N.
DVD/VIDEO CD/CD/Super Audio CD/MP3/JPEG – Play
17
GB

Playing JPEG Image Files
You can play JPEG image files on CD-ROM s,
CD-Rs, or CD-RWs. However, the disc s must be
recorded according to ISO9660 level 1/level 2 or
Joliet format for the system to recognize the
files. You can als o pl ay discs recorded in Multi
Session. See the instructions of the CD-R/RW
device or recording software (not supplied) for
details on the recording format.
1 Load a data disc recorded in JPEG into
the system.
2 Press SA-CD/DVD N.
The system starts to play the first JPEG
image file in the first album on the disc.
Notes
• The system can play the extensi o n “.J PG” or
“.JPEG”.
• Progressive JPEG format files cannot be played on
this system.
• Some CD-Rs or CD-RWs cannot be playe d on this
system depending on file format.
• Maximum album number: 99 (inc luding root folder)
• The maximum file numbe r th at can be cont ai ne d on
a single album is 250.
• Playback is possible up to 8 level s.
• An album that does not include a JPEG format file is
skipped.
Selecting an album and file
1 Press DVD DISPLAY.
The Control Menu and t he JPEG data disc
name appears.
2 Press v or V to select “ALBUM”, then
press ENTER.
The list of albums contained in the disc
appears.
1: MOUNTAIN
FAMILY
FLOWER
GARDEN
TRAIN
CAR
JPEG
3 Select an album you want to play using
v or V and press ENTER.
4 Select “FILE” using v or V and press
ENTER.
The list of files contained in the current
album appear s.
Jump bar
1: MOUNTAIN
FAMILY
HAPPY1.
2.
BIRTHDAY
3.
CELEBRATION
4.
CHRISTMAS
5.
MOM
6.
BASEBALL
7.
PARTY
8.
DAD
9.
TRAVEL
10.
FRIEND
11.
DRIVE
JPEG
When the list of all fi le s or albums cannot
be displaye d on the window, the ju mp bar
appears. Press B to selec t the jump bar icon,
and then scroll the jump bar to display the
rest of the list using v or V.
5 Select a file using v or V and press
ENTER.
The selected file st arts playing.
To return the previous display
Press b or RETURN O.
To turn off the display
Press DVD DISPLAY.
Note
Only the letters in the alp h a b et and numbers can be
used for album or file names. Anything el se is
displayed as “ ”.
Tip
When a JPEG data disc is inserted, you can select a n
album using ALBUM + or –.
18
GB

Enjoying the Slide show
1 Press M while displaying a JPEG
image.
Slide show starts fro m the current image.
2 Press SA-CD/DVD N when you want
to return to Normal Play.
To change the interval time of
Slide show
Each time you press M during Slide show, the
interval time change s as follows:
t FF1M t FF2M t FF3M
The FF3M interval time is faster than
FF2M.
Rotating the current image
Rotate the current image using b or B.
Each time you press B, the im ag e t urns
clockwise by 90º.
Each time you press b, the im ag e t urns
counterclockwise by 90º.
Notes
• Slide show can play in only one direction.
• You cannot rotate the image during Slide show. Press
SA-CD/DVD N to return to Normal Play before
this operation.
Playing repeatedly
— Repeat Play
You can play repeatedly al l the titles /tracks/files
or a single title/chapter/track on a disc.
Using the front panel display
Press REPEAT repeatedly during play until
“REP” or “REP1” appears.
REP: For all the tracks on the disc, or all the
tracks in the album
REP1: For a VIDEO CD, CD, Super Audio CD
or MP3, only the curr ent track. For a DVD, only
the current title
*1
When “ALBM” is selected for MP3 or JPEG.
*2
You can check whether a title or chapter is being
repeatedly played on the TV screen.
To cancel Repeat Play
Press REPEAT repeatedly until both “REP” and
“REP1” disappear.
Notes
• Depending on the DVD, you cannot perform Repeat
Play.
• You cannot perform Repeat Play during PBC
playback of VIDEO CDs (page 17) .
• You cannot select “REP1” during Pro gr am Pl ay .
• When you select “R E P 1”, that title/chapter/track is
repeated endlessly until “REP1” is canc e ll ed .
*1
up to five times.
*2
or chapter*2.
DVD/VIDEO CD/CD/Super Audio CD/MP3/JPEG – Play
continued
19
GB

Using the on-screen display
1 Press DVD DISPLAY during play.
The Control Men u appears.
2 Press v or V repeatedly to select
“REPEAT”, then press ENTER.
If you do not select “O FF”, the “ ”
indicator lights up in green.
3 Press v or V repeatedly to select the
Repeat Play setting.
The default settings are underlined.
x When playing a DVD
•OFF: does not play repeatedly.
• ALL: repeats all the titles.
• TITLE: repeats the current tit le on a dis c.
• CHAPTER: repeats the current chapte r.
x When playing a VIDEO CD/CD/Super
Audio CD/M P3 wh e n P rogram Play is
set to OFF
•OFF: does not play repeatedly.
• ALL: repeats all the t racks on a disc, or
all the tracks in the cur rent album (MP3
only).
• TRACK: rep eats the current tra ck.
x When playing a JPEG
•OFF: does not play repeatedly.
• ALL: repeats all the files on the disc, or
repeats the curre n t al bum only during
Slide Show.
x When Program Play is set to ON
•OFF: does not play repeatedly.
• ALL: repeats Program Play.
4 Press ENTER.
Repeat Play st arts.
To cancel Repeat Play
Select “OFF” in step 3, or press CLEAR.
To turn off the Control Menu
Press DVD DISPLAY.
Notes
• When you remove the disc, Repeat Play is cancelled.
• Depending on the DVD, you cannot perform Repeat
Play.
• You cannot perform Repeat Play during PB C
playback of VIDEO CDs (page 1 7).
• If you select “ALL”, the program repeats up to five
times.
Tips
• You can set Repeat Play when the playb ack is
stopped. Press REPEAT repeatedly to select the
setting, then press SA-CD/DVD N to start Repeat
Play.
• You can quickly display the “REPEAT” status. Press
REPEAT.
20
GB

Creating your own program
— Program Play
You can make a program of up to 25 steps.
You can synchro record the programmed tracks
onto an MD or a ca sset te tap e (page s 43 and 6 7).
Using the front panel di spla y
1 Press FUNCTION to switch the function
to DVD.
2 Press PLAY MODE in stop mode
repeatedly until “PGM” appears.
3 Press . or > repeatedly until the
desired title or track number appears.
When programming an MP3, press
ALBUM + or – to select album, then press
. or > repeatedly until the desired
track number appe ars.
Selected track number
4 Press ENTER.
The track is programm ed.
The program step number appears,
followed by the last programmed track
number.
5 To program additional tracks, repeat
steps 3 and 4.
6 Press SA-CD/DVD N.
Program Play starts.
Other operations
To Do this
Cancel Program
Play
Add a track to the
end of program
Clear a track from
the end of program
Press PLAY MODE in stop
mode repeatedly until “SHUF”,
“PGM” and “ALBM” disappear.
Perform steps 1 to 4 in stop
mode.
Press CLEAR after step 4.
Notes
• When you s w itch the play mo d e to “PGM” while
“REP1” is select ed, “REP1” is automa tic ally
cancelled.
• Program Play is cance lled when the disc is remo v ed .
Tip
The program you made remains after Program Play
finishes. To play the same progra m a gai n, press
SA-CD/DVD N. However, the program is cancelled
when you remove the disc.
Using the o n-screen displ ay
1 Press PLAY MODE in stop mode
repeatedly until “PGM” appears in the
display.
The Program Display appears on the screen.
Program
1
2
3
4
5
6
7
8
9
10
Total Time 0:00
2 Press B.
“Program 1” is se l ected.
Program
1
Track
2
1 TRACK1
3
TRACK2
2
4
TRACK3
3
5
4
TRACK4
6
5
TRACK5
7
TRACK6
6
8
7
TRACK7
9
8
TRACK8
10
9
TRACK9
TRACK10
10
When the list of all tracks cannot be
displayed on the window, the jump bar
appears. Press B to select the jump bar icon,
and then scroll the jump bar to display the
rest of the list using v or V. Press b or
RETURN O to return to the track list.
Total Time
Jump bar
0:00
continued
21
DVD/VIDEO CD/CD/Super Audio CD/MP3/JPEG – Play
GB

3 Select the album, or track you want to
program.
x When programming a VIDEO CD/CD/
Super Audio CD
For example, select track “2”.
Press v/V or the number buttons to select
“2”, then press ENTER .
Total time of the programmed
tracks (except for MP3)*
Program Total Time 12:34
TRACK2
1
2
3
4
5
6
7
8
9
10
* “– –:– –” appe ars whe n a n MP 3 aud io tr a ck is
selected.
x When programming an MP3
For example , sele ct tr ack “3” o f alb um “2”.
Press v or V to select “2”, then press B.
Next, press v/V or the number buttons to
select “3”, then press ENTER.
Press b or RETURN O to return to the
album list before pressing ENTER.
4 To program other albums or tracks,
repeat step 3.
5 Press SA-CD/DVD N.
Program Play starts .
When the program ends, you can restart the
same program ag ai n by pressing SA- C D /
DVD N.
Other operations
To Do this
Return to Normal Play Press PLAY MODE in stop
Clear a track from the
end of program
Notes
• Program Play function is not available for DVD and
JPEG.
• When you switch the play mode to “PGM ” whi le
“REP1” is selected, “REP1” is automatically
cancelled.
• Program Play is canc el led when the disc is removed .
mode repeatedly until
“CONTINUE” appears.
Press CLEAR after step 3.
Tip
You can also perform Repeat Play of the programmed
tracks. Press REPEAT during Program Play, or set
“REPEAT” to “ALL” at the Control Menu screen
(page 20).
22
GB

Searching for a title/ chapter/track/index/ album/file
You can search a title (DVD), chapter (DVD),
track (CD, VIDEO CD, Super Audio CD, MP3),
index (VIDEO CD, Su per Audio CD), album
(MP3, JPEG) and file (JPEG). As titles, tracks,
albums and files ar e as signed unique num bers
on the disc, you can select the desired one from
the Control Me nu. Also chapt ers and index es are
assigned unique numbers on the disc, so you can
select the desired one by entering its number. Or,
you can search for a particular point using the
time code (Tim e Search).
Searching for a title/track/
album/file
1 Press DVD DISPLAY.
The Control Menu ap pears.
2 Press v or V repeatedly to select the
search method.
x When playing a DVD
“TITLE”
x When playing a VIDEO CD without
PBC function
“TRACK”
x When playing a CD/Super Audio CD
“TRACK”
x When playing an MP3
“ALBUM” or “TRACK ”
x When playing a JPEG
“ALBUM” or “FILE ”
3 Press ENTER.
The list of contents i n th e di sc appears.
Jump bar
HIGHWAY1.
VIEW POINT
2.
MY CHILDREN
3.
DANCING
4.
GOOD TASTE
5.
DESTINATION
6.
7.
MARATHON
PLACE-KICK
8.
TAKE IT EASY
9.
PORT TOWER
10.
STANDARD
11.
CD
When the list of all tr acks or al bums c annot
be displayed on th e w indow, the jump bar
appears. Press B to select the jump bar icon,
and then scroll the jump bar to display the
rest of the list using v or V. Press b or
RETURN O to return to the track or the
album list.
4 Press v or V to select the desired title,
track, album or file, then press ENTER.
The system starts playback from the
selected track, etc.
Searching for a chapter/index
1 Press DVD DISPLAY.
The Control Menu a ppears.
2 Press v or V repeatedly to select the
search method.
x When playing a DVD
“CHAPTER”
x When playing a VIDEO CD
“INDEX”
“** (**)” is selected (** refers to a
number).
The number in parentheses indicates the
total number of chapters or indexes.
DVD
1 2 ( 2 7 ) MAKING SCENE
)
1 8 ( 3 4
T
1 : 3 2 : 5 5
DVD
DVD/VIDEO CD/CD/Super Audio CD/MP3/JPEG – Play
continued
23
GB

3 Press ENTER.
“** (**)” change s t o “– – (**)”.
DVD
1 2 ( 2 7 ) MAKING SCENE
)
– – ( 3 4
T
1 : 3 2 : 5 5
DVD
4 Press v or V repeatedly, or press the
number buttons to select the chapter
or index number you want to search.
If you make a mistake, press CLEAR to
cancel the numbe r, th en select another
number.
5 Press ENTER.
The playback star ts fr om the selected
number.
To turn off the Control Menu
Press DVD DISPLAY.
To cancel searching
Press b or RETURN O.
To search for a particular point
using the time code
— Time Search
Tip
You can change the display to show playing ti me or
remaining time. For details, see “Viewing information
about the disc in the on-screen display” (page 78).
24
1 In step 2, select “TIME”.
“T **:**:**” (playing time of the current title)
is selected.
2 Press ENT ER.
“T – –:– –:– –” appears above “T **:**:**”.
3 Input the time code using the number
buttons, then press ENTER.
For example, to find the scene at 2 hours,
10 minutes, and 20 seconds after the
beginning, enter “2:10:20”.
Notes
• The title, chapter or track numbe r displayed on the
TV screen is recorded data on the disc.
• You cannot search a scene of a VIDEO CD.
• If you play a DVD, input the playing time of the
current title using the tim e code . If yo u pla y a
VIDEO CD, CD, Super Audio CD or MP3, input the
playing time of the curren t tr ack u sing the tim e code.
GB

DVD – Various functions
Changing the sound/ subtitle/language
Changing the sound (except
for JPEG)
You can select the audio language and the audio
recording format while playing a DVD.
In addition, you ca n output the sound fo r either
the right or left cha nnel from both the right an d
left speakers while playing a CD, VIDEO CD or
an MP3 file. You can a ls o l is t en to only the
accompaniment of a karaoke VIDEO CD, etc .
Super Audio CDs have a number of recording
formats such as Super Audio CDs that support
multi-channel play back and Super Audio CD s
recorded with both the Super Audio signal and a
normal CD signal. You can select the desired
signal for playback.
1 Press DVD DISPLAY during play.
The Control Menu ap pears.
2 Press v or V repeatedly to select
“AUDIO”, then press ENTER.
The options for “A U DIO” appear.
3 Press v or V repeatedly to select the
audio signal you want.
The default settings are underlined.
x When playing a DVD
The choice of the language and audio
format varie s.
When 4 digits ar e disp laye d, th ey repr esent
the language code (s ee “Language code
list” on pa ge 102). When the same language
is displayed twice or more times, the DVD
is recorded in multiple audio formats.
x When playing a VIDEO CD/CD/MP3
•STEREO:Normal stereo playback
• 1/L: Left channel sound (monaural)
• 2/R: Right channel sound
(monaural)
x When playing a Super Audio CD
Make this setting in stop mode. The
selectable items dif fer acc ording to the dis c.
•MULTI
• 2CH: 2-channel area playback
• CD: Normal CD layer playback
: Multi-channel area playback
4 Press ENTER.
To turn off the Control Menu
Press DVD DISPLAY.
To preset the desired audio track
You can preset the system to the desire d audio
track with the op erations described under
“Changing the scr een display language , DV D
menu language and audio track auto se l ect i on
mode” (page 27).
Notes
• For discs not recorded in multiple audio format, you
cannot change the sound.
• Depending on the DVD, you may not be able to
change the sound even if multiple audio for mat are
recorded on the DVD.
• For VIDEO CDs, CDs and MP3 audio tracks, the
setting returns to “STEREO” when you turn off the
system or remove the disc.
• During DVD playback, the sound may change
automatically.
Tip
You can select the audio setting by pressing AUDIO.
Each time you press the button, the s et ti n g chan g e s .
DVD – Various functions
continued
25
GB

Displaying the audio
information of the disc (DVD
only)
When you select “AUDIO”, the channels being
played are displayed on the screen .
For example, in Dolby Digital format, multiple
signals ranging from monaural to 5.1 channel
signals can be recorded on a DVD. Dependi ng
on the DVD, the number of recorded channels
may differ.
Current audio format*
DVD
1 2 ( 2 7 ) MAKING SCENE
)
1 8 ( 3 4
T
1 : 3 2 : 5 5
1: ENGLISH
DVD
The display examples are as
follows:
• PCM (stereo)
PROGRAM FORMAT
PCM 48kHz 24bit
• Dolby Surround
PROGRAM FORMAT
DOLBY DIGITAL 2/0
DOLBY SURROUND
• Dolby Digital 5.1ch
PROGRAM FORMAT
DOLBY DIGITAL 3/2.1
•DTS
PROGRAM FORMAT
DOLBY DIGITAL 3/2.1
* “PCM”, “DTS”, or “DOLBY DIGITAL” is
displayed. For “DOLBY DIGITAL”, the channels
in the playing track are displayed numerically as
follows:
For Dolby Digital 5.1 ch :
Surround component 2
DOLBY DIGITAL
Front component 2 +
Center component 1
3 / 2 . 1
LFE (Low Fr equency
Effect) component 1
PROGRAM FORMAT
DTS 3/2.1
26
GB

Displaying the subtitles (DVD
only)
With DVDs on which multilingual subtitles are
recorded, you can change the subtitle la nguage
while playing a DVD, or turn the subtit les o n or
off whenever you w ant.
For example, you can select the language yo u
want to master and turn the subtitles on for better
understanding.
1 Press DVD DISPLAY during play.
The Control Menu ap pears.
2 Press v or V repeatedly to select
“SUBTITLE”, then press ENTER.
The options for “SUBTITLE” appear .
3 Press v or V repeatedly to select the
language you want, then press ENTER.
The subtitles are displayed in the selected
language.
When 4 digits ar e disp laye d, th ey repr esent
the language code (s ee “Language code
list” on page102).
To cancel the subtitle setting
Select “OFF” in step 3.
To turn off the Control Menu
Press DVD DISPLAY.
To preset the desired subtitle
You can preset the system to the desired subtitle
with the operat ions describe d under “Changing
the screen display language, DVD menu
language and audio t ra ck auto selection mode ”
(page 27).
Note
Depending on the DVD, you may not be able to change
the subtitles even if multilingual subtitles are recorded
on the DVD.
Tip
You can select the subtitle language by pressing
SUBTITLE. Each time you press the button, the
language changes.
Changing th e screen display
language, DVD menu
language and audio track
auto selection mode
— LANGUAGE SETUP/CUSTOM
SETUP
1 Press DVD SETUP in stop mode.
The Setup Display appears.
2 Press v or V repeatedly to select
“LANGUAGE SETUP” or “CUSTOM
SETUP”, then press ENTER.
Select Setup item
LANGUAGE SETUP OSD
DVD MENU
AUDIO
SUBTITLE
CUSTOM SETUP PARENTAL
CONTROL (page 32)
TRACK SELECTION
AUDIO DRC
DATA CD PRIORITY
JPEG DATE
3 Press v or V repeatedly to select an
item, then press ENTER.
4 Press v or V repeatedly to select a
setting, then press ENTER.
Note
When the selected language is not recorded on the
DVD, one of the recorded languages is automatically
selected (except for “OSD”).
Tips
• You can reset all the DVD settings except for
Parental Control by performing the operat ions
described under “To return the DVD setup to the
default settings*, perform reset as follows:”
(page 92).
• If you select “OTHERSt” in “DVD MENU”,
“AUDIO” or “SUBTITLE”, select and enter the
language code from the language code list using the
number buttons (page 102). The selected language
code (4 digits) is displayed the next time you select
“OTHERSt”.
* Exc ep t fo r P are nta l Control settings
DVD – Various functions
continued
27
GB

x OSD (on-screen display)
Switches the disp l ay l anguage on the screen.
Select the language from the displayed list.
x DVD MENU (DVD only)
Switches the language of the DVD menu. Select
the language from the displayed list.
x AUDIO (DVD only)
Switches the language of the sound track. Select
the language from the displayed list.
x SUBTITLE (DVD only)
Switches the language of the subtitle. Select the
language from the displayed list.
x TRACK SELECTION (DVD only)
Gives the priority to the sound track which
contains the highest number of channels when
you play a DVD on which multiple audio
formats (PCM, MPEG audio, DTS, or Dolby
Digital format) are recorded.
The default setting is underlined.
OFF
AUTO Priority given.
Notes
• When you set to “AUTO”, the language setting may
change. The “TRACK SELECTION” setting has
higher priority than the “AUDIO” setting in
“LANGUAGE SETUP”.
• If PCM, MPEG audio, DTS, and Dolby Digital
sound tracks have the same number of channels, the
system selects PCM, DTS, Dolby Digital, and
MPEG audio sound tracks in this order.
• Depending on the DVD, the audio channel with
priority may be predeter mi ned. In this case, you
cannot give priority to the DTS, or Dolby Digita l or
MPEG audio format by selecting “AUTO ”.
No priori ty given.
x AUDIO DRC (Dynamic Range
Compression)
Narrows the DYNAMIC range of the
soundtrack. Us eful for watching movies at low
volume late at night.
The default setting is underlined.
OFF No compression of DYNAMIC
STANDARD
MAX Narrows the DYNAMIC range
Note
AUDIO DRC only works in Dolby Digital.
range.
Reproduces the sound track with
the kind of DYNAMIC range that
the recording engineer intended .
fully.
x DATA CD PRIORITY (MP3, JPEG only)
Set priority data you want to play, when you
play the data disc (CD-ROM/CD-R/CD-RW)
contained MP3 audio tracks and JPEG image
files.
The default setting is underlined.
MP3
JPEG If a JPEG file exists on the disc,
Notes
• When you play a Multi Session dat a CD , the la st
session and any sessions linked from the last session
are played.
• When you change the setting, re-inse r t the disc .
If an MP3 file exists on the disc,
the system recognise s the d is c as
an “MP3 Disc”. If only JPEG fi les
exist on the disc, the syst em
recognises the disc as a “JPEG
Disc”.
the system recognises the disc as a
“JPEG Disc”. If only MP3 files
exist on the disc, the syst em
recognises the disc as an “MP3
Disc”.
28
GB

x JPEG DATE
Change the date information order of a JPEG
image in the Cont ro l Menu.
The default set ting is underl i ned.
MM/DD/YYYY
YYYY/MM/DD
DD/MM/YYYY
YYYY/DD/MM
YYYY: Year
MM: Month
DD: Day
Adjusting the angle/image
Changing the angles (DVD
only)
When playing a DVD on which vario us angles
(multi-angles ) for a scene are reco rded, the
“ANGLE” indicator lights up in green on the
screen. This means that you can change t he
viewing angle.
For example, while playing a scene of a train in
motion, you can display the view from either the
front of the train, the left window of the train or
from the right window without having the train’s
movement interrupted.
1 Press DVD DISPLAY during play.
The Control Menu a ppears.
2 Press v or V repeatedly to select
“ANGLE”.
The angle number app ears. The number in
parentheses indicates the total number of
angles. The “ANGLE” indicator lights up in
green when angl es ar e reco rd ed o n th e di sc.
3 Press B or ENTER.
The angle number changes to “–”.
4 Select the angle you want using the
number buttons or v/V, then press
ENTER.
The angle is change d t o the selected angle.
To turn off the Control Menu
Press DVD DISPLAY.
Note
Depending on the DVD, you may not be able to change
the angles even if multi-angles are recorded on the
DVD.
Tip
You can select the angle by pressing ANGLE. Each
time you press the button, the angle cha nges.
DVD – Various functions
continued
29
GB

Adjusting t he TV screen
— SCREEN SETUP
1 Press DVD SETUP in stop mode.
The Setup Display appears.
2 Press v or V repeatedly to select
“SCREEN SETUP”, then press ENTER.
•TV TYPE
• SCREEN SAVER
• BACKGROUND
•LINE
3 Press v or V repeatedly to select an
item, then press ENTER.
4 Press v or V repeatedly to select a
setting, then press ENTER.
x TV TYPE (DVD only)
Select the aspect ratio of the connected TV.
The default setting is underlined.
16:9
4:3 LETTER
BOX
4:3 PAN SCAN Select this wh en you connect a 4:3
• 16:9
Select this when you connect a
wide-screen TV or a TV with a
wide mode function.
Select this when yo u connect a 4 :3
screen TV. This setting displays a
wide picture with bands displayed
on the upper and lower portions of
the screen.
screen TV. This setting displays
the wide picture on the enti re
screen and cuts off the portions
that do not fit.
Note
Depending on the DVD, “4:3 LETTER BOX” may be
selected automati call y in st ead of “ 4:3 PAN SCAN” or
vice versa.
x SCREEN SAVER
Turn on and off the screen sa ver. If you turn on
the screen saver, the screen saver image appears
when you leav e the player in pause or s top mode
for 15 minutes or when you play a CD, Super
Audio CD, disc with MP3 audio tracks or JPEG
image files (except for during Slide show) for
more than 15 minutes. The screen saver will
help prevent your display device from becoming
damaged (ghosting). Press SA-CD/DVD N to
turn off the screen saver.
The default setting is underlined.
ON Turns on the screen saver.
OFF Turns off the screen saver.
x BACKGROUND
Select the background color or picture on the TV
screen when th e pl ayback is stopped or w hi le
playing a CD.
The default setting is underlined.
JACKET
PICTURE
GRAPHICS The preset picture stored in the
BLUE The background color is blue.
BLACK The background color is black.
The jacket picture (still picture)
appears in the background, but
only when the jacket picture is
already recorded on the disc (CDEXTRA, etc.). If the disc does not
contain a jacket picture, the
“GRAPHICS” picture appears.
system appears in the background.
30
• 4:3 LETTER BOX
• 4:3 PAN SCAN
GB
x LINE
Select the out pu t met hod for vi de o si gna ls fr om
the T LINE-TV jack on the rear panel of the
system.
The default setting is underlined.
VIDEO
RGB Outputs RGB signals.
Note
If your TV does not accept RGB signals, no picture
appears on the TV screen even if you select “RGB ”.
Refer to the instructions supplied with your TV.
Outputs video signals.
 Loading...