

Page 1

Compact
Component
System
Operating Instructions
3-864-770-14(1)
f
CMT-SD1
CMT-SD3
©1998 by Sony Corporation
Page 2

WARNING
To prevent fire or shock hazard, do not
expose the unit to rain or moisture.
To avoid electrical shock, do not open the cabinet.
Refer servicing to qualified personnel only.
Do not install the appliance in a confined space,
such as a bookcase or built-in cabinet.
This appliance is classified
as a CLASS 1 LASER
product. The CLASS 1
LASER PRODUCT
MARKING is located on
the bottom exterior.
IMPORTANT: Never connect two mains
leads into a single mains plug.
– For MDS-SD1 and TC-SD1 –
The mains lead plugs of MDS-SD1 and TC-SD1 are
2-pin type designed to be connected only to
CMT-SD1 or MDS-SD1.
Do not connect this plug to any other system or
mains supply.
2
Page 3

Table of Contents
Getting Started
Step 1: Hooking up the system............ 4
Step 2: Setting the time ......................... 6
Step 3: Presetting radio stations .......... 7
Saving the power in standby mode ..... 8
Basic Operations
Playing a CD ........................................... 9
Listening to the radio........................... 10
The CD player
Playing the CD tracks in random
order ................................................ 11
Programming the CD tracks ............... 11
Playing the CD tracks repeatedly ...... 12
Using the CD display........................... 13
Labelling a CD ...................................... 14
The Radio
Labelling the preset station................. 16
Using the Radio Data System
(RDS)* .............................................. 17
Timer
Falling asleep to music ........................ 19
Waking up to music ............................. 20
Optional A/V components
Connecting audio components .......... 21
Listening to the sound of connected
components .................................... 23
Recording a CD on an MD/tape........ 23
Connecting outdoor aerials................. 24
Additional Information
Precautions ............................................ 25
Troubleshooting ................................... 26
Messages ................................................ 27
Specifications ........................................ 28
Index........................................ Back cover
* European model only.
Sound Adjustment
Adjusting the sound ............................ 18
Reinforcing the bass sound ................. 18
Selecting the surround effect .............. 19
3
Page 4
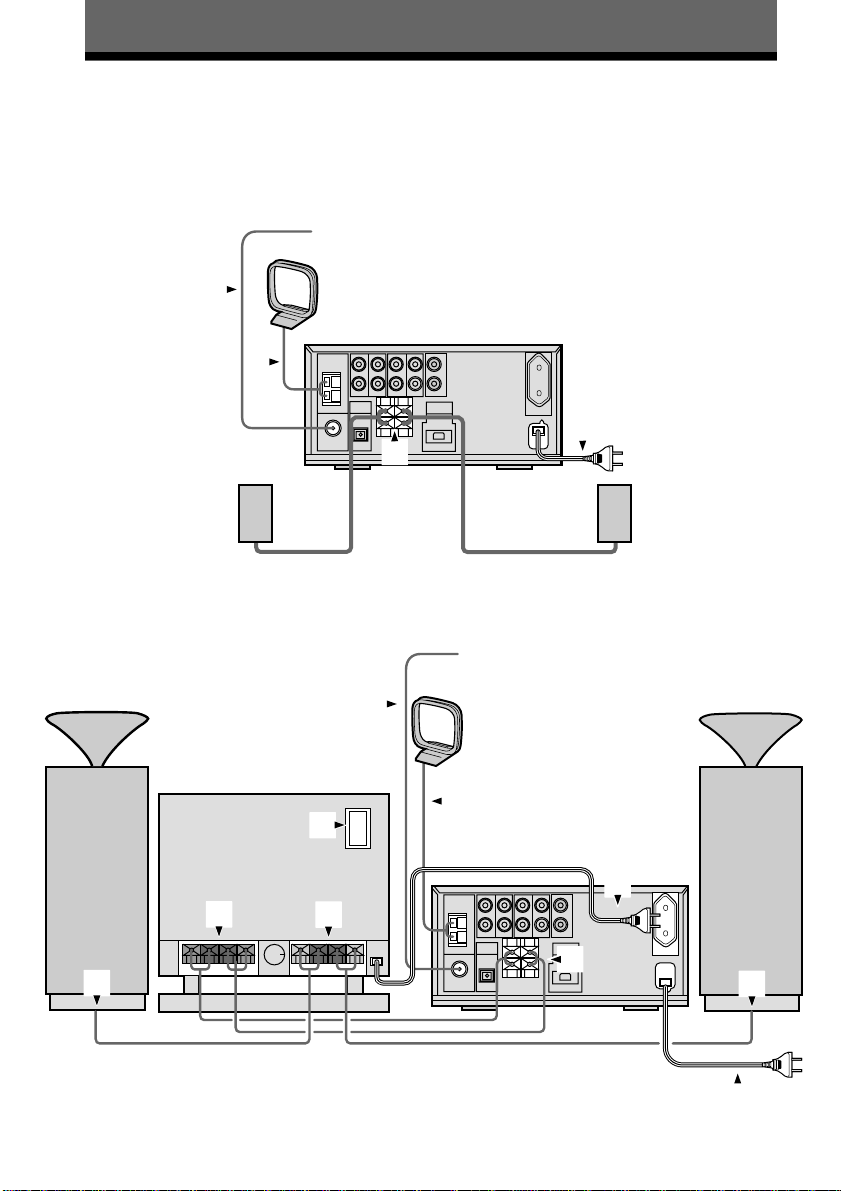
Getting Started
Step 1: Hooking up the system
Perform the following procedures 1 to 5 (2, 4 for CMT-SD3 only) to hook up your system
using the supplied cords and accessories.
The front panel is made of tempered glass. Please remember to handle this unit carefully.
CMT-SD1
3
FM aerial
AM loop aerial
3
5
1
Right speaker
CMT-SD3
FM aerial
Satellite Speaker (Right) Satellite Speaker (Left)
3
AM loop aerial
Left speaker
Sub woofer
3
4
2
1
*
1
* Do not connect the main unit HCD-SD3 to these terminals. This may cause a
malfunction.
4
4
2
1
5
Page 5

1 Connect the speakers.
+
+
L
R
–
–
Connect the speaker cords to the
SPEAKER terminals as below.
CMT-SD1
Back of the main unit
red lined
clear
Back of the speakers
R
+
–
L
+
–
Insert this
portion
2 (CMT-SD3 only)
Connect the sub woofer using the
speaker cords as below.
Back of the main unit
red
black
Back of the sub woofer
red
+
–
Getting Started
–
+
Insert
the
cord
here
clear
_
+
red lined
CMT-SD3
Back of the sub woofer
+
–
–
+
gray
gray
black
Back of the satellite speaker
gray
Notes
• Keep the speaker cords away from the aerials to
prevent noise.
• Be sure to connect both left and right speakers.
Otherwise, the sound will not be heard.
black
red
black
3 Connect the FM and AM aerials.
Set up the AM loop aerial, then connect it.
AM
AM loop
aerial
C
O
AXIAL
FM
75
Extend the FM aerial
Note
Keep the aerials away from the speaker cords to
prevent noise.
horizontally
4 (CMT-SD3 only)
Connect the mains lead of the sub
woofer to the main unit, then turn
the power switch on the back of the
sub woofer to ON.
When the power switch is in the ON position,
the power of the sub woofer turns on/off
when the power of the main unit turns on/off.
continued
5
Page 6
Step 1: Hooking up the system
(continued)
Step 2: Setting the
5 Connect the mains lead of the
CMT-SD1/SD3 to a wall outlet after
you complete all the connections.
To attach the front speaker pads
(CMT-SD1 only)
Attach the supplied front speaker pads to the
bottom of the speakers to stabilize the
speakers and prevent them from slipping.
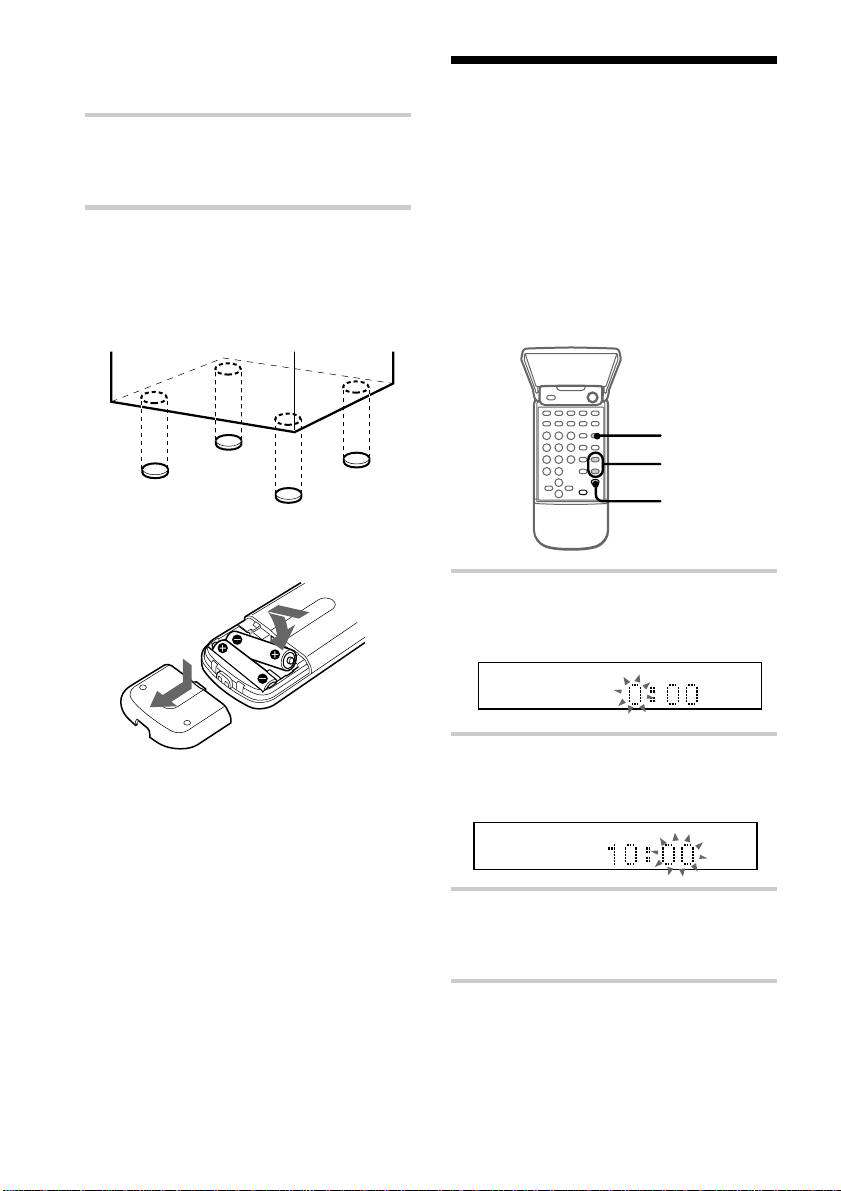
Inserting two R6 (size AA)
batteries into the remote
time
You must set the time before you can use the
timer functions.
The clock is on a 24-hour system for the
European model, and a 12-hour system for
other models.
The 24 hour system model is used for
illustration purpose.
Set the time before turning the power on.
1
2,3
2,3
1 Press TIMER SET while the power is
off.
The hour indication flashes.
Tip
With normal use, the batteries should last for about
six months. When the remote no longer operates the
system, replace both batteries with new ones.
Note
If you do not use the remote for a long period of
time, remove the batteries to avoid possible damage
from battery leakage.
Adjusting the reflector colour of
the satellite speaker (CMT-SD3
only)
The reflector of the satellite speaker lights up
when the power is on.
You can change the colour of the light by
turning the R, G or B dials on the bottom of
the back of the satellite speakers.
6
2 Press +/– to set the hour then press
ENTER.
The minute indication flashes.
3 Press +/– to set the minute then
press ENTER.
The clock starts.
Page 7
To change the time
You can change the preset time while the
power is on.
1 Press TIMER SET.
2 Press +/– repeatedly until “CLOCK SET”
appears then press ENTER.
3 Repeat steps 2 and 3.
Tips
• If you have made a mistake, start again from step
1.
• The built-in clock shows the time in the display
while the power is off. However, the clock is not
displayed in the Power Saving Mode (see page 8).
• The upper dot flashes for the first half of a minute
(0 to 29 seconds), and the lower dot flashes for the
last half of a minute (30 to 59 seconds).
Step 3: Presetting radio stations
You can preset the following number of
stations:
– 20 for FM, 10 for AM.
1
3
5,6
2
5
4,5
6
1 Press 1/u to turn on the power.
2 Press TUNER/BAND repeatedly
until the band you want appears in
the display.
Each time you press the button, the band
changes as follows:
FM n AM
n
Getting Started
3 Press TUNING MODE repeatedly
until “AUTO” appears.
4 Press +/–.
The frequency indication changes and
scanning stops when the system tunes in
a station. “TUNED” and “STEREO” (for
a stereo programme) appear. When you
want to stop scanning, press
TUNING MODE.
continued
7
Page 8
Step 3: Presetting radio stations
(continued)
Saving the power
5 Press MENU/NO then +/–
repeatedly until “Frq-Memory?”
appears then press ENTER/YES.
The preset number flashes. Proceed to
step 6 while the preset number is
flashing. If the unit is not operated for
more than 16 seconds, the preset number
disappears and the unit returns to the
status of step 3. If this happens, start
over from step 4.
6 Press ? or / on the remote to
select the preset number you want
then press ENTER/YES.
The station is stored.
Select 1 to 20 for FM, and select 1 to 10
for AM.
7 Repeat steps 2 through 6 to preset
other stations.
To tune in the station manually
1 Press TUNING MODE repeatedly until
“MANUAL” appears in step 3.
2 Press +/– repeatedly to tune in the station
and continue from step 5.
To change the preset number
Start again from step 1.
To change the AM tuning interval
(except for European model)
The AM tuning interval is factory-set to
9 kHz (10 kHz in some areas). To change the
AM tuning interval, tune in any AM station
first, then turn off the power. While holding
down the TUNING + button, turn the power
back on. When you change the interval, all
the AM preset stations are erased. To reset
the interval, repeat the same procedure.
Tips
• When a new station is memorized, the station
formerly memorized at that preset number is
erased.
• The preset staions are retained for a week even if
you disconnect the mains lead or if a power failure
occurs.
in standby mode
You can lower the power consumption to a
minimum (Power Saving Mode) and save
energy in the standby mode.
DISPLAY
/ Press DISPLAY on the remote or on
the CMT-SD1 when the power is off.
The unit switches to the Power Saving
Mode and the clock display disappears.
The system turns on/off by pressing
1/u.
Tips
• u indicator and timer indicator (when the timer is
set) light up even in the Power Saving Mode.
• The timer work in the Power Saving Mode.
To cancel the Power Saving Mode
Press DISPLAY.
The clock display appears.
8
Page 9

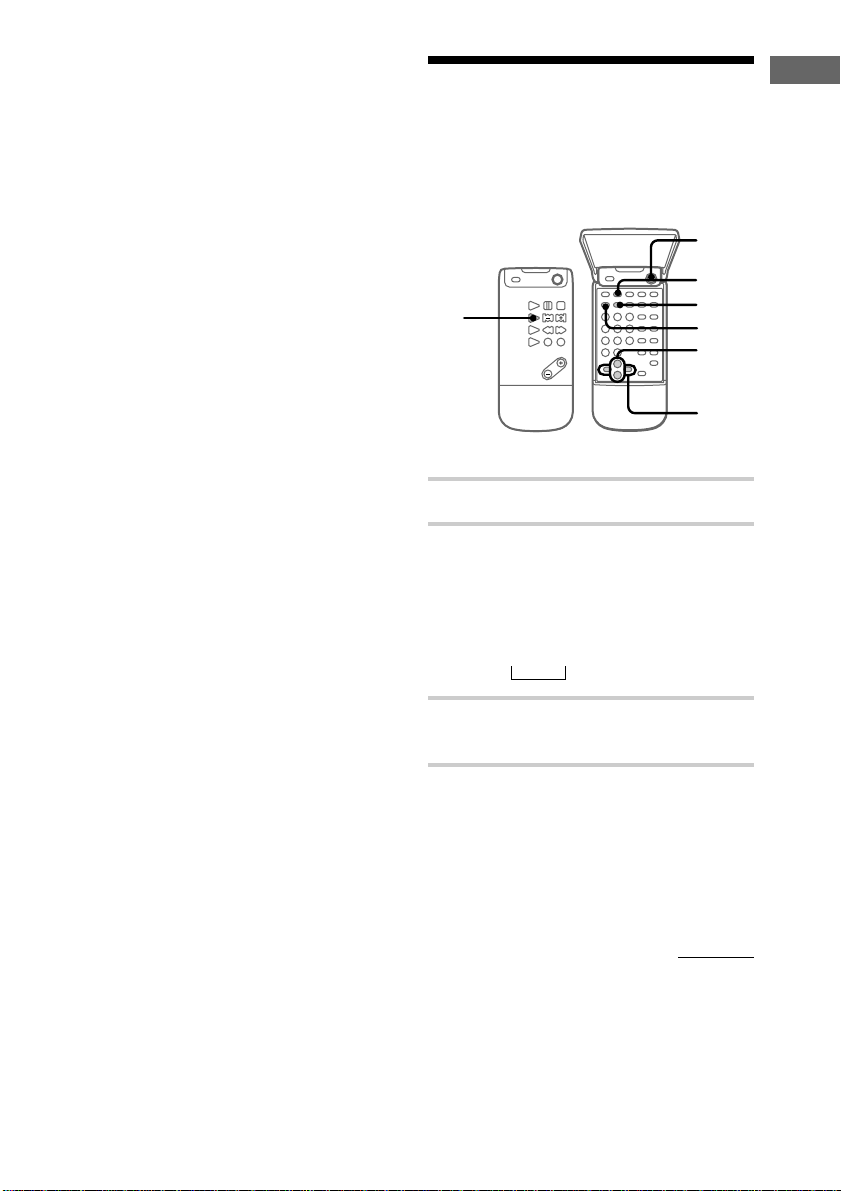
Basic Operations
Playing a CD
To turn on the system, press 1/u.
1/u
(Power)
≠ ±
π VOLUME
2
0 )
1
CD (
P
=/+
0/)
VOL +/–
2 Press ·∏ (or CD ( on the
remote).
The disc tray closes and play starts.
SHUFFLE PROGRAM REPEAT TUNED STEREO MONO1 SURR
DAILY REC SLEEP
DISC
AUTO
PRESTMANUAL
To
Stop play
Pause
Select a track
Find a point in
a track
Remove CD
Adjust the
volume
Tips
• You can switch from another source to the CD
player and start playing a CD by pressing ·∏
(or CD ( on the remote) (Automatic Source
Selection).
• If you push the disc tray lightly, the disc tray
closes and play starts automatically (Auto Play).
Do this
Press π.
Press ·∏ (or P on the
remote). Press again to
resume play.
Press ≠ or ± (or =/
+ on the remote)
repeatedly until you find the
desired track.
Press and hold 0 or ),
during play and release it at
the desired point.
Press §.
Turn VOLUME (or press
VOL +/– on the remote).
DBFB
kHz
MHz
Basic Operations
1 Press § to open the disc tray and
place a CD.
With the label side up.
When you play a single CD,
place it on the inner circle
of the tray.
To close the disc tray, press § again.
9
Page 10

Listening to the radio
Preset radio stations in the tuner’s memory
first (see page 7). To turn on the system, press
1/u.
1/u
(Power)
TUNING +/–TUNER/BAND
+/–
1
VOL
+/–
1 Press TUNER/BAND repeatedly
until the band you want appears.
Each time you press the button, the band
changes as follows:
FMn AM
n
SHUFFLE PROGRAM REPEAT TUNED STEREO MONO1 SURR
DAILY REC SLEEP
DISC
AUTO
PRESTMANUAL
VOLUME
2
STEREO/
MONO
3
DBFB
kHz
MHz
2 Press TUNING MODE repeatedly
until “PRESET” appears.
SHUFFLE PROGRAM REPEAT TUNED STEREO MONO1 SURR
DAILY REC SLEEP
DISC
AUTO
PRESETMANUAL
3 Press +/– to select the desired
station’s preset number.
SHUFFLE PROGRAM REPEAT TUNED STEREO MONO1 SURR
DAILY REC SLEEP
DISC
AUTO
PRESET
MANUAL
To Do this
Turn off the radio Press 1/u to turn off the
Adjust the volume Turn VOLUME (or press
To listen to non-preset radio
stations
• Press TUNING MODE repeatedly until
“MANUAL” appears in step 2, then press
TUNING + or – repeatedly to tune in the
desired station (Manual Tuning).
• Press TUNING MODE repeatedly until
“AUTO” appears in step 2, then press
TUNING + or –. The frequency indication
changes and scanning stops when the
system tunes in a station (Automatic
Tuning).
To cancel the Automatic Tuning
Press TUNING MODE.
Tips
• You can switch from another source to the tuner
by pressing TUNER/BAND (Automatic Source
Selection).
• To improve broadcast reception, reorient the
supplied aerials or connect an optional external
aerial.
• When an FM programme has static noise, press
STEREO/MONO until “MONO” appears. There
will be no stereo effect, but the reception will
improve. Press again to restore the stereo effect.
system
VOL +/– on the remote)
DBFB
kHz
MHz
kHz
MHz
10
Page 11

The CD player
Playing the CD tracks in random order
–– Shuffle Play
You can play all the tracks on a CD in
random order.
=/+
3
1
1 Press FUNCTION repeatedly until
“CD” appears.
2 Press PLAY MODE repeatedly until
“SHUFFLE” appears.
SHUFFLE
3 Press CD (.
Shuffle Play starts. “J” appears, and all
the tracks play in random order.
1
2
Programming the CD tracks
–– Programme Play
You can make a programme of up to 24 tracks
in the order you want them to be played.
π
1
2
5
CLEAR
3
1
1 Press FUNCTION repeatedly until
“CD” appears.
2 Press PLAY MODE repeatedly until
“PROGRAM” appears.
3 Press the track number of the track
you want to hear.
To select track number 11 and higher
Press >10 once and then the number
buttons of the track number.
For example, to select track 32, press >10,
3, and 2.
The CD player
To cancel Shuffle Play
Press PLAY MODE repeatedly until
“SHUFFLE” and “PROGRAM” disappear
from the display. The tracks continue playing
in their original order.
Tip
• If you press PLAY MODE repeatedly until
“SHUFFLE” appears while normal play, all the
tracks are played in random order.
• To skip a track, press + (or ± on the unit).
Press = (or ≠ on the unit) to go back to the
beginning of the current track. However, you
cannot go back to the previous track.
continued
11
Page 12

Programming the CD tracks
(continued)
Playing the CD
4 To programme additional tracks,
repeat step 3.
Each time you programme, the total time
of the programmes is displayed. You can
make a programme of up to 24 tracks.
5 Press CD (.
All the tracks play in the order you
selected.
To cancel Programme Play
Press PLAY MODE repeatedly until
“SHUFFLE” and “PROGRAM” disappear.
To change the program
You can change the program before you start
playback.
To
Clear a track from
the end
Clear the entire
program
Add a track to
the programme
Tips
• The programme you made remains after
Programme Play finishes. To play the same
programme again, press CD (.
• When the total playing time has exceeded 100
minutes, the time is not displayed and the total
number of programmed tracks is displayed.
• If you try to add more than the maximum number
of tracks possible, “Step Full” appears. Erase
unnecessary tracks and programme again.
Do this
Press CLEAR.
Do steps 1 and 2, then press
and hold CLEAR.
Do steps 3 to 5.
tracks repeatedly
–– Repeat Play
You can repeat a CD in normal play, Shuffle
Play and Programme Play.
1
2
1
1 Press FUNCTION repeatedly until
“CD” appears.
2 Press REPEAT during play until
“REPEAT” or “REPEAT 1” appears.
SHUFFLE REPEAT
REPEAT: For all the tracks on the current
CD;
Play mode
Continue
SHUFFLE
(page 11)
PROGRAM
(page 11)
REPEAT 1* : For a single track only.
* You cannot repeat only one track during
Shuffle Play and Programme Play.
Repeat
All the tracks in order
All the tracks in random
order
All the programmed tracks
in order
12
To cancel Repeat Play
Press REPEAT until “REPEAT” and
“REPEAT 1” disappears.
Page 13

Using the CD display
You can check the total number of tracks, the
total playing time, and the remaining time of
the track or the CD.
1
2
SCROLL
1
To check the total playing
time
1 Press FUNCTION repeatedly until
“CD” appears.
To check the remaining
time
/ Press DISPLAY repeatedly during
play.
Each time you press the button, the
display changes as follows:
The track number and the elapsed time
n
of the current track.
n
The track number and the remaining
time of the current track.
n
The remaining time of the current CD.
The CD player
2 While the disc is stopped, press
DISPLAY repeatedly.
Each time you press the button, the
display changes as follows:
The total number of tracks and the total
playing time (The number of
programmed tracks when programmed)
˜
The disc title*
* When the disc is not labelled, “No Name”
appears, then the total number of tracks and
the total playing time are displayed.
13
Page 14

Labelling a CD
–– Disc Memo Function
You can label up to 20 CDs with titles of up to
10 symbols and characters. Whenever you
load a labelled CD, the title (disc name)
appears in the display. If you label a CD and
make a CD Synchro Recording on a new MD,
the title is automatically recorded on the MD
(Disc Memo Copy function).
2
1
4,9
3
1
4,6
5
7
1 Press FUNCTION repeatedly until
“CD” appears.
2 To label a disc, press p to stop
playing the disc.
When “SHUFFLE” or “PROGRAM”
appears in the display, press PLAY
MODE repeatedly until it disappears.
5 Press CHARACTER repeatedly
until the type of character you want
appears.
Each time you press the button, the
display changes as follows:
A (Upper case) n a (Lower case)
n 0 (Numbers) n ! (Symbols)*
n (Space)** n A…
* You can use the following symbols.
!”#$%&’()∗+,–./:;<=>?@_`
**To enter a space
Go to step 7. You cannot use a blank
space for the first letter.
6 Press +/– repeatedly until the
desired character appears.
7 Press /.
The character you selected in step 6 stops
flashing and the cursor shifts to the right.
SHUFFLE PROGRAM REPEAT TUNED STEREO MONO1 SURR
DAILY REC SLEEP
DISC
AUTO
PRESTMANUAL
DBFB
kHz
MHz
3 Press MENU/NO.
4 Press +/– repeatedly until “Name
In ?” appears then press ENTER/
YES.
The cursor flashes.
SHUFFLE PROGRAM REPEAT TUNED STEREO MONO1 SURR
DAILY REC SLEEP
DISC
AUTO
PRESTMANUAL
14
DBFB
kHz
MHz
Page 15

8 Repeat steps 5 through 7 to
complete the entire title.
If you enter an incorrect character, press
? or / until the character you want to
change flashes, then repeat steps 5
through 7.
To erase a character, press CLEAR. You
cannot insert characters between
previously inserted characters.
Note
When you enter more than 10 characters,
“Name Full” appears.
9 Press ENTER/YES to complete the
labelling procedure.
“Complete!!” appears and the title is
memorized.
To cancel labelling
Press MENU/NO.
Tip
You can not scroll the disc title.
Note
You can label the disc when the deck is stopped
only.
To erase a disc title
1 Press MENU/NO repeatedly until “Name
In?” appears.
2 Press +/– repeatedly until “Name Erase ?”
appears then press ENTER/YES.
The disc title flashes.
“No Name” appears if no disc title is
stored.
3 Press ENTER/YES again.
“Complete!!” appears and the disc title is
erased.
The CD player
15
Page 16

The Radio
Labelling the preset station
— Station Name
You can label each preset station with up to
10 characters (Station Name). The Station
Name appears when you tune in the station.
1
3
5
2
1
6,11
4,6,8
7
9
1 Press FUNCTION repeatedly until
“TUNER” appears.
2 Press TUNER/BAND repeatedly
until the band you want appears.
FM n AM
n
3 Press TUNING MODE repeatedly
until “PRESET” appears.
4 Press +/– repeatedly until the preset
number of the station you want to
label appears.
5 Press MENU/NO.
7 Press CHARACTER repeatedly
until the type of character you want
appears.
Each time you press the button, the
display changes as follows:
A (Upper case) n a (Lower case)
n 0 (Numbers) n ! (Symbols)*
n (Space)** n A…
* You can use the following symbols.
!”#$%&’()∗+,–./:;<=>?@_`
**To enter a space
Go to step 9. You cannot use a blank
space for the first letter.
8 Press +/– repeatedly until the
desired character appears.
9 Press /.
The character you selected in step 8 stops
flashing and the cursor shifts to the right.
SHUFFLE PROGRAM REPEAT TUNED STEREO MONO1 SURR
DAILY REC SLEEP
AUTO
PRESET
MANUAL
DISC
DBFB
kHz
MHz
10 Repeat steps 7 through 9 to
complete the entire title.
If you enter an incorrect character, press
? or / until the character you want to
change flashes, then repeat steps 7
through 9.
To erase a character, press ? or / until
the character you want to erase flashes,
then press CLEAR.
11 Press ENTER/YES to complete the
labelling procedure.
“Complete!!” appears and the station
name is memorized.
6 Press +/– repeatedly until “Name
In ?” appears then press ENTER/
YES.
The cursor starts flashing.
SHUFFLE PROGRAM REPEAT TUNED STEREO MONO1 SURR
DAILY REC SLEEP
DISC
AUTO
MANUAL
PRESET
16
DBFB
kHz
MHz
Page 17

To cancel labelling
Press MENU/NO.
To check the station name
Press DISPLAY.
Each time you press the button, the display
changes as follows:
The preset number and the frequency
˜
The station name*
* When the station is not labelled, “No
Name” appears, then the preset number and the
frequency are displayed automatically.
To erase the name
Start over from steps 1 through 6 and press
CLEAR repeatedly until the label disappears
then press ENTER/YES.
Using the Radio Data System (RDS)
(European model only)
What is the Radio Data
System?
Radio Data System (RDS) is a broadcasting
service that allows radio stations to send
additional information along with the regular
programme signal.
Note
RDS may not work properly if the station you are
tuned to is not transmitting the RDS signal properly
or if the signal is weak.
* Not all FM stations provide RDS service, nor do
they all provide the same types of services. If you
are not familiar with the RDS system, check with
your local radio stations for details on RDS
services in your area.
Receiving RDS broadcasts
Simply select a station from the FM band.
When you tune in a station that provides RDS
services, the station name appears in the
display.
The Radio
To check the RDS information
Each time you press DISPLAY, the display
changes as follows:
Station name
˜
Frequency
17
Page 18

Sound Adjustment
Adjusting the sound
You can adjust treble and bass.
BASS +/–
TREBLE +/–
Adjust the treble
/ Press TREBLE +/–.
You can adjust from –3 to +3.
Adjust the bass
/ Press BASS +/–.
You can adjust from –3 to +3.
Tip
You can enjoy the original sound if you release
BASS, TREBLE, DBFB, and SURROUND (see page
19).
Reinforcing the bass sound
— DBFB
You can listen to music with stronger bass or
more powerful sound.
DBFB
/ Press DBFB*
Each time you press the button, the
display changes as follows;
nDBFB ON n DBFB OFF
When DBFB is ON, “DBFB” lights up in
the display.
* DBFB : Dynamic Bass Feedback.
Tip
You can enjoy the original sound if you release
DBFB, BASS, TREBLE, and SURROUND (see page
19).
DBFB
Adjust the woofer level
(CMT-SD3 only)
/ Turn the control dial on the back of
the sub woofer.
18
Page 19

Timer
Selecting the surround effect
You can enjoy the encompassing effects of
surround sound.
SURROUND
/ Press SURROUND
Each time you press the button, the
display changes as follows;
n SURR ON n SURR OFF
When SURROUND is ON, “SURR”
lights up in the display.
Tip
You can enjoy the original sound if you release
SURROUND, BASS, TREBLE, and DBFB (see page
18).
Falling asleep to music
— Sleep Timer
You can set the system to turn off after a
certain amount of time, so that you can fall
asleep to music. You can set the timer in 10
minutes increments.
SLEEP
Sound Adjustment / Timer
Optional A/V Components
/ Press SLEEP repeatedly to select a
desired time.
Each time you press the button, the
minute display (the time after which the
system turns off) changes as follows:
n SLEEP OFF
10N 20...80N 90N
After a few seconds, the previous
display appears. “SLEEP” in the display
and the timer indicator light up.
To check the remaining time
Press SLEEP once.
To change the turn off time
Select the time you want by pressing SLEEP.
To cancel the Sleep Timer function
Press SLEEP repeatedly until “SLEEP OFF”
appears.
Tip
You can use the Sleep Timer, even if you have not
set the clock.
Note
When the Sleep Timer is used, you cannot use other
timer functions.
19
Page 20

Waking up to music
— Wakeup Timer
You can wake up to music at a preset time.
Make sure you have set the clock (see page 6).
To wake up to the radio, preset the radio
stations first (see page 7).
5 Set the time to start play.
Press +/– to set the hour, then press
ENTER.
The minute indication flashes.
DAILY REC SLEEP
Press +/– to set the minute, then press
ENTER.
The hour indication flashes again.
8
3
TIMER
SELECT
4-7
2
4-7
1 Prepare the music source you want
to play.
• CD: Insert a CD. To start from a
specific track, make a programme (see
page 11).
• MD (the optional MD deck
MDS-SD1): Insert an MD. To start
from a specific track, make a
programme.
• Radio: Tune in a preset radio station
(see page 10).
• Tape (the optional tape deck
TC-SD1): Insert a tape.
Note
To wake up to a MD/a tape, you can use the
optional MD deck MDS-SD1/the optional tape
deck TC-SD1 only.
6 Set the time to stop playback
following the procedure in step 5.
7 Press +/– repeatedly until the music
source you want appears.
The indication changes as follows:
n MD PLAY ˜ TAPE PLAY N
n TUNER ˜ CD PLAY N
If you press ENTER, the start time,
followed by the stop time, the music
source appears, then the original display
appears.
“DAILY” in the display and the timer
indicator light up.
When “CONNECTION” appears
The system cable is not connected
correctly. Turn off the power, connect
the components correctly, and turn on
the power again. Then start over from
step 1.
2 Press VOL +/– to adjust the sound
volume.
3 Press TIMER SET.
4 Press +/– repeatedly until “DAILY
TIMER?” appears then press
ENTER.
The hour indication flashes.
20
Page 21

Optional A/V components
8 Press 1/u to turn off the system.
The Wakeup Timer is set. At the selected
time, the power turns on automatically
and the assigned sound source begins
playback. When the time is over the
power turns off, and returns to the
Wakeup Timer.
To change the setting
Start again from step 1.
To check the setting / To use the
timer
Press TIMER SELECT repeatedly until
“DAILY TIMER” appears. The start time,
followed by the stop time, the sound source
appears, then the original display appears.
To cancel the timer
Press TIMER SELECT repeatedly until
“TIMER OFF” appears.
Tip
To reset the Wakeup Time with the same settings,
press TIMER SELECT repeatedly until "DAILY"
appears in the display and then turn off the power.
It is not necessary to set the start and stop times
every time.
Connecting audio components
To enhance your system, you can connect
optional components. Refer to the
instructions of each component.
Connecting an MD deck
for digital recording
You can record from CD into the MD deck
digitally by connecting an optional cable.
Optional A/V Components
To the DIGITAL IN jack of the MD deck
Connecting an MD deck
for analogue recording
Make sure to match the color of the plugs and
the connectors. To listen to the sound of the
connected MD deck, press FUNCTION
repeatedly until “MD” appears.
To the audio input of an
MD deck
To the audio output of an
MD deck
Tip
When you connect a Sony MD deck, you can use the
MD ( button on this unit’s remote to perform
play, pause, and stop operations.
continued
21
Page 22

Connecting audio components
(continued)
Connecting a tape deck
Make sure to match the color of the plugs and
the connectors. To listen to the sound of the
connected tape deck, press FUNCTION
repeatedly until “TAPE” appears.
To the audio input of
a tape deck
To the audio output
of a tape deck
Connecting a VCR
Make sure to match the color of the plugs and
the connectors. To listen to the sound of the
connected VCR, press FUNCTION
repeatedly until “AUX” appears.
To the audio output
of a VCR
22
Page 23

Listening to the
Recording a CD on
sound of connected
components
2
2
1 Prepare the audio components.
2 Press FUNCTION repeatedly until
the music source you want to listen
to appears.
Each time you press the button, the
function display changes as follows:
nTUNER n MD WALKMAN* nAUX
CD N TAPE N MD N
* This function does not appear when the MD
Walkman is not connected or is not
connected properly.
MD Walkman is a trademark of Sony
corporation.
an MD/tape
For the operations of the connected
components, refer to the instructions of each
component.
2
Optional A/V Components
4
2
1 Prepare the recording component
for recording.
2 Press FUNCTION repeatedly until
“CD” appears.
3 Start recording.
4 Press CD (.
Play starts.
23
Page 24

Connecting outdoor aerials
Connect an outdoor aerial to improve the
reception. Refer to the instructions of each
component.
FM aerial
Connect the optional FM outdoor aerial.
You can also use the TV aerial instead.
AM
COAXIAL
FM
75
75-ohm coaxial cable
(not supplied)
Important
If you connect an outdoor aerial, connect the
ground wire and the AM aerial to the y terminal.
To prevent a gas explosion, do not connect the
ground wire to a gas pipe.
AM
y
COAXIAL
FM
75
AM aerial
Connect a 6- to 15- meter (20- to 50- feet)
insulated wire to the AM aerial terminal.
Leave the supplied AM loop aerial connected.
24
Insulated wire
(not supplied)
AM
COAXIAL
FM
75
Page 25

Additional Information
Precautions
On safety
• The system is not disconnected from the mains as
long as it is connected to the wall outlet, even if
the system itself has been turned off.
• Unplug the system from the wall outlet if it is not
to be used for an extended period of time. To
disconnect the mains lead, pull it out by the plug.
Never pull the cord itself.
• Should any solid object or liquid fall into the
system, unplug the system and have it checked by
qualified personnel before operating it any
further.
• The mains lead must be changed only at a
qualified service shop.
• When you connect the mains lead to mains, even
though the power is off, the system begins
charging for remote and timer functions.
Therefore the surface of this unit becomes warm,
this is normal.
• The nameplate indicating operating voltage,
power consumption, etc. is located at the bottom.
On placement
• Make sure the system fan is on during use.
Place the system in a location with adequate air
circulation, and do not place anything on the
system.
• Place the system in a location with adequate
ventilation to prevent heat build up.
• Do not place the system in an inclined position.
• Do not place the system in locations where it is;
– Extremely hot or cold
– Dusty or dirty
– Very humid
– Subject to vibrations
– Subject to direct sunlight.
On installing
When you move the system, remove the CD.
On operation
• If the system is brought directly from a cold to a
warm location, or is placed in a very damp room,
moisture may condense on the lens inside the CD
player. Should this occur, the system will not
operate properly. Remove the CD and leave the
system turned on for about 2 hours until the
moisture evaporates.
• When you move the system, take out any discs.
On the speaker system
This speaker system is magnetically shielded and
can be used near TV sets. However, the picture on
certain TV sets may become magnetically
distorted.In such a case, turn off the power of the TV
set once, and after 15 to 30 minutes turn it on again.
If there seems to be no improvement, locate the
speaker system further away from the TV set. Also,
be sure not to place objects in which magnets are
attached or used near the TV set, such as audio
racks, TV stands and toys. These may cause
magnetic distortion to the picture due to their
interaction with the system.
Notes on CDs
• Do not use a CD with tape, stickers, or paste on it
as this may damage the player.
• Before playing, clean the CD with a cleaning cloth.
Wipe the CD from the center out. Do not use
solvents such as benzine, thinner, commercially
available cleaners, or antistatic spray intended for
vinyl LPs.
• Do not expose the CD to direct sunlight or heat
sources such as hot air ducts, nor leave it in a car
parked in direct sunlight.
Cleaning the cabinet
Use a soft cloth slightly moistened with mild
detergent solution.
Additional Information
If you have any questions or problems concerning
your system, please consult your nearest Sony
dealer.
25
Page 26

Troubleshooting
If you have any problem using this system,
use the following checklist.
First, check that the mains lead is connected
firmly and that the speakers are connected
correctly and firmly.
Should any problem persist, consult your
nearest Sony dealer.
General
There is no sound.
•Turn VOLUME clockwise.
•Make sure the headphones are not
connected.
•Check the speaker connections.
•Check the power switch on the sub
woofer.
There is severe hum or noise.
•A TV or VCR is placed too close to the
system. Move the system away from the
TV or VCR.
“0:00” flashes in the display.
•A power interruption occurred. Set the
clock and timer settings again.
The timer does not function.
•Set the clock correctly.
The remote does not function.
•There is an obstacle between the remote
and the system.
•The remote is not pointing in the
direction of the system’s sensor.
•The batteries have run down. Replace the
batteries.
•Do not place the system in locations
where it is near an electric inverter
system.
•The operation buttons being used are
located on the cover of the remote control
and the cover is not completely closed.
Make sure that the cover of the remote
control is completely closed.
The sub woofer does not turn on.
•The power switch on the back of the sub
woofer is turned to OFF. Turn the switch
to ON.
CD Player
The CD tray does not close.
•The CD was not placed in the disc tray
properly.
•The disc tray was forced. Do not use force
to close the tray. Press § to close the disc
tray or push the tray lightly.
The CD will not eject.
•The CD has tape, stickers, or paste on it.
The CD will not play.
•The CD is dirty.Clean the CD with a
cleaning cloth.
•The face of the CD is scratched. Exchange
the CD.
•The CD is inserted label side down.
•Moisture condensation has built up.
Remove the CD and leave the system
turned on for about 2 hours until the
moisture evaporates.
Play does not start from the first track.
•The player is in programme or shuffle
mode. Press PLAY MODE repeatedly
until “SHUFFLE” and “PROGRAM”
disappear.
“- OVER -” is displayed.
•By pressing ), the last track on the disc
has been exceeded. Press and hold ≠
or 0 or press ≠ or 0 repeatedly to
return to a track where playback can
begin.
26
Page 27

Tuner
Severe hum or noise (“TUNED” or
“STEREO” flashes in the display).
•Adjust the aerial.
•The signal strength is too weak. Connect
an external aerial.
•Make sure the aerial is connected
properly.
•Make sure the aerial is not folded or
rolled up.
•The AM aerial wire is detached from the
stand.
A stereo FM programme is not received in
stereo.
•Press STEREO/MONO so “STEREO”
appears.
Periodic noise during MD recording.
•Adjust the aerial.
If other problems not described
above occur, reset the system as
follows:
1 Unplug the mains lead.
2 Hold down 1/u, then plug the mains lead
into the wall outlet again.
The system is reset to the factory settings. All
the settings you made, such as the preset
stations, clock, and timer are cleared. You
should set them again.
Messages
One of the following messages may appear or
flash in the display window during
operation.
TUNER
Name Full
The system has stored the maximum
number of characters to be input.
CD
Name Full
There is no more space to store track titles
or disc titles.
OVER
You have reached the end of the CD while
pressing ) during pause.
Additional Information
27
Page 28

Specifications
HCD-SD1
Amplifier section
European model:
DIN power output (Rated)
Continuous RMS power output (Reference)
Music power output (Reference)
Other models:
DIN power output (Rated)
Continuous RMS power output (Reference)
Inputs TAPE IN: voltage
Outputs TAPE OUT: voltage
20 + 20 watts
(6 ohms at 1 kHz, DIN)
25 + 25 watts
(6 ohms at 1 kHz,
10% THD)
40 + 40 watts
20 + 20 watts
(6 ohms at 1 kHz, DIN,
240 V)
18 + 18 watts
(6 ohms at 1 kHz, DIN,
220 V)
25 + 25 watts
(6 ohms at 1 kHz,
10% THD, 240 V)
23 + 23 watts
(6 ohms at 1 kHz,
10% THD, 220 V)
250 mV, impedance
47 kilohms
AUX IN: voltage
600 mV, impedance
47 kilohms
MD IN: voltage 600 mV,
impedance 47 kilohms
250 mV, impedance
1 kilohms
MD OUT: voltage
600 mV, impedance
1 kilohms
CD OUT: Optical
PHONES (stereo phones
jack): accepts headphones
of 8 ohms or more
CD player section
System Compact disc and digital
Laser Semiconductor laser
Laser output Max. 44.6 µW*
Frequency response 20 Hz – 20,000 Hz
audio system
(λ=780 nm)
Emission duration:
continuous
*This output is the value
measured at a distance of
200 mm from the
objective lens surface on
the Optical Pick-up Block
with a 7 mm aperture.
Tuner section
FM stereo, FM/AM superheterodyne tuner
FM tuner section
Tuning range 87.5 – 108.0 MHz
Aerial FM lead aerial
Aerial terminals 75 ohms unbalanced
Intermediate frequency 10.7 MHz
(50 kHz step)
AM tuner section
Tuning range
European model: 531 – 1,602 kHz
Other models: 531 – 1,602 kHz
Aerial AM loop aerial
Intermediate frequency 450 kHz
(with the interval set at
9 kHz)
(with the interval set at
9 kHz)
530 – 1,710 kHz
(with the interval set at
10 kHz)
External aerial terminals
28
Page 29

Speaker
SS-CSD1 for CMT-SD1
Speaker system 2-way, bass-reflex type
Speaker units
Woofer: 12 cm dia., glass-fiber
Tweeter: 2.5 cm dia., balanced
Impedance 6 ohms
Dimensions 165 x 280.5 x 265.5 mm
Mass Approx 4.3 kg per unit
cone type
drive
(w/h/d, incl. projecting
parts and controls)
Sub woofer system
SA-CSD1 for CMT-SD3
Twin drive sub woofer
DIN power output (Rated)
Power consumption 40 watts
Output (to 360˚ sound field satellite speaker)
Speaker units
Woofer: 12 cm x 2
Frequency response 25 Hz – 150 Hz
Dimensions 190 x 182 x 350 mm
Mass Approx 7.5 kg
Satellite speaker
Speaker system full range, sealed
Speaker units
Full range 7 cm
Dimensions 95 x 95 x 280 mm
Mass Approx 1.5 kg per unit
40 watts
(8 ohms at 50 Hz, DIN)
DC 15V, 30 mA (for
reflecter lighting)
(w/h/d, incl. projecting
parts and controls)
enclosure type
(w/h/d, incl. projecting
parts and controls)
General
Power requirements
European model: 230 V AC, 50/60 Hz
Other models: 220 – 240 V AC, 50/60 Hz
Power consumption 60 W (Normal)
Dimensions 190 x 91 x 315 mm
Mass Approx. 4.4 kg
Supplied accessories Remote Commander (1)
Designs and specifications are subject to change
without notice.
3 W (power off, with
clock display)
1 W (power off, without
clock display)
(w/h/d, incl. projecting
parts and controls)
batteries (2)
AM loop aerial (1)
FM lead aerial (1)
Speaker cords
(2 for CMT-SD1, 4 for
CMT-SD3)
Speaker pads
(8 for CMT-SD1 only)
Additional Information
29
Page 30

30
Page 31

Additional Information
31
Page 32

Index
A
Adjusting
the sound 18
the volume 9, 10
Aerials 5, 24
Automatic Source Selection
9, 10
B
Batteries 6
C
CD player 11-15
Clock setting 6
Connecting. See Hooking up
D, E, F, G
DBFB 18
Display 13
H, I, J, K
Hooking up
optional components 21
the aerials 4, 24
the speaker 5
L, M
Labelling
a CD 14
a preset station 16
N, O
Normal Play 9
P, Q
Playing
a CD 9
a preset radio station 10
tracks in random order
(Shuffle Play) 11
tracks in the desired
order (Programme Play)
11
tracks repeatedly
(Repeat Play) 12
Presetting radio stations 7
Programme Play 11
R
Radio stations 7
RDS 17
Recording
a CD 23
Repeat Play 12
Resetting the system 27
S
Setting the time 6
Shuffle Play 11
Sleep Timer 19
Sound adjustment 18-19
Speakers 5
Station Name 16
T, U, V
Timer
falling asleep to music
19
waking up to music 19
Track numbers 13
Troubleshooting 26
Tuner 7, 10
W, X, Y, Z
Wake-up timer 20
Sony Corporation Printed in Malaysia
32
 Loading...