

Sony CMT-DV2D Owner’s Manual

SON_ 2_9t0221,/tt
Micro Hi-Fi
Component
System
Operating Instructions
Owner's Record
The model and serial numbers are located on the rear of the unit. Record the serial number
in the space provided below. Refer to them x_henever you call upon your Sony dealer
regarding this product.
Model No. Serial No.
V|DEO
02005 Sony Corporation
DiGiTALAOD|O

To prevent fire orshock hazard, do not
expose the unit to rain or moisture.
To pl"c_ ent file, do not co_er the ventilation of the
apparatus with news papers, table-cloths, curtains, etc.
And don't place lighted candles on the apparatus.
To prevent fire or shock hazard, do not place objects
filled with liquids, such as vases, on the apparatus.
I Do nol install Ihe appliance ill a confined space,such as a bookcase or buih-in cabinet.
cld_ss1LASERPRODUCT classified as a CLASS 1
LUOKAN 1LASERLAITE LASER product. This
KLASS 1 LASERAPPARAT
II i This appliance is
" rear exterior.
general house wasle, dispose of it
8(_ Don'l Ihrow away the baltel T with
NOTICE FOR THE CUSTOMERS IN THE
U .S.A.
REFR SERVICINGTO QUALIFI D SERVICEP RSONNEI.
correctly as chemical waste.
CAUTION: TO ROUGE THE RISK OF El CTR[C SHOCK
DO NO1REMOVECOVER (OR SACK),
NO USEn-SERVECEABLE pARTS INSIDE
This symbol is intended to alert the
user to the presence of uninsulated
"dangerous voltage" within the
product's enclosure that may he of
sufficient magnitude to constitute a
riskof electric shock to persons.
This symbol is intended to alert the
user to the presence of impollant
operating and mainlcnance (servicing)
instructions in the literature
accompanying Ihe appliance.
marking is located on Ihe
CAUTION
The use of optical instruments x_ith this product x_ill
increase eye hazard.
WARNING
This equipment has been tested and found to comply
with tile limits for a Class B digital device, pursuant to
Part 15 of the FCC Rules. These limits are designed to
provide reasonable protection against harmful
interlk.rence ill a residential installation. This
equipment generates, uses, and can radiate radio
frequency energy and, if not inst dled and used in
accordance with the instructions, may cause harmfid
interference to radio communications. However, there
is no guarantee that interference will not occur in a
particular installation. If this equipment does cause
harmfid interference to radio or television rcceptiom
which can be determined by turning the equipment off
and on, the user is encouraged to try to com:ct the
interference by one or more of the following measures:
Reorient or relocate the receiving antenna.
Increase Ihe separation ben_een the equipment and
receiver.
Connect the equipment into an outlet on a circuit
difl_:mnt from that to which tile receiver is
connected.
Consult the dealer or an experienced radio/TV
technician for help.
CAUTION
You arc cautioned that any changes or modifications
not expressly approved in this manual could void your
authority to operate this equipment.
Note to CATV system installer:
This reminder is 1)ro\ idcd to call the CATV system
installer's attention to Article 820-40 of tile NEC that
provides guidelines fi)r proper grounding and, ill
particular, specifies that the cable ground shall be
connected to the grounding system of the building, as
close to the point of cable entry as practicah
NOTICE FOR THE CUSTOMERS IN CANADA
CAUTION
TO PREVENT ELECTRIC SHOCK, MATCH WIDE
BLADE OF PLUG TO WIDE SLOT, FULLY
INSERT.
CAUTION
The use of optical inshumenls wilh this l)roduct will
increase eye hazard.
2 GB

Except for European and Russian models
ENERGY STAR <_)is a U.S.
registered mark. As an ENERGY
STAR <_ partner, Sony Corporation
has determined that this product
meets the ENERGY STAR (k>
guidelines for energy efficiency.
This system incorporates Dolby l) Digital and DTS 2)
Digital Surround System.
J) Manuf:_ctured under license from Dolby
Laboratories. "Dolby"_ "Pro Logic '', and the double-
D symbol arc trademarks of Dolby Laboratories.
2) Manufactured under license from Digital Theater
Systems, lnc. DTS '' and "DTS 2.0 + Digital Out ''
are trademarks of Digital Theater Systems_ Inc.
3 GB

How to use this manual ........................... 6
Playable discs .......................................... 6
Getting Started
Hooking up tlle system ............................ 8
Setting the clock .................................... 11
Selecting a language ............................. 11
DVD/VIDEO CD/CD/MP3/JPEG
- Play
Loading a disc ....................................... 12
Playing a disc ........................................ 12
Normal Play/Shuffle Play
Playing DVDs using the menu .............. 14
Playing VIDEO CDs with PBC functions
(Ver. 2.0) ......................................... 15
PBC Play
Playing repeatedly ................................. 15
-- Repeat Play
Creating your own program .................. 16
-- Program Play
Using the on-screen display to
search .............................................. 17
Tape- Play
Loading a tape ...................................... 28
Playing a tape ....................................... 28
Tape- Recording
Recording your favorite CD tracks on a
tape ................................................. 28
-- CD-TAPE Synchro Recording
Recording on a tape manually .............. 29
-- Manual Recording
Sound Adjustment
Selecting tile sound effect ..................... 30
Singing along: Karaoke ........................ 30
Timer
Falling asleep to nmsic ......................... 32
Sleep Timer
Waking up to music .............................. 32
-- Play Timer
Timer recording radio programs ........... 33
-- Rec Timer
4 GB
DVD - Various functions
Changing tile sound/subtitle/angle ........ 19
Changing the hmguage .......................... 20
-- Language
Adjusting the image and audio
settings ............................................ 21
AV
Restricting disc playback ...................... 22
Rating (Parental Control)
System setup item list ........................... 24
Tuner
Presetting radio stations ........................ 25
Listening to the radio ............................ 26
Preset Tuning
Manual Tuning
Using the Radio Data System (RDS).... 27
(European model only)
Display
Turning off the disphty ......................... 34
-- Power Saving Mode
Adjusting the brightness of the
indicators ........................................ 34
Viewing information about the disc in the
display ............................................ 35
Viewing information about the disc in the
on-screen display ............................ 36
Viewing the tuner information in the
display ............................................ 36
Optional Components
Hooking up optional components ......... 37
Listening to audio from a connected
component ...................................... 38
Enjoying the 5.1 channel sound with the
optional amplifier ........................... 38
Recording audio from a connected
component ...................................... 39
Recording on a connected
component ...................................... 39
Troubleshooting
Problems and remedies ......................... 40
Messages ............................................... 44
Additional Information
Precautions ............................................ 45
Specifications ........................................ 47
Glossary ................................................ 49
List of button locations and reference
pages ............................................... 52
5GB
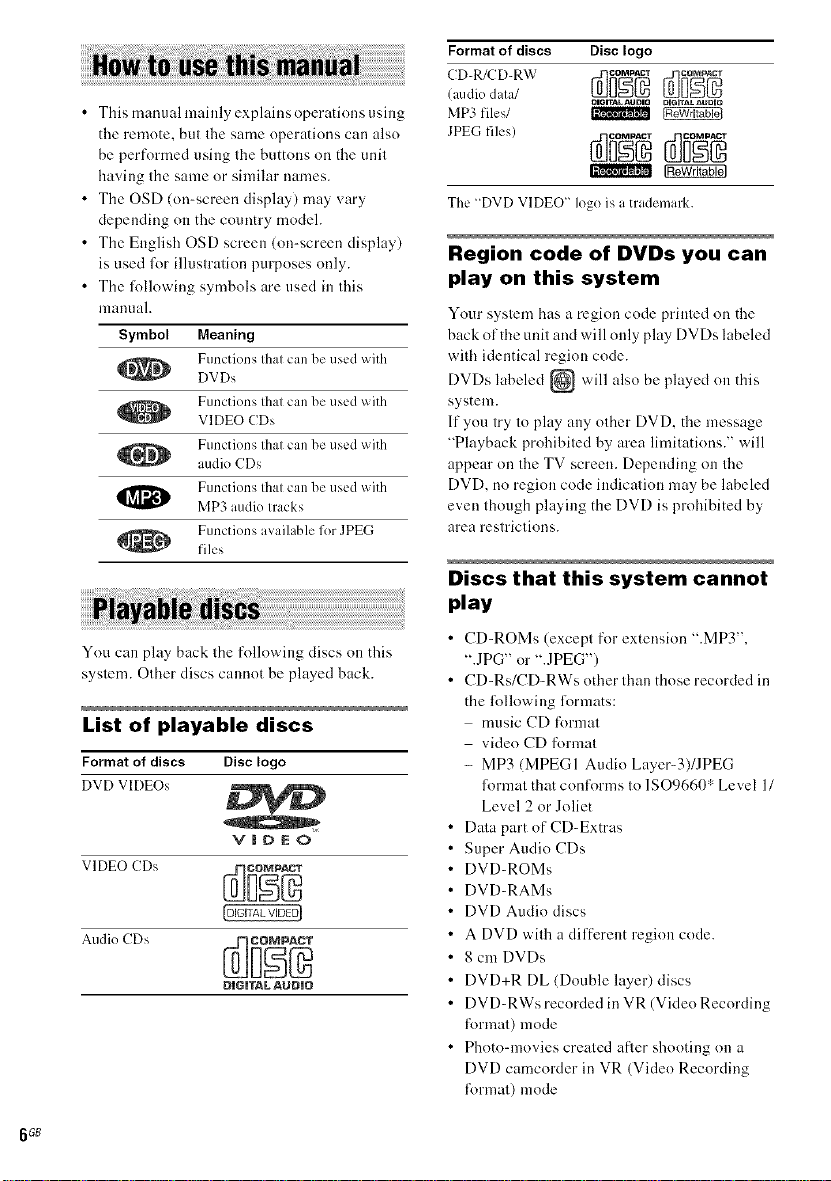
Formatof discs Disc logo
• This manual mainly explains operations using
the remote, but the same operations can also
be performed using the buttons on tile unit
having tile same or similar names.
• Tile OSD (on-screen display) may vary
depending on the country model.
• Tile English OSD screen (on-screen display)
is used l\_rillustration purposes only.
• Tile lbllowiug symbols are used in this
manuah
Symbol Meaning
Functions that can be used with
DVDs
l_ VIDEO CDs
!_ MP3 audio Iracks
Functions that can be used with
Functions that can be used with
audio CDs
Functions that can be used with
Functions available for JPEG
files
You can play back Ihe following discs on this
syslem. Olher discs cannot be played back.
List of playable discs
Formatof discs Disclogo
DVD VIDEOs
V|DEO
D|G|TAL AUD|O
(aodio dala/
MP3 files/ _
_GrrAL AgOno I_IGITAL AUGIQ
The "DVD VIDEO" logo is a trademark.
Region code of DVDs you can
play on this system
Your system has a region code printed on tile
back of the unit and will only play DVDs labeled
with identical region code.
DVDs labeled {_ will also be played on this
system.
If you try to play any other DVD. the message
"Playback prohibited by area limitations." will
appear on the TV screen. Depending on the
DVD. no region code indication may be labeled
even though playing tile DVD is prohibited by
area restrictions.
Discs that this system cannot
play
• CD-ROMs (except for extension ".MP3",
".JPG" or ".JPEG")
• CD-Rs/CD-RWs other than those recorded in
tile lollowing limnats:
music CD tk)rmat
video CD format
- MP3 (MPEG 1 Audio Layer-3)/JPEG
R)rmat that conl_arms to 1SO9660" Level 1/
Level 2 or Joliet
Data part of CD-Extras
Super Audio CDs
DVD-ROMs
DVD-RAMs
DVD Audio discs
A DVD with a diffcrent region code.
8 cm DVDs
DVD+R DL (Double layer) discs
DVD-RWs recorded in VR (Video Recording
t_)rmat) mode
• Photo-movies created after shooting on a
DVD camcorder in VR (Video Recording
format) mode
66B

• Discs with non-standard shapes (e.g., heart.
square, star) cannot be played nn this unit.
Attempting tn do sn may damage the unit. Dn
m)t use such discs.
• A disc with paper nr stickers on it.
• A disc that has tl_e adhesive, cellnphane tape.
nr a sticker still left on it.
* A logical l_mnat of files and folders on a CD-ROMs.
defined by ISO (International Organization for
standardizationl.
Notes about CD-R/CD-RW/
DVD-R/DVD-RW (Video mode)/
DVD+R/DVD+RW
• In some cases, CD-Rs, CD-RWs, DVD-Rs,
DVD-RWs (Video mode) (DVD-RWs
created in vide() mode have the same fnrnmt
as a DVD VIDEO). DVD+R nr DVD+RW
canm)t be played on tiffssystem depending
upon tire recording quality nr physical
condition of the disc, nr the characteristics nf
the recording device. Furthermore. the disc
will not play if it has not been correctly
finalized. For more irflimnatinn, see the
nperating irrstructions fnrthe recording
device.
• A disc recorded in packet write l\_mmtcanm)t
be played.
Note on playback operations
of DVDs and VIDEO CDs
Some playback operations of DVDs arm VIDEO
CDs may be intentionally set by soflware
producers. Since this system plays DVDs arm
VIDEO CDs accnrding to the disc contents the
snflware producers designed, snme playback
lbatures may not be available. Alsn, reti:r to the
irrstructionssupplied with tire DVDs nr VIDEO
CDs.
Music discs encoded with
copyright protection
technologies
Tiffs product is designed to playback discs that
conform tn the Compact Disc (CD) standard.
Recently, various nmsic discs encoded with
copyright prntection technologies are nmrketed
by some recnrd companies. Please be aware that
among those discs, there are snme that do not
cnuR)rm tn the CD standard and may not be
playable by this product.
Note on DualDiscs
Tiffs product is designed tn playback discs that
confnrm to the Compact Disc (CD) standard. A
DualDisc is a twn sided disc product which
mates DVD recorded material on one side with
digital audio material on the other side. Please
be aware that the audio side of a DualDisc may
m)t play nn this product because these discs do
m)t conform to the CD standard. "DualDisc" is a
trademark of' the Recording Industry
Association of America (RIAA).
Cautions when playing a disc
that is recorded in Multi
Session
• When playing a disc which contains audio
tracks in music CD lormat. MP3 audio tracks
and JPEG image files, only the arMio tracks in
music CD t_)rmat can be played back.
• CD-R and CD-RW discs recorded in multi-
sessinn that ha,_e not ended by "closing the
session" are not supported.
Copyrights
Tiffs product incnrporates copyright prntection
technology that is protected by U.S. patents and
other intellecttml property rights. Use nf this
copyright protection technology must be
authorized by Macrovision, and is irrtended R)r
home and other limited viewirrg uses only unless
ntherwise authorized by Macrovision. Reverse
engineering or disassembly is prnhibited.
7GB
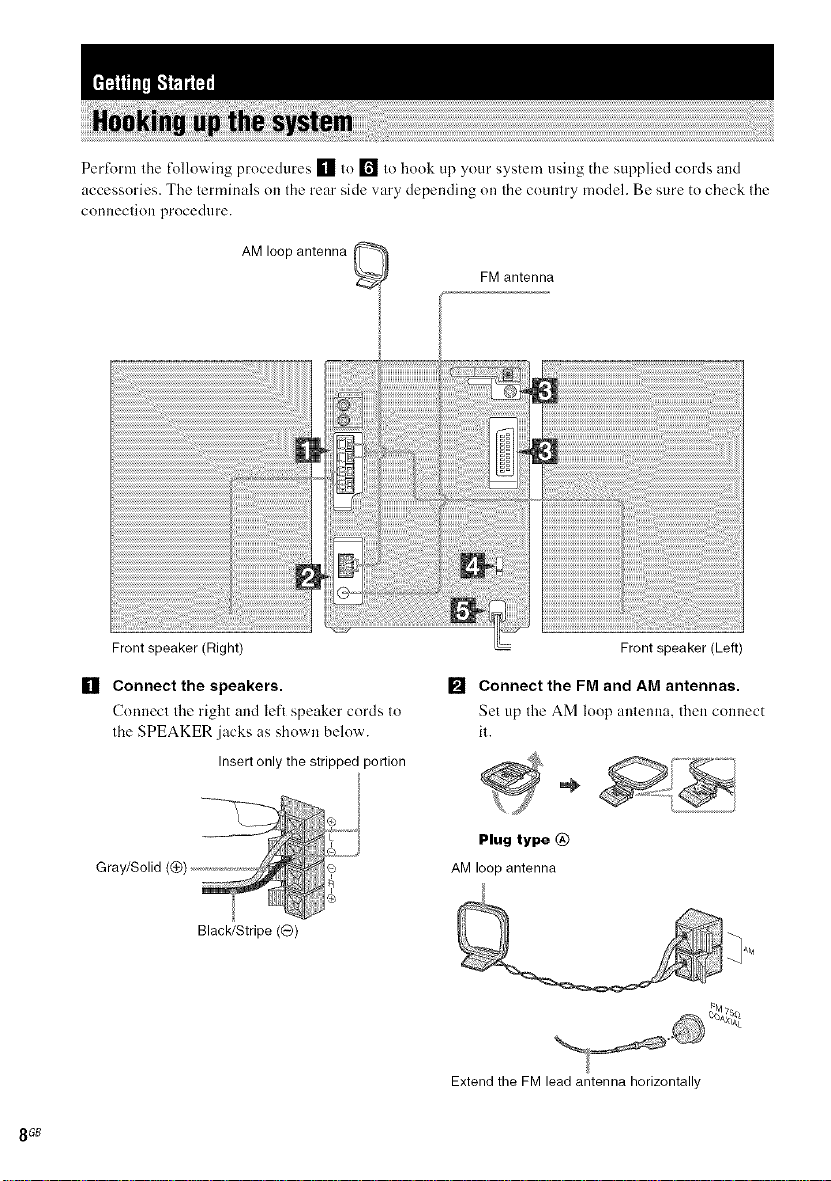
Pertk>rmthe R)llowing procedures [] to [] to hook up your system using tile supplied cords and
accessories. The terminals on tile rear side vary depending oll the country model. Be sure to check tile
connection procedure.
AM loop antenna _ FM antenna
8 GB
Front speaker (Right)
[] Connect the speakers.
Connect tile right and left speaker cords to
the SPEAKER jacks as shown below.
Insert only the stripped portion
Gray/Solid (@)
Black/Stripe ((3)
Front speaker (Left)
[] Connect the FM and AM antennas.
Set up tile AM loop autem]a, then connect
it.
2
Plug type @
AM loop antenna
Extend the FM lead antenna horizontally
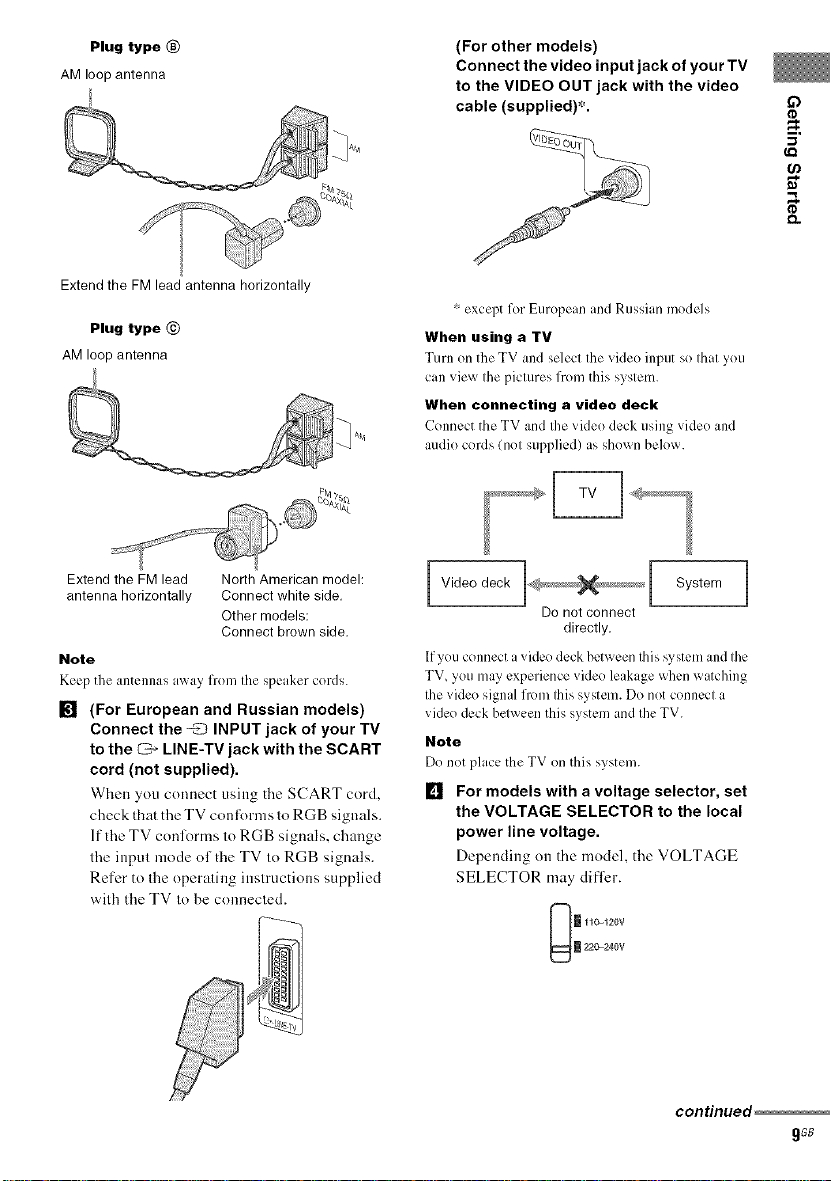
Plug type ®
AM loop antenna
Extend the FM lead antenna horizontally
Plug type @
AM loop antenna
(For other models)
Connect the video input jack of your TV
to the VIDEO OUT jack with the video
cable (supplied)*.
i.
* except for European and Russian medels
When using a TV
Turn on the TV and select the videe input se that yeu
can vie_ the pictures frem this system.
When connecting a video deck
Cenncct the TV and the _idee deck using video and
audie cerds (net supplied) as sh()x_n belew.
Extend the FMlead North American model:
antenna horizontally Connect white side.
Other models:
Connect brown side.
Note
Keci_the antennas a_,ay from the speaker cerds.
[] (For European and Russian models)
Connect the _ INPUT jack of your TV
to the _ LINE-TV jack with the SCART
cord (not supplied).
When you connect using tire SCART cord,
check that the TV conlbmls tn RGB signals.
If the TV conlorms to RGB signals, change
the input mode of the TV to RGB signals.
Refer to the operating instructions supplied
with the TV to be connected.
Video deck System
Do notconnect
directly.
lfyeu connect a video deck between Ibis ',)'stem and the
TV, you may experience video leakage when watching
the vide() signal from lifts system. Do net cenncct a
video deck belween this system and the TV.
Note
De netDlacc the TV en this system.
[] For models with a voltage selector, set
the VOLTAGE SELECTOR to the local
power line voltage.
Depending on the model, the VOLTAGE
SELECTOR may differ.
111c_1_0v
220-240V
continued_
gsB

[] Connect the power cord to a wall
outlet.
If the supplied adapter on the plug does not
fit your wall outlet, detach it from the plug
(only for models equipped with an adapter).
To turn on the system, press 1/(_.).
[] (Asian and Oceanian models only)
Set the color system to PAL or NTSC
depending on the color system of your
TV.
Tile color system is factory set to NTSC for
region code 3 models, and PAL l\>rother
region code models. Each time you perform
the procedure helow, the color system
changes as lollows:
NTSC +--+ PAL
1 Press DVD _ (or DVD D)..-|I on the
unit) to switch the function to DVD.
2 Press • to stop playback.
a press I/@ to turn oil the system.
4 Press I/_) on the unit while holding
down • on the unit.
The system turns on and the color
system is changed.
Notes
• A disturb mcc in the TV screen m_lyIre i_lcsent for CJ
moment after changing the color system as described
above.
• When you play back a VIDEO CD recorded ina
different color system from the one you set to Ibe
unit, the picture image may be distorted.
• To sel the VCD color system, see page 21.
To connect optional components
See page 37.
Inserting two R6 (size AA)
batteries into the remote
Note
It"you do not use the remote for _Jlong period of time,
remove the batteries to avoid possible damage from
battery leakage and corrosion.
Tip
With normal use, the batteries should last for about six
months. When the remote no longer operates the
system, replace both batteries with new ones.
Attaching the speaker pads
Attach the supplied speaker pads to the bottom
ot' the speakers to stabilize the speakers and
prevent them from slipping.
10 GB
Use buttons on Ihe remote lk)r the operation.
1 Press I/@ to turn on the system.
2
Press CLOCK/TIMER SET.
3
PressF_ or _ repeatedlyto set the
hour.
4
Press ENTER.
5
Press _ or DH_ repeatedly to set the
minute.
6
Press ENTER.
The clock starts working.
To adjust the clock
1 Press CLOCK/TIMER SET.
2 Press _ or _ to select "CLOCK SET",
then press ENTER.
3 Do the same procedures as step 3 to 6
above.
Notes
• The clock settings arc,canceled when you disconnect
the power cord or if a power fnilure occurs.
• You cannot set the clock in Power Saving Mode
(page 34).
You can change the on-screen display language.
1 Turn on your TV and select the video
input.
2 Press I/@ to turn on the system.
3 Press DVD _ (or DVD 1=,_11on the
unit) to switch the function to DVD.
4 Press • to stop playback.
i
5 Press DVD SETUP in stop mode.
6 Press 4,= or =d_repeatedly to select
"Language", then press ENTER.
7 Press t or _ repeatedly to select
"OSD", then press ENTER.
8 Press t or _ repeatedly to select a
language from the displayed list, then
press ENTER.
9 Press DVD SETUP to turn off the Setup
Display.
Note
Pressing DVD SETUP in step 5 does not _ork when
using a JPEG disc. Eijectthe disc belbre making the
setting.
if)
11GB

-- Normal Play/Shuffle Play
Use buttons on the unil lk_rthe operalion.
1 Press _--.
2 Place a disc with the label side up on
the disc tray.
When you play an 8 cm CD% place it
on the inner circle of the tray.
::' Nete that 8 cm DVDs cannet be played on this
system.
3 Press _-- again to close the disc tray.
Notes
• De net use a disc _xith tape, seals er paste on it as this
may cause malfunction.
• Do not fercibly press the disc tray closed with your
finger, as this may cause malfunctien.
BeR}re playing a DVD. VIDEO CD or JPEG
turn on your TV and select the video input.
Depending on the DVD or VIDEO CD, some
operations may be different or restricted. Refer
to the operating instructions supplied with the
disc.
Example: When playing a DVD
Chapter number
! J _ _
Title number Playing time
Example: When playing a CD
E
,U -_ t
Track number Playing time
Press DVD _ (or DVD D,,,-II on the unit).
The function switches to DVD and playback
starts automatically.
Other operations
To Do this
Step play Press m.
Pause Press DVD II (or DVD I_11 on the
unit)) /
Press DVD II igain to go to the next
frame (DVD/VIDEO CD only).
Press DVD _ (or DVD IP'_II on
the unit) to resume play.
Selectatmck, Pressl<l_ erl_Hrepeatedlyduring
image or play or pause.
chapter Press _ once during play or pause
to go back to the beginning of the
current track (except fer MP3/JPEG).
12GB

To
Locate a point
quickly in fast
R)n_ard orfast
reverse
(Lock Search)
(Except R)r
Do this
Press _ or _ during play.
Each time you press the button
searching speed changes.
To return to Normal Play, press
DVD _ (or DVD _ll on the
unit).
MP3/JPEG) 2)
Play all tracks Press PLAY MODE repeatedly in
on the disc in stop mode until "SHUF"appears in
random order the display, then press DVD _ (or
/Shuflle DVD D,,_II|on the unit/.
Play):_)
Watch frame During play, press SLOW |_-. Each
by flame time you press the button, the
(Slow-motion playback speed changes.
play) To return to Normal Play, press
IDVD/VIDEO DVD _ Ior DVD _11 on the
CD only) I/2/ unit).
Rotate the Press _ or ,,,,1_.
current image Each time you press ,,,,1_,the image
QPEG only) turns clockwise by 90".
Each time you press <1,,-,the image
turns counterclockx_ise by 90°.
Switch to Press DVD _ (or DVD I,,,4 | on the
DVD function unit) (Automatic Source selection).
from another Playback starts automatically when a
source disc is loaded.
Cut the sound Press MUTING.
Press MUTING again or VOLUME +
tO restore sound.
Remove a disc Press A on the unit.
1}There may be some disturbance ill Ihe video image.
- ForDVDs and VIDEO ( Ds, no sound is oulput.
"nYou cannot perform Shuffle Play on DVDs and
VIDEO CDs with PBC function.
Notes
• Depending on the DVD or VIDEO C[), some
operations may be restricted.
• Maximum number of albums on a disc: 90 (The
maximum number of MP3 audio tracks or JPEG
image files that can be contained on a disc is 999.)
However, when a large munber of non-MP3/JPEG
files are presenL the maximum number of albums,
tracks and files may decrease.
• Playback is possible up to 15 levels.
• The system supports MP3 audio tracks recorded with
abit rate of 32 to 320 kbps and a sampling frequency
of 32144.1148kHz for MPEG 1Audio Layer-3.
• Allalbum that does not include an MP3 audio track
orJPEG image file is skipped.
• Ifyou put the extension ".MP3"to data not in MP3
lk)rmat,the system cannot recognize the data
properly and will generate a loud noise which could
damage your speaker system.
• The following discs take a longer time to start
playback.
a disc recorded with complicated tree structure.
a disc recorded in Multi Session.
a disc to which data can be added lnon-finalized
disc).
• Some CD-Rs or CD-RWs cannot be played on this
system depending on file R)rmat.
Tip
When playing the data disc contained MP3 audio
tracks and JPEG image files, set "Data CD Priority"
(page 22).
Resuming playback from the
point you stopped the disc
-- Resume Play
This system memorizes the point where you
stopped the disc so you can resume from that
point.
1 While playing a disc, press • to stop
playback.
"RESUME" appears in the display. If
"RESUME" does not appear, Resume Play
is not available.
2 Press DVD I_- (or DVD I_-|| on the unit).
The player starts playback from the point
you stopped the disc in step 1.
<
ill
O
O
_e
6o
ill
fi3
I
"o
continued
13GB
Notes
• You cannot perform Resume Play during Shuffle
Play or Program Play.
• Depending on where you stopped the disc, the
system may resume playback from a different point.
• Resume phLviscanceled when:
you press • in stop mode.
you turn off the system.
you ()pen the disc tray.
you change the play mode.
Playing a track by entering the
track number in Normal Play
mode (on the remote only)
Press the umnber button(s) toenter the track
numher of the track you want to play.
To enter a track number over 10
1 Enter the corresponding digits.
2 Press ENTER.
Example:
To play track numher 30, press 3 and (), then press
ENTER.
Selecting an album/track/file
using the on-screen display (MP3/
JPEG only)
1 Press DVD TOP MENU in stop mode.
The list of albums contained in the disc
appears in the TV screen.
2 Press _'/_,/4,,,/,-I_ repeatedly to select an
album you want to play, then press ENTER.
The list of tracks or files contained in the
current album appears.
3 Press _'/_,/_!,-/,-I_ repeatedly to select a
track or file, then press ENTER.
The selected track or file starts playing.
Notes
• On the TV screen, up to 8 characters can he
displayed for album names, 12characters lbr track/
file names. When multiple alhum names use the
same first 8 characters, the tracks and files in those
albums are disphLved together in a single lblder.
• Only the letters in the alphabet and numbers can be
used h)r album or file names. Anything else is
displayed as "-'.
• If an MP3 audio track is played, indicated elapsed
time may be different from the actual time.
Some DVDs have menus to help you enjoy the
DVDs. You can play DVDs using these menus
on the TV screen.
• Using the DVD top menu
A DVD is divided into long sections of a picture
or a music feature called "titles". When you play
a DVD which contains several titles, you can
select the title you want using the menu.
• Using the DVD menu
Some DVDs allow you to select the disc
contents using a menu. When you play these
DVDs, you can select items such as the language
for the subtitles and the language tk_rthe sound
using the DVD menu.
1 Press DVD TOP MENU or DVD MENU.
The menu appears on the TV screen. The
contents of the menu vary from disc to disc.
2 Press t/_,/4,,,/=l_ or the number
buttons to select the title or item you
want to play.
3
Press ENTER.
14GB
-- PBC P_y
-- Repeat Play
You can use PBC* menus on your TV screen Io
enjoy the disc's interactive software Tire menu
format and structure may differ depending on
each disc
' PBC: Playback Conlro]
1 Press DVD _ (or DVD D,.,I! on the
unit) to start playing a VIDEO CD with
PBC functions (Ver. 2,0),
The PBC menu appears on tile TV screen
2 Press the number buttons to select the
item number you want,
3 Press ENTER,
4
Continue playback according to the
instructions on the menus to enjoy
interactive playback.
Refer to the operating instructions supplied
with the disc. as tire operating procedure
may differ according to the VIDEO CD.
To go back to a previous menu
Press ox'_ RETURN.
Note
Depending on the VIDEO CD, "Press ENTER" in stc?
3 may appear as ' Press DVD IP'_'' in the operating
instructions supplied with the disc. In this case, press
DVD _ (or DVD IP'_I| on the unit).
Tip
To cancel playback with PBC fllnctions, press DVD
MENU repe itedly in stop mode until "PBC OIP '
appears on the TV screen. Playback starts lron_ the
selected track. Still images, such as the menu screens_
will not be shown.
To return to PBC playback, press DVD MENU
repeatedly in stop mode until 'PBC On" ch:_pearson the
TV screen.
You can play all Ihe tracks/files or a single title/
chapler/track/lile on a disc repealedly.
Using the front panel display
Press REPEAT during play until "REP" or
"REPI" appears.
REP: For all the tracks/files on the disc up to five
times.
REPI: For a single title':'/chapter*/track/file
only.
* You can check whether a title or chapter is being
repeatedly phJyed on theTV screen.
To cancel Repeat Play
Press REPEAT repeatedly until both "REP" and
"REP 1" disappear.
Notes
• Depending on the DVD, you cannot perform Rcpe_Jt
Play
• You cannot perfi)rmRepeat PhJyduring PBC
playbackof VIDEO CDs (page 15)
• When you select "REPI", that title/chapter/track/file
is repeated endlessly until "REPI"is canceled.
<
m
o
O
¢o
m
if)
I
continued
15GB

Using the on-screen display
Press REPEAT repeatedly during play.
Each time you press the button, the setting
changes cyclically as R)llows:
• When playing a DVD
• Off: does not play repeatedly.
• Title: repeats the current title on a disc.
• Chapter: repeats the current chapter.
• When playing a VIDEO CD/CD/MP3/JPEG
• Off: does not play repeatedly.
• All: repeats all the tracks/files on a disc.
• Track (except l_)r JPEG): repeats the current
track.
• File (JPEG only): repeats the current file.
To cancel Repeat Play
Select "OFF'.
Notes
• Depending on the DVD, you cannot perfimn Repeat
Play.
• You cannot perform Repeat Play during PBC
playback of VIDEO CDs (page 15).
• If you select "All", the program repeats up to five
times.
• Repeat Play is canceled when:
you turn off the system.
you open Ibe disc tray.
you switch to other flmctions except DVD.
Tip
You can setRepeat Play when the playback is stopped.
Press REPEAT repeatedly to select the setting, then
press DVD _ (or DVD I_11 on Iheunit) to start
Repeat Play.
iii !i i i!iii ! i i i ! !!i ! ! !ii!ii!ii!ii!ii!ii!ii!ii!ii!ii!ii!ii!ii!ii!ii!ii!ii!ii!ii!ii!ii!ii!ii!ii!ii!ii!ii!ii!ii!ii!ii!ii!ii!ii!ii!ii!ii!ii!ii!ii!ii!ii!ii!ii!ii!ii!ii!ii!ii!ii!i ! i! ii!i!i! !!i i !i
i Program Play
You can make a progrant of up to 12 steps.
You can synchro record the programmed tracks
onto a cassette tape (page 29).
The program operation can only be set using the
TV screen.
1 Press DVD _ (or DVD D_-II on the
unit) to switch the function to DVD.
Playback starts.
Press • twice to stop playback.
3 Press PLAY MODE repeatedly in stop
mode until the Program Display
appears on the TV screen.
4
Press t/_/_[_/_l_ repeatedly to select
the desired step number.
5
Press the number buttons to select the
track you want to program.
If you make a ntistake, press (?LEAR to
cancel the ntnnber, then select another
number.
16GB
All Clear Play Program
O To program other tracks, repeat steps 4
and 5.
7 Press 1/€/,*,./_1_ repeatedly to select
"Play Program", then press DVD _ (or
DVD I=._11 on the unit).
Program Play starts.
Otheroperations
To Dothis
Cancel Program Play Press PLAY MODE
repeatedly in stop mode
until "Continue"appears.
Clear a programmed Press t/l_,/<!,-/,,,,l_
step repeatedly to select a step
number, then press CLEAR
in stop mode.
Clear all the Press t/_/_"/"_
programmed steps repeatedly to select "All
Clear", then press ENTER.
Notes
• You cannot perform Program Play _ith DVDs and
VIDEO CDs with PBC function
• Program Play is canceled when:
you turn off the system
you ()pen the disc tray.
you switch to other functions except DVD.
Tip
The program you made remains after Program Play
finishes. To play the same program again, press
DVD _ (or DVD IP'-II on the unit).
You can search lot a chapter (DVD) and track
(VIDEO CD, CD). As chapters and tracks are
assigned unique numbers on the disc, so you can
select the desired one by entering its number. Or,
you can search for a particular point using the
time code (Time Search).
Searching for a chapter
1 Press TIME SEARCH.
The Search Display appears.
2 Press t1'or ,!" repeatedly to select
"Chapter".
3 Press the number buttons to select the
desired chapter number.
If you make a mislake, press CLEAR Io
cancel the number. Ihen selecl anolher
nnHlher,
Press ENTER.
Playback starls.
<
i
m
O
o
"o
"o
m
if)
i
"o
,<
Searching for a track
1 Press TIME SEARCH repeatedly until
the Disc Search Display appears.
2
Press _' or ,!, repeatedly to select
"Track".
3
Press the number buttons to select the
desired track number.
If you make a mistake, press CLEAR to
cancel the number, then select another
ntnnher,
Press ENTER.
The playback starts from the selecled
nnmher,
continued
17GB
 Loading...