

Page 1
4-595-967-11(1)
FM/AM
Compact Disc Player
Owner’s Record
The model and serial numbers are located on the
bottom of the unit.
Record the serial number in the space provided below.
Refer to these numbers whenever you call upon your
Sony dealer regarding this product.
Model No. CDX-G3205UV
Serial No.
Operating Instructions
Mode d’emploi
GB
FR
To cancel the demonstration (DEMO) display, see
page 13.
For the connection/installation, see page 26.
Pour annuler l’affichage de démonstration (DEMO),
reportez-vous à la page 13.
Pour le raccordement/l’installation, reportez-vous à
la page 27.
CDX-G3205UV
Page 2

For safety, be sure to install this unit in the
dashboard of the car as the rear side of
the unit becomes hot during use.
For details, see “Connection/Installation”
(page 26).
The nameplate indicating operating voltage,
etc., is located on the bottom of the chassis.
Warning
FOR THE CUSTOMERS IN THE USA.
NOT APPLICABLE IN CANADA,
INCLUDING IN THE PROVINCE OF
QUEBEC.
POUR LES CLIENTS AUX ÉTATS-UNIS.
NON APPLICABLE AU CANADA, Y
COMPRIS LA PROVINCE DE QUÉBEC.
This equipment has been tested and
found to comply with the limits for a Class
B digital device, pursuant to Part 15 of the
FCC Rules.
These limits are designed to provide
reasonable protection against harmful
interference in a residential installation.
This equipment generates, uses, and can
radiate radio frequency energy and, if not
installed and used in accordance with the
instructions, may cause harmful
interference to radio communications.
However, there is no guarantee that
interference will not occur in a particular
installation. If this equipment does cause
harmful interference to radio or television
reception, which can be determined by
turning the equipment off and on, the
user is encouraged to try to correct the
interference by one or more of the
following measures:
– Reorient or relocate the receiving
antenna.
– Increase the separation between the
equipment and receiver.
– Connect the equipment into an outlet
on a circuit different from that to which
the receiver is connected.
– Consult the dealer or an experienced
radio/TV technician for help.
You are cautioned that any changes or
modifications not expressly approved in
this manual could void your authority to
operate this equipment.
2GB
Page 3
CAUTION
The use of optical instruments with this
product will increase eye hazard.
For the State of California, USA only
Perchlorate Material – special handling may
apply, See
www.dtsc.ca.gov/hazardouswaste/
perchlorate
WARNING: Do not ingest
battery, Chemical Burn Hazard.
The remote commander contains a
coin/button cell battery. If the coin/button
cell battery is swallowed, it can cause severe
internal burns in just 2 hours and can lead to
death.
Keep new and used batteries away from
children. If the battery compartment does
not close securely, stop using the product
and keep it away from children.
If you think batteries might have been
swallowed or placed inside any part of the
body, seek immediate medical attention.
Note on the lithium battery
Do not expose the battery to excessive heat
such as direct sunlight, fire or the like.
Warning if your car’s ignition has no
ACC position
Be sure to set the AUTO OFF function
(page 14). The unit will shut off completely
and automatically in the set time after the
unit is turned off, which prevents battery
drain. If you do not set the AUTO OFF
function, press and hold OFF until the
display disappears each time you turn the
ignition off.
Disclaimer regarding services offered
by third parties
Services offered by third parties may be
changed, suspended, or terminated without
prior notice. Sony does not bear any
responsibility in these sorts of situations.
3GB
Page 4

Table of Contents
Warning . . . . . . . . . . . . . . . . . . . . . . . . . . . . . 2
Guide to Parts and Controls. . . . . . . . . . . . . 5
Getting Started
Detaching the Front Panel . . . . . . . . . . . . . . 7
Resetting the Unit. . . . . . . . . . . . . . . . . . . . . 7
Setting the Clock. . . . . . . . . . . . . . . . . . . . . . 7
Connecting a USB Device . . . . . . . . . . . . . . . 8
Connecting Other Portable Audio
Device . . . . . . . . . . . . . . . . . . . . . . . . . . . 8
Listening to the Radio
Listening to the Radio . . . . . . . . . . . . . . . . . 8
Using Radio Data System (RDS). . . . . . . . . . 9
Listening to the SiriusXM Radio . . . . . . . . . 9
Playback
Playing a Disc . . . . . . . . . . . . . . . . . . . . . . . . 11
Playing a USB Device . . . . . . . . . . . . . . . . . . 11
Searching and Playing Tracks . . . . . . . . . . . 11
Listening to Pandora®
Setting up Pandora®. . . . . . . . . . . . . . . . . . 12
Streaming Pandora® . . . . . . . . . . . . . . . . . . 12
Available Operations in Pandora® . . . . . . . 12
Settings
Canceling the DEMO Mode . . . . . . . . . . . . 13
Basic Setting Operation . . . . . . . . . . . . . . . 13
General Setup (GENERAL) . . . . . . . . . . . . . 14
Sound Setup (SOUND) . . . . . . . . . . . . . . . . 15
Display Setup (DISPLAY). . . . . . . . . . . . . . . 16
Connection/Installation
Cautions . . . . . . . . . . . . . . . . . . . . . . . . . . . 26
Parts List for Installation . . . . . . . . . . . . . . 26
Connection . . . . . . . . . . . . . . . . . . . . . . . . . 27
Installation . . . . . . . . . . . . . . . . . . . . . . . . . 29
Additional Information
Updating the Firmware . . . . . . . . . . . . . . . 17
Precautions . . . . . . . . . . . . . . . . . . . . . . . . . 17
Maintenance . . . . . . . . . . . . . . . . . . . . . . . . 18
Specifications . . . . . . . . . . . . . . . . . . . . . . . 19
Troubleshooting . . . . . . . . . . . . . . . . . . . . . 21
Messages. . . . . . . . . . . . . . . . . . . . . . . . . . . 23
4GB
Page 5
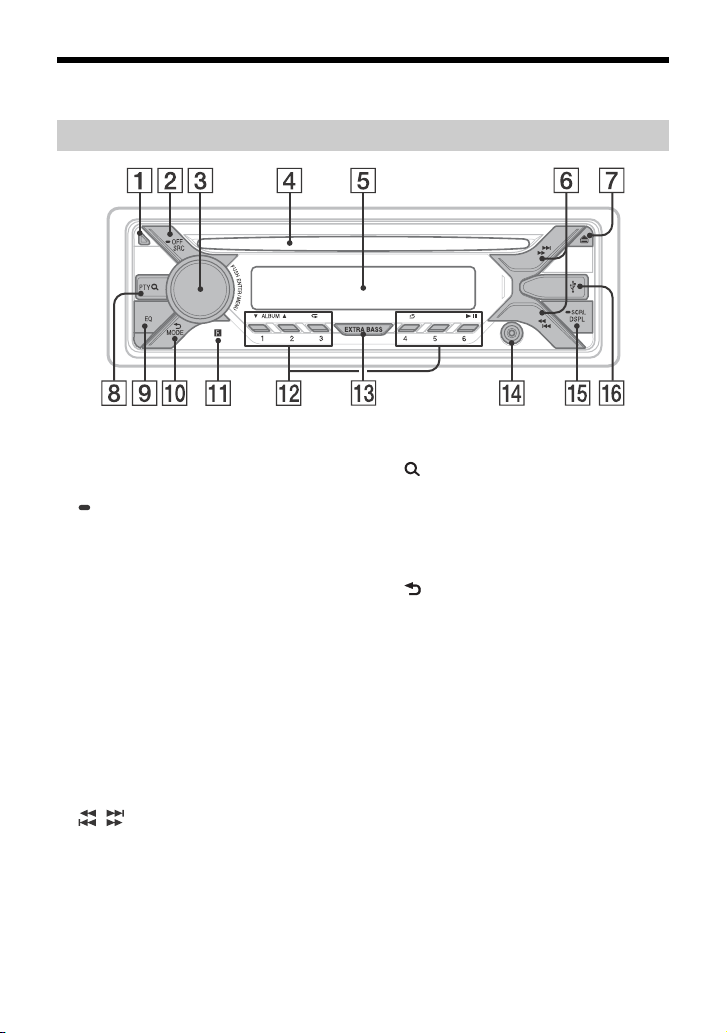
Guide to Parts and Controls
Main unit
Front panel release button
SRC (source)
Turn on the pow er.
Change the source.
OFF
Press and hold for 1 second to turn the
source off and display the clock.
Press and hold for more than 2 seconds
to turn off the power and the display.
If the unit is turned off and the display
disappears, operation by the remote
commander is not available.
Control dial
Rotate to adjust the volume.
PUSH ENTER
Enter the selected item.
MENU
Open the setup menu.
Disc slot
Display window
/ (SEEK –/+)
Tune in radio stations automatically.
Press and hold to tune manually.
/ (prev/next)
/ (fast-reverse/fast-forward)
(disc eject)
PTY (program type)
Select PTY in RDS.
(browse) (page 10, 12, 13)
Enter the browse mode during playback.
(Not available when a USB device in
Android™ mode or iPod is connected.)
EQ (equalizer)
Select an equalizer curve.
(back)
Return to the previous display.
MODE (page 8, 10, 13)
Receptor for the remote commander
5GB
Page 6

Number buttons (1 to 6)
Receive stored radio stations. Press and
hold to store stations.
ALBUM /
Skip an album for audio device. Press and
hold to skip albums continuously.
(Not available when a USB device in
Android mode or iPod is connected.)
Press to thumbs up, or to thumbs
down in Pandora® (page 12).
(repeat)
(Not available when a USB device in
Android mode is connected.)
(shuffle)
(Not available when a USB device in
Android mode is connected.)
(play/pause)
EXTRA BASS
Reinforces bass sound in synchronization
with the volume level. Press to change
the EXTRA BASS setting: [1], [2], [OFF].
AUX input jack
DSPL (display)
Change display items.
SCRL (scroll)
Press and hold to scroll a display item.
USB port
RM-X211 Remote commander
The VOL (volume) + button has a tactile dot.
ATT (attenuate)
Attenuate the sound. Press again to
cancel the attenuation.
SOUND
Open the SOUND menu directly.
MENU
Press and hold to open the setup menu.
///
Select a setup item, etc.
ENTER
Enter the selected item.
/ (prev/next)
+/– (album +/–)
VOL (volume) +/–
6GB
Remove the insulation film before use.
Page 7
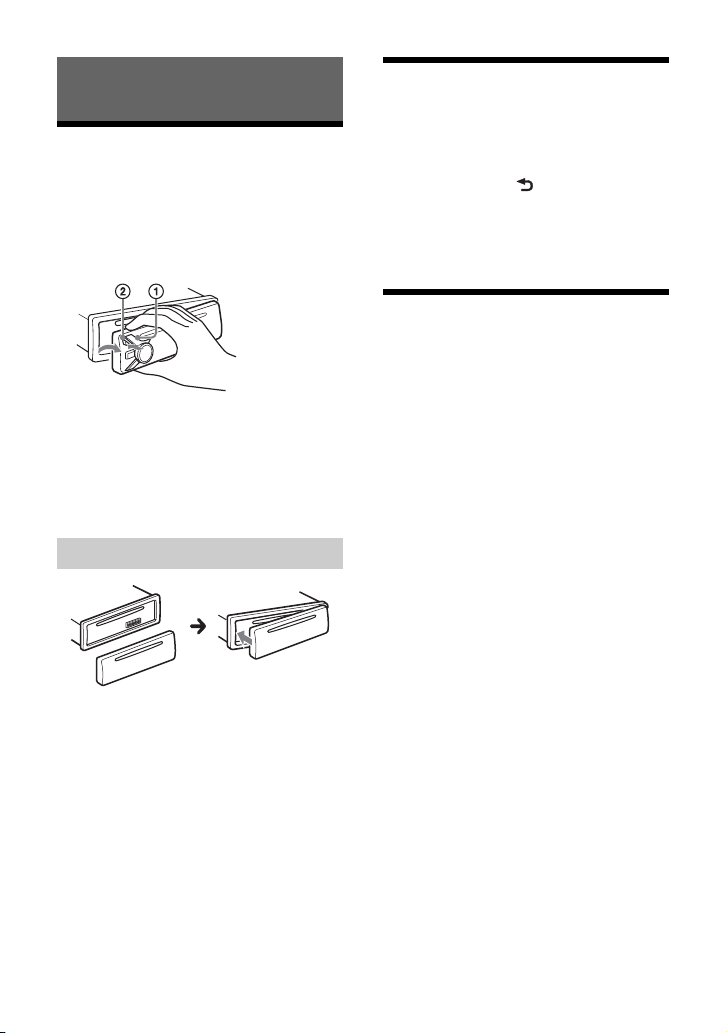
Getting Started
Detaching the Front Panel
You can detach the front panel of this unit to
prevent theft.
1 Press and hold OFF until the unit
turns off, press the front panel
release button , then pull the panel
towards you to remove.
Caution alarm
If you turn the ignition switch to the OFF
position without detaching the front panel,
the caution alarm will sound for a few
seconds. The alarm will only sound if the
built-in amplifier is used.
Attaching the front panel
Resetting the Unit
Before operating the unit for the first time,
or after replacing the car battery or
changing connections, you must reset the
unit.
1 Press DSPL and (back)/MODE for
more than 2 seconds.
Note
Resetting the unit will erase the clock setting and
some stored contents.
Setting the Clock
1 Press MENU, rotate the control dial to
select [GENERAL], then press it.
2 Rotate the control dial to select [SET
CLOCK-ADJ], then press it.
The hour indication flashes.
3 Rotate the control dial to set the hour
and minute.
To move the digital indication, press SEEK
+/–.
4 After setting the minute, press MENU.
The setup is complete and the clock
starts.
To di splay the cl o ck
Press DSPL.
7GB
Page 8
Connecting a USB Device
1 Turn down the volume on the unit.
2 Connect the USB device to the unit.
To connect an iPod/iPhone, use the USB
connection cable for iPod (not supplied).
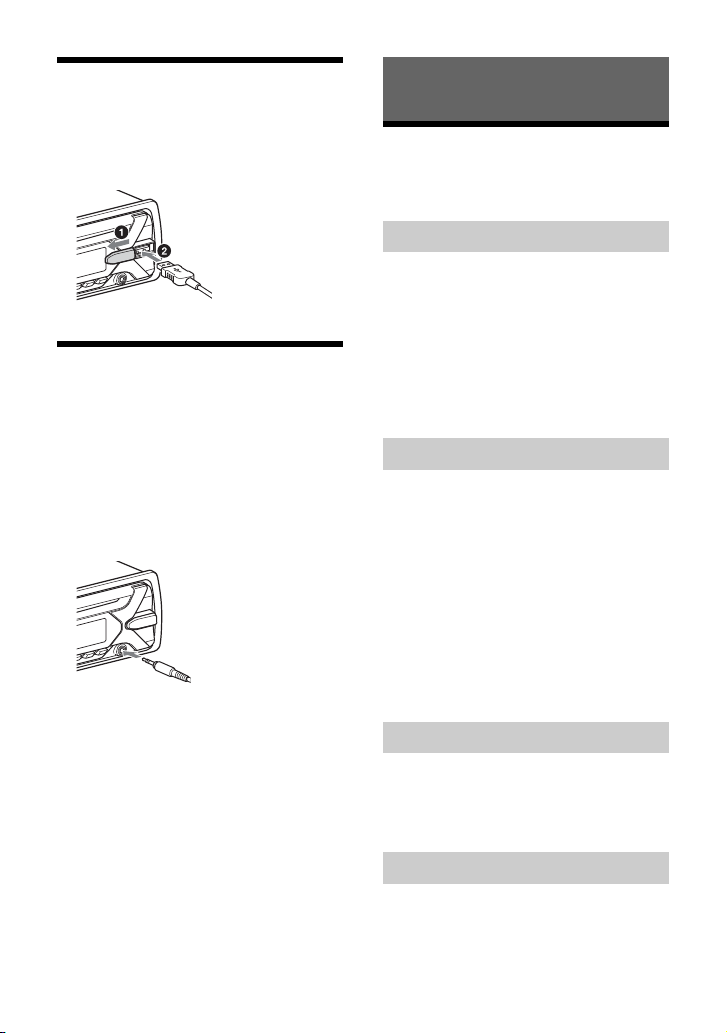
Connecting Other Portable
Audio Device
1 Turn off the portable audio device.
2 Turn down the volume on the unit.
3 Connect the portable audio device to
the AUX input jack (stereo mini jack)
on the unit with a connecting cord
(not supplied)*.
* Be sure to use a straight type plug.
4 Press SRC to select [AUX].
To match the volume level of the
connected device to other sources
Start playback of the portable audio device
at a moderate volume, and set your usual
listening volume on the unit.
Press MENU, then select [SOUND] [SET AUX
VOL] (page 15).
Listening to the Radio
Listening to the Radio
To listen to the radio, press SRC to select
[TUNER].
Storing automatically (BTM)
1 Press MODE to ch ange the band (F M1,
FM2, FM3, AM1 or AM2).
2 Press MENU, rotate the control dial to
select [GENERAL], then press it.
3 Rotate the control dial to select [SET
BTM], then press it.
The unit stores stations in order of
frequency on the number buttons.
Tuning
1 Press MODE to ch ange the band (F M1,
FM2, FM3, AM1 or AM2).
2 Perform tuning.
To tune manually
Press and hold SEEK +/– to locate the
approximate frequency, then press SEEK
+/– repeatedly to fine adjust to the
desired frequency.
To tune automatically
Press SEEK +/–.
Scanning stops when the unit receives a
station.
Storing manually
1 While receiving the station that you
want to store, press and hold a
number button (1 to 6) until [MEM]
appears.
Receiving the stored stations
1 Select the band, then press a number
button (1 to 6).
8GB
Page 9

Using Radio Data System
(RDS)
Listening to the SiriusXM
Radio
Selecting program types (PTY)
1 Press PTY during FM reception.
2 Rotate the control dial until the
desired program type appears, then
press it.
The unit starts to search for a station
broadcasting the selected program type.
Type o f prog ra ms
NEWS (News), INFORM (Information), SPORTS
(Sports), TAL K (Talk), ROCK (Rock), CLS ROCK
(Classic Rock), ADLT HIT (Adult Hits), SOFT RCK
(Soft Rock), TOP 40 (Top 40), COUNTRY
(Country), OLDIES (Oldies), SOFT (Soft),
NOSTALGA (Nostalgia), JAZZ (Jazz), CLASSICL
(Classical), R & B (Rhythm and Blues), SOFT R&B
(Soft Rhythm and Blues), LANGUAGE (Foreign
Language), REL MUSC (Religious Music), REL
TAL K (Religious Talk), PERSNLTY (Personality),
PUBLIC (Public), COLLEGE (College), HABL ESP
(Spanish Talk), MUSC ESP (Spanish Music), HIP
HOP (Hip-Hop), WEATHER (Weather)
Setting clock time (CT)
The CT data from the RDS transmission sets
the clock.
1 Set [SET CT-ON] in [GENERAL]
(page 14).
Activating your SiriusXM
Subscription
Only SiriusXM brings you more of what you
love to listen to, all in one place. Get over
140 channels, including commercial-free
music plus the best sports, news, talk,
comedy and entertainment. Welcome to the
world of satellite radio. A SiriusXM Connect
Vehicle Tuner and Subscription are required.
For more information, visit
www.siriusxm.com
After installing your SiriusXM Connect
Vehicle Tuner and antenna, press SRC to
select [SIRIUSXM]. You should be able to
hear the SiriusXM preview channel on
Channel 1. After verifying that you can hear
the preview channel, select Channel 0 to
find the Radio ID of your tuner. In addition,
the Radio ID is located on the bottom of the
SiriusXM Connect Vehicle Tuner and its
packaging. You will need this number to
activate your subscription. Write the number
down for reference.
In the USA, you can activate online or by
calling SiriusXM Listener Care:
•Online: Visit www.siriusxm.com/
activatenow
•Phone: Call 1-866-635-2349
In Canada, you can activate online or by
calling SiriusXM Listener Care:
• Online: Visit www.siriusxm.ca/activatexm
•Phone: Call 1-877-438-9677
As part of the activation process, the
SiriusXM satellites will send an activation
message to your tuner. When your radio
detects that the tuner has received the
activation message, your radio will display:
[SUBSCRIPTION UPDATED - ENTER TO
CONTINUE]. Once subscribed, you can tune
to channels in your subscription plan.
9GB
Page 10

Notes
• The activation process usually takes 10 to 15
minutes, but may take up to an hour.
• Your radio will need to be turned on and receiving
the SiriusXM signal to receive the activation
message.
Selecting channels for SiriusXM
1 Press (browse).
2 Rotate the control dial to select
[CHANNEL], then press it.
3 Rotate the control dial to select the
desired channel, then press it.
To select channels from categories
Press (browse).
1
2 Rotate the control dial to selec t [CATEGORY],
then press it.
3 Rotate the control dial to select the desired
category, then press it.
To store channels
1
While receiving the channel that you want to
store, press and hold a number button (1 to
6) until [MEM] appears.
To receive the stored channel, press MODE
to select [SX1], [SX2] or [SX3], then press a
number button (1 to 6).
To set a parental control
The parental control feature allows you to
limit access to SiriusXM channels with
mature content. When enabled, the parental
control feature requires you to enter a
passcode to tune to the locked channels.
Information on setting up the passcode and
locking channels can be found below.
1 Press MENU and rotate the control dial.
2 Select [GENERAL] [SXM PARENTAL]
[LOCK SELECT] [LOCK-ON].
3 Enter the passcode by rotating the control
dial on the unit or pressing / on the
remote commander.
To move the entry position, press SEEK +/– on
the unit or / on the remote commander.
The initial passcode is [0000].
4 After entering the passcode, press ENTER.
To unlock the channels, select [LOCK-OFF].
To ch ange t he pas s cod e
1
Press MENU and rotate the control dial.
2 Select [GENERAL] [SXM PARENTAL]
[CODE EDIT].
3 Enter the current passcode on the current
passcode input display, then press ENTER.
The initial passcode is [0000].
4 Enter your new 4-digit passcode on the new
passcode input display, then press ENTER.
To ch ange d i spla y item s
Press DSPL to change as follows:
Channel Number (Default) Channel Name
Artist Name Song Title Content Info
Category Name Clock
10GB
Page 11
Playback
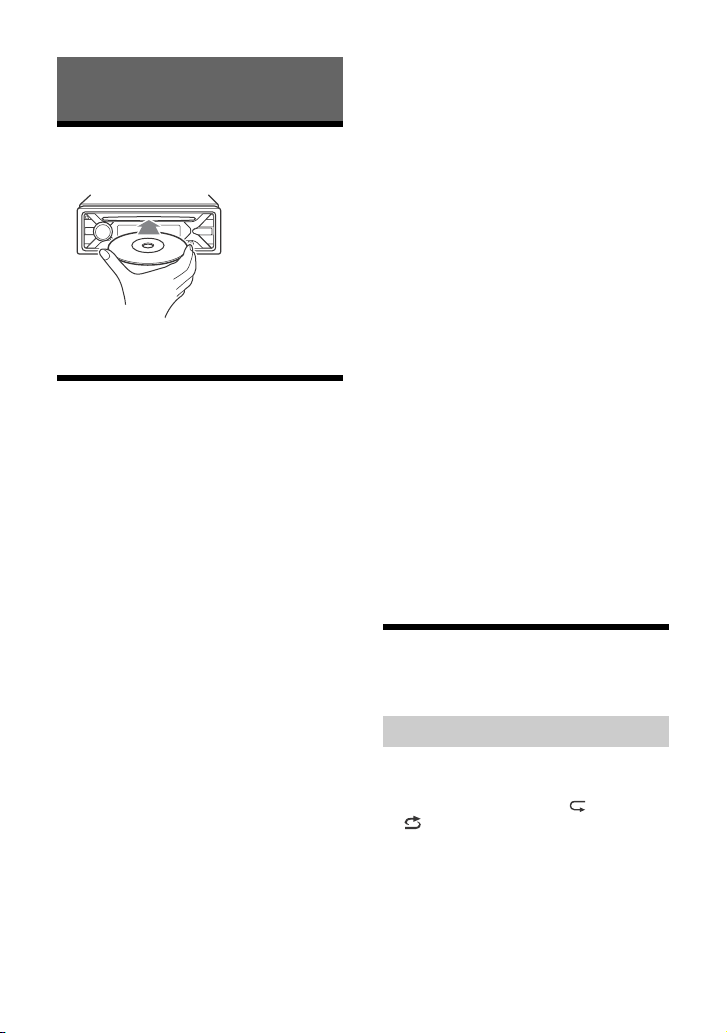
Playing a Disc
1 Insert the disc (label side up).
Playback starts automatically.
Playing a USB Device
In these Operating Instructions, “iPod” is
used as a general reference for the iPod
functions on an iPod and iPhone, unless
otherwise specified by the text or
illustrations.
For details on the compatibility of your iPod,
see “About iPod” (page 18) or visit the
support site on the back cover.
AOA (Android Open Accessory) 2.0, MSC
(Mass Storage Class) and MTP (Media
Transfer Protocol) type USB devices*
compliant with the USB standard can be
used. Depending on the USB device, the
Android mode or MSC/MTP mode can be
selected on the unit.
Some digital media players or Android
smartphones may require setting to MTP
mode.
* e.g., a USB flash drive, digital media player,
Android smartphone
Notes
• For details on the compatibility of your USB device,
visit the support site on the back cover.
• Smartphones with Android OS 4.1 or higher
installed support Android Open Accessory 2.0
(AOA 2.0). However, some smartphones may not
fully support AOA 2.0 even if Android OS 4.1 or
higher is installed.
For details on the compatibility of your Android
smartphone, visit the support site on the back
cover.
• Playback of the following files is not supported.
MP3/WMA/FLAC:
– copyright-protected files
– DRM (Digital Rights Management) files
– Multi-channel audio files
MP3/WMA:
– lossless compression files
Before making a connection, select the USB
mode (Android mode or MSC/MTP mode)
depending on the USB device (page 14).
1 Connect a USB device to the USB port
(page 8).
Playback starts.
If a device is already connected, to start
playback, press SRC to select [USB] ([IPD]
appears in the display when the iPod is
recognized).
2 Adjust the volume on this unit.
To stop pla ybac k
Press and hold OFF for 1 second.
To remove the device
Stop playback, then remove the device.
Caution for iPhone
When you connect an iPhone via USB,
phone call volume is controlled by the
iPhone, not the unit. Do not inadvertently
increase the volume on the unit during a
call, as a sudden loud sound may result
when the call ends.
Searching and Playing
Tracks
Repeat play and shuffle play
Not available when a USB device in Android
mode is connected.
1 During playback, press (repeat) or
(shuffle) repeatedly to select the
desired play mode.
Playback in the selected play mode may
take time to start.
Available play modes differ depending on
the selected sound source.
11GB
Page 12
Searching a track by name (QuickBrowZer™)
Not available when a USB device in Android
mode or iPod is connected.
1 During CD or USB playback, press
(browse)* to display the list of search
categories.
When the track list appears, press
(back) repeatedly to display the desired
search category.
* During USB playback, press (browse) for
more than 2 seconds to directly return to the
beginning of the category list.
2 Rotate the control dial to select the
desired search category, then press it
to confirm.
3 Repeat step 2 to search the desired
track.
Playback starts.
To exit th e Quic k-B rowZ er mo de
Press (browse).
Searching by skipping items
(Jump mode)
Not available when a USB device in Android
mode or iPod is connected.
1 Press (browse).
2 Press SEEK +.
3 Rotate the control dial to select the
item.
The list is jumped in steps of 10 % of the
total number of items.
4 Press ENTER to return to the Quick-
BrowZer mode.
The selected item appears.
5 Rotate the control dial to select the
desired item, then press it.
Playback starts.
Listening to Pandora®
Pandora® is available to stream music
through your iPhone. You can control
Pandora® on a USB connected iPhone from
this unit. Pandora® is only available in certain
countries.
Please visit
http://www.pandora.com/legal
for more information.
Setting up Pandora®
1 Check the compatibility of your
mobile device by visiting the support
site on the back cover.
2 Download the latest version of the
Pandora® application from your
smartphone’s app store. A list of
compatible devices can be found at
www.pandora.com/everywhere/
mobile
Streaming Pandora®
1 Connect the iPhone to this unit
(page 8).
2 Press SRC to select [PANDORA].
3 Launch Pandora® application on your
mobile device.
4 Press PAUSE to start playback.
Available Operations in
Pandora®
“Thumbs” feedback
“Thumbs Up” or “Thumbs Down” feedback
allows you to personalize stations.
1 During playback, press (Thumbs
Up) or (Thumbs Down).
12GB
Page 13
Using the station list
The station list allows you to easily select a
desired station.
1 During playback, press (browse).
2 Press SEEK + to select the sorting
order [BY DATE] or [A TO Z].
3 Rotate the control dial to select the
desired station, then press it.
Playback starts.
Bookmarking
The track currently being played can be
bookmarked and stored in your Pandora®
account.
1 During playback, press MODE.
Settings
Canceling the DEMO Mode
You can cancel the demonstration display
which appears when the source is off and
the clock is displayed.
1 Press MENU, rotate the control dial to
select [GENERAL], then press it.
2 Rotate the control dial to select [SET
DEMO], then press it.
3 Rotate the control dial to select [SET
DEMO-OFF], then press it.
The setting is complete.
4 Press (back) twice.
The display returns to normal reception/
play mode.
Basic Setting Operation
You can set items in the following setup
categories:
General setup (GENERAL), Sound setup
(SOUND), Display setup (DISPLAY)
1 Press MENU.
2 Rotate the control dial to select the
setup category, then press it.
The items that can be set differ
depending on the source and settings.
3 Rotate the control dial to select the
options, then press it.
To return to the previous display
Press (back).
13GB
Page 14

General Setup (GENERAL)
DEMO (demonstration)
Activates the demonstration: [ON], [OFF].
CLOCK-ADJ (clock adjust) (page 7)
CAUT ALM (caution alarm)
Activates the caution alarm: [ON], [OFF]
(page 7).
(Available only while the source is off and
the clock is displayed.)
BEEP
Activates the beep sound: [ON], [OFF].
AUTO OFF
Shuts off automatically after a desired
time when the unit is turned off: [ON]
(30 minutes), [OFF].
STEERING
Registers/resets the setting of the
steering wheel remote control.
(Available when connected with the
connection cable (not supplied).)
(Available only while the source is off and
the clock is displayed.)
STR CONTROL (steering control)
Selects the input mode of the connected
remote control. To prevent a malfunction,
be sure to match the input mode with the
connected remote control before use.
CUSTOM
Input mode for the steering wheel
remote control
PRESET
Input mode for the wired remote
control excluding the steering wheel
remote control (automatically selected
when [RESET CUSTOM] is performed.)
EDIT CUSTOM
Registers the functions (SOURCE, ATT,
VOL +/–, SEEK +/–) to the steering wheel
remote control:
Rotate the control dial to select the
function you want to assign to the
steering wheel remote control, then
press it.
While [REGISTER] is blinking, press and
hold the button on the steering wheel
remote control you want to assign the
function to. When registration is
complete, [REGISTERED] is displayed.
To register other functions, repeat
steps and .
(Available only when [STR CONTROL] is
set to [CUSTOM].)
RESET CUSTOM
Resets the setting of the steering wheel
remote control: [YES], [NO].
(Available only when [STR CONTROL] is
set to [CUSTOM].)
Notes
• While making settings, only button operation
on the unit is available. For safety, park your car
before making this setting.
• If an error occurs while registering, all the
previously-registered information remains.
Restart registration from the function where
the error occurred.
• This function may not be available on some
vehicles. For details on the compatibility of
your vehicle, visit the support site on the back
cover.
USB MODE
Changes the USB mode: [ANDROID],
[MSC/MTP].
(Available only when the USB source is
selected.)
CT (clock time)
Activates the CT function: [ON], [OFF].
BTM (best tuning memory) (page 8)
(Available only when the tuner is
selected.)
SXM PARENTAL
Sets the parental lock to [ON], [OFF], and
edits the passcode (page 10).
(Available only when SiriusXM is
selected.)
14GB
Page 15

SXM RESET
Initializes the SiriusXM Connect Vehicle
Tuner settings (preset channels/parental
lock): [YES], [NO].
(Available only when SiriusXM is
selected.)
FIRMWARE
(Available only while the source is off and
the clock is displayed.)
Checks/updates the firmware version. For
details, visit the support site on the back
cover.
FW VERSION (firmware version)
Displays current firmware version.
FW UPDATE (firmware update)
Enters firmware update process: [YES],
[NO].
Updating the firmware takes a few
minutes to complete. During the update,
do not turn the ignition to the OFF
position, nor remove the USB device.
Sound Setup (SOUND)
This setup menu can also be opened by
pressing SOUND.
EQ10 PRESET
Selects an equalizer curve from 10
equalizer curves or off:
[OFF], [R&B], [ROCK], [POP], [HIP-HOP],
[ELECTRONICA], [JAZZ], [SOUL],
[COUNTRY], [KARAOKE]*, [CUSTOM].
The equalizer curve setting can be
memorized for each source.
* [KARAOKE] reduces the vocal sound but
cannot be fully removed during playback. Also,
using a microphone is not supported.
EQ10 CUSTOM
Sets [CUSTOM] of EQ10.
Setting the equalizer curve: [BAND1] 32
Hz, [BAND2] 63 Hz, [BAND3] 125 Hz,
[BAND4] 250 Hz, [BAND5] 500 Hz,
[BAND6] 1 kHz, [BAND7] 2 kHz, [BAND8] 4
kHz, [BAND9] 8 kHz, [BAND10] 16 kHz.
The volume level is adjustable in 1 dB
steps, from -6 dB to +6 dB.
BALANCE
Adjusts the sound balance: [RIGHT-15] –
[CENTER] – [LEFT-15].
FADER
Adjusts the relative level: [FRONT-15] –
[CENTER] – [REAR-15].
S.WOOFER (subwoofer)
SW LEVEL (subwoofer level)
Adjusts the subwoofer volume level:
[+6 dB] – [0 dB] – [-6 dB].
([ATT] is displayed at the lowest setting.)
SW PHASE (subwoofer phase)
Selects the subwoofer phase: [NORM],
[REV].
LPF FREQ (low pass filter frequency)
Selects the subwoofer cut-off frequency:
[80Hz], [100Hz], [120Hz].
HPF FREQ (high pass filter frequency)
Selects the front/rear speaker cut-off
frequency: [OFF], [80Hz], [100Hz], [120Hz].
AUX VOL (AUX volume level)
Adjusts the volume level for each
connected auxiliary device: [+18 dB] –
[0 dB] – [-8 dB].
This setting negates the need to adjust
the volume level between sources.
(Available only when the AUX is selected.)
15GB
Page 16

Display Setup (DISPLAY)
DIMMER
Changes the display brightness: [ON],
[OFF], [CLK].
To set this function to be active only
during a fixed period, select [CLK], then
set the start and end times.
– To set the brightness when the dimmer
function is activated:
Set [DIMMER] to [ON], then adjust
[BRIGHTNESS].
– To set the brightness when the dimmer
function is deactivated:
Set [DIMMER] to [OFF], then adjust
[BRIGHTNESS].
The brightness setting is stored and
applied when the dimmer function is
activated or deactivated.
BRIGHTNESS
Adjusts the display brightness. The
brightness level is adjustable: [1] – [10].
BUTTON-C (button color)
Sets a preset color or customized color for
the buttons.
COLOR
Selects from 15 presets colors, 1
customized color.
CUSTOM-C (custom color)
Registers a customized color for the
buttons.
RGB RED, RGB GRN, RGB BLUE
Adjustable color range: [0] – [32] ([0]
cannot be set for all color ranges).
DSPL-C (display color)
Sets a preset color or customized color for
the display.
COLOR
Selects from 15 presets colors, 1
customized color.
CUSTOM-C (custom color)
Registers a customized color for the
display.
RGB RED, RGB GRN, RGB BLUE
Adjustable color range: [0] – [32] ([0]
cannot be set for all color ranges).
SND SYNC (sound synchronization)
Activates the synchronization of the
illumination with the sound: [ON], [OFF].
AUTO SCR (auto scroll)
Scrolls long items automatically: [ON],
[OFF].
(Not available when the AUX or tuner is
selected.)
16GB
Page 17
Additional Information
Folder (album)
Audio file (track)
Updating the Firmware
To update the firmware, visit the support site
on the back cover, then follow the online
instructions.
Notes
• Using a USB device (not supplied) is required for
updating the firmware. Store the updater in the
USB device, and connect the device to the USB
port, then perform the update operation.
• Updating the firmware takes a few minutes to
complete. During the update, do not turn the
ignition to the OFF position, nor remove the USB
device.
Precautions
• Cool off the unit beforehand if your car has
been parked in direct sunlight.
• Do not leave the front panel or audio
devices brought in inside the car, or it may
cause malfunction due to high
temperature in direct sunlight.
• Power antenna (aerial) extends
automatically.
Moisture condensation
Should moisture condensation occur inside
the unit, remove the disc and wait for about
an hour for it to dry out; otherwise the unit
will not operate properly.
To maintain high sound quality
Do not splash liquid onto the unit or discs.
• This unit is designed to play discs that
conform to the Compact Disc (CD)
standard. DualDiscs and some of the music
discs encoded with copyright protection
technologies do not conform to the
Compact Disc (CD) standard, therefore,
these discs may not be playable by this
unit.
•Discs that this unit CANNOT play
– Discs with labels, stickers, or sticky tape
or paper attached. Doing so may cause a
malfunction, or may ruin the disc.
– Discs with non-standard shapes (e.g.,
heart, square, star). Attempting to do so
may damage the unit.
–8 cm (3
1
/4 in) discs.
Notes on CD-R/CD-RW discs
• If the multi-session disc begins with a CDDA session, it is recognized as a CD-DA
disc, and other sessions are not played.
•Discs that this unit CANNOT play
– CD-R/CD-RW of poor recording quality.
– CD-R/CD-RW recorded with an
incompatible recording device.
– CD-R/CD-RW which is finalized
incorrectly.
– CD-R/CD-RW other than those recorded
in music CD format or MP3 format
conforming to ISO9660 Level 1/Level 2,
Joliet/Romeo or multi-session.
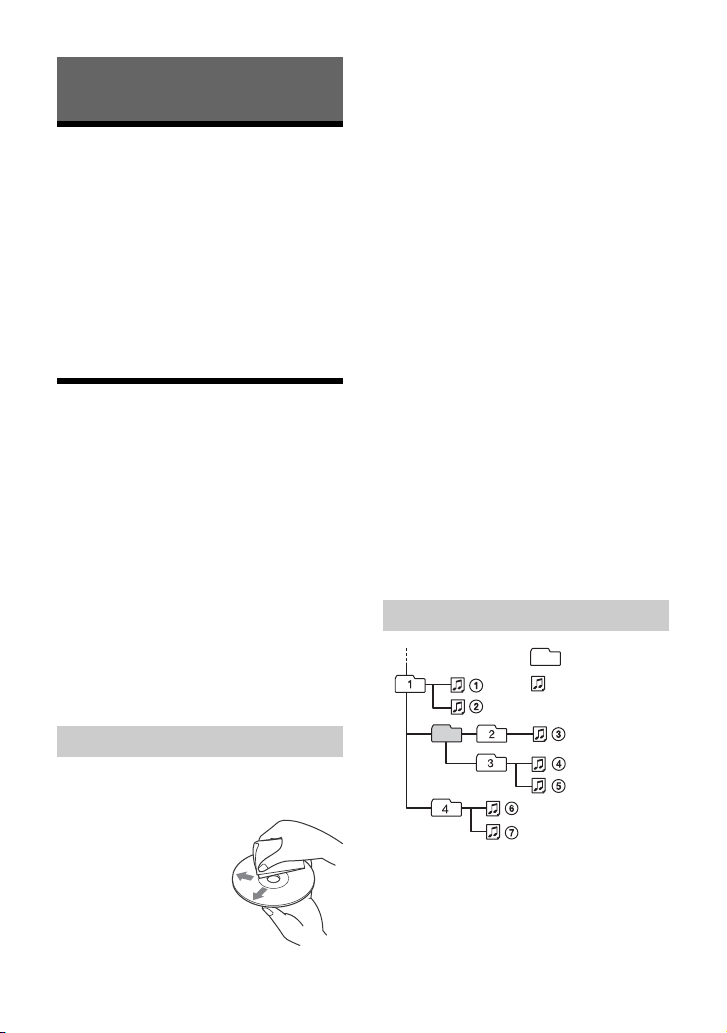
Playback order of audio files
Notes on discs
• Do not expose discs to direct sunlight or
heat sources such as hot air ducts, nor
leave it in a car parked in direct sunlight.
• Before playing, wipe
the discs with a
cleaning cloth from the
center out. Do not use
solvents such as
benzine, thinner,
commercially available
cleaners.
17GB
Page 18
About iPod
+ side up
• You can connect to the following iPod
models. Update your iPod devices to the
latest software before use.
Compatible iPhone/iPod models
Compatible Model USB
iPhone 6s Plus
iPhone 6s
iPhone 6 Plus
iPhone 6
iPhone 5s
iPhone 5c
iPhone 5
iPhone 4s
iPod touch (6th generation)
iPod touch (5th generation)
iPod nano (7th generation)
• “Made for iPod,” and “Made for iPhone,”
mean that an electronic accessory has
been designed to connect specifically to
iPod or iPhone, respectively, and has been
certified by the developer to meet Apple
performance standards. Apple is not
responsible for the operation of this device
or its compliance with safety and
regulatory standards. Please note that the
use of this accessory with iPod or iPhone
may affect wireless performance.
If you have any questions or problems
concerning your unit that are not covered in
this manual, consult your nearest Sony
dealer.
Maintenance
Replacing the lithium battery of the
remote commander
Under normal conditions, the battery will
last approximately 1 year. (The service life
may be shorter, depending on the
conditions of use.)
When the battery becomes weak, the range
of the remote commander becomes shorter.
CAUTION
Danger of explosion if battery is incorrectly
replaced. Replaced only with the same or
equivalent type.
Notes on the lithium battery
• Keep the lithium battery out of the reach of
children. Should the battery be swallowed,
immediately consult a doctor.
• Wipe the battery with a dry cloth to ensure a good
contact.
• Be sure to observe the correct polarity when
installing the battery.
• Do not hold the battery with metallic tweezers,
otherwise a short-circuit may occur.
Cleaning the connectors
The unit may not function properly if the
connectors between the unit and the front
panel are not clean. In order to prevent this,
detach the front panel (page 7) and clean
the connectors with a cotton swab. Do not
apply too much force. Otherwise, the
connectors may be damaged.
18GB
Notes
• For safety, turn off the ignition before cleaning the
connectors, and remove the key from the ignition
switch.
• Never touch the connectors directly with your
fingers or with any metal device.
Page 19

Specifications
FOR THE CUSTOMERS IN THE USA. NOT
APPLICABLE IN CANADA, INCLUDING IN
THE PROVINCE OF QUEBEC.
POUR LES CLIENTS AUX ÉTATS-UNIS.
NON APPLICABLE AU CANADA, Y
COMPRIS LA PROVINCE DE QUÉBEC.
AUDIO POWER SPECIFICATIONS
CTA2006 Standard
Power Output: 20 Watts RMS × 4
at 4 Ohms < 1% THD+N
SN Ratio: 80 dBA
(reference: 1 Watt into 4 Ohms)
Tuner sect ion
FM
Tuning range: 87.5 MHz – 107.9 MHz
Antenna (aerial) terminal:
External antenna (aerial) connector
Intermediate frequency:
FM CCIR: -1,956.5 kHz to -487.3 kHz and
+500.0 kHz to +2,095.4 kHz
Usable sensitivity: 7 dBf
Selectivity: 75 dB at 400 kHz
Signal-to-noise ratio: 73 dB
Separation: 50 dB at 1 kHz
Frequency response: 20 Hz – 15,000 Hz
AM
Tuning range: 530 kHz – 1,710 kHz
Antenna (aerial) terminal:
External antenna (aerial) connector
Sensitivity: 26 µV
CD Player section
Signal-to-noise ratio: 95 dB
Frequency response: 10 Hz – 20,000 Hz
Wow and flutter: Below measurable limit
The maximum number of: (CD-R/CD-RW
only)
– folders (albums): 150 (including root
folder)
– files (tracks) and folders: 300 (may less
than 300 if folder/file names contain many
characters)
– displayable characters for a folder/file
name: 32 (Joliet)/64 (Romeo)
Corresponding codec: MP3 (.mp3) and WMA
(.wma)
USB Player section
Interface: USB (Full-speed)
Maximum current: 1 A
The maximum number of recognizable
tracks:
–folders (albums): 256
– files (tracks) per folder: 256
Compatible Android Open Accessory
protocol (AOA): 2.0
Corresponding codec:
MP3 (.mp3)
Bit rate: 8 kbps – 320 kbps (Supports
VBR (Variable Bit Rate))
Sampling rate: 16 kHz – 48 kHz
WMA (.wma)
Bit rate: 32 kbps – 192 kbps (Supports
VBR (Variable Bit Rate))
Sampling rate: 32 kHz, 44.1 kHz,
48 kHz
FLAC (.flac)
Bit depth: 16 bit, 24 bit
Sampling rate: 44.1 kHz, 48 kHz
Power amplifier section
Output: Speaker outputs
Speaker impedance: 4 – 8
Maximum power output: 55 W × 4 (at 4 )
General
Outputs:
Audio outputs terminal (REAR, SUB)
Power antenna (aerial)/Power amplifier
control terminal (REM OUT)
Inputs:
SiriusXM input terminal
Remote controller input terminal
Antenna (aerial) input terminal
AUX input jack (stereo mini jack)
USB port
Power requirements: 12 V DC car battery
(negative ground (earth))
Rated current consumption: 10 A
Dimensions:
Approx. 178 mm × 50 mm × 177 mm
1
(7
/8 in × 2 in × 7 in) (w/h/d)
Mounting dimensions:
Approx. 182 mm × 53 mm × 160 mm
1
(7
/4 in × 2 1/8 in × 6 5/16 in) (w/h/d)
Mass: Approx. 1.2 kg (2 lb 11 oz)
19GB
Page 20

Package contents:
Main unit (1)
Remote commander (1): RM-X211
Parts for installation and connections
(1 set)
Optional accessories/equipment:
SiriusXM Connect Vehicle Tuner: SXV100,
SXV200, SXV300
Cable for steering wheel remote input:
RC-SR1
Your dealer may not handle some of the
above listed accessories. Please ask the
dealer for detailed information.
Design and specifications are subject to
change without notice.
Copyrights
SiriusXM Connect Vehicle Tuner and
Subscription sold separately.
www.siriusxm.com
Sirius, XM and all related marks and logos
are trademarks of Sirius XM Radio Inc. All
rights reserved.
Windows Media is either a registered
trademark or trademark of Microsoft
Corporation in the United States and/or
other countries.
This product is protected by certain
intellectual property rights of Microsoft
Corporation. Use or distribution of such
technology outside of this product is
prohibited without a license from Microsoft
or an authorized Microsoft subsidiary.
iPhone, iPod, iPod classic, iPod nano, and
iPod touch are trademarks of Apple Inc.,
registered in the U.S. and other countries.
MPEG Layer-3 audio coding technology and
patents licensed from Fraunhofer IIS and
Thomson.
Pandora®, the Pando ra® logo, and the
Pandora® trade dress are trademarks or
registered trademarks of Pandora Media,
Inc., used with permission.
Android is a trademark of Google Inc.
libFLAC
Copyright (C) 2000-2009 Josh Coalson
Copyright (C) 2011-2013 Xiph.Org Foundation
Redistribution and use in source and binary
forms, with or without modification, are
permitted provided that the following
conditions are met:
– Redistributions of source code must retain
the above copyright notice, this list of
conditions and the following disclaimer.
– Redistributions in binary form must
reproduce the above copyright notice, this
list of conditions and the following
disclaimer in the documentation and/or
other materials provided with the
distribution.
– Neither the name of the Xiph.org
Foundation nor the names of its
contributors may be used to endorse or
promote products derived from this
software without specific prior written
permission.
THIS SOFTWARE IS PROVIDED BY THE
COPYRIGHT HOLDERS AND CONTRIBUTORS
“AS IS” AND ANY EXPRESS OR IMPLIED
WARRANTIES, INCLUDING, BUT NOT LIMITED
TO, THE IMPLIED WARRANTIES OF
MERCHANTABILITY AND FITNESS FOR A
PARTICULAR PURPOSE ARE DISCLAIMED. IN
NO EVENT SHALL THE FOUNDATION OR
CONTRIBUTORS BE LIABLE FOR ANY DIRECT,
INDIRECT, INCIDENTAL, SPECIAL,
EXEMPLARY, OR CONSEQUENTIAL DAMAGES
(INCLUDING, BUT NOT LIMITED TO,
PROCUREMENT OF SUBSTITUTE GOODS OR
SERVICES; LOSS OF USE, DATA, OR PROFITS;
OR BUSINESS INTERRUPTION) HOWEVER
CAUSED AND ON ANY THEORY OF LIABILITY,
WHETHER IN CONTRACT, STRICT LIABILITY,
OR TORT (INCLUDING NEGLIGENCE OR
OTHERWISE) ARISING IN ANY WAY OUT OF
THE USE OF THIS SOFTWARE, EVEN IF
ADVISED OF THE POSSIBILITY OF SUCH
DAMAGE.
20GB
Page 21

Troubleshooting
The following checklist will help you remedy
problems you may encounter with your unit.
Before going through the checklist below,
check the connection and operating
procedures.
For details on using the fuse and removing
the unit from the dashboard, see
“Connection/Installation” (page 26).
If the problem is not solved, visit the support
site on the back cover.
General
No power is being supplied to the unit.
If the unit is turned off and the display
disappears, the unit cannot be operated
with the remote commander.
– Turn on the unit.
No sound or the sound is very low.
The position of the fader control [FADER]
is not set for a 2-speaker system.
The volume of the unit and/or connected
device is very low.
– Increase the volume of the unit and
connected device.
No beep sound.
An optional power amplifier is connected
and you are not using the built-in
amplifier.
The contents of the memory have been
erased.
The power supply lead or battery has
been disconnected or not connected
properly.
Stored stations and correct time are
erased.
The fuse has blown.
Makes a noise when the position of the
ignition is switched.
The leads are not matched correctly with
the car’s accessory power connector.
During playback or reception, the
demonstration mode starts.
If no operation is performed for 5 minutes
with [DEMO-ON] set, the demonstration
mode starts.
–Set [DEMO-OFF] (page14).
The display disappears from/does not
appear in the display window.
The dimmer is set to [DIM-ON] (page 16).
The display disappears if you press and
hold OFF.
– Press OFF on the unit until the display
appears.
The connectors are dirty (page 18).
The display/illumination flashes.
The power supply is not sufficient.
– Check that the car battery supplies
enough power to the unit. (The power
requirement is 12 V DC.)
The operation buttons do not function.
The disc will not eject.
Press DSPL and (back)/MODE for more
than 2 seconds to reset the unit.
The contents stored in memory are
erased.
For your safety, do not reset the unit while
you are driving.
Radio reception
Stations cannot be received.
The sound is hampered by noises.
The connection is not correct.
– If your car has built-in radio antenna
(aerial) in the rear/side glass, connect an
REM OUT lead (blue/white striped) or
accessory power supply lead (red) to the
power supply lead of a car’s antenna
(aerial) booster.
– Check the connection of the car antenna
(aerial).
– If the auto antenna (aerial) will not
extend, check the connection of the
power antenna (aerial) control lead.
Preset tuning is not possible.
The broadcast signal is too weak.
21GB
Page 22

RDS
PTY displays [- - - - - - - -].
The current station is not an RDS station.
RDS data has not been received.
The station does not specify the program
type.
CD playback
The disc does not play.
Defective or dirty disc.
The CD-R/CD-RW is not for audio use
(page 17).
MP3/WMA files cannot be played.
The disc is incompatible with the MP3/
WMA format and version. For details on
playable discs and formats, visit the
support site on the back cover.
MP3/WMA files take longer to play than
others.
The following discs take a longer time to
start playback.
– A disc recorded with a complicated tree
structure.
– A disc recorded in Multi Session.
– A disc to which data can be added.
The sound skips.
Defective or dirty disc.
Audio file cannot be played.
USB device formatted with file systems
other than FAT16 or FAT32 are
unsupported.*
* This unit supports FAT16 and FAT32, but some USB
device may not support all of these FAT. For
details, refer to the operating instruction of each
USB device or contact the manufacturer.
Operations for skipping an album,
skipping items (Jump mode), and
searching a track by name (QuickBrowZer) cannot be performed.
These operations cannot be performed
when a USB device in Android mode or
iPod is connected.
– Set [USB MODE] to [MSC/MTP] (page 14).
– Remove the iPod.
The USB mode of the device is not set to
the appropriate mode.
– Make sure that the USB mode of the
device is set to MSC/MTP mode.
The sound cannot be output during
playback in Android mode.
While the unit is in Android mode, the
sound outputs only from the Android
smartphone.
– Check the status of the audio playback
application on the Android smartphone.
– Playback may not perform properly
depending on the Android smartphone.
USB device playback
You cannot play items via a USB hub.
This unit cannot recognize USB devices via
a USB hub.
A USB device takes longer to play.
The USB device contains files with a
complicated tree structure.
The sound is intermittent.
The sound may be intermittent at a high-
bit-rate.
DRM (Digital Rights Management) files
may not be playable in some cases.
22GB
Pandora® operation
Pandora® connection is not possible.
Shut down the Pandora® application on
the mobile device, and then launch it
again.
Page 23

Messages
The following messages may appear or flash
during operation.
CD ERROR: The disc cannot be played. The
disc will be ejected automatically.
Clean or insert the disc correctly, or make
sure the disc is not blank or defective.
CD NO MUSIC: There is no playable file. The
disc will be ejected automatically.
Insert a disc containing playable files
(page 19).
CD PUSH EJT: The disc could not be ejected
properly.
Press (eject).
HUB NO SUPRT: USB hubs are not
supported.
INVALID
The selected operation could be invalid.
[USB MODE] cannot be changed during
iPod playback.
IPD STOP: iPod playback has finished.
Operate your iPod/iPhone to start
playback.
NOT SUPPORT - ANDROID MODE
A USB device not supporting AOA
(Android Open Accessory) 2.0 is
connected to the unit while [USB MODE] is
set to [ANDROID].
– Set [USB MODE] to [MSC/MTP] (page 14).
OVERLOAD: The USB device is overloaded.
Disconnect the USB device, then press SRC
to select another source.
The USB device has a fault, or an
unsupported device is connected.
READ: Now reading information.
Wait until reading is complete and
playback starts automatically. This may
take some time depending on the file
organization.
USB ERROR: The USB device cannot be
played.
Connect the USB device again.
USB NO DEV: A USB device is not connected
or recognized.
Make sure the USB device or USB cable is
securely connected.
USB NO MUSIC: There is no playable file.
Connect a USB device containing playable
files (page 19).
USB NO SUPRT: The USB device is not
supported.
For details on the compatibility of your
USB device, visit the support site on the
back cover.
or : The beginning or the end
of the disc has been reached.
(underscore): The character cannot be
displayed.
For Pandora® operation:
BOOKMARK - ERROR: Bookmarking failed.
Wait for a while, then try again.
CANNOT SKIP: Skipping tracks is not
allowed.
Wait until the commercial ends, next track
begins, or select another station on the
list. Pandora® limits the number of skips
allowed on their service.
LICENSING - RESTRICTIONS: Pand ora® is n ot
available outside your country.
MAINTENANCE - PLEASE - TRY AGAIN LATER: The Pandora® server is under
maintenance.
Wait for a while, then try again.
NO NETWORK: The network connection is
unstable or lost.
Make the network connection again on
the device, or wait until the network
connection is established.
NO STATION - PLEASE - CREATE - STATION IN - PANDORA APP: No stations on your
account.
Create the station on the mobile device.
23GB
Page 24

NOT ALLOWED: The selected operation is
not allowed.
“Thumbs” feedback is not allowed.
– Wait until the commercial ends.
– Some functions, such as Shared Station,
do not permit feedback. Wait until the
next track begins, or select another
station on the list.
Bookmark is not allowed.
– Wait until the commercial ends.
– Select another track or station, then try it
again.
PAN ERROR: The selected operation could
not be performed.
Wait for a while, then try again.
PAN NO SUPRT: The connected device is not
supported.
For details of compatible devices, visit the
support site.
PAN OPEN APP: Pandora® is not running.
Launch the Pandora® application on the
iPhone.
PLEASE LOGIN - PANDORA APP: You are
not logged into your Pandora® account.
Disconnect the device, log into your
Pandora® account, then connect the
device again.
RATING ERROR: “Thumbs” feedback failed.
Wait for a while, then try again.
UPDATE - PANDORA APP: An old version of
Pandora® is connected.
Update the Pandora® application to the
latest version.
For SiriusXM operation:
CH LOCKED
The channel that you have requested is
locked by the radio parental control
feature.
See “To set a parental control” (page 10)
for more information on the parental
control feature and how to access locked
channels.
CH UNAVAIL
The channel that you have requested is
not a valid SiriusXM channel or the
channel that you were listening to is no
longer available.
You may also see this message briefly
when first connecting a new SiriusXM
Connect Vehicle Tuner.
Visit www.siriusxm.com in the USA or
www.siriusxm.ca in Canada for SiriusXM
channel lineup information.
CHAN UNSUB
The channel that you have requested is
not included in your SiriusXM subscription
package or the channel that you were
listening to is no longer included in your
SiriusXM subscription package.
If you have questions about your
subscription package or would like to
subscribe to this channel, please contact
SiriusXM.
In the USA, visit www.siriusxm.com or call
1-866-635-2349.
In Canada, visit www.siriusxm.ca or call
1-877-438-9677.
CHK ANT
The radio has detected a fault with the
SiriusXM antenna.
The antenna cable may be either
disconnected or damaged.
– Verify that the antenna cable is
connected to the SiriusXM Connect
Vehicle Tuner.
– Inspect the antenna cable for damage
and kinks.
– Replace the antenna if the cable is
damaged. SiriusXM products are
available at your local car audio retailer
or online at www.shop.siriusxm.com
24GB
Page 25

CHECK TUNER
The radio is having difficulty
communicating with the SiriusXM Connect
Vehicle Tuner.
The tuner may be disconnected or
damaged.
– Verify that the SiriusXM Connect Vehicle
Tuner cable is securely connected to the
radio.
NO SIGNAL
SiriusXM Connect Vehicle Tuner is having
difficulty receiving the SiriusXM satellite
signal.
– Verify that your vehicle is outdoors with
a clear view of the sky.
– Verify that the SiriusXM magnetic mount
antenna is mounted on a metal surface
on the outside of the vehicle.
– Move the SiriusXM antenna away from
any obstructions.
– Inspect the antenna cable for damage
and kinks.
– Consult the SiriusXM Connect Vehicle
Tuner installation manual for more
information on antenna installation.
– Replace the antenna if the cable is
damaged. SiriusXM products are
available at your local car audio retailer
or online at -
www.shop.siriusxm.com
SUBSCRIPTION UPDATED - ENTER TO
CONTINUE
The radio has detected a change in your
SiriusXM subscription status.
– Press ENTER to clear the message.
If you have questions about your
subscription, please contact SiriusXM.
In the USA, visit www.siriusxm.com or
call 1-866-635-2349.
In Canada, visit www.siriusxm.ca or call
1-877-438-9677.
For steering wheel remote control
operation:
ERROR: An error occurred during the
function registration.
Register again from the function where
the error occurred (page 14).
TIMEOUT: The function registration failed
due to a timeout.
Try completing the registration while
[REGISTER] is blinking (about 6 seconds)
(page 14).
If these solutions do not help improve the
situation, consult your nearest Sony dealer.
If you take the unit to be repaired because of
CD playback trouble, bring the disc that was
used at the time the problem began.
25GB
Page 26

Connection/Installation
× 4
5 × max. 8 mm
(7/32 × max. 5/16 in)
× 2
Cautions
• Run all ground (earth) leads to a
common ground (earth) point.
• Do not get the leads trapped under a
screw, or caught in moving parts (e.g., seat
railing).
• Before making connections, turn the car
ignition off to avoid short circuits.
•Connect the yellow and red power supply
leads only after all other leads have been
connected.
• Be sure to insulate any loose unconnected
leads with electrical tape for safety.
Precautions
• Choose the installation location carefully so
that the unit will not interfere with normal
driving operations.
• Avoid installing the unit in areas subject to
dust, dirt, excessive vibration, or high
temperature, such as in direct sunlight or
near heater ducts.
• Use only the supplied mounting hardware
for a safe and secure installation.
Note on the power supply lead (yellow)
When connecting this unit in combination with
other stereo components, the amperage rating of
the car circuit to which the unit is connected must
be higher than the sum of each component’s fuse
amperage rating.
Mounting angle adjustment
Adjust the mounting angle to less than 45°.
Parts List for Installation
•This parts list does not include all the
package contents.
•The bracket and the protection collar
are attached to the unit before shipping.
Before mounting the unit, use the release
keys to remove the bracket from the
unit. For details, see “Removing the
protection collar and the bracket”
(page 29).
•Keep the release keys for future use as
they are also necessary if you remove the
unit from your car.
26GB
Page 27

Connection
from a wi red remote control
(not supplied)*
4
White
White/black striped
Gray
Black
Yel lo w
Red
Blue/white striped
from a car antenna (aerial)
Front speaker*1*
2
Rear speaker*1*
2
Gray/black striped
Green
Green/black striped
Purple
Purple/black striped
*
3
*
3
Subwoofer*
1
For details, see “Makin g
connections” (page 28).
Power amplifier*
1
Satellit e radio tuner
(SiriusXM)*
1
*1 Not supplied
*2 Speaker impedance: 4 – 8 × 4
*3 RCA pin cord (not supplied)
*4 Depending on the type of car, use an adaptor for
a wired remote control (not supplied). For details
on using the wired remote control, see “Using
the wired remote control” (page 28).
27GB
Page 28

Making connections
Front speaker
Subwoofer
To a common ground (earth) point
First connect the black ground (earth)
lead, then connect the yellow and red
power supply leads.
To the +12 V power terminal which is
energized at all times
Be sure to first connect the black ground
(earth) lead to a common ground (earth)
point.
To the +12 V power terminal which is
energized when the ignition switch is
set to the accessory position
If there is no accessory position, connect
to the +12 V power (battery) terminal
which is energized at all times.
Be sure to first connect the black ground
(earth) lead to a common ground (earth)
point.
To the power antenna (aerial) control
lead or the power supply lead of the
antenna (aerial) booster
It is not necessary to connect this lead if
there is no power antenna (aerial) or
antenna (aerial) booster, or with a
manually-operated telescopic antenna
(aerial).
To AMP REMOTE IN of an optional
power amplifier
This connection is only for amplifiers and
a power antenna (aerial). Connecting any
other system may damage the unit.
Subwoofer Easy Connection
You can use a subwoofer without a power
amplifier when it is connected to a rear
speaker cord.
Memory hold connection
When the yellow power supply lead is
connected, power will always be supplied to
the memory circuit even when the ignition
switch is turned off.
Speaker connection
•Before connecting the speakers, turn the
unit off.
• Use speakers with an impedance of 4 to
8 , and with adequate power handling
capacities to avoid damage.
Using the wired remote control
When using the steering wheel remote
control
Installation of the connection cable RC-SR1
(not supplied) is required before use.
1 To enable the steering wheel remote
control, select [SET STEERING] [EDIT
CUSTOM] to make the registration (page 14).
When the registration completes, the
steering wheel remote control becomes
available.
Notes on installing the connection cable
RC-SR1 (not supplied)
• Refer to the support sites on the back cover for
details, then connect each lead properly to the
appropriate leads. Making an improper
connection may damage the unit.
• Depending on the type of car, be sure to insulate
the unused leads with electrical tape for safety.
• Do not connect t his cable when the steering wh eel
remote control is not used.
• Consulting the dealer or an experienced
technician for help is recommended.
When using the wired remote control
1
To enable the wired remote control, set [STR
CONTROL] in [SET STEERING] to [PRESET]
(page 14).
Note
Use a subwoofer with an impedance of 4 to 8 ,
and with adequate power handling capacities to
avoid damage.
28GB
Page 29

Installation
Face the hook inwards.
182 mm (7 1/4 in)
53 mm (2 1/8 in)
Catch
Removing the protection collar
and the bracket
Before installing the unit, remove the
protection collar and the bracket from
the unit.
1 Pinch both edges of the protection
collar , then pull it out.
Mounting the unit in the
dashboard
•Before installing, make sure the catches on
both sides of the bracket are bent
inwards 2 mm (
•For Japanese cars, see “Mounting the unit
in a Japanese car” (page 30).
3
/32 in).
1 Position the bracket inside the
dashboard, then bend the claws
outward for a tight fit.
2 Insert both release keys until they
click, and pull down the bracket ,
then pull up the unit to separate.
2 Mount the unit onto the bracket ,
then attach the protection collar .
Notes
• If the catches are straight or bent outwards, the
unit will not be installed securely and may spring
out.
• Make sure the 4 catches on the protection collar
are properly engaged in the slots of the unit.
29GB
Page 30

Mounting the unit in a Japanese car
to dashboard/center console
Existing parts supplied
with you r car
Bracket
Bracket
to dashboard/center console
Existing parts supplied
with you r car
Bracket
Bracket
Fuse (10 A)
You may not be able to install this unit in
some makes of Japanese cars. In such a
case, consult your Sony dealer.
TOYOTA
NISSAN
Detaching and attaching the front
panel
For details, see “Detaching the Front Panel”
(page 7).
Resetting the unit
For details, see “Resetting the Unit” (page 7).
Fuse replacement
When replacing the fuse,
be sure to use one
matching the amperage
rating stated on the
original fuse. If the fuse
blows, check the power
connection and replace the
fuse. If the fuse blows again after
replacement, there may be an internal
malfunction. In such a case, consult your
nearest Sony dealer.
Note
To prevent malfunction, install only with the
supplied screws .
30GB
Page 31

Page 32

Pour plus de sécurité, installez cet
appareil dans le tableau de bord du
véhicule, car la section arrière de
l’appareil devient chaude en cours de
fonctionnement.
Pour plus de détails, reportez-vous à la
section « Raccordement/Installation »
(page 27).
La plaque signalétique indiquant la tension
d’alimentation, etc. se trouve sur le dessous
du châssis.
Avertissement
ATTENTION
L’utilisation d’instruments optiques avec ce
produit augmente les risques pour les yeux.
AVERTISSEMENT : Ne pas
ingérer la pile – risque de
brûlure chimique.
La télécommande contient une pile de type
bouton/en forme de pièce de monnaie.
L’ingestion de la pile de type bouton/en
forme de pièce de monnaie peut causer en
seulement 2 heures des brûlures internes
très graves risquant de provoquer la mort.
Gardez les piles neuves et usées hors de la
portée des enfants. Si le compartiment de
pile ne se ferme pas correctement, cessez
d’utiliser le produit et gardez-le hors de la
portée des enfants.
Si vous pensez que des piles ont pu être
avalées ou placées dans une partie du corps
quelconque, demandez des soins médicaux
sans tarder.
Remarque sur la pile au lithium
N’exposez pas la pile à une chaleur
excessive comme à la lumière directe du
soleil, au feu ou autre.
Avertissement si le contact de votre
véhicule ne comporte pas de position
ACC
Veillez à régler la fonction AUTO OFF
(page 14). L’appareil s’éteint
complètement et automatiquement après
le laps de temps choisi une fois l’appareil
arrêté afin d’éviter que la batterie ne se
décharge. Si vous ne réglez pas la
fonction AUTO OFF, appuyez sur la touche
OFF et maintenez-la enfoncée jusqu’à ce
que l’affichage disparaisse chaque fois
que vous coupez le contact.
Avis d’exclusion de responsabilité
relatif aux services proposés par des
tiers
Les services proposés par des tiers peuvent
être modifiés, suspendus ou clôturés sans
avis préalable. Sony n’assume aucune
responsabilité dans ce genre de situation.
2FR
Page 33

Table des matières
Avertissement . . . . . . . . . . . . . . . . . . . . . . . . 2
Guide des pièces et commandes . . . . . . . . 4
Préparation
Retrait de la façade. . . . . . . . . . . . . . . . . . . . 6
Réinitialisation de l’appareil . . . . . . . . . . . . 6
Réglage de l’horloge . . . . . . . . . . . . . . . . . . 7
Raccordement d’un périphérique USB. . . . 7
Raccordement d’un autre appareil audio
portatif. . . . . . . . . . . . . . . . . . . . . . . . . . . 7
Écoute de la radio
Écoute de la radio. . . . . . . . . . . . . . . . . . . . . 8
Utilisation du RDS (système de
radiocommunication de données) . . . . 8
Écoute de la radio SiriusXM . . . . . . . . . . . . . 9
Lecture
Lecture d’un disque . . . . . . . . . . . . . . . . . . 10
Lecture d’un périphérique USB . . . . . . . . . 10
Recherche et lecture des plages . . . . . . . . . 11
Écoute de Pandora®
Configuration de Pandora® . . . . . . . . . . . . 12
Transmission en continu Pandora® . . . . . . 12
Opérations disponibles dans
Pandora® . . . . . . . . . . . . . . . . . . . . . . . . 13
Raccordement/Installation
Mises en garde . . . . . . . . . . . . . . . . . . . . . . 27
Liste des pièces nécessaires à
l’installation . . . . . . . . . . . . . . . . . . . . . 27
Raccordement . . . . . . . . . . . . . . . . . . . . . . 28
Installation . . . . . . . . . . . . . . . . . . . . . . . . . 30
Réglages
Annulation du mode DEMO. . . . . . . . . . . . 13
Configuration de base . . . . . . . . . . . . . . . . 13
Configuration générale (GENERAL) . . . . . . 14
Configuration sonore (SOUND) . . . . . . . . . 15
Configuration d’affichage (DISPLAY). . . . . 16
Informations complémentaires
Mise à jour du micrologiciel. . . . . . . . . . . . 17
Précautions . . . . . . . . . . . . . . . . . . . . . . . . . 17
Entretien . . . . . . . . . . . . . . . . . . . . . . . . . . . 19
Caractéristiques techniques . . . . . . . . . . . 19
Dépannage . . . . . . . . . . . . . . . . . . . . . . . . . 21
Messages. . . . . . . . . . . . . . . . . . . . . . . . . . . 23
3FR
Page 34

Guide des pièces et commandes
Appareil principal
Touche de déverrouillage de la façade
SRC (source)
Permet de mettre l’appareil en marche.
Permet de changer la source.
OFF
Appuyez sur la touche et maintenez-la
enfoncée pendant 1 seconde pour
désactiver la source et afficher l’horloge.
Appuyez sur la touche et maintenez-la
enfoncée pendant plus de 2 secondes
pour éteindre l’appareil et l’affichage.
Si l’appareil est éteint et que l’affichage
disparaît, le fonctionnement par
télécommande est désactivé.
Molette de réglage
Tournez pour régler le volume.
PUSH ENTER
Permet d’entrer l’élément sélectionné.
MENU
Permet d’ouvrir le menu de
configuration.
Fente d’insertion des disques
Fenêtre d’affichage
4FR
/ (SEEK –/+)
Permet de syntoniser automatiquement
des stations de radio. Appuyez sur la
touche et maintenez-la enfoncée pour
syntoniser des stations manuellement.
/ (précédente/suivante)
/ (retour rapide/avance rapide)
(éjection du disque)
PTY (type d’émission)
Permet de sélectionner PTY en mode
RDS.
(navigation) (page 9, 11, 12, 13)
Permet d’accéder au mode de navigation
pendant la lecture.
(Non disponible lorsqu’un périphérique
USB en mode Android™ ou un iPod est
raccordé.)
EQ (égaliseur)
Permet de sélectionner une courbe de
l’égaliseur.
(retour)
Permet de retourner à l’écran précédent.
MODE (page 8, 9, 13)
Récepteur de télécommande
Page 35

Touches numériques (1 à 6)
Permettent de capter des stations de
radio mémorisées. Appuyez sur la touche
et maintenez-la enfoncée pour
mémoriser des stations.
ALBUM /
Permet de sauter un album sur un
appareil audio. Appuyez sur la touche et
maintenez-la enfoncée pour sauter des
albums en continu.
(Non disponible lorsqu’un périphérique
USB en mode Android ou un iPod est
raccordé.)
Appuyez sur pour laisser une
appréciation positive ou sur pour
laisser une appréciation négative dans
Pandora® (page 13).
(répétition)
(Non disponible lorsqu’un périphérique
USB en mode Android est raccordé.)
(aléatoire)
(Non disponible lorsqu’un périphérique
USB en mode Android est raccordé.)
(lecture/pause)
EXTRA BASS
Permet d’accentuer les graves en
synchronisation avec le niveau de
volume. Appuyez sur la touche pour
modifier le réglage EXTRA BASS : [1], [2],
[OFF].
Prise d’entrée AUX
DSPL (affichage)
Permet de changer les éléments
d’affichage.
SCRL (défilement)
Appuyez sur la touche et maintenez-la
enfoncée pour faire défiler un élément
d’affichage.
Port USB
Télécommande RM-X211
La touche VOL (volume) + comporte un point
tactile.
ATT (atténuation du son)
Permet d’atténuer le son. Appuyez à
nouveau pour annuler l’atténuation.
SOUND
Permet d’ouvrir le menu SOUND
directement.
MENU
Appuyez sur la touche et maintenez-la
enfoncée pour ouvrir le menu de
configuration.
///
Permet de sélectionner un élément de
configuration, etc.
ENTER
Permet d’entrer l’élément sélectionné.
/ (précédente/suivante)
+/– (album +/–)
VOL (volume) +/–
5FR
Page 36

Retirez la feuille de protection avant
l’utilisation.
Préparation
Retrait de la façade
Vous pouvez retirer la façade de cet appareil
pour le protéger du vol.
1 Appuyez sur la touche OFF et
maintenez-la enfoncée jusqu’à ce
que l’appareil s’éteigne. Appuyez sur
la touche de déverrouillage de la
façade , puis retirez la façade en la
tirant vers vous.
Alarme d’avertissement
Si vous mettez la clé de contact en position
OFF sans retirer la façade, l’alarme
d’avertissement retentit pendant quelques
secondes. L’alarme retentit uniquement
lorsque l’amplificateur intégré est utilisé.
Installation de la façade
6FR
Réinitialisation de l’appareil
Avant la première utilisation de l’appareil ou
après avoir remplacé la batterie du véhicule
ou modifié les raccordements, vous devez
réinitialiser l’appareil.
1 Appuyez sur DSPL et (retour)/
MODE pendant plus de 2 secondes.
Remarque
La réinitialisation de l’appareil efface le réglage de
l’heure et certaines informations mémorisées.
Page 37

Réglage de l’horloge
1 Appuyez sur MENU, tournez la
molette de réglage pour sélectionner
[GENERAL], puis appuyez dessus.
2 Tournez la molette de réglage pour
sélectionner [SET CLOCK-ADJ], puis
appuyez dessus.
L’indication des heures clignote.
3 Tournez la molette de réglage pour
régler l’heure et les minutes.
Appuyez sur SEEK +/– pour déplacer
l’indication numérique.
4 Appuyez sur MENU après avoir réglé
les minutes.
Le réglage est terminé et l’horloge
démarre.
Affichage de l’horloge
Appuyez sur la touche DSPL.
Raccordement d’un
périphérique USB
1 Réduisez le volume de l’appareil.
2 Raccordez le périphérique USB à
l’appareil.
Pour raccorder un iPod/iPhone, utilisez le
câble de raccordement USB pour iPod
(non fourni).
Raccordement d’un autre
appareil audio portatif
1 Éteignez l’appareil audio portatif.
2 Réduisez le volume de l’appareil.
3 Raccordez l’appareil audio portatif à
la prise d’entrée AUX (mini-prise
stéréo) de l’appareil à l’aide d’un
câble de raccordement (non fourni)*.
* Veillez à utiliser une fiche droite.
4 Appuyez sur SRC pour sélectionner
[AUX].
Pour faire correspondre le niveau de
volume de l’appareil raccordé à celui
des autres sources
Démarrez la lecture sur l’appareil audio
portatif avec un niveau de volume modéré,
puis réglez votre appareil sur le volume
d’écoute habituel.
Appuyez sur MENU, puis sélectionnez
[SOUND] [SET AUX VOL] (page 15).
7FR
Page 38

Écoute de la radio
Écoute de la radio
Pour écouter la radio, appuyez sur SRC pour
sélectionner [TUNER].
Mémorisation automatique (BTM)
1 Appuyez sur MODE pour changer de
bande (FM1, FM2, FM3, AM1 ou AM2).
2 Appuyez sur MENU, tournez la
molette de réglage pour sélectionner
[GENERAL], puis appuyez dessus.
3 Tournez la molette de réglage pour
sélectionner [SET BTM], puis appuyez
dessus.
L’appareil mémorise les stations sur les
touches numériques en respectant
l’ordre des fréquences.
Syntonisation
1 Appuyez sur MODE pour changer de
bande (FM1, FM2, FM3, AM1 ou AM2).
2 Réglez la fréquence.
Pour syntoniser des stations
manuellement
Appuyez sur la touche SEEK +/– et
maintenez-la enfoncée pour localiser la
fréquence approximativement, puis
appuyez plusieurs fois sur SEEK +/– pour
régler la fréquence souhaitée avec
précision.
Pour syntoniser des stations
automatiquement
Appuyez sur SEEK +/–.
Le balayage s’interrompt lorsque
l’appareil capte une station.
Réception des stations
mémorisées
1 Sélectionnez la bande, puis appuyez
sur une touche numérique (1 à 6).
Utilisation du RDS (système
de radiocommunication de
données)
Sélection des types d’émission
(PTY)
1 Appuyez sur PTY pendant la
réception FM.
2 Tournez la molette de réglage jusqu’à
ce que le type d’émission souhaité
apparaisse, puis appuyez dessus.
L’appareil commence à chercher une
station diffusant le type d’émission
sélectionné.
Type d ’émission
NEWS (nouvelles), INFORM (information),
SPORTS (sports), TALK (infovariétés), ROCK
(rock), CLS ROCK (rock classique), ADLT HIT
(succès adultes), SOFT RCK (rock détente), TOP
40 (palmarès), COUNTRY (country), OLDIES
(anciens succès), SOFT (détente), NOSTALGA
(nostalgie), JAZZ (jazz), CLASSICL (classique),
R&B (rhythm and blues), SOFT R&B (rhythm
and blues léger), LANGUAGE (langue
étrangère), REL MUSC (musique religieuse), REL
TAL K (infovariétés religieuses), PERSNLTY
(personnalités), PUBLIC (publique), COLLEGE
(collège), HABL ESP (infovariétés espagnoles),
MUSC ESP (musique espagnole), HIP HOP (hiphop), WEATHER (météo)
Mémorisation manuelle
1 Lorsque vous captez la station que
vous souhaitez mémoriser, appuyez
sur une touche numérique (1 à 6) et
maintenez-la enfoncée jusqu’à ce
que [MEM] apparaisse.
8FR
Réglage de l’heure (CT)
Les données CT de la transmission RDS
règlent l’horloge.
1 Réglez l’appareil à [SET CT-ON] dans
[GENERAL] (page 14).
Page 39

Écoute de la radio SiriusXM
Activation de votre abonnement
SiriusXM
Seule la radio SiriusXM vous permet
d’écouter encore plus de canaux que vous
aimez, le tout au même endroit. Obtenez
plus de 140 canaux, y compris des chaînes
musicales exemptes de publicité, ainsi que
les meilleures émissions de sports, de
nouvelles, d’infovariétés, d’humour et de
divertissement. Bienvenue dans le monde
de la radio satellite. Un récepteur SiriusXM
Connect Voiture et un abonnement sont
requis. Pour plus d’informations, visitez
www.siriusxm.com
Après l’installation du récepteur SiriusXM
Connect Voiture et de l’antenne, appuyez
sur SRC pour sélectionner [SIRIUSXM]. Vous
devriez être en mesure d’écouter le canal
d’aperçu de SiriusXM au Canal 1. Après avoir
vérifié qu’il est possible d’écouter le canal
d’aperçu, sélectionnez le Canal 0 pour
obtenir l’identifiant de radio de votre
récepteur. L’identifiant de radio est
également indiqué sur la partie inférieure du
récepteur SiriusXM Connect Voiture et son
emballage. Vous aurez besoin de ce numéro
pour activer votre abonnement. Notez le
numéro pour référence ultérieure.
Aux États-Unis, vous pouvez effectuer
l’activation en ligne ou en appelant le
service à l’auditoire de SiriusXM :
• En ligne : Visitez www.siriusxm.com/
activatenow
• Téléphone : Composez le 1-866-635-2349
Au Canada, vous pouvez effectuer
l’activation en ligne ou en appelant le
service à l’auditoire de SiriusXM :
• En ligne : Visitez www.siriusxm.ca/
activatexm
• Téléphone : Composez le 1-877-438-9677
Dans le cadre du processus d’activation, les
satellites SiriusXM envoient un message
d’activation à votre récepteur. Lorsque votre
radio détecte que le récepteur a reçu le
message d’activation, elle affiche :
[SUBSCRIPTION UPDATED - ENTER TO
CONTINUE]. Une fois abonné, vous pouvez
syntoniser les canaux offerts dans votre plan
d’abonnement.
Remarques
• Le processus d’activation prend normalement de
10 à 15 minutes, mais peut parfois prendre jusqu’à
une heure.
• Votre radio doit être allumée et syntonisée sur le
signal SiriusXM pour recevoir le message
d’activation.
Sélection des canaux pour
SiriusXM
1 Appuyez sur (navigation).
2 Tournez la molette de réglage pour
sélectionner [CHANNEL], puis
appuyez dessus.
3 Tournez la molette de réglage pour
sélectionner le canal de votre choix,
puis appuyez dessus.
Pour sélectionner des canaux à partir
des catégories
Appuyez sur (navigation).
1
2 Tournez la molette de réglage pour
sélectionner [CATEGORY], puis appuyez
dessus.
3 Tournez la molette de réglage pour
sélectionner la catégorie de votre choix, puis
appuyez dessus.
Pour mémoriser des canaux
1
Lorsque vous captez le canal que vous
souhaitez mémoriser, appuyez sur une
touche numérique (1 à 6) et maintenez-la
enfoncée jusqu’à ce que [MEM] apparaisse.
Pour capter le canal mémorisé, appuyez sur
MODE pour sélectionner [SX1], [SX2] ou
[SX3], puis appuyez sur une touche
numérique (1 à 6).
9FR
Page 40

Pour régler le contrôle parental
La fonction de contrôle parental vous
permet de limiter l’accès aux canaux
SiriusXM proposant un contenu destiné aux
adultes. Lorsqu’elle est activée, la fonction
de contrôle parental vous demande d’entrer
un mot de passe pour syntoniser les canaux
verrouillés. Vous trouverez ci-dessous les
informations relatives au réglage du mot de
passe et au verrouillage des canaux.
1 Appuyez sur MENU et tournez la molette de
réglage.
2 Sélectionnez [GENERAL] [SXM PARENTAL]
[LOCK SELECT] [LOCK-ON].
3 Entrez le mot de passe en tournant la
molette de réglage de l’appareil ou en
appuyant sur / sur la télécommande.
Pour déplacer la position de saisie, appuyez
sur SEEK +/– sur l’appareil ou / sur la
télécommande.
Le mot de passe initial est [0000].
4 Après avoir entré le mot de passe, appuyez
sur ENTER.
Pour déverrouiller les canaux, sélectionnez
[LOCK-OFF].
Pour modifier le mot de passe
1
Appuyez sur MENU et tournez la molette de
réglage.
2 Sélectionnez [GENERAL] [SXM PARENTAL]
[CODE EDIT].
3 Entrez le mot de passe actuel sur l’affichage
d’entrée du mot de passe actuel, puis
appuyez sur ENTER.
Le mot de passe initial est [0000].
4 Entrez votre nouveau mot de passe à
4 chiffres sur l’affichage d’entrée du
nouveau mot de passe, puis appuyez sur
ENTER.
Pour changer les éléments d’affichage
Appuyez sur DSPL pour les changer comme
suit :
Numéro de canal (par défaut) Nom de
canal Nom de l’artiste Titre de chanson
Informations de contenu Nom de
catégorie Horloge
Lecture
Lecture d’un disque
1 Insérez le disque (côté imprimé vers
le haut).
La lecture démarre automatiquement.
Lecture d’un périphérique
USB
Dans ce mode d’emploi, « iPod » est utilisé
comme référence générale pour des
fonctions iPod sur les iPod et iPhone, sauf
mention contraire dans le texte ou les
illustrations.
Pour plus de détails sur la compatibilité de
votre iPod, reportez-vous à la section « À
propos du iPod » (page 18) ou visitez notre
site d’assistance à l’adresse indiquée sur la
couverture arrière.
Vous pouvez utiliser des périphériques USB*
de type AOA (Android Open Accessory) 2.0,
MSC (stockage de masse) et MTP (protocole
de transfert des médias) conformes à la
norme USB. Selon le périphérique USB, le
mode Android ou le mode MSC/MTP peut
être sélectionné sur l’appareil.
Certains lecteurs média numériques ou
téléphones intelligents Android peuvent
nécessiter le réglage au mode MTP.
* par exemple, mémoire flash USB, lecteur média
numérique, téléphone intelligent Android
10FR
Page 41

Remarques
• Pour plus de détails sur la compatibilité de votre
périphérique USB, visitez notre site d’assistance à
l’adresse indiquée sur la couverture arrière.
• Les téléphones intelligents avec Android OS 4.1 ou
supérieur installé prennent en charge Android
Open Accessory 2.0 (AOA 2.0). Toutefois, certains
téléphones intelligents pourraient ne pas
entièrement prendre en charge AOA 2.0 si Android
OS 4.1 ou supérieur est installé.
Pour plus de détails sur la compatibilité de votre
téléphone intelligent Android, visitez notre site
d’assistance à l’adresse indiquée sur la couverture
arrière.
• La lecture des fichiers suivants n’est pas prise en
charge.
MP3/WMA/FLAC :
– fichiers avec protection des droits d’auteur
– fichiers DRM (Gestion des droits numériques)
– fichiers audio multicanal
MP3/WMA :
– fichiers avec compression sans perte
Avant d’effectuer un raccordement,
sélectionnez le mode USB (mode Android ou
mode MSC/MTP), selon le périphérique USB
(page 14).
1 Raccordez un périphérique USB au
port USB (page 7).
La lecture commence.
Si un périphérique est déjà raccordé,
appuyez sur SRC pour sélectionner [USB]
afin de lancer la lecture ([IPD] apparaît
dans l’affichage lorsque le iPod est
reconnu).
2 Réglez le volume sur cet appareil.
Pour arrêter la lecture
Appuyez sur la touche OFF et maintenez-la
enfoncée pendant 1 seconde.
Pour retirer le périphérique
Arrêtez la lecture, puis retirez le
périphérique.
Précaution relative au iPhone
Lorsque vous raccordez un iPhone via un
câble USB, le volume de l’appel
téléphonique est contrôlé par le iPhone
plutôt que par l’appareil. N’augmentez pas
le volume de l’appareil par inadvertance
pendant un appel téléphonique, car cela
causerait une accentuation soudaine du
volume après l’appel.
Recherche et lecture des
plages
Lecture répétée et lecture
aléatoire
Non disponible lorsqu’un périphérique USB
en mode Android est raccordé.
1 En cours de lecture, appuyez
plusieurs fois sur (répétition) ou
(aléatoire) pour sélectionner le
mode de lecture souhaité.
La lecture dans le mode de lecture
sélectionné peut prendre un instant à
démarrer.
Les modes de lecture disponibles diffèrent
selon la source sonore sélectionnée.
Recherche d’une plage par nom
(Quick-BrowZer™)
Non disponible lorsqu’un périphérique USB
en mode Android ou un iPod est raccordé.
1 En cours de lecture CD ou USB,
appuyez sur (navigation)* pour
afficher la liste des catégories de
recherche.
Lorsque la liste de plages apparaît,
appuyez plusieurs fois sur (retour)
pour afficher la catégorie de recherche
souhaitée.
* En cours de lecture USB, appuyez sur
(navigation) pendant plus de 2 secondes
pour retourner dire ctement au début de la liste
des catégories.
2 Tournez la molette de réglage pour
sélectionner la catégorie de
recherche de votre choix, puis
appuyez pour valider.
3 Répétez l’étape 2 pour rechercher la
plage souhaitée.
La lecture commence.
Pour quitter le mode Quick-BrowZer
Appuyez sur (navigation).
11FR
Page 42

Recherche d’éléments par saut
(mode Saut)
Non disponible lorsqu’un périphérique USB
en mode Android ou un iPod est raccordé.
1 Appuyez sur (navigation).
2 Appuyez sur SEEK +.
3 Tournez la molette de réglage pour
sélectionner l’élément.
L’appareil effectue des sauts dans la liste
par incréments de 10 % du nombre total
d’éléments.
4 Appuyez sur ENTER pour retourner au
mode Quick-BrowZer.
L’élément sélectionné apparaît.
5 Tournez la molette de réglage pour
sélectionner l’élément de votre choix,
puis appuyez dessus.
La lecture commence.
Écoute de Pandora®
Pandora® est disponible pour la
transmission de musique en continu à l’aide
de votre iPhone. Vous pouvez commander
Pandora® sur un iPhone raccordé via USB à
partir de cet appareil. Pandora® est
disponible uniquement dans certains pays.
Veuillez visiter
http://www.pandora.com/legal
pour plus d’informations.
Configuration de Pandora®
1 Pour plus de détails sur la
compatibilité de votre périphérique
mobile, visitez le site d’assistance à
l’adresse indiquée sur la couverture
arrière.
2 Pour télécharger la plus récente
version de l’application Pandora®,
visitez le magasin d’applications de
votre téléphone intelligent. Vous
trouverez une liste des périphériques
compatibles au
www.pandora.com/everywhere/
mobile
Transmission en continu
Pandora®
1 Raccordez le iPhone à cet appareil
(page 7).
2 Appuyez sur SRC pour sélectionner
[PANDORA].
3 Démarrez l’application Pandora® sur
le périphérique mobile.
4 Appuyez sur PAUSE pour démarrer la
lecture.
12FR
Page 43

Opérations disponibles
dans Pandora®
Réglages
Appréciation positive ou négative
L’appréciation positive ou négative vous
permet de personnaliser les stations.
1 En cours de lecture, appuyez sur
(appréciation positive) ou
(appréciation négative).
Utilisation de la liste des stations
La liste des stations vous permet de
sélectionner facilement la station souhaitée.
1 En cours de lecture, appuyez sur
(navigation).
2 Appuyez sur SEEK + pour sélectionner
l’ordre de tri [BY DATE] ou [A TO Z].
3 Tournez la molette de réglage pour
sélectionner la station de votre choix,
puis appuyez dessus.
La lecture commence.
Mise en signet
La plage en cours de lecture peut être mise
en signet et mémorisée dans votre compte
Pandora® .
1 En cours de lecture, appuyez sur
MODE.
Annulation du mode DEMO
Vous pouvez désactiver l’affichage de
démonstration qui apparaît lorsque la
source est désactivée et que l’horloge est
affichée.
1 Appuyez sur MENU, tournez la
molette de réglage pour sélectionner
[GENERAL], puis appuyez dessus.
2 Tournez la molette de réglage pour
sélectionner [SET DEMO], puis
appuyez dessus.
3 Tournez la molette de réglage pour
sélectionner [SET DEMO-OFF], puis
appuyez dessus.
Le réglage est terminé.
4 Appuyez deux fois sur (retour).
La fenêtre d’affichage retourne au mode
de réception/lecture normal.
Configuration de base
Vous pouvez configurer des paramètres
dans les catégories de configuration
suivantes :
Configuration générale (GENERAL),
Configuration sonore (SOUND),
Configuration d’affichage (DISPLAY)
1 Appuyez sur MENU.
2 Tournez la molette de réglage pour
sélectionner la catégorie de
configuration, puis appuyez dessus.
Les paramètres peuvent être réglés selon
la source et le réglage.
3 Tournez la molette de réglage pour
sélectionner les options, puis
appuyez dessus.
Pour retourner à l’écran précédent
Appuyez sur (retour).
13FR
Page 44

Configuration générale
(GENERAL)
DEMO (démonstration)
Permet d’activer le mode de
démonstration : [ON], [OFF].
CLOCK-ADJ (réglage de l’horloge) (page 7)
CAUT ALM (alarme d’avertissement)
Permet d’activer l’alarme
d’avertissement : [ON], [OFF] (page 6).
(Disponible uniquement lorsque la source
est désactivée et que l’horloge est
affichée.)
BEEP
Permet d’activer le bip : [ON], [OFF].
AUTO OFF
Permet d’éteindre automatiquement
après un laps de temps souhaité lors de
l’arrêt de l’appareil : [ON] (30 minutes),
[OFF].
STEERING
Permet d’enregistrer/de réinitialiser le
réglage de la télécommande du volant.
(Disponible lors du raccordement à l’aide
du câble de raccordement (non fourni).)
(Disponible uniquement lorsque la source
est désactivée et que l’horloge est
affichée.)
STR CONTROL (commande du volant)
Permet de sélectionner le mode d’entrée
de la télécommande raccordée. Pour
éviter un problème de fonctionnement,
assurez-vous de faire correspondre le
mode d’entrée avec la télécommande
raccordée avant l’utilisation.
CUSTOM
Mode d’entrée pour la télécommande
du volant
PRESET
Mode d’entrée pour la télécommande
filaire, excluant la télécommande du
volant (sélectionné automatiquement
lorsque vous effectuez [RESET
CUSTOM].)
EDIT CUSTOM
Permet d’enregistrer les fonctions
(SOURCE, ATT, VOL +/–, SEEK +/–) sur la
télécommande du volant :
Tournez la molette de réglage pour
sélectionner la fonction que vous
souhaitez assigner à la télécommande
du volant, puis appuyez dessus.
Pendant que [REGISTER] clignote,
maintenez enfoncée la touche de la
télécommande du volant à laquelle
vous souhaitez assigner la fonction.
Lorsque l’enregistrement est terminé,
[REGISTERED] s’affiche.
Pour enregistrer d’autres fonctions,
répétez les étapes et .
(Disponible uniquement lorsque [STR
CONTROL] est réglé à [CUSTOM].)
RESET CUSTOM
Permet de réinitialiser le réglage de la
télécommande du volant : [YES], [NO].
(Disponible uniquement lorsque [STR
CONTROL] est réglé à [CUSTOM].)
Remarques
• Pendant que vous effectuez les réglages, seul
le fonctionnement à l’aide des touches de
l’appareil est disponible. Par mesure de
sécurité, stationnez votre voiture avant
d’effectuer ce réglage.
• Lorsqu’une erreur se produit pendant
l’enregistrement, toutes les informations
enregistrées précédemment sont conservées.
Recommencez l’enregistrement à partir de la
fonction où l’erreur s’est produite.
• Cette fonction pourrait ne pas être disponible
sur certains véhicules. Pour plus de détails sur
la compatibilité de votre véhicule, visitez notre
site d’assistance à l’adresse indiquée sur la
couverture arrière.
USB MODE
Permet de modifier le mode USB :
[ANDROID], [MSC/MTP].
(Disponible uniquement lorsque la source
USB est sélectionnée.)
CT (heure)
Permet d’activer la fonction CT : [ON],
[OFF].
BTM (mémorisation des meilleurs accords)
(page 8)
(Disponible uniquement lorsque le
récepteur est sélectionné.)
14FR
Page 45

SXM PARENTAL
Permet de régler le verrouillage parental à
[ON] ou [OFF] et de modifier le mot de
passe (page 10).
(Disponible uniquement lorsque SiriusXM
est sélectionné.)
SXM RESET
Permet d’initialiser les réglages du
récepteur SiriusXM Connect Voiture
(canaux présélectionnés/verrouillage
parental) : [YES], [NO].
(Disponible uniquement lorsque SiriusXM
est sélectionné.)
FIRMWARE
(Disponible uniquement lorsque la source
est désactivée et que l’horloge est
affichée.)
Permet de vérifier/mettre à jour la version
du micrologiciel. Pour plus de détails,
visitez le site d’assistance à l’adresse
indiquée sur la couverture arrière.
FW VERSION (version du micrologiciel)
Affiche la version de micrologiciel
actuelle.
FW UPDATE (mise à jour du micrologiciel)
Permet d’accéder au processus de mise à
jour du micrologiciel : [YES], [NO].
La mise à jour du micrologiciel prend
quelques minutes. Pendant la mise à jour,
ne mettez pas la clé de contact en
position OFF et ne retirez pas le
périphérique USB.
Configuration sonore
(SOUND)
Vous pouvez également ouvrir ce menu de
configuration en appuyant sur SOUND.
EQ10 PRESET
Permet de sélectionner une courbe
d’égaliseur parmi 10 courbes d’égaliseur
ou de désactiver la fonction :
[OFF], [R&B], [ROCK], [POP], [HIP-HOP],
[ELECTRONICA], [JAZZ], [SOUL],
[COUNTRY], [KARAOKE]*, [CUSTOM].
Le réglage de courbe d’égaliseur peut
être mémorisé pour chaque source.
* [KARAOKE] réduit le son de la voix, mais ne
peut pas le supprimer entièrement pendant la
lecture. De plus, l’utilisation d’un microphone
n’est pas prise en charge.
EQ10 CUSTOM
Permet de sélectionner l’option [CUSTOM]
de la fonction EQ10.
Réglage de la courbe d’égaliseur :
[BAND1] 32 Hz, [BAND2] 63 Hz, [BAND3]
125 Hz, [BAND4] 250 Hz, [BAND5] 500 Hz,
[BAND6] 1 kHz, [BAND7] 2 kHz, [BAND8]
4 kHz, [BAND9] 8 kHz, [BAND10] 16 kHz.
Le niveau de volume peut être réglé par
incréments de 1 dB, de -6 dB à +6 dB.
BALANCE
Permet de régler l’équilibre du son :
[RIGHT-15] – [CENTER] – [LEFT-15].
FADER
Permet de régler le niveau relatif :
[FRONT-15] – [CENTER] – [REAR-15].
S.WOOFER (caisson de graves)
SW LEVEL (niveau du caisson de graves)
Permet de régler le volume du caisson de
graves : [+6 dB] – [0 dB] – [-6 dB].
([ATT] est affiché au réglage le plus bas.)
SW PHASE (phase du caisson de graves)
Permet de sélectionner la phase du
caisson de graves : [NORM], [REV].
LPF FREQ (fréquence de filtre passe-bas)
Permet de sélectionner la fréquence de
coupure du caisson de graves : [80Hz],
[100Hz], [120Hz].
HPF FREQ (fréquence de filtre passe-haut)
Permet de sélectionner la fréquence de
coupure du haut-parleur avant/arrière :
[OFF], [80Hz], [100Hz], [120Hz].
AUX VOL (niveau de volume AUX)
Permet de régler le niveau de volume de
chaque périphérique auxiliaire raccordé :
[+18 dB] – [0 dB] – [-8 dB].
Ce réglage évite de régler le niveau de
volume entre les sources.
(Disponible uniquement lorsque AUX est
sélectionné.)
15FR
Page 46

Configuration d’affichage
(DISPLAY)
DIMMER
Permet de modifier la luminosité de la
fenêtre d’affichage : [ON], [OFF], [CLK].
Pour régler cette fonction afin de l’activer
uniquement pendant une période
déterminée, sélectionnez [CLK], puis
réglez les heures de début et de fin.
– Pour régler la luminosité utilisée lorsque
la fonction de gradateur est activée :
Réglez [DIMMER] à [ON], puis réglez
[BRIGHTNESS].
– Pour régler la luminosité utilisée lorsque
la fonction de gradateur est désactivée :
Réglez [DIMMER] à [OFF], puis réglez
[BRIGHTNESS].
Le réglage de luminosité est mémorisé et
appliqué lorsque la fonction de gradateur
est activée ou désactivée.
BRIGHTNESS
Permet de régler la luminosité de la
fenêtre d’affichage. Le niveau de
luminosité est réglable : [1] – [10].
BUTTON-C (couleur des touches)
Permet de sélectionner une couleur
préréglée ou personnalisée pour les
touches.
COLOR
Permet de sélectionner 15 couleurs
préréglées ou 1 couleur personnalisée.
CUSTOM-C (couleur personnalisée)
Permet d’enregistrer une couleur
personnalisée pour les touches.
RGB RED, RGB GRN, RGB BLUE
Gamme de couleur réglable : [0] – [32]
([0] ne peut pas être sélectionné pour
toutes les gammes de couleur).
DSPL-C (couleur de la fenêtre d’affichage)
Permet de sélectionner une couleur
préréglée ou personnalisée pour la
fenêtre d’affichage.
COLOR
Permet de sélectionner 15 couleurs
préréglées ou 1 couleur personnalisée.
CUSTOM-C (couleur personnalisée)
Permet d’enregistrer une couleur
personnalisée pour la fenêtre d’affichage.
RGB RED, RGB GRN, RGB BLUE
Gamme de couleur réglable : [0] – [32]
([0] ne peut pas être sélectionné pour
toutes les gammes de couleur).
SND SYNC (synchronisation sonore)
Permet d’activer la synchronisation de
l’éclairage avec le son : [ON], [OFF].
AUTO SCR (défilement automatique)
Permet de faire défiler automatiquement
les éléments longs : [ON], [OFF].
(Non disponible lorsque AUX ou le
récepteur est sélectionné.)
16FR
Page 47

Informations complémentaires
Mise à jour du micrologiciel
Pour mettre à jour le micrologiciel, visitez le
site d’assistance à l’adresse indiquée sur la
couverture arrière, puis suivez les
instructions en ligne.
Remarques
• L’utilisation d’un périphérique USB (non fourni) est
requise pour la mise à jour du micrologiciel.
Enregistrez le logiciel de mise à jour sur le
périphérique USB, raccordez le périphérique au
port USB, puis effectuez la mise à jour.
• La mise à jour du micrologiciel prend quelques
minutes. Pendant la mise à jour, ne mettez pas la
clé de contact en position OFF et ne retirez pas le
périphérique USB.
Précautions
• Si votre véhicule est resté stationné en
plein soleil, laissez l’appareil refroidir avant
de l’utiliser.
• Ne laissez pas la façade ou les appareils
audio à l’intérieur du véhicule, car la
température élevée résultant du
rayonnement direct du soleil pourrait
causer un problème de fonctionnement.
• L’antenne électrique se déploie
automatiquement.
Condensation
Si de la condensation s’est formée dans
l’appareil, retirez le disque et attendez
environ une heure pour que l’appareil puisse
sécher; sinon, il ne fonctionnera pas
correctement.
Pour conserver un son de haute qualité
Ne renversez pas de liquide sur l’appareil ou
sur les disques.
Remarques sur les disques
• N’exposez pas les disques au rayonnement
direct du soleil ou à des sources de chaleur
telles que des conduits d’air chaud, et ne
les laissez pas dans un véhicule stationné
en plein soleil.
•Avant la lecture,
essuyez les disques
avec un chiffon de
nettoyage en partant
du centre vers
l’extérieur. N’utilisez
pas de solvants tels
que de l’essence, du
diluant ou des
nettoyants disponibles sur le marché.
•Cet appareil est conçu pour la lecture des
disques conformes à la norme Compact
Disc (CD). Les DualDiscs et certains disques
de musique encodés avec des
technologies de protection des droits
d’auteur ne sont pas conformes à la norme
Compact Disc (CD). Par conséquent, il est
possible que ces disques ne soient pas lus
par cet appareil.
•Disques ne pouvant PAS être lus sur cet
appareil
– Les disques sur lesquels sont collés des
étiquettes, des autocollants, du ruban
adhésif ou du papier. De tels disques
peuvent provoquer des problèmes de
fonctionnement ou être endommagés.
– Les disques de forme non standard
(notamment en forme de cœur, de carré
ou d’étoile). Vous risquez d’endommager
votre appareil si vous essayez de lire ces
types de disques.
– Les disques de 8 cm (3
1
/4 po).
17FR
Page 48

Remarques sur les disques CD-R/
Dossier (album)
Fichier audio (plage)
CD-RW
• Si le disque multisession commence avec
une session CD-DA, il est reconnu comme
un disque CD-DA et les autres sessions ne
sont pas lues.
• Disques ne pouvant PAS être lus sur cet
appareil
– CD-R/CD-RW dont la qualité
d’enregistrement est mauvaise.
– CD-R/CD-RW enregistrés avec un
appareil d’enregistrement non
compatible.
– CD-R/CD-RW n’ayant pas été finalisés
correctement.
– CD-R/CD-RW autres que ceux enregistrés
au format CD audio ou MP3
conformément à la norme ISO9660
Level 1/Level 2, Joliet/Romeo ou
multisession.
Ordre de lecture des fichiers
audio
À propos du iPod
•Vous pouvez raccorder cet appareil aux
modèles d’iPod suivants. Mettez vos
périphériques iPod à jour avec le logiciel le
plus récent avant toute utilisation.
Modèles de iPhone/iPod compatibles
Modèle compatible USB
iPhone 6s Plus
iPhone 6s
iPhone 6 Plus
iPhone 6
iPhone 5s
iPhone 5c
iPhone 5
iPhone 4s
iPod touch (6ème génération)
iPod touch (5ème génération)
iPod nano (7ème génération)
•« Made for iPod » et « Made for iPhone »
signifient qu’un accessoire électronique a
été conçu pour être connecté
spécifiquement à un iPod ou un iPhone,
respectivement, et qu’il a été certifié par le
développeur comme étant conforme aux
normes de performances Apple. Apple
n’est pas responsable du bon
fonctionnement de cet appareil ni de sa
conformité aux normes et réglementations
de sécurité. Veuillez noter que l’utilisation
de cet accessoire avec un iPod ou un
iPhone peut affecter les performances des
transmissions sans fil.
Si vous avez des questions ou des
problèmes concernant cet appareil qui ne
sont pas abordés dans ce mode d’emploi,
contactez votre détaillant Sony le plus
proche.
18FR
Page 49

Entretien
Pôle + vers le haut
Caractéristiques techniques
Remplacement de la pile au lithium de
la télécommande
Sous des conditions normales d’utilisation,
la pile durera environ 1 an (selon les
conditions d’utilisation, la durée de vie utile
peut être réduite).
Lorsque la pile est faible, la portée de la
télécommande diminue.
ATTENTION
La pile pourrait exploser si elle n’est pas
remplacée correctement. Remplacez-la
uniquement avec le même type de pile ou
un type équivalent.
Remarques sur la pile au lithium
• Tenez la pile au lithium hors de la portée des
enfants. En cas d’ingestion de la pile, consultez
immédiatement un médecin.
• Essuyez la pile avec un chiffon sec pour assurer un
bon contact.
• Veillez à respecter la polarité lors de l’installation
de la pile.
• Ne tenez pas la pile avec des pinces métalliques,
car cela pourrait causer un court-circuit.
Nettoyage des connecteurs
L’appareil peut ne pas fonctionner
correctement si les connecteurs entre
l’appareil et la façade sont sales. Pour éviter
cette situation, retirez la façade (page 6) et
nettoyez les connecteurs avec un cotontige. N’exercez pas une pression trop forte,
car vous pourriez endommager les
connecteurs.
Remarques
• Pour plus de sécurité, coupez le contact avant de
nettoyer les connecteurs et retirez la clé de
contact.
• Ne touchez jamais les connecteurs directement
avec les doigts ou avec un objet métallique.
Radio
FM
Plage de syntonisation : 87,5 MHz à
107,9 MHz
Borne d’antenne :
Connecteur d’antenne externe
Fréquence intermédiaire :
FM CCIR : -1 956,5 kHz à -487,3 kHz et
+500,0 kHz à +2 095,4 kHz
Sensibilité utile : 7 dBf
Sélectivité : 75 dB à 400 kHz
Rapport signal/bruit : 73 dB
Séparation : 50 dB à 1 kHz
Réponse en fréquence : 20 Hz à 15 000 Hz
AM
Plage de syntonisation : 530 kHz à 1 710 kHz
Borne d’antenne :
Connecteur d’antenne externe
Sensibilité : 26 µV
Lecteur CD
Rapport signal/bruit : 95 dB
Réponse en fréquence : 10 Hz à 20 000 Hz
Pleurage et scintillement : En dessous du
seuil mesurable
Nombre maximal de : (CD-R/CD-RW
uniquement)
– dossiers (albums) : 150 (y compris le
répertoire racine)
– fichiers (plages) et dossiers : 300 (lorsque
les noms de dossier/fichier contiennent un
grand nombre de caractères, ce nombre
peut être inférieur à 300)
– caractères affichables pour un nom de
dossier/fichier : 32 (Joliet)/64 (Romeo)
Codecs correspondants : MP3 (.mp3) et
WMA (.wma)
Lecteur USB
Interface : USB (haute vitesse)
Courant maximal : 1 A
Nombre maximal de plages
reconnaissables :
– dossiers (albums) : 256
– fichiers (plages) par dossier : 256
Protocole Android Open Accessory (AOA)
compatible : 2.0
19FR
Page 50

Codecs correspondants :
MP3 (.mp3)
Débit binaire : 8 kbits/s à 320 kbits/s
(Prise en charge du débit binaire
variable (VBR))
Fréquence d’échantillonnage : 16 kHz
à 48 kHz
WMA (.wma)
Débit binaire : 32 kbits/s à 192 kbits/s
(Prise en charge du débit binaire
variable (VBR))
Fréquence d’échantillonnage : 32 kHz,
44,1 kHz, 48 kHz
FLAC (.flac)
Résolution : 16 bits, 24 bits
Fréquence d’échantillonnage :
44,1 kHz, 48 kHz
Amplificateur de puissance
Sorties : Sorties de haut-parleurs
Impédance des haut-parleurs : 4 Ω à 8 Ω
Puissance de sortie maximale : 55 W × 4
(à 4 )
Généralités
Sorties :
Borne de sorties audio (REAR, SUB)
Borne de commande de relais d’antenne
électrique/d’amplificateur de
puissance (REM OUT)
Entrées :
Borne d’entrée SiriusXM
Borne d’entrée de télécommande
Borne d’entrée de l’antenne
Prise d’entrée AUX (mini-prise stéréo)
Port USB
Alimentation requise : Batterie de véhicule
12 V CC (masse négative)
Consommation de courant nominale : 10 A
Dimensions :
Environ 178 mm × 50 mm × 177 mm
1
(7
/8 po × 2 po × 7 po) (l/h/p)
Dimensions de montage :
Environ 182 mm × 53 mm × 160 mm
1
(7
/4 po × 2 1/8 po × 6 5/16 po) (l/h/p)
Poids : Environ 1,2 kg (2 lb 11 oz)
Contenu de l’emballage :
Appareil principal (1)
Télécommande (1) : RM-X211
Composants destinés à l’installation et
aux raccordements (1 jeu)
Accessoires/appareils en option :
Récepteur SiriusXM Connect Voiture :
SXV100, SXV200, SXV300
Câble pour entrée de télécommande du
volant : RC-SR1
Il est possible que votre détaillant ne
dispose pas de certains accessoires énoncés
ci-dessus. Veuillez vous adresser à lui pour
tout renseignement complémentaire.
La conception et les caractéristiques
techniques sont sujettes à modification sans
préavis.
Droits d’auteur
Récepteur SiriusXM Connect Voiture et
abonnement vendus séparément.
www.siriusxm.com
Sirius, XM et tous les autres logos et
marques connexes sont des marques de
commerce de Sirius XM Radio Inc. Tous
droits réservés.
Windows Media est une marque déposée ou
une marque de commerce de Microsoft
Corporation aux États-Unis et/ou dans les
autres pays.
Ce produit est protégé par des droits de
propriété intellectuelle de Microsoft
Corporation. Toute utilisation ou diffusion de
la technologie décrite sortant du cadre de
l’utilisation de ce produit est interdite sans
licence accordée par Microsoft ou une filiale
autorisée de Microsoft.
iPhone, iPod, iPod classic, iPod nano et iPod
touch sont des marques de Apple Inc.,
déposées aux États-Unis et dans d’autres
pays/régions.
Licence de la technologie de codage audio
MPEG Layer-3 et des brevets obtenue de
Fraunhofer IIS et Thomson.
Pandora®, le logo Pandora® et la
présentation Pandora® sont des marques
commerciales ou des marques déposées de
Pandora Media, Inc., utilisées avec
permission.
20FR
Page 51

Android est une marque de Google Inc.
libFLAC
Copyright (C) 2000-2009 Josh Coalson
Copyright (C) 2011-2013 Fondation Xiph.Org
La redistribution et l’utilisation sous formes
binaire et source, avec ou sans modification,
sont permises sous réserve des conditions
suivantes :
– Les redistributions du code source doivent
conserver l’avis de droit d’auteur
ci-dessus, cette liste de conditions et la
renonciation suivante.
– Les redistributions sous forme binaire
doivent reproduire l’avis de droit d’auteur
ci-dessus, cette liste de conditions et la
renonciation suivante dans la
documentation et/ou tout autre matériel
fourni lors de la distribution.
– Ni le nom de la Fondation Xiph.org ni les
noms de ses contributeurs ne doivent être
utilisés pour endosser ou promouvoir les
produits dérivés de ce logiciel sans
autorisation écrite préalable.
CE LOGICIEL EST FOURNI « TEL QUEL » PAR
LES DÉTENTEURS DE DROITS D’AUTEUR ET
CONTRIBUTEURS, ET TOUTES LES GARANTIES
EXPRESSES OU IMPLICITES, Y COMPRIS,
SANS EN EXCLURE D’AUTRES, LES
GARANTIES IMPLICITES DE VALEUR
MARCHANDE ET D’ADAPTATION À UN USAGE
PARTICULIER SONT DÉCLINÉES. LA
FONDATION OU LES CONTRIBUTEURS NE
PEUVENT EN AUCUN CAS ÊTRE TENUS
RESPONSABLES DES DOMMAGES DIRECTS,
INDIRECTS, ACCESSOIRES, SPÉCIAUX,
EXEMPLAIRES OU CONSÉCUTIFS (Y COMPRIS,
SANS EN EXCLURE D’AUTRES,
L’APPROVISIONNEMENT DE BIENS OU DE
SERVICES DE REMPLACEMENT; LA PERTE
D’UTILISATION, DE DONNÉES OU DE
PROFITS; OU L’INTERRUPTION D’ACTIVITÉS
COMMERCIALES) QUELLES QU’EN SOIENT LA
CAUSE ET LA THÉORIE DE RESPONSABILITÉ,
PAR CONTRAT, RESPONSABILITÉ ABSOLUE
OU CIVILE (Y COMPRIS LA NÉGLIGENCE OU
AUTRE) SURVENANT DE QUELQUE FAÇON
QUI SOIT DE L’UTILISATION DE CE LOGICIEL,
MÊME SI AVERTIS DE LA POSSIBILITÉ DE TELS
DOMMAGES.
Dépannage
La liste de vérification suivante vou s aidera à
remédier aux problèmes que vous pourriez
rencontrer avec cet appareil.
Avant de passer en revue la liste ci-dessous,
vérifiez les procédures de raccordement et
d’utilisation.
Pour plus de détails sur l’utilisation du
fusible et le retrait de l’appareil du tableau
de bord, reportez-vous à « Raccordement/
Installation » (page 27).
Si vous ne parvenez pas à régler le
problème, visitez le site d’assistance à
l’adresse indiquée sur la couverture arrière.
Généralités
L’appareil n’est pas alimenté.
Si l’appareil est éteint et que l’affichage
disparaît, il est impossible de commander
l’appareil avec la télécommande.
– Mettez l’appareil en marche.
Aucun son n’est émis ou le son est très
faible.
La position de la commande d’équilibre
avant/arrière [FADER] n’est pas réglée
pour un système à 2 haut-parleurs.
Le volume de l’appareil et/ou du
périphérique connecté est très faible.
– Augmentez le volume de l’appareil et du
périphérique connecté.
Aucun bip n’est émis.
Un amplificateur de puissance en option
est raccordé et vous n’utilisez pas
l’amplificateur intégré.
Le contenu de la mémoire a été effacé.
Le câble d’alimentation ou la batterie a été
déconnecté(e) ou n’est pas raccordé(e)
correctement.
Les stations mémorisées sont effacées et
l’heure est remise à zéro.
Le fusible est grillé.
Émission d’un bruit lorsque la position de
la clé de contact est modifiée.
Les câbles ne sont pas raccordés
correctement au connecteur
d’alimentation du véhicule destiné aux
accessoires.
21FR
Page 52

Pendant la lecture ou la réception, l’écran
du mode de démonstration apparaît.
Si aucune opération n’est effectuée
pendant 5 minutes alors que le réglage
[DEMO-ON] est sélectionné, l’écran du
mode de démonstration apparaît.
– Sélectionnez le réglage [DEMO-OFF]
(page 14).
L’affichage disparaît de la fenêtre
d’affichage ou il n’apparaît pas.
Le régulateur de luminosité est réglé à
[DIM-ON] (page 16).
L’affichage est désactivé si vous
maintenez la touche OFF enfoncée.
– Maintenez enfoncée la touche OFF de
l’appareil jusqu’à ce que l’affichage
apparaisse.
Les connecteurs sont sales (page 19).
L’affichage/éclairage clignote.
L’alimentation est insuffisante.
– Vérifiez que la batterie du véhicule
fournit une alimentation suffisante à
l’appareil. (L’alimentation requise est
12 V CC.)
Les touches de commande ne
fonctionnent pas.
Impossible d’éjecter le disque.
Appuyez sur DSPL et (retour)/MODE
pendant plus de 2 secondes pour
réinitialiser l’appareil.
Les contenus de la mémoire sont effacés.
Pour votre sécurité, ne réinitialisez pas
l’appareil pendant que vous conduisez.
Réception radio
Impossible de capter les stations.
Le son est parasité.
Le raccordement est incorrect.
– Si votre véhicule est équipé d’une
antenne de radio intégrée dans la
fenêtre arrière ou latérale, raccordez un
câble REM OUT (rayé bleu/blanc) ou un
câble d’alimentation d’accessoires
(rouge) au câble d’alimentation de
l’amplificateur d’antenne du véhicule.
– Vérifiez le raccordement de l’antenne du
véhicule.
– Si l’antenne automatique ne se déploie
pas, vérifiez le raccordement du câble
de commande d’antenne électrique.
Impossible de capter une station
présélectionnée.
Le signal capté est trop faible.
RDS
PTY affiche [- - - - - - - -].
La station captée n’est pas une station
RDS.
Aucune donnée RDS n’a été reçue.
La station ne spécifie pas le type
d’émission.
Lecture de CD
La lecture du disque ne commence pas.
Le disque est défectueux ou sale.
Les CD-R/CD-RW ne sont pas destinés à
un usage audio (page 18).
Impossible de lire des fichiers MP3/WMA.
Le disque n’est pas compatible avec le
format et la version MP3/WMA. Pour plus
de détails sur les formats et disques
pouvant être lus, visitez le site
d’assistance à l’adresse indiquée sur la
couverture arrière.
Certains fichiers MP3/WMA exigent un
délai plus long que d’autres avant le
début de la lecture.
La lecture des types de disques suivants
exige un délai de démarrage plus long :
– Disques comportant une hiérarchie de
dossiers complexe.
– Disques enregistrés en multisession.
– Disques auxquels il est possible
d’ajouter des données.
Le son est saccadé.
Le disque est défectueux ou sale.
22FR
Page 53

Lecture de périphérique USB
Impossible de lire des éléments à l’aide
d’un concentrateur USB.
Cet appareil ne peut pas reconnaître les
périphériques USB raccordés au moyen
d’un concentrateur USB.
La lecture sur un périphérique USB exige
un délai de démarrage plus long.
Le périphérique USB contient des fichiers
avec une hiérarchie de dossiers complexe.
Le son est intermittent.
Il est possible que le son soit intermittent
à un débit binaire élevé.
La lecture des fichiers DRM (Gestion des
droits numériques) pourrait être
impossible dans certains cas.
Impossible de lire le fichier audio.
Les systèmes de fichier autres que FAT16
ou FAT32 d’un périphérique USB ne sont
pas pris en charge.*
* Cet appareil prend en charge les systèmes FAT16
et FAT32. Par contre, certains périphériques USB
pourraient ne pas prendre en charge ces systèmes
FAT. Pour plus de détails, reportez-vous au mode
d’emploi de chacun des périphériques USB ou
communiquez avec le fabricant.
Des opérations de saut d’un album, de
saut d’éléments (mode Saut) et de
recherche d’une piste par nom (QuickBrowZer) ne peuvent pas être effectuées.
Ces opérations ne peuvent pas être
effectuées lorsqu’un périphérique USB en
mode Android ou un iPod est raccordé.
– Réglez [USB MODE] à [MSC/MTP]
(page 14).
– Retirez le iPod.
Le mode USB du périphérique n’est pas
réglé au mode approprié.
– Assurez-vous que le mode USB du
périphérique est réglé au mode MSC/
MTP.
Le son n’est pas émis pendant la lecture
en mode Android.
Pendant que l’appareil est en mode
Android, le son est émis uniquement par
le téléphone intelligent Android.
– Vérifiez l’état de l’application de lecture
audio sur le téléphone intelligent
Android.
– La lecture pourrait ne pas s’effectuer
correctement, selon le téléphone
intelligent Android.
Utilisation de Pandora®
Impossible d’établir la connexion
Pandora®.
Fermez l’application Pandora® sur le
périphérique mobile, puis redémarrez-la.
Messages
Les messages suivants peuvent apparaître
ou clignoter pendant le fonctionnement.
CD ERROR : Le disque ne peut pas être lu. Le
disque sera éjecté automatiquement.
Nettoyez le disque ou insérez-le
correctement. Assurez-vous que le disque
est exempt de défaut et qu’il n’est pas
vierge.
CD NO MUSIC : Il n’y a aucun fichier à lire. Le
disque sera éjecté automatiquement.
Insérez un disque avec des fichiers lisibles
(page 19).
CD PUSH EJT: Le disque n’a pas pu être
éjecté correctement.
Appuyez sur (éjecter).
HUB NO SUPRT : Les concentrateurs USB ne
sont pas pris en charge.
INVALID
L’opération sélectionnée pourrait être
invalide.
[USB MODE] ne peut pas être modifié
pendant la lecture iPod.
IPD STOP : La lecture iPod est terminée.
Faites fonctionner le iPod/iPhone pour
démarrer la lecture.
23FR
Page 54

NOT SUPPORT - ANDROID MODE
Un périphérique USB ne prenant pas en
charge AOA (Android Open Accessory) 2.0
est raccordé à l’appareil pendant que [USB
MODE] est réglé à [ANDROID].
– Réglez [USB MODE] à [MSC/MTP]
(page 14).
OVERLOAD : Le périphérique USB est
saturé.
Débranchez le périphérique USB, puis
changez la source en appuyant sur SRC.
Le périphérique USB présente une
défaillance ou un périphérique non pris en
charge est raccordé.
READ : En cours de lecture.
Attendez que la lecture soit terminée et la
lecture commence automatiquement.
Selon l’organisation des fichiers, cette
opération peut prendre quelques instants.
USB ERROR : Le périphérique USB ne peut
pas être lu.
Raccordez le périphérique USB de
nouveau.
USB NO DEV : Le périphérique USB n’est pas
raccordé ni reconnu.
Assurez-vous que le périphérique USB ou
son câble est solidement raccordé.
USB NO MUSIC : Il n’y a aucun fichier à lire.
Raccordez un périphérique USB avec des
fichiers lisibles (page 19).
USB NO SUPRT : Le périphérique USB n’est
pas pris en charge.
Pour plus de détails sur la compatibilité de
votre périphérique USB, visitez notre site
d’assistance à l’adresse indiquée sur la
couverture arrière.
ou : La fin du disque ou le
début a été atteint.
(trait de soulignement) : Impossible
d’afficher le caractère.
Pour l’utilisation de Pandora® :
BOOKMARK - ERROR : Vous n’avez pas
reussi a utiliser la mise en signet.
Attendez un instant, puis essayez à
nouveau.
CANNOT SKIP : Le saut des plages n’est pas
permis.
Attendez la fin du message publicitaire ou
le début de la plage suivante ou
sélectionnez une autre station dans la
liste. Pandora® limite le nombre de sauts
permis sur leur service.
LICENSING - RESTRICTIONS : Pand ora® n’est
pas offert à l’extérieur de votre pays.
MAINTENANCE - PLEASE - TRY AGAIN LATER : Le serveur Pandora® est en cours
d’entretien.
Attendez un instant, puis essayez à
nouveau.
NO NETWORK : La connexion au réseau est
instable ou perdue.
Établissez de nouveau la connexion entre
le réseau et le périphérique ou attendez
l’établissement d’une connexion réseau.
NO STATION - PLEASE - CREATE - STATION IN - PANDORA APP : Votre compte ne
contient aucune station.
Créez la station sur votre périphérique
mobile.
NOT ALLOWED : La fonction sélectionnée
est interdite.
Il n’est pas permis de laisser une
appréciation.
– Attendez que le message publicitaire se
termine.
– Certaines fonctions, telles que la station
partagée, ne permettent pas de laisser
une appréciation. Attendez le début de
la plage suivante ou sélectionnez une
autre station dans la liste.
La mise en signet n’est pas permise.
– Attendez que le message publicitaire se
termine.
– Sélectionnez une autre plage ou station,
puis essayez à nouveau.
24FR
Page 55

PAN ERROR : La fonction sélectionnée n’a
pu être exécutée.
Attendez un instant, puis essayez à
nouveau.
PAN NO SUPRT : Le périphérique raccordé
n’est pas pris en charge.
Pour plus de détails sur les appareils
compatibles, consultez le site
d’assistance.
PAN OPE N AP P : L’application Pandora® ne
fonctionne pas actuellement.
Démarrez l’application Pandora® sur le
iPhone.
PLEASE LOGIN - PANDORA APP : Aucune
session n’est ouverte à votre compte
Pandora® .
Débranchez le périphérique, ouvrez une
session à votre compte Pandora®, puis
raccordez-le de nouveau.
RATING ERROR : Vous n’avez pas reussi a
laisser une appreciation.
Attendez un instant, puis essayez à
nouveau.
UPDATE - PANDORA APP : L’application
Pandora® fonctionne avec une ancienne
version.
Mettez à jour l’application Pandora® à la
dernière version.
Pour l’utilisation de SiriusXM :
CH LOCKED
Le canal que vous avez syntonisé est
verrouillé par la fonction de contrôle
parental de la radio.
Reportez-vous à la section « Pour régler le
contrôle parental » (page 10) pour plus
d’informations sur la fonction de contrôle
parental et la manière d’accéder aux
canaux verrouillés.
CH UNAVAIL
Le canal que vous avez syntonisé n’est pas
un canal SiriusXM valide ou le canal que
vous écoutiez n’est plus disponible.
Ce message pourrait s’afficher brièvement
lorsque vous raccordez pour la première
fois un récepteur SiriusXM Connect
Voiture.
Visitez www.siriusxm.com aux États-Unis
ou www.siriusxm.ca au Canada pour
obtenir plus d’informations sur la gamme
de canaux SiriusXM.
CHAN UNSUB
Le canal que vous avez syntonisé n’est pas
inclus dans votre forfait d’abonnement
SiriusXM ou le canal que vous écoutiez
n’est plus inclus dans votre forfait
d’abonnement SiriusXM.
Si vous avez des questions au sujet de
votre forfait d’abonnement ou si vous
souhaitez vous abonner à ce canal,
veuillez contacter SiriusXM.
Aux États-Unis, visitez www.siriusxm.com
ou composez le 1-866-635-2349.
Au Canada, visitez www.siriusxm.ca ou
composez le 1-877-438-9677.
CHK ANT
La radio a détecté une défaillance de
l’antenne SiriusXM.
Le câble d’antenne pourrait être
déconnecté ou endommagé.
– Vérifiez que le câble d’antenne est
raccordé au récepteur SiriusXM Connect
Voiture.
– Inspectez le câble d’antenne pour
vérifier s’il est endommagé ou entortillé.
– Remplacez l’antenne si le câble est
endommagé. Les produits SiriusXM sont
disponibles auprès de votre détaillant
local de systèmes audio pour voiture ou
en ligne sur le site
www.shop.siriusxm.com
25FR
Page 56

CHECK TUNER
La radio éprouve de la difficulté à
communiquer avec le récepteur SiriusXM
Connect Voiture.
Le récepteur pourrait être déconnecté ou
endommagé.
– Vérifiez que le câble du récepteur
SiriusXM Connect Voiture est solidement
raccordé à la radio.
NO SIGNAL
Le récepteur SiriusXM Connect Voiture
éprouve de la difficulté à recevoir le signal
satellite SiriusXM.
– Vérifiez que votre véhicule se trouve à
l’extérieur, avec une vue dégagée du
ciel.
– Vérifiez que l’antenne à monture
magnétique SiriusXM est installée sur
une surface métallique à l’extérieur du
véhicule.
– Éloignez l’antenne SiriusXM de tout
obstacle.
– Inspectez le câble d’antenne pour
vérifier s’il est endommagé ou entortillé.
– Consultez le manuel d’installation du
récepteur SiriusXM Connect Voiture pour
obtenir plus d’informations sur
l’installation de l’antenne.
– Remplacez l’antenne si le câble est
endommagé. Les produits SiriusXM sont
disponibles auprès de votre détaillant
local de systèmes audio pour voiture ou
en ligne sur le site
www.shop.siriusxm.com
SUBSCRIPTION UPDATED - ENTER TO
CONTINUE
La radio a détecté une modification dans
les conditions de votre abonnement
SiriusXM.
– Appuyez sur ENTER pour effacer le
message.
Si vous avez des questions au sujet de
votre abonnement, veuillez contacter
SiriusXM.
Aux États-Unis, visitez
www.siriusxm.com ou composez le
1-866-635-2349.
Au Canada, visitez
www.siriusxm.ca ou composez le
1-877-438-9677.
Pour l’utilisation de la télécommande
du volant :
ERROR : Une erreur s’est produite pendant
l’enregistrement de la fonction.
Enregistrez de nouveau à partir de la
fonction où l’erreur s’est produite
(page 14).
TIMEOUT : Échec de l’enregistrement de la
fonction dans le temps alloué.
Essayez de compléter l’enregistrement
pendant que [REGISTER] clignote (environ
6 secondes) (page 14).
Si ces solutions ne permettent pas
d’améliorer la situation, contactez votre
détaillant Sony le plus proche.
Si vous devez faire réparer l’appareil en
raison d’un problème de lecture de CD,
apportez le disque utilisé au moment où le
problème s’est produit.
26FR
Page 57

Raccordement/Installation
×4
5×max. 8mm
(7/32 ×max. 5/16 po)
×2
Mises en garde
• Rassemblez tous les câbles de mise à la
masse en un point de masse commun.
• Évitez de fixer des vis sur les câbles ou de
coincer ceux-ci dans les pièces mobiles
(par exemple, le rail du siège).
• Avant d’effectuer les raccordements,
coupez le contact du véhicule pour éviter
un court-circuit.
• Raccordez les câbles d’alimentation jaune
et rouge seulement après avoir terminé le
raccordement de tous les autres câbles.
• Pour des raisons de sécurité, veillez à isoler
avec du ruban isolant tout câble libre non
raccordé.
Précautions
• Choisissez soigneusement l’emplacement
d’installation pour que l’appareil ne gêne
pas le conducteur pendant la conduite.
• Évitez d’installer l’appareil à un endroit
exposé à la poussière, à la saleté, à des
vibrations excessives ou à des
températures élevées comme en plein
soleil ou à proximité de conduits de
chauffage.
• Pour garantir un montage sûr, n’utilisez
que la quincaillerie fournie.
Remarque concernant le câble d’alimentation
(jaune)
Lorsque cet appareil est raccordé à d’autres
éléments stéréo, la valeur nominale du circuit du
véhicule sur lequel l’appareil sera raccordé doit être
supérieure à la somme des fusibles de chaque
élément.
Réglage de l’angle de montage
Réglez l’inclinaison à un angle inférieur à
45 degrés.
Liste des pièces nécessaires
à l’installation
•Cette liste de pièces ne comprend pas tout
le contenu de l’emballage.
•Le support et le tour de protection
sont fixés en usine. Avant l’installation de
l’appareil, utilisez les clés de déblocage
pour détacher le support de l’appareil.
Pour plus de détails, reportez-vous à la
section « Retrait du tour de protection et
du support » (page 30).
•Conservez les clés de déblocage pour
une utilisation ultérieure, car vous en aurez
également besoin pour retirer l’appareil du
véhicule.
27FR
Page 58

Raccordement
d’une télécommande filaire
(non fournie)*
4
Blanc
Rayé blanc/noir
Gris
Noir
Jaune
Rouge
Rayé bleu/blanc
d’une antenne de véhicule
Haut-parleur avant*1*
2
Haut-parleur arrière*1*
2
Rayé gris/noir
Vert
Rayé vert/noir
Violet
Rayé violet/noir
*
3
*
3
Caisson de graves*
1
Pour plus de détails, reportezvous à la section
« Raccordements » (page 29).
Amplificateur de puissance*
1
Récepteur radio satellite
(SiriusXM)*
1
*1 Non fourni
*2 Impédance des haut-parleurs : 4 à 8 × 4
*3 Cordon à broche RCA (non fourni)
*4 Selon le type de véhicule, utilisez un adaptateur
pour une télécommande filaire (non fourni). Pour
plus de détails sur l’utilisation de la
télécommande filaire, reportez-vous à la section
« Utilisation de la télécommande filaire »
(page 29).
28FR
Page 59

Raccordements
Haut-parleur
avant
Caisson de
graves
À un point de mise à la masse commun
Raccordez d’abord le câble de mise à la
masse noir et ensuite les câbles
d’alimentation jaune et rouge.
À la borne d’alimentation +12 V qui est
alimentée en permanence
Raccordez d’abord le câble de mise à la
masse noir à un point de mise à la masse
commun.
À la borne d’alimentation +12 V qui est
alimentée lorsque la clé de contact est
à la position accessoires
S’il n’y a pas de position accessoires,
raccordez la borne d’alimentation
(batterie) +12 V qui est alimentée en
permanence.
Raccordez d’abord le câble de mise à la
masse noir à un point de mise à la masse
commun.
Au câble de commande d’antenne
électrique ou au câble d’alimentation
de l’amplificateur d’antenne
Il n’est pas nécessaire de raccorder ce
câble s’il n’y a pas d’antenne électrique ni
d’amplificateur d’antenne ou avec une
antenne télescopique manuelle.
Au niveau de AMP REMOTE IN de
l’amplificateur de puissance en option
Ce raccordement s’applique uniquement
aux amplificateurs et à une antenne
électrique. Le raccordement de tout autre
système risque d’endommager l’appareil.
Raccordement facile d’un caisson
de graves
Vous pouvez utiliser un caisson de graves
sans amplificateur de puissance lorsque
vous effectuez le raccordement au cordon
de haut-parleur arrière.
Remarque
Utilisez un caisson de grave avec une impédance de
4 à 8 avec une capacité électrique adéquate
pour éviter de l’endommager.
Raccordement pour la conservation
de la mémoire
Lorsque le câble d’alimentation jaune est
raccordé, le circuit de la mémoire est
alimenté en permanence même si la clé de
contact est à la position d’arrêt.
Raccordement des haut-parleurs
•Avant de raccorder les haut-parleurs,
éteignez l’appareil.
•Utilisez des haut-parleurs avec une
impédance de 4 à 8 avec une capacité
électrique adéquate pour éviter de les
endommager.
Utilisation de la télécommande
filaire
Lors de l’utilisation de la
télécommande du volant
L’installation du câble de raccordement
RC-SR1 (non fourni) est requise avant
l’utilisation.
1 Pour activer la télécommande du volant,
sélectionnez [SET STEERING] [EDIT
CUSTOM] pour effectuer l’enregistrement
(page 14).
Une fois l’enregistrement terminé, la
télécommande du volant devient disponible.
Remarques sur l’installation du câble de
raccordement RC-SR1 (non fourni)
• Reportez-vous aux sites d’assistance indiqués sur
la couverture arrière pour obtenir plus de détails,
puis raccordez chaque câble correctement aux
câbles adéquats. Un raccordement incorrect
pourrait endommager l’appareil.
• Selon le modèle de voiture et par mesure de
sécurité, assurez-vous d’isoler les fils non utilisés
avec du ruban isolant.
• Ne raccordez pas ce câble lorsque la
télécommande du volant n’est pas utilisée.
• Il est recommandé de consulter le détaillant ou un
technicien spécialisé pour obtenir de l’aide.
Lors de l’utilisation de la
télécommande filaire
Pour activer la télécommande filaire, réglez
1
[STR CONTROL] dans [SET STEERING] à
[PRESET] (page 14).
29FR
Page 60

Installation
Tourner le crochet vers l’intérieur.
182 mm (71/4 po)
53 mm (21/8 po)
Loquet
Retrait du tour de protection et du
support
Avant d’installer l’appareil, retirez le tour de
protection et le support de l’appareil.
1 Pincez les deux bords du tour de
protection , puis sortez-le.
2 Insérez les clés de déblocage en
même temps jusqu’au déclic. Tirez le
support vers le bas, puis tirez sur
l’appareil vers le haut pour les
séparer.
Installation de l’appareil dans le
tableau de bord
•Avant l’installation, assurez-vous que les
loquets des deux côtés du support sont
bien pliés de 2 mm (
•Pour les véhicules japonais, consultez
« Installation de l’appareil dans un véhicule
japonais » (page 31).
3
/32 po) vers l’intérieur.
1 Positionnez le support à l’intérieur
du tableau de bord, puis pliez les
griffes vers l’extérieur pour assurer
une prise correcte.
2 Insérez l’appareil dans le support ,
puis fixez le tour de protection .
30FR
Remarques
• Si les loquets sont droits ou pliés vers l’extérieur,
l’appareil ne peut pas être fixé solidement et peut
se détacher.
• Assurez-vous que les 4 loquets situés sur le tour
de protection sont correctement engagés dans
les fentes de l’appareil.
Page 61

Installation de l’appareil dans un
vers le tableau de bord/
la console centrale
Pièces existantes
fournies avec la voiture
Support
Support
vers le tableau de bord/
la console centrale
Pièces existantes
fournies avec la voiture
Support
Support
Fusible (10 A )
véhicule japonais
Cet appareil ne peut pas être installé dans
certaines voitures japonaises. Dans ce cas,
consultez votre détaillant Sony.
TOYOTA
NISSAN
Retrait et fixation de la façade
Pour plus de détails, reportez-vous à la
section « Retrait de la façade » (page 6).
Réinitialisation de l’appareil
Pour plus de détails, reportez-vous à la
section « Réinitialisation de l’appareil »
(page 6).
Remplacement du fusible
Lorsque vous remplacez le
fusible, veillez à utiliser un
fusible dont l’intensité, en
ampères, correspond à la
valeur indiquée sur le
fusible original. Si le fusible
grille, vérifiez le
raccordement de l’a limentation et remplacez
le fusible. Si le fusible neuf grille également,
il est possible que l’appareil soit défectueux.
Dans ce cas, consultez votre détaillant Sony
le plus proche.
Remarque
Pour éviter tout problème de fonctionnement,
utilisez uniquement les vis fournies pour
l’installation.
31FR
Page 62

Page 63

Page 64

http://esupport.sony.com/
Site d’assistance
Si vous avez des questions ou si vous souhaitez consulter
les toutes dernières informations techniques sur ce
produit, rendez-vous sur le site Web suivant :
Support site
If you have any questions or for the latest support
information on this product, please visit
the web site below:
If you have any questions/problems
regarding this product, try the following:
1
Read Troubleshooting in these
Operating Instructions.
2
Please contact (U.S.A. only);
Call
1-800-222-7669
URL
http://www.SONY.com
©2016 Sony Corporation Printed in Thailand http://www.sony.net/
 Loading...