

Page 1

4-467-643-12(1)
FM/MW/LW
Compact Disc
Player
To cancel the demonstration (DEMO) display, see page 10.
Zum Deaktivieren der Demo-Anzeige (DEMO) schlagen Sie
bitte auf Seite 11 nach.
Pour annuler la démonstration (DEMO), reportez-vous à la
page 11.
Per annullare la dimostrazione (DEMO), vedere pagina 11.
Om de demonstratie (DEMO) te annuleren, zie pagina 11.
Operating Instructions
Bedienungsanleitung
Mode d’emploi
Istruzioni per l’uso
Gebruiksaanwijzing
GB
DE
FR
IT
NL
CDX-G2001UI/CDX-G2000UI
Page 2

Be sure to install this unit in the dashboard of
the car for safety.
For installation and connections, see the
supplied installation/connections manual.
Made in Thailand
Laser Diode Properties
Emission Duration: Continuous
Laser Output: Less than 53.3 W
(This output is the value measurement at a
distance of 200 mm from the objective lens
surface on the Optical Pick-up Block with 7 mm
aperture.)
Notice for customers: the following
information is only applicable to equipment
sold in countries applying EU Directives
Manufacturer: Sony Corporation, 1-7-1 Konan
Minato-ku Tokyo, 108-0075 Japan
For EU product compliance: Sony Deutschland
GmbH, Hedelfinger Strasse 61, 70327 Stuttgart,
Germany
Warning if your car’s ignition has no ACC
position
Be sure to set the AUTO OFF function
(page 11). The unit will shut off completely
and automatically in the set time after the
unit is turned off, which prevents battery
drain. If you do not set the AUTO OFF
function, press and hold OFF until the display
disappears each time you turn the ignition
off.
2GB
Page 3

Table of Contents
Guide to Parts and Controls. . . . . . . . . . . . . . 4
Getting Started
Detaching the Front Panel. . . . . . . . . . . . . . . 5
Setting the Clock. . . . . . . . . . . . . . . . . . . . . . . 5
Connecting an iPod/USB Device . . . . . . . . . . 5
Connecting Other Portable Audio
Device. . . . . . . . . . . . . . . . . . . . . . . . . . . . . 6
Listening to the Radio
Listening to the Radio . . . . . . . . . . . . . . . . . . 6
Using Radio Data System (RDS). . . . . . . . . . . 7
Playback
Playing a Disc . . . . . . . . . . . . . . . . . . . . . . . . . 8
Playing an iPod/USB Device . . . . . . . . . . . . . 8
Searching and Playing Tracks . . . . . . . . . . . . 9
Settings
Canceling the DEMO Mode . . . . . . . . . . . . . 10
Basic Setting Operation . . . . . . . . . . . . . . . . 10
GENERAL Setup. . . . . . . . . . . . . . . . . . . . . . . .11
SOUND Setup . . . . . . . . . . . . . . . . . . . . . . . . .11
EQ3 PRESET . . . . . . . . . . . . . . . . . . . . . . . .11
EQ3 SETTING . . . . . . . . . . . . . . . . . . . . . . .11
DISPLAY Setup . . . . . . . . . . . . . . . . . . . . . . . 12
Additional Information
Precautions. . . . . . . . . . . . . . . . . . . . . . . . . . 12
Maintenance. . . . . . . . . . . . . . . . . . . . . . . . . 14
Specifications . . . . . . . . . . . . . . . . . . . . . . . . 14
Troubleshooting . . . . . . . . . . . . . . . . . . . . . . 15
3GB
Page 4
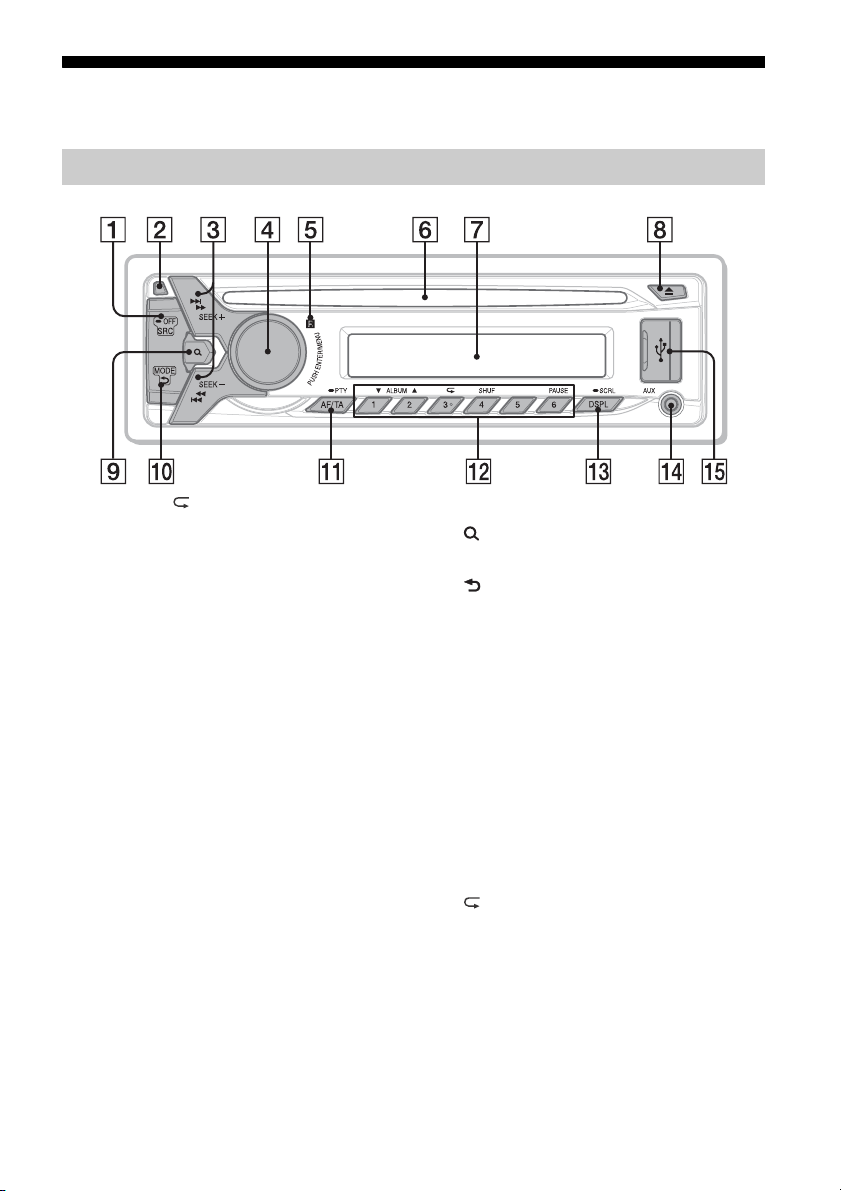
Guide to Parts and Controls
Main unit
The number 3/ (repeat) button has a tactile dot.
SRC (source)
Turn on the power.
Change the source.
-OFF
Press and hold for 1 second to turn off
the power.
Press and hold for more than 2 seconds
to turn off the power and the display.
Front panel release button
SEEK +/–
Tune in radio stations automatically.
Press and hold to tune manually.
/ (prev/next) / (reverse/
fast-forward)
Control dial
Rotate to adjust the volume.
ENTER
Enter the selected item.
MENU
Open the setup menu.
Receptor for the remote commander
Disc slot
Display window
(disc eject)
(browse) (page 9)
Enter the browse mode during playback.
(back)
Return to the previous display.
MODE (page 6, 9)
AF (alternative frequencies)/TA (traffic
announcement)
Set AF and TA.
-PTY (program type)
Press and hold to select PTY in RDS.
Number buttons (1 to 6)
Receive stored radio stations. Press and
hold to store stations.
ALBUM /
Skip an album for audio device. Press and
hold to skip albums continuously.
(repeat)
SHUF (shuffle)
PAU SE
DSPL (display)
Change display items.
-SCRL (scroll)
Press and hold to scroll a display item.
AUX input jack
USB port
4GB
Page 5
Getting Started
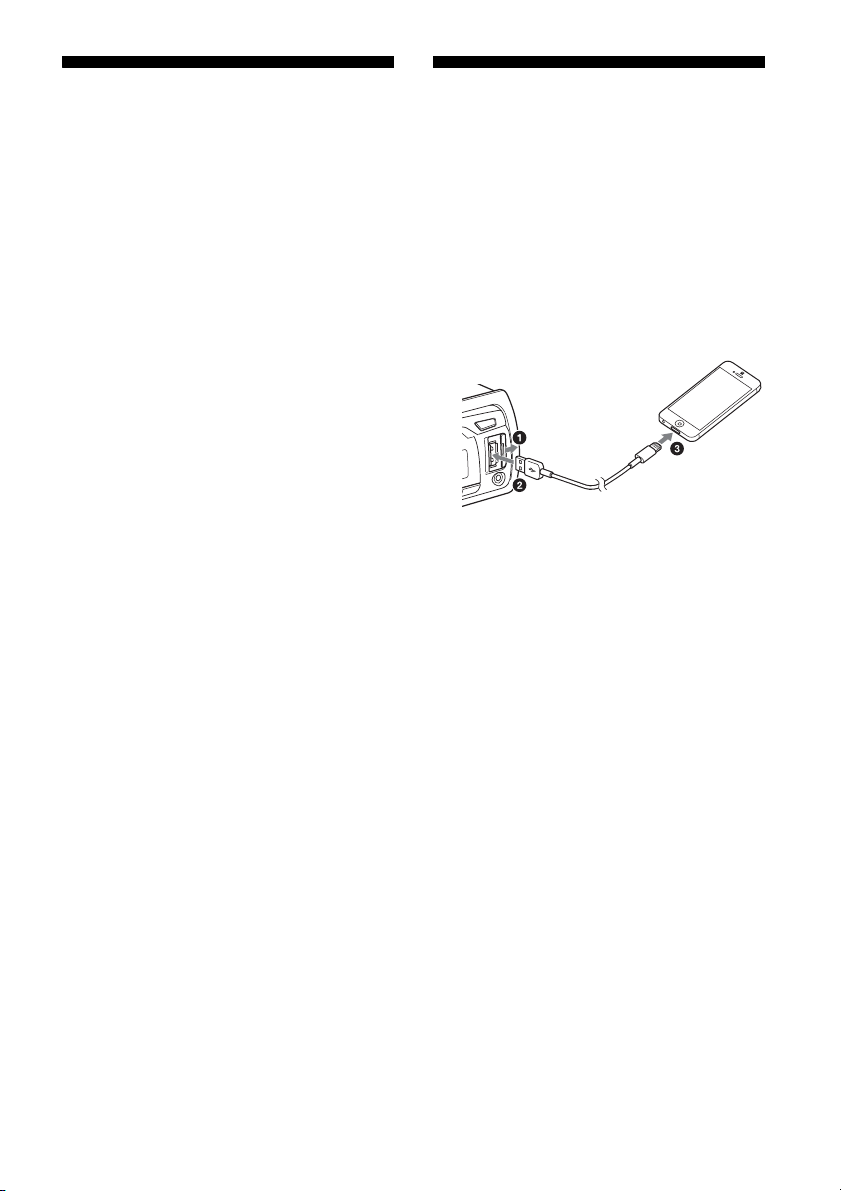
When connecting iPhone 5
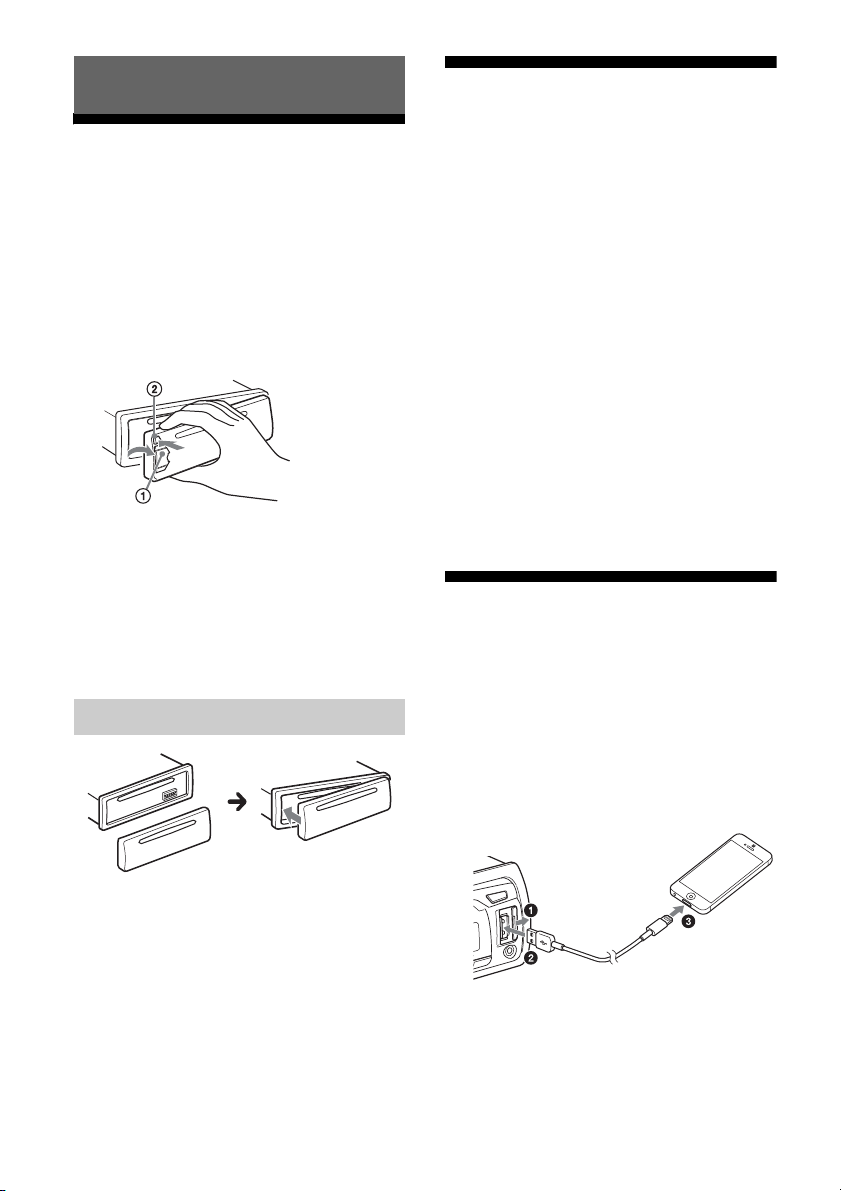
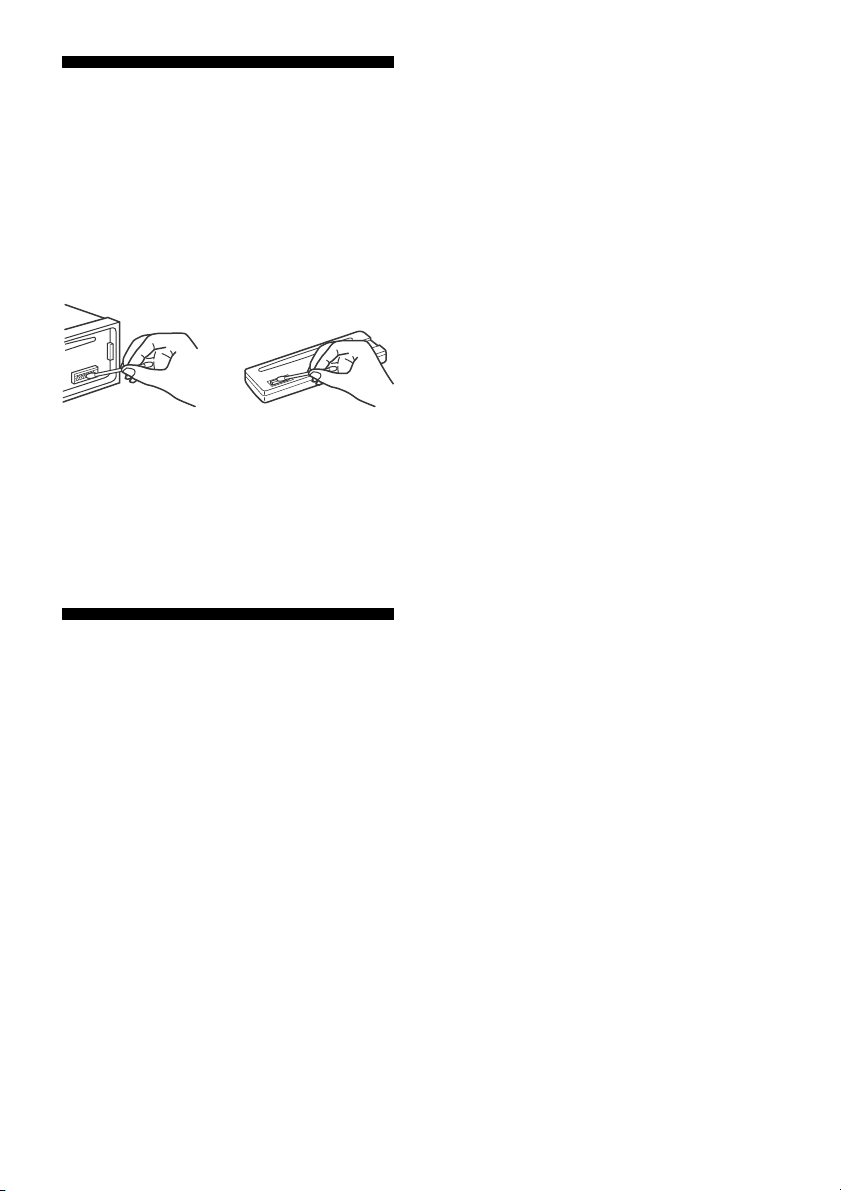
Detaching the Front Panel
You can detach the front panel of this unit to
prevent theft.
1 Press and hold OFF .
The unit is turned off.
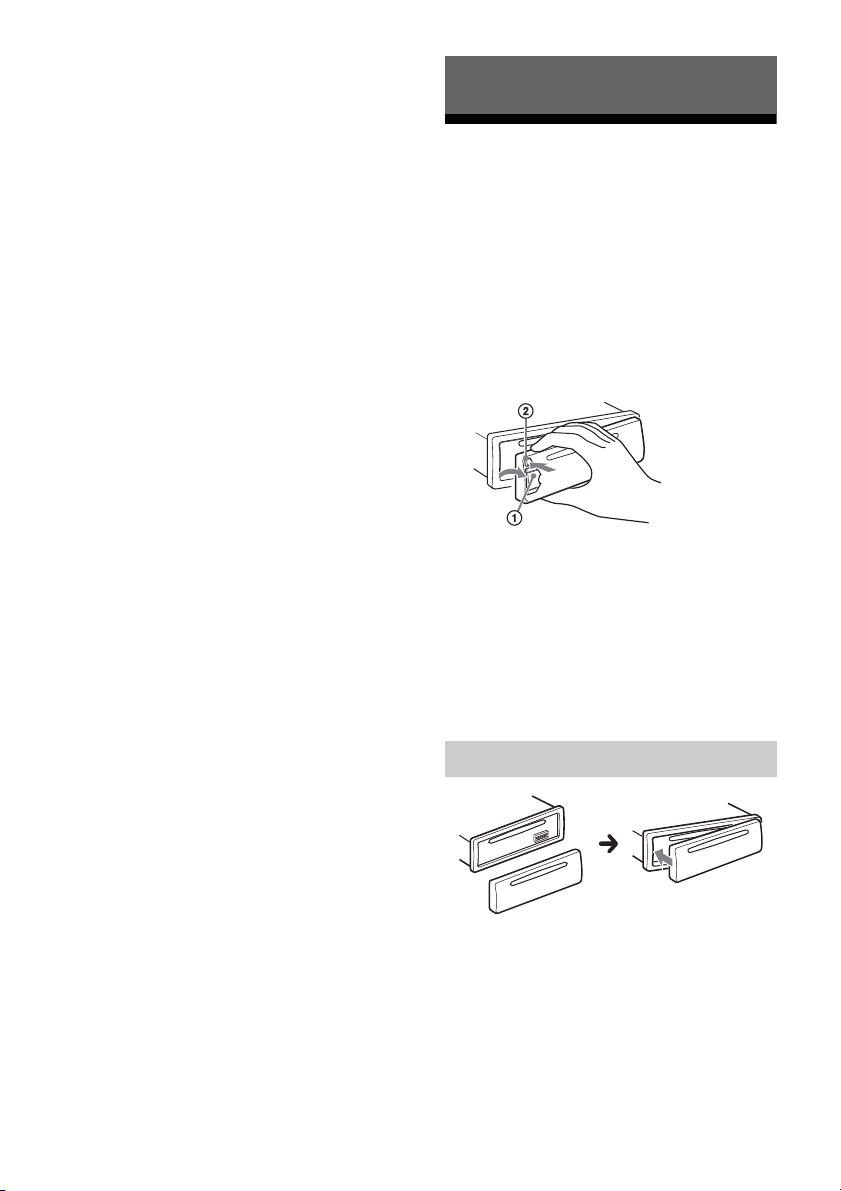
2 Press the front panel release button
, then remove the panel by
pulling it towards you.
Caution alarm
If you turn the ignition switch to the OFF
position without detaching the front panel,
the caution alarm will sound for a few
seconds. The alarm will only sound if the
built-in amplifier is used.
Setting the Clock
1
Press MENU, rotate the control dial
to select [GENERAL], then press it.
2 Rotate the control dial to select
[CLOCK-ADJ], then press it.
The hour indication flashes.
3 Rotate the control dial to set the
hour and minute.
To move the digital indication, press SEEK
+/–.
4 After setting the minute, press
MENU.
The setup is complete and the clock
starts.
To display the clock, press DSPL.
Connecting an iPod/USB
Device
Attaching the front panel
1 Turn down the volume on the unit.
2 Connect the iPod/USB device to the
unit.
To connect an iPod/iPhone, use the USB
connection cable for iPod (not supplied).
5GB
Page 6
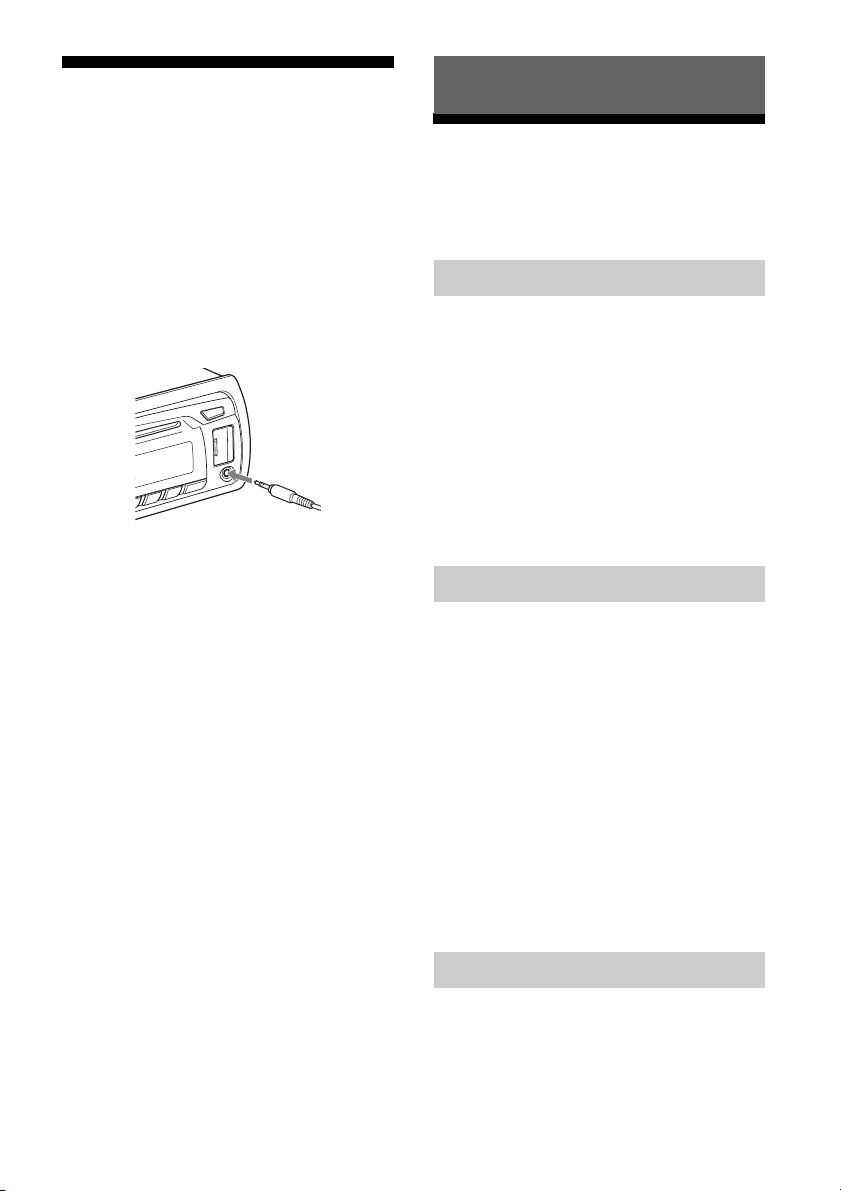
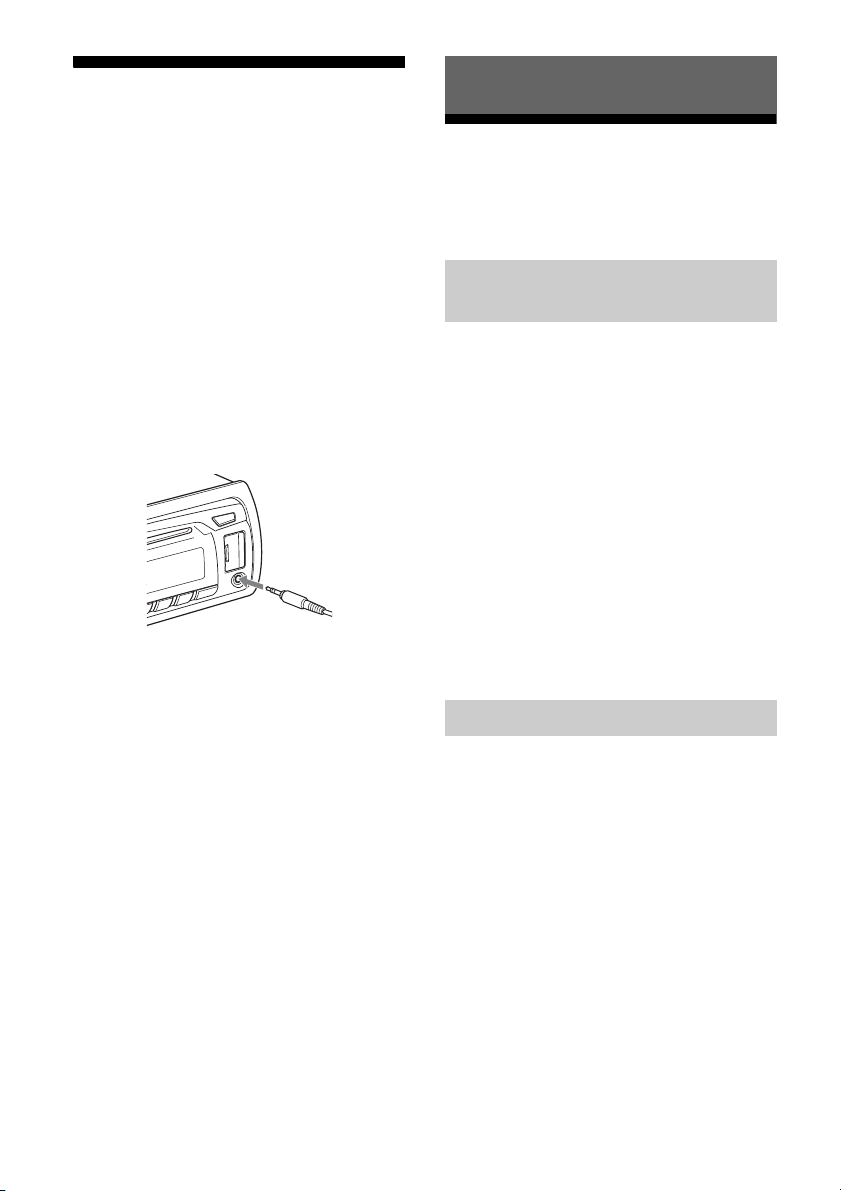
Connecting Other Portable
Audio Device
1 Turn off the portable audio device.
2 Turn down the volume on the unit.
3 Connect the portable audio device
to the AUX input jack (stereo mini
jack) on the unit with a connecting
cord* (not supplied).
* Be sure to use a straight type plug.
4 Press SRC to select [AUX].
To match the volume level of the
connected device to other sources
Start playback of the portable audio device
at a moderate volume, and set your usual
listening volume on the unit.
Press MENU and rotate the control dial.
Select [SOUND] [AUX VOL] (page 11).
Listening to the Radio
Listening to the Radio
To listen to the radio, press SRC to select
[TUNER].
Storing automatically (BTM)
1 Press MODE to change the band
(FM1, FM2, FM3, MW or LW).
2 Press MENU, rotate the control dial
to select [GENERAL], then press it.
3 Rotate the control dial to select
[BTM], then press it.
The unit stores stations in order of
frequency on the number buttons.
Tuning
1 Press MODE to change the band
(FM1, FM2, FM3, MW or LW).
2 Perform tuning.
To tune manually
Press and hold SEEK +/– to locate the
approximate frequency, then press SEEK
+/– repeatedly to fine adjust to the
desired frequency.
To tune automatically
Press SEEK +/–.
Scanning stops when the unit receives a
station. Repeat this procedure until the
desired station is received.
6GB
Storing manually
1 While receiving the station that you
want to store, press and hold a
number button (1 to 6) to display
[MEM].
Page 7

Receiving the stored stations
1 Select the band, then press a
number button (1 to 6).
Using Radio Data System
(RDS)
Setting alternative frequencies (AF)
and traffic announcement (TA)
AF continuously retunes the station to the
strongest signal in a network, and TA
provides current traffic information or traffic
programs (TP) if received.
1 Press AF/TA to select [AF-ON], [TA-
ON], [AF/TA-ON] or [AF/TA-OFF].
To store RDS stations with the AF and TA
setting
You can preset RDS stations along with an
AF/TA setting. Set AF/TA, then store the
station with BTM or manually. If you preset
manually, you can also preset non-RDS
stations.
To receive emergency announcements
With AF or TA on, emergency
announcements will automatically interrupt
the currently selected source.
When adjusting the volume level during
a traffic announcement
Level will be stored into memory for
subsequent traffic announcements,
independently from the regular volume level.
To stay with one regional program
(REGIONAL)
When the AF and REGIONAL functions are
on, you will not be switched to another
regional station with a stronger frequency. If
you leave this regional program’s reception
area, set [REG-OFF] in GENERAL setup during
FM reception (page 11).
This function does not work in the UK and
some other areas.
Local Link function (UK only)
This function enables you to select other
local stations in the area, even if they are not
stored on your number buttons.
During FM reception, press a number button
(1 to 6) on which a local station is stored.
Within 5 seconds, press again a number
button of the local station. Repeat this
procedure until the local station is received.
Selecting program types (PTY)
Use PTY to display or search for a desired
program type.
1 Press and hold PTY during FM
reception.
2 Rotate the control dial until the
desired program type appears,
then press it.
The unit starts to search for a station
broadcasting the selected program type.
Type o f p rogra ms
NEWS (News), AFFAIRS (Current Affairs),
INFO (Information), SPORT (Sports),
EDUCATE (Education), DRAMA (Drama),
CULTURE (Culture), SCIENCE (Science),
VARIED (Varied), POP M (Pop Music), ROCK
M (Rock Music), EASY M (M.O.R. Music),
LIGHT M (Light classical), CLASSICS (Serious
classical), OTHER M (Other Music), WEATHER
(Weather), FINANCE (Finance), CHILDREN
(Children’s program), SOCIAL A (Social
Affairs), RELIGION (Religion), PHONE IN
(Phone In), TRAVEL (Travel), LEISURE
(Leisure), JAZZ (Jazz Music), COUNTRY
(Country Music), NATION M (National Music),
OLDIES (Oldies Music), FOLK M (Folk Music),
DOCUMENT (Documentary)
7GB
Page 8

Setting clock time (CT)
The CT data from the RDS transmission sets
the clock.
1 Set [CT-ON] in GENERAL setup
(page 11).
Playback
Playing a Disc
1 Insert the disc (label side up).
Playback starts automatically.
Playing an iPod/USB Device
In these Operating Instructions, “iPod” is
used as a general reference for the iPod
functions on an iPod and iPhone, unless
otherwise specified by the text or
illustrations.
8GB
For details on the compatibility of your iPod,
see “About iPod” (page 13) or visit the
support site on the back cover.
MSC (Mass Storage Class)-type USB devices
(such as a USB flash drive, digital media
player, Android™ phone) compliant with the
USB standard can be used.
Depending on the digital media player or
Android phone, setting the USB connection
mode to MSC is required.
Notes
For details on the compatibility of your USB
device, visit the support site on the back cover.
Playback of the following MP3/WMA files is not
supported.
lossless compression files
copyright-protected files
DRM (Digital Rights Management) files
Multi-channel audio files
Page 9

1 Connect an iPod/USB device to the
USB port (page 5).
Playback starts.
If a device is already connected, to start
playback, press SRC to select [USB] ([IPD]
appears in the display when the iPod is
recognized).
2 Adjust the volume on this unit.
To stop playback
Press and hold OFF for 1 second.
Searching and Playing
Tracks
Repeat play and shuffle play
1 During playback, press (repeat)
for repeat play, or SHUF for shuffle
play.
To rem ove the devic e
Stop playback, then remove the device.
Caution for iPhone
When you connect an iPhone via USB, phone
call volume is controlled by the iPhone, not
the unit. Do not inadvertently increase the
volume on the unit during a call, as sudden
loud sound may result when the call ends.
Operating an iPod directly
(Passenger control)
Press and hold MODE during playback to
display [MODE IPOD] to enable operation by
the iPod directly.
Note that the volume can be adjusted only
by the unit.
To exit passenger control
Press and hold MODE to display [MODE
AUDIO].
2 Press (repeat) or SHUF repeatedly
to select the desired repeat or
shuffle play mode.
Playback in selected play mode may take
time to start.
Available play modes differ depending on
the selected sound source.
Searching a track by name (QuickBrowZer™)
1 During CD or USB playback, press
(browse)* to display the list of
search categories.
When the track list appears, press
(back) repeatedly.
* During playback, press (browse) for more
than 2 seconds to directly return to the
beginning of the category list.
2 Rotate the control dial to select the
desired search category, then press
it to confirm.
3 Repeat step 2 to search the desired
track.
Playback starts.
To exit the Quick-BrowZer mode
Press (browse).
9GB
Page 10

Searching by skip items
(Jump mode)
Settings
1 Press (browse)
2 Press SEEK +.
3 Rotate the control dial to select the
item.
The list is jumped in steps of 10% of the
total number of items.
4 Press ENTER to return to the Quick-
BrowZer mode.
The selected item appears.
5 Rotate the control dial to select the
desired item, then press it.
Playback starts.
Canceling the DEMO Mode
You can cancel the demonstration display
which appears while this unit is turned off.
1 Press MENU, rotate the control dial
to select [DISPLAY], then press it.
2 Rotate the control dial to select
[DEMO], then press it.
3 Rotate the control dial to select
[DEMO-OFF], then press it.
The setting is complete.
4 Press (back) twice.
The display returns to normal reception/
play mode.
Basic Setting Operation
You can set items in the menu to the
following procedure.
The following items can be set depending on
the source and setting.
10GB
1 Press MENU.
2 Rotate the control dial to select the
setup category, then press it.
Setup categories are follows:
GENERAL setup (page 11)
SOUND setup (page 11)
DISPLAY setup (page 12)
3 Rotate the control dial to select the
options, then press it.
To return to the previous display
Press (back).
Page 11

GENERAL Setup SOUND Setup
CLOCK-ADJ (Clock Adjust) (page 5)
CAUT ALM (Caution Alarm)
Activates the caution alarm: [ON], [OFF]
(page 5). (Available only when the unit is
turned off.)
BEEP
Activates the beep sound: [ON], [OFF].
AUTO OFF
Shuts off automatically after a desired
time when the unit is turned off: [NO],
[30S] (30 seconds), [30M] (30 minutes),
[60M] (60 minutes).
AUX-A (AUX Audio)
Activates the AUX source display: [ON],
[OFF]. (Available only when the unit is
turned off.)
CT (Clock Time)
Activates the CT function: [ON], [OFF].
REGIONAL
Restricts reception to a specific region:
[ON], [OFF]. (Available only when FM is
received.)
BTM (page 6)
EQ3 PRESET
Selects an equalizer curve from 7 equalizer
curves or off: [XPLOD], [VOCAL], [EDGE],
[CRUISE], [SPACE], [GRAVITY], [CUSTOM],
[OFF].
The equalizer curve setting can be
memorized for each source.
EQ3 SETTING
Sets [CUSTOM] of EQ3.
Selects the equalizer settings: [LOW],
[MID], [HIGH].
To restore the factory-set equalizer curve,
press and hold ENTER before the setting is
complete.
BALANCE
Adjusts the sound balance: [RIGHT-15] –
[CENTER] – [LEFT-15].
FADER
Adjusts the relative level: [FRONT-15] –
[CENTER] – [REAR-15].
LOUDNESS (Dynamic Loudness)
Reinforces bass and treble for clear sound
at low volume levels: [ON], [OFF].
SW LEVEL (Subwoofer Level)
Adjusts the subwoofer volume level: [+2
dB] - [0 dB] - [-2 dB].
AUX VOL (AUX Volume Level)
Adjusts the volume level for each
connected auxiliary device:
[+18 dB] - [0 dB] - [-8 dB].
This setting negates the need to adjust
the volume level between sources.
11GB
Page 12
DISPLAY Setup
Additional Information
DEMO (Demonstration)
Activates the demonstration: [ON], [OFF].
DIMMER
Changes the display brightness: [ON],
[OFF].
AUTO SCR (Auto Scroll)
Scrolls long items automatically: [ON],
[OFF].
M.DISPLAY (Motion Display)
Shows moving patterns: [ON], [OFF].
Precautions
Cool off the unit beforehand if your car has
been parked in direct sunlight.
Do not leave the front panel or audio
devices brought in inside the car, or it may
cause malfunction due to high
temperature in direct sunlight.
Power antenna (aerial) extends
automatically.
Moisture condensation
Should moisture condensation occur inside
the unit, remove the disc and wait for about
an hour for it to dry out; otherwise the unit
will not operate properly.
To maintain high sound quality
Do not splash liquid onto the unit or discs.
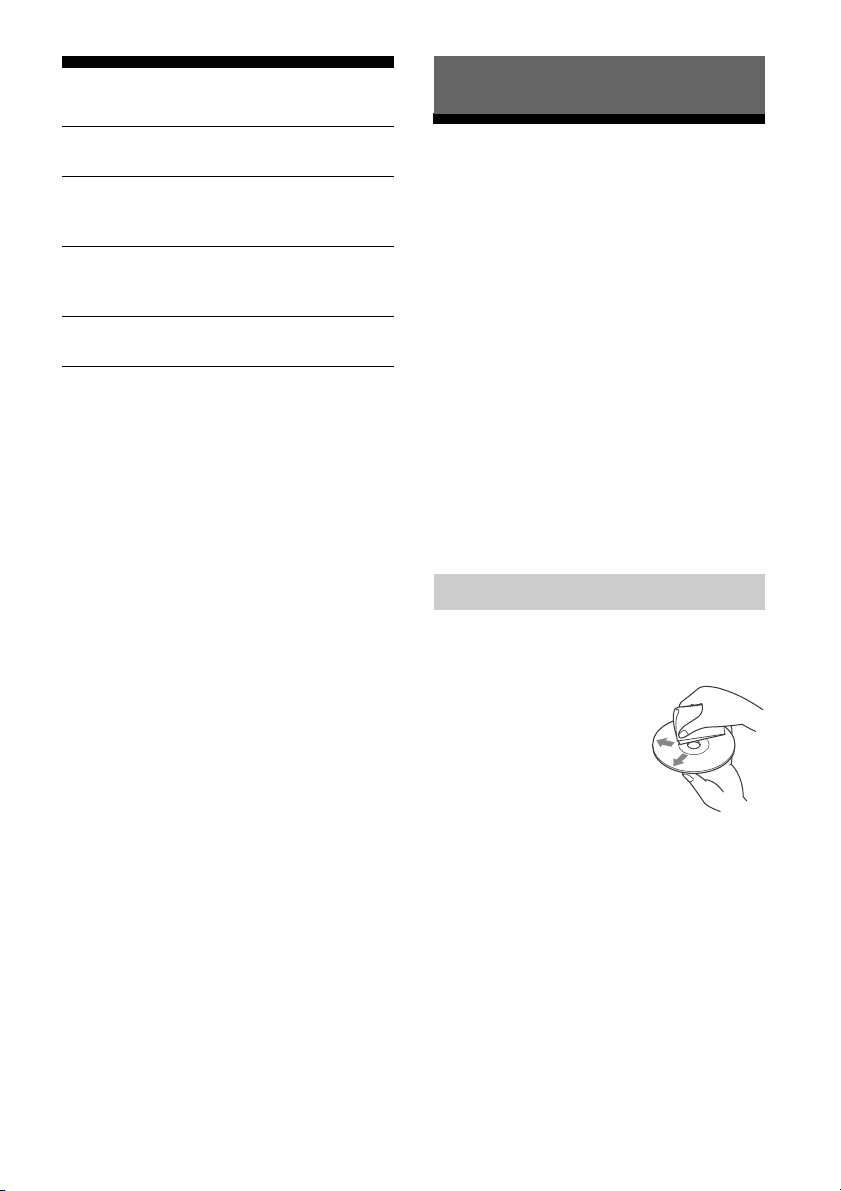
Notes on discs
Do not expose discs to direct sunlight or
heat sources such as hot air ducts, nor
leave it in a car parked in direct sunlight.
Before playing, wipe the
discs with a cleaning
cloth from the center out.
Do not use solvents such
as benzine, thinner,
commercially available
cleaners.
This unit is designed to
play back discs that conform to the
Compact Disc (CD) standard. DualDiscs and
some of the music discs encoded with
copyright protection technologies do not
conform to the Compact Disc (CD)
standard, therefore, these discs may not be
playable by this unit.
Discs that this unit CANNOT play
Discs with labels, stickers, or sticky tape
or paper attached. Doing so may cause a
malfunction, or may ruin the disc.
12GB
Page 13
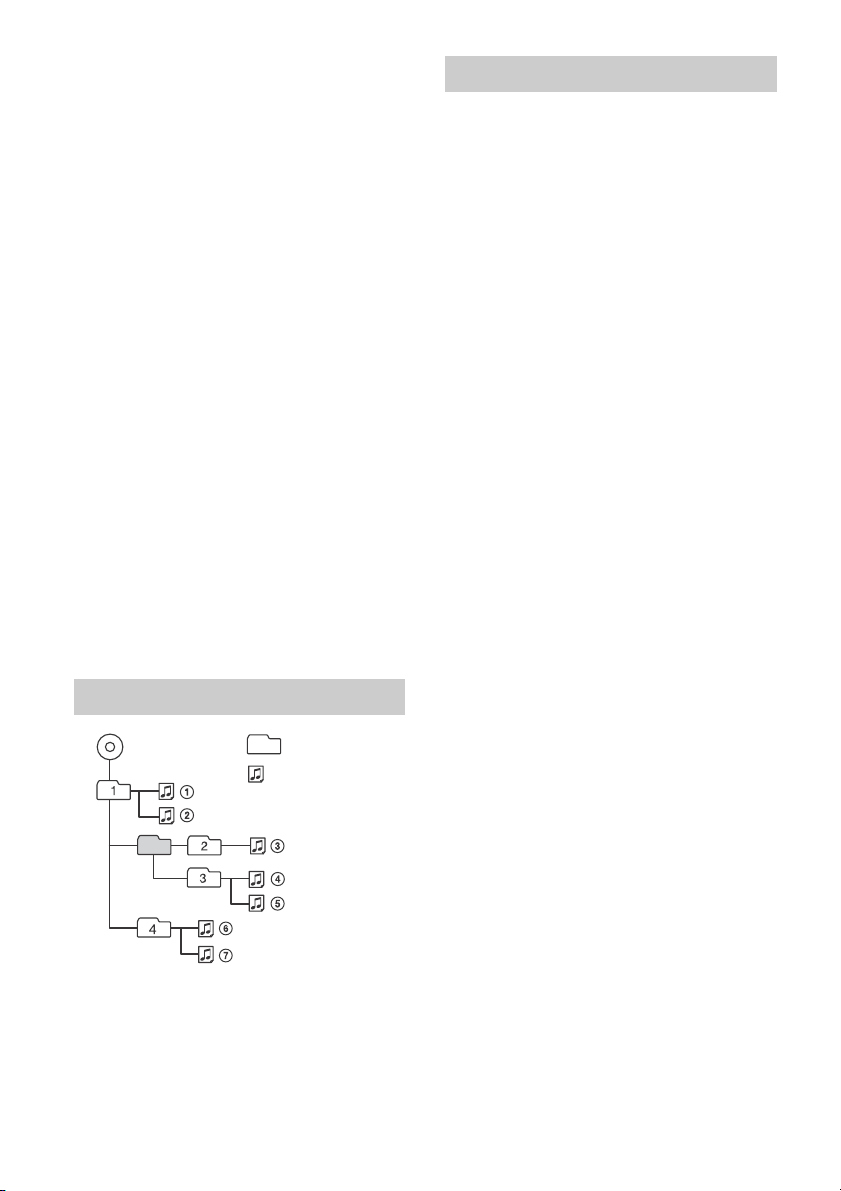
Discs with non-standard shapes (e.g.,
MP3/WMA
Folder (album)
MP3/WMA file
(track)
heart, square, star). Attempting to do so
may damage the unit.
1
8 cm (3
/4 in) discs.
Notes on CD-R/CD-RW discs
The maximum number of: (CD-R/CD-RW
only)
folders (albums): 150 (including root
folder)
files (tracks) and folders: 300 (may less
than 300 if folder/file names contain
many characters)
displayable characters for a folder/file
name: 32 (Joliet)/64 (Romeo)
If the multi-session disc begins with a CD-
DA session, it is recognized as a CD-DA
disc, and other sessions are not played
back.
Discs that this unit CANNOT play
CD-R/CD-RW of poor recording quality.
CD-R/CD-RW recorded with an
incompatible recording device.
CD-R/CD-RW which is finalized
incorrectly.
CD-R/CD-RW other than those recorded
in music CD format or MP3 format
conforming to ISO9660 Level 1/Level 2,
Joliet/Romeo or multi-session.
Playback order of MP3/WMA files
About iPod
You can connect to the following iPod
models. Update your iPod devices to the
latest software before use.
Made for
iPod touch (5th generation)
iPod touch (4th generation)
iPod touch (3rd generation)
iPod touch (2nd generation)
iPod classic
iPod nano (7th generation)
iPod nano (6th generation)
iPod nano (5th generation)
iPod nano (4th generation)
iPod nano (3rd generation)
iPod nano (2nd generation)
iPod nano (1st generation)*
iPhone 5
iPhone 4S
iPhone 4
iPhone 3GS
iPhone 3G
* Passenger control is not available for iPod nano
(1st generation).
“Made for iPod” and “Made for iPhone”
mean that an electronic accessory has
been designed to connect specifically to
iPod or iPhone respectively and has been
certified by the developer to meet Apple
performance standards. Apple is not
responsible for the operation of this device
or its compliance with safety and
regulatory standards. Please note that the
use of this accessory with iPod or iPhone
may affect wireless performance.
If you have any questions or problems
concerning your unit that are not covered in
this manual, consult your nearest Sony
dealer.
13GB
Page 14
Maintenance
Cleaning the connectors
The unit may not function properly if the
connectors between the unit and the front
panel are not clean. In order to prevent this,
detach the front panel (page 5) and clean the
connectors with a cotton swab. Do not apply
too much force. Otherwise, the connectors
may be damaged.
Notes
For safety, turn off the ignition before cleaning
the connectors, and remove the key from the
ignition switch.
Never touch the connectors directly with your
fingers or with any metal device.
Specifications
Tuner section
FM
Tuning range: 87.5 – 108.0 MHz
Antenna (aerial) terminal:
External antenna (aerial) connector
Intermediate frequency: 25 kHz
Usable sensitivity: 8 dBf
Selectivity: 75 dB at 400 kHz
Signal-to-noise ratio: 80 dB (stereo)
Separation: 50 dB at 1 kHz
Frequency response: 20 – 15,000 Hz
MW/LW
Tuning range:
MW: 531 – 1,602 kHz
LW: 153 – 279 k Hz
Antenna (aerial) terminal:
External antenna (aerial) connector
Intermediate frequency:
9,124.5 kHz or 9,115.5 kHz/4.5 kHz
Sensitivity: MW: 26 V, LW: 45 V
CD Player section
Signal-to-noise ratio: 95 dB
Frequency response: 10 – 20,000 Hz
Wow and flutter: Below measurable limit
Corresponding codec:
MP3 (.mp3), and WMA (.wma)
USB Player section
Interface: USB (Full-speed)
Maximum current: 1 A
The maximum number of recognizable data:
folders (albums): 128
files (tracks) per folder: 512
Corresponding codec:
MP3 (.mp3), and WMA (.wma)
Power amplifier section
Output: Speaker outputs
Speaker impedance: 4 – 8 ohms
Maximum power output: 55 W × 4 (at 4 ohms)
General
Outputs:
Audio outputs terminal (rear, sub)
Power antenna (aerial)/Power amplifier
control terminal (REM OUT)
Inputs:
Remote controller input terminal
Antenna (aerial) input terminal
AUX input jack (stereo mini jack)
USB port
Power requirements: 12 V DC car battery
(negative ground (earth))
Dimensions:
Approx. 178 mm × 50 mm × 177 mm
1
(7
/8 in × 2 in × 7 in) (w/h/d)
Mounting dimensions:
Approx. 182 mm × 53 mm × 160 mm
1
(7
/4 in × 2 1/8 in × 6 5/16 in) (w/h/d)
Mass: Approx. 1.2 kg (2 lb 11 oz)
Package contents:
Main unit (1)
Parts for installation and connections (1 set)
Your dealer may not handle some of the
above listed accessories. Please ask the
dealer for detailed information.
Design and specifications are subject to
change without notice.
14GB
Page 15

Copyrights
Quick-BrowZer is a trademark of Sony
Corporation.
Windows Media is either a registered trademark
or trademark of Microsoft Corporation in the
United States and/or other countries.
This product is protected by certain intellectual
property rights of Microsoft Corporation. Use or
distribution of such technology outside of this
product is prohibited without a license from
Microsoft or an authorized Microsoft subsidiary.
iPhone, iPod, iPod classic, iPod nano, and iPod
touch are trademarks of Apple Inc., registered in
the U.S. and other countries.
MPEG Layer-3 audio coding technology and
patents licensed from Fraunhofer IIS and
Thomson.
Android is a trademark of Google Inc. Use of this
trademark is subject to Google Permissions.
Troubleshooting
The following checklist will help you remedy
problems you may encounter with your unit.
Before going through the checklist below,
check the connection and operating
procedures.
For details on using the fuse and removing
the unit from the dashboard, refer to the
installation/connections manual supplied
with this unit.
If the problem is not solved, visit the support
site on the back cover.
General
No sound.
The position of the fader control [FADER] is
not set for a 2-speaker system.
No beep sound.
An optional power amplifier is connected and
you are not using the built-in amplifier.
The contents of the memory have been
erased.
The power supply lead or battery has been
disconnected or not connected properly.
Stored stations and correct time are erased.
The fuse has blown.
Makes a noise when the position of the
ignition is switched.
The leads are not matched correctly with the
car’s accessory power connector.
During playback or reception, the
demonstration mode starts.
If no operation is performed for 5 minutes
with [DEMO-ON] set, the demonstration
mode starts.
Set [DEMO-OFF] (page 12).
The display disappears from/does not appear
in the display window.
The dimmer is set to [DIM-ON] (page 12).
The display disappears if you press and hold
OFF.
Press OFF on the unit until the display
appears.
The connectors are dirty (page 14).
15GB
Page 16

The operation buttons do not function.
The disc will not eject.
Press DSPL and (back)/MODE for more
than 2 seconds to reset the unit.
The contents stored in memory are erased.
For your safety, do not reset the unit while
you are driving.
Radio reception
Stations cannot be received.
The sound is hampered by noises.
The connection is not correct.
Check the connection of the car antenna
(aerial).
If the auto antenna (aerial) will not extend,
check the connection of the power
antenna (aerial) control lead.
Preset tuning is not possible.
The broadcast signal is too weak.
RDS
The SEEK starts after a few seconds of
listening.
The station is non-TP or has weak signal.
Deactivate TA (page 7).
No traffic announcements.
Activate TA (page 7).
The station does not broadcast any traffic
announcements despite being TP.
Tune in another station.
PTY displays [- - - - - - - -].
The current station is not an RDS station.
RDS data has not been received.
The station does not specify the program
type.
Program service name flashes.
There is no alternative frequency for the
current station.
Press SEEK +/– while the program service
name is flashing. [PI SEEK] appears and the
unit starts searching for another frequency
with the same PI (program identification)
data.
CD playback
The disc does not play back.
Defective or dirty disc.
The CD-R/CD-RW is not for audio use
(page 13).
MP3/WMA files cannot be played back.
The disc is incompatible with the MP3/WMA
format and version. For details on playable
discs and formats, visit the support site.
MP3/WMA files take longer to play back than
others.
The following discs take a longer time to start
playback.
A disc recorded with a complicated tree
structure.
A disc recorded in Multi Session.
A disc to which data can be added.
The sound skips.
Defective or dirty disc.
USB playback
You cannot play back items via a USB hub.
This unit cannot recognize USB devices via a
USB hub.
A USB device takes longer to play back.
The USB device contains files with a
complicated tree structure.
The sound is intermittent.
The sound may be intermittent at a high-bit-
rate of more than 320 kbps.
Error displays/Messages
ERROR
The disc is dirty or inserted upside down.
Clean or insert the disc correctly.
A blank disc has been inserted.
The disc cannot play due to a problem.
Insert another disc.
USB device was not automatically recognized.
Connect it again.
Press to remove the disc.
16GB
HUB NO SUPRT (hubs not supported)
USB hub is not supported on this unit.
Page 17

IPD STOP
When repeat play is not set, playback of the
last track in album finished.
The music application in the iPod/iPhone is
terminated.
Press PAUSE to start playback again.
NO AF (no alternative frequencies)
There is no alternative frequency for the
current station.
Press SEEK +/– while the program service
name is flashing. The unit starts searching
for another frequency with the same PI
(program identification) data ([PI SEEK]
appears).
NO DEV (no device)
[USB] is selected as source without a USB
device connected. A USB device or a USB
cable has been disconnected during
playback.
Be sure to connect a USB device and USB
cable.
NO MUSIC
The disc or USB device does not contain a
music file.
Insert a music CD.
Connect a USB device with a music file in it.
USB NO SUPRT (USB not supported)
The connected USB device is not supported.
For details on the compatibility of your USB
device, visit the support site.
[] or []
During reverse or fast-forward, you have
reached the beginning or the end of the disc
and you cannot go any further.
[]
The character cannot be displayed.
If these solutions do not help improve the
situation, consult your nearest Sony dealer.
If you take the unit to be repaired because of
CD playback trouble, bring the disc that was
used at the time the problem began.
NO TP (no traffic programs)
The unit will continue searching for available
TP stations.
OVERLOAD
USB device is overloaded.
Disconnect the USB device, then change
the source by pressing SRC.
The USB device has a fault, or an
unsupported device is connected.
PUSH EJT (push eject)
The disc cannot be ejected.
Press (eject).
READ
The unit is reading all track and album
information on the disc.
Wait until reading is complete and
playback starts automatically. Depending
on the dis c structure, it ma y take mo re th an
a minute.
17GB
Page 18

Für mögliche spätere Service-Anfragen,
notieren Sie sich bitte vor der Installation Ihres
Gerätes hier die Seriennummer:
S/N: ___________________________
Hinweis: Die 7-stellige Seriennummer finden Sie
oben auf der Verpackung des Gerätes oder
unten auf dem Gerät selber.
Montieren Sie dieses Gerät aus
Sicherheitsgründen im Armaturenbrett des
Fahrzeugs.
Zur Installation und zum Anschluss siehe die
mitgelieferte Installations-/
Anschlussanleitung.
Hergestellt in Thailand
Eigenschaften der Laserdiode
Emissionsdauer: kontinuierlich
Laserausgangsleistung: weniger als 53,3 W
(Gemessen im Abstand von etwa 200 mm von
der Linsenoberfläche am optischen Sensorblock
mit einer Öffnung von 7 mm.)
Hinweis für Kunden: Die folgenden
Informationen gelten nur für Geräte, die in
Ländern verkauft werden, in denen EURichtlinien gelten
Hersteller: Sony Corporation, 1-7-1 Konan
Minato-ku Tokio, 108-0075 Japan
Für EU Produktkonformität: Sony Deutschland
GmbH, Hedelfinger Strasse 61, 70327 Stuttgart,
Deutschland
Warnhinweis, wenn die Zündung Ihres
Fahrzeugs nicht über eine
Zubehörposition (ACC oder I) verfügt
Aktivieren Sie unbedingt die
Abschaltautomatik AUTO OFF (Seite 12). Nach
dem Ausschalten wird das Gerät dann nach
der voreingestellten Zeit automatisch
vollständig abgeschaltet, so dass der
Autobatterie kein Strom mehr entzogen wird.
Wenn Sie die Abschaltautomatik AUTO OFF
nicht aktivieren, müssen Sie jedes Mal, wenn
Sie die Zündung ausschalten, die Taste OFF
gedrückt halten, bis die Anzeige
ausgeblendet wird.
2DE
Page 19

Inhalt
Lage und Funktion der Teile und
Bedienelemente . . . . . . . . . . . . . . . . . . . . 4
Vorbereitungen
Abnehmen der Frontplatte . . . . . . . . . . . . . . 5
Einstellen der Uhr . . . . . . . . . . . . . . . . . . . . . . 6
Anschließen eines iPod/USB-Geräts . . . . . . 6
Anschließen eines anderen tragbaren
Audiogeräts . . . . . . . . . . . . . . . . . . . . . . . . 7
Radioempfang
Radioempfang . . . . . . . . . . . . . . . . . . . . . . . . 7
RDS (Radiodatensystem) . . . . . . . . . . . . . . . . 8
Wiedergabe
Wiedergeben einer Disc. . . . . . . . . . . . . . . . . 9
Wiedergabe mit einem iPod/USB-Gerät . . . 9
Suchen und Wiedergeben von Titeln . . . . . 10
Einstellungen
Beenden des DEMO-Modus . . . . . . . . . . . . .11
Grundlegende Schritte zum Vornehmen von
Einstellungen. . . . . . . . . . . . . . . . . . . . . . 12
GENERAL-Konfiguration. . . . . . . . . . . . . . . . 12
SOUND-Konfiguration . . . . . . . . . . . . . . . . . 13
EQ3 PRESET . . . . . . . . . . . . . . . . . . . . . . . 13
EQ3 SETTING . . . . . . . . . . . . . . . . . . . . . . 13
DISPLAY-Konfiguration. . . . . . . . . . . . . . . . . 13
Weitere Informationen
Sicherheitsmaßnahmen . . . . . . . . . . . . . . . 14
Wartung . . . . . . . . . . . . . . . . . . . . . . . . . . . . 15
Technische Daten . . . . . . . . . . . . . . . . . . . . . 16
Störungsbehebung . . . . . . . . . . . . . . . . . . . 17
3DE
Page 20

Lage und Funktion der Teile und Bedienelemente
Hauptgerät
Die Zahlentaste 3/ (Wiederholen) ist mit einem fühlbaren Punkt gekennzeichnet.
SRC (Tonquelle)
Einschalten des Geräts.
Wechseln der Tonquelle.
-OFF
Wenn Sie die Taste 1 Sekunde lang
gedrückt halten, schaltet sich das Gerät
aus.
Wenn Sie die Taste mehr als 2 Sekunden
lang gedrückt halten, schaltet sich das
Gerät aus und die Anzeige wird
ausgeblendet.
Taste zum Lösen der Frontplatte
SEEK +/–
Automatisches Einstellen von
Radiosendern. Halten Sie die Taste zum
manuellen Einstellen gedrückt.
/ (Zurück/Weiter)
/ (Rückwärts-/Vorwärtssuchen)
Steuerregler
Zum Einstellen der Lautstärke drehen Sie
den Regler.
ENTER
Eingeben der ausgewählten Option.
MENU
Aufrufen des Setup-Menüs.
Empfänger für die Fernbedienung
CD-Einschub
Display
(Disc auswerfen)
(Suchen) (Seite 10)
Wechseln in den Suchmodus während
der Wiedergabe.
(Zurück)
Zurückschalten zur vorherigen Anzeige.
MODE (Seite 7, 10)
AF (Alternativfrequenzen)/TA
(Verkehrsdurchsagen)
Einstellen von AF und TA.
-PTY (Programmtypauswahl)
Halten Sie die Taste zum Auswählen von
PTY bei einem RDS-Sender gedrückt.
Zahlentasten (1 bis 6)
Einstellen gespeicherter Radiosender.
Halten Sie die Taste zum Speichern von
Sendern gedrückt.
ALBUM /
Überspringen eines Albums auf einem
Audiogerät. Halten Sie die Taste zum
Überspringen mehrerer Alben gedrückt.
(Wiederholen)
SHUF (Zufall)
PAU SE
4DE
Page 21
DSPL (Anzeige)
Wechseln der Informationen im Display.
-SCRL (Bildlauf)
Halten Sie die Taste zum
Durchlaufenlassen von Informationen
gedrückt.
AUX-Eingangsbuchse
USB-Anschluss
Vorbereitungen
Abnehmen der Frontplatte
Um zu verhindern, dass das Gerät gestohlen
wird, können Sie die Frontplatte abnehmen.
1 Halten Sie OFF gedrückt.
Das Gerät schaltet sich aus.
2 Drücken Sie die Taste zum Lösen
der Frontplatte und ziehen Sie
die Frontplatte zum Abnehmen auf
sich zu.
Warnton
Wenn Sie den Zündschlüssel in die Position
OFF stellen, ohne die Frontplatte
abzunehmen, ertönt einige Sekunden lang
ein Warnton. Der Warnton wird nur
ausgegeben, wenn der integrierte Verstärker
verwendet wird.
Anbringen der Frontplatte
5DE
Page 22
Einstellen der Uhr
Beim Anschließen eines iPhone 5
Anschließen eines iPod/
1
Drücken Sie MENU, drehen Sie den
Steuerregler, um [GENERAL]
auszuwählen, und drücken Sie
anschließend den Steuerregler.
2 Drehen Sie den Steuerregler, um
[CLOCK-ADJ] auszuwählen, und
drücken Sie anschließend den
Steuerregler.
Die Stundenanzeige blinkt.
3 Drehen Sie den Steuerregler, um
die Stunden und Minuten
einzustellen.
Drücken Sie SEEK +/–, um zur jeweils
nächsten Ziffer in der Digitalanzeige zu
wechseln.
4 Drücken Sie MENU, nachdem Sie
die Minuten eingestellt haben.
Der Einstellvorgang ist damit
abgeschlossen und die Uhr beginnt zu
laufen.
Zum Einblenden der Uhrzeit drücken Sie
DSPL.
USB-Geräts
1 Drehen Sie die Lautstärke an
diesem Gerät herunter.
2 Schließen Sie den iPod bzw. das
USB-Gerät an dieses Gerät an.
Schließen Sie einen iPod bzw. ein iPhone
über das USB-Verbindungskabel für iPod
(nicht mitgeliefert) an.
6DE
Page 23
Anschließen eines anderen
tragbaren Audiogeräts
1 Schalten Sie das tragbare
Audiogerät aus.
2 Drehen Sie die Lautstärke an
diesem Gerät herunter.
3 Schließen Sie das tragbare
Audiogerät über ein
Verbindungskabel* (nicht
mitgeliefert) an die AUXEingangsbuchse
(Stereominibuchse) am Gerät an.
* Verwenden Sie unbedingt einen geraden
Stecker.
4 Drücken Sie SRC, um [AUX]
auszuwählen.
So passen Sie den Lautstärkepegel des
angeschlossenen Geräts an andere
Tonquellen an
Starten Sie die Wiedergabe am tragbaren
Audiogerät mit gemäßigter Lautstärke und
stellen Sie an diesem Gerät Ihre normale
Hörlautstärke ein.
Drücken Sie MENU und drehen Sie den
Steuerregler.
Wählen Sie [SOUND] [AUX VOL] (Seite 13).
Radioempfang
Radioempfang
Wenn Sie Radio hören wollen, drücken Sie
SRC, um [TUNER] auszuwählen.
Automatisches Speichern von
Sendern (BTM)
1 Wechseln Sie mit MODE den
Frequenzbereich (FM1 (UKW1), FM2
(UKW2), FM3 (UKW3), MW oder LW).
2 Drücken Sie MENU, drehen Sie den
Steuerregler, um [GENERAL]
auszuwählen, und drücken Sie
anschließend den Steuerregler.
3 Drehen Sie den Steuerregler, um
[BTM] auszuwählen, und drücken
Sie anschließend den Steuerregler.
Das Gerät speichert die Sender in der
Reihenfolge der Frequenzen auf den
Zahlentasten.
Einstellen von Sendern
1 Wechseln Sie mit MODE den
Frequenzbereich (FM1 (UKW1), FM2
(UKW2), FM3 (UKW3), MW oder LW).
2 Stellen Sie einen Sender ein.
So stellen Sie einen Sender manuell ein
Halten Sie SEEK +/– gedrückt, bis die
Frequenz in etwa erreicht ist, und
drücken Sie dann SEEK +/– so oft, bis die
gewünschte Frequenz genau eingestellt
ist.
7DE
Page 24

So stellen Sie einen Sender automatisch
ein
Drücken Sie SEEK +/–.
Der Suchlauf stoppt, wenn ein Sender
empfangen wird. Wiederholen Sie diesen
Vorgang, bis das Gerät den gewünschten
Sender empfängt.
So speichern Sie RDS-Sender zusammen
mit der AF- und TA-Einstellung
Sie können zusammen mit den RDS-Sendern
eine AF/TA-Einstellung speichern. Stellen Sie
AF/TA ein und speichern Sie die Sender dann
mit BTM oder manuell ab. Beim manuellen
Speichern von Sendern können Sie auch
Nicht-RDS-Sender speichern.
Manuelles Speichern von Sendern
1 Während des Empfangs des zu
speichernden Senders halten Sie
eine Zahlentaste (1 bis 6) so lange
gedrückt, bis [MEM] angezeigt wird.
Einstellen gespeicherter Sender
1 Wählen Sie den Frequenzbereich
aus und drücken Sie eine
Zahlentaste (1 bis 6).
RDS (Radiodatensystem)
Einstellen von Alternativfrequenzen
(AF) und Verkehrsdurchsagen (TA)
Mit AF wird der Sender mit den stärksten
Signalen in einem Netzwerk ständig neu
eingestellt, während mit TA gegebenenfalls
aktuelle Verkehrsinformationen bzw.
Verkehrsfunksender (TP) empfangen
werden.
1 Drücken Sie AF/TA, um [AF-ON],
[TA-ON], [AF/TA-ON] oder [AF/TAOFF] auszuwählen.
So empfangen Sie
Katastrophenwarnungen
Wenn AF oder TA aktiviert ist, unterbrechen
Katastrophenwarnungen automatisch die
ausgewählte Tonquelle.
Wenn Sie die Lautstärke während einer
Verkehrsdurchsage einstellen
Der eingestellte Pegel wird für spätere
Verkehrsdurchsagen gespeichert, und zwar
unabhängig von der sonst eingestellten
Lautstärke.
Unveränderter Empfang eines
Regionalsenders (REGIONAL)
Wenn die Funktionen AF und REGIONAL
aktiviert sind, wird nicht zu einem anderen
Regionalsender mit einer stärkeren Frequenz
gewechselt. Wenn Sie den Empfangsbereich
des betreffenden Regionalsenders verlassen,
stellen Sie während des Empfangs eines
UKW-Senders (FM) bei der GENERALKonfiguration [REG-OFF] ein (Seite 12).
Diese Funktion steht in Großbritannien und
einigen anderen Regionen nicht zur
Verfügung.
Lokalsenderfunktion (nur
Großbritannien)
Mithilfe dieser Funktion können Sie andere
Lokalsender auswählen, auch wenn diese
zuvor nicht unter einer Zahlentaste
gespeichert wurden.
Drücken Sie während des Empfangs eines
UKW-Senders (FM) eine Zahlentaste (1 bis 6),
unter der ein Lokalsender gespeichert ist.
Drücken Sie innerhalb von 5 Sekunden
erneut die Zahlentaste des Lokalsenders.
Wiederholen Sie diesen Vorgang, bis das
Gerät den gewünschten Lokalsender
empfängt.
8DE
Page 25

Auswählen des Programmtyps (PTY)
Mit PTY können Sie den Programmtyp
anzeigen oder nach dem gewünschten
Programmtyp suchen.
Wiedergabe
Wiedergeben einer Disc
1 Halten Sie PTY während des
Empfangs eines UKW-Senders (FM)
gedrückt.
2 Drehen Sie den Steuerregler, bis der
gewünschte Programmtyp
angezeigt wird, und drücken Sie
anschließend den Steuerregler.
Das Gerät beginnt, nach einem Sender
zu suchen, der den ausgewählten
Programmtyp ausstrahlt.
Programmtypen
NEWS (Nachrichten), AFFAIRS (Aktuelles
Zeitgeschehen), INFO (Informationen),
SPORT (Sport), EDUCATE (Erziehung und
Bildung), DRAMA (Hörspiele), CULTURE
(Kultur), SCIENCE (Wissenschaft), VARIED
(Verschiedenes), POP M (Pop-Musik), ROCK
M (Rock-Musik), EASY M
(Unterhaltungsmusik), LIGHT M (Leichte
Klassik), CLASSICS (Klassik), OTHER M
(Sonstige Musik), WEATHER (Wetter),
FINANCE (Finanzberichte), CHILDREN
(Kinderprogramme), SOCIAL A
(Magazinsendungen), RELIGION (Religion),
PHONE IN (Hörertelefon), TRAVEL
(Reiseinformationen), LEISURE
(Freizeitprogramm), JAZZ (Jazz), COUNTRY
(Country-Musik), NATION M (Volksmusik),
OLDIES (Oldies), FOLK M (Folk-Musik),
DOCUMENT (Dokumentarbeiträge)
Einstellen der Uhrzeit (CT)
Mit den CT-Daten (Uhrzeitdaten), die von
RDS-Sendern ausgestrahlt werden, lässt sich
die Uhr einstellen.
1 Stellen Sie bei der GENERAL-
Konfiguration [CT-ON] ein (Seite 12).
1 Legen Sie eine Disc mit der
beschrifteten Seite nach oben ein.
Die Wiedergabe beginnt automatisch.
Wiedergabe mit einem
iPod/USB-Gerät
In dieser Bedienungsanleitung wird „iPod“
als allgemeiner Begriff für die iPodFunktionen bei einem iPod und iPhone
verwendet, sofern nicht im Text oder in
Abbildungen anders angegeben.
Erläuterungen zur Kompatibilität des iPod
finden Sie unter „Der iPod“ (Seite 15) oder auf
der Support-Website, die auf der hinteren
Umschlagseite angegeben ist.
Sie können USB-Geräte des Typs MSC
(Massenspeicherklasse) verwenden (z. B.
USB-Flash-Laufwerk, digitaler Medienplayer,
Android™-Mobiltelefon), die dem USBStandard entsprechen.
Je nach dem digitalen Medienplayer oder
Android-Mobiltelefon muss der USBVerbindungsmodus auf MSC eingestellt
werden.
Hinweise
Einzelheiten zur Kompatibilität Ihres USB-Geräts
finden Sie auf der Support-Website, die auf der
hinteren Umschlagseite angegeben ist.
9DE
Page 26

Die Wiedergabe folgender MP3-/WMA-Dateien
wird nicht unterstützt:
Dateien mit verlustfreier Komprimierung
Kopiergeschützte Dateien
DRM-Dateien (digitale Rechteverwaltung)
Mehrkanalaudiodateien
1 Schließen Sie einen iPod bzw. ein
USB-Gerät an den USB-Anschluss
an (Seite 6).
Die Wiedergabe beginnt.
Wenn bereits ein Gerät angeschlossen
ist, drücken Sie zum Starten der
Wiedergabe SRC, um [USB] auszuwählen
([IPD] erscheint im Display, wenn der
iPod erkannt wird).
So beenden Sie die direkte Steuerung
Halten Sie MODE gedrückt, bis [MODE
AUDIO] angezeigt wird.
Suchen und Wiedergeben
von Titeln
Wiederholte Wiedergabe und
Zufallswiedergabe
2 Stellen Sie die Lautstärke an diesem
Gerät ein.
So stoppen Sie die Wiedergabe
Halten Sie OFF 1 Sekunde lang gedrückt.
So trennen Sie das Gerät von diesem
Gerät
Stoppen Sie die Wiedergabe und trennen Sie
das Gerät.
Vorsicht beim iPhone
Wenn Sie ein iPhone über USB anschließen,
wird die Lautstärke beim Telefonieren über
das iPhone, nicht das Gerät gesteuert.
Erhöhen Sie während eines Telefonats nicht
versehentlich die Lautstärke am Gerät.
Andernfalls erfolgt die Tonausgabe nach
Beendigung des Telefonats unvermittelt mit
hoher Lautstärke.
Direktes Bedienen eines iPod
(direkte Steuerung)
Halten Sie während der Wiedergabe MODE
gedrückt, bis [MODE IPOD] angezeigt wird
und Sie den iPod direkt bedienen können.
Beachten Sie, dass die Lautstärke sich nur
mit diesem Gerät einstellen lässt.
1 Drücken Sie während der
Wiedergabe (Wiederholen) für
die wiederholte bzw. SHUF für die
Zufallswiedergabe.
2 Drücken Sie (Wiederholen) oder
SHUF mehrmals, um den
gewünschten Modus für die
wiederholte bzw. die
Zufallswiedergabe auszuwählen.
Es kann eine Weile dauern, bis die
Wiedergabe im ausgewählten
Wiedergabemodus beginnt.
Je nach ausgewählter Tonquelle stehen
unterschiedliche Wiedergabemodi zur
Verfügung.
Suchen nach einem Titel anhand
seines Namens (Quick-BrowZer™)
1 Drücken Sie während der CD- oder
USB-Wiedergabe (Suchen)*, um
die Liste der Suchkategorien
anzuzeigen.
Wenn die Titelliste erscheint, drücken Sie
mehrmals (Zurück).
* Während der Wiedergabe drücken Sie
(Suchen) länger als 2 Sekunden, um direkt
zum Anfang der Kategorieliste zu wechseln.
10DE
Page 27

2 Wählen Sie durch Drehen des
Steuerreglers die gewünschte
Kategorie für die Suche aus und
drücken Sie zum Bestätigen den
Steuerregler.
Einstellungen
Beenden des DEMO-Modus
3 Gehen Sie wie in Schritt 2 erläutert
vor, um den gewünschten Titel zu
suchen.
Die Wiedergabe beginnt.
So deaktivieren Sie den Quick-BrowZerModus
Drücken Sie (Suchen).
Suchen mit Überspringen von
Elementen (Sprung-Modus)
1 Drücken Sie (Suchen).
2 Drücken Sie SEEK +.
3 Drehen Sie den Steuerregler, um
das Element auszuwählen.
Die Liste wird in Schritten von 10% der
Gesamtzahl an Elementen durchsucht.
4 Drücken Sie ENTER, um in den
Quick-BrowZer-Modus
zurückzuschalten.
Das ausgewählte Element erscheint.
Sie können die Demo, die beim Ausschalten
des Geräts angezeigt wird, abbrechen.
1 Drücken Sie MENU, drehen Sie den
Steuerregler, um [DISPLAY]
auszuwählen, und drücken Sie
anschließend den Steuerregler.
2 Drehen Sie den Steuerregler, um
[DEMO] auszuwählen, und drücken
Sie anschließend den Steuerregler.
3 Drehen Sie den Steuerregler, um
[DEMO-OFF] auszuwählen, und
drücken Sie anschließend den
Steuerregler.
Die Einstellung ist damit abgeschlossen.
4 Drücken Sie (Zurück) zweimal.
Die Anzeige wechselt wieder in den
normalen Empfangsmodus bzw.
Wiedergabemodus.
5 Drehen Sie den Steuerregler, um
das gewünschte Element
auszuwählen, und drücken Sie den
Steuerregler.
Die Wiedergabe beginnt.
11DE
Page 28

Grundlegende Schritte zum
GENERAL-Konfiguration
Vornehmen von
Einstellungen
Anhand der folgenden Schritte können Sie
Optionen im Menü einstellen.
Sie können die folgenden Optionen je nach
Tonquelle und Einstellung einstellen.
1 Drücken Sie MENU.
2 Drehen Sie den Steuerregler, um
die Konfigurationskategorie
auszuwählen, und drücken Sie
anschließend den Steuerregler.
Es gibt folgende
Konfigurationskategorien:
GENERAL-Konfiguration (Seite 12)
SOUND-Konfiguration (Seite 13)
DISPLAY-Konfiguration (Seite 13)
3 Drehen Sie den Steuerregler, um
die Option auszuwählen, und
drücken Sie anschließend den
Steuerregler.
So schalten Sie zur vorherigen Anzeige
zurück
Drücken Sie (Zurück).
CLOCK-ADJ (Uhr einstellen) (Seite 6)
CAUT ALM (Warnton)
Zum Einstellen des Warntons: [ON], [OFF]
(Seite 5). (Steht nur bei ausgeschaltetem
Gerät zur Verfügung.)
BEEP
Zum Einstellen des Signaltons: [ON], [OFF].
AUTO OFF (Abschaltautomatik)
Das Gerät kann nach dem Ausschalten
nach einer voreingestellten Zeit
automatisch vollständig abgeschaltet
werden: [NO], [30S] (30 Sekunden), [30M]
(30 Minuten), [60M] (60 Minuten).
AUX-A (AUX-Audio)
Zum Einstellen der AUXTonquellenanzeige: [ON], [OFF]. (Steht nur
bei ausgeschaltetem Gerät zur
Verfügung.)
CT (Uhrzeit)
Zum Einstellen der CT-Funktion: [ON],
[OFF].
REGIONAL
Zum Beschränken des Empfangs auf eine
bestimmte Region: [ON], [OFF]. (Steht nur
bei UKW-Empfang (FM) zur Verfügung.)
BTM (Speicherbelegungsautomatik) (Seite 7)
12DE
Page 29

SOUND-Konfiguration DISPLAY-Konfiguration
EQ3 PRESET
Sie können aus 7 Equalizer-Kurven eine
geeignete auswählen: [XPLOD], [VOCAL],
[EDGE], [CRUISE], [SPACE], [GRAVITY],
[CUSTOM] oder [OFF].
Die Einstellung für die Equalizer-Kurve
kann für jede Tonquelle gespeichert
werden.
EQ3 SETTING
Zum Einstellen von [CUSTOM] in EQ3.
Zum Auswählen der EqualizerEinstellungen: [LOW], [MID], [HIGH].
Wenn Sie die werkseitig eingestellte
Equalizer-Kurve wiederherstellen wollen,
halten Sie ENTER gedrückt, bevor die
Einstellung abgeschlossen ist.
BALANCE
Zum Einstellen der Balance: [RIGHT-15] –
[CENTER] – [LEFT-15].
FAD ER
Zum Einstellen des relativen Pegels:
[FRONT-15] – [CENTER] – [REAR-15].
LOUDNESS (Dynamische Loudness)
Zum Verstärken von Bässen und Höhen,
so dass auch bei niedriger Lautstärke ein
Klang von guter Qualität erzielt wird: [ON],
[OFF].
SW LEVEL (Pegel des Tiefsttonlautsprechers)
Zum Einstellen der Lautstärke des
Tiefsttonlautsprechers: [+2 dB] - [0 dB] [-2 dB].
AUX VOL (AUX-Lautstärkepegel)
Zum Einstellen der Lautstärke der
einzelnen angeschlossenen Zusatzgeräte:
[+18 dB] - [0 dB] - [-8 dB].
Wenn Sie die Einstellung hier vornehmen,
brauchen Sie die Lautstärke der einzelnen
Tonquellen nicht mehr einzustellen.
DEMO (Demo-Modus)
Zum Einstellen des Demo-Modus: [ON],
[OFF].
DIMMER
Zum Wechseln der Helligkeit im Display:
[ON], [OFF].
AUTO SCR (Automatischer Bildlauf)
Zum Einstellen des automatischen
Bildlaufs für lange Informationen: [ON],
[OFF].
M.DISPLAY (Bewegte Anzeige)
Zum Anzeigen bewegter Muster: [ON],
[OFF].
13DE
Page 30

Weitere Informationen
Sicherheitsmaßnahmen
Lassen Sie das Gerät vor dem Betrieb
abkühlen, wenn das Auto in direkter Sonne
geparkt war.
Lassen Sie die Frontplatte oder
Audiogeräte, die Sie ins Fahrzeug
mitgebracht haben, nicht darin liegen.
Andernfalls kann es aufgrund hoher
Temperaturen durch direkte
Sonneneinstrahlung zu Fehlfunktionen
kommen.
Die Motorantenne wird automatisch
ausgefahren.
Feuchtigkeitskondensation
Sollte sich im Inneren des Geräts Feuchtigkeit
niederschlagen, nehmen Sie die Disc heraus
und warten Sie etwa eine Stunde, bis die
Feuchtigkeit verdunstet ist. Andernfalls
funktioniert das Gerät nicht einwandfrei.
So bewahren Sie die hohe Tonqualität
Achten Sie darauf, dass keine Flüssigkeiten
auf das Gerät oder die Discs gelangen.
Hinweise zu Discs
Setzen Sie Discs weder direktem
Sonnenlicht noch Wärmequellen wie zum
Beispiel Warmluftauslässen aus. Lassen Sie
sie auch nicht in einem in der Sonne
geparkten Auto liegen.
Reinigen Sie Discs vor
dem Abspielen mit einem
Reinigungstuch. Wischen
Sie dabei von der Mitte
nach außen. Verwenden
Sie keine Lösungsmittel
wie Benzin oder
Verdünner und keine
handelsüblichen Reinigungsmittel.
Dieses Gerät ist auf die Wiedergabe von
Discs ausgelegt, die dem Compact DiscStandard (CD) entsprechen. DualDiscs und
manche Musik-CDs mit
Urheberrechtsschutzcodierung
entsprechen nicht dem Compact DiscStandard (CD) und können daher mit
diesem Gerät nicht wiedergegeben
werden.
Auf diesem Gerät NICHT abspielbare Discs
Discs mit Etiketten, Aufklebern,
Klebeband oder aufgeklebtem Papier.
Wenn Sie solche Discs verwenden, kann
es zu einer Fehlfunktion kommen oder
die Disc kann beschädigt werden.
Discs mit außergewöhnlichen Formen
(z. B. herzförmige, quadratische oder
sternförmige Discs). Falls Sie es doch
versuchen, kann das Gerät beschädigt
werden.
8-cm-Discs
Hinweise zu CD-Rs/CD-RWs
Höchstzahl an: (nur CD-Rs/CD-RWs)
Ordnern (Alben): 150 (einschließlich
Stammordner)
Dateien (Titeln) und Ordnern: 300
(gegebenenfalls weniger als 300, wenn
die Ordner-/Dateinamen viele Zeichen
enthalten)
anzeigbaren Zeichen für einen Ordner-/
Dateinamen: 32 (Joliet)/64 (Romeo)
Wenn eine Multisession-Disc mit einer CD-
DA-Session beginnt, wird sie als CD-DA
erkannt und andere Sessions werden nicht
wiedergegeben.
Auf diesem Gerät NICHT abspielbare Discs
CD-Rs/CD-RWs mit schlechter
Aufnahmequalität.
CD-Rs/CD-RWs, die mit einem
inkompatiblen Aufnahmegerät bespielt
wurden.
CD-Rs/CD-RWs, die nicht richtig
abgeschlossen wurden.
CD-Rs/CD-RWs, die nicht im Musik-CD-
Format oder im MP3-Format (ISO9660
Level 1/Level 2, Joliet/Romeo oder
Multisession) bespielt wurden.
14DE
Page 31

Wiedergabereihenfolge von MP3-/
MP3/WMA
Ordner (Album)
MP3-/WMA-Datei
(Titel)
WMA-Dateien
Der iPod
Folgende iPod-Modelle können
angeschlossen werden. Aktualisieren Sie
Ihr iPod-Modell vor dem Gebrauch anhand
der neuesten Software.
Made for
iPod touch (5. Generation)
iPod touch (4. Generation)
iPod touch (3. Generation)
iPod touch (2. Generation)
iPod classic
iPod nano (7. Generation)
iPod nano (6. Generation)
iPod nano (5. Generation)
iPod nano (4. Generation)
iPod nano (3. Generation)
iPod nano (2. Generation)
iPod nano (1. Generation)*
iPhone 5
iPhone 4S
iPhone 4
iPhone 3GS
iPhone 3G
* Die direkte Steuerung steht bei einem iPod nano
(1. Generation) nicht zur Verfügung.
„Made for iPod“ bzw. „Made for iPhone“
bedeutet, dass elektronisches Zubehör
speziell für den Anschluss an einen iPod
bzw. ein iPhone konzipiert und vom
Entwickler entsprechend den
Leistungsstandards von Apple getestet
wurde. Apple übernimmt keine Garantie
für die Funktionsfähigkeit dieses Geräts
bzw. die Einhaltung von
Sicherheitsstandards. Bitte beachten Sie,
dass die Verwendung dieses Zubehörs mit
einem iPod oder iPhone die Qualität der
Funkverbindung beeinträchtigen kann.
Sollten an Ihrem Gerät Probleme auftreten
oder sollten Sie Fragen haben, auf die in
dieser Anleitung nicht eingegangen wird,
wenden Sie sich bitte an Ihren Sony-Händler.
Wartung
Reinigen der Anschlüsse
Das Gerät funktioniert möglicherweise nicht
ordnungsgemäß, wenn die Anschlüsse
zwischen dem Gerät und der Frontplatte
verschmutzt sind. Um dies zu vermeiden,
nehmen Sie die Frontplatte ab (Seite 5) und
reinigen Sie die Anschlüsse mit einem
Wattestäbchen. Drücken Sie dabei nicht zu
fest auf die Anschlüsse. Andernfalls können
sie beschädigt werden.
Hinweise
Schalten Sie aus Sicherheitsgründen vor dem
Reinigen der Anschlüsse die Zündung aus und
ziehen Sie den Schlüssel aus dem Zündschloss.
Berühren Sie die Anschlüsse unter keinen
Umständen direkt mit den Händen oder einem
Metallgegenstand.
15DE
Page 32

Technische Daten
Tuner
FM (UKW)
Empfangsbereich: 87,5 – 108,0 MHz
Antennenanschluss:
Anschluss für Außenantenne
Zwischenfrequenz: 25 kHz
Nutzbare Empfindlichkeit: 8 dBf
Trennschärfe: 75 dB bei 400 kHz
Signal-Rauschabstand: 80 dB (stereo)
Kanaltrennung: 50 dB bei 1 kHz
Frequenzgang: 20 – 15.000 Hz
MW/LW
Empfangsbereich:
MW: 531 – 1.602 kHz
LW: 153 – 279 k Hz
Antennenanschluss:
Anschluss für Außenantenne
Zwischenfrequenz:
9.124,5 kHz oder 9.115,5 kHz/4,5 kHz
Empfindlichkeit: MW: 26 µV, LW: 45 µV
CD-Player
Signal-Rauschabstand: 95 dB
Frequenzgang: 10 – 20.000 Hz
Gleichlaufschwankungen: unterhalb der
Messgrenze
Entsprechender Codec:
MP3 (.mp3) und WMA (.wma)
USB-Player
Schnittstelle: USB (Full-Speed)
Maximale Stromstärke: 1 A
Höchstzahl an erkennbaren Daten:
Ordner (Alben): 128
Dateien (Titel) pro Ordner: 512
Entsprechender Codec:
MP3 (.mp3) und WMA (.wma)
Endverstärker
Ausgänge: Lautsprecherausgänge
Lautsprecherimpedanz: 4 – 8 Ohm
Maximale Ausgangsleistung: 55 W × 4 (an
4 Ohm)
Allgemeines
Ausgänge:
Audioausgänge (hinten,
Tiefsttonlautsprecher)
Steueranschluss für Motorantenne/
Endverstärker (REM OUT)
Eingänge:
Fernbedienungseingang
Antenneneingang
AUX-Eingangsbuchse (Stereominibuchse)
USB-Anschluss
Betriebsspannung: 12 V Gleichstrom,
Autobatterie (negative Erdung)
Abmessungen: ca. 178 mm × 50 mm × 177 mm
(B/H/T)
Einbaumaße: ca. 182 mm × 53 mm × 160 mm
(B/H/T)
Gewicht: ca. 1,2 kg
Lieferumfang:
Hauptgerät (1)
Montageteile und Anschlusszubehör (1 Satz)
Ihr Händler führt unter Umständen nicht alle
der oben genannten Zubehörteile. Fragen
Sie Ihren Händler nach ausführlichen
Informationen.
Änderungen, die dem technischen Fortschritt
dienen, bleiben vorbehalten.
Urheberrechte
Quick-BrowZer ist ein Markenzeichen der Sony
Corporation.
Windows Media ist ein eingetragenes
Markenzeichen oder Markenzeichen der
Microsoft Corporation in den USA und/oder
anderen Ländern.
Dieses Produkt ist durch bestimmte
gewerbliche Schutz- und Urheberrechte der
Microsoft Corporation geschützt. Die
Verwendung oder der Vertrieb derartiger
Technologie außerhalb dieses Produkts ohne
eine Lizenz von Microsoft oder einer
autorisierten Microsoft-Niederlassung ist
untersagt.
iPhone, iPod, iPod classic, iPod nano und iPod
touch sind Markenzeichen der Apple Inc., die in
den USA und anderen Ländern eingetragen
sind.
16DE
Page 33

MPEG Layer-3 Audiocodiertechnologie und
Patente lizenziert von Fraunhofer IIS und
Thomson.
Android ist ein Markenzeichen von Google Inc.
Die Verwendung dieses Markenzeichens
unterliegt den Google-Genehmigungen.
Störungsbehebung
Anhand der folgenden Checkliste können Sie
die meisten Probleme, die möglicherweise
an Ihrem Gerät auftreten, selbst beheben.
Bevor Sie die folgende Checkliste
durchgehen, überprüfen Sie bitte zunächst,
ob Sie das Gerät richtig angeschlossen und
bedient haben.
Einzelheiten zum Gebrauch der Sicherung
und zum Abnehmen des Geräts vom
Armaturenbrett finden Sie in der mit diesem
Gerät gelieferten Installations-/
Anschlussanleitung.
Wenn das Problem sich nicht beheben lässt,
besuchen Sie die Support-Website, die auf
der hinteren Umschlagseite angegeben ist.
Allgemeines
Es ist kein Ton zu hören.
Der Fader-Regler [FADER] ist nicht für ein 2-
Lautsprecher-System eingestellt.
Kein Signalton ertönt.
Ein gesondert erhältlicher Endverstärker ist
angeschlossen und Sie verwenden nicht den
integrierten Verstärker.
Der Speicherinhalt wurde gelöscht.
Das Stromversorgungskabel wurde gelöst,
die Verbindung zur Batterie besteht nicht
mehr oder das Kabel bzw. die Batterie ist
falsch angeschlossen.
Gespeicherte Sender und die korrekte Uhrzeit
werden gelöscht.
Die Sicherung ist durchgebrannt.
Störgeräusche sind zu hören, wenn der
Zündschlüssel gedreht wird.
Die Leitungen sind nicht korrekt an den
Stromanschluss für Zubehörgeräte
angeschlossen.
Das Gerät wechselt während der Wiedergabe
bzw. des Radioempfangs in den DemoModus.
Wenn [DEMO-ON] eingestellt ist und
5 Minuten lang keine Funktion ausgeführt
wird, wechselt das Gerät in den DemoModus.
Stellen Sie [DEMO-OFF] ein (Seite 13).
17DE
Page 34

Die Anzeige wird ausgeblendet bzw.
erscheint nicht im Display.
Der Dimmer ist auf [DIM-ON] eingestellt
(Seite 13).
Die Anzeige wird ausgeblendet, wenn Sie OFF
gedrückt halten.
Drücken Sie OFF am Gerät erneut, bis die
Anzeige eingeblendet wird.
Die Anschlüsse sind verschmutzt (Seite 15).
Die Funktionstasten funktionieren nicht.
Die Disc lässt sich nicht auswerfen.
Drücken Sie DSPL und (Zurück)/MODE
länger als 2 Sekunden, um das Gerät
zurückzusetzen.
Der Speicherinhalt wird gelöscht.
Setzen Sie das Gerät aus Sicherheitsgründen
nicht beim Fahren zurück.
Radioempfang
Sender lassen sich nicht empfangen.
Der Ton ist stark gestört.
Die Verbindung wurde nicht richtig
hergestellt.
Prüfen Sie die Verbindung der
Autoantenne.
Wenn die Motorantenne nicht automatisch
ausgefahren wird, prüfen Sie die
Verbindung der MotorantennenSteuerleitung.
Gespeicherte Sender lassen sich nicht
einstellen.
Das Sendesignal ist zu schwach.
RDS
Der Sendersuchlauf (SEEK) startet nach ein
paar Sekunden Radioempfang.
Der Sender ist kein Verkehrsfunksender (TP)
oder die Sendesignale sind zu schwach.
Deaktivieren Sie TA (Seite 8).
Es sind keine Verkehrsdurchsagen zu hören.
Aktivieren Sie TA (Seite 8).
Der Sender sendet keine
Verkehrsdurchsagen, obwohl es sich um
einen Verkehrsfunksender (TP) handelt.
Stellen Sie einen anderen Sender ein.
Bei der PTY-Funktion wird [- - - - - - - -]
angezeigt.
Der aktuelle Sender ist kein RDS-Sender.
Es wurden keine RDS-Daten empfangen.
Der Sender gibt den Programmtyp nicht an.
Der Programmdienstname blinkt.
Für den aktuellen Sender gibt es keine
Alternativfrequenz.
Drücken Sie SEEK +/–, solange der
Programmdienstname blinkt. [PI SEEK] wird
angezeigt und das Gerät beginnt dann mit
der Suche nach einer Frequenz mit
denselben PI-Daten (Programmkennung).
CD-Wiedergabe
Die Disc lässt sich nicht abspielen.
Die Disc ist beschädigt oder verschmutzt.
Die CD-R/CD-RW ist nicht als Audio-CD
konzipiert (Seite 14).
MP3-/WMA-Dateien können nicht
wiedergegeben werden.
Die Disc ist nicht mit dem MP3-/WMA-Format
bzw. der Version kompatibel. Einzelheiten zu
abspielbaren Discs und den Formaten finden
Sie auf der Support-Website.
Es dauert länger, bis die Wiedergabe von
MP3-/WMA-Dateien beginnt.
Bei folgenden Discs dauert es länger, bis die
Wiedergabe beginnt:
Discs mit einer komplizierten Datei-/
Ordnerstruktur.
Multisession-Discs.
Discs, zu denen noch Daten hinzugefügt
werden können.
Tonsprünge treten auf.
Die Disc ist beschädigt oder verschmutzt.
USB-Wiedergabe
Sie können über einen USB-Hub nichts
wiedergeben lassen.
Dieses Gerät kann keine USB-Geräte
erkennen, die über einen USB-Hub
angeschlossen sind.
18DE
Page 35

Es dauert länger, bis an einem USB-Gerät die
Wiedergabe beginnt.
Die Dateien auf dem USB-Gerät befinden sich
in einer komplizierten Datei-/Ordnerstruktur.
Der Ton setzt aus.
Bei einer hohen Bitrate von über 320 Kbps
kommt es möglicherweise zu Tonaussetzern.
Fehleranzeigen/Meldungen
ERROR
Die Disc ist verschmutzt oder falsch herum
eingelegt.
Reinigen Sie die Disc bzw. legen Sie sie
korrekt ein.
Eine leere Disc wurde eingelegt.
Die Disc kann aufgrund eines Problems nicht
wiedergegeben werden.
Legen Sie eine andere Disc ein.
Das USB-Gerät wurde nicht automatisch
erkannt.
Schließen Sie es erneut an.
Drücken Sie , um die Disc herauszunehmen.
HUB NO SUPRT (Hubs nicht unterstützt)
Ein USB-Hub wird von diesem Gerät nicht
unterstützt.
IPD STOP
Wenn die wiederholte Wiedergabe nicht
eingestellt ist, wurde die Wiedergabe des
letzten Titels im Album abgeschlossen.
Die Musikanwendung auf dem iPod/iPhone
ist beendet.
Drücken Sie PAUSE, um die Wiedergabe
erneut zu starten.
NO AF (Keine Alternativfrequenzen)
Für den aktuellen Sender gibt es keine
Alternativfrequenz.
Drücken Sie SEEK +/–, solange der
Programmdienstname blinkt. Das Gerät
beginnt dann mit der Suche nach einer
Frequenz mit denselben PI-Daten
(Programmkennung). [PI SEEK] wird
angezeigt.
NO DEV (Kein Gerät)
[USB] wurde als Tonquelle ausgewählt, aber
es ist kein USB-Gerät angeschlossen. Ein USBGerät oder ein USB-Kabel wurde während der
Wiedergabe von diesem Gerät getrennt.
Schließen Sie unbedingt USB-Gerät und
USB-Kabel an.
NO MUSIC
Die Disc bzw. das USB-Gerät enthält keine
Musikdateien.
Legen Sie eine Musik-CD ein.
Schließen Sie ein USB-Gerät an, das eine
Musikdatei enthält.
NO TP (Keine Verkehrsfunksender)
Das Gerät sucht weiter nach verfügbaren
Verkehrsfunksendern (TP).
OVERLOAD
Das USB-Gerät ist überlastet.
Trennen Sie das USB-Gerät von diesem
Gerät und wechseln Sie mit SRC die
Ton qu ell e.
Das USB-Gerät funktioniert nicht
einwandfrei oder ein nicht unterstütztes
Gerät ist angeschlossen.
PUSH EJT (Auswurftaste drücken)
Die Disc lässt sich nicht auswerfen.
Drücken Sie (Auswerfen).
READ
Das Gerät liest gerade alle Titel- und
Albuminformationen von der Disc ein.
Bitte warten Sie, bis das Einlesen
abgeschlossen ist. Die Wiedergabe
beginnt danach automatisch. Je nach DiscStruktur kann das Einlesen länger als eine
Minute dauern.
USB NO SUPRT (USB nicht unterstützt)
Das angeschlossene USB-Gerät wird nicht
unterstützt.
Einzelheiten zur Kompatibilität Ihres USB-
Geräts finden Sie auf der Support-Website.
[] oder []
Sie sind beim Rückwärts- oder
Vorwärtssuchen am Anfang bzw. Ende der
Disc angelangt und können nicht
weitersuchen.
19DE
Page 36

[]
Das Zeichen kann nicht angezeigt werden.
Wenn sich das Problem mit diesen
Abhilfemaßnahmen nicht beheben lässt,
wenden Sie sich an einen Sony-Händler.
Wenn Sie das Gerät aufgrund einer Störung
bei der CD-Wiedergabe zur Reparatur
bringen, bringen Sie bitte auch die Disc mit,
die eingelegt war, als das Problem zum
ersten Mal auftrat.
20DE
Page 37

Page 38

Pour plus de sécurité, installez cet appareil
dans le tableau de bord de votre véhicule.
Pour de plus amples informations sur
l’installation et les raccordements, reportezvous au manuel d’installation et de
raccordement fourni.
Fabriqué en Thaïlande
Propriétés des diodes laser
Durée d’émission : ininterrompue
Puissance du laser : inférieure à 53,3 W
(Cette puissance correspond à la valeur mesurée
à une distance de 200 mm de la surface de la
lentille de l’objectif du bloc de saisie optique
avec une ouverture de 7 mm.)
Avis à l’attention des clients : les informations
suivantes s’appliquent uniquement aux
appareils vendus dans des pays qui
appliquent les directives de l’Union
Européenne
Fabricant : Sony Corporation, 1-7-1 Konan
Minato-ku Tokyo, 108-0075 Japon
Pour toute question relative à la conformité des
produits dans l’UE : Sony Deutschland GmbH,
Hedelfinger Strasse 61, 70327 Stuttgart,
Allemagne
Avertissement au cas où le contact de
votre voiture ne dispose pas d’une
position ACC
Veillez à activer la fonction AUTO OFF
(page 11). L’appareil s’éteint alors
complètement et automatiquement à l’issue
d’un délai défini une fois l’appareil mis hors
tension, afin d’éviter que la batterie ne se
décharge. Si vous n’activez pas la fonction
AUTO OFF, appuyez sur la touche OFF et
maintenez-la enfoncée jusqu’à ce que
l’affichage disparaisse chaque fois que vous
coupez le contact.
2FR
Page 39

Table des matières
Guide des composants et des
commandes. . . . . . . . . . . . . . . . . . . . . . . . 4
Préparation
Retrait de la façade . . . . . . . . . . . . . . . . . . . . 5
Réglage de l’horloge . . . . . . . . . . . . . . . . . . . 6
Raccordement d’un iPod/périphérique
USB . . . . . . . . . . . . . . . . . . . . . . . . . . . . . . . 6
Raccordement d’un autre appareil audio
portatif . . . . . . . . . . . . . . . . . . . . . . . . . . . . 6
Ecoute de la radio
Ecoute de la radio. . . . . . . . . . . . . . . . . . . . . . 7
Utilisation du système RDS (système de
radiocommunication de données) . . . . . 7
Lecture
Lecture d’un disque . . . . . . . . . . . . . . . . . . . . 9
Lecture d’un iPod/périphérique USB . . . . . . 9
Recherche et lecture de plages. . . . . . . . . . 10
Paramètres
Désactivation du mode DEMO . . . . . . . . . . .11
Utilisation des réglages de base . . . . . . . . . .11
Configuration GENERAL . . . . . . . . . . . . . . . . .11
Configuration SOUND. . . . . . . . . . . . . . . . . . 12
EQ3 PRESET . . . . . . . . . . . . . . . . . . . . . . . 12
EQ3 SETTING . . . . . . . . . . . . . . . . . . . . . . 12
Configuration DISPLAY . . . . . . . . . . . . . . . . . 12
Informations complémentaires
Précautions. . . . . . . . . . . . . . . . . . . . . . . . . . 13
Entretien . . . . . . . . . . . . . . . . . . . . . . . . . . . . 14
Spécifications . . . . . . . . . . . . . . . . . . . . . . . . 15
Dépannage . . . . . . . . . . . . . . . . . . . . . . . . . . 16
3FR
Page 40

Guide des composants et des commandes
Appareil principal
La touche numérique 3/ (répétition) possède un point tactile.
SRC (source)
Permet de mettre l’appareil sous tension.
Permet de modifier la source.
-OFF
Appuyez sur la touche et maintenez-la
enfoncée pendant 1 seconde pour mettre
l’appareil hors tension.
Appuyez sur la touche et maintenez-la
enfoncée pendant plus de 2 secondes
pour mettre l’appareil hors tension et
désactiver l’affichage.
Touche de déverrouillage de la façade
SEEK +/–
Permet de syntoniser automatiquement
des stations de radio. Appuyez et
maintenez-la enfoncée pour syntoniser
manuellement.
/ (préc./suiv.) / (retour
rapide/avance rapide)
Molette de réglage
Tournez cette commande pour régler le
niveau du volume.
ENTER
Permet de valider l’élément sélectionné.
MENU
Permet d’afficher le menu de
configuration.
Récepteur de la télécommande
Fente d’insertion des disques
Fenêtre d’affichage
(éjection du disque)
(parcourir) (page 10)
Permet d’accéder au mode Parcourir
pendant la lecture.
(retour)
Pour revenir à l’écran précédent.
MODE (page 7, 9)
AF (Fréquences alternatives)/TA
(Messages de radioguidage)
Permettent de régler les fonctions AF et
TA.
-PTY (Type d’émission)
Appuyez sur la touche et maintenez-la
enfoncée pour sélectionner PTY en RDS.
Touches numériques (1 à 6)
Permettent de recevoir des stations
mémorisées. Appuyez et maintenez-les
enfoncées pour mémoriser des stations.
ALBUM /
Permet de sauter un album sur l’appareil
audio. Appuyez et maintenez-la
4FR
Page 41

enfoncée pour sauter des albums en
continu.
(répétition)
SHUF (aléatoire)
PAU SE
DSPL (affichage)
Permet de modifier les rubriques
d’affichage.
-SCRL (défilement)
Appuyez et maintenez-la enfoncée pour
faire défiler une rubrique d’affichage.
Prise d’entrée AUX
Port USB
Préparation
Retrait de la façade
Vous pouvez retirer la façade de cet appareil
pour le protéger du vol.
1 Appuyez sur la touche OFF et
maintenez-la enfoncée.
L’appareil est mis hors tension.
2 Appuyez sur la touche de
déverrouillage de la façade , puis
retirez cette dernière en la tirant
vers vous.
Alarme d’avertissement
Si vous mettez la clé de contact en position
OFF sans retirer la façade, l’alarme
d’avertissement retentit pendant quelques
secondes. L’alarme retentit uniquement
lorsque l’amplificateur intégré est utilisé.
Installation de la façade
5FR
Page 42

Réglage de l’horloge
Lors du raccordement d’un iPhone 5
Raccordement d’un autre
1
Appuyez sur MENU, tournez la
molette de réglage pour
sélectionner [GENERAL], puis
appuyez dessus.
2 Tournez la molette de réglage pour
sélectionner [CLOCK-ADJ], puis
appuyez dessus.
L’indication des heures clignote.
3 Tournez la molette de réglage pour
régler l’heure et les minutes.
Appuyez sur SEEK +/– pour déplacer
l’indication numérique.
4 Une fois les minutes réglées,
appuyez sur MENU.
La configuration est terminée et l’horloge
démarre.
Pour afficher l’horloge, appuyez sur DSPL.
Raccordement d’un iPod/
périphérique USB
1 Baissez le volume sur l’appareil.
2 Raccordez l’iPod/périphérique USB
à l’appareil.
Pour raccorder un iPod/iPhone, utilisez le
câble de connexion USB pour iPod (non
fourni).
appareil audio portatif
1 Mettez l’appareil audio portatif hors
tension.
2 Baissez le volume sur l’appareil.
3 Raccordez l’appareil audio portatif à
la prise d’entrée AUX (mini-prise
stéréo) de l’appareil à l’aide d’un
cordon de raccordement* (non
fourni).
* Veillez à utiliser une fiche de type droit.
4 Appuyez sur SRC pour sélectionner
[AUX].
Pour faire correspondre le niveau de
volume de l’appareil raccordé à celui
d’autres sources
Démarrez la lecture sur l’appareil audio
portatif, à un niveau de volume moyen et
réglez votre appareil sur le volume d’écoute
habituel.
Appuyez sur MENU et tournez la molette de
réglage.
Sélectionnez [SOUND] [AUX VOL] (page 12).
6FR
Page 43

Ecoute de la radio
Ecoute de la radio
Pour écouter la radio, appuyez sur SRC afin
de sélectionner [TUNER].
Mémorisation manuelle
1 Lorsque vous recevez la station que
vous souhaitez mémoriser,
appuyez sur une touche numérique
(1 à 6) et maintenez-la enfoncée
jusqu’à ce que [MEM] apparaisse.
Mémorisation automatique (BTM)
1 Appuyez sur MODE pour changer
de bande (FM1, FM2, FM3, MW (PO)
ou LW (GO)).
2 Appuyez sur MENU, tournez la
molette de réglage pour
sélectionner [GENERAL], puis
appuyez dessus.
3 Tournez la molette de réglage pour
sélectionner [BTM], puis appuyez
dessus.
L’appareil mémorise les stations sur les
touches numériques dans l’ordre des
fréquences.
Syntonisation
1 Appuyez sur MODE pour changer
de bande (FM1, FM2, FM3, MW (PO)
ou LW (GO)).
2 Procédez à la syntonisation.
Syntonisation manuelle
Appuyez sur la touche SEEK +/– pour
localiser la fréquence approximative, puis
appuyez plusieurs fois sur SEEK +/– pour
régler la fréquence souhaitée avec
précision.
Syntonisation automatique
Appuyez sur SEEK +/–.
Le balayage s’interrompt lorsque
l’appareil capte une station. Répétez
cette procédure jusqu’à ce que vous
captiez la station souhaitée.
Réception des stations mémorisées
1 Sélectionnez la bande, puis
appuyez sur une touche numérique
(1 à 6).
Utilisation du système RDS
(système de
radiocommunication de
données)
Réglage des fonctions AF
(Fréquences alternatives) et TA
(Messages de radioguidage)
AF règle en permanence la station sur le
signal le plus fort du réseau et TA propose les
messages et les programmes de
radioguidage (TP) disponibles.
1 Appuyez sur AF/TA pour
sélectionner [AF-ON], [TA-ON], [AF/
TA-ON] ou [AF/TA-OFF].
Mémorisation de stations RDS avec les
réglages AF et TA
Vous pouvez présélectionner les stations
RDS avec un réglage AF/TA. Réglez AF/TA,
puis mémorisez la station à l’aide de la
fonction BTM ou manuellement. Si vous
effectuez une présélection manuelle, vous
pouvez également présélectionner des
stations non-RDS.
7FR
Page 44

Réception de messages d’urgence
Lorsque la fonction AF ou TA est activée, les
messages d’urgence interrompent
automatiquement la source sélectionnée en
cours de diffusion.
Lors du réglage du niveau de volume
pendant la diffusion d’un message de
radioguidage
Le niveau est enregistré dans la mémoire
pour les messages de radioguidage suivants,
indépendamment du niveau de volume
normal.
Ecoute continue d’une émission
régionale (REGIONAL)
Lorsque les fonctions AF et REGIONAL sont
activées, vous ne basculez pas vers une
station régionale ayant une fréquence plus
puissante. Si vous quittez la zone de
réception de cette émission régionale, réglez
[REG-OFF] dans la configuration GENERAL en
cours de réception FM (page 11).
Cette fonction est inopérante au RoyaumeUni et dans certaines autres régions.
Fonction de liaison locale (Royaume-Uni
uniquement)
Cette fonction vous permet de sélectionner
d’autres stations locales de la région, même
si elles ne sont pas associées à vos touches
numériques.
En cours de réception FM, appuyez sur une
touche numérique (1 à 6) sur laquelle une
station locale est mémorisée. Dans les 5
secondes qui suivent, appuyez de nouveau
sur la touche numérique de la station locale.
Répétez cette procédure jusqu’à ce que vous
captiez la station locale souhaitée.
2 Tournez la molette de réglage
jusqu’à ce que le type d’émission
souhaité apparaisse, puis appuyez
dessus.
L’appareil commence à rechercher une
station diffusant le type d’émission
sélectionné.
Types d’émissions
NEWS (Nouvelles), AFFAIRS (Dossiers
d’actualité), INFO (Informations), SPORT
(Sports), EDUCATE (Education), DRAMA
(Théâtre), CULTURE (Culture), SCIENCE
(Science), VARIED (Divers), POP M (Musique
pop), ROCK M (Rock), EASY M (Musique
légère), LIGHT M (Musique classique légère),
CLASSICS (Musique classique), OTHER M
(Autres styles de musique), WEATHER
(Météo), FINANCE (Finance), CHILDREN
(Emissions pour les enfants), SOCIAL A
(Affaires sociales), RELIGION (Religion),
PHONE IN (Emissions ligne ouverte), TRAVEL
(Voyage), LEISURE (Loisirs), JAZZ (Jazz),
COUNTRY (Musique country), NATION M
(Musique nationale), OLDIES (Musique
d’autrefois), FOLK M (Musique folk),
DOCUMENT (Documentaires)
Réglage de l’heure (CT)
Les données CT accompagnant la
transmission RDS assurent un réglage de
l’horloge.
1 Sélectionnez [CT-ON] dans la
configuration GENERAL (page 11).
Sélection de types d’émission (PTY)
Utilisez PTY pour afficher ou rechercher le
type d’émission souhaité.
1 Appuyez sur la touche PTY et
maintenez-la enfoncée pendant la
réception FM.
8FR
Page 45

Lecture
fichiers contenant une protection des droits
d’auteur
fichiers DRM (Gestion des droits numériques)
fichiers audio multicanaux
Lecture d’un disque
1 Insérez le disque (étiquette vers le
haut).
La lecture commence automatiquement.
Lecture d’un iPod/
périphérique USB
Dans ce mode d’emploi, « iPod » est utilisé
comme terme générique pour désigner les
fonctions iPod d’un iPod et d’un iPhone, sauf
mention contraire dans le texte ou les
illustrations.
Pour plus de détails sur la compatibilité de
votre iPod, consultez la section « A propos de
l’iPod » (page 14) ou visitez le site
d’assistance indiqué sur la couverture arrière.
Des périphériques USB de stockage de
masse (MSC), tels qu’une clé USB, un lecteur
multimédia numérique ou un téléphone
Android™, compatibles avec la norme USB
peuvent être utilisés avec cet appareil.
Selon le lecteur multimédia numérique ou le
téléphone Android, il peut être obligatoire de
choisir MSC comme mode de connexion USB.
Remarques
Pour plus de détails sur la compatibilité de votre
périphérique USB, visitez le site d’assistance
indiqué sur la couverture arrière.
La lecture des fichiers MP3/WMA suivants n’est
pas prise en charge.
fichiers comprimés sans perte
1 Raccordez un iPod/périphérique
USB au port USB (page 6).
La lecture commence.
Si un périphérique USB est déjà raccordé,
lancez la lecture en appuyant sur SRC
pour sélectionner [USB] ([IPD] apparaît
sur l’affichage lorsque l’iPod est
identifié).
2 Réglez le volume sur cet appareil.
Interruption de la lecture
Appuyez sur la touche OFF et maintenez-la
enfoncée pendant 1 seconde.
Retrait du périphérique
Arrêtez la lecture, puis retirez le
périphérique.
Avertissement concernant l’iPhone
Lorsque vous connectez un iPhone via USB,
le volume d’appel du téléphone est contrôlé
par l’iPhone, et non plus par l’appareil. En
cours d’appel, n’augmentez pas le volume de
l’appareil par inadvertance, car une fois
l’appel terminé vous risqueriez d’être surpris
par l’augmentation soudaine du niveau du
son.
Utilisation directe d’un iPod
(Commande passager)
Appuyez sur la touche MODE et maintenez-la
enfoncée pendant la lecture pour afficher
[MODE IPOD] afin d’activer la commande
directe par l’iPod.
Notez que le volume peut être réglé
uniquement avec l’appareil.
Pour quitter la commande passager
Appuyez sur la touche MODE et maintenez-la
enfoncée pour afficher [MODE AUDIO].
9FR
Page 46

Recherche et lecture de
plages
Lecture répétée et aléatoire
1 Pendant la lecture, appuyez sur
(répétition) pour activer la lecture
répétée ou sur SHUF pour activer la
lecture aléatoire.
2 Appuyez plusieurs fois sur
(répétition) ou sur SHUF pour
sélectionner le mode de lecture
répétée ou aléatoire souhaité.
Le démarrage de la lecture dans le mode
sélectionné peut prendre un certain
temps.
Pour quitter le mode Quick-BrowZer
Appuyez sur (parcourir).
Recherche d’éléments par saut
(Mode Saut)
1 Appuyez sur (parcourir)
2 Appuyez sur SEEK +.
3 Tournez la molette de réglage pour
sélectionner l’élément.
L’appareil effectue des sauts dans la liste
par incrément de 10% du nombre total
d’éléments.
4 Appuyer sur la touche ENTER pour
revenir au mode Quick-BrowZer.
Le paramètre sélectionné apparaît.
Les modes de lecture disponibles diffèrent
selon la source audio sélectionnée.
Recherche d’une plage par son nom
(Quick-BrowZer™)
1 Pendant la lecture d’un CD ou d’un
périphérique USB, appuyez sur
(parcourir)* pour afficher la liste des
catégories de recherche.
Lorsque la liste des plages s’affiche,
appuyez plusieurs fois sur (retour).
* Pendant la lecture, appuyez sur (parcourir)
pendant plus de 2 secondes pour revenir
directement au début de la liste de catégories.
2 Tournez la molette de réglage pour
sélectionner la catégorie de
recherche de votre choix, puis
appuyez pour valider.
3 Répétez l’étape 2 pour rechercher la
plage souhaitée.
La lecture commence.
5 Tournez la molette de réglage pour
sélectionner l’élément souhaité,
puis appuyez dessus.
La lecture commence.
10FR
Page 47

Paramètres
Désactivation du mode
DEMO
Vous pouvez désactiver l’écran de
démonstration qui apparaît lorsque cet
appareil est hors tension.
1 Appuyez sur MENU, tournez la
molette de réglage pour
sélectionner [DISPLAY], puis
appuyez dessus.
Vous avez le choix entre les catégories de
configuration suivantes :
Configuration GENERAL (page 11)
Configuration SOUND (page 12)
Configuration DISPLAY (page 12)
3 Tournez la molette de réglage pour
sélectionner les options, puis
appuyez dessus.
Pour revenir à l’écran précédent
Appuyez sur (retour).
2 Tournez la molette de réglage pour
sélectionner [DEMO], puis appuyez
dessus.
3 Tournez la molette de réglage pour
sélectionner [DEMO-OFF], puis
appuyez dessus.
Le réglage est terminé.
4 Appuyez deux fois sur (retour).
L’affichage revient au mode de
réception/lecture normal.
Utilisation des réglages de
base
Vous pouvez configurer les options du menu
conformément à la procédure suivante.
Les options suivantes peuvent êre définies,
selon la source et le réglage.
1 Appuyez sur MENU.
2 Tournez la molette de réglage pour
sélectionner la catégorie de
configuration, puis appuyez
dessus.
Configuration GENERAL
CLOCK-ADJ (Réglage de l’horloge) (page 6)
CAUT ALM (Alarme d’avertissement)
Permet d’activer la fonction d’alarme
d’avertissement : [ON], [OFF] (page 5).
(Disponible uniquement lorsque l’appareil
est hors tension.)
BEEP
Permet d’activer le bip sonore : [ON],
[OFF].
AUTO OFF
Permet d’éteindre automatiquement
après un laps de temps choisi lorsque
l’appareil est mis hors tension : [NO], [30S]
(30 seconds), [30M] (30 minutes), [60M]
(60 minutes).
AUX-A (Audio AUX)
Permet d’activer l’affichage de la source
AUX : [ON], [OFF]. (Disponible uniquement
lorsque l’appareil est hors tension.)
CT (Heure)
Permet d’activer la fonction CT : [ON],
[OFF].
REGIONAL
Permet de restreindre la réception à une
région spécifique : [ON], [OFF]. (Disponible
uniquement lorsqu’une station FM est
captée.)
BTM (page 7)
11FR
Page 48

Configuration SOUND Configuration DISPLAY
EQ3 PRESET
Permet d’activer ou de désactiver une des
7 courbes de l’égaliseur disponibles :
[XPLOD], [VOCAL], [EDGE], [CRUISE],
[SPACE], [GRAVITY], [CUSTOM], [OFF].
Il est possible de mémoriser le réglage de
la courbe de l’égaliseur pour chaque
source.
EQ3 SETTING
Permet de régler [CUSTOM] de EQ3.
Permet de sélectionner les paramètres de
l’égaliseur : [LOW], [MID], [HIGH].
Pour restaurer la courbe par défaut de
l’égaliseur, appuyez sur la touche ENTER
et maintenez-la enfoncée avant la fin du
réglage.
BALANCE
Permet de régler la balance du son :
[RIGHT-15] – [CENTER] – [LEFT-15].
FAD ER
Permet de régler le niveau relatif : [FRONT15] – [CENTER] – [REAR-15].
LOUDNESS (Intensité sonore dynamique)
Permet de renforcer les graves et les aigus
et d’entendre des sons clairs à des
volumes faibles : [ON], [OFF].
SW LEVEL (Niveau du caisson de graves)
Permet de régler le volume du caisson de
graves : [+2 dB] - [0 dB] - [-2 dB].
AUX VOL (Niveau de volume AUX)
Permet de régler le niveau de volume de
chaque appareil auxiliaire raccordé :
[+18 dB] - [0 dB] - [-8 dB].
Ce réglage évite d’ajuster le niveau de
volume entre les sources.
DEMO (Démonstration)
Permet d’activer la démonstration : [ON],
[OFF].
DIMMER
Permet de modifier la luminosité de
l’affichage : [ON], [OFF].
AUTO SCR (Défilement automatique)
Permet de faire défiler automatiquement
les rubriques longues : [ON], [OFF].
M.DISPLAY (Affichage animé)
Permet d’afficher les motifs animés : [ON],
[OFF].
12FR
Page 49

Informations complémentaires
Précautions
Si votre véhicule est resté garé en plein
soleil, laissez l’appareil refroidir avant de
l’utiliser.
Ne laissez pas la façade ou les appareils
audio à l’intérieur de la voiture, au risque
de provoquer un dysfonctionnement en
raison de la température élevée de celle-ci
en plein soleil.
L’antenne électrique se déploie
automatiquement.
Condensation
Si de la condensation se produisait dans
l’appareil, retirez le disque et attendez
environ une heure que l’humidité se soit
évaporée. Sinon l’appareil ne fonctionnera
pas correctement.
Pour conserver un son de haute qualité
Ne renversez pas de liquide sur l’appareil ou
sur les disques.
Remarques sur les disques
N’exposez pas les disques à la lumière
directe du soleil ou à des sources de
chaleur comme des conduits d’air chaud et
ne les laissez pas dans une voiture garée
en plein soleil.
Avant la lecture, nettoyez
les disques avec un
chiffon de nettoyage en
partant du centre vers
l’extérieur. N’utilisez pas
de solvants tels que de
l’essence, du diluant, des
nettoyants disponibles
dans le commerce.
Cet appareil est conçu pour la lecture des
disques conformes à la norme Compact
Disc (CD). Les DualDiscs et certains disques
de musique encodés avec des
technologies de protection des droits
d’auteur ne sont pas conformes à la norme
Compact Disc (CD), par conséquent, ces
disques ne peuvent pas être lus avec cet
appareil.
Disques NE POUVANT PAS être lus sur cet
appareil
Disques sur lesquels sont collés des
étiquettes, des autocollants, de l’adhésif
ou du papier. La lecture de tels disques
pourrait entraîner un problème de
fonctionnement ou endommager le
disque.
Disques de forme non standard
(notamment en forme de cœur, de carré
ou d’étoile). Vous risquez
d’endommager votre appareil si vous
essayez de les lire.
Disques de 8 cm.
Remarques sur les disques CD-R/CD-RW
Nombre maximal de : (CD-R/CD-RW
uniquement)
dossiers (albums) : 150 (y compris le
répertoire racine)
fichiers (plages) et dossiers : 300 (ce
nombre peut être inférieur à 300 si les
noms de dossiers/fichiers contiennent
un grand nombre de caractères)
caractères affichables pour un nom de
dossier/fichier : 32 (Joliet)/64 (Romeo)
Si le disque en multisession commence par
une session CD-DA, il est identifié comme
un disque CD-DA et les autres sessions ne
sont pas lues.
Disques NE POUVANT PAS être lus sur cet
appareil
Les CD-R/CD-RW avec une qualité
d’enregistrement médiocre.
Les CD-R/CD-RW enregistrés avec un
appareil d’enregistrement incompatible.
Les CD-R/CD-RW finalisés de façon
incorrecte.
Les CD-R/CD-RW autres que ceux
enregistrés au format de CD de musique
ou au format MP3 conforme à la norme
ISO9660 Level 1/Level 2, Joliet/Romeo
ou multisession.
13FR
Page 50

Ordre de lecture des fichiers MP3/
MP3/WMA
Dossier (album)
Fichier MP3/WMA
(plage)
WMA
A propos de l’iPod
Vous pouvez raccorder cet appareil aux
modèles d'iPod suivants. Mettez vos
périphériques iPod à jour avec le logiciel le
plus récent avant toute utilisation.
Made for
iPod touch (5ème génération)
iPod touch (4ème génération)
iPod touch (3ème génération)
iPod touch (2ème génération)
iPod classic
iPod nano (7ème génération)
iPod nano (6ème génération)
iPod nano (5ème génération)
iPod nano (4ème génération)
iPod nano (3ème génération)
iPod nano (2ème génération)
iPod nano (1ère génération)*
iPhone 5
iPhone 4S
iPhone 4
iPhone 3GS
iPhone 3G
* La commande passager n’est pas disponible pour
l’iPod nano (1ère génération).
« Made for iPod » et « Made for iPhone »
signifient qu’un accessoire électronique a
été conçu pour être connecté
spécifiquement à un iPod ou un iPhone,
respectivement, et qu’il a été certifié par le
développeur comme étant conforme aux
normes de performances Apple. Apple
n’est pas responsable du bon
fonctionnement de cet appareil ni de sa
conformité aux normes et réglementations
de sécurité. Veuillez noter que l’utilisation
de cet accessoire avec un iPod ou un
iPhone peut affecter les performances des
transmissions sans fil.
Si vous avez des questions ou des problèmes
concernant cet appareil qui ne sont pas
abordés dans ce mode d’emploi, contactez
votre revendeur Sony.
Entretien
Nettoyage des connecteurs
L’appareil peut ne pas fonctionner
correctement si les connecteurs entre
l’appareil et la façade sont souillés. Pour
éviter cette situation, retirez la façade
(page 5) et nettoyez les connecteurs à l’aide
d’un coton-tige. N’exercez pas une pression
trop forte, sinon les connecteurs peuvent
être endommagés.
Remarques
Pour plus de sécurité, coupez le contact avant de
nettoyer les connecteurs et retirez la clé de
contact.
Ne touchez jamais les connecteurs directement
avec les doigts ou avec un objet métallique.
14FR
Page 51

Spécifications
Radio
FM
Plage de syntonisation : 87,5 – 108,0 MHz
Borne d’antenne :
Connecteur d’antenne externe
Moyenne fréquence : 25 kHz
Sensibilité utile : 8 dBf
Sélectivité : 75 dB à 400 kHz
Rapport signal/bruit : 80 dB (stéréo)
Séparation : 50 dB à 1 kHz
Réponse en fréquence : 20 – 15 000 Hz
MW (PO)/LW (GO)
Plage de syntonisation :
MW : 531 – 1 602 kHz
LW : 153 – 279 kHz
Borne d’antenne :
Connecteur d’antenne externe
Moyenne fréquence :
9 124,5 kHz ou 9 115,5 kHz/4,5 kHz
Sensibilité : MW (PO) : 26 µV, LW (GO) : 45 µV
Lecteur CD
Rapport signal-bruit : 95 dB
Réponse en fréquence : 10 – 20 000 Hz
Pleurage et scintillement :
En dessous du seuil mesurable
Codec correspondant :
MP3 (.mp3) et WMA (.wma)
Généralités
Sorties :
Borne de sorties audio (arrière, caisson de
graves)
Borne de commande de l’antenne
électrique/amplificateur de puissance (REM
OUT)
Entrées :
Borne d’entrée de commande à distance
Borne d’entrée de l’antenne
Prise d’entrée AUX (mini-prise stéréo)
Port USB
Alimentation requise : batterie de véhicule 12 V
CC (masse négative)
Dimensions :
Environ 178 mm × 50 mm × 177 mm
(l/h/p)
Dimensions du support :
Environ 182 mm × 53 mm × 160 mm
(l/h/p)
Poids : environ 1,2 kg
Contenu du coffret :
Appareil principal (1)
Composants destinés à l’installation et au
raccordement (1 jeu)
Il est possible que votre revendeur ne
dispose pas de certains accessoires décrits
ci-dessus. Veuillez vous adresser à lui pour
tout renseignement complémentaire.
La conception et les spécifications sont
sujettes à modification sans préavis.
Lecteur USB
Interface : USB (haute vitesse)
Courant maximal : 1 A
Nombre maximal de données reconnaissables :
dossiers (albums) : 128
fichiers (plages) par dossier : 512
Codec correspondant :
MP3 (.mp3) et WMA (.wma)
Amplificateur de puissance
Sortie : sorties haut-parleurs
Impédance des haut-parleurs : 4 – 8 ohms
Puissance de sortie maximale : 55 W × 4 (sous
4ohms)
Droits d’auteur
Quick-BrowZer est une marque commerciale de
Sony Corporation.
Windows Media est une marque ou une marque
déposée de Microsoft Corporation aux EtatsUnis et/ou dans d’autres pays.
Ce produit est protégé par des droits de
propriété intellectuelle de Microsoft
Corporation. Toute utilisation ou diffusion de la
technologie décrite sortant du cadre de
l’utilisation de ce produit est interdite sans
licence accordée par Microsoft ou une filiale
autorisée de Microsoft.
15FR
Page 52

iPhone, iPod, iPod classic, iPod nano et iPod
touch sont des marques de Apple Inc.,
déposées aux Etats-Unis et dans d’autres pays/
régions.
Licence de la technologie de codage audio
MPEG Layer-3 et des brevets obtenue de
Fraunhofer IIS et Thomson.
Android est une marque commerciale de
Google Inc. Son utilisation est soumise à
l’autorisation de Google.
Dépannage
La liste de contrôles suivante vous aidera à
remédier aux problèmes que vous pourriez
rencontrer avec cet appareil.
Avant de passer en revue la liste de contrôles
ci-dessous, vérifiez les procédures de
raccordement et d’utilisation.
Pour plus de détails sur l’utilisation du fusible
et sur le retrait de l’appareil du tableau de
bord, reportez-vous au manuel
d’installation/raccordement fourni avec cet
appareil.
Si le problème n’est pas résolu, visitez le site
d’assistance indiqué sur la couverture arrière.
Généralités
Aucun son.
La position de la commande d’équilibre
avant-arrière [FADER] n’est pas réglée pour
un système à 2 haut-parleurs.
Aucun bip n’est émis.
Un amplificateur de puissance en option est
raccordé et vous n’utilisez pas l’amplificateur
intégré.
16FR
Le contenu de la mémoire a été effacé.
Le câble d’alimentation ou la batterie a été
débranché ou n’est pas correctement
raccordé.
Les stations mémorisées et l’heure sont
effacées.
Le fusible a sauté.
Emission de bruit lorsque la position de la clé
de contact est modifiée.
Les câbles ne sont pas raccordés
correctement au connecteur d’alimentation
destiné aux accessoires.
En cours de lecture ou de réception, le mode
de démonstration démarre.
Si aucune opération n’est effectuée pendant
5 minutes avec [DEMO-ON] activé, le mode
de démonstration démarre.
Réglez [DEMO-OFF] (page 12).
Page 53

L’affichage disparaît de la fenêtre d’affichage
ou il ne s’affiche pas.
Le régulateur de luminosité est réglé sur
[DIM-ON] (page 12).
L’affichage est désactivé si vous maintenez la
touche OFF enfoncée.
Maintenez de nouveau la touche OFF de
l’appareil enfoncée jusqu’à ce que
l’affichage apparaisse.
Les connecteurs sont sales (page 14).
Les touches de commande sont inopérantes.
Le disque ne s’éjecte pas.
Maintenez les touches DSPL et (retour)/
MODE enfoncées pendant plus de 2 secondes
pour réinitialiser l’appareil.
Le contenu stocké dans la mémoire est
effacé.
Pour votre sécurité, ne réinitialisez pas
l’appareil pendant que vous conduisez.
Réception radio
Impossible de capter des stations.
Le son comporte des parasites.
Le raccordement n’est pas correct.
Vérifiez le raccordement de l’antenne de
voiture.
Si l’antenne automatique ne se déploie
pas, vérifiez le raccordement du câble de
commande de l’antenne électrique.
Impossible de capter une présélection.
Le signal capté est trop faible.
RDS
Une recherche (SEEK) commence après
quelques secondes d’écoute.
La station ne diffuse pas de programmes de
radioguidage (fonction TP désactivée) ou le
signal capté est faible.
Désactivez TA (page 7).
Aucun message de radioguidage.
Activez TA (page 7).
La station n’émet pas de messages de
radioguidage, malgré l’indication TP.
Réglez la fréquence pour capter une autre
station.
PTY affiche [- - - - - - - -].
La station actuellement captée n’est pas une
station RDS.
Les données RDS n’ont pas été reçues.
La station ne spécifie pas le type d’émission.
Le nom du service de l’émission clignote.
Il n’existe aucune fréquence alternative pour
la station actuelle.
Appuyez sur SEEK +/– pendant que le nom
du service de l’émission clignote. [PI SEEK]
apparaît et l’appareil commence à chercher
une autre fréquence avec les mêmes
données PI (identification de programme).
Lecture de CD
La lecture du disque ne démarre pas.
Le disque est défectueux ou sale.
Les CD-R/CD-RW ne sont pas destinés à un
usage audio (page 13).
Impossible de lire des fichiers MP3/WMA.
Le disque n’est pas compatible avec le format
ou la version MP3/WMA. Pour plus de détails
sur les disques et formats compatibles, visitez
le site d’assistance.
Certains fichiers MP3/WMA exigent un délai
plus long que d’autres avant le début de la
lecture.
La lecture des types de disques suivants
exige un délai de démarrage plus long.
Disques comportant une hiérarchie de
dossiers complexe.
Disques enregistrés en multisession.
Disques auxquels il est possible d’ajouter
des données.
Le son saute.
Le disque est défectueux ou sale.
Lecture USB
Ce lecteur ne permet pas la lecture
d’éléments via un concentrateur USB.
Cet appareil ne peut pas reconnaître les
périphériques USB raccordés via un
concentrateur USB.
17FR
Page 54

La lecture sur un périphérique USB exige un
délai de démarrage plus long.
Le périphérique USB contient des fichiers
comportant une hiérarchie de dossiers
complexe.
Le son est intermittent.
Il est possible que le son soit intermittent à
un haut débit binaire supérieur à 320 kbit/s.
Affichage des erreurs et messages
ERROR
Le disque est sale ou inséré à l’envers.
Nettoyez le disque ou insérez-le
correctement.
Un disque vierge a été inséré.
Le disque ne peut pas être lu en raison d’un
problème.
Insérez-en un autre.
Le périphérique USB n’a pas été
automatiquement reconnu.
Raccordez-le de nouveau.
Appuyez sur pour retirer le disque.
HUB NO SUPRT (concentrateurs non pris en
charge)
Cet appareil ne prend pas en charge les
concentrateurs USB.
IPD STOP
Lorsque la lecture répétée n’est pas activée,
la lecture prend fin au terme de la dernière
plage de l’album.
L’application de musique de l’iPod/iPhone se
referme.
Appuyez sur PAUSE pour recommencer la
lecture.
NO AF (aucune fréquence alternative)
Il n’existe aucune fréquence alternative pour
la station actuelle.
Appuyez sur SEEK +/– pendant que le nom
du service de l’émission clignote. L’appareil
commence à rechercher une autre
fréquence avec les mêmes données
d’identification de programme (PI)
(l’indication [PI SEEK] apparaît).
NO DEV (pas de périphérique)
[USB] est la source sélectionnée, mais aucun
périphérique USB n’est raccordé. Un
périphérique USB ou un câble USB a été
déconnecté en cours de lecture.
Raccordez un périphérique USB et un câble
USB.
NO MUSIC
Le disque ou le périphérique USB ne contient
pas de fichiers de musique.
Insérez un CD de musique.
Raccordez un périphérique USB contenant
des fichiers de musique.
NO TP (aucun programme de radioguidage)
L’appareil continue à rechercher les stations
TP disponibles.
OVERLOAD
Le périphérique USB est surchargé.
Déconnectez le périphérique USB, puis
changez la source en appuyant sur SRC.
Le périphérique USB est défaillant ou un
périphérique non pris en charge est
raccordé.
PUSH EJT (appuyer sur éjecter)
Impossible d’éjecter le disque.
Appuyez sur (éjecter).
READ
L’appareil lit toutes les informations de plage
et d’album du disque.
Attendez que la lecture soit terminée et la
lecture commence automatiquement.
Selon la structure du disque, cette
opération peut prendre plus d’une minute.
USB NO SUPRT (USB non pris en charge)
Le périphérique USB raccordé n’est pas pris
en charge.
Pour plus de détails sur la compatibilité de
votre périphérique USB, visitez le site
d’assistance.
[] ou []
Pendant le retour ou l’avance rapide, vous
avez atteint le début ou la fin du disque et
vous ne pouvez pas aller plus loin.
18FR
Page 55

[]
Impossible d’afficher le caractère.
Si ces solutions ne permettent pas
d’améliorer la situation, contactez votre
revendeur Sony le plus proche.
Si vous portez l’appareil à réparer en raison
d’un problème de lecture de CD, apportez le
disque utilisé au moment où le problème
s’est produit.
19FR
Page 56

Per motivi di sicurezza, assicurarsi di installare
il presente apparecchio sul cruscotto
dell’auto.
Per l’installazione e i collegamenti, consultare
il manuale per l’installazione e i collegamenti
in dotazione.
Fabbricato in Thailandia
Proprietà diodo laser
Durata emissione: Continua
Uscita laser: Meno di 53,3 W
(L’uscita corrisponde al valore misurato a una
distanza di 200 mm dalla superficie della lente
dell’obiettivo sul blocco pick-up ottico con
apertura di 7 mm.)
Avviso per i clienti: le seguenti informazioni
riguardano esclusivamente gli apparecchi
venduti in paesi in cui sono applicate le
direttive UE
Produttore: Sony Corporation, 1-7-1 Konan
Minato-ku Tokyo, 108-0075 Giappone
Per la conformità del prodotto in ambito UE:
Sony Deutschland GmbH, Hedelfinger Strasse
61, 70327 Stuttgart, Germania
Avvertenza relativa all’installazione su
un’auto sprovvista della posizione ACC
(accessoria) sul blocchetto di accensione
Assicurarsi di impostare la funzione AUTO OFF
(pagina 12). L’apparecchio si spegne
completamente e in modo automatico dopo
l’intervallo di tempo impostato dal relativo
spegnimento, per evitare lo scaricamento
della batteria. Se non viene impostata la
funzione AUTO OFF, tenere premuto OFF fino
a quando l’indicazione non scompare ogni
volta che si spegne il motore.
2IT
Page 57

Sommario
Guida ai componenti e ai comandi. . . . . . . . 4
Operazioni preliminari
Rimozione del pannello anteriore. . . . . . . . . 5
Impostazione dell’orologio . . . . . . . . . . . . . . 6
Connessione di un iPod/dispositivo USB . . . 6
Collegamento di un altro dispositivo audio
portatile . . . . . . . . . . . . . . . . . . . . . . . . . . . 6
Ascolto della radio
Ascolto della radio . . . . . . . . . . . . . . . . . . . . . 7
Uso di RDS (sistema dati radio) . . . . . . . . . . . 7
Riproduzione
Riproduzione di un disco. . . . . . . . . . . . . . . . 9
Riproduzione del contenuto di un iPod/
dispositivo USB . . . . . . . . . . . . . . . . . . . . . 9
Ricerca e riproduzione dei brani . . . . . . . . . 10
Impostazioni
Disattivazione del modo DEMO . . . . . . . . . .11
Funzionamento delle impostazioni di
base . . . . . . . . . . . . . . . . . . . . . . . . . . . . . .11
Impostazioni GENERAL . . . . . . . . . . . . . . . . 12
Impostazioni SOUND . . . . . . . . . . . . . . . . . . 12
EQ3 PRESET . . . . . . . . . . . . . . . . . . . . . . . 12
EQ3 SETTING . . . . . . . . . . . . . . . . . . . . . . 12
Impostazioni DISPLAY . . . . . . . . . . . . . . . . . 13
Informazioni aggiuntive
Precauzioni . . . . . . . . . . . . . . . . . . . . . . . . . . 13
Manutenzione. . . . . . . . . . . . . . . . . . . . . . . . 15
Caratteristiche tecniche . . . . . . . . . . . . . . . . 15
Guida alla soluzione dei problemi . . . . . . . 17
3IT
Page 58

Guida ai componenti e ai comandi
Unità principale
Sul tasto numerico 3/ (ripetizione) è presente un punto tattile.
SRC (sorgente)
Accendere l’apparecchio.
Cambiare la sorgente.
-OFF
Tenere premuto per 1 secondo per
spegnere l’apparecchio.
Tenere premuto per più di 2 secondi per
spegnere l’apparecchio e il display.
Tasto rilascio pannello anteriore
SEEK +/–
Sintonizzare automaticamente le stazioni
radio. Tenere premuto il tasto per la
sintonizzazione manuale.
/ (precedente/successivo)
/ (indietro/avanti veloce)
Manopola di controllo
Ruotare per regolare il volume.
ENTER
Accedere alla voce selezionata.
MENU
Aprire il menu di configurazione.
Ricettore del telecomando
Alloggiamento del disco
Finestra del display
(espulsione disco)
(browse) (pagina 10)
Accedere al modo browse durante la
riproduzione.
(indietro)
Ritornare al display precedente.
MODE (pagina 7, 9)
AF (frequenze alternative)/TA (notiziari
sul traffico)
Impostare AF e TA.
-PTY (tipo di programma)
Tenere premuto per selezionare PTY in
RDS.
Tasti numerici (da 1 a 6)
Ricevere le stazioni radio memorizzate.
Tenere premuto per memorizzare le
stazioni.
ALBUM /
Saltare un album per un dispositivo
audio. Tenere premuto per saltare gli
album in maniera continua.
(ripetizione)
SHUF (casuale)
PAU SE
4IT
Page 59

DSPL (display)
Cambiare le voci sul display.
-SCRL (scorrimento)
Tenere premuto per scorrere una voce
del display.
Presa di ingresso AUX
Porta USB
Operazioni preliminari
Rimozione del pannello
anteriore
Per evitare il furto dell’apparecchio, è
possibile rimuoverne il pannello anteriore.
1 Tenere premuto OFF .
L’apparecchio si spegne.
2 Premere il tasto rilascio pannello
anteriore , quindi estrarre il
pannello tirandolo verso di sé.
Segnale di avvertimento
Se la chiave di accensione viene impostata
sulla posizione OFF senza che il pannello
anteriore sia stato rimosso, viene emesso per
alcuni secondi un segnale acustico di
avvertimento. Tale segnale viene emesso
solo se è in uso l’amplificatore incorporato.
Installazione del pannello anteriore
5IT
Page 60

Impostazione dell’orologio
Per il collegamento di un iPhone 5
Collegamento di un altro
1
Premere MENU, ruotare la
manopola di controllo per
selezionare [GENERAL], quindi
premere la manopola.
2 Ruotare la manopola di controllo
per selezionare [CLOCK-ADJ], quindi
premere la manopola.
L’indicazione dell’ora lampeggia.
3 Ruotare la manopola di controllo
per impostare l’ora e i minuti.
Per passare da una cifra all’altra
dell’indicazione digitale, premere SEEK
+/–.
4 Dopo aver impostato i minuti,
premere MENU.
L’impostazione è completata e l’orologio
viene attivato.
Per visualizzare l’orologio, premere DSPL.
Connessione di un iPod/
dispositivo USB
1 Abbassare il volume
sull’apparecchio.
2 Collegare l’iPod/dispositivo USB
all’apparecchio.
Per collegare un iPod/iPhone, utilizzare il
cavo di collegamento USB per iPod (non
in dotazione).
dispositivo audio portatile
1 Spegnere il dispositivo audio
portatile.
2 Abbassare il volume
sull’apparecchio.
3 Collegare il dispositivo audio
portatile alla presa di ingresso AUX
(minipresa stereo) dell’apparecchio
con un cavo di collegamento* (non
in dotazione).
* Assicurarsi di utilizzare una spina diritta.
4 Premere SRC per selezionare [AUX].
Per far corrispondere il livello del
volume del dispositivo collegato ad altre
sorgenti
Avviare la riproduzione del dispositivo audio
portatile a un volume moderato, quindi
impostare il volume di ascolto consueto
sull’apparecchio.
Premere MENU e ruotare la manopola di
controllo.
Selezionare [SOUND] [AUX VOL]
(pagina 12).
6IT
Page 61

Ascolto della radio
Ascolto della radio
Per ascoltare la radio, premere SRC per
selezionare [TUNER].
Memorizzazione automatica (BTM)
Memorizzazione manuale
1 Durante la ricezione della stazione
che si desidera memorizzare,
tenere premuto un tasto numerico
(da 1 a 6) per visualizzare [MEM].
Ricezione delle stazioni
memorizzate
1 Premere MODE per cambiare banda
(FM1, FM2, FM3, MW o LW).
2 Premere MENU, ruotare la
manopola di controllo per
selezionare [GENERAL], quindi
premere la manopola.
3 Ruotare la manopola di controllo
per selezionare [BTM], quindi
premere la manopola.
L’apparecchio memorizza le stazioni in
corrispondenza dei tasti numerici in base
all’ordine delle frequenze.
Sintonizzazione
1 Premere MODE per cambiare banda
(FM1, FM2, FM3, MW o LW).
2 Eseguire la sintonizzazione.
Per eseguire la sintonizzazione manuale
Tenere premuto SEEK +/– per individuare
la frequenza approssimativa, quindi
premere più volte SEEK +/– per
sintonizzarsi esattamente sulla
frequenza desiderata.
Per eseguire la sintonizzazione
automatica
Premere SEEK +/–.
La ricerca si arresta non appena
l’apparecchio riceve una stazione.
Ripetere questa procedura fino alla
ricezione della stazione desiderata.
1 Selezionare la banda, quindi
premere un tasto numerico (da 1 a
6).
Uso di RDS (sistema dati
radio)
Impostazione della frequenza
alternativa (AF) e dei notiziari sul
traffico (TA)
AF sintonizza continuamente la stazione con
il segnale più potente, mentre TA fornisce
informazioni o trasmette programmi correnti
relativi al traffico (TP), se disponibili.
1 Premere AF/TA per selezionare [AF-
ON], [TA-ON], [AF/TA-ON] o [AF/TAOFF].
Per memorizzare le stazioni RDS con
l’impostazione AF e TA
È possibile preselezionare le stazioni RDS
insieme a un’impostazione AF/TA. Impostare
AF/TA, quindi memorizzare la stazione
mediante la funzione BTM o manualmente.
Se si effettua la preselezione manuale, è
possibile preselezionare anche stazioni non
RDS.
7IT
Page 62

Per ricevere gli annunci di emergenza
Se è attivato il modo AF o TA, gli annunci di
emergenza interrompono automaticamente
la riproduzione della sorgente selezionata.
Regolazione del livello di volume
durante un notiziario sul traffico
Il livello viene memorizzato per i successivi
notiziari sul traffico, indipendentemente dal
normale livello del volume.
Per mantenere un programma regionale
(REGIONAL)
Se le funzioni AF e REGIONAL sono attive, la
stazione sintonizzata non sarà sostituita da
una stazione regionale con una frequenza
più forte. Se si intende lasciare tale area di
ricezione regionale, impostare [REG-OFF]
nelle impostazioni GENERAL durante la
ricezione FM (pagina 12).
Questa funzione non è disponibile nel Regno
Unito e in altre aree.
Funzione Local Link (solo per il Regno
Unito)
Questa funzione consente di selezionare
altre stazioni locali della stessa area, anche
se non sono memorizzate in corrispondenza
dei tasti numerici.
Durante la ricezione FM, premere un tasto
numerico (da 1 a 6) in corrispondenza del
quale è memorizzata una stazione locale.
Entro 5 secondi, premere nuovamente il
tasto numerico della stazione locale.
Ripetere questa procedura fino alla ricezione
della stazione locale.
2 Ruotare la manopola di controllo
fino a visualizzare il tipo di
programma desiderato, quindi
premere la manopola.
L’apparecchio avvia la ricerca di una
stazione che trasmette il tipo di
programma selezionato.
Tipi di programmi
NEWS (Notiziario), AFFAIRS (Attualità), INFO
(Informazioni), SPORT (Sport), EDUCATE
(Educazione), DRAMA (Teatro), CULTURE
(Cultura), SCIENCE (Scienza), VARI ED (Vari),
POP M (Musica pop), ROCK M (Musica rock),
EASY M (Musica leggera), LIGHT M (Classica
leggera), CLASSICS (Classica), OTHER M (Altri
tipi di musica), WEATHER (Meteo), FINANCE
(Finanza), CHILDREN (Programmi per
bambini), SOCIAL A (Sociale), RELIGION
(Religione), PHONE IN (Chat show), TRAVEL
(Viaggi), LEISURE (Divertimento e tempo
libero), JAZZ (Musica jazz), COUNTRY
(Musica country), NATION M (Musica
nazionale), OLDIES (Musica anni 50/60),
FOLK M (Musica folk), DOCUMENT
(Documentari)
Impostazione dell’ora (CT)
L’orologio viene regolato mediante i dati CT
della trasmissione RDS.
1 Impostare [CT-ON] nelle
impostazioni GENERAL (pagina 12).
Selezione dei tipi di programma
(PTY)
Utilizzare il modo PTY per visualizzare o
cercare un tipo di programma desiderato.
1 Tenere premuto PTY durante la
ricezione FM.
8IT
Page 63

Riproduzione
Riproduzione di un disco
1 Inserire il disco (lato con l’etichetta
rivolto verso l’alto).
Viene avviata la riproduzione
automaticamente.
Riproduzione del
Note
Per ulteriori informazioni sulla compatibilità del
dispositivo USB in uso, visitare il sito di assistenza
riportato sulla retrocopertina.
Non è supportata la riproduzione dei file MP3/
WMA riportati di seguito:
file con compressione senza perdita di dati
file protetti da copyright
file DRM (gestione dei diritti digitali)
file audio multicanale
1 Collegare un iPod/dispositivo USB
alla porta USB (pagina 6).
Viene avviata la riproduzione.
Se è già collegato un dispositivo, per
avviare la riproduzione premere SRC per
selezionare [USB] (quando viene
riconosciuto l’iPod, sul display viene
visualizzato [IPD]).
2 Regolare il volume sul presente
apparecchio.
Per interrompere la riproduzione
Tenere premuto OFF per 1 secondo.
contenuto di un iPod/
dispositivo USB
In queste Istruzioni per l’uso, il termine
“iPod” viene utilizzato come riferimento
generale alle funzioni iPod di un iPod o
iPhone, se non specificato diversamente dal
testo o dalle illustrazioni.
Per ulteriori informazioni sulla compatibilità
dell’iPod in uso, vedere “Informazioni su
iPod” (pagina 14) oppure visitare il sito di
assistenza riportato sulla retrocopertina.
È possibile utilizzare dispositivi USB di tipo
MSC (Memorizzazione di massa, ad esempio
unità flash USB, lettori multimediali digitali,
smartphone Android™) compatibili con lo
standard USB.
A seconda del lettore multimediale digitale o
dello smartphone Android in uso, potrebbe
essere richiesta la modalità di collegamento
USB a MSC.
Per rimuovere il dispositivo
Interrompere la riproduzione e rimuovere il
dispositivo.
Avvertenza durante l’uso dell’iPhone
Se l’iPhone viene collegato tramite USB, il
volume delle conversazioni telefoniche è
controllato dall’iPhone, non dall’apparecchio.
Non alzare il volume sull’apparecchio
durante la conversazione telefonica per
evitare un eventuale aumento improvviso del
volume dopo aver concluso la chiamata.
Uso diretto dell’iPod
(Controllo passeggero)
Tenere premuto MODE durante la
riproduzione per visualizzare [MODE IPOD] e
abilitare l’uso diretto dell’iPod.
Il volume può essere regolato solo mediante
l’apparecchio.
9IT
Page 64

Per chiudere Controllo passeggero
Tenere premuto MODE per visualizzare
[MODE AUDIO].
Ricerca e riproduzione dei
brani
Riproduzione ripetuta e in ordine
casuale
1 Durante la riproduzione, premere
(ripetizione) per la riproduzione
ripetuta o SHUF per la riproduzione
in ordine casuale.
2 Ruotare la manopola di controllo
per selezionare la categoria di
ricerca desiderata, quindi premerla
per confermare.
3 Ripetere il punto 2 per cercare il
brano desiderato.
Viene avviata la riproduzione.
Per annullare il modo Quick-BrowZer
Premere (browse).
Ricerca mediante la modalità salto
delle voci (Modo Jump)
1 Premere (browse).
2 Premere SEEK +.
2 Premere più volte (ripetizione) o
SHUF per selezionare il modo di
riproduzione ripetuta o in ordine
casuale desiderato.
La riproduzione nel modo di
riproduzione selezionato potrebbe
impiegare qualche tempo ad avviarsi.
I modi di riproduzione disponibili variano a
seconda della sorgente audio selezionata.
Ricerca di un brano in base al nome
(Quick-BrowZer™)
1 Durante la riproduzione di CD o
USB, premere (browse)* per
visualizzare l’elenco delle categorie
di ricerca.
Quando viene visualizzato l’elenco dei
brani, premere più volte (indietro).
* Durante la riproduzione, premere (browse)
per più di 2 secondi per tornare direttamente
all’inizio dell’elenco delle categorie.
3 Ruotare la manopola di controllo
per selezionare l’elemento.
L’elenco viene saltato in incrementi pari
al 10% del numero totale di elementi.
4 Premere ENTER per tornare al modo
Quick-BrowZer.
Viene visualizzato l’elemento
selezionato.
5 Ruotare la manopola di controllo
per selezionare la voce desiderata,
quindi premere la manopola.
Viene avviata la riproduzione.
10IT
Page 65

Impostazioni
Disattivazione del modo
DEMO
È possibile disattivare il display di
dimostrazione che viene visualizzato mentre
l’apparecchio è spento.
Funzionamento delle
impostazioni di base
È possibile impostare le voci nel menu con la
seguente procedura.
È possibile impostare le seguenti voci a
seconda della sorgente e dell’impostazione.
1 Premere MENU.
1 Premere MENU, ruotare la
manopola di controllo per
selezionare [DISPLAY], quindi
premere la manopola.
2 Ruotare la manopola di controllo
per selezionare [DEMO], quindi
premere la manopola.
3 Ruotare la manopola di controllo
per selezionare [DEMO-OFF], quindi
premere la manopola.
L’impostazione è completata.
4 Premere due volte (indietro).
Il display torna al modo di ricezione/
riproduzione normale.
2 Ruotare la manopola di controllo
per selezionare la categoria di
impostazione, quindi premere la
manopola.
Le categorie di impostazione sono le
seguenti:
Impostazioni GENERAL (pagina 12)
Impostazioni SOUND (pagina 12)
Impostazioni DISPLAY (pagina 13)
3 Ruotare la manopola di controllo
per selezionare le opzioni, quindi
premere la manopola.
Per tornare al display precedente
Premere (indietro).
11IT
Page 66

Impostazioni GENERAL Impostazioni SOUND
CLOCK-ADJ (Regolazione dell’orologio)
(pagina 6)
CAUT ALM (Segnale di avvertimento)
Consente di attivare/disattivare il segnale
di avvertimento: [ON], [OFF] (pagina 5).
(Disponibile solo quando l’apparecchio è
spento).
BEEP
Consente di attivare/disattivare il segnale
acustico: [ON], [OFF].
AUTO OFF
Consente di spegnere automaticamente
l’apparecchio dopo un intervallo di tempo
prestabilito dallo spegnimento
dell’apparecchio stesso: [NO], [30S]
(30 secondi), [30M] (30 minuti), [60M]
(60 minuti).
AUX-A (Audio AUX)
Consente di attivare/disattivare il display
della sorgente AUX: [ON], [OFF].
(Disponibile solo quando l’apparecchio è
spento).
CT (ora)
Consente di attivare/disattivare la
funzione CT: [ON], [OFF].
REGIONAL
Consente di limitare la ricezione a una
regione specifica: [ON], [OFF]. (Disponibile
solo durante la ricezione FM).
BTM (pagina 7)
EQ3 PRESET
Consente di selezionare una curva
dell’equalizzatore da 7 curve
dell’equalizzatore o di disattivarla:
[XPLOD], [VOCAL], [EDGE], [CRUISE],
[SPACE], [GRAVITY], [CUSTOM], [OFF].
È possibile memorizzare l’impostazione
della curva dell’equalizzatore per ciascuna
sorgente.
EQ3 SETTING
Consente di impostare [CUSTOM] di EQ3.
Consente di selezionare le impostazioni
dell’equalizzatore: [LOW], [MID], [HIGH].
Per ripristinare la curva dell’equalizzatore
impostata in fabbrica, tenere premuto
ENTER prima del completamento
dell’impostazione.
BALANCE
Consente di regolare il bilanciamento
dell’audio: [RIGHT-15] – [CENTER] –
[LEFT-15].
FAD ER
Consente di regolare il livello relativo:
[FRONT-15] – [CENTER] – [REAR-15].
LOUDNESS (Enfasi dei bassi)
Consente di potenziare i bassi e gli acuti
per ottenere un audio nitido a livelli di
volume bassi: [ON], [OFF].
SW LEVEL (Livello subwoofer)
Consente di regolare il volume del
subwoofer: [+2 dB] - [0 dB] - [-2 dB].
AUX VOL (Livello volume AUX)
Consente di regolare il livello del volume
di ciascun dispositivo ausiliario collegato:
[+18 dB] - [0 dB] - [-8 dB].
Questa impostazione elimina la necessità
di regolare il livello del volume tra sorgenti
diverse.
12IT
Page 67

Impostazioni DISPLAY
Informazioni aggiuntive
DEMO (Dimostrazione)
Consente di attivare/disattivare la
dimostrazione: [ON], [OFF].
DIMMER
Consente di modificare la luminosità del
display: [ON], [OFF].
AUTO SCR (Scorrimento automatico)
Consente di fare scorrere
automaticamente le voci composte da
molti caratteri: [ON], [OFF].
M.DISPLAY (Display in movimento)
Consente di visualizzare i modelli in
movimento: [ON], [OFF].
Precauzioni
Se l’auto è stata parcheggiata alla luce
solare diretta, attendere che l’apparecchio
si raffreddi prima di utilizzarlo.
Non lasciare il pannello anteriore o
dispositivi audio all’interno dell’auto;
diversamente, a causa delle temperature
elevate che si sviluppano lasciando l’auto
alla luce solare diretta, potrebbero
verificarsi problemi di funzionamento.
L’antenna elettrica si estende
automaticamente.
Formazione di condensa
Se all’interno dell’apparecchio si è formata
della condensa, rimuovere il disco e
attendere per circa un’ora fino a quando non
si asciuga. Diversamente, l’apparecchio non
funzionerà correttamente.
Per mantenere una qualità audio
elevata
Non bagnare l’apparecchio o i dischi.
Note sui dischi
Non esporre i dischi alla luce solare diretta
o a fonti di calore, quali condotti d’aria
calda, né lasciarli all’interno di un’auto
parcheggiata alla luce solare diretta.
Prima della riproduzione,
pulire i dischi con un
panno di pulizia
procedendo dal centro
verso l’esterno. Non
utilizzare solventi quale
benzene, trielina o
detergenti disponibili in
commercio.
13IT
Page 68

Questo apparecchio è stato progettato per
MP3/WMA
Cartella (album)
File MP3/WMA
(brano)
la riproduzione di dischi conformi allo
standard CD (Compact Disc). I DualDisc e
alcuni dischi audio codificati mediante
tecnologie di protezione dei diritti d’autore
non sono conformi allo standard Compact
Disc (CD), pertanto potrebbe non essere
possibile riprodurli mediante il presente
apparecchio.
Dischi NON riproducibili mediante il
presente apparecchio
Dischi su cui sono applicati etichette,
adesivi oppure nastro o carta adesivi.
Diversamente, potrebbe verificarsi un
problema di funzionamento oppure il
disco potrebbe venire danneggiato.
Dischi dalla forma irregolare (ad
esempio, a forma di cuore, quadrato o
stella). Diversamente, è possibile
causare problemi di funzionamento
all’apparecchio.
Dischi da 8 cm.
Note sui dischi CD-R/CD-RW
Numero massimo di: (solo CD-R/CD-RW)
cartelle (album): 150 (inclusa la cartella
principale)
file (brani) e cartelle: 300 (o un numero
inferiore a 300, se il nome di una
cartella/di un file contiene molti
caratteri)
caratteri visualizzabili per un nome di
cartella/file: 32 (Joliet)/64 (Romeo)
Se il disco multisessione inizia con una
sessione CD-DA, viene riconosciuto come
disco CD-DA e le altre sessioni non
vengono riprodotte.
Dischi NON riproducibili mediante il
presente apparecchio
CD-R/CD-RW con scarsa qualità di
registrazione.
CD-R/CD-RW registrati mediante un
dispositivo di registrazione
incompatibile.
CD-R/CD-RW finalizzati in modo non
corretto.
CD-R/CD-RW diversi da quelli registrati
nel formato CD audio o nel formato MP3
conforme allo standard ISO9660 Level 1/
Level 2, Joliet/Romeo o multisessione.
Ordine di riproduzione di file MP3/
WMA
Informazioni su iPod
È possibile effettuare il collegamento ai
modelli di iPod riportati di seguito. Prima
dell’uso, aggiornare i dispositivi iPod
all’ultima versione del software.
Made for
iPod touch (5
iPod touch (4
iPod touch (3
iPod touch (2
iPod classic
iPod nano (7
iPod nano (6
iPod nano (5
iPod nano (4
iPod nano (3
iPod nano (2
iPod nano (1
iPhone 5
iPhone 4S
iPhone 4
iPhone 3GS
iPhone 3G
* La funzione di controllo passeggero non è
disponibile per iPod nano (1
a
generazione)
a
generazione)
a
generazione)
a
generazione)
a
generazione)
a
generazione)
a
generazione)
a
generazione)
a
generazione)
a
generazione)
a
generazione)*
a
generazione).
14IT
Page 69

“Made for iPod” e “Made for iPhone”
significano che un accessorio elettronico è
stato appositamente progettato per il
collegamento all’iPod o all’iPhone,
rispettivamente, ed è stato certificato dallo
sviluppatore per la conformità agli
standard Apple. Apple non può essere
ritenuta responsabile del funzionamento
del presente dispositivo o della relativa
conformità agli standard di sicurezza e
normativi. Nota: l’utilizzo di questo
accessorio con l’iPod o l’iPhone potrebbe
influire sulle prestazioni wireless.
Per eventuali domande o problemi
riguardanti l’apparecchio non trattati nel
presente manuale, rivolgersi al più vicino
rivenditore Sony.
Manutenzione
Pulizia dei connettori
Se i connettori tra l’apparecchio e il pannello
anteriore sono sporchi, l’apparecchio
potrebbe non funzionare correttamente. Per
evitare questo problema, rimuovere il
pannello anteriore (pagina 5), quindi pulire i
connettori con un cotton fioc. Non esercitare
forza eccessiva. Diversamente, i connettori
potrebbero venire danneggiati.
Note
Per motivi di sicurezza, spegnere il motore prima
di pulire i connettori e rimuovere la chiave dal
blocchetto di accensione.
Non toccare mai direttamente i connettori con le
dita o con oggetti di metallo.
Caratteristiche tecniche
Sintonizzatore
FM
Gamma di frequenze: 87,5 -108,0 MHz
Terminale dell’antenna:
Connettore dell’antenna esterna
Frequenza intermedia: 25 kHz
Sensibilità utilizzabile: 8 dBf
Selettività: 75 dB a 400 kHz
Rapporto segnale-rumore: 80 dB (stereo)
Separazione: 50 dB a 1 kHz
Risposta in frequenza: 20 – 15.000 Hz
MW/LW
Gamma di frequenze:
MW: 531 – 1.602 kHz
LW: 153 – 279 kHz
Terminale dell’antenna:
Connettore dell’antenna esterna
Frequenza intermedia:
9.124,5 kHz o 9.115,5 kHz/4,5 kHz
Sensibilità: MW: 26 µV, LW: 45 µV
Lettore CD
Rapporto segnale-rumore: 95 dB
Risposta in frequenza: 10 – 20.000 Hz
Wow e flutter: al di sotto del limite misurabile
Codec corrispondente:
MP3 (.mp3) e WMA (.wma)
Lettore USB
Interfaccia: USB (velocità massima)
Alimentazione massima: 1 A
Numero massimo di dati riconoscibili:
cartelle (album): 128
file (brani) per cartella: 512
Codec corrispondente:
MP3 (.mp3) e WMA (.wma)
Amplificatore di potenza
Uscita: uscite diffusori
Impedenza diffusori: 4 – 8 ohm
Potenza di uscita massima: 55 W × 4 (a 4 ohm)
15IT
Page 70

Generali
Uscite:
Terminale delle uscite audio (posteriore,
subwoofer)
Antenna elettrica/Terminale di controllo
dell’amplificatore di potenza (REM OUT)
Ingressi:
Terminale di ingresso del telecomando
Terminale di ingresso dell’antenna
Presa di ingresso AUX (minipresa stereo)
Porta USB
Requisiti di alimentazione: batteria auto da 12 V
CC (massa negativa)
Dimensioni:
Circa 178 mm × 50 mm × 177 mm
(l/a/p)
Dimensioni di montaggio:
Circa 182 mm × 53 mm × 160 mm
(l/a/p)
Peso: circa 1,2 kg
Contenuto della confezione:
Unità principale (1)
Elementi per l’installazione e i collegamenti
(1 set)
È possibile che il rivenditore non tratti alcuni
degli accessori di cui sopra. Per ulteriori
informazioni, rivolgersi al rivenditore.
Il design e le caratteristiche tecniche sono
soggetti a modifiche senza preavviso.
Tecnologia di codifica audio MPEG Layer-3 e
brevetti su licenza del Fraunhofer IIS e della
Thomson.
Android è un marchio di fabbrica di Google Inc.
L’uso di questo marchio di fabbrica è soggetto
alle autorizzazioni di Google.
Copyright
Quick-BrowZer è un marchio di fabbrica di Sony
Corporation.
Windows Media è un marchio di fabbrica
registrato o marchio di fabbrica di Microsoft
Corporation negli Stati Uniti e/o in altri paesi.
Questo prodotto è tutelato da specifici diritti di
proprietà intellettuale di Microsoft Corporation.
L’uso o la distribuzione della tecnologia in
questione al di fuori del presente prodotto sono
vietati senza apposita licenza concessa da
Microsoft o da una filiale Microsoft autorizzata.
iPhone, iPod, iPod classic, iPod nano e iPod
touch sono marchi di Apple Inc., registrati negli
U.S.A. e in altri paesi.
16IT
Page 71

Guida alla soluzione dei
problemi
Fare riferimento alla seguente lista di verifica
per risolvere la maggior parte dei problemi
che si potrebbero verificare durante l’uso di
questo apparecchio.
Prima di esaminare l’elenco che segue,
verificare le procedure di collegamento e
d’uso dell’apparecchio.
Per informazioni sull’utilizzo del fusibile e
sulla rimozione dell’apparecchio dal
cruscotto, consultare il manuale per
l’installazione e i collegamenti in dotazione
con il presente apparecchio.
Se il problema persiste, visitare il sito di
assistenza riportato sulla retrocopertina.
Generali
L’audio non viene emesso.
La posizione dell’attenuatore [FADER] non è
appropriata per un sistema a 2 diffusori.
Non viene emesso alcun segnale acustico.
Un amplificatore di potenza opzionale è
collegato e l’amplificatore incorporato non
viene utilizzato.
Il contenuto della memoria è stato cancellato.
Il cavo di alimentazione o la pila sono stati
rimossi o non sono collegati correttamente.
Le stazioni memorizzate e l’ora esatta sono
cancellate.
Si è bruciato il fusibile.
Quando si cambia la posizione della chiave di
accensione, viene emesso un disturbo.
I cavi non sono collegati correttamente al
connettore di alimentazione accessoria
dell’auto.
Durante la riproduzione o la ricezione, viene
attivato il modo di dimostrazione.
Se non viene eseguita alcuna operazione per
5 minuti quando è impostata la funzione
[DEMO-ON], viene attivato il modo di
dimostrazione.
Impostare [DEMO-OFF] (pagina 13).
Il display viene disattivato/non viene
visualizzato nella finestra del display.
L’attenuatore di luminosità è impostato su
[DIM-ON] (pagina 13).
Il display scompare tenendo premuto OFF.
Premere OFF sull’apparecchio fino a
visualizzare il display.
I connettori sono sporchi (pagina 15).
I tasti per le operazioni non funzionano.
Il disco non viene espulso.
Tenere premuto DSPL e (indietro)/MODE
per più di 2 secondi per reimpostare l’unità.
Il contenuto della memoria viene cancellato.
Per ragioni di sicurezza, non reimpostare
l’unità durante la guida.
Ricezione radiofonica
Non è possibile ricevere le stazioni.
L’au di o è distur bato .
Il collegamento non è corretto.
Verificare il collegamento dell’antenna
dell’auto.
Se l’antenna dell’auto non si estende,
verificare il collegamento del cavo di
controllo dell’antenna elettrica.
Non è possibile effettuare la sintonizzazione
preselezionata.
Il segnale di trasmissione è eccessivamente
debole.
RDS
Dopo alcuni secondi di ascolto, viene avviata
la funzione SEEK.
La stazione non è TP oppure il segnale è
debole.
Disattivare il modo TA (pagina 7).
Non viene trasmesso alcun notiziario sul
traffico.
Attivare il modo TA (pagina 7).
La stazione non trasmette notiziari sul traffico
pur essendo una stazione TP.
Sintonizzarsi su un’altra stazione.
Il modo PTY visualizza [- - - - - - - -].
La stazione corrente non è una stazione RDS.
I dati RDS non vengono ricevuti.
La stazione non specifica il tipo di
programma.
17IT
Page 72

Il nome del servizio programmi lampeggia.
Non esiste alcuna frequenza alternativa per la
stazione corrente.
Premere SEEK +/– durante il
lampeggiamento del nome del servizio
programmi. Viene visualizzato [PI SEEK] e
l’apparecchio avvia la ricerca di un’altra
frequenza con gli stessi dati PI
(identificativo programma).
Riproduzione di CD
Il disco non viene riprodotto.
Il disco è difettoso o sporco.
Il CD-R/CD-RW non è per l’uso audio
(pagina 14).
Non è possibile riprodurre file in formato
MP3/WMA.
Il disco non è compatibile con il formato e la
versione MP3/WMA. Per ulteriori informazioni
sui dischi e sui formati riproducibili, visitare il
sito di assistenza.
I file MP3/WMA necessitano di un tempo
maggiore prima di poter essere riprodotti.
Per i dischi indicati di seguito, l’avvio della
riproduzione necessita di un tempo
maggiore.
Dischi registrati con una struttura ad albero
complessa.
Dischi registrati in multisessione.
Dischi ai quali è possibile aggiungere dati.
L’aud io s alta.
Il disco è difettoso o sporco.
Riproduzione USB
Non è possibile eseguire la riproduzione
mediante un hub USB.
Il presente apparecchio non è in grado di
riconoscere i dispositivi USB mediante un hub
USB.
Un dispositivo USB necessita di un tempo
maggiore per avviare la riproduzione.
Il dispositivo USB contiene file con una
struttura ad albero complessa.
L’audio viene trasmesso a intermittenza.
A velocità di trasmissione elevate, superiori a
320 kbps, è possibile che l’audio venga
trasmesso a intermittenza.
Messaggi e indicazioni di errore
ERROR
Il disco è sporco o è stato inserito in senso
contrario.
Pulire il disco o inserirlo correttamente.
È stato inserito un disco vuoto.
Non è possibile riprodurre il disco a causa di
un problema.
Inserire un altro disco.
Il dispositivo USB non è stato riconosciuto
automaticamente.
Ricollegarlo.
Premere per estrarre il disco.
HUB NO SUPRT (hub non supportati)
Il presente apparecchio non supporta hub
USB.
IPD STOP
Quando non è impostata la riproduzione
ripetuta, indica che è terminata la
riproduzione dell’ultimo brano nell’album.
L’applicazione musicale nell’iPod/iPhone è
terminata.
Premere PAUSE per riavviare la
riproduzione.
NO AF (nessuna frequenza alternativa)
Non esiste alcuna frequenza alternativa per la
stazione corrente.
Premere SEEK +/– durante il
lampeggiamento del nome del servizio
programmi. Viene visualizzato [PI SEEK] e
l’apparecchio avvia la ricerca di un’altra
frequenza con gli stessi dati PI
(identificativo programma).
NO DEV (nessun dispositivo)
Come sorgente è stato selezionato [USB]
senza che fosse collegato un dispositivo USB.
Durante la riproduzione sono stati scollegati
un dispositivo o un cavo USB.
Accertarsi di collegare un dispositivo e un
cavo USB.
18IT
Page 73

NO MUSIC
Il disco o il dispositivo USB non contiene file
musicali.
Inserire un CD musicale.
Collegare un dispositivo USB contenente
file musicali.
NO TP (nessun programma sul traffico)
L’apparecchio continua la ricerca di stazioni
TP disponibili.
OVERLOAD
Il dispositivo USB è sovraccaricato.
Scollegare il dispositivo USB, quindi
cambiare sorgente premendo SRC.
Il dispositivo USB presenta problemi di
funzionamento oppure è stato collegato
un dispositivo non supportato.
PUSH EJT (espulsione)
Non è possibile estrarre un disco.
Premere (espulsione).
READ
È in corso la lettura di tutte le informazioni
relative a tutti i brani e agli album del disco.
Una volta terminata l’operazione, la
riproduzione viene avviata
automaticamente. Potrebbe essere
necessario attendere alcuni minuti, a
seconda della struttura del disco.
Se le soluzioni riportate non risolvono il
problema, rivolgersi al più vicino rivenditore
Sony.
Se l’apparecchio viene portato in un centro di
assistenza a causa di un problema relativo
alla riproduzione di un CD, assicurarsi di
portare il disco utilizzato al momento in cui si
è verificato il problema.
USB NO SUPRT (USB non supportato)
Il dispositivo USB collegato non è supportato.
Per ulteriori informazioni sulla
compatibilità del dispositivo USB in uso,
visitare il sito di assistenza.
[] o []
Mentre si procede rapidamente in avanti/
all’indietro, sono stati raggiunti l’inizio o la
fine del contenuto del disco e non è possibile
andare oltre.
[]
Non è possibile visualizzare i caratteri.
19IT
Page 74

Uit veiligheidsoverwegingen moet u dit
apparaat in het dashboard van de auto
installeren.
Raadpleeg de bijgeleverde handleiding voor
installtie/aansluitingen voor meer informatie
over de installatie en aansluitingen.
Geproduceerd in Thailand
Eigenschappen laserdiode
Emissieduur: continu
Laservermogen: minder dan 53,3 W
(Deze uitgangswaarde is gemeten op een
afstand van 200 mm van het lensoppervlak op
het optische opnameblok met 7 mm opening.)
Opmerking voor klanten: de volgende
informatie geldt enkel voor apparatuur
verkocht in landen waar de EU-richtlijnen van
kracht zijn
Producent: Sony Corporation, 1-7-1 Konan
Minato-ku Tokyo, 108-0075 Japan
Voor EU-product conformiteit: Sony
Deutschland GmbH, Hedelfinger Strasse 61,
70327 Stuttgart, Duitsland
Waarschuwing als het contactslot van de
auto geen ACC-positie heeft
Zorg ervoor dat u de functie AUTO OFF instelt
(pagina 11). Hiermee wordt het apparaat na
de ingestelde tijdsduur automatisch volledig
uitgeschakeld nadat u het apparaat hebt
uitgeschakeld. Zo voorkomt u dat de accu
leegraakt. Als u de functie AUTO OFF niet
instelt, houdt u OFF ingedrukt totdat het
scherm verdwijnt wanneer u het contactslot
uitzet.
2NL
Page 75

Inhoudsopgave
Onderdelen en bedieningselementen . . . . . 4
Aan de slag
Het voorpaneel verwijderen . . . . . . . . . . . . . 5
De klok instellen . . . . . . . . . . . . . . . . . . . . . . . 6
Een iPod/USB-apparaat aansluiten . . . . . . . 6
Een ander draagbaar audioapparaat
aansluiten . . . . . . . . . . . . . . . . . . . . . . . . . 6
Luisteren naar de radio
Luisteren naar de radio . . . . . . . . . . . . . . . . . 7
RDS (radiogegevenssysteem) gebruiken . . . 7
Afspelen
Een disc afspelen . . . . . . . . . . . . . . . . . . . . . . 9
Een iPod/USB-apparaat afspelen . . . . . . . . . 9
Tracks zoeken en afspelen. . . . . . . . . . . . . . 10
Instellingen
De DEMO-stand annuleren . . . . . . . . . . . . . .11
Algemene bediening voor instellingen . . . .11
GENERAL-instellingen . . . . . . . . . . . . . . . . . .11
SOUND-instellingen . . . . . . . . . . . . . . . . . . . 12
EQ3 PRESET . . . . . . . . . . . . . . . . . . . . . . . 12
EQ3 SETTING . . . . . . . . . . . . . . . . . . . . . . 12
DISPLAY-instellingen . . . . . . . . . . . . . . . . . . 12
Aanvullende informatie
Voorzorgsmaatregelen . . . . . . . . . . . . . . . . 13
Onderhoud . . . . . . . . . . . . . . . . . . . . . . . . . . 15
Technische gegevens. . . . . . . . . . . . . . . . . . 15
Problemen oplossen . . . . . . . . . . . . . . . . . . 16
3NL
Page 76

Onderdelen en bedieningselementen
Hoofdeenheid
Cijfertoets 3/ (herhalen) is voorzien van een voelstip.
SRC (bron)
Hiermee kunt u het apparaat
inschakelen.
U kunt deze toets ook gebruiken om de
bron te wijzigen.
-OFF
Houd de toets 1 seconde ingedrukt als u
het apparaat wilt uitschakelen.
Houd de toets meer dan 2 seconden
ingedrukt als u het apparaat en het
scherm wilt uitschakelen.
Toets om het voorpaneel los te maken
SEEK +/–
Hiermee kunt u automatisch afstemmen
op radiozenders. Houd de toets
ingedrukt om handmatig af te stemmen.
/ (vorige/volgende)
/ (terugspoelen/
vooruitspoelen)
Regelknop
Draai aan deze knop om het volume te
regelen.
ENTER
Hiermee kunt u het geselecteerde item
bevestigen.
MENU
Hiermee kunt u het instelmenu openen.
Ontvanger voor de afstandsbediening
Discsleuf
Display
(disc uitwerpen)
(bladeren) (pagina 10)
Hiermee kunt u tijdens het afspelen de
bladerstand activeren.
(terug)
Hiermee keert u terug naar de vorige
weergave.
MODE (pagina 7, 9)
AF (alternatieve frequenties)/TA
(verkeersinformatie)
Hiermee kunt u AF en TA instellen.
-PTY (programmatype)
Houd de toets ingedrukt om PTY te
selecteren in RDS.
Cijfertoetsen (1 tot 6)
Hiermee kunt u opgeslagen radiozenders
ontvangen. Houd de toets ingedrukt om
zenders op te slaan.
ALBUM /
Hiermee kunt u een album op een
audioapparaat overslaan. Houd de toets
4NL
Page 77
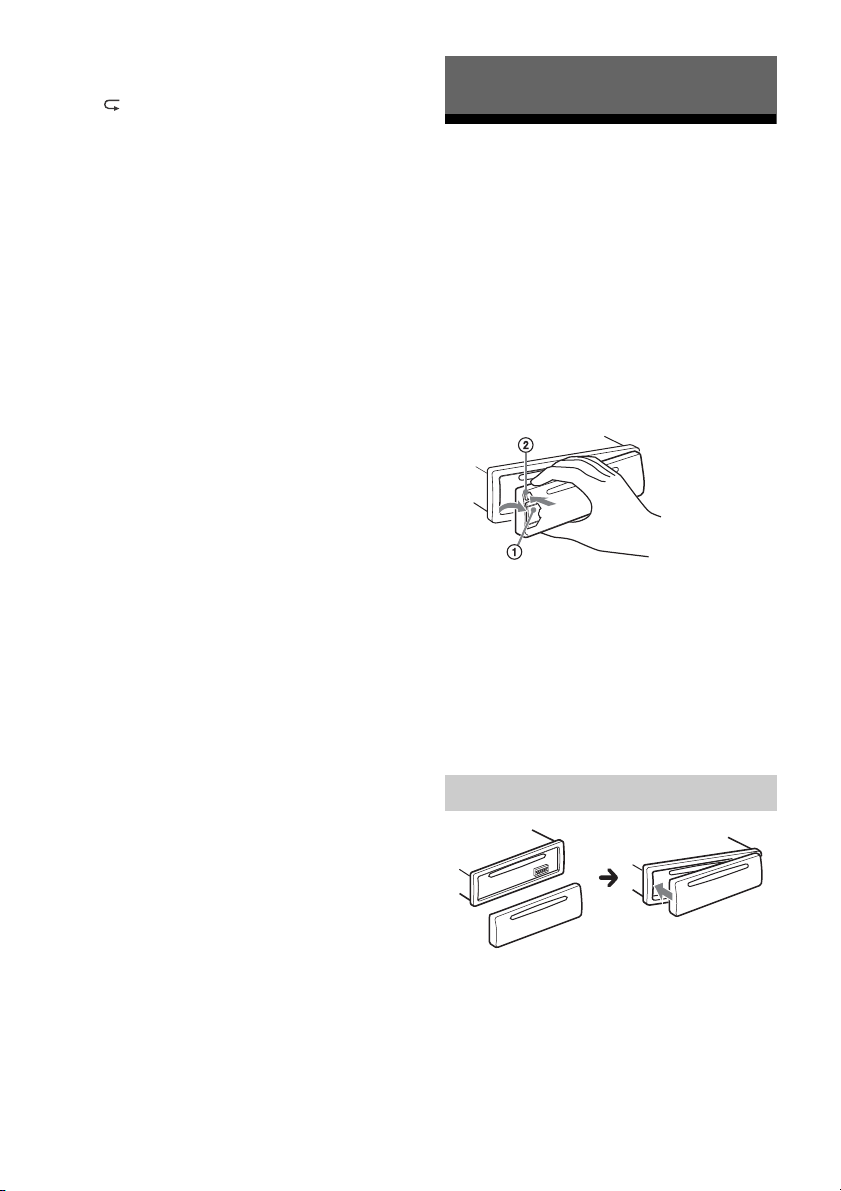
ingedrukt om albums te blijven
overslaan.
(herhalen)
SHUF (willekeurig afspelen)
PAU SE
DSPL (display)
Hiermee kunt u de display-items
wijzigen.
-SCRL (rollen)
Houd deze toets ingedrukt om een item
over het display te laten rollen.
AUX-ingang
USB-poort
Aan de slag
Het voorpaneel
verwijderen
U kunt ter voorkoming van diefstal het
voorpaneel van het apparaat verwijderen.
1 Houd OFF ingedrukt.
Het apparaat wordt uitgeschakeld.
2 Druk op de toets om het
voorpaneel los te maken en
verwijder het voorpaneel door het
naar u toe te trekken.
Waarschuwingstoon
Als u de contactschakelaar in de stand OFF
zet zonder dat u het voorpaneel hebt
verwijderd, klinkt gedurende enkele
seconden de waarschuwingstoon. U hoort
de waarschuwingstoon alleen als de
ingebouwde versterker wordt gebruikt.
Het voorpaneel bevestigen
5NL
Page 78

De klok instellen
Een iPhone 5 aansluiten:
Een ander draagbaar
1
Druk op MENU, selecteer [GENERAL]
door de regelknop te verdraaien en
druk er vervolgens op.
2 Selecteer [CLOCK-ADJ] door de
regelknop te verdraaien en druk er
vervolgens op.
De aanduiding voor het uur gaat
knipperen.
3 Stel de uren en minuten in door de
regelknop te verdraaien.
Druk op SEEK +/– om de digitale
aanduiding te verplaatsen.
4 Druk op MENU na het instellen van
de minuten.
Het instellen is voltooid en de klok begint
te lopen.
Druk op DSPL om de klok weer te geven.
Een iPod/USB-apparaat
aansluiten
1 Verlaag het volume op het
apparaat.
2 Sluit de iPod/het USB-apparaat aan
op het apparaat.
Gebruik voor het aansluiten van een
iPod/iPhone de USB-verbindingskabel
voor iPod (niet bijgeleverd).
audioapparaat aansluiten
1 Schakel het draagbare
audioapparaat uit.
2 Verlaag het volume op het
apparaat.
3 Sluit het draagbare audioapparaat
met behulp van een
verbindingskabel* (niet bijgeleverd)
aan op de AUX-ingang
(stereominiaansluiting) op het
apparaat.
* Gebruik een rechte stekker.
4 Druk op SRC om [AUX] te
selecteren.
Het volumeniveau van het aangesloten
apparaat afstemmen op andere
bronnen
Start het afspelen op het draagbare
audioapparaat bij een gemiddeld volume en
stel uw gebruikelijke luistervolume in op het
hoofdapparaat.
Druk op MENU en draai aan de regelknop.
Selecteer [SOUND] [AUX VOL] (pagina 12).
6NL
Page 79

Luisteren naar de radio
Luisteren naar de radio
Om naar de radio te luisteren, drukt u op SRC
om [TUNER] te selecteren.
Automatisch opslaan (BTM)
1 Druk op MODE om de band te
wijzigen (FM1, FM2, FM3, MW of
LW).
2 Druk op MENU, selecteer [GENERAL]
door de regelknop te verdraaien en
druk er vervolgens op.
3 Selecteer [BTM] door de regelknop
te verdraaien en druk er vervolgens
op.
Het apparaat slaat de zenders in de
volgorde van frequentie op onder de
cijfertoetsen.
Handmatig opslaan
1 Als u de zender ontvangt die u wilt
opslaan, houdt u een cijfertoets (1
tot 6) ingedrukt om [MEM] weer te
geven.
De opgeslagen zenders ontvangen
1 Selecteer de band en druk
vervolgens op een cijfertoets (1 tot
6).
RDS
(radiogegevenssysteem)
gebruiken
Alternatieve frequenties (AF) en
verkeersinformatie (TA) instellen
Afstemmen
1 Druk op MODE om de band te
wijzigen (FM1, FM2, FM3, MW of
LW).
2 Stem af op de gewenste zender.
Handmatig afstemmen
Houd SEEK +/– ingedrukt om ongeveer
op de gewenste frequentie af te
stemmen en druk vervolgens
herhaaldelijk op SEEK +/– om fijn af te
stemmen op de gewenste frequentie.
Automatisch afstemmen
Druk op SEEK +/–.
Het zoeken stopt wanneer een zender
wordt ontvangen. Herhaal deze
procedure tot de zender van uw keuze
wordt ontvangen.
AF stemt continu opnieuw af op de zender
met het sterkste signaal in een netwerk, en
TA biedt u de huidige verkeersinformatie of
verkeersprogramma's (TP) wanneer deze
worden ontvangen.
1 Druk op AF/TA om [AF-ON], [TA-
ON], [AF/TA-ON] of [AF/TA-OFF] te
selecteren.
RDS-zenders met de AF- en TA-instelling
opslaan
U kunt RDS-zenders samen met een AF-/TAinstelling vooraf instellen. Stel AF/TA in en sla
de zender vervolgens op met BTM of
handmatig. Als u handmatig vooraf instelt,
kunt u ook niet-RDS-zenders vooraf instellen.
7NL
Page 80

Noodberichten ontvangen
Als AF of TA is ingeschakeld, wordt de
geselecteerde bron automatisch
onderbroken door de noodberichten.
Wanneer u het volumeniveau aanpast
tijdens een verkeersbericht
Het niveau wordt los van het normale
volumeniveau opgeslagen in het geheugen
voor toekomstige verkeersinformatie.
Op een regionaal programma
afgestemd blijven (REGIONAL)
Wanneer de functies AF en REGIONAL
ingeschakeld zijn, schakelt het apparaat niet
over naar een andere regionale zender met
een sterkere frequentie. Wanneer u het
ontvangstgebied van het regionale
programma verlaat, stelt u tijdens FMontvangst [REG-OFF] in bij de instelling
GENERAL (pagina 11).
Deze functie werkt niet in het Verenigd
Koninkrijk en sommige andere gebieden.
Local Link-functie (alleen voor het
Verenigd Koninkrijk)
Met deze functie kunt u andere lokale
zenders in het gebied selecteren, ook als
deze niet zijn opgeslagen onder de
cijfertoetsen.
Druk tijdens FM-ontvangst op een cijfertoets
(1 tot 6) waaronder een lokale zender is
opgeslagen. Druk binnen 5 seconden
nogmaals op de cijfertoets van de lokale
zender. Herhaal dit tot de lokale zender
wordt ontvangen.
2 Verdraai de regelknop tot het
gewenste programmatype wordt
weergegeven en druk op de
regelknop.
Het apparaat begint te zoeken naar een
zender die het geselecteerde
programmatype uitzendt.
Programmatypen
NEWS (nieuws), AFFAIRS (actualiteiten),
INFO (informatie), SPORT (sport), EDUCATE
(educatieve programma's), DRAMA (toneel),
CULTURE (cultuur), SCIENCE (wetenschap),
VARIED (diversen), POP M (pop-muziek),
ROCK M (rock-muziek), EASY M (variété),
LIGHT M (licht klassiek), CLASSICS (klassiek),
OTHER M (overige muziek), WEATHER
(weerberichten), FINANCE (financiën),
CHILDREN (kinderprogramma's), SOCIAL A
(sociale zaken), RELIGION (religie), PHONE
IN (Phone In), TRAVEL (reizen), LEISURE
(ontspanning), JAZZ (jazz-muziek),
COUNTRY (country-muziek), NATION M
(nationale muziek), OLDIES (oldies), FOLK M
(folk-muziek), DOCUMENT (documentaires)
De kloktijd instellen (CT)
Met de CT-gegevens van de RDS-uitzending
wordt de klok ingesteld.
1 Stel [CT-ON] in bij de instelling
GENERAL (pagina 11).
Programmatypes (PTY) selecteren
Gebruik PTY om een gewenst
programmatype weer te geven of ernaar te
zoeken.
1 Houd PTY ingedrukt tijdens FM-
ontvangst.
8NL
Page 81

Afspelen
Een disc afspelen
1 Plaats de CD (met het label
omhoog).
Het afspelen start automatisch.
Een iPod/USB-apparaat
Bestanden die zonder gegevensverlies zijn
gecomprimeerd (lossless)
Auteursrechtelijk beveiligde bestanden
DRM-bestanden (beheer van digitale rechten)
Meerkanaalsaudiobestanden
1 Sluit een iPod/USB-apparaat aan
op de USB-poort (pagina 6).
Het afspelen wordt gestart.
Als er al een apparaat aangesloten is,
drukt u om het afspelen ervan te starten
op SRC om [USB] te selecteren ([IPD]
wordt weergegeven op het display als de
iPod herkend wordt).
2 Pas het volume op dit apparaat
aan.
Het afspelen stoppen
Houd OFF gedurende 1 seconde ingedrukt.
Het apparaat verwijderen
Stop het afspelen en verwijder het apparaat.
afspelen
In deze gebruiksaanwijzing wordt "iPod"
gebruikt als algemene verwijzing naar de
iPod-functies van een iPod en iPhone, tenzij
anders aangegeven in de tekst of
afbeeldingen.
Zie "Informatie over iPod" (pagina 14) voor
informatie over de geschiktheid van uw iPod
of ga naar de ondersteuningssite op het
achterblad.
USB-apparaten van het type MSC (Mass
Storage Class) (zoals een USB-flashstation,
digitale mediaspeler, Android™-telefoon) die
de USB-norm ondersteunen, kunnen worden
gebruikt.
Afhankelijk van de digitale mediaspeler of
Android-telefoon moet de USBverbindingsstand mogelijk ingesteld worden
op MSC.
Opmerkingen
Ga naar de ondersteuningssite op het achterblad
voor meer informatie over de compatibiliteit van
het USB-apparaat.
Het afspelen van de volgende MP3-/WMA-
bestanden wordt niet ondersteund.
Waarschuwing voor iPhone
Als u een iPhone aansluit via USB, wordt het
gesprekvolume geregeld door de iPhone,
niet door het apparaat. Om plotselinge harde
geluiden na een oproep te voorkomen, moet
u ervoor zorgen dat u tijdens de oproep het
volume van het apparaat niet per ongeluk
verhoogt.
Een iPod rechtstreeks bedienen
(passagiersbediening)
Houd tijdens het afspelen MODE ingedrukt
om [MODE IPOD] weer te geven en
rechtstreeks via de iPod te bedienen.
Het volume kan alleen worden aangepast op
het apparaat.
Passagiersbediening verlaten
Houd MODE ingedrukt om [MODE AUDIO]
weer te geven.
9NL
Page 82

Tracks zoeken en afspelen
De Quick-BrowZer-stand verlaten
Druk op (bladeren).
Herhaaldelijk en willekeurig
afspelen
1 Druk tijdens het afspelen op
(herhalen) om herhaaldelijk af te
spelen of op SHUF om willekeurig
af te spelen.
2 Druk herhaaldelijk op (herhalen)
of SHUF om de gewenste stand
voor herhaaldelijk of willekeurig
afspelen te selecteren.
Het duurt even voor het afspelen start in
de geselecteerde weergavestand.
De beschikbare weergavestanden verschillen
afhankelijk van de geselecteerde
geluidsbron.
Zoeken naar een track op naam
(Quick-BrowZer™)
1 Druk tijdens het afspelen van een
CD of USB-apparaat op
(bladeren)* om de lijst met
zoekcategorieën weer te geven.
Wanneer de tracklijst wordt
weergegeven, drukt u herhaaldelijk op
(terug).
* Druk tijdens het afspelen gedurende meer dan
2 seconden op (bladeren) om rechtstreeks
terug te keren naar het begin van de
categorielijst.
Zoeken door items over te slaan
(Overspring-stand)
1 Druk op (bladeren).
2 Druk op SEEK +.
3 Verdraai de regelknop om het item
te selecteren.
De lijst wordt doorbladerd in stappen van
10% van het totale aantal items in de lijst.
4 Druk op ENTER om terug te keren
naar de Quick-BrowZer-stand.
Het geselecteerde item wordt
weergegeven.
5 Selecteer het item van uw keuze
door de regelknop te verdraaien en
er vervolgens op te drukken.
Het afspelen wordt gestart.
2 Selecteer de zoekcategorie van uw
keuze door de regelknop te
verdraaien en bevestig deze met
een druk op de regelknop.
3 Herhaal stap 2 om de gewenste
track te zoeken.
Het afspelen wordt gestart.
10NL
Page 83

Instellingen
3 Selecteer de opties door de
regelknop te verdraaien en druk er
vervolgens op.
De DEMO-stand annuleren
U kunt het demonstratiescherm annuleren
dat wordt weergegeven wanneer het
apparaat uitgeschakeld is.
1 Druk op MENU, selecteer [DISPLAY]
door de regelknop te verdraaien en
druk er vervolgens op.
2 Selecteer [DEMO] door de
regelknop te verdraaien en druk er
vervolgens op.
3 Selecteer [DEMO-OFF] door de
regelknop te verdraaien en druk er
vervolgens op.
Het instellen is voltooid.
4 Druk twee keer op (terug).
Het display keert terug naar de normale
ontvangst-/weergavestand.
Algemene bediening voor
instellingen
U kunt items instellen in het menu via de
volgende procedure.
De volgende items kunnen ingesteld
worden, afhankelijk van de bron en de
instelling.
Terugkeren naar het vorige display
Druk op (terug).
GENERAL-instellingen
CLOCK-ADJ (klok aanpassen) (pagina 6)
CAUT ALM (waarschuwingstoon)
De waarschuwingstoon inschakelen: [ON],
[OFF] (pagina 5). (Alleen beschikbaar
wanneer het apparaat uitgeschakeld is.)
BEEP
De pieptoon inschakelen: [ON], [OFF].
AUTO OFF
Automatisch uitschakelen na de gewenste
tijd wanneer het apparaat is
uitgeschakeld: [NO], [30S] (30 seconden),
[30M] (30 minuten), [60M] (60 minuten).
AUX-A (AUX-audio)
Het AUX-bronscherm inschakelen: [ON],
[OFF]. (Alleen beschikbaar wanneer het
apparaat uitgeschakeld is.)
CT (kloktijd)
De CT-functie inschakelen: [ON], [OFF].
REGIONAL
De ontvangst beperken tot een specifieke
regio: [ON], [OFF]. (Alleen beschikbaar
wanneer FM ontvangen wordt.)
BTM (pagina 7)
1 Druk op MENU.
2 Selecteer de instelcategorie door
de regelknop te verdraaien en druk
er vervolgens op.
De volgende instelcategorieën zijn
beschikbaar:
GENERAL-instellingen (pagina 11)
SOUND-instellingen (pagina 12)
DISPLAY-instellingen (pagina 12)
11NL
Page 84

SOUND-instellingen DISPLAY-instellingen
EQ3 PRESET
U kunt een equalizercurve selecteren uit 7
verschillende curves of de equalizer
uitschakelen: [XPLOD], [VOCAL], [EDGE],
[CRUISE], [SPACE], [GRAVITY], [CUSTOM],
[OFF].
Voor iedere bron kan de equalizercurve in
het geheugen worden opgeslagen.
EQ3 SETTING
Hiermee kunt u [CUSTOM] instellen voor
EQ3.
De equalizerinstellingen selecteren:
[LOW], [MID], [HIGH].
Als u de fabrieksinstelling voor de
equalizercurve wilt herstellen, houdt u
ENTER ingedrukt voordat het instellen is
voltooid.
BALANCE
De geluidsbalans aanpassen: [RIGHT-15] –
[CENTER] – [LEFT-15].
FAD ER
Het relatieve niveau aanpassen: [FRONT15] – [CENTER] – [REAR-15].
LOUDNESS (dynamische loudness)
Hoge en lage tonen versterken voor
helder geluid bij lagere volumeniveaus:
[ON], [OFF].
SW LEVEL (subwooferniveau)
Het subwoofervolume aanpassen:
[+2 dB] - [0 dB] - [-2 dB].
AUX VOL (AUX-volumeniveau)
Het volume voor elk aangesloten
randapparaat aanpassen:
[+18 dB] - [0 dB] - [-8 dB].
Dankzij deze instelling is het niet nodig
om het volumeniveau tussen bronnen aan
te passen.
DEMO (demonstratie)
De demonstratie inschakelen: [ON], [OFF].
DIMMER
De helderheid van het scherm wijzigen:
[ON], [OFF].
AUTO SCR (automatisch rollen)
Lange items automatisch laten rollen:
[ON], [OFF].
M.DISPLAY (bewegingsdisplay)
Bewegende patronen weergeven: [ON],
[OFF].
12NL
Page 85

Aanvullende informatie
Voorzorgsmaatregelen
Laat het apparaat afkoelen als de auto
geparkeerd heeft gestaan in de volle zon.
Laat het voorpaneel of audioapparaten
niet achter in de auto. Deze kunnen
beschadigd raken door de hoge
temperaturen van direct zonlicht.
De elektrisch bediende antenne schuift
automatisch uit.
Condensvorming
Als er vocht condenseert in het apparaat,
verwijdert u de disc en wacht u ongeveer
een uur tot het apparaat is gedroogd; anders
kan de werking van het apparaat worden
verstoord.
Hoge geluidskwaliteit behouden
Mors geen vloeistof op het apparaat of de
discs.
Opmerkingen over discs
Stel een disc niet bloot aan direct zonlicht
of warmtebronnen, zoals die van de
verwarming in de auto, en laat een disc
niet achter in een auto die in de volle zon
staat geparkeerd.
Veeg een disc van het
midden naar de
buitenrand schoon met
een doekje voordat u
deze afspeelt. Gebruik
geen oplosmiddelen
zoals benzine, thinner en
in de handel verkrijgbare
reinigingsmiddelen.
Dit apparaat is ontworpen voor het
afspelen van discs die voldoen aan de CDnorm (Compact Disc). DualDiscs en
sommige muziekdiscs die zijn gecodeerd
met copyrightbeveiligingstechnologieën
voldoen niet aan de CD-norm (Compact
Disc) en kunnen daarom mogelijk niet
worden afgespeeld met dit apparaat.
Discs die NIET kunnen worden afgespeeld
met dit apparaat
Discs waarop labels, stickers, tape of
papier zijn geplakt. Hierdoor kan de
werking worden verstoord of de disc
worden beschadigd.
Discs met afwijkende vormen
(bijvoorbeeld hart, vierkant, ster). Als u
dit toch probeert, kan het apparaat
worden beschadigd.
8 cm-discs.
Opmerkingen over CD-R's/CD-RW's
Het maximumaantal: (alleen CD-R/CD-RW)
mappen (albums): 150 (inclusief
hoofdmap)
bestanden (tracks) en mappen: 300
(mogelijk minder dan 300 als de map-/
bestandsnaam veel tekens bevat)
tekens die kunnen worden weergegeven
voor de naam van een map/bestand:
32 (Joliet)/64 (Romeo)
Als een disc met Multi Session (meerdere
sessies) begint met een CD-DA-sessie,
wordt deze herkend als een CD-DA-disc en
worden andere sessies niet afgespeeld.
Discs die NIET kunnen worden afgespeeld
met dit apparaat
CD-R's/CD-RW's met slechte
opnamekwaliteit.
CD-R's/CD-RW's die zijn opgenomen
met een incompatibel opnameapparaat.
CD-R's/CD-RW's die onjuist zijn
gefinaliseerd.
CD-R's/CD-RW's die niet zijn
opgenomen in de muziek-CD-indeling of
MP3-indeling conform ISO9660 Level 1/
Level 2, Joliet/Romeo of Multi Session
(meerdere sessies).
13NL
Page 86

Afspeelvolgorde van MP3-/WMA-
MP3/WMA
Map (album)
MP3-/WMAbestand (track)
bestanden
Informatie over iPod
U kunt de volgende iPod-modellen
aansluiten. Werk de software van uw iPod
bij naar de laatste versie vóór gebruik.
Made for
iPod touch (5e generatie)
iPod touch (4e generatie)
iPod touch (3e generatie)
iPod touch (2e generatie)
iPod classic
iPod nano (7e generatie)
iPod nano (6e generatie)
iPod nano (5e generatie)
iPod nano (4e generatie)
iPod nano (3e generatie)
iPod nano (2e generatie)
iPod nano (1e generatie)*
iPhone 5
iPhone 4S
iPhone 4
iPhone 3GS
iPhone 3G
"Made for iPod" en "Made for iPhone"
betekenen dat een elektronisch accessoire
speciaal is ontworpen om aan te sluiten op
respectievelijk een iPod of iPhone en dat
de ontwikkelaar van het accessoire
verklaart dat het voldoet aan de
prestatienormen van Apple. Apple is niet
verantwoordelijk voor de werking van dit
apparaat of voor het voldoen ervan aan de
veiligheids- en overheidsvoorschriften.
Merk op dat het gebruik van dit accessoire
met een iPod of iPhone de draadloze
prestaties kan beïnvloeden.
Met alle vragen of problemen met betrekking
tot dit apparaat die niet aan bod komen in
deze gebruiksaanwijzing, kunt u terecht bij
uw Sony-handelaar.
* Passagiersbediening is niet beschikbaar voor iPod
nano (1e generatie).
14NL
Page 87

Onderhoud
Tussenfrequentie:
9.124,5 kHz of 9.115,5 kHz/4,5 kHz
Gevoeligheid: MW: 26 V, LW: 45 V
Aansluitingen schoonmaken
De werking van het apparaat kan worden
verstoord als de aansluitingen tussen het
apparaat en het voorpaneel niet schoon zijn.
U kunt dit voorkomen door het voorpaneel
(pagina 5) los te maken en de aansluitingen
te reinigen met een wattenstaafje. Gebruik
hierbij niet te veel kracht. Anders kunnen de
aansluitingen worden beschadigd.
Opmerkingen
Uit veiligheidsoverwegingen moet u de motor
uitschakelen en de sleutel uit de
contactschakelaar halen voordat u de
aansluitingen reinigt.
Raak de aansluitingen nooit rechtstreeks aan met
uw vingers of een metalen voorwerp.
Technische gegevens
Tun er
FM
Afstembereik: 87,5 – 108,0 MHz
Antenne-aansluiting:
Aansluiting voor externe antenne
Tussenfrequentie: 25 kHz
Bruikbare gevoeligheid: 8 dBf
Selectiviteit: 75 dB bij 400 kHz
Signaal/ruis-afstand: 80 dB (stereo)
Scheiding: 50 dB bij 1 kHz
Frequentiebereik: 20 – 15.000 Hz
MW/LW
Afstembereik:
MW: 531 – 1.602 kHz
LW: 153 – 279 kHz
Antenne-aansluiting:
Aansluiting voor externe antenne
CD-speler
Signaal/ruis-afstand: 95 dB
Frequentiebereik: 10 – 20.000 Hz
Snelheidsfluctuaties: minder dan meetbare
waarden
Overeenstemmende codec:
MP3 (.mp3) en WMA (.wma)
USB-speler
Interface: USB (Full-speed)
Maximale stroom: 1 A
Het maximale aantal herkenbare gegevens:
mappen (albums): 128
bestanden (tracks) per map: 512
Overeenstemmende codec:
MP3 (.mp3) en WMA (.wma)
Versterker
Uitgang: luidsprekeruitgangen
Luidsprekerimpedantie: 4 – 8 ohm
Maximaal uitgangsvermogen: 55 W × 4 (bij
4 ohm)
Algemeen
Uitgangen:
Audio-uitgangen (achter, sub)
Aansluiting elektrische antenne/versterker
(REM OUT)
Ingangen:
Afstandsbedieningsingang
Antenne-ingang
AUX-ingang (stereominiaansluiting)
USB-poort
Voeding: 12 V gelijkstroom autoaccu (negatieve
aarde)
Afmetingen:
Ongeveer 178 mm × 50 mm × 177 mm
(b/h/d)
Montageafmetingen:
Ongeveer 182 mm × 53 mm × 160 mm
(b/h/d)
Gewicht: ongeveer 1,2 kg
Inhoud verpakking:
Hoofdeenheid (1)
Onderdelen voor installatie en aansluitingen
(1 set)
15NL
Page 88

Het is mogelijk dat niet alle vermelde
accessoires verkrijgbaar zijn bij uw Sonyhandelaar. Neem contact op met uw Sonyhandelaar voor meer informatie.
Wijzigingen in ontwerp en technische
gegevens voorbehouden zonder
voorafgaande kennisgeving.
Auteursrechten
Quick-BrowZer is een handelsmerk van Sony
Corporation.
Windows Media is een gedeponeerd
handelsmerk of een handelsmerk van Microsoft
Corporation in de Verenigde Staten en/of
andere landen.
Dit product wordt beschermd door bepaalde
intellectuele eigendomsrechten van Microsoft
Corporation. Het gebruik of de verspreiding van
dergelijke technologie buiten dit product om is
verboden zonder een licentie van Microsoft of
een erkend dochterbedrijf van Microsoft.
iPhone, iPod, iPod classic, iPod nano en iPod
touch zijn handelsmerken van Apple Inc.,
gedeponeerd in de VS en andere landen.
MPEG Layer-3 audio-codeertechnologie en
-patenten gebruikt onder licentie van
Fraunhofer IIS en Thomson.
Android is een handelsmerk van Google Inc. Het
gebruik van dit handelsmerk is onderhevig aan
Toestemming van Google.
Problemen oplossen
De onderstaande controlelijst kan u helpen
bij het oplossen van problemen die zich met
het apparaat kunnen voordoen.
Voordat u de onderstaande controlelijst
doorneemt, moet u eerst de aanwijzingen
voor aansluiting en gebruik controleren.
Meer informatie over het gebruik van de
zekering en het verwijderen van het apparaat
uit het dashboard vindt u in de handleiding
voor installatie/aansluitingen geleverd bij dit
apparaat.
Als het probleem niet is opgelost, gaat u
naar de ondersteuningssite op het
achterblad.
Algemeen
Geen geluid.
De positie van de faderregelaar [FADER] is
niet ingesteld op een systeem met
2 luidsprekers.
Geen pieptoon.
Er is een optionele versterker aangesloten en
u gebruikt de ingebouwde versterker niet.
De geheugeninhoud is gewist.
De voedingskabel of de accu is losgekoppeld
of niet juist aangesloten.
Opgeslagen zenders en de juiste tijd zijn
gewist.
De zekering is doorgebrand.
Maakt geluid wanneer de stand van het
contactslot wordt gewijzigd.
De kabels zijn niet goed verbonden met de
voedingsaansluiting voor accessoires van de
auto.
16NL
Tijdens het afspelen of radio-ontvangst wordt
de demonstratie gestart.
Als er gedurende 5 minuten geen handeling
wordt uitgevoerd en [DEMO-ON] ingesteld is,
wordt de demonstratie gestart.
Stel [DEMO-OFF] in (pagina 12).
Page 89

Het display verdwijnt van/verschijnt niet in
het display-venster.
De dimmer is ingesteld op [DIM-ON]
(pagina 12).
Het display verdwijnt als u OFF ingedrukt
houdt.
Houd OFF op het apparaat ingedrukt tot
het display verschijnt.
De aansluitingen zijn vuil (pagina 15).
De programmaservicenaam knippert.
Er is geen alternatieve frequentie voor de
huidige zender.
Druk op SEEK +/– terwijl de
programmaservicenaam knippert. [PI SEEK]
wordt weergegeven en het apparaat gaat
zoeken naar een andere frequentie met
dezelfde PI-gegevens (programmaidentificatie).
De bedieningstoetsen werken niet.
De disk wordt niet uitgeworpen.
Druk langer dan 2 seconden op DSPL en
(terug)/MODE om het apparaat te resetten.
De geheugeninhoud wordt gewist.
Reset het apparaat voor uw eigen veiligheid
niet tijdens het rijden.
Radio-ontvangst
Er kunnen geen zenders worden ontvangen.
Het geluid is gestoord.
De aansluiting is niet juist.
Controleer de aansluiting van de auto-
antenne.
Als de automatische antenne niet
uitschuift, controleert u de aansluiting van
de bedieningskabel van de elektrische
antenne.
Er kan niet worden afgestemd op
voorkeuzezenders.
Het signaal van de uitzending is te zwak.
RDS
SEEK begint na enkele seconden afspelen.
De zender is geen TP-zender of heeft een
zwak signaal.
Schakel TA uit (pagina 7).
Geen verkeersinformatie.
Schakel TA in (pagina 7).
De zender is een TP-zender, maar zendt toch
geen verkeersinformatie uit.
Stem af op een andere zender.
PTY geeft [- - - - - - - -] weer.
De huidige zender is geen RDS-zender.
Geen RDS-gegevens ontvangen.
De zender geeft het programmatype niet
door.
CD's afspelen
De CD wordt niet afgespeeld.
CD defect of vuil.
De CD-R/CD-RW is niet geschikt voor
audiogebruik (pagina 13).
MP3-/WMA-bestanden kunnen niet worden
afgespeeld.
De disk is niet compatibel met de MP3-/
WMA-indeling en -versie. Ga naar de
ondersteuningssite voor meer informatie
over discs en indelingen die kunnen worden
afgespeeld.
MP3-/WMA-bestanden worden minder snel
afgespeeld dan andere bestanden.
Bij de volgende discs duurt het langer
voordat het afspelen wordt gestart:
Discs opgenomen met een ingewikkelde
structuur.
Discs die in Multi Session (meerdere
sessies) zijn opgenomen.
Discs waaraan gegevens kunnen worden
toegevoegd.
Het geluid verspringt.
CD defect of vuil.
USB afspelen
U kunt items niet via een USB-hub afspelen.
Dit apparaat kan geen USB-apparaten via een
USB-hub herkennen.
Het duurt langer voordat een USB-apparaat
wordt afgespeeld.
Het USB-apparaat bevat bestanden met een
ingewikkelde boomstructuur.
Het geluid wordt onderbroken.
Het geluid kan worden onderbroken bij een
hoge bitsnelheid van meer dan 320 Kbps.
17NL
Page 90

Foutmeldingen/berichten
ERROR
De disc is vuil of is omgekeerd geplaatst.
Reinig de disc of plaats deze op de juiste
manier.
Er is een lege disc in het apparaat geplaatst.
De disc kan niet worden afgespeeld wegens
een probleem.
Plaats een andere disc.
Het USB-apparaat is niet automatisch
herkend.
Sluit het opnieuw aan.
Druk op als u de disc wilt verwijderen.
NO TP (geen verkeersprogramma's)
Het apparaat blijft zoeken naar beschikbare
TP-zenders.
OVERLOAD
Het USB-apparaat is overbelast.
Koppel het USB-apparaat los en wijzig de
bron door op SRC te drukken.
Het USB-apparaat is defect of wordt niet
ondersteund.
PUSH EJT (drukken op uitwerpen)
De disc kan niet worden uitgeworpen.
Druk op (uitwerpen).
HUB NO SUPRT (geen hub-ondersteuning)
Een USB-hub wordt niet ondersteund door dit
apparaat.
IPD STOP
Wanneer herhaaldelijk afspelen niet ingesteld
is, stopt het afspelen na de laatste track van
het album.
De muziekapplicatie op de iPod/iPhone is
gesloten.
Druk op PAUSE om het afspelen opnieuw
te starten.
NO AF (geen alternatieve frequenties)
Er is geen alternatieve frequentie voor de
huidige zender.
Druk op SEEK +/– terwijl de
programmaservicenaam knippert. Het
apparaat gaat zoeken naar een andere
frequentie met dezelfde PI-gegevens
(programma-identificatie) ([PI SEEK] wordt
weergegeven).
NO DEV (geen apparaat)
[USB] is geselecteerd als bron terwijl er geen
USB-apparaat is aangesloten. Een USBapparaat of een USB-kabel is losgeraakt
tijdens het afspelen.
Het is belangrijk dat u een USB-apparaat
en een USB-kabel aansluit.
READ
Alle track- en albuminformatie op de disc
wordt gelezen.
Wacht totdat het lezen is voltooid en het
afspelen automatisch wordt gestart.
Afhankelijk van de discstructuur kan dit
meer dan een minuut duren.
USB NO SUPRT (geen USB-ondersteuning)
Het aangesloten USB-apparaat wordt niet
ondersteund.
Ga naar de ondersteuningssite voor meer
informatie over de compatibiliteit van het
USB-apparaat.
[] of []
Tijdens het snel terug- of vooruitspoelen hebt
u het begin of het einde van de disc bereikt
en kunt u niet verder.
[]
Het teken kan niet worden weergegeven.
Vraag uw Sony-handelaar advies als deze
oplossingen niet helpen.
Als u het apparaat ter reparatie wegbrengt
omdat CD's niet goed worden afgespeeld,
kunt u het best de disc meenemen waarmee
het probleem is begonnen.
NO MUSIC
De disc of het USB-apparaat bevat geen
muziekbestanden.
Plaats een muziek-CD.
Sluit een USB-apparaat aan waarop
muziekbestanden staan.
18NL
Page 91

Page 92

http://support.sony-europe.com/
Site d’assistance
Si vous avez des questions ou si vous souhaitez
consulter les toutes dernières informations techniques
sur ce produit, rendez-vous sur le site Web suivant :
Sito di assistenza clienti
In caso di domande o per le informazioni più aggiornate
sul presente prodotto, visitare il seguente sito Web:
Support site
If you have any questions or for the latest support
information on this product, please visit
the web site below:
Support-Website
Wenn Sie Fragen haben oder die neuesten
Support-Informationen zu diesem Produkt abrufen
möchten, rufen Sie bitte folgende Website auf:
Ondersteuningssite
Als u vragen hebt of de recentste
ondersteuningsinformatie over dit product wilt
hebben, gaat u naar de onderstaande website:
Register your product online now at:
Registrieren Sie Ihr Produkt jetzt bei:
Merci d’enregister votre produit en ligne sur:
Registra online il tuo prodotto su:
Registreer uw product nu online via:
www.sony-europe.com/myproducts
http://www.sony.net/
©2013 Sony Corporation Printed in Thailand
 Loading...