

Page 1
FM/MW/LW Compact Disc Player
3-238-730-11 (2)
FM/MW/LW
Compact Disc Player
Operating Instructions
Bedienungsanleitung
Mode d’emploi
Istruzioni per l’uso
Gebruiksaanwijzing
Wichtig!
Bitte nehmen Sie sich etwas Zeit, um den Geräte-Pass
vollständig auszufüllen. Dieser befindet sich auf der
hinteren Umschlagseite dieser Bedienungsanleitung.
Si dichiara che l’apparecchio è stato fabbricato in conformità all’art. 2, Comma 1 del
D.M. 28.08.1995 n. 548.
For installation and connections, see the supplied installation/connections
manual.
Zur Installation und zum Anschluß siehe die mitgelieferte Installations-/
Anschlußanleitung.
En ce qui concerne l’installation et les connexions, consulter le manuel
d’installation/connexions fourni.
Per l’installazione e i collegamenti, fare riferimento al manuale di istruzioni di
installazione/collegamenti in dotazione.
Zie voor het monteren en aansluiten van het apparaat de bijgeleverde handleiding
“Installatie en aansluitingen”.
GB
DE
FR
IT
NL
CDX-CA600X
CDX-CA600
2002 Sony Corporation
Page 2

Welcome !
Thank you for purchasing this Sony Compact
Disc Player. You can enjoy its various features
even more with:
•Optional CD/MD units (both changers and
players)*1.
•CD TEXT information (displayed when a CD
TEXT disc*2 is played).
•Optional controller accessories
Card remote commander
RM-X114
Rotary commander
RM-X4S
*1This unit works with Sony products only.
2
A CD TEXT disc is an audio CD that includes
*
information such as the disc name, artist name
and track names. This information is recorded
on the disc.
This label is located on the bottom of the
chassis.
CAUTION INVISIBLE
VIEW DIRECTLY WITH OPTICAL INSTRUMENTS
LASER RADIATIONWHEN OPEN
DO NOT STARE INTO BEAM OR
This label is located on the drive unit’s internal
chassis.
2
Page 3

Table of Contents
Location of controls .................................................. 4
Precautions ................................................................ 6
Notes on discs ........................................................... 6
Getting Started
Resetting the unit ................................................. 7
Detaching the front panel ................................... 8
Setting the clock ................................................... 9
CD Player
CD/MD Unit (optional)
Playing a disc ........................................................ 9
Display items ...................................................... 10
Automatically scrolling a name
— Auto Scroll ................................................ 10
Playing tracks repeatedly
— Repeat Play ............................................... 11
Playing tracks in random order
— Shuffle Play ............................................... 11
Labelling a CD
— Disc Memo* .............................................. 11
Locating a disc by name
— List-up* ..................................................... 12
* Functions available with optional CD/MD unit
Radio
Storing stations automatically
— Best Tuning Memory (BTM) ................... 13
Storing only the desired stations ..................... 13
Receiving the stored stations ............................ 13
RDS
Overview of RDS ............................................... 14
Automatic retuning for best reception results
— AF function ............................................... 15
Receiving traffic announcements
— TA/TP........................................................ 16
Presetting RDS stations with AF and
TA setting ....................................................... 16
Tuning in stations by programme type
— PTY ............................................................. 17
Setting the clock automatically
— CT ............................................................... 18
Other Functions
Using the rotary commander ........................... 18
Adjusting the sound characteristics ................ 20
Quickly attenuating the sound ........................ 20
Changing the sound and display settings ...... 20
Selecting the sound position
— My Best sound Position (MBP) .............. 21
Boosting the bass sound
— D-bass ........................................................ 21
Additional Information
Maintenance........................................................ 22
Removing the unit ............................................. 23
Specifications ...................................................... 24
Troubleshooting.................................................. 25
Error displays/Messages .................................. 26
3
Page 4
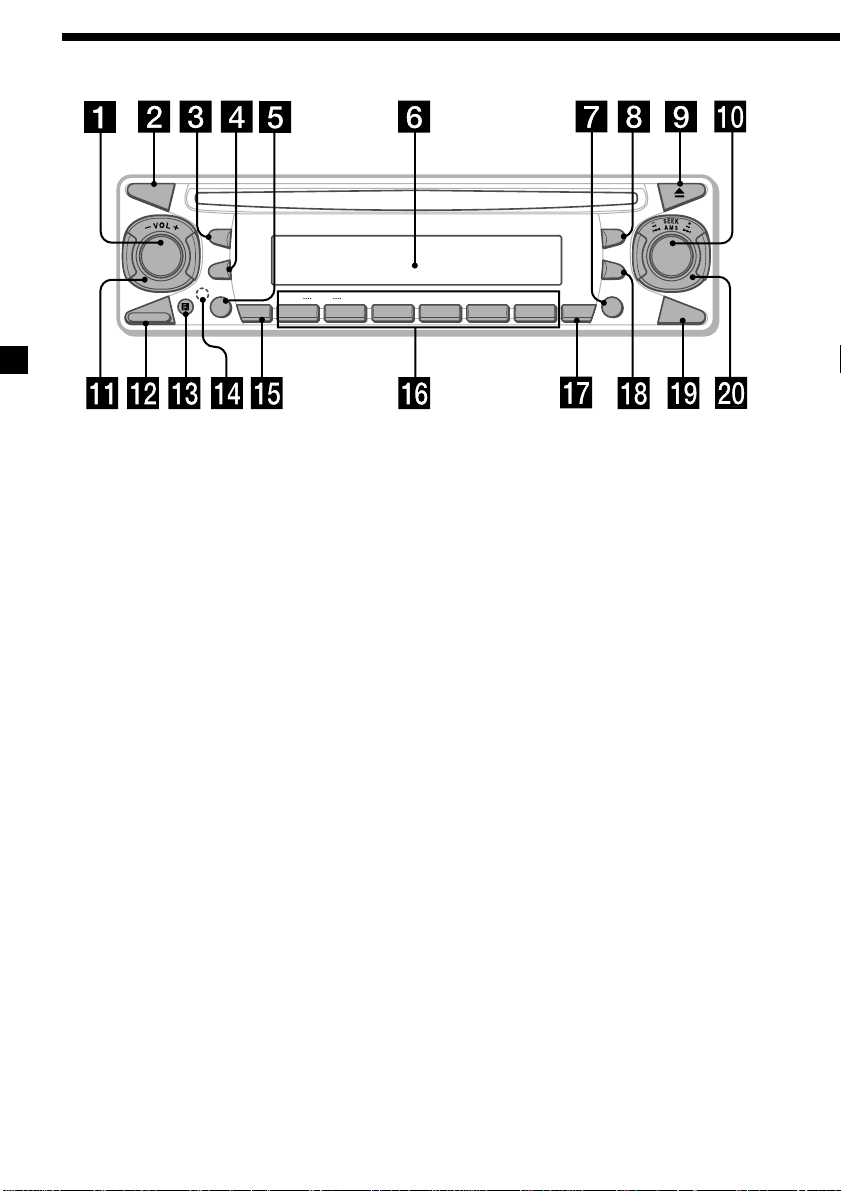
Location of controls
MODE
SEL
SOURCE
RELEASE
L
P
S
D
–+
AF TA
ATT
DISC
1
2 3 4 5 6
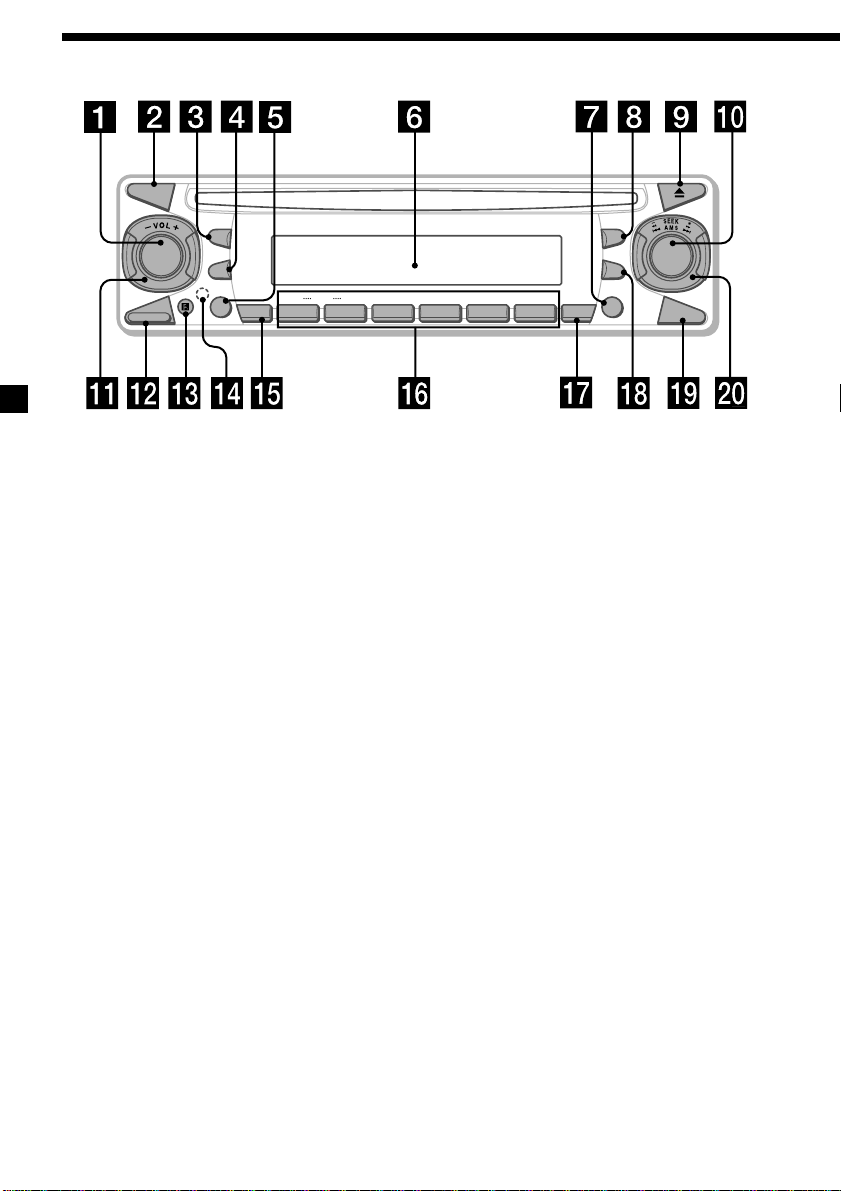
Refer to the pages listed for details.
1 SOURCE (Power on/Radio/CD/MD)
button 9, 10, 12, 13, 16
2 MODE button 10, 12, 13, 16
3 SEL (select) button 9, 10, 11, 12, 18, 20,
21
4 DSPL (display mode change) button
9, 10, 12, 14
5 AF button 15, 16
6 Display window
7 TA button 16
8 MBP (My Best sound Position) button
21
9 Z (eject) button 9
q; D-BASS button 21
qa VOL (volume) –/+ control dial 9, 11, 12,
16, 20
qs RELEASE (front panel release) button 8
qd Receptor for the card remote
commander
MBP
L
IS
T
P
T
REP
SHUF BTM
CDX-CA600X
CDX-CA600
Y
SENS
qf RESET button (located on the front side of
the unit, behind the front panel) 7
qg ATT (attenuate) button 20
qh Number buttons 10, 13, 15, 16, 18, 20
(1) DISC – 10
(2) DISC + 10
(3) REP 11
(4) SHUF 11
qj SENS/BTM button 13, 14, 16
qk LIST/PTY (programme type) button 11,
12, 17
ql OFF button* 8, 9
w; SEEK/AMS –/+ control dial 9, 12, 13, 14,
15, 17
* Warning when installing in a car
without an ACC (accessory) position
on the ignition key switch
Be sure to press (OFF) on the unit for
2 seconds to turn off the clock display
after turning off the engine.
Otherwise, the clock display does not turn
off and this causes battery drain.
D-BASS
OFF
4
Page 5

Card remote commander RM-X114
(optional)
DSPL MODE
+
PRESET
LIST
+
DISC
MENU
–
SEEK
SOUND
SOURCE
DISC
PRESET –
+
VOL
–
+
SEEK
–
ENTER
ATTOFF
The corresponding buttons of the card
remote commander control the same
functions as those on this unit.
1 DSPL button
2 MENU button*
3 SOURCE button
4 SEEK (</,) buttons
5 SOUND button
(used as 3 SEL button for this unit)
6 OFF button
7 VOL (–/+) buttons
8
MODE button
9 LIST button
q; DISC/PRESET (M/m) buttons
qa ENTER button*
qs ATT button
* Not available for this model
Note
If the unit is turned off by pressing (OFF) for 2
seconds, it cannot be operated with the card
remote commander unless (SOURCE) on the unit is
pressed, or a disc is inserted to activate the unit
first.
Tip
Refer to “Replacing the lithium battery” for details
on how to replace the batteries (page 23).
5
Page 6
Precautions
Notes on discs
•If your car was parked in direct sunlight,
allow the unit to cool off before operating it.
•Power aerials will extend automatically
while the unit is operating.
If you have any questions or problems
concerning your unit that are not covered in
this manual, please consult your nearest Sony
dealer.
Moisture condensation
On a rainy day or in a very damp area,
moisture condensation may occur inside the
lenses and display of the unit. Should this
occur, the unit will not operate properly. In
such a case, remove the disc and wait for about
an hour until the moisture has evaporated.
To maintain high sound quality
Be careful not to splash juice or other soft
drinks onto the unit or discs.
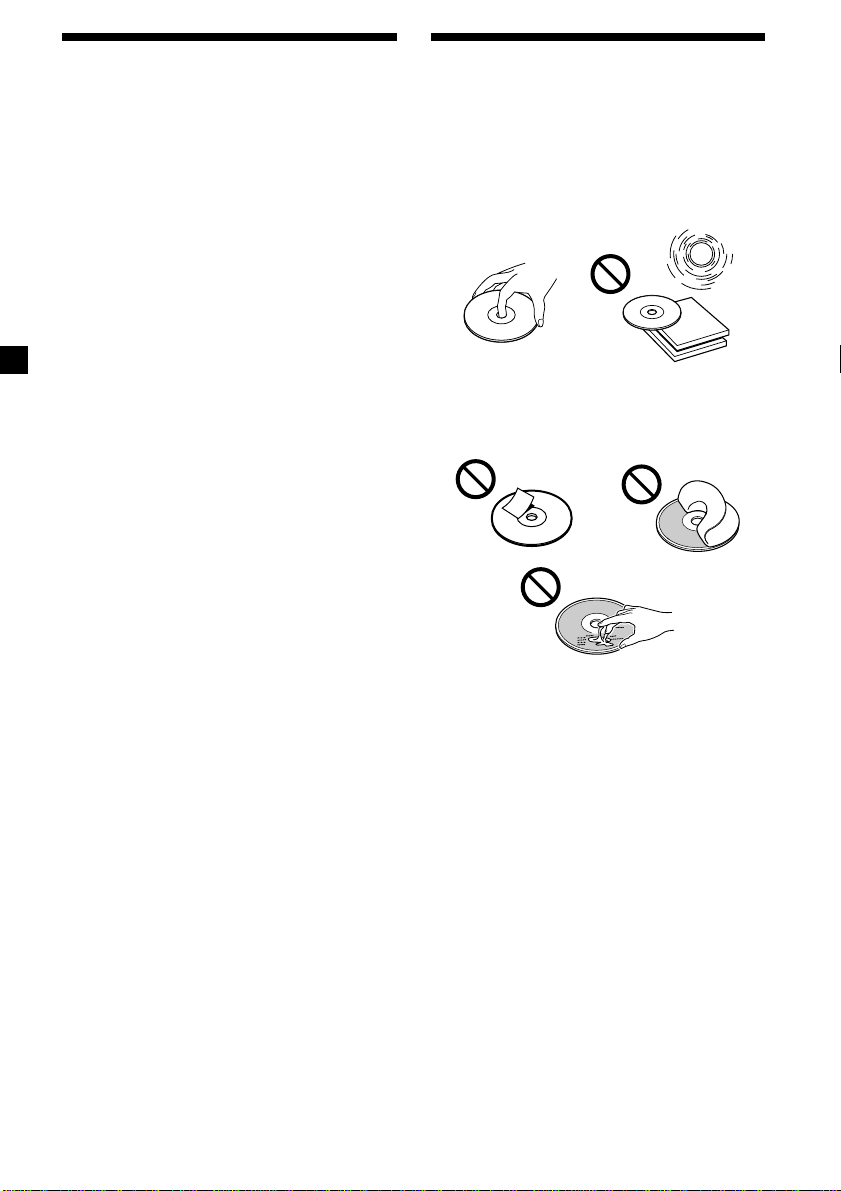
•To keep the disc clean, do not touch the
surface. Handle the disc by its edge.
•Keep your discs in their cases or disc
magazines when not in use. Do not subject
the discs to heat/high temperature. Avoid
leaving them in parked cars or on
dashboards/rear trays.
•Do not attach labels, or use discs with sticky
ink/residue. Such discs may stop spinning
when used, causing a malfunction, or may
ruin the disc.
•Do not use any discs with labels or stickers
attached.
The following malfunctions may result from
using such discs:
— Inability to eject a disc (due to a label or
sticker peeling off and jamming the eject
mechanism).
— Inability to read audio data correctly (e.g.,
playback skipping, or no playback) due to
heat shrinking of a sticker or label causing
a disc to warp.
•Discs with non-standard shapes (e.g., heart,
square, star) cannot be played on this unit.
Attempting to do so may damage the unit.
Do not use such discs.
•You cannot play 8cm CDs.
6
Page 7
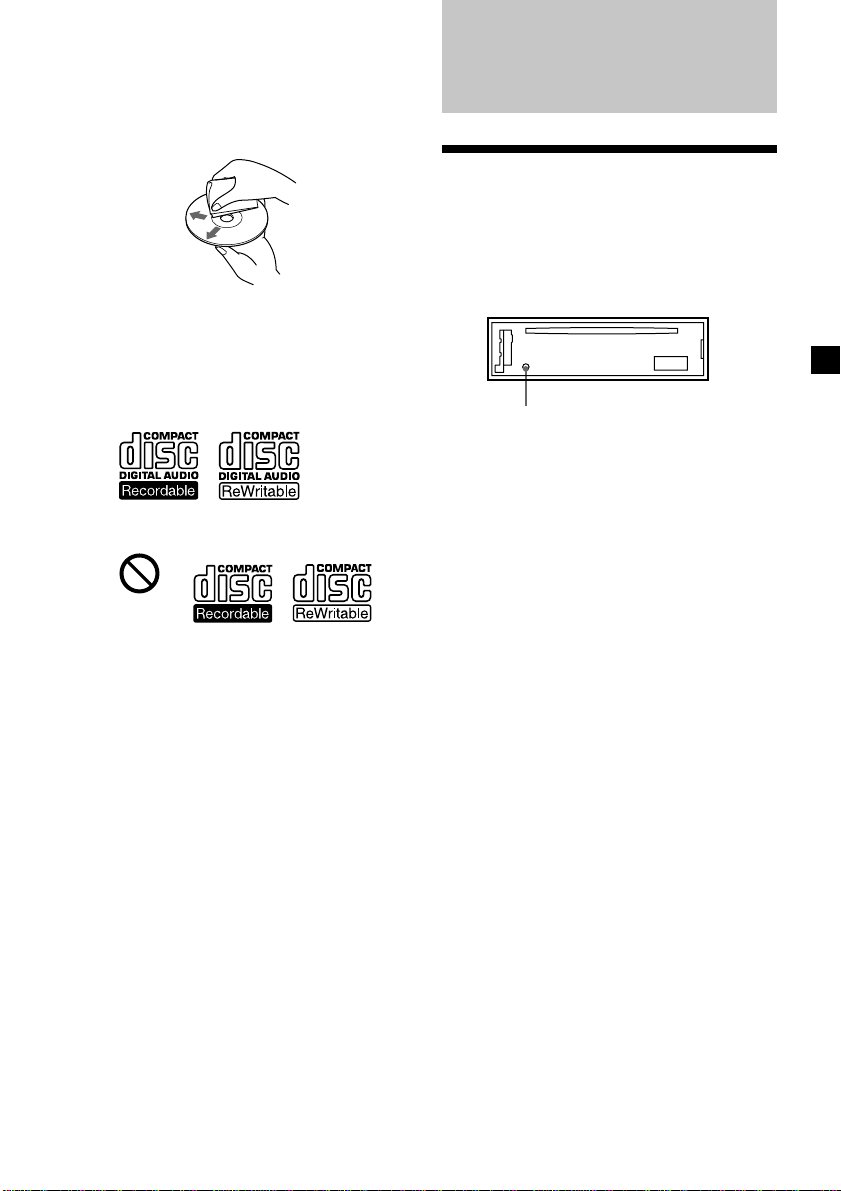
•Before playing, clean the discs with a
commercially available cleaning cloth. Wipe
each disc from the centre out. Do not use
solvents such as benzine, thinner,
commercially available cleaners, or antistatic
spray intended for analog discs.
Notes on CD-R/CD-RW discs
•You can play CD-Rs (recordable CDs)/CDRWs (rewritable CDs) designed for audio use
on this unit.
Look for these marks to distinguish CD-Rs/
CD-RWs for audio use.
These marks denote that a disc is not for
audio use.
Getting Started
Resetting the unit
Before operating the unit for the first time or
after replacing the car battery, you must reset
the unit.
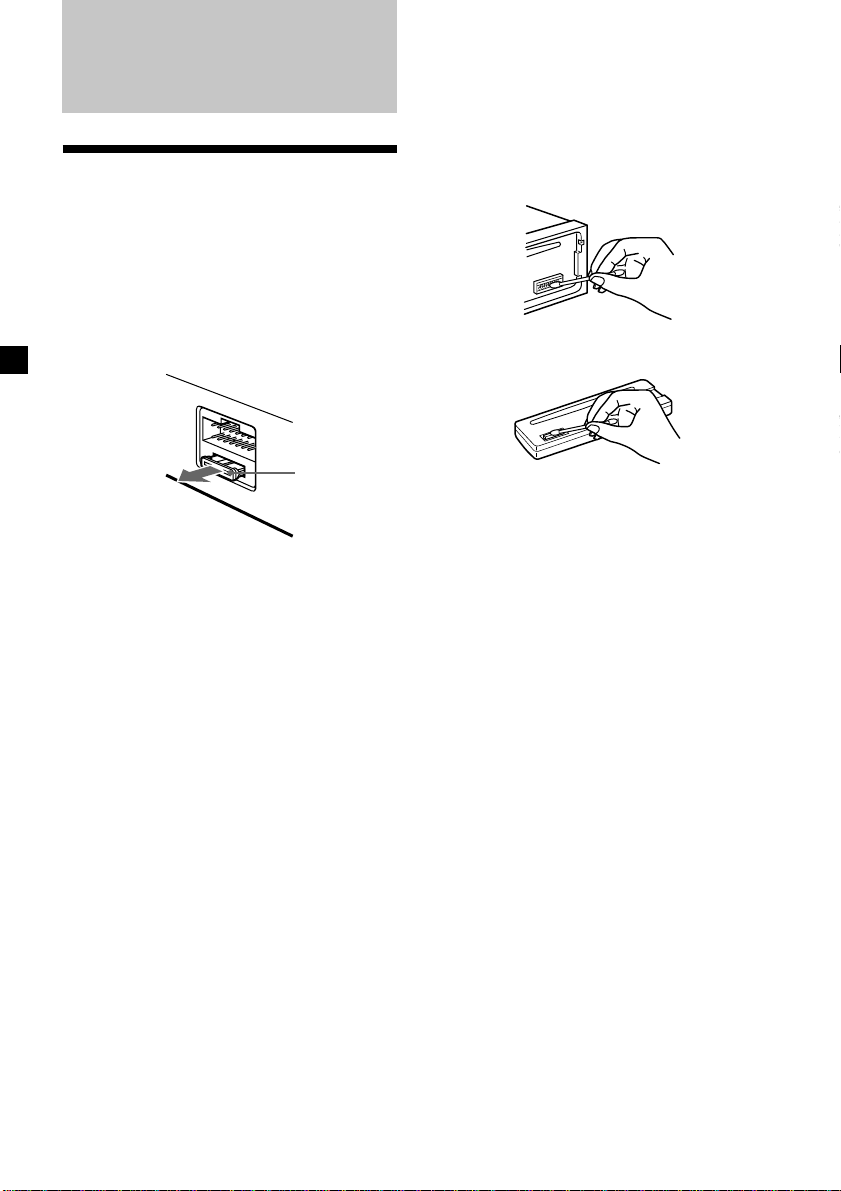
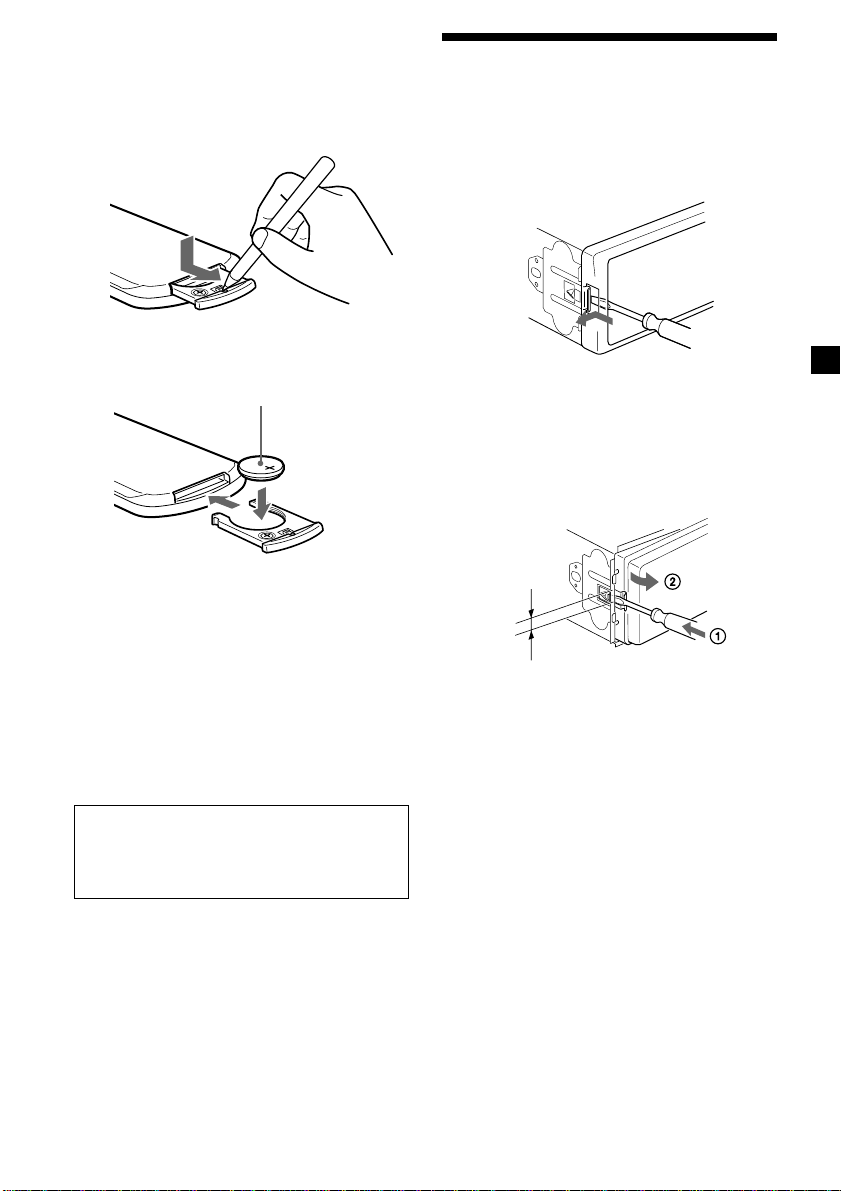
Remove the front panel and press the RESET
button with a pointed object, such as a
ballpoint pen.
RESET button
Note
Pressing the RESET button will erase the clock
setting and some stored contents.
•Some CD-Rs/CD-RWs (depending on the
equipment used for its recording or the
condition of the disc) may not play on this
unit.
•You cannot play a CD-R/CD-RW that is not
finalized*.
* A process necessary for a recorded CD-R/CD-RW
disc to be played on the audio CD player.
7
Page 8
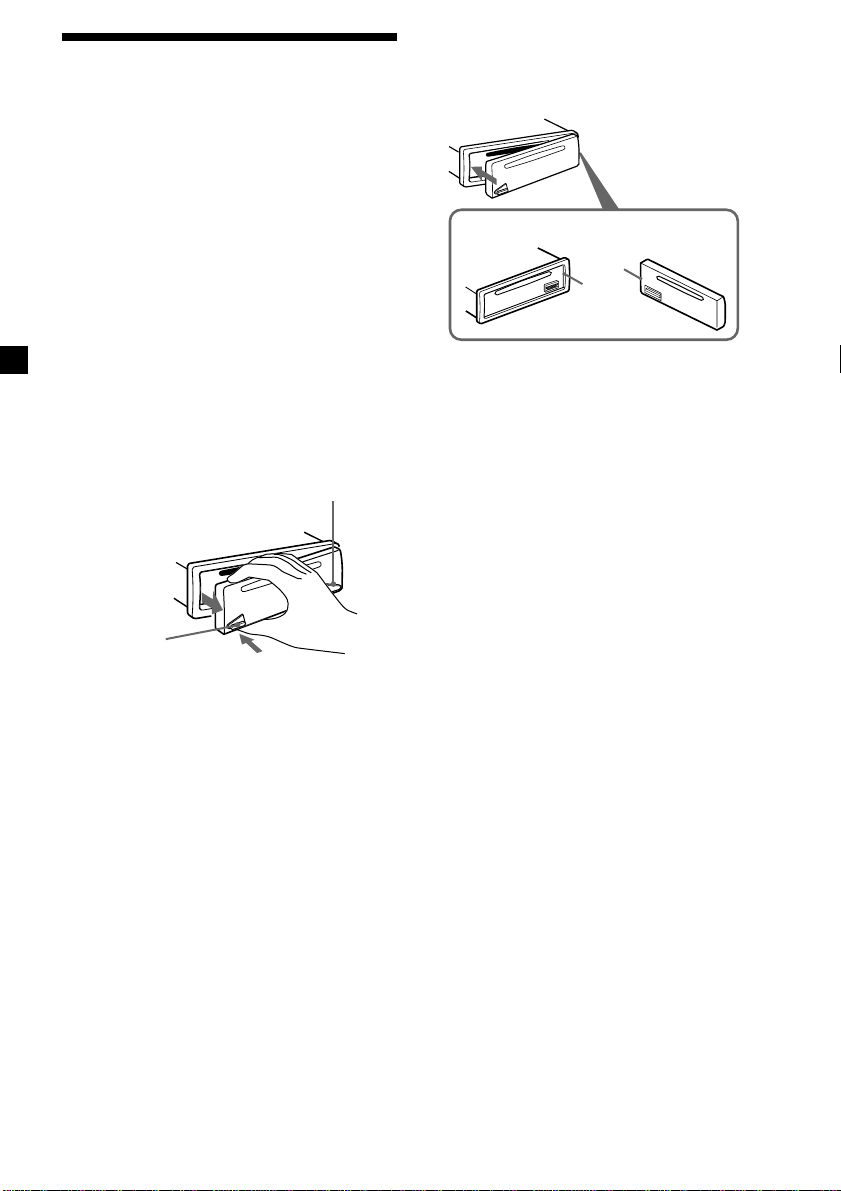
Detaching the front panel
You can detach the front panel of this unit to
protect the unit from being stolen.
Caution alarm
If you turn the ignition switch to the OFF
position without removing the front panel, the
caution alarm will beep for a few seconds.
If you connect an optional amplifier and do not
use the built-in amplifier, the beep sound will
be deactivated.
1 Press (OFF)*.
CD playback or radio reception stops (the
key illumination and display remain on).
* If your car has no ACC position on the
ignition switch, be sure to turn the unit off by
pressing (OFF) for 2 seconds to avoid car
battery drain.
2 Press (RELEASE), then pull it off towards
you.
(OFF)
Attaching the front panel
Attach part A of the front panel to part B of
the unit as illustrated and push the left side
into position until it clicks.
A
B
Note
Do not put anything on the inner surface of the
front panel.
(RELEASE)
Notes
• If you detach the panel while the unit is still
turned on, the power will turn off automatically
to prevent the speakers from being damaged.
• Do not drop or put excessive pressure on the
front panel and its display window.
• Do not subject the front panel to heat/high
temperature or moisture. Avoid leaving it in
parked cars or on dashboards/rear trays.
Tip
When carrying the front panel with you, use the
supplied front panel case.
8
Page 9
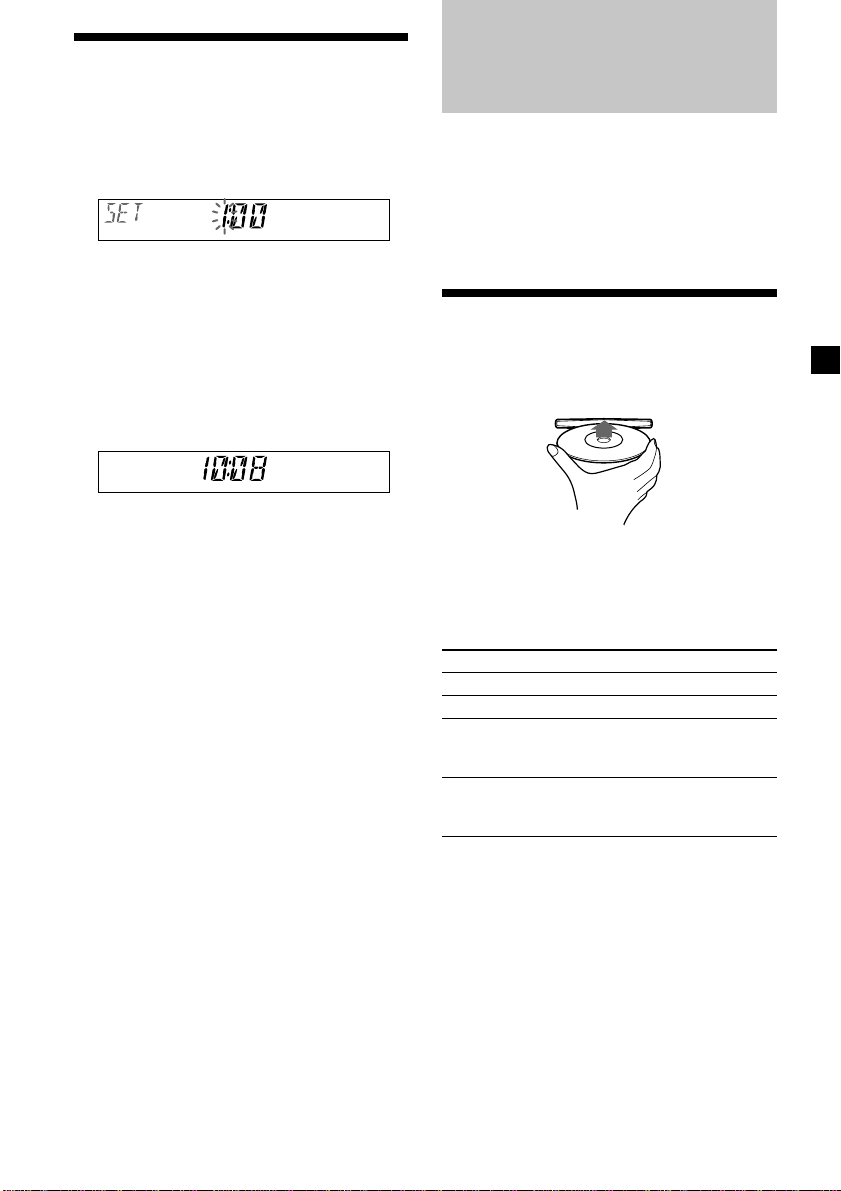
Setting the clock
The clock uses a 24-hour digital indication.
CD Player
CD/MD Unit (optional)
Example: To set the clock to 10:08
1 Press (DSPL) for 2 seconds.
The hour indication flashes.
1 Turn the VOL control dial to set the
hour.
2 Press (SEL).
The minute indication flashes.
3 Turn the VOL control dial to set the
minute.
2 Press (DSPL).
The clock starts. After the clock setting is
completed, the display returns to normal
play mode.
Tip
You can set the clock automatically with the RDS
feature (page 18).
In addition to playing a CD with this unit
alone, you can also control external CD/MD
units.
If you connect an optional CD unit with the
CD TEXT function, the CD TEXT information
will appear in the display when you play a CD
TEXT disc.
Playing a disc
(with this unit)
Insert the disc (labelled side up).
Playback starts automatically.
If a disc is already inserted, press (SOURCE)
repeatedly until “CD” appears to start
playback.
To Do this
Stop playback Press (OFF).
Eject the disc Press Z.
Skip tracks Turn the SEEK/AMS
– Automatic control dial.
Music Sensor [once for each track]
Fast-forward/ Turn the SEEK/AMS
reverse control dial.
– Manual Search [hold to desired point]
Notes
• When the last track on the disc is over, playback
restarts from the first track of the disc.
• With optional units connected, playback of the
same source will continue on to the optional CD/
MD unit.
continue to next page t
9
Page 10

(with optional unit)
1 Press (SOURCE) repeatedly to select
“CD“ or “MD (MS*).“
2 Press (MODE) repeatedly until the
desired unit appears.
Playback starts.
* MS: MG Memory Stick System-up Player MGS-X1
To Press
Skip discs ( 1 ) (DISC –) or
– Disc selection ( 2 ) (DISC +)
Cautions when connecting MGS-X1 and MD unit(s)
This unit recognizes MGS-X1 as an MD unit.
• When you want to play MGS-X1, press (SOURCE)
to select “MS“ or “MD.“ If “MS“ appears in the
source display, MGS-X1 starts to play. If “MD“
appears in the source display, press (MODE) to
select “MS,“ to start playback.
• When you want to play an MD unit, press
(SOURCE) to select “MD“ or “MS.“ If your
desired MD unit appears in the source display, it
starts to play. If “MS“ or another MD unit
appears in the source display, press (MODE) to
select your desired MD unit, to start playback.
Display items
Source (Disc number*1)
Notes
• Disc name, artist name, and track title can be
displayed with up to 8 characters.
• Some characters cannot be displayed.
• This unit cannot display the artist name for each
track of a CD TEXT disc.
Automatically scrolling a name — Auto Scroll
If the disc name, artist name, or track name on
a CD TEXT disc exceeds 8 characters and the
Auto Scroll function is on, information
automatically scrolls across the display as
follows:
• The disc name appears when the disc has
changed (if the disc name is selected).
• The track name appears when the track has
changed (if the track name is selected).
If you press (DSPL) to change the display
item, the disc or track name of the disc is
scrolled automatically whether you set the
function on or off.
Selecting “A.SCRL-ON”
During playback, press (SEL) and (3)
simultaneously.
In 2 seconds the normal display
automatically appears.
To select “A.SCRL-OFF”, press (SEL) and (3)
simultaneously again.
Displayable items
• Clock
• Track number/Elapsed playing time
• Disc name*2/Artist name*
• Track title*
4
To Press
Switch display (DSPL)
item
*1While an optional CD/MD unit is connected.
2
When pressing (DSPL), “NO NAME” indicates
*
that there is no Disc Memo (page 11) or
prerecorded name to display.
3
Only for CD TEXT discs with the artist name.
*
4
*
Only for CD TEXT discs with the track title.
10
Note
For some discs with very many characters, the
following cases may happen:
— Some of the characters are not displayed.
— Auto Scroll does not work.
3
Page 11
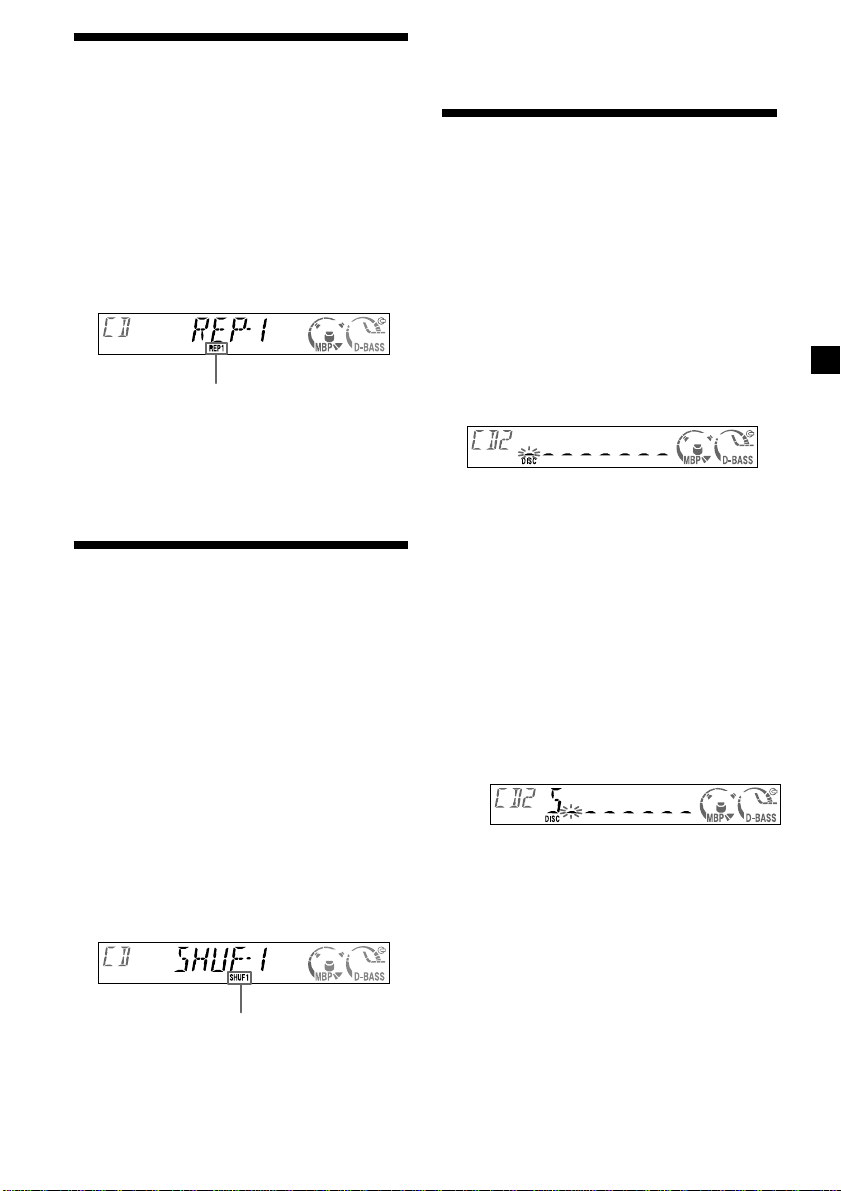
Playing tracks repeatedly
— Repeat Play
The disc in the main unit will repeat a track or
the entire disc when it reaches the end. For
repeat play, you can select:
•REP-1 — to repeat a track.
•REP-2* — to repeat a disc.
* Available only when one or more optional CD/
MD units are connected.
During playback, press (3) (REP)
repeatedly until the desired setting
appears in the display.
Note
“SHUF-ALL” will not shuffle tracks between CD
units and MD units.
Labelling a CD
— Disc Memo (For a CD unit with the
CUSTOM FILE function)
You can label each disc with a custom name
(Disc Memo). You can enter up to 8 characters
for a disc. If you label a CD, you can locate the
disc by name (page 12)
1 Start playing the disc you want to label
in a CD unit with the CUSTOM FILE
function.
“REP” indicator is displayed.
Repeat Play starts.
To return to normal play mode, select “REP-
OFF.”
Playing tracks in random
order
You can select:
•SHUF-1 — to play the tracks on the current
disc in random order.
•SHUF-2*1 — to play the tracks in the current
optional CD (MD) unit in random order.
•SHUF-ALL*2 — to play all the tracks in all
the optional CD (MD) units (including this
unit) in random order.
*1 Available only when one or more optional CD
(MD) units are connected.
2
Available only when one or more optional CD
*
units, or two or more optional MD units are
connected.
— Shuffle Play
During playback, press (4) (SHUF)
repeatedly until the desired setting
appears in the display.
2 Press (LIST/PTY) for 2 seconds.
Name edit mode
The unit will repeat the disc during the
labelling procedure.
3 Enter the characters.
1 Turn the VOL control dial to select the
desired characters.
(A y B y C y ··· Z y 0 y 1 y 2
y ··· 9 y + y – y * y/ y \ y
> y < y . y _ y A ···)
If you want to put a blank space
between characters, select “_.”
2 Press (SEL) after locating the desired
character.
The next character flashes.
3 Repeat steps 1 and 2 to enter the
entire name.
4 To return to normal CD play mode, press
(LIST/PTY) for 2 seconds.
“SHUF” indicator is displayed.
Shuffle Play starts.
To return to normal play mode, select “SHUF-
OFF.”
Tips
• Simply overwrite or enter “_” to correct or erase
a name.
• You can label CDs on a unit without the CUSTOM
FILE function if that unit is connected along with
a CD unit that has the function. The Disc Memo
will be stored in the memory of the CD unit with
the CUSTOM FILE function.
continue to next page t
11
Page 12

Viewing the Disc Memo
As a display item, the Disc Memo always takes
priority over any original CD TEXT
information.
To Press
View (DSPL) during CD/
CD TEXT disc playback
Erasing the Disc Memo
1 Press (SOURCE) repeatedly to select
“CD.”
Locating a disc by name
— List-up (For a CD unit with the CUSTOM
FILE function or an MD unit)
You can use this function for discs that have
been assigned custom names*1 or for CD TEXT
discs*2.
*1Locating a disc by its custom name: when you
assign a name for a CD (page 11) or an MD.
*2Locating discs by the CD TEXT information:
when you play a CD TEXT disc on a CD unit with
the CD TEXT function.
2 Press (MODE) repeatedly to select the CD
unit storing the Disc Memo.
3 Press (LIST/PTY) for 2 seconds.
4 Press (DSPL) for 2 seconds.
5 Turn the VOL control dial to select the
disc name you want to erase.
6 Press (SEL) for 2 seconds.
The name is erased.
Repeat steps 5 and 6 if you want to erase
other names.
7 Press (LIST/PTY) for 2 seconds.
The unit returns to normal CD play mode.
Notes
• When the Disc Memo for a CD TEXT disc is
erased, the original CD TEXT information is
displayed.
• If you cannot find the Disc Memo you want to
erase, try selecting a different CD unit in step 2.
1 Press (LIST/PTY) momentarily.
The name assigned to the current disc
appears in the display.
2 Press (LIST/PTY) repeatedly until you
find the desired disc.
3 Turn the SEEK/AMS control dial to play
the disc.
Notes
• Once a disc name has been displayed for 5
seconds, the display goes back to its normal
playback mode.
• The track names are not displayed during MD
playback.
• If there are no discs in the magazine, “NO DISC”
appears in the display.
• If a disc has not been assigned a custom file, “NO
NAME” appears in the display.
• If the disc information has not been read by the
unit, “NOT READ” apppears in the display. To
load the disc, first press the number button, then
choose the disc that has not been loaded.
• The information appears only in upper cases.
There are also some letters which cannot be
displayed (during MD playback).
12
Page 13

Radio
Storing only the desired stations
The unit can store up to 6 stations per band
(FM1, FM2, FM3, MW, and LW).
Caution
When tuning in stations while driving, use
Best Tuning Memory to prevent accidents.
Storing stations
automatically
— Best Tuning Memory (BTM)
The unit selects the stations with the strongest
signals within the selected band, and stores
them in the order of their frequency.
1 Press (SOURCE) repeatedly to select the
radio.
2 Press (MODE) repeatedly to select the
band.
3 Press (SENS/BTM) for 2 seconds.
The unit stores stations in the order of their
frequencies on the number buttons. A beep
sounds when the setting is stored.
Notes
• If only a few stations can be received due to
weak signals, some number buttons will retain
their former settings.
• When a number is indicated in the display, the
unit starts storing stations from the one currently
displayed.
You can manually preset the desired stations
on any chosen number button.
1 Press (SOURCE) repeatedly to select the
radio.
2 Press (MODE) repeatedly to select the
band.
3 Turn the SEEK/AMS control dial to tune
in the station that you want to store.
4 Press the desired number button ((1) to
(6)) until “MEM” appears.
The number button indication appears in
the display.
Note
If you try to store another station on the same
number button, the previously stored station will
be erased.
Receiving the stored stations
1 Press (SOURCE) repeatedly to select the
radio.
2 Press (MODE) repeatedly to select the
band.
3 Press the number button ((1) to (6)) on
which the desired station is stored.
continue to next page t
13
Page 14
If preset tuning does not work
— Automatic tuning/ Local Seek Mode
Automatic tuning:
Turn the SEEK/AMS control dial to search
for the station.
Scanning stops when the unit receives a
station. Turn the SEEK/AMS control dial
until the desired station is received.
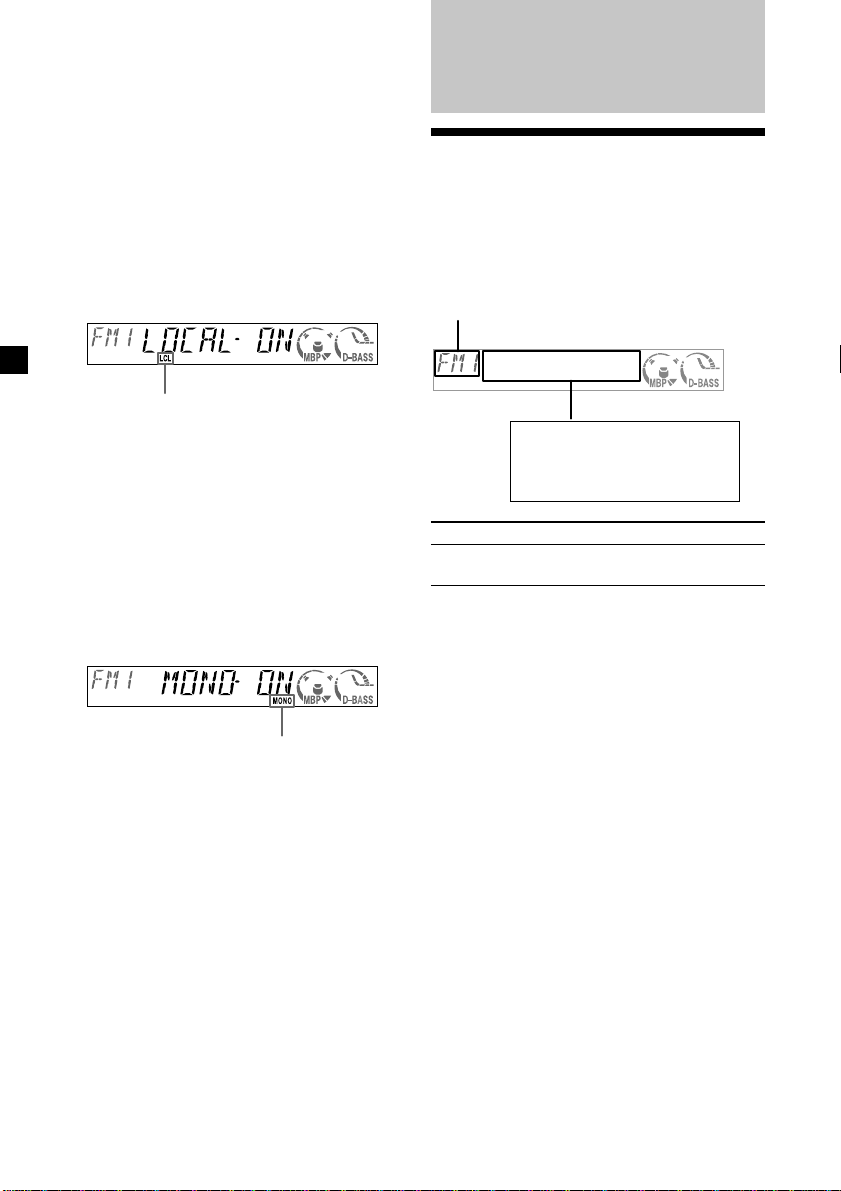
Local Seek Mode:
If the automatic tuning stops too
frequently, press (SENS/BTM) repeatedly
until “LOCAL-ON” appears.
“LCL” indicator is displayed.
Only the stations with relatively strong
signals will be tuned in.
Tip
If you know the frequency of the station you want
to listen to, turn the SEEK/AMS control dial until
the desired frequency appears (manual tuning).
If FM stereo reception is poor
— Monaural Mode
During radio reception, press (SENS/BTM)
repeatedly until “MONO-ON” appears.
“MONO” indicator is displayed.
The sound improves, but becomes
monaural (“ST” disappears).
To return to normal mode, select “MONO-
OFF.”
RDS
Overview of RDS
FM stations with Radio Data System (RDS)
service send inaudible digital information
along with the regular radio programme
signal. For example, one of the following will
be displayed upon receiving a station with
RDS capability.
Source
Displayable items
• Clock
• Station name (Frequency)
• RDS data
To Press
Switch Clock/ (DSPL)
Station name
RDS services
RDS data offers you other conveniences, such
as:
•Automatic retuning of a programme,
helpful during long-distance drives. — AF
t page 15
•Receiving traffic announcements, even
when enjoying another programme/source.
— TA t page 16
•
Selecting stations by the type of programme
— PTY t page 17
•Automatic clock time setting. — CT
t page 18
Notes
• Depending on the country or region, not all of
the RDS functions are available.
• RDS may not work properly if the signal strength
is weak or if the station you are tuned to is not
transmitting RDS data.
.
14
Page 15
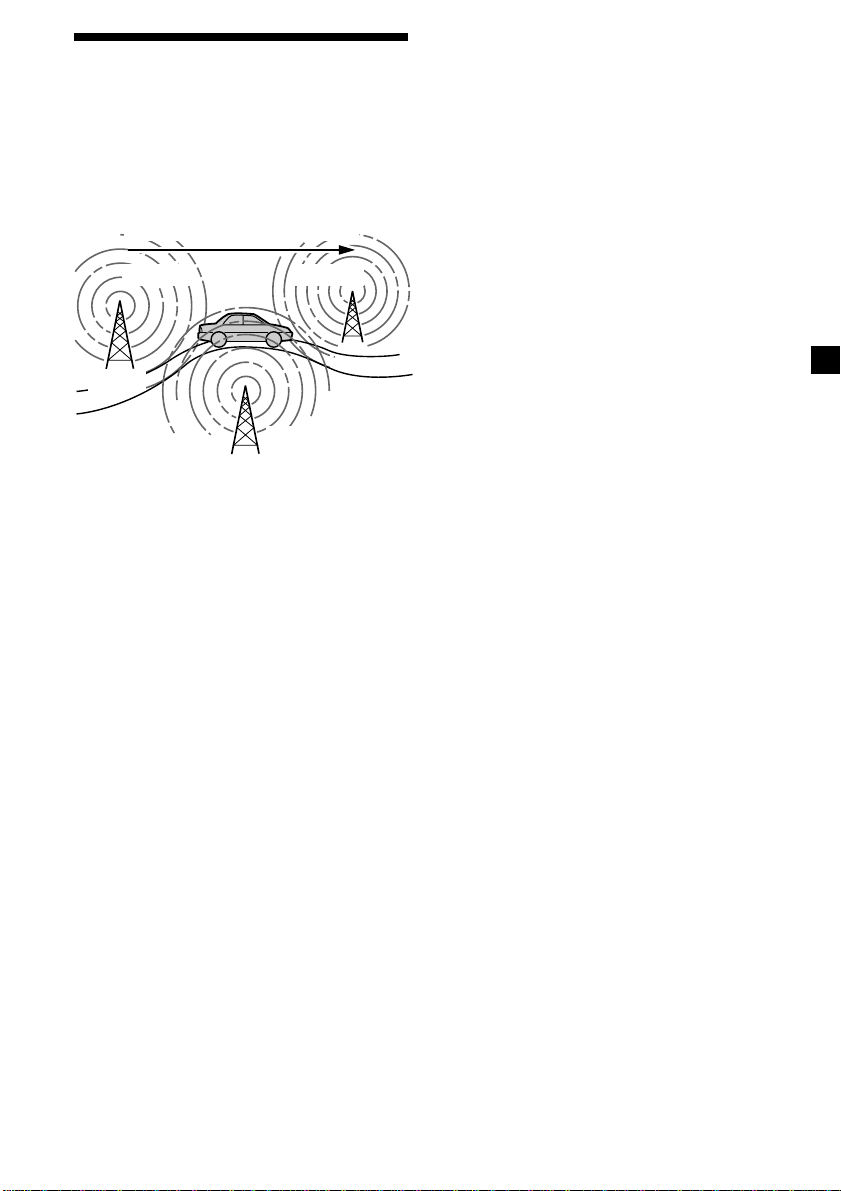
Automatic retuning for
best reception results
— AF function
The alternative frequencies (AF) function
allows the radio to always tune into the area’s
strongest signal for the station you are
listening to.
Frequencies change automatically.
98.5MHz
Station
96.0MHz
Staying with one regional
programme
When AF function is on: this unit’s factory-set
setting restricts reception to a specific region,
so you won’t be switched to another regional
station with a stronger frequency.
If you leave this regional programme’s
reception area or would like to take advantage
of the whole AF function, press (AF) for
2 seconds until "REG-OFF" appears.
Note
This function does not work in the United
Kingdom and in some other areas.
Local Link function
(United Kingdom only)
This function enables you to select other local
stations in the area, even if they are not stored
on your number buttons.
102.5MHz
1 Select an FM station (page 13).
2 Press (AF) repeatedly until “AF-ON”
appears.
The unit starts searching for an alternative
station with a stronger signal in the same
network.
If “NO AF” flashes, the currently tuned into
station does not have an alternative
frequency.
Notes
• If you want to change the on/off setting while
playing a CD, press (AF).
• When there is no alternative frequency in the
area or when you do not need to search for one,
turn the AF function off by selecting “AF-OFF.”
For stations without alternative
frequencies
Turn the SEEK/AMS control dial while
the station name is flashing (within
8 seconds).
The unit starts searching for another
frequency with the same PI (Programme
Identification) data (“PI SEEK” appears).
If the unit cannot find the same PI, the unit
returns to the previously selected
frequency.
1 Press a number button ((1) to (6)) that
has a local station stored on it.
2 Within 5 seconds, press the number
button of the local station again.
3 Repeat this procedure until the desired
local station is received.
15
Page 16

Receiving traffic announcements — TA/TP
Presetting RDS stations with AF and TA setting
By activating the Traffic Announcement (TA)
and Traffic Programme (TP). You can
automatically tune in an FM station
broadcasting traffic announcements. These
settings function regardless of the current FM
programme/source, CD; the unit switches
back to the original source when the bulletin is
over.
Press (TA) repeatedly until “TA-ON”
appears.
The unit starts searching for traffic
information stations.
“TP” indicates reception of such stations,
and “TA” flashes during an actual traffic
announcement. The unit will continue
searching for stations available with TP if
“NO TP” is indicated.
To cancel all traffic announcements, select
“TA-OFF.”
To Press
Cancel current (TA)
announcement
Tip
You can also cancel the current announcement by
pressing (SOURCE) or (MODE).
Presetting the volume of traffic
announcements
You can preset the volume level of the traffic
announcements so you won’t miss hearing
them.
1 Turn the VOL control dial to adjust the
desired volume level.
2 Press (TA) for 2 seconds.
“TA” appears and the setting is stored.
When you preset RDS stations, the unit stores
each station’s AF/TA setting (on/off) as well
as its frequency. You can select a different
setting (for AF, TA, or both) for individual
preset stations, or the same setting for all
preset stations. If you preset stations with “AF
on,” the unit automatically stores stations with
the strongest radio signal.
Presetting the same setting for all
preset stations
1 Select an FM band (page 13).
2 Press (AF) and/or (TA) to select “AF-ON”
and/or “TA-ON.”
Note that selecting “AF-OFF” and “TA-
OFF” applies to non-RDS stations as well as
RDS stations.
3 Press (SENS/BTM) until “BTM” flashes.
Presetting different settings for
each preset station
1 Select an FM band, and tune in the
desired station.
2 Press (AF) and/or (TA) to select “AF-ON”
and/or “TA-ON.”
3 Press the desired number button until
“MEM” appears.
Repeat from step 1 to preset other stations.
Note
If you want to change the AF/TA setting while you
are playing a CD, press (AF) or (TA).
Receiving emergency
announcements
If either AF or TA is on, the unit will switch to
emergency announcements, if one comes in
while listening to an FM station or CD.
16
Page 17

Tuning in stations by programme type — PTY
You can tune in a station by selecting the type
of programme you would like to listen to.
Programme types Display
News NEWS
Current Affairs AFFAIRS
Information INFO
Sports SPORT
Education EDUCATE
Drama DRAMA
Culture CULTURE
Science SCIENCE
Varied VARIED
Popular Music POP M
Rock Music ROCK M
Easy Listening EASY M
Light Classical LIGHT M
Classical CLASSICS
Other Music Type OTHER M
Weather WEATHER
Finance FINANCE
Children’s Programmes CHILDREN
Social Affairs SOCIAL A
Religion RELIGION
Phone In PHONE IN
Travel TRAVEL
Leisure LEISURE
Jazz Music JAZZ
Country Music COUNTRY
National Music NATION M
Oldies Music OLDIES
Folk Music FOLK M
Documentary DOCUMENT
1 Press (LIST/PTY) during FM reception.
The current programme type name appears
if the station is transmitting the PTY data.
“--------” appears if the received station is
not an RDS station, or if the RDS data is not
received.
2 Press (LIST/PTY) repeatedly until the
desired programme type appears.
The programme types appear in the order
shown in the table. “NONE” appears if the
programme type is not specified in the RDS
data.
3 Turn the SEEK/AMS control dial.
The unit starts searching for a station
broadcasting the selected programme type.
Note
You cannot use this function in some countries
where no PTY (Programme Type selection) data is
available.
17
Page 18
Setting the clock automatically — CT
Other Functions
The CT (Clock Time) data from the RDS
transmission sets the clock automatically.
Selecting “CT-ON”
During radio reception, press (SEL) and
(2) simultaneously.
The clock is set.
In one second the normal display
automatically appears.
To select “CT-OFF”, press (SEL) and (2)
simultaneously again.
Notes
• The CT function may not work even though an
RDS station is being received.
• There might be a difference between the time
set by the CT function and the actual time.
You can also control the unit (and optional
CD/MD units) with a rotary commander
(optional).
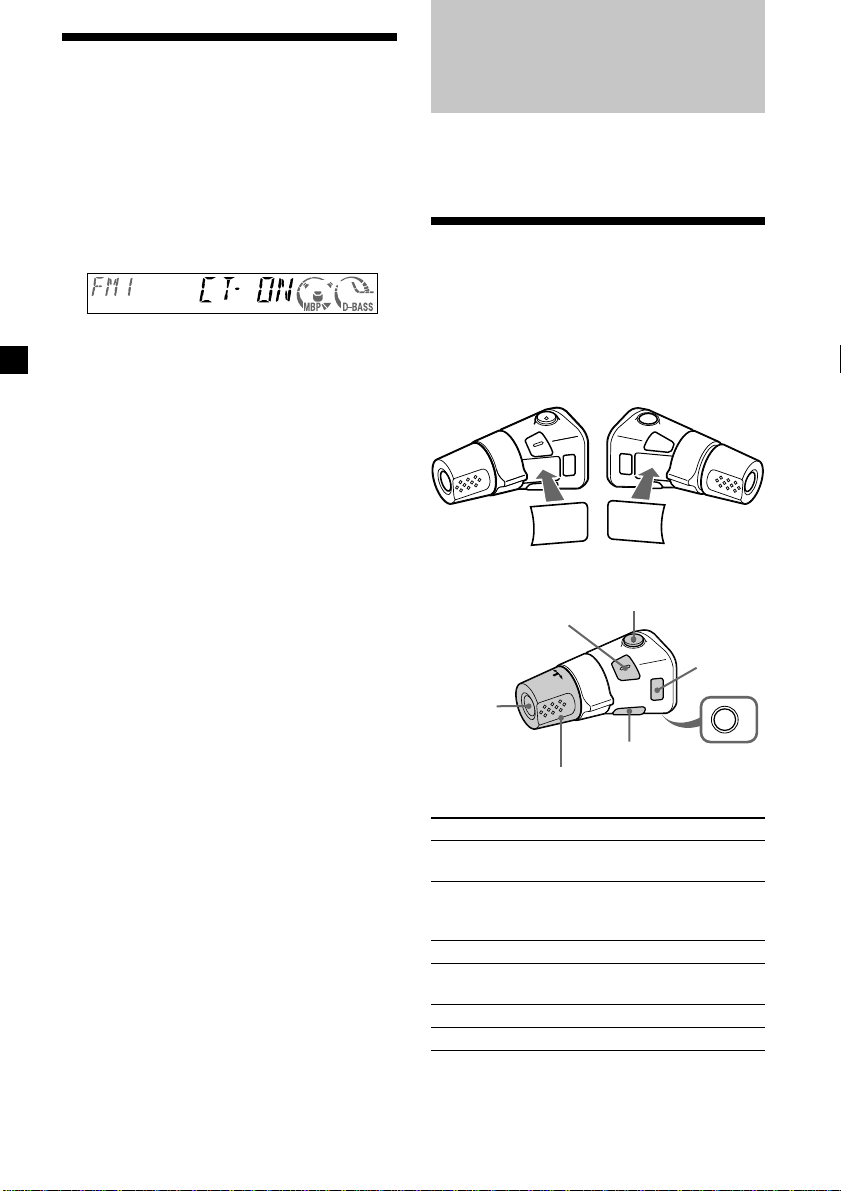
Using the rotary commander
First, attach the appropriate label depending
on how you want to mount the rotary
commander.
The rotary commander works by pressing
buttons and/or rotating controls.
D
SEL
MODE
DSPL
By pressing buttons
(SEL)
(SOURCE)
Rotate the VOL control
to adjust the volume.
SPL
M
O
DE
SEL
(ATT)
(DSPL)
(MODE)
(OFF)
OFF
18
Press To
(SOURCE) Change source
(radio/CD/MD*1)
(MODE) Change operation
(radio band/CD unit/
MD*1 unit)
(ATT) Attenuate sound
2
(OFF)*
Stop playback or radio
reception
(SEL) Adjust and select
(DSPL) Change the display item
Page 19
*1Only if the corresponding optional equipment is
connected.
*2If your car has no ACC (accessory) position on
the ignition key switch, be sure to press (OFF)
for 2 seconds to turn off the clock indication
after turning off the ignition.
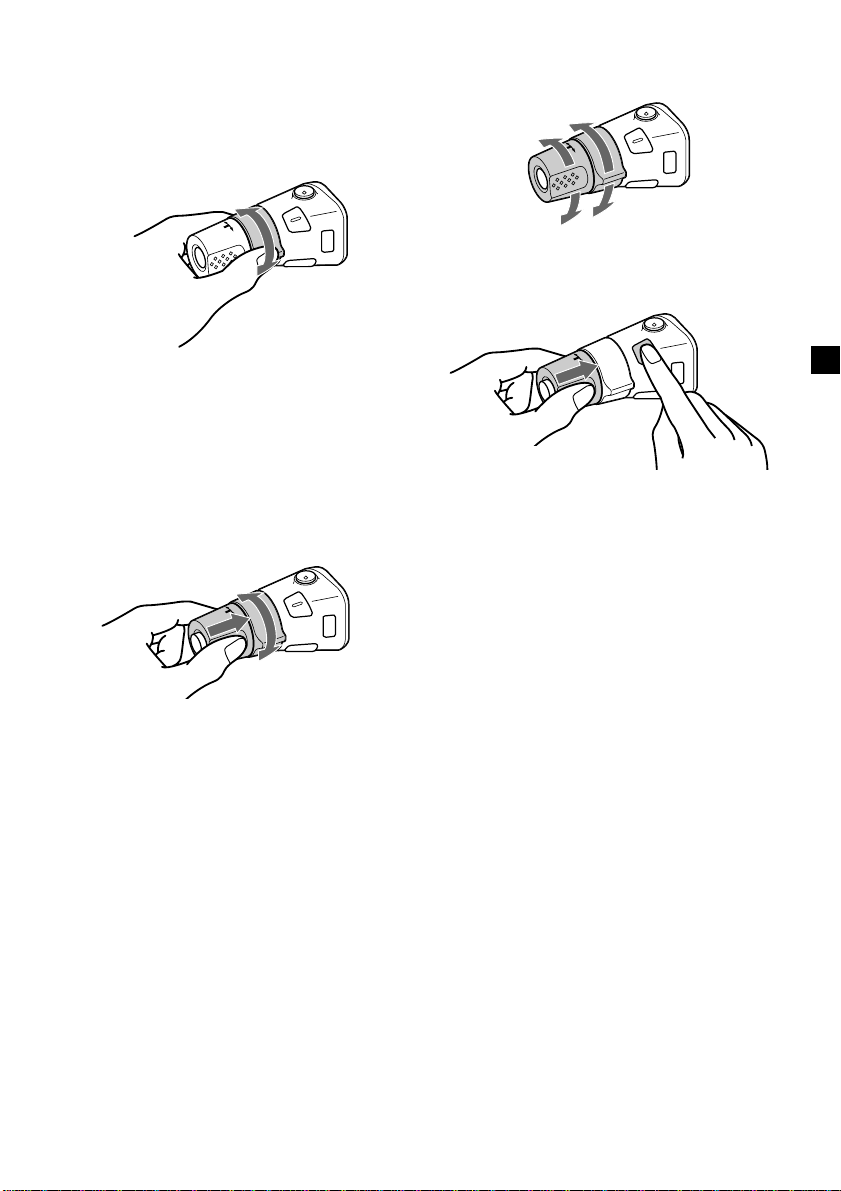
By rotating the control
SEEK/AMS
control
Rotate and release to:
– Skip tracks.
– Tune in stations automatically.
Rotate, hold, and release to:
– Fast-forward/reverse a track.
– find a station manually.
By pushing in and rotating the
control
Changing the operative direction
The operative direction of controls is factoryset as shown below.
To increase
To decrease
If you need to mount the rotary commander on
the right hand side of the steering column, you
can reverse the operative direction.
Press (SEL) for 2 seconds while pushing
the VOL control.
PRESET
control
Push in and rotate the control to:
– Receive preset stations.
– Change the disc*.
* When an optional CD/MD unit is connected.
19
Page 20

Adjusting the sound characteristics
Changing the sound and display settings
You can adjust the bass, treble, balance, and
fader.
1 Select the item you want to adjust by
pressing (SEL) repeatedly.
Each time you press (SEL), the item
changes as follows:
BAS (bass) t TRE (treble) t
BAL (left-right) t FAD (front-rear)
2 Adjust the selected item by turning the
VOL control dial.
Note
Adjust within 3 seconds after selecting the item.
Quickly attenuating the sound
Press (ATT).
After “ATT-ON” momentarily flashes, the
“ATT” indication appears in the display.
To restore the previous volume level, press
(ATT) again.
“ATT-OFF” flashes momentarily.
Tip
When the interface cable of a car telephone is
connected to the ATT lead, the unit decreases the
volume automatically when a telephone call comes
in (Telephone ATT function).
The following items can be set:
•AMBER/GREEN*
– to change the illumination colour to amber
or green
•CT (Clock Time) (page 18).
•A.SCRL (Auto Scroll)*2 (page 10).
•M.DSPL (Motion Display)
– the demonstration mode which appears
when no source is selected (e.g., tuner is
turned off).
•BEEP – to turn the beep sound on or off.
Selecting the desired item
Press (SEL) and the desired preset
number button simultaneously.
(SEL) + (1): AMBER/GREEN*
(SEL) + (2): CT
(SEL) + (3): A.SCRL*
(SEL) + (4): M.DSPL
(SEL) + (6): BEEP
*1CDX-CA600 only
2
When no CD is playing, this item will not
*
appear.
After the mode setting completed, the display
returns to normal play mode.
Note
The displayed item will differ depending on the
source.
To cancel the item, press (SEL) and the preset
number button simultaneously again.
1
1
2
20
Page 21
Selecting the sound
position
— My Best sound Position (MBP)
When you drive without passengers, you can
enjoy the most comfortable sound
environment with “My Best sound Position.”
“My Best sound Position” has two presets,
which are best suited for the front seats. You
can select one very easily with the MBP button.
MBP-A: best suited for the person in the front-
left seat.
MBP-B: best suited for the person in the front-
right seat.
Press (MBP) repeatedly for the desired
listening position.
After one second, the display goes back to
the normal playback mode.
To cancel the MBP function, select
“MBP-OFF.”
If you want to adjust the sound characteristics
more precisely, you can do it using the (SEL)
button (see “Adjusting the sound
characteristics” on page 20).
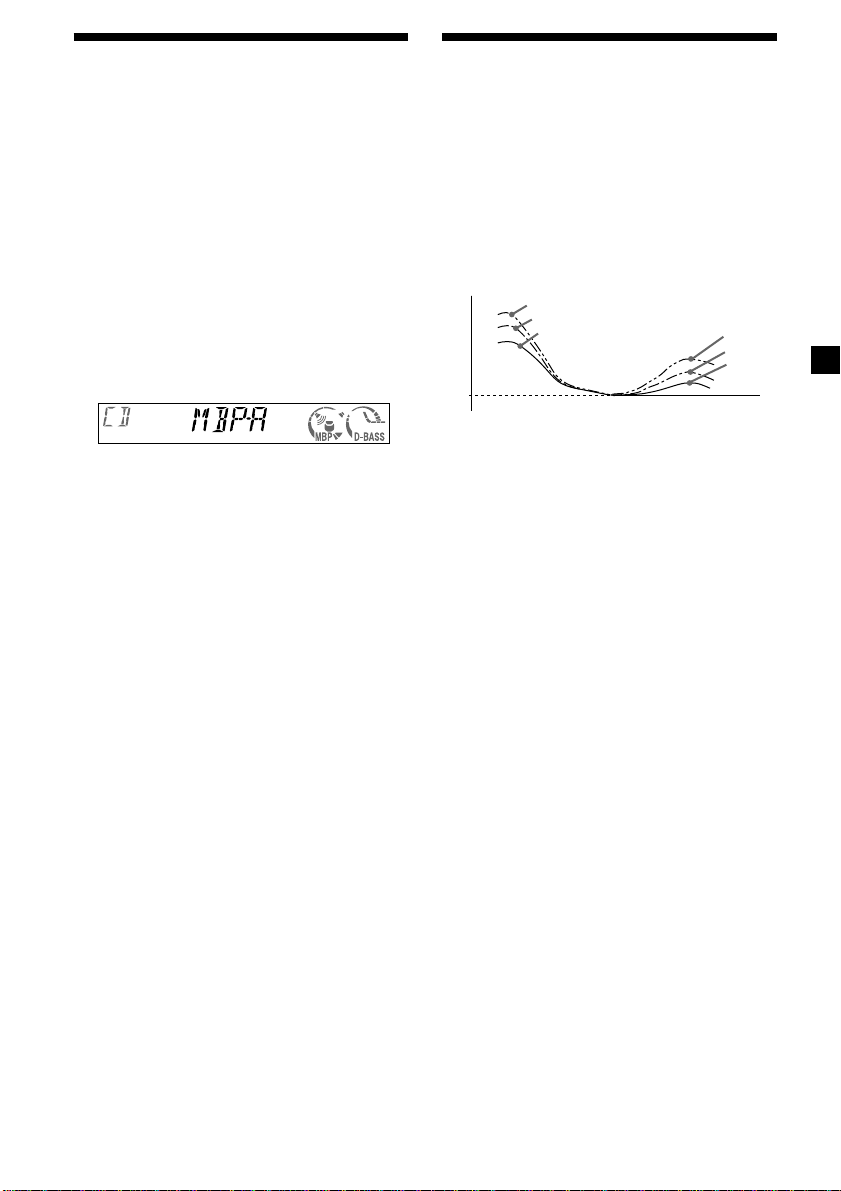
Boosting the bass sound
— D-bass
You can enjoy a clear and powerful bass
sound. The D-bass function boosts the low
frequency signal and high frequency signal
with a sharper curve than conventional bass
boost.
You can hear the bass line more clearly even
while the vocal volume remains the same. You
can emphasize and adjust the bass sound
easily with the (D-BASS) button.
D.BASS-3
Level
0dB
Adjusting the bass curve
Press (D-BASS) repeatedly to select the
desired bass curve.
As the D-BASS number increases so does
the effect.
Note
The bass sound may distort at same volume. If the
bass sound distorts, select less effective bass curve.
D.BASS-2
D.BASS-1
D.BASS-3
D.BASS-2
D.BASS-1
Frequency (Hz)
Notes
• If you adjust any sound characteristics by using
the (SEL) button (page 20), the MBP setting
returns to OFF.
• When MBP is set to OFF, the sound setting you
adjusted (page 20) is activated.
21
Page 22
Additional
Information
Maintenance
Fuse replacement
When replacing the fuse, be sure to use one
matching the amperage rating stated on the
original fuse. If the fuse blows, check the
power connection and replace the fuse. If the
fuse blows again after replacement, there may
be an internal malfunction. In such a case,
consult your nearest Sony dealer.
Cleaning the connectors
The unit may not function properly if the
connectors between the unit and the front
panel are not clean. In order to prevent this,
detach the front panel (page 8) and clean the
connectors with a cotton swab dipped in
alcohol. Do not apply too much force.
Otherwise, the connectors may be damaged.
Main unit
Fuse (10 A)
Warning
Never use a fuse with an amperage rating
exceeding the one supplied with the unit as
this could damage the unit.
Back of the front panel
Notes
• For safety, turn off the ignition before cleaning
the connectors, and remove the key from the
ignition switch.
• Never touch the connectors directly with your
fingers or with any metal device.
22
Page 23
Replacing the lithium battery
When the battery becomes weak, the range of
the card remote commander becomes shorter.
Replace the battery with a new CR2025 lithium
battery. Use of any other battery may present a
risk of fire or explosion.
Removing the unit
1 Remove the front cover
1 Detach the front panel (page 8).
2 Press the clip inside the front cover
with a thin screwdriver.
x
+ side up
Notes on lithium battery
•Keep the lithium battery out of the reach of
children. Should the battery be swallowed,
immediately consult a doctor.
•Wipe the battery with a dry cloth to assure a
good contact.
•Be sure to observe the correct polarity when
installing the battery.
•Do not hold the battery with metallic
tweezers, otherwise a short-circuit may
occur.
WARNING
Battery may explode if mistreated.
Do not recharge, disassemble, or dispose of
in fire.
3 Repeat step 2 for the other side.
2 Remove the unit
1 Use a thin screwdriver to push in the
clip on the left side of the unit, then
pull out the left side of the unit until
the catch clears the mounting.
4 mm
2 Repeat step 1 for the right side.
3 Slide the unit out of its mounting.
23
Page 24

Specifications
CD player section
Signal-to-noise ratio 90 dB
Frequency response 10 – 20,000 Hz
Wow and flutter Below measurable limit
Tuner section
FM
Tuning range 87.5 – 108.0 MHz
Aerial terminal External aerial connector
Intermediate frequency 10.7 MHz/450 kHz
Usable sensitivity 8 dBf
Selectivity 75 dB at 400 kHz
Signal-to-noise ratio 66 dB (stereo),
Harmonic distortion at 1 kHz
Separation 35 dB at 1 kHz
Frequency response 30 – 15,000 Hz
MW/LW
Tuning range MW: 531 – 1,602 kHz
Aerial terminal External aerial connector
Intermediate frequency 10.7 MHz/450 kHz
Sensitivity MW: 30 µV
72 dB (mono)
0.6 % (stereo),
0.3 % (mono)
LW: 153 – 279 kHz
LW: 40 µV
Power amplifier section
Outputs Speaker outputs
Speaker impedance 4 – 8 ohms
Maximum power output 50 W × 4 (at 4 ohms)
(sure seal connectors)
General
Outputs Power aerial relay control
Inputs Telephone ATT control
Tone controls Bass ±9 dB at 100 Hz
Power requirements 12 V DC car battery
Dimensions Approx. 178 × 50 × 177 mm
Mounting dimensions Approx. 182 × 53 × 161 mm
Mass Approx. 1.2 kg
Supplied accessories Parts for installation and
Optional accessories Card remote commander
Optional equipment CD changer (6 discs)
lead
lead
Treble ±9 dB at 10 kHz
(negative earth)
(w/h/d)
(w/h/d)
connections (1 set)
Front panel case (1)
RM-X114
Rotary commander
RM-X4S
CDX-T69
MD changer (6 discs)
MDX-66XLP
MG Memory Stick
System-up Player
MGS-X1
24
Note
This unit cannot be connected to a digital
preamplifier or an equalizer.
Design and specifications are subject to change
without notice.
Page 25

Troubleshooting
The following checklist will help you remedy
problems you may encounter with your unit.
Before going through the checklist below,
check the connection and operating
procedures.
General
No sound.
•Rotate the VOL control dial clockwise to
adjust the volume.
•Cancel the ATT function.
•Set the fader control to the centre position
for a 2-speaker system.
The contents of the memory have been
erased.
•The RESET button has been pressed.
t Store again into the memory.
•The power cord or battery has been
disconnected.
•The power connecting cord is not
connected properly.
No beep sound.
The beep sound is cancelled (page 20).
Indications disappear from/do not appear in
the display.
•The clock display disappears if you press
(OFF) for 2 seconds.
t Press (OFF) again for 2 seconds to
display the clock.
•Remove the front panel and clean the
connectors. See “Cleaning the connectors”
(page 22) for details.
When stopping playback or radio reception,
the clock is not displayed.
M.DSPL is displayed (M.DSPL mode was set
to 1 or 2).
t Set the M.DSPL mode to “off” (page 20).
Stored stations and correct time are erased.
The fuse has blown.
Makes noise when the ignition key is in the
ON, ACC, or OFF position.
The leads are not matched correctly with the
car’s accessory power connector.
No power is being supplied to the unit.
•Check the connection. If everything is in
order, check the fuse.
•The car does not have an ACC position.
t Press (SOURCE) (or insert a disc) to
turn on the unit.
The power is continuously supplied to the
unit.
The car does not have an ACC position.
The power aerial does not extend.
The power aerial does not have a relay box.
CD playback
A disc cannot be loaded.
•Another CD is already loaded.
•The CD is forcibly inserted upside down or
in the wrong way.
Playback does not begin.
•Dirty or defective disc.
•CD-R/CD-RW that is not finalized.
•You tried to playback a CD-R/CD-RW not
designed for audio use.
•Some CD-Rs/CD-RWs may not play due
to its recording equipment or the disc
condition.
A disc is automatically ejected.
The ambient temperature exceeds 50°C.
CD will not be ejected.
The operation buttons do not function.
Press the RESET button.
The sound skips from vibration.
•The unit is installed at an angle of more
than 60°.
•The unit is not installed in a sturdy part of
the car.
The sound skips.
Dirty or defective disc.
continue to next page t
25
Page 26

Radio reception
Preset tuning is not possible.
•Store the correct frequency in the memory.
•The broadcast signal is too weak.
The stations cannot be received.
The sound is hampered by noises.
•Connect a power aerial control lead (blue)
or accessory power supply lead (red) to the
power supply lead of a car’s aerial booster.
(Only when your car has built-in FM/
MW/LW aerial in the rear/side glass.)
•Check the connection of the car aerial.
•The auto aerial will not go up.
t Check the connection of the power
aerial control lead.
•Check the frequency.
Automatic tuning is not possible.
•The local seek mode is set to “ON.”
t Set the local seek mode to “OFF” (page
14).
•The broadcast signal is too weak.
t Perform manual tuning.
The “ST” indication flashes.
•Tune in the frequency accurately.
•The broadcast signal is too weak.
t Set to the monaural reception mode
(page 14).
A programme broadcast in stereo is heard
in monaural.
The unit is in monaural reception mode.
t Cancel monaural reception mode (page
14).
RDS
The SEEK starts after a few seconds of
listening.
The station is non-TP or has weak signal.
t Press (TA) repeatedly until “TA-OFF”
appears.
No traffic announcements.
•Activate “TA.”
•The station does not broadcast any traffic
announcements despite being TP.
t Tune in another station.
PTY displays “--------.”
•The current station is not an RDS station.
•RDS data has not been received.
Error displays/Messages
Error displays
The following indications will flash for about
5 seconds, and an alarm sound will be heard.
1
ERROR*
•A CD is dirty or inserted upside down.
t Clean or insert the CD correctly*2.
•
A CD cannot play because of some problem.
t Insert another CD*2.
HI TEMP
The ambient temperature is more than 50°C.
t Wait until the temperature goes down
below 50°C.
NO DISC
No disc is inserted in the CD unit.
t Insert discs in the CD unit.
RESET
The CD unit cannot be operated because of
some problem.
t Press the RESET button on the unit.
*1When an error occurs during playback of a CD,
the disc number of the CD does not appear in
the display.
2
The disc number of the disc causing the error
*
appears in the display.
If these solutions do not help improve the
situation, consult your nearest Sony dealer.
Messages
L.SEEK +/–
The Local Seek mode is on during automatic
tuning (page 14).
NO AF
There is no alternative frequency for the
current station.
26
Page 27

27
Page 28
Willkommen!
Danke, daß Sie sich für diesen CD-Player von
Sony entschieden haben. Dieses Gerät bietet
eine Vielzahl von Merkmalen, die Sie dank der
folgenden Funktionen und des folgenden
Zubehörs noch besser nutzen können:
•Gesondert erhältliche CD/MD-Geräte
(Wechsler und Player)*1.
•CD-TEXT-Informationen (werden angezeigt,
wenn Sie eine CD mit CD-TEXT*2 abspielen).
•Gesondert erhältliches
Bedienungszubehör
Kartenfernbedienung
RM-X114
Joystick
RM-X4S
*1Dieses Gerät arbeitet nur zusammen mit Sony-
Produkten.
*2Eine CD mit CD TEXT ist eine Audio-CD, die
Informationen wie den Namen der CD, den
Namen des Interpreten und die Namen der Titel
enthält. Diese Daten sind auf der CD
aufgezeichnet.
Dieses Etikett befindet sich an der Unterseite
des Gehäuses.
CAUTION INVISIBLE
VIEW DIRECTLY WITH OPTICAL INSTRUMENTS
Dieses Etikett befindet sich am internen
Chassis der Laufwerkseinheit.
LASER RADIATIONWHEN OPEN
DO NOT STARE INTO BEAM OR
2
Page 29

Inhalt
Lage und Funktion der Teile und
Bedienelemente ......................................................... 4
Sicherheitsmaßnahmen............................................ 6
Hinweise zu CDs ...................................................... 6
Vorbereitungen
Zurücksetzen des Geräts ..................................... 7
Abnehmen der Frontplatte ................................. 8
Einstellen der Uhr ................................................ 9
CD-Player
CD/MD-Gerät (gesondert
erhältlich)
Wiedergeben einer CD/MD ............................... 9
Anzeigen im Display ......................................... 10
Automatisches Verschieben von Namen
im Display — Auto Scroll ............................ 10
Wiederholtes Wiedergeben von Titeln
— Repeat Play ............................................... 11
Wiedergeben von Titeln in willkürlicher
Reihenfolge — Shuffle Play ......................... 11
Benennen einer CD
— Disc Memo* .............................................. 11
Ansteuern einer CD/MD anhand des Namens
— List-up* ..................................................... 12
* Funktionen, wenn ein zusätzlich erhältliches
CD/MD-Gerät angeschlossen ist
Radio
Automatisches Speichern von Radiosendern
— Speicherbelegungsautomatik
(BTM-Funktion) ............................................ 13
Speichern bestimmter Radiosender ................ 13
Einstellen gespeicherter Sender ....................... 13
RDS
Übersicht über RDS ........................................... 14
Automatisches Neueinstellen von Sendern
— AF-Funktion ............................................. 15
Empfang von Verkehrsdurchsagen
— TA/TP........................................................ 16
Speichern von RDS-Sendern zusammen
mit der AF- und TA-Einstellung ................. 16
Einstellen von Sendern nach Programmtyp
— PTY ............................................................. 17
Automatisches Einstellen der Uhr
— CT ............................................................... 18
Weitere Funktionen
Der Joystick ......................................................... 18
Einstellen der Klangeigenschaften .................. 20
Schnelles Dämpfen des Tons ............................ 20
Wechseln der Klang- und
Anzeigeeinstellungen ................................... 20
Auswählen der Klangposition
— Beste Klangposition (MBP)..................... 21
Betonen der Bässe
— D-bass ........................................................ 21
Weitere Informationen
Wartung ............................................................... 22
Ausbauen des Geräts ......................................... 23
Technische Daten ............................................... 24
Störungsbehebung ............................................. 25
Fehlermeldungen/Meldungen ........................ 26
3
Page 30
Lage und Funktion der Teile und Bedienelemente
MODE
SEL
SOURCE
RELEASE
L
P
S
D
– +
AF TA
ATT
DISC
1
REP
2 3 4 5 6
Näheres finden Sie auf den angegebenen Seiten.
1 Taste SOURCE (Einschalten/Radio/CD/
MD) 9, 10, 12, 13, 16
2 Taste MODE 10, 12, 13, 16
3 Taste SEL (Wählen) 9, 10, 11, 12, 18, 20,
21
4 Taste DSPL (Ändern des Anzeigemodus)
9, 10, 12, 14
5 Taste AF 15, 16
6 Display
7 Taste TA 16
8 Taste MBP (Beste Klangposition) 21
9
Taste Z (Auswerfen)
9
q; Taste D-BASS 21
qa Steuerregler VOL (Lautstärkeregler) –/+
9, 11, 12, 16, 20
qs Taste RELEASE (Entriegelung der
Frontplatte) 8
qd Empfänger für die Kartenfernbedienung
MBP
D-BASS
L
IS
T
P
T
SHUF BTM
CDX-CA600X
CDX-CA600
SENS
Y
OFF
qf Taste RESET (befindet sich an der
Vorderseite des Geräts hinter der
Frontplatte) 7
qg Taste ATT (Dämpfen) 20
qh Zahlentasten 10, 13, 15, 16, 18, 20
(1) DISC – 10
(2) DISC + 10
(3) REP 11
(4) SHUF 11
qj Taste SENS/BTM 13, 14, 16
qk Taste LIST/PTY (Programmtypauswahl)
11, 12, 17
ql Taste OFF* 8, 9
w; Steuerregler SEEK/AMS –/+ 9, 12, 13,
14, 15, 17
* Warnhinweis zur Installation des
Geräts in einem Auto mit Zündschloß
ohne Zubehörposition ACC oder I
Drücken Sie am Gerät unbedingt
2 Sekunden lang (OFF), um die
Uhrzeitanzeige auszuschalten, nachdem
Sie den Motor ausgeschaltet haben.
Andernfalls wird die Uhrzeitanzeige nicht
ausgeschaltet, und der Autobatterie wird
Strom entzogen.
4
Page 31

Kartenfernbedienung RM-X114
(gesondert erhältlich)
DSPL MODE
+
PRESET
LIST
+
DISC
MENU
–
SEEK
SOUND
SOURCE
DISC
PRESET –
+
VOL
–
+
SEEK
–
ENTER
ATTOFF
Die entsprechenden Tasten auf der
Kartenfernbedienung haben dieselbe
Funktion wie die Tasten an diesem
Gerät.
1 Taste DSPL
2 Taste MENU*
3 Taste SOURCE
4 Tasten SEEK (</,)
5 Taste SOUND
(fungiert bei diesem Gerät als 3 Taste
SEL)
6 Taste OFF
7 Tasten VOL (–/+)
8 Taste MODE
9 Taste LIST
q; Tasten DISC/PRESET (M/m)
qa Taste ENTER*
qs Taste ATT
* Bei diesem Modell nicht verfügbar
Hinweis
Wenn Sie das Gerät ausschalten, indem Sie (OFF)
2 Sekunden lang drücken, können Sie es nicht mit
der Kartenfernbedienung bedienen. Drücken Sie
zunächst (SOURCE) am Gerät, oder legen Sie eine
Kassette ein, um das Gerät zu aktivieren.
Tip
Informationen zum Auswechseln der Batterien
finden Sie im Abschnitt „Austauschen der
Lithiumbatterie“ (Seite 23).
5
Page 32

Sicherheitsmaßnahmen
Hinweise zu CDs
•Wenn das Auto in direktem Sonnenlicht
geparkt war, warten Sie, bis sich das Gerät
abgekühlt hat, bevor Sie es wieder benutzen.
•Motorantennen werden beim Betrieb des
Geräts automatisch ausgefahren.
Wenn Sie Fragen haben oder an Ihrem Gerät
Probleme auftauchen, die in dieser
Bedienungsanleitung nicht behandelt werden,
wenden Sie sich bitte an Ihren Sony-Händler.
Feuchtigkeitskondensation
Bei Regen oder bei sehr hoher Luftfeuchtigkeit
kann sich in den Linsen und im Display des
Geräts Feuchtigkeit niederschlagen. In diesem
Fall funktioniert das Gerät nicht mehr richtig.
Nehmen Sie die CD heraus, und warten Sie
etwa eine Stunde, bis die Feuchtigkeit
verdunstet ist.
So bewahren Sie die hohe
Tonqualität
Achten Sie darauf, daß keine Säfte oder
anderen zuckerhaltigen Getränke auf das
Gerät oder die CDs spritzen.
•Berühren Sie nicht die Oberfläche, damit die
CD nicht verschmutzt. Fassen Sie die CD nur
am Rand an.
•Bewahren Sie CDs in ihrer Hülle oder in den
CD-Magazinen auf, wenn sie nicht abgespielt
werden. Schützen Sie die CDs vor Hitze und
hohen Temperaturen. Lassen Sie sie nicht in
einem geparkten Auto, auf dem
Armaturenbrett oder der Hutablage liegen.
•Bringen Sie auf CDs keine Aufkleber an.
Verwenden Sie keine CDs mit Resten von
Kleber oder anderen klebrigen Rückständen.
Solche CDs können im Gerät hängenbleiben
und sich nicht weiterdrehen, was zu Schäden
am Gerät und der CD selbst führen kann.
•Verwenden Sie keine CDs, an denen
Etiketten oder Aufkleber angebracht sind.
Bei Verwendung solcher CDs kann es zu
folgenden Fehlfunktionen kommen:
— Die CD läßt sich nicht auswerfen, weil sich
ein Etikett oder Aufkleber gelöst hat und
den Auswurfmechanismus blockiert.
— Die Audiodaten werden nicht korrekt
gelesen (z. B. Tonsprünge bei der
Wiedergabe, keine Wiedergabe), weil ein
Etikett oder Aufkleber durch
Wärmeeinwirkung geschrumpft ist und
die CD sich verzogen hat.
•CDs mit außergewöhnlichen Formen (z. B.
herzförmige, quadratische oder sternförmige
CDs) können mit diesem Gerät nicht
wiedergegeben werden. Falls Sie es doch
versuchen, kann das Gerät beschädigt
werden. Verwenden Sie solche CDs nicht.
•Single-CDs (8-cm-CDs) können nicht
wiedergegeben werden.
6
Page 33

•Reinigen Sie die CDs vor dem Abspielen mit
einem handelsüblichen Reinigungstuch.
Wischen Sie dabei von der Mitte nach außen.
Lösungsmittel wie Benzin, Verdünner oder
handelsübliche, für Schallplatten bestimmte
Reiniger und Antistatiksprays dürfen nicht
verwendet werden.
Hinweise zu CD-Rs/CD-RWs
•Mit diesem Gerät können Sie CD-Rs
(beschreibbare CDs)/CD-RWs
(wiederbeschreibbare CD), die als AudioCDs konzipiert sind, wiedergeben lassen.
An dieser Markierung können Sie CD-Rs/
CD-RWs, die als Audio-CDs konzipiert sind,
erkennen.
Diese Markierungen kennzeichnen
Datenträger, die nicht für die
Audiowiedergabe geeignet sind.
Vorbereitungen
Zurücksetzen des Geräts
Bevor Sie das Gerät zum ersten Mal benutzen
oder nachdem Sie die Autobatterie
ausgetauscht haben, müssen Sie das Gerät
zurücksetzen.
Nehmen Sie die Frontplatte ab, und drücken
Sie die Taste RESET mit einem spitzen
Gegenstand, wie z. B. einem Kugelschreiber.
Taste RESET
Hinweis
Wenn Sie die Taste RESET drücken, werden die
eingestellte Uhrzeit und einige weitere
gespeicherte Einstellungen gelöscht.
•Je nach dem Gerät, mit dem die CD-R/CDRW bespielt wurde, oder dem Zustand der
CD-R/CD-RW selbst ist eine Wiedergabe mit
diesem Gerät jedoch nicht in jedem Fall
möglich.
•Eine noch nicht abgeschlossene CD-R/CDRW kann nicht wiedergegeben werden*.
* Dieser Vorgang ist notwendig, damit eine
bespielte CD-R/CD-RW auf einem Audio-CDPlayer abgespielt werden kann.
7
Page 34

Abnehmen der Frontplatte
Um einem Diebstahl des Geräts vorzubeugen,
kann die Frontplatte abgenommen werden.
Warnton
Wenn Sie den Zündschlüssel in die Position
OFF stellen, ohne die Frontplatte abzunehmen,
ertönt einige Sekunden lang ein Warnton.
Wenn Sie einen gesondert erhältlichen
Verstärker anschließen und den integrierten
Verstärker nicht benutzen, wird der Signalton
deaktiviert.
1 Drücken Sie (OFF)*.
Die CD-Wiedergabe oder der
Radioempfang enden. Die
Tastenbeleuchtung und das Display bleiben
eingeschaltet.
* Wenn Ihr Fahrzeug nicht über ein Zündschloß
mit Zubehörposition (ACC oder I) verfügt,
halten Sie am Gerät unbedingt 2 Sekunden
lang (OFF) gedrückt, um das Gerät
vollständig auszuschalten. Andernfalls wird
der Autobatterie weiterhin Strom entzogen.
2 Drücken Sie auf (RELEASE), und ziehen
Sie die Frontplatte dann auf sich zu.
(OFF)
Anbringen der Frontplatte
Bringen Sie Teil A der Frontplatte wie auf der
Abbildung zu sehen an Teil B des Geräts an,
und drücken Sie das linke Ende der
Frontplatte an, bis diese mit einem Klicken
einrastet.
A
B
Hinweis
Legen Sie auf der Innenseite der Frontplatte nichts
ab.
(RELEASE)
Hinweise
• Wenn Sie die Frontplatte bei eingeschaltetem
Gerät abnehmen, schaltet sich das Gerät
automatisch aus, um eine Beschädigung der
Lautsprecher zu vermeiden.
• Lassen Sie die Frontplatte nicht fallen. Drücken
Sie nicht zu fest gegen die Frontplatte oder das
Display.
• Schützen Sie die Frontplatte vor Hitze, hohen
Temperaturen und Feuchtigkeit. Lassen Sie sie
nicht in einem geparkten Auto, auf dem
Armaturenbrett oder der Hutablage liegen.
Tip
Bewahren Sie die Frontplatte im mitgelieferten
Behälter auf, wenn Sie sie bei sich tragen.
8
Page 35

Einstellen der Uhr
Die Uhr zeigt die Zeit digital im 24-StundenFormat an.
Beispiel: Einstellen der Uhr auf 10:08
1 Drücken Sie (DSPL) 2 Sekunden lang.
Die Stundenanzeige blinkt.
1 Stellen Sie durch Drehen des
Lautstärkereglers VOL die Stunden
ein.
CD-Player
CD/MD-Gerät
(gesondert erhältlich)
Sie können mit diesem Gerät nicht nur CDs
wiedergeben, sondern auch externe CD-/MDGeräte steuern.
Wenn Sie ein gesondert erhältliches CD-Gerät
mit CD TEXT-Funktion anschließen, erscheinen
bei der Wiedergabe einer CD mit CD TEXT die
CD TEXT-Informationen im Display.
2 Drücken Sie (SEL).
Die Minutenanzeige blinkt.
3 Stellen Sie durch Drehen des
Lautstärkereglers VOL die Minuten
ein.
2 Drücken Sie (DSPL).
Die Uhr beginnt zu laufen. Wenn Sie die
Uhreinstellung vorgenommen haben,
erscheint im Display wieder die Anzeige
für den normalen Wiedergabemodus.
Tip
Mit Hilfe der RDS-Funktion können Sie die Uhr
auch automatisch einstellen lassen (Seite 18).
Wiedergeben einer CD/MD
(Mit diesem Gerät)
Legen Sie die CD mit der beschrifteten
Seite nach oben ein.
Die Wiedergabe beginnt automatisch.
Wenn bereits eine CD eingelegt ist, drücken
Sie zum Starten der Wiedergabe (SOURCE) so
oft, bis „CD“ erscheint.
Funktion Gehen Sie
folgendermaßen vor
Beenden der Drücken Sie (OFF).
Wiedergabe
Auswerfen der Drücken Sie Z.
CD
Überspringen Drehen Sie den
von Titeln Steuerregler SEEK/AMS.
– Automatischer [einmal pro Titel]
Musiksensor
Vorwärtsspulen/ Drehen Sie den
Zurückspulen Steuerregler SEEK/AMS.
– Manuelle Suche [gedrückt halten bis
zur gewünschten Stelle]
Hinweise
• Wenn der letzte Titel auf der CD abgespielt ist,
beginnt die Wiedergabe wieder mit dem ersten
Titel.
• Wenn zusätzlich erhältliche Geräte
angeschlossen sind, wird die Wiedergabe
derselben Programmquelle auf dem zusätzlich
erhältlichen CD/MD-Gerät fortgesetzt.
Fortsetzung siehe nächste Seite t
9
Page 36

(Mit einem gesondert erhältlichen
Gerät)
1 Drücken Sie mehrmals (SOURCE), um
„CD“ oder „MD (MS*)“ auszuwählen.
2 Drücken Sie (MODE) so oft, bis das
gewünschte Gerät angezeigt wird.
Die Wiedergabe wird gestartet.
* MS: MG Memory Stick System-up-Player MGS-X1
Funktion Drücken Sie
Überspringen ( 1 ) (DISC –) oder
von CDs ( 2 ) (DISC +)
– CD/
MD-Auswahl
Vorsicht beim Anschließen von MGS-X1 und
MD-Geräten
Dieses Gerät erkennt den MGS-X1 als ein MD-Gerät.
• Wenn die Wiedergabe über den MGS-X1 erfolgen
soll, wählen Sie mit (SOURCE) die Option „MS“
oder „MD“ aus. Wenn „MS“ als Tonquelle
angezeigt wird, beginnt die Wiedergabe am
MGS-X1. Wenn „MD“ als Tonquelle angezeigt
wird, wählen Sie mit (MODE) die Option „MS“,
um die Wiedergabe zu starten.
• Wenn die Wiedergabe über ein MD-Gerät
erfolgen soll, wählen Sie mit (SOURCE) die
Option „MD“ oder „MS“. Wenn das gewünschte
MD-Gerät als Tonquelle angezeigt wird, beginnt
die Wiedergabe. Wenn „MS“ oder ein anderes
MD-Gerät als Tonquelle angezeigt wird, wählen
Sie mit (MODE) das gewünschte MD-Gerät aus,
um die Wiedergabe zu starten.
Anzeigen im Display
Tonquelle (CD/MD-Nummer*1)
Hinweise
• CD-Name, Name des Interpreten und Titelname
können angezeigt werden (bis zu 8 Zeichen).
• Einige Zeichen können nicht angezeigt werden.
• An diesem Gerät kann nicht der Interpretenname
zu jedem Titel auf einer CD mit CD-TEXT
angezeigt werden.
Automatisches
Verschieben von Namen
im Display — Auto Scroll
Wenn bei einer CD mit CD-TEXT der Name
der CD, eines Interpreten oder eines Titels
länger ist als 8 Zeichen und die Funktion Auto
Scroll eingeschaltet ist, werden folgende
Informationen im Display automatisch
nacheinander angezeigt:
• Der CD-Name wird angezeigt, wenn die CD
gewechselt und der CD-Name ausgewählt wurde.
• Der Titelname erscheint, wenn der Titel wechselt
und der Titelname ausgewählt wurde.
Wenn Sie mit (DSPL) die Anzeige wechseln,
wird der Name einer CD oder eines Titels
automatisch verschoben und auf diese Weise
ganz angezeigt, unabhängig davon, ob die
Funktion ein- oder ausgeschaltet ist.
Auswählen von „A.SCRL-ON“
Drücken Sie während der Wiedergabe
gleichzeiting (SEL) und (3).
Nach 2 Sekunden erscheint automatisch
wieder die normale Anzeige im Display.
Um „A.SCRL-OFF“ auszuwählen, drücken Sie
erneut gleichzeitig (SEL) und (3).
Anzeigen
• Uhr
• Titelnummer/Verstrichene Spieldauer
• CD-Name*2/Name des Interpreten*
• Titelname*
4
Funktion Drücken Sie
Wechseln der (DSPL)
angezeigten
Information
*1Wenn ein gesondert erhältliches CD/MD-Gerät
angeschlossen ist.
2
Wenn Sie (DSPL) drücken, wird mit „NO NAME“
*
angezeigt, daß kein Disc Memo (Seite 11) oder
gespeicherter Name zum Anzeigen vorhanden ist.
3
Nur CDs, bei denen die CD TEXT-Informationen
*
den Namen des Interpreten enthalten.
4
Nur bei CDs mit CD TEXT und Titelnamen.
*
10
Hinweis
Bei einigen MDs oder CDs mit außergewöhnlich
langem Text ist folgendes möglich:
— Einige Zeichen werden nicht angezeigt.
— Die Funktion Auto Scroll funktioniert nicht.
3
Page 37

Wiederholtes Wiedergeben
von Titeln — Repeat Play
Hinweis
Mit „SHUF-ALL“ werden nicht Titel von CD-Geräten
und MD-Geräten gemischt wiedergegeben.
Die ganze CD/MD im Hauptgerät oder ein Stück
darauf wird wiederholt wiedergegeben, wenn das
Ende der CD/MD erreicht ist. Sie haben folgende
Möglichkeiten für die wiederholte Wiedergabe:
•REP-1 — zum Wiederholen eines Titels.
•REP-2* — zum Wiederholen einer CD/MD.
* Nur verfügbar, wenn mindestens ein gesondert
erhältliches CD/MD-Gerät angeschlossen ist.
Drücken Sie während der Wiedergabe
(3) (REP) so oft, bis die gewünschte
Einstellung im Display erscheint.
Die Anzeige „REP“ erscheint.
Repeat Play startet.
Wenn Sie wieder in den normalen
Wiedergabemodus schalten möchten, wählen
Sie „REP-OFF“.
Wiedergeben von Titeln in
willkürlicher Reihenfolge
— Shuffle Play
Sie haben folgende Auswahlmöglichkeiten:
•SHUF-1 — zum Wiedergeben der Titel auf der
aktuellen CD (MD) in willkürlicher Reihenfolge.
•SHUF-2*1 — zum Wiedergeben der Titel im
aktuellen CD (MD)-Gerät in willkürlicher
Reihenfolge.
•SHUF-ALL*2 — zum Wiedergeben aller Titel
in allen gesondert erhältlichen CD (MD)Geräten (einschließlich dieses Geräts) in
willkürlicher Reihenfolge.
*1Nur verfügbar, wenn mindestens ein gesondert
erhältliches CD (MD)-Gerät angeschlossen ist.
*2Nur verfügbar, wenn ein oder mehrere
gesondert erhältliche CD-Geräte bzw. zwei oder
mehr gesondert erhältliche MD-Geräte
angeschlossen sind.
Drücken Sie während der Wiedergabe
(4) (SHUF) so oft, bis die gewünschte
Einstellung im Display erscheint.
Die Anzeige „SHUF“ erscheint.
Shuffle Play startet.
Wenn Sie wieder in den normalen
Wiedergabemodus schalten möchten, wählen
Sie „SHUF-OFF“.
Benennen einer CD
— Disc Memo (bei einem CD-Gerät mit
CUSTOM FILE-Funktion)
Sie können für jede CD einen individuellen
Namen speichern (Disc Memo). Sie können
pro CD bis zu 8 Zeichen eingeben. Wenn Sie
einen Namen für eine CD eingeben, können
Sie die CD anhand des Namens ansteuern
(Seite 12).
1 Starten Sie die Wiedergabe der CD, der Sie
einen Namen geben möchten, in einem
CD-Gerät mit CUSTOM FILE-Funktion.
2 Drücken Sie 2 Sekunden lang (LIST/PTY).
Benennungsmodus
Während Sie die CD benennen, wird sie
vom Gerät wiederholt wiedergegeben.
3 Geben Sie die Zeichen ein.
1 Drehen Sie zum Auswählen der
gewünschten Zeichen den
Steuerregler VOL.
(A y B y C y ··· Z y 0 y 1 y 2
y ··· 9 y + y – y * y/ y \ y
> y < y . y _ y A ···)
Wenn Sie nach einem Zeichen ein
Leerzeichen setzen wollen, wählen Sie „_“.
2 Drücken Sie (SEL), wenn Sie das
gewünschte Zeichen gefunden haben.
Die nächste Zeicheneingabeposition
blinkt.
3 Geben Sie wie in Schritt 1 und 2
erläutert den ganzen Namen ein.
4 Um zum normalen CD-
Wiedergabemodus zurückzuschalten,
drücken Sie 2 Sekunden lang (LIST/PTY).
Tips
• Wenn Sie einen Namen korrigieren oder löschen
wollen, überschreiben Sie ihn einfach bzw.
geben „_“ ein.
• Sie können CDs in einem Gerät ohne CUSTOM
FILE-Funktion benennen, wenn dieses in
Kombination mit einem CD-Gerät angeschlossen
ist, das über diese Funktion verfügt. Das Disc
Memo wird in diesem Fall in dem CD-Gerät mit
CUSTOM FILE-Funktion gespeichert.
Fortsetzung siehe nächste Seite t
11
Page 38

Anzeigen des Disc Memo
Beim Anzeigen hat das eingegebene Disc
Memo immer Priorität vor ursprünglichen CD
TEXT-Informationen auf einer CD.
Funktion Drücken Sie
Anzeigen (DSPL) während der
Wiedergabe einer CD bzw.
CD mit CD TEXT
Löschen des Disc Memo
1 Drücken Sie mehrmals (SOURCE), um
„CD“ auszuwählen.
2 Drücken Sie mehrmals (MODE), um das
CD-Gerät auszuwählen, in dem das Disc
Memo gespeichert ist.
3 Drücken Sie (LIST/PTY) 2 Sekunden lang.
4 Drücken Sie (DSPL) 2 Sekunden lang.
5 Wählen Sie durch Drehen des
Lautstärkereglers VOL den CD-Namen
aus, der gelöscht werden soll.
6 Drücken Sie (SEL) 2 Sekunden lang.
Der Name wird gelöscht.
Wenn Sie weitere Namen löschen wollen,
gehen Sie wie in Schritt 5 und 6 erläutert
vor.
7 Drücken Sie (LIST/PTY) 2 Sekunden lang.
Das Gerät schaltet in den normalen
CD-Wiedergabemodus zurück.
Hinweise
• Wenn das Disc Memo einer CD mit CD TEXT
gelöscht wird, werden wieder die ursprünglichen
CD TEXT-Informationen angezeigt.
• Wenn Sie das zu löschende Disc Memo nicht
finden können, wählen Sie in Schritt 2 ein
anderes CD-Gerät aus und versuchen es damit.
Ansteuern einer CD/MD
anhand des Namens
— List-up (bei einem CD-Gerät mit CUSTOM
FILE-Funktion oder einem MD-Gerät)
Sie können diese Funktion bei CDs/MDs
benutzen, für die Sie einen Namen*
eingegeben haben, oder bei CDs mit CD
TEXT*2.
*1Ansteuern einer CD/MD anhand des
eingegebenen Namens: wenn ein Name für eine
CD (Seite 11) bzw. eine MD gespeichert wurde.
2
Ansteuern von CDs anhand der CD TEXT-
*
Informationen: wenn Sie eine CD mit CD TEXT
auf einem CD-Gerät mit CD TEXT-Funktion
wiedergeben.
1 Drücken Sie kurz (LIST/PTY).
Der Name der aktuellen CD/MD erscheint
im Display.
2 Drücken Sie (LIST/PTY) so oft, bis Sie die
gewünschte CD/MD gefunden haben.
3 Drehen Sie zum Wiedergeben der CD/
MD den Steuerregler SEEK/AMS.
Hinweise
• Wenn ein CD/MD-Name 5 Sekunden lang
angezeigt wurde, erscheint im Display wieder die
Anzeige für den normalen Wiedergabemodus.
• Die Namen der Titel können während der
Wiedergabe einer MD nicht angezeigt werden.
• Wenn das Magazin keine CDs/MDs enthält,
erscheint „NO DISC“ im Display.
• Wenn einer CD/MD kein eigener Name
zugeordnet wurde, erscheint „NO NAME“ im
Display.
• Wenn die Daten auf der CD/MD nicht eingelesen
wurden, erscheint „NOT READ“ im Display.
Damit das Gerät die Daten einliest, drücken Sie
zunächst die Zahlentaste, und wählen Sie dann
die CD/MD, deren Daten nicht eingelesen
wurden.
• Die Daten werden nur in Großbuchstaben
angezeigt. Außerdem gibt es einige Buchstaben,
die nicht angezeigt werden können (während
der Wiedergabe einer MD).
1
12
Page 39

Radio
Speichern bestimmter
Radiosender
Für jeden Frequenzbereich (FM1, FM2, FM3,
MW und LW) können Sie bis zu 6 Sender im
Gerät speichern.
ACHTUNG - UNFALLGEFAHR!
Wenn Sie während der Fahrt Sender einstellen
wollen, benutzen Sie, um Unfälle zu
vermeiden, bitte die BTM-Funktion.
Automatisches Speichern
von Radiosendern
— Speicherbelegungsautomatik (BTMFunktion)
Das Gerät wählt die Sender mit den stärksten
Signalen innerhalb des gewählten
Frequenzbereichs aus und speichert diese in
der Reihenfolge ihrer Frequenzen.
1 Drücken Sie mehrmals (SOURCE), um das
Radio auszuwählen.
2 Drücken Sie mehrmals (MODE), um den
gewünschten Frequenzbereich
einzustellen.
3 Drücken Sie 2 Sekunden lang
(SENS/BTM).
Das Gerät speichert die Sender in der
Reihenfolge ihrer Frequenzen auf den
Stationstasten. Ein Signalton ist zu hören,
und die Einstellung wird gespeichert.
Sie können bestimmte Sender manuell auf
beliebige Stationstasten legen.
1 Drücken Sie mehrmals (SOURCE), um das
Radio auszuwählen.
2 Drücken Sie mehrmals (MODE), um den
gewünschten Frequenzbereich
auszuwählen.
3 Drehen Sie den Steuerregler SEEK/AMS,
um den Sender einzustellen, der auf
einer Stationstaste gespeichert werden
soll.
4 Drücken Sie die gewünschte
Stationstaste ((1) bis (6)), bis „MEM“
erscheint.
Die Nummer der gedrückten Stationstaste
erscheint auf dem Display.
Hinweis
Wenn Sie auf einer bereits belegten Stationstaste
einen weiteren Sender speichern, wird der zuvor
gespeicherte Sender gelöscht.
Einstellen gespeicherter
Sender
1 Drücken Sie mehrmals (SOURCE), um das
Radio auszuwählen.
Hinweise
• Wenn aufgrund von schwachen Signalen nur
wenige Sender in guter Qualität zu empfangen
sind, bleiben auf einigen Stationstasten die
vorher gespeicherten Sender erhalten.
• Wenn im Display eine Stationstastennummer
angezeigt wird, werden die Stationstasten
beginnend mit der angezeigten Tastennummer
mit Sendern belegt.
2 Drücken Sie mehrmals (MODE), um den
gewünschten Frequenzbereich
auszuwählen.
3 Drücken Sie die Stationstaste ((1) bis
(6)), auf der der gewünschte Sender
gespeichert ist.
Fortsetzung siehe nächste Seite t
13
Page 40

Wenn das Einstellen gespeicherter
Sender nicht funktioniert
— Automatischer Sendersuchlauf/Lokaler
Suchmodus
Automatischer Sendersuchlauf:
Drehen Sie zum Suchen des Senders den
Steuerregler SEEK/AMS.
Der Suchlauf stoppt, wenn ein Sender
empfangen wird. Drehen Sie den
Steuerregler SEEK/AMS, bis Sie den
gewünschten Sender empfangen.
Lokaler Suchmodus:
Wenn der automatische Sendersuchlauf
zu häufig stoppt, drücken Sie
(SENS/BTM) so oft, bis „LOCAL-ON“
angezeigt wird.
RDS
Übersicht über RDS
UKW-Sender, die RDS (Radiodatensystem)
unterstützen, strahlen zusammen mit den
normalen Radioprogrammsignalen nicht
hörbare, digitale Informationen aus. Beim
Empfang eines RDS-Senders können
beispielsweise folgende Informationen
angezeigt werden.
Tonquelle
Die Anzeige „LCL“ erscheint.
Nun werden nur noch Sender mit relativ
starken Signalen eingestellt.
Tip
Wenn Sie die Frequenz des gewünschten Senders
kennen, drehen Sie den Steuerregler SEEK/AMS,
bis die gewünschte Frequenz erscheint (manuelle
Sendersuche).
Bei schlechtem UKW-Empfang
— Monauraler Modus
Drücken Sie während des
Radioempfangs so oft (SENS/BTM), bis
„MONO-ON” erscheint.
Die Anzeige „MONO“ erscheint.
Dadurch wird die Tonqualität besser, aber
der Ton wird zugleich monaural („Mono“).
Die Anzeige „ST“ wird ausgeblendet.
Wenn Sie wieder in den normalen Modus
schalten möchten, wählen Sie „MONO-OFF“.
Anzeigen
• Uhr
• Sendername (Frequenz)
• RDS-Informationen
Funktion Drücken Sie
Umschalten von (DSPL)
Uhr/Sendername
RDS-Dienste
RDS bietet eine Reihe praktischer Funktionen,
zum Beispiel:
•Automatische Neueinstellung von
Sendern. Das ist bei langen Fahrten sehr
praktisch. — AF t Seite 15
•Wechsel zu Verkehrsdurchsagen, selbst
wenn gerade ein anderer Sender oder eine
andere Tonquelle eingestellt ist. — TA
t Seite 16
•Auswählen eines Senders nach
Programmtyp. — PTY t Seite 17
•Automatisches Einstellen der Uhrzeit. — CT
t Seite 18
Hinweise
• In unterschiedlichen Ländern oder Gegenden
stehen möglicherweise nicht alle RDS-Funktionen
zur Verfügung.
• Wenn die Empfangssignale zu schwach sind oder
der Sender, den das Gerät gerade empfängt,
keine RDS-Daten ausstrahlt, funktioniert das
RDS-System nicht korrekt.
14
Page 41

Automatisches
Neueinstellen von Sendern
— AF-Funktion
Mit der AF-Funktion
(Alternativfrequenzfunktion) stellt sich das
Radio immer auf das stärkste Sendesignal des
gerade ausgewählten Senders in der Region
ein, in der Sie sich gerade befinden.
Die Frequenz wechselt automatisch.
98,5 MHz
Sender
96,0 MHz
102,5 MHz
Empfangen von Regionalsendern
Wenn die AF-Funktion eingeschaltet ist,
bewirkt die werkseitige Einstellung des Geräts,
daß der Empfang nur innerhalb einer
bestimmten Region möglich ist.
Das Gerät schaltet also nicht zu einem anderen
Regionalsender mit stärkerem Sendesignal um.
Wenn Sie den Empfangsbereich des
Regionalsenders verlassen oder die AFFunktion auch bei Regionalsendern nutzen
wollen, drücken Sie 2 Sekunden lang (AF), so
daß „REG-OFF“ angezeigt wird.
Hinweis
Diese Funktion steht in Großbritannien und
manchen anderen Gebieten nicht zur Verfügung.
Local-Link-Funktion
(nur Großbritannien)
Mit Hilfe dieser Funktion können Sie andere
Lokalsender auswählen, auch wenn diese
zuvor nicht unter einer Stationstaste
gespeichert wurden.
1 Wählen Sie einen UKW-Sender aus
(Seite 13).
2 Drücken Sie (AF) so oft, bis „AF-ON“ im
Display aufleuchtet.
Das Gerät beginnt mit der Suche nach einer
Alternativfrequenz, auf der Sie den gerade
eingestellten Sender besser empfangen
können.
Wenn „NO AF“ blinkt, gibt es für den
gerade eingestellten Sender keine
Alternativfrequenz.
Hinweise
• Wenn Sie die Funktion während der Wiedergabe
einer CD ein- oder ausschalten wollen, drücken
Sie (AF).
• Wenn im Sendebereich keine
Alternativfrequenzen vorhanden sind oder Sie
nicht nach Alternativfrequenzen zu suchen
brauchen, schalten Sie die AF-Funktion aus,
indem Sie „AF-OFF“ auswählen.
Bei Sendern ohne
Alternativfrequenzen
Drehen Sie den Steuerregler SEEK/AMS,
während der Sendername blinkt
(ca. 8 Sekunden lang).
Das Gerät beginnt mit der Suche nach einer
Frequenz mit denselben PI-Daten
(Programme Identification Programmkennung). „PI SEEK“ leuchtet auf.
Wenn das Gerät keine Alternativfrequenz
mit der gleichen Programmkennung finden
kann, kehrt das Gerät wieder zur zuvor
eingestellten Frequenz zurück.
1 Drücken Sie eine der Stationstasten
((1) bis (6)), auf der ein Lokalsender
gespeichert ist.
2 Drücken Sie die Stationstaste mit dem
Lokalsender innerhalb von 5 Sekunden
noch einmal.
3 Wiederholen Sie diesen Schritt, bis der
gewünschte Lokalsender empfangen
wird.
15
Page 42

Empfang von
Verkehrsdurchsagen — TA/TP
Dazu müssen Sie die TA-Funktion (Traffic
Announcement) und die TP-Funktion (Traffic
Programme) einschalten. Das Gerät stellt dann
automatisch einen UKW-Sender ein, der
Verkehrsdurchsagen sendet. Dies funktioniert
unabhängig von der aktuellen
Programmquelle (UKW- oder anderer Sender,
CD). Wenn die Verkehrsdurchsage beendet ist,
wechselt das Gerät zurück zu der
ursprünglichen Programmquelle.
Drücken Sie (TA) so oft, bis „TA-ON“ im
Display aufleuchtet.
Das Gerät beginnt, nach
Verkehrsfunksendern zu suchen.
„TP“ zeigt an, daß Sender mit
Verkehrsdurchsagen empfangen werden,
und „TA“ blinkt während einer
Verkehrsdurchsage. Wenn „NO TP“
angezeigt wird, sucht das Gerät weiter nach
Sendern mit TP.
Wollen Sie keine Verkehrsdurchsagen mehr
hören, wählen Sie „TA-OFF“.
Funktion Drücken Sie
Beenden der (TA)
laufenden
Durchsage
Tip
Eine laufende Verkehrsdurchsage können Sie auch
mit (SOURCE) oder (MODE) abbrechen.
Voreinstellen der Lautstärke von
Verkehrsdurchsagen
Sie können für Verkehrsdurchsagen eine feste
Lautstärke voreinstellen, damit Sie sie nicht
überhören.
Speichern von RDSSendern zusammen mit
der AF- und TA-Einstellung
Wenn Sie RDS-Sender speichern, speichert das
Gerät neben den Sendefrequenzen auch die
AF/TA-Einstellung (ein/aus) der einzelnen
Sender. Sie können für die einzelnen
gespeicherten Sender unterschiedliche
Einstellungen (AF, TA oder beides) oder für
alle gespeicherten Sender dieselbe Einstellung
wählen. Wenn Sie Sender mit eingeschalteter
AF-Funktion speichern („AF on“), speichert
das Gerät automatisch die Sender mit den
stärksten Radiosignalen.
Speichern derselben Einstellung für
alle voreingestellten Sender
1 Wählen Sie einen UKW-Frequenzbereich
(Seite 13).
2 Drücken Sie (AF) und/oder (TA), um
„AF-ON“ und/oder „TA-ON“
auszuwählen.
Beachten Sie bitte, daß die Auswahl von
„AF-OFF“ und „TA-OFF“ nicht nur für
RDS-Sender, sondern auch für Nicht-RDSSender gilt.
3 Drücken Sie (SENS/BTM), bis „BTM“
blinkt.
Speichern unterschiedlicher
Einstellungen für jeden
voreingestellten Sender
1 Wählen Sie einen UKW-Frequenzbereich,
und stellen Sie den gewünschten Sender
ein.
1 Stellen Sie mit dem Lautstärkeregler VOL
die gewünschte Lautstärke ein.
2 Drücken Sie (TA) 2 Sekunden lang.
„TA“ erscheint, und die Einstellung wird
gespeichert.
Empfangen von
Katastrophenwarnungen
Wenn AF oder TA eingeschaltet ist, wechselt
das Gerät zu Katastrophenwarnungen, die
gesendet werden, während Sie gerade einen
UKW-Sender oder eine CD hören.
16
1 Drücken Sie (AF) und/oder (TA), um
„AF-ON“ und/oder „TA-ON“
auszuwählen.
3 Drücken Sie die gewünschte
Stationstaste, bis „MEM“ angezeigt wird.
Einstellungen für weitere Sender können
Sie wie in den Schritten oben angegeben
speichern.
Hinweis
Wenn Sie die AF/TA-Einstellung während der
Wiedergabe einer CD ändern wollen, drücken Sie
(AF) oder (TA).
Page 43

Einstellen von Sendern
nach Programmtyp — PTY
1 Drücken Sie (LIST/PTY), während das
Gerät einen UKW-Sender empfängt.
Sie können das Gerät einen Sender einstellen
lassen, der gerade einen bestimmten Typ von
Programm ausstrahlt.
Programmtypen Anzeige im
Display
Nachrichten NEWS
Aktuelles Zeitgeschehen AFFAIRS
Informationssendungen INFO
Sport SPORT
Bildungsprogramme EDUCATE
Hörspiele DRAMA
Kulturprogramme CULTURE
Wissenschaftliche SCIENCE
Sendungen
Sonstiges VARIED
Pop POP M
Rock ROCK M
Unterhaltungsmusik EASY M
Leichte Klassik LIGHT M
Klassik CLASSICS
Sonstige Musikrichtungen OTHER M
Wettervorhersagen WEATHER
Finanzberichte FINANCE
Kinderprogramme CHILDREN
Magazinsendungen SOCIAL A
Religion RELIGION
Hörer-Telefon PHONE IN
Reiseinformationen TRAVEL
Freizeitprogramm LEISURE
Jazz JAZZ
Country-Musik COUNTRY
Volksmusik NATION M
Oldies OLDIES
Folk FOLK M
Dokumentarbeiträge DOCUMENT
Die Bezeichnung des aktuellen
Programmtyps erscheint, wenn der Sender
PTY-Daten ausstrahlt. „--------“ wird
angezeigt, wenn es sich nicht um einen
RDS-Sender handelt oder wenn das Gerät
die RDS-Daten nicht empfängt.
2 Drücken Sie (LIST/PTY) so oft, bis der
gewünschte Programmtyp angezeigt
wird.
Die Programmtypen erscheinen in der
Reihenfolge, die in der Tabelle angegeben
ist. „NONE“ wird angezeigt, wenn der
Programmtyp in den RDS-Daten nicht
angegeben wird.
3 Drehen Sie den Steuerregler SEEK/AMS.
Das Gerät beginnt mit der Suche nach
einem Sender, der den gewählten
Programmtyp ausstrahlt.
Hinweis
Diese Funktion steht in den Ländern, in denen
keine PTY-Daten (Programme Type Selection Programmtypauswahl) ausgestrahlt werden, nicht
zur Verfügung.
17
Page 44

Automatisches Einstellen
der Uhr — CT
Weitere Funktionen
Dieses Gerät kann mit RDS CT-Daten (CT Clock Time = Uhrzeit) empfangen und danach
die Uhrzeit automatisch einstellen.
Auswählen von „CT-ON“
Drücken Sie während des
Radioempfangs gleichzeitig (SEL) und
(2).
Die Uhr wird nun eingestellt.
Nach einer Sekunde erscheint automatisch
wieder die normale Anzeige.
Um „CT-OFF“ auszuwählen, drücken Sie
erneut gleichzeitig (SEL) und (2).
Hinweise
• Die CT-Funktion steht nicht immer zur
Verfügung, auch wenn Sie einen RDS-Sender
empfangen.
• Die über die CT-Funktion eingestellte Uhrzeit ist
nicht immer korrekt.
Sie können das Gerät sowie gesondert
erhältliche CD/MD-Geräte mit einem Joystick
(gesondert erhältlich) steuern.
Der Joystick
Bringen Sie zunächst den richtigen Aufkleber
an, je nachdem, wie Sie den Joystick montieren
wollen.
Der Joystick wird über Tasten und/oder
Drehregler bedient.
SEL
MODE
DSPL
Drücken der Tasten
(SEL)
(SOURCE)
Drehen Sie den Regler VOL, um
die Lautstärke einzustellen.
DSPL
MODE
SEL
(ATT)
(DSPL)
(MODE)
(OFF)
OFF
18
Drücken Sie Funktion
(SOURCE) Wechseln der
Programmquelle
(Radio/CD/MD*1)
(MODE) Wechseln des Modus
(Radiofrequenzbereich/
CD-Gerät/MD*1-Gerät)
(ATT) Stummschalten des Tons
2
(OFF)*
Stoppen der CDWiedergabe oder des
Radioempfangs
(SEL) Einstellen und Auswählen
(DSPL) Wechseln der Anzeige
Page 45

*1Nur wenn die entsprechenden gesondert
erhältlichen Geräte angeschlossen sind.
*2Wenn Ihr Fahrzeug nicht über ein Zündschloß
mit Zubehörposition (ACC oder I) verfügt,
halten Sie unbedingt 2 Sekunden lang (OFF)
gedrückt, um die Uhrzeitanzeige auszuschalten,
nachdem Sie die Zündung ausgeschaltet haben.
Drehen des Reglers
Regler
SEEK/AMS
Drehen Sie den Joystick, und lassen Sie
ihn los zum:
–Überspringen von Titeln.
– Automatischen Einstellen von Sendern.
Drehen und halten Sie den Joystick, und
lassen Sie ihn los zum:
– Vorwärts-/Zurückspulen.
– Manuellen Einstellen von Sendern.
Drehen und Drücken des Reglers
Wechseln der Drehrichtung
Die Drehrichtung der Regler ist werkseitig wie
in der folgenden Abbildung zu sehen
eingestellt.
Erhöhen
Verringern
Wenn Sie den Joystick rechts von der
Lenksäule anbringen, können Sie die
Drehrichtung der Regler ändern.
Drücken Sie 2 Sekunden lang (SEL), und
halten Sie dabei den Regler VOL
gedrückt.
Regler
PRESET
Drücken und drehen Sie den Regler zum:
– Einstellen gespeicherter Sender.
– Wechseln der CD/MD*.
* Wenn ein gesondert erhältliches CD/MD-
Gerät angeschlossen ist.
19
Page 46

Einstellen der
Klangeigenschaften
Wechseln der Klang- und
Anzeigeeinstellungen
Sie können Bässe, Höhen, Balance und Fader
einstellen.
1 Wählen Sie die einzustellende
Klangoption, indem Sie (SEL) mehrmals
drücken.
Mit jedem Tastendruck auf (SEL) wechseln
die Optionen folgendermaßen:
BAS (Bässe) t TRE (Höhen) t
BAL (links-rechts) t FAD (vorn-hinten)
2 Stellen Sie die ausgewählte Option durch
Drehen des Lautstärkereglers VOL ein.
Hinweis
Nehmen Sie die Einstellung innerhalb von
3 Sekunden nach dem Auswählen vor.
Schnelles Dämpfen des
Tons
Drücken Sie (ATT).
„ATT-ON“ blinkt kurz, und danach
leuchtet die Anzeige „ATT“ im Display.
Um die vorherige Lautstärke wieder
einzustellen, drücken Sie (ATT) nochmals.
„ATT-OFF“ wird kurz angezeigt.
Tip
Wenn das Schnittstellenkabel eines Autotelefons
mit der ATT-Leitung verbunden ist und ein
Telefonanruf eingeht, senkt das Gerät die
Lautstärke automatisch (Stummschaltfunktion zum
Telefonieren).
Sie können folgende Optionen einstellen:
•AMBER/GREEN*
– Sie können die Beleuchtungsfarbe zwischen
gelb und grün umschalten.
•CT (Clock Time = Uhrzeit) (Seite 18).
•A.SCRL (Auto Scroll = Automatisches
Verschieben)*2 (Seite 10).
•M.DSPL (Motion Display = Bewegte
Anzeige)
– der Demo-Modus, in den das Gerät
schaltet, wenn keine Tonquelle ausgewählt
ist (z. B. bei ausgeschaltetem Tuner).
•BEEP – Dient zum Ein- oder Ausschalten des
Auswählen der gewünschten Option
Wenn Sie die Einstellung vorgenommen
haben, erscheint im Display wieder die
Anzeige für den normalen Wiedergabemodus.
Hinweis
Je nach aktueller Programmquelle werden
unterschiedliche Optionen angezeigt.
Wenn Sie die Option deaktivieren wollen,
drücken Sie erneut (SEL) und gleichzeitig die
Stationstaste.
Signaltons.
Drücken Sie gleichzeitig (SEL) und die
entsprechende Stationstaste.
(SEL) + (1): AMBER/GREEN*
(SEL) + (2): CT
(SEL) + (3): A.SCRL*
(SEL) + (4): M.DSPL
(SEL) + (6): BEEP
*1nur CDX-CA600
2
Wenn keine CD wiedergegeben wird,
*
erscheint diese Angabe nicht.
1
1
2
20
Page 47

Auswählen der
Klangposition
— Beste Klangposition (MBP)
Wenn Sie alleine im Auto sitzen, können Sie
mit „Beste Klangposition“ eine optimale
Klangumgebung einstellen.
Für „Beste Klangposition“ gibt es zwei
Voreinstellungen für die beiden Vordersitze.
Mit der Taste MBP können Sie mühelos eine
davon auswählen.
MBP-A: am besten geeignet für den Hörer auf
dem Sitz vorne links.
MBP-B: am besten geeignet für den Hörer auf
dem Sitz vorne rechts.
Drücken Sie mehrmals (MBP), um die
gewünschte Sitzposition auszuwählen.
Betonen der Bässe
— D-bass
Sie können die Bässe klarer und kräftiger
wiedergeben lassen. Mit der D-bass-Funktion
können Sie die tiefen und die hohen
Frequenzen mit einer Kurve verstärken, die
steiler ist als bei konventionellen
Baßbetonungssystemen.
Sie können mit dieser Funktion die Bässe
stärker betonen, ohne daß sich an der
Wiedergabe der Singstimmen etwas ändert.
Mit der Taste (D-BASS) können Sie die Bässe
problemlos verstärken und einstellen.
D.BASS-3
Pegel
0dB
D.BASS-2
D.BASS-1
D.BASS-3
D.BASS-2
D.BASS-1
Frequenz (Hz)
Nach einer Sekunde erscheint im Display
wieder die Anzeige für den normalen
Wiedergabemodus.
Wollen Sie die MBP-Funktion ausschalten,
wählen Sie „MBP-OFF“.
Wenn Sie den Klang genauer einstellen wollen,
können Sie dazu die Taste (SEL) verwenden
(siehe „Einstellen der Klangeigenschaften“ auf
Seite 20).
Hinweise
• Wenn Sie irgendwelche Klangeigenschaften mit
der Taste (SEL) (Seite 20) einstellen, wird die
Einstellung für MBP wieder auf OFF gesetzt.
• Wenn MBP auf OFF gesetzt ist, wird die
eingestellte Klangeigenschaft (Seite 20) aktiviert.
Einstellen der Baßkurve
Drücken Sie (D-BASS) so oft, bis die
gewünschte Baßkurve eingestellt ist.
Je höher der D-BASS-Wert, desto stärker
der Baßanhebungseffekt.
Hinweis
Die Bässe können bei höherer Lautstärke verzerrt
sein. Wenn die Bässe verzerrt sind, wählen Sie eine
weniger effektive Baßkurve.
21
Page 48

Weitere
Informationen
Wartung
Austauschen einer Sicherung
Wenn Sie eine Sicherung austauschen, achten
Sie darauf, eine Ersatzsicherung mit dem
gleichen Ampere-Wert wie die
Originalsicherung zu verwenden. Dieser ist
auf der Originalsicherung angegeben. Wenn
die Sicherung durchbrennt, überprüfen Sie den
Stromanschluß und tauschen die Sicherung
aus. Wenn auch die neue Sicherung
durchbrennt, kann es sich um eine interne
Störung handeln. Wenden Sie sich in diesem
Fall an Ihren Sony-Händler.
Reinigen der Anschlüsse
Das Gerät funktioniert möglicherweise nicht
ordnungsgemäß, wenn die Anschlüsse
zwischen dem Gerät und der Frontplatte
verschmutzt sind. Um dies zu vermeiden,
nehmen Sie die Frontplatte ab (Seite 8), und
reinigen Sie die Anschlüsse mit einem mit
Alkohol angefeuchteten Wattestäbchen.
Drücken Sie dabei nicht zu fest auf die
Anschlüsse. Andernfalls können sie beschädigt
werden.
am Gerät
Sicherung
(10 A)
Achtung
Verwenden Sie unter keinen Umständen eine
Sicherung mit einem höheren Ampere-Wert
als dem der Sicherung, die ursprünglich mit
dem Gerät geliefert wurde. Andernfalls kann
es zu Schäden am Gerät kommen.
Rückseite der Frontplatte
Hinweise
• Schalten Sie aus Sicherheitsgründen vor dem
Reinigen der Anschlüsse die Zündung aus, und
ziehen Sie den Schlüssel aus dem Zündschloß.
• Berühren Sie die Anschlüsse unter keinen
Umständen direkt mit den Händen oder einem
Metallgegenstand.
22
Page 49

Austauschen der Lithiumbatterie
Wenn die Batterie schwächer wird, verkürzt
sich die Reichweite der Kartenfernbedienung.
Tauschen Sie die Batterie gegen eine neue
CR2025-Lithiumbatterie aus. Bei Verwendung
einer anderen Batterie besteht Feuer- oder
Explosionsgefahr.
x
Mit der Seite + nach oben
Hinweise zur Lithiumbatterie
•Bewahren Sie die Lithiumbatterie außerhalb
der Reichweite von Kindern auf. Sollte eine
Lithiumbatterie verschluckt werden, ist
umgehend ein Arzt aufzusuchen.
•Wischen Sie die Batterie mit einem trockenen
Tuch ab, um einen guten Kontakt zwischen
den Batteriepolen und -anschlüssen
sicherzustellen.
•Achten Sie beim Einlegen der Batterie auf die
richtige Polarität.
•Halten Sie die Batterie nicht mit einer
Metallpinzette. Dies könnte zu einem
Kurzschluß führen.
Entsorgungshinweis: Bitte werfen Sie nur
entladene Batterien in die Sammelboxen beim
Handel oder den Kommunen. Entladen sind
Batterien in der Regel dann, wenn das Gerät
abschaltet und „Batterie leer“ signalisiert oder
nach längerer Gebrauchsdauer der Batterien
nicht mehr einwandfrei funktioniert.
Um sicherzugehen, kleben Sie die Batteriepole
z.B. mit einem Klebestreifen ab, oder geben Sie
die Batterien einzeln in einen Plastikbeutel.
Ausbauen des Geräts
1 Nehmen Sie die vordere Abdeckung ab.
1 Lösen Sie die Frontplatte (Seite 8).
2 Drücken Sie mit einem kleinen
Schraubenzieher auf die Federlasche
an der Innenseite der vorderen
Abdeckung.
3 Gehen Sie wie in Schritt 2 erläutert
auch an der anderen Seite vor.
2 Nehmen Sie das Gerät heraus.
1 Drücken Sie mit einem dünnen
Schraubenzieher auf die Klammer an
der linken Seite des Geräts, und
ziehen Sie dann die linke Seite des
Geräts heraus, bis die Arretierung
ganz zu sehen ist.
4 mm
2 Gehen Sie wie in Schritt 1 auch auf
der rechten Seite vor.
3 Ziehen Sie das Gerät aus seiner
Halterung heraus.
VORSICHT
Die Batterie kann bei falscher Handhabung
explodieren! Auf keinen Fall darf sie
aufgeladen, auseinandergenommen oder
ins Feuer geworfen werden.
23
Page 50

Technische Daten
CD-Player
Signal-Rauschabstand 90 dB
Frequenzgang 10 – 20.000 Hz
Gleichlaufschwankungen Unterhalb der Meßgrenze
Radio
UKW (FM)
Empfangsbereich 87,5 – 108,0 MHz
Antennenanschluß Anschluß für externe
Zwischenfrequenz 10,7 MHz/450 kHz
Nutzbare Empfindlichkeit
Trennschärfe 75 dB bei 400 kHz
Signal-Rauschabstand 66 dB (stereo),
Harmonische Verzerrung bei 1 kHz
Kanaltrennung 35 dB bei 1 kHz
Frequenzgang 30 – 15.000 Hz
MW/LW
Empfangsbereich MW: 531 – 1.602 kHz
Antennenanschluß Anschluß für externe
Zwischenfrequenz 10,7 MHz/450 kHz
Empfindlichkeit MW: 30 µV
Antenne
8 dBf
72 dB (mono)
0,6 % (stereo),
0,3 % (mono)
LW: 153 – 279 kHz
Antenne
LW: 40 µV
Endverstärker
Ausgänge Lautsprecherausgänge
Lautsprecherimpedanz 4 – 8 Ohm
Maximale Leistungsabgabe
(versiegelte Anschlüsse)
50 W × 4 (an 4 Ohm)
Allgemeines
Ausgänge Motorantennen-
Eingänge Steuerleitung für
Klangregler Bässe ±9 dB bei 100 Hz
Betriebsspannung 12 V Gleichstrom,
Abmessungen ca. 178 × 50 × 177 mm
Einbaumaß ca. 182 × 53 × 161 mm
Gewicht ca. 1,2 kg
Mitgeliefertes Zubehör Montageteile und
Sonderzubehör Kartenfernbedienung
Sonderzubehörgeräte CD-Wechsler (6 CDs)
Steuerleitung
Stummschaltung beim
Telefonieren
Höhen ±9 dB bei 10 kHz
Autobatterie (negative
Erdung)
(B/H/T)
(B/H/T)
Anschlußzubehör (1 Satz)
Behälter für Frontplatte (1)
RM-X114
Joystick
RM-X4S
CDX-T69
MD-Wechsler (6 MDs)
MDX-66XLP
MG Memory Stick
System-up-Player
MGS-X1
24
Hinweis
Dieses Gerät kann nicht an einen digitalen
Vorverstärker oder an einen Equalizer
angeschlossen werden.
Änderungen, die dem technischen Fortschritt
dienen, bleiben vorbehalten.
Page 51

Störungsbehebung
Anhand der folgenden Checkliste können Sie
die meisten Probleme, die möglicherweise an
Ihrem Gerät auftauchen, selbst beheben.
Bevor Sie die Liste unten durchgehen,
überprüfen Sie nochmals, ob die Anschlüsse
korrekt vorgenommen wurden und ob das
Gerät korrekt bedient wurde.
Allgemeines
Kein Ton.
•Stellen Sie die Lautstärke ein, indem Sie
den Lautstärkeregler VOL im
Uhrzeigersinn drehen.
•Schalten Sie die ATT-Funktion aus.
•Stellen Sie den Fader-Regler bei einem
Zweilautsprechersystem in die mittlere
Position.
Der Speicherinhalt wurde gelöscht.
•Die Taste RESET wurde gedrückt.
t Speichern Sie die Einstellungen erneut.
•Das Netzkabel hat sich gelöst, oder die
Autobatterie wurde abgeklemmt.
•Das Stromversorgungskabel ist nicht
richtig angeschlossen.
Kein Signalton ertönt.
Der Signalton wurde ausgeschaltet
(Seite 20).
Im Display erscheinen keine Anzeigen bzw.
die Anzeigen werden ausgeblendet.
•Die Uhrzeitanzeige wird ausgeblendet,
wenn Sie 2 Sekunden lang (OFF) drücken.
t Drücken Sie (OFF) erneut 2 Sekunden
lang, um die Uhrzeit anzuzeigen.
•Nehmen Sie die Frontplatte ab, und
reinigen Sie die Anschlüsse. Näheres dazu
finden Sie unter „Reinigen der
Anschlüsse“ (Seite 22).
Wenn Sie die CD-Wiedergabe oder den
Radioempfang beenden, wird die Uhrzeit
nicht mehr angezeigt.
„M.DSPL“ wird angezeigt (der Modus
M.DSPL wurde auf 1 oder 2 eingestellt).
t Stellen Sie M.DSPL auf „off“ (Seite 20).
Gespeicherte Sender und die korrekte
Uhrzeit werden gelöscht.
Die Sicherung ist durchgebrannt.
Es kommt zu Störgeräuschen, wenn sich der
Zündschlüssel in der Position EIN, AUS oder
ACC bzw. I (Zubehörposition) befindet.
Die Leitungen sind nicht korrekt an den
Hilfsstromanschluß im Auto angeschlossen.
Das Gerät wird nicht mit Strom versorgt.
•Überprüfen Sie die Kabelverbindungen.
Wenn die Anschlüsse in Ordnung sind,
überprüfen Sie die Sicherung.
•Das Auto hat keine Zubehörposition (ACC
bzw. I).
t Drücken Sie (SOURCE), oder legen Sie
eine CD ein, um das Gerät
einzuschalten.
Das Gerät wird permanent mit Strom versorgt.
Das Auto hat keine Zubehörposition (ACC
bzw. I).
Die Motorantenne wird nicht ausgefahren.
Die Motorantenne hat kein Relaiskästchen.
CD-Wiedergabe
Es läßt sich keine CD einlegen.
•Es ist bereits eine CD eingelegt.
•Die CD wird falsch herum bzw. falsch
eingelegt.
Die Wiedergabe startet nicht.
•Die CD ist schmutzig oder defekt.
•Die CD-R/CD-RW ist nicht abgeschlossen.
•Sie versuchen, eine CD-R/CD-RW
wiederzugeben, die nicht als Audio-CD
konzipiert ist.
•Bestimmte CD-Rs/CD-RWs lassen sich
aufgrund des Geräts, mit dem sie
aufgenommen wurden, oder aufgrund
ihres Zustands nicht wiedergeben.
Die CD wird automatisch ausgeworfen.
Die Umgebungstemperatur liegt bei über
50 °C.
Die CD wird nicht ausgeworfen.
Die Betriebstasten funktionieren nicht.
Drücken Sie die Taste RESET.
Aufgrund von Vibrationen kommt es zu
Tonsprüngen.
•Das Gerät wurde mit einem Winkel von
über 60° installiert.
•Das Gerät wurde an einem Teil des Autos
installiert, das zu starken Vibrationen
ausgesetzt ist.
Tonsprünge treten auf.
Die CD ist schmutzig oder defekt.
Fortsetzung siehe nächste Seite t
25
Page 52

Radioempfang
Ein gespeicherter Sender läßt sich nicht
einstellen.
•Speichern Sie den Sender unter der
korrekten Frequenz ab.
•Die Sendesignale werden zu schwach
empfangen.
Sender lassen sich nicht empfangen.
Der Ton ist stark gestört.
•Schließen Sie ein MotorantennenSteuerkabel (blau) oder ein
Stromversorgungskabel für Zubehörgeräte
(rot) an das Stromversorgungskabel für den
Antennenverstärker eines Fahrzeugs an.
(Nur, wenn das Fahrzeug mit einer in der
Heck-/Seitenfensterscheibe integrierten
UKW/MW/LW-Antenne ausgestattet ist.)
•Prüfen Sie die Verbindung zur
Fahrzeugantenne.
•Die Fahrzeugantenne wird nicht ausgefahren.
t Prüfen Sie, ob die Motorantennen-
Steuerleitung korrekt angeschlossen ist.
•Überprüfen Sie die Frequenz.
Der automatische Sendersuchlauf
funktioniert nicht.
•Der lokale Sendersuchlauf ist auf „ON“
eingestellt.
t Setzen Sie den lokalen Sendersuchlauf
auf „OFF“ (Seite 14).
•Die Sendesignale werden zu schwach
empfangen.
t Stellen Sie den Sender von Hand ein.
Die Anzeige „ST“ blinkt.
•Stellen Sie den Sender exakt ein.
•Die Sendesignale werden zu schwach
empfangen.
t Schalten Sie in den Mono-
Empfangsmodus (Seite 14).
Eine Stereosendung ist nur monaural zu
hören.
Das Gerät ist in den Mono-Empfangsmodus
geschaltet.
t Beenden Sie den Mono-Empfangsmodus
(Seite 14).
RDS-Funktionen
Nach ein paar Sekunden Radioempfang
beginnt der Sendersuchlauf (SEEK).
Der Sender ist kein Verkehrsfunksender,
oder die Sendesignale sind zu schwach.
t Drücken Sie (TA) so oft, bis „TA-OFF“
erscheint.
Keine Verkehrsdurchsagen.
•Aktivieren Sie „TA“.
•Der Sender strahlt keine
Verkehrsdurchsagen aus, obwohl es ein
Verkehrsfunksender (TP) ist.
t Stellen Sie einen anderen Sender ein.
Bei PTY wird „--------“ angezeigt.
•Der eingestellte Sender ist kein RDS-Sender.
•Es werden keine RDS-Daten empfangen.
Fehlermeldungen/
Meldungen
Fehlermeldungen
Folgende Anzeigen blinken etwa 5 Sekunden
lang, und ein Alarmton ist zu hören.
1
ERROR*
•Die CD ist verschmutzt oder wurde
falschherum eingelegt.
t Reinigen Sie die CD, bzw. legen Sie sie
mit der richtigen Seite nach oben ein*2.
•Eine CD kann aufgrund einer Störung
nicht abgespielt werden.
t Legen Sie eine andere CD*2 ein.
HI TEMP
Die Umgebungstemperatur ist höher als
50 °C.
t Warten Sie, bis die Temperatur unter
50 °C sinkt.
NO DISC
Es befindet sich keine CD im Gerät.
t Legen Sie CDs in das CD-Gerät ein.
RESET
Das CD-Gerät kann wegen einer Störung
nicht bedient werden.
t Drücken Sie die Taste RESET am Gerät.
*1 Wenn während der Wiedergabe einer CD ein
Fehler auftritt, erscheint die Nummer der CD
nicht im Display.
2
Die Nummer der CD, die den Fehler verursacht,
*
erscheint im Display.
Wenn sich das Problem mit diesen
Abhilfemaßnahmen nicht beheben läßt,
wenden Sie sich an einen Sony-Händler.
Meldungen
L.SEEK +/–
Der lokale Sendersuchlauf ist während der
automatischen Sendersuche eingeschaltet
(Seite 14).
NO AF
Für den eingestellten Sender gibt es keine
Alternativfrequenz.
26
Page 53

27
Page 54

Félicitations !
Nous vous remercions d’avoir fait l’acquisition
d’un lecteur de disque compact Sony. Vous
pourrez exploiter ses multiples fonctions
d’utilisation à l’aide des accessoires de
commande ci-dessous :
•appareils CD/MD en option (changeurs et
lecteurs)*1.
•Les informations CD TEXT (affichées lorsqu’un
disque CD TEXT*2 est en cours de lecture).
•Accessoires de commande en
option
Mini-télécommande
RM-X114
Satellite de commande
RM-X4S
*1Cet appareil fonctionne uniquement avec des
produits Sony.
2
Un disque CD TEXT est un CD audio qui inclut
*
des informations telles que le nom du disque, le
nom de l’artiste et le nom des plages. Ces
informations sont enregistrées sur le disque.
Cette étiquette est située sur la partie inférieure
du châssis.
CAUTION INVISIBLE
VIEW DIRECTLY WITH OPTICAL INSTRUMENTS
LASER RADIATIONWHEN OPEN
DO NOT STARE INTO BEAM OR
Cette étiquette est située sur le châssis interne
de l’unité du lecteur.
2
Page 55

Table des matières
Emplacement des commandes ............................... 4
Précautions ................................................................ 6
Remarques sur les disques compacts .................... 6
Préparation
Réinitialisation de l’appareil............................... 7
Dépose de la façade ............................................. 8
Réglage de l’horloge ............................................ 9
Lecteur CD
Appareil CD/MD (en option)
Lecture d’un disque ............................................. 9
Rubriques d’affichage........................................ 10
Défilement automatique d’un nom
— Défilement automatique ......................... 10
Lecture de plages répétée
— Lecture répétée ......................................... 11
Lecture de plages dans un ordre quelconque
— Lecture aléatoire....................................... 11
Identification d’un CD
— Fonction Disc Memo* ............................. 11
Localisation d’un disque par son titre
— Répertoire (List-up)* ............................... 12
* Fonctions disponibles avec le lecteur de CD/
MD en option
Radio
Mémorisation automatique des stations
— Mémorisation du meilleur accord
(BTM) .............................................................. 13
Mémorisation des stations souhaitées
seulement ....................................................... 13
Ecoute des stations mémorisées....................... 13
RDS
Aperçu de la fonction RDS ............................... 14
Resyntonisation automatique pour une
meilleure réception
— Fonction AF .............................................. 15
Ecoute des messages de radioguidage
— TA/TP........................................................ 16
Présélection des stations RDS avec les
réglages AF et TA .......................................... 16
Syntonisation des stations par type d’émission
— PTY ............................................................. 17
Réglage automatique de l’heure
— CT ............................................................... 18
Autres fonctions
Utilisation du satellite de commande ............. 18
Réglage des caractéristiques du son ................ 20
Atténuation rapide du son ............................... 20
Modification des réglages du son et de
l’affichage ....................................................... 20
Sélection des réglages favoris
— Mes réglages favoris (MBP) ................... 21
Renforcement des graves
— D-bass ........................................................ 21
Informations complémentaires
Entretien .............................................................. 22
Retrait de l’appareil ........................................... 23
Spécifications ...................................................... 24
Dépannage .......................................................... 25
Affichages d’erreur/Messages ......................... 26
3
Page 56

Emplacement des commandes
MODE
SEL
SOURCE
RELEASE
L
P
S
D
–+
AF TA
ATT
DISC
1
REP
2 3 4 5 6
SHUF BTM
Pour plus de détails, reportez-vous aux pages indiquées.
1 Touche SOURCE (Alimentation/Radio/
qf Touche RESET (située sur la partie avant
CD/MD) 9, 10, 12, 13, 16
2 Touche MODE 10, 12, 13, 16
3 Touche SEL (sélection) 9, 10, 11, 12, 18,
qg Touche ATT (mise en sourdine) 20
qh Touches numériques 10, 13, 15, 16, 18,
20, 21
4 Touche DSPL (modification du mode
d’affichage) 9, 10, 12, 14
5 Touche AF 15, 16
6 Fenêtre d’affichage
7 Touche TA 16
8 Touche MBP (Mes réglages favoris) 21
9
Touche Z (éjection)
9
q; Touche D-BASS 21
qa Commande rotative VOL (volume) –/+
qj Touche SENS/BTM 13, 14, 16
qk Touche LIST/PTY (type d’émission) 11,
ql Touche OFF* 8, 9
w; Commande rotative SEEK/AMS –/+
9, 11, 12, 16, 20
qs Touche RELEASE (pour enlever la
façade) 8
qd Récepteur de la mini-télécommande
* Avertissement en cas d’installation
dans une voiture dont le contact ne
comporte pas de position ACC
(accessoires)
Assurez-vous d’appuyer sur la touche
(OFF) de l’appareil pendant 2 secondes
pour désactiver l’affichage de l’horloge
après avoir arrêté le moteur du véhicule.
Dans le cas contraire, l’affichage de l’horloge
n’est pas désactivé et cela décharge la
batterie.
MBP
D-BASS
L
IS
T
P
T
Y
CDX-CA600X
CDX-CA600
SENS
OFF
de l’appareil, derrière la façade) 7
20
(1) DISC – 10
(2) DISC + 10
(3) REP 11
(4) SHUF 11
12, 17
9, 12, 13, 14, 15, 17
4
Page 57

Mini-télécommande RM-X114
(en option)
DSPL MODE
+
PRESET
LIST
+
DISC
MENU
–
SEEK
SOUND
SOURCE
DISC
PRESET –
+
VOL
–
+
SEEK
–
ENTER
ATTOFF
Les touches correspondantes de la
mini-télécommande pilotent les mêmes
fonctions que celles de l'appareil.
1 Touche DSPL
2 Touche MENU*
3 Touche SOURCE
4 Touches SEEK (</,)
5 Touche SOUND
(utilisée comme la touche 3 SEL de cet
appareil)
6 Touche OFF
7 Touche VOL (–/+)
8 Touche
MODE
9 Touche LIST
q; Touche DISC/PRESET (M/m)
qa Touche ENTER*
qs Touche ATT
* Non disponible pour ce modèle
Remarque
Si l'appareil est mis hors tension en appuyant sur
(OFF) pendant 2 secondes, il ne peut plus être
commandé avec la télécommande à moins que la
touche (SOURCE) de l'appareil ne soit enfoncée
ou qu’une cassette ne soit insérée pour activer
l'appareil.
Conseil
Pour obtenir des informations détaillées sur la
façon de remplacer la pile, reportez–vous à
“Remplacement de la pile au lithium“ (page 23).
5
Page 58

Précautions
•Si votre véhicule était garé en plein soleil,
laissez l’appareil refroidir avant de le faire
fonctionner.
•Les antennes électriques se déploient
automatiquement lorsque vous utilisez
l’appareil.
Si vous avez des questions ou des problèmes
concernant le fonctionnement de cet appareil
qui ne sont pas abordés dans le présent mode
d’emploi, veuillez consultez votre revendeur
Sony.
Condensation
Par temps de pluie ou dans des régions très
humides, de l’humidité risque de se condenser
sur les lentilles et dans la fenêtre d’affichage de
l’appareil. Si cela se produit, l’appareil ne
fonctionnera pas correctement. En pareil cas,
retirez le disque et attendez environ une heure
l’évaporation de l’humidité.
Pour conserver un son de haute
qualité
Evitez de renverser du jus de fruit ou des
boissons sucrées sur l’appareil ou les disques.
Remarques sur les disques
compacts
•Pour garder le disque propre, évitez d’en
toucher la surface. Saisissez le disque par les
bords.
•Gardez les disques dans leurs boîtiers ou dans
des étuis de rangement lorsqu’ils ne sont pas
utilisés. N’exposez pas les disques à la
chaleur/à des températures élevées. Evitez de
les laisser dans une voiture en stationnement,
sur le tableau de bord ou la plage arrière.
•Ne collez pas d’étiquettes sur les disques ou
n’utilisez pas de disques rendus collants par
de l’encre/des résidus. De tels disques
peuvent s’arrêter en cours de lecture créant
un dysfonctionnement ou ils peuvent être
endommagés.
•N’utilisez pas de disques comportant des
étiquettes ou des autocollants.
Dans le cas contraire, les dysfonctionnements
suivants peuvent se produire :
— Impossible d’éjecter un disque (à cause
d’une étiquette ou d’un autocollant qui se
décolle et qui bloque le mécanisme
d’éjection).
— Impossible de lire des données audio
correctement (par ex. : saut de lecture ou
pas de lecture), le disque est voilé en
raison du rétrécissement d’un autocollant
ou d’une étiquette sous l’effet de la
chaleur.
•Les disques de forme non standard (par ex. en
forme de coeur, de carré, d’étoile) ne peuvent
pas être lus sur cet appareil. Vous risquez
d’endommager votre appareil si vous essayez
de le faire. N’utilisez pas de tels disques.
6
•Vous ne pouvez pas écouter de CD 8 cm.
Page 59

•Avant la lecture, nettoyez les disques avec un
chiffon de nettoyage disponible dans le
commerce. Essuyez chaque disque en partant
du centre. N’utilisez pas de solvants tels que
de la benzine, du diluant, des produits de
nettoyage vendus dans le commerce ou des
vaporisateurs anti-statiques destinés aux
disques analogiques.
Remarques sur les disques
CD-R/CD-RW
•Vous pouvez lire des CD-R (CD
enregistrables)/CD-RW (CD réinscriptibles)
audio avec cet appareil.
Repérez ces marques pour distinguer les
CD-R/CD-RW à usage audio.
Ces marques indiquent que le CD n’est pas à
usage audio.
Préparation
Réinitialisation de
l’appareil
Avant la première mise en service de l’appareil
ou après avoir remplacé la batterie de la
voiture, vous devez réinitialiser l’appareil.
Retirez la façade et appuyez sur la touche
RESET à l’aide d’un objet pointu comme un
stylo à bille.
Touche RESET
Remarque
Une pression sur la touche RESET efface le réglage
de l’heure et certaines fonctions mémorisées.
•Il est possible que ce lecteur ne puisse pas lire
certains CD-R/CD-RW (selon l’équipement
utilisé pour l’enregistrement ou l’état du
disque).
•Vous ne pouvez pas lire de disques CD-R/
CD-RW non finalisés*.
* Processus nécessaire pour qu’un disque CD-R/CD-
RW puisse être lu sur un lecteur CD audio.
7
Page 60

Dépose de la façade
Vous pouvez retirer la façade de cet appareil
pour le protéger contre le vol.
Avertisseur
Si vous mettez la clé de contact en position
OFF sans ôter la façade, l’alarme retentit
pendant quelques secondes.
Si vous raccordez un amplificateur en option et
que vous n’utilisez pas l’amplificateur intégré,
le bip sonore est désactivé.
1 Appuyez sur (OFF)*.
La lecture du CD ou la réception de la radio
s’arrête (l’éclairage des touches et
l’affichage restent apparents).
* Si votre voiture ne dispose pas de position
ACC sur le démarreur, assurez-vous que vous
éteignez l’appareil en appuyant sur (OFF)
pendant 2 secondes afin d’éviter de
décharger la batterie.
2 Appuyez sur (RELEASE), puis tirez la
façade vers vous.
(OFF)
Fixation de la façade
Fixez la partie A de la façade à la partie B de
l’appareil comme illustré et poussez le côté
gauche en position jusqu’à ce qu’il émette un
“clic”.
A
B
Remarque
Ne rien poser sur la surface interne de la façade.
(RELEASE)
Remarques
• Si vous retirez la façade alors que l’appareil est
toujours sous tension, l’alimentation est coupée
automatiquement de manière à éviter
d’endommager les hauts-parleurs.
• N’exercez pas de pression excessive sur la façade
et sur la fenêtre d’affichage.
• N’exposez pas la façade à la chaleur/à des
températures élevées ou à l’humidité. Evitez de
la laisser dans un véhicule en stationnement, sur
le tableau de bord ou la plage arrière.
Conseil
Lorsque vous emportez la façade, glissez-la dans
l’étui spécial fourni.
8
Page 61

Réglage de l’horloge
L’horloge à affichage numérique fonctionne
suivant un cycle de 24 heures.
Exemple : Pour régler l’heure sur 10:08
1 Appuyez sur (DSPL) pendant 2 secondes.
L’indication des heures se met à clignoter.
1 Réglez l’heure à l’aide de la
commande rotative VOL.
2 Appuyez sur (SEL).
L’indication des minutes se met à
clignoter.
3 Réglez les minutes à l’aide de la
commande rotative VOL.
2 Appuyez sur (DSPL).
L’horloge commence à fonctionner.
Lorsque le réglage de l’horloge est terminé,
l’affichage revient au mode de lecture
normale.
Conseil
Vous pouvez régler l’horloge automatiquement au
moyen de la fonction RDS (page 18).
Lecteur CD
Appareil CD/MD
(en option)
En plus de la lecture d’un CD avec cet appareil
seul, vous pouvez également commander des
appareils CD/MD externes.
Si vous raccordez un appareil CD en option
doté de la fonction CD TEXT, les informations
CD TEXT apparaîtront dans l’affichage lorsque
vous reproduirez un disque CD TEXT.
Lecture d’un disque
(avec cet appareil)
Insérez le disque (avec l’étiquette vers le
haut).
La lecture démarre automatiquement.
Si un CD se trouve déjà dans l’appareil,
appuyez plusieurs fois de suite sur (SOURCE)
jusqu’à ce que l’indication “CD” apparaisse
pour commencer la lecture.
Pour Effectuez cette opération
Arrêter la lecture Appuyez sur (OFF).
Ejecter le disque Appuyez sur Z.
Passer d’une Tournez la commande
plage à l’autre rotative SEEK/AMS.
– Capteur de [une fois pour chaque
musique plage]
automatique
Avance rapide/ Tournez la commande
Retour rotative SEEK/AMS.
– Recherche [maintenir jusqu’à
manuelle l’endroit souhaité]
Remarques
• Lorsque la dernière plage du disque est
terminée, la lecture reprend à partir de la
première plage du CD.
• Lorsque des appareils en option sont raccordés,
la lecture de la même source continue sur
l’appareil CD/MD en option.
page suivante t
9
Page 62

(avec l’appareil en option)
1 Appuyez plusieurs fois sur (SOURCE)
pour sélectionner “CD” ou “MD (MS*)”.
2 Appuyez plusieurs fois sur (MODE) jusqu’à
ce que l’appareil souhaité apparaisse.
La lecture commence.
* MS : Memory stick MG du système de lecteur
MGS-X1
Pour Appuyez sur
Sauter des disques ( 1 ) (DISC –) ou
– Sélection d’un ( 2 ) (DISC +)
disque
Avertissements concernant le raccordement des
éléments MGS-X1 et MD
Cet appareil reconnaît le MGS-X1 comme un
élément MD.
• Pour utiliser le MGS-X1, appuyez sur (SOURCE)
pour sélectionner “MS” ou “MD”. Si “MS”
s’affiche comme source, le MGS-X1 démarre. Si
“MD” s’affiche comme source, appuyez sur
(MODE) pour sélectionner “MS” et commencer la
lecture.
• Pour utiliser un MD, appuyez sur (SOURCE) pour
sélectionner “MD” ou “MS”. Si l’élément MD
souhaité s’affiche comme source, la lecture
commence. Si “MS” ou un autre élément MD
s’affiche comme source, appuyez sur (MODE)
pour sélectionner l’élément MD souhaité, puis
démarrez la lecture.
Rubriques d’affichage
Source (Numéro de disque*1)
Remarques
• Le nom du disque, le nom de l’artiste et le titre
de la plage peuvent être affichés avec
8 caractères maximum.
• Certains caractères ne peuvent pas être affichés.
• Cet appareil ne peut pas afficher le nom de
l’artiste pour chaque plage d’un disque CD TEXT.
Défilement automatique
d’un nom
— Défilement automatique
Lorsqu’un titre de disque, un nom d’artiste ou
un titre de plage d’un disque CD TEXT
dépasse 8 caractères et que la fonction de
défilement automatique est activée, les
informations défilent automatiquement dans la
fenêtre d’affichage comme suit :
• Le titre du disque apparaît lorsque le disque a
changé (si le titre du disque est sélectionné).
• Le titre de la plage apparaît lorsque le disque a
changé (si le titre de la plage est sélectionné).
Si vous appuyez sur (DSPL) pour changer le
paramètre affiché, le titre du disque ou de la
plage du CD TEXT défile automatiquement,
que la fonction soit activée ou non.
Sélection de “A.SCRL-ON”
Pendant la lecture, appuyez
simultanément sur (SEL) et (3).
En 2 secondes, l’affichage normal apparaît
automatiquement.
Pour sélectionner “A.SCRL-OFF”, ré-appuyez
simultanément sur (SEL) et (3).
Rubriques affichables
•Horloge
•Numéro de plage/Temps de lecture
écoulé
•Titre du disque*2/Nom de l’artiste*
•Titre de la plage*
4
Pour Appuyez sur
Passer d’une (DSPL)
rubrique d’affichage
à l’autre
*1Lorsqu’un appareil CD/MD en option est raccordé.
*2Lorsque vous appuyez sur (DSPL), “NO NAME”
indique qu’il n’existe pas de Disc Memo
(page 11) ni de nom préenregistré à afficher.
3
Uniquement pour les disques CD TEXT incluant
*
le nom de l’artiste.
4
Uniquement pour les disques CD TEXT avec le
*
titre de la plage.
10
Remarque
Sur certains disques comportant de très nombreux
caractères, les situations suivantes peuvent se
produire :
— certains caractères ne sont pas affichés.
— la fonction de défilement automatique est
inopérante.
3
Page 63

Lecture de plages répétée
— Lecture répétée
La lecture de la plage en cours ou du disque dans
son ensemble se répète lorsque la fin de cette
plage ou du disque est atteinte. Pour activer le
mode de lecture répétée, sélectionnez :
•REP-1 — pour répéter une plage.
•REP-2* — pour répéter la lecture d’un disque.
* Disponible uniquement lorsqu’un ou plusieurs
lecteurs CD/MD en option sont raccordés.
En cours de lecture, appuyez plusieurs
fois sur (3) (REP) jusqu’à ce que le
réglage souhaité apparaisse dans la
fenêtre d’affichage.
Remarque
“SHUF-ALL” ne passera pas de façon aléatoire des
plages des lecteurs CD à des plages de lecteurs MD.
Identification d’un CD
— Fonction Disc Memo (mémoire de
disque) (pour un lecteur CD disposant de la
fonction CUSTOM FILE)
Vous pouvez identifier chaque disque avec un
nom personnalisé (fonction Disc Memo). Vous
pouvez saisir jusqu’à 8 caractères pour un
disque. Si vous identifiez un CD, vous pouvez
localiser le disque par son nom (page 12).
1 Lancez la lecture du disque que vous
souhaitez identifier dans un lecteur CD
disposant de la fonction CUSTOM FILE.
L’indication “REP” est affichée.
La lecture répétée démarre.
Pour revenir au mode de lecture normale,
sélectionnez “REP-OFF”.
Lecture de plages dans un
ordre quelconque
— Lecture aléatoire
Vous pouvez sélectionner :
•SHUF-1 — pour reproduire les plages du
disque en cours dans un ordre aléatoire.
•SHUF-2*1 — pour lire les plages dans l’appareil
CD (MD) en option dans un ordre aléatoire.
•SHUF-ALL*2 — pour lire toutes les plages dans
les appareils CD (MD) en option (y compris
celles de cet appareil) dans un ordre aléatoire.
*1 Disponible uniquement lorsqu’un ou plusieurs
lecteurs CD (MD) en option sont raccordés.
2
Disponible uniquement lorsqu’un ou plusieurs
*
lecteurs CD, ou deux ou plusieurs lecteurs MD
sont raccordés.
En cours de lecture, appuyez plusieurs
fois sur (4) (SHUF) jusqu’à ce que le
réglage souhaité apparaisse dans la
fenêtre d’affichage.
L’indication “SHUF” est affichée.
La lecture aléatoire démarre.
Pour revenir au mode de lecture normale,
sélectionnez “SHUF-OFF”.
2 Appuyez sur (LIST/PTY) pendant
2 secondes.
Mode d’édition de nom
Le lecteur relit le disque au cours de la
procédure d’identification.
3 Introduisez les caractères.
1 Sélectionnez les caractères souhaités
à l’aide de la commande rotative VOL.
(A y B y C y ··· Z y 0 y 1 y 2
y ··· 9 y + y – y * y/ y \ y
> y < y . y _ y A ···)
Si vous souhaitez insérer un espace
entre des caractères, sélectionnez “_”.
2 Appuyez sur (SEL) après avoir
localisé le caractère de votre choix.
Le caractère suivant se met à clignoter.
3 Répétez les étapes 1 et 2 pour
introduire le titre en entier.
4 Pour revenir au mode de lecture normale
d’un CD, appuyez sur (LIST/PTY) pendant
2 secondes.
Conseils
• Pour corriger ou effacer un nom, réécrivez pardessus le nom saisi précédemment ou saisissez “_”.
• Vous pouvez identifier les CD d’un appareil ne
disposant pas de la fonction CUSTOM FILE si cet
appareil est raccordé à un lecteur CD disposant
de cette fonction. La fonction Disc Memo est
enregistrée dans la mémoire du lecteur CD avec
la fonction CUSTOM FILE.
page suivante t
11
Page 64

Affichage de la Disc Memo
En tant que rubrique d’affichage, la fonction
Disc Memo a toujours la priorité sur n’importe
quelle autre information CD TEXT d’origine.
Pour Appuyez sur
Visualiser (DSPL) en cours de
lecture du disque CD/CD
TEXT
Suppression de la fonction Disc
Memo
1 Appuyez plusieurs fois sur (SOURCE)
pour sélectionner le “CD”.
2 Appuyez plusieurs fois sur (MODE) pour
sélectionner le lecteur CD contenant la
fonction Disc Memo.
3 Appuyez sur (LIST/PTY) pendant
2 secondes.
4 Appuyez sur (DSPL) pendant 2 secondes.
Localisation d’un disque
par son titre — Répertoire (List-up)
pour un lecteur CD disposant de la fonction
CUSTOM FILE ou un appareil MD
Vous pouvez utiliser cette fonction pour les
disques auxquels vous avez attribué un nom
de votre choix*1 ou pour les disques CD
TEXT*2.
*1Localisation d’un disque par son nom : lorsque
vous attribuez un nom au CD (page 11) ou au
MD.
2
Localisation des disques grâce aux informations
*
CD TEXT : lorsque vous écoutez un disque CD
TEXT sur un lecteur CD équipé de la fonction CD
TEXT.
1 Appuyez sur (LIST/PTY) pendant un court
instant.
Le titre attribué au disque en cours apparaît
dans la fenêtre d’affichage.
5 Tournez la commande rotative VOL pour
sélectionner le nom du disque que vous
souhaitez effacer.
6 Appuyez sur (SEL) pendant 2 secondes.
Le titre est effacé.
Répétez les étapes 5 et 6 pour effacer
d’autres titres.
7 Appuyez sur (LIST/PTY) pendant
2 secondes.
L’appareil revient en mode de lecture CD
normal.
Remarques
• Lorsque le mémo de disque d’un disque CD TEXT
est effacé, les informations CD TEXT d’origine
s’affichent.
• Si vous ne pouvez pas trouver la Disc Memo que
vous souhaitez effacer, essayez de sélectionner
un autre lecteur CD dans l’étape 2.
2 Appuyez plusieurs fois sur (LIST/PTY)
jusqu’à ce que vous trouviez le disque
désiré.
3 Lancez la lecture du disque à l’aide de la
commande rotative SEEK/AMS.
Remarques
• L’affichage revient au mode de lecture normale
lorsque le nom du disque est resté affiché
pendant 5 secondes.
• Les noms de plages ne s’affichent pas pendant la
lecture d’un MD.
• S’il n’y a aucun disque dans le chargeur,
l’indication “NO DISC” apparaît dans la fenêtre
d’affichage.
• Si aucun titre personnalisé n’a été attribué à un
disque donné, l’indication “NO NAME” apparaît
dans la fenêtre d’affichage.
• Si le lecteur n’a pas lu les informations du disque,
le message “NOT READ” apparaît dans
l’affichage. Pour charger le disque, appuyez
d’abord sur la touche numérique, puis choisissez
le disque que vous souhaitez charger.
• Les informations s’affichent uniquement en
majuscules. Certains caractères ne peuvent pas
être affichés pendant la lecture de MD.
12
Page 65

Radio
Mémorisation des stations
souhaitées seulement
L’appareil peut mémoriser jusqu’à 6 stations
par bande (FM1, FM2, FM3, MW et LW).
Attention
Pour syntoniser des stations pendant que vous
conduisez, nous vous conseillons d’utiliser la
fonction de mémorisation du meilleur accord
(BTM) de façon à éviter les accidents.
Mémorisation
automatique des stations
— Mémorisation du meilleur accord (BTM)
L’appareil sélectionne les stations émettant
avec le signal le plus puissant dans la bande
sélectionnée et il les mémorise dans l’ordre de
leurs fréquences.
1 Appuyez plusieurs fois sur (SOURCE)
pour sélectionner la radio.
2 Appuyez plusieurs fois sur (MODE) pour
sélectionner la bande de fréquence.
3 Appuyez sur (SENS/BTM) pendant
2 secondes.
L’appareil mémorise les stations sous les
touches numériques dans l’ordre de leur
fréquence. Un bip retentit lorsque le réglage
est mémorisé.
Remarques
• Si seulement quelques stations peuvent être
captées en raison de faibles signaux, certaines
touches numériques conservent leur réglage
préalable.
• Si un numéro est indiqué dans la fenêtre
d’affichage, l’appareil commence la
mémorisation des stations à partir de la station
affichée.
Vous pouvez mémoriser manuellement les
stations souhaitées sur n’importe quelle touche
numérique.
1 Appuyez plusieurs fois sur (SOURCE)
pour sélectionner la radio.
2 Appuyez plusieurs fois de suite sur
(MODE) pour sélectionner la bande de
fréquence.
3 Syntonisez la station que vous souhaitez
mémoriser à l’aide de la commande
rotative SEEK/AMS.
4 Appuyez sur la touche numérique
souhaitée ((1) à (6)) jusqu’à l’affichage
de l’indication “MEM”.
Le numéro de la touche numérique de
présélection apparaît dans la fenêtre
d’affichage.
Remarque
Si vous essayez de mémoriser une autre station
sous une touche numérique déjà utilisée, la station
précédemment mémorisée est supprimée.
Ecoute des stations
mémorisées
1 Appuyez plusieurs fois sur (SOURCE)
pour sélectionner la radio.
2 Appuyez plusieurs fois de suite sur
(MODE) pour sélectionner la bande de
fréquence.
3 Appuyez sur la touche numérique ((1) à
(6)) sous laquelle la station désirée est
mémorisée.
page suivante t
13
Page 66

Si la syntonisation prédéfinie ne
fonctionne pas
— Syntonisation automatique/Mode de
recherche locale
RDS
Syntonisation automatique :
Recherchez la station en tournant la
commande rotative SEEK/AMS.
Le balayage s’arrête lorsque l’appareil capte
une station. Tournez la commande rotative
SEEK/AMS jusqu’à ce que vous captiez la
station souhaitée.
Mode de recherche locale :
Si la recherche automatique des
fréquences s’arrête trop souvent, pressez
la touche (SENS/BTM) de façon répétée
jusqu’à ce que “LOCAL-ON” s’affiche.
L’indication “LCL” est affichée.
Seules les stations dont les signaux sont
suffisamment puissants seront accordées.
Conseil
Si vous connaissez la fréquence de la station que
vous souhaitez écouter, tournez la commande
rotative SEEK/AMS jusqu’à ce que la fréquence
souhaitée s’affiche (syntonisation manuelle).
Si la réception FM est faible
— Mode monaural
Au cours de la réception radio, appuyez
sur (SENS/BTM) plusieurs fois jusqu’à
l’affichage de l’indication “MONO-ON”.
L’indication “MONO” est affichée.
La qualité sonore s’en trouve améliorée,
mais le son est diffusé en mode monaural
(l’indication “ST” disparaît).
Pour revenir au mode normal, sélectionnez
“MONO-OFF”.
Aperçu de la fonction RDS
Les stations FM disposant du système RDS
(Radio Data System) émettent des
informations numériques inaudibles en même
temps que le signal normal de leurs émissions
radiophoniques. Par exemple, l’une des
informations suivantes s’affiche lors de la
réception d’une station disposant de la
fonction RDS.
Source
Rubriques affichables
• Horloge
• Nom de la station
(Fréquence)
•Données RDS
Pour Appuyez sur
Passer à la rubrique (DSPL)
Horloge ou nom de la
station (fréquence)
Services RDS
Les données de la fonction RDS vous offre
d’autres services comme :
•La resyntonisation automatique d’une
émission, très pratique pour les longs trajets.
— AF t page 15
•La réception des messages de radioguidage,
même lorsque vous écoutez une autre
émission/une autre source. — TA t page 16
•La sélection des stations par type de
programme. — PTY t page 17
•Le réglage automatique de l’horloge. — CT
t page 18
Remarques
• Suivant le pays ou la région, toutes les fonctions
RDS peuvent ne pas être accessibles.
• La fonction RDS peut ne pas fonctionner
correctement si le signal de retransmission est
faible ou si la station syntonisée ne transmet pas
de signaux RDS.
14
Page 67

Resyntonisation
automatique pour une
meilleure réception
— Fonction AF
La fonction Fréquences alternatives (AF)
permet à la radio de toujours trouver le signal
le plus puissant de la station que vous écoutez.
Changement automatique de fréquence.
Ecoute en continu d’une émission
régionale
Lorsque la fonction AF est activée : ce réglage
préréglé en usine limite la réception à une
région donnée, vous ne passerez donc pas à
d’une station régionale à une autre disposant
d’une fréquence plus puissante.
Si vous quittez la zone de réception de
l’émission régionale ou si vous souhaitez
profiter pleinement de la fonction AF, appuyez
sur (AF) pendant 2 secondes jusqu’à
l’affichage de l’indication “REG-OFF”.
98,5MHz
Emetteur
96,0MHz
102,5MHz
1 Sélectionnez une station FM (page 13).
2 Appuyez sur (AF) jusqu’à ce que
l’indication “AF-ON” apparaisse dans la
fenêtre d’affichage.
L’appareil entame la recherche d’une
station alternative émettant avec un signal
plus puissant dans le même réseau de
radiodiffusion.
Si l’indication “NO AF” clignote, la station
ne dispose pas de fréquence alternative.
Remarques
• Si vous souhaitez modifier le réglage on/off au
cours de la lecture d’un CD, appuyez sur (AF).
• Lorsqu’il n’y a pas de fréquence alternative dans
la région ou lorsque vous n’avez pas besoin d’en
rechercher une, désactivez la fonction AF en
sélectionnant “AF-OFF”.
Pour les stations sans fréquence
alternative
Tournez la commande rotative SEEK/
AMS pendant que le nom de la station
clignote (dans les 8 secondes).
L’appareil commence à rechercher une
autre fréquence avec les mêmes données
d’identification de programme (PI)
(“PI SEEK” apparaît).
Si l’appareil ne parvient pas à trouver la
même PI, il revient sur la fréquence
sélectionnée précédemment.
Remarque
Cette fonction est inopérante au Royaume-Uni
ainsi que dans d’autres régions.
Fonction de liaison locale
(Royaume-Uni uniquement)
Cette fonction vous permet de sélectionner
d’autres stations locales dans la région, même
si elles ne sont pas mémorisées sur les touches
numériques de votre appareil.
1 Appuyez sur une touche numérique
((1) à (6)) associée à une station locale
mémorisée.
2 Appuyez à nouveau, dans les 5 secondes,
sur la touche numérique de la station
locale.
3 Répétez cette procédure jusqu’à ce que
vous captiez la station locale voulue.
15
Page 68

Ecoute des messages de
radioguidage — TA/TP
En activant Traffic Announcement (TA) et
Traffic Programme (TP), vous pouvez
automatiquement écouter une station FM
diffusant des messages de radioguidage. Ces
réglages fonctionnent sans tenir compte de
l’émission, de la source FM en cours ou du CD ;
l’appareil revient à l’émission d’origine lorsque
le bulletin d’information est terminé.
Appuyez sur (TA) jusqu’à ce que
l’indication “TA-ON” apparaisse dans la
fenêtre d’affichage.
L’appareil recherche alors des stations
d’information routière.
“TP” indique la réception de stations de ce
type et “TA” clignote au cours du bulletin
d’information. L’appareil continue à
rechercher les stations diffusant des
messages de radioguidage si “NO TP”
s’affiche.
Pour annuler la réception de messages de
radioguidage, sélectionnez “TA-OFF”.
Pour Appuyez sur
Annuler (TA)
le bulletin en cours
Conseil
Vous pouvez également interrompre le message
de radioguidage en cours en appuyant sur
(SOURCE) ou (MODE).
Présélection du volume pour les
messages de radioguidage
Vous pouvez présélectionner le niveau de
volume de diffusion des messages de
radioguidage de façon à ne manquer aucune
information.
Présélection des stations
RDS avec les réglages AF
et T A
Lorsque vous présélectionnez des stations
RDS, l’appareil mémorise chaque réglage AF/
TA (on/off) des stations ainsi que leurs
fréquences. Vous pouvez effectuer un réglage
différent (pour AF, TA ou les deux) pour
chaque station prédéfinie ou vous pouvez
effectuer le même réglage pour toutes les
stations prédéfinies. Si vous présélectionnez
des stations avec “AF on”, l’appareil mémorise
automatiquement les stations dont le signal
radio est le plus puissant.
Sélection du même réglage pour
toutes les stations prédéfinies
1 Sélectionnez une bande FM (page 13).
2 Appuyez sur (AF) ou/et (TA) pour
sélectionner “AF-ON” et/ou “TA-ON”.
Remarquez que la sélection de “AF-OFF” et
“TA-OFF” s’applique aussi bien aux
stations non-RDS qu’aux stations RDS.
3 Appuyez sur (SENS/BTM) jusqu’à ce que
“BTM” clignote.
Sélection de réglages différents
pour chaque station
présélectionnée
1 Sélectionnez une bande FM et syntonisez
la station voulue.
2 Appuyez sur (AF) ou/et (TA) pour
sélectionner “AF-ON” et/ou “TA-ON”.
1 Réglez le volume au niveau souhaité à
l’aide de la commande rotative VOL.
2 Appuyez sur (TA) pendant 2 secondes.
“TA” apparaît et le réglage est mémorisé.
Réception de messages d’urgence
Si AF ou TA est activé, l’appareil passera aux
messages de radioguidage présentant un
caractère d’urgence, si l’un d’entre eux est
diffusé pendant que vous écoutez une station
FM ou un CD.
16
3 Appuyez sur la touche numérique
désirée jusqu’à ce que “MEM”
apparaisse.
Répétez la procédure à partir de l’étape
1 pour la présélection d’autres stations.
Remarque
Si vous voulez modifier le réglage AF/TA tandis que
vous écoutez un CD, appuyez sur (AF) ou (TA).
Page 69

Syntonisation des stations
par type d’émission — PTY
1 Appuyez sur (LIST/PTY) au cours de la
réception FM.
Vous pouvez rechercher une station en
sélectionnant le type d’émission que vous
souhaitez écouter.
Types d’émission Affichage
Actualités NEWS
Dossiers d’actualité AFFAIRS
Informations INFO
Sports SPORT
Education EDUCATE
Théâtre DRAMA
Culture CULTURE
Science SCIENCE
Divers VARIED
Musique populaire POP M
Musique rock ROCK M
Musique légère EASY M
Musique classique “légère” LIGHT M
Musique classique CLASSICS
Autres types de musique OTHER M
Météo WEATHER
Finance FINANCE
Programmes pour enfants CHILDREN
Affaires sociales SOCIAL A
Religion RELIGION
Entrée tél PHONE IN
Voyage TRAVEL
Loisir LEISURE
Musique jazz JAZZ
Musique country COUNTRY
Musique nationale NATION M
Musique d’autrefois OLDIES
Musique folk FOLK M
Documentaires DOCUMENT
Le nom du type d’émission en cours
apparaît si la station transmet des données
PTY. “--------” apparaît si la station reçue
n’est pas une station RDS ou si les données
RDS ne sont pas reçues.
2 Appuyez plusieurs fois de suite sur
(LIST/PTY) jusqu’à ce que le type
d’émission voulu s’affiche.
Les types d’émission apparaissent dans
l’ordre indiqué dans le tableau. “NONE”
apparaît si le type d’émission n’est pas
spécifié par les données RDS.
3 Tournez la commande rotative SEEK/
AMS.
L’appareil entame la recherche d’une
station diffusant le type d’émission
sélectionné.
Remarque
Vous ne pouvez pas utiliser cette fonction dans
certains pays où aucun signal PTY (sélection du
type d’émission) n’est accessible.
17
Page 70

Réglage automatique de
l’heure — CT
Autres fonctions
Les données CT (heure) accompagnant la
transmission RDS assurent un réglage
automatique de l’heure.
Sélection de “CT-ON”
Pendant la réception radio, appuyez
simultanément sur (SEL) et (2).
L’heure est réglée.
En une seconde, l’affichage normal apparaît
automatiquement.
Pour sélectionner “CT-OFF”, ré-appuyez
simultanément sur (SEL) et (2).
Remarques
• Il est possible que la fonction CT ne fonctionne
pas même si une station RDS est captée.
• Il peut y avoir une différence entre l’heure réglée
par la fonction CT et l’heure réelle.
Vous pouvez également commander l’appareil
et les appareils CD/MD en option avec un
satellite de commande (en option).
Utilisation du satellite de
commande
Commencez par fixer l’étiquette appropriée
suivant la position de montage du satellite de
commande.
Le satellite de commande fonctionne en
appuyant sur les touches et/ou en tournant les
commandes.
D
SEL
MODE
DSPL
En appuyant sur les touches
(SEL)
SPL
M
O
D
E
SEL
(ATT)
(MODE)
18
(SOURCE)
(DSPL)
Faites tourner la commande
VOL pour régler le volume.
(OFF)
Appuyez sur Pour
(SOURCE) Changer de source
(radio/CD/MD*1)
(MODE) Changer de mode de
fonctionnement (fréquence
radio/lecteur CD/lecteur
MD*1)
(ATT) Atténuer le son
2
(OFF)*
Arrêter la lecture ou
l’écoute de la radio
(SEL) Régler ou sélectionner
(DSPL) Modifier la rubrique
d’affichage
OFF
Page 71

*1Uniquement si l’appareil en option est raccordé.
2
Si votre voiture ne dispose pas de position ACC
*
(accessoires) sur le démarreur, assurez-vous que
vous appuyez pendant 2 secondes sur (OFF)
pour désactiver l’horloge une fois que vous avez
arrêté le moteur.
En tournant la commande
Modification du sens de
fonctionnement
Le sens de fonctionnement des commandes est
réglé par défaut comme indiqué dans
l’illustration ci-dessous.
Pour augmenter
Commande
SEEK/AMS
Tournez la commande et relâchez-la pour :
– Passer d’une plage à l’autre.
– Rechercher des stations automatiquement.
Tournez, appuyez et relâchez pour :
– Avancer rapidement/revenir au début
d’une plage.
– Trouver une station manuellement.
En pressant et en tournant la
commande
Commande
PRESET
Appuyez et tournez la commande pour :
– Ecouter des stations prédéfinies.
– Changer de disque*.
* Lorsqu’un appareil CD/MD en option est
raccordé.
Pour diminuer
Si vous devez monter le satellite de commande
du côté droit de la colonne de direction, vous
pouvez inverser le sens de fonctionnement des
commandes.
Appuyez sur (SEL) pendant 2 secondes
tout en maintenant la commande VOL
enfoncée.
19
Page 72

Réglage des
caractéristiques du son
Vous pouvez régler les graves, les aiguës ainsi
que la balance gauche-droite et la balance
avant-arrière.
1 Sélectionnez le paramètre que vous
voulez régler en appuyant plusieurs fois
de suite sur (SEL).
Chaque fois que vous appuyez sur (SEL),
la source change comme suit :
BAS (graves) t TRE (aiguës) t BAL (balance
gauche-droite) t FAD (balance avant-arrière)
2 Réglez le paramètre sélectionné en
tournant la commande rotative VOL.
Remarque
Effectuez ce réglage dans les 3 secondes après
avoir sélectionné les options.
Atténuation rapide du son
Appuyez sur (ATT).
“ATT-ON” clignote momentanément puis
l’indication “ATT” s’affiche.
Pour restaurer le niveau précédent du volume,
appuyez à nouveau sur (ATT).
L’indication “ATT-OFF” apparaît brièvement.
Conseil
Lorsque le câble de jonction d’un téléphone de
voiture est raccordé au fil ATT, l’appareil réduit le
volume automatiquement lorsqu’un appel
téléphonique est reçu (fonction ATT Téléphone).
Modification des réglages
du son et de l’affichage
Les paramètres suivants peuvent être réglés :
•AMBER/GREEN*
– pour modifier la couleur de l’éclairage
lumineux (ambre ou vert).
•CT (signal d’horloge) (page 18).
•A.SCRL (défilement automatique)*
(page 10).
•M.DSPL (affichage animé)
– mode de démonstration apparaissant
lorsque aucune source n’est sélectionnée
(par ex., lorsque le syntoniseur est arrêté).
•BEEP – pour activer ou désactiver le bip
Sélection du paramètre souhaité
Lorsque le réglage de mode est terminé, la
fenêtre d’affichage revient au mode de lecture
normale.
Remarque
Le paramètre affiché diffère suivant la source.
Pour annuler le paramètre, appuyez à nouveau
simultanément sur (SEL) et la touche
numérique préréglée.
sonore.
Appuyez simultanément sur (SEL) et la
touche numérique prédéfinie souhaité.
(SEL) + (1): AMBER/GREEN*
(SEL) + (2): CT
(SEL) + (3): A.SCRL*
(SEL) + (4): M.DSPL
(SEL) + (6): BEEP
*1CDX-CA600 uniquement
2
Lorsqu’aucun CD n’est en cours de lecture, ce
*
paramètre n’apparaît pas.
1
2
1
2
20
Page 73

Sélection des réglages
favoris — Mes réglages favoris (MBP)
Lorsque vous voyagez seul, vous pouvez
profiter de l’environnement sonore le plus
confortable avec “Mes réglages favoris”.
“Mes réglages favoris” dispose de deux
préréglages qui conviennent le mieux aux
sièges avant. Vous pouvez sélectionner l’un ou
l’autre facilement avec la touche MBP.
MBP-A : réglage idéal pour la personne assise
dans le siège avant gauche.
MBP-B : réglage idéal pour la personne assise
dans le siège avant droite.
Appuyez plusieurs fois sur (MBP) jusqu’à
ce que la position d’écoute voulue soit
sélectionnée.
L’affichage revient en mode de lecture
normal après un délai d’une seconde.
Pour annuler la fonction MBP, sélectionnez
“MBP-OFF.”
Si vous souhaitez régler les caractéristiques
sonores avec une plus grande précision,
utilisez la touche (SEL) (voir, “Réglage des
caractéristiques du son” à la page 20).
Renforcement des graves
— D-bass
Vous pouvez exploiter des graves claires et
puissantes. La fonction D-bass renforce les
signaux de basse fréquence et les signaux de
haute fréquence avec une courbe plus tendue
qu’une fonction d’accentuation classique.
Vous entendez plus distinctement les graves,
même si le volume de la partie vocale reste au
même niveau. Vous pouvez renforcer et ajuster
les graves à l’aide de la touche (D-BASS).
D.BASS-3
D.BASS-2
Niveau
0dB
D.BASS-1
Fréquence (Hz)
Réglage de la courbe des graves
Appuyez plusieurs fois de suite sur
(D-BASS)pour sélectionner la courbe des
graves voulue.
L’effet s’intensifie à mesure que la valeur
D-BASS augmente.
Remarque
Les graves peuvent être distordues au même
volume. Si les graves sont distordues, sélectionnez
une courbe de graves moins efficace.
D.BASS-3
D.BASS-2
D.BASS-1
Remarques
• Si vous réglez une caractéristique sonore à l’aide
de la touche (SEL) (page 20), le réglage MBP
revient à la position OFF.
• Lorsque MBP est réglé sur OFF, le réglage du son
que vous avez effectué (page 20) est activé.
21
Page 74

Informations
complémentaires
Entretien
Remplacement du fusible
En cas de remplacement du fusible, veillez à
utiliser un fusible dont l’intensité correspond à
celle inscrite sur le fusible. Si le fusible grille,
vérifiez le branchement de l’alimentation et
remplacez le fusible. Si le fusible grille une
nouvelle fois après avoir été remplacé, cela
peut révéler une défaillance interne de
l’appareil. Le cas échéant, consultez un
revendeur Sony.
Fusible (10 A)
Avertissement
N’utilisez jamais de fusible dont l’intensité
dépasse celle du fusible fourni avec l’appareil,
car vous risqueriez d’endommager l’appareil.
Nettoyage des connecteurs
L’appareil ne peut pas fonctionner
correctement si les connecteurs entre l’appareil
et la façade sont souillés. Pour éviter cela,
enlevez la façade (page 8) et nettoyez les
connecteurs à l’aide d’un coton-tige imbibé
d’alcool. N’exercez pas une pression trop forte.
Vous risquez sinon d’endommager les
connecteurs.
Autoradio
Dos de la façade
Remarques
• Pour des raisons de sécurité, coupez le moteur
avant de nettoyer les connecteurs et retirez la clé
du contact.
• Ne touchez jamais les connecteurs directement
avec les mains ou avec un ustensile métallique.
22
Page 75

Remplacement de la pile au lithium
Lorsque la pile s’affaiblit, l’autonomie de la
mini-télécommande diminue. Remplacez la
pile par une nouvelle pile au lithium CR2025.
L’utilisation de toute autre pile peut présenter
un risque d’incendie ou d’explosion.
Retrait de l’appareil
1 Déposez la façade.
1 Retirez le panneau avant (page 8).
2 Appuyez sur l’attache du panneau
avant avec un tournevis fin.
x
côté + vers le haut
Remarques sur la pile au lithium
•Gardez la pile au lithium hors de portée des
enfants. En cas d’ingestion de la pile,
consultez immédiatement un médecin.
•Nettoyez la pile au moyen d’un chiffon sec
pour assurer un contact optimal.
•Veillez à respecter les polarités correctes lors
de la mise en place de la pile.
•Ne saisissez pas la pile avec des pinces
métalliques, car cela risque de provoquer un
court-circuit.
AVERTISSEMENT
Utilisée de façon incorrecte, la pile peut
exploser. Ne pas la recharger, la démonter
ni la jeter au feu.
3 Répétez l’étape 2 pour l’autre côté.
2 Retirez l’appareil
1 Utilisez un fin tournevis pour
enfoncer l’attache du côté gauche de
l’appareil, puis tirez le côté gauche de
l’appareil jusqu’au dégagement
complet du côté gauche.
4 mm
2 Répétez l’étape 1 du côté droit.
3 Faites glisser l’appareil en dehors de
sa cage de montage.
23
Page 76

Spécifications
Lecteur CD
Rapport signal-bruit 90 dB
Réponse en fréquence 10 – 20.000 Hz
Pleurage et scintillement En dessous du seuil
mesurable
Radio
FM
Plage de syntonisation 87,5 – 108,0 MHz
Borne d’antenne Connecteur d’antenne
Fréquence intermédiaire 10,7 MHz/450 kHz
Sensibilité utile 8 dBf
Sélectivité 75 dB à 400 kHz
Rapport signal-bruit 66 dB (stéréo),
Distorsion harmonique à 1 kHz
Séparation 35 dB à 1 kHz
Réponse en fréquence 30 – 15.000 Hz
PO/GO (MW/LW)
Plage de syntonisation PO : 531 – 1.602 kHz
Borne d’antenne Connecteur d’antenne
Fréquence intermédiaire 10,7 MHz/450 kHz
Sensibilité PO : 30 µV
externe
72 dB (mono)
0,6 % (stéréo),
0,3 % (mono)
GO : 153 – 279 kHz
externe
GO : 40 µV
Amplificateur de puissance
Sorties Sorties pour haut-parleurs
Impédance de haut-parleurs
Puissance utile maximum 50 W × 4 (à 4 ohms)
(connecteurs de sécurité)
4 – 8 ohms
Caractéristiques générales
Sorties Fil de commande de relais
Entrées Fil de commande de mise
Commandes de tonalité Graves ± 9 dB à 100 Hz
Puissance de raccordement
Dimensions Approx. 178 × 50 × 177 mm
Dimensions de montage Approx. 182 × 53 × 161 mm
Poids Approx. 1,2 kg
Accessoires fournis Eléments d’installation et
Accessoires en option Mini-télécommande
Appareils en option Changeur de CD (6 disques)
d’antenne électrique
en sourdine téléphone
Aiguës ± 9 dB à 10 kHz
Batterie de voiture
12 V CC (masse négative)
(l/h/p)
(l/h/p)
de raccordement (1 jeu)
Etui pour la façade (1)
RM-X114
Satellite de commande
RM-X4S
CDX-T69
Changeur MD (6 disques)
MDX-66XLP
Memory stick MG du
système de lecteur
MGS-X1
24
Remarque
Cet appareil ne peut pas être branché sur un
préamplificateur numérique ou un égaliseur.
La conception et les spécifications sont sujettes à
modifications sans préavis.
Page 77

Dépannage
La liste de contrôle suivante vous aidera à
remédier aux problèmes que vous pourriez
rencontrer avec cet appareil.
Avant de passer en revue la liste de contrôle cidessous, vérifiez les procédures de
raccordement et d’utilisation.
Généralités
Pas de son.
•Baissez ou augmentez le volume en
tournant la commande rotative VOL dans
le sens des aiguilles d’une montre.
•Annulez la fonction ATT.
•Réglez la commande de la balance avantarrière dans la position centrale pour un
système avec 2 enceintes.
Le contenu de la mémoire a été effacé.
•La touche RESET a été enfoncée.
t Recommencez la procédure
d’enregistrement dans la mémoire.
•Le cordon d’alimentation ou la batterie a
été déconnecté.
•Le cordon d’alimentation n’est pas
raccordé correctement.
Aucun bip sonore.
Le bip sonore a été désactivé (page 20).
Les indications disparaissent/n’apparaissent
pas dans la fenêtre d’affichage.
•L’affichage de l’horloge disparaît si vous
appuyez sur (OFF) pendant 2 secondes.
t Appuyez une nouvelle fois sur (OFF)
pendant 2 secondes pour afficher
l’horloge.
•Déposez la façade et nettoyez les
connecteurs. Pour plus de détails, voir la
procédure “Nettoyage des connecteurs”
(page 22).
Lorsque vous arrêtez la lecture d’un CD ou
la réception radio, l’horloge n’est pas
affichée.
M.DSPL est affiché (Le mode M.DSPL était
réglé sur 1 ou 2).
t Réglez le mode M.DSPL sur “off”
(page 20).
Les stations mémorisées et l’heure sont
effacées.
Le fusible a grillé.
Des sons sont émis lorsque la clé de contact
est sur la position ON, ACC ou OFF.
Les fils de commande ne correspondent pas
au connecteur d’alimentation de l’accessoire
du véhicule.
Aucune alimentation ne parvient à
l’appareil.
•Vérifiez les raccordements. Si tout est en
ordre, vérifiez le fusible.
•Le véhicule ne dispose pas de position
ACC.
t Appuyez sur (SOURCE) (ou insérez un
disque) pour allumer l’appareil.
L’appareil est alimenté en continu.
Le véhicule n’a pas de position ACC.
L’antenne électrique ne sort pas.
L’antenne électrique n’a pas de relais.
lecture CD
Impossible d’introduire un disque.
•Un autre CD est déjà en place.
•Le CD est introduit à l’envers en forçant ou
dans le mauvais sens.
La lecture ne commence pas.
•Disque encrassé ou défectueux.
•CD-R/CD-RW non finalisé.
•Vous avez essayé de lire un CD-R/CD-RW
qui n’est pas conçu pour l’usage audio.
•Il est possible que ce lecteur ne lise pas
certains CD-Rs/CD-RWs selon
l’équipement utilisé pour l’enregistrement
ou l’état du disque.
Un disque est éjecté automatiquement.
La température ambiante dépasse 50°C.
Le CD n’est pas éjecté.
Les touches de commande sont inopérantes.
Appuyez sur la touche RESET.
Le son est irrégulier à cause des vibrations.
•L’appareil est installé suivant un angle de
plus de 60˚.
•L’appareil n’a pas été installé à un endroit
suffisamment stable de la voiture.
Le son saute.
Disque encrassé ou défectueux.
page suivante t
25
Page 78

Réception radio
Impossible de syntoniser une présélection.
•Enregistrez la fréquence correcte dans la
mémoire.
•Le signal d’émission est trop faible.
Impossible de recevoir les stations.
Le son comporte des parasites.
•Raccordez un fil de commande d’antenne
électrique (bleu) ou un fil d’alimentation
d’accessoire (rouge) au câble d’alimentation
de l’amplificateur d’antenne de la voiture.
(Uniquement si votre voiture est équipée
d’une antenne FM/PO/GO intégrée dans la
vitre arrière/latérale.)
•Vérifiez les connexions de l’antenne du
véhicule.
•L’antenne automatique ne sort pas.
t Vérifiez les connexions du fil de
commande de l’antenne électrique.
•Vérifiez la fréquence.
La syntonisation automatique est
impossible.
•Le mode de recherche locale est réglé sur
“ON”.
t Réglez le mode de recherche locale sur
“OFF” (page 14).
•Le signal d’émission est trop faible.
t Effectuez une syntonisation manuelle.
L’indication “ST” clignote.
•Syntonisez la fréquence correctement.
•Le signal d’émission est trop faible.
t Sélectionnez le mode de réception
monaural (page 14).
Une émission diffusée en stéréo est
entendue en monaural.
L’appareil est en mode de réception
monaural.
t Annulez le mode de réception monaural
(page 14).
Fonctions RDS
La fonction (SEEK) démarre après quelques
secondes d’écoute.
La station ne diffuse pas de messages de
radioguidage ou émet avec un faible signal.
t Appuyez plusieurs fois sur (TA) jusqu’à
ce que “TA-OFF” apparaisse.
Aucun message de radioguidage.
•Activez “TA”.
•La station n’émet pas d’informations
routières malgré le message TP.
t Syntonisez une autre station.
PTY affiche “--------”.
•La station écoutée n’est pas une station RDS.
•Les données RDS ne sont pas reçues.
26
Affichages d’erreur/
Messages
Affichages d’erreur
Les indications suivantes clignotent pendant
environ 5 secondes et une alarme retentit.
1
ERROR*
•Un CD est souillé ou a été introduit à
l’envers.
t Nettoyez ou introduisez correctement
le CD*2.
•Un CD ne peut pas être lu en raison de
problèmes rencontrés.
t Insérez un autre CD*2.
HI TEMP
La température ambiante est supérieure à
50°C.
t Attendez que la température descende
sous les 50°C.
NO DISC
Aucun disque n’est inséré dans le lecteur
CD.
t Insérez des disques dans le lecteur CD.
RESET
Le lecteur CD ne peut pas fonctionner en
raison de problèmes rencontrés.
t Appuyez sur la touche RESET de
l’appareil.
*1Lorsqu’une erreur se produit au cours de la
lecture d’un CD, le numéro de disque du CD
n’apparaît pas dans l’affichage.
2
Le numéro du disque déclenchant l’erreur est
*
affiché.
Si ces solutions ne permettent pas de remédier
au problème, consultez votre revendeur Sony
le plus proche.
Messages
L.SEEK +/–
Le mode de recherche locale est activé
pendant une syntonisation automatique
(page 14).
NO AF
Il n’existe pas de fréquence alternative pour
la station en question.
Page 79

27
Page 80

Benvenuti !
Grazie per l’acquisto del lettore di compact
disc Sony. Utilizzando i seguenti accessori di
controllo sarà possibile usufruire di una
varietà di funzioni:
•Unità CD/MD opzionali (lettori e cambia
CD/MD)*1 .
•Informazioni di testo relative al CD TEXT
(visualizzate durante la riproduzione di CD
TEXT*2).
•Accessori di controllo opzionali
Telecomando a scheda
RM-X114
Telecomando a rotazione
RM-X4S
*1Questo apparecchio funziona unicamente con
prodotti Sony.
2
Un CD TEXT è un CD audio che include
*
informazioni quali il titolo del disco, il nome
dell’artista e i titoli dei brani. Queste
informazioni sono registrate sul disco.
Questa etichetta è posta nella parte inferiore
esterna.
CAUTION INVISIBLE
VIEW DIRECTLY WITH OPTICAL INSTRUMENTS
LASER RADIATIONWHEN OPEN
DO NOT STARE INTO BEAM OR
Questa etichetta si trova nel rivestimento
interno dell’unità.
2
Page 81

Indice
Posizione dei comandi ............................................. 4
Precauzioni ................................................................ 6
Note sui compact disc .............................................. 6
Operazioni preliminari
Azzeramento dell’apparecchio .......................... 7
Estrazione del pannello frontale ........................ 8
Impostazione dell’orologio................................. 9
Lettore CD
Apparecchio CD/MD (opzionale)
Riproduzione di un disco ................................... 9
Voci visualizzate ................................................. 10
Scorrimento automatico dei nomi
— Scorrimento automatico.......................... 10
Riproduzione ripetuta dei brani
— Riproduzione ripetuta............................. 11
Riproduzione casuale dei brani
— Riproduzione in ordine casuale............. 11
Assegnazione di un nome a un CD
— Funzione di promemoria disco*............ 11
Ricerca di un disco in base al nome
— Elenco* ...................................................... 12
* Funzioni disponibili con un lettore CD/MD
opzionale
Radio
Memorizzazione automatica delle stazioni
— BTM (memorizzazione della sintonia
migliore) ......................................................... 13
Memorizzazione delle stazioni desiderate ..... 13
Ricezione delle stazioni memorizzate ............. 13
RDS
Presentazione della funzione RDS................... 14
Risintonizzazione automatica per una
migliore ricezione
— Funzione AF ............................................. 15
Ricezione dei notiziari sul traffico
— TA/TP........................................................ 16
Preimpostazione delle stazioni RDS con i
dati AF e TA ................................................... 16
Sintonizzazione delle stazioni in base al
tipo di programma
— PTY............................................................. 17
Impostazione automatica dell’orologio
— CT ............................................................... 18
Altre funzioni
Utilizzo del telecomando a rotazione ............. 18
Regolazione delle caratteristiche
dell’audio ....................................................... 20
Attenuazione rapida del suono........................ 20
Modifica delle impostazioni dell’audio e
del display...................................................... 20
Selezione della posizione del suono
— Posizione preferita (MBP)....................... 21
Riproduzione dei bassi più potente
— D-bass ........................................................ 21
Informazioni aggiuntive
Manutenzione ..................................................... 22
Rimozione dell’apparecchio ............................. 23
Caratteristiche tecniche ..................................... 24
Guida alla soluzione dei problemi .................. 25
Messaggi di errore/Messaggi .......................... 26
3
Page 82

Posizione dei comandi
MODE
SEL
SOURCE
RELEASE
L
P
S
D
–+
AF TA
ATT
DISC
1
REP
2 3 4 5 6
SHUF BTM
Fare riferimento alle pagine indicate per ulteriori dettagli.
1 Tasto SOURCE (Accensione/Radio/CD/
qf Tasto RESET (situato nella parte anteriore
MD) 9, 10, 12, 13, 16
2 Tasto MODE 10, 12, 13, 16
3 Tasto SEL (selezione) 9, 10, 11, 12, 18,
20, 21
qg Tasto ATT (attenuamento) 20
qh Tasti numerici 10, 13, 15, 16, 18, 20
4 Tasto DSPL (per cambiare il modo del
display) 9, 10, 12, 14
5 Tasto AF 15, 16
6 Finestra del display
7 Tasto TA 16
8 Tasto MBP (Posizione preferita) 21
qj Tasto SENS/BTM 13, 14, 16
qk Tasto LIST/PTY (il tipo di programma)
9 Tasto Z (espulsione) 9
q; Tasto D-BASS 21
qa Manopola di controllo VOL (volume) –/+
ql Tasto OFF* 8, 9
w; Manopola di controllo SEEK/AMS –/+
9, 11, 12 , 16, 20
qs Tasto RELEASE
(rilascio pannello frontale) 8
qd Ricevitore per il telecomando a scheda
* Informazioni importanti per quando si
effettua l’installazione su un’auto
sprovvista della posizione ACC
sull’interruttore di accensione
Accertarsi di premere (OFF)
sull’apparecchio per 2 secondi per
disattivare il display dell’orologio dopo
aver spento il motore.
Altrimenti, se il display non viene
disattivato, verrà scaricata la batteria.
MBP
D-BASS
L
IS
T
P
T
Y
CDX-CA600X
CDX-CA600
SENS
OFF
dell’apparecchio, dietro al pannello
frontale) 7
(1) DISC – 10
(2) DISC + 10
(3) REP 11
(4) SHUF 11
11, 12, 17
9, 12, 13, 14, 15, 17
4
Page 83

Telecomando a scheda RM-X114
(opzionale)
DSPL MODE
+
PRESET
LIST
+
DISC
MENU
–
SEEK
SOUND
SOURCE
DISC
PRESET –
+
VOL
–
+
SEEK
–
ENTER
ATTOFF
I tasti del telecomando a scheda
corrispondenti a quelli dell’apparecchio
controllano le stesse funzioni.
1 Tasto DSPL
2 Tasto MENU*
3 Tasto SOURCE
4 Tasti SEEK (</,)
5 Tasto SOUND
(utilizzato come il tasto 3 SEL in questo
apparecchio)
6 Tasto OFF
7 Tasti VOL (–/+)
8 Tasto
MODE
9 Tasto LIST
q; Tasti DISC/PRESET (M/m)
qa Tasto ENTER*
qs Tasto ATT
* Non disponibile per il presente modello
Nota
Se l’apparecchio viene spento premendo (OFF) per
2 secondi, non sarà possibile farlo funzionare con il
telecomando a scheda a meno che non venga
premuto (SOURCE) sull’apparecchio o venga
prima inserito un disco per attivare l’apparecchio.
Suggerimento
Per i dettagli su come sostituire le batterie, fare
riferimento alla sezione relativa alla “Sostituzione
della batteria al litio” (pagina 23).
5
Page 84

Precauzioni
Note sui compact disc
•Se l’auto è stata parcheggiata al sole,
attendere che l’apparecchio si raffreddi
prima di utilizzarlo.
•L’antenna elettrica si estende
automaticamente mentre l’apparecchio è in
funzione.
Per eventuali domande o problemi riguardanti
l’apparecchio non trattati nel presente
manuale, rivolgersi al più vicino rivenditore
Sony.
Formazione di condensa
Nei giorni di pioggia o in zone molto umide, è
possibile che l’umidità si condensi sulle lenti
all’interno del lettore e sul display, impedendo
il corretto funzionamento dell’apparecchio. In
questo caso, rimuovere il disco e attendere per
circa un’ora in modo che l’umidità evapori
completamente.
Per mantenere una qualità elevata
del suono
Fare attenzione a non versare alcun liquido
sull’apparecchio o sui CD.
•Per mantenere puliti i CD, non toccare la
superficie e maneggiarli tenendoli per il
bordo.
•Tenere i CD nella loro custodia o in un
apposito contenitore quando non vengono
utilizzati. Non esporre i CD a temperature
elevate ed evitare di lasciarli nell’auto
parcheggiata al sole o sul cruscotto.
•Non applicare etichette sui CD e non
utilizzarli con residui adesivi o inchiostro,
onde evitare l’arresto del CD durante la
riproduzione o danni all’apparecchio e ai CD
stessi.
•Non utilizzare dischi su cui sono applicate
etichette o adesivi.
Se vengono utilizzati tali tipi di disco,
potrebbero verificarsi i seguenti problemi di
funzionamento:
— Non è possibile espellere il disco (a causa
di un’etichetta o di un adesivo sporgente
che inceppa il meccanismo di espulsione).
— Non è possibile leggere i dati audio in
modo corretto (ad esempio, la
riproduzione salta o non funziona) a causa
del restringimento per surriscaldamento di
un adesivo o di un’etichetta che può
deformare il disco.
•Non riprodurre dischi dalla forma irregolare
quali CD a forma di cuore o di stella con
questo apparecchio, onde evitare problemi di
funzionamento al lettore. Non utilizzare
questo genere di dischi.
•Non è possibile riprodurre CD da 8 cm.
6
Page 85

•Prima della riproduzione, pulire i CD con un
panno apposito disponibile in commercio.
Pulire ciascun disco partendo dal centro
verso l’esterno. Non usare solventi come
benzene, acquaragia, pulitori reperibili in
commercio o spray antistatici per dischi
analogici.
Note sui CD-R/CD-RW
•Su questo apparecchio è possibile riprodurre
CD-R (CD registrabili)/CD-RW (CD
riscrivibili) audio.
Controllare i seguenti marchi per distinguere
i CD-R/CD-RW audio.
I seguenti marchi indicano che i CD non sono
di tipo audio.
Operazioni
preliminari
Azzeramento
dell’apparecchio
Se si utilizza l’apparecchio per la prima volta o
si è sostituita la batteria dell’auto, è necessario
azzerare l’apparecchio.
Rimuovere il pannello frontale e premere il
tasto RESET con un oggetto appuntito, come
una penna a sfera.
Tasto RESET
Nota
Premendo il tasto RESET verranno cancellate le
impostazioni dell’orologio e alcune funzioni
memorizzate.
•Alcuni CD-R/CD-RW potrebbero non venire
riprodotti su questo apparecchio (a seconda
dell’apparecchiatura utilizzata per la
registrazione o delle condizioni del CD).
•Non è possibile riprodurre CD-R/CD-RW
non finalizzati*.
* Processo necessario affinché un CD-R/CD-RW
registrato possa essere riprodotto su un lettore di
CD audio.
7
Page 86

Estrazione del pannello
frontale
Il pannello frontale di questo apparecchio può
essere estratto per evitare il furto
dell’apparecchio.
Segnale di avvertimento
Se la chiave di accensione si trova nella
posizione OFF senza che il pannello frontale
sia stato rimosso, viene emesso per alcuni
secondi un segnale acustico di avvertimento.
Se si collega un amplificatore di potenza
opzionale e non si utilizza l’amplificatore
incorporato, il segnale di avvertimento viene
disattivato.
1 Premere (OFF)*.
La riproduzione di CD o la ricezione di
programmi radio si arresta (rimangono
attivi il display e l’illuminazione dei tasti).
* Se l’auto è priva della posizione ACC per la
chiave di avviamento, accertarsi di disattivare
l’apparecchio premendo (OFF) per 2 secondi
onde evitare di scaricare la batteria.
2 Premere (RELEASE), quindi tirare verso
l’esterno.
(OFF)
Applicazione del pannello frontale
Applicare la parte A del pannello frontale alla
parte B dell’apparecchio come mostrato
nell’illustrazione e premere il lato sinistro
finché non scatta in posizione.
A
B
Nota
Non mettere nulla sulla superficie interna del
pannello frontale.
(RELEASE)
Note
• Se si estrae il pannello mentre l’apparecchio è
ancora acceso, l’alimentazione viene disattivata
automaticamente per evitare di danneggiare i
diffusori.
• Fare attenzione a non far cadere il pannello
frontale e a non esercitare una pressione
eccessiva sul pannello o sul relativo display.
• Non esporre il pannello frontale a temperature
elevate o umidità. Evitare di lasciarlo nell’auto
parcheggiata o sul cruscotto.
Suggerimento
Durante il trasporto conservare il pannello frontale
nella sua custodia.
8
Page 87

Impostazione dell’orologio
L’orologio mostra l’indicazione digitale
dell’ora in base al sistema delle 24 ore.
Esempio: impostazione dell’orologio alle 10:08
1 Premere (DSPL) per 2 secondi.
L’indicazione dell’ora lampeggia.
1 Ruotare la manopola di controllo VOL
per impostare l’ora.
Lettore CD
Apparecchio CD/MD
(opzionale)
Oltre a riprodurre CD, con questo apparecchio
è possibile controllare unità CD/MD esterne.
Se si collega un apparecchio CD opzionale
dotato della funzione CD TEXT, quando viene
riprodotto un disco CD TEXT nel display
appaiono le informazioni CD TEXT.
2 Premere (SEL).
L’indicazione dei minuti lampeggia.
3 Ruotare la manopola di controllo VOL
per impostare i minuti.
2 Premere (DSPL).
L’orologio viene attivato. Quando
l’impostazione dell’orologio è completata, il
display torna al modo di riproduzione
normale.
Suggerimento
È possibile impostare l’orologio automaticamente
tramite la funzione RDS (pagina 18).
Riproduzione di un disco
(con questo apparecchio)
Inserire un CD (lato etichetta verso
l’alto).
La riproduzione inizia automaticamente.
Se è già inserito un CD, premere più volte
(SOURCE) finché non appare “CD” per
avviare la riproduzione.
Per Eseguire quanto segue
Interrompere la Premere (OFF).
riproduzione
Estrarre il CD. Premere Z.
Saltare i brani Ruotare la manopola di
– Sensore controllo SEEK/AMS.
musicale [una volta per ciascun
automatico brano]
Avanzamento Ruotare la manopola di
rapido/indietro controllo SEEK/AMS.
– Ricerca manuale [tenere premuto fino al
punto desiderato]
Note
• Quando termina l’ultimo brano del CD, la
riproduzione viene riavviata dal primo brano.
• Se sono collegati apparecchi opzionali, la
riproduzione della stessa fonte verrà continuata
sull’apparecchio CD/MD opzionale.
continua alla pagina successiva t
9
Page 88

(con un apparecchio opzionale)
1 Premere più volte (SOURCE)per
selezionare “CD” o “MD (MS*)”.
2 Premere più volte (MODE) fino a
visualizzare l’apparecchio desiderato.
La riproduzione viene avviata.
* MS: lettore MG Memory Stick System-up MGS-X1
Note
• I nomi dei CD, degli artisti e i titoli dei brani
possono essere visualizzati con un massimo di
8 caratteri.
• Alcuni caratteri potrebbero non venire
visualizzati.
• Su questo apparecchio non è possibile
visualizzare il nome dell’artista per ciascun brano
di un CD TEXT.
Per Premere
Ignorare i dischi ( 1 ) (DISC –) o
– Selezione del ( 2 ) (DISC +)
disco
Avvertenze per il collegamento di apparecchi
MGS-X1 e MD
Questo apparecchio riconosce MGS-X1 come
apparecchio MD.
• Se si desidera utilizzare MGS-X1, premere
(SOURCE) per selezionare “MS” o “MD”. Se sul
display della sorgente viene visualizzato “MS”,
MGS-X1 viene attivato. Se sul display della
sorgente viene visualizzato “MD”, premere
(MODE) per selezionare “MS”, quindi avviare la
riproduzione.
• Se si desidera utilizzare un apparecchio MD,
premere (SOURCE) per selezionare “MD” o
“MS”. Se sul display della sorgente viene
visualizzato l’apparecchio MD desiderato, è
possibile avviare la riproduzione. Se sul display
della sorgente vengono visualizzati “MS” o un
altro apparecchio MD, premere (MODE) per
selezionare l’apparecchio MD desiderato, quindi
avviare la riproduzione.
Voci visualizzate
Sorgente (Numero del disco*1)
Voci visualizzate
• Orologio
• Numero del brano/Tempo di
riproduzione trascorso
• Titolo del disco*2/Nome dell’artista*
• Titolo del brano*
4
Scorrimento automatico
dei nomi
— Scorrimento automatico
Se il nome del disco, dell’artista o del brano su
un disco CD TEXT supera gli 8 caratteri ed è
attivata la funzione di scorrimento automatico,
sul display scorrono automaticamente le
seguenti informazioni:
• Il nome del disco appare quando il disco viene
cambiato (se è selezionato il nome del disco).
• Il nome del brano appare quando il brano
cambia (se è selezionato il nome del brano).
Se si preme (DSPL) per cambiare la voce sul
display, il nome del disco o del brano sul disco
CD TEXT scorre automaticamente sia che la
funzione sia attiva o meno.
Selezione di “A.SCRL-ON”
Durante la riproduzione, premere
contemporaneamente (SEL) e (3).
Dopo 2 secondi appare automaticamente il
display normale.
Per selezionare “A.SCRL-OFF”, premere di
nuovo (SEL) e (3) contemporaneamente.
Nota
Se un disco contiene molti caratteri, potrebbe
verificarsi quanto segue:
— Alcuni caratteri non vengono visualizzati.
— La funzione di scorrimento automatico non
funziona.
3
Per Premere
Cambiare la voce (DSPL)
visualizzata
*1Se è collegato un apparecchio CD/MD opzionale.
*2Se premendo (DSPL) appare “NO NAME”
significa che non esiste alcun promemoria disco
(pagina 11) o nome preregistrato da visualizzare.
3
Solo per i CD TEXT con il nome degli autori.
*
*4Solo per CD TEXT con il titolo del brano.
10
Page 89

Riproduzione ripetuta dei
brani — Riproduzione ripetuta
Nota
Mediante la funzione “SHUF-ALL” non è possibile
riprodurre in ordine casuale i brani nei lettori CD
insieme a quelli nei lettori MD.
Una volta raggiunto il termine, il disco inserito
nell’unità principale è in grado di riprodurre
nuovamente un brano o l’intero disco. Per la
riproduzione ripetuta è possibile selezionare:
•REP-1 — per ripetere un brano.
•REP-2* — per impostare la riproduzione
ripetuta del disco.
* Disponibile solo quando sono collegati uno o più
apparecchi CD/MD opzionali.
Durante la riproduzione, premere più
volte (3) (REP) fino a visualizzare
l’impostazione desiderata.
Viene visualizzato l’indicatore “REP”.
Viene avviata la riproduzione ripetuta.
Per tornare al modo di riproduzione normale,
selezionare “REP-OFF”.
Riproduzione casuale dei
brani — Riproduzione in ordine casuale
Le impostazioni possibili sono:
•SHUF-1 —per riprodurre i brani del disco
corrente in ordine casuale.
•SHUF-2*1 — per riprodurre i brani
nell’apparecchio CD (MD) corrente
(opzionale) in ordine casuale.
•SHUF-ALL*2 — per riprodurre tutti i brani in
tutti gli apparecchi CD (MD) opzionali in
ordine casuale (incluso questo apparecchio).
*1Disponibile solo quando uno o più apparecchi
CD (MD) opzionali sono collegati.
*2Disponibile solo se sono collegati uno o più
apparecchi CD opzionali oppure due o più
apparecchi MD opzionali.
Durante la riproduzione, premere più
volte (4) (SHUF) fino a visualizzare
l’impostazione desiderata.
Viene visualizzato l’indicatore “SHUF”.
Viene avviata la riproduzione casuale.
Per tornare al modo di riproduzione normale,
selezionare “SHUF-OFF”.
Assegnazione di un nome
a un CD — Funzione di promemoria
disco (per un lettore CD con la funzione
CUSTOM FILE)
È possibile assegnare un nome a un disco
(funzione di promemoria disco). È possibile
inserire fino a 8 caratteri per ogni disco. Se si
assegna un nome a un CD, è possibile
individuarlo per nome (pagina 12).
1 Avviare la riproduzione del disco a cui si
desidera assegnare il titolo mediante un
apparecchio CD dotato della funzione
CUSTOM FILE.
2 Premere (LIST/PTY) per 2 secondi.
Modo di composizione/modifica del nome
Durante la procedura di assegnazione del
titolo l’apparecchio riproduce nuovamente
il disco.
3 Immettere i caratteri.
1 Ruotare la manopola di comando VOL
per selezionare i caratteri desiderati.
(A y B y C y ··· Z y 0 y 1 y 2
y ··· 9 y + y – y * y/ y \ y
> y < y . y _ y A ···)
Per inserire uno spazio vuoto dopo un
carattere, selezionare “_”.
2 Premere (SEL) dopo aver individuato
il carattere desiderato.
Il carattere successivo lampeggia.
3 Ripetere le istruzioni dei punti 1 e 2
per inserire tutto il nome.
4 Per tornare al modo di riproduzione CD
normale, premere (LIST/PTY) per
2 secondi.
Suggerimenti
• Sovrascrivere o immettere “_” per correggere o
cancellare un nome.
•È possibile assegnare un nome a un CD in un
apparecchio sprovvisto della funzione CUSTOM
FILE se tale apparecchio è collegato ad un lettore
CD dotato di tale funzione. Il promemoria disco
verrà conservato nella memoria del lettore CD
provvisto della funzione CUSTOM FILE.
continua alla pagina successiva t
11
Page 90

Visualizzazione del promemoria
disco
Tra le voci visualizzate, il promemoria disco ha
la priorità rispetto alle altre informazioni di
testo del CD.
Per Premere
Visualizzare (DSPL) durante la
riproduzione di CD/CD
TEXT
Cancellazione del promemoria
disco
1 Premere (SOURCE) più volte per
selezionare “CD”.
2 Premere (MODE) più volte per
selezionare il lettore CD contenente il
promemoria disco.
3 Premere (LIST/PTY) per 2 secondi.
Ricerca di un disco in base
al nome
— Elenco (per un lettore CD con la funzione
CUSTOM FILE o un lettore MD)
È possibile utilizzare questa funzione per i
dischi ai quali sono stati assegnati titoli
personalizzati*1 o per i dischi CD TEXT*2.
*1 Individuazione di un disco in base al nome
assegnato: quando si assegna un nome a un CD
(pagina 11) o a un MD.
2
Individuazione di un disco tramite le
*
informazioni CD TEXT: quando si riproduce un
disco CD TEXT su un lettore CD con la funzione
CD TEXT.
1 Premere momentaneamente (LIST/PTY).
Il display indica il nome assegnato al disco
corrente.
4 Premere (DSPL) per 2 secondi.
5 Ruotare la manopola di comando VOL
per selezionare il titolo del disco che si
desidera cancellare.
6 Premere (SEL) per 2 secondi.
Il nome è eliminato.
Ripetere le istruzioni dei punti 5 e 6 per
eliminare altri nomi.
7 Premere (LIST/PTY) per 2 secondi.
L’apparecchio ripristina il modo di
riproduzione normale di CD.
Note
• Se le informazioni del promemoria relative ad un
disco CD TEXT vengono cancellate, saranno
visualizzate le informazioni di testo originali del
disco.
• Se non è possibile individuare il promemoria
disco che si desidera eliminare, selezionare un
apparecchio CD diverso al punto 2.
2 Premere più volte (LIST/PTY) fino a che
non viene individuato il disco desiderato.
3 Ruotare la manopola di controllo SEEK/
AMS per avviare la riproduzione del
disco.
Note
• Una volta visualizzato per 5 secondi il titolo del
disco, il display torna al modo di riproduzione
normale.
• Durante la riproduzione MD i titoli dei brani non
vengono visualizzati.
• Se non vi sono più dischi nel contenitore, nel
display appare “NO DISC”.
• Se non è stato assegnato un archivio
personalizzato ad un disco, nel display appare
“NO NAME”.
• Se l’apparecchio non legge le informazioni del
disco, “NOT READ” viene visualizzato nel display.
Per caricare il disco, premere il tasto numerico,
quindi scegliere il disco che non è stato caricato.
• Le informazioni vengono visualizzate in lettere
maiuscole e alcuni tipi di lettere non vengono
visualizzati affatto (durante la riproduzione MD).
12
Page 91

Radio
Memorizzazione delle
stazioni desiderate
È possibile memorizzare fino a 6 stazioni per
ogni banda (FM1, FM2, FM3, MW e LW).
Sicurezza nella guida
Quando si sintonizzano le stazioni mentre si
guida, usare la funzione BTM per evitare
incidenti.
Memorizzazione
automatica delle stazioni
— BTM (memorizzazione della sintonia
migliore)
Questa funzione seleziona le stazioni
radiofoniche che trasmettono il segnale più
forte nella banda selezionata e le memorizza in
ordine di frequenza.
1 Premere più volte (SOURCE) per
selezionare la radio.
2 Premere (MODE) più volte per
selezionare la banda.
3 Premere (SENS/BTM) per 2 secondi.
L’apparecchio memorizza stazioni
seguendo l’ordine di frequenza sui tasti
numerici. Quando l’impostazione è stata
memorizzata viene emesso un segnale
acustico.
Note
• Se si ricevono solo poche stazioni a causa della
debolezza dei segnali, alcuni tasti numerici
manterranno la loro impostazione iniziale.
• Se il display visualizza un numero, l’apparecchio
inizia a memorizzare le stazioni a partire da
quella correntemente selezionata.
È possibile preselezionare manualmente le
stazioni desiderate sui tasti numerici prescelti.
1 Premere più volte (SOURCE) per
selezionare il sintonizzatore.
2 Premere (MODE) più volte per
selezionare la banda.
3 Ruotare la manopola di controllo SEEK/
AMS per sintonizzarsi sulla stazione che
si desidera memorizzare.
4 Premere il tasto numerico desiderato (da
(1) a (6)) finché non appare “MEM”.
Nel display appare il tasto numerico.
Nota
Se si tenta di memorizzare un’ulteriore stazione
nello stesso tasto numerico, la stazione
precedentemente memorizzata verrà eliminata.
Ricezione delle stazioni
memorizzate
1 Premere più volte (SOURCE) per
selezionare la radio.
2 Premere (MODE) più volte per
selezionare la banda.
3 Premere il tasto numerico (da (1) a (6))
su cui è memorizzata la stazione
desiderata.
continua alla pagina successiva t
13
Page 92

Se non è possibile sintonizzarsi su
una stazione preselezionata
— Sintonizzazione automatica/ Modo di
ricerca locale
Sintonizzazione automatica:
Ruotare la manopola di controllo SEEK/
AMS per ricercare la stazione.
La ricerca si arresta non appena
l’apparecchio riceve una stazione. Ruotare
la manopola di controllo SEEK/AMS fino a
ricevere la stazione desiderata.
Modo di ricerca locale:
Se la sintonizzazione automatica si
arresta di frequente, premere più volte
(SENS/BTM) fino a far apparire “LOCAL-
ON”.
RDS
Presentazione della
funzione RDS
L’RDS (sistema dati radio) è un servizio che
consente alle stazioni radio FM di trasmettere
informazioni digitali aggiuntive oltre al
normale segnale in radiofrequenza. Quando
viene ricevuta una stazione con la funzione
RDS viene visualizzata, ad esempio, una delle
seguenti voci.
Sorgente
Viene visualizzato l’indicatore “LCL”.
Vengono sintonizzate solo le stazioni con
un segnale relativamente forte.
Suggerimento
In caso sia nota la frequenza della stazione
desiderata, ruotare la manopola di controllo SEEK/
AMS fino a visualizzare la frequenza
(sintonizzazione manuale).
Se la ricezione in FM stereo non è
soddisfacente
— Modo monofonico
Durante la ricezione della radio, premere
più volte (SENS/BTM) finché non appare
“MONO-ON”.
Viene visualizzato l’indicatore “MONO”.
Il suono migliorerà ma diventa monofonico
(scompare l’indicazione “ST”).
Per tornare al modo normale, selezionare
“MONO-OFF”.
Voci visualizzate
• Ora
• Nome della stazione
(Frequenza)
• Dati RDS
Per Premere
Alternare tra ora/ (DSPL)
nome della stazione
Servizi RDS
I dati RDS consentono ulteriori vantaggi, quali:
•Risintonizzazione automatica di un
programma, utile durante i viaggi molto
lunghi. — AF t pagina 15
•Ricezione dei notiziari sul traffico, anche
durante l’ascolto di un altro programma o
sorgente. — TA t pagina 16
•Selezione di stazioni in base al tipo di
programma. — PTY t pagina 17
•Impostazione automatica dell’orologio.
— CT t pagina 18
Note
• A seconda del paese o dell’area di utilizzo,
alcune funzioni RDS non sono disponibili.
• Se l’intensità del segnale è debole o se la
stazione su cui si è sintonizzati non trasmette
dati RDS, questa opzione potrebbe non
funzionare correttamente.
14
Page 93

Risintonizzazione
automatica per una
migliore ricezione
— Funzione AF
La funzione AF (frequenza alternativa)
consente la risintonizzazione continua sul
segnale più forte della stazione che si sta
ascoltando nell’area in cui ci si trova.
Le frequenze cambiano automaticamente.
98,5MHz
Stazione
96,0MHz
Ascolto di un programma locale
Quando è attivata la funzione AF,
l’impostazione di fabbrica di questo
apparecchio restringe la ricezione ad un’area
specifica, in modo da non passare su un’altra
stazione locale con una frequenza più potente.
Se si abbandona l’area di ricezione del
programma locale o se si desidera sfruttare per
intero la funzione AF, premere (AF) per
2 secondi finché non appare “REG-OFF”.
Nota
Questa caratteristica non funziona nel territorio
del Regno Unito e in alcune altre zone.
Funzione di collegamento locale
(soltanto Regno Unito)
La funzione di collegamento locale consente di
selezionare altre stazioni locali presenti nella
zona, anche se non memorizzate sui tasti
numerici.
102,5MHz
1 Selezionare una stazione FM (pagina 13).
2 Premere (AF) più volte fino a
visualizzare “AF-ON”.
L’apparecchio inizia la ricerca di una
frequenza alternativa con un segnale più
intenso nella stessa rete.
Se nel display lampeggia il messaggio
“NO AF”, la stazione sulla quale si è
sintonizzati non dispone di frequenza
alternativa.
Note
• Se si desidera modificare l’impostazione di
accensione/spegnimento durante la riproduzione
di un CD, premere (AF).
• Se nella zona non sono disponibili stazioni
alternative e non occorre individuarne una,
disattivare la funzione AF selezionando
“AF-OFF”.
Per le stazioni prive di frequenze
alternative
Ruotare la manopola di controllo SEEK/
AMS quando il nome della stazione
lampeggia (entro 8 secondi).
L’apparecchio inizia la ricerca di un’altra
frequenza con gli stessi dati PI
(identificativo di programma) (viene
visualizzato “PI SEEK”).
Se l’apparecchio non riesce a trovare gli
stessi dati PI, tornerà alla frequenza
precedentemente selezionata.
1 Premere un tasto numerico (da (1) a (6))
su cui è stata memorizzata una stazione
locale.
2 Entro 5 secondi, premere nuovamente il
tasto numerico relativo alla stazione
locale.
3 Ripetere questa operazione fino alla
ricezione della stazione locale
desiderata.
15
Page 94

Ricezione dei notiziari sul
traffico — TA/TP
I dati dei notiziari sul traffico (TA) e dei
programmi sul traffico (TP) consentono di
sintonizzarsi automaticamente su una stazione
FM che trasmette notizie relative al traffico,
indipendentemente dal programma FM o dal
CD che si sta ascoltando. L’apparecchio
tornerà alla sorgente originale quando il
notiziario sarà terminato.
Premere (TA) più volte fino a
visualizzare “TA-ON”.
L’apparecchio inizia la ricerca delle stazioni
con le notizie sul traffico.
“TP” indica la ricezione di tali stazioni e
“TA” lampeggia durante la trasmissione
del notiziario. Se viene visualizzato “NO
TP”, l’apparecchio continuerà la ricerca di
stazioni in cui sono disponibili programmi
sul traffico.
Per annullare la ricezione dei notiziari sul
traffico, selezionare “TA-OFF”.
Per Premere
Annullare il (TA)
notiziario corrente
Suggerimento
È possibile annullare il notiziario corrente anche
premendo (SOURCE) o (MODE).
Preimpostazione del volume dei
notiziari sul traffico
È possibile regolare in anticipo il livello del
volume dei notiziari sul traffico per evitare il
mancato ascolto a causa di un volume
inadeguato.
Preimpostazione delle
stazioni RDS con i dati AF
e T A
Nella preimpostazione di stazioni RDS,
l’apparecchio memorizza i dati (attivazione/
disattivazione) AF/TA di ciascuna stazione
insieme alla relativa frequenza. È possibile
selezionare impostazioni diverse (per AF, TA o
entrambe) per le singole stazioni predefinite,
oppure la stessa impostazione per tutte le
stazioni. Se le stazioni vengono preimpostate
con “AF ON” l’apparecchio memorizzerà
automaticamente le stazioni con il segnale
radio più potente.
Preselezione della stessa
impostazione per tutte le stazioni
predefinite
1 Selezionare una banda FM (pagina 13).
2 Premere (AF) e/o (TA) per selezionare
“AF-ON” e/o “TA-ON”.
Si noti che le selezioni “AF-OFF” e “TA-
OFF” sono effettive sia per le stazioni RDS
che per le stazioni che non dispongono di
tale sistema.
3 Premere (SENS/BTM) finché “BTM” non
lampeggia.
Preselezione di impostazioni
diverse per ciascuna stazione
predefinita
1 Selezionare una banda FM e sintonizzarsi
sulla stazione desiderata.
1 Ruotare la manopola di controllo VOL
per regolare il livello di volume
desiderato.
2 Premere (TA) per 2 secondi.
Appare l’indicazione “TA” e l’impostazione
viene registrata.
Ricezione di annunci di emergenza
Se durante l’ascolto di una stazione FM o di un
CD sono attivati AF o TA, l’apparecchio si
sintonizzerà automaticamente su eventuali
annunci di emergenza trasmessi.
16
2 Premere (AF) e/o (TA) per selezionare
“AF-ON” e/o “TA-ON”.
3 Premere il tasto numerico desiderato
finché non appare “MEM”.
Ripetere le istruzioni dal punto 1 per la
preimpostazione di altre stazioni.
Nota
Se si desidera modificare l’impostazione AF/TA
durante la riproduzione di un CD, premere (AF) o
(TA).
Page 95

Sintonizzazione delle
stazioni in base al tipo di
programma
È possibile sintonizzarsi su una stazione
selezionando il tipo di programma che si
desidera ascoltare.
Tipo di programma Indicazione
Giornale radio NEWS
Attualità AFFAIRS
Informazioni INFO
Sport SPORT
Istruzione EDUCATE
Teatro DRAMA
Cultura CULTURE
Scienza SCIENCE
Vario VARIED
Musica pop POP M
Musica rock ROCK M
Musica leggera EASY M
Classica leggera LIGHT M
Classica CLASSICS
Altri tipi di musica OTHER M
Bollettino metereologico WEATHER
Finanza FINANCE
Programmi per bambini CHILDREN
Sociale SOCIAL A
Religione RELIGION
Chat show PHONE IN
Viaggi TRAVEL
Diversivi LEISURE
Musica jazz JAZZ
Musica country COUNTRY
Musica nazionale NATION M
Musica degli anni ’50/’60 OLDIES
Musica folk FOLK M
Documentari DOCUMENT
— PTY
visualizzatta
1 Premere (LIST/PTY) durante la ricezione
FM.
Se la stazione trasmette dati PTY, viene
visualizzato il nome del tipo di programma
corrente. Se la stazione captata non è una
stazione RDS o se non vengono ricevuti
dati RDS, viene visualizzato “--------”.
2 Premere (LIST/PTY) più volte fino a
visualizzare il tipo di programma
desiderato.
I tipi di programma vengono visualizzati
nell’ordine illustrato nella tabella. Se nei
dati RDS non è indicato il tipo di
programma, viene visualizzato “NONE”.
3 Ruotare la manopola di controllo SEEK/
AMS.
L’apparecchio inizia la ricerca di una
stazione che trasmette il tipo di programma
selezionato.
Nota
Nei paesi in cui non sono disponibili dati PTY
(selezione tipo di programma), questa funzione
non può essere utilizzata.
17
Page 96

Impostazione automatica
dell’orologio — CT
Altre funzioni
I dati CT (ora orologio) della trasmissione RDS
impostano automaticamente l’ora.
Selezione di “CT-ON”
Durante la ricezione radio, premere
contemporaneamente (SEL) e (2).
L’ora è impostata.
Dopo un secondo appare automaticamente
il display normale.
Per selezionare “CT-OFF”, premere di nuovo
(SEL) e (2) contemporaneamente.
Note
• La funzione CT potrebbe non funzionare anche
se si riceve una stazione RDS.
• L’ora impostata dalla funzione CT e l’ora
effettiva possono essere diverse.
È inoltre possibile controllare l’apparecchio (e
le unità CD/MD opzionali) tramite un
telecomando a rotazione (opzionale)
Utilizzo del telecomando a
rotazione
Per prima cosa, applicare l’apposita etichetta in
base a come si desidera montare il
telecomando a rotazione.
Il telecomando a rotazione funziona tramite
pressione dei tasti e/o rotazione dei comandi.
SEL
MODE
DSPL
Pressione dei tasti
(SEL)
(SOURCE)
Ruotare il comando VOL
per regolare il volume.
DSPL
MODE
SEL
(ATT)
(DSPL)
(MODE)
(OFF)
OFF
18
Premere Per
(SOURCE) Cambiare sorgente
(radio/CD/MD*1)
(MODE) Cambiare operazione
(banda radio/lettore CD/
lettore MD*1)
(ATT) Attenuare l’audio
2
(OFF)*
Arrestare la riproduzione o
la ricezione della radio
(SEL) Regolare e selezionare
(DSPL) Cambiare la voce nel
display
Page 97

*1Solo se l’apparecchio opzionale corrispondente
è collegato.
*2Se l’auto è priva della posizione ACC per la
chiave di avviamento, accertarsi di disattivare
l’apparecchio premendo (OFF) per 2 secondi
onde evitare di scaricare la batteria.
Tramite rotazione del telecomando
comando
SEEK/AMS
Ruotare e rilasciare per:
– Saltare i brani.
– Sintonizzare automaticamente le stazioni.
Ruotare, mantenere ruotato e rilasciare
per:
– Avanzare/tornare indietro rapidamente
all’interno di un brano.
– Trovare una stazione manualmente.
Ruotare il telecomando e spingerlo
verso l’interno
Modifica della direzione operativa
La direzione operativa dei comandi è
impostata in fabbrica come illustrato qui sotto.
Per aumentare
Per diminuire
Se si desidera montare il telecomando a
rotazione sul lato destro del piantone di guida,
è possibile invertire la direzione operativa dei
comandi.
Premere (SEL) per 2 secondi premendo
contemporaneamente il comando VOL.
comando
PRESET
Spingere e ruotare il telecomando per:
– Ricevere le stazioni preimpostate.
– Cambiare disco*.
* Quando è collegato un lettore CD/MD
opzionale.
19
Page 98

Regolazione delle
caratteristiche dell’audio
È possibile regolare bassi, acuti, bilanciamento
e attenuatore.
1 Selezionare la voce da regolare
premendo (SEL) più volte.
Ogni volta che si preme (SEL), le
indicazioni nel display scorrono come
segue:
BAS (bassi) t TRE (acuti) t BAL (sinistradestra) t FAD (anteriore-posteriore)
2 Regolare la voce selezionata ruotando la
manopola di controllo VOL.
Nota
Regolare entro 3 secondi dalla selezione delle voci.
Attenuazione rapida del
suono
Premere (ATT).
“ATT-ON” lampeggia per alcuni istanti,
quindi l’indicatore “ATT” viene
visualizzato sul display.
Per ripristinare il volume precedente, premere
(ATT) nuovamente.
“ATT-OFF” appare per alcuni secondi.
Suggerimento
Se al cavo ATT è collegato un cavo di interfaccia
per telefoni per auto, quando vi è una telefonata
in arrivo il volume viene abbassato
automaticamente (funzione ATT di esclusione del
volume).
Modifica delle
impostazioni dell’audio e
del display
È possibile impostare le seguenti voci:
• AMBER/GREEN*
– per cambiare il colore dell’illuminazione in
ambra o verde.
•CT (ora orologio) (pagina 18).
•
A.SCRL (scorrimento automatico)
(pagina 10).
•M.DSPL (display in movimento)
– il modo di dimostrazione che appare
quando non è selezionata alcuna sorgente,
ad esempio se il sintonizzatore non è attivo.
•BEEP – per attivare o disattivare i segnali
Selezione della voce desiderata
Quando l’impostazione del modo è
completata, il display torna al modo di
riproduzione normale.
Nota
Le voci visualizzate sono differenti a seconda della
fonte utilizzata.
Per annullare la voce, premere di nuovo
contemporaneamente (SEL) e il tasto
corrispondente al numero di preselezione.
acustici.
Premere contemporaneamente (SEL) e il
tasto corrispondente al numero di
preselezione desiderato.
(SEL) + (1): AMBER/GREEN*
(SEL) + (2): CT
(SEL) + (3): A.SCRL*
(SEL) + (4): M.DSPL
(SEL) + (6): BEEP
*1solo CDX-CA600
2
Se non vi è un CD in riproduzione, questa
*
voce non apparirà.
1
2
*
1
2
20
Page 99

Selezione della posizione
del suono — Posizione preferita (MBP)
Riproduzione dei bassi più
potente — D-bass
Se ci si trova alla guida senza passeggeri, è
possibile ascoltare il suono in modo
estremamente comodo grazie alla funzione
“Posizione preferita”.
“Posizione preferita” è dotata di due
impostazioni particolarmente adatte ai posti
anteriori. Il tasto MBP consente di selezionare
facilmente queste preimpostazioni.
MBP-A: adatta per il passeggero del sedile
anteriore sinistro.
MBP-B: adatta per il passeggero del sedile
anteriore destro.
Premere più volte (MBP) fino ad
individuare la posizione di ascolto
desiderata.
Dopo un secondo, il display torna al modo
di riproduzione normale.
Per disattivare la funzione MBP, selezionare
“MBP-OFF”.
Per regolare in modo preciso le caratteristiche
audio, è possibile utilizzare il tasto (SEL)
(vedere “Regolazione delle caratteristiche
dell’audio” a pagina 20).
Note
• Se le caratteristiche audio vengono regolate
mediante il tasto (SEL) (pagina 20),
l’impostazione MBP viene riportata su OFF.
• Se MBP è impostato su OFF, l’impostazione audio
regolata (pagina 20) viene attivata.
È possibile ascoltare dei bassi chiari e potenti.
La funzione D-bass aumenta il segnale a bassa
frequenza e il segnale ad alta frequenza con
una curva più acuta rispetto ai bassi normali.
È possibile ascoltare i bassi in maniera più
chiara anche quando il volume rimane lo
stesso. È possibile amplificare e regolare
facilmente il suono dei bassi con il tasto
(D-BASS).
D.BASS-3
Livello
0dB
D.BASS-2
D.BASS-1
Frequenza (Hz)
D.BASS-3
D.BASS-2
D.BASS-1
Regolazione della curva dei bassi
Per selezionare il livello dei bassi
desiderato, premere più volte (D-BASS).
Con l’aumento dei numeri D-BASS
aumenta l’effetto dei bassi.
Nota
Ad alcuni livelli di volume, i bassi potrebbero
risultare distorti. In questo caso, selezionare un
livello dei bassi inferiore.
21
Page 100

Informazioni
aggiuntive
Manutenzione
Sostituzione del fusibile
Quando si sostituisce il fusibile, accertarsi di
usare un fusibile dello stesso amperaggio di
quello originale. Se il fusibile si brucia,
controllare i collegamenti e sostituire il
fusibile. Se dopo la sostituzione si verifica un
altro cortocircuito, potrebbe trattarsi di un
problema interno. In tal caso, rivolgersi al più
vicino rivenditore Sony.
Pulizia dei connettori
L’apparecchio potrebbe non funzionare
correttamente se i connettori tra l’apparecchio
e il pannello frontale non sono puliti. Per
evitare tale problema, rimuovere il pannello
frontale (pagina 8) e pulire i connettori con un
batuffolo di cotone imbevuto di alcol. Non
esercitare troppa pressione, onde evitare di
danneggiare i connettori.
Apparecchio principale
Fusibile (10 A)
Avvertenza
Non usare mai un fusibile con amperaggio
superiore a quello del fusibile fornito in
dotazione con l’apparecchio. Ciò potrebbe
danneggiare l’apparecchio.
Retro del pannello frontale
Note
• Per motivi di sicurezza, spegnere il motore prima
di pulire i connettori e rimuovere la chiave dal
dispositivo di avviamento.
• Non toccare i connettori direttamente con le dita
o oggetti in metallo.
22
 Loading...