

Page 1
3-862-701-21 (1)
Compact Disc
Changer System
Operating Instructions
Manual de instrucciones
Bruksanvisning
Manual de instruções
For installation and connections, see the supplied installation/connections
manual.
Con respecto a la instalación y a las conexiónes, consulte el manual de
Instalación/conexiones suministrado.
Information om installation och anslutningar finns i den medföljande
bruksanvisningen för installation/anslutningar.
Para instalação e as ligações, consulte o manual de instalação/ligações fornecido.
EN
ES
S
P
CDX-505RF
1998 by Sony Corporation
Page 2

EN
Welcome!
Thank you for purchasing the SONY CD
changer system. This unit lets you enjoy CD
sound with the changer.
You can use this unit with the FM receiver of
your car audio.
2
Page 3

Table of contents
Getting Started
Resetting the hideaway unit .............................. 4
Preparing the CD changer ................................. 4
Preparing the wireless remote .......................... 5
Changing the transmitting frequency .............. 6
CD Changer
Listening to a CD ................................................ 6
Playing tracks in random order
— Shuffle Play ................................................ 7
Playing tracks repeatedly
— Repeat Play ................................................ 7
Changing the output level ................................. 7
Additional Information
Precautions........................................................... 8
Notes on compact discs ...................................... 8
Maintenance......................................................... 8
Location of controls ............................................ 9
Specifications ..................................................... 11
Troubleshooting guide ..................................... 12
Index ................................................................... 13
EN
3
Page 4
Getting Started
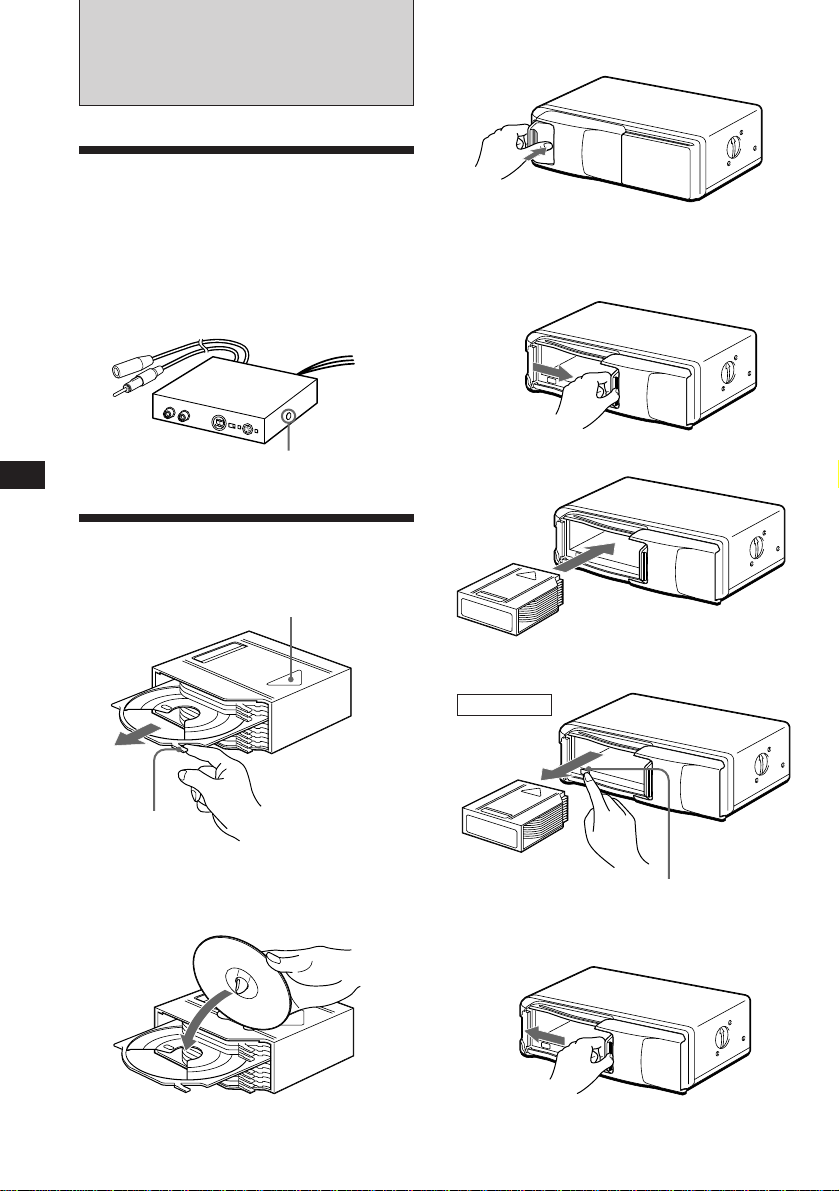
Resetting the hideaway
unit
2
Unlock
EN
Before operating the unit for the first time or
after replacing the car battery, you must reset
the hideaway unit.
Press the RESET button with a pointed object,
such as a ballpoint pen.
RESET button
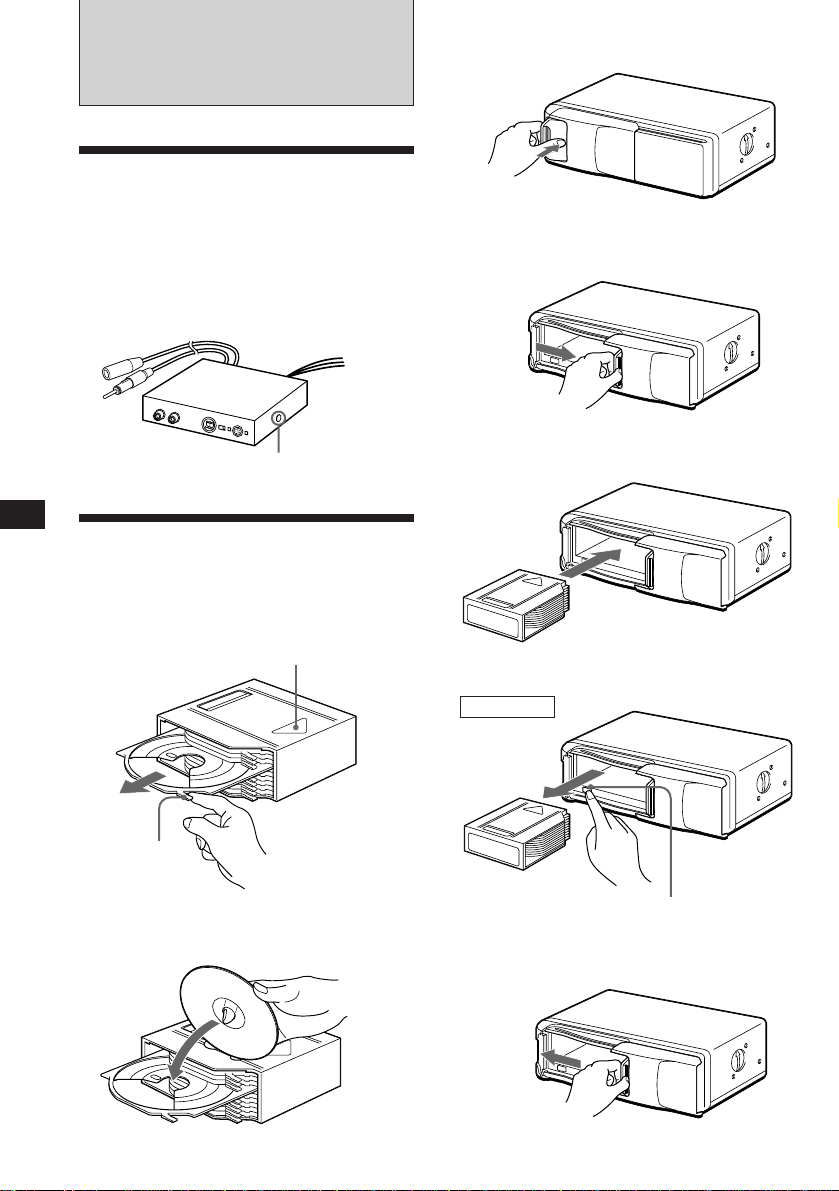
Preparing the CD changer
1
With the arrow side facing up
Tab
µ
Release, and slide open
3
Disc magazine
To remove
µ
Labeled surface up
EJECT
4
10 discs, one in each tray
4
Page 5
Use the supplied disc magazine or the disc
magazine XA-250. The disc magazine XA-10B
can not be used with this unit. If you use any
other magazine, it may cause a malfunction.
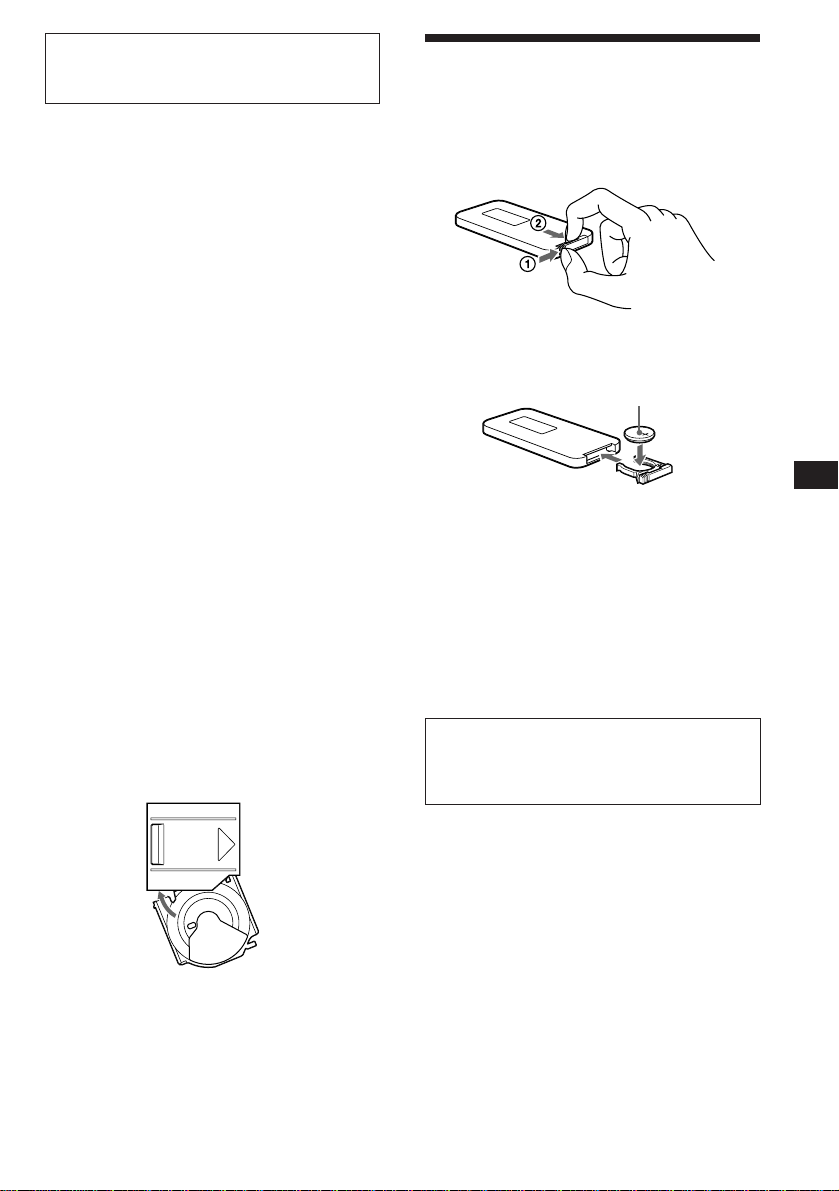
Preparing the wireless
remote
Notes
• To listen to an 8 cm CD, use the separately sold Sony
CD, adapter CSA-8. Be sure to always use the specified
adapter, as failing to do so may cause a malfunction of
the unit. If you use any other adapter, the unit may not
operate properly. When using the Sony CD adapter,
make sure that the three catches on the adapter are firmly
latched onto the 8 cm CD.
• Do not insert the Sony CD adapter CSA-8 in the
magazine without a disc, malfunction may result.
If the disc magazine does not lock properly
Take out the disc magazine, press (EJECT),
and reinsert it.
Use the unit with the door closed
Otherwise, foreign matter may enter the unit,
and contaminate the lenses inside the CD
changer.
Notes on the disc magazine
•Do not leave the disc magazine in locations
with high temperatures and high humidity,
such as on a car dashboard or in the rear
window where the disc magazine will be
subjected to direct sunlight.
•Do not place more than one disc at a time
onto a tray, otherwise the changer and the
discs may be damaged.
•Do not drop the disc magazine or subject it to
a violent shock.
When the tray comes out
Normally, the trays will not comes out of the
magazine. However, if they are pulled out of
the magazine, it is easy to re-insert them.
Installing the battery
µ
+ side up
EN
Getting Started
Replace the battery with a Sony CR2025 or
Duracell DL-2025 lithium battery. Use of
another battery may present a risk of fire or
explosion.
When the battery becomes weak, you will not
be able to operate the unit with the wireless
remote.
Battery life is about six months depending on
the conditions of use.
WARNING
The battery may explode if mistreated.
Do not recharge, disassemble or dispose of
in fire.
With the cut-away portion of the tray facing you,
insert the right corner of the tray in the slot, then
push in the left corner until it clicks.
Note
Do not insert the tray upside down or in the wrong
direction.
Notes on the lithium battery
•Keep the lithium battery out of the reach of
children.
Should the battery be swallowed,
immediately consult a doctor.
•Wipe the battery with a dry cloth to assure a
good contact.
•Be sure to observe the correct polarity when
installing the battery.
•Do not hold the battery with metallic
tweezers, otherwise a short circuit may
occur.
5
Page 6

AMS
Mounting the wireless remote
Use the supplied velcro tapes and mount the
wireless remote to a suitable location where it
will not interfere with your driving.
CD Changer
EN
Velcro tapes
to the mounting
surface
Changing the transmitting
frequency
Because this unit processes CD playback
sound through an FM tuner, there may be
interference noise during CD playback. In this
case change the frequency of the modulated
RF signal transmitted from hideaway unit. The
initial setting is 88.3 MHz.
1 Press (REP) for two seconds.
2 Press either the left or right side of
(AMS) to select the frequency.
Each time you press (AMS), the frequency
changes as follows:
=:
88.3 MHz n 89.9 MHz n 89.7 MHz n
89.5 MHz n 89.3 MHz n 89.1 MHz n
88.9 MHz n 88.7 MHz n 88.5 MHz n
88.3 MHz
+:
88.3 MHz n 88.5 MHz n 88.7 MHz n
88.9 MHz n 89.1 MHz n 89.3 MHz n
89.5 MHz n 89.7 MHz n 89.9 MHz n
88.3 MHz
3 Press (REP) for two seconds.
Note
Be sure to set the frequency of your FM tuner to that of the
newly selected frequency.
Listening to a CD
1 Turn on the FM tuner of the car audio.
2 Adjust the selected transmitting
frequency with the wired remote.
(88.3 MHz/88.5 MHz/88.7 MHz/88.9 MHz/
89.1 MHz/89.3 MHz/89.5 MHz/89.7 MHz/
89.9 MHz)
3 Press ^.
CD playback starts.
When the unit is used in a car without an
accessory position on the ignition switch
Be sure to press (OFF) on the wireless remote to turn the
system off to avoid battery wear while the engine is not
running.
If the POWER SELECT switch on the hideaway unit is set
to the OFF position and the display on the wired remote is
turned off, you will not be able to start CD playback with
the wireless remote. In this case, press ^ on the wired
remote .
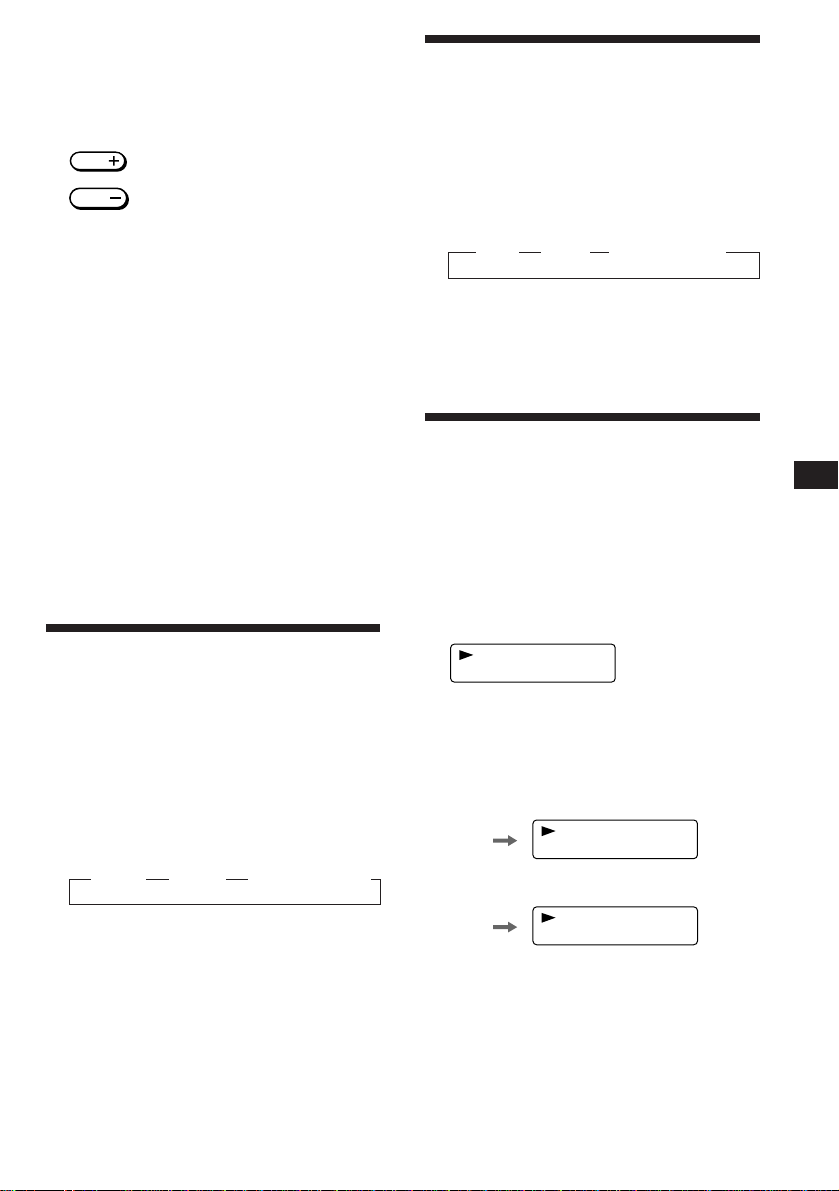
4 Adjust the volume with the volume
control on the car audio.
All the tracks play from the beginning.
Locating a specific track
— Automatic Music Sensor (AMS)
During playback, press either side of
(AMS) once for each track you wish to
skip.
To locate
previous tracks
Locating a specific point in a track
— Manual Search
During playback, press and hold
(DISC+)or (DISC–). Release the button
when you have found the desired part.
To locate
succeeding tracks
DISC
DISC
To search forward
To search backward
6
Page 7
Locating a specific disc
— Disc Select
During playback, press (DISC+) or
(DISC–) once for each disc you wish to
skip.
DISC
DISC
To locate succeeding discs
To locate previous discs
Stopping CD play
Press (OFF).
Notes
• When CD playback is stopped, you may hear some noise
from the speakers. To prevent this from happening, turn
the volume down before stopping CD playback.
• If you turn off the ignition switch of your car without
stopping CD playback, it will automatically resume CD
playback from where it was stopped when you turn on
the ignition switch again.
Listening to the radio or a tape
Be sure to stop CD playback before you start
listening to the radio or a tape.
Note
Be sure to stop CD playback, otherwise there may be some
interference with radio reception.
Playing tracks in random
order
You can select:
• SHUF 1 to play the tracks on the current disc
• SHUF 2 to play all the discs in random
— Shuffle Play
in random order.
order.
Press (SHUFFLE) or (SHUF) repeatedly
until the desired setting appears (SHUF 1
or SHUF 2).
z SHUF 1 z SHUF 2 z Cancel (SHUF off)
Playing tracks repeatedly
— Repeat Play
You can select:
• REP 1 to repeat the track.
• REP 2 to repeat the disc.
Press (REPEAT) or (REP) repeatedly until
the desired setting appears (REP 1 or REP
2).
R
REP 1 z REP 2 z Cancel (REP off)
Repeat play starts.
To go back to the normal playback mode, press
(REP) until “REP” disappears.
Changing the output level
You can select the output level from the CD
changer. Normally the system is used in the
initial output level; change the level if
necessary.
1 Press (REP) for two seconds.
2 Press (REP) momentarily.
00 0
3
CD
LEVEL
Initial setting
3 Press either the left or right side of
(AMS) to select the output level.
To decrease the output level
=:
To increase the output level
0 1CD
LEVEL
EN
Getting Started/CD Changer
Shuffle play starts.
To go back to the normal playback mode, press
(SHUF) until “SHUF” disappears.
+:
00 00
4
CD
LEVEL
4 Press (REP) for two seconds.
7
Page 8
EN
Additional
Information
Precautions
• If your car was parked in direct sunlight
resulting in a considerable rise in
temperature inside the car, allow the system
to cool off before operating it.
• If no power is being supplied to the system,
check the connections first. If everything is in
order, check the fuse.
• Avoid installing the CD changer, wireless
remote, and wired remote in places:
— subject to temperatures exceeding 55°C.
— subject to direct sunlight.
— near heat sources (such as heaters).
— exposed to rain or moisture.
— exposed to excessive dust or dirt.
— subject to excessive vibration.
If you have any questions or problems
concerning your unit that are not covered in
this manual, please consult your nearest Sony
dealer.
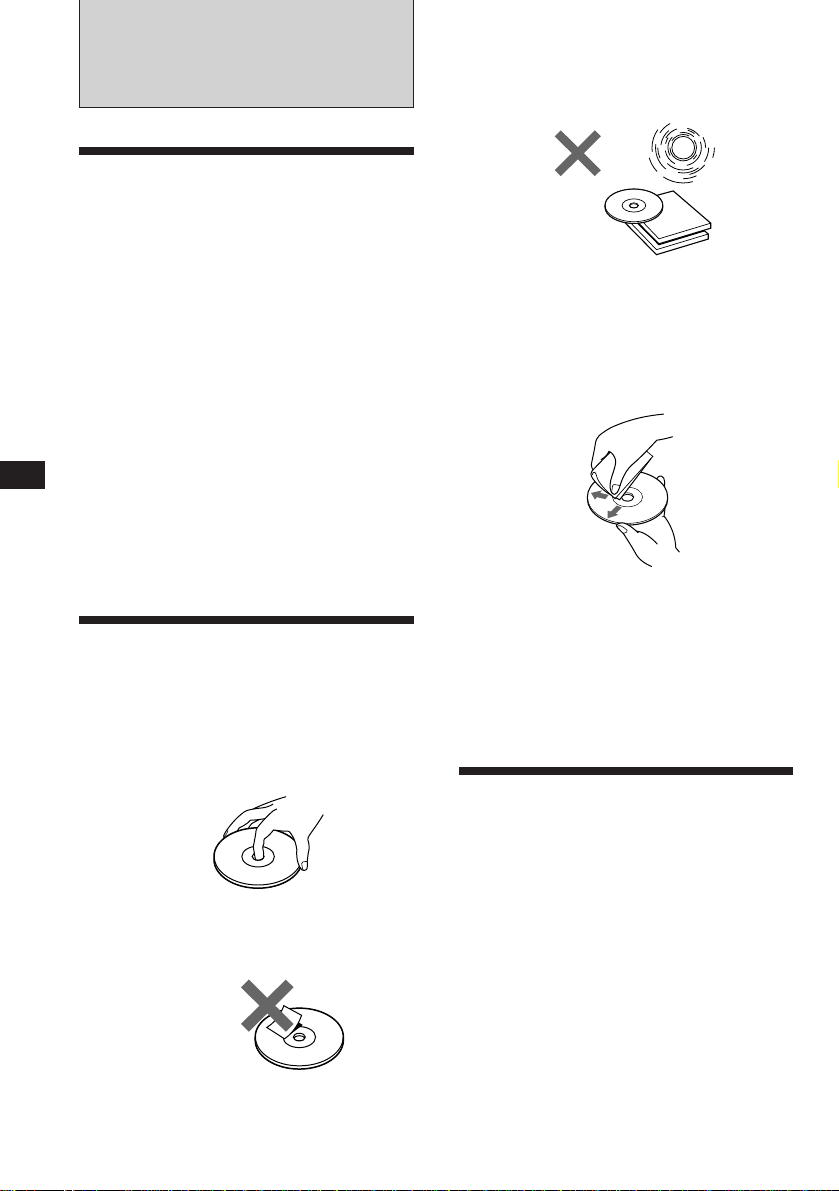
Notes on compact discs
A dirty or defective disc may cause sound
drop-outs during playback. To enjoy optimum
sound, handle the disc as follows.
Do not expose the discs to direct sunlight or
heat sources such as hot air-ducts. Do not leave
discs in a car parked in direct sunlight where
there can be a considerable rise in the
temperature inside the car.
Not this way
Before playing, clean the discs with an optional
cleaning cloth. Wipe each disc in the direction
of the arrows.
Do not use solvents such as benzine, thinner,
commercially available cleaners, or antistatic
spray intended for analog discs.
This way
Moisture condensation
On a rainy day or in a very damp area,
moisture may condense on the lenses inside
the unit, and the unit will not operate
properly. In this case, remove the disc
magazine and wait for about an hour until
the moisture has evaporated.
Handle the disc by its edge, and do not touch
the unlabelled surface.
This way
Do not stick paper or tape on the discs.
Not this way
8
Maintenance
Fuse replacement
If the fuse blows, check the power connection
and replace the fuse. If the fuse blows again
after replacement, there may be an internal
malfunction. In this case, consult your nearest
Sony dealer.
Warning
Use the specified amperage fuse.
Use of a higher amperage fuse may cause
serious damage.
Page 9

Location of controls
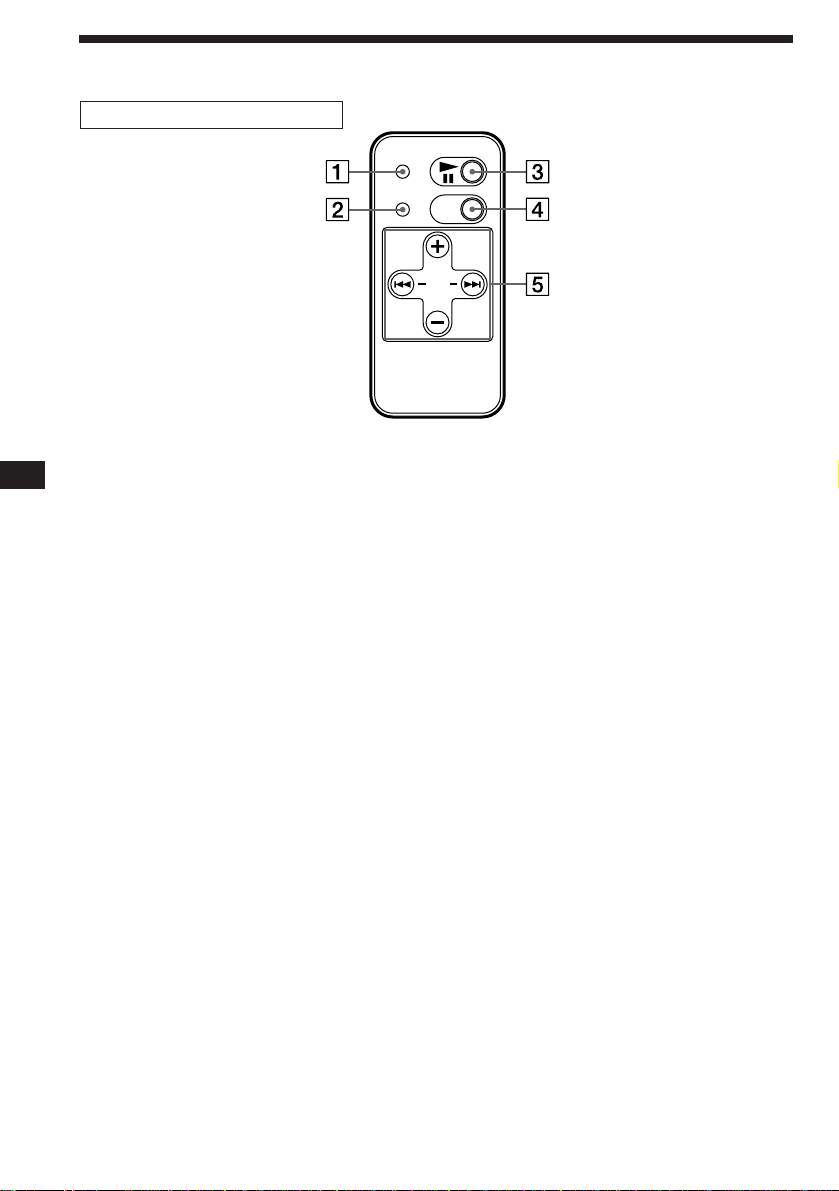
Wired remote (RM-X57)
5 3CD
TRACK DISC
Refer to the pages for details.
1 ( (play/pause) indication
Lights during CD playback and flashes
when the pause button is pressed.
2 REP (repeat play) indication
3 SHUF (shuffle play) indication
4 REP (repeat play/control mode set)
button 6, 7
5 ^ (play/pause) button 6
If pressed during playback, the CD will
pause. If pressed again, playback will
continue.
SHUF
REP
12
REP
12
SHUF
OFF
DISC
AMS
DISC
6 DISC (disc number) indication
7 TRACK (track number) indication
EN
Additional Information
8 SHUF (shuffle play) button 7
9 Infrared receptor for the wireless
remote
!º OFF button 6, 7
!⁄ AMS (Automatic Music Sensor/manual
search) button 6, 7
!™ DISC (disc select)button 6, 7
9
Page 10
Location of controls
Wireless remote (RM-X58)
REPEAT
SHUFFLE
OFF
DISC
AMS
DISC
EN
1 REPEAT (repeat play) button
2 SHUFFLE (shuffle play) button
3 ^ (play/pause) button
4 OFF button
5 AMS/DISC (Automatic Music Sensor/
disc select) button
You cannot do the manual search with the
wireless remote.
10
Page 11

Specifications
CD changer (CDX-505RF)
System Compact disc digital audio
system
Frequency response 10 – 20,000 Hz
Wow and flutter Less than measurable limit
Signal-to-noise ratio 94 dB
Output terminals BUS control output
terminal (8 pins)
Analog audio output
terminal (RCA pin)
Current drain 800 mA (at playback)
800 mA (at disc loading /
ejecting)
Operating temperature –10°C to +55°C
Dimensions Approx. 262 × 90 × 181.5
mm (w/h/d)
Mass Approx. 2.1 kg
Hideaway unit
Frequency 88.3 MHz/88.5 MHz/
88.7␣ MHz/88.9␣ MHz/
89.1 MHz/89.3 MHz/
89.5␣ MHz/89.7␣ MHz/
89.9␣ MHz (switchable)
Dimensions Approx.
124.8 × 30.0 × 99.8 mm
(w/h/d)
Mass Approx. 330 g
Wired remote (RM-X57)
Dimensions Approx.
Mass Approx. 120 g
148 × 30 × 15 mm
(w/h/d)
Wireless remote (RM-X58)
Dimensions Approx.
Mass Approx. 20 g not incl.
38.4 × 6.4 × 84.4 mm
(w/h/d)
battery
General
Supplied accessories Disc magazine (1)
Optional accessories CD single adaptor CSA-8
Design and specifications are subject to change without
notice.
Parts for installation and
connections (1 set)
Lithium battery (CR2025) (1)
Disc magazine XA-250
EN
Additional Information
11
Page 12
Troubleshooting guide
The following checklist will assist in the correction of most problems which you may encounter with
your unit.
Before going through the checklist below, refer to the connection and operating procedures.
General
Problem
The unit does not function.
The sound skips.
The disc magazine is not
locked in changer.
Cause/Solution
• The built-in micro computer has malfunctioned.
n Press the RESET button on the hideaway unit.
• The connecting cords are not connected properly.
• The CD changer is installed in an unstable location.
n Re-install it in a stable location.
• The Disc(s) is dirty or defective.
n Clean or replace it (them).
Take out the disc magazine, press (EJECT), and reinsert the disc
magazine until it is locked securely.
EN
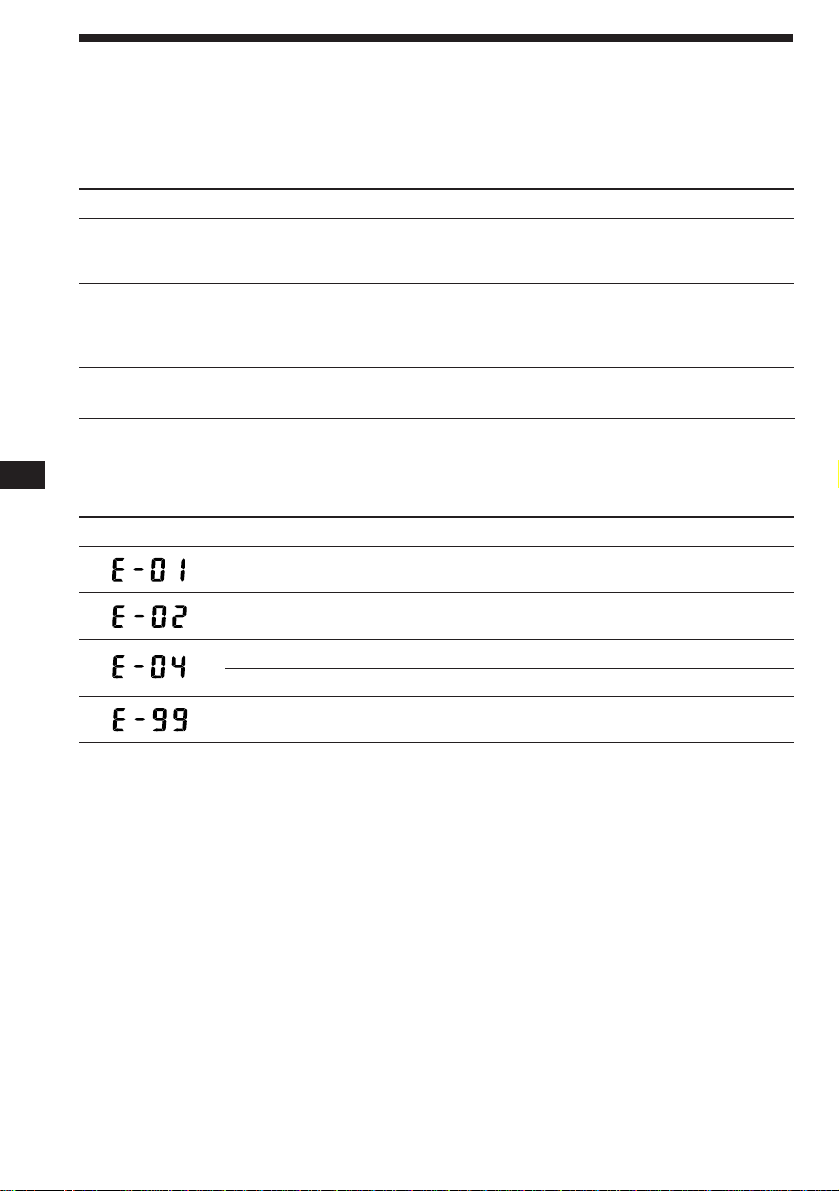
Error displays
The following indication will flash for about five seconds.
Display Cause
The disc magazine is not inserted in
the CD changer.
No disc is inserted in the disc
magazine.
The disc is dirty.
The disc is inserted upside down.
The CD changer cannot be operated
because of some problem.
If the solutions mentioned above do not help to improve the situation, consult your nearest Sony
dealer.
Solution
Insert the disc magazine with discs into
the CD changer.
Take out the magazine and insert a
disc(s).
Clean the disc.
Insert the disc correctly.
Press the RESET button of the
hideaway unit.
12
Page 13

Index
A, B, C, D, E
CD playback 6
Change
Frequency 6
Output level 7
F, G, H, I, J, K, L, M, N
Fuse 8
O, P, Q
Output level 7
R
Radio 7
Repeat play 7
Reset 4
S
Shuffle play 7
T, U, V
Tape play 7
W, X, Y, Z
Wireless remote 5, 6, 10
Wired remote 9
EN
Additional Information
13
Page 14

ES
¡Bienvenido!
Enhorabuena por la adquisición del sistema de
cambiador de discos compactos de SONY. Esta
unidad le permitirá disfrutar del sonido de los
discos compactos con el cambiador.
Es posible emplear esta unidad con el receptor
de FM del sistema de audio del automóvil.
2
Page 15

Índice
Procedimientos iniciales
Restauración de la unidad oculta ..................... 4
Preparación del cambiador de discos
compactos ....................................................... 4
Preparación del mando a distancia
inalámbrico ..................................................... 5
Cambio de la frecuencia de transmisión ......... 6
Cambiador de discos compactos
Escucha de la reproducción de discos
compactos ....................................................... 6
Reproducción de temas en orden aleatorio
— Reproducción aleatoria ............................ 7
Reproducción repetida de temas
— Reproducción repetida............................. 7
Cambio del nivel de salida ................................ 8
Información complementaria
Precauciones ........................................................ 8
Notas sobre los discos compactos .................... 9
Mantenimiento .................................................... 9
Ubicación de los controles ............................... 10
Especificaciones................................................. 12
Guía para la solución de problemas............... 13
Indice alfabético ................................................ 14
ES
3
Page 16
Procedimientos
iniciales
Restauración de la unidad
oculta
Antes de utilizar la unidad por primera vez o
después de sustituir la batería del automóvil,
es necesario restaurar la unidad oculta.
Pulse el botón RESET con un objeto
puntiagudo, como un bolígrafo.
2
Desbloqueo
Suelte y deslice para abrir.
µ
ES
Preparación del
cambiador de discos
compactos
Con el lado de la flecha hacia arriba
1
Lengüeta
Con la superficie de la etiqueta hacia arriba
Botón RESET
µ
3
Cargador de discos
Para extraer
EJECT
4
4
10 discos, uno en cada bandeja
Page 17

Emplee el cargador de discos suministrado o el
XA-250. El cargador de discos XA-10B no puede
utilizarse con esta unidad. Si emplea otro tipo
de cargador, puede producir fallos de
funcionamiento.
Notas
• Para reproducir un disco compacto de 8 cm, utilice un
adaptador para discos compactos CSA-8 Sony vendido
aparte. Cerciórese de utilizar siempre el adaptador
espicificado, ya que de lo contrario la unidad podría
funcionar mal. Si utilizase otro adaptador, es posible que
la unidad no funcionase adecuandamente. Cuando utilice
el adaptador para discos compactos Sony, cerciórese de
que las tres uñas del mismo hayan quedado firmemente
enganchadas en el disco compacto de 8 cm.
• No inserte el adaptador para discos compactos CSA-8
Sony en el cargador sin discos, ya que pueden producirse
fallos de funcionamiento.
Si el cargador de discos no encaja
adecuadamente
Extraiga el cargador, pulse (EJECT) y vuelva a
insertarlo.
Utilice el cambiador de discos compactos
con la cubierta cerrada
De lo contrario, podrían entrar objetos
extraños en el mismo y ensuciar las lentes de
su interior.
Notas sobre el cargador de discos
•No deje el cargador de discos en lugares con
temperatura y humedad altas, como en el
salpicadero o en la bandeja trasera del
automóvil, donde podría quedar sometido a
la luz solar directa.
•No coloque más de un disco en un bandeja,
ya que en caso contrario el cambiador y los
discos pueden dañarse.
•No deje caer el cargador de discos ni lo
someta a golpes violentos.
Si la bandeja se sale
Normalmente, las bandejas no se salen del
cargador. No obstante, si esto ocurre, pueden
volver a insertarse con facilidad.
Preparación del mando a
distancia inalámbrico
Instalación de la pila
µ
lado + hacia arriba
Sustituya la pila por una de litio DL-2025 de
Duracell o CR2025 de Sony. El uso de otro tipo
de pila puede presentar el riesgo de incendios
o explosión.
Cuando la pila se agote, no será posible
emplear la unidad con el mando a distancia
inalámbrico.
Dependiendo de las condiciones de uso, la
duración de las pilas es de aproximadamente
seis meses.
ADVERTENCIA
La pila puede explotar si se emplea de
forma inadecuada.
No la recargue, no la desmonte ni la arroje
al fuego.
ES
Procedimientos iniciales
Con la parte de corte de la bandeja hacia fuera,
inserte la esquina derecha de dicha bandeja en la
ranura y, a continuación, presione la esquina
izquierda para introducirla hasta oír un chasquido.
Nota
No inserte la bandeja al revés o en la dirección incorrecta.
Notas sobre la pila de litio
•Manténgala fuera del alcance de los niños.
En caso de ingestión, póngase
inmediatamente en contacto con un médico.
•Límpiela con un paño seco para obtener un
contacto óptimo.
•Al instalarla, observe que la polaridad sea la
correcta.
•No la maneje con pinzas metálicas, ya que
puede producirse un cortocircuito.
5
Page 18

AMS
Instalación del mando a distancia
inalámbrico
Utilice las cintas velcro suministradas e instale
el mando en un lugar donde no dificulte la
conducción.
Cambiador de discos
compactos
Cintas velcro
Cambio de la frecuencia
de transmisión
Dado que esta unidad procesa el sonido
ES
reproducido de discos compactos mediante un
sintonizador de FM, es posible que se
produzca ruido de interferencia durante la
reproducción de los discos. En este caso,
cambie la frecuencia de la señal RF modulada
transmitida por la unidad oculta. El ajuste
inicial es de 88,3 MHz.
1 Pulse (REP) durante 2 segundos.
2 Pulse el lado izquierdo o el derecho de
(AMS) para seleccionar la frecuencia.
Cada vez que pulse (AMS), la frecuencia
cambiará de la forma siguiente:
=:
88,3 MHz n 89,9 MHz n 89,7 MHz n
89,5 MHz n 89,3 MHz n 89,1 MHz n
88,9 MHz n 88,7 MHz n 88,5 MHz n
88,3 MHz
+:
88,3 MHz n 88,5 MHz n 88,7 MHz n
88,9 MHz n 89,1 MHz n 89,3 MHz n
89,5 MHz n 89,7 MHz n 89,9 MHz n
88,3 MHz
3 Pulse (REP) durante 2 segundos.
Nota
Cerciórese de ajustar la frecuencia de su sintonizador de
FM a la nuevamente seleccionada.
a la superficie
de montaje
Escucha de la
reproducción de discos
compactos
1 Active el sintonizador de FM del sistema
de audio del automóvil.
2 Ajuste la frecuencia de transmisión
seleccionada con el mando a distancia
alámbrico.
(88,3 MHz/88,5 MHz/88,7 MHz/88,9 MHz/
89,1 MHz/89,3 MHz/89,5 MHz/89,7 MHz/
89,9 MHz)
3 Pulse ^.
Se inicia la reproducción de discos
compactos.
Si la unidad se utiliza en un automóvil sin posición
para accesorios en la llave de encendido
Asegúrese de pulsar (OFF) en el mando a distancia
inalámbrico para desactivar el sistema con el fin de evitar el
desgaste de la batería cuando el motor no se encuentre en
funcionamiento.
Si el interruptor POWER SELECT de la unidad oculta se
encuentra ajustado en la posición OFF y el visor del mando
alámbrico está desactivado, no será posible iniciar la
reproducción de discos compactos con el mando inalámbrico.
En este caso, pulse ^ en el mando alámbrico.
4 Ajuste el volumen con el control de
volumen del sistema de audio del
automóvil.
Todos los temas se reproducen desde el
principio.
Localización de un tema específico
— Sensor de música automático (AMS)
Durante la reproducción, pulse cualquier
lado de (AMS) tantas veces como temas
desee omitir.
Para localizar
temas
anteriores
Para localizar
temas
posteriores
6
Page 19

Localización de un punto específico
de un tema
— Búsqueda manual
Durante la reproducción, mantenga
pulsado (DISC+) o (DISC–). Suelte el
botón cuando localice la parte deseada.
DISC
DISC
Para buscar hacia delante
Para buscar hacia atrás
Localización de un disco específico
— Selección de disco
Durante la reproducción, pulse (DISC+) o
(DISC–) tantas veces como discos desee
omitir.
DISC
DISC
Para localizar discos posteriores
Para localizar discos anteriores
Detención de la reproducción de
CD
Pulse (OFF).
Notas
• Al detener la reproducción de discos compactos, es
posible que escuche ruido de los altavoces. Para evitarlo,
disminuya el volumen antes de detener la reproducción.
• Si desactiva la lave de encendido del automóvil sin
detener la reproducción del disco compacto, ésta se
reanudará automáticamente desde el punto donde se
detuvo al volver a activar la llave de encendido.
Pulse (SHUFFLE) o (SHUF) varias veces
hasta que aparezca el ajuste que desee
(SHUF 1 o SHUF 2).
z SHUF 1 z SHUF 2
Cancelación (desactivación de SHUF) Z
Se inicia la reproducción aleatoria.
Para volver al modo de reproducción normal,
pulse (SHUF) hasta que “SHUF” desaparezca.
Reproducción repetida de
temas
Es posible seleccionar lo siguiente:
• REP 1 para repetir el tema.
• REP 2 para repetir el disco.
Para volver al modo de reproducción normal,
pulse (REP) hasta que “REP” desaparezca.
— Reproducción repetida
Pulse (REPEAT) o (REP) varias veces
hasta que aparezca el ajuste que desee
(REP 1 o REP 2).
z REP 1 z REP 2
Cancelación (desactivación de REP) Z
Se inicia la reproducción repetida.
ES
Procedimientos iniciales/Cambiador de discos compactos
Escucha de la radio o de una cinta
Antes de escuchar la radio o una cinta,
asegúrese de detener la reproducción de CD.
Nota
Asegúrese de detener la reproducción de CD, ya que en
caso contrario pueden producirse interferencias en la
recepción de la radio.
Reproducción de temas en
orden aleatorio
— Reproducción aleatoria
Es posible seleccionar lo siguiente:
• SHUF 1 para reproducir aleatoriamente los
temas del disco actual.
• SHUF 2 para reproducir aleatoriamente
todos los discos.
7
Page 20

Cambio del nivel de salida
Es posible seleccionar el nivel de salida del
cambiador de discos compactos. Aunque el
sistema se utiliza con el nivel de salida inicial,
puede cambiar dicho nivel si es necesario.
1 Pulse (REP) durante dos segundos.
2 Pulse (REP) durante un instante.
00 0
3
CD
LEVEL
Ajuste inicial
3 Pulse el lado izquierdo o el derecho de
(AMS) para seleccionar el nivel de salida.
Para disminuir el nivel de salida
ES
=:
Para aumentar el nivel de salida
+:
0 1CD
LEVEL
00 00
4
CD
LEVEL
Información
complementaria
Precauciones
•Si dejó el automóvil aparcado al sol y
aumentó considerablemente la temperatura
interior del mismo, antes de utilizar el
sistema, deje que se enfríe.
•Si el sistema no recibe alimentación,
compruebe en primer lugar las conexiones. Si
todo está en orden, compruebe el fusible.
•Evite instalar el cambiador de discos
compactos, el mando alámbrico y el
inalámbrico en un lugar:
— sometido a temperaturas superiores a
55°C.
— sometido a la luz solar directa.
— cercano a fuentes térmicas (como aparatos
de calefacción).
— expuesto a la lluvia o a la humedad.
— expuesto a polvo o suciedad excesivos.
— sometido a vibraciones excesivas.
4 Pulse (REP) durante dos segundos.
Si tiene alguna pregunta o problema en
relación con el sistema que este manual no
pueda resolver, consulte a su proveedor Sony.
8
Page 21

Notas sobre los discos
compactos
Un disco sucio o defectuoso puede causar la
pérdida de sonido durante la reproducción.
Para obtener el óptimo sonido, tome los discos
como se indica a continuación.
Coja el disco por los bordes y no toque la
superficie sin etiqueta.
Así
No adhiera papel ni cinta en los discos.
Así no
No exponga los discos a la luz solar directa ni
a fuentes térmicas, como conductos de aire
caliente. No deje los discos en un automóvil
aparcado bajo la luz solar directa donde pueda
producirse un considerable aumento de
temperatura en el interior de dicho automóvil.
Así no
Condensación de humedad
En los días lluviosos o en zonas muy húmedas,
puede condensarse humedad en las lentes del
interior de la unidad, y ésta no funcionará
correctamente. En este caso, extraiga el
cargador de discos y espere durante una
hora aproximadamente hasta que la
humedad se evapore.
Mantenimiento
Sustitución del fusible
Si el fusible se funde, compruebe la conexión
de alimentación y sustitúyalo. Si vuelve a
fundirse después de sustituirlo, es posible que
exista un funcionamiento interno defectuoso.
En este caso, póngase en contacto con el
proveedor Sony más próximo.
Advertencia
Utilice un fusible con el amperaje especificado,
ya que si emplea uno de amperaje superior
puede causar daños serios.
ES
Cambiador de discos compactos/Información complementaria
Antes de reproducir un disco, frótelo con un
paño limpiador opcional. Hágalo en la
dirección de las flechas de la ilustración.
No utilice disolventes tales como bencina,
diluyentes, ni limpiadores disponibles en las
tiendas del ramo ni aerosoles destinados a
discos analógicos.
Así
9
Page 22

Ubicación de los controles
Mando a distancia alámbrico (RM-X57)
5 3
CD
Con respecto a los detalles, consulte las páginas.
1 Indicación de reproducción/pausa (()
ES
Se iluminará durante la reproducción de
un disco compacto y parpadeará cuando
pulse el botón de pausa.
2 Indicación de reproducción repetida
(REP)
3 Indicación de reproducción aleatoria
(SHUF)
4 Botón selector de reproducción
repetida/modo de control (REP) 6, 7, 8
5 Botón de reproducción/pausa (^) 6
Si lo pulsa durante la reproducción, el
disco compacto entrará en el modo de
pausa. Si vuelve a pulsarlo, se reanudará la
reproducción.
REP
REP
12
SHUF
TRACK DISC
12
SHUF
OFF
DISC
AMS
DISC
6 Indicación de número de disco (DISC)
7 Indicación de número de tema (TRACK)
8 Botón de reproducción aleatoria (SHUF)
7
9 Receptor infrarrojo para el mando a
distancia inalámbrico
0 Botón de desconexión (OFF) 6, 7
!⁄ Botón AMS (sensor de música
automático/búsqueda manual) 6, 8
!™ Botón DISC (selección de disco) 7
10
Page 23

Mando a distancia inalámbrico (RM-X58)
REPEAT
SHUFFLE
OFF
DISC
AMS
DISC
1 Botón REPEAT (reproducción repetida)
2 Botón SHUFFLE (reproducción aleatoria)
3 Botón ^ (reproducción/pausa)
4 Botón OFF
5 Botón AMS/DISC (sensor de música
automático/selección de disco)
Usted no podrá realizar la búsqueda
manual con el mando a distancia
inalámbrico.
ES
Información complementaria
11
Page 24

Especificaciones
Cambiador de discos compactos
(CDX-505RF)
Sistema Sistema audiodigital de
Respuesta en frecuencia 10 – 20.000 Hz
Fluctuación y trémolo Inferiores al límite
Relación señal/ruido 94 dB
Terminales de salida Conector de salida de
Consumo de corriente 800 mA (en reproducción)
Temperatura de funcionamiento
Dimensiones Aprox. 262 × 90 × 181,5
Masa Aprox. 2,1 kg
discos compactos
mesurable
control BUS (8 terminales)
Toma de salida de audio
analógico (terminales
RCA)
800 mA (en la carga/
extracción de un disco)
–10 a +55°C
mm (an/al/prf)
Unidad oculta
Frecuencia 88,3 MHz/88,5 MHz/
ES
Dimensiones Aprox.
Masa Aprox. 330 g
88,7 MHz/88,9 MHz/
89,1 MHz/89,3 MHz/
89,5 MHz/89,7 MHz/
89,9 MHz
(conmutable)
124,8 × 30,0 × 99,8 mm
(an/al/prf)
Mando a distancia alámbrico
(RM-X57)
Dimensiones Aprox.
Masa Aprox. 120 g
148 × 30 × 15 mm
(an/al/prf)
Generales
Accesorios suministrados Cargador de discos (1)
Accesorios opcionales Adaptador para disco
Diseño y especificaciones sujetos a cambio sin previo aviso.
Componentes de
instalación y conexiones
(1 juego)
Pila de litio (CR2025) (1)
compacto de 8 cm CSA-8
Cargador de discos
XA-250
Mando a distancia inalámbrico
(RM-X58)
Dimensiones Aprox.
Masa Aprox. 20 g, excl.pila
38,4 × 6,4 × 84,4 mm
(an/al/prf)
12
Page 25

Guía para la solución de problemas
La siguiente lista de comprobaciones se resultará útil para solucionar la mayoría de los problemas
que puede encontrar con la unidad.
Antes de consultar la siguiente lista, examine los procedimientos de conexión y funcionamiento.
Generales
Problema
El sistema no funciona.
El sonido salta.
El cargador de discos no
queda encajado en el
cambiador de discos
compactos.
Causa/Solución
• El microprocesador incorporado funciona mal.
n Pulse el botón RESET de la unidad oculta.
• Los cables conectores no están correctamente conectados.
• El cambiador de discos compactos está instalado en un lugar
inestable.
n Reinstálelo en un lugar estable.
• Disco(s) sucio(s) o defectuoso(s).
n Límpielo(s) o cámbielo(s).
Extráigalo, pulse (EJECT), y vuelva a insertarlo hasta que quede
encajado con seguridad.
Indicaciones de error
Las indicaciones siguientes parpadearán durante unos cinco segundos.
Indicación Solución
Si con las medidas indicadas arriba no logra solucionar el problema, consulte a su proveedor Sony.
Causa
El cargador de discos no está
insertado en el cambiador de discos
compactos.
No hay discos insertados en el
cargador de discos.
El disco está sucio.
El disco está insertado al revés.
El cambiador de discos compactos no
funciona debido a algún problema.
Insértelo con discos.
Extráigalo e insértele discos.
Límpielo.
Insértelo correctamente.
Pulse el botón RESET de la unidad
oculta.
ES
Información complementaria
13
Page 26

Indice alfabético
ES
A, B, C, D, E
Cambio
de frecuencia 6
de nivel de salida 8
F, G, H, I, J, K, L,
Fusible 9
M
Mando a distancia alámbrico 10
Mando a distancia inalámbrico 5, 6, 11
N, O, P, Q
Nivel de salida 8
R, S, T, U, V, W, X, Y, Z
Radio 7
Reproducción aleatoria 7
Reproducción de discos compactos 6
Reproducción de cintas 7
Reproducción repetida 7
Restauración 4
14
Page 27

ES
15
Page 28

Välkommen!
Vi gratulerar dig till köpet av SONY CDväxlarsystem. Med enheten kan du njuta av
CD-ljud.
Du kan använda enheten tillsammans med
bilradions FM-mottagare
S
2
Page 29

Innehållsförteckning
Komma igång
Återställa den dolda enheten ............................ 4
Förbereda CD-växlaren ...................................... 4
Förbereda den trådlösa fjärrkontrollen............ 5
Ändra sändningsfrekvensen ............................. 6
CD-växlaren
Lyssna på en CD-skiva ....................................... 6
Spela upp spår i slumpässig ordning
— Slumpmässig uppspelning ...................... 7
Spela upp spår flera gånger
— Upprepad uppspelning ........................... 7
Ändra utgångsnivån ........................................... 7
Ytterligare information
Försiktighetsåtgärder ......................................... 8
Hantera CD-skivor.............................................. 8
Underhåll ............................................................. 8
Kontrollernas placering...................................... 9
Tekniska data..................................................... 11
Felsökning .......................................................... 12
Register ............................................................... 13
S
3
Page 30

Komma igång
Återställa den dolda
enheten
2
Lås upp
Innan du använder enheten för första gången
eller om du byter bilbatteri, måste du återställa
den dolda enheten.
Tryck på RESET-knappen med ett spetsigt
föremål, tex en kulspetspenna.
RESET-knapp
Förbereda CD-växlaren
S
1
Tunga
Med sidan med pilen uppåt
µ
Lossa och skjut åt sidan.
3
Skivmagasin
Ta ur
µ
Med etikettsidan uppåt
EJECT
4
10 skivor, en i varje fack
4
Page 31

Använd medföljande skivmagasin eller
skivmagasinet XA-250. Skivmagasinet XA-10B
kan användas med denna enhet. Använd inget
annat magasin, eftersom det kan orsaka fel.
Observera
• Om du vill lyssna på en 8 centimeters CD-skiva (CDsingel), använder du CD-adaptern CSA-8 som säljs
separat. Använd alltid denna adapter, eftersom du
annars kan skada CD-växlaren. Om du använder en
annan adapter kan det hända att växlaren inte fungerar
som den ska. När du använder Sony-adaptern, måste du
se till att de tre hakarna ordentligt håller fast CD-skivan.
• Sätt aldrig i Sonys CD-adapter CSA-8 i magasinet utan
skiva – fel kan uppstå.
Förbereda den trådlösa
fjärrkontrollen
Sätta i batteriet
Om skivmagasinet inte stängs ordentligt
Ta ur det, tryck på utmatningsknappen
(EJECT) och sätt i det igen.
Använd apparaten med luckan stängd
Främmande föremål kan annars komma in i
apparate¢n och smutsa ned linserna inuti CDväxlaren.
Observera
•Lämna inte skivmagasinet på platser med
hög temperatur eller fuktighet, t ex på
instrumentbrädan eller i bakrutan där
skivorna kan utsättas för direkt solljus.
•Lägg aldrig mer än en CD-skiva på en
skivtallrik, eftersom det kan skada både
skivorna och CD-växlaren.
•Tappa inte magasinet och utsätt det inte för
kraftiga stötar.
När skivtallriken matas ut
Normalt matas inte skivtallrikarna ut ur
magasinet. Om så ändå sker är det enkelt att
sätta i dem igen.
Med den avskurna bilte mot dig sätter di i
skivtallrikens högra hörn i öppningen. Tryck sedan
in det vänstra hörnet tills ett klick hörs.
µ
+-sidan vänd uppåt
Ersätt batteriet med ett Sony CR2025 eller ett
Duracell DL-2025 litiumbatteri. Om du väljer
ett annat batteri riskerar du brand eller
explosion.
När batteriet börjar bli svagt fungerar inte
fjärrkontrollen.
Batteriets livslängd är ungefär sex månader,
med det beror naturligtvis på hur mycket det
används.
Varning
Batteriet kan explodera om det hanteras på
ett felaktigt sätt. Försök inte ladda om, ta
isär eller tända eld på batteriet.
Om litiumbatteriet
•Förvara batteriet oåtkomligt för barn.
Kontakta läkare omedelbart om någon skulle
råka svälja batteriet.
•Torka batteriet med en trasa så att kontakten
blir bra.
•Kontrollera att polerna sätts åt rätt håll när
du sätter i batteriet.
•Håll inte i batteriet med en pincett, eftersom
detta kan leda till kortslutning.
S
Komma igång
Observera
Sätt inte i skivtallriken upp och ned eller felvänd.
5
Page 32

AMS
Montera den trådlösa
fjärrkontrollen
Använd de medföljande kardborrbanden och
fäst fjärrkontrollen på en plats där den inte är
ivägen när du kör.
CD-växlaren
Kardborrband
Ändra
sändningsfrekvensen
Eftersom enheten behandlar CDuppspelningsljudet genom en FM-kanalväljare
kan störningar uppstå under uppspelningen.
Om så är fallet kan du ändra frekvens för den
S
modulerade RF-signal som överförs från den
dolda enheten. Ursprungsinställningen är 88,3
MHz.
1 Tryck på (REP) i två sekunder.
2 Tryck på vänster eller höger sida på
(AMS)-omkopplaren för att välja
frekvens.
Varje gång du trycker på denna knapp
ändras frekvensen enligt följande:
=:
88,3 MHz n 89,9 MHz n 89,7 MHz n
89,5 MHz n 89,3 MHz n 89,1 MHz n
88,9 MHz n 88,7 MHz n 88,5 MHz n
88,3 MHz
+:
88,3 MHz n 88,5 MHz n 88,7 MHz n
88,9 MHz n 89,1 MHz n 89,3 MHz n
89,5 MHz n 89,7 MHz n 89,9 MHz n
88,3 MHz
3 Tryck på (REP) i två sekunder.
Observera
Ställ även in FM-kanalen på samma frevens.
på den plats där
fjärrkontrollen ska
monteras
Lyssna på en CD-skiva
1 Slå på FM-delen på bilradion.
2 Justera överföringsfrekvensen med
fjärrkontrollen.
(88,3 MHz/88,5 MHz/88,7 MHz/88,9 MHz/
89,1 MHz/89,3 MHz/89,5 MHz/89,7 MHz/
89,9 MHz)
3 Tryck på ^.
CD-uppspelningen påbörjas.
Om enheten används i en bil utan tillbehörsläge
på tändlåset
Tryck på (OFF) på trådlösa fjärrkontrollen för att stänga
av systemet så att det inte drar på batteriet när motorn är
avstängd.
Om POWER SELECT-omkopplaren på den dolda enheten
är inställd på OFF och teckenfönstret på fjärrkontrollen är
avstängt, kan du inte börja spela upp CD:n med den
trådlösa fjärrkontrollen. I så fall trycker du på ^
fjärrkontrollen.
4 Justera volymen med volymreglaget på
bilradion
Alla spår spelas upp från början.
Söka efter ett visst spår
— Automatisk musiksökning (AMS)
Under uppspelningen trycker du på valfri
sida på (AMS) en gång för det spår som
du vill skippa.
Söka senare spårSöka tidigare spår
Söka en viss punkt i ett spår
— Manuell sökning
Under uppspelningen trycker du på och
håller ned (DISC+) eller (DISC–). Släpp
upp knappen när du har hittat önskad
del.
DISC
Sök framåt
DISC
Sök bakåt
6
Page 33

Söka en viss skiva
— Skivval
Under uppspelningen trycker du på
(DISC+) eller (DISC–) en gång för varje
skiva som du vill hoppa över.
DISC
DISC
När du vill söka senare skivor
När du vill söka tidigare skivor
Avbryta CD-uppspelningen
Tryck på (OFF).
Observera
• När uppspelningen av en CD avbryts kan du höra visst
brus från högtalarna. Om du vill förhindra att detta
inträffar vrider du ned volymen innan du avbryter
CD-uppspelningen.
• Om du stänger av tändningen utan att avbryta CDuppspelningen startas CD-uppspelningen automatiskt
från den position där den avbröts nästa gång du slår på
tändningen.
Lyssna på radion och kassettbandet
Kontrollera att CD är avstängd innan du sätter
på radion eller ett kassettband.
Observera
Se till att avbryta CD-uppspelningen, annars kan
radiomottagningen störas.
Spela upp spår flera
gånger
— Upprepad uppspelning
Du kan välja
• REP 1 för att upprepa spåret
• REP 2 för att upprepa skivan
Tryck på (REPEAT) eller (REP) flera
gånger tills den önskade inställningen
visas (REP 1 eller REP 2).
z REP 1 z REP 2 z Cancel (REP off)
Spårens repetering startar.
Om du vill återgå till normal uppspelning,
trycker du på (REP) tills “REP” försvinner.
Ändra utgångsnivån
Du kan välja utgångsnivå på CD-växlaren.
Normalt använder systemet ett förinställt
värde som du dock kan ändra.
1 Tryck på (REP) i två sekunder.
S
Komma igång/CD-växlaren
Spela upp spår i
slumpässig ordning
— Slumpmässig uppspelning
Du kan välja:
• SHUF 1 när du vill spela upp spåren på den
aktuella skivan i slumpmässig ordning.
• SHUF 2 när du vill spela upp alla spår i
slumpmässig ordning.
Tryck på (SHUFFLE) eller (SHUF) flera
gånger tills den önskade inställningen
visas (SHUF 1 eller SHUF 2).
z SHUF 1 z SHUF 2 z Cancel (SHUF off)
Spårens uppspelning i slumpmässig
ordning startar.
Om du vill gå tillbaka till normalt
uppspelningsläge trycker du på (SHUF) tills
“SHUF” försvinner.
2 Tryck lätt på (REP).
00 0
3
CD
LEVEL
Förinställt värde
3 Tryck på vänster eller höger sida på
(AMS) för att välja utnivå.
Sänka utnivån
=:
Öka utnivån
+:
0 1CD
LEVEL
00 00
4
CD
LEVEL
4 Tryck på (REP) i två sekunder.
7
Page 34

Ytterligare
information
Försiktighetsåtgärder
•Om bilen har stått parkerad i direkt solljus så
att den har blivit märkbart varm, bör du låta
CD-växlaren svalna innan du använder den.
•Kontrollera alla anslutningar om enheten inte
får någon ström. Om allt ser ut att vara i
ordning kontrollerar du säkringen.
•Undvik att montera CD-växlare, trådlös
fjärrkontroll eller ansluten fjärrkontroll på
följande slags platser:
— med temperaturer på över 55°C
— med direkt solljus
— nära varma källor, t ex varmluftsutsläpp
— utsatta för regn eller fukt
— utsatta för mycket damm eller smuts
— med mycket vibrationer.
Om du har frågor om eller problem med CDväxlaren kan du kontakta närmaste Sonyåterförsäljare.
S
Utsätt inte CD-skivor för direkt solljus eller
värmekällor, t ex varmluftsutblås. Lämna dem
inte heller i en bil som står parkerad i solen,
eftersom temperaturen inne i bilen kan bli
mycket hög.
Fel
Rengör skivan med en mjuk rengöringsduk
(tillval) innan du spelar den första gången.
Torka skivan från mitten och ut.
Använd inte rengöringsmedel, t ex bensin,
thinner eller andra lösningsmedel, eller
antistatspray som är avsedd för LP-skivor.
Rätt
Hantera CD-skivor
En smutsig eller repig skiva återger inte ljudet
på rätt sätt. Om du skall få optimalt ljud bör
du hantera skivorna på följande sätt:
Håll CD-skivan i kanterna och undvik att
vidröra själva skivytan.
Rätt
Fäst inte etiketter eller tejp på skivorna.
Fel
8
Fuktbildning
Vid regn eller på mycket fuktiga platser kan
fukt kondenseras på linserna inuti CDspelaren. Om detta inträffar fungerar inte CDspelaren som den ska. Ta ur CD-skivan och
vänta ca en timme tills fukten har
avdunstat.
Underhåll
Byta säkring
Om säkringen går, kontrollerar du
nätanslutningen och byter ut säkringen. Om
även den nya säkringen går kan det vara något
internt fel. Ta i så fall kontakt med närmaste
Sony-återförsäljare.
Varning
Använd aldrig en säkring med högre ampertal
än det angivna. Om du använder ett högre
ampertal kan detta leda till allvarliga skador.
Page 35

Kontrollernas placering
Fjärrkontrollen (RM-X57)
REP
REP
12
SHUF
5 3
CD
TRACK DISC
12
SHUF
Mer information om respektive knapp finns på den sida som anges.
1 Indikator för uppspelning/paus (()
Lyser under CD-uppspelning och blinkar
när du trycker på pausknappen.
2 Indikator för uppspelning med
repetition (REP)
3 Indikator för slumpmässig uppspelning
(SHUF)
4 Knapp för uppspelning med repetition/
inställning av kontrolläge (REP) 6, 7
5 Uppspelnings-/pausknapp (^) 6
Om du trycker på denna knapp under CD-
6 Skivnummerindikator (DISC)
7 Spårnummerindikator (TRACK)
8 Knapp för slumpmässig uppspelning
(SHUF) 7
9 Infraröd mottagare för den trådlösa
fjärrkontrollen
!º Avstängningsknapp (OFF) 6, 7
!⁄ AMS-knapp (Automatisk musiksökning/
manuell sökning) 6,7
!™ DISC-knapp (Skivval) 6,7
uppspelning, görs en paus. Om du trycker
en gång till på knappen fortsätter
uppspelningen.
OFF
DISC
AMS
DISC
S
Ytterligare information
9
Page 36

Kontrollernas placering
Trådlösa fjärrkontrollen (RM-X58)
REPEAT
SHUFFLE
OFF
DISC
AMS
DISC
1 Upprepad uppspelning (REPEAT)
2 Slumpmässig uppspelning (SHUFFLE)
3 Uppspelning/paus (^)
S
4 Strömbrytare (OFF)
5 Automatisk musiksökning/skivval
(AMS/DISC)
Snabbsökning av spår kan inte utföras
med hjälp av den trådlösa fjärrkontrollen.
10
Page 37

Tekniska data
CD-växlare (CDX-505RF)
System Digitalt ljudsystem för CD-
skivor
Frekvensgång 10 – 20.000 Hz
Svaj och fladder Ej mätbara gränser
Signal-/brusförhållande
94 dB
Utgångar BUS-kontrollerad utgång
(8-stift)
Analog ljudutgång
(RCA-kontakt)
Strömförlust 800 mA (vid uppspelning)
800 mA (vid
skivladdning/
-utmatning)
Arbetstemperatur –10 till +55°C
Mått Ca 262 × 90 × 181,5 mm
(b/h/d)
Vikt Ca 2,1 kg
Dold enhet
Frekvens 88,3 MHz/88,5 MHz/
88,7 MHz/88,9 MHz/
89,1 MHz/89,3 MHz/
89,5 MHz/89,7 MHz/
89,9 MHz
(går att växla mellan)
Mått Ca 124,8 × 30,0 × 99,8 mm
(b/h/d)
Vikt Ca 330 g
Fjärrkontrollen (RM-X57)
Mått Ca
Vikt Ca 120 g
148 × 30 × 15 mm
(b/h/d)
Trådlösa fjärrkontrollen (RM-X58)
Mått Ca
Vikt Ca 20 g
38,4 × 6,4 × 84,4 mm
(b/h/d)
exkl batteri
Allmänt
Medföljande tillbehör Skivmagasin (1)
Valfria tillbehör CD-adapter (för CD-singel)
Rätt till ändringar förbehålles.
Medföljande
monteringsdelan
(1 sats)
Litiumbatteri (CR2025) (1)
CSA-8
Skivmagasin XA-250
S
Ytterligare information
11
Page 38

Felsökning
Följande lista hjälper dig att åtgärda de flesta problem som kan uppstå med CD-växlaren.
Innan du går igenom listan bör du kontrollera att instruktionerna för installation och användning
har följts.
Allmänt
Problem
Apparaten fungerar inte.
Ljudet hoppar.
Skivmagasinet är inte låst i
CD-växlaren.
Felkoder
Följande felkoder blinkar i ca fem sekunder.
Orsak/Åtgärd
• Den inbyggda mikrodatorn fungerar inte som den ska.
n Tryck på RESET-knappen på den dolda enheten.
• Kablarna har inte anslutits på rätt sätt.
• CD-växlaren har placerats på ett ostadigt underlag.
n Placera den på ett stadigt underlag.
• Smutsig eller repig skiva.
n Rengör eller byt ut den.
Ta ur magasinet, tryck på utmatningsknappen (EJECT) och sätt
i magasinet igen tills det är låst.
Felkod Orsak
S
Om ovanstående anvisningar inte avhjälper problemet, kontaktar du närmaste Sony-återförsäljare.
Det finns inget skivmagasin i CDväxlaren.
Det finns ingen skiva i magasinet.
Skivan är smutsig.
Skivan är isatt upp och ned.
CD-växlaren fungerar inte.
Åtgärd
Sätt i magasinet med skivorna.
Ta ur magasinet och sätt i en skiva.
Rengör skivan.
Sätt i skivan rätt.
Tryck på RESET-knappen på den dolda
enheten.
12
Page 39

Register
A, B
Bandspelning 7
C, D, E
CD-uppspelning 6
F, G, H, I, J, K, L, M, N, O, P, Q
Fjärrkontrollen 9
R
Radion 7
S
Säkring 8
Slumpmässig uppspelning 7
T
Trådlösa fjärrkontrollen 5, 6, 10
U, V, W, X, Y, Z
Upprepad uppspelning 7
Utnivå 7
Å
Återställa 4
Ä, Ö
Ändra
Frekvens 6
Utnivå 7
S
Ytterligare information
13
Page 40

Bem-vindo!
Obrigado por ter adquirido o sistema de
permutador de CD da SONY. Este aparelho
permite-lhe ouvir CD no permutador.
Pode utilizar este aparelho com o receptor de
FM do autorádio.
P
2
Page 41

Índice
Como começar
Reinicializar o aparelho...................................... 4
Preparar o permutador de CD .......................... 4
Preparar o telecomando sem fios ..................... 5
Alterar a frequência de transmissão................. 6
Permutador de CD
Reprodução de um CD ....................................... 6
Reproduzir faixas por ordem aleatória
— Reprodução aleatória ............................... 7
Repetir a reprodução das faixas
— Reprodução repetitiva .............................. 7
Alterar o nível de saída ...................................... 8
Informações adicionais
Precauções ............................................................ 8
Notas sobre CD ................................................... 9
Manutenção ......................................................... 9
Localização dos comandos .............................. 10
Especificações .................................................... 12
Guia de resolução de prablemas..................... 13
Índice .................................................. última capa
P
3
Page 42

Como começar
Reinicializar o aparelho
Antes de pôr o aparelho a funcionar pela
primeira vez ou depois de substituir a bateria
do automóvel, tem de voltar a reinicializá-lo.
Carregue no botão RESET com um objecto
ponteagudo como, por exemplo, uma caneta
esferográfica.
Botão RESET
Preparar o permutador de
CD
P
1
Com o lado da seta virado para cima
2
3
Destranque
µ
Solte e abra.
Carregador de CD
Para retirar
Tab
µ
Superfície com etiqueta virada para cima
4
10 discos, um em cada compartimento
4
EJECT
Page 43

Utilize o carregador de discos fornecido ou o
carregador XA-250. Não pode utilizar o
carregador de discos XA-10B com este
aparelho. Se utilizar outro carregador qualquer
pode provocar uma avaria.
Nota
• Para ouvir um CD de 8 cm, é necessário utilizar o
adaptador de CD CSA-8 da Sony, vendido
separadamente. Utilize unicamente o adaptador
especificado, pois se não o fizer, pode danificar o aparelho.
Se utilizar outro tipo de adaptador, o aparelho pode não
funcionar correctamente. Quando utilizar o adaptador de
CD da Sony, verifique se os três prendedores do
adaptador estão presos correctamente ao CD de 8 cm.
• Se introduzir o adaptador de CD CSA-8 da Sony no
carregador sem um disco, pode ocorrer uma avaria.
Se o carregador de CD não fechar
correctamente
Retire o carregador. Em seguida, carregue
(EJECT) e volte a colocá-lo.
Feche a porta do aparelho
Se não o fizer, podem cair objectos estranhos
para dentro do aparelho, e sujar as lentes do
permutador de CD.
Notas sobre o carregador de CD
•Não deixe o carregador de CD em locais
expostos a temperaturas elevadas ou em
zonas muito húmidas, tais como o tablier ou
a prateleira traseira do automóvel, locais
onde o carregador de CD ficaria exposto à
incidência directa dos raios solares.
•Não coloque mais do que um disco de cada
vez num tabuleiro. Caso contrário, o
permutador e os discos podem ficar
danificados.
•Não deixe cair o carregador de CD nem o
submeta a choques violentos.
Se o tabuleiro sair do carregador
Normalmente, os tabuleiros não saiem do
carregador. No entanto, se forem puxados para
fora do carregador, é facil voltar a introduzilos.
Preparar o telecomando
sem fios
Colocar a pilha
µ
lado + para cima
Substitua a pilha por uma pilha de lítio Sony
CR2025 ou Duracell DL-2025. A utilização de
outro tipo de pilha pode provocar incêndios
ou explosões.
Quando a pilha estiver gasta, o telecomando
deixará de funcionar.
A pilha dura cerca de seis meses consoante as
condições em que é utilizada.
ATENÇÃO
Se for mal utilizada, a pilha pode explodir.
Não recarregue a pilha, não a abra nem a
deite para o lume.
Notas sobre as pilhas de lítio.
•Mantenha as pilhas longe do alcance das
crianças.
Se alguém engolir a pilha, consulte
imediatamente o médico.
•Limpe a pilha com um pano seco para
assegurar um bom contacto.
•Quando colocar as pilhas, respeite a
polaridade indicada nas mesmas.
•Não agarre na pilha com pinças de metal pois
pode provocar um curto circuito.
P
Como começar
Com a parte recortada do tabuleiro virada para si,
introduza o canto direito do tabuleiro na ranhura
e depois empurre o canto esquerdo para dentro
até ouvir um estalido.
Nota
Não introduza o tabuleiro de cabeça para baixo ou na
direcção errada.
5
Page 44

AMS
Instalar o telecomando sem fios
Utilize as fitas de velcro fornecidas e monte o
telecomando sem fios num local onde não
interfira com a condução.
Permutador de CD
Fitas de velcro
ao suporte de
montagem
Alterar a frequência de
transmissão
Como esta unidade processa o som de
reprodução do CD através de um sintonizador
FM, pode haver interferências durante a
reprodução do CD. Neste caso, altere a
frequência do sinal RF modulado transmitido
a partir da unidade de controlo. A regulação
inicial é de 88,3 MHz.
P
1 Carregue em (REP) durante dois
segundos.
2 Para seleccionar a frequência, carregue
no lado esquerdo ou direito de (AMS).
Sempre que carregar em (AMS), a
frequência altera-se da seguinte forma:
=:
88,3 MHz n 89,9 MHz n 89,7 MHz n
89,5 MHz n 89,3 MHz n 89,1 MHz n
88,9 MHz n 88,7 MHz n 88,5 MHz n
88,3 MHz
+:
88,3 MHz n 88,5 MHz n 88,7 MHz n
88,9 MHz n 89,1 MHz n 89,3 MHz n
89,5 MHz n 89,7 MHz n 89,9 MHz n
88,3 MHz
3 Carregue em (REP) durante dois
segundos.
Nota
Não se esqueça de regular a frequência do sintonizador de
FM para a frequência que acabou de seleccionar.
Reprodução de um CD
1 Ligue o sintonizador FM do equipamento
áudio do seu automóvel.
2 Regule a frequência de transmissão
seleccionada com o telecomando com
fios.
(88,3 MHz/88,5 MHz/88,7 MHz/88,9 MHz/
89,1 MHz/89,3 MHz/89,5 MHz/89,7 MHz/
89,9 MHz)
3 Carregue em ^.
A reprodução do CD inicia-se.
Quando utilizar o aparelho num automóvel sem
posição acessórios na ignição
Quando o motor estiver desligado, não se esqueça de
carregar em (OFF) no telecomando sem fios para desligar
o sistema evitando o desgaste da bateria.
Se o selector POWER SELECT da unidade de controlo
estiver colocado na posição OFF e o visor do telecomando
com fios estiver desligado, não poderá iniciar a reprodução
do CD com o telecomando sem fios. Neste caso, carregue
em ^ no telecomando com fios.
4 Regule o volume com o controlo de
volume do equipamento áudio do
automóvel.
São reproduzidas todas as faixas desde o
início.
Localizar uma faixa específica
— Sensor automático de música (AMS)
Durante a reprodução, carregue num dos
lados de (AMS) o número de vezes
correspondente ao número de faixas que
pretende saltar.
Para localizar as
faixas anteriores
Para localizar as
faixas seguintes
6
Page 45

Localizar um ponto específico de
uma faixa
— Pesquisa manual
Durante a reprodução, carregue sem
soltar em (DISC+) ou (DISC–). Solte
quando localizar a parte pretendida.
DISC
DISC
Para procurar para a frente
Para procurar para trás
Localizar um disco específico
— Seleccionar disco
Durante a reprodução, carregue em
(DISC+) ou (DISC–) o número de vezes
correspondente ao número de discos que
pretender saltar.
DISC
DISC
Para localizar os discos
seguintes.
Para localizar os discos
anteriores.
Parar a reprodução do CD
Carregue em (OFF).
Notas
• Depois de parar a reprodução do CD, pode ouvir barulho
proveniente dos altifalantes. Para evitar que isto
aconteça, antes de parar a reprodução, baixe o volume do
som.
• Se desligar a ignição do automóvel sem parar a
reprodução do CD, o aparelho retoma automaticamente a
reprodução do CD do ponto em que foi interrompida,
quando voltar a ligar a ignição.
Ouvir o rádio ou uma cassete
Verifique se parou a reprodução do CD antes
de começar a ouvir o rádio ou uma cassete.
Reproduzir faixas por
ordem aleatória
— Reprodução aleatória
Pode seleccionar:
•SHUF 1 para reproduzir as faixas de um
disco por ordem aleatória.
•SHUF 2 para reproduzir todos os discos por
ordem aleatória.
Carregue várias vezes em (SHUFFLE) ou
(SHUF) até aparecer a indicação
desejada (SHUF1 ou SHUF2).
z SHUF 1 z SHUF 2 z Cancel (SHUF off)
Inicia-se a leitura aleatória.
Para voltar ao modo de reprodução normal,
carregue em (SHUF) até que a indicação
“SHUF” desapareça.
Repetir a reprodução das
faixas
— Reprodução repetitiva
Pode seleccionar:
•REP 1 para repetir a faixa.
•REP 2 para repetir o disco.
Carregue várias vezes em (REPEAT) ou
(REP) até que apareça a indicação
desejada (REP 1 ou REP”).
z REP 1 z REP 2 z Cancel (REP off)
P
Como começar/Permutador de CD
Nota
Não se esqueça de parar a reprodução do CD pois, se não o
fizer, pode provocar interferências na recepção de estações
de rádio.
Inicia-se a leitura repetida.
Para voltar ao modo de reprodução normal,
carregue em (REP) até que a indicação “REP”
desapareça.
7
Page 46

Alterar o nível de saída
Pode seleccionar o nível de saída do
permutador de CD. Normalmente, o sistema é
utilizado com o nível de saída inicial; se for
necessário, altere o nível de saída.
1 Carregue em (REP) durante dois
segundos.
2 Carregue levemente em (REP).
00 0
3
CD
LEVEL
Definição inicial
3 Carregue no lado direito ou esquerdo de
(AMS) para seleccionar o nível de saída.
Para diminuir o nível de saída
=:
Para aumentar o nível de saída
+:
4 Carregue em (REP) durante dois
P
segundos.
0
1
CD
LEVEL
00 00
4
CD
LEVEL
Informações
adicionais
Precauções
•Se tiver estacionado o automóvel ao sol, a
temperatura no seu interior sobe
consideravelmente, pelo que deve deixar o
sistema arrefecer antes de o ligar.
•Se o aparelho não estiver a receber corrente,
verifique as ligações. Se estiverem correctas,
verifique o fusível.
•Evite instalar o permutador de CD, o
telecomando sem fios e o telecomando com
fios em locais:
— expostos a temperaturas superiores a
55°C.
— expostos à incidência directa dos raios
solares.
— próximos de fontes de calor (tais como
aquecedores).
— expostos à chuva ou à humidade.
— expostos a poeiras ou sujidade excessivas.
— expostos a vibrações excessivas.
Se tiver dúvidas ou problemas relativos ao
sistema que não estejam abrangidos neste
manual, consulte o agente Sony.
8
Page 47

Notas sobre CD
Um CD sujo ou defeituoso pode provocar
oscilações de som durante a reprodução. Para
obter um som de boa qualidade, siga as
instruções indicadas abaixo.
Segure no disco pela extremidade, tendo o
cuidado de não tocar na superfície sem
etiqueta.
Correcto
Não cole papel nem fita adesiva nos discos.
Incorrecto
Não exponha os discos à incidência directa dos
raios solares nem a fontes de calor como
condutas de ar quente. Não deixe os discos
num automóvel estacionado ao sol porque a
temperatura no seu interior pode aumentar
consideravelmente.
Incorrecto
Condensação de humidade
Em dias de chuva ou em zonas muito
húmidas, a humidade pode condensar-se na
lente que se encontra no interior do aparelho e
prejudicar o seu funcionamento. Neste caso,
retire o carregador de discos e espere cerca
de uma hora até que a humidade se
evapore.
Manutenção
Substituir o fusível
Se o fusível rebentar, verifique as ligações e
substitua o fusível. Se o fusível voltar a
rebentar, pode haver um mau funcionamento
interno. Nesse caso, consulte o agente Sony
mais próximo.
Atenção
Utilize um fusível com a amperagem
especificada.
A utilização de um fusível com uma
amperagem superior pode causar danos
graves.
P
Permutador de CD/Informações adicionais
Antes de reproduzir os CD, limpe-os com um
pano de limpeza. Limpe os CD partindo do
centro para as extermidades.
Não utilize dissolventes, tais como benzina,
diluentes, produtos de limpeza à venda no
mercado ou sprays anti-electricidade estática
destinados aos discos de vinil.
Correcto
9
Page 48

Localização dos comandos
Telecomando com fios (RM-X57)
5 3
CD
Para mais informações, consulte as páginas.
1 Indicação ( (reprodução/pausa)
Acende-se durante a reprodução de CD e
começa a piscar quando se carrega na tecla
de pausa.
2 Indicação REP (reprodução repetitiva)
P
3 Indicação SHUF (reprodução aleatória)
4 Tecla REP (reprodução repetitiva/
definição do modo de controlo) 6, 7, 8
5 Tecla ^ (reprodução/pausa) 6
Se carregar nesta tecla durante a
reprodução, o CD entra em modo de
pausa. Se carregar novamente, a
reprodução continua.
REP
REP
12
SHUF
TRACK DISC
12
SHUF
OFF
DISC
AMS
DISC
6 Indicação DISC (número do CD)
7 Indicação TRACK (número da faixa)
8 Tecla SHUF (reprodução aleatória) 7
9 Receptor de infravermelhos para o
telecomando sem fios.
!º Tecla OFF 6, 7
!⁄ Tecla AMS (Sensor automático de
música/pesquisa manual) 6, 8
!™ Tecla DISC (Selecção do disco) 7
10
Page 49

Telecomando sem fios (RM-X58)
REPEAT
SHUFFLE
OFF
DISC
AMS
DISC
1 Tecla REPEAT (Reprodução repetitiva)
2 Tecla SHUFFLE (Reprodução aleatória)
3 Tecla ^ (Reprodução pausa)
4 Tecla OFF
5 Tecla AMS/DISC (Sensor automático de
música/selecção de disco)
Não é possível executar a busca manual
com o telecomando sem fios.
P
Informações adicionais
11
Page 50

Especificações
Permutador de CD (CDX-505RF)
Sistema Sistema digital áudio de
Resposta em frequência 10 – 20.000 Hz
Vibração e oscilação Inferior ao limite
Relação sinal/ruído 94 dB
Terminais de saída Terminal BUS de controlo
Saída 800 mA (durante a
Temperatura de funcionamento
Dimensões Aprox. 262 × 90 × 181,5
Peso Aprox. 2,1 Kg
CD
mensurável
de saída (8 pinos)
Terminal de saída áudio
analógica (pino RCA)
reprodução)
800 mA (durante a
introdução ou a ejecção de
um CD)
–10°C a +55°C
mm (l/a/p)
Unidade de controlo
Frequência 88,3 MHz/88,5 MHz/
P
Dimensões Aprox.
Peso Aprox. 330 g
88,7 MHz/88,9 MHz/
89,1 MHz/89,3 MHz/
89,5 MHz/89,7 MHz/
89,9 MHz
(comutáve)
124,8 × 30,0 × 99,8 mm
(l/a/p)
Telecomando com fios (RM-X57)
Dimensões Aprox.
Peso Aprox. 120 g
148 × 30 × 15 mm
(l/a/p)
Telecomando sem fios (RM-X58)
Dimensões Aprox.
Peso Aprox. 20 g não incluindo
38.4 × 6.4 × 84.4 mm
(l/a/p)
as pilhas
Generalidades
Acessórios fornecidos Carregador de CD (1)
Acessórios opcionais Adaptador individual de
Design e especificações sujeitos a alterações sem aviso
prévio.
Paças para instalação e
ligações (1 conjunto)
Pilha de lítio (CR2025) (1)
CD CSA-8
Carregador de CD XA-250
12
Page 51

Guia de resolução de problemas
A lista de verificação abaixo vai ajudá-lo a resolver a maioria dos problemas que possam ocorrer
com o aparelho.
Antes de consultar esta lista de verificação, leia os procedimentos relativos à ligação e ao
funcionamento do aparelho.
Generalidades
Problema
O aparelho não funciona.
O som oscila.
O carregador de CD não está
fixo no permutador de CD.
Mensagens de erros
As indicações a seguir piscam durante cerca de cinco segundos.
Causa/Solução
• O micro-computador incorporado avariou-se.
n Carregue na tecla RESET na unidade de controlo.
• Os cabos de ligação não estão correctamente ligados.
• O permutador de CD está instalado numa superfície instável.
n Volte a instalar o permutador numa superfície estável.
• O CD está sujo ou danificado.
n Limpe-o(s) ou substitua-o(s).
Retire o carregador de CD, carregue (EJECT) e, em seguida,
volte a introduzir o carregador de CD até que o mesmo fique
bem fixo.
Mensagem Causa
O carregador de CD não está
introduzido no permutador de CD.
O carregador de CD não possui
nenhum CD.
O CD está sujo.
O CD foi introduzido ao contrário.
O permutador de CD não funciona
devido a algum problema.
Se as soluções acima descritas não contribuirem para resolver a situação, consulte o seu agente Sony.
Solução
Introduza o carregador de CD, com
discos, no permutador de CD.
Retire o carregador de CD e introduza
os CD.
Limpe o CD.
Introduza o CD correctamente.
Carregue na tecla RESET na unidade
oculta.
P
Informações adicionais
13
Page 52

Índice
A, B, C, D, E
Alterar
a frequência 6
o nível de saída 8
F, G, H, I, J, K, L, M
Fusível 9
N, O, P, Q
Nível de saída 8
P
R, S
Rádio 7
Reinicializar 4
Reprodução repetitiva 7
Reprodução aleatória repetitiva 7
Reproduzir um CD 6
Reproduzir uma cassete 7
T, U, V, W, X, Y, Z
Telecomando com fios 10
Telecomando sem fios 5, 6, 11
14
Sony Corporation Printed in Thailand
 Loading...