

Page 1
4-234-046-22 (2)
Compact Disc
Player
Operating Instructions
FR
US
Mode d’emploi
CDP-CE575
FRESFR
© 2001 Sony Corporation
Page 2

This Class B digital apparatus complies with
Canadian ICES-003.
CAUTION
TO PREVENT ELECTRIC SHOCK, DO NOT USE
THIS POLARIZED AC PLUG WITH AN
EXTENSION CORD, RECEPTACLE OR OTHER
OUTLET UNLESS THE BLADES CAN BE FULLY
INSERTED TO PREVENT BLADE EXPOSURE.
About this manual
The instructions in this manual is for CDP-CE575.
Tip
Instructions in this manual describe the controls on
the player.
You can also use the controls on the remote if they
have the same or similar names as those on the
player.
US
2
Page 3

Table of Contents
Parts Identification 4
Front Panel ..............................................................................................................................4
Rear Panel................................................................................................................................4
Remote Control .......................................................................................................................5
Getting Started
Inserting Batteries Into the Remote Control............................................................................6
Hooking Up the System ..........................................................................................................6
Connecting Another CD Player...............................................................................................8
Playing CDs
Loading a CD ..........................................................................................................................9
Playing the CD –– Normal Play/Shuffle Play/Repeat Play.....................................................9
Using the CD display ............................................................................................................11
Replacing Discs While Playing a Disc..................................................................................12
Programming the CD tracks .................................................................................................. 13
Fading In or Out ....................................................................................................................14
Recording From CDs
Recording a CD by Specifying Tape Length (Time Edit).....................................................14
Adjusting the Recording Level (Peak Search) ......................................................................15
FRUS
Storing Information About CDs (Custom Files)
What You Can Do With the Custom Files ............................................................................ 16
Labeling Discs (Disc Name) .................................................................................................16
Using the Player with Another Component
Controlling Another CD Player (Advanced Mega Control) .................................................18
Playing Alternately (No-Delay Play/X-Fade Play) .............................................................. 19
Additional Information
Using the CONTROL A1II control system...........................................................................20
Precautions ............................................................................................................................22
Notes on CDs.........................................................................................................................23
Troubleshooting.....................................................................................................................24
Specifications ........................................................................................................................24
US
3
Page 4
Parts Identification
Front Panel
The items are arranged in alphabetical order.
Refer to the pages indicated in parentheses ( ) for details.
CHECK qh (13)
CLEAR qj (13, 14, 16, 17)
CONTINUE 2 ( 9, 13, 15, 18)
DISC 1–5 3 ( 9, 10, 13)
Disc compartment ws (9)
DISC SKIP 9 (9, 12, 13)
Display 4 (11)
EX-CHANGE 8 (12, 15)
FADER ql (14, 20)
MEGA CONTROL 0 (18, 19)
MENU wf (8, 16, 17)
Rear Panel
2ND CD IN jacks 3 (8)
ANALOG OUT L/R jacks 4 (6)
CONTROL A1II jacks 1 (6, 20)
DIGITAL OUT OPTICAL jack 2 (7)
Mains lead 5 (6)
US
4
PEAK SEARCH qk (15)
PHONES jack wh (10)
POWER 1 (7, 9, 16 )
PROGRAM qd (9, 13, 18)
Remote sensor wa (6)
REPEAT qf (10, 18)
SHUFFLE qs (9, 10, 18)
TIME EDIT qg (14)
TIME/TEXT w; (11)
X-FADE/NO DELAY wg (19, 20)
BUTTON DESCRIPTIONS
A OPEN/CLOSE wj (7, 9, 10, 11)
H 5 (9, 13, 15, 18, 20, 22)
X 6 (10, 15, 18, 22)
x 7 (10, 15, 18)
lAMSL (DISC) dial qa (10,
13, 15, 17, 18, 19)
m/M (AMS+/–) wd (10, 14, 17,
18)
Page 5
Remote Control
Parts Identification
ANALOG OUT LEVEL +/– wh (6,
7, 10)
CD1/2/3 switch 1 (7)
CHECK 9 (13)
CLEAR ws (13, 14, 16, 17)
CONTINUE 3 ( 9, 13, 15, 18)
DISC/CAPS 6 (10, 17)
DISC SKIP +/– qh (9, 12, 13)
ENTER wa (17)
FADER/DEL w; (14, 20)
HIGH-LIGHT wd (12)
MEGA CONTROL 4 (18, 19)
MUSIC SCAN qa (10)
NAME INPUT qs (17)
NO DELAY ql (19, 20)
Number buttons 7 (10, 13, 17)
PROGRAM qj (9, 13, 18)
REPEAT 0 (10, 18)
SHUFFLE 2 (9, 10, 18)
TIME/TEXT/SPACE 5 (11, 17)
X-FADE qk (19, 20)
BUTTON DESCRIPTIONS
>10 8 (10, 13)
N wf (9, 13, 15, 18, 20, 22)
X qd (10, 15, 18, 22)
x wg (10, 15, 18)
./> qf (10, 13, 15, 17, 18,
19)
m/M qg (10, 14, 17, 18)
US
5
Page 6
Getting Started
Inserting Batteries Into
the Remote Control
You can control the player using the supplied
remote.
Insert two R6 (size AA) batteries by matching
the + and – on the batteries to the diagram
inside the battery compartment.
Insert the negative (–) end first, then push in
and down until the positive (+) end clicks into
position.
When using the remote, point it at the remote
sensor
Tip
When the remote no longer operates the system,
replace both batteries with new ones.
Note
• Do not leave the remote near an extremely hot or
• Do not drop any foreign object into the remote
• Do not expose the remote sensor to direct sunlight
• If you don’t use the remote for an extended period
on the player.
humid place.
casing, particularly when replacing the batteries.
or lighting apparatuses. Doing so may cause a
malfunction.
of time, remove the batteries to avoid possible
damage from battery leakage and corrosion.
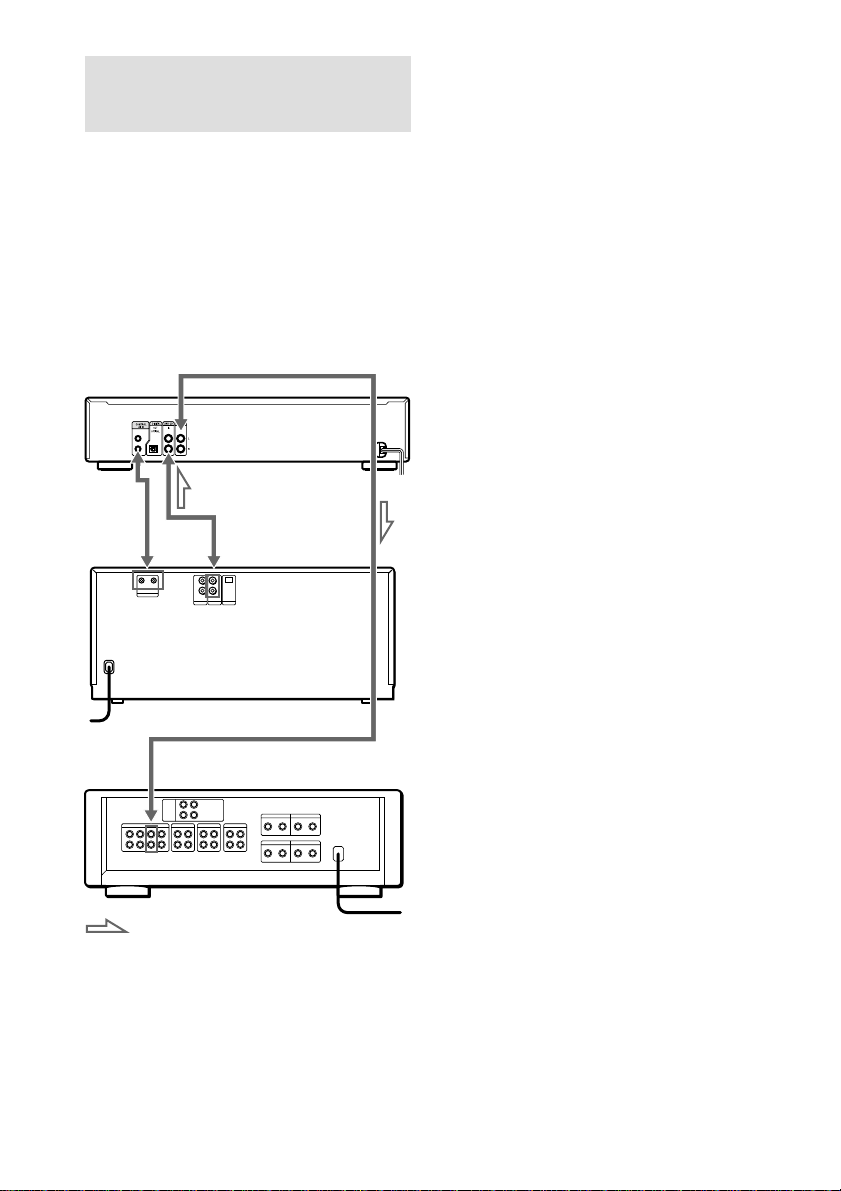
Hooking Up the System
Hookups
This section describes how to hook up the CD
player to an amplifier. Be sure to turn off the
power of each component before making the
connections.
CD player
ANALOG OUT
(Red) (R)
Audio input
(White) (L)
: Signal flow
Tips
• You can adjust the analog output level to the
amplifier using the remote comes with this player.
Press ANALOG OUT LEVEL +/– on the remote.
You can reduce the output level up to –20 dB.
When you reduce the analog output level, “FADE”
appears in the display.
• If you have a Sony component with the CONTROL
A1II jack, connect the component via the
CONTROL A1II jack. You can simplify the
operation of audio systems composed of separate
Sony components. For details, see “Using the
CONTROL A1II control system” on page 20.
ANALOG OUT
(White) (L)
Audio input
(Red) (R)
To mains
Amplifier
To mains
US
6
Page 7
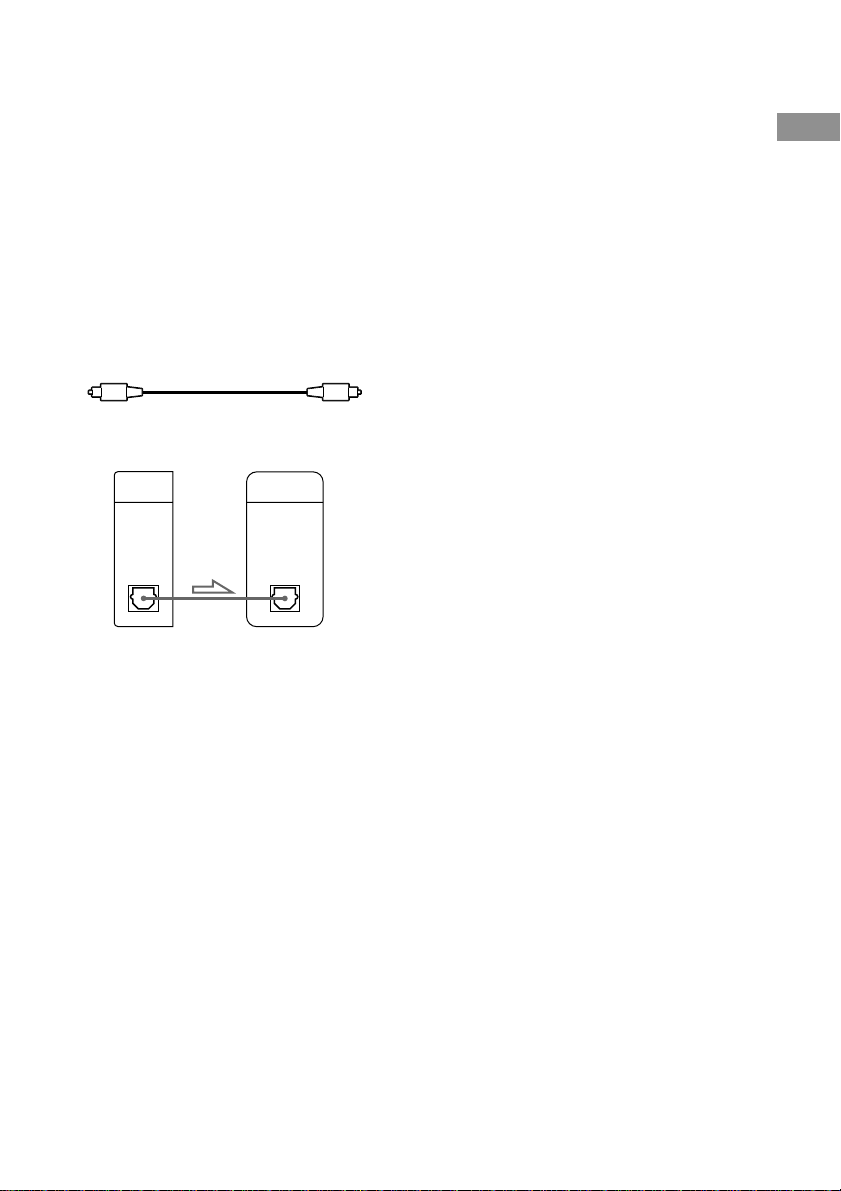
Making digital hookups
If you have a digital component such as a
digital amplifier, D/A converter, DAT, or MD,
connect the component via the DIGITAL OUT
(OPTICAL) connector using the optical cable
(not supplied). Take off the cap and plug in the
optical cable.
Note that you cannot use the following
functions when making this connection:
• Fading In or Out (see page 14)
• Adjusting the output level using the
ANALOG OUT LEVEL +/– buttons on the
remote
POC-15
Optical cable (not supplied)
CD player
DIGITAL
OUT
OPTICAL
Digital component
DIGITAL
INPUT
OPTICAL
When using another Sony CD player
in conjunction with this player
You can set the supplied remote to be effective
on this player only.
• If the other player’s command mode can be set:
Set the CD1/2/3 switch of this player’s remote to
CD1 (factory setting), and set the other player’s
remote to CD2 or CD3.
• If the other player’s command mode cannot be set:
Set the CD1/2/3 switch of this player’s remote to
CD2 or CD3.
When you change the command mode of the
remote, you have to set the command mode of each
player. For details, see “Changing the command
mode of the player” on page 8.
Transporting the player
Before transporting the player, follow the
procedure below to return the internal
mechanisms back to their original position.
1 Remove all the discs from the disc tray.
2 Press A OPEN/CLOSE to close the
disc tray.
“–NO DISC–” appears in the display.
3 Wait for 10 seconds, then press
POWER to turn off the player.
Getting Started
Note
When you connect via the DIGITAL OUT
(OPTICAL) connector, noise may occur when you
play CD software other than music, such as a CDROM.
US
7
Page 8
Connecting Another CD
Player
If you have a Sony CD player in which 5, 50,
200, 300, or 400 discs can be inserted and
which is equipped with the CONTROL A1II
(or CONTROL A1) jack and the command
mode of that player can be set to CD 3, you can
control that player as the second player with
this player. After connecting this player and an
amplifier, follow the procedure below.
Be sure to turn off the power of each player
before making this connection.
CDP-CE575
To
CONTROL
A1II
To ANALOG OUT
To 2ND CD IN
To audio output
CDP-CX400, etc.
3 Set the command mode of this player
to CD1 (factory setting) or CD2, and set
that of the second player to CD3.
Check the display for the current command
mode of this player, if the mode is CD3,
you have to change the mode as described
below.
When the setting of both players is
complete, set the CD1/2/3 switches on each
remote accordingly.
For details on how to operate the second
player, see “Controlling Another CD
Player” on page 18 and “Playing
Alternately” on page 19.
Notes
• Do not connect a player other than that you use as
the second player to the 2ND CD IN jacks of this
player.
• When connecting a second CD player, do not
connect the DIGITAL OUT (OPTICAL) connector
of this player to the amplifier.
Changing the command mode
of the player
1 Press MENU.
2 Turn l AMS L to select
“COMMAND MODE.”
To audio input
: Signal flow
1 Connect the players with an audio cord
(see also “Hookups” on page 6).
2 Connect the players with a monaural
(2P) mini-plug cord.
For details on this connection, see “Using
the CONTROL A1II control system” on
page 20.
US
8
3 Push l AMS L.
The current command mode appears.
4 Turn l AMS L to select CD1 or
CD2, then push l AMS L again.
Amplifier
Page 9
Playing CDs
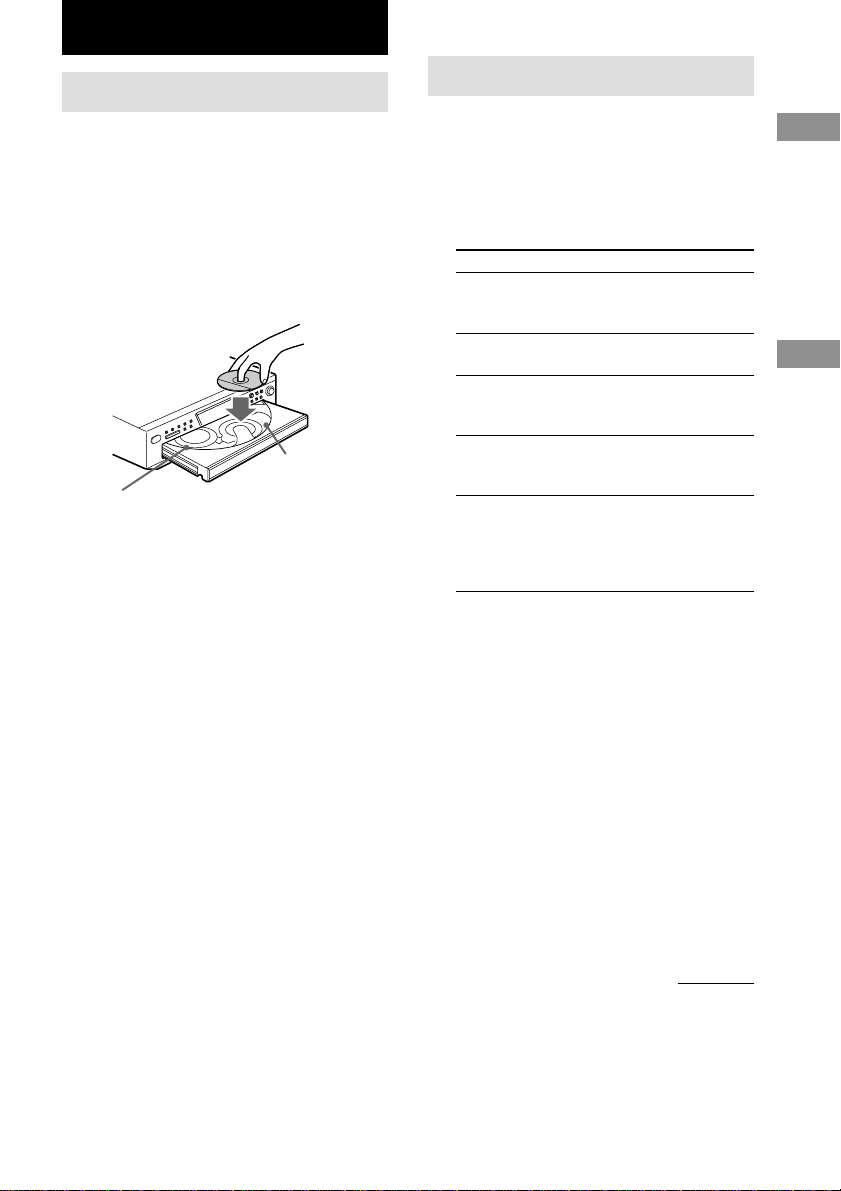
Loading a CD
1 Turn on the amplifier and select the CD
player position so that you can listen to
the sound from this player.
2 Press POWER to turn on the player.
3 Press AOPEN/CLOSE.
The disc compartment slides out.
4 Place a disc on the disc tray with the
label side up.
Disc number
When you play a CD
single, place it on the
inner circle of the tray.
5 To place other discs, press DISC SKIP
and place the discs in the order you
want to play.
Each time you press the button, the disc tray
turns and you can place the discs in the
empty disc compartments. The player plays
the disc in front of you first.
6 Press AOPEN/CLOSE to close the disc
compartment.
Playing the CD
––Normal Play/Shuffle Play/Repeat
Play
This unit lets you play the CD in different play
modes.
1 Select the play mode.
To play
All discs in the player
consecutively in the
order of disc number.
Only the disc you’ve
selected.
All tracks on all discs
in random order.
All tracks on the
specific disc in
random order.
The tracks on the CD
in the order you want
them to be played (see
“Programming the CD
tracks” on page 13).
2 Press H.
Tips
• You can select the disc you want to start playing
first by pressing one of the DISC 1 – 5 buttons.
• You can specify discs during ALL DISCS Shuffle
Play mode, and the tracks on the specified discs are
played in a random order.
Press DISC 1 – 5 to specify the discs after Step 1.
Semi-circles appear around the specified disc
numbers in the display. To cancel the selected discs,
press DISC 1 – 5 again. The semi-circles disappear.
To return to ALL DISCS Shuffle Play, press
SHUFFLE until “ALL DISCS SHUFFLE” appears
in the display.
Press
CONTINUE repeatedly
until “ALL DISCS”
appears.
CONTINUE repeatedly
until “1 DISC” appears.
SHUFFLE repeatedly
until ”ALL DISCS
SHUFFLE” appears.
SHUFFLE repeatedly
until ”1 DISC
SHUFFLE” appears.
PROGRAM.
Getting Started
Playing CDs
continued
US
9
Page 10

Playing the CD (continued)
Repeat Play Operations
You can play the CD tracks repeatedly in any
play modes.
To activate the Repeat Play function, press
REPEAT until “REPEAT’ appears in the
display.
To
Repeat only one track
Cancel Repeat Play
Press REPEAT
Until “REPEAT 1” appears
while playing the track you
want to repeat.
Until “REPEAT” or
“REPEAT1” disappears.
When you are in the Repeat Play function, the
player repeats the tracks as follows:
When the disc is
played in
Continuous Play
(ALL DISCS)
Continuous Play
(1 DISC)
Shuffle Play
(ALL DISCS)
Shuffle Play
(1 DISC)
Program Play
(page 13)
The player repeats
All the tracks on all discs
All the tracks on the current
disc
All the tracks on all discs in
random orders
All the tracks on the current
disc in random orders
The same program
Other Operations
To
Stop playback
Pause
Select a track
Do this
Press x.
Press X. Press X again or
H to resume play.
During play or pause, turn
lAMSL clockwise
(to go forward) or
counterclockwise (to go
backward) (or press >(
to go forward) or . (to
go backward) on the
remote).
To
Select a track directly
Go to the next disc
Select a disc directly
Find a point in a track
By scanning each track
for 10 seconds
(Music Scan)
Play tracks in random
order
Remove the CD
Adjust the volume
* When you directly locate a track numbered over 10,
press >10 first, then the corresponding number
buttons. To enter “0,” use button 10.
Example: To play track number 30
Press >10 first, then 3 and 10.
Tips
• You can adjust the analog output level with the
ANALOG OUT LEVEL +/– on the remote (page
6).
• You can adjust the headphones volume on the
remote. To adjust the volume, connect the
headphones to the PHONES jack and adjust the
volume with the ANALOG OUT LEVEL +/– on
the remote.
• If there is no CD in the player, “–NO DISC–”
appears in the display.
Notes
• If “OVER” appears in the display, the disc has
reached the end while you were pressing M. Press
m or turn lAMSL counterclockwise to go
back.
• If you press ANALOG OUT LEVEL +/– while
recording, the recording level will change even
when it is preset on the tape deck, etc.
Do this
Press the number button on
the remote.*
Press DISC SKIP.
Press DISC 1 – 5.
When using the remote,
follow the procedure below.
1 Press DISC.
2 Press the number button
of the disc.
3 Press ENTER.
Press and hold M or m
during playback, and
release at the desired point.
Press MUSIC SCAN. When
you find the track you want,
press H to start playing
the track. Each time you
press MUSIC SCAN, the
playing time changes
cyclically.
Press SHUFFLE until
“SHUFFLE” appears in the
display.
Press AOPEN/CLOSE.
Press ANALOG OUT
LEVEL +/– on the remote.
10
US
Page 11
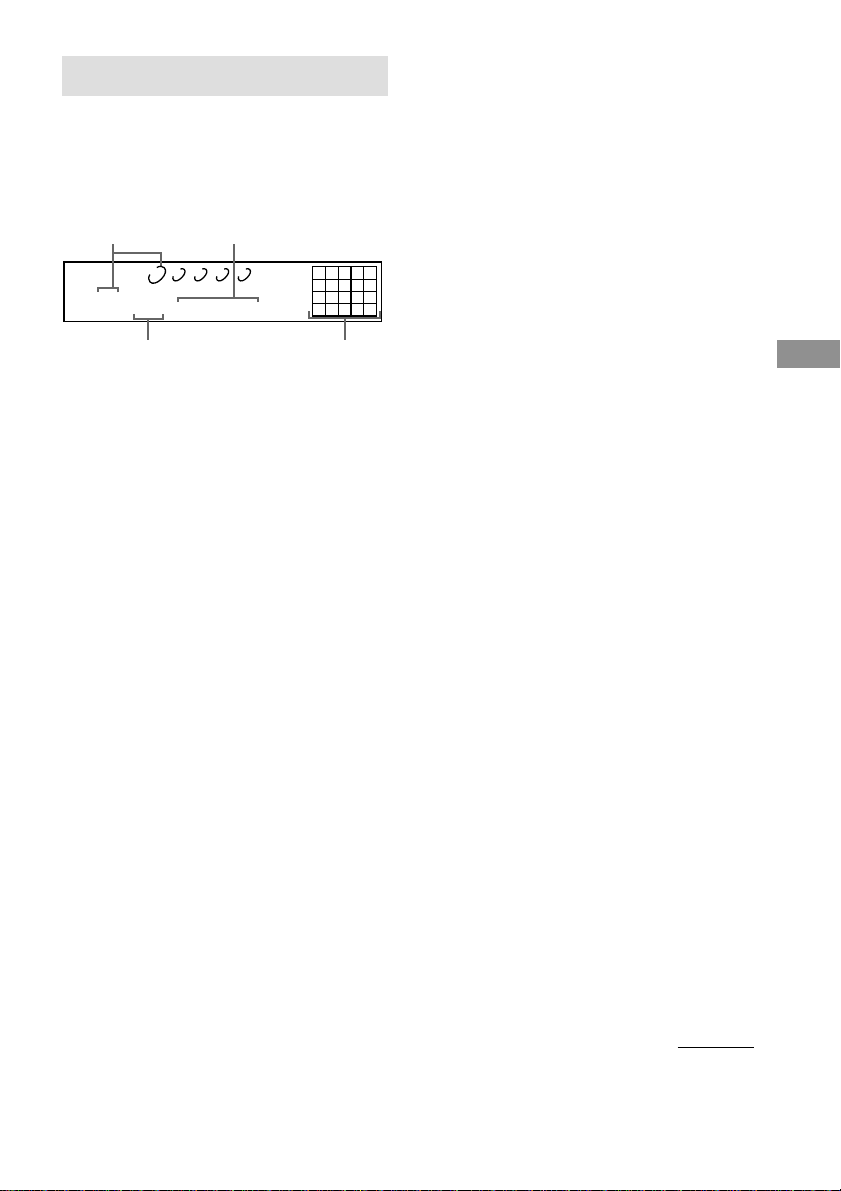
Using the CD display
You can check information about the disc using
the display.
In the stop mode
Press TIME/TEXT.
Current disc number
DISCSALL
DISC
TRACK
12345
1 1O 45.28
Total number of tracks
The display shows the current disc number, the
total number of tracks, total playing time, and
music calendar.
The information also appears when you press
AOPEN/CLOSE to close the disc tray.
Notes on the disc number
indications
• The red circle around a disc number
indicates the disc is ready to be played.
• When all the tracks on a disc have been
played, the semi-circle around the disc
number disappears.
• When a disc compartment is recognized as
empty, the semi-circled disc number
disappears.
During normal playback
While playing a disc, the display shows the
current disc number, track number, playing
time of the track and the music calendar.
The track numbers in the music calendar
disappear after they are played.
Total playing time
MIN SEC
CD1
Music calendar
12345
678910
To check the remaining time
Press TIME/TEXT during playback.
Each time you press this button while playing a
disc, the display changes as shown in the chart
below.
Playing time on the current track t
Remaining time on the current track t
Remaining time on the disc
Note
In Program Play mode,the remaining time on the disc
does not appear.
While playing a CD TEXT disc
CD TEXT discs have information, such as the
disc titles or artist names, memorized in a blank
space on the discs where, on normal discs,
there is no information. The display shows the
CD TEXT information of the disc so that you
can check the current disc title, artist name, and
track title. When the player detects CD TEXT
discs, the “CD TEXT” indication appears in the
display.
In the Stop Mode
Press TIME/TEXT.
Each time you press this button, the display
changes as shown in the chart below.
Disc title t Artist name t Total number of
tracks and total playing time
During normal playback
Press TIME/TEXT.
Each time you press this button, the display
changes as shown in the chart below.
Track title t Playing time on the current disc
t Remaining time on the current track t
Remaining time on the disc
If a title or name has more than 12 characters,
the first 12 characters will light up after the title
or name scrolls by in the display.
Playing CDs
continued
11
US
Page 12

Using the CD display (continued)
Replacing Discs While
Tip
Some CD TEXT discs have a feature to play only the
highlights of the discs.
Press HIGH-LIGHT on the remote to start playing
disc highlights in the stop mode.
“HIGH LIGHT” appears momentaly in the display
while playing disc highlights.
Notes
• The display may not show all the characters
depending on the disc.
• This player can only display the disc titles, track
titles and artist names from CD TEXT discs. Other
information cannot be displayed.
Playing a Disc
You can open the disc tray while playing a disc
so that you can check what discs are to be
played next and replace discs without
interrupting playback of the current disc.
1 Press EX-CHANGE.
The disc tray opens and two disc
compartments appear. Even if the player is
playing a disc, it doesn’t stop playing.
2 Replace discs in the compartments
with new ones.
The player plays the disc on the left side
compartment after the current disc, and then
the one on the right side compartment.
3 Press DISC SKIP.
The disc tray turns and other two disc
compartments appear.
4 Replace discs in the compartments
with new ones.
5 Press EX-CHANGE.
The disc tray closes.
While the disc tray is open by
pressing the EX-CHANGE button
• If the playback of the current disc ends, the
player stops playing. If the disc is played in
1 DISC Repeat Play mode (see page 10), the
current disc starts playing again.
• In ALL DISCS Shuffle Play mode (see page
9), tracks are reshuffled on the current disc.
• In Program Play mode (see page 13), only
the tracks on the current disc are played.
• Do not push the disc tray to close it in
Step 5, as you may damage the
player.
12
US
Page 13

Programming the CD
tracks
You can arrange the order of the tracks on the
discs and create your own program. The
program can contain up to 32 “steps” — one
“step” may contain a track or a whole disc.
1 Press PROGRAM so that “PROGRAM”
appears in the display before you start
playing.
If a program is already stored, the last step
of the program appears in the display. When
you want to erase the whole program, hold
down CLEAR until “CLEAR” appears in
the display (see page 14).
2 Press DISC 1 – 5 to select the disc.
“AL” in the display stands for “all” tracks.
When you want to program the whole disc
as one step, skip Step 3, and go to Step 4.
3 Turn lAMSL until the track you
want appears and push lAMSL to
select the track.
The track number that you programmed, the
playing order, and the total playing time
appear in the display.
If you’ve made a mistake
Press CLEAR, then repeat Step 3.
Tip
You can select the track using the number buttons
on the remote. To select a track with a number
over 10, use >10 (see page 10).
4 To program other discs or tracks, do
the following:
To program
Other discs
Other tracks on the
same disc
Other tracks on
other discs
Repeat Step(s)
2
3
2 and 3
To cancel Program Play
Press CONTINUE.
Tips
• You can create your program while checking the
disc labels.
While the disc tray is open, follow Steps 1 to 4 with
pressing the DISC SKIP button to check the disc
labels. If you close the disc tray before Step 5, the
total playing time appears in the display after a
while.
Note that, if the programmed track number isn’t
found on the disc, that step is automatically erased.
• The program remains even after the Program Play
ends. When you press the H button, you can play
the same program again.
• The program remains until you erase it. If you
replace discs, the programmed disc and track
numbers remain. So, the player plays only the
existing disc and track numbers. However, the disc
and track numbers that aren’t found in the player or
on the disc are deleted from the program, and the
rest of the program is played in the programmed
order.
• For the recording to the A side or B side of the
cassette tape, you can pause Program Play.
Note
The total playing time doesn’t appear when:
—You have programmed a track whose number
exceeds 20.
—The total playing time of the program exceeds 200
minutes.
Checking the track order
You can check your program before or after
you start playing.
Press CHECK.
Each time you press this button, the display
shows the track (the disc and track numbers) or
the disc (the disc number and “AL” indication)
of each step in the programmed order. After the
last step in the program, the display shows “–
END –” and returns to the original display. If
you check the order after you start playing, the
display shows only the remaining steps.
Playing CDs
5 Press H to start Program Play.
continued
13
US
Page 14
Creating your own program
(continued)
Changing the track order
You can change your program before you start
playing.
To
Erase a track
Erase the last track
in the program
Add tracks to the
end of the
program
Change the whole
program
completely
You need to
Press CHECK until the track you
don’t want appears in the display,
then press CLEAR.
Press CLEAR. Each time you
press the button, the last track will
be cleared.
Follow Steps 2 through 4 of the
programming procedure.
Hold down CLEAR until
“CLEAR” appears in the display.
Create a new program following
the programming procedure.
Fading In or Out
You can manually fade in or out to prevent
tracks from starting or ending abruptly.
Note that you cannot use this effect when you
use the DIGITAL OUT (OPTICAL) connector.
To
Start play fading in
End play fading out
Fading time lasts for 5 seconds.
Press FADER
During pause. “FADE” flashes.
The play fades in.
When you want to start fading
out. “FADE” flashes. Then play
fades out and the player pauses.
Recording From CDs
Recording a CD by
Specifying Tape Length
(Time Edit)
You can have the player create a program that
will fit the length of the tape.
The player automatically creates a program,
keeping the original order of the disc.
The program can contain up to 32 steps (a
pause inserted between steps is counted as one
step).
Note that tracks numbered over 20 cannot be
programmed automatically.
1 Press DISC SKIP to select the disc.
2 Press TIME EDIT repeatedly before you
start playing until “EDIT” appears and
“A” in the indication flashes in the
display.
3 Press m or M to specify the tape
length.
Each time you press these buttons, the
display changes as shown below, with the
tape length of one side following each
indication.
C-54 27.00C-46 23.00 C-60 30.00
- -. - - C-90 45.00
4 Press TIME EDIT to have the player
create the program.
The display shows the tracks to be recorded.
“B” in the indication flashes in the
display.
5 When you record on both sides of the
tape, press TIME EDIT again.
The player inserts a pause, then creates the
program for side B. The display shows the
programmed tracks.
When you record on one side of the tape,
skip this step.
C-74 37.00
14
US
Page 15

6 Start recording on the deck and then
press H on the player.
7 Reverse the tape to side B and press
H or X on the player to resume
playing the remaining tracks.
To cancel Time Edit
Press CONTINUE.
Tips
• You can program the tracks you want in advance.
Create a program selecting the desired tracks, then
follow Steps 2 to 7. Be careful that the total playing
time of the program does not exceed the tape length
of one side.
• You can set the tape length freely using
l AMS L.
Example:When the tape length of one side is 30
minutes and 15 seconds
1 To set the minutes, turn l AMS
L until “30” appears in the display,
then push l AMS L.
2 To set the seconds, turn l AMS
L until “15” appears in the display,
then push l AMS L.
• To check and change your program, see pages 13
and 14.
Adjusting the Recording
Level (Peak Search)
The player locates the highest level among the
tracks to be recorded to let you adjust the
recording level before you start recording.
1 Before you start playing, press PEAK
SEARCH.
“PEAK” flashes in the display and the
player starts scanning the disc searching for
the highest peak level.
After scanning all the tracks, the player
repeats the portion with the highest peak
level.
2 Adjust the recording level on the deck.
3 Press x on the player to stop Peak
Search.
“PEAK” disappears from the display.
Notes
• The portion with the highest level may differ every
time you try the adjustment on the same disc. The
difference is, however, so slight that you won’t
find any problem in adjusting the recording level
precisely.
• Peak Search does not operate while you open the
disc tray by pressing the EX-CHANGE button.
Playing CDs
Recording From CDs
15
US
Page 16

Storing Information About CDs (Custom Files)
What You Can Do With the
Custom Files
The player can store the information called
“Custom Files” for each disc. By using this
function, you can label discs using up to 12
characters.
Once you have stored Custom Files for a disc,
the player automatically recalls what you have
stored whenever you select the disc. Note that
Custom Files will be erased if you do not use
the player for about one month.
Where are Custom Files stored?
Custom Files are stored not on the disc, but in
the player’s memory. It means you cannot use
Custom Files when you play the disc on other
players.
Erasing all Custom Files of all discs
Turn off the player. While holding down
CLEAR, press POWER to turn on the player.
“ALL ERASE” appears in the display, and all
Custom Files will be erased.
Labeling Discs
(Disc Name)
You can label discs using up to 12 characters
and have the player display the Disc Name
each time you select the disc. The Disc Name
can be anything you like, such as a title,
musician’s name, category or date of purchase.
Tip
When you select a CD TEXT disc, the disc title is
stored as the Disc Name automatically.
If the disc title has more than 12 characters, the first
12 characters of the disc title are stored.
Note that you cannot change the Disc Name of the
CD TEXT disc.
Labeling discs on the player
1 Insert or select the disc.
2 Press MENU.
“DISC NAME” flashes in the display.
3 Push l AMS L.
“NAME INPUT” appears, then the flashing
cursor ( ) appears.
4 Turn l AMS L until the character
you want appears in the display.
The cursor disappears and the first space for
the Disc Name flashes.
As you turn l AMS L clockwise, the
characters appear in the following order.
Turn l AMS L counterclockwise to
go back to the previous character.
16
(space) A B C D E F G H I J K L M N O
P Q R S T U V W X Y Z a b c d e f g h i j
k l m n o p q r s t u v w x y z 0 1 2 3 4 5 6
7 8 9 ! “ # $ % & ’ ( ) * + , – . / : ; < = > ?
@ _
US
Page 17

5 Push l AMS L to select the
character.
The selected character lights up, and the
flashing cursor appears to indicate the next
space to be input.
To insert a space
Press M.
If you have made a mistake
Press m/M to flash the incorrect character,
then input the correct character.
6 Repeat Steps 4 and 5 to input more
characters.
7 Press MENU to store the Disc Name.
Repeat Steps 1 to 7 to assign Disc Names to
other discs.
If you have made a mistake while
inputting the character
To correct the character which has been
input
1 Press m or M until the incorrect character
flashes.
2 Turn l AMS L until the desired character
appears.
To correct the character currently being
input
1 Press CLEAR to delete the incorrect character.
2 Input the correct character.
To insert a character between the input
characters
Press m or M until the cursor moves to the former
of the two characters, then press ENTER and input
the correct character.
Labeling discs using the
remote
1 Press DISC in Continuous Play Mode.
2 Press the number button of the disc
you want to assign a Disc Name, and
then ENTER.
3 Press NAME INPUT.
The flashing cursor ( ) appears.
4 Press CAPS to find the letter type you
want.
Each time you press the button, the letter
type changes cyclically among capital
letters (ABC), small letters (abc) and
numbers (123). To select a symbol, you
have to select the capital or small letter
type.
5 To input a letter, press the number
button corresponding to the letter you
want (indicated beside each number
button).
Each time you press the button, the letter
changes cyclically among the ones indicated
beside the button.
To input symbols, press the number button
1 repeatedly until the symbol you want
appears in the display.
To insert a space, press SPACE once.
To input a number, press the number button
you want.
6 Press M to select the character.
The selected character lights up, and the
flashing cursor appears to indicate the next
space to be input.
You can also go to the next space by
pressing other number buttons.
7 Repeat Steps 4 through 6 to input more
characters.
8 Press NAME INPUT to store the Disc
Name.
Repeat Steps 1 through 8 to assign Disc
Names to other discs.
Erasing the Disc Name
1 Follow Steps 1 and 3 in “Labeling discs
on the player” on page 16 to select the
Disc Name you want to erase.
2 Press CLEAR repeatedly until all the
characters disappear.
3 Press MENU.
Storing Information
About CDs (Custom Files)
17
US
Page 18

Using the Player with Another Component
Controlling Another CD
Player (Advanced Mega
Control)
This unit can control a second CD player (see
“Connecting Another CD Player” on pages 8).
Even when a second CD player is connected,
the controls on both of the units will function.
When you press the play button on either unit,
the operating player stops and the resting
player starts.
Note that depending on the player, you may not
be able to operate all the functions of the
second CD player.
The controls as described below are effective
while the MEGA CONTROL button is lit:
CONTINUE, SHUFFLE, PROGRAM,
REPEAT, MENU, MEGA CONTROL,
l AMS L, H, X, x, m/M
Playing discs of the second
CD player
1 Press MEGA CONTROL.
The MEGA CONTROL button lights up
and the display shows the current disc
number of the second player.
2 Select the play mode you want.
To program tracks, use the controls on the
second player.
3 Press H to start playing.
The play starts and the display shows the
current disc and track numbers and the
playing time of the track.
While the MEGA CONTROL button is lit,
you can control the second player with the
controls on this player as follows:
To
Pause
Stop play
Locate a disc while
the second player is
set to Continuous
Play mode
Locate a track
• To do other operations, use the controls on the
second player or the supplied remote.
• The AMS buttons (./>) and search buttons
(m/M) on the remote operate the second player
as indicated on the remote.
To control the second player directly
using the supplied remote
Set CD 1/2/3 on the remote to CD 3, which is
the same mode set for the second player.
To control this player again
Press MEGA CONTROL. The MEGA
CONTROL button goes off and you can
control this player.
Notes
• You cannot locate a particular point in a track of the
second player using the controls on this player.
• Some controls on this player work on the second
player differently from they do to this player.
You need to
Press X.
Press x.
Turn l AMS L until the
display shows the disc number
you want, then push
l AMS L.
Press m/M until the display
shows the track number you
want.
Loading the Disc Names
(Disc Memos) of the second
CD player
If the second CD player has the Disc Name
(Disc Memo) function (see page 16), you can
load the Disc Name (Disc Memo) of the second
CD player to this player’s memory and display
them on this player.
1 Press MENU.
2 Turn l AMS L until “LOAD
2ndNAME” appears in the display.
3 Push l AMS L.
This player starts loading. (Loading takes
about one minute.)
18
US
Page 19

Note
If each Disc Name (Disc Memo) of the second CD
player has more than 12 characters, the first 12
characters of each are loaded to this player.
Playing Alternately
(No-Delay Play/X-Fade
Labeling discs of the second
CD player
You can label discs of the second CD player or
change the Disc Names (Disc Memos) loaded
from the second CD player.
1 Press MEGA CONTROL.
The MEGA CONTROL button lights up.
2 Press CONTINUE.
3 Turn l AMS L to select the disc
you want, then push l AMS L.
4 Press MENU.
5 Turn l AMS L until “DISC NAME”
appears in the display, then push
l AMS L.
6 Input the new Disc Name (Disc Memo)
following the procedure in “Labeling
Discs” on page 16.
Note
The new Disc Names (Disc Memos) are stored on this
player’s memory, so you cannot display them on the
second CD player.
Play)
When you connect the second player, you can
play tracks in this player and those in the
second player alternately in any play mode (see
“Connecting Another CD Player” on page 8).
Select one of the following methods:
• No-Delay Play: The current player changes at
each track. Each time the current player changes to
the other player, the other player starts play without
a break in sound immediately after the current
player ends play. The other player skips the lead-in
portion and starts playing from where the sound
actually begins.
• X-Fade Play: The current player changes at each
track or at the specified interval. You can select the
interval among 30, 60 and 90 seconds. Each time
the current player changes to the other player, the
sound from both players is mixed. The current
player ends play by fading out, and the other player
starts play by fading in.
1 Select the play mode you want on each
player.
2 When you select No-Delay Play
Press X-FADE/NO DELAY repeatedly
until “NO DELAY” appears in the display
(or press NO DELAY on the remote).
When you select X-Fade Play
Press X-FADE/NO DELAY or X-FADE on
the remote.
Each time you press X-FADE/NO DELAY,
the indication (X-Fade mode) appears as
follows:
X-FADE 30SNO DELAY X-FADE 60S
Storing Information
About CDs (Custom Files)
OFF
Each time you press X-FADE on the
remote, the indication (X-Fade mode)
appears as follows:
X-FADE ALL
after 30 secat track end after 60 sec
X-FADE off
X-FADE 90S
after 90 sec
continued
19
US
Page 20

Playing Alternately (No-Delay Play/XFade Play) (continued)
Note
“NO DELAY” does not appear when you operate
from the remote.
To change the current player each time a
whole track is finished, select “X-FADE
ALL.”
To change the current player at the specified
interval, press X-FADE/NO DELAY
repeatedly until the interval you want
appears in the display.
3 Press H to start playing.
The MEGA CONTROL button lights up
while the track in the second player is
selected.
To check the X-Fade mode status
Press X-FADE/NO DELAY once.
The X-Fade mode status appears momentarily.
To cancel No-Delay/X-Fade Play
Press X-FADE/NO DELAY repeatedly until
“X-FADE” or “NO DELAY” goes off. The
current player continues playing.
Tips
• you can change the method (No-Delay or X-Fade)
during play when you press X-FADE/NO DELAY
in Step 2.
• When you press FADER during X-Fade Play, you
can start X-Fade whenever you like.
Even after you have set the X-Fade mode and
started X-Fade Play, you can start X-Fade manually
at the point you like. Note that you cannot do this
operation while the sound from both players is
mixed.
Notes
• The play starts from the second player if you start
play while the MEGA CONTROL button is lit.
• When either player has played all its discs/tracks,
both players stop, even if the other player has not
finished yet.
• Do not use the controls on the second player during
No-Delay Play/X-Fade Play. They may not work
correctly.
Additional Information
Using the CONTROL A1II
control system
This player is compatible with the CONTROL
A1II Control System.
The CONTROL A1II control system was
designed to simplify the operation of audio
systems composed of separate Sony
components. CONTROL A1II connections
provide a path for the transmission of control
signals that enable automatic operation and
control features usually associated with
integrated systems.
Currently, CONTROL A1II connections
between a Sony MD deck, CD player, amplifier
(receiver), and cassette deck provide automatic
function selection and synchronized recording.
In the future the CONTROL A1II connection
will work as a multifunction bus allowing you
to control various functions for each
component.
Note
The CONTROL A1II control system is designed to
maintain upward compatibility as the control system
is upgraded to handle new functions. In this case,
however, older components will not be compatible
with the new functions.
20
US
Page 21

CONTROL A1II and CONTROL A1
compatibility
The CONTROL A1 control system has been
updated to the CONTROL A1II which is the
standard system in the Sony 300 disc CD
changer and other recent Sony components.
Components with CONTROL A1 jacks are
compatible with components with CONTROL
A1II, and can be connected to each other.
Basically, the majority of the functions
available with the CONTROL A1 control
system will be available with the CONTROL
A1II control system. However, when making
connections between components with
CONTROL A1 jacks and components with
CONTROL A1II jacks, the number of
functions that can be controlled may be limited
depending on the component. For detailed
information, refer to the operating instructions
supplied with the component(s).
Connecting the CONTROL
A1II control system
Connect monaural (2P) mini-plug cables in
series to the CONTROL A1II jacks on the back
of each component. You can connect up to ten
CONTROL A1II compatible components in
any order. However, you can connect only one
of each type of component (i.e., 1 CD player, 1
MD deck, 1 tape deck and 1 receiver). (You
may be able to connect more than one CD
player or MD deck, depending on the model.
Refer to the operating instructions supplied
with the respective component for details.)
Example
In the CONTROL A1II control system, the
control signals flow both ways, so there is no
distinction of IN and OUT jacks. If a
component has more than one CONTROL A1II
jack, you can use either one, or connect
different components to each jack.
About the connecting cable
Use the supplied monaural (2P) mini-plug
cable.
Basic functions of the
CONTROL A1II control
system
Automatic function selection
When you connect CONTROL A1II
compatible Sony components using
CONTROL A1II cables (not supplied), the
function selector on the amplifier (or receiver)
automatically switches to the correct input
when you press the play button on one of the
connected components.
(For example, when you press H (play
button) on the CD while the MD deck is
playing, the function selector on the amplifier
switches from MD to CD.)
Notes
• This function works only when the components are
connected to the amplifier (or receiver) inputs
according to the names on the function buttons.
Certain receivers allow you to switch the names of
the function buttons. In this case, refer to the
operating instructions supplied with the receiver.
• When recording, do not play any components other
than the recording source. It will cause the
automatic function selection to operate.
Using the Player with
Another Components
Additional Information
Amplifier CD player MD deck
Other
component
continued
21
US
Page 22

Using the CONTROL A1
system (continued)
II
control
Precautions
Synchronized recording
This function lets you conduct synchronized
recording between the CD and the recording
component.
1 Set the source selector on the amplifier
(or receiver) to the CD.
2 Set the CD to playing pause mode
(make sure both the H and X
indicators light together).
3 Set the recording component to
recording pause mode.
4 Press X on the deck.
The CD is automatically released from
pause mode, and recording begins shortly
thereafter.
When play ends from the CD, recording
stops.
Tip
Certain recorder components may be equipped with a
special synchronized recording function that uses the
CONTROL A1II Control System; like “CD Synchro
Dubbing.” In this case, refer to the Operating
Instructions supplied with the recorder component.
Note
Do not set more than one component to the pause
mode.
On safety
• Caution — The use of optical instruments with this
product will increase eye hazard.
• Should any solid object or liquid fall into the
cabinet, unplug the player and have it checked by
qualified personnel before operating it any further.
• Discs with non-standard shapes (e.g., heart, square,
star) cannot be played on this unit. Attempting to do
so may damage the unit. Do not use such discs.
On power sources
• Before operating the player, check that the
operating voltage of the player is identical with
your local power supply. The operating voltage is
indicated on the nameplate at the rear of the player.
• The player is not disconnected from the AC power
source (mains) as long as it is connected to the wall
outlet, even if the player itself has been turned off.
• If you are not going to use the player for a long
time, be sure to disconnect the player from the wall
outlet. To disconnect the AC power cord (mains
lead), grasp the plug itself; never pull the cord.
• AC power cord must be changed only at the
qualified service shop.
On placement
• Place the player in a location with adequate
ventilation to prevent heat build-up in the player.
• Do not place the player on a soft surface such as a
rug that might block the ventilation holes on the
bottom.
• Do not place the player in a location near heat
sources, or in a place subject to direct sunlight,
excessive dust or mechanical shock.
On operation
• If the player is brought directly from a cold to a
warm location, or is placed in a very damp room,
moisture may condense on the lenses inside the
player. Should this occur, the player may not
operate properly. In this case, remove the disc and
leave the player turned on for about an hour until
the moisture evaporates.
On adjusting volume
• Do not turn up the volume while listening to a
portion with very low level inputs or no audio
signals. If you do, the speakers may be damaged
when a peak level portion is played.
22
US
Page 23

On cleaning
• Clean the cabinet, panel and controls with a soft
cloth slightly moistened with a mild detergent
solution. Do not use any type of abrasive pad,
scouring powder, or solvent such as alcohol or
benzine.
If you have any questions or problems
concerning your player, please consult your
nearest Sony dealer.
Notes on CDs
On handling CDs
• To keep the disc clean, handle the disc by its edge.
Do not touch the surface.
• Do not stick paper or tape on the disc.
• Do not expose the disc to direct sunlight or heat
sources such as hot air ducts, nor leave it in a car
parked in direct sunlight as there can be
considerable rise in temperature inside the car.
• Do not use any commercially available stabilizer. If
you do, the disc and the player may be damaged.
• After playing, store the disc in its case.
On cleaning
• Before playing, clean the disc with a cleaning cloth.
Wipe the disc from the centre out.
Additional Information
• Do not use solvents such as benzine, thinner,
commercially available cleaners or anti-static spray
intended for vinyl LPs.
Notes on CD-R/CD-RW playback
• Discs recorded on CD-R/CD-RW drives may not be
played back because of scratches, dirt, recording
condition, or the drive’s characteristics. Besides, the
discs, which are not yet finalized at the end of
recording, cannot be played back.
23
US
Page 24

Troubleshooting
Specifications
If you experience any of the following
difficulties while using the player, use this
troubleshooting guide to help you remedy the
problem. Should any problem persist, consult
your nearest Sony dealer.
There’s no sound.
• Check that the player is connected securely.
• Make sure you operate the amplifier correctly.
• Adjust the analog output level with ANALOG
OUT LEVEL +/– on the remote.
The CD does not play.
• There’s no CD inside the player. “–NO DISC–”
appears. Insert a CD.
• Place the CD with the label side up on the disc
tray correctly.
• Clean the CD (see page 23).
• Moisture has condensed inside the player.
Remove the disc and leave the player turned on
for about an hour.
• Place the CD in the correct position on the disc
tray.
The recording level has changed.
• The recording level changes if you adjust the
analog output level with ANALOG OUT
LEVEL +/– on the remote during recording.
The remote does not function.
• Remove the obstacles in the path of the remote
and the player.
• Point the remote at the remote sensor on the
player.
• Replace all the batteries in the remote with new
ones if they are weak.
The player functions incorrectly.
• The microcomputer chips may be operating
incorrectly. Turn the power off, then turn it back
on to reset the player.
Compact disc player
Laser Semiconductor laser (λ =
Frequency response 2 Hz to 20 kHz ± 0.5 dB
Dynamic range More than 93 dB
Harmonic distortion Less than 0.0045%
780 nm)
Emission duration:
continuous
Outputs
Load
impedance
Over 10
kilohms
Wave
length:
660 nm
32 ohms
ANALOG
OUT
DIGITAL
OUT
(OPTICAL)
PHONES
Jack
type
Phono
jacks
Optical
output
connector
Stereo
phone
jack
Maximum
output level
2 V
(at 50 kilohms)
–18 dBm
10 mW
General
Power requirements 120 V AC, 60 Hz
Power consumption 11 W
Dimensions (approx.) 430 x 110 x 400 mm
(w/h/d) (17 x 4 3/8 x 15 3/4 in.)
Mass (approx.) 5.2 kg (11 lbs 8 oz)
incl. projecting parts
Supplied accessories
Audio cord (2 phono plugs – 2 phono plugs) (1)
Remote commander (remote) (1)
R6 (size AA) batteries (2)
Monaural (2P) mini-plug cable (1)
Design and specifications are subject to change
without notice.
24
US
Page 25

Additional Information
25
US
Page 26

Cet appareil numérique de la classe B est conforme à
la norme NMB-003 du Canada.
ATTENTION
POUR PREVENIR LES CHOCS ELECTRIQUES,
NE PAS UTILISER CETTE FICHE POLARISEE
AVEC UN PROLONGATEUR, UNE PRISE DE
COURANT OU UNE AUTRE SORTIE DE
COURANT, SAUF SI LES LAMES PEUVENT
ETRE INSEREES A FOND SANS EN LAISSER
AUCUNE PARTIE A DECOUVERT.
A propos de ce manuel
Les instructions contenues dans le présent mode
d’emploi concernent le modèle CDP-CE575.
Conseil
Les instructions de ce manuel décrivent les
commandes du lecteur.
Vous pouvez également utiliser les commandes de la
télécommande si elles portent les même noms que
celles du lecteur ou des noms similaires.
FR
2
Page 27

Table des matières
Identification des pièces 4
Panneau avant..........................................................................................................................4
Panneau arrière ........................................................................................................................ 4
Télécommande ........................................................................................................................5
Préparation
Insertion de piles dans la télécommande ................................................................................. 6
Raccordement du système ....................................................................................................... 6
Connexion d’un autre lecteur CD............................................................................................8
Lecture de CD
Chargement d’un CD...............................................................................................................9
Lecture de CD –– Lecture normale/Lecture aléatoire/Lecture répétée ................................... 9
Utilisation de la fenêtre d’affichage CD................................................................................11
Remplacement de disques en cours de lecture d’un disque .................................................. 12
Programmation des pistes du CD ..........................................................................................13
Fondu enchaîné......................................................................................................................14
Enregistrement de CD
FRFR
Enregistrement d’un CD en spécifiant la longueur de la bande (Time Edit) ........................ 14
Réglage du niveau d'enregistrement (Recherche de crête)....................................................15
Stockage d’informations sur les CD (fichiers personnalisés)
Possibilités des fichiers personnalisés ................................................................................... 16
Identification des disques (nom du disque) ........................................................................... 16
Utilisation du lecteur avec un autre appareil
Contrôle d’un autre lecteur CD (Advanced Mega Control) .................................................. 18
Lecture alternée (No-Delay Play/X-Fade Play) .................................................................... 19
Informations complémentaires
Utilisation du système CONTROL A1II...............................................................................20
Précautions ............................................................................................................................ 22
Remarques sur les CD ...........................................................................................................23
Dépannage ................................................................................................... Couverture arrière
Spécifications .............................................................................................. Couverture arrière
FR
3
Page 28

Identification des pièces
Panneau avant
Les éléments sont classés par ordre alphabétique.
Reportez-vous aux pages indiquées entre parenthèses ( ) pour plus de détails.
Capteur de la télécommande wa (6)
CHECK qh (13)
CLEAR qj (13, 14, 16, 17)
Compartiment à disques ws (9)
CONTINUE 2 (9, 13, 15, 18)
DISC 1–5 3 ( 9, 10, 13)
DISC SKIP 9 (9, 12, 13)
EX-CHANGE 8 (12, 15)
FADER ql (14, 20)
Fenêtre d’affichage 4 (11)
MEGA CONTROL 0 (18, 19)
Panneau arrière
Câble secteur 5 (6)
Prise DIGITAL OUT OPTICAL 2 (7)
Prises 2ND CD IN 3 (8)
Prises ANALOG OUT L/R 4 (6)
Prises CONTROL A1II 1 (6, 20)
FR
4
MENU wf (8, 16, 17)
PEAK SEARCH qk (15)
POWER 1 (7, 9, 16)
Prise PHONES wh (10)
PROGRAM qd (9, 13, 18)
REPEAT qf (10, 18)
SHUFFLE qs (9, 10, 18)
TIME EDIT qg (14)
TIME/TEXT w; (11)
X-FADE/NO DELAY wg (19, 20)
DESCRIPTIONS DES
TOUCHES
A OPEN/CLOSE wj (7, 9, 10, 11)
H 5 (9, 13, 15, 18, 20, 22)
X 6 (10, 15, 18, 22)
x 7 (10, 15, 18)
Molette lAMSL (DISC) qa
(10, 13, 15, 17, 18, 19)
m/M (AMS+/–) wd (10, 14, 17,
18)
Page 29

Télécommande
Identification des pi
èces
ANALOG OUT LEVEL +/– wh (6,
7, 10)
CHECK 9 (13)
CLEAR ws (13, 14, 16, 17)
Commutateur CD1/2/3 1 (7)
CONTINUE 3 ( 9, 13, 15, 18)
DISC/CAPS 6 (10, 17)
DISC SKIP +/– qh (9, 12, 13)
ENTER wa (17)
FADER/DEL w; (14, 20)
HIGH-LIGHT wd (12)
MEGA CONTROL 4 (18, 19)
MUSIC SCAN qa (10)
NAME INPUT qs (17)
NO DELAY ql (19, 20)
PROGRAM qj (9, 13, 18)
REPEAT 0 (10, 18)
SHUFFLE 2 (9, 10, 18)
TIME/TEXT/SPACE 5 (11, 17)
Touches numériques 7 (10, 13,
17)
X-FADE qk (19, 20)
DESCRIPTIONS DES
TOUCHES
>10 8 (10, 13)
N wf (9, 13, 15, 18, 20, 22)
X qd (10, 15, 18, 22)
x wg (10, 15, 18)
./> qf (10, 13, 15, 17, 18,
19)
m/M qg (10, 14, 17, 18)
FR
FR
5
5
Page 30

Préparation
Insertion de piles dans la
télécommande
Vous pouvez commander le lecteur à l’aide de
la télécommande fournie.
Insérez deux piles R6 (AA) en faisant
correspondre les signes + et – des piles avec le
schéma situé à l’intérieur du compartiment.
Commencez par insérer le pôle négatif (–), puis
appuyez sur la pile jusqu’à ce que le pôle
positif (+) s’encliquette.
Lorsque vous utilisez la télécommande,
dirigez-la vers le capteur
Conseil
Lorsque la télécommande ne fonctionne plus,
remplacez les deux piles par des piles neuves.
Remarque
• Ne laissez pas la télécommande dans un endroit
extrêmement chaud ou humide.
• Ne laissez pas tomber de corps étrangers dans le
boîtier de la télécommande, notamment lorsque
vous changez les piles.
• N’exposez pas le capteur de télécommande
directement aux rayons du soleil ou à des
équipements d’éclairage. Sinon, vous risquez de
déclencher un dysfonctionnement de l’appareil.
• Si vous n’utilisez la télécommande pendant une
période prolongée, retirez les piles pour éviter les
dommages dus à la fuite des piles ou à la
corrosion.
du lecteur.
Raccordement du système
Raccordements
Cette section décrit comment raccorder le
lecteur CD à un amplificateur. Assurez-vous
que vous avez mis les deux appareils hors
tension avant de procéder aux raccordements.
Lecteur CD
ANALOG
OUT
(rouge) (R)
Entrée audio
(blanc) (L)
: Sens du signal
Conseils
• Vous pouvez régler le niveau de sortie analogique
de l’amplificateur à l’aide de la télécommande
livrée avec l’appareil.
Appuyez sur ANALOG OUT LEVEL +/– sur la
télécommande. Vous pouvez réduire le niveau de
sortie jusqu’à – 20 dB.
Lorsque vous réduisez le niveau de sortie
analogique, l’indication “FADE” apparaît dans la
fenêtre d’affichage.
• Si vous disposez d’un appareil Sony doté de la prise
CONTROL A1II, raccordez-le via cette prise. Vous
pouvez simplifier le fonctionnement des systèmes
audio constitués de composants Sony séparés. Pour
obtenir davantage d’informations, reportez-vous à
la section “Utilisation du système CONTROL
A1II” à la page 20.
ANALOG OUT
(blanc) (L)
Entrée audio
(rouge) (R)
Vers le
secteur
Amplificateur
Vers le
secteur
FR
6
Page 31

Raccordements numériques
Si vous disposez d’un composant numérique,
comme par exemple un amplificateur
numérique, un convertisseur D/A, DAT ou
MD, raccordez le composant via le connecteur
DIGITAL OUT (OPTICAL) à l’aide du câble
optique (non fourni). Retirez le capuchon et
raccordez le câble optique.
Lorsque vous effectuez ce raccordement, notez
que vous ne pouvez pas utiliser les fonctions
suivantes :
• Fondu enchaîné (voir page 14)
• Réglage du niveau de sortie à l’aide des
touches ANALOG OUT LEVEL +/– sur la
télécommande
POC-15
Câble optique (non fourni)
Lecteur CD
DIGITAL
OUT
OPTICAL
Remarque
Lorsque vous effectuez le raccordement via le
connecteur DIGITAL OUT (OPTICAL), des bruits
parasites peuvent se produire lors de la lecture d’un
CD non musical, comme par exemple un CD-ROM.
Composant numérique
DIGITAL
INPUT
OPTICAL
Lorsque vous utilisez un autre
lecteur CD Sony en parallèle à ce
lecteur
Vous pouvez régler la télécommande fournie
pour qu’elle opère uniquement sur ce lecteur.
• S’il est possible de régler le mode de contrôle de
l’autre lecteur :
Réglez le commutateur CD1/2/3 de la
télécommande de ce lecteur sur CD1 (réglage
usine), puis réglez la télécommande de l’autre
lecteur sur CD2 ou CD3.
• S’il est impossible de régler le mode de contrôle de
l’autre lecteur :
Réglez le commutateur CD1/2/3 de la
télécommande de ce lecteur sur CD2 ou CD3.
En cas de changement de mode de la
télécommande, vous devez régler le mode de
commande de chaque lecteur. Pour obtenir
davantage d’informations, reportez-vous à la
section “Modification du mode de contrôle du
lecteur” à la page 8.
Transport du lecteur
Avant de transporter le lecteur, suivez la
procédure ci-dessous pour replacer les
mécanismes internes dans leur position
d’origine.
1 Retirez tous les disques du plateau.
2 Appuyez sur AOPEN/CLOSE pour
refermer le plateau.
L’indication “–NO DISC–” apparaît dans la
fenêtre d’affichage.
3 Attendez 10 secondes, puis appuyez
sur POWER pour mettre le lecteur hors
tension.
Préparation
FR
7
Page 32

Connexion d’un autre
lecteur CD
Si vous disposez d’un lecteur CD Sony dans
lequel vous pouvez insérer 5, 50, 200, 300 ou
400 disques, qui est équipé de la prise
CONTROL A1II (ou CONTROL A1) et dont
le mode de contrôle peut être réglé sur CD 3,
vous pouvez commander ce lecteur en tant
qu’appareil auxiliaire de votre lecteur
d’origine. Après avoir raccordé le lecteur et un
amplificateur, procédez comme suit.
Veillez à ce que chaque lecteur soit hors
tension avant de réaliser ce raccordement.
CDP-CE575
Vers
CONTROL
A1II
Vers ANALOG OUT
Vers 2ND CD IN
Vers sortie audio
CDP-CX400, etc.
3 Réglez le mode de contrôle de ce
lecteur sur CD1 (réglages usine) ou sur
CD2, puis réglez le second lecteur sur
CD3.
Vérifiez l’affichage du mode de contrôle
actuel de ce lecteur. Si le mode est réglé sur
CD3, vous devez modifier le mode comme
décrit ci-dessous.
Lorsque le réglage des deux lecteurs est
terminé, réglez correctement les
commutateurs CD1/2/3 de chaque
télécommande.
Pour obtenir davantage d’informations sur
le fonctionnement du deuxième lecteur,
reportez-vous à la section “Contrôle d’un
autre lecteur CD” à la page 18 et à la section
“Lecture alternée” à la page 19.
Remarques
• Ne raccordez pas un lecteur autre que celui que
vous utilisez comme lecteur auxiliaire aux prises
2ND CD IN de ce lecteur.
• Lors du raccordement d’un deuxième lecteur CD,
ne branchez pas le connecteur DIGITAL OUT
(OPTICAL) de ce lecteur à l’amplificateur.
Modification du mode de
contrôle du lecteur
1 Appuyez sur MENU.
Vers entrée audio
: Sens du signal
1 Raccordez les lecteurs avec un câble
audio (voir également la section
“Raccordements” à la page 6).
2 Raccordez les lecteurs avec un cordon
à mini fiche (2P) monaural.
Pour obtenir davantage d’informations sur
ce raccordement, reportez-vous à la section
“Utilisation du système CONTROL A1II”,
FR
8
à la page 20.
Amplificateur
2 Tournez l AMS L pour
sélectionner “COMMAND MODE”.
3 Appuyez sur l AMS L.
Le mode de contrôle actuel apparaît.
4 Tournez l AMS L pour
sélectionner CD1 ou CD2, puis appuyez
de nouveau sur l AMS L.
Page 33

Lecture de CD
Chargement d’un CD
1 Mettez l’amplificateur sous tension et
sélectionnez la position du lecteur CD
de façon à pouvoir écouter le son de ce
lecteur.
2 Appuyez sur POWER pour mettre le
lecteur sous tension.
3 Appuyez sur AOPEN/CLOSE.
Le compartiment à disques sort.
4 Placez un disque sur le plateau,
étiquette vers le haut.
Numéro du disque
Lorsque vous écoutez un
seul CD, placez-le sur le
cercle situé à l’intérieur du
plateau.
5 Pour placer d’autres disques, appuyez
sur DISC SKIP et placez les disques
dans l’ordre où vous souhaitez les
écouter.
A chaque pression sur la touche, le plateau
tourne et vous pouvez placer les disques
dans les emplacements vides. Le lecteur
commence par lire le disque se trouvant en
face de vous.
6 Appuyez sur AOPEN/CLOSE pour
fermer le compartiment à disques.
Lecture du CD
––Lecture normale/Lecture aléatoire/
Lecture répétée
Cet appareil vous permet d’écouter le CD selon
différents modes de lecture.
1Sélectionnez le mode de lecture.
Pour lire
Tous les disques du
lecteur dans l’ordre.
Uniquement le
disque sélectionné.
Toutes les pistes de
l’ensemble des
disques en ordre
aléatoire.
Toutes les pistes d’un
disque spécifique en
ordre aléatoire.
Les pistes du CD
selon votre
programmation
(voir
“Programmation des
pistes du CD” à la
page 13).
2 Appuyez sur H.
Conseils
• Vous pouvez sélectionner le premier disque que
vous souhaitez écouter en appuyant sur l’une des
touches DISC 1 – 5.
• Vous pouvez spécifier les disques en cours de
lecture aléatoire ALL DISCS et les pistes des
disques spécifiés sont lues dans un ordre aléatoire.
Appuyez sur DISC 1 – 5 pour spécifier les disques
après l’étape 1.
Dans la fenêtre d’affichage, des demi-cercles
apparaissent autour des numéros de disques
spécifiés. Pour annuler les disques sélectionnés,
appuyez une nouvelle fois sur DISC 1 – 5. Les
demi-cercles disparaissent.
Pour revenir à la lecture aléatoire ALL DISCS,
appuyez sur SHUFFLE jusqu’à ce que l’indication
“ALL DISCS SHUFFLE” apparaisse dans la
fenêtre d’affichage.
Appuyez
plusieurs fois sur
CONTINUE jusqu’à ce que
“ALL DISCS” apparaisse.
plusieurs fois sur
CONTINUE jusqu’à ce que
“1 DISC” apparaisse.
plusieurs fois sur
SHUFFLE jusqu’à ce que
“ALL DISCS SHUFFLE”
apparaisse.
plusieurs fois sur
SHUFFLE jusqu’à ce que
“1 DISC SHUFFLE”
apparaisse.
sur PROGRAM.
Préparation
Lecture de CD
suite page suivante
FR
9
Page 34

Lecture du CD (suite)
Lecture répétée
Vous pouvez lire les pistes CD de façon répétée
dans n’importe quel mode de lecture.
Pour activer la fonction de lecture répétée,
appuyez sur REPEAT en cours de lecture
jusqu’à ce que l’indication “REPEAT”
apparaisse dans la fenêtre d’affichage.
Pour
Répéter une seule piste
Annuler la lecture
répétée
Appuyez sur REPEAT
Jusqu’à ce que “REPEAT
1” apparaisse en cours de
lecture de la piste que vous
voulez répéter.
Jusqu’à ce que “REPEAT”
ou “REPEAT 1”
disparaisse.
Lorsque l’appareil est en mode de lecture
répétée, il répète les pistes de la façon suivante :
Lorsque
le disque est lu en
Lecture continue
(ALL DISCS)
Lecture continue
(1 DISC)
Lecture aléatoire
(ALL DISCS)
Lecture aléatoire
(1 DISC)
Lecture programmée
(page 13)
Le lecteur répète
Toutes les pistes de tous les
disques.
Toutes les pistes du disque
en cours.
Toutes les pistes de tous les
disques dans un ordre
aléatoire.
Toutes les pistes du disque
en cours dans un ordre
aléatoire.
Le même programme.
Autres opérations
Pour
Arrêter la lecture
Effectuer une pause
Sélectionner une piste
FR
10
Procédez de la façon
suivante
Appuyez sur x.
Appuyez sur X. Puis
appuyez une nouvelle fois
sur X ou sur H pour
reprendre la lecture.
En cours de lecture ou de
pause, tournez la molette
lAMSL dans le sens
horaire (pour avancer) ou
dans le sens antihoraire
(pour revenir en arrière)
(ou appuyez sur > (pour
avancer) ou sur . (pour
revenir en arrière) sur la
télécommande).
Pour
Sélectionner
directement une piste
Passer au disque suivant
Sélectionner directement
un disque
Trouver un endroit dans
une piste
En explorant les 10
premières secondes de
chaque plage
(balayage des intros)
Lire les pistes en ordre
aléatoire
Retirer le CD
Régler le volume
* Pour localiser directement une piste dont le numéro
est supérieur à 10, appuyez d’abord sur >10 puis sur
les touches numériques correspondantes. Pour saisir
“0”, utilisez la touche 10.
Exemple : pour lire la piste 30
Conseils
• Vous pouvez sélectionner le niveau de sortie
analogique à l’aide de la touche ANALOG OUT
LEVEL +/– de la télécommande (page 6).
• Vous pouvez régler le volume du casque à partir de
la télécommande. Pour ce faire, branchez le casque
à la prise PHONES et réglez le volume avec
ANALOG OUT LEVEL +/– sur la télécommande .
• S’il n’y a aucun CD dans le lecteur, l’indication
“– NO DISC –” apparaît.
Remarques
• Si l’indication “OVER” apparaît dans la fenêtre
d’affichage, le disque a atteint la fin alors que vous
appuyiez sur M. Appuyez sur m ou tournez la
molette lAMSL dans le sens anti-horaire
pour revenir en arrière.
• Si vous appuyez sur les touches ANALOG OUT
LEVEL +/– de la télécommande en cours
d’enregistrement, le niveau d’enregistrement sera
modifié même s’il est préréglé sur la platine
cassette.
Appuyez d'abord sur >10 puis sur 3 et
10.
Procédez de la façon
suivante
Appuyez sur la touche
numérique de la
télécommande.*
Appuyez sur DISC SKIP.
Appuyez sur DISC 1 - 5.
Lorsque vous utilisez la
télécommande, procédez
comme suit.
1 Appuyez sur DISC.
2 Appuyez sur la touche
numérique correspondant
au disque.
3 Appuyez sur ENTER.
Maintenez la touche M ou
m enfoncée en cours de
lecture et relâchez-la à
l’endroit souhaité.
Appuyez sur MUSIC SCAN.
Lorsque vous avez trouvé la
plage voulue, appuyez sur H
pour démarrer la lecture.
Chaque fois que vous appuyez
sur cette touche, la durée de
lecture change suivant une
séquence cyclique.
Appuyez sur SHUFFLE jusqu’à
ce que “SHUFFLE” apparaisse
dans la fenêtre d’affichage.
Appuyez sur AOPEN/CLOSE.
Appuyez sur la touche
ANALOG OUT LEVEL
+/– de la télécommande.
Page 35

Utilisation de la fenêtre
d’affichage CD
Vous pouvez vérifier les informations
concernant le disque au moyen de la fenêtre
d’affichage.
En mode d’arrêt
Appuyez sur TIME/TEXT.
Numéro de disque en
cours
DISCSALL
DISC
TRACK
12345
1 1O 45.28
Nombre total de pistes
L’affichage montre le numéro du disque en
cours, le nombre total de pistes, la durée de
lecture totale et le calendrier musical.
Les informations apparaissent également
lorsque vous appuyez sur AOPEN/CLOSE
pour refermer le plateau.
Remarques sur les indications des
numéros de disques
• Le cercle rouge autour d’un numéro de
disque indique que le disque est prêt pour la
lecture.
• Lorsque toutes les pistes d’un disque ont été
lues, le demi-cercle autour du numéro de
disque disparaît.
• Lorsqu’un compartiment à disque est vide, le
numéro de disque avec le demi-cercle
disparaît.
En cours de lecture normale
Lorsque vous écoutez un disque, le numéro du
disque en cours, le numéro de la piste, la durée
de lecture de la piste et le calendrier musical
s’affichent.
Les numéros de piste apparaissant dans le
calendrier musical disparaissent lorsque la piste
a été lue.
Durée de lecture totale
MIN SEC
CD1
Calendrier musical
12345
678910
Pour vérifier la durée restante
Appuyez sur TIME/TEXT en cours de
lecture
A chaque fois que vous appuyez sur cette
touche en cours de lecture d’un disque,
l’affichage change de la façon indiquée dans le
diagramme ci-dessous.
Durée de lecture de la piste en cours t Durée
restante sur la piste en cours t Durée restante
sur le disque
Remarque
En mode de Lecture programmée, la durée restante du
disque n’apparaît pas.
Pendant la lecture d’un
disque CD TEXT
Les disques CD TEXT contiennent des
informations, telles les titres du disque ou le
nom de l’artiste, mémorisées sur un espace
vierge du disque, où habituellement aucune
information n’est stockée sur les disques
classiques. La fenêtre d’affichage indique les
informations CD TEXT du disque, afin de vous
aider à vérifier le titre du disque en cours, le
nom de l’artiste et le titre des pistes. Lorsque le
lecteur détecte des disques CD TEXT,
l’indication “CD TEXT” apparaît dans la
fenêtre d’affichage.
Au mode d’arrêt
Appuyez sur TIME/TEXT.
A chaque pression de cette touche, l’affichage
change de la façon indiquée dans le diagramme
ci-dessous.
Titre du disque t Nom de l’artiste t
Nombre total de pistes et durée de lecture totale
Pendant la lecture normale
Appuyez sur TIME/TEXT.
A chaque pression de cette touche, l’affichage
change de la façon indiquée dans le diagramme
ci-dessous.
Titre de la piste t Durée de lecture sur le
disque en cours t Durée restante sur la piste
en cours t Durée restante du disque
Si un titre ou un nom est composé de plus de
12 caractères, les 12 premiers apparaissent une
fois que le titre ou le nom a défilé dans la
fenêtre d’affichage.
suite page suivante
Lecture de CD
FR
11
Page 36

Utilisation de la fenêtre d’affichage
CD (suite)
Conseil
Certains disques CD TEXT disposent d’une fonction
de lecture limitée aux extraits principaux des disques.
Appuyez sur la touche HIGH-LIGHT de la
télécommande pour démarrer la lecture des extraits
principaux du disque en mode d’arrêt.
Lors de la lecture des principaux extraits d’un disque,
la mention “HIGH LIGHT” apparaît brièvement dans
la fenêtre d'affichage.
Remarques
• Selon le disque, le lecteur n’est pas en mesure
d’afficher tous les caractères.
• Ce lecteur peut lire uniquement les titres, les pistes,
ainsi que les noms d’artistes à partir de disques CD
TEXT. Il est impossible d’afficher d’autres
informations.
Remplacement de disques
en cours de lecture d’un
disque
En cours de lecture d’un disque, vous pouvez
ouvrir le plateau pour vérifier les disques
suivants et les remplacer par d’autres sans
interrompre la lecture du disque en cours.
1 Appuyez sur EX-CHANGE.
Le plateau s’ouvre et deux compartiments à
disques apparaissent. Même si le lecteur est
en cours de lecture d’un disque, il ne
s’interrompt pas.
2 Remplacez les disques dans les
compartiments.
Le lecteur lit le disque se trouvant dans le
compartiment situé à gauche du disque en
cours de lecture, puis il lit celui se trouvant
à droite.
3 Appuyez sur DISC SKIP.
Le plateau tourne et deux autres
compartiments à disques apparaissent.
4 Remplacez les disques des
compartiments.
5 Appuyez sur EX-CHANGE.
Le plateau se referme.
Pendant que le plateau est ouvert en
appuyant sur la touche EX-CHANGE
• Si la lecture du disque en cours se termine, le
lecteur s’arrête. Si le disque est lu en mode
de lecture répétée 1 DISC (voir page 10), la
lecture du disque en cours recommence.
• En mode de lecture aléatoire ALL DISCS
(voir page 9), les pistes sont lues en mode
aléatoire sur le disque en cours.
• En mode de lecture programmée (voir page
13), seules les pistes du disque en cours sont
lues.
• Ne poussez pas le plateau pour le
refermer à l’étape 5, vous risqueriez
d’endommager le lecteur.
12
FR
Page 37

Programmation des pistes
du CD
Vous pouvez définir l’ordre des pistes des disques
et créer votre propre programme. Le programme
peut contenir jusqu’à 32 “étapes”, une “étape”
pouvant contenir une piste ou tout un disque.
1
Appuyez plusieurs fois sur PROGRAM
jusqu’à ce que l’indication “PROGRAM”
apparaisse dans la fenêtre d’affichage
avant de commencer la lecture.
Si un programme est déjà mémorisé, la
dernière étape du programme apparaît dans la
fenêtre d’affichage. Si vous voulez supprimer
le programme dans son intégralité, maintenez
la touche CLEAR enfoncée jusqu’à ce que
l’indication “CLEAR” apparaisse dans la
fenêtre d’affichage (voir page 14).
2
Appuyez sur DISC 1 – 5 pour sélectionner
le disque.
L’indication “AL” de la fenêtre d’affichage
signifie “toutes” les pistes.
Lorsque vous souhaitez programmer tout le
disque comme une seule étape, ignorez l’étape
3, puis passez à l’étape 4.
3
Tournez la molette lAMSL jusqu’à
ce que la piste souhaitée apparaisse, puis
appuyez sur lAMSL pour
sélectionner la piste.
Le numéro de piste que vous avez programmé,
l’ordre de lecture et la durée totale de lecture
apparaissent dans la fenêtre d’affichage.
Si vous avez fait une erreur
Appuyez sur la touche CLEAR, puis répétez
l’étape 3.
Conseil
Vous pouvez sélectionner la piste à l’aide des
touches numériques de la télécommande. Pour
choisir une piste dont le numéro est supérieur à 10,
utilisez la touche >10 (voir page 10).
4 Pour programmer d’autres disques ou
d’autres pistes, procédez de la façon
suivante :
Pour programmer
D’autres disques
D’autres pistes
du même disque
D’autres pistes sur
d’autres disques
5 Appuyez sur H pour commencer la
lecture programmée.
Répétez l’étape (ou les
étapes)
2
3
2 et 3
Pour annuler la lecture programmée
Appuyez sur CONTINUE.
Conseils
• Vous pouvez créer votre programme en vérifiant les
étiquettes des disques.
Tandis que le plateau est ouvert, suivez les étapes 1
à 4 en appuyant sur la touche DISC SKIP pour
vérifier les étiquettes des disques. Si vous fermez le
plateau avant l’étape 5, la durée de lecture totale
apparaît dans la fenêtre d’affichage après un instant.
Notez que si le numéro de piste programmé n’est
pas trouvé sur le disque, cette étape est
automatiquement supprimée.
• Le programme reste en mémoire même après la fin
de la lecture programmée. Lorsque vous appuyez
sur la touche H, vous pouvez réécouter le même
programme.
• Le programme reste en mémoire jusqu’à son
effacement. Si vous remplacez des disques, les
numéros de disques et de pistes programmés restent
en mémoire. Ainsi, le lecteur ne lit que les numéros
de disques et de pistes existants. Cependant, les
numéros de disques et de pistes qui ne sont pas
trouvés dans le lecteur ou sur le disque sont
supprimés du programme et le reste du programme
est lu dans l’ordre programmé.
• Pour l’enregistrement sur la face A ou B de la
bande de la cassette, vous pouvez effectuer une
pause dans la lecture programmée.
Remarque
La durée de lecture totale n’apparaît pas lorsque :
—Vous avez programmé une piste dont le numéro est
supérieur à 20.
—La durée totale de lecture du programme dépasse
200 minutes.
Vérification de l’ordre des
pistes
Vous pouvez vérifier votre programme avant
ou après le début de la lecture.
Appuyez sur CHECK.
A chaque fois que vous appuyez sur cette
touche, l’affichage montre la piste (le numéro
du disque et de la piste) ou le disque (le numéro
du disque et l’indication “AL”) de chacune des
étapes dans l’ordre programmé. Après la
dernière étape du programme, l’affichage
indique “– END –” et revient à l’affichage
normal. Si vous vérifiez l’ordre après avoir
commencé la lecture, l’affichage montre
uniquement les étapes restantes.
suite page suivante
Lecture de CD
FR
13
Page 38

Programmation des pistes du CD
(suite)
Enregistrement de CD
Enregistrement d’un CD
Modification de l’ordre des
pistes
Vous pouvez modifier votre programme avant
le début de la lecture.
Pour
Effacer une piste
Effacer la dernière
piste du
programme
Ajouter des pistes
à la fin du
programme
Modifier
le programme
dans
son intégralité
Vous devez
Appuyer sur CHECK jusqu’à ce
que la piste que vous souhaitez
effacer apparaisse, puis appuyez
sur CLEAR.
Appuyer sur CLEAR. A chaque
fois que vous appuyez sur cette
touche, la dernière piste est
effacée.
Suivre les étapes 2 à 4 de la
procédure de programmation.
Maintenir la touche CLEAR
enfoncée jusqu’à ce que
l’indication “CLEAR” apparaisse
dans la fenêtre d’affichage. Créez
un nouveau programme en suivant
la procédure de programmation.
Fondu enchaîné
Vous pouvez manuellement baisser ou
augmenter le son au début et/ou à la fin d’une
piste pour empêcher que les pistes ne
commencent ou ne finissent de façon trop
brutale.
Notez que vous ne pouvez pas utiliser cet effet
lorsque vous utilisez le connecteur DIGITAL
OUT (OPTICAL).
Pour
Commencer
la lecture avec
le fondu enchaîné
Terminer
la lecture avec
le fondu enchaîné
La durée du fondu est de 5 secondes.
FR
14
Appuyez sur FADER
En cours de pause, l’indication
“FADE” clignote. La lecture est
effectuée avec un fondu
enchaîné.
Lorsque vous voulez diminuer
progressivement le son à la fin
d’une lecture. L’indication
“FADE” clignote. Puis la lecture
est effectuée avec un fondu
enchaîné et le lecteur s’arrête.
en spécifiant la longueur
de la bande (Time Edit)
Le lecteur peut créer un programme
correspondant à la durée de la bande.
Le lecteur crée automatiquement un
programme en conservant l’ordre d’origine du
disque.
Le programme peut contenir jusqu’à 32 étapes
(une pause entre deux étapes étant considérée
comme une étape).
Notez que les pistes portant un numéro
supérieur à 20 ne peuvent pas être
programmées automatiquement.
1 Appuyez sur DISC SKIP pour
sélectionner le disque.
2 Appuyez plusieurs fois sur TIME EDIT
avant de commencer la lecture jusqu’à
ce que l’indication “EDIT” apparaisse et
que l’indication “A” clignote dans
la fenêtre d’affichage.
3 Appuyez sur m ou M pour spécifier
la longueur de la bande.
Chaque fois que vous appuyez sur ces
touches, l’affichage change de la façon
indiquée ci-dessous, avec la longueur de
bande d’une face mentionnée.
C-54 27.00C-46 23.00 C-60 30.00
- -. - - C-90 45.00
4 Appuyez sur TIME EDIT pour que le
lecteur crée le programme.
L’affichage montre les pistes à enregistrer.
“B” clignote dans la fenêtre
d’affichage.
5 Lorsque vous enregistrez les deux
faces de la bande, appuyez une
nouvelle fois sur TIME EDIT.
Le lecteur insère une pause, puis crée le
programme de la face B. L’affichage
montre les pistes programmées.
Lorsque vous effectuez un enregistrement
sur une face de la cassette, ignorez cette
étape.
C-74 37.00
Page 39

6 Commencez l’enregistrement sur la
platine, puis appuyez sur la touche H
du lecteur.
7 Passez à la bande de la face B et
appuyez sur la touche H ou X sur le
lecteur pour reprendre la lecture des
pistes restantes.
Pour annuler Time Edit
Appuyez sur CONTINUE.
Conseils
• Vous pouvez programmer les pistes que vous
souhaitez à l’avance. Créez un programme en
sélectionnant les piste souhaitées, puis suivez les
étapes 2 à 7. Prenez garde que la durée totale de
lecture du programme n’excède pas la longueur de
bande d’une face de cassette.
• Vous pouvez définir la longueur de bande de votre
choix à l’aide de l AMS L.
Exemple : Lorsque la longueur de bande d’une face
de cassette est de 30 minutes et 15
secondes
1 Pour régler les minutes, tournez l
AMS L jusqu’à ce que l’indication
“30” apparaisse dans la fenêtre
d’affichage, puis appuyez sur l
AMS L.
2 Pour régler les secondes, tournez l
AMS L jusqu’à ce que l’indication
“15” apparaisse dans la fenêtre
d’affichage, puis appuyez sur l
AMS L.
• Pour vérifier et modifier votre programme,
reportez-vous aux pages 13 et 14.
Réglage du niveau
d’enregistrement
(Recherche de crête)
Le lecteur repère le niveau de son le plus élevé
parmi les pistes à enregistrer afin de vous
permettre de régler le niveau d’enregistrement
avant le commencement de l’enregistrement.
1 Avant de commencer l’écoute, appuyez
sur PEAK SEARCH.
L’indication “PEAK” clignote dans la
fenêtre d’affichage et le lecteur commence
le balayage du disque à la recherche du
niveau de son le plus élevé.
Après avoir effectué un balayage de toutes
les pistes, le lecteur répète la portion avec le
niveau de son le plus élevé.
2 Réglez le niveau d’enregistrement de la
platine.
3 Appuyez sur la touche x du lecteur
pour arrêter la recherche.
L’indication “PEAK” disparaît de la fenêtre
d’affichage.
Remarques
• La portion avec le niveau de son le plus élevé peut
être différente à chaque fois que vous essayez
d’effectuer le réglage sur le même disque. La
différence est cependant si infime que vous n’aurez
aucun problème à ajuster le niveau
d’enregistrement de façon précise.
• La recherche de crête ne fonctionne pas lorsque
vous ouvrez le plateau de disques à l’aide de la
touche EX-CHANGE.
Lecture de CD
Enregistrement de CD
15
FR
Page 40

Stockage d’informations sur les CD (fichiers personnalisés)
Possibilités des fichiers
personnalisés
Le lecteur peut stocker des informations sur des
“Fichiers personnalisés” pour chaque disque. A
l’aide de cette fonction, vous pouvez identifier
des disques avec 12 caractères maximum.
Une fois que vous avez enregistré les fichiers
personnalisés d’un disque, le lecteur vous
rappelle automatiquement ce que vous avez
enregistré à chaque fois que vous sélectionnez
le disque. Notez que les fichiers personnalisés
seront effacés si vous n’utilisez pas le lecteur
pendant un mois environ.
Où sont stockés les fichiers
personnalisés ?
Les fichiers personnalisés ne sont pas stockés
sur le disque, mais dans la mémoire du lecteur.
Ce qui signifie que vous ne pouvez pas les
utiliser lorsque vous écoutez le disque sur
d’autres lecteurs.
Suppression de l’ensemble des
fichiers personnalisés de tous les
disques
Mettez le lecteur hors tension. Tout en
maintenant la touche CLEAR enfoncée,
appuyez sur POWER pour mettre le lecteur
sous tension. “ALL ERASE” apparaît dans la
fenêtre d’affichage et l’ensemble des fichiers
personnalisés est effacé.
Identification des disques
(nom du disque)
Vous pouvez identifier des disques à l’aide de
12 caractères maximum, ce qui vous permet de
visualiser dans la fenêtre d’affichage le nom du
disque à chaque sélection de ce disque. Il peut
porter un nom quelconque, tel qu’un titre, le
nom du musicien, la catégorie ou la date
d’achat.
Conseil
Lorsque vous sélectionnez un disque CD TEXT, son
titre est enregistré automatiquement sous l’option
Disc Name.
Si le titre du disque comporte plus de 12 caractères,
les 12 premiers sont enregistrés.
Veuillez noter qu’il est impossible de modifier le nom
du disque d’un CD TEXT.
Identification des disques sur
le lecteur
1 Insérez ou sélectionnez le disque.
2 Appuyez sur MENU.
“DISC NAME” clignote dans la fenêtre
d’affichage.
3 Appuyez sur l AMS L.
“NAME INPUT” apparaît, puis le curseur
( ) clignote.
4 Tournez l AMS L jusqu’à ce que
le caractère souhaité apparaisse dans
la fenêtre d’affichage.
Le curseur disparaît et le premier espace
réservé au nom du disque clignote.
Lorsque vous tournez l AMS L dans
le sens des aiguilles d’une montre, les
caractères apparaissent dans l’ordre suivant.
Tournez l AMS L dans le sens
inverse des aiguilles d’une montre pour
revenir au caractère précédent.
16
(espace) A B C D E F G H I J K L M N O
P Q R S T U V W X Y Z a b c d e f g h i j
k l m n o p q r s t u v w x y z 0 1 2 3 4 5 6
7 8 9 ! “ # $ % & ’ ( ) * + , – . / : ; < = > ?
@ _
FR
Page 41

5 Appuyez sur l AMS L pour
sélectionner le caractère.
Le caractère sélectionné s’allume et le
curseur clignote pour indiquer le prochain
espace à entrer.
Pour insérer un espace
Appuyez sur M.
Si vous avez fait une erreur
Appuyez sur m/M pour faire clignoter le
caractère erroné, puis corrigez-le.
6 Répétez les étapes 4 et 5 pour entrer
davantage de caractères.
7 Appuyez sur MENU pour enregistrer le
nom du disque.
Répétez les étapes 1 à 7 pour attribuer des
noms à d’autres disques.
Si vous avez fait une erreur lors de
l’entrée du caractère
Pour corriger le caractère entré
1 Appuyez sur m ou M jusqu’à ce que le
caractère erroné clignote.
2 Tournez l AMS L jusqu’à ce que le
caractère souhaité apparaisse.
Pour corriger le caractère en cours
d’entrée
1 Appuyez sur CLEAR pour effacer le caractère à
corriger.
2 Entrez le caractère correct.
Pour insérez un caractère entre les
caractères entrés
Appuyez sur m ou M jusqu’à ce que le curseur se
déplace sur le premier des deux caractères, puis
appuyez sur ENTER et corrigez le caractère.
Identification des disques à
l’aide de la télécommande
1 Appuyez sur DISC en mode de lecture
continue.
2 Appuyez sur la touche numérique
correspondant au disque auquel vous
souhaitez affecter un nom de disque,
puis appuyez sur ENTER.
3 Appuyez sur NAME INPUT.
Le curseur ( ) clignote.
4 Appuyez sur CAPS pour rechercher le
type de lettre souhaité.
A chaque pression sur cette touche, le type
de lettre change selon le cycle majuscules
(ABC), minuscules (abc) et chiffres (123).
Pour sélectionner un symbole, vous devez
sélectionner les majuscules ou les
minuscules.
5 Pour entrer une lettre, appuyez sur la
touche numérique correspondant à la
lettre souhaitée (indiquée en regard de
chaque touche numérique).
A chaque pression sur cette touche, la lettre
change conformément au cycle indiqué en
regard de cette touche.
Pour entrer des symboles, appuyez plusieurs
fois sur la touche numérique 1 jusqu’à ce
que le symbole souhaité apparaisse dans la
fenêtre d’affichage.
Pour insérer un espace, appuyez sur
SPACE.
Pour entrer un chiffre, appuyez sur la touche
numérique correspondante.
6 Appuyez sur M pour sélectionner le
caractère.
Le caractère sélectionné est mis en
surbrillance et le curseur clignote pour
indiquer le prochain espace à entrer.
Vous pouvez également accéder au
prochain espace en appuyant sur d’autres
touches numériques.
7 Répétez les étapes 4 à 6 pour entrer
davantage de caractères.
8 Appuyez sur NAME INPUT pour
enregistrer le nom du disque.
Répétez les étapes 1 à 8 pour attribuer des
noms à d’autres disques.
Effacement du nom du disque
1 Répétez les étapes 1 et 3 de la section
“Identification des disques sur le
lecteur” à la page 16 pour sélectionner
le nom du disque à effacer.
2 Appuyez plusieurs fois sur CLEAR
jusqu’à ce que tous les caractères
soient effacés.
3 Appuyez sur MENU.
Stockage d’informations sur
les CD (fichiers personnalis
és)
17
FR
Page 42

Utilisation du lecteur avec un autre appareil
Contrôle d’un autre
lecteur CD (Advanced
Mega Control)
Cet appareil peut contrôler un deuxième lecteur
CD (voir “Connexion d’un autre lecteur CD” à
la page 8).
Même lorsqu’un deuxième lecteur CD est
raccordé, les commandes des deux appareils
fonctionnent. Lorsque vous appuyez sur la
touche de lecture de chaque appareil, le lecteur
en cours d’utilisation s’arrête et l’autre lecteur
démarre.
Notez cependant que selon le lecteur, il se peut
que certaines fonctions du deuxième lecteur
CD ne fonctionnent pas.
Les commandes ci-dessous sont opérantes
lorsque la touche MEGA CONTROL est
allumée :
CONTINUE, SHUFFLE, PROGRAM,
REPEAT, MENU, MEGA CONTROL,
l AMS L, H, X, x, m/M
Lecture de disques du
deuxième lecteur CD
1 Appuyez sur MEGA CONTROL.
La touche MEGA CONTROL s’allume et la
fenêtre d’affichage présente le numéro du
disque en cours sur le deuxième lecteur.
2 Sélectionnez le mode de lecture
souhaité.
Pour programmer des pistes, utilisez les
commandes du deuxième lecteur.
3 Appuyez sur H pour démarrer la
lecture.
La lecture démarre et la fenêtre d’affichage
présente les numéros du disque en cours et
des pistes, ainsi que la durée de lecture de la
piste.
Tant que la touche MEGA CONTROL est
allumée, vous pouvez contrôler le deuxième
lecteur avec les commandes de ce lecteur de
la manière suivante :
FR
18
Pour
Mettre en pause
Arrêter la lecture
Localiser un disque
alors que
le second lecteur est
réglé sur le mode
Localiser une piste
• Pour réaliser d’autres opérations, utilisez les commandes
du deuxième lecteur ou la télécommande fournie.
• Les touches AMS (./>) et de recherche (m/M)
de la télécommande contrôlent le deuxième lecteur
comme indiqué sur la télécommande.
Pour contrôler le deuxième lecteur
directement à l’aide de la
télécommande fournie
Réglez CD 1/2/3 de la télécommande sur CD 3,
ce qui correspond au même réglage de mode
que le deuxième lecteur.
Pour reprendre le contrôle du lecteur
Appuyez sur MEGA CONTROL. La touche
MEGA CONTROL s’éteint et vous pouvez
contrôler ce lecteur.
Remarques
• Il est impossible de localiser un point précis d’une
piste du second lecteur à l’aide des commandes de
ce lecteur.
• Certaines commandes de ce lecteur fonctionnent
différemment sur le deuxième lecteur.
Vous devez
Appuyer sur X.
Appuyer sur x.
Tourner l AMS L
jusqu’à ce la fenêtre d’affichage
indique le numéro du disque
souhaité, puis appuyer sur
l AMS L.
Appuyer sur m/M jusqu’à
ce que la fenêtre d’affichage
indique le numéro de la piste
souhaité.
Chargement des noms de
disques (Disc Memos) du
deuxième lecteur CD
Si le deuxième lecteur CD dispose de la
fonction Nom du disque (Disc Memo) (voir
page 16), vous pouvez charger le nom du
disque (Disc Memo) du deuxième lecteur CD
vers la mémoire de ce lecteur, puis l’afficher.
1 Appuyez sur MENU.
2 Tournez l AMS L jusqu’à ce que
“LOAD 2ndNAME” apparaisse dans la
fenêtre d’affichage.
3 Appuyez sur l AMS L.
Ce lecteur démarre le chargement. (Cette
opération prend environ une minute.)
Page 43

Remarque
Si chaque nom du disque (Disc Memo) du deuxième
lecteur CD comporte plus de 12 caractères, les 12
premiers de chaque nom sont chargés vers ce lecteur.
Identification des disques du
deuxième lecteur CD
Vous pouvez identifier des disques du
deuxième lecteur CD ou modifier les noms du
disque (Disc Memos) chargés à partir du
deuxième lecteur CD.
1 Appuyez sur MEGA CONTROL.
La touche MEGA CONTROL s’allume.
2 Appuyez sur CONTINUE.
3 Tournez l AMS L pour
sélectionner le disque souhaité, puis
appuyez sur l AMS L.
4 Appuyez sur MENU.
5 Tournez l AMS L jusqu’à ce que
“DISC NAME” apparaisse dans la
fenêtre d’affichage, puis appuyez sur
l AMS L.
6 Entrez le nouveau nom du disque (Disc
Memo) selon la procédure spécifiée à la
section “Identification des disques” à
la page 16.
Remarque
Les nouveaux noms du disque (Disc Memos) sont
enregistrés dans la mémoire de ce lecteur, par
conséquent vous ne pouvez pas les afficher sur le
deuxième lecteur CD.
Lecture alternée (NoDelay Play/X-Fade Play)
Lorsque vous raccordez le deuxième lecteur,
vous pouvez lire des pistes de ce lecteur et
celles du deuxième lecteur alternativement
dans tous les modes de lecture (voir
“Connexion d’un autre lecteur CD” à la page
8).
Sélectionnez l’une des méthodes suivantes :
• No-Delay Play : le lecteur utilisé change à chaque
piste. Le relais entre les deux lecteurs se fait sans
interruption. Dès qu’un lecteur s’arrête, l’autre
démarre la lecture immédiatement à la note
suivante.
• X-Fade Play : le lecteur utilisé change à chaque
piste ou selon un intervalle spécifié. Vous pouvez
sélectionner un intervalle de 30, 60 et 90 secondes.
A chaque passage d’un lecteur à l’autre, le son des
deux lecteurs est mélangé. La lecture sur le lecteur
en cours s’achève sur un fondu enchaîné, l’autre
lecteur prenant le relais progressivement.
1 Sélectionnez le mode de lecture
souhaité sur chaque lecteur.
2 Lorsque vous sélectionnez No-Delay
Play
Appuyez plusieurs fois sur X-FADE/NO
DELAY jusqu’à ce que l’indication “NO
DELAY” apparaisse dans la fenêtre
d’affichage (ou appuyez sur la touche NO
DELAY de la télécommande).
Lorsque vous sélectionnez X-Fade Play
Appuyez sur X-FADE/NO DELAY ou sur
la touche r X-FADE de la télécommande.
A chaque pression sur X-FADE/NO
DELAY, l’indication (X-Fade mode)
apparaît comme suit:
Utilisation du lecteur
avec un autre appareil
X-FADE 30SNO DELAY X-FADE 60S
OFF
A chaque pression sur X-FADE de la
télécommande, l’indication (X-Fade mode)
apparaît comme suit:
X-FADE ALL
after 30 secat track end after 60 sec
X-FADE off
suite page suivante
X-FADE 90S
after 90 sec
19
FR
Page 44

Lecture alternée (No-Delay Play/XFade Play) (suite)
Remarque
“NO DELAY” n’apparaît pas lorsque vous
effectuez cette opération à partir de la
télécommande.
Pour changer de lecteur à la fin de chaque
piste, sélectionnez “X-FADE ALL”.
Pour changer de lecteur selon l’intervalle
spécifié, appuyez plusieurs fois sur XFADE/NO DELAY jusqu’à ce que
l’intervalle souhaité apparaisse dans la
fenêtre d’affichage.
3 Appuyez sur H pour démarrer la
lecture.
La touche MEGA CONTROL s’allume
lorsque la piste du deuxième lecteur est
sélectionnée.
Pour vérifier l’état du mode X-Fade
Appuyez sur X-FADE/NO DELAY.
L’état du mode X-Fade apparaît
temporairement.
Pour annuler No-Delay Play/X-Fade
Play
Appuyez à plusieurs reprises sur X-FADE/NO
DELAY, jusqu’à ce que l’indication “XFADE” ou “NO DELAY” disparaisse. Le
lecteur en cours continue la lecture.
Conseils
• Vous pouvez changer de méthode (No-Delay ou XFade) en cours de lecture en appuyant sur X-FADE/
NO DELAY à l’étape 2.
• Lorsque vous appuyez sur FADER au cours de la
lecture X-Fade, vous pouvez démarrer la fonction
X-Fade dès que souhaité.
Même après avoir réglé le mode X-Fade et démarré
X-Fade Play, vous pouvez lancer manuellement XFade à un endroit précis. Veuillez noter qu’il est
impossible d’effectuer cette opération au moment
du mixage du son des deux lecteurs.
Remarques
• La lecture démarre à partir du deuxième lecteur si
vous lancez la lecture lorsque la touche MEGA
CONTROL est allumée.
• Lorsque l’un des lecteurs a lu tous les disques et
toutes les pistes, ils s’arrêtent simultanément, même
si l’autre lecteur n’a pas encore terminé.
• N’utilisez pas les commandes du deuxième lecteur
pendant
que les fonctions No-Delay Play/X-Fade Play sont
activées. Elles peuvent ne pas fonctionner
FR
20
correctement.
Informations complémentaires
Utilisation du système
CONTROL A1II
Ce lecteur est compatible avec le système
CONTROL A1II.
Ce système a été conçu pour simplifier le
fonctionnement des systèmes audio composés
d’appareils Sony séparés. Les raccordements
CONTROL A1II fournissent un trajet pour la
transmission des signaux de contrôle qui
autorisent l’automatisation et le contrôle,
généralement associés à des systèmes intégrés.
Actuellement, les raccordements CONTROL
A1II entre une platine MD, un lecteur CD, un
amplificateur (récepteur) et une platine cassette
Sony fournissent une sélection de fonction
automatique et un enregistrement synchronisé.
A l’avenir, le raccordement CONTROL A1II
fonctionnera comme un bus multifonctions
vous permettant de contrôler diverses fonctions
de chaque appareil.
Remarque
Le système CONTROL A1II est conçu de façon à
pouvoir évoluer lors d’une mise à niveau pour l’ajout
de nouvelles fonctions. Dans ce cas cependant, les
anciens appareils ne seront plus compatibles avec les
nouvelles fonctions.
Page 45

Compatibilité CONTROL A1II et
CONTROL A1
Le système CONTROL A1 a évolué vers
CONTROL A1II qui représente le système
standard des changeurs 300 CD Sony et des
autres appareils Sony récents. Les appareils à
prise CONTROL A1 sont compatibles avec
ceux dotés du CONTROL A1II ; ils peuvent
être raccordés entre eux. La majorité des
fonctions disponibles avec le système
CONTROL A1 seront disponibles avec le
système CONTROL A1II. Cependant, lorsque
vous raccordez des éléments avec des prises
CONTROL A1 et des éléments avec des prises
CONTROL A1II, le nombre de fonctions
contrôlables peut être limité selon l’appareil.
Pour obtenir davantage d’informations,
reportez-vous au mode d’emploi fourni avec
l’appareil.
Raccordement du système
CONTROL A1II
Raccordez les câbles à mini fiche monauraux
(2P) de série aux prises CONTROL A1II
situées à l’arrière de chaque appareil. Vous
pouvez raccorder dans n’importe quel ordre
jusqu’à dix appareils CONTROL A1II
compatibles. Cependant, vous pouvez raccorder
uniquement un type d’appareil (par ex., 1
lecteur CD, 1 platine MD, 1 platine cassette et
1 récepteur). (Selon le modèle, il est parfois
possible de raccorder plusieurs lecteurs CD ou
platines MD. Pour obtenir davantage
d’informations, reportez-vous au mode
d’emploi fourni avec chaque appareil.)
Exemple
Dans le système CONTROL A1II, les signaux
de contrôle circulent dans les deux sens, ainsi,
il n’existe pas de différence entre les prises IN
et OUT. Si un appareil dispose de plusieurs
prises CONTROL A1II, vous pouvez utiliser
l’une d’entre elles ou raccorder différents
appareils à chaque prise.
A propos du câble de raccordement
Utilisez le câble à mini fiche (2P) monaural
fourni.
Fonctions de base du
système CONTROL A1II
Sélection de fonction automatique
Lorsque vous raccordez des appareils Sony
compatibles CONTROL A1II à l’aide de câbles
CONTROL A1II (non fournis), le sélecteur de
fonction de l’amplificateur (ou récepteur)
bascule automatiquement vers l’entrée adaptée
lorsque vous appuyez sur la touche de lecture
de l’un des appareils raccordés.
(Par exemple, lorsque vous appuyez sur H
(touche de lecture) sur le lecteur CD alors que
la platine MD est en cours de lecture, le
sélecteur de fonction de l’amplificateur bascule
de MD sur CD.)
Remarques
• cette fonction est active uniquement lorsque les
appareils sont raccordés aux entrées de
l’amplificateur (ou récepteur) conformément aux
noms des touches de fonction. Avec certains
récepteurs, vous pouvez échanger les noms des
touches de fonction. Dans ce cas, reportez-vous au
mode d’emploi fourni avec le récepteur.
• Lors de l’enregistrement, procédez à la lecture
uniquement à partir de la source d’enregistrement.
Sinon, la sélection de fonction automatique se met
en marche.
Utilisation du lecteur
avec un autre appareil
Informations
complémentaires
Amplificateur
Lecteur
de CD
Platine
MD
Autre
élément
suite page suivante
21
FR
Page 46

Utilisation du système CONTROL A1
(suite)
II
Précautions
Enregistrement synchronisé
Cette fonction vous permet d’effectuer des
enregistrements synchronisés entre l’appareil
d’enregistrement et le lecteur CD.
1 Réglez le sélecteur de source de
l’amplificateur (ou récepteur) sur CD.
2 Mettez le lecteur CD en mode pause
(vérifiez que les voyants H et X
s’allument en même temps).
3 Mettez l’appareil d’enregistrement en
mode pause.
4 Appuyez sur la touche X de la platine.
Le mode pause du lecteur CD se désactive
automatiquement et l’enregistrement
démarre peu de temps après.
Lorsque la lecture du CD prend fin,
l’enregistrement s’arrête.
Conseil
Certains appareils d’enregistrement peuvent être
équipés d’une fonction d’enregistrement spéciale qui
utilise le système CONTROL A1II comme “CD
Synchro Dubbing”. Dans ce cas, reportez-vous au
mode d’emploi fourni avec l’appareil
d’enregistrement.
Remarque
Ne mettez qu’un seul appareil en mode pause.
FR
22
Sécurité
• Attention : l’utilisation d’instruments optiques avec
ce produit peut augmenter les risques oculaires.
• En cas de chute d’un objet solide ou d’un liquide
dans le boîtier, débranchez le lecteur et faites-le
vérifier par un personnel qualifié avant de le
réutiliser.
• Les disques de formes non standard (par exemple,
en forme de cœur, de carré, d’étoile) ne peuvent pas
être lus sur cet appareil. Si vous essayez malgré
tout, vous risquez d’endommager l’appareil.
N’utilisez pas ce type de disques.
Sources d’alimentation
• Avant d’utiliser le lecteur, vérifiez que la tension de
fonctionnement du lecteur est identique à votre
alimentation secteur locale. La tension de
fonctionnement est indiquée sur la plaque portant le
nom du modèle à l’arrière du lecteur.
• Le lecteur n’est pas déconnecté de la source
d’alimentation secteur tant qu’il est raccordé à la
prise murale, même s’il a lui-même été mis hors
tension.
• Si vous n’avez pas l’intention d’utiliser le lecteur
pendant une période prolongée, veillez à le
déconnecter de la prise murale. Pour déconnecter le
cordon d’alimentation secteur (câble secteur),
saisissez la prise, ne tirez jamais sur le cordon.
• Le cordon d’alimentation secteur doit être changé
uniquement dans un atelier d’entretien qualifié.
Emplacement
• Placez le lecteur dans un emplacement avec une
ventilation adéquate pour éviter une surchauffe de
l’appareil.
• Ne placez pas le lecteur sur une surface molle,
comme un tapis, qui pourrait obstruer les trous de
ventilation situés dans la partie inférieure de
l’appareil.
• Ne placez pas le lecteur à proximité de sources de
chaleur ou dans un endroit soumis directement aux
rayons du soleil, à une poussière excessive ou à des
chocs mécaniques.
Fonctionnement
• Si le lecteur passe directement d’un environnement
froid à un environnement chaud ou s’il est placé
dans une pièce très humide, de la condensation peut
se former sur les lentilles à l’intérieur du lecteur. Si
cela se produit, il est possible que le lecteur ne
fonctionne pas correctement. Dans ce cas, retirez le
disque et laissez le lecteur fonctionner pendant
environ une heure jusqu’à évaporation de
l’humidité.
Réglage du volume
• N’augmentez pas le volume si vous écoutez une
partie avec des entrées d’un niveau très faible ou
sans signaux audio. Si vous le faites, les enceintes
risquent d’être endommagées lorsqu’une partie avec
un niveau de son très élevé est lue.
Page 47

Nettoyage
• Nettoyez le boîtier, le panneau et les commandes
avec un chiffon doux, légèrement humidifié avec
une solution détergente douce. N’utilisez pas de
tampon abrasif, de poudre détergente ou de solvant
comme de l’alcool ou du benzène.
Si vous avez des questions ou des problèmes
concernant votre lecteur, consultez votre
revendeur Sony le plus proche.
Remarques sur les CD
Manipulation des CD
• Pour garder les disques propres, prenez-les par les
bords. N’en touchez pas la surface.
• Ne collez pas de papier ou de ruban adhésif sur le
disque.
• N’exposez pas le disque en plein soleil ou près
d’une source de chaleur comme des conduites d’air
chaud, ne le laissez pas dans un véhicule stationné
en plein soleil car les températures peuvent
considérablement augmenter à l’intérieur du
véhicule.
• N’utilisez pas de stabilisateur disponible dans le
commerce. Le disque et le lecteur risqueraient
d’être endommagés.
• Après la lecture, rangez le disque dans son boîtier.
Nettoyage
• Avant la lecture, nettoyez le disque avec un chiffon
de nettoyage. Essuyez le disque en partant du centre
vers l’extérieur.
Remarques concernant la lecture
d’un CD-R/CD-RW
• Il est possible que certains disques enregistrés avec
un graveur CD-R/CD-RW ne puissent pas être
reproduits en raison de rayures, de souillures, de
leurs conditions d’enregistrement ou des
caractéristiques techniques du graveur. En outre, les
disques qui ne sont pas finalisés à la fin de
l’enregistrement ne peuvent pas être reproduits.
Informations
complémentaires
• N’utilisez pas de solvants comme du benzène, du
dissolvant, des nettoyants disponibles dans le
commerce ou du spray antistatique destiné aux
disques vinyles.
23
FR
Page 48

Dépannage
Spécifications
Si vous vous trouvez confronté à l’un des
problèmes décrits ci-après en cours de
fonctionnement du lecteur, utilisez ce guide de
dépannage pour vous aider à y remédier. Si le
problème persiste, consultez votre revendeur
Sony le plus proche.
Aucun son n’est émis.
• Vérifiez que le lecteur est raccordé correctement.
• Assurez-vous que vous utilisez l’amplificateur
correctement.
• Réglez le niveau de sortie analogique à l’aide de
la touche ANALOG OUT LEVEL +/– de la
télécommande.
Le CD n’est pas lu.
• Il n’y a pas de CD dans le lecteur. L’indication
“– NO DISC –” apparaît. Insérez un CD.
• Placez correctement le CD avec l’étiquette vers
le haut sur le plateau.
• Nettoyez le CD (voir page 23).
• De l’humidité s’est formée dans le lecteur.
Retirez le disque et laissez le lecteur sous tension
pendant environ une heure.
• Placez le CD dans la position correcte sur le
plateau.
Le niveau d’enregistrement a changé.
• Le niveau d’enregistrement change si vous réglez
le niveau de sortie analogique à l’aide de la
touche ANALOG OUT LEVEL +/– de la
télécommande pendant l’enregistrement.
La télécommande ne fonctionne pas.
• Retirez les obstacles entre la télécommande et le
lecteur.
• Dirigez la télécommande vers le capteur du
lecteur.
• Remplacez toutes les piles de la télécommande si
elles sont faibles.
Le lecteur ne fonctionne pas correctement.
• Les puces du micro-ordinateur ne fonctionnent
peut-être pas correctement. Mettez l’appareil
hors tension, puis sous tension pour le
réinitialiser.
Lecteur de disques compacts
Laser Laser à semi-conducteur
Plage de fréquence 2 HZ à 20 Hz ± 0,5 db
Plage dynamique Supérieure à 93 dB
Distorsion harmonique Inférieure à 0,0045 %
(λ = 780 nm)
Durée d’émission :
continue
Sorties
Impédance
de charge
Supérieure à
10 kilohms
Longueur
d’onde :
660 nm
32 ohms
ANALOG
OUT
DIGITAL
OUT
(OPTICAL)
PHONES
Type de
prise
Prises
phono
Connecteur
de sortie
optique
Prise
phono
stéréo
Niveau de
sortie
maximal
2 V
(à 50
kilohms)
–18 dBm
10 mW
Caractéristiques générales
Puissance de raccordement120 V CA, 60 Hz
Consommation électrique 11 W
Dimensions hors tout 430 x 110 x 400 mm
(l/h/p) (17 x 4 3/8 x 15 3/4 in.)
Masse (approx.) 5,2 kg (11 lbs 8 oz)
parties saillantes
comprises
Accessoires fournis
Câble audio (2 fiches phono – 2 fiches phono) (1)
Télécommande (1)
Piles R6 (AA) (2)
Câble à mini fiche (2P) monaural (1)
La conception et les spécifications sont sujettes
à modifications sans préavis.
Sony Corporation Printed in Malaysia
FR
24
 Loading...