


Sony Bravia KDL-70R551A, Bravia KDL-70R550A, Bravia KDL-60R551A, Bravia KDL-60R550A, Bravia KDL-60R520A Operating Instructions Manual
...
SONY
4-460-662-11(1 )
LCD TV
Introducing Your New
BRAVIA®
Getting Started
Operating the TV
Using Features
Using the Menus
Other Information
BRAVlA
Sony Customer Support
U.S.A.: http ://www. sony. com/tvsu ppo rt
Canada: http://www.sony.ca/su pport
United States Canada
1.800.222.SONY 1.877.899.SONY
Please Do Not Return
the Product to the Store
Owner's Record
The model and serial numbers are located at the side
and rear of the TV. Record these numbers in the spaces
provided below. Refer to them whenever you call upon
your Sony dealer regarding this TV.
Model Name
Serial No.
CAUTION
To prevent electric shock and blade exposure, do not use
this polarized AC plug with an extension cord, receptacle or
other outlet unless the blades can be fully inserted.
[] Operate the TV only on 110-240 V AC
(USA/Canada 120 V AC).
[] Avoid operating the TV at temperatures
below 41°F (5°C).
Licensing Information
MHL, Mobile High-Definition Link and the MHL Logo are
trademarks or registered trademarks of MHL Licensing, LLC.
HDMI, the HDMI logo, and High-Definition Multimedia
Interface are trademarks or registered trademarks of HDMI
Licensing, LLC in the United States and other countries.
Fergason Patent Properties, LLC:
U.S. Patent No. 5,717,422
U.S. Patent No. 6,816,141
Manufactured under license from Dolby Laboratories.
Blu-ray Disc is a trademark.
"BRAVIA" and BRAVlA, BRAVlA Sync, and [] are
trademarks or registered marks of Sony Corporation.
"PlayStation" is a registered trademark and "PS3" is a
trademark of Sony Computer Entertainment Inc.
Opera @Devices SDK from Opera Software ASA.
Copyright 1995-2013 Opera Software ASA.
All rights reserved.
DLNA ®, the DLNA Logo and DLNA CERTIFIED ® are
trademarks, service marks, or certification marks of the
Digital Living Network Alliance.
Cleaning
When cleaning, be sure to unplug the power
cord to avoid any chance of electric shock.
• Wipe the LCD screen gently with a soft cloth.
• Stubborn stains may be removed with a
cloth slightly moistened with a solution of
mild soap and warm water.
• Ifusing a chemically pretreated cloth, 31ease
follow the instruction provided on the
package.
• Never use strong solvents such as a thinner,
alcohol or benzine for cleaning.
• See the supplied Safety Booklet for
additional information.
Your BRAVIA TV is ENERGY STAR ® qualified
in the "Home" mode. It meets strict energy
efficiency guidelines set by the U.S.
Environmental Protection Agency and
Department of Energy.
ENERGY STAR is a joint program of these
government agencies, designed to promote energy efficient
products and practices. Changes to certain features,
settings, and functionalities of this TV (i.e. TV Guide, Picture/
Sound, Light Sensor, Power Savings, Picture Scene) can
increase or change the power consumption. The Auto and
General picture scenes are default settings optimized for the
input signal selected. Your BRAVlA TV is tested in these
settings for ENERGY STAR qualification. Depending upon
such changed settings, the power consumption may exceed
the limits required for the ENERGY STAR qualification in the
"Home" mode.
Wi-Fi Protected Setup TM(WPS) is a mark of the Wi-Fi
Alliance.
Wi-Fi Protected Access TM(WPA) is a mark of the Wi-Fi
Alliance.
I The 70 class has a 69.5 inch viewable image size (measured diagonally).
I The 50 class has a 49.5 inch viewable image size (measured diagonally),
2
Contents
Introducing Your New BRA VIA ®
Welcome to the World of BRAVIA ® ........ 4
Experiencing Stunning HD with Your
BRAVIA ........................... 4
The Four Steps to a Stunning HD
Experience ......................... 5
TV Feature Highlights ................... 5
Getting Started
Setting Up Your TV ..................... 7
Attaching the Table-Top Stand ............ 8
Locating Inputs and Outputs .............. 9
Connecting the TV .................... 11
Connecting Other Equipment ............ 14
When Installing the TV Against a Wall or
Enclosed Area ..................... 15
Securing the TV ...................... 16
Running Initial Setup ................... 19
Operating the TV
Using the Remote Control ............... 21
Remote Control Button Description ....... 22
TV Controls and Indicators .............. 25
Playing back Photo/Music/Video via USB...31
Viewing 3D Video
(except KDL-60R520A) .............. 34
Home Network ....................... 38
Using Screen mirroring ................. 39
Photo Frame ......................... 40
Using Home Network Features ........... 41
Setting up the Internet Connection ........ 42
If You Cannot Connect to the Internet ..... 44
Adjusting the Server Display Settings ...... 45
Browsing Websites .................... 45
Enjoying Sony Entertainment Network ..... 46
Enjoying Applications .................. 47
Using the Menus
Navigating through TV Menus ........... 48
Using the Picture Settings ............... 50
Using the Sound Settings ............... 52
Using the Screen Settings .............. 54
Using the Channel Settings ............. 56
Using the Parental Lock Settings ......... 57
Using the Setup Settings ............... 60
Using the Eco Settings ................. 66
Using Features
BRAVIA Sync Control .................. 26
Using PIP Feature ..................... 27
Using PAP Feature .................... 28
Favorites ............................ 28
Wide Mode .......................... 29
Wide Mode with HDMI/MHL Input
(PC Timing) ....................... 30
Inputs .............................. 31
Other Information
PC Input Signal Reference Chart for
HDMI/MHL IN ...................... 67
Using a Wall-Mount Bracket ............. 68
Troubleshooting ...................... 69
Important Notices ..................... 77
Specifications ........................ 78
Index ............................... 81
Customer Support
United States
http://www.sony.com/tvsu pport
Canada
http://www.sony.ca/su pport
On-line Registration
United States
http://prod uctregistration .sony.com
Canada
http://www.sony.ca/registration
3
Welcome to the World of BRAVIA ®
Thank you for choosing this Sony BRAVIA®high-definition television. Use the
documentation listed below to get the most out of your TV.
Safety Booklet
Contains precautionary measures to
keep you and your TV safe. Read
this information prior to setting up
your TV.
Operating Instructions
Provides the most detailed
information to operate your TV.
Quick Setup Guide
Provides TV setup information with
sample connection diagrams.
Experiencing Stunning HD with Your
BRAVIA
The quality of the image you see on your BRAVlA TV is only as good as the quality of the
signal it receives. To experience the stunning detail of your new BRAVlA TV, you need
access to HD programming. Your BRAVlA TV can receive and display HD programming
from:
• Over-the-air broadcasting via HD-quality antenna
• HD cable subscription
• HD satellite subscription
• Blu-ray Disc TM player or other HD compatible external equipment
Contact your cable, satellite or HD service provider for information on upgrading to HD
programming.
4
The Four Steps to a Stunning HD
Experience
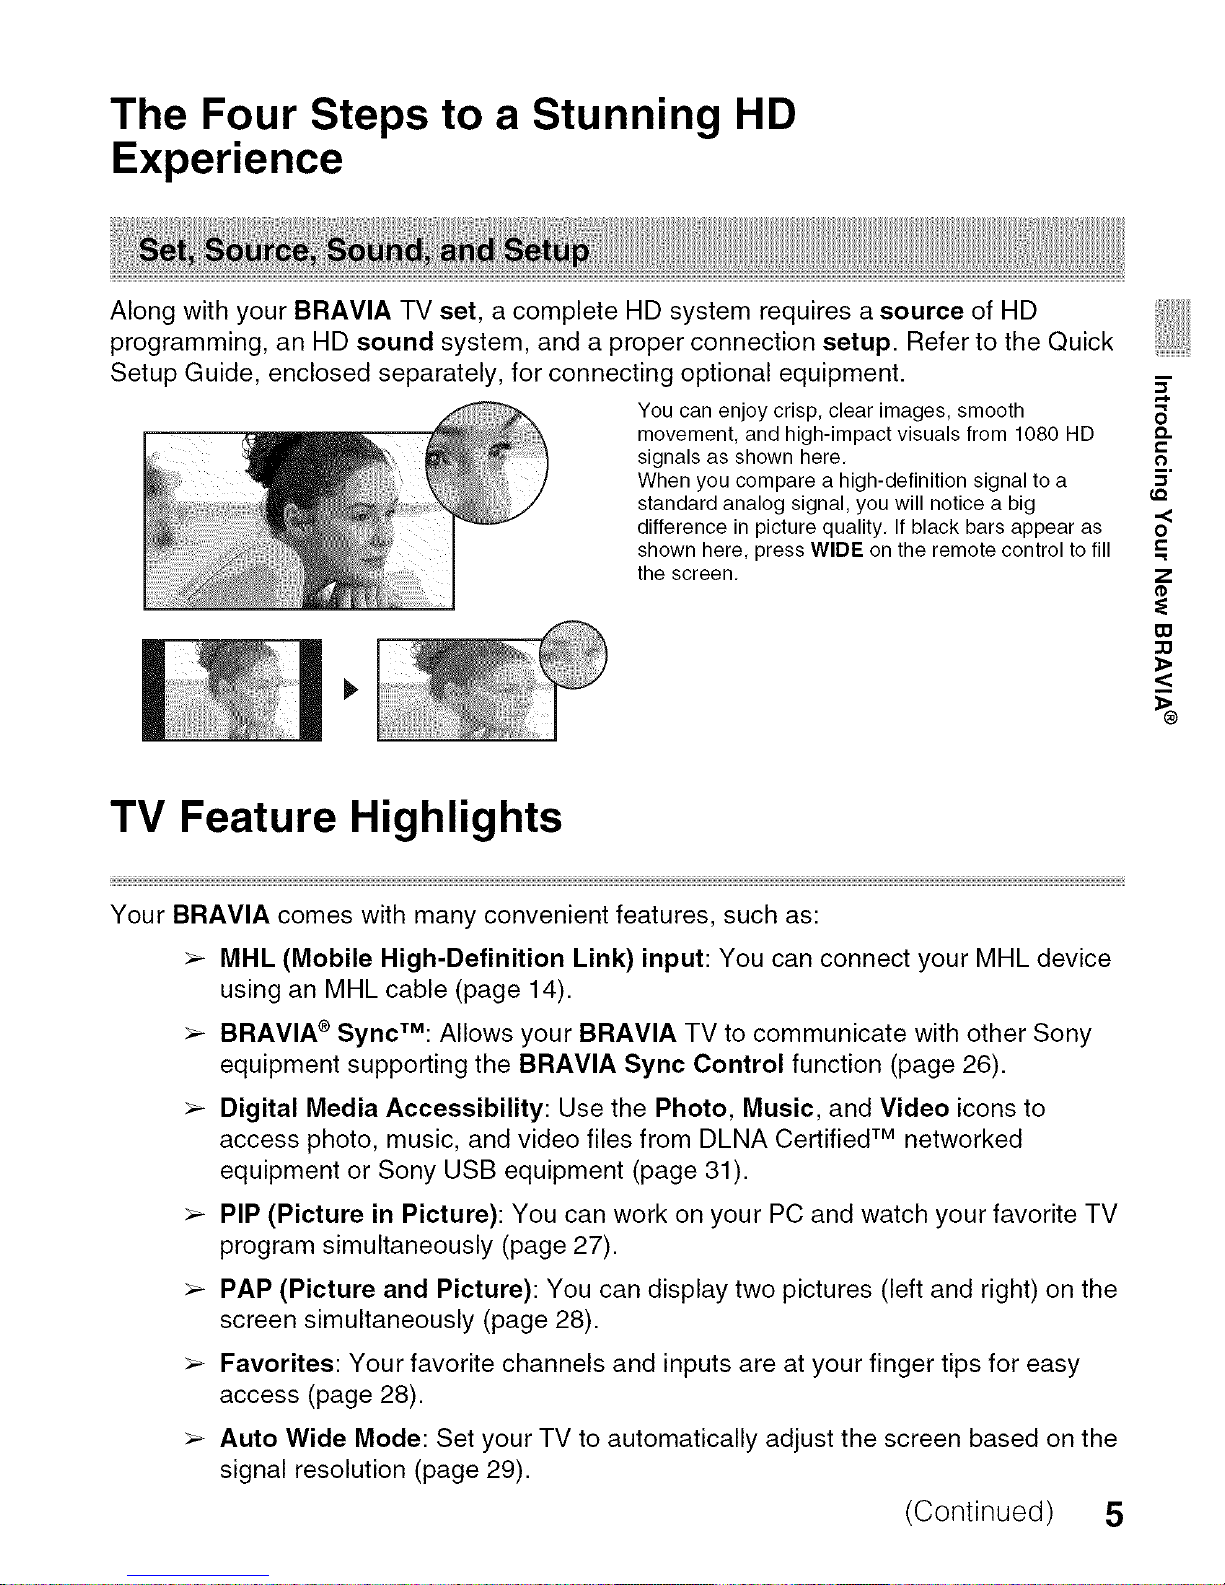
Along with your BRAVIA TV set, a complete HD system requires a source of HD
programming, an HD sound system, and a proper connection setup. Refer to the Quick
Setup Guide, enclosed separately, for connecting optional equipment.
You can enjoy crisp, clear images, smooth
movement, and high-impact visuals from 1080 HD
signals as shown here,
When you compare a high-definition signal to a
standard analog signal, you will notice a big
difference in picture quality, If black bars appear as
shown here, press WIDE on the remote control to fill
the screen,
TV Feature Highlights
Your BRAVlA comes with many convenient features, such as:
> MHL (Mobile High-Definition Link) input: You can connect your MHL device
using an MHL cable (page 14).
> BRAVlA ®SyncTM: Allows your BRAVlA TV to communicate with other Sony
equipment supporting the BRAVlA Sync Control function (page 26).
> Digital Media Accessibility: Use the Photo, Music, and Video icons to
access photo, music, and video files from DLNA Certified TM networked
equipment or Sony USB equipment (page 31).
> PIP (Picture in Picture): You can work on your PC and watch your favorite TV
program simultaneously (page 27).
> PAP (Picture and Picture): You can display two pictures (left and right) on the
screen simultaneously (page 28).
> Favorites: Your favorite channels and inputs are at your finger tips for easy
access (page 28).
> Auto Wide Mode: Set your TV to automatically adjust the screen based on the
signal resolution (page 29).
(Continued) 5
Input Selection: Allows you to easily switch between the connected equipment
(page 31 ).
Scene Select: Allows you to easily adjust your TV to the most suitable picture
and sound settings based on the scenes for the best quality result for the
contents genre you are watching.
Opera Apps: Opera Apps are typically video rich and designed to give the user
a comfortable "lean-back" experience without complex interactions requiring
typing or searching.
DLNA: You can enjoy various content (e.g. photo/music/video files) stored on
DLNA Certified TM media servers. The home network feature allows you to enjoy
network content in other rooms (page 38).
Internet Video: Internet Video brings videos, movies and much more from the
Internet to your TV (page 46).
Browser: Allows you easily browse websites.
Photo Frame: You can enjoy the large photo frame display with music.
On Timer: Set timer to wake up TV automatically with preferred setting of input
and volume. You can also wake up with your favorite photo and music through
photo frame feature (page 63).
Screen mirroring: "Screen mirroring" is a function to display the screen of a
mobile device on the TV by Miracast technology (page 39).
6
Setting Up Your TV
.............................................................................................................................................................................................................................................._iiiiiii iiiiii HHHHHHHHHHHHHHHHHHHHHHHHHHHHHHHHHHHHHHHHHHHHHHHHHHHHHHHHHHHHHHHHHHHHHHHHHHHH_HHHHHHHHHHHHHHHHHHHHHHHHHHHHHHHHHHHHHHHHHH__ iiiiiiiiiiiiiiiiiiii_
Some TV models are packaged with a detached Table-Top Stand so you can mount
your TV to a wall right away. If you are not mounting the TV to a wall, you will need to
attach the Table-Top Stand. You will need a Phillips screwdriver (not supplied) and the
supplied screws to complete the task. Look for the supplied Table-Top Stand instruction
leaflet.
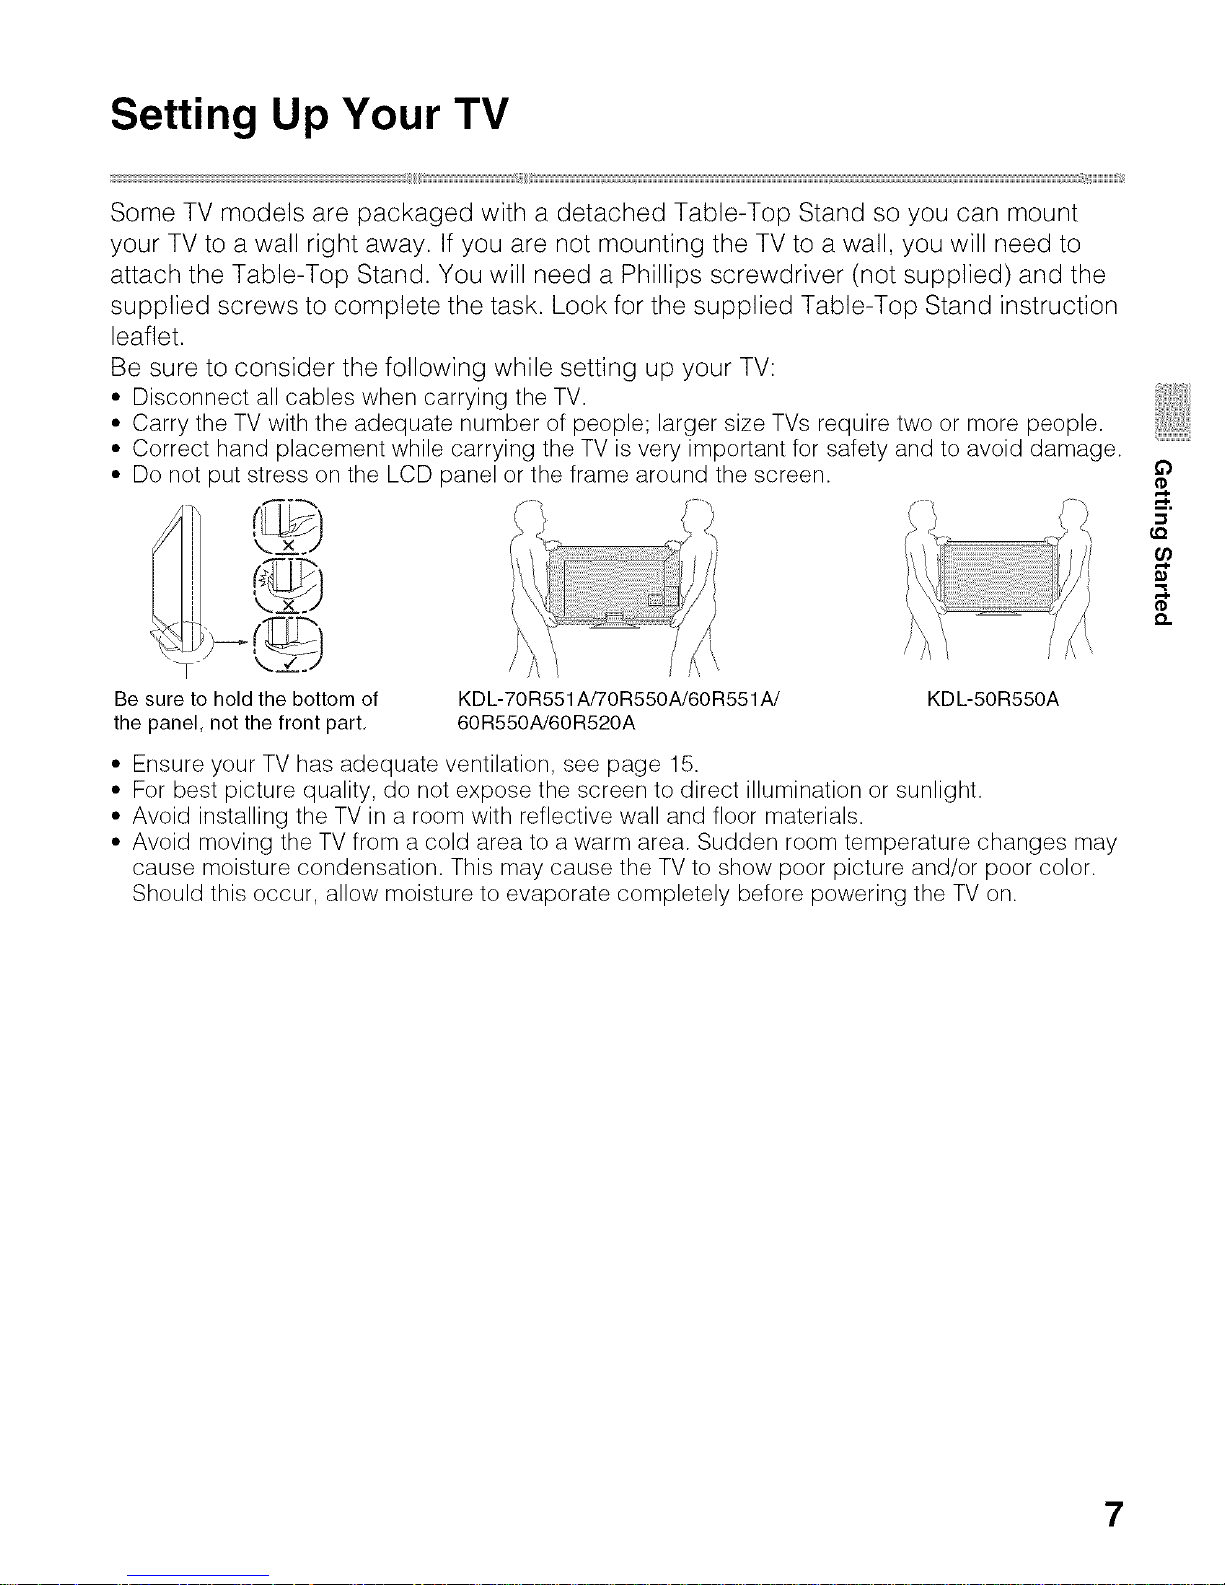
Be sure to consider the following while setting up your TV:
• Disconnect all cables when carrying the TV.
• Carry the TV with the adequate number of people; larger size TVs require two or more people.
• Correct hand placement while carrying the TV is very important for safety and to avoid damage.
• Do not put stress on the LCD panel or the frame around the screen.
Be sure to hold the bottom of
the panel, not the front part.
KDL-70R551A/70R550A/60R551A/ KDL-50R550A
60R550A/60R520A
• Ensure your TV has adequate ventilation, see page 15.
• For best picture quality, do not expose the screen to direct illumination or sunlight.
• Avoid installing the TV in a room with reflective wall and floor materials.
• Avoid moving the TV from a cold area to a warm area. Sudden room temperature changes may
cause moisture condensation. This may cause the TV to show poor picture and/or poor color.
Should this occur, allow moisture to evaporate completely before powering the TV on.
LQ
7
Attaching the Table-Top Stand
......................................................................................ii_jiiiiiii_ ........................................................................................................................................................................................iIIIIIIIIIIIIIIIIIIIIIIIIIIIIIIIIIIIIIIIIIIIIIIIIIIIIiiiiiiiiiiiiiiiiiiiiiiiiiiiiiiiiiiiiiiiiiiiiiiiii_iiiiiiiiiiiiiiiiiiiiiiiiiiiiiiiiiiiiiiiiiiiiiiiiiiiiiiiiiiiiiiiiiiiiiiiiiiiiiiiiiiiiiiiiiiiiiiiiiiiiiiiiiiiiiiiiiiiiii_jiiiii_iiiiiiiiiiiiiiiiiiiiii{iiiiiiiiiiiiiiiiiiiiiiiiiiiiiiiiiiiiiiiiiiiiiiiiiiii{iiiiiiiiiiiiiiiiiiiiiiiiiiiiiiiiiiiiiiiiiiiiiiiiiiiiiiiiiiiiiiiiiiiiiiiiiiiiiiii_
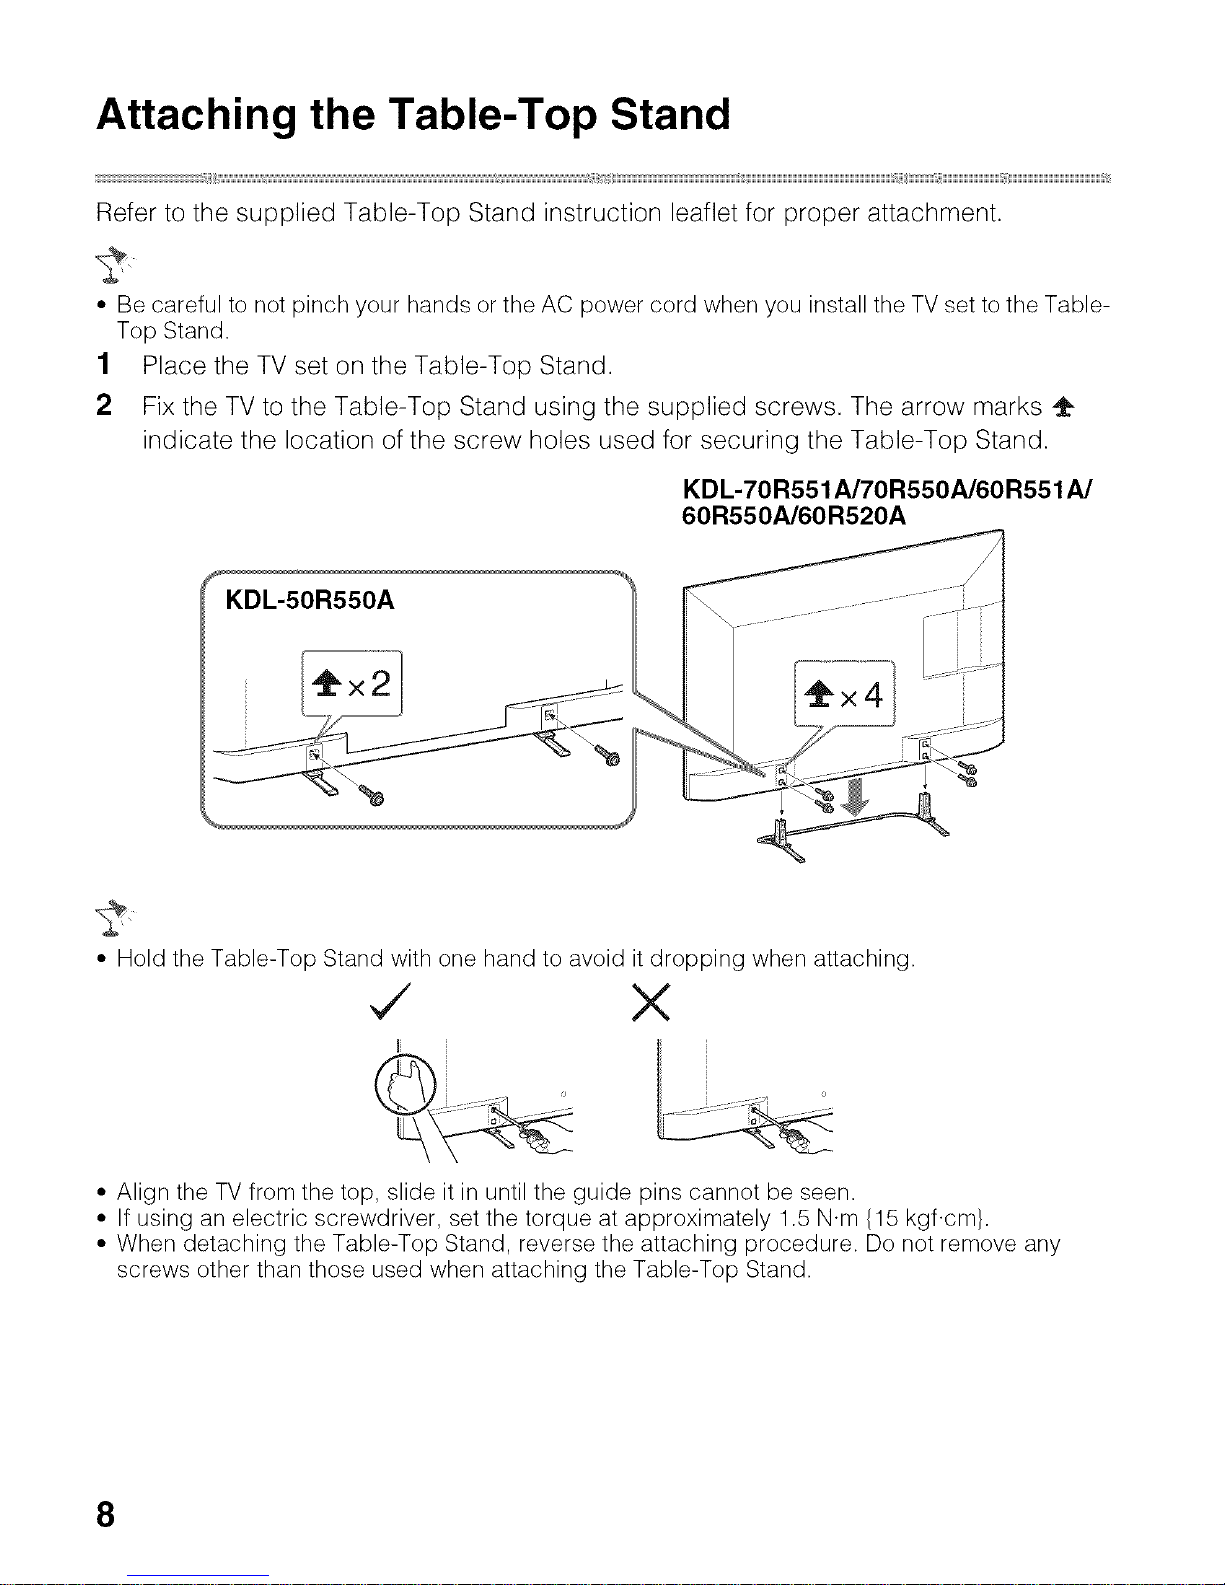
Refer to the supplied Table-Top Stand instruction leaflet for proper attachment.
• Becareful to not pinch your hands or the AC power cord when you install the TVsetto the Table-
Top Stand.
1 Place the TV set on the Table-Top Stand.
2 Fix the TV to the Table-Top Stand using the supplied screws. The arrow marks
indicate the location of the screw holes used for securing the Table-Top Stand.
KDL-70R551A/70R550A/60R551A/
60R550A/60R520A
KDL-50R550A
• Hold the Table-Top Stand with one hand to avoid it dropping when attaching.
,/
{{
X
• Align the TV from the top, slide it in until the guide pins cannot be seen.
• If using an electric screwdriver, set the torque at approximately 1.5 N.m {15 kgf.cm}.
• When detaching the Table-Top Stand, reverse the attaching procedure. Do not remove any
screws other than those used when attaching the Table-Top Stand.
8
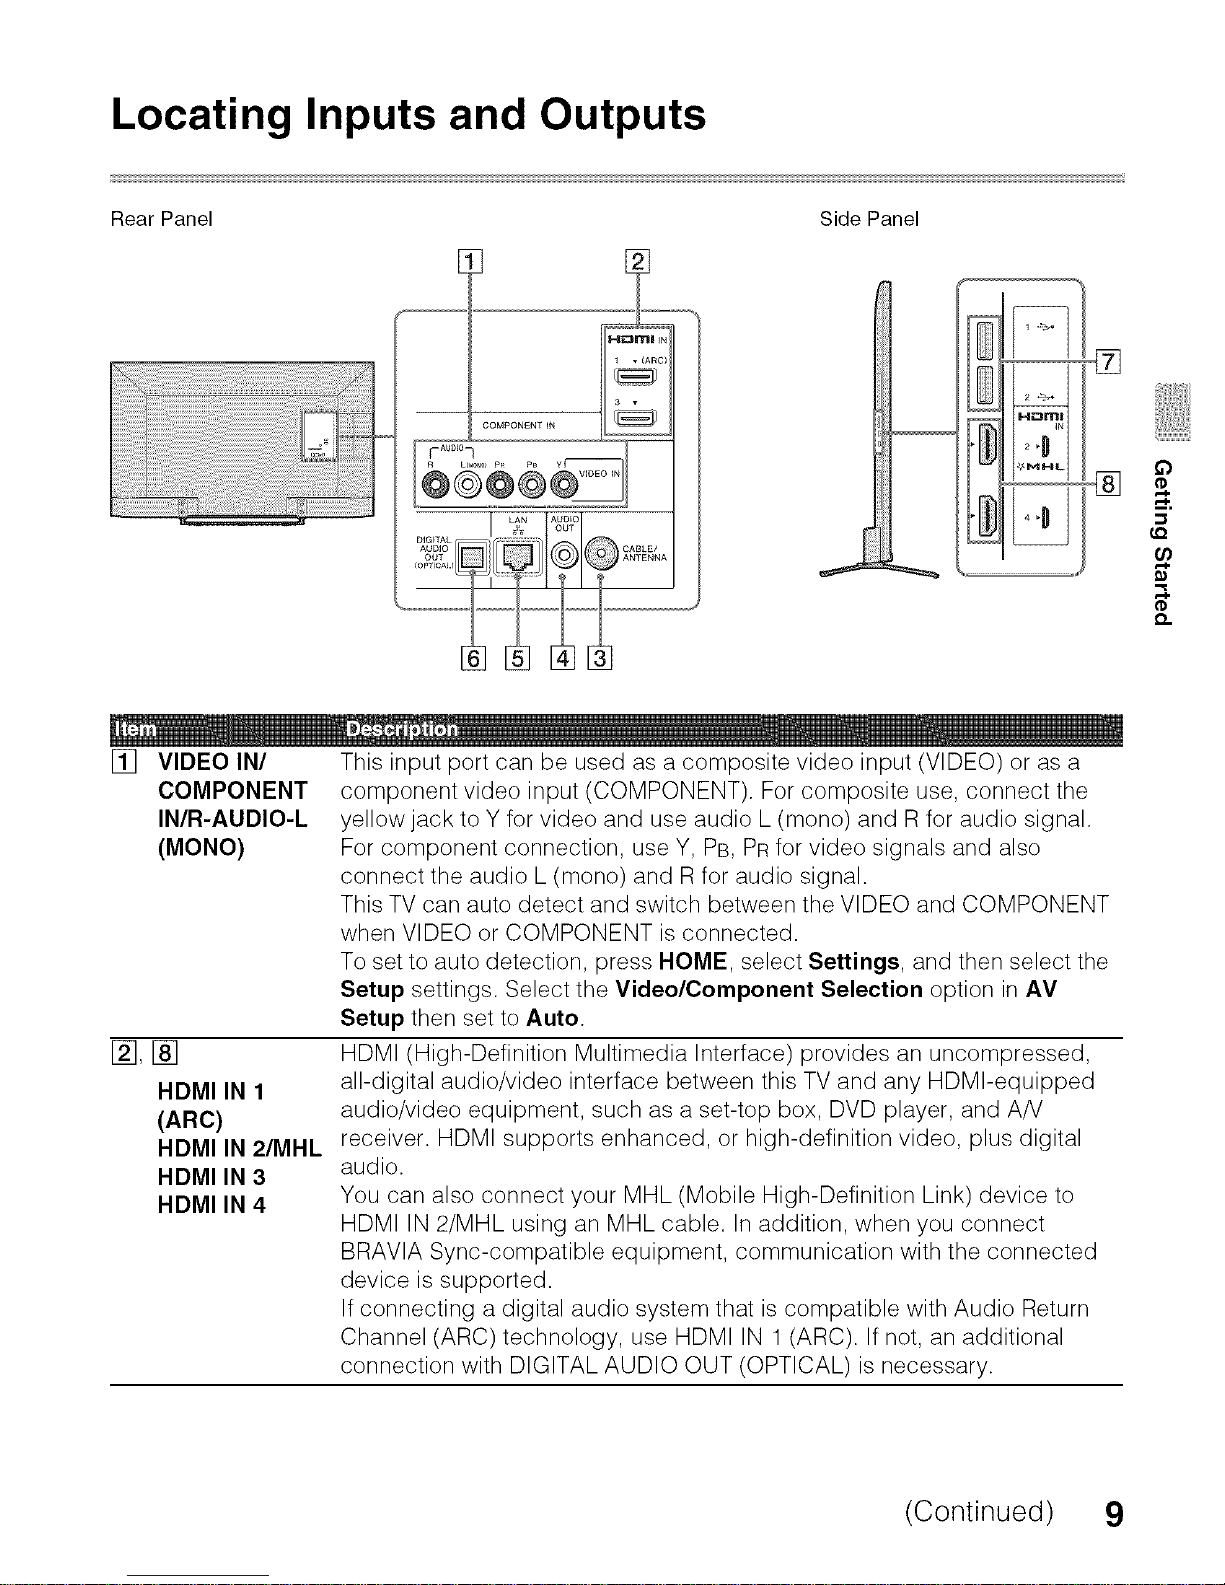
Locating Inputs and Outputs
Rear Panel Side Panel
[]
VIDEO IN/
COMPONENT
IN/R-AUDIO-L
(MONO)
@,®
HDMI IN 1
(ARC)
HDMI IN 2/MHL
HDMI IN 3
HDMI IN 4
This input port can be used as a composite video input (VIDEO) or as a
component video input (COMPONENT). For composite use, connect the
yellow jack to Y for video and use audio L (mono) and R for audio signal.
For component connection, use Y, PB, PR for video signals and also
connect the audio L (mono) and R for audio signal.
This TV can auto detect and switch between the VIDEO and COMPONENT
when VIDEO or COMPONENT is connected.
To set to auto detection, press HOME, select Settings, and then select the
Setup settings. Select the Video/Component Selection option inAV
Setup then set to Auto.
HDMI (High-Definition Multimedia Interface) provides an uncompressed,
all-digital audio/video interface between this TV and any HDMI-equipped
audio/video equipment, such as a set-top box, DVD player, and A/V
receiver. HDMI supports enhanced, or high-definition video, plus digital
audio.
You can also connect your MHL (Mobile High-Definition Link) device to
HDMI IN 2/MHL using an MHL cable. In addition, when you connect
BRAVlA Sync-compatible equipment, communication with the connected
device is supported.
If connecting a digital audio system that is compatible with Audio Return
Channel (ARC) technology, use HDMI IN 1 (ARC). If not, an additional
connection with DIGITAL AUDIO OUT (OPTICAL) is necessary.
(Continued) 9
[] CABLE/
ANTENNA
[] AUDIO OUT Connects to the audio input jack of your analog audio equipment. You can
use this output to listen to your TV's audio through your stereo system.
[] LAN You can enjoy contents stored in DLNA Certified TM devices via a network
(page 41), and also IPTV, applications and Internet Browser are available.
[] DIGITALAUDIO Connects to the optical audio input of digital audio equipment that is PCM/
OUT (OPTICAL) Dolby Digital compatible.
[] USB Connects to USB equipment to access photo, music, and video files.
A standard USB mouse and USB keyboard can also be connected to the
USB ports. An USB mouse or USB keyboard can only operate while
navigating on the internet browser (page 45).
RF input that connects to your Cable or VHF/UHF antenna.
• An HDMI or Component video (YPBPR) connection is required to view 480i, 480p, 720p, 1080i
and 1080p video formats. 1080/24p is available only with HDMI/MHL connection.
• Be sure to use only an authorized HDMI cable bearing the HDMI logo. We recommend that you
use a Sony HDMI cable (high speed type).
10
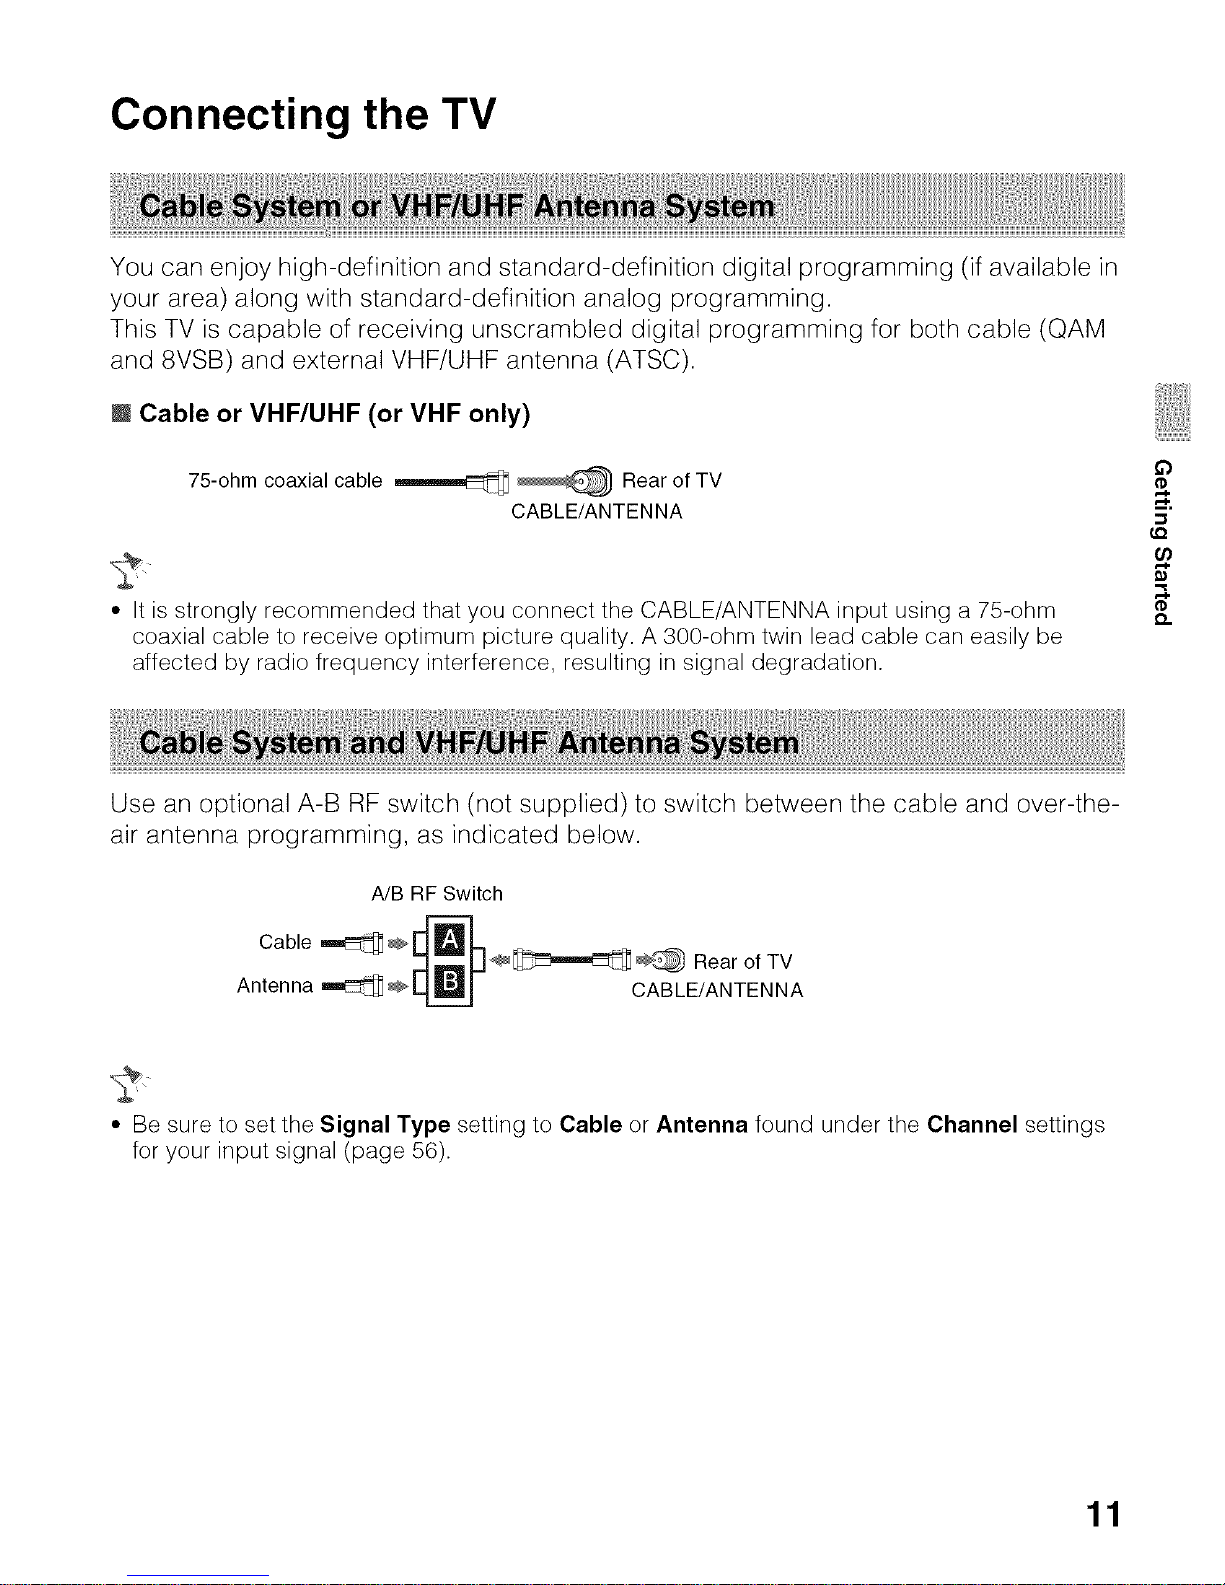
Connecting the TV
You can enjoy high-definition and standard-definition digital programming (if available in
your area) along with standard-definition analog programming.
This TV is capable of receiving unscrambled digital programming for both cable (QAM
and 8VSB) and external VHF/UHF antenna (ATSC).
l Cable or VHF/UHF (or VHF only)
75-ohm coaxial cable _ _ Rear of TV
CABLE/ANTENNA
• It is strongly recommended that you connect the CABLE/ANTENNA input using a 75-ohm
coaxial cable to receive optimum picture quality. A 300-ohm twin lead cable can easily be
affected by radio frequency interference, resulting in signal degradation.
Use an optional A-B RF switch (not supplied) to switch between the cable and over-the-
£3
air antenna programming, as indicated below.
A/B RF Switch
Cable _,_ _
_p___ Rear of TV
Antenna _ _-_ CABLE/ANTENNA
• Be sure to set the Signal Type setting to Cable or Antenna found under the Channel settings
for your input signal (page 56).
11
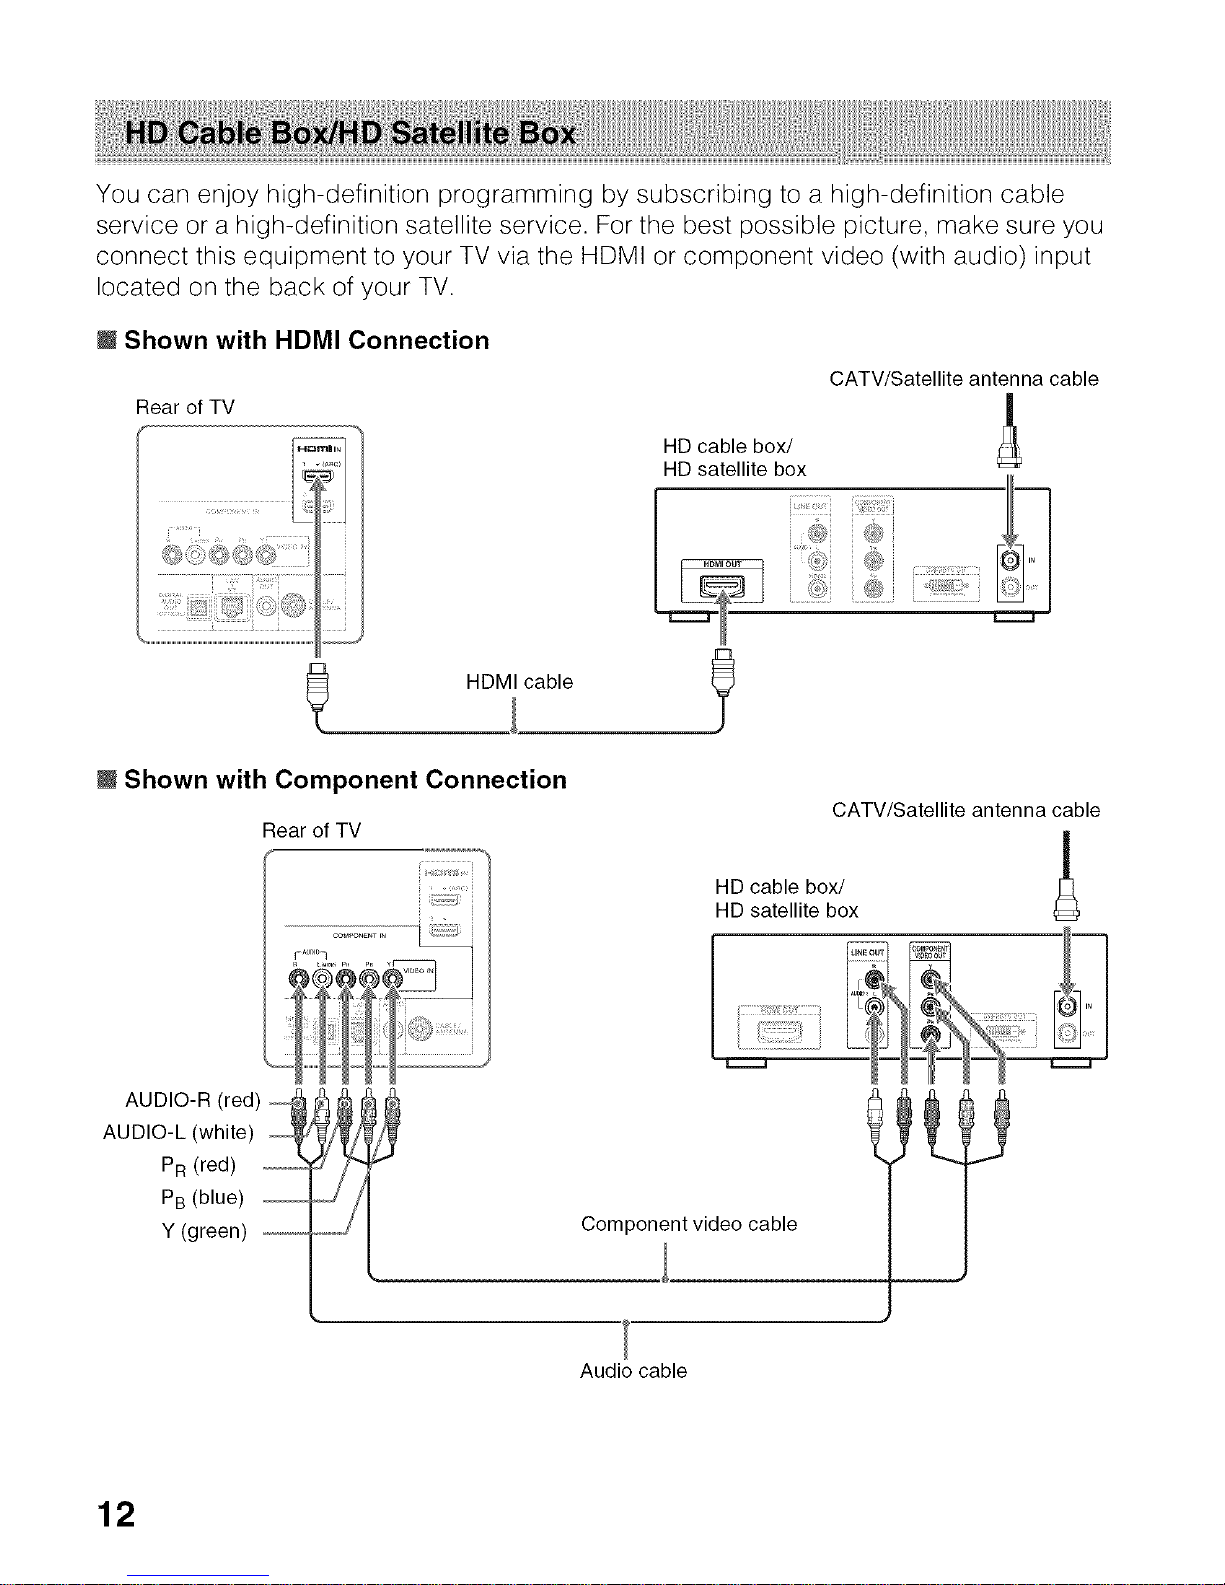
You can enjoy high-definition programming by subscribing to a high-definition cable
service or a high-definition satellite service. For the best possible picture, make sure you
connect this equipment to your TV via the HDMI or component video (with audio) input
located on the back of your TV.
l Shown with HDMI Connection
Rear of TV
¢_{i_:_::4_?,___ .........
?.¢ bt_i_',s, )_¢
HDMI cable
CATV/Satellite antenna cable
HD cable box/
HD satellite box
A
h
_ _;;_s_ ¸ i _
l Shown with Component Connection
Rear of TV
CATV/Satellite antenna cable
|
HD cable box/ J_
HD satellite box
AUDIO-R (red)
AUDIO-L (white) _
PR (red)
PB (blue)
Y (green)
Component video cable
J
Audio cable
12
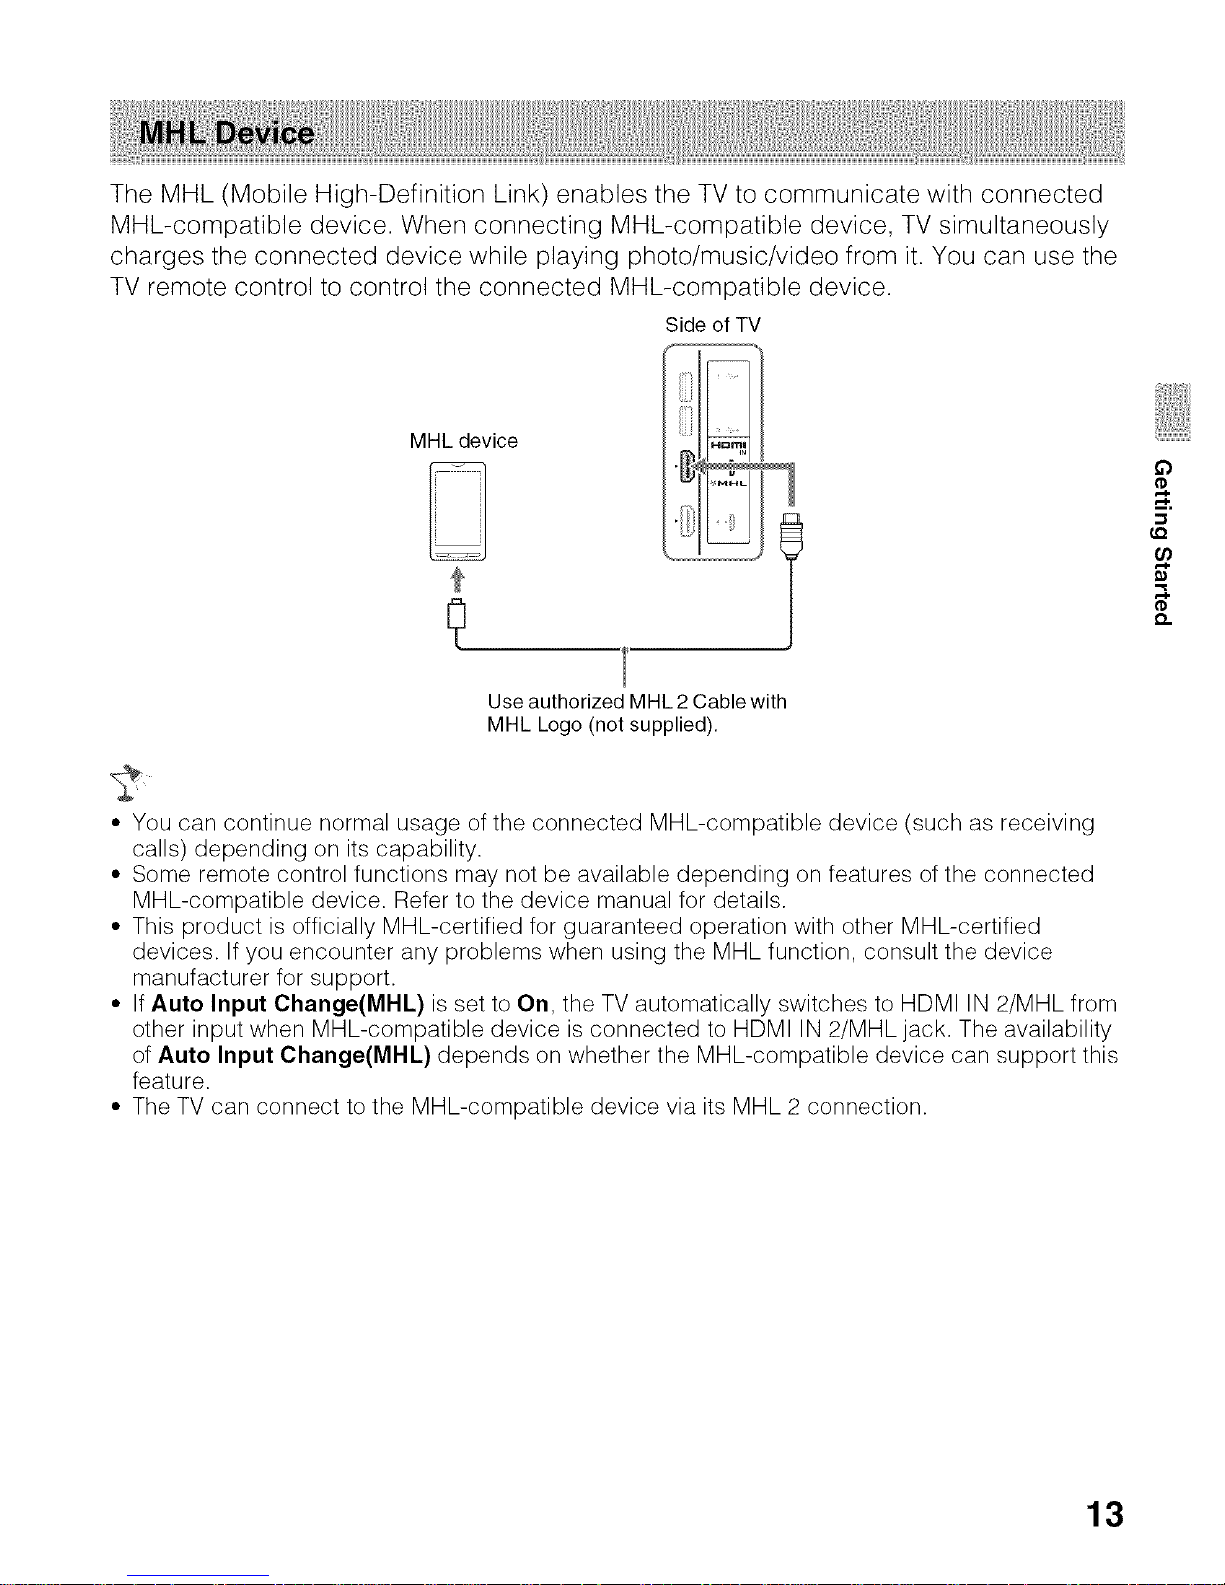
The MHL (Mobile High-Definition Link) enables the TV to communicate with connected
MHL-compatible device. When connecting MHL-compatible device, TV simultaneously
charges the connected device while playing photo/music/video from it. You can use the
TV remote control to control the connected MHL-compatible device.
Side of TV
MHL device
I.Q
¢D
Use authorized MHL 2 Cable with
MHL Logo (not supplied).
• You can continue normal usage of the connected MHL-compatible device (such as receiving
calls) depending on its capability.
• Some remote control functions may not be available depending on features of the connected
MHL-compatible device. Refer to the device manual for details.
• This product is officially MHL-certified for guaranteed operation with other MHL-certified
devices. If you encounter any problems when using the MHL function, consult the device
manufacturer for support.
• If Auto Input Change(l_lHL) is set to On, the TV automatically switches to HDMI IN 2/MHL from
other input when MHL-compatible device is connected to HDMI IN 2/MHL jack. The availability
of Auto Input Change(MHL) depends on whether the MHL-compatible device can support this
feature.
• The TV can connect to the MHL-compatible device via its MHL 2 connection.
13
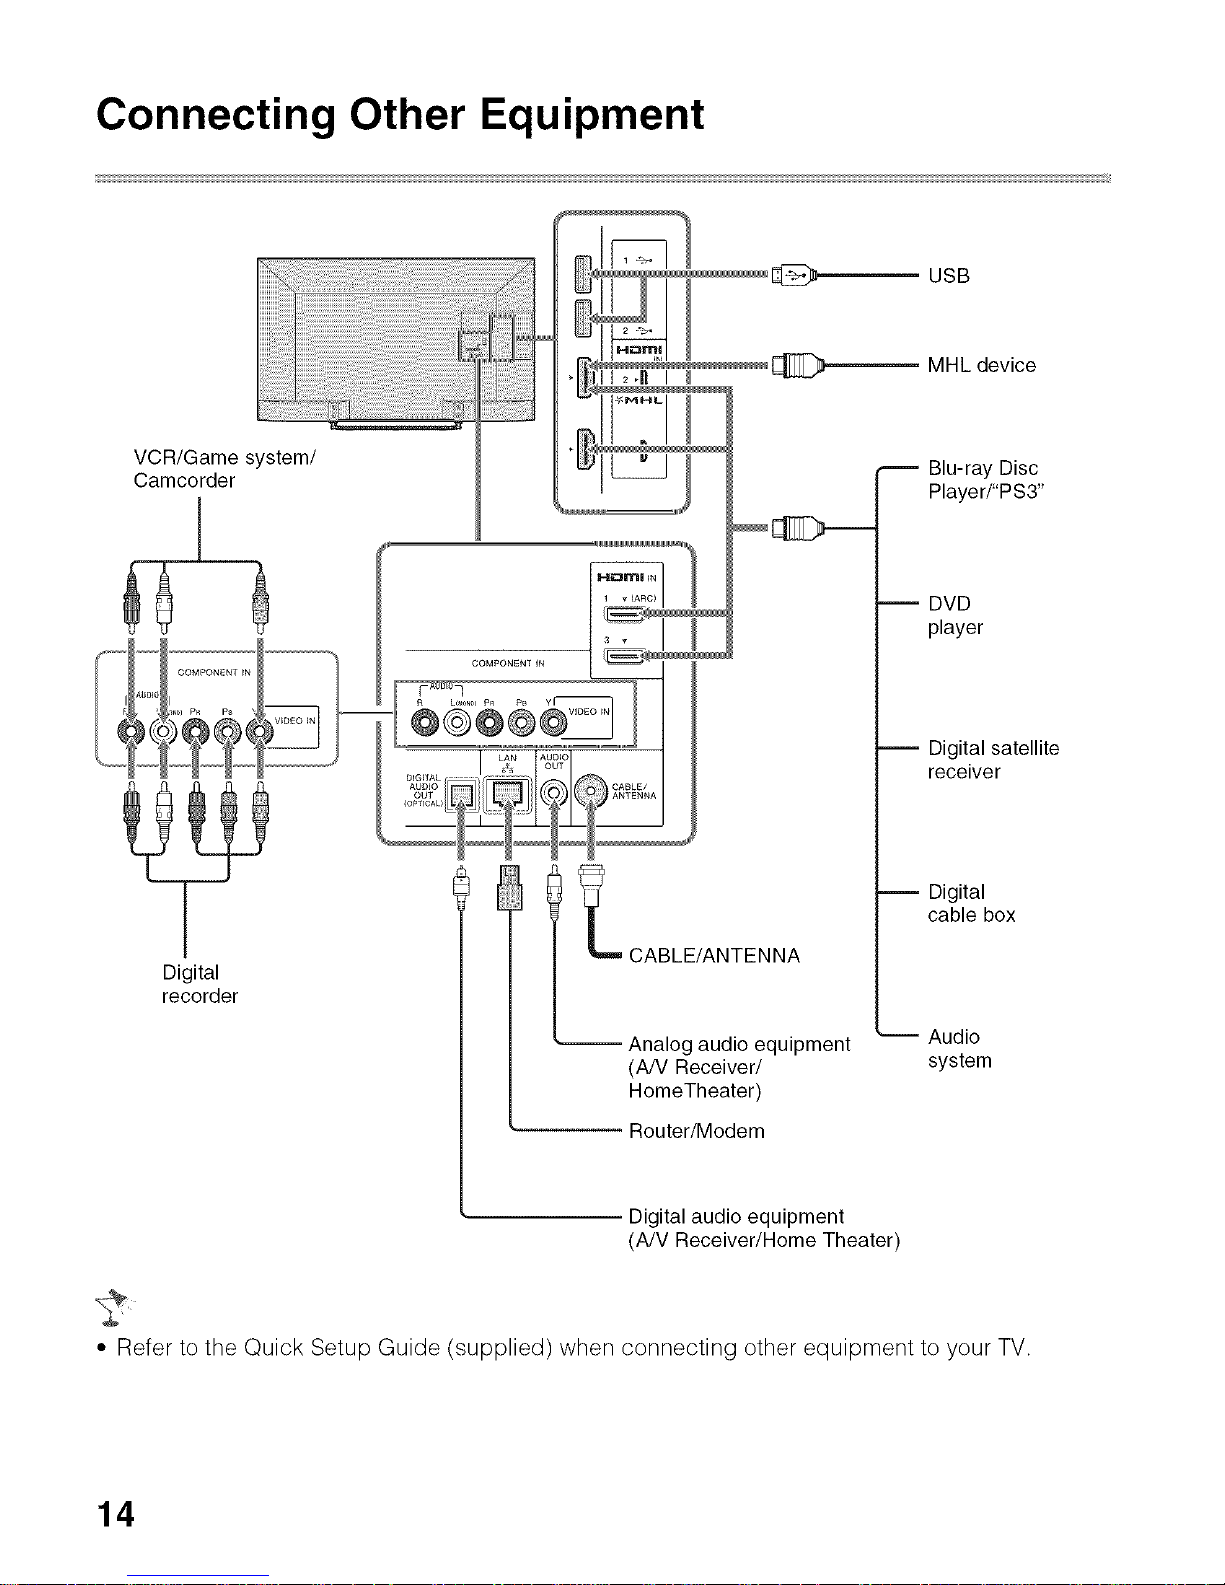
Connecting Other Equipment
VCR/Game system/
Camcorder
Digital
recorder
_,_ _'_ % E_ USB
_1 ,; _ Blu-ray DiscPlayer/"PS3"
l _ CABLE/ANTENNA
-- Analog audio equipment
(AN Receiver/
HomeTheater)
DVD
player
Digital satellite
receiver
Digital
cable box
-- Audio
system
Router/Modem
Digital audio equipment
(A/V Receiver/Home Theater)
• Refer to the Quick Setup Guide (supplied) when connecting other equipment to your TV.
14
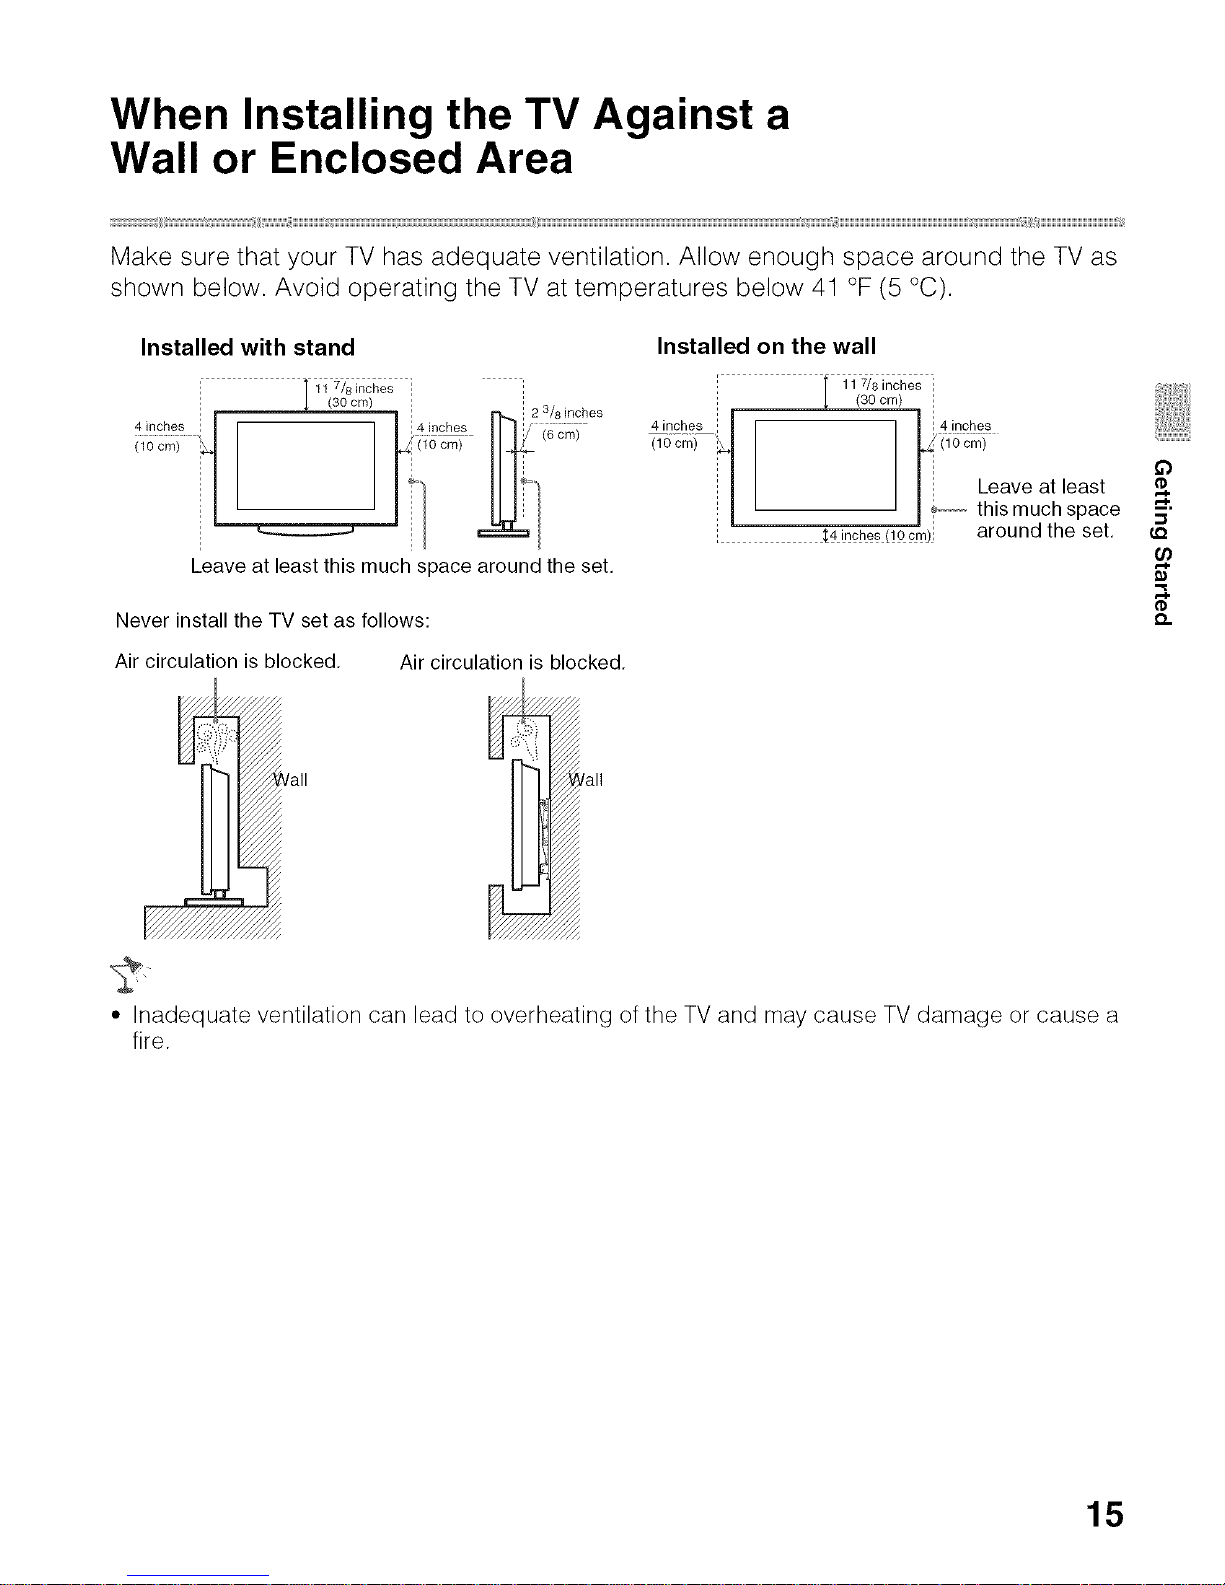
When Installing the TV Against a
Wall or Enclosed Area
Make sure that your TV has adequate ventilation. Allow enough space around the TV as
shown below. Avoid operating the TV at temperatures below 41 °F (5 °C).
Installed with stand
11 7/8inches '
(30 cm)
_t_!!........................[, i_},_£_ I I I!/ 6;;i .....
r/,°c_/lit, -
Leave at least this much space around the set.
Installed on the wall
(3o cm)
(lOcm) _ _/(lOcm)
_ Leave at least
[ _..... this much space
_4 inches (10 c_j around the set.
Never install the TV set as follows:
Air circulation is blocked. Air circulation is blocked.
£3
• Inadequate ventilation can lead to overheating of the TV and may cause TV damage or cause a
fire.
15
Securing the TV
z_ Sony strongly recommends taking measures to prevent the TV from toppling
over. Unsecured TVs may topple and result in property damage, serious bodily
injury or even death.
[] Secure the TV to a wall and/or stand.
[] Do not allow children to play or climb on furniture and TV sets.
[] Avoid placing or hanging items on the TV.
[] Never install theTVon:
• Slippery, unstable and/or uneven surfaces.
• Furniture that can easily be used as steps, such as a chest of drawers.
[] Install the TV where it cannot be pulled, pushed, or knocked over.
[] Route all AC power cords and connecting cables so that they are not accessible to curious
children.
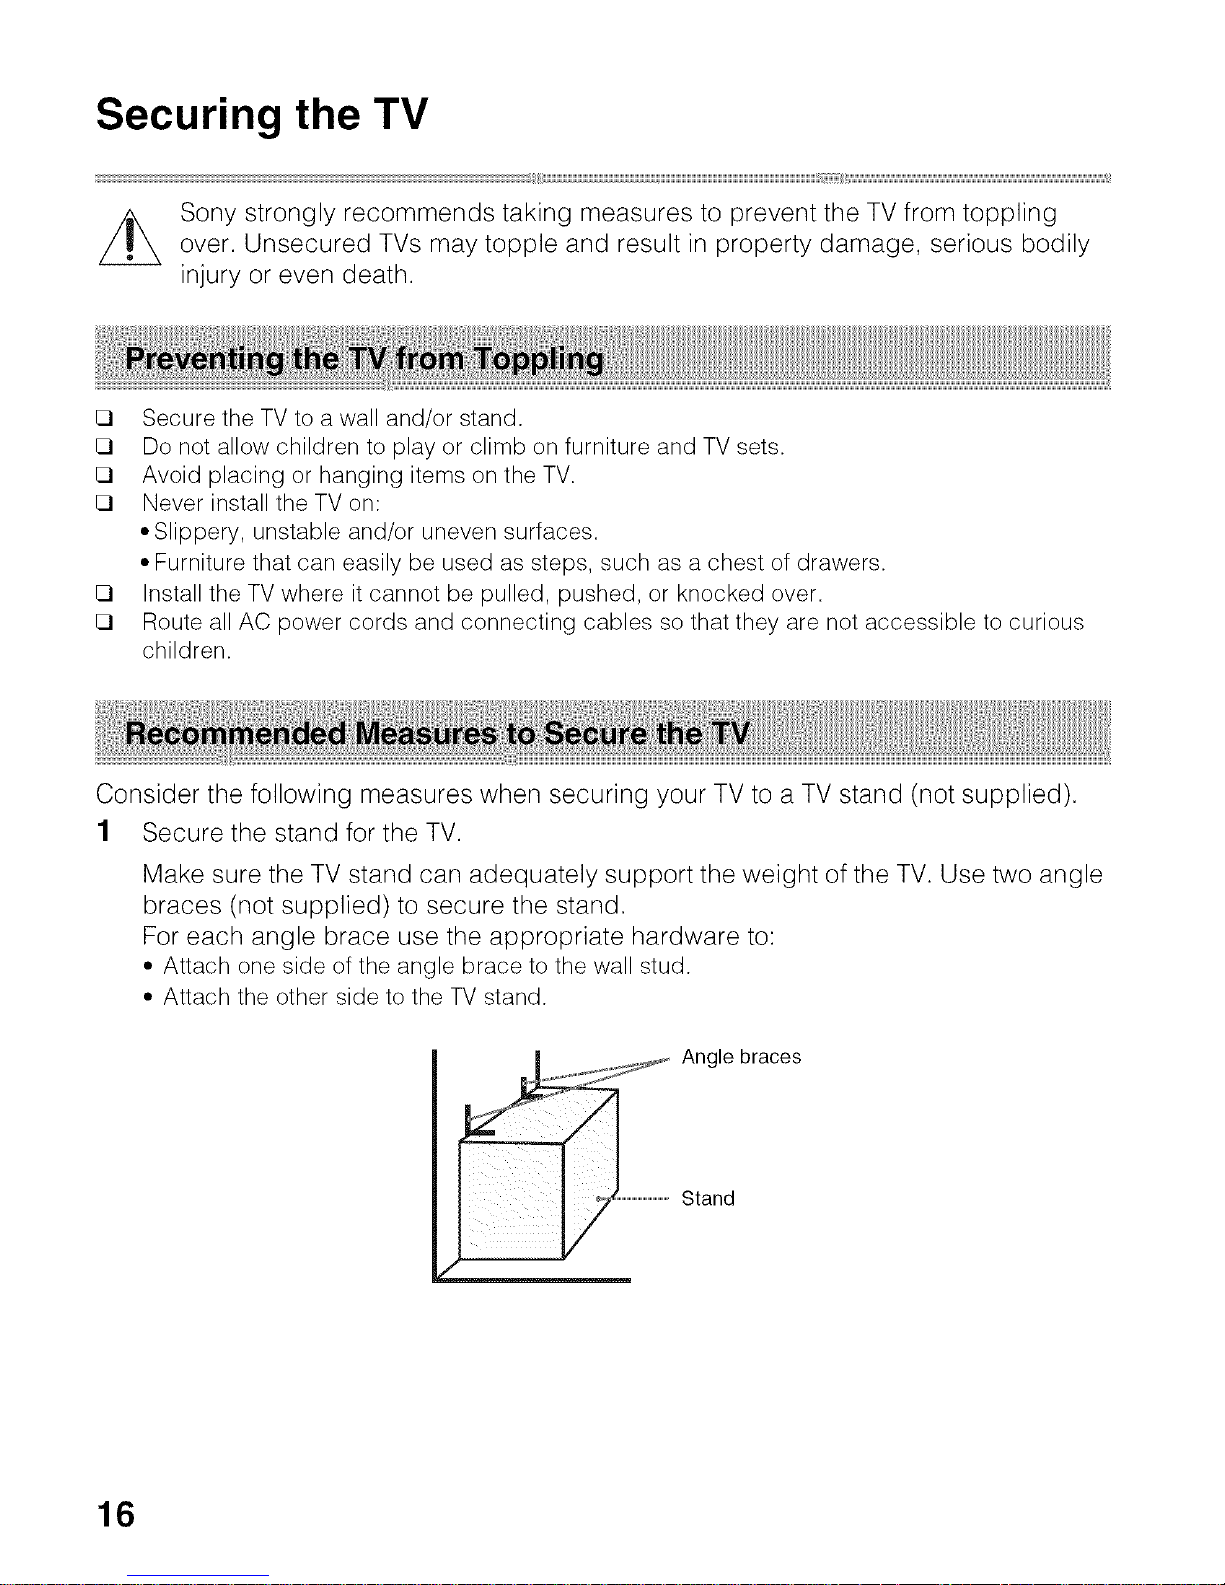
Consider the following measures when securing your TV to a TV stand (not supplied).
1 Secure the stand for the TV.
Make sure the TV stand can adequately support the weight of the TV. Use two angle
braces (not supplied) to secure the stand.
For each angle brace use the appropriate hardware to:
• Attach one side of the angle brace to the wall stud.
• Attach the other side to the TVstand.
,,I,o,, Angle braces
_ ........................................Stand
16
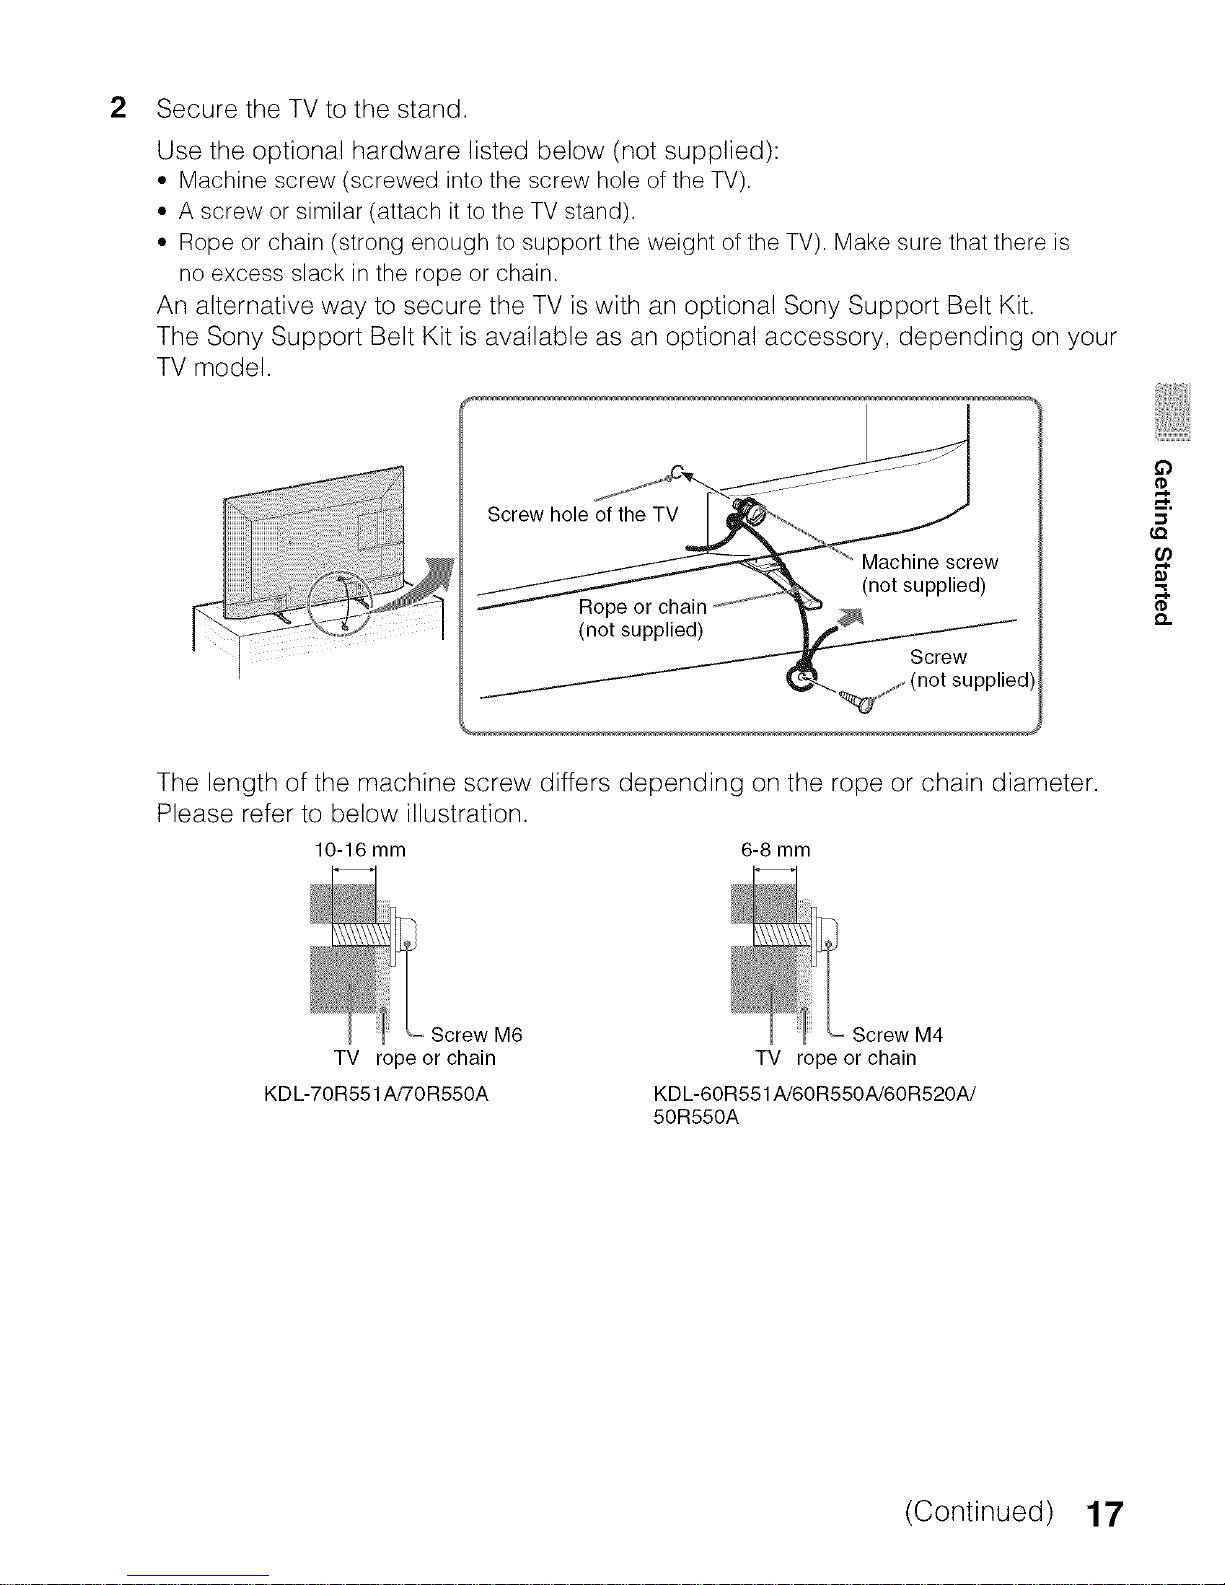
2 Secure the TV to the stand.
Use the optional hardware listed below (not supplied):
• Machine screw (screwed intothe screw hole of the TV).
• A screw or similar (attach it to the TVstand).
• Rope or chain (strong enough to support the weight of the TV). Make sure that there is
no excess slack in the rope or chain.
An alternative way to secure the TV is with an optional Sony Support Belt Kit.
The Sony Support Belt Kit is available as an optional accessory, depending on your
TV model.
Sc ewho,e :TV
__ .... Machine screw
_---_-- j% (not supplied)
- i ;su'p ,4' l-
Screw ..
f_,-4._j _(not supplied
The length of the machine screw differs depending on the rope or chain diameter.
Please refer to below illustration.
10-16 mm 6-8 mm
£3
Screw M6
TV rope or chain
KDL-70R551A/70R550A
Screw M4
TV rope or chain
KDL-60R551 A/60R550A/60R520A/
50R550A
(Continued) 17

3 Anchor the TV to the wall.
Anchor the TV to the wall by using bolts, wall anchor and chain (or rope).
Anchor bolts
(not supplied)
Wall-mount _J
holes
Ropeor chain
(not supplied)
j,j Wall-anchor
(not supplied)
• Contact Sony Customer Support to obtain the optional Support Belt Kit by providing your TV
model name.
For United States call: 1-800-488-7669 or visit: www.sony.com/accessories
For Canada call: 1-877-899-7669
• Securing the TV to the stand without securing the TV and the stand to the wall provides minimum
protection against the TV toppling over. For further protection, be sure to follow the three
measures recommended.
18
Running Initial Setup
During initial setup, you will perform the following:
• Set the language for the On Screen Display (OSD) text
• Choose your viewing country
• Select the type of use
• Scan for digital and analog channels
• Set the current time
• Set the network setup
• Set Automatic Software Download (page 65)
Complete your cable connections before beginning the Initial Setup. Refer to the Quick
Setup Guide (supplied) for sample connection diagrams.
2
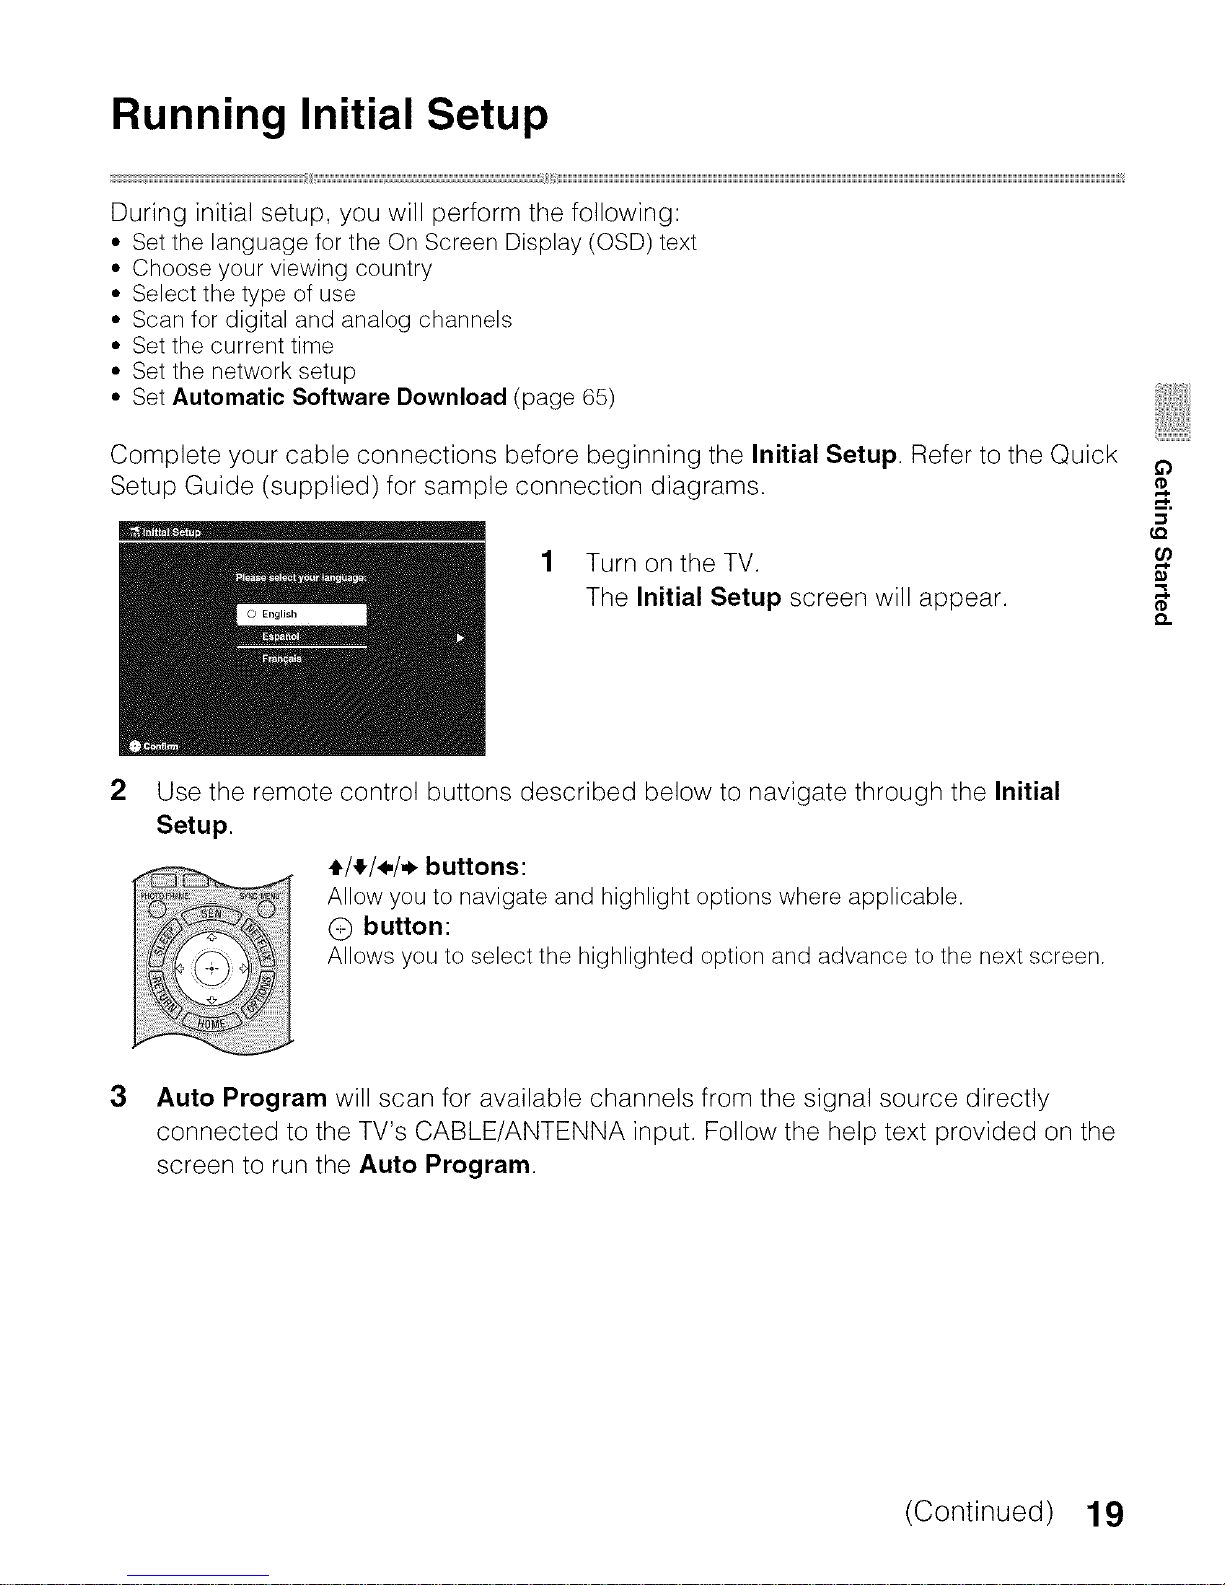
1 Turn on the TV.
The Initial Setup screen will appear.
Use the remote control buttons described below to navigate through the Initial
Setup.
t/!/_./._, buttons:
Allow you to navigate and MgMightoptions where applicable.
Q button:
Allows you to select the highlighted option and advance to the next screen.
3 Auto Program will scan for available channels from the signal source directly
connected to the TV's CABLE/ANTENNA input. Follow the help text provided on the
screen to run the Auto Program.
:3
LQ
O.
(Continued) 19
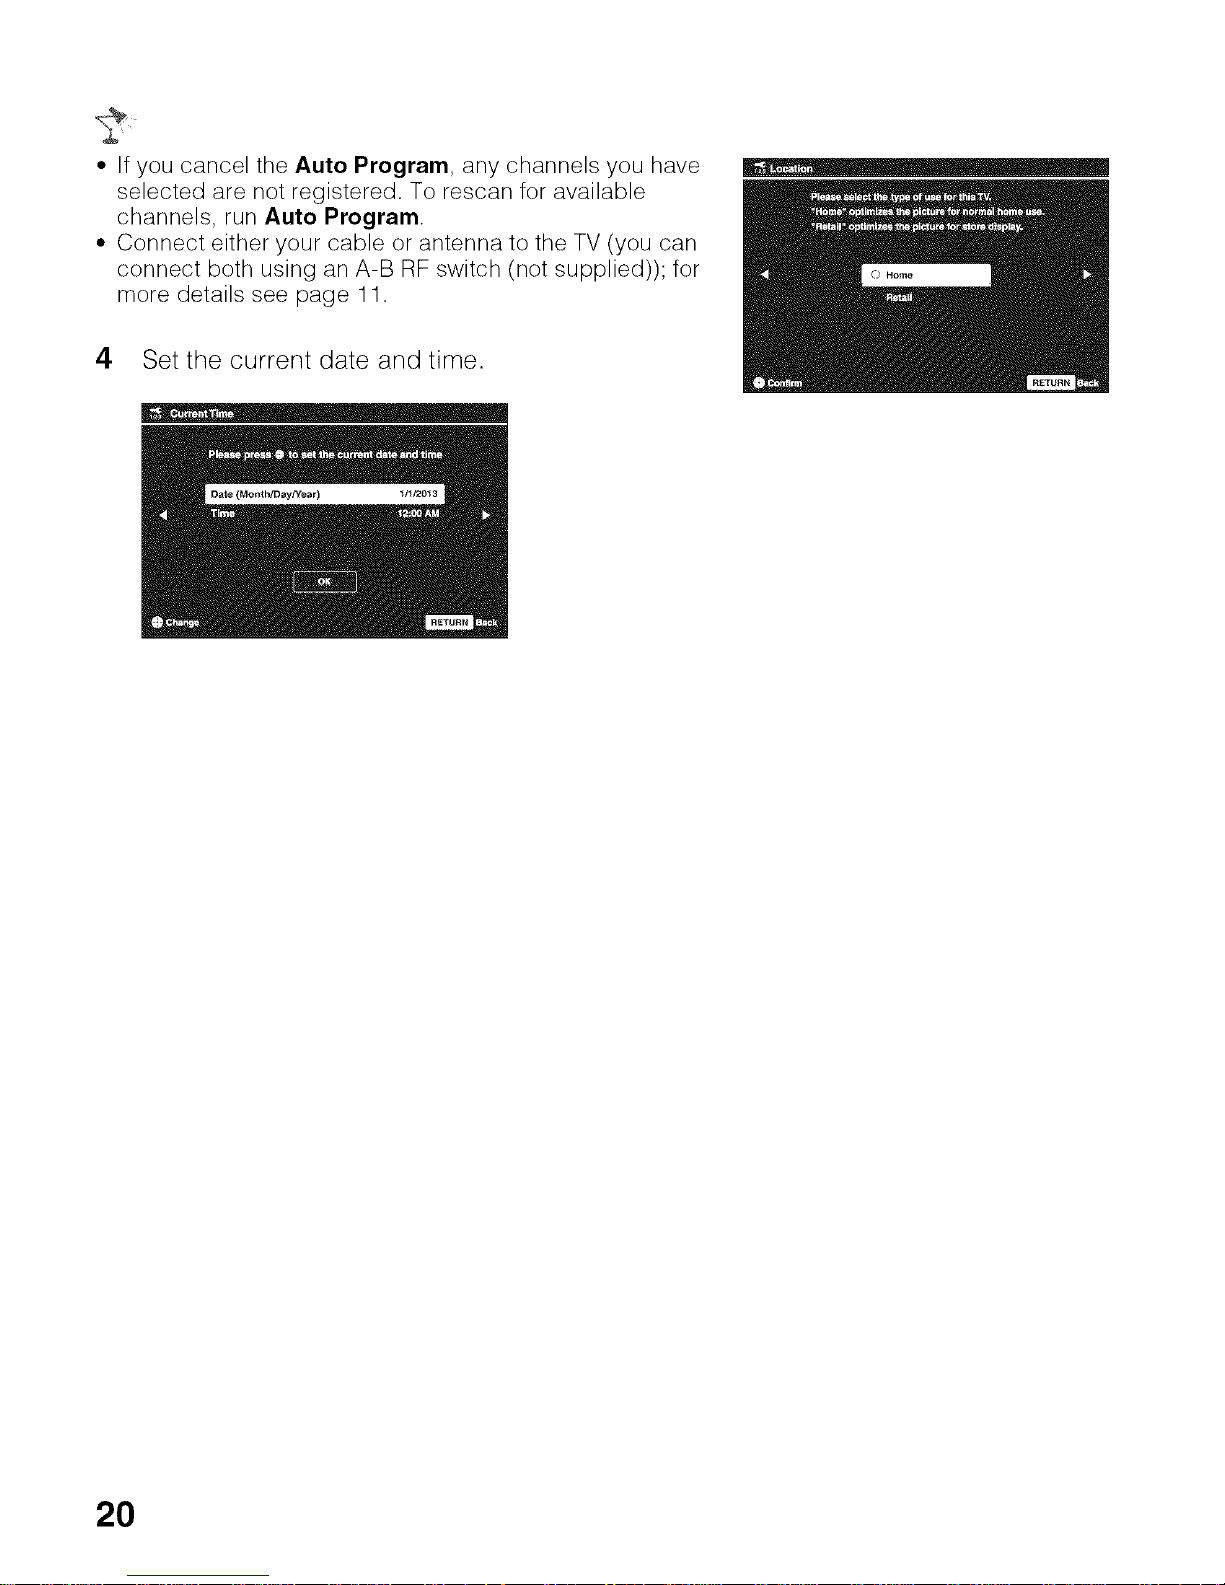
• If you cancel the Auto Program, any channels you have
selected are not registered• To rescan for available
channels, run Auto Program.
• Connect either your cable or antenna to the TV (you can
connect both using an A-B RF switch (not supplied)); for
more details see page 11.
4 Set the current date and time.
2O
Using the Remote Control
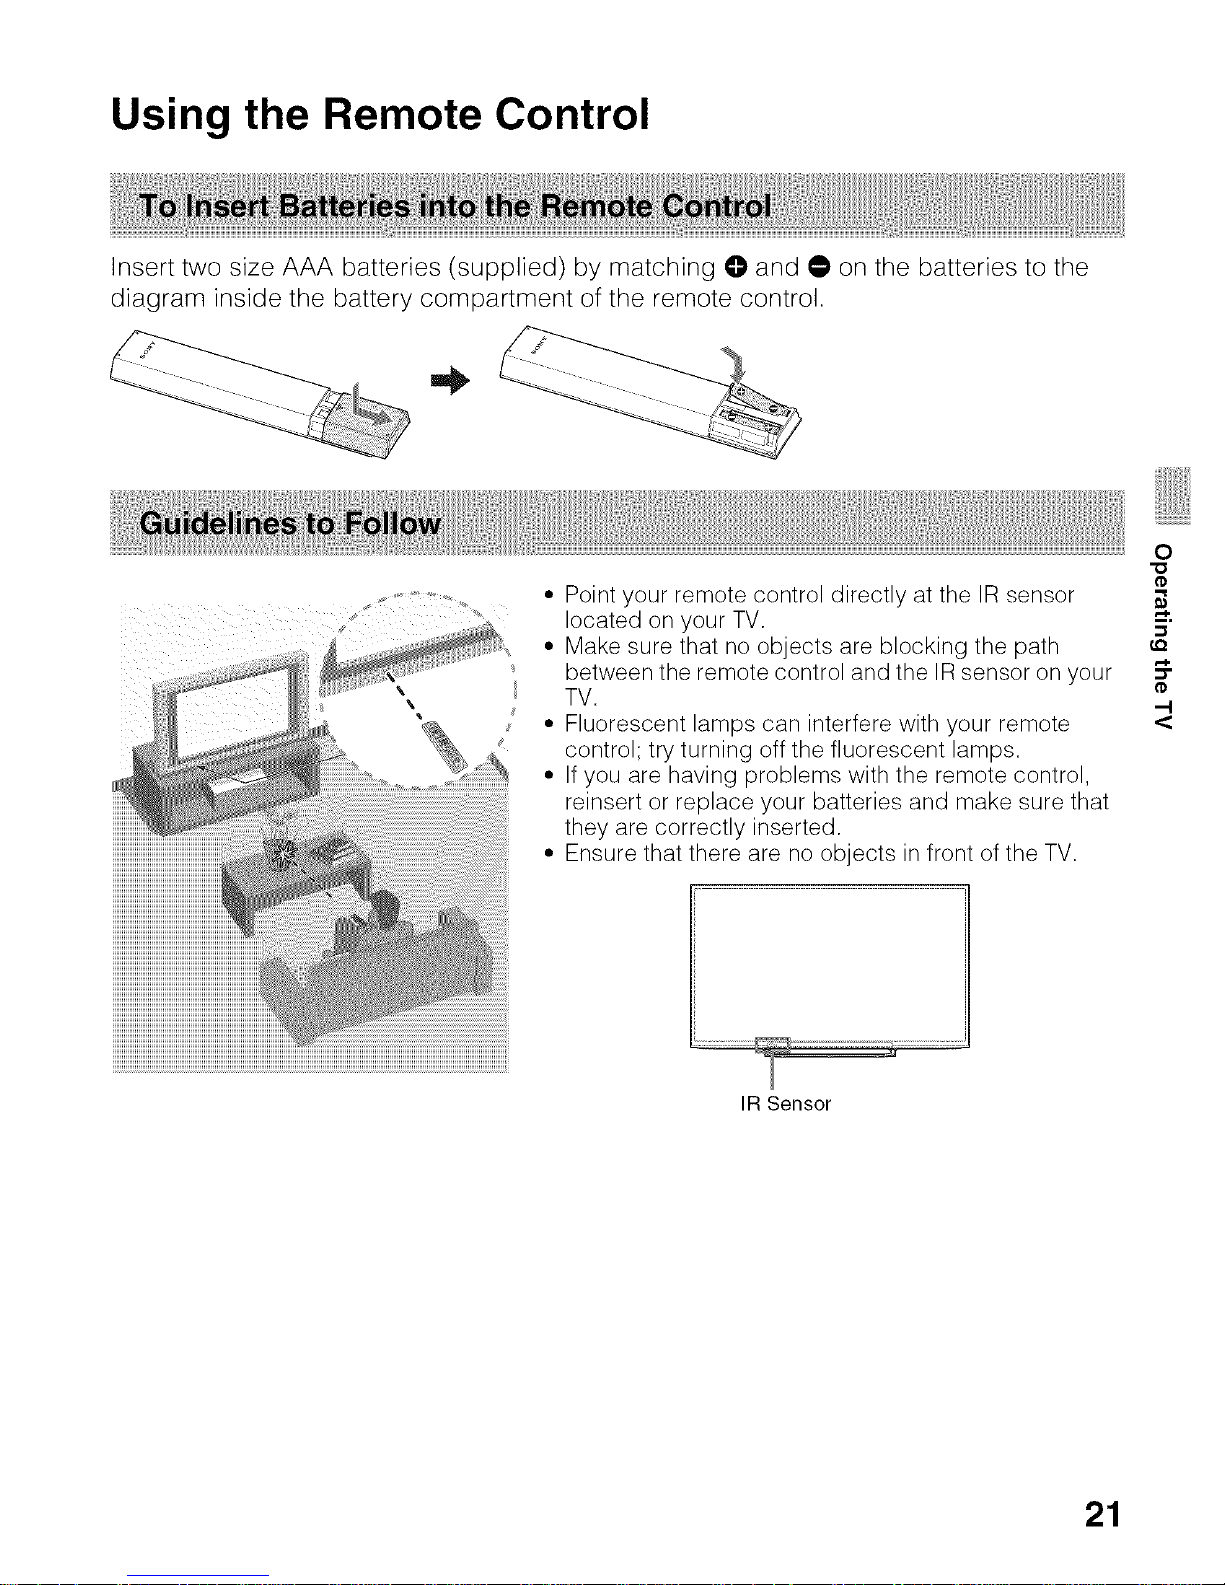
Insert two size AAA batteries (supplied) by matching O and • on the batteries to the
diagram inside the battery compartment of the remote control.
\
\
• Point your remote control directly at the IR sensor
located on your TV. 5"
• Make sure that no objects are blocking the path
between the remote control and the IR sensor on your -_
TV.
-I
• Fluorescent lamps can interfere with your remote <
control; try turning off the fluorescent lamps.
• If you are having problems with the remote control,
reinsert or replace your batteries and make sure that
they are correctly inserted.
• Ensure that there are no objects in front of the TV.
IR Sensor
21
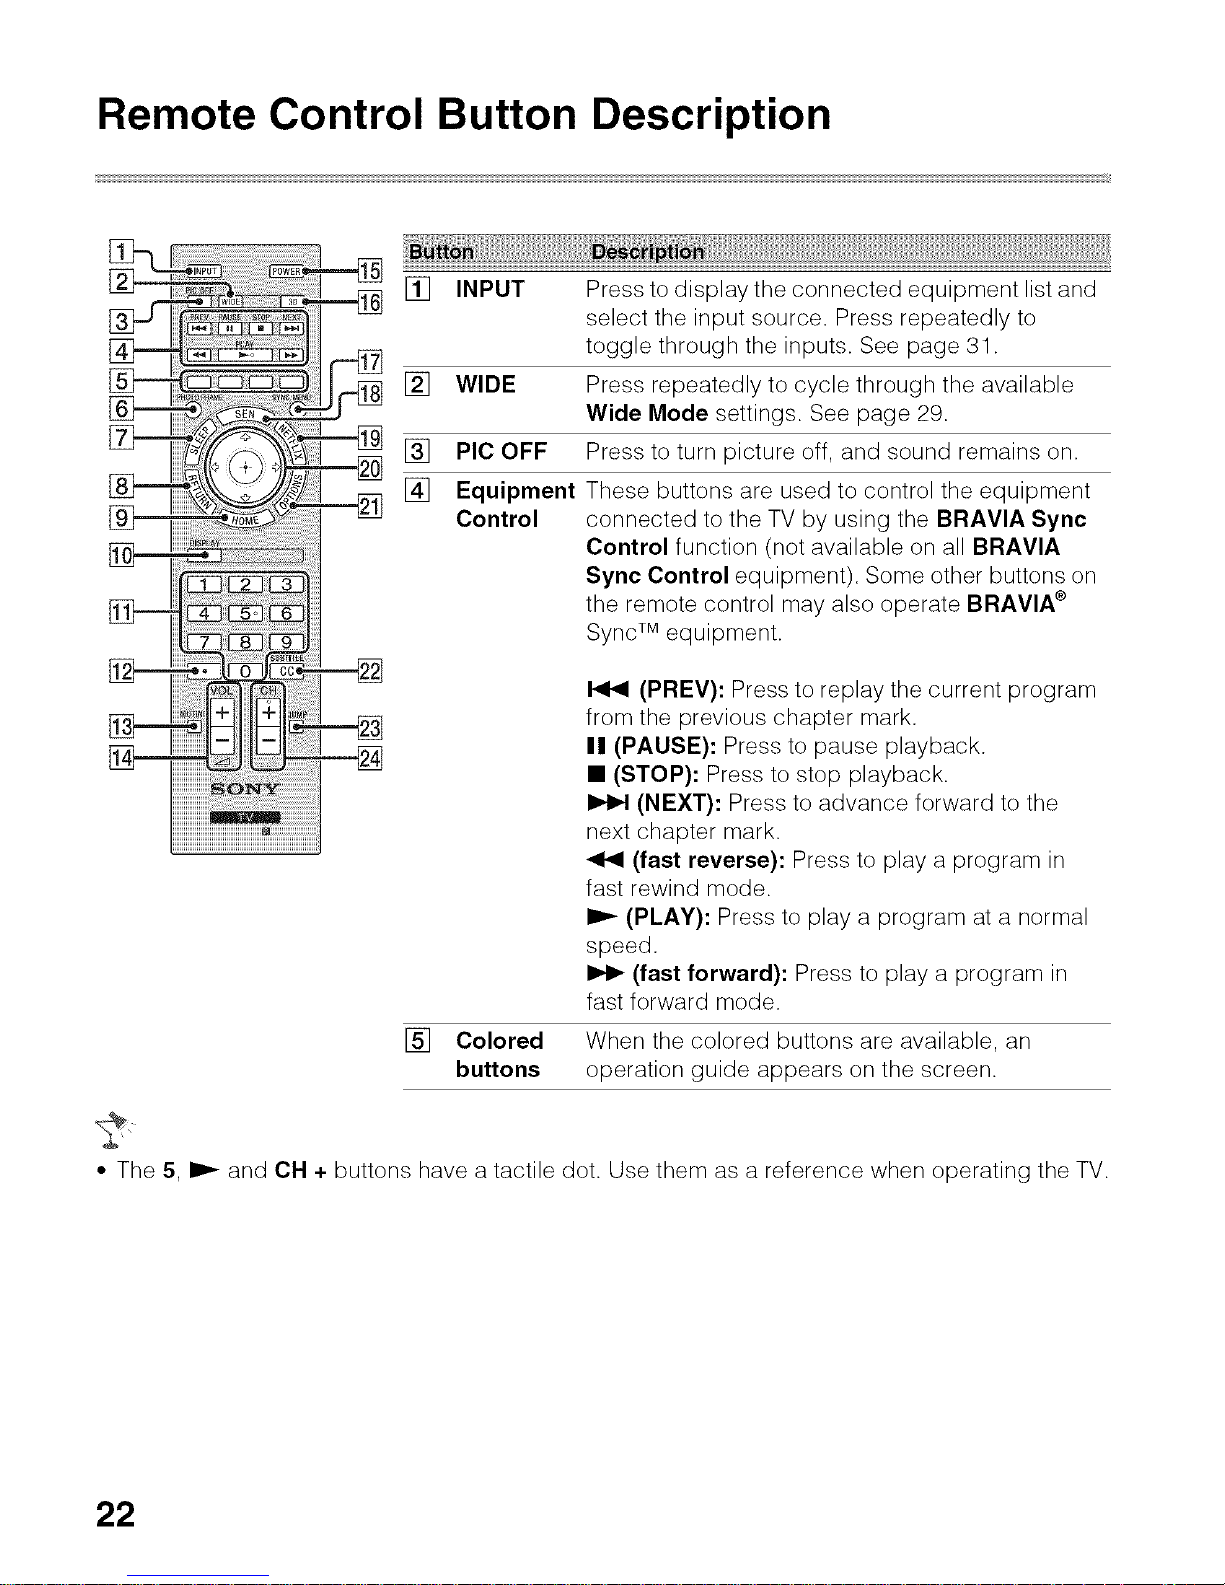
Remote Control Button Description
[] INPUT
[] WIDE
[] PIC OFF
[] Equipment
Control
Press to display the connected equipment list and
select the input source. Press repeatedly to
toggle through the inputs. See page 31.
Press repeatedly to cycle through the available
Wide Mode settings. See page 29.
Press to turn picture off, and sound remains on.
These buttons are used to control the equipment
connected to the TV by using the BRAVIA Sync
Control function (not available on all BRAVIA
Syne Control equipment). Some other buttons on
the remote control may also operate BRAVIA ®
SyncTM equipment.
(PREV): Press to replay the current program
from the previous chapter mark.
II (PAUSE): Press to pause playback.
• (STOP): Press to stop playback.
(NEXT): Press to advance forward to the
next chapter mark.
(fast reverse): Press to play a program in
fast rewind mode.
(PLAY): Press to play a program at a normal
speed.
I_ (fast forward): Press to play a program in
fast forward mode.
[] Colored When the colored buttons are available, an
buttons operation guide appears on the screen.
• The 5, _ and CH + buttons have a tactile dot. Use them as a reference when operating the TV.
22
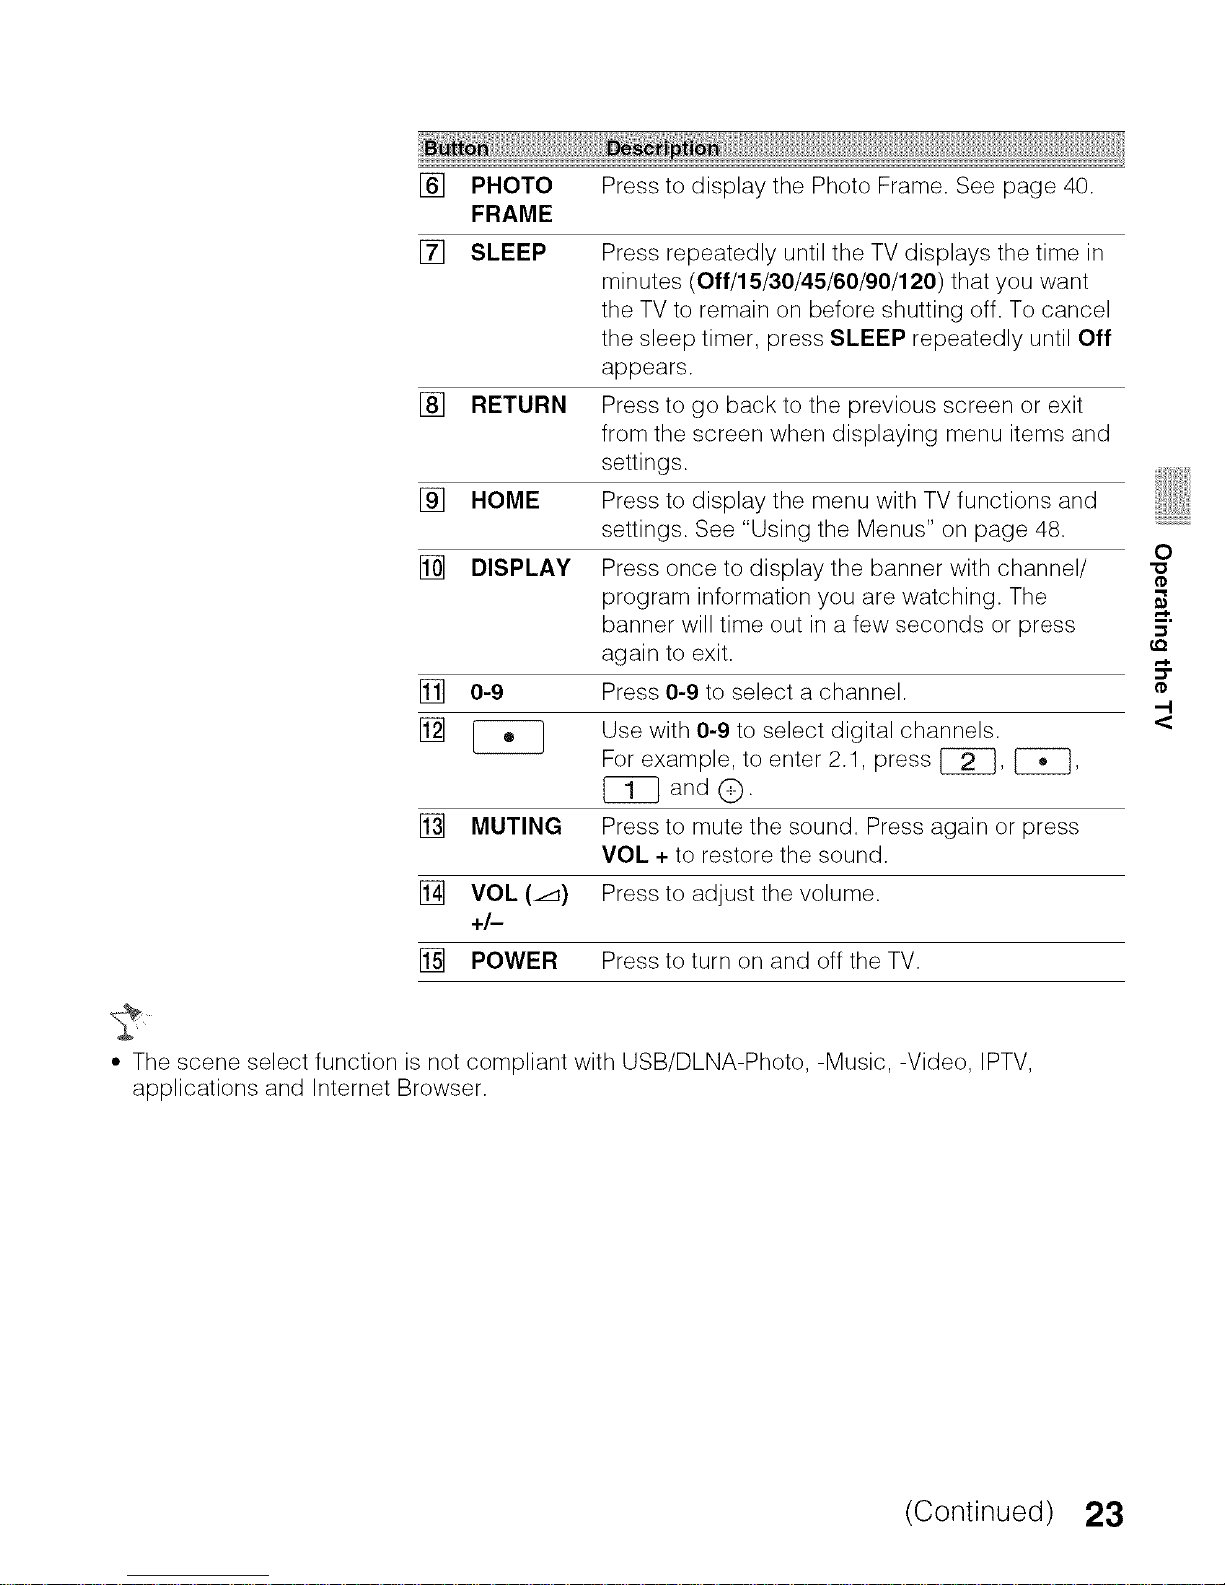
[]
[]
PHOTO Press to display the Photo Frame. See page 40.
FRAME
SLEEP Press repeatedly until the TV displays the time in
minutes (0ff/15/30/45/60/90/120) that you want
the TV to remain on before shutting off. To cancel
the sleep timer, press SLEEP repeatedly until Off
appears.
[] RETURN Press to go back to the previous screen or exit
from the screen when displaying menu items and
settings.
[] HOME Press to display the menu with TV functions and
settings. See "Using the Menus" on page 48.
O
[] DISPLAY Press once to display the banner with channel/
program information you are watching. The _.
banner will time out in a few seconds or press
again to exit.
[] 0-9 Press 0-9 to select a channel.
-I
[] _ Use with 0-9 to select digital channels. <
For example, to enter 2.1, press [_, [_,
[_ and (_.
[] MUTING Press to mute the sound. Press again or press
VOL + to restore the sound.
[] VOL (LJ) Press to adjust the volume.
+/-
[] POWER Press to turn on and off the TV.
• The scene select function is not compliant with USB/DLNA-Photo, -Music, -Video, IPTV,
applications and Internet Browser.
(Continued) 23
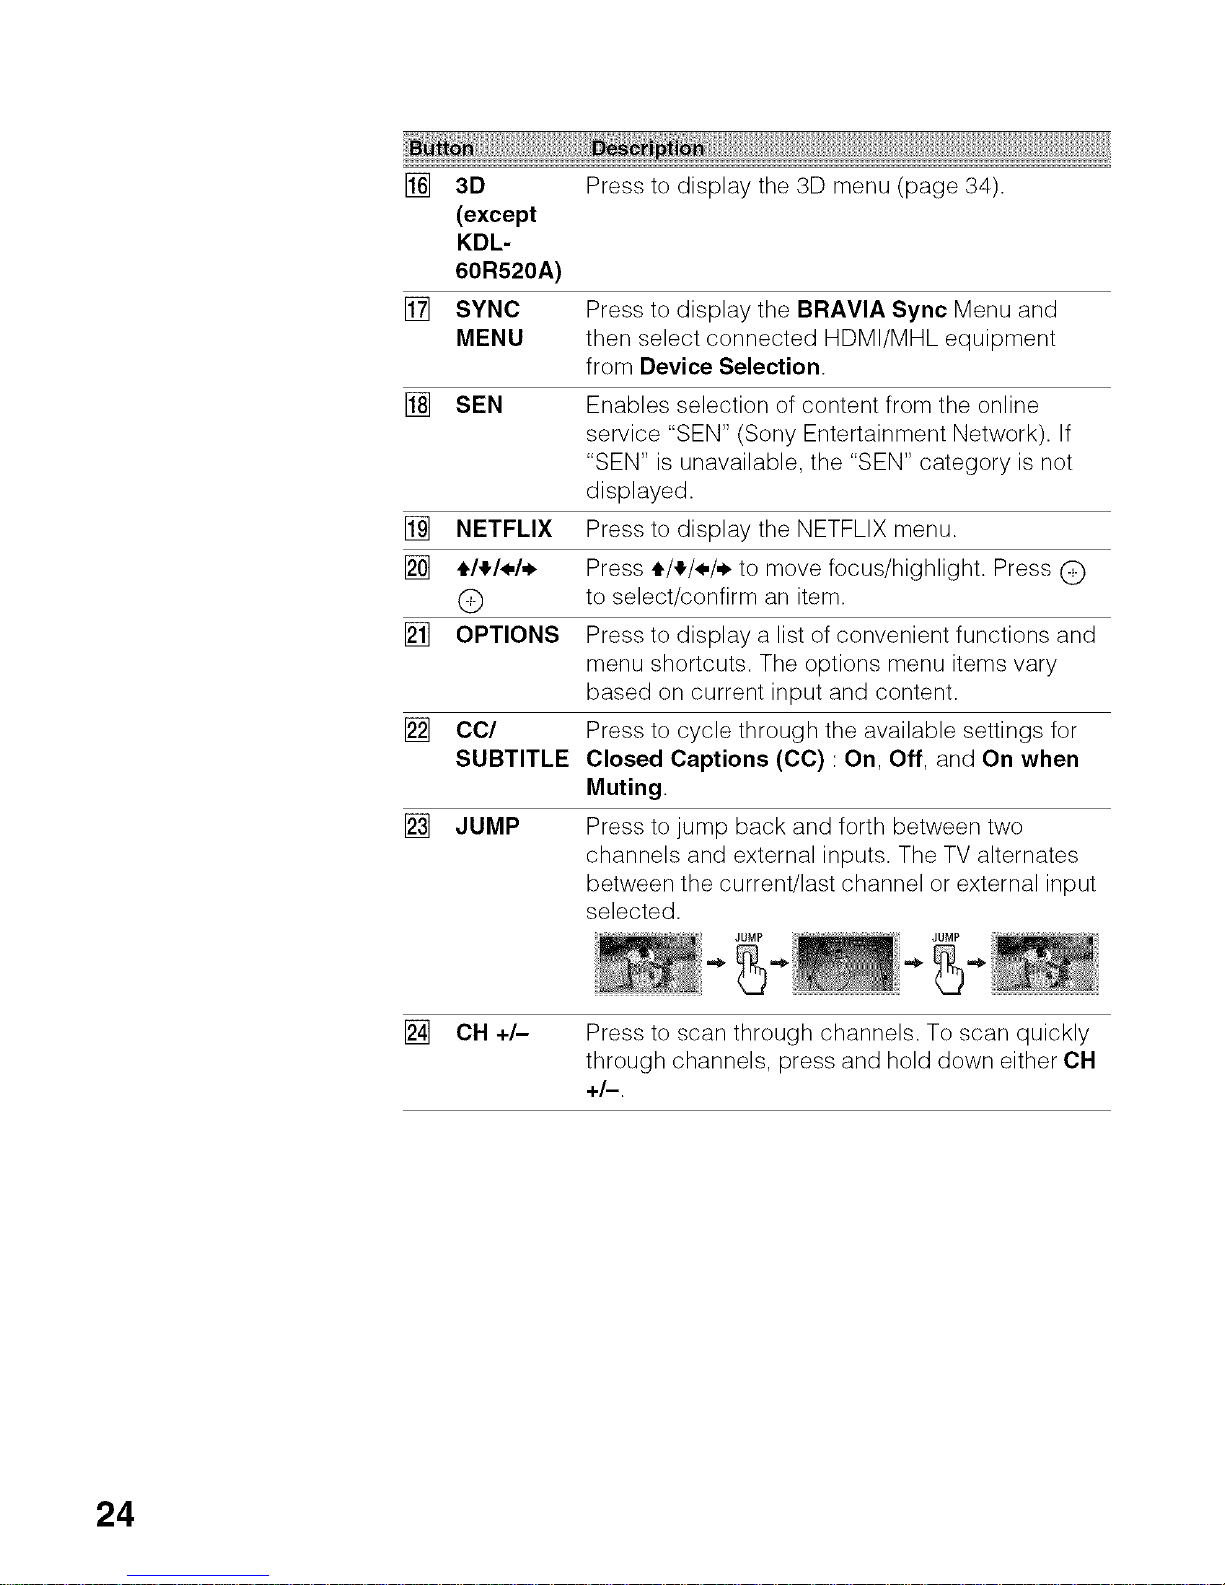
[] 3D Press to display the 3D menu (page 34).
(except
KDL-
60R520A)
[] SYNC Press to display the BRAVIA Sync Menu and
MENU then select connected HDMI/MHL equipment
from Device Selection.
[] SEN Enables selection of content from the online
service "SEN" (Sony Entertainment Network). If
"SEN" is unavailable, the "SEN" category is not
displayed.
[] NETFLIX Press to display the NETFLIX menu.
[] _./_/_,/,,_ Press _/_/_,/,*, to move focus/highlight. Press Q
(_ to select/confirm an item.
[] OPTIONS Press to display a list of convenient functions and
menu shortcuts. The options menu items vary
based on current input and content.
[] CC/ Press to cycle through the available settings for
SUBTITLE Closed Captions (CC) : On, Off, and On when
Muting.
[] JUMP Press to jump back and forth between two
channels and external inputs. The TV alternates
between the current/last channel or external input
selected.
JUMP
[] CH +/- Press to scan through channels. To scan quickly
through channels, press and hold down either CH
+/-.
24
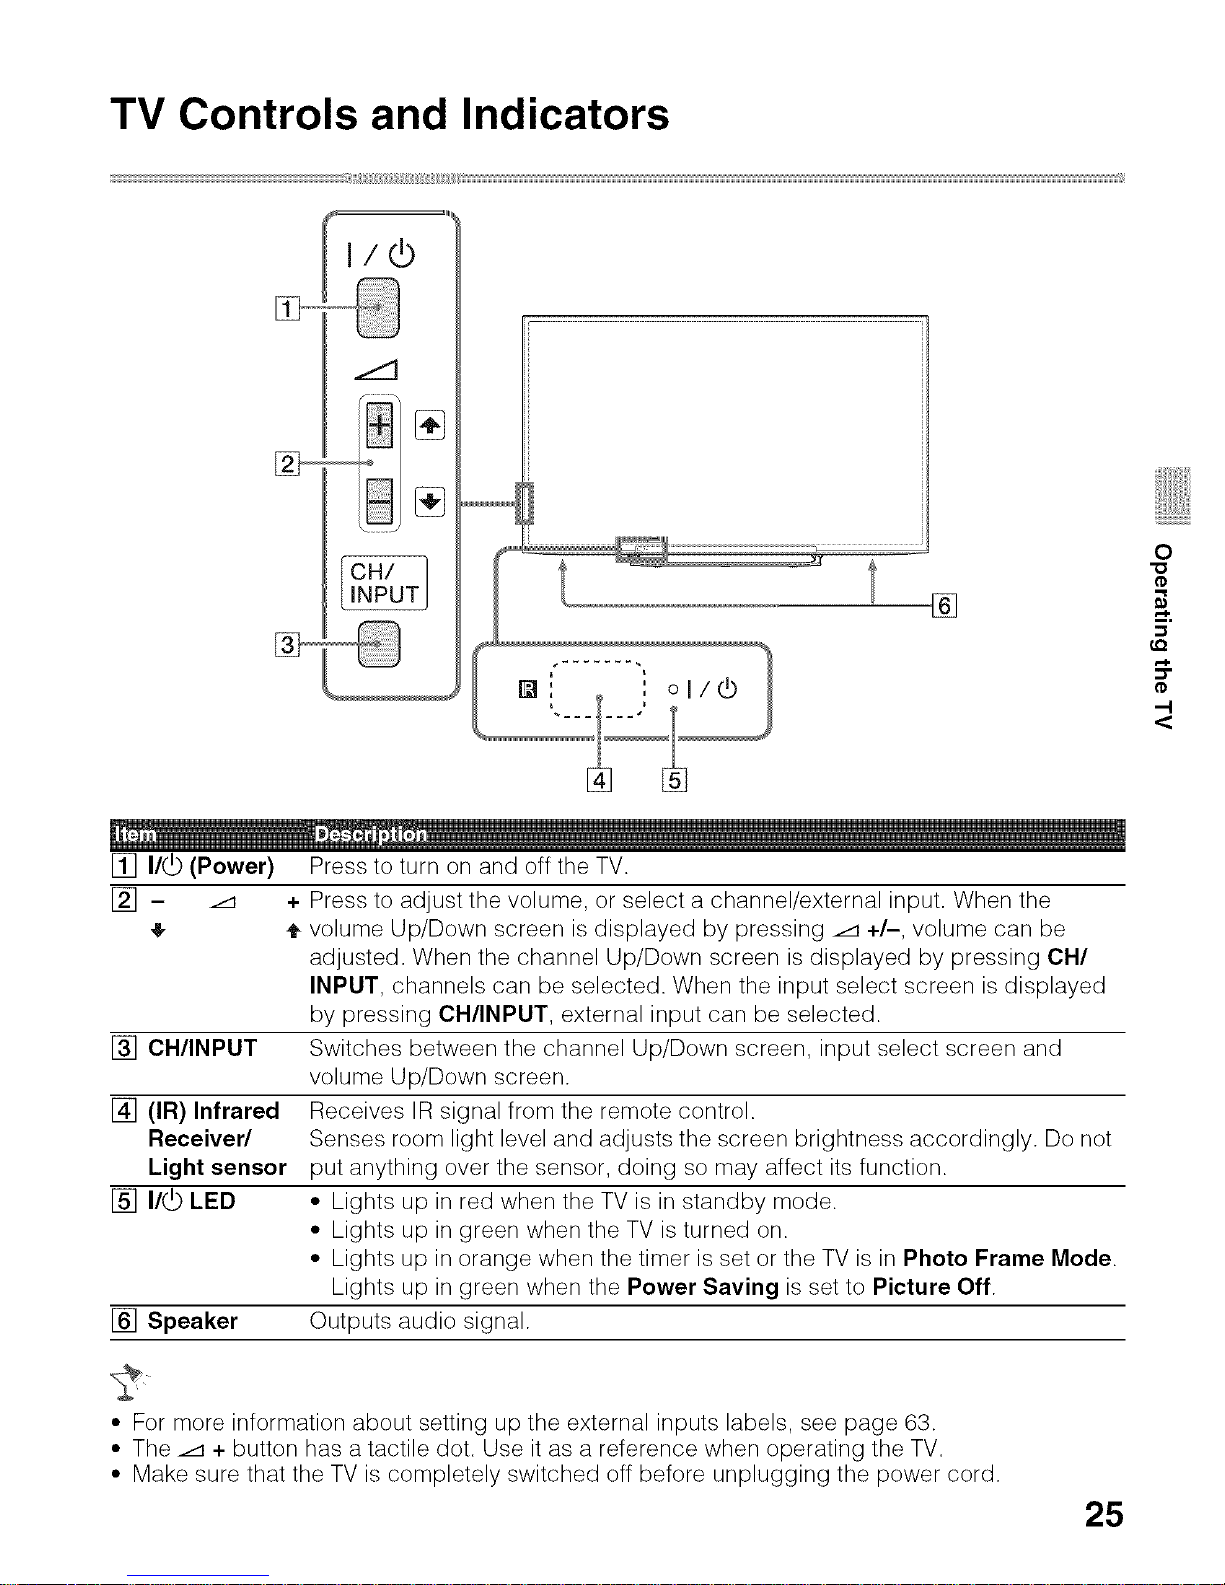
TV Controls and Indicators
[] I/_) (Power) Press to turn on and off the TV.
[] - /-1 + Press to adjust the volume, or select a channel/external input. When the
,_ ,_ volume Up/Down screen is displayed by pressing /-1 +/-, volume can be
adjusted. When the channel Up/Down screen is displayed by pressing CH/
INPUT, channels can be selected. When the input select screen is displayed
by pressing CH/INPUT, external input can be selected.
[] CH/INPUT Switches between the channel Up/Down screen, input select screen and
volume Up/Down screen.
[] (IR) Infrared Receives IR signal from the remote control.
Receiver/ Senses room light level and adjusts the screen brightness accordingly. Do not
Light sensor put anything over the sensor, doing so may affect its function.
[] I/_ LED • Lights up in red when the TV is in standby mode.
• Lights up in green when the TV is turned on.
• Lights up in orange when the timer is set or the TV is in Photo Frame Mode.
Lights up in green when the Power Saving is set to Picture Off.
[] Speaker Outputs audio signal.
0
"0
;3
LQ
--I
<
• For more information about setting up the external inputs labels, see page 63.
• The/-1 + button has a tactile dot. Use it as a reference when operating the TV.
• Make sure that the TV is completely switched off before unplugging the power cord.
25
BRAVIA Sync Control
With the BRAVIA Sync Control function,
BRAVIA Sync helps to communicate with
BRAVIA Sync-compatible equipment
connected with an HDMI/MHL cable. Use
the following settings and tips to help
unify control of your connected
equipment.
1 Press HOME and select Settings,
then select the Setup settings.
2 Select the BRAVIA Sync Settings,
then highlight BRAVIA Sync Control,
and set to On.
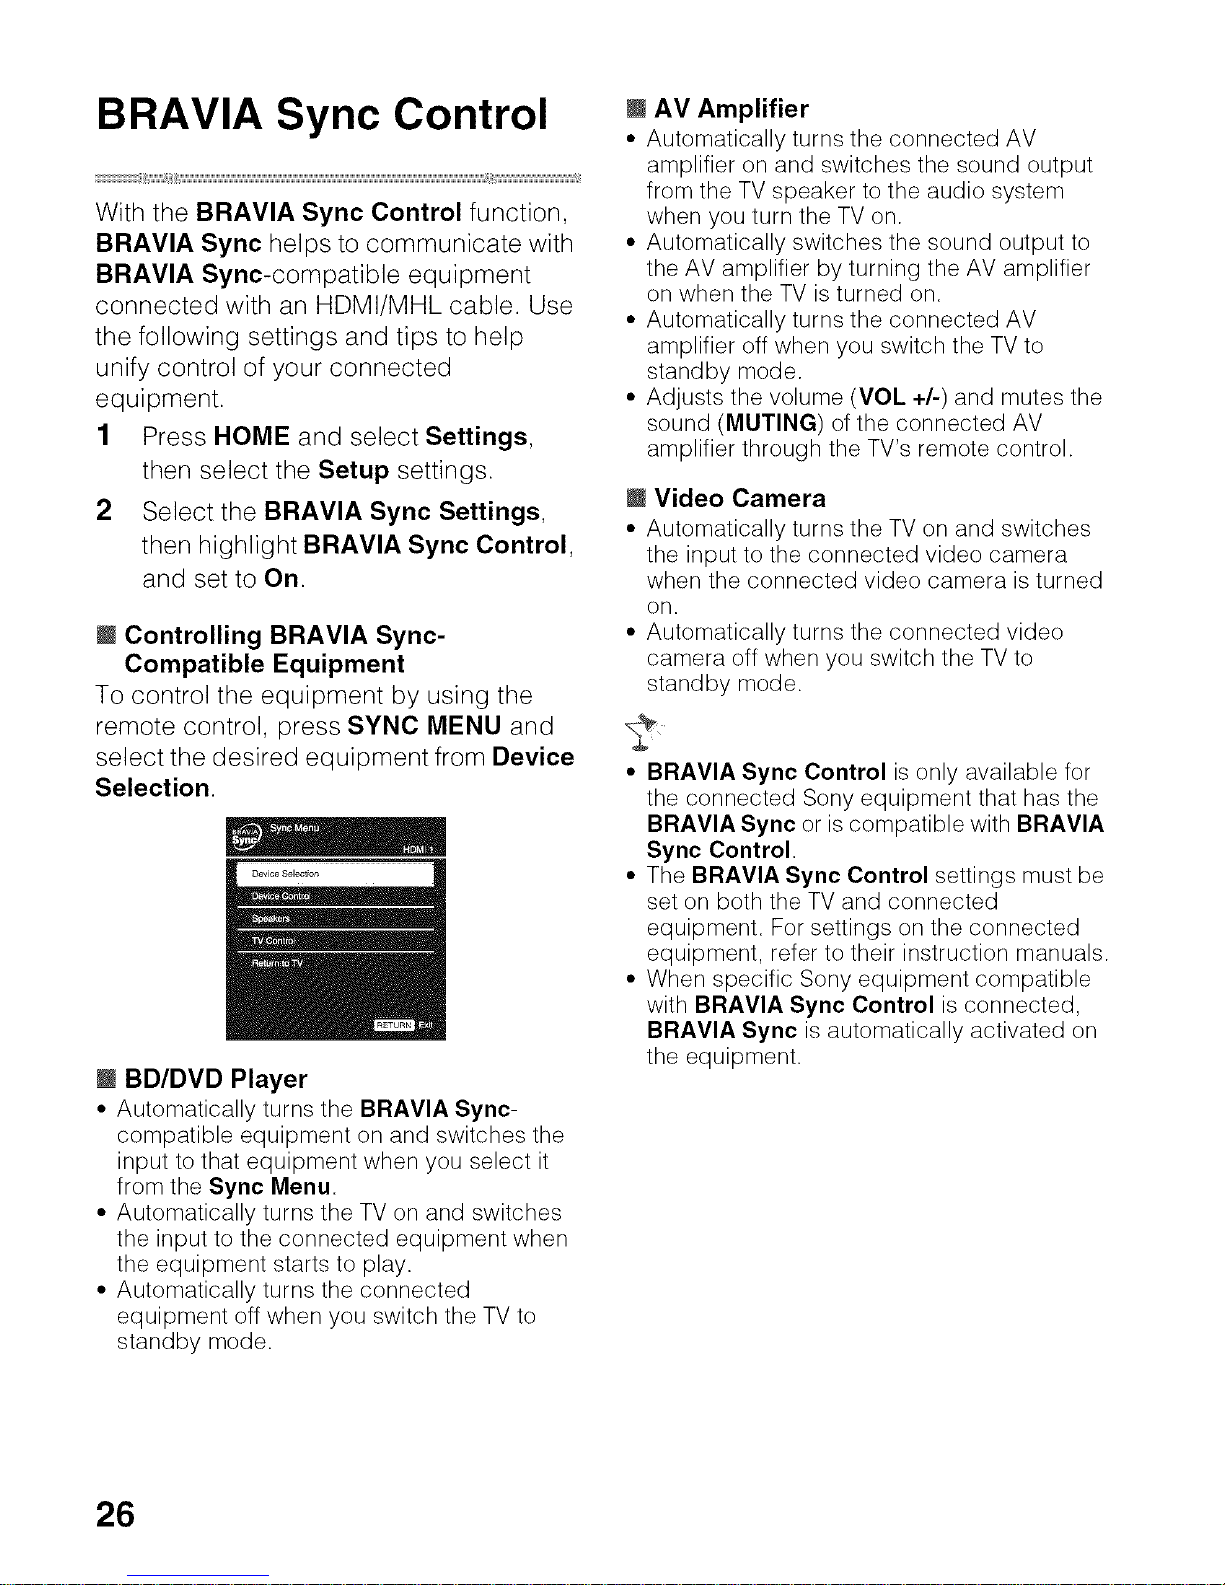
l Controlling BRAVIA Sync-
Compatible Equipment
To control the equipment by using the
remote control, press SYNC MENU and
select the desired equipment from Device
Selection.
............ ii
M BD/DVD Player
• Automatically turns the BRAVIA Sync-
compatible equipment on and switches the
input to that equipment when you select it
from the Sync Menu.
• Automatically turns the TV on and switches
the input to the connected equipment when
the equipment starts to play.
• Automatically turns the connected
equipment off when you switch the TV to
standby mode.
M AV Amplifier
• Automatically turns the connected AV
amplifier on and switches the sound output
from the TV speaker to the audio system
when you turn the TV on.
• Automatically switches the sound output to
the AV amplifier by turning the AV amplifier
on when the TV is turned on.
• Automatically turns the connected AV
amplifier off when you switch the TV to
standby mode.
• Adjusts the volume (VOL +/-) and mutes the
sound (MUTING) of the connected AV
amplifier through the TV's remote control.
M Video Camera
• Automatically turns the TV on and switches
the input to the connected video camera
when the connected video camera is turned
on.
• Automatically turns the connected video
camera off when you switch the TV to
standby mode.
• BRAVIA Sync Control is only available for
the connected Sony equipment that has the
BRAVIA Sync or is compatible with BRAVIA
Sync Control.
• The BRAVIA Sync Control settings must be
set on both the TV and connected
equipment. For settings on the connected
equipment, refer to their instruction manuals.
• When specific Sony equipment compatible
with BRAVIA Sync Control is connected,
BRAVIA Sync is automatically activated on
the equipment.
26
 Loading...