

Phonak ComPilot
User Guide

Contents
1. Welcome 5
2. Getting to know your ComPilot 6
2.1 Legend 7
2.2 Accessories 8
3. Getting started 9
3.1 Setting up the power supply 9
3.2 Charging the ComPilot battery 10
3.3 Turning the ComPilot ON and OFF 11
3.4 ComPilot Bluetooth pairing introduction 13
3.5 Wearing the ComPilot correctly 14
3.6 Testing sound via the ComPilot 15
4. Using the ComPilot as an audio streamer 16
4.1 Streaming music via a cable 16
4.2 Streaming music via Bluetooth 17
4.3 Watching TV 19
4.4 Adjusting the volume 20
2

5. Using the ComPilot for phone calls 21
5.1 Introduction 21
5.2 Incoming calls 25
5.3 Making phone calls 28
5.4 Ending a call 29
5.5 Advanced phone options 30
5.6 Using the external microphone 32
5.7 Locking the main button 33
6. Using the ComPilot as a remote control 34
7. Using the ComPilot with FM 38
8. More detailed information 40
8.1 Wearing the ComPilot in different ways 41
8.2 Managing multiple inputs to the ComPilot 42
8.3 Resetting your ComPilot 47
8.4 Summary of indicator lights 48
8.5 Introduction to Bluetooth 51
3

Contents
8.6 Setting up Bluetooth 56
8.7 Caller identification: spoken caller names 62
8.8 VoiceAlerts: spoken ComPilot status 63
9. Troubleshooting ComPilot 65
10. Important safety information 73
10.1 Hazard warnings 73
10.2 Information on product safety 75
10.3 Other important information 78
11. Service and warranty 79
12. Compliance information 81
13. Information and explanation of symbols 84
4
1. Welcome
Your new ComPilot is a Swiss premium-quality product
developed by Phonak, one of the world‘s leading
companies in hearing technology.
Please read the user instructions thoroughly in order to
benefi t from all the possibilities your hearing system
offers.
“Compatibility information: Check your hearing aid
compatibility with your hearing care professional.”
Phonak – life is on www.phonak.com
CE mark applied: 2011
5

2. Getting to know your ComPilot
The intended use of the Phonak ComPilot is to connect
all Phonak wireless hearing aids wirelessly to
Bluetooth®-enabled phones and devices or MP3
players for speech or stereo music. The ComPilot is
also compatible with Phonak’s range of FM receivers
via Europlug input.
The remote control gives you access to important
control elements for most of the Phonak wireless hearing
aids. A list of compatible hearing aids can be found at
http://www.phonak.com/compilot
I Please note that your hearing care professional
must configure your ComPilot before it can be used
as a remote control for your hearing aids. Audio
streaming however is possible at any time.
Bluetooth® is a registered trademark owned by the
Bluetooth SIG, Inc.
6
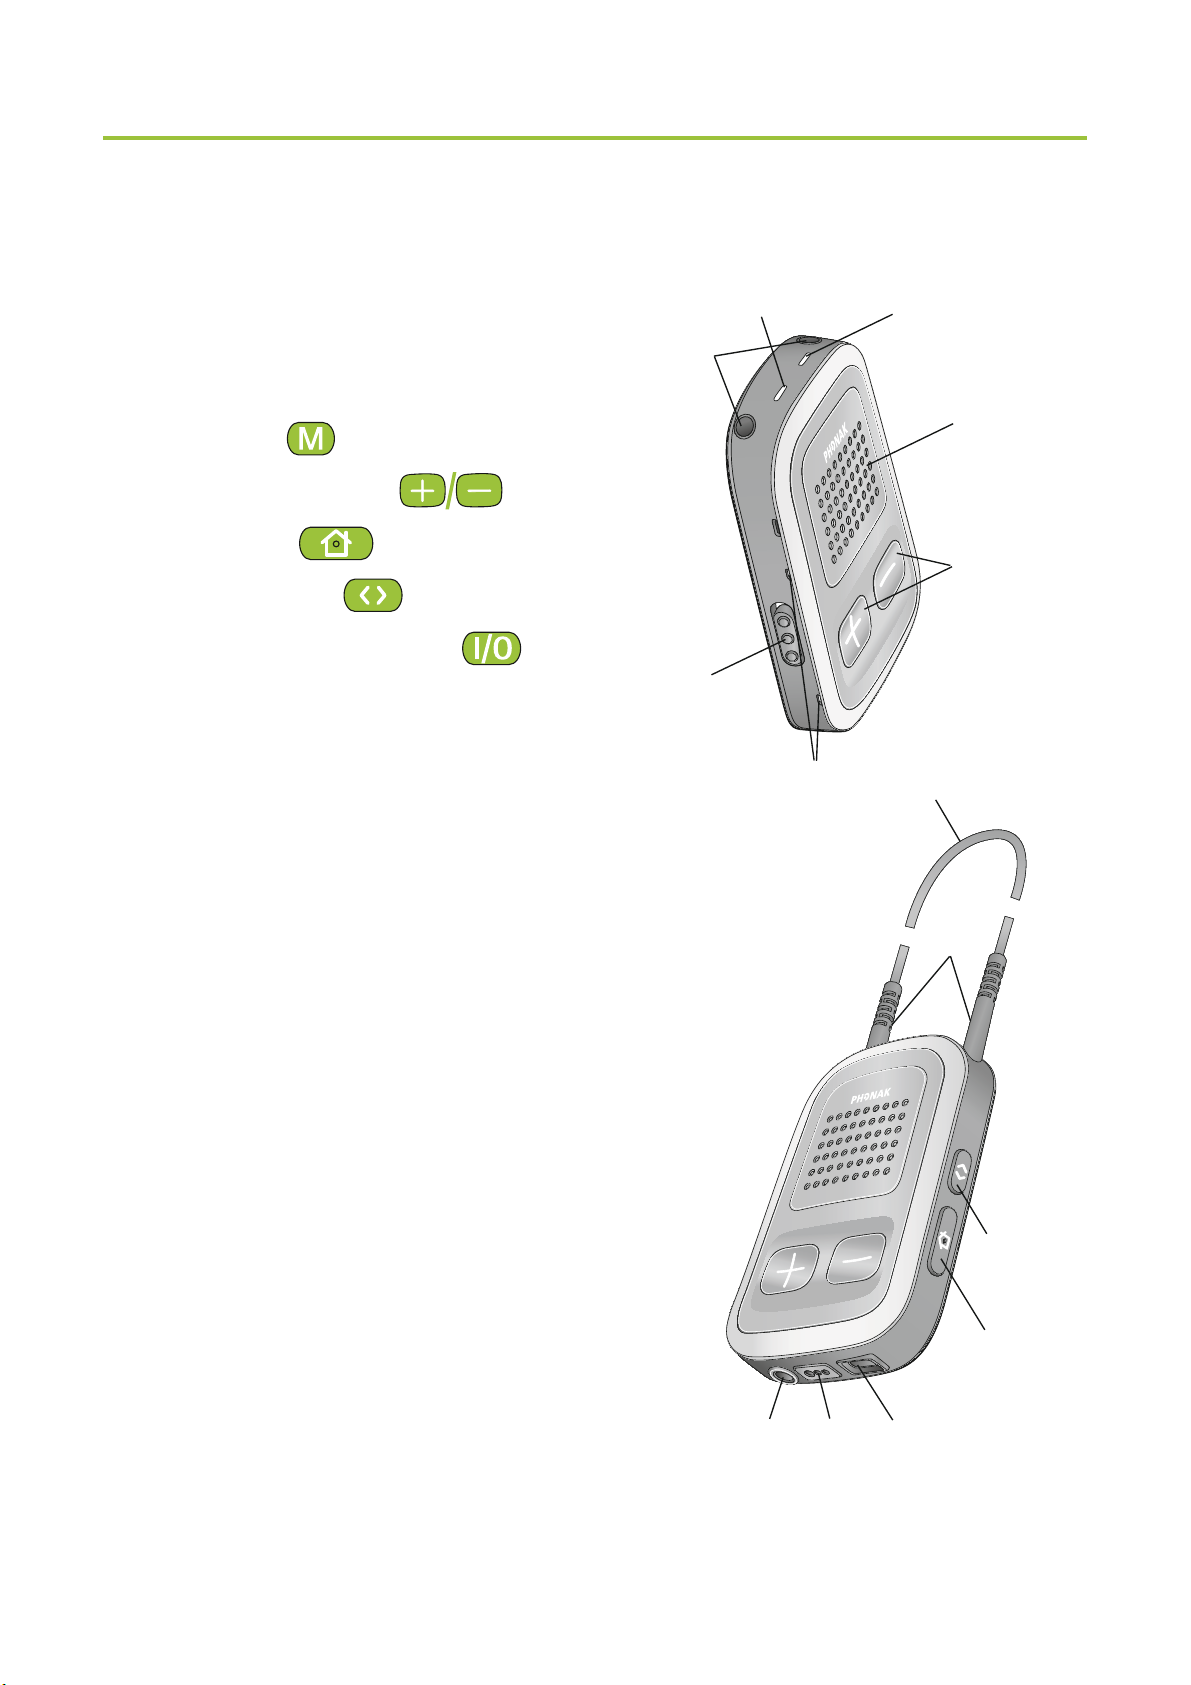
2.1 Legend
Buttons
a Main (
b Volume +/- (
c Home (
d Connect (
e ON/OFF switch (
)
)
)
)
)
Inputs
f Microphone openings
g Audio input (3.5 mm jack)
l
e
power
audio
f
jk
a
b
m
h FM input (Europlug)
i Charging input (mini-USB)
Indicators
j Audio indicator
k Power indicator
Neckloop
l Neckloop sockets
m Neckloop (with antenna)
n Neckloop plugs
n
d
c
ghi
7
2. Getting to know your ComPilot
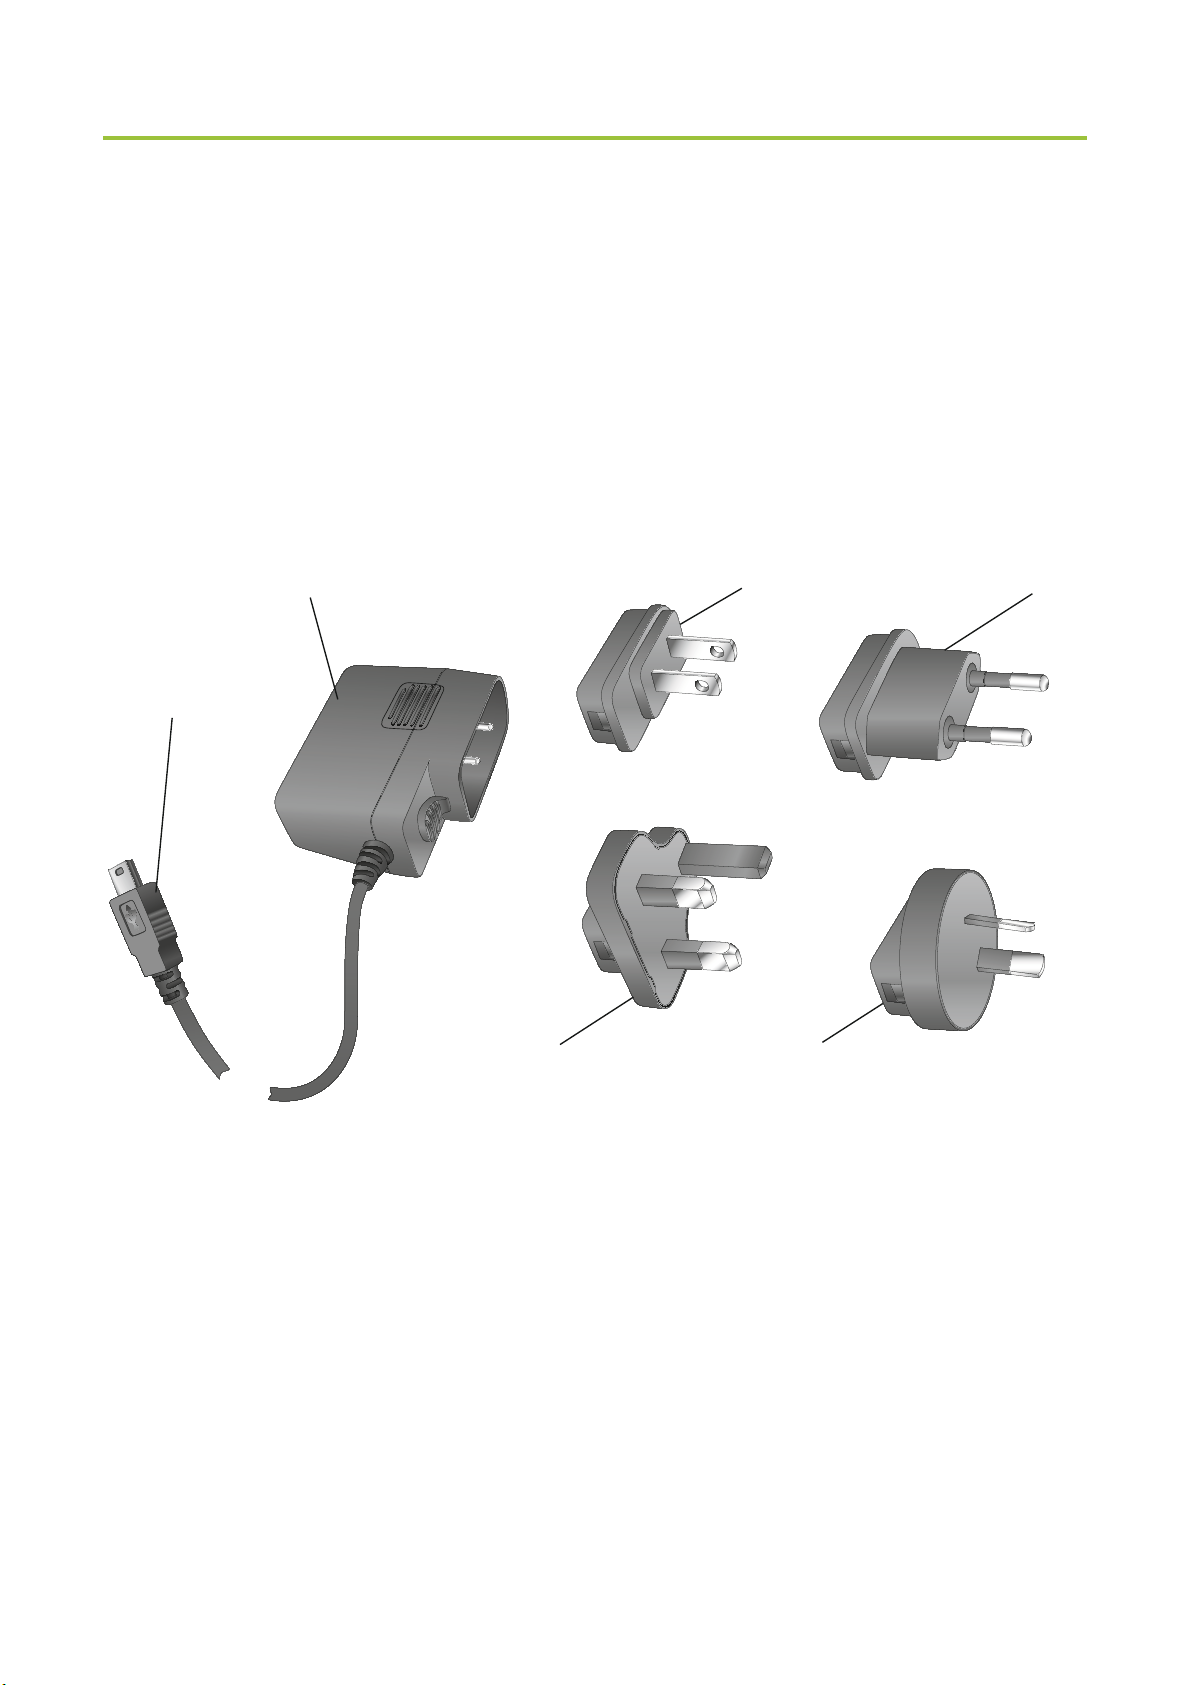
2.2 Accessories
(content may vary depending on the country)
o/p Universal power supply with mini-USB plug
q–t US, EU, UK, AUS adapter
pqr
o
Other optional accessories
External lapel microphone “MC1”
Short neckloop (51 cm)
Phonak TVLink S basestation
(Phonak Bluetooth transmitter for TV use)
Audio cable, 1.5 m / 5 ft.
USB cable, 3 m / 10 ft.
8
ts
3. Getting started
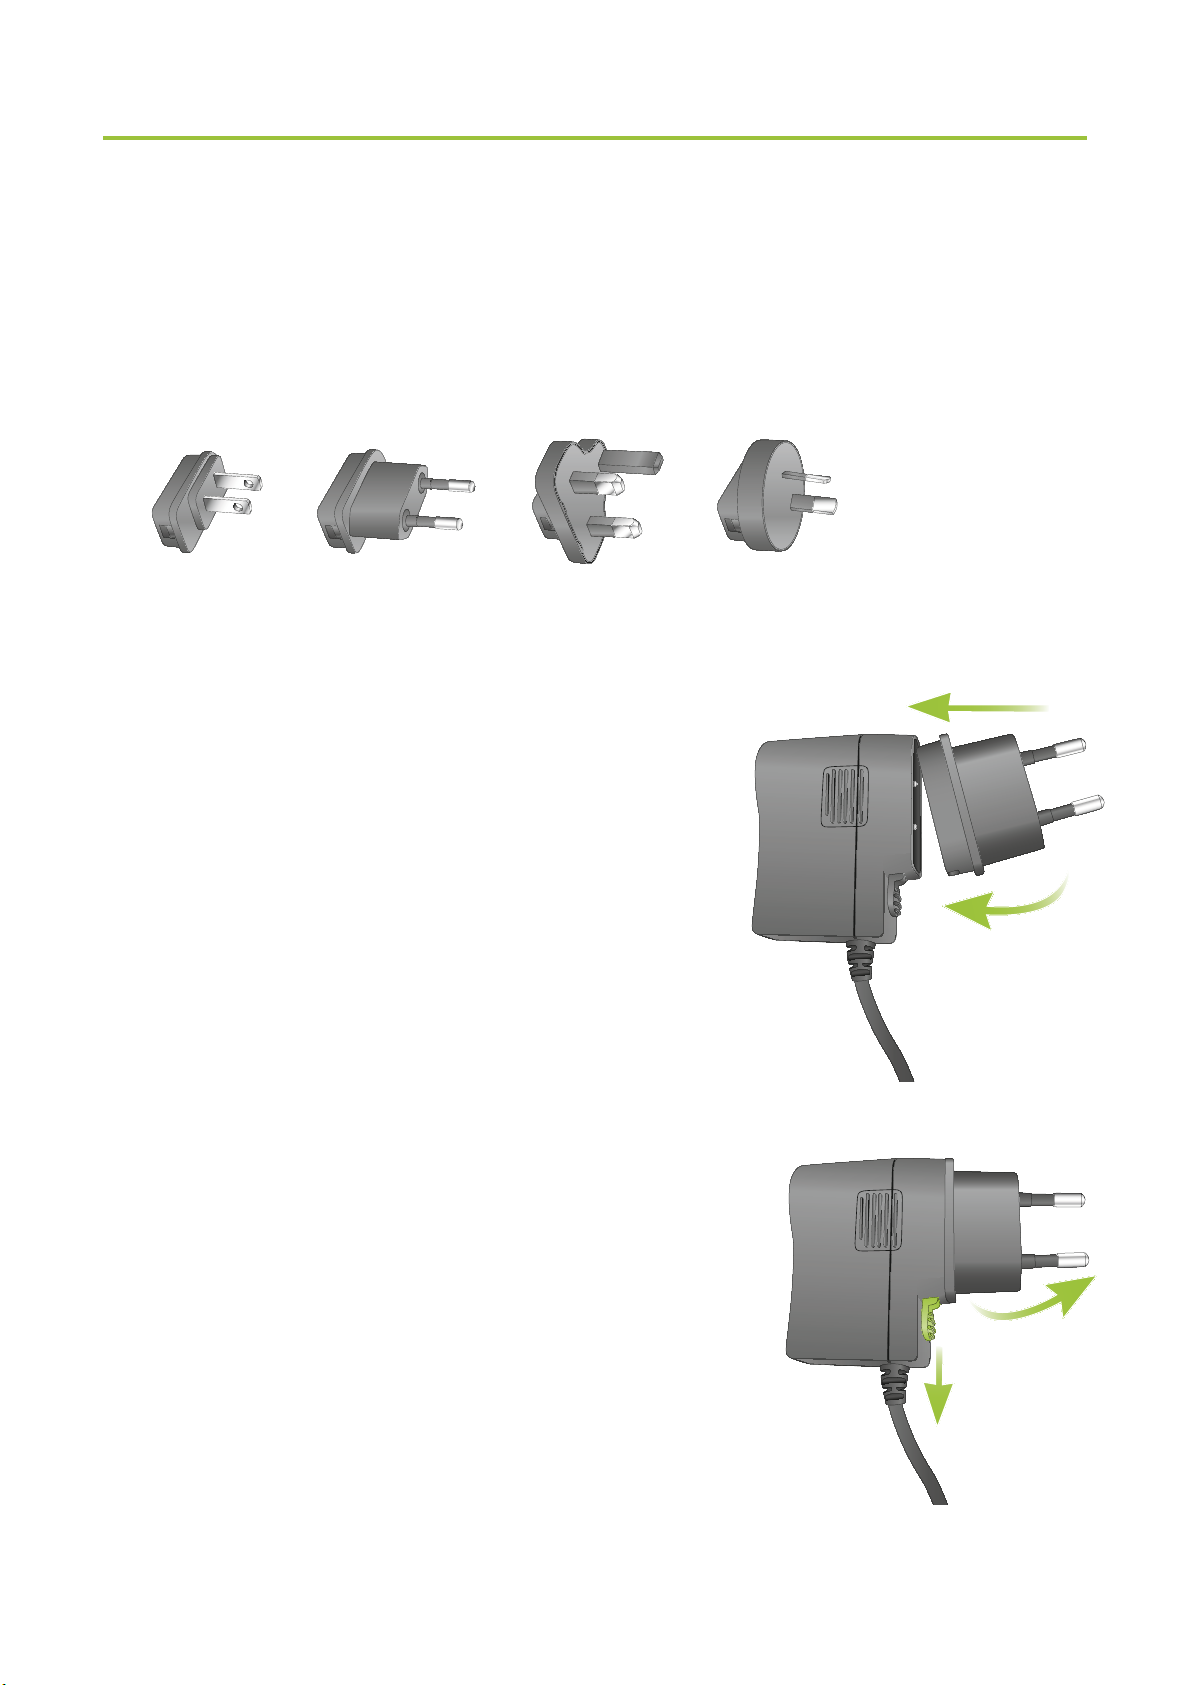
3.1 Setting up the power supply
1. Select the adapter that corresponds to your country.
US EU UK AUS
2. Insert the round corner of the
adapter to the round corner of
the universal power supply
until it is completely inserted.
3. Click the tail of the adapter in
to lock it into place. Make sure
the adapter is securely locked.
To remove the power adapter:
a. Pull back the tab on the universal
2.
3.
power supply and hold.
b. Gently pull the adapter upwards
to remove it from receptacle.
c. Then start over with step 1 (above).
b.
a.
9
3. Getting started
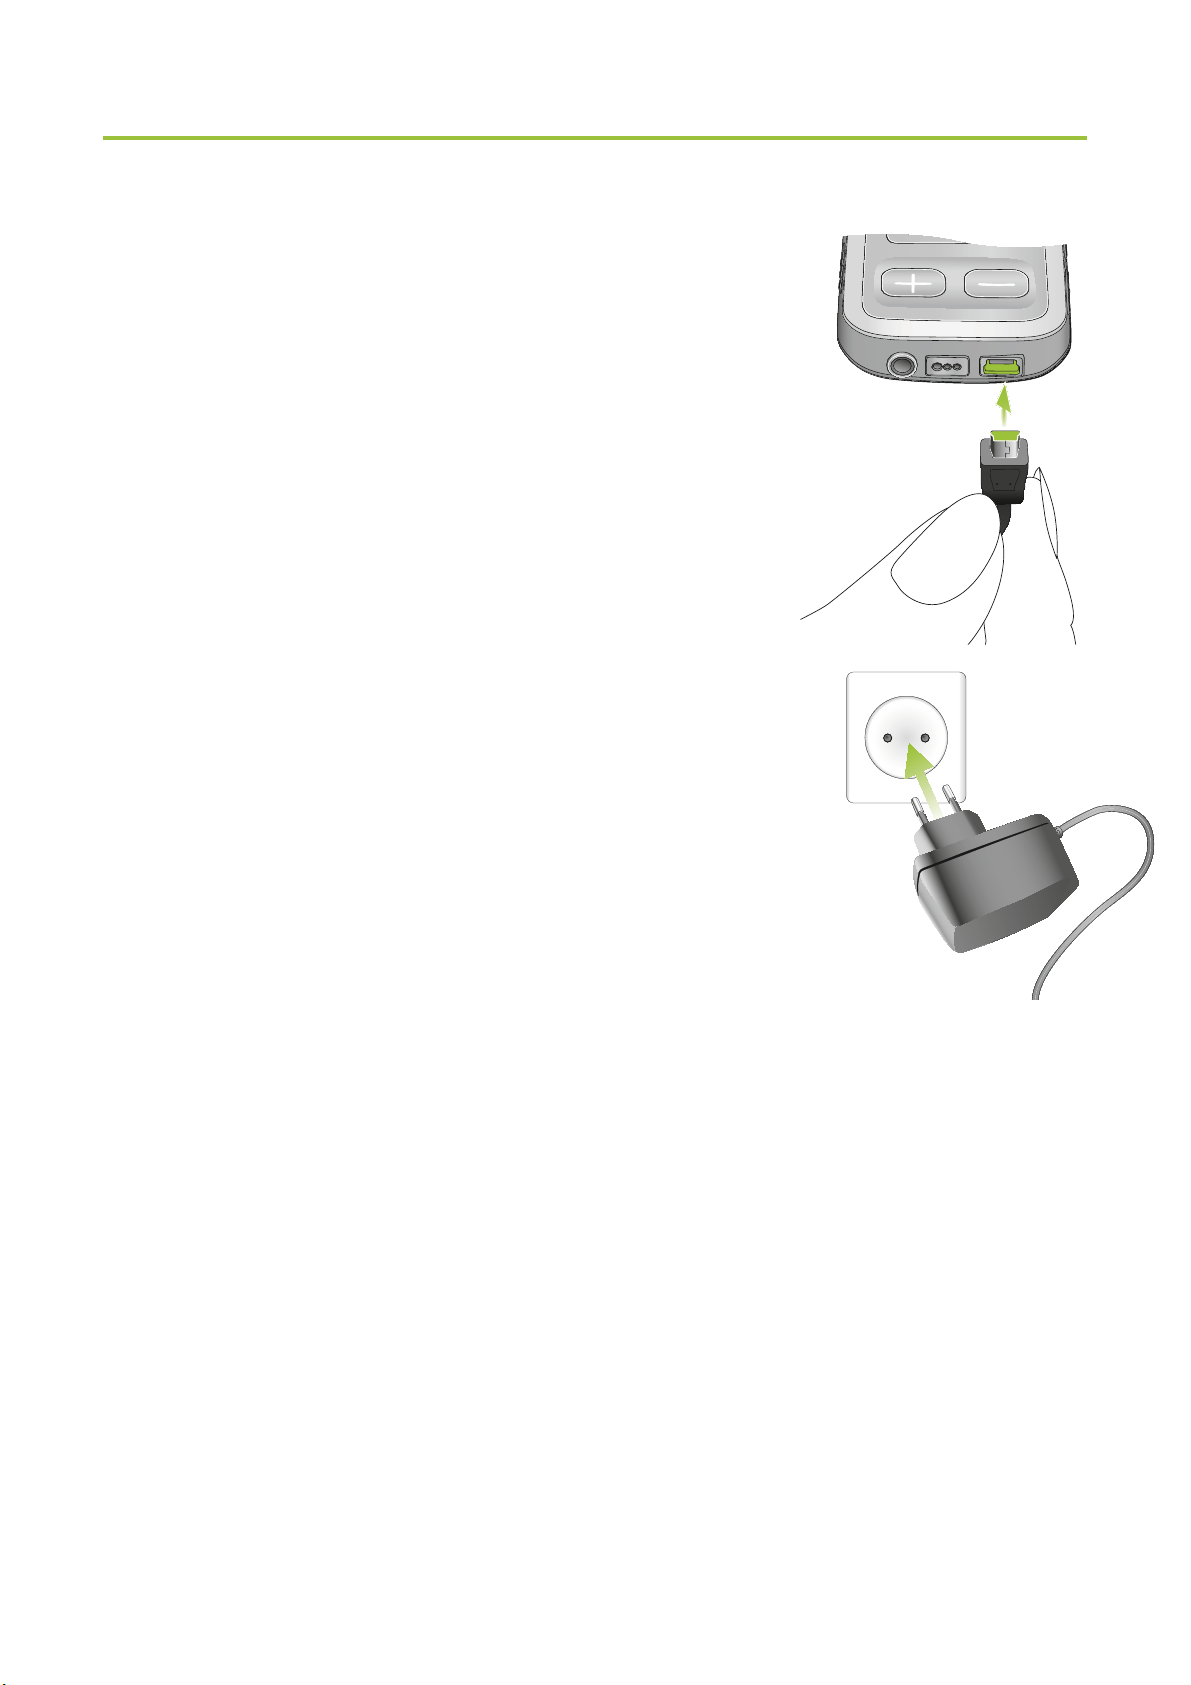
3.2 Charging the ComPilot battery
Your ComPilot has a non-removable
rechargeable battery.
To charge it:
1. Plug the mini-USB plug into the
mini-USB port on the ComPilot.
2. Plug the power supply into a power
outlet.
Power indicator
Solid red: Charging, typically 90 minutes.
Solid green: Battery fully charged.
It is safe to leave the ComPilot connected to the
charger overnight.
I When charging your ComPilot for the first time,
leave it charging for at least three hours, even if
the battery indicator is not lit or turns green
10
earlier.
I A new battery’s full performance is achieved only
after two to three complete charge and discharge
cycles.
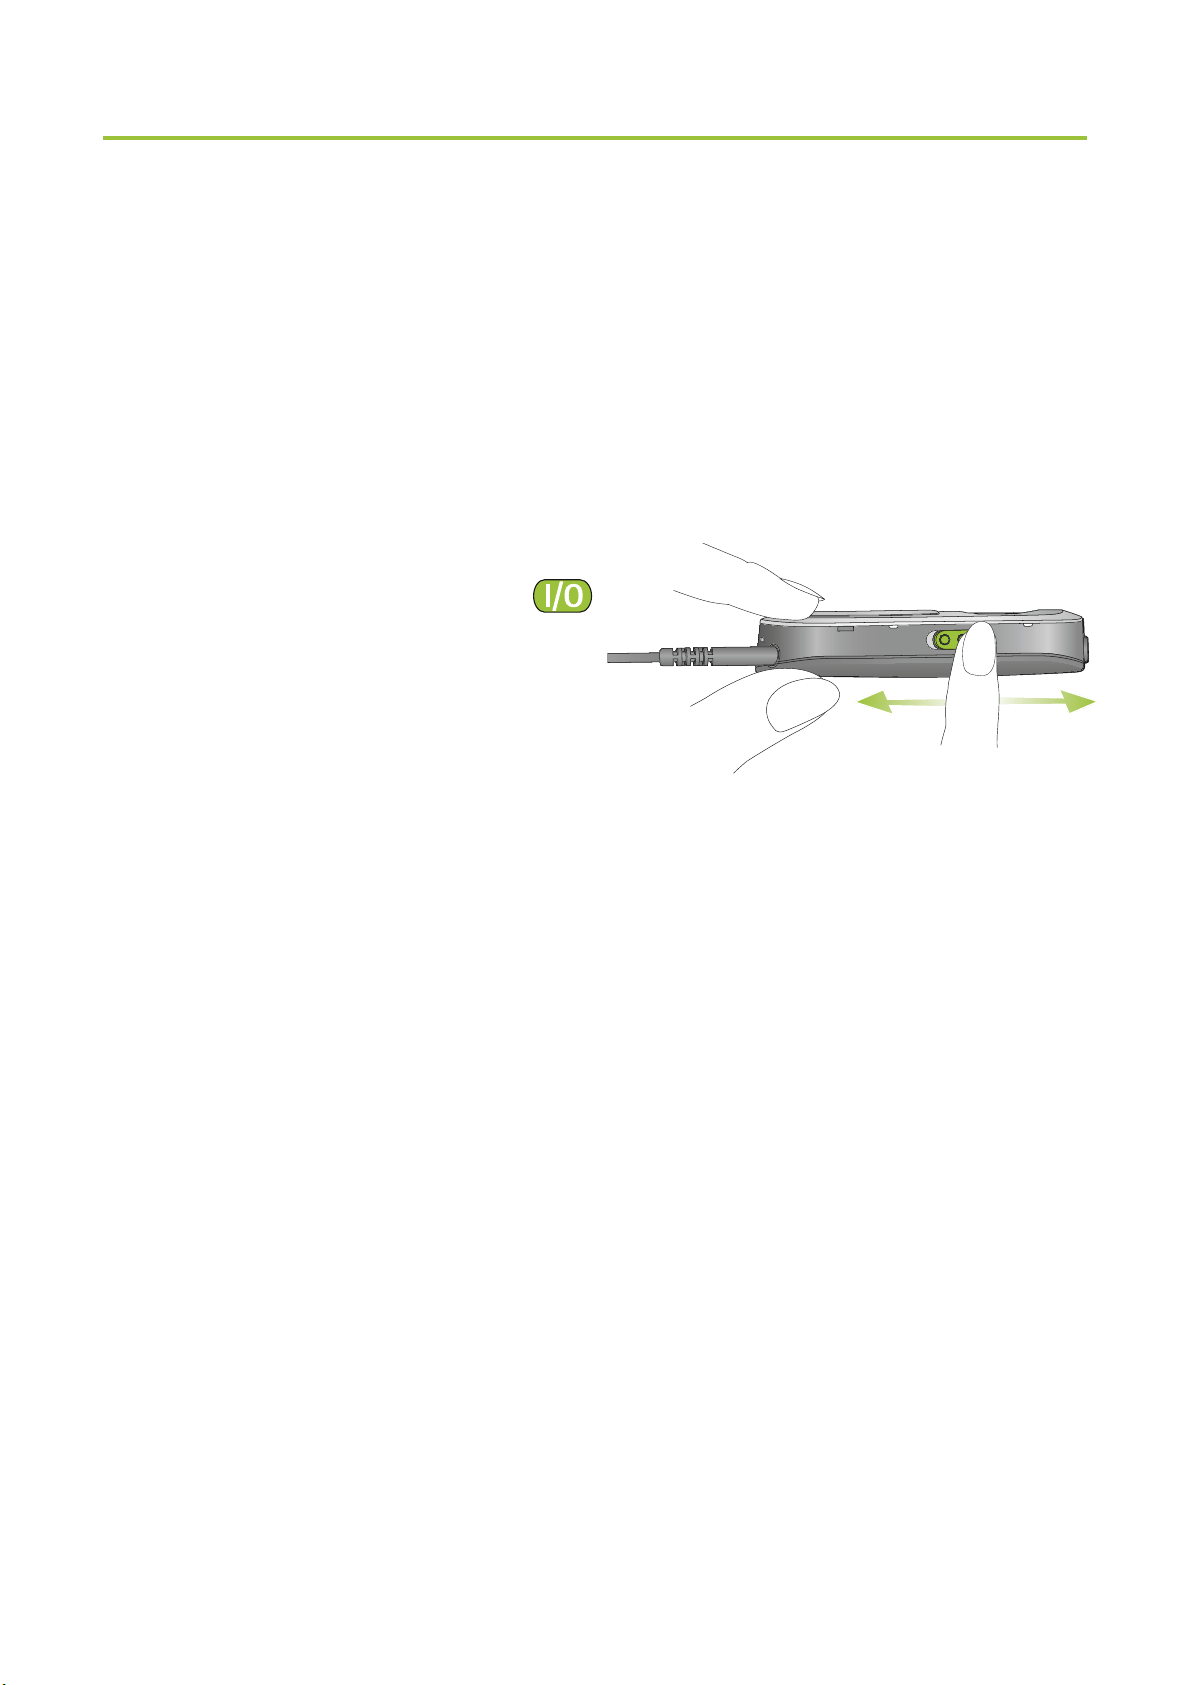
3.3 Turning the ComPilot ON and OFF
Slide the Power switch (
as shown to turn the
ComPilot ON or OFF.
OFF ON
Switch the ComPilot OFF when not in use or if in storage
or during transportation.
For operational use switch the ComPilot ON.
)
11
3. Getting started
Battery status information
The Power indicator shows the following:
Green for 2 seconds
Blink red then solid
for 2 seconds
Slow blink green
Short blink red
No blinking just after
switching ON
Switching ON
Switching OFF
Normal operation
<20% battery left.
Please charge
Charge for at least
2 hours
I If the neckloop was removed for more than
2 minutes, the Power indicator is only lit as long
as a button is pressed.
12
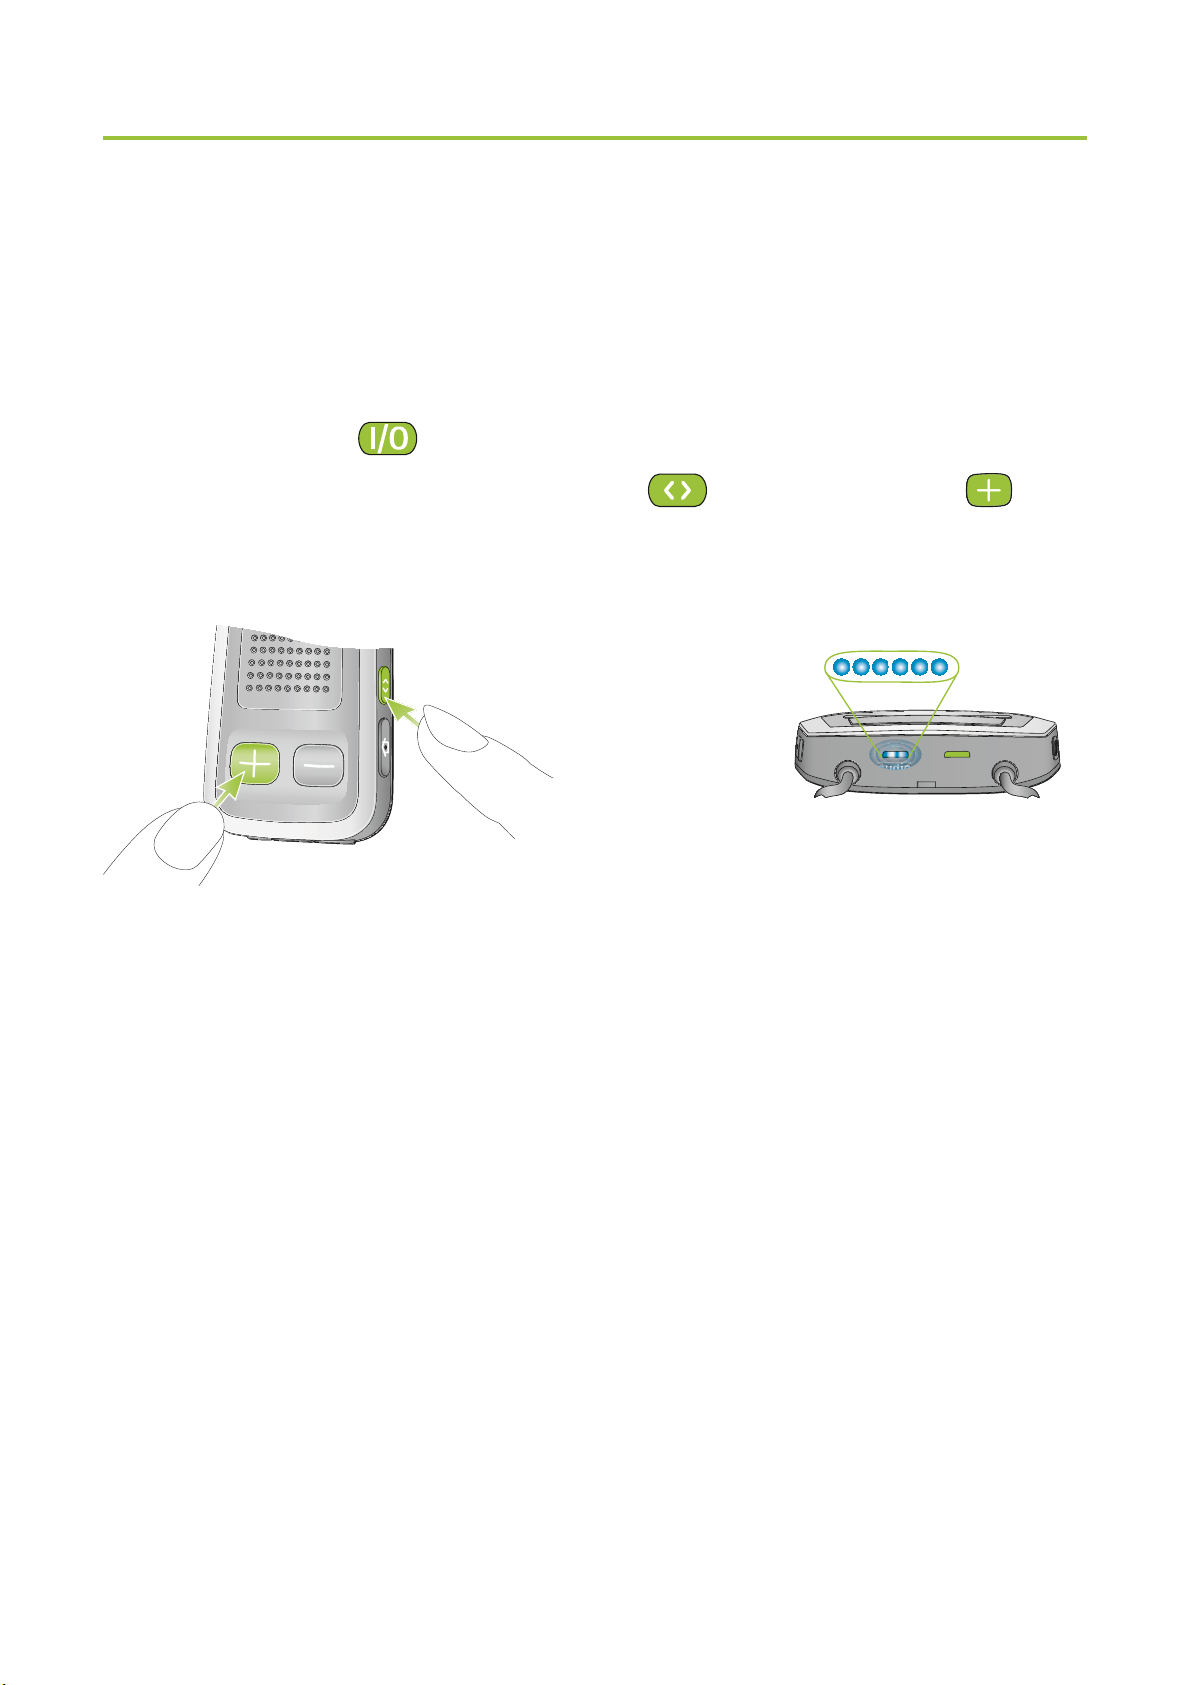
3.4 ComPilot Bluetooth pairing introduction
Find more details on page 56.
1. Switch ON (
2. Press and hold the Connect (
) the ComPilot.
) and Volume ( )
button simultaneously for 2 seconds until the Audio
indicator starts to rapidly blink blue.
2 sec
poweraudio
3. Start the pairing process on the Bluetooth device
(e.g., phone) within 1 minute according to the devices
user guide and use code “0000” when prompted.
4. After successful pairing, the Audio indicator will stop
rapidly blinking blue.
I The pairing process does not require the neckloop
to be plugged in. For streaming and Bluetooth
connection the neckloop is mandatory.
I When pairing to a cellular phone we recommend
disabling the phone key tones and SMS alerts.
13
3. Getting started
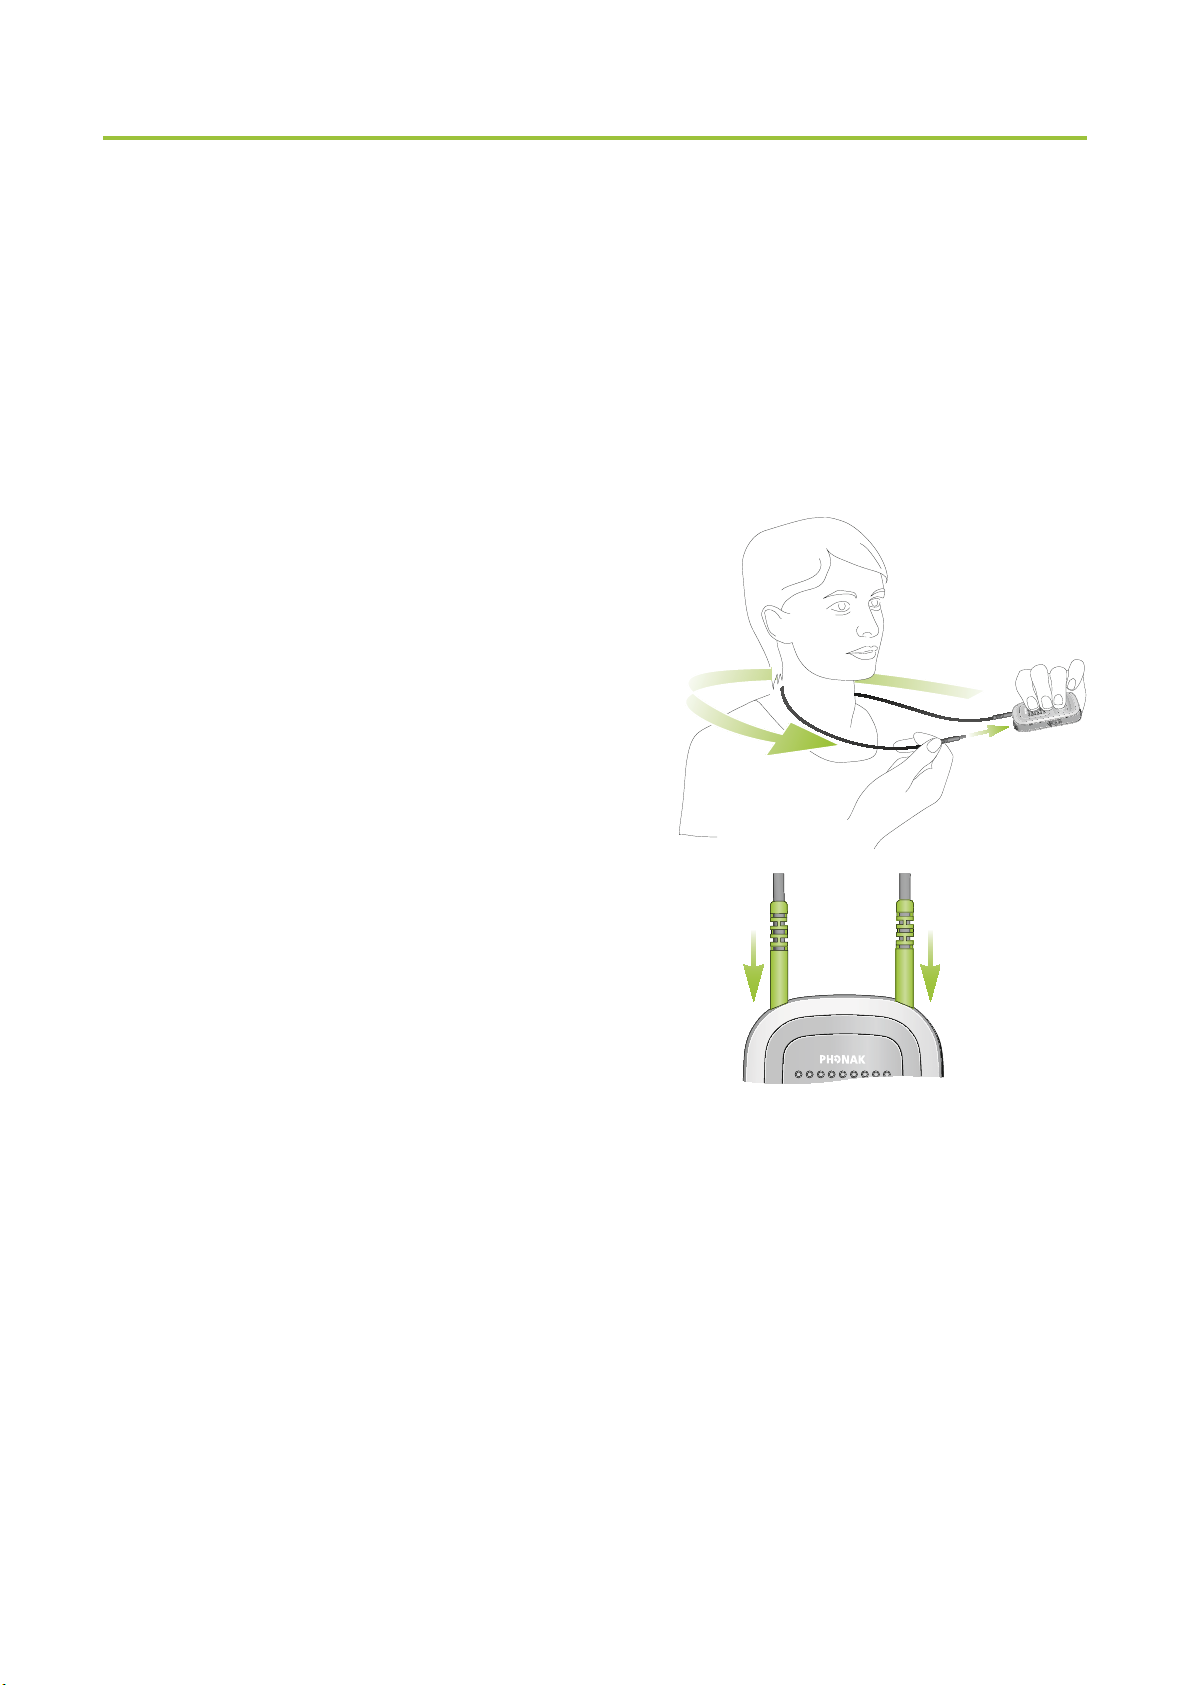
3.5 Wearing the ComPilot correctly
Before any phone, music or TV streaming can take
place, the ComPilot must be switched ON and worn
correctly as shown below:
1. Put the neckloop around
your neck (easily done when
unplugging one neckloop
plug).
2. Make sure both plugs are
well connected in the neckloop
sockets.
3. Switch the ComPilot ON.
I For streaming the neckloop must always be plugged
in. When unplugged, the ComPilot will go into
sleep mode after two minutes. The Power and Audio
indicators will stop blinking and all active Bluetooth
connections are terminated to save power. Plug
the neckloop in again to activate the streaming.
14
3.6 Testing sound via the ComPilot
1. Wear the ComPilot correctly and
switch it ON.
2. Press and hold the Connect (
Main (
for 2 seconds until the Audio indicator
turns violet.
The hearing aids will switch to the streaming mode
and you will hear the ComPilot theme sound demo for
30 seconds.
Use the Volume (
The volume level is permanently stored and will be
applied to all VoiceAlert messages.
) buttons simultaneously
) buttons to adjust the volume.
) and
If you cannot hear the demo sound:
Make sure your hearing aids are inserted correctly.
Make sure the ComPilot neckloop is properly plugged
in on both ends and worn around your neck.
Make sure the ComPilot is charged and switched ON.
Make sure you are not on a phone call connected
through the ComPilot.
15
4. Using the ComPilot as an audio
streamer
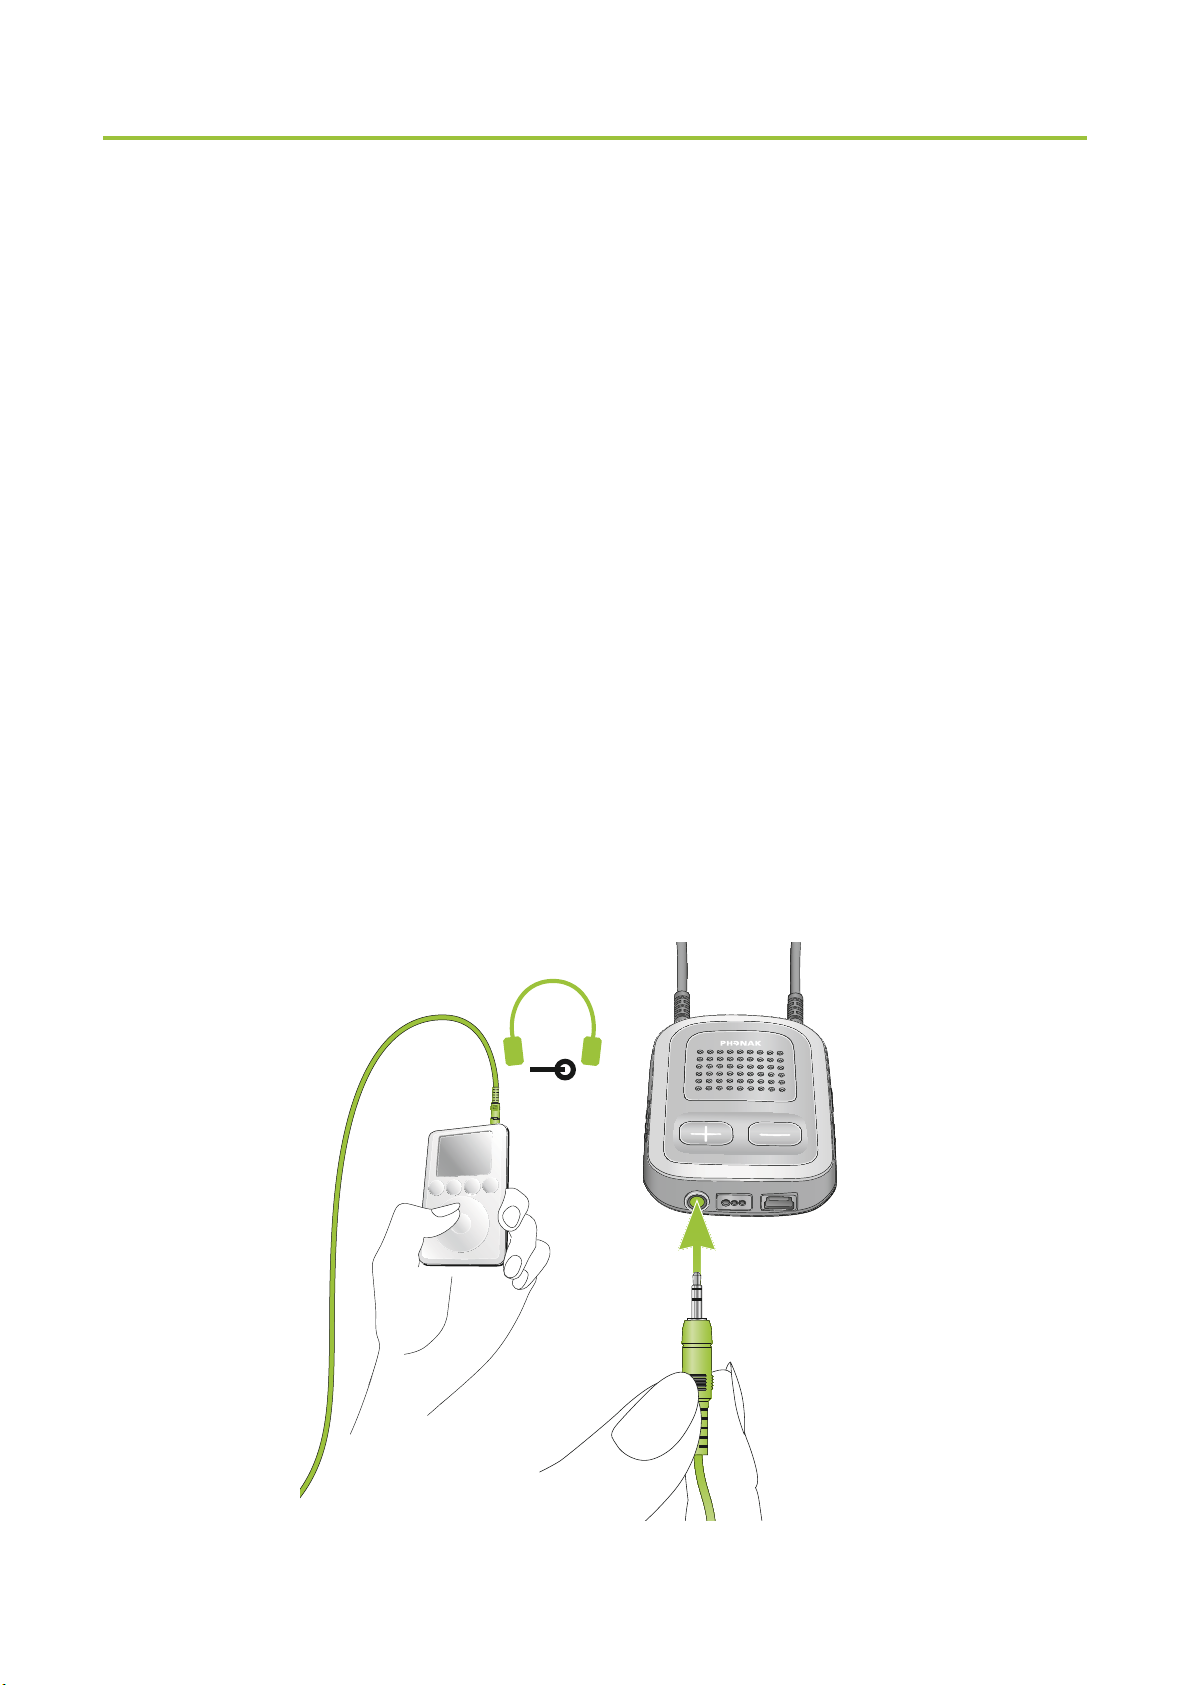
4.1 Streaming music via a cable
The ComPilot must be switched ON and worn correctly
around your neck.
1. Insert the audio cable into the headphones socket
on your audio player and start the player.
2. Insert the other end of the audio cable into the Audio
input on your ComPilot. The audio streaming is
automatically activated and the Audio indicator will
change to orange.
AUDIO
16

Briefly press the Main ( ) button to stop and restart
streaming.
The programs of your hearing aids cannot be changed
via the ComPilot Main (
cable is plugged in.
I ComPilot will confirm streaming via cable when
activated (speech messages (VoiceAlerts) or beeps,
according to the ComPilot configuration).
4.2 Streaming music via Bluetooth
If you have an audio source equipped with Bluetooth
functionality (e.g., MP3 player), you can stream audio
wirelessly to your hearing aids.
) button when the audio
In order to use your ComPilot with a Bluetooth enabled
audio device or transmitter, you must first pair the
devices. Please refer to page 56 for further details.
To start Bluetooth streaming:
1. ComPilot must be switched ON and worn correctly.
2. Switch ON the other Bluetooth device.
17

4. Using the ComPilot as an audio streamer
3. For some Bluetooth devices it may be necessary to
press “Play” on the device.
4. If the devices were paired and connected correctly
streaming will start automatically and the Audio
indicator will turn solid blue.
Use the Main (
) button to stop and restart Bluetooth
streaming.
To stop Bluetooth streaming completely, switch the
other Bluetooth device OFF or disable its Bluetooth
feature.
I The ComPilot will confirm that Bluetooth streaming
is activated (speech messages (VoiceAlerts) or
beeps, depending on the ComPilot configuration).
I The hearing aid programs cannot be changed via
18
the ComPilot Main (
) button when the Bluetooth
device is streaming. Find more details about the
remote control on page 34.
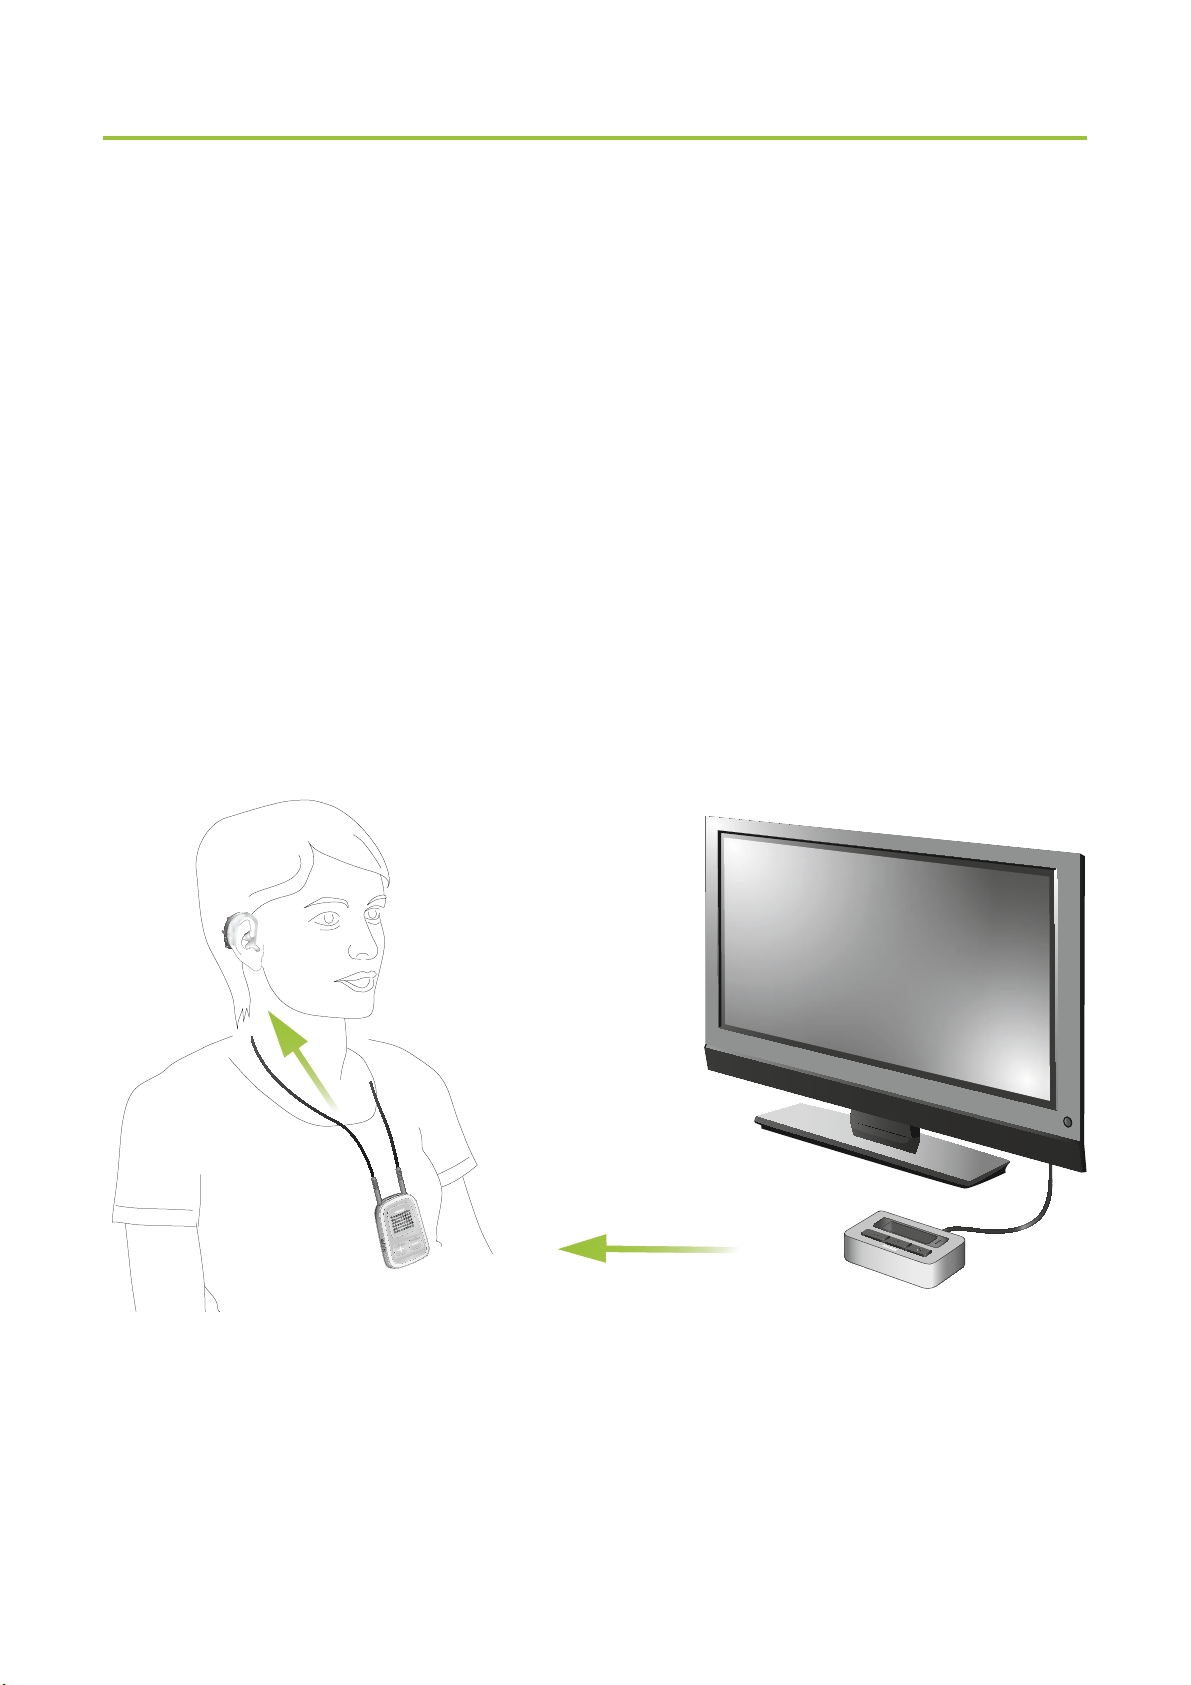
4.3 Watching TV
We recommend using the dedicated and optimized
Phonak TVLink S or TVLink II basestation for watching
TV.
It ensures low latency wireless transmission for up to
30 meters (90 ft.), offers a built-in volume control and
acts as a charging cradle for the ComPilot.
a
u
di
o
po
w
e
r
19

4. Using the ComPilot as an audio streamer
4.4 Adjusting the volume
Press the ComPilot Volume (
Press (
Press (
) to increase the volume
) to decrease the volume
) buttons to adjust:
I Adjusting the volume on the ComPilot will have the
same effect as adjusting the volume of the hearing
aids.
You can also change the volume of the streaming
audio signal only by using the volume controls of
the audio device (e.g., cellular phone, MP3 player,
TVLink S basestation).
This gives you the ability to decrease the hearing
aid volume using the Minus (
) button during a
phone call in a noisy environment, and increase the
phone volume at the same time by using the volume
up button on the phone.
I If your ComPilot was not grouped with your hearing
aids by your hearing care professional, the (
Volume buttons will only change the streaming audio
but not the hearing aid volumes.
20
)
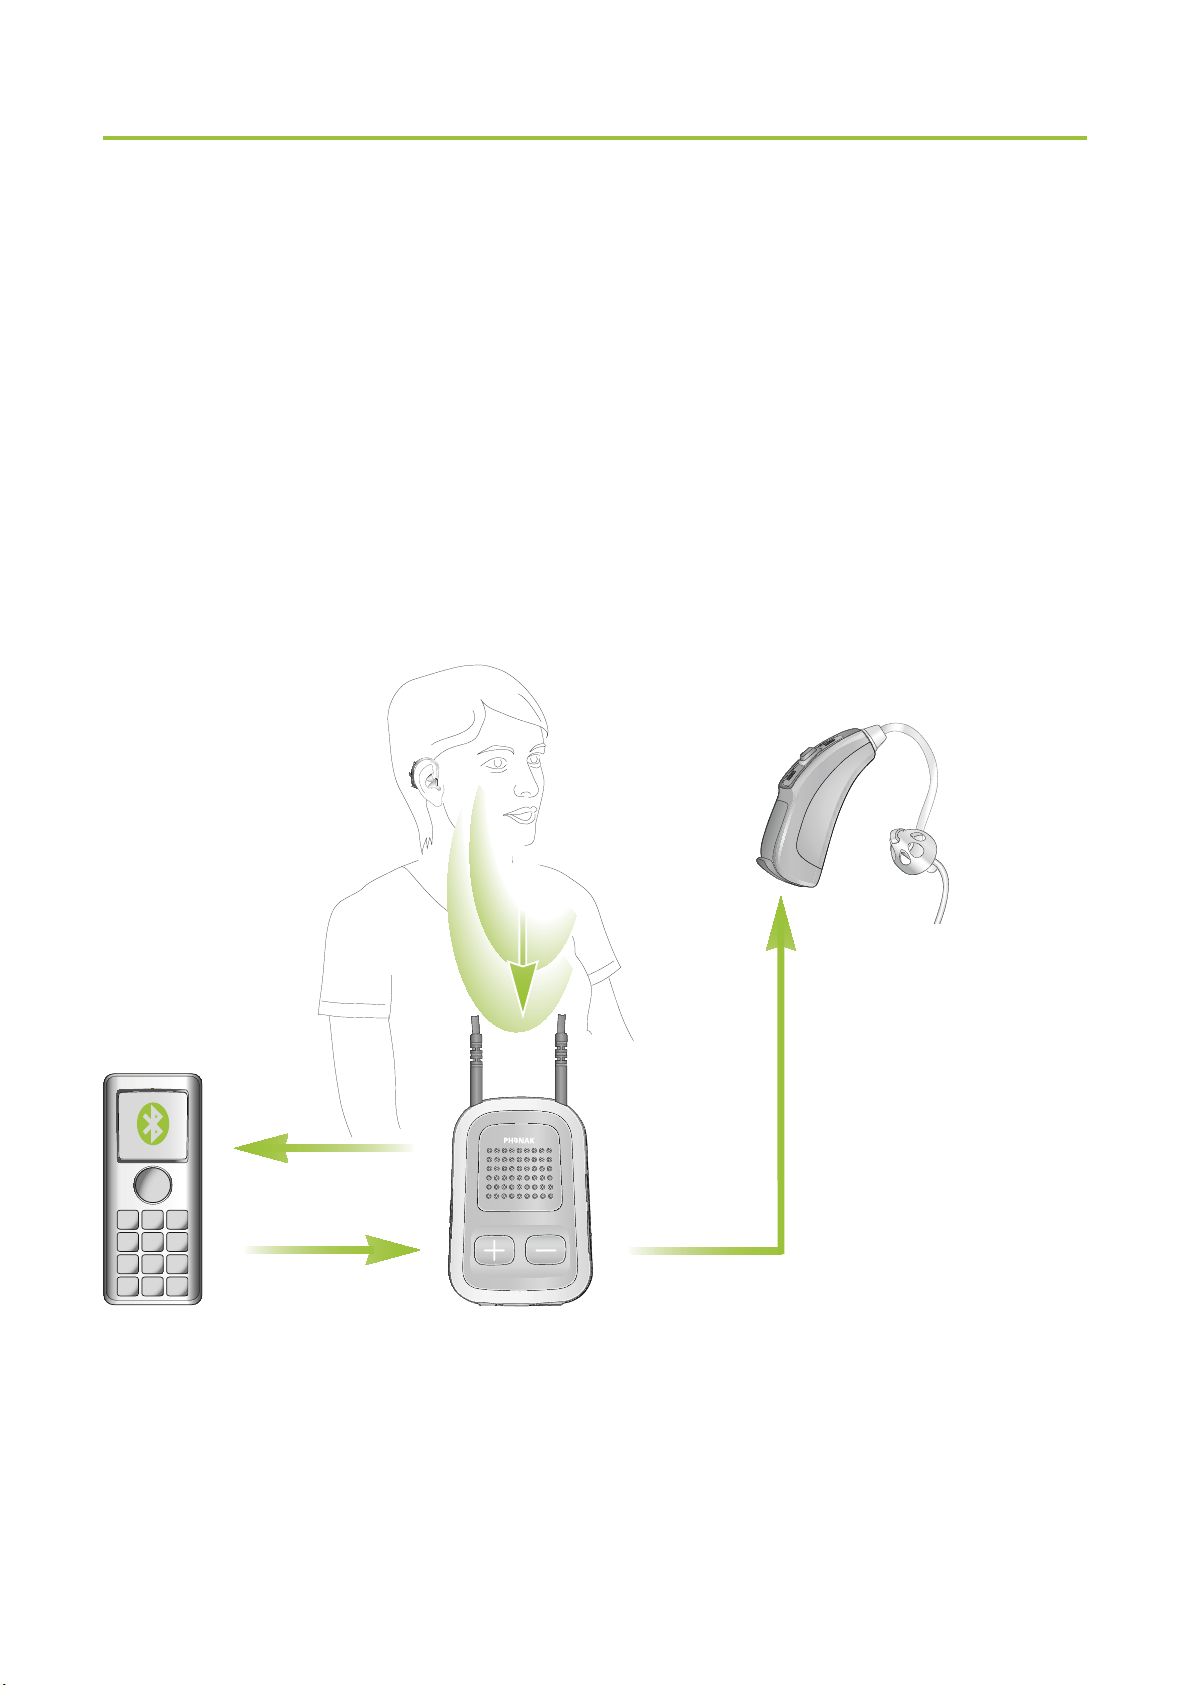
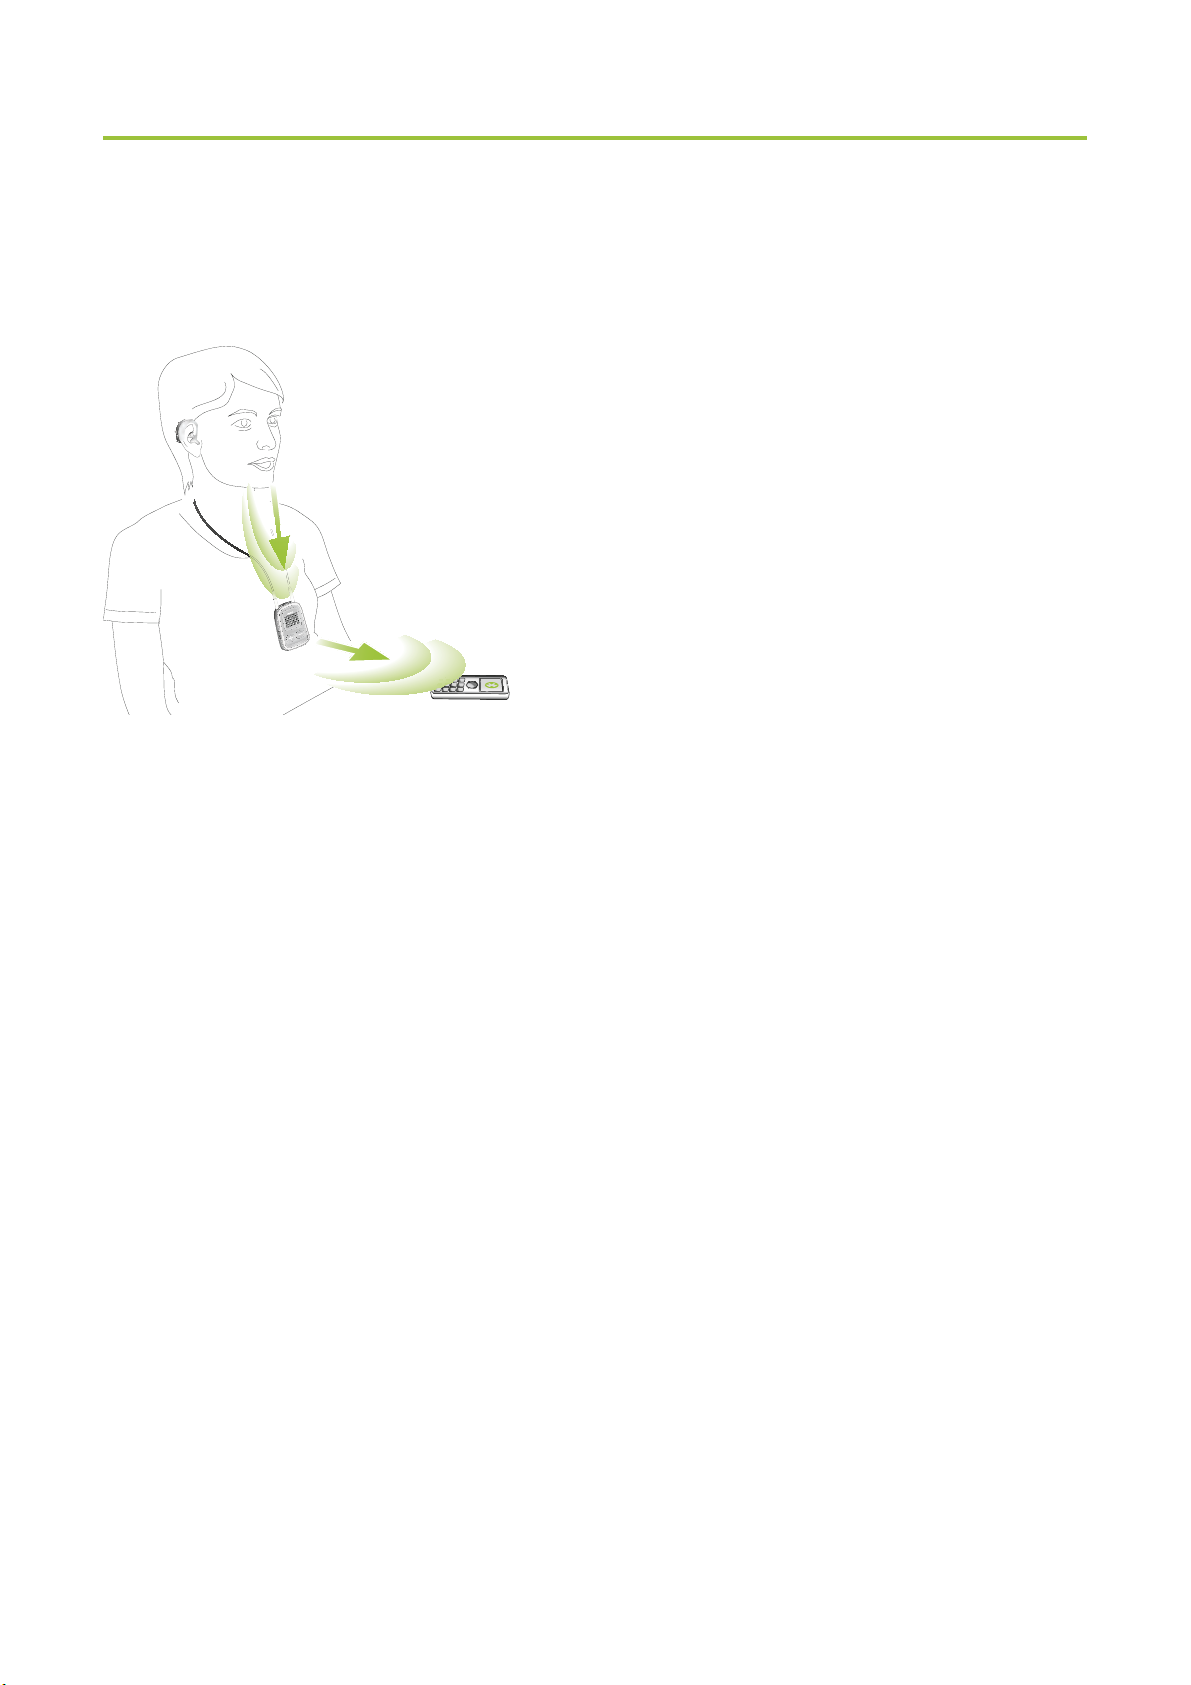
5. Using the ComPilot for phone calls
5.1 Introduction
Before you can use your ComPilot with your phone,
you need to make sure the phone is Bluetooth enabled
and complete the pairing and connection procedures
(details on page 56).
Caller’s voice
audible here
Your voice
Caller’s voice
Bluetooth Wireless signal
21

5. Using the ComPilot for phone calls
The Main ( ) button offers multi-operation
functionality:
It accepts and ends a phone call.
It pauses and resumes the streaming from an audio
device.
It operates as a remote control (ComPilot must be
configured as a remote control by your hearing care
professional).
Some phones are configured to play key-press tones,
SMS announcements and confirmation beeps to the
ComPilot.
If this is set:
You will hear these tones interrupting any active
audio streaming through your hearing aids.
Your hearing aids may shortly switch to streaming
mode which may be unwanted.
Please refer to your phone user guide for information
about disabling these sounds.
22

I Phone calls via Bluetooth will always take priority
over other audio sources on your ComPilot.
I It is not possible to change hearing aid programs
during a phone call.
I You will hear the caller’s voice through both
hearing aids.
23
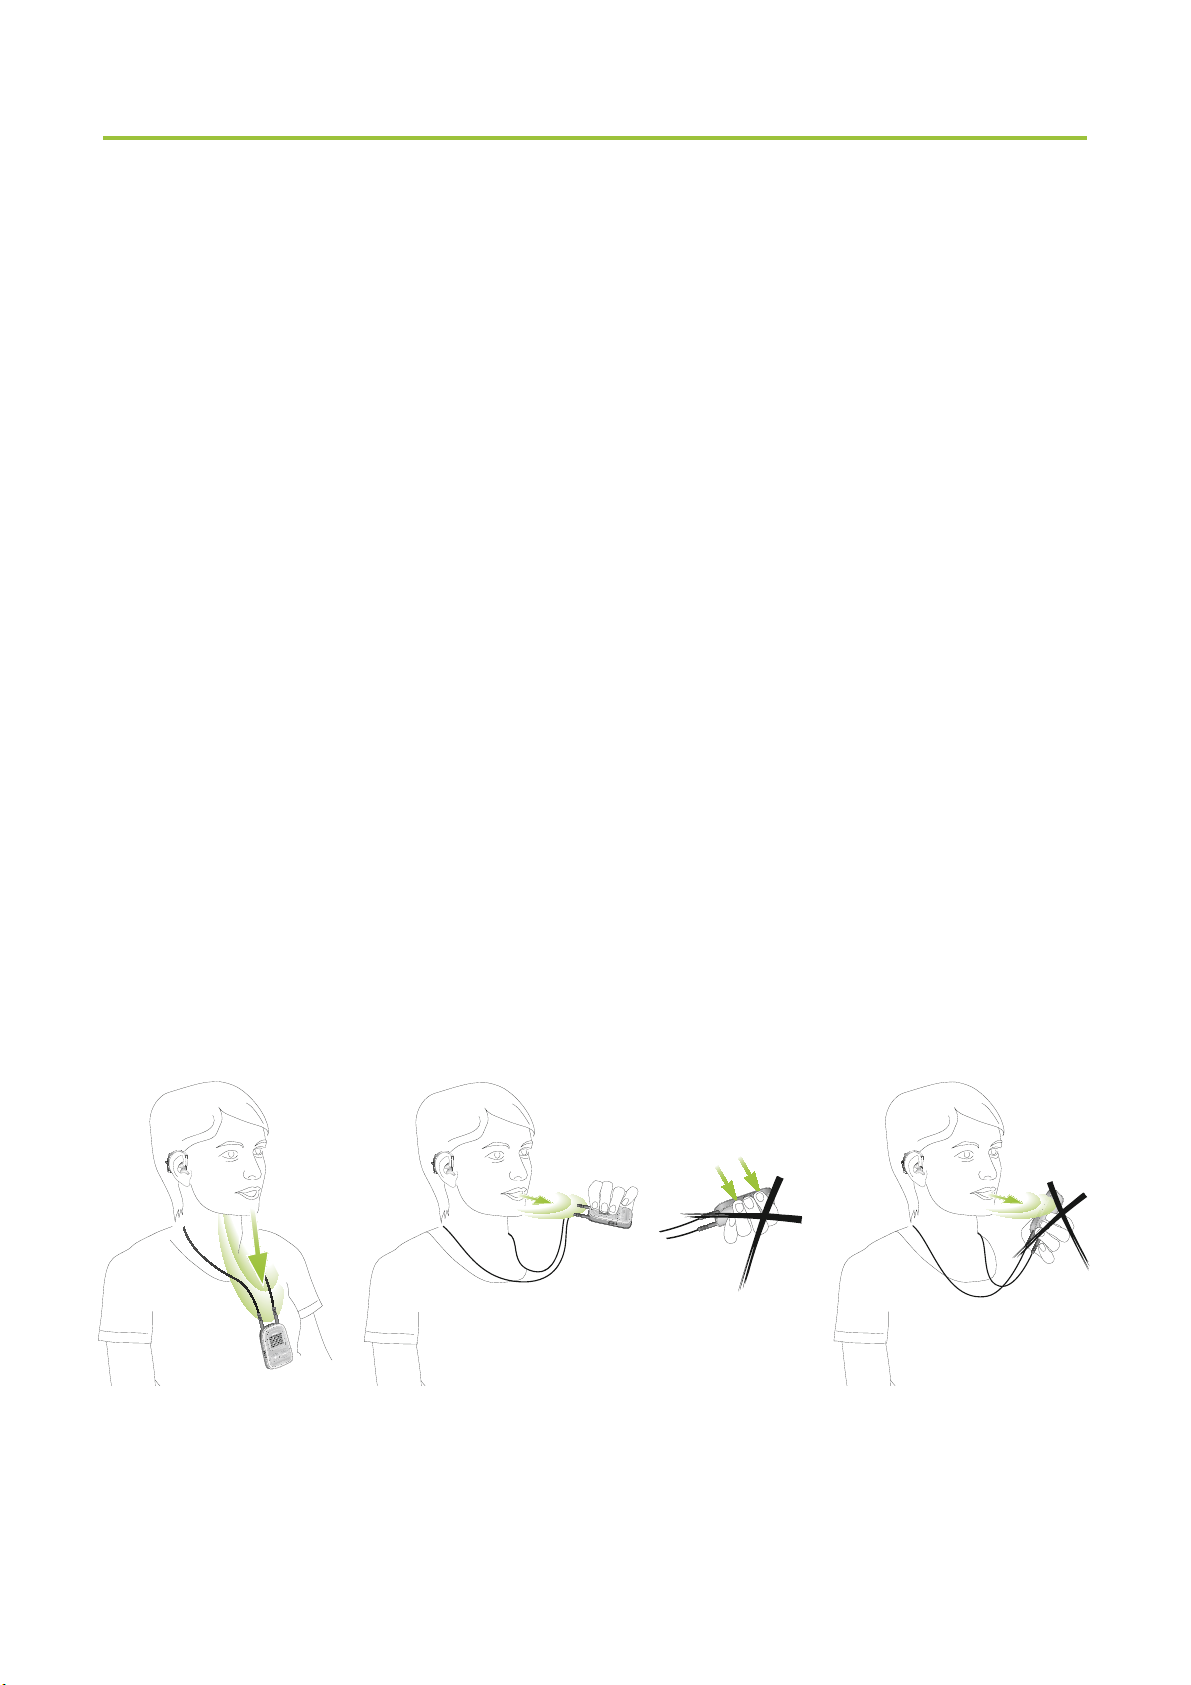
5. Using the ComPilot for phone calls
Use of ComPilot during phone calls
The Bluetooth range (maximum distance between
ComPilot and the phone) is 5–10 meters (15–30 ft).
Outside this range the connection will be lost or you
will encounter intermittency during a call.
When engaged in a phone call, wear the ComPilot
normally as shown in figure a below.
In very noisy environments, you may move the
ComPilot closer to your mouth (figure b).
Avoid covering the small microphone openings on
the side with your fingers or clothes (figure c) and
do not speak from the front (figure d).
au
di
o
po
we
r
a b d
c
24

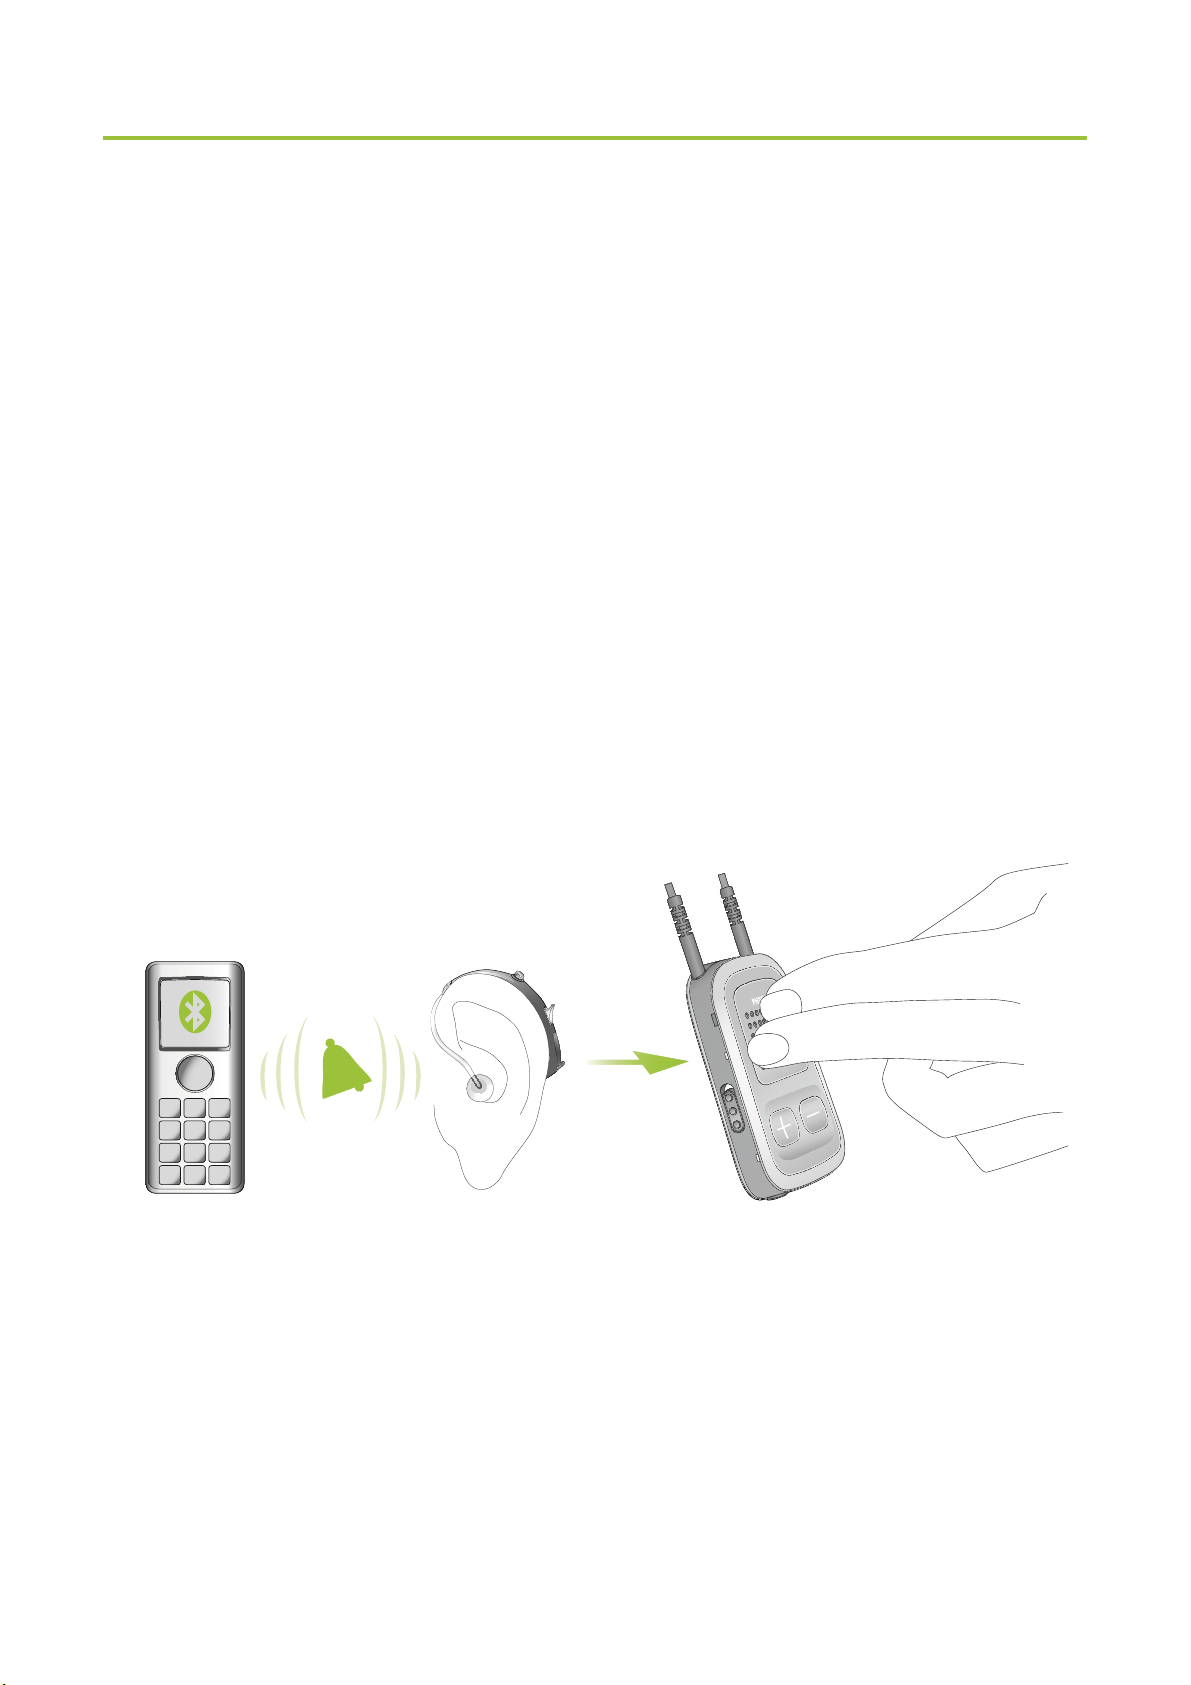
5.2 Incoming calls
The ComPilot must be switched ON, paired to the
phone and worn correctly.
When a call is received on your phone, the ComPilot
Audio indicator will show a solid blue light, and
you will hear the ringtone signal through your hearing
aids.
Different ringtones of the ComPilot
The phone ringtone depends on the ComPilot
configuration and your phone capabilities.
The ringtone is assigned automatically during the
initial phone pairing process and cannot be configured.
When pairing more than one phone, the second
and third paired phone will have a different ringtone.
A total of 3 different ringtones are automatically
assigned.
25

5. Using the ComPilot for phone calls
The ComPilot will also announce the caller name as
shown on the phone display (Caller identification using
text-to-speech technology). The name is taken from
your phone’s directory.
I Please note that this feature must be supported by
your phone. Please consult the phone user guide or
the phone supplier for more information.
I The default language setting of a new ComPilot is
US English. Your hearing care professional may
configure the appropriate language setting for proper
pronunciation of the names.
Your hearing care professional may switch the
Caller identification off upon your request.
Accepting incoming calls
To accept an incoming call, briefly press the Main (
button on your ComPilot once you hear the ringtone
through your hearing aids.
)
Speak into the ComPilot – not into the phone – when
the call is in progress.
26
It will take about 5 seconds before you hear the
ringtone through your hearing aids.
I For your safety, the hearing aid microphones will
remain on at reduced level during phone calls and
audio streaming.
I Only one phone call at a time is possible. A second
ringing phone is ignored while phoning.
“click”
27
5. Using the ComPilot for phone calls
5.3 Making phone calls
Make sure the ComPilot and
your phone are connected
through Bluetooth as described
on page 56.
a
u
d
i
o
p
o
w
e
r
Use the phone keypad to
enter the number and press
the phone dialing button.
When connected, you will hear the dialing tone
through your hearing aid after approximately 3 seconds.
Using cordless phones (DECT) or older phones with
Headset profile only
If your phone only supports the Headset profile (HSP),
the connection must be initiated manually for outgoing
calls. This often applies to cordless home phones (DECT
standard).
I For these phones, the Audio indicator might not
28
blink blue even if the phone was paired before.

1. Type the number you want to dial on your phone,
or select it from the phone book.
2. Briefly press the Connect (
5 seconds.
3. The dialing process will automatically start and the
Audio indicator will turn solid blue. You may hear a
confirmation beep through your hearing aids.
5.4 Ending a call
To end a phone call via your ComPilot, briefly press the
Main (
hearing aids will return to the previously-active program
or audio source (such as the audio jack input).
) button. The call will terminate and your
) button then wait
You can also end a call by operating your phone
instead of your ComPilot.
29

5. Using the ComPilot for phone calls
5.5 Advanced phone options
Rejecting a call
If you prefer not to answer an incoming call, press and
hold the Main (
) button on your ComPilot for about
two seconds until the ringtone stops. Using your phone
to reject the call will have the same effect.
Pressing the Home (
) button will terminate the call
and the hearing aids will switch to the startup program.
Your hearing care professional may configure the
following additional features on ComPilot. They will be
assigned to a long press (2 seconds) of the Main
(
)- or the Connect ( )-button:
I Your phone must support these features. Please
consult the phone user manual for details.
1. Redial last number
A long press of the assigned button will redial the
last dialed number.
30

2. Voice dial
A long press of the assigned button will start the
voice dial which allows you to speak the person’s
name instead of typing the number.
I When using two phones at the same time (Multi
Point) only the last paired phone can be used for
voice dial.
3. Hold call
While in a phone conversation, a long press of the
assigned button will put the call on hold. The caller
stays on the line but there is no audio transfer
and the hearing aids switch to the previous hearing
program. Use this mode to have a side conversation
with a person next to you without transmitting the
conversation to the person on the phone.
4. Transfer call
A long press of the assigned button will transfer the
call to the phone. This allows you to hand your
phone to another person. Your hearing aids will
switch back to the previous hearing program.
31

5. Using the ComPilot for phone calls
After holding or transferring a call, either a short press
of the Main- or another long press of the assigned
button transfers the call back to the ComPilot and the
call is resumed through your hearing aids.
5.6 Using the external microphone
Use the optional external lapel microphone “MC1” if
you wear the ComPilot underneath clothing during a
phone call.
1. Plug the 3.5 mm microphone plug into the audio
input of the ComPilot.
Hereby, the internal ComPilot microphones are
completely disabled.
32

2. Use the clip to place the
omnidirectional microphone
as close to your mouth as
possible.
3. Put the neckloop around your
neck and switch the ComPilot ON.
Jackets, etc., will not negatively influence the wireless
link to your hearing aids.
5.7 Locking the main button
To prevent the Main button being accidentally pressed:
Briefly press the Connect and Home button
simultaneously to lock or unlock the Main button.
When the Main button is locked, pressing it will have
no effect. All other buttons are unaffected.
I Accepting an incoming call is still possible.
I The Power indicator will tripple-flash red if the
Main button is pressed during locked state.
33

6. Using the ComPilot as a remote
control
Important: The remote control functionality of
the ComPilot is only available for wireless Spice
Generation, Spice+ and Quest hearing aids.
The streaming functionality is available for all wireless
hearing aids. Please ask your hearing care professional
for more information.
I Before the remote control functionality can be
used, your hearing care professional must enable
the remote control.
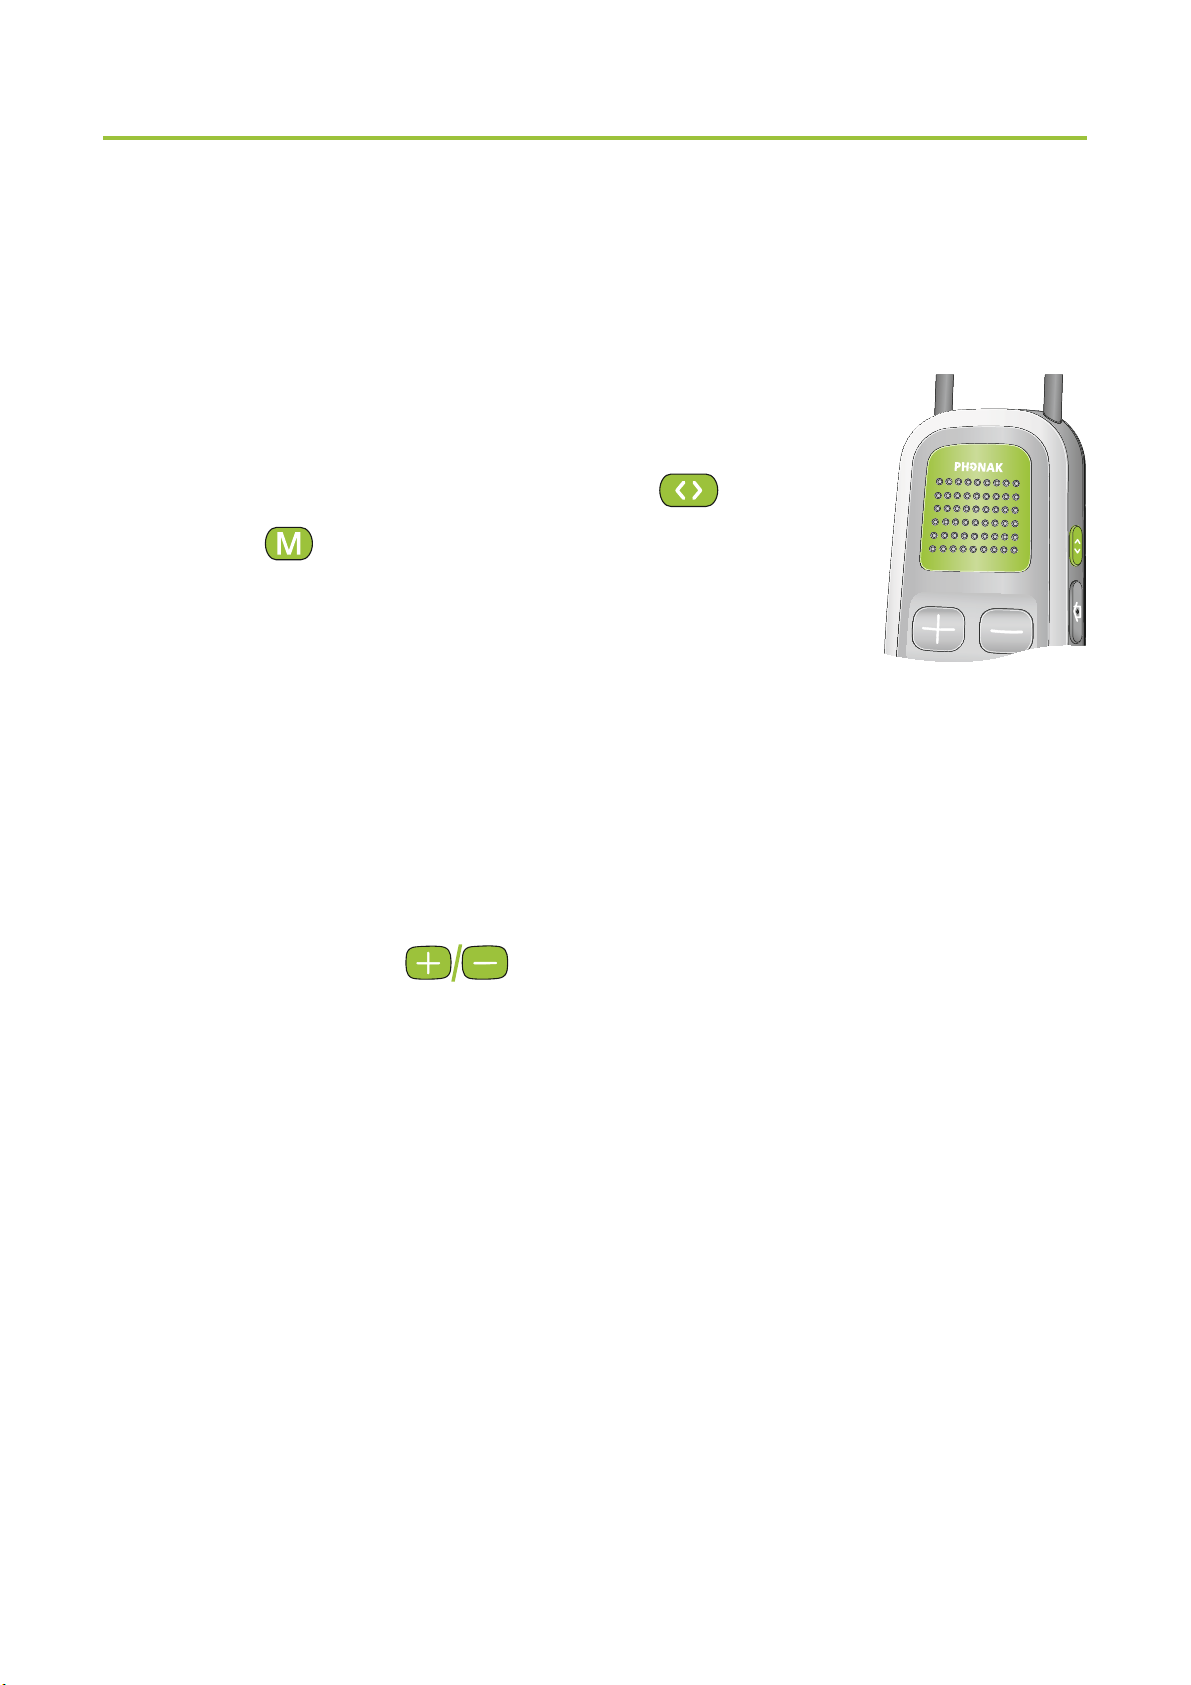
There are two ways to use the ComPilot as remote control
The neckloop is plugged in with both
ends and the ComPilot must be worn
around your neck. The remote control
function is available as long as you
are not streaming audio.
34

The neckloop is completely un-plugged
and ComPilot is operated at arm’s
length.
No streaming is possible in this
configuration.
Make sure the ComPilot is switched ON.
Volume change/FlexControl (optional)
FlexControl helps you optimize clarity and comfort for
different listening situations (optional on selected
hearing aids). Press the (
) volume button on the
ComPilot to adjust:
Press (
Press (
) to increase
) to decrease
35

6. Using the ComPilot as a remote control
Program change
Use the Main (
) button to change
hearing aid listening programs.
Changing hearing aid programs is
only possible if no streaming is
in progress.
Push the Home (
) button to
return to the startup hearing aid
program and volume levels of
your hearing aids.
Press and hold the Home (
) button
(>2 sec) to select a favorite program
(configured by the hearing care
professional).
The first program sent after switching ON the ComPilot
is the first program after the startup program.
36

More remote control information:
Your hearing aids may beep to confirm that your
selection was applied.
Both hearing aids are controlled at the same time.
Please ask your hearing care professional to print
your personal ComPilot report.
The available hearing aid programs and volume
levels are set by your hearing care professional.
The Power indicator is lit as long as you press a
ComPilot button. Green confirms a good ComPilot
battery state, red indicates that you need to
charge the ComPilot battery.
I 2 minutes after unplugging the neckloop both
indicator lights will switch off and the ComPilot
disconnects Bluetooth to save power.
Operating distance
If ComPilot is used as a handheld
remote control (without neckloop)
Max. distance 80 cm / 32’’
Hold ComPilot as shown
37

7. Using ComPilot with Roger / FM
ComPilot can be used together with Roger or FM
receivers through its direct audio input (Europlug).
Place the Roger / FM transmitter near
the sound source and turn it on.
Attach your receiver to ComPilot
via the Europlug socket as shown
in the picture (turn receiver on if
required).
When a signal is detected, you
will hear a beep notification
through your hearing aids.
Press main
the signal.
Press main
stop or resume the signal.
button to accept
button again to
38

After 20 seconds the input will be put on hold
automatically if you do not accept it.
As long as a signal is received the hearing aid
programs cannot be changed via the main
If ComPilot does not receive a signal through the
Europlug for 3 minutes, an alert will be heard.
button.
39

8. More detailed information
This section gives more insight in the following topics:
8.1. Wearing the ComPilot in different ways
8.2. Managing multiple inputs to the ComPilot
8.3. Resetting your ComPilot
8.4. Summary of indicator lights
8.5. Introduction to Bluetooth
8.6. Setting up Bluetooth
8.7. Caller identification: spoken caller names
8.8. VoiceAlerts: spoken ComPilot status
40

8.1 Wearing the ComPilot in different ways
Standard
To benefit from the streamer and
remote control function, we
recommend wearing the ComPilot
around the neck.
During calls your voice can only be
picked up if the ComPilot is not
covered by clothes.
au
di
o
po
w
e
r
Handheld remote control
To use the ComPilot as a remote
control only, it can be held and
operated in the hand. The neckloop
must be removed in this case.
Under clothing
If you wear the ComPilot under clothing
during phone calls, the external Phonak
microphone “MC1” is needed (optional
acccessory).
41

8. More detailed information
8.2 Managing multiple inputs to the ComPilot
When an audio source is connected via the ComPilot,
your hearing aids will automatically switch to special
programs.
Up to 4 automatic programs can be fine-tuned by your
hearing care professional.
It is possible to have multiple audio sources connected
and in operation with the ComPilot:
Two Bluetooth devices
(e.g., phone and TVLink S basestation).
One audio input (3.5 mm audio plug).
One FM receiver.
Speech messages (VoiceAlerts) and the Audio indicator
light inform you about the different inputs. For a
summary of the Audio indicator color during streaming
please see page 50.
42

An audio source is considered as “connected” to the
ComPilot if:
The audio plug is inserted (with or without audio
signal).
An FM receiver is inserted and receives a FM signal.
A Bluetooth music source is streaming music or
paused.
A Bluetooth phone is paired and within reach.
I A phone call always has priority. You will hear the
ringing indication even when listening to other audio
sources via cable, Bluetooth or FM. If you reject
or terminate the call, audio streaming will resume.
I It is not possible to change hearing aid programs
using the Main (
source is connected to the ComPilot.
I Most Bluetooth phones connect to the ComPilot as
a phone and a music player at the same time. If
you want to listen to music, you must start the music
via your phone; it cannot be started from the
) button as long as any audio
ComPilot.
43

8. More detailed information
Selecting one of multiple sources using the ComPilot
With only one audio source (e.g., from a Bluetooth
transmitter), each press of the Main (
) button will
pause or resume the audio source.
Multiple sound sources can
Previously-active
be accessed sequentially
by pressing the Main (
button. After each press,
)
Europlug
hearing program
FM
Bluetooth
music 1
the ComPilot selects the
next connected source in
3.5 mm
plug
Bluetooth
music 2
a fixed sequence.
If a source is not connected, the ComPilot will proceed
to the next source.
After the last connected source in the sequence,
streaming stops and your hearing aids will resume the
previously-active hearing aid program, indicated by
beeps.
Every connected audio source has a fixed place in
the sequence, as shown in the picture.
44

Keep on briefly pressing the Main ( ) button until
you reach your preferred audio source.
ComPilot will announce each active audio source as
you go through the sequence (VoiceAlerts).
Pause streaming
To temporarily interrupt streaming, e.g., if someone
wants to speak to you, briefly press the Main (
) button
on the ComPilot as many times as needed until you
hear the beeps announcing the previously-active acoustic
hearing aid program.
To resume streaming, briefly press the Main (
) button
until your preferred audio source is found.
I Pressing the Home (
) button will always select
the startup programs of your hearing aids, regardless
of the audio source sequence.
Stopping streaming
To stop audio streaming completely, stop the Bluetooth
audio players and unplug the audio plug or the FM
receiver.
45

8. More detailed information
Streaming interruptions
To avoid streaming interruptions, make sure you wear
the ComPilot with the neckloop around your neck and
keep the Bluetooth device within the operating range.
Situations where streaming may be interrupted:
If the ComPilot is too far away from the hearing aids
while streaming, e.g., if you are not wearing the
neckloop or if you have unplugged the neckloop cable.
If the hearing aids are not worn correctly, e.g., if
they are not in an upright position.
If the Bluetooth signal is out of range.
If the Bluetooth transmitter is affected by an obstacle,
e.g., when carrying a cellular phone in the backpocket.
In these cases, your hearing aids will lose the audio
signal. If this situation continues for more than
approximately 5 seconds, they will automatically
switch to the previously-active hearing aid program.
46

8.3 Resetting your ComPilot
If, for some reason, the ComPilot becomes unresponsive:
1. Slide the ComPilot power switch
to the ON position.
2. Press and hold the (
and (
) button simultaneously
), ( )
for 2 seconds.
3. Slide the ComPilot power switch
to the OFF position.
4. Wait for 5 seconds.
The ComPilot is now reset and will resume normal
operation when switching ON again.
I After resetting the Bluetooth pairings, the
configuration status and the grouping to the hearing
aids are kept.
47

power
8. More detailed information
8.4 Summary of indicator lights
The indicator lights provide helpful
information as follows:
Power indicator
Charging Solid Red
Charged and full battery Solid green
Switching ON Green 2 seconds
Switching OFF Red 2 seconds *
Battery above 20% Blink green **
<20% battery remaining Short blink red **
* When switching the ComPilot OFF, the Power indicator
may blink red first while the ComPilot is properly
disconnecting all Bluetooth devices.
** If the neckloop is not connected to the ComPilot, the
battery level is only shown during startup, charging
and when a button is pressed.
48

I After unplugging the neckloop the ComPilot enters
power down mode after 2 minutes and the Power
indicator goes off. Only the remote control functions
can be used while the neckloop is unplugged.
Battery state
The color of the Power indicator informs you about the
ComPilot battery state.
The green Power indicator indicates a battery
level > 20%.
The red Power indicator indicates a battery
level < 20%. Less than 1.5 hours streaming
remain and the battery should be charged.
49

audio
8. More detailed information
Audio indicator
The neckloop must be plugged in for
any streaming.
Plug or FM streaming Solid orange
Bluetooth phone or Solid blue
music streaming
1 Bluetooth device Short blink blue
connected
2 Bluetooth device Double-blink blue
connected
In a phone call Solid blue
Bluetooth pairing Very fast blue blinking
Demo sound playing Solid violet
I The Bluetooth pairing indication will be visible even if
the neckloop is not plugged in.
50

I During cable or FM streaming, the Audio indicator
will remain orange regardless of the Bluetooth
connection state.
8.5 Introduction to Bluetooth
What is Bluetooth?
Bluetooth provides a way for devices like cellular or
cordless phones, laptops and personal computers to
communicate wirelessly.
Your ComPilot supports Bluetooth to allow audio to be
wirelessly received from many different audio devices and
transmitted to your hearing aids. For example, you can
receive phone calls directly to your hearing aids or listen
to a TV show via the TVLink S basestation.
For further information about Bluetooth, visit
www.bluetooth.org
51

8. More detailed information
What Bluetooth devices can I use with my ComPilot?
First, check whether the device you wish
to use is Bluetooth-enabled: Look for
the following symbol on the device or in
its user guide.
Second, the possible applications on a Bluetooth enabled
device are defined by “profiles”. The device you wish to
use with your ComPilot must support the appropriate
Bluetooth profiles. These differ depending on what you
want to do with your ComPilot:
To receive phone calls your phone must support either
the “Head Set” or “Hands Free” profile (HSP/HFP)
To listen to stereo music from your phone or PC, it
must support the A2DP / “Stereo Headset” profile.
The Phone Book Access Profile (PBAP) is an indicator
whether Caller identification will work or not.
Look for this information in your phone‘s user guide or
via the compatibility guide at:
http://www.phonak.com/compilot
52

Bluetooth device compatibility
If a problem occurs in the connection between your
device and the ComPilot, or if you are unsure about your
device’s Bluetooth capabilities, please consult your
device’s user guide or ask your dealer.
Bluetooth operating range
Your ComPilot supports Bluetooth Class 2 operation up
to a range of 10 meters (30 ft).
When used with the TVLink S basestation for watching
TV, the operation range is up to 30 meters (90 ft).
Line-of-sight between your ComPilot and other devices
is not required. However, the following factors may
affect the range achieved:
Interference with other devices in the environment
may reduce the operating range.
The Bluetooth device with which you are connecting
may only support a more limited range.
53

8. More detailed information
If your Bluetooth device moves out of range of your
ComPilot and has an active audio connection, this
connection first starts to be intermittent and will finally
be terminated.
If the device is then moved back into range of your
ComPilot, it may or may not resume streaming to your
hearing aids. In this case, switch OFF the ComPilot
and switch it ON again after the red Power indicator is
turned off.
Using a Bluetooth device: pairing and connecting
Only when your device is Bluetooth-enabled and supports
the appropriate profiles, it can communicate with the
ComPilot. To enable this communication two simple
procedures must be completed:
1. Pairing: The pairing procedure allows you to
control which Bluetooth devices are permitted to
communicate with each other. It needs to be
completed only once for each device you wish to
use with your ComPilot.
54

2. Connecting: Once a device is allowed to communicate
with the ComPilot (“paired”) the connection procedure
makes sure the devices can exchange audio signals.
The paired devices connect every time they are
switched ON and are within reach of each other.
This is indicated on the ComPilot by the blue blinking
Audio indicator.
Most Bluetooth devices perform the connection
procedure automatically after pairing.
On the following pages the pairing and the connecting
procedures are described.
55

8. More detailed information
8.6 Setting up Bluetooth
This section describes the pairing and connection
procedure for Bluetooth devices.
Step-by-step: pairing a Bluetooth-enabled phone
I It is only necessary to perform the pairing procedure
once with each Bluetooth device. The pairing
procedure is controlled by your phone.
I Different phones have different menu structures.
You should, therefore, refer to your phone’s user guide
or dealer support if you cannot complete the pairing
procedure with the generic steps described here.
I A maximum of 8 devices can be paired to the
ComPilot. Another pairing will replace the device
that was not used for the longest period.
I The ComPilot can support (connect) two phones at
the same time but only one call at a time is possible.
For more information about Bluetooth pairing
instructions specific to some of the most popular
manufacturers, go to:
http://www.phonak.com/compilot
56

1. Turn ON your ComPilot and the phone. Place them
next to each other.
2. Locate the connectivity settings in your phone
menu. Look for the Bluetooth feature.
3. On your phone, ensure that the Bluetooth feature
is turned on.
4. On your phone choose SEARCH to search for
Bluetooth devices or audio enhancements.
5. To initiate the pairing process on your ComPilot,
press and hold the (
) and ( ) buttons
simultaneously for 2 seconds until the Audio
indicator starts to rapidly blink blue.
2 sec
poweraudio
6. Your ComPilot will remain in the pairing mode for
two minutes or until pairing is completed.
7. Your phone should present a list of Bluetooth
devices discovered. Select “Phonak ComPilot” from
this list.
57

8. More detailed information
8. Your phone may then ask you to enter a passcode. If
so, enter “0000” (four zeros). Some phones may ask
which Bluetooth service you want to enable. Select
“Headset” or, if available, “Stereo Headset”.
9. Your ComPilot should now be paired to your phone
and the Audio indicator will stop blinking.
I The pairing process is independent from the neckloop
(it can be plugged in or not).
I It may be necessary to redo the pairing if your
phone’s firmware was updated.
How to connect to a phone
Once your phone and ComPilot are paired (see Pairing
a Bluetooth-enabled phone), the phone needs to be
‘connected’ to your ComPilot before it will actually
send audio signals to it.
This function should also appear in your phone’s
Bluetooth menu.
58

1. Ensure that the ComPilot is turned ON and the
neckloop is plugged in and worn correctly.
2. Locate the Bluetooth section in your phone menu
and select list of “Paired devices”.
3. Locate and highlight your ComPilot and select
“Connect”.
4. Confirmation of successful connection is indicated
on the ComPilot by the Audio indicator blinking
blue. Additionally a headset symbol (
on the main screen of your phone.
I The connection between your ComPilot and your
phone will be maintained as long as the two devices
remain on and are within range of each other. If
either device is switched off or moves out of range,
you may need to repeat the connection procedure.
I Some phones may perform the connection procedure
automatically after pairing. We recommend selecting
“Yes” when prompted to allow this device to connect
automatically once the pairing is completed.
) may appear
Please consult your phone‘s user guide in the case
where a manual connection is necessary.
59

8. More detailed information
Pairing with other external Bluetooth devices
If you want to use your ComPilot to listen to music
from your stereo system you may use an external
Bluetooth transmitter. The ComPilot can also be used
with a Bluetooth-enabled landline phone.
I The pairing procedure for other Bluetooth devices
is controlled by the device with which you are
attempting to pair. The procedure for pairing may
vary for each device. Please refer to the device’s user
guide or dealer support if you cannot complete the
pairing procedure with the generic steps described
below.
1. Turn ON both your ComPilot and the other device.
2. Place them next to each other.
3. Set your device into Bluetooth pairing mode.
4. Initiate the pairing process on your ComPilot by
simultaneously pressing the (
)- and ( )-buttons
for 2 seconds until the Audio indicator is rapidly
blinking blue.
60

5. Your ComPilot will remain in the pairing mode for
two minutes or until the pairing is completed.
6. If a passcode is required, enter “0000” (four zeros).
After pairing, wait until the devices have completed
connection.
Confirmation of successful connection is indicated
on the ComPilot by the Audio indicator shortly
blinking blue. A double-blink indicates that two
devices are connected to ComPilot.
Deleting the pairing of Bluetooth devices
If you encounter issues with one of the paired devices,
or if a device stops connecting to your ComPilot,
you may consider deleting the pairing of devices to
the ComPilot.
1. Turn ON your ComPilot.
2. Press and hold the (
10 seconds until the blue rapid blinking Audio
)- and ( ) buttons for
indicator stops.
61

Mike
Office
8. More detailed information
Deleting the pairing of Bluetooth devices removes the
ability to connect to any previously paired Bluetooth
device. You will need to perform the pairing process
again if you wish to reconnect.
8.7 Caller identification: spoken caller names
The ComPilot is able to tell you the name of the caller.
If your phone supports Phone Book Access (PBA) or
Phone Book Access Profile (PBAP), the ComPilot will try
to access information about the caller every time the
phone rings.
As the phone rings, the displayed
information is transferred to the
ComPilot and spoken through your
hearing aids as follows:
The stored name in your phones
phonebook. In the example, you
will hear “Mike Office”.
The number if the name is not
62
known.

To make sure the pronunciation is correct your hearing
care professional can configure the language settings
of your ComPilot.
The phonebook is not downloaded to the ComPilot.
This way, ComPilot can also support the use of different
phones.
Please consult your phone’s user guide or the phone
dealer to check whether this feature is supported by
your phone.
8.8 VoiceAlerts: spoken ComPilot status
VoiceAlerts inform you about the different operation
modes and status of the ComPilot using text-to-speech.
Your hearing care professional can configure the
language setting as well as the speech levels.
Warnings only: Spoken information about a low
ComPilot battery and during the Bluetooth pairing
process.
63

8. More detailed information
Standard: Additional information about switching
ComPilot ON or OFF, start or end charging during
streaming, input channel confirmation and FM
announcements.
Detailed: Additional information about start or end
of charging even if no streaming source is active,
external microphone connection, Bluetooth device
connect or disconnect and transfer or hold a call.
I A new ComPilot is always delivered with English
speech messages (VoiceAlerts) on speech level
“Standard”.
I Caller identification is independent of the speech
level.
I Adjust the VoiceAlert volume level by setting the
demo sound as described in chapter 3.6.
64

9. Troubleshooting ComPilot
A summary of frequently asked questions and their answers:
Most probable cause
During Bluetooth pairing my other device is prompting for a
code, what do I have to enter?
The pairing code is required
for the initial coupling of
ComPilot with your Bluetooth
device (“pairing”).
I hear intermittency during an audio transfer via ComPilot.
The Bluetooth device is too
far away, or worn in a back
pocket (body shielding).
Remedy
The ComPilot pairing code is
“0000” (four zeros).
Do not to exceed the
maximum distance and keep
Bluetooth devices in front
of you.
ComPilot searches for known
devices for 2 minutes after
switching on.
A phone connected to other
devices such as a PC may
not be able to continuously
stream music.
The volume of the music is too loud or too quiet. The volume of
phone conversations is not comfortable (too low or too high).
Different audio sources have
different outputs.
After 2 minutes, ComPilot
will stop searching and the
intermittency will stop.
When using your Bluetooth
phone as music player,
disconnect it from other
devices such as PCs.
To change the volume of the
phone, or any other sound
source to ComPilot, use
the volume control of that
external device.
65

9. Troubleshooting ComPilot
Most probable cause Remedy
I have difficulties understanding the phone conversation in a
noisy environment.
Your hearing aid
microphones are set too
high during the call.
The caller can hear me but I cannot hear the caller.
The call was transferred to
your phone.
ComPilot is no longer recognized by the phone or other
Reduce the hearing aid volume
by pressing the
If the sound volume over the
phone (or music) is too low
after this reduction use
the phone volume button to
increase the volume.
Make sure the call is
transferred back to ComPilot
via the phone menu.
button.
Bluetooth device to which it was previously paired.
2 minutes after no device was
found, ComPilot stops seeking
devices to save power.
The devices are too far away
from each other.
ComPilot can be paired to a
maximum of 8 different
Bluetooth devices. If the
internal memory is full, new
pairings may overwrite
previous pairings.
66
Switch ComPilot OFF. Wait
until the red indicator
switched off, then turn
device ON again.
Bring devices within 1 meter
range and try again.
Repeat the pairing between
ComPilot and the Bluetooth
device which was overwritten.

Most probable cause
Pairing was deleted.
I am not streaming but the hearing aids keeps switching
between the Bluetooth and the normal hearing aid program.
Your phone sends sounds to
ComPilot due to incoming
SMS or mails.
Phone key tones are switched
on.
I hear my phone’s key-press tones in my hearing aids.
Remedy
Repeat the pairing between
ComPilot and the Bluetooth
device which was deleted.
Disable the system sounds for
reminders, alarms, SMS, etc.
via your phone menu.
Switch off phone key tones
via your phone menu.
The key-press tones may be
enabled on your phone.
Every time I switch on my phone, the music player starts.
For some phones this is
normal behavior and not
initiated by ComPilot.
Deactivate key-press and
confirmation tones on your
phone. Please refer to the
phone’s user guide.
Some phones can be
configured not to start the
music player automatically.
Stop the music player via
phone menu after the phone
is connected.
67

9. Troubleshooting ComPilot
Most probable cause Remedy
Every time I get in my car the ComPilot connection to my
phone shows unexpected behavior.
The car Bluetooth system
connects to your phone.
I accepted the incoming phone call but cannot hear the call
in my hearing aids.
Some phones, when accepting
the call through the phone
button, don‘t use ComPilot.
The phone is ringing but the Audio indicator is not solid blue
and there is no ringing signal through the hearing aids.
Bluetooth is disabled in the
phone.
Consider disconnecting the car
system from your phone.
Always accept the call
by pressing the ComPilot
Main (
Ensure Bluetooth is enabled
according to your phone’s
user guide.
) button.
ComPilot and your phone are
not connected to each other.
68
1. Disable the Bluetooth
functionality in your phone
and turn it on again.
2. Restart ComPilot by
switching it OFF and then ON.
The ComPilot Bluetooth functionality will be automatically
reactivated.
3. Activate ComPilot by
selecting it in the phone’s
“Active device” menu.
4. Reduce the distance
between ComPilot and the
phone.

Most probable cause
ComPilot is not paired to the
phone.
The distance is too great
between ComPilot and the
phone.
The phone is ringing, the Audio indicator is solid blue but
there is no ringing signal through the hearing aids.
ComPilot is out of range of
the hearing aids.
Phone is set to vibrate.
Remedy
Follow the pairing process in
this guide.
Wear ComPilot around your
neck. Keep distance to phone
<5 m (15 ft).
Wear ComPilot correctly
around your neck with both
neckloop plugs firmly
plugged in.
Enable ring tone on phone.
You are already having a
phone call, then a second
call cannot be recognized.
My phone rings but the name of the caller is not being
acoustically given.
The Caller identification
feature is not available or not
enabled on your phone.
Two phones are connected to
your ComPilot.
Caller identification may be
Hang up the first phone call,
then accept the second call
Please refer to the phone’s
user guide to check the
availability of this feature.
If two phones are connected
Caller identification is only
available on the phone that
was last paired to ComPilot.
Please ask your hearing care
switched off.
professional to enable Caller
identification on your
ComPilot.
69

9. Troubleshooting ComPilot
Most probable cause Remedy
During a phone call the other party reports difficulties
hearing me.
ComPilot microphone
openings may be covered.
ComPilot may not be worn
correctly.
ComPilot may rub against
clothing.
The surrounding noise may
be too loud.
Make sure the microphone
openings are not covered by
part of your body, clothing
or dirt and debris.
Do not turn ComPilot side-
ways and make sure the neckloop plugs point towards your
mouth as you speak.
Reduce movement while you
speak, or consider using the
external microphone (optional).
Although ComPilot features
noise reduction technologies,
too noisy environments
should be avoided.
70
Suggest to your callers that
they increase the phone
volume.

Most probable cause Remedy
ComPilot is unresponsive or does not show any indicator when
switching ON.
ComPilot may be completely
discharged.
It may indicate a software
problem.
The operating time of your ComPilot is reduced substantially.
The battery typically needs
Charge your ComPilot for at
least 1 hour.
Unplug any connectors from
ComPilot.
Switch ComPilot OFF and ON
again.
Consider resetting ComPilot.
Press the Connect button (<>)
and Volume up (+) and Volume down (-) at the same
time.
Charge for at least 3 hours
several charging cycles to
achieve full performance.
Please consult the datasheet
for the typical operating
time for your ComPilot.
For any problems not listed in this user guide, please contact
your hearing care professional.
the first time you charge
ComPilot.
Let a new ComPilot discharge
completely three times.
71

10. Important safety information
Please read the information on the following pages
before using your Phonak ComPilot.
10.1 Hazard warnings
! Keep this device out of reach of children under
3 years and mentally challenged people or pets.
! Phonak devices may generate magnetic fields. Tests
that Phonak conducted showed that no interferences with the Implantable devices (e.g. pacemakers, defibrillators, etc.) were caused that would
impact the safe and effective use of the Implantable devices. Users of Implantable devices should
contact their doctor and/or the manufacturer of
the Implantable device before they start using a
Phonak device. Stop using the Phonak device if any
influence of the Phonak device on the Implantable
Device is experienced and contact the manufacturer of the Implantable device for advice.
! Do not wear ComPilot around the neck whilst it is
72
connected to any programming equipment.

! Make sure to always remove both plugs of the
neckloop and other cables when using the ComPilot
as a handheld remote control.
! Opening the ComPilot might damage it. If problems
occur which cannot be resolved by following the
remedy guidelines in the troubleshooting section of
this user guide, consult your hearing care professional.
! The ComPilot may only be repaired by an authorized
service center. Changes or modifications to the
device that were not explicitly approved by Phonak
are not permitted.
! Dispose of electrical components in accordance with
your local regulations by Phonak AG.
! Do not use the device in explosive areas (mines or
industrial areas with danger of explosions, oxygen
rich environments or areas where flammable
anesthetics are handled) or where electronic
equipment is prohibited.
73

10. Important safety information
! External devices may only be connected if they
have been tested in accordance with corresponding
IECXXXXX standards Only use accessories approved
by Phonak AG, to avoid any electrical shock.
! Using your ComPilot cables in any way contradictory
to their intended purpose (e.g., wearing the USB cable
around the neck) can cause injury.
! When operating machinery, ensure that no parts get
caught in the machine.
! The mini-USB port is to be used for the described
purpose only.
74

! Caution: electric shock. Do not insert plug alone
into electrical outlets.
10.2 Information on product safety
I Protect the ComPilot from excessive moisture
(bathing, swimming), heat (radiator, car dashboard),
and direct skin contact when sweating (workout,
fitness, sport).
I Special medical or dental examination including
radiation described below, may adversely affect the
correct functioning of your hearing aids. Remove and
keep them outside the examination room/area before
undergoing:
S Medical or dental examination with X-ray (also CT
scan)
S Medical examinations with MRI/NMRI scans,
generating magnetic fields
75

10. Important safety information
I Do not drop the device. Dropping onto a hard sur-
face can damage your device.
I Do not use excessive force when connecting your
ComPilot to the different cables.
I Protect the device connectors, plugs, charging slot
and power supply from dirt and debris.
I Keep the device at least 10 cm away from any kind
of magnets.
I Clean the device using a damp cloth. Never use
household cleaning products (washing powder,
soap, etc.) or alcohol to clean the device. Never use
a microwave or other heating devices to dry the
device.
I The digitally-coded, inductive transmission
technology used in the ComPilot is highly reliable
and experiences virtually no interference from
other devices. It should be noted, however, that
76
when operating the hearing system near computer
equipment, larger electronic installation or other

strong electromagnetic fields, it may be necessary
to be at least 60 cm (24”) away from the interfering
device to ensure proper operation.
I Do not disconnect the neckloop while the ComPilot
is transmitting signals to your hearing aids.
I For safety reasons, recharge the ComPilot
only with chargers supplied by Phonak or by
USB-certified chargers >500 mA.
I Do not connect an USB or audio cable exceeding
3 meters (9 ft) in length to the ComPilot.
I When the ComPilot is not in use, turn it OFF and
store it safely.
77

10. Important safety information
10.3 Other important information
I High-powered electronic equipment, larger electronic
installations and metallic structures may impair and
significantly reduce the operating range.
I If the hearing aids do not respond to the ComPilot
because of an unusual field disturbance, move
away from the disturbing field.
78

11. Service and warranty
11.1 Local warranty
Please ask the hearing care professional, where you
purchased your ComPilot, about the terms of the local
warranty.
11.2 International warranty
Phonak offers a one year limited international warranty,
valid as of the date of purchase. This limited warranty
covers manufacturing and material defects. The warranty
only comes into force if proof of purchase is shown.
The international warranty does not affect any legal
rights that you might have under applicable national
legislation governing sale of consumer goods.
79

10. Service and warranty
11.3 Warranty limitation
This warranty does not cover damage from improper
handling or care, exposure to chemicals, immersion in
water or undue stress. Damage caused by third parties or
non-authorized service centers renders the warranty
null and void. This warranty does not include any services
performed by a hearing care professional in their office.
Serial number:
Purchase date:
Authorized hearing
care professional
(stamp/signature):
80

12. Compliance information
Europe:
Declaration of Conformity
Hereby Phonak AG declares that this Phonak product
is in compliance with the essential requirements
of the Medical Devices Directive 93/42/EEC as well as
the Radio and Telecommunications Terminal Equipment
Directive 1999/5/EC. The full text of the Declaration
of Conformity can be obtained from the manufacturer
or the local Phonak representative whose address can
be taken from the list on http://www.phonak.com
(worldwide locations).
Australia:
Supplier Code Number
New Zealand:
Supplier Code Number Z1285
N15398
81

12. Compliance information
Notice 1:
This device complies with Part 15 of the FCC Rules and
with RSS-210 of Industry Canada. Operation is subject
to the following two conditions:
1) this device may not cause harmful interference, and
2) this device must accept any interference received,
including interference that may cause undesired
operation.
Notice 2:
Changes or modifications made to this device not
expressly approved by Phonak may void the FCC
authorization to operate this device.
Notice 3:
This device has been tested and found to comply
with the limits for a Class B digital device, pursuant to
Part 15 of the FCC Rules and ICES-003 of Industry
Canada. These limits are designed to provide reasonable
protection against harmful interference in a residential
installation. This device generates, uses and can
radiate radio frequency energy and, if not installed
and used in accordance with the instructions, may
82

cause harmful interference to radio communications.
However, there is no guarantee that interference will
not occur in a particular installation. If this device
does cause harmful interference to radio or television
reception, which can be determined by turning the
equipment off and on, the user is encouraged to try to
correct the interference by one or more of the following
measures:
Reorient or relocate the receiving antenna.
Increase the separation between the device and
receiver.
Connect the device into an outlet on a circuit
different from that to which the receiver is connected.
Consult the dealer or an experienced radio/TV
technician for help.
Notice 4:
Japanese Radio Law and Japanese Telecommunications
Business Law Compliance. This device is granted pursuant
to the Japanese Radio Law (電波法) and the Japanese
Telecommunications Business Law (電気通信事業法).
This device should not be modified (otherwise the granted
designation number will become invalid).”
83

13. Information and explanation
of symbols
With the CE symbol, Phonak AG
confirms that this Phonak product
meets the requirements of the
Medical Devices Directive 93/42/EEC
as well as the R&TTE Directive
1999/5/EC on radio and telecommunications equipment.
This symbol indicates that the products described in these user instructions adhere to the requirements for
an application part of Type B of EN
60601-1. The surface of the device is
specified as applied part of Type B.
Indicates the medical device
manufacturer, as defined in EU
Directive 93/42/EEC.
84

This symbol indicates that it is
important for the user to read and
take into account the relevant
information in this user guide.
This symbol indicates that it is
important for the user to pay
attention to the relevant warning
notices in these user guides.
Operating
conditions
Important information for handling
and product safety.
EMC and Radiocommunications
compliance label Australia.
This device is designed such that
it functions without problems or
restrictions if used as intended,
unless otherwise noted in these user
guides.
Relative humidity of <95% (non
condensing).
85

13. Information and explanation of symbols
Transport
and storage
conditions
Humidity transportation: Up to 90%
(non condensing).
Humidity storage: 0% to 70%, if not
in use.
Atmospheric pressure: 200 hPA to
1500 hPa.
Temperature transport and storage:
–20° to +45° Celsius
(–4° to +113° Fahrenheit).
Temperature operation:
0° to +45° Celsius
(+32° to +113° Fahrenheit).
Keep dry.
86

The symbol with the crossed-out
garbage bin is to make you aware
that this device may not be thrown
away as normal household waste.
Please dispose of old or unused device,
at waste disposal sites intended for
electronic waste, or give your device
to your hearing care professional
for disposal. Proper disposal protects
the environment and health.
The Bluetooth® word mark and logos
are registered trademarks owned
by Bluetooth SIG, Inc. and any use
of such marks by Phonak is under
license. Other trademarks and trade
names are those of their respective
owners.
Japanese mark for certified radio
equipment.
87

Phonak AG
Laubisrütistrasse 28
CH-8712 Stäfa
Switzerland
www.phonak.com
029-0237-02/V3.00/2015-02/FO Printed in Switzerland © Phonak AG All rights reserved
 Loading...