


Owner’s Manual
Grill & Smoker
Model No.
PS9900-SY18
“Conforms to ANSI STD Z21.58-2015 OUTDOOR COOKING GAS APPLIANCES”
THIS IS YOUR ASSEMBLY, CARE & USE MANUAL WITH IMPORTANT WARNING & SAFETY INFORMATION.
PLEASE SAVE THESE INSTRUCTIONS.
CUSTOMER SERVICE: 1-866-475-5180 (Monday–Friday, 8:30 am–4:30 pm, CST)
www.olp-inc.com
FOR OUTDOOR USE ONLY
 DANGER
IF YOU SMELL GAS:
1.SHUT OFF GAS TO THE APPLIANCE
2.EXTINGUISH ANY OPEN FLAME
3.OPEN LID
4.IF ODOR CONTINUES, KEEP AWAY FROM THE APPLIANCE AND IMMEDIATELY CALL YOUR GAS SUPPLIER OR YOUR FIRE DEPARTMENT.
 WARNING
1.Do not store or use gasoline or other flammable liquids or vapors in the vicinity of this or any other appliance.
2.An LP cylinder not connected for use, should not be stored in the vicinity of this or any other appliance.
 GAS GRILL GENERAL WARNINGS
•Never use or store gasoline, lighter fluid, paint thinner, or other flammable vapors and liquids or combustible materials in or near your grill.
•Never use charcoal, lava rocks or wood briquets in a gas grill. Flavoring chips must be contained in a metal smoking box to contain ash and prevent fires.
•Ensure flames come out of all burner ports at each use. Spiders and insects like to build nests in burner tubes. Blocked burner tubes can prevent gas flow to the burners and could result in a burner tube fire or fire beneath the grill.
•Position your grill outdoors on a non-combustible level surface in a well ventilated location, a safe distance 10 ft. (3.1 m) from combustible materials, buildings and overhangs.
•Maintain a minimum clearance of 36 inches (91 cm) between all sides of grill, deck railings, walls or other combustible material. Not adhering to these clearances may prevent proper ventilation and can increase the risk of a fire and/or property damage, which could also result in personal injury. DO NOT use grill under overhead unprotected combustible construction.
•DO NOT leave the grill unattended while ON or in use.
•DO NOT use or install this grill in or on a recreational vehicle and/or boat.
•DO NOT allow grease or hot drippings to fall on hose and regulator assembly. If this occurs, turn gas supply OFF at once. Empty grease tray/cup and clean the hose and regulator assembly and inspect for damage before use.
•FOR OUTDOOR USE ONLY. DO NOT operate indoors or in an enclosed area such as a garage, shed or breezeway.
•Keep children and pets away from hot grill. DO NOT allow children to use or play near this grill.
•DO NOT use water on a grease fire. Closing the lid to extinguish a grease fire is not possible.
•DO NOT allow the gas hose to come in contact with hot surfaces. Redirect the gas hose if necessary.
•DO NOT block ventilation areas in sides, back or cart compartment of grill.
•Never check for leaks using a match or open flame.
•DO NOT store items in cart that can catch fire or damage your grill (such as swimming pool supplies/ chemicals, table cloth, wood chips).
2

 CHARCOAL GRILL GENERAL WARNINGS
•Only use this grill on a hard, level, non-combustible, stable surface (concrete, ground, etc.) capable of supporting the weight of the grill. Never use on wooden or other surfaces that could burn.
•DO NOT use grill without charcoal ash tray in place. DO NOT attempt to remove charcoal ash tray while tray contains hot coals.
•Proper clearance of 10 feet (3.1 m) between the grill and combustible material (bushes, trees, wooden decks, fences, buildings, etc.) or construction should be maintained at all times when grill is in use. Do not place grill under a roof overhang or other enclosed area.
•For outdoor use only. Do not operate grill indoors or in an enclosed area.
•For household use only. Do not use this grill for other than its intended purpose.
•We recommend the use of a Charcoal Chimney Starter to avoid the dangers associated with charcoal lighting fluid.
•Use charcoal chimney starter or charcoal that has been pre-treated with lighter fluid when starting fire in charcoal section of your grill.
•Do not store lighter fluid or other flammable liquids, material or charcoal that has been pre-treated with lighter fluid under or around the grill.
•Do not use gasoline, kerosene or alcohol for lighting charcoal. Use of any of these or similar products could cause an explosion possibly leading to severe bodily injury.
•Never add charcoal lighting fluid to hot or even warm coals as flashback may occur causing severe burns.
•Place grill in an area where children and pets cannot come into contact with unit. Close supervision is necessary when grill is in use.
•Do not leave grill unattended when in use.
•Do not exceed a temperature of 400°F (205°C). Do not allow charcoal and/or wood to rest on the walls of grill. Doing so will greatly reduce the life of the metal and finish of your grill.
•Use caution when assembling and operating your grill to avoid scrapes or cuts from sharp edges of metal parts. Use caution when reaching into or under grill.
USE CAUTION AND COMMON SENSE WHEN OPERATING YOUR GRILL. FAILURE TO ADHERE TO SAFETY WARNINGS AND GUIDELINES IN THIS MANUAL COULD RESULT IN BODILY INJURY OR PROPERTY DAMAGE.
SAVE THIS MANUAL FOR FUTURE REFERENCE.
 WARNING
CALIFORNIA PROPOSITION 65
This product contains, or the use of this product releases, chemicals known to the State of California to cause cancer and birth defects or other reproductive harm. For more information go to www.P65Warnings.ca.gov.
3

Congratulations
on your purchase of your new Smoke Hollow® Grill & Smoker.
With proper set-up, operation and maintenance, this appliance will provide you with years of delicious food and cooking enjoyment.
IMPORTANT
When you un-pack your grill, remove all parts and packaging material from the box and inside the grill. Make sure you have all the items on the parts list. Carefully check the unit and make sure there is no damage.
IF YOU HAVE ANY PROBLEMS WITH THIS PRODUCT OR THERE ARE MISSING OR DAMAGED PARTS , PLEASE CALL CUSTOMER SERVICE TOLL FREE 1-866-475-5180 (Monday–Friday, 8:30 am–4:30 pm, CST).
NOTE : DO NOT RETURN UNIT TO THE STORE BEFORE CALLING THE TOLL FREE NUMBER. Do not dispose of your cartons until you are completely satisfied with your new Smoke Hollow grill.
4

Parts and Tool List
5
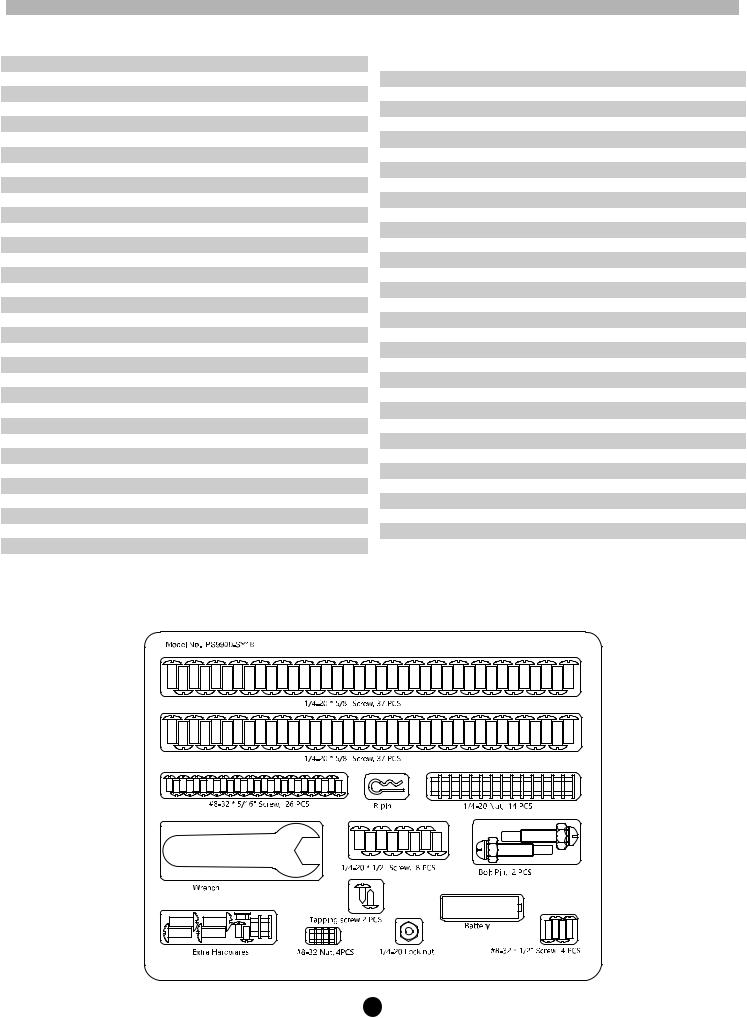
Parts and Tool List
Key |
Description |
Qty |
Part # |
1 |
Sear Burner Cooking Grid |
1 |
PS9900SY-1 |
2 |
Gas Cooking Grid |
2 |
PS9900SY-2 |
3 |
Charcoal Cooking Grid |
1 |
PS9900SY-3 |
4 |
Cooking Grid Side Frame |
1 |
PS9900SY-44 |
5 |
Cooking Grid Rear Frame |
1 |
PS9900SY-45 |
6 |
Cooking Grid Front Frame with Handle |
1 |
PS9900SY-46 |
7 |
Drip Tray-Gas Grill |
1 |
PS9900SY-5 |
8 |
Firebox Wood Rack |
1 |
PS9900SY-6 |
9 |
Drip Tray-Charcoal Grill |
1 |
PS9900SY-7 |
10 |
Removable Grease Cup-Gas Grill |
1 |
H4930-05 |
11 |
Warming Rack |
1 |
PS9900SY-4 |
12 |
Charcoal Tray |
1 |
PS9900SY-13 |
13 |
Removable Grease Tray-Charcoal |
1 |
PS9900SY-14 |
14 |
Heat Tent |
4 |
PS9900SY-8 |
15 |
Burner Tubes |
4 |
PS9900SY-16 |
16 |
Sear Burner |
1 |
TR023 |
17 |
Sear Burner Lid Handle |
1 |
PS9900SY-9 |
18 |
Sear Burner Housing and Lid Assembly |
1 |
PS9900SY-17 |
19 |
Sear Burner Knob Bezel |
1 |
PS9900SY-20 |
20 |
Burner Knob |
1 |
TR037 |
21 |
HVR Cover |
1 |
47183T-03 |
22 |
Gas and Charcoal Cabinet with Lids |
1 |
PS9900SY-18 |
23 |
Gas Grill Lid Handle |
1 |
PS9900SY-11 |
24 |
Heat Indicator |
2 |
TR041 |
25 |
Charcoal Grill Lid Handle |
1 |
PS9900SY-12 |
26 |
Smoke Stack |
1 |
PS9900SY-15 |
27 |
Firebox Lid Handle |
1 |
PS9900SY-27 |
28 |
Firebox Housing |
1 |
PS9900SY-26 |
29 |
Firebox Door Handle |
1 |
TR036 |
30 |
Firebox Brace Support |
1 |
PS9900SY-29 |
31 |
Control Panel Assembly |
1 |
PS9900SY-23 |
32 |
HVR |
1 |
PS9900SY-43 |
33 |
Charcoal Vent Knob |
1 |
TR016 |
Key |
Description |
Qty |
Part # |
34 |
Charcoal Tray Lift Lever |
1 |
PS9900SY-25 |
35 |
Left Side Shelf Support |
1 |
PS9900SY-19 |
36 |
Left Side Drip Tray Guide |
1 |
PS9900SY-22 |
37 |
Cart Front Panel |
1 |
PS9900SY-21 |
38 |
Middle Condiment Rack |
1 |
PS9900SY-32 |
39 |
Lower Condiment Front Mesh |
1 |
PS9900SY-33 |
40 |
Cart Front Horizontal Bracket |
1 |
PS9900SY-34 |
41 |
Center Drip Tray Guide |
1 |
PS9900SY-24 |
42 |
Cylinder Retainer Wire |
1 |
47183T-34 |
43 |
Left Front Leg |
1 |
PS9900SY-37 |
44 |
Left Rear Leg |
1 |
PS9900SY-38 |
45 |
Bottom Shelf |
1 |
PS9900SY-36 |
46 |
Caster Wheel |
4 |
PS9900SY-42 |
47 |
Middle Mesh Shelf |
1 |
PS9900SY-35 |
48 |
Match Lighter and Chain |
1 |
N/A |
49 |
Right Front Leg |
1 |
PS9900SY-39 |
50 |
Right Rear Leg |
1 |
PS9900SY-40 |
51 |
Right Side Shelf Support |
1 |
PS9900SY-47 |
52 |
Firebox Support Bracket |
1 |
PS9900SY-31 |
53 |
Right Side Drip Tray Guide |
1 |
PS9900SY-30 |
54 |
Rear Vertical Support |
1 |
PS9900SY-28 |
55 |
Tank Brace |
1 |
PS9900SY-48 |
56 |
Hose Clamp |
1 |
PS9900SY-49 |
57 |
Right Tray Stop |
1 |
PS9900SY-50 |
58 |
Left Tray Stop |
1 |
PS9900SY-51 |
59 |
Grease Cup Track |
2 |
PS9900SY-52 |
60 |
Locking Caster Wheel |
1 |
PS9900SY-53 |
61 |
Bolt Pin |
2 |
PS9900SY-HW |
62 |
“R” Pin |
1 |
PS9900SY-HW |
63 |
Control Knob |
4 |
PS9900SY-54 |
64 |
Sear Burner Electrode Assembly |
1 |
PS9900SY-55 |
65 |
Burner and Heat Tent Bracket |
4 |
PS9900SY-56 |
66 |
Hardware Pack |
1 |
PS9900SY-HW |
Hardware Pack (Part # PS9900SY-HW)
6
Grill Assembly
Carefully cut the straps holding the carton together. Cut the carton sleeve so that it can lay flat on the ground to provide a clean surface for assembling your Grill. Remove the packing materials and all the parts from inside the Cabinet. After unpacking all the parts, check to make sure you HAVE all the parts. If anything is damaged or missing, contact our toll free number: 866-475-5180. Discard all packing material in a safe and recyclable manner. Save this Assembly Manual for future reference.
NOTE: Assembly instructions are labeled with part key numbers for reference.
(Please refer to pages 5 and 6 for help with identifying parts and hardware).
Tools Required: Phillips Head Screwdriver, Adjustable Wrench and Long Nose Pliers
Hardware Needed: |
(10) #8-32x5/16” Screws |
Use Styrofoam from carton packing as a stable base while assembling in this position.
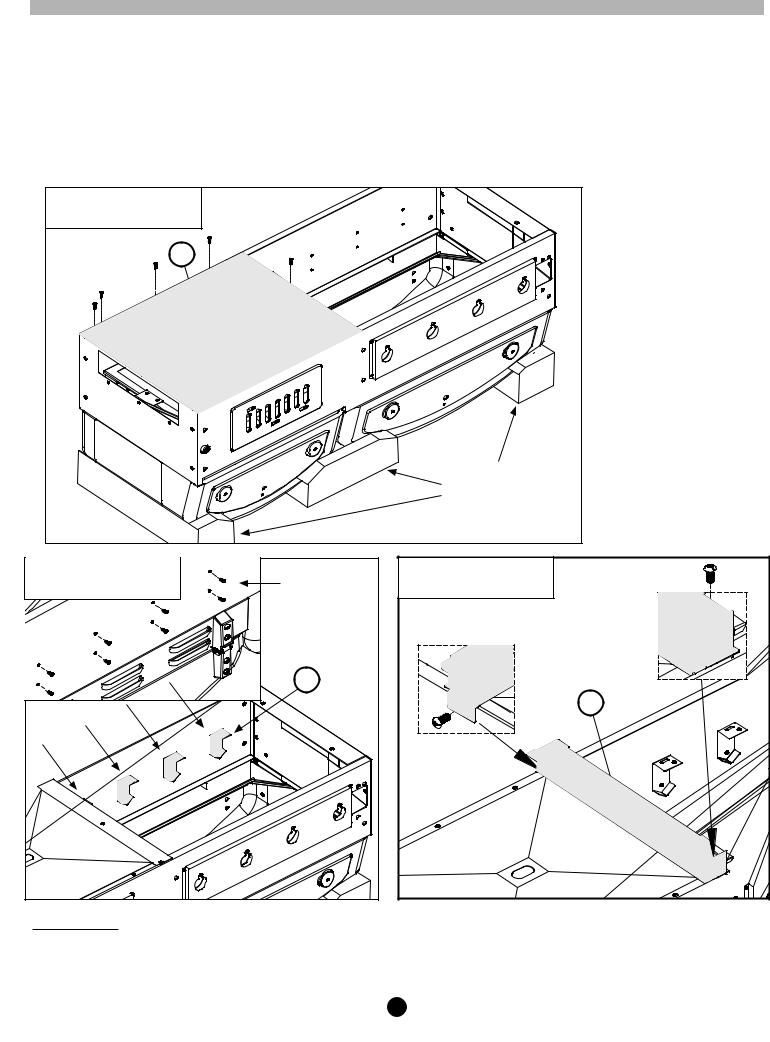
STEP 1:
With Cabinet in upside down position resting on styrofoam from carton, attach Drip Tray to bottom of Cabinet as shown here.
Hardware Needed: |
screw in from |
|
(8) #8-32x5/16” Screws |
||
backside of |
||
|
cabinet. |
|
|
65 |
|
STEP 2: |
|
Attach (4) Burner and Heat Tent Brackets as shown here.
Hardware Needed: |
(2) 1/4-20x5/8” Screws |
41 |
STEP 3:
Attach Center Drip Tray Guide to bottom of Cabinet as shown here.
7
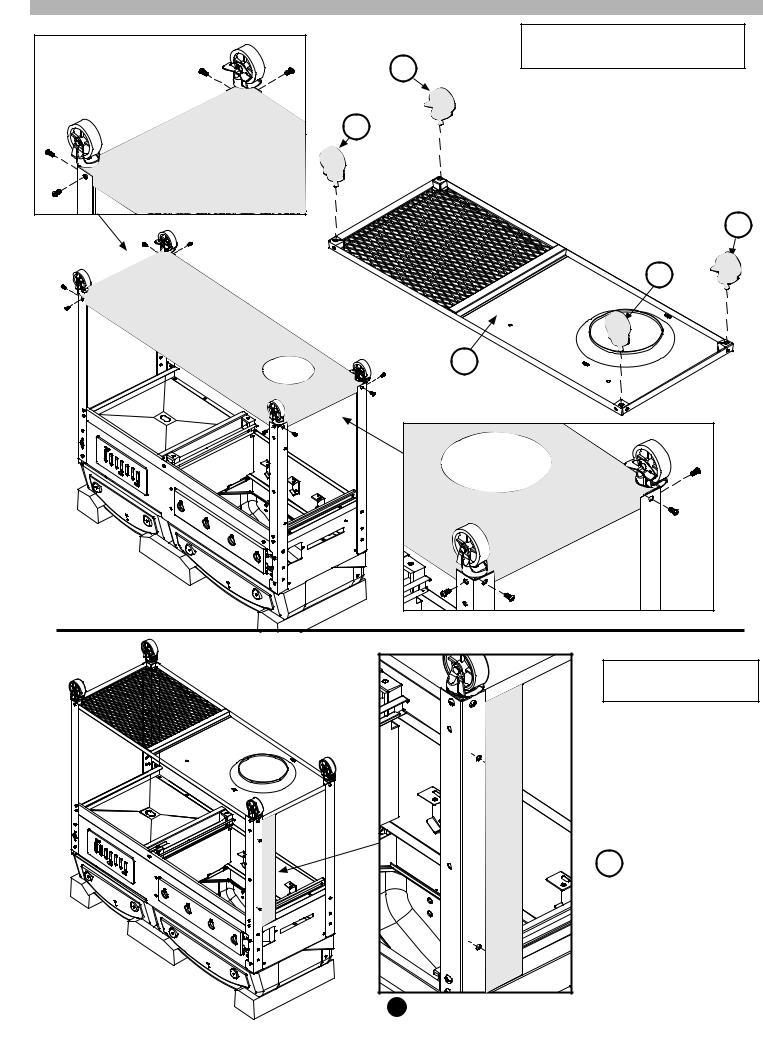
Grill Assembly
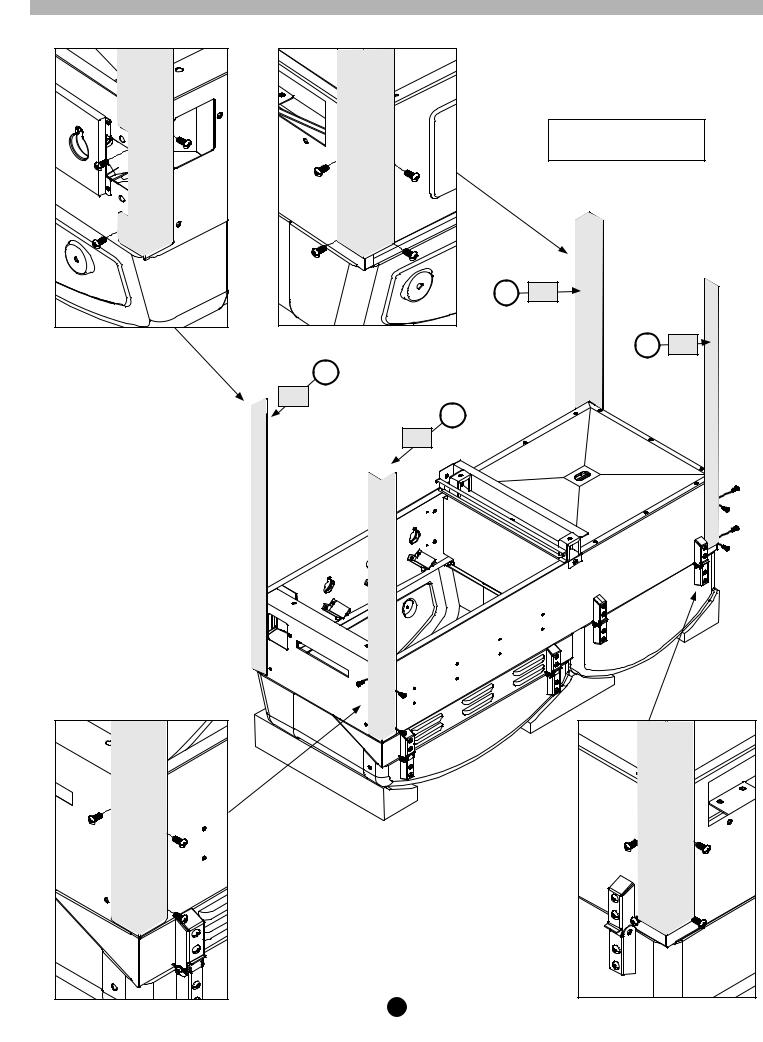
STEP 4:
Attach Legs to Cabinet as shown here. Legs will be labeled LF, RF, LR and RR for correct identification.
Note:
Do not tighten screws until instructed to do so later in the assembly.
(After completing step 16)
|
Hardware Needed: |
|
|
(14) 1/4-20x5/8” Screws |
|
49 |
RF |
|
|
50 |
RR |
43 |
|
|
LF |
|
|
44 |
|
|
LR |
|
|
8

Grill Assembly
Hardware Needed:
(2) 1/4-20x5/8” Screws
STEP 5:
Attach Left Side Drip Tray Guide.
Hardware Needed:
(7) 1/4-20x5/8” Screws
53
STEP 6:
Attach Right Side Drip
Tray Guide and Cart Front
Horizontal Bracket.
40
9
Grill Assembly
60 |
46 |
Hardware Needed:
(8) 1/4-20x1/2” Screws and wrench
STEP 7:
Screw Caster Wheels into corner holes on the bottom side of the Bottom Shelf. Use wrench to tighten the nuts holding the Casters Wheels secure. Attach the Bottom Shelf Assembly to the Legs as shown with (2) screws in each leg.
60
46
45
Hardware Needed:
(2) 1/4-20x5/8” Screws
STEP 8:
Attach Left Side Shelf Support. Make sure part is positioned as shown.
 35
35
10
Grill Assembly
37
Hardware Needed:
(4) 1/4-20x5/8” Screws
STEP 9:
Attach Cart Front Panel. Make sure part is positioned as shown.
STEP 10:
Attach Front Vertical Support as shown here. Make sure the (2) holes in the Front Vertical Support are facing the grill front.
Hardware Needed:
(4) 1/4-20x5/8” Screws
51
11
 Loading...