Smoke Hollow Cab3617, 3616dews, 3616dew Owner's Manual

Owner’s Manual
Digital
Electric
Smoker
For Models:
3616DEW / 3616DEWS CAB3617
THIS IS YOUR ASSEMBLY, CARE & USE MANUAL WITH IMPORTANT WARNING & SAFETY INFORMATION.
PLEASE SAVE THESE INSTRUCTIONS.
Approximate assembly time: 20 minutes Tools needed for assembly: Phillips head screwdriver
FOR OUTDOOR USE ONLY

 WARNING
THIS MANUAL CONTAINS IMPORTANT INFORMATION NECESSARY FOR THE PROPER AND SAFE USE OF THIS UNIT. READ AND FOLLOW ALL WARNINGS AND INSTRUCTIONS BEFORE USING SMOKER AND DURING USE.
FAILURE TO FOLLOW THESE WARNINGS AND INSTRUCTIONS PROPERLY
COULD RESULT IN PERSONAL INJURY OR DEATH.
 CARBON MONOXIDE HAZARD
BURNING WOOD CHIPS GIVES OFF CARBON MONOXIDE, WHICH HAS NO ODOR AND CAN CAUSE DEATH. DO NOT BURN WOOD CHIPS INSIDE HOMES, VEHICLES, TENTS, GARAGES OR ANY ENCLOSED AREAS. USE ONLY OUTDOORS WHERE IT IS WELL VENTILATED.
 GENERAL WARNINGS
READ ALL INSTRUCTIONS
• Do not leave smoker unattended.
• Do not cover cooking racks with metal foil. This will trap heat and cause severe damage to the electric smoker.
• Drip tray is only for the bottom of electric smoker. Do not put drip tray on cooking rack as this may damage the electric smoker.
• The wood chip tray is HOT when electric smoker is in use. Use caution when handling or adding wood.
• To disconnect, turn control panel “OFF” then remove plug from outlet.
• Unplug from outlet when not in use and before cleaning. Allow unit to cool completely before adding/removing grates, wood chip tray or water pan.
• Dispose of cold ashes by placing them in aluminum foil, soaking with water and discarding in a non-combustible container.
• Do not store the electric smoker with HOT ashes inside unit. Store only when all surfaces are cold.
• Accessory attachments or parts not supplied by Outdoor Leisure Products, Inc. are not recommended and may cause injury.
• Never use the electric smoker for anything other than its intended purpose. This unit is not for commercial use.
• Always use the electric smoker in accordance with all applicable local, state and federal fire codes.
• Longer, detachable power-supply cords or extension cords are available and may be used if care is exercised in their use, based on the following requirements.
• If a longer, detachable power-supply cord or extension cord is used, the marked electrical rating of the cord set or extension cord should be at least as great as the electrical rating of the appliance.
• The extension cord must be a grounding -type 3-wire cord.
• Outdoor extension cords must be used with outdoor use products and are marked with suffix “W” and with the statement “Suitable for Use with Outdoor Appliances.”
• CAUTIONTo ensure continued protection against risk of electric shock, connect to properly grounded outlets only.
• CAUTION - To reduce the risk of electric shock, keep extension cord connection dry and off the ground.
• Do not clean this product with a water sprayer or the like.
• Do not use wood pellets or wood chunks.
• Store products indoors when not in use - out of reach of children.
2

 GENERAL WARNINGS
When using electrical appliances, basic safety precautions should always be followed including the following:
•For outdoor use only. Do not operate in an enclosed areas (example, porch or garage).
•Unit MUST be on the ground. Do not place unit on tables or counters. Do NOT move unit across uneven surfaces.
•Do not lift unit by rear handle.
•Do not plug in the electric smoker until fully assembled and ready for use.
•Use only an approved grounded electrical outlet.
•Do not use during an electrical storm.
•Do not expose the electric smoker to rain or water at anytime.
•CAUTIONTo ensure continued protection against risk of electric shock, connect to properly grounded outlets only.
•To protect against electrical shock do not immerse cord, plug or control panel in water or other liquid.
•Do not operate any appliance with a damaged cord or plug, or after appliance malfunctions or has been damaged in any manner. Contact OLPI Customer Service for assistance at 1-866-475-5180.
•Keep a fire extinguisher accessible at all times while operating the electric smoker.
•Do not let cord touch hot surfaces.
•Do not place on or near a hot gas or electric burner, or in a heated oven.
•Keep children and pets away from electric smoker at all times. Do not allow children to use electric smoker. Close supervision is necessary should children or pets be in area where the electric smoker is being used.
•Fuel, such as charcoal briquettes or heat pellets, are not to be used in the electric smoker.
•Never use the electric smoker as a heater (READ CARBON MONOXIDE HAZARD ON PAGE 2).
•Use the electric smoker only on a level, stable surface to prevent tipping.
•The electric smoker is HOT while in use and will remain HOT for a period of time afterwards. Use caution.
•Do not touch HOT surfaces. Use handles or knobs.
•Do not allow anyone to conduct activities around the electric smoker during or following its use until the unit has cooled.
•The use of alcohol, prescription or non-prescription drugs may impair the user’s ability to properly assemble or safely operate the electric smoker.
•Avoid bumping or impacting the electric smoker.
•Never move the electric smoker when in use. Allow the smoker to cool completely before moving or storing.
•Be careful when removing food from the electric smoker. All surfaces are HOT and may cause burns. Use protective gloves or long, sturdy cooking tools.
•Avoid using the smoker on wooden or flammable surfaces.
•Store products indoors when not in use - out of reach of children.
 WARNING
CALIFORNIA PROPOSITION 65
This product contains, or the use of this product releases, chemicals known to the State of California to cause cancer and birth defects or other reproductive harm. For more information go to www.P65Warnings.ca.gov.
SAVE THESE INSTRUCTIONS
3

Congratulations
on your purchase of your new Smoke Hollow® Digital Electric Smoker.
With proper set-up, operation and maintenance, this appliance will provide you with years of delicious food and cooking enjoyment.
IMPORTANT
When you un-pack your smoker, remove all parts and packaging material from the box and inside the smoker. Make sure you have all the items on the parts list. Carefully check the unit and make sure there is no damage.
IF YOU HAVE ANY PROBLEMS WITH THIS PRODUCT OR THERE ARE MISSING OR DAMAGED PARTS , PLEASE CALL CUSTOMER SERVICE TOLL FREE 1-866-475-5180 (Monday–Friday, 8:30 am–4:30 pm, CST).
NOTE : DO NOT RETURN UNIT TO THE STORE BEFORE CALLING THE TOLL FREE NUMBER.
Do not dispose of your cartons until you are completely satisfied with your new Smoke Hollow smoker.
4

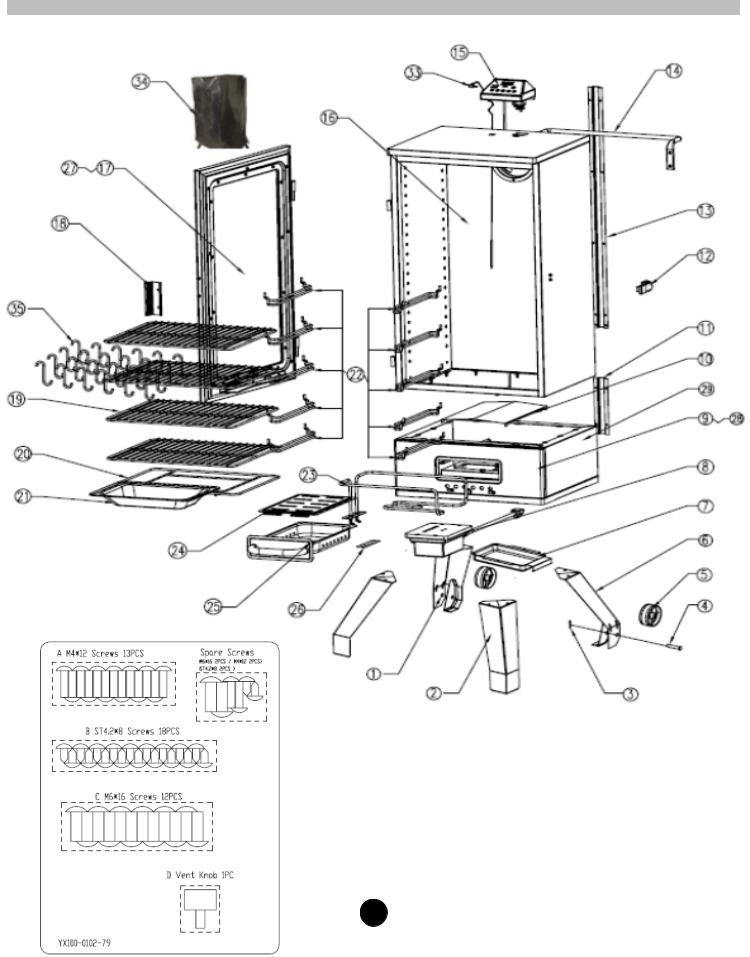
Parts and Tool List
Toolsneededforassembly:
Phillips head screwdriver
5

Parts and Tool List
Note: For assistance, including missing or damaged parts, call
toll free 1- 866-475-5180 from 8:30 am - 4:30 pm Central Time, Monday - Friday
|
Part # |
|
Part Name |
Quantity |
|
3616DEW |
3616DEWS |
CAB3617 |
|||
|
|
||||
1 |
1 |
1 |
Rear-Left Leg |
1 |
|
2 |
2 |
2 |
Front Leg |
2 |
|
3 |
3 |
3 |
R-Clip |
2 |
|
4 |
4 |
4 |
Axle Pin |
2 |
|
5 |
5 |
5 |
Wheel |
2 |
|
6 |
6 |
6 |
Rear-Right Leg |
1 |
|
7 |
7 |
7 |
Grease Tray |
1 |
|
8 |
8 |
8 |
Power Box Assembly |
1 |
|
9 |
28 |
28 |
Lower Cabinet Front Panel |
1 |
|
10 |
10 |
10 |
Heat Tent |
1 |
|
11 |
11 |
11 |
Cable Cover - Short |
1 |
|
12 |
12 |
12 |
Door Latch Assembly |
1 |
|
13 |
13 |
13 |
Cable Cover - Long |
1 |
|
14 |
14 |
14 |
Rear Handle |
1 |
|
15 |
15 |
15 |
Control Panel Assembly |
1 |
|
16 |
16 |
16 |
Upper Cabinet |
1 |
|
17 |
27 |
27 |
Door Assembly |
1 |
|
18 |
18 |
18 |
Door Handle |
1 |
|
19 |
19 |
19 |
Cooking Grid |
4 |
|
20 |
20 |
20 |
Water Pan Support |
1 |
|
21 |
21 |
21 |
Water Pan |
1 |
|
22 |
22 |
22 |
Grid Support |
10 |
|
23 |
23 |
23 |
Heating Element |
1 |
|
24 |
24 |
24 |
Wood Chip Tray Lid |
1 |
|
25 |
25 |
25 |
Wood Chip Tray Assembly |
1 |
|
26 |
26 |
26 |
Heating Element Gasket |
1 |
|
29 |
29 |
29 |
Lower Cabinet |
1 |
|
30 |
30 |
30 |
Vent Knob |
1 |
|
31 |
31 |
31 |
Hardware Pack |
1 |
|
32 |
32 |
32 |
Instruction Manual |
1 |
|
N/A |
N/A |
33 |
Meat Probe |
1 |
|
N/A |
N/A |
34 |
Smoker Cover |
1 |
|
N/A |
N/A |
35 |
S-Hook |
24 |
6

Smoker Assembly
Step 1 |
|
Locate: |
|
• Lower Cabinet Assembly |
|
|
|
|
Rear-Right |
Rear-Left |
• (2) Front Legs |
Leg |
Leg |
• Rear-Left Leg |
|
|
• Rear-Right Leg |
|
|
• (8) M6 x 16 Screws |
|
|
Tools Needed: |
Front |
Front |
Phillips Screwdriver |
Leg |
|
|
Leg |
|
|
|
|
|
|
|
Procedure: |
Use (8) M6x16mm Screws to assemble the Legs to the
Lower Cabinet Assembly as shown.
Step 2 |
Locate: |
|
• Lower Cabinet Assembly |
||
|
||
A |
• Upper Cabinet Assembly |
|
• (9) M4 x 12 Screws |
||
B |
• (2) ST4.2 x 8 Self-tapping Screws |
|
|
Tools Needed: |
|
|
Phillips Screwdriver |
|
|
Procedure: |
Use (9) M4x12mm Screws and (2) ST4.2x8mm Self-Tapping Screws to assemble the Upper Cabinet
Assembly into the Lower Cabinet Assembly as shown.
|
Note: The (2) ST4.2x8 Self-Tapping Screws are |
7 |
noted as “B” in illustration and attach along |
the front opening. |

Smoker Assembly
Step 3
Locate:
•Upper Cabinet
•Control Panel Assembly
•Cable Cover - Long
•(12) ST4.2 x 8 Self Tapping Screws
Tools Needed:
Phillips Screwdriver
Procedure:
Place two hooks of Control Panel onto the Cabinet square holes and push back into place as shown. Use (2)ST4.2x8mm Self-tapping Screws to assemble the Control Panel Assy into the Upper Cabinet as shown. Use (10) ST4.2x8mm Self-tapping Screws to assemble the Cable Cover into the Upper Cabinet as shown.
Meat
Probe
For Model CAB3617 only:
Plug in the supplied Meat Probe into 8 the Control Panel and feed the Probe through the back vent as shown here.
 Loading...