

Singer C240 Instruction Manual
INSTRUCTION MANUAL
C240

This household sewing machine is designed to comply with IEC/EN 60335-2-28 and UL1594.
IMPORTANT SAFETY INSTRUCTIONS
When using an electrical appliance, basic safety precautions should always be followed, including the following:
Read all instructions before using this household sewing machine. Keep the instructions at a suitable place
close to the machine. Make sure to hand them over if the machine is given to a third party.
DANGER – To reduce the risk of electric shock:
• A sewing machine should never be left unattended when plugged in. Always unplug this sewing machine
from the electric outlet immediately after using and before cleaning, removing covers, lubricating or when
making any other user servicing adjustments mentioned in the instruction manual.
WARNING – To reduce the risk of burns, re, electric shock, or injury to
person:
• Do not allow to be used as a toy. Close attention is neccesary when this sewing machine is used by or near
children.
• Use this sewing machine only for its intended use as described in this manual. Use only attachments
recommended by the manufacturer as contained in this manual.
• Never operate this sewing machine if it has a damaged cord or plug, if it is not working properly, if it has
been dropped or damaged, or dropped into water. Return the sewing machine to the nearest authorized
service center for examination, repair, electrical or mechanical adjustment.
• Never operate the sewing machine with any air openings blocked. Keep ventilation openings of the sewing
machine and foot control free from the accumulation of lint, dust, and loose cloth.
• Keep ngers away from all moving parts. Special care is required around the sewing machine needle.
• Always use the proper needle plate. The wrong plate can cause the needle to break.
• Do not use bent needles.
• Do not pull or push fabric while stitching. It may deect the needle causing it to break.
• Wear safety glasses.
• Switch the sewing machine off (“O”) when making any adjustment in the needle area, such as threading
needle, changing needle, threading bobbin, or changing presser foot, etc.
• Never drop or insert any object into any opening.
• Do not use outdoors.
• Do not operate where aerosol (spray) products are being used or where oxygen is being administrated.
• To disconnect, turn all controls to the off (“O”) position, then remove plug from outlet.
• Do not unplug by pulling on cord. To unplug, grasp the plug, not the cord.
• The foot control is used to operate the machine. Avoid placing other objects on the foot control.
• Do not use the machine if it is wet.
• If the LED lamp is damaged or broken, it must be replaced by the manufacturer or its service agent or a
similarly qualied person, in order to avoid a hazard.
• If the supply cord connected with the foot control is damaged, it must be replaced by the manufacturer or
its service agent or a similarly qualied person, in order to avoid a hazard.
• This sewing machine is provided with double insulation. Use only identical replacement parts. See
instructions for Servicing of Double-Insulated Appliances.
2

SAVE THESE INSTRUCTIONS
For Europe only:
This appliance can be used by children aged from 8 years and above and persons with reduced physical,
sensory or mental capabilities or lack of experience and knowledge if they have been given supervision or
instruction concerning use of the appliance in a safe way and understand the hazards involved. Children
shall not play with the appliance. Cleaning and user maintenance shall not be made by children without
supervision.
The noise level under normal operating conditions is less than 75dB(A).
The machine must only be used with foot control of type "C-9002" manufactured by CHIENHUNG
TAIWAN., LTD.
For outside Europe:
This sewing machine is not intended for use by persons (including children) with reduced physical, sensory
or mental capabilities, or lack of experience and knowledge, unless they have been given supervision or
instruction concerning use of the sewing machine by a person responsible for their safety. Children should be
supervised to ensure that they do not play with the sewing machine.
The noise level under normal operating conditions is less than 75dB(A).
The machine must only be used with foot control of type "C-9002" manufactured by CHIENHUNG
TAIWAN., LTD.
SERVICING OF DOUBLE INSULATED PRODUCTS
In a double-insulated product, two systems of insulation are provided instead of grounding. No ground
means is provided on a double-insulated product, nor should a means for grounding be added to the product.
Servicing of a double-insulated product requires extreme care and knowledge of the system and should
be done only by qualied service personnel. Replacement parts for a double-insulated product must be
identical to those parts in the product. A double-insulated product is marked with the words ‘DOUBLE
INSULATION’ or ‘DOUBLE INSULATED’.
3

Table of contents
Introduction 5
Machine Overview ................................................... 5
Accessories ............................................................. 5
Presser Feet ............................................................... 7
Stitch Chart .............................................................. 8
Preparations 9
Unpacking................................................................ 9
Connect to the Power Supply .................................. 9
Pack Away After Sewing .......................................... 9
Free Arm ................................................................ 10
Leveling the Machine Base Plate .......................... 10
Thread Cutter ........................................................ 10
Spool Pins ............................................................. 10
Bobbin Winding ..................................................... 11
Inserting the Bobbin............................................... 12
Threading the Machine .......................................... 12
Needle Threader ...................................................... 13
Threading for Twin Needle ....................................... 13
Integrated Even Feed System .............................. 14
Presser Foot Pressure........................................... 15
Thread Tension ...................................................... 15
Needles ................................................................. 16
Changing the Needle ............................................. 16
Lowering Feed Teeth ............................................. 17
Presser Foot Lifter ................................................. 17
Changing the Presser Foot.................................... 17
Machine Operation Buttons ................................... 18
Warning Messages/Sound ....................................19
Sewing 20
Select a Stitch........................................................ 20
Stitch Adjustments ................................................. 20
Sewing Techniques ................................................ 21
Multi-Stitch Zigzag Stitch .......................................... 21
Buttonholes .............................................................. 21
Sew on a Button ....................................................... 22
Sewing Hems in Heavy Fabric ................................. 23
Quilting ..................................................................... 23
Blindhem .................................................................. 24
Sewing in Zippers ..................................................... 24
Maintenance 25
Cleaning the Machine ............................................ 25
Replacing the Stitch Plate ..................................... 25
Troubleshooting ..................................................... 26
4
Introduction
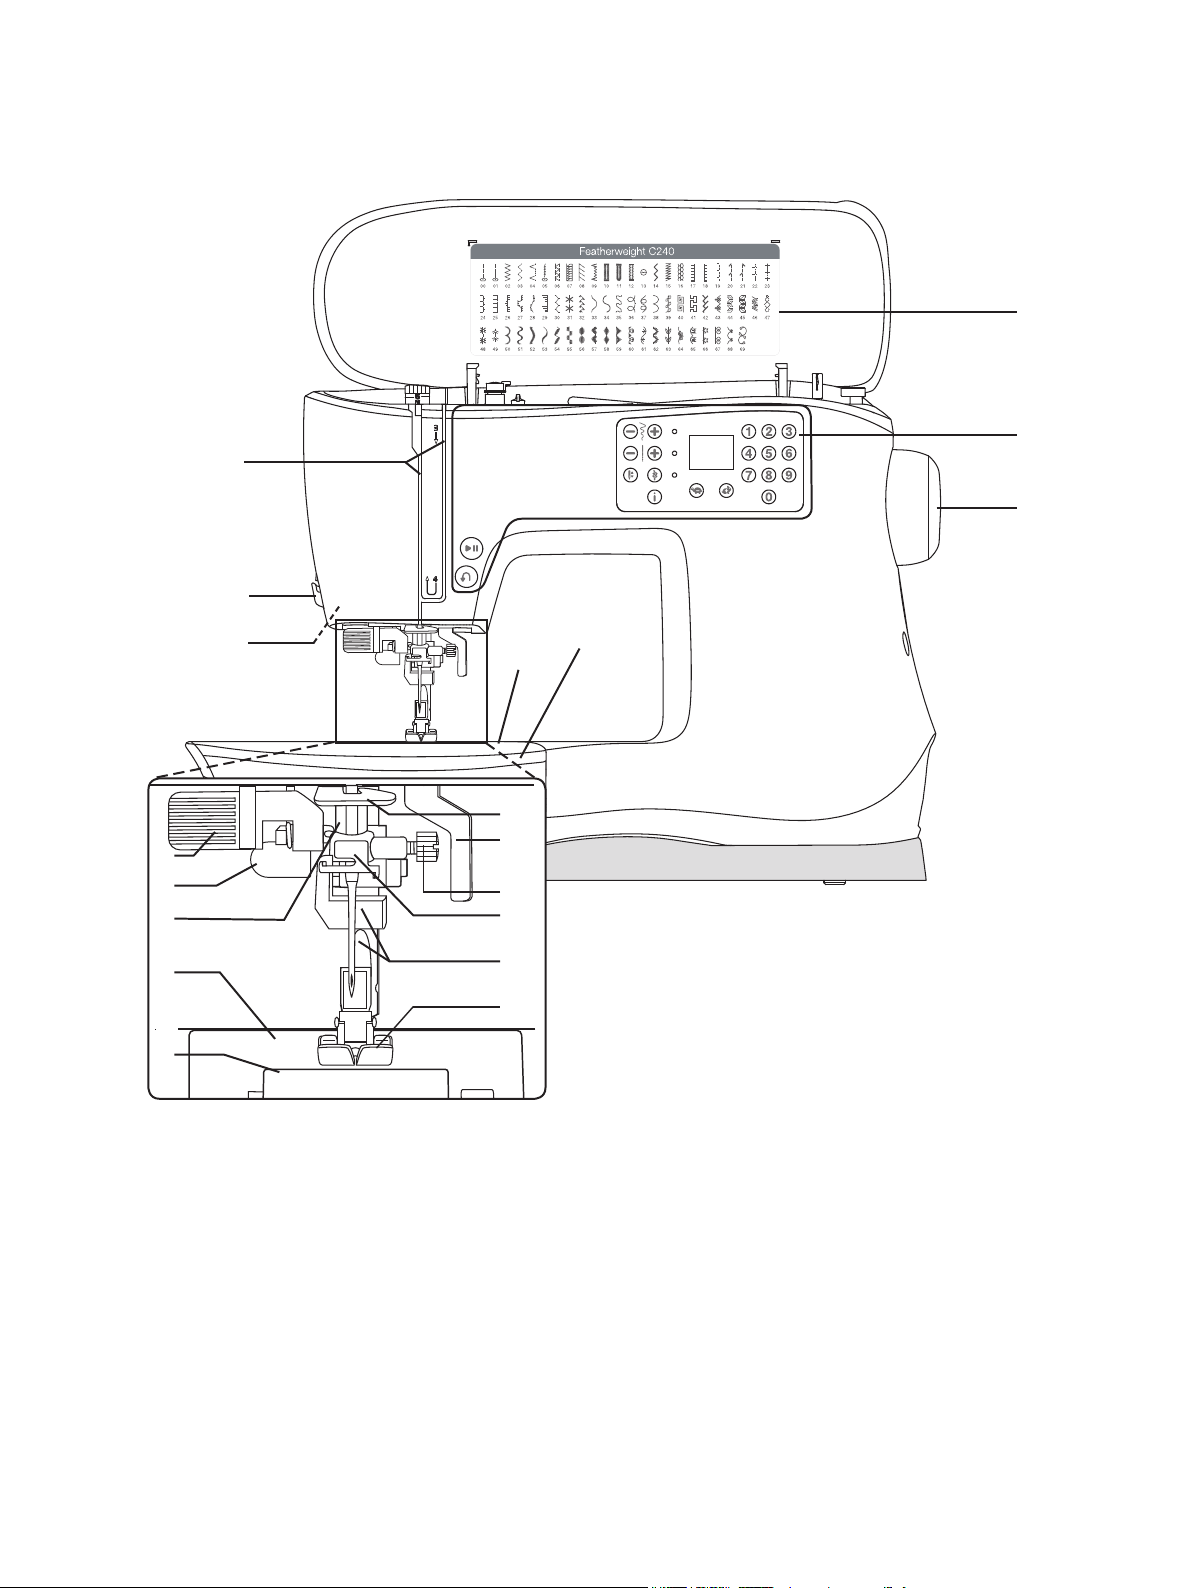
Machine Overview
1
2
17
18
19
3
4
5
6
7
8
Front Side
1. Threading slots
2. Thread cutter
16
15
9
10
11
12
13
14
11. Needle clamp screw
12. Needle thread guide
3. LED lights
4. Built-in needle threader
5. Buttonhole lever
6. Needle bar
7. Stitch plate
8. Bobbin cover
9. Lower thread guide
10. Presser foot lifter
13. Presser foot bar and presser foot holder
14. Presser foot
15. Free arm
16. Removable storage compartment
17. Stitch chart
18. Machine operation buttons and display
19. Handwheel
5
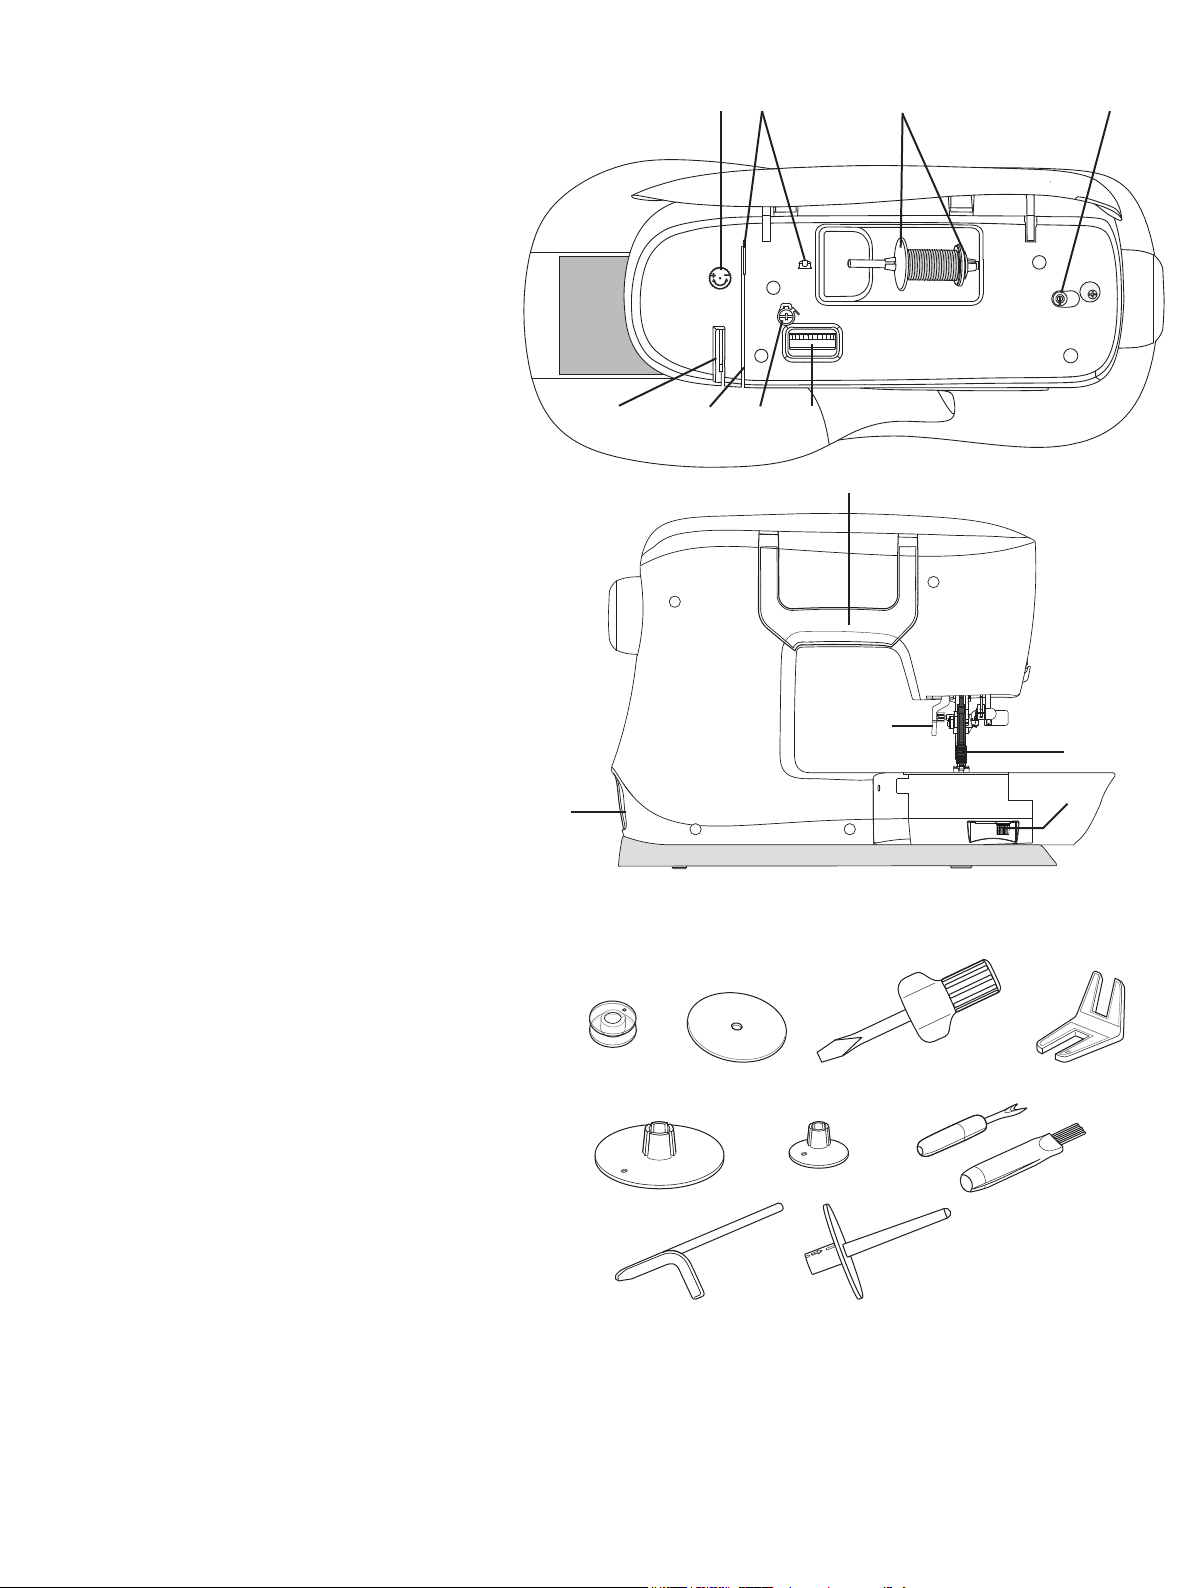
Top Parts
20. Presser foot pressure dial
21. Thread guides
22. Spool caps
23. Attachment for auxiliary spool pin /
Bobbin winding spindle
24. Take-up lever
25. Thread tension discs
26. Bobbin winding tension disc
27. Thread tension dial
Rear Side
28. Main switch, connectors for power cord
and foot control
29. Handle
30. Presser foot lifter
24 25
20
21 22
26
27
23
29
31. Integrated Even Feed System
32. Switch for lowering the feed teeth
Accessories
Included Accessories
33. Bobbins (5) (SINGER® Class 15
transparent bobbins)
34. Felt pad
35. Screwdriver for needle plate
36. Clearance plate
37. Spool cap, large (2)
38. Spool cap, small
39. Seam ripper & brush
28
33 34
37 38
35
30
31
32
36
39
40. Edge/quilting guide
41. Auxiliary spool pin
Included Accessories Not in Picture
• Foot control
• Power cord
• Needles
• Hard cover
6
40 41
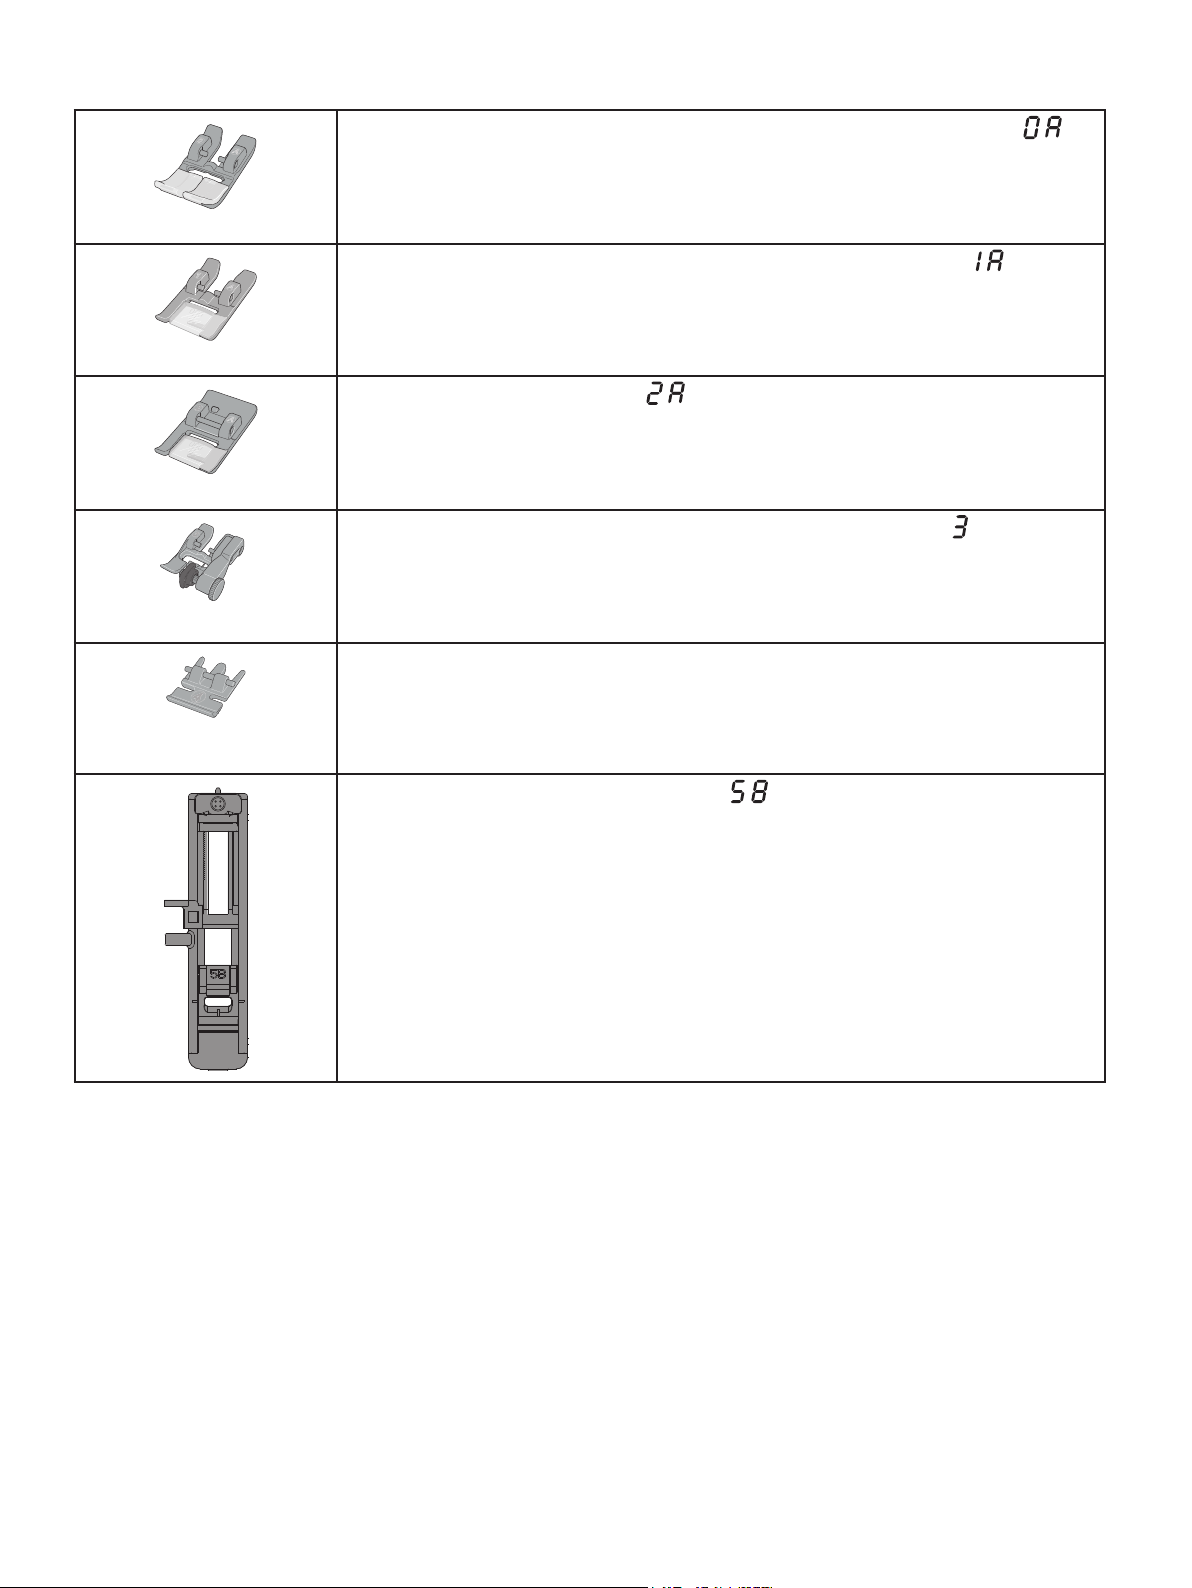
Presser Feet
General Purpose Foot 0A with Integrated Even Feed System (shown as in
the display, attached on the machine upon delivery)
This foot is used mainly for straight stitching and zigzag stitching with a stitch
length longer than 1.0 mm.
All Purpose Foot 1A with Integrated Even Feed System (shown as in the
display)
This foot is used for decorative stitches. The groove on the underside of the foot is
designed to ow smoothly over the stitches.
Satin Stitch Foot 2A (shown as in the display)
When sewing decorative stitches or short zigzag stitches and other stitches with
less than 1.0 mm stitch length, use this foot. The groove on the underside of the
foot is designed to ow smoothly over the stitches.
Blind Hem Foot 3 with Integrated Even Feed System (shown as in the
display)
This foot is used for blindhem stitches. The toe on the foot guides the fabric. The
red guide on the foot is designed to ride along the fold of the hem edge.
Zipper Foot 4 with Integrated Even Feed System
This foot can be snapped on either the right or the left of the needle, making it easy
to sew close to both sides of the zipper teeth. Move the needle position to the right
or left to sew closer to zipper teeth.
One-step Buttonhole Foot 5B (shown as in the display)
This foot has a space in the back to set the size of the buttonhole. The machine will
sew a buttonhole to t that button size.
Important: Make sure that the Integrated Even Feed System is disengaged when using presser foot 2A, 5B.
7
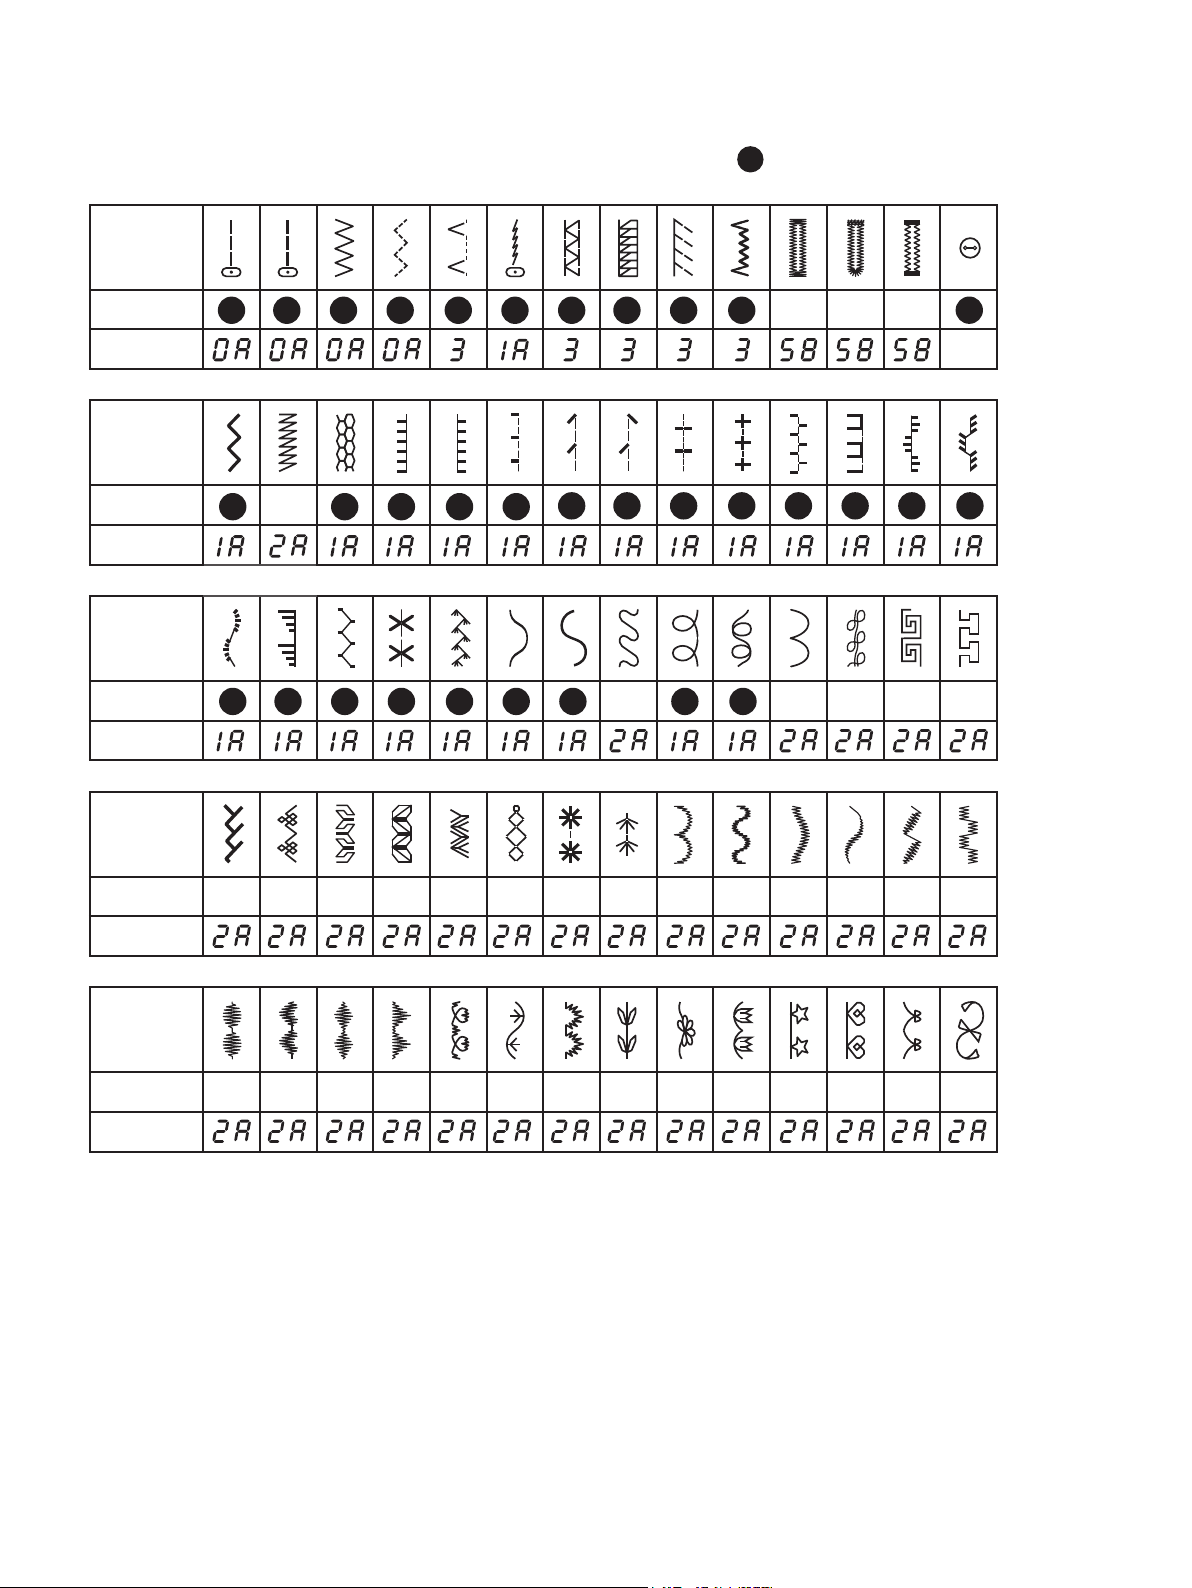
Stitch Chart
Stitches
Stitch
No.
Presser foot
Stitch
No.
Presser foot
Stitch
No.
= Engage Integrated Even Feed System
00 01 02 03 04 05 06 07 08
15 16 17 18 19
14
28 29 30 31 32 33 34 35 36 37 38 39
10 11 12 13
09
2520 21 22 23 24 26 27
40 41
Presser foot
Stitch
No.
Presser foot
Stitch
No.
Presser foot
42 43 44 45 46 47 48 49
56 57 58 59
60 61 62 63 64 65 66 67 68 69
50 51 52 53 54 55
8
Preparations
Unpacking
1. Place the box on a steady, at surface. Lift the
machine out of the box, remove the outer packaging
and lift off the machine carrying case.
2. Remove all outer packing material and the plastic
bag.
Note: Your sewing machine is adjusted to provide the
best stitch result at normal room temperature. Extreme
hot and cold temperatures can affect the sewn result.
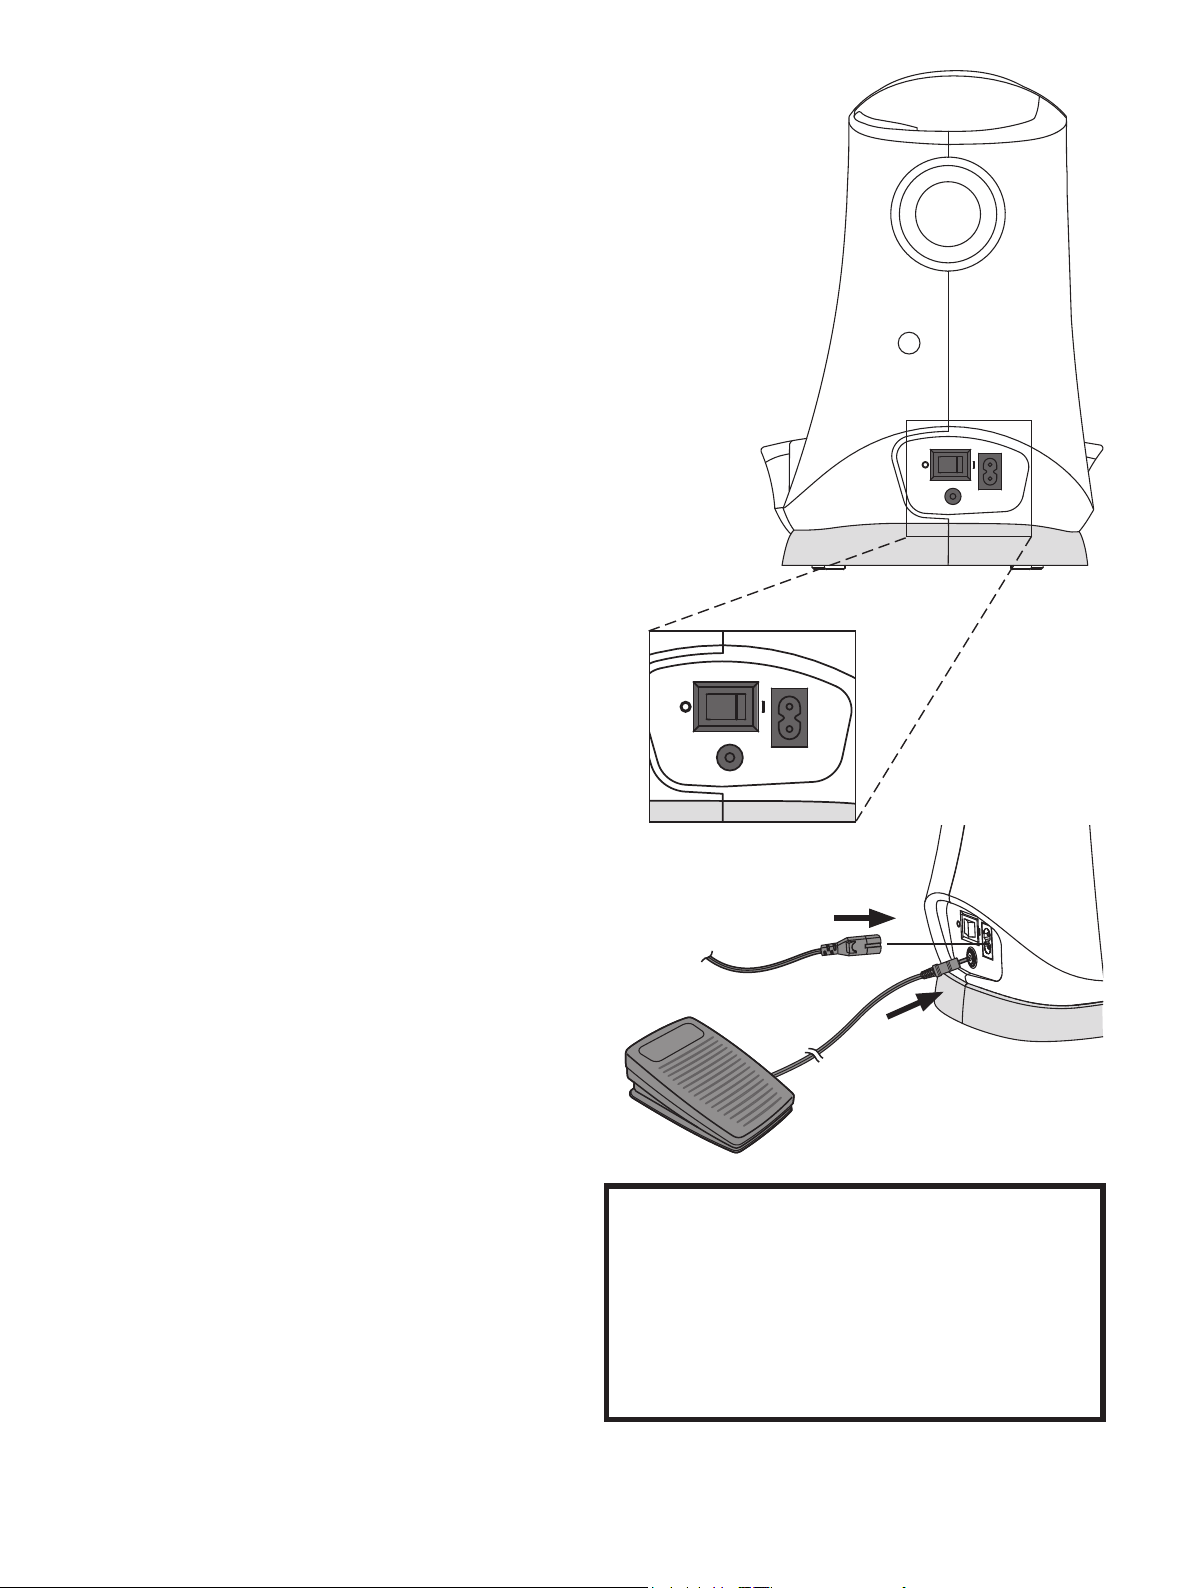
Connect to the Power Supply
Among the accessories you will nd the power cord and
the foot control.
Note: Consult a qualied electrician if in doubt as to
how to connect the machine to the power source. Unplug
the power cord when the machine is not in use.
For this sewing machine, foot control model C-9002
manufactured by CHIENHUNG TAIWAN., LTD must
be used.
1. Connect the foot control cord to the front socket on
the bottom right side of the machine (A).
2. Connect the power cord to the rear socket on the
bottom right side of the machine (B). Plug the cord
into the wall socket.
C
A
B
3. Press the ON/OFF switch to ON to turn on power
and light (C).
Pack Away After Sewing
1. Switch the main switch off.
Note: After switching off, residual power may still
remain in the machine. This may cause the light to stay
on for a few seconds while the power is consumed. This
is normal behavior for an energy efcient appliance.
2. Unplug the cord from the wall socket and then from
the machine.
3. Unplug the foot control cord from the machine.
Wind the cord around the foot control for easy
storage.
4. Place all accessories in the Removable Storage
Compartment. Slide the Removable Storage
Compartment on to the machine around the free
arm.
5. Place the foot control in the space above the free
arm.
For the USA and Canada
This sewing machine has a polarized plug (one blade
wider than the other). To reduce the risk of electric
shock, this plug is intended to t in a polarized outlet only one way. If the plug does not t fully in the
outlet, reverse the plug. If it still does not t, contact
a qualied electrician to install the proper outlet. Do
not modify the plug in any way.
6. Put on the hard cover.
9
 Loading...