

Page 1
MODEL
AR-203E
DIGITAL MULTIFUNCTIONAL
SYSTEM
OPERATION MANUAL
Page
INTRODUCTION
LOADING PAPER
MAKING COPIES
INSTALLING THE
SOFTWARE
SPECIAL FUNCTIONS
MAINTENANCE
TROUBLESHOOTING
THE UNIT
OPTIONS
APPENDIX
12
20
42
45
50
58
61
4
7
Page 2

Shielded interface cables must be used with this equipment to maintain
compliance with EMC regulations.
Do not make copies of anything which is prohibited from copying by law. The
following items are normally prohibited from copying by national law. Other
items may be prohibited by local law.
Money Stamps Bonds Stocks Bank drafts
Checks Passports Driver's licenses
In some areas, the "POWER" switch positions are marked "I" and "O" on the
copier instead of "ON" and "OFF".
The symbol "O" denotes the copier is not completely de-energized but in a standby condition at this "POWER" switch position. If your copier is so marked, please
read "I" for "ON" and "O" for "OFF".
Caution!
For a complete electrical disconnection, pull out the main plug.
The socket-outlet shall be installed near the equipment and shall be easily
accessible.
Page 3
CAUTIONS
Caution label on the unit
The label ( ) in the fusing area of the unit indicates the following:
: Caution, risk of danger : Caution, hot surface
Cautions on using
Follow the cautions below when using this unit.
Warning:
• The fusing area is hot. Exercise care in this area when removing misfed paper.
• Do not look directly at the light source. Doing so may damage your eyes.
• Do not switch the unit rapidly on and off. After turning the unit off, wait 10 to 15 seconds
before turning it back on.
• Unit power must be turned off before installing any supplies.
Caution:
• Place the unit on a firm, level surface.
• Do not install the unit in a humid or dusty location.
• When the unit is not used for a long time, for example for consecutive holidays, turn the
power switch off and remove the power cord from the outlet.
• When moving the unit, be sure to turn the power switch off and remove the power cord from
the outlet.
• Do not cover the unit with a dust cover, cloth or plastic film while the power is on. Doing so
may prevent heat radiation, damaging the unit.
• Use of controls or adjustments or performance of procedures other than those specified
herein may result in hazardous radiation exposure.
• The socket-outlet shall be installed near the equipment and shall be easily accessible.
Important points when selecting an installation site
Do not install your unit in areas that are:
• damp, humid, or very dusty
• exposed to direct sunlight
• poorly ventilated
• subject to extreme temperature or humidity changes, e.g., near an air conditioner or heater.
Be sure to connect the power cord only to a power outlet that meets the specified voltage
and current requirements. Also make certain the outlet is properly grounded.
Connect the unit to a power outlet which is not used for other electric
appliances. If a lighting fixture is connected to the same outlet, the light
may flicker.
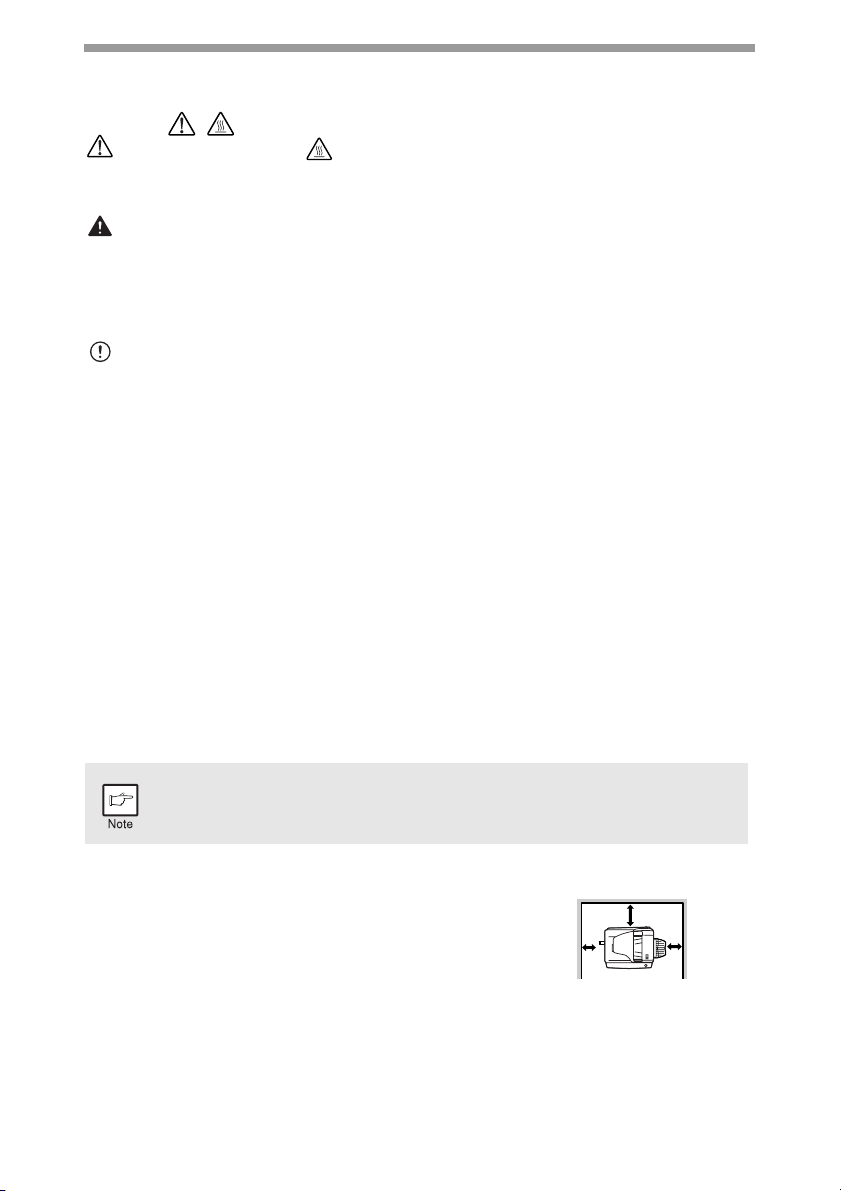
Be sure to allow the required space around the
machine for servicing and proper ventilation.
10 cm
20 cm
10 cm
Cautions on handling
Be careful in handling the unit as follows to maintain the performance of this unit.
Do not drop the unit, subject it to shock or strike it against any object.
Store spare toner cartridges in a cool dry place without removing from the package before use.
• If they are exposed to direct sunlight or excessive heat, poor copies may result.
Do not touch the photoconductive drum (green portion).
• Scratches or smudges on the drum will cause dirty copies.
1
Page 4
Proper storage for supplies
Store the supplies (paper and toner cartridges) in a location that is:
• clean and dry
• at a stable temperature
• not exposed to direct sunlight.
Store paper in the wrapper and lying flat.
• Paper stored out of the wrapper or in packages standing on end may curl or get damp,
resulting in paper misfeeds.
Trademark acknowledgements
• Microsoft and Windows are trademarks of Microsoft Corporation in the U.S.A. and other
countries.
• IBM and PC/AT are trademarks of International Business Machines Corporation.
• Adobe and Acrobat are trademarks of Adobe Systems Incorporated.
• All other trademarks and copyrights are the property of their respective owners.
Products that have earned the ENERGY STAR® are designed to
protect the environment through superior energy efficiency.
Laser information
Wave length 780 nm +15 nm
-10 nm
Pulse times 12.88 µs ±12.88 ns/7 mm
Output power Max 0.2 mW (Total Power)
At the production line, the output power of the scanner unit is adjusted to 0.18
MILLIWATT (Total Power) PLUS 5% and is maintained constant by the operation of
the Automatic Power Control (APC).
Caution
Use of controls or adjustments or performance of procedures other than those
specified herein may result in hazardous radiation exposure.
This Digital Equipment is CLASS 1 LASER PRODUCT (IEC 60825-1 Edition 1.2-2001)
(Four laser diodes)
A small amount of ozone is produced within the unit during operation. The emission
level is insufficient to cause any health hazard.
Note:
The present recommended long term exposure limit for ozone is 0.1 ppm
(0.2 mg/m
However, since the small amount that is emitted may have an objectionable odor, it is
advisable to place the unit in a ventilated area.
3
) calculated as an 8 hr. time-weighted average concentration.
SOFTWARE LICENSE
The SOFTWARE LICENSE will appear when you install the software from the CD-ROM. By
using all or any portion of the software on the CD-ROM or in the machine, you are agreeing to
be bound by the terms of the SOFTWARE LICENSE.
2
Page 5

CONTENTS
1 INTRODUCTION
USING THE MANUAL ................... 4
PART NAMES ............................... 5
OPERATION PANEL..................... 6
2 LOADING PAPER
PAPER........................................... 7
LOADING THE PAPER TRAY....... 8
BYPASS FEED (including special
paper) .......................................... 10
3 MAKING COPIES
COPY FLOW ...............................12
CONNECTING THE POWER CORD 13
ORIGINAL PLACEMENT............. 15
SET THE COPY QUANTITY ....... 17
EXPOSURE ADJUSTMENT/
PHOTO COPYING ......................17
REDUCTION/ENLARGEMENT/
ZOOM ..........................................19
4
INSTALLING THE SOFTWARE
SOFTWARE ................................ 20
BEFORE INSTALLATION ...........21
INSTALLING THE SOFTWARE......... 22
INDICATORS ON THE
OPERATION PANEL................... 29
USING THE PRINTER MODE..... 30
USING THE SCANNER MODE... 32
HOW TO USE THE ONLINE
MANUAL...................................... 41
5
DESCRIPTION OF SPECIAL FUNCTIONS
DESCRIPTION OF SPECIAL
FUNCTIONS................................ 42
TONER SAVE MODE..................42
USER PROGRAMS.....................43
DISPLAYING TOTAL NUMBER OF
COPIES .......................................44
7
TROUBLESHOOTING THE UNIT
TROUBLESHOOTING.................50
STATUS INDICATORS................51
MISFEED REMOVAL ..................52
DEVELOPER REQUIRED ...........56
MAINTENANCE REQUIRED.......56
SCAN HEAD LOCKING SWITCH 57
8 OPTIONS
SYSTEM CONFIGURATION ....... 58
SINGLE PASS FEEDER (AR-SP9).... 58
IF A PAPER MISFEED OCCURS IN
THE MAIN UNIT WHEN USING
THE SPF...................................... 59
250-SHEET PAPER FEED UNIT
(AR-D33)......................................60
9 APPENDIX
SPECIFICATIONS .......................61
ABOUT SUPPLIES AND OPTIONS... 64
INDEX.................................................65
1
2
3
4
5
6
7
8
6 MAINTENANCE
TONER CARTRIDGE
REPLACEMENT..........................45
TONER CARTRIDGE LIFE ......... 47
CLEANING THE UNIT.................48
9
3
Page 6

1
This chapter provides basic information for using the unit.
INTRODUCTION
USING THE MANUAL
The operation manual contains explanations of how to operate the unit, important
considerations, and maintenance procedures. To get the most out of the unit, please
read the operation manual. Please keep the operation manuals in a suitable location
that will allow for convenient future reference.
Conventions used in the manual
This operation manual explains the operation of the AR-203 model.
AR-203E
Copier with multi-bypass
Printer
Scanner
1
SPF *
(AR-SP9)
250-sheet paper feed unit *
(AR-D33)
:Standard functions and equipment
:Optional functions and equipment
*1 The optional single pass feeder (AR-SP9) can be installed.
*2 The optional 250-sheet paper feed unit (AR-D33) can be installed.
2
• Wherever "AR-xxxx" appears in this manual, please substitute your model name for "xxxx".
• Illustrations of driver screens and other computer screens show the screens that
appear in Windows XP Home Edition. Some of the names that appear in these
illustrations may differ slightly from the screens that appear in other operating systems.
• This operation manual refers to the Single Pass Feeder as the "SPF".
• In this manual, the following icons are used to provide the user with information
pertinent to the use of the unit.
Warns the user that injury may result if the contents of the warning
are not properly followed.
Cautions the user that damage to the unit or one of its components
may result if the contents of the caution are not properly followed.
Notes provide information relevant to the unit regarding
specifications, functions, performance, operation and such, that
may be useful to the user.
Indicates a letter displayed in the display.
4
Page 7
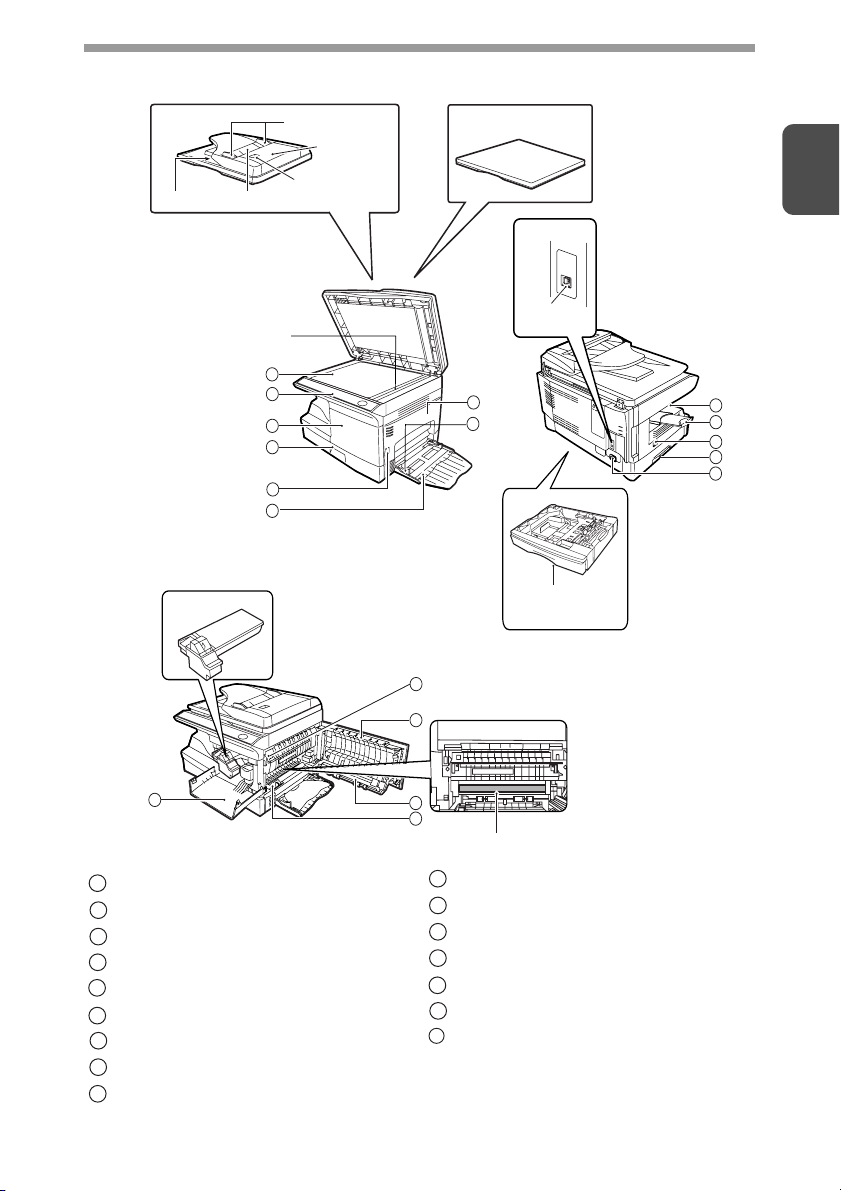
PART NAMES
SPF as an option
Exit area
Toner cartridge
Document feeder tray
SPF scan area
(option)
Original guide
Peep hole
1
2
3
4
5
6
Document
feeder cover
14
Original cover
Interface
USB
connector
7
8
Paper tray 2
as an option
1
9
10
11
12
13
3
Original table
1
Operation panel
2
Front cover
3
Paper tray
4
Side cover open button
5
Multi-bypass tray
6
Side cover
7
Bypass paper guides
8
Paper output tray
9
7
15
16
Photoconductive drum
Paper output tray extension
10
Power switch
11
Handle
12
Power cord socket
13
Fusing unit release lever
14
Transfer charger
15
Charger cleaner
16
5
Page 8
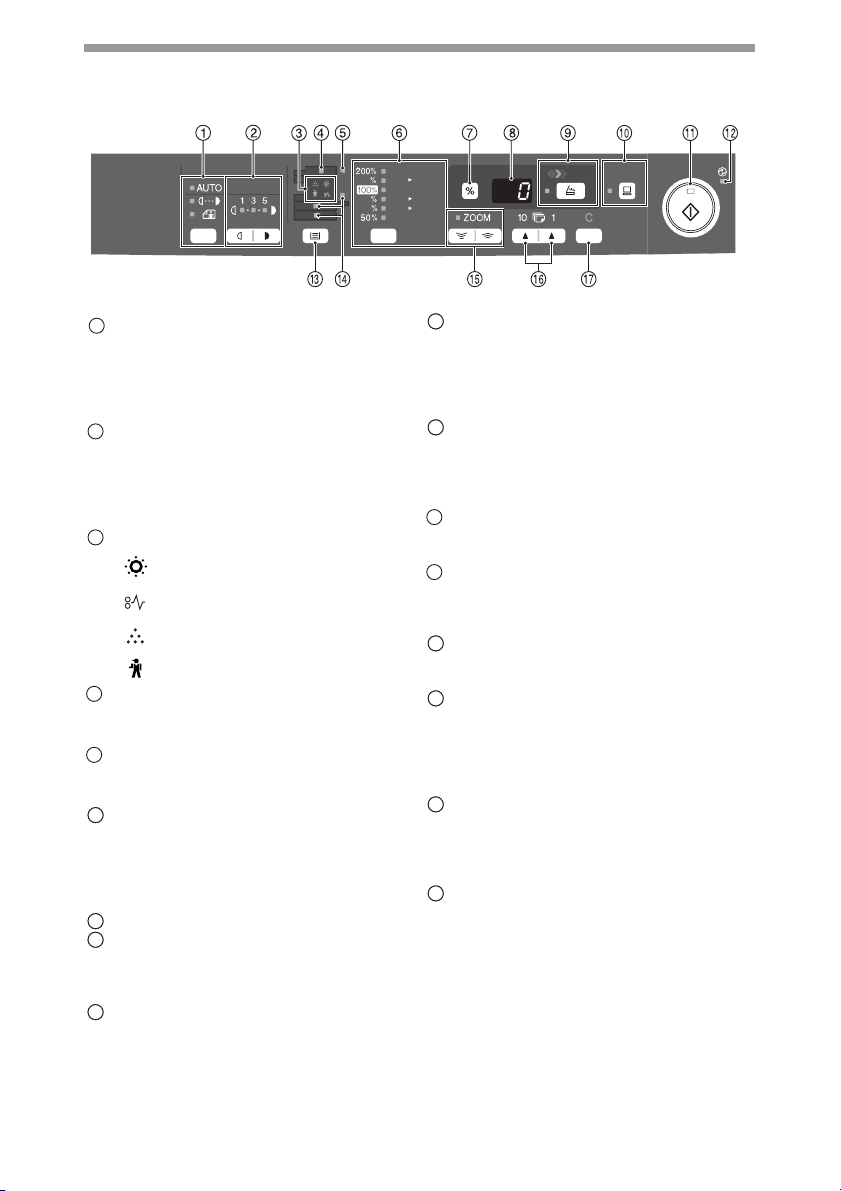
OPERATION PANEL
Exposure mode selector key and
1
indicators
Use to sequentially select the exposure
modes: AUTO, MANUAL or PHOTO.
Selected mode is shown by a lit
indicator. (p.17)
Light and dark keys and indicators
2
Use to adjust the MANUAL or PHOTO
exposure level. Selected exposure level
is shown by a lit indicator. (p.17) Use to
start and terminate user program
setting. (p.43)
Alarm indicators
3
4
5
46
57
68
79
Developer replacement required
indicator (p.56)
Misfeed indicator (p.52)
Toner cartridge replacement
required indicator (p.45)
Maintenance indicator (p.45)
SPF indicator (p.16)
Can be used only when your unit has
the SPF.
SPF misfeed indicator (p.55)
Can be used only when your unit has
the SPF.
Copy ratio selector key and
indicators
Use to sequentially select preset
reduction/enlargement copy ratios.
Selected copy ratio is shown by a lit
indicator. (p.19)
Copy ratio display (%) key (p.19)
Display
Displays the specified copy quantity,
zoom copy ratio, user program code,
and error code.
SCAN key and indicator
(p.29, p.37)
A5
A4
141
A4
B5
86
A4
A5
70
ONLINE key and indicator (p.29)
8
10
Lights up when the unit is used as a
printer and scanner. For description of
the ONLINE indicator, see
"INDICATORS ON THE OPERATION
PANEL" (p.29).
Start key and indicator
1411
• Copying is possible when the
indicator is on.
• Press to start copying.
• Use to set a user program. (p.43)
Power save indicator
12
Lights up when the unit is in a power
save mode. (p.42, p.43)
Tray select key
13
Use to select a paper feed station (paper
tray 1, paper tray 2 or multi-bypass tray)
(
p.19)
Paper feed location indicators
1014
Light up to show the selected paper
feed station.
ZOOM keys and indicator
1115
Use to select any reduction or
enlargement copy ratio from 25% to
400% in 1% increments. (When the
SPF is being used, the zoom copy ratio
range is 50% to 200%.) (p.19)
Copy quantity keys
1216
• Use to select the desired copy
quantity (1 to 99). (p.17)
• Use to make user program entries.
(p.43)
Clear key
1317
• Press to clear the display, or press
during a copy run to terminate
copying. (p.17)
• Press and hold down during standby
to display the total number of copies
made to date. (p.44)
6
Page 9

2
Follow the steps below to load paper into the tray.
LOADING PAPER
PAP ER
For best results, use only paper recommended by SHARP.
Type of paper
feeding
Paper tray Standard paper A4
Multi-bypass
tray
* Do not use non-standard envelopes, and envelopes that have metal clasps, plastic
snappers, string closures, windows, linings, self-adhesive, patches or synthetic
materials. Do not use envelopes that are filled with air or envelopes that have
labels or stamps attached. These will cause physical damage to the unit.
** For paper weighing from 105g/m
fed through the multi-bypass tray.
• Special papers such as transparency film, labels and envelope must be fed one
sheet at a time through the multi-bypass tray.
Type of media Size Weight
56g/m
Standard paper and
thick paper
Special
media
Transparency
film
Envelope* International DL
2
A5
B5
Letter
Legal
Invoice
A4
A5
A6
B5
B6
Letter**
Legal
Invoice
A4
Letter
International C5
Commercial 10
Monarch
to 128g/m2, A4 is the maximum size that can be
80g/m
56g/m
128g/m2**
2
2
2
to
to
2
7
Page 10
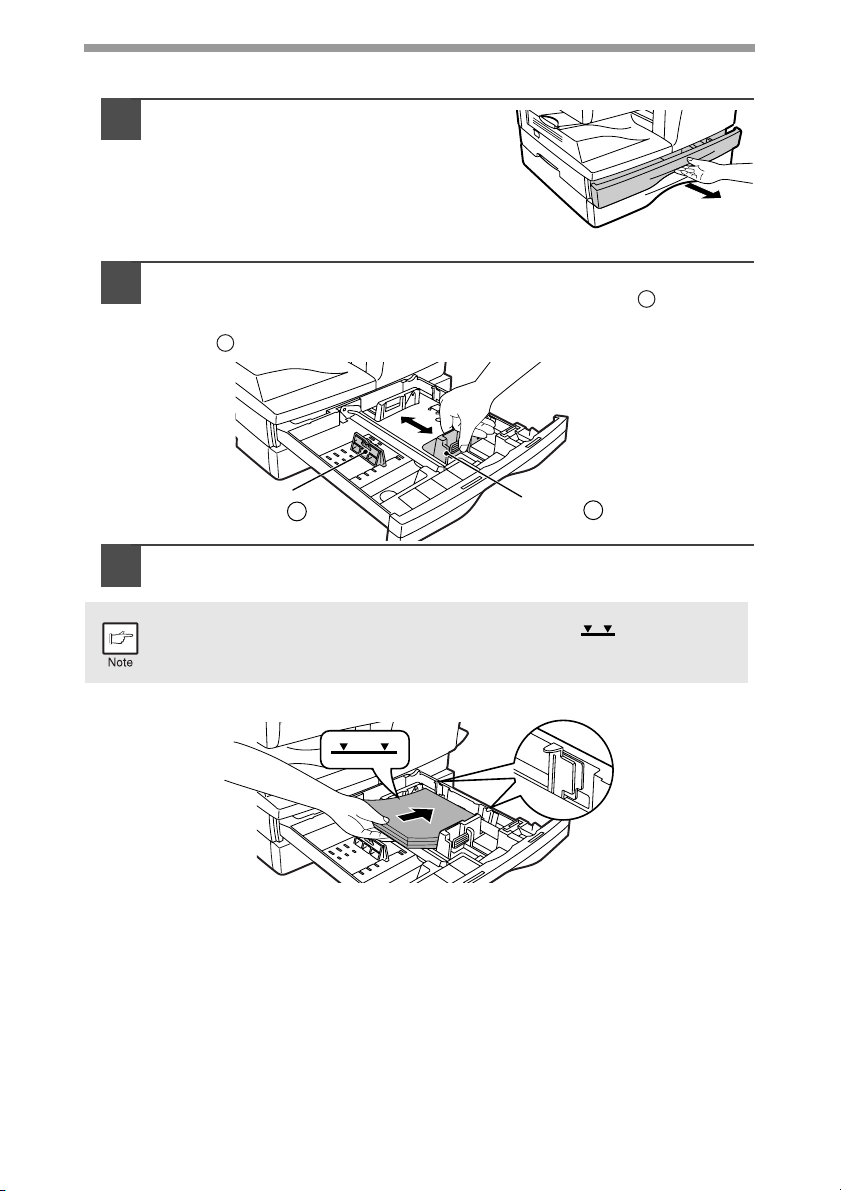
LOADING THE PAPER TRAY
Raise the handle of the paper tray
1
and pull the paper tray out until it
stops.
Adjust the paper guides on the paper tray to the copy paper
2
width and length. Squeeze the lever of paper guide and slide
the guide to match with the width of the paper. Move paper
guide to the appropriate slot as marked on the tray.
B
A
Paper
guide B
Fan the paper and insert it into the tray. Make sure the edges go
3
under the corner hooks.
Do not load paper above the maximum height line ( ). Exceeding
the line will cause a paper misfeed.
Paper
guide A
8
Page 11

Gently push the paper tray back into the unit.
4
• After loading paper, to cancel the blinking without restarting
copying, press the clear ( ) key. The in the display will go out
and the start ( ) indicator will light up.
Be sure that paper is free of rips, dust, wrinkles, and curled or bent edges.
•
• Make sure all the paper in the stack is the same size and type.
• When loading paper, ensure there is no space between the paper and
the guide, and check if the guide is not set too narrow causing the
paper to bend. Loading paper in these ways will result in document
skew or a paper jam.
• When not using the unit for an extended period, remove all paper from
the paper tray and store it in a dry place. If paper is left in the unit for
an extended period, the paper will absorb moisture from the air,
resulting in paper jams.
When adding new paper to the paper tray, remove the old paper already
•
contained in the tray. Placing new paper on top of the paper already
contained in the tray may result in feeding two sheets at one time.
•
If output paper curls, it may help to turn the paper over when loading it in
the tray.
2
9
Page 12
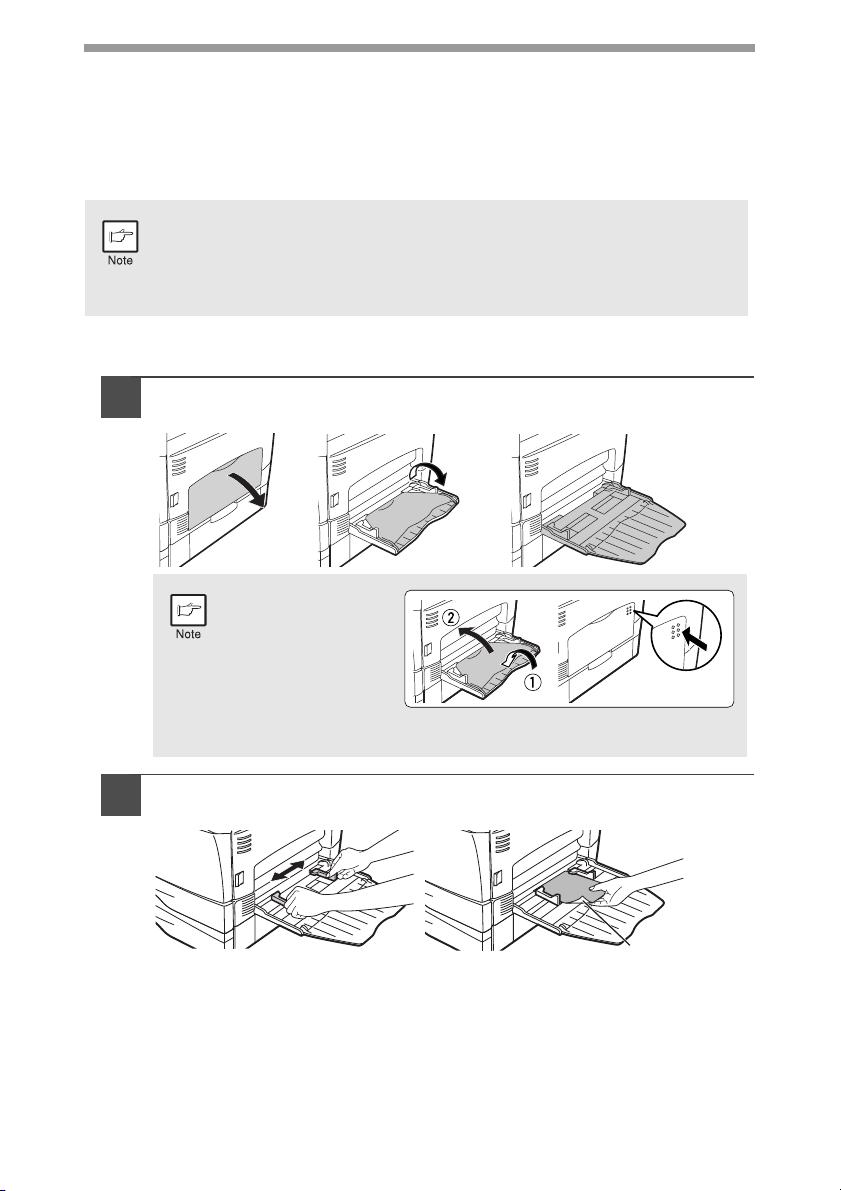
BYPASS FEED (including special paper)
The multi-bypass tray can be used to feed standard paper, transparency film, labels,
envelopes, and other special purpose paper. Paper measuring from A6 to A4 and in
the weight range of 56 to 128g/m
105 to 128g/m2, A4 is the maximum size.)
• The multi-bypass tray can hold maximum of 50 sheets of paper.
(Capacity will vary depending on the type of paper loaded.)
• The original image must be smaller than the paper or media for
copying. If the original image is bigger than the paper or media, this
may cause smudges on the edges of the copies.
The multi-bypass tray
Open the multi-bypass tray and extend the tray.
1
To close the multibypass tray, perform
step 1 and then step
2 in the illustration
and push the round
projections at the
right of the tray until
they click.
2
can be used in this tray. (For paper weighing from
10
Set the paper guides to the paper width. Insert the paper (print
2
face down) all the way into the multi-bypass tray.
Print face
Page 13
• Paper must be fed narrow side into the feed slot.
• Transparency film, labels, envelopes, and other special
purpose papers must be fed individually.
• When copying onto transparency film, remove each copy
promptly. Do not let copies stack up. When loading an
envelope, make sure that it is straight and flat.
Press the tray select ( ) key to select the multi-bypass tray.
3
Note for loading envelopes
• Envelopes must be fed narrow side into the feed slot one at a time.
• Do not use non-standard envelopes, and envelopes that have metal
clasps, plastic snappers, string closures, windows, linings, self-adhesive,
patches or synthetic materials. Do not use envelopes that are filled with
air or envelopes that have labels or stamps attached.
• Envelopes of which the surface is not flat because of embossing may
cause the copies/prints to become smudged.
• Under high humidity and temperature conditions the glue flaps on some
envelopes may become sticky and be sealed closed when copied/
printed.
• Use only envelopes which are flat and crisply folded. Curled or poorly
formed envelopes may be poorly copied/printed or may cause misfeeds.
• It is recommended that you perform a test copy before performing the
actual copied/printed job.
• Be sure to select either Com 10, DL, C5 or Monarch on the paper size
setting of the printer driver. (For detailed information on printer driver,
refer to the online manual.)
2
Note for loading thick paper
Copying on thick paper requires higher fusing temperature setting. Set the user
program 29 to "2 (High)" when using thick paper. (See page 43 and 44.)
11
Page 14
3
This chapter explains basic and other copying functions.
The unit is equipped with a one-page memory buffer. This memory allows the unit to
scan an original once only and make up to 99 copies. This feature improves
workflow, reduces operation noise from the copier, and provides higher reliability by
reducing wear and tear on the scanning mechanism.
If the unit does not function properly during use, or if a function cannot
be used, see "TROUBLESHOOTING THE UNIT" (p.50).
MAKING COPIES
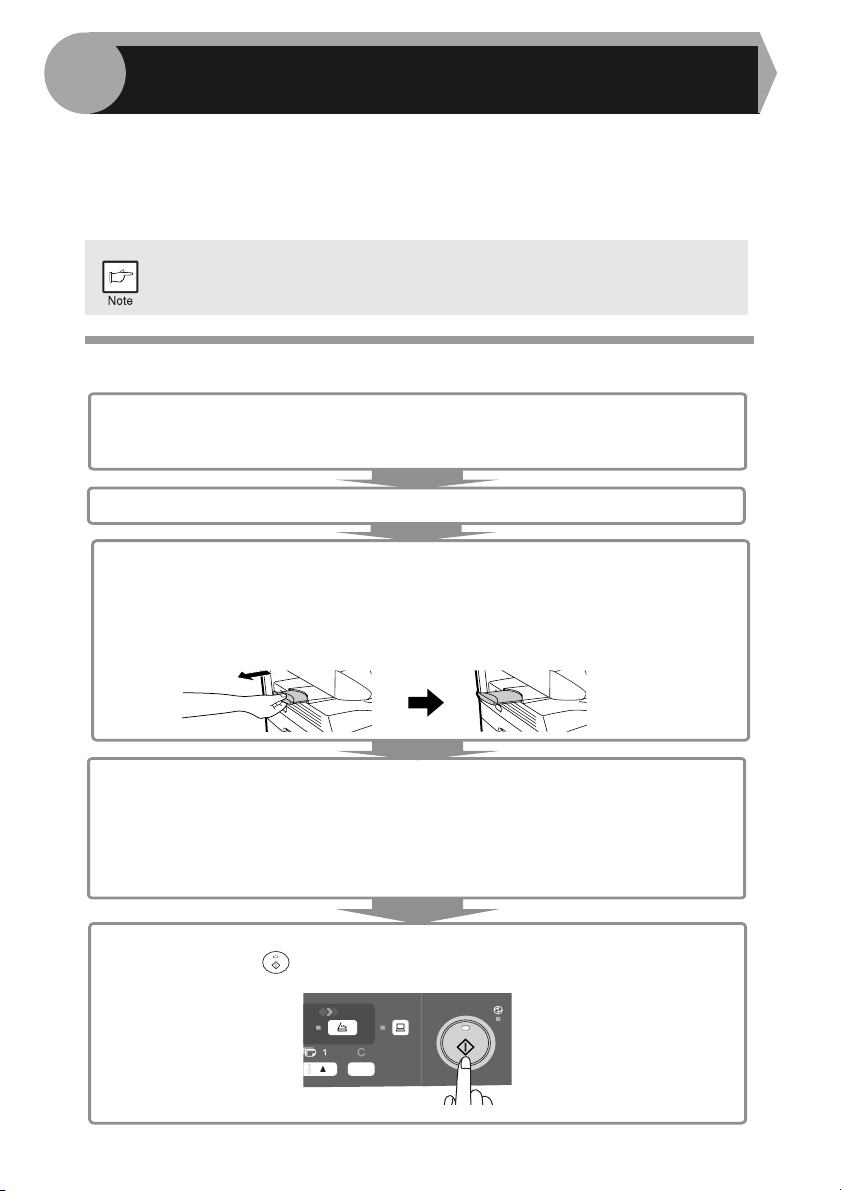
COPY FLOW
1
Make sure that paper has been loaded in the paper tray (p.8) or multibypass tray (p.10), and check the paper size (p.7).
If paper is not loaded, see page 8.
2 Turn on the unit (p.13).
3
Place the original.
If you are using the original table, see "Using the original table" (p.15).
If you are using the SPF, see "Using the SPF" (p.16).
When copying onto paper larger than A4, pull out the paper output tray
extension.
12
4
Select the copy settings.
If you wish to copy using the initial settings (p.14), proceed to the next step.
To set the number of copies, see page 17.
To adjust the resolution and contrast settings, see page 17.
To enlarge or reduce the copy, see page 19.
To change the tray used, see page 19.
5 Start copying.
Press the start ( ) key.
Page 15
CONNECTING THE POWER CORD
If you use the unit in a country other than the country where the unit was
purchased, you will need to make sure that your local power supply is
compatible with your model. If you plug the unit into an incompatible
power supply, irreparable damage to the unit will result.
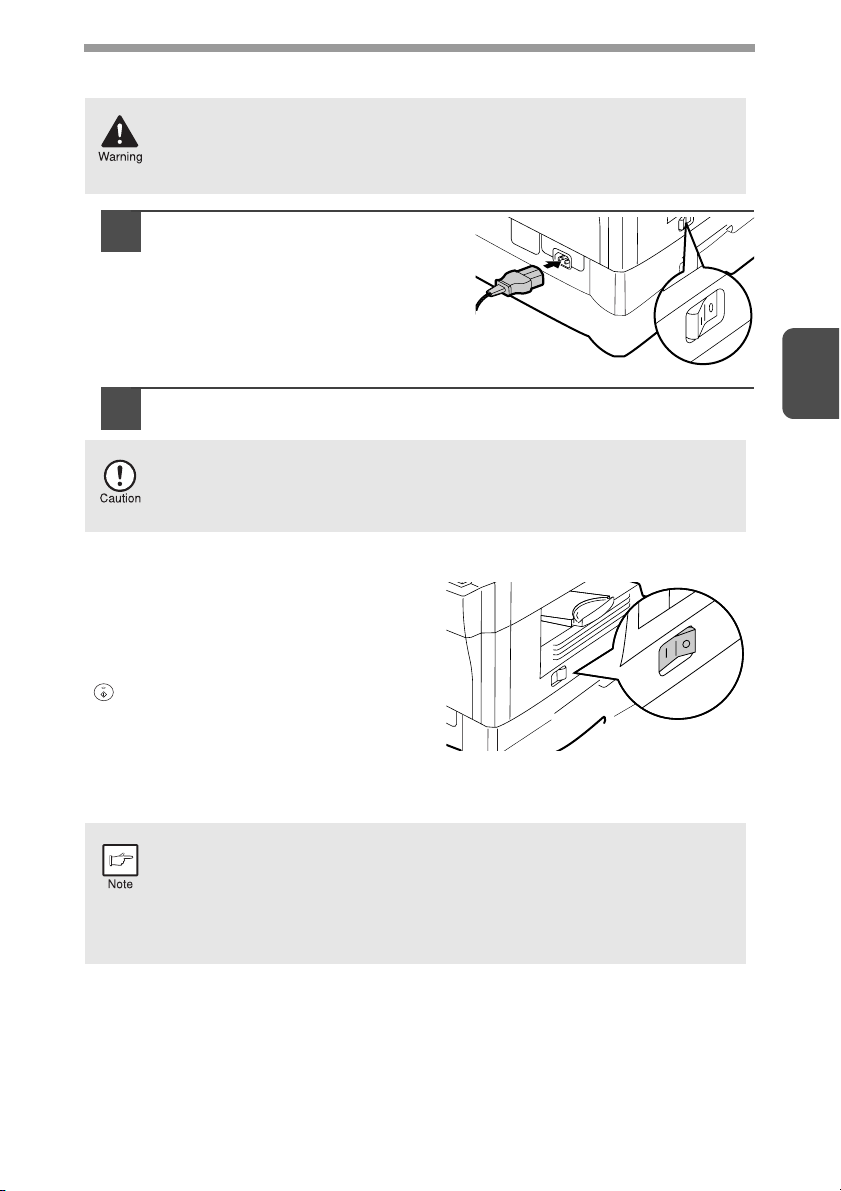
Ensure that the power switch of
1
the unit is in the OFF position.
Insert the attached power cord
into the power cord socket at the
rear of the unit.
Plug the other end of the power cord into the nearest outlet.
2
Only insert the power cord into a properly grounded wall socket.
Do not use extension cords or power strips.
Power on
Ensure that the power switch of the unit is
in the OFF position. Plug the other end of
the power cord into the nearest outlet.
Turn the power switch on the left side of
the unit to the "ON" position. The start
( ) indicator will light up and other
indicators which show the initial settings
of the operation panel will also light up to
indicate the ready condition. For the initial
settings, see the "Initial settings of
operation panel" described on the next page.
• The unit will enter a power save mode once the set time has elapsed
without any unit operation. The settings of the power save modes can
be modified. See "USER PROGRAMS" (p.43).
• The unit will return to the initial settings a preset amount of time after
the end of copy or scanning job. The preset amount of time (auto
clear time) can be changed. See "USER PROGRAMS" (p.43).
3
13
Page 16
About the scan head
The scan head lamp remains on constantly when the unit is in the ready condition
(when the start ( ) indicator is illuminated).
The unit adjusts the scan head lamp periodically to maintain copying quality. At this
time, the scan head moves automatically. This is normal and does not indicate unit
trouble.
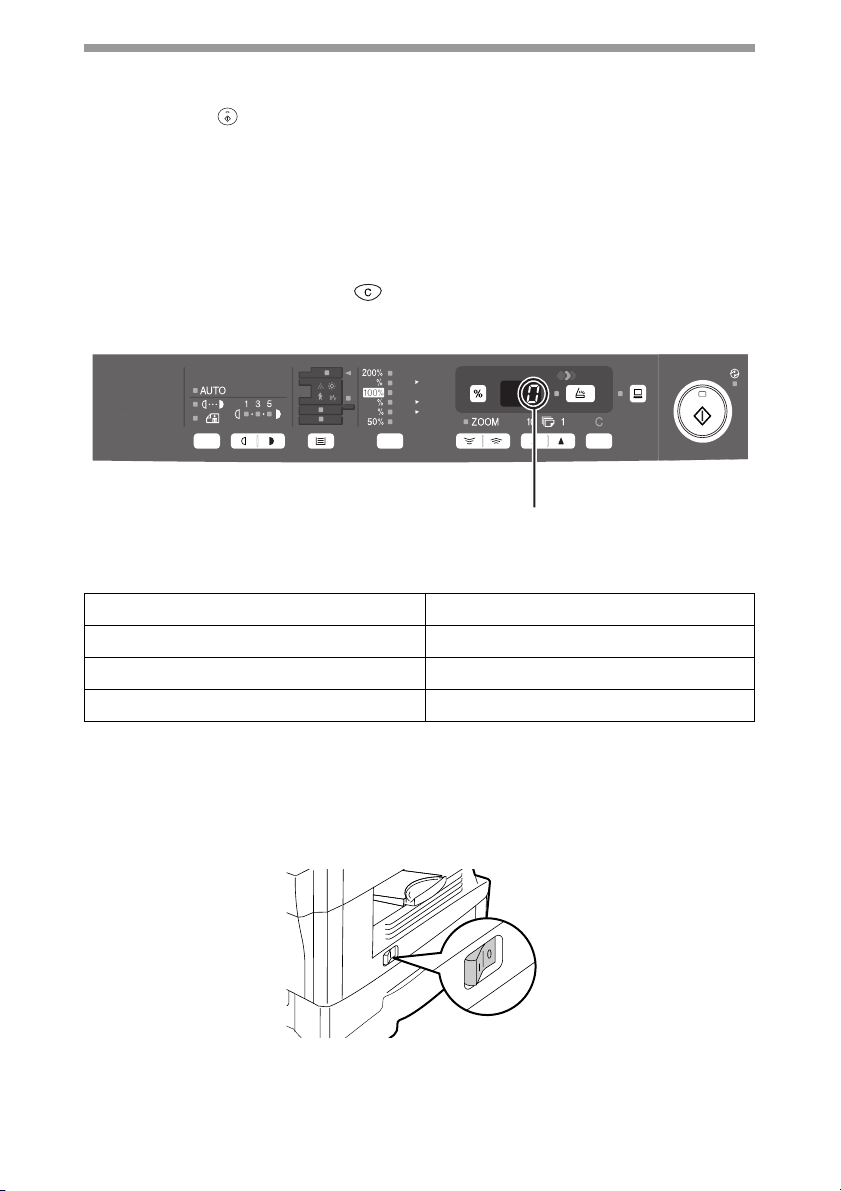
Initial settings of operation panel
When the unit power is on, the operation panel will revert to the initial settings when
the time set with the "Auto clear time" setting (p.42) elapses after a copy or scanner
job is finished, or when the clear ( ) key is pressed twice.
The initial settings of the operation panel are shown below.
A5
A4
141
A4
B5
86
A4
A5
70
"0" is displayed in the display.
When copying is begun in this state, the settings in the following table are used.
Copy quantity 1 copy
Exposure adjustment AUTO
Zoom 100%
Tray Paper tray 1
14
Power off methods
If not used for a certain period of time, the unit will automatically enter auto power
shut-off mode (p.43) in order to minimise power consumption. In cases where the
machine will not be used for a long time, turn off the power switch and remove the
power cord from the outlet.
Page 17
ORIGINAL PLACEMENT
Using the original table
• The original table can read up to A4 original.
• Image loss 4mm can occur at the leading and trailing edges of the
copies. Also image loss 4.5mm in total can occur along the other
edges of the copies.
• When copying a book or an original which has been folded or a
crumpled original, press down the original cover lightly. If the original
cover is not securely closed, the copies may be striped or blurred.
• When using the document glass to scan an original, make sure that an
original is not placed in the SPF.
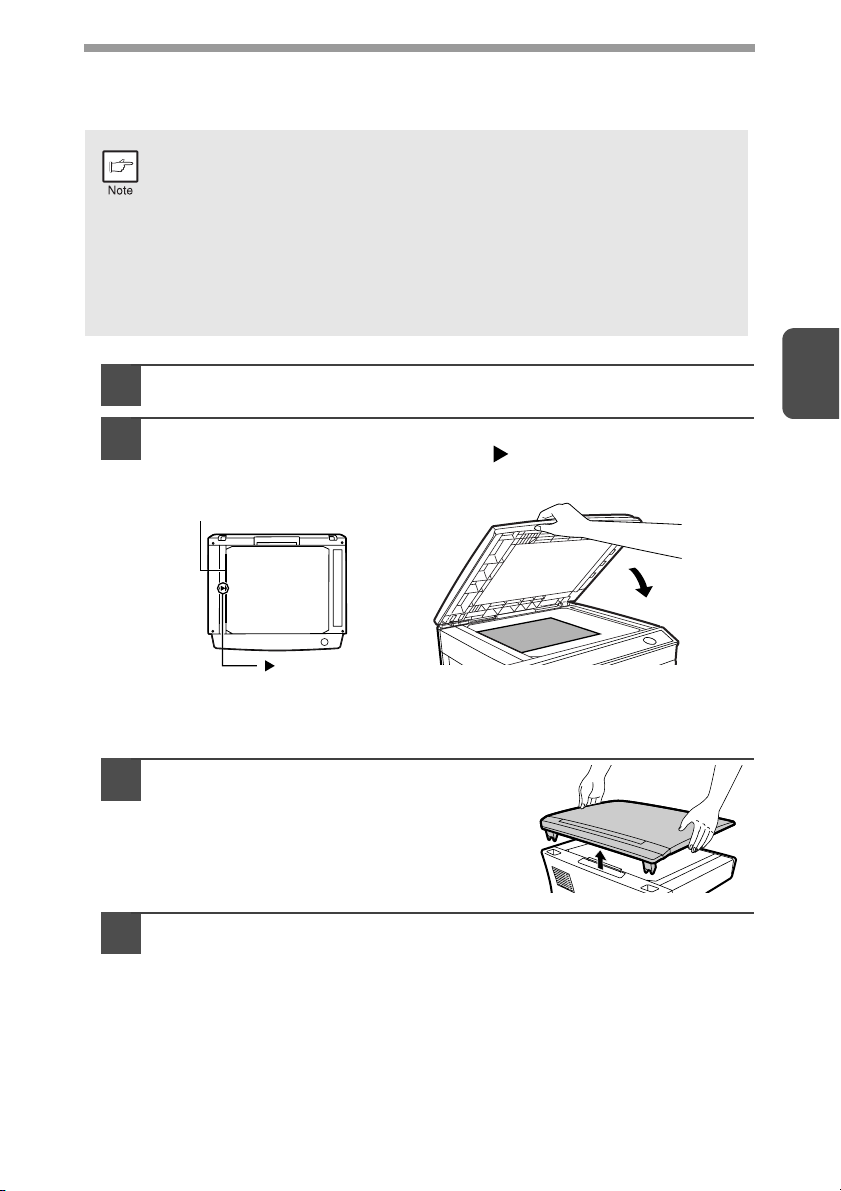
Open the original cover, and place the original.
1
Place an original face down on the original table. Align it with
2
the original scale and the centring ( ) mark. Gently close the
original cover.
Original scale
3
mark
Setting a large original
The original cover can be removed to allow copying of bulky objects.
Simply lift the original cover straight
1
up.
To reattach the original cover, reverse the above procedure.
2
15
Page 18
Using the SPF
The SPF is designed to hold up to 50 originals measuring from A5 to A4 and
weighting from 56 to 90 g/m2.
• Before feeding originals in the original feeder tray, be sure to remove
any staples or paper clips from them.
• Before placing curled or wavy originals into the original feeder tray, be
sure to flatten them. If not, original misfeeds may result.
• The SPF ( ) indicator on the operation panel will light up. If this
indicator does not light up, the originals are not properly set or the
SPF is not properly closed.
• Badly damaged originals may misfeed in the SPF. It is recommended
that such originals be copied from the original table.
• Special originals such as transparency film should not be fed through
the SPF, but should be placed directly on the original table.
• Image loss (max. 4 mm) can occur at the leading and trailing edges of
the copies. Also image loss (max. 4.5 mm in total) can occur along the
other edges of the copies.
• To stop continuous copying using the SPF, press the clear ( )
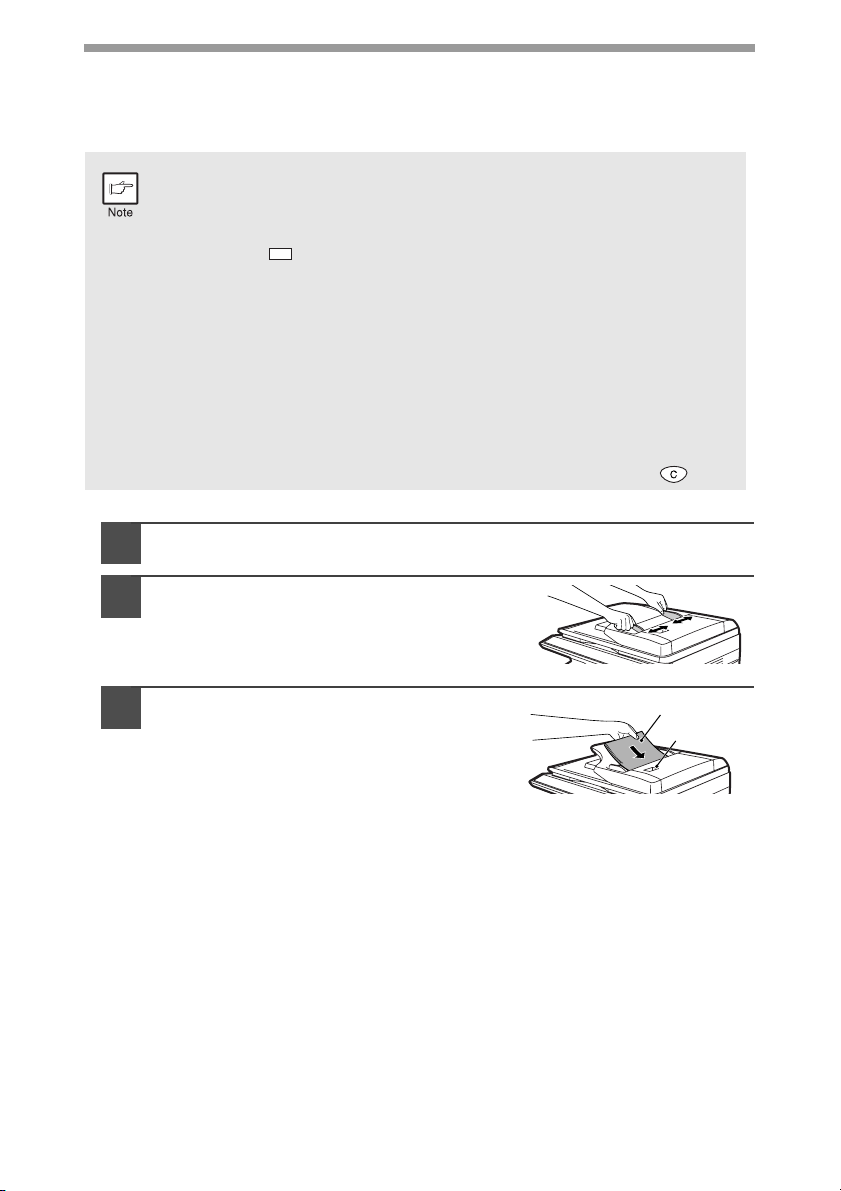
Make sure that no original is left on the original table.
1
Adjust the original guides to the size
2
of originals.
key.
16
Set the originals face up in the
3
original feeder tray.
Use the peep hole (see the illustration at
right) to check the position of the original.
There is an original top edge mark U in the
peep hole. Align the top edge of the original
with this mark.
Original face up
Peep hole
Page 19
SET THE COPY QUANTITY
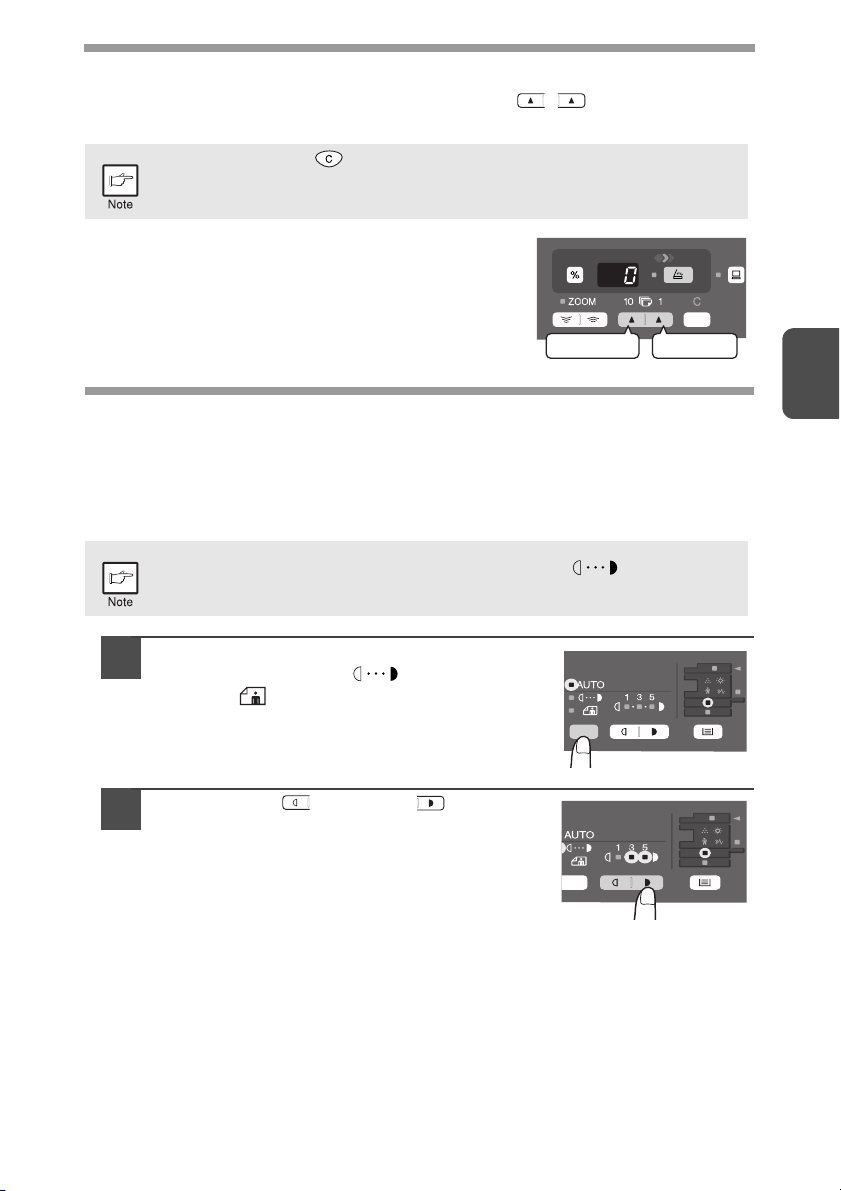
Set the number of copies using the two copy quantity ( , ) keys when copying
from the original table or from the SPF if installed.
• Press the clear ( ) key to clear an entry if a mistake is made.
• A single copy can be made with the initial setting, i.e., when "0" is
displayed.
• Press the right copy quantity key to set the unit digit
from 0 to 9. This key will not change the tens digit.
• Press the left copy quantity key to set the tens digit
from 1 to 9.
A4
B5
A5
Tens digit Unit digit
EXPOSURE ADJUSTMENT/PHOTO COPYING
Exposure adjustment
Copy density adjustment is not required for most originals in the automatic exposure
mode. To adjust the copy density manually or to copy photographs, the exposure
level can be adjusted in 2 steps manually.
The copy resolution used for AUTO and MANUAL ( ) mode can be
changed. (p.43)
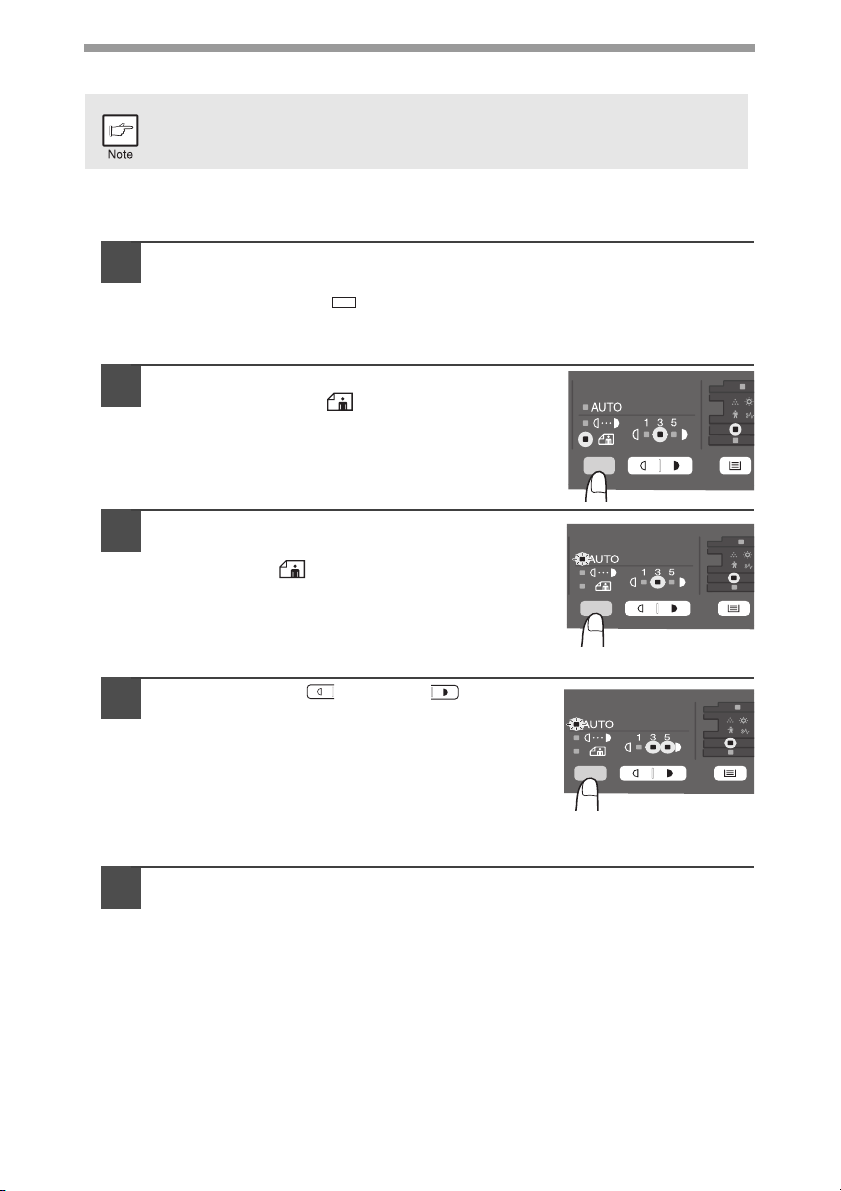
Press the exposure mode selector key to
1
select the MANUAL ( ) mode or
PHOTO ( ) mode.
3
Use the light ( ) and dark ( ) keys to
2
adjust the exposure level. If exposure level
2 is selected, the two left-handmost
indicators for that level will light up
simultaneously. Also, if level 4 is selected,
the two right-handmost indicators for that
level will light up simultaneously.
17
Page 20
Automatic exposure adjustment
This automatic exposure level will remain in effect until you change it
again by this procedure.
The automatic exposure level can be adjusted to suit your copying needs. This level
is set for copying from the original table and copying from the SPF respectively.
When adjusting the automatic exposure level for copying from
1
the SPF, place an original in the original feeder tray and make
sure that the SPF ( ) indicator lights up. When adjusting the
level for copying from the original table, make sure that no
original is left in the original feeder tray.
Press the exposure mode selector key to
2
select the PHOTO ( ) mode.
Press and hold down the exposure mode
3
selector key for approximately 5 seconds.
The PHOTO ( ) indicator will go out and
the AUTO indicator will begin to blink. One
or two light and dark indicators
corresponding to the automatic exposure
level which has been selected will light up.
18
Press the light ( ) or dark ( ) key to
4
lighten or darken the automatic exposure
level as desired. If exposure level 2 is
selected, the two left-handmost indicators
for that level will light up simultaneously.
Also, if level 4 is selected, the two righthandmost indicators for that level will
light up simultaneously.
Press the exposure selector key. The AUTO indicator will stop
5
blinking and light up steadily.
Page 21
REDUCTION/ENLARGEMENT/ZOOM
Three preset reduction ratios and two enlargement ratios can be selected. The zoom
function enables copy ratio selection from 25% to 400% in 1% increments.
Set the original and check the paper size.
1
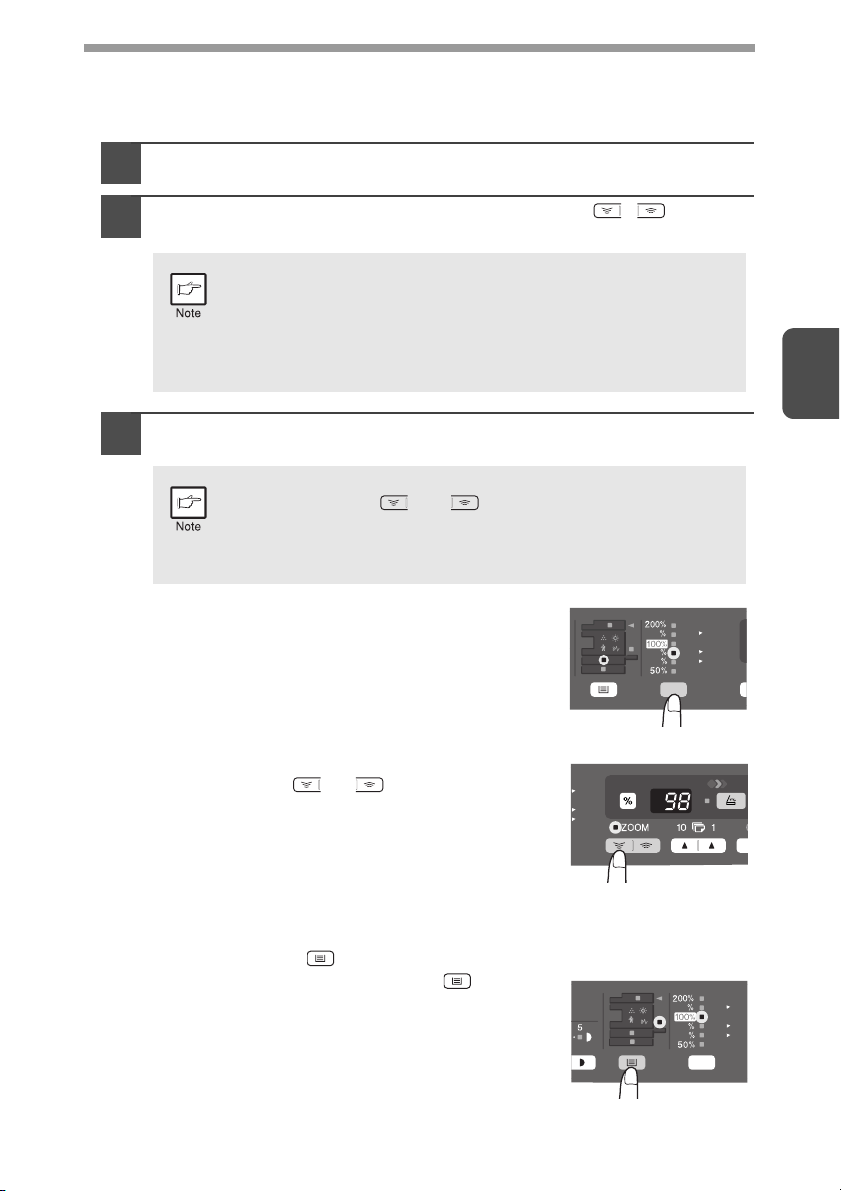
Use the copy ratio selector key and/or ZOOM ( , ) keys to
2
select the desired copy ratio.
• To verify a zoom setting without changing the zoom ratio,
press and hold down the copy ratio display (%) key. When the
key is released, the display will return to the copy quantity
display.
• To reset the ratio to 100%, press the copy ratio selector key
repeatedly until the 100% indicator lights up.
Set the reduction/enlargement ratio.
3
To decrease or increase the zoom ratio rapidly, press and hold
down the ZOOM ( ) or ( ) key. However the value will
stop at the preset reduction or enlargement ratios. To move
beyond these ratios, release the key and then press and hold it
down again.
To select a preset copy ratio:
Preset reduction and enlargement ratios are:
50%, 70%, 86%, 141%, and 200%.
A5
A4
141
A4
B5
86
A4
A5
70
3
To select a zoom ratio:
When a ZOOM (
or ) key is pressed, the
ZOOM indicator will light up and the zoom ratio will
be displayed in the display.
Selecting the tray
Press the tray select () key.
Each time you press the tray select ( ) key, the
location indicated by the paper feed location
indicator changes in the following order: paper tray
1, paper tray 2 if installed, multi-bypass tray.
A4
B5
A5
A5
A4
141
A4
B5
86
A4
A5
70
19
Page 22

4
This chapter explains how to install and configure the software that is required for the
printer and scanner functions of the machine. The procedure for viewing the Online
Manual is also explained.
INSTALLING THE SOFTWARE
• The screen images in this manual are mainly for Windows XP. With
other versions of Windows, some screen images may be different
from those in this manual.
• This manual refers to the CD-ROM that accompanied the machine
simply as "CD-ROM".
SOFTWARE
The CD-ROM that accompanies the machine contains the following software:
MFP driver
Printer driver
The printer driver enables you to use the printer function of the machine.
The printer driver includes the Print Status Window. This is a utility that monitors
the machine and informs you of the printing status, the name of the document
currently being printed, and error messages.
Scanner driver*
The scanner driver allows you to use the scanning function of the machine with
TWAIN-compliant and WIA-compliant applications.
20
Sharpdesk*
Sharpdesk is an integrated software environment that makes it easy to manage
documents and image files, and launch applications.
Button Manager*
Button Manager allows you to use the scanner menus on the machine to scan a
document.
*The scanning feature can only be used with computers that are connected to the
machine by a USB cable.
Page 23
BEFORE INSTALLATION
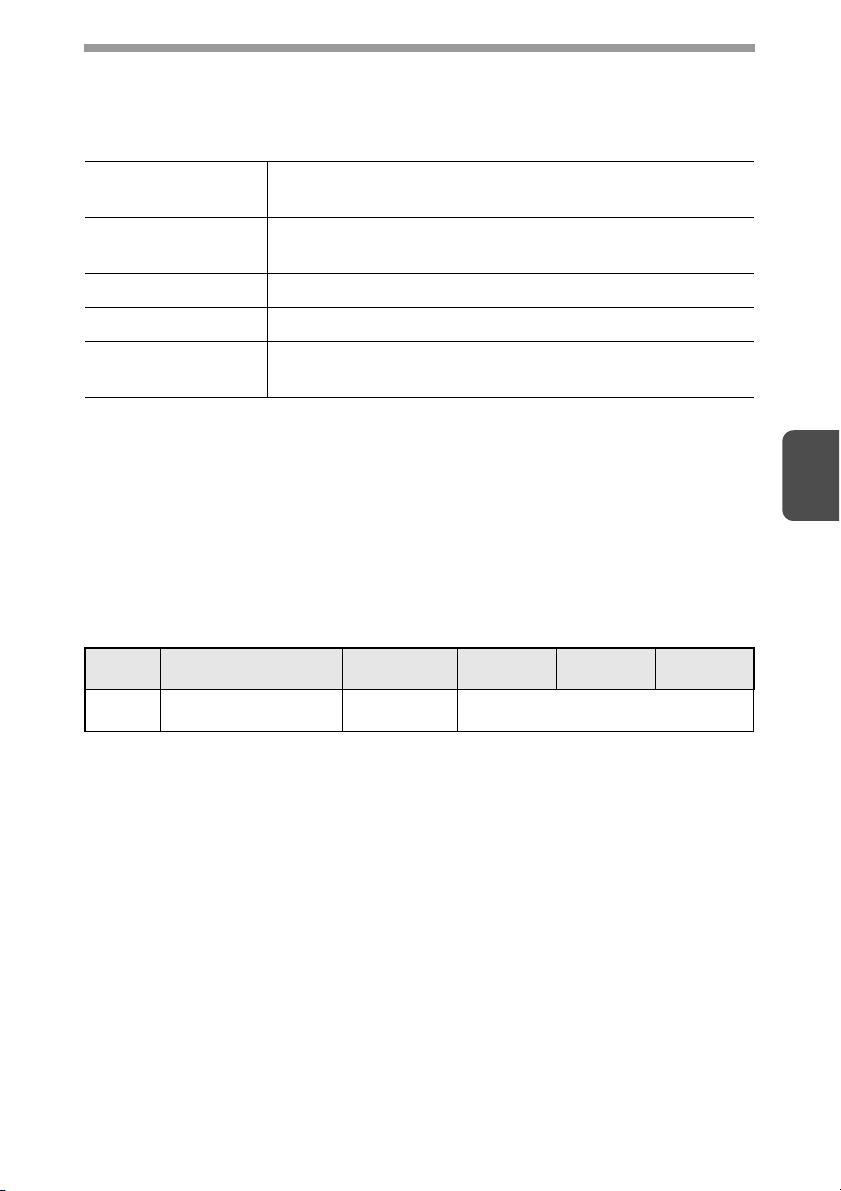
Hardware and software requirements
Check the following hardware and software requirements in order to install the software.
Computer type IBM PC/AT or compatible computer equipped with a
USB 2.0*
3
Operating system*2 *
Display 800 x 600 dots (SVGA) display with 256 colors (or better)
Hard disk free space 150 MB or more
Other hardware
requirements
*1 Compatible with Windows 98, Windows Me, Windows 2000 Professional,
Windows XP or Windows Vista preinstalled model standardly equipped with a
USB port.
*2 Printing is not available in MS-DOS mode.
*3 The machine does not support printing from a Macintosh environment.
*4 Administrator's rights are required to install the software using the installer.
Windows 98, Windows Me, Windows 2000 Professional*4,
Windows XP*4, Windows Vista*
An environment on which any of the operating systems
listed above can fully operate
1
4
Installation environment and usable software
The following table shows the drivers and software that can be installed for each
version of Windows and interface connection method.
Cable Operating system
USB Windows 98/Me/
2000/XP/Vista
* The printer driver that is installed will vary depending on the type of connection
between the machine and your computer.
Printer
driver
Available* Available
Scanner
driver
Button
Manager
Sharpdesk
4
21
Page 24
INSTALLING THE SOFTWARE
• In the following explanations it is assumed that the mouse is
configured for right hand operation.
• The scanner function only works when using a USB cable.
• If an error message appears, follow the instructions on the screen to
solve the problem. After the problem is solved, the installation
procedure will continue. Depending on the problem, you may have to
click the "Cancel" button to exit the installer. In this case, reinstall the
software from the beginning after solving the problem.
Using the machine with a USB connection
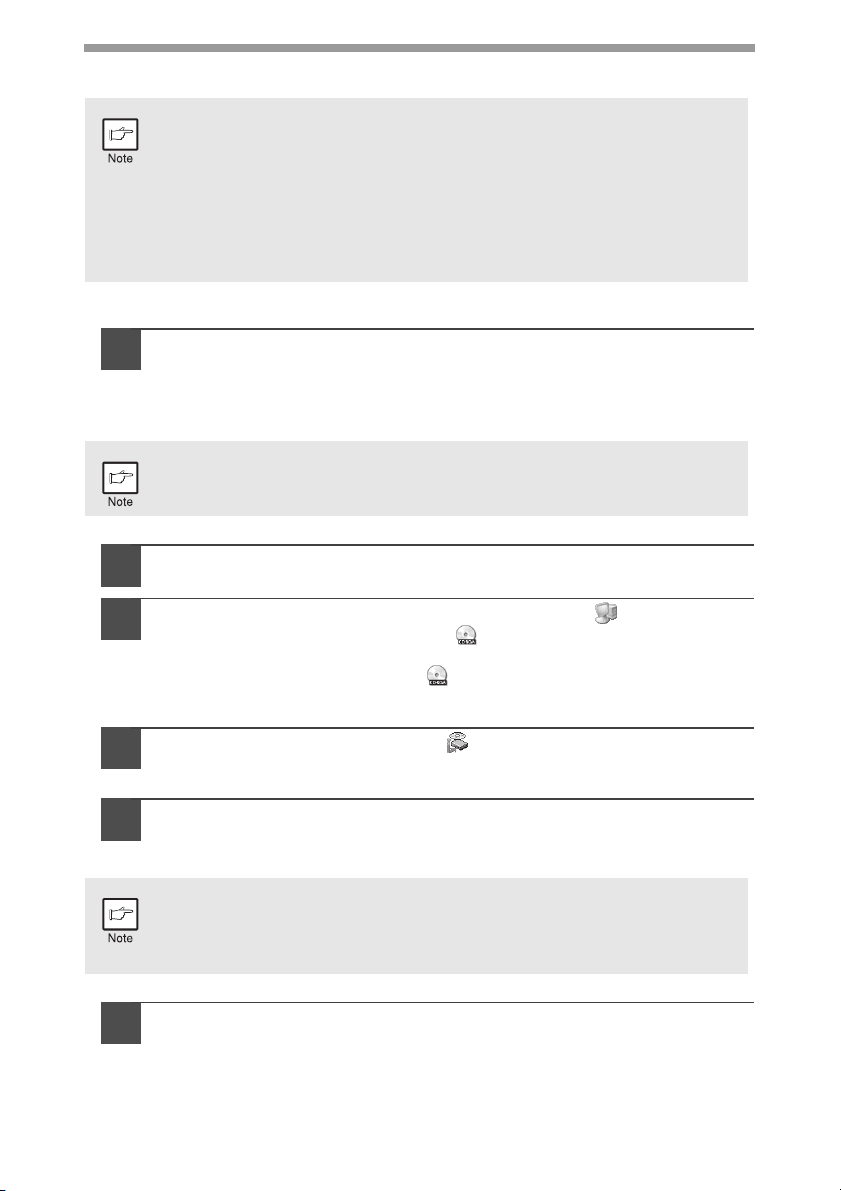
The USB cable must not be connected to the machine. Make
1
sure that the cable is not connected before proceeding.
If the cable is connected, a Plug and Play window will appear. If this
happens, click the "Cancel" button to close the window and disconnect the
cable.
The cable will be connected in step 13.
Insert the CD-ROM into your computer's CD-ROM drive.
2
Click the "start" button, click "My Computer" ( ), and then
3
double-click the CD-ROM icon ( ).
• On Windows Vista, click the "Start" button, click "Computer" and then
double-click the CD-ROM icon ( ).
• On Windows 98/Me/2000, double-click "My Computer", and then
double-click the CD-ROM icon.
Double-click the "setup" icon ( ).
4
On Windows Vista, if a message screen appears asking you for
confirmation, click "Allow".
The "SOFTWARE LICENSE" window will appear. Make sure
5
that you understand the contents of the software license, and
then click the "Yes" button.
22
You can show the "SOFTWARE LICENSE" in a different language by
selecting the desired language from the language menu. To install the
software in the selected language, continue the installation with that
language selected.
Read the "Readme First" in the "Welcome" window and then
6
click the "Next" button.
7
8
9
Page 25
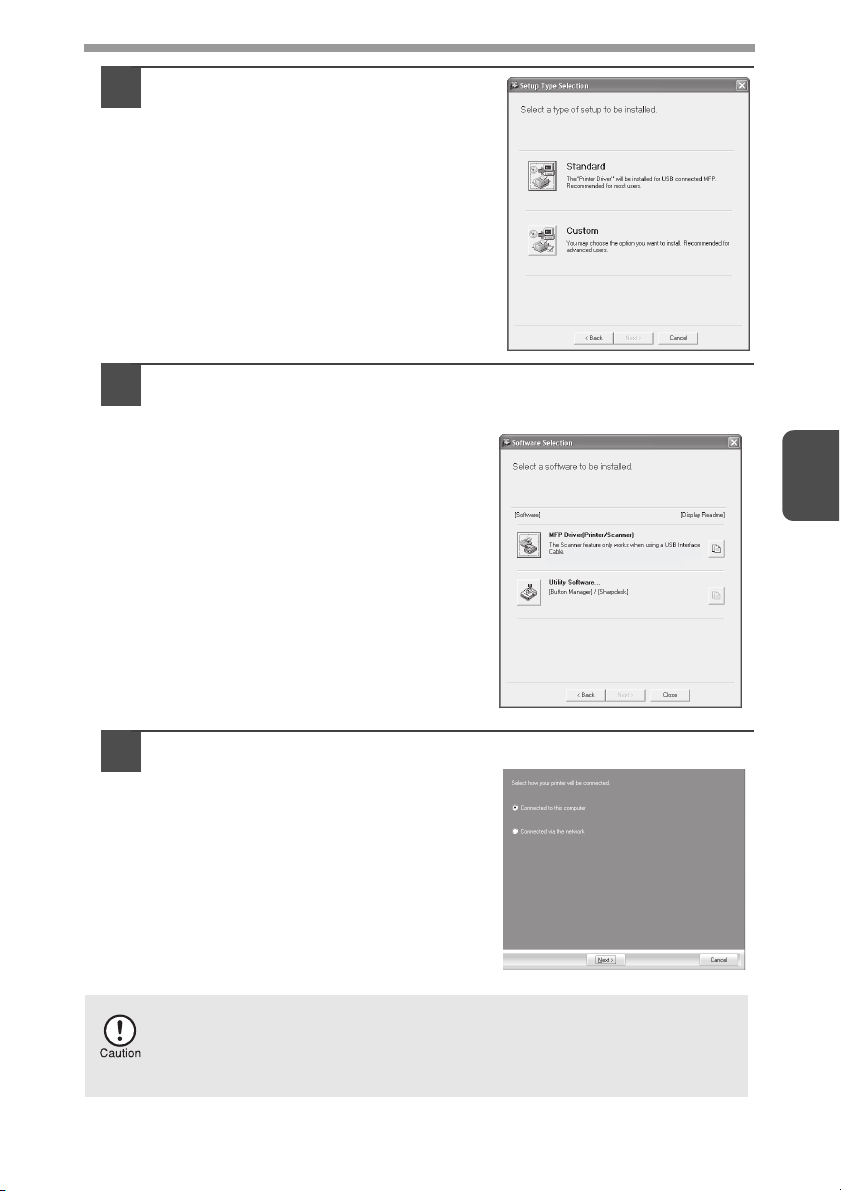
To install all of the software, click
7
the "Standard" button and go to
step 12.
To install particular packages,
click the "Custom" button and go
to next step.
Click the "MFP Driver" button.
8
Click the "Display Readme" button to show information on packages that
are selected.
4
Select "Connected to this computer" and click the "Next" button.
9
Follow the on-screen instructions.
When "The installation of the SHARP
software is complete." appears, click the
"OK" button and go to step 12.
• If you are using Windows Vista and a security warning window
appears, be sure to click "Install this driver software anyway".
• If you are running Windows 2000/XP and a warning message appears
regarding the Windows logo test or digital signature, be sure to click
"Continue Anyway" or "Yes".
23
Page 26
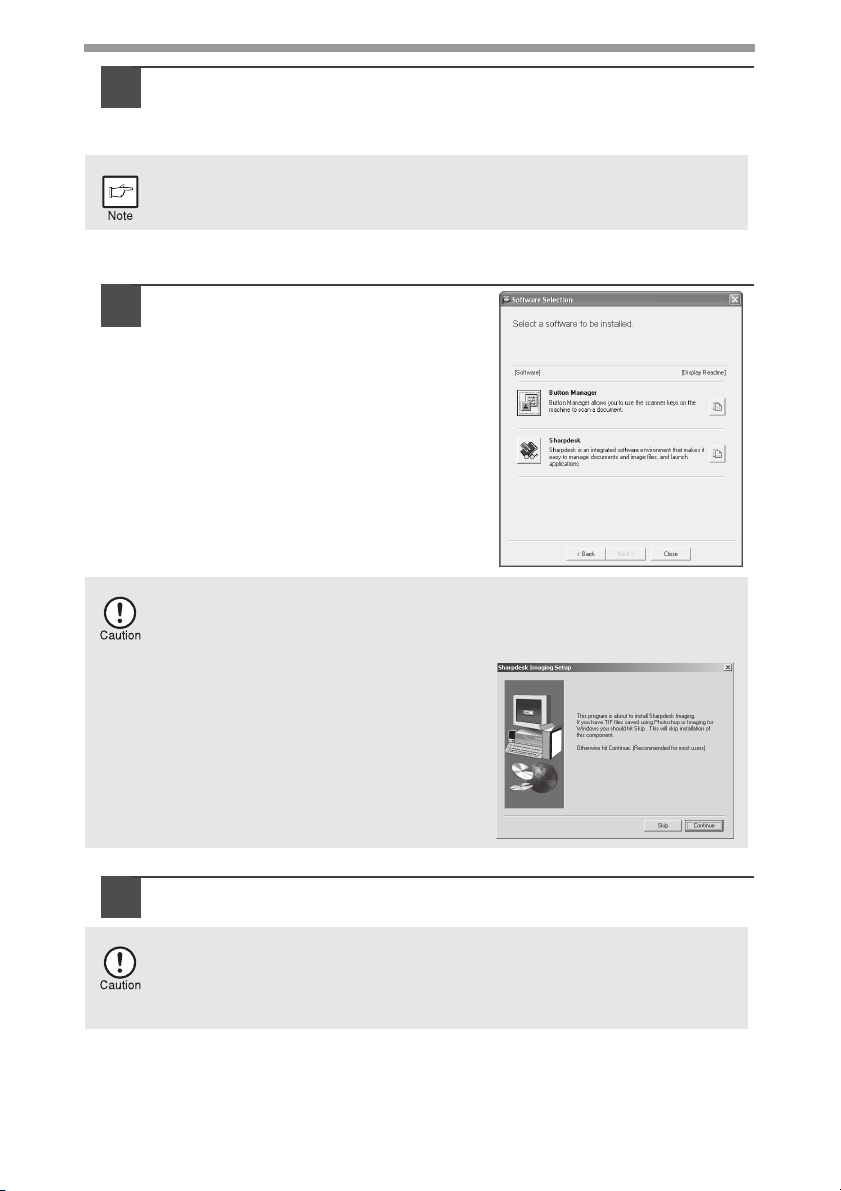
You will return to the window of step 8. If you wish to install
10
Button Manager or Sharpdesk, click the "Utility Software" button.
If you do not wish to install the Utility Software, click the "Close" button and
go to step 12.
After the installation, a message prompting you to restart your computer
may appear. In this case, click the "Yes" button to restart your computer.
Installing the Utility Software
Click the "Button Manager" or the
11
"Sharpdesk" button.
Click the "Display Readme" button to
show information on packages that are
selected.
Follow the on-screen instructions.
In Windows 98/Me/2000, if the following screen appears, click the "Skip"
button or the "Continue" button as appropriate to continue the
Sharpdesk installation.
24
If "Skip" is selected, the Sharpdesk
installation will continue without
installing Sharpdesk Imaging.
If "Continue" is selected, Sharpdesk
Imaging will be installed. If Imaging for
Windows is installed on your computer,
Sharpdesk Imaging will overwrite
Imaging for Windows.
When installing is finished, click the "Close" button.
12
• If you are using Windows Vista and a security warning window
appears, be sure to click "Install this driver software anyway".
• If you are running Windows 2000/XP and a warning message appears
regarding the Windows logo test or digital signature, be sure to click
"Continue Anyway" or "Yes".
A message will appear instructing you to connect the machine to your
computer. Click the "OK" button.
Page 27
After the installation, a message prompting you to restart your computer
may appear. In this case, click the "Yes" button to restart your computer.
Make sure that the power of the machine is turned on, and then
13
connect the USB cable (p. 26).
Windows will detect the machine and a Plug and Play screen will appear.
Follow the instructions in the plug and play window to install
14
the driver.
Follow the on-screen instructions.
• If you are using Windows Vista and a security warning window
appears, be sure to click "Install this driver software anyway".
• If you are running Windows 2000/XP and a warning message appears
regarding the Windows logo test or digital signature, be sure to click
"Continue Anyway" or "Yes".
A "USB 2.0 Composite Device" installation window may appear prior to
this procedure. In this case, follow the instructions in the window to
install the USB 2.0 Composite Device.
This completes the installation of the software.
• If you installed Button Manager, set up Button Manager as explained in "Setting up
the Button Manager" (p.32).
• If you installed Sharpdesk, the Sharpdesk setup screen will appear. Follow the
instructions in the screen to set up Sharpdesk.
4
25
Page 28
Connecting a USB cable
Follow the procedure below to connect the machine to your computer.
A USB cable for connecting the machine to your computer is not included with the
machine. Please purchase the appropriate cable for your computer.
• USB is available with a PC/AT compatible computer that was
originally equipped with USB and had Windows 98, Windows Me,
Windows 2000 Professional, Windows XP Professional or Windows
Vista preinstalled.
Do not connect the USB cable before installing the printer driver. The
•
USB cable should be connected during installation of the printer driver.
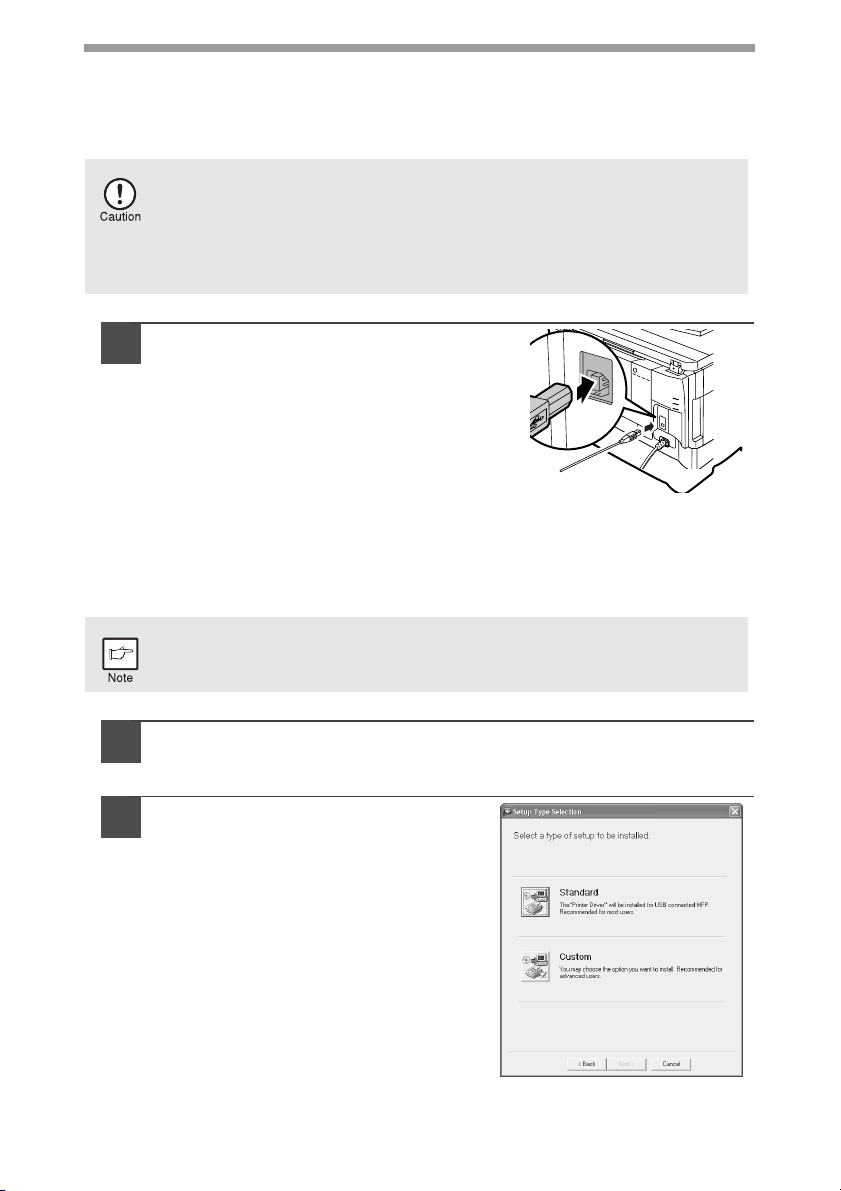
Insert the cable into the USB
1
connector on the machine.
Using the machine as a shared printer
If the machine will be used as a shared printer on a network, follow these steps to
install the printer driver in the client computer.
To configure the appropriate settings in the print server, see the
operation manual or help file of your operating system.
26
Perform steps 2 through 6 in "Using the machine with a USB
1
connection" (p.22).
Click the "Custom" button.
2
Page 29
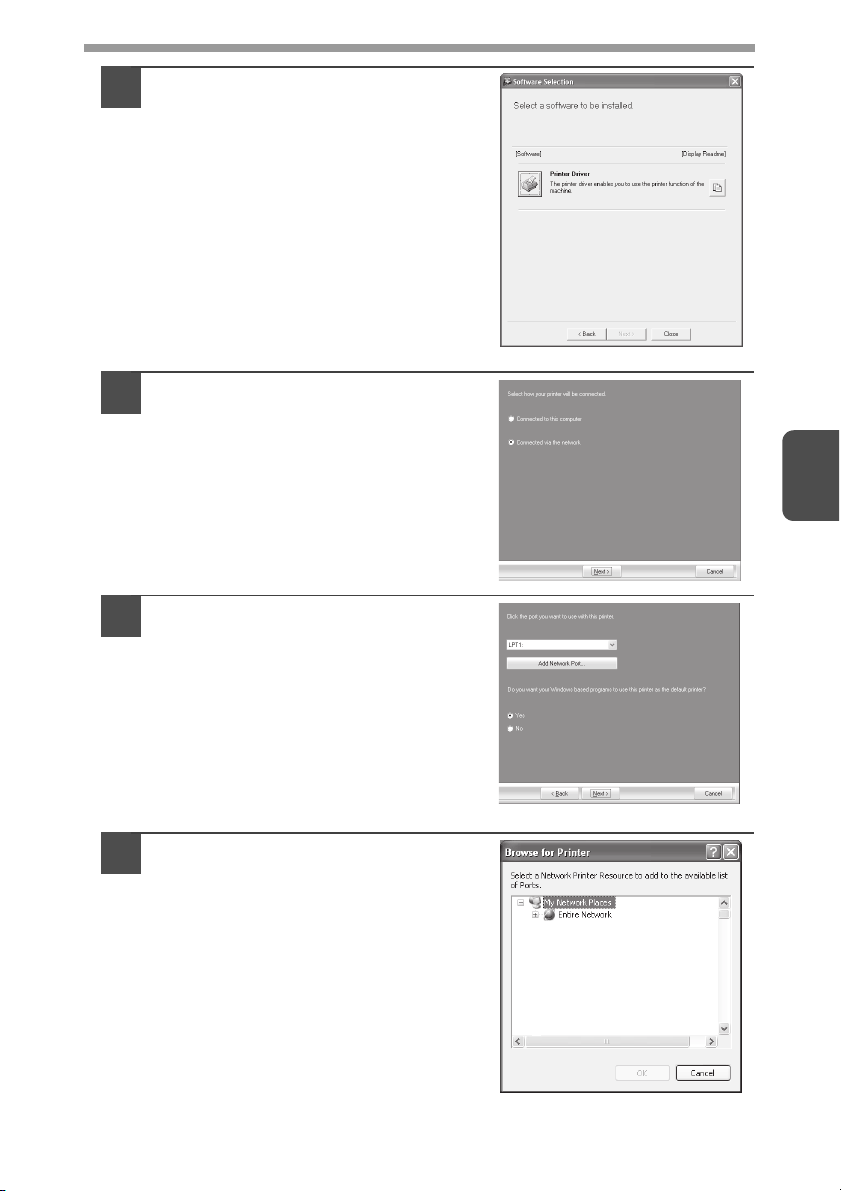
Click the "Printer Driver" button.
3
Click the "Display Readme" button to
show information on packages that are
selected.
Select "Connected via the
4
network" and click the "Next"
button.
Click the "Add Network Port"
5
button.
If you are using Windows
98/Me/2000/XP, you can also click the
"Add Network Port" button and select
the printer to be shared by browsing the
network in the window that appears. (On
Windows Vista, the "Add Network" Port"
button does not appear.
4
Select the network printer that is
6
shared and click the "OK" button.
Ask your network administrator for the
server name and printer name of the
machine on the network.
27
Page 30
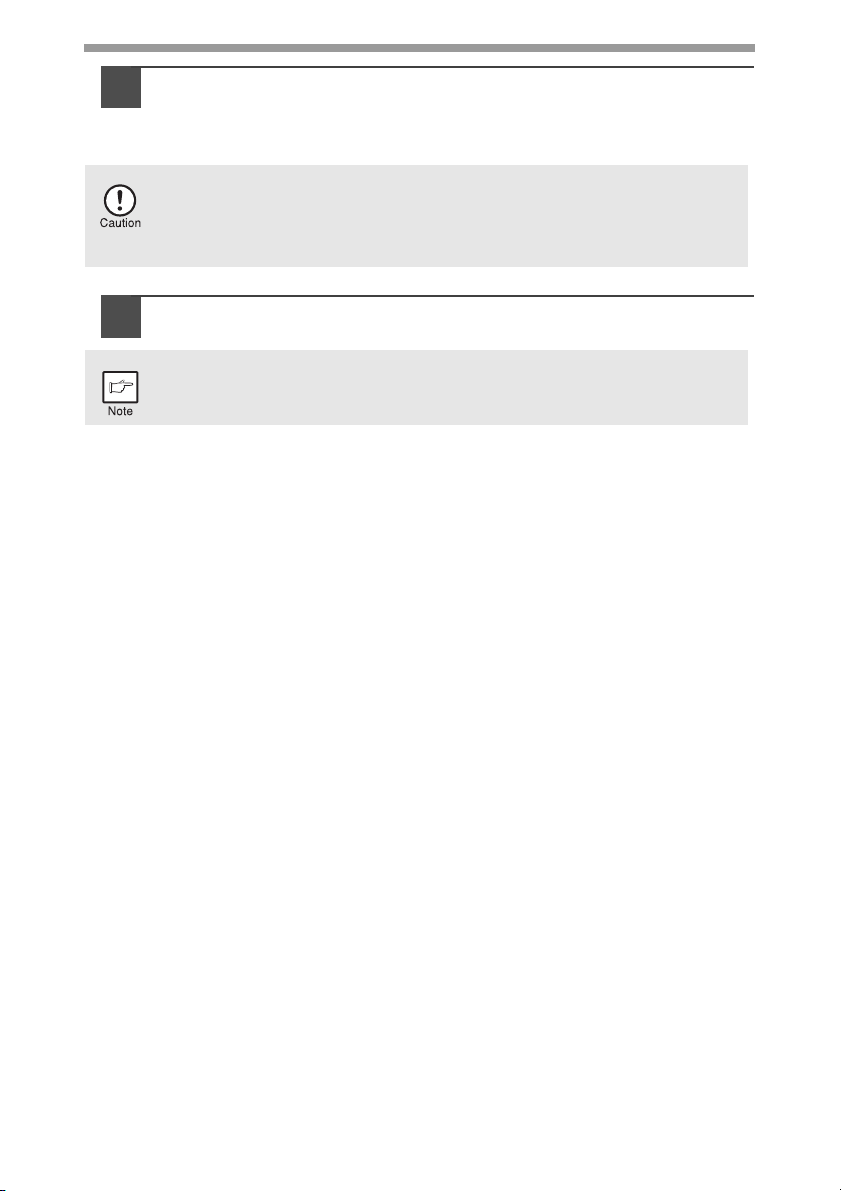
In the printer port selection window, verify the network printer
7
that is shared and whether the machine is to be used as the
default printer, make the selections and click the "Next" button.
Follow the on-screen instructions.
• If you are using Windows Vista and a security warning window
appears, be sure to click "Install this driver software anyway".
• If you are running Windows 2000/XP and a warning message appears
regarding the Windows logo test or digital signature, be sure to click
"Continue Anyway" or "Yes".
You will return to the window of step 3. Click the "Close" button.
8
After the installation, a message prompting you to restart your computer
may appear. In this case, click the "Yes" button to restart your computer.
This completes the installation of the software.
28
Page 31
INDICATORS ON THE OPERATION PANEL
To configure the appropriate settings in the print server, see the
operation manual or help file of your operating system.
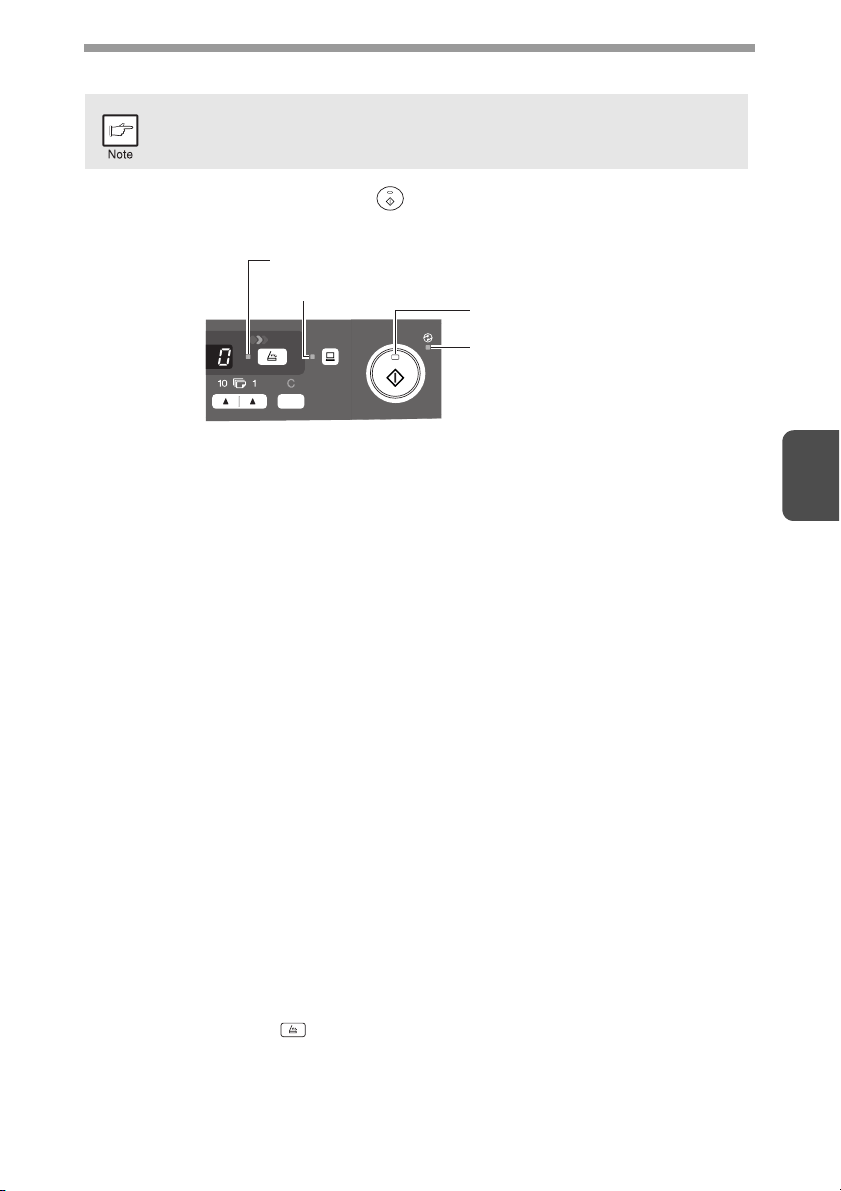
The ONLINE indicator and the start ( ) indicator indicate the state of the printer or
scanner.
SCAN indicator
ONLINE indicator
Start indicator
Power save indicator
Start indicator
On: Indicates the unit is ready for copying or scanning is being performed.
Blinking: The indicator blinks in the following situations:
• When a print job is interrupted.
• When reserving a copy job.
• When toner is being replenished during a copy or print job.
Off: The indicator is off in the following situations:
• During copying or scanning.
• The unit is in the auto power shut-off mode.
• When a misfeed or error has occurred.
• During print online.
ONLINE indicator
The ONLINE key is pressed and on line and off line are changed.
On: Indicates the unit is ready for printing or scanning is being performed.
(On line)
Blinking: Printing or data is being received from a computer.
Off: Copying is being performed. (Off line)
Power save indicator
On: Indicates the unit is in a power save mode.
Blinking: Indicates that the unit is initialising (when the side cover is opened and
closed or the power turned off and on).
SCAN indicator
On: The SCAN ( ) key has been pressed and the unit is in scanner mode.
Blinking: A scan job is being executed from the computer, or scan data is stored
in the unit's memory.
Off: The unit is in the copy mode.
4
29
Page 32
USING THE PRINTER MODE
For problems with the printer function, see the online manual or the help
file for the driver.
Opening the printer driver from the start menu
Open the printer driver setup screen by the method shown below.
Click the "start" button.
1
Click "Control Panel", select "Printers and Other Hardware",
2
and then click "Printers and Faxes".
• On Windows Vista, click "Control Panel", and then click "Printer".
• On Windows 98/Me/2000, select "Settings" and click "Printers".
Click the "SHARP AR-xxxx" printer driver icon and from the
3
"File" menu select "Properties".
On Windows Vista, select "Properties" from the "Organize" menu.
4
Click "Printing Preferences" button in the "General" tab.
5
On Windows 98/Me, click the "Setup" tab.
The printer driver setup screen will appear.
Refer to the Windows manual or help file for more information
on the "General" tab, "Details" tab, "Color Management" tab and
"Sharing" tab.
30
Page 33
How to print
Make sure that the paper of the desired size and type is loaded
1
in the tray.
The procedure for loading paper is the same as for loading copy paper. See
"LOADING PAPER" (p.7).
Open the document you intend to print, and select "Print" from
2
the application's "File" menu.
Make sure that "SHARP AR-xxxx" is selected as the current
3
printer. If you intend to change any print setting, click the
"Preferences" button to open the setting dialog.
On Windows 98/Me, click the "Properties" button.
On Windows 2000, the "Properties" button does not appear. Set your
preferences by switching the tab in the "Print" dialog box.
Specify the print settings including the number of copies,
4
media type, and print quality, and then click the "Print" button
to start printing.
On Windows 98/Me, click the "OK" button to start printing.
For details on print settings, see the online manual or the help file for the
printer driver.
• If copying is being performed when printing is started, copying will
continue. After copying is complete, printing will be executed when the
clear key is pressed twice, the ONLINE key is pressed to switch the
unit to the online state or approximately 60 seconds (auto clear time)*
elapse.
* The auto clear time varies with a user program setting. See "USER
PROGRAMS" (p.43).
• Preheat mode and auto power shut-off mode will be canceled when
printing is started.
• If the paper size specified from the software application is larger than
the paper size in the printer, part of the image that is not transferred to
the paper may remain on the surface of the drum. In this case, the
backside of the paper may become dirty. If this occurs, change to the
correct size paper and print two or three pages to clean the image.
• If you start a print job while a scan job is in progress, the print data will
be stored in the unit's memory. When the scan job or copy job is
completed, printing will begin.
4
About interrupt copying
If you press the start ( ) key to begin a copy job while a print job using the paper
tray is in progress, the copy job will begin automatically after the print data in the
unit's memory is printed (interrupt copying). When this is done, the print data
remaining in the computer is not sent to the unit. When the copy job ends, press the
clear ( ) key twice, or press the ONLINE key once to change the unit to the online
state (p.29), or wait until the set auto clear time (p.42) elapses. The remaining print
data will be sent to the unit and printing will resume.
31
Page 34
USING THE SCANNER MODE
Button Manager is a software program that works with the scanner driver to enable
scanning from the machine. To scan using the machine, Button Manager must be
linked with the scan menu on the machine.
Follow the steps below to link Button Manager to scanner events.
For problems with the scanner function, see the online manual or the
help file for the driver.
Using the Button Manager
Setting up the Button Manager
Windows XP/Vista
Click the "start" button, select "Control Panel" and click
1
"Printers and Other Hardware", and then click "Scanners and
Cameras" in the start menu. Right click the "SHARP AR-xxxx"
icon and click "Properties" in the menu that appears.
On Windows Vista, click the "start" button, select "Control Panel" and click
"Hardware and sound", and then click "Scanners and Cameras".
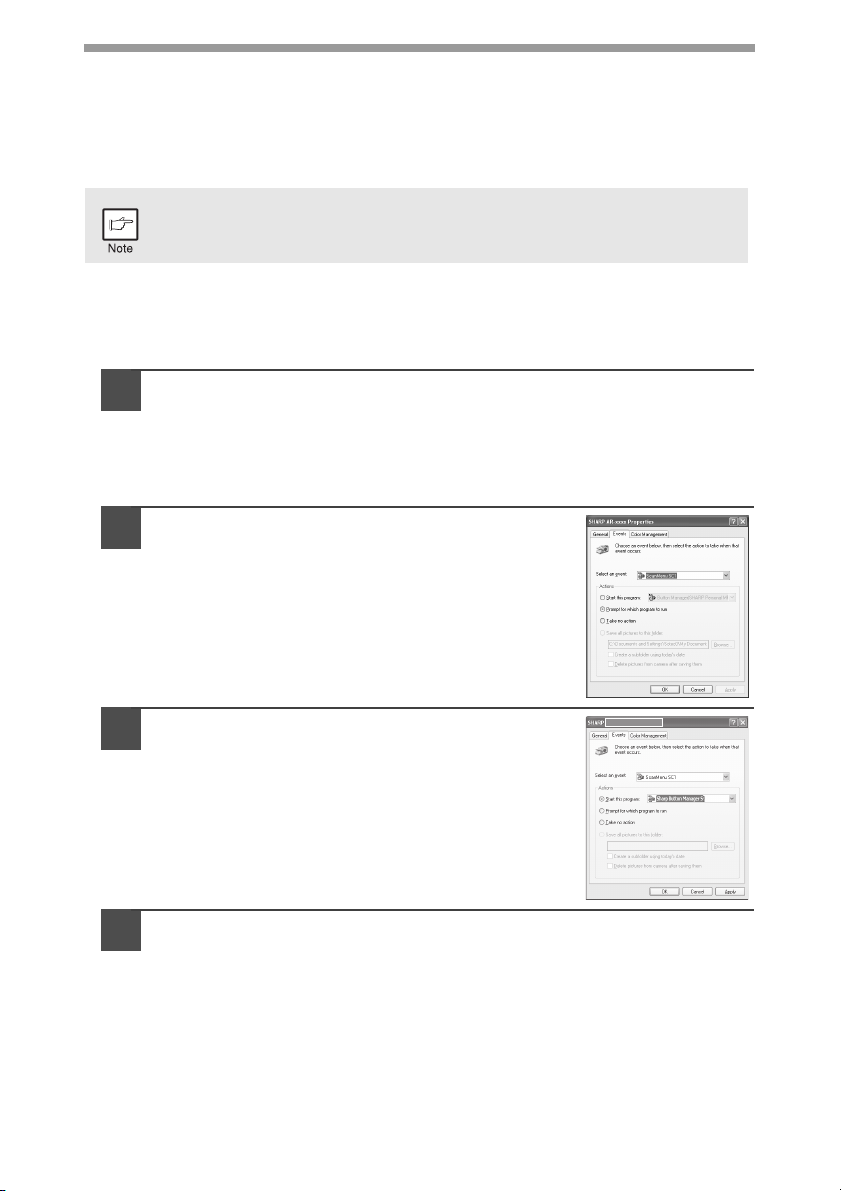
In the "Properties" screen, click the
2
"Events" tab.
32
Click the "Select an event" button and
3
select "ScanMenu SC1" from the pull-down
menu. Select "Sharp Button Manager S" in
"Start this program" and click "Apply".
Repeat step 3 to set "ScanMenu SC2" through "ScanMenu
4
SC6".
Click the "Select an event" button and select "ScanMenu SC2" from the
pull-down menu. Select "Sharp Button Manager S" in "Start this program" and
click "Apply". Do the same for each ScanMenu through "ScanMenu SC6".
When the settings have been completed, click the "OK" button to close the
screen. When the settings have been completed in Windows, start the
Button Manager. Adjust detailed settings and then scan an image from the
unit. For the procedures for starting Button Manager and adjusting settings,
see "Scan Button Destination Setting Dialog Box" (p.34).
Page 35
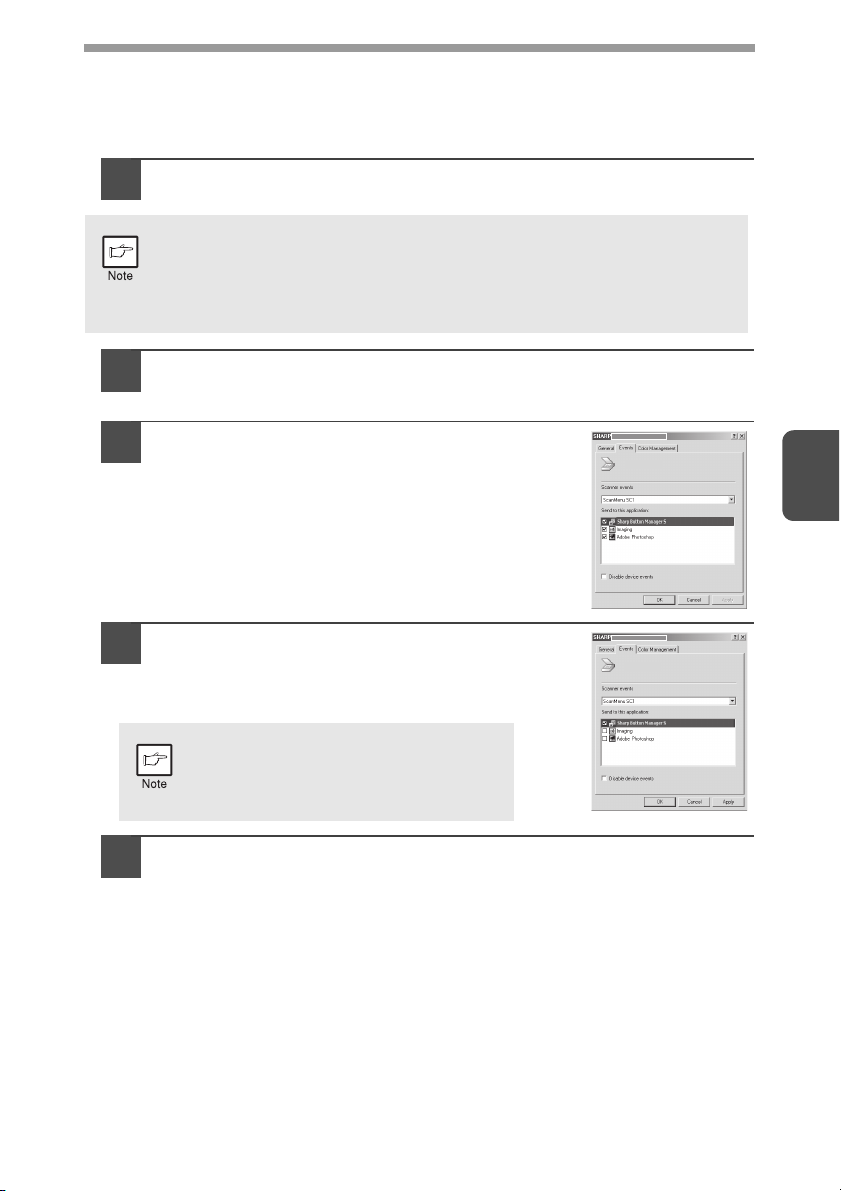
Windows 98/Me/2000
To scan directly into an application using the Button Manager on Windows 98,
Windows Me and Windows 2000. Set the Event Manager properties to send only to
Button Manager as shown below.
Click the "Start" button, select "Control Panel" from "Settings",
1
and open "Scanners and Cameras" in start menu.
In Windows Me, it occasionally happens that the "Scanners and
Cameras" icon does not appear immediately after installation of the
MFP driver is completed. If the icon does not appear, click "View all
Control Panel options" in the Control Panel and display the "Scanner
and Cameras" icon.
Select "SHARP AR-xxxx", and click the "Properties" button.
2
In Windows Me, right click "SHARP AR-xxxx" and click "Properties" in the
menu that appears.
In the "Properties" screen, click the
3
"Events" tab.
Click the "Scanner events" button and
4
select "ScanMenu SC1" from the pull-down
menu. Select "Sharp Button Manager S" in
"Send to this application" and click "Apply".
SHARP AR-xxxx
SHARP AR-xxxx
4
If other applications are shown,
deselect the checkboxes for the other
applications and leave only the Button
Manager checkbox selected.
Repeat step 4 to set "ScanMenu SC2" through "ScanMenu
5
SC6".
Click the "Scanner events" and select "ScanMenu SC2" from the pull-down
menu. Select "Sharp Button Manager S" in "Start this program" and click
"Apply". Do the same for each ScanMenu through "ScanMenu SC6".
When the settings have been completed, click the "OK" button to close the
screen. When the settings have been completed in Windows, start the
Button Manager. Adjust detailed settings and then scan an image from the
unit. For the procedures for starting Button Manager and adjusting settings,
see "Scan Button Destination Setting Dialog Box" (Next page).
33
Page 36
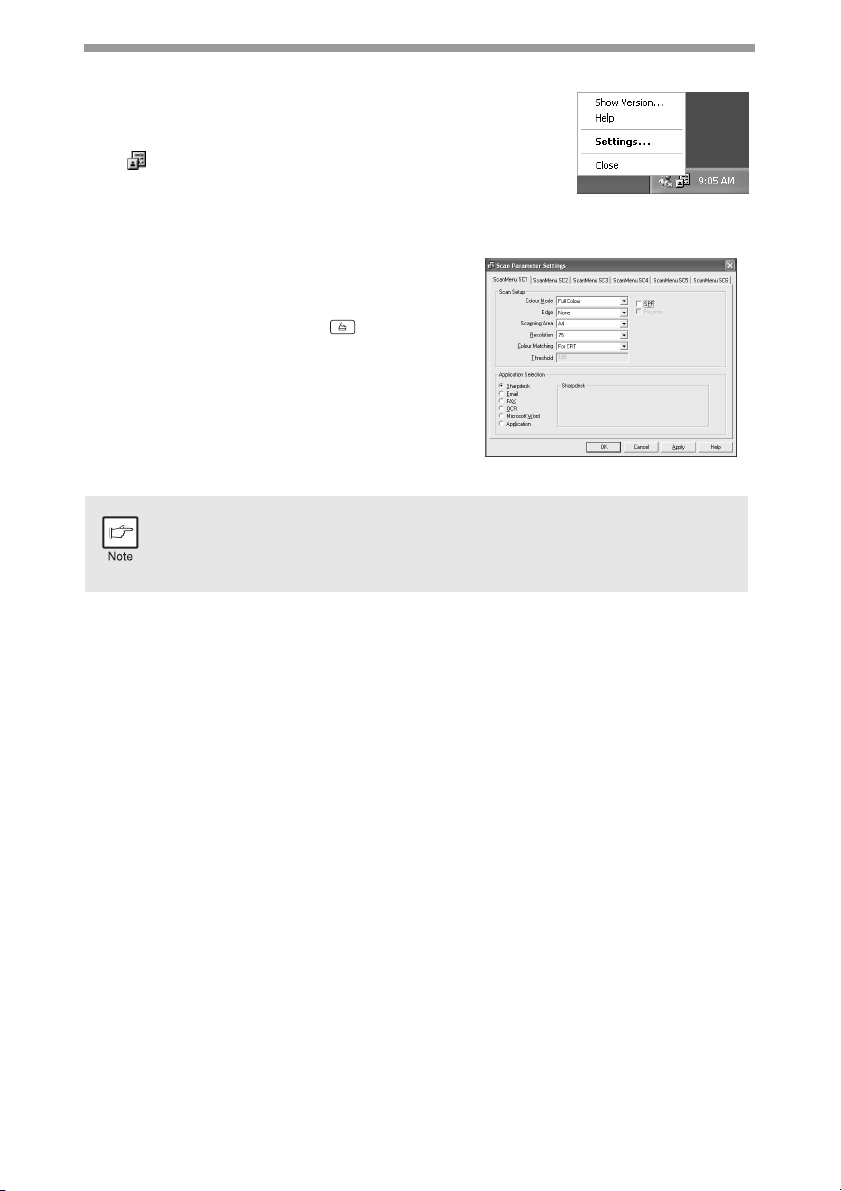
Scan Button Destination Setting Dialog Box
After you have completed the Button Manager settings in
Windows, configure the scan settings in Button Manager.
To configure the scan settings in Button Manager, right click
the ( ) icon in the Taskbar and select "Setting" from the
menu that appears.
For details on configuring the scan settings in Button
Manager, see the online manual or the help file.
This is the corresponding setting in the Button
Manager to automatically send multiple images
from the SPF at 75 dpi to Sharpdesk using the
operation panel "SC1" SCAN ( ) key
selection.
This dialog shows the SC1 event set to go directly to Button Manager.
With the Button Manager set to send the image to Sharpdesk. (factory
default setting) Sharpdesk will open after acquiring the image
automatically.
34
Page 37
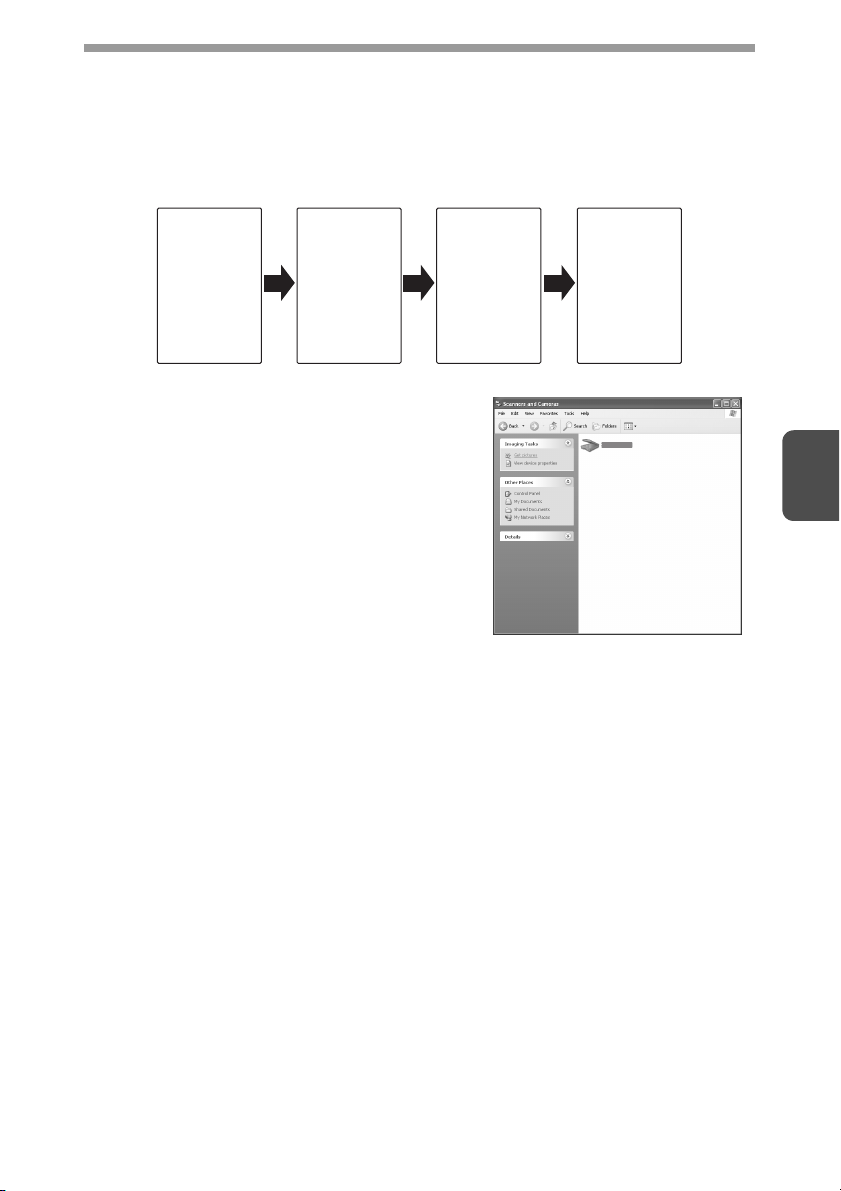
Flow of the Button Manager setting
The Button Manager can directly handle an AR-xxxx (where xxxx is the model name
of your unit) series device event and start your selected application according to the
scan setting made on the AR-xxxx (where xxxx is the model name of your unit)
operation panel (SC1, SC2, SC3, SC4, SC5, SC6).
This will scan directly into your application from the device.
Scanner
SCAN key
pressed.
Event
Manager
Windows OS
Button
Manager
No Selection
dialog is
displayed.
The settings for the Windows Event Manager for
the SHARP AR-xxxx (where xxxx is the model
name of your unit) device allow the user to take
advantage of the Sharp Button Manager to take
control of events from Windows and send
scanned images to any application that can be
selected in Button Manager.
This can be done with the Windows OS showing
the Event Manager selection dialog or directly
into a selected application if the Button Manager
is the only allowed handler for device events
from the SHARP AR-xxxx (where xxxx is the
model name of your unit).
This is done by changing the Windows device
settings for the AR-xxxx (where xxxx is the model
name of your unit) in the Scanner and Camera
device settings in the Control Panel.
User
selected
application
The user
application
opens.
SHARP AR-xxxx
4
This is the Control Panel
Properties dialog for "Scanners and
Cameras".
The AR-xxxx is shown selected.
35
Page 38
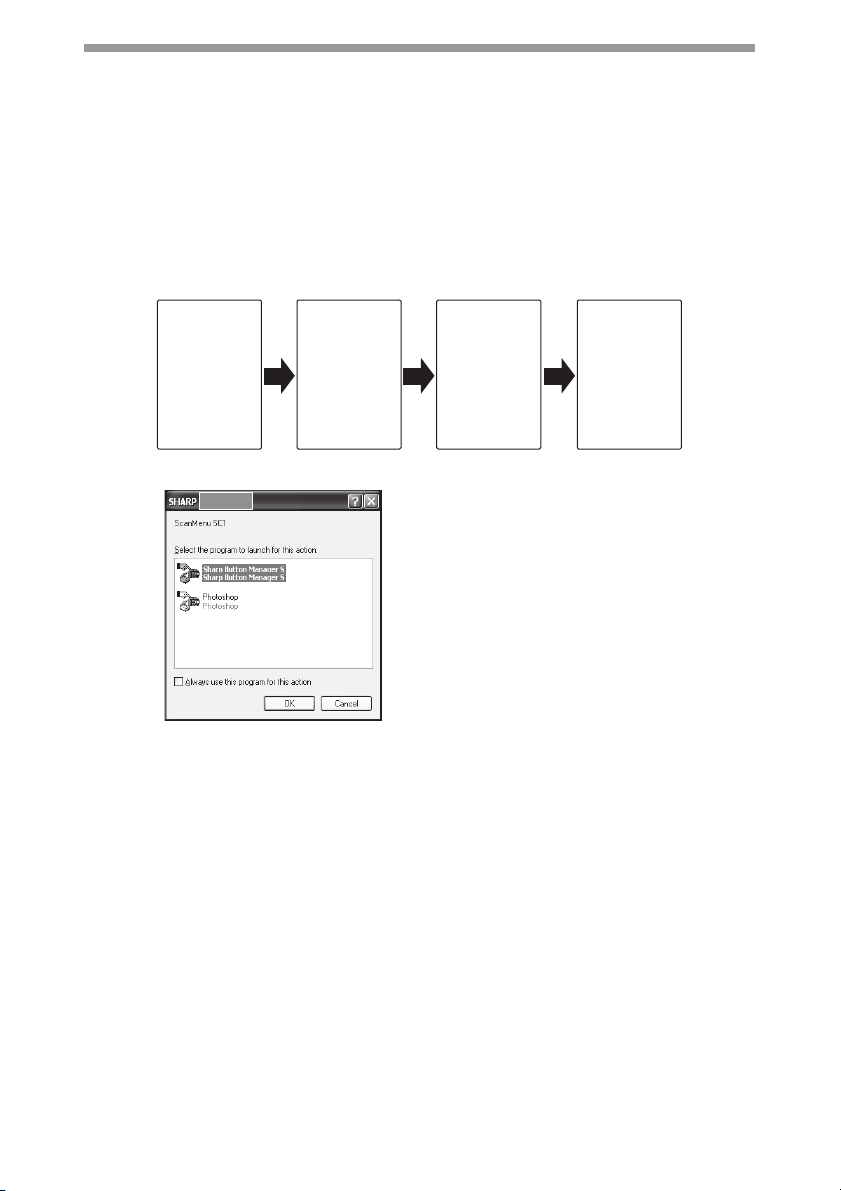
All About The Windows Event Manager and scanner events in
Windows 98, Windows Me, Windows 2000, Windows XP and Windows
Vista
Windows Platforms provide a mechanism for software to handle external events for
a scanner device like the SHARP AR-xxxx (where xxxx is the model name of your
unit) series products. This mechanism is controlled by the device manager on a
device basis. Applications that can handle events from a scanner/camera device
register with the Windows Event Manager and shown as available in the registered
applications. The path an event takes to get to the user's selected application
depends upon the event settings for the device.
Scanner
SCAN key
pressed.
Event
Manager
Windows OS
Event
Manager
selection
dialog
Displayed on
screen
s is the Windows Event Manager
Thi
Selection Dialog.
Shown are two applications registered
to handle the scanner event from
AR-xxxx (where xxxx is the model name
of your unit) device.
User selects
an
application.
The user
application
opens.
36
Page 39
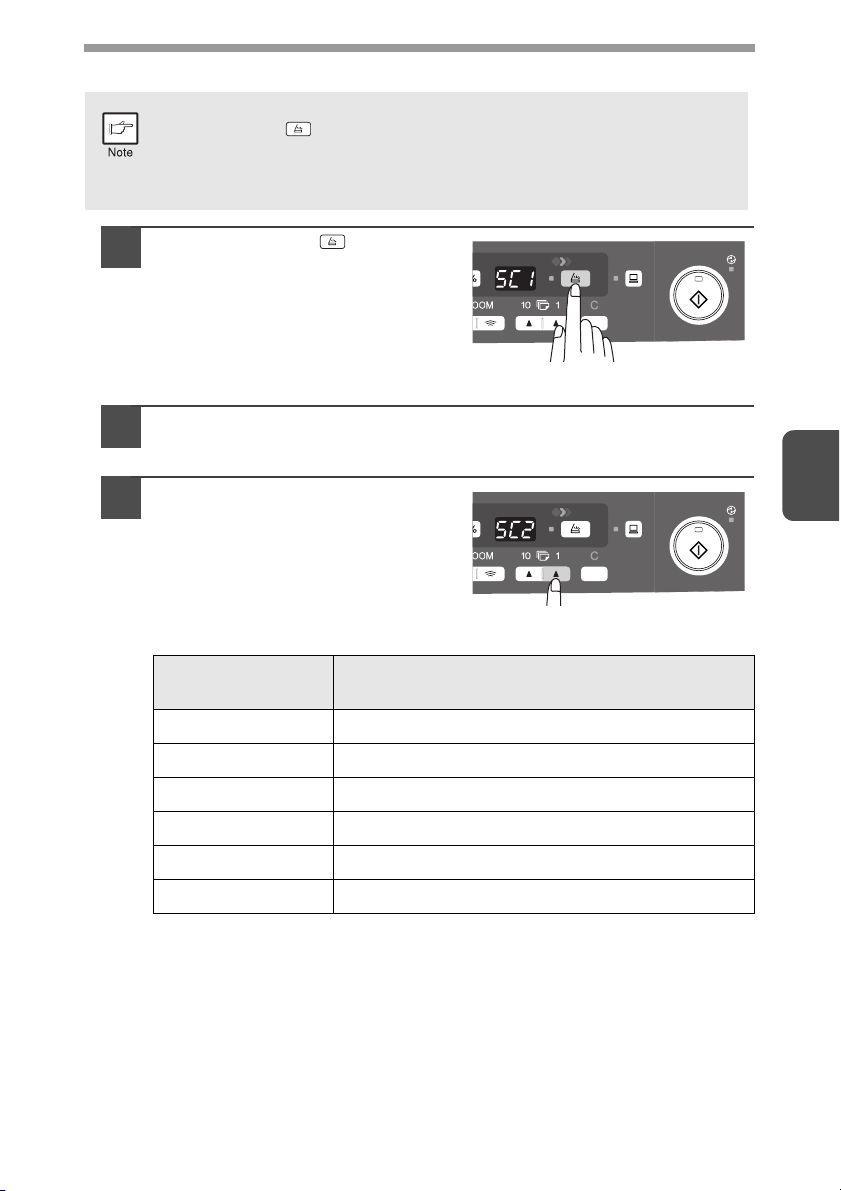
Using the SCAN key to begin scanning
• Scanning is not possible during a copy job.
•
If the SCAN ( ) key is pressed during a print job, the scan job will be
stored.
•
When scanning an original that has been placed in the SPF, only one
original can be placed unless you are using Sharpdesk.
Press the SCAN ( ) key.
1
The unit enters scan mode.
Place the original you wish to scan on the document glass/SPF.
2
For the procedure for placing the original, see "ORIGINAL PLACEMENT"
(p.15).
Press the right copy quantity
3
key to display the number of
the application that you wish to
use for scanning.
The application numbers are initially
as follows.
4
Application
number
SC1 Sharpdesk
SC2 E-mail
SC3 Fax
SC4 OCR
SC5 Microsoft Word
SC6 Filing
To check the settings, see "Scan Button Destination Setting Dialog Box"
(p.34) and then open the settings window of the Button Manager.
Application launched
37
Page 40
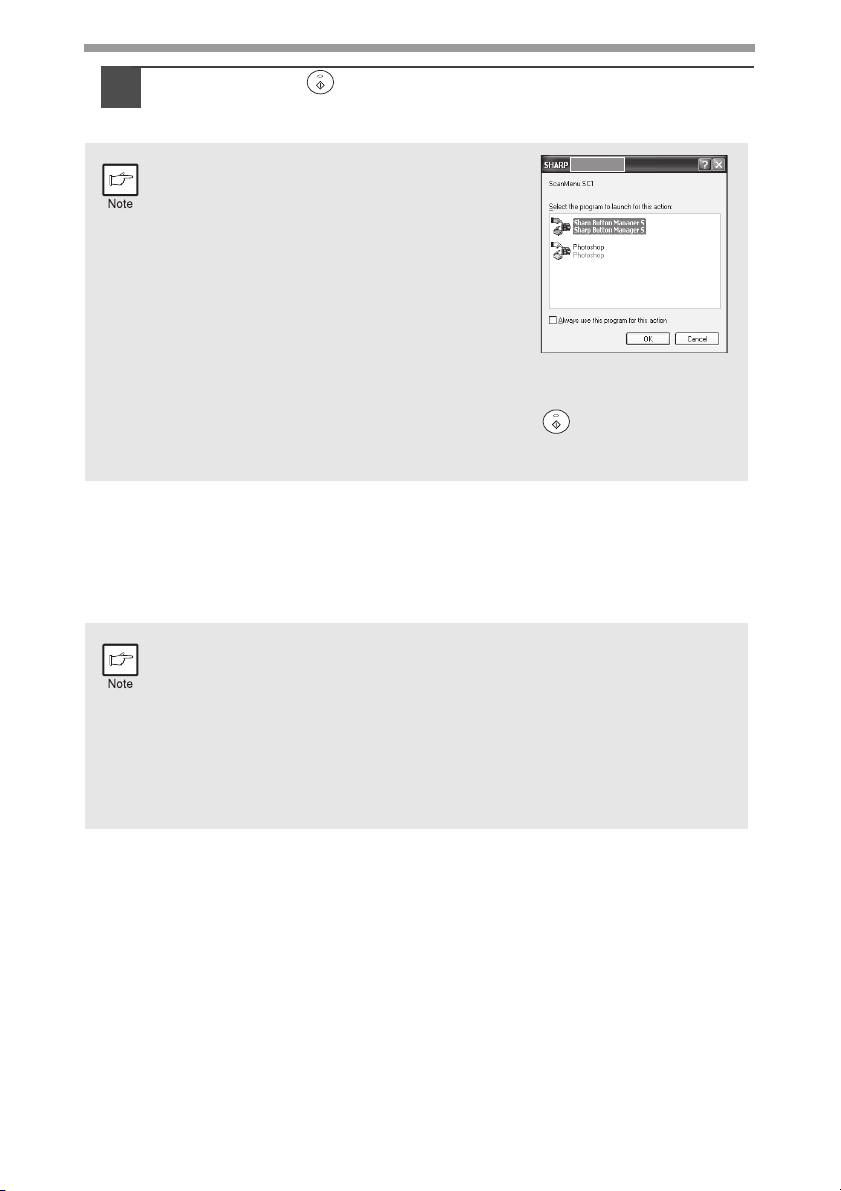
Press the start ( ) key.
4
Scanning will start and the scanned data will be transferred to the
application.
• If the following screen appears, select
Button Manager and click "OK". Button
Manager starts and the application
associated with Button Manager starts. If
you want only Button Manager to start in
this case, set up Button Manager for use in
Windows as explained in "Setting up the
Button Manager" (p.32).
• If step 4 is performed with the "Show
TWAIN setting screen when scanning"
checkbox selected in the Scan Button Destination Setting Dialog Box
(p.34), the TWAIN settings screen (p.39) will automatically appear.
Check the settings, and then press the start ( ) key again or click
the "Scan" button in the TWAIN setting screen to start scanning. The
scanned data will be transferred to the application.
Opening the scanner driver and scanning from your
computer
Follow the steps below to open the scanner driver setup screen. As an example, this
instruction is given using Sharpdesk as an image capture application.
• Scanning is not possible during a copy and print job.
• The method for starting the scanner driver differs depending on the
type of application. Refer to the manual or the help file of your
application.
• When using the scanner driver to scan an original that has been
placed in the SPF. If you perform "preview" (see the online manual or
the help file for the scanner driver), the original in the SPF will be
output to the exit area after previewing. To scan the original after
previewing, place the original in the SPF once again.
38
Page 41
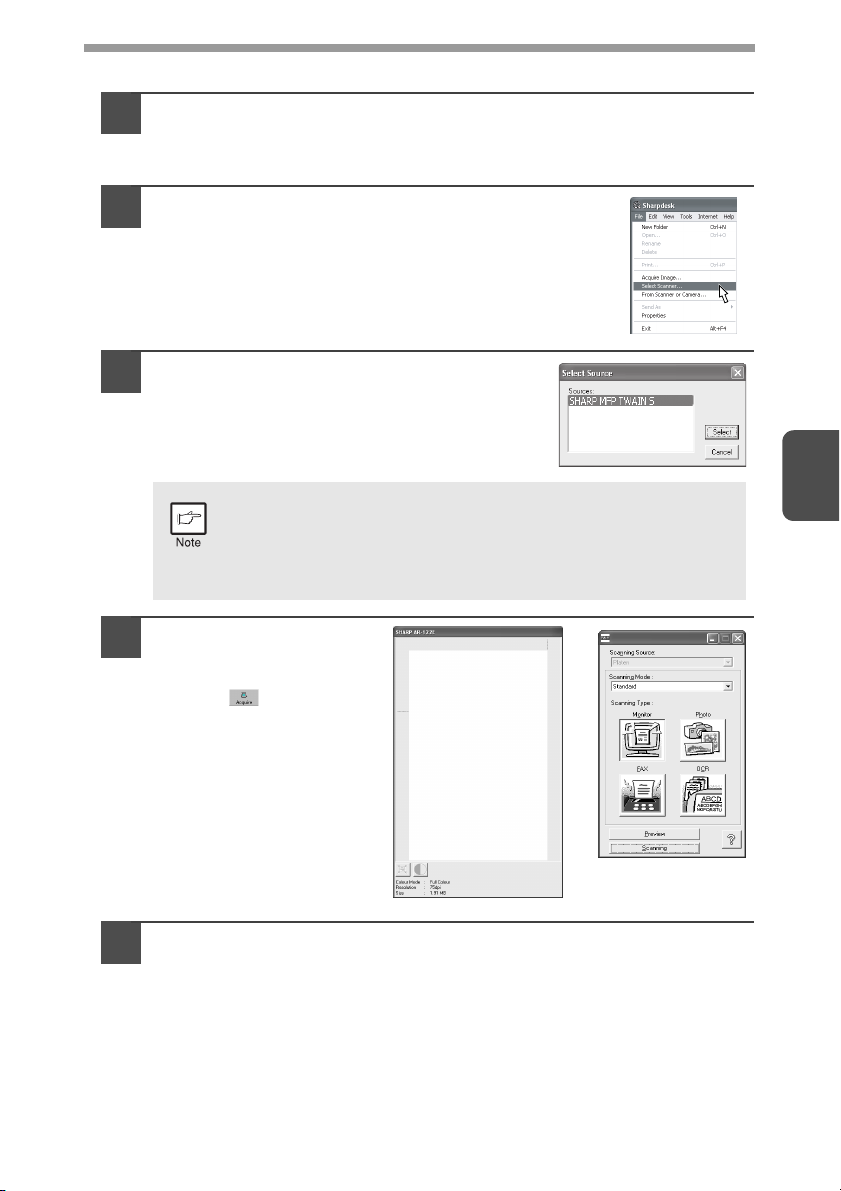
Using the SHARP TWAIN
Place the original(s) you wish to scan on the document
1
glass/SPF.
For the procedure for placing the original, see "ORIGINAL PLACEMENT"
(p.15).
After starting Sharpdesk, click the "File" menu
2
and select "Select Scanner".
Select "SHARP MFP TWAIN S", and click
3
the "Select" button.
WIA-SHARP AR-xxxx
If you use more than one scanning device, select the scanner
you want to use through the application. The method for
accessing the "Select Scanner" option, depends upon the
application. For more information, see the online manual or the
help file of your application.
Select "Acquire Image"
4
from the "File" menu,
or click the "Acquire"
button ( ) .
Set the configuration for scanning (refer to the online manual
5
and help file), and click the "Scan" button.
Scan is started.
4
39
Page 42
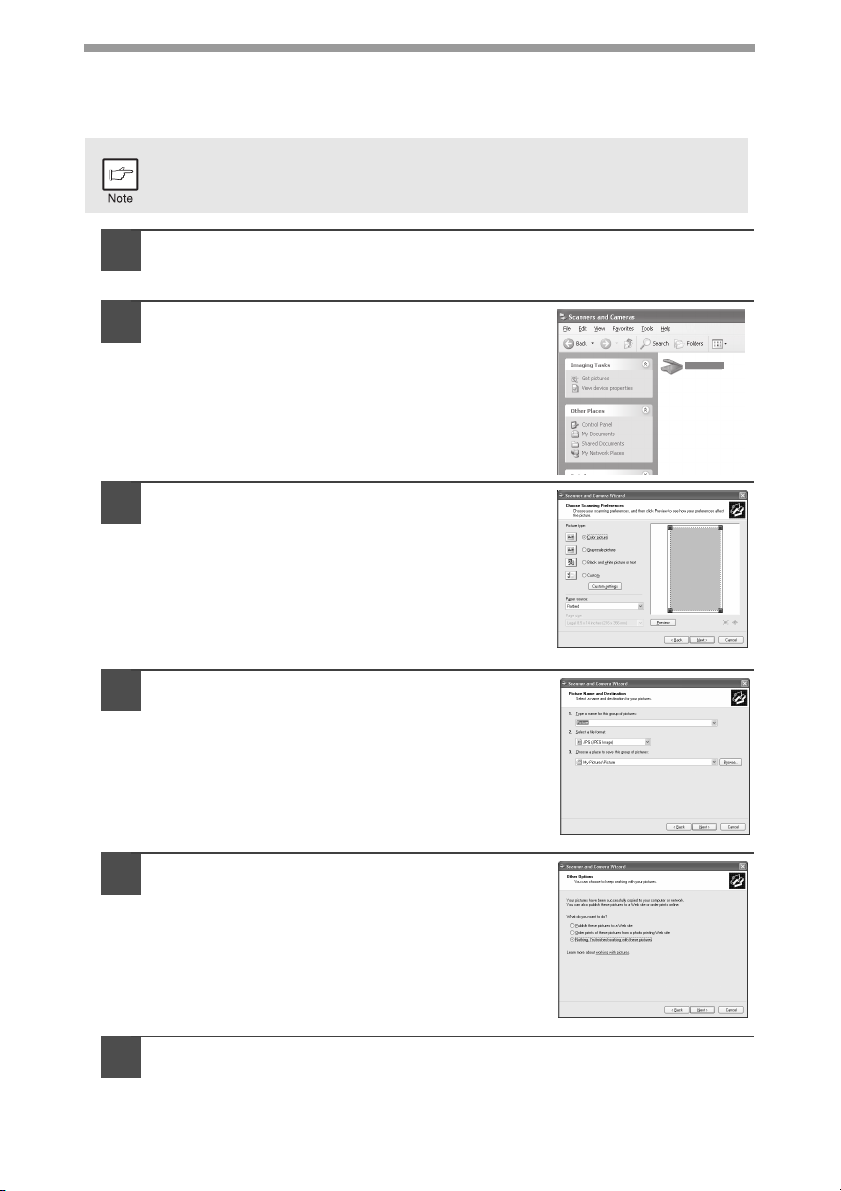
Scanning with the "Scanner and Camera Wizard" in Windows XP
Windows XP includes as a standard feature an image scanning function. The
procedure for scanning with the "Scanner and Camera Wizard" is explained here.
To cancel scanning, click the "Cancel" button in the screen that is
displayed.
Place the original you wish to scan on the document glass/SPF.
1
For the procedure for placing the original, see "ORIGINAL PLACEMENT"
(p.15).
Click the "start" button, select "Control
2
Panel", and click "Printers and Other
Hardware", and then click "Scanners
and Cameras" in the start menu. Click
the "SHARP AR-xxxx" icon and click
"Get picture" in "Imaging Tasks".
The "Scanner and Camera Wizard"
3
appears. Click "Next" and establish the
basic settings for scanning.
For information on the settings, see the
Windows XP help file. After completing each
setting, click "Next".
SHARP AR-xxxx
40
Select a name, format, and folder for the
4
scanned image.
For information on the image name, file format,
and folder, see the Windows XP help file.
Scanning begins. When scanning ends,
5
select the next task you wish to perform.
For information on each selection, see the
Windows XP help file. To quit the "Scanner and
Camera Wizard", select "Nothing. I’m finished
working with these pictures." and click "Next".
Click "Finish" in the screen that appears.
6
The "Scanner and Camera Wizard" closes and the scanned image is saved.
Page 43
HOW TO USE THE ONLINE MANUAL
The online manual provides detailed instructions for operating the unit as a printer or
scanner and a list of methods for dealing with printing or scanner problems.
To access the online manual, your computer must have Acrobat Reader 6.0 or a
later version.
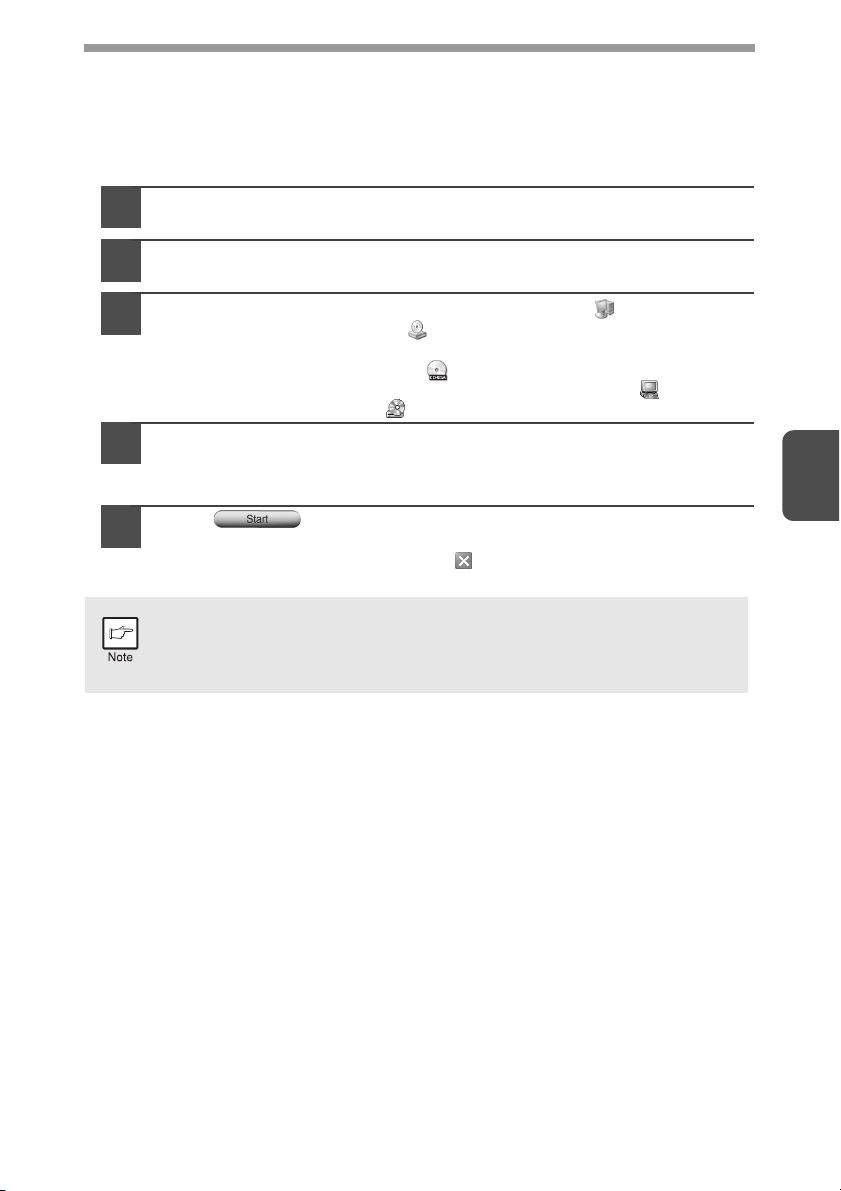
Turn on your computer.
1
Insert the supplied CD-ROM into your CD-ROM drive.
2
Click the "start" button, click "My Computer" ( ), and then
3
double-click the CD-ROM ( ) icon.
• On Windows Vista, click the "Start" button, click "Computer" and then
double-click the CD-ROM icon ( ).
• On Windows 98/Me/2000, double-click "My Computer" ( ), and then
double-click the CD-ROM ( ) icon.
Double-click the "Manual" folder, then "AR-203E", double-click
4
the "Online" folder, then double-click the "English" folder, and
then double-click the "AR-203E.pdf" icon.
Click to read the online manual.
5
To close the online manual, click the ( ) button located at the top-right of
the window.
• The online manual can be printed out using Acrobat Reader. SHARP
recommends printing out the sections which you refer to frequently.
• Refer to "Help" of Acrobat Reader for more details on the operation
and function of Acrobat Reader.
4
VIEWING THE ONLINE MANUAL
The "Software CD-ROM" that accompanies the machine contains an online manual
in PDF format. To view the manual in PDF format, Acrobat Reader or Adobe Reader
of Adobe Systems Incorporated is required. If neither program is installed on your
computer, the programs can be downloaded from the following URL:
http://www.adobe.com/
41
Page 44
5
This chapter describes the special functions of this unit. Use these functions as needed.
SPECIAL FUNCTIONS
DESCRIPTION OF SPECIAL FUNCTIONS
Toner save mode (page 42)
Reduces toner consumption by approximately 10%.
Power save modes (page 43)
The unit has two power save modes of operation: preheat mode and auto power
shut-off mode.
Preheat mode
When the unit enters the preheat mode, the power save ( ) indicator will light up
and other indicators will remain on or off as before. In this condition, the fuser in
the unit is maintained at a lower heat level, thereby saving power. To copy from
the preheat mode, make desired copier selections and press the start ( ) key
using the normal copying procedure.
Auto power shut-off mode
When the unit enters the auto power shut-off mode, the power save ( ) indicator
will light up and other indicators will go out. The auto power shut-off mode saves
more power than the preheat mode but requires a longer time before starting
copying. To copy from the auto power shut-off mode, press the start ( ) key.
Then make desired copier selections and press the start ( ) key using the
normal copying procedure.
Auto clear (page 43)
The unit returns to the initial settings a preset amount of time after the end of copy, or
scanner job. This preset amount of time (auto clear time) can be changed.
Resolution of AUTO & MANUAL mode (page 43)
You can set the copy resolution used for AUTO and MANUAL ( ) exposure mode.
Prevention of OC copies when the SPF is up function
When enabled, this function may help prevent wasteful use of toner that occurs
when the OC cover is not completely closed.
If the start ( ) key is pressed when the OC cover is not completely closed, " "
will appear in the display and copying may not take place. If copying does not take
place, copying can be performed by pressing the start ( ) key again, however, the
scan size set in "Copy effective paper width setting function" (program numbers 25,
26, and 27) will be used.
If the OC cover is completely closed after " " appears, copying will take place at
the normal size.
42
TONER SAVE MODE
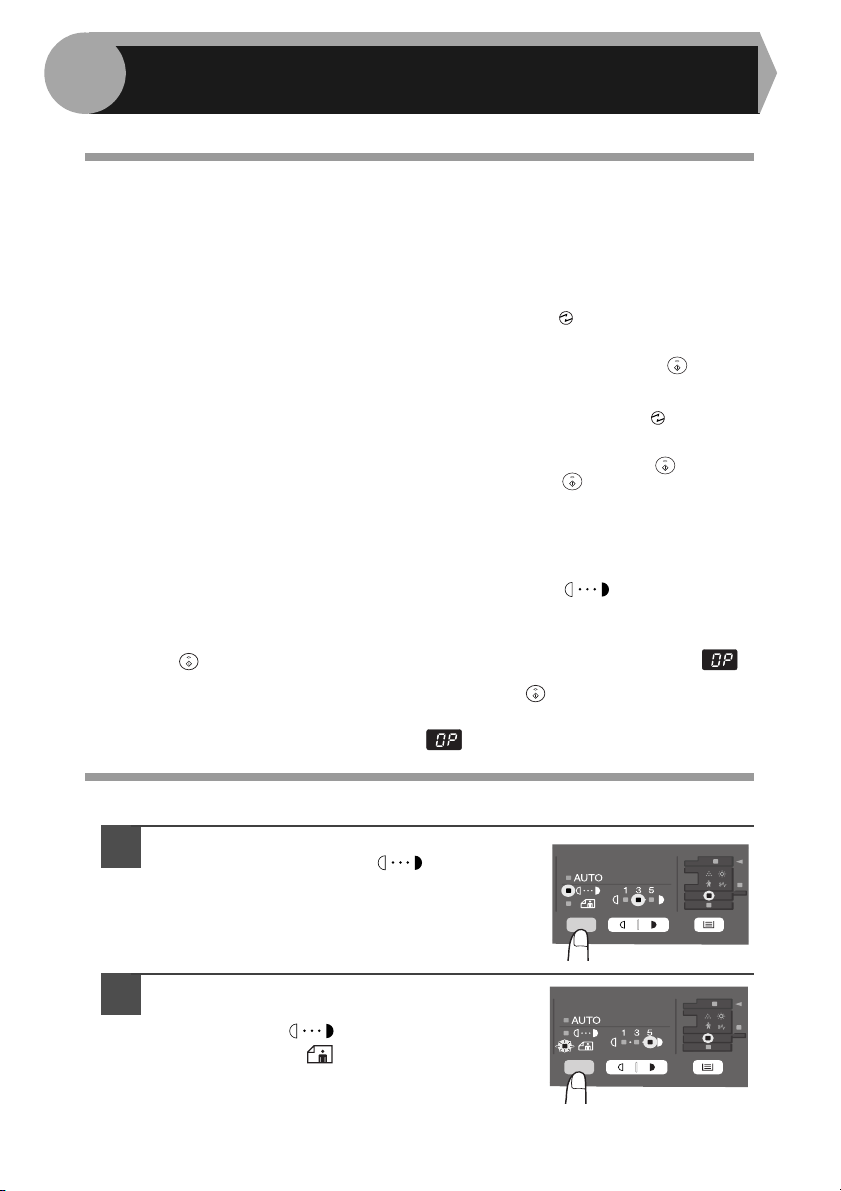
Press the exposure mode selector key
1
to select the MANUAL ( ) mode.
Press and hold down the exposure mode
2
selector key for approximately 5 seconds.
The MANUAL ( ) indicator will go out
and the PHOTO ( ) indicator will begin
to blink. The light and dark indicator
marked "5" will light up, indicating the
standard toner mode is active.
Page 45
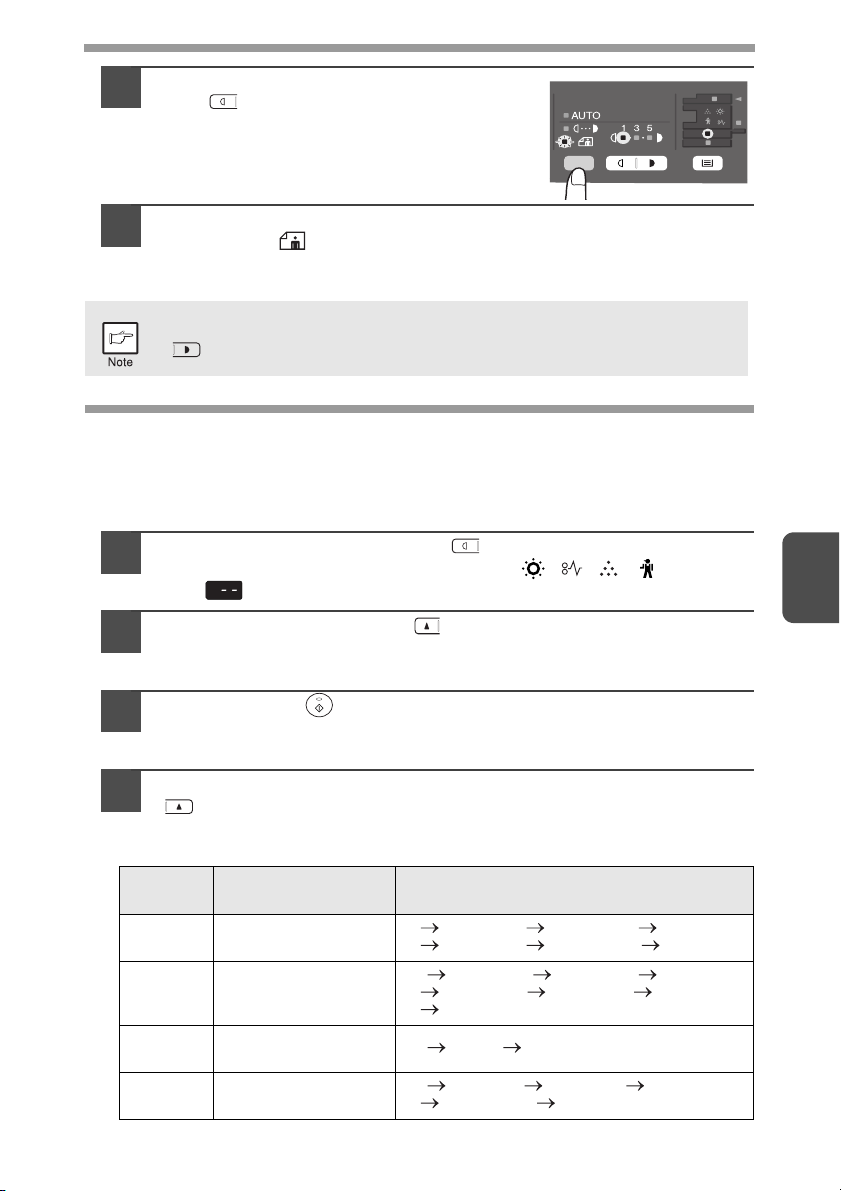
To enter the toner save mode, press the
3
light ( ) key. The light and dark
indicator marked "1" will light up,
indicating the toner save mode is
selected.
Press the exposure mode selector key.
4
The PHOTO ( ) indicator will stop blinking and will light up
steadily. The light and dark indicator marked "3" will light up.
The toner save mode is now active.
To return to the standard mode, repeat the procedure but use the dark
( ) key to select exposure level "5" in step 3.
USER PROGRAMS
The user programs allow the parameters of certain functions to be set, changed, or
cancelled as desired.
Setting the user programs
Press and hold down the light ( ) key for more than 5
1
seconds until all the alarm indicators ( , , , ) blink
and " " appears in the display.
Use the left copy quantity ( ) key to select a user program
2
number. The selected number will blink in the left side of the
display.
5
Press the start ( ) key. The entered program number will be
3
steadily lit and the currently selected parameter number for the
program will blink on the right side of the display.
Select the desired parameter using the right copy quantity
4
( ) key. The entered parameter number will blink on the right
of the display.
Program
No.
1 Auto clear time
2 Preheat mode
3
4
Mode Parameters
1 10 sec., 2 30 sec., *3 60 sec.,
4 90 sec., 5 120 sec., 6 OFF
*1 30 sec., 2 60 sec., 3 5 min.,
4 30 min., 5 60 min., 6 120 min.,
7 240 min.
Auto power shut- off
mode
Auto power shut- off
timer
*1 ON, 2 OFF
*1 5 min., 2 30min., 3 60 min.,
4 120 min., 5 240 min.
43
Page 46
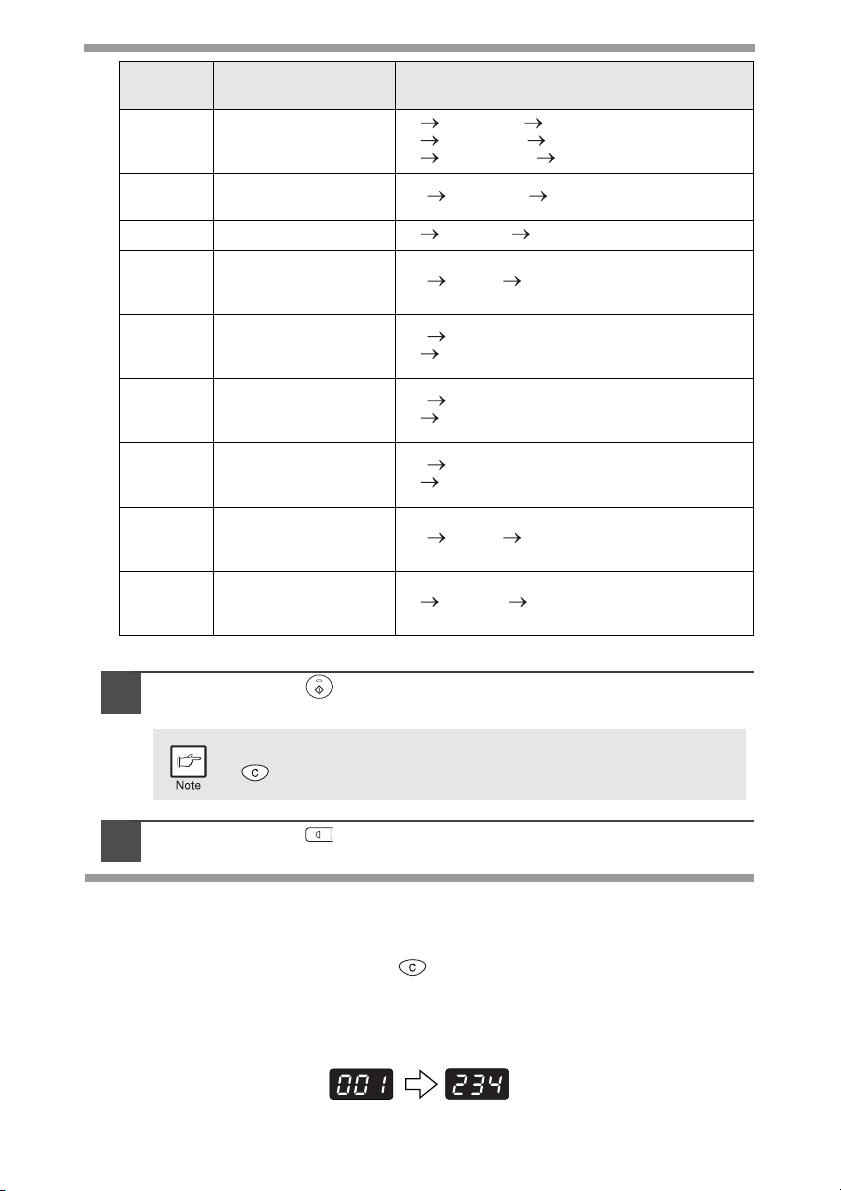
Program
No.
6
10
21 Reset factory 1 YES, *2 NO
24
25
26
27
28
29
* Factory default settings are indicated with an asterisk (*).
Mode Parameters
SPF automatic
original discharge
time (if installed)
Resolution of AUTO
& MANUAL mode
Prevention of OC
copies when the
SPF is up function
Copy effective paper
width setting function
(Bypass tray)
Copy effective paper
width setting function
(Tray 1)
Copy effective paper
width setting function
(Tray 2 if installed)
Selection of copy
start state (Polygon
rotation on/off)
Fusing temperature
setting when the
bypass tray is used
1 5 min., *2 30 min.,
3 60 min., 4 120 min.,
5 240 min., 6 OFF
*1 300dpi, 2 600dpi
*1 ON, 2 OFF
*1 Large (A4 width),
2 Small (B5R width)
*1 Large (A4 width),
2 Small (B5R width)
*1 Large (A4 width),
2 Small (B5R width)
*1 ON, 2 OFF
1 Low, *2 High
44
Press the start ( ) key. The right-hand number in the display
5
will be steadily lit and the entered value will be stored.
To change the setting or to set another mode, press the clear
( ) key. The unit will return to step 2.
Press the light ( ) key to return to the normal copy mode.
6
DISPLAYING TOTAL NUMBER OF COPIES
Use the following procedure to display the total number of copies.
1
Press and hold down the clear ( ) key for approximately 5 seconds.
The total number of copies will appear in two steps, each with three
digits.
Example: Total number of copies is 1,234.
Page 47
6
This chapter describes how to replace the toner cartridge and how to clean unit.
Be sure to use only genuine SHARP parts and supplies.
For best copying results, be sure to use only SHARP Genuine
Supplies which are designed, engineered, and tested to maximise the
life and performance of SHARP copiers. Look for the Genuine
Supplies label on the toner package.
MAINTENANCE
TONER CARTRIDGE REPLACEMENT
When the toner cartridge replacement required ( ) indicator lights up, replacement
of the toner cartridge will be needed soon. Obtain a new cartridge. When the toner
cartridge replacement required ( ) indicator blinks, the toner cartridge must be
replaced before copying can be resumed. Replace the toner cartridge by following
the procedure below.
During long copy run of a dark original, the start ( ) indicator may
blink, the indicator light up, and the unit stop, even though toner is left.
The unit will feed toner up to 2 minutes and then the start ( ) indicator
will light up. Press the start ( ) key to restart copying.
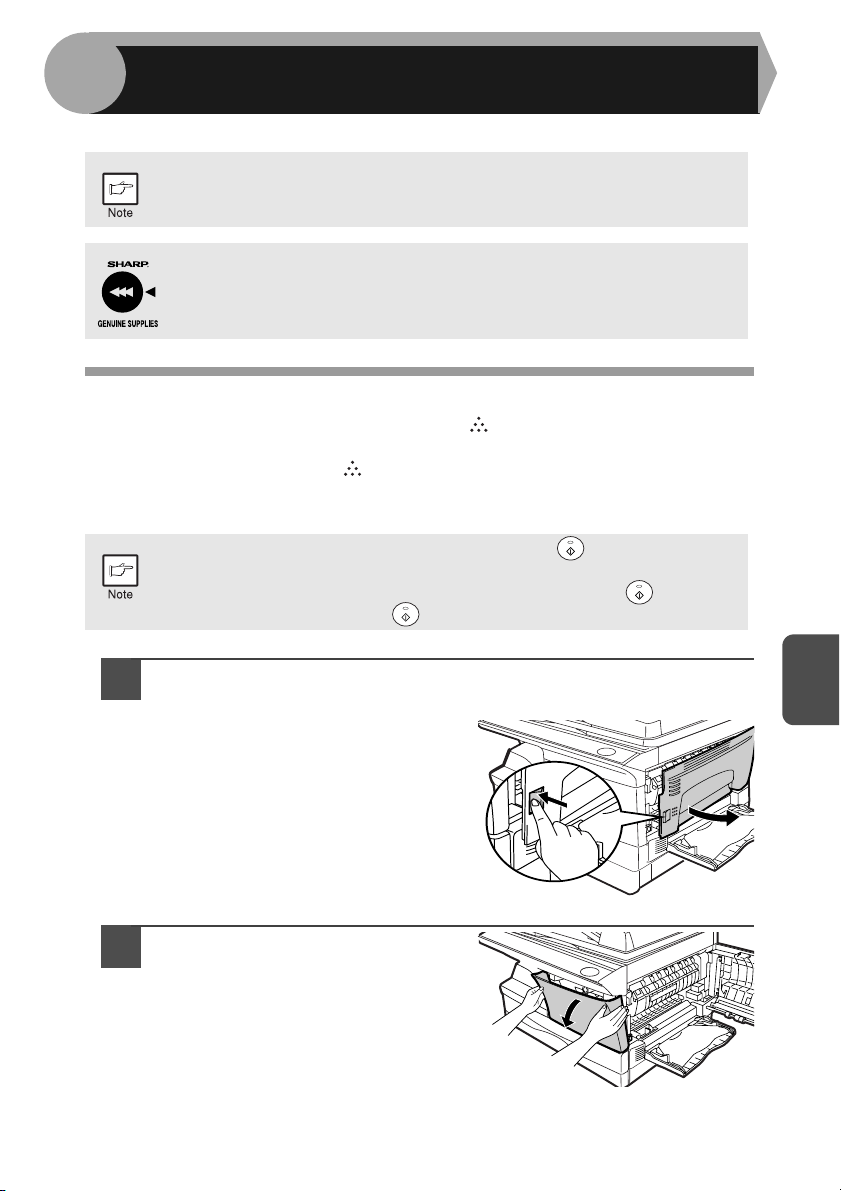
Open the multi-bypass tray, side cover, and front cover, in that
1
order.
To open the multi-bypass tray, see
"The multi-bypass tray" (p.10).
Push gently on both sides of
2
the front cover to open the
cover.
6
45
Page 48
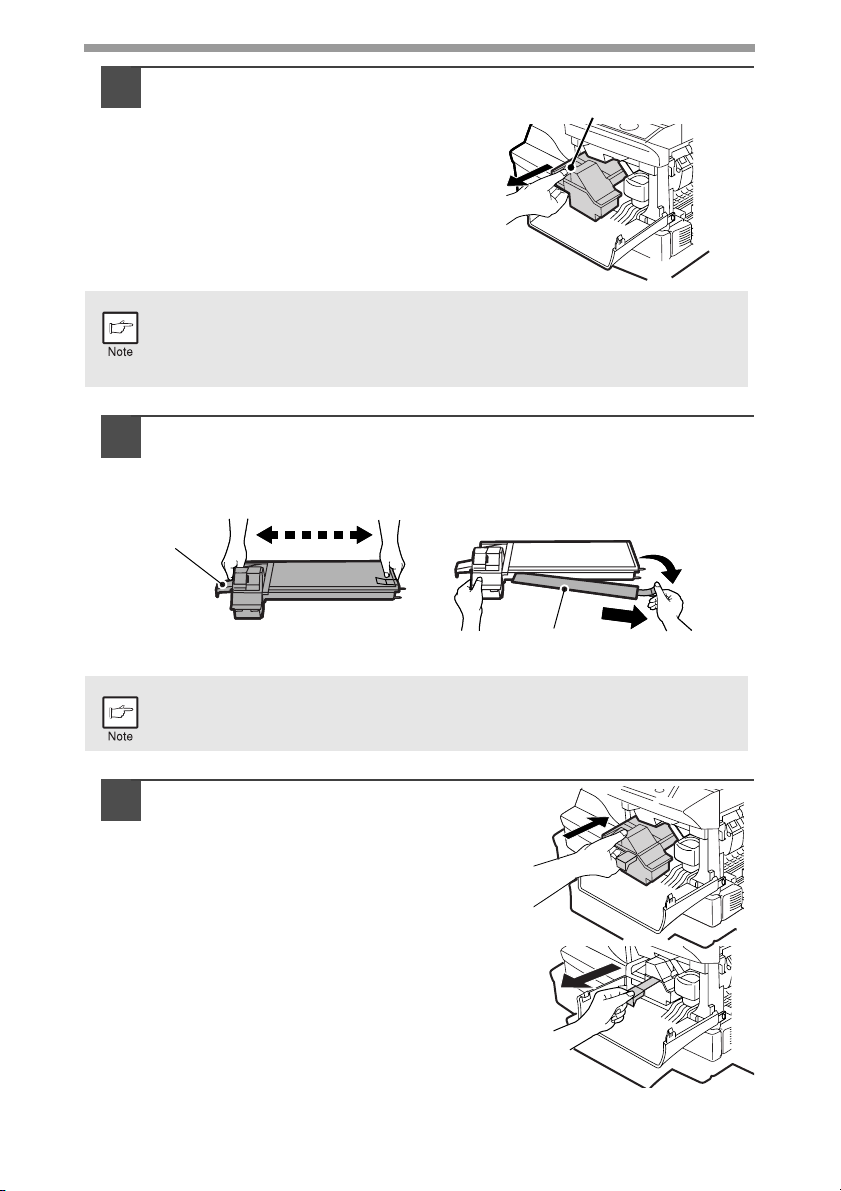
Gently pull the toner cartridge
3
out while pressing the lock
release lever.
• After removing the toner cartridge, do not shake it or tap on it. Doing
so may cause toner to leak from the cartridge. Put the old cartridge
immediately in the bag contained in the box of the new cartridge.
• Dispose of the old toner cartridge in accordance with local regulations.
Remove the toner cartridge from the bag. Grasp the cartridge
4
on both sides and shake it horizontally four or five times. After
shaking the cartridge, remove the toner seal.
4 or 5 times
4 or 5 times
Shutter
Shutter
Toner cartridge lock
release lever
Toner seal
Toner seal
46
Grasp the toner cartridge as shown in the illustration. Do not hold the
cartridge by the shutter. Be sure to only shake the cartridge before the
toner seal is removed.
Gently insert the toner cartridge along
5
the guides until it locks in place while
pushing the lock release lever.
Remove the tape from the shutter. Pull
the shutter out of the toner cartridge
as shown in the illustration. Discard
the shutter.
Page 49
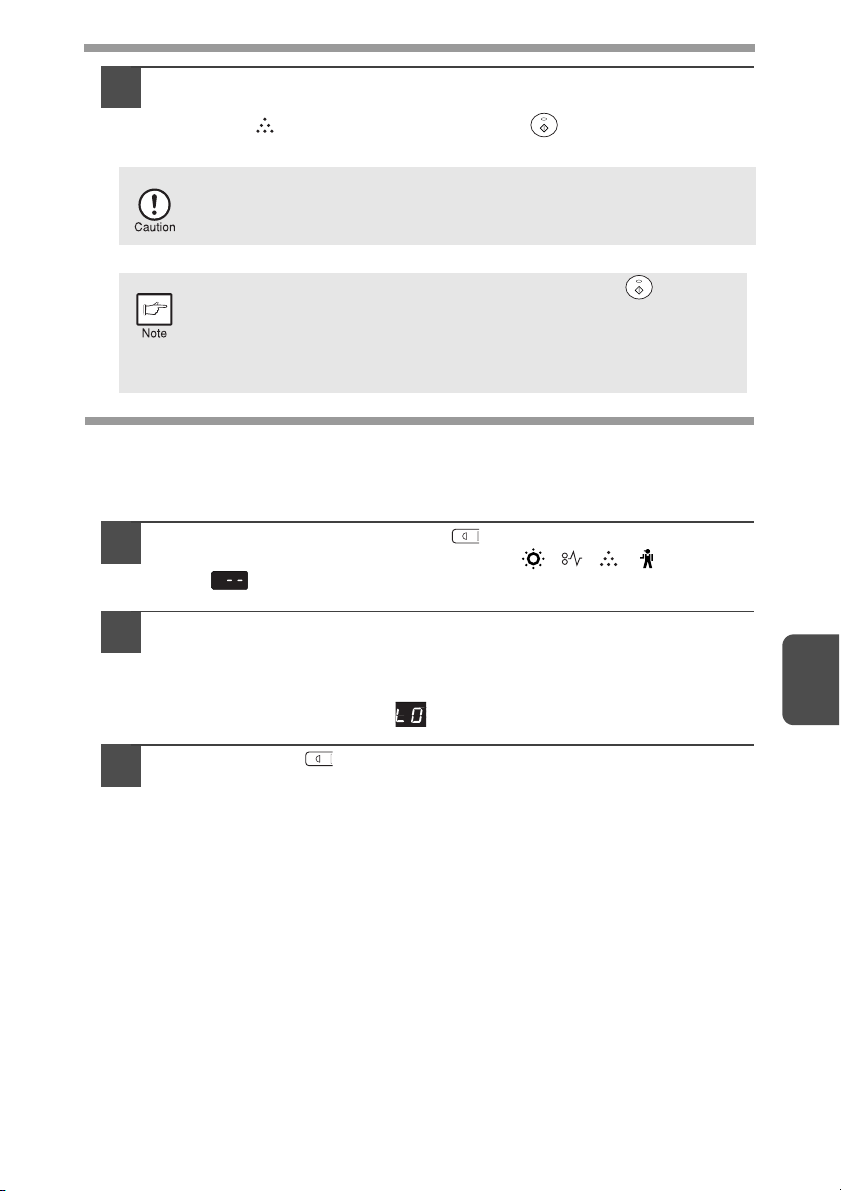
Close the front cover and then the side cover by pressing the
6
round projections near the side cover open button. The
indicator ( ) will go out and the start ( ) indicator will light
up.
When closing the covers, be sure to close the front cover securely
and then close the side cover. If the covers are closed in the wrong
order, the covers may be damaged.
Even after a new toner cartridge is installed, the start ( ) indicator
may not light up, indicating copying cannot be restarted (toner is not
sufficiently fed). In this case, open and close the side cover. The
copier will feed toner again approximately 2 minutes and then
copying can be restarted.
TONER CARTRIDGE LIFE
To find out the approximate quantity of toner remaining, follow the procedure
described below.
Press and hold down the light ( ) key for more than 5
1
seconds until all the alarm indicators ( , , , ) blink
and " " appears in the display.
Press and hold down the copy ratio display (%) key for more thn
2
5 seconds.
The approximate quantity of toner remaining will be indicated in the display
as a percentage ("100", "75", "50", "25" or "10" is displayed). When the
percentage is less than 10%,
() will be displayed.
6
Press the light ( ) key.
3
All alarm indicators wil go out.
47
Page 50
CLEANING THE UNIT
Proper care is essential in order to get clean, sharp copies. Be sure to take a few
minutes to regularly clean the unit.
Do not spray flammable cleaner gas. Gas from the spray may come in
contact with the internal electrical components or high-temperature parts
of the fusing unit, creating a risk of fire or electrical shock.
• Before cleaning, be sure to turn the power switch off and remove the
power cord from the outlet.
• Do not use thinner, benzene or other volatile cleaning agents. Doing
so may cause deformation, discoloration, deterioration or malfunction.
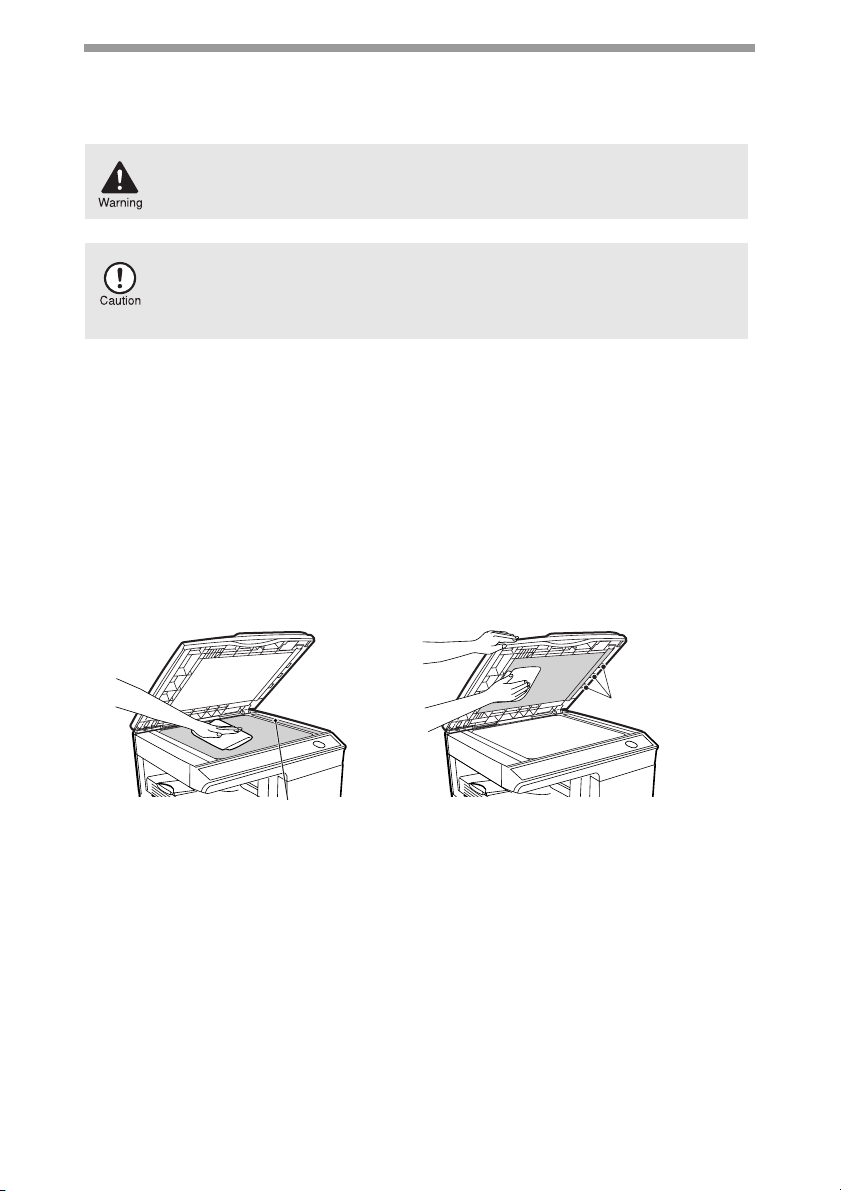
Cabinet
Wipe the cabinet with a soft, clean cloth.
Original table and the back side of the original cover and
SPF (if installed)
Stains on the glass, scanning window, cover or SPF roller will also be copied. Wipe
the glass, scanning window, cover or SPF roller with a soft, clean cloth. If necessary,
dampen the cloth with a glass cleaner.
48
Original table/scanning window
SPF scanning window
Original cover/SPF
SPF roller
Page 51
Transfer charger
If copies start becoming streaky or blotchy, the transfer charger may be dirty. Clean
the charger using the following procedure.
Turn the power switch off. (p.14)
1
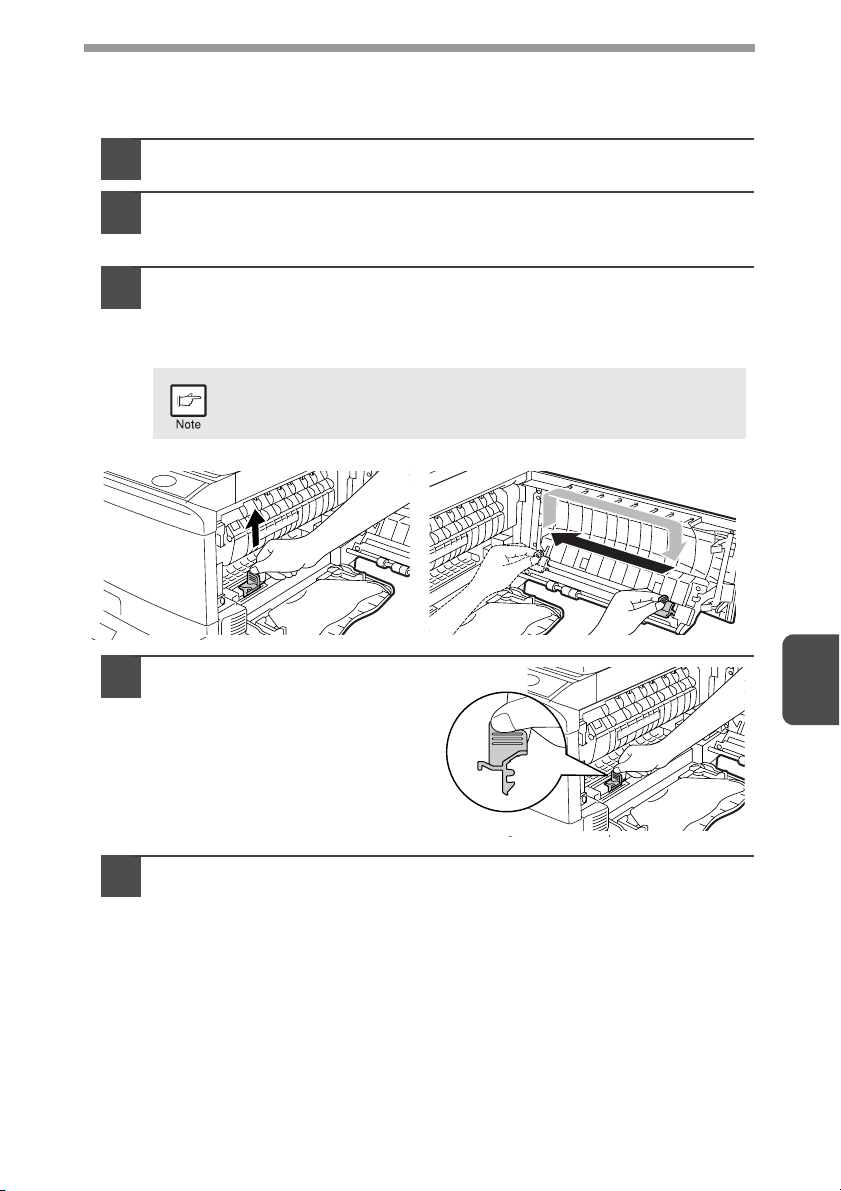
Open the multi-bypass, then the side cover while pressing the
2
side cover open button.
Take the charger cleaner out by holding the tab. Set the charger
3
cleaner onto the right end of the transfer charger, gently slide
the cleaner to the left end, and then remove it. Repeat this
operation two or three times.
Slide the charger cleaner from the right end to the left end along
the groove of the transfer charger. If the cleaner is stopped on
the way, smudges on copies may occur.
Return the charger cleaner
4
to its original position.
Close the side cover by
pressing the round
projections near the side
cover open button.
Turn the power switch on. (p.13)
5
6
49
Page 52
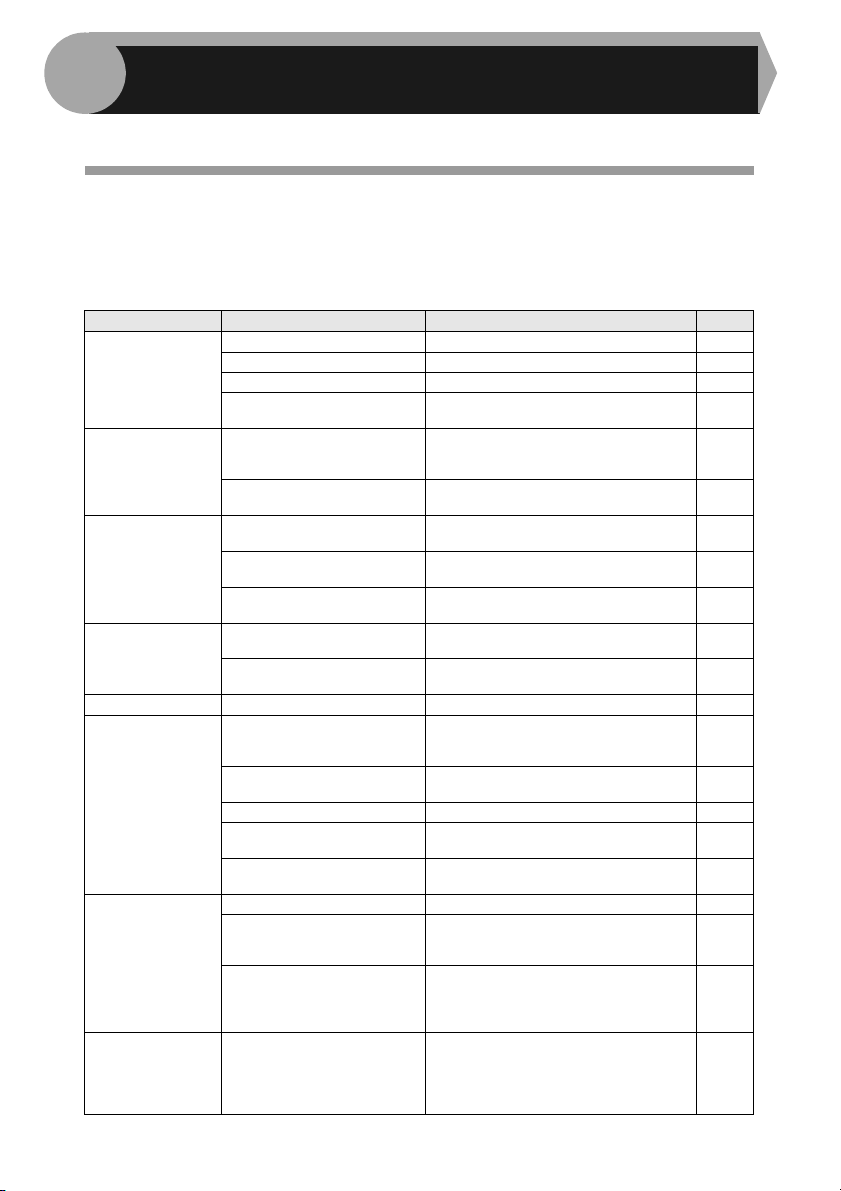
7
TROUBLESHOOTING THE UNIT
This chapter describes misfeed removal and troubleshooting.
TROUBLESHOOTING
If any problem occurs, check the list below before contacting your authorised service
representative.
For problems with the printer function or the scanner function, see the online manual
or the Help file for the printer/scanner driver.
Problem Possible cause Solution Page
Unit plugged in? Plug the unit into a grounded outlet. 13
Unit does not
operate.
Blank copies
Copies are too
dark or too light.
Dust, dirt,
smudges appear
on copies.
Striped copies Is transfer charger clean? Clean the transfer charger. 49
Paper misfeeds
frequently.
Images rub off the
copy easily.
Printing is not
uniform between
the edges of the
paper and the
center.
Power switch on? Turn the power switch on. 13
Side cover closed securely? Gently close the side cover. 47
Front cover closed?
Is the original placed face
down on the document glass
or face up in the SPF?
Is the scan head locking
switch locked?
Is original image too dark or
too light?
Is the unit in the automatic
exposure mode?
Is the unit in the photo
exposure mode?
Original table or original
cover dirty?
Original smudged or
blotchy?
Non-standard paper used?
Paper curled or damp?
Pieces of paper inside unit? Remove all pieces of misfed paper. 52
Paper guides in the paper
tray not set properly?
Too much paper in the paper
tray or multi-bypass tray ?
Is the paper too heavy? Use paper within the specified range. 7
The fusing temperature is
not appropriate.
Paper damp? Replace with dry paper. If the unit is
The fusing temperature is
not appropriate.
Gently close the front cover and then
close the side cover.
Place the original face down on the
document glass or face up in the SPF. 15
Unlock the scan head locking switch.
Adjust the exposure manually. 17
Adjust the automatic exposure level. 18
Cancel the photo exposure mode. 17
Clean regularly. 48
Use a clean original. –
Use standard paper. If using special
papers, feed the paper through the
multi-bypass tray.
Store paper flat in the wrapper in a dry
location.
Set the guides properly depending on
the paper size.
Remove excessive paper from the
tray.
In the user programs, set "Fusing
temperature setting when the bypass tray
is used" (program 29) to "2 (High)".
not used for long time, remove the
paper from the paper tray and store it
in its wrapper in a dry location.
In the user programs, set "Fusing
temperature setting when the bypass
tray is used" (program 29) to "1 (Low)".
47
57
7
–
8
8
44
2
44
50
Page 53
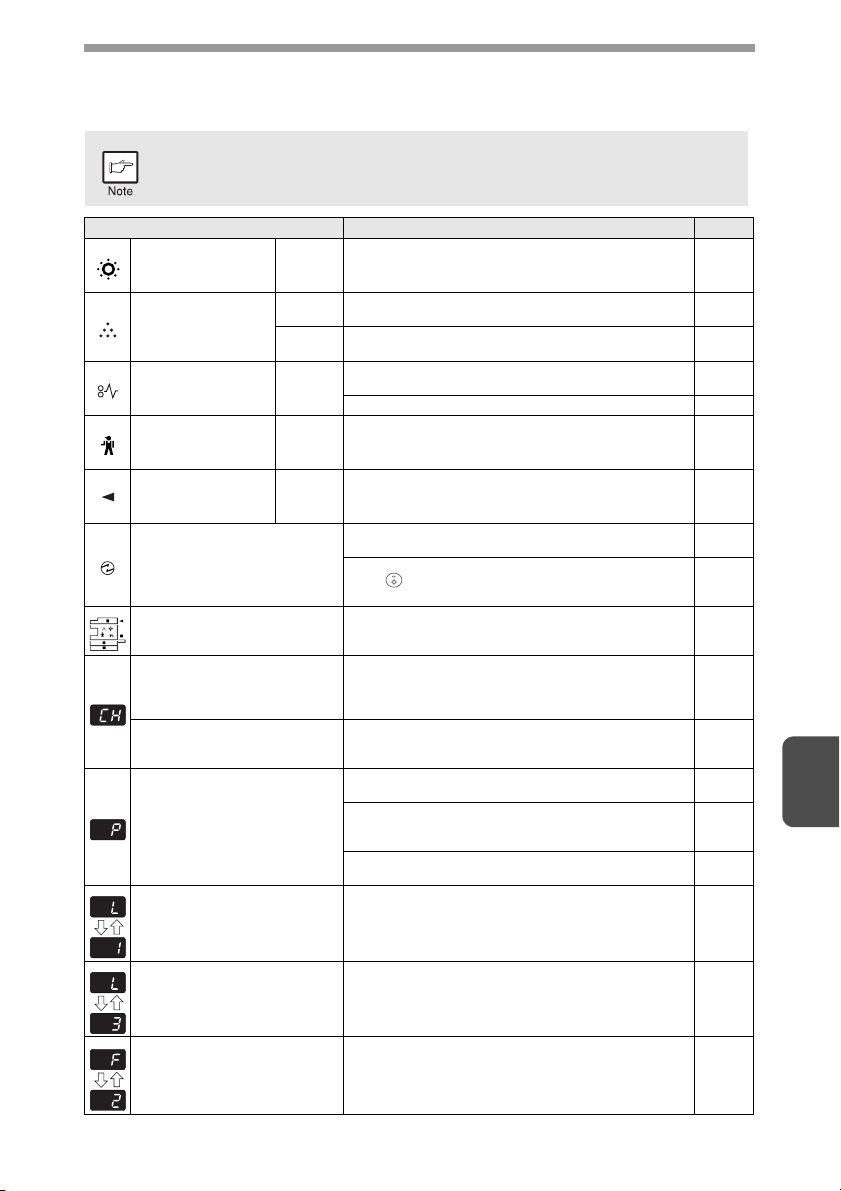
STATUS INDICATORS
When the following indicators light up or blink on the operation panel or the following alphanumeric codes
appear in the display, solve the problem immediately referring to both the table below and the relevant page.
Be sure to use only genuine SHARP parts and supplies.
Indication Cause and remedy Page
Developer
replacement required
indicator
Toner cartridge
replacement required
indicator
Misfeed indicator Blinking
Maintenance
indicator
SPF misfeed
indicator
Power save indicator is steadily
lit.
The paper tray indicator is
blinking.
"CH" is blinking in the display.
"CH" is steadily lit in the display.
"P" is blinking in the display.
A letter and a number appear
alternately.
Steadily
lit
Steadily
lit
Blinking
Steadily
lit
Blinking
Developer is required. contact your authorised
service representative.
Replacement of Toner cartridge will be needed soon.
Prepare a new cartridge. (AR-208T)
Toner cartridge must be replaced. Replace it with a
new one. (AR-208T)
A misfeed has occurred. Remove the misfed paper
referring to the description of "MISFEED REMOVAL".
The lower side cover may be open. If so, close it. 55
Service by an authorised SHARP service technician
is required.
An original misfeed has occurred in the SPF. Remove
the misfed originals referring to the description of "E:
Misfeed in the SPF".
The unit is in the preheat mode. Press any key to
cancel the preheat mode.
The unit is in the auto power shut-off mode. Press the
start ( ) key to cancel the auto power shut-off
mode.
The paper tray is not installed properly. Push the tray
into the unit securely.
The toner cartridge is not installed. Check if the
cartridge is installed. If "CH" is blinking even if a
cartridge is installed properly, contact your SHARP
service centre immediately.
Side cover is open. Close the side cover securely by
pressing the round projections near the side cover
open button.
The paper tray or multi-bypass tray is empty.
Load paper.
A misfeed has occurred in the paper tray, single
bypass or multi-bypass tray. Remove the misfed
paper.
Paper tray is not securely installed. Push the tray in
securely.
The scan head locking switch is locked. Unlock the
scan head locking switch and turn the power switch
off/on.
8, 10
56
45
45
52
56
55
42
42
–
–
–
52
–
57
7
A letter and a number appear
alternately.
A letter and a number appear
alternately.
The unit will not function. Turn the power switch off
and then switch it on, and if there is again an error,
remove the power cord from the outlet, and contact
your authorized service representative.
The unit will not function. Turn the power switch off
and then switch it on, or when the side cover is
opened and then closed ; and if there is again an
error, check whether or not you forgot to remove the
bundling tape on the cartridge.
–
–
51
Page 54
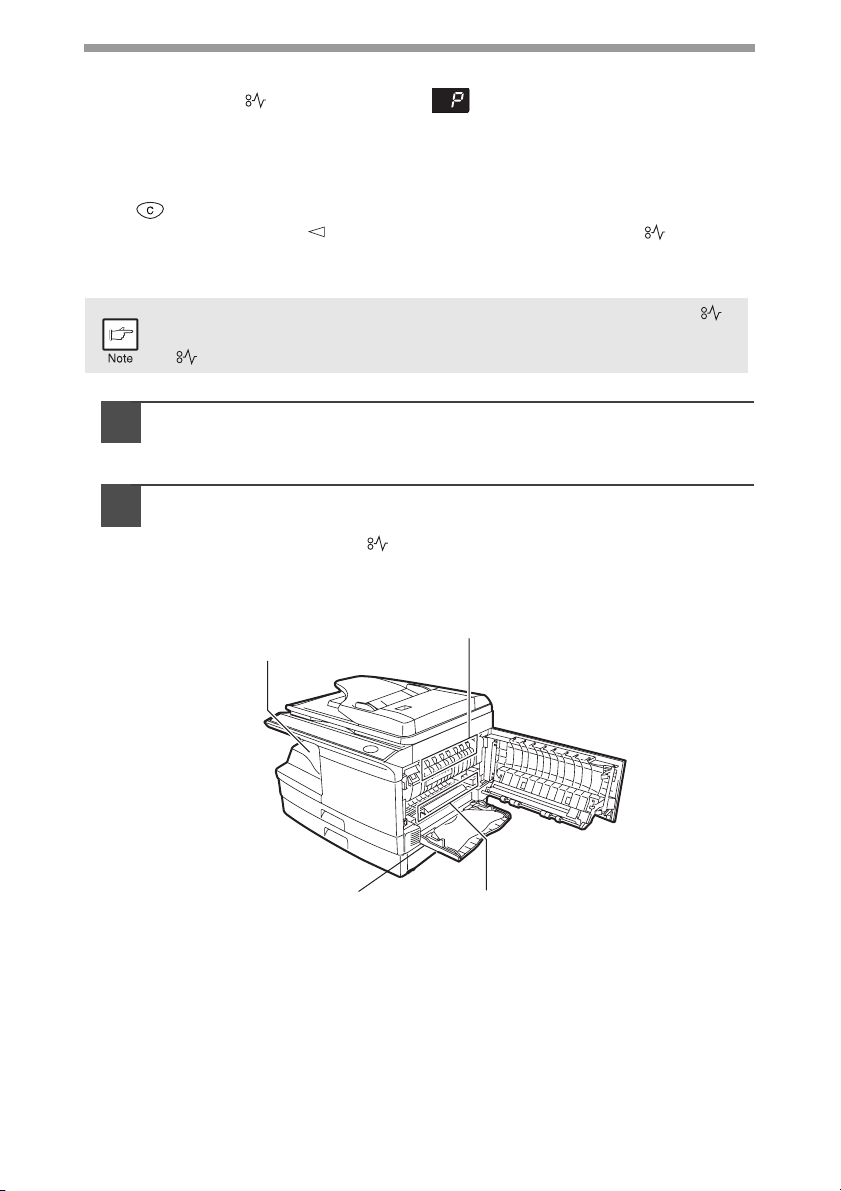
MISFEED REMOVAL
When the misfeed ( ) indicator blinks or blinks in the display, the unit will
stop because of a misfeed. If a misfeed occurs when using the SPF, a number may
appear in the display after a minus sign. This indicates the number of the originals
that must be returned to the original feeder tray after a misfeed. Return the required
number of originals. Then this number will disappear when copying is resumed or the
clear ( ) key is pressed. When the SPF misfeeds an original sheet, the unit will
stop and the SPF misfeed ( ) indicator will blink, while the misfeed ( ) indicator
will remain off. For a misfeed of originals in the SPF, see "E: Misfeed in the SPF"
(p.55).
If the unit is turned on with the lower side cover open, the misfeed ( )
indicator will blink. In this case, close the lower side cover. The misfeed
( ) indicator will go out.
Open the multi-bypass tray, and side cover, in that order.
1
To open the multi-bypass tray, see "The multi-bypass tray" (p.10). To open
the side cover, see "TONER CARTRIDGE REPLACEMENT" (p.45).
Check the misfeed location. Remove the misfed paper
2
following the instructions for each location in the illustration
below. If the misfeed ( ) indicator blinks, proceed to "A:
Misfeed in the paper feed area" (p.53).
52
If the misfed paper is seen from
this side, proceed to "C: Misfeed
in the transport area". (p.54)
If paper is misfed here, proceed
to "D: Misfeed in the lower
paper feed area". (p.55)
If paper is misfed here, proceed to "B:
Misfeed in the fusing area". (p.53)
If paper is misfed here, proceed to "A:
Misfeed in the paper feed area". (p.53)
Page 55
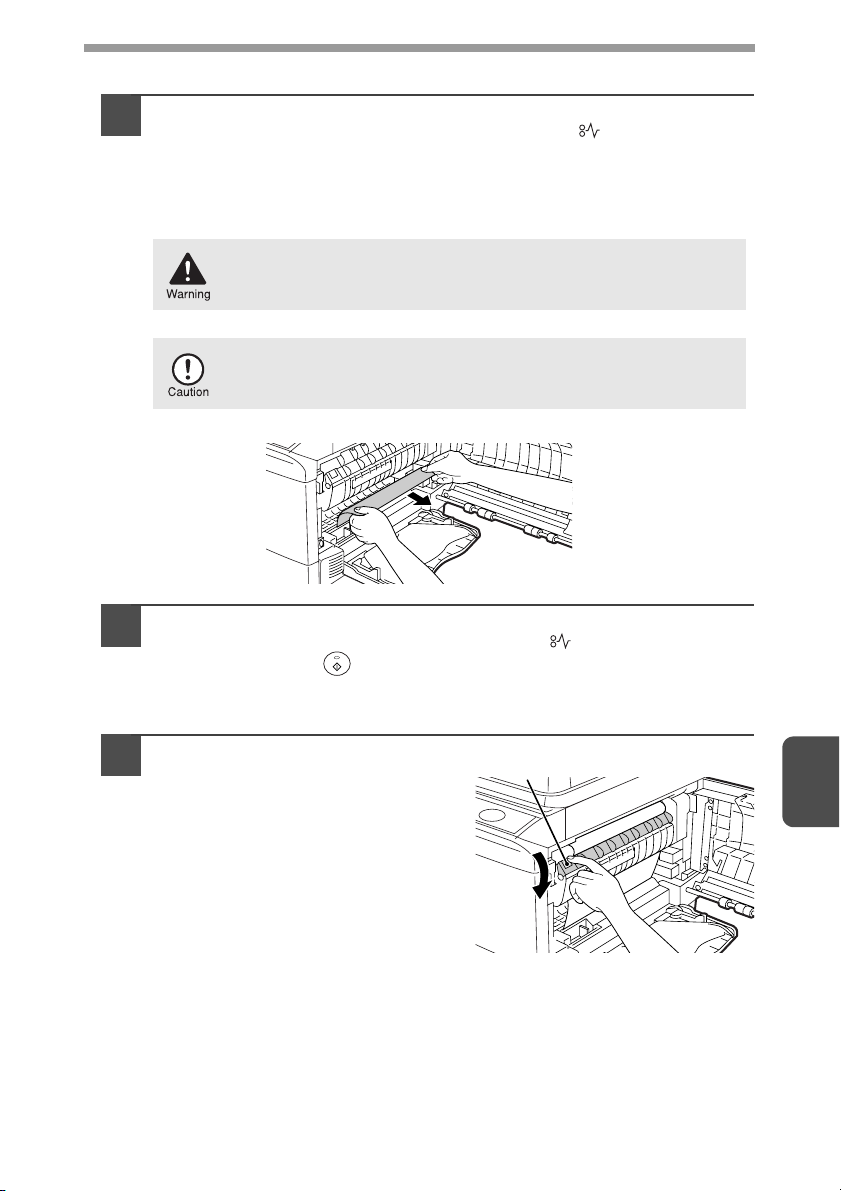
A: Misfeed in the paper feed area
Gently remove the misfed paper from the paper feed area as
1
shown in the illustration. When the misfeed ( ) indicator
blinks, and the misfed paper is not seen from the paper feed
area, pull out the paper tray and remove the misfed paper. If the
paper cannot be removed, proceed to "B: Misfeed in the fusing
area".
The fusing unit is hot. Do not touch the fusing unit when
removing misfed paper. Doing so may cause a burn or other
injury.
Do not touch the photoconductive drum (green portion) when
removing the misfed paper. Doing so may cause smudges on
copies.
Close the side cover by pressing the round projections near
2
the side cover open button. The misfeed ( ) indicator will go
out and the start ( ) indicator will light up.
B: Misfeed in the fusing area
Lower the fusing unit release
1
lever.
Fusing unit release lever
7
53
Page 56
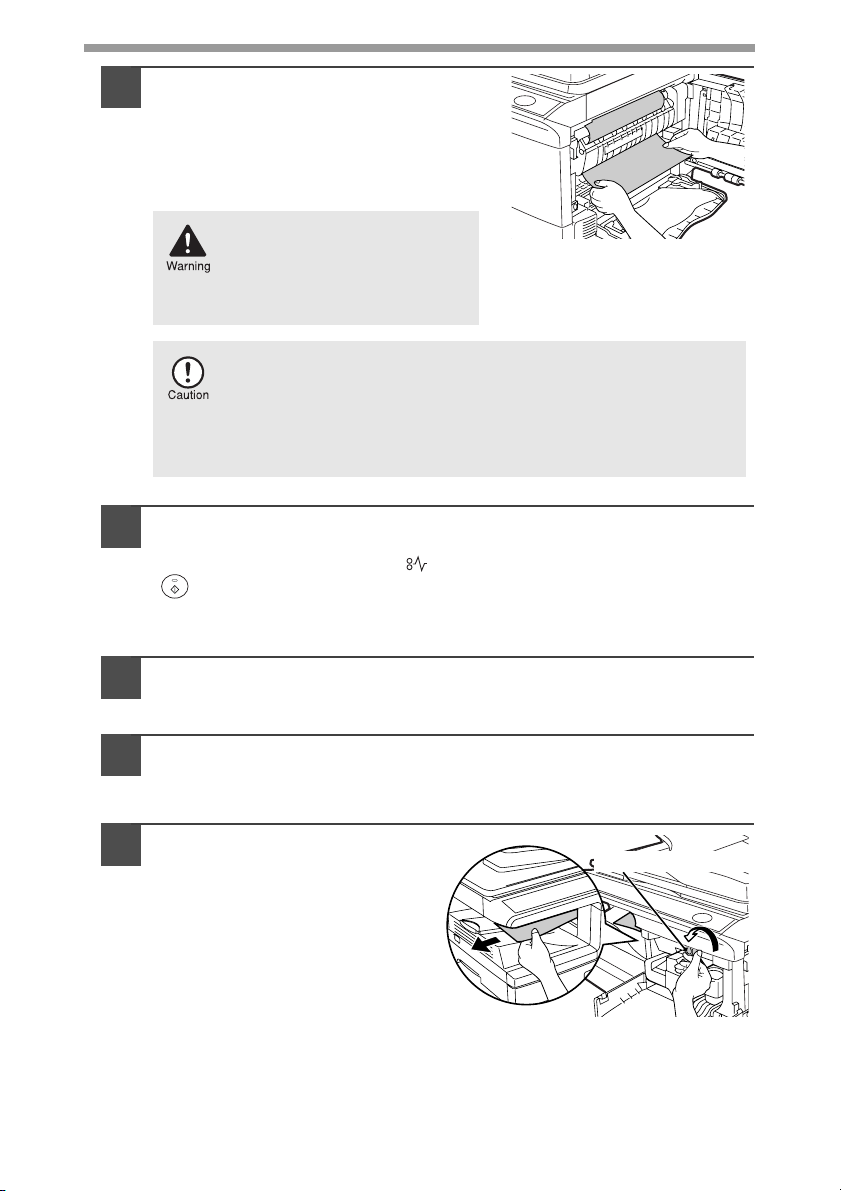
Gently remove the misfed paper
2
from under the fusing unit as
shown in the illustration. If the
paper cannot be removed, proceed
to "C: Misfeed in the transport
area".
The fusing unit is hot. Do not
touch the fusing unit when
removing misfed paper. Doing
so may cause a burn or other
injury.
• Do not touch the photoconductive drum (green portion) when
removing the misfed paper. Doing so may cause smudges on
copies.
• Do not remove the misfed paper from above the fusing unit.
Unfixed toner on the paper may stain the paper transport
area, resulting in smudges on copies.
Raise the fusing unit release lever and then close the side
3
cover by pressing the round projections near the side cover
open button. The misfeed ( ) indicator will go out and the start
( ) indicator will light up.
C: Misfeed in the transport area
54
Lower the fusing unit release lever.
1
See "B: Misfeed in the fusing area" (p.53).
Open the front cover.
2
To open the front cover, see "TONER CARTRIDGE REPLACEMENT"
(p.45).
Rotate the feeding roller in
3
the direction of the arrow
and gently remove the
misfed paper from the exit
area.
Roller rotating knob
Page 57
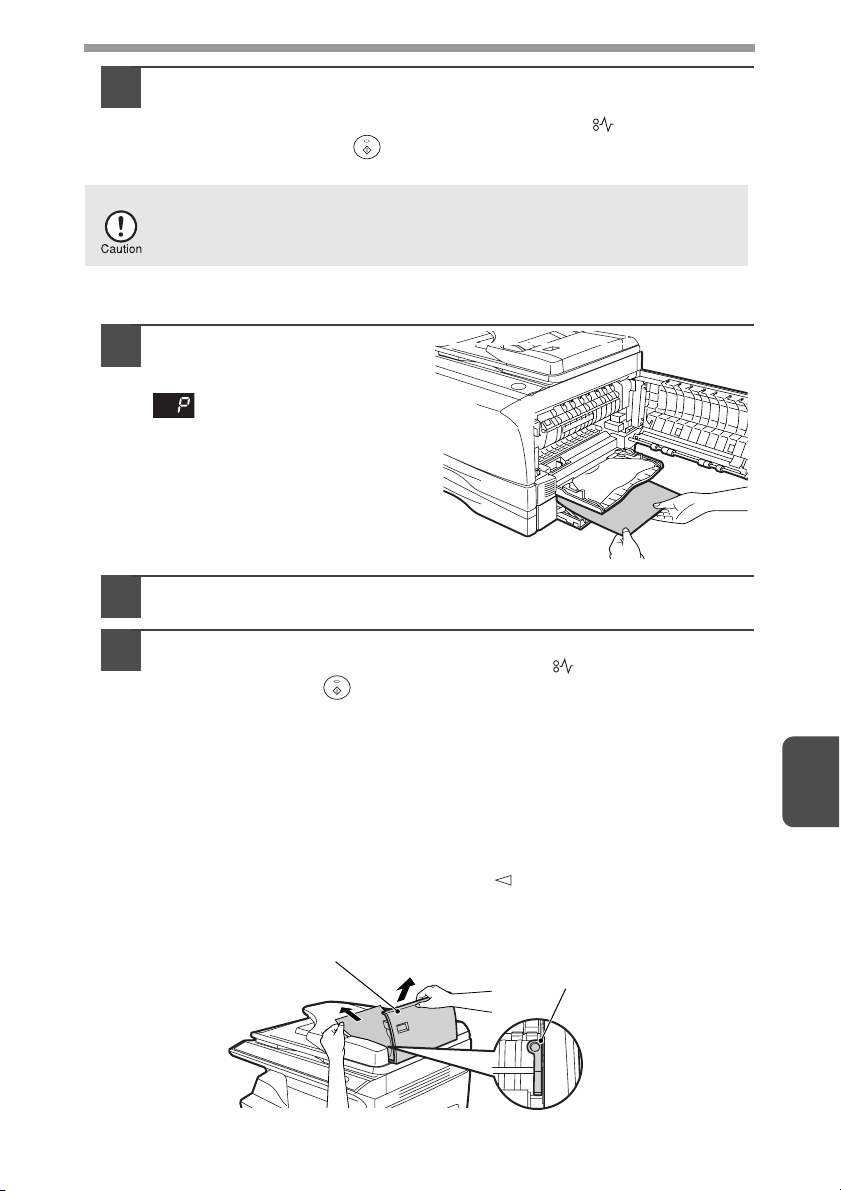
Raise the fusing unit release lever, close the front cover and
4
then close the side cover by pressing the round projections
near the side cover open button. The misfeed ( ) indicator will
go out and the start ( ) indicator will light up.
5
When closing the covers, be sure to close the front cover securely and
then close the side cover. If the covers are closed in the wrong order,
the covers may be damaged.
D: Misfeed in the lower paper feed area
Open the lower side cover
1
(under the manual tray) and
remove the misfed paper. If
blinks and the misfed
paper is not seen from the
area of the lower side cover,
pull out the lower paper tray
and remove the misfed
paper. Then close the lower
paper tray.
Close the lower side cover.
2
Close the side cover by pressing the round projections near
3
the side cover open button. The misfeed ( ) indicator will go
out and the start ( ) indicator will light up.
E: Misfeed in the SPF
An original misfeed may occur at one of three locations: if the misfed original is seen
from the original feeder tray, (A) in the original feeder tray; if the misfed original is not
seen from the original feeder tray, (B) in the exit area or (C) under the feeding roller.
Remove the misfed original following the instructions for each location.
(A) Open the feeding roller cover and pull the original gently to the left and out
from the original feeder tray. Close the feeding roller cover. Open and close
the original cover to clear the SPF misfeed ( ) indicator. If the misfed
original cannot be easily removed, proceed to (C).
7
Document feeder cover
SPF jam release lever
55
Page 58
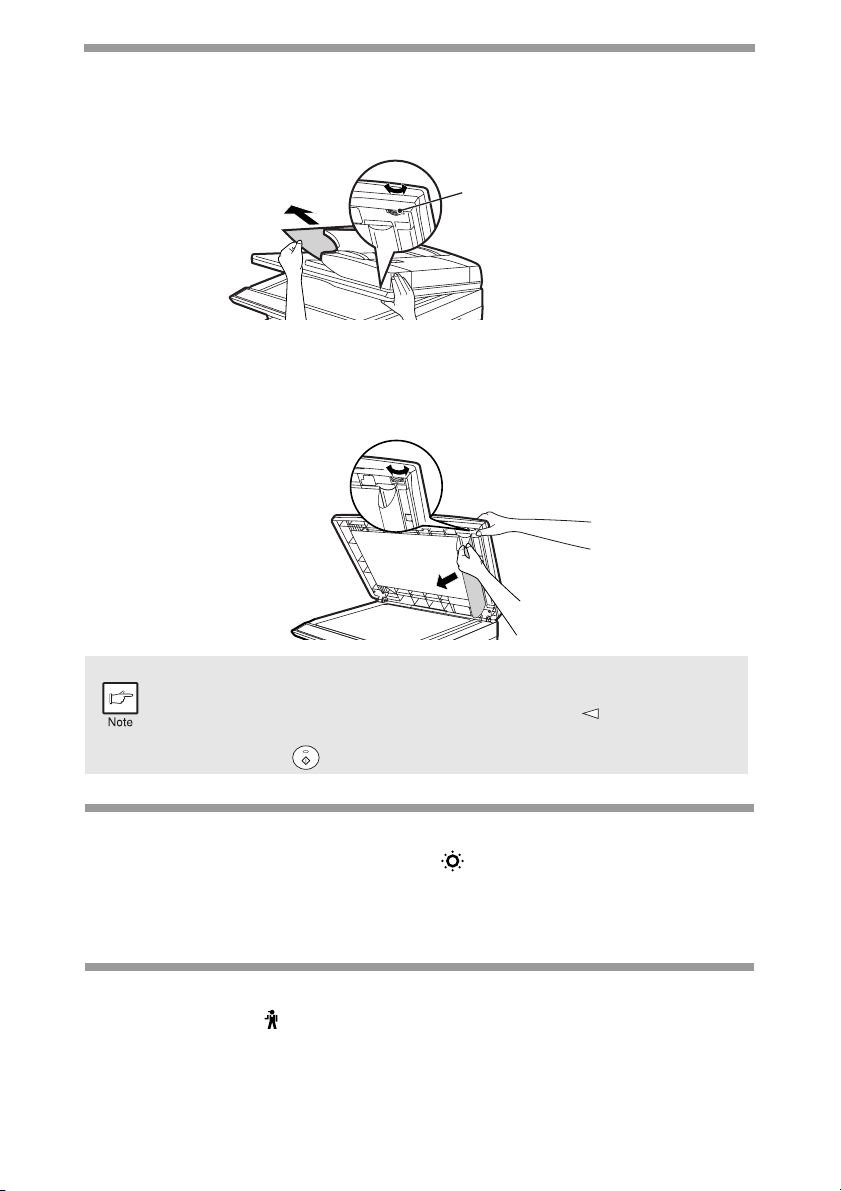
(B) Open the original cover and rotate the roller rotating knob to remove the
misfed original from the exit area. If the misfed original cannot be easily
removed, proceed to (C).
Roller
(C) If the original does not move easily into the exit area, remove it in the
direction of the arrow while rotating the knob.
56
A number may appear in the display after a minus sign, indicating the
number of the originals that must be returned to the original feeder tray.
Open and close the SPF to clear the SPF misfeed
then clear the misfeed and return the required number of originals. Then
press the start ( ) key to resume copying.
() indicator and
DEVELOPER REQUIRED
When the developer replacement required ( ) indicator lights up, the developer
should be replaced. DEVELOPER REPLACEMENT SHOULD ONLY BE DONE BY
AN AUTORIZED SHARP SERVICE TECHNICIAN. Contact your service centre as
soon as possible.
MAINTENANCE REQUIRED
When maintenance ( ) indicator lights up, service by an authorised SHARP
service technician is required. Contact your service centre as soon as possible.
Page 59
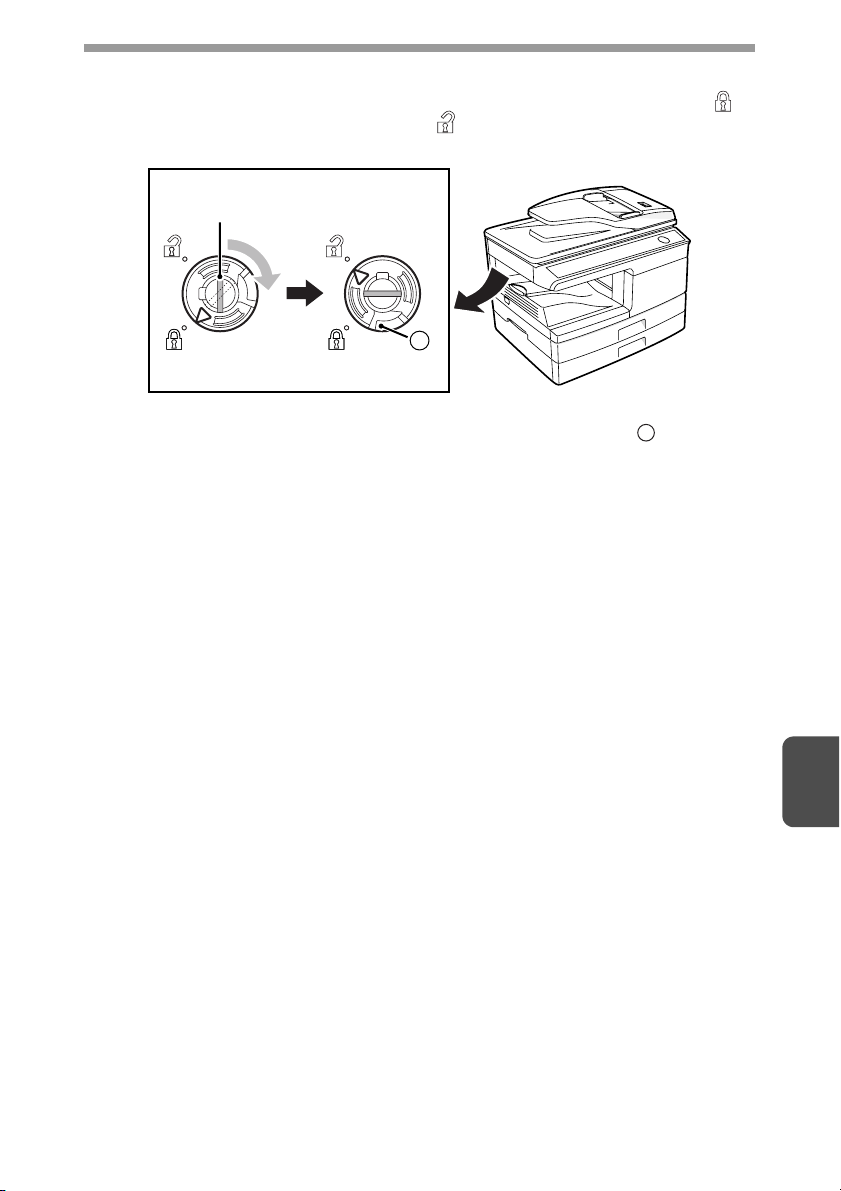
SCAN HEAD LOCKING SWITCH
The scan head locking switch is under the original table. If the switch is locked ( ),
the unit will not operate. Unlock the switch ( ) as shown below.
Grasp here and turn in
the direction of the arrow.
A
Lock Unlock
To lock the scan head locking switch, hold up the catch in illustration and
turn the center knob counter-clockwise 90 degrees until you hear a click.
A
7
57
Page 60
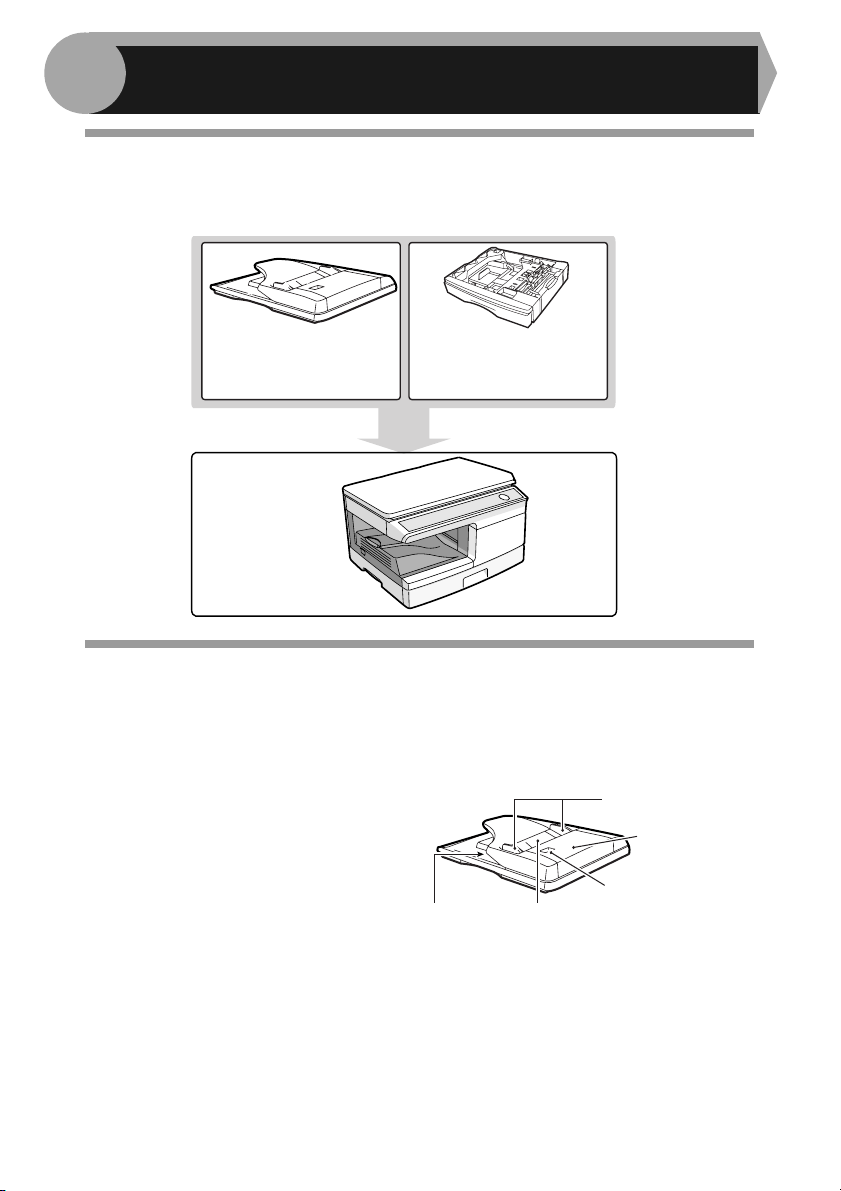
8
OPTIONS
SYSTEM CONFIGURATION
A number of options are available for the unit which allow you to configure a system
to meet your particular needs. The options include the following.
Single Pass Feeder
(AR-SP9)
AR-203E
250-sheet paper
feed unit
(AR-D33)
SINGLE PASS FEEDER (AR-SP9)
The single pass feeder (SPF) holds up to 50 originals for automatic feeding.
The procedures for placing originals in
the SPF, cleaning the SPF, and
removing a misfeed are explained in
the following sections. See "Using the
SPF" (p.16), "CLEANING THE UNIT"
(p.48) and "E: Misfeed in the SPF"
(p.55).
Exit area
Document feeder tray
Original guide
Document
feeder cover
Peep hole
58
Page 61
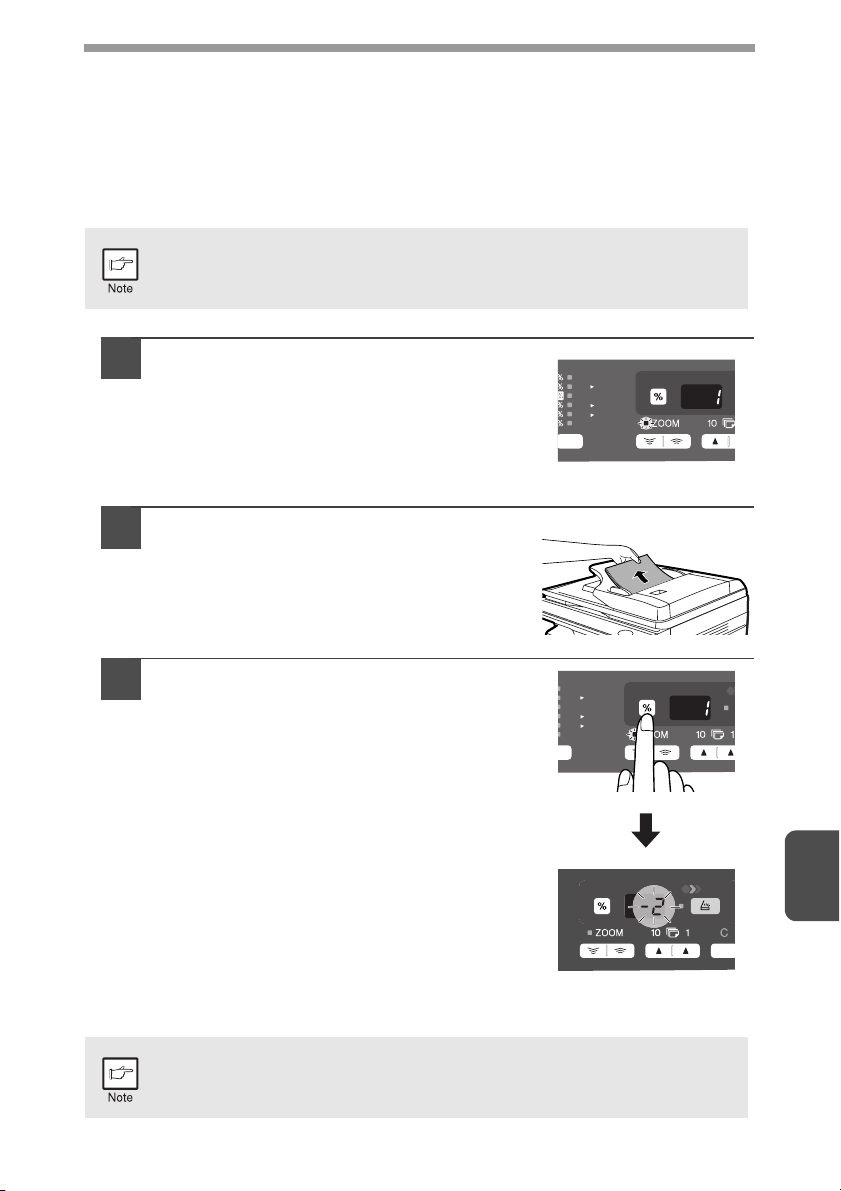
IF A PAPER MISFEED OCCURS IN THE MAIN UNIT WHEN USING THE SPF
If a paper misfeed occurs in the main unit paper path when making copies with
original(s) through the SPF, the SPF will automatically stop scanning. Manually
remove the misfed paper(s) in the main unit. You can check the number of originals
that must be returned to the document feeder tray in the display on the operation
panel. Follow the steps below to display the number of originals to be returned.
The following procedure omits removal of the misfeed. Be sure to remove
the misfeed before displaying the number of originals to be returned. For
the misfeed removal procedure, see "MISFEED REMOVAL" (p.52).
When a paper misfeed occurs in the
1
main unit, the SPF stops and the ZOOM
indicator blinks.
The remaining number of sets will blink in the
display.
Be sure to remove misfed paper(s) at the main
unit paper path first. Then follow the step 2
onwards.
Remove any originals that have not yet
2
been scanned from the document
feeder tray.
For the original(s) stuck in the SPF, do not
remove manually. This may cause a machine
malfunction. See the step 3.
A5
A4
A4
B5
A4
A5
Press the copy ratio display (%) key.
3
The originals that were being scanned in the SPF
will be discharged and the number of original
sheets to be returned will blink in the display.
A5
A4
A4
B5
A4
A5
Place the displayed number of original sheets
back in the document feeder tray together with
the original sheets removed in step 2.
A4
B5
A5
Display of number of original
sheets to be returned
If "SPF automatic original discharge time" is enabled in the user
programs, the originals in the SPF will be automatically discharged after
the set time elapses. ("USER PROGRAMS" (p.43)
8
59
Page 62
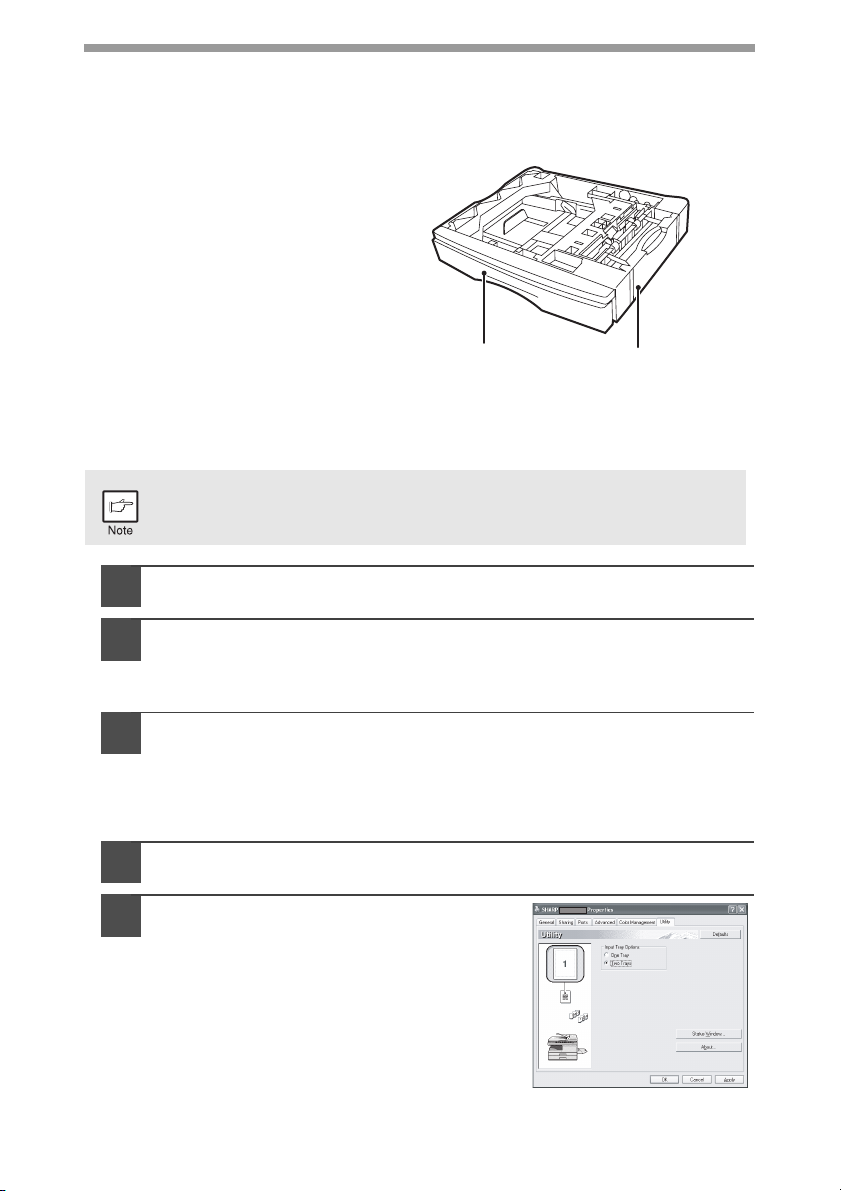
250-SHEET PAPER FEED UNIT (AR-D33)
The paper feed unit provide the convenience of increased paper capacity for the unit
and a greater choice of paper size readily available for copying.
The procedures for loading paper in the
paper tray of paper feed unit, changing
the paper size, and selecting the paper
tray are same as for the paper tray in the
unit. See "LOADING THE PAPER TRAY"
(p.8) and "Selecting the tray" (p.19).
Tr ay
Lower side cover
Using the paper feed unit
with the printer function
The AR-D33 can also be used with the printer function. To use the AR-D33 with the
printer function, follow these steps to adjust the settings in the printer driver.
The printer driver cannot be set for use with the AR-D33 when opened
from the application.
Click the "start" button.
1
Click "Control Panel", select "Printer and Other Hardware", and
2
then click "Printer and Faxes".
• On Windows Vista, select "Settings" and click "Printers".
• On Windows 98/Me/2000, select "Setting" and click "Printers".
Click the "SHARP AR-xxxx" printer driver icon and from the
3
"File" menu select "Properties".
• On Windows Vista, click the "SHARP AR-xxxx" printer driver icon and
select "Properties" from the "Organize" menu.
• On Windows 98/Me, click the "SHARP AR-xxxx" printer driver icon, select
"Properties" from the "File" menu, and then click the "Setup" tab.
Click the "Utility" tab.
4
Select "Two trays" for "Input tray
5
option", and click "OK".
The printer driver closes. This completes the
settings needed to use the AR-D33.
60
Page 63
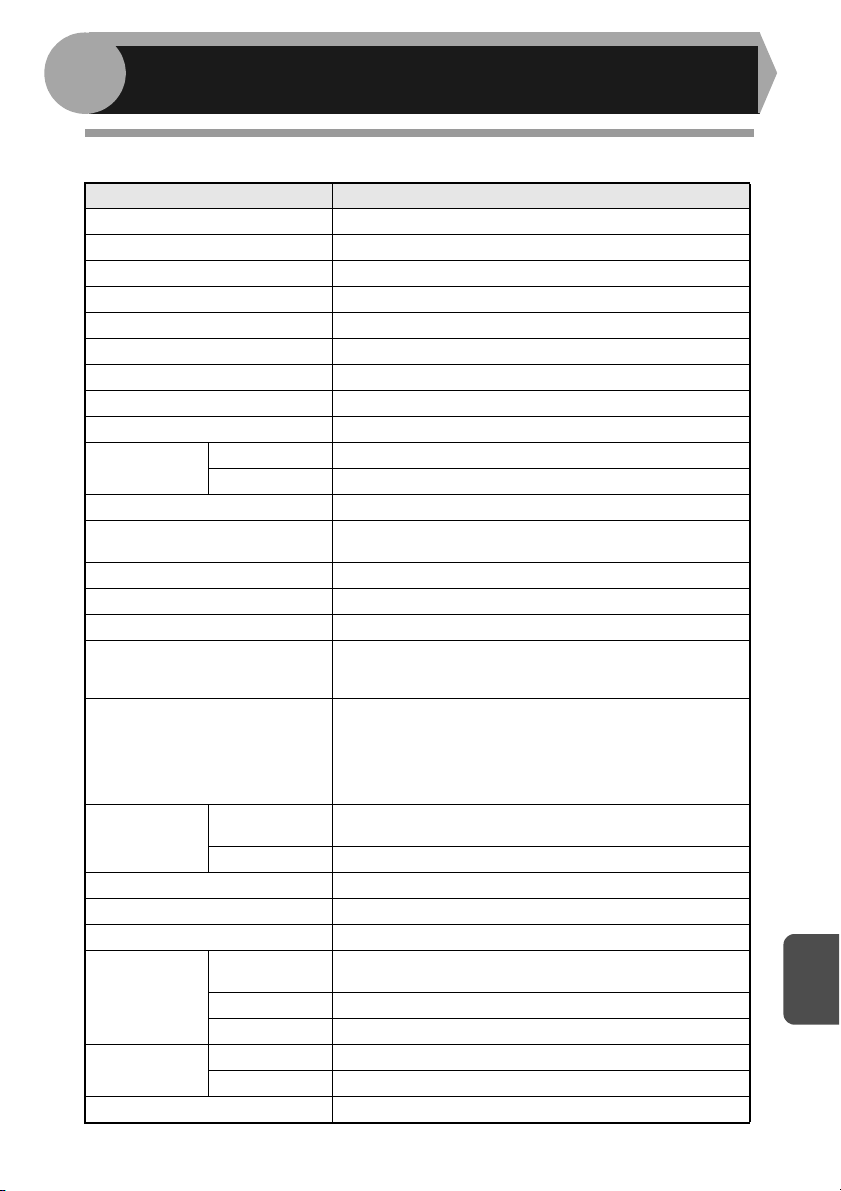
9
APPENDIX
SPECIFICATIONS
Model AR-203E
Type Digital multifunctional system, desk-top type
Copy system Dry, electrostatic transfer
Originals Sheets, bound documents
Printer function Available - Cable required (USB)
Scanner function Available - Cable required (USB)
Paper tray 250 sheets
Multi-bypass tray 50 sheets
Paper output tray 200 sheets
Original sizes Max. A4
Original feed
Copy / printing size A6 to A4 *
Image loss
Copy speed 20 pages/min.
Print speed Max. 15 pages/min. (A4)
Continuous copying Max. 99 pages subtractive counter
First-copy time
(Approximately)
Copy ratio
Exposure
system
Fusing system Heat rollers
Development system Magnetic brush development
Light source Cold cathode fluorescent lamp
Resolution
Gradation
Bit depth 1 bit or 8 bit/pixel
Original table 1 sheet
SPF Up to 50 sheets
Max. 4mm *
Max. 4.5mm *
8.0 seconds (When user program 24 is set to OFF)
10.7 seconds (When user program 24 is set to ON)
(paper: A4, exposure mode: AUTO, copy ratio: 100%)
Original table :
Variable:25% to 400% in 1% increments (total 376 steps)
Fixed: 50%, 70%, 86%, 100%, 141%, 200%
SPF:
Variable:50% to 200% in 1% increments (total 151 steps)
Fixed: 50%, 70%, 86%, 100%, 141%, 200%
Original table
SPF Moving original
Copier
Printer 600dpi
Scanner 600 x 1200dpi
Scan 256 levels
Output 2 levels
Moving optical source, slit exposure (stationary platen)
with automatic exposure
600 x 300dpi (Auto/Manual mode)
600 x 600dpi (Photo mode)
1
2
3
9
61
Page 64
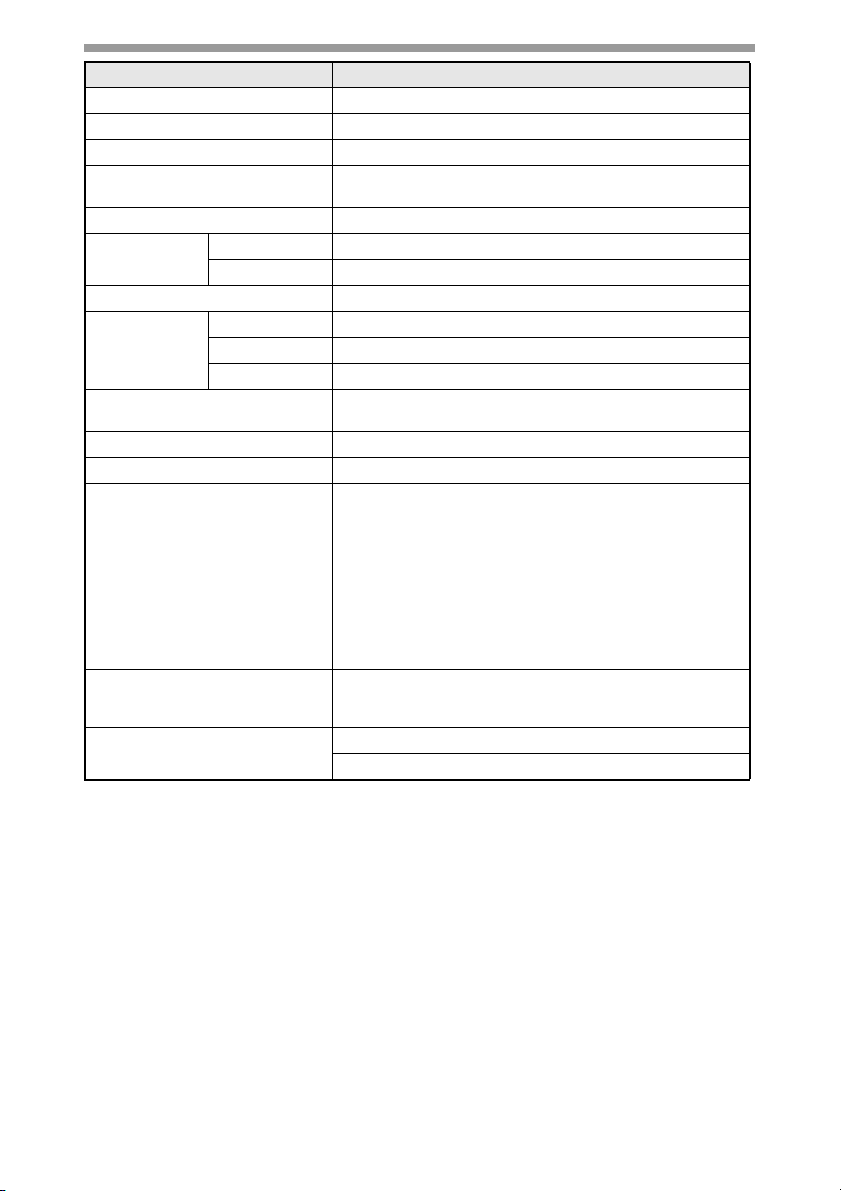
Model AR-203E
Sensor Colour CCD
Scanning speed Max. 2.88ms/line
Memory 8 MB
Power supply
Local voltage
the name plate located on the back of the unit)
±10% (For this copier power supply, see
Power consumption 1000 W
Overall
dimensions
Weight (Approximately) *
Width 607.6mm
Depth 462.5mm
4
16kg
Width 518mm
Unit dimensions
Depth 462.5mm
Height 295.6mm
Operating conditions
Temperature: 10°C to 30°C
Humidity: 20% to 85%
Emulation SHARP GDI
Interface port USB interface (USB 2.0 Full Speed)
wA (1B=10dB)
pA (bystander positions)
pA (operator position)
3
3
3
Noise level
Emission concentration
(measurement according to
RAL-UZ 62)
Optional equipment
*1Feed paper lengthwise only.
2
*
Leading and trailing edges.
3
*
Along the other edges in totals.
4
*
Not including toner and drum cartridges.
Sound Power Level L
Copying: 6.4 [B]
Standby: 3.3 [B]
Sound Pressure Level L
Copying: 48 [dB (A)]
Standby: 17 [dB (A)]
Sound Pressure Level L
Copying: 52 [dB (A)]
Standby: 17 [dB (A)]
Noise emission measurement in accordance with ISO
7779.
Ozone: less than 0.02 mg/m
Dust: less than 0.075 mg/m
Styrene: less than 0.07 mg/m
250-sheet paper feed unit (AR-D33)
Single Pass Feeder (AR-SP9)
62
Page 65
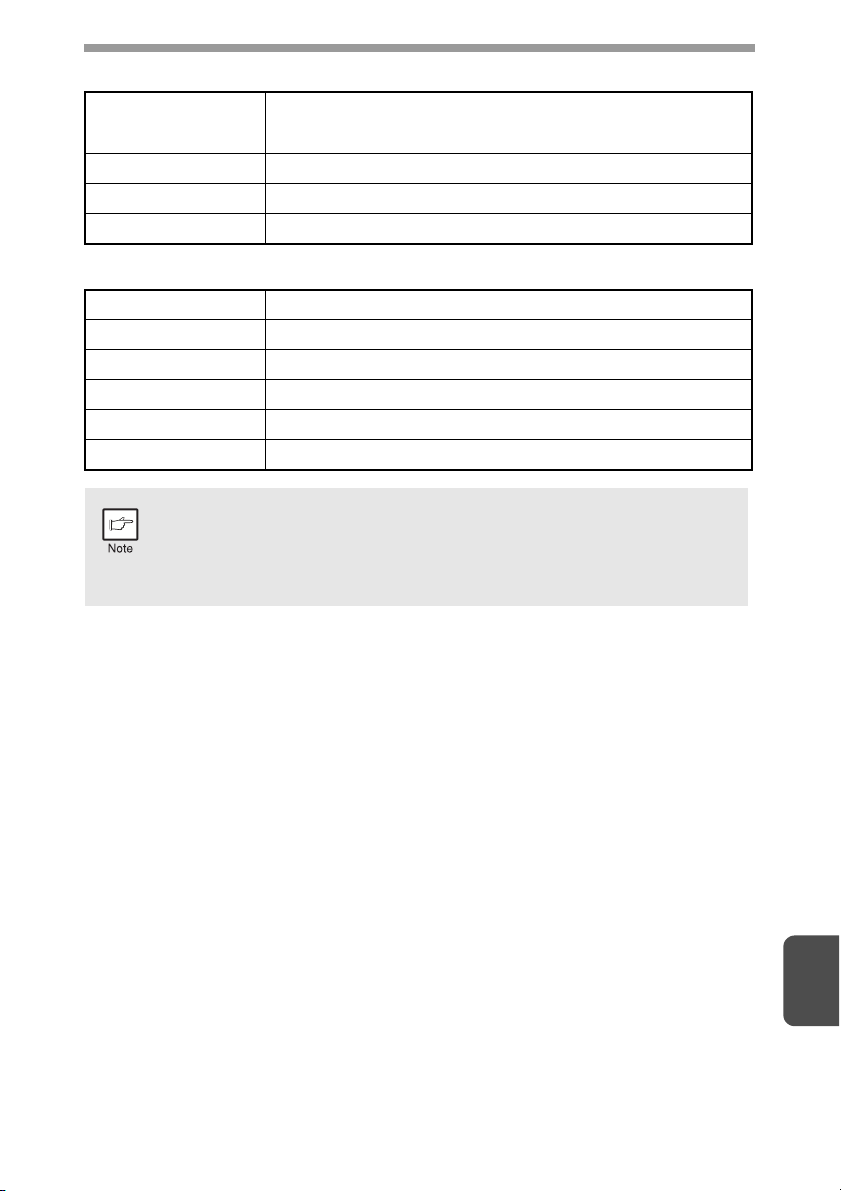
Single pass feeder (AR-SP9)
Acceptable originals
Power supply Drawn from the unit.
Weight Approx. 3kg
Dimensions 498mm (W) x 380mm (D) x 110mm (H)
Weight: 56g/m2 to 90g/m2
Size: A5 to A4
Capacity: Up to 50 sheets
250-sheet paper feed unit (AR-D33)
Paper size A5 to A4
Paper weight 56g/m
Paper capacity One paper tray with capacity for 250 sheets of 80g/m
Weight 3kg
Dimensions 498mm (W) x 395mm (D) x 88mm (H)
Power supply Drawn from the unit
As a part of our policy of continuous improvement, SHARP reserves the
right to make design and specification changes for product improvement
without prior notice. The performance specification figures indicated are
nominal values of production units. There may be some deviations from
these values in individual units.
2
to 80g/m2
2
bond paper
9
63
Page 66
ABOUT SUPPLIES AND OPTIONS
When ordering supplies, please use the correct part numbers as listed below.
Be sure to use only genuine SHARP parts and supplies.
For best copying results, be sure to use only SHARP Genuine
Supplies which are designed, engineered, and tested to maximize the
life and performance of SHARP copiers. Look for the Genuine
Supplies label on the toner package.
Supply list
Supply Part number Usable life
Toner cartridge AR-208T Approx. 8,000 sheets*
*Based on copying onto A4-type paper at 6% toned area.
Interface cable
Please purchase the appropriate cable for your computer.
USB interface cable
Use a shielded cable.
64
Page 67

INDEX
2
250-sheet paper feed unit ....................60
A
About supplies .....................................64
Alarm indicator
- Developer replacement required
indicator.................................6, 51, 56
- Maintenance indicator ...........6, 51, 56
- Misfeed indicator ...................6, 51, 53
- Toner cartridge replacement required
indicator................................6, 45, 51
Appendix..............................................61
Auto clear time .....................................43
Auto power shut-off mode....................43
Automatic exposure adjustment...........18
B
Before installation ................................21
Button Manager .............................20, 32
Bypass feed .........................................10
Bypass paper guides .......................5, 10
C
Cautions
- Handling ............................................1
- Label..................................................1
- Laser .................................................2
- Using .................................................1
Charger cleaner ............................... 5, 49
CLEANING...........................................48
Cleaning the unit
- Cabinet............................................48
- Original cover ..................................48
- Original table ...................................48
- SPF .................................................48
- SPF scanning window.....................48
- Transfer charger..............................49
Clear key.................................... 6, 17, 44
Connecting a USB interface cable.......26
Conventions used in this manual ........... 4
Copy flow .............................................12
Copy quantity .......................................17
Copy quantity key ......................6, 14, 17
Copy ratio display key......................6, 17
Copy ratio selector indicator ............6, 17
Copy ratio selector key ....................6, 17
D
Dark key .......................................... 6, 17
Developer replacement required
indicator .................................... 6, 51, 56
Developer required .............................. 56
Display................................................... 6
Displaying total number of copies........ 44
E
Exposure adjustment........................... 17
Exposure mode indicator................. 6, 17
Exposure mode selector key ........... 6, 17
F
Front cover ............................................ 5
Fusing unit release lever ................. 5, 53
H
Handle ................................................... 5
Hardware and software
requirements........................................ 21
How to print ......................................... 31
How to use the online manual .............41
I
Indicators on the operation panel ........ 29
Initial settings of operation panel ......... 14
Installing the software.......................... 22
Interrupt copying.................................. 31
Introduction............................................ 4
L
Light and dark indicator ...................6, 17
Light key .......................................... 6, 17
Loading paper........................................ 7
Loading the paper tray........................... 8
M
Maintenance indicator ............... 6, 51, 56
Making copies...................................... 12
MFP driver
- Print Status Window........................ 20
- Printer driver....................................20
- Scanner driver................................. 20
Misfeed indicator ....................... 6, 51, 53
Misfeed removal
- Fusing area .....................................53
- Lower paper feed area....................55
65
Page 68

- Paper feed area...............................53
- SPF .................................................55
- Transport area.................................54
Multi-bypass tray..................................10
N
Name
- Operation panel.................................6
- Part names........................................5
O
ONLINE indicator .............................6, 29
ONLINE key .....................................6, 29
Online manual......................................41
Opening the printer driver ....................30
Opening the scanner driver..................38
Operation panel .....................................6
Optional equipment..............................58
Original placement...............................15
- Original table ..................................15
- SPF .................................................16
Original table.......................................... 5
Original to copy indicator .......................6
Original to copy key .........................6, 12
P
Paper ..................................................... 7
Paper feed location indicator .................6
Paper output tray ...................................5
Paper output tray extension ...................5
Paper tray ..........................................5, 8
Photo copying ......................................17
Photoconductive drum ...............5, 54, 55
Power cord socket .................................5
Power off.............................................. 14
Power on.............................................. 13
Power save indicator........................ 6, 29
Power save mode indicator..................43
Power switch.................................... 5, 13
Preheat mode ......................................43
Printer driver ........................................20
Proper storage .......................................2
SCAN key ........................................ 6, 37
Scanning from your computer ............. 38
Scanning with the "Scanner and
Camera Wizard" .................................. 40
Sharpdesk ........................................... 20
Side cover.............................................. 5
Side cover open button.......................... 5
Software .............................................. 20
Specifications ...................................... 61
SPF...................................................... 16
SPF indicator ................................... 6, 16
SPF misfed indicator ................. 6, 52, 55
Start indicator .................................. 6, 29
Start key .................................... 6, 12, 44
Status indicators .................................. 51
System configuration ........................... 58
T
Toner cartridge .................................... 45
Toner cartridge life............................... 47
Toner cartridge replacement ............... 45
Toner cartridge replacement
indicator ..................................... 6, 45, 51
Transfer charger .............................. 5, 49
Tray select key ................................ 6, 19
Troubleshooting................................... 50
Troubleshooting the unit ...................... 50
U
USB interface cable............................. 26
Using the manual................................... 4
Using the printer mode ........................ 30
Using the scanner mode...................... 32
Using the SHARP TWAIN ................... 38
Z
ZOOM indicator ............................... 6, 19
ZOOM key ....................................... 6, 19
66
R
Reduction/enlargement/zoom ..............19
S
Scan head locking switch..................... 57
Scanner driver......................................20
Scanner indicator .............................6, 29
Page 69

INDEX BY PURPOSE
Cleaning the unit
- Cabinet............................................48
- Original cover ..................................48
- Original table ...................................48
- SPF .................................................48
- Transfer changer.............................49
Connecting a USB interface cable .......26
Copying................................................12
Displaying total number of copies ........44
Enlarging/reducing copies....................19
Installing the software
- Button Manager...............................20
- MFP driver.......................................20
- Sharpdesk .......................................20
Loading paper
- Multi-bypass tray .............................10
- Paper tray..........................................7
Loading the original..............................15
- Original table...................................15
-SPF.................................................16
Opening the printer driver ....................30
Power off..............................................14
Power on.............................................. 13
Printing.................................................30
Removing paper jams
- Fusing area .....................................53
- Lower paper feed area....................55
- Paper feed area ..............................53
- SPF .................................................55
- Transport area.................................54
Replacing the toner cartridge .............. 45
Scanning
- Button Manager...............................37
- Scanner and Camera Wizard.......... 40
- SHARP TWAIN ...............................39
Selecting the tray ................................. 19
Setting the copy quality
- AUTO ..............................................17
- MANUAL .........................................17
- PHOTO ........................................... 18
Setting the copy quantity ..................... 17
Setting the toner save mode................ 42
Setting the user program ..................... 43
Setting up the Button Manager............ 32
Storing the supplies ............................... 2
Using the online manual ...................... 41
67
Page 70
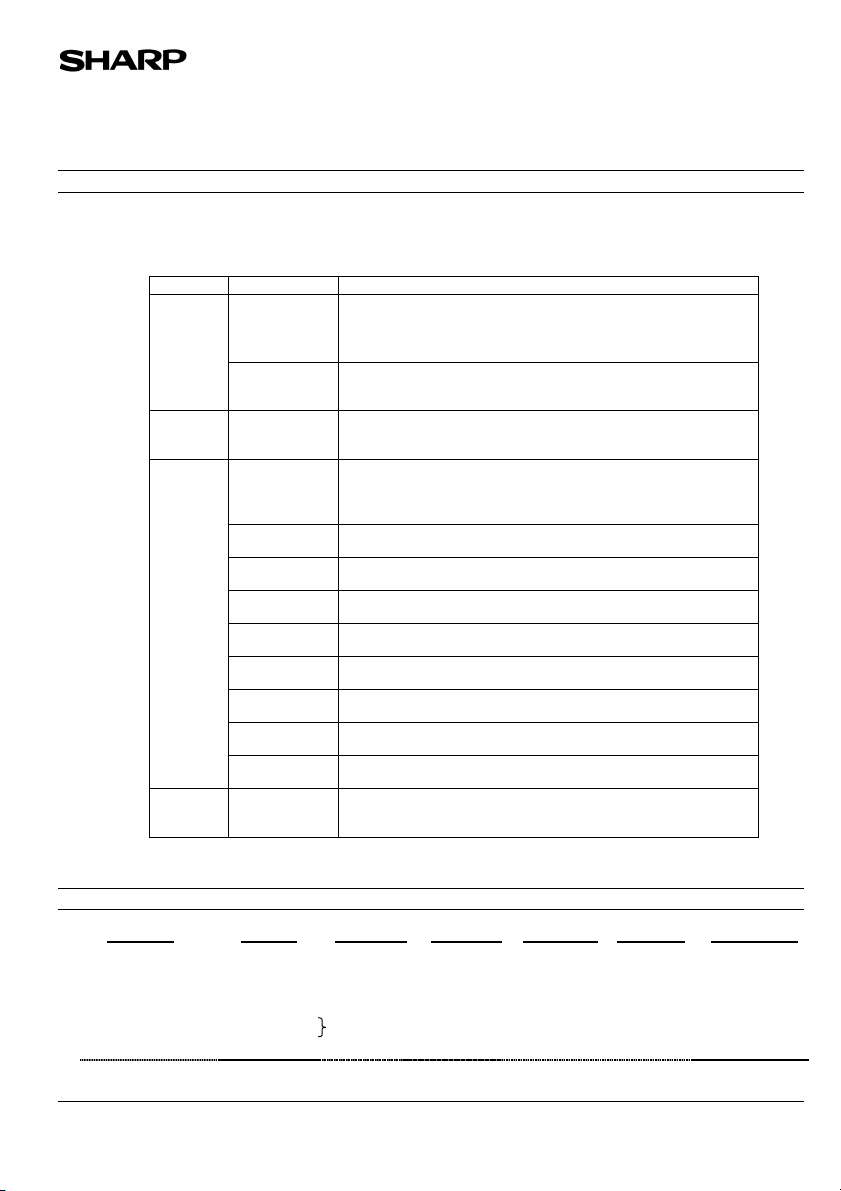
1.PRODUCT AND COMPANY IDENTIFICATION
Product Name : AR-208NT/ AR-208T (Black Toner)
Supplier Identification : Sharp Corporation
Local suppliers are listed below. Please contact the nearest supplier for additional information.
Area (Country) (Name and Telephone Number)
North
America
Oceania
Europe
Middle
East
2.COMPOSITION / INFORMATION ON INGREDIENTS
Substance[ ] Preparation[X]
Ingredient CAS No. Proportion OSHA PEL ACGIH TLV MAK-TWA NOHSC-TWA
Styrene-Acrylate
copolymer
Carbon black
Iron oxide
Metal Complex dye*
MATERIAL SAFETY DATA SHEET Page : 1/4
Date Issued : Nov. 1, 2007
MSDS No. F-01601
22-22 Nagaike-cho, Abeno-ku, Osaka, Japan
U.S.A. Sharp Electronics Corporation
Canada Sharp Electronics of Canada Ltd.
Australia Sharp Corporation of Australia PTY. Ltd.
Germany Sharp Electronics (Europe) GMBH
United
Kingdom
France Sharp Electronics France S.A.
Austria Sharp Electronics GMBH
Italy Sharp Electronics (Italy) S.P.A.
Spain Sharp Electronics (Espana) S.A.
Netherlands Sharp Electronics Benelux B.V.
Sweden Sharp Electronics Nordic AB
Switzerland Sharp Electronics(Schweiz)AG
U.A.E. Sharp Middle East FZE
29497-14-1
1333-86-4
1309-38-2
109125-51-1
84179-66-8
* EC N0. : 400-110-2, Symbol letter : F,N , R Phrase : R11, R50/53
Sharp Plaza, Mahwah, NJ
Telephone number for information : 1-800-237-4277
Emergency telephone number : 1-800-255-3924
Telephone number for information : 905-890-2100
Emergency telephone number : 1-800-255-3924
No1 Huntingwood Drive Huntingwood Blacktown N.S.W.
Telephone number for information : 1300-13-50-22
Sonninstrasse 3, 20097 Hamburg
Telephone number to access MSDS : 040-2376-2185
For more information : 040-2376-2613
Sharp Electronics (U. K.) Ltd.
Telephone number for information : 08705-274-277
Telephone number for information : 01-49-90-34-00
Telephone number for information : 01-727-19-0
Telephone number for information : 02895951
Telephone number for information : 93-581-97-00
Telephone number for information : 30-6359500
Telephone number for information : 08-634-36-00
Telephone number for information : 01-846-6111
P.O.Box 17115 Jebel Ali, Dubai
Telephone number for information : 04-815311
85-95%
5-10%
1-5%
< 2%
Not listed
3.5mg/m3
Not listed
0.5mg/m3
Not listed
3.5mg/m3
Not listed
0.5mg/m3
Not listed
Not listed
Not listed
Not listed
Not listed
3mg/m3
Not listed
Not listed
Page 71

3.HAZARDS IDENTIFICATION
Most Important Hazards and Effects of the Products
Human Health Effects : There are no anticipated carcinogenic effects from exposure based on animal tests
Environmental Effects : Not toxic to aquatic organisms
Specific Hazards : Dust explosion (like most finely divided organic powders)
Directive 1999/45/EC(Europe) : Not classified as dangerous
4.FIRST-AID MEASURES
Route(s) of Entry : Inhalation? Skin? Ingestion?
Yes No Possible but very unusual.
Inhalation : Remove to fresh air. If symptoms occur, consult medical personnel.
Skin Contact : Wash with soap and water for 15 minutes or until particle is removed.
If irritation does occur, consult medical personnel.
Eye Contact : Flush eyes immediately with water for 15 minutes. If irritation does occur, consult medical personnel.
Ingestion : Rinse with water and drink several glasses of water. If irritation or discomfort does occur, consult
medical personnel.
5.FIRE-FIGHTING MEASURES
Extinguishing Media : Water, CO2, foam and dry chemicals
Special Fire Fighting Procedures : None
Fire and Explosion Hazards : Toner material, like most finely divided organic powders, may form an explosive
6.ACCIDENTAL RELEASE MEASURES
Personal Precautions : None
Environmental Precautions : None
Methods for Cleaning Up : Wipe off with paper or cloth. Do not use vacuum cleaner when a large amount is
7.HANDLING AND STORAGE
Handling
Technical Measures : None
Precautions : None
Safe Handling Advice : Use of a dust mask is recommended when handling a large quantity of toner or during long
Storage
Technical Measures : None
Storage Conditions : Keep container closed and Store in a cool and dry place.
Incompatible Products : None
8.EXPOSURE CONTROLS / PERSONAL PROTECTION
Engineering Measures
Ventilation : Not required under intended use.
MATERIAL SAFETY DATA SHEET Page : 2/4
Date Issued : Nov. 1, 2007
MSDS No. F-01601
performed using toner. When used as intended according to instructions, studies do not
indicate any symptoms of fibrosis will occur.
[Estimated from the other product containing similar material]
mixture.
released. It, like most finely divided organic powders, is capable of creating a
dust explosion.
term exposure, as with any non-toxic dust. Try not to disperse the particles.
Keep out of the reach of children.
Page 72

Exposure Limit Values
OSHA-PEL(USA) : 15mg/m3 (Total Dust), 5mg/m3 (Respirable Dust)
ACGIH-TLV(USA) : 10mg/m3 (Total Dust), 3mg/m3 (Respirable Dust)
Personal Protective Equipment
Respiratory Protection : Not required under intended use.
Hand Protection : Not required under intended use.
Eye Protection : Not required under intended use.
Skin Protection : Not required under intended use.
Other Protective Equipment : Use of a dust mask and goggles are recommended when handling a large
9.PHYSICAL AND CHEMICAL PROPERTIES
Appearance
Physical State : Solid Form : Powder Color : Black Odor : odorless
Ph : Not applicable
Boiling / Melting Point : Not applicable
Softening Point(°C) : 100 - 130
Flash Point(°C) : Not applicable
lgnition Point(°C ) : > 350
Explosion Properties : No data
Density(g/cm³) : 1.1 (bulk density : 0.35)
Solubility in Water : Negligible
10.STABILITY AND REACTIVITY
Stability : Stable
Hazardous Reactions : Dust explosion, like most finely divided organic powders.
Conditions to Avoid : Electric discharge, throwing into fire.
Materials to Avoid : Oxidizing Materials
Hazardous Decomposition Products : CO, CO2 and NOX
Further Information : None
11.TOXICOLOGICAL INFORMATION
Acute Toxicity
Ingestion(oral) : LD50 > 2500mg/kg [Estimated from the other product containing similar material]
Inhalation : No data
Eye irritation : Not an irritant [Estimated from the other product containing similar material]
Skin irritation : Not an irritant [Estimated from the other product containing similar material]
Skin sensitizer : No sensitized [Estimated from the other product containing similar material]
Mutagenicity : Negative (Ames Test) [Estimated from the other product containing similar material]
Carcinogenicity : In 1996 the IARC reevaluated carbon black as a Group 2B carcinogen (possible human
MATERIAL SAFETY DATA SHEET Page : 3/4
Date Issued : Nov. 1, 2007
MSDS No. F-01601
quantity of toner or during long term exposure, as with any non-toxic dust.
carcinogen). This classification is given to chemicals for which there is inadequate human
evidence, but sufficient animal evidence on which to base an opinion of carcinogenicity. The
classification is based upon the development of lung tumors in rats receiving chronic inhalation
exposures to free carbon black at levels that induce particle overload of the lung. Studies
performed in animal models other than rats did not show any association between carbon black
and lung tumors. Moreover, a two-year cancer bioassay using a typical toner preparation
containing carbon black demonstrated no association between toner exposure and tumor
development in rats.
Page 73

Chronic Effect : In a study in rats of chronic inhalation exposure to a typical toner, a mild to moderate degree of
12.ECOLOGICAL INFORMATION
Ecotoxicity : On available data, toner is not harmful to aquatic organisms
[Estimated from the other product containing similar material]
13.DISPOSAL CONSIDERATIONS
Waste from Residues : Waste material may be dumped or incinerated under conditions which meet all federal,
Contaminated Packaging : Waste may be disposed or incinerated under conditions which meet all federal, state
14.TRANSPORT INFORMATION
UN Classification : None
Not classified as hazardous for transport.
15.REGULATORY INFORMATION
US Information
TSCA(Toxic Substances Control Act) :
All chemical substances in this product comply with all applicable rules or order under TSCA.
SARA(Superfund Amendments and Reauthorization Act) Title III
302 Extreme Hazardous Substance : None
311/312 Hazard Classification : None
EU Information
1999/45/EC and 67/548/EEC
Symbol & Indication : Not required
R-Phrase : Not required
76/769/EEC : All chemical substances in this product comply with all applicable rules or
16.OTHER INFORMATION
NFPA Rating (USA) : Health=1 Flammability=1 Reactivity=0
WHMIS Legislation (Canada) : This product is not a controlled product.
List of R phrases : R11 : Highly flammable
R50/53 : Very toxic to aquatic organisms, may cause long-term adverse effects in
the aquatic environment.
References
IARC(1996) : IARC monographs on the Evaluation of the Carcinogenic Risk of Chemicals to Humans, Vol. 65,
Printing Process And Printing Inks, Carbon Black and Some Nitro Compounds, Lyon, pp.149-261
H.Muhle, B.Bellmann, O.Creutzenberg, C.Dasenbrock, H.Ernst, R.Kilpper, J.C.MacKenzie, P.Morrow, U.Mohr,
S.Takenaka, and R.Mermelstein(1991) Pulmonary Response to Toner upon Chronic Inhalation Exposure in Rats.
Fundamental and Applied Toxicology 17, pp.280-299.
The information on this data sheet represents our current data and best opinion as to the proper use in handling of this
product under normal conditions. However, all materials may present unknown hazards and should be used with
caution. Although certain hazards are described herein, we do not guarantee that these are the only hazards which
exist.
MATERIAL SAFETY DATA SHEET Page : 4/4
Date Issued : Nov. 1, 2007
MSDS No. F-01601
lung fibrosis was observed in 92% of the rats in the high concentration (16mg/m3) exposure
group, and a minimal to mild degree of fibrosis was noted in 22% of the animals in the middle
(4mg/m3) exposure group, but no pulmonary change was reported in the lowest (1mg/m3)
exposure group, the most relevant level to potential human exposures.
state and local environmental regulations.
and local environmental regulations.
order under 76/769/EEC.
Page 74
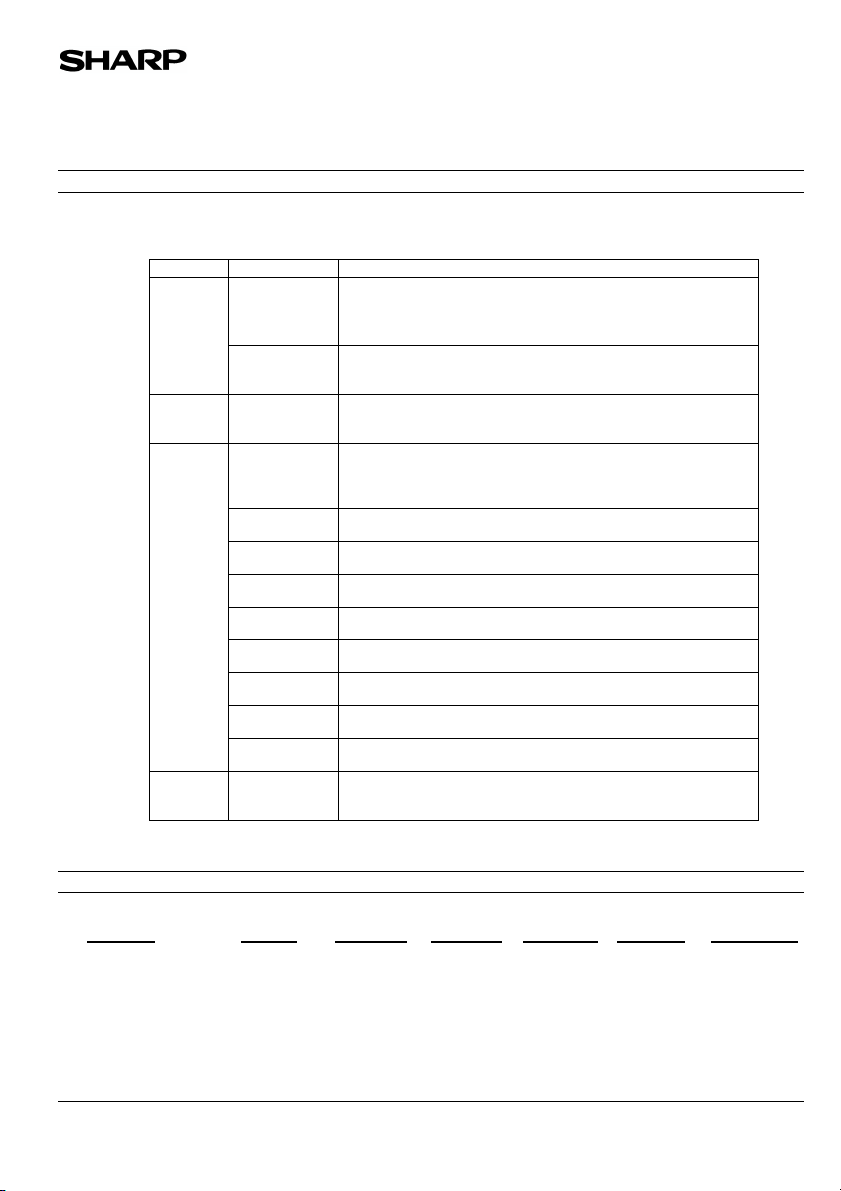
Iron powder
6
1
1.PRODUCT AND COMPANY IDENTIFICATION
Product Name : AR-208ND / AR-208DV (Black Developer)
Supplier Identification : Sharp Corporation
Local suppliers are listed below. Please contact the nearest supplier for additional information.
Area (Country) (Name and Telephone Number)
North
America
Oceania
Europe
Middle
East
2.COMPOSITION / INFORMATION ON INGREDIENTS
Substance[ ] Preparation[X]
Ingredient CAS No. Proportion OSHA PEL ACGIH TLV MAK-TWA NOHSC-TWA
Styrene-Acrylate
copolymer
Carbon black 1333-86-4 < 1 % 3.5mg/m3 3.5mg/m3 Not listed 3mg/m3
MATERIAL SAFETY DATA SHEET Page : 1/4
Date Issued : Nov.01, 2007
MSDS No. F-31601
22-22 Nagaike-cho, Abeno-ku, Osaka, Japan
U.S.A. Sharp Electronics Corporation
Canada Sharp Electronics of Canada Ltd.
Australia Sharp Corporation of Australia PTY. Ltd.
Germany Sharp Electronics (Europe) GMBH
United
Kingdom
France Sharp Electronics France S.A.
Austria Sharp Electronics GMBH
Italy Sharp Electronics (Italy) S.P.A.
Spain Sharp Electronics (Espana) S.A.
Netherlands Sharp Electronics Benelux B.V.
Sweden Sharp Electronics Nordic AB
Switzerland Sharp Electronics(Schweiz)AG
U.A.E. Sharp Middle East FZE
7439-8929497-14-
Sharp Plaza, Mahwah, NJ
Telephone number for information : 1-800-237-4277
Emergency telephone number : 1-800-255-3924
Telephone number for information : 905-890-2100
Emergency telephone number : 1-800-255-3924
No1 Huntingwood Drive Huntingwood Blacktown N.S.W.
Telephone number for information : 1300-13-50-22
Sonninstrasse 3, 20097 Hamburg
Telephone number to access MSDS : 040-2376-2185
For more information : 040-2376-2613
Sharp Electronics (U. K.) Ltd.
Telephone number for information : 08705-274-277
Telephone number for information : 01-49-90-34-00
Telephone number for information : 01-727-19-0
Telephone number for information : 02895951
Telephone number for information : 93-581-97-00
Telephone number for information : 30-6359500
Telephone number for information : 08-634-36-00
Telephone number for information : 01-846-6111
P.O.Box 17115 Jebel Ali, Dubai
Telephone number for information : 04-815311
85-95 % Not listed Not listed Not listed Not listed
5-10 % Not listed Not listed Not listed Not listed
Page 75

3.HAZARDS IDENTIFICATION
Most Important Hazards and Effects of the Products
Human Health Effects : There are no anticipated carcinogenic effects from exposure based on animal tests
Environmental Effects : Not toxic to aquatic organisms
Specific Hazards : Dust explosion (like most finely divided organic powders)
Directive 1999/45/EC(Europe) : Not classified as dangerous
4.FIRST-AID MEASURES
Route(s) of Entry : Inhalation? Skin? Ingestion?
No No Possible but very unusual.
Inhalation : Remove to fresh air. If symptoms occur, consult medical personnel.
Skin Contact : Wash with soap and water for 15 minutes or until particle is removed.
If irritation does occur, consult medical personnel.
Eye Contact : Flush eyes immediately with water for 15 minutes. If irritation does occur, consult medical personnel.
Ingestion : Rinse with water and drink several glasses of water. If irritation or discomfort does occur, consult
medical personnel.
5.FIRE-FIGHTING MEASURES
Extinguishing Media : Water, CO2, foam and dry chemicals
Special Fire Fighting Procedures : None
Fire and Explosion Hazards : Toner material, like most finely divided organic powders, may form an explosive
6.ACCIDENTAL RELEASE MEASURES
Personal Precautions : None
Environmental Precautions : None
Methods for Cleaning Up : Wipe off with paper or cloth. Do not use vacuum cleaner when a large amount is
7.HANDLING AND STORAGE
Handling
Technical Measures : None
Precautions : None
Safe Handling Advice : Use of a dust mask is recommended when handling a large quantity of toner or during long
Storage
Technical Measures : None
Storage Conditions : Keep container closed and Store in a cool and dry place.
Incompatible Products : None
8.EXPOSURE CONTROLS / PERSONAL PROTECTION
Engineering Measures
Ventilation : Not required under intended use.
MATERIAL SAFETY DATA SHEET Page : 2/4
Date Issued : Nov.01, 2007
MSDS No. F-31601
performed using toner. When used as intended according to instructions, studies do not
indicate any symptoms of fibrosis will occur.
[Estimated from the other product containing similar material]
mixture.
released. It, like most finely divided organic powders, is capable of creating a
dust explosion.
term exposure, as with any non-toxic dust. Try not to disperse the particles.
Keep out of the reach of children.
Page 76

Exposure Limit Values
OSHA-PEL(USA) : 15mg/m3 (Total Dust), 5mg/m3 (Respirable Dust)
ACGIH-TLV(USA) : 10mg/m3 (Total Dust), 3mg/m3 (Respirable Dust)
Personal Protective Equipment
Respiratory Protection : Not required under intended use.
Hand Protection : Not required under intended use.
Eye Protection : Not required under intended use.
Skin Protection : Not required under intended use.
Other Protective Equipment : Use of a dust mask and goggles are recommended when handling a large
9.PHYSICAL AND CHEMICAL PROPERTIES
Appearance
Physical State : Solid Form : Powder Color : Black Odor : odorless
Ph : Not applicable
Boiling / Melting Point : Not applicable
Flash Point(°C) : Not applicable
lgnition Point(°C ) : No data
Explosion Properties : No data
Density(g/cm³) : 7.3 (bulk density : 2.0)
Solubility in Water : Negligible
10.STABILITY AND REACTIVITY
Stability : Stable
Hazardous Reactions : Dust explosion, like most finely divided organic powders.
Conditions to Avoid : Electric discharge, throwing into fire.
Materials to Avoid : Oxidizing Materials
Hazardous Decomposition Products : CO, CO2 and NOX
Further Information : None
11.TOXICOLOGICAL INFORMATION
Acute Toxicity
Ingestion(oral) : LD50 > 2000mg/kg [Estimated from the other product containing similar material]
Inhalation : No data
Eye irritation : Not an irritant [Estimated from the other product containing similar material]
Skin irritation : Not an irritant [Estimated from the other product containing similar material]
Skin sensitizer : No sensitized [Estimated from the other product containing similar material]
Mutagenicity : Negative (Ames Test) [Estimated from the other product containing similar material]
Carcinogenicity : In 1996 the IARC reevaluated carbon black as a Group 2B carcinogen (possible human
MATERIAL SAFETY DATA SHEET Page : 3/4
Date Issued : Nov.01, 2007
MSDS No. F-31601
quantity of toner or during long term exposure, as with any non-toxic dust.
carcinogen). This classification is given to chemicals for which there is inadequate human
evidence, but sufficient animal evidence on which to base an opinion of carcinogenicity. The
classification is based upon the development of lung tumors in rats receiving chronic inhalation
exposures to free carbon black at levels that induce particle overload of the lung. Studies
performed in animal models other than rats did not show any association between carbon black
and lung tumors. Moreover, a two-year cancer bioassay using a typical toner preparation
containing carbon black demonstrated no association between toner exposure and tumor
development in rats.
Page 77

Chronic Effect : In a study in rats of chronic inhalation exposure to a typical toner, a mild to moderate degree of
12.ECOLOGICAL INFORMATION
Ecotoxicity : On available data, toner is not harmful to aquatic organisms
[Estimated from the other product containing similar material]
13.DISPOSAL CONSIDERATIONS
Waste from Residues : Waste material may be dumped or incinerated under conditions which meet all federal,
Contaminated Packaging : Waste may be disposed or incinerated under conditions which meet all federal, state
14.TRANSPORT INFORMATION
UN Classification : None
Not classified as hazardous for transport.
15.REGULATORY INFORMATION
US Information
TSCA(Toxic Substances Control Act) :
All chemical substances in this product comply with all applicable rules or order under TSCA.
SARA(Superfund Amendments and Reauthorization Act) Title III
302 Extreme Hazardous Substance : None
311/312 Hazard Classification : None
EU Information
1999/45/EC and 67/548/EEC
Symbol & Indication : Not required
R-Phrase : Not required
76/769/EEC : All chemical substances in this product comply with all applicable rules or
16.OTHER INFORMATION
NFPA Rating (USA) : Health=1 Flammability=1 Reactivity=0
WHMIS Legislation (Canada) : This product is not a controlled product.
References
IARC(1996) : IARC monographs on the Evaluation of the Carcinogenic Risk of Chemicals to Humans, Vol. 65,
Printing Process And Printing Inks, Carbon Black and Some Nitro Compounds, Lyon, pp.149-261
H.Muhle, B.Bellmann, O.Creutzenberg, C.Dasenbrock, H.Ernst, R.Kilpper, J.C.MacKenzie, P.Morrow, U.Mohr,
S.Takenaka, and R.Mermelstein(1991) Pulmonary Response to Toner upon Chronic Inhalation Exposure in Rats.
Fundamental and Applied Toxicology 17, pp.280-299.
The information on this data sheet represents our current data and best opinion as to the proper use in handling of this
product under normal conditions. However, all materials may present unknown hazards and should be used with
caution. Although certain hazards are described herein, we do not guarantee that these are the only hazards which
exist.
MATERIAL SAFETY DATA SHEET Page : 4/4
Date Issued : Nov.01, 2007
MSDS No. F-31601
lung fibrosis was observed in 92% of the rats in the high concentration (16mg/m3) exposure
group, and a minimal to mild degree of fibrosis was noted in 22% of the animals in the middle
(4mg/m3) exposure group, but no pulmonary change was reported in the lowest (1mg/m3)
exposure group, the most relevant level to potential human exposures.
state and local environmental regulations.
and local environmental regulations.
order under 76/769/EEC.
Page 78

A. Information on Disposal for Users (private households)
1. In the European Union
Attention: If you want to dispose of this
equipment, please do not use the ordinary dust
bin!
Used electrical and electronic equipment must
be treated separately and in accordance with
legislation that requires proper treatment,
recovery and recycling of used electrical and
electronic equipment.
Following the implementation by member states,
private households within the EU states may
return their used electrical and electronic
equipment to designated collection facilities free
of charge*. In some countries* your local retailer
may also take back your old product free of
charge if you purchase a similar new one.
*) Please contact your local authority for further details.
Attention: Your product is
marked with this symbol. It
means that used electrical
and electronic products
should not be mixed with
general household waste.
There is a separate
collection system for these
products.
If your used electrical or electronic equipment
has batteries or accumulators, please dispose of these separately beforehand
according to local requirements.
By disposing of this product correctly you will help ensure that the waste undergoes
the necessary treatment, recovery and recycling and thus prevent potential
negative effects on the environment and human health which could otherwise arise
due to inappropriate waste handling.
2. In other Countries outside the EU
If you wish to discard this product, please contact your local authorities and ask for
the correct method of disposal.
For Switzerland: Used electrical or electronic equipment can be returned free of
charge to the dealer, even if you don’t purchase a new product. Further collection
facilities are listed on the homepage of
www.swico.ch or www.sens.ch.
. Information on Disposal for Business Users.
B
1. In the European Union
If the product is used for business purposes and you want to discard it:
Please contact your SHARP dealer who will inform you about the take-back of the
product. You might be charged for the costs arising from take-back and recycling.
Small products (and small amounts) might be taken back by your local collection
facilities.
For Spain: Please contact the established collection system or your local authority
for take-back of your used products.
2. In other Countries outside the EU
If you wish to discard of this product, please contact your local authorities and ask for the
correct method of disposal.
Page 79
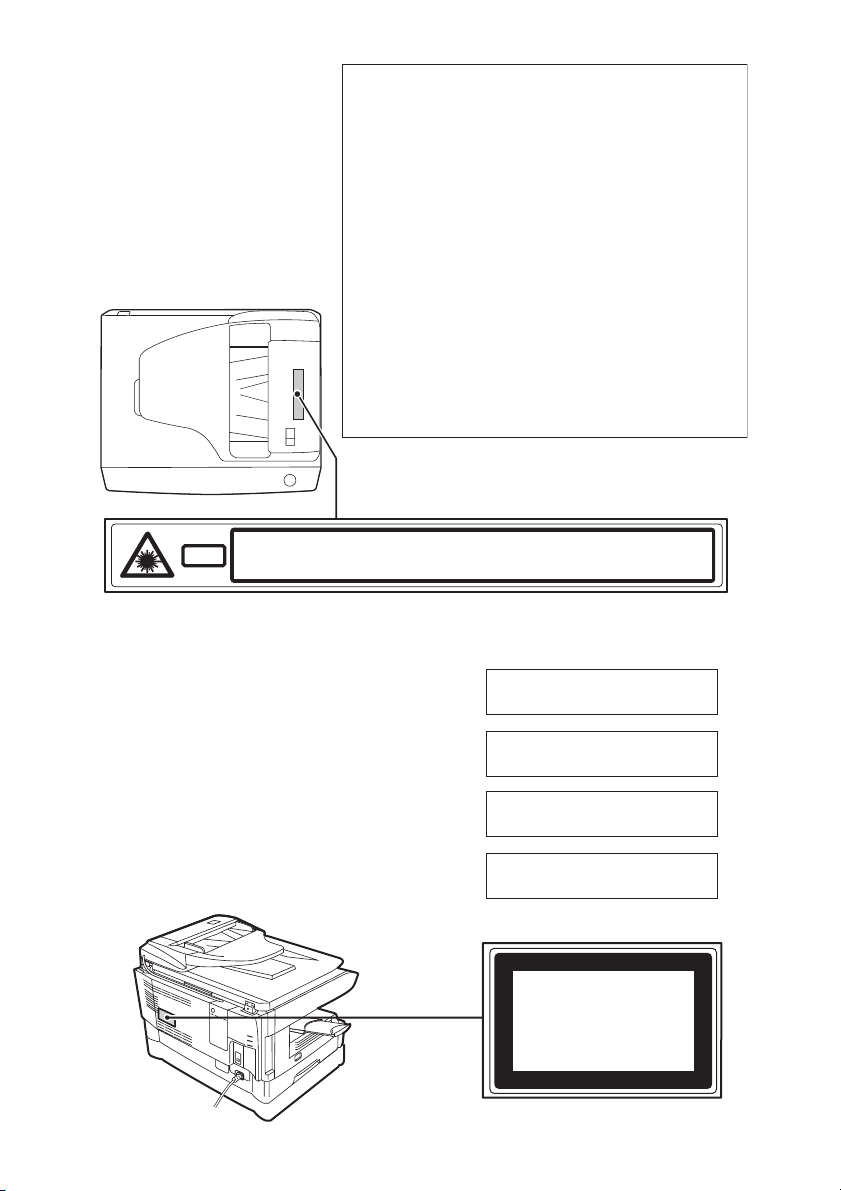
CLASS 3B INVISIBLE LASER
CAUTION
RADIATION WHEN OPEN AND
INTERLOCKS DEFEATED.
AVOID EXPOSURE TO BEAM.
VORSICHT
UNSICHTBARE
LASERSTRAHLUNG DER
KLASSE 3B, WENN
ABDECKUNG GEÖFFNET UND
SICHERHEITSVERRIEGELUNG
ÜBERBRÜCKT. NICHT DEM
STRAHL AUSSETZEN.
ADVARSEL
USYNLIG LASERSTRÅLING AF
KLASSE 3B VED ÅBNING, NÅR
SIKKERHEDSBRYDERE ER
UDE AF FUNKTION. UNDGÅ
UDSÆTTELSE FOR STRÅLING.
ADVARSEL
USYNLIG KLASSE 3B
LASERSTRÅLING NÅR DEKSEL
ÅPNES OG SIKKERHEDSLÅS
BRYTES. UNNGÅ
EKSPONERING FOR STRÅLEN.
VARNING
OSYNLIG LASERSTRÅLNING
KLASS 3B NÄR DENNA DEL ÄR
ÖPPNAD OCH SPÄRRAR ÄR
URKOPPLADE. UNDVIK
EXPONERING FÖR STRÅLEN.
VAR O!
AVAT TA E SSA JA
SUOJALUKITUS OHITETTAESSA
OLET ALTTIINA NÄKYMÄTÖNTÄ
LUOKAN 3B LASERSÄTEILYLLE.
ÄLÄ KATSO SÄTEESEEN.
CAUTION
VORSICHT
Laserstrahl
ADVARSEL
CLASS 3B INVISIBLE LASER RADIATION WHEN OPEN AND INTERLOCKS DEFEATED.
AVOID EXPOSURE TO BEAM.
UNSICHTBARE LASERSTRAHLUNG DER KLASSE 3B, WENN ABDECKUNG GEÖFFNET UND
SICHERHEITSVERRIEGELUNG ÜBERERÜCKT. NICHT DEM STRAHL AUSSETZEN.
SYNLIG LASERSTRÅLING AF KLASSE 3B VED ÅBNING, NÅR SIKKERHEDSAFBRYDERE ER
U
UDE AF FUNKTION. UNDGA UDSAETTELSE FOR STRÅLING.
ADVERSEL
VARNING
AVATTAESSA JA SUOJALUKITUS OHITETTAESSA OLET ALTTIINA NÄKYMÄTÖNTÄ
VARO!
LUOKAN 3 B LASERSÄTEILYLLE. ÄLÄ KATSO SÄTEESEEN.
CLASS 1 LASER PRODUCT
LASER KLASSE 1
LUOKAN 1 LASERLAITE
KLASS 1 LASERAPPARAT
USYNLIG KLASSE 3B LASERSTRÅLING NÅR DEKSEL ÅPNES
OG SIKKERHEDSLÅS BRYTES. UNNGÅ EKSPONERING FOR STRÅLEN.
OSYNLIG LASERSTRÅLNING KLASS 3B NÄR DENNA DEL ÄR ÖPPNAD OCH
SPÄRRAR ÄR URKOPPLADE. UNDVIK FÖR STRÅLEN
CLASS 1
LASER PRODUCT
LASER KLASSE 1
Page 80

SHARP Manufacturing France S.A.
Route de Bollwiller 68360 SOULTZ FRANCE
Page 81

AR-203E OPERATION MANUAL
AR-203E_v1
 Loading...