

Page 1
14
U 34B/234B
Operator’s
Guide
Page 2

14U 34B/234B
preface
Thank you for your purchase of this sewing machine.
This machine intended for household use will provide you with excellent performance in sewing from
light to heavy material (lawn to denim). Please refer to this booklet for proper use and optimum service.
To get the most out of your sewing machine, read the entire operator’s manual before attempting to
operate the machine. Then familiarize yourself with the machine by follwing the operator’s manual page
by page.
To ensure that you are always provided with the most modern sewing capabilities, the manufacturer reseves
the right to change the appearance, design or accessories of this sewing machine when considered necessary
without notification or obligation.
Copyright©1990 SINGER SEWING MACHINE COMPANY
All Rights Reserved Throughout The World
Page 3

IMPORTANT SAFETY INSTRUCTIONS
When using this machine, basic safety precautions should always be followed including the following.
Read all instructions before using this machine.
DANGER
The machine should never be left unattended when plugged in. Always unplug the machine from the
electric outlet immediately after using and before cleaning.
Always unplug before relamping. Replace bulb with the same type rated 12 volt, 6 watts. Be sure to
replace the face plate which covers the Hght bulb before operating the machine.
WARNING
Be sure that the electrical voltage of the socket outlet (wall receptacle) is the same as the rated voltage
of the motor.
Use this machine only for its intended use as described in this Operator’s Guide. Use only attachments
recommended by the manufacturer as contained in the Operator’s Guide.
To disconnect, turn all controls to the off (“0”) position, then remove plug from outlet.
Disconnect the power line plug from the socket outlet or switch the machine off when making any
adjustments in the needle area, such as threading needle and loopers, changing needle, changing throat
plate or changing presser foot, etc.
Always unplug the machine from the electrical outlet when removing covers, lubricating, or when
making any other user servicing adjustments mentioned in the Operator’s Guide.
— To reduce the risk of electric shock:
— To reduce the risk of burns, fire, electric shock or injury to persons:
Do not attempt to adjust the motor belt. Contact your nearest Service Center should any adjustment
be required.
Do not unplug by pulHng on cord. To unplug, grasp the plug, not the cord.
Handle the foot controller with care and avoid dropping it on the floor. Be sure not to place anything
on top of it.
Always use the proper throat plate. The wrong plate can cause the needle to break.
Do not use bent needles.
When sewing, keep fingers away from all moving parts. Special care is required around the sewing
machine needle.
Do not pull or push fabric while stitching. It may deflect the needle causing it to break.
For double insulated machines, when servicing use only identical replacement parts. See instructions
for Servicing of Double-Insulated Appliances.
Use only the handle to lift and move the machine.
Never operate the machine if it has a damaged cord or plug, if it is not working properly, if it has been
dropped or damaged, or dropped into the water. Return the machine to the nearest authorized dealer
or Service Center for examination, repair, electrical, or mechanical adjustment.
Never operate the machine with any air openings blocked. Keep ventilation openings of the machine
and foot controller free from the accumulation of lint, dust, and loose cloth.
Page 4

Never drop or insert any object into any opening.
Do not use outdoos.
Do not operate where aerosol (spray) products are being used or where oxygen is being adminstered.
Do not allow to be used as a toy. Close attention is necessary when the machine is used by or near
children.
Do not expose the machine or machine plastic case to sunlight directly. Also, do not keep it in a very
warm or damp place.
SERVICING OF DOUBLE-INSULATED PRODUCTS. In a double-insulated product, two systems
of insulation are provided instead of grounding. No grounding means is provided on a double-insulated
product, nor should a means for grounding be added to the product. Servicing of a double-insulated
product requires extreme care and knowledge of the system, and should be done only by qualified
service personnel. Replacement parts for a double-insulated product must be identical to those parts
in the product. A double-insulated product is marked with the words “DOUBLE-INSULATION” or
“DOUBLE-INSULATED.”
SAVE THESE INSTRUCTIONS
Servicing should be performed by an authorized service representative.
This product is intended for household use.
FOR EUROPEAN AND SIMILAR TERRITORIES :
This product is suppressed for radio and television interference with the International Electrotechnical
Commission requirements of the CISPR.
Machines for Great Britain and some other countries having similar wiring standards are shipped from
the factory without a plug for connection to the mains. The wires in this mains lead are colored in accord
ance with the following code.
Blue: neutral (N)
As the colors of the wires in the mains lead of this appliance may not correspond with the colored markings
identifying the terminals in your plug, proceed as follows:
The wire which is colored blue must be connected to the terminal which is marked with the letter N or
colored black. The wire which is colored brown must be connected to the terminal which is marked with
letter L or colored red. If a 13 Amp. (BS 1363) plug is used, a 3 Amp. fuse must be fitted, or if any other
type of plug is used, a 5 Amp. fuse must be fitted either in the plug or adaptor or at the distribution board.
Neither cord is to be connected to the earth terminal of a three-pin plug.
Brown: live (L)
Page 5

CONTENTS
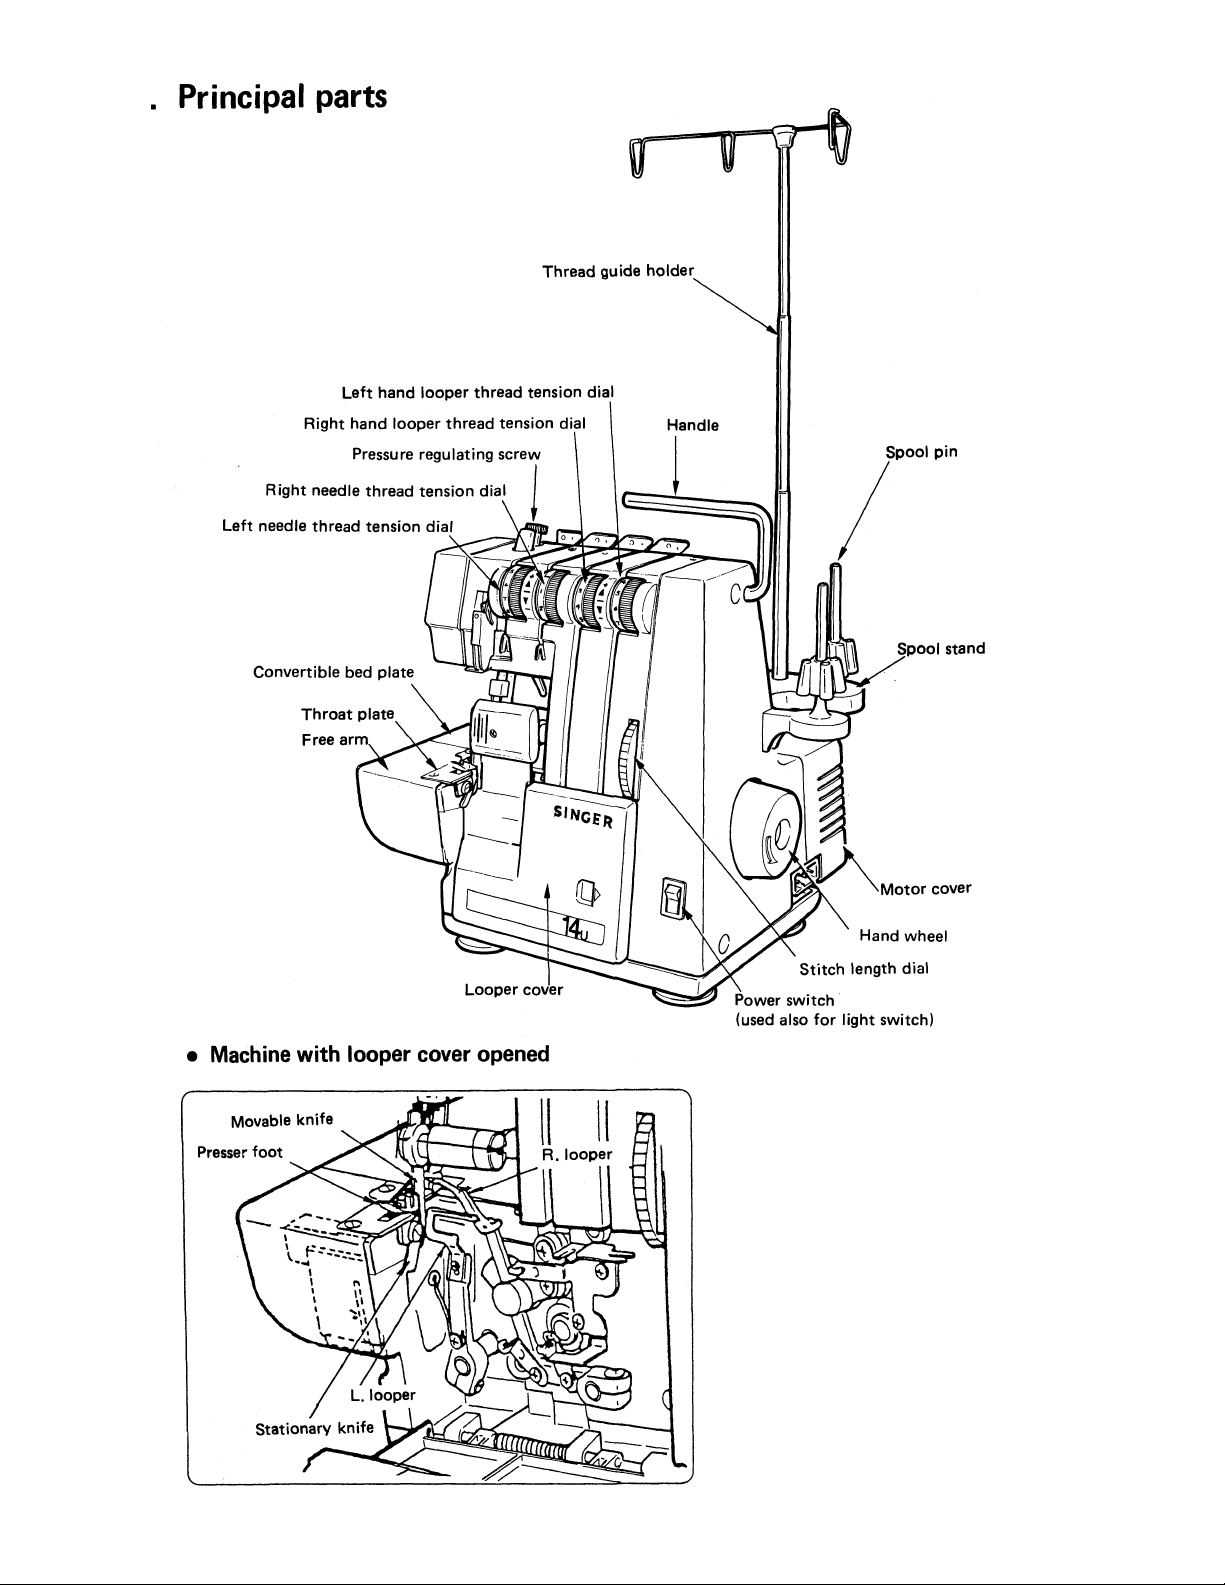
1. Principal parts......................................................................................................................................... 2
2. Preparation prior to sewing.................................................................................................................... 3
3. Threading the machine .......................................................................................................................... 4
• Setting up the thread guide holder................................................................................................4
• How to open looper cover .......................................................................................................... 4
• How to remove cylinder cover.................................................................................................... 4
• How to thread your machine correctly....................................................................... . /
• How to change threads
Chain off and test sew............................................................................................................................ 8
4.
5.
1-Needle, 3-Threads overedge stitching
6.
How to adjust thread tension ................................................................................................................10
How to adjust stitch length...................................................................................................................12
7.
8.
How to adjust overedge seam width
9.
How to do rolled hemming...................................................................
Differential feed (with differential feed machine only)
10.
• Gathered overedge .....................................................................................................................15
• Stretch overedge..........................................................................................................................16
Free arm sewing (tubular work)...........................................................................................................17
11.
Seam guide lines...................................................................................................................................17
12.
Edge guide (optional parts)...................................................................................................................17
13.
Variation stitch......................................................................................................................................18
14.
• Ornamental stitching...................................................................................................................18
• Blindstitching .............................................................................................................................19
• Braiding by chaining-off.............................................................................................................19
• Pin tuking.................................................................................................................................... 20
• Turning square corners ...............................................................................................................20
15. How to replace needles ...................................................................................................................... 21
16. How to replace stationary knife............................................................................................................22
17. How to exchange light bulb .................................................................................................................22
18. How to adjust presser foot pressure......................................................................................................22
19. Cleaning................................................................................................................................................23
20. Reasons for poor stitches and how to make adjustment..................................................................... 24
21. Relationship between cloth, thread and needle....................................................................................25
22. Accessories.......................................................................................................................................... 26
23. Specification......................................................................................................................................... 26
.........................
...............................
.............
...................................................................................... 8
................................................................ 9
........................................................................................
............
........................................................................
.....................................13
.............
12
15
Page
5
Page 6
Page 7
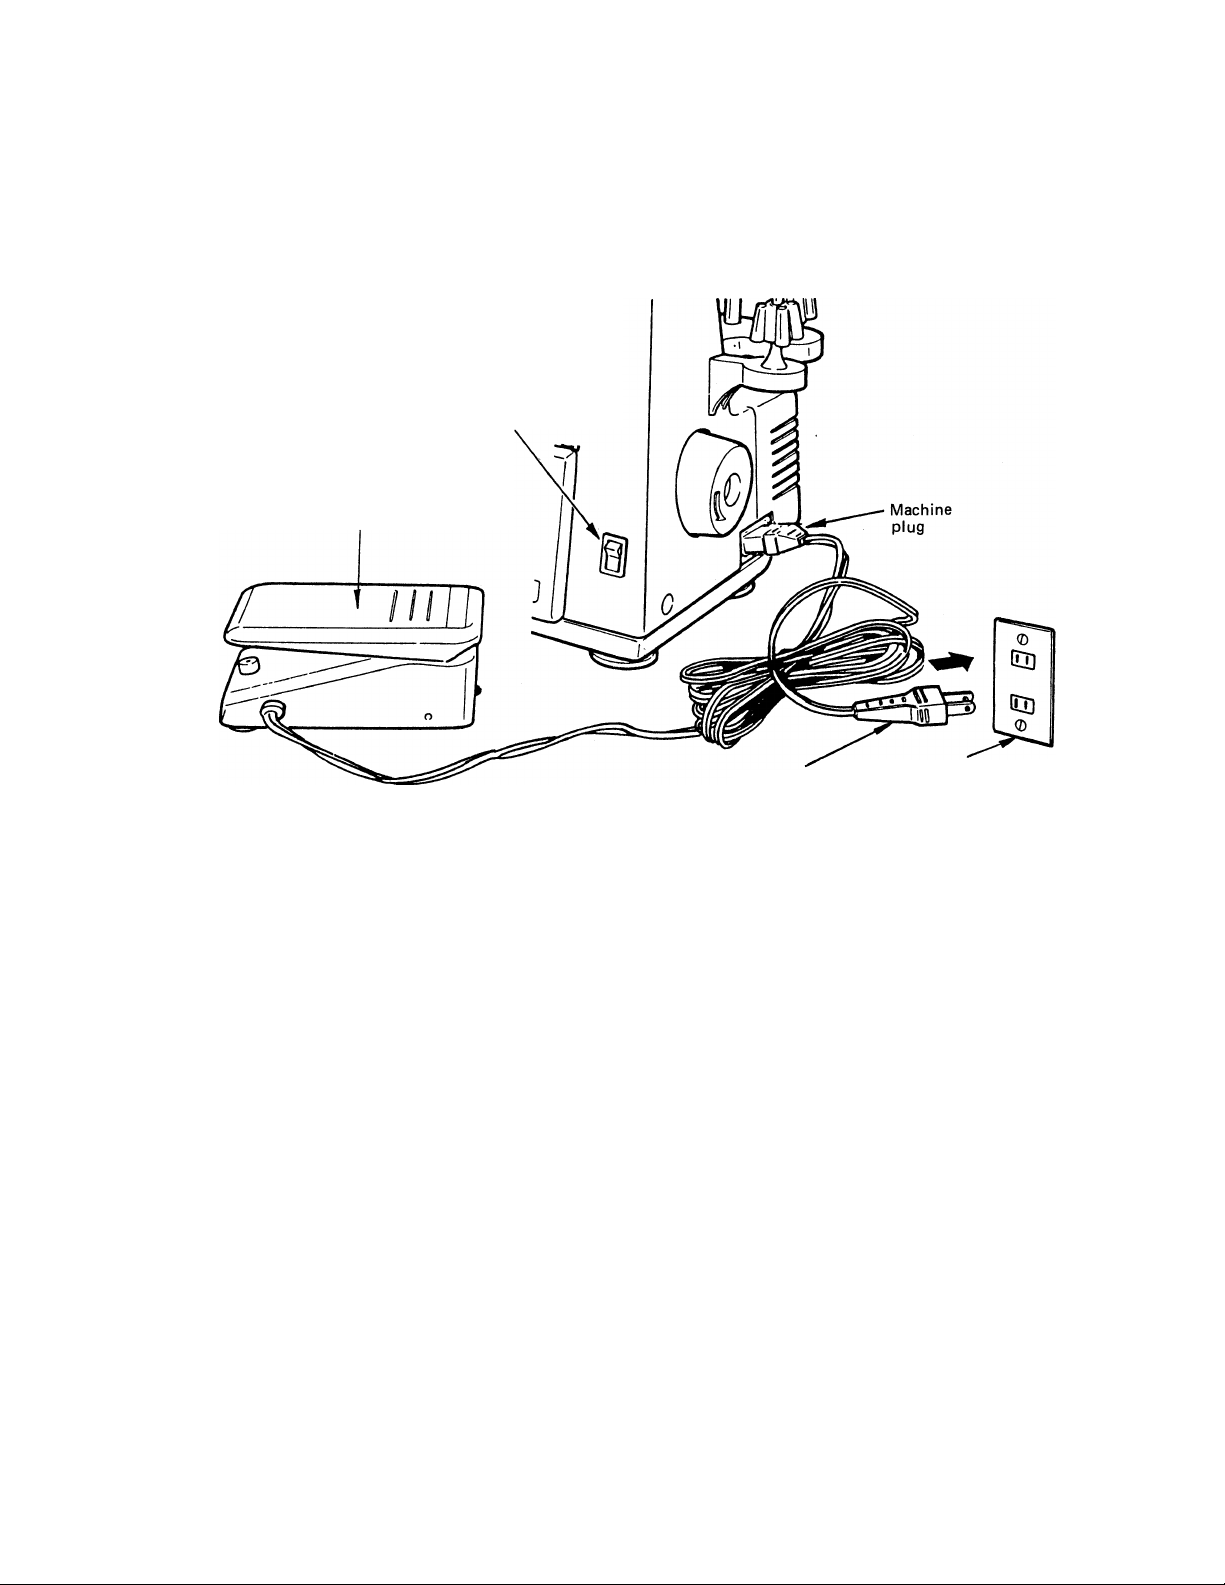
2. Preparation prior to sewing
Connect the machine plug to the electrical receptacle of your machine and the power line plug to the wall
receptacle.
For 120/220/240V
Power switch
(used also for light switch)
Push "I” mark side
to turn "ON"
Push "O" mark side
to turn "OFF"
Controller
For 120V
Power switch
(used also for light switch)
When the switch is ON,
the red mark on the knob
is visible
Power line plug
Wall receptacle
To run the machine and control the speed, press the speed controller. The harder you press, the faster the
machine will sew. To stop the machine from sewing, remove your foot from the speed controller.
Warning:
• Be sure that the electrical voltage of the socket outlet (wall receptacle) is the same as the rated voltage of
the motor.
• Handle the foot controller with care and avoid dropping it on the floor. Be sure not to place anything
on top of it.
• Disconnect the power-line plug from the socket outlet when changing needles, presser feet or throat
plates, or when leaving the machine unattended. This eliminates the possibility of starting the machine
by accidentally pressing the speed controller.
• Before cleaning your machine, disconnect the power-line plug from the socket outlet.
Page 8
3. Threading the machine
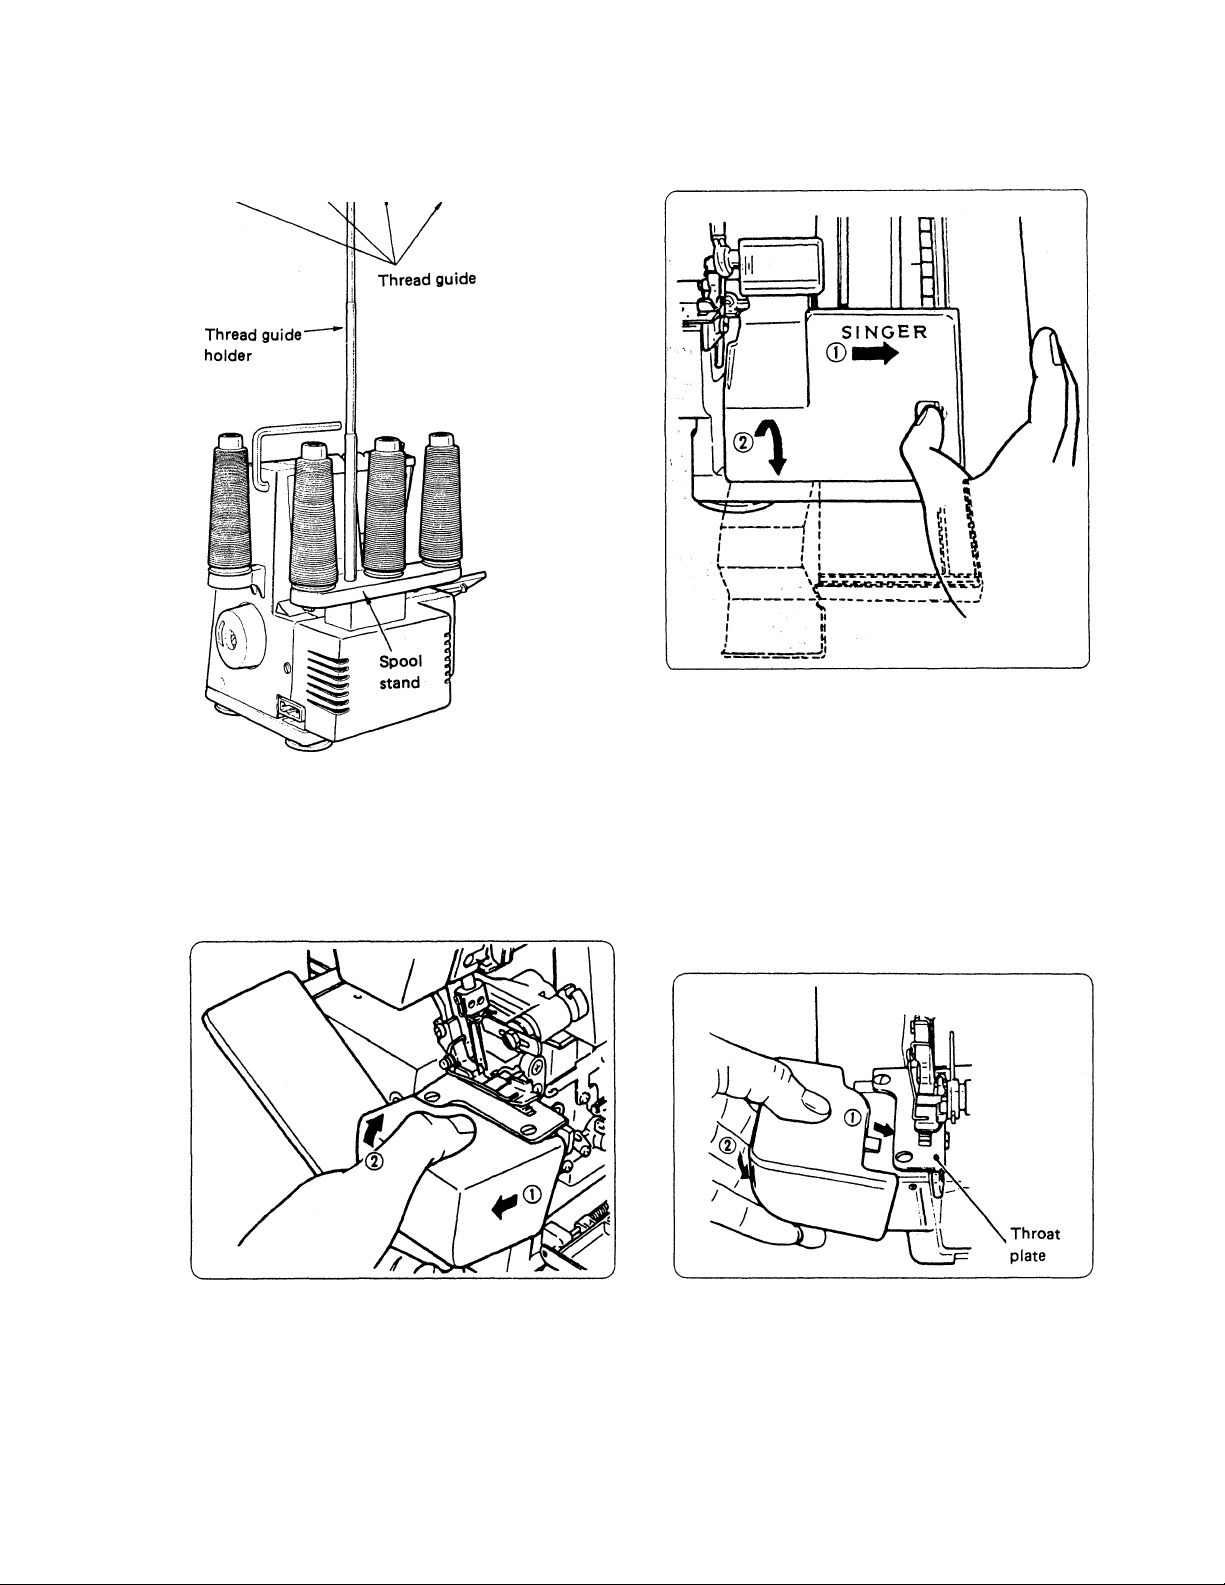
• Setting up the thread guide holder
c'Tm
• How to open looper cover
Extend the thread guide holder as far as possible
and set the thread guides so that they are located
right above the spool pins.
Place the thread on the spool stand as shown
above.
• How to remove cylinder cover
0 Push the cover to the right as
far as it will go and
@ Pull cover down toward you.
Caution:
* Be sure looper cover is closed when sewing.
To replace cover
0 While pulling the cylinder cover to the left,
(2) Lift cover upward and off the machine.
0 Place tab on top of cover under the
0 Press cover downward to the right.
Warning:
Do not hold the cylinder cover when lifting or carrying the machine.
Caution:
Be sure cylinder cover is replaced when sewing.
throat plate.
Page 9
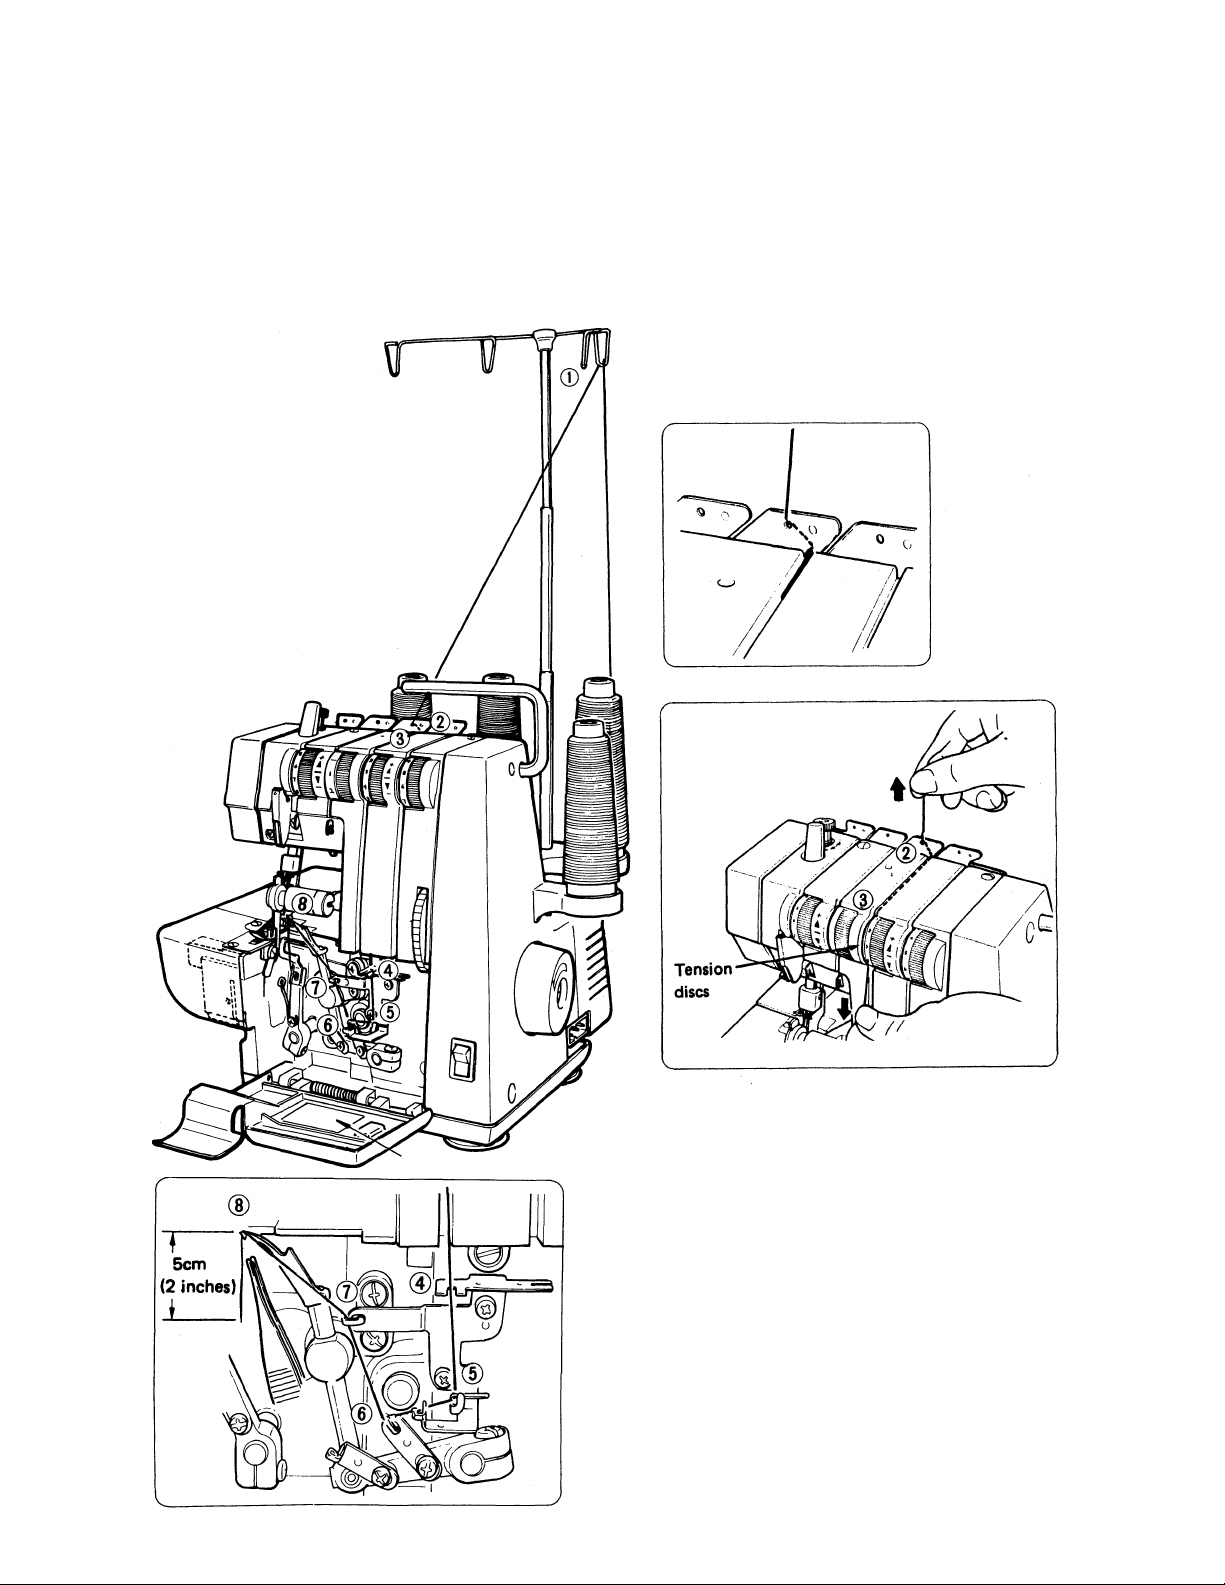
• How to thread your machine correctly
Correct sewing cannot be obtained when machine is threaded incorrectly.
Threading is diagrammed on the inner side of the looper cover and identified with colors on the various
thread guides.
(1) Open looper cover. Thread the right looper in the order 0 to (|) as indicated in the figure below,
(threading points marked in orange)
Threading Chart
While holding thread with finger, pass it
between the tension discs and pull thread
down to make certain it is properly located
in between the tension discs.
• Use tweezers provided in the accessory set when
threading looper thread hole (8) .
• Draw about 5cm (2 inches) of thread from the
looper thread hole.
Page 10
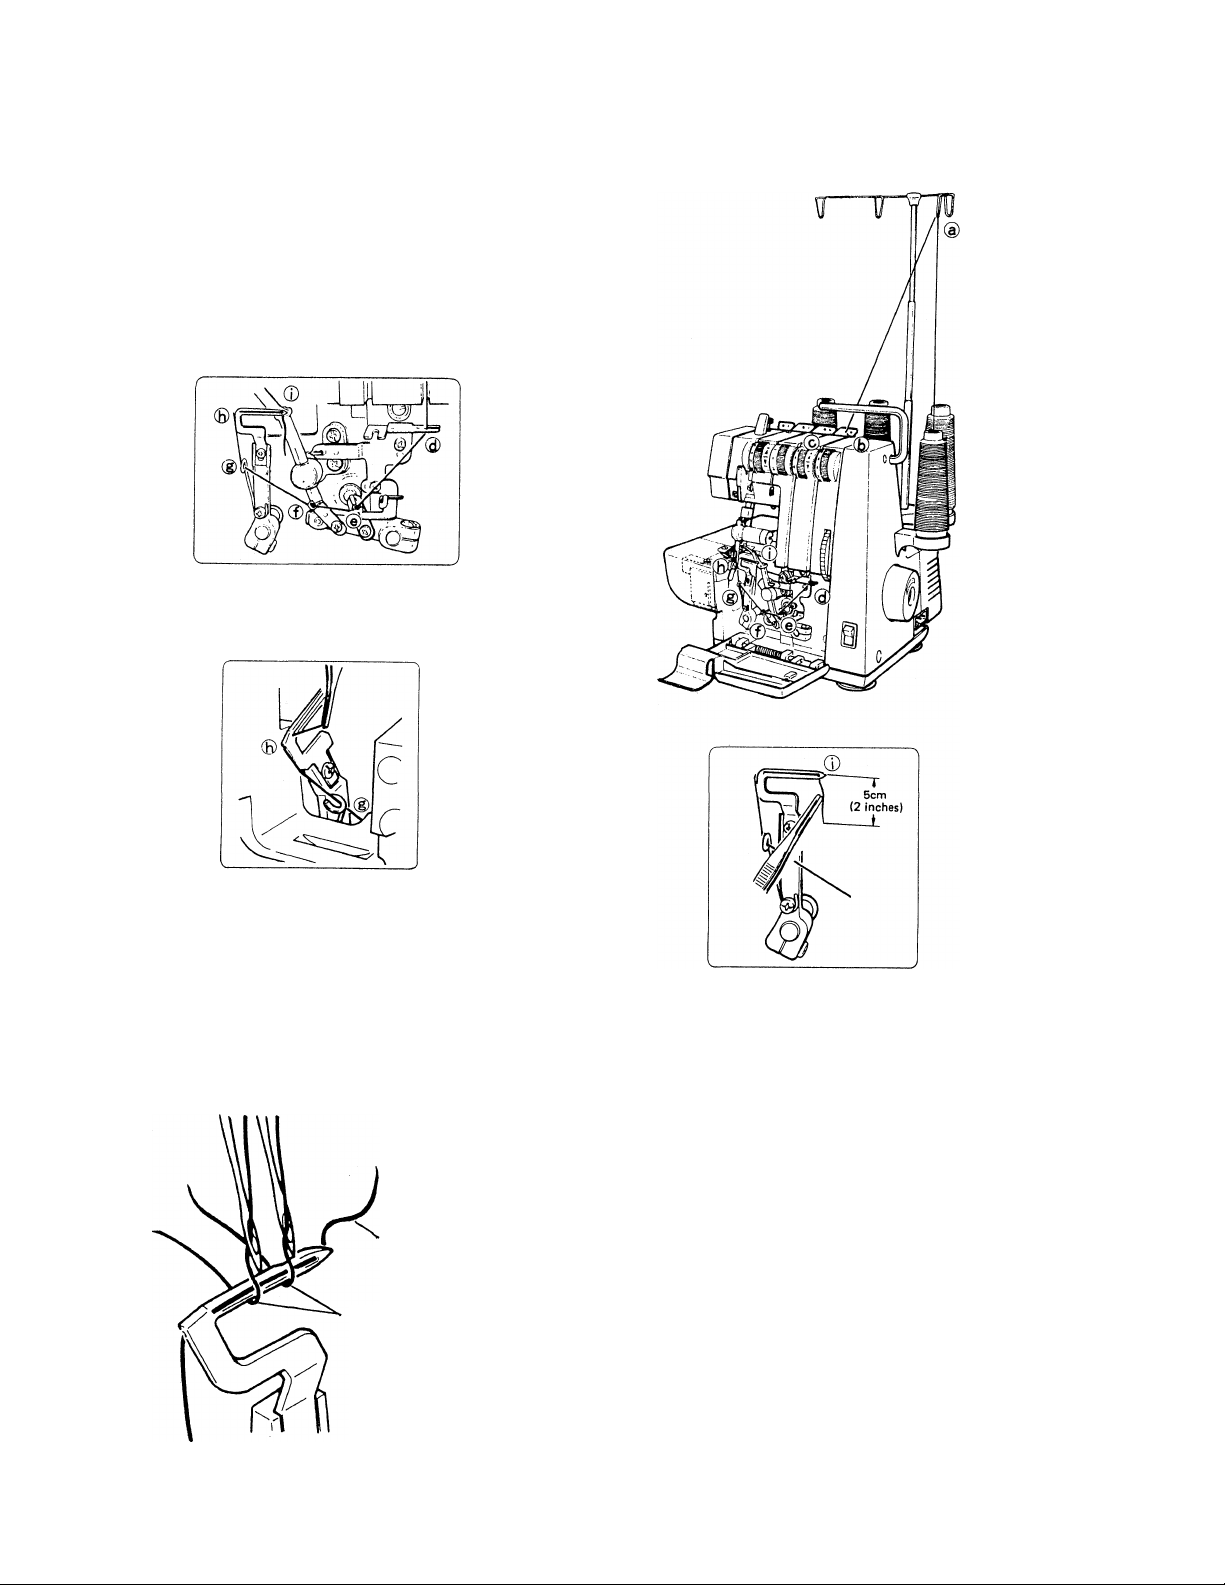
(2) Thread left looper in sequence from ® to © (marked in yellow color). Cylinder cover must also be
removed when threading this part, (Refer to page 4 for cylinder cover removal).
While holding thread with finger,
pass it between the tension discs
and pull thread down to make
certain it is properly located In
between the tension discs.
Turn hand wheel toward you
until left looper is at left as far
as it will go and thread looper
thread hole (J) from left to
right. (Use tweezers provided in
your accessory set).
Left looper
thread
Needle thread
Turn hand wheel toward you until
the looper is at right as far as
it will go passing the thread under
the throat plate, then using the
tweezers, thread the looper thread
hole © from front to back. Draw
about 5cm (2 inches) of thread
from thread hole.
Note: When left looper thread breaks or when changing
the thread, be sure to pass the left looper thread
through the inner side of the needle thread as
shown. If it is difficult to thread the left looper
in the manner described above, cut the needle
thread and rethread left looper first and then
the needle to avoid erroneous threading.
Page 11

(3) Thread the left needle thread in the order ® to (H) (blue mark).
Threading of needle eye (8) becomes easier when the movable knife is set at the non-operating posi
tion (See figure on page 12 for movable knife non-operating position).
While holding thread with
finger, pass it between the
tension discs and pull thread
down to make certain it is
properly located in between
the tension discs.
• Lower needle bar when
threading (E) and ® .
• Use tweezers to thread
needle eye ® .
• Draw about 5cm (2 inches)
of thread from needle eye.
(4) Thread the right needle thread in the order ® to (p (green mark).
Threading of needle eye ® becomes easier when the movable knife is set at the non-operating position
(See figure on page 12 for movable knife non-operating position).
—i
While holding thread with
finger, pass it between the
tension discs and pull thread
down to make certain it is
properly located in between
the tension discs.
• Lower needle bar when
threading 0 and @ .
• Use tweezers to thread
needle eye 0 .
• Draw about 5cm (2 inches)
of thread from needle eye.
Page 12

• How to change threads
When you wish to change the left needle
thread, right needle thread, left looper
thread or right looper thread with a different
thread, the following steps will make the
changing convenient.
(1) Cut the thread near the spool and tie
the end to the thread you wish to
change to as shown in figure at right.
(2) Raise presser foot.
(3) Note tension reference numbers.
(4) Turn the tension dials down toward the
(—) mark until the dial stops and draw
the thread out so that the tie knot of
the threads extend about 5 cm (2
inches) from the presser foot. When
drawing needle thread through the
needle eye, stop the tie knot before the
needle eye, cut the thread and pass it
through the needle eye.
(5) Return tension dials to reference num
bers.
4. Chain off and test sew
When the machine is completely threaded,
turn the hand wheel toward you 2 or 3 turns
while holding the 4 threads applying a slight
tension as shown in figure at left.
After chaining off, make a test stitch on a
sample of your fabric so that you can adjust
the thread tensions correctly.
After completing the seam, chain off approx.
5 cm (2 inches) as shown in figure at left and
cut thread with scissors.
Page 13

5. 1—Needle, 3—Threads overedge stitching
This is a two needles four threads overedge machine but one needle three threads overedge can be done by
means of using only the left or right needle and three threads.
No. of thread
Overedge width
Needle used
Needle thread Tension
dial
Threading
3 threads
5.7mm
Left needle
Blue
3 threads
3.5mm
Right needle
Green
4 threads
5.7mm
Left and Right needle
Blue Green
Stitch Type
Page 14

6. How to adjust thread tension
Adjust thread tension to suit the type of material and size of the thread used. The thread tension dials on
this machine are a one-turn system and as the number on the thread tension dials increases, the thread
tension becomes tighter.
1) 2-needle, 4-thread overedge stitching.
• Correct thread tension
Be sure the threads are correctly threaded otherwise
proper thread tension cannot be obtained (See page 5).
Set each of the thread tension dials to the settings shown below
and test sew.
Right
needle
thread
Topside
Right looper thread
Underside
Left
thread
threi
looper
Right needle
Thread
^Xtjnsion
Fabric
Light
wieght
Medium
weight
Heavy
weight
Left Right Right
needle
thread
3
4
6
needle looper
thread thread
2
3
5
Left
looper
thread
2,5
2,5 2
3,5
Left needle
thread tension
dial (blue)
2
2
thread tension
dial (green)
Right looper
thread tension
dial (orange)
With following figure as reference, adjust the thread tension dials to obtain correct tension.
When right looper thread lies on the underside
of fabric.
Right needle
thread
Topside
Turn right looper dial (orange) toward the (+)
mark. Or, turn left looper dial (yellow) toward
the (-) mark.
When left needle thread tension is too loose.
Right looper thread
Underside
Left looper
thread
Right looper
thread
When left looper thread appears on the top.
Right looper thread
Right needle
thread
Left needle
thread
Topside Underside
Turn left looper dial (yellow) toward the (+)
mark.
Or, turn right looper dial (orange) toward the
(—) mark.
When right needle thread tension is too loose.
Right looper thread
Left looper
thread tension
dial (yellow)
looper
thread
Right needle Left needle
thread thread
Topside
Turn left needle thread tension dial (blue)
toward the (+) mark.
10
Lett looper
thread
Underside
Right needle
thread
Topside
Turn right needle thread tension dial (green)
toward the (+) mark.
Underside
Left looper
thread
Page 15

2) Standard 1-needle, 3-thread overedge stitching
This machine can do 1-needle, 3-thread overedge stitching by using only the left or right needle.
• Correct thread tension
Be sure the threads are correctly threaded otherwise
proper thread tension cannot be obtained (See page 5).
Set each of the thread tension dials to the settings shown
below and test sew.
When using the left needle, be sure to remove the
right needle.
^^Thread tension
Fabric
Light weight
Medium weight
Heavy weight
Left needle
thread
3
4
6
Right looper
Left looper
thread thread
2,5
2,5
3,5
2
2
2
Needle thread
Topside
Needle thread
tension dial
(blue)
Right looper thread
Underside
Right looper
thread tension
dial (orange)
Left looper
thread
Left looper
thread tension
dial (yellow)
• When using the right needle, be sure to remove the
left needle.
^'"'^Thread tension
F abric
Light weight
Medium weight
Heavy weight
Right needle
thread
2
3
5
Right looper
thread
2,5
2,5
3,5
Left looper
thread
2
2
2
Needle thread Right looper Left looper
tension dial , thread tension thread tension
(green) \ dial (orange) dial (yellow)
With following figure as reference, adjust the thread tension dials to obtain correct tension.
When right looper thread lies
on the underside of fabric.
When left looper thread
appears on the top.
Left looper
thread
When needle thread tension is
too loose.
mxmmmi)
Needle thread
Right looper'
thread
Topside
Turn right looper dial (orange)
toward the (+) mark.
Or, turn left looper dial
(yellow) toward the (—) mark.
thread
Underside
t looper
Right lodper
thread
Needle
thread
Topside
Turn left looper dial (yellow)
toward the (+) mark.
Or, turn right looper dial
(orange) toward the (—) mark.
Underside
Left looper
thread
Topside
Turn needle thread tension
dial (green) toward the (+)
mark.
Needle
thread
Underside
11
Page 16

7. How to adjust stitch length
The stitch length dial on this machine is pre-set to 3mm for
normal sewing condition. Since the adjustment can be made
easily, adjust the stitch length to 4mm when sewing heavy weight
fabrics such as quilting and to 2mm when sewing light weight
fabrics such as lining fabric, crepe, etc. and you will obtain ex
cellent seams without puckering.
8. How to adjust overedge seam width
Overedge seam width of this machine is set to 3.5 mm for normal sewing with right needle and 5.7 mm
with left needle however it can be increased up to 5 mm for overedge heavy weight fabrics with right needle
and 7.2 mm with left needle as instructed below.
(1) Before making the adjustment, be sure that the power line plug is disconnected from the wall re
ceptacle.
(2) Open the looper cover. (See page 4).
(3) Turn the hand wheel toward you, lower the movable knife as far as it will go and set it in the non
operating position as shown in figure below.
(4) Remove the cylinder cover. (See page 4).
12
Push the movable knife holder to the right
as far as it will go and turn the knob in the
direction shown.
/
-LA
rr=\
Stationary knife holder
set screw
Stationary
knife holder
As shown above, the movable knife
will be in a non-operating position.
(5) Loosen the 2 stationary knife holder set screws
with the hex-head wrench provided in the acces
sories, move the stationary knife holder to the
right or left and tighten the set screw.
(When a wider seam is desired, move the holder to
the right and when a narrower seam is desired,
move the holder to the left).
Be sure to align the cutting edge of the stationary
knife level with the top surface of the throat plate.
(6) Replace the cylinder cover. (See page 4)
(7) Return the movable knife to its original position.
(8) Test Sew
Page 17

9. How to do rolled hemming
This machine can do the 2 types of standard and right looper thread wrapped rolled hem stitching with a
seam width of 1.5mm.
Always remove the left needle
1. Fabric, needle, thread and stitch length
Fabric: Light to medium weight (See page 25)
• Rolled hemming is done by rolling the fabric and overedging (seam width 1.5mm), and is not
suited for heavy or stiff fabrics.
Needle: Singer Cat. No. 2054 (#10), #14.
Thread: A variety of thread combinations can be used for rolled hemming.
o
Stitch length adjustment (See page 12)
For rolled hemming, set the stitch length dial to “2” or “F” and a fine seam
can be obtained.
2. How to exchange throat plate
A throat plate for rolled hem stitching has been furnished in the accessories for
this machine. By exchanging the ordinary overedge throat plate on the machine
with a rolled hemming throat plate by the follovring procedure, the machine can
be used for rolled hem stitching.
1. First of all, always disconnect the power line plug from
the receptacle.
2. Turn the hand wheel towards you until the needle is at
its highest point.
3. Lift the presser foot.
4. Remove the cylinder cover. (See page 4).
5. Unscrew the throat plate screw (1) and remove the throat
plate.
6. Install the rolled hemming throat plate and replace the
screw (1).
7. Replace the cylinder cover (see page 4).
r
M
Rolled hemming
throat plate
Note: • When replacing the throat plate, be careful that the thread is not
caught between the throat plate and machine.
• Set seam width to the “M” mark on the rolled hemming throat plate.
• To set seam width, align left edge of stationary knife holder with the
“M” mark on the rolled hemming throat plate.
Be sure the stationary knife is not in contact with the edge of throat
plate.
13
Page 18

3. How to adjust thread tension
1. Standard rolled hem stitching
As adjustments are the same as 1-needle, 3-thread overedge stitching, refer to page 11.
2. Right looper thread wrapped rolled hem stitching (rolled hem variation)
• Correct thread tension
Needle thread
(green dial)
Right looper thread
(orange dial)
Topside
Underside
Left looper thread
(yellow dial)
Needle thread
(green dial)
To correctly adjust the thread tension, set the dials as follows from the standard thread tension dial sett
ings.
a. Turn the right looper thread tension dial (orange) one half graduation toward the (—) mark.
b. Turn the left looper thread tension dial (yellow) 2 3 graduations toward the (+) mark,
For light and medium weight fabrics which are dif
ficult to roll, a fine seam can be obtained by this
stitching.
Slight adjustment will give better thread tensions.
When right looper
thread is too loose
When left looper
thread is too loose
mmm'kvi
Needle thread
Right looper
thread
Topside
Underside
Turn right looper thread tension
dial (orange) toward the (+)
mark.
4. How to sew
Sewing
Needle thread
Right looper
thread
Topside
Turn left looper thread tension
dial (yellow) toward the (+)
mark.
Or, turn right looper thread ten
sion dial (orange) toward the
(—) mark.
Left looper
thread
Underside
When needle thread is
too loose
Left looper
thread '
Topside
Turn needle thread dial (green)
toward the (+) mark.
Needle thread
Underside
• See page 8, “4. Chain off and test sew”.
• For rolled hemming, if a slight tension is applied to the material in the sewing direction, a finer seam
finish can be obtained.
• At the start of sewing, slightly pull the end of the chain off so it will not be entangled in the stitch.
• The minimum overedge stitch width that can be obtained for rolled hemming is approximately
1.5mm since the cutting width cannot be set below 3.5mm.
14
Page 19

10. Differential feed (with differential feed machine only)
Differential feed is a system which “stretches” or “gathers” the fabric, when amount of feed of front
feed dog in relation to the rear feed dog is changed. The differential feed ratio ranges from 1:0.77 ~
1:2.0. Adjustment is made by means of the differential
feed adjusting lever pictured below.
Use of differential feed is very effective in overedging
stretch fabrics and fabrics cut on the bias.
• Gathered overedge (Use regular throat plate)
Gathered overedge is most suited for shirring sleeves, yokes, front and back bodices, skirt hems, etc. in
stretch fabrics such as knits and jersey before assembling into garment.
To set the differential feed adjusting lever
• Open looper cover and loosen differential feed adjusting lever thumb screw.
• Slide adjusting lever downward below the center mark, as required, to gather, and tighten the thumb
screw.
Note: The setting position of the lever will differ depending on the material being sewn and the amount
of feed for shirring.
When differential feed adjusting lever is set to maximum gathering ratio, the stitch length dial will
automatically move to setting “3” if previous setting was higher than setting “3”.
Be sure to reset the differential feed adjustingdever to center
mark for normal overedge stitching.
15
Page 20

• Stretch overedge (Use regular or rolled hemming throat Plate)
Stretch overedge is ideal for sewing decorative collars, sleeves, skirt hems, etc. on loosely knit and woven
fabrics.
• Open looper cover and loosen differential feed adjusting lever thumb screw.
• Slide adjusting lever upward above the center mark, as required, to stretch, and tighten the thumb
screw (Fig. 1)
To sew a seam, apply gentle tension to the fabric by holding the seam lightly in front and back of the
presser foot. (Fig. 2)
Note: If amount of “stretch” is not correctly set in relation to the fabric being sewn, the fabric is apt to
shift away from the needle resulting in improperly sewn overedge seam. In such case, reset dif
ferential feed adjusting lever closer to the center mark.
16
Be sure to reset the differential feed adjusting lever to center mark for normal overedge stitching.
Page 21

11. Free arm sewing (tublar work)
As shown in figure at left, this machine becomes a free
arm machine simply by pushing the convertible bed
plate down making tubular work such as sewing sleeves
very easy.
This is especially convenient for finishing hard-to-reach
areas such as arm holes and overcasting trouser cuffs.
Slip tubular work
onto the free arm
and sew.
12. Seam guide lines
Use seam guide lines on looper cover to measure seam allow
ances.
Thick line on extreme right is 5/8 inch from center of right
needle. Other lines are 5/64 inch apart.
13. Edge guide (optional parts)
For ornamental and blind (overedge) stitching, use of the edge
guide attachment is very convenient.
Attach edge guide as shown in figure.
Washer
Edge guide
LX
Edge guide
set screw
17
Page 22

14. Variation stitch
• Ornamental 3 thread stitching
Ornamental stitching can be used for various applications.
Preparation
• Use ordinary overedge throat plate.
• Remove left needle.
• The right looper thread forms the decorative stitch, therefore fine and unobtrusive threads should be
used for the needle and left looper.
Example: Right looper thread
Left looper thread
Needle thread
....................
.....................
Woolly nyron
extra fine
...................... extra fine
Stitch length...............................2—3
1. Set thread tensions to normal sewing condition
for 1 needle, 3 thread overedge stitch and make
a test sample. (See page 11).
• When making above adjustment, the right
looper thread tension should be adjusted
as possible.
• Make a teat sample with two ply fabric.
2. Turn left Looper thread tension dial (yellow)
toward (+) mark so that the right looper thread
will come as close as possible to the needle thread
as shown in the sketch.
3. Turn needle thread tension dial (green) toward
(—) mark so that right looper thread, left looper
thread and needle thread will all come to the
edge of fabric as shown in the sketch.
4. Open loopei cover.
Needle thread
(green dial)
Right looper thread
(orange dial)
Topside
Needle thread
Right looper
thread
T opside
Left looper thread
(yellow dial)
Needle thread
(green dial)
Underside
Needle thread
Left looper
thread
Underside
5. Turn hand wheel toward you to bring movable knife to its lowest position and place it in the non
operating position as shown in sketch below.
18
Page 23

6. Attach edge guide (optional parts) to machine.
7. Fold fabric in half with the wrong side facing up.
8. Place fabric under the foot with the fold resting against the wall of edge guide. Adjust edge guide so
that it is positioned in the center of the seam width as shown in the sketch.
9. When stitching is completed, unfold fabric and press the stitching from the underside of the fabric.
• 3-Thread blindstitching
Blindstitching provides a durable hem finish that is almost invisible. It is best suited for sewing cuffs on
knitwear and skirt hems.
Preparation
Remove left needle
Material Knit fabric
Throat plate Ordinary overedge throat plate
Thread tensions Set tensions to normal sewing condition for 1 needle, 3 thread overedge stiTchihg
(see page 11).
Stitch length dial Set stitch length dial to 4—5.
With the underside up, place the threefold fabric under the foot with the soft fold resting against the wall
of edge guide as shown in the sketch. Lower the foot, and make a test sample to see that the needle will
pierce the edge of the fold. Adjust position of edge guide if necessary.
• Braiding by chaining-off
Chained-off braids can be used for making 3 ply or 4 ply braids.
To make chained-off braids, place movable knife in the non-operating position. Insert filler cord such as
woollen yarn or tape through hole in foot and chain-off.
19
Page 24

• 3-Thread pin tucking
Pin tucking is a useful decoration when sewing blouses and children’s clothes. Pin tucking is accomplished
before cutting out garment.
• Use ordinary overedge throat plate or rolled hemming throat plate.
• Remove left needle.
• Before sewing on your garment, always make a test stitch on a sample of your fabric so that you can
adjust the thread tensions correctly for standard 1 needle, 3 thread overedge stitching.
. Place movable knife in non-operating position.
• Fold fabric in half with the wrong side facing.
• Place fabric under the foot with the fold resting against the wall of edge guide, (optional parts)
• Adjust edge guide (optional parts) so that the stitches will just overcast the edge of the fold as shown in
the sketch.
• Lower the foot and sew. When stitching is completed, press pin tuck to lay flat on one side.
• Turning square corners
Outside corner
1. Cut out approximately
2cm from the comer in
line with the overedge
seam edge.
2. Sew to point A, one stitch
beyond edge of fabric and
stop machine.
3. Raise needle and presser
foot.
4. Pull fabric to the rear of
machine just enough to
release the thread caught
on the finger of the throat
plate.
5. Turn fabric and lower
presser foot so that its
finger is positioned on the
edge of fabric.
6. Pull slack threads up, then
start to sew.
20
Page 25

Inside corner
1. Cut fabric at seam edge.
2. Place movable knife in
non-operating position.
3. Fold fabric as shown in
sketch.
4. Sew to point B, as close as
possible to the diagonal
fold. Leave needle in
fabric.
15. How to replace needles
Use Singer needles Cat. No. 2054 available in sizes #14 and (#10)
To remove the needles:
• Be sure the power line plug is disconnected from the wall receptacle.
• Turn the hand wheel toward, you until the needle is at its highest
position. Loosen the needle set screw with a screwdriver and remove
needles.
5. Raise presser foot, leaving
the needle in the fabric.
6. Refold fabric so that the
overedge is in line with the
already sewn seam.
To replace the needle:
• Insert the needles into the needle bar hole as far as they will go with
flat surface to the rear and securely tighten the needle set screw.
21
Page 26

16. How to replace stationary knife
The stationary knife should be changed when it becomes dull.
The stationary knife can be replaced according to the following steps, however if there are any difficulties
experienced, call your Singer representative to make the adjustment.
(1) Be sure that the power line plug is disconnected from
the wall receptacle.
(2) Open the looper cover and set the movable knife in the
non-operating position (see page 12).
(3) Loosen the stationary knife set screw and remove the
stationary knife.
(4) Place a new stationary knife in the groove of the
stationary knife holder, align the cutting edge level
with the top surface of the throat plate and tighten set
screw.
(5) Return the movable knife to its original position.
17. How to exchange light bulb
Danger: Always unplug before relamping.
Light bulb (available from your Singer Dealer) is a bayonet
type 12 volt, 6 watt bulb.
Disconnect power line plug.
Remove light cover as shown in figure, turn bulb to left
and remove. To replace, push bulb into socket and turn
to right.
18. How to adjust presser foot pressure
The presser foot pressure of this machine is
preadjusted at the factory to suit the sewing of
medium weight fabrics.
It may become necessary to adjust the pressure
in the case of delicate or heavy weight fabric.
For light weight fabric — Decrease the pressure
(as shown at left).
Heavy weight fabric — Increase the pressure
(as shown at left).
Page 27

19. Cleaning
Your machine will serve you perfectly for many years if you take a few moments of your time to keep
it clean.
Danger‘.Before cleaning your machine, disconnect power line plug from the wall receptacle.
Open looper cover and remove lint and fluff which may have accumulated around the areas shown with
arrows.
23
Page 28

20. Reasons for poor stitches and how to make adjustment
Whenever sewing difficulty is encountered, make the adjustments as noted below.
Condition
When the fabric is not
• Insufficient presser foot pressure.
Reason
feeding.
When the needle breaks.
• Needle not inserted properly.
• Fabric being pulled too hard.
• Loose needle set screw.
When the thread breaks.
• Incorrect threading. • Thread machine correctly (page
• Bent needle or needle point
damaged.
• Thread tension too tight. • Adjust tension (page 10).
• Thread tangled. • Thread correctly (page 5).
• Needle inserted incorrectly.
When stitches skip. • Needle bent or needle point
damaged.
• Needle set loosely.
• Incorrect threading.
• Wrong needle used.
Method of Adjustments
(reference pages)
• Increase presser foot pressure
(page 22).
• Insert needle correctly or replace
with correct needle (page 21).
• Do not pull the fabric by hand.
Use hand only to guide the fabric.
• Tighten screw firmly.
5).
• Replace needle (page 21).
• Insert needle correctly (page 21).
• Replace needle (page 21).
• Set needle firmly in position
(page 21).
• Thread machine correctly
(page 5).
• Use Singer Cat. 2054, #14.
• Increase presser foot pressure
(page 22).
When stitches are
• Insufficient presser foot
pressure.
• Thread tension not balanced. • Adjust tensions (page 10).
irregular.
When fabric puckers • Thread tension too tight. • Adjust tension (page 10).
When the machine does
• Threading incorrect or tangled.
• Power line plug not connected.
• Rethread machine (page 5).
• Connect with power source.
not operate.
24
Page 29

21. Relationship between cloth, thread and needle
Type of Fabric
Light Weight
Lawn, Organdy,
Voil, Crepe, etc.
Medium Weight
Muslin, Sheersucker,
Satin, Gabardine
Broadcloth, etc.
Heavy Weight
Oxford, Denim
Tweedt Corduroy
Serge
Type of Thread
Cotton #100
Silk #100
Spun #80 - #90
Tetron #80 - #100
Cotton #60 - #80
Silk #50
Spun #60 - #80
Tetron #60 - #80
Cotton #40 — #60
Silk #40 - #60
Spun #60 - #80
Tetron #50 - #80
Needle
Singer Cat. No. 2054
(#10), #14
#14
#14
Knit
Tricot
Spun #80 - #90
(#10), #14
Tetron #60 - #80
Jersey
Spun #60 - #80
Tetron #60 — #80
#14
Cotton #60 - #80
Wool (woven, knit)
Spun #60 - #80
Tetron #50 - #60
Woolly nylon
Woolly tetron
Singer needle, Cat. No. 2054-42 is furnished with the machine however, the following variety needles
are available for use on the 14U machines.
Cat. No. 2054-42 (Regular point)
Cat. No. 2054-06 (Ball point, for knit fabrics)
It is recommended that you select your needle in accordance with the material you are sewing.
#14
25
Page 30

22. Accessories
1. Needle pack 1
2. Screwdriver (medium size) 1
3. Screwdriver (small size) 1
4. Tweezers 1
5. Rolled hemming throat plate 1
6. Hex-he ad wrench 1
23. Specification
Item
Sewing speed
Stitch length (feed amount) 1 ~ 5mm (Standard; Rolled hemming F ^ 2, ordinary
Differential feed ratio
Overedge stitch width
Needle bar stroke
Presser foot rise 5mm
Needle
Number of threads
Machine dimensions
Weight
1,300 spm maximum
overedge 3)
1:0.77 ~ 1:2 (with differential feed machine)
Rolled hemming 1.5mm, ordinary overedge 3.5 7.2mm
(standard 3.5mm)
27mm
Rolled hemming Singer Cat. No. 2054 (#10), #14
Ordinary overedge Singer Cat. No. 2054 (#10), #14
4
width 257mm x depth 231mm x height 313mm
14U 34B : 5.6 kg 14U 234B : 6.0 kg
Specification
26
Page 31

Form U3865 (Rev. 393)
Part No. 379211-002 (Rev. 4)
Printed in Japan
 Loading...