

Page 1
14
U32A
Operator’s
Guide
Page 2

14U 32A
PREFACE
Thank you for your purchase of this sewing machine.
This machine will provide you with excellent performance in sewing from light to heavy material (lawn to
denim). Please refer to this booklet for proper use and optimum service.
Safety Cautions:
Be sure that the etectrical voitage of the socket ©utlet (wail, receptacle) is the same as the rated
smltage of the motor.
o ïJiscoîiîiect ihe power-ime ptug îrom the socket outlet rohen ciiangiag needles, presser idet or
throat pistes, or when ieindiig the machine imattended. This eliminakes the possibilitv of
starting the machine by accidentally pressing the speed coiitroÎIer.
® IJo not piiii the fabric while yon are stitching as this may deflect the needle, causing it to break.
« Before deanliig your maciime, disconnect the powenhiie plug from the socket mitiet,
® ÎJO not attempt to adjust tîîe motor belt, tiontact your nearest Service Center sltoiiki any
adj'ustnient be reipiifed.
® Handle the foot controHer with care and avoid dropping it on the floor. Be sure not to place
anytliliig on top of it.
o When, sewing ciose.15' watch the area being sewn, to avoid injuries from needles and knives.
® Do not lîoid the free amt wften lifting or moving tiie niadiine.
★ A Trademark of THE SINGER COMPANY
Copyright © 1988 SINGER SEWING MACHINE COMPANY
All Rights Reserved Trhoughout The World
Page 3

CONTENTS
Page
1. Principal parts..............................................................................................................................................2
2. Preparation prior to sewing..........................................................................................................................3
3. Threading the machine ................................................................................................................................4
• Setting up the thread guide holder.........................................................................................................4
• How to open looper cover ......................................................................................................................4
• How to remove cylinder cover................................................................................................................4
• How to thread your machine correctly....................................................................................................5
• How to change threads .......................................................................................................................... 8
4. Chain off and test sew................................................................................................................................. 8
5. How to adjust thread tension .......................................................................................................................9
6. How to adjust stitch length........................................................................................................................ 10
7. How to do rolled hemming (Throat plate available at additional cost) ................................................... 11
8. Free arm sewing (Tublar work)................................................................................................................ 13
9. Margin lines.............................................................................................................................................. 13
10. How to replace needle............................................................................................................................... 14
11. How to replace knives............................................................................................................................... 14
12. Adjustment of presser foot pressure.......................................................................................................... 15
13. Reasons for poor stitches and how to make adjustment........................................................................... 16
14. Relationship between cloth, thread and needle......................................................................................... 17
15. Accessories................................................................................................................................................ 18
16. Specification of the 14U 32A machine..................................................................................................... 18
Page 4
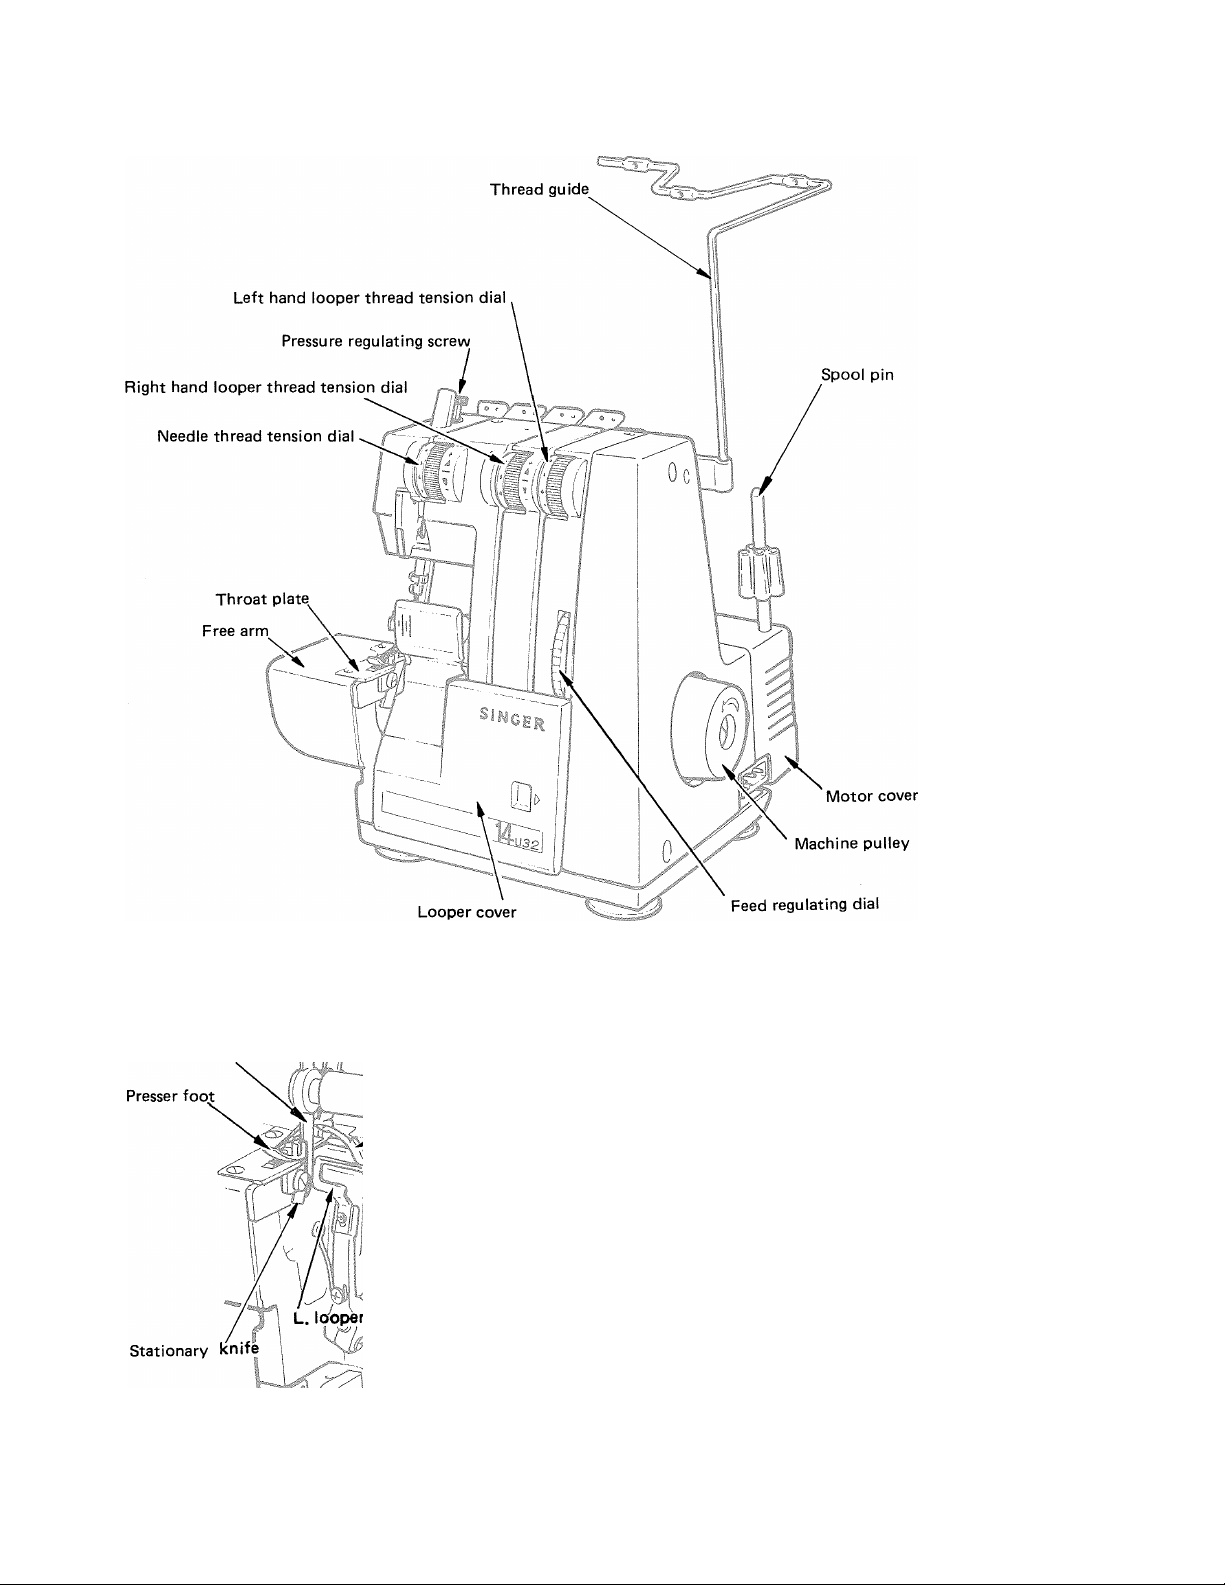
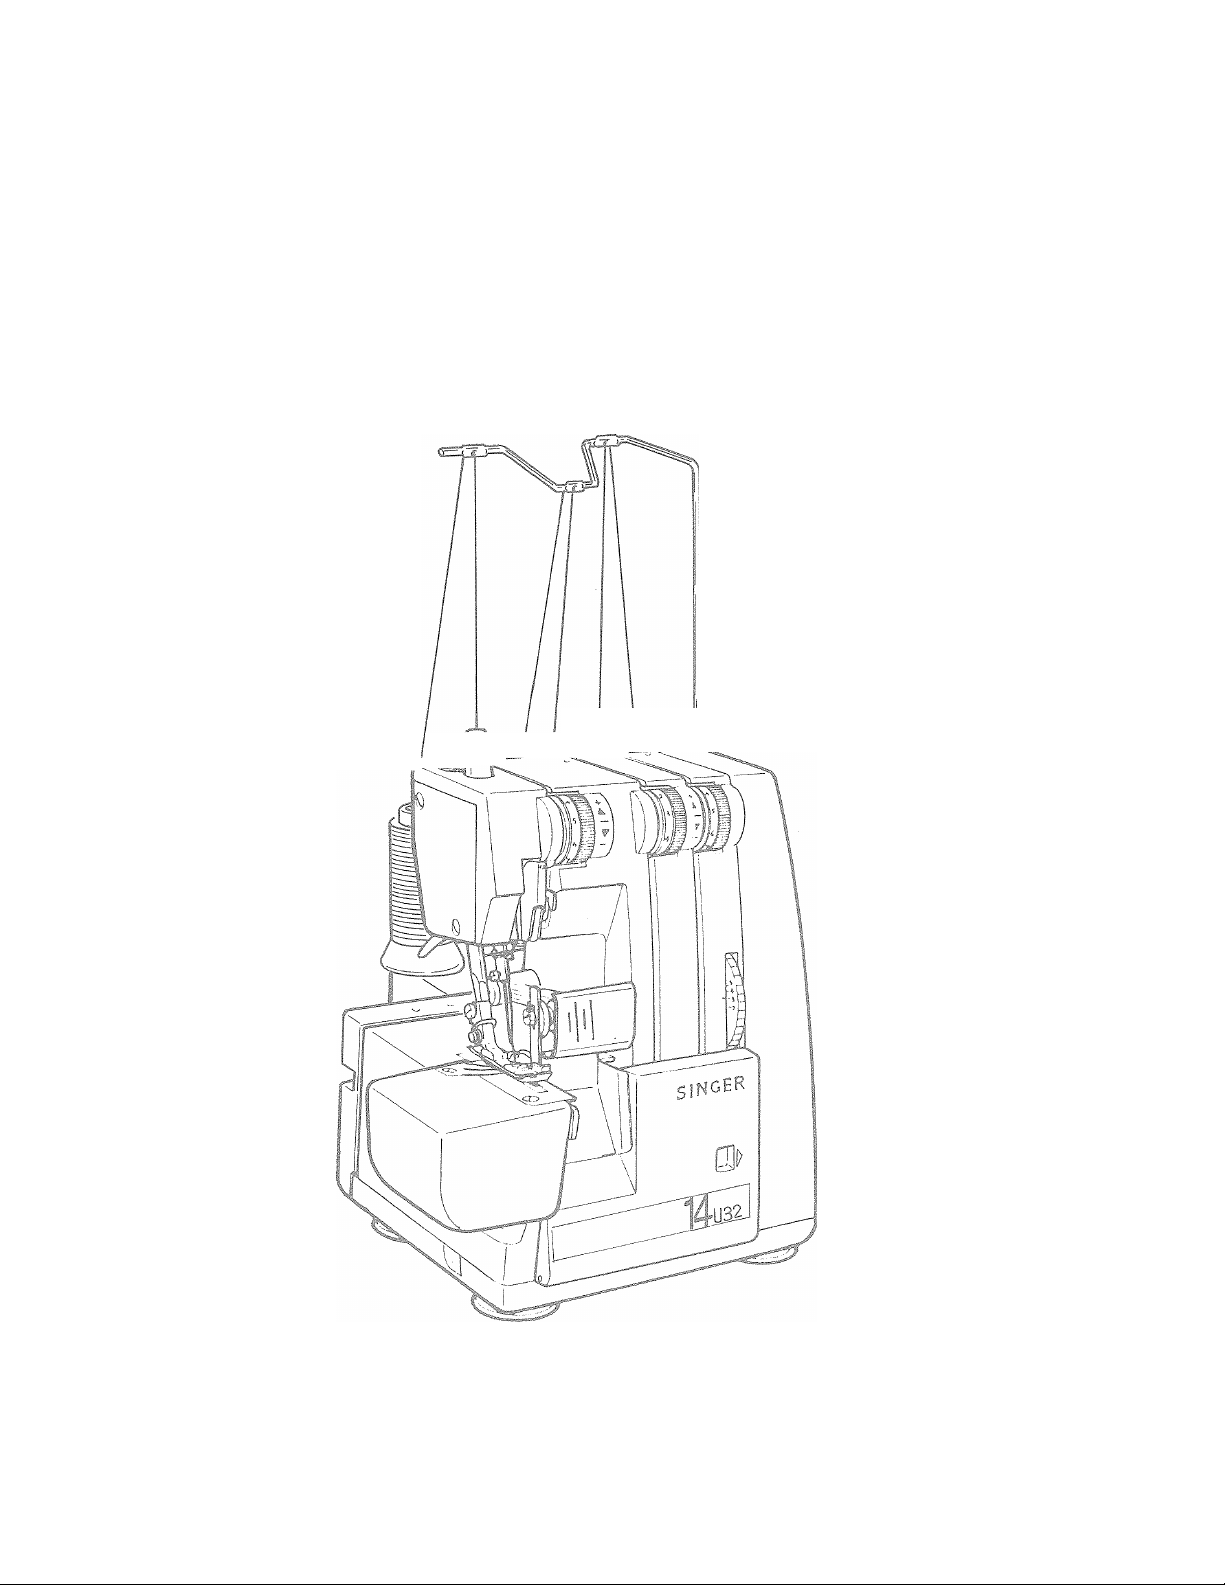
1. Principal parts
• Machine with looper cover opened
Movable knife
Rj looperi
Page 5
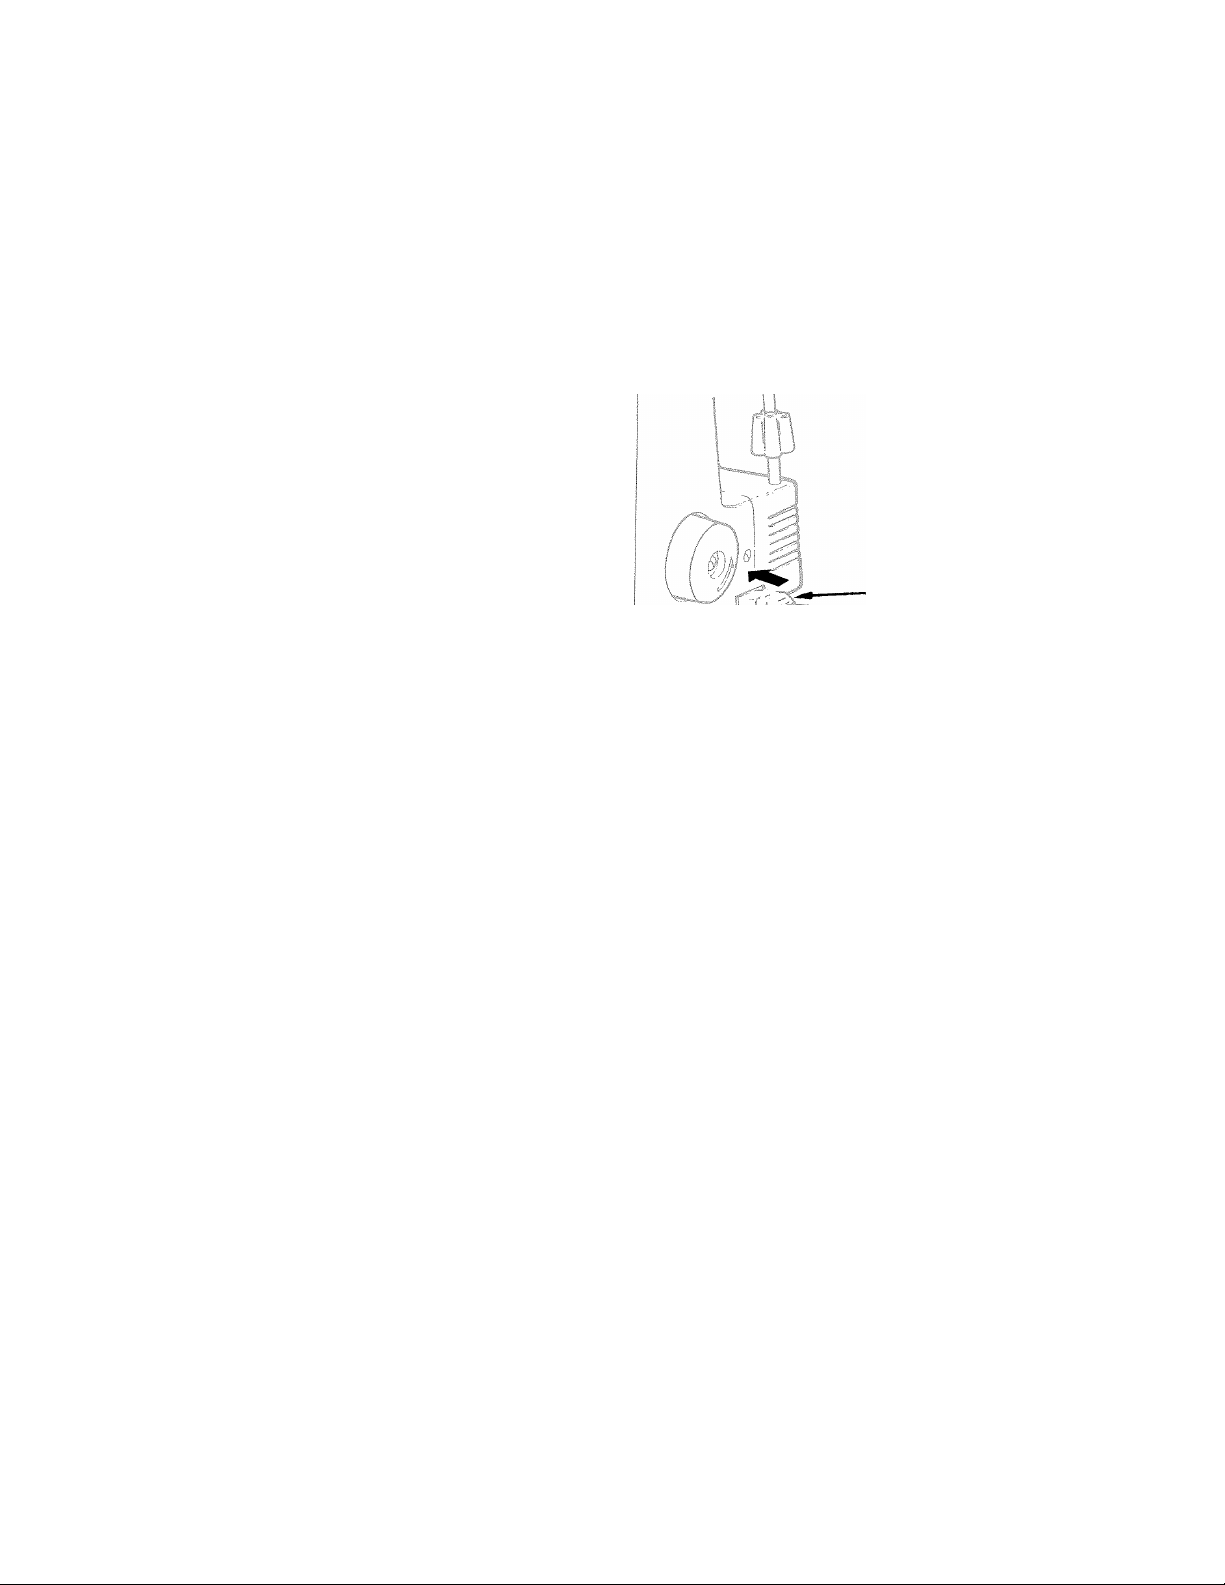
2. Preparation prior to sewing
Connect the machine plug to the electrical receptacle of your machine and the power line plug to the wall
receptacle.
Controller
Machine
\
plug
Power line plug wall receptacle
To run the machine and control the speed, press the speed controller. The harder you press, the faster the
machine will sew. To stop the machine from sewing, remove your foot from the speed controller.
Caytion:
• Be sure that the electrical voltage of the socket outlet (wa!! receptacle! is the same as the rated voltage of
the motor.
® Handle the foot controller with care and avoid dropping it on the floor. Be sure not to place anything
on top of it.
® Disconnect the power-line plug from the socket outlet vvhen changing needles, presses feet or throat
plates, or vtfhen leaving the rnachirie linattended. This eliminates the possibility of startiing the rtiaehine
by accidentally pressing the speed controller.
• Before cleaning your machine, cJiscorinect the power-line plug from the socket outlet.
Page 6
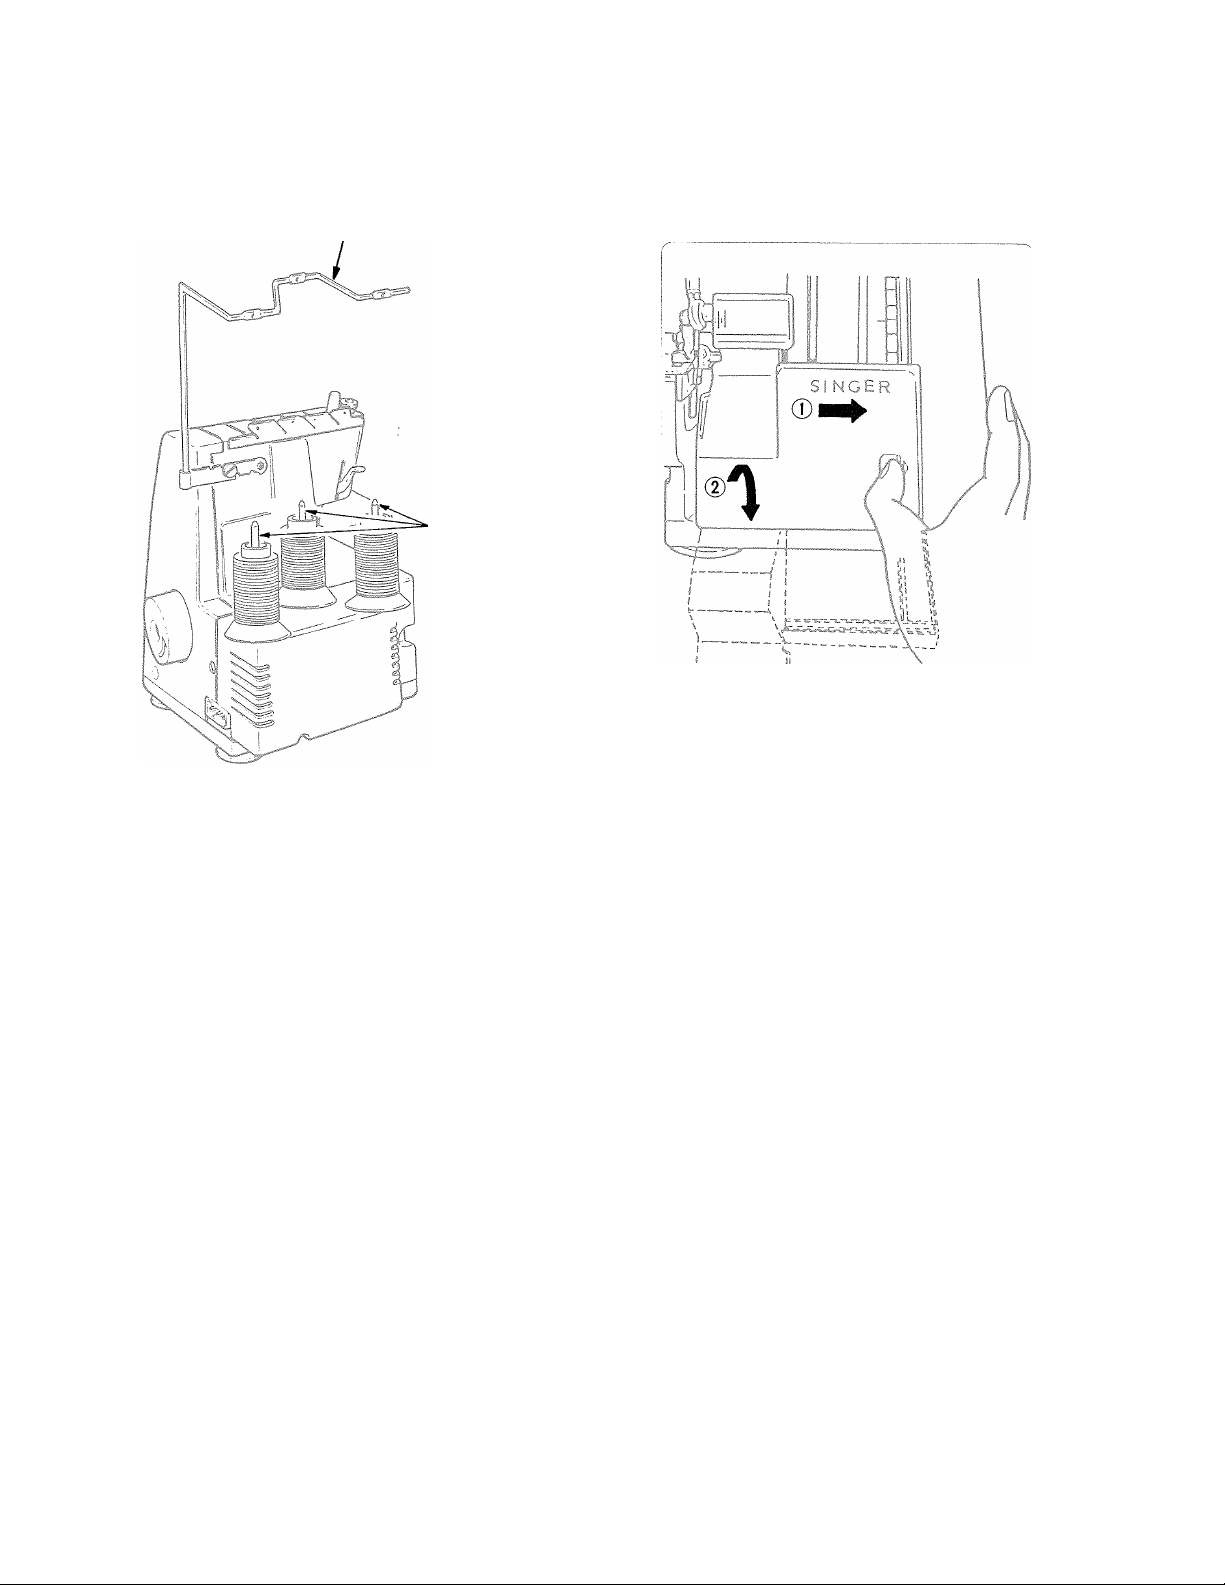
• Setting up the thread guide holder
Thread guide
Spool pin
• How to open looper cover
Swing thread guide up as far as it will go so that
thread guide holes are located just above the spool
pins.
Place the thread on the spool stand as shown
above.
® How to remove cylinder cover
II
^Ll
\
Cylinder cover
0 Push the cover to the right as
far as it will go and
0 Pull cover down toward you.
Be sure looper cover is closed when sewing.
To replace cover
r\
/
Throat
plate
(D While pulling the cylinder cover to the left,
(D Lift cover upward and off the machine.
* Do not hold the cylinder cover when inoviiig the rnachirie.
Place the upper on the cover under the throat
plate and press cover downward to the right.
Page 7
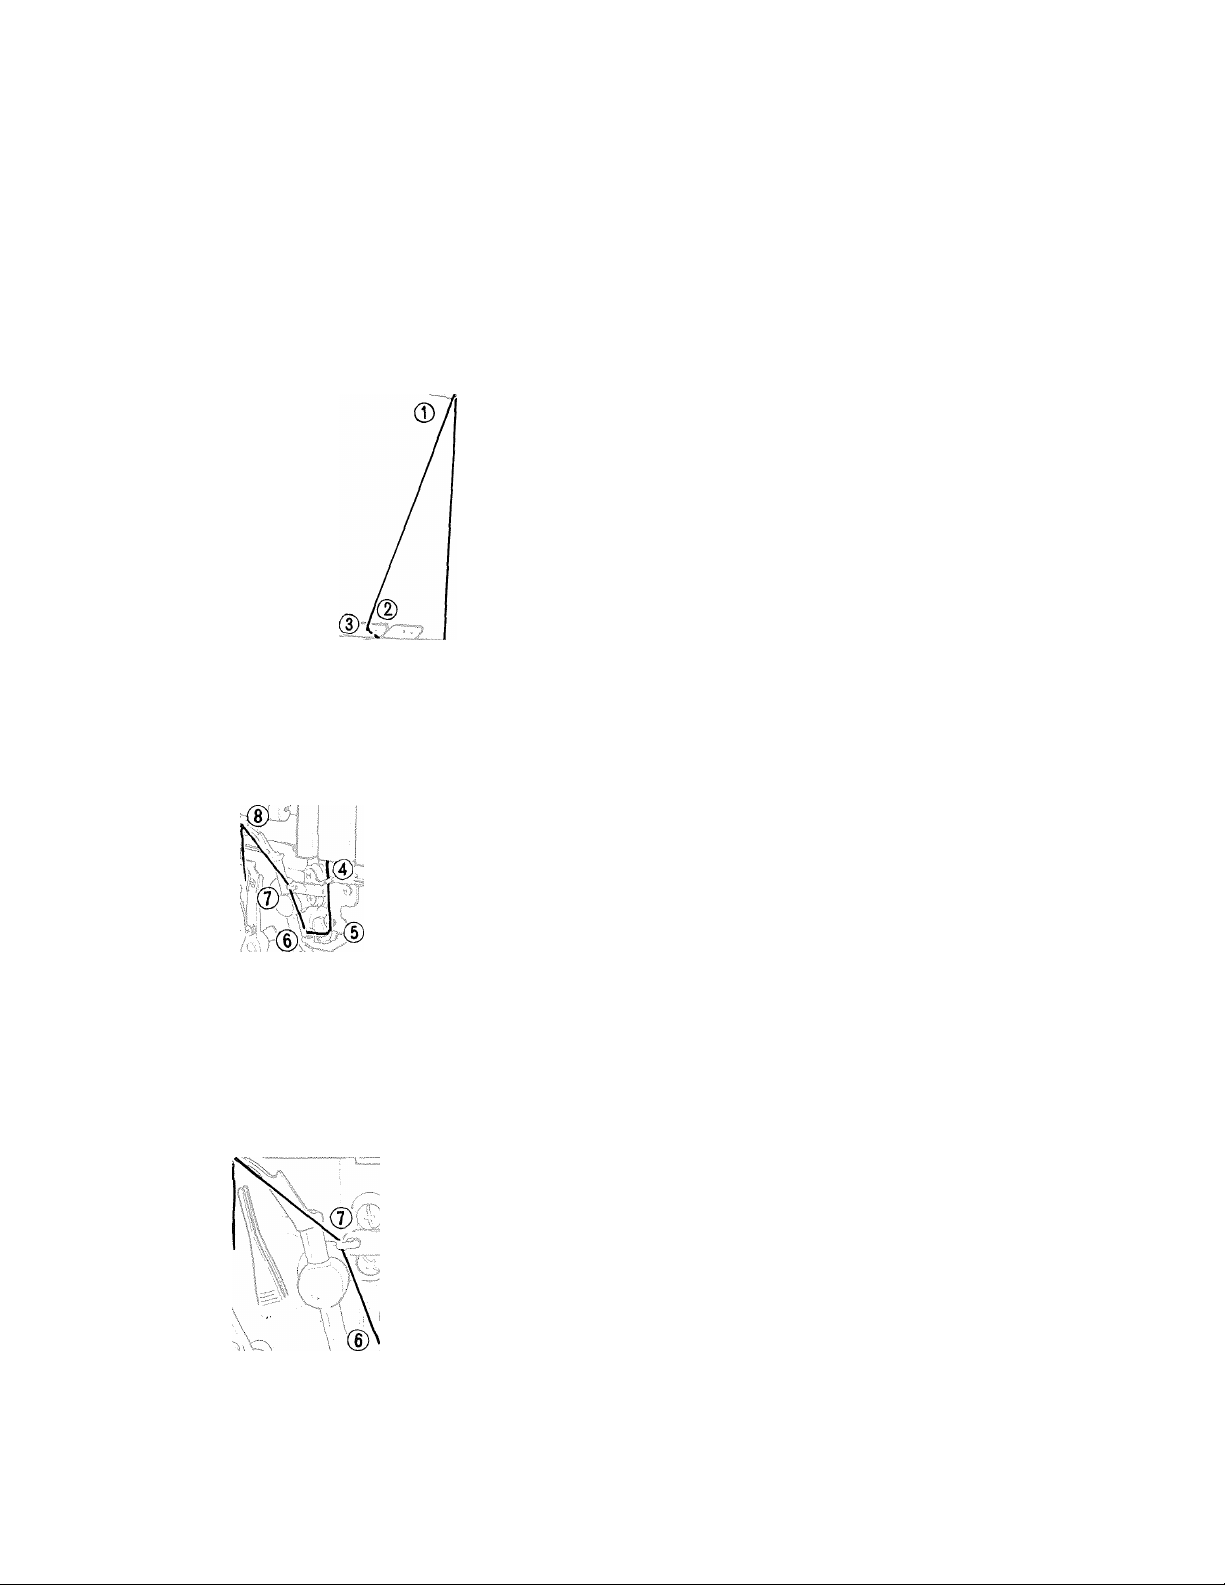
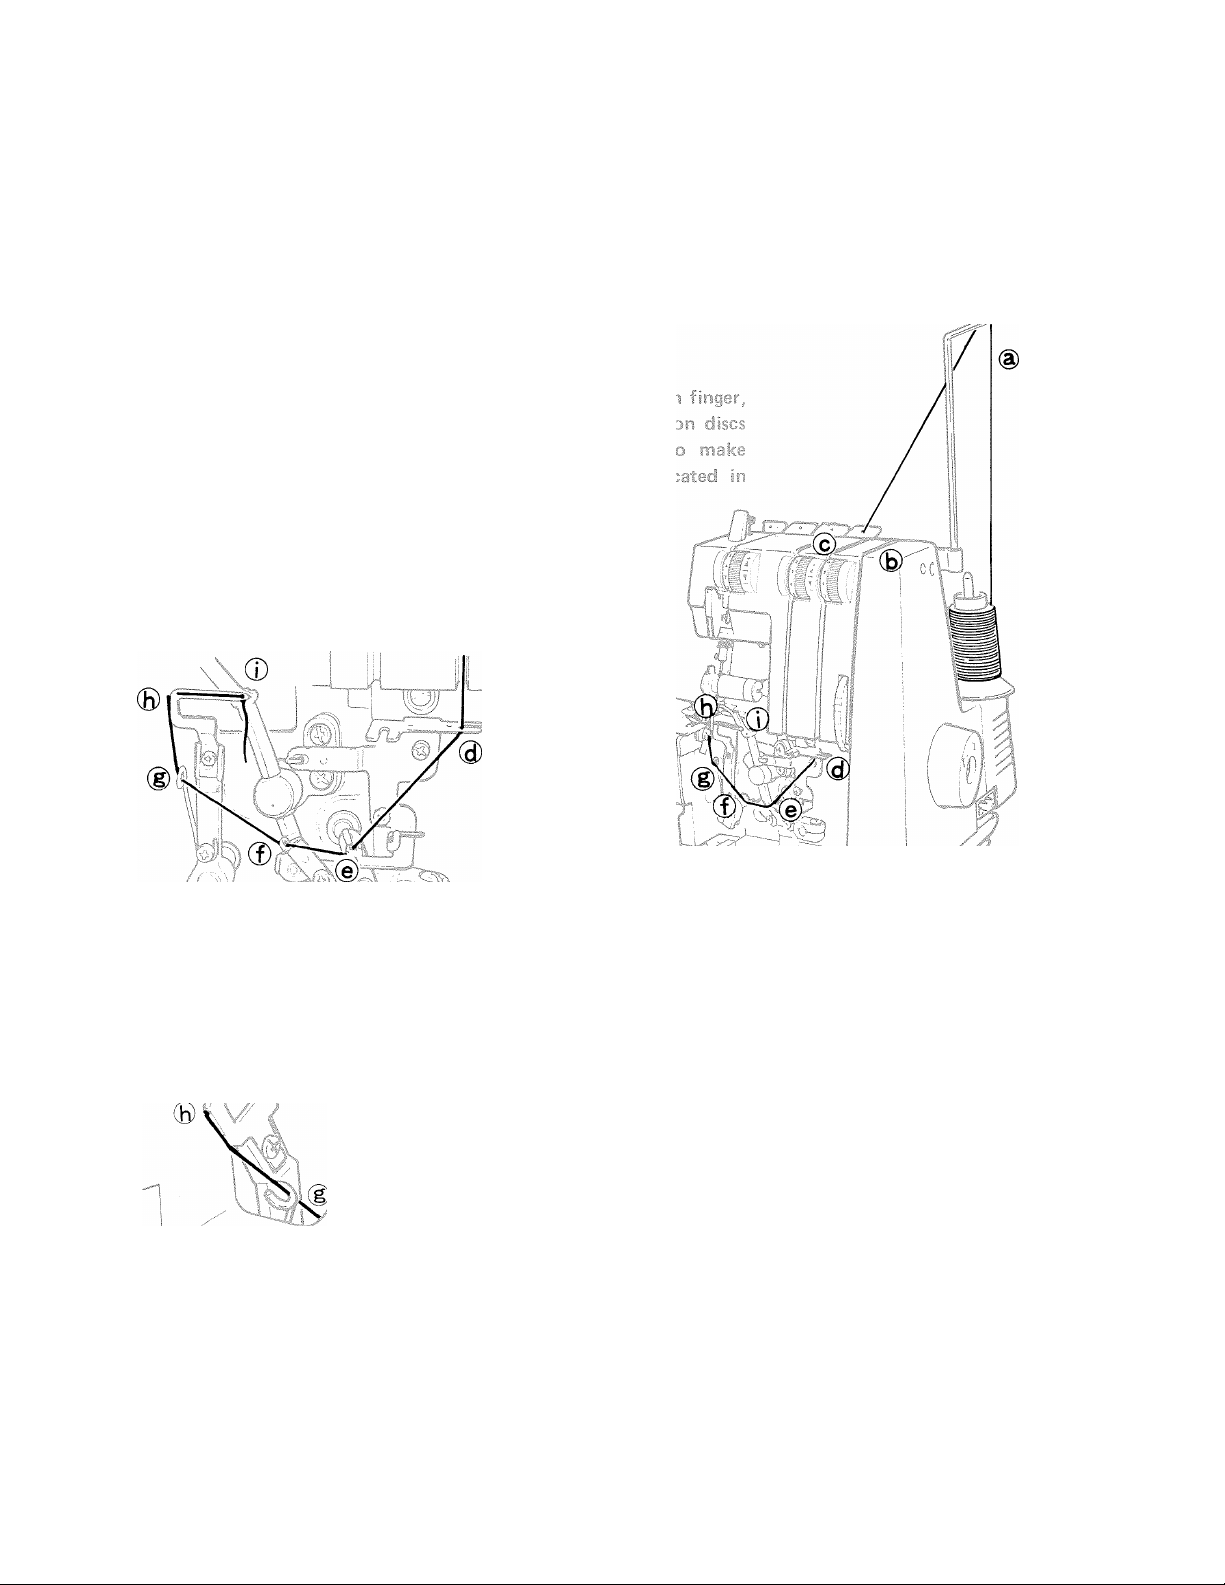
9 How to thread your machine correctly
Correct sewing cannot be obtained when machine is threaded incorrectly.
Threading is diagrammed on the inner side of the looper cover and identified with colors on the various
thread guides.
(1) Open looper cover. Thread the right looper in the order 0 to (8) as indicated in the figure below,
(threading points marked in orange)
Threading Chart
01
/
y
Tension'
discs
/
Use tweezers provided in the accessory set when
threading looper thread hole 0
Draw about 5cm (2 inches) of thread from the
looper thread hole.
Page 8
(2) Thread left looper in sequence from @ to 0 (marked in yellow color). Cylinder cover must also be
removed when threading this part. (Refer to page 4 for cylinder cover removal).
Tension discs
Turn machine pulley toward you
until left looper is at left as far
as it will go and thread looper
thread hole (£) from left to
right. (Use tweezers provided in
your accessory set).
©
5cm
(2 inches)
—L
Turn machine pulley toward you
until the looper is at right as far
as it will go passing the thread
under the throat plate, then
using a tweezer, thread the
looper thread hole ©from front
to back. Draw about 5cm (2
inches) of thread from thread
hole.
Page 9

(3) Thread the needle thread in the order® to © (green mark).
Threading of needle eye ©becomes easier when the movable knife is set at the nonoperating position
(See figure on page 14 for movable knife non-operating position).
](D
Tension discs'
(4) When needle thread is not correctly
threaded between the tension discs,
it will lie loose on the underside of
the material as shown in figure at
right.
Topside
Underside
Page 10

• How to change thread
When you wish to change the needle
thread, left looper thread or right
looper thread with a different thread,
the following steps will make the
changing convenient.
(1) Cut the thread near the spool and
tie the end to the thread you wish
to change to as shown in figure at
right.
(2) Raise presser foot.
(3) Turn the tension dials down
toward the minus (—) sign until
the dial stops and draw the thread
out so that the tie knot of the
threads extend about 5cm (2
inches) from the presser foot.
When drawing needle thread
through the needle eye, stop the
tie knot before the needle eye, cut
the thread and pass it through the
needle eye.
Tie knot
Cloth,,
When the machine is completely threaded,
turn the machine pulley toward you 2 or 3
turns while holding the 3 threads applying a
slight tension as shown in figure at left.
After chaining off, make a test stitch on a
sample of your fabric so that you can adjust
the thread tensions correctly.
After completing the seam, chain off approx.
5 cm (2 inches) as shown in figure at left and
cut thread with scissors.
Page 11

5. Mow to adjust thread tension
Adjust thread tension to suit the type of material and size of the thread used. The thread tension dial
on this machine are a one-tum system and as the number on the thread tension dials increases, the thread
tension become tighter.
® Correct thread tension
Be sure the threads are correctly threaded since otherwise proper thread tension cannot be obtained (See
page 5).
Right looper thread
Needle thread
Topside
Underside
When each of the dials are set to the stand
ard settings shown in the table, correct
tension can be obtained. Slight adjustments
may give better thread tensions.
Thread Tension
Needle thread
123456789
Fabric
A;
-3/
"■'bo
-Left looper
thread
Right
Looper Thread
123456789
Left
Looper Thread
123456789
Light
Weight
Medium
Weight
Heavy
Weight
-
Page 12

When the right looper thread
lie on the underside of fabric.
/
Needle thread
Right looper"^
thread
Topside
'Left looper
thread
Underside
When the left looper thread
appears on the top.
Left looper
thread
\
Right \oo<per /
thread J
Needle^
thread
Topside Underside
When the needle thread tension is too loose.
/
Rightlooper f > \ /
th read - j
Left looper------------ ¿leedle
thread thread
Topside .
Underside
Turn right looper dial (orange
color) toward the plus sign (+).
Or, turn the left looper dial
(yellow) toward the Minus
sign (-).
Turn left looper dial (yellow)
toward the plus sign (+).
Or, turn the right looper dial
(orange) toward the minus
sign (—).
The feed regulator dial on this machine is pre-set to
Feed
Regulator
dial
3mm for normal sewing condition. Since the adjust
ment can be made easily, adjust the stitch length to
4mm when sewing heavy weight fabrics such as
quilting and to 2mm when sewing light weight
fabrics such as lining fabric, crepe, etc. and you will
obtain excellent seams without puckerings.
Turn the needle thread tension
dial (green) toward the plus
sign (+).
Or, turn both right and left
looper dials (orange and
yellow) toward the minus sign
(-).
10
Page 13

(Throat plate available at additional cost)
1. Fabric, needle and thread
Fabric; Light to medium weight (See page 17)
• Rolled hemming is done by rolling the fabric and overedging (seam width 1.5mm), and is not
suited for heavy or stiff fabrics.
Needle: Singer Cat. No. 2054 (#10), #14.
Thread: A variety of thread combinations can be used for rolled hemming.
2. How to exchange throat plate
o
A throat plate for rolled hem stitching is available
at additional cost. By exchanging the ordinary
overedge throat plate on the machine with a
rolled hemming throat plate by the following
procedure, the machine can be used for rolled hem
stitching.
o
nr
o
Rolled hemming
throat plate
1. First of all, always disconnect the power line plug from
the receptacle.
2. Turn the hand wheel towards you until the needle is at
its highest point.
3. Lift the Presser foot.
4. Remove the cylinder cover, (see page 4).
5. Unscrew the throat plate screw (1) and remove the
throat plate.
6. Install the ordinary overedge throat plate and replace
the screw (1).
7. Replace the cylinder cover (See paged).
Ordinary overedge
throat plate
be ~ c : I ' - '
11
Page 14

3. How to adjust thread tension
1. Standard rolled hem stitching
Set each dial to the standard settings shown in the table for correct tension. For adjustments refer to
page 9, Item 5. How To Adjust Thread Tension.
Thread Tension!
^0/
Stitching
Needle Thread
123456789
123456789
Right
Looper Thread
123456789
Standard
Rolled hem
Rolled hem
Variation
2. Right looper thread wrapped rolled hem stitching (rolled hem variation)
® Correct thread tension
Right looper
(orange dial)
For light and medium weight fabrics which are difficult
Needle thread
(green dial)
Topside
\ \
Left looper thread
(yellow dial)
Underside
to roll, a fine seam can be obtained by this stitching.
Left
Looper Thread
To correctly adjust the thread tension, first set the dials to the standard settings shown in the above
chart and adjust to proper tension. Next set the dials as follows from the above standard thread tension
dial settings.
a. Turn the right looper thread tension dial (orange) towards the minus (—) sign half settings.
b. Turn the left looper thread tension dial (yellow) towards plus (+) sign 2 — 3 settings.
When the right looper
thread is too loose
1
Needle thread
Right looper^
thread
Topside
Turn right looper thread tension
dial (orange) towards the plus
(+) sign.
\ \
Left looper
thread
Underside
When the left looper
thread is too loose
/
Needle thread
Right looper -
thread
\
Topside //
Turn left looper thread tension
dial (yellow) towards the plus
(+) sign.
Or, turn right looper thread ten
sion dial (orange) towards the
minus (—) sign.
Left looper
thread
Underside
When the needle thread
is too loose
Right looper
thread
Topside
Underside
Turn needle thread dial (green)
towards the plus (+) sign.
Or, turn both right and left
looper dials (orange and yellow)
towards the minus (—) sign.
\
Left looper
thread \
\
Needle thread
12
Page 15

4. How to sew and cautions
1. Stitch length adjustment (See page 10)
For rolled hemming, set the feed regulator dial to “2” or “F” and a fine seam can be obtained.
2. Sewing
• See page 8, “4. Chain off and test sewing”.
• For rolled hemming, if a slight tension is applied to the material in the sewing direction, a finer seam
finish can be obtained.
• At the start of sewing, slightly pull the end of the chain off so it will not be entangled in the stitch.
• The overedge stitch width for rolled hemming is approximately 1.5mm and cannot be adjusted,
Inthis case, note that the fabric cut width is 3.5mm (adjusted at shipment).
8. Free arm seeving fTyblar work!
This is a free arm machine and is suited for tubular
work.
This is especially convenient for finishing hard-toreach areas such as arm holes and overcasting
cuffs.
Slip tubular work onto the free arm and sew.
Use margin lines on looper cover.
Thick line on extreme right is 5/8 inch from center
of needle.
13
Page 16

10, Homi to replace needle
Needle set
screw
Use Singer needle Cat. No. 2054 Available in
sizes (#10), #14.
To remove the needle:
Replace
\
Remove
Flat surface to the rear
• Be sure the power line plug is disconnected
from the wall receptacle.
• Turn the machine pulley toward you until
the needle is at its highest position. Loosen
the needle set screw with a coin and remove
needle.
To replace the needle:
• Insert the needle into the needle bar hole as
far as it will go with flat surface to the rear
and securely tighten the needle set screw.
11, How to replace kriices
The stationary knife should be changed when it becomes dull.
(1) Be sure that the power line plug is disconnected from the wall receptacle.
(2) Open the looper cover and set the movable knife in the non-operating position.
(3) Loosen the stationary knife set screw and remove the stationary knife.
J
Movable
knife
holder
Push the movable knife holder to the
right as far as it will go and turn the knob
in the direction shown.
14
As shown above, the movable knife
will be in a non-operating position.
Page 17

(4) Place a new stationary knife in the groove of the stationary knife holder, align the cutting edge level with
the top surface of the throat plat and tighten set screw.
(5) Return the movable knife to its original position.
Same height
Stationary
knife set
screw
Stationary knife
12. Acijustfiierit of presser foot pressore
Pressure regulating thumb screw
Less pressure
More pressure
The presser foot pressure of this machine is
preadjusted at the factory to suit the sewing of
medium weight fabrics.
It may become necessary to adjust the pressure
in the case of delicate or heavy weight fabric.
For light weight fabric
(as shown at left).
Heavy weight fabric (as shown at left).
Decrease the pressure
Increase the pressure
15
Page 18

Whenever sewing difficulty is encoutered, make the adjustments as noted below.
Condition
When the fabric is not fed.
When the needle breaks.
» Insufficient presser foot pressure.
® Needle not inserted properly.
Reason
* Fabric being pulled too hard.
® Loose needle set screw.
When the thread breaks. ® Incorrect threading.
® Bent needle or needle point
damaged.
® Thread tension too tight.
® Thread tangled.
® Needle inserted incorrectly.
When stitches skip.
® Needle bent or needle point
damaged.
® Needle set loosely.
Method of Adjustments
(reference pages)
® Increase presser foot pressure
(page 15).
® Insert needle correctly or replace
with correct needle (page 14).
® Do not pull the fabric by hand.
Use hand only to guide the fabric.
® Tighten screw firmly.
® Thread machine correctly
(page 5).
® Change to correct needle
(page 14).
® Adjust tension (page 9).
® Thread correctly (page 5).
® Insert needle correctly (page 14).
® Replace with correct needle
(page 14).
® Set needle firmly in position
(page 14).
When stitches are
irregular.
When fabric puckers
When the machine does
not operate.
When motor is excessively
noisy or when sparking is
excessive.
® Incorrect threading.
® Thread machine correctly
(page 5).
® Wrong needle used.
® Insufficient presser foot
pressure.
® Thread tension not balanced.
® Thread tension too tight.
® Threading incorrect or tangled.
® Power line plug not connected.
® Motor damaged.
® Controller damaged.
® Use Singer Cat. 2054 #14.
® Increase presser foot pressure
(page 15).
® Adjust tensions (page 9).
® Adjust tension (page 9).
® Thread correctly (page 5).
® Connect with power source.
® Change carbon brush.*
® Have your Singer representative
repair and service the controller.
® Motor damaged. ® Change carbon brush.*
* Have your Singer representative
replace the carbon brush.
16
Page 19

eloth, thread and needle
Type of Fabric
Lightweight
Lawn, Organdy,
Voil, Crepe, etc.
Medium Weight
Muslin, Sheersucker,
Satin, Gabardine
Broadcloth, etc.
Heavy Weight
Oxford, Denim
Tweed, Corduroy
Serge
Type of Thread
Cotton #100
Silk #100
Spun #80 - #90
Tetron #80 — #100
Cotton #60 — #80
Silk #50
Spun #60 — #80
Tetron #60 — #80
Cotton #40 — #60
Silk #40 - #60
Spun #60 — #80
Needle
Singer Cat. No. 2054
(#10) #14
#14
#14
Knit
Tricot
Jersey
Wool (woven, knit)
Tetron #50 — #80
Spun #80 - #90
Tetron #60 — #80
Spun #60 “ #80
Tetron #60 — #80
Cotton #60 — #80
Spun #60 -- #80
Tetron #50 — #60
Wooley nylon
Wooley tetron
(#10) #14
#14
#14
17
Page 20

15„ Accessories
1. Needle set
2. Tweezers
16= Specification of the 14U32A machine
Item Specification
Sewing speed 1,300 spm maximum
Stitch length (feed amount)
Overedge stitch width
Needle bar stroke
Presser foot rise
Needle Singer Cat. No. 2054 (#10) #14
Number of threads
Machine dimensions
Weight
1 ~ 5 mm
3.5 mm
25 mm
5 mm
3
width 257 mm x depth 231mm x height 313 mm
5.0 kg
18
Page 21

6L
01AI31M
Page 22

MEMO
20
Page 23

Page 24

Form U3864 (788)
Part No. 379210-002
Printed in Japan
 Loading...