

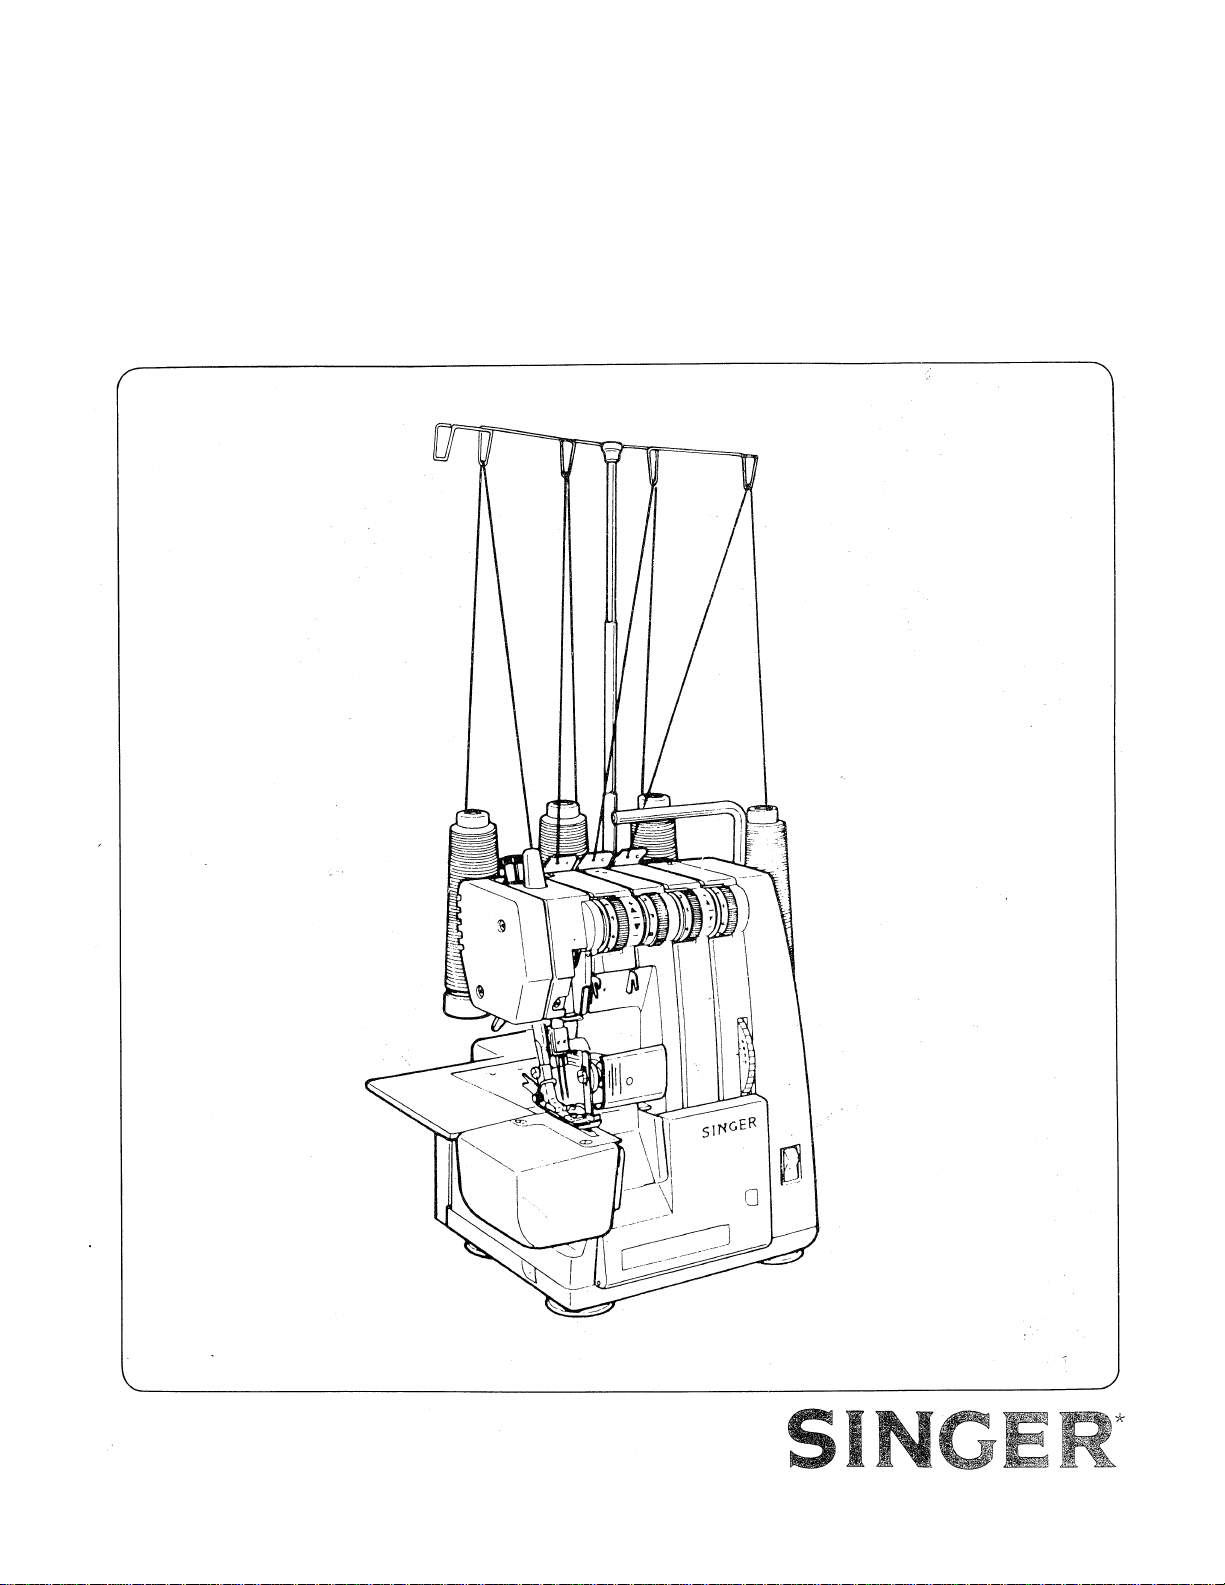
SINGER 14U236B User Manual
14
U286B/236B
Operator’s
Guide

14U286B/236B
PREFACE
Thank you for your purchase of this sewing machine.
This machine will provide you with excellent performance in sewing from light to heavy material (lawn to
denim). Please refer to this booklet for proper use and optimum service.
To get the most out of your sewing machine, read the entire operator’s manual before attempting to
operate the machine. Then familiarize yourself with the machine by following the operator’s manual page
by page.
Safety Cautions:
® Be sure that the electrical voltage of the socket outlet (wall receptacle) is the same as the rated
voltage of the motor.
• Disconnect the power-line plug from the socket outlet when changing needles, presser foot or
throat plate, or when leaving the machine unattended. This eliminates the possibility of start
ing the machine by accidentally pressing the speed controller.
Do not pull the fabric while you are stitching as this may deflect the needle, causing it to break.
Before cleaning your machine, disconnect the power-line plug from the socket outlet.
Do not attempt to adjust the motor belt. Contact your nearest Service Center should any
adjustment be required.
Handle the foot controller with care and avoid dropping it on the floor. Be sure not to place
anything on top of it.
When sewing closely watch the area being sewn to avoid injuries from needles and knives.
Use only the handle to lift and move the machine.
To ensure that you are always provided with the most modern sewing capabilities, the manufacturer
reserves the right to change the appearance, design or accessories of this sewing machine when considered
necessary without notification or obligation.
■k A Trademark of THE SINGER COMPANY
Copyright ©1990 SINGER SEWING MACHINE COMPANY
All Rights Reserved Throughout The World

CONTENTS
Selection of stitches.................................................................................................................... 2
Handy reference chart............................................................................................................... 4
Principal parts..............................................................................................................................5
Preparation for sewing.................................................................................................................6
Preparation for threading.......................................................................................................... 7
Page
Setting up the thread guide holder
How to insert the needles...............................................................
......................................................................................
.....................................
How to open looper cover.................................................................................................. 8
How to remove cylinder cover.............................................................................................8
How to thread the machine................................................................................................. 8
How to change threads.........................................................................................................9
Chain off and test sew....................................................................................................... 9
6.
How to sew two-thread overlock and overedge.........................................................................10
How to sew three-thread standard overlock, flatlock and wrapped edge overlock
7.
8.
How to sew three-thread ultra-stretch mock safety stitch..........................................................19
How to sew four-thread ultra-stretch mock safety stitch
9.
10.
How to adjust stitch length
How to adjust overedge seam width
11.
12.
How to do rolled hemming.........................................................................................................22
13.
Differential feed..........................................................................................................................25
.............
.......................................................................................... 21
..........................................................................................
..........................................................
.................
• Gathered overedge...............................................................................................................25
• Stretch overedge..................................................................................................................26
14.
Free arm sewing (tubular work).................................................................................................27
15.
Seam guide lines........................................................................................................................ 27
16.
Edge guide..................................................................................................................................27
17.
Three-thread flatlock stitch.........................................................................................................28
18.
Two-thread flatlock stitch...........................................................................................................28
19.
Two or three-thread blindstitching............................................................................................. 29
Braiding by chaining-off........................................................................................................... 29
20.
Two or three-thread pin tucking................................................................................................30
21.
Reinforced (tapes) overedge stitching .....................................................................................30
22.
Applying elastic......................................................................................................................... 31
23.
Turning square corners...............................................................................................................32
24.
How to replace stationary knife.................................................................................................33
25.
How to exchange light bulb...................................................................................................... 33
26.
How to adjust presser foot pressure........................................................................................... 33
27.
Lubrication................................................................................................................................34
28.
Reasons for poor stitches and how to make adjustment............................................................35
29.
Relationship between cloth, thread and needle......................................................................... 36
30.
Accessories.................................................................................................................................37
31.
Specification.............................................................................................................................. 37
32.
7
7
15
20
21
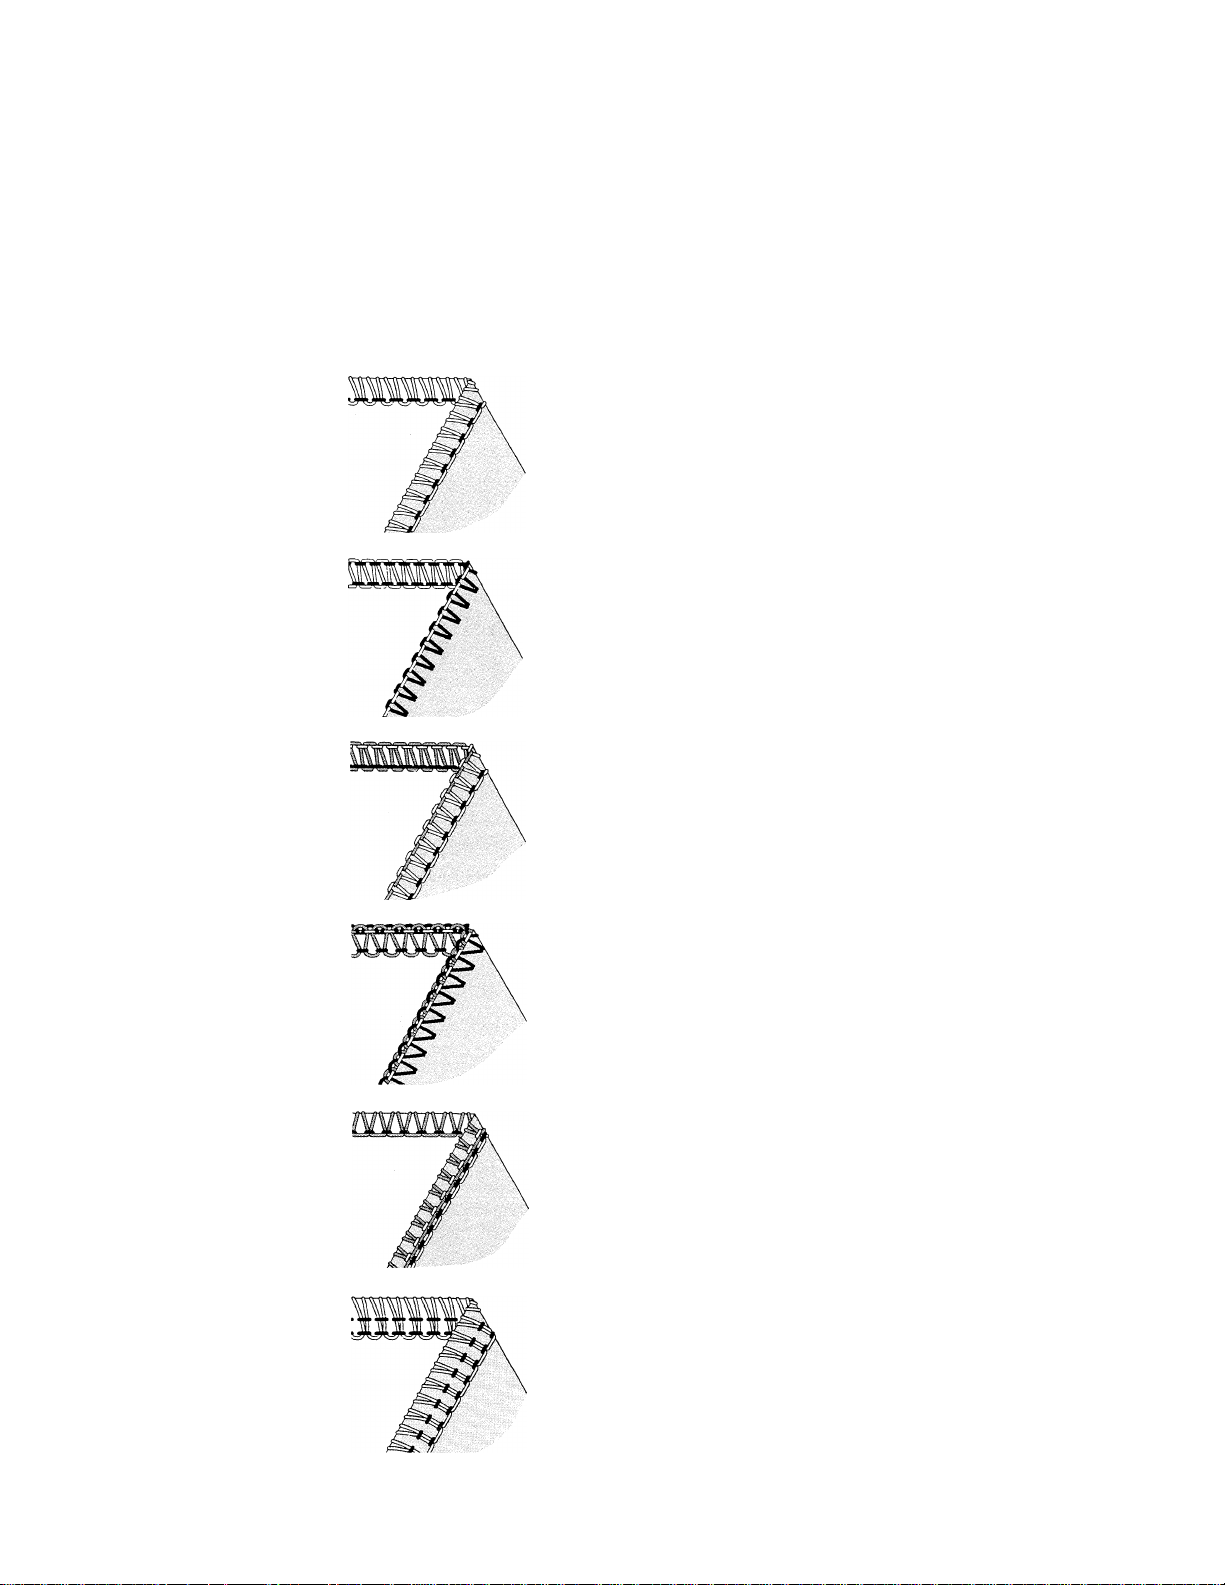
1. Selection of stitches
This machine is capable of producing various types of stitches according to the combination of needle
positions, threading methods, tension adjustment and the use of convertible right looper/spreader.
Stitch Type
(D Two-Thread
Wrapped Edge
Over lock
(2) Two-Thread
Overedge
Three-Thread
Overlock
1-needle 2-thread stitch is used for
seaming lightweight or stretch fabrics.
Also ideal for roiled hemming. Also,
a 3.5mm and 5.7mm overlock seam
width can be obtained by changing the
needle position.*
1-needle 2-thread stitch is used for
overedging common fabrics. It is also
ideal for flatlock (butted or lapped)
seams and blind hemming. Also, a
3.5mm and 5.7mm overedge seam
width can be obtained by changing the
needle position.*
1 -needle 3-thread stitch is used for
overedging and seaming on common
fabrics. Also, a 3.5mm and 5.7mm
overlook seam width can be obtained
by changing the needle position.*
Reference
Pages
10
11
12
13
10
11
12
14
15
16
(4) Three-Thread
Flatlock
(5) Three-Thread
Wrapped Edge
Over lock
(D Three-Thread
Ultra-Stretch
Mock
Safety Stitch
1-needle 3-thread stitch is used for
butted or lapped seams and ornamental
stitching with decorative thread. Also,
a 3.5mm and 5.7mm flatlock width
can be obtained by changing the needle
position.*
1-needle 3-thread stitch is used for
sewing narrow rolled hems or
ornamental edges. Also, a 3.5mm and
5.7mm wrapped overlock seam width
can be obtained by changing the needle
position.*
2-needle 3-thread stitch which is
Ideal for lightweight, extremely
stretchy fabrics such as tricot and
spandex.
15
17
15
18
19
Stitch Type
Reference
Pages
(7) Four-Thread
Ultra-Stretch
Mock
Safety Stitch
^Depending on the needle position used, this machine can sew 2-thread and 3-thread standard width 3.5mm overedge
and a 5.7mm wide overedge seams.
JlJIJO 2-needle 4-thread stitch which is
ideal for medium to heavy weight
\ stretchy fabrics such as double knits
\ and swim wear.
20
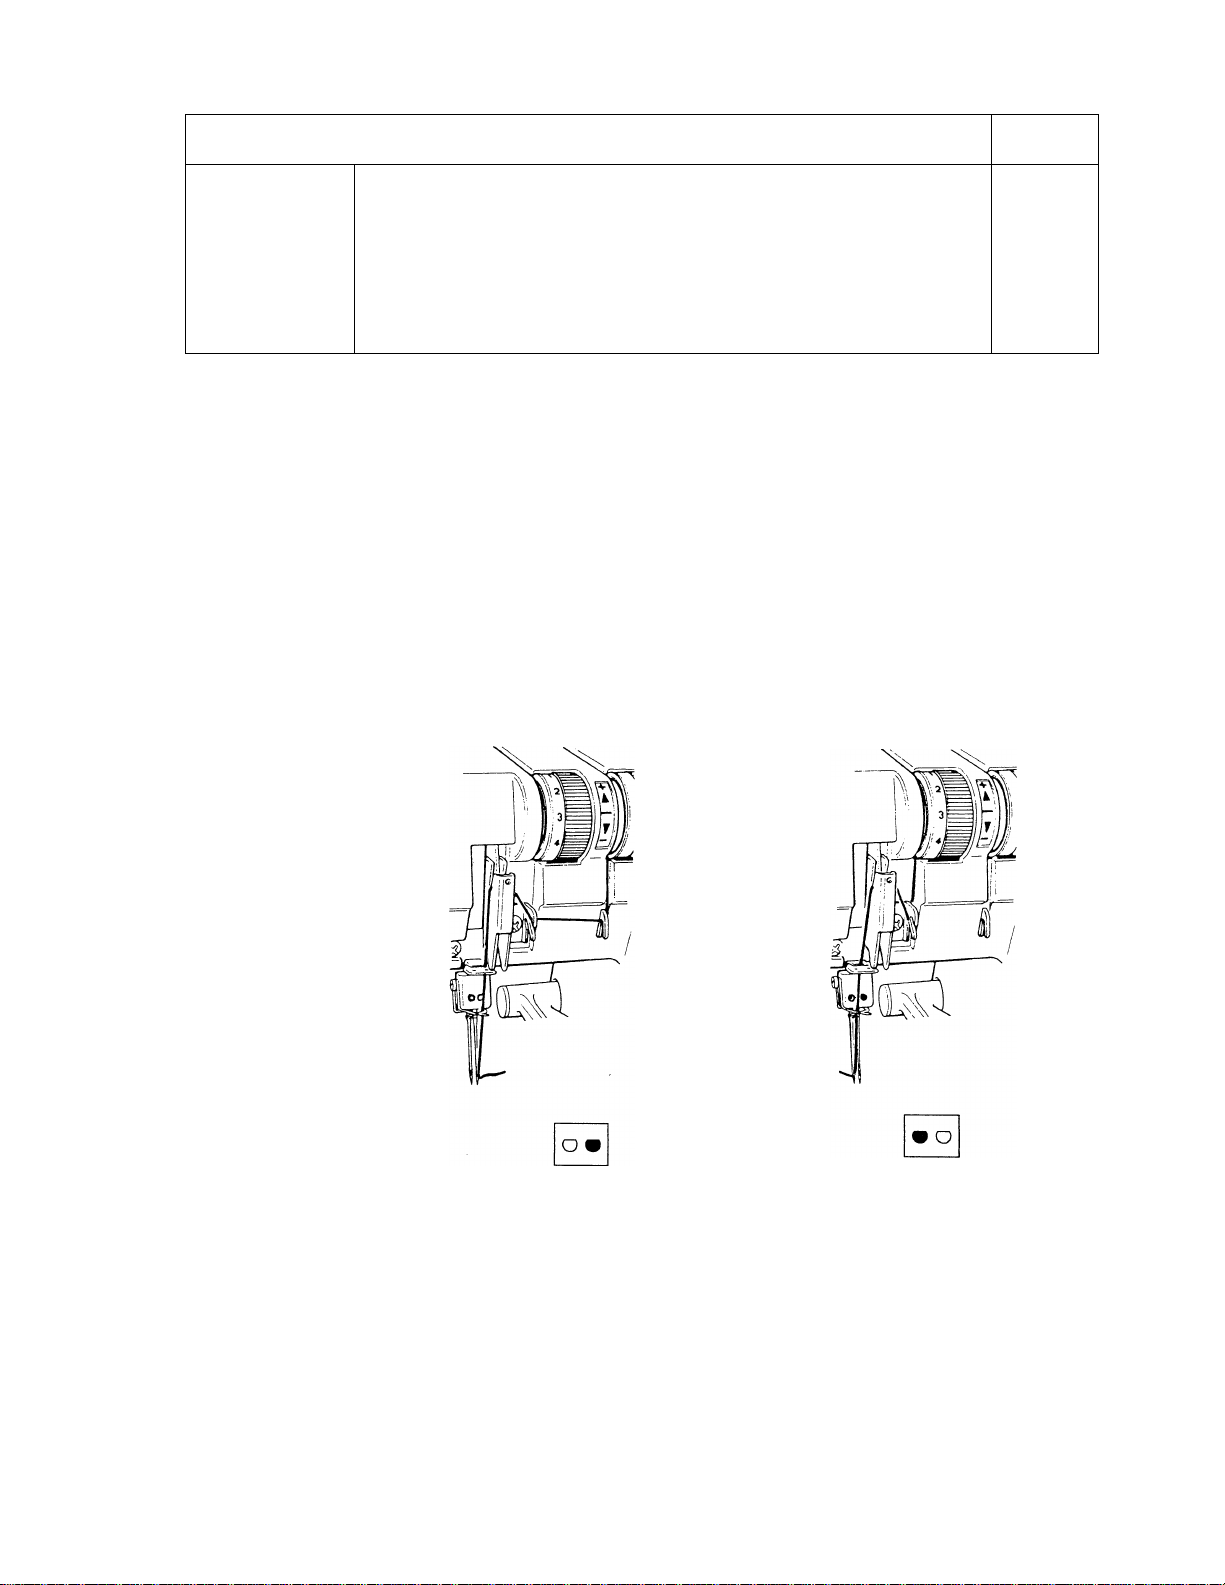
Also, for overedging heavyweight fabrics, the seam width can be increased still more by adjusting the
position of stationary knife holder. (See page 21)
Overedge width
Needle used
Needle thread
tension dial
3.5mm
Right needle
Green
5.7mm
Left needle
Blue
Threading
Stitch Type

2. Handy reference chart
Stitch Type
Needle
Positions
Tension Dial: Numbers shown are average
settings on medium weight fabric with
standard #80 Polyester thread
Blue Green
Orange Yellow
Right Looper or
Spreader
(T) Two-Thread
Wrapped Edge
Over lock
Two-Thread
Overedge
Three-Thread
Overlock
(4) Three-Thread
Flatlock
3.5mm
5.7mm
3.5mm
5.7mm
3.5mm
5.7mm
3.5mm
5.7mm
O
O
6.0
O
O
1.5
O
O
5.0
O
O
1.0 3.0
5.5
1.0
3.5
1.0
1.5
1.0
3.5
2.0
1.0
4.5
3.5
2.5
1.5
6.0
6.5
Spreader
Spreader
Spreader
Spreader
Looper
Looper
Looper
Looper
Three-Thread
Wrapped Edge
Overlock
Three-Thread
Ultra-Stretch
Mock
Safety Stitch
(7) Four-Thread
Ultra-Stretch
Mock
Safety Stitch
3.5mm
5.7mm
O
O
8.0
5.0
5.0
4.0 0.5
1.5
1.5
1.0
8.0
8.5
1.0
2.0 Looper
Looper
Looper
Spreader
The thread tensions become tighter as the dials are turned to higher numbers. This is indicated through
out the manual. (+) symbol means tighter tension or higher number and (—) means looser tension or
lower number. The tension settings shown on this page as well as throughout the operator’s manual
are suggested guides. Adjust thread tensions to suit the fabric and size of thread used. For best results
make tension adjustments in small increments of no greater than half a number at a time.
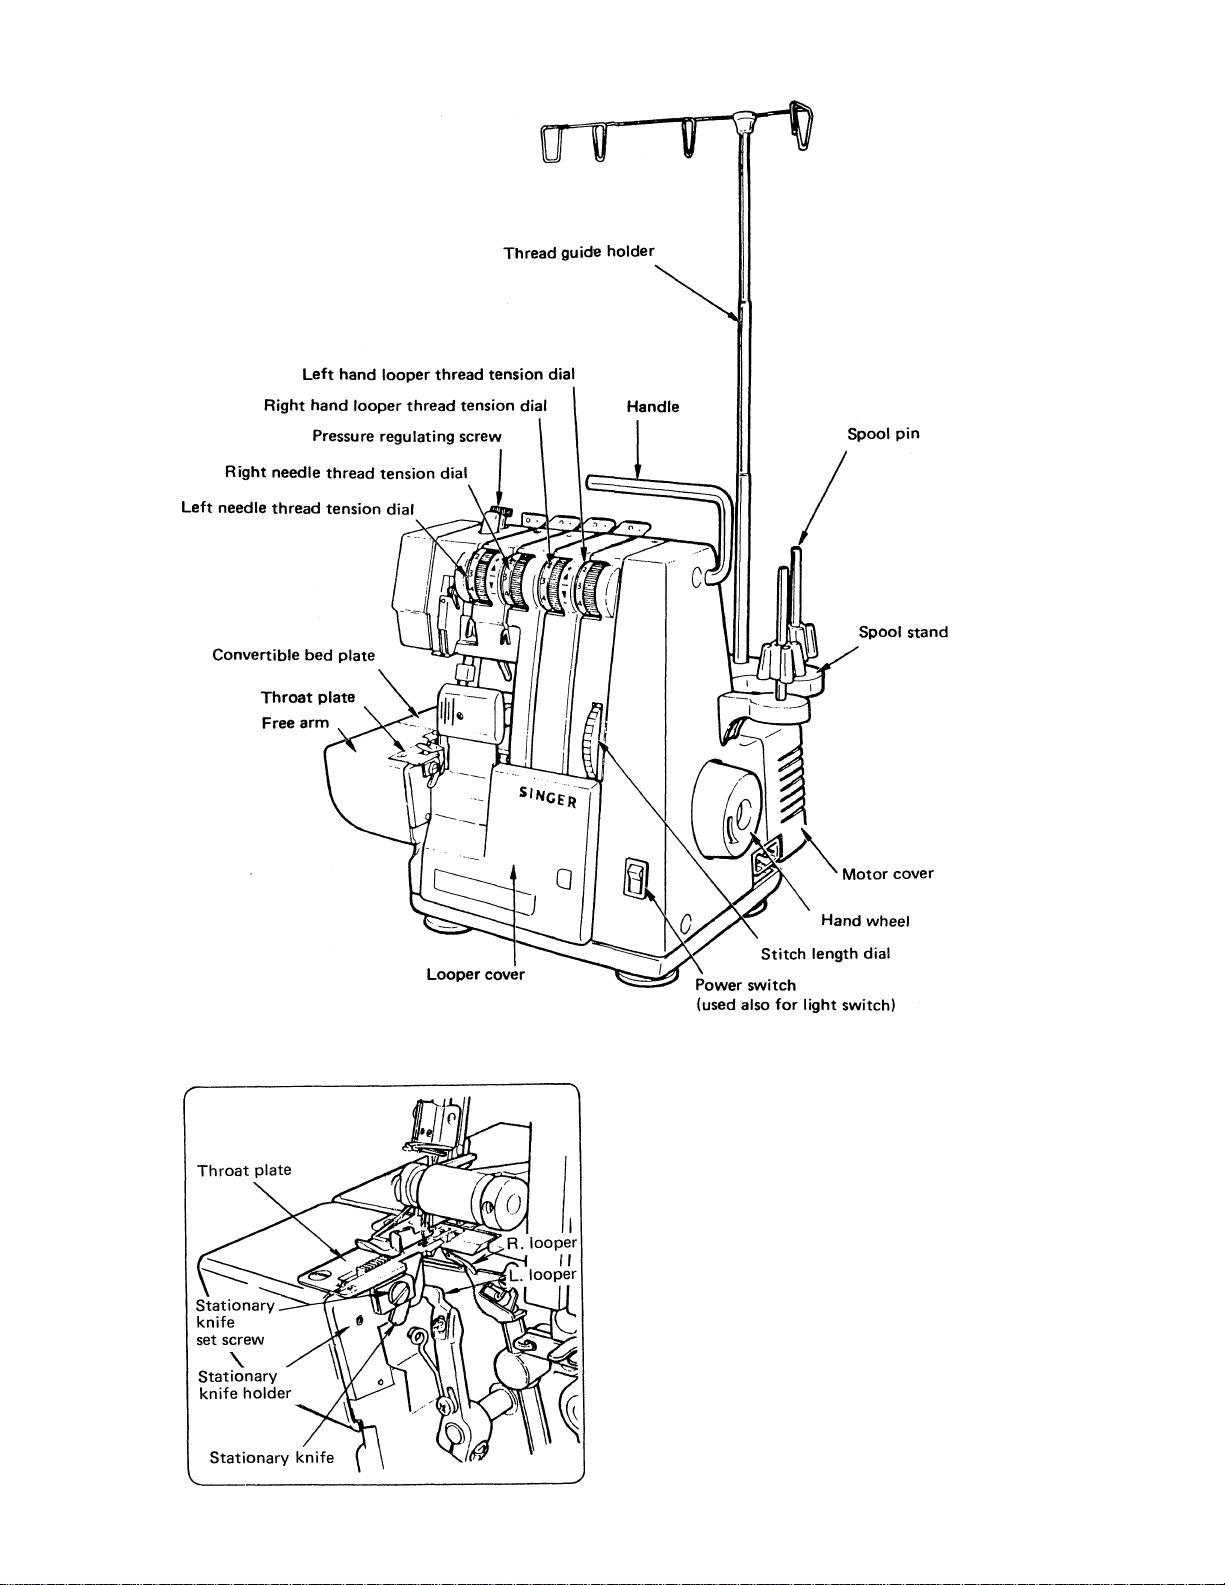
3. Principal parts
• Machine with looper cover opened
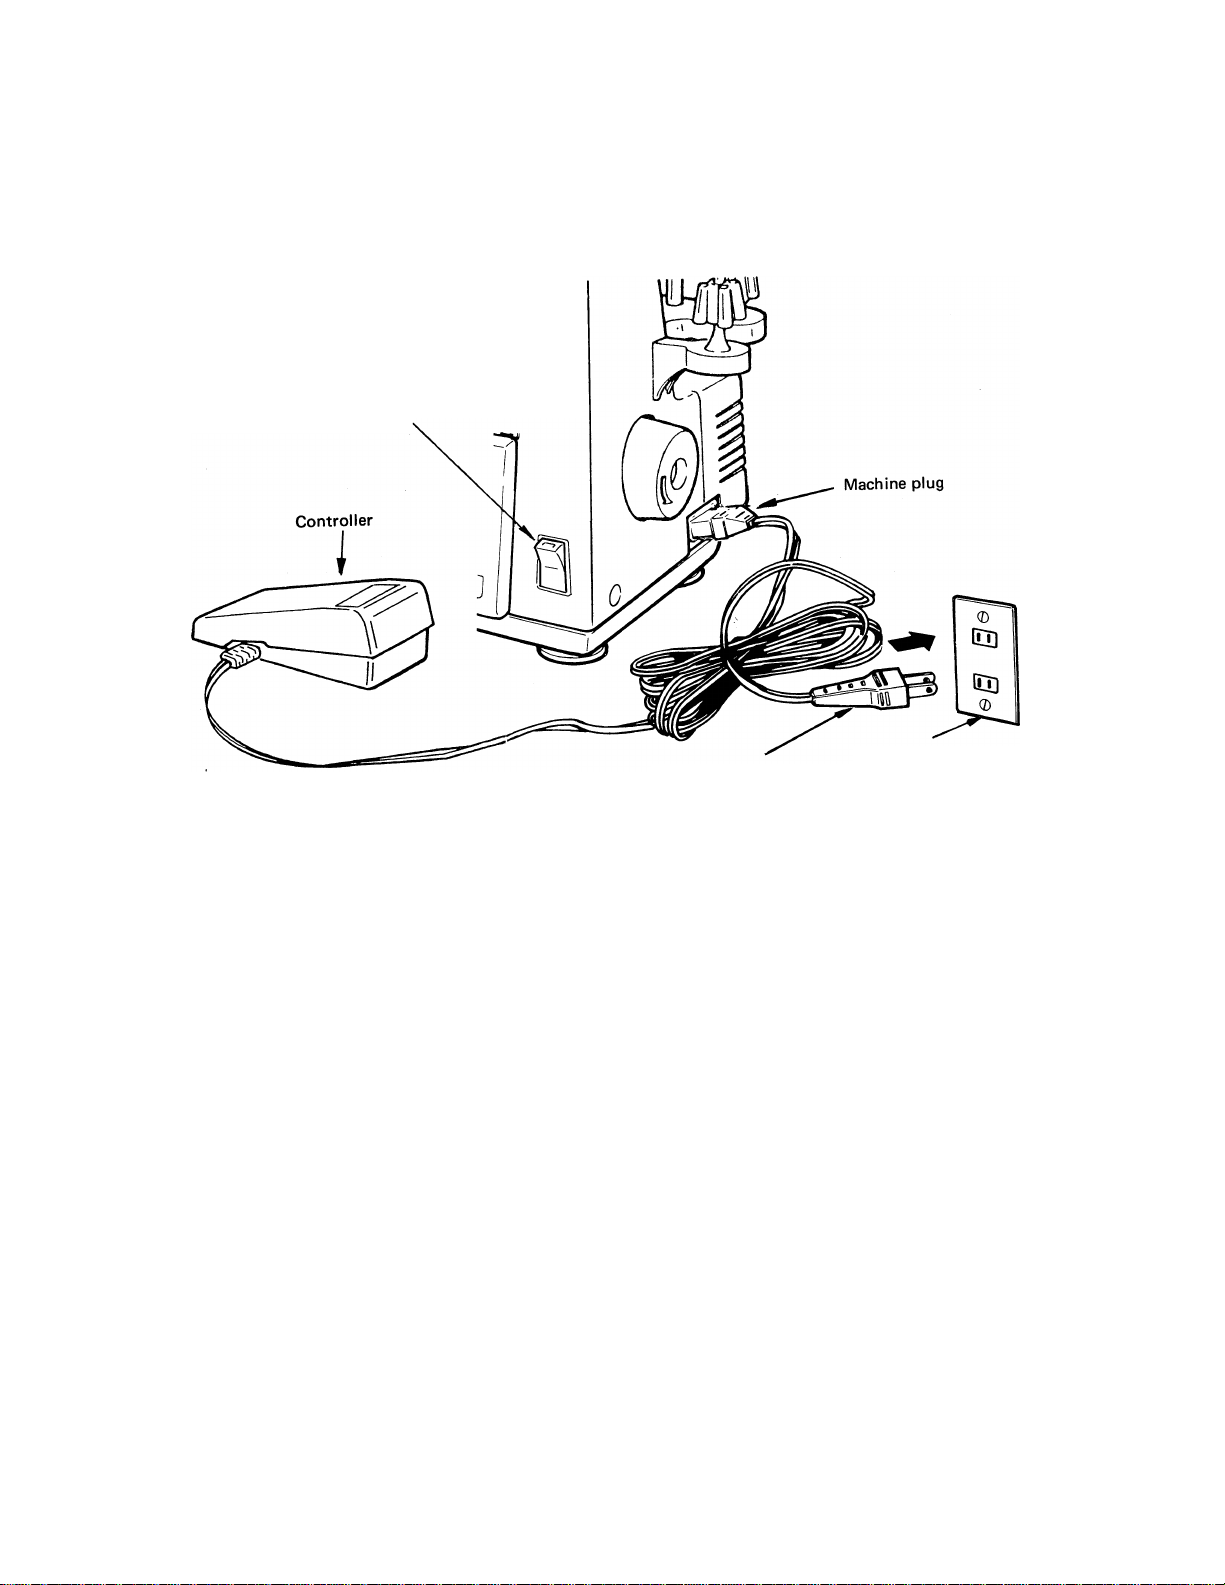
4. Preparation for sewing
Connect the machine plug to the electrical receptacle of your machine and the power line plug to the wall
receptacle.
For 220/240V
Power switch Power switch
(used also for light switch) (used also for light switch)
Push upper side ("I" mark) When the switch is ON,
to turn “ON''. the red mark on the knob
Push lower side (“O" mark) is visible
to turn ''OFF..
For 120 V
Power line plug
Wall receptacle
To run the machine and control the speed, press the speed controller. The harder you press, the faster the
machine will sew. To stop the machine from sewing, remove your foot from the speed controller.
Caution:
• Be sure that the electrical voltage of the socket outlet (wall receptacle) is the same as the rated voltage
of the motor.
• Handle the foot controller with care and avoid dropping it on the floor. Be sure not to place anything
on top of it when not in use.
• Disconnect the power-line plug from the socket outlet when changing needles, presser feet or throat
plates, or when leaving the machine unattended. This eliminates the possibility of starting the machine
by accidentally pressing the speed controller.
• Before cleaning your machine, disconnect the power-line plug from the socket outlet.
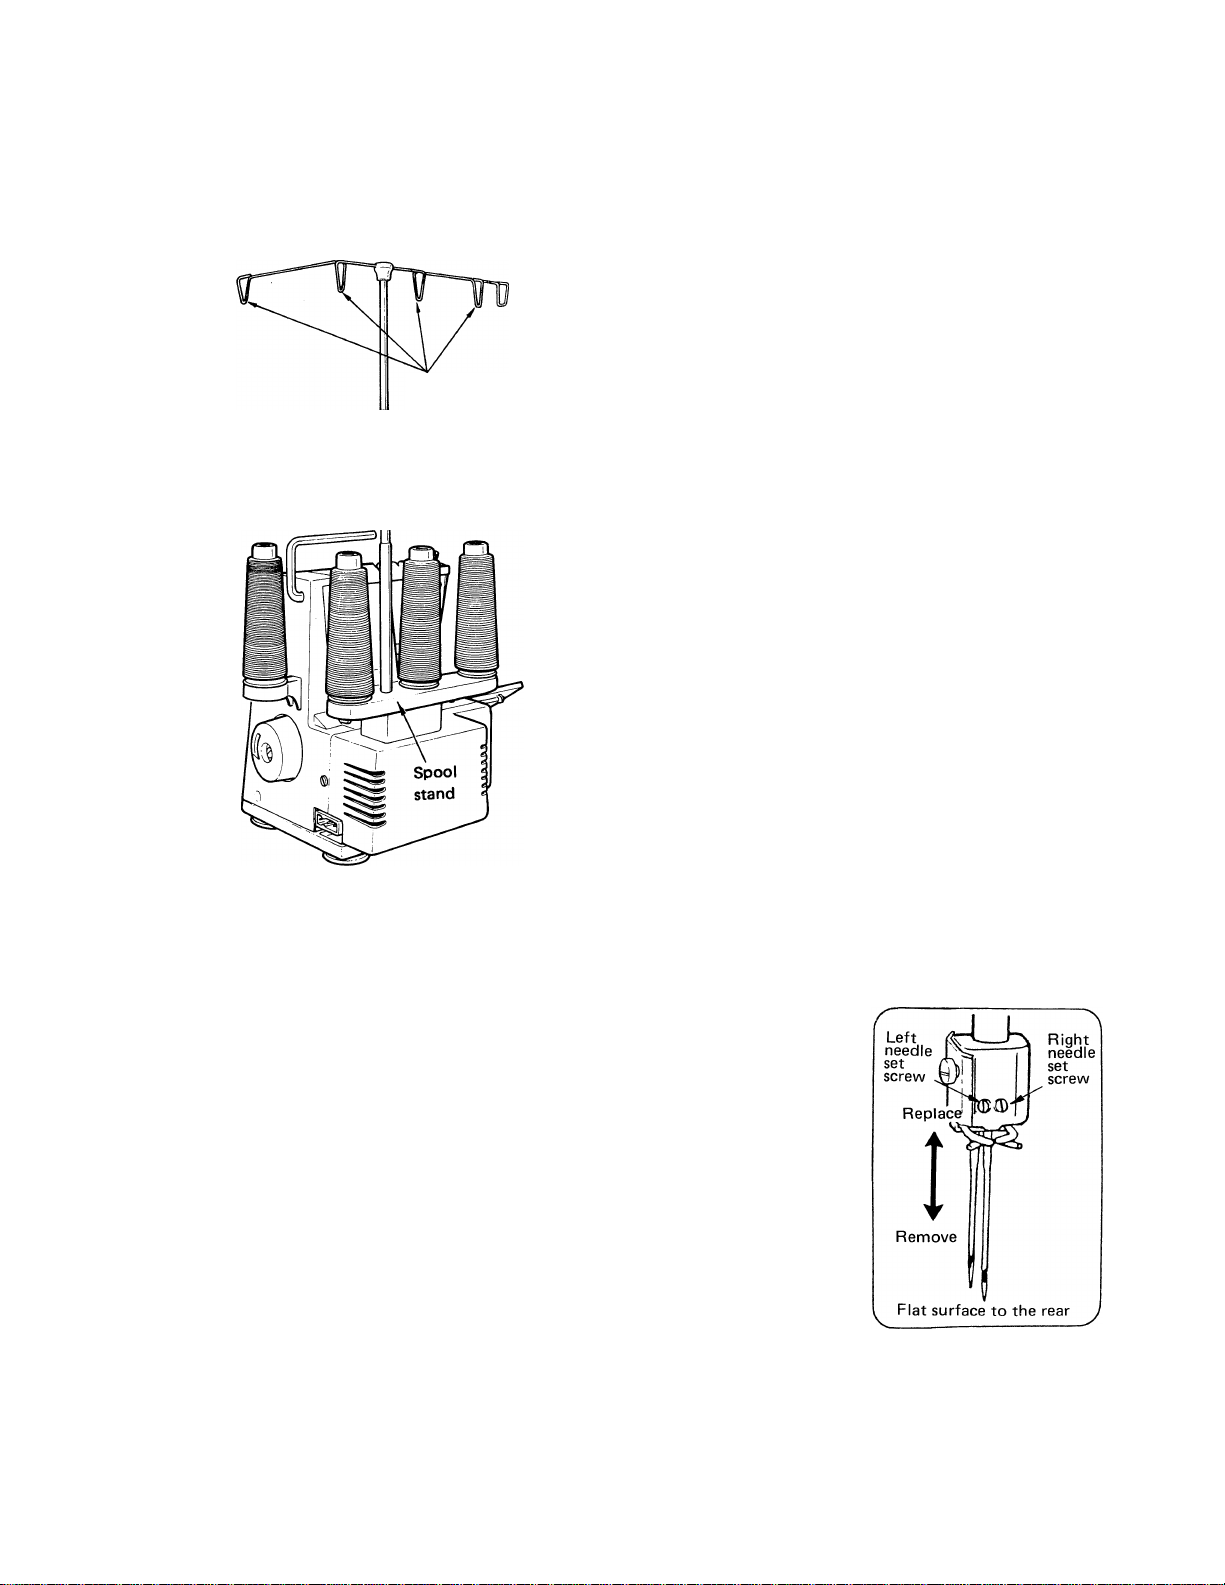
5. Preparation for threading
• Setting up the thread guide holder
Thread guide
Extend the thread guide holder as far as possible
and set the thread guides so that they are located
right above the spool pins.
Thread guide
holder
• How to insert the needles
Place the thread on the spool stand as shown
above.
Use Singer needles Cat. No. 2054 available in sizes #14 and #10
To remove the needles:
• Be sure the power line plug is disconnected from the wall receptacle.
• Turn the hand wheel toward you until the needle is at its highest
position. Loosen the needle set screw with a screwdriver and remove
needles.
To replace the needle:
• Insert the needles into the needle bar hole as far as they will go with
flat surface to the rear and securely tighten the needle set screw.
Note: When both the left and right needles are inserted, the left needle will be slightly higher than
the right.
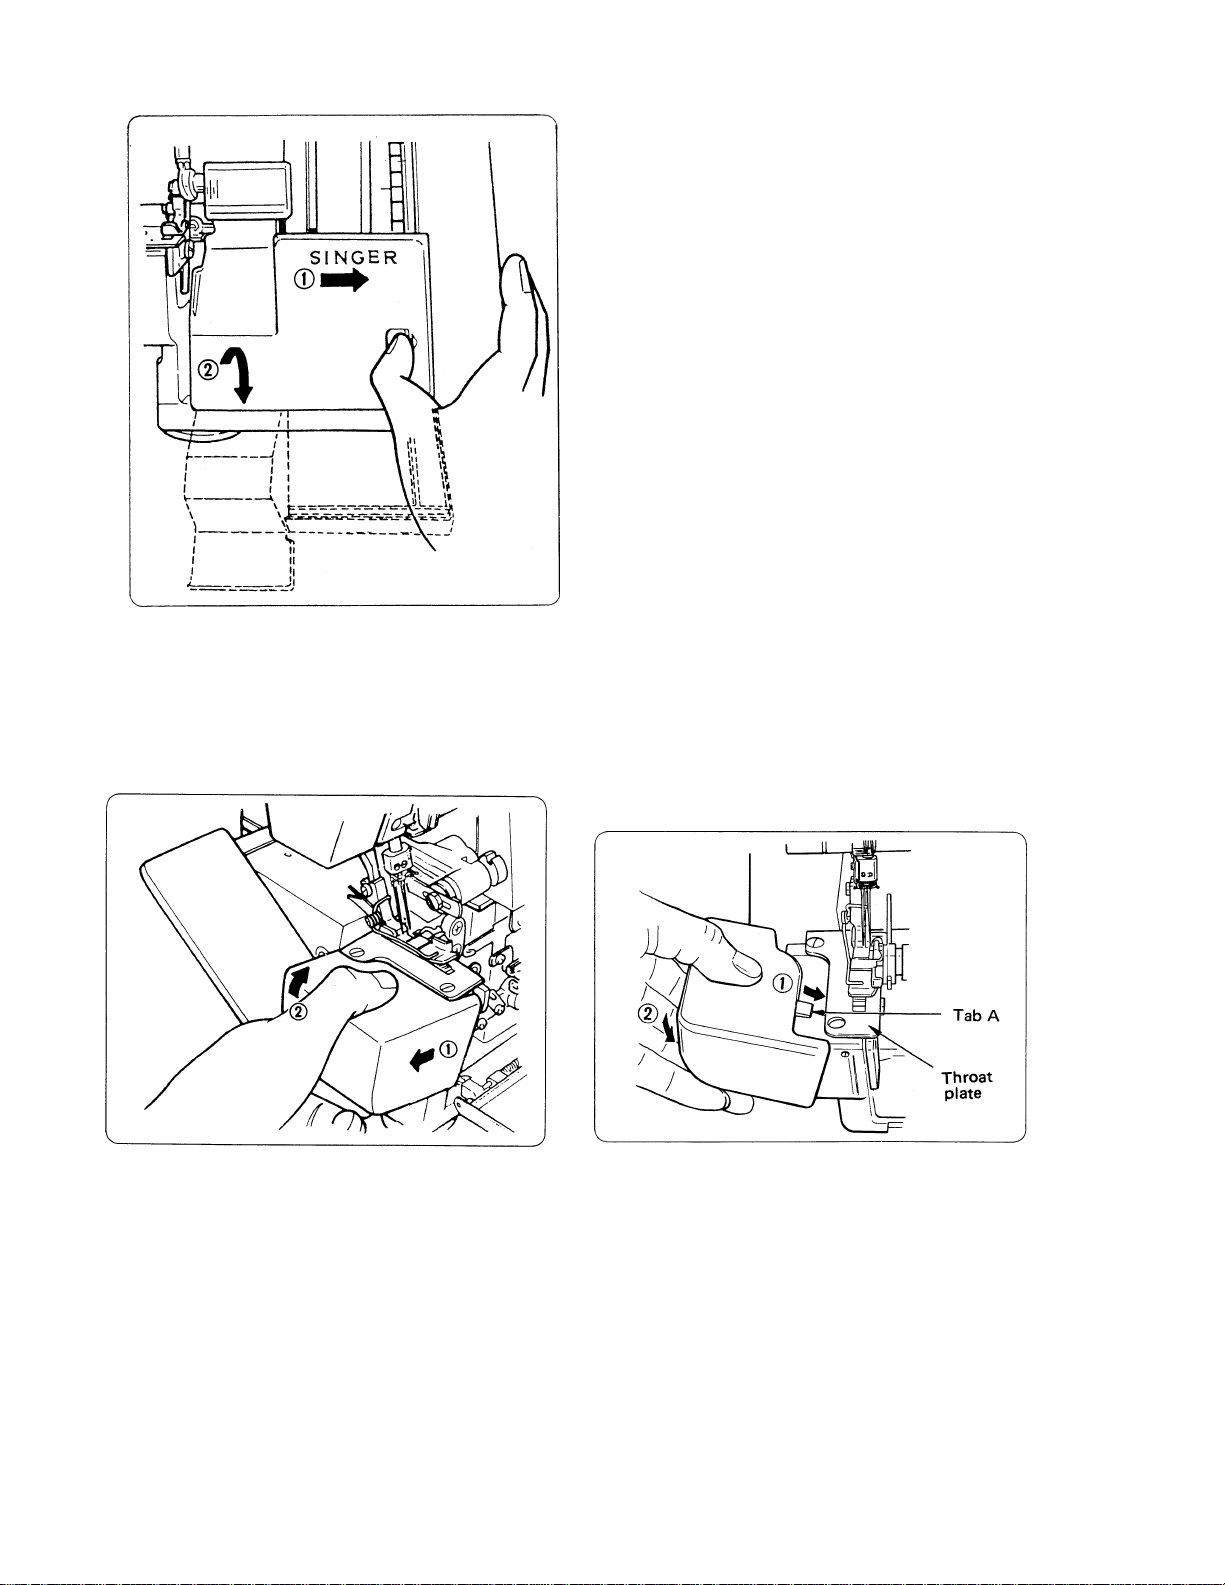
• How to open looper cover
0 Push the cover to the right as
far as it will go and
(2) Pull cover down toward you.
Be sure looper cover is closed when sewing.
• How to remove cylinder cover
(D While pulling the cylinder cover to the left,
(2) Lift cover upward and off the machine.
To replace cover
0 Place tab A under the throat plate.
(2) Press cover downward to the right.
* Do not hold the cylinder cover when lifting or carrying the machine.
• How to thread the machine
To thread the machine correctly, simply follow the steps on the following pages making reference to the
threading chart on the inner side of the looper cover showing the threading paths in different colors.
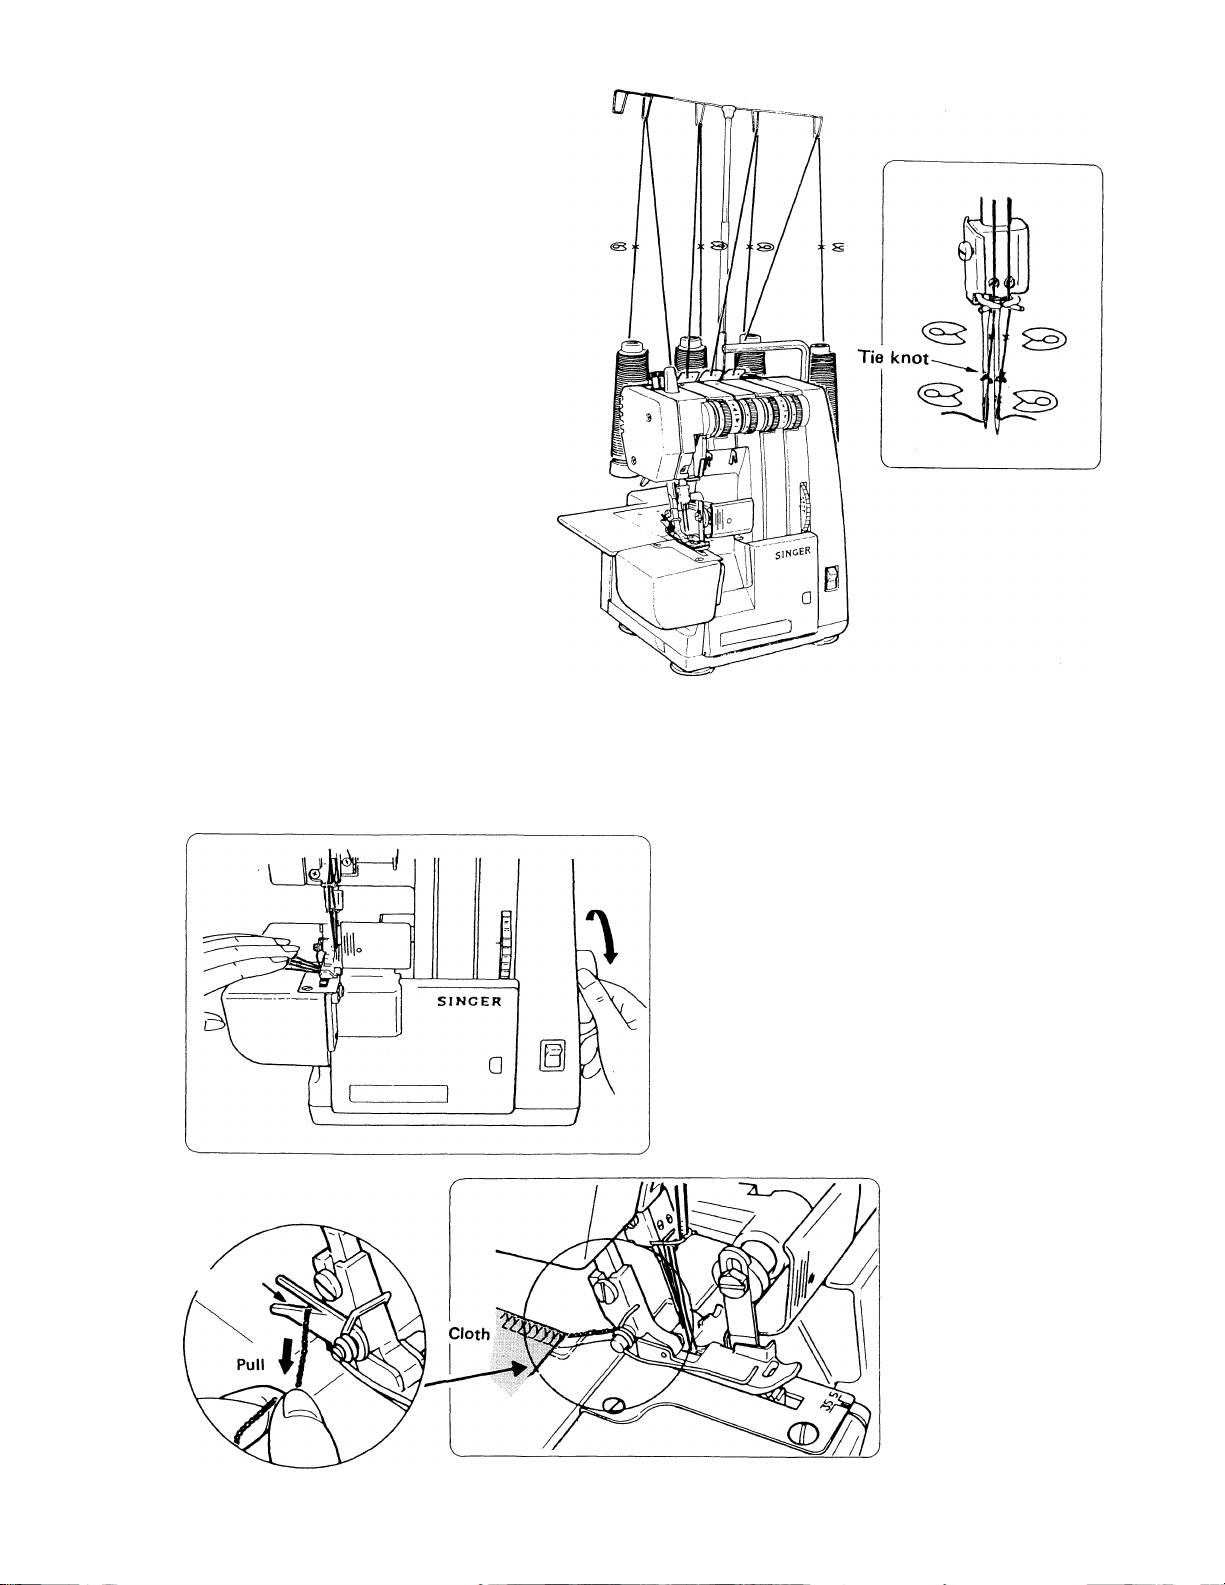
• How to change threads
When you wish to change the left needle
thread, right needle thread, left looper
thread or right looper thread with a different
thread, the following steps will make the
changing convenient.
(1) Cut the thread near the spool and tie
the end to the thread you wish to
change to as shown in figure at right.
(2) Raise presser foot.
(3) Note tension reference numbers.
(4) Turn the tension dials down toward the
(—) mark until the dial stops and draw
the thread out so that the tie knot of
the threads extend about 5 cm (2
inches) from the presser foot. When
drawing needle thread through the
needle eye, stop the tie knot before the
needle eye, cut the thread and pass it
through the needle eye.
(5) Return tension dials to reference num
bers.
• Chain off and test sew
Thread cutter
When the machine is completely threaded,
turn the hand wheel toward you 2 or 3 turns
while holding the 4 threads applying a slight
tension as shown in figure at left.
After chaining off, make a test stitch on a
sample of your fabric so that you can adjust
the thread tensions correctly.
14U286B
After completing the
seam, chain off approx.
5cm(2inches) as shown
in figure at left and cut
thread with the thread
cutter on the presser
foot.
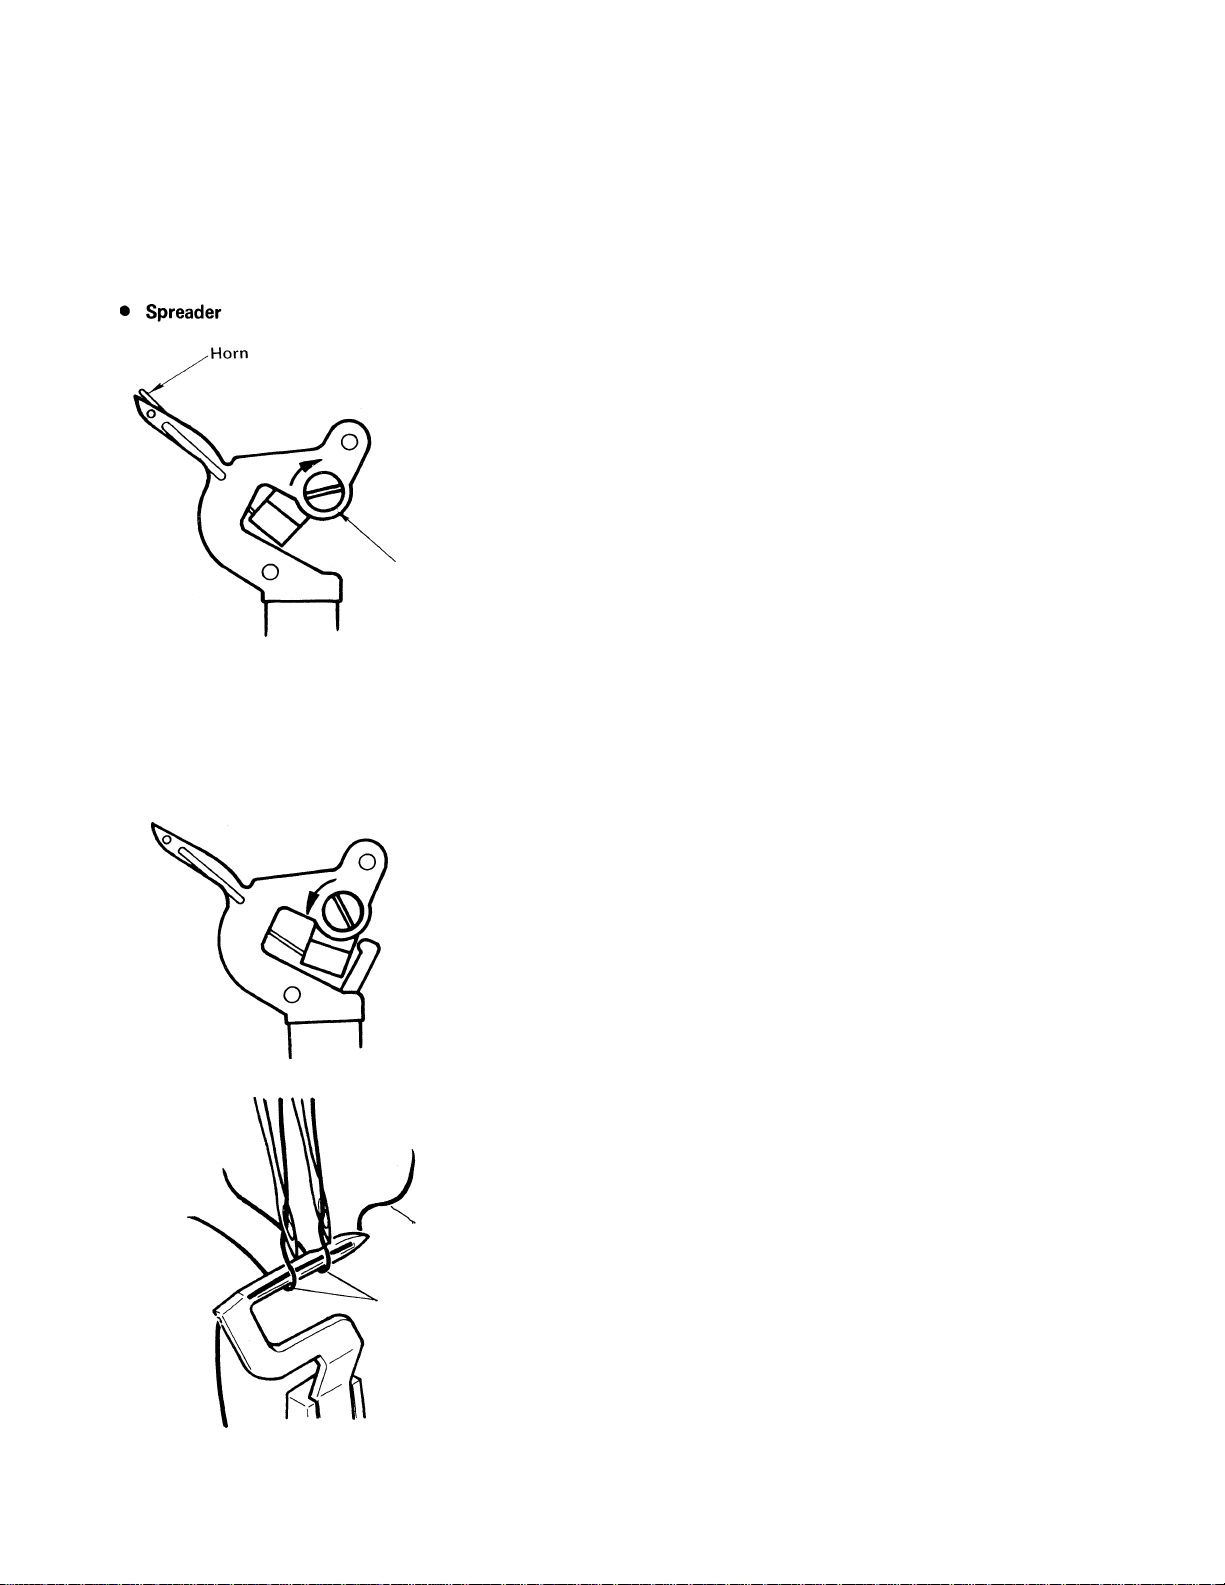
6. How to sew two-thread overlook and overedge
The 2-thread overlook and overedge is sewn with one needle, one looper and a spreader.
(1) Convert right looper into spreader
The right looper used in this machine can be easily converted into spreader.
1. Remove right looper thread. (Orange thread path)
2. With the small screwdriver, turn spreader conversion screw
clockwise as far as it will easily turn. Do not over turn.
The right looper will now serve as a spreader.
Spreader conversion screw
• Converting spreader
back to right looper
1. With the small screwdriver, turn spreader conversion screw
2. Thread the right looper.
Left looper
thread
Needle thread
counterclockwise as far as it will easily turn. Do not over turn.
The right looper will now serve its purpose of looper.
Note: When left looper thread breaks or when changing
the thread, be sure to pass the left looper thread
through the inner side of the needle thread as
shown. If it is difficult to thread the left looper
in the manner described above, cut the needle
thread and rethread left looper first and then
the needle to avoid erroneous threading.
10
 Loading...