

Page 1

I^ofmufnd
-..«y, ».n'-L.-» ijg ' " iS ^
i Jt'' ~ ’ ,
■v'-c-^V'. 'f -*
'A ii
14
n
U11/13
mu
—
Mil
w
L'>
: \'
Operator’s
Guide
M—HHmH
•r
im
mggBggHm
——
V^O*''
m
SINGER
Page 2

Professional 14U11/13
PREFACE
Thank you for your purchase of this sewing machine.
This machine will provide you with excellent performance in two thread overedging, two thread chain stitch
ing (14U13) and interlocking (safe.ty stitching)(14U13) from light to heavy material (lawn to denim). Please
refer to this booklet for proper use and optimum service.
Safety Cautions:
• Be sure that the electrical voltage of the socket outlet (wall receptacle) is the same as the rated
voltage of the motor.
• Disconnect the power-line plug from the socket outlet when changing needles, presser feeet or
throat plates, or when leaving the machine unattended. This eliminates the possibility of start
ing the machinery by accidentally pressing the speed controller.
*
• Do not pull the fabric while you are stitching as this may deflect the needle, causing it to break.
• Before cleaning your machine, disconnect the power-line plug from the socket outlet.
• Do not attempt to adjust the motor belt. Contact your nearest Service Center should any
adjustment be required.
• Handle the foot controller with care and avoid dropping it on the floor. Be sure not to place
anything on top of it.
• When sewing closely watch the area being sewn to avoid injuries from needles and knives.
• Use only the handle to lift and move the machine.
* A Trademark of The Singer Company
Copyright ©1982 The Singer Company
All right reserved throughout the World
Page 3

CONTENTS
1. Principal parts............................................................................................................................................. 2
Page
2. Preparation prior to sewing
3. Threading the machine
• Setting up the thread guide holder
• How to open looper cover..................................................................................................................... 5
• How to remove cylinder cover.............................................................................................................. 5
• How to thread your machine correctly.................................................................................................. 6
• How to change threads ........................................................................................................................ 10
4. How to sew................................................................................................................................................ 11
5. Chain off and test sew................................................................................................................................. 13
6. How to adjust thread tension ..................................................................................................................... 14
7. How to adjust stitch length......................................................................................................................... 15
8. Free arm sewing (Tubular work)................................................................................................................ 16
9. Adjustment of presser foot pressure........................................................................................................... 17
10. How to replace needle.............................................................................................................................. 17
11. Adjustment of overedge seam width.......................................................................................................... 18
......................................................
.............................................................................................................................
.......................................................................................................
...................
..............................................
3
4
4
12. How to replace knives................................................................................................................................. 20
13. Lubrication................................................................................................................................................ 21
14. Reasons for poor stitches and how to make adjustment........................................................................... 22
15. Relationship between cloth, thread and needle .
16. Accessories................................................................................................................................................. 24
17. Specification of the 14U11/13 machine ................................................................................................... 24
...
.................................................................................... 23
Page 4
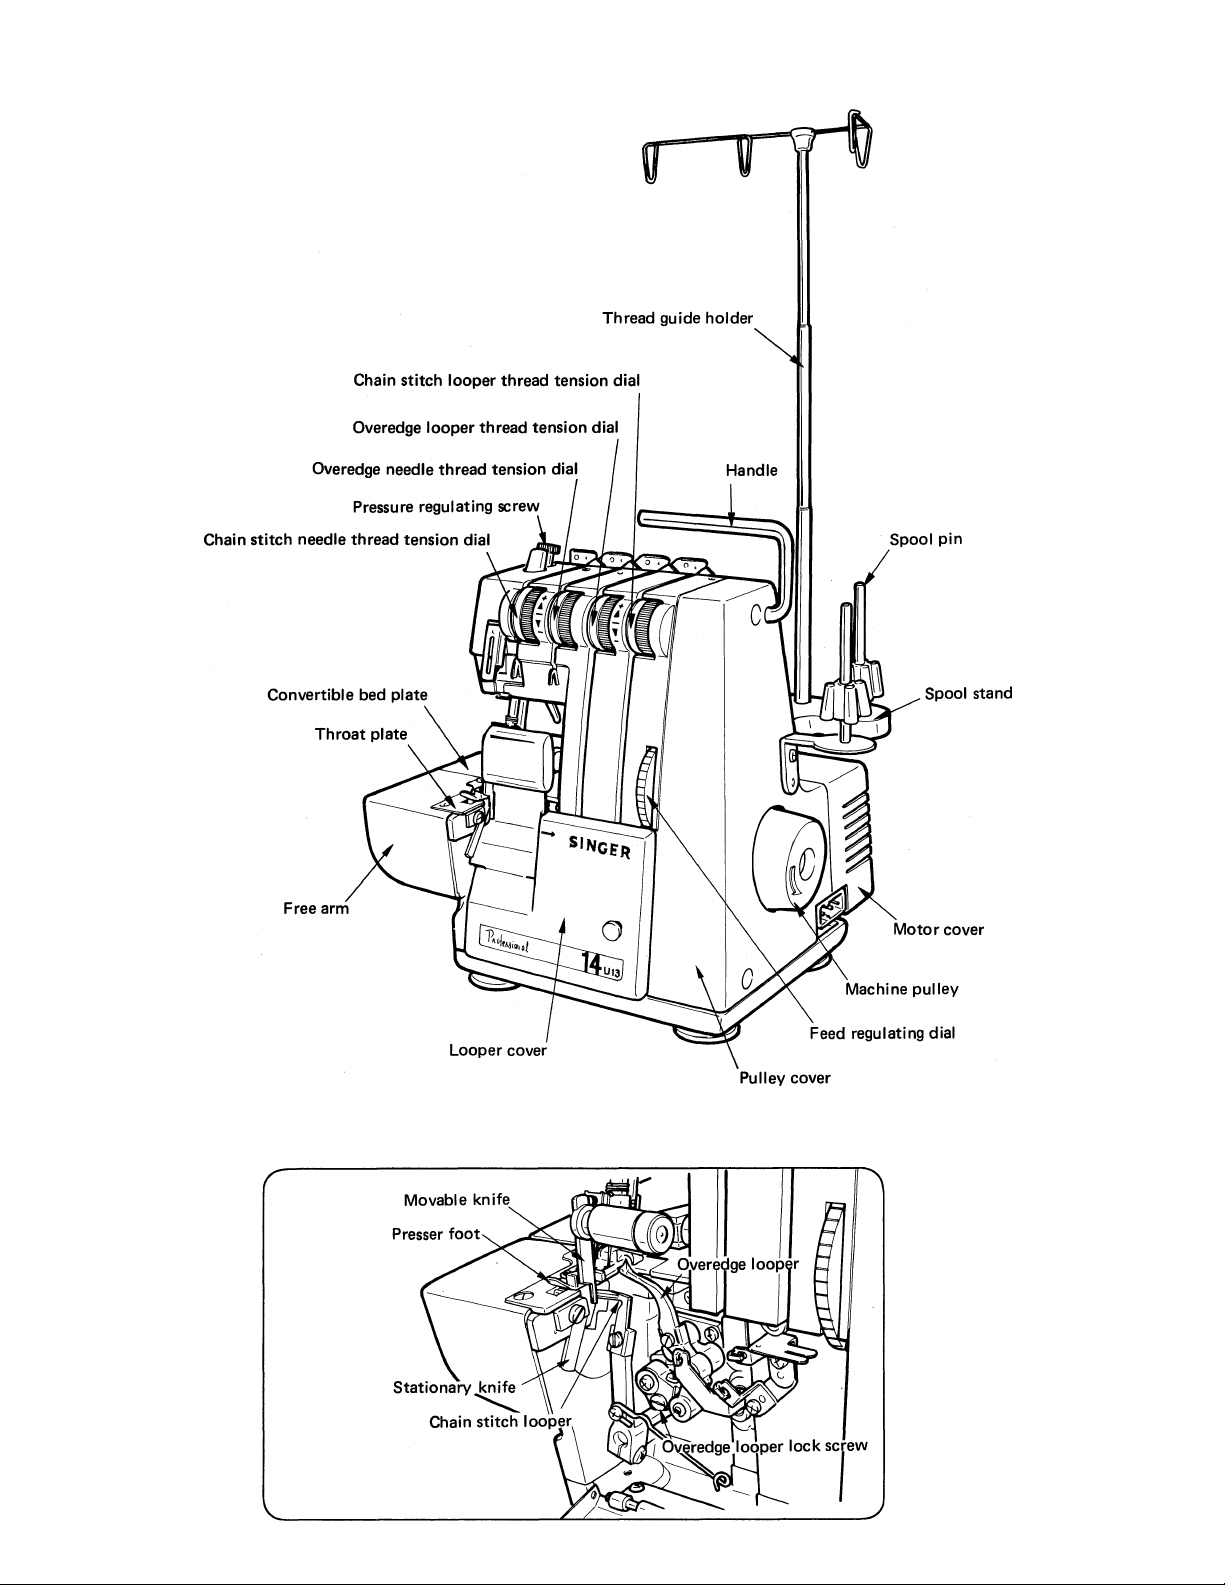
1. Principal parts
• Machine with looper cover opened
Page 5
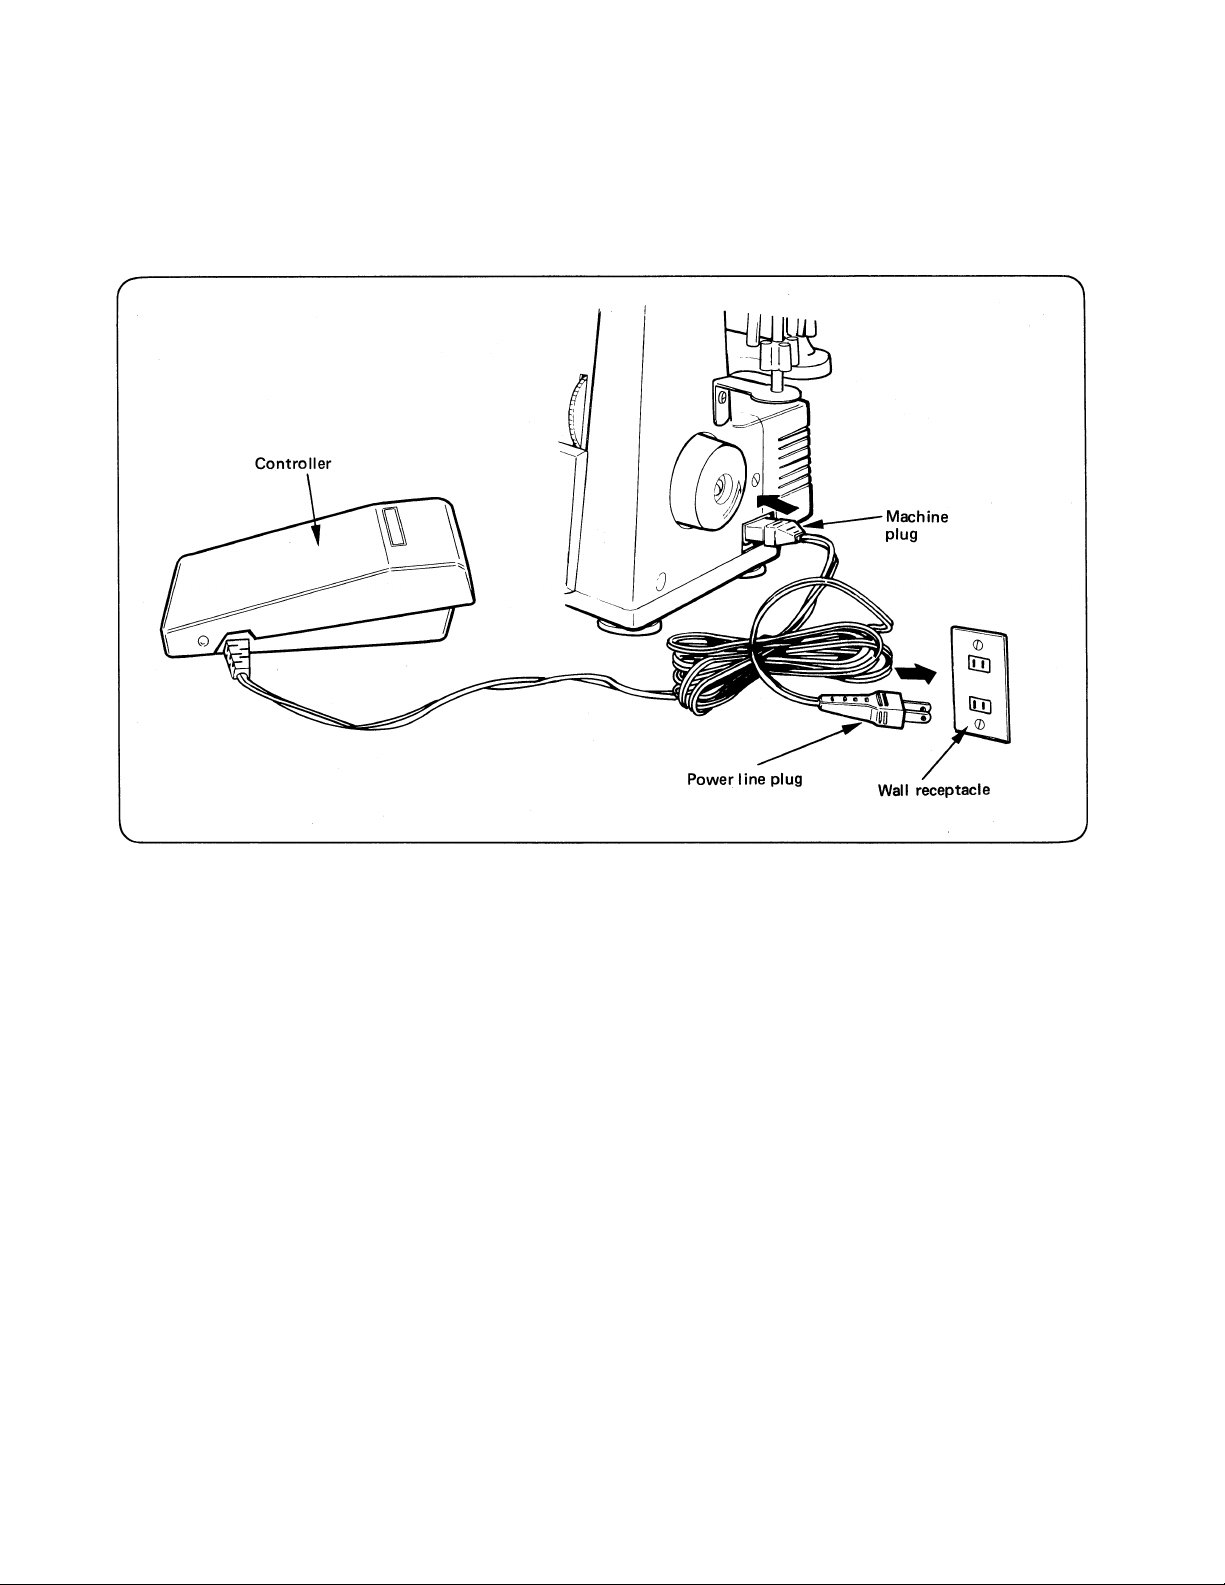
2. Preparation prior to sewing
Connect the machine plug to the electrical receptacle of your machine and the power line plug to the wall
receptacle.
To run the machine and control the speed, press the speed controller. The harder you press, the faster the
machine will sew. To stop the machine from sewing, remove your foot from the speed controller.
Caution:
• Be sure that the electrical voltage of the socket outlet (wall receptacle) is the same as the rated voltage of
the motor.
> Handle the foot controller with care and avoid dropping it on the floor. Be sure not to place anything
on top of it.
• Disconnect the power-line plug from the socket outlet when changing needles, presser feet or throat
plates, or when leaving the machine unattended. This eliminates the possibility of starting the machine by
accidentally pressing the speed controller.
Before cleaning your machine, disconnect the power-line plug from the socket outlet.
Page 6
3. Threading the machine
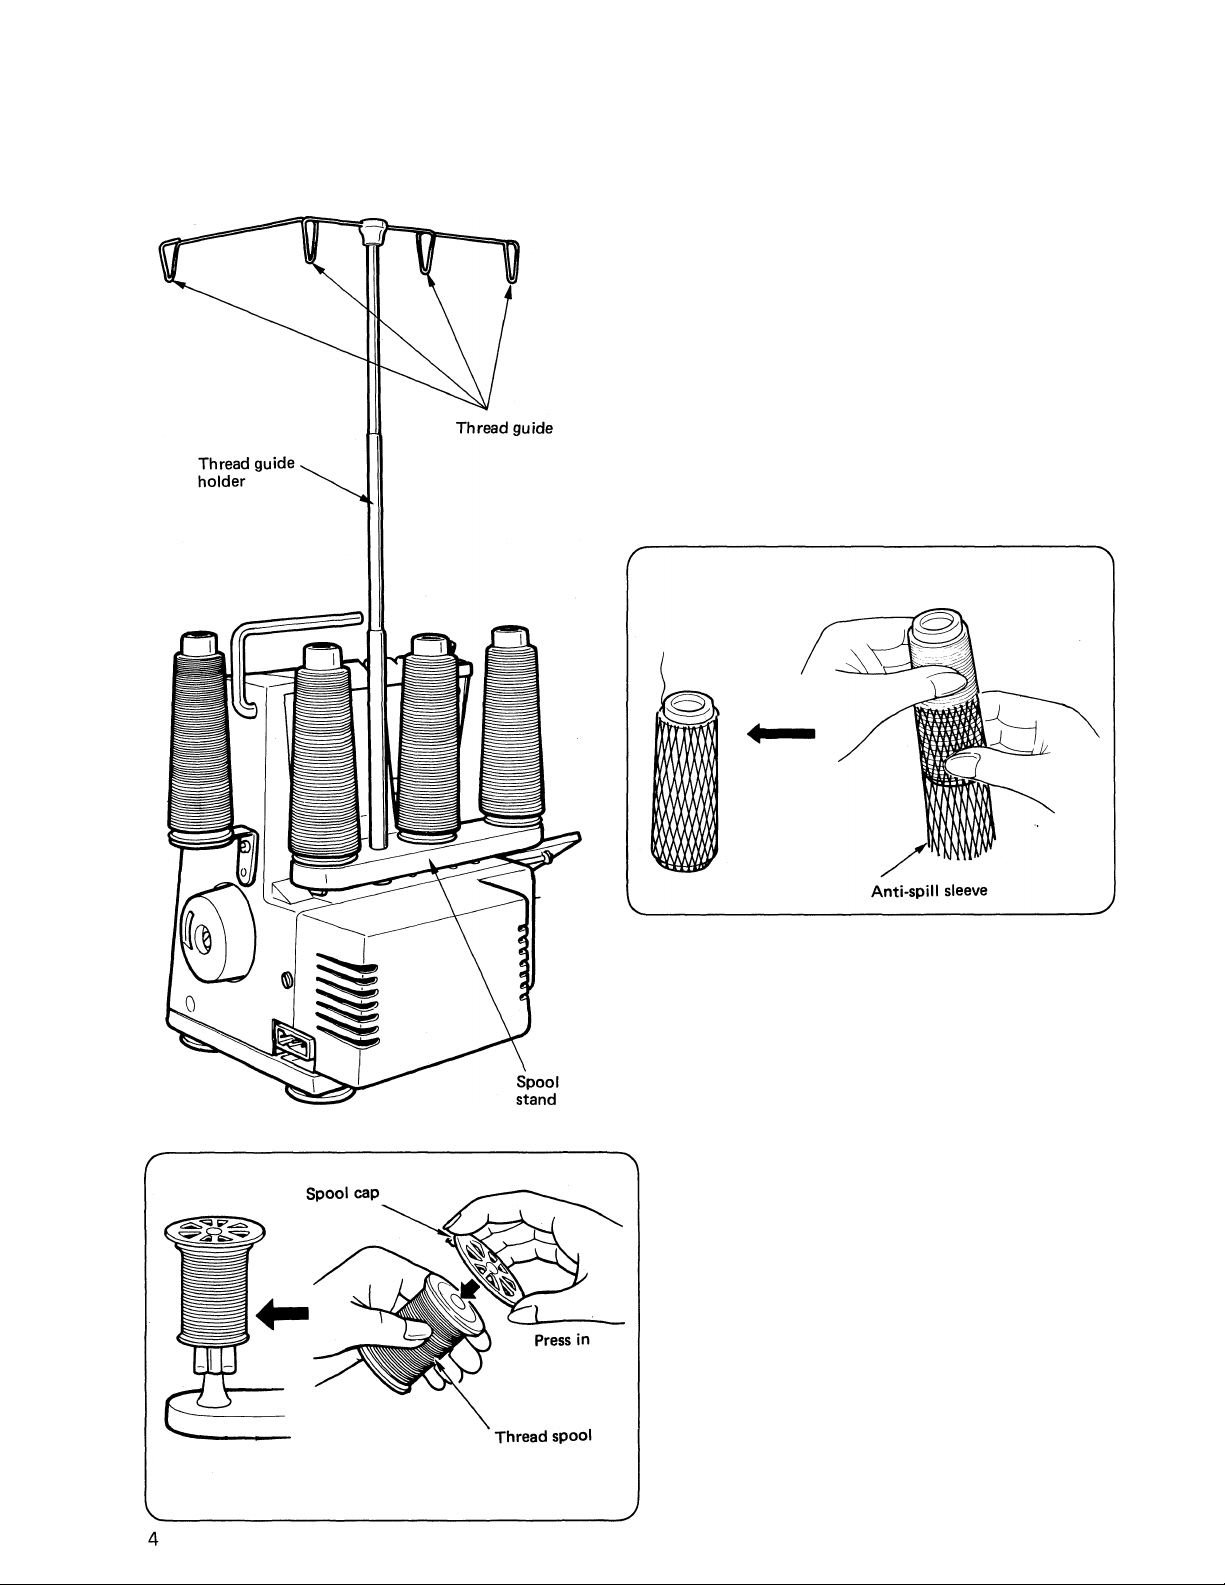
• Setting up the thread guide holder
Extend the thread guide holder as far as possible and set
the thread guides so that they are located right above
the spool pins.
Place the thread on the spool stand as shown in the
figure at the left.
When using synthetic threads that easily spill off the
cop (cone) slip the anti-spill sleeve furnished with the
machine over the thread from the bottom of the cop
(cone) leaving the thread end hanging free at the top of
the anti-spill sleeve as shown above.
When using a reel type thread spool, fit the
spool cap supplied with the machine onto
the thread spool as shown at left.
Page 7
Be sure looper cover is closed when sewing.
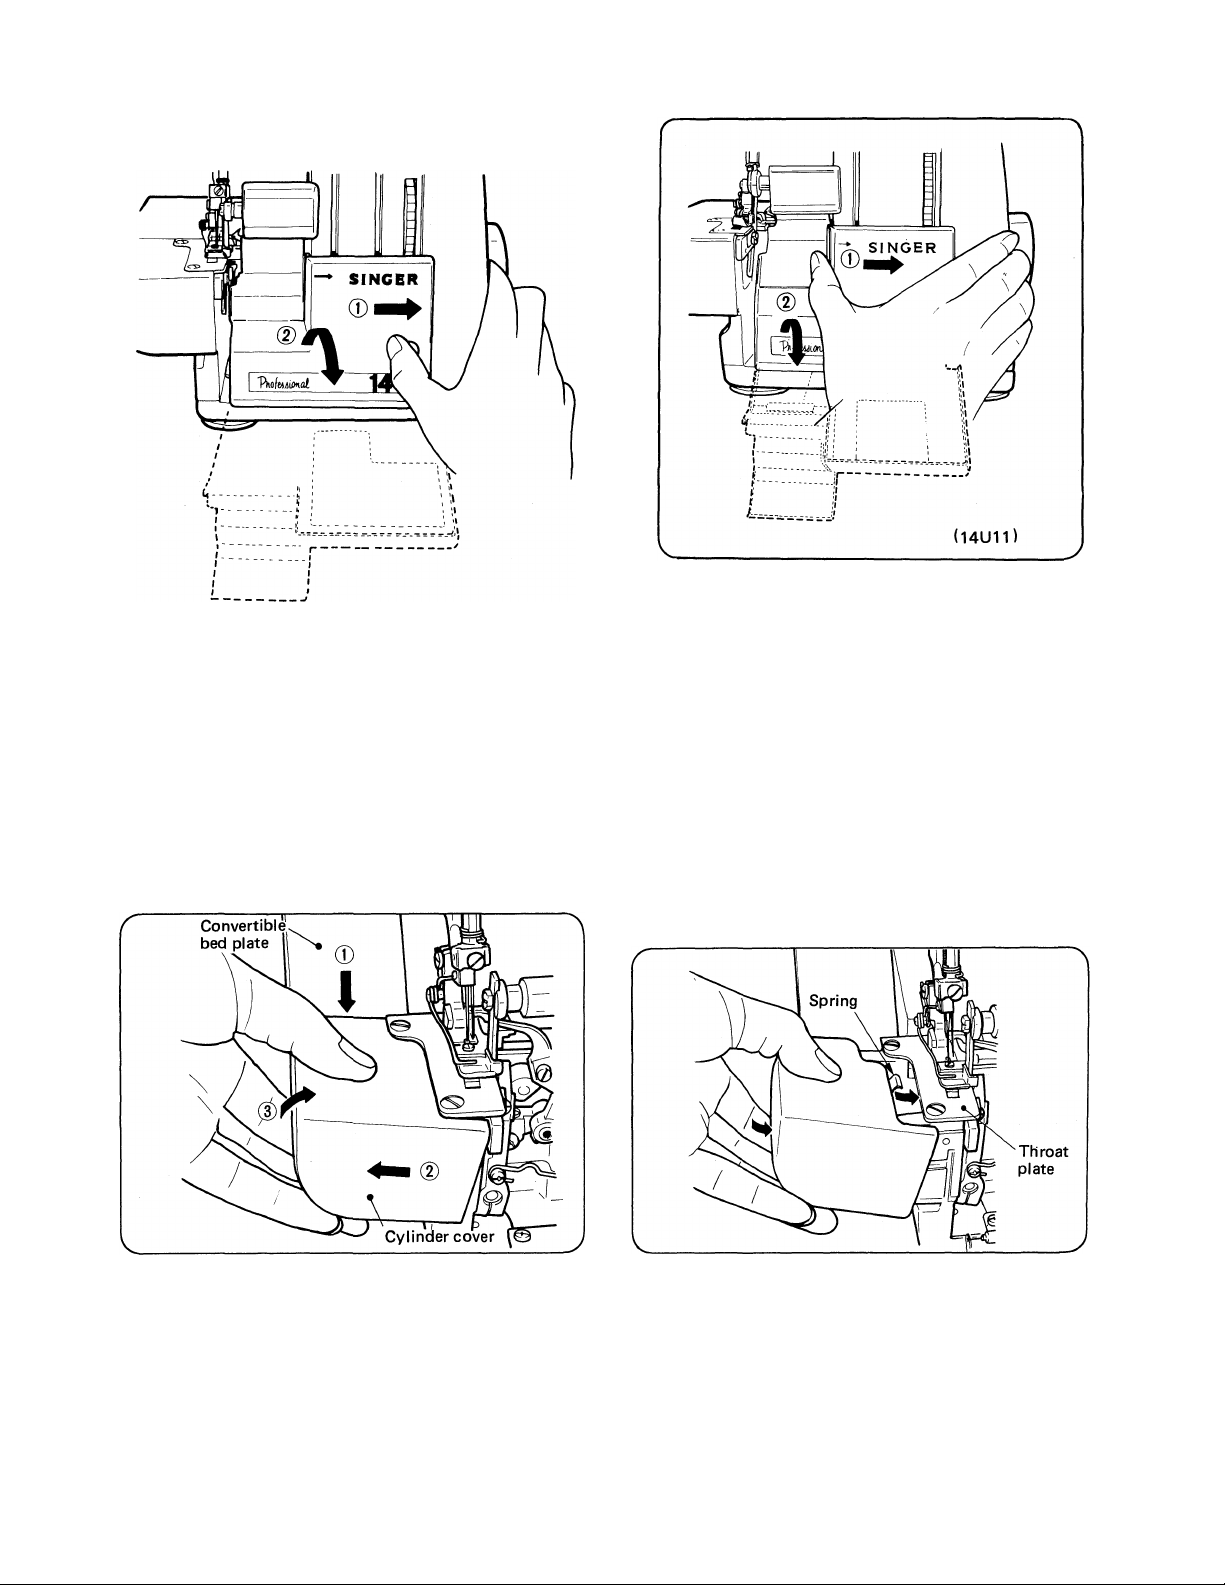
• How to remove cylinder cover
(14U13)
® Push the cover to the right as
far as it will go and
(D Pull cover down toward you.
To replace cover
® Push convertible bed plate down and
(2) While pulling the cylinder cover to the left,
d) Lift cover upward and off the machine.
*
* Be sure to lower the plate.
* Do not hold the cylinder cover when moving the machine.
Place the upper spring on the cover under the
throat plate and press cover downward to the
right.
Page 8
• How to thread your machine correctly
Correct sewing cannot be obtained when machine is threaded incorrectly.
Threading is diagrammed on the inner side of the looper cover and identified with colors on the various
thread guides.
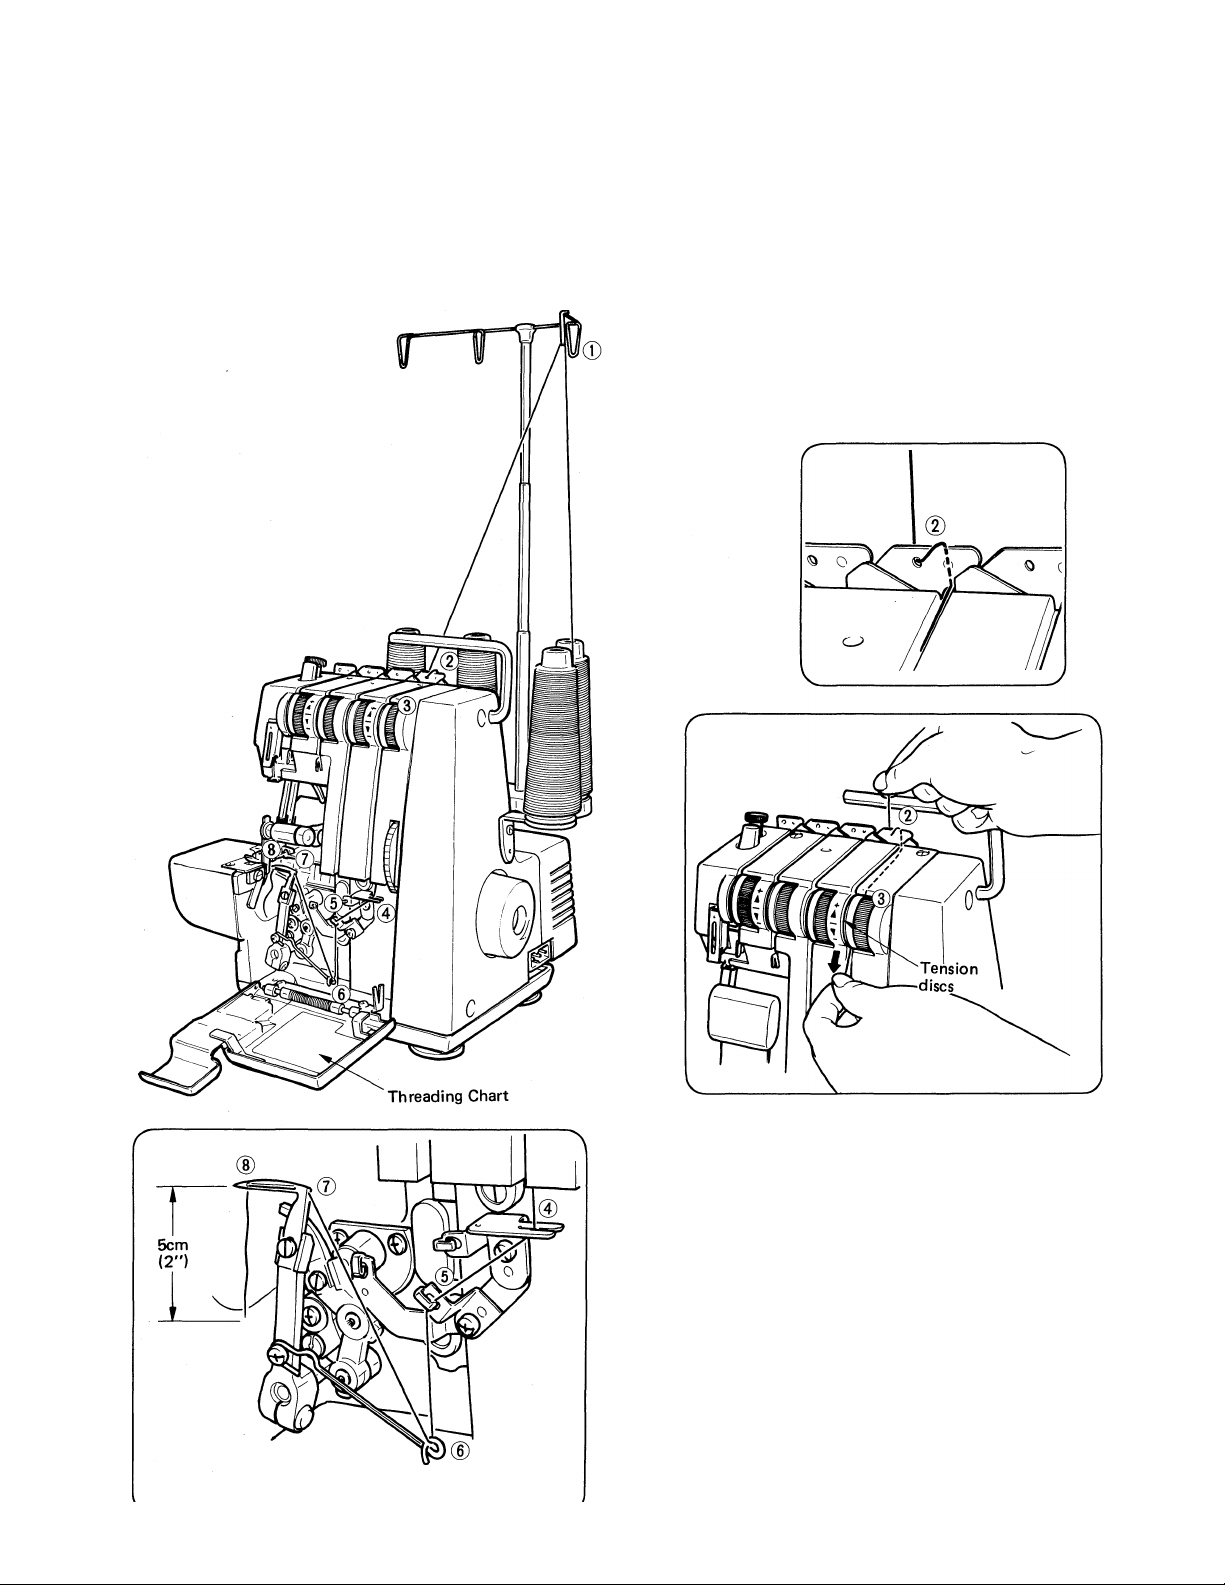
(1) Open looper cover. Thread the chain stitch looper in the order 0 to (8) as indicated in the figure below,
(threading points marked in yellow) (14U13 only).
Wind thread around thread
guide when threading @ as
shwon in figure below.
While holding thread with finger, pass it
between the tension discs and pull thread
down to make certain it is properly located
in between the tension discs.
• Use tweezer provided in the accessory set when
threading looper thread hole ©, ®.
•
• Draw about 5cm (2 inches) of thread from the
looper thread hole.
Page 9
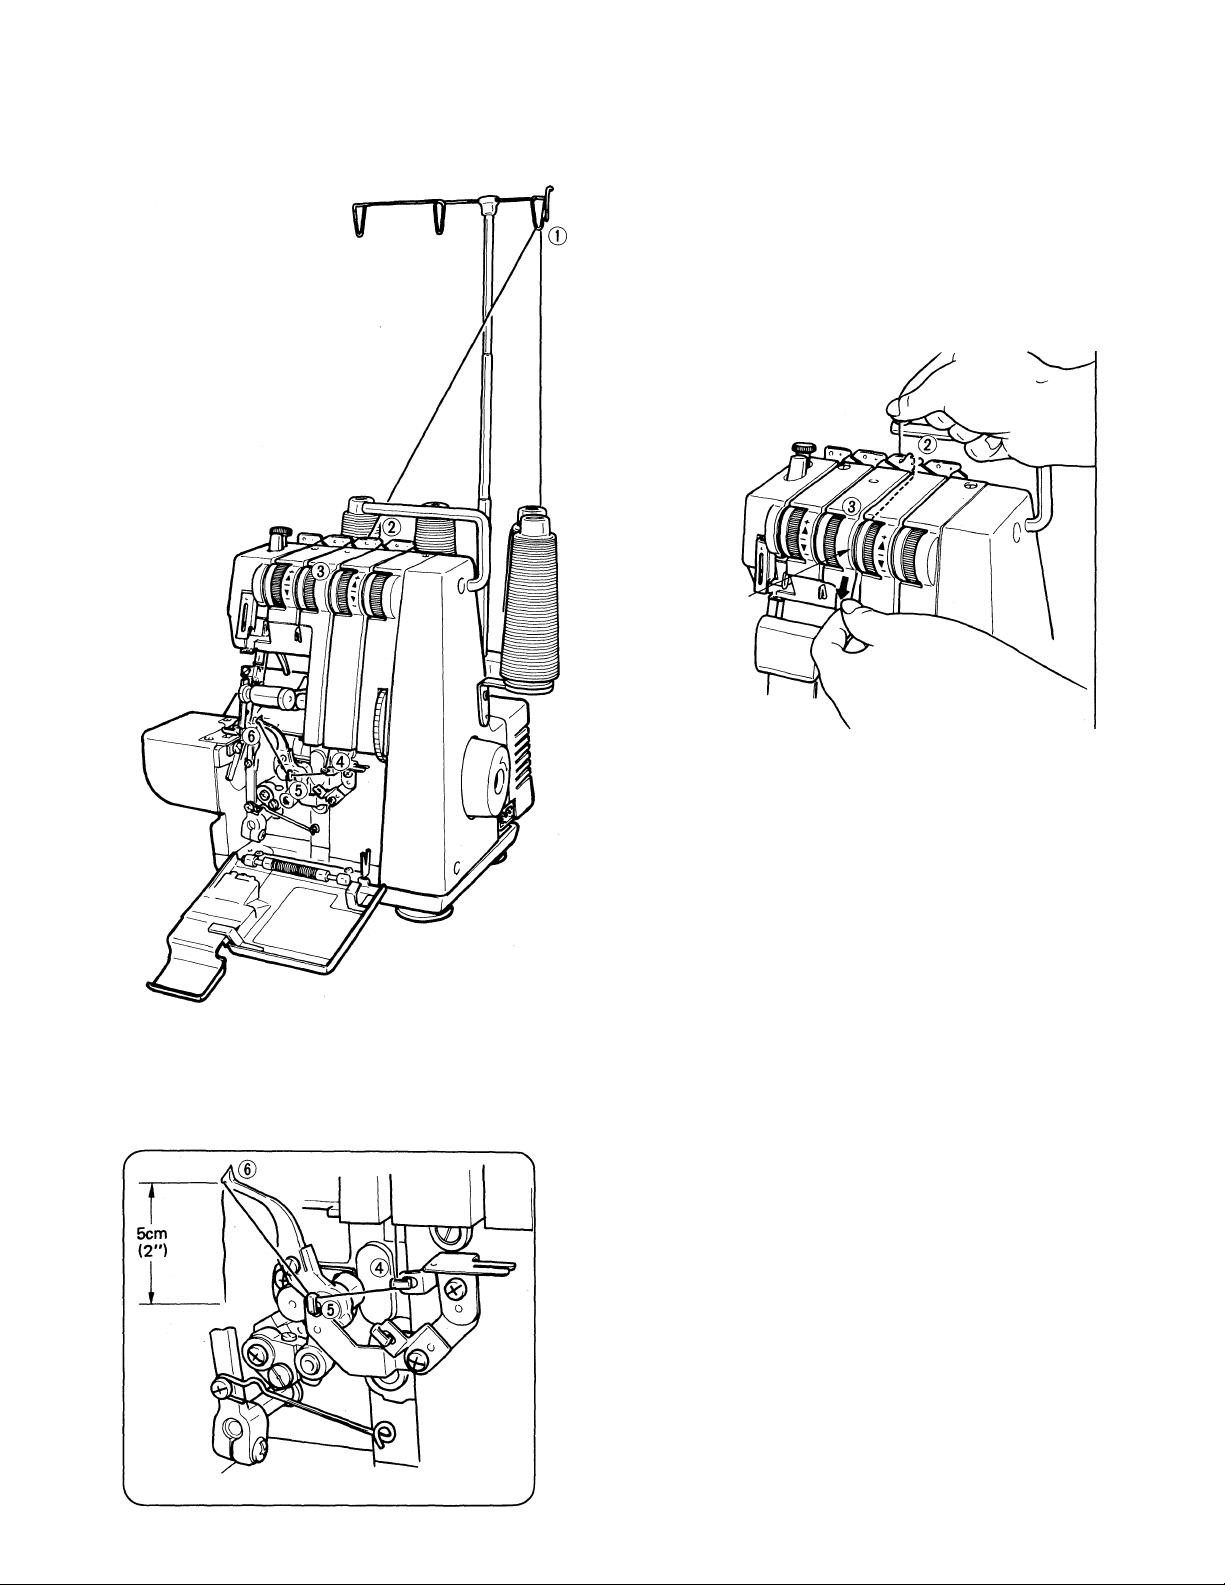
(2) Thread the overedge looper in sequence from 0 to (6) (marked in orange color).
Wind thread around thread
guide when threading (2) as
shown in figure below.
Tension
discs
While holding thread with finger,
pass it between the tension discs
and pull thread down to make
certain it is properly located in
between the tension discs.
Use tweezer provided in the accessory set when
threading looper thread hole (6).
Draw about 5cm (2 inches) of thread from the
looper thread hole.
Page 10

(3) Thread the overedge needle thread in the order ® to (7) (green mark).
Threading of needle eye (7) becomes easier when the movable knife is set at the nonoperating position
(See figure on page 18 for movable knife non-operating position).
Wind thread around thread
guide when threading (2) as
shown in figure below.
Tension
discs
While holding thread with finger, pass it
between the tension discs and pull thread
down to make certain it is properly located
in between the tension discs.
Use tweezer provided in the accessory set when
threading looper thread hole (7) .
• Draw about 5cm (2 inches) of thread from the
looper thread hole.
Page 11

(4) Thread the chain stitch needle thread in the order (I) to @ (blue mark).(14U13 only)
Wind thread around thread
guide when threading (2) as
shown in figure below.
Tension
discs
While holding thread with finger, pass it
between the tension discs and pull thread
down to make certain it is properly located
in between the tension discs.
• Lower needle bar as for as it
will go when threading (5) .
• Use tweezer to thread eye
•
• Draw about 5cm (2 inches)
of thread from needle eye.
Page 12

(5) Check to see that thread tension dials are properly threaded (especially needle thread).
When needle thread is not correctly threaded between the tension discs, it will lie loose on the underside
of the material as shown in figure.
0
• How to change thread
The thread is pre-set at the factory
before shipment.
When you wish to change the thread
with a different thread, the following
steps will make the changing con
venient.
(1) Cut the thread near the spool and
tie the end to the thread you wish
to change to as shown in figure at
right.
(2) Raise presser foot.
(3) Turn the tension dials down
toward the minus (-) sign until
the dial stops and draw the thread
out so that the tie knot of the
threads extend about 5cm (2
inches) from the presser foot.
(4) When drawing needle thread
through the needle eye, stop the
tie knot before the needle eye, cut
the thread and pass it through the
needle eye.
10
Page 13

4. How to sew
This sewing machine will allow the following 3 different kinds of stitch formations obtainable by simple
adjustments.
1. Safety Stitch Formation (14U13 only)
Safety stitch can be obtained when all 4 threads are
used. The stitches are attractive and can be sewn on all
kind of fabrics from light weight to heavy weight.
(Application) Inserting sleeves into shirts, blouse, and
dresses as well as sewing sides together.
2, Two Thread Chain Stitch Formation (14U13 only)
A useful two thread chain stitch can be obtained
when needle thread for chain stitch and looper
thread for chain stitch are used.
When you wish to obtain a tight seam, sew another
row of stitches next to the previously row.
(Application) Binding knit wear, jersey, etc.
When chain stitching, be sure to disengage the overedge looper so that it does not move, in the following
manner.
Also place the movable knife in a non operating position as required. (See Page 18)
• The overedge looper is disengaged as follows.
With the screw driver turn the overedge looper
screw in direction of arrow shoym in figure until
the screw comes off the overedge looper driving
lever (back).
Ensure the screw is completely out of engagement
with the driving lever by pulling the screw outward
with fingers.
Press down the released overedge looper so that
it is in its lowest position.
(Make sure overedge looper does not move by
turning machine pulley towards you slowly.)
11
Page 14

To re-engage overedge looper, lift overedge looper driv
ing lever (front) up as far as it will go as shown in figure
and while pressing the overedge looper lock screw
tighten it in the direction of arrow shown in figure
at left.
When sewing with movable knife in non-operating position, sewing can be performed more conveniently by
installing the chain stitch seam width gage in place of the knife cover.
3. Overedge Stitch Formation
12
Attractive overedge seams can be obtained when needle
thread for overedge and looper thread for overedge are
used.
(Application) Overedging of suit, blouse, slacks, etc.
Page 15

5. Chain off and test sew
When the machine is completely threaded,
place a piece of the fabric to be sewn complete
ly under the presser foot.
Hold the needle thread with a slight tension as
shown in figure at left and turn the machine
pulley towards you 2 or 3 turns.
After threading for the first time or when
rethreading due to thread breakage during
sewing, repeat the above.
Thread cutter
After completing the seam,
chain off approx. 5cm (2 inches)
as shown in figure at left and
cut thread with the thread cut
ter on the presser foot.
13
Page 16

6. How to adjust thread tension
Adjust thread tension to suit the type of material and size of the thread used. Tension becomes tighter as
the tension dial is turned up toward the plus sign (+).
• Correct thread tension
Be sure the threads are correctly threaded since otherwise proper thread tension cannot be obtained (See
page 6).
Correct chain stitch. (14U13 only)
• How to obtain correct thread tension.
When the chain stitch needle thread tension is weak.(14U13 only)
Correct overedge stitch
Topside
Underside
14
Turn the chain stitch needle thread tension
dial (blue) toward the plus sign (+), or chain
stitch looper thread tension to minus sign
(-).
Page 17

When the overedge needle thread is tight but
overedge looper thread tension is weak.
When the overedge needle thread tension is weak
but the overedge looper thread tension is tight.
—
—
Overedge
looper dial
(orange)
+ i\i'
m
A
=
liljj
TEUZT, l =
Overedge
needle dial
(green)
Topside
+
A
▼
“r
Either turn the overedge needle thread tension
dial (green) toward the minus sign (-) or turn
the overedge looper thread tension dial (orange)
toward the plus sign (+).
Overedge
needle dial
(green)
Topside
Overedge
looper dial
(orange)
Either turn the overedge needle thread tension
dial (green) toward the plus sign (+) or turn the
overedge looper thread tension dial (orange)
toward the minus sign (-).
7. How to adjust stitch length
The feed regulator dial on this machine is pre-set
to 3mm for normal sewing condition. Since the
adjustment can be made easily, adjust the stitch
length to 4mm when sewing heavy weight fabrics
such as quilting and to 2mm when sewing light
weight fabrics such as lining fabric, crepe, etc.
and you will obtain excellent seams without
puckering.
15
Page 18

8. Free arm sewing (Tubular work)
As shown in figure at left, this machine becomes a free
arm machine simply by pushing the convertible bed
plate down making tubular work such as sewing sleeves
very easy.
This is especially convenient for finishing hard-to-reach
areas such as arm holes and overcasing trouser cuffs.
Slip tubular work
onto the free arm
and sew.
16
Page 19

9. Adjustment of presser foot pressure
The presser foot pressure of this machine is
preadjusted at the factory to suit the sewing of
medium weight fabrics.
It may become necessary to adjust the pressure
in the case of delicate or heavy weight fabric.
For hght weight fabric — Decrease the pressure
(as shown at left).
Heavy weight fabric — Increase the pressure
(as shown at left).
10. How to replace needle
Use Singer needle Cat. No. 2053. Available in
sizes #10, #11, #12 #14.
Needles for household machines can not be used.
To remove the needle:
• Be sure the power line plug is disconnected
from the wall receptacle.
• Turn the machine pulley toward you until
the needle is at its highest position. Loosen
the needle set screw with a screw driver and
remove needle.
To replace the needle:
• Insert the needle into needle bar as far as it
will go, with long groove toward you, as
shown in figure at left.
•
• Hold needle firmly so that its direction can
not change and securely tighten the needle set
screw.
17
Page 20

11. Adjustment of overedge seam width
The overedge seam width of this machine is set to 3.5mm (9/64 inches) for normal sewing condition, how
ever it can be increased up to 5mm (13/64 inches) for overedging heavy weight fabrics as instructed below.
If any problems arise in making the adjustment, call your Singer representative.
(1) Before making the adjustment, be sure that the power line plug is disconnected from the wall receptacle.
(2) Open the looper cover. (See page 5)
(3) Turn the machine pulley toward you, lower the movable knife as far as it will go and set it in the
nonoperating position as shown in figure below.
(4) Prjess down convertible bed plate and remove the cylinder cover. (See page 5)
(5) Loosen the 2 stationary knife holder set
screws with the hex-head wrench provided in
the accessories, move the stationary knife
holder to the right or left and tighten the
set screws.
(Wehn a wider seam is desired, move the
holder to the right and when a narrower
seam is desired, move the holder to the left).
Be sure to align the cutting edge of the
stationary knife level with the top surface of
the throat plate.
18
Page 21

(6) Replace the cylinder cover. (See page 5)
(7) Loosen the chaining-off finger set screw on the presser foot and adjust the fìnger to the cutting width
desired by moving it either to the right or left and tighten set screw.
(8) Return the movable knife to its original position.
(9) Test sew
Make a test sample first so that you can correctly adjust the position of the chaining-off finger, since an
improperly positioned finger may cause the cutting width to become narrower than the overedge seam
width, or become wider and cause the edge of the fabric to fold.
It may be necessary to re-adjust position of chaining-off fmger when other materials are used.
19
Page 22
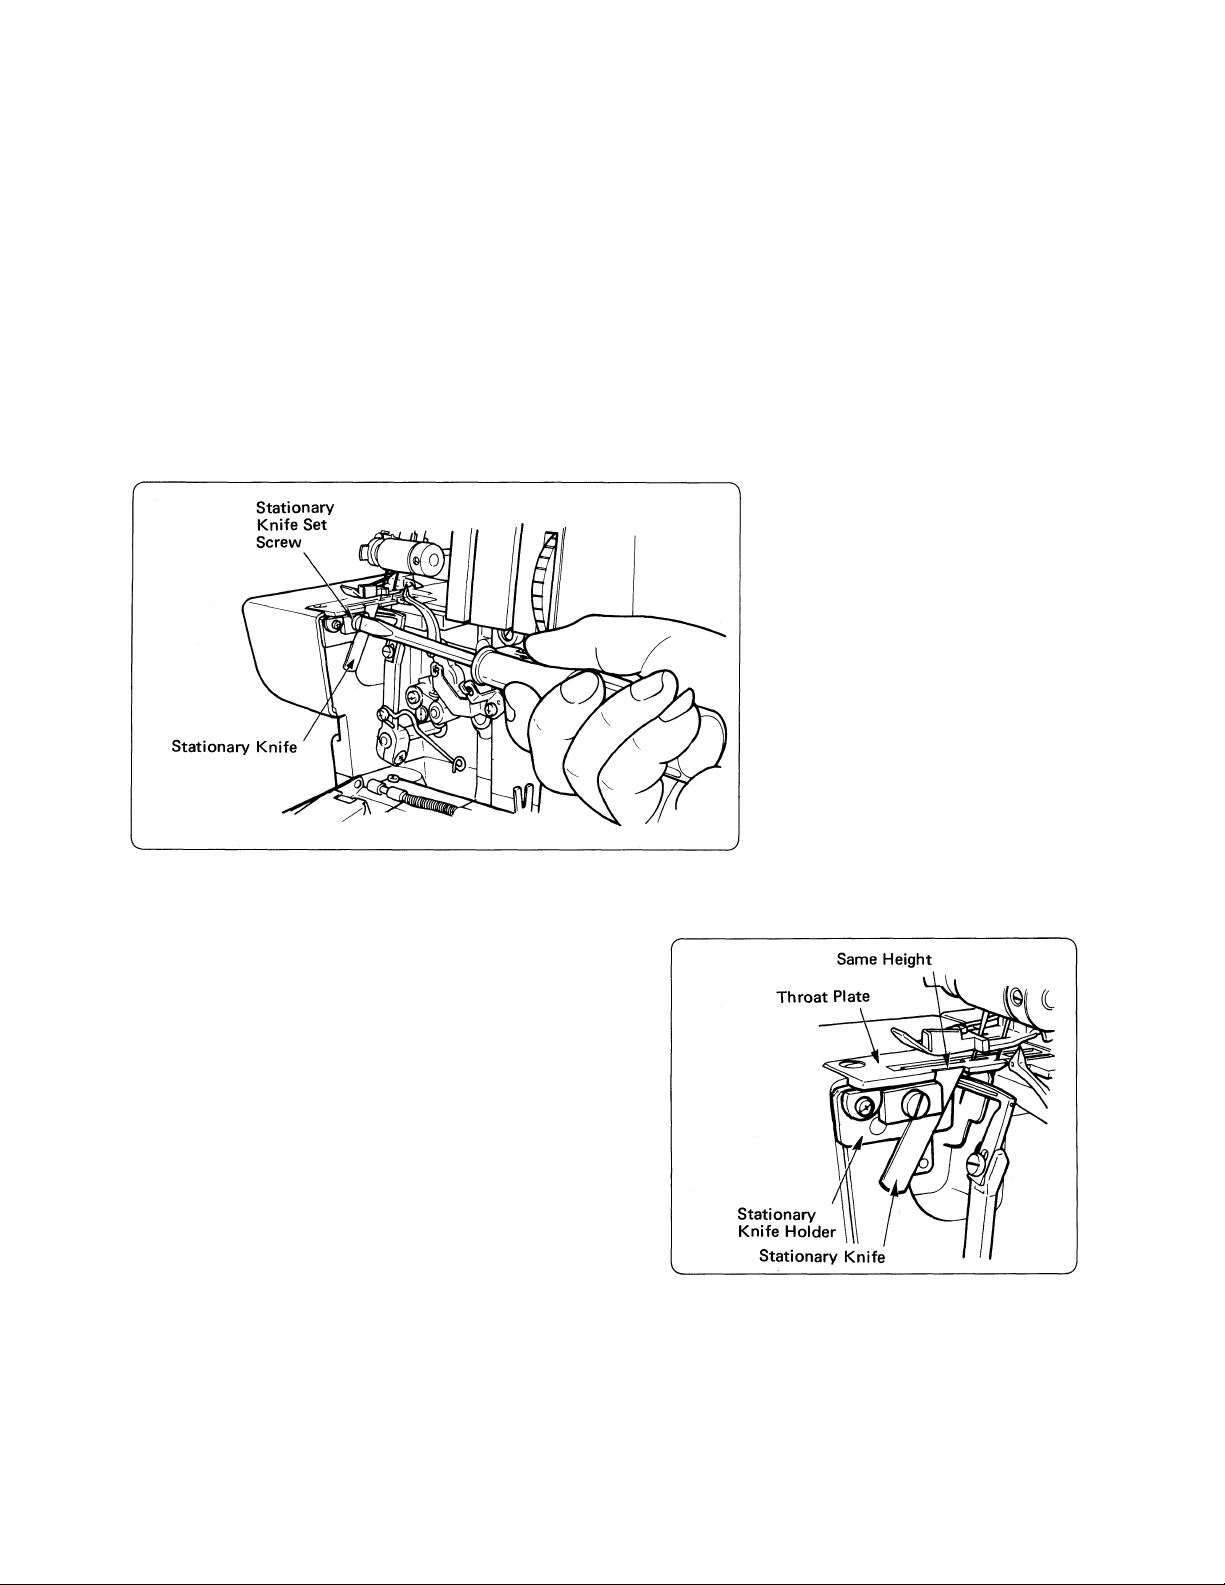
12. How to replace knives
The stationary knife should be changed when it becomes dull.
The stationary knife can be replaced according to the following steps, however if there are any difficulties
experienced, call your Singer representative to make the adjustment.
(1) Besure that the power line plug is disconnected from the wall receptacle.
(2) Open the looper cover and set the movable knife in the non-operating position (see page 18).
(3) Loosen the stationary knife set screw and remove the stationary knife.
(4) Place a new stationary knife in the groove of the
stationary knife holder, aUgn the cutting edge level
with the top surface of the throat plate and tighten
set screw.
(5) Return the movable knife to its original position.
• The movable knife on this machine has a carbide
alloy tip cutting edge and under normal use will
not required replacement.
20
Page 23

13. Lubrication
Special material is used for the important parts of this machine, therefore only occasional lubrication is
required. The oiling points shown on the figure below should be lubricated periodically.
21
Page 24

14. Reasons for poor stitches and how to make adjustment
Whenever sewing difficulty is encountered, make the adjustments as noted below.
Condition
When the fabric is not fed.
When the needle breaks.
When the thread breaks.
When stithces skip.
Reason
• Insufficient presser foot pressure.
• Needle not inserted properly.
• Fabric being pulled too hard.
• Loose needle set screw.
• Inccorect threading.
• Bent needle or needle point
damaged.
• Thread tension too tight.
• Thread tangled.
• Needle inserted incorrectly.
• Needle bent or needle point
damaged.
• Needle set loosely.
Method of Adjustments
(reference pages)
• Increase presser for pressure
(page 17).
• Insert needle correctly or replace
with correct needle (page 17).
• Do not pull the fabric by hand.
Use hand only to guide the fabric.
• Tighten screw firmly.
• Thread machine correctly (page
6).
• Change to correct needle
(page 17).
• Adjust tension (page 14).
• Thread correctly (page 6).
• Insert needle correctly (page 17).
• Replace with correct needle
(page 17).
• Set needle firmly in position
(page 17).
When stitches are
irregular.
When fabric puckers
When the machine does
not operate.
When motor is excessively
noisy or when sparking is
excessive.
• Incorrect threading.
• Wrong needle used.
• Insufficient presser foot
pressure.
• Thread tension not balanced.
• Thread tension too tight.
• Threading incorrect or tangled.
• Power line plug not connected.
• Motor damaged.
• Motor damaged.
• Thread machine correctly
(page 6).
• Use Singer Cat. 2053 #10, #11,
#12 #14.
• Increase presser foot pressure
(page 17).
• Adjust tensions (page 14).
• Adjust tension(page 14).
• Thread correctly (page 6).
• Connect with power source.
• Change Motor.*
• Change Motor.*
* Have your Singer representative
replace the carbon brush.
22
Page 25

15. Relationship between cloth, thread and needle
Type of Fabric
Lightweight
Lawn, Organdy,
Voil, Crepe, etc.
Medium Weight
Muslin, Soccer,
Satin, Gabardine
Broadcloth, etc.
Heavy Weight
Oxford, Denim
Tweed, Corduroy
Serge
Type of Thread
Cotton #100
Silk #100
Spun #80 - #90
Tetron #80 - #100
Cotton #60 — #80
Silk #50
Spun #60 — #80
Tetron #60 — #80
Cotton #40 - #60
Silk #40 - #60
Spun #60 — #80
Tetron #50 - #80
Needle
Singer Cat. No. 2053
#10
#11, #12 #14
#14
Knit
Tricot
Jersey
Wool (woven, knit)
Spun #80 — #90
Tetron #60 - #80
Spun #60 - #80
Tetron #60 - #80
Cotton #60 — #80
Spun #60 - #80
Tetron #50 - #60
Bulk tetron
Bulk nylon
#10, #11
#11, #12 #14
#11, #12 #14
23
Page 26

16. Accessories
(Accessory box)
1. Needle Set of 5 needles (Singer Cat. No. 2053 2 each #10 and 3 each #14 needles)
2. Screwdriver (medium size)
3. Hex-head wrench
4. Tweezer
5. Thread unwinder spool cap
6. Stationary knife
7. Brush
8. Oiler
9. Machine cover
10. Anti-spill sleeve
1
1
1
2(14U11),4(14U13)
1
1
1
1
2(14U11),4(14U13)
11. Chain stitch gage
1 (14U13 only)
17. Specification of the 14U11/13 machine
Item
Sewing speed
Stitch length (amount of feed)
Overedge stitch width
Needle bar stroke
1,500 spm maximum
2 - 5 mm (5/64" - 13/64") (5 to 12 s.pi.)
3.5-5 mm (Standard 3.5 mm) (9/64'' - 13/64")
27 mm (1 - 5/64")
Specification
Presser bar rise
Needle
Number of threads used
Size of machine
Weight of machine
24
5 mm (13/64")
Singer Cat. No. 2053 #10, #11, #12 #14
14U11....2,14U13....4
Width 257 mm X Depth 231 mm X Height 290 mm
(10-1/8" X 9-3/32" X 11-13/32")
14U11....8.1 kg. (17.8 lbs.), 14U13....8.5 kg. (18.7 lbs.)
Page 27

Page 28

Form U 3360
Part No. 409764-002
Printed in Japan
 Loading...