

Page 1

SINGER
INSTRUCTION ROOK
l£Ilo
' 1
&s
Page 2

PREFACE
Thank you for your purchase of this Combination Overiock, Chain Stitch and Cover Stitch
Sewing Machine. This machine, that is intended for househoid use wiii provide you with
exceiient performance in sewing from iight to heavy materiai (iawn to denim).
Piease refer to this Instruction Book for proper use and optimum service. To get the most
out of your sewing machine, read the entire Instruction Book before attempting to operate
the machine. Then famiiiarize yourseif with the machine by foiiowing the instruction Book
page by page.
To ensure that you are aiways provided with the most modern sewing capabiiities, the
manufacturer reserves the right to change the appearance, design or accessories of this
sewing machine when considered necessary without notification or obiigation.
Page 3

IMPORTANT SAFETY INSTRUCTIONS
When using an electrical appliance, basic safety precautions should always
be followed, including the following: Read the instruction carefully before you
use the machine.
ADANGER - To reduce the risk of electric shock:
* The appliance should never be left unattended when plugged in.
* Always unplug this appliance from the electric outlet immediately after using
and before cleaning.
* Always unplug this sewing machine from the electric outlet immediately
after using and before cleaning, removing covers, relamping, lubricating
or when making any other user servicing adjustments mentioned in the
instruction manual.
A WARNING - To reduce the risk of burns, fire, electric shock or
injury to persons:
* Do not allow this appliance to be used as a toy. Close attention is necessary
when this appliance is used by or near children and infirm persons.
* Use this appliance only for its intended use as described in this manual. Use
only attachments recommended by the manufacturer as contained in this
manual.
* Never operate this appliance if it has a damaged cord or plug, if it is not
working properly, if it has been dropped or damaged, or dropped into water.
Return the appliance to the nearest authorized dealer or service center for
examination, repair, electrical or mechanical adjustment.
* Never operate the appliance with any air openings blocked. Keep
ventilation openings of the sewing machine and foot control free from the
accumulation of lint, dust, and loose cloth.
* Keep fingers away from all moving parts. Special care is required around
the sewing machine needle and cutter.
* Always use the proper stitch plate. The wrong plate can cause the needle
to break.
* Do not use bent needles.
* Do not pull or push fabric while stitching. It may deflect the needle causing
it to break.
* Switch the sewing machine off “ O “ when marking any adjustments in the
needle area, such as threading needle area, such as threading needle,
changing needle, threading looper, or changing presser foot and the like.
Page 4

Never drop or insert any object into any opening.
Do not use outdoors.
Do not operate where aerosol (spray) products are being used or where
oxygen is being administered.
To disconnect, turn all controls to the off “ O “ position, then remove plug
from outlet.
Do not unplug by pulling on cord. To unplug, grasp the plug, not the cord.
Use only identical replacement parts. See instructions for servicing double
insulated appliances.
If oil gets in eyes, immediately, rinse the oil out with water. If you swallow
oil by mistake, immediately consult a medical doctor.
Close cover before operating machine.
Keep the instructions at a suitable place close to the machine and hand it
over if you give the machine to a third party.
Use the machine only in dry locations. Don’t use the machine if it’s wet or
in humid environment.
SAVE THESE INSTRUCTIONS
This overlook sewing machine is intended for household use only.
* The machine may only be used with foot pedal type 4C-326G/ 4C-316C/
4C-345G/ 4C-326C manufactured by Wakaho. Never place anything on
the pedal.
* European contact window provided.
* The sound pressure level at normal operation is smaller than 76dB(A).
* SERVICING DOUBLE-INSULATED PRODUCTS (USA and Canada
version excepted) In a double-insulated product, two systems of insulation
are provided instead of grounding. No grounding means is provided on a
double-insulated product nor should a means for grounding be added to
the product. Servicing a double-insulated product requires extreme care
and knowledge of the system and should and only be done by qualified
service personnel. Replacement parts for a double-insulated product must
be identical to those parts in the product. A double-insulated product is
marked with the words DOUBLE INSULATION or DOUBLE INSULATED.
The symbol 0 may also be marked on the product.
Page 5

TABLE OF CONTENTS
Page
1. Principal parts....................................................................................................................................................... 5
2. Accessories........................................................................................................................................................... 7
3. Needle information............................................................................................................................................... 7
4. How to open looper cover..................................................................................................................................... 8
5. Principal parts behind the looper cover................................................................................................................ 8
6. Preparation prior to sewing................................................................................................................................... 8
7. Preparation for threading.................................................................................................................................... 10
* Setting Up the Thread Guide Holder........................................................................................................... 10
* Anti-spill Net.................................................................................................................................................... 10
* Spool Cap....................................................................................................................................................... 10
8. How to remove and insert needles..................................................................................................................... 11
* Needle Position.............................................................................................................................................. 11
* To Remove Needle(s)..................................................................................................................................... 11
* To Insert Needles(s)....................................................................................................................................... 11
9. Selection of stitches............................................................................................................................................ 12
10. Handy reference chart........................................................................................................................................ 12
11. How to sew a cover stitch................................................................................................................................... 13
12. Threading the machine....................................................................................................................................... 16
* Threading Diagram: Three Thread Cover/Chain Stitch............................................................................... 16
* Tension Color Code: Cover Stitch................................................................................................................... 16
* Three-Thread Cover Stitch Suggested Tension Settings............................................................................ 25
* Threading Diagram: Cover Stitch - Two Thread Narrow................................................................................. 26
* Tension Color Code: Two Thread Narrow Cover............................................................................................ 26
* Threading Diagram: Cover Stitch - Two Thread Wide.................................................................................... 32
* Tension Color Code: Two Thread Wide Cover............................................................................................... 32
* Two-Thread Cover Stitch Suggested Tension Settings
* Threading Diagram: Chain Stitch.................................................................................................................... 39
* Tension Color Code: Chain Stitch................................................................................................................... 39
* Double Chain Stitch Suggested Tension Settings
13. How to change threads: tie on method............................................................................................................... 46
14. How to adjust the stitch length............................................................................................................................ 47
15. How to adjust the presser foot pressure............................................................................................................. 47
16. Differential feed.................................................................................................................................................. 48
17. Machine maintenance........................................................................................................................................ 49
18. Snap-on type presser foot.................................................................................................................................. 51
19. Troubleshooting chart......................................................................................................................................... 52
20. Relationship between cloth, thread and needle.................................................................................................. 53
21. Specification....................................................................................................................................................... 54
..............................................................................
......................................................................................
38
44
Page 6
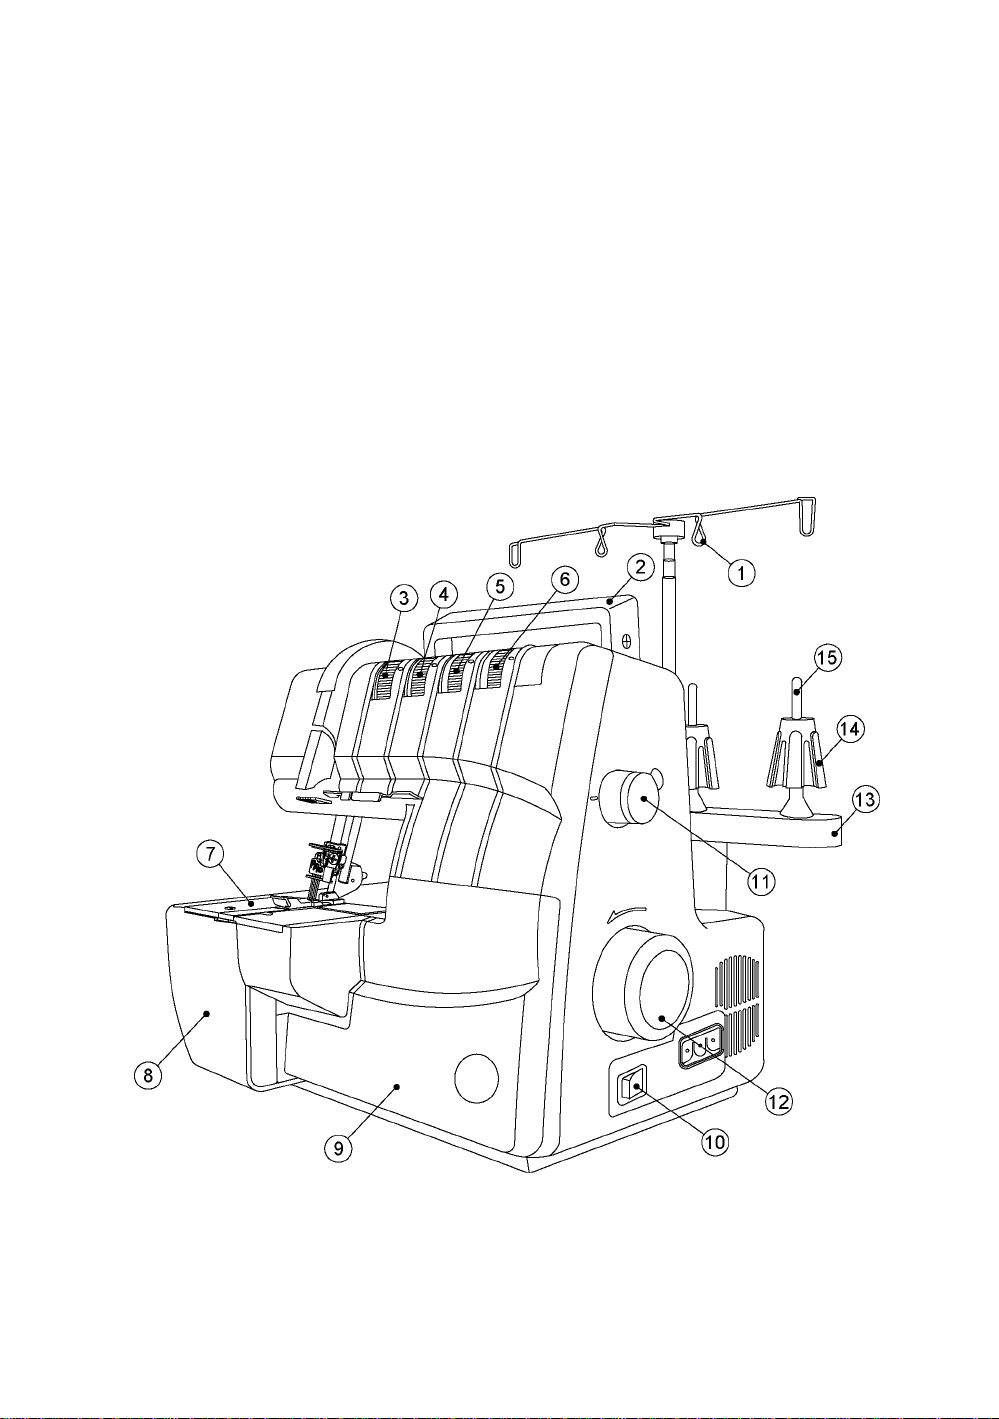
1. PRINCIPAL PARTS
1. Thread Guides and Holder
2. Handle
3. Left Needle Thread Tension Dial (blue)
4. Middle Needle Thread Tension Dial (green)
5. Right Needle Thread Tension Dial (red)
6. Chain Stitch Looper Thread Tension Dial (yellow)
7. Throat Plate
8. Cloth Plate
9. Looper Cover
10. Power & Light Switch
11. Stitch Length Dial
12. Handwheel
13. Spool Stand
14. Cone Adaptor
15. Spool Pin
Page 7
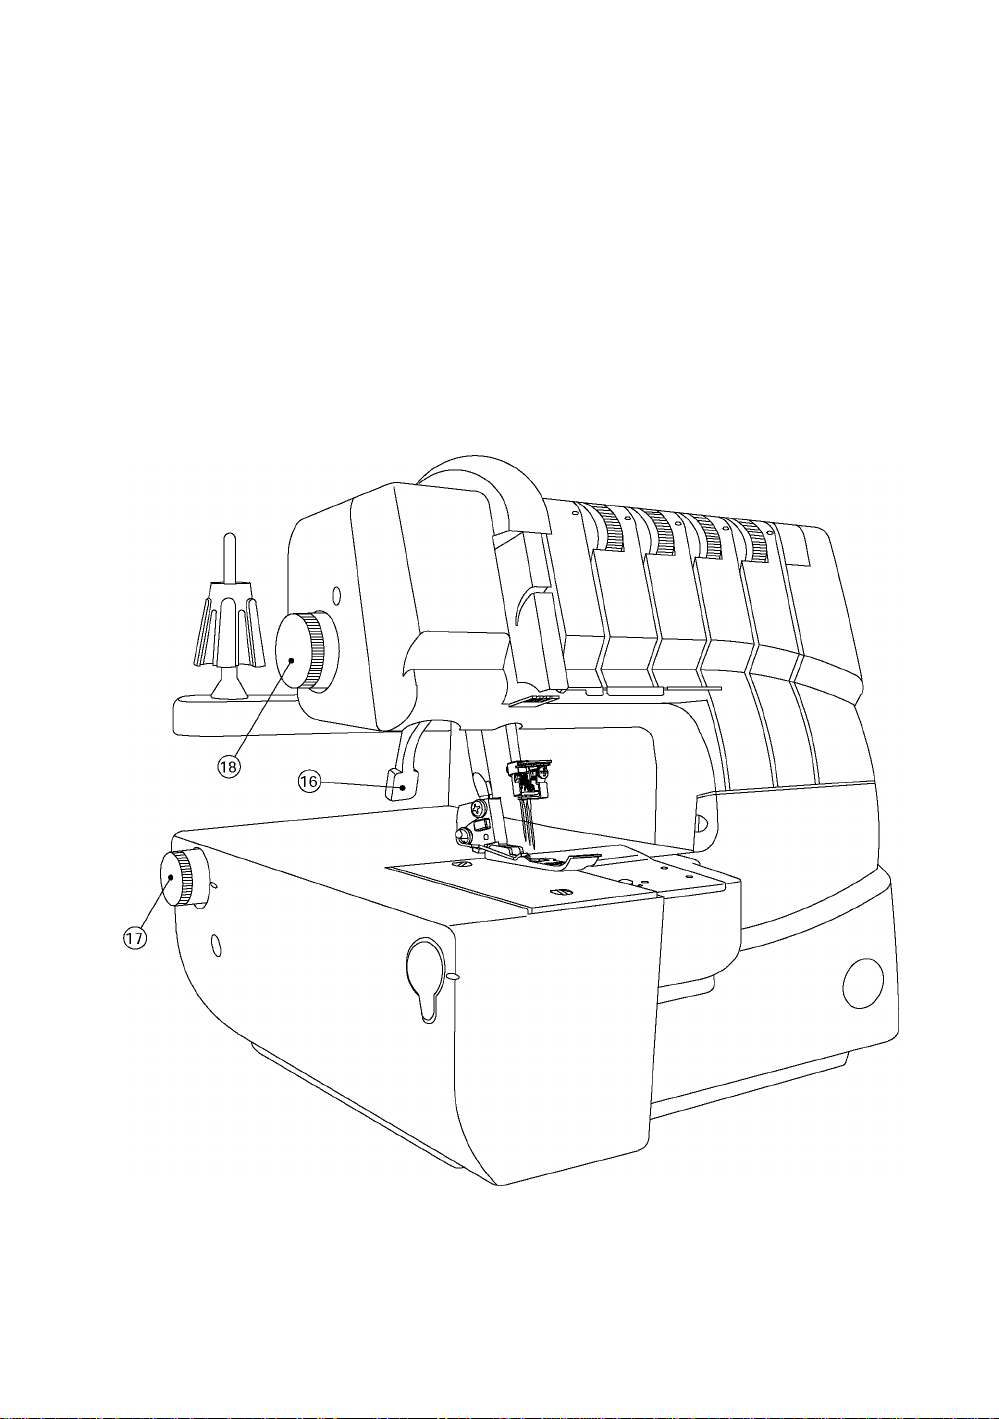
16. Presser Bar Lifter and Tension Release
17. Differentiai Feed Adjusting Diai
18. Foot Pressure Adjusting Diai
Page 8
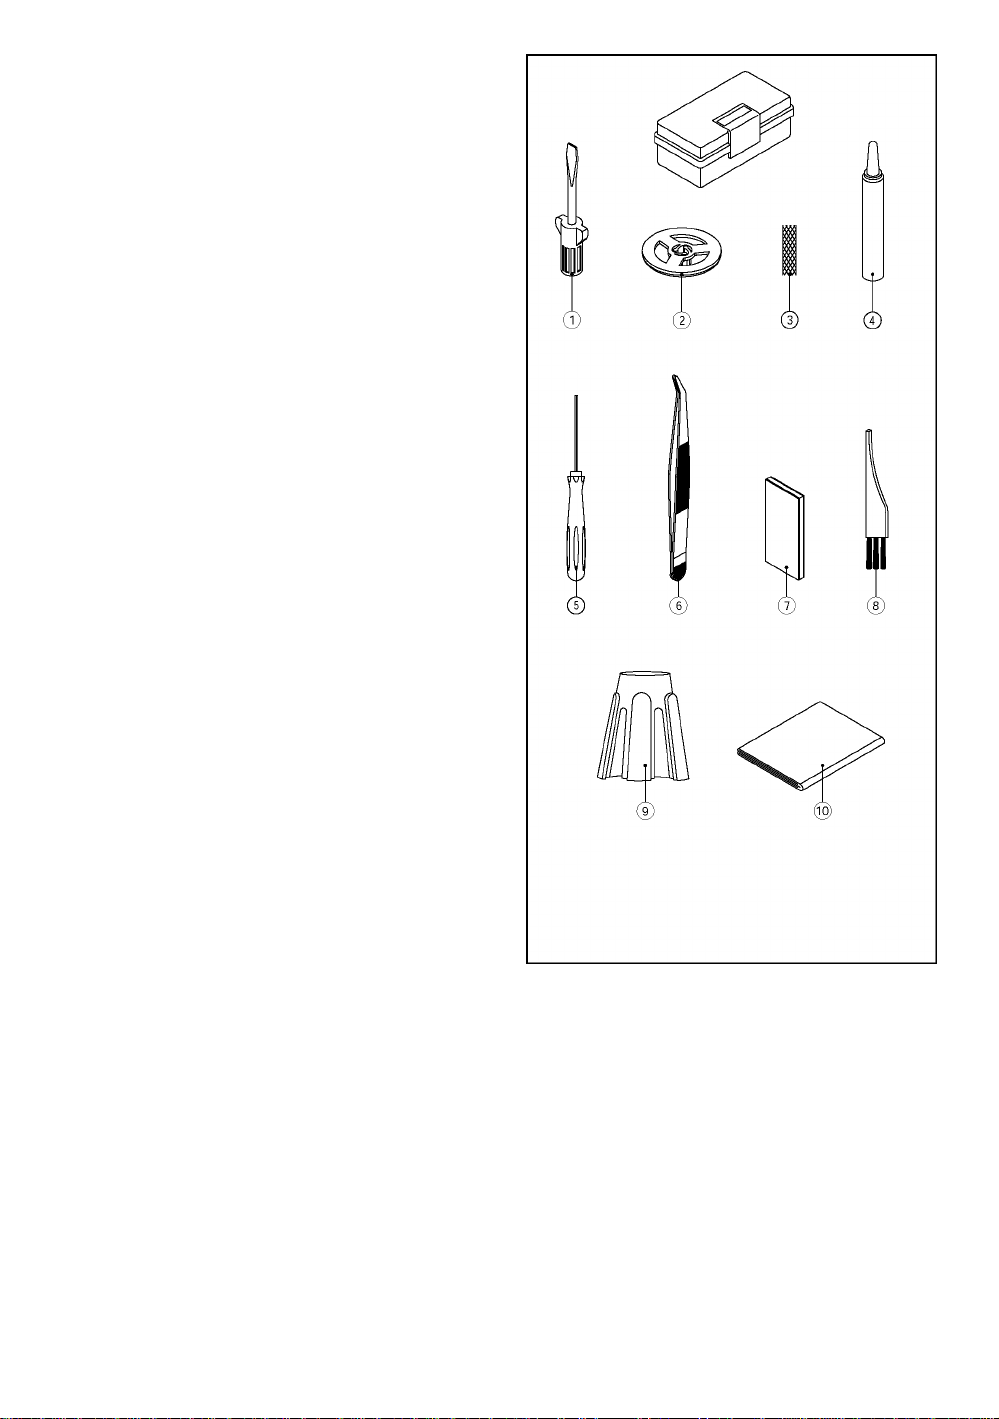
2. ACCESSORIES
Accessories are contained in the accessory case
1. Screw Driver (iarge size) 1
2. Thread Unwinder Spooi Cap 4
3. Anti-Spili Net 4
4. Oiier 1
5. Aiien Screw Driver (smali) 1
6. Tweezers 1
7. Needie Set 1
8. Brush 1
9. Spooi Holder 1
10. Machine Cover 1
3. NEEDLE INFORMATION
' This cover stitch uses a flat shank industrial needle
that eliminates the possibility of inserting the needle
backwards.
' Do not attempt to use a standard household sewing
machine needle of any size or type in this cover
stitch.
’ SINGER 2022 Needles size 14/90 are furnished
with the machine.
' Only use SINGER 2022 Needles size 14/90 and
11/80 as supplied in the accessory case.
SINGER 2022
Overlook needle
Page 9
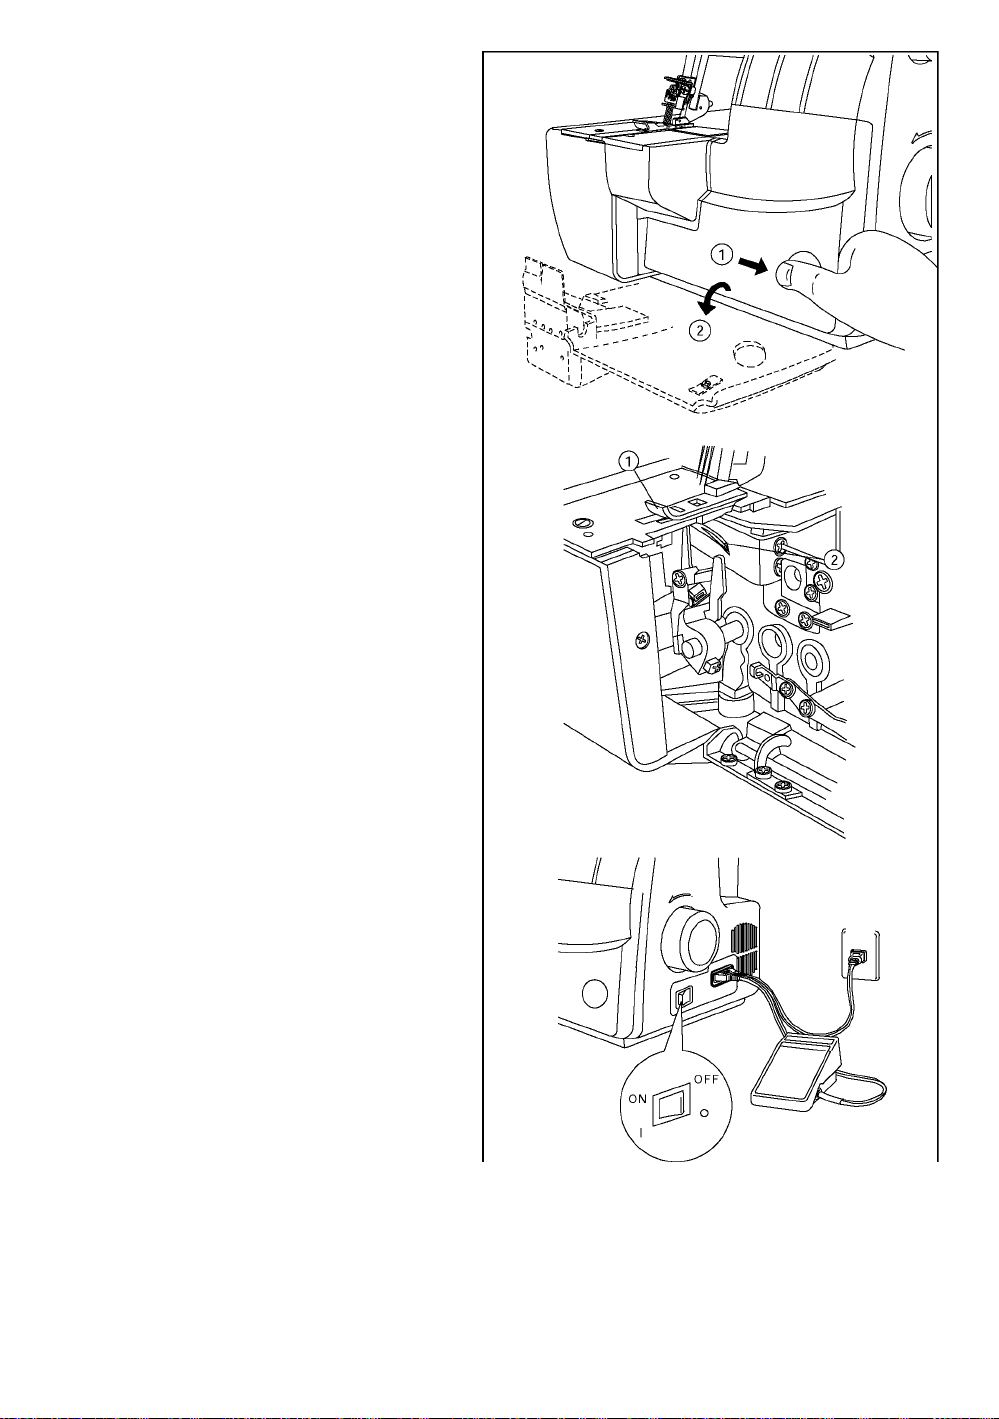
4. HOWTO OPEN LOOPER COVER
Caution:
A
Push the cover to the right as far as it wiii go.
Puii cover down toward you.
A
Be sure to turn off power switch.
Caution:
|\ Be sure iooper cover is ciosed when
sewing.
5. PRINCIPAL PARTS BEHIND THE
LOOPER COVER
1. Chain/Cover Looper
6. PREPARATION PRIOR TO SEWING
' Connect the controlier/eiectric piug to the
machine receptacle.
’ Plug power line into eiectric outlet.
' Power Switch: Push "i" mark side to turn “ON”
Push "O" mark side to turn “OFF”
' To run the machine and controi the speed, press
the controlier.
' The harder you press, the faster the machine
wiii sew.
' To stop the machine from sewing, remove your
foot from the controiier.
WARNING:
Use only foot controller provided with this machine.
(Type 4C-316B for U.S.A. & CANADA only)
Be sure to make reference to “Warning” on following
Page.
Page 10

POLARIZED PLUG INFORMATION (FOR U.S.A. & CANADA ONLY)
This appliance has a polarized plug (one blade wider than the other). To reduce the risk of
electric shock, this plug is intended to fit in a polarized outlet only way. If the plug does not fit
fuily in the outlet, reverse the plug. If it still does not fit contact a qualified electrician to instail
the proper outlet. Do not modify the piug in any way.
A
Warning:
' Be sure that the eiectrical voitage of the eiectric outlet (wall receptacle) is the same as the
rated voltage of the motor.
' Handle the foot controller with care and avoid dropping it on the floor. Be sure not to place
anything on top of it when not in use.
' Disconnect the power line plug from the electric outlet when changing needles, presser feet or
when leaving the machine unattended. This eiiminates the possibility of starting the machine
by accidentally pressing the controller.
Page 11
7. PREPARATION FOR THREADING
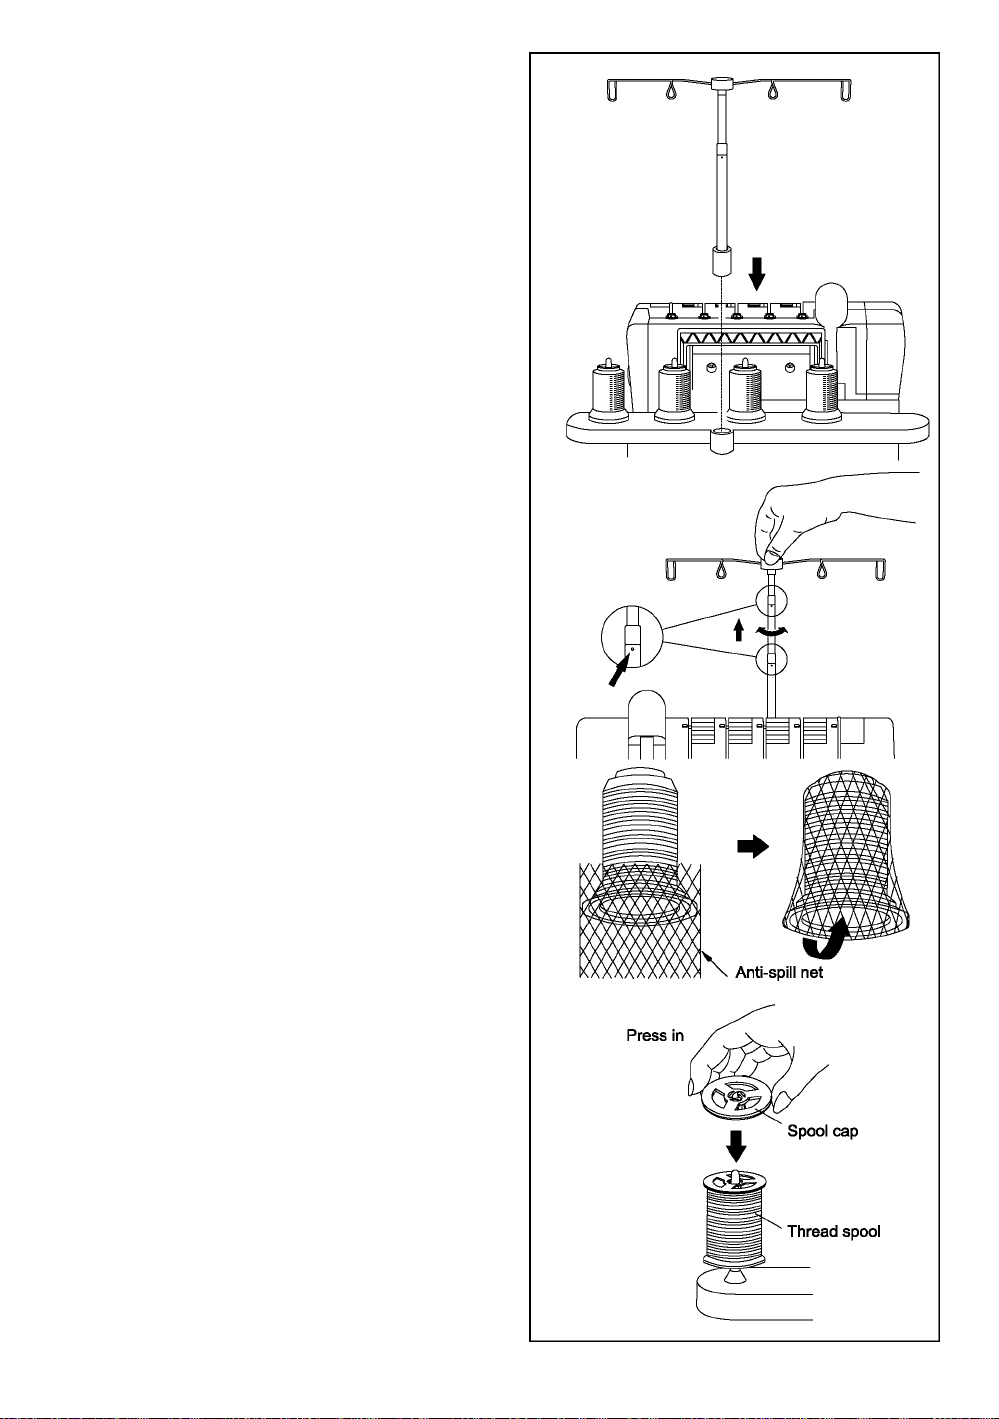
Setting Up the Thread Guide Hoider
• Take out the thread guide from the top of
Styrofoam, and insert it as shown on the right
iiiustration.
• This machine is shipped with the thread guide
hoider on the top of styrofoam.
• Fuiiy extend the thread guide hoider.
• The two joints on the teiescope wili ciick into
place when they are correctiy positioned.
• Center the thread guides above the spooi pins.
• Place thread over the cone adapters on the
spool pins.
Note: Your new machine is threaded to sew
Triple Cover Stitch. Refer to Page 45 for
instructions on tying on to the threads.
Anti-spili Net
• When using synthetic threads that easily spill off
the cone, slip the anti-spill net furnished with the
machine over the thread from the bottom of the
cone leaving the thread end hanging free at the
top the anti-spill net as shown at right.
Spool Cap
• When using a regular thread spool, fit the spool
cap supplied with the machine onto the thread
spool as shown at right.
10
Page 12
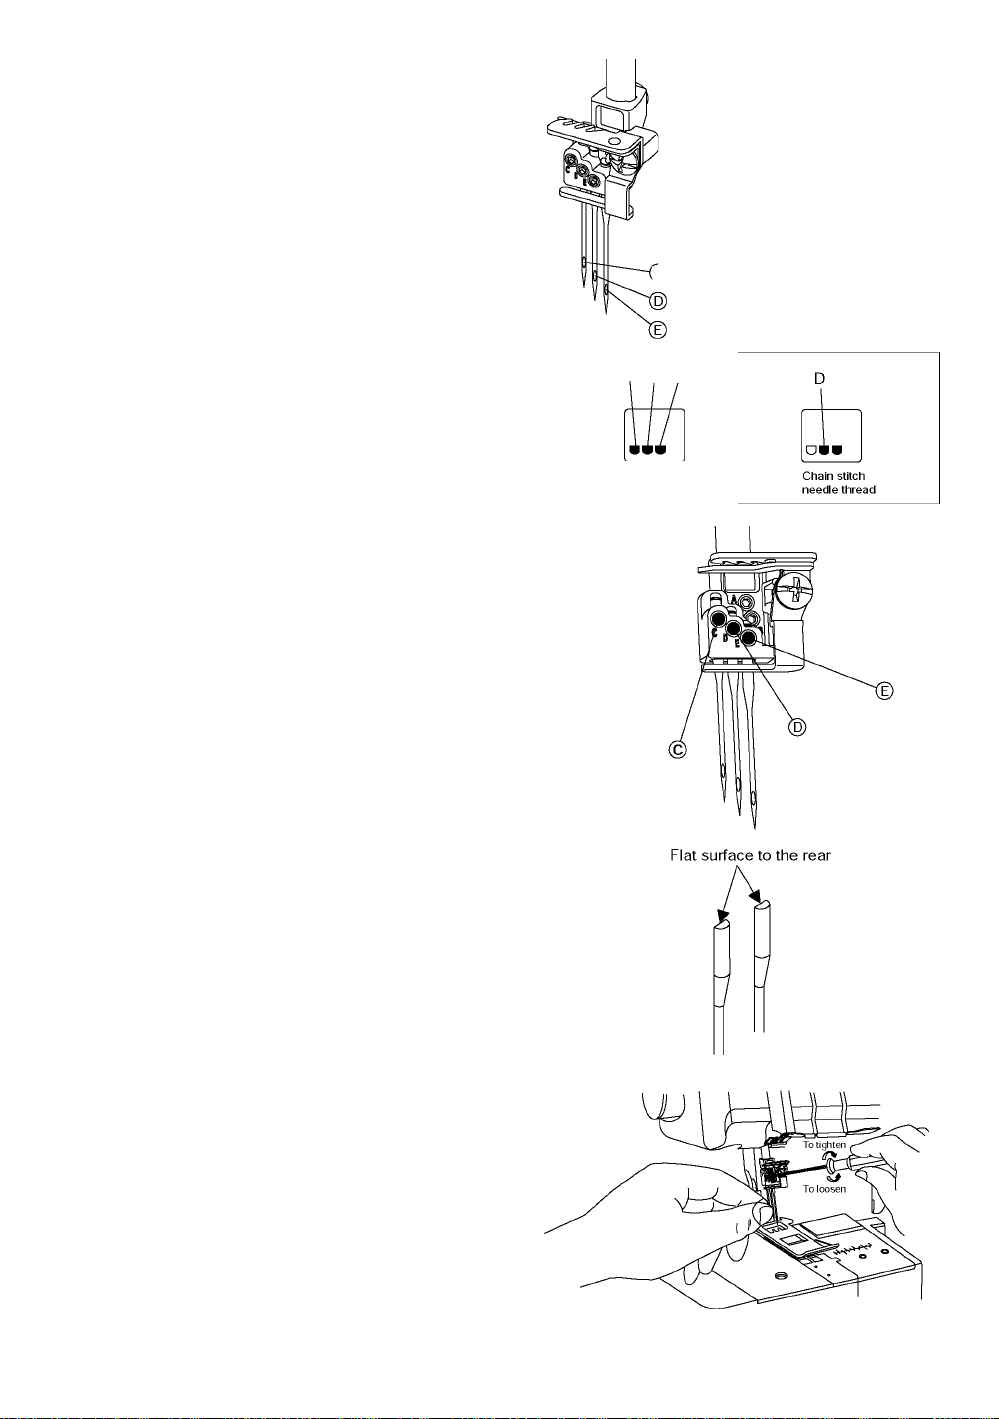
8. HOWTO REMOVE AND INSERT NEEDLES
Needle Position
• With this machines, three needies can be inserted to
the needie clamp as shown in the drawing.
• The Instruction Book refers to different needie positions
by iliustrating the needle clamp at right.
Note: When all cover stitch needles are inserted,the left
needle will be slightly higher than the others.
To Remove Needle(s)
Caution:
Be sure to disconnect the machine from the
A
• Turn the hand wheel toward you until the needles are at
their highest position.
• Place a thick piece of fabric [such as felt] under the
presser foot. Lower the needles halfway into the fabric.
• Loosen, but do not remove the needle set screws
with the small alien screwdriver. Hold the needles with
your fingers and raise the needle bar. The needles will
remain in the fabric.
electric outlet before removing needle(s).
C. Cover stitch left needle
D. Cover stitch middle needle
E. Cover stitch right needle
C
Cover stitch right needle
Cover stitch middle needle-|—I
/ Chain stitch needle
Cover stitch left needle -
C D E
Vo
Left, middle and right cover
stitch needle thread
Attention:
After removing the specific needle which is not currently to
be used for sewing, remember to fasten the set screw in
the screw hole of the needle clamp and to Just fasten tight
into the hole. Please do not over-tighten the screw into the
hole or the needle clamp will be damaged.
To Insert Needles(s)
• Hold the needle with the flat surface to the back.
• Insert the needle into the needle socket as far as it
will go.
• When inserting a needle, if you first lower it down
into the hole in the throat plate it will line up with the
needle socket. Then direct it upwards
This machine uses SINGER 2022 needles.
Do not use Standard Household Needles.
11
Page 13
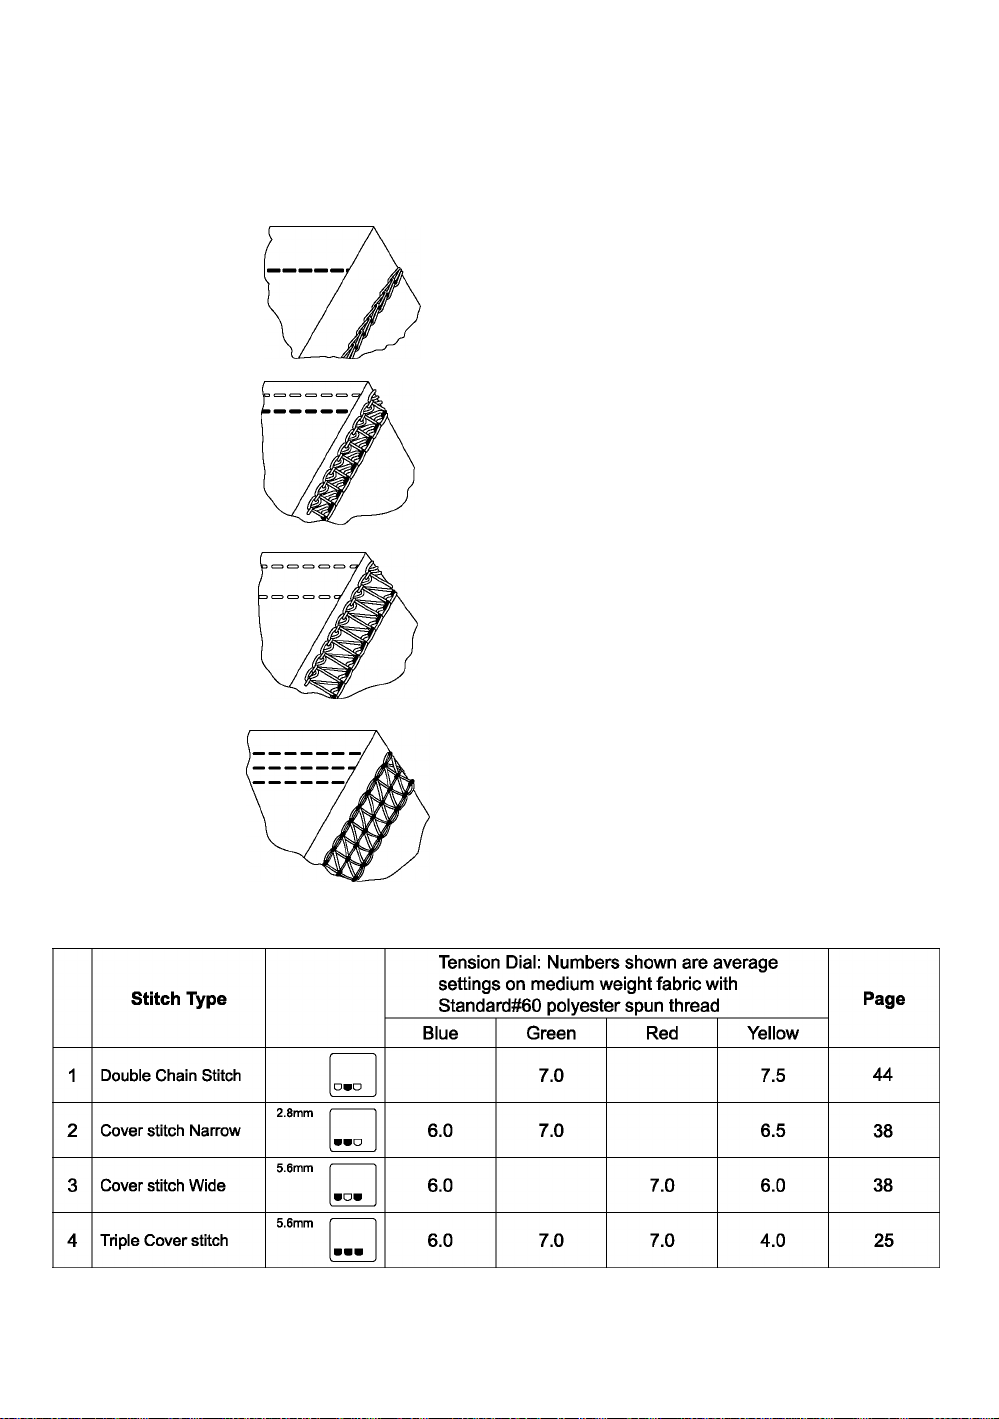
9. SELECTION OF STITCHES
This machine is capable of producing 4 types of stitches according to the combination of needie positions, threading
methods, tension adjustment.
Stitch Type
1. Double
Chain Stitch
2. Cover Stitch
Narrow
(2.8mm)
3. Cover Stitch
Wide (5.6mm)
4. Triple Cover
Stitch
(5.6mm)
A1-needie 2-thread straight stitch is
used for construction or decorative
stitching. Seams also can be sewn at
desired distance from edge of fabric
by disengaging the right iooper and
movabie knife.
2-needie, 3-thread cover stitch is
suitabie for stretchy fabrics such as
knits, etc.
A narrow seam is formed by using ieft
and middle needles.
2-needle 3-thread cover stitch is
suitable for stretchy fabrics such as
knits, etc.
A wide seam is formed by using left
and right needles.
3-needle 4-thread cover stitch is
suitable for stretchy fabrics such as
knits, etc.
A triple seam is formed by using left,
middle, and right needle.
Reference
Page
44
38
38
25
10. HANDY REFERENCE CHART
The thread tension becomes tighter as the diais are turned to higher numbers. The tension settings shown on this page as weli as throughout
the instruction book are suggested guides. Adjust thread tensions to suit the fabric and size of thread of thread used. For best results make
tension adjustments in smali increments of no greater than haif a number at a time.
* When chainstitching under conditions given in No.1, set stitch iength to over 2mm.
* When cover stitching under conditions given in No.2,3,4, set stitch iength to over N (2.5mm).
12
Page 14
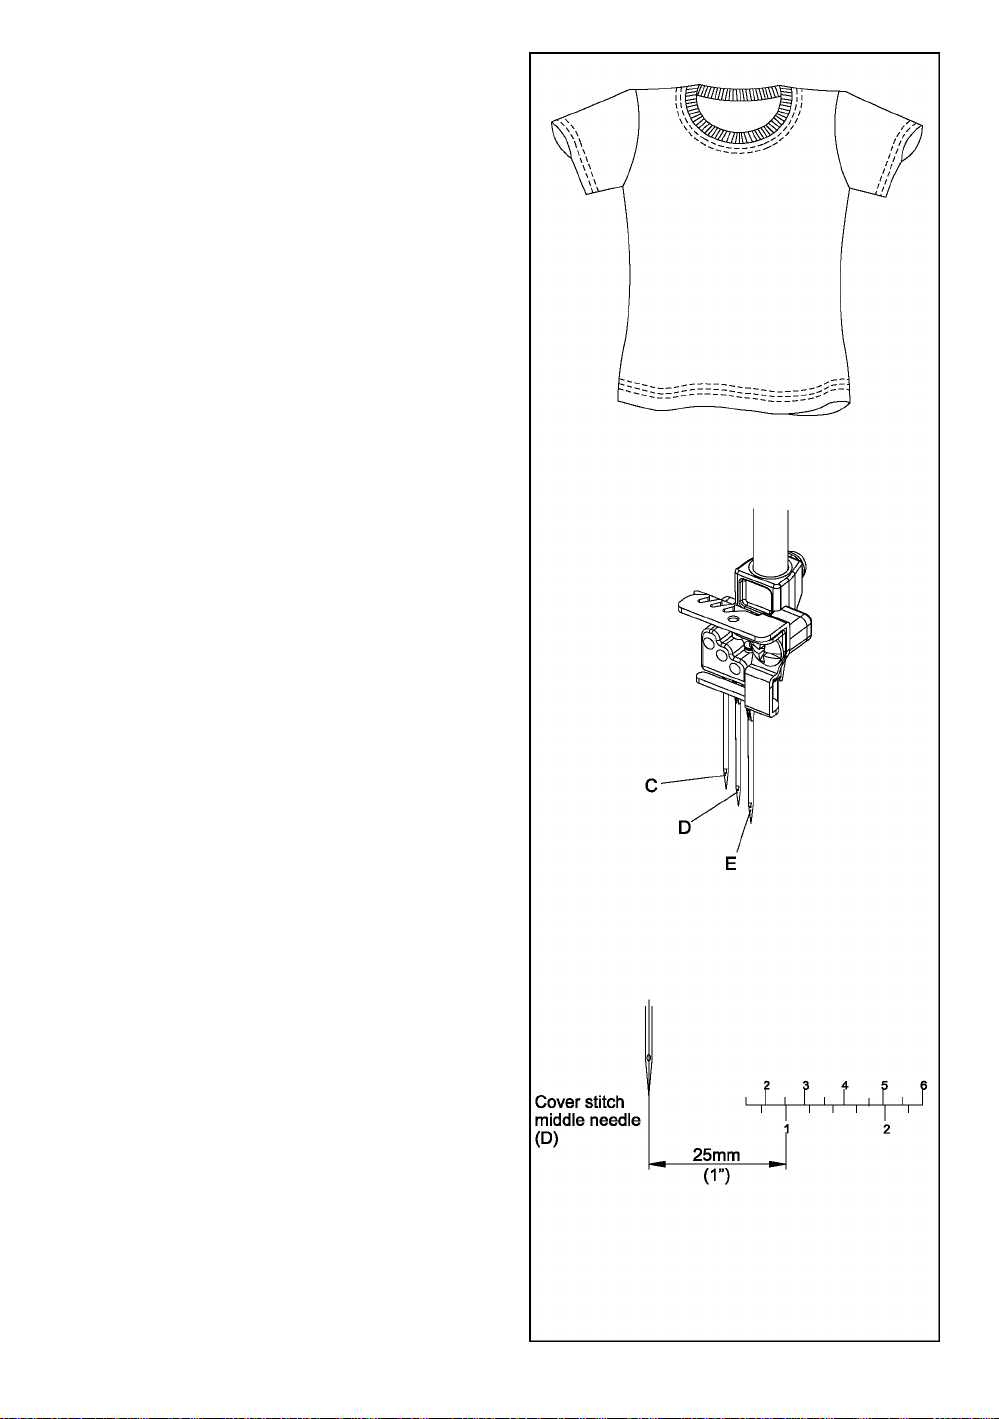
11. HOWTO SEW A COVER STITCH
This machine can produce a 3-thread 5.6 mm wide
bottom cover stitch.
The cover stitch can be used for covering, binding
or top-stitching necklines and for hemming the
bottom, of T-shirts and sweatsuits, etc. in addition
to flat joining seams (plain seaming).
The cover stitch is most suitable for stretchy
fabrics such as knit.
It also can be used In woven fabrics such as
denim, but careful attention must be paid to the
tension settings or there is the possibility of thread
breakage and or skipping.
If you experience skipping or thread breakage
sewing denim change needles first and then adjust
the tensions little by little (1/4 number at a time).
Machine Set up
Caution:
A
• Open looper cover. (See page 8)
• For Triple 5.6mm cover stitch, install cover stitch
right needle (E), cover stitch middle needle (D) and
cover stitch left needle (C).
• Pass thread through needles (E), (D) and (C) and
thread cover stitch looper [yellow].
• The graduations on seam guide plate indicate the
distance from cover stitch middle needle.
Use It as a guide when positioning fabric edge.
• Close looper cover.
Be sure to turn off power switch.
13
Page 15
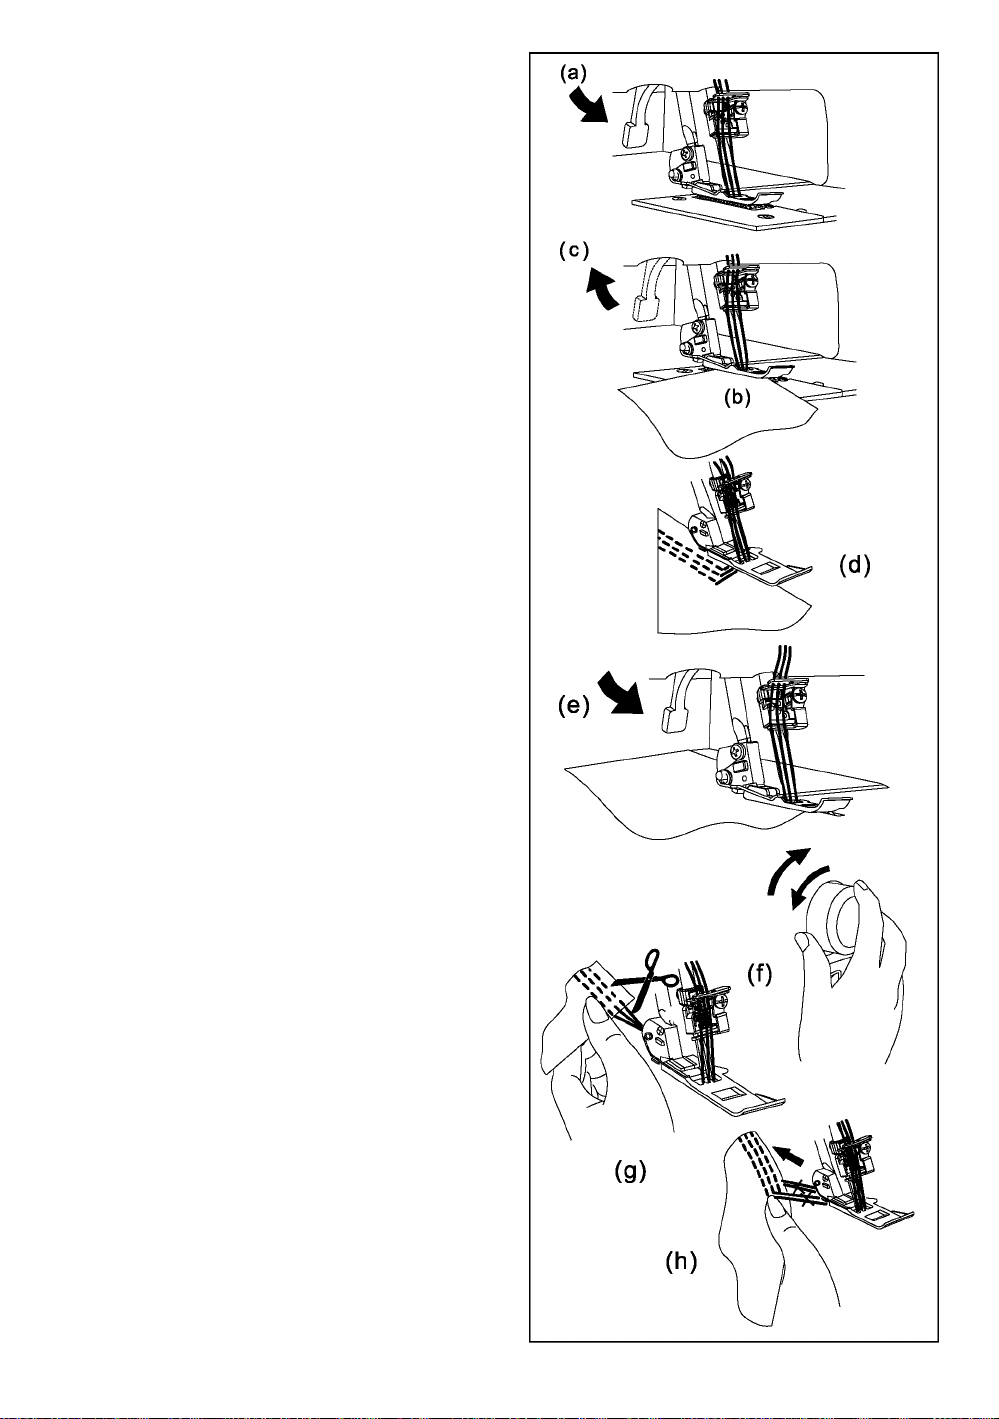
Additional Information About Cover Stitch
At start of sewing
• Raise presser foot, (a)
Place fabric under presser foot behind the needle, (b)
Lower presser foot, (c)
Note:
When you start to sew from the middle of the fabric,
place the fabric at the desired starting point of sewing,
(d)
At end of sewing
stop sewing when the fabric is not under
the needles
Raise presser foot, (e)
Turn the hand wheel toward you one circle
(counter-clockwise), then turn away from you
one circle back, (Clockwise) stopping with
needles in the highest position, (f)
Place your thumb on the stitches, then pull out
the fabric lightly to rear of machine and cut the
threads, (g)
Note:
The instructions are given when sewing cover
stitches because it is not possible to chain-off
when doing a cover stitch, (h)
14
Page 16
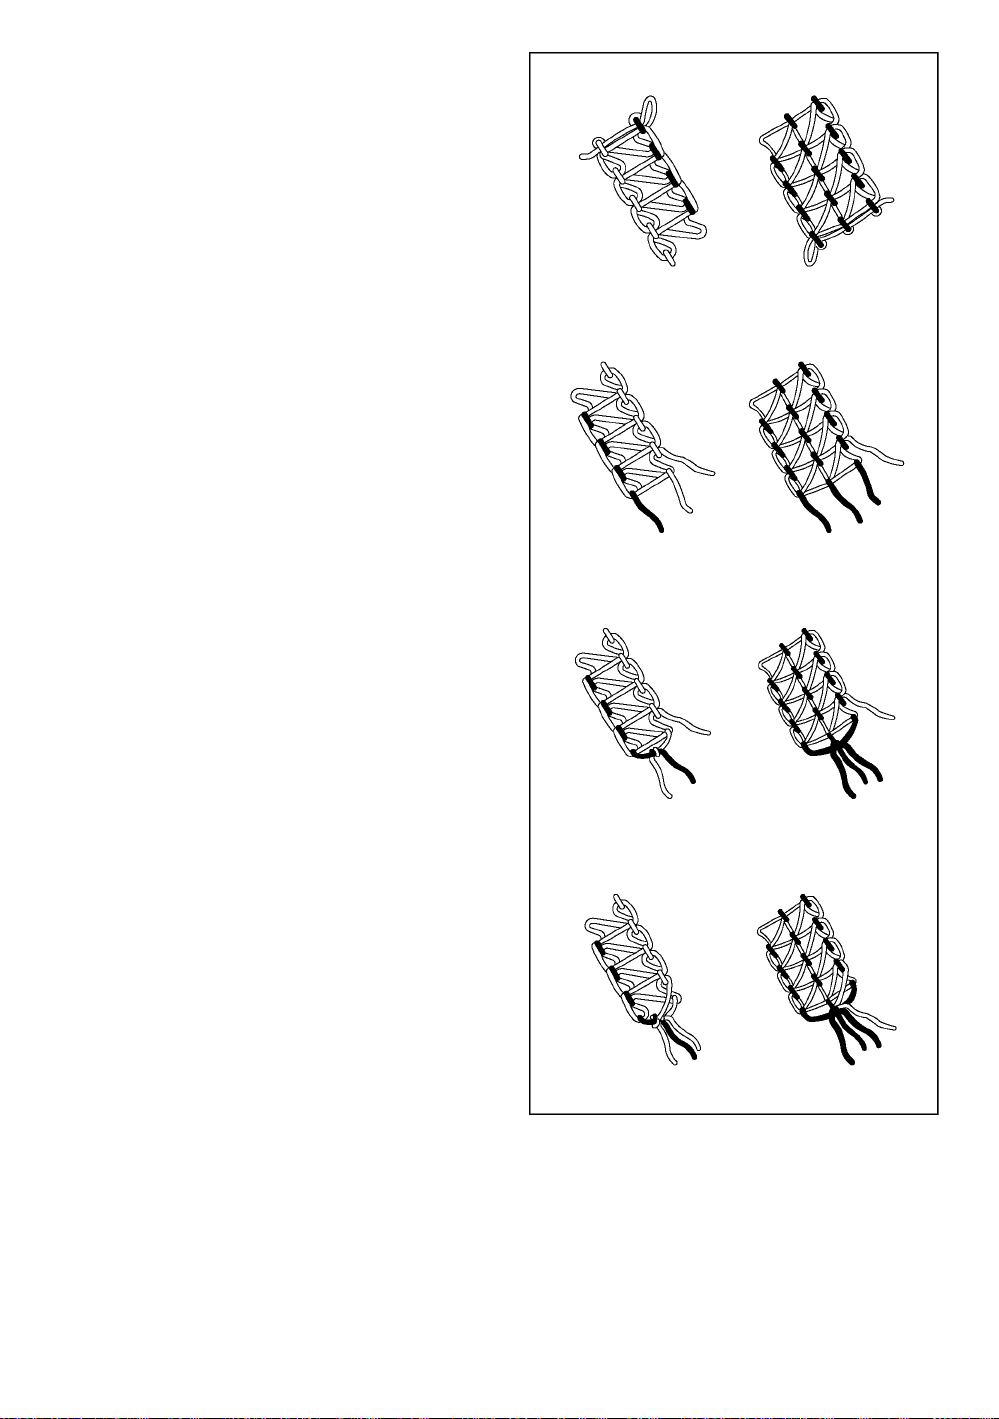
Securing the Seam End
• Since the seams formed by cover stitch unravei
when the iooper thread is pulied out at the end
of sewing, secure the seam end in the foliowing
manner.
When sewing through to the edge of fabric, among
the threads coming out of the fabric edge, knot
the needie threads (2 or 3 threads) together first,
as shown on the right iliustration. Then, tie these
threads with the Iooper threads.
When sewing is stopped haifway, puil out the
needie threads (2 or 3 threads) on the underside of
the fabric and knot the threads in the same manner
as described above.
Cut extra threads.
Note: Normaiiy, the seams at the start of sewing do
not unravel, but it is safe to secure the seam
end foliowing the same steps as described
when sewing through to the edge of fabric.
15
Page 17
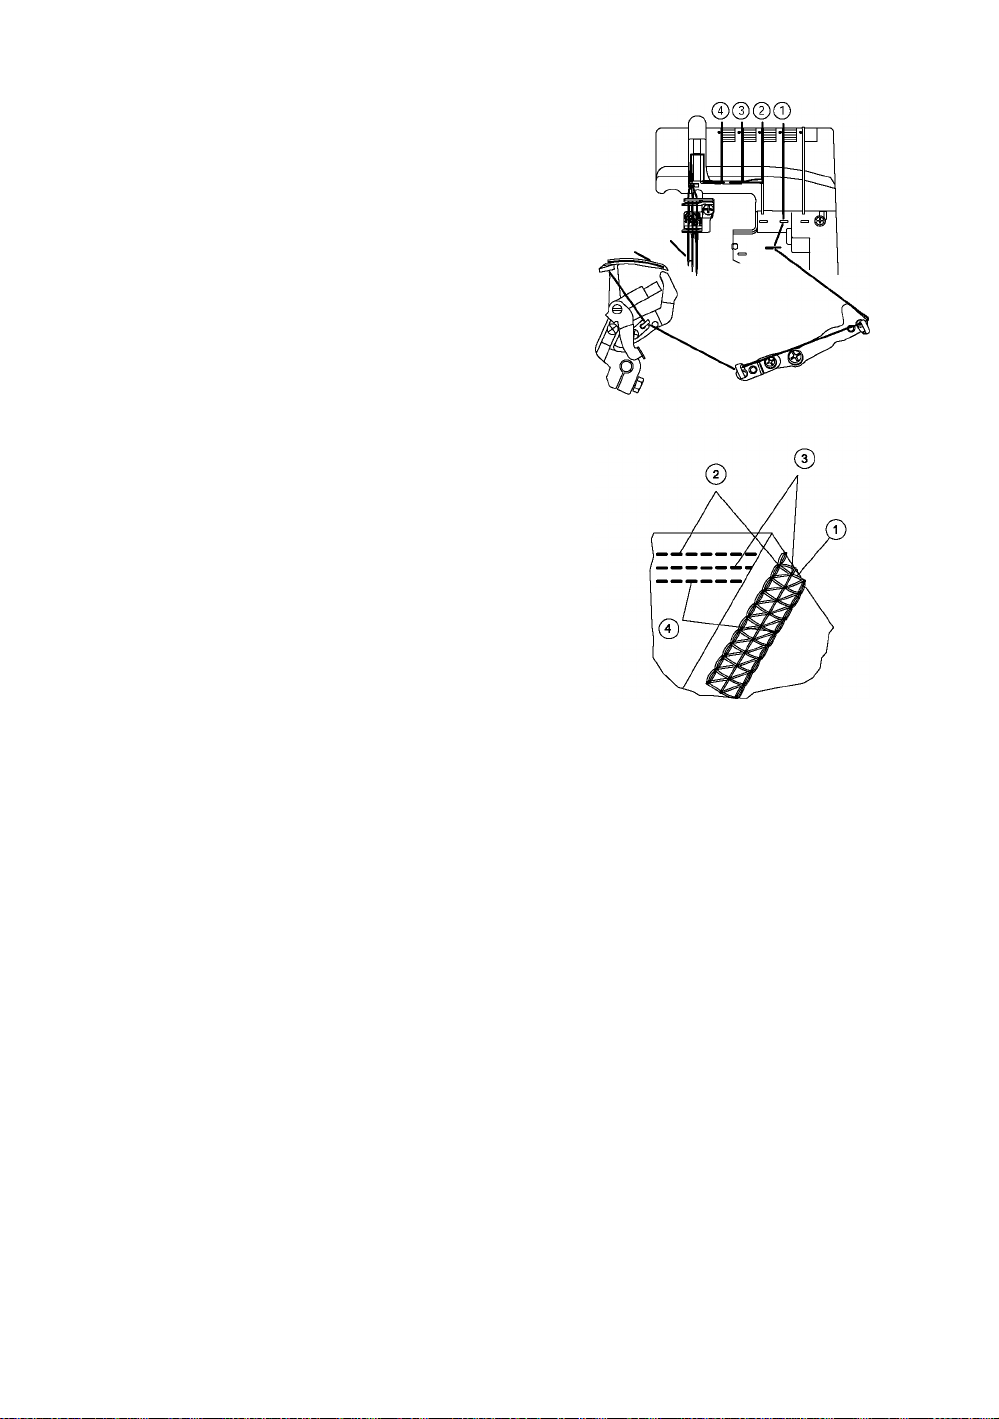
12. THREADING THE MACHINE
Threading Diagram:
Three Thread Cover Stitch
• A color coded threading diagram is located Inside
the looper cover for quick reference.
• Thread the machine in the order 1 to 4 as shown
at right.
Tension Color Code: Cover Stitch
J
1. Cover stitch looper thread
2. Right needle thread...................... Red
3. Middle needle thread
4. Left needle thread
........................
..........
...................
Yellow
Green
Blue
16
Page 18
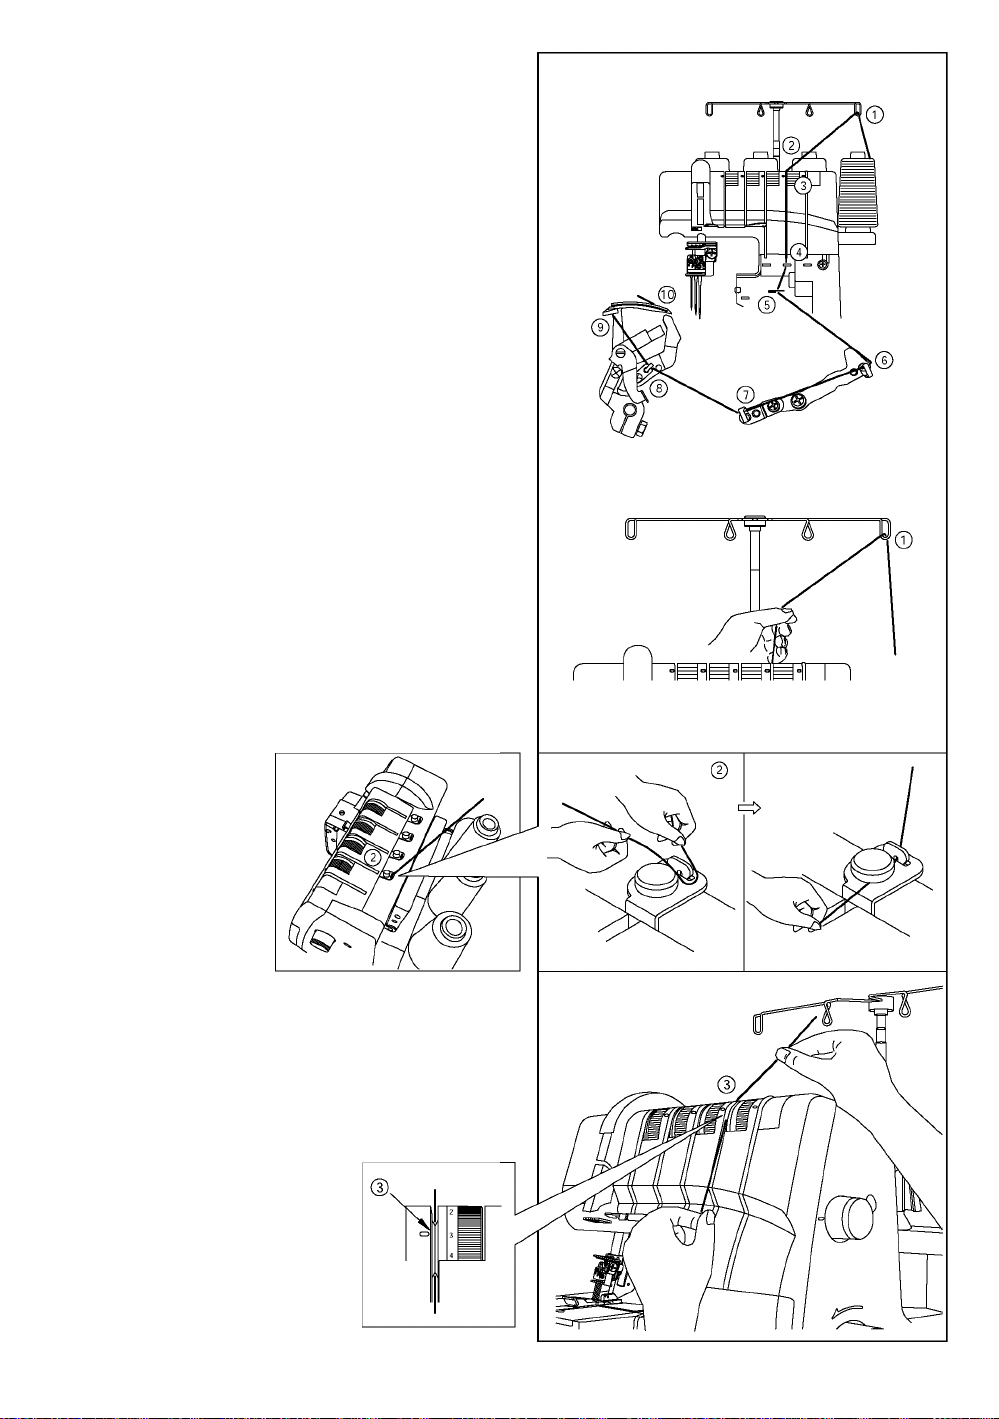
1) Threading the Chain Stitch/Cover Stitch Looper
(Yeiiow)
• Thread the chain stitch/cover stitch iooper as
indicated 1~10.
Raise Presser foot to reiease Tension discs
Pass thread from back to the front through the thread
guide 1.
Thread the top cover
thread guide by puiiin
the thread towards the
ieft untii it siips under
guide. Then puii threa
aiong the right side of
button as iliustrated.
Whiie hoiding thread with fingers, pass it between the
tension discs and puii thread down to make certain it is
properiy iocated in between the tension discs 3.
17
Page 19

Turn the hand wheel toward you until the chain stitch
iooper extends out 10mm from the throat piate edge.
Thread the iooper area of the machine foiiowing the
yeiiow color-coded thread guides 4~10.
Note: Use the tweezers provided in the accessory case
to aid in threading the Iooper.
Place the thread with the point of the tweezers through
threading guide 4.
Place the thread with the point of the tweezers through
the front slot of threading guide 5.
Place the thread with the point of the tweezers through
threading guide 6,7 and 8.
Thread the Iooper eye (A) from front to back.
Pull about 10cm (4 inches) of thread through the
Iooper. Position thread into V cutout (B) on threader.
Firmly hold thread tail with left hand and pull threader
lever (C) up into place (D).
18
Page 20

(2) Threading the Cover Stitch Right Needie
(Red) (E on needie ciamp)
• Thread the cover stitch right needie as
indicated 1-9.
Raise Presser foot to reiease Tension discs
Pass thread from back to the front through the thread
guide 1.
Thread the top cover
thread guide by puiiing
the thread towards the
ieft untii it siips under
guide. Then puii thread
aiong the right side of
button as iiiustrated.
19
Page 21

While holding thread with fingers, pass it between the
tension discs and pull thread down to make certain it is
properly located in between the tension discs 3.
Continue to thread points 4-8.
Note: Slip thread into the rear slot on thread guides 5.
Slip the thread into the slot of the Take-up Lever
Cover 6. Slip the thread into the right slots for
thread guides 7 and 8.
Before threading eye of needle, make sure thread is
in front of thread guide located on the bottom of the
needle clamp for Cover stitch.
Thread the eye of the right needle 9.
Note: Use of tweezers in the accessory case will
make needle eye threading easy.
Draw about 10cm (4 inches) of thread through
needle eye towards the rear of the machine.
Place the thread to the back under the presser foot.
20
Page 22

(3) Threading the Cover Stitch Middie/Chain Stitch Needle
(Green) (D on needle clamp)
• Thread the cover stitch middle/chain stitch needie as
indicated 1~9.
• Raise the Presser Foot to reiease Tension discs.
Pass thread from back to the front through the thread
guide 1.
Thread the top cover
thread guide by pulling
the thread towards the
left until it slips under
guide. Then pull thread
along the right side of
button as illustrated.
21
Page 23

While holding thread with fingers, pass it between the
tension discs and puli thread down to make certain it is
properly located in between the tension discs 3.
Continue to thread points 4-8.
Note: Slip thread into the middle slot of the thread
guide 5 and into the slot of take-up lever cover 6
Then continue by slipping thread into the middie
slot of the thread guides 7 and 8.
Before threading eye of needie, make sure thread is
in front of thread guide iocated on the bottom of the
needle clamp for Cover stitch and for Chain stitch.
Thread the eye of the right needie 9.
Note: Use of tweezers in the accessory case wiil
make needle eye threading easy.
Draw about 10cm (4 inches) of thread through
needle eye towards the rear of the machine.
Place the thread to the back under the presser foot.
22
Page 24

4) Threading the Cover Stitch Needies
(1) Threading the Cover Stitch Left Needle
(Blue) (C on needle clamp)
• Thread the cover stitch left/chain stitch needie as
indicated 1~9.
• Raise Presser foot to reiease Tension discs.
Pass thread from back to the front through the thread
guide 1.
©
Thread the top cover
thread guide by puiiing
the thread towards the
ieft untii it siips under
guide. Then puii thread
aiong the right side of
button as iiiustrated.
Whiie hoiding thread with finger, pass it between the
tension discs and puii thread down to make certain it
is properiy iocated in between the tension discs 3.
23
Page 25

Continue to thread points 4~8.
Note: Siide thread into front slot on thread guide 5
and the slot of take-up lever over 6. Then slip
thread Into left slots of thread guides 7 and 8.
Before threading eye of needle, make sure thread is
in front of thread guide located on the bottom of the
needle clamp.
Thread the eye of the left needle 9.
Note: Use of tweezers In the accessory case will
make needle eye threading easy.
Draw about 10cm (4 inches) of thread through
needle eye to hang free.
Place the thread to the back, under the presser foot.
24
Page 26

Three-Thread Cover Stitch Suggested Tension Settings
Note: * These are suggested tension settings oniy.
* Tension settings are effected by;
1) Type and thickness of fabric
2) Needie size
3) Size, type and fiber content of thread
* Stitch iength for cover stitch should be set at
over N (2.5mm).
Correct Balance
• Set each tension diai to settings shown at right
and test sew on a sampie of your fabric.
How to Balance
• When the cover stitch looper thread is too ioose;
-Turn the cover stitch iooper thread tension diai
(yellow) toward a higher number.
• When the cover stitch left needle thread tension is
too loose;
-Turn the cover stitch left needle thread tension dial
(blue) toward a higher number.
-Or, turn cover stitch looper thread tension dial
(yellow) toward a lower number.
• When the cover stitch middle needle thread tension
is too loose;
-Turn the cover stitch middle needle thread tension
dial (green) toward a higher number.
-Or, turn cover stitch looper thread tension dial
(yellow) toward a lower number.
• When the cover stitch right needle thread tension is
too loose;
-Turn the cover stitch right needle thread tension
dial (red) toward a higher number.
-Or, turn the cover stitch looper thread tension dial
(yellow) toward a lower number.
NEEDLE POSITION
STITCH LENGTH N~4
Cover stitch right needle thread
Cover stitch
Left needle thread
Topside
Cover stitch
looper Thread
Polyester
Woolly nylon 6.0 7.0 7.0 0
Cover stitch right needie thread Cover stitch middle
Cover stitch
Left needle thread
Topside
Cover stitch right needle thread
Cover stitch
Left needle thread
Topside
Cover stitch right needle thread Cover stitch middle
Cover stitch
Left needle thread
Topside
Cover stitch right needle thread Cover stitch middle
Blue Green Red Yellow
6.0 7.0 7.0 4.0
Cover stitch middle
needle thread
Cover stitch
looper thread
Underside
Tension Dial
needle thread
Cover stitch
looper thread
Underside
Cover stitch middle
needle thread
Cover stitch
looper thread
Underside
needle thread
Cover stitch
looper thread
Underside
needle thread
• When the top surface of fabric bulges between
needle threads and the seams on the underside of
the fabric becomes tight;
- Turn the cover stitch looper thread tension dial
(yellow) toward a lower number.
25
Cover stitch
Left needle thread
Topside Underside
Cover stitch
looper thread
Page 27

Threading Diagram: Cover Stitch - Two Thread Narrow
Tension Color Code: Two Thread Narrow Cover
1. Cover Stitch Looper
2. Middle Needle Thread (D)...........................Green
3. Left Needle Thread (C)
4. Remover Needle (E)
....................................
...............................
Yellow
Blue
1) Threading the Chain Stitch/Cover Stitch Looper
(Yeliow)
• Thread the chain stitch/cover stitch looper as
indicated 1~10.
Raise Presser foot to release Tension discs.
Pass thread from back to the front through the thread
guide 1.
Thread the top cover
thread guide by pulling
the thread towards the
left until it slips under
guide. Then pull thread
along the right side of
button as illustrated.
26
Page 28

While holding thread with fingers, pass it between the
tension discs and pull thread down to make certain It Is
properly located in between the tension discs 3.
Turn the hand wheel toward you until the chain stitch
looper extends out 10mm from the throat plate edge.
Thread the looper area of the machine following the
yellow color-coded thread guides 4~10.
Note: Use the tweezers provided in the accessory case
to aid In threading the looper.
Place the thread with the point of the tweezers through
threading guide 4.
Place the thread with the point of the tweezers through
the front slot of threading guide 5.
Place the thread with the point of the tweezers through
threading guide 6,7 and 8.
Thread the looper eye (A) from front to back.
Pull about 10cm (4 inches) of thread through the
looper. Position thread into V cutout (B) on threader.
Firmly hold thread tall with left hand and pull threader
lever (C) up into place (D).
B
Sk
C
27
Page 29

(2) Threading the Cover Stitch Middie/Chain Stitch Needle
(Green) (D on needle clamp)
• Thread the cover stitch middle/chain stitch needie as
indicated 1~9.
• Raise the Presser Foot to reiease Tension discs.
Pass thread from back to the front through the thread
guide 1.
Thread the top cover
thread guide by pulling
the thread towards the
left until it slips under
guide. Then pull thread
along the right side of
button as illustrated.
While holding thread with fingers, pass it between the
tension discs and pull thread down to make certain it is
properly located in between the tension discs 3.
28
Page 30

Continue to thread points 4-8.
Note: Slip thread into the middle slot of the thread
guide 5 and into the slot of take-up lever cover 6.
Then continue by slipping thread into the middie
slot of the thread guides 7 and 8.
Before threading eye of needie, make sure thread is
in front of thread guide located on the bottom of the
needle clamp for Cover stitch and for Chain stitch.
Thread the eye of the right needle 9.
Note: Use of tweezers in the accessory case will
make needle eye threading easy.
Draw about 10cm (4 inches) of thread through
needle eye towards the rear of the machine.
Place the thread to the back under the presser foot.
29
Page 31

Threading the Cover Stitch Needies
(3) Threading the Cover Stitch Left Needie
(Blue) (C on needle clamp)
• Thread the cover stitch left/chain stitch needie as
indicated 1~9.
• Raise Presser foot to reiease Tension discs.
Pass thread from back to the front through the thread
guide 1.
©
Thread the top cover
thread guide by puiiing
the thread towards the
ieft untii it siips under
guide. Then puii thread
aiong the right side of
button as iiiustrated.
Whiie hoiding thread with finger, pass it between the
tension discs and puii thread down to make certain it
is properiy iocated in between the tension discs 3.
30
Page 32

Continue to thread points 4~8.
Note: Siide thread into front slot on thread guide 5
and the slot of take-up lever over 6. Then slip
thread Into left slots of thread guides 7 and 8.
Before threading eye of needle, make sure thread is
in front of thread guide located on the bottom of the
needle clamp.
Thread the eye of the left needle 9.
Note: Use of tweezers In the accessory case will
make needle eye threading easy.
Draw about 10cm (4 inches) of thread through
needle eye to hang free.
Place the thread to the back, under the presser foot.
31
Page 33

Threading Diagram: Cover Stitch - Two Thread Wide
Tension Coior Code: Two Thread Wide Cover
1. Cover Stitch Looper
2. Middle Needle Thread (E)...........................Red
3. Left Needle Thread (C)
4. Remover Needle (D)
....................................
...............................
Yellow
Blue
1) Threading the Chain Stitch/Cover Stitch Looper
(Yeilow)
• Thread the chain stitch/cover stitch looper as
indicated 1~10.
Raise Presser foot to release Tension discs.
Pass thread from back to the front through the thread
guide 1.
Thread the top cover
thread guide by pulling
the thread towards the
left until it slips under
guide. Then pull thread
along the right side of
button as illustrated.
32
Page 34

While holding thread with fingers, pass it between the
tension discs and pull thread down to make certain It Is
properly located in between the tension discs 3.
Turn the hand wheel toward you until the chain stitch
looper extends out 10mm from the throat plate edge.
Thread the looper area of the machine following the
yellow color-coded thread guides 4~10.
Note: Use the tweezers provided in the accessory case
to aid In threading the looper.
Place the thread with the point of the tweezers through
threading guide 4.
Place the thread with the point of the tweezers through
the front slot of threading guide 5.
Place the thread with the point of the tweezers through
threading guide 6,7 and 8.
Thread the looper eye (A) from front to back.
Pull about 10cm (4 inches) of thread through the
looper. Position thread into V cutout (B) on threader.
Firmly hold thread tall with left hand and pull threader
lever (C) up into place (D).
B
Sk
C
33
Page 35

(2) Threading the Cover Stitch Right Needie
(Red) (E on needie ciamp)
• Thread the cover stitch right needie as
indicated 1-9.
Raise Presser foot to reiease Tension discs
Pass thread from back to the front through the thread
guide 1.
Thread the top cover
thread guide by puiiing
the thread towards the
ieft untii it siips under
guide. Then puii thread
aiong the right side of
button as iiiustrated.
34
Page 36

While holding thread with fingers, pass it between the
tension discs and pull thread down to make certain it is
properly located in between the tension discs 3.
Continue to thread points 4-8.
Note: Slip thread into the rear slot on thread guides 5.
Slip the thread into the slot of the Take-up Lever
Cover 6. Slip the thread into the right slots for
thread guides 7 and 8.
Before threading eye of needle, make sure thread is
in front of thread guide located on the bottom of the
needle clamp for Cover stitch.
Thread the eye of the right needle 9.
Note: Use of tweezers in the accessory case will
make needle eye threading easy.
Draw about 10cm (4 inches) of thread through
needle eye towards the rear of the machine.
Place the thread to the back under the presser foot.
35
Page 37

3) Threading the Cover Stitch Needies
(1) Threading the Cover Stitch Left Needle
(Blue) (C on needle clamp)
• Thread the cover stitch left/chain stitch needie as
indicated 1~9.
• Raise Presser foot to reiease Tension discs.
Pass thread from back to the front through the thread
guide 1.
©
Thread the top cover
thread guide by puiiing
the thread towards the
ieft untii it siips under
guide. Then puii thread
aiong the right side of
button as iiiustrated.
Whiie hoiding thread with finger, pass it between the
tension discs and puii thread down to make certain it
is properiy iocated in between the tension discs 3.
36
Page 38

Continue to thread points 4~8.
Note: Siide thread into front slot on thread guide 5
and the slot of take-up lever over 6. Then slip
thread Into left slots of thread guides 7 and 8.
Before threading eye of needle, make sure thread is
in front of thread guide located on the bottom of the
needle clamp.
Thread the eye of the left needle 9.
Note: Use of tweezers In the accessory case will
make needle eye threading easy.
Draw about 10cm (4 inches) of thread through
needle eye to hang free.
Place the thread to the back, under the presser foot.
37
Page 39

Two-Thread Cover Stitch Suggested Tension Settings
Note: * These are suggested tension settings oniy.
NEEDLE POSITION
mmu mum
* Tension settings are effected by;
1) Type and thickness of fabric
2) Needie size
3) Size, type and fiber content of thread
* Stitch iength for cover stitch should be set at
over N (2.5mm).
Correct Baiance
• Set each tension diai to settings shown at right
and test sew on a sample of your fabric.
How to Balance
• When the cover stitch iooper thread is too ioose;
-Turn the cover stitch Iooper thread tension dial
(yellow) toward a higher number.
Cover stitch
Iooper thread
Underside
Cover stitch
Iooper thread
Underside
N~4
STITCH LENGTH
Cover stitch right needie thread
Cover stitch
Left needie thread
Topside
Cover stitch
Iooper Thread
Polyester 6.0 7.0 5.0
Woolly nylon 6.0 7.0 0
Cover stitch
Iooper Thread
Polyester 6.0 7.0 4.0
Woolly nylon 6.0 7.0 0
Cover stitch
Left needie thread
Blue Green Red Yellow
Blue Green Red Yellow
Cover stitch right needie thread
V Topside
Tension Dial
Tension Dial
When the cover stitch left needle thread tension
is too loose;
-Turn the cover stitch left needle thread tension
dial (blue) toward a higher number.
-Or, turn cover stitch Iooper thread tension dial
(yellow) toward a lower number.
When the cover stitch right needle thread tension
is too loose;
-Turn the cover stitch right needle thread tension
dial (green) or (blue) toward a higher number.
- Or, turn the cover stitch Iooper thread tension
dial (yellow) toward a lower number.
When the top surface of fabric bulges between
needle threads and the seams on the underside
of the fabric becomes tight;
- Turn the cover stitch Iooper thread tension dial
(yellow) toward a lower number.
38
Cover stitch
Left needle thread
Cover stitch
Left needle thread
Cover stitch
Left needle thread
V
Topside
Cover stitch right needle thread
Jlopside
Cover stitch right needle thread
Topside Underside
Underside
Cover stitch
Iooper thread
Cover stitch
Iooper thread
Cover stitch
Iooper thread
Page 40

Threading Diagram: Chain Stitch
• A color coded threading diagram is located inside
the looper cover for quick reference.
• Remove Left (C) and Right (E) Needle
• Thread the machine in the order 1 to 2 as shown
at right.
Tension Coior Code: Chain Stitch
1. Chain stitch looper thread
2. Chain stitch needle thread (D)... Green
............
Yellow
39
Page 41

1) Threading the Chain Stitch/Cover Stitch Looper
(Yeiiow)
• Thread the chain stitch/cover stitch iooper as
indicated 1~10.
Raise Presser foot to reiease Tension discs
Pass thread from back to the front through the thread
guide 1.
Thread the top cover
thread guide by puiiin
the thread towards the
ieft untii it siips under
guide. Then puii threa
aiong the right side of
button as iliustrated.
Whiie hoiding thread with fingers, pass it between the
tension discs and puii thread down to make certain it is
properiy iocated in between the tension discs 3.
40
Page 42

Turn the hand wheel toward you until the chain stitch
iooper extends out 10mm from the throat piate edge.
Thread the iooper area of the machine foiiowing the
yeiiow color-coded thread guides 4~10.
Note: Use the tweezers provided in the accessory case
to aid in threading the Iooper.
Place the thread with the point of the tweezers through
threading guide 4.
Place the thread with the point of the tweezers through
the front slot of threading guide 5.
Place the thread with the point of the tweezers through
threading guide 6,7 and 8.
Thread the Iooper eye (A) from front to back.
Pull about 10cm (4 inches) of thread through the
Iooper. Position thread into V cutout (B) on threader.
Firmly hold thread tail with left hand and pull threader
lever (C) up into place (D).
(2) Threading the Cover Stitch Middie/Chain Stitch Needie
(Green) (D on needie ciamp)
• Thread the cover stitch middle/chain stitch needle as
indicated 1~9.
• Raise the Presser Foot to release Tension discs.
Pass thread from back to the front through the thread
guide 1.
B
Sk
C
J
41
Page 43

Pass thread from back to the front through the thread
guide 1.
Thread the top cover
thread guide by puiling
the thread towards the
left until it siips under
guide. Then pull thread
along the right side of
button as illustrated.
While holding thread with fingers, pass it between the
tension discs and pull thread down to make certain it is
properly located in between the tension discs 3.
U © 1
/ /"f m
/ / ^ m
/ \.ry
T
0
1
42
Page 44

Continue to thread points 4~8.
Note: Slip thread into the middle slot of the thread
guide 5 and into the slot of take-up lever cover 6.
Then continue by slipping thread into the middle
slot of the thread guides 7 and 8.
Before threading eye of needle, make sure thread is
in front of thread guide located on the bottom of the
needle clamp for Cover stitch and for Chain stitch.
• Thread the eye of the right needle 9.
Note: Use of tweezers in the accessory case will
make needle eye threading easy.
• Draw about 10cm (4 inches) of thread through
needle eye towards the rear of the machine.
• Place the thread to the back under the presser foot.
43
Page 45

Double Chain Stitch Suggested Tension Settings
Note: * These are suggested tension settings oniy.
* Tension settings are effected by;
1) Type and thickness of fabric
2) Needie size
3) Size, type and fiber content of thread
* Stitch iength for double chain stitch should
be set at over 2mm.
Correct Balance
• Set each tension dial to settings shown at right
and test sew on a sample of your fabric.
NEEDLE POSITION
STITCH LENGTH 2-4
How to Balance
• When the chain stitch needle thread tension is
too loose;
-Turn the needle thread tension dial (green)
toward a higher number.
-Or, turn the chain stitch looper thread tension
dial (yellow) toward a lower number.
Fabric
Medium weight 7.0 7.5
Biue Green Red Yeilow
Tension Dial
44
Page 46

How to Sew
The double chain stitch is sewn with 2 threads, one
needie and one iooper.
Start and end of sewing
• When starting to sew, pull the thread chain
lightly to the rear of machine until the needle
penetrates the fabric.
• When starting to sew after threading the
machine, sew 2 ~ 3 cm on a scrap fabric and
chain-off to make a chain.
• At end of sewing, pull the fabric lightly to the
rear of machine and chain-off.
45
Page 47

13. HOWTO CHANGE THREADS:
TIE ON METHOD
To change thread type or color, clip thread near the
spool.
Place new thread on stand.
Tie new thread and old thread ends together with
a square knot. Clip thread taiis to 2~3cm (1 inch)
length. If clipped too short, threads may come untied.
Firmly pull both thread to test knot security.
Raise Presser foot to release Tension discs.
Pull the threads through the machine one at a time.
If threads do not pull easily, check for tangles on
thread guides or looping under thread stand.
When pulling thread through the needles, STOP
when the knot Is in front of the needle.
Cut the thread, and insert it through the needle.
46
Page 48

14. HOW TO ADJUST THE STITCH
LENGTH
The stitch length dial should be set on the N
setting for most sewing conditions.
Adjust the stitch length to N~ 4 when sewing
heavy weight fabrics.
Adjust the stitch length to 2~N when sewing
lightweight fabrics to obtain excellent seams
without puckering.
15. HOWTO ADJUST THE PRESSER
FOOT PRESSURE
The presser foot pressure of this machine is pre
adjusted at the factory to suit the sewing of medium
weight fabrics.
Most of the materials do not require adjustment of
presser foot pressure. However, there are some
instances where adjustment is necessary, such as
when sewing lightweight and heavyweight fabrics.
In such case, N for normal, 1 for the lightest pressure,
and 5 for the heaviest.
For lightweight fabric...Decrease the pressure
For heavyweight fabric...Increase the pressure
47
Page 49

16. DIFFERENTIAL FEED
• Differential feed is a system which “stretches” or
“gathers” the fabric, when the amount of feed of
front feed dogs in relation to the rear feed dogs is
changed.
• The differential feed ratio ranges from 1:0.6~1:2.0.
Adjustment is made by means of the differential
feed adjusting dial pictured at right.
• Use of differential feed is very effective in stretch
fabrics.
• Setting “N” is differential feed adjusting dial setting
for ratio 1:1.
To set the differential feed adjusting dial for gathering
• Set differential feed adjusting dial above setting “N”.
Setting of adjusting dial depends on material being
sewn as well as the amount of desired gather.
Therefore set dial to suit the fabric and test sew before
sewing your garment.
Note: For normal stitching, set differential feed
adjusting dial to graduation “N”.
To set the differential feed adjusting dial for stretch
• Set differential feed adjusting lever knob below
setting “N”.
48
Page 50

17. MACHINE MAINTENANCE
Cleaning the Machine
Danger:
y\ Before cleaning your machine, disconnect
A
power line piug from the wali receptacle.
Clean the lint from the looper area often with
a dry lint brush.
Oiling the Machine
Danger:
Before cleaning your machine, disconnect
A
power line plug from the wall receptacle.
The oiling points shown in the diagram, should
be oiled periodically.
Note: Use only sewing machine oil. Do not use
any other oil or damage could result.
49
Page 51

How to Exchange Light Bulb
Danger:
A
Always unplug before re-lamping.
Light bulb is available at your dealer shop.
Take old bulb to the dealer shop and ask for
same bulb.
If voltage Indicated on the electrical rating
plate of your machine is 120V, ask for light
bulb conforming to following specification.
- Bayonet type: 110~120V, 15W
• Glass shape: T-20
• Lamp cap: El2
• Overall length: 48mm
• Remove light cover screw and while pushing
the cover lightly to the rear, swing cover to
the left and remove from machine as shown
in the illustration. Turn bulb to the left to
remove. To replace the bulb, push bulb Into
the socket and turn to the right.
A
A
Caution:
Be sure the light bulb has cooled off before
changing with a new one.
Warning:
Replace the light cover first before connecting
the power line plug.
If voltage Indicated on the electrical rating
plate of your machine is 220-240V, ask
for light bulb conforming to following
specification.
Edison type (screw type): 220-240V, 15W
• Glass shape: T-22
• Lamp cap: El4
• Overall length: 56mm
Remove light cover screw and while pushing
the cover lightly to the rear, swing cover to
the left and remove from machine as shown
in the illustration. Turn bulb to the left to
remove. To replace the bulb, screw bulb Into
the socket and turn to the right.
50
Page 52

18. SNAP-ON TYPE PRESSER FOOT
• The following snap-on type presser foot
specially prepared for this machine are
available at extra-charge.
Note: Do not use presser foot made for other
machines. Use of such presser foot may
result In Interference with the needle and
can be hazardous.
• The snap-on type presser foot of this machine
permits easy removal and replacement.
Caution:
Be sure to disconnect the power line plug or
turn off the power switch when changing the
A
Removal
presser foot.
Raise presser foot and raise needle bar to its
highest position.
Press red colored lever (A) located on back
of clamp under the presser foot shank, raise
presser bar lifter to its High Lift position and
while holding the presser bar lifter in this
position, remove the presser foot plate.
Replacement
• Place presser foot plate on throat plate under
presser foot shank so that hinge pin (C) will fit
in slot (B) of the shank. Then lower presser bar
lifter.
• If presser foot plate can not be placed under
presser foot shank easily, raise presser bar lifter
to its High Lift position and while holding it in this
position, place presser foot plate under presser
foot shank. Then lower presser bar lifter.
• Raise presser bar lifter and make sure the
presser foot plate Is properly attached to the
presser foot shank.
•
51
Page 53

19. TROUBLESHOOTING CHART
Problem Solution
Page
Fabric does not feed well - Lengthen stitch length.
- Increase presser foot pressure for heavy weight fabric.
- Decrease presser foot pressure for lightweight fabric.
Needle breaks
- Insert needle correctly. 11
- Tighten needle set screw. 11
- Use a larger needle on heavy fabrics.
Thread breaks - Check threading.
16-45
- Cheek for tangled or caught thread.
- Insert needle correctly.
- Insert new needle, current needle may be bent or have a blunt
point. 7
- Use only high quality thread. 34
- Loosen thread tension. 12, 25, 38, 44
Stitch skip - Insert new needles, current needles may be bent or have a blunt 7
point. Use only Branded Style SINGER 2022 Needles. 11
- Tighten needle set screw. 11
- Insert needles correctly. 11
- Change type or size of needles.
16-45
- Check threading. 21
- Increase presser foot pressure.
- Use a high quality thread.
47
47
47
11
46
11
53
Irregular stitches
- Balance thread tension.
12,25,38,44
- Check for tangled or caught thread. 20
- Check threading.
16-45
Fabric puckers - Loosen thread tension. 12,25,38,44
- Check for tangled or caught thread.
- Use high quality lightweight thread.
46
53
- Shorten stitch length. 21
- Decease presser foot pressure for lightweight fabrics. 21
Fabric jams
- Close looper cover before sewing.
- Check for tangled or caught thread.
8
46
- Compress thick layers of fabric with conventional machine before
sewing.
Machine does not operate - Connect machine to power source. 8
52
Page 54

20. RELATIONSHIP BETWEEN CLOTH, THREAD AND NEEDLE
Type of Fabric Type of Thread Needle SINGER 2022
WOVEN
Lightweight
Lawn, Organdy, Voiie,
Crepe, etc.
Medium Weight
Musiin, Seersucker,
Satin, Gabardine,
Broadcioth, etc
Heavy Weight
Oxford, Denim, Tweed,
Serge,Corduroy
KNIT
Tricot Spun: #80 ~ #90
Cotton: #100
Siik/ Rayon: #100
Spun: #80 ~ #90
Poiyester: #80 ~ #100
Cotton: #60 ~ #80
Siik/ Rayon: #50
Spun: #60 ~ #80
Poiyester: #60 ~ #80
Cotton: #40 ~ #60
Siik/ Rayon: #40 ~ #60
Spun: #60 ~ #80
Poiyester: #50 ~ #80
Poiyester: #60 ~ #80
#11/80
#14/90, #11/80
#14/90
#11/80
Jersey Spun: #60 ~ #80
Poiyester: #60 ~ #80
Cotton: #60 ~ #80
Wool (woven, knit) Spun: #60 ~ #80
Poiyester: #50 ~ #60
Wooiiy nyion
Wooiiy Polyester
53
#14/90, #11/80
#14/90, #11/80
Page 55

21. SPECIFICATION
Item Specification
Sewing speed 1,300 spm maximum
Differential feed ratio 1:0.6 ~ 1:2 (with differential feed machine)
Cover stitch needle gauge Two needles: 2.8mm (narrow), 5.6mm (wide)
Triple needles: 5.6mm
Needle bar stroke 27mm
Pressure foot rise 4.5mm
Needle SINGER 2022 #90
Number of threads
Machine dimensions (mm)
Width 360
Depth 290
Height 300
Weight (kg) 7.3kgs
2-4
54
Page 56

RECYCLING
Do not dispose of electrical appliances as unsorted municipal waste, use separate collection
facilities.
Contact your local government for information regarding the collection systems available.
If electrical appliances are disposed of in landfills or dumps, hazardous substances can leak
into the groundwater and get into the food chain, damaging your health and well-being.
When replacing old appliances with new one, the retailer is legally obligated to take back
your old appliance for disposal at least for free of charge.
55
Page 57

G5P32
 Loading...