

Page 1
SFS 5707 BUHARLI P‹fi‹R‹C‹
KULLANMA KILAVUZU
TR
EN
FR
NL
ES
RU
HR
AR
Page 2

SINBO SFS 5707
BUHARLI P‹fi‹R‹C‹
KULLANIM TAL‹MATI
De¤erli müflterimiz,
Bu cihaz radyo enterferans›n›n bast›r›lmas› ve alçak-voltaj güvenli¤ine ilflikin CEDirektiflerine uygundur ve yürürlükteki güvenlik gerekliliklerine uygun flekilde üretilmifltir.
Lütfen cihaz› kullanmaya bafllamadan önce bu k›lavuzu dikkatli bir flekilde okuyunuz. Bu
k›lavuzda güvenlik, cihaz›n kullan›m› ve bak›m› hakk›nda önemli bilgiler yer almaktad›r.
Sayg›lar›m›zla,
Sinbo Küçük Ev Aletleri
TEHL‹KE!
Gövdeyi kesinlikle suya sokmay›n›z ya da muslu¤un alt›nda y›kamaya kalk›flmay›n›z.
This appliance is not intended for use by persons (including children) with reduced physical,
sensory or mental capabilities, or lack of experience and knowledge, unless they have
been given supervision or instruction concerning use of the appliances by a person
responsible for their safety. Children should be supervised to ensure that they do not play
with the appliance.
This appliance is intended to be used in household and similar applications such as:
- staff kitchen areas in shops, offices and other working environments;
- farm houses;
- by clients in hotels, motels and other residential type environments;
- bed and breakfast type environments.
Bu ürün (çocuklar dahil ) fiziksel hassasiyeti az, zihinsel olarak yetersiz, deneyimsiz ve
yeterli bilgiye sahip olmadan yada kendilerinin güvenli¤inden sorumlu olan kifliler tarafından
bu ürünü kullanmak için gerekli talimatlar verilmemifl kiflilerin kullanımına uygun de¤ildir.
- 1 -
Page 3
C‹HAZIN ÖZELL‹KLER‹
Model: SFS 5707
Anma voltaj›: 230V~
Anma frekans›: 50Hz
Güç: 650W
Pozisyon : Yatay
Buhar üretimi: H›zl›
Çal›flma süresi: azm. 2 saat
Zamanlay›c›: azm. 13 saat
S›cak tutma süresi: azm. 12 saat
Su miktar›: azm. 1 Litre
A¤›rl›k: 2,5 kg
Boyutlar (mm): 340 x 252 x 396
D‹KKAT!!
Ürünün üzerinde bulunan iflaretlemelerde veya ürünle verilen di¤er bas›l› dökümanlarda
beyan edilen de¤erler, ilgili standartlara göre laboratuar ortam›nda elde edilen
de¤erlerdir.Bu de¤erler, ürünün kullan›m ve ortam flartlar›na göre de¤iflebilir.
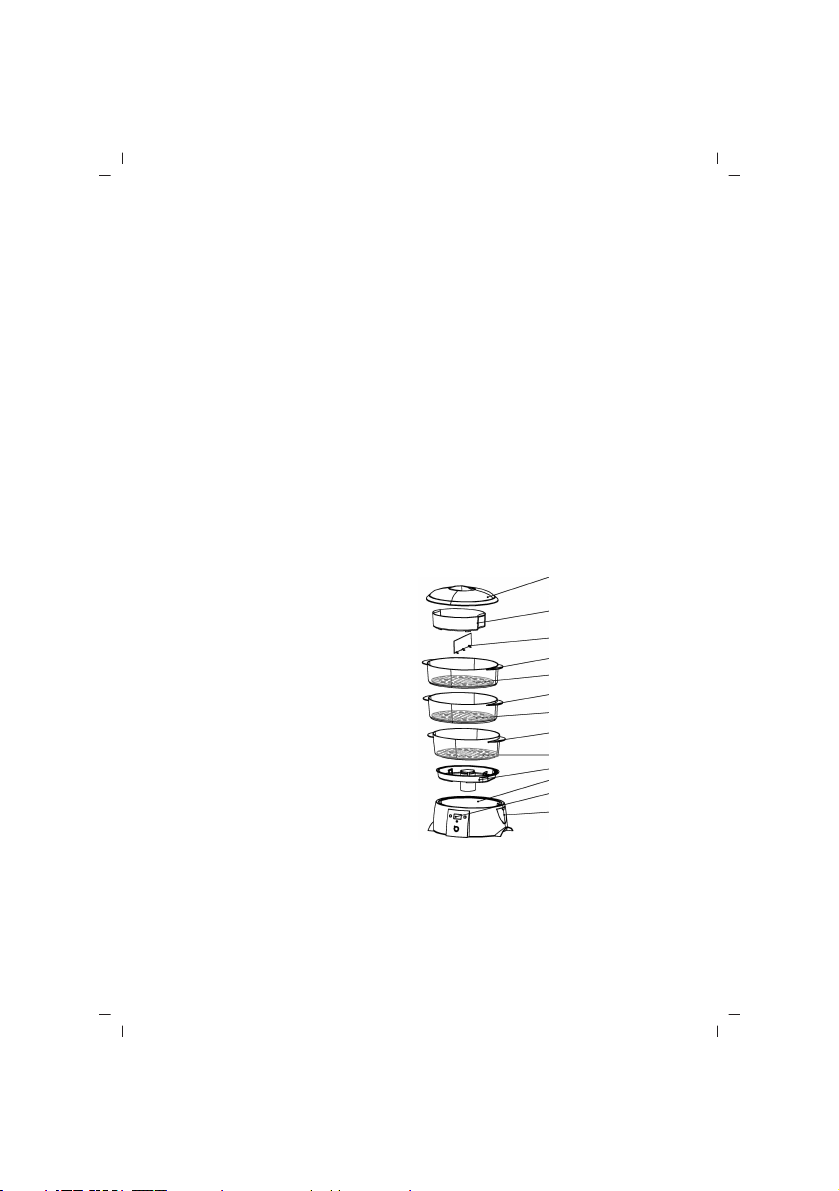
C‹HAZIN TANITIMI
1. Kapak
2. Pilav Tas›
3. Ayr›c›
4. Buharda Piflirme Sepeti
5. Sepet Taban›
6. Damlama Tepsisi
7. Altl›k Gövdesi
8. Kontrol Panosu
9. Su Göstergesi ve su doldurma deli¤i
1
2
3
4
5
4
5
4
5
6
7
8
9
ÖNEML‹ GÜVENL‹K UYARILARI
• Bakım, Onarım ve Kullanımda Uyulması Gereken Kurallar
1. Cihaz›n fiflini prize takmadan önce ak›m tipi ve flebeke voltaj›n›n bu Kullan›m Talimat›nda
yer alan teknik özelliklere uygun oldu¤undan emin olunuz. Cihaz›n topraklanmas›
gerekmektedir.
- 2 -
Page 4

ÖNEML‹ GÜVENL‹K UYARILARI
2. Çocuklar, elektrikli cihazlar›n neden olabilece¤i tehlikeleri anlamayabilirler. Çocuklar›
böylesi cihazlardan uzak tutunuz.
3. Cihaz› kesinlikle içinde su olmadan çal›flt›rmaya kalk›flmay›n›z. Altl›k ünitesine yaln›zca
yeterli miktarda su doldurunuz ve azami su seviyesi iflaretini kesinlikle aflmay›n›z.
4. Yaln›zca üreticinin tavsiye etti¤i orijinal aksesuarlar› kullan›n›z.
5. Kullan›m s›ras›nda cihaz›n baz› parçalar› afl›r› flekilde ›s›nabilir, bu nedenle s›cak
yüzeylerle temas etmeyiniz ve yaln›zca tutacaklar› ya da dü¤meleri kullan›n›z.
6. Cihaz› içinde s›cak su ya da yiyecek varken tafl›may›n›z.
7. Cihaz› temizlemeye bafllamadan önce fiflini çekiniz. Cihaz› ya da fiflini kesinlikle suya
sokmay›n›z.
8. Güç kablosunda ya da fiflte herhangi bir ar›za varsa ya da cihaz yere düflürülmüflse ya
da baflka bir flekilde hasar görmüflse cihaz› çal›flt›rmay›n›z. Böylesi durumlarda kontrol
ve onar›m ifllemi için yetkili servise baflvurunuz.
9. Bu cihaz yaln›zca ev içi kullan›m› için tasarlanm›flt›r, ticari uygulamalar için de¤ildir.
Cihaz› kesinlikle d›fl mekanlarda kullanmay›n›z.
Güç kablosunun ar›zalanmas› durumunda tehlikelerin önlenmesi için kablo üretici, servis
yetkilisi ya da benzer bir ehliyetli kifli taraf›ndan de¤ifltirilmelidir.
TAfiIMA ESNASINDA
• Ürünü düflürmeyiniz,
• Darbelere maruz kalmamas›na özen gösteriniz.
• S›k›flmamas›n›, ezilmemesine özen gösteriniz.
• Ambalaj üzerindeki iflaretlemelere uyunuz.
• Orjinal ambalajıyla taflımaya özen gösteriniz.
ÇEVRE VE ‹NSAN SA⁄LI⁄I
Çevre korumas›na siz de katk›da bulunabilirsiniz!
Lütfen yerel düzenlemelere uymay› unutmay›n: Çal›flmayan
elektrikli cihazlar›, uygun elden ç›karma merkezlerine götürün
Kullanım sırasında insan ve çevre sa¤lı¤ına tehlikeli veya zararlı olabilecek bir durum
söz konusu de¤ildir.
‹LK KULLANIM
1. Cihaz› ve tüm aksesuarlar› kutudan ç›kar›n›z. ‹lk kullan›mdan önce kapa¤›, buharda
piflirme sepetlerini ve taslar› su ve bir miktar bulafl›k deterjan›yla y›kayarak temizleyiniz.
Parçalar› iyice kurulay›n›z.
2. Cihaz› düz bir yüzeye yerlefltiriniz. Cihazla mobilyalar, duvarlar ve di¤er eflyalar aras›nda
uygun bir mesafe b›rak›n›z. Güvenlik nedeniyle, çocuklar› cihazdan uzak tutunuz.
3. Cihaz›n etiketinde yazan voltaj düzeyinin evinizdeki güç kayna¤›yla ayn› oldu¤undan
emin olunuz.
4. Su doldurma:
1. Cihaza su doldurmak için su doldurma deli¤inden içeri su seviyesi iflaretine ulafl›lana
- 3 -
Page 5

‹LK KULLANIM
kadar su dökünüz, ya da
2. Hazneyi azami su seviyesi iflaretine kadar suyla doldurunuz.
Not! Hazneye sudan baflka herhangi bir s›v› doldurmay›n›z ya da suya baharat gibi ek
malzemeler ilave etmeye kalk›flmay›n›z.
5. Damlama tepsisini tabana yerlefltiriniz.
C‹HAZIN KULLANIMI
• Ba¤lantı veya Montajın Nasıl Yapılaca¤ını Gösterir fiema ile Ba¤lantı veya Montajın
Kimin Tarafından Yapılaca¤ına (tüketici, yetkili servis) iliflkin bilgiler
Buharda Piflirme Sepeti:
1. Buharda piflirme sepetlerini ve/ya da sepet tabanlar›n› kendi tercihlerinize göre
efllefltirebilirsiniz.
2. Piflirme süresi uzun olan büyük parçalar› en alttaki buharda piflirme sepetine doldurunuz.
3. Cihaz tek seferde birden fazla yemek piflirebilir. Tatlar›n birbirini zenginlefltirmesi
sa¤lan›r.
4. Piflirme süreleri farkl› olan yiyecekler: Piflirme süresi uzun olan yiyecekleri en alttaki
buharda piflirme sepetine doldurunuz. Zamanlay›c› piflirme süresi k›sa olan yiyece¤in
süresine ulaflt›¤›nda kapa¤› bir bezle tutarak kald›r›n›z ve üstteki buharda piflirme sepetini
alttaki sepetin üstüne yerlefltiriniz. Kapa¤› yerine tak›n›z.
5. Büyük yiyecekler: Sepetin alt›n› ç›karabilir (yukar› do¤ru bast›rarak) ve 2 sepeti birlefltirip
daha büyük bir buhar sepeti elde edebilirsiniz. Not! Alttaki sepetin taban› tak›l› olmal›d›r.
6. Sepet taban›ndaki oyuklar yumurta gibi yiyeceklerin piflirilmesi aç›s›ndan kolayl›k
sa¤lar.
Bafllatma
1. Cihaza su doldurup fiflini tak›n›z.
2. Cihaz› aç›n›z, sesli bir uyar›dan sonra LCD ekran üzerinde < 0:00 > mesaj›
görüntülenecektir.
A) Manüel çal›flt›rma: “SET” tufluna bas›n›z, ekran üzerinde < 00:20 > görüntülenecektir
(varsay›lan piflirme süresi: 20dk.) ve ekranda “STEAMER” mesaj› yan›p sönmeye
bafllayacakt›r. ‹stenilen piflirme süresini “Hr” ve “Min” tufllar›yla ayarlay›n›z.
Ayarlanabilecek azami süre 1 saat 59 dakikad›r. Ayarlama iflleminden sonra 5 saniye
boyunca baflka hiçbir ifllem yap›lmad›¤› takdirde cihaz otomatik olarak program›
çal›flt›rmaya bafllayacakt›r. Ekrandaki “STEAMER” mesaj›n›n yan›p sönmesi durur ve
kontrol lambas› yanar.
Not: Cihazdan hiç buhar ç›km›yorsa ya da çok az buhar ç›k›yorsa altl›ktaki su doldurma
deli¤inden su ilavesi yap›n›z.
B) Zamanlay›c›: Piflirme süresini ayarlad›ktan hemen sonra “SET” tufluna basarsan›z
(ya da bafllang›çta “SET” tufluna iki kez basarsan›z) ekranda < 00:00 > görüntülenir ve
“TIMER” yaz›s› yan›p sönmeye bafllar. ‹stenilen bafllatma zaman›n› “Hr” ve “Min”
tufllar›yla ayarlay›n›z. Ayarlanabilecek azami bafllang›ç zaman› 12 saat 59 dakikad›r.
- 4 -
Page 6

C‹HAZIN KULLANIMI
Ayarlama iflleminden sonra 5 saniye boyunca baflka hiçbir ifllem yap›lmad›¤› takdirde
cihaz program› çal›flt›rmak için geri say›m süresini otomatik olarak bafllatacakt›r.
Ekrandaki “TIMER” yaz›s›n›n yan›p sönmesi durur. Geri say›m ifllemi tamamland›ktan
sonra cihaz otomatik olarak piflirme ifllemini bafllat›r. Ekranda “STEAMER” yaz›s›
görüntülenir ve kontrol lambas› yanar.
C) S›cak tutma ifllevi: Piflirme ifllemi tamamland›ktan sonra sesli bir uyar› iflitilir (befl
‘bip’ sesi) ve kontrol lambas› söner. Ekranda “KEEP WARM” yaz›s› görüntülenir ve saat
ilerlemeye bafllar. S›cak tutma ifllemi en fazla 12 saat kullan›labilir. Daha sonra yeni bir
sesli uyar› (üç ‘bip’ sesi) gelir ve cihaz kapal› konuma geçer.
3. Bofl çal›flmama korumas›: Cihaz, altl›k ünitesinin cihaza su dolu de¤ilken kazayla
çal›flt›r›lmas›n› ve cihaz›n içinde su olmadan ›s›nmas›n› önlemek için ›s›t›c› eleman›
kapatan otomatik bir bofl çal›flmama güvenlik tertibat›yla donat›lm›flt›r. Bu durumda
sürekli bir sesli uyar› iflitilir ve kontrol lambas› yan›p söner. Saat durur. Cihaza su ilavesi
yapt›ktan sonra “SET” tufluna bast›¤›n›zda cihaz iflleme kald›¤› yerden devam edecektir.
4. Cihaz› kulland›ktan sonra kapal› konuma getirip fiflini çekiniz. Buharda piflirme sepetini
bir bez yard›m›yla tutarak ç›kar›n›z. Cihaz› kald›rmadan önce tamamen so¤umas›n›
bekleyiniz.
5. Alarm› duydu¤unuzu do¤rulamak için “SET” tufluna bas›n›z.
KULLANIM HATALARINA ‹L‹fiK‹N B‹LG‹LER
Cihazınızı, beyan edilen voltaj ile çal›flt›r›n›z. Bulundu¤unuz yerin voltaj›n›n uygun olup
olmad›¤›n› kontrol ediniz.
Güç kablosunun ar›zalanmas› durumunda tehlikelerin önlenmesi için kablo üretici, servis
merkezi ya da benzer bir ehliyetli kifli taraf›ndan de¤ifltirilmelidir. Ar›za durumunda cihaz›
kendiniz sökmeye kalk›flmay›n›z, bak›m merkezimiz ya da sat›fl sonras› hizmet merkezimiz
ile ba¤lant›ya geçiniz.Cihaz› kendiniz onarmaya kalk›flmay›n›z. Meydana gelebilecek
ar›zalardan firmam›z kesinlikle sorumlu de¤ildir, ve cihaz›n›z garanti kapsam› d›fl›nda
ifllem görecektir.
TEM‹ZL‹K VE BAKIM
• Tüketicinin Kendi Yapabilece¤i Bakım, Onarım veya Ürünün Temizli¤ine ‹liflkin Bilgiler
1. Temizlik ifllemi için kesinlikle afl›nd›r›c› temizlik malzemeleri ya da keskin cisimler
kullanmay›n›z.
2. Altl›k ünitesini yumuflak nemli bir bezle siliniz, üniteyi kesinlikle suya sokmay›n›z.
3. Su haznesini her kullan›mdan sonra boflalt›n›z ve yeniden kullanmadan önce temiz
suyla doldurunuz.
4. Altl›k ünitesini ve di¤er tüm aksesuarlar› temizlik iflleminden sonra kurulay›n›z.
5. Kireç söktürme: Cihaz›n sa¤l›kl› flekilde çal›flmaya devam etmesi için cihaz›n kirecini,
bölgenizdeki suyun sertli¤ine göre belirli aral›klarla (7-10 kullan›mdan sonra) söktürmenizi
tavsiye ederiz.
I. Su haznesine azami seviyeye kadar su ve sirke (1:1) doldurunuz.
- 5 -
Page 7

TEM‹ZL‹K VE BAKIM
II. Cihaz›n fiflini tak›n›z ve gücü aç›n›z. Bu ifllem s›ras›nda damlama tepsisi, buharda
piflirme sepeti ve kapak kullanmay›n›z. Zamanlay›c›y› 20-25 dakikaya ayarlay›n›z. Sirke
kaynamaya bafllad›¤›nda cihaz› kapat›n›z. Sirkeyi dökmeden önce cihaz›n so¤umas›n›
bekleyiniz.
III. Su haznesini temiz suyla birkaç kez durulay›n›z.
‹PUCU
1. Piflirme süresini k›saltmak için hazneye ›l›k su doldurunuz.
2. Yiyecekleri birbirine çok yak›n yerlefltirmeyiniz. Buhar›n serbestçe dolaflabilmesi için
arada boflluk b›rak›n›z.
3. Büyük miktarlarda yemek piflirmeniz gerekiyorsa piflirme süresinin ortas›nda kapa¤›
kald›r›p yiyece¤i nazikçe kar›flt›r›n›z ve kapa¤› geri kapat›n›z.
• Periyodik Bakım Gerektirmesi Durumunda, Periyodik Bakımın Yapılaca¤ı Zaman
Aralıkları ile Kimin Tarafından Yapılması Gerekti¤ine ‹liflkin Bilgiler
Cihaz periyodik bak›m gerektirmez.
Her kullan›mdan sonra temizli¤inin yap›lmas›nda fayda vard›r.
SATIfi SONRASI H‹ZMETLER‹
Bu cihaz kullan›c› taraf›ndan de¤ifltirilebilen parçalara sahip de¤ildir. Ünitenin çal›flmamas›
durumunda flu ad›mlar› izleyin.
1. Talimatlar›n do¤ru biçimde izlendi¤ini denetleyin.
2. Ana kayna¤›nda ifllevselli¤ini denetleyin.
Cihaz hâlâ çal›flm›yorsa, sat›n ald›¤›n›z yere geri götürün.
Güç kablosu hasar görmüflse, tehlikeleri önlemek için, cihaz üreticisine iade edilmelidir.
Kendi kendinize tamir etmeye KALKIfiMAYIN.
fiu talimatlar› izleyin:
1. Dikkatlice, tercihen orijinal kutusuna paketleyin.
Ünitenin temiz oldu¤undan emin olun.
2. Tüm yaz›flmalarda, ad›n›z›, adresinizi ve ürünün model numaras›n› belirtin.
3. ‹ade etme nedeninizi belirtin.
4. Garanti kapsam›ndaysa, nereden, ne zaman al›nd›¤›n› belirtin ve sat›n alma kan›t›n›
ekleyin (örn. kasa fifli).
Bas›m hatalar› bulunabilir.
- 6 -
Page 8
ENGLISH
SINBO SFS 5707 FOOD STEAMER
INSTRUCTION MANUAL
This appliance confirms with the CE- Directives for radio interference suppression and
low-voltage safety and has been built to meet current safety requirements.
Please read this operating instructions attentively, before you operate this appliance. It
gives important notes for safety, the use and maintenance of the appliance.
TECHNICAL DATA:
Model: SFS 5707
Rated voltage: 230V~
Rated frequency: 50Hz
Power: 650W
Position: Horizontal
Steam Producing: Celerity
Operating time: max. 2 h
Timer: max. 13 h
Warm-keeping time: max. 12 h
Water amount: max. 1 Liter
Weight: 2.5 kg
Dimensions (mm): 340 x 252 x 396
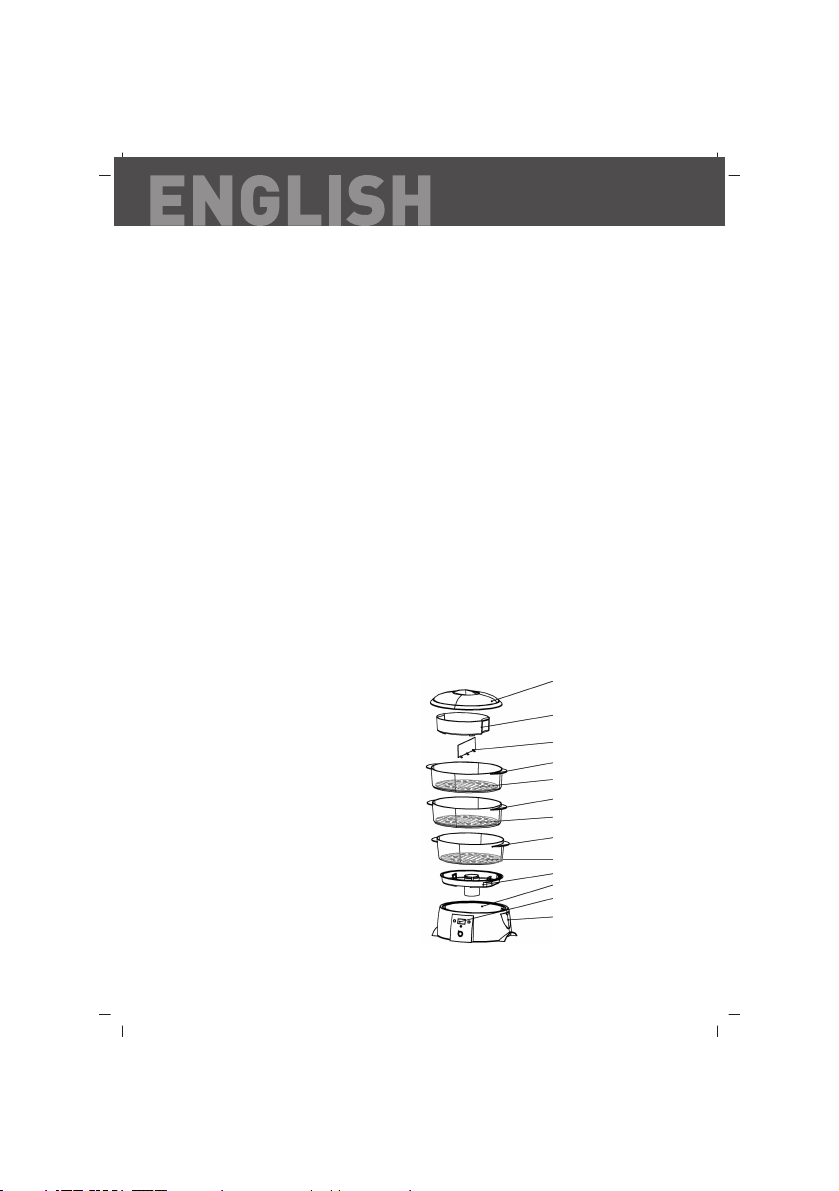
PARTS NAME
1. Lid
2. Reis Container
3. Separator
4. Steam Basket
5. Basket Bottom
6. Drip Pan
7. Base Body
8. Control Panel
1
2
3
4
5
4
5
4
5
6
7
8
9
9. Water Gauge and water filling hole
- 7 -
Page 9

OPERATION
First use:
1. Unpack the appliance and all the accessories. Clean cover, steam baskets as well as
the containers with water and little tableware detergent before the first use. Dry the
parts.
2. Place the base on an even surface. The appliance must have an appropriate distance
from furniture, walls and other articles. For safety reasons, keep children well away
from the appliance.
3. Check that the voltage on the appliance rating plate corresponds to the voltage on
your mains supply meter.
4. Water filling:
1. Fill water by the water filling hole up to the maximum water level mark, or
2. Fill water directly into the container up to the max water level mark.
Note! Never fill other liquid into the container and do not give additional ingredients
e.g. spices to the water.
5. Place the drip pan on the base.
Steam basket:
1. You can combine the steam baskets and/or basket bottoms depending upon desire.
2. Place the large pieces, which need a longer cooking time, in the lower steam basket.
3. Man can cook different food in one process. Make sure however that the flavors
complement each other.
4. Food with different cooking times: Place the food, which need a longer cooking time,
in the lower steam basket. As soon as the timer reaches the time for food with shorter
cooking time, remove the cover with a cloth and place the upper steam basket on the
lower basket. Replace the cover.
5. Large food: You can remove a basket bottom(press upward) and build from 2 baskets
a larger steam basket. Note! The lower basket must be used with bottom.
6. The caves on the basket bottom are practical for food such as eggs.
Start-up:
1. Fill water in the appliance and plug in it.
2. Switch on the appliance, an acoustic signal sounded and the symbol < 0:00 > appears
in the LCD display.
A) Manual switch on: Press the key “SET”, the symbol < 00:20 > appears in the display
(default cooking time: 20Min) and the word “STEAMER” flashes in the display. Adjust the
desired cooking time with the keys “Hr” and “Min”. The max. adjustable cooking time
amounts to 1 hour 59 minutes. If no further indication is given for 5 seconds after the
adjustment, the appliance starts the procedure automatically. Now the “STEAMER” in
the display does not flash any more and the control lamp lights up.
Note: If you detect that no steam or only very little steam comes out, pour water by the
water filling hole into the base.
- 8 -
Page 10

OPERATION
B) Timer: If you press the key “SET” right after the adjustment of the cooking time. (or
press the key “SET” twice at the beginning), the symbol < 00:00 > appears in the display
and the word “TIMER” flashes in the display. Adjust the desired start-time with the keys
“Hr” and “Min”, The max. adjustable starting-time amounts to 12 hours 59 minutes. If
no further indication is given for 5 seconds after the adjustment, the appliance starts the
count down procedure automatically. Now the word “TIMER” does not flash any more.
At the expiration of the count down procedure the appliance switches the cooking
procedure on automatically. The word “STEAMER” appears in the display and the control
lamp lights up.
C) Warm-keeping function: At the expiration of the cooking procedure comes an acoustic
signal (five times beep) and the control lamp goes out. The word “KEEP WARM” appears
in the display and the clock begins. The warm-keeping procedure can last up to max. 12
hours. Afterwards comes an acoustic signal sounds (three times beep) again and the
appliance switches itself off.
3. Boil dry cut-out: The appliance is fitted with an automatic boil dry cut-out which
switches off the heating element if the base is accidentally switched on empty or boils
dry. In this case a continuing acoustic signal sounds and the control lamp flashes. The
clock stops. After you refilled water, press the key “SET” to acknowledging, the appliance
continues the procedure.
4. Switch off the appliance after the use and unplug it from the mains supply socket.
Remove the steam basket with help of a cloth. Let the appliance completely cool down,
before you store it.
5. In order to acknowledge the wrong alarm, press the key “SET” .
CLEANING AND CARE
1. Never use abrasive cleaners or sharp objects for cleaning.
2. Clean the base with a soft damp cloth, never immerse it in water.
3. Always empty the water tank before each use, fill up with clear water again.
4. Dry the base and all the accessories after each cleaning.
5. Descaling: In order to maintain the excellent quality of the appliance, we recommend
you to descale the appliance at regular intervals, which depends on the local water
hardness (after 7-10 operations).
I. Fill water with vinegar (1:1) into the base up to the maximum level mark.
II. Plug in the appliance and switch on. For this procedure do not use the drip pan, the
steam baskets and the cover. Set the timer to 20-25 minutes. If the vinegar overflows,
switch off the appliance. Wait, until the appliance is cooled down, before you empty the
vinegar.
III. Rinse the water tank several times with clear water.
TIPS
1. In order to reduce the cooking time, fill up the water tank with lukewarm water.
- 9-
Page 11

TIPS
2. Do not put the food too closely. Leave something place, so that steam can flow through
well.
3. If you cook a larger quantity of food, removed the cover after half the cooking time,
agitate the food gently and close the cover again.
IMPORTANT SAFETY INSTRUCTIONS
1. Before connecting the plug to the socket, please check whether the type of current
and mains voltage agree with the specifications in these Operating Instructions. The
appliance must be earthed.
2. Children do not recognize the dangers that may occur when operating electrical
appliances. Therefore keep children away from such appliances.
3. Never switch on the appliance without water. Fill only appropriate water into the base,
the max water level mark announcement may not be exceeded.
4. Use only original or accessories recommended by manufacturer
5. Beware that some parts of the appliance get very hot during operation, therefore never
touch the hot surface, and use only the handles or buttons.
6. Never transport an appliance filled with hot liquid or food.
7. Unplug the appliance from the mains supply socket before cleaning. Never immerse
the appliance or the plug in water.
8. Do not operate the appliance if the mains cable or the mains plug show signs of
damage, if the appliance has fallen on the floor or has been otherwise damaged. In such
cases take the appliance to a specialist for checking and repair, if necessary.
9. This appliance is intended for domestic use only and not for commercial applications.
Never use the appliance outdoors.
If the supply cord is damaged, it must be replaced by the manufacturer or its service
agent or a similarly qualified person in order to avoid a hazard.
- 10-
Page 12

FRANÇAIS
SINBO SFS 5707 CUISEUR À VAPEUR
MODE D'EMPLOI
Cet appareil est conforme aux Directifs- CE relatifs à la suppression de l’interférence
de la radio et à la sécurité de voltage-bas et aux nécessités de sécurité.
Veuillez lire attentivement ce manuel avant de commencer à utiliser l'appareil. Ce manuel
contient des renseignements importants au sujet de la sécurité, de l’emploi et de
l’entretien de l’appareil.
VALEURS TECHNIQUES
Modèle : SFS 5707
Voltage Nominal : 230V~
Fréquence Nominale : 50Hz
Puissance : 650W
Position : Horizontal
Production de vapeur : Rapide
Durée de fonctionnement : Max. 2 heures
Chronomètre : Max. 13 heures
Durée de maintien chaud : Max. 12 heures
Quantité d’eau : Max. 1 Litre
Poids : 2,5 kg
Dimensions (mm) 340 x 252 x 396
DESCRIPTION
1. Couvercle
2. Récipient de Riz
3. Séparateur
4. Panier de cuisson vapeur
5. Semelle de panier
6. Plateau d’égouttement
7. Corps de base
8. Contrôle de Panneau
9. Indicateur d’eau et orifice de remplissage d’eau
- 11 -
1
2
3
4
5
4
5
4
5
6
7
8
9
Page 13

EXÉCUTION
Première utilisation:
1. Enlevez l’appareil et tous les accessoires de la boîte. Avant la première utilisation,
nettoyez le couvercle, les paniers de cuisson à vapeur et les récipients en les lavant avec
de l’eau et un peu de détergent. Asséchez bien les pièces.
2. Installez l’appareil sur une surface plate. Laissez une distance convenable entre
l’appareil et les meubles et les autres objets. Pour des raisons de sécurité, gardez
l’appareil hors de la portée des enfants.
3. Assurez-vous que le niveau de voltage indiqué sur l’étiquette de l’appareil soit identique
à la source d’alimentation de votre résidence.
4. Remplissage d’eau:
1. Pour remplir de l’eau dans l’appareil, versez de l’eau dans l’appareil par l’orifice de
remplissage d’eau jusqu'au signe de niveau d’eau ou encore
2. Remplissez le réservoir avec de l’eau jusqu'au niveau d’eau maximum.
Remarque! Ne mettez aucun autre liquide en dehors de l’eau dans le réservoir ou ne
tentez pas de mettre des matériels supplémentaires comme des épices dans l’eau.
5. Installez le plateau d’égouttement à la semelle.
Panier de cuisson à vapeur:
1. Vous pouvez accoupler les paniers de cuisson à vapeur et/ou les semelles de panier
selon vos préférences.
2. Mettez les grands morceaux dont les durées de cuisson sont longues dans le panier
de cuisson à vapeur qui est tout au-dessous.
3. L’appareil peut faire cuire plus de un repas à la fois. Ainsi les goûts s’enrichissent.
4. Les aliments dont les durées de cuisson sont différentes: Mettez les aliments dont
les durées de cuisson sont les plus longues dans le panier de cuisson à vapeur qui est
tout au fond. Lorsque le chronomètre sera arrivé à la durée de l’alimentation dont la
durée de cuisson est courte, soulevez le couvercle en le saisissant avec un chiffon et
installez le panier de cuisson à vapeur du haut sur le panier du bas. Installez le couvercle
à sa place.
5. Grands aliments: Vous pouvez retirer le dessous du panier (en pressant vers le haut)
et obtenir un plus grand panier en assemblant les 2 paniers. Remarque! La semelle
d’au-dessous doit être montée.
6. Les cavités qui sont sur la semelle du panier vous facilitent de faire cuire les aliments
tels que les œufs.
Lancement
1. Remplissez de l’eau dans l’appareil et brancher la fiche électrique.
2. Mettez l’appareil en marche, le message de < 0:00 > s’affichera sur l’écran à cristaux
liquides suite à une sommation sonore.
A) Mise en marche manuelle: Appuyez sur la touche de “SET”, < 00:20 > s’affichera
sur l’écran (durée de cuisson par défaut: 20min.) et le message de “STEAMER” clignotera
- 12 -
Page 14

EXÉCUTION
sur l’écran. Réglez les durées de cuisson désirées avec les touches de “Hr” et “Min. La
durée maximum pouvant être réglée est de 1 heure 59 minutes. Dans le cas où aucune
autre opération n’est effectuée pendant 5 secondes après l’opération de réglage, l’appareil
commencera automatiquement à mettre le programme en marche. Le message de
“STEAMER” arrêtera de clignoter sur l’écran et la lampe de contrôle s’allumera.
Remarque: Si aucune vapeur ne sort de l’appareil, ou si peu de vapeur sort de l’appareil,
faites un rajout d’eau par l’orifice de remplissage d’eau qui est au-dessous.
B) Chronomètre: Si vous appuyez sur la touche de “SET” tout de suite après avoir réglé
la durée de cuisson (ou si vous appuyez deux fois sur la touche de “SET” au début) <
00:00 > s’affichera sur l’écran et le message de “TIMER” commencera à clignoter.
Réglez le moment de lancement avec les touches de “Hr” et “Min”. Le moment de
lancement maximum pouvant être réglé est 12 heures 59 minutes. Dans le cas où aucune
autre opération n’est effectuée pendant 5 secondes après l’opération de réglage, l’appareil
lancera automatiquement la durée de compte à rebours pour mettre le programme en
marche. Le message de “TIMER” arrêtera de clignoter sur l’écran. Une fois que l’opération
de compte à rebours sera terminée l’appareil lancera automatiquement l’opération de
cuisson. Le message de “STEAMER” s’affichera sur l’écran et la lampe de contrôle
s’allumera.
C) Fonction de maintien chaud: Une sommation sonore retentira une fois que l’opération
de cuisson sera terminée (cinq ‘bip’ sonores) et la lampe de contrôle s’éteindra. Le
message de “KEEP WARM” s’affichera sur l’écran et l’heure commencera à avancer.
L’opération de maintien chaud peut être utilisée maximum 12 heures. Ensuite une
nouvelle sommation sonore retentira (trois ‘bip’ sonores) et l’appareil passera en position
d’arrêt.
3. Protection de non-fonctionnement à vide: L’appareil est doté d’un dispositif automatique
de sécurité de non-fonctionnement à vide arrêtant l’élément de chauffage qui empêche
l’appareil de chauffer sans que de l’eau y soit présente et qui empêche que l’unité de
base soit mise en marche accidentellement sans eau dans l’appareil. En pareil cas, une
sommation sonore continuelle retentira et la lampe de contrôle clignotera. L’heure
s’arrêtera. L’appareil continuera à l’opération de là où il est resté lorsque vous appuierez
sur la touche de “SET” après avoir fait le rajout d’eau dans l’appareil.
4. Après avoir utilisé l’appareil, positionnez-le sur « arrêt » et débranchez-le de la prise.
Retirez le panier de cuisson à vapeur à l’aide d’un chiffon. Attendez que l’appareil
refroidisse complètement avant de le ranger.
5. Appuyez sur la touche de “SET” pour affirmer que vous avez entendu l’alarme.
NETTOYAGE ET ENTRETIEN
1. N’utilisez jamais de produits de nettoyage qui sont abrasifs ou d’objets coupant pour
le nettoyage.
2. Nettoyez l’unité de base avec chiffon doux et humide, n’immergez jamais l’unité dans
l’eau.
3. Dégorgez le réservoir d’eau suite à chaque utilisation et remplissez-le avec de l’eau
propre avant de le réutiliser.
4. Asséchez l’unité de base et tous les autres accessoires suite à l’opération de nettoyage.
- 13 -
Page 15

NETTOYAGE ET ENTRETIEN
5. Décalcification: Pour que l’appareil continue à fonctionner correctement, nous vous
conseillons d’éliminer le calcaire de votre appareil à des intervalles précis (suite à 710 usages) dépendant de la dureté de l’eau de votre région.
I. Mettez de l’eau et du vinaigre (1:1) dans le réservoir d’eau jusqu'à ce qu’au niveau
maximum.
II. Branchez la fiche électrique de la prise et mettez l’alimentation en marche. N’utilisez
pas de plateau d’égouttement, de panier de cuisson à vapeur ou de couvercle lors de
cette opération. Réglez le chronomètre à 20-25 minutes. Lorsque le vinaigre aura
commencé à bouillir, arrêtez l’appareil. Attendez que l’appareil refroidisse avant de
déverser le vinaigre.
III. Rincez plusieurs fois le réservoir d’eau avec de l’eau propre.
INDICES
1. Mettez de l’eau tiède dans le réservoir pour raccourcir la curée de cuisson.
2. N’installez pas les aliments trop près l’un de l’autre. Laissez des espaces entre eux
pour que la vapeur puisse circuler librement.
3. Si vous devez cuisiner des repas de grandes quantités, soulevez le couvercle au milieu
de l’opération de cuisson et mélanger gentiment l’aliment et refermez le couvercle.
CONSIGNES IMPORTANTES DE SÉCURITÉ
1. Avant de brancher la fiche électrique à la prise de courant, assurez-vous que le type
de courant et que le voltage du réseau correspondent aux spécifications techniques
indiqués dans ce MODE D'EMPLOI. L’appareil doit être lié à une source de terre.
2. Il se peut que les enfants ne se rendent pas compte des dangers que peuvent causer
les appareils électriques. Tenez ce genre d’appareils hors de la portée des enfants.
3. Ne tentez jamais de faire fonctionner l’appareil sans eau à l’intérieur. Mettez seulement
suffisamment d’eau à l’unité de base et ne dépassez jamais le signe de niveau maximum
d’eau.
4. Utilisez uniquement les accessoires originaux qui sont conseillés pas le fabricant.
5. Certaines pièces de l’appareil peuvent extrêmement chauffer lors de l’usage, de ce
fait, ne contactez pas les surfaces chaudes et utilisez uniquement les poignées ou les
boutons.
6. Ne portez pas l’appareil pendant qu’il y a de l’eau chaude ou de l’aliment à l’intérieur.
7. Débranchez la fiche électrique de l’appareil avant de commencer à nettoyer l’appareil.
Ne plongez jamais l’appareil ni la fiche électrique dans l’eau.
8. Ne faites pas fonctionner l’appareil si le cordon d’alimentation ou la fiche électrique
sont en panne ou si l’appareil est tombé parterre ou si un dommage quelconque est
survenu. Remettez l’appareil au centre de service agréé pour contrôle et réparation.
9. Cet appareil est conçu uniquement pour usage domestique, et non pas pour des
applications commerciales. N’utilisez jamais l’appareil dans des endroits de plein air.
10. En cas de dysfonctionnement du cordon d’alimentation, afin d’éviter les dangers ; le
cordon doit être remplacé par le fabricant, l’autorisé de service ou une personne similaire
autorisée.
- 14 -
Page 16

NEDERLANDS
SINBO SFS 5707 STOOMKOKER
GEBRUIKSAANWIJZING
Dit apparaat voldoet aan de EC richtlijnen voor beperking van interferentie in
radiocommunicatie en aan de voorschriften voor beveiliging van elektrische apparaten
laagspanning en is gefabriceerd overeenkomstig de van kracht zijnde veiligheidsvereisten
Gelieve deze handleiding aandachtig te lezen vooraleer u het toestel in gebruik neemt.
Zij bevat belangrijke informatie inzake veiligheid, gebruik en onderhoud van dit apparaat.
TECHNISCHE SPECIFICATIES
Model: SFS 5707
Spanning: 230V~
Frequentie: 50Hz
Vermogen: 650W
Positie: Horizontaal
Stoomgeneratie: Snel
Kooktijd: max. 2 uur
Timer: max. 13 uur
Warmhoudsduur: max. 12 uur
Waterinhoud: max. 1 liter
Gewicht: 2,5 kg
Afmetingen (mm): 340 x 252 x 396
BESCHRIJVING
1. Deksel
2. Rijstpan
3. Tussenplaat
4. Stoommand
5. Stoommand bodemplaat
6. Vochtcollector
7. Onderstel - Behuizing
8. Bedieningspaneel
9. Waterpeilindicatie en vulopening
- 15 -
1
2
3
4
5
4
5
4
5
6
7
8
9
Page 17

GEBRUIK
Eerste gebruik:
1. Neem het apparaat en alle accessoires uit de verpakking. Vooraleer het apparaat in
gebruik te nemen, was het deksel, de stoommanden en de pannen in water en een weinig
detergent, spoel na en droog alle onderdelen zorgvuldig af.
2. Installeer het apparaat op een vlak en stabiel oppervlak. Laat voldoende vrije ruimte
tussen het apparaat en muren, kasten, andere meubelen en zaken. Kinderen moeten
om veiligheidsredenen op afstand worden gehouden.
3. Controleer of de voltage op het typeplaatje overeenkomt met de plaatselijke netspanning.
4. Vul het waterreservoir:
1. Vul het reservoir langs de vulopening tot aan de waterpeilaanduiding met water, of
2. Vul het reservoir tot aan de max. niveau aanduiding met water.
Opmerking! Doe uitsluitend zuiver water, nooit een andere vloeistof in het reservoir en
voeg er geen specerijen of andere ingrediënten aan toe.
5. Plaats de vochtcollector in het onderstel.
Stoommand:
1. De stoommanden en/of bodemplaten kunt u naar believen combineren.
2. Plaats grote stukken eetwaar die een langere kooktijd vereisen in de onderste
stoommand.
3. In dit apparaat kunt u verschillende gerechten tegelijkertijd bereiden. De smaken
zullen erdoor verrijkt worden.
4. Gerechten met verschillende bereidingstijden: doe het voedsel dat langer moet gekookt
worden in de onderste stoommand. Als de timer teruggelopen is tot de tijd die nodig is
voor het bereiden van het voedsel dat korter moet worden gekookt, neemt u met een
doek voorzichtig het deksel van het apparaat en zet u de stoommand met daarin het
voedsel dat een kortere kooktijd vereist op de onderste stoommand. Plaats opnieuw het
deksel.
5. Grote stukken voedsel: de bodemplaten kunnen uit de mand verwijderd worden (door
ze naar boven te drukken) en 2 manden kunnen samengekoppeld worden tot één grote
stoommand. Opgelet! De bodemplaat van de onderste mand moet bevestigd blijven.
6. De uithollingen in de bodemplaten zijn handig, ondermeer voor het koken van eieren.
Opstarten
1. Vul het waterreservoir en steek de stekker in het stopcontact.
2. Zet het apparaat aan, na een geluidssignaal ziet u op het LCD scherm de melding <
0:00 > verschijnen.
A) Manueel gebruik: Duw op de “SET” toets; op het scherm zal < 00:20 > verschijnen
(voorgeregelde kookduur: 20 minuten) en de melding “STEAMER” die aan en uitgaat. U
kunt nu de gewenste kookduur instellen door middel van de uur “Hr” en Minuten “Min”
toetsen. De maximaal instelbare duur van het kookproces is 1 uur 59 minuten. Als er
binnen de 5 seconden na het regelen van de kooktijd geen enkele toets wordt aangeraakt
zal het kookprogramma automatisch opstarten. De “STEAMER” melding stopt met
- 16 -
Page 18

GEBRUIK
pinken en het indicatielampje gaat branden.
Opmerking: ingeval u tijdens het kookproces merkt dat er geen of weinig stoom uit het
apparaat ontsnapt kunt u het waterreservoir bijvullen langs de vulopening in het onderstel.
B) Timer: Als u dadelijk na het regelen van de kookduur op de “SET” toets drukt (of bij
aanvang tweemaal op de “SET” toets drukt) ziet u op het scherm < 00:00 > en de
melding “TIMER” die aan en uitgaat. U kunt nu door middel van de “Hr” en “Min” toetsen
de gewenste starttijd van het kookproces instellen. De maximaal instelbare starttijd is
12 uur 59 minuten (na het moment van instelling). Als er binnen de 5 seconden na het
regelen van de starttijd geen enkele toets wordt aangeraakt zal het apparaat automatisch
de tijd beginnen aftellen voor het inzetten van het kookproces. De “TIMER” melding op
het scherm stopt met pinken. Als het aftellen voltooid is, is de wachttijd verstreken en
wordt het kookprogramma automatisch gestart. Op het scherm zal de melding “STEAMER”
verschijnen en het indicatielampje gaat branden.
C) Warmhoud functie: Als het kookproces voltooid is hoort u een geluidssignaal (vijf
‘biepjes’) en het indicatielampje dooft. Op het scherm leest u “KEEP WARM” en de
timer blijft doorlopen. De warmhoud functie zal de gerechten maximaal 12 uur lang
warm houden. Daarna hoort u opnieuw een geluidssignaal (drie “biepjes”) en het apparaat
wordt automatisch uitgeschakeld.
3. Beveiliging tegen droog functioneren: Dit apparaat is uitgerust met een
beveiligingssysteem dat de verwarmingselementen automatisch uitschakelt als het
apparaat per ongeluk zou worden aangezet terwijl het reservoir leeg is of als het water
gedurende het kookproces opgebruikt is. In dit geval hoort u een doorlopend alarmsignaal
terwijl het indicatielampje gaat pinken. De timer valt stil. Nadat u water in het reservoir
hebt gedaan drukt u op de “SET” toets om het kookprogramma voort te zetten.
4. Schakel na gebruik het apparaat uit en haal de stekker uit het stopcontact. Neem de
stoommand uit het apparaat met behulp van een doek of ovenwant. Wacht met opbergen
tot het apparaat volledig is afgekoeld.
5. Druk op de “SET” toets om te bevestigen dat u het alarmsignaal hebt gehoord.
REINIGING EN ONDERHOUD
1. Gebruik in geen geval bijtende of schurende producten of scherpe voorwerpen om het
apparaat te reinigen.
2. Wrijf de buitenzijde van de behuizing schoon met een zachte vochtige doek, dompel
dit onderdeel nooit in water.
3. Leeg het waterreservoir na elk gebruik en vul het met zuiver water voordat u het
apparaat opnieuw gebruikt.
4. Droog na reiniging de behuizing en alle onderdelen van het apparaat zorgvuldig af.
5. Ontkalken: Om een blijvende optimale werking te verzekeren raden wij u aan het
apparaat, regelmatig te ontkalken, bv. om de 7 -10 stoomkook beurten, afhankelijk van
de hardheid van het water in uw regio.
- 17 -
Page 19

REINIGING EN ONDERHOUD
I. Vul het waterreservoir tot maximum peil met water en azijn (1:1).
II. Steek de stekker in het stopcontact en zet het apparaat aan. Maak voor deze bewerking
geen gebruik van de vochtcollector, stoommand en deksel. Regel de kooktijd op 20-25
minuten. Schakel het apparaat uit als het azijnmengsel begin te koken. Wacht met
uitgieten tot het apparaat is afgekoeld.
III. Spoel het waterreservoir enkele keren met zuiver water.
NUTTIGE WENKEN
1. Vul het reservoir met lauw of warm water om het kookproces te verkorten.
2. Leg de stukken voedsel niet te dicht bij elkaar, laat enige ruimte zodat de stoom vrij
kan circuleren.
3. Als u grote hoeveelheden voedsel bereidt, licht dan halverwege het kookproces het
deksel even op om de ingrediënten voorzichtig te herschikken, om te scheppen of te
roeren.
BELANGRIJKE VEILIGHEIDSINSTRUCTIES
1. Controleer aan de hand van de technische specificaties in deze handleiding, of het
stroomtype en de netspanning bij u thuis, geschikt zijn voor het apparaat, voordat u het
in gebruik neemt. Het apparaat moet aangesloten worden op een geaard stopcontact.
2. Het is verstandig kinderen uit de buurt te houden want zij zijn zich niet bewust van het
gevaar van elektrische apparaten.
3. Zet het apparaat niet aan als er geen water in het reservoir is. Doe voldoende water
in het reservoir maar let erop het maximum peil nooit te overschrijden.
4. Gebruik met dit apparaat geen accessoires die niet door de fabrikant zijn aanbevolen.
5. Sommige delen van dit apparaat worden erg heet tijdens het gebruik; raak de buitenzijde
van het apparaat niet aan tenzij aan handgreep en knoppen.
6. Verplaats het apparaat niet terwijl als heet water of voedsel bevat.
7. Neem altijd de stekker uit het stopcontact voordat u het apparaat gaat reinigen.
Dompel de behuizing, het snoer of de stekker nooit in water.
8. Gebruik het apparaat niet als het snoer, de stekker of het apparaat zelf beschadigd
of defect is, als het gevallen of in water gevallen is. Contacteer in dit geval een bevoegde
Service voor nazicht en herstel.
9. Dit apparaat is uitsluitend bedoeld voor huishoudelijk gebruik en het is niet geschikt
voor handelsdoeleinden. Gebruik het apparaat nooit buitenhuis.
Ingeval het snoer defect of beschadigd is moet het om alle gevaar te vermijden, vervangen
worden door de kabelfabrikant, een bevoegde Service of geschoold vakman.
- 18 -
Page 20

ESPANOL
SINBO SFS 5707 COCEDOR A VAPOR
INSTRUCCIÓN DEL USO
Esta máquina se conforme con los Directivos de CE sobre la seguridad de voltaje bajo
y empujar la interferencia de radio y se ha producido según los requisitos de la seguridad
vigente.
Antes de empezar a utilizar la máquina por favor lee este guía cuidadamente. En este
guía hay informaciones importantes sobre la seguridad, uso de la máquina y mantenimiento.
DATOS TÉCNICOS
Modelo: SFS 5707
Voltaje: 230V~
Frecuencia : 50Hz
Energía: 650W
Posición: Horizontal
Producir vapor: Rápido
Duración de funcionamiento: máx. 2 horas
Temporizador: máx. 13 horas
Duración de guardar la temperatura: máx. 12 horas
Cantidad de agua: máx. 1 Litre
Peso: 2,5 kg
Tamaños (mm): 340 x 252 x 396
DESCRIPCIÓN
1. Tapa
2. Escudilla de arroz
3. Separador
4. Cesta de cocción a vapor
5. Suelo de la cesta
6. Bandeja de goteo
7. Cuerpo del suelo
8. Panel de control
9. Indicador de agua y hueco de llenar agua
- 19 -
1
2
3
4
5
4
5
4
5
6
7
8
9
Page 21

FUNCIONAMIENTO
Uso primero:
1. Saca todos los accesorios desde la caja. Antes del primer uso, limpie la tapa, cestas
de cocción a vapor y escudillas por agua y un poco de detergente. Seca las piezas bien.
2. Haga situar la máquina encima de una superficie recta. Deje un intervalo entre los
muebles, muros y otros materiales y la máquina. Por la seguridad, guarde los niños
fuera de la máquina.
3. Tiene que estar seguro que los niveles de voltajes de su casa y la máquina son los
mismos.
4. Llenar por agua:
1. Para llenar la máquina por agua verte agua dentro del hueco de llenar agua hasta el
signo del nivel de agua, o
2. Llene la cisterna por agua hasta el nivel máximo por agua.
Nota! No llene la cisterna por otro líquido excepto agua o no añade otros materiales
como especies.
5. Haga situar la bandeja de goteo encima del suelo.
Cesta de cocción a vapor:
1. Puede combinar las cestas de cocción a vapor y/o los suelos de cesta según sus
preferencias.
2. Llene la cesta de cocción a vapor inferior por las piezas grandes que necesitan
duraciones largas de cocción.
3. La máquina puede cocer la comida más de uno en una vez. Se suministra enriquecer
los sabores.
4. Los alimentos que necesitan distintas duraciones de cocción: llene la cesta inferior
de cocción a vapor por los alimentos que necesitan la duración larga de cocción. Cuando
el temporizado se llega a la duración del alimento que necesita corta duración de cocción,
levanta la tapa por un paño y haga situar la cesta de cocción a vapor encima de la cesta
inferior. Monte la tapa a su lugar.
5. Alimentos grandes: Suelo de la cesta se puede desmontar (por pulsar hacia arriba)
y puede unir las dos cestas para obtener una cesta más grande.
Nota: El suelo de la cesta inferior se debe estar montado.
6. Los huecos que están en el suelo de la cesta suministran facilidad para cocer los
alimentos como huevos.
Iniciar
1. Llene la máquina por agua y enchúfela.
2. Haga funcionar la máquina, después de un aviso de sonido se muestra un mensaje de
0:00 en la pantalla de LCD.
A) Hacer funcionar manualmente: pulse el botón de SET, en la pantalla se muestra 0:02
(la duración defecto: 20 min.) y en la pantalla se muestra el mensaje de STEAMER.
Configure la duración deseada por los botones de “Hr” y “min”. La duración máxima es
1 hora y 59 minutos. Después del proceso de configuración si no se hace ningún proceso
- 20 -
Page 22

FUNCIONAMIENTO
durante 5 segundos la máquina hace funcionar el programa automáticamente. El mensaje
de STEAMER se para y la luz de control se ilumina.
Nota: Si no sale vapor desde la máquina o si se sale un poco de vapor añade agua por
el hueco de llenar agua en el suelo.
B) Temporizador: Después de configurar la duración de cocción si pulsa el botón de SET
(o en el inicio si pulsa el botón de SET dos veces), se muestra 0:00 en la pantalla y el
menaje de TIMER empieza a mostrarse. El tiempo deseado de iniciar se configura por
los botones de Hr y Min.
La duración máxima es 1 hora y 59 minutos. Después del proceso de configuración si no
se hace ningún proceso durante 5 segundos la máquina hace funcionar el programa
automáticamente. El mensaje de STEAMER se para y la luz de control se ilumina.
C) Función de guardar la temperatura: después de finalizar el proceso de cocción se
sale un aviso de sonido (5 sonidos de bip) y la luz de control se apaga. Se muestra KEEP
WARM en la pantalla y la hora empieza a seguir. La función de guardar la temperatura
se puede utilizar por 12 horas máxima. Luego se sale un aviso nuevo de sonido (3 sonidos
de bip) y la máquina se pasa a la posición apagada.
3. Protección contra funcionamiento vacio: La máquina tiene un sistema de seguridad
para ni funcionarse cuando está vacía que apaga el aparato de calentamiento
automáticamente para evitar el calentamiento sin agua dentro de la máquina y para
evitar funcionamiento indeseado del suelo si la máquina no tiene agua. En este caso se
sale un aviso de sonido continuadamente y la luz de control se ilumina y apaga. La hora
se para. Después de añadir agua, cuando pulse el botón de SET la máquina continua al
proceso desde el punto quedado.
4. Después de utilizar la máquina lleve a la posición de apagada y desenchúfela. Saque
la cesta de cocción a vapor mediante un paño. Antes de levantar la máquina espere que
se enfríe completamente.
5. Para comprobar la alarma, pulse el botón de SET.
LIMPIEZA Y MANTENIMIENTO
1. No utiliza los materiales abrasivos de limpieza o materiales cortantes para el proceso
de limpieza.
2. Limpie la unidad del suelo por un paño suave húmedo, no mete la unidad en agua
nunca.
3. Haga vaciar la cisterna de agua después de cada uso y antes de utilizar otra vez llene
por agua limpio.
4. Seca la unidad del suelo y otros accesorios después del proceso de limpieza.
5. Limpiar la cal: Para la continuación del funcionamiento correcto de la máquina
recomendamos limpiar la cal de su máquina a veces según el agua de su región (después
de 7-10 uso).
I. Llene la cister por vinagre hasta el nivel máximo (1:1).
II. Enchufe la máquina y abre la energía. No utilice la bandeja de goteo, cesta de cocción
- 21 -
Page 23

INSTRUCCIÓN SOBRE LA PROTECCIÓN DE MEDIOAMBIENTE
a vapor y tapa en este proceso. Configure el temporizador a 20-25 minutos. Apaga la
máquina cuando el vinagre empieza a hervirse. Antes de verter el vinagre espere que
se enfríe.
III. Lava la cisterna de agua por agua limpio unas veces.
INDICIO
1. Para reducir la duración de cocción llene la cisterna por agua fresco.
2. No haga situar los alimentos muy juntos. Deje intervalo entre de ellos para la circulación
libre del vapor.
3. Si necesita cocer mucha comida mezcla la comida en el medio de la duración de
cocción por levantar la tapa y cierre la tapa otra vez.
INSTRUCCIÓN IMPORTANTE DE LA SEGURIDAD
1. Antes de enchufar la máquina tiene que comprobar que el tipo de corriente y voltaje
son convenientes según las características técnicas indicadas en la Instrucción del Uso.
Se debe tener alambre de tierra.
2. Los niños no pueden entender los peligros de las máquinas eléctricas. Guarde los
niños fuera de las máquina.
3. No intente hacer funcionar la máquina sin agua. Llene la unidad del suelo por agua
solo suficiente y no supere el nivel máximo de agua nunca.
4. Solo utilice los accesorios recomendados por el fabricante.
5. Durante el uso las piezas de la máquina se pueden calentar excesivamente, por eso
no toque a las superficies calientes y solo utilice los mangos o botones.
6. No lleve la máquina cuando hay alimento o agua caliente dentro de la máquina.
7. Antes de empezar a limpiar la máquina desenchúfela. No mete la máquina o el enchufe
en agua nunca.
8. Si hay una avería en el cable de energía o enchufe o la máquina se cae al suelo o la
máquina se avería por otra cosa, no hace funcionar la máquina. Para este caso consulte
al servicio autorizado para el proceso de control y reparación.
9. Esta máquina se ha diseñado solo para el uso domestico, no es para las aplicaciones
comerciales. No utilice la máquina nunca en la fuera.
En el caso de las averías del cable de energía para evitar los peligros el cable se debe
cambiar por el fabrican, competente del servicio o una persona cualificada similar.
- 22 -
Page 24

- 23 -
1
2
3
4
5
4
5
4
5
6
7
8
9
Page 25

- 24 -
Page 26

- 25 -
Page 27

- 26 -
Page 28

- 27 -
1
2
3
4
5
4
5
4
5
6
7
8
9
.1
.2
.3
.4
.5
.6
.7
.8
.9
Page 29

-28 -
Page 30

- 29 -
Page 31

- 30 -
Page 32

HRVATSKI
SINBO SFS 5707 KUHALO NA PARU
UPUTSTVO ZA UPORABU
Ovaj ured¯aj je u skladu s CE-direktivom u vezi potiskivanja radio interferencije i sigurnosti
niskog napona i proizveden je u skladu sa vaˇze´cim sigurnosnih zahtjevima.
Molimo vad da prije poˇcetka uporabe ured¯aja temeljno proˇcitate ovo uputstvo za uporabu.
U ovom uputstvu nalaze se znaˇcajne informacije u vezi vaˇse sigurnosti, naˇcina rukovanja
i odrˇzavanja ured¯aja.
TEHNIˇCKE VRIJEDNOSTI
Model : SFS 5707
Nazivni napon: 230V~
Nazivna frekvencija: 50Hz
Snaga: 650W
Pozicija : Vodoravan
Proizvodnja pare: Brza
Vrijeme rada : max. 2 sata
Timer: max. 13 sati
Odrˇzavanje u toplom stanju: max. 12 sati
Koliˇcina vode: max. 1 Litar
Teˇzina: 2,5 kg
Dimenzije (mm): 340 x 252 x 396
OPIS
1. Poklopac
2. Posuda za riˇzu
3. Separator
4. Koˇsara za kuhanje na paru
5. Dno posude/koˇsare
6. Posuda za kapanje
7. Ku´ciˇste
8. Kontrolna ploˇca
1
2
3
4
5
4
5
4
5
6
7
8
9
9. Indikator vode i otvor za usipanje vode
- 31 -
Page 33

RUKOVANJE
Kod prve uporabe:
1. Ured¯aj i sav ostali pribor izvadite iz kutije. Prije prve uporabe poklopac, koˇsare i posude
za kuhanje na paru operite u vodi uz uporabu deterdˇzenta za sud¯e. Sve dijelove dobro
posuˇsite.
2. Ured¯aj postavite na ravnu povrˇsinu. Ured¯aj postavite na odgovaraju´ce rastojanje od
namjeˇstaja, zidova i ostalih stvari. Iz sigurnosnih razloga djecu drˇzite dalje od ured¯aja.
3. Uvjerite se da vrijednost napona naznaˇcena na informacijskoj naljepnici ured¯aja
odgovara naponu u vaˇsem domu.
4. Usipanje vode:
1. Kroz otvor za usipanje vode u ured¯aj naspite vodu do oznake za razinu vode, ili
2. Spremnik za vodu napunite vodom do oznake za max.razinu vode.
Napomena! U spremnik ne usipajte nikakvu drugu teku´cinu osim vode i u vodu ne dodajite
zaˇcine.
Na ku´ciˇste postavite pladanj za kapanje/sakupljanje soka.
Koˇsara za kuhanje na paru:
1. Koˇsare/posude za kuhanje na paru i/ili dno posude moˇzete upariti prema vaˇsoj ˇzelji.
2. Velike dijelove hrane koji se dugo kuhaju stavite u koˇsaru za kuhanje na paru koja se
nalazi na najniˇzem katu.
3. U ovom ured¯aju moˇzete istovremeno kuhati viˇse jela. On vam omogu´cava oboga´cenje
okusa.
4. Hrana ˇcije je vrijeme kuhanja razliˇcito: Hranu koja se dugo kuha stavite u najdonju
koˇsaru za kuhanje na paru. Kada se ispuni vrijeme kuhanja hrane koja se najbrˇze kuha
podignite poklopac uz pomo´c krpice i gornju koˇsaru za kuhanje na paru postavite na
donju koˇsaru. Zatvorite poklopac.
5. Veliki komadi hrane: Dno koˇsare za kuhanje na paru je odvojivo(gurnite ka gore) i na
taj naˇcin moˇzete spojiti dvije koˇsare za kuhanje i dobiti jednu veliku.
Napomena! Dno donje koˇsare mora biti postavljeno.
6. Rupe na dnu koˇsare olakˇsavaju kuhanje jaja.
Poˇcetak rada
1. Uspite vodu u ured¯aj i umetnite utikaˇc u utiˇcnicu.
2. Ukljuˇcite ured¯aj. Nakon zvuˇcnog signala na LCD zaslonu pojavi´ce se poruka < 0:00
>.
A) Ruˇcno rukovanje: Pritisnite na tipku “SET”, na zaslonu ´ce se pojaviti poruka < 00:20
> (zadano vrijeme kuhanja: 20min.) i na zaslonu ´ce poˇceti da treperi poruka “STEAMER”
. Vrijeme kuhanja moˇzete podesiti pritiskom na tipke “Hr” i “Min”. Raspoloˇzivo vrijeme
kuhanja je 1 sat i 59 minuta. Ukoliko se 5 sekundi nakon podeˇsavanja vremena kuhanja
ne izvrˇsi nikakva intervencija, ured¯aj ´ce automatski poˇceti da radi. Poruka “STEAMER”
na zaslonu ´ce prestati da treperi i upali´ce se kontrolna lampica.
Napomena: Ako iz ured¯aja ne izlazi para ili izlazi samo malo pare, kroz donji otvor za
usipanje vode dodajte vodu.
- 32 -
Page 34

RUKOVANJE
B) Timer: Odmah nakon podeˇsavanja vremena kuhanja pritisnite na tipku “SET” (ili na
poˇcetku dva puta pritisnite na tipku “SET”) na zaslonu ´ce se pojaviti poruka < 00:00 >
i poruka “TIMER” ´ce poˇceti da treperi. ˇzeljeno vrijeme poˇcetka kuhanja podesite
uporabom tipki “Hr” i “Min”. Maksimalno vrijeme poˇcetka kuhanja mogu´ce je podesiti
na 12 sati i 59 minuta. Ako nakon podeˇsavanja vremena u toku 5 sekundi ne izvrˇsite
nikakvu intervenciju ured¯aj ´ce automatski poˇceti sa odbrojavanjem podeˇsenog vremena
za poˇcetak programa. Na zaslonu ´ce poˇceti da treperi poruka “TIMER”. Po ispunjenju
funkcije odbrojavanja vremena ured¯aj ´ce automatski poˇceti s radom. Na zaslonu ´ce se
pojaviti poruka“STEAMER” i upali´ce se kontrolna lampica.
C) Funkcija odrˇzavanja topline: Po ispunjenju vremena kuhanja oglasi´ce se zvuˇcni
upozoravaju´ci signal (pet puta ´ce se oglasiti zvuk ‘bip’) i ugasi´ce se kontrolna lampica.
Na zaslonu ´ce se pojaviti poruka“KEEP WARM” i poˇcinje vrijeme odrˇzavanja topline.
Maksimalno odrˇzavanje vremena topline je 12 sati. Kasnije ´ce se oglasiti novi zvuˇcni
signal (tri puta ´ce se oglasiti zvuk ‘bip’) i ured¯aj prelazi u poziciju iskljuˇceno.
3. Zaˇstita od rada na suho: Ured¯aj je opremljen sigurnosnim sustavom zaˇstite od rada
na suho koji automatski iskljuˇcuje grija´ci elemenat kako bi sprijeˇcio zagrijavanje ured¯aja
bez vode. U tom sluˇcaju oglasi´ce se kontinuirani zvuˇcni signal i kontrolna lampica ´ce
poˇceti ta treperi. Sat ´ce stati. Nakon dodavanja vode u ured¯aj pritisnite na tipku “SET” i
ured¯aj ´ce nastaviti s radom od mjesta na kom je zaustavljen.
4. Nakon uporabe iskljuˇcite ured¯aj i izvucite utikaˇc iz utiˇcnice. Koˇsaru za kuhanje na paru
izvadite uz uporabu krpe. Prije odlaganja saˇcekajte da se ured¯aj u potpunosti ohladi.
5. Da biste potvrdili da ste ˇculi alarm pritisnite na tipku “SET”.
ˇCIˇS´
CENJE I ODRˇZAVANJE
1. Nipoˇsto ne koristite abrazivna sredstva za ˇciˇs´cenje ili oˇstre predmete.
2. Ku´ciˇste ured¯aja oˇcistite mekom vlaˇznom krpom i posuˇsite. Ku´ciˇste nipoˇsto ne uranjajte
u vodu.
3. Nakon svake uporabe ispraznite spremnik za vodu i prije ponovne uporabe napunite
ˇcistom vodom.
4. Ku´ciˇste i ostali pribor nakon ˇciˇs´cenja dobro posuˇsite.
5. Uklanjanje kamenca: za uredan rad ured¯aja preporuˇcujemo vam da u zavisnosti od
tvrdo´ce vode u vaˇsoj oblasti vrˇsite periodno uklanjanje kamenca iz ured¯aja (nakon 7-10
koriˇstenja).
I. U spremnik za vodu uspite rastvor vode i ocata (1:1) do oznake za max.oznaku.
II. Umetnite utikaˇc u utiˇcnicu. Za funkciju ˇciˇs´cenja kamenca ne koristite pladanj za kapanje,
koˇsaru za kuhanje i poklopac. Timer podesite na 25-30 minuta. Nakon ˇsto rastvor s
ocatom prokuha iskljuˇcite ured¯aj. Prije nego prospete rastvor iz ured¯aja saˇcekajte da se
ured¯aj ohladi.
III. Spremnik za vodu isperite viˇse puta ˇcistom vodom.
- 33 -
Page 35

SAVJET
1. Za skra´cenje vremena kuhanja u spremnik za vodu uspite mlaku vodu.
2. Komade hrane rasporedite po posudi za kuhanje. Nemojte ih zbijati. Omogu´cite slobodno
kruˇzenje zraka unutar ured¯aja.
3. Ukoliko trebate skuhati veliku koliˇcinu hrane na polovini kuhanja podignite poklopac
lagano promjeˇsajte hranu i zatvorite poklopac.
BITNE SIGURNOSNE UPUTE
1. Prije umetanja utikaˇca u utiˇcnicu uvjerite se da vrsta struje i napon u vaˇsoj strujnoj
mreˇzi odgovaraju tehniˇckim specifikacijama proizvoda koje su naznaˇcene u ovom upustvu
za uporabu.
2. Djeca nisu dovoljno odrasla da bi razumjela opasnosti koje sa sobom nose elektriˇcni
ured¯aji. Molimo vas da djecu drˇzite dalje od ove vrste ured¯aja.
3. Nipoˇsto ne pokuˇsavajte ukljuˇciti ured¯aj bez vode. U spremnik za vodu uspite samo
dovoljnu koliˇcinu vode i nipoˇsto ne prelazite oznaku za max.razinu vode.
4. Koristite samo originalan pribor koji preporuˇcuje proizvod¯aˇc.
5. Tijekom uporabe neki dijelovi ured¯aja se mogu jako zagrijati. Zbog toga ne dodirujte
vru´ce povrˇsine i koristite samo ruˇcke i tipke.
6. Ne nosite ured¯aj u kom se nalazi vrela voda ili hrana.
7. Prije ˇciˇs´cenja izvucite utikaˇc iz utiˇcnice. Ured¯aj ili utikaˇc nipoˇsto ne uranjajte u vodu.
8. Ne koristite ured¯aj s oˇste´cenim kabelom ili utikaˇcem, ured¯aj koji je pao na pod ili je
oˇste´cen na neki drugi naˇcin. Za kontrolu i opravku ured¯aja kontaktirajte ovlaˇsteni servisni
centar.
9. Ovaj ured¯aj dizajniran je samo ta ku´cansku uporabu i nije namjenjen za uporabu u
komercijalne svrhe. Ured¯aj nipoˇsto ne koristite na otvorenim povrˇsinama. Za izbjegavanje
svake vrste opasnosti oˇste´ceni kabel treba da zamjeni proizvod¯aˇc kabela, ovlaˇsteni
servisni centar ili sliˇcna struˇcna osoba.
- 34 -
Page 36

YETK‹L‹ SERV‹SLER L‹STES‹
ADANA-SEYHAN-DORUK SO⁄UTMA -REfiATBEY MAH. AV. MEHMET ERO⁄LU CAD. NO:8-TEL.:0322 458 55 14 ADANA-KOZAN-DURAN
SO⁄UTMA-CUMHUR‹YET MH. DEDEO⁄LU SK. S‹S. APT.- TEL.:0322 516 57 78 ADANA-SEYHAN-DÜZOVA ELEKTR‹K - KÜÇÜK SAAT
MEYDANI HILAL HAN IS MRK NO 32 - TEL.:0322 363 67 87 ADANA-SEYHAN-ÖZER ELEKTRON‹K - OBALAR CAD. SAL‹H ZEK‹ BUGAY ‹fi
HANI NO:11 - TEL.:0322 352 25 75 ADANA-SEYHAN-SER‹N ELEKTRON‹K - MAHFESI⁄MAZ MH. KENAN EVREN BULV. 21.SK. KAROL S‹T.
E BLOK NO:2/A - TEL.:0322 233 74 84 ADANA-CEYHAN-URANYUM ELEKTRON‹K - ‹NÖNÜ BULVARI NO: 172 - TEL.:0322 611 29 95
ADANA-CEYHAN-CEYHAN ELEKTRON‹K - BÜYÜKKIRIM MH. MEHMET fiER‹F Y‹⁄‹T CD. 4.SK. NO:3/B TEL. : 0322 613 45 96 ADIYAMANYILDIRIM SERV‹S - BAHÇEL‹EVLER MH. 177 SK. NO:2 - TEL.:0416 214 40 83 ADIYAMAN-KAHTA-ELK. EV ALET. TAM‹RC‹S‹-FAT‹H MH.
ZAFER CD. NO:20 - TEL.:0416 725 99 89 ADIYAMAN-ÜNAL ELEKTRON‹K-BAHÇEL‹EVLER MAH. ESK‹ KAHTA CAD. NO:11/A-TEL.:0416
216 75 56 ADIYAMAN-BEYAZ EfiYA TAM‹R‹-ÇATI MH. BADEM SK. NO:11 BESN‹ TEL.: 0416 318 32 00 AFYON-EM‹N ELEKTRON‹K-ENST‹TÜ
CAD. NO:19-TEL.:0272 215 43 32 AFYON-D‹NAR-GÖKÇEO⁄LU ELEKTR‹K-EMN‹YET MH. YEN‹YOL CD. 146 BLOK NO:4-TEL.: 0272 353 53
44 A⁄RI-PATNOS-ACELE PEfi‹N ELEKTRON‹K-BUHARA SOK. NO:12-TEL.:0472 616 46 08 A⁄RI-ÖZPAK ELEKTRONIK-ESKI VAN CAD
NO: 341 Ömer Hamam Yan›-TEL.:0472 216 53 14 AKSARAY-‹T‹NA ELEKTR‹K-TAfi PAZARI MH. fiEH‹T HAT‹P UÇKUN SK. ESK‹ TERM‹NAL
ÇIKIfiI NO:9/A-TEL.:0382 212 63 99 AMASYA-KUTUP TEKN‹K SO⁄UTMA-GÖKMEDRESE MAH. M.K.P. CAD. HAM‹TBATIR APT. NO:115/ATEL.:0358 212 61 66 AMASYA-SULUOVA-ÇALIfiKAN ELEKTRON‹K-ÖZEL ‹DARE ‹fi HANI NO:121-TEL.:0358 417 18 64 AMASYA-FLAfi
ELEKTRON‹K-YÜZEVLER MAH.TORUMTAY SOK. NO:25 DEM‹RD‹fi APT. ALTI-TEL.:0358 212 33 71 ANKARA-YEN‹MAHALLE-ERDO⁄DU
SO⁄UTMA-ÇARfiI MH. DAMLADOL SK. NO:74/C-TEL.:0312 315 60 25 ANKARA-KEÇ‹ÖREN-VEFA ELEKTRON‹K-PINARBAfiI MH. AfiIK
PAfiA CD. NO: 67/C-TEL.:0312 380 42 30 ANKARA-MAMAK-YÜCEL ELEKTRON‹K-ASIM GÜNDÜZ CD. 20/D-TEL.:0312 365 14 14 ANKARAÇANKAYA-GÖKSEL ELEKTRON‹K-21.CD. KARTAL KAYA APT. NO:29/A KIRKKONAKLAR-TEL.:0312 496 42 53 ANKARA-ÇANKAYA-ATC
‹LET‹fi‹M-SELAN‹K CAD. NO: 31/3-TEL.: 0312 419 82 70 ANKARA-GÖLBAfiI-BEKS SERV‹S H‹ZMETLER‹-SE⁄MENLER MAH. CEMAL
GÜRSEL CAD. NO:51/A-TEL.:0312 484 21 19 ANKARA-BEYPAZARI-DO⁄AN TEKN‹K-KAYHAN GÜVEN CD. NO:22/C-TEL.:0312 762 89 19
ANKARA-S‹NCAN-Y‹⁄‹T TEKN‹K ONARIM-M.Ç.M. 12. CADDE GÜLSUYU SK. NO:5/21-TEL.:0312 264 10 31
ANKARA-KEÇ‹ÖREN-MERT TEKN‹K SERV‹S-ÖZYURT CD. NO:27/A AKTEPE-TEL.: 0312 380 00 22 ANKARA-ERYAMAN-ARSLANLAR
ELEKTRON‹K-GÜZELKENT MAH.ÇARfiI ARYA 511 SK. NO:40-TEL.:0312 279 16 41 ANKARA-KIZILAY-ARTUKLU ELEKTR‹KL‹ EV ALETLER‹-
SAKARYA CD. ÖRNEK ‹fiHANI NO:8/70 TEL. : 0312 435 83 55 ANTALYA-KUMLUCA-AKGÜL TEKN‹K SERV‹S H‹ZMETLER‹-ADNAN
MENDERES BULV.KAVAKLI KUYU CAD. YED‹TEPELER KAR.SULAR APT.NO:9-TEL.:0242 887 53 80 ANTALYA-CANKALP ELEKTRON‹K-
TUZCULAR MAH. ‹MARET SOK. FARAÇLAR PASJ.NO:11-TEL.:0242 242 31 35 ANTALYA-MANAVGAT-ÖNAL ‹LET‹fi‹M-AfiA⁄I PAZARCI
MH. ‹BRAH‹M SÖZEN CD. fiELALE PSJ.NO: 18 1006 SK. TEL.:0242 742 35 36 ANTALYA-ALANYA-Ç‹NTAfi ELEKTRON‹K-SARAY MH.
ATATÜRK CD. HACI HAMD‹ O⁄LU SK.NO: 20/A-TEL.:0242 513 88 85 ANTALYA-MERKEZ-BÜYÜKGEB‹Z ELEKTROMEKAN‹K GÜVENL‹K-
MUSTAFA GÖKSU-KIZILSARAY MH. DOLAPLIDERE CD. 80 SK. ÇAKMAK ‹fi HANI NO: 8/5-6 TEL. :0242 243 33 90 ARDAHAN-YILDIRIM
ELEKTR‹K-ATATÜRK CAD.NO:69-TEL.:0478 211 28 58 ARTV‹N-ARTV‹N ELEKTR‹K-HALKEVI CADDESI NO: 12-TEL.: 0466 212 10 82 AYDINYILMAZ ELEKTRON‹K-KURTULUS MH. GARAJ CD. NO:5/B-TEL.:0256 212 00 35 AYDIN-SÖKE-ÖZLEM ELEKTRON‹K-YEN‹ CAM‹ MH.
SEK‹LER CD. NO: 47-TEL.:0256 518 26 40 AYDIN-NAZ‹LL‹-BARIN ELEKTRON‹K-ALTINTAfi MH. HÜRR‹YET CD. NO:161 B-TEL.: 0256 315
43 21 BALIKES‹R-BANDIRMA-ANIL SO⁄UTMA-GÜNAYDIN MAH. 2.OKUL CAD.NO:16/A-TEL.:0266 713 56 78 BALIKES‹R-EDREM‹T-ÖZER
TEKN‹K-CAM‹ VASAT MH. PARK CD. NO:12/A-TEL.:0266 373 12 44 BALIKES‹R-BURHAN‹YE-U⁄UR TEKN‹K SO⁄UTMA-MAHKEME MH.
M‹THATPAfiA CD. NO: 68-TEL.:0266 412 86 89 BALIKES‹R-KILIÇ ELEKTRON‹K-YEN‹ ÇARfiI BASIN SOK. NO: 4/B-TEL.:0266-241 87 54
BALIKES‹R-GÖNEN-GÜRSES ELEKTRON‹K-MALKOÇ MAH.MÜFTÜ fiEVKET CAD. 76.SOK. NO:2/B-TEL.:0266 762 01 28 BALIKES‹RBANDIRMA-D‹J‹TAL ELEKTRON‹K-17 EYLÜL MAH.HAVUZLU BAHÇE SK.NO:8/A-TEL.:0266 715 16 46 BALIKES‹R-ERDEK-MERT TEKN‹K-
YALI MH. HÜKÜMET CD. NO:55-TEL.:0266 845 61 10-97 BARTIN-MARTI ELEKTRON‹K-HENDEKYANI CAD. ORTA MAH.101/B - BARTINTEL.:0378 228 34 22 BATMAN-fiAH‹NLER ELEKTRON‹K-CUMHUR‹YET CD. NO:20 2000 ‹fi MERKEZ‹ KARfiISI-TEL.:0488 213 17 02 B‹LEC‹K-
EDEBAL‹ TEKN‹K-‹ST‹KLAL MH V.REF‹K A ÖZTÜRK CD NO: 1/A-TEL.:0228 212 46 80 B‹NGÖL-KARLIOVA-MEHMET KARTAL - KARTAL
ELEKTRON‹K-CUMHUR‹YET CD. NO:8-TEL.:0426 511 26 39 B‹NGÖL-S‹MGE ELEKTRON‹K- YEN‹fiEH‹R MH. YEfi‹M SK. BO⁄ATEK‹N APT
ALTI NO:14/C-TEL.:0426 213 77 56 B‹TL‹S-AHLAT-U⁄UR SO⁄UTMA-TOK‹ KONUTLARI YUKARI ÇARfiI-TEL.:0434 412 41 72 B‹TL‹S-D‹ZAYN
ELEKTR‹K-NUR CAD. EREM CENTER ‹fi MERKEZ‹KAT:2 NO:5-TEL.:0434 226 74 43 BOLU-BEST ELEKTRON‹K-TABAKLAR MAH.CUMHUR‹YET
CAD.NO:28/B-TEL.:0374 218 12 25 BURSA-OSMANGAZ‹-AKYÜZ ELEKTRON‹K-ÇIRPAN MH. UYSAL SK. NO:13/B-TEL.:0224 254 60 76
BURSA-GEML‹K-AC‹L TV TAM‹R SERV‹S‹-DEM‹R SUBAfiI MH. FIRIN SK. NO:7-TEL.:0224 514 71 20 BURSA-MUDANYA-ER T‹CARET-
ÖMERBEY MH. CAM‹ SK. SU APT. NO:30-TEL.:0224 544 86 16 BURSA-MUSTAFAKEMALPAfi-AGUfi ELEKTR‹K-HAMZABEY MAHALLESI
PAZARYERI SOKAK NO: 2/A-TEL.:0224 613 19 99 BURSA-‹NEGÖL-S.B.S ELEKTRON‹K-OSMAN‹YE MH.DERE SK. N:25/D-TEL.:0224 715
48 94 BURSA-KARACABEY-GÜRKAN T‹CARET-RUNGUÇPAfiA MH. 14. SK. NO:11-TEL.: 0224 676 66 80 BURSA-N‹LÜFER-ÖZME TEKN‹K-
KARAMAN MH. BAYINDIR SK. NO:4/B CARREFOUR KARfiISI-TEL.: 0224 249 12 48 ÇANAKKALE-ÇAN-TÜRKER ELEKTRON‹K-CUMHUR‹YET
MAH. ÇANAKKALE CAD.NO:41-TEL.:0286 416 13 89 ÇANAKKALE-GEL‹BOLU-GÜVEN ELEKTRON‹K-YAZICIZADE MAH. M‹RALAY fiEF‹K
AKER CAD. 2. SOK NO:4 / A TEL.:0286 566 90 70 ÇANAKKALE-MERKEZ-SAM ELEKTRON‹K-‹SMETPAfiA MH. ARSLANCA SK.-TEL.:0286
212 35 59 ÇANKIRI-B‹LG‹ÇLER ELEKTRON‹K-BUGDAY PAZARI MH. A.TALAT ONAY BULVARI SAIM A⁄A S‹T. B/BLOK TEL.:0376 213 48
19 ÇORUM-H‹T‹T SO⁄UTMA-YEN‹YOL MH. MÜFTÜ AHMET GÖKEfiME SK. NO: 5 / I-TEL.:0364 225 70 58 ÇORUM-U⁄UR ELEKTRON‹K-
ÜÇTUTLAR MAH. FAT‹H CAD. 5.SOK.EYÜP SULTAN APT. NO:1/C-TEL.:0364 227 44 91 ÇORUM-ÖMÜR ELEKTRON‹K-CENG‹ZTOPEL CAD.
NO:2/F-TEL.:0364 224 68 09 ÇORUM-ALACA-EROL ELEKTRON‹K-AYHAN MH. ANKARA CD. NO:18-TEL.:0364 411 42 03 ÇORUM-GÜNDÜZ
BEYAZ EfiYA SERV‹S‹-SUNGURLU-SUNGURO⁄LU MH. ÇANKIRI CD. NO: 46-TEL.:0364 311 31 13 DEN‹ZL‹-KARDELEN SO⁄UTMA-EMEK
CD. NO: 30-TEL.:0258 241 67 31 DEN‹ZL‹-ÖZ ELEKTRON‹K-ÇAYBAfiI CD. ÜNAL APT. NO: 28-TEL.:0258 261 29 25 DEN‹ZL‹-MERKEZ-
ÇA⁄LAYAN SO⁄UTMA-TOPRAKLIK MH. TURAN GÜNEfi CD.NO:34 TEL. : 0258 242 85 86 D‹YARBAKIR-B‹SM‹L-fiIK ELEKTR‹K-KURTULUfi
MH. AHMET AR‹F BULVARI NO: 19/F-TEL.:0412 415 05 94 D‹YARBAKIR-‹LKADIM T‹CARET-BATIKENT S‹T. A/5 BLOK ALTI NO:1 SA⁄LIK
OCA⁄I YANIBA⁄LAR-TEL.:0412 235 70 89 D‹YARBAKIR-AZ‹Z ELEKTRON‹K-HATBOYU CD. 469. SK. GÜNEfi 2 APT. NO:3/B-TEL.:0412 223
33 46 D‹YARBAKIR-S‹LVAN-DIGITAL ELEKTRONIC-KALE MH. SAM‹ SEÇK‹N CD. NO:9/B-TEL.:0412 711 44 14 D‹YARBAKIR-JAPON
- 35 -
Page 37

RECEP-YENI MAH 19 MAYIS CAD NO74-TEL.:0412 511 24 10 D‹YARBAKIR-BA⁄LAR-AZ‹Z ELEKTRON‹K-HATBOYU CD. 469 SK. NO:3/B-
YETK‹L‹ SERV‹SLER L‹STES‹
TEL.: 0412 236 81 10 DÜZCE-ENSAR TEK SU S‹STEMLER‹-AZM‹N‹LL‹ MH. AYDINPINAR CD. SERHAT SK.NO:1/B-TEL.:0380 514 34 12
DÜZCE-BULUfi ELEKTRON‹K-CED‹D‹YE MAH. M‹MAR S‹NAN CAD.-TEL.: 0380 514 66 81 ED‹RNE-UZUNKÖPRÜ-GÜVEN TEKN‹K-GAZ‹
CAD. YUSUF SOK. YURDACAN PASAJI NO:7-TEL.:0284 513 89 66 ED‹RNE-YILDIZ SO⁄UTMA-1.MURAT MH. GÜNGÖR MAZLUM CAD.
SERHAT S‹TES‹ B/BLOK 35/A-TEL.:0284 235 37 63 ED‹RNE-KEfiAN-MUTLU TEKN‹K-YUKARI ZAFER‹YE MH. ‹LYASBEY CD. NO:32/BTEL.:0284 715 22 71ELAZI⁄-ÖZDEV TEKN‹K -‹ZZETPAfiA MAH.KAZIM BAYER CAD.NO:24/A-TEL.:0424 238 51 67 ELAZI⁄-YILMAZ BOB‹NAJ-
YEN‹ MAH. KEMAL fiEDELE CAD. NO: 12/E-TEL.:0424 212 08 96 ELAZI⁄-GÜNEfi ELEKTRON‹K-KÜLTÜR MAH. VAL‹ FAHR‹BEY CAD.NO:113/DTEL.:0424 233 10 18 ERZ‹NCAN-AYDINLAR ELEKTR‹K-‹NÖNÜ MAH. MERKEZ ÇARfiISI 15.SK NO:5 -TEL.:0446 223 59 76 ERZ‹NCAN-
REFAH‹YE-B‹LG‹N ELEKTRON‹K-ERZ‹NCAN CAD. BELED‹YE ‹fi HANI-TEL.:0446 611 26 10 ERZURUM-OLTU-GÜVEN ELEKTRON‹K-
Z‹YABEY CAD. BELED‹YE PSJ. NO:6-TEL.:0442 816 42 23 ERZURUM-AT‹LAY ELEKTRON‹K-KONGRE CAD. HASIRHAN PASJ. NO:87TEL.:0442 213 30 60 ERZURUM-‹SP‹R-YILMAZ ELEKTRON‹K-Z‹YAPAfiA CD. AfiA⁄I MH. NO:186-TEL.:0442 451 40 95 ESK‹fiEH‹R-ARZU
ELEKTRON‹K-DEL‹KL‹TAfi MH. GÜRMAN SOK. NO:37/B-TEL.:0222 234 87 15 ESK‹fiEH‹R-S‹VR‹H‹SAR-DERMAN ELEKTRON‹K-CAM‹KEB‹R
MH. YUNUSEMRE CD. NO:7-TEL.:0222 711 22 60 GAZ‹ANTEP-ELEKTR‹KL‹ EV ALETLER‹ TAM‹RC‹S‹-MÜTERC‹M ASIM CAD. KÖRÜKÇÜ
SOK. NO:8/A-TEL.:0342 231 00 73 GAZ‹ANTEP-ISLAH‹YE-YILMAZ SO⁄UTMA-AYDINLIK MH. GÖZ CAD.ÜNLÜ S‹TES‹ NO: 2-TEL.:0342 862
12 20 GAZ‹ANTEP-‹K‹ZO⁄LU ELEKTRON‹K-BEY MAH. EBLEHAN ÇARfiISI NO:12/A-TEL.:0342 230 71 00 GAZ‹ANTEP-N‹Z‹P-ÇAPAN
TEKN‹K-CUMHUR‹YET MAH. MERMER SOK. NO:10-TEL.:0342 517 51 66 G‹RESUN-BULANCAK-YÜKSEL SO⁄UTMA-‹HSAN‹YE MH. CEMAL
GÜRSEL. CD. NO: 257-TEL.:0454 318 17 28 G‹RESUN-U⁄UR ELEKTRON‹K-HACI HÜSEY‹N MH. GAZ‹ CD. NO: 185 / 1-TEL.:0454 212 00
90 GÜMÜfiHANE-GÜMÜfiHANE SERV‹S‹-HASANBEY MH. HASANBEY CD.NO:17/A-TEL.:0456 213 51 54 HATAY-SAMANDA⁄-GÜNEfi
ELEKTR‹K-ATATÜRK MAH. ‹SKELE CAD. HAYÜK PSJ NO:38-TEL.:0326 512 71 04 HATAY-KIRIKHAN-SEREN MAK‹NA-BARBAROS MAH.
BOZTEPE CAD. NO:23/B-TEL.:0326 344 32 49 HATAY-ANTAKYA-SER‹ SO⁄UTMA-KURTULUfi CD. NO:51/C-TEL.:0326 213 28 32 HATAY-
ERZ‹N-YEL‹Z BOB‹NAJ-MUSTAFAL‹ MH. ‹STASYON CD. NO: 143-TEL.:0326 68148 32 HATAY-REYHANLI-BAfi TEKN‹K SO⁄UTMA-ATATÜRK
CD. DÖ⁄ÜCÜLER ‹fiHANI NO:1 -TEL.:0326 413 44 04 HATAY-REYHANLI-ÖZ ‹fi SO⁄UTMA-CUMHUR‹YET MH. TAYFUR SÖKMEN CD.
NO:26/B TEL. : 0326 413 21 22 HATAY-DÖRTYOL-FAT‹H ELEKTRON‹K-SANAY‹ MH. EVREN CD. YEN‹ S‹NEMA KARfiISI NO:15 - TEL.:0326
712 86 46 HATAY-‹SKENDERUN-GÜL‹STAN ELEKTRON‹K-KURTULUfi MH. fi.O⁄UZ YENER CD. NO:64/C-TEL.:0326 613 50 64 I⁄DIR-
PARLAK TEKN‹K-TOPÇULAR CD. NO:34-TEL.:0476 227 47 51 ISPARTA-ÖZSOYLAR SO⁄UTMA-YAYLA MAH. ‹SMETPAfiA CAD. NO: 60 fi‹FA
TIP MERKEZ‹ ALTI-TEL.:0246 223 13 61 ‹ÇEL-ERDEML‹-ESEN ELEKTR‹K-MERKEZ MAH. ATATÜRK CAD. NO:11-TEL.:0324 515 68 87
‹ÇEL-MEZ‹TL‹-AKN‹SAN SO⁄UTMA&ELEKTRON‹K-GMK.BUL. FAT‹H MH. 18 SK.ÖZÜDO⁄RU S‹T. 3/A-TEL.:0324 359 64 34 ‹ÇEL-PINAR
ELEKTRON‹K-MAHMUD‹YE MH. 108. CD. NO:32/B-TEL.:0324 336 82 98 ‹ÇEL-TARSUS-MERT ELEKTRON‹K-GAZ‹LER MAH. ATATÜRK
BULV. NO:119-TEL.:0324 626 83 98 ‹ÇEL-TARSUS-TEKN‹K ‹fi ELEKTR‹K T‹C.-ATATÜRK CAD. U⁄UR ‹fi HANI NO:1-TEL.:0324 6242797
‹ÇEL-ANAMUR-ÇEL‹K ELEKTRON‹K-BAHÇE MH. ORMAN ‹fiLETMES‹ ALTI NO:61/B-TEL.:0324 814 85 90 ‹ÇEL-HAKAN ELEKTRON‹K-
BAHÇEL‹EVLER MH. 1809 SK. D‹NL‹ APT.ALTI NO:3/B-TEL.:0324 328 03 25 ‹ÇEL-S‹L‹FKE-SADIK ELEKTR‹K-GÖKSU MAH. O⁄UZKAAN
CAD. DERYALAR APT.NO:22/B-TEL.:0324 714 05 54 ‹STANBUL-ATAfiEH‹R-VURAL ELEKTRON‹K-KARAMAN Ç‹FTL‹K YOLU NO:12(ESK‹
PTT HAST. KARfiISI) ‹ÇERENKÖY TEL. : 0216 575 63 35 ‹STANBUL-fi‹fiL‹-YILKA T‹CARET-SEYMEN SOK. NO:27/A KURTULUfi-TEL.:0212233 80 53 ‹STANBUL-KÜÇÜKÇEKMECE-ÇA⁄DAfi SERV‹S-CENNET MAH.Y.KEMAL BEYATLI CAD.NO:14/D-TEL.:0212 579 35 30 ‹STANBUL-
ZEYT‹NBURNU-KARDEfiLER SO⁄UTMA-SEY‹T N‹ZAM MAH. fiEH‹T ERKAN ALYANAK SOK.NO:11-TEL.:0212 546 57 36 ‹STANBULESENLER-YILDIRIM ELEKTRON‹K-KAZIM KARABEK‹R MAH. 2.SOK. NO:10 -TEL.:0212 611 10 76 ‹STANBUL-EM‹NÖNÜ-IRMAK DIfi
T‹CARET-TAHTAKALE CD. TAHTAKALE T‹CARET MERKEZ‹ NO:34 2.BODRUM NO:204 -TEL.:0212 520 55 80 ‹STANBUL-ÜMRAN‹YE-GÜLSER TEKN‹K SERV‹S-NAMIK KEMAL MH. SÜTCÜ ‹MAM CD. SÜTÇÜ ÇIKMAZI NO:6/1- TEL.:0216 335 60 19 ‹STANBUL-ÜMRAN‹YE-GÖZDE
ELEKTRON‹K-ATATÜRK MH. ALEMDA⁄ CD. YILDIZ SK. NO:12/A-TEL.: 0216 329 57 03 ‹STANBUL-MALTEPE-GÜR TEKN‹K SERV‹S-BA⁄DAT
CD. BOLAYIR SK. NO:3/A-TEL.:0216 352 25 20 ‹STANBUL-GAZ‹OSMANPAfiA-DEDEO⁄LU ELEKTR‹K-2124 SOK NO:4 SULTANÇ‹FTL‹⁄‹TEL.:0212 594 50 91 ‹STANBUL-TUZLA-AKIN ISI TEKN‹K SERV‹S-YAYLA MH. F.ÇAKMAK CD. ‹SMA‹L A⁄A SK. NO:11 TEL.:0216 395 66
62 ‹STANBUL-SARIYER-H‹SAR SERV‹S 1-NUR‹PAfiA CD NO\48A BA⁄LAR MEVK‹ YEN‹KÖY-TEL.:0212 223 27 96 ‹STANBUL-BÜYÜKÇEKMECE-
AYGÜL DEKORASYON-19 MAYIS MH. OSMAN GAZ‹ CD. NO: 7-TEL.:0212 881 33 18 ‹STANBUL-GAZ‹OSMANPAfiA-ÇAM TEKN‹K-ISLAMBEY
MAH NECIP FAZIL CAD 257 SK NO:25-TEL.:0212 597 86 62 ‹STANBUL-KÜÇÜKÇEKMECE-YILDIZ ELEKTR‹K SO⁄UTMA-HALKALI CD.
ANADOLU PSJ. NO: 185-TEL.:0212 580 76 02 ‹STANBUL-BAYRAMPAfiA-ÖZKAN ELEKTRON‹K-KARTALTEPE MH. B‹LGEHAN CD. NO:36TEL.:0212 564 33 46 ‹STANBUL-GAZ‹OSMANPAfiA-TOROS ELEKTRON‹K-MERKEZ MH. BA⁄LAR CD. NO:77-TEL.:0212 563 50 38 ‹STANBUL-
fi‹fiL‹-CHIP ELEKTRON‹K-BOZKURT CAD.NO: 235-TEL.:0212 231 65 43 ‹STANBUL-GÜNGÖREN-YÜKSEL ELEKTRON‹K-M.FEVZ‹ ÇAKMAK
MAH.‹NÖNÜ CAD.NO: 138-TEL.:0212-504 61 42 ‹STANBUL-BEYO⁄LU-TOLGA ELEKTRON‹K-CAM‹ KEB‹R MH. DEREBOYU CAD. NO:28
KASIMPAfiA-TEL.:0212 235 65 34 ‹STANBUL-AVCILAR-NUR ELEKTRON‹K-DEN‹ZKÖfiKLER MAH.DERYA SOK. NO:36/1-TEL.:0212 694
12 82 ‹STANBUL-BA⁄CILAR-ÇA⁄LAYAN ELEKTRON‹K-‹STOÇ 25.ADA NO.:109-TEL.:0212 659 92 49 ‹STANBUL-KADIKÖY-UMUT
ELEKTRON‹K-HAL‹TA⁄A CAD. CELAL MUHTAR SOK. NO:20/2-TEL.:0216 346 39 78 ‹STANBUL-ZEYT‹NBURNU-UZMAN ELEKTRON‹K-
YEN‹DO⁄AN MH. 42.SK NO:50-TEL.:0212 582 36 37 ‹STANBUL-KADIKÖY-MICROSYSTEM ELEKTRON‹K-1. ORTA SK. NO:18/1 GÖZTEPETEL.:0216 411 91 50 ‹STANBUL-MALTEPE-BEYDA⁄I TEKN‹K ELEKTRON‹K-BA⁄LARBAfiI MAH. ‹NÖNÜ CAD.-TEL.:0216 457 63 34
‹STANBUL-BA⁄CILAR-KUMRU ELEKTRON‹K-KEMALPAfiA MAH. NAMIK KEMAL CAD. NO: 126-TEL.:0212 429 34 19 ‹STANBUL-fi‹fiL‹KASVA ELEKTRON‹K-MEC‹D‹YE CAD. ‹MAM FEYZULLAH SOK. NO:2/B -TEL.:0212 211 33 11 ‹STANBUL-BAKIRKÖY-‹K‹ZLER ELEKTRON‹K-
SAKIZA⁄A MH. BERR‹NC‹N‹ SK. NO:16/A-TEL.:0212 543 85 83 ‹STANBUL-ÜSKÜDAR-KÖYLÜBAY ELEKTRON‹K-ALBAY HÜSAMETT‹N
ERTÜRK SK. NO:7/A ÇENGELKÖY TEL.:0216 318 35 13 ‹STANBUL-ÜSKÜDAR-AKÇEL‹K T‹CARET-M‹MAR S‹NAN MH. ‹SMA‹L DÜMBÜLLÜ
SK. NO:9/A TEL.:0216 342 99 22 ‹STANBUL-KADIKÖY-TELV‹D ELEKTRON‹K-MAZHAR OSMAN SOK FERAH APT NO:24/A FENERYOLUTEL.:0216 414 66 00 ‹STANBUL-‹K‹TELL‹-BARIfi TEKN‹K-ATATÜRK MH. ‹K‹TELL‹ CD. DURAK SK. NO:18 TEL. : 0212 471 04 76 ‹STANBUL-
K.ÇEKMECE-ENG‹N ELEKTRON‹K-TEVF‹K BEY MH. MERKEZ CD. ORK‹DE SOK. NO: 3 /1-TEL.:0212 598 44 76 ‹STANBUL-BAHÇEL‹EVLERSEV-CAN DAYANIKLI TÜK.MALLARI.-YILDIRIM BEYAZIT CD .ZAFER MH. TÜRKBEY‹ SK. NO:6/2-3-TEL.:0212 552 45 87 ‹STANBUL-fi‹fiL‹-
- 36 -
Page 38

IfiIK ELEKTRON‹K-AYAZA⁄A MASLAK ATATÜRK CD NO: 25-TEL.:0212 289 76 94 ‹STANBUL-PEND‹K-GÖKHAK ELEKTRON‹K-BATI MH.
YETK‹L‹ SERV‹SLER L‹STES‹
SABR‹ TAfiKIN CD. SEB‹L SK. NO:4/1 TEL. : 0216 354 07 00 ‹STANBUL-G.O.PAfiA-ATILIM ELEKTRON‹K-CEBEC‹ MAH. 2472 SOK: NO:14/A
SULTANÇ‹FTL‹⁄‹- TEL.:0212 475 85 62 ‹STANBUL-GÜNGÖREN-NUR ELEKTR‹K ELEKTRON‹K-MERKEZ MH. ASALET CD. NO: 22/DTEL.:0212 641 42 09 ‹STANBUL-BEYKOZ-ULUDO⁄AN ELEKTRON‹K-KAYABAfiI ÇIKMAZI NO: 4/B PAfiABAHÇE-TEL.:0216 322 85 85
‹STANBUL-KARTAL-ÖZO⁄LU ELEKTRON‹K-KIZILAY BULVARI CD. BAHADIR SK. 4/A-TEL.:0216 387 18 87 ‹STANBUL-FAT‹H-SOYLU
TEKN‹K-HIRKA‹ fiER‹F CAM‹ ARKASI ESK‹ AL‹PAfiA CD. NO: 26-TEL.:0212 631 85 88 ‹STANBUL-FAT‹H-IRMAK DIfi T‹CARET-HACI KADIN
CD. NO:15 K.M. PAfiA TEL.: 0212 589 75 27 ‹STANBUL-S‹L‹VR‹-PDS ELEKTRON‹K-P.M. PAfiA MH. HACI PERVANE CD. NO:35/B -TEL.:0212
728 76 75 ‹STANBUL-GÜLTEPE-B‹L‹M ELEKTRON‹K-HARMANTEPE MH. ABD‹ ‹PEKÇ‹ CD. NO:14/D -TEL.:0212 278 72 27 ‹ZM‹R-BERGAMA-
GEZG‹N SERV‹S-K.KEMALBEY CAD. NO:82-84-TEL.:0232 633 35 15 ‹ZM‹R-KONAK-TUNCA ELEKTR‹K-76 SK 10/A GÜZELYALI-TEL.:0232
246 40 62 ‹ZM‹R-ÇAMD‹B‹-KUDRET ELEKTRON‹K-BURAK RE‹S CAD. NO: 239/A-TEL.:0232 435 81 36 ‹ZM‹R-MENEMEN-AY ELEKTRON‹K-
DR. SELAHATT‹N ÖZKURT CD. NO:22/B-TEL.:0232 832 02 31 ‹ZM‹R-KONAK-S‹STEM ELEKTRON‹K-2414 SK. NO:10 GÜLTEPE-TEL.:0232
469 72 69 ‹ZM‹R-KARfiIYAKA-LEVENT ELEKTR‹K LABORATUVARI-1710 SK. NO:70/B ESHOT SOKA⁄I-TEL.:0232 381 14 42 ‹ZM‹R-
KARfiIYAKA-ASMERKEZ T‹CARET-ESK‹ TRAMVAY CD. 1675. SK. NO:78/1B ALAYBEY-TEL.:0232 364 33 73 ‹ZM‹R-BORNOVA-ACEM
ELEKTRON‹K-552/2 SK. NO: 4/A-TEL.:0232 339 73 31 ‹ZM‹R-KONAK-KILIÇ ELEKTRON‹K-BARBAROS HAYRETT‹N PAfiA CD. NO:62/1
LEVENT-TEL.:0232 433 15 19 ‹ZM‹R-URLA-‹LTER ELEKTRON‹K-‹ZM‹R 75. YILl CADDES‹NO:81/C-D-TEL.:0232 754 44 44 ‹ZM‹R-BUCAÇA⁄LAR ELEKTRON‹K-670/1 SK. NO:57/B-TEL.:0232 276 27 77 ‹ZM‹R-YEfi‹LYURT-UMUT ELEKTR‹K & ELEKTRON‹K-YILDIZ CAD. NO:
152/A-TEL.:0232 244 65 77 ‹ZM‹R-ÖDEM‹fi-MURAT ELEKTRON‹K-UMURBEY MH. SANAY‹ S‹T. 9.SK NO: 10 -TEL.:0232 544 41 98
KAHRAMANMARAfi-AKSUNGUR ELEKTR‹K-UZUNOLUK CAD. 20.SOKAK NO:20/A-TEL.:0344 212 77 50 KAHRAMANMARAfi-KALE
ELEKTRON‹K-FEVZ‹PAfiA MH. UZUNLUK CD.-TEL.: 0344 225 07 94 KAHRAMANMARAfi-ELB‹STAN-DEM‹RO⁄LU SO⁄UTMA-GÜNEfiL‹
MH. TERM‹NAL CD. NO:30-TEL.:0344 413 60 67 KARABÜK-SAFRANBOLU-MEHMET SA⁄LAM - GÖKAY TEKN‹K-‹NÖNÜ MH. ESK‹ BA⁄LAR
SK. NO:13-TEL.:0370 712 24 97 KARABÜK-ACAR ELEKTRON‹K-VAKIF ‹fi HANI KAT:2 EMN‹YET MÜDÜRLÜ⁄Ü YANI-TEL.:0370 424 32 00
KARAMAN-ÖZ AS SO⁄UTMA-ABBAS MH. MUT CD. NO: 82/A TEL. : 0338 214 56 74 KARS-AYDIN ELEKTRON‹K-KAZIM KARABEK‹R ‹fiHANI
KAT:2 NO: 125 -TEL.:0474 212 87 82 KASTAMONU-TAfiKÖPRÜ-DE⁄‹fi‹M ELEKTR‹K-TABAKHANE MH. ATATÜRK CD. NO:55/A-TEL.:0366
417 42 04 KASTAMONU-TOSYA-DO⁄Ufi ELEKTRON‹K-VAKIF SK. 15/A-TEL.:0366 313 42 59 KASTAMONU-HARUN TELEKOMÜN‹KASYON-
‹NÖNÜ MAHALLES‹ AFfi‹NBEY SOKAK NO:8/B-TEL.:0366 212 33 66 KAYSER‹-MEL‹KGAZ‹-AKTÜRK BEYAZ EfiYA SERV‹S‹-AYDINLIKEVLER
MH.FIRAT CD.KR‹STAL APT.A-B NO.17 TEL.:0352 332 08 25 KAYSER‹-MEL‹KGAZ‹-AKIfi ELEKTRON‹K-ÇORAKÇILAR MH. CENG‹Z TOPEL
CD.NO:20/B-TEL.:0352 320 14 00 KAYSER‹-DEVEL‹-U⁄UR SO⁄UTMA-HARMAN MAHALLES‹ BELED‹YE PASAJ‹ ÜZER‹ NO: 15-TEL.:0352
621 56 31 KAYSER‹-SÖNMEZ ELEKTRON‹K-CAM‹ KEB‹R MAH. BASMANE SOK. NO:16/A-TEL.:0352 231 69 62 KAYSER‹-ZERO COMPUTER-
SAHAB‹YE MH. METE CD. fiAH‹R SATO⁄LU SK. SATO⁄LU AP D: 1-TEL.:0352 232 15 34 KIRIKKALE-KARDEfiLER ELEKTRON‹K-GÜZELTEPE
MH. CELAL AT‹K CD. NO:4/B-TEL.:0318 224 47 42 KIRKLAREL‹-MERKEZ-BUSE ELEKTRON‹K-KARACA ‹BRAH‹M MH. KAPAN CAM‹ SK.
ACUN PSJ. NO:23-TEL.:0288 212 73 57 KIRKLAREL‹-LÜLEBURGAZ-BUSE ELEKTRON‹K-YILMAZ MH. ESK‹ KIRKLAREL‹ CD. EFSANE
DÜ⁄ÜN SALONU YANI NO:36/A TEL.: 0288 412 88 92 KIRfiEH‹R-GARANT‹ ELEKTRON‹K-ANKARA CD. C‹NGÖZ BEBE ARKASI YA⁄MUR
‹fiHANI NO:9/B-TEL.:0386 214 02 18 K‹L‹S-FLAfi ELEKTRON‹K-fiEH‹TLER PARKI KARfiISI NO:63/1-TEL.: 0348 814 55 28 KOCAEL‹-DORUK
TEKN‹K H‹Z. -KARABAfi MH. CENG‹Z TOPEL CD. MÜNECC‹M AR‹F SK. NO:6/A -TEL.:0262 331 11 66 KOCAEL‹-KARAMÜRSEL-KILINÇ
ELEKTRON‹K-‹NÖNÜ CD. M.YASEF SK. NO:10/M-TEL.:0262 452 55 55 KOCAEL‹-D‹LOVASI-SAMET ELEKTRON‹K-BA⁄DAT CAD NO: 42/2-
TEL.:0262 754 79 86 KOCAEL‹-DARICA-KARDEfiLER ELEKTRON‹K-KAZIM KARABEK‹R MH. MEVALANA CAD. NO: 1/A-TEL.:0262 656 27
88 KOCAEL‹-GEBZE-YILDIRIM ELEKTRON‹K-H. HAL‹L MH. 1209 SK. NO:13/C-TEL.:0262 641 35 88KONYA-BEYfiEH‹R-SELV‹ SO⁄UTMA-
HACI ARMA⁄AN MH. ANTALYA CD. NO:108/F-TEL.:0332 512 40 10 KONYA-SELÇUKLU-SAF‹R SO⁄UTMA-FER‹T PAfiA MH. GÜNEY SK.
NO:3/F KULE S‹TE C‹VARI-TEL.:0332 236 36 75 KONYA-ERKAM SO⁄UTMA-KARAKURT MH. FURKAN DEDE CD.ASBAfiKAN SK. NO:13/BTEL.:0332 350 00 32 KONYA-ÖZCAN SO⁄UTMA VE ISITMA LTD fiT‹-N‹fiANTAfiIMH. HULUS‹ BAYBAL CD. NO:36/A-TEL.:0332 236 33 37
KONYA-SELÇUKLU-KONSEY SOGUTMA VE ISITMA-KÜÇÜK ‹HSAN‹YE MH. fiA‹R GUBAR‹ SK.B‹NSA S‹TES‹ ALTI NO : 15 TEL.:0332 321
21 22 KONYA-AKfiEH‹R-EROL ELEKTRON‹K-MEYDAN MAH. ÇOCUK PARKI KOD NO:38-TEL.:0332 812 61 12 KONYA-MERAM-GÜRKAN
TEKN‹K-‹HT‹YARETT‹N MH.SIRÇALI MEDRESE CAD.‹BN‹B‹B‹ SK. NO:1/B-TEL.:0332-351 02 03 KONYA-SEYD‹fiEH‹R-TUNCER ELEKTRON‹K-
KIBRIS CD. NO:26-TEL.:0332 582 93 92 KONYA-DURMAZLAR ELEKTR‹K-ANKARA-KONYA CAD. NO:67-TEL.:0332 673 28 48 KONYA-
ERE⁄L‹-ERDEM‹R TEKN‹K-ÜÇ GÖZ MH. KIBRIS CD.EL‹T APT. NO:3 TEL.: 0332 713 02 53 KÜTAHYA-EL‹FO⁄LU ELEKTR‹K-FAT‹H SULTAN
MEHMET BULVARI DUAGÜR CAM‹‹ ALTI 43/B-TEL.:0274 226 32 80 MALATYA-YUVAM ELEKTRON‹K-‹ST‹KLAL MH. FUZUL‹ CD.‹MAMO⁄LU
SK. NO:1-TEL.:0422 322 52 88 MALATYA-HAL‹M ELEKTRON‹K-SARAY MH. DEVECEL SK. NO:3-TEL.:0422 321 86 08MAN‹SA-SOMA-
GÜRMAK TEKN‹K-KURTULUfi MH. ‹DMAN SK. NO:47/A-TEL.:0236 613 66 56 MAN‹SA-SAL‹HL‹-AYKAR SO⁄UTMA- BEfiEYLÜL MH.
BELED‹YE CD. NO:TEL.:243-0236 714 88 68 MAN‹SA-AY ELEKTRON‹K MAN‹SA fiB.-YARHASANLAR MAH. ESK‹ HASA⁄A 2306 SOK.NO:
18/A-TEL.:0236 237 30 62-63 MAN‹SA-BURCU ELEKTRON‹K-TUNCA MAH. KURTULUfi CAD. NO:54-TEL.:0236-234 57 42 MAN‹SA-
TURGUTLU-EM‹N ELEKTRON‹K-ALTAY MH. SEV‹NÇ SK. NO:25-TEL.:0236 313 28 35 MAN‹SA-AKH‹SAR-AKIN ELEKTRON‹K-PAfiA MAH.
7.SOK. NO:25BELED‹YE ARKASI-TEL.:0236 413 50 53 MAN‹SA-SARUHANLI-fiEN SO⁄UTMA-ATATÜRK MH. 7 EYLÜL CD. NO: 21/BTEL.:0236 357 12 00 MAN‹SA-KULA-ERDAL KARAHAN-TERMO D‹NAM‹K-CAM‹‹ CED‹T MH. 62 SK. NO:67-TEL.:0236 816 70 99 MARD‹N-
M‹DYAT-SA⁄LAM ELEKTRON‹K-ESNAF SANATKARLAR KRED‹ KOOP. KARfiISI 2.CD.NO:56-TEL.:0482 462 33 90 MARD‹N-KIZILTEPE‹BRAH‹MO⁄LU ISITMA-fiANLIURFA CAD. ECE PASAJI NO:7-TEL.:0482 312 55 99 MARD‹N-DER‹K-UZAY ELEKTRON‹K-BELED‹YE MEYDANI
NO:36-TEL.:0482 251 34 35 MARD‹N-YEN‹fiEH‹R-MERKEZ TEKN‹K-KARAYOLLARI ARKASI BARIfi CAD GÜNAYDIN APT ALTI-TEL.:0482
212 83 06 MARD‹N-NUSAYB‹N-BÜDÜN ELEKTRON‹K-ZEYNEL AB‹D‹N MH. Ç‹LEK SK NO: 1/B-TEL.:0482 415 61 98 MU⁄LA-FETH‹YE-
ANADOLU TEKN‹K SERV‹S-ÖLÜDEN‹Z YOLU ÜZER‹ BAHA fiIKMAN CD.NO:157-TEL.:0252 611 39 12 MU⁄LA-M‹LAS-AFfi‹N YILDIRIM TEKN‹K SO⁄UTMA-HACI ‹LYAS MAH. PAZAR SOK.NO:14-TEL.:0252 512 14 45 MU⁄LA-YATA⁄AN-ASTEKN‹K ISITMA SO⁄UTMA SERV‹S‹-
YEN‹ MH. 152. SK. NO:8-TEL.:0252 572 56 31 MU⁄LA-DALAMAN-ÖZKAN TEKN‹K SO⁄UTMA-MERKEZ MAHALLES‹ ATATÜRK CD.NO:56TEL.:0252 692 25 25 MU⁄LA-ELBO ELEKTR‹K ELEKTRON‹K-ORHAN‹YE MH. HÜRR‹YET CAD. NO:1/6-TEL.:0252 214 18 84 MU⁄LA-DATÇA-
- 37 -
Page 39

MEL‹H ELEKTRON‹K-‹SKELE MH. AMBARCA CD. NO:17-TEL.:0252 712 02 30 MU⁄LA-MARMAR‹S-‹LKSEL ELEKTRON‹K-YEN‹ YOL CD.
YETK‹L‹ SERV‹SLER L‹STES‹
N0:51/9-TEL.:0252 412 62 60 MU⁄LA-URLA-STAR ELEKTRON‹K-‹N‹fiD‹B‹ CAD NO 1/C AKYAKA BELDES‹-TEL.:0252 243 40 42 MUfiHAfi‹MO⁄LU EK‹C‹ ELEKTRON‹K-HAfi‹MO⁄ULLARI EK‹C‹ ‹fi HANI BELED‹YE CD.NO:20/A-TEL.:0436 212 38 80 N‹⁄DE-HUZUR ELEKTR‹K-
ILHANLI MAH ÖZKUL MARKET KARSISI ÖZKILIÇ AP ALTI NO: 43-TEL.:0388 233 54 05 ORDU-TEK ISITMA SO⁄UTMA-SAKARYA MAH YENI
KUMRU CAD NO: 111-TEL.:0452 423 84 49 ORDU-HAZAR SO⁄UTMA-YEN‹ MAH. 26.SOK NO:17-TEL.:0452 214 04 49 ORDU-ÜNYE-STAR
TEKN‹K-KALEDERE MH. 20TEMMUZ CD. NO:16-TEL.:0452 324 82 51 ORDU-MERKEZ-M‹KRO ELEKTRON‹K-YEN‹ MH. 319 SK. NO:18 TEL.: 0452 223 13 49 OSMAN‹YE-MODERN ELEKTRON‹K-ORTAOKUL CD. K‹fi‹O⁄LU ÇARfiISI NO:15-TEL.:0328 812 82 84 OSMAN‹YE-
DÜZ‹Ç‹-TERMO SO⁄UTMA-UZUNBANI MAH. UZUNBANI CAD. NO: 31 / A-TEL.:0328 876 25 60 R‹ZE-ÇAYEL‹-ÖZER TEKN‹K- MAKSUT
ÖZER-EMNIYET MÜD.KARfiISI fiA‹RLER YOLU ÜZERI NO:3/2B-TEL.:0464 532 63 81 R‹ZE-CEVAH‹R ELEKTRON‹K-TOPHANE MAH. ATATÜRK
CAD. ‹fi PASAJI-TEL.:0464 213 16 17 SAKARYA-ADAPAZARI-ÇINAR ELEKTRON‹K-KÖMÜR PAZARI CAD. NO: 15 A-TEL.:0264 271 39 12
SAMSUN-ÇARfiAMBA-ÖZKAN SO⁄UTMA-ORTA MH. TUNCAY KOCABAfi SK. NO:85-TEL.:0362 832 28 90 SAMSUN-BAFRA-KARATAfi
T‹CARET-KIZILIRMAK MH. F.ÇAKMAK SK. NO:18/A-TEL.: 0362 543 04 91 SAMSUN-GÜLTEK‹N SERV‹S-ATATÜRK BULVARI NO.285-
TEL.:0362 437 33 82 SAMSUN-DEN‹Z ELEKTRON‹K-KADIKÖY MH. OSMAN‹YE CD. NO: 68-TEL.:0362 432 44 80 S‹‹RT-ERYILMAZ
ELEKTRON‹K-CUMHUR‹YET CAD. NO:25 ULUCAM‹ KARfiISI-TEL.:0484 224 03 92 S‹NOP-ADA EV ALETLER‹-CAM‹ KEB‹R MH. TÜTÜNCÜ
SK. NO: 16-TEL.:0368 260 12 64 S‹NOP-AYANCIK-YILKAY SO⁄UTMA-YALI MH. DR.AZM‹ HAMZAO⁄LU CD. NO:46-TEL.:0368 613 52 12
S‹NOP-BOYABAT-ÖZTÜRK BEYAZ EfiYA BAKIM SERV‹S-GÖKDERE MH.YUSUF KEMAL BEY CD.NO:24-TEL.:0368 315 61 21 S‹VAS-EKOL
ELEKTRON‹K-H‹KMET IfiIK CD.NALBANTLAR BAfiI KAVfiA⁄I NO:1/D-TEL.:0346 223 44 96 fiANLIURFA-SURUÇ-IfiIK SO⁄UTMA
TEKN‹KERL‹⁄‹-D‹K‹L‹ MH. Z‹YARET CD. NO:10-TEL.:0414 612 17 25 fiANLIURFA-AKTAfi ELEKTRON‹K-ASFALT CD. N0.22/F-TEL.:0414
217 14 87 fiANLIURFA-B‹REC‹K-YARAfiIR SO⁄UTMA-MEYDAN MAH 10 TEMMUZ CAD KÖPRÜ ÇIKIfiI NO : 9-TEL.:0414 652 36 38 fiIRNAKS‹LOP‹-ABAY ELEKTRON‹K-2. CADDE S‹EMENS BAY‹‹ KARfiISI-TEL.:0486 518 50 99 fiIRNAK-ULUDERE-ÜRÜN ELEKTRON‹K-CUMHUR‹YET
CD. PTT YANI-TEL.:0486 351 28 22 TEK‹RDA⁄-HAYRABOLU-POYRAZ TEKN‹K-H‹SAR MAH. ADELET SK. NO:24-TEL.:0282 315 55 48
TEK‹RDA⁄-SARAY-BATI TEKN‹K-YEN‹ MH. TAKS‹M CD. NO:9 TEL.:0282 768 69 34 TEK‹RDA⁄-MURATLI-AKAN ELEKTRON‹K-MURAD‹YE
MH. NAZIM SAV CD. NO:30/A-TEL.:0282 361 28 17 TEK‹RDA⁄-ÇORLU-FULL TEKN‹K-MUH‹TT‹N MH. F‹K‹R SK. NO:12/B-TEL.:0282 652
28 68 TEK‹RDA⁄-ARI ELEKTRON‹K-AYDO⁄DU MH. fiEH‹TLER CD. NO: 33/A-TEL.:0282 263 40 61 TEK‹RDA⁄-MALKARA-KER‹MO⁄ULLARI
T‹CARET-YEN‹MAHALLE GÜLDESTE SOK. NO: 4/B-TEL.:0282 427 16 61 TEK‹RDA⁄-ÇERKEZKÖY-ÇA⁄RI ELEKTRON‹K-G.O. PAfiA MH.
SAYAR SK. KARDEfiLER APT. NO:5 -TEL.:0282 726 02 66 TOKAT-ERBAA-H‹DRO ELEKT‹R‹K-CUMHUR‹YET MH. GAZ‹ BULVARI NO:144TEL.:0356 715 56 01 TOKAT-C‹HAN ELEKTRON‹K-G.O.PAfiA BULVARI S‹VAS CAD. NO:290/A- TEL.:0356 214 00 74 TOKAT-TURHAL-GÜÇLÜ
SO⁄UTMA-CELAL MH. TUNA SK. NO:11-TEL.: 0356 276 39 66 TOKAT-CEM TEKN‹K SO⁄UTMA-SO⁄UKPINAR MH. GOP BULVARI 241/A
GÖKÇE PASAJI NO:14-TEL.:0356 212 37 57 TRABZON-ÇIRAK TEKN‹K-FAT‹H MH. AYASOFYA CD. NO: 57 MÜZE KARfiISI-TEL.:0462 229
66 44 TRABZON-AKÇAABAT-ATOM ELEKTR‹K-ORTA MH. ERENLER SK. NO:5 -TEL.:0462 228 12 58 TRABZON-YET-SAN ELEKTRON‹K-
FAT‹H MH. FAT‹H CD. COfiKUNER PASAJI NO:2/B-TEL.:0462 223 15 04 TRABZON-ARAKLI-fiENGÜL TEKN‹K-BA⁄KUR ÇARfiISI NO: 10 /
A-TEL.:0462 721 74 11 VAN-ERC‹fi-ÖZKANAT TAM‹RAT-EMN‹YET KARAKOL ARKASI NO:3-TEL.:0432 351 95 40 VAN-EB‹NÇ TEKN‹K-
SIHKE CAD ATEfi SOK. NO 10-TEL.:0432 214 31 37 VAN-BURHAN AYDIN - ÖZ USTA TAM‹RAT-KÜLTÜR MERKEZ‹ C‹VARI DEM‹RC‹LER
1. SK. NO:1/C-TEL.:0432 216 34 58 YALOVA-ALTINOVA-DO⁄AN TEKN‹K SO⁄UTMA-CUMHUR‹YET MH.MERKEZ DURAK KARfiISI NO:29ATEL.:0226 461 26 21 YALOVA-TINAZTEPE ELEKTR‹K-‹STANBUL CD. BORA SK. NO: 14-TEL.:0226 812 01 60 YOZGAT-AKDA⁄MADEN‹-
AYDIN SO⁄UTMA-AHISHAVI MH. 2. HANLAR SK. NO :10-TEL.:0354 314 64 12 YOZGAT-ÖNDER ELEKTRON‹K-UN PAZARI NO:14-TEL.:0354
212 79 67 YOZGAT-SORGUN-KARDEfiLER ELEKTRON‹K-CUMHUR‹YET CD. NO:29 1/C-TEL.:0354 415 45 79 ZONGULDAK-KRD ERE⁄L‹-
UZMAN ELEKTRON‹K-ERDEM‹R CAD NO:130-TEL.:0372 316 31 28 ZONGULDAK-MERKEZ-EMEK ELEKTRON‹K-PAP‹LA ‹fi HANI ZEM‹N
KAT NO:9 SO⁄UKSU-TEL.:0372 251 67 31
- 38 -
Page 40

MÜfiTER‹ H‹ZMETLER‹
De¤erli Müflterimiz,
En uygun fiyata en iyi ürünü vermenin yan› s›ra; en iyi hizmeti vermenin de
önemli oldu¤una inan›yoruz. Bu nedenle siz bilinçli tüketicilere daha yak›n
olabilmek için, internet adresimizdeki eriflim formlar›n›n yan› s›ra, tüketici
dan›flma hatlar›m›z› da hizmetinize açm›fl durumday›z.
TÜKET‹C‹
DANIfiMA HATTI
444 66 86
MERKEZ
TEKN‹K SERV‹S
(0212) 422 94 94
www.sinbo.com.tr
Dan›flma Hatlar›m›z›,
- Hafta içi her gün 08.30-18.00 saatleri aras›nda arayabilir; istek, öneri ve
flikayetlerinizi firmam›za iletebilirsiniz.
Tüketicinin Dikkatine:
Ürünlerimizle ilgili hizmetleri tam olarak alabilmek için afla¤›daki önerilere
uyman›z› rica ederiz:
1. Ürünü ald›¤›n›zda Garanti Belgesini mutlaka yetkili sat›c›n›za onaylatt›r›n›z.
2. Ürünü kullanma k›lavuzu esaslar›na göre kullan›n›z.
3. Ürününüzle ilgili hizmet talebiniz oldu¤unda yukar›daki telefon
numaralar›ndan, Tüketici ‹liflkileri Merkezi'ne baflvurunuz.
4. Ürünü promosyon arac›l›¤› ile edinmiflseniz, ürüne ait garanti belgesini en
yak›n yetkili servisimize giderek onaylatt›r›n›z.
5. Teknik servisteki ifliniz bitti¤inde "Hizmet Fifli" almay› unutmay›n›z.
Alaca¤›n›z bu fifl, ileride ürününüzde meydana gelebilecek herhangi bir
sorunda size yarar sa¤layacakt›r.
6. Cihaz›n›z ilk çal›flt›rmada çal›flm›yor veya ar›zal› ise, size en yak›n S‹NBO
Yetkili Servisine baflvurabilir veya S‹NBO Dan›flma Hatlar›ndan yard›m
alabilirsiniz.
- 39 -
Page 41

- GARANT‹ fiARTLARI -
1. Garanti süresi, mal›n teslim tarihinden itibaren bafllar ve 2 y›ld›r.
2. Mal›n bütün parçalar› dahil(kullan›m hatalar›ndan kaynaklanan k›r›lmalar hariç) olmak üzere tamam› firmam›z›n
garantisi kapsam›ndad›r.
3. Mal›n garanti süresi içerisinde ar›zalanmas› durumunda, tamirde geçen süre garanti süresine eklenir. Mal›n tamir
süresi en fazla 30 ifl günüdür. Bu süre, mala iliflkin ar›zan›n servis istasyonuna servis istasyonunun olmamas›
durumunda, mal›n sat›c›s›, bayii, acentas›,temsilcili¤i, ithalatç›s› veya imalatç›s›-üreticisinden birisine bildirim tarihinden
itibaren bafllar. Mal›n ar›zas›n›n 15 ifl günü içerisinde giderilmemesi halinde, imalatç›-üretici veya ithalatç›; mal›n
tamiri tamamlan›ncaya kadar, benzer özelliklere sahip baflka mal› tüketicinin kullan›m›na tahsis etmek zorundad›r.
4. Mal›n garanti süresi içerisinde, gerek malzeme ve iflçilik, gerekse montaj hatalar›ndan dolay› ar›zalanmas› halinde,
iflçilik masraf›, de¤ifltirilen parça bedeli ya da baflka herhangi bir ad alt›nda hiçbir ücret talep etmeksizin tamiri
yap›lacakt›r.
5. Tüketicinin onar›m hakk›n› kullanmas›na ra¤men mal›n;
-Tüketiciye teslim edildi¤i tarihten itibaren, belirlenen garanti süresi içinde kalmak kayd›yla,bir y›l içerisinde; ayn›
ar›zan›n ikiden fazla tekrarlanmas› veya farkl› ar›zalar›n dörtten fazla meydan gelmesi veya belirlenen garanti süresi
içerisinde farkl› ar›zalar›n toplam›n›n alt›ndan fazla olması unsurlar›n›n yan›s›ra, bu ar›zalar›n maldan yararlanamamay›
sürekli k›lmas›,
-Tamiri için gereken azami sürenin afl›lmas›,
-Firman›n servis istasyonunun, servis istasyonunun mevcut olmamas› halinde s›rayla sat›c›s›, bayii, acentesi temsilcili¤i,
ithalatç›s› veya imalatç› - üreticisinden birisine düzenleyece¤i raporla ar›zan›n tamirine mümkün bulunmad›¤›n›n
belirlenmesi,durumlar›nda, tüketici mal›n ücretsiz de¤ifltirilmesini, bedel iadesi veya ay›p oran›nda bedel indirimi
talep edebilir.
6. Mal›n kullanma k›lavuzunda yer alan hususlara ayk›r› kullan›lmas›ndan kaynaklanan ar›zalar garanti kapsam›
d›fl›ndad›r.
7. Garanti Belgesi ile ilgili olarak ç›kabilecek sorunlar için Sanayi ve Ticaret Bakanl›¤› Tüketicinin ve Rekabetin
Korunmas› Genel Müdürlü¤ü’ne baflvurulabilir.
‹THALATÇI F‹RMA
DE‹MA ELEKTROMEKAN‹K ÜRÜNLER ‹NfiAAT SPOR MALZEMELER‹ ‹MALAT SAN. VE T‹C. A.fi.
Cihangir Mh. Güvercin Cd. No:4 Haramidere Mevkii Avcılar - ‹stanbul - Türkiye
Tel : (0212) 422 94 94 & Fax : (0212) 422 03 49
www.sinbo.com.tr - info@sinbo.com.tr
- 40 -
Page 42

- SFS 5707 BUHARLI P‹fi‹R‹C‹ -
- GARANT‹ BELGES‹ -
Garanti Belge No : 79336
SSHY Belge No : 25551
‹THALATÇI F‹RMA
Ünvanı : DE‹MA ELEKTROMEKAN‹K ÜRÜNLER‹ ‹Nfi. SPOR MALZ.
‹MALAT SAN. ve T‹C. A.fi.
Adresi : Cihangir Mah. Güvercin Cad. No:4 Haramidere Mevkii
Avc›lar / ‹STANBUL
Tel. : 0212 422 94 94 & Fax: 0212 422 03 49
Yetkili Kifli :
Yönetim Kurulu Baflkan›
Ürünün Cinsi : BUHARLI P‹fi‹R‹C‹
Markası : S‹NBO
Modeli : SFS 5707
Alt Modeli : Bandrol ve Seri No :
Teslim Tarihi ve Yeri :
Garanti Süresi : 2 Yıldır
Azami Tamir Süresi : 30 ‹fl Günü
Kullanım Ömrü : Bakanl›kça belirlenen ve ilan edilen kullan›m ömrü 7 y›ld›r.
(Ürünün fonksiyonlar›n› yerine getirebilmesi için gereken yedek parça temin süresi)
SATICI F‹RMA
Ünvanı :
Adresi :
Tel.Fax :
Fatura Tarihi ve No :
Teslim Tarihi ve Yeri :
‹mza ve Kafle :
Bu bölüm, ürünü sat›n ald›¤›n›z Yetkili Sat›c› taraf›ndan imzalanacak ve kaflelenecektir.
Bu belgenin kullan›lmas›na; 4077 say›l› Tüketicinin Korunması Hakkında Kanun ve bu Kanun’a dayan›larak yürürlü¤e konulan Garanti Belgesi
Uygulama Esaslar›na Dair Tebli¤ uyar›nca, TC Sanayi ve Ticaret Bakanl›¤› Tüketicinin ve Rekabetin Korunmas› Genel Müdürlü¤ü tarafından
izin verilmifltir.
Garanti Belge Onay Tarihi : 22/02/2010
SSHY Belge Onay Tarihi : 30/03/2010
- 41 -
Page 43

Made in China
‹mal Y›l› : 2010
- TEDAR‹KÇ‹ F‹RMA / EXPORTER United Favour Development Limited
Unit B, 10/F Lee May Building 788-790
Nathan Road, Mongkok, Kowloon, HK.
- UYGUNLUK BEYANI / CE TÜV Rheinland Product Safety GmbH
Am Grauen Stein, D-51105, Köln
Germany
AN 50166815 0001
EEE Yönetmeli¤ine uygundur.
 Loading...