

Sinbo SFH 3367, SFH 3365, SFH 3366 User Manual
SFH 3365
SFH 3365, SFH 3366, SFH 3367 KONVEKTÖR ISITICI
KULLANMA KILAVUZU
SFH 3367
SFH 3366
TR
EN
FR
NL
DE
ES
RU
UA
HR
AR
PT
www.sinbo.com.tr
- 1 -

De¤erli Müflterimiz,
Ürün seçiminde S‹NBO'yu tercih etti¤iniz için teflekkür ederiz.
Uzun ve verimli bir kullan›m için cihaz› kullanmadan önce bu k›lavuzu özellikle güvenlik
talimatlar›na dikkat ederek okuman›z› ve devaml› suretle saklaman›z› tavsiye ederiz.
Garantiden do¤an haklar›n kullan›lmas› ile ilgili olarak ç›kabilecek uyuflmazl›klarda
yerleflim yerinin bulundu¤u veya tüketici iflleminin yap›ld›¤› yerdeki Tüketici Hakem
Heyetine veya Tüketici Mahkemesine baflvurabilirsiniz.
Ayrıca, mal›n ay›pl› oldu¤unun anlafl›lmas› durumunda, 6502 say›l› Tüketicinin Korunmas›
Hakk›nda Kanunun 11 inci maddesinde yer alan;
a- Sözleflmeden dönme,
b- Sat›fl bedelinden indirim isteme,
c- Ücretsiz onar›lmas›n› isteme,
ç- Sat›lan›n ay›ps›z bir misli ile de¤ifltirilmesini isteme, haklar›ndan birini kullanabilirsiniz.
Sayg›lar›m›zla,
Sinbo Küçük Ev Aletleri
Cihazla oynamamalarını güvenceye almak için çocuklar gözetim altında tutulmalıdır.
Bu ürün (çocuklar dahil ) fiziksel hassasiyeti az, zihinsel olarak yetersiz, deneyimsiz ve yeterli bilgiye
sahip olmadan yada kendilerinin güvenli¤inden sorumlu olan kifliler tarafından bu ürünü kullanmak
için gerekli talimatlar verilmemifl kiflilerin kullanımına uygun de¤ildir.
Children being supervised not to play with the appliance.
This appliance is not intended for use by persons (including children) with reduced physical,sensory
or mental capabilities, or lack of experience and knowledge, unless they havebeen given supervision
or instruction concerning use of the appliances by a personresponsible for their safety. Children
should be supervised to ensure that they do not play with the appliance.
- 2 -

SINBO SFH 3365, SFH 3366, SFH 3367
Konvektör Is›t›c›
Kullan›m K›lavuzu
TEKN‹K PARAMETRE
Model Gerilim Frekans Güç I / II
SFH 3365 AC220-240V 50Hz 500W/1000W
SFH 3366 AC220-240V 50Hz 750/1500W
SFH 3367 AC220-240V 50Hz 1000W/2000W
GÜVENL‹K AÇIKLAMALARI (›s›t›c› çal›flt›r›lmadan önce okunmal›d›r)
1) Is›t›c›n›n portatif bir cihaz olarak kullan›lmas› durumunda, ayaklar› do¤ru bir flekilde
ba¤lan›ncaya kadar ›s›t›c›y› kullanmay›n.
2) Is›t›c›n›n fiflinin tak›laca¤› elektrik prizinin, ›s›t›c› üzerinde bulunan etiket de¤erlerine
uygun oldu¤undan ve prizin topraklanm›fl oldu¤undan emin olun.
3) Elektrik kablosunu ›s›t›c›n›n s›cak gövdesinden uzak tutun.
4) Is›t›c› banyolar, çamafl›r odalar› veya benzeri bina içi ortamlarda kullan›lmak üzere
üretilmemifltir. Is›t›c›y› banyo küvetine veya baflka bir su kab›n›n içine düflebilece¤i bir
flekilde asla yerlefltirmeyin.
5) Bina d›fl›nda kullanmay›n.
6) Is›t›c›n›n ›s› ç›k›fl kanallar›n› veya hava girifl aç›kl›klar›n› kapatmay›n veya engellemeyin.
7) Is›t›c›y› tüyleri çok uzun olan hal›lar›n üzerine yerlefltirmeyin.
8) Is›t›c›n›n her zaman sa¤lam bir yüzeye yerlefltirildi¤inden emin olun. Yang›n tehlikesi
oluflturabilece¤i için ›s›t›c›y› perdelere veya mobilyalara yak›n bir yere yerlefltirmeyin.
9) Is›t›c›y› bir elektrik prizinin önüne veya hemen alt›na yerlefltirmeyin.
10) Is›t›c›n›n ›s› ç›k›fl›na veya hava girifl aç›kl›klar›na herhangi bir nesne sokmay›n.
11) Is›t›c›y› kolay tutuflan s›v›lar›n sakland›¤› veya kolay tutuflan bu¤ular›n bulunabilece¤i
yerlerde kullanmay›n.
12) Bu ›s›t›c›y› banyolar›n, yüzme havuzlar›n›n dufllar›n›n hemen yak›nlar›nda kullanmay›n.
13) Is›t›c›n›n çocuklar›n ve engellilerin bulundu¤u alanlarda kullan›lmas› durumunda
özellikle dikkat edilmesi gereklidir.
14) Is›t›c›y› bir yerden baflka bir yere tafl›rken her zaman fiflini prizden çekin.
15) Is›t›c›n›n hemen bir elektrik prizinin alt›na yerlefltirilmemesi gereklidir.
16) E¤er elektrik kablosu hasar görmüflse ›s›t›c›y› kullanmay›n. E¤er elektrik kablosu
hasar görmüflse servis temsilcisi veya baflka bir kalifiye personel taraf›ndan de¤ifltirilmesi
gereklidir. E¤er fifl hasar görmüflse, afla¤›daki Fifl De¤ifltirme detaylar›na bak›n.
17) Kullan›lmad›¤› zamanlarda, cihaz›n fiflini prizden çekin.
18) E¤er ›s›t›c› banyoda kullan›l›rsa, duvara monte edilmeli ve banyo küvetinde veya
duflta olan birinin dokunamayaca¤› bir yere yerlefltirilmelidir.
19) Kablosunun keskin kenarlara ve s›cak yüzeylere temas etmesine izin vermeyin.
20) E¤er elektrik kablosu hasar görmüflse, bir tehlike yaratmamak için kablonun imalatç›,
- 3 -

onun servis acentesi veya bunun gibi kalifiye kifliler taraf›ndan de¤ifltirilmesi gerekir.
21) E¤er ürün belirli bir süre boyunca 0ºC alt›nda s›cakl›klara maruz kal›rsa,
çal›flt›r›lmadan önce en az 2 saat oda s›cakl›¤›nda bekletilmelidir.
22) Küçük çocuklar, cihazla oynamad›klar›ndan emin olmak için gözetim alt›nda
tutulmal›d›r.
23) Bu cihaz, kendi güvenliklerinden sorumlu kiflilerin gözetimi alt›nda olmamalar› veya
cihaz›n kullan›m› ile ilgili talimatlar verilmemifl olmas› durumunda (çocuklar dahil olmak
üzere) fiziksel, alg›sal ya da zihinsel yetenekleri k›s›tl› kifliler ile deneyimi ve bilgisi
olmayan kiflilerin kullan›m› için uygun de¤ildir.
MONTAJ TAL‹MATI VE KULLANIM ALANI
Kullanmadan Önce:
A. Is›t›c›n›n düz ve sa¤lam bir masan›n üzerine veya yere konulmas› ve sonra fiflinin prize
tak›lmas› gereklidir.
(Uyar›: Prizin ve kablonun özellikleri: AC220-224V, 50Hz,10A ve topraklama kablosu
gereklidir.
B. Tekerleri takmadan önce fifli prize takmay›n.
Tekerlerin tak›lmas›
Tekerleri ›s›t›c›n›n alt›na tak›n, vida deliklerinin düzgün hizada oldu¤undan emin olun,
sonra vidalar› (birlikte verilmektedir) s›k›n.
DUVARA MONTAJ
• Vidalar› ve somunlar› (birlikte verilmektedir) kullanarak büyük ba¤lant› aya¤›n› duvara
sabitleyin.
• Is›t›c›y› taban parças› ile zemin aras›nda en az 50 cm kalacak flekilde bir boflluk b›rakarak
yerlefltirin ve döflemelerden veya perdelerden en az 1 m mesafe kald›¤›ndan emin olun.
Cihaz›n arka taraf›na kauçuk takozlar› tak›n.
Cihaz›n yan taraf›nda bulunan yuvalar›n arkas›na büyük bir sabitleme pimi tak›n. Koruyucu
küçük ba¤lant› ayaklar›n› tak›n ve bu küçük ba¤lant› ayaklar›n› büyük olanlara vidalay›n.
E¤er gerekirse, ›s›t›c›y› duvara sabitleyin.
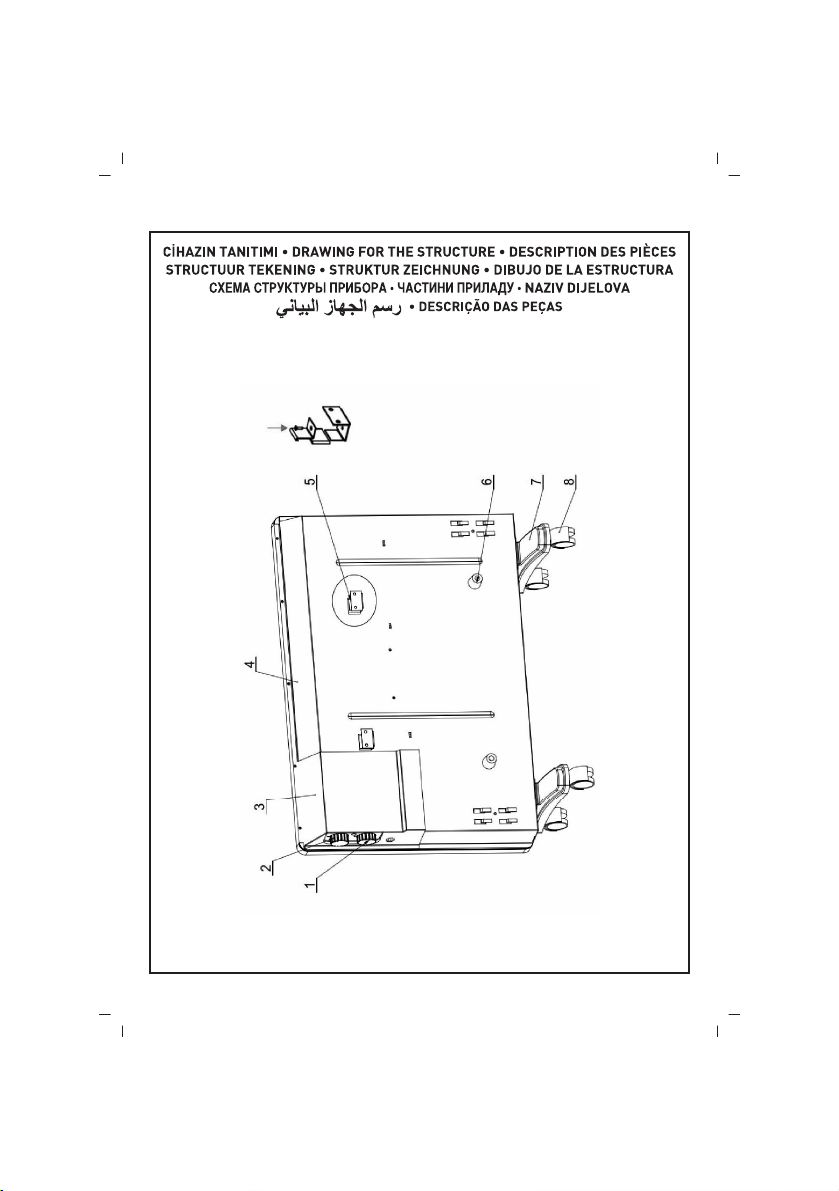
C‹HAZIN TANITIMI
1. Güç anahtar› dü¤mesi, 2. Termostat dü¤mesi, 3. Kontrol paneli, 4. Arka panel, 5.
Duvara montaj aya¤›, 6. Kauçuk takoz, 7. Destek taban›, 8. Tekerlekler
C‹HAZIN ÇALIfiTIRILMASI
• Cihaz›n fiflini uygun bir prize tak›n, s›cakl›k kontrol dü¤mesini en yüksek seviyeye getirin
(örn., dü¤meyi saat yönünde sonuna kadar çevirin) Yüksek pozisyon.
- 4 -

SICAKLIK KONTROLÜ
• Bu cihaz› kullan›rken odan›n s›cakl›¤›n›n çok yüksek oldu¤unu hissederseniz, ›s›y›
düflürmek için: maksimum pozisyonda olan s›cakl›k kontrol dü¤mesini saat yönünün
tersine çevirin. Bundan sonra, elektrikli ›s›t›c› arada durarak çal›flacakt›r.
GÜÇ KONTROLÜ
• Güç ç›k›fl›, ç›k›fl regülatörü aç›larak ayarlanabilir. Is›t›c›n›n iki çal›flma seviyesi
bulunmaktad›r: 1 ve 2.
C‹HAZIN KAPATILMASI
• Cihaz› kapatmak için, güç regülatörünü 0 pozisyonuna al›n veya fiflini prizden çekin.
UYARI: Is› kayb›n›n önlenmesi için, odan›n kapal› tutulmas› gereklidir, aksi takdirde oda
›s›nmayacakt›r.
TEM‹ZL‹K VE BAKIM
• Yüzeyindeki tozlar›n silinmesi için ›s›t›c›n›n düzenli aral›klarla temizlenmesi gereklidir.
Bu flekilde ›s›tma verimi korunur.
• Cihaz›n fiflini prizden çekin ve so¤umas›n› bekleyin.
• Yumuflak nemli bir bezle silin. Deterjan veya afl›nd›r›c› maddeler kullanmay›n.
• Kanatlar›n yüzeylerini keskin ve sert aletler ile çizmeyin, aksi takdirde paslanmaya ve
boya katman›n›n kalkmas›na neden olabilir.
SAKLAMA
• Cihaz› kapat›n ve fiflini prizden çekin. Is›t›c›n›n tamamen so¤umufl oldu¤undan emin
olun.
• BAKIM VE TEM‹ZL‹K bölümünde anlat›lan tüm gereklilikleri tamamlay›n.
• Elektrik kablosunu toplay›n.
• Cihaz› kuru ve serin bir yerde saklay›n.
Bu ürünün do¤ru flekilde bertaraf edilmesi
Bu iflaret, bu ürünün AB dahilinde ev at›klar›ndan ayr›flt›r›lak at›lmas› gerekti¤i anlam›na
gelmektedir. Denetimsiz at›klar›n çevreye ve insan sa¤l›¤›na olas› olumsuz etkilere yol
açmamas› amac›yla, malzeme kaynaklar›n›n sürdürülebilir bir flekilde yeniden
kullan›labilmesini sa¤lamak için sorumlu davranarak ürünü geri dönüfltürün. Kullan›lan
cihaz›n›z› iade etmek için lütfen iade ve toplama sistemlerini kullan›n›z veya ürünü sat›n
ald›¤›n›z perakendeci ile irtibata geçiniz. Belirtilen noktalar bu ürünü çevreyi korumak
üzere geri dönüfltürmek için alabilirler.
- 5 -

ENGLISH
SINBO SFH 3365, SFH 3366, SFH 3367
Panel Heater
Instruction Manual
TECHNICAL PARAMETER
Model Voltage Frequency Power I / II
SFH 3365 AC220-240V 50Hz 500W/1000W
SFH 3366 AC220-240V 50Hz 750/1500W
SFH 3367 AC220-240V 50Hz 1000W/2000W
SAFETY INSTRUCTIONS (to be read before operating the heater)
1) Do not use the heater unless the feet are correctly attached if the heater is used as
portable appliance.
2) Ensure the power supply to the socket into which the heater is plugged is in accordance
with the rating label on the heater and that the socket is earthed.
3) Keep the mains lead away from the hot body of the heater.
4) The heater is not intended for use in bathrooms, laundry areas or similar indoor
locations. Never place the heater where it may fall into a bathtub or other water container.
5) Do not use outdoors.
6) Do not cover or obstruct any of the heat outlet grilles or the air intake openings of the
heater.
7) Do not place the heater on carpets having a very deep pile.
8) Always ensure that the heater is placed on a firm level surface. Ensure that the heater
is not positioned close to curtains or furniture as this could create a fire hazard.
9) Do not position the heater in front of, or immediately below, a wall socket.
10) Do not insert any object through the heat outlet or air intake grilles of the heater.
11) Do not use the heater in areas where flammable liquids are stored or where flammable
fumes may be present.
12) Do not use this heater in the immediate surrounding of a bath, a shower of a swimming
pool.
13) Particular care should be taken when the heater is situated in areas occupied by
children or invalids.
14) Always unplug the heater when moving it from one location to another.
15) The convector must not be located immediately below a socket-outlet.
16) Do not use the heater if the power cord is damaged. If the power cord is damaged
it must be replaced by a recognized service agent or other qualified person. If the plug
is damaged, see Plug Replacement details below.
17) Always unplug the appliance from the power supply when not in use
18) If the heater used in the bathroom, then it must be installed on the wall, and must
be in a place where couldn’t be touched once in bathtub or shower bath
19) Do not allow the cord to touch sharp edges and hot surfaces
- 6 -

20) If the supply cord is damaged, it must be replaced by the manufacturer, its service
agent or similarly qualified persons in order to avoid a hazard.
21) If the product has been exposed to temperatures below 0ºC for some time, it should
be kept room temperature for at least 2 hours before turning it on.
22) Young children should be supervised to ensure that they do not play with the appliance.
23) This appliance is not intended for use by persons (including children) with reduced
physical, sensory or mental capabilities, or lack of experience and knowledge, unless
they have been given supervision or instruction concerning use of the appliance by a
person responsible for their safety.
ASSEMBLE INSTRUCTION AND USING AREA
Before Using:
A. The heater should be put on a smooth solid tabletop or ground, then insert the plug.
(Warning: The requirement of the socket and cable: AC220-224V, 50Hz,10A and earthing
cable necessary.
B. Don’t insert the cable before installing the wheels
Install the wheels
Attach the wheels to the bottom of the convector, make sure that the bolt holes are
properly aligned, then tighten the screws (supplied).
MOUNTING TO THE WALL
• Attach the large bracket to the wall, using the available bolts and nuts (supplied).
• Place the heater, leaving the distance between the base device and the floor for at least
50 cm, and make sure that the distance between the upholstery and curtains is at least
1 m. Attach the rubber stops to the back of the device.
Place a large staple to the rear of the notches on the side of the device. Wear protective
top small brackets and screw them to the larger ones. It is necessary to secure the
convector on the wall.
PARTS DESCRIPTION
1. Power switch knob, 2. Thermostat knob, 3. Control panel, 4. Real panel, 5. Wall
mounted bracket, 6. Rubber post, 7. Support base, 8. Wheel
SWITCHING ON THE DEVICE
• Plug it into a suitable outlet, set the temperature controller at the highest level (i.e.,
turn the knob clockwise until it stops), High position.
TEMPERATURE CONTROL
• When using this device you feel that the room temperature is too high, you can reduce
it as follows: turn the temperature controller anti-clockwise from the maximum position.
After that, electric convector would work intermittently.
- 7 -
POWER CONTROL
• Power output can be set by switching the output regulator. Convector has two power
levels: 1 and 2.
TURNING OFF THE DEVICE
• To turn the device off, put a power regulator to 0 or disconnect the power cord.
WARNING: To avoid heat loss room should be kept closed, otherwise it will not get warm.
CLEAN AND CARE
• The convector should be cleaned regularly to wipe out the dust on the surface. As this
may result the convection efficient.
• Unplug from the power supply and allow the appliance to cool down.
• Wipe out with a soft damp cloth. Do not use detergent or abrasives.
• Do not scrap the surfaces of fins with sharp hard tools, to avoid surfaces getting rusty,
because of damage of the paint coat.
STORAGE
• Switch off and unplug the appliance. Ensure the convector is completely cool.
• Complete all requirements of chapter CLEAN AND CARE.
• Reel on the power cord.
• Keep the appliance in a dry cool place.
Correct Disposal of this product
This marking indicates that this product should not be disposed with other household
wastes throughout the EU. To prevent possible harm to the environment or human health
from uncontrolled waste disposal, recycle it responsibly to promote the sustainable
reuse of material resources. To return your used device, please use the return and
collection systems or contact the retailer where the product was purchased. They can
take this product for environmental safe recycling.
- 8 -

FRANÇAIS
SINBO SFH 3365, SFH 3366, SFH 3367
Panneau chauffant
Manuel d'utilisation
PARAMÈTRES TECHNIQUES
Modèle Tension Fréquence Puissance I / II
SFH 3365 CA220-240 V 50Hz 500 W~1000 W
SFH 3366 CA220-240 V 50Hz 750/1500W
SFH 3367 CA220-240 V 50Hz 1000W~2000W
CONSIGNES DE SÉCURITÉ (à lire avant l'utilisation du panneau chauffant)
1) Si le panneau chauffant est utilisé comme appareil portable, évitez d'en faire usage sans
fixer correctement les pieds.
2) Assurez-vous que l'alimentation de la prise dans laquelle est branché le panneau chauffant
correspond à ce qui est écrit sur la fiche signalétique de l'appareil et que la prise est mise
à la terre.
3) Tenez le câble électrique loin de la partie chaude du panneau.
4) Le panneau chauffant n'est pas conçu pour être utilisé dans les salles de bain, les espaces
buanderie ou d'autres endroits similaires à l'intérieur. Ne placez jamais le panneau à un
endroit où il pourrait tomber dans une baignoire ou dans un récipient d'eau.
5) Ne pas l'utiliser à l’extérieur.
6) Évitez de couvrir ou d'obstruer les grilles de sortie ou les orifices d'admission d'air du
panneau chauffant.
7) Évitez de placer le panneau sur des tapis à poil très profond.
8) Assurez-vous toujours que le panneau est placé sur une surface ferme et plane. Assurez-
vous que le panneau n'est pas positionné près des rideaux ou des meubles afin de prévenir
tout risque d'incendie.
9) Évitez de positionner le panneau en face ou immédiatement en dessous d'une prise murale.
10) Évitez d'insérer des objets dans la sortie de chaleur ou dans les grilles d'admission d'air
du panneau.
11) Évitez d'utiliser le panneau dans des espaces de stockage de liquides inflammables ou
des espaces où des fumées inflammables pourraient être présentes.
12) Évitez d'utiliser ce panneau dans les environs immédiats d'une baignoire, d'une salle de
bain ou d'une piscine.
13) Faites très attention lorsque le panneau chauffant est placé dans des espaces occupés
par des enfants ou des personnes handicapées.
14) Débranchez toujours le panneau lorsque vous le déplacez d'un endroit à un autre.
15) Le convecteur ne doit pas être situé directement en dessous de la prise de courant.
16) Évitez d'utiliser le panneau chauffant lorsque le cordon d'alimentation est endommagé.
Si le cordon d'alimentation est endommagé, faites-le remplacer par un agent de service
reconnu ou toute autre personne qualifiée. Si la fiche est endommagée, référez-vous aux
informations ci-dessous, relatives au remplacement de la fiche.
17) Débranchez toujours l'appareil lorsqu'il n'est pas utilisé.
- 9 -

18) Si le panneau chauffant est utilisé dans une salle de bain, il doit être installé sur le mur
et à un endroit où tout contact serait impossible une fois dans la baignoire ou pendant la
douche.
19) Ne laissez pas le cordon en contact avec des bords tranchants et des surfaces chaudes.
20) Si le cordon d'alimentation est endommagé, faites-le remplacer par le fabricant, son
agent de service ou par des personnes qualifiées similaires afin d'éviter tout risque.
21) Si l'appareil a été exposé à une température en deçà de 0ºC, il doit être maintenu à
température ambiante pendant 2 heures au moins avant son utilisation.
22) Les enfants doivent être surveillés afin de s'assurer qu'ils ne jouent pas avec l'appareil
23) Cet appareil n'est pas conçu pour être utilisé par des personnes (y compris les enfants)
dont les capacités physiques, sensorielles ou mentales sont réduites ou par des personnes
manquant d'expérience et de connaissances, à moins qu'elles n'aient été formées et encadrées
pour l'utilisation de cet appareil par une personne responsable de leur sécurité.
INSTRUCTIONS RELATIVES AU MONTAGE ET CONTEXTE D'UTILISATION
Avant utilisation :
A. L'appareil de chauffage doit être posé sur une surface solide et lisse ou sur le sol avant
tout branchement.
Avertissement : Exigences sur la prise et le câble : AC220-224 V, 50 Hz, 10 A et
nécessairement un câble de prise de terre.
B. Évitez d'insérer le câble avant l'installation des roues
Installation des roues
Montez les roues sur le bas du convecteur en vous assurant que les trous de vis sont bien
alignés, puis serrez les vis (fournis).
MONTAGE AU MUR
• Fixez le large support au mur à l'aide des boulons et écrous prévus à cet effet (fournis).
• Placez le panneau chauffant en laissant un espace d'au moins 50 cm entre le bas de
l'appareil et le support et assurez-vous que l'espace entre l'ameublement et les rideaux est
d'au moins 1 m. Ensuite, montez les tampons en caoutchouc à l'arrière de l'appareil.
Placez une large agrafe à l'arrière des encoches situées sur le côté de l'appareil. Montez
les petits supports supérieurs de protection et vissez-les aux plus grandes. Il est nécessaire
de protéger le convecteur sur le mur.
DESCRIPTION DES PIÈCES
1. Bouton de l'interrupteur, 2. Bouton de thermostat, 3. Panneau de commande,
4. Panneau réel, 5. Support mural, 6. Poste en caoutchouc, 7. Base de soutien, 8. Roue
ACTIVATION DE L'APPAREIL
• Branchez-le sur une prise appropriée, puis ajustez le régulateur de température au niveau
maximal (Tournez le bouton dans le sens des aiguilles d'une montre jusqu'à ce qu'il bloque),
position haute.
- 10 -

CONTRÔLE DE LA TEMPÉRATURE
• Si vous sentez que la température est très élevée lors de l'utilisation de l'appareil, vous
pouvez la réduire comme suit : tournez le régulateur de température au sens contraire des
aiguilles d'une montre à partir de sa position maximale. Après l'avoir fait, le convecteur
électrique fonctionnera par intermittence.
COMMANDE DE PUISSANCE
La puissance de sortie peut être ajustée en allumant le régulateur de sortie. Le convecteur
a deux niveaux de puissance : 1 et 2.
EXTINCTION DE L’APPAREIL
• Pour éteindre l'appareil, placez le régulateur de puissance sur la position « 0 » ou
déconnectez le cordon d'alimentation.
AVERTISSEMENT: Pour éviter la perte de chaleur, la pièce doit être fermée, sinon elle ne
se réchauffera pas.
NETTOYAGE ET ENTRETIEN
• Le convecteur doit être régulièrement nettoyé afin de le dépoussiérer. Cela favorisera son
bon fonctionnement.
• Débranchez l'appareil de l'alimentation électrique et laissez le refroidir.
• Nettoyez-le à l'aide d'un chiffon doux et humide. N'utilisez pas de détergents ou d'agents
abrasifs.
• Évitez de nettoyer la surface des ailettes avec des outils durs et tranchants afin de les
préserver de la rouille, causée par la dégradation de la couche de peinture.
STOCKAGE
Éteignez et débranchez l'appareil. Vérifiez que le convecteur se refroidisse complètement.
• Appliquez toutes les recommandations du chapitre NETTOYAGE ET ENTRETIEN.
• Embobinez le cordon d'alimentation.
• Gardez l'appareil dans un endroit sec.
Mise au rebut appropriée de cet appareil
Ce symbole indique que cet appareil ne doit pas être jeté avec les ordures ménagères à
travers l'Europe. Pour préserver l'environnement et la santé des personnes face à l'élimination
incontrôlée des déchets, veuillez recycler l'appareil afin de promouvoir la réutilisation durable
des ressources. Pour renvoyer votre ancien appareil, utilisez les systèmes de renvoi et de
collecte ou contactez le revendeur chez qui vous avez acheté l'appareil. Ils pourront procéder
au recyclage de l'appareil en toute sécurité.
- 11 -

NEDERLANDS
SINBO SFH 3365, SFH 3366, SFH 3367
Paneelverwarming
Gebruiksaanwijzing
Technische gegevens
Model Spanning Frequentie Power I / II
SFH 3365 AC220-240V50Hz 500W/1000W
SFH 3366 AC220-240V50Hz 750/1500W
SFH 3367 AC220-240V50Hz 1000W/2000W
VEILIGHEIDSINSTRUCTIES (te lezen voor u de verwarming in gebruik neemt)
1) Gebruik de verwarming niet tenzij de voetjes correct verbonden zijn als de verwarming
als een draagbaar apparaat wordt gebruikt.
2) Zorg ervoor dat de voeding naar het stopcontact waarin de stekker van de verwarming is
ingevoerd overeenstemt met het naamplaatje op de verwarming en dat het stopcontact
geaard is.
3) Houd het netsnoer uit de buurt van het apparaat.
4) De verwarming is niet bedoeld voor gebruik in badkamers, waslokalen of gelijkaardige
locaties. Plaats de verwarming nooit waar ze in een badkuip of een andere watercontainer
kan vallen.
5) Niet buitenshuis gebruiken.
6) Dek of belemmer de uitlaatroosters of luchtinlaatopeningen van de verwarming nooit.
7) Plaats de verwarming niet op dikke tapijten.
8) Zorg ervoor dat de verwarming op een stevige harde ondergrond is geplaatst. Zorg ervoor
dat de verwarming niet dichtbij gordijnen of meubels wordt geplaatst want dit kan een
brandrisico inhouden.
9) Plaats de verwarming niet voor, of onmiddellijk onder een wandcontact.
10) Voer geen voorwerp door de warmte-uitlaat of luchtinlaatroosters van de verwarming.
11) Gebruik de verwarming niet in plaatst waar ontvlambare vloeistoffen worden opgeborgen
of waar ontvlambare dampen aanwezig kunnen zijn.
12) Gebruik de verwarming niet in de onmiddellijke omgeving van een bad, een douche of
een zwembad.
13) Bijzondere zorg moet worden gedragen als de verwarming in een plaats is geplaatst
waar kinderen of mindervaliden aanwezig zijn.
14) Ontkoppel de verwarming altijd als u ze van de ene ruimte naar de andere verplaatst.
15) De convector mag niet onder een stopcontact worden geplaatst.
16) Gebruik het apparaat niet als het netsnoer beschadigd is. Als het netsnoer beschadigd
is, moet het worden vervangen door onderhoudspersoneel of een andere gekwalificeerde
persoon. Als de stekker beschadigd is, verwijzen wij u naar de Stekker vervanging details
hieronder.
17) Ontkoppel het apparaat altijd van de netspanning als u het niet gebruikt.
18) Als de verwarming in de badkamer wordt gebruikt, moet ze op de muur worden
geïnstalleerd op een locatie die niet kan worden aangeraakt vanuit de badkuip of douche.
- 12 -

19) Laat het snoer niet in aanraking komen met scherpe randen en hete oppervlakten.
20) Als het netsnoer beschadigd is, moet het worden vervangen door de fabrikant, zijn
onderhoudsdienst of dergelijk gekwalificeerde personen om ieder risico uit te sluiten.
21) Als het product wordt blootgesteld aan temperaturen van minder dan 0°C gedurende
een bepaalde periode moet het gedurende 2 uur aan kamertemperatuur worden gehouden
voor u het inschakelt.
22) Jonge kinderen moeten onder toezicht staan om zeker te zijn dat ze niet spelen met dit
apparaat.
23) Dit apparaat is niet bestemd voor gebruik door personen (inclusief kinderen) met
verminderde fysieke, zintuiglijke of mentale mogelijkheden, of personen met een gebrek
aan ervaring en kennis, tenzij zij onder toezicht staan van of instructies hebben ontvangen
met betrekking tot het gebruik van het apparaat door een persoon die instaat voor hun
veiligheid.
ASSEMBLAGE INSTRUCTIES EN GEBRUIKSLOCATIES
Voor gebruik:
A. De verwarming moet op een vlak, stevig tafelblad of op de grond worden geplaatst. Voer
daarna de stekker in het stopcontact.
(Waarschuwing: De vereisten van het stopcontact en het netsnoer: AC220-224V, 50Hz,10A
en aardkabel noodzakelijk.
B. Steek de stekker niet in het stopcontact voor u de wieltjes geïnstalleerd hebt.
De wieltjes installeren
Bevestig de wieltjes op de onderzijde van de convector. Zorg ervoor dat de boutopeningen
correct uitgelijnd zijn en draai de schroeven aan (geleverd).
WANDMONTAGE
• Bevestig de grote beugel aan de muur met de beschikbare bouten en moeren (geleverd).
• Plaats de verwarming met een tussenruimte tussen de basis en de vloer van minimum 50
cm en zorg ervoor dat er minimum 1 meter afstand is tussen het apparaat en de meubelen
of gordijnen . Bevestig de rubberen stops aan de achterzijde van het apparaat.
Plaats een groot nietje op de achterzijde van de inkepingen op de zijkanten van het apparaat.
Schroef de beschermende kleine beugels op de grotere beugels. De convector moet op de
muur worden bevestigd.
OMSCHRIJVING ONDERDELEN
1. Stroomschakelaar, 2. Thermostaatknop, 3. Bedieningspaneel, 4. Achterpaneel,
5. Wandgemonteerde beugel, 6. Rubberen post, 7. Steunbasis, 8. Wiel
HET APPARAAT INSCHAKELEN
• Voer de stekker in een geschikt stopcontact, stel de temperatuurregelaar op het maximum
niveau (m.a.w. draai de knop in wijzerzin tot hij stopt), de High-stand.
- 13 -
 Loading...