

Page 1
SFH 3321, SFH 3322 ELEKTR‹KL‹ ISITICI
KULLANMA KILAVUZU
TR
EN
FR
NL
ES
RU
AR
HR
SFH 3321 : 1500W
SFH 3322 : 2000W
Page 2

G‹R‹fi
De¤erli Müflterimiz,
Ürün seçiminde S‹NBO'yu tercih etti¤iniz için teflekkür ederiz.
Uzun ve verimli bir kullan›m için cihaz› kullanmadan önce bu k›lavuzu özellikle güvenlik
talimatlar›na dikkat ederek okuman›z› ve devaml› suretle saklaman›z› tavsiye ederiz.
Sayg›lar›m›zla,
Sinbo Küçük Ev Aletleri
YA⁄LI RADYATÖR
KULLANIM TAL‹MATI
SFH 3321 : 1500W
SFH 3322 : 2000W
D‹KKAT: C‹HAZI KULLANMAYA BAfiLAMADAN ÖNCE BU KILAVUZU D‹KKATL‹ B‹R
fiEK‹LDE OKUYUNUZ
Yaln›zca ev içi kullan›ma yöneliktir.
Kullan›m Talimat›
Cihazınızı kullanmaya bafllamadan önce lütfen bu kullan›m k›lavuzunu dikkatli bir flekilde
okuyarak cihaz› tan›y›n›z. Bu k›lavuzu baflvuru kayna¤› olarak saklay›n›z.
This appliance is not intended for use by persons (including children) with reduced physical,
sensory or mental capabilities, or lack of experience and knowledge, unless they have
been given supervision or instruction concerning use of the appliances by a person
responsible for their safety. Children should be supervised to ensure that they do not play
with the appliance.
This appliance is intended to be used in household and similar applications such as:
- staff kitchen areas in shops, offices and other working environments;
- farm houses;
- by clients in hotels, motels and other residential type environments;
- bed and breakfast type environments.
Bu ürün (çocuklar dahil ) fiziksel hassasiyeti az, zihinsel olarak yetersiz, deneyimsiz ve
yeterli bilgiye sahip olmadan yada kendilerinin güvenli¤inden sorumlu olan kifliler tarafından
bu ürünü kullanmak için gerekli talimatlar verilmemifl kiflilerin kullanımına uygun de¤ildir.
- 1 -
Page 3

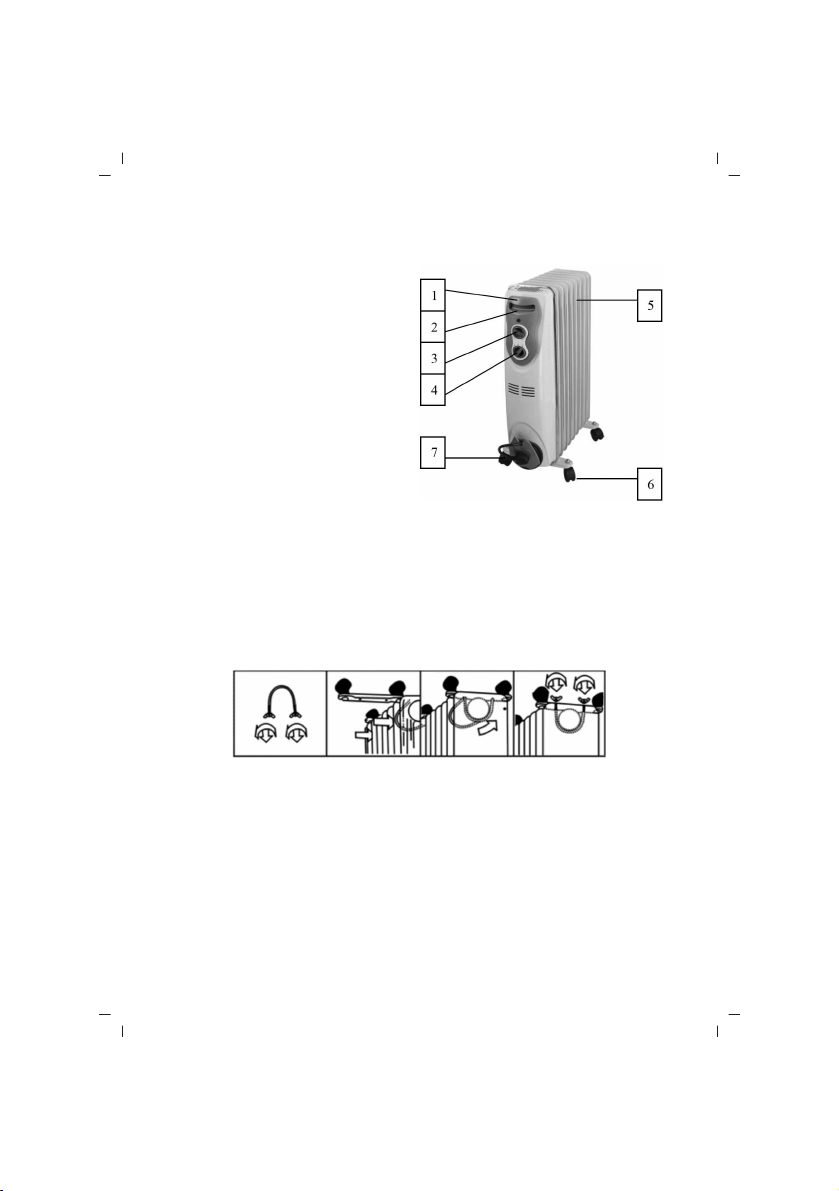
C‹HAZIN TANITIMI
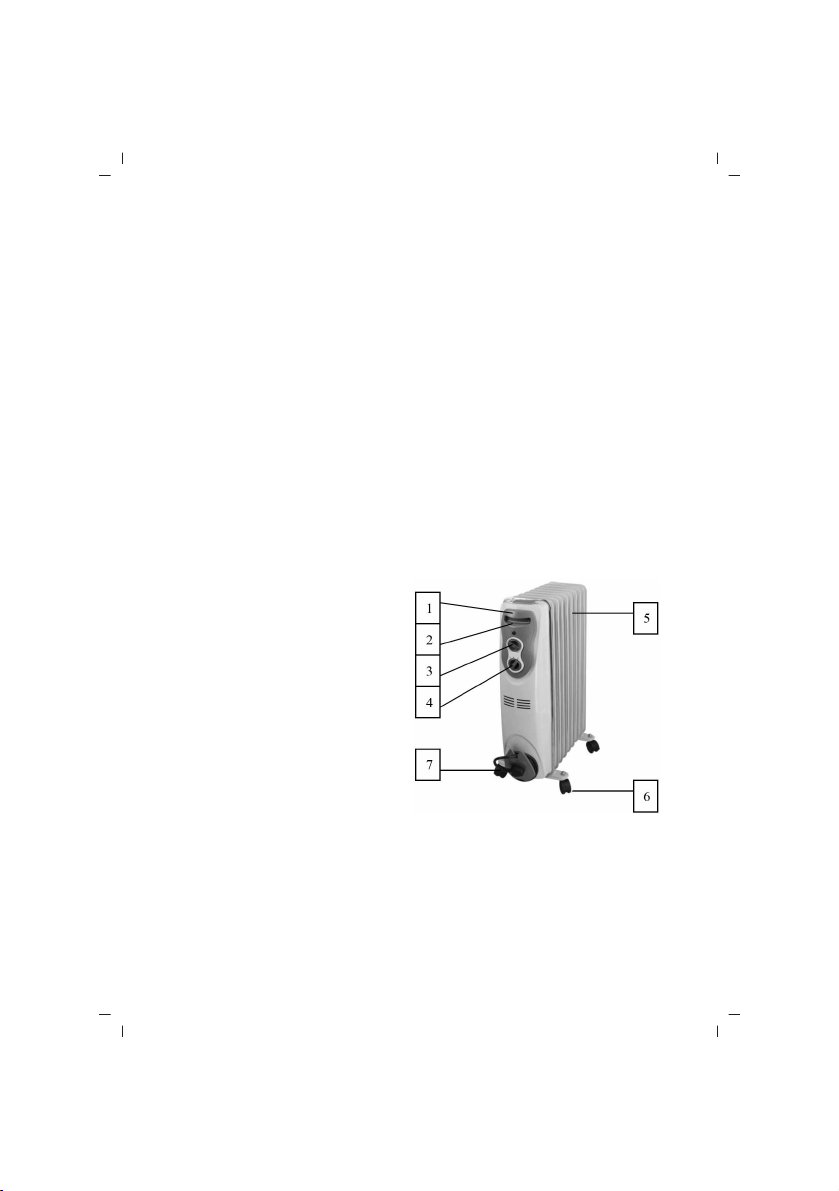
1. Kontrol panosu
2. Tafl›ma tutaca¤›
3. Is› ayar› dü¤mesi
4. Güç dü¤mesi
5. Is›t›c› petekleri
6. Tekerlek
7. Kablo sarma
C‹HAZIN ÖZELL‹KLER
• Ayarlanabilir termostat
• Kolay taflıma için tekerlekler
• Yüksek ısı koruma sistemi
• Termostat kontrollü
• Entegre tutacak
• Kablo sarma
• Tekerlekler üzerine monte edilir
• 230V~, 50Hz, 1500W (SFH 3322 2000W)
Bu cihaz kalite belgesine haizdir.
EN 60335-1, EN 60335-2-30, EN 50366
Kullanım Ömrü 7 yıldır.
Made in P.R.C.
D‹KKAT!!
Ürünün üzerinde bulunan iflaretlemelerde veya ürünle verilen di¤er bas›l› dökümanlarda
beyan edilen de¤erler, ilgili standartlara göre laboratuar ortam›nda elde edilen
de¤erlerdir.Bu de¤erler, ürünün kullan›m ve ortam flartlar›na göre de¤iflebilir.
- 2 -
Page 4

ÖNEML‹ GÜVENL‹K UYARILARI
• Bakım, Onarım ve Kullanımda Uyulması Gereken Kurallar
Cihazınızı kullan›rken afla¤›daki temel güvenlik önlemlerini mutlaka göz önünde
bulundurman›z gerekmektedir.
C‹HAZI KULLANMADAN ÖNCE TÜM TAL‹MATI OKUYUNUZ.
D‹KKAT: Yang›n, elektrik floku ya da yaralanma riskini asgari düzeye çekmek için:
1. Bu cihaz, cihazlar›n kullan›lmas›nda güvenlik aç›s›ndan sorumluluk üstlenebilecek bir
kiflinin gözetimi ve yönlendirmesi olmadan fiziksel, duyusal ya da zihinsel engeli olan
kifliler (çocuklar dahil), bu konuda bilgi ya da deneyim sahibi olmayan kifliler taraf›ndan
kullan›lmamal›d›r.
2. Çocuklar›n cihazla oynamas›na engel olmak için yeterli gözetim yap›lmal›d›r.
3. Bu cihaz yaln›zca evde kullan›ma yöneliktir
4. Cihaz› yaln›zca ürün etiketinde belirtilen voltaj de¤erine uygun bir tek fazl› AC güç
kayna¤›na ba¤lay›n›z.
5. Afl›r› ›s›nmaya neden olmamak için ›s›t›c›n›n üstünü örtmeyiniz.
6. Is›t›c› kullan›mdayken kesinlikle bafl›ndan ayr›lmay›n›z. Cihaz kullan›lmad›¤› zamanlarda
mutlaka KAPALI konuma getirerek fiflini prizden çekiniz.
7. Herhangi bir ›s›t›c› çocuklar›n, engelli kiflilerin ya da yafll› kiflilerin yak›n›nda
kullan›l›yorken ve ›s›t›c› bu durumlarda çal›fl›r durumda b›rak›ld›¤›nda çok dikkatli
olunmal›d›r.
8. Is›t›c› elektrik prizinin hemen alt›na yerlefltirilmemelidir.
9. Kabloyu hal› alt›ndan geçirmeyiniz ya da üstünü kilim, yolluk ve benzeri eflyalarla
örtmeyiniz. Kabloyu insan trafi¤inin olmad›¤› ve tak›lma riski yaratmayaca¤› bir alandan
geçiriniz.
10. Kablosu ya da fifli ar›zalanm›fl olan, ›s›tma mekanizmas› ar›zalanm›fl olan, düflürülmüfl
ya da baflka bir flekilde zarar görmüfl olan bir ›s›t›c›y› kesinlikle çal›flt›rmay›n›z.
11. Güç kablosunun ar›zalanmas› durumunda tehlikelerin önlenmesi için kablo üretici,
servis yetkilisi ya da benzer bir ehliyetli kifli taraf›ndan de¤ifltirilmelidir.
12. Afl›r› ›s›nma ve yang›n riskine neden olabilece¤i için uzatma kablosu kullanmay›n›z.
13. Is›t›c›y› iyi havaland›r›lm›fl bir alanda kullan›n›z. Havaland›rma ya da hava ç›k›fl
deliklerinden içeri herhangi bir cismin girmesine izin vermeyiniz. Yang›n riskine yol
açmamak için hava girifllerini ya da ç›k›fllar›n› kapatmay›n›z. Cihaz›, üzerideki boflluklar›n
örtülebilece¤i yatak gibi yumuflak yüzeylerde kullanmay›n›z. Is›t›c›y› yaln›zca düz ve kuru
yüzeylerde kullan›n›z.
14. Yang›n riskini önlemek için ›s›t›c›y› yan›c› malzemelerin, yüzeylerin ya da maddelerin
yak›n›na yerlefltirmeyiniz. Bahsi geçen yan›c› malzemeler, yüzeyler ya da maddeler
ürünün önünden en az 1m, yanlar›ndan ve arkas›ndan en az 15 cm uzak olmal›d›r. Is›t›c›n›n
içerisinde s›cak, ark yapan ya da k›v›lc›m ç›karan parçalar bulundu¤u için ›s›t›c›y› benzin,
boya ya da di¤er yan›c› s›v›lar›n sakland›¤› yerlerde kullanmay›n›z ör: tamirhaneler ya
da atölyeler.
16. Bu ›s›t›c›y› banyo, dufl ya da yüzme havuzu gibi su kaynaklar›n›n hemen yak›n›nda
kullanmay›n›z. Is›t›c›y› küvete ya da su dolu eflyalar›n içine düflebilecek flekilde
- 3 -
Page 5
ÖNEML‹ GÜVENL‹K UYARILARI
konumland›rmay›n›z.
17. Bu ›s›t›c› kullan›m s›ras›nda ›s›n›r. Yan›k ya da yaralanma riskine maruz kalmamak
için s›cak yüzeylere cildinizle temas etmeyiniz. Ürünü hareket ettirmek için tutacak
k›sm›n› kullan›n›z.
18. Devrede afl›r› yüklenme olmas›n› önlemek için ayn› devreye baflka elektrikli cihazlar›n
ba¤lanmam›fl oldu¤undan emin olunuz.
19. Is›t›c› miktar› hassas bir flekilde belirlenmifl özel bir ya¤ ile doldurulmufltur.
20. Ya¤ haznesinin aç›lmas›n› gerektiren onar›m ifllemleri yaln›zca üretici ya da onun
yetkili servis merkezi arac›l›¤›yla gerçeklefltirilmelidir ve herhangi bir ya¤ s›z›nt›s›
oldu¤unda buralarla ba¤lant›ya geçilmelidir.
21. Cihaz›n hurdaya ç›kar›lmas› s›ras›nda ya¤›n elden ç›kar›lmas›na yönelik düzenlemelere
riayet edilmelidir.
22. Is›t›c›, alan› 5m2’den daha küçük olan odalarda kullan›lmamal›d›r.
23. Güç kablosu cihaz›n s›cak yüzeylerinin yak›n›na yerlefltirilmemelidir.
24. Bu cihaz, cihazlar›n kullan›lmas›nda güvenlik aç›s›ndan sorumluluk üstlenebilecek
bir kiflinin gözetimi ve yönlendirmesi olmadan fiziksel, duyusal ya da zihinsel engeli olan
kifliler (çocuklar dahil), bu konuda bilgi ya da deneyim sahibi olmayan kifliler taraf›ndan
kullan›lmamal›d›r.
YALNIZCA EV ‹Ç‹ KULLANIMA YÖNEL‹KT‹R
BU TAL‹MATI MUHAFAZA ED‹N‹Z
TAfiIMA ESNASINDA
• Ürünü düflürmeyiniz,
• Darbelere maruz kalmamas›na özen gösteriniz,
• S›k›flmamas›n›, ezilmemesine özen gösteriniz
• Ambalaj üzerindeki iflaretlemelere uyunuz.
• Orjinal ambalajıyla taflımaya özen gösteriniz.
ÇEVRE VE ‹NSAN SA⁄LI⁄I
Çevre korumas›na siz de katk›da bulunabilirsiniz!
Lütfen yerel düzenlemelere uymay› unutmay›n: Çal›flmayan elektrikli cihazlar›,
uygun elden ç›karma merkezlerine götürün
Kullanım sırasında insan ve çevre sa¤lı¤ına tehlikeli veya zararlı olabilecek bir durum
söz konusu de¤ildir.
C‹HAZIN KULLANIMI
• Ba¤lantı veya Montajın Nasıl Yapılaca¤ını Gösterir fiema ile Ba¤lantı veya Montajın
Kimin Tarafından Yapılaca¤ına (tüketici, yetkili servis) iliflkin bilgiler
Cihaz›n›zla birlikte gelen aksesuarları kolayl›kla kendiniz tak›p ç›kartabilirsiniz.
Olası bir arıza durumunda cihazın içini açmayınız. En yak›n yetkili servise baflvurunuz.
- 4 -
Page 6
C‹HAZIN MONTAJI
MONTAJ TAL‹MATI
Is›t›c›, ayaklar› demonte edilmifl flekilde paketlenmifltir. Is›t›c›y› çal›flt›rmadan önce
ayaklar›n› monte ediniz.
D‹KKAT: Cihaz› ayaklar› tak›l› de¤ilken kullanmaya kalk›flmay›n›z. Is›t›c›y› yaln›zca dik
konumdayken (ayaklar afla¤›da, kumandalar yukar›da) çal›flt›r›n›z, cihaz› baflka
pozisyonlarda çal›flt›rmaya kalk›flman›z tehlikeli durumlara yol açabilir.
1. Radyatörü, cihaz›n çizilmesine neden olmayacak bir yerde bafl afla¤› çeviriniz, dengeli
durdu¤undan ve düflmeyece¤inden emin olunuz.
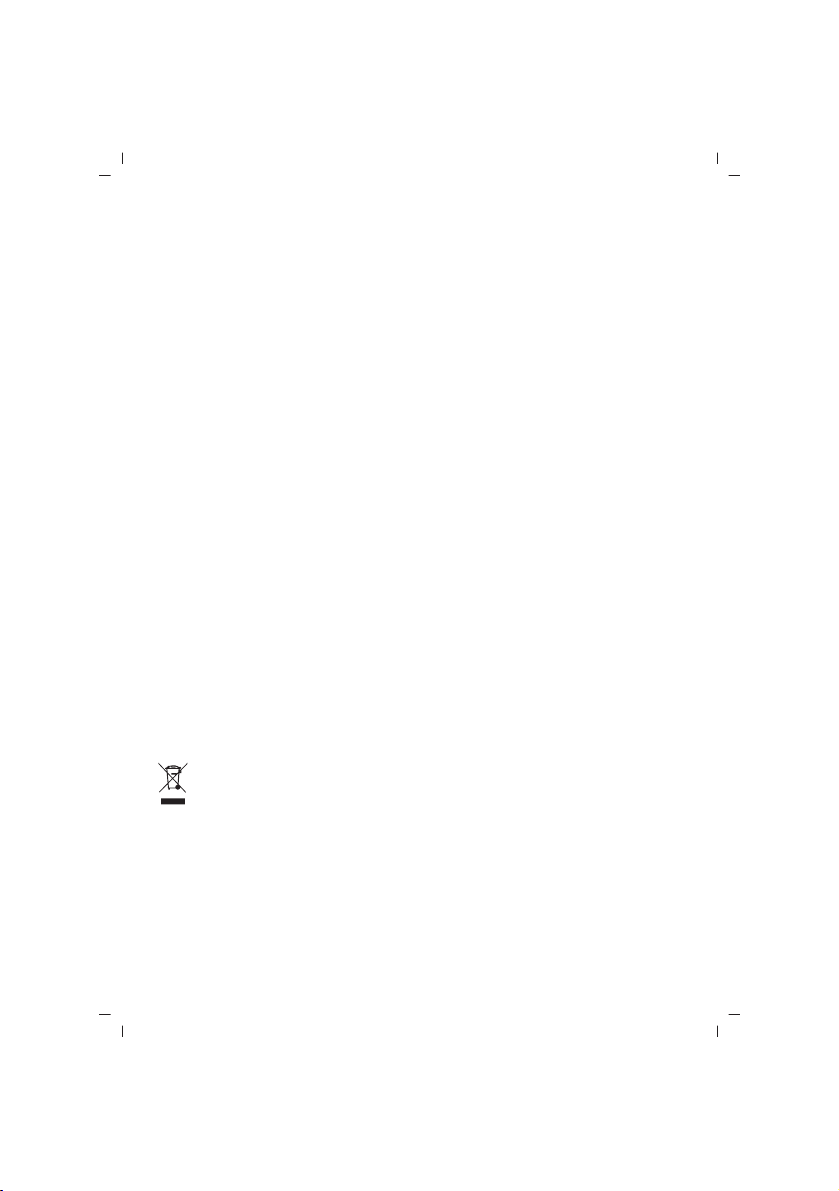
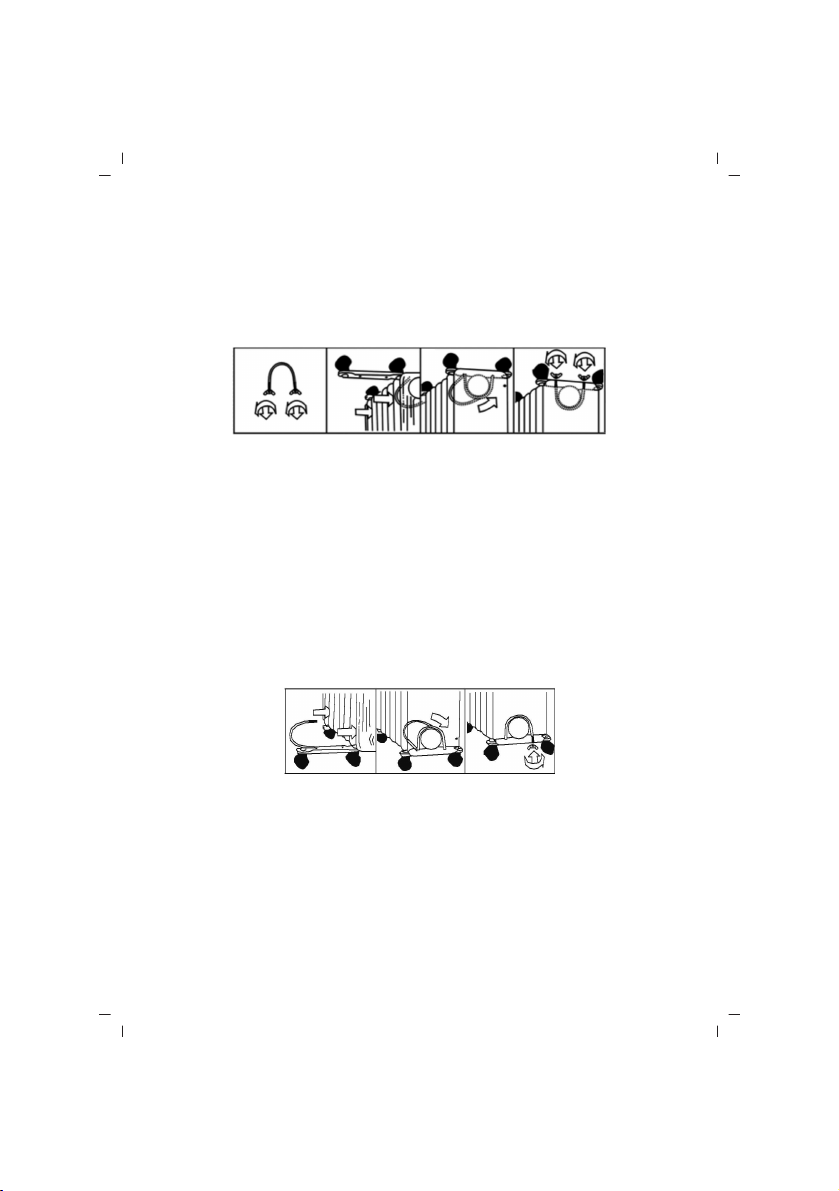
2. Ürünle birlikte gelen U flekilli c›vatan›n üzerindeki kelebek somunlar› sökünüz, U
flekilli c›vatay› birinci ve ikinci petekler aras›ndaki flanfltan (ön kapa¤›n yak›n›ndaki)
geçiriniz.
3. Tekerler montaj plakas›n› radyatör gövdesine monte etmek için U c›vatan›n yivli uçlar›n›
tekerlek montaj plakas›n›n deliklerinden geçiriniz.
4. Kelebek somunlar› U c›vataya geri tak›n›z ve somunlar› iyice s›k›flt›r›n›z.
Not: somunlar› afl›r› miktarda s›kmay›n›z, aksi takdirde radyatör flanfl› zarar görecektir.
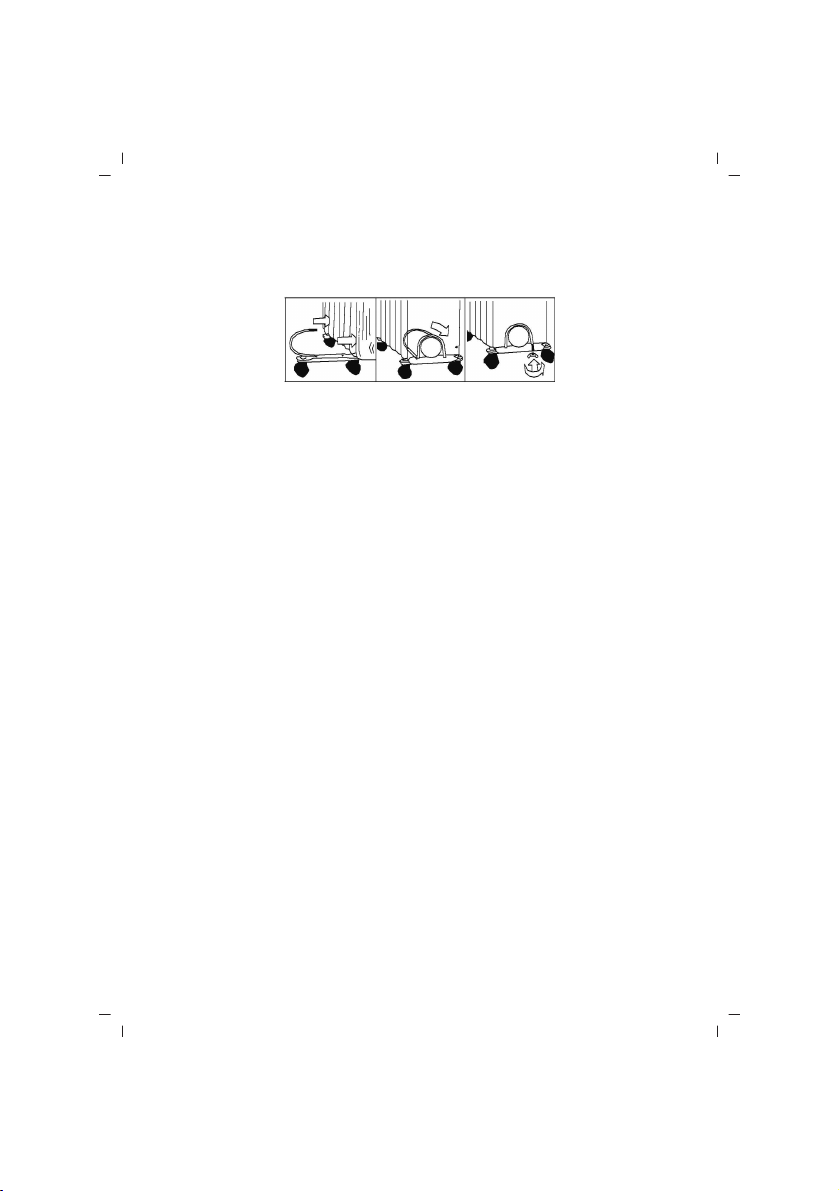
5. Dairesel somunu tekerlekten ç›kar›n›z, flaft› tekerlek montaj plakas›n›n deli¤ine
hizalad›ktan sonra içine sokunuz ve dairesel somunu tak›n›z.
6. Arka tekerlekleri monte etmek için 2, 3, 4 ve 5 numaral› ad›mlar› tekrarlay›n›z.
Not: Arka tekerlekler di¤er uçtaki iki petek aras›na monte edilmelidir.
KULLANIM TAL‹MATI
1. Radyatörü kullanmaya bafllamadan önce düz ve dengeli bir zemin üzerine
yerlefltirildi¤inden emin olunuz.
Radyatör e¤imli bir zemin üzerine yerlefltirildi¤i takdirde ar›zalanabilir.
2. Tüm kumandalar› KAPALI konuma getiriniz ve fifli do¤ru flekilde topraklanm›fl prize
tak›n›z. Fiflin prize tam olarak oturdu¤undan emin olunuz.
3. Termostat dü¤mesini saat yönünde çevirerek MAX konumuna getiriniz ve ›s›t›c›y›
afla¤›daki flekilde çal›flt›r›n›z: düflük s›cakl›k için I numaral› dü¤meyi, orta s›cakl›k için
II numaral› dü¤meyi ve yüksek s›cakl›k için her iki dü¤meyi aç›n›z.
4. Oda s›cakl›¤› istedi¤iniz seviyeye ulaflt›ktan sonra termostat dü¤mesini pilot lamba
- 5 -
Page 7

C‹HAZIN KULLANIMI
sönene kadar ters saat yönünde çeviriniz. Termostat bu ayarda b›rak›labilir. Oda s›cakl›¤›
ayarlanm›fl olan s›cakl›¤›n alt›na düfltü¤ü takdirde cihaz ayarlanan s›cakl›¤a yeniden
ulafl›lana kadar otomatik olarak çal›flmaya bafllayacakt›r. Bu flekilde oda s›cakl›¤› sabit
kal›r ve elektrik ekonomik bir flekilde kullan›lm›fl olur.
5. Oda s›cakl›¤› ayar›n› de¤ifltirmek istiyorsan›z termostat dü¤mesini saat yönünde
çevirerek s›cakl›¤› artt›r›n›z ya da ters saat yönünde çevirerek s›cakl›¤› azalt›n›z.
6. Bu ›s›t›c›, parçalar afl›r› ›s›nmaya maruz kald›¤›nda cihaz› kapatan bir afl›r› ›s›nma
koruma sistemine sahiptir.
7. Is›t›c›y› tamamen kapatmak için tüm kumandalar› KAPALI konuma getiriniz ve fifli
prizden ç›kar›n›z.
KULLANIM HATALARINA ‹L‹fiK‹N B‹LG‹LER
Cihazınızı, beyan edilen voltaj ile çal›flt›r›n›z.Bulundu¤unuz yerin voltaj›n›n uygun olup
olmad›¤›n› kontrol ediniz.
Güç kablosunun ar›zalanmas› durumunda tehlikelerin önlenmesi için kablo üretici, servis
merkezi ya da benzer bir ehliyetli kifli taraf›ndan de¤ifltirilmelidir. Ar›za durumunda cihaz›
kendiniz sökmeye kalk›flmay›n›z, bak›m merkezimiz ya da sat›fl sonras› hizmet merkezimiz
ile ba¤lant›ya geçiniz.
Cihaz› kendiniz onarmaya kalk›flmay›n›z. Meydana gelebilecek ar›zalardan firmam›z
kesinlikle sorumlu de¤ildir, ve cihaz›n›z garanti kapsam› d›fl›nda ifllem görecektir.
TEM‹ZL‹K VE BAKIM
• Tüketicinin Kendi Yapabilece¤i Bakım, Onarım veya Ürünün Temizli¤ine ‹liflkin Bilgiler
1. Is›t›c›y› temizlemeye bafllamadan önce fifli prizden mutlaka çekiniz ve radyatörün
so¤umas›n› bekleyiniz.
2. Radyatörü hafifçe nemlendirilmifl yumuflak bir bezle (›slak de¤il) silerek temizleyiniz.
UYARI:
Is›t›c›y› kesinlikle suya sokmay›n›z.
Deterjan ve afl›nd›r›c› temizlik malzemeleri kullanmay›n›z.
Tehlikeli sonuçlar do¤urabilece¤i için cihaz›n iç k›sm›n›n ›slanmas›na izin vermeyiniz.
3. Radyatörü kald›rmadan önce kabloyu kablo makaras›na sar›n›z ve cihaz› kuru bir yerde
muhafaza ediniz.
4. Ar›za durumunda ya da ar›za flüphesinde radyatörü kendiniz onarmaya kalk›flmay›n›z,
aksi takdirde yang›n ya da elektrik floku gibi tehlikeler ortaya ç›kabilir.
• Periyodik Bakım Gerektirmesi Durumunda, Periyodik Bakımın Yapılaca¤ı Zaman
Aralıkları ile Kimin Tarafından Yapılması Gerekti¤ine ‹liflkin Bilgiler
Cihaz periyodik bak›m gerektirmez.
Düzenli olarak temizli¤inin yapılmasında fayda vardır.
- 6 -
Page 8

D‹KKAT
Güç kablosunda herhangi bir ar›za oldu¤unda onar›m için sat›c›n›zla ya da yetkili servis
merkeziyle ba¤lant›ya geçiniz.
Onar›m, kablo ya da fifl de¤iflimi ya da ayarlama ifllemleri için lütfen yetkili teknisyenlere
baflvurunuz ya da cihaz› yetkili servis merkezine getiriniz.
D‹REKT‹FLERE UYGUNLUK
Bu ürün tadil edilmifl haliyle 2006/95/EC say›l› Alçak Voltaj Direktifi ve 2004/108/EC say›l›
EMC (Elektromanyetik Uyumluluk) Direktifine uygun olarak CE iflaretiyle iflaretlenmifltir.
Bu ürünü do¤ru flekilde elden ç›kar›n›z
Bu iflaret, ürünün AB genelinde di¤er ev at›klar›yla birlikte elden ç›kar›lmamas› gerekti¤ini
göstermektedir. Çevre ve insan sa¤l›¤›n›n kontrolsüz flekilde elden ç›kar›lm›fl olan at›klar
nedeniyle zarar görmesini önlemek amac›yla, malzeme kaynaklar›n›n sürdürülebilir
yeniden kullan›m›n› sa¤lamak için cihaz›n geri dönüflümünü sa¤lay›n›z. Kullan›lm›fl
cihazlar›n›z› lütfen iade ve toplama merkezlerine ulaflt›r›n›z ya da ürünün sat›n al›nd›¤›
ma¤azayla ba¤lant›ya geçiniz. Bu yerler ürünü teslim al›p çevreye duyarl› bir flekilde geri
dönüflümlerini sa¤layabilirler.
SATIfi SONRASI SERV‹S H‹ZMETLER‹
Bu cihaz kullan›c› taraf›ndan de¤ifltirilebilen parçalara sahip de¤ildir. Ünitenin çal›flmamas›
durumunda flu ad›mlar› izleyin.
1. Talimatlar›n do¤ru biçimde izlendi¤ini denetleyin.
2. Ana kayna¤›nda ifllevselli¤ini denetleyin.
Cihaz hâlâ çal›flm›yorsa, sat›n ald›¤›n›z yere geri götürün.
Güç kablosu hasar örmüflse, tehlikeleri önlemek için, cihaz üreticisine iade edilmelidir.
Kendi kendinize tamir etmeye KALKIfiMAYIN.
fiu talimatlar› izleyin:
1. Dikkatlice, tercihen orijinal kutusuna paketleyin.
Ünitenin temiz oldu¤undan emin olun.
2. Tüm yaz›flmalarda, ad›n›z›, adresinizi ve ürünün model numaras›n› belirtin.
3. ‹ade etme nedeninizi belirtin.
4. Garanti kapsam›ndaysa, nereden, ne zaman al›nd›¤›n› belirtin ve sat›n alma kan›t›n›
ekleyin (örn. kasa fifli).
- 7 -
Page 9

ENGLISH
SINBO OIL FILLED RADIATOR
USER INSTRUCTIONS
SFH 3321 : 1500W
SFH 3322 : 2000W
WARNING: READ THIS OWNER’S MANUAL CAREFULLY BEFORE USE
IMPORTANT SAFEGUARDS
When using an electrical appliance, basic safety precautions should always be observed,
including the following:
READ ALL INSTRUCTIONS BEFORE USING
WARNING: To reduce the risk of fire, electrical shock, or injury to person:
1. This appliance is not intended for use by persons (including children) with reduced
physical, sensory or mental capabilities, or lack of experience and knowledge, unless
they have been given supervision or instruction concerning use of the appliance by a
person responsible for their safety.
2. Children should be supervised to ensure that they do not play with the appliance.
3. The product is for household use only.
4. Connect the appliance to single phase AC supply of the voltage specified on the rating
plate.
5. In order to avoid overheating, do not cover the heater.
6. Never leave the heater unattended while it is in use. Always turn the product to the
OFF position and unplug it from the electrical outlet when not in use.
7. Extreme caution is necessary when any heater is used by or near children, invalids or
elderly person and whenever the heater is left operating and unattended.
8. The heater must not be located immediately below an electrical socket-outlet.
9. Do not run cord under carpeting and do not cover cord with throw rugs, runners or
the like. Arrange cord away from traffic area and where it will not be tripped over.
10. Do not operate the heater with a damaged cord or plug, or after the heater malfunctions,
has been dropped, or damaged in any manner.
11. If the supply cord is damaged, it must be replaced by the manufacturer or its service
agent or a similarly qualified person to avoid a hazard.
12. Avoid the use of an extension cord as this may overheat and cause a risk of fire.
13. Use the heater in a well-ventilated area. Do not insert or allow objects to enter any
ventilation or exhaust opening. To prevent a possible fire, do not block air intakes or
exhaust openings in any manner. Do not use on soft surfaces, like a bed, where openings
may become blocked. Use the heater on flat, dry surfaces only.
14. Do not place this heater near flammable materials, surfaces or substances, as there
may be a risk of fire. Keep the above flammable materials, surfaces or substances at
least 1m from the front of the product and keep them away from the sides and rear.
15. Do not use the heater in any areas where petrol, paint or other flammable liquids
are stored e.g. Garages or workshops as a hot, arcing or sparking parts inside the heater.
- 8 -
Page 10
IMPORTANT SAFEGUARDS
16. Don’t use this heater in the immediate surroundings of a bath, a shower or a swimming
pool. Never locate the heater where it may fall into bathtub or other water container.
17. This heater is hot when in use. To avoid burns and personal injury, do not let bare
skin touch hot surfaces. If provided, use handles when moving the product.
18. Be sure that no other appliances are in use on the same electrical circuit as your
product as an overload can occur.
19. This heater is filled with a precise quantity of special oil.
20. Repair requiring opening of the oil container are only to be made by the manufacturer
or his service agent who should be contacted if there is an oil leakage.
21. Regulations concerning the disposal of oil when scrapping the appliance have to be
followed.
22. The heater should not be used in a room, of which the floor area is less than 5 M2.
23. The cord shouldn’t be placed nearby the hot surface of the appliance.
24. This appliance is not intended for use by persons (including children) with reduced
physical, sensory or mental capabilities, or lack of experience and knowledge, unless
they have been given supervision or instruction concerning use of the appliance by a
person responsible for their safety.
FOR HOUSEHOLD USE ONLY
SAVE THESE INSTRUCTIONS
SPECIFICATIONS
1. Control panel
2. Carry handle
3. Temperature knob
4. Power selector
5. Radiant fins
6. Castor
7. Cord storage
• Adjustable thermostat
• Wheels for convenient moving
• High temperature protection system
• Thermostatıc control
• Intergrated handle
• Cord storage
• Monuted on castors
• 230V~, 50Hz, 1500W (SFH 3322 2000W)
ASSEMBLY INSTRUCTIONS
The heater is packaged with the feet unattached. You must attach them before operating
the heater.
- 9 -
Page 11

ASSEMBLY INSTRUCTIONS
WARNING: Do not operate without feet attached. Do operate the heater only in upright
position (feet on the bottom, controls on the top), any other position could create a
hazardous situation.
1. Place the radiator body upside-down on a scratch-free location, make sure it is stable
and will not fall.
2. Screw off the wing nuts from the U-shaped bolt provided, attach the U-shaped bolt to
the U-facing flange between first and second fins (near the front cover).
3. To attach the castor mounting plate to the radiator body, you should insert the threaded
ends of the U bolt in the holes on the castor mounting plate.
4. Screw the wing nuts back to the U bolt and fasten the wing nut properly.
Note: Do not over tighten, which may cause the damage of radiator flange.
5. Screw off spherical nut from the castor, align the shaft to the hole of the castor
mounting plate, insert in, and screw on the spherical nut.
6. Repeat 2, 3, 4 and 5 on the rear of radiator for mounting of the rear castors.
Note: the rear castors must be mounted between the end two fins.
INSTRUCTIONS FOR USE
1. Before using the heater, make sure that it is on a flat and stable surface.
Damage may occur if it is placed on an incline or decline.
2. Set all the controls to OFF position and insert the plug into a socket-outlet with well
grounded. Be sure that plug fits firmly.
3. Rotate the thermostat knob clockwise to MAX position and switch the heater on as
follow: the switch I for low heat, the switch II for medium heat and both switches on for
high heat.
4. When your room reaches the desired temperature, now slowly rotate the thermostat
knob counter clockwise until the pilot light goes out. The thermostat can now be left at
this setting. As soon as the room temperature has dropped below the set temperature,
the unit will switch it self on automatically until the set temperature has been reached
again. In this way the room temperature remains constant with the most economical use
of electricity.
- 10 -
Page 12
INSTRUCTION FOR USE
5. If you want to change the room temperature setting, rotate the thermostat knob
clockwise to raise the temperature, or counter clockwise to lower it.
6. This heater includes an overheat protection system that shuts off the heater when
parts of the heater are getting excessively hot.
7. To completely shut the heater off, turn all the controls to OFF, and remove plug from
the socket-outlet.
MAINTENANCE
1. Always remove the plug from the socket-outlet and allow the radiator to cool down
before clean the heater.
2. Wipe radiator with a soft damp (not wet) cloth.
WARNING:
Do not immerse the heater in water.
Do not use any cleaning chemicals such as detergents and abrasives.
Do not allow the interior to get wet as this could create a hazard.
3. To store away the heater, wind the cable round bobbin and store the heater in a clean
dry place.
4. In case of malfunction or doubt, do not try to repair the radiator yourself, it may result
in a fire hazard or electric shock.
CONFORMITY WITH DIRECTIVES
This product is CE marked to denote conformity with Directives 2006/95/EC (Low Voltage)
and the EMC directive (2004/108/EC), as amended.
Correct Disposal of this product
This marking indicates that this product should not be disposed with other
household wastes throughout the EU. To prevent possible harm to the
environment or human health from uncontrolled waste disposal, recycle it
responsibly to promote the sustainable reuse of material resources. To return your used
device, please use the return and collection systems or contact the retailer where the
product was purchased. They can take this product for environmental safe recycling.
- 11 -
Page 13

FRANÇAIS
SINBO RADIATEUR À BAIN D’HUILE
MODE D’EMPLOI
SFH 3321 : 1500W
SFH 3322 : 2000W
ATTENTION: LISEZ ATTENTIVEMENT CE MANUEL AVANT DE COMMENCER À UTILISER
L’APPAREIL.
CONSIGNES IMPORTANTES DE SÉCURITÉ
Vous devez absolument prendre en considération les précautions principales de sécurité
ci-dessous lors de l’utilisation de l’appareil électrique:
LISEZ LES INSTRUCTIONS EN ENTIER AVANT D’UTILISER L’APPAREIL.
ATTENTION: Pour minimiser les risques d’incendies, de chocs électriques ou de
blessures :
1. Cet appareil n’est pas prévu pour être utilisé par des personnes (y compris les enfants)
dont les capacités physiques, sensorielles ou mentales sont réduites, ou des personnes
dénuées d’expérience ou de connaissance, sauf si elles ont pu bénéficier, par l’intermédiaire
d’une personne responsable de leur sécurité, d’une surveillance ou d’instructions
préalables concernant l’utilisation de l’appareil.
2. Il convient de bien surveiller les enfants pour s’assurer qu’ils ne jouent pas avec
l’appareil.
3. Cet appareil est destiné uniquement à l’usage domestique.
4. Branchez l’appareil uniquement à une source d’alimentation AC (Courant Alternatif)
de phase unique convenable avec la valeur de voltage indiquée sur l’étiquette du produit.
5. Afin d’éviter une surchauffe, ne couvrez pas le dessus du réchauffeur.
6. Ne vous absentez jamais lorsque le réchauffeur est en marche. Positionnez absolument
l’appareil sur « ARRÊT » lorsque vous n’en faites pas usage et débranchez la fiche de
la prise de courant.
7. Il convient d’être très prudent lorsqu’un réchauffeur quelconque est utilisé près des
enfants, des personnes handicapées ou des personnes âgées et lorsque le réchauffeur
est laissé en état de marche dans les cas dits.
8. Le réchauffeur ne doit pas être installé juste au dessous de la prise électrique.
9. Ne faites pas passer le cordon par-dessous le tapis ou ne le couvrez pas avec des
objets similaires. Faites passer le cordon par un endroit où les personnes ne circulent
pas et où il ne crée pas de risque de trébuchement.
10. Ne faites jamais fonctionner un réchauffeur dont le cordon ou la fiche électrique est
détériorée, dont le mécanisme de chauffage est en panne, ou s’il est tombé ou endommagé
d’une autre façon.
11. En cas de dysfonctionnement du cordon d’alimentation, afin d’éviter tout dangers;
le cordon doit être remplacé par le fabricant, l’autorisé de service ou une personne
similaire autorisée.
12. N’utilisez pas de cordon d’extension étant donné qu’il peut causer un risque de
surchauffe et d’incendie.
- 12 -
Page 14

CONSIGNES DE SÉCURITÉ IMPORTANTES
13. Utilisez le réchauffeur dans un espace bien aéré. Ne permettez aucun objet entrer
dedans à travers les ventouses ou les orifices de sortie d’air. Pour éviter de causer un
risque d’incendie, ne couvrez pas les entrées ou les sorties d’air. N’utilisez pas l’appareil
sur des surfaces molles telles que les lits où les orifices peuvent être bouchés. Utilisez
le réchauffeur uniquement sur des surfaces plates et sèches.
14. Pour éviter les risques d’incendies, ne placez pas le réchauffeur à proximité des
surfaces, des produits ou des matériaux combustibles. Les dits matériaux, surfaces ou
produits combustibles doivent être à une distance de au moins de 1m concernant le
devant du produit, et de au moins de 15cm concernant les côtés et le derrière du produit.
Étant donné que le réchauffeur contient des pièces chaudes, créant de l’arc ou produisant
des étincelles, n’utilisez pas le réchauffeur où se trouvent de la benzine, de la peinture
ou d’autres liquides combustibles par ex : les lieux de réparation ou les ateliers.
16. N’utilisez pas ce réchauffeur tout près des sources d’eau telles que les salles de
bain, les douches ou les piscines. Ne placez pas le réchauffeur à un endroit d’où il peut
tomber dans la baignoire ou dans les objets remplis d’eau.
17. Ce réchauffeur chauffe lors de l’usage. Pour éviter de subir des brûlures ou des
blessures, ne contactez pas votre peau avec les surfaces chaudes. Servez-vous de la
poignée pour déplacer le produit.
18. Pour empêcher qu’une surcharge s’exerce au circuit, assurez-vous qu’aucun autre
appareil électrique n’est branché au même circuit.
19. Le réchauffeur est rempli avec une huile spéciale dont la quantité est déterminée
avec délicatesse.
20. Les opérations de réparations nécessitant l’ouverture du réservoir d’huile ne doivent
être réalisées qu’avec l’intermédiaire du fabricant ou son centre de service agréé et ces
derniers doivent être contactés en cas de tout suintement d’huile.
21. Lors de la mise au rebut de l’appareil, vous devez respecter les réglementations
relatives à la mise au rebut de l’huile.
22. Le réchauffeur ne doit pas être utilisé dans des pièces dont l’aire est plus petite que
5m2.
23. Le cordon d’alimentation ne doit pas être placé près des surfaces chaudes de
l’appareil.
24. Cet appareil n’est pas prévu pour être utilisé par des personnes (y compris les enfants)
dont les capacités physiques, sensorielles ou mentales sont réduites, ou des personnes
dénuées d’expérience ou de connaissance, sauf si elles ont pu bénéficier, par l’intermédiaire
d’une personne responsable de leur sécurité, d’une surveillance ou d’instructions
préalables concernant l’utilisation de l’appareil.
DESTINÉ UNIQUEMENT À L’USAGE DOMESTIQUE
CONSEREZ CE MANUEL
- 13 -
Page 15
SPÉCIFICATIONS TECHNIQUES
1. Panneau de Contrôle
2. Poignée de transport
3. Bouton de réglage de température
4. Bouton d’alimentation
5. Ailettes chauffantes
6. Roulettes
7. Enroulement de cordon
• Thermsotat réglable
• Avec rouleaux pour déplacer
• Protection surchauffe
• Thermostat réglable
• Poignée intégrée
• Réservoir de câble
• Roulettes pivontantes
• 230V~, 50Hz, 1500W (SFH 3322 2000W)
INSTRUCTIONS DE MONTAGE
Le réchauffeur est emballé les pieds démontés. Montez les pieds avant de mettre le
réchauffeur en marche.
ATTENTION: Ne tentez pas d’utiliser l’appareil sans avoir monté les pieds. Faites
fonctionner le réchauffeur uniquement en position verticale (les pieds en bas, les
commandes en haut), les tentatives de mise en marche de l’appareil dans d’autres
positions peuvent causer des situations dangereuses.
1. Retournez le radiateur à l’envers dans un endroit ou le radiateur ne risque pas d’être
rayé, assurez-vous qu’il est en équilibre et qu’il ne va pas tomber.
2. Démontez les écrous papillons qui se trouvent sur le boulon en forme de U qui est
fourni avec le produit, faites passer le boulon en forme de U par la bride (qui est près
du couvercle avant) qui se trouve entre la première et la deuxième ailette.
3. Pour monter la plaque de montage de roulettes au corps de radiateur, faites passer
les bouts cannelés du boulon U par les trous de la plaque de montage de roulettes.
4. Montez à nouveau les écrous papillons au boulon U et visser bien les écrous.
Remarque: Ne serrez pas trop les écrous, cela endommagera la bride du radiateur.
5. Retirez l’écrou circulaire de la roue, introduisez l’axe après l’avoir aligné avec le trou
de la plaque de montage de radiateur puis montez l’écrou circulaire.
- 14 -
Page 16
INSTRUCTIONS DE MONTAGE
6. Suivez les pas numéros 2, 3, 4 et 5 pour monter les roulettes arrières.
Remarque: Les roulettes arrières doivent être montées entre les deux ailettes qui se
trouve à l’autre bout.
MODE D'EMPLOI
1. Assurez-vous d’avoir installé le radiateur sur une surface plate et équilibrée avant de
commencer à l’utiliser. Le radiateur peut faire panne si installé sur une surface penchante.
2. Positionnez toutes les commandes sur ARRÊT et branchez la fiche sur la prise de
terre installée correctement. Assurez-vous que la fiche est bien installée dans la prise.
3. Positionnez le bouton de thermostat sur MAX en le faisant tourner dans le sens horaire
et faites fonctionner le réchauffeur comme ci-dessous : allumez le bouton numéro I pour
une température basse, le bouton numéro II pour une température moyenne, et tous les
deux boutons pour une température élevée.
4. Une fois que la température de votre pièce a atteint la chaleur que vous souhaitez,
faites tourner le bouton de thermostat dans le sens antihoraire jusqu'à ce que la lampe
témoin s’éteigne. Le thermostat peut être laissé à ce niveau. Dans le cas où la température
de la pièce descend au-dessous de la température réglée, l’appareil commencera
automatiquement à fonctionner jusqu'à ce que la température réglée soit obtenue de
nouveau. Ainsi, la température de la pièce restera stable et l’électricité sera consommée
de façon économique.
5. Si vous désirez changer la température de la pièce, faites augmenter la température
en faisant tourner le bouton de thermostat dans le sens horaire ou faites diminuer la
température en faisant tourner dans le sens antihoraire.
6. Ce réchauffeur est doté d’un système de protection contre la surchauffe qui arrête
l’appareil dans le cas où les pièces subissent une surchauffe.
7. Positionnez toute les commandes sur ARRÊT pour arrêter complètement le réchauffeur
et débranchez la fiche électrique de la prise de courant.
ENTRETIEN
1. Débranchez absolument la fiche et attendez que le radiateur refroidisse avant de
commencer à nettoyer le réchauffeur.
2. Nettoyez le radiateur en le frottant avec un chiffon doux et légèrement humidifié (non
pas mouillé).
AVERTISSEMENT:
N’immergez jamais le réchauffeur dans l’eau.
- 15 -
Page 17

AVERTISSEMENTS
N’utilisez pas de détergent ou de produit nettoyant abrasif.
Ne permettez pas que la partie intérieure de l’appareil se mouille puisque cela peut
créer des résultats dangereux.
3. Enroulez le cordon autour de la bobine de cordon avant de ranger le radiateur et
préservez l’appareil dans un endroit sec.
4. En cas de panne ou de doute de panne, ne tentez pas de réparer le radiateur vousmême sinon des dangers d’incendies ou de chocs électriques peuvent survenir.
CONFORMITÉ AUX DIRECTIFS
Ce produit est signalisé avec le signe de CE, étant conforme au Directif de Voltage Bas
avec numéro 2006/95/EC de version amendée et conforme au Directif de EMC (Conformité
Électromagnétique) avec numéro 2004/108/EC.
Mettez au rebut ce produit de façon correcte
Ce signe signifie partout dans l’UE que le produit ne doit pas être jeté ensemble
avec les autres ordures ménagères. Pour éviter que l’environnement et la santé
publique s’endommagent à cause des déchets jetés de façon incontrôlée, assurez
le recyclage de l’appareil pour permettre la réutilisation continue des sources de
matériels. Veuillez remettre vos appareils utilisés aux centres de rétrocession et de
collectes ou mettez-vous en contact avec le magasin d’où le produit a été acheté. Ces
endroits peuvent réceptionner le produit et assurer leur recyclage de façon respectueuse
envers l’environnement.
- 16 -
Page 18

NEDERLANDS
SINBO OLIERADIATOR
GEBRUIKSHANDLEIDING
SFH 3321 : 1500W
SFH 3322 : 2000W
OPGELET: NEEM DEZE HANDLEIDING AANDACHTIG DOOR VOORALEER U HET APPARAAT
IN GEBRUIK NEEMT
BELANGRIJKE VEILIGHEIDSREGELS
Bij het gebruik van dit elektrisch apparaat moeten altijd volgende essentiële
veiligheidsvoorzorgen worden genomen:
LEES AANDACHTIG DE VOLLEDIGE HANDLEIDING VOORDAT U HET APPARAAT IN
GEBRUIK NEEMT.
OPGELET: Om brand, elektrische schok en persoonlijk letsel te voorkomen:
1. Dit apparaat mag niet gebruikt worden door kinderen en personen met lichamelijke,
zintuiglijke of geestelijke handicap of met gebrek aan kennis en ervaring tenzij onder
toezicht en leiding van een persoon die verantwoordelijk is voor het veilig gebruik.
2. Er moet voldoende toezicht gehouden worden om te beletten dat kinderen met het
apparaat gaan spelen.
3. Dit apparaat is uitsluitend bedoeld voor huishoudelijk gebruik.
4. Sluit het apparaat alleen aan op een enkele fase AC stroombron van het juiste voltage.
5. Bedek de radiator niet om oververhitting te vermijden.
6. Laat de radiator niet onbeheerd achter terwijl hij functioneert. Schakel het apparaat
UIT als het niet wordt gebruikt en neem de stekker uit het stopcontact.
7. Let vooral op als een verwarmingstoestel wordt gebruikt en achtergelaten in
aanwezigheid van kinderen, gehandicapten of bejaarden.
8. Plaats het verwarmingstoestel niet vlak onder het stopcontact.
9. Leid het snoer niet onder een tapijt of vloerkleed, zorg dat de doorgang niet wordt
belemmerd en dat niemand het risico loopt over het snoer te struikelen.
10. Dit verwarmingstoestel mag niet gebruikt worden als het snoer, de stekker of het
verwarmingsmechanisme beschadigd of defect, als het toestel gevallen is of op een
andere manier schade heeft opgelopen.
11. Ingeval het snoer beschadigd is moet het, om gevaar te voorkomen, worden vervangen
door de fabrikant, een bevoegde service of geschoold vakman.
12. Gebruik geen verlengsnoer want dit zou aanleiding kunnen geven tot oververhitting
en brandgevaar.
13. Gebruik het verwarmingstoestel in een goed geventileerde ruimte. Zorg dat er langs
de ventilatieopeningen geen vreemde voorwerpen in het apparaat komen. Bedek de
openingen niet om oververhitting en brandgevaar te vermijden. Gebruik het apparaat
niet op een bed of op een ander zacht oppervlak waardoor de ventilatieopeningen zouden
kunnen bedekt worden. Installeer het verwarmingstoestel altijd op een vlakke, stabiele
en droge bodem.
- 17 -
Page 19

BELANGRIJKE VEILIGHEIDSREGELS
14. Om brandgevaar te voorkomen, installeer het verwarmingstoestel niet op of nabij
brandbare oppervlakken of materialen. Laat een afstand van minstens 1m aan de voorzijde
en 15 cm aan de achterzijde en aan de zijkanten tussen het toestel en brandbare
oppervlakken of materialen.
15. Wegens de warme, sprank- en vonkverwekkende inhoud, mag dit toestel niet gebruikt
worden in ruimtes waar benzine, verf en dergelijke ontvlambare stoffen worden opgeslagen
of gebruikt, bv. reparatiewerkplaatsen, ateliers.
16. Gebruik dit verwarmingstoestel niet vlak naast een bad, douche, zwembad of andere
waterbronnen. Plaats het niet zodanig dat het in een bad of in een andere met water
gevulde kuip kan vallen.
17. Dit toestel wordt warm tijdens het gebruik. Raak de hete delen niet aan met de blote
huid, om geen brandwonden op te lopen. Maak gebruik van het handvat om het apparaat
te verplaatsen.
18. Vergewis u ervan dat er geen andere elektrische apparaten zijn aangesloten op
hetzelfde circuit, om overbelasting te voorkomen.
19. Het verwarmingstoestel is gevuld met een nauwkeurig vastgestelde hoeveelheid
speciale olie.
20. Reparatiewerkzaamheden die het openen van het oliereservoir vereisen mogen
uitsluitend door de fabrikant of een erkende service worden uitgevoerd en ingeval van
een olielek moeten zij beslist gecontacteerd worden.
21. Wie zich van dit apparaat wil ontdoen dient de voorschriften inzake het afvoeren van
olie in acht te nemen.
22. Dit verwarmingstoestel is niet geschikt voor gebruik in ruimtes, kleiner dan 5m2.
23. Zorg dat het snoer niet in aanraking komt met de hete delen van het apparaat.
24. Dit apparaat mag niet gebruikt worden door kinderen en personen met lichamelijke,
zintuiglijke of geestelijke handicap of met gebrek aan kennis en ervaring tenzij onder
toezicht en leiding van een persoon die verantwoordelijk is voor het veilig gebruik.
ALLEEN VOOR HUISHOUDELIJK GEBRUIK
BEWAAR DEZE HANDLEIDING
- 18 -
Page 20

TECHNISCHE SPECIFICATIES
1. Bedieningspaneel
2. Handvat
3. Thermostaatregelaar
4. Schakelknop
5. Verwarmingspanelen
6. Rollen
7. Snoeropwikkelaar
• Regelbare thermostaat
• Wielen voor gemakkelijk verplaatsen
• Hoge temperatuur bescherming systeem
• Regelbare thermostaat
• Handgreep geintegreerd
• Kabel reservoir
• Op zwenkwielen
• 230V~, 50Hz, 1500W (SFH 3322 2000W)
MONTAGE INSTRUCTIES
Het verwarmingstoestel is verpakt met gedemonteerde voetsteun. Monteer de voetsteun
vooraleer het apparaat in gebruik te nemen.
OPGELET: Gebruik het apparaat niet voordat u de voetsteun gemonteerd hebt en gebruik
het uitsluitend in rechtopstaande positie (voetsteun onderaan, bedieningsknoppen
bovenaan). Het apparaat in een andere positie inschakelen kan gevaarlijke toestanden
veroorzaken.
1. Plaats de radiator ondersteboven gekeerd, evenwichtig op een stabiele maar zachte
bodem die geen krassen op het apparaat kan veroorzaken.
2. Demonteer de vleugelmoeren van de meegeleverde beugelschroef en schuif de beugel
door de flens tussen de eerste en tweede radiatorrib (aan de voorkant van de radiator)
zodat de schroefdraad aan beide kanten uitsteekt.
3. Leg de rollenrail er overheen zodat de schroefdraad door de gaten steekt
4. Bevestig opnieuw de vleugelmoeren en draai ze goed aan.
Opmerking: Draai ze echter niet al te vast aan, om de flens van de radiator niet te
beschadigen.
5. Haal vervolgens de moeren van de rollen, bevestig de rollen in de hiervoor voorziene
railgaten en draai de moeren stevig vast.
- 19 -
Page 21

REINIGEN EN OPBERGEN
6. Om de rollen aan de achterzijde van de radiator te monteren herhaalt u de handelingen
onder punt 2, 3, 4 en 5.
GEBRUIKSAANWIJZING
1. Installeer de radiator op een horizontale, vlakke en stabiele bodem; gebruik op een
hellend oppervlak kan defecten tot gevolg hebben.
2. Zet alle bedieningsknoppen op “0” (Uit) en steek de stekker in een degelijk geaard
stopcontact. Controleer of de stekker goed in het stopcontact zit.
3. Draai de thermostaatknop in de richting van het uurwerk tot in MAX. stand en gebruik
het verwarmingstoestel als volgt: zet voor lage temperatuur knop nr. I aan, voor
middelmatige temperatuur knop nr. II en voor hogere temperatuur beide knoppen
tegelijkertijd.
4. Als de kamertemperatuur de gewenste graad bereikt heeft draait u de thermostaatknop
in tegengestelde richting van het uurwerk tot het indicatielampje uitgaat, zodat de
thermostaatknop op deze temperatuur blijft ingesteld. Als de temperatuur onder de
ingestelde warmtegraad daalt, zal het apparaat automatisch aanslaan tot de ingestelde
temperatuur opnieuw wordt bereikt. Op deze wijze blijft de kamertemperatuur constant
terwijl op economische wijze gebruik wordt gemaakt van energie.
5. Om de kamertemperatuur te verhogen of te verlagen verdraait u de thermostaatknop
respectievelijk in de richting of in tegengestelde richting van het uurwerk.
6. Dit verwarmingstoestel is uitgerust met een systeem ter bescherming tegen
oververhitting, waardoor het apparaat automatisch wordt uitgeschakeld als bepaalde
delen te heet worden.
7. Zet alle knoppen op “0” /UIT en haal de stekker uit het stopcontact als u het apparaat
niet gebruikt.
REINIGING EN ONDERHOUD
1. Neem de stekker uit het stopcontact en wacht tot de radiator afgekoeld is voordat u
hem gaat reinigen.
2. Wrijf de radiator schoon met een lichtjes bevochtigde (niet natte) zachte doek..
WAARSCHUWING:
Dompel het verwarmingstoestel nooit in water.
Gebruik geen detergent, bijtende of schurende reinigingsproducten.
Om gevaar te voorkomen, draag er zorg voor dat er geen water in de behuizing komt.
- 20 -
Page 22

WAARSCHUWING
3. Wikkel het snoer op het spoel en berg de radiator op in een droge omgeving.
4. Tracht nooit de radiator zelf te repareren inval van defect of een vermoed defect, want
dit kan leiden tot gevaarlijke situaties, brand en elektrische schok.
OVEREENKOMSTIG EUROPESE RICHTLIJNEN
Dit product voldoet aan volgende Europese richtlijnen: 2006/95/EC Laagspanning gewijzigde vorm en 2004/108/EC Elektromagnetische velden.
Ontdoe u van dit product op de voorgeschreven wijze.
Dit symbool wijst erop dat het product binnen de grenzen van de EU, niet met
het gewone huisvuil mag worden verwijderd. Om beschadiging van het milieu
door ongecontroleerde afvoer te voorkomen, dient u ervoor te zorgen dat dit
product of de materialen, opnieuw kunnen worden gebruikt of herverwerkt. Gelieve
elektrische en elektronische apparaten die u niet meer gebruikt, in te leveren bij uw
leverancier of op de plaatsen voor inzameling en recycling die door de lokale overheid
zijn aangewezen.
- 21 -
Page 23

ESPANOL
SINBO RADIADOR CON ACEITE
GUÍA DEL USO
SFH 3321 : 1500W
SFH 3322 : 2000W
ATENCIÓN: ANTES DE EMPEZAR A UTILIZAR LA MÁQUINA LEE ESTE GUÍA
CUIDADAMENTE.
NORMAS IMPORTANTES DE LA SEGURIDAD
Cuando está utilizando esta máquina eléctrica tiene que tener en cuenta las siguientes
precauciones básicas de la seguridad:
ANTES DE UTILIZAR LA MÁQUINA LEE TODA DE LA INSTRUCCIÓN.
ATENCIÓN: Para reducir el riesgo de incendio, choque de electricidad o herirse al
mínimo:
1. Esta máquina no se debe utilizar sin vigilancia de una persona que puede tener la
responsabilidad por las personas minusválidas sentimentales, físicos o mentales (incluso
los niños), personas que no tienen información sobre el uso de la máquina.
2. Tiene que hacer la vigilancia suficiente para evitar que los niños juegan con la máquina.
3. Esta máquina es solo para el uso domestico.
4. Conecta la máquina a una fuente de energía de AC de mono fases de un valor de voltaje
apropiado que se indica en la etiqueta de la máquina.
5. Para no causar a calentamiento excesivo no cierre la superficie de radiador.
6. Cuando el radiador está en uso no lo deje solo. Cuando no está utilizando la máquina,
hágalo APAGADO absolutamente y desenchúfela.
7. Cuando cualquier calentador está utilizando cerca de los niños, minusválidos o personas
viejos y cuando el calentador se deja funcionando en este caso, tiene que tener mucho
cuidado.
8. No se debe situar el radiador debajo del enchufe.
9. No haga pasar el cable a través de la alfombra o no cierre su superficie por los
materiales como alfombra y similares. Haga pasar el cable por una zona que no tiene
tráfico de personas.
10. No hace funcionar el radiado, si su cable o enchufe o sistema de calentamiento está
averiado, si se cae o avería.
11. Si el cable de energía se avería para evitar los peligros, el cable se debe cambiar por
el fabricante, competente del servicio u otra persona cualificada similar.
12. No utilice el cable de extensión porque se puede causar el calentamiento excesivo
e incendio.
13. Utilice el radiador en un lugar ventilado bien. No permite que ningún material entra
en los huecos de ventilación o huecos de la salida del aire. Para no causar al riesgo de
incendio no cierre las entradas o salidas del aire. No utilice la máquina en las superficies
suaves como cama que se puede cerrar los huecos de la máquina. Utilice la máquina
solo en las superficies rectas y secas.
- 22 -
Page 24

NORMAS IMPORTANTES DE LA SEGURIDAD
14. Para evitar el riesgo de incendio no haga situar el radiador cerca de los materiales,
superficies inflamables. Los materiales o superficies inflamables mencionados se debe
estar en una distancia de 1m desde sus bordes y 15cm de su espalda. No utilice la
máquina en los lugares en que hay gasolina, pintura o los líquidos inflamables como
talleres porque hay las piezas que se hacen calentamiento y arque o chispas.
15. No utilice este radiador cerca de baño, ducha o piscina. No haga situar el radiador
en la forma de se puede caer al bañadero u materiales llenados por agua.
16. Este radiador se calienta durante el uso. Para evitar el riesgo de quemarse y herirse
no toque la máquina. Para hacer mover utilice el mango.
17. Para evitar el cargo excesivo tenga en cuenta que no hay otras máquinas conectadas
al mismo circuito.
18. El radiador se ha llenado por un aceite especial que se ha determinado sensiblemente.
19. Los procesos de reparación que se necesitan abrir el encaje de aceite se deben
realizar por el fabricante o su competente del servicio y se ocurre un escape de aceite
conecta a ellos.
20. Durante tirando la máquina tiene que tener en cuenta las disposiciones sobre tirar
el aceite.
21. Esta máquina no se debe utilizar en los cuartos menos de 5m2.
22. No se debe situar el cable de energía cerca de los niños
23. Esta máquina no se debe utilizar sin vigilancia de una persona que puede tener la
responsabilidad por las personas minusválidas sentimentales, físicos o mentales (incluso
los niños), personas que no tienen información sobre el uso de la máquina.
24. Tiene que hacer la vigilancia suficiente para evitar que los niños juegan con la máquina.
ES SOLO PARA EL USO DOMESTICO
GUARDE ESTA INSTRUCCIÓN
Características Técnicas
1. Panel de control
2. Mango para llevar
3. Botón de la configuración de calor
4. Botón de energía
5. Panales calentadores
6. Rueda
7. Enrolle de cable
• Termostato configurable
• Ruedas para llevar fácilmente
• Sistema de protección de calor alto
• Control de termostato
•Mango integrado
• Enrolle de cable
• Se monte encima de las ruedas
• 230V~, 50Hz, 1500W
- 23 -
Page 25

INSTRUCCIÓN DE MONTAJE
Las patas del radiador se han hecho paquete en la forma de desmontaje. Antes de hacer
funcionar el radiador, monte sus patas.
ATENCIÓN: No intente utilizar la máquina cuando sus patas no están montadas. Haga
funcionar el radiador solo cuando el radiador está en la posición vertical (patas abajo y
mandos arriba), no intente hacer funcionar en distintas posiciones, se puede causar al
peligro.
1. Haga girar el radiador como su cabeza hacia abajo, tiene que estar seguro que está
equilibrado y no se cae.
2. Desmonte la tuerca de mariposa que está encima del tornillo de la forma U que se
viene con el producto, haga pasar el tornillo de la forma U por la brida (cerca de la tapa
delantero) entre primer panal y segundo panal.
3. Para montar las ruedas al cuerpo del radiador, haga pasar los extremos estriados de
los tornillos de U por los huecos de la placa de montaje.
4. Monte las tuercas de mariposas al tornillo de U de nuevo y estruje las tuercas bien.
Nota: No estruje las tuercas excesivamente, si no, la brida del radiador se daña.
5. Desmonte la tuerca circular desde la rueda, después de nivelar la brida al hueco de
la placa de montaje de rueda, ponga al dentro y monte la tuerca circular.
6. Para montar las ruedas traseras repite los pasos de 2, 3, 4 y 5.
Nota: Las ruedas traseras se debe montar entre los panales de otro extremo.
INSTRUCCIÓN DEL USO
1. Antes de empezar a utilizar el radiador tiene que estar seguro que se sitúa encima de
una superficie recta y equilibrada. Si el radiador se sitúa encima de una superficie
inclinada, se puede averiar.
2. Haga todos los mandos a la posición de APAGADO y conecte el enchufe a una toma
con alambre de tierra. Tiene que estar seguro que el enchufe se conecta a la toma bien.
3. Lleve el botón del termostato a la posición de MAX por girar hacia la dirección de reloj
y haga funcionar el radiador como la siguiente forma: Botón I para la temperatura baja,
Botón II para la temperatura media y los dos de botones para la temperatura alta.
4. Después la temperatura de habitación se llega al nivel querida, gire el botón del
- 24 -
Page 26

INSTRUCCIÓN DEL USO
termostato hacia la contra dirección hasta que la luz pilota se apaga. El termostato se
puede dejar en esta configuración. Si la temperatura se baja debajo de la temperatura
configurada, la máquina se empieza a funcionar automáticamente hasta llegar la
temperatura otra vez. Como este, la temperatura de la habitación se queda fijo y la
electricidad se utiliza económicamente.
5. Para cambiar la configuración de la temperatura de habitación, aumente la temperatura
por girar el botón del termostato hacia la dirección de reloj o reduce la temperatura por
girar hacia la contra dirección de reloj.
6. Este radiador tiene un sistema de protección porque las piezas se someten el
calentamiento excesivo.
7. Para apagar el radiador completamente lleve todos los mandos a la posición de
APAGADO y desenchúfela.
MANTENIMIENTO
1. Antes de empezar a limpiar el radiador desenchúfela y espere que el radiador se
enfríe.
2. Limpie el radiador por un paño húmedo (no mojado) y suave.
AVISO:
No mete el radiador en el agua nunca.
No utilice los materiales como detergente y materiales abrasivos de limpieza.
No permite que la parte interior de la máquina se moja, porque se puede causar los
resultados peligrosos.
3. Antes de guardar el radiador enrolle el cable a la bobina de cable y guarde la máquina
en un lugar seco.
4. En el caso de averías o duda de avería, no intente reparar el radiador usted mismo,
si no, se puede ocurrir los peligros del choque de electricidad o incendio.
Conformidad con los Directivos
Este producto con su forma fabricada se ha marcado por el signo de CE con la conformidad
con el Directivo de Voltaje Bajo 2006/95/EC y EMC (Compatibilidad electromagnético)
2004/108/EC.
Tirar este producto en la forma correcta.
Este signo se significa que no debe tirar este producto con los residuos domésticos
en la zona de UE. Con el objeto de evitar que los daños de la sanidad humana y
medioambiente por los residuos que se tiran sin control, para suministrar uso
continúo de los recursos de materiales suministra el reciclaje de la máquina. Haga llegar
sus máquinas viejas a los centros de devolución y recogida o conecta a la tienda en que
ha comprado. Estos lugares pueden aceptar y suministrar el reciclaje del producto.
- 25 -
Page 27

- 26 -
Page 28

- 27 -
Page 29

- 28 -
Page 30

- 29 -
Page 31

- 30 -
Page 32

- 31 -
Page 33

- 32 -
Page 34

- 33 -
Page 35

- 34 -
Page 36

HRVATSKI
SINBO ULJNI RADIJATOR
UPUTSTVO ZA UPORABU
SFH 3321 : 1500W
SFH 3322 : 2000W
POZOR: PRIJE POˇCETKA UPORABE URED–AJA NAJPRIJE TEMELJNO PROˇCITAJTE OVE
UPUTE ZA UPORABU
BITNA SIGURNOSNA UPOZORENJA
Kod uporabe ovog elektriˇcnog ured¯aja obavezno se pridrˇzavajte sljede´cih temeljnih
sigurnosnih naputaka:
PRIJE POˇCETKA UPORABE URED–AJA NAJPRIJE PROˇCITAJTE SVE UPUTE ZA UPORABU.
POZOR: Za smanjenje rizika od poˇzara, strujnog udara ili ozljede na najniˇzu razinu:
1. Ovaj ured¯aj ne treba da koriste osobe s fiziˇckim, psihiˇckim i mentalnim invaliditetom
(ukljuˇcuju´ci i djecu) bez nadzora osobe koja moˇze snositi odgovornost za sigurnu uporabu
ured¯aja. Isto tako ured¯aj ne treba da koriste neiskusne i osobe koje nisu dovoljno upu´cene
u naˇcin njegove uporabe.
2. Zabranite djeci da se igraju s ured¯ajem. Budite jako oprezni kod uporabe ured¯aja u
blizini djece.
3. Ured¯aj je namjenjen samo za ku´cansku uporabu.
4. Ured¯aj prikljuˇcite samo na odgovaraju´ci jednofazni izvor napajanja AC koji odgovara
vrijednostima napona naznaˇcenim na etiketi proizvoda.
5. Da biste izbjegli pregrijavanje ured¯aja nipoˇsto ne prekrivajte povrˇsinu radijatora.
6. Nipoˇsto se ne odvajajte od ukljuˇcenog grijaˇca. Kada ured¯aj ne koristite obavezno ga
podesite u poziciju ISKLJUˇCENO i izvucite utikaˇc iz utiˇcnice.
7. Uporaba bilo kog grijaˇca u blizini djece, osoba s invaliditetom ili starijih osoba zahtjeva
veliki oprez. Isto tako morate biti jako paˇzljivi kada ostavite ukljuˇcen ured¯aj u blizini
spomenutih osoba
8. Radijator ne treba stavljati odmah ispod elektriˇcne utiˇcnice.
9. Kabel nipoˇsto ne zavlaˇcite ispod tepiha i ne prekrivajte ga ´cilimom, stazom ili sliˇcnim
stvarima. Kabel postavite na mjesto na kojem ne´ce smetati ljudima i gdje ne postoji
opasnost od zapinjanja.
10. Nipoˇsto ne koristite radijator s oˇste´cenim kabelom ili utikaˇcem, ured¯aj koji je pao
na pod ili je oˇste´cen na neki drugi naˇcin.
11. Za izbjegavanje svake vrste opasnosti oˇste´ceni kabel za napajanje treba zamjeniti u
ovlaˇstenom servisnom centru ili od strane struˇcne osobe.
12. Ne koristite produˇzni kabel jer on moˇze uzrokovati pregrijavanje i izbijanje poˇzara.
13. Radijator koristite u dobro prozraˇcenoj prostoriji. Ne dozvolite da kroz otvore za
ventilaciju i zrak ud¯u bilo kakva strana tijela. Za izbjegavanje rizika od strujnog udara ne
zatvarajte otvore za ulaz i izlaz zraka. Ured¯aj ne treba koristiti na leˇzaju i sliˇcnoj mekanoj
povrˇsini koja moˇze uzrokovati zatvaranje otvora. Ured¯aj koristite samo na ravnoj i suhoj
povrˇsini.
14. Za izbjegavanje rizika od poˇzara ured¯aj ne postavljajte u blizini zapaljivih tvari, povrˇsina
- 35 -
Page 37

BITNA SIGURNOSNA UPOZORENJA
ili stvari. Spomenute zapaljive tvari, povrˇsine ili stvari moraju biti udaljene najmanje 1
metar ispred i najmanje po 15 cm sa strana i iza ured¯aja. Unutar grijalice nalaze se topli
dijelovi koji stvaraju iskru pa stoga ovaj ured¯aj ne treba koristiti na mjestima kao ˇsto su
radionice ili garaˇze u kojima se ˇcuvaju benzin, farba ili druge zapaljive teku´cine.
16. Ovu grijalicu ne treba koristiti u kupaonici, blizu tuˇsa ili bazena kao i drugih sliˇcnih
izvora vode. Grijalicu ne postavljajte na mjesto sa kojeg moˇze upasti u kadu ili druga
mjesta ispunjena vodom.
17. Ova grijalica se tijekom uporabe zagrijava. Da biste se zaˇstitili od opeklina ili ozljeda
ne dodirujte vru´ce povrˇsine. Za pomjeranje ured¯aja koristite ruˇcku.
18. Da bi se izbjeglo preoptere´cenje strujne mreˇze pazite da ured¯aj ukljuˇcite u utiˇcnicu
u kojoj nije ukljuˇcen neki drugi ured¯aj.
19. Grijalica je napunjena odred¯enom koliˇcinom specijalnog ulja.
20. U sluˇcaju potrebe otvaranja spremnika za ulje u cilju opravke to treba da uradi samo
proizvod¯aˇc ili ovlaˇsteni servisni centar Ukoliko primjetite bilo kakvo curenje ulja
kontaktirajte proizvod¯aˇca ili ovlaˇsteni servisni centar.
21. U sluˇcaju zbrinjavanaj ured¯aja pridrˇzavajte se ured¯enja koja se odnose na pravilno
zbrinjavanje ulja.
22. Grijalicu ne treba koristiti u prostorijama manjim od 5m2.
23. Kabel za napajanje zaˇstitite od vru´cih povrˇsina.
24. Ovaj ured¯aj, ne treba da koriste osobe s fiziˇckim, psihiˇckim i mentalnim invaliditetom
(ukljuˇcuju´ci i djecu) bez nadzora osobe koja moˇze snositi odgovornost za sigurnu uporabu
ured¯aja. Isto tako ured¯aj ne treba da koriste nevjeˇste i osobe koje nisu dovoljno upu´cene
u naˇcin njegove uporabe.
SAMO ZA KU´CANSKU UPORABU
SAˇCUVAJTE OVO UPUTSTVO
TEHNIˇCKE KARAKTERISTIKE
1. Kontrolna ploˇca
2. Ruˇcka za noˇsenje
3. Termostat
4. Power/Snaga
5. Rebra
6. Kotaˇci
7. Spremnik za kabel
• Podesiv termostat
• Kotraˇci za jednostava transport
• Sustav zaˇstite od pregrijavanja
• Termostat
• Ugrad¯ena ruˇcka
• Namatanje kabela
• Montiranje na kotaˇcima
• 230V~, 50Hz, 1500W (SFH 3322 2000W)
- 36 -
Page 38

INSTALIRANJE
Grijalica je upakovana sa demontiranim kotaˇcima. Prije poˇcetka uporabe instalirajte
kotaˇce.
POZOR: Ne pokuˇsavajte koristiti ured¯aj bez kotaˇca. Ured¯aj koristite samo u uspravnoj
poziciji(kotaˇci dole, komande gore). Uporaba ured¯aja u nekoj drugoj poziciji moˇze biti
jako opasna.
1. Radijator okrenite ka dole paze´ci da ne dod¯e do njegovog oˇste´cenja.Uvjerite se da je
stabilno postavljen i da ne´ce pasti.
2. Uklonite leptiraste matice koje se nalaze na vijku u obliku slova U koji je priloˇzen s
proizvodom. Vijak u obliku slova U provucite izmed¯u prvog i drugog rebra radijatora pri
rubu( u blizini prednjeg poklopca).
3. Za montiranje kotaˇca na ploˇce radijatora, krajeve U vijka s navojima provucite kroz
rupe na ploˇci za montiranje kotaˇca.
4. Leptiraste matice postavite na vijak u obliku slova U i dobro priˇcvrstite.
Napomena: Matice ne zateˇzite previˇse u suprotnom ´ce do´ci do oˇste´cenja prirubnice
radijatora.
5. Uklonite kruˇznu maticu s kotaˇca, poravnjajte rupe montaˇzne ploˇce s osovinom kotaˇca
i postavite kruˇznu maticu.
6. Za montiranje straˇznjih kotaˇca ponovite korake 2, 3, 4 i 5.
Napomena: Straˇznje kotaˇce treba montirati izmed¯u dva rebra radijatora na drugom kraju.
RUKOVANJE
1. Prije poˇcetka uporabe radijatora uvjerite se da ste ured¯aj postavili na ravnu i stabilnu
povrˇsinu.
Ako je radijator postavite na nagnutoj povrˇsini moˇze do´ci do njegovog kvara.
2. ISKLJUˇCITE sve komande i utikaˇc umetnite u utiˇcnicu s uzemljenjem. Uvjerite se da
je utikaˇc ispravno umetnut u utiˇcnicu.
3. Okrenite termostat u smjeru kazaljke na satu i podesite u poziciju MAX. Ukljuˇcite
radijator na sljede´ci naˇcin: za nisku temperaturu pritisnite tipku I, za srednju temperaturu
pritisnite tipku II a za visoku temperaturu pritisnite obdje tipke istovremeno.
4. Nakon zagrijavanja prostorije do ˇzeljene temperature okrenite termostat u smjeru
- 37 -
Page 39

RUKOVANJE
suprotnom satu sve dok se ne ugasi pilot lampica. Termostat ostavite na toj postavci.
Nakon ˇsto dod¯e do smanjenja podeˇsene sobne temperature ured¯aj ´ce automatski poˇceti
da radi sve do postizanja podeˇsene temperature. Na taj naˇcin odrˇzava se konstantna
sobna temperature i vrˇsi se ekonomiˇcna potroˇsnja elektriˇcne energije.
5. Ako ˇzelite promjeniti postavku sobne temperature termostat okrenite u smjeru sata
i pove´cajte temperaturu ili u smjeru suprotnom satu ako ˇzelite smanjiti temperature.
6. Ovaj radijator je opremljen sustavom zaˇstite od pregrijavanja koji se automatski aktivira
u sluˇcaju da dod¯e do pregrijavanja ured¯aja.
7. Ako ˇzelite upotpunosti iskljuˇciti radijator sve komande podesite u poziciju ISKLJUˇCENO
i izvucite utikaˇc iz utiˇcnice.
ODRˇZAVANJE
1. Prije poˇcetka ˇciˇs´cenja radijatora obavezno izvucite utikaˇc iz utiˇcnice i saˇcekajte da se
radijator ohladi.
2. Radijator oˇcistite mekom vlaˇznom krpom (ne mokrom).
UPOZORENJE:
Radijator nipoˇsto ne uranjajte u vodu.
Ne koristite deterdˇzent i abrazivna sredstva za ˇciˇs´cenje.
Unutarnji dio radijatora zaˇstite od vode jer to moˇze imati opasne posljedice.
3. Prije spremanja radijatora kabel za napajanje smjestite u spremnik za namatanje i
radijator odloˇzite na suho mjesto.
4. U sluˇcaju bilo kakvog kvara ne pokuˇsavajte sami opraviti radijator. U suprotnom moˇze
do´ci do poˇzara ili strujnog udara.
SUKLADNOST S DIREKTIVAMA
Ovaj proizvod je u skladu sa Direktivom o niskom naponu pod brojem 2006/95/EC i
Direktivom o Elektromagnetskoj sukladnosti EMC pod brojem 2004/108/EC te nosi oznaku
CE.
Potrudite se o pravilnom zbrinjavanju ovog ured¯aja
Ovaj simbol oznaˇcava da ovaj proizvod ne treba bacati s ostalim ku´canskim
otpadom na podruˇcju EU. U cilju zaˇstite zdravlja ˇcovjeka i okoliˇsa potrudite se
da omogu´cite recikliranje starih elektriˇcnih i elektronskih ured¯aja i na taj naˇcin
ih iskoristite u neke druge svrhe. Molimo vas da dotrajale ured¯aje predate u sabirne
centre ili stupite u kontakst s prodavcem kod kojeg ste kupili ured¯aj. Ova mjesta ´ce
preuzeti stare ured¯aje i omogu´citi njihovo recikliranje vode´ci raˇcuna o zaˇstiti ˇzivotnog
okoliˇsa.
- 38 -
Page 40

ADANA-SEYHAN-DORUK SO⁄UTMA -REfiATBEY MAH. AV. MEHMET ERO⁄LU CAD. NO:8-TEL.:0322 458 55 14 ADANA-KOZAN-DURAN
YETK‹L‹ SERV‹SLER L‹STES‹
SO⁄UTMA-CUMHUR‹YET MH. DEDEO⁄LU SK. S‹S. APT.- TEL.:0322 516 57 78 ADANA-SEYHAN-DÜZOVA ELEKTR‹K - KÜÇÜK SAAT
MEYDANI HILAL HAN IS MRK NO 32 - TEL.:0322 363 67 87 ADANA-SEYHAN-ÖZER ELEKTRON‹K - OBALAR CAD. SAL‹H ZEK‹ BUGAY ‹fi
HANI NO:11 - TEL.:0322 352 25 75 ADANA-SEYHAN-SER‹N ELEKTRON‹K - MAHFESI⁄MAZ MH. KENAN EVREN BULV. 21.SK. KAROL S‹T.
E BLOK NO:2/A - TEL.:0322 233 74 84 ADANA-CEYHAN-URANYUM ELEKTRON‹K - ‹NÖNÜ BULVARI NO: 172 - TEL.:0322 611 29 95
ADANA-CEYHAN-CEYHAN ELEKTRON‹K - BÜYÜKKIRIM MH. MEHMET fiER‹F Y‹⁄‹T CD. 4.SK. NO:3/B TEL. : 0322 613 45 96 ADIYAMANYILDIRIM SERV‹S - BAHÇEL‹EVLER MH. 177 SK. NO:2 - TEL.:0416 214 40 83 ADIYAMAN-KAHTA-ELK. EV ALET. TAM‹RC‹S‹-FAT‹H MH.
ZAFER CD. NO:20 - TEL.:0416 725 99 89 ADIYAMAN-ÜNAL ELEKTRON‹K-BAHÇEL‹EVLER MAH. ESK‹ KAHTA CAD. NO:11/A-TEL.:0416
216 75 56 ADIYAMAN-BEYAZ EfiYA TAM‹R‹-ÇATI MH. BADEM SK. NO:11 BESN‹ TEL.: 0416 318 32 00 AFYON-EM‹N ELEKTRON‹K-ENST‹TÜ
CAD. NO:19-TEL.:0272 215 43 32 AFYON-D‹NAR-GÖKÇEO⁄LU ELEKTR‹K-EMN‹YET MH. YEN‹YOL CD. 146 BLOK NO:4-TEL.: 0272 353 53
44 A⁄RI-PATNOS-ACELE PEfi‹N ELEKTRON‹K-BUHARA SOK. NO:12-TEL.:0472 616 46 08 A⁄RI-ÖZPAK ELEKTRONIK-ESKI VAN CAD
NO: 341 Ömer Hamam Yan›-TEL.:0472 216 53 14 AKSARAY-‹T‹NA ELEKTR‹K-TAfi PAZARI MH. fiEH‹T HAT‹P UÇKUN SK. ESK‹ TERM‹NAL
ÇIKIfiI NO:9/A-TEL.:0382 212 63 99 AMASYA-KUTUP TEKN‹K SO⁄UTMA-GÖKMEDRESE MAH. M.K.P. CAD. HAM‹TBATIR APT. NO:115/ATEL.:0358 212 61 66 AMASYA-SULUOVA-ÇALIfiKAN ELEKTRON‹K-ÖZEL ‹DARE ‹fi HANI NO:121-TEL.:0358 417 18 64 AMASYA-FLAfi
ELEKTRON‹K-YÜZEVLER MAH.TORUMTAY SOK. NO:25 DEM‹RD‹fi APT. ALTI-TEL.:0358 212 33 71 ANKARA-PURSAKLAR-DEM‹R TEKN‹K-
MERKEZ MH. MEL‹KfiAH CD.NO:11/A-TEL.:0312 328 1122 ANKARA-YEN‹MAHALLE-ERDO⁄DU SO⁄UTMA-ÇARfiI MH. DAMLADOL SK.
NO:74/C-TEL.:0312 315 60 25 ANKARA-KEÇ‹ÖREN-VEFA ELEKTRON‹K-PINARBAfiI MH. AfiIK PAfiA CD. NO: 67/C-TEL.:0312 380 42 30
ANKARA-MAMAK-YÜCEL ELEKTRON‹K-ASIM GÜNDÜZ CD. 20/D-TEL.:0312 365 14 14 ANKARA-ÇANKAYA-GÖKSEL ELEKTRON‹K-21.CD.
KARTAL KAYA APT. NO:29/A KIRKKONAKLAR-TEL.:0312 496 42 53 ANKARA-ÇANKAYA-ATC ‹LET‹fi‹M-SELAN‹K CAD. NO: 31/3-TEL.:
0312 419 82 70 ANKARA-GÖLBAfiI-BEKS SERV‹S H‹ZMETLER‹-SE⁄MENLER MAH. CEMAL GÜRSEL CAD. NO:51/A-TEL.:0312 484 21 19
ANKARA-BEYPAZARI-DO⁄AN TEKN‹K-KAYHAN GÜVEN CD. NO:22/C-TEL.:0312 762 89 19 ANKARA-S‹NCAN-Y‹⁄‹T TEKN‹K ONARIM-
M.Ç.M. 12. CADDE GÜLSUYU SK. NO:5/21-TEL.:0312 264 10 31ANKARA-KEÇ‹ÖREN-MERT TEKN‹K SERV‹S-ÖZYURT CD. NO:27/A AKTEPETEL.: 0312 380 00 22 ANKARA-ERYAMAN-ARSLANLAR ELEKTRON‹K-GÜZELKENT MAH.ÇARfiI ARYA 511 SK. NO:40-TEL.:0312 279 16
41 ANTALYA-KUMLUCA-AKGÜL TEKN‹K SERV‹S H‹ZMETLER‹-ADNAN MENDERES BULV.KAVAKLI KUYU CAD. YED‹TEPELER KAR.SULAR
APT.NO:9-TEL.:0242 887 53 80 ANTALYA-CANKALP ELEKTRON‹K-TUZCULAR MAH. ‹MARET SOK. FARAÇLAR PASJ.NO:11-TEL.:0242
242 31 35 ANTALYA-MANAVGAT-ÖNAL ‹LET‹fi‹M-AfiA⁄I PAZARCI MH. ‹BRAH‹M SÖZEN CD. fiELALE PSJ.NO: 18 1006 SK. TEL.:0242 742
35 36 ANTALYA-ALANYA-Ç‹NTAfi ELEKTRON‹K-SARAY MH. ATATÜRK CD. HACI HAMD‹ O⁄LU SK.NO: 20/A-TEL.:0242 513 88 85 ANTALYA-
MERKEZ-BÜYÜKGEB‹Z ELEKTROMEKAN‹K GÜVENL‹K-MUSTAFA GÖKSU-KIZILSARAY MH. DOLAPLIDERE CD. 80 SK. ÇAKMAK ‹fi HANI
NO: 8/5-6 TEL. :0242 243 33 90 ARDAHAN-YILDIRIM ELEKTR‹K-ATATÜRK CAD.NO:69-TEL.:0478 211 28 58 ARTV‹N-ARTV‹N ELEKTR‹K-
HALKEVI CADDESI NO: 12-TEL.: 0466 212 10 82 AYDIN-YILMAZ ELEKTRON‹K-KURTULUS MH. GARAJ CD. NO:5/B-TEL.:0256 212 00 35
AYDIN-SÖKE-ÖZLEM ELEKTRON‹K-YEN‹ CAM‹ MH. SEK‹LER CD. NO: 47-TEL.:0256 518 26 40 AYDIN-NAZ‹LL‹-BARIN ELEKTRON‹K-
ALTINTAfi MH. HÜRR‹YET CD. NO:161 B-TEL.: 0256 315 43 21 BALIKES‹R-BANDIRMA-ANIL SO⁄UTMA-GÜNAYDIN MAH. 2.OKUL
CAD.NO:16/A-TEL.:0266 713 56 78 BALIKES‹R-EDREM‹T-ÖZER TEKN‹K-CAM‹ VASAT MH. PARK CD. NO:12/A-TEL.:0266 373 12 44
BALIKES‹R-BURHAN‹YE-U⁄UR TEKN‹K SO⁄UTMA-MAHKEME MH. M‹THATPAfiA CD. NO: 68-TEL.:0266 412 86 89 BALIKES‹R-KILIÇ
ELEKTRON‹K-YEN‹ ÇARfiI BASIN SOK. NO: 4/B-TEL.:0266-241 87 54 BALIKES‹R-GÖNEN-GÜRSES ELEKTRON‹K-MALKOÇ MAH.MÜFTÜ
fiEVKET CAD. 76.SOK. NO:2/B-TEL.:0266 762 01 28 BALIKES‹R-BANDIRMA-D‹J‹TAL ELEKTRON‹K-17 EYLÜL MAH.HAVUZLU BAHÇE
SK.NO:8/A-TEL.:0266 715 16 46 BALIKES‹R-ERDEK-MERT TEKN‹K-YALI MH. HÜKÜMET CD. NO:55-TEL.:0266 845 61 10-97 BARTIN-
MARTI ELEKTRON‹K-HENDEKYANI CAD. ORTA MAH.101/B - BARTIN-TEL.:0378 228 34 22 BATMAN-fiAH‹NLER ELEKTRON‹K-CUMHUR‹YET
CD. NO:20 2000 ‹fi MERKEZ‹ KARfiISI-TEL.:0488 213 17 02 B‹LEC‹K-EDEBAL‹ TEKN‹K-‹ST‹KLAL MH V.REF‹K A ÖZTÜRK CD NO: 1/ATEL.:0228 212 46 80 B‹NGÖL-KARLIOVA-MEHMET KARTAL - KARTAL ELEKTRON‹K-CUMHUR‹YET CD. NO:8-TEL.:0426 511 26 39 B‹NGÖL-
S‹MGE ELEKTRON‹K- YEN‹fiEH‹R MH. YEfi‹M SK. BO⁄ATEK‹N APT ALTI NO:14/C-TEL.:0426 213 77 56 B‹TL‹S-AHLAT-U⁄UR SO⁄UTMA-
TOK‹ KONUTLARI YUKARI ÇARfiI-TEL.:0434 412 41 72 B‹TL‹S-D‹ZAYN ELEKTR‹K-NUR CAD. EREM CENTER ‹fi MERKEZ‹KAT:2 NO:5TEL.:0434 226 74 43 BOLU-BEST ELEKTRON‹K-TABAKLAR MAH.CUMHUR‹YET CAD.NO:28/B-TEL.:0374 218 12 25 BURSA-OSMANGAZ‹-
AKYÜZ ELEKTRON‹K-ÇIRPAN MH. UYSAL SK. NO:13/B-TEL.:0224 254 60 76 BURSA-GEML‹K-AC‹L TV TAM‹R SERV‹S‹-DEM‹R SUBAfiI
MH. FIRIN SK. NO:7-TEL.:0224 514 71 20 BURSA-MUDANYA-ER T‹CARET-ÖMERBEY MH. CAM‹ SK. SU APT. NO:30-TEL.:0224 544 86 16
BURSA-MUSTAFAKEMALPAfi-AGUfi ELEKTR‹K-HAMZABEY MAHALLESI PAZARYERI SOKAK NO: 2/A-TEL.:0224 613 19 99 BURSA‹NEGÖL-S.B.S ELEKTRON‹K-OSMAN‹YE MH.DERE SK. N:25/D-TEL.:0224 715 48 94 BURSA-KARACABEY-GÜRKAN T‹CARET-RUNGUÇPAfiA
MH. 14. SK. NO:11-TEL.: 0224 676 66 80 BURSA-N‹LÜFER-ÖZME TEKN‹K-KARAMAN MH. BAYINDIR SK. NO:4/B CARREFOUR KARfiISITEL.: 0224 249 12 48 ÇANAKKALE-ÇAN-TÜRKER ELEKTRON‹K-CUMHUR‹YET MAH. ÇANAKKALE CAD.NO:41-TEL.:0286 416 13 89
ÇANAKKALE-GEL‹BOLU-GÜVEN ELEKTRON‹K-YAZICIZADE MAH. M‹RALAY fiEF‹K AKER CAD. 2. SOK NO:4 / A TEL.:0286 566 90 70
ÇANAKKALE-MERKEZ-SAM ELEKTRON‹K-‹SMETPAfiA MH. ARSLANCA SK.-TEL.:0286 212 35 59 ÇANKIRI-B‹LG‹ÇLER ELEKTRON‹K-
BUGDAY PAZARI MH. A.TALAT ONAY BULVARI SAIM A⁄A S‹T. B/BLOK TEL.:0376 213 48 19 ÇORUM-H‹T‹T SO⁄UTMA-YEN‹YOL MH. MÜFTÜ
AHMET GÖKEfiME SK. NO: 5 / I-TEL.:0364 225 70 58 ÇORUM-U⁄UR ELEKTRON‹K-ÜÇTUTLAR MAH. FAT‹H CAD. 5.SOK.EYÜP SULTAN
APT. NO:1/C-TEL.:0364 227 44 91 ÇORUM-ÖMÜR ELEKTRON‹K-CENG‹ZTOPEL CAD. NO:2/F-TEL.:0364 224 68 09 ÇORUM-ALACA-EROL
ELEKTRON‹K-AYHAN MH. ANKARA CD. NO:18-TEL.:0364 411 42 03 ÇORUM-GÜNDÜZ BEYAZ EfiYA SERV‹S‹-SUNGURLU-SUNGURO⁄LU
MH. ÇANKIRI CD. NO: 46-TEL.:0364 311 31 13 DEN‹ZL‹-KARDELEN SO⁄UTMA-EMEK CD. NO: 30-TEL.:0258 241 67 31 DEN‹ZL‹-ÖZ
ELEKTRON‹K-ÇAYBAfiI CD. ÜNAL APT. NO: 28-TEL.:0258 261 29 25 DEN‹ZL‹-MERKEZ-ÇA⁄LAYAN SO⁄UTMA-TOPRAKLIK MH. TURAN
GÜNEfi CD.NO:34 TEL. : 0258 242 85 86 D‹YARBAKIR-B‹SM‹L-fiIK ELEKTR‹K-KURTULUfi MH. AHMET AR‹F BULVARI NO: 19/F-TEL.:0412
415 05 94 D‹YARBAKIR-‹LKADIM T‹CARET-BATIKENT S‹T. A/5 BLOK ALTI NO:1 SA⁄LIK OCA⁄I YANIBA⁄LAR-TEL.:0412 235 70 89
D‹YARBAKIR-AZ‹Z ELEKTRON‹K-HATBOYU CD. 469. SK. GÜNEfi 2 APT. NO:3/B-TEL.:0412 223 33 46 D‹YARBAKIR-S‹LVAN-DIGITAL
ELEKTRONIC-KALE MH. SAM‹ SEÇK‹N CD. NO:9/B-TEL.:0412 711 44 14 D‹YARBAKIR-JAPON RECEP-YENI MAH 19 MAYIS CAD NO74-
- 39 -
Page 41

TEL.:0412 511 24 10 D‹YARBAKIR-BA⁄LAR-AZ‹Z ELEKTRON‹K-HATBOYU CD. 469 SK. NO:3/B-TEL.: 0412 236 81 10 DÜZCE-ENSAR TEK
YETK‹L‹ SERV‹SLER L‹STES‹
SU S‹STEMLER‹-AZM‹N‹LL‹ MH. AYDINPINAR CD. SERHAT SK.NO:1/B-TEL.:0380 514 34 12 DÜZCE-BULUfi ELEKTRON‹K-CED‹D‹YE
MAH. M‹MAR S‹NAN CAD.-TEL.: 0380 514 66 81 ED‹RNE-UZUNKÖPRÜ-GÜVEN TEKN‹K-GAZ‹ CAD. YUSUF SOK. YURDACAN PASAJI NO:7TEL.:0284 513 89 66 ED‹RNE-YILDIZ SO⁄UTMA-1.MURAT MH. GÜNGÖR MAZLUM CAD. SERHAT S‹TES‹ B/BLOK 35/A-TEL.:0284 235 37
63 ED‹RNE-KEfiAN-MUTLU TEKN‹K-YUKARI ZAFER‹YE MH. ‹LYASBEY CD. NO:32/B-TEL.:0284 715 22 71ELAZI⁄-ÖZDEV TEKN‹K -
‹ZZETPAfiA MAH.KAZIM BAYER CAD.NO:24/A-TEL.:0424 238 51 67 ELAZI⁄-YILMAZ BOB‹NAJ-YEN‹ MAH. KEMAL fiEDELE CAD. NO: 12/ETEL.:0424 212 08 96 ELAZI⁄-GÜNEfi ELEKTRON‹K-KÜLTÜR MAH. VAL‹ FAHR‹BEY CAD.NO:113/D-TEL.:0424 233 10 18 ERZ‹NCAN-
AYDINLAR ELEKTR‹K-‹NÖNÜ MAH. MERKEZ ÇARfiISI 15.SK NO:5 -TEL.:0446 223 59 76 ERZ‹NCAN-REFAH‹YE-B‹LG‹N ELEKTRON‹K-
ERZ‹NCAN CAD. BELED‹YE ‹fi HANI-TEL.:0446 611 26 10 ERZURUM-OLTU-GÜVEN ELEKTRON‹K-Z‹YABEY CAD. BELED‹YE PSJ. NO:6TEL.:0442 816 42 23 ERZURUM-AT‹LAY ELEKTRON‹K-KONGRE CAD. HASIRHAN PASJ. NO:87-TEL.:0442 213 30 60 ERZURUM-‹SP‹R-
YILMAZ ELEKTRON‹K-Z‹YAPAfiA CD. AfiA⁄I MH. NO:186-TEL.:0442 451 40 95 ESK‹fiEH‹R-ARZU ELEKTRON‹K-DEL‹KL‹TAfi MH. GÜRMAN
SOK. NO:37/B-TEL.:0222 234 87 15 ESK‹fiEH‹R-S‹VR‹H‹SAR-DERMAN ELEKTRON‹K-CAM‹KEB‹R MH. YUNUSEMRE CD. NO:7-TEL.:0222
711 22 60 GAZ‹ANTEP-ELEKTR‹KL‹ EV ALETLER‹ TAM‹RC‹S‹-MÜTERC‹M ASIM CAD. KÖRÜKÇÜ SOK. NO:8/A-TEL.:0342 231 00 73
GAZ‹ANTEP-ISLAH‹YE-YILMAZ SO⁄UTMA-AYDINLIK MH. GÖZ CAD.ÜNLÜ S‹TES‹ NO: 2-TEL.:0342 862 12 20 GAZ‹ANTEP-‹K‹ZO⁄LU
ELEKTRON‹K-BEY MAH. EBLEHAN ÇARfiISI NO:12/A-TEL.:0342 230 71 00 GAZ‹ANTEP-N‹Z‹P-ÇAPAN TEKN‹K-CUMHUR‹YET MAH.
MERMER SOK. NO:10-TEL.:0342 517 51 66 G‹RESUN-BULANCAK-YÜKSEL SO⁄UTMA-‹HSAN‹YE MH. CEMAL GÜRSEL. CD. NO: 257TEL.:0454 318 17 28 G‹RESUN-U⁄UR ELEKTRON‹K-HACI HÜSEY‹N MH. GAZ‹ CD. NO: 185 / 1-TEL.:0454 212 00 90 GÜMÜfiHANE-
GÜMÜfiHANE SERV‹S‹-HASANBEY MH. HASANBEY CD.NO:17/A-TEL.:0456 213 51 54 HATAY-SAMANDA⁄-GÜNEfi ELEKTR‹K-ATATÜRK
MAH. ‹SKELE CAD. HAYÜK PSJ NO:38-TEL.:0326 512 71 04 HATAY-KIRIKHAN-SEREN MAK‹NA-BARBAROS MAH. BOZTEPE CAD. NO:23/BTEL.:0326 344 32 49 HATAY-ANTAKYA-SER‹ SO⁄UTMA-KURTULUfi CD. NO:51/C-TEL.:0326 213 28 32 HATAY-ERZ‹N-YEL‹Z BOB‹NAJ-
MUSTAFAL‹ MH. ‹STASYON CD. NO: 143-TEL.:0326 68148 32 HATAY-REYHANLI-BAfi TEKN‹K SO⁄UTMA-ATATÜRK CD. DÖ⁄ÜCÜLER
‹fiHANI NO:1 -TEL.:0326 413 44 04 HATAY-REYHANLI-ÖZ ‹fi SO⁄UTMA-CUMHUR‹YET MH. TAYFUR SÖKMEN CD. NO:26/B TEL. : 0326
413 21 22 HATAY-DÖRTYOL-FAT‹H ELEKTRON‹K-SANAY‹ MH. EVREN CD. YEN‹ S‹NEMA KARfiISI NO:15 - TEL.:0326 712 86 46 HATAY-
‹SKENDERUN-GÜL‹STAN ELEKTRON‹K-KURTULUfi MH. fi.O⁄UZ YENER CD. NO:64/C-TEL.:0326 613 50 64 I⁄DIR-PARLAK TEKN‹K-
TOPÇULAR CD. NO:34-TEL.:0476 227 47 51 ISPARTA-ÖZSOYLAR SO⁄UTMA-YAYLA MAH. ‹SMETPAfiA CAD. NO: 60 fi‹FA TIP MERKEZ‹
ALTI-TEL.:0246 223 13 61 ‹ÇEL-ERDEML‹-ESEN ELEKTR‹K-MERKEZ MAH. ATATÜRK CAD. NO:11-TEL.:0324 515 68 87 ‹ÇEL-MEZ‹TL‹-
AKN‹SAN SO⁄UTMA&ELEKTRON‹K-GMK.BUL. FAT‹H MH. 18 SK.ÖZÜDO⁄RU S‹T. 3/A-TEL.:0324 359 64 34 ‹ÇEL-PINAR ELEKTRON‹K-
MAHMUD‹YE MH. 108. CD. NO:32/B-TEL.:0324 336 82 98 ‹ÇEL-TARSUS-MERT ELEKTRON‹K-GAZ‹LER MAH. ATATÜRK BULV. NO:119TEL.:0324 626 83 98 ‹ÇEL-TARSUS-TEKN‹K ‹fi ELEKTR‹K T‹C.-ATATÜRK CAD. U⁄UR ‹fi HANI NO:1-TEL.:0324 6242797 ‹ÇEL-ANAMUR-
ÇEL‹K ELEKTRON‹K-BAHÇE MH. ORMAN ‹fiLETMES‹ ALTI NO:61/B-TEL.:0324 814 85 90 ‹ÇEL-HAKAN ELEKTRON‹K-BAHÇEL‹EVLER
MH. 1809 SK. D‹NL‹ APT.ALTI NO:3/B-TEL.:0324 328 03 25 ‹ÇEL-S‹L‹FKE-SADIK ELEKTR‹K-GÖKSU MAH. O⁄UZKAAN CAD. DERYALAR
APT.NO:22/B-TEL.:0324 714 05 54 ‹STANBUL-ATAfiEH‹R-VURAL ELEKTRON‹K-KARAMAN Ç‹FTL‹K YOLU NO:12(ESK‹ PTT HAST. KARfiISI)
‹ÇERENKÖY TEL. : 0216 575 63 35 ‹STANBUL-fi‹fiL‹-YILKA T‹CARET-SEYMEN SOK. NO:27/A KURTULUfi-TEL.:0212-233 80 53 ‹STANBUL-
KÜÇÜKÇEKMECE-ÇA⁄DAfi SERV‹S-CENNET MAH.Y.KEMAL BEYATLI CAD.NO:14/D-TEL.:0212 579 35 30 ‹STANBUL-ZEYT‹NBURNUKARDEfiLER SO⁄UTMA-SEY‹T N‹ZAM MAH. fiEH‹T ERKAN ALYANAK SOK.NO:11-TEL.:0212 546 57 36 ‹STANBUL-ESENLER-YILDIRIM
ELEKTRON‹K-KAZIM KARABEK‹R MAH. 2.SOK. NO:10 -TEL.:0212 611 10 76 ‹STANBUL-EM‹NÖNÜ-IRMAK DIfi T‹CARET-TAHTAKALE CD.
TAHTAKALE T‹CARET MERKEZ‹ NO:34 2.BODRUM NO:204 -TEL.:0212 520 55 80 ‹STANBUL-ÜMRAN‹YE-GÜL-SER TEKN‹K SERV‹S-
NAMIK KEMAL MH. SÜTCÜ ‹MAM CD. SÜTÇÜ ÇIKMAZI NO:6/1- TEL.:0216 335 60 19 ‹STANBUL-ÜMRAN‹YE-GÖZDE ELEKTRON‹K-
ATATÜRK MH. ALEMDA⁄ CD. YILDIZ SK. NO:12/A-TEL.: 0216 329 57 03 ‹STANBUL-MALTEPE-GÜR TEKN‹K SERV‹S-BA⁄DAT CD. BOLAYIR
SK. NO:3/A-TEL.:0216 352 25 20 ‹STANBUL-BEYL‹KDÜZÜ-SC ELEKTRON‹K-GÜZELYURT MH. M‹MAR S‹NAN CD. NO:71-TEL.:0212 852
34 45 ‹STANBUL-GAZ‹OSMANPAfiA-DEDEO⁄LU ELEKTR‹K-2124 SOK NO:4 SULTANÇ‹FTL‹⁄‹-TEL.:0212 594 50 91 ‹STANBUL-TUZLA-
AKIN ISI TEKN‹K SERV‹S-YAYLA MH. F.ÇAKMAK CD. ‹SMA‹L A⁄A SK. NO:11 TEL.:0216 395 66 62 ‹STANBUL-SARIYER-H‹SAR SERV‹S
1-NUR‹PAfiA CD NO\48A BA⁄LAR MEVK‹ YEN‹KÖY-TEL.:0212 223 27 96 ‹STANBUL-SARIYER-H‹LAL SO⁄UTMA-KAPTAN SK. NO:2-
TEL.:0212 218 45 61 ‹STANBUL-BÜYÜKÇEKMECE-AYGÜL DEKORASYON-19 MAYIS MH. OSMAN GAZ‹ CD. NO: 7-TEL.:0212 881 33 18
‹STANBUL-GAZ‹OSMANPAfiA-ÇAM TEKN‹K-ISLAMBEY MAH NECIP FAZIL CAD 257 SK NO:25-TEL.:0212 597 86 62 ‹STANBULKÜÇÜKÇEKMECE-YILDIZ ELEKTR‹K SO⁄UTMA-HALKALI CD. ANADOLU PSJ. NO: 185-TEL.:0212 580 76 02 ‹STANBUL-KÜÇÜKÇEKMECEBATI TEKN‹K-GÜLTEPE MH. DEL‹ORMAN CD. NO:75 SEFAKÖY-TEL.:0212 599 36 79 ‹STANBUL-BAYRAMPAfiA-ÖZKAN ELEKTRON‹K-
KARTALTEPE MH. B‹LGEHAN CD. NO:36-TEL.:0212 564 33 46 ‹STANBUL-GAZ‹OSMANPAfiA-TOROS ELEKTRON‹K-MERKEZ MH. BA⁄LAR
CD. NO:77-TEL.:0212 563 50 38 ‹STANBUL-fi‹fiL‹-CHIP ELEKTRON‹K-BOZKURT CAD.NO: 235-TEL.:0212 231 65 43 ‹STANBUL-GÜNGÖREN-
YÜKSEL ELEKTRON‹K-M.FEVZ‹ ÇAKMAK MAH.‹NÖNÜ CAD.NO: 138-TEL.:0212-504 61 42 ‹STANBUL-BEYO⁄LU-TOLGA ELEKTRON‹K-
CAM‹ KEB‹R MH. DEREBOYU CAD. NO:28 KASIMPAfiA-TEL.:0212 235 65 34 ‹STANBUL-AVCILAR-NUR ELEKTRON‹K-DEN‹ZKÖfiKLER
MAH.DERYA SOK. NO:36/1-TEL.:0212 694 12 82 ‹STANBUL-BA⁄CILAR-ÇA⁄LAYAN ELEKTRON‹K-‹STOÇ 25.ADA NO.:109-TEL.:0212 659
92 49 ‹STANBUL-KADIKÖY-UMUT ELEKTRON‹K-HAL‹TA⁄A CAD. CELAL MUHTAR SOK. NO:20/2-TEL.:0216 346 39 78 ‹STANBUL-
ZEYT‹NBURNU-UZMAN ELEKTRON‹K-YEN‹DO⁄AN MH. 42.SK NO:50-TEL.:0212 582 36 37 ‹STANBUL-KADIKÖY-MICROSYSTEM
ELEKTRON‹K-1. ORTA SK. NO:18/1 GÖZTEPE-TEL.:0216 411 91 50 ‹STANBUL-MALTEPE-BEYDA⁄I TEKN‹K ELEKTRON‹K-BA⁄LARBAfiI
MAH. ‹NÖNÜ CAD.-TEL.:0216 457 63 34 ‹STANBUL-BA⁄CILAR-KUMRU ELEKTRON‹K-KEMALPAfiA MAH. NAMIK KEMAL CAD. NO: 126TEL.:0212 429 34 19 ‹STANBUL-BAKIRKÖY-‹K‹ZLER ELEKTRON‹K-SAKIZA⁄A MH. BERR‹NC‹N‹ SK. NO:16/A-TEL.:0212 543 85 83
‹STANBUL-ÜSKÜDAR-KÖYLÜBAY ELEKTRON‹K-ALBAY HÜSAMETT‹N ERTÜRK SK. NO:7/A ÇENGELKÖY TEL.:0216 318 35 13 ‹STANBULÜSKÜDAR-AKÇEL‹K T‹CARET-M‹MAR S‹NAN MH. ‹SMA‹L DÜMBÜLLÜ SK. NO:9/A TEL.:0216 342 99 22 ‹STANBUL-KADIKÖY-TELV‹D
ELEKTRON‹K-MAZHAR OSMAN SOK FERAH APT NO:24/A FENERYOLU-TEL.:0216 414 66 00 ‹STANBUL-‹K‹TELL‹-BARIfi TEKN‹K-ATATÜRK
MH. ‹K‹TELL‹ CD. DURAK SK. NO:18 TEL. : 0212 471 04 76 ‹STANBUL-K.ÇEKMECE-ENG‹N ELEKTRON‹K-TEVF‹K BEY MH. MERKEZ CD.
- 40 -
Page 42

ORK‹DE SOK. NO: 3 /1-TEL.:0212 598 44 76 ‹STANBUL-BAHÇEL‹EVLER-SEV-CAN DAYANIKLI TÜK.MALLARI.-YILDIRIM BEYAZIT CD
YETK‹L‹ SERV‹SLER L‹STES‹
.ZAFER MH. TÜRKBEY‹ SK. NO:6/2-3-TEL.:0212 552 45 87 ‹STANBUL-fi‹fiL‹-IfiIK ELEKTRON‹K-AYAZA⁄A MASLAK ATATÜRK CD NO: 25TEL.:0212 289 76 94 ‹STANBUL-PEND‹K-GÖKHAK ELEKTRON‹K-BATI MH. SABR‹ TAfiKIN CD. SEB‹L SK. NO:4/1 TEL. : 0216 354 07 00
‹STANBUL-G.O.PAfiA-ATILIM ELEKTRON‹K-CEBEC‹ MAH. 2472 SOK: NO:14/A SULTANÇ‹FTL‹⁄‹- TEL.:0212 475 85 62 ‹STANBULGÜNGÖREN-NUR ELEKTR‹K ELEKTRON‹K-MERKEZ MH. ASALET CD. NO: 22/D-TEL.:0212 641 42 09 ‹STANBUL-BEYKOZ-ULUDO⁄AN
ELEKTRON‹K-KAYABAfiI ÇIKMAZI NO: 4/B PAfiABAHÇE-TEL.:0216 322 85 85 ‹STANBUL-KARTAL-ÖZO⁄LU ELEKTRON‹K-KIZILAY BULVARI
CD. BAHADIR SK. 4/A-TEL.:0216 387 18 87 ‹STANBUL-FAT‹H-SOYLU TEKN‹K-HIRKA‹ fiER‹F CAM‹ ARKASI ESK‹ AL‹PAfiA CD. NO: 26TEL.:0212 631 85 88 ‹STANBUL-FAT‹H-IRMAK DIfi T‹CARET-HACI KADIN CD. NO:15 K.M. PAfiA TEL.: 0212 589 75 27 ‹STANBUL-S‹L‹VR‹-
PDS ELEKTRON‹K-P.M. PAfiA MH. HACI PERVANE CD. NO:35/B -TEL.:0212 728 76 75 ‹STANBUL-GÜLTEPE-B‹L‹M ELEKTRON‹K-
HARMANTEPE MH. ABD‹ ‹PEKÇ‹ CD. NO:14/D -TEL.:0212 278 72 27 ‹ZM‹R-KARfiIYAKA-AYSER ELEKTR‹KL‹ EV ALETLER‹-ZÜBEYDE
HANIM CADDES‹ NO:87/A-TEL.:0232 366 19 19 ‹ZM‹R-BERGAMA-GEZG‹N SERV‹S-K.KEMALBEY CAD. NO:82-84-TEL.:0232 633 35 15
‹ZM‹R-KONAK-TUNCA ELEKTR‹K-76 SK 10/A GÜZELYALI-TEL.:0232 246 40 62 ‹ZM‹R-ÇAMD‹B‹-KUDRET ELEKTRON‹K-BURAK RE‹S
CAD. NO: 239/A-TEL.:0232 435 81 36 ‹ZM‹R-MENEMEN-AY ELEKTRON‹K-DR. SELAHATT‹N ÖZKURT CD. NO:22/B-TEL.:0232 832 02 31
‹ZM‹R-KONAK-S‹STEM ELEKTRON‹K-2414 SK. NO:10 GÜLTEPE-TEL.:0232 469 72 69 ‹ZM‹R-KARfiIYAKA-LEVENT ELEKTR‹K
LABORATUVARI-1710 SK. NO:70/B ESHOT SOKA⁄I-TEL.:0232 381 14 42 ‹ZM‹R-KARfiIYAKA-ASMERKEZ T‹CARET-ESK‹ TRAMVAY CD.
1675. SK. NO:78/1B ALAYBEY-TEL.:0232 364 33 73 ‹ZM‹R-BORNOVA-ACEM ELEKTRON‹K-552/2 SK. NO: 4/A-TEL.:0232 339 73 31 ‹ZM‹RKONAK-KILIÇ ELEKTRON‹K-BARBAROS HAYRETT‹N PAfiA CD. NO:62/1 LEVENT-TEL.:0232 433 15 19 ‹ZM‹R-URLA-‹LTER ELEKTRON‹K‹ZM‹R 75. YILl CADDES‹NO:81/C-D-TEL.:0232 754 44 44 ‹ZM‹R-BUCA-ÇA⁄LAR ELEKTRON‹K-670/1 SK. NO:57/B-TEL.:0232 276 27 77
‹ZM‹R-YEfi‹LYURT-UMUT ELEKTR‹K & ELEKTRON‹K-YILDIZ CAD. NO: 152/A-TEL.:0232 244 65 77 ‹ZM‹R-ÖDEM‹fi-MURAT ELEKTRON‹K-
UMURBEY MH. SANAY‹ S‹T. 9.SK NO: 10 -TEL.:0232 544 41 98 KAHRAMANMARAfi-AKSUNGUR ELEKTR‹K-UZUNOLUK CAD. 20.SOKAK
NO:20/A-TEL.:0344 212 77 50 KAHRAMANMARAfi-KALE ELEKTRON‹K-FEVZ‹PAfiA MH. UZUNLUK CD.-TEL.: 0344 225 07 94 KARABÜK-
SAFRANBOLU-MEHMET SA⁄LAM - GÖKAY TEKN‹K-‹NÖNÜ MH. ESK‹ BA⁄LAR SK. NO:13-TEL.:0370 712 24 97 KARABÜK-ACAR
ELEKTRON‹K-VAKIF ‹fi HANI KAT:2 EMN‹YET MÜDÜRLÜ⁄Ü YANI-TEL.:0370 424 32 00 KARAMAN-ÖZ AS SO⁄UTMA-ABBAS MH. MUT
CD. NO: 82/A TEL. : 0338 214 56 74 KARS-AYDIN ELEKTRON‹K-KAZIM KARABEK‹R ‹fiHANI KAT:2 NO: 125 -TEL.:0474 212 87 82
KASTAMONU-TAfiKÖPRÜ-DE⁄‹fi‹M ELEKTR‹K-TABAKHANE MH. ATATÜRK CD. NO:55/A-TEL.:0366 417 42 04 KASTAMONU-TOSYADO⁄Ufi ELEKTRON‹K-VAKIF SK. 15/A-TEL.:0366 313 42 59 KASTAMONU-HARUN TELEKOMÜN‹KASYON-‹NÖNÜ MAHALLES‹ AFfi‹NBEY
SOKAK NO:8/B-TEL.:0366 212 33 66 KAYSER‹-MEL‹KGAZ‹-AKTÜRK BEYAZ EfiYA SERV‹S‹-AYDINLIKEVLER MH.FIRAT CD.KR‹STAL APT.AB NO.17 TEL.:0352 332 08 25 KAYSER‹-MEL‹KGAZ‹-AKIfi ELEKTRON‹K-ÇORAKÇILAR MH. CENG‹Z TOPEL CD.NO:20/B-TEL.:0352 320
14 00 KAYSER‹-DEVEL‹-U⁄UR SO⁄UTMA-HARMAN MAHALLES‹ BELED‹YE PASAJ‹ ÜZER‹ NO: 15-TEL.:0352 621 56 31 KAYSER‹-SÖNMEZ
ELEKTRON‹K-CAM‹ KEB‹R MAH. BASMANE SOK. NO:16/A-TEL.:0352 231 69 62 KAYSER‹-ZERO COMPUTER-SAHAB‹YE MH. METE CD.
fiAH‹R SATO⁄LU SK. SATO⁄LU AP D: 1-TEL.:0352 232 15 34 KIRIKKALE-MERKEZ-BULUT ELEKTR‹K B‹LG‹SAYAR-B.HAYRETT‹N CAD.
NO:9/C-TEL.:0318 212 31 73 KIRKLAREL‹-MERKEZ-BUSE ELEKTRON‹K-KARACA ‹BRAH‹M MH. KAPAN CAM‹ SK. ACUN PSJ. NO:23TEL.:0288 212 73 57 KIRKLAREL‹-LÜLEBURGAZ-BUSE ELEKTRON‹K-YILMAZ MH. ESK‹ KIRKLAREL‹ CD. EFSANE DÜ⁄ÜN SALONU YANI
NO:36/A TEL.: 0288 412 88 92 KIRfiEH‹R-GARANT‹ ELEKTRON‹K-ANKARA CD. C‹NGÖZ BEBE ARKASI YA⁄MUR ‹fiHANI NO:9/B-TEL.:0386
214 02 18 K‹L‹S-FLAfi ELEKTRON‹K-fiEH‹TLER PARKI KARfiISI NO:63/1-TEL.: 0348 814 55 28 KOCAEL‹-DORUK TEKN‹K H‹Z. -KARABAfi
MH. CENG‹Z TOPEL CD. MÜNECC‹M AR‹F SK. NO:6/A -TEL.:0262 331 11 66 KOCAEL‹-KARAMÜRSEL-KILINÇ ELEKTRON‹K-‹NÖNÜ CD.
M.YASEF SK. NO:10/M-TEL.:0262 452 55 55 KOCAEL‹-D‹LOVASI-SAMET ELEKTRON‹K-BA⁄DAT CAD NO: 42/2-TEL.:0262 754 79 86
KOCAEL‹-DARICA-KARDEfiLER ELEKTRON‹K-KAZIM KARABEK‹R MH. MEVALANA CAD. NO: 1/A-TEL.:0262 656 27 88 KOCAEL‹-GEBZEYILDIRIM ELEKTRON‹K-H. HAL‹L MH. 1209 SK. NO:13/C-TEL.:0262 641 35 88KONYA-BEYfiEH‹R-SELV‹ SO⁄UTMA-HACI ARMA⁄AN MH.
ANTALYA CD. NO:108/F-TEL.:0332 512 40 10 KONYA-SELÇUKLU-SAF‹R SO⁄UTMA-FER‹T PAfiA MH. GÜNEY SK. NO:3/F KULE S‹TE
C‹VARI-TEL.:0332 236 36 75 KONYA-ERKAM SO⁄UTMA-KARAKURT MH. FURKAN DEDE CD.ASBAfiKAN SK. NO:13/B-TEL.:0332 350 00
32 KONYA-ÖZCAN SO⁄UTMA VE ISITMA LTD fiT‹-N‹fiANTAfiIMH. HULUS‹ BAYBAL CD. NO:36/A-TEL.:0332 236 33 37 KONYA-SELÇUKLU-
KONSEY SOGUTMA VE ISITMA-KÜÇÜK ‹HSAN‹YE MH. fiA‹R GUBAR‹ SK.B‹NSA S‹TES‹ ALTI NO : 15 TEL.:0332 321 21 22 KONYA-AKfiEH‹REROL ELEKTRON‹K-MEYDAN MAH. ÇOCUK PARKI KOD NO:38-TEL.:0332 812 61 12 KONYA-MERAM-GÜRKAN TEKN‹K-‹HT‹YARETT‹N
MH.SIRÇALI MEDRESE CAD.‹BN‹B‹B‹ SK. NO:1/B-TEL.:0332-351 02 03 KONYA-SEYD‹fiEH‹R-TUNCER ELEKTRON‹K-KIBRIS CD. NO:26TEL.:0332 582 93 92 KONYA-DURMAZLAR ELEKTR‹K-ANKARA-KONYA CAD. NO:67-TEL.:0332 673 28 48 KONYA-ERE⁄L‹-ERDEM‹R
TEKN‹K-ÜÇ GÖZ MH. KIBRIS CD.EL‹T APT. NO:3 TEL.: 0332 713 02 53 KÜTAHYA-EL‹FO⁄LU ELEKTR‹K-FAT‹H SULTAN MEHMET BULVARI
DUAGÜR CAM‹‹ ALTI 43/B-TEL.:0274 226 32 80 MALATYA-YUVAM ELEKTRON‹K-‹ST‹KLAL MH. FUZUL‹ CD.‹MAMO⁄LU SK. NO:1-TEL.:0422
322 52 88 MALATYA-HAL‹M ELEKTRON‹K-SARAY MH. DEVECEL SK. NO:3-TEL.:0422 321 86 08MAN‹SA-SOMA-GÜRMAK TEKN‹K-
KURTULUfi MH. ‹DMAN SK. NO:47/A-TEL.:0236 613 66 56 MAN‹SA-SAL‹HL‹-AYKAR SO⁄UTMA- BEfiEYLÜL MH. BELED‹YE CD. NO:TEL.:2430236 714 88 68 MAN‹SA-AY ELEKTRON‹K MAN‹SA fiB.-YARHASANLAR MAH. ESK‹ HASA⁄A 2306 SOK.NO: 18/A-TEL.:0236 237 30 62-63
MAN‹SA-BURCU ELEKTRON‹K-TUNCA MAH. KURTULUfi CAD. NO:54-TEL.:0236-234 57 42 MAN‹SA-TURGUTLU-EM‹N ELEKTRON‹K-
ALTAY MH. SEV‹NÇ SK. NO:25-TEL.:0236 313 28 35 MAN‹SA-SARUHANLI-fiEN SO⁄UTMA-ATATÜRK MH. 7 EYLÜL CD. NO: 21/B-TEL.:0236
357 12 00 MAN‹SA-KULA-ERDAL KARAHAN-TERMO D‹NAM‹K-CAM‹‹ CED‹T MH. 62 SK. NO:67-TEL.:0236 816 70 99 MARD‹N-M‹DYAT-
SA⁄LAM ELEKTRON‹K-ESNAF SANATKARLAR KRED‹ KOOP. KARfiISI 2.CD.NO:56-TEL.:0482 462 33 90 MARD‹N-KIZILTEPE-‹BRAH‹MO⁄LU
ISITMA-fiANLIURFA CAD. ECE PASAJI NO:7-TEL.:0482 312 55 99 MARD‹N-DER‹K-UZAY ELEKTRON‹K-BELED‹YE MEYDANI NO:36-
TEL.:0482 251 34 35 MARD‹N-YEN‹fiEH‹R-MERKEZ TEKN‹K-KARAYOLLARI ARKASI BARIfi CAD GÜNAYDIN APT ALTI-TEL.:0482 212 83
06 MARD‹N-NUSAYB‹N-BÜDÜN ELEKTRON‹K-ZEYNEL AB‹D‹N MH. Ç‹LEK SK NO: 1/B-TEL.:0482 415 61 98 MU⁄LA-FETH‹YE-ANADOLU
TEKN‹K SERV‹S-ÖLÜDEN‹Z YOLU ÜZER‹ BAHA fiIKMAN CD.NO:157-TEL.:0252 611 39 12 MU⁄LA-M‹LAS-AFfi‹N YILDIRIM - TEKN‹K
SO⁄UTMA-HACI ‹LYAS MAH. PAZAR SOK.NO:14-TEL.:0252 512 14 45 MU⁄LA-YATA⁄AN-ASTEKN‹K ISITMA SO⁄UTMA SERV‹S‹-YEN‹ MH.
152. SK. NO:8-TEL.:0252 572 56 31 MU⁄LA-DALAMAN-ÖZKAN TEKN‹K SO⁄UTMA-MERKEZ MAHALLES‹ ATATÜRK CD.NO:56-TEL.:0252
- 41 -
Page 43

692 25 25 MU⁄LA-ELBO ELEKTR‹K ELEKTRON‹K-ORHAN‹YE MH. HÜRR‹YET CAD. NO:1/6-TEL.:0252 214 18 84 MU⁄LA-DATÇA-MEL‹H
YETK‹L‹ SERV‹SLER L‹STES‹
ELEKTRON‹K-‹SKELE MH. AMBARCA CD. NO:17-TEL.:0252 712 02 30 MU⁄LA-MARMAR‹S-‹LKSEL ELEKTRON‹K-YEN‹ YOL CD. N0:51/9TEL.:0252 412 62 60 MU⁄LA-URLA-STAR ELEKTRON‹K-‹N‹fiD‹B‹ CAD NO 1/C AKYAKA BELDES‹-TEL.:0252 243 40 42 MUfi-HAfi‹MO⁄LU
EK‹C‹ ELEKTRON‹K-HAfi‹MO⁄ULLARI EK‹C‹ ‹fi HANI BELED‹YE CD.NO:20/A-TEL.:0436 212 38 80 N‹⁄DE-HUZUR ELEKTR‹K-ILHANLI
MAH ÖZKUL MARKET KARSISI ÖZKILIÇ AP ALTI NO: 43-TEL.:0388 233 54 05 ORDU-TEK ISITMA SO⁄UTMA-SAKARYA MAH YENI KUMRU
CAD NO: 111-TEL.:0452 423 84 49 ORDU-HAZAR SO⁄UTMA-YEN‹ MAH. 26.SOK NO:17-TEL.:0452 214 04 49 ORDU-ÜNYE-STAR TEKN‹K-
KALEDERE MH. 20TEMMUZ CD. NO:16-TEL.:0452 324 82 51 ORDU-MERKEZ-M‹KRO ELEKTRON‹K-YEN‹ MH. 319 SK. NO:18 -TEL.: 0452
223 13 49 OSMAN‹YE-MODERN ELEKTRON‹K-ORTAOKUL CD. K‹fi‹O⁄LU ÇARfiISI NO:15-TEL.:0328 812 82 84 R‹ZE-ÇAYEL‹-ÖZER TEKN‹K-
MAKSUT ÖZER-EMNIYET MÜD.KARfiISI fiA‹RLER YOLU ÜZERI NO:3/2B-TEL.:0464 532 63 81 R‹ZE-CEVAH‹R ELEKTRON‹K-TOPHANE
MAH. ATATÜRK CAD. ‹fi PASAJI-TEL.:0464 213 16 17 SAKARYA-ADAPAZARI-ÇINAR ELEKTRON‹K-KÖMÜR PAZARI CAD. NO: 15 ATEL.:0264 271 39 12 SAMSUN-ÇARfiAMBA-ÖZKAN SO⁄UTMA-ORTA MH. TUNCAY KOCABAfi SK. NO:85-TEL.:0362 832 28 90 SAMSUN-
BAFRA-KARATAfi T‹CARET-KIZILIRMAK MH. F.ÇAKMAK SK. NO:18/A-TEL.: 0362 543 04 91 SAMSUN-GÜLTEK‹N SERV‹S-ATATÜRK
BULVARI NO.285-TEL.:0362 437 33 82 SAMSUN-DEN‹Z ELEKTRON‹K-KADIKÖY MH. OSMAN‹YE CD. NO: 68-TEL.:0362 432 44 80 S‹‹RT-
ERYILMAZ ELEKTRON‹K-CUMHUR‹YET CAD. NO:25 ULUCAM‹ KARfiISI-TEL.:0484 224 03 92 S‹NOP-ADA EV ALETLER‹-CAM‹ KEB‹R MH.
TÜTÜNCÜ SK. NO: 16-TEL.:0368 260 12 64 S‹NOP-AYANCIK-YILKAY SO⁄UTMA-YALI MH. DR.AZM‹ HAMZAO⁄LU CD. NO:46-TEL.:0368
613 52 12 S‹NOP-BOYABAT-ÖZTÜRK BEYAZ EfiYA BAKIM SERV‹S-GÖKDERE MH.YUSUF KEMAL BEY CD.NO:24-TEL.:0368 315 61 21
S‹VAS-EKOL ELEKTRON‹K-H‹KMET IfiIK CD.NALBANTLAR BAfiI KAVfiA⁄I NO:1/D-TEL.:0346 223 44 96 fiANLIURFA-SURUÇ-IfiIK SO⁄UTMA
TEKN‹KERL‹⁄‹-D‹K‹L‹ MH. Z‹YARET CD. NO:10-TEL.:0414 612 17 25 fiANLIURFA-AKTAfi ELEKTRON‹K-ASFALT CD. N0.22/F-TEL.:0414
217 14 87 fiANLIURFA-B‹REC‹K-YARAfiIR SO⁄UTMA-MEYDAN MAH 10 TEMMUZ CAD KÖPRÜ ÇIKIfiI NO : 9-TEL.:0414 652 36 38 fiIRNAKS‹LOP‹-ABAY ELEKTRON‹K-2. CADDE S‹EMENS BAY‹‹ KARfiISI-TEL.:0486 518 50 99 fiIRNAK-ULUDERE-ÜRÜN ELEKTRON‹K-CUMHUR‹YET
CD. PTT YANI-TEL.:0486 351 28 22 TEK‹RDA⁄-HAYRABOLU-POYRAZ TEKN‹K-H‹SAR MAH. ADELET SK. NO:24-TEL.:0282 315 55 48
TEK‹RDA⁄-SARAY-BATI TEKN‹K-YEN‹ MH. TAKS‹M CD. NO:9 TEL.:0282 768 69 34 TEK‹RDA⁄-MURATLI-AKAN ELEKTRON‹K-MURAD‹YE
MH. NAZIM SAV CD. NO:30/A-TEL.:0282 361 28 17 TEK‹RDA⁄-ÇORLU-FULL TEKN‹K-MUH‹TT‹N MH. F‹K‹R SK. NO:12/B-TEL.:0282 652
28 68 TEK‹RDA⁄-ARI ELEKTRON‹K-AYDO⁄DU MH. fiEH‹TLER CD. NO: 33/A-TEL.:0282 263 40 61 TEK‹RDA⁄-MALKARA-KER‹MO⁄ULLARI
T‹CARET-YEN‹MAHALLE GÜLDESTE SOK. NO: 4/B-TEL.:0282 427 16 61 TEK‹RDA⁄-ÇERKEZKÖY-ÇA⁄RI ELEKTRON‹K-G.O. PAfiA MH.
SAYAR SK. KARDEfiLER APT. NO:5 -TEL.:0282 726 02 66 TOKAT-ERBAA-H‹DRO ELEKT‹R‹K-CUMHUR‹YET MH. GAZ‹ BULVARI NO:144TEL.:0356 715 56 01 TOKAT-C‹HAN ELEKTRON‹K-G.O.PAfiA BULVARI S‹VAS CAD. NO:290/A- TEL.:0356 214 00 74 TOKAT-TURHAL-GÜÇLÜ
SO⁄UTMA-CELAL MH. TUNA SK. NO:11-TEL.: 0356 276 39 66 TOKAT-CEM TEKN‹K SO⁄UTMA-SO⁄UKPINAR MH. GOP BULVARI 241/A
GÖKÇE PASAJI NO:14-TEL.:0356 212 37 57 TRABZON-ÇIRAK TEKN‹K-FAT‹H MH. AYASOFYA CD. NO: 57 MÜZE KARfiISI-TEL.:0462 229
66 44 TRABZON-AKÇAABAT-ATOM ELEKTR‹K-ORTA MH. ERENLER SK. NO:5 -TEL.:0462 228 12 58 TRABZON-YET-SAN ELEKTRON‹K-
FAT‹H MH. FAT‹H CD. COfiKUNER PASAJI NO:2/B-TEL.:0462 223 15 04 TRABZON-ARAKLI-fiENGÜL TEKN‹K-BA⁄KUR ÇARfiISI NO: 10 /
A-TEL.:0462 721 74 11 UfiAK-MERKEZ-KOÇ SO⁄UTMA- ‹fiL‹CE MH. ADAfi SK. NO:29/E -TEL.:0284 513 89 66 VAN-ERC‹fi-ÖZKANAT
TAM‹RAT-EMN‹YET KARAKOL ARKASI NO:3-TEL.:0432 351 95 40 VAN-EB‹NÇ TEKN‹K-SIHKE CAD ATEfi SOK. NO 10-TEL.:0432 214 31
37 VAN-BURHAN AYDIN - ÖZ USTA TAM‹RAT-KÜLTÜR MERKEZ‹ C‹VARI DEM‹RC‹LER 1. SK. NO:1/C-TEL.:0432 216 34 58 YALOVA-
ALTINOVA-DO⁄AN TEKN‹K SO⁄UTMA-CUMHUR‹YET MH.MERKEZ DURAK KARfiISI NO:29A-TEL.:0226 461 26 21 YALOVA-TINAZTEPE
ELEKTR‹K-‹STANBUL CD. BORA SK. NO: 14-TEL.:0226 812 01 60 YOZGAT-AKDA⁄MADEN‹-AYDIN SO⁄UTMA-AHISHAVI MH. 2. HANLAR
SK. NO :10-TEL.:0354 314 64 12 YOZGAT-ÖNDER ELEKTRON‹K-UN PAZARI NO:14-TEL.:0354 212 79 67 YOZGAT-SORGUN-KARDEfiLER
ELEKTRON‹K-CUMHUR‹YET CD. NO:29 1/C-TEL.:0354 415 45 79 ZONGULDAK-KRD ERE⁄L‹-UZMAN ELEKTRON‹K-ERDEM‹R CAD NO:130-
TEL.:0372 316 31 28 ZONGULDAK-MERKEZ-EMEK ELEKTRON‹K-PAP‹LA ‹fi HANI ZEM‹N KAT NO:9 SO⁄UKSU-TEL.:0372 251 67 31
- ONLINE YETK‹L‹ SERV‹SLER L‹STES‹ -
"Yetkili servislerimizin güncellenmifl haldeki listesine
www.sinbo.com.tr internet adresinden ulaflabilirsiniz."
- 42 -
Page 44

- GARANT‹ fiARTLARI -
1. Garanti süresi, mal›n teslim tarihinden itibaren bafllar ve 2 y›ld›r.
2. Mal›n bütün parçalar› dahil(kullan›m hatalar›ndan kaynaklanan k›r›lmalar hariç) olmak üzere tamam› firmam›z›n
garantisi kapsam›ndad›r.
3. Mal›n garanti süresi içerisinde ar›zalanmas› durumunda, tamirde geçen süre garanti süresine eklenir. Mal›n tamir
süresi en fazla 30 ifl günüdür. Bu süre, mala iliflkin ar›zan›n servis istasyonuna servis istasyonunun olmamas›
durumunda, mal›n sat›c›s›, bayii, acentas›,temsilcili¤i, ithalatç›s› veya imalatç›s›-üreticisinden birisine bildirim tarihinden
itibaren bafllar. Mal›n ar›zas›n›n 15 ifl günü içerisinde giderilmemesi halinde, imalatç›-üretici veya ithalatç›; mal›n
tamiri tamamlan›ncaya kadar, benzer özelliklere sahip baflka mal› tüketicinin kullan›m›na tahsis etmek zorundad›r.
4. Mal›n garanti süresi içerisinde, gerek malzeme ve iflçilik, gerekse montaj hatalar›ndan dolay› ar›zalanmas› halinde,
iflçilik masraf›, de¤ifltirilen parça bedeli ya da baflka herhangi bir ad alt›nda hiçbir ücret talep etmeksizin tamiri
yap›lacakt›r.
5. Tüketicinin onar›m hakk›n› kullanmas›na ra¤men mal›n;
-Tüketiciye teslim edildi¤i tarihten itibaren, belirlenen garanti süresi içinde kalmak kayd›yla,bir y›l içerisinde; ayn›
ar›zan›n ikiden fazla tekrarlanmas› veya farkl› ar›zalar›n dörtten fazla meydan gelmesi veya belirlenen garanti süresi
içerisinde farkl› ar›zalar›n toplam›n›n alt›ndan fazla olması unsurlar›n›n yan›s›ra, bu ar›zalar›n maldan yararlanamamay›
sürekli k›lmas›,
-Tamiri için gereken azami sürenin afl›lmas›,
-Firman›n servis istasyonunun, servis istasyonunun mevcut olmamas› halinde s›rayla sat›c›s›, bayii, acentesi temsilcili¤i,
ithalatç›s› veya imalatç› - üreticisinden birisine düzenleyece¤i raporla ar›zan›n tamirine mümkün bulunmad›¤›n›n
belirlenmesi,durumlar›nda, tüketici mal›n ücretsiz de¤ifltirilmesini, bedel iadesi veya ay›p oran›nda bedel indirimi
talep edebilir.
6. Mal›n kullanma k›lavuzunda yer alan hususlara ayk›r› kullan›lmas›ndan kaynaklanan ar›zalar garanti kapsam›
d›fl›ndad›r.
7. Garanti Belgesi ile ilgili olarak ç›kabilecek sorunlar için Sanayi ve Ticaret Bakanl›¤› Tüketicinin ve Rekabetin
Korunmas› Genel Müdürlü¤ü’ne baflvurulabilir.
‹THALATÇI F‹RMA
DE‹MA ELEKTROMEKAN‹K ÜRÜNLER ‹NfiAAT SPOR MALZEMELER‹ ‹MALAT SAN. VE T‹C. A.fi.
Cihangir Mh. Güvercin Cd. No:4 Haramidere Mevkii Avcılar - ‹stanbul - Türkiye
Tel : (0212) 422 94 94 & Fax : (0212) 422 03 49
www.sinbo.com.tr - info@sinbo.com.tr
- 43 -
Page 45

- SFH 3321, SFH 3322 ELEKTR‹KL‹ ISITICI -
- GARANT‹ BELGES‹ -
Garanti Belge No : 61151
SSHY Belge No : 25551
‹THALATÇI F‹RMA
Ünvanı : DE‹MA ELEKTROMEKAN‹K ÜRÜNLER‹ ‹Nfi. SPOR MALZ.
‹MALAT SAN. ve T‹C. A.fi.
Adresi : Cihangir Mah. Güvercin Cad. No:4 Haramidere Mevkii
Avc›lar / ‹STANBUL
Tel. : 0212 422 94 94 & Fax: 0212 422 03 49
Yetkili Kifli :
Yönetim Kurulu Baflkan›
Ürünün Cinsi : ELEKTR‹KL‹ ISITICI
Markası : S‹NBO
Modeli : SFH 3321, SFH 3322
Alt Modeli : Bandrol ve Seri No :
Teslim Tarihi ve Yeri :
Garanti Süresi : 2 Yıldır
Azami Tamir Süresi : 30 ‹fl Günü
Kullanım Ömrü : Bakanl›kça belirlenen ve ilan edilen kullan›m ömrü 7 y›ld›r.
(Ürünün fonksiyonlar›n› yerine getirebilmesi için gereken yedek parça temin süresi)
SATICI F‹RMA
Ünvanı :
Adresi :
Tel.Fax :
Fatura Tarihi ve No :
Teslim Tarihi ve Yeri :
‹mza ve Kafle :
Bu bölüm, ürünü sat›n ald›¤›n›z Yetkili Sat›c› taraf›ndan imzalanacak ve kaflelenecektir.
Bu belgenin kullan›lmas›na; 4077 say›l› Tüketicinin Korunması Hakkında Kanun ve bu Kanun’a dayan›larak yürürlü¤e konulan Garanti Belgesi
Uygulama Esaslar›na Dair Tebli¤ uyar›nca, TC Sanayi ve Ticaret Bakanl›¤› Tüketicinin ve Rekabetin Korunmas› Genel Müdürlü¤ü tarafından
izin verilmifltir.
Garanti Belge Onay Tarihi : 09/10/2008
SSHY Belge Onay Tarihi : 30/03/2010
- 44 -
Page 46

MÜfiTER‹ H‹ZMETLER‹
De¤erli Müflterimiz,
En uygun fiyata en iyi ürünü vermenin yan› s›ra; en iyi hizmeti vermenin de
önemli oldu¤una inan›yoruz. Bu nedenle siz bilinçli tüketicilere daha yak›n
olabilmek için, internet adresimizdeki eriflim formlar›n›n yan› s›ra, tüketici
dan›flma hatlar›m›z› da hizmetinize açm›fl durumday›z.
TÜKET‹C‹
DANIfiMA HATTI
444 66 86
MERKEZ
TEKN‹K SERV‹S
(0212) 422 94 94
www.sinbo.com.tr
Dan›flma Hatlar›m›z›,
- Hafta içi her gün 08.30-18.00 saatleri aras›nda arayabilir; istek, öneri ve
flikayetlerinizi firmam›za iletebilirsiniz.
Tüketicinin Dikkatine:
Ürünlerimizle ilgili hizmetleri tam olarak alabilmek için afla¤›daki önerilere
uyman›z› rica ederiz:
1. Ürünü ald›¤›n›zda Garanti Belgesini mutlaka yetkili sat›c›n›za onaylatt›r›n›z.
2. Ürünü kullanma k›lavuzu esaslar›na göre kullan›n›z.
3. Ürününüzle ilgili hizmet talebiniz oldu¤unda yukar›daki telefon
numaralar›ndan, Tüketici ‹liflkileri Merkezi'ne baflvurunuz.
4. Ürünü promosyon arac›l›¤› ile edinmiflseniz, ürüne ait garanti belgesini en
yak›n yetkili servisimize giderek onaylatt›r›n›z.
5. Teknik servisteki ifliniz bitti¤inde "Hizmet Fifli" almay› unutmay›n›z.
Alaca¤›n›z bu fifl, ileride ürününüzde meydana gelebilecek herhangi bir
sorunda size yarar sa¤layacakt›r.
6. Cihaz›n›z ilk çal›flt›rmada çal›flm›yor veya ar›zal› ise, size en yak›n S‹NBO
Yetkili Servisine baflvurabilir veya S‹NBO Dan›flma Hatlar›ndan yard›m
alabilirsiniz.
- 45 -
Page 47

Page 48

Made in P.R.C.
‹mal Y›l› : 2010
- TEDAR‹KÇ‹ F‹RMA / EXPORTER United Favour Development Limited
Unit B, 10/F Lee May Building 788-790
Nathan Road, Mongkok, Kowloon, HK.
- UYGUNLUK BEYANI / CE TÜV SÜD Product Service GmbH
Zertifizierstelle Ridlerstrasse 65
80339 München, Germany
E8 07 05 60109 006
EEE Yönetmeli¤ine uygundur.
 Loading...