


 Loading...
CRYSTAL4 UHD HDR
User Guide
CRYSTAL4 1
User Guide

Contents
3Important Information
3About this User Guide & Safety
5 Environnent
6 Notice
7Introduction
7System Components
8 Overview
8 Remote Control
12Product Overview
13Connections
14Keypad
15Installation
15Location
16Mounting
19Connections
21Switching On and Off
22LED indicators
24Operation
24Main Menu
25Source
26Image
29Color
30Lamp Control
31Setup
33Advanced
34Info
35Image Size and Projection Distances
36Compatibility Modes
37Replacing the lamp
40Adjusting the volume
41How to install a ceiling bracket with Crystal4
42Specifications
43Dimensions

• Important information
About this User Guide
This User Guide describes how to set up and operate the following projectors:
CRYSTAL4
Except where otherwise indicated, the information in this guide applies to all the projectors listed above, that will be referred to as “CRYSTAL4”.
Information contained in this User Guide may be updated from time to time due to product improvements and customer feedback. Visit www.sim2.com to find the latest version of this document.
This document contains proprietary information protected by copyright. All rights are reserved.
All trademarks and registered trademarks are the property of their respective owners.
Safety
To reduce the risk of electrocution, disconnect the power cord on the rear panel before removing the glass cover or side panels of the projector. For technical service refer to trained personnel authorized by the manufacturer.
Read this manual
Read all chapters of this manual carefully before switching on the projector. This manual provides basic instructions for operating the CRYSTAL4 projector. Installation, preliminary adjustments and procedures that necessitate the removal of the glass cover and the contact with electrical components, must be performed by authorized trained technicians. To ensure safe operation and long term reliability use only the power cord supplied by the manufacturer. Observe all warnings and precautions. Keep the manual for future consultation.
Do not touch internal parts of the projector
Inside the housing there are electrical parts carrying dangerously high voltages and parts operating at high temperature. Never open the housing. Entrust all servicing and repair work to a SIM2 Authorized Service Center. Opening the housing voids the warranty.
Disconnect the projector from the power supply
The device that disconnects the projector from the electrical outlet, is the power plug. Ensure that the power cord plugs and the electrical outlets are easily accessible during installation operations. Pull the plug, not the cord, to disconnect the projector from the electrical outlet. Use only the specified power supply. Connect the projector to the electrical supply with rated voltage of between 100-240 V AC, 50/60 Hz and equipped
CRYSTAL4 3
User Guide

with a protective earth connection. If you are not sure of your domestic electrical out - let, contact an electrician. Take care to avoid overloading the power socket and any extension leads.
Switching the projector off
Pay attention to the switch off procedure for the projector. The projector must always be brought back to the standby state to allow the projector to carry out the cooling procedure. Should this not happen, for example due to a power cut, the projector may enter a state of protection that leads to switch-on being blocked. This block will last until the internal components of the projector have completely cooled down. Allow 90 seconds for the projector to cool down.
Be careful with cables
Make sure cables are routed so that people are not impeded or become a trip hazard. Keep all cables away from children. Install the projector as close to the wall socket as possible. Avoid stepping on power cords, make certain they do not become tangled, and never jerk or tug them; do not expose them to sources of heat, and make sure they do not become knotted or crimped. If the power cords become damaged, stop using the projector and request the assistance of an authorized technician.
Disconnect the projector from the electrical outlet during storms and when not in use
To prevent damage from lightning strikes in the vicinity, disconnect the projector during storms or when the projector is going to be left unused for a long time.
Avoid contact with liquids and exposure to damp
Do not use the projector near water (sinks, tubs and so on); do not place objects containing liquids on or near the projector and do not expose it to rain, humidity, drops of water or sprays; do not use water or liquid detergent to clean it.
Place the projector on a stable surface
Place the projector on a stable surface or use a suitable ceiling mounting bracket. Never place the projector on its side or rear, on the lens or top panel or rear.
Do not allow the projector to overheat
To prevent overheating, allow a free space of at least 0.20 m (5 in) on the rear, on the top, and on the right and left sides of the projector. Do not obstruct the ventilation slots. Do not place the projector near heat sources such as heaters, radiators or other devices (including amplifiers) that generate heat. Do not place the projector in an area where there is insufficient space (shelving units, bookshelves and so on) and in general avoid placing it in poorly ventilated areas as this may prevent sufficient cooling and significantly reduce lamp life.
Take special care regarding movement of the lens
Do not place objects in the slots on the side of the lens and also ensure that vertical lens movements are not impeded by external objects.
Do not hold the projector by its lens.
CRYSTAL4 4
User Guide
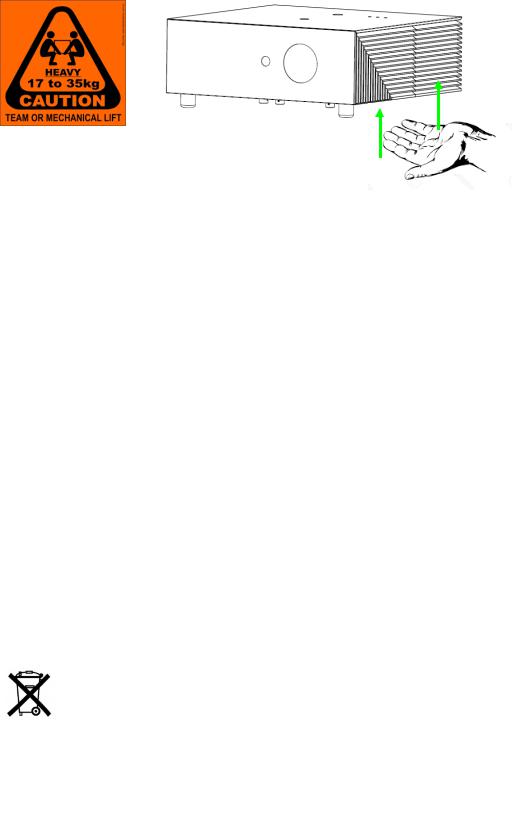
CRYSTAL4 handling and transportation
Do not insert objects through the openings in the projector
Make sure that no objects are inserted inside the projector.
If this should occur, disconnect the projector from the power supply immediately and call an authorized technician.
Power saving
We advise disconnecting the projector from the power supply when not in use. In this way you will achieve considerable power savings while at the same time protecting internal electrical parts from wear.
Do not use under the following conditions:
•In extremely hot, cold or humid environments
◦Ensure that the ambient room temperature is within 5°C ~ 35°C
◦Relative humidity is 10% ~ 85%
•In areas susceptible to excessive dust and dirt.
•Near any equipment generating a strong magnetic field.
•In direct sunlight.
Environment
This product contains materials derived from natural resources during its manufacture. It may contain materials that constitute a health and environmental hazard. To prevent harmful materials from being released into the environment and to promote the use of natural materials, SIM2 provides the following information regarding the disposal and recycling of the product.
Waste electrical and electronic materials (WEEE) should never be disposed of in normal urban waste disposal facilities.
The label on the product, shown here, indicating a canceled garbage can, is intended to remind you that the product requires special handling at the end of its service life. Materials such as glass, plastic and some chemical compounds are recoverable and can be recycled for reuse.
CRYSTAL4 5
User Guide

Observe the following instructions:
When you no longer wish to use your electrical and electronic equipment, take it to your local waste disposal facility for recycling.
You may return your old equipment to your SIM2 Authorized Dealer free of charge when you buy a new product that is equivalent or has the same functions as the old one. Contact SIM2 to find your local dealer.
If you need more information regarding recycling, reuse and product exchanges, contact SIM2 customer service.
Lastly we suggest further measures to safeguard the environment, such as recycling of internal and external packaging (including that used for shipping) in which the product was delivered. With your help, we can reduce the amount of environmental resources required to make electric and electronic equipment, reduce the use of waste tips for used equipment and, in general, improve our quality of life by making sure that hazardous materials are correctly scrapped. Incorrect treatment of the product at the end of its service life and failure to follow the above disposal instructions are punishable under local legislation.
Notice
The projector has been subjected to exhaustive operating tests by SIM2 to guarantee the highest quality. The projector light source life should thus initially be around 30-60 hours. In addition to the customary checks, the Quality Control department also runs additional statistical tests before shipment. In such cases, the packaging may show signs of having been opened, and the hours of light source operation may prove to be higher than those normally shown when only standard tests are performed.
As the optical system of the CRYSTAL4 is extremely compact and has the purpose of developing very high brightness and contrast, it is possible that a small quantity of light is visible outside of the projection area and will vary depending the zoom and shift setup. This characteristic of the optical system is to be deemed as normal. In order to reduce this effect SIM2 recommends that the area surrounding the projection screen is as dark as possible.
As with any bright light source, do not stare into the beam, RG2 IEC 62471-5:2015.
CRYSTAL4 6
User Guide

• Introduction
The SIM2 CRYSTAL 4 UHD HDR projector achieves excellent picture quality through the partnership of the latest 4K UHD 0.67” DLP® chipset from Texas Instruments and SIM2’s advanced video processing technology for a crisp, natural, and colorful viewing experience in UHD HDR format.
A high-power 300W lamp enables SIM2 CRYSTAL 4 UHD HDR to provide up to 2.200 ANSI-lumens on-screen.
The SIM2 CRYSTAL 4 UHD HDR is the best solution for mid-size Home and Media Rooms. The SIM2 CRYSTAL 4 UHD HDR features a stylish ‘made-in-Italy’ design:
a distinctive, contemporary cabinet enriched by a luxurious crystal finish by designer Giorgio Revoldini. Available in Black Crystal glass.
System Components
Your CRYSTAL4 projector ships with the following items:
1 x backlit remote control unit (with two AAA/LR03 batteries)
1 x AC power cord - 2 m (6.6 ft.) long
1 x User Guide (this document)
1 x HDMI cable
CRYSTAL4 7
User Guide

• Overview
Remote Control
1
2
3
4
5
6
7
8
9
 Power Off
Power On
 HDMI 1,2,3
Picture Mode
 Night
Night
Day
 Menu
Menu
EXIT
10 16 : 9
11 4 : 3
4 : 3
12 16 : 10
13 2.35 : 1
14 Source
15 Auto (Resync)
16 Volume
17 HDR
HDR
18 Mute
Mute
19 Freeze
20 Blank
Blank
CRYSTAL4 8
User Guide
1 Power Off
2Power On
3 HDMI 1,2,3
4Picture Mode
5 Night
Night
6Day
7 Menu
Menu
8EXIT
9
10 16 : 9
11 4 : 3
4 : 3
12 16 : 10
13 2.35 : 1
14 Source
15 Auto (Resync)
16 Volume
17 HDR
HDR
18 Mute
Mute
19 Freeze
20 Blank
Blank
 Turn Off the projector
Turn On the projector
 Choose source from HDMI 1, 2 or 3 connector number
Select a picture mode for optimized settings for different applications
 Switch the picture mode to Night mode
Switch the picture mode to Day mode.
 Display or exit the on-screen display menus for projector
Goes back to previous OSD menu, exits and saves menu settings.
Four directional select keys – use these menu arrows to select items or make adjustments to your selection
 Displays 16 : 9 aspect ratio.
Displays 4 : 3 aspect ratio.
 Displays 16 : 10 aspect ratio.
Displays 2.35 :1 aspect ratio.
 Displays the source selection menu.
Automatically synchronizes the projector to the input source.
 Displays the volume setting menu.
Activate the HDR function
 Toggles the audio from on and off in the built-in speaker
  Toggles the freeze and unfreeze function in the displayed image
  Toggles the blank function in the displayed image
CRYSTAL4 9
User Guide

Custom Remotes
You can use your own IR remote control to control your CRYSTAL4 projector.
If you are using a remote control with learning capabilities, use the projector re - mote control to teach the commands to your remote.
If you are using a programmable remote control, the setup software probably allows importing Hex codes. See “SIM2 CRYSTAL4 IR Control” document, for a list of all the projector codes.
Operation
The CRYSTAL4 projector has 3 IR receivers: one (A) on the front of the unit, one (B) on the top and one (C) on inputs panel. The operative range of the remote control is approximately 10 m (33 ft.) and ±15°. Make sure that there is nothing obstructing the infrared beam between the remote control and the IR receiver you are pointing to. You can point the remote control towards the screen, as the IR beam is reflected by the screen towards front IR receiver of the projector. In this case the effective range of the
remote control may be smaller than declared.
B
C
A
Item Description
A Front IR receiver
BTop IR receiver
C Input panel IR receiver
Batteries
To install batteries in the remote control:
Open the battery cover.
Insert two AAA (LR03) batteries making sure the polarities match the + marks inside the battery compartment.
Reinsert the cover.
CRYSTAL4 10
User Guide
Replace the batteries with new ones when the operating range of the remote control decreases. Replace only with the same or equivalent type recommended by the manufacturer. Dispose of used batteries according to local regulations. Make sure you do not mix old and new batteries or different types of batteries.
Remove the battery compartment cover by sliding the cover in the direction of the arrow.
Insert the batteries paying attention to the positive pole.
Reinsert the compartment cover by sliding the cover in the direction of the arrow.
Warning: If you will not use the remote control for a long time, remove the batteries to avoid battery leakage. When you dispose of the battery, you must obey the law in the relative area or country.
CRYSTAL4 11
User Guide
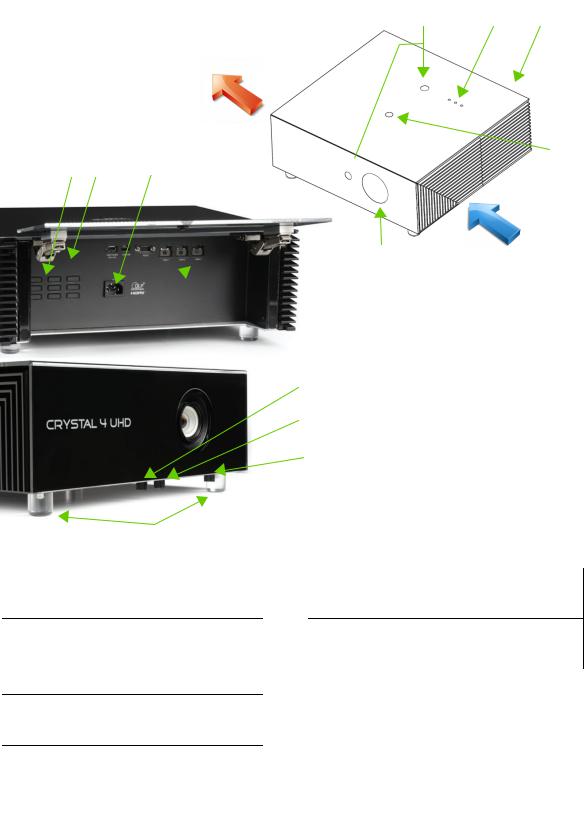
Product overview
A B A
F
G A H  C
C
E
D
 I
I
J
K
L
M
A |
IR Receiver |
|
H |
|
Power Socket |
|
B |
LED Status Indicators |
|
I |
|
Input / Output |
|
C |
Glass safety screw |
|
J |
|
Optical Lens Vertical Shift |
|
D |
Lens |
|
K |
|
Optical Lens Zoom |
|
E |
Ventilation Inlet |
|
L |
|
Optical Lens Focus |
|
|
|
|
||||
|
|
|
|
|
|
|
F |
Ventilation Outlet |
|
M |
|
Tilt-Adjustment Feet |
|
G |
Keypad |
|
|
|
|
|
|
|
|
|
|
||
|
|
|
|
|
|
|
CRYSTAL4 12
User Guide
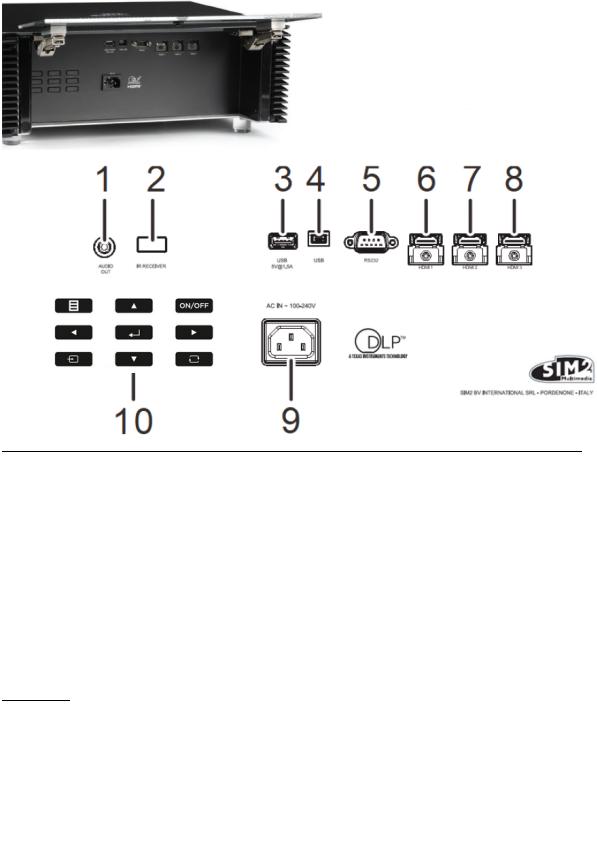
Connections
Inputs |
6 |
HDMI 1 |
v2.0a, HDCP 2.2 |
UHD |
|
7 |
HDMI 2 |
v2.0a, HDCP 2.2 |
UHD |
|
8 |
HDMI 3 |
v2.0a, HDCP 2.2 |
MHL UHD |
Control/ |
2 |
IR receiver |
Receive IR signal from remote control. |
|
Service |
3 |
USB |
USB-A (Power out 5V-1,5A) for firmware upgrade. |
|
|
||||
|
4 |
USB |
Mini USB-B for firmware upgrade. |
|
|
5 |
RS-232 |
RS232 port: projector control from serial commands |
|
|
10 |
Keypad |
Function keys for projector's control and OSD operations |
|
Outputs |
1 |
AUDIO |
For a connection to an audio amplifier. |
|
Power In |
9 |
AC in |
Connect the Power cable |
|
CRYSTAL4 13
User Guide
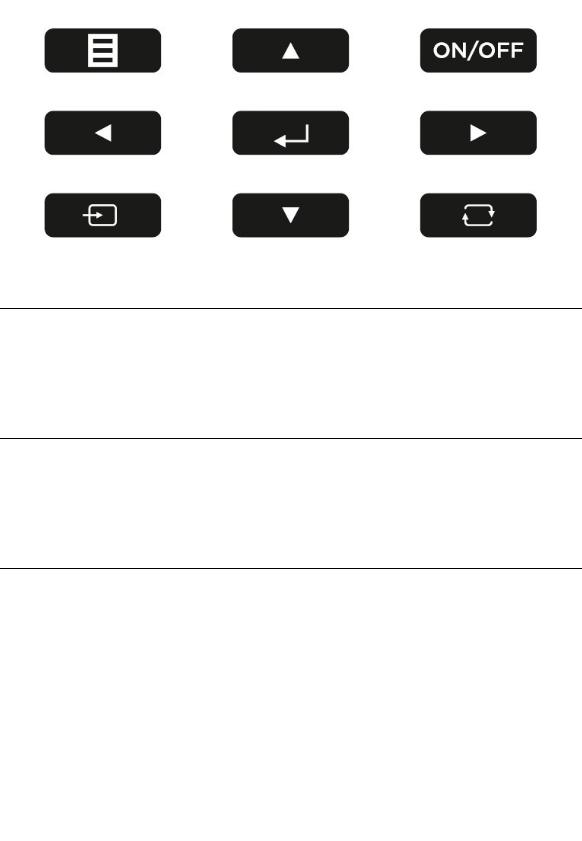
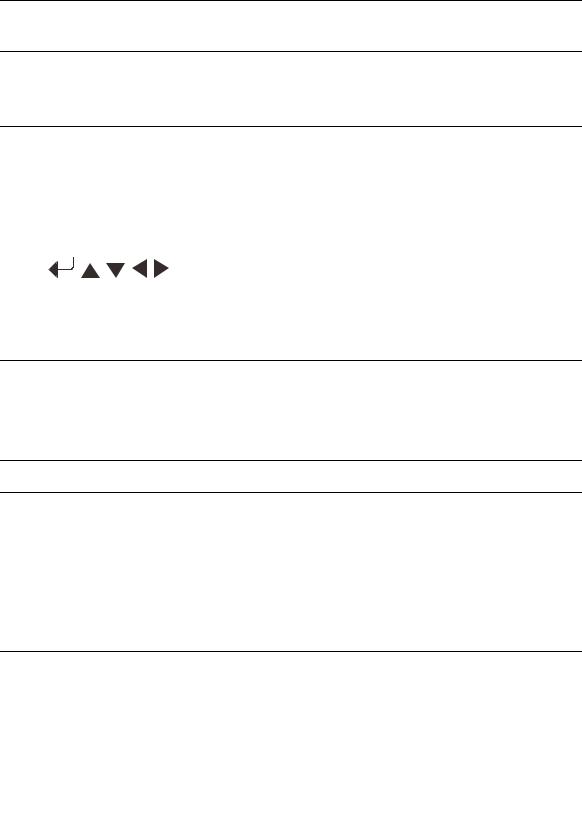
Keypad
A B F
B C B
D B E
A |
Menu - opens and exits from the OSD menus |
|
|
B |
Left, Up, Right and Down, for Directional Select Keys in the OSD |
|
|
C |
Select or Enter in the OSD item |
|
|
D |
Source selection |
|
|
E |
Auto (Resync) - automatically synchronizes the projector to the input source. |
|
|
F |
Turn On or turn Off the projector |
|
CRYSTAL4 14
User Guide
Loading...