


 Loading...
CRYSTAL Digital Projector
Home Cinema Series
User Manual
Table of contents |
|
Important safety |
|
instructions ........................... |
3 |
Shipping contents........................ |
5 |
Remote control batteries ........... |
6 |
Remote control operation ......... |
6 |
Projector features ........................ |
7 |
Projector exterior view ................ |
8 |
Controls and functions................ |
9 |
Controls ............................................. |
9 |
Remote control .............................. |
10 |
Positioning your projector.11 |
|
Choosing a location ................. |
11 |
Obtaining a preferred projected |
|
image size................................... |
12 |
How to determine the position of the projector for a given screen size ..12
How to determine the |
|
recommended screen size for a |
|
given distance................................ |
12 |
Projection dimensions.................... |
14 |
Shifting the projection lens............ |
16 |
Preparations.................................... |
17 |
Connecting HDMI devices............ |
17 |
Connecting component-video |
|
devices ............................................ |
18 |
Connecting S-Video or video |
|
devices ............................................ |
18 |
Connecting a computer............... |
19 |
Using the projector ............ |
19 |
Turning the projector on ........... |
19 |
Selecting an input source......... |
20 |
Fine-tuning the image size and |
|
clarity .......................................... |
20 |
Using the menus ........................ |
21 |
Adjusting the projected image22 |
|
Adjusting the projection angle..... |
22 |
Correcting picture distortion......... |
22 |
Using the preset and user |
|
modes......................................... |
23 |
Fine-tuning the picture quality . 25
Advanced picture quality |
|
controls ....................................... |
26 |
Selecting the aspect ratio ........ |
29 |
Operating in a high altitude |
|
environment ............................... |
31 |
Displaying more than one image |
|
source simultaneously ............... |
31 |
Creating your own startup |
|
screen ......................................... |
33 |
Personalizing the projector menu |
|
display......................................... |
33 |
Turning the projector off ........... |
33 |
On-Screen Display (OSD) |
|
menus.......................................... |
35 |
Care of the projector ................ |
41 |
Lamp information ...................... |
42 |
Getting to know the lamp hour ... |
42 |
Extending lamp life ........................ |
42 |
Replacement lamp ....................... |
42 |
Indicators .................................... |
43 |
Troubleshooting ......................... |
44 |
Specifications............................. |
45 |
Warranty and Copyright |
|
information ........................ |
48 |
2 Table of contents
Thank you for your purchase of this quality video projector! It has been designed to provide you with an enjoyable home theater viewing experience. For the best results, please read this manual through carefully as it is your guide through the control menus and operation.
Important safety instructions
Your projector is designed and tested to meet the latest standards for safety of information technology equipment. However, to ensure safe use of this product, it is important that you follow the instructions mentioned in this manual and marked on the product.
1.Please read this user manual before you operate your projector. Keep this manual in a safe place for future reference.
2.Always place the projector on a level, horizontal surface during operation.
-Do not place the projector on an unstable cart, stand, or table as it may fall and be damaged;
-Do not place inflammables near the projector;
-Do not use if tilted at an angle of more than 10 degrees left to right, nor at angle of more than 15 degrees front to back.
3.Do not store the projector on end vertically. Doing so may cause the projector to fall over, causing injury or resulting in damage.
4.Do not place the projector in any of the following environments:
-space that is poorly ventilated or confined. Allow at least 50 cm clearance from walls and free flow of air around the projector;
-locations where temperatures may become excessively high, such as the inside of a car with all windows closed;
-locations where excessive humidity, dust, or cigarette smoke may contaminate optical components, shorten the projector’s lifespan and darken the screen;
-locations near fire alarms;
-locations with an ambient temperature above 35°C/95°F;
-locations where altitude is higher than 1500 meters/4920 feet above sea level.
5.Do not block the vents holes while the projector is on (even in standby mode):
-Do not cover the projector with any item;
-Do not place the projector on a blanket, bedding or any other soft surface.
6.In areas where the mains power supply voltage may fluctuate by 10 volts, it is recommended that you connect your projector through a power stabilizer, surge protector or uninterruptible power supply (UPS) as appropriate to your situation.
7.Do not step on the projector or place any objects upon it, glass surface could be damaged.
8.Do not place liquids near or on the projector. Liquids spilled into the projector will void your warranty. If the projector does become wet, disconnect it from the power supply.
9.Do not look straight into the projector lens during operation. It may harm your sight.
10.Do not operate the projector lamp beyond the rated lamp life. Excessive operation of lamps beyond the rated life could cause a lamp to break on rare occasions.
11.Never attempt to replace the lamp assembly until the projector has cooled down and is unplugged from the power supply.
12.When you think service or repair is required, take the projector only to a suitably qualified technician.
Important safety instructions |
3 |
13.Do not attempt to disassemble this projector. There are dangerous high voltages inside which may cause death if you should come into contact with live parts.
Under no circumstances should you ever undo or remove any other covers. Refer servicing only to suitably qualified professional service personnel.
14.Do not install product if glasses appear damaged or broken. Go in touch with local service for replacement.
15.The projector does not require internal adjustment. There are no user serviceable parts inside the projector. To replace the bulb or any other repairs, contact your local service centre, whose engineers will be happy to efficiently solve any problem.
Moisture condensation
Never operate the projector immediately after moving it from a cold location to a hot location. When the projector is exposed to such a change in temperature, moisture may condense on the crucial internal parts. To prevent the projector from possible damage, do not use the projector for at least 2 hours when there is a sudden change in temperature.
Avoid volatile liquids
Do not use volatile liquids, such as insecticide or certain types of cleaner, near the projector. Do not have rubber or plastic products touching the projector for a long time. They will leave marks on the finish. If cleaning with a chemically treated cloth, be sure to follow the cleaning product’s safety instructions.
Disposal
This product contains the following materials which are harmful to human bodies and environment.
•Mercury, which is used in the lamp.
-To dispose of the product or used lamps, consult your local environment authorities for regulations.
Notice
Please keep the original packing for possible future shipment. If you need to pack your projector after use, adjust the projector lens to an appropriate position, put the lenscushion around the lens and fit the lens cushion and projector cushion together to prevent damage during transportation.
4 Important safety instructions

Overview
Shipping contents
Carefully unpack and verify that you have the video projector and the items below. Some of the items may not be available depending on your region of purchase. Please check with your place of purchase.
 Some of the accessories may vary from region to region.
The warranty card is only supplied in some specific regions. Please consult your dealer for detailed information.
Remote control 2 pieces |
Batteries*2 |
HDMI cable |
RS232 cable |
(USA)
|
|
(UK) |
(EU) |
|
User manual CD |
Quick start guide |
Power cable |
Hexagonal tool |
|
Important safety instructions |
5 |

Remote control batteries
1. To open the battery cover, turn the remote control over to view its back, push on the finger grip on the cover and slide it down in the direction of the arrow as illustrated. The cover will slide off.
2.Remove any existing batteries (if necessary) and install two new AAA batteries observing the battery polarities as indicated in the base of the battery compartment. Positive (+) goes to positive and negative (-) goes to negative.
3.Refit the cover by aligning it with the case and sliding it back up into position. Stop when it clicks into place.
 Notes on handling batteries
•Do not mix old batteries with new ones, or mix different types of batteries.
•Avoid leaving the remote control and batteries in an excessive hot or humid environment like the kitchen, bathroom, sauna, sunroom, or in a closed car.
•Dispose of used batteries according to the battery manufacturer’s instructions and
local environment regulations for your region.
•If the remote control will not be used for an extended period of time, remove the batteries to avoid damage to the control from possible battery leakage.
Remote control operation
• Make sure that there is nothing positioned between the remote control and the infrared (IR) sensors on the projector that
might obstruct the IR beam from the remote up to 8 m control reaching the projector.
• The effective range of the remote control is up to 8 meters, and at an angle within 45
degrees of the IR beam. Always aim straight
at the projector, however most screens will also reflect the IR beam to the projector.
 Ceiling mounting the projector
We want you to have a pleasant experience using our projector, so we need to bring this safety matter to your attention to prevent damage to person and property.
If you intend to mount your projector on the ceiling, we strongly recommend that you use a proper projector ceiling mount kit and that you ensure it is securely and safely installed.
6 Important safety instructions
Projector features
•Full HD compatible
The projector is compatible with Standard Definition TV (SDTV) 480i, 480p, 576i, 576p, and High Definition TV (HDTV) 720p, 1080i and 1080p formats, with the 1080p format providing a true 1:1 image reproduction.
•High picture quality
The projector provides excellent picture quality due to its high resolution, excellent home theater brightness, super high contrast ratio, vivid color and rich gray-scale reproduction.
•High brightness
The projector features super high brightness to achieve excellent picture quality in ambient light conditions, outperforming ordinary projectors.
•Super-high contrast ratio
The projector features a dynamic black control to achieve a super-high contrast ratio.
•Vivid color reproduction
The projector features a 6-segment color wheel to produce realistic color depth and range unattainable with lesser segment color wheels.
•Rich gray-scale
When viewed in a darkened environment, the automatic gamma control provides excellent gray-scale display which reveals details in shadows and in night or darkened scenes.
•Extra-low noise operation
The projector’s unique cooling system design prevents unnecessary fan noise, and is rated at less than 32 dB in normal mode and a low 29 dB in Economic mode.
•Wide variety of inputs and video formats
The projector supports a wide variety of inputs for connection to your video and PC equipment, including component video, S-Video, and composite video, as well as dual HDMI, PC, and an output trigger for connection to automated screen and environment lighting systems.
Important safety instructions |
7 |
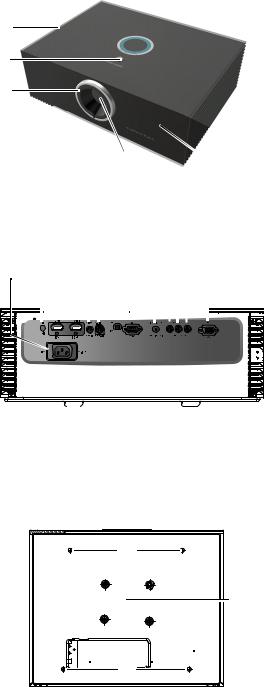
Projector exterior view
Front and upper side view
2
5
4
1.Front IR sensor
2.Vent (heated air exhaust)
3.Projection lens
4.Adjustable rings for ZOOM and FOCUS lens
5.Vertical shift lens system
3 1
Rear view
See "Connecting with video equipment" on page 17 for connection details.
6 |
7 |
|
8 |
9 10 11 12 13 |
14 |
15 |
|
|
||||||||||||
|
|
|
|
|
|
|
|
|
|
|
|
|
|
|
|
|
|
|
|
|
|
|
|
|
|
|
|
|
|
|
|
|
|
|
|
|
|
|
|
|
|
|
|
|
|
|
|
|
|
|
|
|
|
|
|
|
|
|
|
|
|
|
|
|
|
|
|
|
|
|
|
|
|
|
|
|
|
|
|
|
|
|
|
|
|
|
|
|
|
|
|
|
|
|
|
|
|
|
|
|
|
|
|
|
|
|
|
|
|
|
|
|
|
|
|
|
|
|
|
|
|
|
|
|
|
|
|
|
|
|
|
|
|
|
|
|
|
|
|
|
|
|
|
|
|
|
|
|
|
|
|
|
|
|
|
|
|
|
|
|
|
|
|
|
|
|
|
|
|
|
|
|
|
|
|
|
|
|
|
|
|
|
|
|
|
|
|
|
6.AC Power cable inlet
7.Rear IR sensor
8.HDMI ports
9.Composite Video input (RCA)
10.S-Video input (mini 4-pin DIN)
11.USB port


 12.RS-232 control port
Used to interface with a PC or home theater control/automation system.


 13.12VDC output terminal
Used to trigger external devices such
as an electric screen or light control, etc. Consult your dealer for how to connect these devices.
14.Component Video inputs (RCA) support Y/PB/PR or Y/CB/CR video signal
15.RGB (PC)/Component video (YPbPr/ YCbCr) signal input jack
Under view
16 |
17 |
16 |
16.Adjustable feet
17.Ceiling mount screws
8 Important safety instructions
Controls and functions
 For details, see the info provided behind the hand sign
  .
.
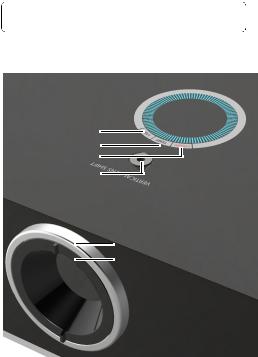
Controls
6
5
4
3 |
2
1
1.Focus ring
Adjusts the focus of the projected image.
 "Fine-tuning the image size and clarity" on page 20
2.Zoom ring
Adjusts the size of the projected image.
 "Fine-tuning the image size and clarity" on page 20
3.VERTICAL LENS SHIFT
Adjust the vertical position of image
 "Shifting the projection lens" on page 16
4.POWER indicator light
Lights up or flashes when the projector is operating.
 "Indicators" on page 43
5.TEMPerature warning light
Lights up or flashes if the projector's temperature becomes too high.
 "Indicators" on page 43
6.LAMP indicator light
Lights up or flashes when the projector lamp has developed a problem.
 "Indicators" on page 43
Important safety instructions |
9 |

Remote control
1
2
3


 4 5
4 5 


 6
6 


7


8


 9
9
10


11

 12
12
13 14
1.POWER ON/OFF
Single button for POWER ON and POWER OFF the projector.
"Turning the projector on" on page 19, "Turning the projector off" on page 34
2.Source selection keys (COMP, VIDEO, S- VIDEO, HDMI1, HDMI2, PC)
Selects an input source for display.
 "Selecting an input source" on page 20
3.Aspect keys (ANA, 4:3, LB, WIDE, REAL)
Selects the display aspect ratio.
 "Selecting the aspect ratio" on page 30
4.PRESET MODE
Sequentially selects a predefined picture setting available for each input.
 "Selecting a preset mode" on page 23
5.MEMORY keys (USER 1, USER 2, USER 3, and DEFAULT)
Restores picture settings for the current input source.
"Setting the User 1/User 2/User 3 mode" on page 24
6.ENTER
Enacts the selected On-Screen Display (OSD) menu item.
7.Arrow/Keystone keys (Left  /
/  , Up
, Up  /
/
 , Right
  /
/  , Down
 /
/ )
)
Moves the current On-Screen Display (OSD) menu selection in the direction of the arrow being pressed when the OSD menu is activated.
Manually corrects distorted pictures resulting from an angled projection.
"Using the menus" on page 21, "Correcting picture distortion" on page 22
8.MENU
Toggles the On-Screen Display (OSD) menu on and off.
 "Using the menus" on page 21
9.EXIT
Goes back to previous OSD menus, exits and saves any changes made using the On-Screen Display (OSD) menu.
 "Using the menus" on page 21
10.Picture quality adjustment keys (BRIGHTNESS, CONTRAST, COLOR, TINT)
Displays the setting bars for adjustment of the appropriate picture quality values.
 "Fine-tuning the picture quality" on page 25
11.Picture window control keys (PIP, SIZE, POSITION, ACTIVE)
Displays the Picture In Picture (PIP) windows, toggles between the main window and sub-window with ACTIVE, and adjusts the size and position of the currently active window with SIZE and POSITION.
"Displaying more than one image source simultaneously" on page 32
12.TEST
Displays the test pattern.
 "Test Pattern" on page 40
13.INFO
Displays the Information menu.
 "Information menu" on page 40
14.LIGHT
Turns on the remote control backlight for about 10 seconds. Pressing any other key while the backlight is on keeps the backlight on for a further 10 seconds. Press the key again to turn the backlight off.
10 Important safety instructions
Positioning your projector
Choosing a location
Your projector is designed to be installed in one of four possible installation locations.
Your room layout or personal preference will dictate which installation location you select. Take into consideration the size and position of your screen, the location of a suitable power outlet, as well as the location and distance between the projector and the rest of your equipment.
1. Floor Front:
Select this location with the projector placed near the floor in front of the screen. This is the most common way to position the projector for quick setup and portability.
2. Ceiling Front:
Select this location with the projector suspended from the ceiling in front of the screen.
Purchase the original Projector Ceiling Mount Kit from your dealer to mount your projector on the ceiling.
*Set Ceiling Front after you turn the projector on.
3. Floor Rear:
Select this location with the projector placed near the floor behind the screen.
Note that a special rear projection screen is required.
*Set Floor Rear after you turn the projector on.
4. Ceiling Rear:
Select this location with the projector suspended from the ceiling behind the screen.
Note that a special rear projection screen and the proper Projector Ceiling Mount Kit are required for this installation location.
*Set Ceiling Rear after you turn the projector on.
*To set the projector position:
1.Press MENU on the projector or remote control and then press  /
/  until the System menu is highlighted.
2.Press  /
/ to highlight Projector Position and press
  /
/  until the correct position is selected.
Display |
System |
Setup |
Language |
|
English |
Splash Screen |
|
Brand |
Projector Position |
|
Floor Front |
Auto Off |
|
Disable |
Sleep Timer |
|
Disable |
Background Color |
|
Blue |
Menu Settings |
|
|
|
|
|
Input Source |
|
|
Auto Source Search |
|
Off |
S-Video |
EXIT Back |
Positioning your projector |
11 |
Obtaining a preferred projected image size
The distance from the projector lens to the screen, the zoom setting, and the video format each factors in the projected image size.
The projector should always be placed horizontally level (like flat on a table), and positioned directly perpendicular 90° right-angle square) to the screen. This prevents image distortion caused by angled projections (or projecting onto angled surfaces). If the projector is mounted on a ceiling, it must be mounted upside-down.
If the projector is positioned further away from the screen, the projected image size increases, and the vertical offset also increases proportionately.
When determining the positions of the screen and projector, you will need to account for both the projected image size and the vertical offset dimension, which are directly proportional to the projection distance.
This projector is equipped with a movable lens. See "Shifting the projection lens" on page 16 for details. You can see the diagrams on pages 14 and 15 for the vertical offset values in the dimension tables that are measured when the lens is shifted fully up or down.
How to determine the position of the projector for a given screen size
1.Determine the aspect ratio of your screen.
2.Refer to the table and find the closest match to your screen size in the left columns labelled "Screen dimensions". Using this value, look across this row to the right to find the corresponding average distance from screen value in the column labelled "Average". This is the projection distance.
3.Decide the exact position of your projector according to the position of your screen and the adjustable lens shift range.
For example, if you are using a 120-inch, 4:3-aspect-ratio screen, please refer to "The screen aspect ratio is 4:3 and the projected picture is 16:9". The average projection distance is 668 cm.
How to determine the recommended screen size for a given distance
This method can be used for situations where you have purchased this projector and would like to know what screen size will fit in your room.
The maximum screen size is limited by the physical space available in your room.
1.Determine the aspect ratio of your screen.
2.Measure the distance between the projector and where you want to position the screen. This is the projection distance.
3.Refer to the table and find the closest match to your measurement in the average distance from screen column labelled "Average". Check that your measured distance is between the min and max distances listed on either side of the average distance value.
4.Using this value, look across that row to the left to find the corresponding screen diagonal listed in that row. That is the projected image size of the projector at that projection distance.
12 Positioning your projector
For example, if you have a 16:9-aspect-ratio screen and your measured projection distance was 4.5 m (450 cm), please refer to "The screen aspect ratio is 16:9 and the projected picture is 16:9". The closest match in the "Average" column is 455 cm. Looking across this row shows that a 100-inch screen is required.
Checking the min and max projection distance values in the columns of "Projection distance <D> [cm]" on page 14 indicates that the 4.5 m measured projection distance will also fit the 90 and 110-inch size screens. The projector can be adjusted (using the zoom control) to display on these different screen sizes at the projection distance. Be aware that these different screens have different vertical offset values.
If you place the projector in a different position (to that recommended), you will have to tilt it down or up to center the image on the screen. In these situations, some image distortion will occur. Use the Keystone function to correct the distortion. See "Correcting picture distortion" on page 22 for details.
Positioning your projector |
13 |
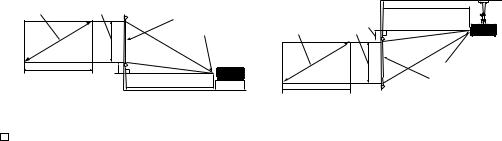
Projection dimensions
Installation for a 16:9 ratio screen
Floor Installation |
|
Ceiling Installation |
<A> |
|
<B> |
<F> |
|
<D> |
|
|
|
|
||
|
|
|
<G> |
<A> |
<E> |
|
|
|
<B> |
||
|
<C> |
<E> |
|
|
<G> |
|
|
<D> |
|
<F> |
|
|
|
|
|
<F>: Screen |
<G>: Center of lens |
<C> |
<G>: Center of lens |
<F>: Screen |
|
|
The screen aspect ratio is 16:9 and the projected picture is 16:9 |
|
||||||
|
|
|
|||||||
|
|
|
|||||||
|
|
|
Screen dimensions |
Projection distance <D> [cm] |
Lowest/ |
||||
|
Diagonal |
Height |
Width |
Min distance |
|
Max distance |
Highest lens |
||
|
<A> |
|
<B> |
<C> |
(with max |
Average |
(with min |
position <E> |
|
|
[inch (cm)] |
[cm] |
[cm] |
zoom) |
|
zoom) |
[cm] |
||
|
30 |
(76) |
37 |
66 |
109 |
136 |
164 |
4.7 |
|
|
|
|
|
|
|
|
|
|
|
|
40 |
(102) |
50 |
89 |
145 |
182 |
218 |
6 |
|
|
|
|
|
|
|
|
|
|
|
|
50 |
(127) |
62 |
111 |
182 |
227 |
273 |
8 |
|
|
|
|
|
|
|
|
|
|
|
|
60 |
(152) |
75 |
133 |
218 |
273 |
327 |
9 |
|
|
|
|
|
|
|
|
|
|
|
|
70 |
(178) |
87 |
155 |
255 |
318 |
382 |
11 |
|
|
|
|
|
|
|
|
|
|
|
|
80 |
(203) |
100 |
177 |
291 |
364 |
436 |
12 |
|
|
|
|
|
|
|
|
|
|
|
|
90 |
(229) |
112 |
199 |
327 |
409 |
491 |
14 |
|
|
|
|
|
|
|
|
|
|
|
|
100 |
(254) |
125 |
221 |
364 |
455 |
545 |
16 |
|
|
|
|
|
|
|
|
|
|
|
|
110 |
(279) |
137 |
243 |
400 |
500 |
600 |
17 |
|
|
|
|
|
|
|
|
|
|
|
|
120 |
(305) |
149 |
266 |
436 |
545 |
655 |
19 |
|
|
|
|
|
|
|
|
|
|
|
|
130 |
(330) |
162 |
288 |
473 |
591 |
709 |
20 |
|
|
|
|
|
|
|
|
|
|
|
|
140 |
(356) |
174 |
310 |
509 |
636 |
764 |
22 |
|
|
|
|
|
|
|
|
|
|
|
|
150 |
(381) |
187 |
332 |
545 |
682 |
818 |
23 |
|
|
|
|
|
|
|
|
|
|
|
|
160 |
(406) |
199 |
354 |
582 |
727 |
873 |
25 |
|
|
|
|
|
|
|
|
|
|
|
|
170 |
(432) |
212 |
376 |
618 |
773 |
927 |
26 |
|
|
|
|
|
|
|
|
|
|
|
|
180 |
(457) |
224 |
398 |
655 |
818 |
982 |
28 |
|
|
|
|
|
|
|
|
|
|
|
|
190 |
(483) |
237 |
421 |
691 |
864 |
1036 |
30 |
|
|
|
|
|
|
|
|
|
|
|
|
200 |
(508) |
249 |
443 |
727 |
909 |
1091 |
31 |
|
|
|
|
|
|
|
|
|
|
|
|
250 |
(635) |
311 |
553 |
909 |
1136 |
1364 |
39 |
|
|
|
|
|
|
|
|
|
|
|
|
300 |
(762) |
374 |
664 |
1091 |
1364 |
1636 |
47 |
|
|
|
|
|
|
|
|
|
|
|
 The above numbers are approximate and may be slightly different from the actual measurements. Only the recommended screen sizes are listed. If your screen size is not in the table above, please contact your dealer for assistance.
14 Positioning your projector

Installation for a 4:3 ratio screen
The illustrations and table below are provided for those users who already have 4:3 aspect ratio screens or intend to purchase 4:3 aspect ratio screens to view 16:9 ratio projected images.
Floor Installation |
Ceiling Installation |
<A> |
<H> |
<B> |
|
|
|
|
<F> |
|
|
|
<G> |
<C> |
<E> |
<D> |
|
|
|
|
|
<F>: Screen |
|
|
<G>: Center of lens |
<A> |
<D> |
|
|
|
<H> <E> |
|
<G> |
|
<F> |
<C> |
<B> |
<F>: Screen |
<G>: Center of lens |

 The screen aspect ratio is 4:3 and the projected picture is 16:9
|
Screen dimensions |
Projection distance <D> |
Lowest/ |
|
||||
|
|
[cm] |
|
|
||||
|
|
|
|
|
|
Highest |
Image |
|
|
|
|
|
Min |
|
Max |
lens |
|
|
|
|
|
|
height <H> |
|||
Diagonal |
Height |
Width |
distance |
|
position |
|||
|
distance |
[cm] |
||||||
<A> |
|
<B> |
<C> |
(with |
Average |
(with min |
<E> |
|
[inch (cm)] |
[cm] |
[cm] |
max |
|
zoom) |
[cm] |
|
|
|
|
|
|
zoom) |
|
|
||
|
|
|
|
|
|
|
|
|
30 |
(76) |
46 |
61 |
134 |
167 |
200 |
4.3 |
34 |
|
|
|
|
|
|
|
|
|
40 |
(102) |
61 |
81 |
178 |
223 |
267 |
5.7 |
46 |
|
|
|
|
|
|
|
|
|
50 |
(127) |
76 |
102 |
223 |
278 |
334 |
7.1 |
57 |
60 |
(152) |
91 |
122 |
267 |
334 |
401 |
8.6 |
69 |
|
|
|
|
|
|
|
|
|
70 |
(178) |
107 |
142 |
312 |
389 |
467 |
10.0 |
80 |
|
|
|
|
|
|
|
|
|
80 |
(203) |
122 |
163 |
356 |
445 |
534 |
11.4 |
91 |
90 |
(229) |
137 |
183 |
401 |
501 |
601 |
12.9 |
103 |
|
|
|
|
|
|
|
|
|
100 |
(254) |
152 |
203 |
445 |
556 |
668 |
14.3 |
114 |
|
|
|
|
|
|
|
|
|
110 |
(279) |
168 |
224 |
490 |
612 |
734 |
15.7 |
126 |
120 |
(305) |
183 |
244 |
534 |
668 |
801 |
17.1 |
137 |
|
|
|
|
|
|
|
|
|
130 |
(330) |
198 |
264 |
579 |
723 |
868 |
18.6 |
149 |
|
|
|
|
|
|
|
|
|
140 |
(356) |
213 |
284 |
623 |
779 |
935 |
20.0 |
160 |
150 |
(381) |
229 |
305 |
668 |
835 |
1001 |
21.4 |
171 |
|
|
|
|
|
|
|
|
|
160 |
(406) |
244 |
325 |
712 |
890 |
1068 |
22.9 |
183 |
|
|
|
|
|
|
|
|
|
170 |
(432) |
259 |
345 |
757 |
946 |
1135 |
24.3 |
194 |
180 |
(457) |
274 |
366 |
801 |
1001 |
1202 |
25.7 |
206 |
|
|
|
|
|
|
|
|
|
190 |
(483) |
290 |
386 |
846 |
1057 |
1269 |
27.1 |
217 |
|
|
|
|
|
|
|
|
|
200 |
(508) |
305 |
406 |
890 |
1113 |
1335 |
28.6 |
229 |
250 |
(635) |
381 |
508 |
1113 |
1391 |
1669 |
35.7 |
286 |
|
|
|
|
|
|
|
|
|
300 |
(762) |
457 |
610 |
1335 |
1669 |
2003 |
42.9 |
343 |
|
|
|
|
|
|
|
|
|
 The above numbers are approximate and may be slightly different from the actual measurements. Only the recommended screen sizes are listed. If your screen size is not in the table above, please contact your dealer for assistance.
Positioning your projector |
15 |

Shifting the projection lens
The lens shift control provides flexibility for installing your projector. It allows the projector to be positioned off the center of the screen.
You can use the exsagonal screw (6 mm) on top of the video projector to shift the projector lens in vertical direction, within the allowable range, depending on your desired image position.
Range of placement |
VERTICSL LENS SHIFT |
 Lens shift adjustment will not result in a degraded picture quality. In the unlikely event that the image distortion is produced, see "Adjusting the projected image" on page 22 for details.
16 Positioning your projector
Loading...