

Page 1
Parasol LED Light
153662
®
24 LED
Parasol LED Light
Eclairage LED pour parasol
LED-Sonnenschirmlampe
2
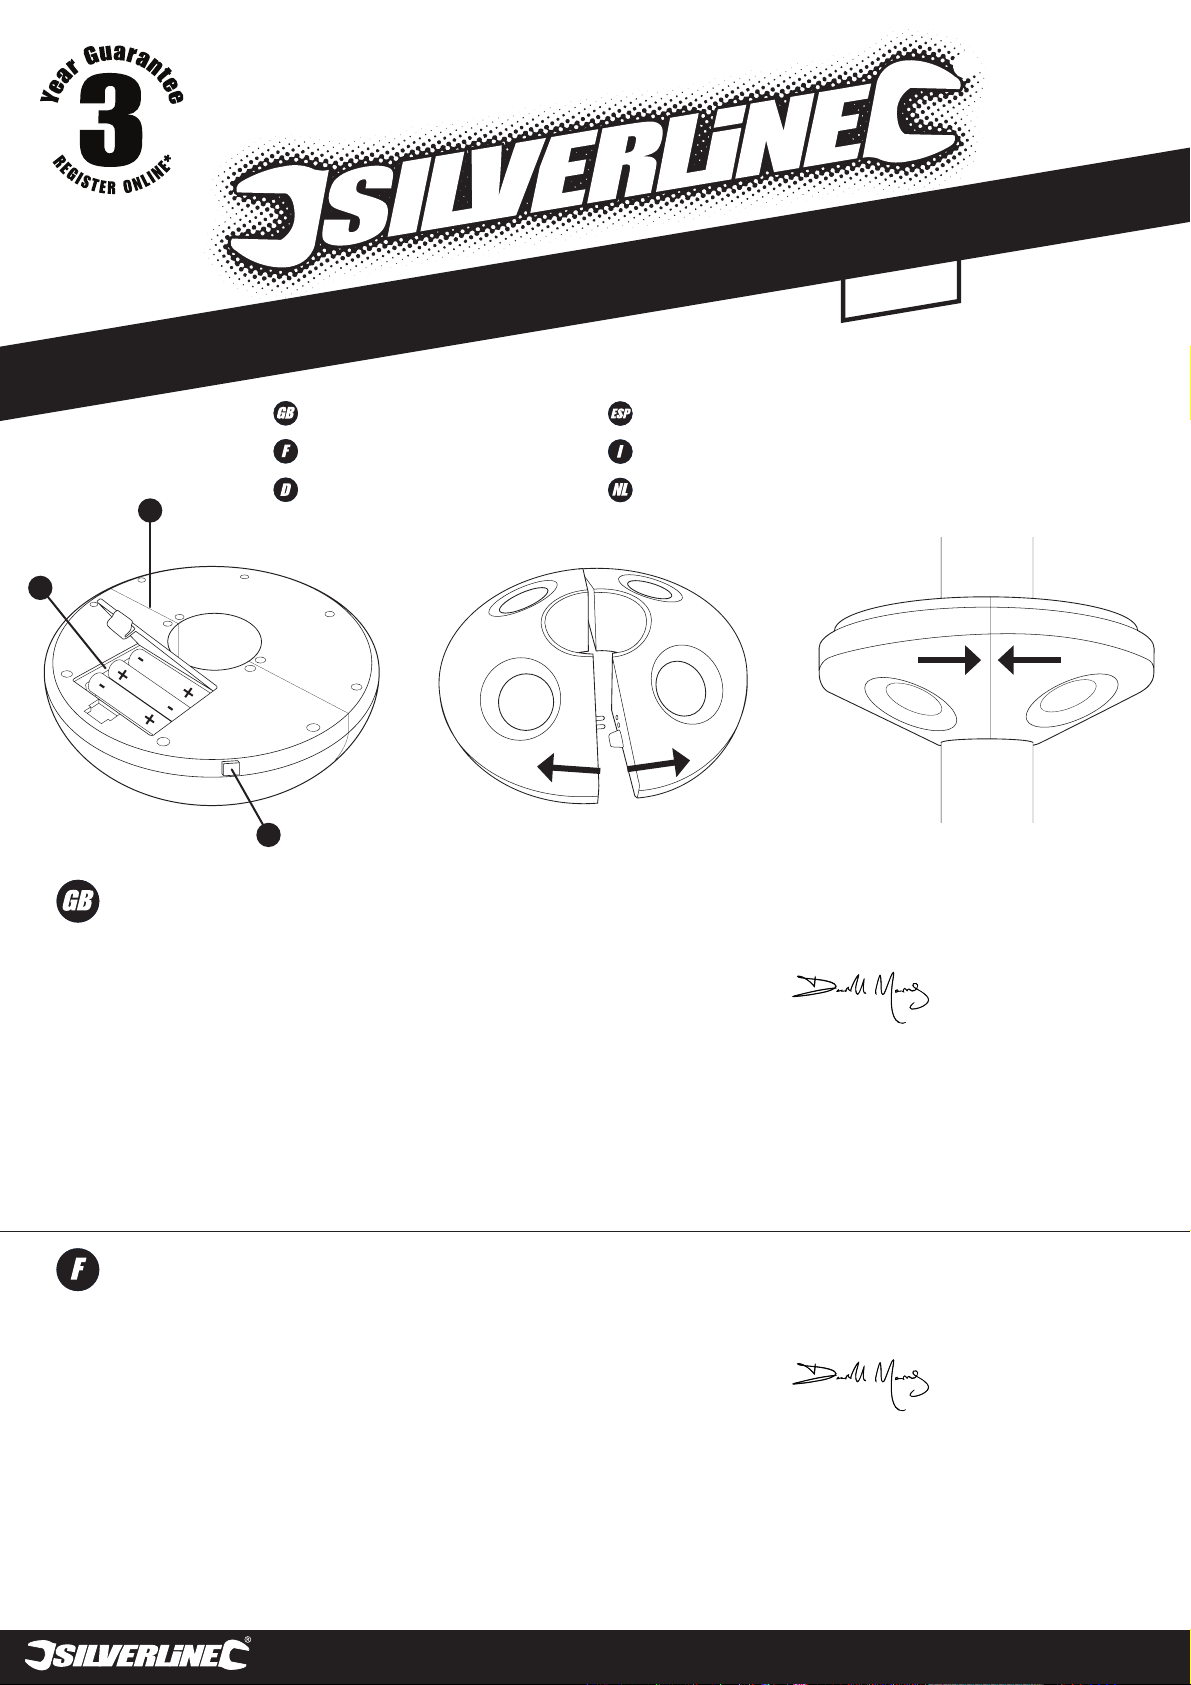
• Step 1 • Step 2
1
3
1. Battery Compartment
2. Central Joint Line
3. On/Off Button
To install the Parasol LED Light
Step 1
• Open the battery compartment and insert 3 x AA 1.5V batteries, observing the
correct polarity – see diagram. Replace the compartment cover
• Press the On/Off button to test the light
Step 2
• Grasp the unit firmly either side of the central joint line and pull the two halves
apart. You will hear a snap
Step 3
• Wrap the two halves of the unit around the umbrella stand at the height
required
• Align the fixing nibs and electrical pins with their respective sockets
• Press the two halves together until they lock. You will hear a snap
• NOTE: The unit will automatically adjust to fit 33-55mm dia poles
CE Declaration of Conformity
The undersigned: Mr Darrell Morris
as authorised by: Silverline Tools
Declares that
Identification code: 153662
Description: Parasol LED Light
Conforms to the following directives and standards:
• EMC Directive 2004/108/EC
• RoHS Directive 2011/65/EU
• EN 55015:2006+A2:2009
• EN 61547:2009
• EN61000-3-2:2006+A2:2009
• EN61000-3-3:2008
Lámpara LED para sombrilla
LED luce per ombrelloni
LED parasollamp
• Step 3
Notified body: AOV Testing Technology Co., Ltd, Shenzhen, China
The technical documentation is kept by:
Silverline Tools
Date: 15/07/13
Signed:
Director
Name and address of the manufacturer:
Powerbox International Ltd., Boundary Way, Lufton Trading Estate,
Yeovil, Somerset, BA22 8HZ, United Kingdom
1. Compartiment pour piles
2. Ligne centrale de séparation
3. Bouton marche/arrêt
Installation de l’éclairage LED sur le parasol
Première étape
• Ouvrez le compartiment pour piles et introduisez 3 piles AA (1,5 V) en prenant soin de
les monter correctement (voir le schéma). Refermez le compartiment
• Appuyez sur le bouton marche/arrêt pour faire un essai
Deuxième étape
• Tenez fermement l’appareil de chaque côté de la ligne centrale de séparation et
séparez les deux moitiés en tirant, ce qui produira un bruit sec normal
Troisième étape
• Placez les deux moitiés de l’appareil de chaque côté du pied du parasol à la hauteur
voulue
• Faites coïncider les pattes de fixation et les broches électriques avec leur logement
respectif
• Ré-emboîtez solidement les deux moitiés, ce qui produira là encore un bruit sec
• NOTA : l’appareil est conçu pour s’adapter automatiquement aux pieds de
33 à 55 mm de diamètre
Déclaration de conformité CE
Le soussigné : Mr Darrell Morris
Autorisé par : Silverline Tools
Déclare que le produit :
Code d’identification : 153662
Description: Eclairage LED pour parasol
Est conforme aux directives suivantes :
• Directive sur la compatibilité électromagnétique
2004/108/CE
• Directive RoHS 2011/65/UE
• EN 55015:2006+A2:2009
• EN 61547:2009
• EN61000-3-2:2006+A2:2009
• EN61000-3-3:2008
Organisme notifié : AOV Testing Technology Co., Ltd, Shenzhen,
China
La documentation technique est conservée par : Silverline
Tools
Date 15/07/13
Signature :
Name and address of the manufacturer:
Powerbox, Boundary Way, Lufton Trading Estate, Yeovil, Somerset,
BA22 8HZ, United Kingdom
www.silverlinetools.com
Page 2
1. Batteriefach
2. Verbindungsnut
3. Ein-/Aus-Schalter
Anbringen der LED-Sonnenschirmlampe
Schritt 1
• Öffnen Sie das Batteriefach und legen Sie 3 AA-Batterien mit 1,5 V ein.
Achten Sie dabei auf die richtige Polarität (siehe Abbildung). Setzen Sie den
Batteriefachdeckel wieder auf
• Betätigen Sie zur Überprüfung der Lampe den Ein-/Aus-Schalter
Schritt 2
• Halten Sie die Lampe beidseitig der Verbindungsnut gut fest und ziehen Sie die
beiden Hälften auseinander. Dabei entsteht ein lautes Knackgeräusch
Schritt 3
• Legen Sie die beiden Hälften auf der gewünschten Höhe um das
Sonnenschirmrohr
• Richten Sie die Befestigungsnasen und die elektrischen Stifte auf die
entsprechenden Löcher aus
• Drücken Sie die beiden Hälften zusammen, bis sie einrasten. Dabei entsteht ein
Knackgeräusch
• HINWEIS: Die Lampe passt sich automatisch an Rohre mit einem Durchmesser
von 33-55 mm an
EU-Konformitätserklärung
Name des Unterzeichners: Mr. Darrell Morris
Bevollmächtigt durch: Silverline Tools
Erklärt hiermit, dass das Produkt:
Ident.-Nr.: 153662
Produktbeschreibung: LED-Sonnenschirmlampe
Den folgenden Richtlinien entspricht:
• Elektromagnetische Verträglichkeitsrichtlinie 2004/108/EG
• RoHS-Richtlinie 2011/65/EG
• EN 55015:2006+A2:2009
• EN 61547:2009
• EN61000-3-2:2006+A2:2009
• EN61000-3-3:2008
Benannte Stelle: AOV Testing Technology Co., Ltd, Shenzhen,
China
Techn. Unterlagen bei: Silverline Tools
Datum: 15.07.2013
Unterzeichnet von:
Geschäftsführender Direktor
Name und Anschrift des Herstellers oder seines
niedergelassenen Bevollmächtigten:
Powerbox International Ltd., Boundary Way, Lufton Trading Estate,
Yeovil, Somerset, BA22 8HZ, Großbritannien
1. Compartimento de pilas
2. Línea de separación central
3. Botón de encendido/apagado
Instalación de la lámpara LED para sombrilla
Etapa 1
• Abre el compartimento de pilas e inserta 3 pilas AA de 1,5 V, teniendo en cuenta
su polaridad (véase el diagrama). Cierre el compartimento de nuevo
• Pulse el botón de encendido/apagado para comprobar la luz
Etapa 2
• Sujete firmemente el aparato por cada lado de la línea central de separación y
separe las dos mitades. Se oirá un ruido seco
Etapa 3
• Coloque las dos mitades del aparato por cada lado del pie de la sombrilla a la
altura deseada
• Alinee las patillas de fijación y los conectores eléctricos con sus alojamientos
respectivos
• Vuelva a encajar las dos mitades sólidamente. Se oirá de nuevo un ruido seco
• Nota: el aparato se ajusta automáticamente a los pies de sombrillas de 33-55
mm de diámetro
1. Compartimento Batteria
2. Linea di giunzione centrale
3. Pulsante On/Off
Per installare la luce per ombrelloni LED
Primo passo
• Aprire il compartimento batteria e inserire 3 batterie AA 1.5V, osservando la
polaritá corretta- visualizzare diagramma. Sostituire il coperchio copri batterie
• premere il pulsante On/Off per provare la luce
Secondo passo
• Afferare l’unitá fermamente su entrambi i lati della linea di giunzione centrale e
tirare le due metá aparte. Sentirete un forte schiocco
Terzo passo
• Avvolgere le due metà dell’unità in torno l’ombrellone all’altezza desiderata
• Allineare i pennini di fissaggio e spine elettriche ai fori di prese rispettive
• Premere le due metá insieme fino a bloccarli. Sentirete un forte schiocco
• Nota: l’unitá si regolerá automaticamente per adattarsi a pali di un diametro di
33-55mm
Declaración de conformidad CE
El abajo firmante: Mr Darrell Morris
Autorizado por: Silverline Tools
Declara que el producto:
Código de identificación: 153662
Descripción: Lámpara LED para sombrilla
Está en conformidad con las directivas:
• Compatibilidad electromagnética 2004/108/CE
• Directiva RoHS 2011/65/UE
• EN 55015:2006+A2:2009
• EN 61547:2009
• EN61000-3-2:2006+A2:2009
• EN61000-3-3:2008
Dichiarazione di conformità CE
Il sottoscritto: Sig. Darrell Morris
come autorizzato di: Silverline Tools
Dichiara che il prodotto:
Codice di identificazione: 153662
Descrizione: LED luce per ombrelloni
Si conforma alle seguenti direttive
• Direttiva compatibilità elettromagnetica 2004/108/CE
• Direttiva RoHS 2011/65/UE
• EN 55015:2006+A2:2009
• EN 61547:2009
• EN61000-3-2:2006+A2:2009
• EN61000-3-3:2008
Organismo notificado: AOV Testing Technology Co., Ltd,
Shenzhen, China
La documentación técnica se conserva en:
Silverline Tools
Fecha: 15/07/13
Firma:
Director General
Nombre y dirección del fabricante o representante
autorizado:
Powerbox International Ltd.,, Boundary Way, Lufton Trading Estate,
Yeovil, Somerset, BA22 8HZ, Reino Unido.
Organismo informato: AOV Testing Technology Co., Ltd,
Shenzhen, China
La documentazione tecnica è mantenuta da: Silverline Tools
Data: 15/07/2013
Firma:
Direttore
Nome e indirizzo del fabbricante oppure persona autorizzata:
Powerbox International Ltd.,, Boundary Way, Lufton Trading Estate,
Yeovil, Somerset, BA22 8HZ, Regno Unito
1. Batterijvak
2. Centrale naad
3. Aan-/uitschakelaar
De LED parasollamp monteren
Stap 1
• Open het batterijvak en plaats 3 x AA 1,5V batterijen, met de polen op de juiste
plaats – zie afbeelding. Plaats het deksel terug
• Press the On/Off button to test the light
Stap 2
• Neem het toestel stevig vast aan beide zijden van de centrale naad en trek de
helften uit elkaar. U hoort de helften van elkaar losbreken
Stap 3
• Plaats de twee helften van het toestel op de gewenste hoogte rond de
parasolpaal
• Lijn de montage- en elektrische pennen af met de bijhorende openingen
• Druk beide helften tegen elkaar tot ze zich vastzetten. U hoort de helften
samenklikken
• Opmerking: Het toestel past zich automatisch aan palen van 33-55 mm
diameter aan
EG-verklaring van overeenstemming
De ondergetekende: Mr. Darrell Morris
Gemachtigd door: Silverline Tools
Verklaart dat
Identificatienummer: 153662
Beschrijving: LED parasollamp
Voldoet aan de volgende richtlijnen:
• Elektromagnetische verenigbaarheid 2004/108/EG
• RoHS-richtlijn 2011/65/EG
• EN 55015:2006+A2:2009
• EN 61547:2009
• EN61000-3-2:2006+A2:2009
• EN61000-3-3:2008
Keuringsinstantie: AOV Testing Technology Co., Ltd, Shenzhen,
China
De technische documentatie wordt bijgehouden door:
Silverline Tools
Datum: 15-07-2013
Handtekening:
Directeur
Naam en adres van fabrikant of gemachtigde:
Powerbox International Ltd.,, Boundary Way, Lufton Trading Estate,
Yeovil, Somerset, BA22 8HZ, Verenigd Koninkrijk
www.silverlinetools.com
 Loading...