

Page 1
3 Year Guarantee
*Register online within 30
days. Terms & Conditions apply
Garantie de 3 ans
*Enregistrez votre produit en ligne
dans les 30 jours. Sous réserve des
termes et conditions appliquées
3 Jahre Garantie
*Registrieren Sie sich innerhalb von 30
Tagen online. Es gelten die allgemeinen
Geschäftsbedingungen
3 años de garantía
*Registre su producto online durante
los primeros 30 días. Se aplican
términos y condiciones.
3 anni di garanzia
*Registrare il vostro prodotto on-line
entro 30 giorni.
Termini e condizioni si applicano.
3 Jaar Garantie
*Registreer online binnen 30 dagen.
Algemene voorwaarden van toepassing
www.silverlinetools.com
Page 2

V
L
I
S
DIY
R
A
R
E
L
I
N
E
E
G
N
845135
185mm
1200W Circular Saw
1200W Circular Saw
Scie circulaire 1200 W
1200-W-Kreissäge
Sierra circular 1200 W
Sega circolare 1200 W
1200 W cirkelzaag
www.silverlinetools.com
Page 3
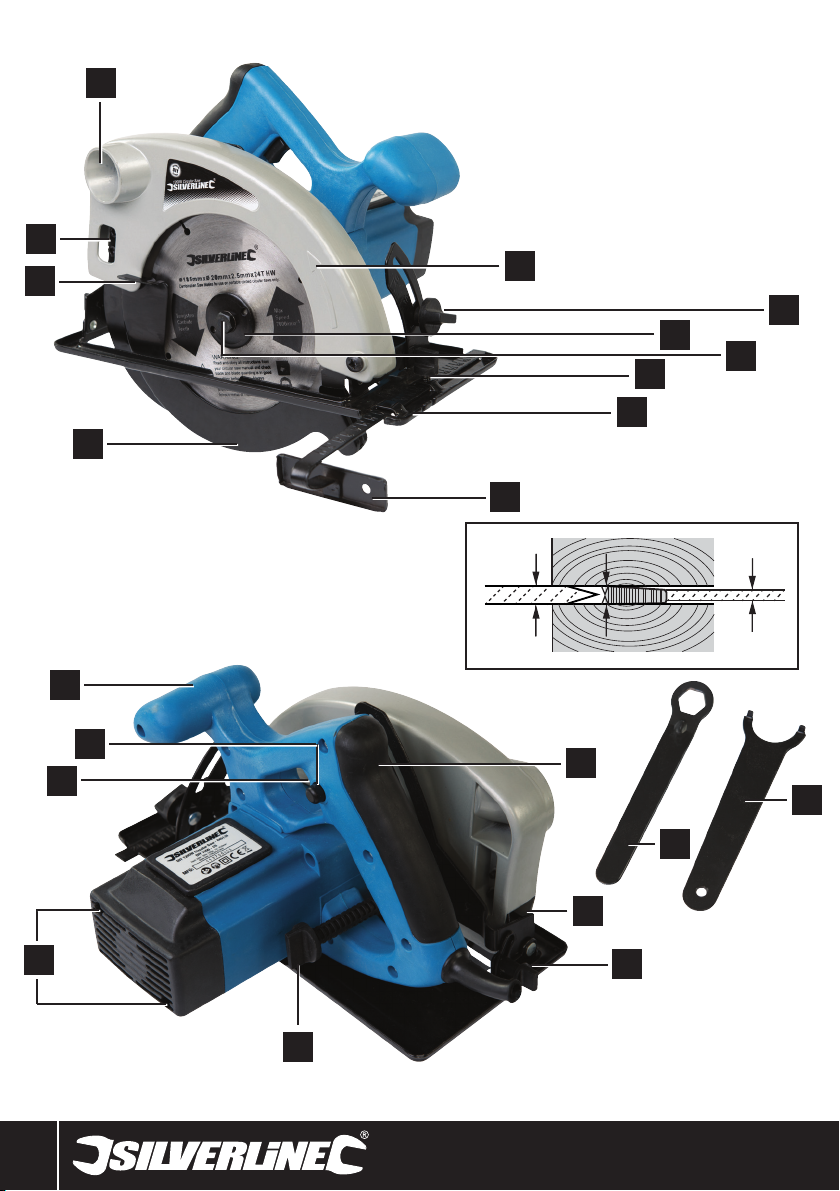
11
10
1
2
3
4
5
6
7
9
8
Fig A
A B
C
2
16
19
18
12
17
20
21
13
14
15
Page 4

V
L
I
S
DIY
R
A
R
E
L
I
N
E
®
E
G
N
185mm
1200W Circular Saw
English .................. 4
Français ................ 10
Deutsch ................. 16
Español ................. 22
Italiano .................. 28
Nederlands ............ 34
www.silverlinetools.com
3
Page 5
GB
Description of Symbols
The rating plate on your tool may show symbols. These represent important information
about the product or instructions on its use
Wear hearing protection
Wear eye protection
Wear breathing protection
Wear head protection
Wear hand protection
Read instruction manual
Double insulated for additional protection
Conforms to relevant legislation and safety standards
Environmental protection
Waste electrical products should not be disposed of with household waste.
Please recycle where facilities exist. Check with your local authority or
retailer for recycling advice
Specification
Voltage: ................................................230-240V~50Hz
Power: ..................................................1200W
No load speed: .....................................4500min
Blade size (max):....................... ...........Ø185mm
Riving knife thickness: .........................1.7mm
Supplied blade: ....................................Ø185 x Ø20 x
............................................................2.5mm x 24T
Max depth of cut: .................................63mm (90°)
............................................................38mm (45°)
Bevel range:............................. ............0-45°
Protection class: ...................................
Ingress protection rating:......................IP20
Dimension (L x W x H): ................................330 x 240 x 250mm
Weight: .................................................4kg
As part of our ongoing product development, specifications
of Silverline products may alter without notice.
Sound and vibration information:
Weighted vibration: ..............................5m/s2
............................................................(Main Handle)
............................................................6m/s2
............................................................(Aux. Handle)
Uncertainty:......................................... .1.5m/s
Sound pressure (LPA):..............................66dB(A)
Sound power (LWA):.................................77dB(A)
Uncertainty:......................................... .3dB(A)
The sound intensity level for the operator may exceed
85dB(A) and sound protection measures are necessary.
-1
2
WARNING: Always wear ear protection where the sound level exceeds 85dB(A) and
limit the time of exposure if necessary. If sound levels are uncomfortable, even with ear
protection, stop using the tool immediately and check the ear protection is correctly fitted
and provides the correct level of sound attenuation for the level of sound produced by
your tool.
WARNING: User exposure to tool vibration can result in loss of sense of touch, numbness,
tingling and reduced ability to grip. Long term exposure can lead to a chronic condition. If
necessary, limit the length of time exposed to vibration and use anti-vibration gloves. Do
not operate the tool with hands below a normal comfortable temperature, as vibration will
have a greater effect. Use the figures provided in the specification relating to vibration to
calculate the duration and frequency of operating the tool.
Sound and vibration levels in the specification are determined according to EN60745
or similar international standards. The figures represent normal use for the tool in
normal working conditions. A poorly maintained, incorrectly assembled, or misused tool,
may produce increased levels of noise and vibration. www.osha.europa.eu provides
information on sound and vibration levels in the workplace that may be useful to domestic
users who use tools for long periods of time.
General Power Tool
Safety Warnings
WARNING Read all safety warnings and all instructions. Failure to follow the warnings
and instructions may result in electric shock, fire and/or serious injury.
WARNING: This appliance is not intended for use by persons (including children) with
reduced, physical or mental capabilities or lack of experience or knowledge unless
they have been given supervision or instruction concerning use of the appliance by
a person responsible for their safety. Children must be supervised to ensure that they do
not play with the appliance.
Save all warnings and instructions for future reference.
The term "power tool" in the warnings refers to your mains-operated (corded) power tool
or battery-operated (cordless) power tool.
Work area safety
a) Keep work area clean and well lit. Cluttered or dark areas invite accidents
b) Do not operate power tools in explosive atmospheres, such as in the presence
of flammable liquids, gases or dust. Power tools create sparks which may ignite
the dust or fumes
c) Keep children and bystanders away while operating a power tool. Distractions
can cause you to lose control
Electrical safety
a) Power tool plugs must match the outlet. Never modify the plug in any way. Do
not use any adapter plugs with earthed (grounded) power tools. Unmodified
plugs and matching outlets will reduce risk of electric shock
b) Avoid body contact with earthed or grounded surfaces, such as pipes,
radiators, ranges and refrigerators. There is an increased risk of electric shock if
your body is earthed or grounded
c) Do not expose power tools to rain or wet conditions. Water entering a power tool
will increase the risk of electric shock
d) Do not abuse the cord. Never use the cord for carrying, pulling or unplugging
the power tool. Keep cord away from heat, oil, sharp edges or moving parts.
Damaged or entangled cords increase the risk of electric shock
e) When operating a power tool outdoors, use an extension cord suitable for
outdoor use. Use of a cord suitable for outdoor use reduces the risk of electric
shock
f) If operating a power tool in a damp location is unavoidable, use a residual
current device (RCD) protected supply. Use of an RCD reduces the risk of electric
shock
NOTE: The term “residual current device (RCD)” may be replaced by the term
“ground fault circuit interrupter (GFCI)” or “earth leakage circuit breaker (ELCB)”.
Personal safety
a) Stay alert, watch what you are doing and use common sense when operating a
power tool. Do not use a power tool while you are tired or under the influence
of drugs, alcohol or medication. A moment of inattention while operating power
tools may result in serious personal injury
b) Use personal protective equipment. Always wear eye protection. Protective
equipment such as dust mask, non-skid safety shoes, hard hat, or hearing protection
used for appropriate conditions will reduce personal injuries
c) Prevent unintentional starting. Ensure the switch is in the off-position before
connecting to power source and/or battery pack, picking up or carrying the
tool. Carrying power tools with your finger on the switch or energising power tools
that have the switch on invites accidents
d) Remove any adjusting key or wrench before turning the power tool on. A
wrench or a key left attached to a rotating part of the power tool may result in
personal injury
e) Do not overreach. Keep proper footing and balance at all times. This enables
better control of the power tool in unexpected situations
f) Dress properly. Do not wear loose clothing or jewellery. Keep your hair, clothing
and gloves away from moving parts. Loose clothes, jewellery or long hair can be
caught in moving parts
4
Page 6

845135
1200W Circular Saw
g) If devices are provided for the connection of dust extraction and collection
facilities, ensure these are connected and properly used. Use of dust collection
can reduce dust-related hazards
Power tool use & care
a) Do not force the power tool. Use the correct power tool for your application.
The correct power tool will do the job better and safer at the rate for which it was
designed
b) Do not use the power tool if the switch does not turn it on and off. Any power
tool that cannot be controlled with the switch is dangerous and must be repaired
c) Disconnect the plug from the power source and/or the battery pack from the
power tool before making any adjustments, changing accessories, or storing
power tools. Such preventive safety measures reduce the risk of starting the power
tool accidentally
d) Store idle power tools out of the reach of children and do not allow persons
unfamiliar with the power tool or these instructions to operate the power tool.
Power tools are dangerous in the hands of untrained users
e) Maintain power tools. Check for misalignment or binding of moving parts,
breakage of parts and any other condition that may affect the power tool’s
operation. If damaged, have the power tool repaired before use. Many accidents
are caused by poorly maintained power tools
f) Keep cutting tools sharp and clean. Properly maintained cutting tools with sharp
cutting edges are less likely to bind and are easier to control
g) Use the power tool, accessories and tool bits etc. in accordance with these
instructions, taking into account the working conditions and the work to be
performed. Use of the power tool for operations different from those intended could
result in a hazardous situation
Service
a) Have your power tool serviced by a qualified repair person using only identical
replacement parts. This will ensure that the safety of the power tool is maintained
Kickback Prevention and
Operator Safety
Kickback is a sudden reaction to a pinched, bound or misaligned saw blade, causing an
uncontrolled saw to lift up and out of the workpiece toward the operator. Kickback is the
result of saw misuse and/or incorrect operating procedures or conditions and can be
avoided by taking precautions as follows:
a) Maintain a firm grip with both hands on the saw and position your arms to resist
kickback forces. Position your body to either side of the blade but not in line with the
blade. Kickback could cause the saw to jump backwards, however, if precautions are
taken, kickback forces can be controlled by the operator.
b) When the blade is binding, or when interrupting a cut for any reason, release the
trigger and hold the saw motionless in the workpiece until the blade comes to a
complete stop. Never attempt to remove the saw from the work or pull the saw
backward while the blade is in motion. Investigate and take corrective action to
eliminate the cause of blade binding.
c) When restarting a saw within an incomplete cut, centre the saw blade in the kerf and
check that the saw teeth are not engaged into the material (a binding saw blade may
‘propel upwards’ or kickback from the workpiece as the tool is restarted).
d) A large workpiece should be supported close to the line of the cut, and at the edge
of the panel, to prevent sagging. This will minimise the risk of blade pinching and
kickback.
e) Do not use dull or damaged blades. Unsharpened or improperly set blades produce
narrow kerf causing excessive friction, blade binding and kickback.
f) Blade depth and bevel adjusting locking levers must be tight and secure before
making a cut. If blade adjustment shifts while cutting, it may cause binding and
kickback.
g) Use extra caution when making a ‘plunge cut’ into existing walls or other blind areas.
The protruding blade may cut objects causing kickback.
h) Check the lower guard before each use and do not use if it does not close freely,
ensuring that the blade does not touch any part of the guard or tool in all angles and
depths of cut. Never clamp or tie the lower guard in the open position.
i) Check the operation of the lower guard spring. If the guard and the spring are not
operating correctly, they must be serviced before use. The lower guard may operate
sluggishly due to damaged parts, gummy deposits, or a build-up of debris.
j) The lower guard should be retracted manually only for special cuts such as ‘plunge
cuts’ and ‘compound cuts.’ Raise the lower guard by the retracting handle and as
soon as the blade enters the material, the lower guard must be released. For all other
sawing, the lower guard should operate automatically.
k) Ensure that the lower guard is covering the blade before placing the saw down.
An unprotected, coasting blade will cause the saw to ‘propel backwards’, cutting
whatever is in its path. Be aware of the time it takes for the blade to stop after the
switch is released. Do not use abrasive wheels, doing so will void the warranty.
www.silverlinetools.com
5
Page 7

GB
Circular Saw Safety
WARNING. Before connecting a tool to a power source (mains switch power point
receptacle, outlet, etc.) be sure that the voltage supply is the same as that specified on
the nameplate of the tool. A power source with a voltage greater than that specified for
the tool can result in serious injury to the user, and damage to the tool. If in doubt, do not
plug in the tool. Using a power source with a voltage less than the nameplate rating is
harmful to the motor.
• Do not allow anyone under the age of 18 years to operate this saw
• When operating the saw, use safety equipment including safety goggles or shield, ear
protection, dust mask and protective clothing including safety gloves
• Hand-held power tools may produce vibration. Vibration can cause disease. Gloves may
help to maintain good blood circulation in the fingers. Hand-held tools should not be
used for long periods without a break
• Always use recommended blades with correct size and shape of arbor holes e.g.
diamond or round. Blades that do not match the mounting hardware of the saw will run
eccentrically, causing loss of control
• Whenever possible, use a vacuum dust extraction system to control dust/waste
• Power tools must always be held by the insulated gripping surfaces when performing
an operation, ensuring protection if the cutting tool makes contact with its own cord or
hidden wiring. Contact with a ‘live’ wire will make exposed metal parts of the power tool
‘live’ and shock the operator if the insulated gripping surfaces are not used
• Ensure hands are kept away from the cutting area and blade. Keep one hand on the
auxiliary handle or motor housing. If both hands are holding the tool they cannot be cut
by the blade
• Do not attempt to cut material thicker than detailed in the Specifications section of this
manual
• Adjust the cutting depth to the thickness of the workpiece i.e. less than a full tooth of
the blade should be visible below the workpiece
• Ensure that work is correctly supported. Large panels may sag under their own weight
and bind the saw blade. Supports must be placed under the panel on both sides, close
to the line of cut and near the edge of the panel
• Ensure all supports and power cables are completely clear of the cutting path
• Always secure the workpiece to a stable platform, ensuring body exposure is minimised,
avoiding blade binding, or loss of control
• For accuracy of cut, and to avoid blade binding, always use a rip fence or straight edge
guide
• Never hold a workpiece in your hand or across your legs whilst cutting
• Always stand at an angle to the tool when operating
• Be aware that the blade will project from the underside of the workpiece
• Do not reach beneath the workpiece where the guard cannot protect you from the blade
• Note the direction of rotation of the motor and the blade
• Inspect the workpiece and remove all nails and other embedded objects prior to starting
work
• Do not apply any sideways or twisting force to the blade whilst cutting
• If a cut does not extend to the edge of the workpiece, or if the blade binds in the cut,
allow the blade to come to a complete stop and lift the saw out of the workpiece
• Do not attempt to free a jammed blade before first disconnecting the machine from
power
• Do not move the saw backwards at any time whilst cutting
• Beware of projected waste. In some situations, waste material may be projected at
speed from the cutting tool. It is the user’s responsibility to ensure that other people in
the work area are protected from the possibility of projected waste
• If you are interrupted when operating the saw, complete the process and switch off
before diverting your attention
• The blade bolt and washers were specially designed for your saw. For optimum
performance and safety of operation never use damaged or incorrect bolt/blade
washers
• Regularly check the operation of the blade guard. If the guard does not automatically
cover the blade, have the saw repaired before use
• Periodically check that all nuts, bolts and other fixings have not loosened, tighten where
necessary
The tool must be used only for its prescribed purpose. Any use other than those mentioned
in this manual will be considered a case of misuse. The user, and not the manufacturer,
shall be liable for any damage or injury resulting from such cases of misuse.
The manufacturer shall not be liable for any modifications made to the tool nor for any
damage resulting from such modifications.
Even when the tool is used as prescribed it is not possible to eliminate all residual risk
factors.
Product Familiarisation
1 Dust Extraction Port
2 Blade Direction Indicator
3 Bevel Angle Locking Screw
4 Blade Flange
5 Blade Securing Bolt
6 Guide Locking Screw
7 Base Plate
8 Parallel Guide Fence
9 Blade Guard
10 Guard Retraction Lever
11 Riving Knife Bolts
12 Rear Handle
13 Riving Knife
14 Bevel Locking Screw
15 Depth Locking Screw
16 Brush Access Cover Screws
17 On/Off Trigger
18 Lock Off Button
19 Front Handle
20 Pin Spanner
21 Spanner
Fig A:
A – Riving knife
B – Kerf (cutting/teeth width)
C – Blade body
6
Page 8

845135 1200W Circular Saw
Unpacking Your Tool
Carefully unpack and inspect your tool. Familiarise yourself with all its features and
functions.
Ensure that all parts of the tool are present and in good condition. If any parts are missing
or damaged, have such parts replaced before attempting to use this tool.
Operating Instructions
Dust extraction
• For a cleaner, safer work environment connect a dust extraction system or workshop
vacuum cleaner to the Dust Extraction Port (1)
Notes:
• Before you use your saw, it is recommended that you practice on scrap material. The
settings of the machine are crucial to achieving a good quality finish, and your work
could easily be damaged by using an incorrect setting
• The supplied blade comes pre-fitted. Make sure the Blade Securing Bolt (5) is securely
tightened before first use
WARNING: Always disconnect the saw from the power supply before fitting or removing
any accessory.
Fitting and removing blades
• Always check the blade being fitted is suitable for the material you intend to cut
• Only fit blades that are in perfect condition. Blunt, bent, and cracked blades should be
discarded
1. Hold the Blade Flange in position using the Pin Spanner (20). Unscrew the Blade
Securing Bolt (5) anti-clockwise using the Spanner (21)
2. Remove the blade securing bolt, washer and blade flange. A saw blade can now be
fitted or removed
3. Use the Guard Retraction Lever (10) to rotate the guard out of the way
4. Fit the required blade, making sure the direction indicator on the face of the blade is
in the same direction as the Blade Direction Indicator (2)
5. Re-fit the blade flange, washer and blade securing bolt, and tighten using the pin
spanner and spanner
6. Ensure the blade is secure before use
Setting bevel angle
• This saw is equipped with a tilting Base Plate (7). This allows bevel cuts to be made
• To alter the angle of the base plate, loosen the Bevel Angle Locking Screw (3) and the
Bevel Locking Screw (14). The base plate will now be free to pivot
• Select the angle required (0-45°) using the angle scale next to the bevel angle locking
screw and re-tighten both bevel screws
• To ensure accuracy, the angle between the blade and the base plate should be checked
using a suitable protractor
Setting depth adjustment
• This saw is equipped with a depth adjustment mechanism
• To alter the depth of the cut, loosen the Depth Locking Screw (15). The base plate is
now free to adjust to the required depth
• Adjust the base plate to the required depth using the depth scale or a ruler and retighten
the depth locking screw
• When set correctly, the blade teeth should project approximately 3mm from the
underside of the material being cut
Handling your circular saw
• Always hold the saw securely, with both hands, by the handles provided
• Always allow the blade to come to a complete stop before placing the machine down
• Always unplug the machine if it is to be left unattended
• Always make sure that work will not move whilst being cut. Use clamps where
appropriate
Making a cut
1. Hold the saw securely and rest the front edge of the Base Plate (7) on the edge of the
work piece
2. Check that the blade is not in contact with the work piece, or any other object
3. Start the machine by pressing in the Lock Off Button (18) and squeezing the On/Off
Trigger (17)
4. Allow the motor to reach full speed, and push the saw smoothly forwards across the
workpiece
5. Maintain a steady movement and ensure the base plate is kept pressed against the
work
NOTE: The front edge of the base plate features a guide notch. For normal cutting align
the notch marked ‘0˚’ with the intended cutting line; for 45˚ bevel cutting align the notch
marked ‘45˚’ with the cutting line.
6. Allow the blade to pass through the material and release the trigger switch.
Alternatively, if the cut does not reach the edge of the workpiece, release the trigger
switch and allow the blade to stop moving before lifting out of the cut
7. Do not place the machine down until the blade has stopped completely
Using the parallel guide fence
1. When working parallel to an edge, the Parallel Guide Fence (8) should be used
2. The guide fence attaches to the Base Plate (7), and is secured using the Guide
Locking Screw (6). Ensure the guide fence is attached securely
3. The position of the guide fence can be adjusted to suit different tasks
4. To follow an edge, keep the vertical foot of the guide fence pressed against the
vertical edge as the cut is made
Riving knife
• This power tool has a fitted Riving Knife (13) which is a small blade situated behind the
saw blade. This is an important safety device which helps prevent kickbacks during use
• The thickness of the riving knife (A) should fall between the thickness of the kerf (B) and
the thickness of the blade body (C), see Fig. A.
• The supplied blade has a kerf of 2.5mm and a blade body thickness of 1.4mm. The
riving knife is 1.7mm. When replacing blades ensure the blade body thickness is below
1.7mm and the kerf is above 1.7mm when using the supplied riving knife
• Minor adjustment of the riving knife position can be achieved by loosening the Riving
Knife Bolts (11), re-positioning and then re-tightening
• In some instances the riving knife may need to be re-flattened, replaced or temporarily
removed, in which case the riving knife bolts should be fully removed before sliding the
riving knife out
• Replace immediately if the riving knife becomes damaged or cannot be made flat
• Position the riving knife so it is centralised behind the saw blade. The riving blade
bolts may require additional washers to centralise the riving knife when using different
thickness saw blades
• The riving knife can be removed for plunge cuts. Plunge cuts needs special care and
attention. Take time to prepare and make sure all safety precautions are followed
WARNING: Always re-fit the riving knife. It is an essential safety feature for normal use.
www.silverlinetools.com
7
Page 9

GB
Maintenance
WARNING: Always disconnect from the power supply before carrying out any
maintenance/cleaning.
Cleaning
• Keep your tool clean at all times. Dirt and dust will cause internal parts to wear quickly,
and shorten the machine’s service life. Clean the body of your machine with a soft
brush, or dry cloth. If available, use clean, dry, compressed air to blow through the
ventilation holes
Brushes
• Over time the carbon brushes inside the motor may become worn
• Excessively worn brushes may cause loss of power, intermittent failure, or visible
sparking
• If the brushes are worn and need replacing, have them replaced by an authorised
service centre if you are not capable of replacing them yourself
• Fully disconnect the tool from the mains, unscrew the Brush Access Cover Screws (16)
and remove the cover to access the carbon brushes
• Carefully replace both worn brushes with new brushes
NOTE: Carbon brushes are available from www.toolsparesonline.com.
Storage
• Store this tool carefully in a secure, dry place out of the reach of children
Disposal
Always adhere to national regulations when disposing of power tools that are no longer
functional and are not viable for repair.
• Do not dispose of power tools, or other waste electrical and electronic equipment
(WEEE), with household waste
• Contact your local waste disposal authority for information on the correct way to
dispose of power tools
8
Page 10

845135 1200W Circular Saw
Silverline Tools Guarantee
This Silverline product comes with a 3 year
guarantee
Register this product at silverlinetools.com within 30 days of purchase
in order to qualify for the 3 year guarantee. Guarantee period begins
according to the date of purchase on your sales receipt.
Registering your purchase
Registration is made at silverlinetools.com by selecting the Guarantee
Registration button. You will need to enter:-
• Your personal details
• Details of the product and purchase information
Once this information is entered your guarantee certificate will be created
in PDF format for you to print out and keep with your purchase.
Terms & Conditions
Guarantee period becomes effective from the date of retail purchase as
detailed on your sales receipt.
PLEASE KEEP YOUR SALES RECEIPT
If this product develops a fault within 30 days of purchase, return it to the
stockist where it was purchased, with your receipt, stating details of the
fault. You will receive a replacement or refund.
If this product develops a fault after the 30 day period, return it to:
Silverline Tools Service Centre
PO Box 2988
Yeovil
BA21 1WU, UK
The guarantee claim must be submitted during the guarantee period.
You must provide the original sales receipt indicating the purchase date,
your name, address and place of purchase before any work can be
carried out.
You must provide precise details of the fault requiring correction.
Claims made within the guarantee period will be verified by Silverline Tools
to establish if the deficiencies are related to material or manufacturing of
the product.
Carriage will not be refunded. Items for return must be in a suitably clean
and safe state for repair, and should be packaged carefully to prevent
damage or injury during transportation. We may reject unsuitable or
unsafe deliveries.
All work will be carried out by Silverline Tools or its authorized
repair agents.
The repair or replacement of the product will not extend the period
of guarantee
Defects recognised by us as being covered by the guarantee shall be
corrected by means of repair of the tool, free of charge (excluding carriage
charges) or by replacement with a tool in perfect working order.
Retained tools, or parts, for which a replacement has been issued, will
become the property of Silverline Tools.
The repair or replacement of your product under guarantee provides
benefits which are additional to and do not affect your statutory rights as
a consumer.
What is covered:
The repair of the product, if it can be verified to the satisfaction of Silverline
Tools that the deficiencies were due to faulty materials or workmanship
within the guarantee period.
If any part is no longer available or out of manufacture, Silverline Tools will
replace it with a functional replacement part.
Use of this product in the EU.
What is not covered:
Silverline Tools does not guarantee repairs required as a result of:
Normal wear and tear caused by use in accordance with the operating
instructions eg blades, brushes, belts, bulbs, batteries etc.
The replacement of any provided accessories drill bits, blades, sanding
sheets, cutting discs and other related items.
Accidental damage, faults caused by negligent use or care, misuse,
neglect, careless operation or handling of the product.
Use of the product for anything other than normal domestic purposes.
Change or modification of the product in any way.
Use of parts and accessories which are not genuine Silverline Tools
components.
Faulty installation (except installed by Silverline Tools).
Repairs or alterations carried out by parties other than Silverline Tools or its
authorized repair agents.
Claims other than the right to correction of faults on the tool named in
these guarantee conditions are not covered by the guarantee.
CE Declaration of Conformity
The undersigned: Mr Darrell Morris
as authorised by: Silverline Tools
Declares that
Identification code: 845135
Description: 1200W Circular Saw
Conforms to the following directives and standards:
• MachineryDirective2006/42/EC
• LowVoltageDirective2006/95/EC
• RoHSDirective2011/65/EU
• EMCDirective2004/180/EC
• EN60745-1:2009•EN60745-2-5:2007+A11
• EN60825-1:2007•EN55014-1:2006+A1
• EN55014-2:1997+A1+A2•EN61000-3-2:2006+A1+A2
• EN61000-3-3:2008
Notified body: SGS-CSTC Standards Technical Services Co., Ltd, Shanghai, China
The technical documentation is kept by: Silverline Tools
Date: 04/06/13
Signed:
Director
Name and address of manufacturer:
Powerbox International Ltd, Boundary Way, Lufton Trading Estate, Yeovil, Somerset,
BA22 8HZ United Kingdom
www.silverlinetools.com
9
Page 11
F
Description des symboles
La plaque signalétique figurant sur votre outil peut présenter des symboles. Ces symboles
constituent des informations importantes relatives au produit ou des instructions
concernant son utilisation.
Port de protection auditive
Port de lunettes de sécurité
Port de masques respiratoires
Port du casque
Port de gants
Lire le manuel d’instructions
Double isolation pour une protection supplémentaire
Conforme à la règlementation et aux normes européennes de sécurité
pertinentes
Protection de l’environnement
Les produits électriques usagés ne doivent pas être jetés avec les ordures
ménagères. Veuillez les recycler dans les centres prévus à cet effet. Pour
de plus amples informations, veuillez contacter votre municipalité ou
point de vente
Caractéristiques techniques
Tension : ....................................................230 - 240 V~ 50 Hz
Puissance : ...........................................1200 W
Vitesse à vide : .....................................4500 min
Diamètre max. de la lame : ..................185 mm
Epaisseur de couteau diviseur : ............1,7 mm
Dimension de la lame fournie : .............Ø185 x Ø20 x
............................................................2,5 mm x 24 dents
Profondeur max. de coupe :..................63 mm (90°)
............................................................38 mm (45°)
Réglage du biseau :............................. .0 - 45°
Classe de protection : ...........................
Indice de protection : ............................IP20
Dimension (L x l x H) : ........................................330 x 240 x 250 mm
Poids : ..................................................4 kg
Du fait de l’évolution constante de notre développement
produit, les caractéristiques des produits Silverline peuvent
changer sans notification préalable.
Informations sur l’intensité du niveau sonore et vibratoire:
Vibration pondérée : .............................5 m/s2
............................................................(poignée principale)
............................................................6 m/s2
(poignée auxiliaire)
Incertitude :......................................... .1,5 m/s
Pression acoustique (Lpa) : ....................66 dB(A)
Puissance acoustique (Lwa) : .................. 77 dB(A)
Incertitude:......................................... ..3 dB(A)
L’intensité sonore peut dépasser 85 dB(A) et il est
nécessaire que l’utilisateur prenne des mesures de
protection auditive.
-1
2
Attention : Toujours porter des protections sonores lorsque le niveau d’intensité est
supérieur à 85 dB(A) et limiter le temps d’exposition si nécessaire. Si l’intensité sonore
devient inconfortable, même avec les protections, arrêter immédiatement d’utiliser
l’appareil, vérifier que les protections soient bien mises et qu’elles soient adéquates avec
le niveau sonore produit par l’appareil.
Attention : L’exposition de l’utilisateur aux vibrations peut engendrer une perte du toucher,
des engourdissements, des picotements et ainsi réduire la capacité de préhension. De
longues expositions peuvent également provoquer ces symptômes de façon chronique.
Si nécessaire, limiter le temps d’exposition aux vibrations, et porter des gants antivibrations. Ne pas utilisez cet appareil avec vos mains sous des conditions en dessous
de températures normales, car l’effet vibratoire en est accentué. Se référer au cas de
figures des caractéristiques relatives aux vibrations pour calculer le temps et fréquence
d’utilisation de l’appareil.
Les niveaux sonores et vibratoires des caractéristiques techniques sont déterminés
en fonction de la norme EN60745 ou autres normes internationales. . Ces données
correspondent à un usage normale de l’appareil, et ce dans des conditions de travail
normales. Un appareil mal entretenu, mal assemblé ou mal utilisé peut augmenter les
niveaux sonores et vibratoires. Pour plus d’informations sur la directive des émissions
sonores et vibratoires, visitez le site http://osha.europa.eu/fr.
Lisez attentivement ce manuel ainsi que toute étiquette apposée sur l’outil et assurezvous d’en comprendre le sens avant utilisation. Rangez ces consignes avec l’outil, pour
référence ultérieure. Assurez-vous que toute personne venant à utiliser cet outil ait
attentivement pris connaissance de ce manuel.
Sachez qu’utiliser un outil conformément aux prescriptions ne garantit pas l’élimination de
tous les facteurs de risque. Procédez avec prudence. N’utilisez pas cet outil si vous avez
des doutes quant à la manière sûre et correcte de procéder.
Consignes générales de
sécurité relatives aux appareils
électriques
AVERTISSEMENT Veuillez lire l’intégralité des consignes de sécurité et des
instructions. Le non-respect de ces consignes et instructions peut entraîner un risque de
choc électrique, d’incendie et/ou se traduire par des blessures graves
ATTENTION: Cet appareil n’est pas conçu pour être utilisé par des personnes (enfants
compris) ayant des capacités physiques ou mentales réduites, ou n’ayant pas la
connaissance ou l’expérience requise, à moins d’être sous la supervision d’une
personne responsable de leur sécurité ou d’avoir reçu les instructions nécessaires.
Les enfants ne doivent pas s’approcher et jouer avec cet appareil.
Veuillez conserver ces instructions et consignes de sécurité pour référence
ultérieure.
L’expression « appareil électrique » employée dans les présentes consignes recouvre aussi
bien les appareils filaires à brancher sur le secteur que les appareils sans fils fonctionnant
sous batterie.
Sécurité sur la zone de travail
a) Maintenir une zone de travail propre et bien éclairée. Des zones encombrées et
mal éclairées sont sources d’accidents.
b) Ne pas utiliser d’outils électriques dans des environnements explosifs, tels
qu’à proximité de liquides, de gaz ou de poussières inflammables. Les appareils
électriques produisent des étincelles susceptibles d’enflammer la poussière ou les
vapeurs présentes.
c) Eloigner les enfants et les passants pendant l’utilisation d’un appareil
électrique. Ceux-ci peuvent provoquer une perte d’attention et faire perdre la
maîtrise de l’appareil.
Sécurité électrique
a) La prise d’un appareil électrique doit être adaptée à la prise du secteur. Ne
jamais modifier la prise en aucune façon. Ne jamais utiliser d’adaptateur sur la
prise électrique d’appareil mis à la terre. Des prises non modifiées, adaptées aux
boîtiers de prise de courant, réduiront le risque de décharge électrique.
b) Eviter le contact corporel avec les surfaces mises à la terre telles que tuyaux,
radiateurs, cuisinières et réfrigérateurs. Le risque de décharge électrique est plus
important si le corps est mis à la terre.
c) Ne pas exposer l’appareil électrique à la pluie ou à l’humidité. L’infiltration d’eau
dans un appareil électrique accroît le risque de décharge électrique.
d) Ne pas maltraiter le cordon électrique. Ne jamais utiliser le cordon électrique
pour porter, tirer ou débrancher l’appareil. Protéger le cordon électrique de la
chaleur, du contact avec l’essence, des bords tranchants et pièces rotatives.
Un cordon électrique endommagé ou entortillé accroît le risque de décharge
électrique.
e) Lors d’une utilisation de l’appareil électrique en extérieur, se servir d’une
rallonge appropriée à une utilisation en extérieur. Cela réduit le risque de
décharge électrique.
f) Si une utilisation de l’appareil électrique dans un environnement humide
ne peut être évitée, utiliser une alimentation protégée par un disjoncteur
différentiel. L’utilisation d’un disjoncteur différentiel réduit le risque de décharge
électrique.
Sécurité des personnes
a) Rester vigilent et faire preuve de bon sens lors de la manipulation de l’appareil.
Ne pas utiliser un appareil électrique lorsque l’on se trouve dans un état
10
Page 12

845135 Scie circulaire 1200 W
de fatigue, ou sous l’influence de drogues, d’alcool ou de médicaments. Un
moment d’inattention pendant l’utilisation d’un outil électrique peut se traduire par
des blessures graves.
b) Porter un équipement de protection approprié. Toujours porter une protection
oculaire. Le port de masque à poussières, chaussures de sécurité antidérapantes,
casque de sécurité et protections antibruit adaptés aux différentes conditions de
travail réduit le risque de blessures corporelles.
c) Eviter tout démarrage accidentel. S’assurer que l’interrupteur marche-arrêt
soit en position d’arrêt avant de brancher l’appareil sur l’alimentation secteur
ou d’installer la batterie, de prendre l’appareil ou de le transporter. Porter un
appareil électrique tout en maintenant le doigt posé sur l’interrupteur ou brancher
un appareil électrique dont l’interrupteur est sur la position de marche est source
d’accidents.
d) Enlever toute clé et tout instrument de réglage avant de mettre l’appareil
électrique en marche. Une clé ou un instrument de réglage laissé fixé à un élément
en rotation de l’appareil électrique peut entraîner des blessures physiques.
e) Ne pas essayer d’atteindre une zone hors de portée. Se tenir toujours en
position stable permettant de conserver l’équilibre. Cela permet de mieux
contrôler l’appareil électrique dans des situations inattendues.
f) Porter des vêtements appropriés. Ne pas porter de vêtements amples ou
des bijoux pendants. Eloigner cheveux, vêtements et gants des pièces en
mouvement. Les vêtements amples, les bijoux pendants et cheveux longs peuvent
être happés par les pièces en rotation.
g) Si l’appareil est pourvu de dispositifs destinés au raccord d’équipements
d’extraction et de récupération de la poussière/sciure, s’assurer qu’ils soient
bien fixés et utilisés correctement L’utilisation de ces dispositifs peut réduire les
risques dus à la poussière.
Utilisation et entretien des appareils électriques
a) Ne pas forcer sur l’appareil électrique. Utiliser l’appareil électrique approprié
au travail à effectuer. Un appareil électrique adapté et employé au rythme pour
lequel il a été conçu permettra de réaliser un travail de meilleure qualité et dans de
meilleures conditions de sécurité.
b) Ne pas utiliser un appareil électrique dont l’interrupteur marche-arrêt est
hors service. Tout appareil électrique dont la commande ne s’effectue plus par
l’interrupteur marche-arrêt est dangereux et doit être réparé.
c) Débrancher l’appareil électrique ou démonter sa batterie avant d’effectuer tout
réglage ou changement d’accessoire et avant de le ranger. De telles mesures
préventives réduiront les risques de démarrage accidentel.
d) Ranger les appareils électriques inutilisés hors de portée des enfants et ne
pas permettre l’utilisation de cet appareil aux personnes non habituées à
son maniement ou n’ayant pas lu les présentes instructions. Les appareils
électriques sont dangereux dans les mains d’utilisateurs inexpérimentés.
e) Veiller à l’entretien des appareils électriques. Vérifier que les éléments
rotatifs soient bien alignés et non grippés. S’assurer de l’absence de pièces
cassées ou endommagées susceptibles de nuire au bon fonctionnement de
l'appareil. Si l’appareil électrique est endommagé, le faire réparer avant toute
utilisation. De nombreux accidents sont dus à l’utilisation d’appareils électriques
mal entretenus.
f) Veiller à ce que les outils de coupe soient tenus affûtés et propres. Des outils de
coupe bien entretenus, aux tranchants bien affûtés, sont moins susceptibles de se
gripper et sont plus faciles à contrôler.
g) Utiliser l’appareil électrique, les accessoires et outils à monter conformément
à ces instructions, en tenant compte des conditions de travail et de la tâche à
réaliser. Toute utilisation d’un appareil électrique autre que celle pour laquelle il a
été conçu peut entraîner des situations à risque.
Révision
a) Ne faire réparer votre appareil électrique que par un réparateur qualifié
utilisant uniquement des pièces de rechange identiques. Cela permet de
maintenir la sécurité d’utilisation de l’appareil électrique.
Rebond : causes et prevention :
Le rebond est une réaction soudaine de l’appareil survenant lorsque la lame vient se
coincer ou se gripper dans la pièce à couper ou lorsqu’elle est mal centrée, ce qui amène
la scie à se soulever et à être projetée vers l’utilisateur. Lorsque la lame se trouve coincée
ou grippée fermement dans un trait de coupe allant en diminuant, la lame cale et l’entrain
du moteur amène la machine à reculer soudainement en direction de l’utilisateur ; si la
lame se tord ou se décentre pendant la coupe, la dent à l’arrière de la lame peut venir
mordre dans la surface supérieure du bois, amenant la lame à sortir du trait de coupe et à
sauter vers l’utilisateur. Le rebond provient d’une mauvaise utilisation et/ou de procédures
ou de conditions inadaptées de manipulation de l’appareil, qui peuvent être évitées en
tenant compte des précautions suivantes :
a) Exercez une prise en main sûre et ferme de la scie, des deux mains, en tenant les
bras de manière à résister aux forces de rebond. Placez-vous d’un côté ou de l’autre
de la lame, mais jamais dans son prolongement. Le rebond peut entraîner un sursaut
de la machine vers l’arrière, mais la mise en œuvre de précautions adéquates
permettra à l’utilisateur de maîtriser les forces de rebond.
b) Lorsque la lame se grippe, ou lors de l’interruption d’une coupe pour une raison
quelconque, relâchez la gâchette et maintenez la scie sur la pièce à couper, sans
la déplacer, jusqu’à arrêt complet de la lame. Ne retirez jamais la scie de la pièce
en la soulevant ou en la faisant reculer dans le trait de coupe tant que la lame
tourne. Recherchez la cause du problème et prenez toutes les mesures permettant
d’y remédier.
c) Lors du redémarrage de l’appareil dans la pièce à couper, centrez la lame de la
scie dans le trait de coupe et vérifiez que les dents de la scie ne mordent pas dans
le matériau, dans le cas contraire, la lame pourrait être projetée vers le haut ou
rebondir au moment du redémarrage de la scie.
d) Placez des éléments de support sous les panneaux de grande taille de chaque côté
de la ligne de coupe, à proximité de la ligne de coupe et à proximité des bords du
panneau, afin d’empêcher l’affaissement du panneau. Ceci réduit également le
risque de pincement de la lame et de rebond.
e) N’utilisez pas de lames émoussées ou endommagées. Les lames non affûtés ou
mal montées produisent des traits de coupe plus étroits, entraînant un excès de
frottement, un grippage de la lame et un risque de rebond.
f) Les leviers de blocage de réglage de profondeur de lame et de réglage du biseau
doivent être bien serrés avant de procéder à la coupe. Tout dérèglement de la lame
au cours de la coupe peut être cause de grippage et de rebond.
g) Procéder avec une prudence particulière lors de la réalisation de « coupes
plongeantes » dans des parois ou autres zones non débouchantes. La lame est
susceptible de venir couper des objets pouvant occasionner un rebond.
h) Vérifiez avant chaque utilisation que la protection inférieure ferme bien. Ne mettez
pas la scie en marche si la protection inférieure ne s’actionne pas librement et ne
se ferme pas instantanément. Ne fixez jamais la protection inférieure en position
ouverte par un moyen quelconque. Toute chute de la scie peut entraîner une
déformation de la protection inférieure. Relevez la protection inférieure à l’aide de
la poignée de retrait pour vous assurer qu’elle n’est pas entravée et qu’elle ne vient
pas toucher la lame ou tout autre partie de la scie, à tous les angles et toutes les
profondeurs de coupe possibles.
i) Vérifiez le bon fonctionnement du ressort de la protection inférieure. Si la protection
et son ressort ne fonctionnent pas correctement, faites-les réparer avant toute
utilisation. Une détérioration du fonctionnement de la protection inférieure peut
provenir de l’endommagement des composants, de dépôts résineux ou d’une
accumulation de débris.
j) La protection inférieure ne doit se rétracter à la main que dans le cas de coupes
spécifiques, telles que les coupes « plongeantes » et les coupes composées (coupes
d’onglets biseautées). Soulevez la protection inférieure en rétractant la poignée
et, dès que la lame pénètre dans le matériau, relâchez la protection inférieure.
Dans tous les autres cas de sciage, laissez la protection inférieure procéder
automatiquement.
k) Assurez-vous toujours que la protection inférieure recouvre bien la lame avant de
déposer la scie. Une lame non protégée et en rotation peut entraîner une projection
de la scie vers l’arrière, avec un risque de coupure des éléments avec lesquels elle
viendrait en contact. N’oubliez pas que la lame met un certain temps à s’arrêter
totalement une fois que la gâchette est relâchée. N’utilisez pas de meules ou disques
de meuleuses à la place des lames de scie circulaire. Ceci annulerait votre garantie.
www.silverlinetools.com
11
Page 13

F
Consignes de sécurité
supplémentaires pour les scies
circulaires
AVERTISSEMENT : avant de brancher l’outil sur l’alimentation secteur, vérifiez bien que la
tension d’alimentation soit la même que celle indiquée sur la plaque signalétique de l’outil.
Une alimentation électrique dont la tension est supérieure à celle indiquée sur l’outil risque
d’entraîner des blessures chez l’utilisateur et des dommages sur l’outil. En cas de doute,
ne branchez pas l’outil. L’utilisation d’une source de courant dont la tension est inférieure à
celle indiquée sur l’outil peut endommager le moteur.
• Il est interdit à toute personne de moins de 18 ans d’employer cet appareil.
• L’utilisation d’une scie circulaire demande le port d’équipements de sécurité tels que
lunettes ou visière de sécurité, casque anti-bruit et habillement protecteur tel que gants
de sécurité.
• Les outils électriques portatifs produisent des vibrations. Les vibrations peuvent provoquer
des maladies. En conservant la chaleur, des gants portés par l’utilisateur peuvent lui
permettre de maintenir une bonne circulation sanguine dans les doigts. Les outils portatifs
ne doivent pas être utilisés pendant de longues périodes sans marquer une pause
• Utilisez toujours les lames recommandées, de la taille indiquée et de l’alésage indiqué.
Les lames non adaptées aux éléments de montage prévus sur la scie présenteront des
défauts de concentricité et conduiront à une mauvaise maîtrise de la machine.
• Si possible, utilisez un système d’extraction de la poussière.
• En fonctionnement, les outils électriques doivent toujours être tenus par les surfaces de
préhension isolantes, ce qui garantit votre protection en cas de contact entre l’appareil
et son cordon d’alimentation ou des fils électriques cachés. Tout contact entre un fil
sous tension et les parties métalliques apparentes de l’appareil peut entraîner un risque
de choc électrique si l’utilisateur vient à toucher ces parties métalliques.
• Gardez toujours les mains à distance de la zone de coupe et de la lame. En tenant l’outil
à deux mains, la lame ne risque pas de vous blesser. Tenez d’une main la poignée
principale, de l’autre la poignée secondaire ou le carter du moteur.
• Ne tentez pas de couper des matériaux plus épais que ceux recommandés dans ce manuel.
• Adaptez la profondeur de coupe en fonction de l’épaisseur de la pièce à couper, c’est-à-
dire que la lame ne doit ressortir sous la pièce à couper que sur une longueur inférieure
à la taille d’une dent
• Assurez-vous que la pièce à couper se trouve sur des supports adéquats. Les grosses
pièces peuvent ployer sous leur propre poids et ainsi coincer la lame. Les panneaux et
pièces de grande taille doivent être soutenus de manière adéquate de chaque côté de la
ligne de coupe, bien à proximité de celle-ci, ainsi que sur les bords.
• Assurez-vous que tous les supports et les câbles électriques se trouvent en dehors du
trait de coupe.
• Immobilisez toujours la pièce à couper sur une surface stable à l’aide d’instruments
vous laissant libre de vos mouvements, en les plaçant de manière qu’ils n’entraînent
pas le grippage de la lame ou la perte du contrôle de la machine.
• Pour des coupes de précision, et pour empêcher le grippage de la lame, utilisez toujours
un guide de coupe.
• Ne tenez jamais la pièce à couper dans la main ou en vous servant de votre jambe
comme point d’appui lors de la coupe.
• Ne vous placez jamais dans l’axe de la lame lors du maniement de l’appareil.
• Tenez compte du fait que la lame ressortira par dessous la pièce à couper.
• Ne placez pas vos doigts sous la pièce à couper car le carter de protection de lame ne
permettrait plus de vous en protéger.
• Tenez compte du sens de rotation du moteur et de la lame.
• Examinez préalablement la pièce à couper et retirez les clous et autres objets étrangers
• N’appliquez jamais de force latérale ou de torsion sur la lame lors de la coupe.
• Si la coupe entreprise ne doit pas parvenir jusqu’au bord de la pièce à couper, ou si la
lame se grippe en cours de coupe, laissez-la lame s’arrêter complètement avant de
lever la scie.
• Ne commencez jamais à dégager une lame coincée avant d’avoir bien débranché la
machine.
• Ne jamais faire reculer la scie lors de la coupe.
• Attention aux projections de débris. Dans certaines circonstances, des éclats de
matériau peuvent se trouver projetés à grande vitesse. Il appartient à l’utilisateur de
s’assurer que toute personne également présente dans la zone de travail soit protégée
contre ces projections.
• Si l’on vous interrompt durant la coupe, finissez l’action entreprise et éteignez bien la
machine avant de lever les yeux de l’ouvrage.
• Le boulon ainsi que les rondelles de montage de la lame ont été spécialement conçus
pour cette scie. Pour préserver les performances et le bon fonctionnement de la
machine, n’utilisez jamais de boulons et rondelles abîmés ou inadaptés.
• Inspectez régulièrement le carter de protection de la lame. Si le carter ne revient pas
automatiquement sur la lame, faites réviser l’appareil avant toute utilisation.
• Vérifiez régulièrement que toutes les fixations par écrous, boulons et autres soient bien
serrées.
L’outil doit être uniquement utilisé dans son but prescrit. Toute autre utilisation que celle
indiquée dans le présent manuel sera considérée impropre. Tout dommage et toute lésion
découlant d’une quelconque utilisation impropre de l’outil relèveront de la responsabilité de
l’utilisateur et non pas de celle du fabricant.
Le fabricant ne saurait être responsable d’aucune modification apportée à l’outil ni d’aucun
dommage résultant de telles modifications.
Même lorsque l’outil est utilisé comme indiqué, il est impossible d’éliminer tous les
facteurs de risque résiduels. De par sa fabrication et sa conception, cet outil peut entraîner
les risques suivants.
Se familiariser avec le produit
1 Tubulure d’extraction de la poussière
2 Indicateur du sens de rotation de la lame
3 Molette de verrouillage de l’angle de biseau
4 Bride
5 Boulon de fixation de la lame
6 Molette de verrouillage du guide
7 Embase
8 Guide parallèle
9 Carter de protection de la lame
10 Levier du carter de protection
11 Boulons du couteau diviseur
12 Poignée arrière
13 Couteau diviseur
14 Molette de verrouillage du biseau
15 Molette de verrouillage de la profondeur
16 Vis pour l’accès aux balais de charbon
17 Gâchette de marche/arrêt
18 Bouton de sécurité
19 Poignée avant
20 Clé à ergot
21 Clé
Fig A:
A - Couteau diviseur
B - Trait de scie
C - Lame
12
Page 14

845135 Scie circulaire 1200 W
Déballage
Déballez le produit avec soin. Veillez à retirer tout le matériau d’emballage et familiarisezvous avec toutes les caractéristiques du produit.
Si des pièces sont endommagées ou manquantes, faites-les réparer ou remplacer avant
d’utiliser l’appareil
Instructions d’utilisations
Extraction de la poussière
• Pour travailler dans un environnement plus propre et sain, branchez un système
d’extraction de la poussière sur la tubulure d’extraction (1).
REMARQUE :
• Il est recommandé de s’entraîner sur une chute de matériau avant d’utiliser la scie.
Régler la scie est important pour obtenir un travail de qualité, et une scie mal réglée
peut endommager votre pièce de travail.
• La lame fournie est préinstallée. Cependant, vérifiez bien que le boulon de fixation de la
lame (5) soit bien serré avant la première utilisation.
ATTENTION : débranchez toujours la scie de sa source d’alimentation avant de mettre ou
enlever des accessoires ou effectuer des réglages.
Fixer et retirer une lame
• Vérifiez toujours que la lame à fixer est adéquate avec le matériau à couper
• Fixez uniquement des lames en bonne condition. Des lames émoussées pliées ou
fissurées doivent être rejetées.
1. Maintenez la bride en place à l’aide de la clé à ergot (20). Desserrez le boulon de
fixation de la lame (5) avec la clé (21).
2. Enlevez le boulon, la rondelle et la bride. Vous pouvez maintenant poser ou enlever la
lame.
3. Utilisez le levier du carter de protection pour faire pivoter le carter afin de libérer le
passage.
4. Installez la lame en respectant le sens de rotation de la lame, indiqué par la flèche
sur la scie et sur la lame
5. Remettez le boulon, la rondelle et la bride et resserrez en utilisant la clé à ergot et la clé.
6. Vérifiez que la lame soit bien fixée avant toute utilisation.
Réglage de l’angle de biseau
• Cette scie est équipée d’une embase pivotante (7) pour permettre d’effectuer des
coupes biseautées.
• Pour changer l’angle d’inclinaison de l’embase, desserrez les molettes de verrouillage
de l’angle de biseau (3 et 14).
• Réglez à l’angle de biseau voulu en vous aidant de l’échelle graduée puis resserrez
les deux molettes
• Pour un réglage précis de l’angle de biseau, il est recommandé d’utiliser un rapporteur
entre l’embase et la lame.
Réglage de la profondeur
• Cette scie est équipée avec un mécanisme pour régler la hauteur.
• Pour changer la profondeur de coupe, dévissez la molette de verrouillage de profondeur
(15).
• Pour régler la profondeur, utilisez l’échelle graduée ou une règle, puis revissez la
molette.
• La profondeur est bien réglée lorsque la lame dépasse à peu près de 3 mm en dessous
du matériau à couper.
Manipuler la scie
• Maintenez toujours la scie fermement, avec une main sur chaque poignée.
• Attendez toujours l’arrêt complet de la lame avant de reposer la scie.
• Débranchez toujours la scie si elle n’est plus sous surveillance.
• Immobilisez toujours votre pièce de travail pour effectuer votre coupe. Utilisez des
serre-joints si approprié.
Effectuer une coupe
1. Maintenez la scie fermement et posez l’avant de l’embase (7) sur le bord de la pièce
de travail.
2. Vérifiez que la lame ne soit pas en contact avec la pièce de travail ou tout autre
objet.
3. Démarrez la scie en appuyant sur le bouton de sécurité (18) et appuyez sur la
gâchette de marche/arrêt (17)
4. Laissez le moteur atteindre sa vitesse maximale, et poussez sur la scie de façon
régulière sur la pièce de travail.
5. Maintenez bien l’embase de la scie contre la pièce de travail
REMARQUE : Deux encoches se trouvent sur l’avant de l’embase pour servir de guide : une
encoche pour une coupe à 0° et l’autre pour une coupe à 45 ° (encoche marquée 45°).
6. Attendez que la lame ait fini la coupe avant de relâcher la gâchette de marche/arrêt.
Si la coupe ne se fait pas d’un bord à l’autre, attendez que la lame s’arrête avant de
soulever la scie de la piève de travail.
7. Ne reposez pas la scie tant que la lame ne soit pas arrêter.
Utilisation du guide parallèle
1. Pour faire une coupe parallèle par rapport à un bord, utilisez le guide parallèle (8).
2. Le guide se fixe sur l’embase (7) avec la molette de verrouillage du guide (6). Vérifiez
qu’il soit bien fixé.
3. Le guide peut se régler en fonction de la coupe à effectuer.
4. Pour une coupe parallèle à un bord, gardez le pied vertical du guide appuyé contre
le bord vertical de la pièce
Le couteau diviseur
• Cette scie est équipée d’un couteau diviseur (13) , c’est-à-dire d’une petite lame située
derrière la lame de la scie. Le couteau diviseur est un élément de sécurité important
qui empêche l’effet de rebond.
• L’épaisseur du couteau diviseur doit se située entre l’épaisseur du trait de scie (B) et
l’épaisseur de la lame (C), voir Fig.A.
• La lame fournie a un trait de scie de 2,5 mm et d’une épaisseur de 1,4 mm. Celle du
couteau diviseur est de 1,7 mm. Lorsque vous remplacez une lame, assurez-vous que
l’épaisseur de la lame soit inférieure à 1,7 mm et le trait de scie supérieur à 1,7 mm si
vous utilisez le couteau diviseur fourni.
• Vous pouvez légèrement régler la position du couteau en dévissant les boulons (11),
puis en les resserrant après d’avoir repositionné le couteau.
• Dans certains cas, le couteau peut avoir besoin d’être raplati, remplacé ou
temporairement enlevé. Pour cela les boulons doivent être complètement retirés pour
pouvoir enlever le couteau.
• Remplacez immédiatement le couteau s’il est endommagé et qu’il ne peut pas être
raplati.
• Placez le couteau de sorte qu’il soit bien centré derrière la lame. Des rondelles peuvent
être nécessaires pour remettre les boulons si l’épaisseur de la lame est différente.
• Le couteau diviseur peut être enlevé pour effectuer des coupes plongeantes. Les
coupes plongeantes doivent être effectuées avec attention : prenez toutes les mesures
de sécurités requises.
ATTENTION : Remettez toujours le couteau diviseur pour des coupes normales car c’est un
élément de sécurité important.
www.silverlinetools.com
13
Page 15

F
Entretien
ATTENTION : Débranchez l’appareil de sa source d’alimentation avant de le nettoyer ou
de l’entretenir
Nettoyage
• Gardez l’appareil propre. La poussière et la saleté provoquent l’usure rapide des
éléments internes de l’appareil et réduit sa durabilité. Utilisez une brosse souple ou
un chiffon sec pour le nettoyage. Si possible, nettoyez les orifices de ventilation à l’air
comprimé propre et sec
Remplacement des balais
• Avec le temps, les balais de charbon du moteur s’usent. Ce processus d’usure est
accéléré si la machine est surchargée ou utilisée dans des environnements poussiéreux
• Si les balais sont excessivement usés, le rendement du moteur peut diminuer, la
machine peut ne pas démarrer ou une quantité anormale d’étincelles peut être
observée
• Pour remplacer les balais, contacter un centre d’entretien agréé si vous ne savez pas
comment procéder.
• Pour remplacer les balais par vous-même, débranchez l’appareil et dévissez les vis
pour l’accès aux balais de charbon (16) et retirez le cache .
• Remplacez les deux balais par des nouveaux.
REMARQUE : Des balais de charbon sont disponible sur www.toolsparesonline.com.
Rangement
• Ranger cet outil dans un endroit sûr, sec et hors portée des enfants
Recyclage
Lorsque l’appareil n’est plus en état de fonctionner et qu’il n’est pas réparable, recyclez
l’appareil en accordance avec les régulations nationales.
• Ne jetez pas les outils électriques et autres équipements électriques ou
électroniques(DEEE) avec les ordures ménagères
• Contactez les autorités locales compétentes en matière de gestion des déchets pour
vous informer de la procédure à suivre pour recycler les outils électriques
14
Page 16

845135 Scie circulaire 1200 W
Garantie Silverline
Ce produit Silverline bénéficie d’une garantie de
3 ans
Enregistrez ce produit sur le site silverlinetools.com dans les 30 jours
suivant l’achat afin de bénéficier de la garantie de 3 ans. La période de
garantie commence à partir de la date d’achat figurant sur votre facture
d’achat.
Enregistrement de votre achat
Visitez silverlinetools.com, sélectionnez le bouton d’enregistrement et
saisissez :
Vos informations personnelles
Les informations concernant le produit et l’achat
Vous recevrez le certificat de garantie en format PDF. Veuillez l’imprimer et
le conserver avec votre achat.
Conditions de garantie des outils Silverline
La période de garantie prend effet à compter de la date de l’achat en
magasin, comme indiqué sur votre facture d’achat.
VEUILLEZ CONSERVER VOTRE FACTURE D’ACHAT.
Si ce produit est défectueux pendant les 30 jours qui suivent l’achat,
retournez-le au magasin où vous l’avez acheté, avec votre facture, en
expliquant en détail le problème. Le produit sera remplacé ou vous serez
remboursé(e).
Si ce produit est défectueux après cette période de 30 jours,
retournez-le à :
Silverline Tools Service Centre
PO Box 2988
Yeovil
BA21 1WU, Royaume Uni
Toute demande de service sous garantie doit être soumise pendant la
période de garantie.
Avant toute intervention sous garantie, vous devez présenter la facture
d’achat originale sur laquelle doivent figurer la date d’achat, votre nom,
votre adresse et le lieu d’achat.
Vous devez expliquer en détail la défaillance nécessitant réparation.
Les demandes de service sous garantie faites pendant la période de
garantie seront vérifiées par Silverline Tools pour établir si la défaillance
du produit est liée à un vice de matériau ou de fabrication.
Les frais de port ne seront pas remboursés. Les articles retournés doivent
être convenablement propres et sûrs pour être réparés et devraient être
emballés soigneusement pour éviter tout dommage ou toute blessure
pendant le transport. Nous pouvons refuser les livraisons qui ne sont pas
convenables ou sûres.
Toute intervention sera effectuée par Silverline Tools ou ses agents de
réparation agréés.
La réparation ou le remplacement du produit ne dépassera pas la période
de garantie.
Les anomalies que nous reconnaissons être couvertes par la garantie
seront rectifiées par la réparation de l’outil, sans frais (hormis les
frais de port) ou par son remplacement par un outil en parfait état de
fonctionnement.
Les pièces ou les outils remplacés deviendront la propriété de Silverline
Tools.
La réparation ou le remplacement de votre produit sous garantie vous
apporte des avantages ; ces avantages s’ajoutent à vos droits statutaires
en tant que consommateur sans les affecter aucunement.
La présente garantie couvre:
La réparation du produit, s’il peut être vérifié, à la satisfaction de Silverline
Tools, que les défaillances du produit ont été provoquées par un vice de
matériau ou de fabrication au cours de la période de garantie.
Si une pièce n’est plus disponible ou n’est plus fabriquée, Silverline Tools la
remplacera par une pièce de rechange opérationnelle.
Utilisation de ce produit dans l’UE.
La présente garantie ne couvre pas:
Silverline Tools ne garantit pas les réparations nécessaires du produit
engendrées par :
L’usure normale provoquée par l’utilisation conforme aux instructions
d’utilisation, par exemple les lames, les charbons, les courroies, les
ampoules, les batteries, etc.
Le remplacement de tout accessoire fourni tel que les forêts, les lames, les
feuilles abrasives, les outils de coupes et les autres articles associés.
Les dommages et les défaillances accidentels causés par une utilisation ou
un entretien négligent, une mauvaise utilisation, un manque d’entretien ou
une utilisation ou une manipulation imprudente du produit.
L’utilisation du produit à des fins autres que son utilisation domestique
normale.
Le moindre changement ou la moindre modification du produit.
L’utilisation de pièces et d’accessoires qui ne sont pas des composants
véritables de Silverline Tools.
Une installation défectueuse (sauf si l’installation a été réalisée par
Silverline Tools).
Les réparations ou les modifications réalisées par des tiers autres que
Silverline Tools ou ses agents de réparation agréés.
Les demandes de service autres que le droit de rectifier les défaillances
de l’outil indiquées dans ces conditions de garantie ne sont pas couvertes
par cette garantie
Déclaration de conformité CE
Le soussigné : Mr Darrell Morris
Autorisé par : Silverline Tools
Déclare que le produit :
Code d’identification : 845135
Description : Scie circulaire 1200 W
Est conforme aux directives suivantes :
• Directive sur les machines 2006/42/CE
• Directive sur les basses tensions 2006/95/CE
• Compatibilité électromagnétique 2004/108/CE
• DirectiveRoHS2011/65/EU
• EN60745-1:2009•EN60745-2-5:2007+A11
• EN60825-1:2007•EN55014-1:2006+A1
• EN55014-2:1997+A1+A2•EN61000-3-2:2006+A1+A2
• EN61000-3-3:2008
Organisme notifié : SGS-CSTC Standards Technical Services Co., Ltd, Shanghai, Chine
La documentation technique est conservée par : Silverline Tools
Date : 04/06/13
Signature :
Directeur général
Nom et adresse du fabricant ou de son représentant agréé :
Powerbox International Ltd, Boundary Way, Lufton Trading Estate, Yeovil, Somerset, BA22
8HZ Royaume-Uni
www.silverlinetools.com
15
Page 17

D
Beschreibung der Symbole
Auf dem Leistungsschild des Werkzeugs sind möglicherweise Symbole abgebildet. Sie
vermitteln wichtige Informationen über das Produkt oder dienen als Gebrauchsanweisung.
Gehörschutz tragen
Augenschutz tragen
Atemschutz tragen
Kopfschutz tragen
Handschutz tragen
Bedienungsanleitung sorgfältig lesen
Für zusätzlichen Schutz doppelt isoliert
Erfüllt die entsprechenden rechtlichen Vorschriften und Sicherheitsnormen
Umweltschutz
Elektroaltgeräte dürfen nicht über den Haushaltsmüll entsorgt werden. Nach
Möglichkeit bitte über entsprechende Einrichtungen entsorgen. Lassen Sie
sich bezüglich der sachgemäßen Entsorgung von Elektrowerkzeugen von
der zuständigen Behörde oder dem Händler beraten.
Technische Daten
Spannung: ............................................230-240 V
Leistung: ..............................................1200 W
Leerlaufdrehzahl:..................................4500 min
Max. Sägeblattabmessungen: ..............Ø 185 mm
Spaltkeildicke: ......................................1,7 mm
Mitgeliefertes Sägeblatt:.......................Ø 185 x Ø 20 x
............................................................2,5 mm x 24 ZpZ
Max. Schnitttiefe: .................................63 mm (bei 90°)
............................................................38 mm (bei 45°)
Gehrungswinkelbereich:.......................0-45°
Schutzklasse: .......................................
Schutzart:................. ............................IP 20
Abmessungen (L x B x H): ...........................330 x 240 x 250 mm
Gewicht: ...............................................4 kg
Aufgrund der fortlaufenden Weiterentwicklung unserer
Produkte können sich die technischen Daten von Silverline-
Produkten ohne vorherige Ankündigung ändern.
Geräusch- und Vibrationsinformationen:
Hand-Arm-Vibration: ............................5 m/s2
............................................................(Hauptgriff)
............................................................6 m/s2
............................................................(Zusatzhandgriff)
Unsicherheit:........................................1,5 m/s
Schalldruckpegel (LPA):......................... 66 dB(A)
Schallleistungspegel (LWA):....................77 dB(A)
Unsicherheit:........................................ 3 dB(A)
Der Schallintensitätspegel kann für den Bediener 85 dB(A)
übersteigen und Lärmschutzmaßnahmen sind notwendig.
~,
50 Hz
-1
2
WARNUNG: Tragen Sie in Bereichen, wo der Lärmpegel 85 dB(A) überschreitet, unbedingt
angemessenen Gehörschutz und begrenzen Sie nach Möglichkeit die Belastungsdauer.
Sollte trotz Gehörschutz Unbehagen irgendeiner Art auftreten, beenden Sie die Arbeit
unverzüglich und überprüfen Sie den Gehörschutz auf korrekten Sitz und Funktion und
stellen Sie sicher, dass dieser einen angemessenen Schutz für den Lärmpegel bietet, der
von den verwendeten Werkzeugen ausgeht.
WARNUNG: Bei der Benutzung mancher Werkzeuge wird der Benutzer Vibrationen
ausgesetzt, welche zum Verlust des Tastsinns, zu Taubheitsgefühl, Kribbeln und zu
einer Verminderung der Handgreifkraft führen können. Langfristige Belastung kann zu
chronischen Beschwerden führen. Begrenzen Sie, falls nötig, die Exposition zu Vibrationen
und tragen Sie vibrationsmindernde Handschuhe. Verwenden Sie dieses Werkzeug
nicht mit kalten Händen, da Vibrationen bei Temperaturen unter dem individuellen
Komfortbereich eine stärkere Wirkung zeigen. Beurteilen Sie die Vibrationsbelastung unter
Zuhilfenahme der Technischen Daten des jeweiligen Werkzeuges und bestimmen Sie die
zulässige Belastungsdauer und -häufigkeit.
Die in den Technischen Daten angegebenen Geräusch- und Vibrationsinformationen
werden nach EN 60745 bzw. vergleichbaren internationalen Standards bestimmt.
Die angegebenen Werte beziehen sich auf eine normale Benutzung des Werkzeuges
unter normalen Arbeitsbedingungen. Schlecht gewartete, inkorrekt montierte und
unsachgemäß verwendete Werkzeuge können erhöhte Schallpegel und Vibrationswerte
aufweisen. Weitere Informationen zur EU-Vibrationsrichtlinie und zu Schall- sowie
Vibrationsbelastungen, die auch für Heimanwender relevant sein können, finden Sie
auf den Seiten der Europäischen Agentur für Sicherheit und Gesundheitsschutz am
Arbeitsplatz: www.osha.europa.eu.
Allgemeine Sicherheitshinweise
WARNUNG! Lesen Sie alle Sicherheitshinweise und Anweisungen. Versäumnisse bei
der Einhaltung der Sicherheitshinweise und Anweisungen können elektrischen Schlag,
Brand und/oder schwere Verletzungen verursachen.
WARNUNG: Dieses Gerät darf nicht von Personen (wie z.B. Kindern) mit reduzierter
physischer oder mentaler Kapazität, oder von Personen ohne Erfahrung im Umgang
mit einem solchen Gerät betrieben werden, außer wenn sie von einer für ihre
persönliche Sicherheit verantwortlichen Person in der Benutzung unterwiesen
worden sind und dabei beaufsichtigt werden. Kinder müssen beaufsichtigt werden, um
sicherzustellen, dass sie das Gerät nicht als Spielzeug verwenden.
Bewahren Sie alle Sicherheitshinweise und Anweisungen für die Zukunft auf.
Der in den Sicherheitshinweisen verwendete Begriff „Elektrowerkzeug“ bezieht
sich auf netzbetriebene Elektrowerkzeuge (mit Netzkabel) und auf akkubetriebene
Elektrowerkzeuge (ohne Netzkabel).
Arbeitsplatzsicherheit
a) Halten Sie Ihren Arbeitsbereich sauber und gut beleuchtet. Unordnung oder
unbeleuchtete Arbeitsbereiche können zu Unfällen führen.
b) Arbeiten Sie mit dem Elektrowerkzeug nicht in explosionsgefährdeter
Umgebung, in der sich brennbare Flüssigkeiten, Gase oder Stäube befinden.
Elektrowerkzeuge erzeugen Funken, die den Staub oder die Dämpfe entzünden
können.
c) Halten Sie Kinder und andere Personen während der Benutzung des
Elektrowerkzeugs fern. Bei Ablenkung können Sie die Kontrolle über das Gerät
verlieren.
Elektrische Sicherheit
a) Der Anschlussstecker des Elektrowerkzeuges muss in die Steckdose passen.
Der Stecker darf in keiner Weise verändert werden. Verwenden Sie keine
Adapterstecker gemeinsam mit schutzgeerdeten Elektrowerkzeugen.
Unveränderte Stecker und passende Steckdosen verringern das Risiko eines
elektrischen Schlages.
b) Vermeiden Sie Körperkontakt mit geerdeten Oberflächen wie von Rohren,
Heizungen, Herden und Kühlschränken. Es besteht ein erhöhtes Risiko durch
elektrischen Schlag, wenn Ihr Körper geerdet ist.
c) Halten Sie Elektrowerkzeuge von Regen oder Nässe fern. Das Eindringen von
Wasser in ein Elektrowerkzeug erhöht das Risiko eines elektrischen Schlages.
d) Zweckentfremden Sie das Kabel nicht, um das Elektrowerkzeug zu tragen,
aufzuhängen oder um den Stecker aus der Steckdose zu ziehen. Halten Sie das
Kabel fern von Hitze, Öl, scharfen Kanten oder sich bewegenden Geräteteilen.
Beschädigte oder verwickelte Kabel erhöhen das Risiko eines elektrischen Schlages.
e) Wenn Sie mit einem Elektrowerkzeug im Freien arbeiten, verwenden Sie
nur Verlängerungskabel, die auch für den Außenbereich geeignet sind. Die
Anwendung eines für den Außenbereich geeigneten Verlängerungskabels verringert
das Risiko eines elektrischen Schlages.
f) Wenn der Betrieb des Elektrowerkzeuges in feuchter Umgebung nicht
vermeidbar ist, verwenden Sie einen Fehlerstromschutzschalter. Der Einsatz
eines Fehlerstromschutzschalters vermindert das Risiko eines elektrischen Schlages.
Hinweis: Der Begriff „Fehlerstromschutzschalter” wird synonym mit den Begriffen
„FI-Schutzschalter” und „FI-Schalter” verwendet.
Sicherheit von Personen
a) Seien Sie aufmerksam, achten Sie darauf, was Sie tun, und gehen Sie mit
Vernunft an die Arbeit mit einem Elektrowerkzeug. Benutzen Sie kein
Elektrowerkzeug, wenn Sie müde sind oder unter dem Einfluss von Drogen,
Alkohol oder Medikamenten stehen. Ein Moment der Unachtsamkeit beim
Gebrauch des Elektrowerkzeuges kann zu ernsthaften Verletzungen führen.
b) Tragen Sie persönliche Schutzausrüstung und immer eine Schutzbrille.
Das Tragen persönlicher Schutzausrüstung, wie Staubmaske, rutschfeste
Sicherheitsschuhe, Schutzhelm oder Gehörschutz, je nach Art und Einsatz des
Elektrowerkzeuges, verringert das Risiko von Verletzungen.
16
Page 18

845135 1200-W-Kreissäge
c) Vermeiden Sie eine unbeabsichtigte Inbetriebnahme. Vergewissern Sie
sich, dass das Elektrowerkzeug ausgeschaltet ist, bevor Sie es an die
Stromversorgung und/oder den Akku anschließen, es aufnehmen oder tragen.
Wenn Sie beim Tragen des Elektrowerkzeuges den Finger am Schalter haben oder
das Gerät eingeschaltet an die Stromversorgung anschließen, kann dies zu
Unfällen führen.
d) Entfernen Sie Einstellwerkzeuge oder Schraubenschlüssel, bevor Sie das
Elektrowerkzeug einschalten. Ein Werkzeug oder Schlüssel, der sich in einem
drehenden Geräteteil befindet, kann zu Verletzungen führen.
e) Vermeiden Sie eine unnatürliche Körperhaltung. Sorgen Sie für einen sicheren
Stand und halten Sie jederzeit das Gleichgewicht. Auf diese Weise lässt sich das
Elektrowerkzeug in unerwarteten Situationen besser kontrollieren.
f) Tragen Sie geeignete Kleidung. Tragen Sie keine weite Kleidung oder Schmuck.
Halten Sie Haare, Kleidung und Handschuhe fern von sich bewegenden Teilen.
Lockere Kleidung, Schmuck oder lange Haare können von sich bewegenden Teilen
erfasst werden.
g) Wenn Staubabsaug- und -auffangeinrichtungen montiert werden können,
vergewissern Sie sich, dass diese angeschlossen sind und richtig verwendet
werden. Verwendung einer Staubabsaugung kann Gefährdungen durch Staub
verringern.
Verwendung und Behandlung des Elektrowerkzeuges
a) Überlasten Sie das Gerät nicht. Verwenden Sie für Ihre Arbeit das dafür
bestimmte Elektrowerkzeug. Mit dem passenden Elektrowerkzeug arbeiten Sie
besser und sicherer im angegebenen Leistungsbereich.
b) Benutzen Sie kein Elektrowerkzeug, dessen Schalter defekt ist. Ein
Elektrowerkzeug, das sich nicht mehr ein- oder ausschalten lässt, ist gefährlich und
muss repariert werden.
c) Ziehen Sie den Stecker aus der Steckdose und/oder entfernen Sie den Akku,
bevor Sie Geräteeinstellungen vornehmen, Zubehörteile wechseln oder das
Gerät weglegen. Diese Vorsichtsmaßnahme verhindert den unbeabsichtigten Start
des Elektrowerkzeuges.
d) Bewahren Sie unbenutzte Elektrowerkzeuge außerhalb der Reichweite
von Kindern auf. Lassen Sie Personen das Gerät nicht benutzen, die mit
diesem nicht vertraut sind oder diese Anweisungen nicht gelesen haben.
Elektrowerkzeuge sind gefährlich, wenn sie von unerfahrenen Personen benutzt
werden.
e) Pflegen Sie Elektrowerkzeuge mit Sorgfalt. Kontrollieren Sie, ob bewegliche
Teile einwandfrei funktionieren und nicht klemmen, ob Teile gebrochen oder
so beschädigt sind, dass die Funktion des Elektrowerkzeuges beeinträchtigt
ist. Lassen Sie beschädigte Teile vor dem Einsatz des Gerätes reparieren. Viele
Unfälle haben ihre Ursache in schlecht gewarteten Elektrowerkzeugen.
f) Halten Sie Schneidwerkzeuge scharf und sauber. Sorgfältig gepflegte
Schneidwerkzeuge mit scharfen Schneidkanten verklemmen sich weniger und sind
leichter zu führen.
g) Verwenden Sie Elektrowerkzeug, Zubehör, Einsatzwerkzeuge usw.
entsprechend diesen Anweisungen. Berücksichtigen Sie dabei die
Arbeitsbedingungen und die auszuführende Tätigkeit. Der Gebrauch von
Elektrowerkzeugen für andere als die vorgesehenen Anwendungen kann zu
gefährlichen Situationen führen.
Service
a) Lassen Sie Ihr Elektrowerkzeug nur von qualifiziertem Fachpersonal und nur
mit Original-Ersatzteilen reparieren.Damit wird sichergestellt, dass die Sicherheit
des Elektrowerkzeuges erhalten bleibt.
Vermeidung von Rückschlag:
Benutzersicherheit
Rückschlag bezeichnet eine plötzliche Reaktion auf ein verklemmtes, verhaktes oder
fehlausgerichtetes Sägeblatt und führt dazu, dass die Säge unkontrolliert aus dem
Werkstück nach oben und in Richtung Bediener gehoben wird. Rückschlag resultiert
aus missbräuchlichem und/oder unsachgemäßem Betrieb der Säge oder ungeeigneten
Bedingungen und kann durch die nachfolgenden Vorsichtsmaßnahmen vermieden werden:
a. Halten Sie die Säge mit beiden Händen gut fest und positionieren Sie die Arme
so, dass Sie den Rückschlagkräften widerstehen können. Bringen Sie Ihren
Körper niemals auf eine Linie mit dem Sägeblatt, sondern immer seitlich zur
Säge in Position. Rückschlag kann dazu führen, dass die Säge zurückschnellt; die
Rückschlagkräfte lassen sich jedoch mithilfe entsprechender Vorsichtsmaßnahmen
durch den Bediener kontrollieren.
b. Wenn sich das Sägeblatt verklemmt oder der Sägevorgang aus irgendwelchen
Gründen unterbrochen wird, lassen Sie den Auslöser los und halten Sie die Säge
vollkommen ruhig, bis das Sägeblatt zum völligen Stillstand gekommen ist.
Versuchen Sie niemals, die Säge aus dem Werkstück zu nehmen oder nach hinten
zu ziehen, während sich das Sägeblatt noch bewegt, da es sonst zu Rückschlag
kommen kann. Untersuchen Sie den Vorfall und treffen Sie Abhilfemaßnahmen, um
die Ursache für das Festfahren des Sägeblatts zu beseitigen.
c. Wenn Sie die Säge in einem Werkstück wiedereinschalten, zentrieren Sie das
Sägeblatt im Spalt und prüfen Sie, dass die Zähne nicht in den Werkstoff eingreifen.
Wenn das Sägeblatt im Material verklemmt ist, dann kann es sich hocharbeiten oder
vom Werkstück zurückschlagen, wenn die Säge eingeschaltet wird.
d. Platzieren Sie beim Bearbeiten großer Platten Stützen an den Endkanten nahe
der Schnittlinie, um ein Hinunterbiegen der Platte unter ihrem Eigengewicht zu
verhindern. Dadurch werden ein Festfahren des Sägeblattes und Rückschlag
vermieden.
e. Verwenden Sie keine stumpfen oder beschädigten Sägeblätter. Ungeschärfte
oder nicht richtig eingesetzte Sägeblätter ergeben einen engen Sägespalt, der
übermäßige Reibung, Festfahren und Rückschlag verursachen kann.
f. Vor dem Sägen müssen die Tiefeneinstellungs- und Winkelfeststellhebel fest
angezogen und abgesichert sein. Wenn sich die Sägeblatteinstellung während
des Sägens verändert, dann kann sich das Sägeblatt verklemmen und es kann zu
Rückschlag kommen.
g. Lassen Sie bei Tauchschnitten in Wände oder Blindbereiche besondere Vorsicht
walten. Das hervorstehende Sägeblatt kann auf Gegenstände treffen, die Rückschlag
verursachen.
h. Überprüfen Sie vor jeder Benutzung, ob die untere Schutzhaube richtig schließt.
Verwenden Sie die Säge nicht, wenn die untere Schutzhaube nicht bei allen
Winkeleinstellungen und Schnitttiefen frei beweglich ist und sich nicht sofort
schließt. Klemmen oder binden Sie die untere Schutzhaube niemals in geöffneter
Position fest.
i. Überprüfen Sie die Funktionsfähigkeit der Schutzhaubenfeder. Lassen Sie das Gerät
vor dem Gebrauch warten, wenn Schutzhaube und Feder nicht einwandfrei arbeiten.
Die untere Schutzhaube wird möglicherweise durch beschädigte Teile, klebrige
Ablagerungen oder angesammeltes Sägemehl blockiert.
j. Die untere Schutzhaube darf nur für besondere Anwendungen wie Tauchschnitte
oder Schifterschnitte manuell zurückgezogen werden. Heben Sie die untere
Schutzhaube mithilfe des Blattschutzhebels an; sobald das Sägeblatt in den
Werkstoff einschneidet, muss die untere Schutzhaube losgelassen werden. Für alle
anderen Sägearbeiten sollte die untere Schutzhaube automatisch funktionieren.
k. Achten Sie vor dem Ablegen der Säge immer darauf, dass die untere Schutzhaube
das Sägeblatt bedeckt. Ein ungeschütztes, leer laufendes Sägeblatt führt dazu,
dass die Säge rückwärts arbeitet und alles, was im Weg ist, durchsägt. Beachten
Sie, dass es einige Zeit dauert, bis das Sägeblatt nach Freigabe der Taste zum
Stillstand kommt. Verwenden Sie keine Schleifscheiben, da dies zum Erlöschen der
Garantie führt.
Zusätzliche Sicherheitshinweise
für Kreissägen
WARNUNG! Vergewissern Sie sich vor Anschluss des Geräts an eine Stromquelle
(Netzsteckdose, Verlängerungsleitung, Kabeltrommel usw.), dass die Versorgungsspannung
mit der auf dem Leistungsschild des Elektrowerkzeugs angegebenen Spannung
übereinstimmt. Eine Stromquelle mit höherer Spannung als der auf dem Gerät
angegebenen Spannung kann zu schweren Verletzungen des Bedieners führen und das
Gerät beschädigen. Falls Sie sich nicht sicher sind, schließen Sie das Gerät nicht an die
Stromquelle an. Die Nutzung einer Stromquelle mit einer geringeren Spannung als der auf
dem Leistungsschild angegebenen ist schädlich für den Motor.
• ErlaubenSieniemandunter18Jahren,diesesWerkzeugzubedienen.
• VerwendenSiebeiderBedienungderSägeSicherheitsausrüstungeinschließlich
Schutzbrille oder -schild, Gehörschutz, Staubmaske und Schutzkleidung einschließlich
Schutzhandschuhen.
• TragbareElektrowerkzeugekönnenstarkeSchwingungskräfteerzeugen.Diese
Vibrationen können gesundheitsschädigend sein. Wärmende Handschuhe können zu
einer guten Durchblutung der Finger beitragen. Tragbare Werkzeuge sollten nie über
längere Zeiträume ohne Pausen verwendet werden.
• BenutzenSienurdieempfohlenenSägeblättermitAufnahmebohrungender
richtigen Größe und Form, z.B. rautenförmig oder rund. Sägeblätter, die nicht auf die
www.silverlinetools.com
17
Page 19

D
Haltevorrichtungen der Säge passen, laufen außermittig, was zu einem Verlust der
Kontrolle über das Gerät führt.
• VerwendenSienachMöglichkeiteinStaubabsaugsystem,umanfallendenStaubund
Abfall unter Kontrolle zu halten.
• ElektrowerkzeugemüssenwährenddesBetriebsimmerandenisolierten
Griffflächen gehalten werden, damit die Sicherheit auch gewährleistet ist, falls das
Schneidewerkzeug mit dem eigenen Gerätekabel oder einer verborgenen Stromleitung
in Berührung kommt. Durch Kontakt mit einer spannungführenden Leitung werden
freiliegende Metallteile des Elektrowerkzeugs unter Strom gesetzt und der Bediener
erleidet einen elektrischen Schlag, wenn die isolierten Griffflächen nicht benutzt werden.
• HaltenSiedieHändevomSägebereichunddemSägeblattfern.HaltenSieIhrefreie
Hand am Hauptgriff oder dem Motorgehäuse. Wenn beide Hände die Säge halten, dann
können sie nicht durch das Sägeblatt verletzt werden.
• DieStärkedeszubearbeitendenWerkstücksdarfdieAngabenindentechnischen
Daten dieser Gebrauchsanweisung nicht übersteigen.
• PassenSiedieSchnitttiefeandieStärkedesWerkstücksan,d.h.unterdemWerkstück
darf kein ganzer Sägeblattzahn sichtbar sein.
• StellenSiesicher,dassdasWerkstückordnungsgemäßabgestütztist.GroßePlatten
können unter ihrem Eigengewicht durchhängen und ein Verklemmen des Sägeblattes
verursachen. Stützvorrichtungen müssen beidseitig unter der zu bearbeitenden Platte
nahe der Schnittlinie und den Plattenkanten aufgestellt werden.
• SorgenSiedafür,dasssichkeineNetzkabelundAbstütz-bzw.Einspannvorrichtungenin
der Schnittbahn befinden.
• SpannenSiedasWerkstückstetsaufeinerstabilenUnterlageein,damitdie
Berührungspunkte Ihres Körpers mit dem Werkstück auf ein Minimum beschränkt und
ein Festfahren des Sägeblattes sowie ein Kontrollverlust vermieden werden.
• VerwendenSiestetseinenParallelanschlagodereineFührungsschiene,umdie
Schnittgenauigkeit zu erhöhen und ein Festfahren des Sägeblattes zu vermeiden.
• NiemalseinWerkstückwährenddesSägensindenHändenhaltenoderüberIhrBein
legen.
• StellenSiesichbeiderBedienungderSägeimmerseitlichzurSäge.
• BedenkenSie,dassdasSägeblattüberdieUnterseitedesWerkstückshinausreicht.
• GreifenSieniemalsunterdasWerkstück,dadieSchutzhaubedortkeinenSchutzvor
dem Sägeblatt bietet.
• BeachtenSiedieDrehrichtungdesMotorsunddesSägeblattes.
• UntersuchenSiedasWerkstückundentfernenSiealleNägelundanderenFremdkörper,
bevor Sie mit der Arbeit beginnen.
• WirkenSiewährenddesSägensnichtseitlichoderdrehendaufdasSägeblattein.
• WenneinSchnittnichtbiszurWerkstückkantereichtoderwenndasSägeblatt
verklemmt, lassen Sie das Sägeblatt zum völligen Stillstand kommen und heben Sie
dann die Säge vom Werkstück ab.
• SchaltenSieimmerdasGerätaus,bevorSieeinverklemmtesSägeblattzulösen
versuchen.
• BewegenSiedieSägewährenddesSchneidevorgangsniemalsrückwärts.
• SeienSiesichderGefahrdurchweggeschleudertesAusschussmaterialbewusst.Unter
Umständen können Verschnittstücke mit hoher Geschwindigkeit vom Schneidwerkzeug
fortkatapultiert werden. Es liegt in der Verantwortung des Benutzers, andere Personen
im Arbeitsbereich vor der Gefahr durch umherfliegende Schnittreste zu schützen.
• FallsSiewährenddesSägensunterbrochenwerden,beendenSiedenArbeitsschrittund
schauen Sie erst dann auf.
• DerSägeblattbolzenunddieUnterlegscheibenwurdenspeziellfürIhreSägekonstruiert.
Um optimale Leistung und sicheren Betrieb zu gewährleisten, benutzen Sie niemals
beschädigte oder ungeeignete Sägeblattunterlegscheiben und -bolzen.
• PrüfenSiedieSägeblattschutzhauberegelmäßigaufordnungsgemäßeFunktion.Falls
die Schutzhaube das Sägeblatt nicht automatisch abdeckt, muss die Säge vor dem
Gebrauch repariert werden.
• ÜberprüfenSieinregelmäßigenAbständen,dassalleMuttern,Schraubenundanderen
Befestigungselemente fest angezogen sind.
DasGerätdarfnurfürseinenbestimmungsgemäßenZweckverwendetwerden.Jede
von der Beschreibung in dieser Gebrauchsanweisung abweichende Verwendung wird als
missbräuchliche Verwendung angesehen. Der Bediener, nicht der Hersteller, ist für jegliche
Schäden oder Verletzungen aufgrund missbräuchlicher Verwendung haftbar.
Der Hersteller ist weder für am Gerät vorgenommene Modifikationen noch für aus solchen
Veränderungen resultierende Schäden haftbar.
Selbst bei Verwendung des Geräts entsprechend den Anweisungen ist es nicht möglich,
alle verbleibenden Risikofaktoren auszuschließen.
Geräteübersicht
1 Spanauswurf
2 Drehrichtungsanzeiger
3 Gehrungswinkelarretierung
4 Spannflansch
5 Spannschraube
6 Anschlagsarretierung
7 Grundplatte
8 Parallelanschlag
9 Sägeblattschutzhaube
10 Schutzhaubenhebel
11 Spaltkeilschrauben
12 Hauptgriff
13 Spaltkeil
14 Winkelarretierung
15 Schnitttiefenarretierung
16 Schrauben für Zugang zu Kohlebürsten
17 Ein-/Ausschalter
18 Einschaltsperre
19 Zusatzgriff
20 Stirnlochschlüssel
21 Schraubenschlüssel
Abb. A
A – Spaltkeil
B – Schnittfuge (Breite der Sägeblattzähne)
C – Blattgrundkörper
18
Page 20

845135 1200-W-Kreissäge
Auspacken des Gerätes
Packen Sie Ihr Werkzeug vorsichtig aus und überprüfen Sie es. Machen Sie sich vollständig
mit allen seinen Eigenschaften und Funktionen vertraut.
Vergewissern Sie sich, dass sämtliche Teile des Werkzeugs vorhanden und in
einwandfreiem Zustand sind. Sollten Teile fehlen oder beschädigt sein, lassen Sie diese
ersetzen, bevor Sie das Werkzeug verwenden.
Bedienung
Staubabsaugung
• Schließen Sie einen Staubfangbeutel oder eine Absauganlage an den Spanauswurf (1)
an, um für eine sauberere, sicherere Arbeitsumgebung zu sorgen.
HINWEISE:
• Für hochwertige Arbeitsergebnisse sind die Sägeeinstellungen entscheidend. Durch
falsche Einstellungen kann es zudem leicht zu Schäden am Werkstück kommen. Es
wird daher empfohlen, vor Gebrauch der Säge an Restmaterial zu üben.
• Das im Lieferumfang enthaltene Sägeblatt ist ab Werk montiert. Kontrollieren Sie vor
Inbetriebnahme, dass die Spannschraube (5) fest angezogen ist.
WARNUNG! Trennen Sie die Säge stets vom Stromnetz, bevor Sie Zubehörteile anbringen
oder abnehmen.
Sägeblatt wechseln
• Vergewissern Sie sich stets, dass das Sägeblatt für den zu bearbeitenden Werkstoff
geeignet ist.
• Montieren Sie nur Sägeblätter, die sich in einwandfreiem Zustand befinden. Stumpfe,
verbogene und gerissene Sägeblätter müssen umgehend entsorgt werden.
1. Halten Sie den Spannflansch mithilfe des Stirnlochschlüssels (20) in Position. Lösen
Sie mit dem Schraubenschlüssel (21) die Spannschraube (5) durch Drehen im
Gegenuhrzeigersinn.
2. Entfernen Sie die Spannschraube, die Unterlegscheibe und den Spannflansch. Das
Sägeblatt kann jetzt montiert bzw. demontiert werden.
3. Drehen Sie die Schutzhaube mittels Schutzhaubenhebel (10) nach oben.
4. Bringen Sie das benötigte Sägeblatt an und achten Sie dabei darauf, dass der Pfeil
am Sägeblatt und der Drehrichtungsanzeiger (2) in der angegebenen Richtung
übereinstimmen.
5. Bringen Sie den Spannflansch, die Unterlegscheibe und die Spannschraube
wieder an und ziehen Sie sie anschließend mit dem Stirnlochschlüssel und dem
Schraubenschlüssel fest.
6. Vergewissern Sie sich vor dem Einschalten der Säge, dass das Sägeblatt fest sitzt.
Gehrungswinkel einstellen
• Diese Säge ist mit einer schwenkbaren Grundplatte (7) ausgestattet, so dass
Gehrungsschnitte vorgenommen werden können.
• Um den Neigungswinkel der Grundplatte zu verändern, lösen Sie die
Gehrungswinkelarretierung (3) und die Winkelarretierung (14). Die Grundplatte lässt
sich jetzt schwenken.
• Wählen Sie anhand der Winkelskala neben der Gehrungswinkelarretierung den
gewünschten Winkel (0–45°) und ziehen Sie beide Schrauben wieder an.
• Es wird empfohlen, den Winkel zwischen Sägeblatt und Grundplatte mit einem
geeigneten Winkelmesser zu überprüfen, um Genauigkeit zu gewährleisten.
Schnitttiefe einstellen
• Diese Säge verfügt über einen Mechanismus zur Einstellung der Schnitttiefe.
• Lösen Sie zum Ändern der Schnitttiefe die Schnitttiefenarretierung (15). Die Grundplatte
lässt sich jetzt auf die gewünschte Tiefe einstellen.
• Bringen Sie die Grundplatte mithilfe der Tiefenskala oder einem Lineal auf die benötigte
Schnitttiefe und ziehen Sie die Schnitttiefenarretierung wieder an.
• Bei korrekter Einstellung reichen die Sägeblattzähne etwa 3 mm über die Unterseite
des Werkstücks hinaus.
Handhabung der Kreissäge
• Halten Sie die Säge stets gut mit beiden Händen an den Handgriffen fest.
• Warten Sie stets, bis das Sägeblatt zum völligen Stillstand gekommen ist, bevor Sie
die Säge ablegen.
• Ziehen Sie stets den Netzstecker der Säge, bevor die Säge unbeaufsichtigt gelassen wird.
• Sorgen Sie stets dafür, dass sich das Werkstück während des Sägens nicht verschieben
kann. Setzen Sie bei Bedarf Schraubzwingen ein.
Arbeitshinweise
1. Halten Sie die Säge gut fest und setzen Sie die Vorderkante der Grundplatte (7) auf
die Werkstückkante.
2. Achten Sie darauf, dass das Sägeblatt weder das Werkstück noch andere
Gegenstände berührt.
3. Schalten Sie die Säge ein, indem Sie die Einschaltsperre (18) drücken und den Ein-/
Ausschalter (17) betätigen.
4. Warten Sie, bis der Motor seine volle Drehzahl erreicht hat und schieben Sie die
Säge dann gleichmäßig vorwärts in das Werkstück.
5. Achten Sie auf eine beständige Bewegung und halten Sie die Grundplatte fest gegen
das Werkstück gedrückt.
HINWEIS: Die Vorderkante der Grundplatte verfügt über eine Führungskerbe. Richten
Sie für herkömmliche Sägearbeiten die mit 0° markierte Kerbe auf die Schnittlinie aus.
Für 45°-Gehrungsschnitte muss die mit 45° gekennzeichnete Kerbe auf die Schnittlinie
ausgerichtet sein.
6. Geben Sie den Ein-/Ausschalter frei, sobald das Sägeblatt das Werkstück durchtrennt
hat. Falls der Schnitt das Werkstück nicht durchtrennen soll, geben Sie den Ein-/
Ausschalter zur Beendigung des Schnittes frei und warten Sie, bis das Sägeblatt zum
völligen Stillstand gekommen ist, bevor Sie es aus dem Werkstück nehmen.
7. Legen Sie die Säge erst ab, nachdem das Sägeblatt zum völligen Stillstand
gekommen ist.
Sägen mit Parallelanschlag
1. Soll parallel zu einer Kante gesägt werden, muss der Parallelanschlag (8) verwendet
werden.
2. Der Parallelanschlag wird an der Grundplatte (7) montiert und mit der
Anschlagsarretierung (6) befestigt. Überprüfen Sie den Parallelanschlag auf festen Sitz.
3. Die Position des Parallelanschlags lässt sich der jeweils auszuführenden Aufgabe
anpassen.
4. Um an einer Kante entlangzusägen, halten Sie den senkrechten Fuß des
Parallelanschlags während des Schnitts gegen die senkrechte Kante gedrückt.
Spaltkeil
• Diese Kreissäge ist mit einem Spaltkeil (13), d.h. einem hinter dem Sägeblatt
befindlichen Metallstück, ausgestattet. Dabei handelt es sich um eine wichtige
Schutzvorrichtung, welche die Rückschlaggefahr während des Sägebetriebs verringert.
• Die Breite des Spaltkeils (A) muss zwischen der Breite der Schnittfuge (B) und der Breite
des Blattgrundkörpers (C) liegen (siehe Abb. A).
• Das im Lieferumfang enthaltene Sägeblatt hat eine Schnittfuge von 2,5 mm und eine
Grundkörperbreite von 1,4 mm. Der Spaltkeil ist 1,7 mm breit. Achten Sie beim Ersetzen
des Sägeblattes darauf, dass der Blattgrundkörper unter 1,7 mm Breite und die
Schnittfuge über 1,7 mm liegt, sofern der eingebaute Spaltkeil verwendet wird.
• Geringe Anpassungen der Spaltkeilposition lassen sich vornehmen, indem die
Spaltkeilschrauben (11) gelöst, umgesetzt und dann wieder angezogen werden.
• Unter Umständen muss der Spaltkeil wieder abgeflacht, ersetzt oder vorübergehend
entfernt werden. Ist dies der Fall, so müssen die Spaltkeilschrauben ganz
herausgenommen werden, bevor der Spaltkeil entfernt werden kann.
• Lassen Sie das Gerät sofort ersetzen, wenn der Spaltkeil beschädigt wird oder sich nicht
mehr abflachen lässt.
• Setzen Sie den Spaltkeil so ein, dass er genau fluchtend hinter dem Sägeblatt liegt.
Wenn andere Sägeblattstärken verwendet werden, werden für die Spaltkeilschrauben
möglicherweise zusätzliche Unterlegscheiben benötigt, um den Spaltkeil mittig auszurichten.
• Der Spaltkeil lässt sich entfernen, um Tauchschnitte vorzunehmen. Bei diesen sind
besondere Aufmerksamkeit und Umsicht vonnöten. Lassen Sie sich bei der Vorbereitung Zeit
und achten Sie ganz besonders darauf, dass alle Sicherheitsvorkehrungen befolgt werden.
WARNUNG! Der Spaltkeil muss nach dem Tauchschnitt immer wieder montiert werden. Er
ist ein wesentlicher Bestandteil der Schutzvorrichtungen bei herkömmlichen Betriebsarten.
www.silverlinetools.com
19
Page 21

D
Wartung
WARNHINWEIS: Trennen Sie das Gerät immer vom Stromnetz, bevor Sie Wartungs- oder
Reinigungsarbeiten durchführen.
Reinigung
• Halten Sie Ihr Gerät stets sauber. Durch Schmutz und Staub verschleißen die
inneren Teile schnell und die Lebensdauer des Gerätes wird verkürzt. Reinigen
Sie das Gerätegehäuse mit einer weichen Bürste oder einem trockenen Tuch. Die
Entlüftungsöffnungen mit sauberer, trockener Druckluft reinigen, sofern verfügbar.
Kohlebürsten
• Mit der Zeit unterliegen die Kohlebürsten des Motors dem Verschleiß.
• Wenn der Verschleiß der Bürsten fortgeschritten ist, kann dadurch die Motorleistung
abnehmen, die Maschine kurzzeitig ausfallen oder es kann zu sichtbarer Funkenbildung
kommen.
• Wenn die Kohlebürsten ausgewechselt werden müssen, wenden Sie sich an einen
zugelassenen Vertragskundendienst, falls Sie die Kohlebüsten nicht selbst wechseln
können.
• Trennen Sie das Gerät vom Stromnetz, lösen Sie die Schrauben für den Zugang zu den
Kohlebürsten (16) und nehmen Sie die Abdeckung ab.
• Ersetzen Sie vorsichtig die beiden abgenutzten mit neuen Kohlebürsten.
HINWEIS: Kohlebürsten sind auf www.toolsparesonline.com erhältlich.
Lagerung
• Bewahren Sie dieses Gerät an einem trockenen, sicheren Ort außerhalb der Reichweite
von Kindern auf.
Entsorgung
Beachten Sie bei der Entsorgung von defekten und nicht mehr reparablen
Elektrowerkzeugen die geltenden Vorschriften und Gesetze.
• Elektrowerkzeuge und andere elektrische und elektronische Altgeräte nicht über den
Hausmüll entsorgen.
• Lassen Sie sich von der zuständigen Behörde bezüglich der ordnungsgemäßen
Entsorgung von Elektrowerkzeugen beraten.
20
Page 22

845135 1200-W-Kreissäge
Silverline Tools Garantie
Dieses Silverline Produkt beinhaltet eine
3-Jahre-Garantie
Registrieren Sie dieses Produkt unter silverlinetools.com innerhalb von 30
TagennachdemKauf,umdie3-Jahre-Garantiezunutzen.DieGarantiezeit
beginnt mit dem Kaufdatum auf Ihrem Kaufbeleg.
Registrieren Sie Ihren Kauf
Gehen Sie zu: silverlinetools.com, wählen Sie den Link Registrierung und
geben Sie Folgendes ein:
Ihre persönlichen Angaben
Produktdetails und Kaufinformationen
Das Garantiezertifikat wird Ihnen im PDF-Format zugeschickt. Bitte
drucken Sie es aus und bewahren Sie es zusammen mit Ihrem Produkt auf.
Garantiebedingungen für Silverline Tools
Die Garantiezeit beginnt mit dem Datum des auf dem Kaufbeleg
angegebenen Einzelhandelskaufs.
BITTE BEWAHREN SIE IHREN KAUFBELEG AUF
Falls dieses Produkt innerhalb von 30 Tagen nach dem Kauf einen Defekt
aufweisen sollte, bringen Sie es bitte mit Ihrem Kaufbeleg und unter
Angabe des Fehlers zu dem Fachhändler, bei dem es gekauft wurde,
zurück. Sie erhalten einen Ersatz oder eine Erstattung.
Falls dieses Produkt nach den 30 Tagen nach dem Kauf einen Defekt
aufweist, schicken Sie es zurück an:
Silverline Tools Service Centre
PO Box 2988
Yeovil
BA21 1WU, U.K.
Der Garantieanspruch muss während der Garantiezeit gestellt werden.
Sie müssen den Originalkaufbeleg mit Angabe des Kaufdatums einreichen,
Ihren Namen und Ihre Adresse sowie den Ort des Kaufs angeben, bevor
Schritte eingeleitet werden können.
Sie müssen genaue Einzelheiten des zu behebenden Defekts angeben.
Ansprüche, die während der Garantiezeit gestellt werden, werden von
Silverline Tools überprüft, um nachzuweisen, dass der Defekt durch
fehlerhaftes Material oder Herstellung des Produkts bedingt ist.
Transportkosten werden nicht erstattet. Eingereichte Produkte sollten
sich in einem zur Reparatur geeigneten sauberen und sicheren Zustand
befinden und sorgfältig verpackt werden, damit es beim Transport nicht
zu Schäden oder Verletzungen kommen kann. Wir können die Annahme
ungeeigneter oder unsicherer Lieferungen verweigern.
Alle Arbeiten werden von Silverline Tools oder den von Silverline Tools
ernannten Reparaturbeauftragten durchgeführt.
Die Reparatur oder der Ersatz des Produkts wird die Garantiezeit nicht
erweitern.
Defekte, die von uns als unter die Garantie fallend erachtet werden,
werden entweder durch kostenlose Reparatur des Werkzeugs (exklusive
Transportkosten) oder durch Ersatz durch ein Werkzeug in einwandfreiem
Zustand behoben.
Einbehaltene Werkzeuge oder Teile, für die ein Ersatz ausgegeben wurde,
werden zu Eigentum von Silverline Tools.
Die Reparatur bzw. der Ersatz Ihres Produkts unter dieser Garantie erfolgt
zusätzlich zu Ihren gesetzlichen Rechten als Verbraucher und hat keine
nachteiligen Folgen auf diese.
Was abgedeckt ist:
Die Reparatur des Produkts, nachdem zur Zufriedenheit von Silverline Tools
nachgewiesen wurde, dass der Defekt durch fehlerhaftes Material oder
mangelhafte Arbeitsausführung während der Garantiezeit bedingt ist.
Wenn ein Ersatzteil nicht mehr erhältlich ist oder nicht mehr hergestellt
wird, kann Silverline Tools es gegen einen funktionellen Ersatz
austauschen.
Gebrauch des Produkts in der EU.
Was nicht abgedeckt ist:
Silverline Tools garantiert keine Reparaturen, die erforderlich sind
aufgrund von:
Normale Verschleißerscheinungen, die durch einen der
Bedienungsanleitung entsprechenden Gebrauch entstehen, z.B. an
Messern, Bürsten, Riemen, Glühbirnen, Batterien usw.
Der Ersatz von mitgeliefertem Zubehör wie etwa Bohrspitzen, Messer,
Sandpapier, Schneidscheiben und anderen zugehörigen Artikeln.
Unfallschäden, Defekte verursacht durch: unsachgemäßen Gebrauch,
unzureichende Wartung oder nachlässige Bedienung bzw. Handhabung
des Produkts.
Verwendung des Produkts für andere als normale häusliche Zwecke.
Produktänderungen oder -modifikationen jeglicher Art.
Durch den Gebrauch von Zubehörteilen, die keine echten Silverline Tools-
Teile sind, entstandene Defekte.
Fehlerhafte Installation (außer, wenn von Silverline Tools installiert).
Reparaturen oder Änderungen, die von anderen als Silverline Tools oder
seinen autorisieren Reparaturbeauftragten durchgeführt wurden.
Forderungen anderer Art als dem Recht auf Behebung von Defekten des
Produkts im Rahmen dieser Bedingungen fallen nicht unter die Garantie.
EU-Konformitätserklärung
Name des Unterzeichners: Mr. Darrell Morris
Bevollmächtigt durch: Silverline Tools
Erklärt hiermit, dass das Produkt:
Ident.-Nr.: 845135
Produktbeschreibung: 1200-W-Kreissäge
Den folgenden Richtlinien entspricht:
• Maschinenrichtlinie2006/42/EG
• Niederspannungsrichtlinie2006/95/EG
• ElektromagnetischeVerträglichkeit2004/108/EG
• RoHS-Richtlinie2011/65/EU
• EN60745-1:2009•EN60745-2-5:2007+A11
• EN60825-1:2007•EN55014-1:2006+A1
• EN55014-2:1997+A1+A2•EN61000-3-2:2006+A1+A2
• EN61000-3-3:2008
Bennante Stelle: SGS-CSTC Standards Technical Services Co., Ltd, Shanghai, China
Techn. Unterlagen bei: Silverline Tools
Datum: 04.06.2013
Unterzeichnet von:
Geschäftsführender Direktor
Name und Anschrift des Herstellers oder seines niedergelassenen Bevollmächtigten:
Powerbox International Ltd., Boundary Way, Lufton Trading Estate, Yeovil, Somerset, BA22 8HZ,
Großbritannien
www.silverlinetools.com
21
Page 23

ESP
Descripción de los símbolos
Los símbolos siguientes pueden aparecer en la placa de características de su herramienta.
Éstos representan información importante sobre el producto o instrucciones relativas a
su uso
Lleve protección auditiva
Lleve protección ocular
Lleve protección respiratoria
Lleve un casco de seguridad
Lleve guantes de seguridad
Lea el manual de instrucciones
Doble aislamiento para mayor protección
Conforme a las normas de seguridad y a la legislación correspondiente
Protección medioambiental
Los productos eléctricos usados no se deben mezclar con la basura casera.
Están sujetos al principio de recogida selectiva. Solicite información a su
ayuntamiento o distribuidor sobre las opciones de reciclaje
Características técnicas
Tensión: ................................................230 - 240 V, 50 Hz
Potencia: ..............................................1.200W
Velocidad sin carga: .............................4.500 min
Diámetro del disco: ..............................185 mm
Grosor de la cuña de separación: .........1,7 mm
Hoja suministrada: ...............................Ø185 x Ø20 x
............................................................2,5mm x 24 dientes
Profundidad máxima de corte: .............63 mm a (90°)
............................................................38 mm (45°)
Ángulo de bisel:............................. .......0 - 45°
Clase de protección: .............................
Grado de protección:................. ...........IP20
Dimensiones (L x An x A):............................330 x 240 x 250 mm
Peso: ....................................................4 kg
Como parte de nuestra política de desarrollo de productos,
los datos técnicos de los productos Silverline pueden
cambiar sin previo aviso.
Datos sobre ruido y vibración:
Vibración ponderada:............................5 m/s2
............................................................(empuñadura principal)
............................................................6 m/s2
............................................................(empuñadura auxiliar)
Incertidumbre:......................................1,5 m/s
Presión acústica (LPA):...........................66 dB(A)
Potencia acústica (LWA):.........................77 dB(A)
Incertidumbre:......................................... 3 dB(A)
El nivel de intensidad sonora para el usuario puede
exceder de 85 dB(A). Se recomiendan usar medidas de
protección sonora.
-1
2
ADVERTENCIA: Utilice siempre protección auditiva cuando el nivel ruido exceda 85 dB(A)
o cuando esté expuesto durante largos periodos de tiempo. Si por algún motivo nota algún
tipo de molestia auditiva incluso llevando orejeras de protección, detenga inmediatamente
la herramienta y compruebe que las orejeras de protección estén colocadas
adecuadamente. Asegúrese de que el nivel de atenuación y protección de las orejeras sea
adecuado dependiendo del tipo de herramienta y el trabajo a realizar.
ADVERTENCIA: La exposición a la vibración durante la utilización de una herramienta
puede provocar pérdida del sentido del tacto, entumecimiento, hormigueo y disminución de
la capacidad de sujeción. La exposición durante largos periodos de tiempo puede provocar
enfermedad crónica. Si es necesario, limite el tiempo de exposición a la vibración y utilice
guantes anti-vibración. No utilice la herramienta cuando sus manos estén muy frías, las
vibraciones tendrán un mayor efecto. Utilice los datos técnicos de su herramienta para
evaluar la exposición y medición de los niveles de ruido y vibración.
Los niveles de vibración y ruido están determinados por la directiva EN60745 y otras
directivas internacionales similares. Los datos técnicos se refieren al uso normal de
la herramienta en condiciones normales. Una herramienta defectuosa, mal montada o
desgastada puede incrementar los niveles de ruido y vibración. Para más información
sobre ruido y vibración, puede visitar la página web www.osha.europa.eu.
Instrucciones de seguridad
relativas a las herramientas
eléctricas
ADVERTENCIA: Lea todas las advertencias de seguridad e instrucciones. El no
respetar estas advertencias e instrucciones puede causar descargas eléctricas, incendios
y/o lesiones graves.
ADVERTENCIA: No permita que los niños, personas discapacitadas o personas no
cualificadas utilicen esta herramienta. Mantenga esta herramienta fuera del alcance de
los niños.
Conserve estas instrucciones para futuras referencias.
La expresión “herramienta eléctrica” en todas la advertencias se refiere a su herramienta
eléctrica alimentada por la red eléctrica (herramienta alámbrica) o su herramienta eléctrica
alimentada por baterías (herramienta inalámbrica).
Seguridad en el área de trabajo
a) Mantenga el área de trabajo limpia y bien iluminada. Las áreas desordenadas y
oscuras invitan a que se produzcan accidentes.
b) No utilice herramientas eléctricas en atmósferas explosivas, como por ejemplo
en presencia de líquidos, gases o polvos inflamables. Las herramientas
eléctricas producen chispas que pueden incendiar el polvo o los vapores.
c) Mantenga alejados a los niños y a las personas que se encuentren a su
alrededor mientras esté trabajando con una herramienta eléctrica. Las
distracciones pueden hacerle perder el control de la herramienta.
Seguridad eléctrica
a) El enchufe de la herramienta eléctrica debe coincidir con la toma de corriente.
No modifique nunca el enchufe de ninguna manera. No utilice ningún
adaptador de enchufe sin toma de tierra. Los enchufes si modificar y el uso de
tomas de corrientes adecuadas reducirán el riesgo de descargas eléctricas.
b) Evite el contacto con materiales conductores tales como tuberías, radiadores,
estufas y refrigeradores. El riesgo de descarga eléctrica se incrementa si su
cuerpo está expuesto a materiales conductores.
c) No exponga las herramientas eléctricas a la lluvia o la humedad. El contacto de
agua en una herramienta eléctrica aumentará el riesgo de descargas eléctricas.
d) No maltrate el cable de alimentación. No use nunca el cable de alimentación
para transportar la herramienta eléctrica, tirar de ella o desenchufarla.
Mantenga el cable de alimentación alejado de fuentes de calor, del aceite, de
los bordes afilados o de las piezas móviles. Los cables de alimentación dañados
o enredados aumentan el riesgo de descargas eléctricas.
e) Cuando utilice una herramienta eléctrica en el exterior, use un cable de
extensión adecuado para uso en exteriores. La utilización de un cable adecuado
para exteriores reduce el riesgo de descargas eléctricas.
f) Si es inevitable trabajar con una herramienta eléctrica en lugares húmedos,
use un suministro protegido por un interruptor diferencial o disyuntor por
corriente diferencial o residual (RCD). El uso de un RCD reduce el riesgo de
descargas eléctricas.
Seguridad personal
a) Manténgase alerta, fíjese en lo que está haciendo y use el sentido común
cuando esté utilizando una herramienta eléctrica. No use una herramienta
eléctrica si se encuentra cansado o bajo la influencia de drogas, alcohol
o medicamentos. Un momento de distracción mientras esté utilizando una
herramienta eléctrica puede provocar lesiones corporales graves.
b) Use equipo de protección personal. Use siempre protección ocular. El uso de
equipamientos de seguridad tales como máscara antipolvo, calzado de seguridad
antideslizante, casco duro y protecciones auditivas adecuadas reducirá el riesgo de
lesiones corporales.
c) Evite el arranque accidental. Asegúrese de que el interruptor está en la posición
de apagado antes de enchufar la herramienta. No transporte herramientas con el
dedo en el interruptor o con el interruptor encendido, podría ocurrir un accidente.
22
Page 24

845135 Sierra circular 1200 W
d) Quite todas las llaves de ajuste antes de encender la herramienta eléctrica.
Una llave colocada en una parte móvil de la herramienta eléctrica puede causar
lesiones corporales.
e) No adopte posturas forzadas. Manténgase en posición firme y en equilibrio en
todo momento. De este modo, podrá controlar mejor la herramienta eléctrica en
situaciones inesperadas.
f) Vístase adecuadamente. No lleve ropa holgada ni joyas. Mantenga el pelo, la
ropa y los guantes alejados de las piezas móviles. La ropa holgada, las joyas o el
pelo largo pueden quedar atrapados en las piezas móviles.
g) Si dispone de conexión a sistemas de extracción y recolección de polvo,
asegúrese de que estén conectados y funcionen correctamente. El uso de estos
dispositivos puede reducir los riesgos producidos por la inhalación de polvo.
Uso y mantenimiento de las herramientas eléctricas
a) No fuerce la herramienta eléctrica. Use la herramienta eléctrica de forma
adecuada. Utilice su herramienta únicamente para la tarea que haya sido destinada.
b) No use la herramienta eléctrica si el interruptor no la enciende o la apaga. Toda
herramienta eléctrica que no se pueda controlar mediante el interruptor es peligrosa
y debe ser reparada.
c) Desconecte el enchufe de la fuente de alimentación y/o la batería antes de
realizar cualquier ajuste, cambiar de accesorios o almacenar la herramienta
eléctrica. Estas medidas de seguridad preventivas reducen el riesgo de arranque
accidental de su herramienta eléctrica.
d) Guarde las herramientas eléctricas y manténgalas fuera del alcance de los
niños. No permita que las personas que no estén familiarizadas con estas
instrucciones las utilicen. Las herramientas eléctricas son peligrosas en manos de
personas que no estén capacitadas para su uso.
e) Mantenga sus herramientas eléctricas. Revise que no haya piezas en
movimiento mal alineadas o trabadas, piezas rotas o cualquier otra condición
que pueda afectar el funcionamiento de la herramienta eléctrica. Si encuentra
aluna pieza dañada, haga reparar la herramienta eléctrica antes de utilizarla.
Muchos accidentes son causados por herramientas eléctricas que carecen de un
mantenimiento adecuado.
f) Mantenga las herramientas de corte afiladas y limpias. Las herramientas de
corte correctamente afiladas son menos propensas a trabarse y son más fáciles
de controlar.
g) Utilice la herramienta eléctrica, los accesorios, brocas etc. de acuerdo con
estas instrucciones, teniendo en cuenta las condiciones y el trabajo que
necesite realizar. El uso de la herramienta eléctrica con un propósito distinto al cual
ha sido diseñada, podría causar una situación peligrosa.
Mantenimiento y reparación
a) Lleve siempre su herramienta eléctrica a un servicio técnico cualificado
y utilice únicamente piezas de recambio idénticas. Esto garantizará un
funcionamiento óptimo y seguro de su herramienta eléctrica.
Contragolpe: Instrucciones de
seguridad
El contragolpe es una reacción repentina causada por una hoja apresada, atascada o
mal alineada, que hace que la sierra se levante de manera incontrolada hacia arriba
por encima de la pieza de trabajo hacia el operario. El contragolpe es el resultado de un
uso incorrecto de la sierra y se puede evitar si toma las precauciones apropiadas de la
siguiente manera:
a) Agarre firmemente la sierra con ambas manos y coloque sus brazos de forma que
pueda contrarrestar la fuerza del contragolpe. Coloque su cuerpo a cada lado de la
hoja, pero no en línea con la hoja. El contragolpe de la sierra puede provocar que la
sierra salte hacia atrás, sin embargo, si se toman estas precauciones, la fuerza del
contragolpe puede ser controlada por el usuario.
b) Cuando la hoja esté atascada, o cuando se interrumpa un corte por cualquier razón,
suelte el gatillo y mantenga la sierra inmóvil en la pieza de trabajo hasta que la
hoja se detenga por completo. No intente retirar la sierra de la pieza de trabajo o
tirar de la sierra hacia atrás mientras la hoja esté en movimiento. Intente buscar y
corregir el problema.
c) Al reiniciar una sierra en un corte incompleto, centre la hoja de la sierra en el corte y
asegúrese de que los dientes de la sierra no están atascados con en el material. Si
la hoja de sierra está atascada, es posible que salga impulsada hacia arriba o que se
produzca un retroceso con respecto a la pieza.
d) Coloque soportes bajo grandes paneles en ambos lados, cerca de la línea del corte,
y cerca del borde del panel para evitar la deformación. Esto minimizará el riesgo de
contragolpe y de que la hoja quede apresada.
e) No utilice hojas poco afiladas o que estén dañadas. Las hojas mal afiladas o mal
ajustadas producen cortes estrechos, causando una fricción excesiva, atasco de la
hoja y el contragolpe.
f) Las palancas de bloqueo de la profundidad de corte y del ajuste de bisel deben
estar firmes y seguras antes de realizar un corte. Si el ajuste de la hoja se desplaza
durante el corte, puede causar atasco y por consecuencia un contragolpe.
g) Tenga mucho cuidado al hacer un "corte profundo" en las paredes existentes u
otros puntos ciegos. La hoja que puede cortar objetos que podrían producir un
contragolpe.
h) Compruebe que el protector inferior se cierra con seguridad antes de cada uso. No
haga funcionar la sierra si el protector inferior no se mueve libremente y cierra al
instante. Nunca deje el protector en posición abierta.
i) Compruebe el funcionamiento del muelle del protector inferior. Si el protector y el
muelle no funcionan correctamente, deben ser reparados antes de su uso. Es posible
que el protector inferior pueda funcionar con lentitud debido a las piezas dañadas,
depósitos pegajosos, o una acumulación de aserrín.
j) El protector inferior debe retraerse manualmente solamente para cortes especiales,
tales como los "cortes profundos" y cortes compuestos (de ingletes biselados).
Levante el protector inferior al plegar la manija y tan pronto como la hoja entre en
contacto con el material, el protector inferior deberá ser liberado. Para todos los otros
tipos de aserrado, el protector inferior debe funcionar automáticamente.
k) Asegúrese siempre de que el protector inferior esté cubriendo la hoja antes de bajar
la sierra. Una hoja sin protección, que se desliza, hará que la sierra se impulse hacia
atrás, cortando todo lo que encuentre a su paso. Tenga en cuenta el tiempo que
tarda la hoja en detenerse después de haber apretado y soltado el interruptor. No
utilice discos abrasivos, al hacerlo, se anulará automáticamente la garantía.
www.silverlinetools.com
23
Page 25

ESP
sierras circulares
ADVERTENCIA: Antes de conectar esta herramienta a la red eléctrica, asegúrese de que
la tensión eléctrica sea la misma que el especificada en la placa de datos indicada en
esta herramienta. No conecte esta herramienta a una fuente con una tensión inadecuada,
podría dañar gravemente la herramienta y al usuario. Si tiene alguna duda, no enchufe la
herramienta. Utilizar una fuente con un voltaje inferior al valor nominal indicado en la placa
de datos será perjudicial para el motor.
ADVERTENCIA: Mantenga los protectores colocados en todo momento. Asegúrese de
tener instalados los protectores de la herramienta después de cambiar un disco de corte.
Compruebe que los protectores no estén dañados.
• No permita que ninguna persona menor de 18 años opere esta herramienta.
• Use equipo de seguridad como gafas de seguridad o una visera protectora, protección
auditiva, mascarilla contra el polvo y ropa protectora, incluyendo guantes de seguridad.
• Utilice siempre hojas de sierra con la misma medida y forma que los agujeros de
centro. Las hojas de sierra que no sean adecuadas para esta herramienta girarán
excéntricamente, causando la pérdida de control.
• Las herramientas eléctricas deben siempre sujetarse por las superficies de agarre que
estén aisladas para evitar cualquier riesgo de descarga eléctrica en el usuario.
• Asegúrese de que las manos están lejos de la zona de corte y de la hoja de sierra.
Mantenga una mano sobre la empuñadura auxiliar, o la cubierta del motor.
• No intente cortar material con un grosor superior al especificado en este manual.
• Adapte la profundidad de corte al espesor de la pieza de trabajo. El diente de la hoja de
sierra no debería ser visible en su totalidad por debajo de la pieza de trabajo.
• Asegúrese de que la pieza de trabajo esté completamente sujeta. Los paneles largos
pueden hacer que la hoja de la sierra se pueda doblar. Deberá colocar siempre algún
tipo de soporte debajo de la pieza a cortar, cerca de la línea de corte y del borde del
panel.
• Asegúrese de que todos los cables y soportes estén fuera de la trayectoria de corte.
• Sujete siempre la pieza de trabajo sobre una plataforma estable, asegúrese de estar lo
más lejos posible y evite que la hoja se doble o pierda el control.
• Para una mayor precisión de corte, y para evitar el atasco de la hoja, utilice siempre una
guía de corte.
• Nunca sujete una pieza de trabajo en la mano o con las extremidades, mientras realice
un corte.
• Manténgase hacia un lado de la sierra cuando esté trabajando con esta herramienta.
• Tenga en cuenta que la sierra se proyectará desde la parte inferior de la pieza de
trabajo.
• No coloque la mano por debajo de la pieza de trabajo ya que la protección no podrá
protegerle de la hoja de sierra.
• Tenga en cuenta el sentido de giro del motor y de la hoja de sierra.
• Inspeccione la pieza de trabajo y retire clavos u otros elementos antes de comenzar el
trabajo.
• No intente empujar la sierra hacia los lados cuando esté cortando.
• Si el corte no puede llegar hasta el borde de la pieza de trabajo o la hoja se dobla, deje
que se pare completamente y retírela.
• No intente retirar una hoja de sierra atascada sin antes haber desconectado la
herramienta.
• No mueva la sierra hacia atrás mientras esté cortando
• Tenga cuidado con los residuos que puedan ser proyectados. En algunas situaciones,
el material puede ser expulsado a gran velocidad. Es responsabilidad del usuario
asegurarse de que otras personas no estén situadas cerca de la zona de trabajo.
• Si se le interrumpe mientras trabaja con la sierra, complete el proceso y apague la
herramienta antes de realizar otra acción.
• El perno de la hoja y las arandelas han sido diseñados especialmente para su sierra.
Para lograr un rendimiento óptimo y garantizar la seguridad durante su operación,
nunca utilice tornillos/arandelas de hoja que estén dañados o no sean los correctos.
• Compruebe regularmente la protección de la hoja de sierra. Si la protección no cubre la
hoja, repárela antes de utilizar la sierra.
• Compruebe periódicamente que todas las tuercas, pernos y otras fijaciones estén bien
apretados.
• Las herramientas eléctricas pueden generar vibraciones y causar enfermedades. Utilice
siempre guantes de seguridad para mejorar la circulación sanguínea. Las herramientas
eléctricas no deben utilizarse durante largos periodos de tiempo sin descansar.
La herramienta sólo debe utilizarse para su finalidad prevista. Cualquier uso distinto a
los mencionados en este manual se considerará un caso de mal uso. El usuario y no el
fabricante será el responsable de cualquier daño o lesión resultante de tales casos de
mal uso.
El fabricante no se hace responsable de ningún daño causado por la modificación de
este producto.
Tenga en cuenta que las indicaciones descritas anteriormente no pueden eliminar todos
los factores de riesgo.
Características del productoInstrucciones de seguridad para
1 Salida de extracción de polvo
2 Indicador del sentido de la hoja
3 Perilla de ajuste del ángulo de bisel
4 Brida de la hoja
5 Tornillo de seguridad de la hoja
6 Perilla de bloqueo de la guía
7 Placa de base
8 Guía paralela
9 Protector de la hoja
10 Palanca del protector de la hoja
11 Tornillos de la cuña de separación
12 Empuñadura posterior
13 Cuña de separación
14 Perilla de bloqueo del ángulo de bisel
15 Perilla de bloqueo de profundidad
16 Tornillos de acceso a las escobillas
17 Interruptor de encendido/apagado
18 Botón de funcionamiento continuo
19 Empuñadura frontal
20 Llave de espiga
21 Llave
Fig. A:
A – Cuña de separación
B – Anchura de los dientes
C – Cuerpo de la hoja
24
Page 26

845135 Sierra circular 1200 W
Desembalaje
Desembale e inspeccione la herramienta con cuidado. Familiarícese con todas sus
características y funciones.
Asegúrese de que el embalaje contiene todas las partes y que están en buenas
condiciones. Si faltan piezas o están dañadas, solicite su sustitución antes de utilizar esta
herramienta.
Instrucciones de funcionamiento
Salida de extracción de polvo
• Para mantener un entorno de trabajo limpio y seguro, utilice siempre un sistema de
extracción de polvo o una aspiradora.
NOTAS:
• Antes de utilizar esta herramienta, se recomienda practicar con un trozo de material
desechable. Los ajustes correctos de esta herramienta serán cruciales para conseguir
un acabado de buena calidad. Utilizar ajustes incorrectos podría dañar seriamente la
pieza de trabajo.
• El disco de corte suministrado viene pre-fijado en la herramienta. Asegúrese de que el
tornillo de seguridad de la hoja (5) bien apretado antes de utilizar esta herramienta.
ADVERTENCIA: Desconecte siempre la sierra de la toma de corriente antes de realizar
ajustes o cambiar cualquier accesorio.
Instalación y sustitución de la hoja
• Compruebe siempre que la hoja sea adecuada para tipo de material que vaya a cortar.
• Únicamente instale las hojas que se encuentren en perfectas condiciones. Un utilice
nunca hojas que estén desafiladas, dobladas o agrietadas.
1. Sujete la brida de la hoja utilizando la llave de espiga (20). Afloje el tornillo de
seguridad de la hoja (5) en sentido antihorario utilizando la llave (21).
2. Retire el tornillo de seguridad de la hoja, la arandela y la brida. Ahora podrá colocar o
retirar la hoja de la sierra.
3. Utilice la palanca del protector de la hoja (10) para desplazar el protector.
4. Coloque la hoja de manera que el sentido de rotación sea el mismo que el del
indicador del sentido de la hoja (2).
5. Vuelva a colocar la brida de la hoja, la arandela y el tornillo de seguridad. Aprietelos
correctamente utilizando la llave de espiga y la llave.
6. Asegúrese de que la hoja se encuentre bien sujeta antes de utilizarla.
Ajuste del ángulo de bisel
• La placa de base (7) de esta sierra se puede inclinar. Esta función le permitirá realizar
cortes a bisel.
• Para ajustar el ángulo de inclinación de la base, afloje la perilla de ajuste del ángulo
de bisel (3) y la perilla de bloqueo del ángulo de bisel (14). Ahora podrá ajustar la
inclinación de la base.
• Seleccione el ángulo requerido (0- 45°) utilizado la escala situada junto a la perilla de
bloqueo del ángulo de bisel y vuelva a apretar ambas perillas.
• Para mayor precisión, utilice un transportador para verificar el ángulo entre la hoja y la
base.
Ajuste de profundidad
• Esta sierra esta dispone de mecanismo de ajuste de profundidad.
• Para ajustar la profundidad de corte, afloje la perilla de ajuste de profundidad (15).
Ahora podrá ajustar la herramienta a la profundidad requerida.
• Ajuste la placa de base a la profundidad requerida utilizando la escala de profundidad o
una regla. Vuelva a apretar la perilla de ajuste de profundidad.
• Cuando este correctamente ajustada, los dientes de la cuchilla deben sobresalir
aproximadamente 3 mm sobre la superficie inferior que se está cortando.
Funcionamiento de la sierra circular
• Sujete siempre la sierra por las empuñaduras con las dos manos.
• Asegúrese de que la hoja se haya detenido completamente antes de dejar la
herramienta.
• Desconecte siempre la herramienta cuando vaya a estar desatendida.
• Asegúrese siempre de que la pieza de trabajo no se mueva mientras esté cortando. Use
abrazaderas cuando sea necesario.
Realizar un corte
1. Sostenga bien la sierra y apoye el borde delantero de la placa de base (7) en el
borde de la pieza de trabajo.
2. Compruebe que la hoja no esté en contacto con la pieza de trabajo o cualquier otro
objeto.
3. Para encender la herramienta, presione el botón de funcionamiento continuo (18) y
apriete el interruptor de gatillo (17).
4. Deje que el motor alcance la velocidad máxima y empuje la sierra suavemente hacia
delante a través de la pieza de trabajo.
5. Mantenga un movimiento constante, asegurándose de que la placa de base haga
presión sobre la pieza de trabajo.
NOTA : Utilice la muesca de guía del borde delantero de la placa base para alinear el corte.
Para corte normal, debe alinear la muesca marcada “0 ˚” con la línea a cortar. Para cortes
biselados a 45º, debe alinear la muesca marcada “45 ˚” con la línea a cortar.
6. Deje que la hoja pase a través del material hasta el final de recorrido y suelte el
interruptor de gatillo. Alternativamente, si desea que el corte no alcance el borde
de la pieza de trabajo, suelte el interruptor de gatillo y deje que la hoja se para por
completo antes de levantarla y sacarla de la línea de corte.
7. No deje nunca la herramienta hasta que la hoja se haya detenido por completo.
Uso de la guía paralela
1. Cuando trabaje en paralelo a un borde, deberá utilizar la guía paralela (8).
2. Acople la guía a la placa de base (7) y sujétela mediante perilla de bloqueo de la guía
(6). Asegúrese de que la guía está sujeta con seguridad antes empezar el corte.
3. La posición de la guía puede ajustarse para adecuarse a diferentes tareas.
4. Para seguir un borde mantenga la base vertical de la guía presionando el borde
vertical de la pieza a cortar.
Cuña de separación
• Esta herramienta dispone de cuña de separación (13). La cuña de separación es una
pequeña placa situada detrás de la hoja de la sierra y sirve para prevenir el contragolpe.
• El grosor de la cuña de separación (A) debe de estar entre el grosor de la anchura de los
dientes (B) y el grosor del cuerpo de la hoja (C), ver fig. A.
• La anchura de los dientes de la hoja suministrada es de 2,5 mm, el cuerpo de la hoja
dispone de un grosor de 1,4 mm. La cuña de separación es de 1,7 mm, ideal para
utilizar con el disco suministrado.
• La cuña de separación puede ajustarse aflojando los tornillos de la cuña de separación
(11). Ajuste la cuña y vuelva a apretar los tornillos.
• En algunas ocasiones puede que requiera enderezar la cuña, sustituirla por una nueva o
retirarla temporalmente. En estos casos deberá de retirar previamente los tornillos de la
cuña de separación.
• Sustituya la cuña de separación cuando esté dañada o demasiado doblada.
• Coloque la cuña de separación bien centrada detrás de la hoja de la sierra. En
determinadas ocasiones, dependiendo del grosor de la hoja que esté utilizando y para
centrar la cuña correctamente puede que necesite usar arandelas adicionales.
• Retire la cuña de separación siempre que realice cortes de incisión. Estos tipos de
cortes pueden ser peligrosos. Tome todas las medidas de precaución posibles.
ADVERTENCIA: Siempre que sea posible mantenga la cuña de separación instalada. Esta
es una característica esencial de seguridad.
www.silverlinetools.com
25
Page 27

ESP
Mantenimiento
ADVERTENCIA: Desconecte siempre la herramienta de la red eléctrica antes de realizar
cualquier tarea de mantenimiento o limpieza.
Limpieza
• Mantenga la herramienta siempre limpia. Limpie siempre el polvo y las partículas y
nunca deje que los orificios de ventilación se bloqueen. Utilice un cepillo suave o un
paño seco para limpiar la herramienta, si dispone de un aparato de aire comprimido,
sople con aire seco y limpio para limpiar los orificios de ventilación.
Sustitución de las escobillas
• Con el tiempo, las escobillas de carbono del motor se desgastarán.
• Si las escobillas se han desgastado excesivamente, el rendimiento del motor puede
disminuir, la herramienta tal vez no arranque o quizás observe una excesiva presencia
de chispas.
• Si tiene dudas sobre como sustituir las escobillas, lleve la herramienta a un servicio
técnico autorizado.
• Para sustituir las escobillas, retire los tornillos de acceso a las escobillas (16) y retire
las escobillas.
• Reemplace las escobillas por unas nuevas.
NOTE: Existen escobillas de repuesto disponibles a través de www.toolsparesonline.com.
Almacenaje
• Guarde esta herramienta y accesorios en un lugar seco y seguro fuera del alcance
de los niños.
Eliminación
Deshágase siempre de las herramientas eléctricas adecuadamente respetando las normas
indicadas en su país.
• No elimine sus herramientas u otro equipo eléctrico o electrónico junto con la basura
convencional. Recíclelos si hay puntos de reciclaje.
• Póngase en contacto con la autoridad local encargada de la gestión de residuos
si necesita más información sobre cómo eliminar este tipo de herramientas
correctamente.
26
Page 28

845135 Sierra circular 1200 W
Garantía de Silverline Tools
Este producto Silverline dispone de una garantía de
3 años.
Registre el producto en www.silverlinetools.com antes de que transcurran
30 días a partir de la fecha de compra para obtener la garantía de 3 años.
El periodo de garantía comienza desde la fecha indicada en su recibo de
compra.
Registro del producto
Visite: silverlinetools.com, seleccione el botón de registro e indique:
Sus datos personales
Detalles del producto e información de compra
El certificado de garantía le será enviado en formato PDF. Imprímalo y
guárdelo con el producto.
Condiciones
El periodo de garantía entra en vigor a partir de la fecha indicada en el
recibo de compra.
GUARDE EL RECIBO DE COMPRA
En caso de que el producto se averíe antes de que transcurran 30 días
desde la fecha de compra, devuélvalo al distribuidor donde lo compró,
junto con el recibo y los detalles de la avería. Le sustituiremos el producto
o le reembolsaremos el importe.
Si el producto se avería después de que transcurran 30 días desde la fecha
de compra, devuélvalo a:
Servicio Técnico Silverline Tools
PO Box 2988
Yeovil
BA21 1WU, Reino Unido
La reclamación siempre debe presentarse durante el periodo de garantía.
Antes de poder realizar cualquier trabajo de reparación, deberá entregar
el recibo de compra original en el que se indica la fecha de compra, su
nombre, dirección y el lugar donde lo adquirió.
También deberá indicar claramente los detalles del fallo a reparar.
Las reclamaciones presentadas dentro del periodo de garantía deberán
ser verificadas por Silverline Tools para averiguar si las deficiencias son
consecuencia de los materiales o de la mano de obra del producto.
Los gastos de transporte no son reembolsables. Los productos a devolver
deberán estar limpios y en buenas condiciones para su reparación,
debiendo empaquetarse cuidadosamente con el fin de prevenir daños
o lesiones durante el transporte. Nos reservamos el derecho a rechazar
envíos incorrectos o inseguros.
Todas las reparaciones serán realizadas por Silverline Tools o por un
servicio técnico de autorizado.
La reparación o sustitución del producto no prolongará el periodo de
garantía.
Si los defectos están cubiertos por la garantía, la herramienta será
reparada sin cargo alguno (salvo los gastos de envío), o bien la
sustituiremos por una herramienta en perfecto estado de funcionamiento.
Las herramientas o piezas que hayan sido sustituidas serán propiedad de
Silverline Tools.
Declaración de conformidad CE
El abajo firmante: Mr Darrell Morris
Autorizado por: Silverline Tools
Declara que el producto:
Código de identificación: 845153
Descripción: Sierra circular 1200 W
Está en conformidad con las directivas:
•Directivademáquinas2006/42/CE
•Directivadebajatensión2006/95/CE
•Compatibilidadelectromagnética2004/108/CE
•DirectivaRoHS2011/65/EU
• EN60745-1:2009•EN60745-2-5:2007+A11
• EN60825-1:2007•EN55014-1:2006+A1
• EN55014-2:1997+A1+A2•EN61000-3-2:2006+A1+A2
• EN61000-3-3:2008
La reparación o sustitución del producto bajo garantía aporta beneficios
adicionales a sus derechos legales como consumidor, sin afectarlos.
Qué está cubierto:
Silverline Tools deberá comprobar si las deficiencias se deben a materiales
o mano de obra defectuosos dentro del periodo de garantía.
En caso de que cualquier pieza no estuviera disponible o estuviera fuera
de fabricación, Silverline Tools la sustituirá por una pieza funcional con las
mismas características.
Uso del producto en la Unión Europea.
Qué no está cubierto:
Silverline Tools no garantiza las reparaciones causadas por:
Desgaste normal por uso adecuado de la herramienta, por ejemplo hojas,
escobillas, correas, bombillas, baterías, etc...
La sustitución de cualquier accesorio suministrado: brocas, hojas, papel de
lija, discos de corte y otras piezas relacionadas.
Daño accidental, averías debidas a uso o cuidado negligente, uso
incorrecto, negligencia, funcionamiento o manejo indebido del producto.
Utilizar del producto para una finalidad distinta.
Cualquier cambio o modificación del producto.
El uso de piezas y accesorios que no sean recambios originales de
Silverline Tools.
Instalación incorrecta (excepto si fue realizada por Silverline Tools).
Reparaciones o alteraciones realizadas por servicios técnicos no
autorizados por Silverline Tools.
Las reclamaciones distintas a las indicadas en las presentes condiciones
de garantía no estarán cubiertas.
Organismo notificado: SGS-CSTC Standards Technical Services Co., Ltd, Shanghai, China
La documentación técnica se conserva en: Silverline Tools
Fecha: 04/06/13
Firma:
Director General
Nombre y dirección del fabricante o representante autorizado:
Powerbox International Ltd, Boundary Way, Lufton Trading Estate, Yeovil, Somerset, BA22 8HZ,
Reino Unido
www.silverlinetools.com
27
Page 29

I
Descrizione dei simboli
La targhetta identificativa del vostro elettroutensile potrebbe riportare dei simboli. Tali
simboli sono una rappresentazione grafica che mira a evidenziare importanti informazioni
sul prodotto o istruzioni per il suo utilizzo corretto e sicuro.
Indossare protezioni per l’udito
Indossare protezioni per gli occhi
Indossare una protezione per le vie respiratorie
Protezione della testa di usura
Protezione della mano di usura.
Leggere il manuale d’istruzione
Doppio isolamento per una protezione supplementare
Il prodotto e conforme alle vigenti normative e norme di sicurezza
applicabili
Protezione ambientale
Il simbolo del cestino barrato indica che il prodotto, una volta
diventato inservibile, non deve essere gettato tra i rifiuti domestici
ma conferito ad un centro di raccolta differenziata per apparecchi
elettrici ed elettronici oppure riconsegnato al rivenditore al
momento dell’acquisto di apparecchio sostitutivo.
Specifiche tecniche
Tensione: ...................................................230-240 V ~ 50 Hz
Potenza: ...............................................1200 W
Velocità a vuoto: ...................................4500 min
Dimensioni lama (max):....................... .Ø 185 mm
Spessore taglierino: ..............................1,7 mm
Lama in dotazione: ...............................Ø185 x 20 x
............................................................2,5 mm x 24T
(2,5 mm è il solco di taglio, 1,4 mm è lo spessore della lama)
Max profondità di taglio: .......................63 mm (90 °)
............................................................38 mm (45 °)
Gamma a smusso:............................. ..0-45 °
Classe di protezione: ............................
Valutazione Protezione:................. .......IP20
Dimensioni (L x W x H): ..................................... 330 x 240 x 250 mm
Peso: ....................................................4 kg
Come parte del nostro continuo sviluppo del prodotto,
le specifiche dei prodotti Silverline possono variare
senza preavviso
Dati del suono e vibrazione:
Vibrazione ponderata: ...........................5 m/s2
........................................................................(impugnatura principale)
............................................................6 m/s2
............................................................(maniglia supplementare)
Tolleranza:......................................... ...1.5 m/s
Pressione sonora (LPA):........................ 66 dB(A)
Potenza sonora (LWA):.......................... 77 dB(A)
Tolleranza:......................................... ...3 dB(A)
Il livello di intensità del suono per l'operatore può superare
85 dB (A) e le misure di protezione del suono sono necessari.
-1
2
ATTENZIONE: Indossare sempre protezioni per le orecchie, dove il livello sonoro
supera i 85 dB (A) e limitare il tempo di esposizione, se necessario. Se i livelli
sonori sono scomodi, anche con la protezioni per le orecchie, smettere di usare
lo strumento immediatamente e controllare la protezione acustica sia montata
correttamente e fornisce il corretto livello di isolamento acustico per il livello del
suono prodotto dal vostro strumento.
ATTENZIONE: l'esposizione dell'utente alle vibrazioni dello strumento può
causare la perdita del senso del tatto, intorpidimento, formicolio e riduzione della
capacità di presa. Esposizione a lungo termine può portare ad una condizione
cronica. Se necessario, limitare la lunghezza del tempo esposti a vibrazioni e
utilizzare guanti anti-vibrazione. Non utilizzare lo strumento con le mani sotto
ad una temperatura normale comoda, siccome le vibrazioni avranno un effetto
maggiore. Utilizzare i dati forniti nella specifica relativa alle vibrazioni per
calcolare la durata e la frequenza di funzionamento dello strumento.
I livelli sonori e vibrazioni nella specifica sono determinate a secondo EN60745 o
simili standard internazionali. Le figure rappresentano un normale utilizzo per lo
strumento in normali condizioni di lavoro. Uno strumento a mal tenuta, montata
in modo errato, o usato in modo improprio, possono produrre un aumento dei
livelli di rumore e vibrazioni. www.osha.europa.eu fornisce informazioni sui livelli
sonori e vibrazioni nei luoghi di lavoro che possono essere utili per gli utenti
domestici che utilizzano strumenti per lunghi periodi di tempo.
Leggere attentamente e comprendere il presente manuale ed ogni etichetta
apposta su ogni strumento prima dell'uso. Conservare le istruzioni con il
prodotto per riferimento futuro. Assicurarsi che tutte le persone che utilizzano
questo prodotto siano a perfetta conoscenza di questo manuale.
Anche quando usato come prescritto non è possibile eliminare tutti i fattori di
rischio residuo. Usare con cautela. Se non siete sicuri del modo corretto e sicuro
in cui utilizzare questo strumento, non tentare di usarlo.
Norme generali di sicurezza
AVVERTENZA: Leggere ed assimilare tutte le istruzioni. La non osservanza delle
seguenti istruzioni può causare scosse elettriche, incendi e/o lesioni gravi.
ATTENZIONE: Questo apparecchio non è destinato all'uso da parte di persone (inclusi
i bambini) con capacità ridotta, fisiche o mentali o con mancanza di esperienza o di
conoscenza, a meno che non siano controllati o istruiti all'uso dell'apparecchio da
una persona responsabile della loro sicurezza. I bambini devono essere sorvegliati per
assicurarsi che non giochino con l'apparecchio.
Conservare tutte le avvertenze di pericolo e le istruzioni operative per ogni esigenza
futura.
Il termine “elettroutensile” si riferisce all’utensile a rete fissa (con filo) o un utensile a
batteria (senza filo).
Area di lavoro
a) Mantenere l’area di lavoro pulita e adeguatamente illuminata. Il disordine e le
zone di lavoro non illuminate possono essere fonte di incidenti.
b) Non usare gli elettroutensili in presenza di atmosfere esplosive, come liquidi,
gas e polveri infiammabili. Gli elettroutensili producono scintille che potrebbero
accendere le polveri o i fumi.
c) Tenere altre persone e i bambini a distanza di sicurezza durante l’impiego
dell’utensile elettrico. Eventuali distrazioni potrebbero far perdere il controllo
dell’utensile all’operatore.
Sicurezza elettrica
a) Le spine degli elettroutensili devono essere compatibili con le prese di corrente.
Non modificare in alcun modo la spina dell’elettroutensile. Non usare adattatori con
gli elettroutensili dotati di collegamento di messa a terra. L’uso delle spine originali
non modificate e delle prese corrispondenti ridurrà il rischio di scosse elettriche.
b) Evitare il contatto del corpo con le superfici collegate a massa come i tubi, i
radiatori, le cucine e i frigoriferi. Se il corpo dell’operatore è collegato alla terra o
alla massa il rischio di scosse elettriche è maggiore.
c) Non esporre gli elettroutensili alla pioggia e non lasciarli in ambienti umidi
o bagnati. L’ingresso dell’acqua in una macchina utensile aumenta il rischio di
scosse elettriche.
d) Non usare il cavo in modo improprio. Non afferrare mai il cavo per trasportare,
tirare o staccare l’elettroutensile dalla presa di corrente. Tenere il cavo lontano
da fonti di calore, olio, e sostanze affini, bordi appuntiti o parti in movimento. I cavi
danneggiati o attorcigliati aumentano il rischio di scosse elettriche.
e) Qualora si voglia usare l’utensile all’aperto, usare cavi di prolunga compatibili
con l’uso in ambienti esterni. Un cavo idoneo all’uso in ambienti esterni riduce il
rischio di scosse elettriche.
f) Se l’utilizzo di un elettroutensile in ambiente umido è inevitabile, utilizzare
una fonte di alimentazione protetta da un dispositivo differenziale. L’uso di un
dispositivo differenziale riduce notevolmente il rischio di scosse elettriche.
NOTA: Il termine "dispositivo di corrente residua (RCD)" può essere sostituito
con il termine "dispersione verso terra del circuito (GFCI)" o "dispersione a terra
interruttore (ELCB)".
28
Page 30

Sega circolare 1200 W845135
Sicurezza personale
a) Quando si usa un elettroutensile lavorare sempre con la massima attenzione
e concentrazione, lasciandosi guidare dal buon senso. Non usare mai un
elettroutensile quando si è stanchi o sotto l’effetto di medicinali e/o sostanze
alcoliche o stupefacenti. Quando si usa un elettroutensile un attimo di distrazione è
sufficiente a causare gravi lesioni alle persone.
b) Usare dispositivi per la protezione personale. Indossare sempre protezioni per
gli occhi. I dispositivi per la sicurezza personale, come le mascherine antipolvere, le
calzature di sicurezza antiscivolo, il casco e la cuffia, se usati in maniera appropriata,
riducono i rischi di lesioni alle persone.
c) Evitare l’avviamento accidentale. Garantire che l’interruttore è in posizione
arresto (OFF) prima di attaccare la presa. Trasportare gli elettroutensili con il dito
al di sopra dell’interruttore o attaccando l’elettroutensile con l’interruttore acceso,
aumenta il rischio di accidenti.
d) Rimuovere tutte le chiavi di regolazione e le chiavi inglesi prima di accendere
l’elettroutensile. Una chiave inglese o una chiave di regolazione collegata a una
parte in movimento dell’elettroutensile potrebbe causare lesioni alle persone.
e) Non andare oltre l’altezza consentita. In qualsiasi momento mantenere i piedi
poggiati su superfici solide e un punto di appoggio sicuro. Un buon equilibrio
consente di avere il massimo controllo sull’elettroutensile nelle situazioni inaspettate.
f) Vestirsi con abbigliamento adeguato. Non indossare abiti larghi o gioielli.Tenere
i capelli, vestiti e guanti lontano da parti in movimento.
g) Se il dispositivo utilizzato è dotato di bocchetta per l’aspirazione della polvere
accertarsi che sia collegato e utilizzato correttamente. L’uso di tali dispositivi
riduce i rischi correlati alle polveri.
Maneggio ed impiego accurato di utensili elettrici
a) Non forzare l’elettroutensile. Usare sempre l’elettroutensile corretto per il
lavoro da eseguire. L’elettroutensile corretto sarà in grado di svolgere il lavoro in
modo più efficiente e sicuro nell’ambito della gamma di potenza indicata.
b) Non usare l’elettroutensile se l’interruttore di accensione non si accende e si
spegne. Gli elettroutensili con un interruttore di accensione difettoso sono pericolosi
e devono essere riparati immediatamente.
c) Staccare la spina dalla presa di corrente prima di effettuare qualsiasi
regolazione, sostituire gli accessori o riporre gli attrezzi a motore. Queste
misure di sicurezza preventive riducono il rischio di avvio involontario.
d) Conservare l’elettroutensile fuori dalla portata dei bambini e non lasciare che
venga utilizzato da persone non adeguatamente addestrate e competenti
nell’uso degli elettroutensili o che non abbiano letto questo manuale di
istruzioni. Gli elettroutensili diventano estremamente pericolosi nelle mani di
persone non addestrate.
e) Mantenere gli elettroutensili. Controllare per disallineamento o la legatura
delle parti in movimento, la rottura di parti e altre condizioni che possono
influire il funzionamento dell’apparecchio. In caso di danneggiamento, fare
riparare prima dell’uso. Molti incidenti sono causati da una scarsa manutenzione
dell’utensile.
f) Mantenere le lame pulite e affilate. Gli utensili da taglio tenuti in buone condizioni
operative e con i bordi taglienti affilati sono meno soggetti a bloccarsi e più facili
da controllare.
g) Utilizzare l’elettroutensile e tutti i componenti e gli accessori in conformità con
le istruzioni di questo manuale e nella maniera prevista per ciascun tipo di
utensile, tenendo conto delle condizioni lavorative e del compito da eseguire.
L’utilizzo degli elettroutensili per fini diversi da quelli previsti rappresenta un rischio
per le persone.
Assistenza
a) Qualsiasi intervento sull’elettroutensile deve essere eseguito da personale
qualificato utilizzando unicamente pezzi di ricambio compatibili e approvati.
Ciò garantisce la sicurezza dell’utensile elettrico.
Prevenzione contraccolpo e la
sicurezza dell'operatore:
Contraccolpo è una reazione improvvisa da una lama di sega pizzicata, legata o
disallineata, che causando una sega incontrollata di sollevarsi al di fuori il pezzo di
lavoro verso l'operatore. Il contraccolpo è il risultato di un uso improprio della sega e / o
procedure o condizioni operative errate e possono essere evitate adottando precauzioni
come segue:
a) Mantenere una salda presa con entrambe le mani sulla sega e posizionare le braccia
per resistere alle forze del contraccolpo. Posizionare il corpo a entrambi i lati della
lama, ma non in linea con la lama. Contraccolpo potrebbe causare la sega a saltare
indietro, tuttavia, se sono prese precauzioni, forze di contraccolpo possono essere
controllate dall'operatore.
b) Quando la lama si attacca, o quando si interrompe un taglio per qualsiasi motivo,
rilasciare il grilletto e tenere la sega nel pezzo fino a quando la lama si ferma
completamente. Non tentare di rimuovere la sega dal lavoro o tirare la sega
all'indietro mentre la lama è in movimento. Indagare e intraprendere azioni correttive
per eliminare la causa del blocco della lama.
c) Quando si riavvia una sega all'interno di un taglio incompleto, centrare la lama nel
taglio e controllare che i denti della sega non siano ingaggiate nel materiale (una
lama di sega rilegata può 'spingere verso l'alto' o causare un contraccolpo dal pezzo
quando lo strumento viene riavviato).
d) Un pezzo di lavoro grande deve essere sostenuto in prossimità alla linea di taglio,
e al bordo del pannello, per evitare cedimenti. Questo ridurrà al minimo il rischio di
schiacciamento contraccolpo della lama.
e) Non utilizzare lame danneggiate o rovinate. Lame affilate o non correttamente
impostate producono un taglio stretto, causando eccessivo attrito, inceppamento
della lama e il contraccolpo.
f) Profondità della lama e le leve di blocco regolazione inclinazion devono essere
ristrinte e sicure prima di effettuare un taglio. Se la regolazione della lama si sposta
durante il taglio, potrebbe causare un attacco e contraccolpi.
g) Prestare particolare attenzione quando si effettua un 'taglio a immersione' in pareti
esistenti o altre aree cieche. La lama sporgente potrebbe tagliare oggetti che
causano contraccolpi.
h) Controllare la guardia inferiore prima di ogni utilizzo e non usare se non si chiude
liberamente, in modo che la lama non tocchi nessuna parte della guardia o
strumento in tutte le angolazioni e profondità di taglio. Non bloccare la guardia
inferiore nella posizione aperta.
i) Controllare il funzionamento della guardia inferiore. Se la guardia e la molla non
funzionano correttamente, devono essere riparate prima dell'uso. La guardia
inferiore può funzionare lentamente a causa di parti danneggiate, depositi gommosi,
o un accumulo di detriti.
j) La guardia inferiore deve essere retratta manualmente per tagli speciali come “tagli
d’immersione” e “tagli composti”. 'Alzare la guardia inferiore dalla maniglia e non
appena la lama entra nel materiale, la guardia inferiore deve essere rilasciata. Per
tutti gli altri tipi di taglio, la guardia inferiore deve funzionare automaticamente.
k) Assicurarsi che la guardia inferiore copra la lama prima di mettere giu la sega. Una
lama a costeggio non protetta, causerà la sega a 'spingere indietro', tagliando tutto
ciò che è nel suo percorso. Siate consapevoli del tempo necessario per la lama a
fermarsi dopo che l'interruttore viene rilasciato. Non utilizzare dischi abrasivi, così
facendo si annulla la garanzia.
www.silverlinetools.com
29
Page 31

I
seghe circolari
AVVERTENZE. Prima di collegare uno strumento per una fonte di alimentazione
(interruttore di rete presa di alimentazione punto, presa di corrente, ecc) assicurarsi
che la tensione è la stessa di quella indicata sulla targhetta dell'utensile. Una fonte di
alimentazione con una tensione superiore a quella indicata per lo strumento può causare
gravi lesioni per l'utente, e danni allo strumento. In caso di dubbio, non collegare lo
strumento. Utilizzando una fonte di alimentazione con una tensione inferiore alla nominale
di targa è dannoso per il motore.
• Non consentite nessuno al di sotto l’eta` di 18 di operare questa sega
• Quando operando questa sega, utilizzare le adeguate protezioni come gli occhiali
di sicurezza o scudo a schermo, protezione per l’udito, mascherina anti-polvere e
indumenti prottetivi compresi I guanti di sicurezza.
• Utensili elettrici portatili possono produrre vibrazioni. Le vibrazioni possono causare
malattie. Guanti possono aiutare a mantenere una buona circolazione del sangue nelle
dita. Strumenti portatili non devono essere utilizzati per lunghi periodi senza una pausa
• Usare sempre lame raccomandate della corretta dimensione e forma dei fori del
mandrino per esempio: diamantata o rotunda. Le lame che non corrispondono al
supporto della sega eseguirà in modo eccentrico, causando la perdita di controllo
• Se possibile, utilizzare un sistema di aspirazione per il controllo delle polveri / rifiuti
• Utensili elettrici devono sempre essere tenuti dalle superfici di presa isolate quando si
eseguono operazioni, assicurando la protezione se l’utensile di taglio viene in contatto
con il proprio filo o fili nascosti. Il contatto con un filo 'live' mette le parti metalliche
esposte dell'utensile 'live' causando una scossa all'operatore se le superfici di presa
isolate non vengono utilizzate.
• Assicurarsi che le mani sono lontani dalla zona di taglio e dalla lama. Tenere una mano
sulla maniglia ausiliaria, o carcassa del motore. Se entrambe le mani tengono l'utensile
non possono essere tagliate dalla lama
• Non tentate di tagliare materiali di spessori superiori a quelli descritti dettagliamente
nella sezione dati tecnici presenti in questo manuale
• Regolare la profondità di taglio allo spessore del pezzo cioè meno di un dente integrale
della lama deve essere visibile al di sotto del pezzo in lavorazione
• Assicurarsi che il lavoro sia correttamente supportato. I pannelli di grandi dimensioni
possono piegarsi sotto il loro stesso peso e si legano alla lama della sega. Supporti
devono essere posizionati al di sotto il pannello su entrambi i lati, vicino alla linea di
taglio e vicino al bordo del pannello
• Assicurarsi che tutti i supporti e cavi di alimentazione sono del tutto liberi dal percorso
di taglio
• Fissare sempre il pezzo su una piattaforma stabile, assicurando che l'esposizione del
corpo è ridotto al minimo, evitando lame di attacco o la perdita di controllo
• Per una maggiore precisione di taglio, e per evitare un attacco lama, utilizzare sempre
una guida parallela o guida a bordo diritto
• Non mantenere mai un pezzo di lavoro in mano o appogiate sulle gambe, mentre
tagliando
• Stare sempre da una parte quando si utilizza la sega
• Essere consapevoli del fatto che la lama si proietta dalla parte inferiore del pezzo
• Non raggiungere al di sotto il pezzo dove la guardia non è in grado di proteggervi
dalla lama
• Notare la direzione di rotazione del motore e la lama
• Controllare il pezzo e rimuovere tutti i chiodi e altri oggetti incorporati prima dell'inizio
dei lavori
• Non applicare alcuna forza laterale o torcimento alla lama durante il taglio
• Se un taglio non si estende fino al bordo del pezzo, o se la lama lega nel taglio,
permettere alla lama di arrestarsi completamente e poi sollevare la sega dal pezzo
• Non tentare di liberare una lama inceppata prima di averla scollegata dalla rete elettrica
• Non spostare la sega indietro in qualsiasi momento durante il taglio
• Attenzione ai rifiuti previsti. In alcune situazioni, materiale di scarto possono essere
proiettati dalla velocità dell'utensile da taglio. E' la responsabilità degli utenti di
assicurare che altre persone nella zona di lavoro sono protetti dalla possibilità di scarti
ribaltanti.
• Se venite interrotti quando utilizzando la sega, completare il processo e spegnerla prima
di alzare gli occhi
• il bullone della lama e le rondelle sono state appositamente progettati per la vostra
sega. Per le prestazioni non ottimali e la sicurezza di operazione non utilizzare mai
rondelle/bulloni lama danneggiati o non corretti
• Controllare regolarmente il funzionamento della protezione della lama. Se la guardia
non si estende automaticamente al di sopra la lama, portate la sega a un centro di
riparazione prima dell'uso
• Controllare periodicamente che tutti i dadi, bulloni e altri componenti di fissaggio non si
siano allentati, stringere se necessario
Lo strumento deve essere utilizzato solo per lo scopo previsto. Ogni utilizzo diverso da
quello indicato in questo manuale sarà considerato un caso di abuso. L'utente, e non il
produttore, saranno responsabili per eventuali danni o lesioni derivanti da tali casi di abuso.
Il produttore non si assume alcuna responsabilità per eventuali modifiche apportate allo
strumento né per eventuali danni derivanti da tali modifiche.
Anche quando lo strumento viene utilizzato come prescritto non è possibile eliminare tutti
i fattori di rischio residuo.
Familiarizzazione con il prodottoSicurezza supplementare per le
1 Presa di estrazione polvere
2 Indicatore di direzione lama
3 Vite di blocco angolo smussato
4 Flangia della lama
5 Bullone di fissaggio lama
6 Vite di blocco guida
7 Piastra di base
8 Guida parallela
9 Guardia della lama
10 Leva di rientro guardia
11 Bulloni del divisore
12 Impugnatura posteriore
13 Divisore a cuneo
14 Vite di blocco inclinazione
15 Vite di blocco profondità
16 Viti per il coperchio di accesso spazzole
17 Grilletto On / Off
18 Pulsante di blocco
19 Maniglia anteriore
20 Chiave a pioli
21 Chiave inglese
Fig A:
A – Coltello divisore a cuneo
B – Taglio (taglio / larghezza denti)
C – Corpo della lama
30
Page 32

Sega circolare 1200 W845135
Disimballaggio dello strumento
Disimballare con cura e controllare il vostro strumento. Familiarizzarsi con tutte le sue
caratteristiche e funzioni.
Assicurarsi che tutte le parti dello strumento sono presenti e in buone condizioni. In caso di
parti mancanti o danneggiate, avere tali pezzi sostituiti prima di utilizzare questo strumento.
Istruzioni per l'uso
Estrazione della polvere
• Per un ambiente di lavoro più sicuro e più pulito collegare un sistema di aspirazione o
aspirapolvere di uso in officina alla presa di estrazione polvere (1)
NOTE:
• Prima di utilizzare la sega, si raccomanda che si pratica su materiale di scarto. Le
impostazioni della macchina sono cruciali per raggiungere una finitura di buona qualità,
e il vostro lavoro potrebbe essere facilmente danneggiato utilizzando un'impostazione
errata
• La lama in dotazione viene fornita pre-montata. Assicurarsi che il bullone di fissaggio
lama (5) sia ben stretto prima del primo utilizzo
ATTENZIONE: Scollegare sempre la sega dalla rete elettrica prima di montare o rimuovere
qualsiasi accessorio.
Montaggio e rimozione lame
• Controllare sempre la lama che viene montata è adatta per il materiale che si intende
tagliare
• Utilizzare solo lame che sono in perfette condizioni. Lame ottuse, piegate, e screpolata
devono essere scartate
1. Tenere la flangia della lama in posizione utilizzando la chiave a pioli (20). Svitare la
vite di fissaggio della lama (5) in senso antiorario con la chiave inglese (21)
2. Rimuovere il bullone di fissaggio della lama, la rondella e flangia della lama . Una
lama della sega può ora essere montata o rimossa
3. Utilizzare la leva di rientro guardia (10) per ruotare la guardia fuori mano
4. Montare la lama richiesta accertandosi che l'indicatore di direzione sulla faccia della
lama è nella stessa direzione dell’indicatore di direzione lama (2)
5. Rimontare la flangia della lama, la rondella e il bullone di fissaggio, e serrare con la
chiave a pioli e chiave inglese
6. Assicurarsi che la lama è sicura prima dell'uso
Regolazione dell’angolo del bisello
• Questa sega è dotata di base inclinabile (7). Questo permette l’esecuzione di tagli a
smusso.
• Per alterare l'angolo della base di appoggio, allentare la vite di blocco bisello (3). La
base di appoggio ora sarà libera di girare
• Selezionare l'angolo richiesto (0-45 °) utilizzando la scala ad angolazione accanto alla
vite di bloccaggio angolo di smusso e serrare le due viti coniche
• Per garantire maggiore precisione, si consiglia di controllare l'angolo tra la lama e la
base con un goniometro adatto
Impostazione della profondità
• Questa sega è dotata di un meccanismo di regolazione della profondità.
• Per modificare la profondità del taglio, allentare la vite di blocco profondità (15). La base
è ora libera di essere regolata alla profondità richiesta
• Regolare la base alla profondità richiesta usando la scala di profondità o un righello e
riserri la vite di blocco profondità
• Dopo avere impostato correttamente la profondità, i denti della lama devono sporgere di
circa 3mm dalla parte inferiore del materiale da tagliare.
Maneggio della sega circolare
• Utilizzare la sega impugnandola sempre saldamente con entrambe le mani, mediante le
apposite impugnature fornite.
• Assicurarsi che la lama si sia arrestata completamente prima di poggiare la macchina
a terra.
• Scollegare sempre la macchina dall’alimentazione di rete prima di lasciarla incustodita.
• Verificare sempre che il pezzo in lavorazione sia saldamente bloccato in posizione per il
taglio. Usare se necessario, una morsa.
Effettuando un taglio
1. Tenere saldamente la sega e posizionare l'estremità anteriore della base (5) sul
bordo del pezzo in lavorazione.
2. Assicurarsi che la lama non sia a contatto con il pezzo in lavorazione o con altri
oggetti.
3. Avviare la macchina premendo il pulsante di blocco (18) e premendo il grilletto di
accensione/spegnimento (17).
4. Attendere che il motore raggiunga la massima velocità; quindi, spingere con una
pressione costante la sega in avanti sul pezzo in lavorazione.
5. Operare con movimenti stabili e uniformi, assicurandosi che la base sia sempre
perfettamente aderente al pezzo in lavorazione.
NB: il bordo anteriore della piastra di base dispone di una scanalatura di guida. Per il
taglio normale allineare la tacca segnata '0 ˚ 'con la linea di taglio prevista; per tagli di 45˚
allineare la tacca segnata '45 ˚' con la linea di taglio.
6. Lasciare che la lama penetri nel materiale e rilasciare il pulsante di avviamento.
In alternative, se il taglio non raggiunge il bordo del pezzo da lavorare, allentare
l’interruttore di accensione e attendere che la lama si fermi prima di sollevare la
sega.
7. Non poggiare la macchina fino a quando la lama non si è completamente arrestata.
Utilizzo della guida parallela
1. Per l’esecuzione di lavori paralleli a un bordo, è necessario utilizzare la guida
parallela (8).
2. La guida parallela è collegata alla base (7) e viene fissata usando la vite di blocco
guida (6). Una volta completata l’installazione, assicurarsi che la guida sia fissata
saldamente.
3. La guida può essere regolata in varie posizioni, per adeguarsi a vari tipi di compiti.
4. Per seguire un bordo, tenere il piede della guida verticale premuto contro il bordo
verticale, mentre il taglio viene effettuato
Coltello divisore a cuneo
• Questo strumento elettrico ha un coltello divisore a cuneo montato (13), che è una
piccola lama situata dietro la lama della sega. Questo è un importante dispositivo di
sicurezza che aiuta a prevenire contraccolpi durante l'uso
• Lo spessore del cuneo (A) deve essere compreso tra lo spessore della fessura di taglio
(B) e lo spessore del corpo della lama (C), vedi fig. A.
• La lama in dotazione ha un solco di taglio di 2,5 mm e uno spessore del corpo della
lama di 1,4 mm. Il cuneo è di 1,7 mm. Quando si sostituisce le lame assicurarsi che lo
spessore del corpo della lama è sotto 1,7 mm e il solco di taglio è superiore ai 1,7 mm
quando si usa il cuneo in dotazione
• Regolazione minore della posizione del cuneo può essere raggiunto allentando i bulloni
del divisore (11), ri-posizionarlo e poi serrarlo
• In alcuni casi il cuneo può avere bisogno di essere ri-appiattito, sostituito o
temporaneamente rimosso, nel qual caso i bulloni del cuneo devono essere
completamente rimossi prima di far scorrere il cuneo fuori mano
• Sostituire immediatamente se il cuneo viene danneggiato o non può essere appiattito
• Posizionare il cuneo in modo che sia centralizzato dietro la lama della sega. I bulloni
possono richiedere rondelle aggiuntive per centralizzare il cuneo quando si utilizza un
diverso spessore della lama
• Il cuneo può essere rimosso per tagli ad immersione. Tagli ad immersione hanno
bisogno di una particolare cura ed attenzione. Prendetevi il tempo per preparare e
verificare che tutte le misure di sicurezza sono seguite
ATTENZIONE: Rimontare sempre il cuneo. È una caratteristica essenziale di sicurezza per
l'uso normale.
www.silverlinetools.com
31
Page 33

I
Manutenzione
ATTENZIONE: Assicurasi sempre che la macchina sia staccata dalla rete di alimentazione
prima di eseguire le operazioni di manutenzione.
Pulizia
• Mantenere la macchina sempre pulita. Lo sporco e la polvere causano un'usura veloce
delle parti interne e abbreviano la durata in esercizio della macchina.
• Pulire il corpo della macchina con una spazzola morbida o una panno asciutto. Se
possibile, insufflare i fori di ventilazione con aria compressa pulita e asciutta.
Spazzole
• Nel tempo le spazzole all'interno potrebbero usurarsi
• Spazzole eccessivamente usurate possono causare la perdita di potere, mancanza
intermittente, o visibile scintille
• Se le spazzole sono consumate e devono essere sostituite, farli sostituire da un centro
di assistenza autorizzato se non siete in grado di farlo voi stessi
• Scollegare completamente l’utensile dalla rete elettrica, svitare le viti di accesso
spazzole (16) e rimuovere il coperchio per accedere alle spazzole di carbone
• Sostituire accuratamente entrambe le spazzole usurate con le nuove
NB: Spazzole di carbone sono disponibili presso il sito: www.toolsparesonline.com
Conservazione
• Conservare con cura questo strumento in un luogo sicuro, asciutto, fuori dalla portata
dei bambini
Smaltimento
Rispettare sempre le normative nazionali per lo smaltimento di strumenti elettrici che non
sono più funzionali e non sono vitali per la riparazione.
• Non gettare gli elettroutensili, o altre apparecchiature elettriche ed elettroniche (RAEE),
con i rifiuti domestici
• Contattare l'ente locale per lo smaltimento dei rifiuti per informazioni sul modo corretto
di disporre di strumenti elettrici
32
Page 34

Garanzia Silverline Tools
Questo prodotto Silverline è protetto da una
garanzia di 3 anni
Per attivare la garanzia di 3 anni è necessario registrate il prodotto sul sito
silverlinetools.com entro 30 giorni dalla data d'acquisto. La data d'inizio
del periodo di garanzia corrisponde alla data d'acquisto riportata sullo
scontrino di vendita.
Condizioni Della Garanzia
Il periodo di garanzia decorre dalla data dell’acquisto presso il rivenditore
indicata sulla ricevuta d’acquisto.
SI PREGA DI CONSERVARE LA RICEVUTA D'ACQUISTO
Nel caso in cui il prodotto risultasse difettoso entro 30 giorni dalla data
d’acquisto, sarà necessario restituirlo al punto vendita presso cui è stato
acquistato, presentando la ricevuta e spiegando chiaramente la natura del
difetto riscontrato. Il prodotto difettoso sarà sostituito o sarà rimborsato
l'importo d'acquisto.
Nel caso in cui il prodotto risultasse difettoso dopo 30 giorni dalla data
d’acquisto, sarà necessario inviare una richiesta di indennizzo in garanzia
a:
Silverline Tools Service Centre
PO Box 2988
Yeovil
BA21 1WU, GB
Le richieste di indennizzo devono essere presentate durante il periodo
della garanzia.
Affinché la richiesta sia approvata, è necessario presentare anche la
ricevuta d’acquisto originale, indicante il luogo e la data dell’acquisto del
prodotto e il proprio nome e indirizzo.
Sarà necessario inoltre fornire una descrizione dettagliata del guasto
riscontrato.
Le richieste effettuate durante il periodo di garanzia saranno verificate da
Silverline Tools per stabilire se il difetto del prodotto è dovuto a problemi di
materiali o di lavorazione.
Le spese di spedizione non saranno rimborsate. Tutti i prodotti devono
essere spediti puliti e in condizioni tali da garantire l'esecuzione della
riparazione in modo sicuro. I prodotti devono essere imballati con cura
per evitare danni o lesioni durante il trasporto. Silverline Tools si riserva
il diritto di non accettare prodotti spediti in condizioni non idonee o non
sicure.
Le riparazioni saranno eseguite da Silverline Tools o da un centro di
riparazione autorizzato.
La riparazione o la sostituzione del prodotto non estende o rinnova il
periodo di garanzia.
Nel caso in cui determini che il prodotto e il difetto riscontrato sono coperti
dalla garanzia, Silverline Tools provvederà a riparare l'utensile
Sega circolare 1200 W845135
Registrazione dell'acquisto
Accedere al sito: silverlinetools.com e selezionare il tasto Registrazione
per inserire:
Informazioni personali
Dettagli del prodotto e informazioni sull'acquisto
Il Certificato di Garanzia sarà inviato per posta elettronica nel formato
PDF. Si prega di stampare e conservare il Certificato insieme alla ricevuta
d'acquisto.
gratuitamente (esclusi i costi di spedizione) o, a propria discrezione, a
sostituirlo con un nuovo utensile.
Gli utensili o le parti trattenuti da Silverline Tools in cambio di un prodotto o
componente sostitutivo diventano proprietà di Silverline Tools.
La riparazione o la sostituzione di un prodotto in garanzia estende i diritti
del consumatore previsti per legge, senza modificarli.
Cosa copre la garanzia:
La riparazione del prodotto, nel caso in cui Silverline Tools determini che il
problema sia dovuto a difetti dei materiali o difetti di lavorazione riscontrati
durante il periodo della garanzia.
Nel caso in cui un componente non sia più disponibile o fuori produzione,
Silverline Tools si riserva il diritto di sostituirlo con un componente
adeguato.
Prodotti acquistati e utilizzati all’interno dell’Unione Europea.
Cosa non copre la garanzia:
La Garanzia Silverline Tools non copre le riparazioni se il difetto è stato
causato da:
La normale usura dei componenti per via dell’utilizzo del prodotto come
indicato nelle istruzioni d’uso (ad esempio, lame, spazzole, cinghie,
lampadine, batterie, ecc.).
La sostituzione di accessori forniti a corredo, come ad esempio punte,
lame, fogli abrasivi, dischi di taglio e altri componenti correlati.
I danni accidentali, causati dall'uso improprio, dall'abuso e dalla
manipolazione, conservazione e cura inadeguata dell'utensile da parte del
proprietario.
L’uso del prodotto per fini non domestici.
La modifica o alterazione del prodotto.
Difetti causati dall’uso di parti e accessori che non siano componenti
originali Silverline Tools.
Installazione difettosa (fatto salvo quando l'installazione viene eseguita da
Silverline Tools).
Riparazioni o alterazioni eseguite da terze parti che non siano la Silverline
Tools o i centri di riparazione autorizzati da quest'ultima.
Silverline Tools non fornisce alcuna garanzia per le richieste formulate per
la correzione dei difetti dell'utensile oggetto della garanzia fatto salvo per
quanto previsto nelle condizioni di cui sopra.
Dichiarazione di conformità CE
Il sottoscritto: Sig. Darrell Morris
come autorizzato di: Silverline Tools
Dichiara che il prodotto:
Codice di identificazione: 845153
Descrizione: Sega circolare 1200 W
Si conforma alle seguenti direttive
•DirettivaMacchine2006/42/CE
•DirettivaBassaTensione2006/95/CE
•DirettivaEMC2004/108/CE
•DirettivaRoHS2011/65/EU
• EN60745-1:2009•EN60745-2-5:2007+A11
• EN60825-1:2007•EN55014-1:2006+A1
• EN55014-2:1997+A1+A2•EN61000-3-2:2006+A1+A2
• EN61000-3-3:2008
Organismo informato: SGS-CSTC Standards Technical Services Co., Ltd, Shanghai, China
La documentazione tecnica è mantenuta da: Silverline Tools
Data: 04/06/13
Firma:
Direttore
Nome e indirizzo del fabbricante oppure persona autorizzata:
Powerbox International Ltd., Boundary Way, Lufton Trading Estate, Yeovil, Somerset, BA22 8HZ,
Regno Unito
www.silverlinetools.com
33
Page 35

NL
Beschrijving symbolen
Op het gegevensplaatje van uw gereedschap kunnen zich symbolen bevinden. Deze
vertegenwoordigen belangrijke productinformatie en gebruiksinstructies.
Draag gehoorbescherming
Draag een veiligheidsbril
Draag een stofmasker
Draag een veiligheidshelm
Draag handschoenen
Lees de handleiding
Dubbel geïsoleerd voor extra bescherming
Voldoet aan de relevante wetgeving en veiligheidsnormen
Milieubescherming
Elektrische producten mogen niet met het normale huisvuil worden
weggegooid. Indien de mogelijkheid bestaat, dient u het product te
recyclen. Vraag de plaatselijke autoriteiten of winkelier om advies
betreffende recyclen
Specificaties
Spanning: .............................................230-240 V~ 50 Hz
Vermogen: ............................................1200 W
Onbelaste snelheid: ..............................4500 min
Zaagblad afmeting (Max):.....................Ø185 mm
Spouwmes dikte:..................................1,7 mm
Inbegrepen zaagblad: ...........................Ø185 x Ø20 x
............................................................2,5 mm x 24 T
Maximale zaagdiepte: ..........................63 mm (90°)
............................................................38 mm (45°)
Verstekhoek:............................. ...........0-45°
Beschermingsklasse: ...........................
Beschermingsniveau:................. ..........IP20
Afmetingen: ........................................................ 330 x 240 x 250 mm
Gewicht: ...............................................4 kg
Met het oog op onze aanhoudende productontwikkeling
kunnen de specificaties van Silverline producten zonder
voorafgaande kennisgeving worden gewijzigd.
Geluid en trilling:
Trilling: .................................................5 m/s2
............................................................(hoofdhandvat)
............................................................6 m/s2
............................................................(hulphandvat)
Onzekerheid:........................................1,5 m/s
Geluidsdruk (LPA):.............................. ....66 dB(A)
Geluidsvermogen (LWA):.........................77 dB(A)
Onzekerheid:.........................................3 dB
De geluidsintensiteit voor de bediener kan 85 dB(A)
overschrijden en de gehoorbescherming is noodzakelijk.
-1
2
WAARSCHUWING: Bij een geluidsintensiteit van 85 dB(A) of hoger is het dragen van
gehoorbescherming en het limiteren van de blootstellingstijd vereist. Bij oncomfortabel
hoge geluidsniveaus, zelfs met het dragen van gehoorbescherming, stopt u het gebruik
van de machine onmiddellijk. Controleer de pasvorm en het geluiddempingsniveau van
de bescherming.
WAARSCHUWING: Blootstelling aan trilling resulteert mogelijk in gevoelloosheid, tinteling
en een vermindert gripvermogen. Langdurige blootstelling kan leiden tot chronische
condities. Limiteer de blootstellingsduur en draag anti-vibratie handschoenen. Vibratie heeft
een grotere invloed op handen met een temperatuur lager dan een normale, comfortabele
temperatuur. Maak gebruik van de informatie in de specificaties voor het bereken van de
gebruiksduur en frequentie van de machine.
Geluid- en trillingsniveaus in de specificatie zijn vastgesteld volgens EN60745 of een
gelijksoortige internationale norm. De waarden gelden voor een normaal gebruik in
normale werkomstandigheden. Een slecht onderhouden, onjuist samengestelde of onjuist
gebruikte machine produceert mogelijk hogere geluids- en trillingsniveaus. www.osha.
europa.eu biedt informatie met betrekking tot geluids- en trillingsniveaus op de werkplek
wat mogelijk nuttig is voor regelmatige gebruikers van machines.
Lees voor gebruik deze handleiding en alle etiketten op het gereedschap zorgvuldig na.
Bewaar deze handleiding bij het product voor toekomstig gebruik. Zorg ervoor dat iedereen
die dit product gebruikt, de handleiding heeft doorgenomen.
Zelfs indien het gereedschap wordt gebruikt volgens de aanwijzingen, is het onmogelijk om
alle risicofactoren te elimineren. Wees dus voorzichtig. Gebruik dit gereedschap niet als u
twijfelt aan de juiste en veilige gebruikswijze.
Algemene veiligheid voor
elektrisch gereedschap
WAARSCHUWING Lees alle bediening- en veiligheidsvoorschriften. Het niet opvolgen
van alle voorschriften die hieronder vermeld staan, kan resulteren in een elektrische schok,
brand en/of ernstig letsel.
WAARSCHUWING: De lader is niet geschikt voor gebruik door personen met een
verminderde mentale of fysieke bekwaamheid of een gebrek aan ervaring, tenzij de
persoon wordt begeleid of geïnstrueerd door een persoon verantwoordelijk voor de
veiligheid
Bewaar deze voorschriften voor toekomstig gebruik.
De term “elektrisch gereedschap” in alle hieronder vermelde waarschuwingen heeft
betrekking op uw elektrische gereedschap dat op de stroom is aangesloten (met een
snoer) of met een accu wordt gevoed (snoerloos).
Veiligheid in de werkruimte
a) Houd de werkruimte schoon en zorg voor een goede verlichting. Rommelige en
donkere ruimtes leiden vaak tot ongelukken.
b) Werk niet met elektrisch gereedschap in explosieve omgevingen, bijvoorbeeld
in de aanwezigheid van ontvlambare vloeistoffen, gassen of stof. Elektrisch
gereedschap brengt vonken teweeg die stof of dampen kunnen doen ontbranden.
c) Houd kinderen en omstanders uit de buurt wanneer u elektrisch gereedschap
bedient. Door afleiding kunt u de controle over het gereedschap verliezen.
Elektrische veiligheid
a) De stekkers van het elektrische gereedschap moeten passen bij het
stopcontact. Pas de stekker niet aan. Gebruik geen adapterstekkers bij geaard
elektrisch gereedschap. Het gebruik van ongewijzigde stekkers en passende
stopcontacten vermindert het risico op een elektrische schok.
b) Vermijd lichamelijk contact met geaarde oppervlakken zoals pijpen, radiatoren,
fornuizen en koelkasten. Het risico op een elektrische schok neemt toe als uw
lichaam geaard wordt.
c) Laat elektrisch gereedschap niet nat worden. Wanneer elektrisch gereedschap
nat wordt, neemt het risico op een elektrische schok toe.
d) Beschadig het snoer niet. Gebruik het snoer nooit om het elektrisch
gereedschap te dragen, te trekken of om de stekker uit het stopcontact
te trekken. Houd het snoer uit de buurt van hitte, olie, scherpe randen of
bewegende delen. Een beschadigde of in de knoop geraakte snoer verhoogt het
risico op een elektrische schok toe.
e) Wanneer u elektrisch gereedschap buiten gebruikt, maak dan gebruik van een
verlengsnoer dat geschikt is voor gebruik buitenshuis. Gebruik een verlengsnoer
dat geschikt is voor gebruik buitenshuis om het risico op een elektrische schok te
verminderen.
f) Indien het onvermijdelijk is elektrisch gereedschap te gebruiken in een
vochtige omgeving, gebruik dan een energiebron met een aardlek beveiliging
(Residual Currency Device). Het gebruik van een RCD vermindert het risico op een
elektrische schok.
Persoonlijke veiligheid
a) Blijf alert en gebruik uw gezonde verstand wanneer u elektrisch gereedschap
bedient. Gebruik het elektrisch gereedschap niet wanneer u vermoeid bent of
onder invloed bent van drugs, alcohol of medicijnen. Onoplettendheid tijdens het
bedienen van elektrisch gereedschap kan leiden tot ernstig letsel.
b) Maak gebruik van persoonlijke bescherming. Draag altijd een veiligheidsbril.
Passende bescherming voor de omstandigheden, zoals een stofmasker, nietslippende veiligheidsschoenen een helm of gehoorbescherming, vermindert het
risico op persoonlijk letsel.
c) Zorg ervoor dat het apparaat niet per ongeluk wordt gestart. Controleer of
de schakelaar in de ‘uit’ stand staat voordat u de stekker in het stopcontact
steekt. Het dragen van elektrisch gereedschap met uw vinger op de schakelaar
34
Page 36

1200 W cirkelzaag845135
of het aansluiten op de stroom van elektrisch gereedschap met de schakelaar
ingeschakeld kan tot ongelukken leiden.
d) Verwijder alle stel- of moersleutels voordat u het elektrische gereedschap
inschakelt. Een moer- of stelsleutel die zich op een draaiend onderdeel van het
elektrische gereedschap bevindt, kan leiden tot letsel.
e) Reik niet te ver. Blijf altijd stevig en in balans staan. Zo houdt u meer controle
over het elektrische gereedschap in onverwachte situaties.
f) Draag geschikte kleding. Draag geen loshangende kleding of sieraden.
Houd haren, kleding en handschoenen uit de buurt van bewegende delen.
Loshangende kleding, sieraden en los hangende haren kunnen vast komen te zitten
in bewegende delen.
g) Als er onderdelen voor stofafvoer- en stofverzameling worden meegeleverd,
sluit deze dan aan en gebruik deze op de juiste wijze. Het gebruik van deze
onderdelen kan het risico op stofgerelateerde ongelukken verminderen.
Gebruik en verzorging van elektrisch gereedschap
a) Forceer elektrisch gereedschap niet. Gebruik elektrisch gereedschap dat
geschikt is voor het werk dat u wilt uitvoeren. Geschikt elektrisch gereedschap
werkt beter en veiliger op een passende snelheid.
b) Gebruik het elektrische gereedschap niet als de schakelaar van het apparaat
niet in- en uitschakelt. Elektrisch gereedschap dat niet bediend kan worden met de
schakelaar is gevaarlijk en moet gerepareerd worden.
c) Haal de stekker uit het stopcontact voordat u instellingen aanpast,
toebehoren verwisselt of het elektrische gereedschap opbergt. Dergelijke
voorzorgsmaatregelen verminderen het risico op het per ongeluk starten van het
elektrische gereedschap.
d) Berg elektrisch gereedschap dat niet in gebruik is op buiten bereik van
kinderen en laat mensen die niet bekend zijn met het elektrische gereedschap
of met deze instructies het elektrische gereedschap niet bedienen. Elektrisch
gereedschap is gevaarlijk in de handen van onervaren gebruikers.
e) Onderhoud uw elektrisch gereedschap. Controleer op foutieve uitlijning of
het vastslaan van bewegende delen, gebroken onderdelen en elke andere
afwijking die de werking van het elektrische gereedschap zou kunnen
beïnvloeden. Indien het elektrische gereedschap beschadigd is, moet u
het laten repareren voordat u het weer gebruikt. Veel ongelukken worden
veroorzaakt door slecht onderhouden elektrisch gereedschap.
f) Houd snijwerktuigen scherp en schoon. Goed onderhouden snijwerktuigen met
scherpe messen slaan minder snel vast en zijn gemakkelijker te bedienen.
g) Gebruik het elektrische gereedschap, de accessoires en onderdelen, etc.
volgens deze instructies en volgens bestemming voor het specifieke
type elektrisch gereedschap, en houd daarbij rekening met de
werkomstandigheden en het uit te voeren werk. Gebruik van elektrisch
gereedschap voor werkzaamheden die verschillen van die waarvoor het apparaat
bestemd is, kan leiden tot gevaarlijke situaties.
Onderhoud
a) Laat uw elektrische gereedschap onderhouden door een gekwalificeerde
vakman en gebruik alleen identieke vervangstukken. Zo bent u er zeker van dat
de veiligheid van het elektrische gereedschap gewaarborgd blijft.
Terugslag
Terugslag is een plotselinge reactie op een vastlopend, geforceerd of een foute uitlijning
van het zaagblad, waardoor de zaag uit het materiaal omhoog, naar de gebruiker wordt
geschoten. Terugslag is het gevolg van misbruik en/of onjuiste gebruiksprocedures
of –omstandigheden, en kan voorkomen worden door het volgen van de volgende
voorzorgsmaatregelen:
a) Houd de zaag met beide handen stevig vast en positioneer uw armen zo, dat
terugslag tegengewerkt kan worden. Positioneer uw lichaam links een zijkant
van de zaag en niet in lijn met het zaagblad. Door het nemen van de juiste
voorzorgsmaatregelen kunnen terugslagkrachten door de gebruiker onder controle
gehouden worden
b) Wanneer het blad stroef in het materiaal draait of wanneer u tijdens het zagen
onderbroken wordt laat u de trekker schakelaar los en houd u de zaag stil in het
materiaal tot het blad volledig stil staat. Probeer de zaag nooit uit het materiaal te
halen of naar achteren te trekken wanneer het zaagblad roteert.
c) Wanneer de zaag in een onafgemaakte snede herstart wordt, zorgt u ervoor dat
de zaag recht in de snede ligt en dat de tanden niet in het materiaal grijpen (een
vastzittend blad kan bij het her starten van de machine omhoog geschoten worden).
d) Een groot werkstuk hoort dicht bij de snede en dicht bij de rand ondersteund te
worden om inzakking te voorkomen en de kans op terugslag te minimaliseren.
e) Gebruik geen beschadigde of botte bladen. Deze bladen produceren een smalle nerf
wat resulteert in overmatige wrijving, het buigen van zaagbladen en terugslag.
f) Voor het maken van sneden horen alle verstel vergrendelingshendels goed vast
gezet te worden. Het bewegen van bladverstellingen kan leiden tot het buigen van
bladen en terugslag.
g) Ben uitermate voorzichtig bij het zagen in muren en andere verborgen gebieden. Het
zaagblad raakt mogelijk verborgen voorwerpen wat kan leiden tot terugslag.
h) Controleer voor elk gebruik de beschermkap en gebruik de zaag niet wanneer de
beschermkap niet vrij sluit. Zorg ervoor dat het zaagblad in elke hoek en diepte,
niet in contact komt met de beschermkap. Vergrendel de beschermkap niet in de
open positie.
i) Controleer de werking van de beschermkapveer. Wanneer de kap en de veer niet
juist functioneren, laat u deze voor gebruik repareren. De beschermkap werkt
mogelijk langzaam door beschadigde onderdelen of ophopend zaagsel.
j) De beschermkap hoort alleen voor speciale sneden handmatig ingetrokken te
worden. Verhoog de beschermkap met behulp van het handvat en laat de kap los
wanneer het blad door het materiaal zaagt.
k) Zorg ervoor dat de beschermkap over het zaagblad valt voordat u de zaag neerlegt.
Ben bewust van de benodigde tijd voor het zaagblad om tot volledige stilstand te
komen. Gebruik geen schuurschijven. Dit ontkracht de garantie.
www.silverlinetools.com
35
Page 37

NL
Cirkelzaag veiligheid
WAARSCHUWNG: Voordat u de machine op de stroombron aansluit, controleert u of
de spanning gelijk is aan de spanning weergegeven op het gegevensplaatje van de
laminaatzaag. De aansluiting op een stroombron met een hogere spanning kan resulteren
in serieuze verwondingen aan de gebruiker en beschadigingen aan de machine. Een lagere
spanning is schadelijk voor de motor. Sluit de machine bij enige twijfel niet aan.
• Laat niemand, jonger dan 18 jaar oud, de zaag gebruiken
• Wanneer u de zaagt gebruikt, hoort u te allen tijde bescherming te dragen. Denk hierbij
aan een veiligheidsbril, gehoorbeschermers, mondkapje, beschermende kleding en
handschoenen
• Elektrisch handgereedschap kan trillingen veroorzaken. Trillingen kunnen ziektes
veroorzaken. Handschoenen die de handen van de bediener warmhouden kunnen een
goede circulatie van het bloed in de vingers bevorderen. Gebruik handgereedschap niet
langdurig zonder onderbreking
• Gebruik te allen tijde aanbevolen zaagbladen van de juiste grootte en vorm. Bladen
die niet passen bij het montage hardware van de zaag lopen excentrisch wat leid tot
controleverlies
• Gebruik wanneer mogelijk een stof ontginningssysteem
• ‘Power Tools’ horen tijdens gebruik bij de geïsoleerde handvaten vast gehouden te
worden. Zo bent u beschermd wanneer het blad in contact komt met het snoer van
de zaag of andere bedrading. Komt het blad in contact met draad wat onder spanning
staat, dan komen metalen onderdelen van de zaag onder spanning te staan, wat de
gebruiker van de zaag een schok kan geven wanneer de handvaten niet gebruikt
worden
• Zorg dat uw handen uit de buurt van het zaagblad blijven. Houd één hand op het
hulphandvat, en houd de andere hand op de motorkast. Wanneer beide handen op het
gereedschap geplaatst zijn, kunnen ze niet beschadigd raken door het zaagblad
• Zaag geen materiaal, dikker dan beschreven in de specificaties van deze handleiding
• Pas de zaagdiepte, aan de breedte van het werkstuk aan. Minder dan een volledige
tandhoogte dient onder het werkstuk uit te komen
• Zorg dat het werkstuk stevig gemonteerd is, en niet te ver uitsteekt over de werkbank
om buiging van het zaagblad en controleverlies te voorkomen
• Zorg ervoor dat steunen en stroomsnoeren uit de zaag lijn verwijdert zijn
• Zet het werkstuk met een minimale blootstelling op een stabiel platform vast, om het
buigen van het zaagblad en controleverlies te voorkomen
• Voor een accurate snede en voorkomen van het buigen van het zaagblad is het aan te
raden een zaaggeleider te gebruiken bij het zagen van materialen
• Houd het werkstuk tijdens het zagen nooit met de hand vast of steunend op uw benen
• Wanneer u aan het zagen bent, staat u aan de zijkant van het werkstuk
• Het zaagblad steekt onder de tafel uit
• Reik niet onder het werkstuk waar uw handen niet beschermd zijn tegen het zaagblad
• Let op de draairichting van de motor en het zaagblad
• Inspecteer het werkstuk en verwijder alle voorwerpen in de buurt van de zaag voordat u
begint met zagen
• Oefen tijdens het zagen geen zijwaartse of draaiende druk op het zaagblad uit
• Wanneer het zaagblad niet tot de volledige breedte van het werkstuk reikt, of wanneer
het zaagblad in het werkstuk klemt, laat u de zaag volledig tot stilstand komen voordat
u de zaag uit het werkstuk tilt
• Wanneer het zaagblad vast geklemd zit in het werkstuk hoort u de machine uit te
schakelen voordat u het blad los probeert te krijgen
• Beweeg de zaag niet naar achter tijdens het zagen van een werkstuk
• Kijk uit voor rondvliegend zaagafval. Het is de gebruikers verantwoordelijkheid
omstanders te beschermen tegen rondvliegend zaagafval
• Wanneer u onderbroken wordt tijdens het zagen, maak de snede dan eerst af en
schakel de machine uit voordat u opkijkt
• De blad bout en de sluitringen zijn speciaal ontworpen voor uw zaag. Voor een optimale
prestatie en een optimale veiligheid, gebruikt u geen beschadigde of onjuiste sluitringen
• Controleer regelmatig of de beschermkap juist functioneert. Wanneer de kap het
zaagblad niet automatisch afdekt, laat u de machine repareren voor verder gebruik
• Controleer regelmatig of alle bouten, moeren en andere bevestigingen goed
vastgedraaid zijn
De zaagmachine mag alleen gebruikt worden voor het voorgeschreven doel. Elk ander doel
dan vermeld staat in deze handleiding wordt beschouwd als misbruik. De gebruiker en
niet de fabrikant is vervolgens aansprakelijk voor eventuele schade of eventueel letsel ten
gevolge van dergelijke gevallen van misbruik.
De fabrikant is niet verantwoordelijk voor eventuele wijzigingen die gedaan worden aan het
gereedschap, noch voor eventuele schade die het resultaat is van dergelijke wijzigingen.
Zelfs wanneer het gereedschap gebruikt wordt zoals is voorgeschreven, is het niet mogelijk
alle resterende risicofactoren te elimineren. De volgende gevaren kunnen zich voordoen
met betrekking tot de constructie en het ontwerp van het gereedschap.
Productbeschrijving
1 Stofpoort
2 Zaagblad richting indicator
3 Verstekhoek vergrendelschroef
4 Zaagblad flensmoer
5 Zaagblad vergrendelbout
6 Geleider vergrendelschroef
7 Basisplaat
8 Parallelgeleider
9 Zaagblad beschermkap
10 Beschermkap intrekhendel
11 Spouwmes bouten
12 Achter handvat
13 Spouwmes
14 Verstek vergrendelschroef
15 Diepte vergrendelschroef
16 Koolstofborstel dekselschroeven
17 Aan-/uit trekker schakelaar
18 Uit stand vergrendelknop
19 Voorhandvat
20 Pinsleutel
21 Moersleutel
Fig A:
A – Spouwmes
B – Zaagtand breedte
C – Zaagblad
36
Page 38

1200 W cirkelzaag845135
Het uitpakken van uw
gereedschap
Pak uw toestel / gereedschap uit. Inspecteer het en zorg dat u met alle kenmerken en
functies vertrouwd raakt.
Controleer of alle onderdelen aanwezig zijn en in goede staat verkeren. Als er onderdelen
ontbreken of beschadigd zijn, zorg dan dat deze vervangen worden voor u dit toestel /
gereedschap gebruikt.
Gebruiksinstructies
Stofontginning
• Voor een schonere en veiligere werkomgeving sluit u de stofpoort (1) van de cirkelzaag
op een ontginningssysteem aan
OPMERKINGEN:
• Oefen op een stuk afvalmateriaal voordat u in et werkstuk gaat zagen. De instellingen
zijn cruciaal voor het verkrijgen van een fijne afwerking. Foutieve instellingen kunnen
uw werkstuk gemakkelijk beschadigen
• Het inbegrepen zaagblad is op de machine gemonteerd. Controleer voor het eerste
gebruik of de vergrendelbout goed is vastgedraaid
WAARSCHUWING: Ontkoppel de machine van de stroombron voordat accessoires
verwijdert of bevestigd worden
Het bevestigen en verwijderen van zaagbladen
• Controleer of het te bevestigen zaagblad geschikt is voor het te zagen materiaal
• Bevestig enkel zaagbladen die in perfecte staat verkeren. Botte, gebogen en
beschadigde zaagbladen horen weggegooid te worden
1. Houdt de zaagblad flensmoer met behulp van de moersleutel pinsleutel (20) in plaats.
Schroef de vergrendelbout (5) linksom, met behulp van de moersleutel (21) los
2. Verwijder de vergrendelbout, sluitring en flensmoer. Een zaagblad kan nu geplaatst
of afgenomen worden
3. Gebruik de beschermkap intrekhendel om de beschermkap in te trekken
4. Let bij er bij het plaatsen van het zaagblad op dat de rotatierichting, aangegeven op
het zaagblad in de zelfde richting als de zaagblad richting indicator wijst
5. Plaats de sluitring, flensmoer en vergrendelbout terug op de machine en draai deze
met behulp van de pin- en moersleutel vast
6. Zorg er voor gebruik voor dat het zaagblad goed vastgedraaid is
Het stellen van de verstekhoek
• De zaagmachine is voorzien van een kantelende basisplaat 7), voor het maken van
versteksneden
• Om de hoek van de basisplaat aan te passen, draait u de verstekhoek vergrendelschroef
(3) en verstek vergrendelschroef (14) los. De basisplaat kan nu vrij gekanteld worden
• Selecteer de vereiste hoek (0-45°) op de gradenboog naast de vergrendelknop en draai
beide schroeven vast
• Controleer de hoek tussen het zaagblad en de basisplaat met behulp van een geschikte
gradenboog op nauwkeurigheid
Het stellen van de zaagdiepte
• De machine is voorzien van een diepte verstelmechanisme
• Om de zaagdiepte aan te passen, draait u de diepte vergrendelschroef (15) los. De
basisplaat kan nu vrij op de gewenste diepte worden gesteld
• Pas de diepte van de machine met behulp van de diepteschaal of een liniaal aan en
draai de vergrendelknop vast
• Bij een juiste instelling steken de tanden ongeveer 3 mm onder het werkstuk uit
Het hanteren van de cirkelzaag
• Houdt de machine te allen tijde stevig, met beide handen op de handvaten vast
• Laat het zaagblad volledig tot stilstand komen voordat u de machine neerlegt
• Ontkoppel de machine van de stroombron wanneer u de machine onbeheerd achterlaat
• Zorg ervoor dat het werkstuk tijdens het zagen niet beweegt. Klem het werkstuk
wanneer mogelijk vast
Het maken van een zaagsnede
1. Houdt de machine stevig vast en rust de voorzijde van de basisplaat (7) op de rand
van het te zagen werkstuk
2. Zorg ervoor dat het zaagblad het werkstuk niet raakt
3. Start de machine door de uit stand vergrendelknop (18) in te drukken, gevolgd door
de trekker schakelaar (17)
4. Laat de motor op volledige snelheid komen voordat u de machine door het werkstuk
leidt
5. Houdt een gelijke snelheid en houdt de basisplaat op het werkstuk gedrukt
LET OP: De voorzijde van de basisplaat is voorzien van twee inkepingen. Voor normale
toepassingen lijnt u de 0° inkeping uit met de zaaglijn. Voor 45° versteksneden lijnt u de
45° inkeping uit met de zaaglijn
6. Wanneer het volledige werkstuk door het zaagblad in gepasseerd, laat u de trekker
schakelaar los. Wanneer de snede voor de rand stopt, laat u de trekker schakelaar
los en het zaagblad volledig tot stilstand komen voordat u de machine van het
werkstuk haalt
7. Leg de machine niet neer voordat het zaagblad volledig tot stilstand gekomen is
Het gebruik van de parallelgeleider
1. De parallelgeleider (8) wordt gebruikt wanneer parallel aan een rand gezaagd wordt
2. De parallelgeleider is met behulp van de vergrendelschroef (6) op de basisplaat (7) te
bevestigen
3. De positie van de geleider kan versteld worden om te passen bij elke uit te voeren taak
4. Om een rand te volgen houdt u de verticale voet van de geleider tijdens de volledige
zaagsneden tegen de rand gedrukt
Spouwmes
• De machine is voorzien van een spouwmes (13). Dit is het smalle mes achter het
zaagblad. Het spouwmes is een belangrijk veiligheidshulpmiddel wat terugslag tijdens
het zagen helpt te voorkomen
• De breedte van het mes (A) hoort tussen de breedte van de zaagtanden (B) en de
breedte van het zaagblad (C) te vallen, zie Fig. A
• Het inbegrepen zaagblad heeft een tandbreedte van 2,5 mm en een zaagbladbreedte
van 1,4 mm. Het spouwmes is 1,7 mm breed. Zorg ervoor dat de tandbreedte boven de
1,7 mm valt en de zaagbladbreedte onder de 1,7 mm valt
• Om het spouwmes te verstellen draait u de bouten (11) los, past u de positie van het
mes aan en draait u de bouten weer vast
• In sommige gevallen hoort het mes opnieuw plat gemaakt, vervangen of tijdelijk
afgenomen te worden. Verwijder de bouten volledig en schuif het mes van de machine
• Vervang het mes wanneer het beschadigd is of niet plat gemaakt kan worden
• Plaats het mes centraal achter het zaagblad. Het mes vereist mogelijk sluitringen om
het te centraliseren wanneer gebruik wordt gemaakt van zaagbladen met een andere
breedte
• Voor invalzaagsneden kan het mes afgenomen worden. Invalzaagsneden vereisen
extra aandacht. Neem de tijd en zorg ervoor dat alle veiligheidsmaatregelen opgevolgd
worden
WAARSCHUWING: Bevestig het spouwmes te allen tijde terug op de machine. Het mes is
een essentieel veiligheidshulpmiddel bij een normaal gebruik van de cirkelzaag
www.silverlinetools.com
37
Page 39

NL
Onderhoud
WAARSCHUWING: Haal de stekker uit het stopcontact voordat u de machine schoonmaakt
of enig onderhoud uitvoert.
Schoonmaak
• Houd uw machine schoon. Zorg ervoor dat afval zich niet ophoopt op de onderdelen
van het gereedschap. Verwijder stof en vuil en zorg ervoor dat de ventilatiegaten
nooit verstopt raken. Gebruik een zachte borstel of een droge doek om de machine te
reinigen. Gebruik wanneer mogelijk zuivere, droge perslucht om door de luchtgaten te
blazen.
Borstels
• Na verloop van tijd zullen de koolborstels in de motor verslijten.
• Bij overmatige slijtage van de borstels verliest de motor mogelijk vermogen, start het
niet meer, en/ of produceert het overmatig vonken.
• Wanneer u niet in staat bent de borstels te vervangen laat u de borstels bij een erkend
servicecenter vervangen
• Ontkoppel de machine van de stroombron, schroef de koolstofborstel dekselschroeven
(16) los en neem de deksel af
• Vervang de versleten borstels met nieuwe
LET OP: Koolstofborstels zijn verkrijgbaar via www.toolsparesonline.com
Opberging
• Berg de machine op een droge en veilige plek, buiten het bereik van kinderen op
Verwijdering
Bij de verwijdering van elektrische machines neemt u de nationale voorschriften in acht.
• Elektrische en elektronische apparaten mogen niet met uw huishoudelijk afval worden
weggegooid
• Neem contact op met uw gemeente voor informatie betreffende de verwijdering van
elektrisch gereedschap
38
Page 40

Silverline Tools Garantie
Dit Silverline product komt met 3 jaar garantie.
Registreer dit product binnen 30 dagen van aankoop op silverlinetools.com
om in aanmerking te komen voor 3 jaar garantie. De garantieperiode begint
op de datum van aankoop op het ontvangstbewijs.
Voorwaarden
De garantieperiode gaat in vanaf de datum van aankoop op het
ontvangstbewijs.
BEWAAR HET ONTVANGSTBEWIJS OP EEN VEILIGE PLAATS
Als dit product binnen 30 dagen van de aankoopdatum een fout heeft,
breng het dan naar de winkelier waar u het heeft gekocht, met uw
ontvangstbewijs, en met vermelding van de details van de storing. U kunt
om een nieuwe vragen of om uw geld terug.
Als dit product na de periode van 30 dagen een fout heeft, stuur het dan
naar:
Silverline Tools Service Centre
PO Box 2988
Yeovil
BA21 1WU, GB
Alle claims moeten binnen de garantieperiode worden ingediend.
U moet het originele ontvangstbewijs geven met de datum van aankoop,
uw naam, adres en plaats van aankoop voordat er aan kan worden
gewerkt.
U moet nauwkeurige gegevens verschaffen van de fout die verholpen
moet worden.
Claims die binnen de garantieperiode worden ingediend, worden door
Silverline Tools nagelopen om te kijken of het probleem een kwestie is van
de materialen of de fabricage van het product.
De verzendkosten worden niet vergoed. De geretourneerde items moeten
voor de reparatie in een redelijk schone en veilige staat verkeren en
moeten zorgvuldig worden verpakt om schade en letsel tijdens het vervoer
te voorkomen. Ongeschikte en onveilige leveringen kunnen worden
afgewezen.
Al het werk wordt uitgevoerd door Silverline Tools of een officiële
reparatiedienst.
De garantieperiode wordt niet door de reparatie of vervanging van het
product verlengd.
Defecten waarvan wij beschouwen dat ze onder de garantie vallen, worden
verholpen door middel van gratis reparatie van het gereedschap (exclusief
verzendingskosten) of door vervanging door een gereedschap in perfecte
staat van werking.
EG-verklaring van overeenstemming
De ondergetekende: Mr. Darrell Morris
Gemachtigd door: Silverline Tools
Verklaart dat
Identificatienummer: 845135
Beschrijving: 1200 W cirkelzaag
Voldoet aan de volgende richtlijnen:
• Machinerichtlijn2006/42/EG
• Richtlijnlaagspanning2006/95/EG
• Elektromagnetischeverenigbaarheid2004/108/EG
• RichtlijnROHS2011/65/EU
• EN60745-1:2009•EN60745-2-5:2007+A11
• EN60825-1:2007•EN55014-1:2006+A1
• EN55014-2:1997+A1+A2•EN61000-3-2:2006+A1+A2
• EN61000-3-3:2008
1200 W cirkelzaag845135
Het gekochte product registreren
Ga naar: silverlinetools.com, kies Registration (registratie) en voer het
volgende in:
Uw persoonlijke gegevens
De gegevens van het product en de aankoop
U ontvangt het garantiebewijs in PDF-vorm. Druk het af en bewaar het bij
het product.
De ingehouden gereedschappen of onderdelen die zijn vervangen, worden
het eigendom van Silverline Tools.
De reparatie of vervanging van het product onder garantie zijn voordelen
die bijkomstig zijn aan uw wettelijke rechten als consument, en hebben
daar geen invloed op.
Wat is gedekt:
De reparatie van het product, mits naar tevredenheid van Silverline Tools
kan worden vastgesteld dat de gebreken het gevolg zijn van defecte
materialen of fabrieksfouten binnen de garantieperiode.
Onderdelen die niet meer verkrijgbaar zijn en die niet meer worden
vervaardigd worden door Silverline Tools vervangen door een functionele
vervanging.
Gebruik van dit product in de EU.
Wat niet is gedekt:
Silverline Tools geeft geen garantie op reparaties als gevolg van:
Normale slijtage veroorzaakt door gebruik in overeenstemming met de
bedieningsinstructies zoals zaagbladen, borstels, riemen, gloeilampen,
batterijen enz.
De vervanging van geleverde accessoires zoals boortjes, zaagbladen,
schuurvellen, snijschrijven en aanverwante producten.
Accidentele schade, storingen veroorzaakt door nalatigheid in gebruik of
verzorging, misbruik, verwaarlozing, onvoorzichtige bediening en hantering
van het product.
Gebruik van het product voor andere doeleinden dan normaal huishoudelijk
gebruik.
Alle soorten wijzigingen en modificaties van het product.
Gebruik van andere onderdelen en accessoires dan de originele onderdelen
van Silverline Tools.
Defecte installatie (behalve wanneer geïnstalleerd door Silverline Tools).
Reparaties of wijzigingen die zijn uitgevoerd door anderen dan Silverline
Tools of diens officiële reparatiediensten.
Behalve claims voor het recht op correctie van fouten van het gereedschap
volgens de bepalingen van deze garantie zijn geen andere claims gedekt.
Keuringsinstantie: SGS-CSTC Standards Technical Services Co., Ltd, Shanghai, China
De technische documentatie wordt bijgehouden door: Silverline Tools
Datum: 04-06-2013
Handtekening:
Directeur
Naam en adres van fabrikant of gemachtigde:
Powerbox International Ltd., Boundary Way, Lufton Trading Estate, Yeovil, Somerset, BA22 8HZ,
Verenigd Koninkrijk
www.silverlinetools.com
39
 Loading...