

Page 1
AUSSEN-FUNKSTECKDOSEN-SET
AUSSEN FUNKSTECKDOSEN-SET
Bedienungs- und Sicherheitshinweise
SET PRESE TELECOMANDATE
PER ESTERNI
Indicazioni per l’uso e per la sicurezza
IAN 101170
SET DE PRISES TÉLÉCOMMANDÉES
D‘EXTÉRIEUR
Instructions d‘utilisation et consignes de sécurité
OUTDOOR WIRELESS
SOCKET SET
Operation and Safety Notes
Page 2
Klappen Sie vor dem Lesen die Seite mit den Abbildungen aus und machen Sie sich
anschließend mit allen Funktionen des Gerätes vertraut.
Avant de lire le mode d‘emploi, ouvrez la page contenant les illustrations et
familiarisez-vous ensuite avec toutes les fonctions de l‘appareil.
Prima di leggere aprire la pagina con le immagini e prendere confidenza con le
diverse funzioni dell’apparecchio.
Before reading, unfold the page containing the illustrations and familiarise yourself
with all functions of the device.
DE / AT / CH Bedienungs- und Sicherheitshinweise Seite 5
FR / CH Instructions d‘utilisation et consignes de sécurité Page 15
IT / CH Indicazioni per l’uso e per la sicurezza Pagina 25
GB Operation and Safety Notes Page 35
Page 3
A
1
2
34
B C
D
5
7
8
9
10
11
12
6
Page 4

Page 5

Inhaltsverzeichnis
Einleitung
Bestimmungsgemäßer Gebrauch ...............................................................Seite 6
Lieferumfang ................................................................................................Seite 6
Bedienelemente ........................................................................................... Seite 6
Technische Daten ......................................................................................... Seite 6
Sicherheit
Allgemeine Sicherheitshinweise .................................................................Seite 7
Sicherheitshinweise zu Batterien ................................................................ Seite 8
Vorbereitung
Fernbedienung vorbereiten .........................................................................Seite 9
Systemcode synchronisieren ....................................................................... Seite 9
Systemcode an der Fernbedienung einstellen ..........................................Seite 9
Systemcode an der Funksteckdose einstellen............................................Seite 10
Funksteckdose einer Bedientaste der Fernbedienung zuweisen .............Seite 10
Geräte anschließen ..................................................................................... S ei te 11
Bedienung
Funksteckdose einschalten ..........................................................................S e i t e 11
Funksteckdose ausschalten .........................................................................S e i t e 11
Reinigung ................................................................................................. S e i t e 11
Wartung .................................................................................................... Seite 12
Fehler beheben ...................................................................................S eite 12
Entsorgung..............................................................................................Seite 12
Garantie und Service
Garantieerklärung ....................................................................................... S eite 13
Serviceadresse ............................................................................................Seite 13
Konformitätserklärung ................................................................................. Sei te 13
Hersteller ...................................................................................................... Seite 13
5 DE/AT/CH
Page 6
Einleitung
Außen-Funksteckdosen-Set
Einleitung
Bestimmungsgemäßer
Gebrauch
Das Funksteckdosen-Set ist zum ferngesteuerten Ein- und Ausschalten von
Elektrogeräten und Lampen geeignet.
Die Funksteckdosen sind für die
Verwendung im Freien geeignet.
Die Geräte dürfen nur einzeln betrieben
werden. Nicht mehrere Funksteckdosen
hintereinander stecken. Alle Veränderungen des Gerätes sind nicht bestimmungsgemäß und können erhebliche
Unfallgefahren bedeuten. Der Hersteller
übernimmt für aus bestimmungswidriger
Verwendung entstandene Schäden
keine Haftung. Dieses Gerät ist nicht für
den gewerblichen Einsatz bestimmt.
Lieferumfang
Prüfen Sie dieses Set nach dem Auspacken auf seinen vollständigen Inhalt.
2 Funksteckdosen IP44
1 4-Kanal-Fernbedienung
2 Batterien AAA á 1,5 V
1 Bedienungsanleitung
Bedienelemente
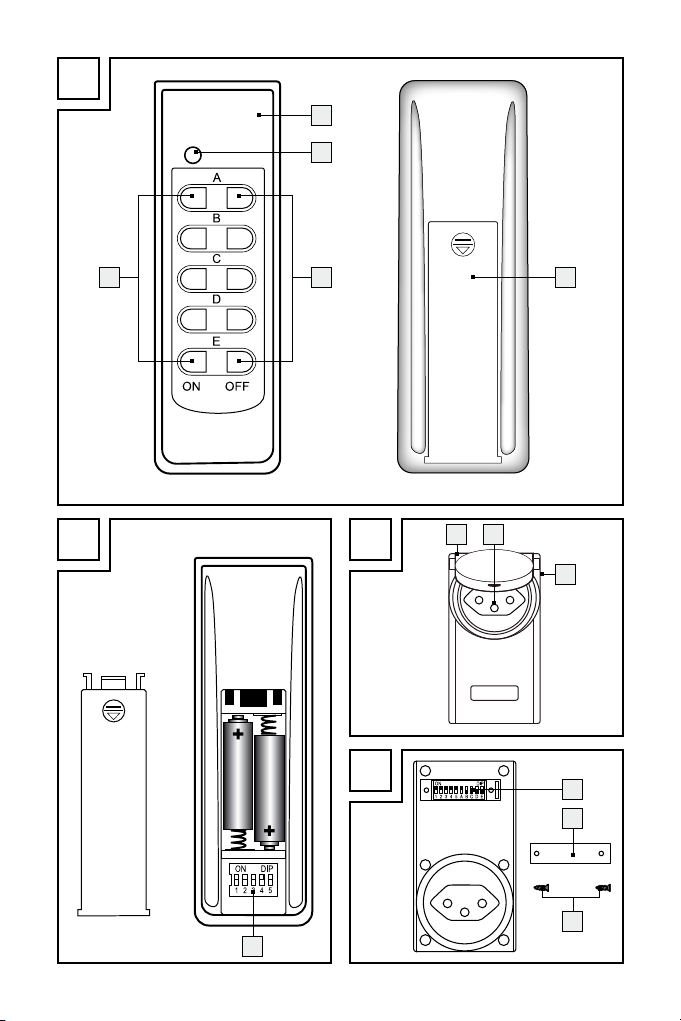
Fernbedienung (Abb. A/B):
1
Fernbedienung
2
Betriebskontroll-Leuchte
3
Kanal-OFF-Taste Kanal A, B, C, D, E
4
Kanal-ON-Taste Kanal A, B, C, D, E
5
Batteriefachabdeckung
6
DIP-Schalter
Funksteckdose (Abb. C/D):
7
Funksteckdose
8
Schutzkontaktsteckdose IP44 mit
Klappdeckel und Kinderschutz
9
Schutzkontaktstecker
10
DIP-Schalter
11
Abdeckung (Fach DIP-Schalter)
12
Schrauben
Technische Daten
Fernbedienung
Typenbezeichnung: RCS AAA1000-A
IP44
Batterie: 2 x AAA, 1,5 V
Übertragungsfrequenz: 433,92 MHz
Zulassung: Das System besitzt
eine allgemeine
Zulassung (BZT)
und ist anmelde-
und gebührenfrei.
Reichweite: abhängig von den
Umgebungsbedin-
gungen ca. 40 m
bei optimalen Be-
dingungen
6 DE/AT/CH
Page 7
Einleitung / Sicherheit
Funksteckdose
Typenbezeichnung: RCE AAA1000-A
IP44 CH
Betriebsspannung: 230 V∼, 50 Hz
Schaltspannung: 230 V∼, 4,35 A
Max. Schaltleistung: 1000 W
Übertragungsfrequenz: 433,92 MHz
Umgebungstemperatur: 0 ° bis 35 °C
Lagertemperatur: - 40 ° bis 70 °C
Schutzart: IP44
EG-konform
Hinweis: Die Funksteckdosen verfügen
jeweils über eine Kinderschutz-Steckdose.
Dadurch wird die häusliche Sicherheit
erheblich erhöht. Die Kontakte sind entsprechend geschützt, so dass Kinder
keine leitende Verbindung (mit Nadeln
o. ä.) herstellen können. Bewahren Sie
das Gerät trotzdem außerhalb der
Reichweite von Kindern auf.
Sicherheit
Allgemeine Sicherheitshinweise
Lesen Sie diese Bedienungsanleitung
und Sicherheitshinweise aufmerksam
durch. Klappen Sie die Bildseite aus
und machen Sie sich vor der ersten Inbetriebnahme mit allen Funktionen des
Gerätes vertraut.
Vermeiden Sie Lebensgefahr
durch elektrischen Schlag!
Schließen Sie die Funksteckdosen
nur an geerdete 230 Volt Haushaltssteckdosen an.
Setzen Sie das Gerät keinen
extremen Temperaturen aus.
Bewahren Sie das Gerät trotz
Kinderschutz-Steckdose immer außerhalb der Reichweite von Kindern
auf. Kinder erkennen nicht die Gefahren, die bei unsachgemäßem
Umgang mit Elektrogeräten entstehen können. Lassen Sie Kinder niemals unbeaufsichtigt Elektrogeräte
benutzen.
Erstickungsgefahr! Lassen Sie
Verpackungsmaterial nicht achtlos
liegen. Kinder können Kleinteile
verschlucken und daran ersticken.
Vermeiden Sie eine Überlastung
des Gerätes. Bei Überlastung kann
Brandgefahr oder Schaden am
Gerät auftreten. Die maximale Belastbarkeit beträgt ca. 1.000 W je
Funksteckdose.
Wenden Sie sich bei Funktionsstö-
rungen bitte sofort an die Servicestelle.
Öffnen Sie das Gerät auf keinen
Fall selbst. Lassen Sie notwendige
Reparaturen ausschließlich von der
Servicestelle oder einer ElektroFachwerkstatt ausführen.
Unterbrechen Sie vor der Reinigung
des Gerätes unbedingt den Stromfluss. Trennen Sie in diesem Fall
immer die Funksteckdose von der
Wandsteckdose und alle Netzstecker vom Gerät.
7 DE/AT/CH
Page 8
Sicherheit
Stecken Sie die Funksteckdosen
nicht hintereinander.
Verwenden Sie keine zusätzlichen
Kindersicherungen für die Funksteckdosen. Die Verbindung zwischen
Stecker und Funksteckdose könnte
beeinträchtigt werden und die
Gefahr der Überhitzung besteht.
Schließen Sie nur Verbraucher in-
nerhalb der angegebenen Leistungsgrenzen der Funksteckdosen an.
Schließen Sie keine Verbraucher an,
deren unbeaufsichtigtes Einschalten
Brände oder andere Schäden auslösen kann (z. B. ein Bügeleisen).
Schließen Sie keine Verbraucher
an, die einen Motorkondensator
benötigen (z. B. ein Kühlschrank).
Decken Sie die Funksteckdosen nicht
ab. Unter der Abdeckung staut sich
die Hitze. Es besteht Brandgefahr.
Kontrollieren Sie die Geräte regel-
mäßig auf Schäden. Beschädigte
Teile nicht ersetzen. Wenden Sie
sich an den Hersteller oder entsorgen Sie die Geräte umweltgerecht.
Fassen Sie die Geräte nicht mit
nassen Händen an.
Ziehen Sie bei Störungen das Ge-
rät sofort aus der Wandsteckdose.
Beachten Sie, dass angeschlossene
Verbraucher nur nach Ziehen des
Netzsteckers vollständig vom Netz
getrennt sind.
Betreiben Sie keine schweren Ste-
ckernetzgeräte in der Funksteckdose,
da sonst die Steckkontakte der
Wandsteckdose mechanisch überlastet werden können.
Um die Funksteckdosen spannungs-
los zu schalten, trennen Sie die
Funksteckdosen vom Stromnetz.
Diese Anleitung ist ein Bestandteil
des Gerätes. Geben Sie diese deshalb bei Weitergabe des Gerätes
an Dritte unbedingt auch weiter.
Sicherheitshinweise
zu Batterien
Batterien gehören nicht in Kinder-
hände. Suchen Sie im Falle eines
Verschluckens sofort einen Arzt auf!
Laden Sie nicht aufladbare Batte-
rien niemals wieder auf, schließen
Sie sie nicht kurz und/oder öffnen
Sie sie nicht. Überhitzung, Brandgefahr oder Platzen können die Folge
sein.
Werfen Sie Batterien niemals in
Feuer oder Wasser.
Setzen Sie Batterien keiner mecha-
nischen Belastung aus.
Im Falle eines Auslaufens der Batte-
rien entfernen Sie diese sofort aus
dem Gerät, um Beschädigungen zu
vermeiden!
Vermeiden Sie den Kontakt mit
Haut, Augen und Schleimhäuten!
Spülen Sie bei Kontakt mit Batteriesäure die betroffenen Stellen sofort
mit klarem Wasser und suchen Sie
umgehend einen Arzt auf!
Verwenden Sie nur Batterien des
gleichen Typs. Alte Batterien nicht
mit neuen mischen!
Vermeiden Sie extreme Bedin-
gungen und Temperaturen, die auf
8 DE/AT/CH
Page 9
Sicherheit / Vorbereitung
Batterien einwirken können z. B.
auf Heizkörpern.
Entfernen Sie die Batterien, wenn
das Gerät längere Zeit nicht verwendet wurde.
Ausschließlich den angegebenen
Batterietyp verwenden!
Achten Sie beim Einsetzen auf die
richtige Polarität! Diese wird im
Batteriefach angezeigt.
Reinigen Sie Batterie- und Geräte-
kontakt vor dem Einlegen falls
erforderlich!
Entfernen Sie erschöpfte Batterien
umgehend aus dem Gerät.
Vorbereitung
Bevor Sie die Geräte benutzen können,
müssen Sie
die Batterien einsetzen,
den Systemcode zwischen der
Fernbedienung
steckdosen
Schalter
1
und den Funk-
7
mit Hilfe der DIP-
6, 10
synchronisieren
und
ein Tastenpaar ON/OFF 4, 3
der Fernbedienung
steckdose
7
1
zuweisen.
einer Funk-
Fernbedienung
vorbereiten
Setzen Sie die beiden mitgeliefer-
ten AAA-Batterien ein.
Drücken Sie eine der ON- / OFF-Ta-
4, 3
sten
Fernbedienung
, um zu prüfen, ob die
1
funktioniert.
Wenn ja, leuchtet die Betriebskontroll-Leuchte
2
. Leuchtet diese
nicht, bekommt das Gerät keine Energie von den Batterien. Überprüfen Sie, ob Sie die Batterien richtig
eingesetzt haben.
Schließen Sie das Batteriefach.
Systemcode
synchronisieren
Vor der ersten Verwendung der Geräte
muss der Systemcode mit Hilfe der DIPSchalter
damit alle Funksteckdosen
Funksignal der Fernbedienung
reagieren. Außerdem muss jeder Funksteckdose
bedienung
damit jede Funksteckdose
zu bedienen ist.
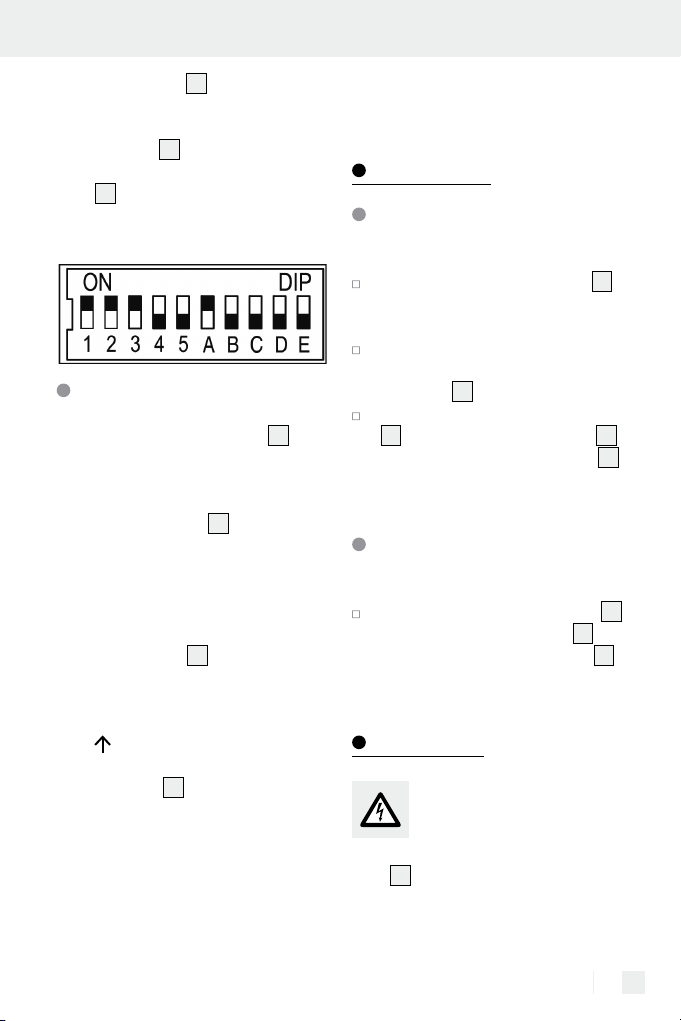
Hinweis: Ändern Sie die Stellung der
DIP-Schalter
neten Gegenstand, z. B. einem kleinen
Schraubendreher, indem Sie die DIPSchalter
unten schieben.
6, 10
synchronisiert werden,
7
7
ein Tastenpaar der Fern-
1
zugewiesen werden,
7
6, 10
mit einem geeig-
6, 10
nach oben oder nach
auf das
1
einzeln
Öffnen Sie das Batteriefach auf der
Rückseite der Fernbedienung
1
,
indem Sie die Batteriefachabde-
5
ckung
nach unten wegschieben
und dann anheben.
Systemcode an der
Fernbedienung einstellen
Öffnen Sie das Batteriefach auf der
Rückseite der Fernbedienung
1
,
9 DE/AT/CH
Page 10
Vorbereitung
indem Sie die Batteriefachabde-
5
ckung
und dann anheben.
Stellen Sie mit den DIP-Schaltern 6
1 bis 5 einen beliebigen Systemcode ein.
Schließen Sie das Batteriefach.
Systemcode an der
Funksteckdose
einstellen
Drehen Sie die Schrauben 12 der
Abdeckung
schlitz-Schraubendreher Größe
PH0 heraus.
Nehmen Sie die Abdeckung 11
über dem Fach der DIP-Schalter
ab.
Stellen Sie mit den DIP-Schaltern 10
1 bis 5 den gleichen Systemcode
ein wie bei der Fernbedienung
Funksteckdose einer
Bedientaste der Fernbedienung zuweisen
Stellen Sie mit den DIP-Schaltern 10
A bis D eine Bedientaste der Fernbedienung
Hinweis: Der DIP-Schalter E ist
nicht belegt.
nach unten wegschieben
11
mit einem Kreuz-
1
ein:
DIP-Schalter
Funksteckdose
Bedientaste
Fernbedienung
A B C D E
A ON
B
C
D
Setzen Sie die Abdeckung 11
wieder ein.
Führen Sie die Schrauben 12 durch
die Schraubenöffnung in das Ge-
10
1
.
winde ein und ziehen Sie diese fest.
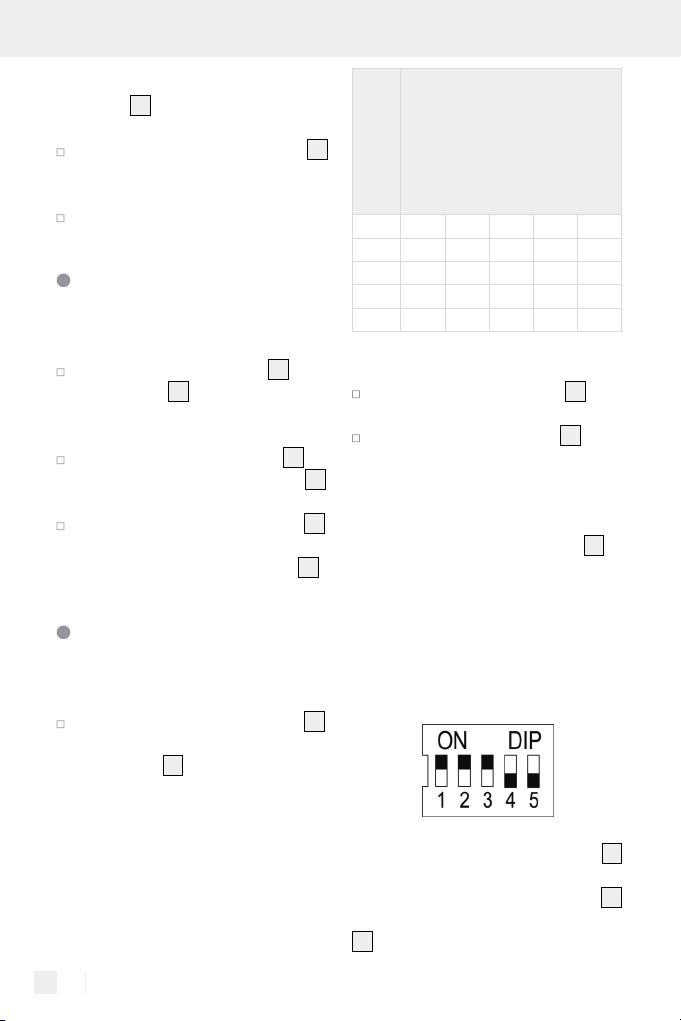
Beispiel
Stellen Sie an der Fernbedienung
den Systemcode 123 ein, indem Sie
die DIP-Schalter „1“, „2“ und „3“ nach
oben schieben, während die DIP-Schalter „4“ und „5“ in der unteren Position
bleiben:
Ansicht Rückseite Fernbedienung
OFF OFF OFF OFF
OFF
OFF OFF
OFF OFF OFF
OFF OFF OFF
ON
ON
OFF OFF
OFF
ON
1
10 DE/AT/CH
Stellen Sie bei allen Funksteckdosen 7
den Systemcode 123 ein. Weisen Sie
außerdem der ersten Funksteckdose
die Bedientaste „A“ der Fernbedienung
1
zu, indem Sie den DIP-Schalter „A“
7
Page 11
Vorbereitung / Bedienung / Reinigung
der Funksteckdose 7 nach oben schieben, während die DIP-Schalter B, C und
D in der unteren Position bleiben. Diese
Funksteckdose
dem Tastenpaar “A“ der Fernbedie-
1
nung
Ansicht Rückseite Funksteckdose
7
können Sie nun mit
ein- und ausschalten.
Geräte anschließen
Stecken Sie die Funksteckdose 7
immer direkt in eine geerdete Wandsteckdose ein.
Um die Schutzart IP44 zu gewährleisten,
soll die Funksteckdose
in Steckdosen der Schutzart IP 44 eingesteckt werden. Bei Verwendung in
Kombination mit einer IP20-Steckdose
ist kein vollständiger Feuchtigkeitsschutz
gewährleistet.
Die Funksteckdose
auf dem Geräteetikett angezeigten
Richtung eingesteckt werden, damit der
Spritzwasserschutz gewährleistet ist
(Pfeil
muss nach oben zeigen).
Die Reichweite des Funksignals der
Fernbedienung
und ist abhängig von den baulichen
Gegebenheiten. Die Reichweite kann
durch bauliche (z. B. Stahlbeton), elektrische (z. B. elektrische Leitung) oder
elektromagnetische (z. B. Telefon)
Gegebenheiten gestört werden. Falls
notwendig, entfernen Sie die Störquelle
7
ausschließlich
7
darf nur in der
1
beträgt max. 40 m
oder halten Sie einen entsprechenden
Abstand zur Störquelle ein.
Bedienung
Funksteckdose
einschalten
Stecken Sie die Funksteckdose 7
in eine geerdete Schutzkontaktsteckdose.
Stecken Sie das Gerät, das sie
fernschalten möchten, in die Funksteckdose
Drücken Sie an der Fernbedienung
1
(z. B. A), um die Funksteckdose
einzuschalten.
7
.
die zugewiesene Taste ON 4
Funksteckdose
ausschalten
Drücken Sie an der Fernbedienung 1
die zugewiesene Taste OFF
(z.B. A), um die Funksteckdose
auszuschalten.
3
7
Reinigung
ACHTUNG! GEFAHR
DURCH ELEKTRISCHEN
SCHLAG! Trennen Sie
vor der Reinigung immer die Funksteck-
7
dose
von der Wandsteckdose und
alle Netzstecker vom Gerät.
7
11 DE/AT/CH
Page 12
Reinigung / Wartung / Fehler beheben / Entsorgung
ACHTUNG! GEFAHR
DURCH ELEKTRISCHEN
SCHLAG! Es dürfen keine
Flüssigkeiten in das Innere des Gerätes
gelangen.
Verwenden Sie zum Reinigen des
Gehäuses ein weiches Tuch. Verwenden Sie niemals Benzin, Lösungsmittel oder Reiniger, die Kunststoff
angreifen.
Wartung
Überprüfen Sie in regelmäßigen
Abständen die Batterien auf Schäden.
Fehler beheben
= Störung
= Ursache
= Behebung
Betriebskontroll-Leuchte 2
leuchtet nicht beim Drücken
einer Taste.
Batterien sind falsch eingelegt.
Batterien polungsrichtig einlegen
Batterien haben keinen Kontakt.
Batterien an Kontaktklemmen
andrücken.
Batterien sind leer.
Neue Batterien einlegen.
Verbraucher funktioniert
nicht.
Funksteckdose 7 ist nicht richtig
angeschlossen.
Funksteckdose 7 fest in die Steck-
dose stecken.
Verbraucher ist nicht eingeschaltet.
Verbraucher einschalten.
Funksteckdose schaltet nicht
ein.
Systemcode der Funksteckdose 7
ist nicht richtig eingestellt.
Systemcode der Fernbedienung 1
in der Funksteckdose
Reichweite zwischen Fernbedie-
1
nung
und Funksteckdose 7 ist
nicht ausreichend.
Den Abstand zwischen Fernbedie-
1
nung
und Funksteckdose 7
verringern.
Elektrische Geräte stören.
Mögliche Störquellen entfernen.
7
einstellen.
Entsorgung
Elektrogeräte nicht in
den Hausmüll werfen!
Gemäß Europäischer Richtlinie
2012 / 19 / EC über Elektro- und Elektronik-Altgeräte müssen verbrauchte
Elektrogeräte, Leuchtmittel und Batterien getrennt gesammelt und einer
umweltgerechten Wiederverwertung
zugeführt werden. Möglichkeiten zur
Entsorgung des ausgedienten Geräts
erfahren Sie bei Ihrer Gemeinde- oder
Stadtverwaltung.
12 DE/AT/CH
Page 13
Entsorgung / Garantie und Service
Umweltschäden durch
falsche Entsorgung
Pb
der Batterien!
Batterien gehören nicht in den Hausmüll.
Sie können giftige Schwermetalle enthalten und unterliegen der Sondermüllbehandlung. Geben Sie deshalb
verbrauchte Batterien bei einer kommunalen Sammelstelle ab.
Garantie und Service
Garantieerklärung
3 Jahre Garantie ab Kaufdatum auf
dieses Gerät. Bitte Kassenbon als
Nachweis aufbewahren. Das Gerät
wurde sorgfältig produziert und vor
Auslieferung gewissenhaft geprüft. Die
Garantieleistung gilt nur für Materialoder Fabrikationsfehler bei sachgemäßer Verwendung.
Die Garantie erlischt bei Fremdeingriff.
Ihre gesetzlichen Rechte werden durch
diese Garantie nicht eingeschränkt. Im
Garantiefall mit der Servicestelle telefonisch in Verbindung setzen. Nur so
kann eine kostenlose Einsendung Ihres
Geräts gewährleistet werden.
Für weitere Informationen empfehlen
wir den Bereich Service/FAQ’s auf
unserer Homepage
www.dvw-service.com.
IAN 101170
Konformitätserklärung
In Übereinstimmung mit folgenden
Europäischen Richtlinien wurde das
CE-Zeichen angebracht:
1999/5/EG R&TTE-Richtlinie
2006/95/EG Niederspannungsrichtlinie
2004/108/EG EMV-Richtlinie
2011/65/EU (RoHS II)
Die Konformitätserklärung ist unter
folgendem Link hinterlegt:
www.dvw-service.com/konformitaetserklaerung/ke_1049712706.pdf
Hersteller
BAT
Lindenstraße 35
72074 Tübingen
Deutschland
Serviceadresse
BAT, Lindenstraße 35,
D-72074 Tübingen
E-Mail: exp@bat-tuebingen.com
Service-Tel.: 00800 48720741
13 DE/AT/CH
Page 14

14
Page 15

Table des matières
Introduction
Utilisation conforme ..................................................................................... Page 16
Contenu de la livraison ............................................................................... Page 16
Élément de réglage .....................................................................................Page 16
Caractéristiques techniques ........................................................................ Page 16
Sécurité
Instructions générales de sécurité .............................................................. Page 17
Consignes de sécurité sur les piles .............................................................Page 18
Préparation
Préparation de la télécommande ............................................................... Page 19
Synchroniser les fréquences .......................................................................Page 19
Régler le code système de la télécommande ...........................................Page 20
Régler le code système des prises radio ................................................... Page 20
Attribuer une prise radio à une touche de la télécommande .................. Page 20
Raccorder des appareils .............................................................................Page 21
Utilisation
Allumer la prise radio ..................................................................................Page 21
Éteindre la prise radio ................................................................................. Page 21
Nettoyage ............................................................................................... Pa g e 21
Maintenance .........................................................................................Page 22
Problèmes et solutions ................................................................. Page 22
Mise au rebut .......................................................................................Page 22
Garantie et service après-vente
Déclaration de garantie .............................................................................. Page 23
Adresse du service après-vente .................................................................. Page 23
Déclaration de conformité .......................................................................... Page 23
Fabricant ......................................................................................................Page 23
15 FR/CH
Page 16

Introduction
Set de prises télécommandées d’extérieur
Introduction
Utilisation conforme
Le set de prise radio est prévu pour
contrôler à distance l‘allumage et l‘extinction d‘appareils électriques et de
lampes. Les sets de prise radio conviennent
à une utilisation en extérieur. Les appareils doivent être utilisés individuellement.
Ne pas brancher les prises radio les
unes après les autres. Toutes modifications opérées sur l‘appareil sont non
conformes a l‘usage prévu et peuvent
engendrer de graves d‘accidents. Le
fabricant n‘endosse aucune responsabilité pour tous dommages survenant lors
d‘une utilisation de l‘appareil en non
conformité avec l‘usage prévu. Ce produit n‘est pas destiné a l‘usage professionnel.
Contenu de la livraison
Contrôlez ce set après le déballage
pour vérifier qu‘il est complet.
2 prises radio IP44
1 télécommande 4 canaux
2 piles AAA á 1,5 V
1mode d‘emploi
Élément de réglage
Télécommande (ill. A/B) :
1
Télécommande
2
Témoin de contrôle de fonctionnement
3
Touche canal OFF pour les canaux
A, B, C, D, E
4
Touche canal ON pour les canaux
A, B, C, D, E
5
Couvercle du compartiment de la pile
6
Interrupteur DIP
Prise télécommandée (ill, C/D) :
7
Prise télécommandée
8
Prise murale IP44 avec clapet et
protection enfant
9
Prise mâle
10
Interrupteur DIP
11
Couvercle (compartiment
interrupteur DIP)
12
Vis
Caractéristiques
techniques
Télécommande
TypesDescription: RCS AAA1000-A
IP44
Pile: 2 x AAA, 1,5V
Fréquence de
transmission: 433,92 MHz
Homologation: Le système possède
une homologation
générale (BZT) et
est exempt de taxe
ou d‘obligation
d‘inscription.
16 FR/CH
Page 17

Introduction / Sécurité
Portée: dépendante de
l‘environnement et
d‘env. 40 m avec
des conditions
optimales
Prise télécommandée
Indication de type: RCE AAA1000-A
IP44 CH
Tension de service: 230 V ∼, 50 Hz
Tension de
commutation: 230 V ∼, 4,35 A
Puissance de
commutation max.: 1000 W
Fréquence
de transmission: 433,92 MHz
Température
ambiance: 0° à 35°C
Température
de stockage: - 40 ° à 70°C
Indice de
protection: IP44
Conformité à la
législation
communautaire
Remarque : Les prises radio disposent
chacune d‘une prise de sécurité enfant.
Ce qui garantit une sécurité domestique
considérable. Les contacts électriques
sont protégés de façon à ce que les enfants ne peuvent créer une connexion
conductrice (avec leurs ongles ou
autre). Rangez malgré tout l’appareil
hors de portée des enfants.
Sécurité
Instructions générales de sécurité
Lisez attentivement le mode d’emploi et
les instructions de sécurité. Dépliez
l‘image et familiarisez-vous avec les
fonctions de l‘appareil avant la première mise en marche.
Evitez les dangers de mort
par électrocution !
Branchez les prises radio unique-
ment à des prises classiques 230 V
mises à la terre.
N’exposez pas l’appareil à des
températures extrêmes.
Malgré la sécurité enfant, rangez
toujours l‘appareil hors de portée
des enfants. Les enfants ne sont pas
conscients des risques inhérents à
une manipulation inappropriée
d‘appareils électriques. Ne laissez
jamais les enfants utiliser des appareils électriques sans surveillance.
Risque d‘asphyxie! Ne laissez pas
traîner le matériel d‘emballage
sans surveillance. Les enfants
peuvent avaler les petites pièces et
s‘étouffer.
Évitez une surcharge de l‘appareil.
Une surcharge peut entraîner un
incendie ou une dégradation de
l‘appareil. La charge maximale est
d‘env. 1000W par prise radio.
En cas de dysfonctionnement,
adressez-vous immédiatement au
S.A.V.
17 FR/CH
Page 18

Sécurité
N‘ouvrez en aucun cas l‘appareil
vous-même. Faites effectuer les réparations nécessaires exclusivement par le service après-vente ou
par des électrotechniciens.
Coupez l‘alimentation électrique
avant de nettoyer l‘appareil. Dans
ce cas, débrancher toujours la
prise radio de la prise murale et
toutes les fiches de l‘appareil.
Ne branchez pas les prises radio
les unes après les autres.
N‘utilisez pas de sécurités enfant
supplémentaires pour les prises
radio. La connexion entre la prise
mâle et la prise radio pourrait en
être altérée et créer une surchauffe.
Raccordez uniquement des consom-
mateurs électriques dans les limites
de puissances des prises radio.
Ne raccordez aucun consomma-
teur électrique dont la mise en
route sans surveillance peut entraîner un incendie ou autres dégâts
(par ex. un fer à repasser). Ne raccordez aucun consommateur électrique nécessitant un condensateur
moteur (par ex. un réfrigérateur).
Ne couvrez pas les prises radio. La
chaleur s‘accumule sous le cache
ou la couverture. Il existe un risque
d‘incendie.
Contrôlez régulièrement les appa-
reils présentent des dommages. Ne
pas remplacer les pièces endommagées. Adressez-vous au fabricant
ou jetez de l‘appareil conformément
aux normes antipolluantes en vigueur.
Ne pas toucher l‘appareil avec les
mains mouillées.
En cas de dysfonctionnement,
débranchez l‘appareil de la prise
murale. Veuillez bien prendre note
que le consommateur électrique ne
sera totalement déconnecté du réseau qu‘une fois la fiche d‘alimentation retirée.
N‘utiisez pas de transformateur
d‘alimentation de haute puissance
avec la prise radio car les prises de
contact de la prise murale peuvent
être surchargé mécaniquement.
Afin de mettre les prises radio hors-
tension, séparez-les du réseau d‘alimentation.
La présente notice fait partie inté-
grante de l‘appareil. Il faut ainsi la
remettre impérativement si l‘appareil
est cédé à un tiers.
Consignes de
sécurité
Ne pas laisser les piles à la portée
des enfants. En cas d´ingestion,
consultez immédiatement un médecin !
Ne jamais recharger les piles à
usage unique, ni les court-circuiter
et / ou les ouvrir. Une surchauffe,
un risque d‘incendie ou un éclatement pourraient en résulter.
Ne jamais jeter les piles au feu ou
dans l‘eau.
Ne pas soumettre les piles à une
charge mécanique.
En cas de fuite de la pile, retirez-la
aussitôt de l´appareil pour éviter
tout endommagement.
sur les piles
18 FR/CH
Page 19

Sécurité / Préparation
Évitez tout contact avec la peau,
les yeux et les muqueuses. En cas
de contact avec l‘acide d‘une pile,
rincez la zone touchée avec de
l‘eau claire et contactez immédiatement un médecin !
Utilisez uniquement des piles de
type identique. Ne pas mélanger
des piles usées et des piles neuves !
Évitez les conditions et les tempéra-
tures extrêmes pouvant avoir un effet
sur les piles, par ex. les radiateurs.
Retirez les piles si l‘appareil n‘a
pas été utilisé depuis longtemps.
Utilisez exclusivement le type de
pile indiqué !
Lors de la mise en place des piles,
veillez à respecter la polarité!
Celle-ci est indiquée dans le compartiment à piles.
Au besoin, nettoyer les contacts
des piles et de l’appareil avant
l’insertion.
Retirez immédiatement les piles
usées de l’appareil.
Préparation
Avant d‘utiliser l‘appareil il vous faudra
insérer les piles,
synchroniser le code système de la
télécommande
7
dio
avec l‘aide de l‘interrupteur
6, 10
DIP
attribuer une paire de touche ON/
4, 3
OFF
1
à une prise radio 7.
1
et des prises ra-
et
de la télécommande
Préparation de la
télécommande
Ouvrez le compartiment à pile sur
la face arrière de la télécommande
1
en poussant le couvercle du
compartiment à pile
5
vers le bas.
Insérez les deux piles AAA livrées.
Appuyez sur une des touches ON/
4, 3
OFF
lécommande
pour vérifier que la té-
1
fonctionne. Si oui,
le témoin de contrôle de fonctionnement s‘allume
2
. Si il ne s‘allume
pas, l‘appareil n‘est pas alimenté
par les piles. Vérifiez si les piles ont
été correctement mises en place.
Fermez le boîtier à piles.
Synchroniser les
fréquences
Avant la première utilisation de l‘appareil, le code système doit être synchronisé à l‘aide de l‘interrupteur DIP
afin que toutes les prises radio
gissent au signal de la télécommande
1
. De plus, chaque prise radio 7 doit
se voir attribuer un couple de touche
de la télécommande
chaque prise radio
1
7
puisse être utili-
ser individuellement.
Remarque : Modifier la position des
interrupteurs DIP
6, 10
adapté, par ex. un petit tournevis, en
les déplaçant vers le haut ou vers le bas.
6, 10
7
réa-
afin que
avec un objet
19 FR/CH
Page 20

Préparation
Régler le code système
de la télécommande
Ouvrez le compartiment à pile sur
la face arrière de la télécommande
1
en poussant le couvercle du
6
1 à 5.
10
1 à 5.
5
vers le bas.
10
compartiment à pile
Choisissez un code avec les inter-
rupteurs DIP
Fermez le boîtier à piles.
Régler le code système
des prises radio
Dévissez les vis 12 du couvercle 11
avec un tournevis cruciforme PH0.
Retirez le couvercle 11 sur le com-
partiment de l‘interrupteur DIP
Comme pour la télécommande 1,
choisissez un des codes avec les
interrupteurs DIP
Attribuer une prise
radio à une touche de
la télécommande
Interrupteur DIP
mande
Télécommande
Touche de com-
A ON
B
C
D
Remettez le couvercle 11 en place.
Introduisez les vis 12 dans la ta-
raude par l‘ouverture et vissez la
fermement.
Exemple
.
Réglez le code système 123 sur la
télécommande
interrupteur „1“, „2“ et „3“ vers le haut
et laissez les interrupteur DIP „4“ et „5“
en position basse.
Vu arrière de la télécommande
Prise radio
A B C D E
OFF OFF OFF OFF
OFF
OFF OFF
OFF OFF OFF
OFF OFF OFF
ON
ON
1
en faisant glisser les
OFF OFF
OFF
ON
Avec les interrupteurs DIP 10 A à
D, choisissez une des touches de
commande de la télécommande
Remarque : L‘interrupteur E n‘est
pas utilisé.
20 FR/CH
1
.
Réglez le code système 123 pour toutes
les prises radio
la touche de commande A de la télécommande
7
dio
en faisant glisser l‘interrupteur
DIP „A“ de la prise radio
haut en laissant les interrupteur DIP B,
C et D en position basse. Vous ne pour-
7
. Attribuez par ailleurs
1
à la première prise ra-
7
vers le
Page 21

Préparation / Utilisation / Nettoyage
rez alors allumer et éteindre cette prise
7
radio
télécommande
Vue arrière de la prise radio
qu‘avec la touche „A“ de la
1
.
Raccorder des
appareils
Branchez toujours la prise radio 7 directement dans une prise murale réliée
à la terre.
Afin de garantir l‘indice de protection
IP44, la prise radio
vement branchée à une prise de l‘indice
de protection IP44. Avec une utilisation
en combinaison avec une prise IP20,
une protection complète contre l‘humidité n‘est pas garantie.
La prise radio
chée que dans la direction indiquée sur
l‘étiquette pour garantir son étanchéité
(la flèche
La porté du signal de la télécommande
1
est d‘env 40 m et est dépendante
des conditions structurelles. La portée
peut se voir réduite par des structures
architecturales (par ex. béton armé),
électriques (par ex des ligues électriques)
ou électromagnétiques (par ex le téléphone). Si nécessaire, éliminer ou
garder ses distances vis-à-vis de cette
source d‘interférence.
7
doit être exclusi-
7
ne peut être bran-
doit être tirée vers le haut).
Utilisation
Allumer la prise radio
Branchez la prise radio 7 dans
une prise de courant à contacts de
protection liée à la terre.
Glissez l‘appareil que vous souhai-
tez allumer dans la prise radio
Appuyez sur la touche ON 4
(par ex. A) attribuée de la télécom-
1
mande
radio
pour activer la prise
7
.
7
Éteindre la prise radio
Appuyez sur la touche OFF 3
(par ex. A) attribuée de la télécom-
1
mande
radio
pour éteindre la prise
7
.
Nettoyage
ATTENTION ! RISQUE
DE DÉCHARGE ÉLECTRIQUE ! Avant le nettoyage,
débrancher toujours la prise radio
de la prise murale et toutes les fiches
de l‘appareil.
ATTENTION ! RISQUE
DE DÉCHARGE ÉLECTRIQUE ! Aucun fluide ne
doit pénétrer à l‘intérieur de l‘appareil.
Utilisez pour le nettoyage du boîtier
un chiffon doux. N’utilisez en aucun
cas de l’essence, des solvants ou des
nettoyants attaquant le plastique.
7
.
21 FR/CH
Page 22

Maintenance / Problèmes et solutions / Mise au rebut
Maintenance
Vérifiez à espaces réguliers que les
piles ne sont pas endommagées.
Problèmes et solutions
= Dysfonctionnement
= Cause
= Réparation
La lampe de contrôle de ser-
2
vice
ne s‘allume lorsque
la touche est pressée.
Les piles sont mal insérées.
Insérer les piles en respectant la
polarité
Les piles n‘ont aucun contact
électrique.
Appuyer les piles contre les bornes
de contact.
Les piles sont vides.
Insérer de nouvelles piles.
Le consommateur électrique
ne fonctionne plus.
La prise radio 7 est mal raccordée.
Brancher fermement la prise radio
7
dans la prise.
Le consommateur électrique n‘est
pas allumé.
Allumer le consommateur électrique.
La portée entre la télécommande
1
et la prise radio 7 n‘est pas
suffisante.
Diminuer l‘écart entre la télécom-
1
mande
et la prise radio 7.
Gêner des appareils électriques.
Supprimer les possibles sources
d‘interférence.
Mise au rebut
Ne jetez pas les
appareils électriques
usés dans les ordures
ménagères !
Conformément à la directive européenne
2012 / 19 / EC relative aux appareils
électriques et électroniques usés, les
systèmes d‘éclairages et les piles, les
appareils électriques usés doivent être
collectés séparément et faire l’objet d’un
recyclage respectueux de l’environnement. Renseignez-vous auprès de votre
mairie ou de votre ville concernant les
possibilités de mise au rebut de l’appareil usé.
Pollution de l’environ-
nement par mise au
Pb
rebut incorrecte des
piles!
La prise radio ne s‘allume pas.
Le code système de la prise radio
7
n‘a pas été réglé correctement.
Régler le code système de la télé-
commande
7
.
22 FR/CH
1
dans la prise radio
Ne pas jeter les piles dans les ordures
ménagères. Elles peuvent contenir des
métaux lourds toxiques et doivent être
considérées comme des déchets spéciaux. Pour cette raison, veuillez toujours déposer les piles usagées dans
Page 23

Mise au rebut / Garantie et service après-vente
les conteneurs de recyclage de la commune.
Garantie et service
après-vente
Déclaration de
garantie
Cet appareil bénéficie de 3 ans de garantie à compter de la date d’achat.
Conservez le ticket de caisse en tant
que justificatif. L’appareil a été fabriqué
avec soin et consciencieusement contrôlé avant sa livraison. La garantie couvre
les vices matériels et de fabrication dans
le cadre d‘une utilisation conforme.
La garantie est annulée en cas d‘intervention externe. Cette garantie ne
constitue pas une restriction de vos
droits légaux. Veuillez contacter le
S.A.V. par téléphone pour toute réclamation. Il est autrement impossible d‘assurer l‘envoi gratuit de votre appareil.
Pour de plus amples informations, nous
recommandons de visiter la rubrique
Service/FAQ de notre site
www.dvw-service.com.
IAN 101170
Déclaration de
conformité
Cet appareil porte le sigle CE pour
signaler sa conformité aux directives
européennes ci-dessous :
Directive R&TTE 1999/5/CE
Directive „Basse tension“ 2006/95/CE
Directive CEM 2004/108/CE
Directive RoHs II 2011/65/CE
La déclaration de conformité est
disponible au lien suivant:
www.dvw-service.com/konformitaetserklaerung/ke_1049712706.pdf
Adresse du service
après-vente
BAT
Lindenstraße 35
D-72074 Tübingen
E-Mail: exp@bat-tuebingen.com
Hotline du S.A.V. :
00800 48720741
Fabricant
BAT
Lindenstraße 35
72074 Tübingen
Allemagne
23 FR/CH
Page 24

24
Page 25

Indice
Introduzione
Utilizzo conforme alla destinazione d’uso .............................................Pagina 26
Contenuto della confezione ....................................................................Pagina 26
Elementi di comando ................................................................................Pagina 26
Dati tecnici ................................................................................................Pagina 26
Sicurezza
Avvertenze generali di sicurezza ............................................................Pagina 27
Indicazioni di sicurezza per le batterie ..................................................Pagina 28
Preparazione
Preparazione del telecomando ...............................................................Pagina 29
Sincronizzazione del codice di sistema .................................................Pagina 29
Impostare il codice di sistema sul telecomando.....................................Pagina 29
Impostare il codice di sistema sulle prese telecomandate ....................Pagina 30
Assegnare un pulsante di comando del telecomando
alla presa telecomandata ........................................................................Pagina 30
Collegamento dispositivi ..........................................................................Pagina 31
Uso
Accensione della presa telecomandata .................................................Pagina 31
Spegnimento della presa telecomandata ..............................................Pagina 31
Pulizia ......................................................................................................Pag i n a 31
Manutenzione ...................................................................................Pagina 32
Eliminazione degli errori .........................................................Pagina 32
Smaltimento .......................................................................................Pagina 32
Garanzia e assistenza
Dichiarazione di garanzia .......................................................................Pagina 33
Indirizzo servizio clienti ...........................................................................Pagina 33
Dichiarazione di conformità ....................................................................Pagina 33
Produttore ..................................................................................................Pagina 33
25 IT/CH
Page 26

Introduzione
Set prese telecomandate
per esterni
Introduzione
Utilizzo conforme alla
destinazione d’uso
Il set di prese telecomandate è adatto
per l’accensione e lo spegnimento a distanza di apparecchi elettrici. Le prese
telecomandate sono destinate all‘utilizzo
in ambienti esterni. I dispositivi devono
essere messi in funzione singolarmente.
Non collegare le prese telecomandate
in serie. Tutte le modifiche apportate
all’apparecchio sono da considerarsi non
conformi e possono comportare notevoli pericoli di infortuni. Il produttore non
risponde dei danni causati da un utilizzo inadeguato del prodotto. Questo
apparecchio non è destinato all’uso
commerciale.
Contenuto della
confezione
Dopo aver estratto il set dall’imballaggio, controllarne la completezza.
2 prese telecomandate IP44
1 telecomando a 4 canali
2 batterie AAA á 1,5 V
1 manuale di istruzioni
Elementi di comando
Telecomando (fig. A/B):
1
Telecomando
2
Spia di controllo del funzionamento
3
Tasto OFF canale A, B, C, D, E
4
Tasto ON canale A, B, C, D, E
5
Copertura del vano portabatterie
6
Interruttore DIP
Presa telecomandata (fig. C/D):
7
Presa telecomandata
8
Presa isolata IP44 con coperchio ri-
baltabile e protezione per bamibini
9
Spina isolata
10
Interruttore DIP
11
Coperchio (interruttore DIP)
12
Viti
Dati tecnici
Telecomando
Denominazione
del modello: RCS AAA1000-A
IP44
Batteria: 2 x AAA, 1,5 V
Frequenza di
emissione: 433,92 MHz
Omologazione: il sistema dispone
di omologazione
generale (BZT) ed
è esente da cano-
ne e dall’obbligo
di dichiarazione.
Portata: a seconda delle
condizioni ambien-
tali, circa 40 m se
le condizioni sono
ottimali
26 IT/CH
Page 27

Introduzione / Sicurezza
Presa telecomandata
Denominazione
del modello: RCE AAA1000-A
IP44 CH
Tensione di esercizio: 230 V∼, 50 Hz
Tensione di contatto: 2 30 V∼, 4 ,35 A
Potenza di
commutazione max.: 1000 W
Frequenza
di trasmissione: 433,92 MHz
Temperaturadell‘ambiente: 0 ° – 35 °C
Temperatura di
immagazzinamento: - 40 ° – 70 °C
Classe di protezione: IP 44
Conforme alle
norme CE
Nota: Le prese telecomandate dispongono di una presa a protezione di manomissioni da parte di bambini. In questo modo si aumenta notevolmente la
sicurezza domestica. I contatti sono
protetti in modo tale che i bambini non
possano creare nessun collegamento
conduttore (con aghi oppure oggetti
simili). Ciò nonostante è consigliabile
conservare l’apparecchio fuori dalla
portata dei bambini.
Sicurezza
Avvertenze generali di sicurezza
Leggere attentamente le presenti istruzioni d’uso e indicazioni di sicurezza.
Aprire la pagina delle illustrazioni e
prendere dimestichezza con tutte le
funzioni dell’apparecchio prima di
metterlo in funzione per la prima volta.
Evitare il pericolo di morte a
seguito di scossa elettrica!
Collegare le prese telecomandate
esclusivamente a prese domestiche
da 230 volt collegate a terra.
Non esporre l‘apparecchio a tem-
perature estreme.
Tenere inoltre l’apparecchio fuori
dalla portata dei bambini. I bambini potrebbero non riconoscere i
pericoli che possono presentarsi
utilizzando l‘apparecchio elettrico
in modo non corretto. Non lasciate
i bambini incustoditi mentre utilizzano apparecchi elettrici.
Pericolo di soffocamento! Non la-
sciare il materiale di imballaggio
incustodito. I bambini possono ingoiare i componenti più minuti e
morire di soffocamento.
Evitare un sovraccarico dell‘appa-
recchio. In caso di sovraccarico
può sussistere il pericolo di incendio o di danni all’apparecchio. Il
carico massimo è di circa 1000 W
per ogni presa telecomandata.
In caso di anomalie contattare
subito il centro di assistenza.
Non aprire mai l‘apparecchio. Fare
eseguire le riparazioni necessarie
esclusivamente dal centro di assistenza o da un elettricista.
Prima di pulire l’apparecchio assi-
curarsi di interrompere il flusso di
corrente. In questo caso separare
sempre la presa telecomandata
dalla presa a muro e tutte le spine
27 IT/CH
Page 28

Sicurezza
dall’apparecchio.
Non collegare le prese telecoman-
date in serie.
Non utilizzare nessun altro dispositi-
vo di protezione per bambini per le
prese telecomandate. Il collegamento
tra spina e presa telecomandabile
potrebbe essere danneggiato e sussiste il pericolo di surriscaldamento.
Collegare solo consumatori che
rientrano nei limiti di potenza
indicati.
Non collegare consumatori che,
senza un‘adeguata supervisione,
possono causare incendi o altri
danni (ad es. ferri da stiro). Non
collegare consumatori dotati di motori-condensatori (ad es. frigoriferi).
Non coprire le prese telecomanda-
te. Sotto il coperchio si accumula il
calore. Sussiste pericolo d‘incendio.
Verificare regolarmente la presenza
di danni sull‘apparecchio. Non sostituire le parti danneggiate. Rivolgersi al produttore o smaltire l‘apparecchio nel rispetto dell‘ambiente.
Non toccare l‘apparecchio con
mani bagnate.
In caso di anomalie rimuovere im-
mediatamente l‘apparecchio dalla
presa muro. Notare che i consumatori collegati sono completamente
isolati dalla rete solo dopo aver
estratto la spina.
Non collegare alimentatori a spina
a potenza elevata alle prese telecomadate, altrimenti i contatti delle
presa a muro potrebbero essere
sottoposti a sovraccarico meccanico.
Per azionare le prese telecomanda-
te in assenza di tensione, scollegarle dalla corrente.
Le presenti istruzioni sono parte in-
tegrante dell‘apparecchio. Pertanto
in caso di consegna dell’apparecchio a terzi, fornire anche queste
istruzioni insieme ad esso.
Indicazioni di
sicurezza per le
batterie
Le batterie vanno tenute fuori dalla
portata dei bambini. In caso di
ingerimento consultare subito un
medico!
Non ricaricare mai batterie non ri-
caricabili, non cortocircuitarle e / o
aprirle. In caso contrario, sussiste il
pericolo di incendio, surriscaldamento o scoppio.
Non gettare mai le batterie nel
fuoco o in acqua.
Non esercitare alcuna pressione
meccanica sulle batterie.
Nel caso di perdite delle batterie,
rimuoverle subito dall‘apparecchio
per evitare danni!
Evitare il contatto con pelle, occhi e
mucose! In caso di contatto con gli
acidi delle batterie risciacquare le
aree affette con acqua corrente e
chiedere immediatamente l’intervento di un medico!
Utilizzare solamente batterie dello
stesso tipo. Non mischiare le batterie nuove con quelle vecchie!
Evitare condizioni e temperature
estreme che potrebbero avere
28 IT/CH
Page 29

Sicurezza / Preparazione
influenza sulle batterie, quali ad
esempio vicinanza a caloriferi.
Rimuovere le batterie dall‘apparec-
chio qualora questo non venisse
utilizzato per lungo tempo.
Utilizzare esclusivamente il tipo di
batterie indicato!
Inserendo le batteria, fare attenzio-
ne a rispettare la polarità corretta!
Questa viene indicata sul vano
portabatterie.
Se necessario, pulire i contatti della
batteria e dell’apparecchio prima
di inserire le batterie!
Rimuovere immediatamente le
batterie esauste dall’apparecchio.
Preparazione
Prima di utilizzare l‘apparecchio è
necessario
inserire le batterie,
sintonizzare il codice di sistema tra
il telecomando
comandate
interruttori DIP
assegnare una coppia di tasti ON/
4, 3
OFF
ad una presa telecomandata
1
e le prese tele-
7
, utilizzando gli
6, 10
e
del telecomando 1
7
Inserire entrambe le batterie AAA
in dotazione.
Premere uno dei tasti ON- / OFF
4, 3
per verificare se il teleco-
1
mando
funziona. Se si, la spia
di controllo funzionamento
accende. In caso contrario il dispositivo non riceve energia dalle
batterie. Verificare che le batterie
siano posizionate correttamente.
Chiudere il vano portabatterie.
Sincronizzazione del
codice di sistema
Al primo utilizzo dell‘apparecchio il codice di sistema deve essere sincronizzato, usando l‘interruttore DIP
modo tale che tutte le prese telecoman-
7
date
reagiscano al segnale del telecomando
mandata
una coppia di tasti del telecomando
1
mandata
Nota: Cambiare la posizione degli
interruttori DIP
adatto, ad es. un piccolo cacciavite,
spostando gli interruttori
.
l‘alto e verso il basso.
1
. Inoltre ogni presa teleco-
7
deve essere assegnata ad
, in modo tale che ogni presa teleco-
7
sia gestibile singolarmente.
6, 10
con un oggetto
6, 10
6, 10
2
si
, in
verso
Preparazione del
telecomando
Aprire il vano portabatteria sul re-
tro del telecomando
verso il basso il coperchio del vano
portabatteria
1
, spingendo
5
e quindi sollevarlo.
Impostare il codice di
sistema sul telecomando
Aprire il vano portabatteria sul re-
tro del telecomando
verso il basso il coperchio del vano
portabatteria
1
, spingendo
5
e quindi sollevarlo.
29 IT/CH
Page 30

Preparazione
Impostare con gli interruttori DIP 6
da 1 a 5 un codice di sistema a
piacere.
Chiudere il vano portabatterie.
Interruttore DIP
presa telecomandata
Impostare il codice di
sistema sulle prese
telecomandate
Allentare le viti 12 del coperchio 11
con un cacciavite a stella PH0.
Rimuovere il coperchio 11 dal
vano degli interruttori DIP
Impostare con gli interruttori DIP 10
da 1 a 5 lo stesso codice di sistema del telecomando
10
.
1
.
Assegnare un pulsante
di comando del telecomando alla presa
telecomandata
Impostare con gli interruttori DIP 10
da A a D uno dei tasti di comando
del telecomando
Nota: L‘interruttore DIP E non è
assegnato.
1
:
Telecomando
Tasto di comando
A B C D E
A ON
B
C
D
Inserire nuovamente il coperchio 11.
Inserire le viti 12 nell‘apposito foro
nella filettatura e stringerle bene.
Esempio
Impostare sul telecomando
di sistema123,spostandi i DIP „1“, „2“
e „3“ verso l‘alto, mentre i DIP „4“ e
„5“ restan abbassati:
Vista retro del telecomando
Impostare il codice 123 a tutte le prese
telecomandate
alla prima presa telecomandata
tasto di comando „A“ del telecomando
1
, sollevando l‘interruttore DIP „A“
della presa telecomandata
l‘interruttore DIP B, C e D restano abbassati. Questa presa telecomandata
7
può essere accesa o spenta solo
OFF OFF OFF OFF
OFF
OFF OFF
OFF OFF OFF
OFF OFF OFF
ON
ON
7
. Assegnare inoltre
OFF OFF
OFF
ON
1
il codice
7
7
, mentre
il
30 IT/CH
Page 31

Preparazione / Uso / Pulizia
con il tasto di comando „A“ del teleco-
1
mando
Vista retro presa telecomandata
.
Collegamento
dispositivi
Inserire la presa telecomandata 7 in
una presa a muro collegata a terra.
Per garantire la classe di protezione
IP44, la presa telecomandata
infine essere inserita in prese della classe di protezione IP 44. In caso di utilizzo con una presa IP20 non è garantita
una totale protezione antiumidità.
Affinché la funzione antispruzzo sia
garantita, la presa telecomandata
può essere inserita solo in una delle
posizioni illustrate sull‘etichetta (freccia
deve essere rivolta verso l‘alto).
Il telecomando
max. di 40 m che dipende dalla struttura dell‘edificio. La portata può essere
disturbata da caratteristiche costruttive
(ad es. calcestruzzo armato), elettriche
(ad es. conduttori elettrici)o elettromagnetiche (ad es. telefono). Se necessario, allontanare la fonte di disturbo o
tenere una certa distanza da essa.
1
ha una portata
7
deve
7
Uso
Accensione della presa
telecomandata
Inserire la presa telecomandata 7
in una presa isolata collegata a terra.
Collegare l‘apparecchio che si
desidera telecomandare alla presa
telecomandata
Premere il tasto ON 4 (ad es. A)
assegnato sul telecomando
accendere la presa telecomandata
7
.
7
.
Spegnimento della
presa telecomandata
Premere il tasto OFF assegnato 3
(ad es. A) assegnato sul teleco-
1
mando
telecomandata
per spegnere la presa
7
.
Pulizia
ATTENZIONE! PERICOLO
DI SCOSSA ELETTRICA!
Prima della pulizia separare
sempre la presa telecomandata
la presa a muro e tutte le spine dall’apparecchio.
ATTENZIONE! PERICOLO
DI SCOSSA ELETTRICA!
All‘interno dell‘apparecchio
non devono infiltrarsi liquidi.
1
7
per
dal-
Per pulire l’alloggiamento utilizzare
un panno soffice. Non utilizzare
31 IT/CH
Page 32

... / Manutenzione / Eliminazione degli errori / Smaltimento
mai benzina, solventi o detergenti
aggressivi per la plastica.
Manutenzione
Verificare regolarmente che le
batterie non siano danneggiate.
Eliminazione degli
errori
= Problema
= Causa
= Eliminazione
La spia di controllo del fun-
zionamento
de alla pressione di un tasto.
Le batterie non sono inserite corret-
tamente.
Inserire le batterie rispettando la
polarità.
Le batterie non fanno contatto.
Premere le batterie sui morsetti di
contatto.
Le batterie sono scariche.
Inserire nuove batterie.
Il consumatore non funziona.
La presa telecomandata 7 non è
collegata correttamente.
Inserire bene la presa telecoman-
7
data
Il consumatore è spento.
Accendere il consumatore.
2
non si accen-
nella presa elettrica.
La presa telecomandata non
si accende.
Il codice di sistema dell presa tele-
comandata
7
non è impostato
correttamente.
Impostare il codice di sistema del
telecomando
mandata
1
nella prese teleco-
7
.
La portata tra il telecomando 1 e
la presa telecomandata
7
non
abbastanza potente.
Diminuire la distanza tra telecoman-
1
do
e presa telecomandata 7.
Dispositivi elettrici disturbano.
Rimuovere eventual fonti di disturbo.
Smaltimento
Non gettare apparecchi
elettrici nella spazzatura domestica!
Ai sensi della direttiva europea
2012/19/CE sullo smaltimento di apparecchi elettrici ed elettronici usati, gli
apparecchi elettrici usati, le lampade e
le batterie usate devono essere raccolti
in maniera differenziata e riciclati nel rispetto dell’ambiente. Ulteriori indicazioni sullo smaltimento del prodotto sono
reperibili presso il municipio o l‘amministrazione comunale.
Lo smaltimento impro-
prio delle batterie può
Pb
causare danni all‘ambiente!
32 IT/CH
Page 33

Smaltimento / Garanzia e assistenza
Le batterie non devono essere gettate
nei rifiuti domestici. Esse possono contenere metalli pesanti nocivi e sono soggette a smaltimento come rifiuti tossici.
Consegnare quindi le batterie usate
presso un punto di raccolta comunale.
Garanzia e assistenza
Dichiarazione di
garanzia
Questo apparecchio dispone di una
garanzia di 3 anni a partire dalla data
di acquisto. Si prega di conservare la
ricevuta d‘acquisto a dimostrazione
dell‘avvenuto pagamento. L’apparecchio è stato realizzato con cura ed esaminato con attenzione prima della fornitura. La prestazione di garanzia trova
applicazione solamente per vizi di materiale e di fabbricazione in presenza
di un utilizzo corretto.
La garanzia decade in caso di intervento sul prodotto da parte di terzi. Questa garanzia non costituisce alcun limite
ai diritti legali del consumatore. In caso
di necessità di interventi di riparazione
nel periodo di garanzia, mettersi in
contatto telefonicamente con il centro
di assistenza. Solo in questo modo si
può garantire la spedizione gratuita
dell’apparecchio.
Indirizzo servizio clienti
D-72074 Tübingen
E-mail: exp@bat-tuebingen.com
Service-Tel.: 00800 48720741
Per maggiori informazioni rimandiamo
all’area Assistenza/FAQ sul nostro sito
www.dvw-service.com.
IAN 101170
Dichiarazione di
conformità
Sul prodotto è stato apposta la marcatura CE ai sensi delle seguenti direttive
europee:
Direttiva R&TTE1999/ 5 / CE
Direttiva CE sulla bassa tensione
2006/95/CE
2004/108/CE (direttiva CEM)
2011/65/EU (RoHS II)
La dichiarazione di conformità è depositata al seguente link:
www.dvw-service.com/konformitaetserklaerung/ke_1049712706.pdf
Produttore
BAT
Lindenstraße 35
72074 Tübingen
Germania
BAT
Lindenstraße 35
33 IT/CH
Page 34

34
Page 35

Table of contents
Introduction
Intended use ................................................................................................. Page 36
Scope of delivery ........................................................................................ Page 36
Control elements ..........................................................................................Page 36
Technical Data ............................................................................................. Page 36
Safety
General safety instructions .........................................................................Page 37
Safety Instructions for Batteries .................................................................. Page 38
Preparation
Preparing the remote control ...................................................................... Page 39
Synchronise the system code ...................................................................... Page 39
Inputting the system code into the remote control .................................... Page 39
Inputting the system code into the remote controlled socket ................... Page 39
Allocate the remote controlled socket a control button
on the remote control .................................................................................. Page 40
Connecting devices .....................................................................................Page 40
Operation
Switching on the remote controlled socket ................................................ Page 41
Turn off the remote controlled socket ......................................................... Page 41
Cleaning .................................................................................................... Page 41
Maintenance .........................................................................................Page 41
Troubleshooting ................................................................................. Pa ge 41
Disposal .....................................................................................................Page 42
Guarantee and Service
Warranty Declaration ................................................................................. Page 42
Service address ........................................................................................... Page 43
Declaration of Conformity .......................................................................... Page 43
Manufacturer ............................................................................................... Page 43
35 GB
Page 36

Introduction
Outdoor Wireless
Socket Set
Introduction
Intended use
The remote controlled socket set is suitable for the remote switching on and off
of electrical appliances and lamps. The
remote control socket set is suitable for
outdoor use. This device may only be
used individually. Do not have one remote controlled socket inserted behind
another. Any modification to the appliance shall be considered as improper
use and could lead to considerable risk
of accident. The manufacturer will not
accept liability for loss or damage
arising from improper use. This device is
not intended for commercial use.
Scope of delivery
Please check after unpacking that this
set is complete.
2 Remote controlled sockets IP44
1 4-channel remote control
2 AAA batteries 1.5 V
1 Set of operating instructions
Control elements
3
Channel OFF button
Channel A, B, C, D, E
4
Channel ON button
Channel A, B, C, D, E
5
Battery compartment cover
6
DIP switch
Remote controlled socket
(fig. C/D):
7
Remote controlled socket
8
Earthed wall socket IP44 with flap
lid and child protection
9
Safety plug
10
DIP switch
11
Cover (DIP switch compartment)
12
Screws
Technical Data
Remote control
Classification: RCS AAA1000-A
IP44
Battery: 2 x AAA, 1.5 V
Transmission
frequency: 433.92 MHz
Certification: The system has a
general certifica-
tion (BZT) and is
subscription free
and non-billable.
Range: depends on the
environmental
conditions, ap-
prox. 40 m in
optimal conditions
Remote Control (fig. A/B):
1
Remote control unit
2
Power indicator light
36 GB
Page 37

Introduction / Safety
Remote controlled socket
Classification: RCE AAA1000-A
IP44 CH
Operating voltage: 230 V∼, 50 Hz
Switched voltage: 230 V∼, 4.35 A
Max. switching
capacity: 1000 W
Transmission
frequency: 433.92 MHz
Surrounding
temperature: 0 ° to 35 °C
Storage
temperature: - 40 ° to 70 °C
Protection type: IP44
EG compliant:
Note: The remote control socket is
equipped with a child protection socket.
Whereby domestic safety is greatly increased. The contacts are appropriately
protected so that children cannot create
a conducting connection (with pins
etc.). Store the appliance out of the
reach of children.
Safety
General safety
instructions
Please read these operating instructions
and the safety advice carefully. Before
reading, unfold the illustrated page and
familiarise yourself with all functions of
the device before operating it for the
first time.
Avoid the danger of death
from electric shock!
Only connect the remote controlled
sockets to earthed 230 V household sockets.
Do not expose the device to
extreme temperatures.
Always store the appliance out of
the reach of children despite the
child protection socket. Children
are not able to understand the dangers that can arise when handling
electronic devices. Never leave
children unsupervised when using
electronic devices.
Risk of suffocation! Do not leave
the packaging material lying unattended. Children could swallow
and choke on small parts.
Avoid overloading the appliance.
Overloading can cause fire hazards
or cause damage to the device. The
maximum load is approx. 1,000 W
per remote controlled socket.
In case of a malfunction, contact
your point of service immediately.
Under no circumstances open the
appliance yourself. Repairs may
only be carried out by the point of
service or by a qualified electrician.
Before cleaning the power must be
switched off. In this case always
pull the remote control socket out
the wall socket and remove all
plugs from the socket.
Do not have one remote controlled
socket inserted behind another.
Do not use any additional child
protection for this remote controlled
socket. The connection between the
37 GB
Page 38

Safety
plug and the remote controlled
socket could be impaired and there
is a danger of over heating.
Only connect devices which are
within the stated power limit.
Do not connect appliances which
could cause fires or other damage
when switched on without supervision (e.g. an iron). Do not connect
any appliances which need an engine capacitor (e.g. a refrigerator).
Do not cover the remote controlled
sockets. Heat accumulates under
the cover. There is a fire hazard.
Check the devices regularly for
damage. Do not replace damaged
parts. Contact the manufacturer or
dispose of the devices in an environmentally responsible way.
Never touch the devices with moist
or wet hands.
In the event of malfunctions, pull
the device out of the wall socket.
Be aware that the unplugged device
is completely disconnected from the
mains only after it has been pulled
out of the mains socket.
Do not plug any heavy power cube
transformers in the remote controlled
socket as the wall sockets‘ plug
contacts may become overloaded.
To switch the remote controlled
socket not energized, remove the
remote controlled socket from the
mains.
These operating instructions are
part of the appliance. Therefore
please ensure to pass them on,
when you hand the appliance to
third parties.
Safety Instructions
for Batteries
Batteries are not intended for chil-
dren. If accidentally swallowed
seek immediate medical attention!
Never recharge non-rechargeable
batteries, short-circuit and / or open
batteries. The battery may overheat, ignite or explode.
Never throw batteries into fire or
water.
Do not exert mechanical loads to
batteries.
In the event of a battery leak, im-
mediately remove it from the device
to prevent damage!
Avoid contact with the skin, eyes
and mucous membranes! In the
event of contact with battery acid,
thoroughly flush the affected area
with plenty of clean water and seek
immediate medical attention!
Only use the same type of batteries.
Do not mix used and new batteries!
Avoid extreme conditions and tem-
peratures which may impact batteries, e.g. on radiators.
Remove the batteries if the appli-
ance has not been used for a long
period.
Only use the specified battery
type!
Make sure you insert the batteries
the right way round (polarity)! This
is shown in the battery compartment.
If necessary, clean the battery and
device contacts before inserting the
battery!
38 GB
Page 39

Safety / Preparation
Remove spent batteries immediately
from the device.
Preparation
Before using these devices you must
insert the batteries,
synchronise the system code for the
6, 10
1
and the remote
7
using the DIP
and
7
.
remote control
controlled socket
switch
allocate a ON/OFF button pair 4,
3
on the remote control 1 to a
remote controlled socket
Preparing the remote
control
Open the battery compartment on
the back of the remote control
by pushing away the battery compartment cover
then up.
Insert two enclosed batteries AAA.
Press one of the ON/OFF buttons
4, 3
to test whether the remote
control
power indicator light
on. If this light is not lit then the
device is not receiving any energy
from the batteries. Check if the
batteries are in the right way.
Close the battery compartment.
5
downwards and
1
works. If it does, the
2
will come
Synchronise the
system code
To use this device for the first time the system code must be synchronised by using
the DIP switch
the remote controlled sockets
to the remote control‘s
Each remote controlled socket
assigned to a button pair on the remote
control
socket
Note: Change the position of the DIP
switch
a small screw driver with which the DIP
switch
downwards.
6, 10
in order for all
1
so that each remote controlled
7
can be operated separately.
6, 10
with a suitable item, e.g.
6, 10
can be push upwards or
Inputting the system
code into the remote
1
control
Open the battery compartment on
the back of the remote control
by pushing away the battery compartment cover
then up.
With the DIP switch 6 put in any
system code with the number 1 to 5.
Close the battery compartment.
5
Inputting the system
code into the remote
controlled socket
7
to react
1
radio signal.
7
must be
1
downwards and
Turn the screws 12 of the cover 11
with a crosshead screw driver size
PH0.
39 GB
Page 40

Preparation
Remove the cover 11 above the
compartment of the DIP switch
10
With the DIP switch 10 put in the
same system code as the remote
1
control
with the number 1 to 5.
Allocate the remote
controlled socket a
control button on the
remote control
With the DIP switch 10 put in a
control button, A to D, into remote
1
control
Note: E can not be selected with
the DIP switch.
Control button
A ON
B
C
D
:
DIP switch
remote controlled socket
Remote Control
A B C D E
OFF OFF OFF OFF
OFF
OFF OFF
OFF OFF OFF
OFF OFF OFF
ON
ON
OFF OFF
ON
OFF
View back side of the remote
control
.
Put the system code 123 in all of the remote controlled sockets
remote controlled socket
7
. For the first
7
control button „A“ on the remote con-
1
trol
by pushing the DIP switch „A“
up for the remote controlled socket
whilst keeping the DIP switches B, C,
and D in the down position. This remote
controlled socket
7
can now be
switched on and off with the control
button „A“ on the remote control
View back side of the remote
controlled socket
Connecting devices
chose the
7
1
.
Put the cover 11 back on.
Put the screws 12 in the threads of
the screw holes and tighten them.
Example
Put the system code 123 into the remote
1
control
by pushing the DIP switch
up to „1“, „2“ and „3“ whist keeping
„4“ and „5“ in the down position:
40 GB
Plug the remote controlled socket 7
into an earthed household socket.
To guaranty the protection type IP44,
the remote controlled socket
7
should
be plugged exclusively into sockets with
protection type IP44. With use in combination with a IP20 socket there is no
moisture protection guarantee.
The remote controlled socket
7
can
Page 41

... / Operation / Cleaning / Maintenance / Troubleshooting
only be plugged in the the direction
shown on the device label for the spray
water protection to be guarantied
(arrow
The range of the remote control‘s
radio signal reaches max. 40 m and is
dependent on the structural conditions.
The range can be impaired by structural (e.g. steel concrete), electrical (e.g.
electric lines) or electromagnetic (e.g.
telephones) conditions. If needed, remove the source of disturbance or keep
an appropriate distance from the
source of disturbance.
must be pointing up).
1
Operation
Switching on the remote
controlled socket
Plug the remote controlled socket 7
in an earthed shockproof socket.
Plug in the device which you want
to control remotely in the remote
control socket
Press the allocated ON button 4
of the remote control
switch on the remote controlled
socket
7
.
1
(e.g. A) to
7
.
Cleaning
ATTENTION! RISK OF
ELECTRIC SHOCK! Before
cleaning, always unplug the
remote control socket
socket and remove all plugs from the
socket.
ATTENTION! RISK OF
ELECTRIC SHOCK! Do not
allow any liquids to enter the
device.
Please use a soft cloth for cleaning
the housing. Never use petrol,
solvents or cleaning agents that
attack plastic.
7
from the wall
Maintenance
Check the batteries for damage at
regular intervals.
Troubleshooting
= Disturbance
= Cause
= Rectification
Turn off the remote
controlled socket
Press the allocated OFF button 3
on the remote control
to switch off the remote controlled
7
socket
.
1
(e.g. A)
The operating control light 2
on the remote control does
not goes on when pressing
a button.
The batteries are falsely inserted.
Put the batteries in the right way
round.
41 GB
Page 42

Troubleshooting / Disposal / Guarantee and Service
Batteries have no contact.
Press the batteries to the contact
terminals.
The batteries are dead.
Put in new batteries.
Appliance does not function.
The remote controlled socket 7 is
not correctly plugged in.
Push the remote controlled socket 7
firmly into the socket.
The device is not switched on.
Switch the device on.
Remote controlled socket
does not switch on.
The system code for the remote
controlled socket
7
is not correctly
put in.
Put the remote control‘s 1 system
code into the remote controlled
7
socket
.
The range between the remote con-
1
trol
and the remote controlled
7
socket
does not reach.
The reduce the distance between
the remote control
remote controlled socket
1
and the
7
.
Electric devices disturb.
Remove possible sources of
disturbance.
Disposal
Do not dispose of
electrical equipment in
the household waste!
In accordance with European Directive
2012/ 19 / EC relating to old electrical
and electronic appliances and, used
electrical equipment must be collected
separately and recycled in an ecologically compatible way. Contact your
local authorities for information on how
to dispose of the appliance at the end
of product life.
Improper disposal of
batteries can harm the
Pb
environment!
Batteries do not belong in the household refuse bin. They may contain toxic
heavy metals and are subject to hazardous waste regulations. Therefore
dispose of used batteries through your
municipal collection site.
Guarantee and Service
Warranty Declaration
This tool has a warranty of 3 years
from the date of purchase. Please keep
your receipt as proof of purchase. The
product has been produced to the highest standards and thoroughly checked
before dispatch. The guarantee only
applies to faults in material or manufacture when used properly.
Any modifications will void the guarantee. This warranty does not limit your
legal rights. Please phone the service
centre for guarantee claims. This is the
only way to return your product free of
charge.
42 GB
Page 43

Service address
BAT
Lindenstraße 35
D-72074 Tübingen
E-Mail: exp@bat-tuebingen.com
Service tel.: 00800 48720741
For further information, we recommend
you visit the service section/FAQs of
our home page www.dvw-service.com.
IAN 101170
Declaration of
Conformity
The CE marking has been affixed in accordance with the following European
directives:
1999/5/EG R&TTE-Directive
2006/95/EC Low Voltage Directive
2004/108/EG EMV Directive
2011/65/EU (RoHS II)
Guarantee and Service
The Declaration of Conformity can be
found at the following link:
www.dvw-service.com/konformitaetserklaerung/ke_1049712706.pdf
Manufacturer
BAT
Lindenstraße 35
72074 Tübingen
Germany
43 GB
Page 44

44
Page 45

BAT
Lindenstraße 35
72074 Tübingen
Germany
Stand der Informationen · Version des informations
Versione delle informazioni · Last Information Update:
06 / 2014 · Ident.-No.: 0474758 062014-CH
IAN 101170
 Loading...