

Page 1
USB Travel Kit for use on the move
GB
IE
CY
FI
SE
GR
CY
DK
User manual and
service information
Bruksanvisning och
serviceinformation
Εγχειρίδιο χρήσης και πληροφορίες
για την τεχνική εξυπηρέτηση
Käyttöopas ja
huolto-ohjeet
Brugervejledning og
serviceinformation
NTK-2100
Page 2
User manual
Welcome
SilverCrest Notebook-Traveller-Kit
Many thanks for having chosen this high-end SilverCrest Notebook-Traveller-Kit. Please read this User manual
carefully and follow the safety instructions.
PLEASE NOTE
All technical data in the User manual has been compiled and arranged with the greatest care, and reproduced
under the most effective measures of control. However, we cannot exclude the fact that it may contain mistakes.
Therefore we provide no guarantee nor can be held liable for any consequences resulting from erroneous
information. Thank you for reporting any mistakes to us.
PACKAGE CONTENTS AND OPERATING NOTES
Using the list on page 3 of this User manual, check that the package contents are complete, otherwise please notify
us within 10 days if there is anything missing from the Notebook-Traveller-Kit.
SYSTEM REQUIREMENTS
- Operating system: Microsoft® Windows® 2000 SP4, Windows® XP, Windows Vista® & Windows 7®
- At least one free USB port
Important Notice
IMPORTANT SAFETY INSTRUCTIONS
- Before you use these devices for the first time, read the corresponding notes in this manual even if you are
familiar with handling electronic devices.
- Keep this manual in a safe place for future reference. If you sell or pass these devices on to another person, it
is imperative that you also hand over this manual.
- Do not allow children to play with electrical devices when not under supervision. Children may not be able to
comprehend the presence of potential risks. Swallowing small parts can be potentially dangerous.
- Install the cables in a safe way. Avoid tripping over them.
- Do not expose the devices to direct sunlight or place them near sources of heat.
- Protect the cables and devices from dust, dirt and abrasive liquids.
- Do not open the housing of the devices as they contain no serviceable parts.
- The equipment and cables must not be splashed by water. Do not place any recipients containing liquids (such
as vases or beverages) onto or next to the devices.
- Do not place any fire sources (such as candles) onto or next to the devices.
- Always hold the cable by the plug and never pull on the cable itself. Cables should be positioned so that
nobody can trip over them. A damaged cable can cause a fire or an electric shock.
EN
1
Page 3
INTENDED USE
The Silvercrest Notebook-Traveller-Kit comprises various cables, adapters and devices for the connection to the
USB port of a PC or notebook. The numeric keypad, hub, and the mouse must only be operated via a USB
connection. The products should only be used indoors and in dry areas. These devices and adapters contained in
this set have not been designed for corporate or commercial applications. Use the devices and adapters in
domestic environments for private applications only. Any use other than that mentioned above does not correspond
to the intended use.
Targa accepts no liability for damages resulting from the non-intended use of or unauthorized alterations to the
Silvercrest Notebook Traveller Kit.
EN
CONFORMITY NOTICE
This device complies with the basic and other relevant requirements of the EMC Directive
2004/108/EC. The corresponding Declaration of Conformity can be found at the end of this User's
Manual.
DISPOSAL OF OLD DEVICES
Devices marked with this symbol are subject to the European Directive 2002/96/EC. All electric and
electronic devices must be disposed of separately from household waste at established bodies. Avoid
hazards to the environment and dangers to your personal health by disposing of the device properly.
For further information about proper disposal, contact your local government, disposal bodies or the
shop where you bought the device.
REGISTERED TRADEMARKS
Targa® is the registered trademark of Targa GmbH.
®
is the registered trademark of USB Implementers Forum, Inc.
USB
Microsoft
All other brand names are trademarks of their respective owners.
®
, Windows® ,Windows Vista® and the Windows Logo are registered trademarks of Microsoft Corporation.
Table of Contents
System Requirements............................................................................................1
Important Notice..................................................................................................... 1
Package Contents..................................................................................................3
Introduction and Getting Started............................................................................3
Headset.................................................................................................................. 5
USB Extension Cable ............................................................................................6
Modem Connection Cable ..................................................................................... 6
Network Connection Cable ....................................................................................7
USB Adapter (A-type Connector to B-type Connector) ......................................... 7
USB Adapter (A-type Connector to Mini-USB Connector) ....................................8
USB Mouse............................................................................................................8
USB Hub 2040x ..................................................................................................... 9
Numeric Keypad ..................................................................................................10
Technical Specifications ......................................................................................11
Important Warranty Information ...........................................................................12
2
Page 4
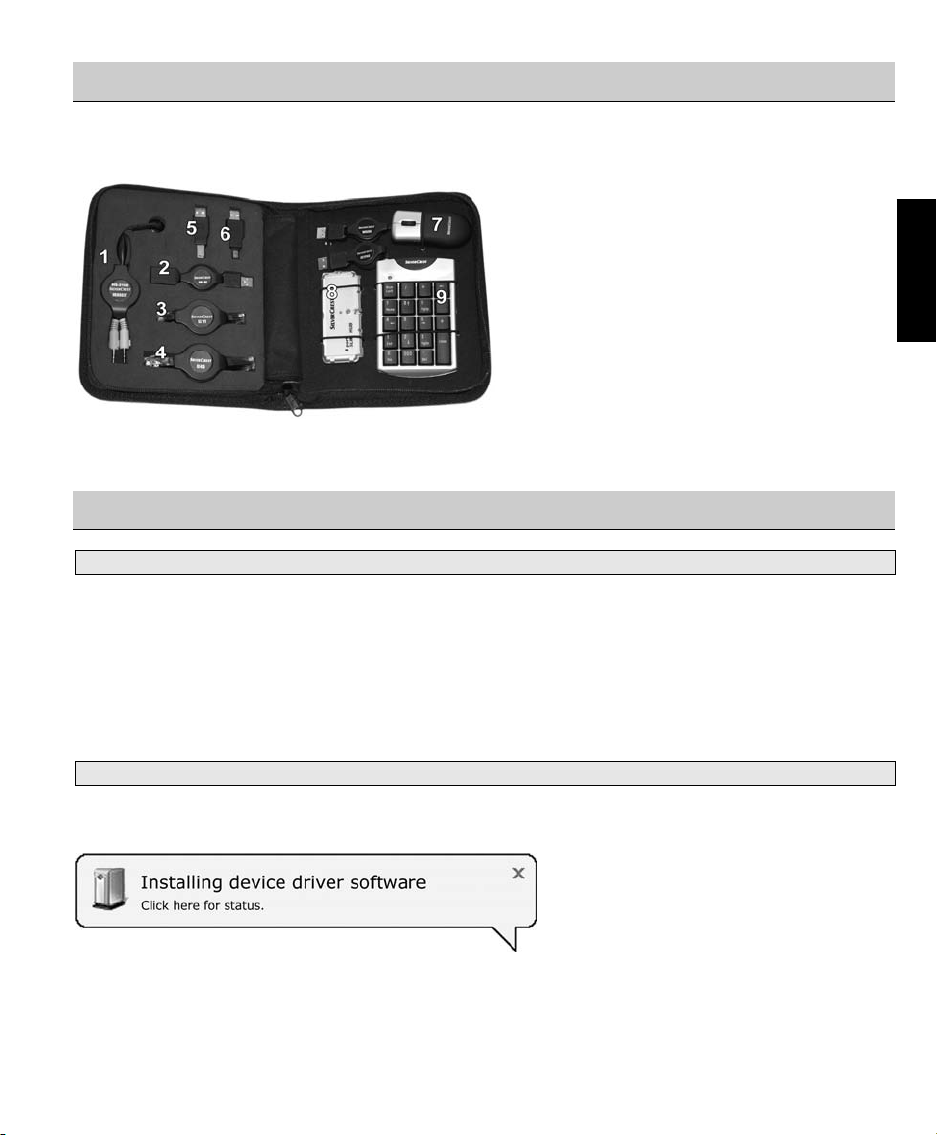
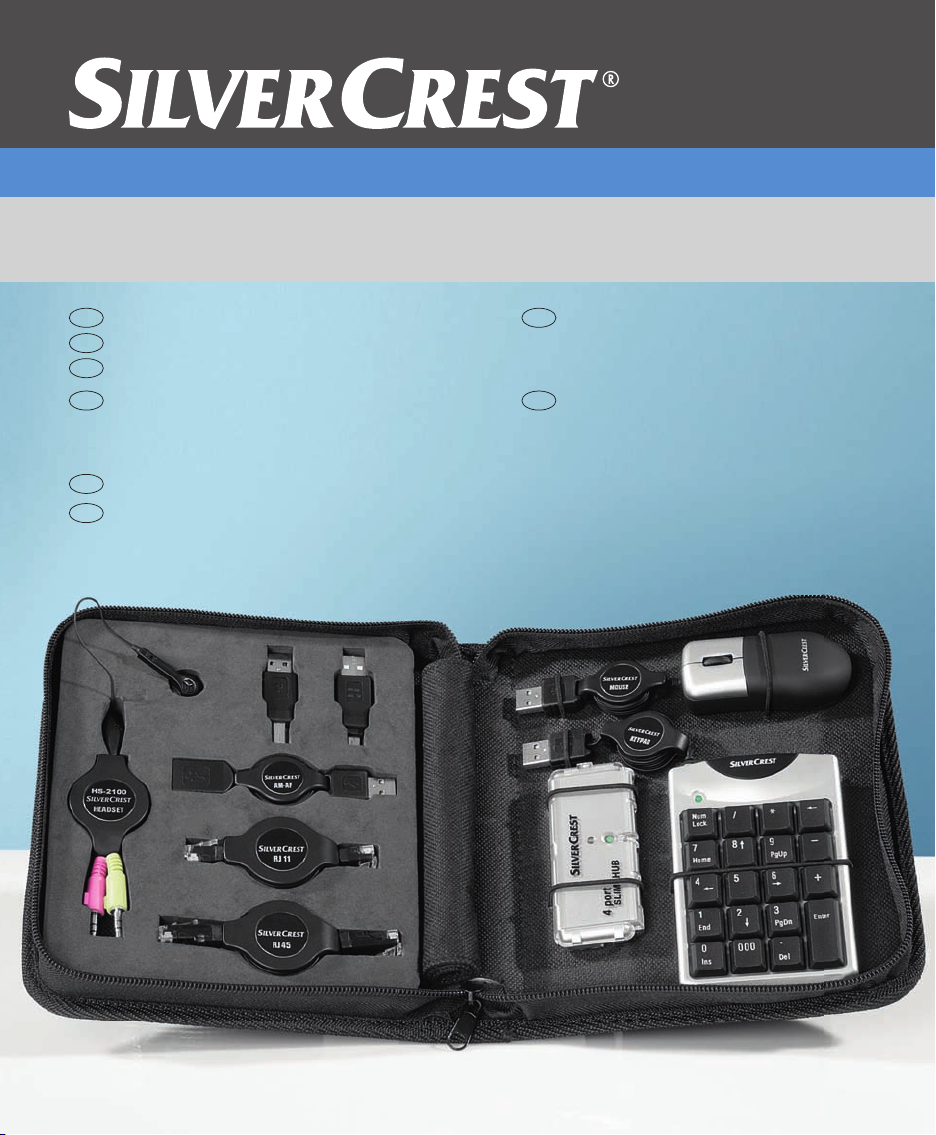
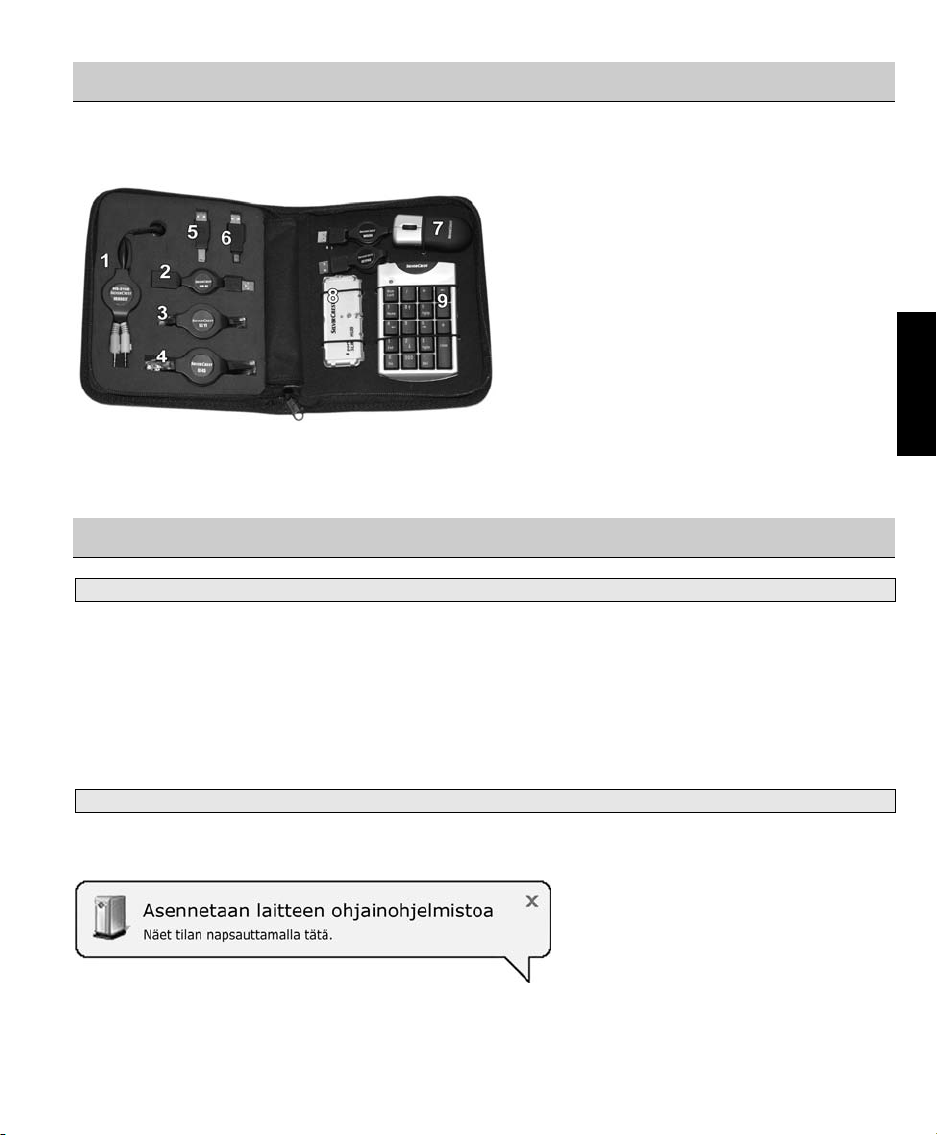
Package Contents
1 Headset
2 USB extension cable
3 Modem connection cable, RJ11
4 Network connection cable, 100 MBit, RJ45
5 USB adapter
(A-type connector to B-type connector)
6 USB adapter
(A-type connector to mini-USB connector)
7 USB mouse
8 USB hub 2040x
9 Numeric keypad
Introduction and Getting Started
Connecting USB Devices to the Computer
USB are the initials of "Universal Serial Bus". When you connect a USB device to your computer, it is detected and
configured automatically by the system. If your computer has several USB ports available, you can use any of the
ports. Some desktop computers may have USB ports to the rear for the more long-term connections and further
USB ports at the front for connections that change often.
It is not possible to confuse the ports. If a USB device is connected to another USB port, the operating system will
install the driver again if necessary and the device will be ready for use.
Procedure
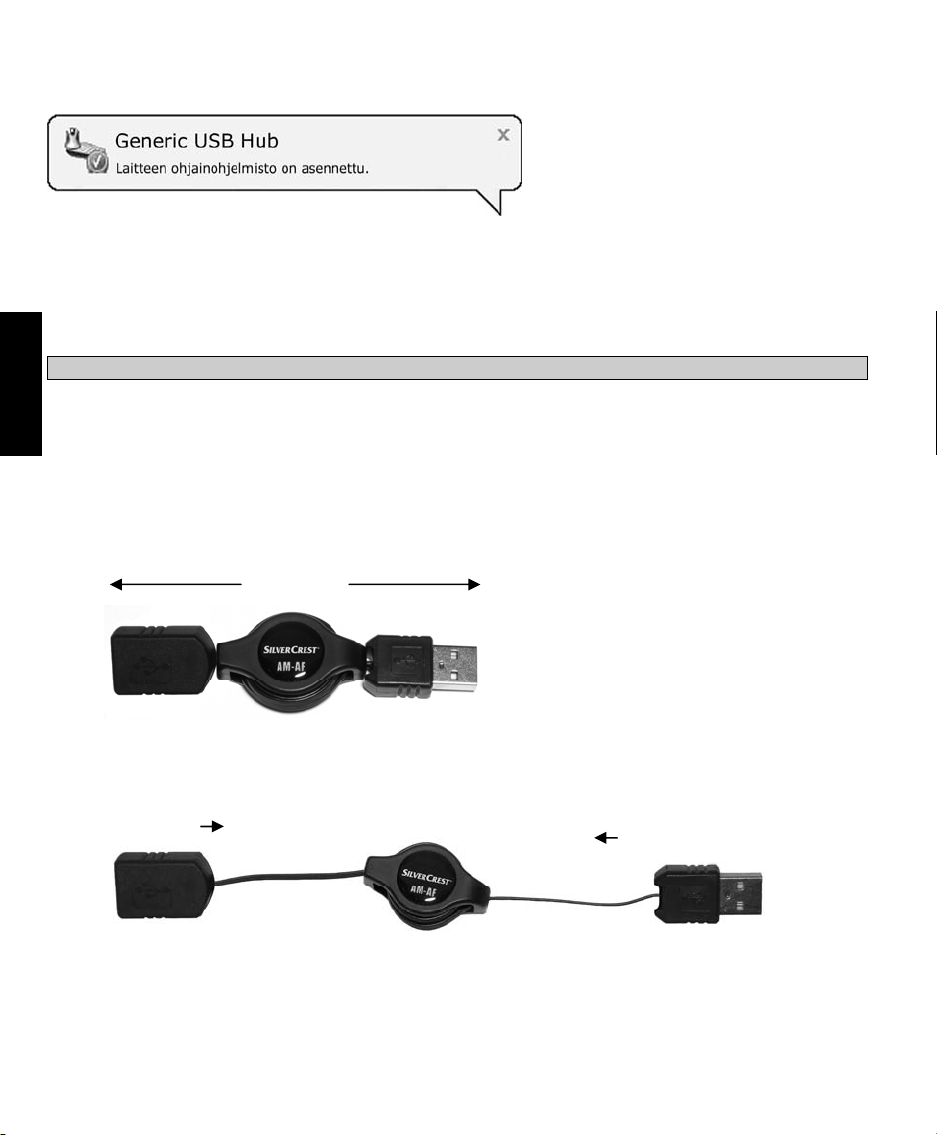
EN
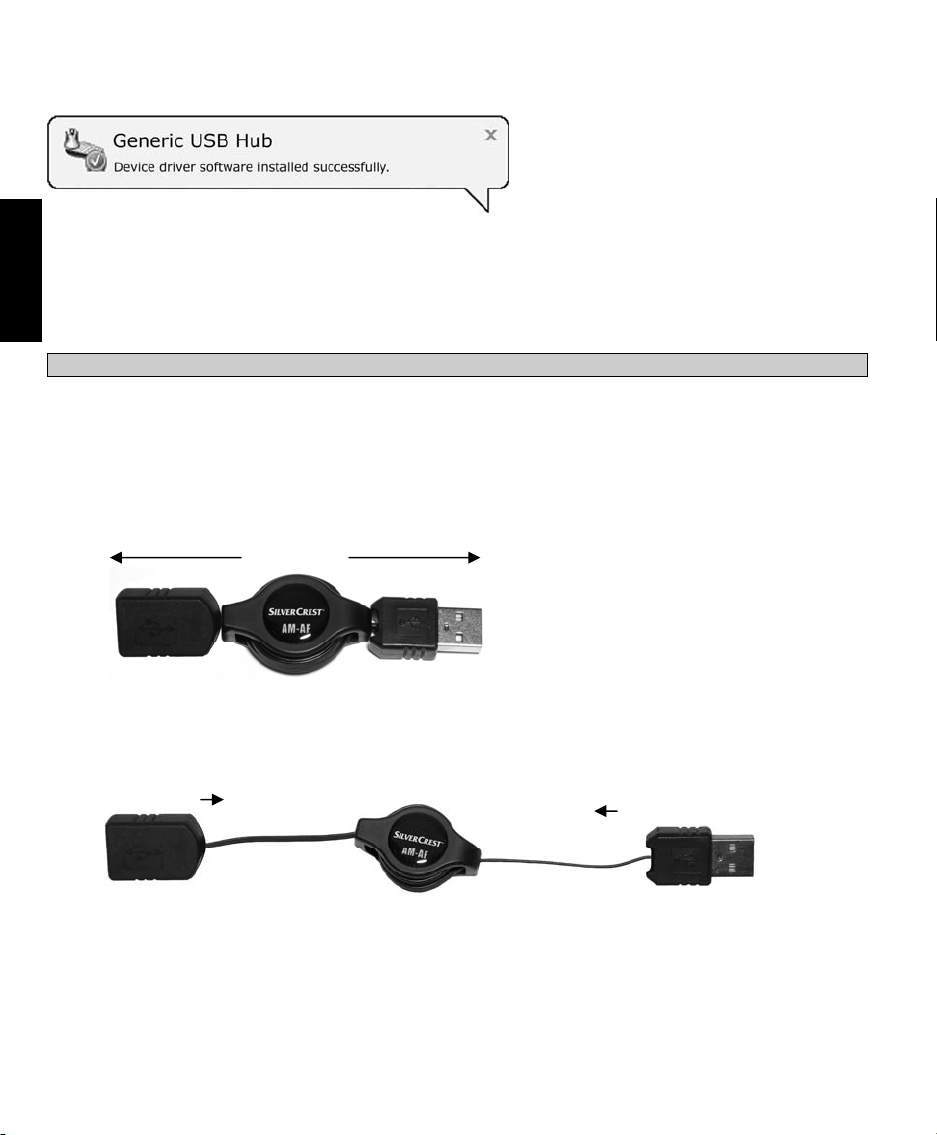
Plug the USB connector of the device into a USB port on your computer. You will immediately be prompted by this
message that appears on the lower-right of your screen:
(Fig.: Example by means of the
USB mouse of the
Notebook-Traveller-Kit)
3
Page 5
Your computer has detected the USB device, automatically installed the driver and now shows the following
message:
(Fig.: Installation completed)
The operating system confirms that the device has been correctly integrated into the system and is ready for
EN
immediate use.
If the device is unable to establish a connection with the computer, unplug the USB connector for a few seconds
and then reconnect the device to the computer. You can also try a different USB port on your computer.
Please read the notes on the following pages concerning the individual products of the Notebook-Traveller-Kit.
Cable-Winding Mechanism
The USB mouse, the numeric keypad, the headset, the USB extension cable, the modem connection cable and the
network cable have a smart cable-winding mechanism. By using this mechanism you can have the connection
cable at your required length.
To do this, pull gently on both ends of the cable at the same time until the required length is reached. When you
stop pulling, the winding mechanism pulls the cable from both sides in a little until it locks at the next ratchet.
To wind the cable in, carefully pull on both ends again. The ratchet is released and the cable winds itself back into
the housing. To ensure that the cable winds up correctly when the cable is rolled off completely, release the
connector after the cable is wound up completely.
4
Pull the cable from both sides at the
same time to the desired length.
The mechanism will wind
the cable back slightly until
it locks in place.
Page 6
~ 1cm ~ 1cm
Gently pull until it
unlocks and the cable
winds back in.
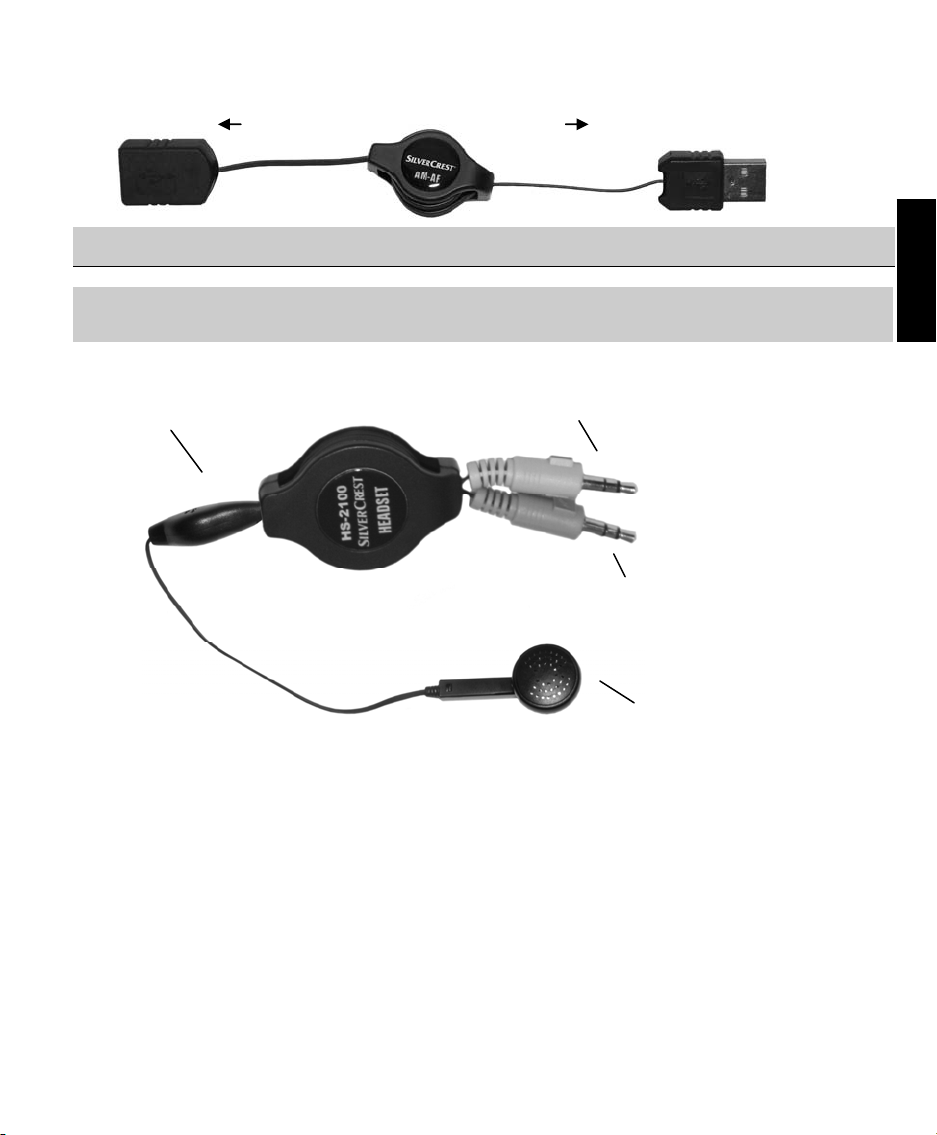
Headset
Use
- Telephony through the computer
- Length: approx. 130 cm
Microphone
To connect the headset to your computer a sound card must be installed on your computer. This offers connection
possibilities for an external microphone as well as headphones. Usually the connection ports are marked either by
colors or with printed symbols to differentiate them. Simultaneously pull on the microphone and the connector to
make the cable the required length. Please see winding mechanism notes on page 4.
The red jack of the headset connects to the microphone port on the computer and the green jack connects to the
headphone port on the computer. Your computer may offer further audio jacks. If you are not sure which is the
correct connector port on your computer, please refer to the User manual of your computer.
To headphone
connector on PC
(green)
Microphone connector
(red)
Earpiece
EN
5
Page 7
USB Extension Cable
Use
- The connection of USB devices whose connector cable is too short
- Length: approx. 76 cm
EN
USB jack
Pull the USB extension cable to the required length. Please see winding mechanism notes on page 4.
Insert the USB connector into a free USB port on the computer and then insert a USB device into the USB jack on
the extension cable.
USB connector
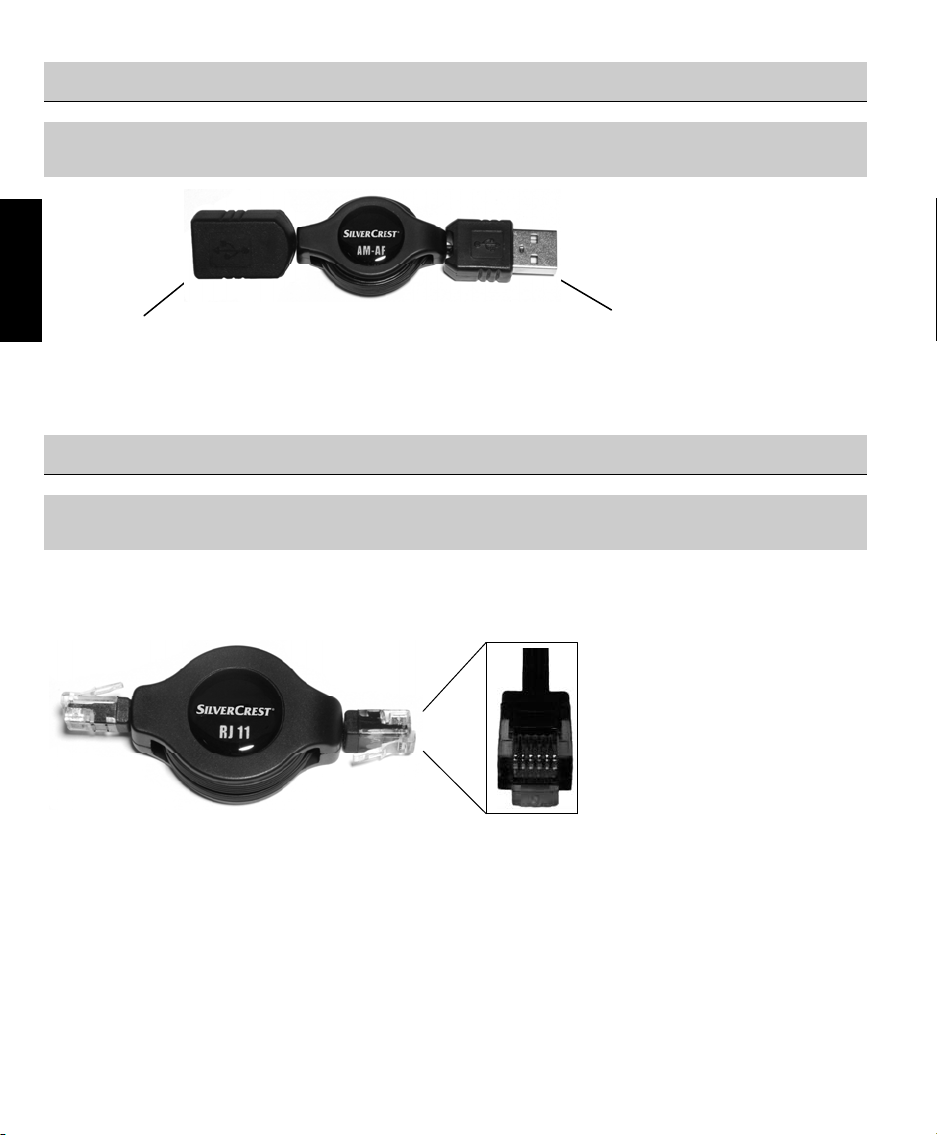
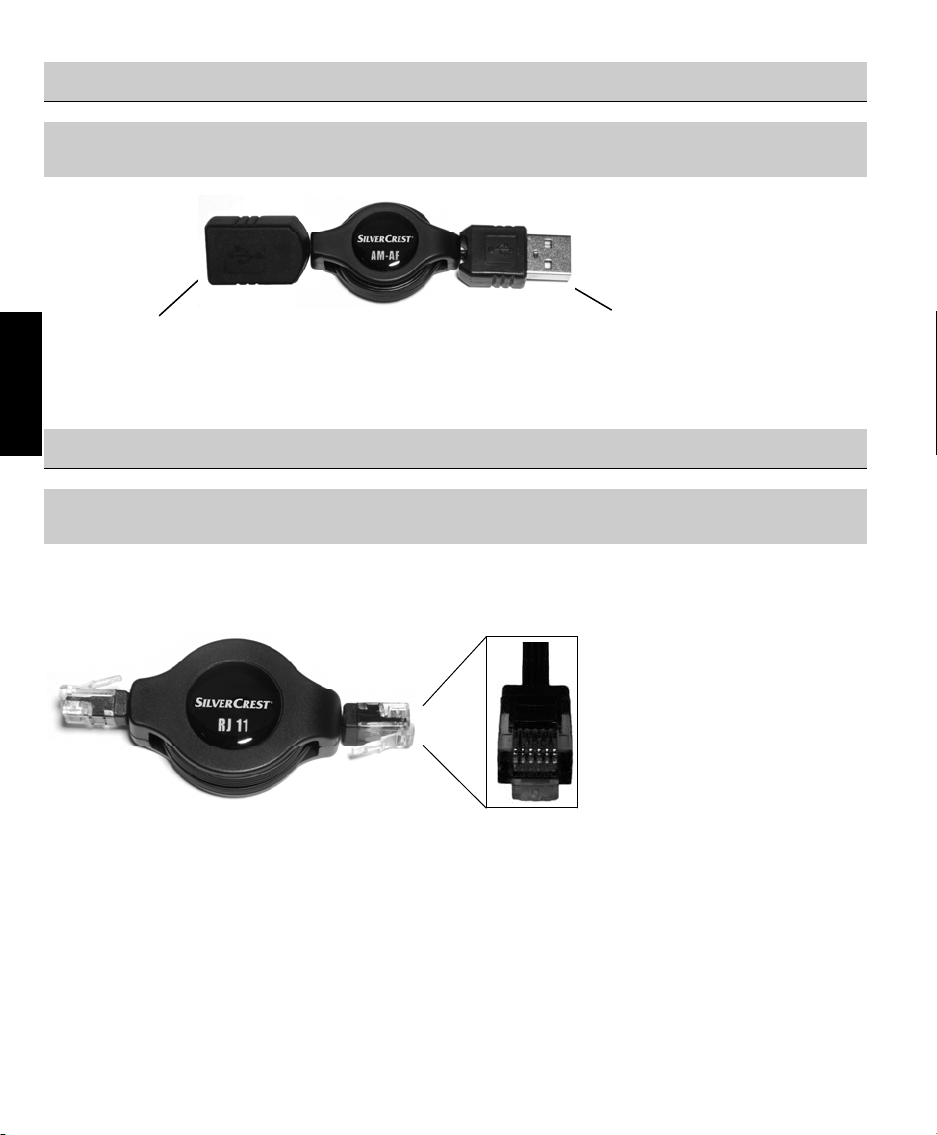
Modem Extension Cable
Use
- The connection of a PC modem to a telephone point
- Length: approx. 130 cm
You can use the Internet, telephony and fax functions with a modem connection. This requires extra software and a
payable Internet connection if applicable.
The modem connection cable serves to connect a computer via its built-in modem (depending on the configuration
of your computer) to the telephone network. The connection cable has a 6-pin modular jack, model "RJ11", at both
ends. Pull on both connectors simultaneously to make the cable the required length. Please see winding
mechanism notes on page 4. If the modular jack model RJ11 does not fit into your telephone point, use a suitable
adapter in accordance with the country's specifications.
Please note that although the network connection cable (page 7) is very similar in type, it has however an 8pin modular jack, model "RJ45".
!
Fig.: 6-pin modular jack of the
modem connection cable,
model: RJ11
6
Page 8
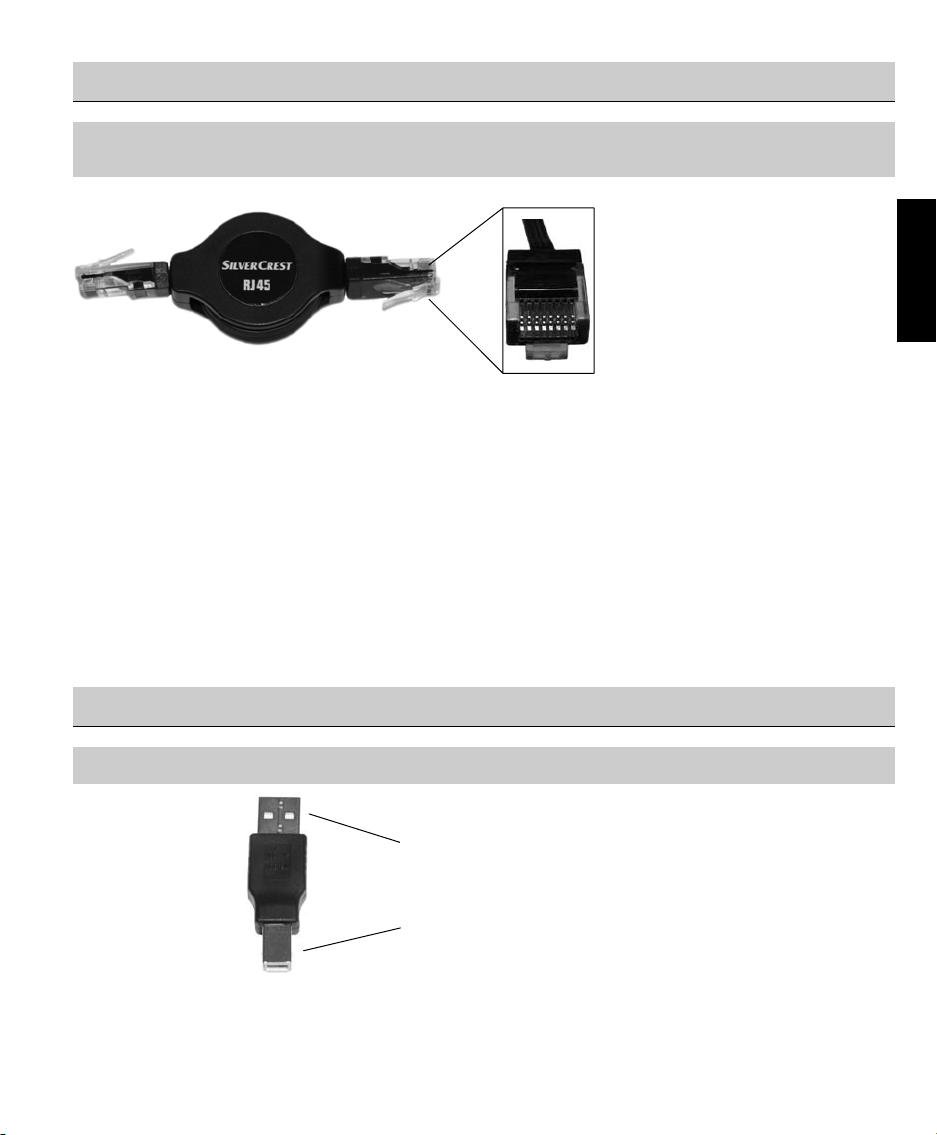
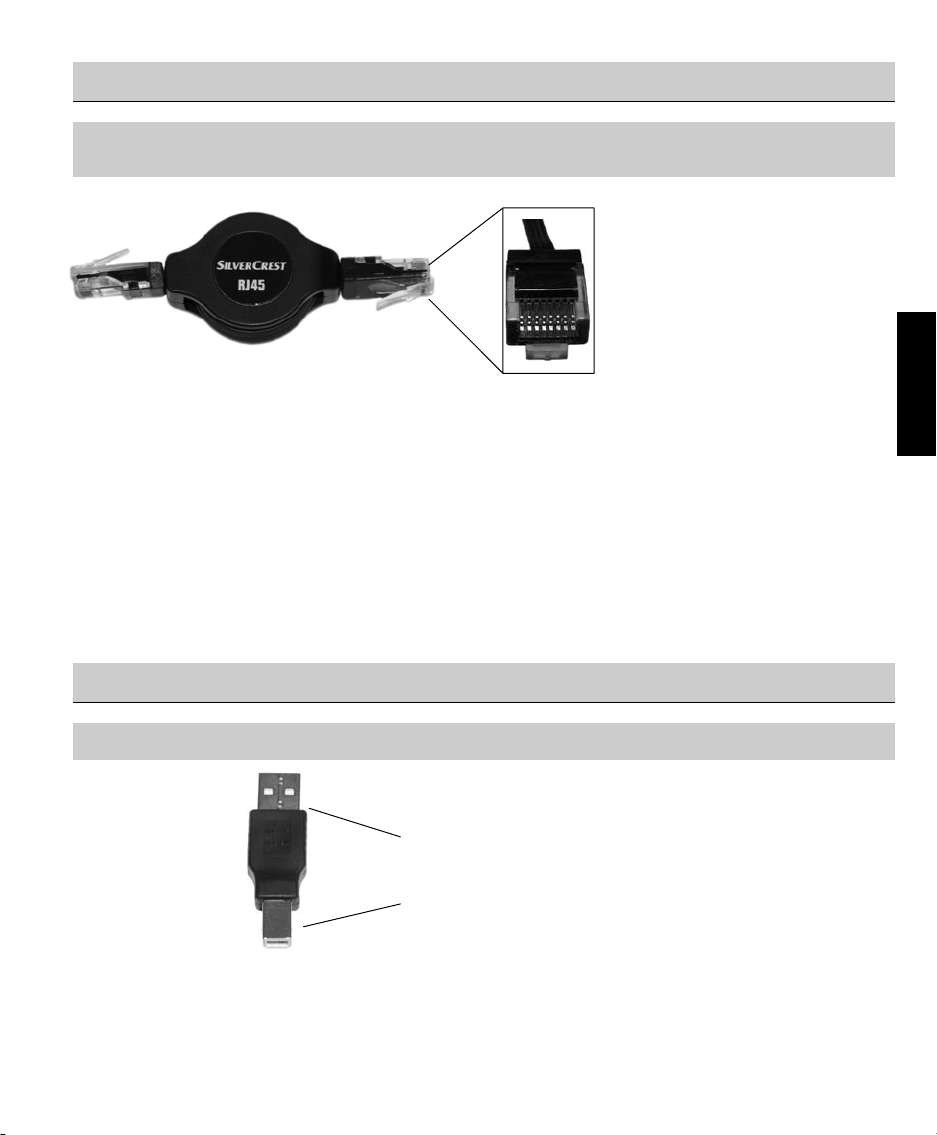
Network Connection Cable
Use
- For connecting a computer to a network, 100 MBit
- Length: approx. 130 cm
To be able to connect your computer to a network you must first have an integrated network card. This provides a
port where the 8-pin modular jack of the network connection cable can be inserted. If you are not sure whether your
computer already has this network port, please refer to the technical documentation of your computer.
Pull both connectors simultaneously to make the cable the required length. Please see winding mechanism notes
on page 4.
Insert either end of the connection cable into the network port of the computer and connect the other end of the
network connection cable to a switch (or network hub).
Please note that although the modem connection cable (page 6) is very similar in type, it has however a 6pin modular jack, model "RJ11".
!
Fig.: 8-pin modular jack of the
network connection cable,
model: RJ45
USB Adapter (A-type Connector to B-type Connector)
EN
Use
- To adapt a USB cable for use with various types of connectors
A-type connector
B-type connector
7
Page 9
If required, the adapter can be inserted into a USB extension cable to use as a connector cable with additional
devices. The larger A-type connector is by default designated as the connector to a computer, whilst the smaller Btype connector is reserved for additional devices, such as printers, scanners, etc.
USB Adapter (A-type Connector to Mini-USB Connector)
Use
EN
- To adapt a USB cable for use with various types of connectors
The mini-USB connector is usually designated as the connector for small devices such as digital cameras, etc. Put
the adapter onto the extension cable to use the interface cable with small devices.
A-type
connector
Mini-USB
connector
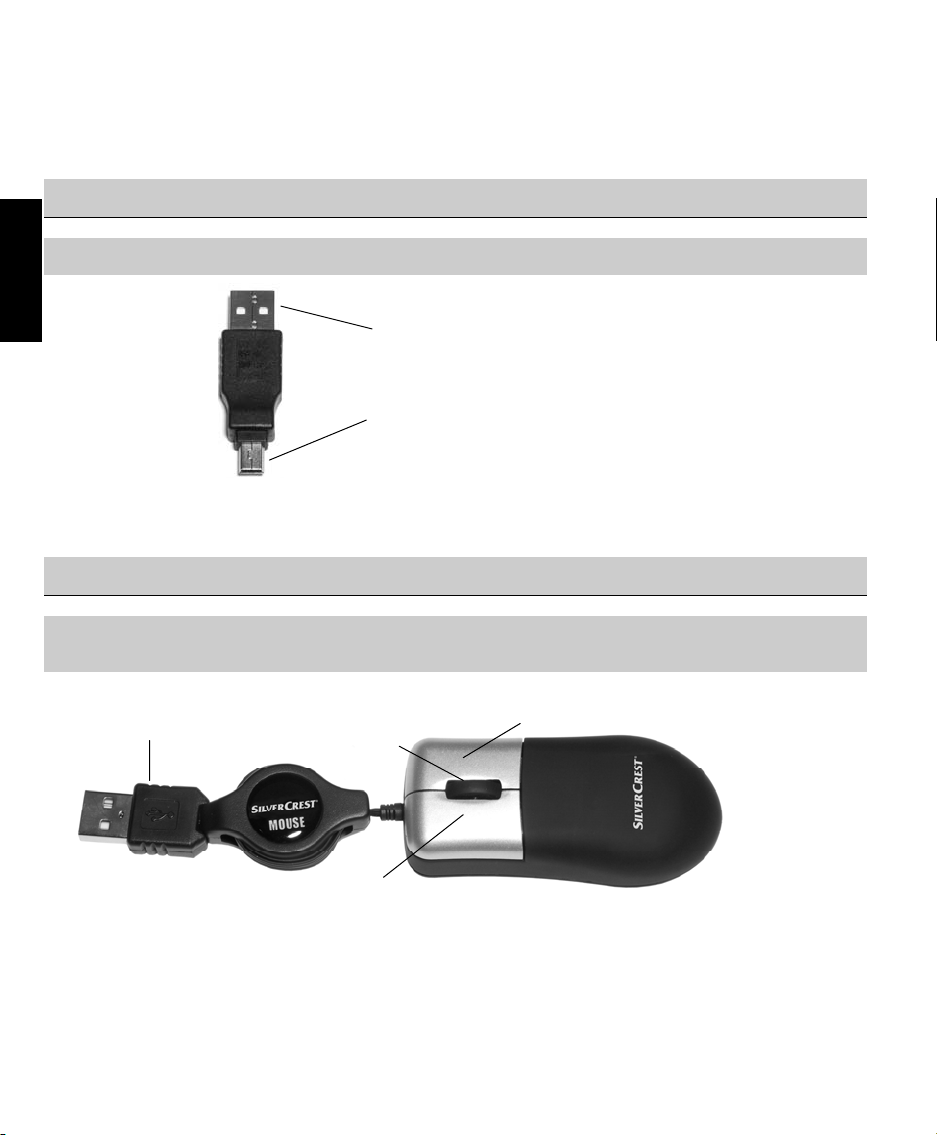
USB Mouse
Use
- Connection to a desktop PC or a notebook
- Length: approx. 76 cm
Pull the mouse and connector simultaneously and carefully to make the connection cable the desired length.
Please see winding mechanism notes on page 4. If required, put the extension cable on the connector of the USB
mouse in order to make the connector cable longer.
A-type
connector
Centre mouse
button and scroll
wheel
Left mouse button
Right mouse button
8
Page 10
The USB mouse is an active device which does not need manual driver installation under Microsoft® Windows® 7,
Windows Vista
will be automatically installed (see page 3 - Procedure).
Plug the connector of the USB mouse (or of the extension cable) into a USB port of your computer. As soon as the
driver has been installed upon first connection, the mouse will function as a 3-button mouse with scroll wheel.
Note:
By default, the left mouse button is the primary button for activating functions as most users operate the mouse
with their right hand. In the operating system, under Control Panel, you can change the primary button to the
right one to adapt the USB mouse for operation with the left hand.
®
, Windows® XP or Windows® 2000. On first operation of the USB mouse the corresponding driver
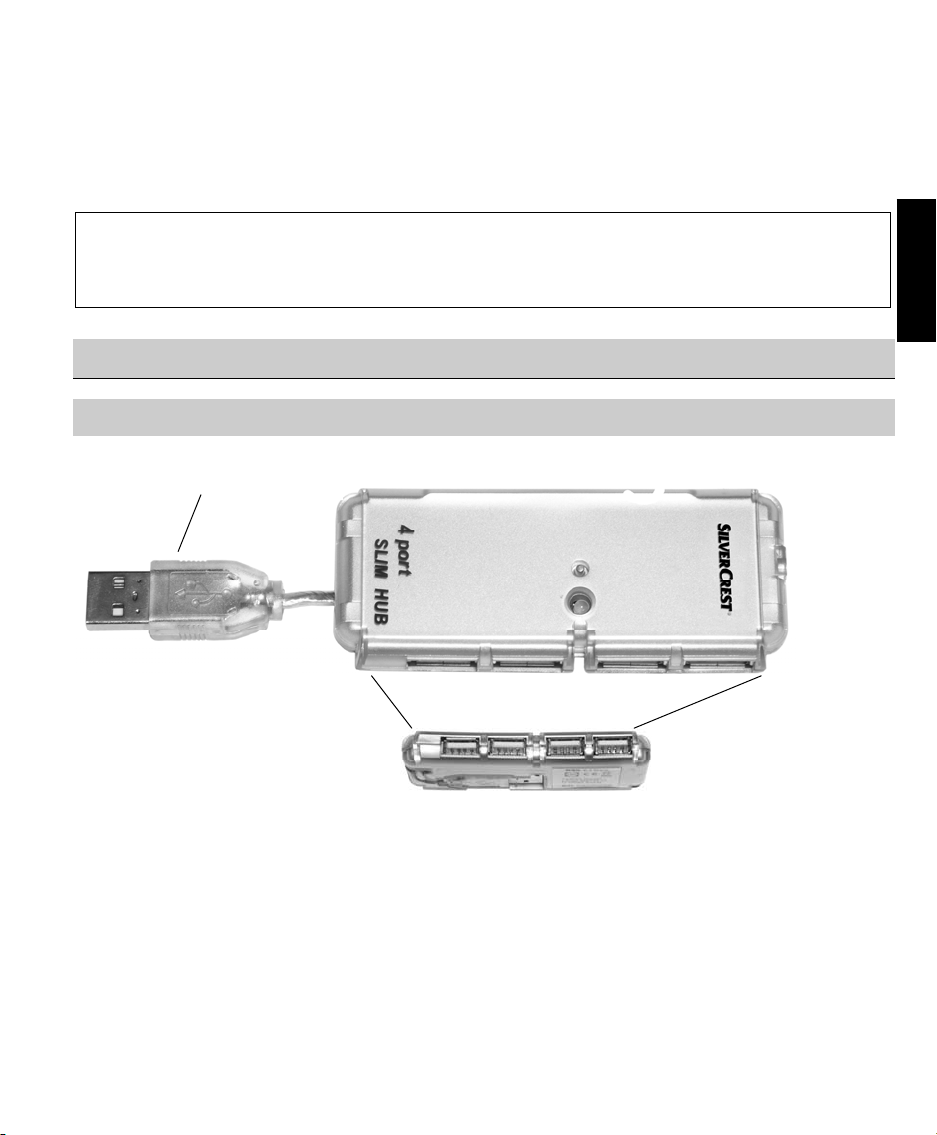
USB Hub 2040x
Use
- Providing a desktop PC or notebook with three further USB ports
In order to connect several USB devices to a computer it is necessary to have the corresponding number of USB
ports. By using a hub you can increase one port to four ports. Take the connector cable from the underside of the
USB hub and insert it into a free USB port on your computer.
The USB hub is an active component which requires the installation of a driver upon first use. This occurs
automatically under Microsoft
(see page 3 - Procedure).
A-type connector
®
Fig.: Detailed view of the USB ports
Windows® 7, Windows Vista®, Windows® XP or Windows® 2000 operating systems
EN
9
Page 11
After the driver has been installed you will now have four ports on the USB hub where you can connect any USB
device. In order to obtain the highest and most reliable data transfer rate, the USB hub must be connected directly
to the PC/notebook.
Please note that the total power consumption of all connected USB devices should not exceed 500 milliampere.
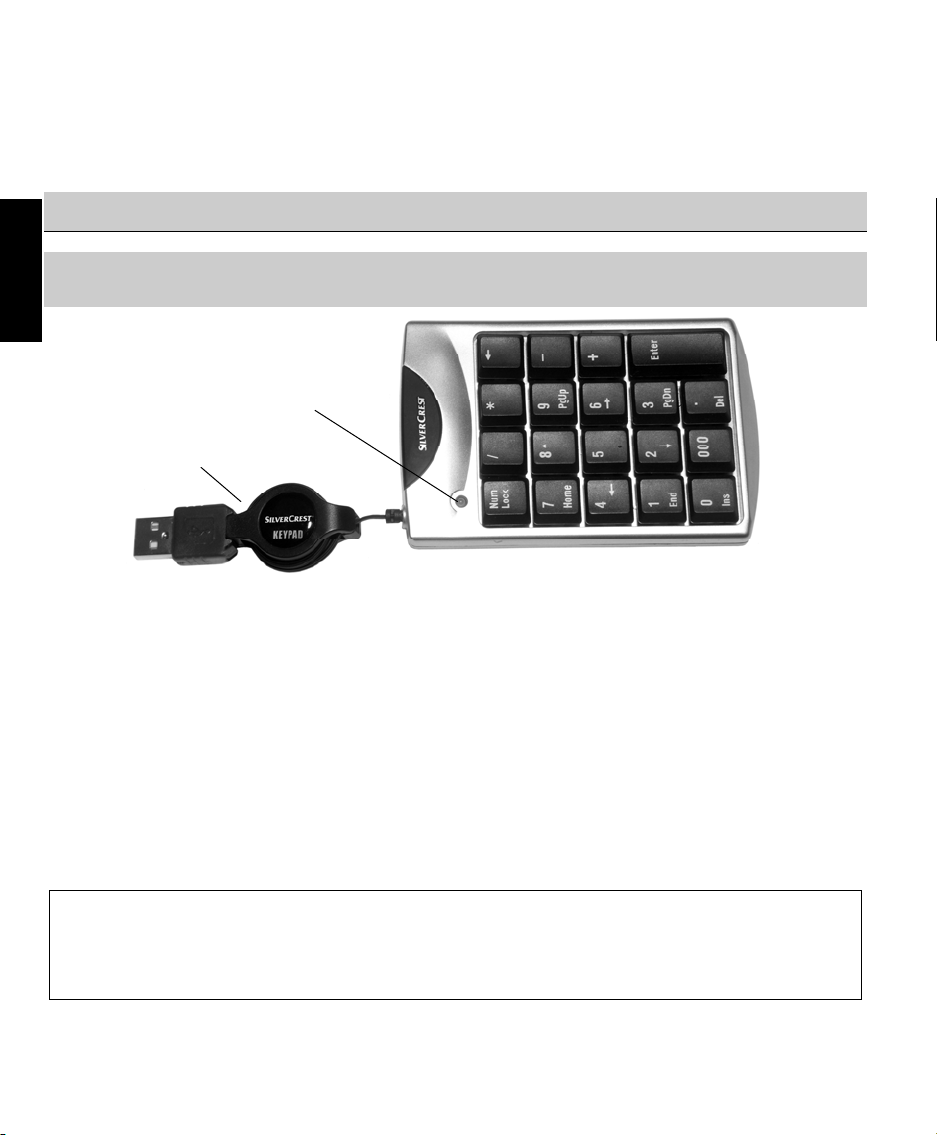
Numeric Keypad
EN
Use
- Expanding a PC or a notebook with an external numeric keypad
- Length: approx. 76 cm
If your keyboard has no numeric keypad, you can use this add-on device to make numeric entries. Pull the numeric
keypad and connector simultaneously and carefully to make the connection cable the desired length. Please see
winding mechanism notes on page 4. If required, put the extension cable on the connector of the numeric keypad
in order to make the connector cable longer.
The numeric keypad is an active device which does not need manual driver installation under Microsoft
7, Windows Vista
driver will be automatically installed (see page 3 - Procedure).
Some keys have a double assignment. To switch assignments press the "Num Lock" key at the top left on the
numeric keypad. When you enable Num Lock a control light shows and the numbers on the numeric keypad are
enabled. When you disable Num Lock, the control light goes out and the special functions are enabled.
Note:
You can use the numeric keypad to directly operate the Windows® operating system calculator. If you invoke
the programme Calculator and the Num Lock function on the numeric keypad is enabled, then you can use the
numbers and mathematical functions as a calculator.
Connector
cable
Num Lock control light
®
®
, Windows® XP or Windows® 2000. On first operation of the numeric keypad the corresponding
Windows®
10
Page 12

Technical Specifications
USB HUB 2040X
Dimensions (LxWxH): 90.6 x 38.6 x 12.6 mm
Weight: 38 g
Ports (quantity): 4 ports (USB 2.0)
Interface: USB 2.0
Operating temperature: 0 °C ~ +45 °C
Storage temperature: -20 °C ~ +60 °C
Operating Humidity: < 85 % RH
HEADSET
Weight: 25 g
Cable Length: approx. 130 cm
Earphones
Impedance: 35 Ohms
Signal-to-Noise Ratio: > 60 dB
Frequency Response: 190 Hz ~ 18 kHz (+/- 10 dB)
Broadband characteristic voltage: > 75 mV
Microphone
Frequency range: <50 Hz – 4,5 kHz (+/- 10 dB)
Sensitivity: 8,65 mV/Pa
USB MOUSE
Cable Length: approx. 76 cm
Number of Buttons: 3 (centre button on scroll wheel)
Tracking: Optical sensor
Resolution: 800 dpi
Dimensions (LxWxH): 77 x 36 x 20 mm
Weight: 40 g
Operating temperature: 0 °C ~ +45 °C
Storage temperature: -20 °C ~ +60 °C
Operating Humidity: 20 % - 70 % RH
NUMERIC USB KEYPAD
Cable Length: approx. 76 cm
Dimensions (LxWxH): 113 x 74 x 21 mm
Weight: 94 g
Operating temperature: 0 °C ~ +45 °C
Storage temperature: -20 °C ~ +60 °C
Operating Humidity: 20 % - 70 % RH
EN
11
Page 13
EN
12
Page 14

Käyttöohje
Tervetuloa
SilverCrest Notebook-Traveller-Kit
Kiitos, kun valitsit tämän uusinta teknologiaa edustavan SilverCrest Notebook-Traveller-Kitin. Lue tämä käyttöohje
huolellisesti ja noudata turvaohjeita.
HUOM.
Kaikki käyttöohjeen tekniset tiedot on koostettu ja järjestetty huolellisesti ja tietojen toistoa valvotaan
tehokkaimmilla tarkastusmenetelmillä. Emme kuitenkaan voi pois sulkea virheiden mahdollisuutta. Sen vuoksi me
emme anna takuuta ohjeiden sisällöstä emmekä vastaa mahdollisten virheiden aiheuttamista seuraamuksista.
Otamme mielellämme vastaan ilmoituksia mahdollisista virheellisyyksistä.
PAKKAUKSEN SISÄLTÖ JA KÄYTTÖHUOMAUTUKSET
Tarkista tämän käyttöohjeen sivulla 15 olevan luettelon avulla, että kaikki osat ovat mukana pakkauksessa. Siinä
tapauksessa, että jokin osa puuttuu Notebook-Traveller-Kitistä, ota meihin yhteyttä 10 vuorokauden kuluessa.
JÄRJESTELMÄVAATIMUKSET
- Käyttöjärjestelmä: Microsoft® Windows® 2000 SP4, Windows® XP, Windows Vista® & Windows® 7
- Vähintään yksi vapaa USB-portti
Tärkeä huomautus
TÄRKEITÄ TURVAOHJEITA
- Ennen kuin käytät näitä laitteita ensimmäistä kertaa, lue niihin liittyvät huomautukset tästä käyttöohjeesta,
vaikka olisitkin tottunut käyttämään sähkölaitteita.
- Säilytä tämä käyttöohje turvallisessa paikassa tulevaa tarvetta varten. Jos myyt tai annat nämä laitteet toiselle
henkilölle, on tämä käyttöohje ehdottomasti toimitettava laitteiden mukana.
- Älä anna lasten leikkiä sähkölaitteilla ilman valvontaa. Lapset eivät aina ymmärrä niihin liittyviä mahdollisia
riskejä. Pienten osien nieleminen saattaa olla vaarallista.
- Asenna kaapelit turvallisesti. Vältä kompastumasta kaapeleihin.
- Älä altista laitteita suoralle auringonvalolle äläkä aseta niitä lämmönlähteiden lähelle.
- Suojaa kaapelit ja laitteet pölyltä ja lialta, äläkä käytä puhdistamiseen hankaavia nesteitä.
- Älä avaa laitteiden koteloja, sillä sisällä ei ole huollettavia osia.
- Laitetta ja kaapeleita tulee suojella roiskevedeltä. Älä aseta nesteitä sisältäviä astioita (kuten maljakot tai
juomat) laitteiden päälle tai viereen.
- Älä sijoita elävää tulta (kuten kynttilää) laitteen viereen tai päälle.
- Pidä kiinni aina johdon pistokkeesta, älä vedä koskaan itse johdosta. Johdot on sijoitettava niin, ettei kukaan
kompastu niihin. Vahingoittunut johto voi aiheuttaa tulipalon tai sähköiskun.
FI
13
Page 15
KÄYTTÖTARKOITUS
Silvercrest Notebook-Traveller-Kit sisältää useita kaapeleita, sovittimia ja laitteita tietokoneen tai sylimikron USBporttiin yhdistämiseksi. Numeronäppäimistöä, keskitintä ja hiirtä voi käyttää vain USB-liitännällä. Tuotteita tulee
käyttää ainoastaan sisätiloissa ja kuivissa paikoissa. Tämän pakkauksen sisältämiä laitteita ja sovittimia ei ole
tarkoitettu yrityskäyttöön eikä kaupallisiin sovelluksiin. Käytä laitteita ja sovittimia kotioloissa ja vain yksityisiin
sovelluksiin. Muu kuin edellä mainittu käyttö ei vastaa tarkoitettua käyttötapaa.
Targa ei vastaa vahingoista, jotka ovat seurausta Silvercrest Notebook Traveller Kitin valtuuttamattomasta tai
muusta kuin tarkoitetusta käytöstä.
VAATIMUSTENMUKAISUUSLAUSEKE
Tämä laite on täysin EMC-direktiivin 2006/108/EC perusvaatimusten ja muiden vaatimusten
mukainen. Tätä vastaava vaatimustenmukaisuuslauseke löytyy tämän käyttöoppaan lopusta.
VANHOJEN LAITTEIDEN HÄVITTÄMINEN
FI
Tällä symbolilla merkittyihin laitteisiin pätee eurooppalainen direktiivi 2002/96/EC. Kaikki sähkö- ja
elektroniikkalaitteet on hävitettävä erillään yhdyskuntajätteistä julkisissa käsittelylaitoksissa.
Hävittämällä laitteen oikein et vaaranna ympäristön puhtautta tai omaa terveyttäsi. Lisätietoja
oikeasta hävitystavasta saat viranomaisilta, kierrätyspisteistä tai myymälästä, josta ostit laitteen.
REKISTERÖIDYT TAVARAMERKIT
Targa® on Targa GmbH:n rekisteröity tavaramerkki.
®
on USB Implementers Forum, Inc:n rekisteröity tavaramerkki.
USB
Microsoft
Kaikki muut tuotenimet ovat omistajiensa tavaramerkkejä.
®
, Windows® ,Windows Vista® ja Windows-logo ovat Microsoft Corporationin rekisteröityjä tavaramerkkejä.
Sisällysluettelo
Järjestelmävaatimukset .......................................................................................13
Tärkeä huomautus............................................................................................... 13
Pakkauksen sisältö .............................................................................................. 15
Johdanto ja alkuvalmistelut.................................................................................. 15
Kuulokkeet ........................................................................................................... 17
USB-jatkokaapeli .................................................................................................18
Modeemiliitäntäkaapeli ........................................................................................18
Verkkoliitäntäkaapeli............................................................................................ 19
USB-sovitin (A-tyypin liitin B-tyypin liittimeen) .....................................................19
USB-sovitin (A-tyypin liitin miniliittimeen).............................................................20
USB-hiiri............................................................................................................... 20
USB-keskitin 2040x..............................................................................................21
Numeronäppäimistö............................................................................................. 22
Tekniset tiedot...................................................................................................... 23
Tärkeää takuutietoa .............................................................................................24
14
Page 16
Pakkauksen sisältö
1 Kuulokkeet
2 USB-jatkokaapeli
3 Modeemiliitäntäkaapeli, RJ11
4 Verkkoliitäntäkaapeli, 100 Mbit, RJ45
5 USB-sovitin
(A-tyypin liitin B-tyypin liittimeen)
6 USB-sovitin
(A-tyypin liitin miniliittimeen)
7 USB-hiiri
8 USB-keskitin 2040x
9 Numeronäppäimistö
Johdanto ja alkuvalmistelut
USB-laitteiden liittäminen tietokoneeseen
USB on lyhenne sanoista "Universal Serial Bus". Kun liität USB-laitteen tietokoneeseen, se havaitaan ja liitetään
järjestelmään. Jos tietokoneessa on käytössä useita USB-portteja, voit valita portit, joita haluat käyttää. Joissakin
pöytätietokoneissa saattaa olla USB-portteja takana pitkäaikaisia liitäntöjä varten ja lisä-USB-portteja edessä usein
vaihtuvia liitäntöjä varten.
USB-porteista ei voi erehtyä. Jos USB-laite liitetään toiseen USB-porttiin, käyttöjärjestelmä asentaa ohjaimen
uudelleen, jos on tarpeen, ja laite on valmis käytettäväksi.
Toimenpiteet
FI
Liitä laitteen USB-liitin tietokoneen USB-porttiin. Saat välittömästi tällaisen huomautusviestin näytön oikeaan
alakulmaan:
(Kuva: Esimerkissä on kyse
Notebook-Traveller-Kitin
USB-hiirestä)
15
Page 17
Tietokone on havainnut USB-laitteen, asentanut automaattisesti ohjaimen ja näyttää nyt seuraavan viestin:
(Kuva: Asennus valmis)
Käyttöjärjestelmä vahvistaa, että laite on integroitu oikein järjestelmään ja on välittömästi valmis käytettäväksi.
Jos laite ei pysty muodostamaan yhteyttä tietokoneeseen, irrota USB-liitin muutamaksi sekunniksi ja liitä sen
jälkeen laite uudelleen tietokoneeseen. Voit myös kokeilla toista USB-porttia tietokoneessa.
Lue seuraavilta sivuilta Notebook-Traveller-Kitin yksittäisiä laitteita koskevat huomautukset.
FI
Kaapelinkelausmekanismi
USB-hiirellä, numeronäppäimistöllä, kuulokkeilla, USB-jatkokaapelilla, modeemiliitäntäkaapelilla ja verkkokaapelilla
on älykäs kaapelinkelausmekanismi. Tämän mekanismin avulla saat liitäntäkaapeleista juuri sen mittaiset kuin
haluat.
Tämän aikaansaadaksesi vedä kaapelin molempia päitä samanaikaisesti, kunnes haluttu pituus on saavutettu. Kun
lopetat vetämisen, kelausmekanismi vetää kaapelia molemmilta puolilta hieman sisään, kunnes se lukkiutuu
seuraavaan pidätyshakaan.
Vedä kaapelia molemmilta puolilta
yhtä aikaa haluttuun pituuteen.
Mekanismi kelaa kaapelia
hieman sisään, kunnes se
lukkiutuu paikoilleen.
16
Page 18

Kelataksesi kaapelin sisään, vedä varovasti kumpaakin päätä uudelleen. Lukitushaka vapautuu ja kaapeli kelautuu
itsestään takaisin koteloon. Jos kaapeli on vedetty kokonaan esiin, vapauta ensin liitin varmistaaksesi, että se
kelautuu kunnolla.
~ 1 cm
Vedä varovasti, kunnes
mekanismin lukitus avautuu ja
kaapeli kelautuu takaisin sisään.
~ 1 cm
Kuulokkeet
Käyttö
- Tietokoneen puhelin
- Kaapelin pituus: noin 130 cm
Mikrofoni
Voidaksesi liittää kuulokkeen tietokoneeseen, siihen on oltava asennettu äänikortti. Tämä antaa
liitäntämahdollisuuden sekä ulkoiselle mikrofonille että kuulokkeelle. Liitäntäportit on tavallisesti merkitty joko
väreillä tai painetuilla symboleilla, jotka erottavat ne toisistaan. Vedä samanaikaisesti mikrofonia ja liitintä
saadaksesi kaapelista halutun mittaisen. Katso huomautukset kelausmekanismista sivulla 16.
Kuulokkeen punainen liitin liitetään tietokoneen mikrofoniporttiin, vihreä tietokoneen kuulokeporttiin. Tietokoneessa
on tarvittaessa lisää audioliitäntöjä. Jollet ole varma, mikä on tietokoneen oikea liitäntäportti, tarkista asia
tietokoneen käyttöoppaasta.
Kuulokkeen liitin
(vihreä)
Mikrofonin liitin
(punainen)
Kuuloke
FI
17
Page 19
USB-jatkokaapeli
Käyttö
- Liittämään USB-laitteita, joiden liitäntäkaapeli on liian lyhyt
- Kaapelin pituus: noin 76 cm
USB-liitäntä
FI
Vedä USB-kaapeli halutun mittaiseksi. Katso huomautukset kelausmekanismista sivulla 16.
Liitä USB-liitin tietokoneen vapaaseen USB-liitäntään ja liitä sitten USB-laite jatkokaapelin USB-liitäntään.
USB-liitin
Modeemijatkokaapeli
Käyttö
- Tietokonemodeemin yhteys puhelinliitäntään
- Kaapelin pituus: noin 130 cm
Voit käyttää modeemiyhteydellä internetiä, puhelinta ja faksia. Tämä vaatii oman ohjelmistonsa ja maksullisen
internetyhteyden, jos sovellettavissa.
Modeemiliitäntäkaapeli yhdistää tietokoneen puhelinverkkoon sisäänrakennetulla modeemilla (riippuen tietokoneen
kokoonpanosta). ”RJ11”-liitäntäkaapelissa on 6-pinninen modulaarinen liitin molemmissa päissä. Vedä
samanaikaisesti molempia liittimiä saadaksesi kaapelista halutun mittaisen. Katso huomautukset
kelausmekanismista sivulla 16. Jos mallin RJ11 modulaarinen liitin ei sovi puhelinpistokkeeseen, käytä maasi
määrityksien mukaista sopivaa sovitinta.
Huomaa, että vaikka verkkoliitäntäkaapeli (s. 19) on tyypiltään hyvin samanlainen, siinä on kuitenkin 8pinninen modulaarinen liitin, mallia ”RJ45”.
!
Kuva: Modeemiyhteyskaapelin 6-
pinninen modulaarinen liitin,
malli: RJ11
18
Page 20
Verkkoliitäntäkaapeli
Käyttö
- Tietokoneen liittämiseksi verkkoon, 100 Mbit
- Kaapelin pituus: noin 130 cm
Voidaksesi liittää tietokoneen verkkoon, sinulla on ensin oltava integroitu verkkokortti. Siinä on portti, johon
verkkoliitäntäkortin 8-pinninen liitin voidaan liittää. Jollet ole varma, onko tietokoneessa jo tämä verkkoportti, katso
tietokoneen teknisistä tiedoista.
Vedä samanaikaisesti molempia liittimiä saadaksesi kaapelista halutun mittaisen. Katso huomautukset
kelausmekanismista sivulla 16.
Liitä verkkoliitäntäkaapelin jompikumpi pää tietokoneen verkkoporttiin ja toinen pää kytkimeen (verkko-ohjain).
Huomaa, että vaikka modeemiliitäntäkaapeli (s. 18) on tyypiltään hyvin samanlainen, siinä on kuitenkin 6pinninen modulaarinen liitin, mallia ”RJ11”.
!
Kuva: Verkkoyhteyskaapelin 8-
pinninen modulaarinen liitin,
malli: RJ45
USB-sovitin (A-tyypin liitin B-tyypin liittimeen)
FI
Käyttö
- Sovittamaan USB-kaapelin käytettäväksi useisiin erityyppisiin liittimiin
Jos välttämätöntä, sovitin voidaan liittää USB-jatkojohtoon käytettäväksi lisälaitteiden liitäntäjohtona. Suurempi Atyypin liitin on oletusarvoisesti suunniteltu liittimeksi tietokoneeseen, kun taas pienempi B-tyypin liitin on varattu
lisälaitteille, kuten tulostimille, skannereille, jne.
A-tyypin liitin
B-tyypin liitin
19
Page 21

USB-sovitin (A-tyypin liitin miniliittimeen)
Käyttö
- Sovittamaan USB-kaapeli käytettäväksi useisiin erityyppisiin liittimiin
FI
USB-miniliitin on tavallisesti suunniteltu liittimeksi pieniin laitteisiin, kuten digitaalikameraan, jne. Aseta sovitin
jatkokaapeliin käytettäväksi liittimenä pienissä laitteissa.
A-tyypin liitin
Miniliitin
USB-hiiri
Käyttö
- Liitäntä pöytätietokoneeseen tai sylimikroon
- Kaapelin pituus: noin 76 cm
Vedä samanaikaisesti hiirtä ja liitintä varovaisesti saadaksesi liitäntäkaapelista halutun mittaisen. Katso
huomautukset kelausmekanismista sivulla 16. Jos on tarpeen, liitä jatkokaapeli USB-hiiren liittimeen saadaksesi
liitäntäkaapelista pidemmän.
USB-hiiri on aktiivinen laite, joka ei tarvitse manuaalista ohjaimen asentamista Microsoft
Windows
asennetaan automaattisesti (ks. s. 15 - Toimenpiteet).
Liitä USB-hiiren (tai jatkokaapelin) liitin tietokoneen USB-porttiin. Heti kun ohjain on asennettu ensimmäisen käytön
yhteydessä, hiiri toimii 3-painikkeisena hiirenä, jossa on vierityskiekko.
20
A-tyypin liitin
®
XP:ssä tai Windows® 2000:ssa. Käytettäessä USB-hiirtä ensimmäistä kertaa, vastaava ohjain
Hiiren
keskimmäinen
painike ja
vierityskiekko
Hiiren vasen painike
Hiiren oikea painike
®
Windows Vista®,
Page 22

Huomautus:
Oletusarvoisesti hiiren vasen painike on ensisijainen painike toimintojen aktivoimiseen, koska useimmat
käyttäjät käyttävät hiirtä oikealla kädellä. Voit vaihtaa ensisijaisen painikkeen oikeaksi painikkeeksi
käyttöjärjestelmän ohjauspaneelissa sovittaaksesi USB-hiiren käytettäväksi vasemmalla kädellä.
USB-keskitin 2040x
Käyttö
- Lisäämään pöytätietokoneelle tai sylimikrolle kolme lisä-USB-porttia
Useiden USB-laitteiden liittämiseksi tietokoneeseen on välttämätöntä olla vastaava määrä USB-portteja.
Käyttämällä keskitintä voit kasvattaa porttien lukumäärää yhdestä neljään. Ota liitäntäkaapeli USB-keskittimen
alapuolelta ja liitä se tietokoneen vapaaseen USB-porttiin.
USB-keskitin on aktiivinen osa, joka vaatii ohjaimen asennuksen ensimmäisellä käyttökerralla. Tämä tapahtuu
automaattisesti Microsoft
Toimenpiteet).
Kun ohjain on asennettu, sinulla on käytettävissä neljä porttia USB-keskittimessä. Voit liittää niihin minkä tahansa
USB-laitteen. Keskitin on kytkettävä suoraan tietokoneeseen/kannettavaan, jotta saavutetaan suurin ja luotettavin
tiedonsiirtonopeus.
Huomaa, että kaikkien liitettyjen USB-laitteiden yhteinen kokonaisvirrankulutus ei saa ylittää 500 milliampeeria.
A-tyypin liitin
Kuva: Yksityiskohtainen näkymä USB-porteista
®
Windows Vista®, Windows® XP- tai Windows® 2000 -käyttöjärjestelmissä (ks. s. 15 -
FI
21
Page 23

Numeronäppäimistö
Käyttö
- Tietokoneen tai sylimikron laajentaminen ulkoisella numeronäppäimistöllä
- Kaapelin pituus: noin 76 cm
Liitäntäkaapeli
FI
Jos näppäimistössäsi ei ole numeronäppäimistöä, voit käyttää tätä lisälaitetta numeroiden syöttämiseen. Vedä
samanaikaisesti numeronäppäimistöä ja liitintä varovaisesti saadaksesi liitäntäkaapelista halutun mittaisen. Katso
huomautukset kelausmekanismista sivulla 16. Liitä tarvittaessa jatkokaapeli numeronäppäimistön liittimeen
saadaksesi liitäntäkaapelista pidemmän.
Numeronäppäimistö on aktiivinen laite, joka ei tarvitse manuaalista ohjaimen asentamista Microsoft
®
, Windows® XP:ssä tai Windows® 2000:ssa. Käytettäessä numeronäppäimistöä ensimmäistä kertaa,
Vista
vastaava ohjain asennetaan automaattisesti (ks. s. 15 - Toimenpiteet).
Joillakin näppäimillä on kaksoistoiminto. Vaihtaaksesi toimintoa, paina ”Num Lock”-näppäintä numeronäppäimistön
vasemmassa yläkulmassa. Kun otat Num Lockin käyttöön, merkkivalo syttyy, ja numeronäppäimistön numerot ovat
käytössä. Kun otat Num Lockin pois käytöstä, merkkivalo sammuu, ja erikoistoiminnot ovat käytössä.
Huomautus:
Voit käyttää numeronäppäimistöä suoraan Windows®-käyttöjärjestelmän laskimen käyttämiseen. Jos käynnistät
laskimen ja numeronäppäimistön Num Lock -toiminto on käytössä, voit käyttää näppäimistön numeroita ja
matemaattisia funktioita laskimen tapaan.
Num Lock merkkivalo
®
Windows
22
Page 24

Tekniset tiedot
USB-KESKITIN 2040X
Mitat (S x L x K): 90,6 x 38,6 x 12,6 mm
Paino: 38 g
Liitäntöjä (määrä): 4 liitäntää (USB 2.0)
Liitäntä: USB 2.0
Käyttölämpötila: 0 °C ~ +45 °C
Varastointilämpötila: -20 °C ~ +60 °C
Käyttökosteus: < 85 % RH
KUULOKKEET
Paino: 25 g
Kaapelin pituus: noin 130 cm
Kuulokkeet
Näennäisvastus: 35 Ohmia
Häiriöetäisyys: > 60 dB
Taajuusvaste: 190 Hz - 18 kHz (+/- 10 dB)
Mukana tulevien laajakaistaisten
kuulokkeiden:
Mikrofoni
Taajuusalue: <50 Hz - 4,5 kHz (+/- 10 dB)
Herkkyys: 8,65 mV/Pa
USB-HIIRI
Kaapelin pituus: noin 76 cm
Painikkeiden lukumäärä: 3 (keskipainike vieritysrullassa)
Seuranta: Optinen tunnistin
Tarkkuus: 800 dpi
Mitat (S x L x K): 77 x 36 x 20 mm
Paino: 40 g
Käyttölämpötila: 0 °C ~ +45 °C
Varastointilämpötila: -20 °C ~ +60 °C
Käyttökosteus: 20 % - 70 % RH
USB-NUMERONÄPPÄIMISTÖ
Kaapelin pituus: noin 76 cm
Mitat (S x L x K): 113 x 74 x 21 mm
Paino: 94 g
Käyttölämpötila: 0 °C ~ +45 °C
Varastointilämpötila: -20 °C ~ +60 °C
Käyttökosteus: 20 % - 70 % RH
> 75 mV
FI
23
Page 25

FI
24
Page 26

Bruksanvisning
SilverCrest Notebook-Traveller-Kit
Välkommen!
Tack för att du valt denna exklusiva SilverCrest Notebook-Traveller-Kit. Läs denna bruksanvisning noggrant och följ
säkerhetsinstruktionerna.
OBSERVERA!
All teknisk data i denna bruksanvisning har sammanställts och ordnats med största omsorg, samt återskapats med
de effektivaste kontrollåtgärder. Vi kan dock inte utesluta att den kan innehålla felaktigheter. Därför kan vi inte ge
några garantier och ej heller hållas ansvariga för konsekvenser som beror på felaktig information. Tack för att du
rapporterar alla misstag till oss.
FÖRPACKNINGSINNEHÅLL OCH DRIFTNOTERINGAR
Använd listan på sidan 27 i denna bruksanvisning för att kontrollera att innehållet i detta paket är komplett, i annat
fall meddela oss inom 10 dagar om det är något som saknas för Notebook-Traveller-Kit.
SYSTEMKRAV
- Operativsystem: Microsoft® Windows® 2000 SP4, Windows® XP, Windows Vista® & Windows® 7
- Minst en ledig USB-port
Viktig notering
SE
VIKTIGA SÄKERHETSINSTRUKTIONER
- Innan du använder denna enhet för första gången ska motsvarande noteringar i denna handbok läsas, även
om du är van vid att hantera elektroniska apparater.
- Spara denna handbok på en säker plats för framtida referens. Om du säljer eller ger bort denna enhet till
någon annan person, är det av yttersta vikt att du också lämnar över denna manual.
- Låt inte barn leka med elektriska enheter utan tillsyn. Barn förstår inte alltid de potentiella riskerna. Sväljning
av mindre delar kan vara farligt.
- Montera kablarna på ett säkert sätt. Undvik att snava över dem.
- Utsätt inte enheten för direkt solljus och placera den inte i närheten av värmekällor.
- Skydda kablarna och enheterna mot damm, smuts och frätande vätskor.
- Öppna inte enhetens hölje eftersom den inte innehåller några delar som kan lagas.
- Utrustningen och kablarna får inte utsättas för vattenstänk. Placera inga saker som innehåller vatten (t ex
vaser och drycker) på eller intill enheterna.
- Placera ingen öppen eld (som t ex ett stearinljus) på eller i närheten av enheten.
- Håll alltid i kabelns kontakt och dra aldrig i själva kabeln. Placera kablarna så att det inte går att snubbla över
dem. En skadad kabel kan orsaka brand eller elektrisk stöt.
25
Page 27

AVSEDD ANVÄNDNING
Silvercrest Notebook-Traveller-Kit omfattar olika kablar, adaptrar och enheter för anslutning till USB-porten på en
dator eller en bärbar dator. Det numeriska tangentbordet, hubben och musen får endast användas via USBanslutning. Produkterna bör enbart användas på torra platser inomhus. De enheter och adaptrar som medföljer
detta set har inte konstruerats för företag eller kommersiella tillämpningar. Använd enheterna och adaptrarna
endast i hemmet för privata tillämpningar. Alla annan användning utöver den som nämns ovan motsvarar inte den
avsedda användningen.
Targa tar inget ansvar för skador som uppstår genom icke avsedd användning eller obehörig ändring av Silvercrest
Notebook Traveller Kit.
MEDDELANDE OM ÖVERENSSTÄMMELSE
Denna enhet överensstämmer till fullo med grundläggande och andra relevanta krav i EMC-direktiv
2004/108/EC. Motsvarande deklaration om överensstämmelse kan hittas i slutet av denna
användarhandbok.
KASSERING AV GAMLA ENHETER
Enheter märkta med denna symbol är underkastad det Europeiska direktivet 2002/96/EC. Alla
elektriska och elektroniska enheter måste avyttras separat från hushållsavfallet vid offentligt
anordnade insamlingsställen. Undvik miljömässiga risker och fara för din personliga hälsa genom att
kassera enheten på rätt sätt. Kontakta ditt kommunkontor, renhållningsverk eller butiken där du har
köpt enheten, för mer information om korrekt kassering.
SE
REGISTRERADE VARUMÄRKEN
Targa® är ett registrerat varumärke som tillhör Targa GmbH.
®
är registrerat varumärke för USB Implementers Forum, Inc.
USB
Microsoft
Corporation.
Alla andra varunamn är varumärken som tillhör dess respektive ägare.
®
, Windows®, Windows Vista® och Windows-logotypen är registrerade varumärken som tillhör Microsoft
Innehållsförteckning
Systemkrav .......................................................................................................... 25
Viktig notering ...................................................................................................... 25
Paketinnehåll .......................................................................................................27
Introduktion och komma igång............................................................................. 27
Hörlur med mikrofon ............................................................................................29
USB-förlängningskabel ........................................................................................30
Modemanslutningskabel ......................................................................................30
Nätverksanslutningskabel....................................................................................31
USB Adapter (A-typansslutning till B-typanslutning) ...........................................31
USB Adapter (A-typansslutning till minianslutning) .............................................32
USB-mus.............................................................................................................. 32
USB-Hub 2040x................................................................................................... 33
Numeriskt tangentbord.........................................................................................34
Tekniska specifikationer ......................................................................................35
Viktig garantiinformation ......................................................................................36
26
Page 28

Paketinnehåll
1 Hörlur med mikrofon
2 USB-förlängningskabel
3 Modemanslutningskabel, RJ11
4 Nätverksanslutningskabel, 100 Mbit, RJ45
5 USB Adapter
(A-typansslutning till B-typanslutning)
6 USB Adapter
(A-typansslutning till minianslutning)
7 USB-mus
8 USB-hub 2040x
9 Nummeriskt tangentbord
Introduktion och komma igång
Anslutning av USB-enheter till datorn
USB betyder "Universal Serial Bus". När du ansluter en USB-enhet till datorn avkänns den av datorn och
konfigureras in i systemet. Om din dator har flera USB-portar kan du välja vilken av portarna du vill använda. Vissa
bordsdatorer har USB-portar på baksidan för långsiktiga anslutningar och ytterligare USB-portar på framsidan för
anslutningar som byts ofta.
Det är inte möjligt att göra fel med portarna. Om en USB-enhet ansluts till en annan USB-port kommer
operativsystemet att installera enheten igen om så behövs och enheten är klar att använda.
Procedur
SE
Koppla in USB-kontakten från enheten i USB-porten på din dator. Du kommer omedelbart att se detta meddelande
som visas i nedre högra hörnet på skärmen:
(Fig.: Exempel med hjälp av USB
musen till Notebook-Traveller-Kit)
27
Page 29

Din dator har hittat USB-enheten och automatiskt installerat drivrutinen och visar nu följande meddelande.
(Fig.: Installationen slutförd)
Operativsystemet bekräftar att enheten korrekt har integrerats i systemet och är klar att använda.
Om enheten inte lyckas ansluta till datorn ska USB-kontakten dras ur i några sekunder. Anslut sedan enheten till
datorn igen. Du kan också prova med en annan USB-port på datorn.
Läs igenom noteringarna på de följande sidorna om de enskilda produkterna för Notebook-Traveller-Kit.
Kabelupplindningsmekanism
USB musen, det numeriska tangentbordet, hörluren med mikrofon, USB förlängningskabel,
modemanslutningskabeln och nätverkskabeln har en smart kabelupplindningsmekanism. Genom att använda
denna mekanism kan du ha anslutningskabeln utdragen till önskad längd.
För att göra detta, dra försiktigt i båda ändarna av kabeln samtidigt tills du har önskad längd utdragen. När du slutar
SE
att dra dras upplindningsmekanismen in kabeln från båda sidorna tills den låses på nästa spärrhake.
För att dra in kabeln, dra försiktigt i båda ändarna igen. Haken lossar och kabeln drar tillbaka sig själv in i höljet.
Om kabeln är helt utdragen lossa först anslutningen för att garantera att den dras in ordentligt.
Dra ut kabeln från båda sidorna
samtidigt till önskad längd.
Mekanismen drar tillbaka
kabeln något tills den låses
på plats.
28
Page 30

~ 1cm ~ 1cm
Dra försiktigt tills den
låses upp och kabeln
lindas tillbaka in.
Hörlur med mikrofon
Användning
- Ringa med datorn
- Längd: ungefär 130 cm
Mikrofon
För att kunna ansluta hörluren med mikrofon på din dator måste du ha ett ljudkort installerat i datorn. Denna
möjliggör anslutning av en extern mikrofon och även hörlurar. Vanligtvis är anslutningskontakterna markerade med
antingen färger eller skrivna symboler för att särskilja dem. Dra samtidigt i mikrofonen och anslutningen för att få
kabeln till önskad längd. Se noteringarna om upplindningsmekanismen på sidan 28.
Den röda kontakten på hörluren med mikrofon ansluts till mikrofonporten på datorn och den gröna kontakten
ansluts till hörlursporten på datorn. Din dator har ytterligare ljudanslutningar om så krävs. Om du inte är säker på
vilken som är rätt anslutningsport på din dator, se bruksanvisningen för din dator.
Hörlursanslutning(grön)
Mikrofonanslutning (röd)
Hörlur
SE
29
Page 31

USB-förlängningskabel
Användning
- Anslutning av USB-enheter vars anslutningskabel är för kort
- Längd: ungefär 76 cm
USB-kontakt
Dra ut USB-förlängningssladden till önskad längd. Se noteringarna om upplindningsmekanismen på sidan 28.
Sätt i USB-kontakten i ett ledigt USB-uttag på datorn och sätt sedan in USB-enheten i USB-uttaget på
förlängningskablen.
SE
Modem-förlängningskabel
Användning
- Anslutning av ett datormodem till ett telefonuttag
- Längd: ungefär 130 cm
Du kan använda Internet, telefon och fax med modemanslutning. Detta kräver extra programvara och en betald
internetanslutning om så är tillämpligt.
Modemanslutningskabeln ansluter en dator via dess inbyggda modem (beroende på din dators konfiguration) till
telenätet. Denna anslutningskabel har en 6-pin modularkontakt, modell ”RJ11” i båda ändarna. Dra i båda
kontakterna samtidigt för att få kabeln till önskad längd. Se noteringarna om upplindningsmekanismen på sidan 28.
Om modularkontakten modell RJ11 inte passar i teleuttaget, använd en lämplig adapter enligt specifikationerna
som gäller för ditt land.
Notera att även om nätverkets anslutningskabel (sidan 31) liknar denna har den emellertid en 8-pin
modularkontakt, modell ”RJ45”.
!
USB- anslutning
Fig.: 6-pin modularkontakt på
modemanslutningskabel
n, modell: RJ11
30
Page 32

g
Nätverksanslutningskabel
Användning
- För anslutning av en dator till ett nätverk, 100 Mbit
- Längd: ungefär 130 cm
För att kunna ansluta din dator till ett nätverk måste du först ha ett integrerat nätverkskort. Detta har ett uttag där
den 8-pin modularkontakten på nätverkskabeln kan sättas in. Om du inte är säker på om din dator redan har denna
nätverksport, se den tekniska dokumentation på din dator.
Dra i båda kontakterna samtidigt för att få kabeln till önskad längd. Se noteringarna om upplindningsmekanismen
på sidan 28.
Sätt i ena änden av anslutningskabeln i nätverksporten på datorn och anslut den andra änden av nätverkskabeln
till en switch (nätverksväxel).
Notera att även om modemets anslutningskabel (sidan 30) liknar denna har den emellertid en 6-pin
modularkontakt, modell ”RJ11”.
!
Fig.: 8-pin modularkontakt på
en anslutningskabel för
nätverk, modell: RJ45
USB Adapter (A-typansslutning till B-typanslutning)
SE
Användning
- För att ansluta en USB-kabel för användning med olika typer av anslutningskontakter
En anslutnin
B-typanslutning
31
Page 33

Om så krävs kan adptern sättas in i en USB-förlängningskabel för att användas som en anslutningskabel för
ytterligare enheter. Den stora A-typanslutningen är som standard tillverkad som kontakt till en dator medan den
mindre B-typkontakten är reserverad för ytterligare enheter såsom skrivare, skanner etc.
USB Adapter (A-typansslutning till minianslutning)
Användning
- För att ansluta en USB-kabel för användning med olika typer av anslutningskontakter.
USB-minianslutning används vanligen som kontakt för mindre enheter såsom digitalkameror etc. Placera adaptern
SE
på förlängningskabeln för att använda anslutningskabeln med små enheter.
En anslutning
Minianslutning
USB-mus
Användning
- Anslutning till en bordsdator eller en bärbar dator
- Längd: ungefär 76 cm
Dra samtidigt försiktigt i musen och kontakten för att få önskad längd på anslutningskabeln. Se noteringarna om
upplindningsmekanismen på sidan 28. Om så krävs kan förlängningskabeln kopplas till USB-musen för att få en
längre anslutningskabel.
USB-musen är en aktiv enhet som inte behöver någon manuell drivrutininstallation under Microsoft
Windows Vista
motsvarande drivrutin att installeras automatiskt (se sedan 27 – Procedur).
En anslutning
®
, Windows® XP eller Windows® 2000. Vid första användningen av USB-musen kommer
Mittersta
musknappen och
skrollhjul
Vänster musknapp
Höger musknapp
®
Windows® 7,
32
Page 34

Sätt in kontakten till USB-musen (eller förlängningskabeln) i USB-porten på din dator. Så snart som drivrutinen har
installerats vid första anslutningen kommer musen att fungera som en 3-knappsmus med skrollhjul.
Obs!
Som standard är den vänstra musknappen huvudknapp för aktivering av funktioner eftersom de flesta
användare använder höger hand för musen. I operativsystemet, i kontrollpanelen kan du ändra huvudknapp till
den högra för att anpassa musen för användning med vänster hand.
USB-Hub 2040x
Användning
- Ge en bordsdator eller en bärbar dator ytterligare tre USB-portar
För att kunna ansluta flera USB-enheter till en dator är det nödvändigt att ha motsvarande antal USB-portar.
Genom att använda en hubb kan du göra fyra portar av en enda. Ta anslutningskabeln från undersidan av USBhubben och sätt in den i en ledig USB-port på din dator.
USB-hubben är en aktiv komponent som kräver installation av drivrutin vid första användningen. Detta sker
automatiskt under Microsoft
sidan 27 – procedur).
När drivrutinen har installerats kommer du att ha fyra portar på USB-hubben där du kan ansluta alla USB-enheter.
För att uppnå högsta och mest tillförlitliga dataöverföringshastighet måste USB-hubben vara ansluten direkt till den
stationära/bärbara datorn.
En anslutning
Fig.: Detaljerad visning av USB-portarna
®
Windows® 7, Windows Vista®, Windows® XP eller Windows® 2000 operativsystem (se
33
SE
Page 35

A
Notera att den totala strömförbrukningen för alla anslutna USB-enheter inte bör överstiga 500 milliampere.
Numeriskt tangentbord
Användning
- Förse en dator eller en bärbar dator med ett externt numeriskt tangentbord
- Längd: ungefär 76 cm
nslutningskabel
SE
Om ditt tangentbord inte har något numeriskt tangentbord kan du använda denna tilläggsenhet för att skriva siffror.
Dra samtidigt försiktigt i numeriska tangentbordet och kontakten för att få önskad längd på anslutningskabeln. Se
noteringarna om upplindningsmekanismen på sidan 28. Om så krävs kan förlängningskabeln kopplas till numeriska
tangentbordet för att få en längre anslutningskabel.
Numeriska tangentbordet är en aktiv enhet som inte behöver någon manuell drivrutininstallation under Microsoft
Windows
tangentbordet kommer motsvarande drivrutin att installeras automatiskt (se sedan 27 – Procedur).
Vissa tangenter har dubbla funktioner. För att växla mellan funktionerna tryck på tangenten “Num Lock” överst till
vänster på numeriska tangentbordet. När du aktiverar Num Lock lyser en kontrollampa och siffrorna på numeriska
tangentbordet är aktiva. När du avaktiverar Num Lock släcks kontrollampan och specialfunktionerna är aktiva.
®
7, Windows Vista®, Windows® XP eller Windows® 2000. Vid första användningen av numeriska
Obs:
Du kan använda numeriska tangentbordet till Windows® operativsystemets kalkylator. Om du har startat
kalkylatorn och Num Lock på det numeriska tangentbordet är aktivt kan du använda siffrorna och de
matematiska funktionerna såsom på en miniräknare.
Kontrollampa
Num Lock
®
34
Page 36

Tekniska specifikationer
USB-HUB 2040X
Mått (lxbxh): 90,6 x 38,6 x 12,6 mm
Vikt: 38 g
Portar (kvantitet): 4 portar (USB 2.0)
Gränssnitt: USB:2.0
Driftstemperatur: 0 °C ~ +45 °C
Förvaringstemperatur: -20 °C ~ +60 °C
Luftfuktighet vid drift: < 85 % relativ luftfuktighet
HÖRLURAR
Vikt: 25 g
Kabellängd: ungefär 130 cm
Hörlurar
Impedans: 35 Ohm
Signal-brusförhållande: > 60 dB
Frekvensåtergivning: 190 Hz - 18 kHz (+/- 10 dB)
Broadband characteristic voltage: > 75 mV
Mikrofon
Frekvensområde: <50 Hz – 4,5 kHz (+/- 10 dB)
Känslighet: 8,65 mV/Pa
USB-MUS
Kabellängd: ungefär 76 cm
Antal knappar: 3 (mittenknapp på rullningshjul)
Spårning: Optisk sensor
Upplösning: 800 dpi
Mått (lxbxh): 77 x 36 x 20 mm
Vikt: 40 g
Driftstemperatur: 0 °C ~ +45 °C
Förvaringstemperatur: -20 °C ~ +60 °C
Luftfuktighet vid drift: 20 % - 70 % relativ luftfuktighet
NUMERISKT USB-TANGENTBORD
Kabellängd: ungefär 76 cm
Mått (lxbxh): 113 x 74 x 21 mm
Vikt: 94 g
Driftstemperatur: 0 °C ~ +45 °C
Förvaringstemperatur: -20 °C ~ +60 °C
Luftfuktighet vid drift: 20 % - 70 % relativ luftfuktighet
SE
35
Page 37

SE
36
Page 38

Brugervejledning
Velkommen
SilverCrest-rejsesæt
Mange tak, fordi du har valgt vores kvalitetsprodukt SilverCrest-rejsesættet. Læs denne vejledning grundigt, og følg
sikkerhedsanvisningerne.
BEMÆRK:
Alle tekniske data i denne brugervejledning er indhentet og sammensat med den største omhu, og de er gengivet
efter udførlig kontrol. Vi kan dog ikke udelukke, at der kan forekomme fejl. Derfor giver vi ingen garanti, og vi
påtager os intet juridisk ansvar for eventuelle konsekvenser af fejlagtige oplysninger. Hvis du opdager fejl i denne
vejledning, er du meget velkommen til at kontakte os.
INDHOLD I PAKKEN OG BETJENINGSVEJLEDNING
Kontroller, at alle dele medfølger på listen på side 39 i denne brugervejledning. Hvis der mangler dele i rejsesættet,
bedes du kontakte os inden 10 dage.
SYSTEMKRAV
- Operativsystem: Microsoft® Windows® 2000 SP4, Windows® XP, Windows Vista® & Windows® 7
- Min. 1 ledig USB-port
Vigtigt
VIGTIGT VEDRØRENDE SIKKERHED
- Før du tager delene i dette sæt i brug første gang, bedes du læse de tilhørende anvisninger i denne vejledning,
også selv om du allerede er fortrolig med at håndtere elektroniske apparater.
- Opbevar denne vejledning på et sikkert sted til fremtidig brug! Hvis du sælger eller videregiver dette sæt til
andre, er det meget vigtigt, at denne vejledning vedlægges.
- Lad ikke børn lege med elektriske apparater uden opsyn. Børn er ikke nødvendigvis klar over farerne, som er
forbundet hermed. Smådele kan være farlige, hvis de bliver slugt.
- Installer kablerne på sikker vis. Pas på ikke at falde over dem.
- Rejsesættets dele må ikke udsættes for direkte sollys eller placeres i nærheden af varmekilder.
- Beskyt kablerne og rejsesættets øvrige dele mod støv, snavs og slibemidler i væskeform.
- Adskil ikke sættets dele (de indeholder ingen vedligeholdelsesdele).
- Udstyret og kablerne må ikke udsættes for vandsprøjt. Placer ikke beholdere med væske (f.eks. vaser eller
drikkevarer) oven på eller ved siden af rejsesættets dele!
- Placer ikke brændende genstande (f.eks. stearinlys) oven på eller ved siden af rejsesættet.
- Hold altid ledningen i stikket, og træk aldrig i selve ledningen. Kabler skal placeres således, at ingen kan falde
over dem. Hvis kablet beskadiges, er der risiko for brand eller elektrisk stød.
DK
37
Page 39

PRODUKTET ER BEREGNET TIL FØLGENDE
SilverCrest-rejsesættet består af diverse kabler, adaptere og dele til tilslutning i USB-porten på en stationær eller
bærbar pc. Taltastaturet, hubben, musen og headsettet kan kun bruges via USB. Produkterne er kun beregnet til
indendørs brug, og hvor der er tørt. De enheder og adaptere, der er vedlagt i dette sæt, er ikke beregnet til
virksomheds- eller erhvervsmæssige formål. Brug kun enhederne og adapterne i husholdningen til private formål.
Enhver anden anvendelse, end den ovenfor nævnte, er i strid med den beregnede brug.
Targa påtager sig intet ansvar for beskadigelse, der skyldes, at SilverCrest-rejsesættet ikke er brugt til det formål,
som det er beregnet til, eller som opstår pga. uautoiserede ændringer.
KONFORMITETSBEMÆRKNING
Dette udstyr opfylder de grundlæggende og andre relevante krav fuldt ud ifølge EMC-direktivet
2004/108/EC. Den tilhørende konformitetserklæring kan også findes i slutningen af denne
Brugervejledning.
BORTSKAFFELSE AF BRUGT UDSTYR
Udstyr, som er mærket med dette symbol, er omfattet af EU-direktiv 2002/96/EC. Alt elektrisk og
elektronisk udstyr skal bortskaffes særskilt fra husholdningsaffald på dertil beregnede steder. For at
undgå sundhedsfare og miljøbelastning skal dette udstyr bortskaffes på korrekt vis. Kontakt de lokale
myndigheder, genbrugsstationer eller den forretning, hvor du har købt udstyret, for nærmere
oplysninger om korrekt bortskaffelse.
REGISTREREDE VAREMÆRKER
Targa® er et registreret varemærke tilhørende Targa GmbH.
®
er et registreret varemærke tilhørende USB Implementers Forum, Inc.
USB
Microsoft
Corporation.
Alle øvrige produktnavne er varemærker tilhørende de respektive ejere.
DK
®
, Windows®, Windows Vista® og Windows-logoet er registrerede varemærker tilhørende Microsoft
Indhold
Systemkrav .......................................................................................................... 37
Vigtigt ...................................................................................................................37
Indhold i pakken................................................................................................... 39
Introduktion og sådan kommer du i gang ............................................................39
Hovedsæt............................................................................................................. 41
USB-forlængerkabel ............................................................................................42
Modemkabel ........................................................................................................42
Netværkskabel ..................................................................................................... 43
USB-adapter (stiktype A til stiktype B).................................................................43
USB-adapter (stiktype A til mini-stik) ................................................................... 44
USB-mus.............................................................................................................. 44
USB-hub 2040x....................................................................................................45
Taltastatur ............................................................................................................46
Tekniske specifikationer ......................................................................................47
Vigtige garantioplysninger ...................................................................................48
38
Page 40

Indhold i pakken
1 Hovedsæt
2 USB-forlængerkabel
3 Modemkabel, RJ11
4 Netværkskabel, 100 Mbit, RJ45
5 USB-adapter (stiktype A til stiktype B)
6 USB-adapter (stiktype A til mini-stik)
7 USB-mus
8 USB-hub 2040x
9 Taltastatur
Introduktion og sådan kommer du i gang
Tilslutning af USB-udstyr til pc
USB er en forkortelse for "Universal Serial Bus" (seriel universalbus). Når du tilslutter USB-udstyr til din pc, bliver
det registreret og konfigureret automatisk af pc’en. Hvis din pc har mere end én ledig USB-port, kan du tilslutte
udstyret i en port som ønsket. Nogle stationære pc’er kan have USB-porte på bagsiden til mere eller mindre
permanent tilslutning og ekstra USB-porte på forsiden til midlertidig tilslutning.
Portene er lette at genkende. Hvis et USB-apparat tilsluttes i en anden USB-port, installerer operativsystemet om
nødvendigt driveren igen, så apparatet er klar til brug.
Fremgangsmåde
DK
Sæt USB-stikket fra udstyret i en USB-port på pc’en. Der bliver straks vist en meddelelse nederst i højre hjørne på
skærmen:
(fig.: eksempel ved brug af USB-musen i
SilverCrest-rejsesættet)
39
Page 41

Din pc har registreret USB-apparatet og installerer automatisk driveren, hvorefter følgende meddelelse bliver vist:
Operativsystemet kontrollerer, at apparatet er korrekt integreret i systemet, så det straks er klar til brug.
Hvis enheden ikke kan oprette en forbindelse til computeren, skal USB-stikket tages ud i nogle sekunder, hvorefter
enheden tilsluttes til computeren igen. Du kan også forsøge med en anden USB-port på computeren.
Læs anvisningerne i det følgende vedrørende de forskellige dele i rejsesættet.
Kabelopruller
USB-musen, taltastaturet, hovedsættet, USB-forlængerkablet, modemkablet og netværkskablet er alle udstyret
med en smart kabeloprullemekanisme. Med denne kan du altid sørge for, at kablerne har den rette længde.
Oprulleren bruges ved at trække let i begge ender af kablet samtidig, indtil længden er som ønsket. Når du stopper
med at trække, oprulles kablet en anelse i begge sider, indtil det fastlåses i det næste hak.
DK
Træk let i begge ender samtidig for at oprulle kablet. Spærremekanismen udløses, og kablet oprulles automatisk.
Hvis kablet er trukket helt ud, skal du først tage stikket ud for at sikre, at det oprulles korrekt.
40
(fig.: Installation fuldført)
Træk i kablet i begge ender samtidig,
indtil længden er som ønsket.
Mekanismen opruller kablet
en anelse for at fastlåse det.
Page 42

~ 1 cm
~ 1 cm
Træk let, indtil kablet er
udløst og kan oprulles.
Hovedsæt
Betjening
- Brug af telefon via pc’en
- Længde: ca. 130 cm
Mikrofon
For at tilslutte hovedsættet til din pc skal der være installeret et lydkort på den. På lydkortet kan der tilsluttes både
en ekstern mikrofon og øretelefoner. Normalt er stikportene farvemærket eller har trykte symboler, så der kan
kendes forskel. Træk i mikrofonen og stikket samtidig, så kablet får den rigtige længde. Se beskrivelsen af
oprullemekanismen på side 40.
Det røde stik til hovedsættet tilsluttes i mikrofonporten på pc’en, og det grønne stik tilsluttes i porten til hovedsættet
på pc’en. Pc’en har yderligere audioporte, hvis du har brug for det. Se brugervejledningen til din pc, hvis du ikke er
sikker på, hvilken port på pc’en du skal bruge.
Høretelefonstik (grøn)
Mikrofonstik (rød)
Øretelefon
DK
41
Page 43

USB-forlængerkabel
Betjening
- Tilslutning af USB-udstyr, som har for kort forbindelseskabel
- Længde: ca. 76 cm
USB-hunstik
Træk i USB-forlængerkablet, indtil det har den rette længde. Se beskrivelsen af oprullemekanismen på side 40.
Sæt USB-stikket i en ledig USB-port på pc’en, og tilslut et USB-apparat i USB-stikket på forlængerkablet.
USB-stik
Modemforlængerkabel
Betjening
- Tilslutning af et pc-modem i telefonstik
- Længde: ca. 130 cm
DK
Du kan bruge internettet, telefon og fax med en modemforbindelse. Det kræver ekstra software og en
internetopkobling.
Modemkablet bruges til at forbinde en pc via dens indbyggede modem (hvis installeret) til telefonnettet. Kablet har
et 6-benet modulstik (model "RJ11") i begge ender. Træk i begge stik samtidig, indtil kablet har den rette længde.
Se beskrivelsen af oprullemekanismen på side 40.
Hvis modulstikket (RJ11) ikke passer i telefonstikket, skal du tilslutte via en passende adapter (afhængig af land).
Bemærk, at selvom netværkskablet (side 43) er tilsvarende, har det et 8-benet modulstik ("RJ45"), som ikke
kan bruges her.
!
Fig.: 6-benet modulstik på
modemkablet,
model: RJ11
42
Page 44

Netværkskabel
Betjening
- Tilslutning af en pc til netværk, 100 Mbit
- Længde: ca. 130 cm
For at tilslutte din pc til et netværk skal du have installeret et netværkskort på pc’en. På dette er der en port til det 8benede modulstik på netværkskablet. Se de tekniske oplysninger til din pc, hvis du ikke ved, om din pc har denne
netværksport.
Træk i begge stik samtidig, indtil kablet har den rette længde. Se beskrivelsen af oprullemekanismen på side 40.
Sæt et af stikkene på kablet i netværksporten på pc’en, og tilslut stikket i den anden ende i en switch
(netværksstyreenhed).
Bemærk, at selvom modemkablet (side 42) er tilsvarende, har det et 6-benet modulstik ("RJ11"), som ikke
kan bruges her.
!
Fig.: 8-benet modulstik på
netværkskablet,
model: RJ45
USB-adapter (stiktype A til stiktype B)
DK
Betjening
- Adapter til et USB-kabel, så det kan bruges til forskellige stiktyper
Type A-stik
Type B-stik
43
Page 45

Denne adapter kan tilsluttes et USB-forlængerkabel, så det kan bruges som tilslutningskabel til andet udstyr. Det
større A-typestik er standardstikket til en pc, og det mindre B-typestik er beregnet til eksternt udstyr såsom printere,
scannere mv.
USB-adapter (stiktype A til mini-stik)
Betjening
- Adapter til et USB-kabel, så det kan bruges til forskellige stiktyper
USB-ministikket er normalt beregnet som stik til mindre apparater såsom digitalkameraer mv. Sæt adapteren på
forlængerkablet for at bruge det som tilslutningskabel til mindre apparater.
Type A-stik
Mini-stik
USB-mus
DK
Betjening
- Tilslutning til en stationær eller bærbar pc
- Længde: ca. 76 cm
Træk i musen og stikket samtidig, indtil tilslutningskablet har den rette længde. Se beskrivelsen af
oprullemekanismen på side 40. Tilslut om nødvendigt forlængerkablet til stikket på USB-musen for at forlænge
forbindelseskablet.
USB-musen er en aktiv enhed, som ikke kræver manuel driverinstallation på pc’er med Microsoft
Windows Vista
installeret automatisk (se side 39 - Fremgangsmåde).
44
Type A-stick
®
, Windows® XP eller Windows® 2000. Så snart USB-musen betjenes, bliver den tilhørende driver
Midterste
musknap og
rullehjul
Venstre musknap
Højre musknap
®
Windows® 7,
Page 46

Tilslut USB-musekablets stik (eller forlængerkablet) i en USB-port på pc’en. Så snart driveren er installeret ved
tilslutningen, fungerer musen som en 3-knaps mus med rullehjul.
Bemærk:
Venstre musknap er som standardindstilling den primære knap til aktivering af funktioner, fordi de fleste bruger
musen med højre hånd. I Kontrolpanel i WIndows kan du indstille højre musknap som den primære knap for at
bruge USB-musen med venstre hånd.
USB-hub 2040x
Betjening
- Til at udvide en stationær eller bærbar pc med 3 ekstra USB-porte
For at tilslutte flere USB-enheder til en pc kræves der det tilsvarende antal USB-porte. Med en hub kan du udvide 1
port til 4. Tag tilslutningskablet på undersiden af USB-hubben og sæt det i en ledig USB-port på pc’en.
USB-hubben er en aktiv komponent, som kræver, at der installeres en driver, før den kan bruges. Det sker
automatisk i Microsoft
Fremgangsmåde).
Når driveren er installeret, har du 4 porte på USB-hubben, som du kan bruge til tilslutning af USB-udstyr som
ønsket. For at kunne opnå den højeste og mest driftsikre dataoverførselshastighed skal USB-hubben forbindes
direkte til den stationære/bærbare computer.
Bemærk, at det samlede strømforbrug for alle tilsluttede USB-enheder ikke må overstige 500 milliampere.
Type A-stick
Fig.: Nærbillede af USB-portene
®
Windows® 7, Windows Vista®, Windows® XP eller Windows® 2000 (se side 39 -
45
DK
Page 47

Taltastatur
Betjening
- Eksternt taltastatur til udvidet betjening af en stationær eller bærbar pc
- Længde: ca. 76 cm
Tilslutningskabel
Hvis der ikke er et taltastatur på dit pc-tastatur, kan du tilføje denne eksterne enhed til at indtaste tal. Træk i
taltastaturet og stikket samtidig, indtil forbindelseskablet har den rette længde. Se beskrivelsen af
oprullemekanismen på side 40. Tilslut om nødvendigt forlængerkablet til stikket på taltastaturet for at forlænge
forbindelseskablet.
DK
Taltastaturet er en aktiv enhed, som ikke kræver manuel driverinstallation på pc’er med Microsoft
Windows Vista
installeret automatisk (se side 39 - Fremgangsmåde).
Nogle af tasterne har dobbeltfunktion. For at skifte mellem tastfunktionerne skal du trykke på "Num Lock"-tasten
øverst til venstre på taltastaturet. Når Num Lock- er aktiv, lyser der en lampe, hvilket betyder, at tallene på
taltastaturet er aktiveret. Når du inaktiverer Num Lock, bliver lampen slukket, og nu er specialfunktionen aktiv.
Bemærk:
Du kan bruge taltastaturet direkte til at bruge regnemaskinen i Windows®. Hvis du starter regnemaskinen, og
Num Lock er slået til på taltastaturet, kan du bruge tallene og de matematiske funktioner som regnemaskine.
®
, Windows® XP eller Windows® 2000. Så snart taltastaturet betjenes, bliver den tilhørende driver
Num Lock-lampe
®
Windows® 7,
46
Page 48

Tekniske specifikationer
USB HUB 2040X
Dimensioner (HxBxD): 90,6 x 38,6 x 12,6 mm
Vægt: 38 g
Porte (antal): 4 porte (USB 2.0)
Interface: USB 2.0
Betjeningstemperatur: 0 °C ~ +45 °C
Opbevaringstemperatur: -20 °C ~ +60 °C
Luftfugtighed under drift: < 85 % RH
HEADSET
Vægt: 25 g
Kabellængde: ca. 130 cm
Høretelefoner
Impedans: 35 Ohm
Signal/Støjforhold: > 60 dB
Frekvensrespons: 190 Hz - 18 kHz (+/- 10 dB)
Broadband characteristic voltage: > 75 mV
Mikrofon
Frekvensområde: <50 Hz – 4,5 kHz (+/- 10 dB)
Følsomhed: 8,65 mV/Pa
USB-MUS
Kabellængde: ca. 76 cm
Antal knapper:
Styring: Optisk sensor
Opløsning: 800 dpi
Dimensioner (HxBxD): 77 x 36 x 20 mm
Vægt: 40 g
Betjeningstemperatur: 0 °C ~ +45 °C
Opbevaringstemperatur: -20 °C ~ +60 °C
Luftfugtighed under drift: 20 % - 70 % RH
NUMERISK USB-TASTATUR
Kabellængde: ca. 76 cm
Dimensioner (HxBxD): 113 x 74 x 21 mm
Vægt: 94 g
Betjeningstemperatur: 0 °C ~ +45 °C
Opbevaringstemperatur: -20 °C ~ +60 °C
Luftfugtighed under drift: 20 % - 70 % RH
3 (midterknap på scroll-hjulet)
DK
47
Page 49

DK
48
Page 50

Εγχειρίδιο χρήσης
Κιτ ταξιδιού SilverCrest για φορητό υπολογιστή
Καλωσορίσατε
Ευχαριστούµε που επιλέξατε το προηγµένης τεχνολογίας Κιτ ταξιδιού SilverCrest για φορητό υπολογιστή. ∆ιαβάστε
προσεκτικά αυτό το Εγχειρίδιο χρήσης και ακολουθήστε τις οδηγίες ασφάλειας.
ΛΑΒΕΤΕ ΥΠΟΨΗ ΤΑ ΠΑΡΑΚΑΤΩ
Όλα τα τεχνικά δεδοµένα που αναφέρονται στο Εγχειρίδιο χρήσης έχουν συγκεντρωθεί και συνταχθεί µε µεγάλη
προσοχή και έχουν αναπαραχθεί µε τα πιο αποτελεσµατικά µέτρα ελέγχου. Ωστόσο, ενδέχεται να υπάρχουν
ορισµένα λάθη. Για το λόγο αυτό, δεν παρέχεται καµία εγγύηση, ούτε αναλαµβάνουµε ευθύνη για τυχόν συνέπειες
που µπορεί να προκύψουν από λανθασµένες πληροφορίες. Στην περίπτωση που εντοπίσετε οποιοδήποτε σφάλµα
στην παρούσα έκδοση, θα σας παρακαλούσαµε να µας το επισηµάνετε.
ΠΕΡΙΕΧΟΜΕΝΑ ΣΥΣΚΕΥΑΣΙΑΣ ΚΑΙ ΣΗΜΕΙΩΣΕΙΣ ΓΙΑ ΤΗ ΛΕΙΤΟΥΡΓΙΑ
Χρησιµοποιώντας τη λίστα της σελίδας 51 του παρόντος Εγχειριδίου, ελέγξτε ότι τα περιεχόµενα της συσκευασίας
είναι πλήρη. Στην περίπτωση που λείπει κάποιο εξάρτηµα από τη συσκευασία, ειδοποιήστε µας εντός 10 ηµερών.
ΑΠΑΙΤΗΣΕΙΣ ΣΥΣΤΗΜΑΤΟΣ
- Λειτουργικό σύστηµα: Microsoft® Windows® 2000 SP4, Windows® XP, Windows Vista® & Windows® 7
- Τουλάχιστον µία ελεύθερη θύρα USB
Σηµαντική σηµείωση
ΣΗΜΑΝΤΙΚΕΣ Ο∆ΗΓΙΕΣ ΓΙΑ ΤΗΝ ΑΣΦΑΛΕΙΑ
- Προτού χρησιµοποιήσετε τις συσκευές για πρώτη φορά, διαβάστε τις σηµειώσεις που περιλαµβάνονται σε αυτό
το εγχειρίδιο, ακόµα και αν είστε εξοικειωµένοι µε τη χρήση ηλεκτρονικών συσκευών.
- Φυλάξτε αυτό το εγχειρίδιο σε ασφαλές µέρος για µελλοντική χρήση. Αν πουλήσετε ή δώσετε τις συσκευές σε
- Μην αφήνετε τα παιδιά να παίζουν µε ηλεκτρικές συσκευές χωρίς την επίβλεψη κάποιου ενηλίκου. Τα παιδιά
- Συνδέστε τα καλώδια µε ασφαλή
- Μην εκθέτετε τις συσκευές στο άµεσο ηλιακό φως και µην τις τοποθετείτε κοντά σε πηγές θερµότητας.
- Προστατέψτε τα καλώδια και τις συσκευές από τη σκόνη, τη βρωµιά και τα διαβρωτικά υγρά.
- Μην ανοίγετε
- Οι συσκευές και τα καλώδια δεν πρέπει να βρέχονται. Μην τοποθετείτε δοχεία µε υγρά ή ποτά (όπως βάζα ή
- Μην τοποθετείτε αντικείµενα µε γυµνή φλόγα (όπως
- Τραβάτε πάντα το βύσµα από την πρίζα και όχι το ίδιο το καλώδιο. Τα καλώδια πρέπει να είναι τοποθετηµένα
, πρέπει να του παραδώσετε και το παρόν εγχειρίδιο.
άλλον
ίσως δεν είναι σε θέση να αναγνωρίσουν τους πιθανούς κινδύνους. Η κατάποση µικρών εξαρτηµάτων
ενδέχεται να είναι επικίνδυνη.
αυτά.
το περίβληµα των συσκευών γιατί δεν περιέχουν µέρη που να µπορούν να επισκευαστούν.
ποτήρια) επάνω ή δίπλα στις συσκευές.
σε σηµείο ώστε να µην υπάρχει κίνδυνος κάποιος να σκοντάψει σε αυτά. Όταν το καλώδιο είναι φθαρµένο,
υπάρχει κίνδυνος πυρκαγιάς ή
τρόπο. Προσέξτε ώστε να µην υπάρχει περίπτωση να µπερδευτεί κάποιος σε
κεριά) επάνω ή δίπλα στις συσκευές.
ηλεκτροπληξίας.
GR
49
Page 51

ΕΝ∆Ε∆ΕΙΓΜΕΝΗ ΧΡΗΣΗ
Το Κιτ ταξιδιού Silvercrest για φορητό υπολογιστή περιλαµβάνει καλώδια, προσαρµογείς και συσκευές για τη
σύνδεση στη θύρα USB ενός προσωπικού ή φορητού υπολογιστή. Η λειτουργία του αριθµητικού πληκτρολογίου,
του διανοµέα και του ποντικιού πρέπει να γίνεται µόνο µέσω σύνδεσης USB. Τα προϊόντα αυτά πρέπει να
χρησιµοποιούνται µόνο σε εσωτερικούς
περιλαµβάνονται στη συσκευασία δεν έχουν σχεδιαστεί για εταιρικές και εµπορικές εφαρµογές. Προορίζονται µόνο
για προσωπική χρήση σε οικιακό περιβάλλον. Οποιαδήποτε άλλη χρήση εκτός από αυτή θεωρείται µη
ενδεδειγµένη χρήση.
Η Targa δεν φέρει ευθύνη για ζηµιές
τροποποιήσεις στο Κιτ ταξιδιού ενός φορητού υπολογιστή Silvercrest.
χώρους χωρίς υγρασία. Οι συσκευές και οι προσαρµογείς που
που προκύπτουν από τη µη ενδεδειγµένη χρήση ή τις µη εγκεκριµένες
∆ΗΛΩΣΗ ΣΥΜΜΟΡΦΩΣΗΣ
Αυτή η συσκευή έχει ελεγχθεί και έχει πιστοποιηθεί ότι πληροί τις σχετικές απαιτήσεις της Οδηγίας
περί Ηλεκτροµαγνητικής Συµβατότητας 2004/108/ΕC. Η σχετική ∆ήλωση Συµµόρφωσης βρίσκεται
στο τέλος αυτού του εγχειριδίου χρήσης.
ΑΠΟΡΡΙΨΗ ΠΑΛΑΙΩΝ ΣΥΣΚΕΥΩΝ
Οι συσκευές που φέρουν αυτό το σύµβολο υπόκεινται στους κανονισµούς της Ευρωπαϊκής Οδηγίας
2002/96/ΕC. Ο ηλεκτρικός και ηλεκτρονικός εξοπλισµός πρέπει να απορρίπτεται ξεχωριστά από τα
οικιακά απορρίµµατα, σε ειδικούς χώρους και από πιστοποιηµένους φορείς. Με την κατάλληλη
απόρριψή τους, διασφαλίζεται η προστασία του περιβάλλοντος και
περισσότερες πληροφορίες σχετικά µε τους ενδεδειγµένους τρόπους απόρριψης, απευθυνθείτε στην
τοπική αυτοδιοίκηση, τους αρµόδιους φορείς ή στο κατάστηµα από όπου αγοράσατε το προϊόν.
η δηµόσια υγεία. Για
ΚΑΤΑΤΕΘΕΙΜΕΝΑ ΕΜΠΟΡΙΚΑ ΣΗΜΑΤΑ
Η ονοµασία Targa® είναι εµπορικό σήµα κατατεθέν της Targa GmbH.
Η ονοµασία USB
Οι ονοµασίες Microsoft
κατατεθέντα της Microsoft Corporation.
Όλες οι άλλες εµπορικές ονοµασίες είναι εµπορικά σήµατα των αντίστοιχων κατόχων τους.
®
είναι εµπορικό σήµα κατατεθέν της USB Implementers Forum, Inc.
®
, Windows®, Windows Vista® και το λογότυπο των Windows είναι εµπορικά σήµατα
Περιεχόµενα
GR
Απαιτήσεις συστήµατος .......................................................................................49
Σηµαντική σηµείωση ............................................................................................ 49
Περιεχόµενα συσκευασίας ................................................................................... 51
Εισαγωγή και έναρξη χρήσης ..............................................................................51
Σετ ακουστικού-µικροφώνου................................................................................53
Καλώδιο επέκτασης USB..................................................................................... 54
Καλώδιο επέκτασης µόντεµ .................................................................................54
Καλώδιο σύνδεσης δικτύου .................................................................................55
Προσαρµογέας USB (βύσµα τύπου A σε βύσµα τύπου B) .................................55
Προσαρµογέας USB (βύσµα τύπου A σε βύσµα Mini-USB) ...............................56
Ποντίκι USB .........................................................................................................56
∆ιανοµέας USB 2040x .........................................................................................57
Αριθµητικό πληκτρολόγιο..................................................................................... 58
Τεχνικές προδιαγραφές .......................................................................................59
Λεπτοµέρειες εγγύησης .......................................................................................60
50
Page 52

Περιεχόµενα συσκευασίας
1 Σετ ακουστικού-µικροφώνου
2 Καλώδιο επέκτασης USB
3 Καλώδιο επέκτασης µόντεµ, RJ11
4 Καλώδιο σύνδεσης δικτύου, 100 MBit,
RJ45
5 Προσαρµογέας USB
(βύσµα τύπου A σε βύσµα τύπου B)
6 Προσαρµογέας USB
(βύσµα τύπου A σε βύσµα Mini-USB)
7 Ποντίκι USB
8 ∆ιανοµέας USB 2040x
9 Αριθµητικό πληκτρολόγιο
Εισαγωγή και έναρξη χρήσης
Σύνδεση συσκευών USB στον υπολογιστή
USB σηµαίνει "Ενιαίος σειριακός δίαυλος" (Universal Serial Bus). Όταν συνδέετε µια συσκευή USB στον
υπολογιστή, το σύστηµα αυτόµατα εντοπίζει τη συσκευή και ρυθµίζει τις παραµέτρους της. Εάν ο υπολογιστής σας
διαθέτει πολλές θύρες USB, µπορείτε να χρησιµοποιήσετε οποιαδήποτε από αυτές. Ορισµένοι επιτραπέζιοι
υπολογιστές µπορεί να διαθέτουν θύρες USB στο πίσω µ
θύρες USB στο µπροστινό µέρος για πιο προσωρινές συνδέσεις.
Μη συγχέετε τις θύρες αυτές. Εάν µια συσκευή USB συνδεθεί σε άλλη θύρα USB, το λειτουργικό σύστηµα θα
εγκαταστήσει ξανά το πρόγραµµα οδήγησης, εάν χρειαστεί, και η συσκευή θα είναι έτοιµη για χρήση.
∆ιαδικασία
έρος για περισσότερες µόνιµες συνδέσεις και επιπλέον
GR
Συνδέστε το βύσµα USB της συσκευής σε µια θύρα USB του υπολογιστή σας. Αµέσως θα εµφανιστεί το παρακάτω
µήνυµα στην κάτω δεξιά πλευρά της οθόνης σας:
(Εικ.: Παράδειγµα µε το ποντίκι USB του Κιτ
ταξιδιού για φορητό υπολογιστή)
51
Page 53

Ο υπολογιστής σας εντόπισε τη συσκευή USB, εγκατέστησε αυτόµατα το πρόγραµµα οδήγησης και τώρα εµφανίζει
το παρακάτω µήνυµα:
Εικ. 2: Η εγκατάσταση ολοκληρώθηκε)
Το λειτουργικό σύστηµα επιβεβαιώνει ότι η συσκευή ενσωµατώθηκε στο σύστηµα και είναι έτοιµη για χρήση.
Αν δεν είναι δυνατή η επικοινωνία µεταξύ συσκευής και υπολογιστή, αποσυνδέστε το καλώδιο USB για µερικά
δευτερόλεπτα και επανασυνδέστε το στον υπολογιστή. Μπορείτε να συνδέστε τη συσκευή σε µια διαφορετική θύρα
USB του
∆ιαβάστε στις παρακάτω σελίδες τις σηµειώσεις για κάθε µεµονωµένο προϊόν του Κιτ ταξιδιού για φορητό
υπολογιστή.
Το ποντίκι USB, το αριθµητικό πληκτρολόγιο, το σετ ακουστικού-µικροφώνου, το καλώδιο επέκτασης USB, το
καλώδιο σύνδεσης µόντεµ και το καλώδιο δικτύου διαθέτουν έναν "έξυπνο" µηχανισµό περιέλιξης καλωδίου. Χάρη
σε αυτό το µηχανισµό, το καλώδιο σύνδεσης µπορεί να έχει το µήκος που επιθυµείτε.
Για να το πετύχετε αυτό, τραβήξτε
επιθυµητό µήκος. Όταν σταµατήσετε να τραβάτε, ο µηχανισµός περιέλιξης τραβά το καλώδιο και από τις δύο
πλευρές, µέχρι αυτό να "κλειδώσει" στον πρώτο αναστολέα.
GR
Για να µαζέψετε
καλώδιο περιελίσσεται µέσα στο περίβληµα. Εάν το καλώδιο ξετυλιχτεί τελείως, απελευθερώστε πρώτα το βύσµα
ώστε να τυλιχτεί σωστά.
52
υπολογιστή σας.
Μηχανισµός περιέλιξης καλωδίου
απαλά τα δύο άκρα του καλωδίου ταυτόχρονα µέχρι το καλώδιο να φτάσει στο
το καλώδιο, τραβήξτε ξανά απαλά και τα δύο άκρα. Ο αναστολέας απελευθερώνεται και το
Τραβήξτε το καλώδιο και από τις
δύο πλευρές ταυτόχρονα, µέχρι να
φτάσει στο επιθυµητό µήκος.
Ο µηχανισµός θα περιελίξει το
καλώδιο ελαφρώς µέχρι να
ασφαλίσει στη θέση του.
Page 54

~ 1cm ~ 1cm
Τραβήξτε µαλακά για να
απελευθερωθεί το καλώδιο
και να περιελιχθεί στο
περίβληµα.
Σετ ακουστικού-µικροφώνου
Χρήση
- Επικοινωνία µέσω του υπολογιστή
- Μήκος καλωδίου: περίπου 130 cm
Μικρόφωνο
Για να συνδέσετε το σετ ακουστικού-µικροφώνου στον υπολογιστή σας, ο υπολογιστής σας πρέπει να διαθέτει
εγκαταστηµένη µια κάρτα ήχου. Αυτή παρέχει δυνατότητα σύνδεσης εξωτερικού µικροφώνου και ακουστικών. Οι
θύρες σύνδεσης συνήθως επισηµαίνονται είτε µε διαφορετικά χρώµ
διαφοροποιούν.
Τραβήξτε ταυτόχρονα το µικρόφωνο και το βύσµα µέχρι το καλώδιο να φτάσει στο επιθυµητό µήκος. ∆είτε τις
σηµειώσεις για το µηχανισµό περιέλιξης στη σελίδα 52.
Το κόκκινο βύσµα του σετ ακουστικού-µικροφώνου συνδέεται στη θύρα µικροφώνου του
πράσινο βύσµα στη θύρα ακουστικών του υπολογιστή. Ο υπολογιστής σας µπορεί να διαθέτει επιπλέον υποδοχές
ήχου. Εάν δεν είστε σίγουροι ποια είναι η σωστή θύρα, ανατρέξτε στο εγχειρίδιο χρήσης του υπολογιστή σας.
Βύσµα ακουστικού (πράσινο
Βύσµα µικροφώνου (κόκκινο)
Ακουστικά
ατα είτε µε τυπωµένα σύµβολα που τις
υπολογιστή και το
GR
53
Page 55

Καλώδιο επέκτασης USB
Χρήση
- Σύνδεση συσκευών USB των οποίων το καλώδιο σύνδεσης είναι πολύ κοντό
- Μήκος καλωδίου: περίπου 76 cm
Βύσµα σύνδεσης USB
Τραβήξτε το καλώδιο επέκτασης USB µέχρι το επιθυµητό µήκος. ∆είτε τις σηµειώσεις για το µηχανισµό περιέλιξης
στη σελίδα 52.
Συνδέστε το βύσµα USB σε µια ελεύθερη θύρα USB του υπολογιστή και έπειτα συνδέστε µια συσκευή USB στην
υποδοχή USB του καλωδίου επέκτασης.
Υποδοχή σύνδεσης USB
Καλώδιο επέκτασης µόντεµ
Χρήση
- Σύνδεση ενός µόντεµ υπολογιστή στο τηλεφωνικό δίκτυο
- Μήκος καλωδίου: περίπου 130 cm
Με µια σύνδεση µόντεµ µπορείτε να χρησιµοποιήσετε το Internet, την τηλεφωνία, καθώς και φαξ. Αυτό απαιτεί
πρόσθετο λογισµικό και µια συνδροµή σε υπηρεσία Internet.
GR
Το καλώδιο σύνδεσης του µόντεµ συνδέει τον υπολογιστή στο τηλεφωνικό δίκτυο µέσω του ενσωµατωµένου
µόντεµ του
ακίδων τύπου "RJ11" και στα δύο άκρα του. Τραβήξτε και τα δύο άκρα ταυτόχρονα µέχρι το καλώδιο να φτάσει στο
επιθυµητό µήκος. ∆είτε τις σηµειώσεις για το µηχανισµό περιέλιξης στη σελίδα 52.
!
54
(ανάλογα µε τη διαµόρφωση του υπολογιστή). Το καλώδιο σύνδεσης διαθέτει µια υποδοχή σύνδεσης 6
Λάβετε υπόψη ότι
υποδοχή σύνδεσης 8 ακίδων, τύπου "RJ45".
παρόλο που το καλώδιο σύνδεσης δικτύου (σελίδα 55) είναι παρόµοιου τύπου, διαθέτει
Εικ.: Βύσµα σύνδεσης 6 ακίδων
Western του καλωδίου
σύνδεσης µόντεµ,
µοντέλο: RJ11
Page 56

Καλώδιο σύνδεσης δικτύου
Χρήση
- Για τη σύνδεση ενός υπολογιστή σε ένα δίκτυο, 100 Mbit
- Μήκος καλωδίου: περίπου 130 cm
Για να είναι δυνατή η σύνδεση του υπολογιστή σας σε ένα δίκτυο, πρέπει να διαθέτει µια κάρτα δικτύου. Αυτή
παρέχει µια θύρα στην οποία συνδέεται το βύσµα 8 ακίδων του καλωδίου σύνδεσης δικτύου. Εάν δεν είστε
σίγουροι εάν ο υπολογιστής σας διαθέτει θύρα δικτύου,
υπολογιστή σας.
Τραβήξτε και τα δύο άκρα ταυτόχρονα µέχρι το καλώδιο να φτάσει στο επιθυµητό µήκος. ∆είτε τις σηµειώσεις για
το µηχανισµό περιέλιξης στη σελίδα 52.
Συνδέστε ένα από τα δύο άκρα του καλωδίου σύνδεσης στη θύρα δικτύου του υπολογιστή και το
µεταγωγέα (ή διανοµέα δικτύου).
Λάβετε υπόψη ότι παρόλο που το καλώδιο σύνδεσης µόντεµ (σελίδα 54) είναι παρόµοιου τύπου, διαθέτει
υποδοχή σύνδεσης 6 ακίδων, τύπου "RJ11".
!
ανατρέξτε στην τεκµηρίωση τεχνικών προδιαγραφών του
Εικ.: Βύσµα σύνδεσης 8 ακίδων
του καλωδίου σύνδεσης
µόντεµ,
µοντέλο: RJ45
άλλο άκρο σε ένα
Προσαρµογέας USB (βύσµα τύπου A σε βύσµα τύπου B)
Χρήση
- Για την προσαρµογή ενός καλωδίου USB για χρήση µε διάφορους τύπους υποδοχών σύνδεσης
Εάν απαιτείται, ο προσαρµογέας µπορεί να συνδεθεί σε ένα καλώδιο επέκτασης USB, για χρήση ως καλώδιο
σύνδεσης σε πρόσθετες συσκευές. Το µεγαλύτερο βύσµα τύπου A αποτελεί από προεπιλογή το βύσµα σύνδεσης
υπολογιστή, ενώ το µικρότερο βύσµα τύπου B προορίζεται για πρόσθετες συσκευές, όπως εκτυπωτές,
σε
σαρωτές, κ.λπ.
Βύσµα σύνδεσης τύπου A
Βύσµα σύνδεσης τύπου B
55
GR
Page 57

Α
Προσαρµογέας USB (βύσµα τύπου A σε βύσµα Mini-USB)
Χρήση
- Για την προσαρµογή ενός καλωδίου USB για χρήση µε διάφορους τύπους υποδοχών σύνδεσης
Η σύνδεση mini-USB συνήθως χρησιµοποιείται για τη σύνδεση µικρών συσκευών, όπως ψηφιακές φωτογραφικές
µηχανές, κ.λπ. Συνδέστε τον προσαρµογέα στο καλώδιο επέκτασης για χρήση του καλωδίου διασύνδεσης µε
µικρές συσκευές.
Βύσµα σύνδεσης
Βύσµα σύνδεσης mini USB
Ποντίκι USB
Χρήση
- Σύνδεση σε επιτραπέζιο ή φορητό υπολογιστή
- Μήκος καλωδίου: περίπου 76 cm
GR
Τραβήξτε το ποντίκι και το βύσµα ταυτόχρονα και προσεκτικά, µέχρι το καλώδιο σύνδεσης να φτάσει στο
επιθυµητό µήκος. ∆είτε τις σηµειώσεις για το µηχανισµό περιέλιξης στη σελίδα 52. Εάν χρειάζεται, συνδέστε το
καλώδιο επέκτασης στο βύσµα του ποντικιού USB για
Το ποντίκι USB είναι µια ενεργή συσκευή, η οποία δεν απαιτεί την εγκατάσταση του προγράµµατος οδήγησης σε
Microsoft
λειτουργία του ποντικιού USB, το αντίστοιχο πρόγραµµα οδήγησής του εγκαθίσταται αυτόµατα (δείτε σελίδα 51 –
∆ιαδικασία).
Κεντρικό κουµπί και κουµπί κύλισης ποντικιού
Βύσµα σύνδεσης
ριστερό κουµπί ποντικιού
να γίνει το καλώδιο σύνδεσης µακρύτερο.
®
Windows 7, Windows Vista®, Windows® XP ή σε Windows® 2000 από το χρήστη. Κατά την πρώτη
∆εξί κουµπί ποντικιού
56
Page 58

Συνδέστε το βύσµα του ποντικιού USB (ή του καλωδίου επέκτασης) στη θύρα USB του υπολογιστή σας. Μόλις το
πρόγραµµα οδήγησης εγκατασταθεί κατά την πρώτη σύνδεση, το ποντίκι θα λειτουργήσει ως ποντίκι 3 κουµπιών
µε τροχό κύλισης.
Σηµείωση:
Από προεπιλογή, το αριστερό κουµπί του ποντικιού είναι το βασικό κουµπί ενεργοποίησης λειτουργιών, καθώς
οι περισσότεροι χρήστες χρησιµοποιούν το ποντίκι µε το δεξί τους χέρι. Στον Πίνακα Ελέγχου του λειτουργικού
συστήµατος µπορείτε να αλλάξετε το βασικό κουµπί ώστε να είναι το δεξί και να προσαρµόσετε το ποντίκι USB
για χρήση από αριστερόχειρες.
∆ιανοµέας USB 2040x
Χρήση
- Παρέχει σε έναν επιτραπέζιο ή φορητό υπολογιστή τρεις επιπλέον θύρες USB
Για να συνδέσετε πολλές συσκευές USB σε έναν υπολογιστή, πρέπει να διαθέτετε και τον αντίστοιχο αριθµό θυρών
USB. Χρησιµοποιώντας ένα διανοµέα, µπορείτε να µετατρέψετε µία θύρα σε τέσσερις. Τραβήξτε το καλώδιο
σύνδεσης
Ο διανοµέας USB αποτελεί ενεργό εξάρτηµα και απαιτεί την εγκατάσταση ενός προγράµµατος οδήγησης κατά την
πρώτη χρήση. Αυτό γίνεται αυτόµατα στα λειτουργικά συστήµατα Microsoft® Windows 7, Windows Vista®,
Windows® XP και Windows® 2000 (δείτε σελίδα 51 – ∆ιαδικασία).
Μόλις το πρόγρα
µπορείτε να συνδέσετε οποιαδήποτε συσκευή USB. Για να επιτύχετε τη µεγαλύτερη δυνατή και ταυτόχρονα
αξιόπιστη ταχύτητα µεταφοράς δεδοµένων, ο διανοµέας USB πρέπει να είναι συνδεδεµένος απευθείας µε το
PC/φορητό υπολογιστή.
Η συνολική κατανάλωση ισχύος
milliampere.
Βύσµα σύνδεσης
Εικ.: Λεπτοµερής εικόνα των θυρών USB
από την κάτω πλευρά του διανοµέα USB και συνδέστε το σε µια ελεύθερη θύρα USB του υπολογιστή.
µµα οδήγησης εγκατασταθεί, θα έχετε διαθέσιµες τέσσερις θύρες στο διανοµέα USB, στις οποίες
όλων των συνδεδεµένων συσκευών USB δεν πρέπει να υπερβαίνει τα 500
57
GR
Page 59

Έ
Αριθµητικό πληκτρολόγιο
Χρήση
- Παρέχει σε έναν επιτραπέζιο ή φορητό υπολογιστή αριθµητικό πληκτρολόγιο
- Μήκος καλωδίου: περίπου 76 cm
Καλώδιο βύσµατος
σύνδεσης
Εάν το πληκτρολόγιό σας δεν διαθέτει αριθµητικό πληκτρολόγιο, µπορείτε να χρησιµοποιήσετε αυτήν την
πρόσθετη συσκευή για την πληκτρολόγηση αριθµών. Τραβήξτε το αριθµητικό πληκτρολόγιο και το βύσµα
ταυτόχρονα και προσεκτικά µέχρι το καλώδιο σύνδεσης να φτάσει στο επιθυµ
µηχανισµό περιέλιξης στη σελίδα 52. Εάν χρειάζεται, συνδέστε το καλώδιο επέκτασης στο βύσµα του αριθµητικού
πληκτρολογίου για να γίνει το καλώδιο σύνδεσης µακρύτερο.
Το αριθµητικό πληκτρολόγιο είναι µια ενεργή συσκευή, η οποία δεν απαιτεί την εγκατάσταση του προγράµµατος
οδήγησης σε Microsoft® Windows 7, Windows Vista®, Windows® XP ή σε Windows® 2000 από το χρήστη. Κατά
την πρώτη λειτουργία του αριθµητικού πληκτρολογίου, το αντίστοιχο πρόγραµµα οδήγησής του εγκαθίσταται
αυτόµατα (δείτε σελίδα 51 – ∆ιαδικασία).
Σε ορισµένα πλήκτρα έχουν εκχωρηθεί διπλές λειτουργίες. Για να αλλάξετε τις λειτουργίες, πατήστε το πλήκτρο
"Num Lock" που βρίσκεται επάνω αριστερά στο αριθµητικό
ενεργοποιηµένο, ανάβει µια ενδεικτική λυχνία και ενεργοποιείται η χρήση των αριθµών στο αριθµητικό
GR
πληκτρολόγιο. Όταν απενεργοποιείτε το πλήκτρο Num Lock, η ενδεικτική λυχνία σβήνει και ενεργοποιούνται οι
ειδικές λειτουργίες.
Σηµείωση:
Μπορείτε να χρησιµοποιήσετε το αριθµητικό πληκτρολόγιο για απευθείας χρήση της αριθµοµηχανής των
Windows®. Εάν εκκινήσετε την Αριθµοµηχανή ενώ είναι ενεργοποιηµένη η λειτουργία Num Lock στο αριθµητικό
πληκτρολόγιο, µπορείτε να χρησιµοποιήσετε τους αριθµούς και τις µαθηµατικές λειτουργίες στην αριθµοµηχανή.
νδειξη
Num Lock
ητό µήκος. ∆είτε τις σηµειώσεις για το
πληκτρολόγιο. Όταν το πλήκτρο Num Lock είναι
58
Page 60

Τεχνικές προδιαγραφές
∆ιανοµέας USB 2040x
∆ιαστάσεις (ΜxΠxΥ): 90,6 x 38,6 x 12,6 mm
Βάρος: 38 g
Θύρες (ποσότητα): 4 θύρες (USB 2.0)
∆ιασύνδεση: USB 2.0
Θερµοκρασία λειτουργίας: 0°C ~ +45°C
Θερµοκρασία φύλαξης: -20°C ~ +60°C
Υγρασία λειτουργίας: < 85% σχετική υγρασία
Σετ ακουστικού-µικροφώνου
Βάρος: 25 g
Μήκος καλωδίου: περίπου 130 cm
Ακουστικά
Σύνθετη αντίσταση εισόδου: 35 Ohm
Λόγος σήµατος προς θόρυβο: > 60 dB
Απόκριση συχνότητας: 190 Hz - 18 kHz (+/- 10 dB)
Broadband characteristic voltage: > 75 mV
Μικρόφωνο
Εύρος συχνότητας: <50 Hz – 4,5 kHz (+/- 10 dB)
Ευαισθησία: 8,65 mV/Pa
Ποντίκι USB
Μήκος καλωδίου: περίπου 76 cm
Αριθµός κουµπιών: 3 (το κεντρικό κουµπί σε τροχό κύλισης)
Ιχνηλάτηση: Οπτικός αισθητήρας
Ανάλυση: 800 dpi
∆ιαστάσεις (ΜxΠxΥ): 77 x 36 x 20 mm
Βάρος: 40 g
Θερµοκρασία λειτουργίας: 0°C ~ +45°C
Θερµοκρασία φύλαξης: -20°C ~ +60°C
Υγρασία λειτουργίας: 20% - 70% σχετική υγρασία
ΑΡΙΘΜΗΤΙΚΟ ΠΛΗΚΤΡΟΛΟΓΙΟ USB
Μήκος καλωδίου: περίπου 76 cm
∆ιαστάσεις (ΜxΠxΥ): 113 x 74 x 21 mm
Βάρος: 94 g
Θερµοκρασία λειτουργίας: 0°C ~ +45°C
Θερµοκρασία φύλαξης: -20°C ~ +60°C
Υγρασία λειτουργίας: 20% - 70% σχετική υγρασία
GR
59
Page 61

GR
60
Page 62

GR
61
Page 63

EC-Declaration of Conformity
We: Targa GmbH
Lange Wende 41
59494 Soest, Germany
declare our responsibility that the
product: USB Traveller Kit
model: SilverCrest NTK-2100
is confirmed to comply with the requirements set out in the Council Directive on the
Approximation of the Laws of the Member States relating to Electromagnetic
Compatibility 2004/108/EC.
The measurements were carried out in accredited laboratories.
For the evaluation of above mentioned Council Directives for Electromagnetic
Compatibility were consulted:
EMC: EN 55024: 1998 + A1: 2001 + A2: 2003
EN 55022: 2006 (limit class B)
Year of marking: 2010
Soest, 18th of May 2010 ____________________________________
authorised signature Matthias Klauke, Managing Director
Page 64

TARGA GmbH
Lange Wende 41
D-59494 Soest
www.silvercrest.cc
1550401
3
 Loading...