

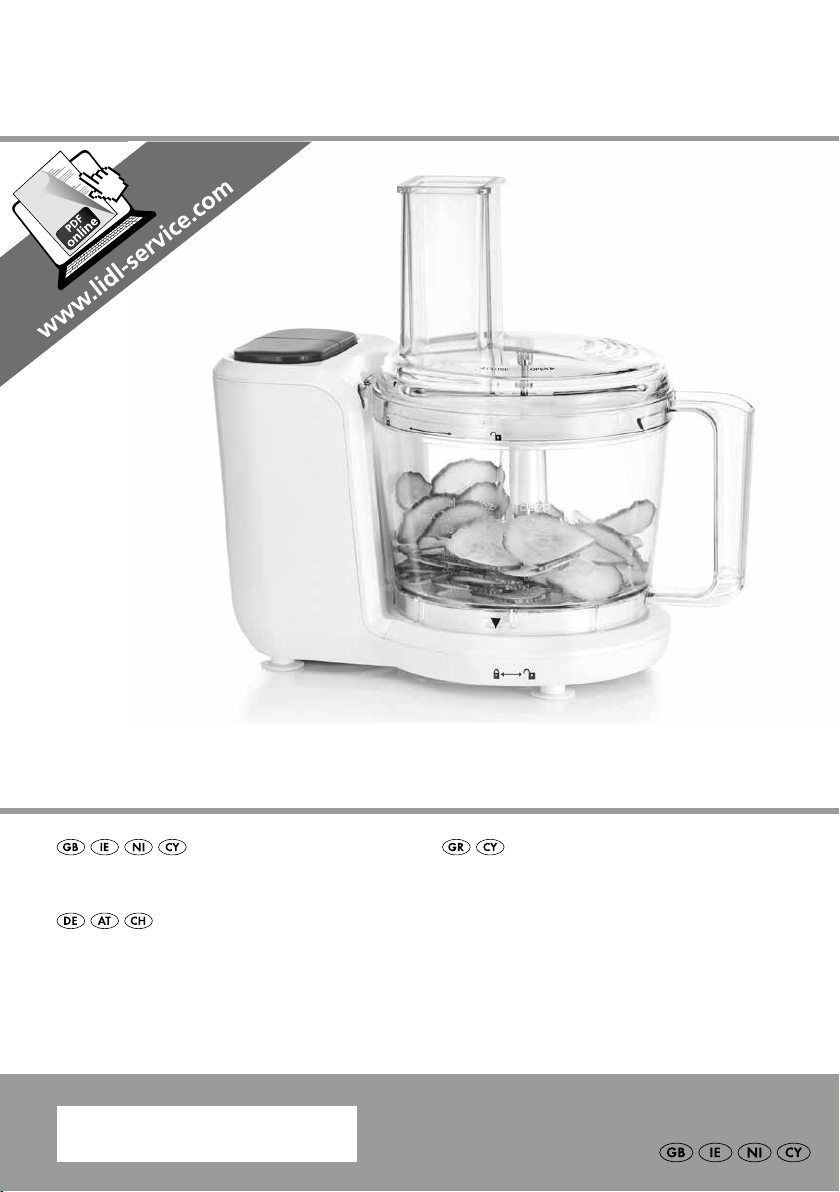
FOOD PROCESSOR KM 250 C1
FOOD PROCESSOR
Operating instructions
KÜCHENMASCHINE
Bedienungsanleitung
IAN 315063
ΉΛΕΚΤΡΙΚΟΣ ΤΡΦΤΉΣ
Οδηүίες χρήσης

Before reading, unfold the page containing the illustrations and familiarise yourself with all functions of
the device.
Πριν ξεκινήσετε την ανάγνωση, ανοίξτε τη σελίδα με τις εικόνες και εξοικειωθείτε με όλες τις λειτουργίες
της συσκευής.
Klappen Sie vor dem Lesen die Seite mit den Abbildungen aus und machen Sie sich anschließend mit allen
Funktionen des Gerätes vertraut.
GB / IE / NI / CY Operating instructions Page 1
GR / CY Οδηүίες χρήσης Σελίδα 11
DE / AT / CH Bedienungsanleitung Seite 21
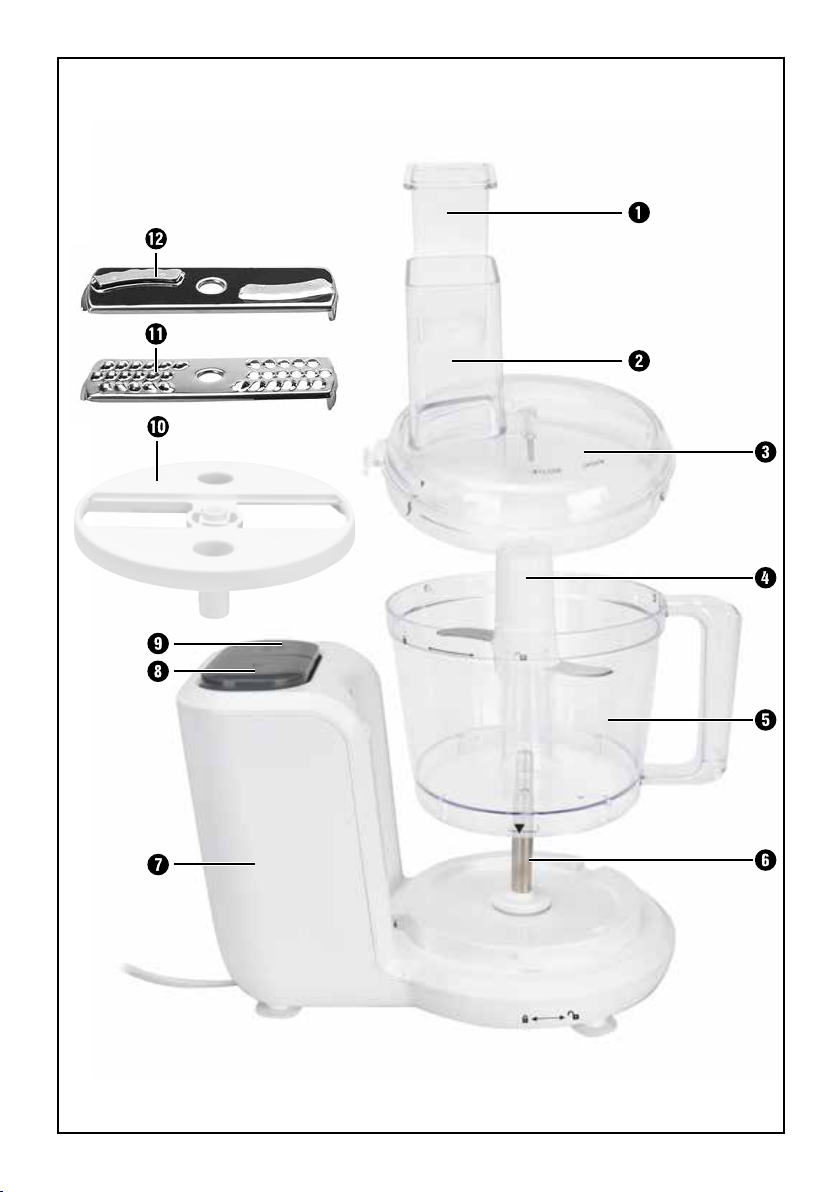

Table of Contents
Introduction ............................................................2
Proper use .............................................................2
Package contents .......................................................2
Appliance description ....................................................2
Technical details ........................................................2
Safety instructions ......................................................3
Before first use .........................................................5
Assembling the appliance ................................................5
Cutting blades ..................................................................... 5
Food processing attachments .......................................................... 6
Operation .............................................................6
Using the cutting blades .............................................................. 6
Working with the food processor ....................................................... 7
Cleaning and care .......................................................8
Storage ...............................................................8
Disposal ...............................................................9
Service ................................................................9
Importer ..............................................................9
Troubleshooting .......................................................10
KM 250 C1
GB│IE│NI│CY
│
1 ■

Introduction
Congratulations on the purchase of your new
appliance.
You have selected a high-quality product.
The operating instructions are part of this product.
They contain important information on safety, use
and disposal. Before using the product, familiarise
yourself with all operating and safety instructions.
Use this product only as described and only for the
specified areas of application. Please also pass
these operating instructions on to any future
owner(s).
Proper use
This appliance is intended exclusively for chopping
and processing food. This appliance is intended
exclusively for use in domestic households.
Not to be used for commercial purposes.
Package contents
Food processor
(lid, pusher, bowl, motor unit)
Cutting blades
Disc adapter
Grater attachment
Slicer attachment
Operating instructions
Check the delivery contents for completeness
immediately after unpacking.
Appliance description
1 Pusher
2 Feed tube
3 Lid
4 Cutting blades
5 Bowl
6 Drive shaft
7 Motor unit
8 ON button
9 OFF/PULSE button
0 Disc adapter
q Grater attachment
w Slicer attachment
Technical details
Rated voltage: 220 – 240 V ∼ (alternating
current), 50 – 60 Hz
Nominal power: 250 W
Protection class: II /
CO time: 1 minute
CO time
The CO time (continuous operation time) is the
amount of time an appliance can be operated
without the motor overheating and becoming
damaged. When the specified CO time has been
reached, the appliance must be switched off until
the motor has cooled down to room temperature.
All of the parts of this appliance that come
into contact with food are food-safe.
(double insulation)
■ 2 │ GB
│IE│NI│
CY
KM 250 C1

Safety instructions
DANGER! RISK OF ELECTRIC SHOCK!
► The appliance must only be connected to correctly installed and
earthed mains power sockets. Ensure that the rating of the local
power supply corresponds with the details on the rating plate of the
appliance.
► Ensure that the power cord does not become wet or moist during
use. Route the cable in such a way that it cannot be crushed or
damaged.
► Keep the power cord away from hot surfaces.
► Do not perform any repairs on the appliance. All repairs must be
performed by our Customer Services or by qualified personnel.
► Remove the plug from the mains power socket when the appliance
is being cleaned or in the event of a fault. Switching the appliance
off is insufficient, since the appliance receives power for as long as
the plug is connected to the mains power socket.
► To avoid risks, arrange for defective plugs and/or power cables to
be replaced at once by qualified technicians or our Customer
Service Department.
► The appliance and its connecting cable must be kept away from
children.
Never submerge the appliance in water or other liquids.
KM 250 C1
GB│IE│NI│CY
│
3 ■

WARNING! RISK OF INJURY!
► Always disconnect the appliance from the mains power supply when
fitting or removing accessory parts. This will prevent unintentional
activation of the appliance.
► The appliance should always be disconnected from the mains when
not supervised and before assembly, disassembly or cleaning.
► Only use the original accessory parts for this appliance. Accessory
parts from other manufacturers may not be suitable, and this may
lead to risks!
► This appliance may not be used by children.
► Appliances can be used by persons with reduced physical, sensory
or mental capabilities or lack of experience and knowledge if they
are supervised or have been given instruction concerning use of the
appliance in a safe way and if they understand the hazards involved.
► Children must not play with the appliance.
► Caution: the cutting blades, the slicer attachment and the grater
attachment are very sharp! For this reason, take care when cleaning.
► Caution: the cutting blades, the slicer attachment and the grater
attachment are very sharp! For this reason, take care when emptying
the bowl.
► When the appliance is operating, do not put anything other than the
ingredients to be processed into the bowl.
► Never use the appliance for purposes other than those described in
these instructions. Misuse of the appliance can lead to a risk of
injury!
► To avoid personal injury and damage to the appliance, never insert
or place your hands or any foreign objects into the feed tube.
■ 4 │ GB
│IE│NI│
CY
KM 250 C1

WARNING! RISK OF INJURY!
► Do not change accessories unless the drive is stationary and the
mixer is unplugged from the power supply! The appliance will run on
for a short time after being switched off!
► Never leave the appliance unattended!
► Before changing accessories or additional parts that are in motion
during operation, the appliance must be switched off and disconnected
from mains power.
Before first use
■ Remove all packaging materials from the
appliance.
■ Clean the appliance as described in the section
“Cleaning and care”.
■ Ensure that all parts are completely dry before
operating the appliance.
Assembling the appliance
NOTE
► The appliance will not start until the bowl 5
and the lid 3 are correctly attached.
1) Place the motor unit 7 on a flat surface so that
the sucker feet can attach firmly and the
appliance stands firmly in place.
2) Place the bowl 5 onto the motor unit 7 so
that the arrow
towards the open lock symbol
motor unit 7. Then turn the bowl 5 until the
arrow
and the bowl 5 clicks into place.
If you want to work with the cutting blades 4,
assemble the appliance as described in the section
“Cutting blades”.
If you want to work with the food processing
attachments, assemble the appliance as described
in the section “Food processing attachments”.
on the bowl 5 points
on the
points to the closed lock symbol
Cutting blades
1) Place the cutting blades 4 onto the drive
shaft6. The flattened side of the drive shaft 6
must correctly fit into the take up of the cutting
blades 4. Otherwise the cutting blades4
cannot be properly attached.
2) Place the lid 3 onto the bowl 5 so that the
arrow ▼ on the lid 3 coincides with the
arrow
the bowl 5.
3) Turn the lid 3until the arrow ▼ on the lid 3
points to the arrow
symbol on the bowl 5.
4) Place the pusher 1 into the feed tube 2.
5) Insert the plug into a mains power socket.
and the opened lock symbol on
and the closed lock
KM 250 C1
GB│IE│NI│CY
│
5 ■

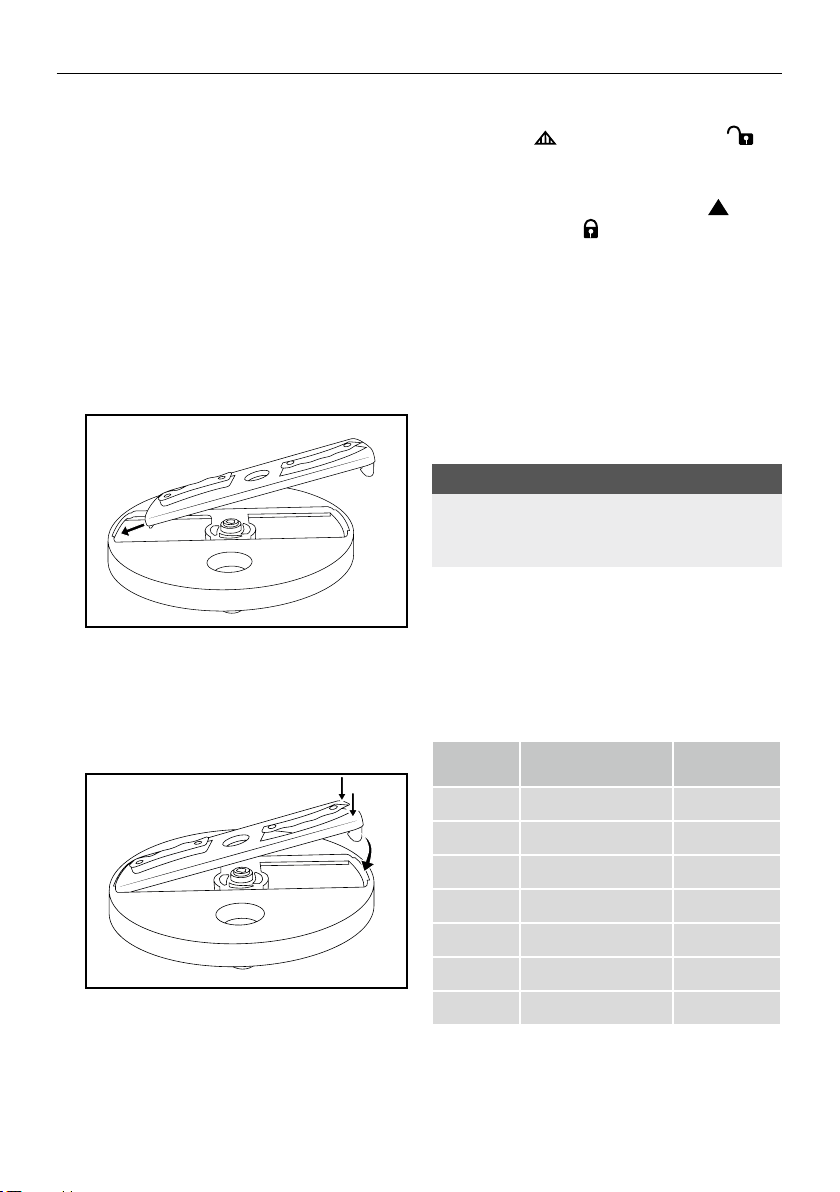
Food processing attachments
1) Select the desired attachment:
– the slicer attachment w
– or the grater attachment q.
2) If a different disk is still installed: Ideally, turn
the disc adapter 0 upside down. Press the
long metal tab of the disc inwards with your
thumb so that this side of the disc is released
from the disc adapter 0. You can now remove
the disc.
3) Insert the new disc with the short metal tab first
into the disc adapter 0:
4) Then carefully push the side with the long metal
tab into the disc adapter 0. The best way to
do this is to press with both thumbs on the
outer edges of the attachment until it clicks
completely into place in the disc adapter 0.
6) Place the lid 3 onto the bowl 5 so that the
arrow ▼ on the lid 3 coincides with the
arrow
on the bowl 5.
7) Turn the lid 3until the arrow ▼ on the lid 3
points to the arrow
symbol
8) Place the pusher 1 into the feed tube 2.
9) Insert the plug into a mains power socket.
and the opened lock symbol
and the closed lock
on the bowl 5.
Operation
Using the cutting blades
The cutting blades 4 can be used to chop foods
such as onions or meat.
NOTE
► Do not attempt to mix liquids with the cutting
blades 4. These will overflow or spray out.
1) Fit the cutting blades 4 as described in the
chapter “Assembling the appliance”.
2) Cut the ingredients into pieces of
approximately 2 – 3 cm.
3) Pour the ingredients in. Do not exceed the
quantities specified in the following table.
INGREDIENT MAX. AMOUNT SPEED
5) Place the disc adapter 0 with the attachment
fitted onto the drive shaft 6. The flattened side
of the drive shaft 6 must correctly fit into the
take up of the disc adapter 0. Otherwise the
disc adapter 0 cannot be properly attached.
■ 6 │ GB
│IE│NI│
CY
Bread max. 80 g ON
Cheese max. 150 g ON
Meat max. 300 g ON
Herbs max. 30 g ON
Garlic 80 – 200 g PULSE
Onions max. 300 g PULSE
Ice cubes max. 140 g PULSE
KM 250 C1

NOTE
► The speeds given in the table are intended as
reference values. These can vary depending
on the quality and quantity of the ingredients!
4) Close the lid 3.
5) Start chopping by pressing the ON button 8.
Press OFF/PULSE button 9 once when all the
ingredients have been chopped and you want
to stop the appliance.
If you would like to continue to process the
ingredients using the PULSE function, press the
OFF/PULSE button 9 several times in
succession until the ingredients are sufficiently
chopped.
If ingredients stick to the sides of the bowl 5
or the blades:
– Switch the appliance off.
– Remove the lid 3.
– Remove the ingredients from the cutting
blades 4 and the inside using a dough
scraper or a spoon.
– Close the lid 3.
– Restart the appliance.
NOTE
► Only process meat that is boneless!
► Do not allow the appliance to operate for long
periods when chopping (hard) cheese.
Otherwise the cheese will become too hot,
start to melt and clump.
► Never allow the appliance to run for longer
than 1 minute! Otherwise, the motor unit could
overheat!
► If you wish to add ingredients during the cutting
process, add them via the feed tube2! The
appliance stops if the lid 3 is opened!
Do not exceed the maximum quantities specified
in the table when adding ingredients!
Working with the food processor
You can grate or slice food using the processor’s
attachments q/w.
1) Select the required attachment and assemble
everything as described in the chapter
“Assembling the appliance”.
2) Remove the pusher 1 from the feed tube 2.
3) Cut the food into pieces that will easily fit into
the feed tube 2.
4) Start grating/slicing by pressing the ON
button8.
5) Then gradually add the food. Push the food in
using the pusher 1 without applying pressure.
Do not exceed the quantities specified in the
following table.
INGREDIENT SLICER ATTACHMENT
Apples/carrots max. 350 g
Cucumber max. 1.5
Potatoes max. 350 g
Onions max. 200 g
INGREDIENT GRATER ATTACHMENT
Apples/carrots max. 350 g
Parmesan max. 150 g
Potatoes max. 350 g
Hard cheese (e.g.
mature Gouda)
max. 200 g
KM 250 C1
GB│IE│NI│CY
│
7 ■

NOTE
► Do not prepare large quantities all at once,
but in several portions. Empty the bowl 5
after each use.
► Do not allow the appliance to operate for
long periods when chopping (hard) cheese or
chocolate. Otherwise the ingredients will
become too hot, start to melt and clump.
► Never allow the appliance to run for longer
than 1 minute! Otherwise, the motor unit could
overheat!
Cleaning and care
DANGER! RISK OF ELECTRIC SHOCK
► Always remove the plug from the mains power
socket before cleaning the appliance.
Under no circumstances must the motor
unit7 be submerged in liquid! This could
result in a potentially fatal electric shock
and the appliance could be damaged.
► Never open the appliance housing! Otherwise
there is a risk of a fatal electric shock.
WARNING RISK OF INJURY!
► Take extreme care when cleaning the cutting
blades 4, the slicer attachment w and the
grater attachment q. These parts are
extremely sharp!
CAUTION! PROPERTY DAMAGE!
► Do not use solvents or abrasive cleaners. These
will damage the surface of the appliance!
► Do not use abrasive, aggressive or chemical
cleaning agents! They could irreparably
damage the surface!
NOTE
► Always clean all parts immediately after use.
This makes food residue easier to remove.
► Processing strongly staining foods, such as
carrots, can lead to staining of the plastic
parts on the appliance. This is not a defect in
the appliance and will not adversely affect
operation.
You can rub off discolourations using a little
cooking oil.
■ Clean the motor unit 7and the power cable
with a damp cloth. Dry everything properly
before re-using it.
■ Clean the bowl 5, the lid 3, the pusher 1, the
cutting blades 4, the disc adapter 0, the slicer
attachment w and the grater attachment qin
warm washing up water. Afterwards, rinse all
parts with clean water so that no detergent
residue remain on the parts.
Dry all parts thoroughly, before re-using the
appliance.
NOTE
You can also clean the bowl 5, the
lid3, the pusher 1, the cutting
blade4, the disc adapter 0, the slicer
attachment w and the grater attachmentq in
the dishwasher.
Place the parts, if possible, in the upper basket
and ensure that none of the parts can get stuck.
Otherwise they could become misshapen or
suffer from stress cracks.
Storage
■ Store the cleaned appliance in a clean, dust-free
and dry location.
■ 8 │ GB
│IE│NI│
CY
KM 250 C1

Disposal
Never dispose of the appliance
in your normal domestic waste.
This product is subject to the
provisions of European
Directive 2012/19/EU.
Dispose of the appliance via an approved waste
disposal company or your municipal waste
disposal facility. Please comply with all applicable
regulations. Please contact your waste disposal
centre if you are in any doubt.
Your local community or municipal
authorities can provide information
on how to dispose of the worn-out
product.
The packaging for this product is made
from environmentally friendly material
and can be disposed of at your local
recycling plant.
Note the labelling on the packaging
and separate the packaging material
components for disposal if necessary.
The packaging material is labelled
with abbreviations (a) and numbers (b) with the
following meanings: 1–7: Plastics, 20–22: Paper
and cardboard, 80–98: Composites.
Service
Service Great Britain
Tel.: 0800 404 7657
E-Mail: kompernass@lidl.co.uk
Service Ireland
Tel.: 1890 930 034
(0,08 EUR/Min., (peak))
(0,06 EUR/Min., (off peak))
E-Mail: kompernass@lidl.ie
CY
Service Cyprus
Tel.: 8009 4409
E-Mail: kompernass@lidl.com.cy
IAN 315063
Importer
Please note that the following address is not the
service address. Please use the service address
provided in the operating instructions.
KOMPERNASS HANDELS GMBH
BURGSTRASSE 21
DE - 44867 BOCHUM
GERMANY
www.kompernass.com
KM 250 C1
GB│IE│NI│CY
│
9 ■

Troubleshooting
PROBLEM POSSIBLE CAUSE POSSIBLE SOLUTIONS
The appliance is not connected
The appliance is not working.
The appliance will not start.
If the malfunction cannot be corrected with the above suggestions, or if you have determined that the
malfunction may have other causes, please contact our Customer Service.
with a mains power socket.
The appliance is damaged. Contact Customer Services.
The bowl 5 is not correctly clicked
into place on the motor unit 7.
The lid 3 is not/not correctly in
place and closed.
Connect the appliance to a mains
power socket.
Check the placement of the bowl
5 and correct it if necessary.
Close the lid 3 correctly.
■ 10 │ GB
│IE│NI│
CY
KM 250 C1

Περιεχόμενα
Εισαγωγή .............................................................12
Προβλεπόμενη χρήση ..................................................12
Παραδοτέος εξοπλισμός ................................................12
Περιγραφή συσκευής ...................................................12
Τεχνικά χαρακτηριστικά .................................................12
Υποδείξεις ασφαλείας ...................................................13
Πριν την πρώτη χρήση ..................................................15
Συναρμολόγηση της συσκευής ...........................................15
Λεπίδα κοπής .....................................................................15
Εξάρτημα τοποθέτησης .............................................................16
Χειρισμός .............................................................16
Εργασία με τη λεπίδα κοπής .........................................................16
Εργασία με το εξάρτημα τοποθέτησης .................................................. 17
Καθαρισμός και φροντίδα ...............................................18
Αποθήκευση ..........................................................18
Απόρριψη ............................................................19
Σέρβις. . . . . . . . . . . . . . . . . . . . . . . . . . . . . . . . . . . . . . . . . . . . . . . . . . . . . . . . . . . . . . . . 19
Εισαγωγέας ...........................................................19
Διόρθωση σφαλμάτων ..................................................20
KM 250 C1
GR│CY
│
11 ■

Εισαγωγή
Συγχαρητήρια για την αγορά της νέας σας
συσκευής.
Αποφασίσατε έτσι για την απόκτηση ενός προϊόντος υψηλής ποιότητας. Οι οδηγίες χρήσης είναι
τμήμα αυτού του προϊόντος. Περιέχουν σημαντικές
υποδείξεις για την ασφάλεια, τη χρήση και την
απόρριψη. Πριν από τη χρήση του προϊόντος,
εξοικειωθείτε με όλες τις υποδείξεις χειρισμού και
ασφάλειας. Χρησιμοποιείτε το προϊόν μόνο όπως
περιγράφεται και για τους αναφερόμενους τομείς
χρήσης. Παραδώστε όλα τα έγγραφα σε περίπτωση παράδοσης του προϊόντος σε τρίτους.
Προβλεπόμενη χρήση
Αυτή η συσκευή προορίζεται αποκλειστικά για το
κομμάτιασμα τροφίμων. Αυτή η συσκευή προορίζεται αποκλειστικά για χρήση σε νοικοκυριά. Μην τη
χρησιμοποιείτε για επαγγελματικό σκοπό.
Παραδοτέος εξοπλισμός
Ηλεκτρικοσ τρφτησ
(Καπάκι, εξάρτημα ώθησης, μπολ, μοτέρ)
Λεπίδα κοπής
Αντάπτορας δίσκων
Δίσκος τριψίματος
Δίσκος κοπής
Οδηγίες χρήσης
Αμέσως μετά την αποσυσκευασία ελέγξτε την
πληρότητα του παραδοτέου εξοπλισμού.
Περιγραφή συσκευής
1 Εξάρτημα ώθησης
2 Χωνί πλήρωσης
3 Καπάκι
4 Λεπίδα κοπής
5 Μπολ
6 Άξονας κίνησης
7 Μοτέρ
8 Πλήκτρο ΟN
9 Πλήκτρο OFF/PULSE
0 Αντάπτορας δίσκων
q Δίσκος τριψίματος
w Δίσκος κοπής
Τεχνικά χαρακτηριστικά
Ονομαστική τάση: 220 – 240 V ∼ (εναλλασσόμενο
ρεύμα), 50 – 60 Hz
Ονομαστική ισχύς: 250 W
Κατηγορία
προστασίας: II /
Χρόνος σύντομης
λειτουργίας: 1 λεπτό
Χρόνος σύντομης λειτουργίας (ΣΛ)
Ο χρόνος ΣΛ (χρόνος σύντομης λειτουργίας) δείχνει για πόσο χρόνο μπορεί κανείς να λειτουργεί
μια συσκευή χωρίς να υπερθερμανθεί το μοτέρ και
χωρίς να πάθει βλάβες. Μετά τον δοθέντα χρόνο
ΣΛ η συσκευή πρέπει να απενεργοποιηθεί έως
ότου το μοτέρ αγγίξει τη θερμοκρασία δωματίου.
(διπλή θωράκιση)
■ 12 │ GR
│
CY
Όλα τα εξαρτήματα αυτής της συσκευής που
έρχονται σε επαφή με τρόφιμα μπορούν να
χρησιμοποιούνται με ασφάλεια στα τρόφιμα.
KM 250 C1

Υποδείξεις ασφαλείας
ΚΊΝΔΥΝΟΣ! ΗΛΕΚΤΡΟΠΛΗΞΊΑ!
► Συνδέετε τη συσκευή μόνο σε μια σύμφωνα με τις προδιαγραφές
εγκατεστημένη και γειωμένη πρίζα. Η τάση δικτύου πρέπει να συμφωνεί με τα στοιχεία στην πινακίδα τύπου της συσκευής.
► Προσέχετε ώστε κατά τη λειτουργία το καλώδιο να μη βρέχεται ή
υγραίνεται. Περνάτε το κατά τέτοιο τρόπο, ώστε να μην πιάνεται ή
φθείρεται.
► Κρατάτε το καλώδιο μακριά από καυτές επιφάνειες.
► Μη διεξάγετε εργασίες επισκευών στη συσκευή. Οποιεσδήποτε
επισκευές πρέπει να διεξάγονται μέσω του τμήματος εξυπηρέτησης
πελατών ή από ειδικό προσωπικό.
► Τραβάτε το βύσμα από την πρίζα, όταν καθαρίζετε τη συσκευή ή σε
περίπτωση βλάβης. Η απενεργοποίηση από μόνη της δεν αρκεί, διότι υπάρχει ακόμα τάση στη συσκευή, όσο το βύσμα βρίσκεται στην
πρίζα.
► Τα βύσματα ή τα καλώδια που έχουν υποστεί βλάβη πρέπει να αντι-
καθίστανται αμέσως από εξουσιοδοτημένο εξειδικευμένο προσωπικό
ή από το τμήμα εξυπηρέτησης πελατών, ώστε να αποφεύγονται κίνδυνοι.
► Η συσκευή και το καλώδιο σύνδεσής της πρέπει να φυλάσσονται
μακριά από παιδιά.
Δεν επιτρέπεται σε καμία περίπτωση να βυθίσετε τη συσκευή σε
νερό ή άλλα υγρά.
KM 250 C1
GR│CY
│
13 ■

ΠΡΟΕΊΔΟΠΟΊΗΣΗ! ΚΊΝΔΥΝΟΣ ΤΡΑΥΜΑΤΊΣΜΟΥ!
► Αποσυνδέετε τη συσκευή από την παροχή ρεύματος όταν τοποθετείτε
ή απομακρύνετε εξαρτήματα. Έτσι αποφεύγεται μια μη ηθελημένη
ενεργοποίηση της συσκευής.
► Η συσκευή πρέπει να αποσυνδέεται πάντα από το δίκτυο όταν δεν
επιτηρείται και πριν από τη συναρμολόγηση, την αποσυναρμολόγηση
ή τον καθαρισμό.
► Χρησιμοποιείτε μόνο τα γνήσια αξεσουάρ για αυτή τη συσκευή.
Αξεσουάρ άλλων κατασκευαστών πιθανώς να μην ενδείκνυνται και
μπορεί να οδηγήσουν σε κινδύνους!
► Η παρούσα συσκευή δεν επιτρέπεται να χρησιμοποιείται από παιδιά.
► Μπορεί να γίνεται χρήση αυτής της συσκευής από άτομα με μειωμένες
φυσικές, αισθητηριακές ή νοητικές ικανότητες ή με έλλειψη εμπειρίας
και/ή γνώσεων, εφόσον επιτηρούνται ή έχουν εκπαιδευτεί αναφορικά
με την ασφαλή χρήση της συσκευής και έχουν κατανοήσει τους επακόλουθους κινδύνους.
► Τα παιδιά δεν επιτρέπεται να παίζουν με τη συσκευή.
► Προσοχή: η λεπίδα κοπής, ο δίσκος κοπής και ο δίσκος τριψίματος
είναι πολύ αιχμηρά! Γι' αυτό να είστε προσεκτικοί κατά τον καθαρισμό.
► Προσοχή: η λεπίδα κοπής, ο δίσκος κοπής και ο δίσκος τριψίματος
είναι πολύ αιχμηρά! Γι' αυτό να είστε προσεκτικοί κατά το άδειασμα
του μπολ.
► Όσο λειτουργεί η συσκευή προσθέτετε αποκλειστικά τα συστατικά
που απαιτούνται για την επεξεργασία.
► Μη χρησιμοποιείτε τη συσκευή για άλλους σκοπούς από τους περι-
γραφόμενους στις παρούσες οδηγίες. Στην περίπτωση εσφαλμένης
χρήσης της συσκευής υφίσταται κίνδυνος τραυματισμού!
► Ποτέ μη βάζετε τα χέρια ή ξένα αντικείμενα στο χωνί πλήρωσης, ώστε
να αποφεύγετε τραυματισμούς και φθορές στη συσκευή.
■ 14 │ GR
│
CY
KM 250 C1

ΠΡΟΕΊΔΟΠΟΊΗΣΗ! ΚΊΝΔΥΝΟΣ ΤΡΑΥΜΑΤΊΣΜΟΥ!
► Αλλάζετε τα αξεσουάρ μόνο όταν ο άξονας κίνησης είναι ακινητο-
ποιημένος και εφόσον έχει τραβηχτεί η πρίζα! Η συσκευή συνεχίζει
να λειτουργεί για λίγο μετά την απενεργοποίηση!
► Ποτέ μην αφήνετε τη συσκευή χωρίς επιτήρηση.
► Πριν από την αντικατάσταση αξεσουάρ ή επιπρόσθετων εξαρτη-
μάτων, τα οποία κινούνται κατά τη λειτουργία, πρέπει να απενεργοποιηθεί η συσκευή και να αποσυνδεθεί από το δίκτυο.
Πριν την πρώτη χρήση
■ Απομακρύνετε όλα τα υλικά συσκευασίας από
τη συσκευή.
■ Καθαρίζετε τη συσκευή όπως περιγράφεται στο
Κεφάλαιο "Καθαρισμός και φροντίδα".
■ Βεβαιώνεστε ότι όλα τα εξαρτήματα είναι
πλήρως στεγνά, προτού χρησιμοποιήσετε τη
συσκευή.
Συναρμολόγηση της συσκευής
ΥΠΟΔΕΙΞΗ
► Η συσκευή μπορεί να εκκινηθεί μόνο όταν το
μπολ 5 και το καπάκι 3 έχουν τοποθετηθεί
σωστά.
1) Τοποθετήστε το μοτέρ 7 σε μια επίπεδη επιφάνεια έτσι ώστε τα πόδια - βεντούζες να ακουμπάνε καλά και η συσκευή να στέκεται με
ασφάλεια.
2) Τοποθετήστε το μπολ 5 κατά τέτοιο τρόπο
στο μοτέρ 7, ώστε το βέλος
να δείχνει στην ανοιχτή κλειδαριά στο
μοτέρ 7. Γυρίστε το μπολ 5 τόσο, ώστε το
βέλος
και το μπολ 5 να κουμπώνει.
Εάν θέλετε να εργαστείτε με τη λεπίδα κοπής 4,
συνεχίστε με τη συναρμολόγηση όπως περιγράφεται στο κεφάλαιο "Λεπίδα κοπής".
Εάν θέλετε να εργαστείτε με το εξάρτημα τοποθέτησης, συνεχίστε με τη συναρμολόγηση όπως περιγράφεται στο κεφάλαιο "Εξάρτημα τοποθέτησης".
να δείχνει στην κλειστή κλειδαριά
στο μπολ 5
Λεπίδα κοπής
1) Τοποθετήστε τη λεπίδα κοπής 4 επάνω στον
άξονα κίνησης 6. Η επίπεδη πλευρά του
άξονα κίνησης 6 πρέπει να μαγκώνει σωστά
στην υποδοχή της λεπίδας κοπής 4. Αλλιώς
η λεπίδα κοπής 4 δεν μπορεί να τοποθετηθεί.
2) Τοποθετήστε το καπάκι 3 επάνω στο μπολ 5,
έτσι ώστε το βέλος ▼ να δείχνει στο καπάκι 3
στο βέλος
μπολ 5.
3) Γυρίστε το καπάκι 3τόσο ώστε το βέλος ▼ να
δείχνει στο καπάκι 3 στο βέλος
κλειστή κλειδαριά
4) Τοποθετήστε το εξάρτημα ώθησης 1 στο χωνί
πλήρωσης 2.
5) Βάλτε το βύσμα σε μια πρίζα.
και η ανοιχτή κλειδαριά στο
και η
στο μπολ 5.
KM 250 C1
GR│CY
│
15 ■
Εξάρτημα τοποθέτησης
1) Επιλέξτε τον επιθυμητό δίσκο:
– το δίσκο κοπής w
– ή το δίσκο τριψίματος q.
2) Στην περίπτωση που έχει εγκατασταθεί άλλος
ένας δίσκος: Περιστρέψτε τον προσαρμογέα
δίσκων 0 κατά προτίμηση επάνω στην
κεφαλή. Πιέστε τη μακριά μεταλλική προεξοχή
του δίσκου προς τα μέσα με τον αντίχειρα, έτσι
ώστε αυτή η πλευρά του δίσκου να λασκάρει
από τον προσαρμογέα δίσκων 0. Τώρα
μπορείτε να απομακρύνετε το δίσκο.
3) Εισάγετε το νέο δίσκο με την κοντή μεταλλική
προεξοχή πρώτα στον προσαρμογέα δίσκων 0:
4) Πιέστε στη συνέχεια προσεκτικά την πλευρά με
τη μακριά μεταλλική προεξοχή στον
προσαρμογέα δίσκων 0. Πιέστε τότε με τους
δύο αντίχειρες στις εξωτερικές ακμές του δίσκου, έως ότου ο δίσκος εδράζεται και κουμπώνει πλήρως στον αντάπτορα δίσκων 0.
6) Τοποθετήστε το καπάκι 3 επάνω στο μπολ 5,
έτσι ώστε το βέλος ▼ να δείχνει στο καπάκι 3
στο βέλος
μπολ 5.
7) Γυρίστε το καπάκι 3τόσο, ώστε το βέλος ▼
να δείχνει στο καπάκι 3 στο βέλος
κλειστή κλειδαριά
8) Τοποθετήστε το εξάρτημα ώθησης 1 στο χωνί
πλήρωσης 2.
9) Βάλτε το βύσμα σε μια πρίζα.
και η ανοιχτή κλειδαριά στο
και η
στο μπολ 5.
Χειρισμός
Εργασία με τη λεπίδα κοπής
Με τη λεπίδα κοπής 4 μπορείτε να ψιλοκόψετε
τρόφιμα όπως για παράδειγμα κρεμμύδια ή κρέας.
ΥΠΟΔΕΙΞΗ
► Μην προσπαθήσετε να αναμίξετε υγρά με τη
λεπίδα κοπής 4. Αυτά ξεχειλίζουν ή εκτοξεύονται.
1) Τοποθετήστε τη λεπίδα κοπής 4, όπως περιγράφεται στο κεφάλαιο "Συναρμολόγηση
συσκευής".
2) Κόψτε τα υλικά σε τεμάχια μεγέθους περ.
2 – 3εκ.
3) Γεμίστε με τα υλικά. Μην υπερβαίνετε τις αναφερόμενες στον ακόλουθο πίνακα ποσότητες:
ΥΛΊΚΟ ΜΕΓ. ΠΟΣΟΤΗΤΑ ΤΑΧΥΤΗΤΑ
5) Τοποθετήστε τον αντάπτορα δίσκων 0 με
τοποθετημένο δίσκο στον άξονα κίνησης 6.
Η επίπεδη πλευρά του άξονα κίνησης 6 πρέπει τότε να μαγκώνει σωστά στην υποδοχή του
αντάπτορα δίσκων 0. Αλλιώς δεν μπορεί να
τοποθετηθεί ο αντάπτορας δίσκων 0.
■ 16 │ GR
│
CY
Ψωμί μέγ. 80 γρ. ON
Τυρί μέγ. 150 γρ. ON
Κρέας μέγ. 300 γρ. ON
Βότανα μέγ. 30 γρ. ON
Σκόρδο 80 – 200 γρ. PULSE
Κρεμμύδια μέγ. 300 γρ. PULSE
Παγάκια μέγ. 140 γρ. PULSE
KM 250 C1

ΥΠΟΔΕΙΞΗ
► Οι αναφερόμενες στον πίνακα ταχύτητες είναι
τιμές αναφοράς. Αυτές μπορεί να ποικίλουν
ανάλογα με τη σύνθεση και την ποσότητα των
υλικών!
4) Κλείστε το καπάκι 3.
5) Μέσω πίεσης του πλήκτρου ON 8, εκκινήστε
την κοπή σε μικρά κομμάτια. Πατήστε το πλήκτρο OFF/PULSE 9 μια φορά όταν έχουν
κοπεί σε μικρά κομμάτια όλα τα υλικά και θέλετε να σταματήσετε τη συσκευή.
Εάν θέλετε να επεξεργαστείτε υλικά με τη βοήθεια της λειτουργίας PULSE, πατήστε το πλήκτρο OFF/PULSE 9 πολλές φορές διαδοχικά,
έως ότου κομματιαστούν όλα τα υλικά.
Εάν έχουν εναποτεθεί υλικά στα τοιχώματα του
μπολ 5 ή έχουν κολλήσει στη λεπίδα:
– Απενεργοποιείστε τη συσκευή.
– Απομακρύνετε το καπάκι 3.
– Απομακρύνετε τα υλικά από τη λεπίδα
κοπής 4 καθώς και από τα εσωτερικά
τοιχώματα με τη βοήθεια ενός ξέστρου ή
ενός κουταλιού.
– Κλείστε το καπάκι 3.
– Εκκινήστε εκ νέου τη συσκευή.
ΥΠΟΔΕΙΞΗ
► Επεξεργάζεστε μόνο κρέας χωρίς κόκαλα!
► Μην αφήνετε τη συσκευή να λειτουργεί για
πολύ χρόνο, όταν ψιλοκόβετε (σκληρό) τυρί.
Αλλιώς αυτό θα ζεσταθεί πολύ, θα αρχίσει να
λιώνει και έτσι θα κολλήσει.
► Μη λειτουργείτε τη συσκευή ποτέ για περισσό-
τερο από 1 λεπτό! Διαφορετικά, ενδέχεται να
υπερθερμανθεί το μοτέρ!
► Εάν κατά τη διάρκεια της διαδικασίας κοπής
θέλετε να προσθέσετε και άλλα υλικά, προσθέστε τα μέσα από το χωνί πλήρωσης2! Όταν
ανοίγετε το καπάκι 3 η συσκευή σταματάει!
Ωστόσο προσέξτε ότι δεν θα πρέπει να υπερβαίνετε τις αναφερόμενες στον πίνακα μέγιστες ποσότητες κατά την πλήρωση υλικών!
Εργασία με το εξάρτημα τοποθέτησης
Με τους δίσκους q/w του εξαρτήματος τοποθέτησης μπορείτε να διεξάγετε τρίψιμο ή κοπή.
1) Επιλέξτε τον επιθυμητό δίσκο και τοποθετήστε
όλα τα εξαρτήματα, όπως περιγράφεται στο
κεφάλαιο "Συναρμολόγηση συσκευής".
2) Απομακρύνετε το εξάρτημα ώθησης 1 από το
χωνί πλήρωσης 2.
3) Κόψτε τα τρόφιμα σε τόσο μεγάλα κομμάτια,
ώστε να χωράνε άνετα στο χωνί πλήρωσης 2.
4) Μέσω πίεσης του πλήκτρου ON 8, εκκινήστε
το τρίψιμο/ την κοπή.
5) Στη συνέχεια προσθέστε το ένα μετά το άλλο
τα τρόφιμα. Ωθήστε τα τρόφιμα με τη βοήθεια
του εξαρτήματος ώθησης 1 χωρίς να ασκείτε
πίεση.
Μην υπερβαίνετε τις αναφερόμενες στον ακόλουθο
πίνακα ποσότητες:
ΥΛΊΚΟ ΔΊΣΚΟΣ ΚΟΠΗΣ
Μήλα/Καρότα μέγ. 350 γρ.
Αγγούρι μέγ. 1,5 τεμάχιο
Πατάτες μέγ. 350 γρ.
Κρεμμύδια μέγ. 200 γρ.
ΥΛΊΚΟ ΔΊΣΚΟΣ ΤΡΊΨΊΜΑΤΟΣ
Μήλα/Καρότα μέγ. 350 γρ.
Παρμεζάνα μέγ. 150 γρ.
Πατάτες μέγ. 350 γρ.
Σκληρό τυρί (π. χ.
παλαιωμένο γκούντα)
μέγ. 200 γρ.
KM 250 C1
GR│CY
│
17 ■
ΥΠΟΔΕΙΞΗ
► Μην επεξεργάζεστε μονομιάς μεγαλύτερες
ποσότητες, αλλά ανά μερίδες διαδοχικά.
Ενδιάμεσα αδειάζετε πάντα το μπολ 5.
► Μην αφήνετε τη συσκευή να λειτουργεί για
πολύ χρόνο, όταν ψιλοκόβετε (σκληρό) τυρί ή
σοκολάτα. Αλλιώς αυτά τα υλικά ζεσταίνονται
πολύ, αρχίζουν να λιώνουν και έτσι κολλάνε.
► Μη λειτουργείτε τη συσκευή ποτέ για περισσό-
τερο από 1 λεπτό! Διαφορετικά, ενδέχεται να
υπερθερμανθεί το μοτέρ!
Καθαρισμός και φροντίδα
ΚΊΝΔΥΝΟΣ! ΗΛΕΚΤΡΟΠΛΗΞΊΑ!
► Πριν από τον καθαρισμό της συσκευής
τραβάτε πάντα το βύσμα από την πρίζα.
Σε καμία περίπτωση δεν επιτρέπεται το
μοτέρ 7 να βυθίζεται σε υγρά! Μπορεί να
προκύψει κίνδυνος ζωής από ηλεκτροπληξία και η συσκευή να υποστεί φθορά.
► Ποτέ μην ανοίγετε το περίβλημα της συσκευής.
Αλλιώς υπάρχει κίνδυνος θανάτου λόγω ηλεκτροπληξίας.
ΠΡΟΕΊΔΟΠΟΊΗΣΗ!
ΚΊΝΔΥΝΟΣ ΤΡΑΥΜΑΤΊΣΜΟΥ!
► Να είστε προσεκτικοί κατά τον καθαρισμό της
λεπίδας κοπής 4, του δίσκου κοπής w και
του δίσκου τριψίματος q. Αυτά τα εξαρτήματα
είναι πολύ αιχμηρά!
ΠΡΟΣΟΧΗ! ΥΛΙΚΕΣ ΖΗΜΙΕΣ!
► Μη χρησιμοποιείτε διαλυτικά ή τριβικά μέσα
καθαρισμού. Αυτά διαβρώνουν τις επιφάνειες
της συσκευής!
► Μη χρησιμοποιείτε επιθετικά, χημικά ή τριβικά
μέσα καθαρισμού. Αυτά μπορεί να προσβάλλουν ανεπανόρθωτα την επιφάνεια!
ΥΠΟΔΕΙΞΗ
► Καθαρίζετε πάντα όλα τα εξαρτήματα απευθεί-
ας μετά τη χρήση. Έτσι, υπολείμματα τροφίμων απομακρύνονται ευκολότερα.
► Όταν επεξεργάζεστε τρόφιμα που χρωματί-
ζουν πολύ, όπως για παράδειγμα καρότα,
ενδέχεται να χρωματιστούν και τα πλαστικά
τμήματα της συσκευής. Αυτό δεν αποτελεί
πρόβλημα της συσκευής και δεν επηρεάζει τη
λειτουργία.
Μπορείτε να αφαιρέσετε τους αποχρωματισμούς τρίβοντας με λίγο λάδι μαγειρικής.
■ Καθαρίστε το μοτέρ 7και το καλώδιο με ένα
ελαφρώς βρεγμένο πανί καθαρισμού. Στεγνώστε
τα όλα καλά προτού τα χρησιμοποιήσετε εκ νέου.
■ Καθαρίζετε το μπολ 5, το καπάκι 3, το εξάρ-
τημα ώθησης 1, τη λεπίδα κοπής 4, τον αντάπτορα δίσκων 0,το δίσκο κοπής w και το
δίσκο τριψίματος q σε ζεστό νερό πλύσης.
Στη συνέχεια ξεπλένετε όλα τα εξαρτήματα με
καθαρό νερό έτσι ώστε να μην απομείνουν
υπολείμματα απορρυπαντικού.
Στεγνώστε όλα τα εξαρτήματα πριν χρησιμοποιήσετε εκ νέου τη συσκευή.
ΥΠΟΔΕΙΞΗ
Μπορείτε να καθαρίσετε το μπολ 5,
το καπάκι 3, το εξάρτημα ώθησης 1,
τη λεπίδα κοπής 4, τον αντάπτορα
δίσκων 0, το δίσκο κοπής w και το δίσκο
τριψίματος q και στο πλυντήριο πιάτων.
Εφόσον είναι δυνατό, τοποθετείτε τα εξαρτήματα
στο επάνω καλάθι του πλυντηρίου πιάτων και
φροντίζετε ώστε να μην μαγκώσουν πουθενά. Ειδάλλως μπορεί να προκύψουν παραμορφώσεις
και ρωγμές λόγω τάσης!
Αποθήκευση
■ Φυλάτε την καθαρή συσκευή σε ένα στεγνό
χώρο χωρίς σκόνη.
■ 18 │ GR
│
CY
KM 250 C1
Απόρριψη
Σε καμία περίπτωση μην απορρίπτετε τη συσκευή στα οικιακά
απορρίμματα. Αυτό το προϊόν
υπόκειται στην ευρωπαϊκή οδηγία 2012/19/ΕU.
Απορρίπτετε τη συσκευή μέσω μιας εγκεκριμένης
επιχείρησης απόρριψης ή μέσω της κοινοτικής επιχείρησης απόρριψης. Τηρείτε τις ισχύουσες προδιαγραφές. Σε περίπτωση αμφιβολιών, επικοινωνείτε
με την αρμόδια επιχείρηση απόρριψης.
Για πληροφορίες σχετικά με τις δυνατότητες απόρριψης του προϊόντος
που δεν χρησιμοποιείται πλέον, απευθυνθείτε στις αρμόδιες υπηρεσίες της
κοινότητας ή του δήμου σας.
Η συσκευασία αποτελείται από φιλικά
προς το περιβάλλον υλικά, τα οποία
μπορείτε να απορρίψετε μέσω των τοπικών σημείων ανακύκλωσης.
Λαμβάνετε υπόψη τη σήμανση στα
διαφορετικά υλικά συσκευασίας και,
εφόσον απαιτείται, ξεχωρίζετέ τα. Τα
υλικά συσκευασίας φέρουν σήμανση
με συντομογραφίες (a) και ψηφία (b) με την εξής
σημασία: 1–7: Πλαστικά, 20–22: Χαρτί και
χαρτόνι, 80–98: Συνθετικά υλικά.
Σέρβις
Σέρβις Ελλάδα
Tel.: 801 5000 019 (0,03 EUR/Min.)
E-Mail: kompernass@lidl.gr
CY
Σέρβις Κύπρος
Tel.: 8009 4409
E-Mail: kompernass@lidl.com.cy
IAN 315063
Εισαγωγέας
Η ακόλουθη διεύθυνση δεν είναι διεύθυνση σέρβις.
Επικοινωνήστε, κατ’ αρχήν, με την αναφερόμενη
υπηρεσία σέρβις.
KOMPERNASS HANDELS GMBH
BURGSTRASSE 21
DE - 44867 BOCHUM
ΓΕΡΜΑΝΊΑ
www.kompernass.com
KM 250 C1
GR│CY
│
19 ■

Διόρθωση σφαλμάτων
ΠΡΟΒΛΗΜΑ ΠΊΘΑΝΗ ΑΊΤΊΑ ΠΊΘΑΝΕΣ ΛΥΣΕΊΣ
Η συσκευή δεν είναι συνδεδεμένη
Η συσκευή δε λειτουργεί.
Η συσκευή δεν εκκινείται.
Εάν οι βλάβες δεν διορθώνονται με τις ανωτέρω αναφερόμενες προτάσεις αντιμετώπισης σφαλμάτων, ή
εάν εξακριβώσετε άλλα είδη βλαβών, απευθυνθείτε στο τμήμα σέρβις μας.
σε πρίζα.
Η συσκευή έχει υποστεί ζημιά. Απευθυνθείτε στο τμήμα σέρβις.
Το μπολ 5 δεν έχει κουμπώσει
σωστά στο μοτέρ 7.
Το καπάκι 3 δεν έχει τοποθετηθεί
και ασφαλιστεί/έχει τοποθετηθεί
λάθος.
Συνδέστε τη συσκευή σε μια πρίζα.
Ελέγξτε την έδραση του μπολ 5 και
διορθώστε την εφόσον απαιτείται.
Κλείστε το καπάκι 3 σωστά.
■ 20 │ GR
│
CY
KM 250 C1

Inhaltsverzeichnis
Einleitung .............................................................22
Bestimmungsgemäßer Gebrauch .........................................22
Lieferumfang ..........................................................22
Gerätebeschreibung. . . . . . . . . . . . . . . . . . . . . . . . . . . . . . . . . . . . . . . . . . . . . . . . . . . . 22
Technische Daten ......................................................22
Sicherheitshinweise ....................................................23
Vor dem ersten Gebrauch ...............................................25
Gerät zusammenbauen .................................................25
Schneidmesser ....................................................................25
Durchlaufschnitzler ................................................................. 26
Bedienen .............................................................26
Arbeiten mit dem Schneidmesser ......................................................26
Arbeiten mit dem Durchlaufschnitzler ................................................... 27
Reinigung und Pflege ...................................................28
Lagerung .............................................................28
Entsorgung ...........................................................29
Service ...............................................................29
Importeur ............................................................29
Fehlerbehebung .......................................................30
KM 250 C1
DE│AT│CH
│
21 ■

Einleitung
Herzlichen Glückwunsch zum Kauf Ihres neuen
Gerätes.
Sie haben sich damit für ein hochwertiges Produkt
entschieden. Die Bedienungsanleitung ist Bestandteil
dieses Produkts. Sie enthält wichtige Hinweise für
Sicherheit, Gebrauch und Entsorgung. Machen Sie
sich vor der Benutzung des Produkts mit allen Bedien- und Sicherheitshinweisen vertraut. Benutzen
Sie das Produkt nur wie beschrieben und für die
angegebenen Einsatzbereiche. Händigen Sie alle
Unterlagen bei Weitergabe des Produkts an Dritte
mit aus.
Bestimmungsgemäßer
Gebrauch
Dieses Gerät dient ausschließlich dem Zerkleinern
von Lebensmitteln. Dieses Gerät ist ausschließlich für
die Benutzung in privaten Haushalten bestimmt.
Benutzen Sie es nicht gewerblich.
Lieferumfang
Küchenmaschine
(Deckel, Stopfer, Schüssel, Motorblock)
Schneidmesser
Scheibenadapter
Raspelscheibe
Schneidscheibe
Bedienungsanleitung
Gerätebeschreibung
1 Stopfer
2 Einfüllschacht
3 Deckel
4 Schneidmesser
5 Schüssel
6 Antriebswelle
7 Motorblock
8 Taste ON
9 Taste OFF/PULSE
0 Scheibenadapter
q Raspelscheibe
w Schneidscheibe
Technische Daten
Nennspannung: 220 – 240 V ∼ (Wechselstrom),
50 – 60 Hz
Nennleistung: 250 W
Schutzklasse: II /
KB-Zeit: 1 Minute
KB-Zeit
Die KB-Zeit (Kurzbetriebszeit) gibt an, wie lange
man ein Gerät betreiben kann, ohne dass der
Motor überhitzt und Schaden nimmt. Nach der
angegebenen KB-Zeit muss das Gerät solange
ausgeschaltet werden, bis sich der Motor auf
Raumtemperatur abgekühlt hat.
(Doppelisolierung)
Kontrollieren Sie direkt nach dem Auspacken den
Lieferumfang auf Vollständigkeit.
■ 22 │ DE
│AT│
CH
Alle Teile dieses Gerätes, die mit Lebensmitteln in Berührung kommen, sind lebensmittelecht.
KM 250 C1

Sicherheitshinweise
GEFAHR! ELEKTRISCHER SCHLAG!
► Schließen Sie das Gerät nur an eine vorschriftsmäßig installierte
und geerdete Netzsteckdose an. Die Netzspannung muss mit den
Angaben auf dem Typenschild des Gerätes übereinstimmen.
► Achten Sie darauf, dass im Betrieb das Netzkabel nicht nass oder
feucht wird. Führen Sie es so, dass es nicht eingeklemmt oder beschädigt werden kann.
► Halten Sie das Netzkabel von heißen Oberflächen fern.
► Führen Sie keine Reparaturarbeiten am Gerät durch. Jegliche
Reparaturen müssen durch den Kundendienst oder von qualifiziertem
Fachpersonal durchgeführt werden.
► Ziehen Sie den Netzstecker aus der Netzsteckdose, wenn das Gerät
gereinigt wird oder im Fehlerfall. Ausschalten alleine genügt nicht,
weil noch immer Netzspannung im Gerät anliegt, solange der Netzstecker in der Netzsteckdose steckt.
► Lassen Sie beschädigte Netzstecker oder Netzkabel sofort von
autorisiertem Fachpersonal oder dem Kundenservice austauschen,
um Gefährdungen zu vermeiden.
► Das Gerät und seine Anschlussleitung sind von Kindern fernzuhalten.
Sie dürfen das Gerät keinesfalls in Wasser oder andere Flüssigkeiten tauchen.
KM 250 C1
DE│AT│CH
│
23 ■

WARNUNG! VERLETZUNGSGEFAHR!
► Trennen Sie das Gerät grundsätzlich vom Stromnetz, wenn Sie Zube-
hörteile abnehmen oder anbringen. Ein unbeabsichtigtes Einschalten
des Gerätes wird so vermieden.
► Das Gerät ist bei nicht vorhandener Aufsicht und vor dem Zusammen-
bau, dem Auseinandernehmen oder Reinigen stets vom Netz zu trennen.
► Verwenden Sie nur die Original-Zubehörteile zu diesem Gerät.
Zubehörteile anderer Hersteller sind dafür möglicherweise nicht
geeignet und führen zu Gefährdungen!
► Dieses Gerät darf nicht von Kindern benutzt werden.
► Dieses Gerät kann von Personen mit reduzierten physischen, senso-
rischen oder mentalen Fähigkeiten oder Mangel an Erfahrung und/
oder Wissen benutzt werden, wenn sie beaufsichtigt oder bezüglich
des sicheren Gebrauchs des Gerätes unterwiesen wurden und die
daraus resultierenden Gefahren verstanden haben.
► Kinder dürfen nicht mit dem Gerät spielen.
► Vorsicht: das Schneidmesser, die Schneidscheibe und die Raspel-
scheibe sind sehr scharf! Gehen Sie daher vorsichtig bei der Reinigung vor.
► Vorsicht: das Schneidmesser, die Schneidscheibe und die Raspel-
scheibe sind sehr scharf! Gehen Sie daher vorsichtig beim Leeren der
Schüssel vor.
► Geben Sie, während das Gerät läuft, ausschließlich die zu verar-
beitenden Zutaten in die Schüssel.
► Verwenden Sie das Gerät nicht für andere Zwecke, als in dieser Be-
dienungsanleitung beschrieben. Bei Missbrauch des Gerätes besteht
Verletzungsgefahr!
► Stecken Sie niemals Hände oder Fremdgegenstände in den Einfüll-
schacht, um Verletzungen und Beschädigungen des Gerätes zu vermeiden.
■ 24 │ DE
│AT│
CH
KM 250 C1

WARNUNG! VERLETZUNGSGEFAHR!
► Wechseln Sie das Zubehör nur bei Stillstand des Antriebs und bei
gezogenem Netzstecker! Das Gerät läuft nach dem Ausschalten
noch kurze Zeit nach!
► Lassen Sie das Gerät niemals unbeaufsichtigt.
► Vor dem Auswechseln von Zubehör oder Zusatzteilen, die im Betrieb
bewegt werden, muss das Gerät ausgeschaltet und vom Netz getrennt werden.
Vor dem ersten Gebrauch
■ Entfernen Sie alle Verpackungsmaterialien vom
Gerät.
■ Reinigen Sie das Gerät, wie im Kapitel
„Reinigung und Pflege“ beschrieben.
■ Vergewissern Sie sich, dass alle Teile vollständig
trocken sind, bevor Sie das Gerät verwenden.
Gerät zusammenbauen
HINWEIS
► Das Gerät lässt sich nur starten, wenn die
Schüssel 5 und der Deckel 3 korrekt aufgesetzt sind.
1) Stellen Sie den Motorblock 7 auf eine ebene
Fläche, so dass die Saugnapffüße sich fest
saugen und das Gerät sicher steht.
2) Setzen Sie die Schüssel 5 so auf den Motorblock 7, dass der Pfeil
auf das geöffnete Schloss
7 weist. Drücken Sie die Schüssel 5 etwas
herunter und drehen Sie sie so weit, dass der
auf das geschlossene Schloss weist
Pfeil
und die Schüssel 5 einrastet.
Wenn Sie mit dem Schneidmesser 4arbeiten
wollen, fahren Sie mit dem Zusammenbau wie im
Kapitel „Schneidmesser“ beschrieben fort.
Wenn Sie mit dem Durchlaufschnitzler arbeiten
wollen, fahren Sie mit dem Zusammenbau wie im
Kapitel „Durchlaufschnitzler“ beschrieben fort.
auf der Schüssel 5
am Motorblock
Schneidmesser
1) Setzen Sie das Schneidmesser 4 auf die
Antriebswelle 6. Die abgeflachte Seite der
Antriebswelle 6 muss dabei korrekt in die Aufnahme des Schneidmessers 4 greifen. Ansonsten kann das Schneidmesser 4 nicht aufgesetzt werden.
2) Setzen Sie den Deckel 3 auf die Schüssel 5,
so dass der Pfeil ▼ am Deckel 3 auf den Pfeil
und das geöffnete Schloss
Schüssel 5 zeigt.
3) Drehen Sie den Deckel 3soweit, dass der
Pfeil ▼ am Deckel 3 auf den Pfeil
und das geschlossene Schloss
Schüssel5 zeigt.
4) Setzen Sie den Stopfer 1 in den Einfüllschacht 2.
5) Stecken Sie den Netzstecker in eine Netzsteckdose.
an der
auf der
KM 250 C1
DE│AT│CH
│
25 ■

Durchlaufschnitzler
1) Wählen Sie die gewünschte Scheibe:
– die Schneidscheibe w
– oder die Raspelscheibe q.
2) Falls noch eine andere Scheibe installiert ist:
Drücken Sie die lange Metalllasche der Scheibe
nach innen und schieben Sie die Scheibe
gleichzeitig mit Hilfe der Metalllasche aus dem
Scheibenadapter 0 heraus. Sie können nun
die Arretierung am anderen Ende der Scheibe
aus dem Scheibenadapter 0 heben.
3) Stecken Sie die neue Scheibe mit der Arretie-
rung zuerst in den Scheibenadapter 0:
4) Drücken Sie dann vorsichtig die Seite mit der
großen Metalllasche in den Scheibenadapter0. Drücken Sie dabei am besten mit den
beiden Daumen an den äußeren Kanten der
Scheibe, bis die Scheibe komplett im Scheibenadapter 0 sitzt und einrastet:
6) Setzen Sie den Deckel 3 auf die Schüssel 5,
so dass der Pfeil ▼ am Deckel 3 auf den Pfeil
und das geöffnete Schloss
Schüssel 5 zeigt.
7) Drehen Sie den Deckel 3soweit, dass der
Pfeil ▼ am Deckel 3 auf den Pfeil
geschlossene Schloss
zeigt.
8) Setzen Sie den Stopfer 1 in den Einfüllschacht 2.
9) Stecken Sie den Netzstecker in eine Netzsteckdose.
auf der Schüssel 5
an der
und das
Bedienen
Arbeiten mit dem Schneidmesser
Mit dem Schneidmesser 4 können Sie Lebensmittel, wie zum Beispiel Zwiebeln oder Fleisch,
zerhacken.
HINWEIS
► Versuchen Sie nicht, Flüssigkeiten mit dem
Schneidmesser 4 zu mischen. Diese laufen
über oder spritzen heraus.
1) Setzen Sie das Schneidmesser 4, wie im Kapitel
„Gerät zusammenbauen“ beschrieben, ein.
2) Schneiden Sie die Zutaten in ca. 2 – 3 cm
große Stücke.
3) Füllen Sie die Zutaten ein. Überschreiten Sie
dabei nicht die in der nachfolgenden Tabelle
angegebenen Mengen:
5) Setzen Sie den Scheibenadapter 0 mit eingesetzter Scheibe auf die Antriebswelle 6.
Die abgeflachte Seite der Antriebswelle 6 muss
dabei korrekt in die Aufnahme des Scheibenadapters 0 greifen. Ansonsten kann der
Scheiben adapter 0 nicht aufgesetzt werden.
■ 26 │ DE
│AT│
CH
ZUTAT
Brot max. 80 g ON
Käse max. 150 g ON
Fleisch max. 300 g ON
Kräuter max. 30 g ON
Knoblauch 80 – 200 g PULSE
Zwiebeln max. 300 g PULSE
Eiswürfel max. 140 g PULSE
MAX.
MENGE
GESCHWINDIG-
KEIT
KM 250 C1

HINWEIS
► Die in der Tabelle angegebenen Geschwindig-
keiten sind Richtwerte. Diese können je nach Beschaffenheit und Menge der Zutaten variieren!
4) Schließen Sie den Deckel 3.
5) Starten Sie, durch Drücken der Taste ON 8,
das Zerkleinern. Drücken Sie die Taste OFF/
PULSE 9 einmal, wenn alle Zutaten zerkleinert
sind und Sie das Gerät stoppen wollen.
Wenn Sie die Zutaten mit Hilfe der PULSE-Funktion verarbeiten wollen, drücken Sie die Taste
OFF/PULSE 9 mehrere Male hintereinander,
bis alle Zutaten zerkleinert sind.
Falls Zutaten sich an der Wand der Schüssel 5
absetzen oder am Messer kleben:
– Schalten Sie das Gerät aus.
– Nehmen Sie den Deckel 3 ab.
– Entfernen Sie die Zutaten vom Schneid-
messer 4 sowie von der Innenwand mit
Hilfe eines Teigschabers oder eines Löffels.
– Schließen Sie den Deckel 3.
– Starten Sie das Gerät erneut.
HINWEIS
► Verarbeiten Sie nur knochenfreies Fleisch!
► Lassen Sie das Gerät nicht zu lange laufen,
wenn Sie (Hart-)Käse zerkleinern. Dieser
wird sonst zu heiß, beginnt zu schmelzen und
verklumpt dadurch.
► Lassen Sie das Gerät niemals länger als
1Minute laufen! Ansonsten kann der Motor
überhitzen!
► Wenn Sie während des Schneidvorganges
noch Zutaten nachfüllen wollen, geben Sie
diese durch den Einfüllschacht 2 hinzu!
Wenn Sie den Deckel 3 öffnen, stoppt das
Gerät!
Achten Sie jedoch darauf, dass Sie die in der
Tabelle angegebenen Höchstmengen beim
Nachfüllen von Zutaten nicht überschreiten!
Arbeiten mit dem Durchlaufschnitzler
Mit den Scheiben q/w des Durchlaufschnitzlers
können Sie raspeln oder schneiden.
1) Wählen Sie die gewünschte Scheibe aus und
setzen Sie alles zusammen, wie im Kapitel
„Gerät zusammenbauen“ beschrieben.
2) Entfernen Sie den Stopfer 1 aus dem Einfüllschacht 2.
3) Schneiden Sie die Lebensmittel in so große
Stücke, dass diese ohne Probleme in den Einfüllschacht 2 passen.
4) Starten Sie, durch Drücken der Taste ON 8,
das Raspeln/Schneiden.
5) Füllen Sie dann nach und nach die Lebensmittel ein. Schieben Sie dabei die Lebensmittel
mit Hilfe des Stopfers 1 nach, ohne Druck
auszuüben.
Überschreiten Sie dabei nicht die in der nachfolgenden Tabelle angegebenen Mengen:
ZUTAT SCHNEIDSCHEIBE
Äpfel/Möhren max. 350 g
Schlangengurke max. 1,5 Stück
Kartoffeln max. 350 g
Zwiebeln max. 200 g
ZUTAT RASPELSCHEIBE
Äpfel/Möhren max. 350 g
Parmesan max. 150 g
Kartoffeln max. 350 g
Hartkäse
(z.B. alter Gouda)
max. 200 g
KM 250 C1
DE│AT│CH
│
27 ■

HINWEIS
► Verarbeiten Sie größere Mengen nicht auf
einmal, sondern in mehreren Portionen hintereinander. Leeren Sie zwichendurch immer die
Schüssel 5.
► Lassen Sie das Gerät nicht zu lange laufen,
wenn Sie (Hart-)Käse oder Schokolade
zerkleinern. Die Zutaten werden sonst zu
heiß, beginnen zu schmelzen und verklumpen
dadurch.
► Lassen Sie das Gerät niemals länger als
1Minute laufen! Ansonsten kann der Motor
überhitzen!
Reinigung und Pflege
STROMSCHLAGGEFAHR
► Bevor Sie das Gerät reinigen, ziehen Sie immer
den Netzstecker aus der Netzsteckdose.
Auf keinen Fall darf der Motorblock 7 in
Flüssigkeiten getaucht werden! Hierdurch
kann Lebensgefahr durch elektrischen
Schlag entstehen und das Gerät beschädigt
werden.
► Öffnen Sie niemals das Gehäuse des Gerätes.
Andernfalls besteht Lebensgefahr durch elektrischen Schlag.
WARNUNG! VERLETZUNGSGEFAHR!
► Seien Sie vorsichtig beim Reinigen des Schneid-
messers 4, der Schneidscheibe w und der
Raspelscheibe q. Diese Teile sind sehr scharf!
ACHTUNG! SACHSCHADEN!
► Verwenden Sie keine Lösungs- oder Scheuer-
mittel. Diese greifen die Oberflächen des
Gerätes an!
► Benutzen Sie keine aggressiven, chemischen
oder scheuernden Reinigungsmittel! Diese
können die Oberfläche irreparabel angreifen!
HINWEIS
► Reinigen Sie alle Teile immer direkt nach dem
Gebrauch. So lassen sich Lebensmittelreste
leichter entfernen.
► Wenn Sie stark färbende Lebensmittel
verarbeiten, wie zum Beispiel Möhren, kann
es sein, dass sich die Plastikteile des Gerätes
verfärben. Dies stellt keinen Mangel am Gerät
dar und beeinträchtigt nicht die Funktion.
Sie können Verfärbungen mit ein wenig
Speise öl abreiben.
■ Reinigen Sie den Motorblock 7und das Netz-
kabel mit einem leicht angefeuchteten Spültuch.
Trocknen Sie alles gut ab, bevor Sie es erneut
verwenden.
■ Reinigen Sie die Schüssel 5, den Deckel 3,
den Stopfer 1, das Schneidmesser 4, den
Scheibenadapter 0, die Schneidscheibe w
und die Raspelscheibe q in warmem Spülwasser. Spülen Sie danach alle Teile mit klarem
Wasser ab, so dass keine Spülmittelreste an den
Teilen haften.
Trocknen Sie alle Teile gut ab, bevor Sie das
Gerät erneut verwenden.
HINWEIS
Sie können die Schüssel 5, den
Deckel 3, den Stopfer 1, das Schneid-
messer 4, den Scheibenadapter 0,
die Schneidscheibe w und die Raspelscheibe q
auch in der Spülmaschine reinigen.
Legen Sie die Teile, wenn möglich, in den oberen
Korb der Spülmaschine und achten Sie darauf,
dass keines der Teile eingeklemmt wird. Ansonsten
kann es zu Verformungen und Spannungsrissen
kommen!
Lagerung
■ Bewahren Sie das gereinigte Gerät an einem
staubfreien und trockenen Ort auf.
■ 28 │ DE
│AT│
CH
KM 250 C1
Entsorgung
Werfen Sie das Gerät keinesfalls in den normalen Hausmüll.
Dieses Produkt unterliegt der
europäischen Richtlinie
2012/19/EU.
Entsorgen Sie das Gerät über einen zugelassenen
Entsorgungsbetrieb oder über Ihre kommunale
Entsorgungseinrichtung. Beachten Sie die aktuell
geltenden Vorschriften. Setzen Sie sich im Zweifelsfall mit Ihrer Entsorgungseinrichtung in Verbindung.
Möglichkeiten zur Entsorgung des
ausgedienten Produkts erfahren Sie
bei Ihrer Gemeinde- oder Stadtverwaltung.
Service
Service Deutschland
Tel.: 0800 5435 111
(Kostenfrei aus dem dt. Festnetz/
Mobilfunknetz)
E-Mail: kompernass@lidl.de
Service Österreich
Tel.: 0820 201 222 (0,15 EUR/Min.)
E-Mail: kompernass@lidl.at
Service Schweiz
Tel.: 0842 665566 (0,08 CHF/Min.,
Mobilfunk max. 0,40 CHF/Min.)
E-Mail: kompernass@lidl.ch
IAN 315063
Die Verpackung besteht aus umweltfreundlichen Materialien, die Sie über
die örtlichen Recyclingstellen entsorgen
können.
Beachten Sie die Kennzeichnung auf
den verschiedenen Verpackungsmaterialien und trennen Sie diese gegebe-
nenfalls gesondert. Die Verpackungsmaterialien sind gekennzeichnet mit Abkürzungen (a)
und Ziffern (b) mit folgender Bedeutung:
1–7: Kunststoffe, 20–22: Papier und Pappe,
80–98: Verbundstoffe.
Importeur
Bitte beachten Sie, dass die folgende Anschrift
keine Serviceanschrift ist. Kontaktieren Sie zunächst
die benannte Servicestelle.
KOMPERNASS HANDELS GMBH
BURGSTRASSE 21
DE- 44867 BOCHUM
DEUTSCHLAND
www.kompernass.com
KM 250 C1
DE│AT│CH
│
29 ■

Fehlerbehebung
PROBLEM MÖGLICHE URSACHE MÖGLICHE LÖSUNGEN
Das Gerät ist nicht mit einer Netz-
Das Gerät funktioniert nicht.
Das Gerät startet nicht.
Sollten sich die Störungen nicht mit oben stehenden Fehlerbehebungen beheben lassen, oder wenn Sie
andere Arten von Störungen feststellen, wenden Sie sich bitte an unseren Service.
steckdose verbunden.
Das Gerät ist beschädigt. Wenden Sie sich an den Service.
Die Schüssel 5 ist nicht korrekt in
den Motorblock 7 eingerastet.
Der Deckel 3 ist nicht/nicht korrekt
aufgesetzt und verriegelt.
Schließen Sie das Gerät an eine
Netzsteckdose an.
Kontrollieren Sie den Stand der
Schüssel 5 und korrigieren Sie ihn
gegebenenfalls.
Schließen Sie den Deckel 3 korrekt.
■ 30 │ DE
│AT│
CH
KM 250 C1

KOMPERNASS HANDELS GMBH
BURGSTRASSE 21
DE - 44867 BOCHUM
GERMANY
www.kompernass.com
Last Information Update · Έκδοση των πληροφοριών · Stand der Informationen:
01 / 2019 · Ident.-No.: KM250C1-112018 -2
IAN 315063
 Loading...