

Page 1
A
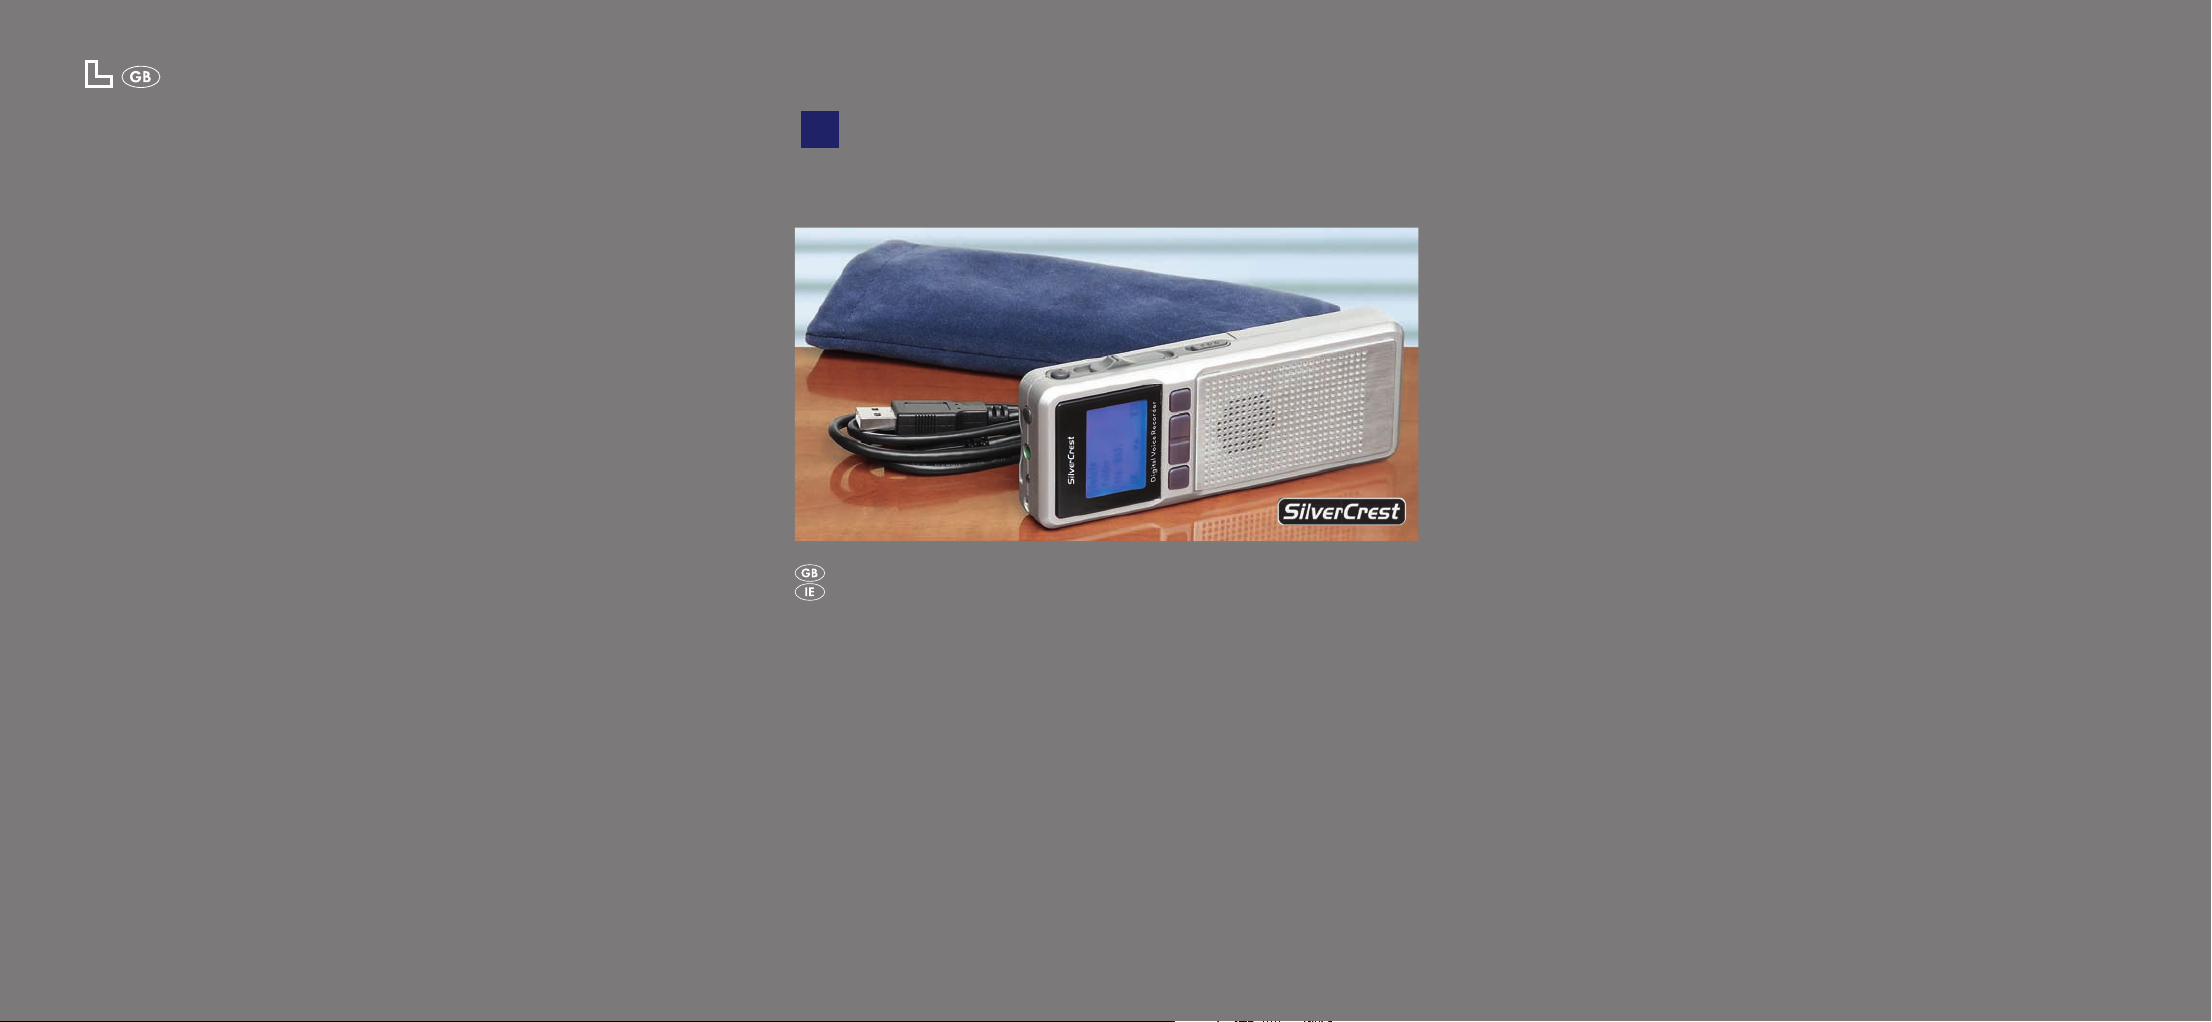
SilverCrest KH 2450
DIGITAL VOICE RECORDER
Operating Instructions
ID-Nr.: KH2450 10/2008 V2
KOMPERNASS GMBH
BURGSTRASSE 21
D-44867 BOCHUM
www.kompernass.com
Page 2
Contents
Warranty
g
q
u
h
i
r e wt
j
y
l
o
k
asdf
;
Contents ................................................................................................................. 4
1. Intended use ....................................................................................................... 6
2. Technical Data .................................................................................................... 6
Power supply .....................................................................................................................6
Memory .............................................................................................................................6
3. Safety Instructions ............................................................................................. 6
4. Items supplied .................................................................................................... 9
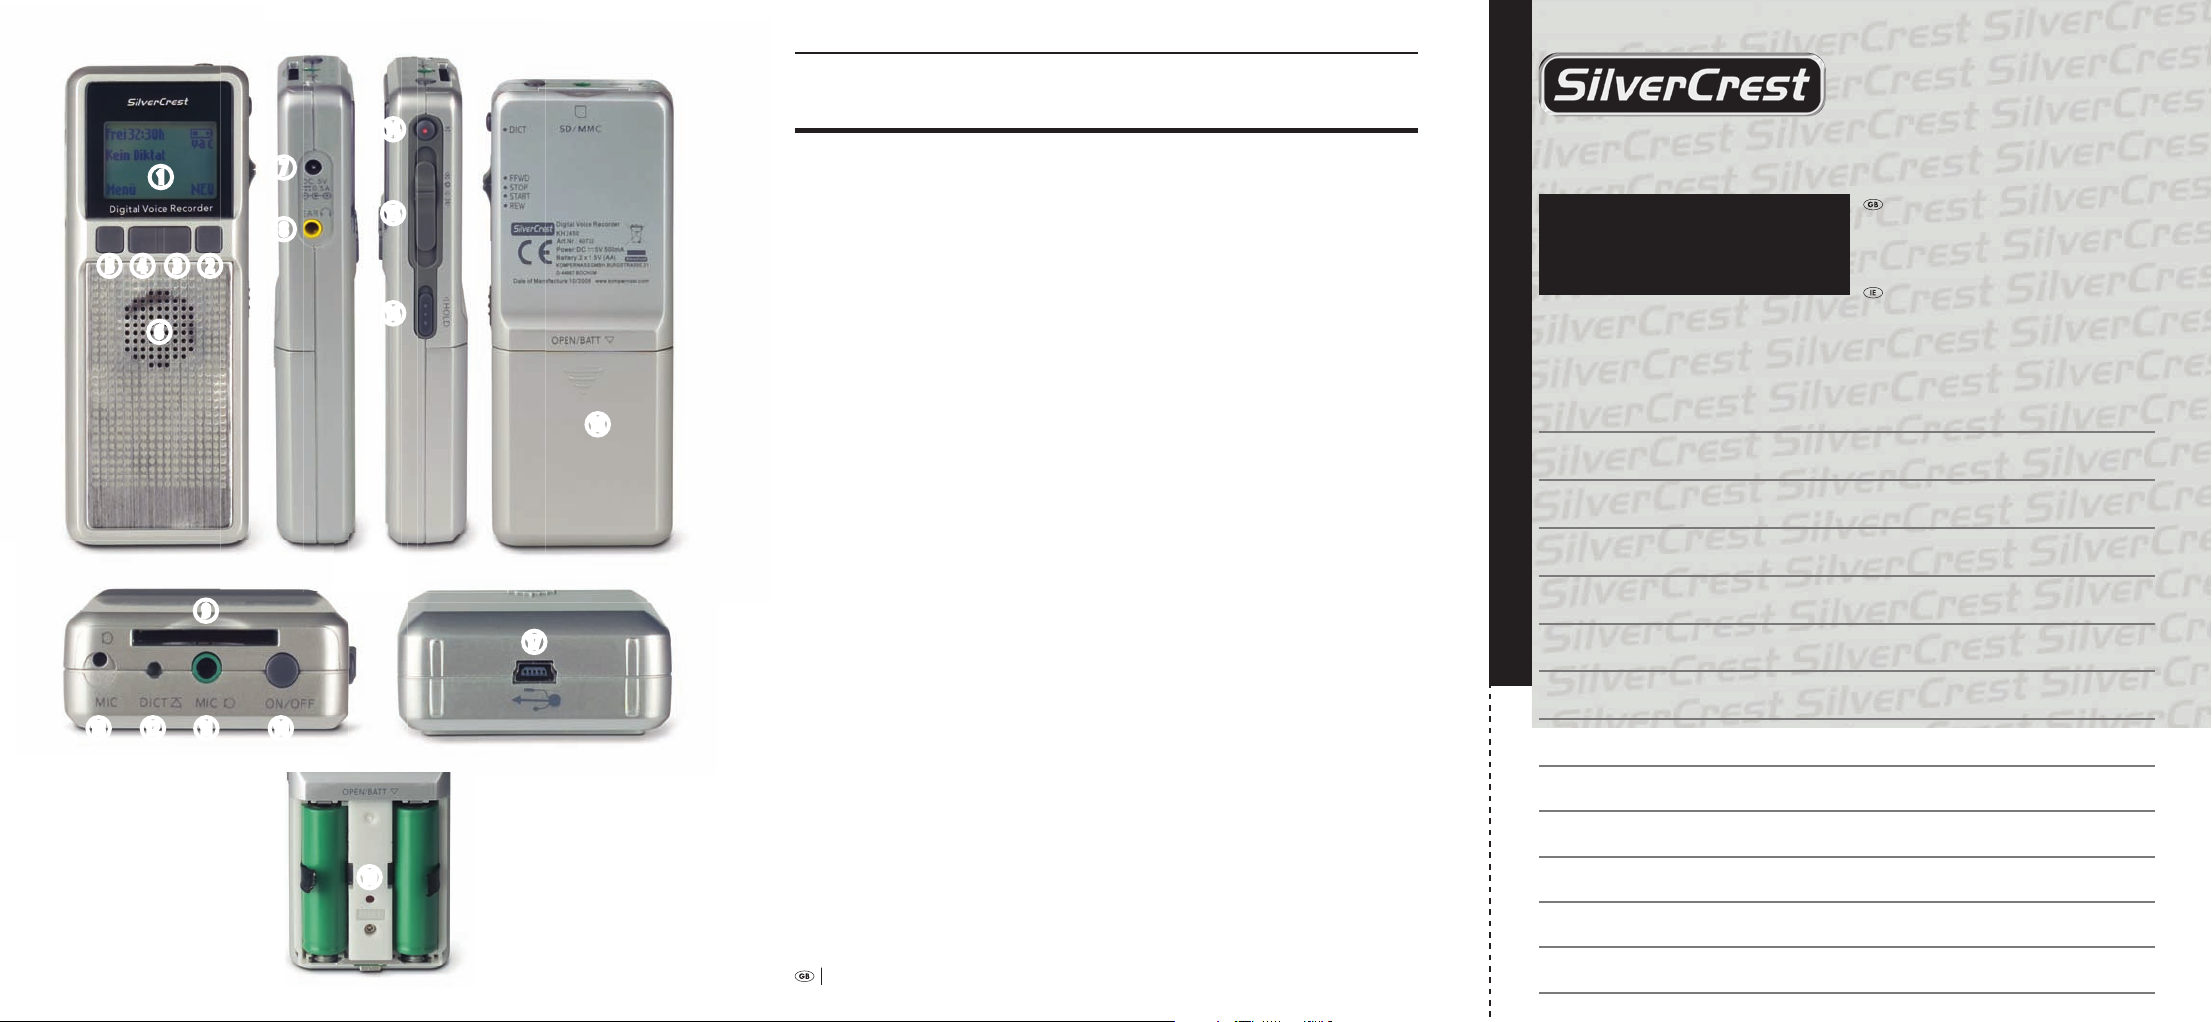
5. Operating elements, connections and displays ................................................. 9
5.1 Front.............................................................................................................................9
5.2 Le ...............................................................................................................................9
5.3 Top ............................................................................................................................ 10
5.4 Right .......................................................................................................................... 10
5.5 Bottom ...................................................................................................................... 10
5.6 Bottom ...................................................................................................................... 10
6. Preparing the voice recorder for use ............................................................... 10
7. Using the voice recorder ................................................................................... 14
7.1 Switching the voice recorder on ........................................................................... 14
7.2 Switching the voice recorder o .......................................................................... 16
7.3 Recording dictation ................................................................................................ 16
7.4 Playback of recorded dictation ............................................................................. 18
7.5 Options during playback ....................................................................................... 19
7.5.1 Stopping the playback ..................................................................................... 19
7.5.2 Adjusting the playback sound volume ......................................................... 19
7.5.3 Adjusting the playback speed ........................................................................ 20
7.5.4 Fast forward/rewind ........................................................................................ 20
7.6 Handling recorded dictations ............................................................................... 22
7.6.1 Overwriting passages in a recorded dictation ............................................. 22
7.6.2 Inserting a passage into a recorded dictation .............................................. 22
7.7 Deleting recorded dictations ................................................................................. 23
7.7.1 Completely deleting recorded dictations ..................................................... 24
7.7.2 Partially deleting recorded dictations ........................................................... 25
8. Further functions and adjustments of the voice recorder .............................. 27
8.1 Activating/deactivating the key lock .................................................................... 27
8.2 Selecting a folder for saving dictation recordings .............................................. 27
8.3 Provide dictation recordings with references ..................................................... 29
8.4 Using memory cards instead of the device internal storage system ................ 33
8.5 Switching voice activation on/o ......................................................................... 34
Digital Voice Recorder
KH 2450
To ensure you receive a free repair procedure, please contact us via our Service-
Hotline. Ensure that you have your sales
slip handy.
Sender, please write clearly:
Last Name:
First Name:
Street Address:
Postal Code/City:
Country:
Telephone:
Fill in this section and submit it with the device!
Date/Signature:
Description of the defect:
DES Ltd
Tel.: 0870/787-6177
Fax: 0870/787-6168
e-mail: support.uk@kompernass.com
Irish Connection
Tel: 00353 (0) 87 99 62 077
Fax: 00353 18398056
e-mail: support.ie@kompernass.com
www.mysilvercrest.de
4
✄
Page 3

8.6 Microphone sensitivity........................................................................................... 36
8.7 Using the voice recorder as a PC microphone .................................................... 38
8.8 Switch-o options ................................................................................................... 40
8.9 Switching audio signals on/o ..............................................................................42
8.10 Adjusting the illumination .................................................................................. 44
8.11 Selecting the recording mode ............................................................................. 46
8.12 Setting the date and time ..................................................................................... 47
8.13 Resetting the internal dictation counter ............................................................ 49
8.14 Returning the voice recorder to factory settings .............................................. 51
8.15 Formatting the internal memory of the voice recorder .................................. 52
8.16 Changing the display language ........................................................................... 54
8.17 Display the version number of the Firmware ................................................... 56
9. Maintenance ..................................................................................................... 58
9.1 Changing the batteries/cells .................................................................................. 58
9.2 Recharging cells in the battery compartment of the voice recorder ............... 58
10. Copying dictation recording from the voice recorder to a PC ..................... 60
10.1 Installing the soware »Convert« onto a PC .................................................... 61
10.2 Using the soware »Convert« ............................................................................. 63
10.3 Deinstalling the soware »Convert« from a PC .............................................. 67
11. Connecting ancillaries to the voice recorder ................................................. 68
11.1 Connecting headphones to the voice recorder ................................................. 68
11.2 Connecting an external microphone to the voice recorder............................ 69
12. Cleaning the voice recorder ........................................................................... 69
13. Troubleshooting ............................................................................................. 69
13.1 e voice recorder indicates no functions ....................................................... 69
13.1.1 With cell/battery operation .......................................................................... 69
13.1.2 With mains power operation ....................................................................... 70
13.1.3 With connection of the voice recorder to a PC via a USB-cable (USB
operation) .................................................................................................................. 70
13.2 Voice recorder has crashed/input not possible ................................................. 70
13.3 Error messages ...................................................................................................... 71
13.4 Other Malfunctions .............................................................................................. 71
14. Disposal .......................................................................................................... 72
14.1 Device ..................................................................................................................... 72
14.2 Batteries/Cells ........................................................................................................ 72
14.3 Packaging materials .............................................................................................. 72
15. Warranty and Service ..................................................................................... 72
16. Importer ......................................................................................................... 73
5
Page 4
. Intended use
e digital voice recorder SilverCrest KH is intended exclusively for the recording,
storage and playback of dictations. is dictation device is not intended for utilisation
in commercial or industrial applications. No warranty claims will be approved for
damage resulting from improper use!
. Technical Data
Power supply
Battery operation: Batteries of Type AA/LR
Mignon . V or Cell Type AA/Mignon . V
Mains operation: V DC, . A, Polarity:
Memory
Internal memory: MB
Expandable memory: SD and MMC memory cards up to a capacity of GB
. Safety Instructions
Read the operating instructions carefully before using the device for the rst time
and preserve this booklet for later reference. Pass this booklet on to whoever might acquire the device at a future date.
DANGER!
†
‹
Should moisture/water penetrate into the voice recorder, …
there is the risk of receiving an electric shock!
Ú
it could be irreparably damaged!
Ú
6
›
Page 5

7
Thus: Do not use or store the voice recorder …
in moist environments!
Ú
in close proximity to water! Additionally, never expose the voice recorder to spray water or rain.
Ú
NEVER place water-lled receptacles on the voice recorder!
Ú
Exposure to extreme heat sources can lead to an overheating of the voice recorder and to the melting of plastic
parts. This could irreparably damage the voice recorder, and there is the additional risk of a re! Thus:
Never place the voice recorder directly adjacent to sources of heat.
Ú
Do not place any open re sources – e.g. burning candles – on the voice recorder!
Ú
Do not leave the voice recorder in a vehicle when the outdoor temperature is high.
Ú
Especially in summer the temperature inside a vehicle can become extremely high.
Do not subject the voice recorder to direct sunlight or strong articial light.
Ú
When operating the voice recorder on mains power use only a suitable and undamaged power adapter;
Output voltage: V DC, Output current: mA, DC-Plug (Barrel plug) ,/, mm (Inner/Outer diameter),
Polarity DC-Plug:
shops. Should the voice recorder be used with an unsuitable or damaged power adapter there is the risk of you
receiving an electric shock! Additionally, the voice recorder could be irreparably damaged!
Never attempt to recharge standard batteries in the battery compartment of the voice recorder! Essentially, only
cells can be recharged. Never throw batteries/rechargeable cells into a re! NEVER open batteries or cells, never
solder or weld them! Should you do so, there is a risk of re or explosion! Additionally, the voice recorder
could become irreparably damaged.
Keep batteries and cells well away from children. Children could put batteries and cells into their mouth and
swallow them. Should a battery or a cell be swallowed, seek medical assistance IMMEDIATELY!
In the event of a defect, NEVER attempt to repair the voice recorder or a power adapter yourself! There is a risk of
receiving an electric shock! Instead, consult our service partner responsible for your country. The contact informati on
for our service hotline can be found on the warranty card at the end of this operating manual.
Do not leave packaging material lying unattended. Plastic foils and bags and pieces of styropor etc. are not
toys, they can be dangerous for small children. There is a risk of suocation!
. Suitable power adapters are available in electronic and audio/video specialist
CAUTION!
™
‹
Equipment connected to a power supply can be damaged during a thunderstorm. Thus:
If working with mains power, always withdraw the plug from the power socket in the event of a thun-
Ú
derstorm.
›
Page 6

The power socket should be close to the appliance and easily accessible at all times, so that the plug can
Ú
be quickly removed in the event of danger.
The voice recorder could be irreparably damaged after a fall! Therefore, place the voice recorder only on rm,
level and non-slip surfaces.
The voice recorder can be irreparably damaged by leaking battery acids.
Thus: Remove all batteries and cells from the battery compartment if you are not planning to use the voice
recorder for an extended period.. Regularly check the inserted batteries/cells. In the event of a leaking battery/cell:
Put on a pair of protective gloves. Then clean the battery compartment and the contacts for the batteries/cells
with a dry cloth.
This device is not intended for use by individuals (including children) with restricted physical, physiological
or intellectual abilities or deciencies in experience and/or knowledge unless they are supervised by a person
responsible for their safety or receive from this person instruction in how the device is to be used. Children
should be supervised to ensure that they do not play with the device. Otherwise, there is a risk of injury!
The voice recorder should not be used or stored in dusty environments. Dust particles could penetrate into the
appliance. If large quantities of dust penetrate the voice recorder it could overheat and be irreparably damaged.
There is also the risk of a re!
NOTICE:
]
‹
NEVER open the housing of the voice recorder! The voice recorder does not contain any user-serviceable components!
If the housing of the voice recorder is opened, the warranty will become void!
Thus: In the event of a defect with your voice recorder contact our service hotline responsible for your locality!
The contact information for our service hotline can be found on the warranty card at the end of this operating manual.
The voice recorder becomes warm when it is switched on. This is no cause for concern and does not indicate
a technical problem.
For damage to the voice recorder that is a result of...
improper use of the voice recorder,
Ú
impact caused by falls,
Ú
the eects of moisture, resp.
Ú
water that has permeated into the voice recorder,
Ú
the eects of heat/overheating,
Ú
the utilisation of power adapters that do not conform to the specications given in this operating
Ú
manual,
›
8
Page 7

9
an attempt to recharge standard (non-rechargeable) batteries in the battery compartment of the voice
Ú
recorder,
opening of the voice recorder housing, and
Ú
attempts at repair eected by non-qualied personnel,
Ú
no liability/warranty will be accepted!
. Items supplied
Digital Voice Recorder SilverCrest KH
•
× Batteries (Type AA/Mignon . V )
•
Storage case
•
USB-Cable for connection of the voice recorder to a PC
•
CD-ROM with the soware »Convert«, for data transfer from the voice re-
•
corder to a PC
. Operating elements, connections and displays
5.1 Front
Display
q
w
Function button A (for diverse adjustments; the respective function is shown
in the display
Function button B (as function button A)
e
Function button C (as function button A)
r
Function button D (as function button A)
t
Loudspeaker
y
q above the function button)
5.2 Left
Jack socket »DC V . A« for a power adapter (not supplied)
u
Headphone jack »EAR « (for connecting headphones with a . mm jack
i
plug to the voice recorder)
Page 8
5.3 Top
Memory card slot » SD/MMC« (for SD/MMC memory cards)
o
Button »ON/OFF« (for switching the voice recorder on and o)
a
Microphone jack socket »MIC « (for connecting an external microphone
s
with a . mm jack plug)
Status lamp »DICT «
d
Microphone »MIC
f
recording)
5.4 Right
Button » DICT«
g
Multi-function slider for the functions
h
» FFWD« (fast forward at playback)
Ú
» STOP« (stop dictation recording/playback)
Ú
» START« (start dictation recording/playback)
Ú
» REW« (fast rewind at playback )
Ú
Slider » HOLD« (Activate/Deactivate the key lock)
j
5.5 Bottom
USB interface » « (to connect the voice recorder to a PC)
k
5.6 Bottom
Battery compartment »OPEN/BATT «
l
Button »RESET«
;
« (internal microphone of the voice recorder for dictation
. Preparing the voice recorder for use
Carefully remove the voice recorder from the packaging.
1
Only for battery/cell operation: Open the battery compartment l at the rear
2
of the voice recorder. Insert …
the two supplied cells, resp.,
Ú
two batteries of the type AA Mignon . V or
Ú
batteries of the type AA/LR . V.
Ú
Be sure to insert the batteries/cells with their correct polarities. The correct
polarity is indicated inside the battery compartment. When done, close and
secure the battery compartment.
10
Page 9
11
Only for mains power operation: Insert the DC plug (barrel plug) of a suit-
2
able power adapter into the socket »DC V .A«
A power adapter is not supplied. Pay heed to the correct polarity of the DC
plug. For this voice recorder, a suitable power adapter must have a positive polarity. Insert the plug of the power adapter into a mains power socket.
DANGER!
†
‹
For mains power operation of the voice recorder use exclusively a suitable power adapter; Output voltage:
V DC, Output current: mA, DC-Plug (Barrel plug) ,/, mm (Inner/Outer diameter), Polarity DC-Plug:
. Suitable power adapters are available in electronic and audio/video specialist shops. Should the
voice recorder be used with an unsuitable power adapter, there is the risk of you receiving an electric shock!
Additionally, the voice recorder could be irreparably damaged!
Only for USB operation: Check to ensure the PC is switched on. Insert the
2
small plug of the supplied USB cable into the USB interface »
voice recorder. Insert the large plug of the USB cable into a free USB interface
on your PC. If batteries/cells have not been inserted into the battery compartment of the voice recorder: Immediately switch the voice recorder on by
pressing the button "On/O "
battery compartment: Switch the voice recorder on before connecting it to
the PC. If you do not, the voice recorder will switch over to PC operation and
will be identied by the PC as a removable media. In PC operation, dictations
from the voice recorder can be copied onto the PC; for this, see also chapter .
»Copying dictation recording from the voice recorder to a PC«. However, in
PC operation the voice recorder cannot be used for dictations. Additionally, in
PC operation you cannot utilise the menu or any of the other adjustments for
the voice recorder.
Switch the voice recorder on by pressing the button "On/O" a.
3
In the display
›
. If batteries/cells have been inserted into the
a
the battery selection screen appears:
q
on the voice recorder.
u
« k on the
Type of battery
Non-rechargeable
battery
OK ESC
Page 10

Aer pressing function button B e/C r, choose between the settings:
4
Rechargeable battery
Ú
Non-rechargeable battery
Ú
Select »Rechargeable battery« if you have inserted rechargeable batteries into
the battery compartment.
Select »Non-rechargeable battery« if you have inserted standard non-recharge-
able batteries into the battery compartment.
Also select »Non-rechargeable battery« if you wish to use the voice recorder …
with a power adapter (not supplied) connected to a mains socket.
Ú
via a USB cable (supplied) connected to the USB interface.
Ú
On completion, and by pressing the function button D
rm the adjustment. If you do not, the voice recorder will automatically
select the adjustment »Non-rechargeable battery«.
DANGER!
†
‹
Ensure absolutely that the correct adjustment has been selected. Otherwise, there is the risk that standard
batteries, ones not suitable for recharging, could be recharged. In this case, there is the real risk of re or an
explosion!
In cases of doubt: Remove the batteries/cells from the battery compartment; check to conrm if they are
standard batteries or rechargeable batteries. Then reinsert the batteries/cells into the battery compartment.
Switch the voice recorder on then select the correct adjustment in the battery selection screen.
Alternatively, you can remove the batteries/cells from the battery compartment if you wish to use the voice
recorder …
with a power adapter connected to a mains power socket
Ú
via a USB cable connected to the USB interface on a PC.
Ú
›
, select »OK« to con-
t
NOTICE:
]
‹
To carry out the steps to you have ca. seconds for each. Otherwise, the adjustment of the time and
date indicator breaks o. In this case, you can reach the adjustment data for the time and date indicators via
the main menu. This is explained in chapter . »Setting the date and time«.
12
›
Page 11

13
In the display q the date/time setting screen is now indicated. First of all the
5
hour indicator is marked. Adjust the hour indicator by selecting »
the function buttons B
On completion, and by pressing the function button D t, select »OK« to con-
6
rm the adjustment. e marking changes to the minute indicator.
Adjust the minute indicator by selecting » «/» « with the function
7
buttons B
On completion, and by pressing the function button D t, select »OK« to con-
8
rm the adjustment. e marking changes to the date indicator.
Adjust the day indicator by selecting » «/» « with the function buttons
9
10
11
12
13
14
Alternatively: Subsequently select with the function button A
Ú
Ú
Ú
As the soware of the voice recorder is loading, the hourglass symbol is blended in
briey. Subsequently, the start screen is displayed. In the upper right corner of the
display
/C r.
B
e
On completion, and by pressing the function button D t, select »OK« to
conrm the adjustment. e marking changes to the month indicator.
Adjust the month indicator by selecting » «/» « with the function buttons
/C r.
B
e
On completion, and by pressing the function button D t, select »OK« to
conrm the adjustment. e marking changes to the year indicator.
Adjust the year indicator by selecting » «/» « with the function buttons
/C r.
B
e
Should you decide to once again change one of the settings: By pressing the func-
tion button D
dicator.
conrm all of the settings. Appearing briey in the display
the SilverCrest logo
»INT«, should there not be a memory card inserted into the memory card slot
; then the internal memory of the voice recorder is used for dictations.
o
»EXT«, should there be an SD/MMC memory card inserted into the memory
card slot
q
/C r.
e
select »OK«. e marking then changes back to the hour in-
t
and this is being used for dictations.
o
appears …
e
/C r.
q
»End«, to
w
…
«/» « with
Page 12
in battery/cell operation, the battery symbol ; the beams in the battery
Ú
symbol indicate the current full resp. charged condition of the batteries.
in mains power/USB operation the symbol .
Ú
e voice recorder is now ready for use.
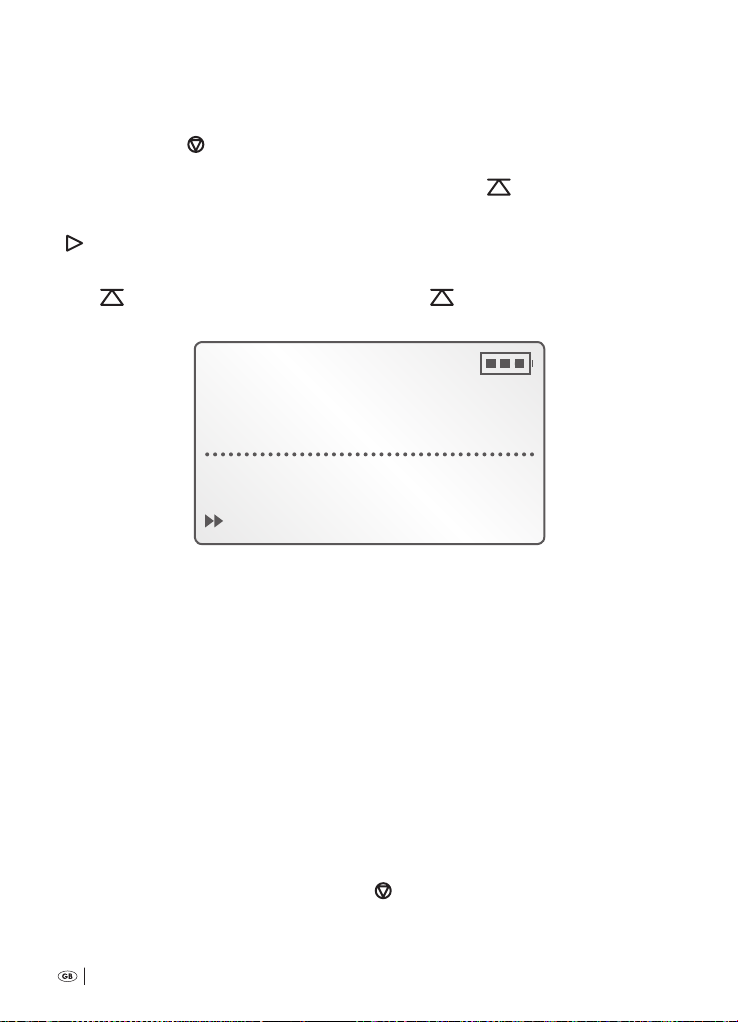
. Using the voice recorder
7.1 Switching the voice recorder on
To switch the voice recorder on: Press the button »ON/OFF« a once. e sta-
1
tus lamp »DICT
logo is briey shown; indicated subsequently are:
should the batteries/cells have been exchanged before switching on: the battery
Ú
selection screen (see chapter »Preparing the voice recorder for use«, step );
the battery selection screen is not indicated if …
the batteries/cells were not exchanged before switching on
Ú
the switched-o voice recorder is connected to a PC via a USB cable
Ú
(PC operation)
subsequently the SilverCrest logo
Ú
»INT«, should there not be a memory card inserted into the memory card slot
Ú
; in this case the internal memory of the voice recorder is used for dicta-
o
tions.
»EXT«, should there be an SD/MMC memory card inserted into the memory
Ú
card slot
memory for dictation recording.
During soware loading phases the hourglass symbol in blended in briey.
Consequently, a short signal tone sounds and the start screen appears with the
following indicators/menu choices:
; in this case the memory card is used exclusively as an external
o
« d briey lights up once. In the display q the SilverCrest
Should it be that no dictations have yet been saved:
14
Page 13
15
Free 11:43h
q w
no dictations
e
r t
Menu NEW
e amount of recording time currently available for dictations, e.g. »Free
q
:h«
With battery/cell operation: the battery symbol ; the beams in the battery
w
symbol indicate the current full resp. charged condition of the batteries.
With mains power/USB operation: the symbol
»no dictations«, insofar as no dictations have yet been saved
e
»MENU« (Selection of the main menu of the voice recorder, by using function
r
button D
»NEW« (for eecting a new dictation)
t
Should dictations have already been saved:
, for adjusting the various functions of the voice recorder)
t
Free 9:15h
DICT006 01:40
y
u
Menu DICT± NEW
Name and length of the last saved dictation, e.g. »DICT :«
y
»DICT ±« (for selection of previously saved dictations by means of the
u
function buttons B
and C r)
e
Page 14

7.2 Switching the voice recorder o
Hold the button »ON/OFF« a pressed down until »O« appears in the display q.
e voice recorder then switches itself o.
7.3 Recording dictation
Switch the voice recorder on by pressing the button »ON/OFF« once.
1
As soon as the start screen is shown in the display
Place the multi-function slider h at » STOP«.
2
en select, by pressing the function button A w, »NEW«. e voice recorder
3
now allocates a new dictation reference with a successive number.
NOTICE:
]
‹
Every new dictation recording is saved under a new, successive number. However, take note: The numbering
of saved dictations does not subsequently change when you delete individual dictations.
EXAMPLE:
Ú
‹
You start a new dictation recording. This is automatically assigned the number »DICT«. At a later date you
delete dictation recording »DICT«. When you start a new dic tation recording, this one is automatically assigned the next following number, »DICT«, although the dictation with the prior number, »DICT«, has
been deleted.
You can however reset the dictate counter back to null. After the resetting of the counter, the subsequent dictations will again be automatically successively numbered, beginning at »DICT«. The resetting of the internal counter for dictations is explained in chapter . » Resetting the internal dictation counter«.
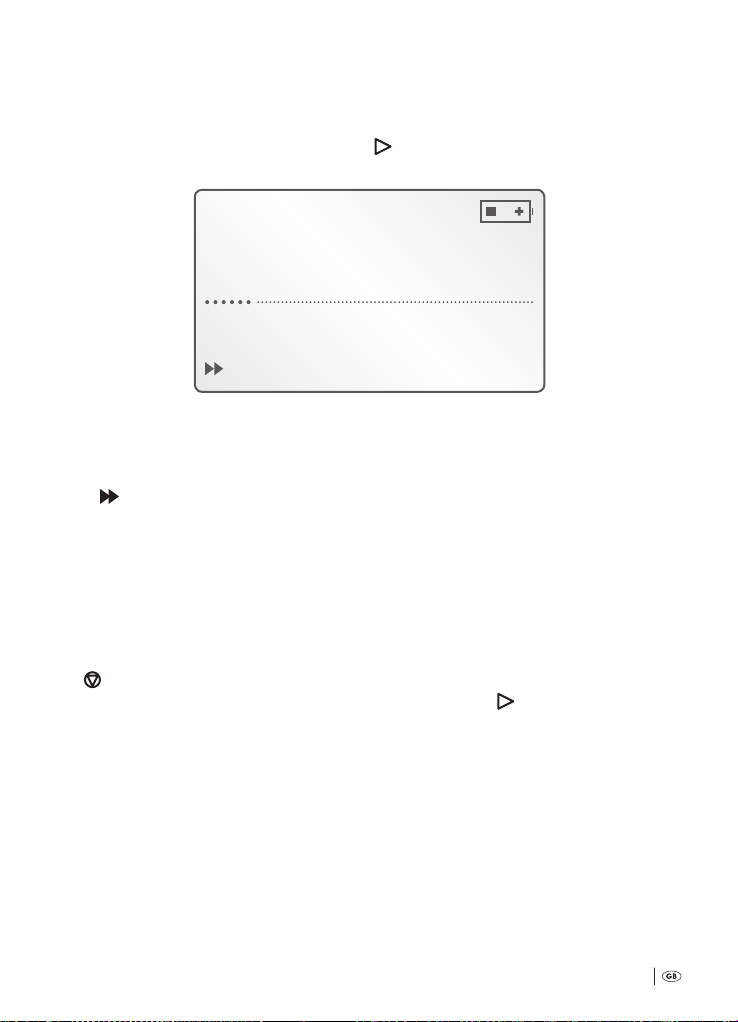
However, the dictation recording does not start immediately, instead, at rst it is in
a pause-mode. e status lamp »DICT
›
›
«
d blinks; in the display q
q
:
is indicated:
16
Page 15
17
Free 9:15h
DICT008 00:00
Record Pause
e successive number of the new dictation recording, e.g. »DICT«
q
e current length of the dictation recording (for new dictations that have not
w
yet been started, always »:«)
»Record Pause«
e
To start the dictation recording: Place the multi-function slider h at »
4
START«. In the display
is started. During the dictation recording the lapsed period of the dictation recording is continuously indicated in the display
« d glows permanently during the dictation recording.
NOTICE:
]
‹
Every individual dictation recording can be up to three hours long (insofar as sucient memory space is available). After three hours a new dictation recording is automatically initiated; thereby, the running dictation
recording is not interrupted. The newly initiated dictation recording receives the same number as the original,
but expanded by a letter. Example After a period of three hours of the dictation recording »DICT«, the new
dictation recording »DICTA« is automatically initiated. In the display
›
Free 14:38h
q w
e
»Record« is indicated, then the dictation recording
q
. e status lamp »DICT
q
is indicated:
q
DICT001A 01:15
Record
Page 16
In accord with this pattern, after every further three hours additional dictations are automatically initiated
(e.g. »DICTB«, »DICTC« etc.). For each of these an acoustic signal sounds.
When you wish to interrupt the dictation recording: Place the multi-function
5
slider
erto period of the dictation recording remains shown. For as long as the dictation recording is interrupted, the status lamp »DICT
To continue the dictation recording: Place the multi-function slider
START«.
»
When you wish to terminate the dictation recording: Press the button
6
»
q
at » STOP«. In the display q »Record Pause« is indicated, the hith-
h
« blinks.
back at
h
DICT« g once. e status lamp »DICT « d goes out. In the display
is indicated:
Free 16:38h
DICT009 01:00
play-back end
1.5 VOL± HOME
Now you can…
play back the saved dictation recording. is is explained in the following
Ú
chapter . »Playback of recorded dictation«.
work on the saved dictation recording. is is explained in the following chap-
Ú
ter . »Handling recorded dictations«.
delete the dictation recording, either completely or partially. is is explained
Ú
in the following chapter . »Deleting recorded dictations«.
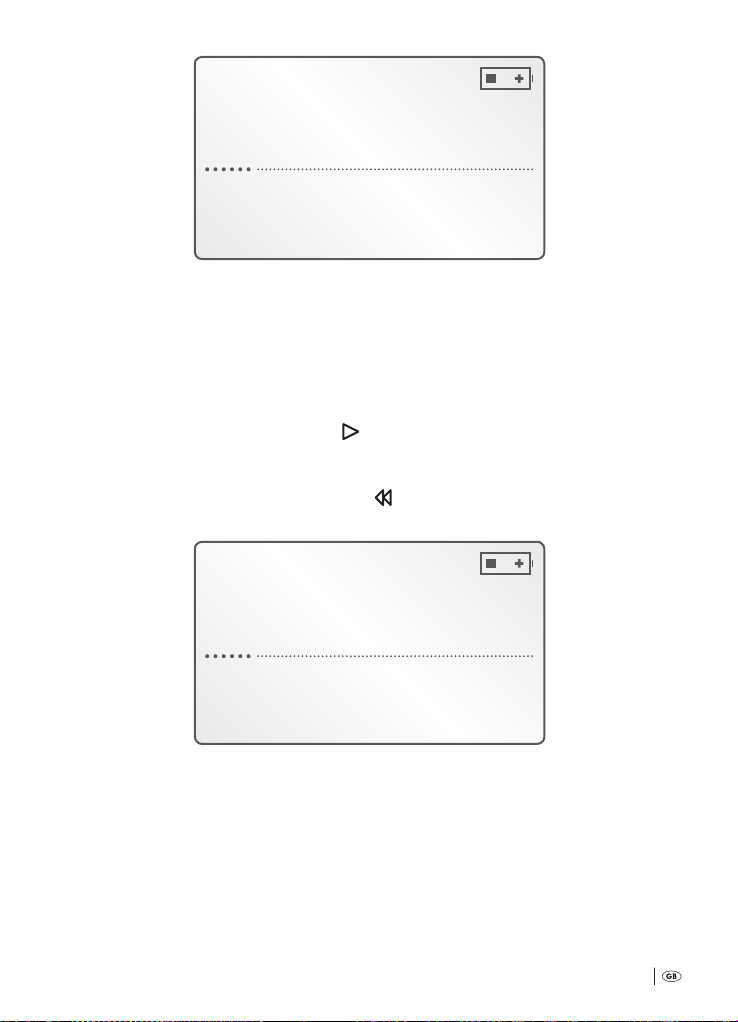
7.4 Playback of recorded dictation
To play back saved dictations:
Switch the voice recorder on by pressing the button »ON/OFF« a.
1
As soon as the start screen is shown in the display
Place the multi-function slider h at » STOP«.
2
18
q
:
Page 17
19
Should there be several dictations extant: Select the one you want by pressing
3
the function buttons B
tions. When the desired dictation recording is shown in the display
Place the multi-function slider h at » START«. e selected dictation re-
4
cording is now played back. In the display
/C r »DICT ±« to switch between the saved dicta-
e
q
is indicated:
q
:
Free 16:38h
DICT005 01:00
playback
q w
e
r yt
1.5 VOL± END
e designation of the dictation recording being played back, e.g. »DICT«
q
e current playback time of the dictation recording
w
»play-back«
e
» .«: by pressing the function button D t, change the playback speed by .
r
»VOL ±« to adjust the playback sound volume
t
»END« to end the playback
y
7.5 Options during playback
.. Stopping the playback
To stop playback of a saved dictation recording: Place the multi-function slider
STOP«. Playback is stopped; in the display
at »
continue playback: Place the multi-function slider
continued from the point where it had been stopped.
.. Adjusting the playback sound volume
During playback you can adjust the playback sound volume between the
values of (muted) and (maximum volume).
»play-back« is faded out. To
q
h back at » START«; playback is
h
Page 18
To increase the playback sound volume: Press the function button B e.:
With each press of the button you raise the playback sound volume by a step.
For a faster raising of the playback sound volume you can also hold down the
function button B
To reduce the playback sound volume: Press the function button C r. With each
press of the button you reduce the playback sound volume by a step. For a faster reduction
of the playback sound volume you can also hold down the function button C
e currently adjusted volume level is indicated for a few seconds in the display
.. Adjusting the playback speed
e playback of saved dictation recordings can take place at two speeds:
normal speed
Ú
one and a half times speed
Ú
e standard factory setting is normal playback speed.
To switch to a one and a half times playback speed: Select it during playback
1
by pressing the function button D
and a half times normal speed.
To switch back to normal playback speed: Select it by pressing the function
2
button D
.. Fast forward/rewind
NOTICE:
]
‹
During fast forward/rewind there is no sound playback.
To select passages of the dictation recording in fast forward during playback:
e.
» .«. Playback now takes place at one
t
» .«. Playback now takes place again at normal speed.
t
›
r
.
q
.
Place the multi-function slider h at » FFWD« and hold it in this position;
1
in the display
20
is indicated:
q
Page 19
21
Free 03:37h
DICT013 1:13:06
Fast forward
During fast forward the actual playback period of the dictation recording is
continuously indicated in the display
As soon as you have reached the desired passage in the dictation recording:
2
Release the multi-function slider
Should you wish to continue playback from the selected passage: Place the
3
multi-function slider
To select passages of the dictation recording in fast rewind during playback:
Place the multi-function slider h at » REW« and hold it in this position;
4
in the display
q
back at » START«.
h
is indicated:
q
h
.
.
Free 03:37h
DICT013 34:30
Rewind
During fast rewind the actual playback period of the dictation recording is
continuously indicated in the display
As soon as you have reached the desired passage in the dictation recording:
5
Release the multi-function slider
from the selected passage.
.
q
. Playback is now automatically continued
h
Page 20

7.6 Handling recorded dictations
.. Overwriting passages in a recorded dictation
You can amend saved dictations at any point; for this, simply start a new dictation
recording at the desired point:
Switch the voice recorder on by pressing the button »ON/OFF« a.
1
As soon as the start screen is shown in the display
Place the multi-function slider h at » STOP«.
2
Should there be several dictations extant: Select the one you want by press-
3
ing the function buttons B
dictations. When the designation of the dictation recording to be amended is
shown in the display
Place the multi-function slider h at » START«. e selected dictation re-
4
cording is now played back. As soon as the point is played back at which you
wish to amend the dictation recording:
Press the button » DICT« g; as soon as »Record« is indicated in the display
5
you can start your new dictation recording. During the dictation recording
q
the lapsed period of the dictation recording is continuously indicated in the
display
tation recording.
When you wish to interrupt the dictation recording: Place the multi-function
6
slider
erto period of the dictation recording remains shown. For as long as the dictation recording is interrupted, the status lamp »DICT
To continue the dictation recording: Place the multi-function slider
START«.
»
. e status lamp »DICT « d glows permanently during the dic-
q
at » STOP«. In the display q »Record Pause« is indicated, the hith-
h
q
/C r »DICT ±« to switch between the saved
e
:
q
:
« blinks.
back at
h
When you wish to terminate the dictation recording:
7
Press the button »
.. Inserting a passage into a recorded dictation
Switch the voice recorder on by pressing the button »ON/OFF« a.
1
As soon as the start screen is shown in the display
22
DICT« g once. e status lamp »DICT « d goes out.
:
q
Page 21
23
Should there be several dictations extant: Select the one you want by press-
2
ing the function buttons B
dictations. When the designation of the dictation recording to be amended is
shown in the display
Place the multi-function slider h at » START«. Should »play-back end«
3
be indicated in the display: Select, by pressing the function button A
»HOME«. e selected dictation recording is now played back; in the display
»play-back« is indicated. As soon as the position is played back at which
q
you would like to insert a passage into the dictation recording:
Place the multi-function slider h at » STOP«.
4
NOTICE:
]
‹
If you would like to continue a saved dictation recording (i.e. add a passage at the end of a dictation recording):
Approx. two seconds before the end of playback place the multi-function slider
Press the button » DICT« g; in the display q »Record Pause« is indicated
5
and the status lamp »DICT
By pressing the function button D t select »INS«.
6
In the display
Place the multi-function slider h at » START«. As soon as the display q
7
indicates »Insert« you can begin with the insertional dictation recording. e
hitherto period of the insertional dictation recording is permanently shown in
the display
dictation recording.
›
q
q
»Insert Pause« is indicated.
q
. e status lamp »DICT « d glows permanently during the
/C r »DICT ±« to switch between the saved
e
:
at » STOP«.
h
« d blinks.
w
When you wish to terminate the insertional dictation recording: Place the
8
multi-function slider
en press the button »
goes out. e new dictation recording is now inserted into the already ex-
d
tant dictation recording.
at » STOP«. e status lamp »DICT « d blinks.
h
DICT« g once again; the status lamp »DICT «
7.7 Deleting recorded dictations
Previously saved dictation recordings can be…
completely or
Ú
partially (i.e. just a passage in a dictation recording) deleted. To do this:
Ú
Page 22
Switch the voice recorder on by pressing the button »ON/OFF« a.
1
As soon as the start screen is shown in the display
Place the multi-function slider h at » STOP«.
2
Should there be several dictations extant: Select the one you want by pressing
3
the function buttons B
tations. In our example we are dealing with a dictation recording designated
with the number . When the designation of the dictation recording to be
changed is indicated in the display
Select, by pressing the function button D t, »Menu«. In the display q is indi-
4
cated:
/C r »DICT ±« to switch between the saved dic-
e
:
q
q
:
Delete
Folder
No./Ref.
OK ESC
By pressing the function button D t select »OK«. In the display q is indicat-
5
ed:
Delete
DICT010 ?
OK PAR T ESC
.. Completely deleting recorded dictations
To completely delete the selected dictation recording:
24
Page 23
25
By pressing the function button D t select »OK«. e dictation recording will
6
now be deleted, subsequently, the Menu is once again indicated in the display
.
q
.. Partially deleting recorded dictations
To partially delete the selected dictation recording:
By pressing the function button B e or C r select »PART«. In the display q
6
is indicated:
Free 04:18h
DICT010 01:30
MARK1 ESC
Place the multi-function slider h at » START«. Should »play-back end«
7
be indicated in the display: Select, by pressing the function button A
»HOME«. e selected dictation recording is now played back; at the start of
the passage to be deleted from the dictation recording:
Place the multi-function slider h at » STOP«. en, select by pressing the
8
function button D
»MARK«. In the display q is indicated:
t
w
Free 04:18h
DICT010 00:17
MARK2 ESC
Page 24

Place the multi-function slider h once again at » START«. Should »play-
9
back end« be indicated in the display: Select, by pressing the function button A
»HOME«. e selected dictation recording is now played back; at the end
w
of the passage to be deleted from the dictation recording:
Place the multi-function slider h at » STOP«. en select, by pressing the
10
function button D
, »MARK«. In the display q is indicated:
t
Free 04:18h
DICT010 00:51
DEL ESC
en select, by pressing the function button D t, »DEL«. In the display q is
11
indicated:
Free 04:18h
Delete […] ?
OK ESC
By pressing the function button D t select »OK«. e selected passage in the
12
dictation recording is now deleted; subsequently, in the display
screen is once again shown.
26
the start
q
Page 25

27
. Further functions and adjustments of the voice recorder
8.1 Activating/deactivating the key lock
is voice recorder is tted with a key lock. With an activated key lock the voice
recorder is protected against unintentional operation resp. being unintentionally
switched on.
To activate the key lock: Place the slider »
as shown in Fig. .
HOLD« j in the direction of the arrow,
á
Fig. : Activate the key lock
In the display
HOLD« j, all keys and the multi-function slider h are now locked.
»
To deactivate the key lock: Place the slider »
row, as shown in Fig .
»Keys locked« is faded in briey. With the exception of the slider
q
HOLD« j in the direction of the ar-
á
Fig. : Deactivate the key lock
8.2 Selecting a folder for saving dictation recordings
Dictations are saved at the top memory level of the voice recorder. Alternatively, dictations
can also be saved in one of ve folders in the voice recorder. is oers the possibility to
separately store dictations from diering elds (e.g. private, commercial).
For this, in the Menu of the voice recorder ve automatically placed folders
(A to E) are available. e folder required for saving a dictation recording
must be selected before beginning the dictation.
To do this:
Page 26

Switch the voice recorder on by pressing the button »ON/OFF« a.
1
As soon as the start screen is shown in the display
Place the multi-function slider h at » STOP«.
2
en select, by pressing the function button D t, »Menu«.
3
In the display
is indicated:
q
q
:
Delete
Folder
No./Ref.
OK ESC
Select, by pressing the function button C r, »Folder«. Subsequently select, by
4
pressing the function button D
, »OK«. In the display q is indicated:
t
No Folder
A
b
OK ESC
Select, by pressing the function buttons B e or C r, one of the Folders, A to
5
E. Subsequently select, by pressing the function button D
the Menu is once again shown; to return to the start screen: Select, by
play
q
pressing the function button A
indicated in the upper right corner of the start screen; in the following illustration, folder »A« has been selected:
28
»ESC«. e letter of the selected folder is
w
»OK«. In the dis-
t
Page 27

29
Free 11:43h A
no dictations
Menu NEW
8.3 Provide dictation recordings with references
Dictation recordings that you save onto the voice recorder can be provided with
a reference. References can be serial numbers or freely selectable combinations of
numbers, letters and characters. References can be useful to make dictations easier …
to allocate to specic subject areas
Ú
to dierentiate between themselves.
Ú
References do not appear in the display
in the column »No./Ref« of the soware »Convert« (see Fig. ). Information regarding the installation and utilisation of the soware »Convert« is to be found in the
chapters …
. »Installing the soware »Convert« onto a PC«
Ú
. »Using the soware »Convert«
Ú
To allocate references to dictations, a choice of three possibilties is available:
NR on: Enter in ones own reference (e.g. »Notice«). e reference entered in
Ú
will be used for all following dictation recordings.
NR o: e voice recorder allocates no reference numbers for new dictation
Ú
recordings.
NR auto: Automatic references; with this, the voice recorder allocates, addi-
Ú
tional to the entered reference (e.g. »Notice«), a consecutive reference number
(, , ...) for every new dictation recording, see Fig. .
of the voice recorder; they are indicated
q
Page 28

Fig. : Listing of automatic references in the column »No./Ref« of the software »Convert«
To carry out the preferred programming:
Switch the voice recorder on by pressing the button »ON/OFF« a.
1
As soon as the start screen is shown in the display
Place the multi-function slider h at » STOP«.
2
en select, by pressing the function button D t, »Menu«.
3
In the display
is indicated:
q
q
:
Delete
Folder
No./Ref.
OK ESC
Select, by repeated pressing of the function button C r, the Menu item »No./
4
Ref.«. By pressing the function button D
indicated:
select »OK«. In the display q is
t
30
Page 29

31
NR on
NR Off
NR auto
OK ESC
Select, by pressing the function buttons B e or C r, the preferred program-
5
ming. Subsequently select, by pressing the function button D
Should you have selected »NR o«: In the display
once again shown. to return to the start screen: Select, by pressing the function button A
Should you have selected »NR on« or »NR auto«, to enter in an own reference to all
following dictation recordings:
6
»ESC«.
w
In the display q the input-screen is shown:
the programming Menu is
q
, »OK«.
t
ABCDEFGHIJKLMN
OPQRSTUVWXYZ
OK END
Initially, the symbol is marked. Shi this marking to the rst letter of the
7
reference-name to be entered in. To do this, select »
function buttons B
ing the function button D
characters: Shi the marking to the symbol ; en select, by pressing the
function button D
lection of gures/characters available:
/C r. As soon as the required letter is marked: By press-
e
t
select »OK«. If you wish to enter in gures or
t
, »OK«. In the display q the input-screen shows the se-
«/» «, by pressing the
Page 30

0123456789-+*:
%&#§)(,._ / << >>
OK END
Select the gures and characters as per letters. All letters/gures/characters appear
in the order of their input into the display
your next input will be placed is marked by the cursor »_«. Should you wish to
move the cursor to a specic position in your reference (to delete/enter): Shi the
marking to the symbols << or >>. en select, by pressing the function button D
»OK«. e cursor now moves itself back or forth by one position.
Should you wish to delete a letter/gure/character: Shi the marking to the symbol ;
then select, by pressing the function button D
is deleted.
Should you wish to return to the input-screen with letter selection: Shi the marking
to the symbol ; then select, by pressing the function button D
When you have completed entry of the preferred reference: Select, by pressing the
function button A
again shown. To return to the start screen: select, by pressing the function button
twice in succession »ESC«.
A
w
With immediate eect all new dictation recordings will be allocated the reference
entered in by you.
»END«. In the display q the programming Menu is once
w
above »OK«. e position at which
q
, »OK«. With this your last entry
t
»OK«.
t
t
,
NOTICE:
]
‹
Your programming is only valid for the dictation recordings that are saved after this programming has been
done. Dictations already saved on the voice recorder retain the references that were previously allocated to
them.
32
›
Page 31

33
8.4 Using memory cards instead of the device internal storage system
e internal memory of the voice recorder has a capacity of MB available for
use. Should there be a requirement for a larger memory capacity you can utilise
memory cards of the types SD and MMC in the voice recorder. However, take note:
Only memory cards with a maximum capacity of GB can be used.
NOTICE:
]
‹
Dictation recordings made with memory cards are saved exclusively to these. When using memory cards
there is no access to the internal memory of the voice recorder.
Data cannot be transferred between the internal memory and the memory card - or the other way round.
Should you wish to use an SD/MMC memory card:
Slide the memory card into the memory card slot o, as depicted on the rear of
1
the voice recorder, until it engages. When sliding in the memory card use only
light pressure.
]
‹
Should the memory card not, or not totally, allow itself to be slid into the memor y card slot: Under no circums tances
apply force! If you do, the card and/or the voice recorder could be irreparably damaged.
Instead, remove the memory card. Check to see if …
it is an SD/MMC memory card. Memory cards of other types cannot be used.
Ú
you have possibly not inserted the memory card as per the illustration on the rear of the voice recorder.
Ú
If you insert the memory card with the voice recorder switched on, the SilverCrest
logo appears briey in the display
then the start screen appears again. e indicated memory capacity for dictation
recordings now refers to the memory card instead of the internal memory.
Aer insertion in the voice recorder the memory card must rst of all be formatted.
is also applies to pre-formatted memory cards.
›
NOTICE:
›
. Subsequently, »EXT« is briey indicated;
q
NOTICE:
]
‹
During formatting, ALL data that may be on the memory card will be deleted. If it contains data that you wish
to retain, copy this data to another memory medium before commencing the formatting.
›
Page 32

To do this:
Select, by pressing the function button D t, »Menu«.
2
Select in the Menu, by pressing the function button C r, the Menu item »For-
3
mat«. Subsequently select, by pressing the function button D
display
Select, by pressing the function button D t, »OK«. Formatting of the memory
4
card begins; during formatting the hourglass symbol is shown in the display
q
»Format memory?« is indicated.
q
. As soon as the formatting is complete, shown in the display q is:
, »OK«. In the
t
Formatting
successful!
OK
Select, by pressing the function button D t, »OK«; formatting is now nished
5
and the memory card can be utilised. In the display
shown; to return to the start screen: Select, by pressing the function button
»ESC«.
A
w
8.5 Switching voice activation on/o
With the function »voice activation«, a continuous dictation recording is interrupted
whenever you make a pause in speaking. As soon as you continue to speak the dictation recording continues automatically. Using this benet you can, especially with long
dictations, save a lot of memory space.
To switch the function »voice activation« on:
Switch the voice recorder on by pressing the button »ON/OFF« a.
1
As soon as the start screen is shown in the display
Place the multi-function slider h at » STOP«.
2
en select, by pressing the function button D t, »Menu«.
3
In the display
is indicated:
q
the Menu is once again
q
:
q
34
Page 33

35
Delete
Folder
No./Ref.
OK ESC
Select, by repeated pressing of the function button C r, the Menu item »Set-
4
tings«.
en select, by pressing the function button D t, »OK«. In the display q is
5
indicated:
Voice active.
Mic. Sensitivity
PC Microphone
OK ESC
By pressing the function button D t select »OK«. In the display q is indicat-
6
ed:
VA Off
VA On
OK ESC
»VA« stands for »Voice Activation«.
Page 34

Select, by pressing the function button C r, »VA on«. Subsequently select, by
7
pressing the function button D
again shown; to return to the start screen: select, by pressing the function
button A
When voice activation is switched on, on the start screen and during dictation
recordings »va« is indicated in the display
twice in succession, »ESC«.
w
, »OK«. In the display q the Menu is once
t
:
q
Free 05:43h
v a
no dictations
Menu NEW
To switch »voice activation« o: Follow the steps to in this chapter.
en select »VA o« in step by pressing function button B
8.6 Microphone sensitivity
e microphone in this voice recorder can be set to two sensitivity levels,
»Dictation« and »Conference«:
Select »Dictation« when the voice recorder is to be used for dictation record-
Ú
ings by a single speaker.
Select »Conference« when conversations are to be recorded.
Ú
To programme the microphone sensitivity:
e
.
Switch the voice recorder on by pressing the button »ON/OFF« a.
1
As soon as the start screen is shown in the display
Place the multi-function slider h at » STOP«.
2
en select, by pressing the function button D t, »Menu«.
3
In the display
36
is indicated:
q
q
:
Page 35

37
Delete
Folder
No./Ref.
OK ESC
Select, by repeated pressing of the function button C r, the Menu item »Set-
4
tings«. en select, by pressing the function button D
is indicated:
q
, »OK«. In the display
t
Voice active.
Mic. Sensitivity
PC Microphone
OK ESC
Select, by pressing the function button C r the Menu item »Mic. Sensitivity«.
5
By pressing the function button D
ed:
select »OK«. In the display q is indicat-
t
Dictation
Conference
OK ESC
Page 36

Now select, by pressing the function buttons B e resp. C r, »Dictation«
6
or »Conference«. Subsequently select, by pressing the function button D
»OK«. e microphone sensitivity is now set to your personal selection;
In the display
Select, by pressing the function button A
the Menu is once again shown. To return to the start screen:
q
twice in succession, »ESC«.
w
t
,
8.7 Using the voice recorder as a PC microphone
is voice recorder can also, with the appropriate dictation/voice recognition soware, be used as the microphone for a PC. For this you will require an audio cable
with a . mm jack plug, available from specialist audio/video shops. To connect
this voice recorder to a PC for utilisation as a microphone:
Insert one of the . mm jack plugs on the audio cable into the headphone
1
socket »EAR
Insert the second . mm jack plug on the audio cable into the microphone
2
socket of a PC.
Switch the voice recorder on by pressing the button "On/O" a.
3
As soon as the start screen is shown in the display
Place the multi-function slider h at » STOP«.
4
en select, by pressing the function button D t, »Menu«.
5
In the display
« i on the voice recorder.
is indicated:
q
q
:
Delete
Folder
No./Ref.
OK ESC
Select, by repeated pressing of the function button C r, the Menu item »Set-
6
tings«. en select, by pressing the function button D
is indicated:
q
38
», OK«. In the display
t
Page 37

39
Voice active.
Mic. Sensitivity
PC Microphone
OK ESC
Select, by pressing the function button C r, the Menu item »PC Micro-
7
phone«. By pressing the function button D
indicated:
select »OK«. In the display q is
t
PC Microphone
activate?
OK ESC
Select, by pressing the function button D t, »OK«. In the display q is indi-
8
cated:
Mode
PC Microphone
Record Pause
VOL± ESC
Start the dictation/voice recognition soware on the PC to which the voice
9
recorder is connected.
Page 38

Place the multi-function slider h at » START«; the voice recorder now
10
functions as the microphone for the dictation/voice recognition soware
on the PC. In the display
is indicated:
q
Mode
PC Microphone
Record
VOL± ESC
In the meanwhile you can adjust the record sound volume level between the values
of (muted) and (maximum volume).
To increase the record sound volume: Press the function button B
press of the button you raise the record sound volume by a step. For a faster raising
of the record sound volume you can also hold down the function button B
To reduce the record sound volume: Press the function button C r: With each press
of the button you reduce the record sound volume by a step. For a faster reduction of
the record sound volume you can also hold down the unction button C
e currently adjusted record volume level is indicated for a few seconds in the display q.
To terminate PC microphone operation: Select, by pressing the function button A
»ESC«; In the display
screen: select, by pressing the function button A
the Menu is once again shown. To return to the start
q
twice in succession, »ESC«.
w
: With each
e
r.
e.
w
,
8.8 Switch-o options
From the factory, this voice recorder is set so that aer minutes, and without a
button being pressed, it switches itself o automatically. Additionally, it can be set
so that …
it automatically switches itself o aer minutes without a button being
Ú
pressed.
it can only be manually switched o by pressing the button »ON/OFF« a.
Ú
To carry out the settings:
40
Page 39

41
Switch the voice recorder on by pressing the button »ON/OFF« a.
1
As soon as the start screen is shown in the display
Place the multi-function slider h at » STOP«.
2
en select, by pressing the function button D t, »Menu«.
3
In the display
is indicated:
q
q
:
Delete
Folder
No./Ref.
OK ESC
Select, by repeated pressing of the function button C r, the Menu item »Set-
4
tings«. en select, by pressing the function button D
is indicated:
q
», OK«. In the display
t
Voice active.
Mic. Sensitivity
PC Microphone
OK ESC
Select, by pressing the function button C r, the Menu item »Power o«. By
5
pressing the function button D
select »OK«. In the display q is indicated:
t
Page 40

Manual
after 10 min
after 30 min
OK ESC
Select, by pressing the function buttons B e resp. C r, your preferred setting.
6
Subsequently select, by pressing the function button D
the Menu is once again shown. To return to the start screen: select, by
play
q
pressing the function button A
8.9 Switching audio signals on/o
is voice recorder is equipped with two types of audio signals:
Ack. beep (e.g. aer switch-on of the voice recorder, as soon as the start screen
Ú
is shown.)
Audio warning (e. g. discharged batteries/cells)
Ú
From the factory all audio signals are switched on. However, you can separate both
warning and ack. beep tones from each other manually, for switch-on and switcho purposes. To do this:
Switch the voice recorder on by pressing the button »ON/OFF« a.
1
As soon as the start screen is shown in the display
Place the multi-function slider h at » STOP«.
2
en select, by pressing the function button D e, »Menu«. In the display q is
3
indicated:
twice in succession, »ESC«.
w
, »OK«; In the dis-
t
:
q
42
Page 41

43
Delete
Folder
No./Ref.
OK ESC
Select, by repeated pressing of the function button C r, the Menu item »Set-
4
tings«. en select, by pressing the function button D
is indicated:
q
», OK«. In the display
t
Voice active.
Mic. Sensitivity
PC Microphone
OK ESC
Select, by pressing the function button C r, the Menu item »Audio signals«.
5
Subsequently select, by pressing the function button D
is indicated:
play
q
, »OK«. In the dis-
t
Auto Off
Battery low
OK ESC
Page 42

Select, by pressing the function button B e or C r, the type of audio signal
6
to be switched on/o. »Auto o« stands for Ack. beep, »Battery low« for audio
warnings. Subsequently select, by pressing the function button D
In the display
is indicated:
q
, »OK«.
t
Signal on
Signal off
OK ESC
To switch o the signal tone type selected in step : Select, by pressing the
7
function button B
To switch the signal tone type selected in step back on: Select, by pressing the
function button B
Select, by pressing the function button D t, »OK«. In the display q the se-
8
lection of the type of audio signal is now shown again. To return to the start
screen: select, by pressing the function button A
»ESC«.
8.10 Adjusting the illumination
e background illumination of the display can be adjusted so that …
it switches on with every press of a button and, aer about ten seconds, auto-
Ú
matically switches itself back o (Setting »auto«)
remains permanently switched o (Setting »O«)
Ú
From the factory, the setting is »auto«. To change the setting:
or C r, »Signal o«.
e
or C r, »Signal on«.
e
three times in succession,
w
Switch the voice recorder on by pressing the button »ON/OFF« a. As soon as
1
the start screen is shown in the display
Place the multi-function slider h at » STOP«.
2
en select, by pressing the function button D t, »Menu«. In the display q is
3
indicated:
44
q
:
Page 43

45
Delete
Folder
No./Ref.
OK ESC
Select, by repeated pressing of the function button C r, the Menu item »Set-
4
tings«. en select, by pressing the function button D
is indicated:
q
, »OK«. In the display
t
Voice active.
Mic. Sensitivity
PC Microphone
OK ESC
Select, by pressing the function button C r, the Menu item »Illumination«.
5
Subsequently select, by pressing the function button D
In the display
is indicated:
q
, »OK«.
t
Off
Auto
OK ESC
Page 44

Select, by pressing the function button B e or C r, »O« or »Auto«. Subse-
6
quently select, by pressing the function button D
the programming Menu is once again shown. To return to the start screen: Select, by pressing the function button A
twice in succession, »ESC«.
w
, »OK«. In the display q
t
8.11 Selecting the recording mode
is voice recorder can record dictations with three varying sampling rates. e
higher the sampling rate, the better the quality of the dictation recording; however,
at the same time, the requirement for memory space for dictation recording rises
accordingly.
Selection can be made from three sampling rates for dictations recordings:
»HP« – highest quality level, dictations require a lot of memory space
Ú
»SP« – standard quality level; optimal compromise between the demands on
Ú
quality and memory space
»LP« – lowest quality level; dictations require very little memory space; recom-
Ú
mended for very long dictations
From the factory, »SP« is set as the sampling rate. To change the setting of the sampling rate:
Switch the voice recorder on by pressing the button »ON/OFF« a.
1
As soon as the start screen is shown in the display
Place the multi-function slider h at » STOP«.
2
en select, by pressing the function button D t, »Menu«.
3
In the display
is indicated:
q
q
:
46
Delete
Folder
No./Ref.
OK ESC
Page 45

47
Select, by repeated pressing of the function button C r, the Menu item »Set-
4
tings«. en select, by pressing the function button D
is indicated:
q
, »OK«. In the display
t
Voice active.
Mic. Sensitivity
PC Microphone
OK ESC
Select, by pressing the function button C r, the Menu item »Rec. mode«. Sub-
5
sequently select, by pressing the function button D
is indicated:
, »OK«. In the display q
t
LP
SP
HP
OK ESC
Select, by pressing the function button B e or C r, the required sampling
6
rate. Subsequently select, by pressing the function button D
the display
start screen: select, by pressing the function button A
»ESC«.
the programming Menu is once again shown. To return to the
q
w
, »OK«. In
t
twice in succession,
8.12 Setting the date and time
Should it be …
you did not programme in the date and time when rst taking the device into
Ú
use, or
wish to subsequently alter these settings
Ú
Page 46

… you can do this as follows:
Switch the voice recorder on by pressing the button »ON/OFF« a. As soon as
1
the start screen is shown in the display
Place the multi-function slider h at » STOP«.
2
en select, by pressing the function button D t, »Menu«. In the display q is
3
indicated:
q
:
Delete
Folder
No./Ref.
OK ESC
Select, by repeated pressing of the function button C r, the Menu item »Set-
4
tings«. en select, by pressing the function button D
is indicated:
q
, »OK«. In the display
t
Voice active.
Mic. Sensitivity
PC Microphone
OK ESC
Select, by repeated pressing of the function button C r the Menu item »Time,
5
Date«. By pressing the function button D
indicated:
48
select »OK«. In the display q is
t
Page 47

49
00h 00m
01d 01m 06y
OK ESC
Carry out the steps to in chapter , » Preparing the voice recorder for use«.
6
To subsequently return to the start screen: Select, by pressing the function but-
ton A
8.13 Resetting the internal dictation counter
Every new dictation recording is saved under a new, consecutive number, beginning with »DICT«. is numbering is automatically carried out by the internal
dictation counter in the voice recorder. e numbering of saved dictations does not
subsequently change when you delete individual dictations.
EXAMPLE:
Ú
‹
You start a new dictation recording. This is automatically assigned the number »DICT«. At a later date you
delete dictation recording »DICT«. When you start a new dic tation recording, this one is automatically assigned
the next following number, »DICT«, although the dictation with the prior number, »DICT«, has been
deleted.
If you wish, that the next following dictation recordings begin their numbering
again at »DICT«: return the internal dictation counter back to null. To do this:
Switch the voice recorder on by pressing the button »ON/OFF« a. As soon as
1
the start screen is shown in the display
Place the multi-function slider h at » STOP«.
2
en select, by pressing the function button D t, »Menu«. In the display q is
3
indicated:
twice in succession, »ESC«.
w
›
:
q
Page 48

Delete
Folder
No./Ref.
OK ESC
Select, by repeated pressing of the function button C r, the Menu item »Set-
4
tings«. en select, by pressing the function button D
is indicated:
q
, »OK«. In the display
t
Voice active.
Mic. Sensitivity
PC Microphone
OK ESC
Select, by repeated pressing of the function button C r, the Menu item »Dic-
5
tation counter«. By pressing the function button D
is indicated:
play
q
select »OK«. In the dis-
t
50
Reset
Dictation counter?
OK ESC
Page 49

51
By pressing the function button D t select »OK«. e dictation counter has
6
now been returned to null. In the display
once again shown. To return to the start screen: Select, by pressing the function button A
8.14 Returning the voice recorder to factory settings
NOTICE:
]
‹
Take note that, in returning the device to factory settings, ALL of the setting entered in by yourself will be
deleted.
If you wish to return the voice recorder back to factory settings:
Switch the voice recorder on by pressing the button »ON/OFF« a. As soon as
1
the start screen is shown in the display
Place the multi-function slider h at » STOP«.
2
en select, by pressing the function button D t, »Menu«. In the display q is
3
indicated:
twice in succession, »ESC«.
w
›
the programming menu is now
q
:
q
Delete
Folder
No./Ref.
OK ESC
Select, by repeated pressing of the function button C r, the Menu item »Set-
4
tings«. en select, by pressing the function button D
is indicated:
q
, »OK«. In the display
t
Page 50

Voice active.
Mic. Sensitivity
PC Microphone
OK ESC
Select, by repeated pressing of the function button C r, the Menu item »Fac-
5
tory setting«. By pressing the function button D
is indicated:
q
select »OK«. In the display
t
Reset all
settings?
OK ESC
Select, by pressing the function button D t, »OK«; the voice recorder has now
6
been returned to factory settings. e display language is now English; In the
display
Select your preferred language by pressing the function buttons B e or C r:
7
Subsequently select, by pressing the function button D
play
shown.
appears the language selection.
q
, »OK«. In the dis-
the SilverCrest logo appears briey, subsequently the start screen is
q
t
8.15 Formatting the internal memory of the voice recorder
Should you frequently save and delete dictations, the access time to saved dictations
could lengthen. In this case a formatting of the internal memory could be benecial.
rough this the access times could be shortened.
52
Page 51

53
NOTICE:
]
‹
Please note: All dictation recordings saved in the internal memory of the voice recorder will be deleted by the
formatting. If it contains data that you wish to retain, copy this data to another memory medium before
commencing. For this you could use the supplied software »Convert«. For this, see also chapter . »Copying
dictation recording from the voice recorder to a PC«.
To format the internal memory of the voice recorder:
Remove the memory card that may have been inserted into the memory card
1
slot
memory card. en remove the memory card from the memory card slot.
]
‹
If you do not remove the memory card before formatting, the card will be formatted instead of the internal
memory. In this case, all dictation recordings on the memory card will be deleted.
Switch the voice recorder on by pressing the button »ON/OFF« a. As soon as
2
the start screen is shown in the display
Place the multi-function slider h at » STOP«.
3
en select, by pressing the function button D e, »Menu«. In the display q is
4
indicated:
›
of the voice recorder. To do this, press once on the upper edge of the
o
NOTICE:
›
:
q
Delete
Folder
No./Ref.
OK ESC
Select, by repeated pressing of the function button C r the Menu item »For-
5
mat«. en select, by pressing the function button D
is indicated:
q
, »OK«. In the display
t
Page 52

Memory
Format?
OK ESC
By pressing the function button D t select »OK«. Formatting of the internal
6
memory begins; during formatting the hourglass symbol is shown in the dis-
. As soon as the formatting is complete, shown in the display q is:
play
q
Formatting
successful!
OK
Select, by pressing the function button D t, »OK«; the formatting is now
7
complete.
e adjustments menu is now shown once again in the display
start screen: Select, by pressing function button A
, »ESC«.
w
. To return to the
q
8.16 Changing the display language
is voice recorder can show all menus in the following languages:
Danish (Dansk)
Ú
German (Deutsch)
Ú
English
Ú
Finnish (Suomi)
Ú
French (Français)
Ú
Greek (Ελληνικά)
Ú
Italian (Italiano)
Ú
54
Page 53

55
Croat (Hrvatski)
Ú
Dutch (Nederlands)
Ú
Norwegian (Norsk)
Ú
Polish (Polski)
Ú
Portugese (Português)
Ú
Slovak (Slovenčina)
Ú
Slovenian (Slovenski)
Ú
Spanish (Español)
Ú
Swedish (Svenska)
Ú
Czech (Česky)
Ú
Hungarian (Magyarul)
Ú
To change the display language:
Switch the voice recorder on by pressing the button »ON/OFF« a.
1
As soon as the start screen is shown in the display
Place the multi-function slider h at » STOP«.
2
en select, by pressing the function button D t, »Menu«. In the display q is
3
indicated:
q
:
Delete
Folder
No./Ref.
OK ESC
Select, by repeated pressing of the function button C r, the Menu item »Set-
4
tings«. en select, by pressing the function button D
is indicated:
q
, »OK«. In the display
t
Page 54

Voice active.
Mic. Sensitivity
PC Microphone
OK ESC
Select, by repeated pressing of the function button C r, the Menu item
5
»Language«. By pressing the function button D
In the display
is indicated:
q
select »OK«.
t
Dansk
Deutsch
English
OK ESC
Select, by pressing the function buttons B e or C r, the required language.
6
Subsequently select, by pressing the function button D
will now be shown in the language you have selected.
In the display
the start screen: Select, by pressing the function button A
»ESC«.
the programming menu is now once again shown. To return to
q
, »OK«. All menus
t
twice in succession,
w
8.17 Display the version number of the Firmware
e term »Firmware« refers to the internal soware in electronic devices. Should
this voice recorder at some time in the future receive a Firmware-Update arranged
by the importer: make available the version number of the Firmware that is installed on your voice recorder. e version number can be displayed as follows:
Switch the voice recorder on by pressing the button »ON/OFF« a. As soon as
1
the start screen is shown in the display
56
q
:
Page 55

57
Place the multi-function slider h at » STOP«.
2
en select, by pressing the function button D t, »Menu«. In the display q is
3
indicated:
Delete
Folder
No./Ref.
OK ESC
Select, by repeated pressing of the function button C r, the Menu item »Set-
4
tings«. en select, by pressing the function button D
is indicated:
q
», OK«. In the display
t
Voice active.
Mic. Sensitivity
PC Microphone
OK ESC
Select, by repeated pressing of the function button C r the Menu item »Ver-
5
sion«. By pressing the function button D
version number is now displayed.
Subsequently select, by pressing the function button A w, »ESC«; In the dis-
6
the programming menu is now once again shown. To return to the
play
q
start screen: Select, by pressing the function button A
»ESC«.
select »OK«. In the display q the
t
twice in succession,
w
Page 56

. Maintenance
9.1 Changing the batteries/cells
If the inserted batteries resp. cells are discharged, the battery symbol blinks in the
display
down« is indicated. Subsequently, the voice recorder then switches itself o.
‹
Should this happen during a working dictation recording, cease it immediately. Otherwise, the dictation
recording could be wholly or partly lost.
Change standard (non-rechargeable) batteries for new ones of the type AA/LR/
Mignon . V. Exchange drained cells for charged ones of the type AA/Mignon . V.
Cells can also be charged in the battery compartment of the voice recorder; further
information available in chapter . » Recharging cells in the battery compartment
of the voice recorder.«
Alternatively, you can also adapt the voice recorder for mains power operation.
9.2 Recharging cells in the battery compartment of the voice recorder
Cells can be recharged in the battery compartment of the voice recorder when they
are discharged. For this, the voice recorder must …
Ú
Ú
. An audio warning sounds, in the display q »Low battery - Shutting
q
NOTICE:
]
be connected to a mains power socket via a suitable power adaptor
(not supplied), or
be connected to a PC via the supplied USB cable.
›
DANGER!
†
‹
Never attempt to recharge standard batteries in the battery compartment of the voice recorder!
Essentially, only cells can be recharged. Otherwise, there is a risk of explosions or re!
Additionally, the voice recorder could become irreparably damaged.
When operating the voice recorder on mains power use only a suitable and undamaged power adapter;
Output voltage: V DC, Output current: mA, DC-Plug (Barrel plug) ,/, mm (Inner/Outer diameter),
Polarity DC-Plug:
shops. Should the voice recorder be used with an unsuitable or damaged power adapter, there is the risk of
you receiving an electric shock! Additionally, the voice recorder could be irreparably damaged!
58
›
. Suitable power adapters are available in electronic and audio/video specialist
Page 57

59
To charge cells in the battery compartment l:
a) via a power adapter (not supplied) connected to a mains power socket:
Insert the DC plug (barrel plug) of a suitable power adapter into the socket
1
»DC V .A«
DC plug. For this voice recorder, a suitable power adapter must have a positive
polarity. Insert the plug of the power adapter into a mains power socket.
NOTICE:
]
‹
With many power adapters the polarity of the DC plug can be changed by replugging or reswitching. In a case
of doubt, consult the operating handbook for the power adapter.
Switch the voice recorder on by pressing the button »ON/OFF« a. In the dis-
2
play
blinks. As soon as the charging process begins, the battery symbol lls and
empties itself continually. Should the charging process be interrupted, for a few
seconds a completely charged battery symbol is shown; subsequently it indicates again the actual charge condition of the inserted batteries.
Ensure that the automatic switch-o of the voice recorder is deactivated.
3
Check this under the Menu item »Power o« (see chapter . »Switch-o options«); for charging operations the setting »manual« must be selected. Bear
in mind that the voice recorder in a switched-o condition cannot charge the
batteries in the battery compartment.
When the inserted batteries are fully charged, the symbol is indicated in
4
the display
move the DC plug of the power adapter from the socket »DC V .A«
the voice recorder.
b) via a USB cable connected to a PC:
›
the symbol appears briey; aerwards, the battery symbol
q
on the voice recorder. Pay heed to the correct polarity of the
u
. Remove the power adapter from the mains power socket; re-
q
u
on
Should the voice recorder be connected to a mains power source via a power
1
adapter: Remove the power adapter from the mains power socket before connecting the voice recorder with a PC. Also remove the DC plug of the power
adapter from the socket »DC V .A«
Switch the PC and the voice recorder on. If you do not, the voice recorder will
2
switch over to PC operation and will be identied by the PC as a removable
media. In PC operation cells are not charged in the battery compartment of
the voice recorder. In PC operation, dictations from the voice recorder can be
copied onto the PC; for this, see also chapter . »Copying dictation recording
from the voice recorder to a PC«. However, in PC operation you cannot use
u
.
Page 58

the voice recorder for dictation recordings. Additionally, in PC operation you
cannot utilise the menu or any of the other adjustments for the voice recorder.
Insert the small plug of the supplied USB cable into the USB interface » « k
3
on the voice recorder.
Insert the large plug of the USB cable into a free USB interface on your PC. In
4
the display
blinks. As soon as the charging process begins, the battery symbol lls
and empties itself continually. Should the charging process be interrupted, for
a few seconds a completely charged battery symbol is shown; subsequently it
indicates again the actual charge condition of the inserted batteries.
Ensure that the automatic switch-o of the voice recorder is deactivated.
5
Check this under the Menu item »Power o« (see chapter . » Switch-o options«); for charging operations the setting »manual« must be selected. Bear
in mind that the voice recorder in a switched-o condition cannot charge the
batteries in the battery compartment.
When the inserted batteries are fully charged, the symbol is indicated in
6
the display
voice recorder and the USB interface on the PC.
the symbol appears briey; aerwards, the battery symbol
q
. Remove the USB cable from the USB interface » « k on the
q
. Copying dictation recording from the voice recorder to a PC
With the supplied soware »Convert« you can copy saved dictation recordings
from the voice recorder to a PC. ereby, the dictation recordings are converted
into Wave les (data ending.wav), which can be played back with standard commercial media players. e soware can be installed and used on PCs complying
with the following minimum requirements:
Pentium III Processor, MHz
Ú
Operating systems …
Ú
… Windows®
… Windows® XP
… Windows® Vista™
USB . or .
Ú
60
Page 59

61
Before taking it into use …
the soware must rst of all be installed on the PC.
Ú
the voice recorder must be connected with the supplied USB cable to a USB in-
Ú
terface on the PC.
NOTICE:
]
‹
The steps towards installing and using the software »Convert« will be shown for the case of the operating
system Windows® XP. They are valid in a comparable form for the operating systems Windows® and Vista ™.
Deactivate the anti-virus programme possibly installed on your PC before installing the software »Convert«.
Otherwise, it could potentially cause problems with the installation. Absolutely remember to reactivate the
anti-virus programme after the successful installation of the software »Convert«. In a case of doubt, consult
the operating handbook for the anti-virus programme.
10.1 Installing the software »Convert« onto a PC
To install the soware:
Switch the PC on and wait until the operating system has booted.
1
Installation of the soware requires a minimum of MB of free disc space on
2
the hard drive.
Place the supplied CD-ROM into the CD-ROM drive of the PC to which you
3
wish to copy dictation recordings from the voice recorder.
Should the function »AutoPlay« be activated on your PC: On the PC monitor
a window opens automatically with the content of the CD-ROM.
If the function »AutoPlay« is not activated: Klick on »Start«, then on »My
Computer«. Subsequently, double-click on the CD-ROM drive in which the
CD has been inserted. On the PC monitor a window opens automatically with
the content of the CD-ROM.
e following window appears on the PC monitor:
4
›
Page 60

Click on the button »Install Soware«. On the PC monitor there now appears
5
the window for »Convert Setups«. is programme installs the soware on
your PC. Installation takes place in the folder »Programs«, whereby a sub-folder, »Convert«, is inserted there.; in this, the data required for the installation,
operation and deinstallation of the soware »Convert« will be deposited.
e installation progresses completely automatically. On completion of the
installation there appears on the PC monitor the message
Click on the button »Finish«.
6
Finally, click in the window of the »Convert Setups« on the button »Exit«:
7
You can now use the soware »Convert«.
On the Desktop of your PC a linkage will now be made to the soware »Convert«:
e window closes.
62
Page 61

63
10.2 Using the software »Convert«
NOTICE:
]
‹
All of the screenshots shown in this chapter (pictures of the display on the PC monitor) are examples.
Dependant on the operating system and settings, the displays on your PC may dier slightly from those
shown here. Should message windows appear on the PC monitor whilst using the »Convert« software: Click
each time on the »OK« button to close the window.
To use the soware »Convert«:
Switch the PC on and wait until the operating system has booted.
1
Double click on the linkage »Convert« on the Desktop of your PC. e win-
2
dow of the soware opens on the PC monitor.
Insert the small plug of the supplied USB cable into the USB interface » « k
3
on the voice recorder. ereby, the voice recorder must be switched o!
Insert the large plug of the USB cable into a free USB interface on your PC.
4
In the display
lamp »DICT«
e PC automatically recognises the switched-o voice recorder as a removable
media resp. an external hard drive. ereby, a drive letter is automatically assigned to
it, in our example (L:). e drive letter that is assigned is dependant on the number
of other data carriers installed on the PC; accordingly, the voice recorder could also
be assigned a dierent drive letter than (L:). On the PC monitor the window opens
with the content of the voice recorder:
›
of the voice recorder »PC operation« is indicated; the status
q
glows permanently.
d
Should a memory card be inserted in the memory card slot o on the voice recorder:
e memory card is – just as with the voice recorder itself – automatically recognised
as an additional removable media. Above the window with the content of the voice
recorder a dialogue window opens:
Page 62

If you want to display the data extant on the memory card: Click on »Open Folder,
to show data with Windows-Explorer«:
Finally, click on the button »OK«. An additional window opens, in which the content
of the memory card is shown.
If you do not want to display the data extant on the memory card: Click on the button
»Finish«. If you want to copy dictation recordings from the memory card to the PC
in the next step: Take note of the drive letter that is indicated on the upper edge of
the dialogue window; in our example (N:).
e window opened in step of the soware »Convert« now shows the follow-
5
ing:
64
Page 63

65
on the le the content of the voice recorder, assigned the drive letter (L:). in
Ú
our example one dictation recording (DICT.DVS) is saved on the voice recorder. Should a memory card be inserted in the memory card slot
voice recorder: the content of the memory card, in our example (N:).
on the right, the content of the hard drive (C:) of the PC.
Ú
Should you wish to rotate between the display of the voice recorder content and the
display of the memory card content: Click on the dropdown menu above the le
window:
ere, select the drive letter of the removable media whose content should be displayed
in the le window. In our example you would select (N:) to display the content of
the memory card; should you again wish to display the content of the voice recorder,
you would select (L:).
First of all, if need be, programme the language of the soware »Convert« into
6
your own vernacular. For this, click in the menu bar at the upper edge of the
window on »Language«:
on the
o
en select the required language from the drop down list:
e menu bar at the upper edge of the window and their menu items now appear
in the selected language.
Page 64

With a double click on the right side of the window select the target folder; the
7
dictation recording will be copied into this as a.wav le.
Should the target folder be a located in a sub-folder: Open the superordinate
le and then double click on the preferred sub-folder.
To leave a sub-folder and return to the superordinate le: Double click on the
folder
On the le of the window, click on the dictation recording to be copied onto
8
the PC.
Should it be that you have saved the required dictation recording into one of
the folders A to E: Double click on the le on the respective folder, to display
its content. en click on the required dictation recording.
To return from one of the folders A to E back to the higher memory level of
the voice recorder: Double click on the folder
Click in the menu bar at the upper edge of the window on »Process« and sub-
9
sequently on »Convert«. e dictation recording is now converted to a.wav le
and copied into the target folder. is can – subject to the size of the dictation
recording – take a few minutes. You can follow the progress of the conversion
on the blue beams in the middle of the window.
As soon as the conversion is completed, the message »Conversion nished«
10
is displayed:
.
.
66
Page 65

67
Click on the button »OK«. e conversion is now nalised. Should you wish to
copy further dictation recordings: Repeat the steps to .
You would like to separate the voice recorder from the PC:
First, click on the symbol »Securely remove hardware« in the Info-area of
11
the task bar. is is to be found on the lower right edge of the PC monitor.
en select the removable media/the USB external hard drive with the drive
12
letter that was assigned to the voice recorder on being connected to the PC.
As soon as the message »Hardware can now be removed« appears on the PC
13
monitor: Remove the large plug of the USB cable from the USB interface on
the PC.
10.3 Deinstalling the software »Convert« from a PC
Should you wish to deinstall the soware »Convert« from your PC:
Click on »Start« .
1
Click on »All Programmes«:
2
Click on »Convert«:
3
Click on »Uninstall Convert«:
4
Page 66

On the PC monitor appears the notication
5
Click on the button »Yes«. Following this, the window for the »Uninstall Wiz-
ard« opens; the deinstallation then progresses completely automatically.
Indicated on completion of the deinstallation is:
6
Finally, click on the button »OK«.
7
e soware »Convert« is now deinstalled from the PC.
. Connecting ancillaries to the voice recorder
11.1 Connecting headphones to the voice recorder
If you would like to connect headphones to the voice recorder: Insert the . mm
jack plug of the headphones into the headphone socket »EAR
loudspeakers of the voice recorder are automatically switched o when headphones
are connected. e playback sound volume can still be adjusted as described in
chapter .. »Adjusting the playback sound volume«.
« i. The
DANGER!
†
‹
68
›
Too frequent and too loud sound playback over headphones can lead to hearing damage!
Page 67

69
11.2 Connecting an external microphone to the voice recorder
Should you prefer to use an external microphone for dictation recording instead of
the internal microphone of the voice recorder:
Insert the . mm jack plug of the microphone into the microphone socket »MIC
e internal microphone of the voice recorder is automatically switched o when
an external microphone is connected.
« s.
. Cleaning the voice recorder
Clean the housing and display of the voice recorder with a lightly moistened cloth
only. In case of stubborn stains, pour a few drops of a mild detergent on the damp
cloth.
DANGER!
†
‹
Ensure that moisture cannot permeate into the voice recorder during cleaning! This applies especially to the
loudspeaker on the front of the voice recorder. Otherwise, there is the risk of receiving an electric shock!
›
. Troubleshooting
13.1 The voice recorder indicates no functions
.. With cell/battery operation
Check that the batteries/cells have been inserted into the battery compartment of
the voice recorder as per their polarity. e correct polarity is indicated inside the
battery compartment. If they have been inserted correctly, they are either discharged
or defect.
Change standard (non-rechargeable) batteries for new ones of the type AA/LR/
Mignon . V. Exchange drained cells for charged ones of the type AA/Mignon .
V. Cells can be recharged in the battery compartment of the voice recorder.
Alternatively, you can also adapt the voice recorder for mains power operation.
Page 68

.. With mains power operation
Check to ensure that the DC plug of the power adapter is correctly inserted
1
into the socket »DC V . A«
Check to see if the power adapter cable is correctly inserted into the mains
2
power socket.
Check to see that the mains power socket into which the power cable is
3
inserted is "live". Connect a known working device to the power socket.
Separate the power adapter from the mains power. Wait a few seconds, then
4
reconnect it to a mains power socket. Check to see if the malfunction is still
extant.
Check to see if perhaps the key lock of the voice recorder is activated. For
5
more details see chapter . »Activating/deactivating the key lock«.
.. With connection of the voice recorder to a PC via a USB-cable (USB operation)
Check to ensure that the PC to which the voice recorder is connected is also
1
switched on.
Check to ensure that the small plug of the USB cable is correctly connected in
2
the USB interface »
Check to ensure that the large plug of the USB cable is correctly connected in
3
the USB interface of the PC.
Check to see if the USB interface of the PC is carrying electrical power; con-
4
nect a dierent but suitable device to this USB interface.
« k on the voice recorder.
u
.
Check to see if the voice recorder can be operated at another USB interface on
5
the PC.
13.2 Voice recorder has crashed/input not possible
If the voice recorder no longer reacts to input when in a switched on condition: e
internal soware of the voice recorder could have crashed. In this case, use the Reset
button
1
; it is to be found inside the battery compartment l. Additionally:
;
Should a USB cable be inserted into the USB interface » « k: Remove this be-
forehand from the USB interface. If the voice recorder was previously supplied
with power over the USB cable: Open the battery compartment
70
l
.
Page 69

71
Insert batteries or fully charged cells into the battery compartment. Be sure to
insert the batteries/cells with their correct polarities. e correct polarity is indicated inside the battery compartment. Close and secure the battery compartment.
Check to see if the voice recorder now functions as it should.
2
Should this not be the case:
Open the battery compartment l. Using a pointed object press the Reset but-
3
Switch the voice recorder on and check to see if the malfunction has cleared it-
4
down; it is to be found in the battery compartment, located somewhat
ton
;
sunken between the two batteries/cells. Take steps to ensure that the batteries
do not fall out of the battery compartment. e voice recorder switches itself
o through the pressing of the Reset button
compartment.
self.
. Close and secure the battery
;
13.3 Error messages
When formatting new memory cards (see chapter . »Using memory cards instead
of the device internal storage system«) error messages can occur. Conrm the error
messages in these cases; select »OK« to them by pressing the function button D
t
13.4 Other Malfunctions
Make contact with our service partners responsible for your country if …
the measures described in chapter . "Troubleshooting" do not eliminate the
Ú
malfunctions as described, or
other malfunctions occur during the operation of the voice recorder.
Ú
e contact information for our service hotline can be found on the warranty card
at the end of this operating manual.
.
WARNING!
™
‹
The voice recorder does not contain any parts that can be ser viced by the user. If the housing of the voice recorder i s
opened, the warranty will become void! For repairs which may be needed, consult our service partner responsi ble
for your country.
›
Page 70

. Disposal
14.1 Device
Do not dispose of the device in your normal domestic waste.
is product is subject to the provisions of European Directive //EC.
Dispose of the device through an approved disposal centre or at your community
waste facility. Observe the currently applicable regulations. In case of doubt, please
contact your waste disposal centre.
14.2 Batteries/Cells
Used batteries/cells may not be disposed of in household waste.
Ú
Batteries/cells can contain toxic substances which may damage the environ-
Ú
ment. erefore, dispose of the batteries/rechargeable batteries in accordance
with statutory regulations.
Every consumer is statutorily obliged to surrender batteries/cells to a commu-
Ú
nity collection centre in their district or to a dealer. e purpose of this obligation is to ensure that batteries are disposed of in a non-polluting manner.
Only dispose of batteries/cells when they are fully discharged.
Ú
14.3 Packaging materials
Dispose of all packaging materials in an environmentally friendly
manner.
. Warranty and Service
A -year warranty applies to this device, starting with the date of purchase. Should
you, in spite of our high quality standards, have grounds for complaint please contact our Service Hotline. e telephone number of the service partner responsible for
your region is given on the warranty card at the end of these operating instructions. If
72
Page 71

73
an immediate resolving of your complaint is not possible, you will receive from
there
a processing number (RMA number) and
Ú
an address to which you can send your product for warranty processing.
Ú
In the case of a mail-in shipment please enclose a copy of the purchase receipt
(sales slip). e device must be securely packed and the RMA number clearly
visible. Products received without the RMA number cannot be processed.
NOTICE:
]
‹
The warranty is valid only for material or manufacturing defects. The warranty does not apply to:
wearing parts, or
Ú
for damage to fragile parts such as switches
Ú
or batteries/cells
Ú
is device is intended for private use only and is not intended for commercial or
industrial use. e warranty shall be null and void in the case of abusive and improper
handling, use of force or any other work not carried out by our authorized service
branch. Your statutory warranty claims are not restricted by this warranty.
›
. Importer
KOMPERNASS GMBH
BURGSTRASSE
D- BOCHUM
www.kompernass.com
Page 72

Index
.wav le, See Wave le
3.5 mm jack plug 9, 10, 38, 69
A
Access times 52
Ack. beep, See Audio signals
Anti-virus programme 61
Audio signals 42, 43
AutoPlay 61
B
Background Illumination, See Illumination adjustments
Barrel plug, See DC plug
Batteries 7, 9, 10, 12, 14, 15, 58, 72, 73
Batteries/rechargeable batteries
changing 58, 70
defect 69
discharged 42, 58, 70
full/charged condition 14, 15, 59, 60
leaking 8
Battery compartment 7, 8, 9, 10, 12, 58, 70, 71
Battery operation 6, 10, 15, 70
Battery selection screen 11, 12, 14, 54
Battery symbol
Button »DICT « 10, 18, 22, 23
Button »ON/OFF« 10, 11, 14, 16
Button »RESET« 10, 70, 71
C
CD-ROM, See Software »Convert«
Cells 7, 9, 10, 12, 14, 15, 58, 72, 73, 74
charging 58, 59, 60
Charge operation 59, 60
Charge procedure 59, 60
Cleaning 70
Convert, See Software »Convert«
Converting 66
Crash 71
D
Date 47, 48
Date indicator 12
Date/Time adjustment screen 13
DC plug 7, 10, 11, 58, 59, 70
Defect 7, 8
Dictation recording
copy to PC 60, 66
handling 22
nish 18, 22
period 17, 19, 21, 22, 23
numbering 16, 17, 49
insert passages 22, 23
overwrite passages 22
delete partially 23, 25, 26
15, 58, 59, 60
delete completely 23, 24
playback 18, 19
stop playback 19
nish playback 19
Dictation recording/playback stopping 10
Dictations
alternate between saved 19, 22, 24
save at uppermost memory level 27
save on folders 27
Display 9, 44, 70
Display Language 52, 54, 55
Disposal 7, 73
Drive letter 63, 64, 65, 67
E
Error messages 72
Expandable memory, See memory cards
F
Factory settings 51, 52
Fast forward (FFWD) 10, 20
Fast rewind (REW) 10, 21
Firmware 56, 57
Folder 27, 28, 66
Folder »Programme Files«, PC 62
Formatting
internal memory 52, 53, 54
memory cards 33, 34, 53, 72
Function button a 9
Function button b 9, 20, 40
Function button c 9, 20, 40
Function button d 9, 15, 19
H
Hardware
Minimum requirements 60
remove securely 67
Headphone socket »EAR
Headphones 69
Hourglass symbol 13, 14, 34, 54
Housing
opening of the 8, 72
Cleaning 70
HP, See Rec. mode
I
Illumination adjustments 44, 45
Importer74
Indicator »EXT« 13, 14, 33
Indicator »INT« 13, 14
Input screen 31, 32
Intended Use 6
Internal dictation counter 16, 49, 50
Items supplied 9, 10, 12, 53, 58, 60, 61
« 9, 38, 69
74
Page 73

75
K
Keys locked 10, 27, 71
L
Language selection
voice recorder, See Display language
Software »Convert«, See Software »Convert«:
display language
Liability, See Warranty
Loudspeaker 69, 70
LP, See Rec. mode
M
Mains power operation 6, 7, 10, 11, 14, 15, 58, 70
Memory 6
expandable, See memory cards
internal 6, 13, 14, 33, 52
Memory capacity 6, 33
Memory cards 6, 9, 13, 14, 33, 53, 63, 65, 72
Memory cards slot 9, 13, 14, 33, 53, 63, 65
Menu 11, 15, 27, 60
Microphone
external 69
internal 10, 36, 37, 69
Microphone sensitivity 36, 38
Microphone socket »MIC
MMC memory card, Siehe memory cardn
Multi-function slider 10, 17, 18, 19, 20, 21, 27
Mute switching 19, 40
P
Packaging material, See Disposal
Pause Mode 16
PC Microphone
Set record sound volume 40
Use the voice recorder as 38, 39, 40
PC operation 14, 59, 63
Playback sound volume 19, 69
Playback speed 19, 20
Polarity
Batteries/Cells 10, 70, 71
DC plug (Barrel plug) 6, 7, 10, 11, 58, 59
Power adapter 7, 8, 9, 10, 11, 12, 58, 59, 70, 71
R
Rec. mode 46, 47
Record Pause 17, 18, 22, 23
Record time 15
References 29, 32
allocated automatically (NR on) 29, 31
give own in (NR auto) 29, 31
none (NR o) 29, 31
Removable medium 11, 59, 63, 65, 67
Repair 9, 72
S
Safety information 6
« 10, 69
Sampling rate, See Rec. mode
SD memory card, See memory cards
Service 73
Service partner 72, 73
Settings 9, 11, 27, 35, 37, 38, 41, 43, 45, 47, 48, 50, 51, 55,
57, 60, 63
Shutdown/Switch o, automatic 58, 59, 60
Slider »HOLD«, See Keys locked
Socket »DC 5V 0.5A« 9, 10, 59, 70
Software »Convert« 9, 29, 30, 53, 60, 61, 63, 64
Language display 65
Deinstallation 68
Desktop linkage 62, 63
Installation 61, 62
Menu bar 65, 66
Setup, See Software »Convert«: Installation
Sound volume, maximum 19, 40
SP, See Rec. mode
start screen 13, 14, 36
status lamp »DICT
Storage bag 9
Sub Folder, PC 66
Switch-o options 40
Symbol 14, 15, 59, 60
T
Target Folder, PC 66
Task beam, PC 67
Time 47
Troubleshooting 70, 71, 72
U
Uninstall Wizard, See Soft ware »Convert«: Deinstallation
Update, See Firmware
USB cable 9, 11, 12, 14, 58, 59, 60, 61, 63, 67, 71
USB external hard drive 63, 67
USB interface »
USB interface, PC 11, 12, 60, 61, 63, 67, 71
USB operation 11, 14, 15, 71
V
Version number, See Firmware
Voice activation 34, 35, 36
Voice Activation, See language activation
W
Warranty 6, 8, 9, 74
Warranty 8, 72, 73
Warranty handling 74
Wave les 60, 66
Windows® 60, 61
« 10, 14, 16, 17, 18, 22, 23, 63
«, voice recorder 10, 11, 60, 63, 71
Page 74

76
 Loading...