

Page 1
GB
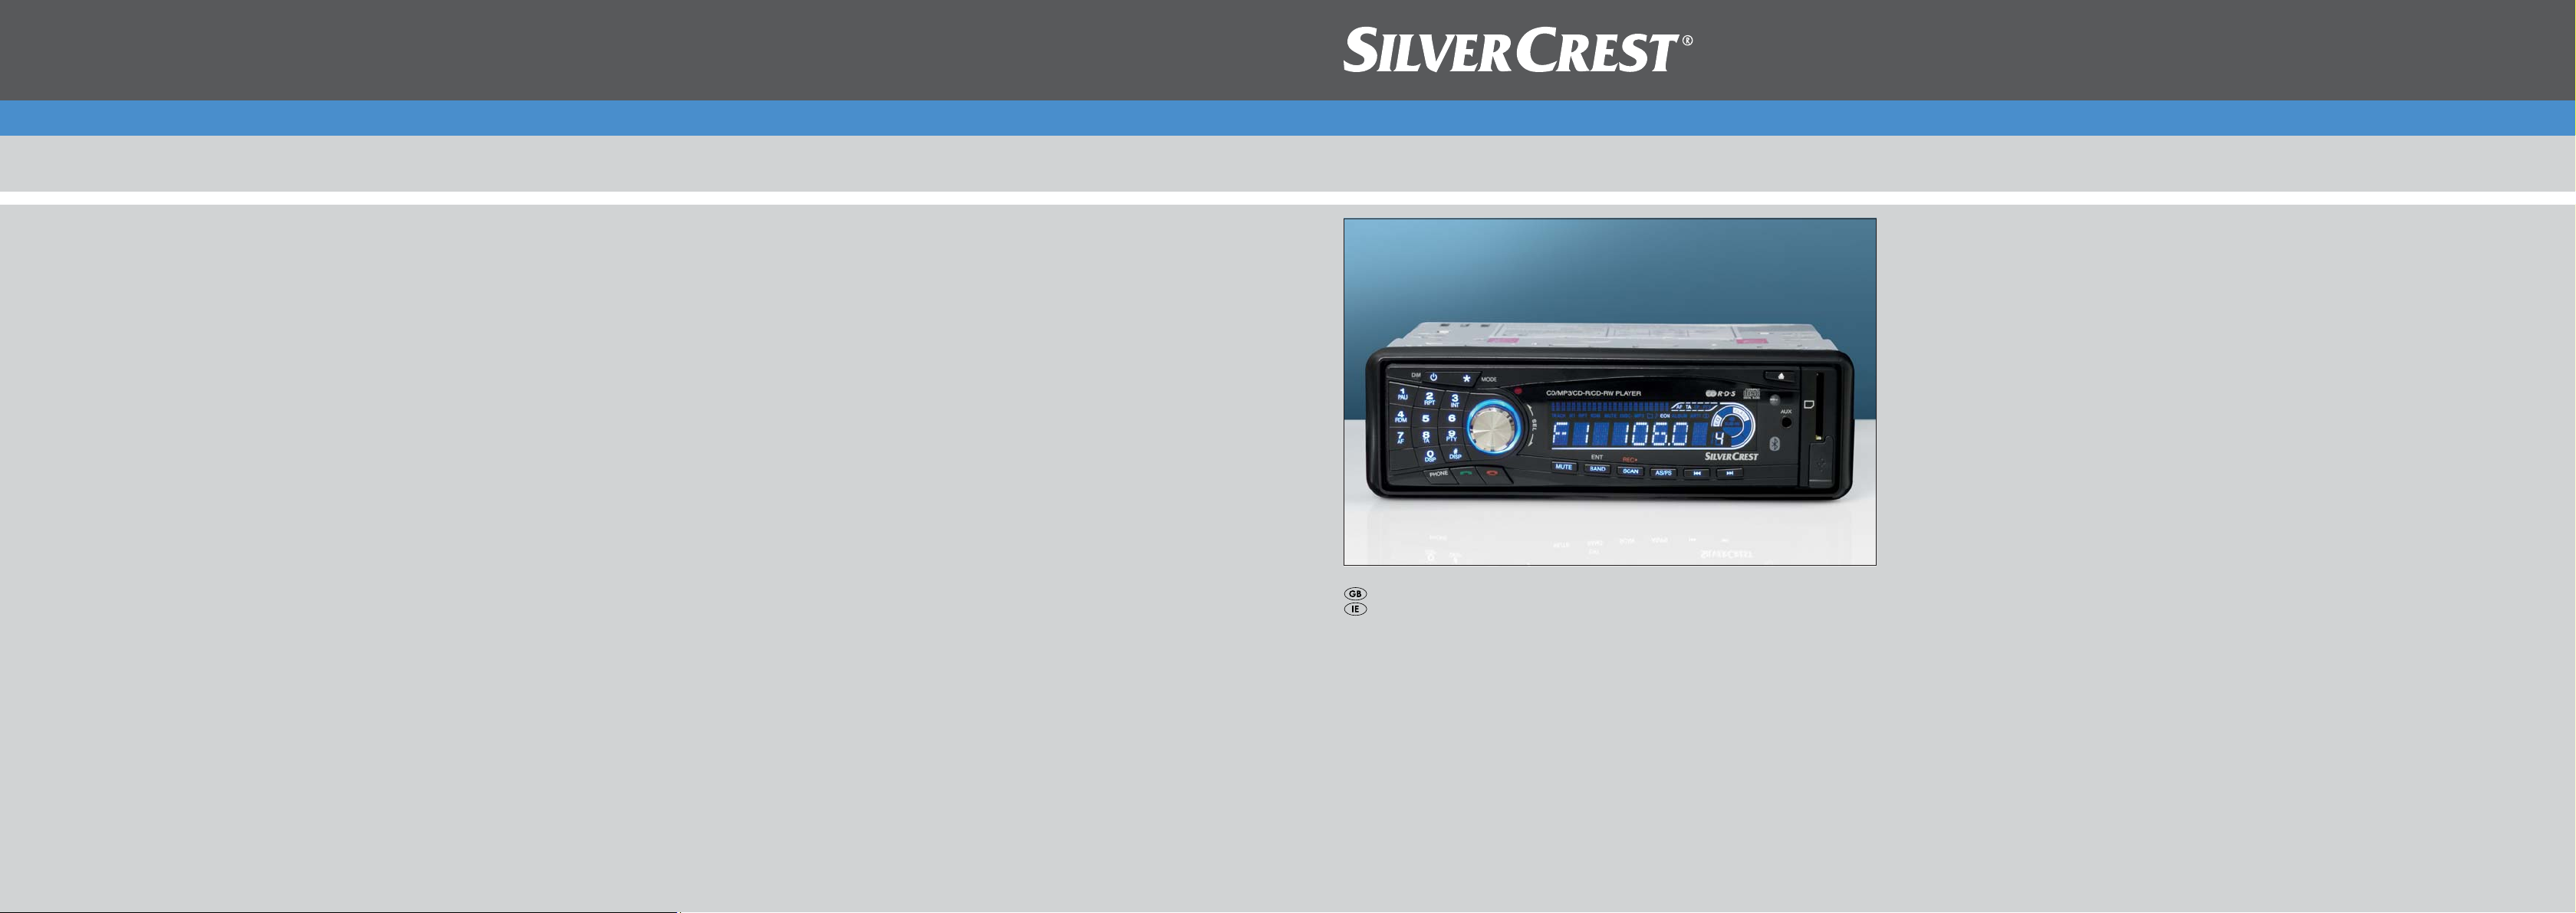
Bluetooth Car Radio
KH 2377
Bluetooth Car Radio
Operating instructions
KOMPERNASS GMBH
BURGSTRASSE 21 · D-44867 BOCHUM
www.kompernass.com
ID-Nr.: KH2377-07/10-V4
Page 2
27
26
25
24
23
22
21
20
28
2
3
4
5 6
7
41 42 43 44 45
61
60
46
47
65
59
29
30
58
57
1213141516171819
1011
89
56
55
54
48
49
50
51
52
64
63
62
53
66
31 31
32
383940
37
33
34
35
36
68
67
69
70
Page 3

Index
Introduction . . . . . . . . . . . . . .2
Preface . . . . . . . . . . . . . . . . . . . . . . . 2
Information for these operating
instructions . . . . . . . . . . . . . . . . . . . . 2
Copyright . . . . . . . . . . . . . . . . . . . . . 2
Limited liability . . . . . . . . . . . . . . . . . 3
Warnings . . . . . . . . . . . . . . . . . . . . . 3
Proper use. . . . . . . . . . . . . . . . . . . . . 4
Safety . . . . . . . . . . . . . . . . . . . . . . . .4
Basic Safety Instructions . . . . . . . . . .4
Danger from laser radiation . . . . . . . 5
Traffi c safety . . . . . . . . . . . . . . . . . . . 6
Interaction with batteries . . . . . . . . .6
Package contents and transport
inspection . . . . . . . . . . . . . . . . . . . . .7
Disposal of the packaging . . . . . . . . 7
Operating components . . . . .8
Installation . . . . . . . . . . . . . .10
Connection . . . . . . . . . . . . . . . . . . .10
Installation . . . . . . . . . . . . . . . . . . .12
Uninstalling the device . . . . . . . . . .14
Initial use . . . . . . . . . . . . . . . .15
Face plate . . . . . . . . . . . . . . . . . . . .15
Remote control . . . . . . . . . . . . . . . .16
GB
IE
Handling and operation . . .16
Switching On and Off . . . . . . . . . .17
Settings . . . . . . . . . . . . . . . . . . . . . .17
Radio reset (RESET) . . . . . . . . . . . .20
Radio functions . . . . . . . . . . . . . . . .21
General CD functions . . . . . . . . . . . 24
MP3 CDs functions . . . . . . . . . . . . . 26
USB port . . . . . . . . . . . . . . . . . . . . .27
Card reader (SD/MMC) . . . . . . . .28
Record function . . . . . . . . . . . . . . . .28
Connecting an external audio
device to the device . . . . . . . . . . . .30
Bluetooth operation . . . . . . . . . . . .30
Cleaning . . . . . . . . . . . . . . . .34
Safety instructions . . . . . . . . . . . . . . 34
Display cleaning . . . . . . . . . . . . . . . 34
Disposal . . . . . . . . . . . . . . . . .34
Disposal of the device . . . . . . . . . . 34
Disposing of the batteries . . . . . . . .34
Troubleshooting . . . . . . . . . .35
Safety instructions . . . . . . . . . . . . . . 35
Malfunction causes and remedies . 35
Appendix . . . . . . . . . . . . . . .37
Technical data . . . . . . . . . . . . . . . .37
Declaration of EG conformity . . . . . 38
Warranty . . . . . . . . . . . . . . . . . . . .38
Importer . . . . . . . . . . . . . . . . . . . . .38
KH 2377
1
Page 4

Introduction
GB
IE
Introduction
Preface
Dear customer,
by purchasing the Bluetooth car radio you have decided on a quality product from
SilverCrest, which, in terms of technology and functionality, meets the most
up-to-date development standards.
Read the information included here so that you can quickly familiarize yourself
with your device and thus make full use of its functions.
We wish you a great deal of enjoyable use.
Information for these operating instructions
These operating instructions are a component of the Bluetooth car radio KH 2377
(hereafter referred to as the device) and supplies you with important information
regarding proper use, safety, installation and connection as well as how to operate
the device.
The operating instructions must be constantly kept available close to the device.
They are to be read and used by anyone assigned to install, service and repair
faults in the device.
Keep these operating instructions and hand them over with the device to any future
owners.
Copyright
2
This documentation is copyright protected.
All rights including those of photographic reproduction, duplication and distribution
by means of particular methods (for example data processing, data carriers and
data networks), wholly or partially as well as substantive and technical changes
are reserved.
KH 2377
Page 5
Introduction
Limited liability
All technical information, data and information for installation, connection and
operation contained in these operating instructions correspond to the latest at
time of printing and, to the best of our knowledge, take into account our previous
experience and know-how.
No claims can be derived from the details, illustrations and descriptions in these
instructions.
The manufacturer assumes no responsibility for damage caused by failure to
observe the instructions, improper use, inappropriate repairs, making unauthorized
changes or for using unapproved replacement parts.
Warnings
In the current operating instructions the following warnings are used:
WARNING
A warning of this danger level signifi es a possible dangerous
situation.
If the dangerous situation is not avoided it can lead to injuries.
The directives in this warning are there to avoid personal injuries. ►
IMPORTANT
A warning of this danger level signifi es possible proper
damage.
If the situation is not avoided it can lead to property damage.
The directives in this warning are there to avoid property damage. ►
GB
IE
ty
KH 2377
NOTICE
A notice signifi es additional information that assists in the handling of the ►
device.
3
Page 6

Introduction
GB
IE
Proper use
This device is intended only for reception of FM/AM radio stations as well as
for the playback of audio and MP3 CDs, MP3 fi les from USB data carriers and
SD/MMC memory cards as well as audio signals of external audio devices. In
addition you can couple the device with a Bluetooth mobile phone and with the
microphone unit use the device as a hands free facility. The device is intended for
installation into a vehicle.
This device is not intended for any other use or for uses beyond those mentioned.
Danger from unintended use!
Danger can come from the device if used for unintended purposes and/or
other types of use.
Claims of any kind for damage resulting from unintended use will not be excepted.
The oper
Safety
In this chapter you receive important safety information regarding handling of the
device.
This device complies with the statutory safety regulations. Incorrect usage can,
however, lead to personal injury and property damage.
WARNING
Use the device exclusively for intended purposes. ►
Observe the procedures described in these operating instructions. ►
ator alone bears liabilit
y.
Basic Safety Instructions
For safe handling of the device observe the following safety information:
Before use check the device for visible external damage. Do not put into ■
operation a device that is damaged or has been dropped.
4
KH 2377
Page 7
Introduction
Damaged cables or connections should be replaced by authorized qualifi ed ■
persons or by the customer service department.
Persons who, due to their physical, intellectual or motor abilities, are incapable ■
of operating the device safely may only use the device under supervision or
direction from a r
Only permit children to use the device under supervision. ■
Repairs should only be carried out by authorized specialist companies or by ■
the customer service department. Incorrect repairs can result in signifi cant
danger
s for the user. In addition w
A repair to the device during the warranty period may only be carried out ■
by a customer service department authorized by the manufacturer otherwise
no additional warrant
Defective components may only be replaced with original replacement parts. ■
Only by using original replacement parts can you guarantee that the safety
requirements ar
Protect the device from moisture and liquid penetration. ■
esponsible person.
y claims can be considered for subsequent damages.
e complied with.
Danger from laser radiation
WARNING
The device is equipped with a class 1 laser.
Laser radiation is dangerous to the eyesight!
Observe the following safety instructions to avoid exposure
of yourself or others to laser radiation:
Never open the device. ►
Have the device repaired only by a specialist. ►
Do not make any modifi cations to the device. ►
GB
IE
arranty claims become void.
KH 2377
5
Page 8

Introduction
GB
IE
Traffi c safety
WARNING
Safety in traffi c has the highest priority!
Observe the following safety instructions so that you do not put yourself or
others in danger:
Before travel commencement familiarize yourself with the operation of the ►
device.
Only operate the device when the tr
place to carry out comprehensive operations.
Only remov
Set the volume to a moderate level so that acoustical signals from police ►
vehicles, fi re trucks and other emergency services can be perceived in
good time.
e or insert the face plate when the vehicle is parked. ►
Interaction with batteries
WARNING
Danger from improper use!
For safe handling of batteries observe the following safety instructions:
Do not throw the batteries into a fi re. ►
Do not short circuit the batteries. ►
Do not attempt to recharge the batteries. ►
Regularly check the condition of the batteries. Leaking battery acid can ►
cause permanent damage to the de
leaking battery special care should be tak
Wear protective gloves.
Store batteries in a place inaccessible to children. When swallowed seek ►
immediate medical attention.
e the batteries from the remote control if you do not intend to use the ►
Remov
device for extended periods of time.
affi c situation allows. Stop in a suitable ►
vice. When handling a damaged or
en. Danger from acid burns!
6
KH 2377
Page 9

Introduction
Package contents and transport inspection
WARNING
Risk of suff ocation!
Packaging material should not be used as a play thing. ►
There is a risk of suff ocation!
The device is deliver
Car radio (incl. face plate) ▯
Installation bracket (Attached) ▯
Bezel frame (Attached) ▯
Fixture plate (incl. securing material) ▯
Remote control ▯
1 Battery CR2025, 3 V DC ▯
Keys for installation frame (2x) ▯
Case for face plate ▯
Microphone unit with adhesive strip ▯
Operating instructions ▯
NOTICE
Check the contents to make sure everything is there and for visible damage. ►
If the contents are not complete or are damaged due to defective packaging ►
or through transportation contact the service hotline (see warranty card).
ed with the following components as standard:
GB
IE
Disposal of the packaging
The packaging protects the device from transport damage. The packaging materials
are selected from the point of view of their environmental friendliness and disposal
technology and are therefore recyclable.
The recirculation of packaging into the material circuit saves on raw material
and reduces generated waste. Dispose of packaging material that is no longer
needed according to the regionally established regulations.
NOTICE
If possible preserve the device's original packaging during the warranty ►
period so that in the case of a warranty claim you can package the device
properly for re
KH 2377
turn.
7
Page 10

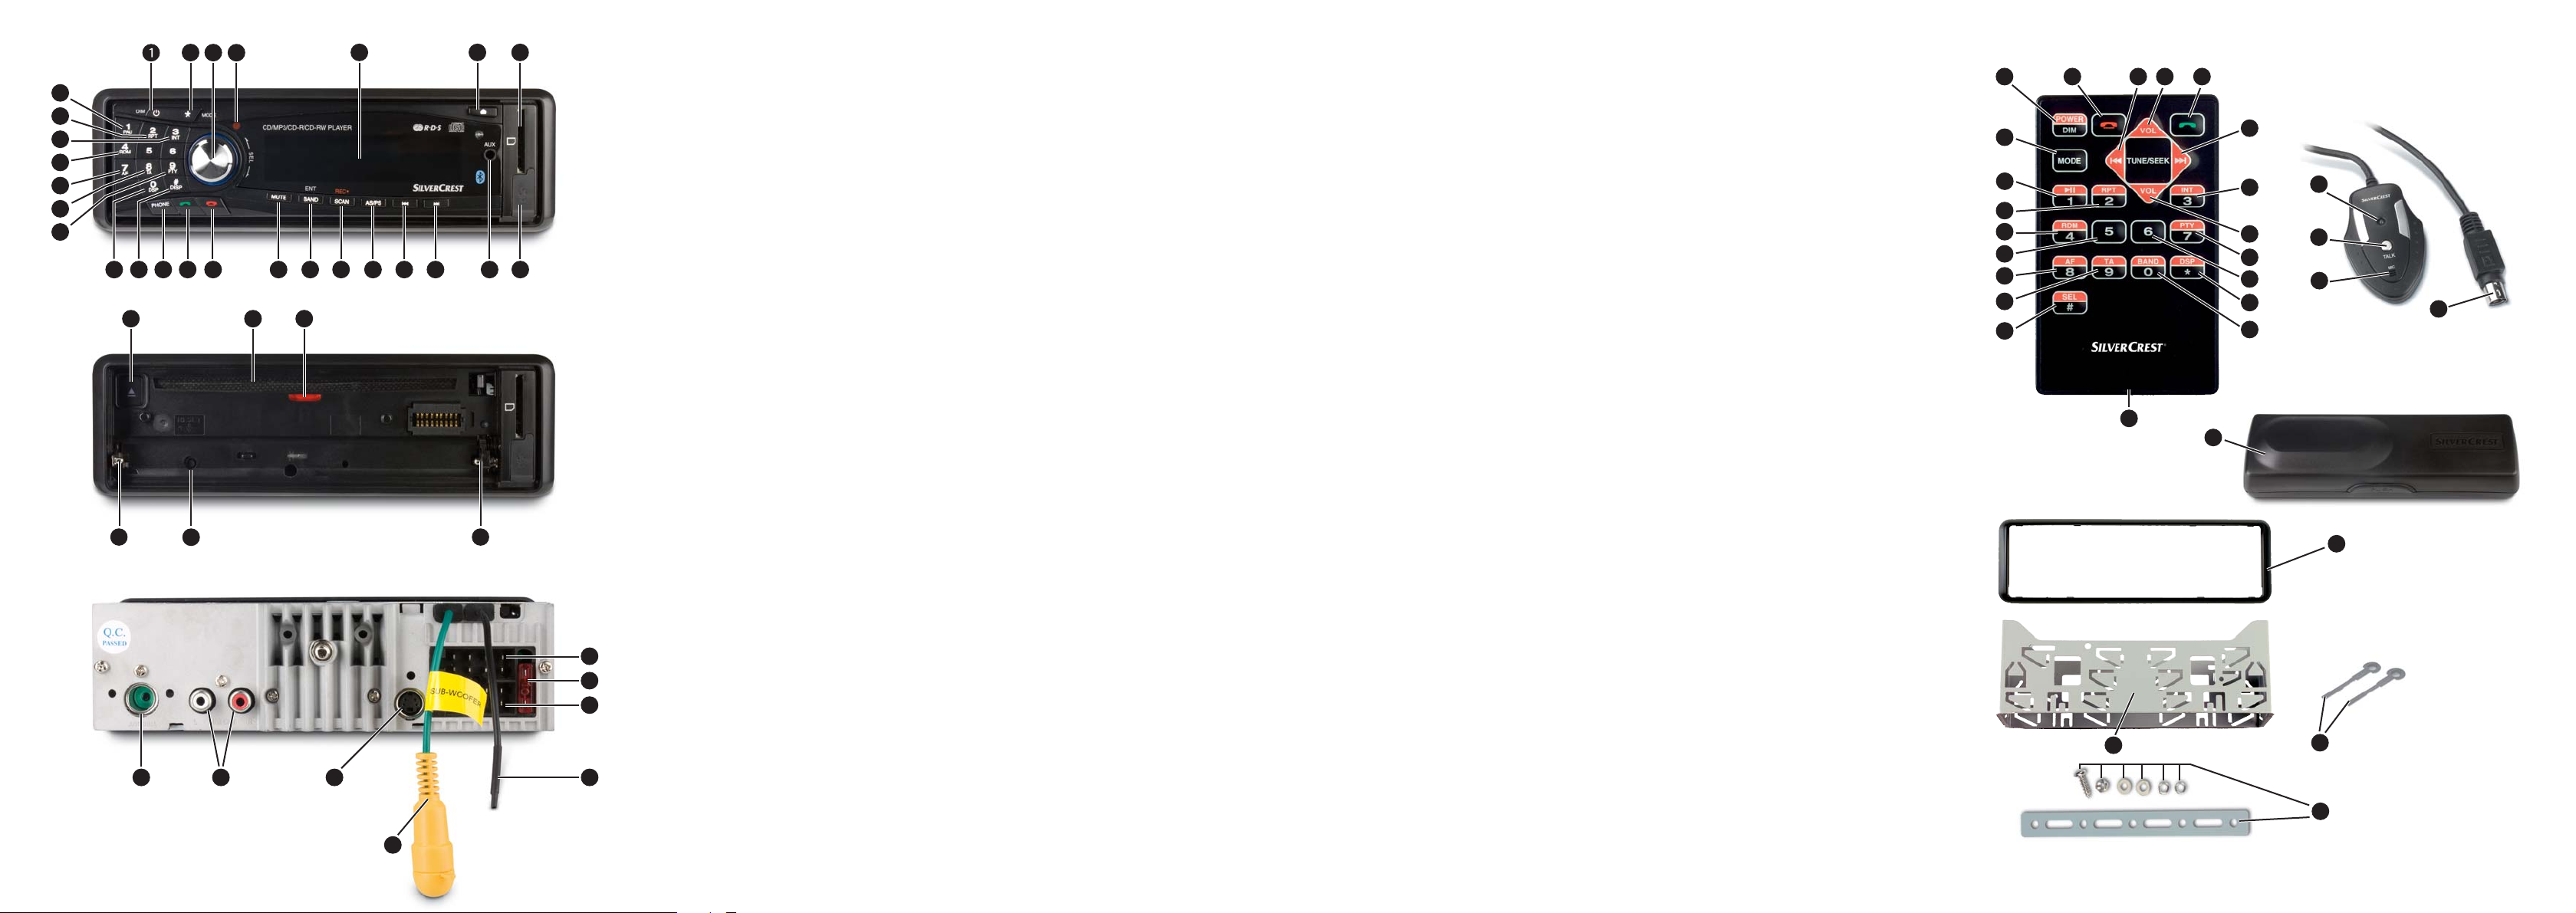
Operating components
GB
IE
Operating components
Car radio
POWER/DIM: Switch device on
and off /dim display illumination
2
MODE: Set the operating mode
3
Multi controller/SEL:
Turn to set value/volume
4
Sensor for remote control
5
Display
6
Unlocking the face plate
7
Card slot for SD/MMC cards
8
USB port
9
AUX: 3.5 mm stereo input
socket for the connection of an
external audio device
10
▸▸I: Title / Station search
forwards
11
I◂◂: Title / Station search
backwards
12
AS/PS: Automatic station
saving
SCAN/REC: Automatic station
13
search/Record to a data carrier
at the USB port or the SD/MMC
card slot
14
BAND/ENT: Select band
range/confi rm selection
15
MUTE: Switching off the sound
16
button: End call
17
button: Accept call
18
PHONE: Access telephone
function
19
DISP/#: Show display information,
# button
20
DSP/0: Adjust sound settings,
number button 0
21
PTY/9: Station search by
PTY group, number button 9
22
TA/8: Activate traffi c radio
station/ number button 8
AF/7: Alternative Frequency
23
search/regional programme
activation, number button 7
24
RDM/4: Random playback in
the CD/MP3 operation mode,
number button 4
25
INT/3: Intro function in the
CD/MP3 operation mode,
number button 3
26
RPT/2: Repeat function in the
CD/MP3 operation mode,
number button 2
27
PAU/1: Stop playback in CD/
MP3 operation, number button 1
28
OPEN: Reject disc
29
CD compartment
30
Theft protection LED/ CD
compartment position LED
31
Holder for the face plate
32
RESET: Resetting the device
33
ISO-Block connection B
Automotive blade type fuse 10 A
34
ISO block connection A
35
36
Bluetooth antenna
SUBWOOFER: Connection
37
cable with cinch connector
for subwoofer
Socket for microphone unit
38
39
LINE OUT: Audio cinch output
L/R for amplifi er
Antenna connection for DIN
40
antenna plug
8
KH 2377
Page 11

Operating components
Remote control
41
POWER/DIM: Switch device on
and off /dim display illumination
42
button: End call
I◂◂: Title / Station search
43
backwards
44
VOL: Volume increase
45
button: Accept call
46
▸▸I: Title / Station search forwards
47
INT/3: Intro function in the CD/MP3
operation mode, number button 3
48
VOL: Volume decrease
49
PTY/7: Station search by
PTY group/number button 7
50
MP3 operation: skip a direc-
tory/ number button 6
51
DSP/*:Sound settings/button*
BAND/0: Select frequency
52
range/number button 0
53
Battery compartment
54
SEL/#: Press or hold down to
access adjustment options/
button #
55
TA/9: Activate traffi c radio
station/number button 9
56
AF/8: Alternative Frequency
search/regional programme
activation/number button 8
57
MP3 operation: skip back a
directory/number button 5
58
RDM/4: Random playback in
the CD/MP3 operation mode/
number button 4
59
RPT/2: Repeat function in the
CD/MP3 operation mode/
number button 2
60
▸II/1: Playback start or stop/
number button 1
61
MODE: Set operation type/
Loudness function
Accessories
62
Microphone unit plug
63
Microphone
64
TALK button
green LED for connection status
65
66
Case for face plate
67
Bezel frame
68
Installation bracket
69
Key for installation bracket
70
Fixture plate
(incl. securing material)
GB
IE
KH 2377
9
Page 12
Installation
GB
IE
Installation
WARNING
With the installation of the device damage can occur!
If possible have the device installed by a qualifi ed technician. ►
If you want to install the device yourself, for safe and fl awless operation of ►
the device follow the instructions for connection and installation.
Connection
IMPORTANT
The use of incorrect connections can lead to damage to the
device.
For installation use the de
adapter that you may possibly require can be obtained from a specialist
establishment, from a local dealer or from the stor
When using other connection types the warranty becomes void!
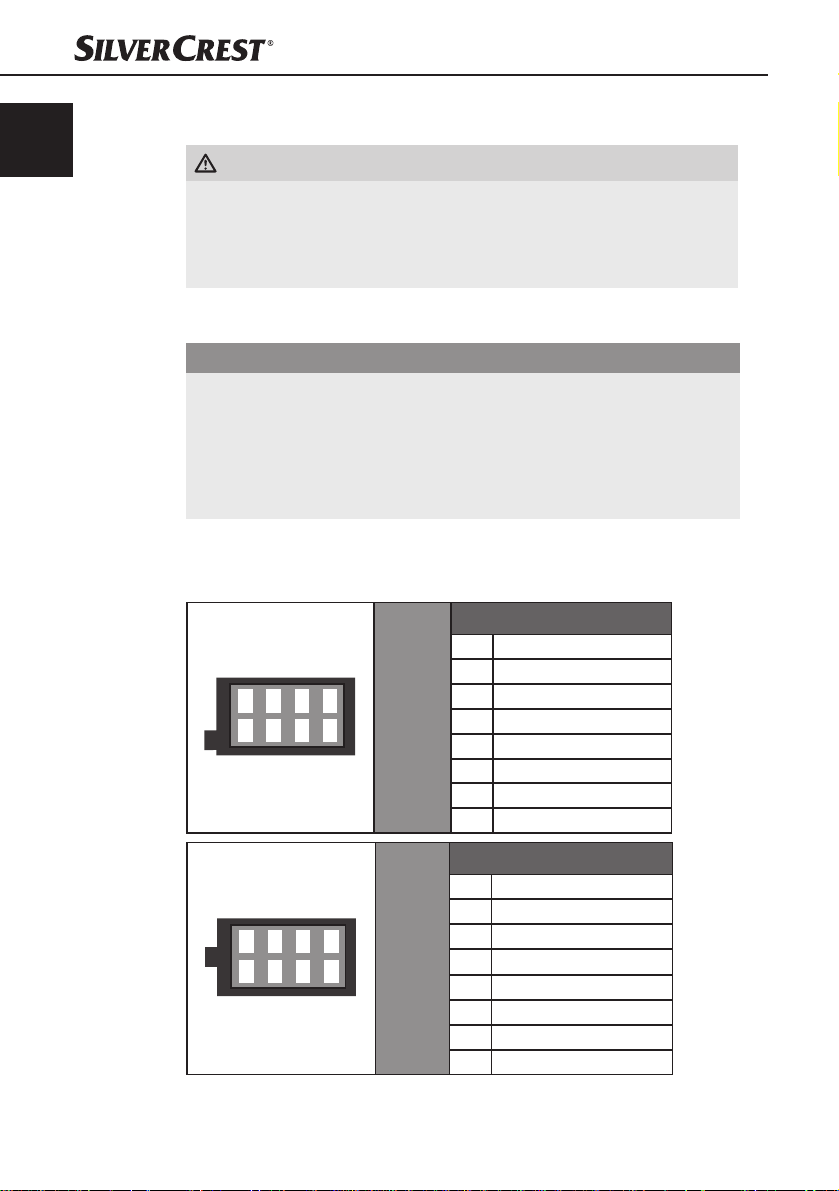
Confi guration of the ISO connections
The view of the plug connector is from behind.
1357
2468
vice's ISO connections. The vehicle specifi c ISO ►
ISO A
e's technical department.
Confi guration
1 unconfi gured
2 unconfi gur
3 unconfi gured
4 Permanent positive
5 Antenna power
6 unconfi gured
7 12 V (Ignition positive)
8 Minus (-)
ed
10
1357
2468
ISO B
Confi guration
1 Rear right +
2 Rear right -
Front right +
3
4 Front right 5 Front left +
6 Front left 7 Rear left +
8 Rear left -
KH 2377
Page 13

Installation
To connect the device to two speakers use only the cables for the front speakers.
NOTICE
Make sure that a permanent positive connection is applied to the station ►
memory of connection 4 in the ISO block A.
In some automobile models the standard confi
[4] and [7] in ISO block A are interchanged at the factory. If this is the
case the station memory can be lost. To corr
(Ignition positive) and 4 (Permanent positive) in the ISO Block A must be
swapped.
You can connect an external amplifi er to the audio cinch output. For this ►
follow the operating instructions for the external amplifi er.
Antenna power connection
IMPORTANT
Possible damage to the device!
Never attach the antenna po
power cable.
The connection for the antenna power is av
The relay then automatically extends the antenna when the device is switched
on. When switched off the antenna retracts. This connection can also be used to
control an external amplifi er. For exact connection information please consult the
amplifi er's operating instructions.
wer connection with the antenna's motor ►
Connection of an external amplifi er
For the connection of an external amplifi er use the audio cinch output LINE OUT 39.
For this follow the operating instructions for the external amplifi er.
GB
IE
guration of the connections ►
ect this, the connections 7
ailable for a relay controlled antenna.
Connection of an external subwoofer
For the connection of an external subwoofer use the yellow cinch connector
SUBWOOFER 37. For this follow the operating instructions for the external
subwoofer.
Connecting the microphone unit
For connection of the microphone unit use the microphone unit socket 38.
KH 2377
11
Page 14

Installation
A
GB
IE
Connection schematic
Antenna
External amplifi
Installation
The device can be installed into any standard ISO mounting duct. In the event that
your vehicle does not have an ISO mounting duct contact your local specialist
establishment, local dealer or the technical department of the store.
NOTICE
Before installation remove, without fail, the two transport securing screws ►
on the top of the housing (marked with a red sticker)!
Connect the cable before fi
plugged in properly and that the system functions correctly.
Subwoofer
Bluetooth antenna
1 3
ISO B
ISO
er
Microphone unit
nally installing the device. Make sure that it is ►
Installation instructions
Install the device in the duct provided for it or select the installation location so ■
that all buttons can be comfortably reached and the driver is not impeded.
Only connect the device to a properly installed 12 V automotiv
Only connect the device in the vehicle via an ISO plug. ■
Install the device in such a way as to avoid the development of heat accumu- ■
lation and so that the device is suffi ciently
12
e battery. ■
ventilated.
KH 2377
Page 15

Installation
To avoid function disturbances the installation angle should be less than 30°. ■
Do not install the device in a location where it will be subjected to high ■
temperatures (i. e. direct sunlight or heating vents), heavy contamination and
strong vibrations.
In the e
vent that changes to the vehicle are necessary contact your vehicle ■
dealer/qualifi ed radio installation facility.
Installing the device into the ISO duct
Pull the installation bracket
housing.
Place the installation bracket into the ISO mounting duct.
Bend the tabs on the installation bracket with a scr
bracket is fi xed fi rmly into the mounting duct (see diagram).
68
and the bezel frame 67 from the device's
driver so that the
ew
GB
IE
KH 2377
Check to make sure that the bracket is securely fi xed.
Connect the ISO socket block of the device with the two ISO plugs on your
vehicle.
Connect the antenna cable from the vehicle antenna to the antenna sock
on the device.
Feed the microphone unit cable into the mounting duct and connect it to the
micr
ophone unit socket. Place the cable in such a way that the microphone
unit can be secured in the vehicle interior later
the microphone" on page 30.
Contingently connect the audio cinch cable of an external amplifi er to the
LINE OUT socket
Contingently connect the audio cinch cable of an external subwoofer to the
yellow cinch socket SUBWOOFER
on the device.
39
37 on the device.
, see also the chapter "Using
et
13
Page 16

Installation
GB
IE
If necessary secure your device against theft with additional measures.
Attach the securing screw with the anchoring plate 70 and the securing
material to the engine fi rewall of the vehicle.
Carefully push the device into the mounting duct until it locks into place.
After all connections have been made activate the RESET button with a ball
point pen or other pointed object.
Attach the face plate as described under "Installing the face plate".
IMPORTANT
Possible damage to the cable!
Observe the position of the cable when sliding the de
as to avoid damaging it.
Finally put on the bezel fr
Uninstalling the device
To remove the installed device proceed as follows:
Remove the bezel frame
Insert the right and left keys
device. (The tabs are now bent back.)
vice into the duct so ►
ame.
67
.
69
into their respective slots on the sides of the
14
Pull the device out.
KH 2377
Page 17

Initial use
Initial use
Face plate
To protect against theft you can remove the face plate from your device. Do not
store the removed face plate in your vehicle.
NOTICE
When the face plate is not inserted into the frame the theft protection ►
30
on the device blinks.
LED
To safeguard the face plate always keep it stored in its case. ►
Installing the face plate
Place the face plate with the left side in the
frame fi rst.
Then fi rmly press the right side until it locks into
place.
Subsequently fl ip the face plate upw
locks into place.
Check to make sure that the face plate is fi
correctly installed in the frame. If the face plate
is incorrectly installed it can result in malfunctions
when operating the device.
Removing the face plate
Press the
The face plate tilts automatically forward.
Tilt the face plate completely forward.
Slide the face plate to the left and then pull fi rst
the right and then the left side away.
6
button to unlock the face plate.
GB
IE
ards until it
rmly and
KH 2377
15
Page 18

Handling and operation
GB
IE
Remote control
Inserting the battery
NOTICE
The supplied battery (Type CR2025) is already installed in the remote ►
control when delivered. Before use remove the isolation strip from the
battery compartment.
or replacement with a new battery procede as follows:
F
Pull the battery compartment out of the remote
control by pressing the lateral locking device and
at the same time pull the battery compartment out.
R
emove the depleted battery and insert a new
battery of the type CR2025 (Button cell) into the
y compartment. Be sur
batter
with the correct polarity.
Slide the battery compartment back into the remote
control until it locks into place.
Using the remote control
Point the remote control to the Infrared sensor
device.
e to insert the battery
4
on the front panel of the
NOTICE
You can use the remote control up to a distance of 8 m from the device. ►
Handling and operation
In this chapter you receive important information for the handling and operation
of the device.
NOTICE
Most of the functions can be operated by the buttons on the device as well ►
as by the buttons on the remote control. In these instructions operation via
the buttons on the device is described. Any r
on the remote control will be specifi cally highlighted.
If no setting is made and/or no button pushed within approx. 5 seconds the ►
device returns to its previous operating mode. Changed settings are saved.
16
eference to the push buttons
KH 2377
Page 19

Handling and operation
Switching On and Off
Press briefl y the POWER/DIM button to switch the device on. In the
display the notice WELCOME appears.
Briefl y tap the POWER/DIM button. In the display appears AUT
Briefl y tap the POWER/DIM button again. In the display appears MAN
DIM.
AUT
O DIM: The display illumination will, depending on the lighting conditions,
set automatically.
MAN DIM: The display illumination can be set in two stages (H = High and
L = Low) by turning the multi controller.
To switch off hold down the POWER/DIM button longer.
Settings
WARNING
Hearing damage as a result of too high a volume!
If the volume is set too high it can lead to permanent hearing damage.
Set the volume to moderate levels only. ►
Volume
Turn the multi controller to set the volume.
Mute switching (MUTE) on / off
Press the MUTE button to switch the sound off . "MUTE" blinks in the display.
To switch the sound on again press the MUTE button once more. The mute
switching is rescinded when r
GB
IE
O DIM.
eceiving a PTY or TA station.
KH 2377
17
Page 20

Handling and operation
GB
IE
Bass/Treble/Balance/Fader
Press the SEL button on the remote control or the multi controller on the
device. The current volume level is shown. Each additional press of the SEL
button or the multi controller accesses the next setting point.
The following settings are possible:
VOL - Volume (from 0 to 50),
BAS - Bass (from -10 to 10),
TRE - Treble (from -10 to 10)
BAL - Balance (sound distribution between the right and left speakers)
(from 10L to 10R)
FAD - Fader (sound distribution between the rear and front speakers)
(from 10F to 10R)
Turn the multi controller to change the settings of the displayed menu items.
additional settings via the SEL button or the multi controller
Hold the SEL button or the multi controller down for approx. 2 seconds then
subsequently press the SEL button or the multi controller repeatedly until the
desired function is shown in the display.
INVOL - switch on volume
Turn the multi controller to set the volume level, with which the device is to
be set when turned on.
REC - Recor
SUB
You can connect an active external subwoofer to produce a more powerful bass
eff ect.
ADJ - Time of da
ding format
Turn the multi controller to set the record format for recording on SD/MMC
and/or USB data carriers, MP3 (MP3 data) or WMA (Windows Media
Audio).
W - Subwoofer
Turn the multi controller to turn the bass eff ect on (SUBW ON) or off
(SUBW OFF).
y
18
NOTICE
The device is equipped with an RDS controlled clock. The clock sets itself ►
automatically when the EON function is switched on and also continues to
run when the radio is switched off
can also set the time of day manually.
Turn the multi controller to the right to set the hours and to the left to set the
minutes.
. If you do not receive any RDS signal you
KH 2377
Page 21

Handling and operation
TAVOL - Volume for traffi c radio
Turn the multi controller to set the volume level, with which traffi c reports are
to be played back.
EON - Information fr
When the EON function is switched on the radio switches to traffi c radio or PTY
groups if the TA or PTY function has been activated.
Turn the multi controller in order to switch the EON function on (EON ON)
or off (EON OFF).
DSP - Equalizer (Digital Sound Pr
Turn the multi controller to select one of the settings DSP CLASSIC, DSP
DSP POP, DSP FLAT or DSP NONE. In the setting DSP NONE
ROCK,
no DSP is switched on. The DSP equalizer setting is shown at the bottom of
the display.
You can also set the equalizer by pressing the DSP button on the remote control.
With this setting DSP is switched off when the radio frequency is shown again.
TA - Traffi c Announcement (traffi c radio)
Turn the multi controller to perform the following settings:
TA SEEK: As soon as the reception signal for traffi c announcements becomes
w
eaker or you leave the reception area the search function starts and will look
for the strongest TA station.
TA ALARM: As soon as the reception signal for traffi c announcements becomes
weaker or you leave the reception area an alarm tone sounds.
PI - Program Identifi cation (Sound with the station search)
Turn the multi controller to perform the following settings:
PI SOUND: Station search with sound.
PI MUTE: Station sear
RETUNE (Search times of s
Turn the multi controller to perform the following settings:
RETUNE L: The search process for a station with the correct PI recognition runs
for 90 seconds.
RETUNE S: The sear
for 30 seconds.
MASK (Conceal specifi c stations)
Turn the multi controller to perform the following settings:
MASK DPI: Conceals the AF stations which have another PI recognition.
MASK ALL: Conceals the AF stations which hav
ying non-PI stations that have the same station frequency.
anno
om other stations
ocessing)
ch without sound.
tations with PI recognition)
ch process for a station with the corr
e another PI recognition and all
ect PI recognition runs
GB
IE
KH 2377
19
Page 22

Handling and operation
GB
IE
Loudness
Hold down the MODE button to switch the loudness function on or off .
In the display appears LOUD ON and/or LOUD OFF.
Operating mode
Press the MODE button to switch between radio reception (Frequency
indicator), CD/MP3 operation (CD), memory card slot (SD/MMC), USB
port (USB) and audio input (AUX).
NOTICE
The operating modes CD, SD/MMC and USB can only be accessed when ►
the corresponding medium is inserted.
Display
Press repeatedly the DISP button to display successively the following
information:
Radio station, title + interpret, time of day (set automatically with RDS reception),
PTY settings (these RDS functions are sent from the broadcasting service in various
ranges; see also the chapter "Radio functions") and frequencies.
NOTICE
When you are not receiving any RDS or PTY information, "PS NONE“ or ►
"PTY NONE“ is shown in the display.
Radio reset (RESET)
To reset the device to its factory default settings, press the RESET button with a
pointed object, such as a pen.
Reset the device:
when operating for the fi rst time, ▯
after the cable connection, ▯
if not all function buttons are working ▯
when an error message appears in the display. ▯
20
KH 2377
Page 23

Handling and operation
Radio functions
Select frequency range
Press the BAND/ENT button to switch between VHF (F1, F2, F3) and
medium wave (M1, M2).
Automatic station search
Press briefl y the buttons I◂◂ or ▸▸I to start a station search. The search will
stop when a station is found.
Manual station selection
Hold down one of the buttons I◂◂ or ▸▸I for two seconds, in the display
appears MANUAL.
Now press the buttons I◂◂ or ▸▸I to change the frequency in steps of
0.05 MHz (VHF) and/or 9 kHz (MW) until the desired frequency is set.
If no button is pressed for appro
again. AUTO appears in the display.
Saving radio stations
For each frequency range 6 stations can be saved.
Hold down for approx. 3 seconds one of the station buttons 1 to 6 to save
the currently set station. The successful saving is signalised b
of the numbers 1 to 6 in the display.
GB
IE
x. two seconds the automatic station search is set
y the showing
Search for stations with alternative frequencies
Press the SCAN/REC button to search for stations with an AF signal in the
VHF band range.
The search stops with each found station for 5 seconds and then continues
searching.
If you want to listen to and save the station press the SCAN/REC button to
stop the search.
Hold down for appr
the currently set station. The successful saving is signalised b
of the numbers 1-6 in the display.
ox. 3 seconds one of the station buttons 1 to 6 to save
Accessing saved stations
Select with BAND/ENT the frequency range.
Press one of the station buttons 1 to 6, to access the saved station.
KH 2377
y the showing
21
Page 24

Handling and operation
GB
IE
Automatic saving
Hold down the AS/PS button for 3 seconds . A search immediately starts
whereby each found station remains for approx. fi ve seconds. The station
indicator and/or the station frequency blinks and the memory slot is displayed. With weak stations the search will automatically continue.
Running through saved stations
Press briefl y the AS/PS button.
All stations will be briefl y selected. When you hear the desired station press
the AS/PS button. The chosen station remains selected.
Switching alternative frequencies (AF) on / off
You can search for alternative frequencies of a station so that it will always have
optimal reception.
Press the AF button. In the display appears the indicator AF. The de
constantly searches for the optimal frequency of the currently set station.
Press the AF button again to switch the function off . In the display the
indicator
AF disappears.
Regional programmes
A few stations broadcast regional programmes.
In order to playback only the station's regional programme hold down the
AF button until the notice REG ON appears in the display.
o again playback the national programme hold down the AF button until
T
the notice REG OFF appears in the display.
vice now
Programme mode (PTY)
With the help of this function you can search for stations in a designated genre.
The following settings are possible:
POP M
ROCK M
NEWS
AFFAIRS
INFO
EASY M
LIGHT M
22
SPORT
EDUCATE
DRAMA
CLASSICS
OTHER M
CULTURE
SCIENCE
VARIED
JAZZ
COUNTRY
WEATHER
FINANCE
CHILDREN
NATION M
OLDIES
SOCIAL
RELIGION
PHONE IN
FOLK M
TRAVEL
LEISURE
DOCUMENT
KH 2377
Page 25

Handling and operation
NOTICE
Please note that this information is dependent on the region, the broadcasting ►
corporation and the station.
For this function the ► EO
Setting the PTY identifi cation
ess the PTY button and subsequently press repeatedly one of the number
Pr
1 to 6 to select the desired PTY input.
buttons
To switch between the PTY inputs "Musical genre" and "Talk contributions"
by the indicator of the fi rst PTY input press the PTY button again.
The number buttons ar
Button Musical genre Talk contributions
1 POP M, ROCK M NEWS, AFFAIRS, INFO
2 EASY M, LIGHT M SPORT, EDUCATE, DRAMA
3 CLASSICS, OTHER M CULTURE, SCIENCE, VARIED
4 JAZZ, COUNTRY WEATHER, FINANCE, CHILDREN
5 NATION M, OLDIES SOCIAL, RELIGION, PHONE IN
6 FOLK M TRAVEL, LEISURE, DOCUMENT
If no further input occurs for 2 seconds an automatic search for stations that
correspond to the PTY input starts The search stops with the fi rst found station.
Switching the PTY function on/off
To activate the PTY search press the PTY button.
In the display the notice PTY appears.
With the station search only stations of the curr
will be considered.
To deactivate the PTY search press the PTY button again.
Station searc
During the display of a PTY identifi cation if you press briefl y the PTY button
or the buttons I◂◂ and/or ▸▸I a search immediately starts for stations, which
corr
If no station is found that corresponds with this PTY identifi cation the indicator
PTY NONE appears briefl y and subsequently the search ends with the last
preset station.
h by PTY identifi cation
espond to this PTY identifi cation.
N function must be switched on.
e reserved as follows:
ently selected PTY identifi cation
GB
IE
KH 2377
23
Page 26

Handling and operation
GB
IE
Traffi c radio (TA - "Traffi c Announcement")
For this function the EON function must be switched on.
Press the TA button to switch this mode on or off .
A mode the device will immediately switch from other stations or operation
In the T
modes to the radio station, which is currently broadcasting traffi c information.
With this the volume level entered under TAVOL will be set.
During the playback of traffi c radio press the TA button to stop the TA function
without switching off this function.
General CD functions
NOTICE
Dampness and high humidity can cause the CD player to malfunction. ►
In this case switch on the vehicle heating to dissipate the dampness before
using the device. Do not subject the device to an
temperatures.
Anti-Shock function (ESP - "Electric Shock Protection")
The device is equipped with an anti shock function. This function serves to compensate for vibrations, for example on uneven streets, and to provide an uninterrupted
playback even with device movement. When the device is switched on the memory
automatically fi lls with data:
with audio CDs for 12 seconds; ■
with MP3 CDs for 75 seconds. ■
y extremely high or low
Inserting and removing CDs
Fold the face plate downward by pressing the face plate's unlocking device.
Push the CD into the CD slot with the inscribed side facing up.
Lock the face plate back into place by folding it upwards. Playback of the
CD begins. In the display appears CDP PL
To remove the CD open the face plate again. Press the OPEN button.
The CD will be ejected. The device switches to radio mode.
Immediately r
within approx. 5 seconds the device will draw it back in, however playback
of the CD will not start.
24
emove the CD from the CD slot. If an ejected CD is not removed
AY
.
KH 2377
Page 27

Handling and operation
Title skip
Press the buttons ▸▸I or I◂◂ to select the next and/or previous title.
The title number will be shown in the display.
Fast forward/backward
Hold down the buttons ▸▸I or I◂◂ longer to start fast forward or backward.
Stop playback
Press the PAU/1, button to stop playback.
To continue playback press the PAU/1 button once more.
Repeat function (RPT - Repeat)
Press several times the RPT/2 button to switch between the repeat functions.
The following settings are possible:
RPT ONE: The current title is repeated. –
RPT ALL: The entire CD will be repeated. – RPT will not be displayed.
Additionally with MP3 CDs:
RPT DIR: All titles in the current dir
If the functions RPT ONE or RPT DIR are activated
Title sampling
Press the INT/3 button. In the display INT is shown. Approx. 10 seconds
from all titles will playback one after the other.
Press the INT/3 button once more to activate normal playback.
GB
IE
ectory will be repeated. –
RPT will appear in the display.
Random playback of all titles (RDM - Random)
Press the RDM/4 button. The display shows RDM. A random controlled
playback is started. A repeat pressing launches the normal playback.
KH 2377
25
Page 28

Handling and operation
GB
IE
MP3 CDs functions
Playback
The device can playback fi les in the MP3 and WMA formats. ■
A mixture of titles and directories on the same level can result in problems ■
when playing back.
During playback the information from the ID3 tag of the MP3 fi
and are shown successively in the display.
Skip director
Press the number button 6 to playback the next director
button 5 to playback the previous directory. The name of the directory will
appear briefl y in the display after which playback begins automatically.
NOTICE
If fi les are located in the CD's main directory the directory name ► ROOT
will be shown in the display.
Search functions
Title number search
Press the AS/PS button. The notice MP3* appears in the display.
Turn the multi controller or press the numbers on the device and/or on the
remote control to set the desired title number.
Press the multi controller or w
les are read ■
y
y and/or the number
ait 3 seconds to start playback of the set title.
26
NOTICE
If a title number is selected that does not exist the title with the largest title ►
number will playback.
Title name search
ess the AS/PS button twice. In the display the notice* appears.
Pr
Turn the multi contr
Press the multi controller to confi rm the letter and to switch to the second letter
of the title name. In this way up to 16 letters/characters can be entered.
When y
ou have set the desir
show all titles that begin with the sought after char
oller until the desired letter appears.
ed character press the BAND/ENT button to
acter.
KH 2377
Page 29

Handling and operation
NOTICE
If no titles are found that begin with the set character ► NO MEDIA will be
shown briefl
Turn the multi controller to select a title and start playback with BAND/ENT.
Search for dir
Press the AS/PS button three times. The director
playing back appears.
Turn the multi controller to switch between the available directories.
Press the BAND/ENT button to select the curr
Playback of the fi rst title from the selected directory starts immediately.
y and you can carry out the setting again.
ectories
USB port
The device can process USB data carriers up to 16 GB. With this the directory
structure may contain a maximum of 1024 folders, 4096 fi les and a directory
depth of 8 levels.
Connecting data carriers
Open the protective cap from the USB port.
Connect your USB device to the port. The device searches for MP3 or
WMA fi les on the data carrier and the notice USB appears in the display.
Place the pr
connected to avoid contamination.
otective cap back on the USB port when no USB device is
y that is currently
ently shown dir
GB
IE
ectory.
KH 2377
27
Page 30

Handling and operation
GB
IE
Playback and search functions
The operations for playing fi les on the external data carrier as well as the ■
search function are exactly the same as with MP3 CDs.
If the device is in a diff
select the USB data carrier with the MODE button.
erent mode ( ■ CD, R
Card reader (SD/MMC)
The device can process SD/MMC memory cards up to 2 GB and SDHC memory
cards up to 32 GB. With this the directory structure may contain a maximum of
1024 folders, 4096 fi les and a directory depth of 8 levels.
Connecting data carriers
Slide a memory card into the memory card slot with the marking pointing
to the right. Playback of the MP3 or WMA title on the memory card begins
automatically.
Playback and search functions
The operations for playing fi les on the external data carrier as well as the ■
search function are exactly the same as with MP3 CDs.
If the device is in a diff erent mode ( ■ CD, Radio, AUX or USB
select the card reader with the MODE button.
Record function
NOTICE
Please observe the legal regulations valid in your place of residence ►
regarding the duplication of copyrighted works. In case of doubt please
consult a specialist in your area.
adio, AUX or MMC
) you can
) you can
28
our device you can record data from audio CDs, radio or external audio
With y
devices onto USB or SD/MMC data carriers and copy MP3 and/or WMA data
from an MP3 CD onto USB or SD/MMC data carriers.
The data will be saved with the following notations:
Title of audio CDs: Track001, Track002, ... ■
Data from MP3 CDs: Music001, Music002, ... ■
Radio recordings: Tuner001, Tuner002, ... ■
Recordings have a bitrate of 128 kbps and a sampling frequency of 44 kHz.
KH 2377
Page 31

Handling and operation
Recording
The audio data is now saved on the data carrier in the format that w
(MP3 or WMA). The preceding blinking "R" signals the recording.
Place a memory medium into the card slot or connect a data carrier to the
USB port.
Insert the CD, if necessary
With the MODE button set the desired operation mode (CD
If necessary start playback of the external audio device.
Hold down the SCAN/REC button until RE
In the operation mode CD, MMC ALL or USB ALL will be diplayed. If no
data carrier is connected, on which recordings can be made NO MEDIA
will be displayed.
Press the SCAN/REC button repeatedly until the desired r
is displayed. When recording an audio CD you can make an additional
setting depending on whether you want to record all titles from the CD
(USB/MMC ALL) or only the current title (USB/MMC ONE).
Start the recording by pressing the BAND/ENT button.
NOTICE
When the selected data carrier is full recording automatically moves to the ►
other data carrier as long as a corresponding data carrier is connected.
To end the recor
After which
ding press briefl y the BAND/ENT button once more.
WAIT is shown briefl y in the display, the recording is saved.
, and/or switch on the external audio device.
, Radio, AUX).
C MMC or
REC USB is displayed.
ecording option
as set
GB
IE
Copying data from an MP3 CD
You can copy individual titles from an MP3 CD to an external USB data carrier
or an SD/MMC memory card.
Place a memory medium into the card slot or connect a data carrier to the
USB port.
Hold down, during playback of a title from an MP3 CD, the SC
button. The notice COPY MMC
carrier is connected, on which recordings can be made NO MEDIA will
be displayed.
KH 2377
AN/REC
and/or COPY USB appears. If no data
29
Page 32

Handling and operation
GB
IE
Press the SCAN/REC button several times to select either the copying option
COPY USB (copying on USB data carriers) or COPY MMC (copying on
SD/MMC cards).
Start the copy process by pressing the BAND/ENT button.
During the copy process COP
from 01 - 100 shows the copying progress. After the notice COPY 100 the
copying process is ended and playback of the MP3 title continues.
Y appears in the display and a percentage indicator
Connecting an external audio device to the device
Connect the audio output of an external audio device (i.e. an MP3 player)
via a 3.5 mm stereo jackplug to the socket AUX IN on the front panel of
the device.
Select playback of the audio input by pressing, several times, the MODE
button until AUX is shown in the display.
Bluetooth operation
The microphone unit must be connected to the device in order to use the Bluetooth
functions. In addition a mobile phone is required that supports the Bluetooth data
transmission.
Connecting the telephone to the device
Activate the Bluetooth function on your mobile phone and conduct a search
for Bluetooth devices.
After a successful search the entry CarBT appears for the device in the display
of the mobile phone.
Select this entry for the connection and for the subsequent password request
enter the password 1234 for the device. You may possibly have to confi rm
the connection structure once mor
After a successful coupling CONN OK appears briefl y in the device's display
and the green LED on the microphone unit lights up.
e.
Using the microphone
During the telephone call you will hear the caller via the speaker connected to
the device.
For optimal transmitting of your voice place the microphone unit close to you.
Attach the microphone unit, for example, to the dashboard. For this purpose
you can use the supplied sticky tape. In this case clean beforehand dust and
grease from the surface. The sticky tape can be used for securing on almost
all smooth sur
30
faces.
KH 2377
Page 33

Handling and operation
NOTICE
Do not mount the microphone in the vicinity of speakers otherwise the voice ►
quality may deteriorate.
Call accept/end
With an incoming call you hear the call signal via your mobile phone, whilst in
the device's display is shown the call number.
You accept an incoming call by pressing the TALK button on the micro-
phone unit or the
You end the call by pressing the TALK button again on the microphone unit
or the
Rejecting a call
With an incoming call press the button on the device and/or on the
remote control to reject the call.
To call
Press the button on the device and/or on the remote control.
DIAL appears in the display.
With the number buttons on the device and/or on the remote control enter
the telephone number that you want to call.
Press the
in the display.
GB
IE
button on the device and/or on the remote control.
button on the device and/or on the remote control.
button again. The number is dialled and CALLING appears
Redial
KH 2377
Hold down the TALK button on the microphone unit or the button on
the device and/or on the remote control for approx. 2 seconds.
If previously no call number was selected via the number buttons on the –
device and/or the remote control the last selected mobile phone call
number is dialled.
If previously a call number w
device and/or the remote control this call number is dialled.
as selected via the number buttons on the –
31
Page 34

Handling and operation
GB
IE
Caller lists
Press the PHONE button on the device. CALL LIST appears in the display
Press the PHONE button again. IN CALL appear
Turn the multi controller to select between the following displays:
IN CALL – : Shows the last 20 incoming calls.
OUT C
ALL – : Show
Press the PHONE button again. READIN
subsequently shows the last incoming (IN CALL) and/or dialled (OUT CALL)
call number.
Turn the multi controller or press the VOL button on the remote control to
sho
w the last 20 incoming and/or dialled numbers one after the other.
Press the
the dialled call number.
Press the
redialling and exit the caller list.
button on the device and/or on the remote control to select
button on the device and/or on the remote control to end
Telephone book function
You can transfer up to 20 contacts (Telephone book entries) from the connected
mobile phone to the device and thus dial and call the contact from the device.
NOTICE
Details for the transference of the contact via Bluetooth can be obtained ►
from the operating instructions of your mobile phone.
Each transfered contact is fi
have already been transfered are automatically fi led one memory slot
further (PB02, etc).
s in the display.
s the last 20 outgoing calls.
G appears in the display and
led in the memory slot ► PB01. The contacts that
32
Press the PHONE button on the device. C
Turn the multi controller to select the display PH BOOK.
Press the PHONE button again. READING appear
Subsequently PB01 appears and the name and call number of the fi rst
memory slot is shown.
Turn the muti controller to select additional telephone book entries.
Press the
the dialled call number.
Press the
call and exit the telephone book function.
button on the device and/or on the remote control to select
button on the device and/or on the remote control to end the
ALL LIST appears in the display
s in the display.
KH 2377
Page 35

Cleaning
Deleting the caller lists and telephone book entries
Press and hold the button on the device and/or on the remote control
until RESET appears in the display. The Bluetooth connection to the mobile
phone is severed and all telephone book entries and caller lists on the
device are deleted.
Audio streaming (A2DP)
The device uses the A2DP profi le (Advanced Audio Distribution Profi le) and
therefore can playback your mobile phone's audio data.
Select an audio fi le from your mobile phone and start the playback.
In the device's display appears the entry A2DP and the audio data will be
played back via the speaker
NOTICE
On the mobile phone it may possibly be necessary to switch playback via ►
the Bluetooth stereo headset. Consult the operating manual of your mobile
phone for more information.
With a few mobile phones the de
A2DP mode. In this case you switch to the A2DP mode by pressing the
MODE button several times until the notice BT MUSIC or A2DP appears
in the display.
s connected to the device.
vice does not automatically switch to the ►
AVRCP (Audio Video Remote Control Profi le)
The device uses the AVRCP profi le thus facilitating the control of audio devices.
With the PAU/1 button on the device or the ▸II/1 button on the r
control you can stop and/or restart the playback of audio fi les on the
mobile phone.
With the buttons I◂◂ or ▸▸I on the device or on the remote control you can
access the previous or next audio fi le on the mobile phone.
GB
IE
emote
KH 2377
33
Page 36

Cleaning
GB
IE
Cleaning
Safety instructions
IMPORTANT
Possible damage to the device
Make sure when y
order to avoid irreparable damage to it.
ou are cleaning the device that no moisture gets inside in ►
Display cleaning
Clean the front panel of the device / the display exclusively with a soft, ■
moist, lint-free cloth and a mild dish washing liquid.
Disposal
Disposal of the device
Do not dispose of the device in your normal domestic waste.
This product is subject to the European directive 2002/96/EC-WEEE
(Waste Electrical and Electronic Equipment).
Dispose of the device through an approved disposal centre or at your community
waste facility. Observe the currently applicable regulations. In case of doubt,
please contact your waste disposal centre.
Disposing of the batteries
Used batteries/rechargeable batteries may not be disposed of in household
waste. Every consumer is legally obliged to dispose of batteries at a collection site
in his community / city district or at a retail store. The purpose of this obligation is
to ensure that batteries are disposed of in a non-polluting manner. Only dispose
of batteries/cells when they are fully discharged.
34
KH 2377
Page 37

Troubleshooting
Troubleshooting
In this chapter you will receive important information for malfunction localization
and remedies. Observe the instructions in order to avoid danger and damage.
Safety instructions
WARNING
Observe the following safety information to avoid danger and property damage:
Repairs to electronic devices may only be carried out by specialists who have ►
been trained by the manufacturer. Considerable danger to the consumer and
damage to the device can occur as a result of incorr
Malfunction causes and remedies
The following table will help with localizing and remedying minor malfunctions:
Defect Possible cause Solution
The device will
not switch on
No sound
The CD will not
load or eject
The ignition is not switched on. Switch the ignition on by turning the key.
The fuse is defective. Replace the fuse.
The volume is set to minimum. Increase the volume.
The cables are not connected
correctly.
The sound is switched off .
A CD is already inserted into
the device.
The CD has been inserted
the wrong way up.
The CD is dirty or defective. Clean the CD or insert a diff erent CD.
The temperature in the
vehicle is too high.
Condensation on the laser
lens
Check the cable connections.
Press the MUTE button to switch
the sound back on.
Remove the CD.
Insert the CD with the inscripted
side up.
Allow the vehicle to air out until the
temperature has again dropped to the
operational temperature.
Switch the device off for a few hours
and then try it again.
GB
IE
ect repairs.
KH 2377
35
Page 38

Troubleshooting
GB
IE
Defect Possible cause Solution
Function buttons are not
functioning
The CD jumps
Failure with
burnt CDs
The radio and/
or the automatic
station saving is
not functioning
Station memory
is not functioning
The device's USB
port does not
function
The card reading
device does not
read the cards
The Bluetooth
connection does
not function
There is a malfunction
with the device.
The face plate is not
correctly installed.
The mounting angle exceeds
30°.
The CD is very dirty or
defective.
The antenna cable is not
connected correctly.
The station signals are too
weak.
The connection 4 in the ISO
block A (Permanent positive)
is not connected correctly.
The USB port is intended for
devices that function according to the USB standard. Not
all market available devices
conform to this standard. It
is possible that a device is
connected that does not function according to the USB
standard.
The card is possibly defective, dirty or not properly
inserted.
The mobile phone does not
support Bluetooth transmissions.
The mobile phone is not
coupled with the device.
Press the RESET button.
Check to see that the face plate is
installed correctly.
Correct the mounting angle.
Clean the CD or insert a diff erent CD.
Check the burnt CD in another
playback device.
Check the antenna cable for correct
connection.
Set the station manually.
Check the cable connections. For this
consult the chapter "Connections".
Connect a device that functions according to the USB standard. Make sure
that the data carrier is formatted for the
FAT32 fi le system.
Check the card. Slide it in with the
inscribed side facing to the right. Make
sure that the data carrier has been
formatted to the FAT32 fi le system.
Reconnect the mobile phone and the
device. For this also read, without fail,
your mobile phone's instructions.
36
NOTICE
If you cannot solve the problem with the aforementioned methods, please ►
contact Customer Service.
KH 2377
Page 39

Appendix
Appendix
Technical data
General
Input voltage 12 VDC
Input current max. 10 A
Max. Impulse output 4 x 40 W
Power rating
(with 1% distortion factor)
Operating temperature +5 - +40 °C
Humidity (no condensation) 5 - 90 %
Dimensions (L x D x H): 18.6 x 20.6 x 5.7 cm
Weight approx. 1480 g
Device fuse
Automotive blade type fuse
Radio frequency range
Frequency FM (VHF) 87.5 - 108 MHz
Frequency AM (MW) 522 - 1620 kHz
GB
IE
4 x 13.5 W
10 A
KH 2377
Station memory slots FM (VHF) 18 Slots
Station memory slots AM (MW) 12 Slots
Remote control
Button cell battery (CR 2025) 3 V
Audio input (AUX)
Stereo jackplug 3.5 mm
USB port
USB 1.1 and 2.0 compatible data carrier
Card slot
SD/MMC memory card slot
37
Page 40

Appendix
GB
IE
Declaration of EG conformity
This device complies in regard to conformity with the
basic requirements and other relevent regulations of the
vehicle directive 2004/104/EC and the R&TTE directive
1999/5/EC.
The complete original declaration of conformity can be
obtained from the importer.
Warranty
You receive a 3-year warranty for this device as of the purchase date. This device
has been manufactured with care and meticulously examined before delivery.
Please retain your receipt as proof of purchase. In the case of a warranty claim,
please get in touch by telephone with our service department. Only in this way
can a post-free dispatch for your goods be assured.
NOTICE
The warranty adjustment is valid only for material or manufacturing defects ►
not, however, for transport damage, wear and tear or for damage to
breakable par
The product is intended merely for private use and not for
commercial purposes.
In the event of misuse and improper handling, use of force and interference not
carried out by our authorized service branch, the warranty will become void.
This warranty does not aff ect your statutory rights.
The warranty period is not extended by repairs eff ected under warranty. This
applies also to replaced and repaired parts. Damages or defects discovered
after purchase are to be reported directly after unpacking, at the latest two days
after the purchase date. After expiry of the warranty period incidental repairs
are subject to payment.
ts, i.e. switches or rechargeable batteries.
Importer
38
KOMPERNASS GMBH
BURGSTRASSE 21
44867 BOCHUM, GERMANY
www.kompernass.com
KH 2377
Page 41

Bluetooth Car Radio
KH 2377
In order to guarantee a cost free
repair procedure please get in touch
with the service hotline. Ensure you
have your sales slip handy.
Sender, please write clearly:
Last name
First name
Street
City/Town
Country
Warranty
DES UK LTD
Tel.: 0871 5000 700
e-mail: support.uk@kompernass.com
Kompernass Service Ireland
Tel: 1850 930 412 (
Standard call rates apply. Mobile operators may vary.
e-mail: support.ie@kompernass.com
(£ 0.10 / minute)
0,082 EUR/Min.)
Telephone
Fill in this section and submit it with the device!
Date/Signature
Description of the defect:
Page 42

 Loading...