

■ IT / MT ■ GB / MT
ALLARME PER PORTA TAS 2 A1
ALLARME PER PORTA
Istruzioni per l'uso
DOOR ALARM
Operating instructions
TÜRALARM
Bedienungsanleitung
IAN 280176
A
max. 10 mm
B
C
Introduzione
Congratulazioni per l'acquisto del Suo nuovo apparecchio. È stato scelto un prodotto di alta qualità. Il
manuale di istruzioni è parte integrante del presente
prodotto. Esso contiene importanti indicazioni per la
sicurezza, l'uso e lo smaltimento. Prima di utilizzare il
prodotto, familiarizzarsi con tutte le indicazioni relative
ai comandi e alla sicurezza. Utilizzare l'apparecchio
solo come descritto e per i campi d'impiego indicati.
Conservare con cura il presente manuale di istruzioni.
In caso di cessione del prodotto a terze persone, consegnare anche tutta la relativa documentazione.
Uso conforme
Questo allarme per porta è previsto esclusivamente
per il monitoraggio di porte e fi nestre in ambito privato e, grazie al suo tono di allarme estremamente alto,
serve a spaventare i ladri. Questo prodotto non è
destinato all'impiego commerciale o industriale. Non
si assume alcuna responsabilità per i danni derivanti
da uso non conforme dell'apparecchio!
Volume della fornitura
▯ 1 dispositivo di allarme
▯ 1 magnete
▯ 2 chiavi
▯ 2 pile 1,5 V tipo AAA/Micro
▯ 3 strisce autoadesive
▯ 4 viti con tasselli
▯ Le presenti istruzioni per l'uso
Liberare l'apparecchio da tutto il materiale d'imballaggio.
Dati tecnici
Tensione di alimentazione
Volume dell'allarme ca. 120 dB(A) / 3 cm
2 pile 1,5 V
tipo AAA/Micro
Indicazioni relative alla sicurezza
PERICOLO
Segnale di allarme ad alto volume!
Non esporre l'udito a questo suono
per un tempo prolungato, in quanto
altrimenti ne possono derivare gravi
danni all'udito!
■ Controllare l'apparecchio prima dell'uso per rileva-
re eventuali danni visibili. Non mettere in funzione
un apparecchio danneggiato o caduto.
■ Questo apparecchio non è indicato per l'uso da par-
te di persone (inclusi bambini) con limitate capacità
fi siche, sensoriali o mentali o prive dell'esperienza
e/o della conoscenza necessaria, a meno che tali
persone non vengano sorvegliate da un responsabile
per la sicurezza o non abbiano ricevuto indicazioni
sull'impiego dell'apparecchio.
■ Sorvegliare i bambini per assicurarsi che non
giochino con l'apparecchio.
- 1 - - 2 - - 3 - - 4 - - 5 -
■ Evitare di apportare autonomamente modifi che
o cambiamenti all'apparecchio.
■ La riparazione dell'apparecchio in periodo di
garanzia può avere luogo solo tramite l'assistenza
ai clienti autorizzata dal produttore; altrimenti
in caso di successivi danni la garanzia non sarà
ritenuta valida.
■ Non collocare l'apparecchio in luoghi esposti
ai raggi solari diretti. Altrimenti esso potrebbe
surriscaldarsi e subire danni irreparabili.
■ Proteggere l'apparecchio dall'umidità, da spruzzi
e gocce d'acqua e dalla penetrazione di liquidi.
Avvertenze relative all'uso delle pile
PERICOLO
► Non gettare le pile nel fuoco.
► Non cortocircuitare le pile.
► Non tentare di ricaricare le pile.
► Controllare periodicamente le pile. L'acido
eventualmente fuoriuscito dalle pile potrebbe
causare danni permanenti all'apparecchio.
► Prestare particolare attenzione in presenza di
pile danneggiate o deteriorate. Pericolo di ustione chimica! Indossare guanti di protezione.
► Conservare le pile fuori dalla portata dei bam-
bini. In caso di ingestione, consultare immediatamente un medico.
► Rimuovere le pile dall'apparecchio in caso di
inutilizzo prolungato dello stesso.
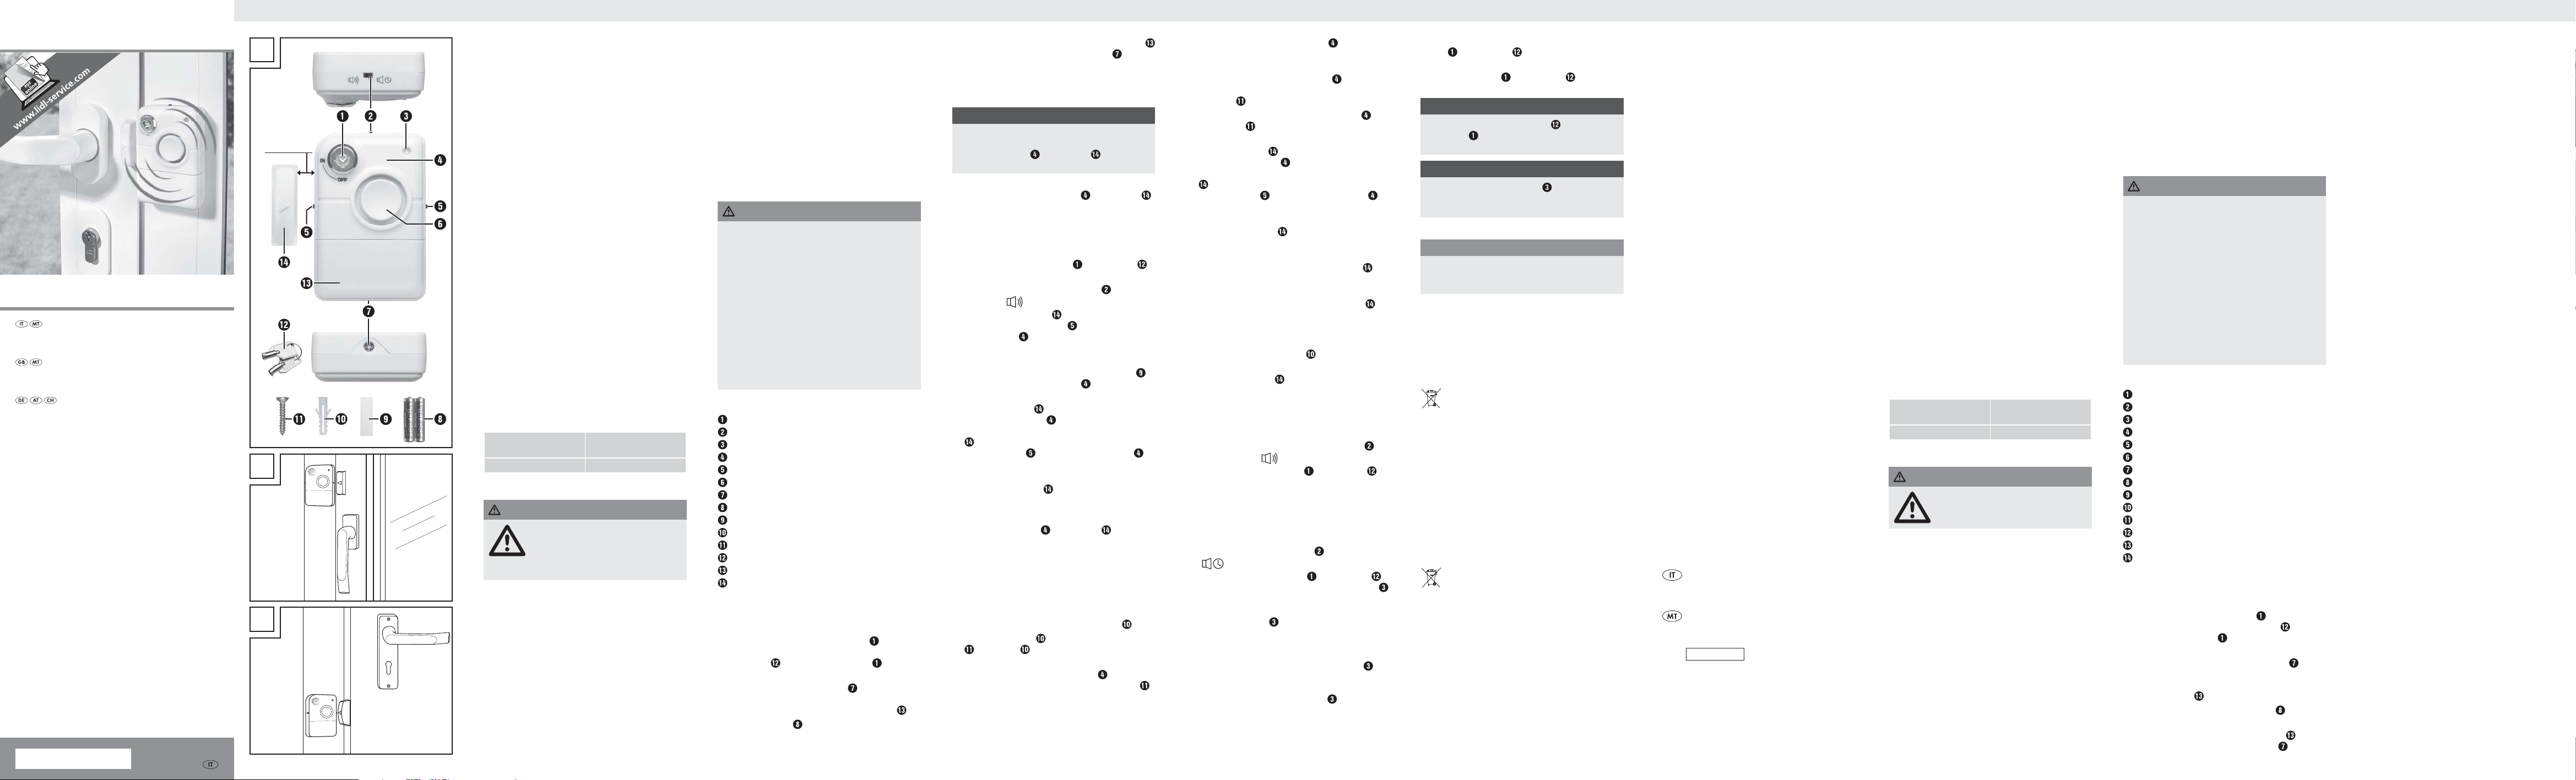
Descrizione dell'apparecchio
Interruttore On/Off
Interruttore per il ritardo dell'allarme
LED indicatore di stato
Dispositivo di allarme
Tacca di orientamento
Sirena
Vite del vano pile
Pila
Strisce autoadesive
Tasselli
Vite
Chiave
Coperchio vano pile
Magnete
Messa in funzione
Inserimento/sostituzione delle pile
♦ Assicurarsi che l'apparecchio sia spento. La frec-
cia al centro dell'interruttore On/Off
verso il basso. Se necessario, inserire la chiave in
dotazione
l'interruttore nella posizione "OFF".
♦ Rimuovere la vite del vano pile
un idoneo cacciavite (non in dotazione). Poi aprire
il vano pile rimuovendo il relativo coperchio
♦ Inserire due pile
recchio, come contrassegnato nel vano pile.
nell'interruttore On/Off e portare
del tipo AAA/Micro nell'appa-
è rivolta
ruotandola con
.
♦ Ricollocare e riavvitare il coperchio del vano pile
e inserirlo ruotando la vite del vano pile
.
Montaggio
L'apparecchio è idoneo per porte/fi nestre con battuta
sinistra o destra. È possibile incollarlo o avvitarlo.
AVVERTENZA
► Indipendentemente dal tipo di montaggio con
la porta/fi nestra chiusa, la distanza tra il dispositivo di allarme
essere maggiore di 10 mm!
e il magnete
Montaggio con strisce autoadesive
Per fi ssare il dispositivo di allarme
è possibile utilizzare le strisce autoadesive in dotazione. Il fondo per le strisce autoadesive deve essere
pulito, privo di grassi e asciutto. Prima del montaggio
defi nitivo nel punto di montaggio desiderato eseguire
un test di funzionamento provvisorio dell'apparecchio.
♦ Portare l’interruttore On/Off
in posizione "ON".
♦ L'interruttore per il ritardo di allarme
posizione "
♦ Poi muovere il magnete lateralmente all'altezza
della tacca di orientamento
tivo di allarme
Questo dovrebbe far scattare l'allarme.
♦ Se l'apparecchio funziona come descritto, rimuovere
la pellicola protettiva dalla striscia autoadesiva
e fi ssare il dispositivo di allarme
fi nestra o della porta.
♦ Fissare il magnete
dispositivo di allarme
della porta (vedere fi g. B). La freccia sul magnete
deve essere rivolta direttamente sulla tacca
di orientamento del dispositivo di allarme
(vedere fi g. A).
♦ Nel caso di ante di porte o fi nestre spesse
collocare il magnete
o fi nestra (vedere fi g. C).
".
avvicinandolo e allontanandolo.
in posizione parallela al
sull'anta della fi nestra o
sul lato dell'anta di porta
Montaggio con viti e tasselli
Il dispositivo di allarme e il magnete possono
anche venire fi ssati con viti e tasselli.
♦ Dapprima assicurarsi che nel punto di montaggio
previsto non vi siano linee che potrebbero venire
eventualmente danneggiate.
♦ Eff ettuare con un trapano e una punta adatta
al materiale di fondo un foro da 5mmØ per
l'aggancio superiore. La profondità del foro deve
corrispondere alla lunghezza del tassello
♦ Inserire un tassello
nel tassello fino a quando la sua testa non
sporge di circa 2mm.
♦ Appendere il dispositivo di allarme
sua apertura di montaggio superiore sulla vite
♦ Aprire il vano pile e tracciare con l'apertura di
montaggio inferiore la tacca inferiore per il foro
sul fondo.
nel foro e avvitare una vite
non deve
e il magnete
con la chiave
si trova in
presente sul disposi-
sul telaio della
.
con la
♦ Rimuovere il dispositivo di allarme
altro foro da 5mmØ per l'apertura di montaggio
inferiore.
♦ Appendere il dispositivo di allarme
sua apertura di montaggio superiore sulla vite
superiore
♦ Avvitare saldamente il dispositivo di allarme
con una vite
inferiore sul fondo.
♦ Fissare il magnete in posizione parallela al
dispositivo di allarme
della porta (vedere fi g.B). La freccia sul magnete
deve essere rivolta direttamente sulla tacca
di orientamento
(vedere fi g. A).
♦ Nel caso di ante di porte o fi nestre più spesse
collocare il magnete
o fi nestra (vedere fi g. C).
♦ Sollevare con attenzione con un cacciavite
piatto la piastra di montaggio dal magnete
♦ Stabilire, seguendo le indicazioni per il test funzio-
nale provvisorio nella sezione precedente del testo,
il luogo di montaggio corretto per il magnete
♦ Qui disegnare attraverso le aperture della piastra
di montaggio le due tacche del foro sul fondo.
♦ Forare sulla base delle tacche due fori da
5mmØ, inserire un tassello
e avvitare la piastra di montaggio.
♦ Disporre il magnete
in modo che questo si incastri con un clic.
.
attraverso l'apertura di montaggio
sull'anta della fi nestra o
del dispositivo di allarme
sul lato dell'anta di porta
sulla piastra di montaggio
e forare un
con la
per ciascuno
.
.
Attivazione / disattivazione
funzione allarme
♦ Per attivare direttamente la funzione allarme,
portare l'interruttore per il ritardo di allarme
nella posizione " ".
♦ Portare l’interruttore On/Off
posizione "ON". La funzione di allarme è attivata e
se si apre la fi nestra o la porta si attiva un allarme
per circa 90 secondi.
♦ Per attivare la funzione di allarme con ritardo,
in quando ad esempio volete prima passare voi
attraverso la porta da proteggere, collocare l'interruttore per il ritardo di allarme
"
".
♦ Portare l’interruttore On/Off
in posizione "ON". Il LED di indicatore di livello
si illumina di verde per 15 secondi.
Solo in seguito la funzione di allarme si attiva e il LED
di indicatore di livello
ne dell'allarme viene ritardata di circa 10 secondi,
affi nché dopo l'apertura della porta ci sia ancora del
tempo per disattivare la funzione di allarme. Durante
questo lasso di tempo il LED indicatore di stato
.
accende di rosso. Se non avviene alcuna disattivazione, si sente per circa 90 secondi l'allarme. Al termine
dell'allarme, il LED indicatore di stato
di verde a una cadenza di circa 2 secondi fi no a
quando la funzione di allarme non si disattiva.
si spegne. Anche l'attivazio-
con la chiave
nella posizione
con la chiave
lampeggia
in
si
♦ Per spegnere l'allarme portare l’interruttore On/
Off
con la chiave
♦ Per disattivare la funzione di allarme portare l’in-
terruttore On/Off
"OFF".
AVVERTENZA
Non lasciare inserita la chiave
►
On/Off
autonomamente l'allarme scattato!
AVVERTENZA
► Se il LED indicatore di stato
rosso, ciò signifi ca che le pile sono esaurite
e vanno sostituite.
, altrimenti l'intruso può disattivare
in posizione "OFF".
con la chiave
nell'interruttore
si accende di
in posizione
Pulizia/Conservazione
ATTENZIONE
► Per evitarne l'irreparabile danneggiamento,
assicurarsi che durante la pulizia non penetri
umidità nell'apparecchio.
♦ Pulire l'apparecchio con un panno asciutto e
morbido.
♦ Se si prevede di non utilizzare l'apparecchio per
un periodo di tempo prolungato, rimuovere le pile
e conservarlo in un luogo pulito e asciutto non
esposto all'irradiazione solare diretta.
Smaltimento
Il simbolo qui accanto che mostra un bidone
dell'immondizia su rulli sbarrato, segnala che
questo apparecchio è soggetto alla direttiva
2012/19/EU. Questa direttiva prescrive che questo
apparecchio al termine della sua durata utile non
venga smaltito assieme ai normali rifi uti domestici,
bensì consegnato presso appositi centri di raccolta,
centri di recycling o aziende di smaltimento.
Questo smaltimento è gratuito per l'utente.
Rispettare l'ambiente e smaltire l'apparecchio in modo adeguato.
Per ulteriori informazioni rivolgersi alla propria
azienda di smaltimento locale o all'amministrazione
cittadina o comunale.
Smaltimento delle pile
Non gettare le pile nel contenitore per i rifi uti
domestici. Ogni utente è obbligato per legge
a conferire le pile presso un centro di raccolta
comunale o di quartiere, ovvero a restituirle al
commerciante. Questo obbligo è fi nalizzato allo
smaltimento ecologico delle pile. Smaltire le pile solo
se scariche.
Garanzia della Kompernass
Handels GmbH
Egregio Cliente,
Questo apparecchio ha una garanzia di 3 anni dalla
data di acquisto. Qualora questo prodotto presentasse
vizi, Le spettano diritti legali nei confronti del venditore
del prodotto. La garanzia qui di seguito descritta non
costituisce alcun limite a tali diritti legali.
Il periodo di garanzia decorre dalla data dell’acquisto.
Si prega di conservare lo scontrino di cassa originale.
Tale documento è necessario come prova di acquisto.
Qualora entro tre anni a partire dalla data dell’acquisto
di questo prodotto si presentasse un vizio del materiale
o di fabbricazione, provvederemo, a nostra discrezione, a riparare o a sostituire gratuitamente il prodotto.
Questa prestazione di garanzia ha come presupposto
che l’apparecchio difettoso e la prova di acquisto
(scontrino di cassa) vengano presentati entro il termine
di tre anni e che si descriva per iscritto in cosa consiste
il vizio e quando si è presentato.
Se il vizio rientra nell’ambito della nostra garanzia, il
Suo prodotto verrà riparato o sostituito da uno nuovo.
Con la riparazione o la sostituzione del prodotto non
decorre un nuovo periodo di garanzia.
Il periodo di garanzia non viene prolungato da interventi in garanzia. Ciò vale anche per le parti sostituite
e riparate. Danni e vizi eventualmente già presenti al
momento dell'acquisto devono venire segnalati immediatamente dopo che l'apparecchio è stato disimballato. Le
riparazioni eseguite dopo la scadenza del periodo di
garanzia sono a pagamento.
L'apparecchio è stato prodotto con cura secondo severe direttive qualitative e debitamente collaudato prima
della consegna.
La garanzia viene prestata in caso di vizi del materiale
o di fabbricazione. Questa garanzia non si estende a
componenti del prodotto che sono esposti al normale
logorio e possono pertanto essere considerati come
componenti soggetti a usura o a danni che si verifi cano
su componenti delicati, per es. interruttori, batterie,
stampi da forno o parti realizzate in vetro.
Questa garanzia decade se il prodotto è stato danneggiato oppure utilizzato o sottoposto a interventi di manutenzione in modo non conforme. Per un utilizzo adeguato del prodotto si devono rigorosamente rispettare tutte
le istruzioni esposte nel manuale di istruzioni per l’uso.
Si devono assolutamente evitare modalità di utilizzo e
azioni che il manuale di istruzioni per l’uso sconsiglia o
da cui esso mette in guardia.
Il prodotto è destinato esclusivamente all'uso domestico
e non a quello commerciale. La garanzia decade in
caso di impiego improprio o manomissione, uso della
forza e interventi non eseguiti dalla nostra fi liale di
assistenza autorizzata.
Assistenza
Assistenza Italia
Tel.: 02 36003201
E-Mail: kompernass@lidl.it
Assistenza Malta
Tel.: 80062230
E-Mail: kompernass@lidl.com.mt
IAN 280176
Importatore
KOMPERNASS HANDELS GMBH
BURGSTRASSE 21
44867 BOCHUM
GERMANY
www.kompernass.com
- 6 - - 7 - - 8 -
Introduction
Congratulations on the purchase of your new appliance.
You have selected a high-quality product. The operating instructions are part of this product. They contain
important information on safety, usage and disposal.
Before using the product, familiarise yourself with all
handling and safety guidelines. Use the product only
as described and for the range of applications specifi ed. Keep these operating instructions in a safe place.
Please also pass these operating instructions on to
any future owner(s).
Intended use
This door alarm is exclusively intended for monitoring
doors and windows in private properties, and can be
used to deter burglars by emitting an extremely loud
acoustic alarm. This product is not intended for commercial or industrial use. The warranty does not apply
to damage caused by improper use of the appliance!
Package contents
▯ 1 × alarm trigger
▯ 1 × magnet
▯ 2 × keys
▯ 2 × 1.5 V batteries type AAA/Micro
▯ 3 × self-adhesive strips
▯ 4 × screws with rawlplugs
▯ These operating instructions
Remove all packaging materials from the appliance.
Technical data
Voltage supply
Alarm volume approx. 120 dBA / 3 cm
2 × 1.5 V batteries
type AAA/Micro
Safety guidelines
DANGER
Loud acoustic alarm! Subjecting your
hearing to this sound over long periods
could cause serious hearing damage!
■ Prior to use, check the device for visible external
damage. Do not operate a appliance that has
been damaged or dropped.
■ This appliance is not intended for use by persons
(including children) with limited physical, sensory
or mental capabilities or lack of experience and/
or knowledge unless they are supervised by a
person who is responsible for their safety, or receive
instructions from this person on how to use the
appliance.
■ Children should be supervised to ensure that they
do not play with the appliance.
■ Do not make any unauthorised modifi cations or
alterations to the device.
■ Repairs to the device during the warranty period
may only be carried out by a customer service
department authorised by the manufacturer.
Otherwise no additional warranty claims can be
considered for subsequent damage.
■ Do not place the appliance in locations that are
subject to direct sunlight Otherwise it may overheat and be irreparably damaged.
■ Protect the device from moisture, spray and drip-
ping water and penetration by liquids.
Information on using batteries
DANGER
► Do not throw the batteries into the fi re.
► Do not short-circuit the batteries.
► Do not attempt to recharge the batteries.
► Check the condition of the batteries at regular
intervals. Leaking battery acid can cause permanent damage to the appliance.
► Special care should be taken when handling
damaged or leaking batteries. Risk of acid
burns! Wear protective gloves.
► Store batteries in a place that is inaccessible to
children. If a battery is swallowed, seek medical
attention IMMEDIATELY.
► If you do not intend to use the device for a long
time, remove the batteries.
Appliance description
On/off switch
Switch for alarm delay
Condition display LED
Alarm trigger
Alignment marking
Siren
Battery compartment screw
Battery
Self-adhesive strips
Rawlplug
Screw
Key
Battery compartment cover
Magnet
Initial operation
Inserting/replacing the batteries
♦ Ensure that the appliance is switched off . The arrow
in the centre of the on/off switch
downwards. If necessary, insert the key
into the on/off switch
"OFF" position.
♦ Unscrew the battery compartment screw
a suitable screwdriver (not supplied). Open the
battery compartment by removing the battery compartment cover
♦ Insert two type AAA/Micro batteries
battery compartment as shown .
♦ Replace the battery compartment cover
screw the battery compartment screw
and turn the switch to the
.
is then pointing
supplied
using
into the
and
back in.

■ DE / AT / CH
KOMPERNASS HANDELS GMBH
BURGSTRASSE 21
44867 BOCHUM
DEUTSCHLAND / GERMANY
www.kompernass.com
Versione delle informazioni · Last Information Update
Stand der Informationen: 04 / 2016
Ident.-No.: TAS2A1-042016-1
IAN 280176
5
Installation
The appliance is suitable for doors/windows with the
hinges on the right or left. You can glue it or screw it
in position.
NOTE
Irrespective of the installation method, the gap
►
between the alarm trigger and the magnet
may not be greater than 10 mm when the door/
window is closed!
Installation with self-adhesive strips
You can use the self-adhesive strips supplied to fix
the alarm trigger
and the magnet
to which the self-adhesive strips are affixed must be
clean, free of grease and dry. Carry out a provisional
function test of the device prior to final installation in
the desired position.
♦ Use the key
to turn the on/off switch to the
"ON" position.
♦ The switch for alarm delay is in the " "
position.
♦ Now move the magnet
sideways at the same
height as the alignment marking
trigger towards it and then away from it. This
should trigger the alarm.
♦ If the appliance functions as described, you should
now remove the protective film on both sides of the
self-adhesive strips
and fix the alarm trigger
to the door or window frame.
♦ You should then fix the magnet
alarm trigger
on the window casement or door
panel (see Fig. B). The arrow on the magnet
must point directly to the alignment marking on
the alarm trigger
(see Fig. A).
♦ For thicker door panels or window casements,
position the magnet
on the side of the door
panel or window casement (see Fig. C).
Installation with screws and rawlplugs
The alarm sensor
fixed using screws and rawlplugs.
♦ First ensure that there are no supply lines which
could be damaged at the proposed installation
location.
♦ Use a drill and a suitable drill bit for the material
to drill a hole of 5mmØ for the top mounting.
The depth of the drill hole must be the same as the
rawlplug length
♦ Press a rawlplug
screw the screw
head is protruding by around 2 mm.
♦ Suspend the alarm trigger
the upper mounting hole .
♦ Open the battery compartment and mark the bot-
tom drill hole on the substrate material through the
bottom mounting hole.
♦ Remove the alarm trigger
5mmØ drill hole for the bottom mounting hole.
♦ Suspend the alarm trigger
using the upper mounting hole
and the magnet can also be
.
into the drill hole and then
into the rawlplug
. The surface
on the alarm
parallel to the
, until its
on the screw using
and drill a second
on the top screw
.
♦ Screw the alarm trigger
tightly onto the
substrate using a screw through the bottom
mounting hole.
♦ You should then fix the magnet
alarm trigger
on the window casement or door
panel (see Fig. B). The arrow on the magnet
must point directly to the alignment marking
on the alarm trigger
(see Fig. A).
parallel to the
♦ For thicker door panels or window casements,
position the magnet
on the side of the door
panel or window casement (see Fig. C).
♦ Use a slot screwdriver to carefully lever the
mounting plate off the magnet
.
♦ Using the information on the provisional function
test in the previous section, determine the correct
mounting position for the magnet
.
♦ Use the openings on the mounting plate to make
two drill hole markings on the substrate.
♦ Use the markings to drill two 5mmØ drill holes,
insert a rawlplug
into each of them and then
screw the mounting plate in place.
♦ Place the magnet
on the mounting plate so that
it audibly engages.
Activate/deactivate alarm function
♦ To activate the alarm function immediately, set the
alarm delay switch
♦ Use the key
"ON" position. The alarm function is now activated
and the alarm will sound for around 90 seconds if
the door or window is opened.
♦ If you wish to activate the alarm function with a
delay, for example if you first wish to exit through
the door to be secured, turn the alarm delay
switch
to the " " position.
♦ Use the key
"ON" position. The condition display LED
glow green for 15 seconds.
The alarm function will only be activated after this
and the condition display LED
alarm trigger will also be delayed for around 10seconds so that you have time to deactivate the alarm
function after you have opened the door. During this
time the condition display LED
you do not deactivate it, the alarm will then sound for
around 90seconds. At the end of the alarm, the condition display LED
around 2 seconds until the alarm function has been
deactivated.
♦ To switch off an alarm, use the key
on/off switch
♦ Use the key to turn the on/off switch to the
"OFF" position to deactivate the alarm function.
NOTE
► Do not leave the key
otherwise the burglar can switch the alarm off
himself when it triggers!
to the " " position.
to turn the on/off switch to the
to turn the on/off switch to the
will go out. The
will
will glow red. If
will blink green at an interval of
to turn the
to the "OFF" position.
in the on/off switch
,
- 10 - - 11 - - 12 - - 13 - - 14 - - 15 - - 16 - - 17 -
NOTE
If the condition display LED
►
blinks red, the
batteries are discharged and must be replaced.
Cleaning/storage
IMPORTANT
To avoid irreparable damage to the device, en-
►
sure that no moisture gets into it during cleaning.
♦ Clean the appliance with a soft, dry cloth.
♦ If you decide not to use the appliance for a long
period, remove the batteries and store it in a clean,
dry place away from direct sunlight.
Disposal
The adjacent symbol of a crossed-out wheelie
bin means that this appliance is subject to
Directive 2012/19/EU. This directive states
that this device may not be disposed of in normal
domestic waste at the end of its usable life, but must
be handed over to specially set-up collection
locations, recycling depots or disposal companies.
This disposal is free of charge for the user.
Protect the environment and dispose of this
device properly.
You can obtain further information from your local
disposal company or the city or local authority.
Disposing of the batteries
Batteries should not be disposed of in the domestic
waste. Consumers are legally obliged to dispose
of used batteries at a collection point in their
town/district or at a retail store. This obligation is
intended to ensure that batteries are disposed of in
an environmentally responsible manner. Dispose of
batteries only when they are fully discharged.
Kompernass Handels GmbH
warranty
Dear Customer,
This appliance has a 3-year warranty valid from the
date of purchase. If this product has any faults, you, the
buyer, have certain statutory rights. Your statutory rights
are not restricted in any way by the warranty described
below.
The validity period of the warranty starts from the date
of purchase. Please keep your original receipt in a
safe place. This document will be required as proof of
purchase.
If any material or production fault occurs within three
years of the date of purchase of the product, we will
either repair or replace the product for you at our
discretion. This warranty service is dependent on you
presenting the defective appliance and the proof of
purchase (receipt) and a short written description of the
fault and its time of occurrence.
If the defect is covered by the warranty, your product
will either be repaired or replaced by us. The repair or
replacement of a product does not signify the beginning
of a new warranty period.
The warranty period is not prolonged by repairs effected
under the warranty. This also applies to replaced and
repaired components. Any damage and defects present
at the time of purchase must be reported immediately
after unpacking. Repairs carried out after expiry of the
warranty period shall be subject to a fee.
This appliance has been manufactured in accordance
with strict quality guidelines and inspected meticulously
prior to delivery.
The warranty covers material faults or production faults.
The warranty does not extend to product parts subject
to normal wear and tear or fragile parts such as switches, batteries, baking moulds or parts made of glass.
The warranty does not apply if the product has been
damaged, improperly used or improperly maintained.
The directions in the operating instructions for the product regarding proper use of the product are to be strictly
followed. Uses and actions that are discouraged in the
operating instructions or which are warned against must
be avoided.
This product is intended solely for private use and
not for commercial purposes. The warranty shall be
deemed void in cases of misuse or improper handling,
use of force and modifications/repairs which have
not been carried out by one of our authorised Service
centres.
Service
Service Great Britain
Tel.: 0871 5000 720 (£ 0.10/Min.)
E-Mail: kompernass@lidl.co.uk
Service Malta
Tel.: 80062230
E-Mail: kompernass@lidl.com.mt
IAN 280176
Importer
KOMPERNASS HANDELS GMBH
BURGSTRASSE 21
44867 BOCHUM
GERMANY
www.kompernass.com
Einleitung
Herzlichen Glückwunsch zum Kauf Ihres neuen Gerätes.
Sie haben sich damit für ein hochwertiges Produkt
entschieden. Die Bedienungsanleitung ist Bestandteil dieses Produkts. Sie enthält wichtige Hinweise für
Sicherheit, Gebrauch und Entsorgung. Machen Sie
sich vor der Benutzung des Produkts mit allen Bedienund Sicherheitshinweisen vertraut. Benutzen Sie das
Produkt nur wie beschrieben und für die angegebenen Einsatzbereiche. Bewahren Sie diese Bedienungsanleitung gut auf. Händigen Sie alle Unterlagen bei
Weitergabe des Produkts an Dritte mit aus.
Bestimmungsgemäße Verwendung
Dieser Türalarm ist ausschließlich für die Überwachung von Türen und Fenstern im Privatgebrauch
vorgesehen und kann durch seinen extrem lauten
Alarmton der Abschreckung von Einbrechern dienen.
Dieses Produkt ist nicht für den gewerblichen oder
industriellen Einsatz vorgesehen. Für Schäden, die aus
nicht bestimmungsgemäßem Gebrauch des Gerätes
resultieren, wird keine Gewährleistung übernommen!
Lieferumfang
▯ 1 × Alarmgeber
▯ 1 × Magnet
▯ 2 × Schlüssel
▯ 2 × 1,5V-Batterien Typ AAA/Micro
▯ 3 × Selbstklebestreifen
▯ 4 Schrauben mit Dübeln
▯ Diese Bedienungsanleitung
Entfernen Sie sämtliches Verpackungsmaterial vom
Gerät.
Technische Daten
Spannungsversorgung
Alarmlautstärke ca. 120 dB(A) / 3 cm
2 × 1,5V-Batterie Typ
AAA/Micro
Sicherheitshinweise
GEFAHR
Lauter Alarmton! Setzen Sie Ihr Gehör
diesem Ton nicht über einen längeren
Zeitraum aus, da sonst schwere Gehörschäden die Folge sein können!
■ Kontrollieren Sie das Gerät vor der Verwendung
auf äußere, sichtbare Schäden. Nehmen Sie ein
beschädigtes oder heruntergefallenes Gerät nicht
in Betrieb.
■ Dieses Gerät ist nicht dafür bestimmt, durch Personen
(einschließlich Kinder) mit eingeschränkten physischen, sensorischen oder geistigen Fähigkeiten
oder mangels Erfahrung und/oder mangels Wissen benutzt zu werden, es sei denn, sie werden
durch eine für ihre Sicherheit zuständige Person
beaufsichtigt oder erhielten von ihr Anweisungen,
wie das Gerät zu benutzen ist.
■ Kinder sollten beaufsichtigt werden, um sicherzu-
stellen, dass sie nicht mit dem Gerät spielen.
■ Nehmen Sie keine eigenmächtigen Umbauten
oder Veränderungen an dem Gerät vor.
■ Eine Reparatur des Gerätes während der Garantie-
zeit darf nur von einem vom Hersteller autorisierten
Kundendienst vorgenommen werden, sonst besteht
bei nachfolgenden Schäden kein Garantieanspruch
mehr.
■ Stellen Sie das Gerät nicht an Orten auf, die direk-
ter Sonnenstrahlung ausgesetzt sind. Anderenfalls
kann es überhitzen und irreparabel beschädigt
werden.
■ Schützen Sie das Gerät vor Spritz- und Tropfwasser
und dem Eindringen von Flüssigkeiten.
Hinweise zum Umgang mit Batterien
GEFAHR
► Werfen Sie die Batterien nicht ins Feuer.
► Schließen Sie die Batterien nicht kurz.
► Versuchen Sie nicht die Batterien wieder
aufzuladen.
► Überprüfen Sie regelmäßig die Batterien.
Ausgetretene Batteriesäure kann dauerhafte
Schäden am Gerät verursachen.
► Im Umgang mit einer beschädigten oder aus-
gelaufenen Batterie besondere Vorsicht walten
lassen. Verätzungsgefahr! Schutzhandschuhe
tragen.
► Batterien für Kinder unzugänglich aufbewahren.
Bei Verschlucken umgehend einen Arzt aufsuchen.
► Entnehmen Sie die Batterien aus dem Gerät,
wenn Sie es längere Zeit nicht benutzen.
Gerätebeschreibung
Ein-/Ausschalter
Schalter für die Alarmverzögerung
Zustandsanzeige-LED
Alarmgeber
Ausrichtungsmarkierung
Sirene
Batteriefachschraube
Batterie
Selbstklebestreifen
Dübel
Schraube
Schlüssel
Batteriefachabdeckung
Magnet
Inbetriebnahme
Batterien einlegen/wechseln
♦ Stellen Sie sicher, dass das Gerät ausgeschaltet
ist. Der Pfeil in der Mitte des Ein-/Ausschalters
zeigt dann nach unten. Ggf. stecken Sie den
mitgelieferten Schlüssel
und stellen den Schalter in die Position „OFF“.
♦ Drehen Sie die Batteriefachschraube mit einem
geeigneten Schraubendreher (nicht mitgeliefert)
heraus. Dann öffnen Sie das Batteriefach, indem
Sie die Batteriefachabdeckung
in den Ein-/Ausschalter
abnehmen.
♦ Legen Sie zwei Batterien vom Typ AAA/Micro,
wie im Batteriefach gekennzeichnet, in das Gerät ein.
♦ Setzen Sie die Batteriefachabdeckung
auf und drehen Sie die Batteriefachschraube
wieder
wieder ein.
Montage
Das Gerät ist für Türen/Fenster mit linkem oder rechtem Anschlag geeignet. Sie können es ankleben oder
anschrauben.
HINWEIS
Unabhängig von der Montageart darf bei ge-
►
schlossener Tür/Fenster der Abstand zwischen
dem Alarmgeber
nicht größer als 10 mm sein!
Montage mit Selbstklebestreifen
Zur Befestigung des Alarmgebers und des
Magneten
können die beiliegenden Selbstklebestreifen verwendet werden. Der Untergrund für die
Selbstklebestreifen muss sauber, fettfrei und trocken
sein. Führen Sie vor der endgültigen Montage an
der gewünschten Montagestelle einen provisorischen
Funktionstest des Gerätes durch.
♦ Bringen Sie den Ein-/Ausschalter
Schlüssel
in die Position „ON“.
♦ Der Schalter für die Alarmverzögerung steht in
der Position „
♦ Dann bewegen Sie den Magneten
in Höhe der Ausrichtungsmarkierung
Alarmgeber
sollte den Alarm auslösen.
♦ Funktioniert das Gerät wie beschrieben, lösen Sie
die Schutzfolie von beiden Seiten des Selbstklebestreifens
und befestigen Sie den Alarmgeber
am Rahmen des Fensters oder der Tür.
♦ Den Magneten
Alarmgeber
(siehe Abb.B). Der Pfeil auf dem Magneten
muss direkt auf die Ausrichtungsmarkierung
Alarmgebers
♦ Bei dickeren Türblättern bzw. Fensterflügeln
platzieren Sie den Magneten
Türblattes oder des Fensterflügels (siehe Abb. C).
Montage mit Schrauben und Dübeln
Der Alarmgeber und der Magnet können auch
mit Schrauben und Dübeln befestigt werden.
♦ Stellen Sie zunächst sicher, dass sich am vorgese-
henen Montageort keine Leitungen befinden, die
evtl. beschädigt werden könnten.
♦ Bohren Sie mit einer Bohrmaschine und einem
zum Untergrundmaterial passenden Bohrer mit
5mmØ das Bohrloch für die obere Aufhängung.
Die Bohrtiefe muss der Länge des Dübels
entsprechen.
♦ Stecken Sie einen Dübel
schrauben Sie eine Schraube
Dübel
♦ Hängen Sie den Alarmgeber mit dessen oberer
Montageöffnung auf die Schraube
, dass ihr Kopf ca. 2mm herausragt.
und dem Magneten
mit dem
“.
seitlich
an den
heran und dann von ihm weg. Dies
befestigen Sie parallel zum
am Fensterflügel oder Türblatt
des
zeigen (siehe Abb. A).
auf der Seite des
in das Bohrloch und
so weit in den
.
♦ Öffnen Sie das Batteriefach und zeichnen Sie
durch die untere Montageöffnung die untere
Bohrlochmarkierung auf den Untergrund.
♦ Nehmen Sie den Alarmgeber
ab und bohren
Sie ein weiteres 5mmØ-Bohrloch für die untere
Montageöffnung.
♦ Hängen Sie den Alarmgeber
Montageöffnung auf die obere Schraube
mit dessen oberer
.
♦ Schrauben Sie den Alarmgeber mit einer
Schraube
durch die untere Montageöffnung
fest an den Untergrund.
♦ Den Magneten
Alarmgeber
(siehe Abb.B). Der Pfeil auf dem Magneten
muss direkt auf die Ausrichtungsmarkierung
Alarmgebers
befestigen Sie parallel zum
am Fensterflügel oder Türblatt
des
zeigen (siehe Abb. A).
♦ Bei dickeren Türblättern bzw. Fensterflügel
platzieren Sie den Magneten
auf der Seite des
Türblattes oder des Fensterflügels (siehe Abb. C).
♦ Hebeln Sie mit einem Schlitzschraubendreher vor-
sichtig die Montageplatte vom Magneten
ab.
♦ Ermitteln Sie gemäß den Angaben zum proviso-
rischen Funktionstest im vorherigen Textabschnitt
den korrekten Montageort für den Magneten
.
♦ Dort zeichnen Sie durch die Öffnungen der Mon-
tageplatte die zwei Bohrlochmarkierungen auf
den Untergrund.
♦ Bohren Sie anhand der Markierungen zwei
5mmØ-Bohrlöcher, stecken je einen Dübel
ein
und schrauben die Montageplatte an.
♦ Setzen Sie den Magneten
auf die Montage-
platte, sodass dieser spürbar einrastet.
Alarmfunktion aktivieren/
deaktivieren
♦ Um die Alarmfunktion unmittelbar zu aktivieren,
bringen Sie den Schalter für die Alarmverzögerung
in die Stellung „ “.
♦ Stellen Sie den Ein-/Ausschalter
Schlüssel
in die Position „ON“. Die Alarmfunktion ist nun aktiviert und beim Öffnen des Fensters
oder der Tür ertönt für ca. 90 Sekunden ein
Alarmton.
♦ Um die Alarmfunktion verzögert zu aktivieren, weil
Sie z. B. zunächst selbst noch durch die zu sichernde Tür gehen wollen, bringen Sie den Schalter für
die Alarmverzögerung
in die Stellung „ “.
♦ Stellen Sie den Ein-/Ausschalter
Schlüssel
zeige-LED
in die Position „ON“. Die Zustandsan-
leuchtet 15 Sekunden lang grün.
Erst dann wird die Alarmfunktion aktiviert und die
Zustandsanzeige-LED
erlischt. Auch die Alarmauslösung wird um ca. 10 Sekunden verzögert, damit Sie
nach Öffnen der Tür noch Zeit haben, die Alarmfunktion zu deaktivieren. Während dieser Zeit leuchtet die
Zustandsanzeige-LED
rot. Erfolgt keine Deaktivierung, ertönt für ca. 90 Sekunden der Alarmton. Nach
Alarmende blinkt die Zustandsanzeige-LED
Intervall von ca. 2 Sekunden grün, bis die Alarmfunktion deaktiviert wird.
mit dem
mit dem
im
♦ Um einen Alarm abzuschalten, stellen Sie den
Ein-/Ausschalter
mit dem Schlüssel in die
Position „OFF“.
♦ Stellen Sie den Ein-/Ausschalter
Schlüssel
in die Position „OFF“, um die Alarm-
mit dem
funktion zu deaktivieren.
HINWEIS
► Lassen Sie den Schlüssel
schalter
stecken, sonst kann der Einbrecher
nicht im Ein-/Aus-
den ausgelösten Alarm selbst abschalten!
HINWEIS
► Blinkt die Zustandsanzeige-LED
rot, sind die
Batterien erschöpft und müssen ersetzt werden.
Reinigung/Lagerung
ACHTUNG
► Stellen Sie sicher, dass bei der Reinigung keine
Feuchtigkeit in das Gerät eindringt, um eine irreparable Beschädigung des Gerätes zu vermeiden.
♦ Reinigen Sie das Gerät mit einem trockenen,
weichen Tuch.
♦ Sollten Sie das Gerät längere Zeit nicht benutzen,
entnehmen Sie die Batterien und lagern Sie es
an einem sauberen, trockenen Ort ohne direkte
Sonneneinstrahlung.
Entsorgung
Das nebenstehende Symbol einer durchgestri-
chenen Mülltonne auf Rädern zeigt an, dass
dieses Gerät der Richtlinie 2012/19/EU
unterliegt. Diese Richtlinie besagt, dass Sie dieses
Gerät am Ende seiner Nutzungszeit nicht mit dem
normalen Haushaltsmüll entsorgen dürfen, sondern in
speziell eingerichteten Sammelstellen, Wertstoffhöfen
oder Entsorgungsbetrieben abgeben müssen.
Diese Entsorgung ist für Sie kostenfrei.
Schonen Sie die Umwelt und entsorgen Sie
fachgerecht.
Weitere Informationen erhalten Sie bei Ihrem lokalen
Entsorger oder der Stadt bzw. Gemeindeverwaltung.
Batterien entsorgen
Batterien dürfen nicht im Hausmüll entsorgt werden.
Jeder Verbraucher ist gesetzlich verpflichtet,
Batterien bei einer Sammelstelle seiner Gemeinde/seines Stadtteils oder im Handel abzugeben. Diese
Verpflichtung dient dazu, dass Batterien einer umweltschonenden Entsorgung zugeführt werden können.
Geben Sie Batterien nur im entladenen Zustand zurück.
Garantie der Kompernaß
Handels GmbH
Sehr geehrte Kundin, sehr geehrter Kunde,
Sie erhalten auf dieses Gerät 3 Jahre Garantie ab
Kaufdatum. Im Falle von Mängeln dieses Produkts
stehen Ihnen gegen den Verkäufer des Produkts gesetzliche Rechte zu. Diese gesetzlichen Rechte werden
durch unsere im Folgenden dargestellte Garantie nicht
eingeschränkt.
Die Garantiefrist beginnt mit dem Kaufdatum. Bitte
bewahren Sie den Original Kassenbon gut auf. Diese
Unterlage wird als Nachweis für den Kauf benötigt.
Tritt innerhalb von drei Jahren ab dem Kaufdatum dieses Produkts ein Material- oder Fabrikationsfehler auf,
wird das Produkt von uns – nach unserer Wahl – für Sie
kostenlos repariert oder ersetzt. Diese Garantieleistung
setzt voraus, dass innerhalb der Drei-Jahres-Frist das defekte Gerät und der Kaufbeleg (Kassenbon) vorgelegt
und schriftlich kurz beschrieben wird, worin der Mangel
besteht und wann er aufgetreten ist.
Wenn der Defekt von unserer Garantie gedeckt ist, erhalten Sie das reparierte oder ein neues Produkt zurück.
Mit Reparatur oder Austausch des Produkts beginnt kein
neuer Garantiezeitraum.
Die Garantiezeit wird durch die Gewährleistung nicht
verlängert. Dies gilt auch für ersetzte und reparierte
Teile. Eventuell schon beim Kauf vorhandene Schäden
und Mängel müssen sofort nach dem Auspacken gemeldet werden. Nach Ablauf der Garantiezeit anfallende
Reparaturen sind kostenpflichtig.
Das Gerät wurde nach strengen Qualitätsrichtlinien
sorgfältig produziert und vor Auslieferung gewissenhaft
geprüft.
Die Garantieleistung gilt für Material- oder Fabrikationsfehler. Diese Garantie erstreckt sich nicht auf Produktteile, die normaler Abnutzung ausgesetzt sind und
daher als Verschleißteile angesehen werden können
oder für Beschädigungen an zerbrechlichen Teilen, z.
B. Schalter, Akkus, Backformen oder Teile die aus Glas
gefertigt sind.
Diese Garantie verfällt, wenn das Produkt beschädigt,
nicht sachgemäß benutzt oder gewartet wurde. Für eine
sachgemäße Benutzung des Produkts sind alle in der
Bedienungsanleitung aufgeführten Anweisungen genau
einzuhalten. Verwendungszwecke und Handlungen,
von denen in der Bedienungsanleitung abgeraten oder
vor denen gewarnt wird, sind unbedingt zu vermeiden.
Das Produkt ist nur für den privaten und nicht für den
gewerblichen Gebrauch bestimmt. Bei missbräuchlicher
und unsachgemäßer Behandlung, Gewaltanwendung
und bei Eingriffen, die nicht von unserer autorisierten
Service-Niederlassung vorgenommen wurden, erlischt
die Garantie.
Service
Service Deutschland
Tel.: 0800 5435 111 (Kostenfrei aus dem dt.
Festnetz/Mobilfunknetz)
E-Mail: kompernass@lidl.de
Service Österreich
Tel.: 0820 201 222 (0,15 EUR/Min.)
E-Mail: kompernass@lidl.at
Service Schweiz
Tel.: 0842 665566 (0,08 CHF/Min.,
Mobilfunk max. 0,40 CHF/Min.)
E-Mail: kompernass@lidl.ch
IAN 280176
Importeur
KOMPERNASS HANDELS GMBH
#63(453"44&t#0$)6.t(&3."/:
www.kompernass.com
- 18 -- 9 -
 Loading...