

Page 1
FUNKSTECKDOSEN-SET
FUNKSTECKDOSEN-SET
Bedienungs- und Sicherheitshinweise
SET PRESE
RADIOCOMANDATE
Indicazioni per l’uso e per la sicurezza
IAN 91210
SET DE PRISES
TÉLÉCOMMANDÉES
Instructions d‘utilisation et consignes de sécurité
ELECTRICAL SOCKETS
Operation and Safety Notes
Page 2
Klappen Sie vor dem Lesen die Seite mit den Abbildungen aus und machen Sie sich
anschließend mit allen Funktionen des Gerätes vertraut.
Avant de lire le mode d‘emploi, ouvrez la page contenant les illustrations et
familiarisez-vous ensuite avec toutes les fonctions de l‘appareil.
Prima di leggere aprire la pagina con le immagini e prendere confidenza con le
diverse funzioni dell’apparecchio.
Before reading, unfold the page containing the illustrations and familiarise yourself
with all functions of the device.
DE / AT / CH Bedienungs- und Sicherheitshinweise Seite 5
FR / CH Instructions d‘utilisation et consignes de sécurité Page 13
IT / CH Indicazioni per l’uso e per la sicurezza Pagina 21
GB Operation and Safety Notes Page 29
Page 3
A
1
A
B
B
C
D
Master
4
5 6 7
ON/OFF LEARN
OFFON
2
3
8
Page 4

Page 5

Inhaltsverzeichnis
Einleitung
Bestimmungsgemäßer Gebrauch ...............................................................Seite 6
Lieferumfang ................................................................................................Seite 6
Bedienelemente ........................................................................................... Seite 6
Technische Daten .........................................................................................Seite 6
Sicherheit
Sicherheitshinweise...................................................................................... Seite 7
Vorbereitung
Fernbedienung vorbereiten ......................................................................... Seite 8
Funksteckdose vorbereiten .......................................................................... Seite 8
Inbetriebnahme
Funksteckdose benutzen .............................................................................Seite 9
Fernbedienung benutzen ............................................................................Seite 9
Fehlerhinweise ............................................................................................. Seite 9
Reinigung ................................................................................................. S eite 10
Entsorgung..............................................................................................Seite 11
Garantie und Service
Garantieer klärung ....................................................................................... Seite 11
Serviceadresse ............................................................................................Seite 11
Konformitäts erkläru ng ................................................................................. Seite 11
Herstelle r ......................................................................................................Sei te 11
5 DE/AT/CH
Page 6
Einleitung
Funksteckdosen-Set
Einleitung
Bestimmungsgemäßer
Gebrauch
Das Funksteckdosen-Set ist zum ferngesteuerten Ein- und Ausschalten von
Elektrogeräten geeignet. Alle Veränderungen des Gerätes sind nicht bestimmungsgemäß und können erhebliche
Unfallgefahren bedeuten. Der Hersteller
übernimmt für aus bestimmungswidriger
Verwendung entstandene Schäden keine
Haftung.
gewerblichen
Dieses Gerät ist nicht für den
Einsatz bestimmt.
Lieferumfang
Prüfen Sie dieses Set nach dem Auspacken auf seinen vollständigen Inhalt.
4 Funksteckdosen
1 4-Kanal-Fernbedienung
2 Batterien AAA (für Fernbedienung)
1 Bedienungsanleitung
Bedienelemente
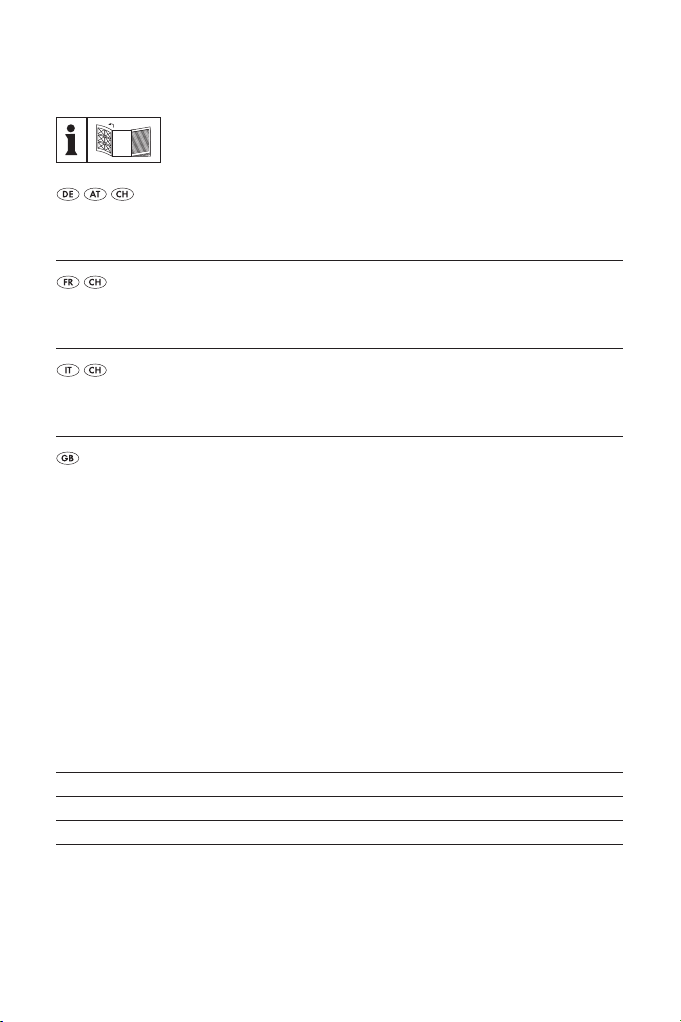
Fernbedienung (Abb. A):
1
Betriebskontroll-Leuchte
2
Kanal-ON- / OFF-Taste Kanal A, B,
C, D
3
ALL-ON- / OFF-Taste (Master-
EIN / AUS)
4
Batteriefachabdeckung
6 DE/AT/CH
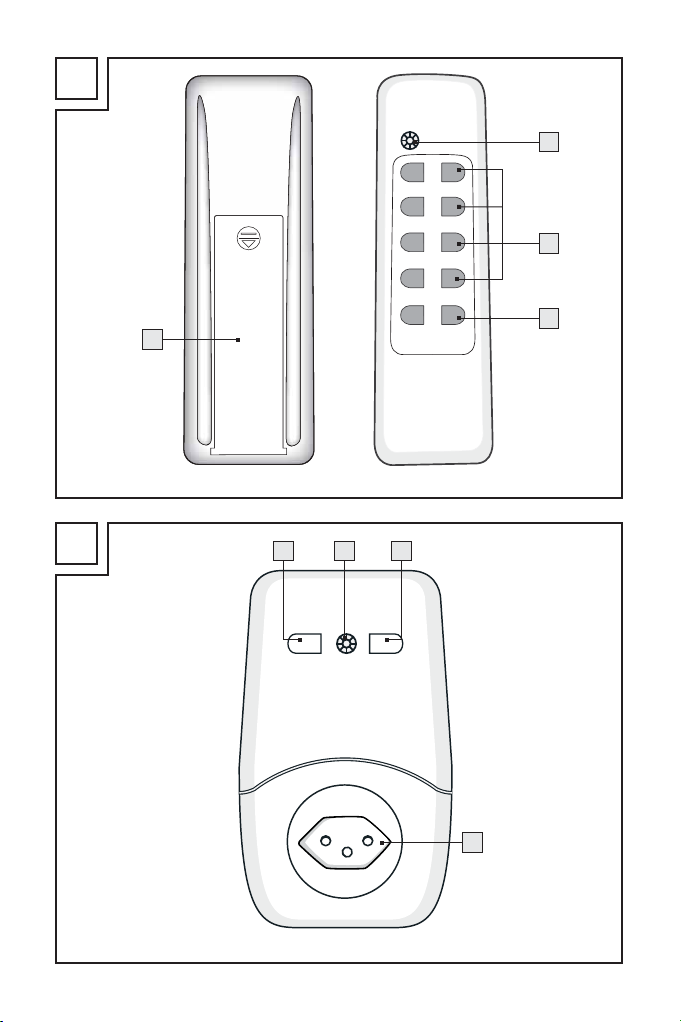
Funksteckdose (Abb. B):
5
Manuelle ON- / OFF-Taste
(EIN / AUS)
6
LED-Betriebsanzeige
7
LEARN-Taste (Lernen)
8
Kinderschutz-Steckdose
Technische Daten
Fernbedienung
RCS AAA3680-A IP20:
Batterien: 2 x AAA, je 1,5 V
Übertragungsfrequenz: 433,92 MHz
Zulassung: Das System besitzt eine
allgemeine Zulassung
(BZT) und ist anmeldeund gebührenfrei.
Reichweite: abhängig von den Um-
gebungsbedingungen
ca. 25 m bei optimalen
Bedingungen
Funksteckdose
RCE AAA3680-A IP20 CH:
Nennspannung: 230 V∼, 50 Hz
Max. Schaltleistung: 10 A 2.300 W
Stand-by-Verbrauch: < 0,7 W
Übertragungsfrequenz: 433,92 MHz
Hinweis: Die Funksteckdosen verfügen
jeweils über eine Kinderschutz-Steckdose
8
. Dadurch wird die häusliche Sicherheit erheblich erhöht. Die Kontakte sind
entsprechend geschützt, so dass Kinder
keine leitende Verbindung (mit Nadeln
o.ä.) herstellen können. Bewahren Sie das
Gerät trotzdem außerhalb der Reichweite von Kindern auf.
Page 7
Sicherheit
Sicherheit
Sicherheitshinweise
Lesen Sie diese Bedienungsanleitung
und Sicherheitshinweise aufmerksam
durch. Klappen Sie die Bildseite aus
und machen Sie sich vor der ersten
Inbetriebnahme mit allen Funktionen
des Gerätes vertraut.
Vermeiden Sie Lebensgefahr
durch elektrischen Schlag!
Schließen Sie die Funksteckdosen
nur an geerdete 230 Volt Haushaltssteckdosen an.
Vermeiden Sie unbedingt die
Einwirkung von Feuchtigkeit und
extremen Temperaturen.
Verwenden Sie die Funksteckdosen
nur in geschlossenen Räumen. Sie
sind nicht für den Außenbereich
geeignet.
Bewahren Sie das Gerät trotz
Kinderschutz-Steckdose
außerhalb der Reichweite von
Kindern auf.
Vermeiden Sie eine Überlastung
des Gerätes. Bei Überlastung kann
Brandgefahr oder Schaden am
Gerät auftreten. Die maximale
Belastbarkeit beträgt ca. 2.300 W
je Funksteckdose.
Wenden Sie sich bei Funktions-
störungen bitte sofort an die
Servicestelle.
Öffnen Sie das Gerät auf keinen
Fall selbst. Lassen Sie notwendige
Reparaturen ausschließlich von der
8
immer
Servicestelle oder einer ElektroFachwerkstatt ausführen.
Unterbrechen Sie vor der Reinigung
des Gerätes unbedingt den Stromfluss. Trennen Sie in diesem Fall
immer die Funksteckdose von der
Wandsteckdose und alle Netzstecker
vom Gerät.
Stecken Sie die Funksteckdosen
nicht hintereinander.
Verwenden Sie keine zusätzlichen
Kindersicherungen für die Funksteckdosen. Die Verbindung zwischen
Stecker und Funksteckdose könnte
beeinträchtigt werden und die
Gefahr der Überhitzung besteht.
Die Funksteckdosen verfügen bereits
über eine Kindersicherung, welche
verhindert, dass Kinder irgendwelche
Gegenstände in die Steckdose
einbringen können.
Stellen Sie sicher, dass die ange-
schlossenen Funksteckdosen frei
zugänglich und nicht mit Gegenständen abgedeckt sind.
Schalten Sie bei Störungen das
Gerät sofort aus.
Diese Anleitung ist ein Bestandteil
des Gerätes. Geben Sie diese deshalb bei Weitergabe des Gerätes
an Dritte unbedingt auch weiter.
7 DE/AT/CH
Page 8
Vorbereitung
Vorbereitung
Fernbedienung
vorbereiten (Abb. A)
1. Öffnen Sie das Batteriefach auf der
Rückseite der Fernbedienung, indem
Sie die Batteriefachabdeckung
4
nach unten wegschieben. Setzen
Sie zwei AAA-Batterien ein. Achten
Sie auf die richtige Polarität.
2. Drücken Sie eine der ON- / OFF-
2
Tasten
oder 3, um zu prüfen,
ob die Fernbedienung funktioniert;
wenn ja, leuchtet die Betriebskontroll-Leuchte
1
.
Funksteckdose
vorbereiten (Abb. B)
1. Stecken Sie die Funksteckdose in
eine geerdete Haushaltssteckdose
und schalten Sie diese mit der ON- /
OFF-Taste
anzeige
2. Halten Sie die Fernbedienung mit
einem Abstand von ca. 50 cm auf
die Funksteckdose gerichtet.
3. Drücken Sie die Taste LEARN
Funksteckdose für ca. 3 Sekunden
und lassen diese wieder los. Die
LED-Betriebsanzeige
ca. 10 Sekunden. Drücken Sie während des Blinkens die gewünschte
ON-Taste der Kanal-ON- / OFFTaste
Fernbedienung. Die LED-Betriebsanzeige
Sie können nun einen angeschlos-
5
ein. Die LED-Betriebs-
6
leuchtet auf.
6
blinkt nun für
2
(A, B, C oder D) an der
6
leuchtet jetzt dauerhaft.
7
der
senen Verbraucher ferngesteuert einoder ausschalten.
4. Wiederholen Sie diesen Vorgang
mit der anderen Funksteckdose.
5. Sie können mit einer Kanal-ON- / OFF-Taste
2
mehrere
Funksteckdosen gleichzeitig schalten. Außerdem können Sie sechs
Fernbedienungen nacheinander einlernen und diese für einen einzelnen
Empfänger verwenden. So kann ein
Gerät von bis zu sechs verschiedenen Plätzen geschaltet werden.
6. Synchronisieren Sie in diesem Fall
jede Funksteckdose mit dem Kanal
der Fernbedienung.
7. Der Code der Fernbedienung
bleibt auch dann erhalten, wenn
Sie die Batterien wechseln.
8. Wenn Sie die Funksteckdose vom
Netz nehmen, bleiben die Codierungen dauerhaft gespeichert.
9. Um die Codierungen wieder zu
löschen, drücken Sie die LEARN-
7
Taste
länger als 6 Sekunden,
bis die LED-Betriebsanzeige
blinken beginnt. Alle Codierungen
werden nun gelöscht.
10. Vermeiden Sie Störungen: Stellen Sie
sicher, dass der Abstand zwischen
den verschiedenen Funksteckdosen
ca. 50 cm beträgt.
11. Jede Funksteckdose hat zusätzlich
einen manuellen ON- / OFF-Schal-
5
ter
. Sie können auch ohne Fernbedienung die Funksteckdose einoder ausschalten. Die
LED-Betriebsanzeige
6
zeigt an,
ob die Funksteckdose im
EIN- / AUS-Modus ist.
6
zu
8 DE/AT/CH
Page 9
Inbetriebnahme
Inbetriebnahme
Funksteckdose
benutzen (Abb. B)
1. Stecken Sie die Funksteckdose in
eine geerdete Schutzkontaktsteckdose ein und schließen Sie den zu
schaltenden Verbraucher an.
2. Schalten Sie das Verbrauchergerät
ein. Die Funksteckdose kann die
Schaltfunktion nur dann übernehmen,
wenn das zu schaltende Gerät
eingeschaltet ist.
VORSICHT! BRANDGEFAHR!
Schließen Sie keine Geräte an,
deren unbeaufsichtigtes Einschalten
Brände oder andere Schäden verursachen könnte. Die maximale
Belastbarkeit je Funksteckdose beträgt ca. 2.300 W. Eine Überlastung
kann Brandgefahr oder Schaden
am Gerät verursachen.
3. Drücken Sie die manuelle ON- /
OFF-Taste
direkt am Gerät einzuschalten. Die
LED-Betriebsanzeige
Alternativ können Sie die Funksteckdose auch über die Fernbedienung
einschalten (siehe „Fernbedienung
benutzen“).
4. Drücken Sie die manuelle
ON- / OFF-Taste
steckdose direkt am Gerät auszuschalten. Die LED-Betriebsanzeige
6
die Funksteckdose auch über die
Fernbedienung ausschalten (siehe
„Fernbedienung benutzen“).
5
, um die Funksteckdose
6
leuchtet.
5
, um die Funk-
erlischt. Alternativ können Sie
Fernbedienung
benutzen (Abb. A)
1. Betätigen Sie die ON- / OFF-Taste 2
für den Kanal, dessen Verbraucher
Sie ein- oder ausschalten möchten.
Die Fernbedienung steuert bis zu
4 Funksteckdosen (einzeln, in
Gruppen oder alle gleichzeitig).
2. Betätigen Sie die ALL-ON- / OFF-
3
Taste
, um alle Funksteckdosen
gleichzeitig zu schalten.
Fehlerhinweise
Sollte die Fernschaltung nicht
funktionieren, prüfen Sie bitte
das System auf folgende Punkte:
Problem
Abhilfe
Betriebskontroll-Leuch-
1
te
an der Fernbedienung leuchtet, keine Reaktion
· Prüfen Sie, ob die Ampe-
re-Leistung der Batterien
noch ausreichend ist.
Setzen Sie gegebenenfalls neue Batterien ein.
9 DE/AT/CH
Page 10
Inbetriebnahme / Reinigung
Problem
Abhilfe
Problem
Abhilfe
Betriebskontroll-Leuch-
1
te
an der Fernbedienung leuchtet nicht
beim Drücken von ON
oder OFF
· Prüfen Sie, ob die
Batterien richtig eingelegt sind.
· Prüfen Sie, ob die
Batterien guten Kontakt
mit den Klemmen haben,
evtl. an drücken.
Keine Reaktion am
Verbraucher
· Prüfen Sie, ob der Ver-
braucher eingeschaltet
ist.
· Ordnen Sie der Funk-
steckdose einen neuen
Code zu (siehe „Funksteckdose vorbereiten“,
Punkt 3).
· Stellen Sie durch Annä-
hern fest, ob die Reichweite ausreichend für
den gewünschten
Standort ist.
Problem
Abhilfe
Reichweite zu gering
· Stellen Sie für hohe
Reichweiten sicher, dass
möglichst wenig Wände,
Möbel etc. zwischen
Fernbedienung und
Funksteckdose liegen.
· Wenn die Reichweite
nur zeitweise gering ist,
kann
der Grund in einem
Sender, der
ähnlichen Frequenz arbeitet, liegen. Sobald
dieser Sender aktiv ist,
sinkt die Reichweite
(z.B. drahtlose Kopfhörer, Funkbewegungsmelder, Funkgong etc.).
auf einer
Reinigung
Es dürfen keine Flüssigkeiten in
das Innere des Gerätes gelangen.
Verwenden Sie zum Reinigen des
Gehäuses ein weiches Tuch. Verwenden Sie niemals Benzin, Lösungsmittel oder Reiniger, die Kunststoff
angreifen.
Trennen Sie vor der Reinigung
immer die Funksteckdose von der
Wandsteckdose und alle Netzstecker
vom Gerät.
10 DE/AT/CH
Page 11
Entsorgung / Garantie und Service
Entsorgung
Elektrogeräte nicht in
den Hausmüll werfen!
Gemäß Europäischer Richtlinie
2012 / 19 / EC über Elektro- und Elektronik-Altgeräte müssen verbrauchte
Elektrogeräte, Leuchtmittel und Batterien
getrennt gesammelt und einer umweltgerechten Wiederverwertung zugeführt
werden. Möglichkeiten zur Entsorgung
des ausgedienten Geräts erfahren Sie bei
Ihrer Gemeinde- oder Stadtverwaltung.
Umweltschäden durch
falsche Entsorgung der
Pb
Batterien!
Batterien gehören nicht in den Hausmüll.
Sie können giftige Schwermetalle enthalten und unterliegen der Sondermüllbehandlung. Geben Sie deshalb verbrauchte Batterien bei einer kommunalen
Sammelstelle ab.
Garantie und Service
Garantie nicht eingeschränkt. Im Garantiefall mit der Servicestelle telefonisch in
Verbindung setzen. Nur so kann eine
kostenlose Einsendung Ihres Geräts
gewährleistet werden.
Serviceadresse
BAT, Lindenstraße 35,
72074 Tübingen, Deutschland
E-Mail: exp@bat-tuebingen.com
Service-Tel.: 00800 48720741
Für weitere Informationen empfehlen wir
den Bereich Service / FAQ‘s auf unserer
Homepage www.dvw-service.com.
IAN 91210
Konformitätserklärung
Die Konformitätserklärung ist unter
folgendem Link hinterlegt:
www.dvw-service.com/konformitaetserklaerung/ke_1049012706.pdf
Garantieerklärung
3 Jahre Garantie ab Kaufdatum auf dieses
Gerät. Bitte Kassenbon als Nachweis
aufbewahren. Das Gerät wurde sorgfältig
produziert und vor Auslieferung gewissenhaft geprüft. Die Garantieleistung gilt
nur für Material- oder Fabrikationsfehler
bei sachgemäßer Verwendung. Die
Garantie erlischt bei Fremdeingriff. Ihre
gesetzlichen Rechte werden durch diese
Hersteller
BAT
Lindenstraße 35
72074 Tübingen
Deutschland
11 DE/AT/CH
Page 12

12
Page 13

Table des matières
Introduction
Utilisation conforme ..................................................................................... Page 14
Fourniture ...................................................................................................... Page 14
Éléments de commande .............................................................................. Page 14
Caractér istiques ........................................................................................... Page 14
Sécurité
Consignes de sécurité .................................................................................Page 15
Préparation
Préparation de la télécommande ............................................................... Page 16
Préparation de la prise télécommandée ...................................................Page 16
Mise en service
Utilisation de la prise télécommandée ......................................................Page 17
Utilisation de la télécommande .................................................................. Page 17
Guide de dépannage .................................................................................Page 17
Nettoyage ...............................................................................................Page 18
Elimination .............................................................................................. Page 19
Garantie et S.A.V.
Déclaration de garantie ..............................................................................Page 19
Adresse S.A.V. ............................................................................................. Page 19
Déclaration de conformité ..........................................................................Page 19
Fabricant ...................................................................................................... Page 19
13 FR/CH
Page 14

Introduction
Set de prises
télécommandées
Introduction
Utilisation conforme
Le jeu de prises sans fil est conçu pour
commander à distance la mise en marche
et l‘extinction d‘appareils électriques.
Toute modification de l’appareil est
considérée comme non conforme et
peut être source de graves dangers. Le
fabricant décline toute responsabilité
pour les dégâts issus d’une utilisation
non conforme. Ne convient pas pour
l’exploitation commerciale.
Fourniture
Déballer le jeu de prises sans fil et
contrôler s’il est au complet.
4 prises radio
1 télécommande 4 canaux
2 piles AAA (pour la télécommande)
1 mode d‘emploi
3
Touche ALL-ON / OFF (Master
MARCHE / ARRÊT)
4
Couvercle du compartiment à pile
Prise télécommandée (ill. B) :
5
Touche manuelle ON / OFF
(MARCHE / ARRÊT)
6
Témoin de fonctionnement à DEL
7
Touche LEARN (apprentissage)
8
Prise de courant avec protection
enfants
Caractéristiques
Télécommande
RCS AAA3680-A IP20 :
Piles: 2 x 1,5 V AAA
Fréquence
de transmission : 433,92 MHz
Homologation : Le système est
homologué BZT
et est exempt de
permis et de redevance.
Portée : Selon l’environne-
ment env. 25 m
dans conditions
idéales.
Éléments de commande
Télécommande (ill. A) :
1
Témoin de contrôle de
fonctionnement
2
Touche canal ON / OFF pour les
canaux A, B, C, D
14 FR/CH
Prises télécommandées
RCE AAA3680-A IP20 CH :
Tension secteur : 230 V~, 50 Hz
Puissance de rupture : 10 A, 2.300 W
Consommation
en mode veille : < 0,7 W
Fréquence
de transmission : 433,92 MHz
Page 15

Introduction / Sécurité
Remarque : Les prises télécommandées
sont équipés d’une prise avec sécurité
8
enfants
blement la sécurité domestique. Les
contacts sont protégés de manière à
exclure qu’un enfant puisse établir une
connexion conductrice (par ex. avec
une aiguille). Veuillez cependant tenir
cet appareil hors de portée des enfants.
, ce qui augmente considéra-
Sécurité
Consignes de
sécurité
Veuillez lire attentivement cette notice
d’utilisation et les consignes de sécurité.
Ouvrez la page des illustrations avant
de commencer la lecture et familiarisezvous ensuite avec toutes les fonctions
de l’appareil.
Prévention de danger de
mort par électrocution !
Uniquement brancher les prises
télécommandées sur les prises de
courant domestiques de 230 volts
reliées à la terre.
Absolument éviter l’humidité et les
températures extrêmes.
Uniquement utiliser les prises télé-
commandées dans des locaux fermés,
elles ne sont pas conçues pour les
applications à l’extérieur.
Bien que les prises soient équipées
de sécurité enfants
tenir hors de porté des enfants.
Éviter toute surcharge de l’appareil.
Une surcharge
8
, toujours les
peut provoquer un in-
cendie ou endommager l’appareil.
La charge maximale des prises est
d’env. 2.300 W pour chaque prise.
Immédiatement contacter le service
après vente en cas de défaillance.
N’ouvrez jamais l’appareil vous-
même. Exclusivement confier les
parations nécessaires au service après
vente ou à un atelier électrique.
Coupez obligatoirement l‘alimenta-
tion électrique avant de nettoyer
l‘appareil. Débranchez toujours dans
ce cas la prise télécommandée de
la prise de courant et débranchez
toutes les prises branchées à la prise
télécommandée.
Ne branchez pas les prises télécom-
mandée à la suite l‘une de l‘autre.
Ne pas utiliser de sécurités enfants
supplémentaires pour les prises
télécommandées sous peine de
perturber le contact entre la fiche
et la prise télécommandée et de
provoquer une surchauffe. Les prise
télécommandées sont équipées d’une
sécurité enfants prévenant l’introduction d’objets quelconques dans
la prise murale.
Assurez-vous que les prises télécom-
mandées branchées sont librement
accessibles et ne sont pas recouvertes par des objets.
En cas de dysfonctionnements,
coupez immédiatement l‘appareil.
Cette notice est partie intégrante de
l’appareil. Veuillez donc la remettre
aux autres utilisateurs.
ré-
15 FR/CH
Page 16

Préparation
Préparation
Préparation de la
télécommande (ill. A)
1. Ouvrir le compartiment à pile sur la
face arrière de la télécommande en
poussant le couvercle du compartiment à pile
deux piles de type AAA. Vérifier
que la polarité est correcte.
2. Appuyer sur la touche ON / OFF
ou
ment de la télécommande ; le
témoin de contrôle de fonctionnement
Préparation de la prise
télécommandée
1. Brancher la prise télécommandée
dans une prise de courant reliée à
la terre et l’allumer d’une pression sur
la touche ON / OFF
de fonctionnement à DEL
2. Diriger la télécommande vers la prise
télécommandée à une distance
d’env. 50 cm.
3. Appuyer sur la touche LEARN
la prise télécommandée pendant
env. 3 secondes et la relâcher. Le
témoin de fonctionnement à DEL
clignote alors pendant env. 10 secondes. Pendant le clignotement,
appuyer sur la touche ON de la
touche de canal ON / OFF
désiré (A, B, C ou D) sur la télécommande. Le témoin de fonctionnement à DEL
4
vers le bas. Insérer
3
afin de vérifier le fonctionne-
1
doit s’allumer.
5
. Le témoin
6
s’éclaire.
2
6
reste alors éclairé
2
7
de
6
en permanence. Vous pouvez à
présent allumer et éteindre à distance un consommateur connecté.
4. Répéter la procédure avec l’autre
prise télécommandée.
5. Vous pouvez alors commander simultanément plusieurs prises télécommandées avec une touche canal
ON / OFF
2
. Vous pouvez en outre
programmer consécutivement six télécommandes et les utiliser pour un
seul récepteur. Ceci permet de
commander un appareil depuis
jusque six endroits différents.
6. Il faut alors synchroniser chaque
prise télécommandée avec le canal
de la télécommande.
7. Le code de la télécommande reste
mémorisé, même si vous remplacez
les piles.
8. Si vous débranchez la prise télécommandée du secteur, les codes
restent mémorisés à long terme.
9. Pour effacer les codes, appuyer sur
la touche LEARN
7
pendant plus
de 6 secondes, jusqu’à ce que le
témoin de fonctionnement à DEL
se mette à clignoter. Tous les codes
sont alors effacés.
10. Prévention de pannes : veiller à respecter un écart d’env. 50 cm entre les
différentes prises télécommandées.
11. Chaque prise télécommandé est en
plus équipée d’un interrupteur manuel ON / OFF
5
. Vous pouvez
donc aussi allumer et éteindre la
prise télécommandée sans utiliser
la télécommande. Le témoin de
fonctionnement à DEL
6
indique
6
16 FR/CH
Page 17

Préparation / Mise en service
le mode MARCHE / ARRÊT de la
prise télécommandée.
Mise en service
Utilisation de la prise
télécommandée (ill. B)
1. Introduire la prise télécommandée
dans une prise de courant à
contact de protection et brancher
le consommateur que vous désirez
commuter à distance.
2. Allumer l’appareil. La prise télécommandée peut seulement effectuer la
commande si l’appareil correspondant est allumé.
ATTENTION ! RISQUE D’IN-
CENDIE ! Ne jamais brancher des
appareils dont l’allumage involontaire
peut provoquer un incendie ou
d’autres dégâts. La charge maximale
de chaque prise télécommandée est
d’env. 2.300 W. Toute surcharge
représente un risque d’incendie ou
d’endommagement de l’appareil.
3. Appuyer sur la touche manuelle
ON / OFF
ment la prise télécommandée. Le
témoin de fonctionnement à DEL
s’éclaire. Vous pouvez aussi allumer
la prise télécommandée par la
télécommande (voir «Utiliser la
télécommande»).
4. Appuyer sur la touche manuelle
ON / OFF
tement la prise télécommandée. Le
témoin de fonctionnement à DEL
s’éteint. Vous pouvez aussi éteindre
5
pour allumer directe-
5
pour éteindre direc-
la prise télécommandée par la télécommande (voir «Utilisation de la
télécommande»).
Utilisation de la
télécommande (ill. A)
1. Appuyez sur la touche (ON / OFF)
2
du canal de l’appareil que vous
désirez allumer et éteindre. La télécommande commande jusque 4
prises télécommandées (séparément,
groupés ou tous simultanément).
2. Actionnez la touche ALL-ON / OFF
3
pour commander simultanément
toutes les prises télécommandées.
Guide de dépannage
Si la télécommande ne fonctionne pas, veuillez contrôler le
système comme suit :
Problème
6
Dépannage
6
Témoin de contrôle
de fonctionnement
1
de la télécommande allumé,
aucune réaction
·
Contrôlez si la puissance
en ampère des piles
est encore suffisante. Si
nécessaire, insérez de
nouvelles piles.
17 FR/CH
Page 18

Mise en service / Nettoyage
Problème
Dépannage
Problème
Dépannage
Le témoin de fonctionnement
1
de la
télécommande ne
s’allume pas lorsque
vous appuyez sur
«ON» ou «OFF»
·
Contrôlez si les piles sont
correctement insérées.
· Contrôlez que les piles
soient bien en contact
avec les bornes, appuyer
éventuellement dessus.
Aucune réaction du
consommateur
· Contrôler si l’appareil
est allumé.
· Attribuez un nouveau
code à la prise radio
(voir „préparation
prise radio“, point 3).
· Rapprocher la télécommande pour contrôler si
la portée est suffisante.
Pro-
Portée insuffisante
blème
Dépan-
nage
· Pour obtenir une portée
optimale, éviter si possible que des murs,
meubles, etc. se trouvent
entre la télécomande et
la prise télécommandée.
· Si la portée est temporairement faible, ceci
peut être causé par une
télécommande qui
fonctionne sur une
fréquence similaire.
Lorsque cette télécommande fonctionne, la
portée diminue (par ex.
casque sans fil, détecteur de mouvement sans
fil, sonnette sans fil, etc.).
Nettoyage
Exclure toute infiltration de liquides
dans le boîtier de l’appareil. Essuyer le boîtier avec un chiffon
doux. Ne jamais utiliser d’essence,
solvant ou détergent susceptibles
d’attaquer le plastique.
Toujours débrancher la prise télé-
commandée de la prise murale et
toutes les fiches secteurs de l’appareil avant d’effectuer le nettoyage
de l’appareil.
18 FR/CH
Page 19

Elimination / Garantie et S.A.V.
Elimination
Ne pas jeter des appareils électriques aux
ordures ménagères!
Conformément à la Directive européenne
2012 / 19 / EC sur les appareils électriques et électroniques usagés, les
appareils électriques ampoules et piles
usagés doivent être collectés séparément
et recyclés dans le respect de l’environnement. Pour les possibilités d’élimination
de l’appareil mis au rebut, renseignezvous auprès de votre commune.
Dommages écologiques
en cas d’élimination
Pb
incorrecte des piles!
Les piles ne font pas partie des ordures
ménagères. Elles peuvent renfermer des
métaux lourds toxiques et sont donc
soumises au traitement des déchets spéciaux. Aussi, remettez les piles usagées
à un point de collecte municipal.
sation correcte. La garantie est annulée
en cas d’intervention sur le produit. Les
droits vous revenant de par la loi ne
sont pas limités par la présente garantie.
En cas de recours à la garantie, prenez
contact par téléphone avec le point
S.A.V. Ce n’est qu’ainsi que peut être assuré un retour gratuit de votre appareil.
Adresse S.A.V.
BAT, Lindenstraße 35,
72074 Tübingen, Allemagne
Mél.: exp@bat-tuebingen.com
Tél. S.A.V.: 00800 48720741
Pour de plus amples informations, nous
recommandons de visiter la rubrique
Service / FAQ de notre site
www.dvw-service.com.
IAN 91210
Déclaration de
conformité
Garantie et S.A.V.
Déclaration de garantie
Garantie de 3 ans sur cet appareil à
compter de la date d’achat. Conservez
le bon de caisse à titre de preuve de
votre achat. Cet appareil a été fabriqué
avec soin et contrôlé consciencieusement
avant de quitter nos usines. La garantie
ne s’applique qu’aux vices de matériel
et de fabrication dans le cas d’une utili-
La déclaration de conformité est disponible au lien suivant:
www.dvw-service.com/konformitaetserklaerung/ke_1049012706.pdf
Fabricant
BAT
Lindenstraße 35
72074 Tübingen
Allemagne
19 FR/CH
Page 20

20
Page 21

Indice
Introduzione
Uso conforme ............................................................................................Pagina 22
Fornitura ....................................................................................................Pagina 22
Elementi di comando ................................................................................Pagina 22
Dati tecnici ................................................................................................Pagina 22
Sicurezza
Indicazioni di sicurezza ...........................................................................Pagina 23
Preparazione
Preparazione del telecomando ...............................................................Pagina 24
Preparazione della presa telecomandabile ...........................................Pagina 24
Messa in funzione
Utilizzo della presa telecomandabile .....................................................Pagina 25
Utilizzo del telecomando .........................................................................Pagina 25
Indicazioni di errore .................................................................................Pagina 25
Pulizia ......................................................................................................Pagina 26
Smaltimento .......................................................................................Pagina 27
Garanzia e assistenza
Dichiarazione di garanzia .......................................................................Pagina 27
Recapito dell’assistenza ...........................................................................Pagina 27
Dichiarazione di conformità ....................................................................Pagina 27
Produttore ..................................................................................................Pagi na 28
21 IT/CH
Page 22

Introduzione
Set prese radiocomandate
Introduzione
Uso conforme
Il set di prese telecomandabili è adatto
per l’accensione e lo spegnimento a
distanza di apparecchi elettrici. Tutte le
modifiche apportate all’apparecchio
sono da considerarsi non conformi e
possono comportare notevoli pericoli
di infortuni. Il produttore non si assume
alcuna responsabilità per danni derivanti
da un utilizzo non conforme. Questo
apparecchio non è destinato all’uso
commerciale.
Fornitura
Dopo avere estratto il set dall’imballaggio, controllarne la completezza.
4 Prese telecomandate
1 Telecomando a 4 canali
2 Batterie AAA (per il telecomando)
1 Manuale di istruzioni
Presa telecomandabile (fig. B):
5
Tasto ON / OFF manuale
(ON / OFF)
6
Indicatore di funzionamento con LED
7
Tasto LEARN (apprendimento)
8
Presa a protezione di manomissioni
da parte di bambini
Dati tecnici
Telecomando
RCS AAA3680-A IP20:
Batterie: 2 x AAA, ognuna
da 1,5 V
Frequenza di
emissione: 433,92 MHz
Omologazione: Il sistema dispone
di omologazione
generale (BZT)
ed è esente da
canone e dall’ob-
bligo di dichiara-
zione.
Portata: A seconda delle
condizioni am-
bientali, circa
25 m se le condi-
zioni sono ottimali
Elementi di comando
Telecomando (fig. A):
1
Lampada di controllo del
funzionamento
2
Tasto ON / OFF canale A, B, C, D
3
Tasto TUTTI ON / OFF
(ON / OFF master)
4
Copertura del vano portabatteria
22 IT/CH
Presa telecomandabile
RCE AAA3680-A IP20 CH:
Tensione nominale: 230 V~, 50 Hz
Potenza di
commutazione max.: 10 A, 2.300 W
Consumo in stand-by: < 0,7 W
Frequenza
di emissione: 433,92 MHz
Page 23

Introduzione / Sicurezza
Nota: Le prese telecomandabili
dispongono di una presa a protezione
di manomissioni da parte di bambini
8
. In questo modo si aumenta notevolmente la sicurezza domestica. I contatti
sono protetti in modo tale che i bambini
non possono creare nessun collegamento conduttore (con aghi oppure oggetti
simili). Ciononostante conservare l’apparecchio fuori dalla portata dei bambini.
Sicurezza
Indicazioni di
sicurezza
Leggere attentamente le presenti istruzioni
d’uso e indicazioni di sicurezza. Aprire
la pagina delle illustrazioni e prendere
dimestichezza con tutte le funzioni
dell’apparecchio prima di metterlo in
funzione per la prima volta.
Evitare il pericolo di morte
per scossa elettrica!
Collegare le prese telecomandabili
esclusivamente a prese domestiche
da 230 volt collegate a terra.
Evitare assolutamente l’azione di
umidità e temperature estreme.
Utilizzare le prese telecomandabili
solo in ambienti chiusi. Non sono
idonee per ambienti esterni.
Nonostante la presa a protezione di
manomissioni da parte di bambini
conservare sempre l’apparecchio
fuori dalla portata dei bambini.
Evitare un sovraccarico dell’appa-
recchio. In caso di sovraccarico
8
può sussistere il pericolo di incendio o di danni all’apparecchio. Il
carico massimo è di circa 2.300 W
per ogni presa telecomandabile.
In caso di anomalie del funziona-
mento contattare subito il centro di
assistenza.
Non aprire in nessun caso l’appa-
recchio. Fare eseguire le riparazioni
necessarie esclusivamente dal centro
di assistenza o da un elettricista.
Prima di pulire l’apparecchio assi-
curarsi di interrompere il flusso di
corrente. In questo caso separare
sempre la presa telecomandabile
dalla presa a muro e tutte le spine
dall’apparecchio.
Non collegare le prese telecoman-
dabili di seguito.
Non utilizzare nessun altro dispositi-
vo di protezione per bambini perle
prese telecomandabili. Il collega-mento tra spina e presa telecomandabile
potrebbe essere danneggiato e
sussiste il pericolo di surriscaldamento. Le prese telecomandabili
dispongono già di un dispositivo di
protezione per bambini che impedisce ai bambini di inserire qualsiasioggetto nella presa.
Assicurarsi che le prese telecoman-
dabili collegate siano ben accessibili e non siano coperte da oggetti.
In caso di anomalie spegnere subito
l’apparecchio.
Le presenti istruzioni sono parte in-
tegrante dell’apparecchio. Pertanto
in caso di consegna dell’apparecchio a terzi, fornire anche queste
istruzioni insieme ad esso.
23 IT/CH
Page 24

Preparazione
Preparazione
Preparazione del
telecomando (fig. A)
1. Aprire il vano portabatteria sulla
parte posteriore del telecomando,
spingendo verso il basso il coper-
4
chio
del vano portabatteria. Inserire due batterie AAA. Fare attenzione a che la polarità sia corretta.
della
6
lam-
2
2. Premere uno dei tasti ON / OFF
3
o
, per controllare che il telecomando sia funzionante; in caso
affermativo, la lampada di controllo
del funzionamento
Preparazione della
1
si accende.
presa telecomandabile
1. Inserire la presa telecomandabile in
una presa domestica collegata a
terra e accenderla con il tasto ON /
5
OFF
. L’indicatore di funziona-
mento con LED
2. Tenere il telecomando a una distanza di circa 50 cm dalla presa telecomandabile.
3. Premere il tasto LEARN
presa telecomandabile per circa 3
secondi e rilasciarlo. L’indicatore di
funzionamento con LED
peggia per circa 10 secondi. Mentre
l’indicatore lampeggia, premere il
tasto ON desiderato del tasto ON /
OFF canale
lecomando. L’indicatore di funzionamento con LED
modo fisso. A questo punto è possi-
6
si accende.
7
2
(A, B, C o D) sul te-
6
si accende in
bile accendere o spegnere a distanza
un’utenza collegata.
4. Ripetere la procedura con l’altra
presa telecomandabile.
5. Con un tasto ON / OFF canale
è possibile commutare contemporaneamente più prese telecomandabili.
Inoltre è possibile eseguire l’apprendimento per sei telecomandi in successione e utilizzarli per un solo
ricevitore. In questo modo è possibile commutare un apparecchio da
un massimo di sei postazioni diverse.
6. In questo caso sincronizzare ogni
presa telecomandabile con il canale
del telecomando.
7. Il codice del telecomando si conserva anche quando si sostituiscono
le batterie.
8. Quando si scollega la presa telecomandabile dalla rete, i codici rimangono salvati in modo permanente.
9. Per cancellare nuovamente i codici,
premere il tasto LEARN
7
per più
di 6 secondi, fino a quando l’indicatore di funzionamento con LED
inizia a lampeggiare. A questo punto
tutti i codici vengono cancellati.
10. Evitare guasti: assicurarsi che la
distanza tra le diverse prese telecomandabili sia di circa 50 cm.
11. Ogni presa telecomandabile dispone
inoltre di un interruttore ON / OFF
manuale
5
. In questo modo è
possibile accendere o spegnere la
presa telecomandabile anche senza
telecomando. L’indicatore di funzionamento con LED
6
mostra se la
presa telecomandabile si trova nello
stato ON / OFF.
2
6
24 IT/CH
Page 25

Messa in funzione
Messa in funzione
Utilizzo della presa
telecomandabile (fig. B)
1. Inserire la presa telecomandabile
in una qualsiasi presa Schuko e
collegare l’utenza da commutare.
2. Accendere l’utenza. La presa telecomandabile può eseguire la funzione di commutazione solo se l’apparecchio da commutare è acceso.
ATTENZIONE! PERICOLO DI
INCENDIO! Non collegare appa-
recchi la cui accensione non sorvegliata potrebbe causare incendi o
altri danni. Il carico massimo per
ogni presa telecomandabile è di
circa 2.300 W. Un sovraccarico può
comportare il pericolo di incendio
o di danni all’apparecchio.
3. Premere il tasto ON / OFF manuale
5
per accendere la presa telecomandabile direttamente dall’apparecchio. L’indicatore di funzionamento
con LED
è possibile accendere la presa
telecomandabile anche con il telecomando (vedi “Utilizzo del telecomando”).
4. Premere il tasto ON / OFF manuale
mandabile direttamente dall’apparecchio. L’indicatore di funzionamento con LED
alternativa è possibile spegnere la
presa telecomandabile anche con
il telecomando (vedi “Utilizzo del
telecomando”).
6
si accende. In alternativa
5
per spegnere la presa teleco-
6
si spegne. In
Utilizzo del telecomando
(fig. A)
1. Attivare il tasto ON / OFF 2 per il
canale relativo all’utenza che si
desidera accendere o spegnere. Il
telecomando controlla fino a 4 prese
telecomandabili (singolarmente, in
gruppi o tutte contemporaneamente).
2. Attivare il tasto TUTTI ON / OFF
per commutare contemporaneamente tutte le prese telecomandabili.
Indicazioni di errore
In caso di problemi di funzionamento del telecomando, controllare il sistema in relazione ai
seguenti punti:
Problema
Lampada di controllo
funzionamento
del telecomando si
accende, nessuna
reazione
·
Rimedio
Controllare che la potenza
in ampere delle batterie
sia ancora sufficiente. Se
necessario inserire due
nuove batterie.
3
1
25 IT/CH
Page 26

Messa in funzione / Pulizia
Problema
Rimedio
Problema
Rimedio
Lampada di controllo
funzionamento
1
del telecomando non
si accende alla pressione di ON o OFF
·
Controllare che le batterie
siano state inserite correttamente.
· Controllare che le batterie presentino un buon
contatto con i morsetti,
se necessario premere.
Nessuna reazione
dell'utenza
· Controllare se l’utenza
è accesa.
· Assegnare alla presa
telecomandabile un nuovo codice (vedi „Preparazione della presa telecomandabile“, punto 3).
· Avvicinare per verificare
che la portata sia sufficiente per il luogo desiderato.
Pro-
Portata insufficiente
blema
Rime-
dio
· Per portate elevate assicurarsi che la presenza di
pareti, mobili ecc. tra il
telecomando e la presa
telecomandabile sia il
più possibile ridotta.
· Se la portata è limitata
solo temporaneamente,
il motivo può essere un
trasmettitore operante
su una frequenza simile.
Non appena tale trasmettitore si attiva, la portata
diminuisce (ad es. cuffie
senza fili, radiorilevatore
di movimento, radiocampanello ecc.).
Pulizia
Non devono penetrare liquidi all’in-
terno dell’apparecchio. Per pulire
l’alloggiamento utilizzare un panno
morbido. Non utilizzare mai benzina,
solventi o detergenti aggressivi per
la plastica.
Prima della pulizia separare sempre
la presa telecomandabile dalla presa
a muro e tutte le spine dall’apparecchio.
26 IT/CH
Page 27

Smaltimento / Garanzia e assistenza
Smaltimento
Non gettare gli
apparecchi elettrici nei
rifiuti domestici!
Ai sensi della direttiva europea
2012 / 19 / EC sullo smaltimento di apparecchi elettrici ed elettronici usati, gli
apparecchi elettrici usati, le lampade e le
batterie usate devono essere raccolti in
maniera differenziata e riciclati nel rispetto
dell’ambiente. Informarsi presso l’amministrazione comunale o cittadina sulle
possibilità di smaltimento dell’apparecchio
non più utilizzabile.
Danni ambientali dovuti
a uno smaltimento non
Pb
corretto delle batterie!
Le batterie non devono essere gettate nei
rifiuti domestici. Infatti possono contenere
metalli pesanti tossici e fanno parte dei
rifiuti speciali. Per questo motivo consegnare le batterie scariche presso un
punto di raccolta comunale.
con attenzione prima della fornitura. La
prestazione di garanzia trova applicazione solamente per vizi di materiale e
di fabbricazione in presenza di un utilizzo corretto. La garanzia decade in
caso di intervento sul prodotto da parte
di terzi. I diritti dell’acquirente ai sensi
di legge non vengono limitati dalla presente garanzia. In caso di necessità di
interventi di riparazione nel periodo di
garanzia, mettersi in contatto telefonicamente con il punto di assistenza.
Solo in questo modo si può garantire la
spedizione gratuita dell’apparecchio.
Recapito
dell’assistenza
BAT, Lindenstraße 35,
72074 Tübingen, Germania
E-mail: exp@bat-tuebingen.com
Tel.: 00800 48720741
Per maggiori informazioni rimandiamo
all’area Assistenza / FAQ sul nostro sito
www.dvw-service.com.
Garanzia e assistenza
Dichiarazione
di garanzia
Questo apparecchio dispone di una
garanzia di 3 anni a partire dalla data
di acquisto. Si prega di conservare lo
scontrino di cassa a dimostrazione
dell’avvenuto acquisto. L’apparecchio è
stato realizzato con cura ed esaminato
IAN 91210
Dichiarazione di
conformità
La dichiarazione di conformità è
depositata al seguente link:
www.dvw-service.com/konformitaetserklaerung/ke_1049012706.pdf
27 IT/CH
Page 28

Garanzia e assistenza
Produttore
BAT
Lindenstraße 35
72074 Tübingen
Germania
28 IT/CH
Page 29

Table of contents
Introduction
Proper handling ........................................................................................... Page 30
Scope of supply ........................................................................................... Page 30
Control elements .......................................................................................... Page 30
Technical data .............................................................................................. Page 30
Safety
Safety advice ............................................................................................... Page 31
Setting up
Preparing the remote control ......................................................................Page 31
Setting up the remote- controlled socket ...................................................Page 32
Setting-up operation
Using the radio-controlled socket............................................................... Page 33
Using the remote- control ............................................................................ Page 33
Trouble-shooting .......................................................................................... Page 33
Cleaning .................................................................................................... Page 34
Disposal .....................................................................................................Page 35
Guarantee and service
Guarantee .................................................................................................... Page 35
Service address ........................................................................................... Page 35
Declaration of conformity ........................................................................... Page 35
Manufacturer ............................................................................................... Page 36
29 GB
Page 30

Introduction
Electrical Sockets
Introduction
Proper handling
The radio-controlled socket set is suitable
for switching electrical equipment on and
off by remote control. Any alterations to
this device are not in accordance with
regulations and could represent significant risk of accidents. The manufacturer
does not accept liability for any damage
caused through the device not being
used in accordance with the regulations.
This device is not intended for commercial
use.
Scope of supply
After you have unpacked this set, please
check to make sure all the contents are
complete.
4 Remote controlled sockets
1 4-channel remote control
2 Batteries AAA (for remote control)
1 Set of operating instructions
Control elements
Remote control (fig. A):
Power indicator light
1
Channel ON / OFF button Channel
2
A, B, C, D
Master ON / OFF switch
3
Battery compartment lid
4
Remote-controlled socket (fig. B):
Manual ON / OFF button
5
LED power indicator
6
LEARN button
7
Child protection socket
8
Technical data
Remote control
RCS AAA3680-A IP20:
Batteries:
2 x AAA, each 1.5 V
Transmission
frequency: 433.92 MHz
Licensing: The system is li-
censed for general
use, is free of
charge and does
not require regis-
tration.
Range: Depending on the
circumstances
approx. 25 m under
optimum circum-
stances.
Radio-controlled sockets
RCE AAA3680-A IP20 CH:
Rated voltage: 230 V~ 50 Hz
Breaking capacity: 10 A 2.300 W
Standby power
consumption: < 0,7 W
Transmission
frequency: 433.92 MHz
Advice: The radio-controlled sockets
each have a child protection socket
8
,
which significantly increases safety at
home. The contacts are protected in
such a way that children cannot stick
30 GB
Page 31

Introduction / Safety / Setting up
needles or other sharp objects into them
and thus get an electric shock. Nevertheless, please keep the device out of
the reach of children at all times.
Safety
Safety advice
Read these operating instructions and
safety advice carefully. Look at the diagram page and familiarise yourself with
all functions of the device before starting it up for the first time.
Avoid danger to life from
electric shock!
Only connect the radio-controlled
sockets to earthed 230 V~ domestic
sockets.
At all costs, avoid exposure to damp
and extreme temperatures.
Only use the radio-controlled sockets
in enclosed spaces. They are not
suitable for outdoor use.
Despite the child protection socket
8
, please keep the device out of
the reach of children at all times.
Avoid overloading the device. Over-
loading can cause a fire hazard or
damage to the device. The maximum
capacity is approx. 2.300 W per
radio-controlled socket.
Please contact the service department
immediately operational faults arise.
Do not open the device on any ac-
count. All necessary repairs should
only be carried out by the service
department or a specialist electrical
workshop.
Before cleaning always disconnect
the device from the mains supply. In
this case always remove the radiocontrolled electrical outlet socket from
the mains wall socket and remove
all plugs from the device.
Do not have one radio-controlled
electrical outlet socket inserted
behind the other.
Do not use any additional child
protection devices for the radiocontrolled sockets. The connection
between the plug and the radiocontrolled socket could be impaired
and risk from overheating then arises.
The radio-controlled sockets already
have a child protection device which
prevents children from putting any
objects into the socket.
Make sure that the connected radio-
controlled electrical outlet sockets are
freely accessible and not covered by
other objects.
If the device malfunctions, switch it
off immediately.
These instructions are a component
of the device. If you pass the device
on to a third party, these instructions
must also be handed on.
Setting up
Preparing the remote
control (fig. A)
1. Open the battery compartment on
the back of the remote control by
31 GB
Page 32

Setting up
pushing away the battery compartment cover
4
downwards. Insert
two batteries AAA. Make sure you
fit the battery the right way round
(polarity).
2. Press one of the ON / OFF buttons
or 3 to test whether the remote
2
control works; if it does, the power
indicator light will come on
Setting up the remote-
.
1
controlled socket
1. Insert the remote-controlled socket
into an earthed household socket
and switch it on with the ON / OFF
switch
display
2. Point the remote control at the re-
mote-controlled socket at a distance
of approx. 50 cm.
3. Press the LEARN button
remote-controlled socket for approx. 3 seconds and release it
again. The LED operating status display
seconds. While it is flashing, press the
desired ON button of the channel
ON / OFF button
of the remote control. The LED operating status display
shine permanently. You can now
switch a connected consumer on or
off using the remote control.
4. Repeat this procedure with the oth-
er remote-controlled socket.
5. You can switch several remote-con-
trolled sockets on and off at the
same time using the ON / OFF but-
. The LED operating status
5
will come on.
6
of the
7
will flash for approx. 10
6
(A, B, C or D)
2
will now
6
ton
of one channel. In addition,
2
you can programme six remote
controls one after the other and use
them for individual receivers. This
means you can switch one appliance
on and off from up to six different
places.
6. In this case, synchronise every remote-controlled socket with the
channel of the remote control.
7. The coding of the remote control
will be maintained even when you
change the batteries.
8. If you disconnect the remote-controlled socket from the power supply,
the codings will be permanently
stored.
9. In order to delete the codings again,
press the LEARN button
longer
7
than 6 seconds until the LED operating status display
starts to flash.
6
All codings will now be deleted.
10. Avoid interference: Make sure that
the distance between the various
remote-controlled sockets is approx.
50 cm.
11. Every remote-controlled socket also
has a manual ON / OFF switch
5
You can switch the remote-controlled
socket on and off without using the
remote control. The LED operating
status display
will indicate
6
whether the remote-controlled socket is in the ON / OFF mode.
.
32 GB
Page 33

Setting-up operation
Setting-up operation
Using the radio-controlled
socket (fig. B)
1. Put the radio-controlled socket into
any shuttered socket and connect
the appliance you want to operate.
2. Switch the electrical appliance on.
The radio-controlled socket can
only perform its switching function
when the device to be controlled is
switched on.
ATTENTION! FIRE HAZARD!
Do not attach any appliances which
could cause fires or other damaged
if left unattended when switched
on. The maximum load of every
radio-controlled socket is approx.
2.300 W. Any overload could cause
a risk of fire or damage to the device.
3. Press the manual ON / OFF button
to switch the remote-controlled
5
socket on directly on the appliance.
The LED operating status display
will shine. Alternatively, you can also
switch the remote-controlled socket
on using the remote control (See
“Using the remote control”).
4. Press the manual ON / OFF button
to switch the remote-controlled
5
socket off directly on the appliance.
The LED operating status display
will go out. Alternatively, you can
also switch the remote-controlled
socket off using the remote control
(See “Using the remote control”).
Using the remotecontrol (fig. A)
1. Use the button ON / OFF
the channel whose device you would
like to switch on or off. The remote
control controls up to 4 radio-controlled sockets (individually, in groups,
or all at the same time).
2. Use the ALL-ON / OFF button
switch all radio-controlled sockets on
or off at the same time.
Trouble-shooting
If the remote control does not
work, please check the following points:
Problem
6
Remedy
6
The operating indicator
on the remote
1
control device illuminates but there is no
reaction
· Check that the batteries
still have enough power.
If applicable put in new
batteries.
2
for
3
to
33 GB
Page 34

Setting-up operation / Cleaning
Problem
Remedy
Problem
Remedy
No indicator light
on remote control
when pressing “ON”
or “OFF”
· Check if the batteries are
inserted correctly.
· Check if the batteries
have proper contact with
the springs, if necessary
adjust.
No reaction from
consumer
· Check that the appliance
is switched on.
· Assign new code to the
remote control socket (see
„preparing the remote
control socket“, point 3).
· Check - by walking closer
to it - that the range is
correct for the desired
location.
1
Problem
Remedy
Ensure that no liquids get into the
Before cleaning, always disconnect
Range is too small
· For large ranges, ensure
that as few walls and as
little furniture as possible
are in the way of the
remote control and the
radio-controlled socket.
· If the range is too small
at times, the reason could
be a remote control which
works on a similar frequency. Whenever this remote
control is active, the range
declines (e.g. wireless
headphones, radio-controlled movement alarms,
radio gongs etc.).
Cleaning
inside of the device. Use a soft cloth
to clean the housing. Never use
petroleum, solvents or cleaners
which corrode plastics.
the radio-controlled socket from the
wall socket and remove all power
plugs from the device.
34 GB
Page 35

Disposal / Guarantee and service
Disposal
Electrical appliances
must not be disposed
of with domestic waste.
In accordance with Council Directive
2012 / 19 / EC on waste electrical and
electronic equipment (WEEE), used
electrical appliances, lighting equipment
and batteries have to be collected separately and recycled in an environmentally friendly way. Enquire at your city
council or local government regarding
the possibilities of disposing of electronic
waste in a correct and environmentally
friendly way.
Environmental damage
through incorrect dis-
Pb
posal of the batteries!
Batteries should not be disposed of with
domestic waste. They may contain toxic
heavy metals and are subject to hazardous waste treatment rules and regulations. That is why you should dispose of
used batteries at a local collection
point.
and thoroughly checked before dispatch.
The guarantee only applies to faults in
materials or workmanship when used
properly. The guarantee lapses in cases
of unauthorized tampering. This guarantee does not restrict your legal rights.
If you wish to make a claim under the
guarantee, please telephone the service
centre. Only by doing so can we ensure
that your appliance is returned free of
charge.
Service address
BAT, Lindenstraße 35,
72074 Tübingen, Germany
E-mail: exp@bat-tuebingen.com
Service Tel.: 00800 48720741
For further information, we recommend
you visit the service section / FAQs of
our home page www.dvw-service.com.
IAN 91210
Declaration of
conformity
Guarantee and service
Guarantee
This appliance comes with a 3-year
guarantee commencing on the date of
purchase. Please keep your receipt as
proof of purchase. The appliance has
been produced to the highest standards
The Declaration of Conformity can be
found at the following link:
www.dvw-service.com/konformitaetserklaerung/ke_1049012706.pdf
35 GB
Page 36

Guarantee and service
Manufacturer
BAT
Lindenstraße 35
72074 Tübingen
Germany
36 GB
Page 37

BAT
Lindenstraße 35
72074 Tübingen
Germany
Stand der Informationen · Version des informations
Versione delle informazioni · Last Information Update:
07 / 2013 · Ident.-No.: 0472163 072013-CH
IAN 91210
 Loading...