

Page 1
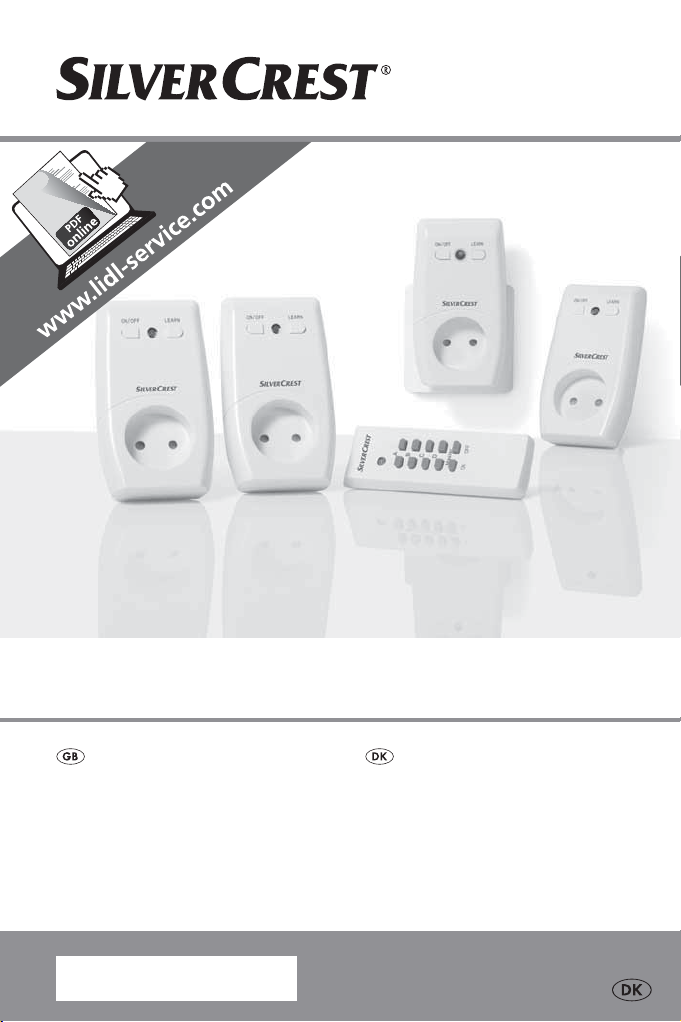
ELECTRICAL SOCKETS
ELECTRICAL SOCKETS
Operation and Safety Notes
IAN 91210
RADIOSTYREDE STIKDÅSER
Brugs- og sikkerhedsanvisninger
Page 2
Before reading, unfold the page containing the illustrations and familiarise yourself
with all functions of the device.
Før du læser, vend siden med billeder frem og bliv bekendt med alle apparatets
funktioner.
GB Operation and Safety Notes Page 5
DK Brugs- og sikkerhedsanvisninger Side 13
Page 3
A
1
A
B
B
C
D
Master
4
5 6 7
ON/OFF LEARN
OFFON
2
3
8
Page 4

Page 5

Table of contents
Introduction
Proper handling ........................................................................................... Page 6
Scope of supply ...........................................................................................Page 6
Control elements .......................................................................................... Page 6
Technical data ..............................................................................................Page 6
Safety
Safety advice ............................................................................................... Page 7
Setting up
Preparing the remote control ...................................................................... Page 7
Setting up the remote- controlled socket ...................................................Page 8
Setting-up operation
Using the radio-controlled socket............................................................... Page 9
Using the remote- control ............................................................................ Page 9
Trouble-shooting .......................................................................................... Page 9
Cleaning .................................................................................................... Page 10
Disposal .....................................................................................................Page 11
Guarantee and service
Guarantee .................................................................................................... Pag e 11
Service address ...........................................................................................Page 11
Declaration of conformity ...........................................................................Page 11
Manufacturer ............................................................................................... Page 12
5 GB
Page 6
Introduction
Electrical Sockets
Introduction
Proper handling
The radio-controlled socket set is suitable
for switching electrical equipment on and
off by remote control. Any alterations to
this device are not in accordance with
regulations and could represent significant risk of accidents. The manufacturer
does not accept liability for any damage
caused through the device not being
used in accordance with the regulations.
This device is not intended for commercial
use.
Scope of supply
After you have unpacked this set, please
check to make sure all the contents are
complete.
4 Remote controlled sockets
1 4-channel remote control
2 Batteries AAA (for remote control)
1 Set of operating instructions
Control elements
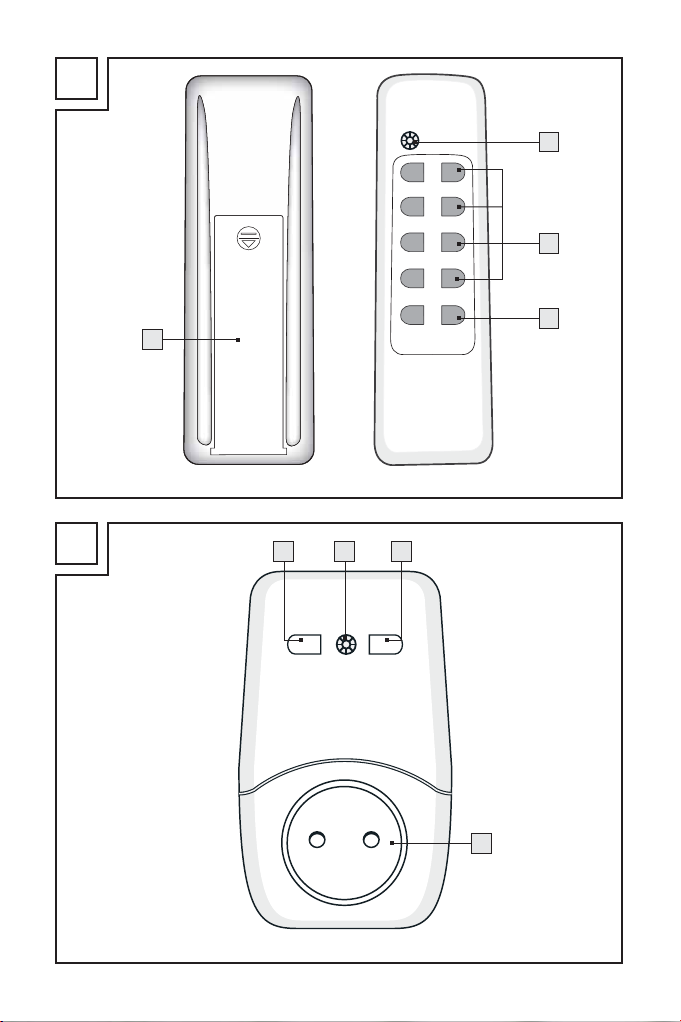
Remote control (fig. A):
Power indicator light
1
Channel ON / OFF button Channel
2
A, B, C, D
Master ON / OFF switch
3
Battery compartment lid
4
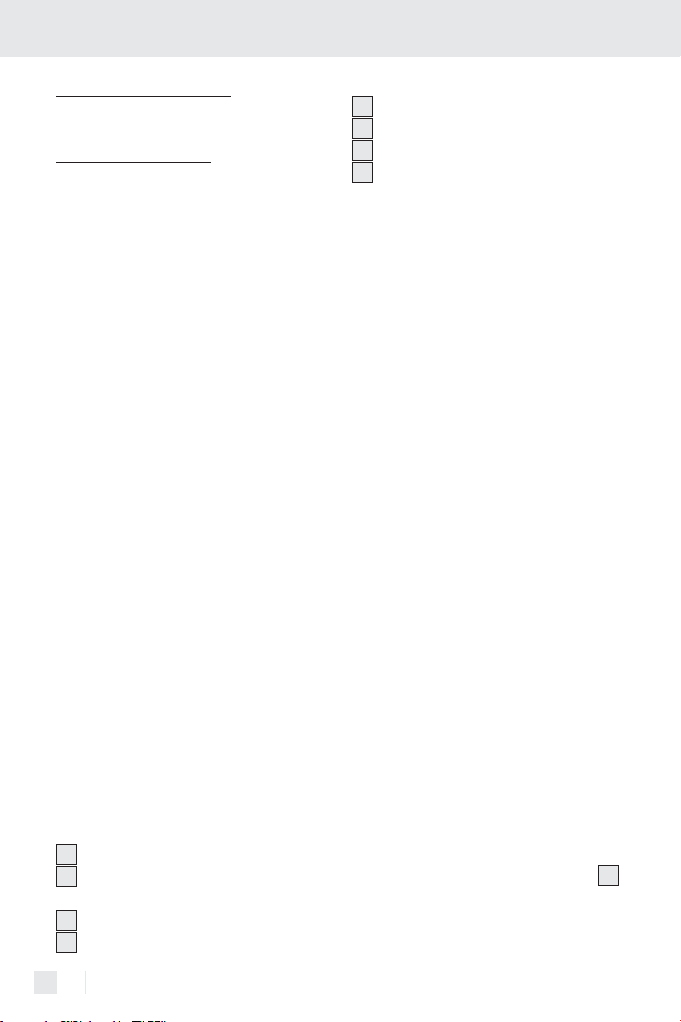
Remote-controlled socket (fig. B):
Manual ON / OFF button
5
LED power indicator
6
LEARN button
7
Child protection socket
8
Technical data
Remote control
RCS AAA3680-A IP20:
Batteries:
2 x AAA, each 1.5 V
Transmission
frequency: 433.92 MHz
Licensing: The system is li-
censed for general
use, is free of
charge and does
not require regis-
tration.
Range: Depending on the
circumstances
approx. 25 m under
optimum circum-
stances.
Radio-controlled sockets
RCE AAA3680-A IP20 DK:
Rated voltage: 230 V~ 50 Hz
Breaking capacity:
15,7A 3.600W
Standby power
consumption:
< 0,7 W
Transmission
frequency: 433.92 MHz
Advice: The radio-controlled sockets
each have a child protection socket
which significantly increases safety at
home. The contacts are protected in
such a way that children cannot stick
8
,
6 GB
Page 7
Introduction / Safety / Setting up
needles or other sharp objects into
them and thus get an electric shock.
Nevertheless, please keep the device
out of the reach of children at all times.
Safety
Safety advice
Read these operating instructions and
safety advice carefully. Look at the diagram page and familiarise yourself with
all functions of the device before starting it up for the first time.
Avoid danger to life from elec-
tric shock!
Only connect the radio-controlled
sockets to earthed 230 V~ domestic
sockets.
At all costs, avoid exposure to
damp and extreme temperatures.
Only use the radio-controlled sockets
in enclosed spaces. They are not
suitable for outdoor use.
Despite the child protection socket
8
, please keep the device out of
the reach of children at all times.
Avoid overloading the device.
Overloading can cause a fire hazard
or damage to the device. The maximum capacity is approx. 3.600 W
per radio-controlled socket.
Please contact the service department
immediately operational faults arise.
Do not open the device on any ac-
count. All necessary repairs should
only be carried out by the service
department or a specialist electrical
workshop.
Before cleaning always disconnect
the device from the mains supply. In
this case always remove the radiocontrolled electrical outlet socket
from the mains wall socket and
remove all plugs from the device.
Do not have one radio-controlled
electrical outlet socket inserted
behind the other.
Do not use any additional child
protection devices for the radiocontrolled sockets. The connection
between the plug and the radiocontrolled socket could be impaired
and risk from overheating then arises.
The radio-controlled sockets already
have a child protection device which
prevents children from putting any
objects into the socket.
Make sure that the connected
radio-controlled electrical outlet
sockets are freely accessible and not
covered by other objects.
If the device malfunctions, switch it
off immediately.
These instructions are a component
of the device. If you pass the device
on to a third party, these instructions
must also be handed on.
Setting up
Preparing the remote
control (fig. A)
1. Open the battery compartment on
the back of the remote control by
7 GB
Page 8

Setting up
pushing away the battery compartment cover
4
downwards. Insert
two batteries AAA. Make sure you
fit the battery the right way round
(polarity).
2. Press one of the ON / OFF buttons
or 3 to test whether the remote
2
control works; if it does, the power
indicator light will come on
Setting up the remote-
.
1
controlled socket
1. Insert the remote-controlled socket
into an earthed household socket
and switch it on with the ON / OFF
switch
display
2. Point the remote control at the remote-
controlled socket at a distance of
approx. 50 cm.
3. Press the LEARN button
remote-controlled socket for approx. 3 seconds and release it
again. The LED operating status display
seconds. While it is flashing, press the
desired ON button of the channel
ON / OFF button
of the remote control. The LED operating status display
shine permanently. You can now
switch a connected consumer on or
off using the remote control.
4. Repeat this procedure with the other
remote-controlled socket.
5. You can switch several remote-con-
trolled sockets on and off at the
same time using the ON / OFF but-
. The LED operating status
5
will come on.
6
of the
7
will flash for approx. 10
6
(A, B, C or D)
2
will now
6
ton
of one channel. In addition,
2
you can programme six remote
controls one after the other and use
them for individual receivers. This
means you can switch one appliance
on and off from up to six different
places.
6. In this case, synchronise every remotecontrolled socket with the channel
of the remote control.
7. The coding of the remote control
will be maintained even when you
change the batteries.
8. If you disconnect the remote-controlled socket from the power supply,
the codings will be permanently
stored.
9. In order to delete the codings again,
press the LEARN button
longer
7
than 6 seconds until the LED operating status display
starts to flash.
6
All codings will now be deleted.
10. Avoid interference: Make sure that
the distance between the various
remote-controlled sockets is approx. 50 cm.
11. Every remote-controlled socket also
has a manual ON / OFF switch
5
You can switch the remote-controlled
socket on and off without using the
remote control. The LED operating
status display
will indicate
6
whether the remote-controlled socket is in the ON / OFF mode.
.
8 GB
Page 9

Setting-up operation
Setting-up operation
Using the radio-controlled
socket (fig. B)
1. Put the radio-controlled socket into
any shuttered socket and connect
the appliance you want to operate.
2. Switch the electrical appliance on.
The radio-controlled socket can
only perform its switching function
when the device to be controlled is
switched on.
ATTENTION! FIRE HAZARD!
Do not attach any appliances which
could cause fires or other damaged
if left unattended when switched
on. The maximum load of every
radio-controlled socket is approx.
3.600 W. Any overload could cause
a risk of fire or damage to the device.
3. Press the manual ON / OFF button
to switch the remote-controlled
5
socket on directly on the appliance.
The LED operating status display
will shine. Alternatively, you can also
switch the remote-controlled socket
on using the remote control (See
“Using the remote control”).
4. Press the manual ON / OFF button
to switch the remote-controlled
5
socket off directly on the appliance.
The LED operating status display
will go out. Alternatively, you can
also switch the remote-controlled
socket off using the remote control
(See “Using the remote control”).
Using the remotecontrol (fig. A)
1. Use the button ON / OFF
the channel whose device you would
like to switch on or off. The remote
control controls up to 4 radio-controlled sockets (individually, in groups,
or all at the same time).
2. Use the ALL-ON / OFF button
switch all radio-controlled sockets on
or off at the same time.
Trouble-shooting
If the remote control does not
work, please check the following points:
Problem
6
Remedy
6
The operating indicator
on the remote
1
control device illuminates but there is no
reaction
· Check that the batteries
still have enough power.
If applicable put in new
batteries.
2
for
3
to
9 GB
Page 10

Setting-up operation / Cleaning
Problem
Remedy
Problem
Remedy
No indicator light
on remote control
when pressing “ON”
or “OFF”
· Check if the batteries are
inserted correctly.
· Check if the batteries
have proper contact with
the springs, if necessary
adjust.
No reaction from
consumer
· Check that the appliance
is switched on.
· Assign new code to the
remote control socket (see
„preparing the remote
control socket“, point 3).
· Check - by walking closer
to it - that the range is
correct for the desired
location.
1
Problem
Remedy
Ensure that no liquids get into the
Before cleaning, always disconnect
Range is too small
· For large ranges, ensure
that as few walls and as
little furniture as possible
are in the way of the
remote control and the
radio-controlled socket.
· If the range is too small
at times, the reason could
be a remote control which
works on a similar frequency. Whenever this remote
control is active, the range
declines (e.g. wireless
headphones, radio-controlled movement alarms,
radio gongs etc.).
Cleaning
inside of the device. Use a soft cloth
to clean the housing. Never use
petroleum, solvents or cleaners
which corrode plastics.
the radio-controlled socket from the
wall socket and remove all power
plugs from the device.
10 GB
Page 11

Disposal / Guarantee and service
Disposal
Electrical appliances
must not be disposed
of with domestic waste.
In accordance with Council Directive
2012 / 19 / EC on waste electrical and
electronic equipment (WEEE), used
electrical appliances, lighting equipment
and batteries have to be collected separately and recycled in an environmentally friendly way. Enquire at your city
council or local government regarding
the possibilities of disposing of electronic
waste in a correct and environmentally
friendly way.
Environmental damage
through incorrect dis-
Pb
posal of the batteries!
Batteries should not be disposed of with
domestic waste. They may contain toxic
heavy metals and are subject to hazardous waste treatment rules and regulations.
That is why you should dispose of used
batteries at a local collection point.
The guarantee only applies to faults in
materials or workmanship when used
properly. The guarantee lapses in cases
of unauthorized tampering. This guarantee does not restrict your legal rights.
If you wish to make a claim under the
guarantee, please telephone the service
centre. Only by doing so can we ensure
that your appliance is returned free of
charge.
Service address
BAT, Lindenstraße 35,
72074 Tübingen, Germany
E-mail: exp@bat-tuebingen.com
Service Tel.: 00800 48720741
For further information, we recommend
you visit the service section / FAQs of
our home page www.dvw-service.com.
IAN 91210
Declaration of
conformity
Guarantee and service
Guarantee
This appliance comes with a 3-year
guarantee commencing on the date of
purchase. Please keep your receipt as
proof of purchase. The appliance has
been produced to the highest standards
and thoroughly checked before dispatch.
The Declaration of Conformity can be
found at the following link:
www.dvw-service.com/konformitaetserklaerung/ke_1049035706.pdf
11 GB
Page 12

Guarantee and service
Manufacturer
BAT
Lindenstraße 35
72074 Tübingen
Germany
12 GB
Page 13

Indholdsfortegnelse
Indledning
Anvendelse efter bestemmelsen ..................................................................Side 14
Indholdet ....................................................................................................... Side 14
Betjeningselementer .....................................................................................Side 14
Tekniske specifikationer ................................................................................Side 14
Sikkerhed
Bemærkninger om sikkerheden ...................................................................Side 15
Forberedning
Fjernbetjening forberedes ............................................................................Side 15
Radiostikkontakten forberedes ....................................................................Side 16
Ibrugtagning
Anvendelse af radiostikdåse ........................................................................Side 16
Anvendelse af fjernbetjening .......................................................................Side 17
Fejlhenvisninger ............................................................................................Side 17
Rengøring ................................................................................................. Side 18
Bortskaffelse .........................................................................................Side 18
Garanti og service
Garantier klæring ..........................................................................................Sid e 18
Serviceadresse .............................................................................................Side 19
Konformitets erklæring ..................................................................................Sid e 19
Producent ......................................................................................................Side 19
13 DK
Page 14

Indledning
Radiostyrede stikdåser
Indledning
Anvendelse efter
bestemmelsen
Radiostikdåsesættet er egnet til fjernstyret
til- og frakobling af elektriske apparater.
Alle forandringen af apparatet er i strid
med formålet og kan betyde alvorlige
risici for ulykkestilfælde. Fremstilleren
påtager sig for skader efter anvendelse
i strid med formålet intet ansvar. Dette
apparat er ikke beregnet til erhvervsmæssig anvendelse.
Indholdet
Undersøg efter udpakning af dette sæt
at indholdet er fuldstændigt.
4 radiostikkontakter
1 4-kanal-fjernbetjening
2 batterier AAA (til fjernbetjening)
1 betjeningsvejledning
Betjeningselementer
Fjernbetjening (illustr. A):
1
Driftskontrollampe
2
Kanal-ON- / OFF-tast kanal A, B, C, D
3
ALL-ON- / OFF-tast (ma-
ster-TÆND / SLUK)
4
Batteribeholderdæksel
14 DK
Radiostikkontakt (illustr. B):
5
Manuel ON- / OFF-tast (TÆND / SLUK)
6
LED-driftsvisning
7
LEARN-tast (lære)
8
Børnesikret stikkontakt
Tekniske
specifikationer
Fjernbetjening
RCS AAA3680-A IP20:
Batterier: 2 x AAA, je 1,5 V
Transmissionsfrekvens: 433,92 MHz
Tilladelse: Systemet råder
over en generel
tilladelse (BZT)
og er fritaget for
anmeldelses- og
gebyrpligt.
Rækkevidde: Afhængigt af de
omgivende betingelser ca. 25 m
ved optimale
betingelser.
Radiostikdåse
RCE AAA3680-A IP20 DK:
Nominel spænding: 230 V~, 50 Hz
Kontakteffekt:
Stand-by-forbrug:
Transmissionsfrekvens: 433,92 MHz
Henvisning: Radiostikdåserne råder
begge over en børnesikrings-stikdåse
Derved bliver sikkerheden i huset klart
forøget. Kontakterne er sikret tilsvarende
så børn ikke kan etablere nogen ledende
forbindelse (f.eks. med en nål eller lignende). Alligevel bør apparatet opbevares
uden for børns rækkevidde.
15,7A 3.600W
< 0,7 W
8
.
Page 15

Sikkerhed
Bemærkninger
om sikkerheden
Betjeningsvejledning og sikkerhedshenvisningerne bør gennemlæses opmærksomt. Klap billedsiden ud, og gør Dem
fortrolig med alle apparatets funktioner
før De tager det i brug første gang.
Undgå livsfare fra elektriske
stød!
Radiostikdåserne må kun sluttes til
jordede 230 volts stikdåser.
Påvirkninger fra fugtighed og eks-
treme temperaturer skal under alle
omstændigheder undgås.
Anvend kun radiostikdåserne i luk-
kede rum. De er ikke egnet til udendørs anvendelse.
Uanset stikdåsen med børnesikring
8
bør De opbevare stikdåsen
uden for børnsrækkevidde.
Undgå overbelastning af apparatet.
Ved overbelastning kan der optræde
brandfare eller skader på apparatet.
Den maximale belastbarhed andrager ca. 3.600 W pr. radiostikdåse.
I tilfælde af funktionsforstyrrelser
bedes De omgående henvende
Dem til serviceafdelingen.
Undlad under alle omstændigheder
at åbne apparatet på egen hånd.
Lad nødvendige reparationer udelukkende udføre af serviceafdelingen
eller et elektro-fagværksted.
Før rengøring af apparatet skal
strømmen ubetinget afbrydes. I sådanne tilfælde skal radiostikdåsen
Sikkerhed / Forberedning
skilles fra el-nettet og alle stikkontakter fra apparatet.
Radiostikdåserne må ikke stikkes efter
hinanden.
Anvend ingen yderligere børnesik-
ringer til radiostikdåserne. Forbindelsen mellem stikkontakt og radiostikdåse kan blive forstyrret, og der er
da risiko for overophedning. Radiostikdåserne råder allerede over en
børnesikring der forhindrer at børn
kan stikke genstande ind i stikdåsen.
Forvis Dem om at de tisluttede radio-
stikdåser er frit tilgængelige og ikke
er tildækket med nogen genstande.
I tilfælde af uregelmæssigheder skal
apparatet straks slås fra.
Denne vejledning er en bestanddel
af apparatet. Derfor skal det videregives til radiostikdåsen, hvis De
giver apparatet bort.
Forberedning
Fjernbetjening
forberedes (illustr. A)
1. Batteribeholderen på fjernbetjeningens bagside åbnes, idet batteribeholderdækslet
nedad. Indsæt to AAA-batterier.
Vær opmærksom på den rigtige
polaritet.
2. En af ON- / OFF-tasterne
trykkes, for at kontrollere, om fjernbetjeningen virker; hvis den gør,
lyser driftskontrollampen
4
skubbes væk
2
eller 3
1
.
15 DK
Page 16

Forberedning / Ibrugtagning
Radiostikkontakten
forberedes
1. Radiostikkontakten sættes til en jordet
husholdningsstikkontakt og tændes
6
6
vedva-
5
blinker
2
(A, B,
2
kan
7
ved hjælp af ON- / OFF-tasten
LED-driftsvisningen
6
lyser op.
2. Fjernbetjeningen holdes rettet mod
radiostikkontakten i en afstand på
ca. 50 cm.
3. Radiostikkontaktens tast LEARN
trykkes i ca. 3 sekunder og slippes
igen. LED-driftsvisningen
nu i ca. 10 sekunder. Mens den
blinker trykkes den ønskede ON-tast
på kanal-ON- / OFF-tasten
C eller D) på fjernbetjeningen. Nu
lyser LED-driftsvisningen
rende. Nu kan den tilsluttede forbruger tændes og slukkes fjernstyret.
4. Denne procedure gentages med
den anden radiostikkontakt.
5. Med kanal-ON- / OFF-tasten
flere radiostikkontakter betjenes
samtidig. Udover kan seks fjernbetjeninger indlæres efterhinanden og
disse kan så bruges til en enkelt forbruger. På den måde kan apparatet
betjenes fra op til seks forskellige
steder.
6. I dette tilfælde synkroniseres hver
radiostikkontakt med kanalen på
fjernbetjeningen.
7. Fjernbetjeningens kode gemmes
også, når batterierne skiftes.
8. Hvis radiostikkontakten tages fra
strømnettet, forbliver kodningerne
gemt vedvarende.
9. For at slette kodningerne igen, trykkes LEARN-tasten
7
længere end
6 sekunder, indtil LED-driftsvisnin-
6
gen
begynder at blinke igen.
Alle kodningerne er slettet nu.
10. Undgå forstyrrelser: Sikker, at
afstanden mellem de forskellige
.
radiostikkontakter er ca. 50 cm.
11. Hver radiostikkontakt har udover en
manuel ON- / OFF-tast
stikkontakten kan også tændes eller
slukkes uden fjernbetjening. LEDdriftsvisningen
6
viser, om radiostikkontakten er i TÆND / SLUKmodus.
Ibrugtagning
Anvendelse af radiostikdåse (illustr. B)
1. Radiostikdåsen stikkes ind i en sikkerhedskontaktstikdåse og sluttes til den
strømforbruger der skal kobles.
2. Apparatet slås til. Radiostikdåsen
kan kun varetage koblingsfunktionen
hvis det det pågældende apparat
er slået til.
FORSIGTIG! BRANDFARE! Til-
slut ikke apparater hvis utilsigtede
tilkobling kan forårsage brand eller
andre skader. Den maksimale belastbarhed pr. radiostikdåse andrager
ca. 3.600 W. En overbelastning kan
forårsage brandfare eller skader på
apparatet.
3. Den manuelle ON- / OFF-tast
trykkes, for at tænde radiostikkontakten på selve apparatet. LEDdriftsvisningen
kan radiostikkontakten også tændes
6
lyser. Alternativt
5
. Radio-
5
16 DK
Page 17

Ibrugtagning
ved hjælp af fjernbetjeningen (se
”Fjernbetjening anvendes”).
4. Den manuelle ON- / OFF-tast
trykkes, for at slukke radiostikkontakten på selve apparatet. LED-driftsvisningen
kan radiostikkontakten også slukkes
ved hjælp af fjernbetjeningen (se
” Anvendelse af fjernbetjening”).
Anvendelse af
6
slukkes. Alternativt
5
fjernbetjening (illustr. A)
1. Tasten ON / OFF 2 aktiveres for
den kanal hvis strømforbruger der
skal slås til eller fra. Fjernbetjeningen styrer indtil 4 radiostikdåser
(enkeltvis, i grupper eller alle på en
gang).
2. Tryk ALL-ON- / OFF-tasten
stille alle radiostikdåser om samtidigt.
Fejlhenvisninger
Hvis fjernkoblingen ikke fungerer, eftergås systemet på
følgende punkter:
3
for at
Problem
Afhjælpning
Problem
Afhjælpning
Driftskontrollampe 1
på fjernbetjeningen
lyser ikke ved tryk
på ”ON” eller ”OFF”
· Kontroller om batterierne
er lagt rigtigt i.
· Kontrollér om batterierne
har god kontakt med
klemmerne, trykkes evt.
på.
Ingen reaktion hos
forbrugeren
· Se efter om forbrugeren
er slået til.
· Giv radiostikkontakten
en ny kode (se „Forbered radiostikkontakt“,
punkt 3).
· Man kan ved tilnærmelse
fastslå om rækkevidden
er tilstrækkelig for den
valgte position.
Problem
Afhjælpning
Driftskontrollampe 1
på fjernbetjeningen
lyser, ingen reaktion
· Kontroller om batteriernes
amperestyrke stadig er
tilstrækkelig. Indsæt i
givet fald nye batterier.
17 DK
Page 18

Ibrugtagning / Rengøring / Bortskaffelse / Garanti og service
Problem
Afhjælpning
Rækkevidden for
ringe
· Forvis Dem for store
rækkevidder om at der
ligger færrest mulige
vægge, møbler osv.
mellem fjernbetjening
og radiostikdåse.
· Hvis rækkevidden kun er
ringe af og til, kan grunden ligge i en fjernbetjening der arbejder i en
lignende frekvens. Så
snart denne fjernbetjening er aktiv, synker
rækkevidden (f.eks. trådløse hovedtelefoner, radio-bevægelsesmelder,
radiogong osv.).
Rengøring
Der må ikke trænge vædske ind i
apparatets indre. Til rengøring af
huset benyttes der et stykke blødt stof.
Anvend aldrig benzin, opløsningsmidler ellerrengørinsmidler der angriber syntetiske stoffer.
Inden rengøringen skal radiostikdå-
sen altid trækkes ud af stikkontakten
og alle stikkontakter ud af apparatet.
Bortskaffelse
Elektroapparater må
ikke smides i husholdningsaffald!
Ifølge den europæiske retningslinje
2002 / 96 / EC om elektro- og elektronikapparater skal brugte elektronikapparater, lamper og batterier samles
hver for sig og tilføres en miljøbevidst
genanvendelse. Muligheder for bortskaffelse af Deres udtjente apparat erfarer De hos Deres kommuneforvaltning.
Miljøskader på grund
af forkert bortskaffelse
Pb
af batterier!
Batterier hører ikke til i husholdningsaffald. De kan indeholde giftige tungmetaller og underligger behandlingen af
giftigt affald. Derfor bør brugte batterier afleveres på et kommunalt indsamlingssted.
Garanti og service
Garantierklæring
3 år garanti på apparatet fra købsdato.
Venligst opbevar kassekvitteringen som
dokumentation. Apparatet er omhyggeligt produceret og kontrolleret nøje før
udlevering. Garantien gælder kun for
materiale- eller produktionsfejl ved anvendelse efter bestemmelsen. Garantien slettes ved indgreb af fremmede. Deres lovmæssige rettigheder indskrænkes
18 DK
Page 19

ikke af denne garanti. Venligst sæt Dem
telefonisk i forbindelse med servicestedet
i garantifald. Udelukkende på denne
måde kan en gratis indsendelse af Deres
apparat garanteres.
Serviceadresse
BAT, Lindenstraße 35,
72074 Tübingen, Tyskland
E-mail: exp@bat-tuebingen.com
Service-tlf.: 00800 48720741
For yderligere informationer anbefaler
serviceområdet / FAQ’er poå vores
hjemmeside www.dvw-service.com.
IAN 91210
Konformitetserklæring
Konformitetserklæringen er gemt under
følgende link
www.dvw-service.com/konformitaetserklaerung/ke_1049035706.pdf
Garanti og service
Producent
BAT
Lindenstraße 35
72074 Tübingen
Tyskland
19 DK
Page 20

20
Page 21

BAT
Lindenstraße 35
72074 Tübingen
Germany
Last Information Update · Stand der Informationen:
07 / 2013 · Ident.-No.: 0472166 072013-GB / DK
IAN 91210
 Loading...