

Siemens S42 User Manual

ss
Siemens Mobile Phones A/S
Industrivej 30
DK-9490 Pandrup
© Siemens AG 2000
All rights reserved.
Subject to availability.
Rights of modification reserved.
Siemens Aktiengesellschaft
http://www.siemens.com/mobiles
Ref. No.:A31008-H6600-A1-1-7619
Printed in Denmark
(7910.2450 GB / 08.00A)
User Guide
S42S42

Menu overview
List menu
Applications
Outgoing calls
Answered calls
Missed calls
Phone books
Status
Calculator
Dictaphone
Calendar
IrDA
WAP browser
Messages
Address and
phone book
entries
Complete survey of keypad functions
and display symbols on pp. 74-77
Setup menu
Network services
Call divert
Call barring
Call waiting
Call back
Calling name presentation
Closed user group
Network selection
Selection mode
Preferred list
Country list
Network types
Tones setup
Ringing tone
Message tone
Broadcast tone
Your own ring tone
Key tone
Silent mode
Trembler
Factory settings
Phone setup
Language
IrDA
Backlight
Handsfree
Greeting
Signal diode
Graphics
Owner ID
Call setup
Caller ID
Speed dialling
Caller access
Automatic redialling
Any key answer
Call timers and charge
Incoming call setup
Line selection
Message setup
Send SMS setup
Broadcast setup
Sorting of messages
WAP browser setup
Text input setup
Calendar setup
Set time
Set date
Display time and date
Set start of day
Remove entries
Security
PIN code on/off and change
Change PIN 2 code
SIM lock
Change network password
Encryption indication
Fixed dialling on/off
Barred dialling on/off
Keypad lock
Line lock
Siemens service
Abu Dhabi Siemens Service Center 02713500
Australia . Siemens . . . . . . . . . . 1800622414
Austria. . . . Siemens . . . . . . . . . . 0517075004
Bangladesh Siemens . . . . . . . . . . . 017527447
Belgium . . . Siemens . . . . . . . . . . . 078152221
Brunei . . . . incomm . . . . . . . . . . . . . . . . 02151
Bulgaria . . . Omnitel . . . . . . . . . . . . . 02739488
China. . . . . Siemens . . . . . . . . . 02150318149
Croatia. . . . Siemens . . . . . . . . . . . 016105381
Czech Rep.. Siemens . . . . . . . . . . 0233032727
Denmark . . Siemens . . . . . . . . . . . . 35258600
Dubai . . . . Siemens Service Center 04699720
Egypt . . . . . Siemens . . . . . . . . . . . . 23313129
Finland. . . . Siemens . . . . . . . . . . . 092294370
France . . . . Siemens . . . . . . . . . . 0156384200
Germany . . Siemens . . . . . . . . . 01805333226
Greece. . . . Siemens . . . . . . . . . . . 016864389
Hong Kong. Siemens . . . . . . . . . . . . 22583636
Hungary. . . Siemens . . . . . . . . . . 0614712444
Iceland. . . . Smith & Norland . . . . . . . 5113000
India . . . . . Siemens . . . . . . . . . . . 116923988
(ISDN) 116925589
Indonesia. . Dian Graha Elektr. . . . 0214615081
Ireland . . . . Siemens . . . . . . . . . . 1850777277
Italy . . . . . . Siemens . . . . . . . . . . 0269893691
Jordan. . . . F.A. Kettaneh . . . . . . . . 079559663
Kuwait. . . . NGEECO . . . . . . . . . . . . . 4818749
Latvia. . . . . Siemens. . . . . . . . . . . . . . 7501114
Lebanon . . . . F.A. Kettaneh. . . . . . . . 01443043
Lithuania . . . Siemens . . . . . . . . . . 822391555
Luxembourg . Siemens . . . . . . . . . . . 43843399
Malaysia . . . Siemens . . . . . . . . . . 037514974
Morocco. . . . SETEL S.A. . . . . . . . . . . 2352409
Mauritius . . . Ireland Blyth . . . . . . . . . 2116213
Netherlands . Siemens . . . . . . . . . 0703333100
Norway . . . . Siemens . . . . . . . . . . . 22633314
Oman . . . . . . Siemens Service Center . 791012
Pakistan . . . . Siemens . . . . . . . . . 0215673565
Philippines . . Siemens . . . . . . . . . . . 28149888
Poland . . . . . Siemens . . . . . . . . . 0800220990
Portugal . . . . Siemens . . . . . . . . . . 014178393
Russia . . . . . Siemens . . . . . . . . 80957371801
Saudi Arabia . Siemens . . . . . . . . . . 026655058
Singapore. . . Siemens . . . . . . . . . . . . 8454818
Slovak Rep. . Siemens . . . . . . . . . 0759682266
Slovenia . . . . Siemens . . . . . . . . . 0611746336
South Africa . Siemens . . . . . . . . . 080 0114050
Spain . . . . . . Siemens . . . . . . . . . . 902115061
Sweden . . . . Siemens . . . . . . . . . . 087509911
Switzerland . Siemens . . . . . . . . . . 012120090
Taiwan . . . . . Siemens . . . . . . . . . 0225186504
Thailand . . . . Siemens. . . . . . . . . . . 26791777
Turkey . . . . . SIMKO . . . . . . . . . 02122528835
United Kingd. Siemens . . . . . . . . . 0990334411
Vietnam . . . . Opticom . . . . . . . . . . 090456789
Internet:
http://www.siemens.com/cd.service

Contents
Precautions
Getting started
Battery and charging 6
SIM card 8
Calling 9
Redialling a number 10
Silent mode 10
Keypad lock 10
Address and
phone books
Text input 12
Storing entries 14
Finding an entry 16
List menu
Overview 20
Call lists 22
Address and
phone book editing 23
Status 28
Calculator 29
Dictaphone 30
Calendar 31
IrDA 33
WAP browser 34
Messages 37
4
Setup menu
Overview 44
5
Network services 46
Network selection 50
Tones setup 52
Phone setup 56
Call setup 58
Message setup 61
Calendar setup 65
Security 66
11
Conversation menu
Overview 70
Further information
Keypad functions 74
19
Display symbols 76
Technical specifications 78
Accessories 79
Index
43
69
73
Facts & Tips
• Your new GSM mobile telephone
is designed for use in GSM 900, GSM
81
1800 and GSM 1900 networks.
• The telephone will automatically
connect to the available network type.
Furthermore, handover between GSM
900 and 1800 takes place automatic-
ally and seamlessly during conversa-
tion.
3

4
Precautions
Please observe the following guidelines. Breaking these rules may be
dangerous or illegal:
Mobile phones must be
switched off at all times on
board an aircraft.
Do not activate near gas stations, fuel depots, chemical
plants or blasting operations.
Avoid use in hospitals; medical electronics, e.g. pacemakers and hearing aids,
can be affected.
Minor interference may
affect TVs, radios, PCs, etc.
Avoid pointing active
infrared port at eyes.
Do not hold the phone in
your hand while driving.
Do not dismantle phone or
battery.
Use only specified batteries
and chargers, as using thirdparty products can damage
the phone or invalidate type
approvals.
Unusable batteries should
be disposed of in accordance with relevant legislation.
Do not use phone in high
humidity environments, and
do not use alcohol or other
fluids to clean the phone.
Keep the phone in a safe
place out of children’s reach.
Use only ORIGINAL
Siemens accessories to
avoid damage to your
phone.
5
Getting started
Learn how to get your phone
ready for action, and how to
make and receive calls.
6
2
1
1
1
2
3
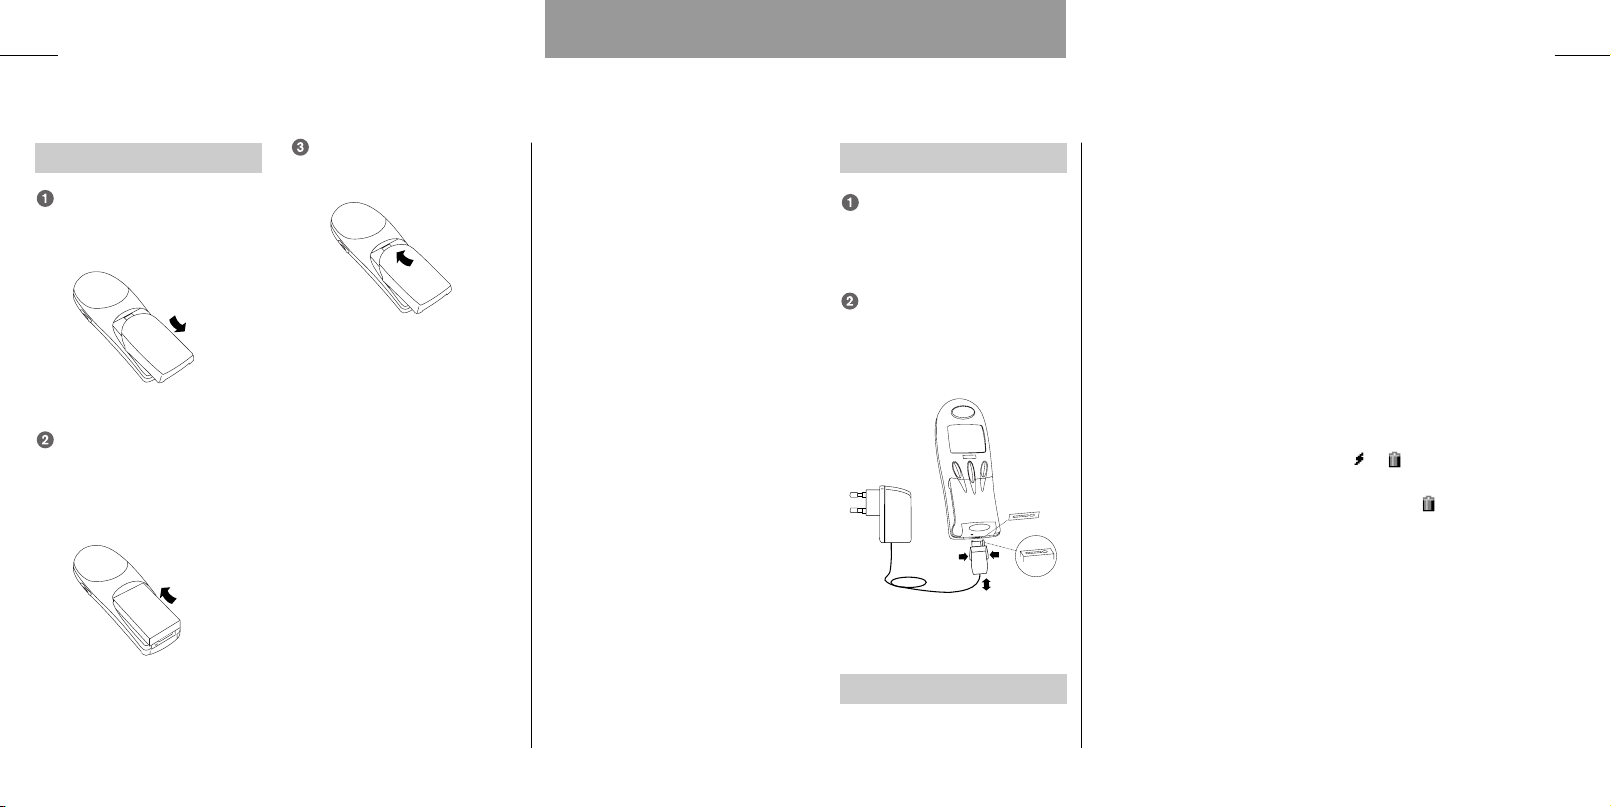
Battery and charging
Insert battery
Remove the battery lid by
pressing and sliding it towards
yourself.
Insert the battery. Please
make sure that the contact
pins are facing against each
other.
Slide the battery lid back into
position.
Getting started
Facts & Tips
• When removing the battery your
phone should always be switched off.
• The on/off key is the left-hand func-
tion key on your phone.
Getting started
Charge battery
Insert the charger plug at the
bottom of the telephone, and
it will start charging immediately.
Fully charging the battery
takes up to 120 minutes,
depending on the type of
charger used.
Remove charger
Press 1 and pull out the charger
plug.
Facts & Tips
• When your battery needs recharg-
ing, the phone will emit a short warn-
ing tone and inform you in the display
that the battery needs charging, and
the LED on top of the telephone will
emit a fast red flash.
• If you don’t connect the charger
within a short while, the telephone
will switch off automatically.
• If the battery is completely dis-
charged, it may take up to 15 minutes
before any information is shown in
the display.
• The phone will inform you when the
charger has been connected
correctly.
7
• During charging the top icon of the
battery indicator will animate a
charging sequence changinging from
to . When the battery is fully
charged, the top icon will turn perma-
nently into and the indicators
beneath it will be filled.
• In the Setup menu under Graphics
you can choose other kinds of battery
indicator symbols.
• To maintain an accurate battery
capacity indication, it is recommend-
ed to let the battery discharge com-
pletely from time to time .
• It is possible to use your phone
during charging.
8
Getting started
Getting started
9
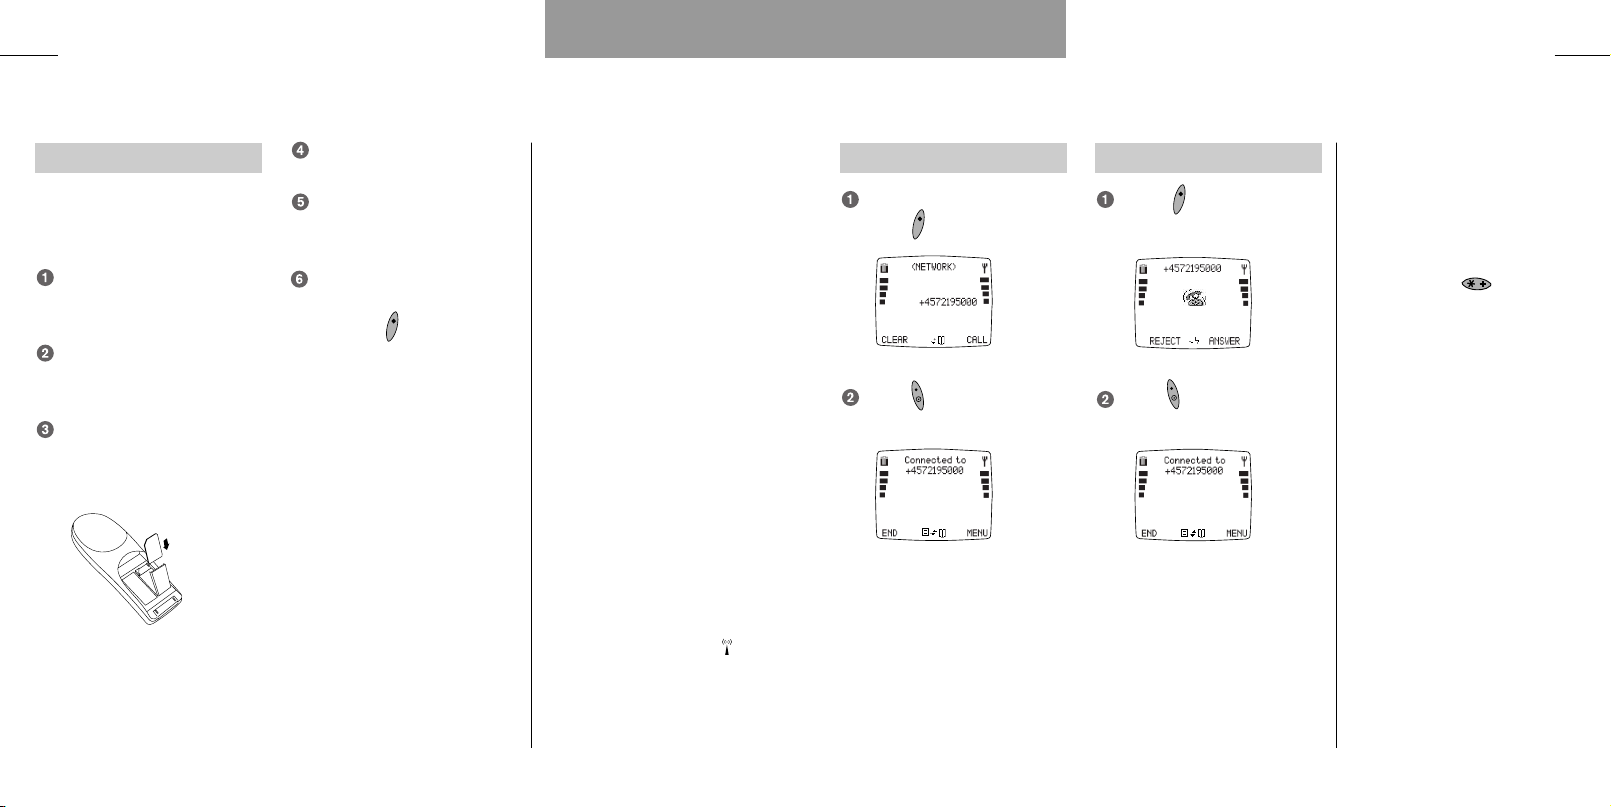
SIM card
Insert SIM card
Before you can make a call with
your mobile phone, you need to
insert the SIM card.
Switch off your phone.
Remove the battery lid and
the battery.
Open the SIM card holder by
sliding the catch towards yourself and lifting the holder.
Insert the SIM card in the
holder with its cut-off corner
pointing up and left.
Close the holder and slide the
catch back into place.
Insert the battery, attach the
battery lid to the phone and
switch the phone on.
Enter PUK or PIN code, if
requested, and confirm by
pressing (»OK«).
The phone will display a welcome
greeting.
Facts & Tips
• Please remember that your SIM
card must support 3V technology to
work with this phone.
• The SIM card is your link to the net-
work operator. The SIM card carries
your phone number, your phone
books and a lot of other information
that will follow your SIM card if you
put it in another phone.
• In this user guide you can see the
full capability of your phone, but the
availability of some of the features
depends on your network operator
and/or your SIM card.These features
are marked with this symbol in
the user guide.
• Most networks allow you to make
emergency calls both with and with-
out a SIM card inserted.
Calling
Making a call
Enter the phone number and
press (»CALL«).
Press (»END«) to end the
call.
Answering a call
Press (»ANSWER«), when
the phone rings.
Press (»END«) to end the
call.
Facts & Tips
• If you start the phone number with
a “+” (hold down for one
second) followed by the national
country code, you can use your phone
abroad without worrying about
International codes.
• An incoming call is indicated by a
ringing tone if enabled, a ringing sym-
bol in the display, and a fast green
flash in the LED.
• Use the side key on the right-hand
of your telephone to increase and
decrease the speaker volume.
• Your phone is equipped with an
internal antenna which is placed in
the upper back part of the phone.To
achieve optimum speech quality and
maximum talk time, always hold your
phone by its lower part during a call. If
you carry the phone in a pocket, the
back of the phone should always face
away from your body.

10
Getting started
111111
Redialling a number
Press for one second,
and the latest dialled number
will be redialled automatically.
Silent mode
You can disable all selected tones:
Press (»MENU«)
Press
The symbol will be seen in
the display.
Just press these two keys again
in the same order to revert to your
original settings.
Keypad lock
To avoid making calls accidentally
while carrying your phone, you can
lock the keypad:
Press (»MENU«)
Press
The keypad lock is, however, automatically disabled:
• during an incoming call until you
have finished the conversation
• if the telephone is connected to a
handsfree device
Just press these two keys again in
the same order to unlock the keypad.
Set clock
In order to activate the clock you
must set the time and date. See p.
65 for more information.
Pressing the left-hand function
key briefly in stand-by position will
display the time, date and week
number.
Facts & Tips
• Take notice of the display texts.The
display text right above the function
keys and will inform you of
the current function of the key at any
time.
• Please note that the menus are
dynamic. This means that your phone
does not always give you all the
options listed in this user guide.This
is because your phone shows an
option only if it is available. For
instance you cannot choose to see
the list of missed calls if you have not
missed any calls.
• All tones can also be disabled in the
Setup menu underTones setup.
• In the Setup menu under Security
you can set the keypad to lock auto-
matically.
• Emergency calls cannot be made if
the keypad lock is activated.
Address and phone books
Learn how to store and find
entries in your address and
phone books.
12
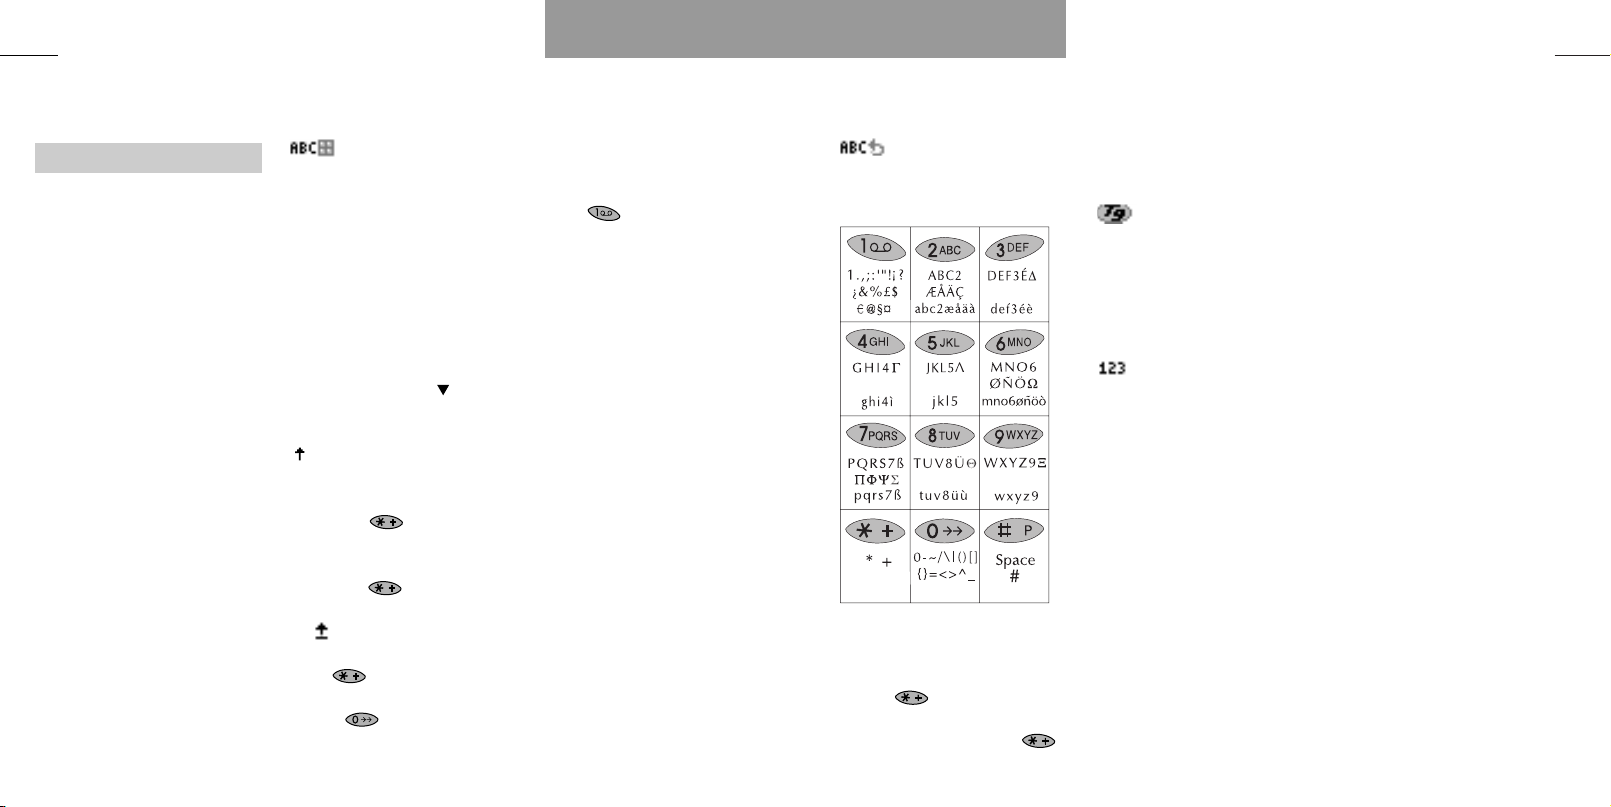
Text input
Using the keypad
Each key on your phone’s keypad
contains a number of characters.
The keypad can be operated in 4
ways: Alphanumeric grid and wheel
mode, T9 mode, which is very useful in connection with SMS messages, plus digit-only mode.
Switching between the different
modes is done by pressing the
side key on the right-hand of the
phone.
Press »CLEAR« briefly to delete
one character.
Press »CLEAR« for one second
to delete the entire text.
grid mode
Press the relevant key for the
intended letter, e.g. B. Now a table
is shown in the display. Press the
key corresponding to the intended
letter (B = 2).
Which characters available on
each key will depend on the keypad language you have selected for
your phone (see p. 64). Additional
language specific characters are
accessed by pressing .
The first letter will always be capitalized, which is indicated by the
symbol in the upper right-hand
corner of the display. The second
letter will automatically be lowercase. Press if you want to
enter a capital letter again.
The caps lock function is enabled
by pressing twice. As long
as the caps lock is active, the symbol will be seen in the upper
right-hand corner of the display.
Press again to disable the
caps lock function.
Press if you want to enter
Address and phone books
digits. Press the relevant key to
enter the intended digit.
To get punctuation and symbols
press .You now have access
to five different pages, each containing up to 9 symbols.You can
scroll through the pages using the
arrow keys. Press the relevant key
to enter the intended symbol, e.g.
on page one, 7 corresponds to “@”.
Address and phone books
wheel mode
The characters available on each
key can be seen in the table below.
Press once to enter the first character, twice to enter the second character, etc.
Press 3 times if you want
to enter a capital letter. To activate
the caps lock function, press
13
4 times. Press it once again to
deactivate the function.
mode
T9® Text Input is a feature enabling
you to more easily use SMS messaging. The T9 feature allows you to
compose text messages with only
one keypress per letter. See p. 40.
mode
In this mode you can enter only
digits.

14
Address and phone books
Address and phone books
15
Address book
Your telephone contains a complete address book similar to the
address book on a PC.
Just follow the instructions below
to store an entry. See on p. 12 how
to use the keypad on your phone.
Storing information in
your address book
Enter the phone number and
press .
Select »Address book« by
pressing »SELECT«.
Press to select whether
you want to store the number
as a
• Home number
• Office number
• Mobile number
• Fax number
• Data number
and confirm by pressing
»OK«.
Press »SELECT« to access the
name box.
Enter the name and press
»OK«.
Press to move to the next
box.
You can enter information about
• Other phone numbers than
the one entered
• Address
• Birthday
• Notes
• Group (see p. 26)
Press »SELECT« to access the
box where you want to enter
information.
Enter the information and
press »OK«.
When you have entered all the
information you want, press
»SAVE«.
The telephone will now ask you
whether you want to store the new
entry.
If you press »YES«, the phone will
store the new entry.
If you press »NO«, the phone will
ask you whether you want to go
back to the entry.
• If you press »NO« at this
stage, all new data will be discarded and deleted.
• If you press »YES«, the phone
will revert to for possible
changes.
Phone books
Your telephone contains a number
of phone books, which are stored
on your SIM card.The plain numbers phone book is always available, whereas your SIM card determines the availability of the other
phone books.
Storing an entry
Enter the phone number and
press .
Press again to select the
phone book in which you want
to store the number
• Plain numbers
• Fixed numbers
• Own numbers
• Barred numbers
and confirm by pressing
»OK«.
Enter the name and press
»OK«.
Plain numbers
This an easy-to-use phone book
where you just store names and
telephone numbers. If you store
the names and numbers from your
address book in the plain numbers
phone book, you will be able to dial
these numbers if you use your SIM
card in another phone.
Fixed numbers
With the help of this extra phone
book you can restrict the use of
your phone to only numbers stored
in this special phone book.
To activate/deactivate fixed
dialling, see under Security in the
setup menu on p. 67
.
Own numbers
This is simply an extra phone book
where you can store your own telephone number(s).
How many numbers you can
store depends on your SIM card.
Normally, you will have the same
options as in your other phone
books, but your network operator
may have imposed some restrictions.
Service numbers
This service number phone book
typically contains customer care,
hotline service numbers, etc.The
contents are defined by your network operator and cannot be
changed by you.
Your network operator may have
given this phone book another
name.
Information numbers
Numbers stored in this phone book
are typically numbers for taxis, airports, hotels, weather forecasts,
news, etc.The contents are
defined by your network operator
and cannot be changed by you.

Phone books
Barred numbers
In this phone book you can store
numbers that it should not be possible to call from the phone.
To activate/deactivate barred
dialling, see under Security in the
setup menu on p. 67.
Prefix phone numbers
In prefix numbers the first digits in
the number are the prefix (the
same for e.g. the whole company),
and the last digits are related to a
specific person or office.
If you want to store the prefix
part of such a phone number in
your phone book, this is done in
exactly the same way as when you
store a normal phone number in
your phone book. Only, instead of
each of the additional digits that
vary from time to time, you enter a
»?«.This is done by holding down
the key for approx. 2 seconds.
Address and phone books Address and phone books
Finding an entry in your
address and phone books
Go to the address and phone
book entry list: .
Scroll through entries:
and .
Press »SELECT« to access a
group.
Having found the desired
name: Press »DETAIL« to see
the numbers stored.
Calling a number:
Select »OPTION«, »Call« and
press »OK«
or
Just press the relevant speed
dial number (1=Home,
2=Office, etc).
If you want to call a prefix number
you must enter the digits to
replace the “?” after having
pressed »OK«.
Facts & Tips
Both address and phone books
• Calling Line Identification (CLI) is a
network feature which displays the
caller’s phone number in your phone's
display. If the caller is one of the
entries stored in your phone book,
his/her name will appear in your dis-
play.
• In the Call setup menu you can acti-
vate the speed dial function enabling
you to call a number by pressing only
one key.
• Use the side key for quick scrolling
through your address and phone book
entries. Each keypress brings you to
the next entry beginning with the
next letter in the alphabet. Of course,
you can also use the arrow keys to
scroll from one entry to the next.
Address book only
• Entries stored in the address book
are marked by .
• The number of entries that can be
stored in your address book depends
on the length of the entries.
• The address book is located in the
internal memory of the phone and
consequently you will not have
access to it if you use your SIM card
in another telephone.
• You can also synchronize your
address book with the address book
in Microsoft Outlook on a PC by
means of the enclosed CD-ROM. To
do this, install the synchronization pro-
gramme on your computer.
1716
Phone books only
• Remember that indicates that
the option depends on your SIM card
and therefore may not be available.
• Entries stored in the phone books
on your SIM card are marked by a
in front of them.
• Phone book entries contain only a
name and a phone number.
• The maximum number of entries
and the length of phone book entries
will depend on the capacity of the
SIM card.
• When there is no more memory
capacity left in either of the phone
books, the option
disappear from the display.
• In order to access fixed and barred
numbers you need to have a PUK 2
code from your network operator and
to use a PIN 2 code of your own
choice.
»Add entry«
will

18
19
List menu
See how to get information
about your calls and messages
and how to edit your address
and phone books.

List menu
List menu
List menu
2120
General
Enter the List menu:
Scroll through the options:
and
Select an option:
Press »SELECT« or »OK«
Go back one level:
Press »EXIT«
Go back to standby:
Hold down »EXIT«
Here is a brief overview of the
options that you may see when
you enter the List menu. Please
remember that the menus are
dynamic.
The options are described in
detail on the following pages.
Applications (SAT)
• The availability, name and func-
tions of this menu depend completely on your network operator
and/or your SIM card. If this
menu item is available on your
SIM card, you will always see it
as the first menu in the List
menu. The menu is typically used
for providing information like
news, weather forecasts, lottery
or banking services.
Outgoing calls
• View names/phone numbers of
your latest outgoing calls
Answered calls
• View names/phone numbers of
your latest answered calls
Missed calls
• View names/phone numbers of
you latest calls received but not
answered
Phone books
• Access to different options with
your address and phone books
Status
• View the status of your SIM card,
address and phone books, voice
memos, and messages
Calculator
• Use your phone as a standard
calculator
Dictaphone
• Find, add or delete voice memos
Calendar
• View your events
• New event
• View week planner
• Go to other date
• Delete events automatically
IrDA
• Receiving
• Synchronization and data
• Send business card
WAP browser
• Access to the Internet
Messages
• Inbox for received SMS messages, business cards, and
calendar appointments
• Outbox for SMS messages ready
to be sent
• Sent messages
• Drafts for unspecified messages
ready to be sent
• Favourite messages
• Send new messages
• Read broadcast messages
• Check your voice mail
Facts & Tips
• Remember that indicates that
the option depends on your SIM card
and therefore may not be available.
22
List menu
List menu
23
Call lists
First
Enter the List menu
by pressing
Select one of the following
options
Outgoing calls
See a list of your last dialled telephone numbers. The number of
phone numbers shown depends on
your SIM card.
Answered calls
See a list of the last 10 calls you
have received and answered.
Missed calls
See a list of the last 20 calls that
you received, but did not answer.
Direct access to the list of
missed calls
When you have missed one or
more calls, the symbol is
shown in your standby display
together with the number of
missed calls. You get direct access
to the list of missed calls simply by
pressing .
Options in call lists
Having selected a number from
one of the call lists you can press
»OPTION« and
• Call the number.
• Delete the number.
• Save the number in your address
book or in one of the phone books.
Facts & Tips
• As the telephone registers only
identified calls in the list, the number
of missed calls shown on the standby
display and the number of phone
numbers actually listed may differ.
• If you call a number from the list of
missed calls, that number will be
removed from the list, but you can
retrieve it from the list of outgoing
calls.
• The detailed view of a missed call
will contain the name and/or phone
number, the date and time of the call,
as well as the number of times the
caller has called.
Phone book editing
First
Enter the List menu
by pressing
Select »Phone books«
Select »Address book« or one
of the phone books
Add entry
Select »Add entry« if you want to
add a new entry (See pp. 14-15).
View entries
This provides a variety of options,
such as calling, editing or moving
the entries. These options are
described in greater detail in the
following.
Having selected »View
entries« you must place the
cursor on the entry you want
to view.
Press »DETAIL« to see the
contents of the entry.
Press »OPTION«
Select one of the following
options.
• Call: If the entry is stored in your
address book and contains more
than one number, you will have to
specify whether you want to call
the home, the office or the mobile
phone number.
• Edit: You can edit the contents of
the entry, e.g. change the office
phone number. Use the arrow keys
to move from one edit box of the
entry to another.
Select the edit box you want to
edit, make your corrections and
press »OK«. Use »CLEAR« to
delete faulty characters and enter
the correct ones via the keypad.
Press »SAVE« when you have finished your corrections.
The telephone will ask you to
confirm the changes. If you press
»YES« the changes are stored automatically.
If you press »NO«, the phone will
ask you whether you want to go
back to the entry.
If you press »NO« at this stage,
all new data will be discarded and
deleted.
If you press »YES«, the phone
will revert to
Facts & Tips
•
Yo u
can also add entries simply by
pressing after entering a phone
number in standby mode.
• You can also view entries in your
address and phone books simply by
pressing in standby mode.
• Service and info number phone
books cannot be edited.

24
Phone book editing
First
Enter the List menu
by pressing
Select »Phone books«
Select »Address book« or one
of the phone books
View entries
• Move: Entries can be moved
from your address book to one of
your phone books. Only the name
and the relevant phone number will
be moved.You have to specify which
phone number (home, office, mobile) you want to move and to which
phone book you want to move it.
Entries can also be moved from
one of your phone books to your
address book or to another phone
book. When moving an entry, you
will always be able to edit the
name.
• Copy: Just as you can move
entries, you can copy your address
book entries to one of your phone
books, and from one of your phone
(continued)
books to the address book or to
another phone book. When copying
an entry you will always be able to
edit the name.
• Delete: If you want to delete an
entry stored both in your address
book and in one of your phone
books, you will have to delete it in
both books. If you delete only the
address book entry, it will still
remain in the phone book.
• Change group/Add to group:
These options are available only if
there is at least one group.
If the entry is already in a group,
»Change group« will be displayed.
Select the group to which you want
to move the entry. Press »SELECT«,
and the phone will confirm that the
entry has been moved to another
group.
If the entry is not already in a
group, »Add to group« will be displayed. Specify the group to which
you want the entry to be assigned
and press »SELECT«.The phone
List menu
will confirm that the entry has
been added to the specified group.
• Remove from group: If you do
not want the entry to be assigned
to a group any longer, press
»SELECT«, and the phone will
inform you that the entry has been
removed from the group.
• Send: You can send the contents
of an address book or phone book
entry to another mobile telephone
either as an SMS message, via
IrDA or via DTMF.
• Print: It is possible to print out an
address or phone book entry via
IrDA (Infrared interface).
List menu
Facts & tips
• When communicating via IrDA, the
distance between your mobile phone
and the receiving unit should not
exceed 40 centimetres.
• The options
group«
are relevant only in connection with
address book entries.
»Change group/Add to
and
»Remove from group«
25
 Loading...