

Service Manual
for
S25 / S2588

V 1.1
| Service Manual S25 / S2588 | V 1.1 | ICP CD ST |
|---|---|---|
| R. Fleuren | ||
| Sm_S25_lvl2_v11 | Page 1 of 35 | 02/00 |
SIEMENS
1 Introduction
The S25 is the first dualband handset (GSM-900 and GSM-1800) in the S-class. The S2588 is a special version for the asian market. It carries a different software which supports presentation of chinese character set in the phones display.
This manual is intended to help you carry out repairs up to level 2 on the mobile telephones -S25 and S2588.
For information on level 2.5 repairs or on the testequipment, please refer to the available documentation.
The repairs for S25 and S2588 are identical unless otherwise noted, and therefore in the text only S25 is mentioned.
Attention:
It must be noted that all repairs have to be carried out in an environment set up according to the ESD (Electrostatic Discharge Sensitive Devices) regulations defined in international standards.
If you have any questions or comments regarding repair procedures or this service manual, please do not hesitate to contact the technical support team in Kamp-Lintfort, Germany:

| Service Manual S25 / S2588 | V 1.1 | ICP CD ST |
|---|---|---|
| R. Fleuren | ||
| Sm_S25_lvl2_v11 | Page 2 of 35 | 02/00 |
2 Table of Contents
| 1 | INTRODUCTION | 2 | |
|---|---|---|---|
| 2 | TABLE OF CONTENTS | ||
| 2 | TECHNICAL DATA | 5 | |
| 3 | GENERAL INFORMATION | 6 | |
| 4 | MECHANICAL CONCEPT | 6 | |
| 4.1 | MECHANICAL DRAWING | 8 | |
| 4.2 | NECESSARY TOOLS | 9 | |
| 4.3 | DISASSEMBLING THE S25 | 9 | |
| 4.4 | ASSEMBLING THE S25 | ||
| 4.5 | HANDSET DATECODES | ||
| 5 | HARDWARE CONCEPT | ||
| 5.1 | BLOCK DIAGRAM | ||
| 5.2 | HARDWARE DESCRIPTION | ||
| 5.3 | POWER SUPPLY CONCEPT | ||
| 5.4 | OVERVOLTAGE CONDITIONS | ||
| 6 | SOFTWARE PROGRAMMING | ||
| 6.1 | HARDWARE OVERVIEW FOR SOF | TWARE UPDATE | |
| 6.2 | DESCRIPTION OF SOFTWARE BOO | )TING | |
| 6.2 | LANGUAGE GROUPS | ||
| 6.3 | CUSTOMER SPECIFIC INITIALISA | ΓΙΟΝS | |
| 7 | BATTERY | ||
| 7.1 | SPECIFICATION | ||
| 7.2 | CHARGING | ||
| 7.3 | SCHEMATIC OF THE BATTERY | ||
| 7.3 | SHORT CIRCUIT PROTECTION | ||
| 7.4 | BATTERY DATECODES | ||
| 7.5 | DEEP DISCHARGE | ||
| 8 | UNBLOCKING | ||
| 8.1 | SIEMENS HOTLINE | ||
| 8.2 | INTERNET SOLUTION | ||
| 9 | ACCESSORIES | ||
| 9.1 | RAPID CHARGER (INCLUDED IN F | PACKAGE) | |
| 9.2 | BATTERY (INCLUDED IN PACKAC | ́Е) | |
| 9.3 | EXTENDED BATTERY | ||
| 9.4 | RAPID CHARGER | ||
| 9.5 | TRAVEL CHARGER | ||
| 9.0 | DESK TOP CHARGER | ||
| 9.7 | ANTENNA CRADI E | ||
| 9.0 | CAP KIT POPTARI E | ||
| 9.10 | CAR KIT COMFORT | 32 | |
| 9.11 | CAR HANDSET | 33 | |
| 9.12 | CAR KIT PROFESSIONAL VOICE | ||
| 9.13 | PHONE ADAPTER PROFESSIONAL | ||
| Ser | vice Manual S25 / S2588 | V 1.0 | ICP CD ST |
| R. Fleuren | |||
| Sm | _S25_lvl2_v11 | Page 3 of 35 | 06/99 |
Information and Communication Products
SIEMENS
Mobile Phones
| 9.14 | Adapter Kit Professional | 33 |
|---|---|---|
| 9.15 | DATA CABLE PROFESSIONAL | 34 |
| 9.16 | Soft Data Link Pro | 34 |
| 9.17 | DATA CABLE | 34 |
| 9.18 | HEADSET | 34 |
| 9.19 | BELT CLP | 35 |
| 9.20 | LEATHER CASE | 35 |
|
9.19
9.20 |
BELT CLIP
LEATHER CASE |
35
35 |
| Service Manual S25 / S2588 | V 1.0 | ICP CD ST |
|---|---|---|
| Sm_S25_lvl2_v11 | Page 4 of 35 |
R. Fleuren
06/99 |
2 Technical Data
| Length: |
117 mm (w/o antenna)
137 mm (with antenna) |
|---|---|
| Width: | 47 mm |
| Thickness: | 23,5 mm |
| Volume: | 110 cm 3 (approx.) |
| Weight: | 125 g (approx.) |
| Standards: | GSM Phase 2 |
| Performance: |
GSM 900, Class 4 (2 Watt)
GSM 1800, Class 1 (1 Watt) |
| Battery: | Li-Ion, 3.6V, 650mAh |
| Standby time: |
Up to 200 hours (Standard battery)
Up to 400 hours (Extended battery) |
| Talk time: |
Up to 5 hours (Standard battery)
Up to 10 hours (Extended battery) |
| Display: | Graphical colour display, 97*54 pixels |
| SIM Card Type: | Plug-In, 3V and 5V types supported |
| Antenna: | Non-retractable, Lambda/2 helix type, Plug-In |
| Accessories: |
a) Standard:
Rapid Charger, Standard Battery (3.6V, 650mAh) |
|
| Service Manual S25 / S2588 | V 1.0 | ICP CD ST |
|---|---|---|
| R. Fleuren | ||
| Sm_S25_lvl2_v11 | Page 5 of 35 | 06/99 |
3 General Information
With the S25/S2588 is the first dual band, E-GSM and triple rate telephone of the S-class of Siemens mobiles. The target consumer group of this class is the High-End customer who requires an attractive telephone capable of high operating times and equipped with an advanced set of features.
This telephone is a so called Dual band telephone , meaning it is capable of operating in GSM 900 networks as well as in GSM 1800 ones.
The S2588 is a special version of S25, which is designed for the asian market. The only difference between S25 and S2588 except the name is the different software inside.
The software of S2588 supports presentation of chinese characters on the display, the S25 software does not.

The mobile offers professional features to the customer, of which some are available for the very first time in a Siemens phone. Specific features are not available in every model of S25. The decision is taken by the relevant customer (network operator, service provider), and the phones he buys are programmed by Siemens in an appropriate way. This has also an effect on the repair process. Please refer to the chapter "Customer Specific Initialisations" in this manual.
4 Mechanical Concept
Note: All part numbers refer to mechanical drawing in section 4.1!
The mechanical concept of the S25 differs in various points from the one of the other Siemens mobile telephones.
The first thing you will experience is how the housing is locked. The housing concept is similar to the one of C25, meaning that in S25 no screws are used to keep the housing closed. Also inside the telephone no screws are used anymore. To open the housing, which is kept closed by catches only, the same opening tool as for C25 can be used. For details on disassembly please refer to the relevant chapter in this manual.
In opposite to C25, in S25 the battery is part of the housing of the phone, so there no separate battery cover is necessary.
Inside the housing the S25 consists of two separate boards, the MMI module (1010) and the RF/Control module (1000). The boards are interconnected not by a plug or an interconnector as known e.g. in S6 phones, but by a flexible cable (1030). This cable not soldered to the
| Service Manual S25 / S2588 | V 1.0 | ICP CD ST |
|---|---|---|
| R. Fleuren | ||
| Sm_S25_lvl2_v11 | Page 6 of 35 | 06/99 |
boards, but plugged into two connectors. Therefore it can be exchanged easily in case of being damaged.
The ringer (1120) of the phone is mechanically fixed on the RF/Control board by a special clip (1190) and electrically connected to the board by means of a cable and a plug. In the same way the vibra alert unit (1160) is connected, so both components can be exchanged without doing soldering work. In S25 the vibra alert unit is not a part of the battery but of the phone itself.
Dust protection frame (1200), cover for IR-interface (1280) and loudspeaker (1140) including spacer (1250) are mounted to the upper housing (1060). The lower housing (1070) carries antenna (1150), battery contacts (1170), microphone (1130), vibra alert unit (1160) and the buttons for voice memo (1350) and side keys (1340).
The antenna (1150) is of a plug-in type, as it is used in Siemens mobiles since C10/C11.
Attention:
The antenna of C10, C11, C25 and S25 are of different types. Be carefull not to mix them up.
S25 carries the same type of external connector as it was introduced with C25. This new "Lumberg"-connector does not feature connecting an external antenna, and therefore there is a separate connector for external antenna located at the back side of the upper end of the mobile, close to the internal antenna (1150). This connector contains the mechanical antenna switch inside. The switch is operated by inserting the appropriate plug e.g. of a car kit comfort.
To perform measurements on the S25 and for software updates the same adapter cable between bootadapter and mobile can be used as it was for C25. For further information on the testequipment please refer to the appropriate documentation or contact the technical support department.
| Service Manual S25 / S2588 | V 1.0 | ICP CD ST |
|---|---|---|
| R. Fleuren | ||
| Sm_S25_lvl2_v11 | Page 7 of 35 | 06/99 |
4.1 Mechanical drawing

Note:
The numbers shown above are NO ordering numbers. For ordering please use the partnumbers supplied by your service manager!
| Service Manual S25 / S2588 | V 1.0 | ICP CD ST |
|---|---|---|
| R. Fleuren | ||
| Sm_S25_lvl2_v11 | Page 8 of 35 | 06/99 |
4.2 Necessary tools
For disassembling the S25 the following Case Opener is mandatory:
Ordering number of Case Opener: F30032-P46-A1

4.3 Disassembling the S25
Attention: ESD regulations have to be followed!
| 1. | First you remove the battery. | |
|---|---|---|
| 2. |
Now remove the SIM card:
First you open the lock of the card holder by moving it as shown in the figure beside. |
|
| Then you lift the holder and take out the SIM card. | ||
| 3. | Then you pull the antenna out. |
| Service Manual S25 / S2588 | V 1.0 | ICP CD ST |
|---|---|---|
| R. Fleuren | ||
| Sm_S25_lvl2_v11 | Page 9 of 35 | 06/99 |
| S | Information and Communication Products EMENS Mobile Phones |
|---|---|
| 4. | Open the housing with the opening tool and carefully pull the lower housing section off. Warning! The silent alarm unit is mounted in the lower housing section. Be careful not to damage the cable while pulling the lower housing section off. Disconnect the silent alarm plug-in connector afterwards. |
| 5. | Now remove the battery contacts from the lower housing section. |
| 6. |
Remove the silent alarm from the lower housing section.
Warning! When disassembling, do not pull the silent alarm cable. |
| 7. | Remove the microphone from the lower housing section. |
| 8. | Remove the buttons for volume and voice memo from the lower housing section. |
| 9. | After that you disconnect the ringer plug-in connector. |
| Service Manual S25 / S2588 | V 1.0 | ICP CD ST |
|---|---|---|
| R. Fleuren | ||
| Sm_S25_lvl2_v11 | Page 10 of 35 | 06/99 |

| Service Manual S25 / S2588 | V 1.0 | ICP CD ST |
|---|---|---|
| R. Fleuren | ||
| Sm_S25_lvl2_v11 | Page 11 of 35 | 06/99 |

| Service Manual S25 / S2588 | V 1.0 | ICP CD ST |
|---|---|---|
| R. Fleuren | ||
| Sm_S25_lvl2_v11 | Page 12 of 35 | 06/99 |
4.4 Assembling the S25
Attention: ESD regulations have to be followed!
| 1. |
|
|
|---|---|---|
| 2. |
Now place the dust protection frame in the upper housing
section. Warning! The copper side of the dust protection frame must face the upper housing section. The dust protection frame clip must be bent so that it is lying on the receiver casing spacer. |
|
| 3. | Place the keypad mat in the upper housing section. | |
| 4. |
If necessary, open the plug-in connector on the radio and contr
flexible cable and close the plug-in connector again (see figure Warning! The flexible cable must be inserted parallel in the connector rig connector must snap into place at the stopper. |
ol module, insert the
s below). ght up to the stopper. The |
| Service Manual S25 / S2588 | V 1.0 | ICP CD ST |
|---|---|---|
| R. Fleuren | ||
| Sm_S25_lvl2_v11 | Page 13 of 35 | 06/99 |
Information and Communication Products SIEMENS Mobile Phones 5. Place the operating module on the radio and control module. open the connector, and insert the flexible cable. Then close the connector again. See figures below. Warning! The flexible cable must be inserted parallel in the connector right up to the stopper. The connector must snap into place at the stopper. 6. Now place the connected modules simultaneously in the upper housing section. 7. Place the clip on the lower RF-screen lid. The projection on the clip must be fitted into the corresponding hole in the screen lid. 8. Place the ringer on the clip. The retaining projections on the clip must be fitted exactly into the holes in the ringer. Warning! If there is no spacer on the clip, please glue one on heforehand 9. Connect the ringer plug-in connector. Warning! The cable must be introduced between screen frame and the RF socket. Otherwise it could be damaged during assembling the housing of the phone.
| Service Manual S25 / S2588 | V 1.0 | ICP CD ST |
|---|---|---|
| R. Fleuren | ||
| Sm_S25_lvl2_v11 | Page 14 of 35 | 06/99 |
Information and Communication Products Mobile Phones
| 10. | Now you place the keys for the volume and voice memo in the lower housing section. | |
|---|---|---|
| 11. | Now place the microphone, the silent alarm unit and the battery contacts in the lower housing section. Warning! The contacts of the components must not be bent, damaged or dirty. | |
| 12. |
Insert the silent alarm cable in the connector on the radio and
control module. Warning! The silent alarm cable must not be pinched when the device is closed. |
|
| 13. |
Close the device by putting on the lower housing section.
Warning! All catches must engage completely. |
|
| 14. | Now push the antenna in. | |
| 15. | Now you insert the SIM card into the holder, and close the holder by moving it into the shown direction until it locks up. |
| Service Manual S25 / S2588 | V 1.0 | ICP CD ST |
|---|---|---|
| R. Fleuren | ||
| Sm_S25_lvl2_v11 | Page 15 of 35 | 06/99 |
| SIEMENS |
Information and Communication Products
Mobile Phones |
|---|---|
| 16. Finally you close the telephone by inserting shown manner. | g the battery in the |
| Service Manual S25 / S2588 | V 1.0 | ICP CD ST |
|---|---|---|
| R. Fleuren | ||
| Sm_S25_lvl2_v11 | Page 16 of 35 | 06/99 |
4.5 Handset Datecodes
Siemens is using the industrial standard DIN EN 60062 to indicate the production / service dates. The code is printed on the IMEI sticker located in the battery compartment.
| SIEMEN | S S25 MADE IN GER | MANY |
|---|---|---|
| S30 | 880-S3100-A100-1 | YY |
| CE 0168 X | ||
|
|∆III
₩ |
||
| YY = Datecode |
-
The first character of the datecode indicates the year of production:
- F = 1995 H = 1996 J = 1997 K = 1998 L = 1999
-
The second character indicates the month of production:
- 1-9 = january to september
- O = october
- N = november
- D = december
Example: "L5" means that the set was produced in may of 1999.
| Service Manual S25 / S2588 | V 1.0 | ICP CD ST |
|---|---|---|
| R. Fleuren | ||
| Sm_S25_lvl2_v11 | Page 17 of 35 | 06/99 |
5 Hardware Concept
5.1 Block Diagram

| Service Manual S25 / S2588 | V 1.0 | ICP CD ST |
|---|---|---|
| R. Fleuren | ||
| Sm_S25_lvl2_v11 | Page 18 of 35 | 06/99 |
5.2 Hardware Description
The handset consists of the following major integrated circuits:
1) HiGOLD (PMB 2800)
This IC is a combination of microprocessor and signalprocessor.
The microprocessor part of this component is responsible for controlling the keyboard, SIM-Card, Flash and RAM. Furthermore it controls the power up/power down of the RF module and sets the amplification of the PA.
The signal processor part of PMB 2800 is responsible for processing the Rx I/Q signals (filtering, equalizing, speech and channel decoding).
Furthermore it does the speech and channel encoding and the GSMK modulation of the Tx I/Q signals.
2) GOLD-SX (PMB 2709)
The coprocessor PMB 2709 is used to realize advanced features regarding coding of the speech signal. These are:
- Halfrate-Encoding
- Halfrate-Decoding
- Enhanced Fullrate Encoding
- Enhanced Fullrate Decoding
- Voice Activity Detection
- Comfort Noise
3) GAIM (PMB 2905)
The GAIM (GAIM = G SM A nalog I nterfacing M odule) provides the interface between the analogue signals (I/Q, voiceband, PA-control, charging control signals) and its digital representation.
4) Receiver Circuit (PMB 2411)
This circuit provides the following main functionalities:
- Low Noise Amplifier (LNA) with a fixed amplification of +20dB to amplify the input RF signal.
- Mixer to mix down the RF signal to the Intermediate Frequency (IF)
- Programmable IF amplifier with a dynamic range of 60dB (-10dB ... +50dB in steps of 2dB).
| Service Manual S25 / S2588 | V 1.0 | ICP CD ST |
|---|---|---|
| R. Fleuren | ||
| Sm_S25_lvl2_v11 | Page 19 of 35 | 06/99 |
Mobile Phones
SIEMENS
- Mixer to mix down the IF signal to the baseband, generating and inphase (I) and a quadrature (Q) signal.
- Offset compensation for the I/Q signals.
5) Transmitter Circuit PMB 2255
This circuit provides the IF synthesizer, the I/Q modulator, prescalers to regulate the RF synthesizer and a buffer stage to feed the PA.
The antenna switch is mechanical, located in the connector for the external antenna.
| Service Manual S25 / S2588 | V 1.0 | ICP CD ST |
|---|---|---|
| R. Fleuren | ||
| Sm_S25_lvl2_v11 | Page 20 of 35 | 06/99 |
5.3 Power Supply Concept
The S25 has two main power inputs:
- 1) Battery Voltage (3.6 Volts) connected at the battery contacts
- 2) Charging Voltage (6.5 Volts) delivered by the different charger types (see accessory list) via the Lumberg connector at the bottom of the telephone.
Since the battery voltage is supplying the power supply asic, it is always needed to operate the phone. You cannot switch on the handset if the battery voltage is not present or if no battery is inserted.
From the battery voltage all other supply voltages of the S25 are derived, controlled by the power supply ASIC.
The RF power amplifier needs an operation voltage of 5,4Volts, which is generated by a DC-DC step-up converter.
The logic module uses 2.9 V, generated by a regulator inside the ASIC.
Furthermore the ASIC generates the supply voltage for the SIM card and the RESET signal for the logic devices.
The ASIC also checks the presence of the watchdog signal from the µP and provides the switching on functionality (ON_OFF button or Ignition signal).
During testing ist is advisable to use a battery dummy, connected to a power supply delivering +4V, max 3A.
Make sure that you connect the battery dummy with the right polarity, the red plug to +4V and the blue plug to ground.
If you use a voltage higher than +7V, or with wrong polarity, the phone can be damaged!
5.4 Overvoltage Conditions
a) Battery Voltage: If the supply voltage rises above 6.2 Volts, the phone will switch off and it cannot be switched on again before the voltage is lower than 6.2 Volts.
If the supply voltage rises above 7 Volts the phone can be destroyed.
| Service Manual S25 / S2588 | V 1.0 | ICP CD ST |
|---|---|---|
| R. Fleuren | ||
| Sm_S25_lvl2_v11 | Page 21 of 35 | 06/99 |
Downloaded from www.Manualslib.com manuals search engine
Information and Communication Broduct Mobile Phone
The charging current must not rise above 1 A or the phone b) Charging Current: (fuse) will be inoperable, meaning that charging the battery will not be possible anymore.
- Be careful with foreign accessories or chargers!
- > Make sure that the charging current is limited to a value below 1A!
6 Software programming
SIEMENS
In previous Siemens mobiles before C25 and S25 mostly the same mobile software was used for all telephones of this type in the worldwide market. The only difference were the languages supported by it. Customer specific values (e.g. ringing tones) were very seldom, but in case there were some, all of them were included in the common mobile software
For C25 and S25 this has changed. For these models as in the past there is a common software available, which is divided into different language groups. This software does not contain the operator or provider specific settings anymore, as there are ringing tones, greeting text, short dial lists, etc. Therefore it may occur that e.g. some menue items differ in different models or are not visible at all.
These settings are stored in a different memory area of the mobile and become activated depending on the customer specific model of the phone by a separate test step during production process.
Due to this separation of common mobile software and customer specific initialisations it is possible to fulfill the demands of the market regarding customization and flexibility.
Attention:
As a consequence the software programming process in the LSO is divided into two different steps now, which will be descriped in the following chapters:
- a) Software update to actual version and appropriate language group.
- b) Programming of Customer specific initialisations
| Service Manual S25 / S2588 | V 1.0 | ICP CD ST |
|---|---|---|
| R. Fleuren | ||
| Sm_S25_lvl2_v11 | Page 22 of 35 | 06/99 |
6.1 Hardware overview for Software Update
The software of the S25 handset is programmed directly from a PC using a bootadapter as an interface between serial port of the PC and the mobile. Because of the new type of external connector used in C25 and S25 (Lumberg type) an additional adapter cable between mobile and bootadapter is required.

6.2 Description of software booting
- Connect COM-port of PC to the bootadapter using the enclosed RS232-cable.
- Connect adapter cable to the connection cable of the bootadapter.
- Afterwards plug in AC-Adapter: If connected correctly the "Power" lamp on the bootadapter will be active.
- • Switch off the handset and connect it to the adapter cable.
- Copy bootsoftware to the PC and follow the instructions in the file "readme.txt".
| Ordering number of Adapter cable: | V30146-A5004-D |
|---|---|
| Ordering number of Bootadapter: |
L24857-F1006-A30
The bootadapter comes complete with AC-Adapter, RS-232 and handset connection cable. |
| Service Manual S25 / S2588 | V 1.0 | ICP CD ST |
|---|---|---|
| R. Fleuren | ||
| Sm_S25_lvl2_v11 | Page 23 of 35 | 06/99 |
6.2 Language Groups
For S25/S2588 the following languages will be available. They will be separated into different language groups.
| Arabian | Bulgar | Catalan |
|---|---|---|
| Cestina | Chinese3 | Czech |
| Danish | Dutch | English |
| English2 | Finnish | French |
| German | Greek | Hungar |
| Italian | Norweg | Polish |
| Portu | Russian | Spanish |
| Swedish | Taiwan | Turkish |
Attention:
This information is subject to change! Contact your service coordinator for the latest update and ordering numbers.
6.3 Customer Specific Initialisations
After the actual software was booted into the telephone, the customer specific initialisations have to be programmed by the LSO.
Attention:
It has to be made shure by the LSO, that after repair the customer gets the mobile back with the same model specific initialisation activated as they were valid before repair was started.
Because Siemens Germany normally is shipping swap boards which are carriing standard values only, besides booting the appropriate language group the customer specific initialisations have to be activated by the LSO.
To perform this task a special software tool is available which is protected by a dongle. Besides this additional dongle the same hardware as for software update can be used.
If you have further questions regarding this tool, please refer to the Service Information dated 30th of April, 1999 or contact the technical support team or your Siemens service manager.
| Service Manual S25 / S2588 | V 1.0 | ICP CD ST |
|---|---|---|
| R. Fleuren | ||
| Sm_S25_lvl2_v11 | Page 24 of 35 | 06/99 |
7 Battery
7.1 Specification
The standard battery of S25 is of a Li-Ion type with a voltage of 3.6Volts and a capacity of 650mAh.
There are four contact pads on the bottom side of the battery pack for supplying the phone, measuring the cell temperature and examining the battery type.

7.2 Charging
The battery can only be charged if inserted into the telephone. The charging process is completely controlled by the mobile. Different kinds of Siemens chargers out of the accessory program for S25 models (also refer to chapter "Accessories") can be used for this task:
- Rapid charger
- Desk top charger
- Travel charger
- ➢ Car charger
Attention:
Charging the battery can be impossible, if temperature of battery and/or environment is too high or too low (e.g. (e.g. in car use during summer, or outside during winter time). This is to prevent the battery from being damaged during fast charge process. To enable the charging process again, battery and phone only need to cool down/warm up. A replacement of battery is not necessary.
| Service Manual S25 / S2588 | V 1.0 | ICP CD ST |
|---|---|---|
| R. Fleuren | ||
| Sm_S25_lvl2_v11 | Page 25 of 35 | 06/99 |
7.3 Schematic of the battery

- BATT+ and GND are used to supply the mobile
- BATT_TYP is used to detect the battery technology and cell capacity.
- BATT_TEMP is used to measure wether the battery temperature is within the allowed range.

| Service Manual S25 / S2588 | V 1.0 | ICP CD ST |
| R. Fleuren | ||
| Sm_S25_lvl2_v11 | Page 26 of 35 | 06/99 |
7.3 Short Circuit Protection
SIEMENS
CAUTION:
Avoid short circuit of battery !
The battery is short-circuit protected by an electronic fuse. This fuse will be activated in case a too high current (e.g. in case of short circuit) is drawn from the battery. This fuse will not be reset automatically.
The resetting of the fuse can be done by the following procedures:
- Insert the battery into the S25 and then connect the rapid charger to the phone Wait for approx. 10 seconds and afterwards the phone can be turned on again
- Plug the battery separately into the desktop charger. The fuse is resetted immediately.
- The set of
7.4 Battery Datecodes
The battery pack is produced by the manufacturer Panasonic.
The production date of the battery is printed on the housing, and looks like this:
The datecode printed on the battery looks like this:
PAN L3
Explanation:
|
PAN
L 7 |
|
(K = 1998, L = 1999)
(Jan=1, Feb=2,Oct=O, Nov=N, Dec=D) |
|---|---|---|
| Evon | mla |
Example:
PAN L6 This battery was produced on June of 1999 by Panasonic
| Service Manual S25 / S2588 | V 1.0 | ICP CD ST |
|---|---|---|
| R. Fleuren | ||
| Sm_S25_lvl2_v11 | Page 27 of 35 | 06/99 |
7.5 Deep Discharge
In case of a deeply discharged battery, the phone can not be turned on and the normal charging process can not be started. No charging symbol is visible in the display. This is because the voltage of the battery is too low to operate the charging circuit and the display controller.
In this case, charging the battery is divided into two different steps, which do cannot be started automatically but have to be run subsequently by the user :
a) Trickle charge
Trickle charge mode is automatically started if the battery voltage is below a certain value when the charger is connected to the mobile. This mode is not terminated automatically but has to be terminated by disconnecting the charger.
Trickle charge mode has to last minimum until the battery voltage has exceeded a certain level. During trickle charge the charging symbol will not be visible and the telephone can not be turned on. This is because the battery voltage is too low to operate the telephone
Action:
Insert battery into handset and connect travel charger to the telephone. Wait for appr. 1 hour, then disconnect and reconnect charger. If the battery voltage is high enough again, the charging symbol will come up.
If the battery is discharched very deeply, the symbol may not come up and the trickle charge time possibly has to be extended up to 24 hours.
b) Normal charge
When the battery voltage is above the a.m. value (e.g. by trickle charge) the mobile will start the normal charging mode and show a charging symbol in the display.
Action:
Connect charger to the telephone (see chapter ,,Charging")
The charging symbol will come up as an indication that the normal charging process has been started by the mobile.
| Service Manual S25 / S2588 | V 1.0 | ICP CD ST |
|---|---|---|
| R. Fleuren | ||
| Sm_S25_lvl2_v11 | Page 28 of 35 | 06/99 |
8 Unblocking
If the phone is disabled due to a wrong entry of the phonecode (not PIN1, PIN2, network code or service provider code!) it can only be resetted by entering the right unblocking code.
This unblocking code is derived from the IMEI number of the mobile and can only be calculated in two different ways:
8.1 Siemens Hotline
You can retreive the code from our hotline personell in Germany. If you need unblocking codes just send a fax with the IMEI numbers to:
Siemens AG ICP CD SD CC Bocholt, Germany Fax: +49 2871 91 3007
Please use the appropriate form provided by your Siemens service coordinator.
8.2 Internet solution
As an alternative to the a.m. procedure, since november 1997 an internet solution is offered to the LSO. It is a password protected internet homepage where you can enter the IMEI number of the affected handset. The page will then present Master Phone Codes, Master Network Codes and Master Service Provider Codes (if applicable to the relevant telephone).
If you do not have access to this tool up to now, please contact your Siemens service manager for details.

9 Accessories

9.1 Rapid Charger (included in package)
- ➢ Voltage: 8.0Volts max.
- ➢ Current: 1000 mA max
- Country specific version
-
> Charging time:
- 1.5 hours for Standard Battery
- 2.25 hours for Extended Battery

9.2 Battery (included in package)

| Service Manual S25 / S2588 | V 1.0 | ICP CD ST |
|---|---|---|
| R. Fleuren | ||
| Sm_S25_lvl2_v11 | Page 30 of 35 | 06/99 |
9.3 Extended Battery
- ≻ Li-Ion
- Standby time:
- Talk time:
- > Charging time:
- 3.6V, 1300mAh up to 200 hours
- up to 10 hours
- time: Approx. 2.25 hours

9.4 Rapid Charger
- Compact charger in 5 country versions (EU, UK, US/ Taiwan, China, Australia)
- > Quick charging time: approx. 1.5 hrs

9.5 Travel Charger
The Travel Charger is similar to the Rapid Charger, but enables the user to use the worldwide voltage range of 90-270 Volts.
- Compact size; 5 versions available (EU, UK, US/ Taiwan, China, Australia)
- Operating voltage: 90 270V
- Quick charging time: approx. 1.5 hours for 650 mAh Battery, approx. 2.25 hours for 1300 mAh Battery
- Power supply for: Phone and Desk Top Charger

9.6 Desk Top Charger
| Þ | Small attractive design | |
|---|---|---|
| ≻ | Comfortable charging of the phone and of the | |
| batteries | E | |
| ۶ | Dual slot for upright phone positioning | |
| ۶ | Two LEDs indicate the charging level of the | |
| telephone and of the battery slot | ||
| ۶ | Power supply by Rapid Charger, Travel Charger | No. |
| Service Manual S25 / S2588 | V 1.0 | ICP CD ST |
|---|---|---|
| R. Fleuren | ||
| Sm S25 lvl2 v11 | Page 31 of 35 | 06/99 |
Mobile Phones
9.7 Car Charger
- Power supply and battery charging
- Quick charging with auto switch over to trickle charging
- Connection to cigar lighter (12V/24V)
- LED signalizing power supply
- Recommended use together with Antenna Cradle
9.8 Antenna cradle
- Connection for external antenna
- Secure phone hold
- Comforable, quick release for phone and cradle
- Adjustable angle positioning
- > Park Position for Car Charger etc.

9.9 Car Kit Portable
- High quality (duplex) handsfree
- Power supply and battery charging
- Easy, quick installation in cigar lighter (12 V)
- Supports automatic call acceptance
- > Permanent display illumination
- > Volume control over side key or mobile
- ➢ Rotatable speaker, 90°
- > Variable microfone positioning
- LED indicates operational mode
- > Recommended use together with cradle
9.10 Car Kit Comfort
- High quality duplex handsfree
- > Power supply and quick charging
- Radio mute
- Supports automatic call acceptance
- ➢ Fix installation, 12V
- > Permanent display illumination
- Programmable power off via ignition switch
- Separate E-Box with plug and play connections
- Universal connector for external antenna
- Private functionality (via optional Handset)
- Secure phone hold, adjustable angle positioning

Service Manual S25 / S2588
V 1.0
S25 lvl2 v11
Page 32 of 35
ICP CD ST R. Fleuren 06/99

ng
9.11 Car Handset
- Additional handset for private calls
- > Direct call acceptance by lifting up handset
- Volume control on the handset
- ➢ Curley cord
- Plug and play connector to handsfree unit
- For connection to Car Kit Comfort and Car Kit Professional Voice
- Push to talk key functionality for Car Kit Professional Voice

9.12 Car Kit Professional Voice
- High quality duplex handsfree
- Outstanding voice controlled functions
- Number and name voice dialing system (German or English)
- Phone number-selection speaker independant
- > Voice controlled administration of car kit phone book
- Automatic synchronization with mobile phone book
- Full VDA-Compatibility
- Ignition detection and permanent display illumination
- > Power supply and charging function for the phone
- Connection for Siemens Data Products
- Car Handset connection for privacy function
9.13 Phone Adapter Professional
- Secure phone hold
- Connection for external antenna
- Safety supplement for in car use
- Adjustable angle positioning
- For connection to Car Kit Professionnal Voice

- Adapter set of Car Kit Professional Voice for cars without VDA-pre-installation
- Plug & play connections
- Separate loudspeaker and microphone

| Service Manual S25 / S2588 | V 1.0 | ICP CD ST |
|---|---|---|
| R. Fleuren | ||
| Sm_S25_lvl2_v11 | Page 33 of 35 | 06/99 |


9.15 Data Cable Professional
- To connect Car Kit Professional Voice to a computer for fax and data transmission
- Enables Soft Data Link Pro applications for in car use.
- For connection to a serial interface of the computer (RS232), please use Data Cable

9.16 Soft Data Link Pro
- Program package for the mobile office for sending and receiving of SMS and e-mail via incoming mail with MAPI-conform applications
- Sending and receiving of faxes
- Managing of the phone books (SIM-card and in the Mobile Phone)
- Generating and playing of ringing melodies
9.17 Data Cable
- In case the computer hasn't got infrared interface or doesn't support it, this cable offers a simple and flexible connection of the mobile phone to a serial interface of the computer (RS232).
- To be used in conjunction with Soft Data Link Pro or Data Cable Professional
9.18 Headset
The headset offers safe high quality hands free use whilst walking or driving.
- Portable Handsfree Kit
- ➢ Full duplex digital quality
- Automatic call acceptance controlled by mobile phone menue
- Comfort fixation

| Service Manual S25 / S2588 | V 1.0 | ICP CD ST |
|---|---|---|
| R. Fleuren | ||
| Sm_S25_lvl2_v11 | Page 34 of 35 | 06/99 |

9.19 Belt Clip
The belt clip allows easy and secure attachement to a belt. The phone can rotate to a convenient angle. Rotatable fixation
- ➢ Easy to remove
- ➤ Insertion in each angle possible
- Secure phone hold
9.20 Leather Case
> The 25 series Leather Case from Siemens provides optimum protection for your telephone Specially conceived for the 25 series, this case is characterised by its functionality, its sleek, elegant design and its ideal fit. Your mobile phone is thus always at hand, conveniently and securely fastened to your belt.

| Service Manual S25 / S2588 | V 1.0 | ICP CD ST |
|---|---|---|
| R. Fleuren | ||
| Sm_S25_lvl2_v11 | Page 35 of 35 | 06/99 |

-


)「
User Guide
SIEMENS
Overview


Soft Keys
The current function(s) are shown above in the display, in some cases, eg scrolling, the left and right hand end of the key offer different functions.
In standby, the soft keys enable fast 'name' dialling, or may have special services (eg Applications).
Precautions
All radio transmitters carry risks of interference with electronics in close proximity:

Mobile phones must be switched off in an aircraft. (as a courtesy, also switch off alarms.)

Do not activate near gas stations, fuel depots, chemical plants or blasting operations.

Avoid use in hospitals, medical electronics eg pacemakers, and hearing aids can be affected.

Minor interference may affect TV's, radios, phones, etc.

Avoid pointing active Infrared Port at eyes.
| ATT |
|---|
| K/ |
| 1 |
Avoid touching antenna whilst using phone.

Do not hold phone in your hand whilst driving. Use hands free car accessories (page 59).
Please note:

Do not dismantle phone or battery (no user serviceable parts).

Use only specified battery, others can damage the phone or even explode. Also avoid contacts shorting.

Exhausted batteries should be recycled. Dealers and local facilities provide special containers

There may be risks of damage when using non ORIGINAL accessories
Introduction
Thank you for choosing a Siemens mobile Phone. This, together with GSM, the international network standard, enables the latest features and services, providing state of the art communication. It is much more than a phone, and used effectively, can do much to help organisation and communication for both business and leisure. In addition to easy to use PhoneBooks. Text and Voice messaging, it offers integral Data. Applications software, and even Internet, and can enable future services including Electronic Commerce - vou can keep much of your Office in your pocket! It will work on both GSM 900 and 1800 networks, enabling you to keep in touch in most of the world. Please check with your Operator concerning details of current and planned network coverage and services.
Siemens wish you every success with your phone. Should you experience difficulties, there is a dedicated Helpline in most countries - waiting to help you (details inside rear cover)
Your User Guide
Your 'Quick Start' will help you quickly use basic functions. You should also read this User Guide for complete, safe, and effective operation of the phone and network features.
Further Tips and Tricks can be found at:
http://www.siemens.com/S25
The following symbols are used:
| Use the keypad to write numbers or letters. | |
|---|---|
| ••• | Use the soft key, function displayed above. |
| J. | Press indicated end of soft key. |
| <8i | Network service, this may not be available in all net-works. |
| OK | Black background indicates a softkey. |
Contents
| Getting Started | 5 |
|---|---|
|
5
5 6 6 6 |
| Making Calls | 7 |
|
Dialling a Number
International Dialling Redialling Auto Redialling Answering Calls Ending Calls Unwanted Calls Data/Fax Calls |
7
7 7 8 8 8 8 |
| Fast Access Keys | 9 |
|
Setting
Calling Changing |
9
9 9 |
| Phonebook | 10 |
|
Writing in Phonebook
Calling from Phonebook Checking Entries Changing Entries Editing Phonebook Own Phone Numbers Using Saved Prefixes Red PhoneBook Memory Numbers PhoneBook Menu |
10
10 11 11 11 11 12 12 |
| During a Call | 15 |
|
Volume Control
Microphone on/off Recording a Number Use Voice Memo Call waiting Hold/Multi Party Calls In Call Menu In Call PhoneBook Sending Control Tones |
15
15 15 15 15 17 17 |
| Voice Memo | 18 |
|---|---|
|
Recording
Playing Pausing/Additional Memos |
18
18 18 |
| Menu | 19 |
|
Menu Introduction
Menu Use Sub Menu Other Controls Display Info Menu Tree |
19
19 19 19 19 20 |
| Applications (option) | 21 |
| Usage Hints | 21 |
| Message | 22 |
|
Text Messages
Writing/Sending Replying to Message Sending on Message Sending Business Card Preformatted Messages Reusing Messages Message Settings Voice Mail Cell Broadcast |
22
23 24 25 25 25 25 26 27 28 |
| Records | 29 |
|
Call Records
Calls Missed Calls Received Calls Dialled Alarms Missed |
29
29 29 29 29 |
| Alert Tones | 30 |
| Organizer | 31 |
|
Calendar
Alarm List Calculator Currency Converter Business Card Games |
31
32 34 34 35 36 |
Contents
| Internet | 37 |
|---|---|
|
How to Use
Further Options |
37
38 |
| Divert | 39 |
|
To Set Divert
To Clear Diverts To Reset Divert To Change a Divert No To Check Divert |
39
39 39 39 40 |
| Network | 41 |
|
Network Info
Change Network Auto Network Operator List Preferred Network Call Waiting Fast Search Conceal ID Band Selection (option) |
41
41 41 41 41 41 41 41 41 41 41 |
| Control Use | 42 |
|
Line
Call Time Charge Setup PIN on/off General Restrictions (Codes) Restrict Phone Network Barrings User Groups |
42
42 42 43 43 43 43 44 44 |
| Setup | 45 |
|
Language
FAX/Data Mode Clock Auto Phone Off Keys Display |
45
45 45 46 46 47 |
| Using Data and Fax | 48 |
|---|---|
|
Introduction
Prerequisites Initial PC Setup Phone Setup Sending Data or Fax Ending Transmission Receiving Data/Fax calls Info Technical Specification |
48
48 48 49 49 49 49 50 |
| Menu Tree | 51 |
| Display Symbols | 53 |
| Siemens Service | 54 |
| Trouble Shooting | 55 |
| Specifications | 57 |
|
Licensing
Technical Specification |
57
57 |
| Care of Phone | 57 |
| Accessories | 58 |
| Car Accessories | 59 |
| Index | ~ 4 |
Getting Started
1. Insert SIM Card
Your Service Provider will supply a SIM card, containing your phone number and billing details. It may be used in other GSM phones. You may need to carefully snap this out from a credit card sized SIM.
If removing battery ensure phone is switched off first.
• Remove battery if fitted (1,2).

• Unlock SIM carrier by sliding top as shown (3).

Swing up carrier (4) then slide in SIM card (5). Ensure angled corner is as shown.

- Swing down carrier (reverse of 4), ensure it fits flush.
- Lock carrier (reverse of 3), listen for click.
- Fit battery, locating bottom end, then swinging in top until it clicks.
2. Charge battery
Your new Lithium Ion battery will not be fully charged:
• Insert charger plug into socket in base (arrow facing up).

- Plug charging unit into mains power socket (ensure voltage range stated on charger is not exceeded).
- Phone can be used whilst charging.
Your display shows charging status.
A half hour charge enables more than 100 hours standby, allow at least one and a half hours for maximum charge.
Usage Time
A full charge can provide up to 200 hours standby, or up to 5 hours talktime, but dependant on network, environment, SIM card and services used, lower times will be expired.

Your display shows charge level.
(t)
A beep sounds when nearly empty.
Getting Started
3. Switch on

Hold down to switch on or off.
4. Enter PIN
Your SIM card is normally provided with a PIN code to prevent misuse.

Enter your PIN code (shown as ****).
Correct any errors with • C.
| P |
Lease
your |
ente
PIN |
er |
|---|---|---|---|
| SOS | *** |
**
•C |
ОК |
| Pres | s 💽 | -r-R |
Your phone will register with Network, this may take some seconds.
| ¢ | |
|---|---|
| Network 0 | perator |
| Name? | Name? |
You are ready to make and receive calls when Operator's name appears.

May also appear if your SIM is enabled for special Applications eg Banking (see also p. 21).
Demonstration
Demo
is offered when no SIM is fitted. Press to see dynamic demonstration.
PIN
The SIM card will be blocked after the third incorrect PIN entry.
In this case, or if you forget your PIN, see p. 55.
To switch off PIN control or change your PIN number, see p. 43.
SOS
Press the soft key to access your normal emergency service, even without a SIM (provided you are within network coverage). Please do not abuse this.
Network connection:
- Indicates incoming signal strength.
- If it is very weak, there may be risks of call quality or continuity.
You can normally improve reception by moving to a window, elevated or open space, see also Trouble Shooting page 55.
Your phone will automatically select another GSM network if you are abroad, or outside your 'home' network.
Making Calls
Dialling a Number
Operator name must show in display.

Dial required number.
Use always full area code , even if calling locally.

Use to correct any errors. A short press clears last digit, a long press the entire number.

Call displayed number.
Press to end your call.
Easier Ways to Call
For easier, quicker, and error free use, you can call any highlighted number or name, including:
- Redial previous calls
- Automatically redial failed calls
- Call back received calls
- Call back unanswered calls
- Call numbers in messages
You can also use your PhoneBook, Fast Dial keys and Quick Dial, details follow.
International Dialling
Proce

Hold down (+ appears).
Press soft key, choose country.

Enter the national call number (in many countries without the first digit).

Call displayed number.
Of course, you can also enter the entire number sequence directly.
Redialling
The last 10 numbers called, are recorded. From your standby display:

Shows last calls.


Press again to redial last call
or
to redial previous calls:

Scroll to highlight required number.

Call
Info
Please see 'Records', p. 29 for further recorded numbers you can call.
Auto Redialling
If a call is unsuccessful you are offered:
AutRedial Press to repeatedly dial number in progressive intervals for 15 minutes.
or

Press for reminder in 15 minutes (beeps and displays number)
Any other use of phone will clear these.
Incoming Calls
Answering Calls

or

Press
Ending Calls

Press.
Usually your call ends if the other party ends it, but you should not rely on this.
Unwanted Calls
Diverting Calls

Select.

Will be offered if no 'Divert' set
Rejecting Calls

Press to reject call.
Turning off Ringer

Hold down.
Info
- You can return calls you have received (see p. 29).
- An incoming call will interrupt any other use of phone, but you will be returned to your previous task afterwards
Data/Fax Calls

Please see p. 48 for details.
Fast Access Keys

'Name' enables you to set a named number for one touch calling, see below. You can alternatively program a frequently used function on these keys, see p. 46.
Note that your Operator may have already set a function on the left key, enabling easiest access (eg Applications).
Cotting
| Ν | а | m | е | ? | |
|---|---|---|---|---|---|
Press and select Phone Number.
Either

Press to open the Phone-Book.
Select a name by entering the first letter and/or scroll to the relevant entry, e.g. office.
Select
or
Press.
Press.
Enter the required call
/OK Enter the name associated with the call number, e.g. of-
The name is programmed as a fast access key (max 7 characters) and added to the PhoneBook.
Calling

Hold down key to call (eg Office).
hanging

Press briefly.
nge Select.
Set new entry as above.
Phonebook
With ever longer phone numbers, it is easier to dial them once only and save them in your electronic PhoneBook. Writing a name makes finding and calling the number easy.
Writing in Phonebook


Write name, number keys now write letters (see right)

Confirm entry.

Committe Citary.
Dial number if required.

Press to return to standby, ready for next entry.
Writing Letters
Press number / letter keys repeatedly. Cursor advances after a short delay.
| 2ABC | Press once for 'A', twice for 'B' etc. |
|---|---|
| Available characters are displayed on the top line. | |
|
Press to erase letter pre-
|
ceding cursor, hold down to erase name. |
| * |
Press to manually switch
'letter' case. The first letter of each name is written UPPERCASE, switching automatically to lowercase |
| Press to create space | |
| 1-9 | For numbers first step through letters. |
| 4 1 I > | Controls cursor position for |
Calling from Phonebook

Open PhoneBook.
Write first letter of required name, and/or scroll to highlight required name.


Call highlighted name.
- Own numbers, see p. 11
- Information, or Service Numbers may already be saved in your PhoneBook.
Phonebook
Dial complete number:
• Always enter complete number including area code.
International Use
• For easier use when travelling, save all entries with + international prefix, see p. 7.
Other characters
Space 1 € £ $ ¥
| + | 0 | - | • | , | : | ? | ć | |
|---|---|---|---|---|---|---|---|---|
| ! | i | " | ' | ; | _ | |||
| (¥ A) | Shift | * | 1 | ( | ) | < | = | > |
| % | ¤ | |||||||
| # | @ | & | § | Γ | Δ | ϑ | ||
| Λ | Ξ | П | Σ | Φ | Ψ | Ω |
Hints for Advanced Use
- Use Red PhoneBook for priority numbers (see p. 12)
- You may enter a range of numbers for same person eg. Carol O (Office) Carol M (Mobile) Carol H (Home)
- You may save highlighted numbers from lists (eg Calls Dialled).
- You may save numbers in messages:
Press to save highlighted number.
- If you have many entries starting with same letter, enter next letter and scroll backwards.
- You can save up to 40 number/ code combinations per entry.
Checking Entries

Press and highlight required entry.
| V | 'i | е | W | |
|---|---|---|---|---|
Press to see complete entry.
Changing Entries
Check entry as above, then:

Select. Number is shown with flashing cursor.
Change number.
Press to advance to name.
Editing Phonebook
Use your PhoneBook Menu for further options (see p. 13).
Own Phone Numbers
The first entry in your PhoneBook can be used for your own number. You may also store other personal numbers (eg Fax).
Entering your number(s) and name is similar to PhoneBook entries.
Using Saved Prefixes
You can save a prefix (eg a Business exchange/PABX).
To call, first highlight the prefix name:
/iew Press,

Add number, then call.
Phonebook
Red PhoneBook
For quicker access you can enter priority names in your Red PhoneBook.
Incoming calls matching Red Phone-Book entries are identified by a distinctive ring (see p. 30).
New Entry
Transferring from PhoneBook

Open the PhoneBook and choose an entry
Open the PhoneBook Menu and select Red Book Entry Pross
New entry

Enter the call number and name as for a normal Phone-Book
Press red icon (instead of OK).
le used to mark Red PhoneBook.
Moving an entry from Red to normal PhoneBook

Open the PhoneBook and highlight an entry.
Open the PhoneBook Menu and select M Phonebook .
Press
Calling

Press twice and select an entrv.


Memory Numbers
Every phonebook entry is automatically assigned a memory location number.
Using memory number

Enter a number (eq 3).
Press to display.


Press to call
or

Press to see entry.
Changing memory number
Display the phonebook entry

Open the PhoneBook Menu, choose Location.

Confirm
You are guided via the display.
Phonebook
PhoneBook Menu
Your PhoneBook Menu provides further options. When using PhoneBook:

Press to see special Menu, and select as required:
| Edit Entry | (p. 11) |
|---|---|
| Red Book Entry | (p. 12) |
| Delete Entry | |
| New Entry | (p. 10) |
| Location | |
| Delete PhoneBook | |
| Check Space | |
| Send as Text | |
| Send via IrDA | |
| Print via IrDA |
Delete Entry

Open PhoneBook and highlight entry.
Open PhoneBook Menu and choose Delete Entry .
Lect Press.
Location
You can choose where your Phone-Book is stored:
in SIM
Entries are automatically stored in your SIM card, enabling them to be transferred to another GSM Phone.
in Phone
Select to use Phone Memory. If your SIM is full, entries will overflow into this memory (50 max).

Marks an entry in Phone memory.
Restricted (in SIM)
If you have a special SIM, offering 'Fixed Dialling Number', you can restrict calls to entries in this PhoneBook, and no new entries can be made. PIN 2 is needed to control this, please note security code precautions page 43.

Marks an entry in Restricted PhoneBook
Delete PhoneBook
You are asked for PhoneBook type, and then, as a security the relevant code (PIN 1, PIN 2 or PHONECODE).
Check Space
Entries are normally saved on your SIM, the capacity is defined by your Service Provider.
You can check used and available capacity for:
- SIM card (up to 400 entries)
- SIM (restricted)
- Phone (up to 50 entries)
Send as Text
A phonebook entry can be sent as an SMS.
Send via IrDA
A phonebook entry is transmitted via infrared to another phone.
Print via IrDA
A phonebook entry is transmitted via infrared to a PC for printed.
Phonebook
Control Codes
Control codes can be saved like normal phonebook entries in the PhoneBook (eg for controlling an AnswerPhone remotely).

Enter the phone number.
Hold down until ' + ' appears.
If additional codes are required:
You can hold down again to create a further pause of 3 seconds, repeat if a longer pause is required.
This creates a pause until the connection is established.

Enter Code number.
Press and add suitable name as usual.
Alternatively, just save the Control Code, and send it during call, but note special procedure (see p. 17).
Info
Improved PhoneBook Management
You can create and manage your PhoneBook via a computer/PDA using appropriate software, including SoftDataLink PRO (see "Accessories", p. 58).
Service Provider Control
Your Service Provider may be able to create or update your PhoneBook over the air.
Information/Service Numbers
These useful numbers may already be entered in your PhoneBook, select and scroll through the sub directory.

Identifies a Premium Service number.

Indicates number not available when outside your home network.
PhoneBook Restrictions
Please see 'Control Use' p. 42. Note that your PhoneBook may already be restricted (normal for some business applications).
Partial Number Restrictions
Your Service Provider may setup Restricted PhoneBook entries such as "613??00" iff so, the user can enter any number inplace of the question marks.
During a Call
Some features are only available during call.
Volume Control
Use side keys to adjust volume.
If using Car Kit Comfort, this adjustment will not affect normal (handheld) setting.
Microphone on/off

Press right soft key again to switch microphone back on.
Recording a Number
If a caller dictates a number, you can enter it into your phone.

Enter the phone number. The number can be called or saved after the call.
Use Voice Memo

You can use the right side key to record or play a voice memo, see p. 18.
Call waiting
8 !
During a call you can be advised that there is another call waiting. You may need to register for this service, and need to set your phone (see p. 45).
You will hear a special tone during the call.

Your caller will hear ringing tone. You have 3 options:
• Swap

This accepts waiting call and places current call on hold. You may swap back and forth as required.
You can call as follows:

Press to end current call.
If you press No, the waiting call is not terminated and can be retrieved with Go back. Otherwise, the call is automatically terminated after 10 seconds.
During a Call

End current call, answer new

Press to end current call, waiting call will ring and can be answered as usual
Reject waiting call

This is offered if set. (eq Voice Mail, see p. 27).
or

Caller will hear busy tone.
Hold/Multi Party Calls 8!
You can hold your current call. You can then make and control additional calls
Networks may not offer all the described options.
During a call, explain your intention then.


Select from PhoneBook or dial number.

Press, and speak to the new partv
You have 4 options:

This returns to the held call and places current call on hold. You may swap back and forth as required
2 Join

Select to provide a 3 way conference
You may repeat this, adding a maximum of 5 calls
Call Transfer
To join original call to new one, dropping out vourself:

Press and select Call Transfer
End / Return

Press to end current call.
If you press No, the waiting call is not terminated and can be retrieved with back. Otherwise, the call is automatically terminated after 10 seconds.
During a Call
In Call Menu

Press during a call.
Your menu offers some additional functions:
Call Transfer Conference Time/Cost Send DTMF tone Volume NORMAL OPTIONS Call Status
Call Transfer (see p. 16)
Conference (see left page)
Time/Cost (see p. 42)
You can check current call time, and cost (if programmed).
Send DTMF tone
You may transmit control codes for controlling an AnswerPhone and other facilities.
You may use this menu entry, or follow 'Sending Control Tones', see right, for more direct operation.
Volume control (see p. 30)
The volume can be set.
NORMAL OPTIONS
You may find it useful to refer to a message, or to your Records (see p. 29), to pass on, or connect a number.
Call Status
Active and held calls are listed (eg in a conference).
In Call PhoneBook

This may be used during a call
It may be useful to pass on a number (view the entry to see details).
Sending Control Tones
You may transmit control tones for controlling remote facilities (eg AnswerPhone). Whilst connected to the facility:

Simply enter the code number.
You can alternatively send a saved control code:

Highlight the named control code.

Press, then

Press to transmit code number.
See also saving code in combination with phone number, see p. 14.
Voice Memo
This enables you to:
- Record a conversation useful if you are given a phone number or address.
- Dictate a memo, as a reminder, or for others to hear.
- Save a message to play a caller.
Recording

Hold in the Memo key (on right side). A beep indicates the start of recording. Release key to stop recording.
| Memo |
| topped |
| Exit |
A beep will warn you when the memory is almost full (20 seconds max.).
Playing

Press the Memo key briefly.
Pausing/Additional Memos

You can release key to pause, hold in again to continue.
A pause of more than 10 seconds will return the phone to standby, ready for another memo. A new memo will replace the oldest one, when the memory is full.
Soft Keys
You may also use soft keys for the above functions whilst using Voice Memo.
Private Answer
If you don't wish to disturb others (eg meeting) you can prerecord a message:
' I have answered, but I am moving to where we can talk privately'.
To use, answer the call, then

Press briefly.
Talk when ready.
Menu
Menu Introduction
Your menu enables you to set and control a valuable range of features and network services, enabling you to keep constantly in touch, and efficiently organise your business and leisure activities. Not all the listed services may be available in your network, or may require registration, please check with your Service Provider.
The following sections describe using the Menu key when in standby. Pressing the key in other states (eg when using PhoneBook) provides further options relevant to that state.
Menu Use
Press to open Menu.

Sub Menu
Repeat the procedure to choose from your sub menu(es). The highlighted entry contains additional information.

Your final menu task is offered as Set, Clear, On, Off, OK, etc. After you have completed your task, you are returned to the previous list.
Other Controls
Hold down to exit (return to normal standby state). Press briefly to step back to previous list

Press to clear an entry (short press to clear last character).
Display Info
-----
- Indicates end of list, this wraps round.
- Indicates that function is switched on.

State unknown.
When displayed (top right) indicates further options available by reusing the menu key.
If no keys are pressed for 2 minutes, you will automatically exit the Menu and return to standby state.
Menu
Info
Menu Assistance
Usage Hints is offered for each top menu

Scroll up and select to see relevant information
Fast Access Key
You can set Menu functions on your Fast Access key (see p. 46).
Short Cut to Submenu
Your sub menu location is displayed. These numbers may be used for rapid access, eq

(1) 12 Will select your Message list
Alternative Line 🖓
If you subscribe to a second phone line, you may set each menu entry specific to this line (eq. a different ring, divert, security). You must however select the required line before entering the menu.
Network Feature
Some Network features may not be currently offered by your Operator, or may require registration.

Indicates network dependent feature.
Menu Changes
There may be omissions or additions to your menu (enabled via your Service Provider).
Standby time
Use of some features, eq Cell Broadcast can reduce vour effective standby time.
Menu Tree

See appendix page 51.
Applications (option)
Optional Features
Your Operator may offer special applications (SIM Application Toolkit). These can include Information and Electronic Commerce services (eg Banking, Booking) and other powerful applications.
When active, the name of the service may appear in your menu, there will be a submenu if more than one application is active.
This, or the application name may show in standby, enabling instant soft key access.
Please contact your Operator for details, your phone is enabled to handle future services through this facility.
Usage Hints
This section provides a basic introduction to using key features.
Using Info Basic Use Ways to Call During a Call Dialling Lists PhoneBook Red PhoneBook Voice Memo Voice Mail Text Message Accessories
Helpful information is also available for, each top menu, select: Usage Hints
Message
Your phone can to receive and send written (SMS) messages, set vour VoiceMail and manage Cell Broadcast.
Write Message Incomina Outaoina Business Card Message Setup Voice Mail Cell Broadcast
Please consult your Operator concerning service availability.
Text Messages
Reading a Text Message
Will appear in your display when a new message is waiting
| Network 0 | perator |
| Name? | |
| Press to re | ad 🔹 |

Date/Time Originator's Number Start of message


Your left side keys enable you to scroll page by page.
These also display a full page, any other key press will revert to normal.
Deleting Messages
At end of a message you are asked to delete it, you should normally do so since capacity (of SIM card) is limited. and when full, you cannot receive more messades.
| | * | |
|---|
Will flash to alert you.
Info

Press to save any highlighted number in your PhoneBook
Press to call any highlighted number. This may be originator, or another number contained in message.
See p 24
Your message menu enables further functions includina:
Delete Actual or all messages.
Check Space Check message store
Send Text See p. 24
Old Messages
A list of old messages can be seen, and reused

The messages are listed chronologically, scroll and view as required.
Press •
* Indicates an unread message.
Message
Writing/Sending
Messages up to 160 characters long can be written and sent to other GSM phones as follows:
- Writing new message.
- Replying or Sending on.
- Editing and reusing messages.
- Sending preformatted messages (eg Business Card).
Have your Service Centre Number ready prior to sending your first message (available from your Service Provider).
Writing

Select Message, then Write Message then Create New.
Write Message using alphanumeric keypad (see right).
When your message is complete:

Press •

Select from PhoneBook or enter number.
Sending

Press (enter Service Centre Number if requested).

Can be used at any time.
Writing Letters
Press number / letter keys repeatedly. The cursor advances after a short delay.
- Press once for 'A', twice for 'B' etc.
- Press to insert space.
-
Press to erase letter preceding cursor, hold down to erase word.
- Use to switch letter case.
- Shows lower or UPPER case.
- 0 9 For numbers first step through letters.
- Controls cursor position. 160 Top display shows number of characters left.
Other characters
-
5 Space 1
€
- £$¥

Other Options
Press to see other options
Message
Info
- You are advised when your message has been sent and then you can save it. It will appear in your message Outgoing list.
- If your message is not sent, you are offered Repeat . If this fails, check that your Service Centre is correctly set (see p. 26).
- Note that 'Message sent' means it has been received by your Service Centre, if it cannot be immediately delivered, it will be continuously retransmitted. You may also obtain Delivery information (see p. 26).
- Your Service Centre may be able to transmit your message to PC's or other terminals.
- C enables quick sending of a message (provided no number is highlighted).
Improved Messaging
You can write and manage Textmessages via computer/PDA using appropriate communications software, and the built in IrDA (infrared) interface.
Please see Data and Fax page 48, and SoftDataLink PRO accessory page 58.
Replying to Message
Display message including from your list.

Write Message Answer is YES Answer is NO Edit text
'Answer is Yes/No' plus your number are added to the response.
Use C and normal writing procedure for editing a reply.
Message
Sending on Message
View message.

(if no number is highlighted)
٥r

Delete destination number (if incorrect).

Select from PhoneBook or dial number.
OK ,Send Press.
Sending Business Card

Select Message, then Rusiness Card

Add destination number and send
Since the business card is transmitted as SMS only the first 160 characters will be cont
Please see p. 35 to create your own Business Card
Preformatted Messages
Select Message, then Write Message then choose from:
Late Appointment Anniversarv

The preformatted message displays the cursor at the first variable

Overwrite variable entry.

Hold down to move to next variable

Enter address and send as
Reusing Messages
You can write your own message, or edit one you have received, and save it.
Retrieve the message from your 'Outgoing List':

Modify as required and send
Message
Message Settings
Once your Service Centre is set, you can send normal SMS messages. You can, however, choose from special settings:
E
Select Message, then Message Setup then choose from:
Service Centre Message Type Message Life Delivery Report Direct Reply
Service Centre
Enter or change Centre number advised by your Service Provider.
Message Type
Enables you to send a specific type of message, you can choose from:
| Variable | • |
|---|---|
| Standard | text |
| Telex | |
| Fax | |
| X400 | |
| New |
Variable setting offers choice of type when sending each message.
Alternatively you may use Setup menu to set another type as normal.
Standard text setting will transmit all messages as normal SMS. Your Message Centre may enable different types which you can choose.
New will ask you to enter a code number as advised by your Service Provider
Message Life
Alters period your Service Centre will keep and continue sending a message.
Delivery Report
Your phone will alert you and display when message has been delivered to its final destination, or reason if it is delayed or delivery not possible.
You may be charged for this special service.
Direct Reply
When set, a reply to your message will be sent via your own Service Centre.
Message
Voice Mail
This network service can be provided as an inclusive service and set automatically. You may need to register for service and set it manually, please check with Operator.
Owing to different systems in use, operation could differ from that mentioned below
Hearing Voice Mail
A waiting message may be indicated by one of following:
| Network | Operator |
| Name? | 00 |

Will appear (plus beep). Press to call and hear messade

Will appear (plus beep)

Press to check text message (it may advise that you have
Voice Mail waiting)
or
Phone call/recorded announcement
If a Voice Mail is waiting, you need to call your Message Centre to hear it (automatic with OO indication):

Hold down to call. If not set, see 'Save Mailbox Number (right).
Setting Voice Mail
Your Service Provider may preset this. or advice special procedure, If not they will supply 'calling' and 'divert' numbers (normally different) you should set as follows:

Save Mailbox Number
- Select Message then Voice Mail
Enter your Mailbox 'calling' numhór
2 Divert to Voice Mail
It is necessary to set 'Divert' so that unanswered calls (including those when you are unreachable or switched off) are forwarded to your Voice Mail.

Hold down to return to standby.
Select Divert , then A11 Unanswered then Set

Enter vour Voice Mail 'Divert' number.
Please see 'Divert', p. 39 for details of all divert possibilities.
Info
-
Unanswered calls means that calls will be diverted.
- when switched off, or out of coverage
- if you do not reply, or if busy (exception Call Waiting p. 15).
- It may be necessary to call a different Mailbox № when outside your home network.
- If you need an access code to hear your Voice Mail, you can save this together with the 'calling' number, see Control Codes, see p. 14.
Message
Cell Broadcast
Your Operator may offer Cell Broadcast, where information is broadcast to all phones in specific network Cells. Information relevant to the specific locality can include local phone codes. traffic, weather, events and other local information services.
This range of topics is currently being developed, and may in some cases be limited to one

Select Message, then Cell Broadcast
Receive CBOR Read Broadcast Set CB Topics Topic Index Auto Displav Set Language
Receive CB CB
When switched on, you will receive the preset broadcast topic.
The first line of the broadcast will appear in the display, a longer broadcast will scroll automatically. A new broadcast automatically replaces an old one on the same topic.
| Operator | Name |
|---|---|
| Delays on | M25 |
| 10:25 | |
| Home | Office |

Lise to save broadcast as an SMS message, or delete it. If a number is highlighted:

You can call it.
You can save it
Read Broadcast
Select if you have switched off 'Auto display' or need to read an old broadcast. You can choose from a list of topics you have previously set.
Set CB Topics
You may see a list of Topics (Channels), see Topic Index below. You can choose and switch on as required, if the list is empty:
Press
New entry Select
Enter the Topic ID number as advised by your Service Provider - vou can name it.
For further entries, and other options
- Press to open Cell Broadcast sub menu, and choose as required.
Info
You may switch on (activate) up to 5 Topics.

Topic activated.
Topic Index
Your network may broadcast an index of currently available Topics. Switch on to update your "Set Topics" list from which vou can choose.
Auto Display
You may switch off Auto Display, if preferred You can also control alert tones, see p. 30
Set Language
Select the required language for the info service
Records
Call Records
Your phone remembers your last 10 calls, you can check in the following lists, and redial / callback.

Select Records
Scroll and select from the following lists.
Calls Missed Calls Received Calls Dialled Alarms Missed

Call highlighted number.
Calls Missed
c 8!
Calls you have received, but not answered. Numbers can only be listed if networks involved provide 'Caller Identity' feature. Note callers may have left a Voice Mail, see p. 27.
Calls Received

Numbers can only be listed if networks provide 'Caller Identity' feature.
Calls Dialled
You can also see these more directly from standby:

Press (see p. 7).
Call Lists Info
View Press to see time of inco-
ming call. You can also save numbers permanently in your PhoneBook
Your SIM may enable more than 10 calls to be listed, when full the oldest records are erased
Delete / Edit
When viewing Calls List.

Press, and select as required.
Alarms Missed
Alarms you have failed to respond to are listed for reference (see Organizer page 31).
Alert Tones

Select AlertTones then required function:
Situations Ringer Setting Volume Melody Silent Alert Service Tones MelodyComposer
Situations
This collectively controls all audible signals (except low Battery warning). Choose from:
Normal
QuietEnvironm.
Ringer beeps once - other tones silent
NoisyEnvironm.
Loudest / Clearest Ringer, All Tones on maximum.
Screening (only ____)

Set to avoid disturbance by 'unknown' callers, whose number does not match an entry in your PhoneBook. If Divert (Unanswered) is set, the call will be diverted (eg to VoiceMail). If the call identity is not provided by the networks, the phone will not ring.
→ A indicates screening is set.
Red Screening (only Red 🛄)
As above, but only for Red Phone-Book.
Ringer Setting
You can switch off or set unobtrusive single beep.
✗ or ▲ Shows in standby.
Volume
You can adjust your Ringer and other tones for all alerts, or separately for each type.

Indicates escalating ring starts quietly then increases.
Note, adjustments made when using accessories (eg Portable Hands Free) do not affect normal settings.
Melody
You can choose from 42 melodies to differentiate between signal tones, message indications or alert tones.
Silent Alert
You can switch silent vibrator on or off.
Service Tones
You can switch off the alert tones indicating:
- Connection to Network
- Connection after dialling
Melody Composer
You can compose your own melodies:
(# -
F
- Keys 1-7 correspond to the notes C, D, E, F, G, A, H.
- Play and rewind the melody.
- Set notes higher or lower.
- One octave higher
- One octave lower.
-
Set a pause.
-
Switch to semitones.
- Melodies Menu for saving, deleting, playing, inserting notes, etc.
-
Switch to semitones.
You can set the tone length with the left side key.
(三)
Organizer Select Organizer then required function: Calendar Q Alarm List Calculator Currency Conv. Business Card Games or Calendar trv: Select from your Organizer thon menu Feb 2000 (6 Alarm type Press left soft key to scroll through days, hold down to scroll vertically (eq to adja-
Browsing Calendar
| Scroll to h |
ighlight required day.
Detail view for the day. |
||
|---|---|---|---|
| 1-7 | Use to see week. | ||
| 1-31 | Use to see month. | ||
| 14 | Filled dates indicate planned events. | ||
| (6) | Indicates week (0-52) | ||
| Week is ordered: | |||
| Monday - Sunday (red) | |||
cent month).
New calendar entries
-
Select a day.
- Press
If there are already entries for that dav, a list is displayed.
Press and select New entry
if this day does not yet contain an en-
Press
Enter the alarm time
Recurring alarm (see p. 32).
Press and choose one of the following alarm types:
Memo Write a short text (max. 16 characters).
Call
Use 🖾 or enter number. it will be offered when alarm sounds.

Meeting
Birthday
Voice Memo
Use side key O to record. alarm will invite you to plav it.
If necessary, make an entry.
Confirm
Organizer
Alarm List

/
Select from your Organizer menu.

Display shows that the alarm has not yet been triggered.
To change an alarm entry:
- Select Press. The alarm is displayed with time, date and, if applicable, a text.
-
hange Press to enable change of date and time.
- Confirm. Bopost to change ty
Repeat to change type.
Setting Recurring Alarms
Select Alarm List as above. If there are entries listed.

Organizer
Alarm List Menu
Further options are available when your Alarm List is displayed:

Select Alarm menu.
Scroll and select from the following list:
New Alarm Deactivate Entry Delete Alarm Modify Alarm Clear List Send as Text Send via IrDA Print via IrDA
New Alarm
See also "New calendar entries" on the previous page.
Deactivate Entry
If an active a alarm is marked I , it can be deactivated or re-activated here.
It may be useful to temporarily deactivate a daily alarm, or change an old alarm to a new date.
Delete Alarm
A selected alarm is deleted.
Modify Alarm
See left.
Clear List
All alarms are deleted.
Send as Text
All alarm information (date, time, alarm type, memo text) can be sent as text.
Send via IrDA
The alarm information is sent via infrared to another phone.
Print via IrDA
The alarm information is sent via infrared to a PC for printing.
Info
- A Shows in your standby display an active alarm.
- Your alarm will sound even with the phone switched off - any key will silence it. A pause (5 minutes) is offered.
- To adjust alarm sound, (see p. 30).
- To set clock, (see p. 45).
- Calendar and Alarm List may be used to set all alarm types.
Organizer
Calculato

Select from your Organizer menu.

Basic Calculations

Enter first number (use if required).

Repeatedly press left soft key (right end) to display required function.
Repeat procedure for second and subsequent numbers.

Press to calculate.
Additional Functions

Press the right side of the left soft key repeatedly until the additional function required is selected.
- Memorises the displayed number including result of calculation.
- Recalls the memorised number.
- e Exponential value (only single entry possible).
- ± Swaps + and -.
Info

Can also be used for =.
Can also be used for +.
Currency Converter

Select from your Organizer menu.

Setting Exchange Rate
For first time use, you need to set the currencies and exchange rate:
Press and enter the designation for your own currency, eg DM (max 3 characters). 0K / 🕂 Press and enter the designation for the foreign currency, eq f (Furo) 0к / 🕂 Confirm and enter the relevant exchange rate, eg DM = 1000, then € = 485. Confirm If a currency pair has already been entorod. Open the currency menu and select New Entry. Offers the symbols € $ f ¥ This setting enables currency conversion in both directions. Up to 3 currency pairs can be set.
Organizer
Using Converter

From Organizer menu select Currency Conv. Converter

Select required conversion.
Enter amount to be converted.
=
Converts this to the other currency.
Repeat
Enter the new amount.
Currency Menu
Select an entry from the list of currency pairs:

Press. The Currency Menu is displayed:
New entry Edit entry Delete entry
New entry
∙ C / [
Enter currencies and exchange rates as above.
Edit entry
Highlight unwanted entry (eg exchange rate). Proceed as for a new entry.
Delete entry
A highlighted entry is deleted.
Business Card
You can create your own business card, and send it via SMS, or using Infra Red to another IrDA equipped GSM phone or PC.

Select from your Organizer menu.
If you have not yet created a business card, proceed as follows.
ј / ок
You will be prompted to write entry as follows:
<First name>
<Name>
<Company>
<email>
<Phone> (Office)
<City>
<Postcode>
<Street> (No.)
Info
The card content/order conforms to the new (vCard) internat. standard.
Business Card Menu
Select the required function in the Business Card Menu:
Send as Text Send via IrDA Print via IrDA Edit text
Send as Text
Send as SMS message (the first 160 characters).
Send via IrDA
The business card is sent via infrared to another phone.
Print via IrDA
The business card is sent via infrared to a PC for printing.
Edit text
Proceed as described above for a new entry.
Organizer
Games
Select Games in the Organizer Menu, then select the required game:
Wayout Reversi Quattropoli Minesweeper
Wayout
Find your way out of a 3D labyrinth.
Options This button provides tips on how to play the game, shows the highest score and allows you to set the level of difficulty.
Start
Start a game.
Reversi
Try to score as many tiles as possible by "blocking" your opponent's tiles.
This button provides tips on how to play the game, allows you to define who begins and set the level of difficulty.
.rt Start a game.
Controls for Wayout and Reversi:

Quattropoli
Throw tiles down into a field. The objective is to be the first to get 4 tiles in a row (horizontal, vertical, diagonal).

This button provides tips on how to play the game, allows you to define who begins and test the level of difficulty.

Controls :

Minesweeper
Find all fields without mines.
- tons This button provides tips on how to play the game, allows you to set the playing field and shows the highest score.
- Start Start a game.
Controls :

-
Digit Show the number of mines in the surrounding fields.
- Uncover a field.

(0+),(5)(Cover if the number of mines and hits are equal.
Internet
The Internet Browser is optional, subject to your network and SIM card. Your phone uses SMS and special services which may be available via your Service Provider. The Internet Browser enables advanced information and communication services, eg home banking, teleshopping etc.
The Internet content is similar to that accessed via a PC, but this standard content is unsuitable for display on a mobile phone. Hence you need to set up and use special pages, as below:
How to Use
You will need to open your Internet account with your Service Provider.

Press, then select Internet Browser
Initial setup:
You may be asked to enter the following (available from your Service Provider):
- Your SMS Service Centre Number (You may need a different Internet number).
- Your Destination address, enabling access to the special pages for mobile phones. You may be asked for a second Destination address.


Enter the required information.
Use to select letters and case if required.
Operation
When you have entered the required information, and when accessing subsequently, you will enter your homepage. This may appear similar to that shown below.


Use left soft key to scroll up and down lists (they do not wrap around).
Soft key labels are defined by Internet, use left end of right soft key.

If more then one soft key is available, use right end of right soft key to scroll through soft key labels.
You can select and view listed entries. You will be prompted to enter required alpha or numeric information, enabling full interaction.
Info
If you cannot access your homepage, please check:
- You are registered for Internet Services
- Your Service Centre Number and Destination address are correct (see settings - next page)
- Your Own Number is entered (see p. 11).
Internet (option)
Further Options

From your Internet Browser select from:
- 1 Home
- 2 Bookmarks
- 3 Mark Site
- 4 Show URL
- 5 Help
- 6 Settings
- 7 Reset 8 Version
- 8 Version
- 9 Go to URL
Home
You will find a list of topics under this section such as travel, weather, news etc. Please check with your Service Provider for details.
Bookmarks
Here you will find a list of your most frequently used pages with the Internet address. To revisit a page, select, the bookmarked page.
Mark Site
Select to mark the current page, enabling quick revisiting via bookmark list.
Show URL
(Uniform Resource Locator)
Select, if you wish to view or copy Internet address of your current location
Help
Select, if you require information on your current location.
Settings
You may set up a second Internet link, and UP address. You can also check or change existing settings, including your Own Phone Number.
Reset
You can clear list of previously visited pages.
Version
You can reference browser version.
Go to URL
Input option for dialling an Internet address directly.
Your Internet Browser is licensed from:


Divert
This network feature diverts (or forwards) calls to your Voice Mail or another phone, ensuring you can be reached at all times.
All Unanswered All Calls Specific Divert All Fax Calls All Data Calls Status Check ClearAllDivert
To Set Divert
It is most usual to divert All Unanswered calls. This includes 'If no Reply', 'If Busy' and ' Unreachable' (eg when switched off or out of coverage). These, and other conditions are set the same way:
E
Select Divert , then All Unanswered then Set .
May be offered and used to divert to Voice Mail.
or
Enter the number you wish to divert to (use C if number is incorrect).
OK
There will be a short delay while your network confirms this.
Press
Info
If you cannot set this divert, it may be possible to set other conditions, see next page.
To Clear Diverts
Select Divert then ClearAllDivert .
If you wish to clear a specific divert, select condition, then Clear .
To Reset Divert
The last divert destination is memorized, enabling easy resetting. Proceed as for setting, press OK.
To Change a Divert No.
Proceed as for setting, to display the current (or last) divert destination.

Press to clear number.

Enter new number.

_

Press.
Divert
To Check Divert
Will show permanently if 'Divert all Calls' is set.
Appears in Divert list to indicate that a condition has been set.
?
1
Appears if status unknown (eg new SIM inserted).
Note, however, that since Divert is a network setting, the actual setting could be different.
To check, and possibly update your display:

Select Divert then Check .
If you wish to check a specific divert, including destination, select condition then Check .
There will be a delay while your network checks and advises you.
Divert Conditions
All Unanswered
This general setting includes, 'If not Reachable, If no Reply, If Busy' see below.
All Calls
No calls will be received by your phone.
Specific Divert:
The following can be set, enabling different call conditions to be diverted to different numbers.
- If not Reachable
Calls will be diverted when your phone is switched off, or out of coverage.
- If no Reply
Your phone will ring, but after a delay, the call will be diverted. You can set delay time (increments of 5 sec., 30 sec. max).
- If Busy
Calls are diverted when your phone is Busy (unless Call Waiting is set, see p. 15).
All Fax Calls
Incoming Faxes can be diverted to a convenient Fax Machine.
All Data Calls
Incoming Data calls can be diverted to a PC, if you are not equipped to receive them.
Network
41
Select Network then required function:
Network Info Change Network Auto Network Operator List Preferred Net. Call Waiting Fast Search Conceal ID Band Selection
Network Info
Lists networks you are receiving signals from, you can select service from this list but:
Indicates that your SIM will not allow this Operator.
Change Network
You can change to the next preferred Network (which is selected automatically when outside your home Network).
Auto Network
Your phone will automatically select an alternative Operator when your home Operator is not available. The automatic selection priority is controlled by your Preferred Network list. You may switch to manual operation and choose the Operator you require.
Operator List
A list of known GSM Operators may be referenced for information.
Preferred Network
Operators on this list have priority for automatic selection. You can edit this list, deleting an entry or inserting a new one from the Operator List. If the required Operator is not listed, you can enter it via the Country (MCC) and Network (MNC) codes they supply.
Call Waiting 48
If you register for this service, you may need to set it, you can also check status. For operation see p. 15.
Fast Search
You may speed up Network reconnection time, useful in fringe coverage areas. This can increase power consumption.
Conceal ID <8!
Subject to your Network, and other carriers, the person you are calling may be able to see who is calling them. You may choose to conceal your identity, either for the next call or generally.
Band Selection (option) 48!
You may able to choose whether your phone operates at GSM 900 or GSM 1800 frequency.
Control Use

Select Control Use then required function:
Line Call Time Charge Setup PIN on/off
Limit Phone Netw. Barrings User Groups
Line
c 8!
If you subscribe to a second phone line, you can switch lines. It may be more convenient to assign a soft key for this, see p. 46.
You may lock the phone so that only one outgoing line can be used. You will be asked for PHONECODE, please see restrictions.
Call Time

You can see the duration of your last call, and total calls (outgoing and also incoming). You can also reset these.
If the network indicates the call units used, they will also displayed, together with cost, if you have set this, see below.
Charge Setup
8 !
Charge Info
Your network may provide 'Advice of Charge' enabling you to see actual units used. You may need to register for this service. You can program the cost per unit, and your phone will calculate and display related charge.
Charge Limit (Prepaid)
If you are using prepaid service, your residual credit may be displayed after each call. You will be advised when credit is almost finished - prior to service termination. Please contact your Service Provider to renew your credit.
If you have a special SIM, and subscribe to 'Advice of Charge', you may enter a limited number of units, after which service will be suspended. The limit can be adjusted, or switched off using PIN 2.
Combined In/Out
Enables you to set Call Time (Charge) display to show total calls.
Charge Incoming
Enables setting of separate rate, relevant where incoming calls are charged.
Auto Display
Set to see Time (Charge) display briefly after every call.
1 Minute Beep
Set to hear an elapsed time reminder during your calls.
Control Use
General Restrictions (Codes)
The following options exist to prevent unauthorised use:
PIN on/off, Restrict Phone, Netw. Barrings
These are controlled by different codes.
CAUTION
Ensure codes are written down, and kept for reference.
You are allowed only 3 attempts to enter correct code, the function will then be locked (see also p. 55). Emergency calls (112 or 999 in GB) can always be made when in coverage.
PIN on/off
Your SIM is supplied with a PIN number. You should also be supplied with a Master PIN or PUK (Personal Unblocking Key) which should be used if your SIM is mislaid.
You can switch off PIN control, but note risks of unauthorised use. Note that some Operators will not allow this.
New PIN Number
You can change your PIN to any 4-8 digit number (one you may remember more easily).

Select Control Use. then PIN Control

Enter your current PIN

Press instead of OK
Enter the new PIN and repeat this.
Restrict Phone
You can set the following restrictions using PHONECODE. This 4-8 digit code is created by you when you first select a restriction, you will be asked to repeat it.
Babysitter
You can lock the phone to allow calls to only one number.
Allow only 🛄 / 🗖
Only Numbers previously entered in your PhoneBook can be called, and no new entries can be made.
If prefix (area code) numbers only are entered, it will be possible to call numbers commencing with this code.
If your SIM offers 'Fixed Dialling Number', you will be asked for PIN 2 to control this restriction. Your phone could be supplied with this set.
Allow Last1-10
Calls can be restricted to your Redial list.
If you want to restrict calls to a few numbers, or to change your Redial list:

Press to see Redial List
Press to see the special menu, enabling you to clear total list.
Return to standby, make 'dummy' calls to the required numbers (pressing followed by ). You can then set above restriction.
Deter Theft
This prevents use of a different SIM card making the phone valueless when your SIM is disabled. Your Service Provider will do this when you report loss or theft.
Control Use
Network Barrings
The following Call Barring Options are controlled in your network. Your Operator will supply the PASSWORD (numeric code) on request.
All Calls Out
Emergency 112 calls are possible.
Out Internat.
Only national calls are possible.
Out Intexc Home
As International Call Barring, but when abroad, calls are possible to your home country.
All Calls In
All incoming calls are barred.
In When Roaming
When abroad you will normally receive calls, depending on your tariff structure you may prefer not to.
Status Check
Indicates that a bar has been set.
Appears if status unknown (new SIM inserted).
As Barring is network controlled, you can check and possibly update your display.
Clear all Barrings
All barrings are cleared, but clearing may not be allowed by your operator.
User Groups
c 8!
Your Operator may offer this service, enabling groups of users (eg a business) to benefit from closed internal communications, perhaps at special tariffs. Please check for service availability.
The following settings are available:
Preferred Group (on/off)
This is controlled by PHONECODE. If switched off, normal service may be denied (subject to contract).
Select Group
You may be able to select other groups, and enter further groups: Group code numbers are available from your Service Provider.
Outgoing Access
This is controlled by PHONECODE, certain group members may be denied this.
Ensure that Closed User Group is switched off for normal use.
Setup
Language FAX/Data Mode Clock Auto Phone Off Keys Display Car Use Headset Answer Status
Language
You can select your language for the display texts. 'Automatic' will set the language normally used by your 'home' Operator.
If set in a language you cannot understand, you can escape as follows: *#0000#
This will set language of 'home' Operator.
FAX/Data Mode
Please see page 48 for details of setting up and using Data and Fax. You will need to switch on IrDA below, the other options may not be required.
IrDA (On/Off)
Switch on to enable your IrDA (Infrared) to transmit data.
Indicates IrDA in standby.
Self Test
Your display will show connection status.
Send Sp/FAX
Use for special service enabling a voice call to be subsequently changed to Fax.
Receive Sp/FAX
If your Fax/Data number is the same as your phone number, you will need to set this when you are expecting a Fax/ Data call.
Clock
You will initially need to set the correct time.
Set Time&Date
Time and Date are displayed with a flashing cursor. Replace current settings as required.
Change Press.
-
,0К
- Enter the date first (day/ month/year), then the time (24 hours incl. seconds.
Please note, if your battery is removed for more than a few minutes you may need to reset clock
Format Date
Set date order as required.
Auto Display (On/Off)
Your time display appears when you have set it, but you may prefer to switch it off.
Setup
Auto Phone Off
The phone is automatically switched off after a preset time (eg at night).
Setting
Press
1.
Enter the time (24 hour clock)

Confirm
Switching Off

Press
Confirm
Left/Right Soft Key (Fast Access)
You may use both soft keys for fast access to PhoneBook names or functions. The left key may already be set by the Service Provider in order to offer you special services.

Press, select Setup followed by Keys and then for the required key: Left Fast Dial or Right Fast Dial

Press. You can now reset an
Confirm
existing setting
or
List Press, and set one of the following functions: • Usage Hints ..... (p. 21) • Phone Number ...... (p. 9) • Calendar (p. 31) Calculator (p. 34) Currency converter (p. 34) • Write message...... (p. 23) View Broadcast (n 28) • Games (n. 36) • Select Group .................................... • Conceal ID.................................... • IrDA .................................... • Credit Left ...... (p. 42) All names are abbreviated to 7 characters
Anv Kev Answer
Enables answering with any key (exept 🕥)
Auto Key Lock
You can quard against accidental use. setting automatic Keyl ock (active after one minute without use).

Hold down to unlock.
Note this key also offers manual locking/unlocking.
Kev Tones
You can choose Click. Tones or Silent
Setup
Display
Colour
The intensity of the colours can be adjusted.
Illumination
You can switch off display illumination to increase your usage time.
Own Greeting
You can program a 'switch on' greeting, which will be visible until the Operator's name appears.
Change
Press to delete existing 'Greeting', and write new one.
Car Use
Auto Answer
Calls will be answered after 3 rings when connected to Portable, Comfort and Professional car kits (see p. 59). This will not operate when ignition is switched off, subject to installation.
Auto Power Off
The Comfort Car Kit is normally powered via the ignition circuit, enabling automatic switch off. You can program a delay time to avoid premature switching off.
Headset Answer
Calls will be answered after 3 rings, when connected to Headset (see p. 59).
Info
Handsfree Override
To change to hand-held operation during a call:
Press (again to switch back)
Car Handset
If you have this accessory for the Car Kit, you may answer and end calls as with a normal 'corded' telephone.
Status
Master Reset
This returns phone to its original settings, note SIM and Network settings remain unchanged.
Phone Identity
This contains your phone's identity number (IMEI), which may be helpful for service and security.
Expert Mode
Allows you to directly switch function on and off.
47
Using Data and Fax
Introduction
Your phone has an integral modem, enabling communication with a PC, using either the integrated IrDA (infrared) interface, or a cable (Accessory).
Standard PC programs (eg Windows) enable you to send and receive Data and FAX, and may offer additional features (eg SMS or PhoneBook management) which you can use with your phone. For optimum use, you should install the SoftDataLink PRO software (see p. 58). This offers the above, and many further capabilities including Melody composition, Organiser and synchronization etc.
Prerequisites
You should check with your Service Provider, regarding availability of Data and FAX service, and registration procedure (incoming service may be optional).
If using the IrDA interface, your PC, Laptop or PDA must also have an IrDA compliant infrared window. You may alternatively use the standard serial output port, via the cable accessory (see p. 58).
Initial PC Setup
To enable Data and/or FAX communication, you must first install a modem in the PCs operating system, as follows:
• Standard Modem with 9600 bit/s
For FAX only, You may alternatively install
Class 1 Fax Modem (max. 9600 bit/s)
You must also select the appropriate port (serial connector or IrDA).
In the event of problems, see p. 50.
Phone Setup
(only relevant for IrDA)

Press and select Setup then FAX/Data Mode
Chang
. ...
Press to switch IrDA standby on (or off).
indicates that IrDA is in standby.
Using Data and Fax
Sending Data or Fax
Align the IrDA window of the phone and PC (max. 30 cm apart). Ensure that IrDA is activated in your PC and phone.
or
• Connect the data cable.
Start your communications program, and enter "Send" or equivalent. For first use, you will need to select the modem you have installed (PC settings see p. 48). You will then need to enter the required destination.
indicates that communication is under way.
Ending Transmission
Your PC should be used terminate the call, if necessary:
May be used, but note risks of interrupting a PC program.
Receiving Data/Fax calls
You will be alerted by a special tone.

Ensure that your IrDA window is correctly aligned (or Data Cable connected) see 'Sending' above.
In most cases your communications program needs to be started to answer and receive the data/fax call.
indicates that IrDA communication is under way.
Info
You may set 'Divert All Data - or Fax' to a convenient PC if you do not have a PC with you (see p. 40).
Your PC software may offer additional communication functions for your phone, eg write SMS messages or manage the PhoneBook.
For optimum use, load the SoftData-Link PRO software (see p. 58). This also enables many other facilities to enhance communication, time management and usability.
Please see Setup (see p. 45) to check Link up, or set for special Data and Fax services.
Using Data and Fax
Problems
Your PC software is likely to be compatible, please recheck the above settings. It may be necessary to also make the following settings:
- Maximum baud rate up to 115 000 bits/s (for IrDA)
- Baud rate at 19 200 bit/ s (for Cable)
- Set the init string to ATZ^M
- Your phone has an IrDA compliant interface, if your PC / PDA infrared driver does not, you may need to upgrade it.
If transmission is interrupted (eg loss of coverage) your PC program may automatically reconnect and retransmit.
Please also check with your Service Provider regarding service availability, or with your PC software supplier.
Please use your Siemens Helpline, or consult Siemens Internet:
http://www.siemens.com/cd.service
http://www.siemens.com/S25
Technical Specification
Modem Driver
Conforms to V.25ter command set.
Data Transmission speed
Conforms to the ITU-T standard V.22bis (transfer at 2400, 4800 and 9600 bits/s).
Data compression programs may enable up to 38400 bits/s between computers.
Facsimile
Facsimile operation, at 2400, 4800, 7200 and 9600 bits/s. conforms to Service Class 1.
SMS/Phonebook Management
Remote Control conforms to ETSI GSM 07.05 and 07.07.
| Menu | Tree | 51 | |||
|---|---|---|---|---|---|
| Usage Hints |
Using Info
Basic Use Ways to Call During a Call Dialling Lists |
Alert Tones | Situations |
Normal
QuietEnvironm. NoisyEnvironm. Screening Red Screening |
|
|
PhoneBook
Red PhoneBook Voice Memo Voice Mail Text Message Accessories |
Ringer Setting
Volume |
Any Call
RedBook Call Alarm Message CB Cell Broadcast |
|||
| Applications | (optional) | Create North | Melody |
Any Call
RedBook Call Alarm Message |
|
| Message |
Create New
Late Appointment Anniversary |
Vibrator Alarm
Service Tones MelodyComposer |
|||
|
Incoming
Outgoing Message Setup Voice Mail |
Service Centre
Message Type Message Life Delivery Report Direct Reply |
Organizer |
Calendar
Alarm List Calculator Currency Conv. Business Card Games |
||
| Cell Broadcast |
Receive CB
Read Broadcast Set CB Topics Topic Index Auto Display Set Language |
Internet Brows | ser | ||
| Divert |
All Unanswered
All Calls Specific Divert |
If not Reachable | |||
| Records |
Calls Missed
Calls Received Calls Dialled Alarms Missed |
All Fax Calls
All Data Calls Status Check ClearAllDivert |
If Busy |
| 52 | Menı | I Tree | |||
|---|---|---|---|---|---|
| Network |
Network Info
Change Network Auto Network Operator List Preferred Net. Call Waiting |
Setup |
Language
FAX/Data Mode |
IrDA (On/Off)
Self Test Send Sp/FAX Receive Sp/FAX Receive Fax/Data |
|
|
Fast Search
Conceal ID Band Selection |
Clock |
Set Time&Date
Format Date Auto Display Auto Phone Off |
|||
| Control Use |
Line
Call Time |
Select Line
Lock Line Last Call All Calls Out All Calls In Charge Rate Charge Limit Combined In/Out Charge Incoming Auto Display 1 Minute Beep |
Keys |
Left Fast Dial
Right Fast Dial Any Key Answer Auto Key Lock |
|
| Charge Setup | Display |
Colour
Illumination Own Greeting |
|||
|
Headset Answer
Status |
Auto Answer
Auto Power Off |
||||
|
PIN on/off
Restrict Phone |
Babysitter
Allow only Allow Last1-10 Deter Theft |
Status |
Phone Identity
Expert Mode |
||
| Netw. Barrings |
All Calls Out
Out Internat. Out Intexc Home All Calls In In When Roaming Status Check Clear all Barr |
||||
| User Groups |
User Groups
Select Group Outgoing Access Preferred Group |
Display Symbols
These symbols may appear on display during operation:
Display Indicators Incoming signal strength. Battery being charged. Battery indicator (see n'3) Divert Set is displayed: - briefly for unanswered calls - permanent for all calls (( ( ( ) ) Ringer off. Ringer Beep Call Screening. ) A Only 'known' calls will ring. Use Menu key for further options. IrDA (infraRed) in standby. ... Transmitting via IrDA. Alarm set. ::--C Kevpad locked. Low level encryption ABC Indicates UPPER/lower case. PhoneBook (in SIM), PhoneBook in phone. Restricted PhoneBook. × Service or number barred. 1)) Line 1 (or 2) active. Menu feature set. Unknown status of network feature DATA Receive only Data.
| FAX | Receive only Fax. |
|---|---|
| • |
| Organi | zer loons |
|---|---|
| Memo. | |
| Meeting. | |
| Call. | |
| Birthday. | |
| OB | Voice Memo. |
| +-*/ | Calculator function change. |
| ЪŤ | Calculator memory in/out. |
| Q | Calendar day view. |
| 1 - 7 | Calendar week view. |
| 1-31 | Calendar month view. |
| 9. | Recurring Alarm. |
| Soft Ke | ey Symbols |
|
Short press clears last character, long press clears entry. |
|
Message received.
Press to read it. |
|
| 00 |
Voice message waiting.
Press to hear it. |
|
Unanswered Call.
Press to see identity. |
|
| Applications (p.22). | |
| • | Switch to handset. |
| ♦Щ |
Save in PhoneBook or Red
PhoneBook |
| ▲ ▼ | Vertical scrolling. |
| Horizontal scrolling. |
T
Siemens Service
International Service Numbers
| Siemens | |
|---|---|
| Siemens | 0117075004 |
| Siemens | 1800 622414 |
| Siemens | 017527447 |
| Siemens | 078152221 |
| DST | |
| Omnitel | |
| Siemens | 02150318149 |
| Siemens | 016105381 |
| Siemens | 02 24199 259 |
| Siemens | |
| Siemens | 04699720 |
| Siemens | |
| Siemens | 0922943700 |
| Siemens | 0156384200 |
| Siemens | 0180 5333 226 |
| Siemens | 01 686 4389 |
| Siemens | |
| Siemens | 0614712444 |
| Smith & Norland | |
| Siemens | |
| Siemens (ISDN) | 116925589 |
| Dian Graha Elektr | 0214 615081 |
| Siemens | 1850777277 |
| Siemens | 0269893691 |
| F.A. Kettaneh | 079559663 |
| NGEECO | |
|
Siemens.
Siemens Sieme |
| Latvia | Siemens | |
|---|---|---|
| Lebanon | 01 443043 | |
| Lithuania | Siemens | |
| Luxembourg | .Siemens | 438 43 399 |
| Malaysia | Hello service | |
| Morocco | .SETEL S.A | |
| Mauritius | .Ireland Blyth | |
| Netherlands | . Siemens | 070 333 3100 |
| Norway | . Siemens | |
| Oman | .Siemens Service | Center 791012 |
| Pakistan | Siemens | |
| Philippines | Siemens | |
| Poland | Siemens | |
| Portugal | Siemens | 01 417 8393 |
| Russia | .Siemens | 8095 7371801 |
| Saudi Arabia | Arabia Electric | |
| Singapore | Siemens | |
| Slovak Rep | Siemens | 0759682266 |
| Slovenia | Siemens | |
| South Africa | Siemens | |
| Spain | Siemens | |
| Sweden | Siemens | |
| Switzerland | Siemens | 01495 4487 |
| Taiwan | .Siemens | |
| Thailand | Siemens | |
| Turkey | SIMK0 | 02122528835 |
| United Kingdor | n Siemens | 0990 334411 |
| Vietnam | Opticom |
Trouble Shooting
Your phone will be reliable unless it suffers from extreme shock or moisture. The following list should help you identify and remedy problems. In many SIM and net-work-related instances it may, however, be necessary to call your Service Provider's Customer Service Helpline.
| Problem | Possible Causes | Possible corrective measures |
|---|---|---|
|
Unable to switch
on |
Empty battery. | Charge it. Check charging indication in display. |
| Battery contacts dirty. |
Clean contacts (battery and phone).
Repeat switching on and off. |
|
| Battery replacement. | Briefly recharge. | |
|
No charging
display |
Empty battery. | Charge for 2 hours, disconnect and charge normally. |
| Battery defective. |
Battery performance will reduce over
time, replace it when exhausted. Avoid extreme heat to prolong life. |
|
| Contact problem. | Check mains socket, and connection to phone. | |
| Flashing charging display |
Temperature exceeds
- 10 °C to + 45 °C range. |
Adjust and allow time. |
|
'Insert SIM'
is displayed after fitting it |
SIM card not correctly located. | Ensure SIM is correctly orientated and seated |
| Damaged SIM card | Make visual check. Return SIM to your Service Provider. | |
| SIM contact dirty. | Clean SIM contacts with a dry cloth. | |
| PIN error | 3 incorrect entries. |
Enter MASTER PIN (PUK), supplied with
your SIM as instructed. If your MASTER PIN or PIN are lost, call your Service Provider. |
|
PHONE
CODE error |
3 incorrect entries. | Contact Siemens Service. |
|
No connection to
network |
Weak signal. | Move higher, to a window or open space. |
| Outside GSM coverage. | Check Operator coverage map. | |
| SIM not valid. | Call your Service Provider. | |
| New network not authorized. | Try selecting manually, or try other network (p. 41). | |
|
Phone loses
network |
Weak signal. |
Reconnection, or connection to another
Operator is automatic. Switching off and on may accelerate this. |
|
Calls not
possible |
Dialling error. | Use full national area code. |
| New SIM fitted. | Check for new restrictions. | |
| Charge limit reached. | Call your Service Provider, or use PIN 2 to reset. |
Trouble Shooting
| Problem | Possible Causes | Possible corrective measures |
|---|---|---|
| Certain calls not possible | Call restriction set. | Restrictions may be set by your Operator. |
| Cannot save | Call restriction set. | Check PhoneBook restrictions (p. 13). |
| in PBook | PhoneBook is full. | Edit it (p. 11). |
|
Cannot find
PhoneBook |
SIM has been changed. | Refit original SIM. |
|
Voice Mail
not working |
Divert not set. | Set divert (see page 27 and page 39). |
| ∑ flashing | Message store full. | Delete a message to make room (p. 22). |
|
Cannot send
a message |
Operator does not support this service. | Check with your Service Provider. |
| Service Centre not set. | Set Service Centre (p. 26). | |
| Destination does not have compatible phone. | Check. | |
| Message type wrong. | Check. | |
| Cannot set a function |
Not supported by your Opera-
tor, or registration required. |
Call your Service Provider. |
|
Menu en-
tries missing |
SIM Restrictions | Check with your Service Provider. |
| Accidents | ||
| Severe shock | Internal damage could result. |
Remove and refit battery and SIM.
Do not dismantle. |
|
Immersion in
water |
Internal damage could result. |
Rapidly dry with cloth, do not heat. Dry
contacts thoroughly. Remove and refit battery and SIM. Stand upright in moving air. Do not dismantle. |
Resetting Phone
You can reset your phone to its original condition:
Enter * # 9 # and press C . This will not effect SIM or network settings.
Siemens Assistance/Service
Worldwide assistance is supplied by Siemens Partners - a simple phone call away.
Internet: http://www.siemens.com/cd.service
If your phone appears faulty, please check Troubleshooting. If the problem persists please contact Siemens Service. In the unlikely event of a defect appropriate service steps can be taken locally.
Specifications
Licensing
Your phone is authorized for use in GSM networks. The phone set complies with following EU directives:
- 89/336/EEC 'Electromagnetic Compatibility'
- 98/13/EC, CTR 19 and CTR 20 'Telecommunication Terminal and Satellite Earth Station Equipment Directive'
- 91/263/EC, CTR 31 and CTR 32 'Telecommunication Terminal and Satellite Earth Station Equipment Directive'
- 73/23/EEC 'Low Voltage Directive' as amended by 93/68/EEC
CE
Technical Specification
- GSM Class 4 (2 Watt) Frequency Range 880 - 960 MHz
- GSM Class 1 (1 Watt) Frequency Range 1710-1880 MHz
Weight
: 125 g
Size
: 116 x 46 x 28 mm
(118 cc)
Operating Voltage:3.6 V
Power Consumption: max. 550 mA
Standby Time: 60 h - 200 h
The standby time is dependant on network, environment, SIM card and services used.
Talk Time : up to 5 h
Care of Phone 57
- To clean, use a damp, or antistatic cloth, a dry cloth could create electrostatic charges.
- Do not use chemical or abrasive cleaners, these could damage casing.
- As with most electronics products avoid extreme shock, temperature and moisture. Avoid leaving it behind glass, in direct suplicit (eq in a car, this can cause)
sunlight (eg in a car, this can cause excessive temperatures).
Care of your SIM Card
• The SIM card must be treated with the same care as a bank card. Do not bend, scratch or moisten the card and take care that it is not exposed to static electricity.
mportant
You are advised to write down the following details (to help recovery of your phone).
Phone No:
Nº of SIM card:
Phone Serial Number (beneath battery, 14 or 15 characters):
Customer Service:
Loss
If your phone and/or SIM card are lost or stolen, call your Service Provider immediately to prevent misuse.
Accessories
Spare Battery
L 36880-N3101-A104
Identical to that supplied with your phone (Li Ion).
Extended Battery
L 36880-N3101-A105
This doubles your standby and talk time (Li Ion).
Rapid Charger
L 36880-N3015-A102/A103
The same as that supplied with your phone.
Travel Charger
L36880-N3015-A107 ... A111 Similar to Rapid Charger but enables worldwide voltage range 90-270 V.
Desk Top Charger
L36880-N3101-A103

This forms a convenient stand, and enables easy drop in charging. A spare or extended battery can be charged simultaneously. It connects to all S25 chargers.
Belt Clip
L36880-N3101-A108

This allows easy and secure attachment to a belt. The phone can rotate to a convenient angle.
Leather Bag
L36880-N3015-A122
Provides optimum protection for your phone, and is characterized by its functionality.
Headset
L36880-N3015-A119

This offers safe high quality hands free use, whilst walking or driving.
SoftDataLink PRO
L36880-N3101-A100

This Windows software provides optimum communication with your computer/PDA, enabling further functions:
- Data and Fax communication
- Enhanced Messaging (SMS)
- Enhanced PhoneBook management
- Extended range of Ringer melodies
- Synchronisation of Organizer
Data Cable
L36880-N3101-A102
Provides same functionality as IrDA, but enhances connectivity for professional use via serial interface.
Car Accessories
Antenna Cradle


An external antenna avoids radiation and interference risks, and leads to increased operating range. This robust cradle provides automatic connection, and can be used with Car Charger, and Car Kit Portable.
Ensure that vehicle functions (eg Airbag) are not obstructed when installing Car fitments.
Car Charger L36880-N3015-A114

This fits standard cigarette lighter sockets (12-24 V). It can be used together with Antenna Cradle.
Car Kit Portable
L36880-N3015-A117

This enables safe handsfree use, as well as rapid charging, and auto answer. It simply plugs into standard
cigarette lighter sockets, enabling easy movement between vehicles. It can be used together with the Antenna Cradle.
Car Kit Comfort L36880-N3101-A107

This enables natural, high quality and safe communication when on the move. It incorporates advanced full duplex digital technology.
Car Kit Professional Voice
L36880-N3101-A110 (English)
L36880-N3101-A109 (German)
State of the art Voice Recognition System enabling safe and reliable hands free calling.
Phone Adapter Professional
L36880-N3101-A111 For use with above Voice Recognition System.
Adapter Kit Professional (VDA)
L36880-N1201-A110
To connect Car Kit Professional Voice to vehicles without VDA (pre installation).
Data Cable Professional
L36880-N3101-A112
For connecting PC to Car Kit Professional Voice.
Car Handset
L36880-N3015-A123
This enables optimum private use whilst connected to Car Kit Comfort, or Car Kit Professional Voice. It can be used to answer and end calls.
60

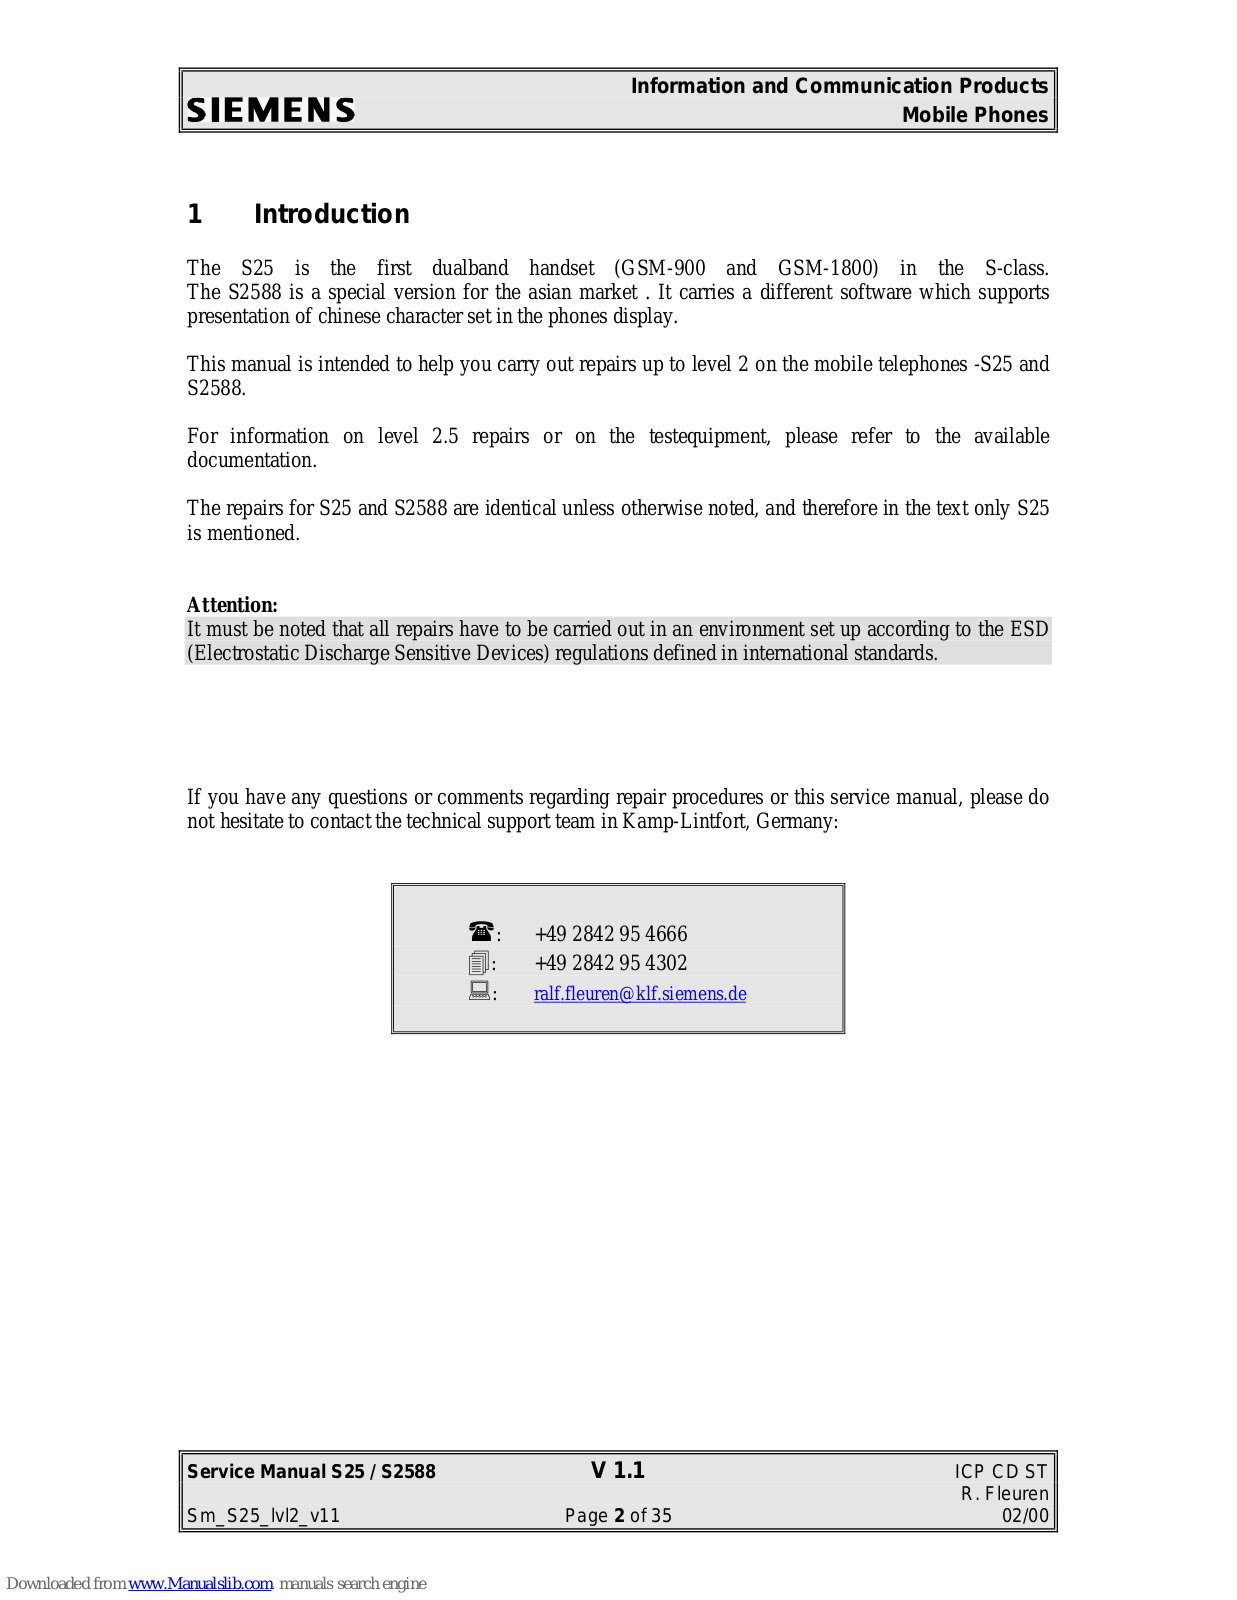
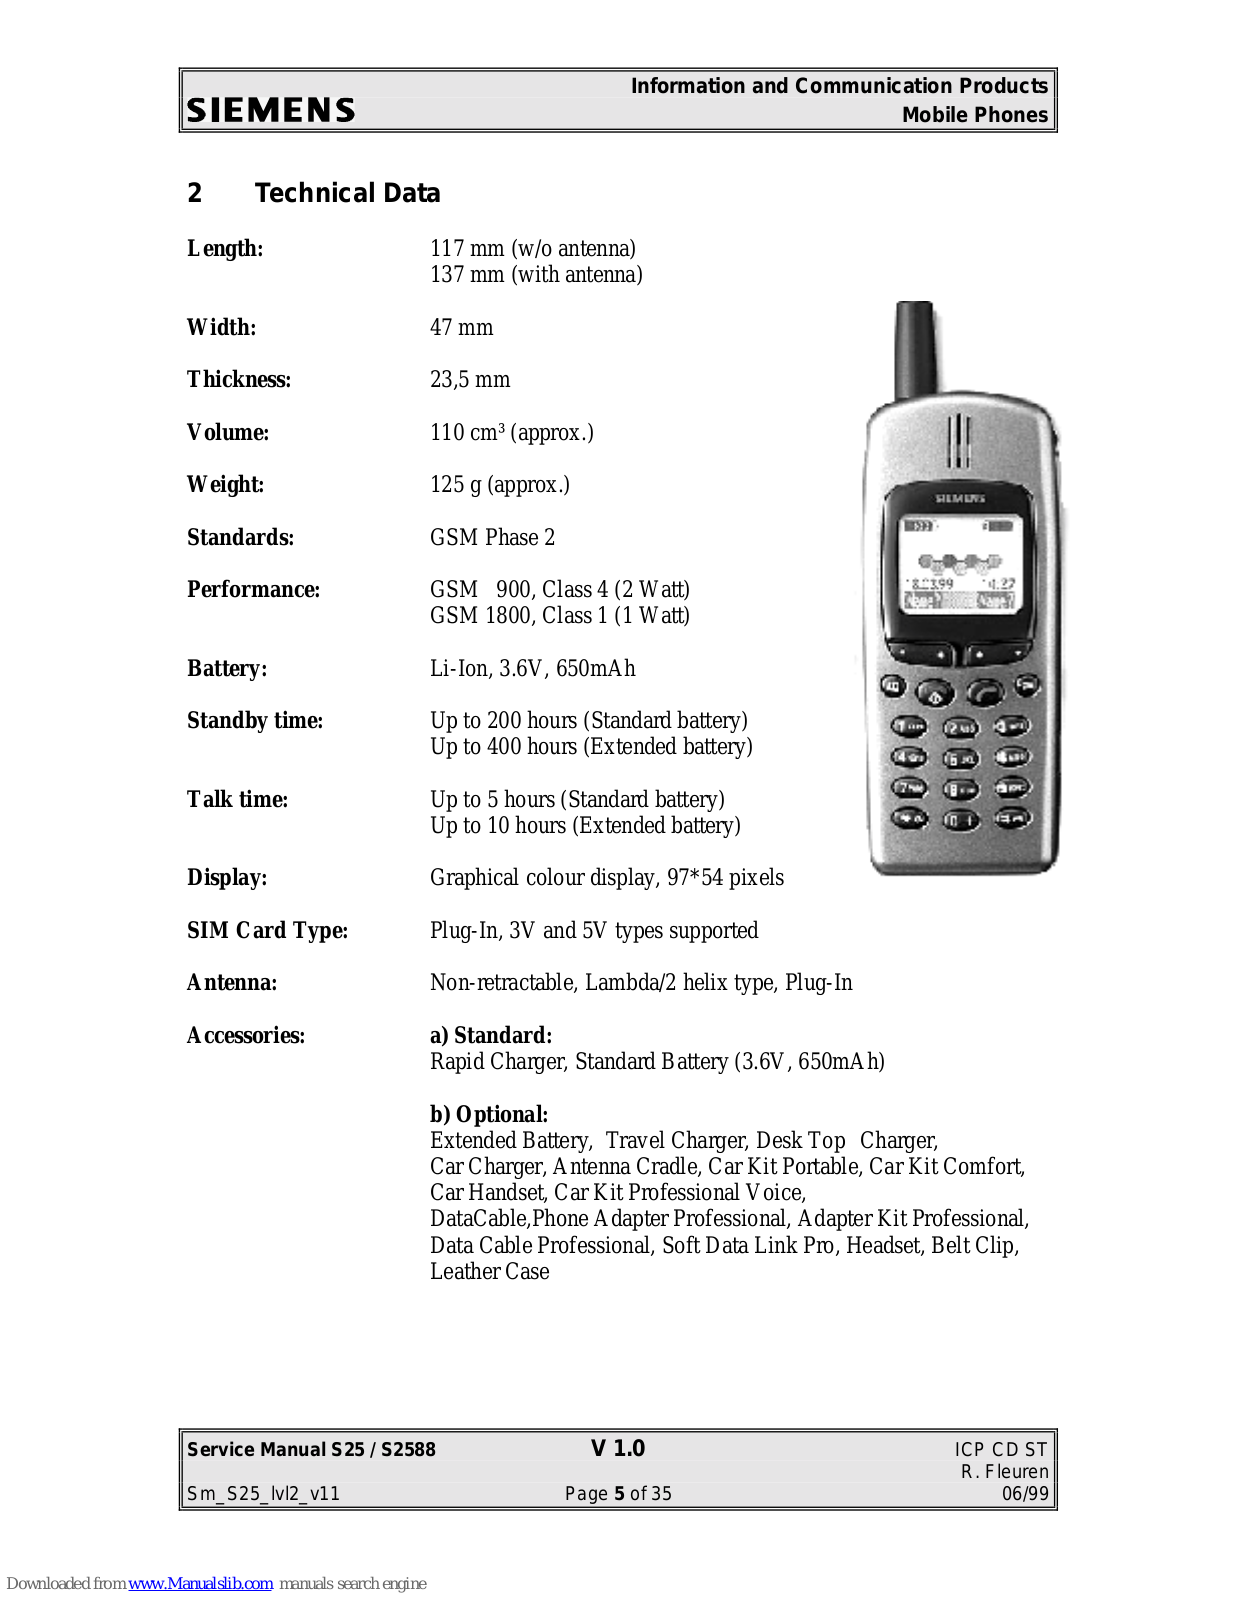
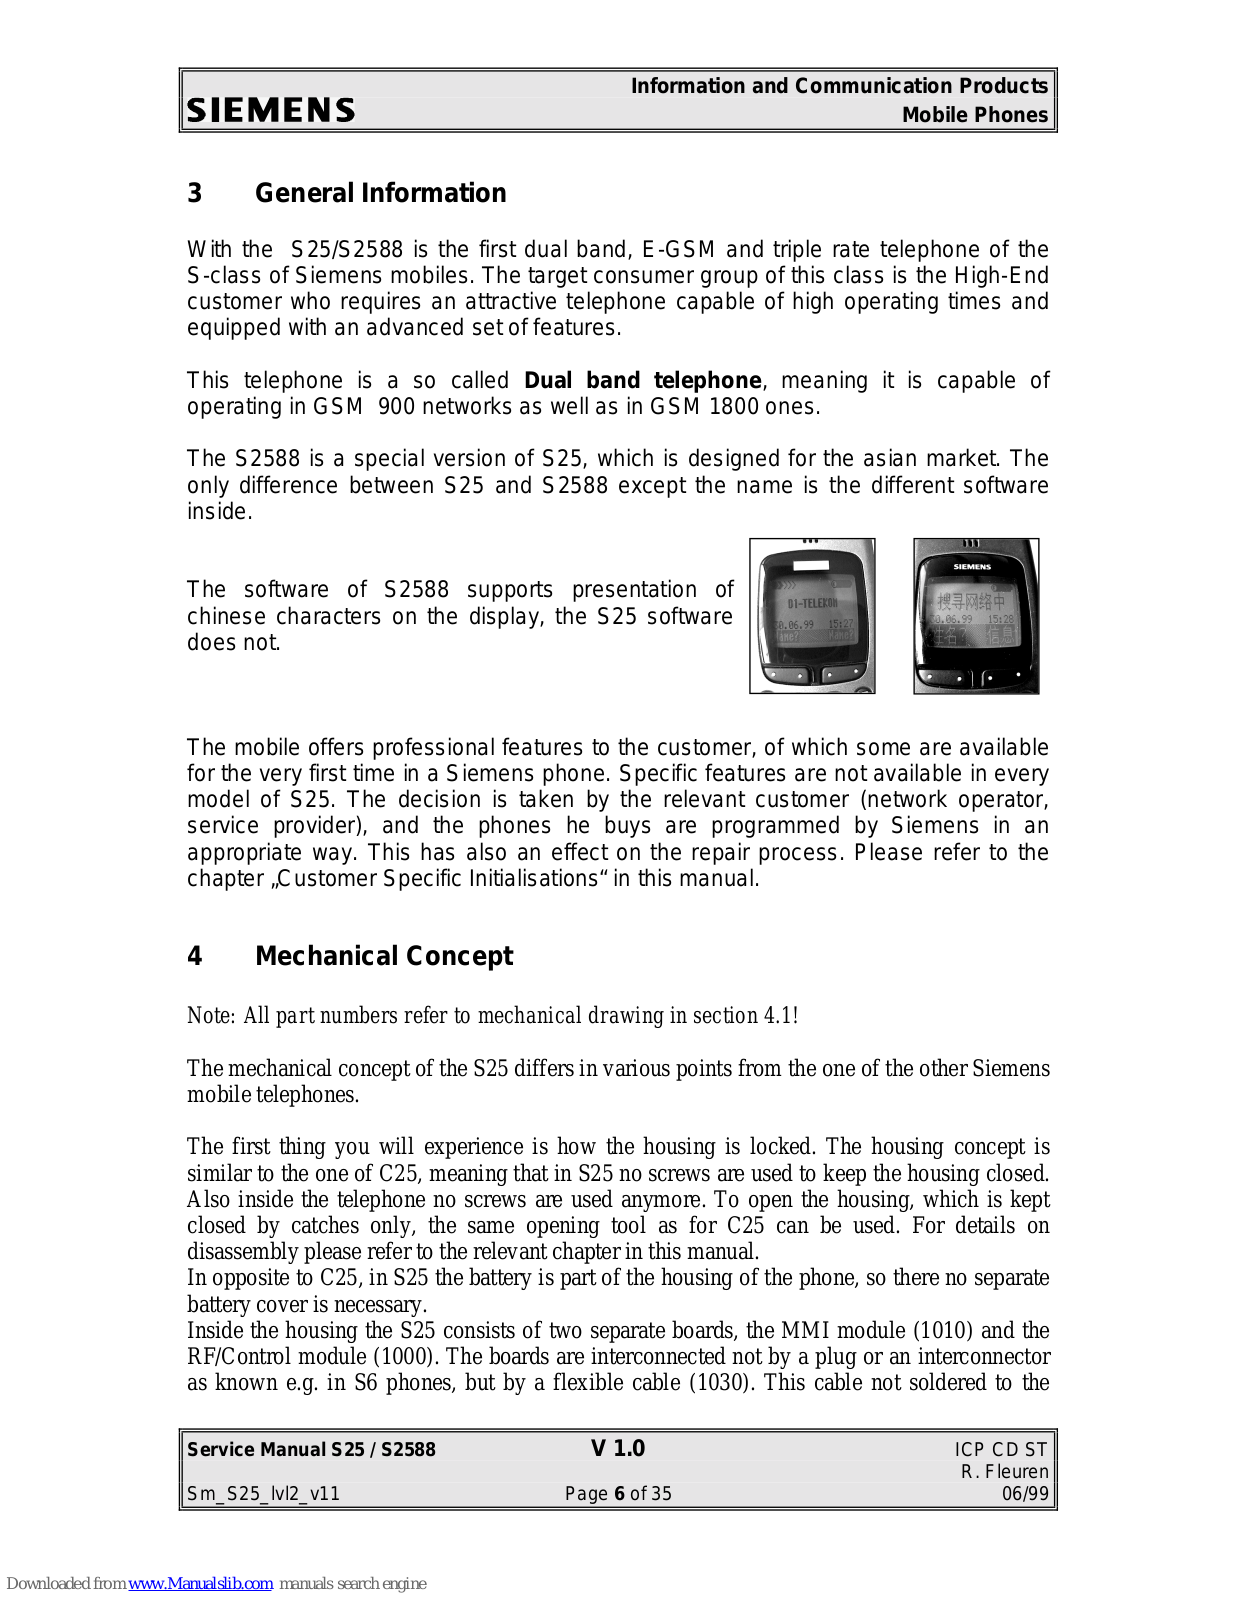
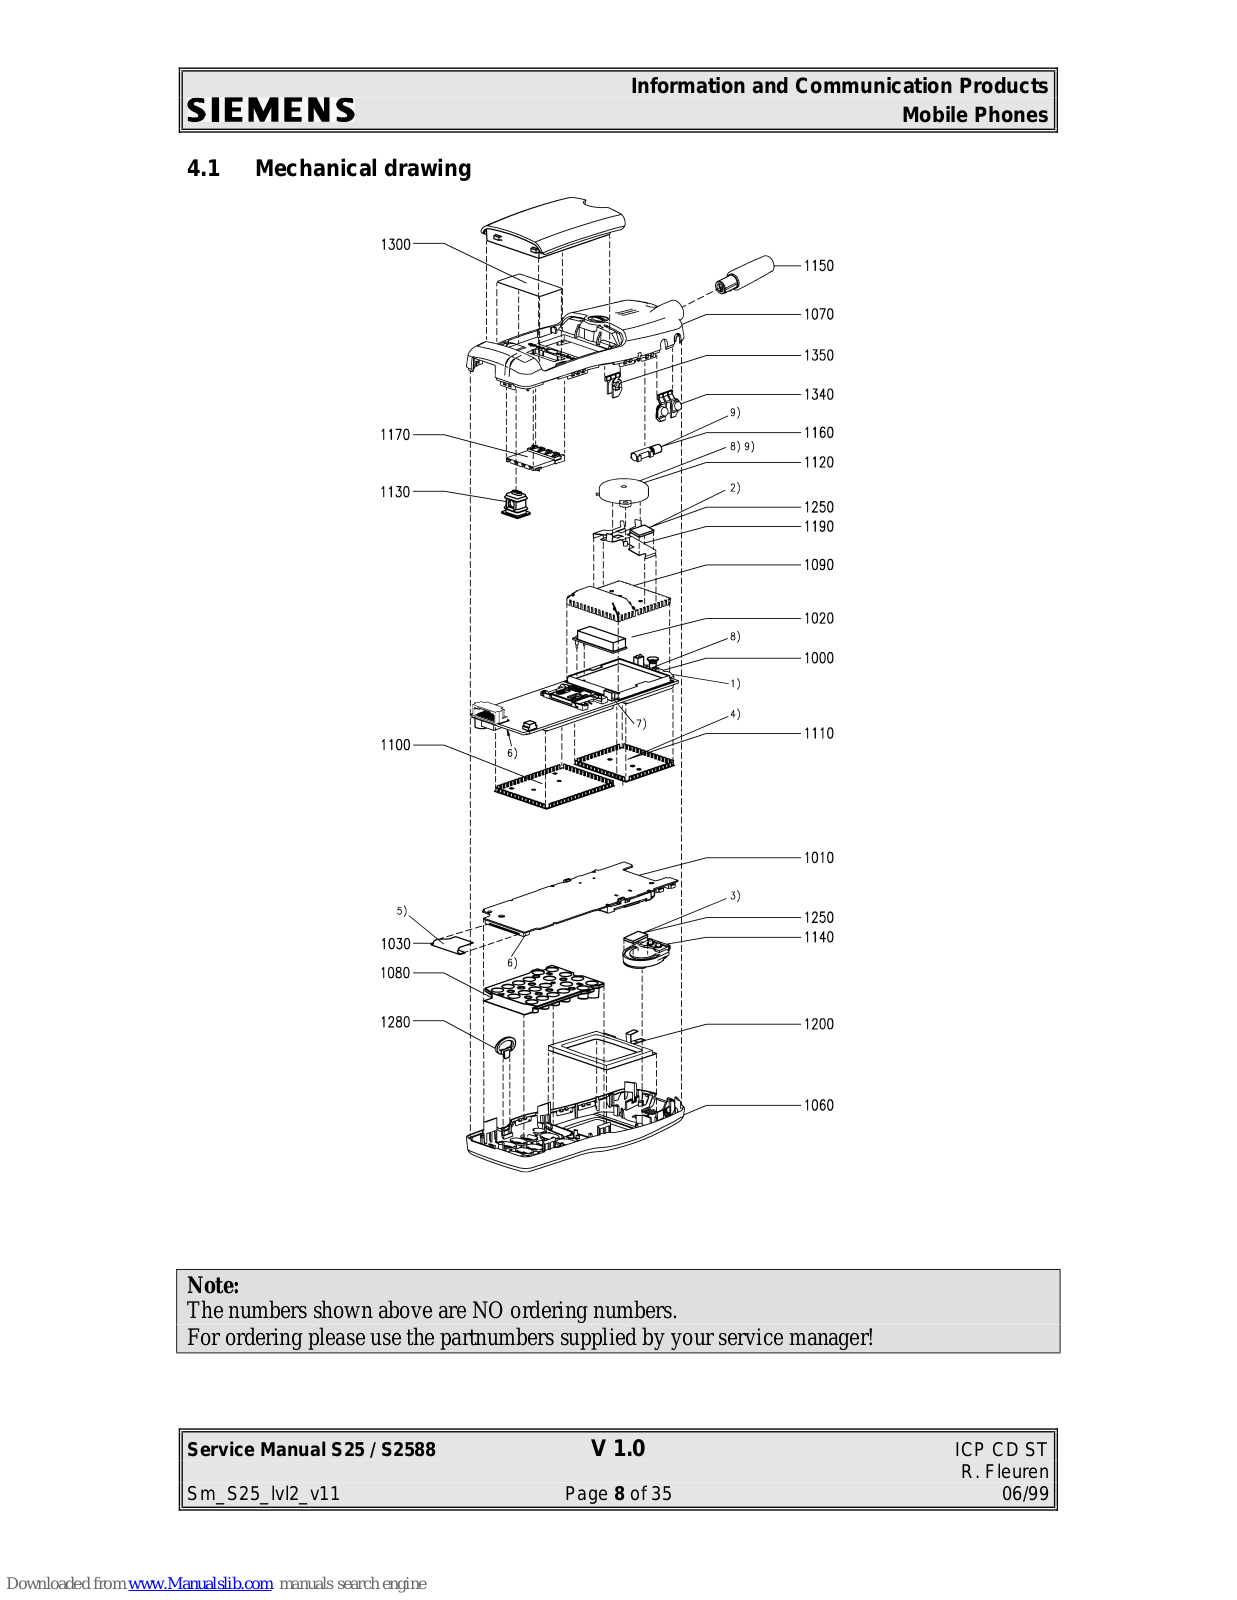
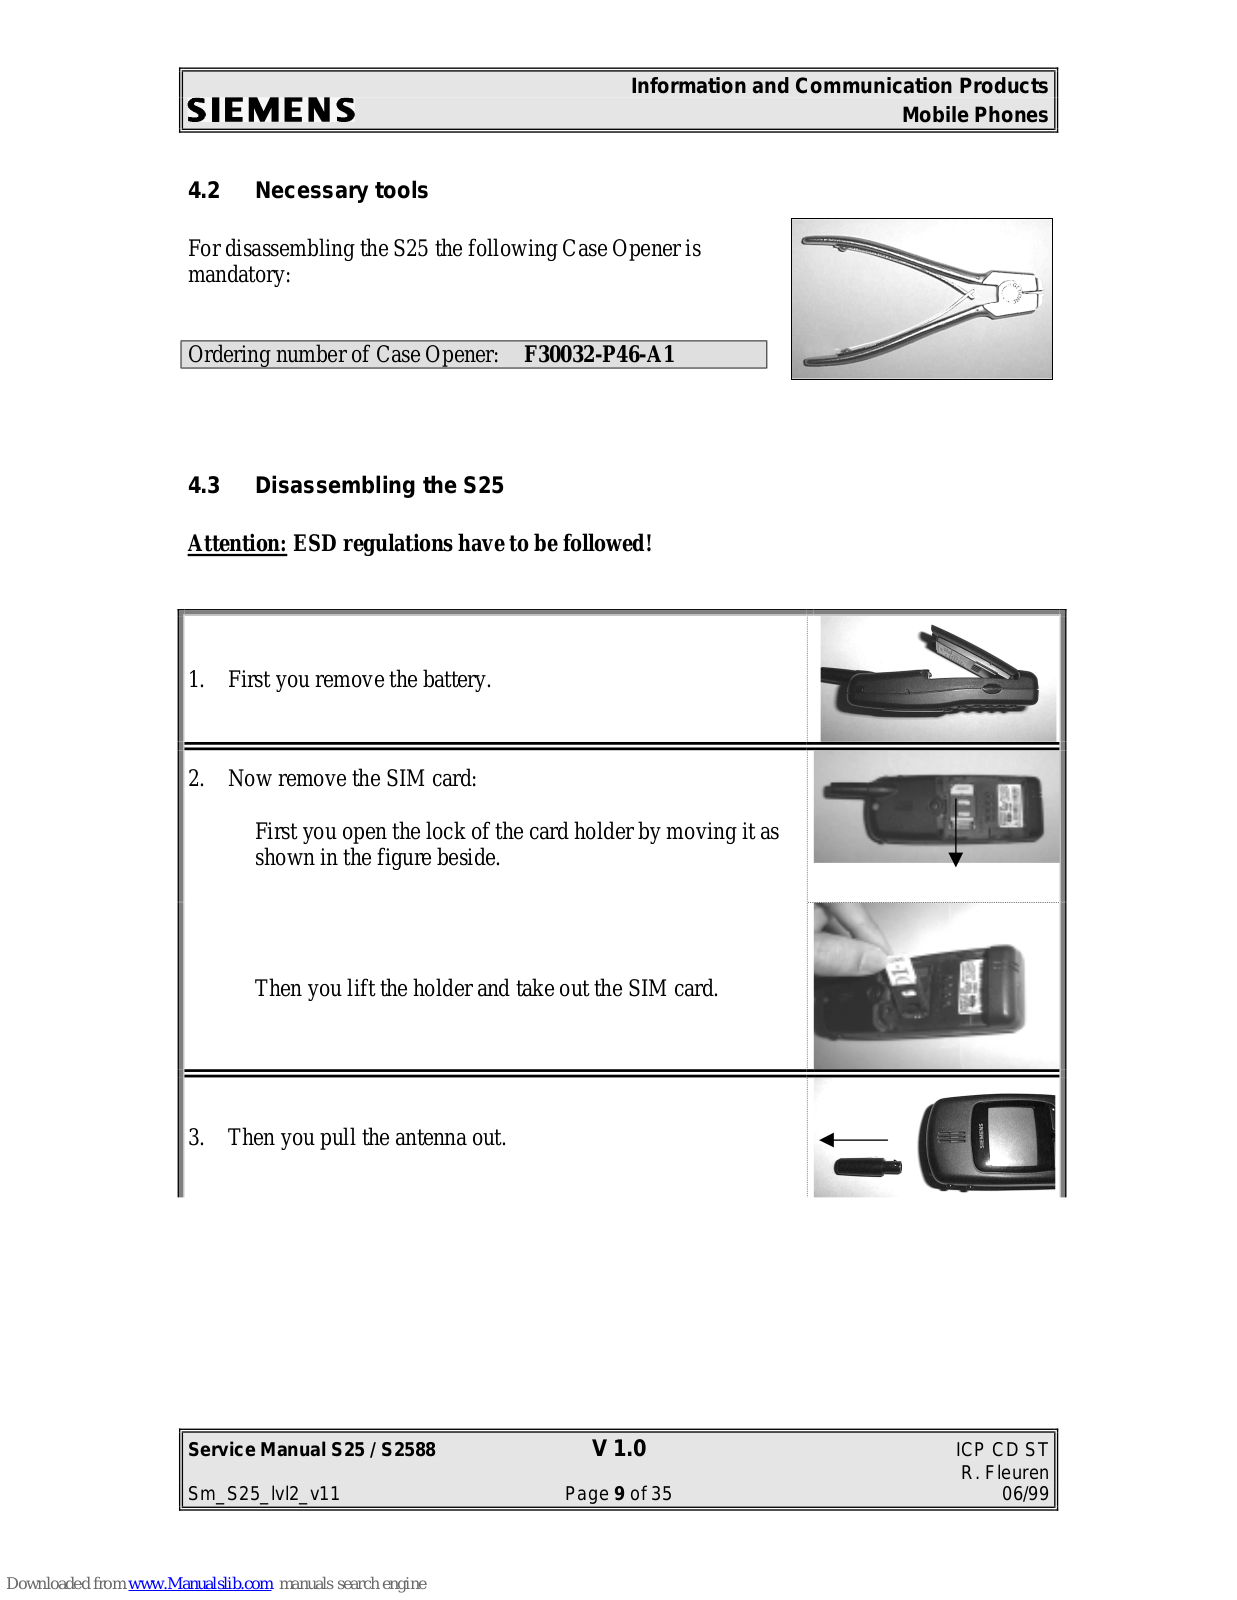
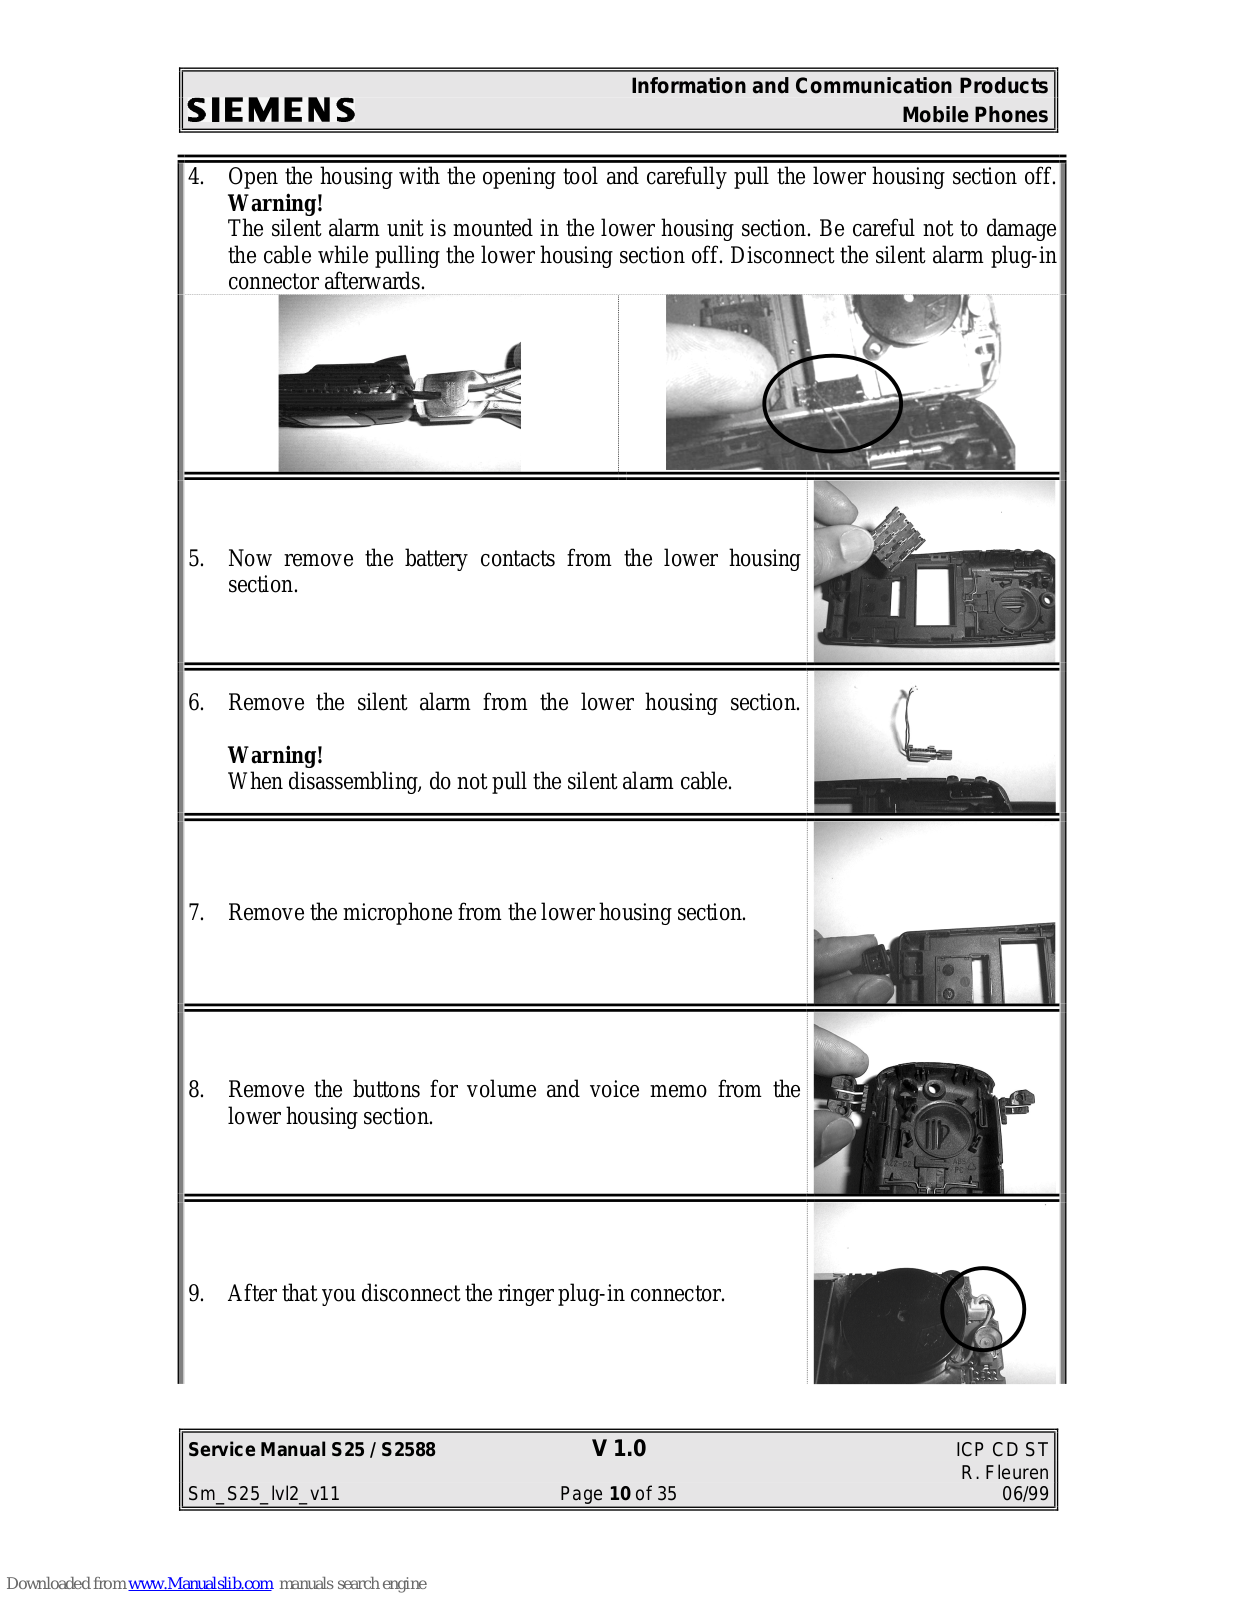
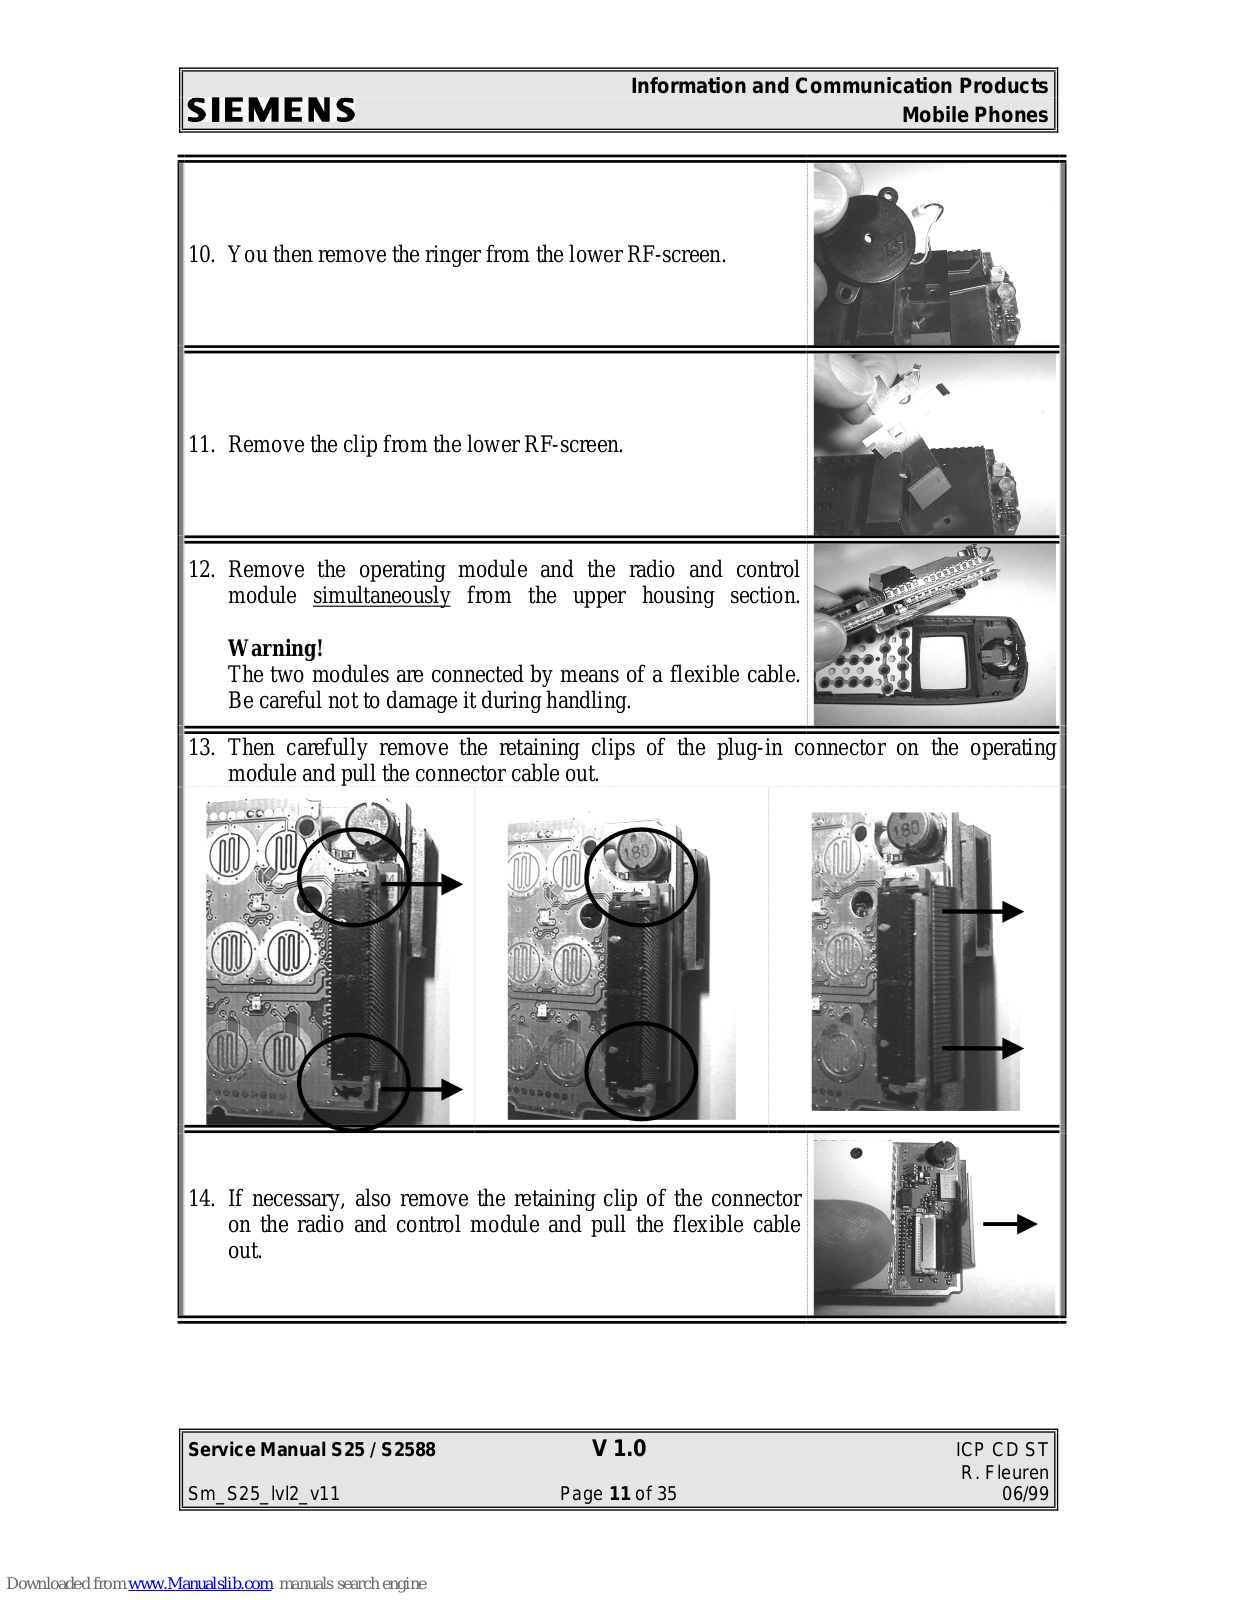
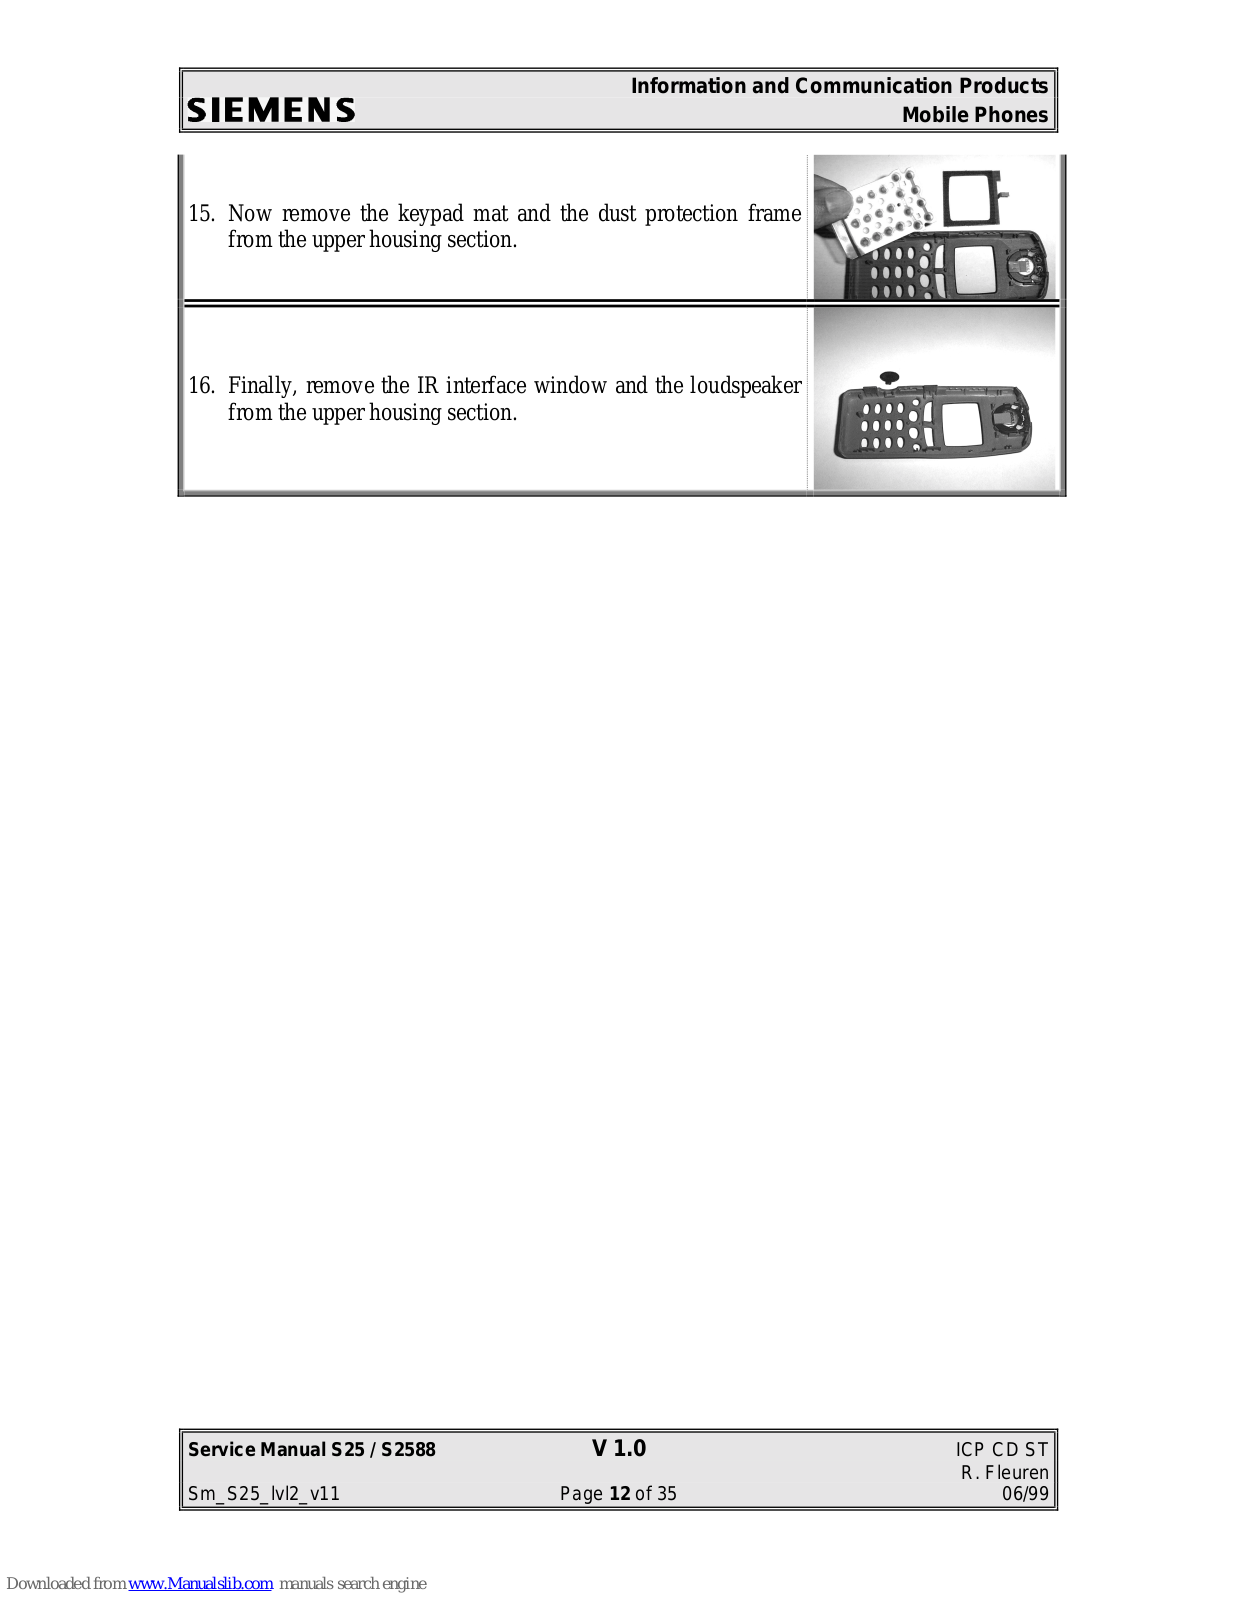
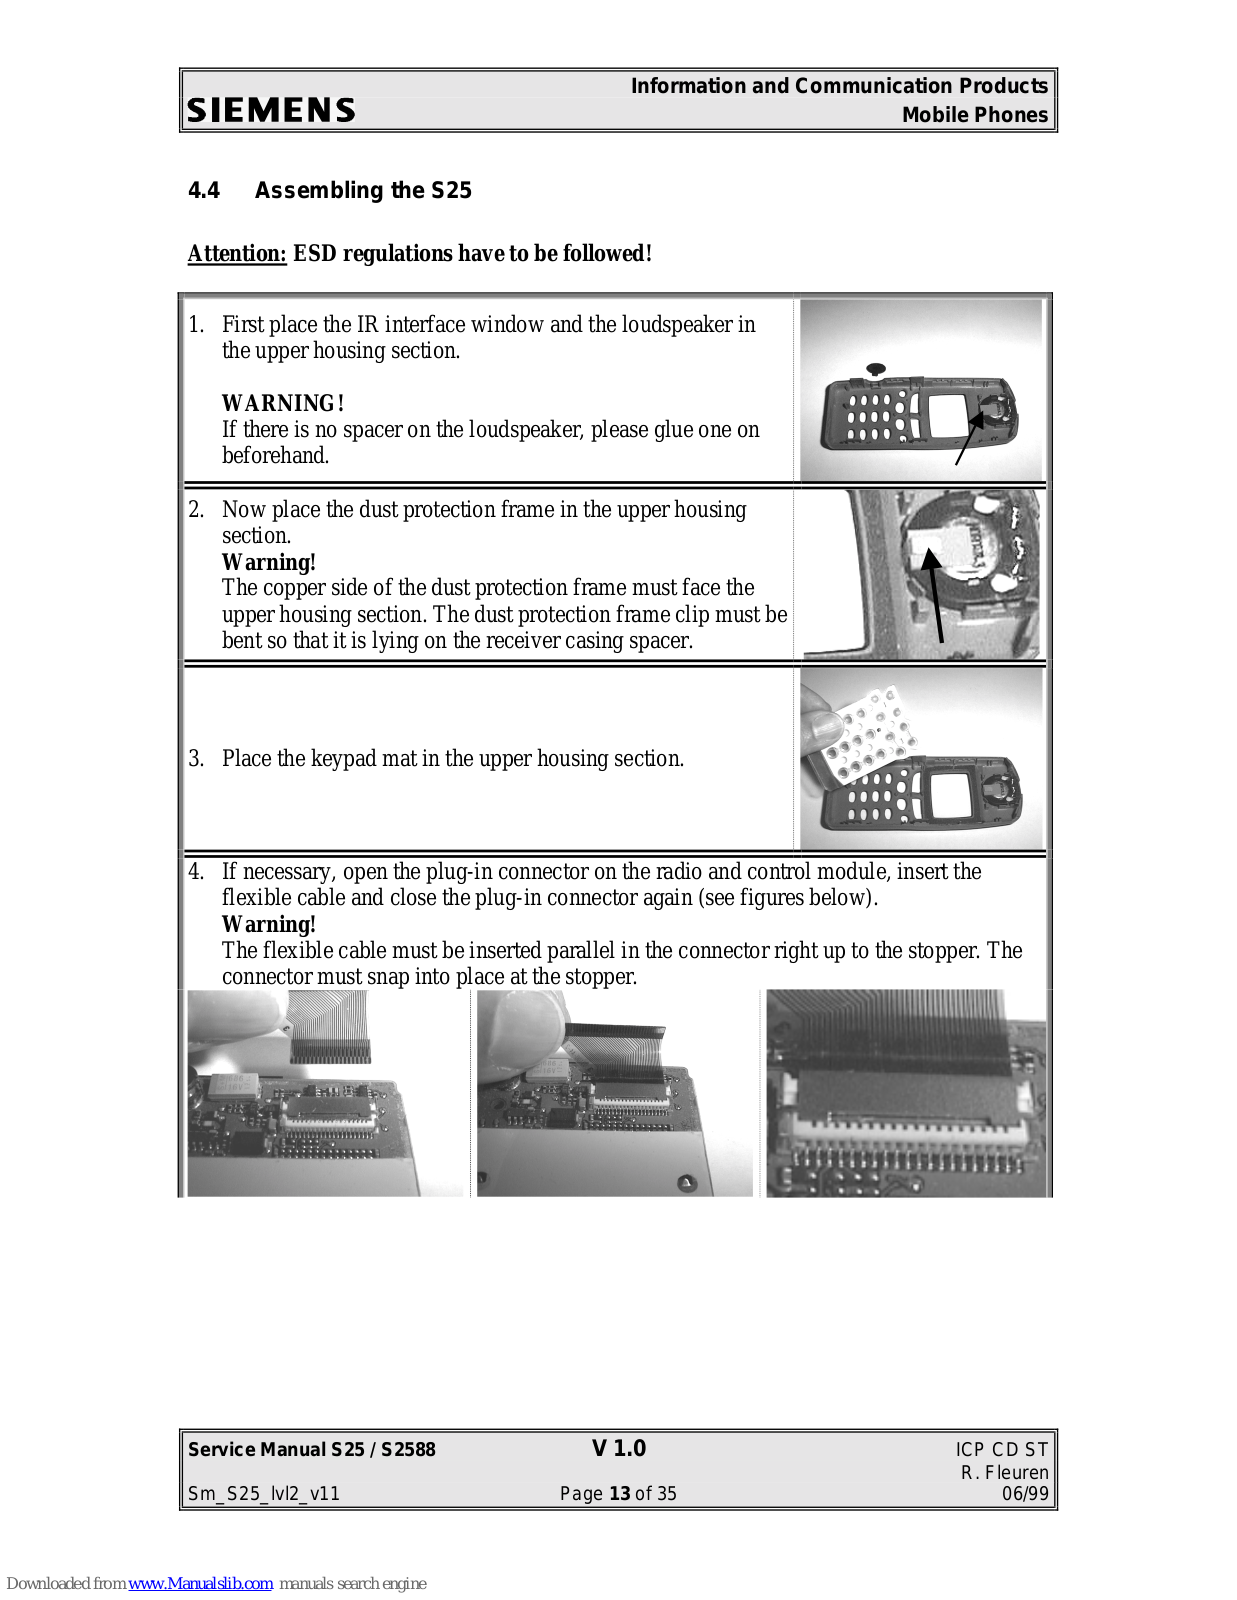
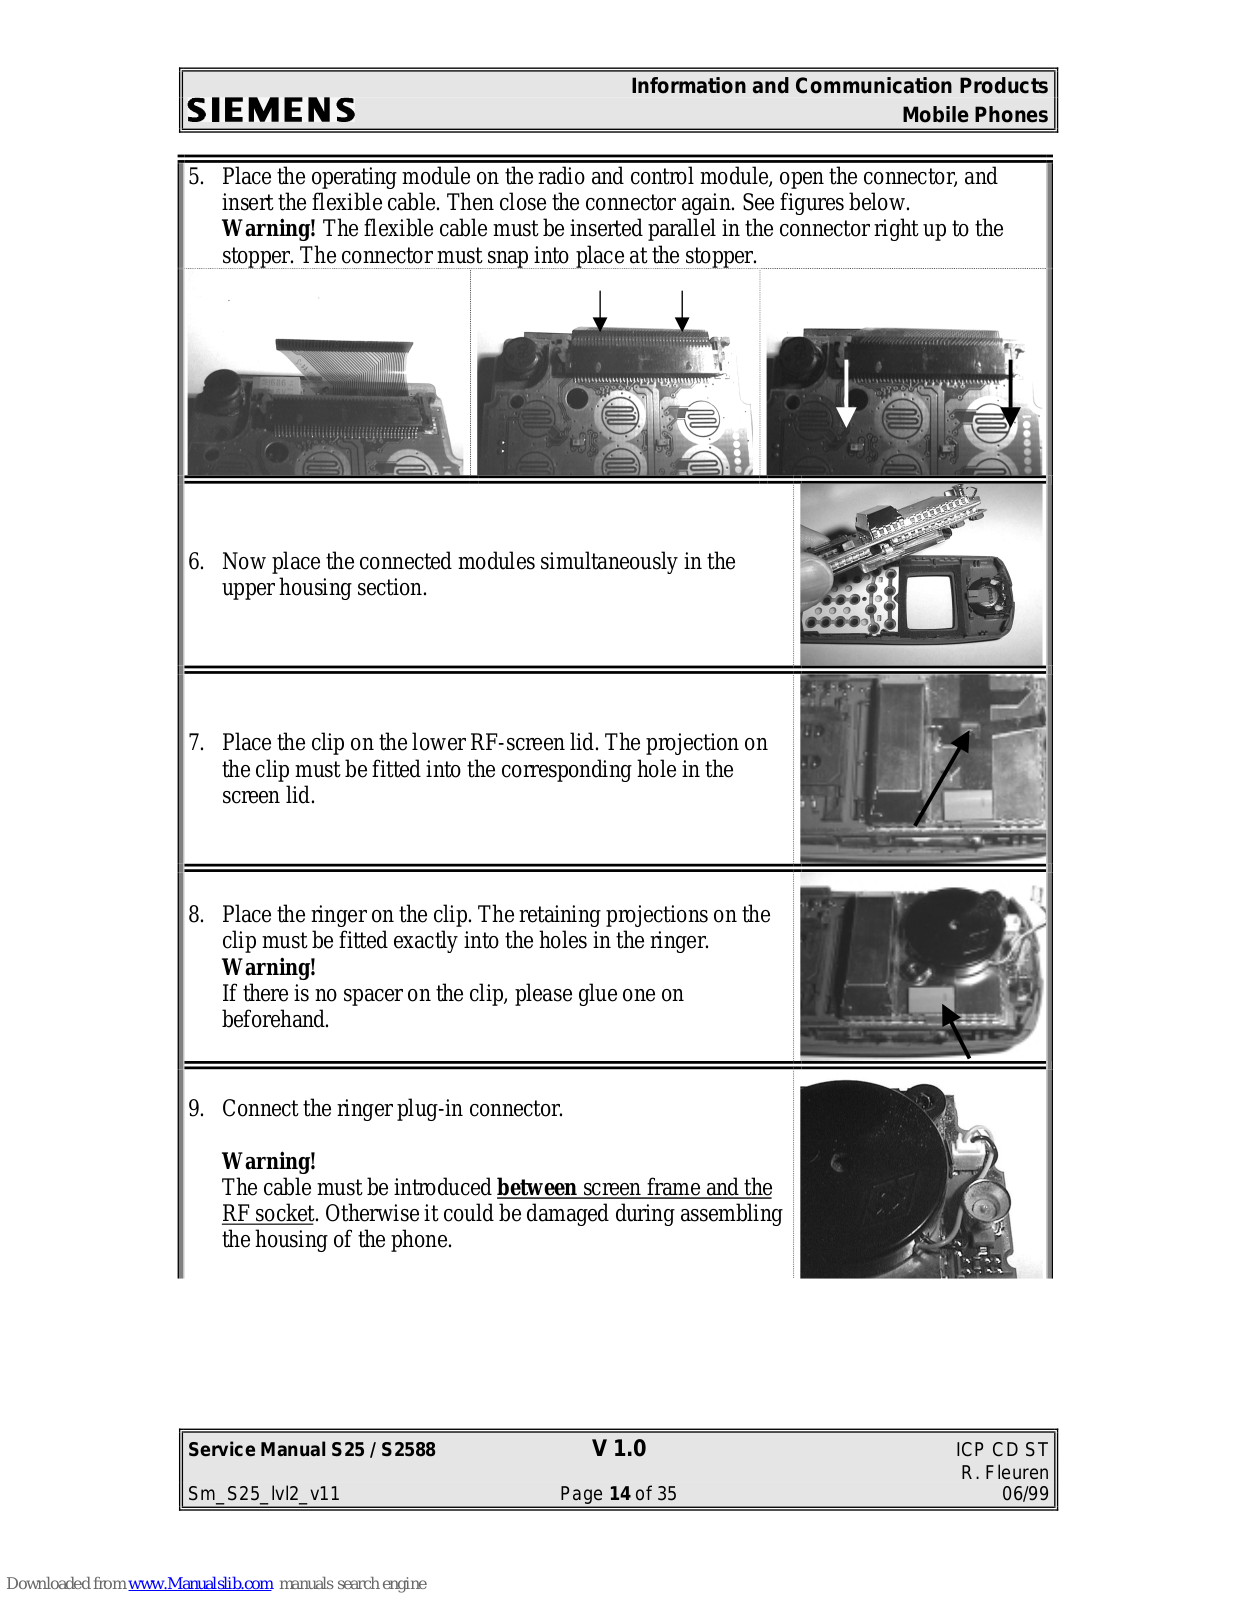
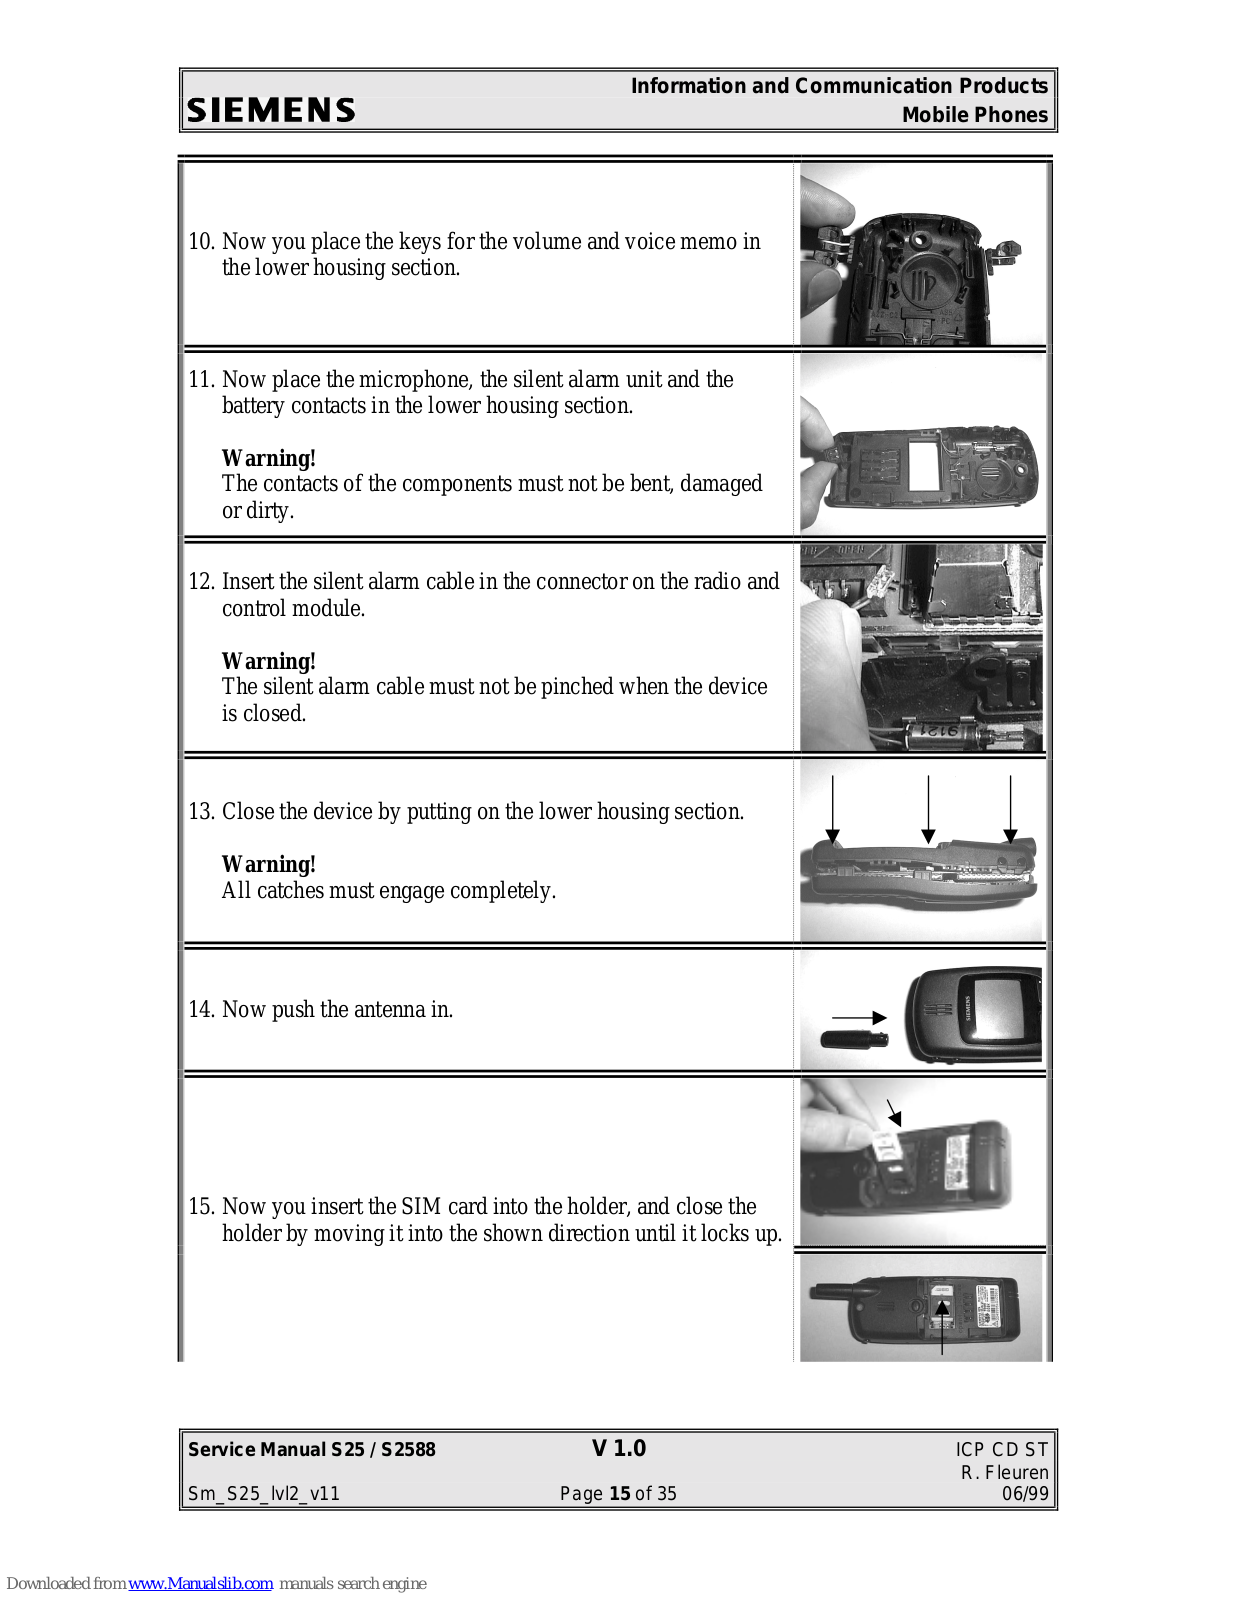
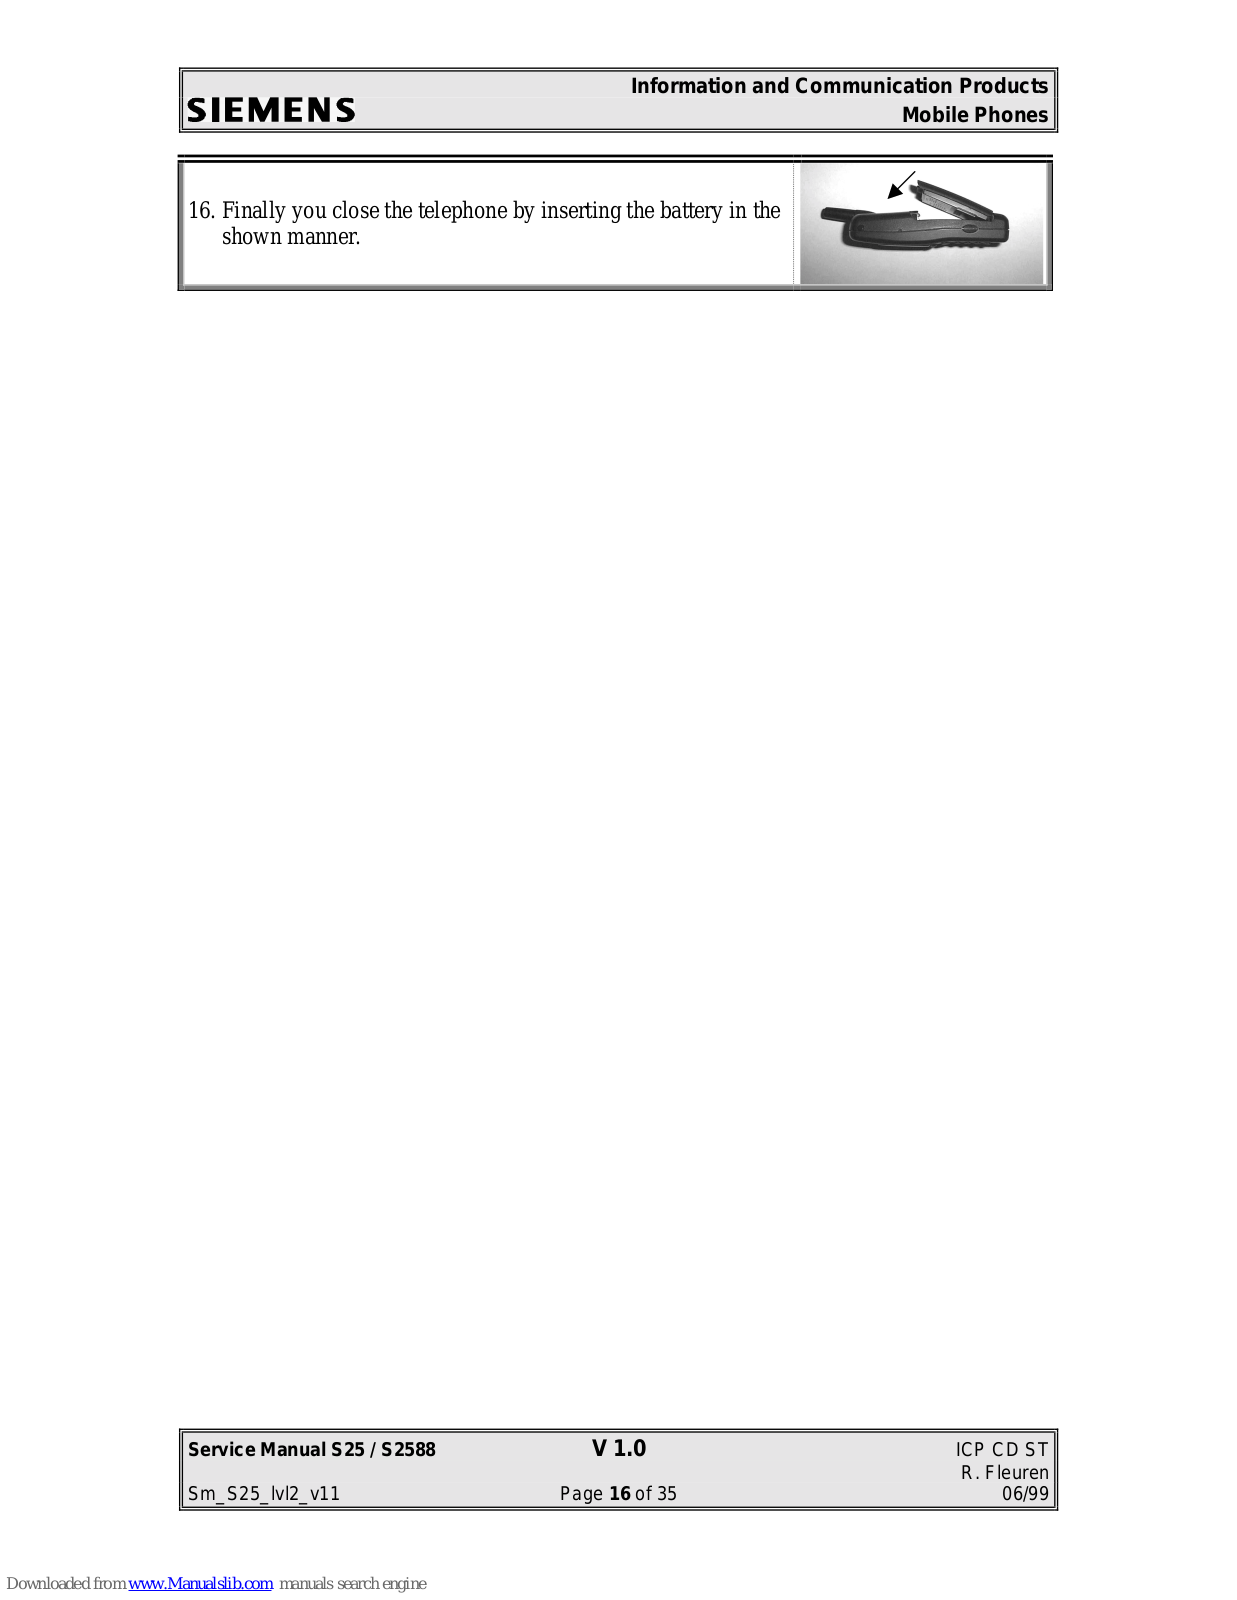
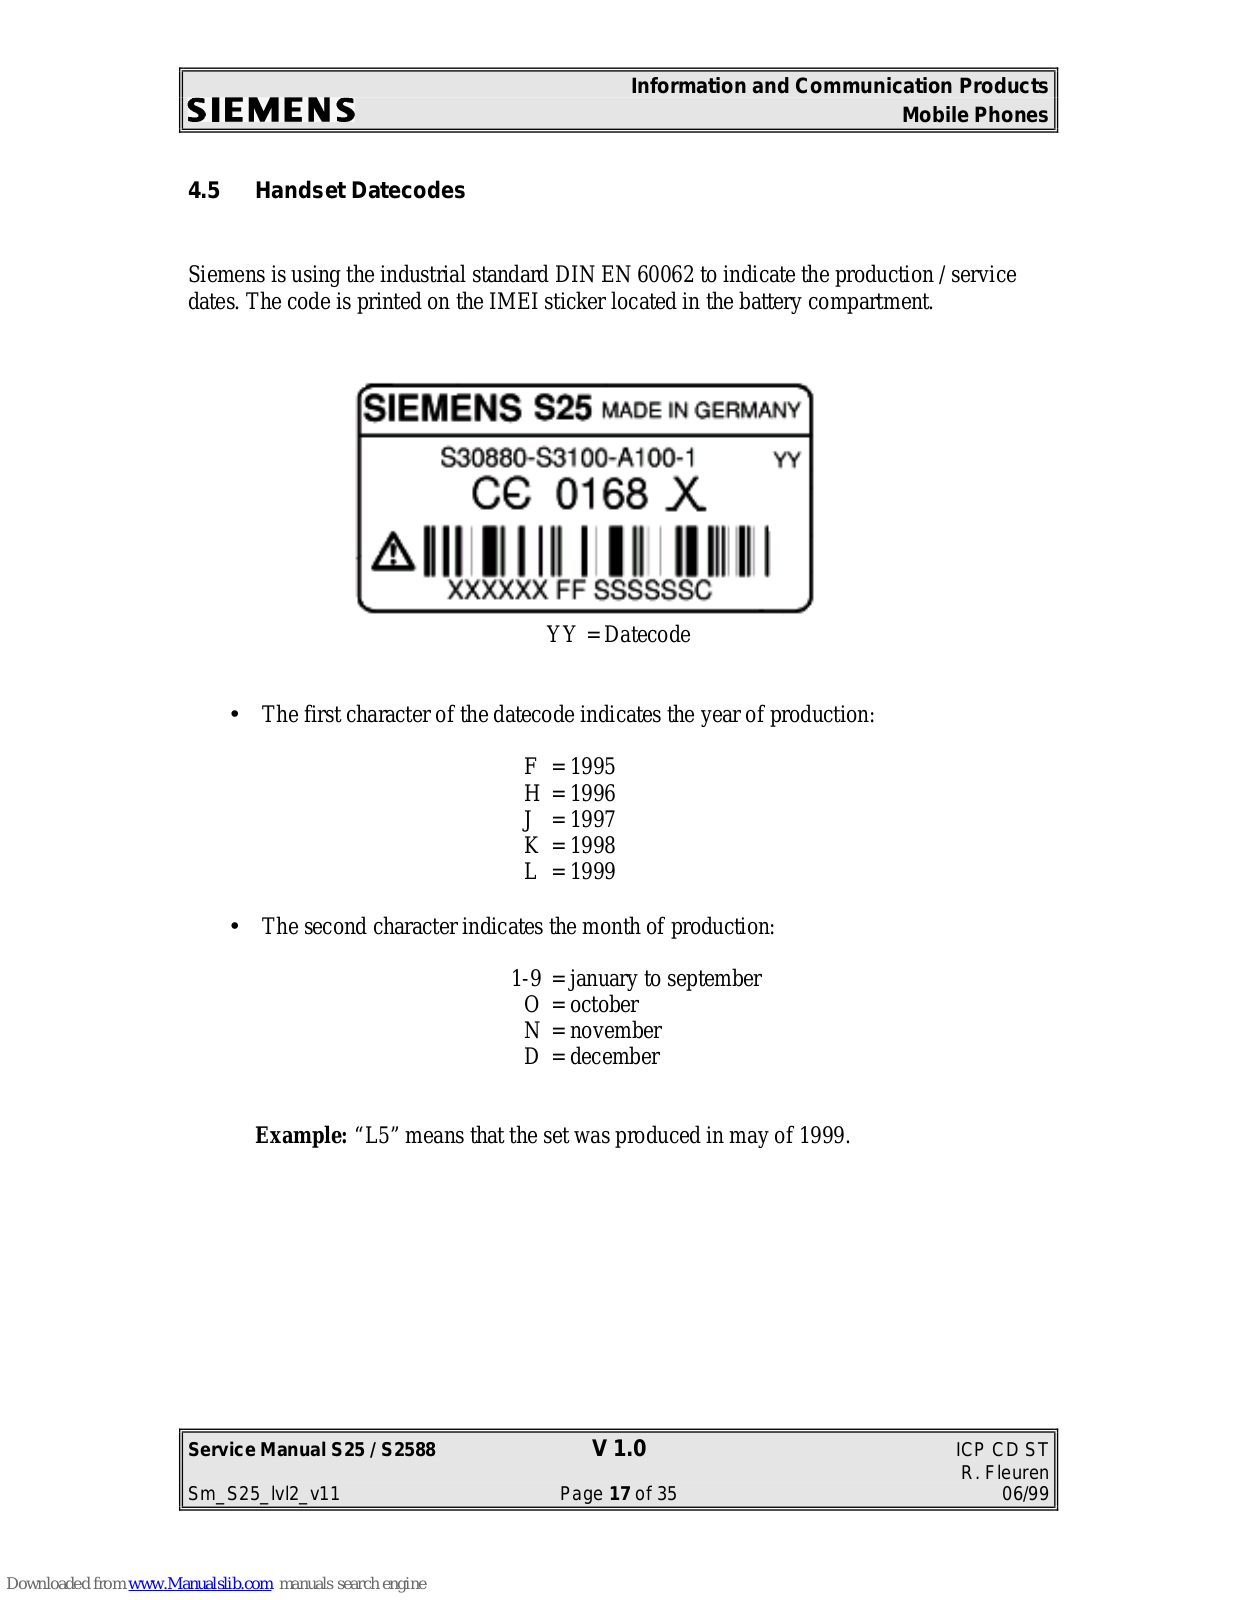
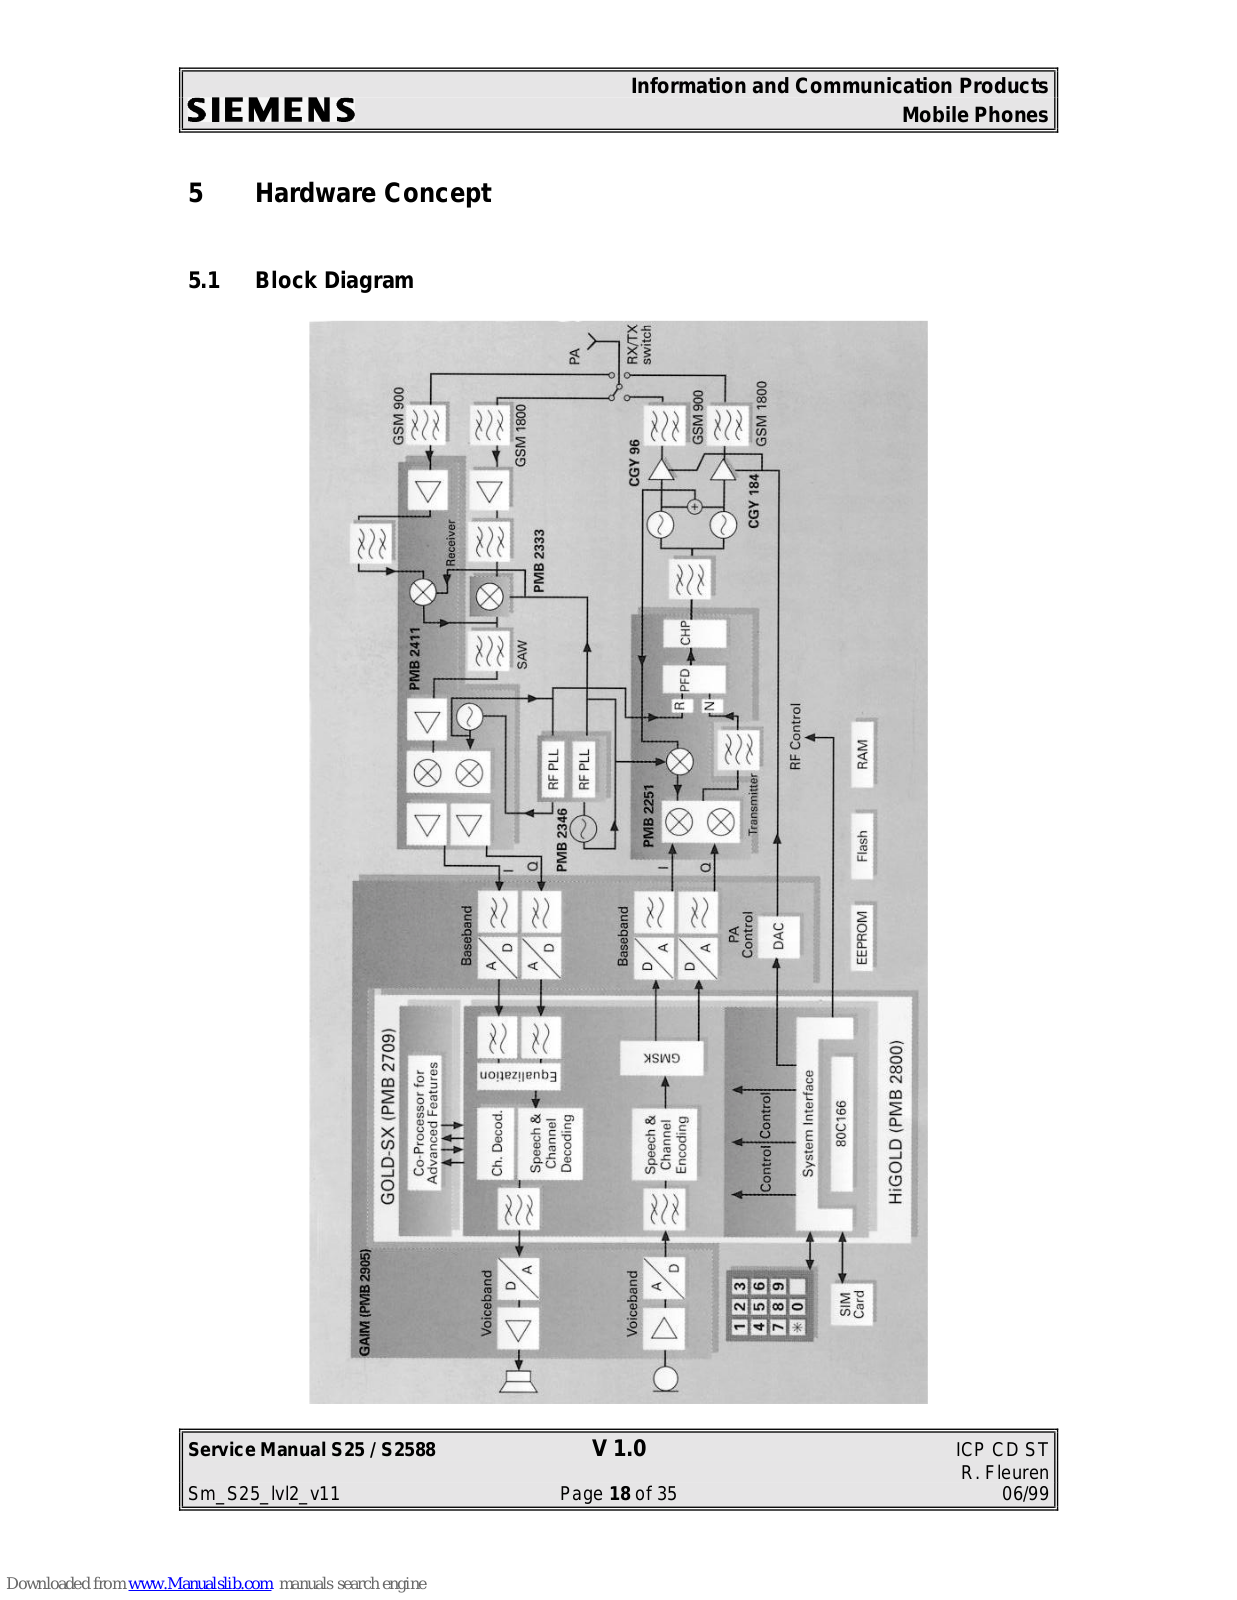
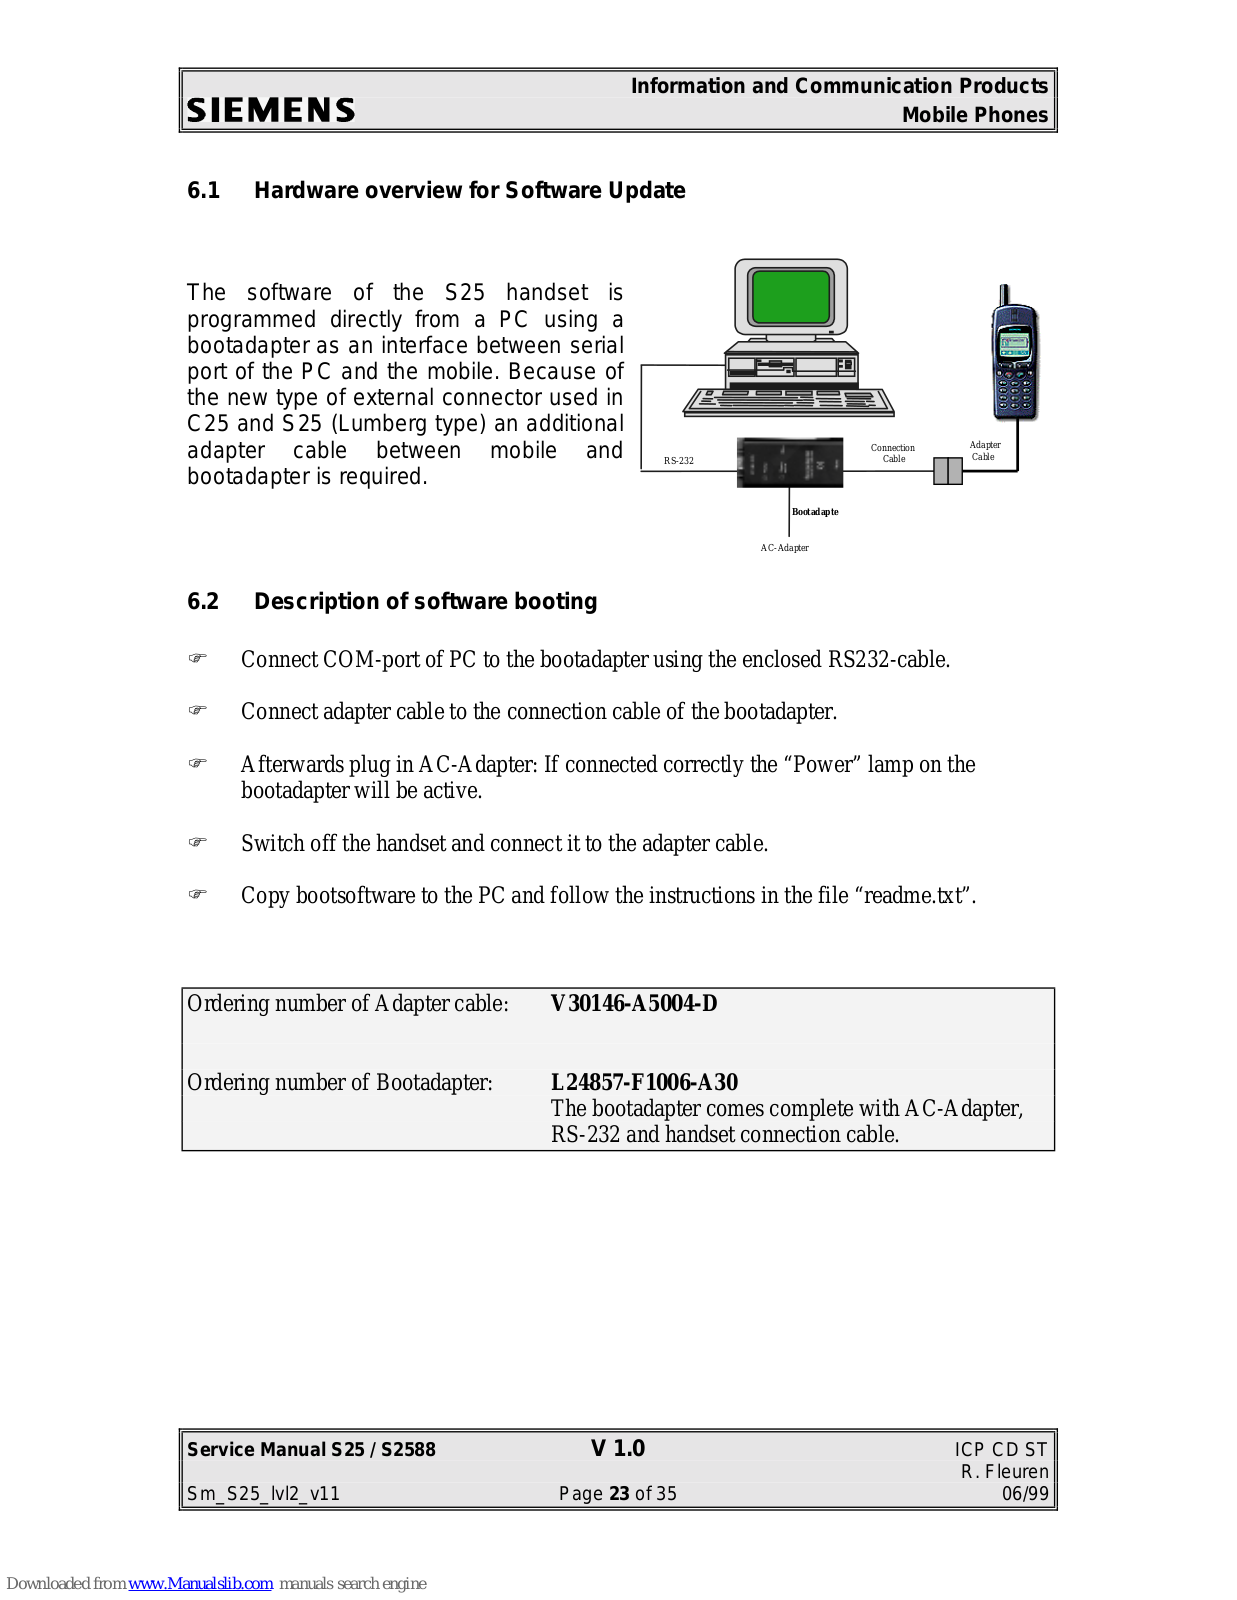
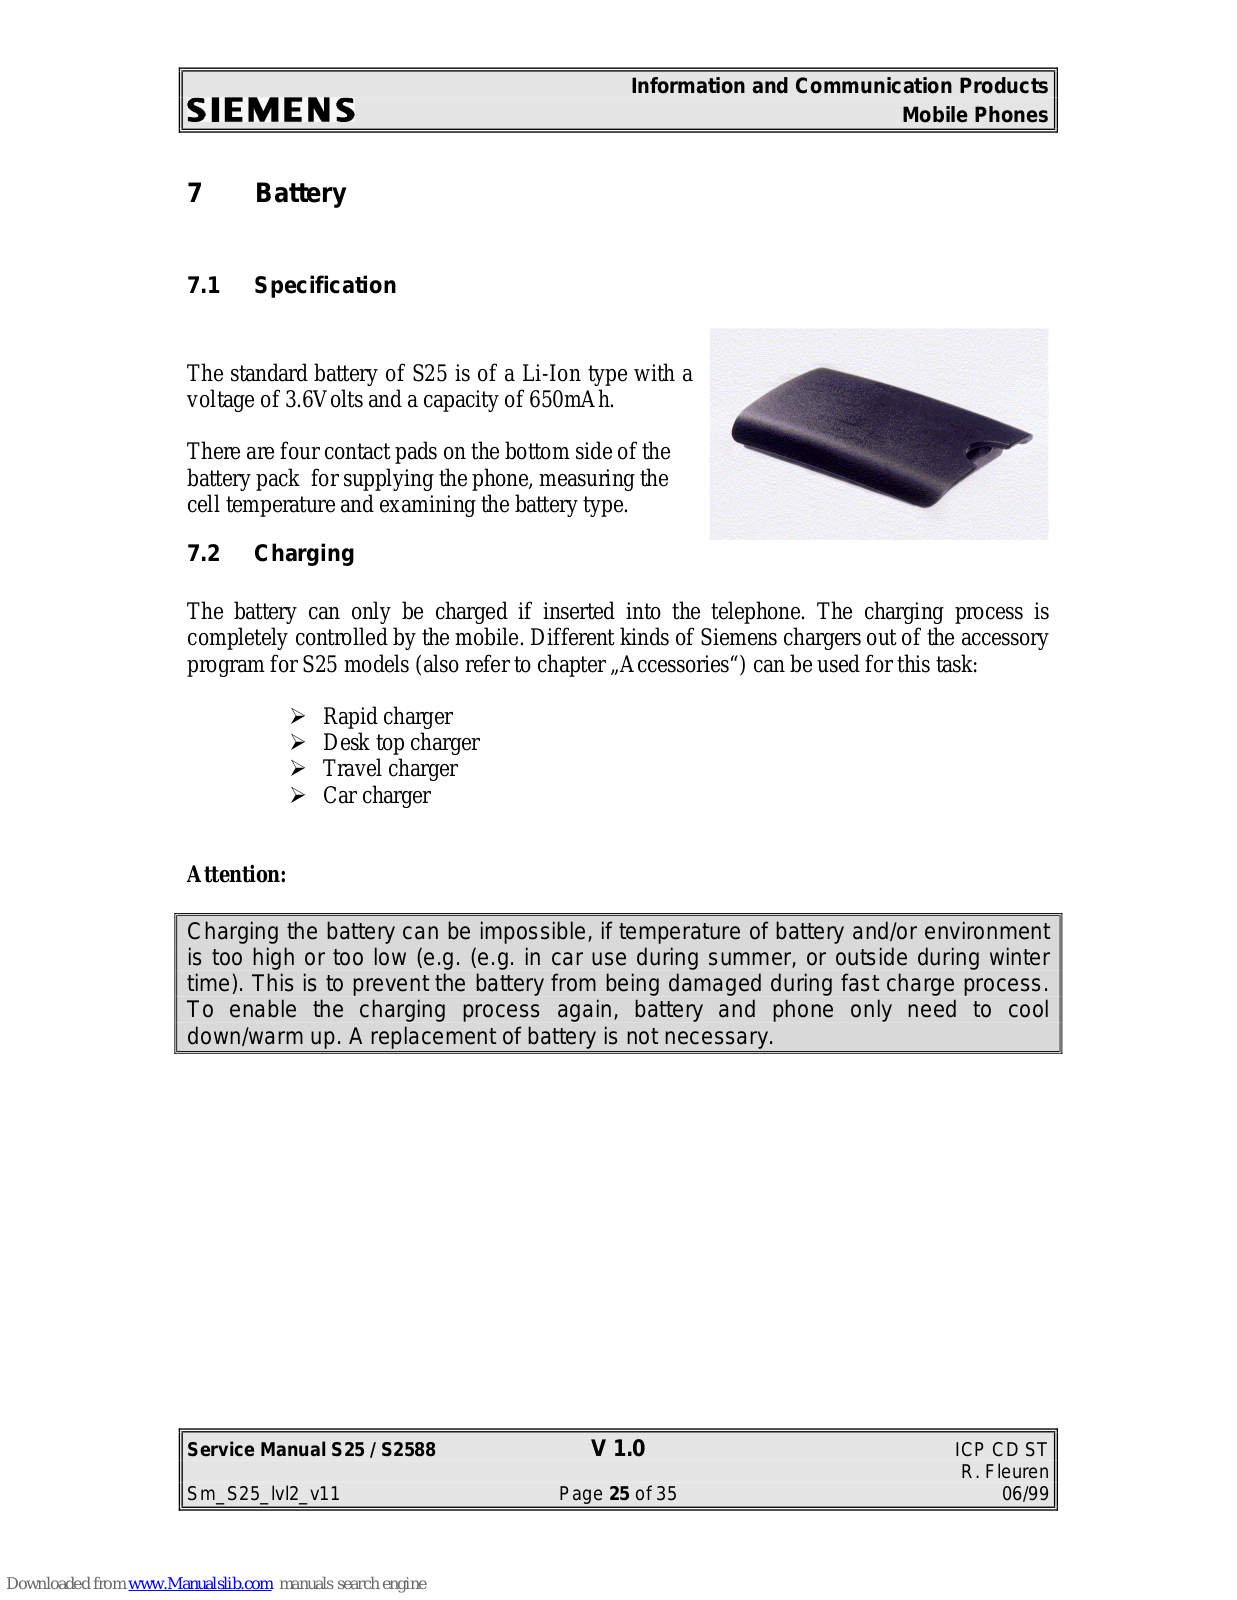
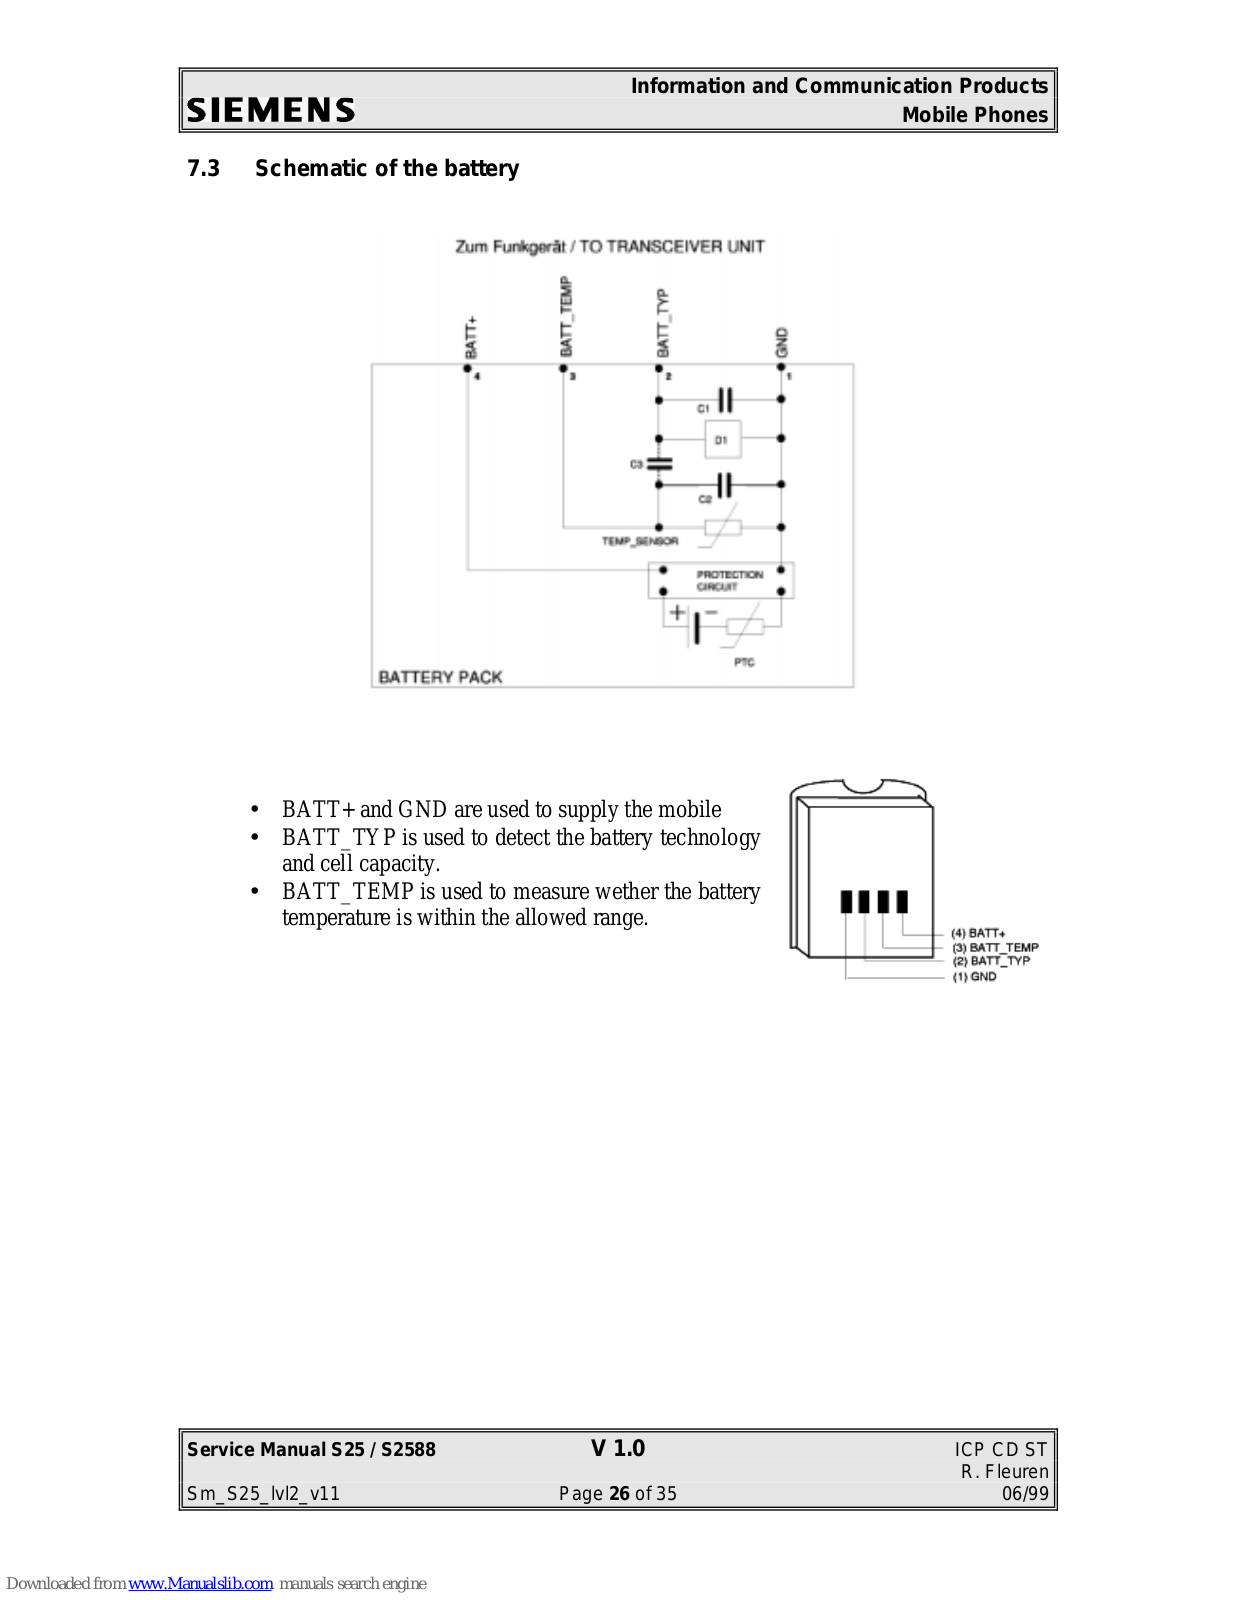
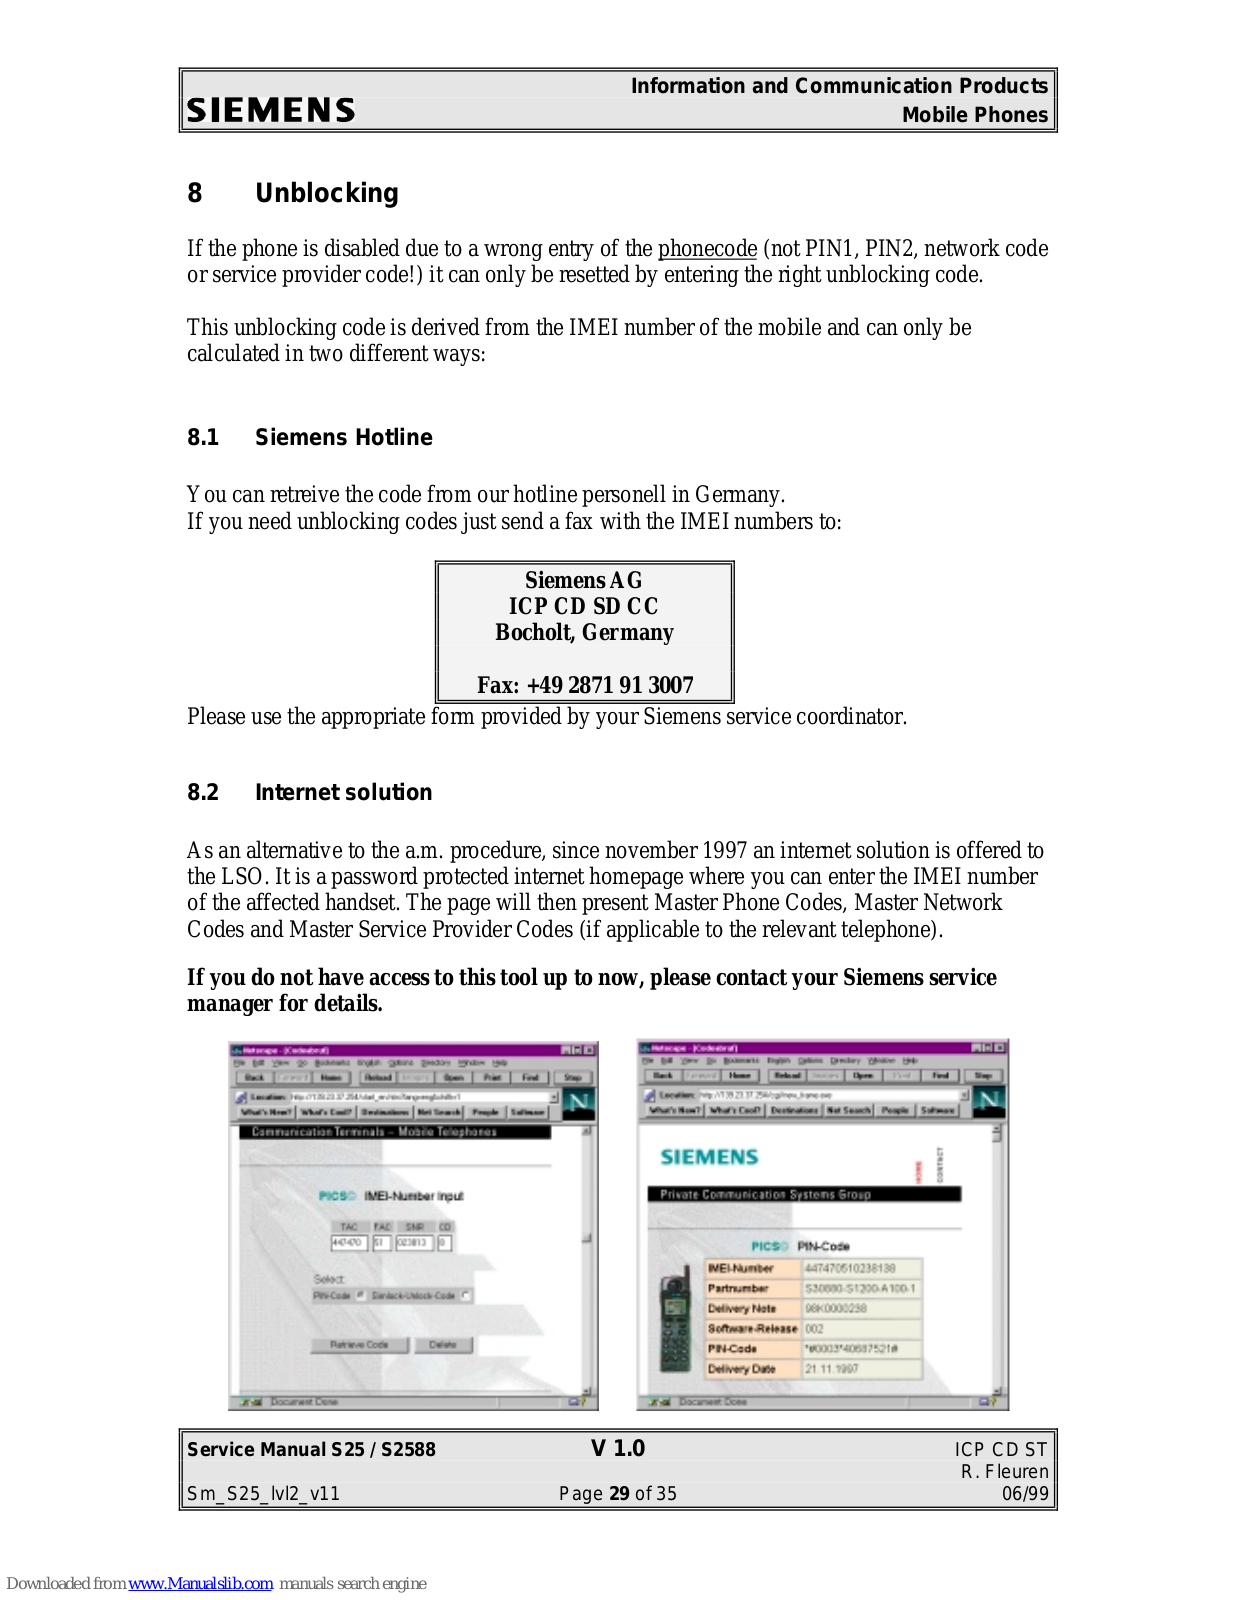
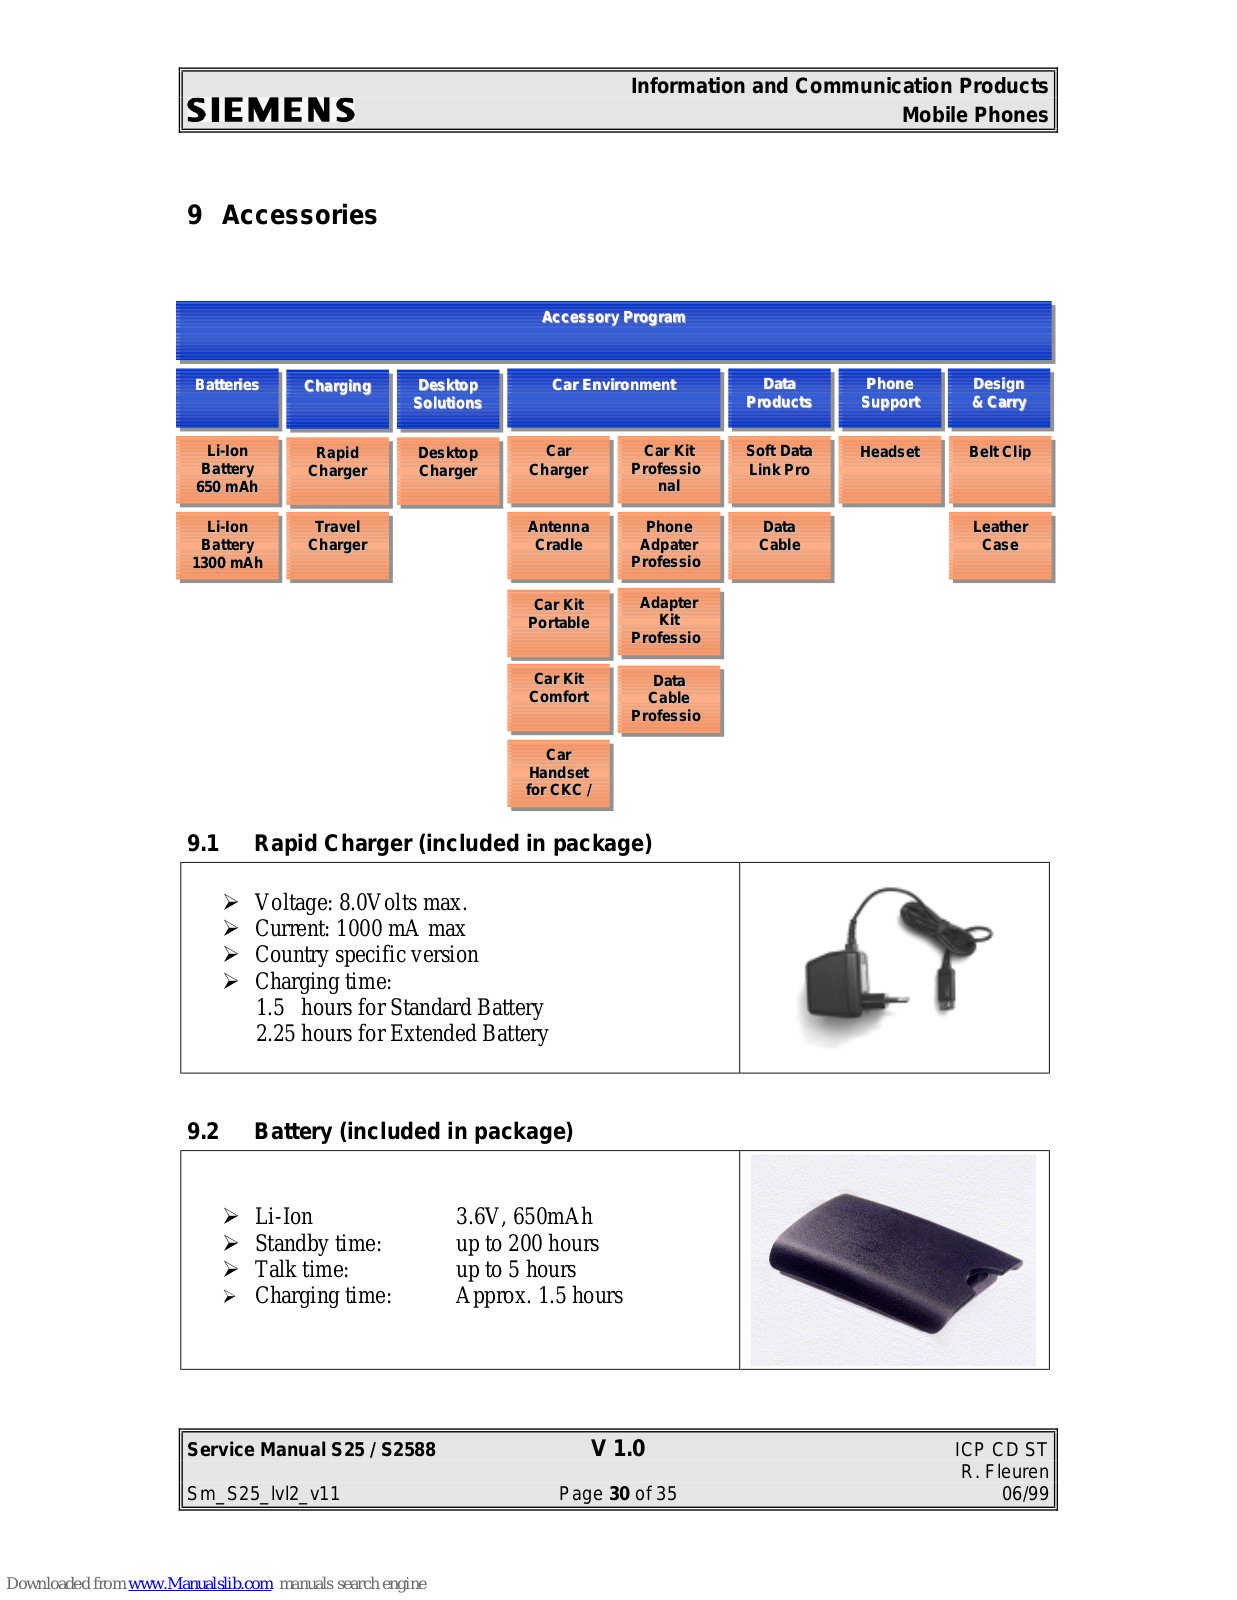


 Loading...