

Page 1

User Manual
HiPath 3000/5000
HiPath optiClient 130
Version 4.0
May 2003
OP5374-00
Page 2

Warning
Hackers who unlawfully gain access to customer telecommunications systems are criminals. Currently, we do
not know of any telecommunications system that is immune to this type of criminal activity. Siemens Information and Communication Networks, Inc. will not accept liability for any damages, including long distance charges, which result from unauthorized use. Although Siemens has designed security features into its products, it
is your sole responsibility to use the security features and to establish security practices within your company,
including training, security awareness, and call auditing.
Siemens sales and service personnel, as well as Siemens business partners, are available to work with you
to help you guard against this unauthorized use of your telecommunications system.
May 2003
Job No. 5374
No part of this publication may be reproduced, stored in a retrieval system, or transmitted, in any form or by
any means, mechanical, electronic, photocopying, recording, or otherwise, without prior written permission of
Siemens. The software described in this publication is furnished under a license agreement and may be used
only in accordance with the terms of that agreement.
Request Siemens publications from your Siemens representative or the Siemens branch serving you. Publications are not stocked at the address below.
Siemens Information and Communication Networks, Inc.
1700 Technology Drive
San Jose, CA 95110
(408) 492-2000
1 (800) 765-6123
Fax: (408) 492-3430
Siemens is a registered trademark of Siemens AG.
All other trademarks and company names are the property of their respective owners.
Copyright Siemens Information and Communication Networks, Inc. 2003. All rights reserved.
Page 3
s
HiPath 3000/5000 V4.0
optiClient 130
User Manual
Page 4

*1PA31003-G2540-A100-3-76A9*
1P A31003-G2540-A100-3-76A9
The information in this document contains general descriptions of the technical options available, which do not always have to be present in individual cases.
The required features should therefore be specified in each individual case at the time
of closing the contract.
Siemens AG 2003
Reference No.: A31003-G2540-A100-3-76A9
Printed in the Federal Republic of Germany.
Subject to availability. Right of modification reserved.
●
Information and Communication Networks, Hofmannstraße 51, D-81359 München, Germany
●
Page 5

HiPath 3000/5000 V4.0
Introduction and Important
Notes
Installation
1
2
optiClient 130
User Manual
First Steps and User
Configuration
optiClient phone User Interface
optiClient office User Interface
optiClient easyCom User
Interface
3
4
5
6
A31003-G2540-A100-3-76A9
Using the optiClient phone
7
Using the optiClient office
8
Electronic Telephone Directory
9
Call List Management
10
Page 6

Page 7
opticl130v40IVZ.fm
Nur für den internen Gebrauch Contents
Contents 0
short
name
MS-HTML help name
e.g., eshb_hlp.chm
E-Doku path V2.0(relative)
z.B.: ../../../../bk1/01/bh/01
E-Doku Pfad V3.0(relative)
e.g.: ../bk1
e.g., eshb
easyCom easyCom_EN.chm ../11 ../12optiClient130easyCom
1 Introduction and Important Notes. . . . . . . . . . . . . . . . . . . . . . . . . . . . . . . . . . . . . . . . 1-2
1.1 Hardware and Software Requirements . . . . . . . . . . . . . . . . . . . . . . . . . . . . . . . . . . . . 1-3
1.2 Target Group and Requirements. . . . . . . . . . . . . . . . . . . . . . . . . . . . . . . . . . . . . . . . . 1-5
1.3 Safety Information . . . . . . . . . . . . . . . . . . . . . . . . . . . . . . . . . . . . . . . . . . . . . . . . . . . . 1-6
1.3.1 Safety information: Danger . . . . . . . . . . . . . . . . . . . . . . . . . . . . . . . . . . . . . . . . . . 1-7
1.3.2 Safety information: Warning . . . . . . . . . . . . . . . . . . . . . . . . . . . . . . . . . . . . . . . . . 1-7
1.3.3 Safety information: Caution. . . . . . . . . . . . . . . . . . . . . . . . . . . . . . . . . . . . . . . . . . 1-7
1.3.4 General Notes. . . . . . . . . . . . . . . . . . . . . . . . . . . . . . . . . . . . . . . . . . . . . . . . . . . . 1-8
1.4 Data Protection and Data Security . . . . . . . . . . . . . . . . . . . . . . . . . . . . . . . . . . . . . . . 1-9
2 Installation. . . . . . . . . . . . . . . . . . . . . . . . . . . . . . . . . . . . . . . . . . . . . . . . . . . . . . . . . . . 2-1
2.1 General Information. . . . . . . . . . . . . . . . . . . . . . . . . . . . . . . . . . . . . . . . . . . . . . . . . . . 2-2
2.2 Configuring/installing Quality of Service . . . . . . . . . . . . . . . . . . . . . . . . . . . . . . . . . . . 2-4
2.3 Configuring Location Information . . . . . . . . . . . . . . . . . . . . . . . . . . . . . . . . . . . . . . . 2-10
2.4 optiClient Installation Procedure . . . . . . . . . . . . . . . . . . . . . . . . . . . . . . . . . . . . . . . . 2-12
3 First Steps and User Configuration . . . . . . . . . . . . . . . . . . . . . . . . . . . . . . . . . . . . . . 3-1
3.1 General . . . . . . . . . . . . . . . . . . . . . . . . . . . . . . . . . . . . . . . . . . . . . . . . . . . . . . . . . . . . 3-2
3.2 Working with the Administration Tool. . . . . . . . . . . . . . . . . . . . . . . . . . . . . . . . . . . . . . 3-3
3.2.1 Configuring PC settings. . . . . . . . . . . . . . . . . . . . . . . . . . . . . . . . . . . . . . . . . . . . . 3-4
3.2.2 Configuring Setup information (License information) . . . . . . . . . . . . . . . . . . . . . . 3-6
3.2.3 Configuring Parameters for PC Performance . . . . . . . . . . . . . . . . . . . . . . . . . . . . 3-7
3.2.4 Configuring Parameters for Quality of Service . . . . . . . . . . . . . . . . . . . . . . . . . . . 3-9
3.3 Starting the Program . . . . . . . . . . . . . . . . . . . . . . . . . . . . . . . . . . . . . . . . . . . . . . . . . 3-11
3.4 Logging on . . . . . . . . . . . . . . . . . . . . . . . . . . . . . . . . . . . . . . . . . . . . . . . . . . . . . . . . 3-12
3.4.1 Logging on with a new telephone number. . . . . . . . . . . . . . . . . . . . . . . . . . . . . . 3-13
3.4.2 Extended Options parameters. . . . . . . . . . . . . . . . . . . . . . . . . . . . . . . . . . . . . . . 3-13
3.4.2.1 General parameters . . . . . . . . . . . . . . . . . . . . . . . . . . . . . . . . . . . . . . . . . . . 3-14
3.4.2.2 Audio parameters. . . . . . . . . . . . . . . . . . . . . . . . . . . . . . . . . . . . . . . . . . . . . 3-16
3.4.2.3 Telephone Directory parameters . . . . . . . . . . . . . . . . . . . . . . . . . . . . . . . . . 3-18
3.4.2.4 Update parameters. . . . . . . . . . . . . . . . . . . . . . . . . . . . . . . . . . . . . . . . . . . . 3-19
3.4.2.5 Server parameters . . . . . . . . . . . . . . . . . . . . . . . . . . . . . . . . . . . . . . . . . . . . 3-20
3.5 Changing the User Password . . . . . . . . . . . . . . . . . . . . . . . . . . . . . . . . . . . . . . . . . . 3-21
A31003-G2540-A100-3-76A9, 04/2003
optiClient 130 V4.0, User Manual
0-1
Page 8

opticl130v40IVZ.fm
Contents Nur für den internen Gebrauch
3.6 Exiting optiClient phone / office / easyCom. . . . . . . . . . . . . . . . . . . . . . . . . . . . . . . . . 3-22
4 optiClient phone User Interface . . . . . . . . . . . . . . . . . . . . . . . . . . . . . . . . . . . . . . . . . . 4-1
4.1 Layout of the optiClient phone User Interface. . . . . . . . . . . . . . . . . . . . . . . . . . . . . . . . 4-2
4.2 General Operation. . . . . . . . . . . . . . . . . . . . . . . . . . . . . . . . . . . . . . . . . . . . . . . . . . . . . 4-4
4.2.1 Using the PC keyboard. . . . . . . . . . . . . . . . . . . . . . . . . . . . . . . . . . . . . . . . . . . . . . 4-5
4.2.2 Setting the speaker and microphone volume. . . . . . . . . . . . . . . . . . . . . . . . . . . . . 4-5
4.2.3 Special Tone Settings. . . . . . . . . . . . . . . . . . . . . . . . . . . . . . . . . . . . . . . . . . . . . . . 4-6
4.2.4 Headset . . . . . . . . . . . . . . . . . . . . . . . . . . . . . . . . . . . . . . . . . . . . . . . . . . . . . . . . . 4-6
4.2.5 Telephone Directory Management. . . . . . . . . . . . . . . . . . . . . . . . . . . . . . . . . . . . . 4-7
4.2.6 Call lists . . . . . . . . . . . . . . . . . . . . . . . . . . . . . . . . . . . . . . . . . . . . . . . . . . . . . . . . . 4-7
4.2.7 Key Modules . . . . . . . . . . . . . . . . . . . . . . . . . . . . . . . . . . . . . . . . . . . . . . . . . . . . . 4-8
4.2.8 Key Captions . . . . . . . . . . . . . . . . . . . . . . . . . . . . . . . . . . . . . . . . . . . . . . . . . . . . . 4-9
4.2.9 Accepting / Terminating a Call . . . . . . . . . . . . . . . . . . . . . . . . . . . . . . . . . . . . . . . . 4-9
4.3 Information on the optiClient phone . . . . . . . . . . . . . . . . . . . . . . . . . . . . . . . . . . . . . . 4-10
4.4 Manual Update Check for the optiClient phone . . . . . . . . . . . . . . . . . . . . . . . . . . . . . 4-11
4.5 Option Settings for the optiClient phone. . . . . . . . . . . . . . . . . . . . . . . . . . . . . . . . . . . 4-13
4.5.1 General Options . . . . . . . . . . . . . . . . . . . . . . . . . . . . . . . . . . . . . . . . . . . . . . . . . 4-14
4.5.2 Display Options . . . . . . . . . . . . . . . . . . . . . . . . . . . . . . . . . . . . . . . . . . . . . . . . . . 4-15
4.5.3 Telephone Directory Options . . . . . . . . . . . . . . . . . . . . . . . . . . . . . . . . . . . . . . . . 4-17
4.5.3.1 Telephone Directory Options - LDAP Settings. . . . . . . . . . . . . . . . . . . . . . . . 4-17
4.5.4 Telephony Options. . . . . . . . . . . . . . . . . . . . . . . . . . . . . . . . . . . . . . . . . . . . . . . . 4-20
4.6 View Settings for the optiClient phone . . . . . . . . . . . . . . . . . . . . . . . . . . . . . . . . . . . . 4-21
4.7 Online Help. . . . . . . . . . . . . . . . . . . . . . . . . . . . . . . . . . . . . . . . . . . . . . . . . . . . . . . . . 4-22
5 optiClient office User Interface . . . . . . . . . . . . . . . . . . . . . . . . . . . . . . . . . . . . . . . . . . . 5-1
5.1 Layout of the optiClient office User Interface . . . . . . . . . . . . . . . . . . . . . . . . . . . . . . . . 5-1
5.2 General Operation. . . . . . . . . . . . . . . . . . . . . . . . . . . . . . . . . . . . . . . . . . . . . . . . . . . . . 5-3
5.2.1 Opening and Closing Windows . . . . . . . . . . . . . . . . . . . . . . . . . . . . . . . . . . . . . . . 5-4
5.2.2 Minimizing optiClient office. . . . . . . . . . . . . . . . . . . . . . . . . . . . . . . . . . . . . . . . . . . 5-5
5.2.3 Changing your Code Key (PIN) . . . . . . . . . . . . . . . . . . . . . . . . . . . . . . . . . . . . . . . 5-5
5.2.4 Setting the speaker and microphone volume. . . . . . . . . . . . . . . . . . . . . . . . . . . . . 5-6
5.2.5 Special Tone Settings. . . . . . . . . . . . . . . . . . . . . . . . . . . . . . . . . . . . . . . . . . . . . . . 5-7
5.2.6 Headset . . . . . . . . . . . . . . . . . . . . . . . . . . . . . . . . . . . . . . . . . . . . . . . . . . . . . . . . . 5-7
5.2.7 Telephone Directory Management. . . . . . . . . . . . . . . . . . . . . . . . . . . . . . . . . . . . . 5-8
5.2.8 Call List Management. . . . . . . . . . . . . . . . . . . . . . . . . . . . . . . . . . . . . . . . . . . . . . . 5-8
5.2.9 Programming the Function Keys . . . . . . . . . . . . . . . . . . . . . . . . . . . . . . . . . . . . . . 5-9
5.3 Information on the optiClient office . . . . . . . . . . . . . . . . . . . . . . . . . . . . . . . . . . . . . . . 5-11
5.4 Manual Update Check for optiClient office . . . . . . . . . . . . . . . . . . . . . . . . . . . . . . . . . 5-12
5.5 Option Settings for the optiClient office . . . . . . . . . . . . . . . . . . . . . . . . . . . . . . . . . . . 5-13
5.5.1 General Options. . . . . . . . . . . . . . . . . . . . . . . . . . . . . . . . . . . . . . . . . . . . . . . . . . 5-14
5.5.2 Display Options . . . . . . . . . . . . . . . . . . . . . . . . . . . . . . . . . . . . . . . . . . . . . . . . . . 5-15
5.5.3 Telephone directory options. . . . . . . . . . . . . . . . . . . . . . . . . . . . . . . . . . . . . . . . . 5-16
5.5.3.1 Telephone directory options - LDAP Settings . . . . . . . . . . . . . . . . . . . . . . . . 5-16
5.5.4 Telephony Options. . . . . . . . . . . . . . . . . . . . . . . . . . . . . . . . . . . . . . . . . . . . . . . . 5-19
A31003-G2540-A100-3-76A9, 04/2003
0-2 optiClient 130 V4.0, User Manual
Page 9

opticl130v40IVZ.fm
Nur für den internen Gebrauch Contents
5.5.5 Speed-dial Keys . . . . . . . . . . . . . . . . . . . . . . . . . . . . . . . . . . . . . . . . . . . . . . . . . 5-20
5.6 Functions . . . . . . . . . . . . . . . . . . . . . . . . . . . . . . . . . . . . . . . . . . . . . . . . . . . . . . . . . 5-23
5.7 Connection Parties Window. . . . . . . . . . . . . . . . . . . . . . . . . . . . . . . . . . . . . . . . . . . . 5-26
5.7.1 Call status display . . . . . . . . . . . . . . . . . . . . . . . . . . . . . . . . . . . . . . . . . . . . . . . 5-28
5.8 Online Help . . . . . . . . . . . . . . . . . . . . . . . . . . . . . . . . . . . . . . . . . . . . . . . . . . . . . . . . 5-28
6 optiClient easyCom User Interface . . . . . . . . . . . . . . . . . . . . . . . . . . . . . . . . . . . . . . . 6-1
7 Using the optiClient phone . . . . . . . . . . . . . . . . . . . . . . . . . . . . . . . . . . . . . . . . . . . . . 7-1
7.1 Extended Dialing Functions Using Drag & Drop . . . . . . . . . . . . . . . . . . . . . . . . . . . . . 7-1
7.2 Basic and advanced functions. . . . . . . . . . . . . . . . . . . . . . . . . . . . . . . . . . . . . . . . . . . 7-2
7.3 Overview of Functions and Codes (in Alphabetical Order) . . . . . . . . . . . . . . . . . . . . . 7-3
8 Using the optiClient office . . . . . . . . . . . . . . . . . . . . . . . . . . . . . . . . . . . . . . . . . . . . . . 8-1
8.1 Making and Answering Calls . . . . . . . . . . . . . . . . . . . . . . . . . . . . . . . . . . . . . . . . . . . . 8-1
8.1.1 Answering Calls . . . . . . . . . . . . . . . . . . . . . . . . . . . . . . . . . . . . . . . . . . . . . . . . . . 8-1
8.1.2 Call Pickup . . . . . . . . . . . . . . . . . . . . . . . . . . . . . . . . . . . . . . . . . . . . . . . . . . . . . . 8-1
8.1.3 Do Not Disturb Feature . . . . . . . . . . . . . . . . . . . . . . . . . . . . . . . . . . . . . . . . . . . . 8-2
8.1.4 Ringer Off . . . . . . . . . . . . . . . . . . . . . . . . . . . . . . . . . . . . . . . . . . . . . . . . . . . . . . . 8-3
8.1.5 Microphone on/off . . . . . . . . . . . . . . . . . . . . . . . . . . . . . . . . . . . . . . . . . . . . . . . . 8-4
8.2 Making calls. . . . . . . . . . . . . . . . . . . . . . . . . . . . . . . . . . . . . . . . . . . . . . . . . . . . . . . . . 8-5
8.2.1 Caller ID Suppression . . . . . . . . . . . . . . . . . . . . . . . . . . . . . . . . . . . . . . . . . . . . . 8-5
8.2.2 Initiating Calls . . . . . . . . . . . . . . . . . . . . . . . . . . . . . . . . . . . . . . . . . . . . . . . . . . . . 8-5
8.2.3 Extended Dialing Functions per Drag & Drop . . . . . . . . . . . . . . . . . . . . . . . . . . . 8-7
8.2.4 Terminating Calls . . . . . . . . . . . . . . . . . . . . . . . . . . . . . . . . . . . . . . . . . . . . . . . . . 8-8
8.3 Calling Multiple Parties Simultaneously. . . . . . . . . . . . . . . . . . . . . . . . . . . . . . . . . . . . 8-9
8.3.1 Consultation Hold . . . . . . . . . . . . . . . . . . . . . . . . . . . . . . . . . . . . . . . . . . . . . . . . . 8-9
8.3.2 Conferencing . . . . . . . . . . . . . . . . . . . . . . . . . . . . . . . . . . . . . . . . . . . . . . . . . . . 8-10
8.3.3 Toggle . . . . . . . . . . . . . . . . . . . . . . . . . . . . . . . . . . . . . . . . . . . . . . . . . . . . . . . . 8-11
8.3.4 Call Transfer . . . . . . . . . . . . . . . . . . . . . . . . . . . . . . . . . . . . . . . . . . . . . . . . . . . . 8-11
8.3.5 Parking Calls . . . . . . . . . . . . . . . . . . . . . . . . . . . . . . . . . . . . . . . . . . . . . . . . . . . 8-12
8.4 Making Calls to Stored Destinations . . . . . . . . . . . . . . . . . . . . . . . . . . . . . . . . . . . . . 8-14
8.4.1 Redial . . . . . . . . . . . . . . . . . . . . . . . . . . . . . . . . . . . . . . . . . . . . . . . . . . . . . . . . . 8-14
8.4.2 Call Lists . . . . . . . . . . . . . . . . . . . . . . . . . . . . . . . . . . . . . . . . . . . . . . . . . . . . . . . 8-14
8.5 If You Cannot Reach a Destination... . . . . . . . . . . . . . . . . . . . . . . . . . . . . . . . . . . . . 8-15
8.5.1 Callback . . . . . . . . . . . . . . . . . . . . . . . . . . . . . . . . . . . . . . . . . . . . . . . . . . . . . . . 8-15
8.5.2 Call Waiting . . . . . . . . . . . . . . . . . . . . . . . . . . . . . . . . . . . . . . . . . . . . . . . . . . . . 8-16
8.6 Call Forwarding . . . . . . . . . . . . . . . . . . . . . . . . . . . . . . . . . . . . . . . . . . . . . . . . . . . . . 8-17
8.6.1 Call Forwarding . . . . . . . . . . . . . . . . . . . . . . . . . . . . . . . . . . . . . . . . . . . . . . . . . 8-17
8.6.2 Night Service. . . . . . . . . . . . . . . . . . . . . . . . . . . . . . . . . . . . . . . . . . . . . . . . . . . . 8-18
8.7 Using Other Functions. . . . . . . . . . . . . . . . . . . . . . . . . . . . . . . . . . . . . . . . . . . . . . . . 8-19
8.7.1 Displaying Call Charges . . . . . . . . . . . . . . . . . . . . . . . . . . . . . . . . . . . . . . . . . . . 8-19
8.7.2 Telephone Lock . . . . . . . . . . . . . . . . . . . . . . . . . . . . . . . . . . . . . . . . . . . . . . . . . 8-19
8.7.3 Infos . . . . . . . . . . . . . . . . . . . . . . . . . . . . . . . . . . . . . . . . . . . . . . . . . . . . . . . . . . 8-21
8.7.4 Answer Text . . . . . . . . . . . . . . . . . . . . . . . . . . . . . . . . . . . . . . . . . . . . . . . . . . . . 8-23
8.7.5 Telephone Data Service . . . . . . . . . . . . . . . . . . . . . . . . . . . . . . . . . . . . . . . . . . . 8-24
A31003-G2540-A100-3-76A9, 04/2003
optiClient 130 V4.0, User Manual
0-3
Page 10

opticl130v40IVZ.fm
Contents Nur für den internen Gebrauch
8.7.6 DTMF Suffix Dialing . . . . . . . . . . . . . . . . . . . . . . . . . . . . . . . . . . . . . . . . . . . . . . . 8-24
8.7.7 Hunting Group . . . . . . . . . . . . . . . . . . . . . . . . . . . . . . . . . . . . . . . . . . . . . . . . . . . 8-25
8.7.8 Resetting Functions . . . . . . . . . . . . . . . . . . . . . . . . . . . . . . . . . . . . . . . . . . . . . . . 8-26
8.8 ACD Functions . . . . . . . . . . . . . . . . . . . . . . . . . . . . . . . . . . . . . . . . . . . . . . . . . . . . . 8-27
8.8.1 ACD Logon (Logging on to System) . . . . . . . . . . . . . . . . . . . . . . . . . . . . . . . . . . 8-28
8.8.2 ACD Logoff (Logging off from the System) . . . . . . . . . . . . . . . . . . . . . . . . . . . . . 8-29
8.8.3 ACD Post-Processing . . . . . . . . . . . . . . . . . . . . . . . . . . . . . . . . . . . . . . . . . . . . . 8-30
8.8.4 ACD Unavailability . . . . . . . . . . . . . . . . . . . . . . . . . . . . . . . . . . . . . . . . . . . . . . . . 8-31
8.8.5 Displaying the Number of Waiting Calls . . . . . . . . . . . . . . . . . . . . . . . . . . . . . . . 8-32
8.8.6 ACD Night Service . . . . . . . . . . . . . . . . . . . . . . . . . . . . . . . . . . . . . . . . . . . . . . . . 8-32
9 Electronic Telephone Directory . . . . . . . . . . . . . . . . . . . . . . . . . . . . . . . . . . . . . . . . . . 9-1
9.1 General Functions. . . . . . . . . . . . . . . . . . . . . . . . . . . . . . . . . . . . . . . . . . . . . . . . . . . . . 9-3
9.1.1 Selecting the Telephone Directory. . . . . . . . . . . . . . . . . . . . . . . . . . . . . . . . . . . . . 9-3
9.1.2 Viewing Options of the Telephone Directory . . . . . . . . . . . . . . . . . . . . . . . . . . . . . 9-4
9.1.3 Edit entries in the directory . . . . . . . . . . . . . . . . . . . . . . . . . . . . . . . . . . . . . . . . . . 9-5
9.1.4 Finding a Contact in the Telephone Directory . . . . . . . . . . . . . . . . . . . . . . . . . . . . 9-8
9.1.5 Calling a Contact from the Telephone Directory. . . . . . . . . . . . . . . . . . . . . . . . . . . 9-9
9.1.6 Sending an E-mail to a Contact . . . . . . . . . . . . . . . . . . . . . . . . . . . . . . . . . . . . . . . 9-9
10 Call List Management . . . . . . . . . . . . . . . . . . . . . . . . . . . . . . . . . . . . . . . . . . . . . . . . 10-1
Index . . . . . . . . . . . . . . . . . . . . . . . . . . . . . . . . . . . . . . . . . . . . . . . . . . . . . . . . . . . . . . . . . . 1-1
A31003-G2540-A100-3-76A9, 04/2003
0-4 optiClient 130 V4.0, User Manual
Page 11

1einl.fm
Introduction and Important Notes Nur für den internen Gebrauch
1 Introduction and Important Notes
This documentation describes the installation, user configuration and use of the
>
General Information
The optiClient 130 is a telephony application that can be run on a PC. It permits phone calls to
be conducted via a LAN (Voice over IP) in conjunction with the HiPath 3000/5000 V4.0 communication system.
The HG 1500 board of the HiPath 3000/5000 V4.0 enables the connection with optiClient 130
via a LAN connection. The maximum number of clients that can be connected are as follows:
optiClient 130 V4.0. In order to make this documentation easier to read, the terms
optiClient 130 (for the overall product) and optiClient phone or optiClient office
as well as optiClient easyCom are used for the respective user interfaces.
HiPath 3000/5000 V4.0 V3.0 or earlier V3.0 or later
● Office Pro A maximum of 3 HG1500
boards with 48 clients per
HG1500
(of which 16 stations can establish a connection simultaneously)
● Office Com A maximum of 2 HG1500
boards with 48 clients each
(of which 8 stations can establish a connection simultaneously)
● Office Point A maximum of 1 HG1500
board with 48 clients
(of which 8 stations can establish a connection simultaneously)
A maximum of 8 HG1500 boards
with 96 clients each for a maximum
of 500 clients
(outside the LAN, 16 stations can
simultaneously set up a connection
in each HG1500).
A maximum of 4 HG1500 boards
with 48 clients each
(outside the LAN, 8 stations can simultaneously set up a connection in
each HG1500).
A maximum of 2 HG1500 boards
with 48 clients each
(outside the LAN, 8 stations can simultaneously set up a connection in
each HG1500).
A31003-G2540-A100-3-76A9, 04/2003
1-2 optiClient 130 V4.0, User Manual
Page 12

1einl.fm
Nur für den internen Gebrauch
Introduction and Important Notes
Hardware and Software Requirements
1.1 Hardware and Software Requirements
Hardware
● Minimum processor and RAM requirements for optiClient 130 phone/office:
Windows 98SE Windows 2000 Windows XP
Processor Pentium II with
233 MHz
RAM at least 64 MB at least 128 MB at least 256 MB
● Minimum processor and RAM requirements for optiClient 130 easyCom:
Windows 98SE Windows 2000 Windows XP
Processor Pentium II with
450 MHz
Pentium III with
450 MHz
Pentium III with
450 MHz
Pentium III with
450 MHz
Pentium III with
450 MHz
RAM at least 128 MB at least 256 MB at least 256 MB
These specifications are minimum requirements. optiClient 130 is an application
>
that transfers incoming and outgoing voice packets in real time. This means that
the PC being used must have enough CPU capacity and system resources available for optiClient 130 and other applications. If other applications overload the
CPU at the same time, voice quality may suffer as a result.
Please consult the Readme file on the system CD for further information on
>
● 150 MB free hard disk space
● CD-ROM drive
● Ethernet adapter (for QoS functionality with 802.1p support)
● Full-duplex sound card or optiPoint handset
● In addition, when using a sound card :
optiClient 130.
– Microphone and speaker (possibly also handset or headset)
or
– a multimedia keyboard with or without a hookswitch. The hookswitch will only work un-
der Windows 2000.
A31003-G2540-A100-3-76A9, 04/2003
optiClient 130 V4.0, User Manual
1-3
Page 13

1einl.fm
Introduction and Important Notes Nur für den internen Gebrauch
Hardware and Software Requirements
Software
● Operating system Windows 98 SE, Windows 2000 (SP2) or Windows XP
● The installation software for the optiClient 130 on the system CD offers you the following
two user interfaces, depending on the HiPath system connected:
– optiClient 130 phone:
An optPoint-based user interface called the
“optiClient phone User Interface” in the following documentation.
– optiClient 130 office:
a system bar-based user interface called the
“optiClient office User Interface“ in the following documentation.
– optiClient 130 easyCom
a system bar-based user interface called the
“optiClient easyCom User Interface“ in the following documentation.
A31003-G2540-A100-3-76A9, 04/2003
1-4 optiClient 130 V4.0, User Manual
Page 14

1einl.fm
Nur für den internen Gebrauch
Introduction and Important Notes
Target Group and Requirements
1.2 Target Group and Requirements
The Installation chapter supports service technicians on installation and startup.
All other chapters provide an overview of the product and serve as a reference to assist the
user in getting started.
Prerequisites
A31003-G2540-A100-3-76A9, 04/2003
optiClient 130 V4.0, User Manual
1-5
Page 15

1einl.fm
Introduction and Important Notes Nur für den internen Gebrauch
Safety Information
1.3 Safety Information
Only service personnel and authorized specialists are permitted to work on the installation.
Observe the following information:
● Read through all the information on the equipment carefully and follow all the safety guide-
lines. Make sure that you also note down the emergency numbers.
● Always contact your manager before starting any work where the necessary safety precau-
tions do not appear to be in place.
Types of safety information
This manual uses three types of safety information:
Danger
7
Danger symbols call attention to a situation that could cause serious injury or death
to a person.
Warning:
7
7
Further symbols for defining the source of danger in greater detail1:
Warning symbols call attention to a situation that could cause serious injury to a person.
Caution
Hazards that can cause damage to the hardware and software and even destroy it.
1530642
Electricity Weight: Heat Fire Chemicals ESD* Laser
* Electrostatically sensitive devices
1. These symbols are normally not used in the manual. They only explain the symbols that may appear on the
systems.
A31003-G2540-A100-3-76A9, 04/2003
1-6 optiClient 130 V4.0, User Manual
Page 16

1einl.fm
Nur für den internen Gebrauch
Introduction and Important Notes
Safety Information
1.3.1 Safety information: Danger
● If the power cable appears to be damaged, replace it immediately.
● Only personnel with proper qualifications or authorized electricians should perform work
on the low-voltage network (100 - 240 VAC).
● During a thunderstorm, you should not connect or remove telephone lines and PC boards.
● Expect to encounter leakage current from the telecommunications network.
Disconnect all telecommunications cables from the system before unplugging the ground
wire from the system.
● Ensure that the installation is never left unsupervised whenever work is carried out on an
open installation.
1.3.2 Safety information: Warning
● There is the risk of an explosion if the lithium battery is not replaced correctly. The lithium
battery must be replaced only by the same or equivalent types recommended by the dealer. (Always dispose of lithium batteries properly.)
● If there are any optical interfaces: possibility of laser radiation: do not look directly into the
beam.
1.3.3 Safety information: Caution
● Prior to startup, check the set nominal voltage of the installation (operating instructions and
nameplate).
● As long as the power supply is switched on, always observe the greatest caution when per-
forming measurements on powered components and maintenance work on plug-in cards,
PC boards and covers.
● Disconnect all power plugs in the system when you need to turn off the system power sup-
ply.
● To protect electrostatically sensitive devices (ESD):
– Always wear the wristband in the prescribed manner before performing any work on
PC boards and modules.
– Transport PC boards only in suitable protective packaging.
– Always place the PC boards on a grounded conducting base, and do not work on the
PC boards anywhere else.
– Only use grounded soldering irons.
A31003-G2540-A100-3-76A9, 04/2003
optiClient 130 V4.0, User Manual
1-7
Page 17

1einl.fm
Introduction and Important Notes Nur für den internen Gebrauch
Safety Information
● Install cables in such a way that they do not pose an accident risk (by people tripping over
them) and also so that they are not damaged.
1.3.4 General Notes
● If the installation is brought into the operating site from a cold environment, condensation
may occur. Wait until the temperature of the installation has adjusted to the ambient temperature and make sure that the system is absolutely dry before you start it.
● Before starting a wall assembly, check whether the load-bearing capacity of the wall is ad-
equate, e.g., in the case of dry walls.
● When maintenance work has been completed, always re-install all safety equipment in the
right place. Also close all doors, covers, or the housing after completing test and maintenance work.
● All cables and lines which leave a system cabinet must be shielded at least between the
connection point in the cabinet and the point at which the cable leaves the cabinet.
Use a clip and pressure screw to contact all shield fabric to the cabinet outlet. This also
applies to permanently connected service equipment.
● Connect all cables only to the specified connection points.
● Do not install any external modems in the installation cabinets.
A31003-G2540-A100-3-76A9, 04/2003
1-8 optiClient 130 V4.0, User Manual
Page 18

1einl.fm
Nur für den internen Gebrauch
Introduction and Important Notes
Data Protection and Data Security
1.4 Data Protection and Data Security
This system also processes and uses personal data for purposes such as call detail recording,
displays, and customer data acquisition.
In Germany, the processing and use of personal data are subject to various regulations, including the regulations of the Federal Data Protection Law (Bundesdatenschutzgesetz = BDSG).
For other countries, please follow the appropriate national laws.
The aim of data protection is to protect the rights of individuals being affected by use of their
personal data.
In addition, the aim of data protection is to prevent the misuse of data when it is processed and
to ensure that one’s own interests and the interests of other parties which need to be protected
are not affected.
Members of Siemens and Siemens Rolm staff are required to observe business and data
secrecy as a result of the company’s work rules.
In order to ensure that the statutory requirements during service – whether during "on-site service" or during "remote service" – are consistently met, you should always observe the following
rules. You will not only maintain the interests of your and our customers, you will also avoid personal consequences.
Conscious action helps maintain data protection and data security:
● Ensure that only appropriately authorized persons have access to customer data.
● Take full advantage of password assignment options; do not allow unauthorized persons
to gain access to passwords by writing them down on a piece of paper or through other
means.
● Ensure that no unauthorized person is able to process (store, modify, transmit, disable, de-
lete) or use customer data in any way.
● Prevent unauthorized persons from gaining access to data media, e. g., on backup disks
or printed reports. This applies to service calls as well as to storage and transport.
● Ensure that data media which are no longer required are completely destroyed. Ensure
that no papers remain generally available.
Work together with your contacts at the customer’s company: This creates mutual confidence and reduces your own workload.
A31003-G2540-A100-3-76A9, 04/2003
optiClient 130 V4.0, User Manual
1-9
Page 19

1einl.fm
Introduction and Important Notes Nur für den internen Gebrauch
Data Protection and Data Security
A31003-G2540-A100-3-76A9, 04/2003
1-10 optiClient 130 V4.0, User Manual
Page 20

2install.fm
Nur für den internen Gebrauch Installation
2Installation
This section contains information on the following topics:
● General Information
● Configuring/installing Quality of Service
● Configuring Location Information
● optiClient Installation Procedure
A31003-G2540-A100-3-76A9, 04/2003
optiClient 130 V4.0, User Manual
2-1
Page 21

2install.fm
Installation Nur für den internen Gebrauch
General Information
2.1 General Information
QoS (Quality of Service)
To guarantee optimum voice quality in the network, QoS service installation and configuration
must first be performed and checked in Windows (see Section Configuring/installing Quality of
Service).
Configuring location properties
Client PC location properties must be configured on the client PC to ensure smooth optiClient
operation (e.g. dial prefix; see section QoS RSVP service deactivation).
Internet Explorer
In order to run the optiClient 130 properly, you will need to have Internet Explorer 4.0.1 with
Service Pack 2 or a later version installed.
Installation Medium/License
A CD with the following code number label is supplied as the installation medium for optiClient
130:
● HiPath 3000/5000
optiClient 130 V4.0
System CD
P30370-P182-A1-*
● HiPath 3000/5000
optiClient 130 V4.0 Upgrade
System CD
P30370-P183-A1-*
The license number required for the installation is located on the reverse side of the CD case.
Always keep the license number in a safe place! No replacement license numbers
>
can be issued in the case of misplacement or loss.
A31003-G2540-A100-3-76A9, 04/2003
2-2 optiClient 130 V4.0, User Manual
Page 22

2install.fm
Nur für den internen Gebrauch
General Information
Installation Components
The following components are installed during the optiClient 130 installation:
– optiClient 130 (application software)
– optiClient 130 V2 TAPI Service Provider
Service Provider of the optiClient 130;
bidirectional TAPI (also used by other applications)
Installation
A31003-G2540-A100-3-76A9, 04/2003
optiClient 130 V4.0, User Manual
2-3
Page 23

2install.fm
Installation Nur für den internen Gebrauch
Configuring/installing Quality of Service
2.2 Configuring/installing Quality of Service
General
optiClient 130 can use the Windows QoS packet scheduler (Quality of Service) for network traffic control in order to optimize voice quality. This service gives telephony packages priority over
"normal" data packets. The following applies depending on the Windows variant installed on
the client PC:
● Windows 2000 / XP:
The QoS features required are supported by the operating system. The required configuration steps are described below.
● under Windows 98SE:
Only limited QoS features, if any, are supported. No further configuration steps are required for activation.
If QoS is to be implemented, the service must be installed and configured on the client PC.
The following may occur when transferring data in IP networks:
● Time problems as a result of large e-mail attachments and Web surfing
● Network congestion as a result of multiple requests for the same Web page
● Reduced voice quality as a result of:
–delays
–jitter
– packet loss
Quality of Service incorporates various methods to ensure the transfer of certain properties in
packet-oriented networks (IP).
It is therefore important to ensure a minimum bandwidth for the duration of the transfer for Voice
over IP, for example. The available bandwidth of a transmission path (a 64 Kbps ISDN B channel, for example) is divided up if several applications run simultaneously via IP. As a result, packet losses leading to poor voice quality may occur in the case of a voice connection.
In HiPath networks, various types of traffic are transported via a single IP infrastructure. Quality
of Service aims to meet data and voice traffic requirements.
A high priority must be assigned to voice traffic to prevent it from being suppressed by data traffic. In addition, it must be specified that high-priority traffic is to be transferred before low-priority
traffic. These specifications are performed in Layer 2 and 3:
● In Layer 2, the three bits are used in the 802.1p field (the part of the 802.1Q day).
A31003-G2540-A100-3-76A9, 04/2003
2-4 optiClient 130 V4.0, User Manual
Page 24

2install.fm
Nur für den internen Gebrauch
Installation
Configuring/installing Quality of Service
● In Layer 3, the six bits of the DiffServ Code Point (DSCP) field are used in the Type of Ser-
vice (ToS) byte of the IP header.
It is also important to ensure that there is sufficient bandwidth within the QoS class (Codepoint/
IEEE802.1p User Priority) used.
QoS activation for the optiClient
1. QoS must only be activated in optiClient 130 V4.0 Administration for use under Windows
2000 (see Section 3.2.3, “Configuring Parameters for PC Performance”).
2. QoS must be provided on the relevant client PCs, i.e. installed and configured.
3. An unused QoS service for network traffic management, must be deactivated on the client
PCs.
To install and configure QoS on the client PC, proceed as follows:
For optimum network traffic control, the optiClient client PC with the installed net-
>
work adapter as well as all other relevant components (routers, switches, servers,
etc.) must support QoS.
Step Procedure
1 Open the context menu for
My Network Places
on the desktop and select
2In the Network and Dial-up Connections dialog, open the context menu for
Area Connection
● If the QoS packet scheduler is not yet available, continue with Step 3 to install the
and select
Properties
.
QoS packet scheduler.
● If the entry exists, ensure it is activated (check mark in the box) and continue with
Step 4.
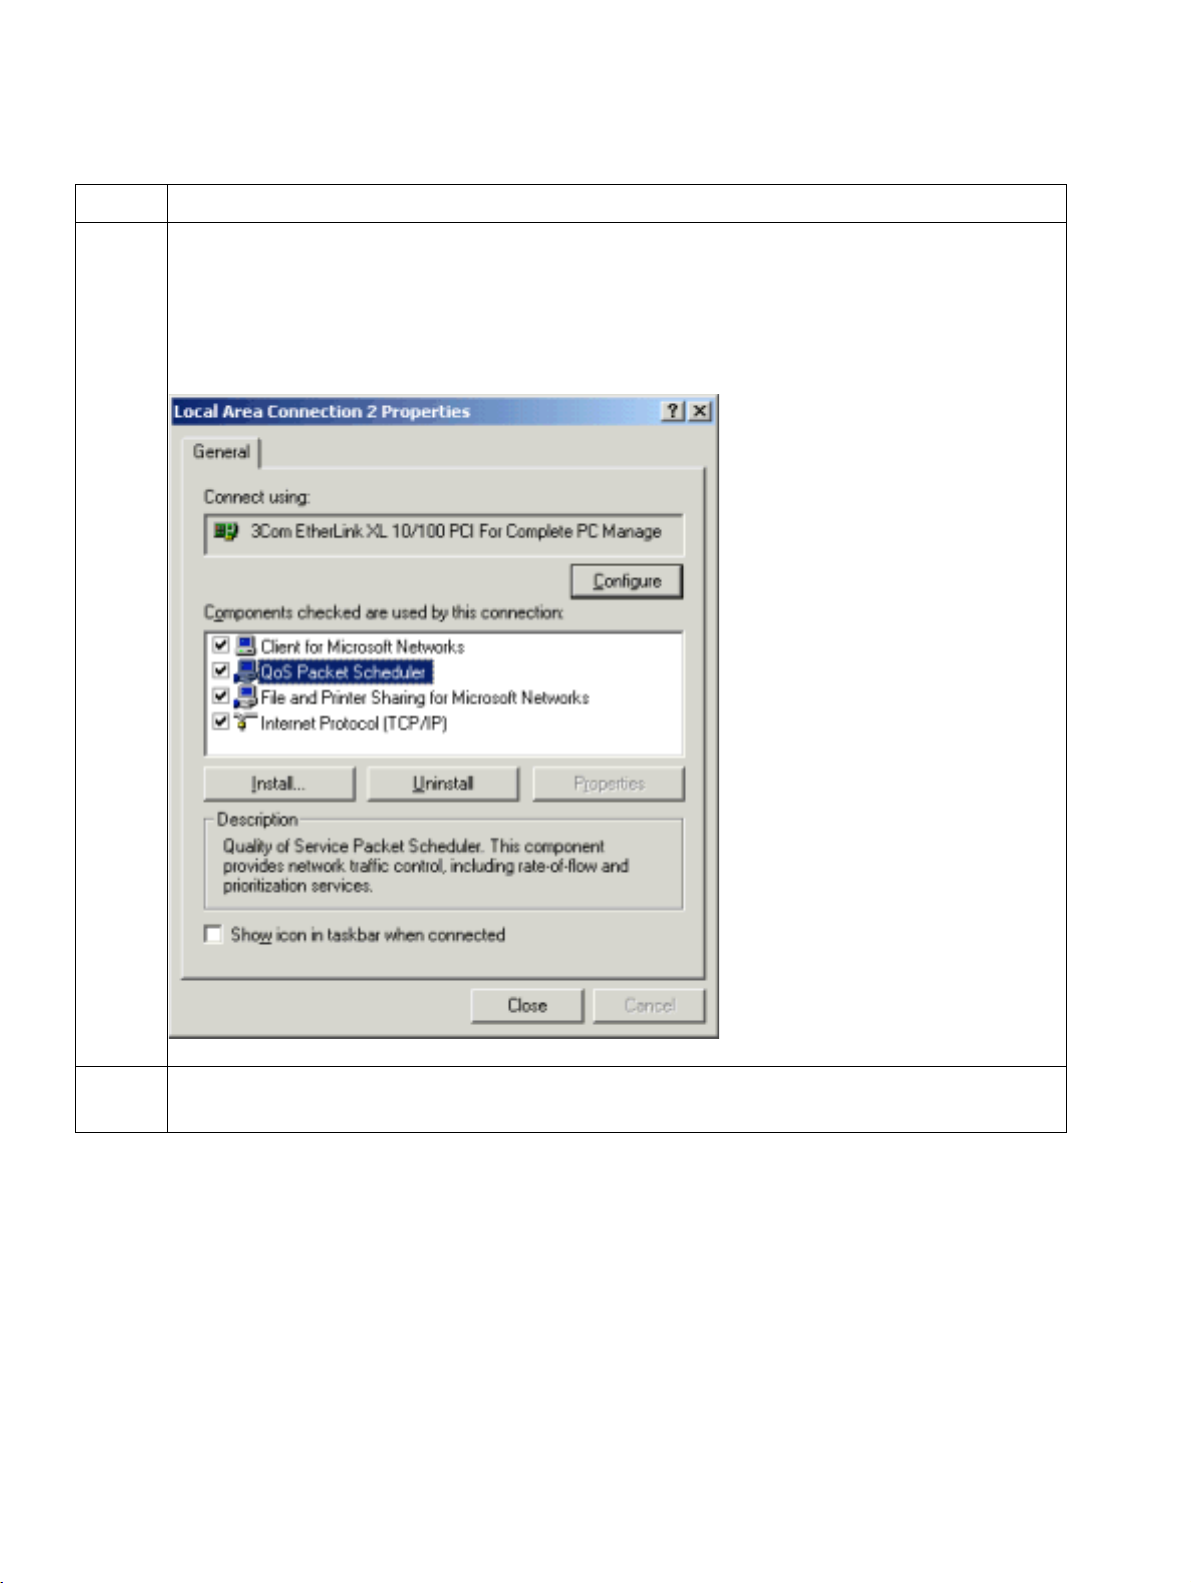
3The Local Area Connection Properties dialog appears.
● If there is no
QoS Packet Scheduler
entry there, continue with Step 4 to install
the QoS packet scheduler.
● If the entry exists, ensure it is activated (check mark in the box) and continue with
Step 6.
4Click Install.... Select
Service
in the Network Component Type dialog and click
Add....
Properties
Local
.
A31003-G2540-A100-3-76A9, 04/2003
optiClient 130 V4.0, User Manual
2-5
Page 25
2install.fm
Installation Nur für den internen Gebrauch
Configuring/installing Quality of Service
Step Procedure
5 In the Select Network Service dialog, click QoS Packet Scheduler and click OK.
The service is installed. Upon completion of this task, you are returned to the properties dialog (as in Step 3) in which the QoS Packet Scheduler entry is displayed
and activated:
Display
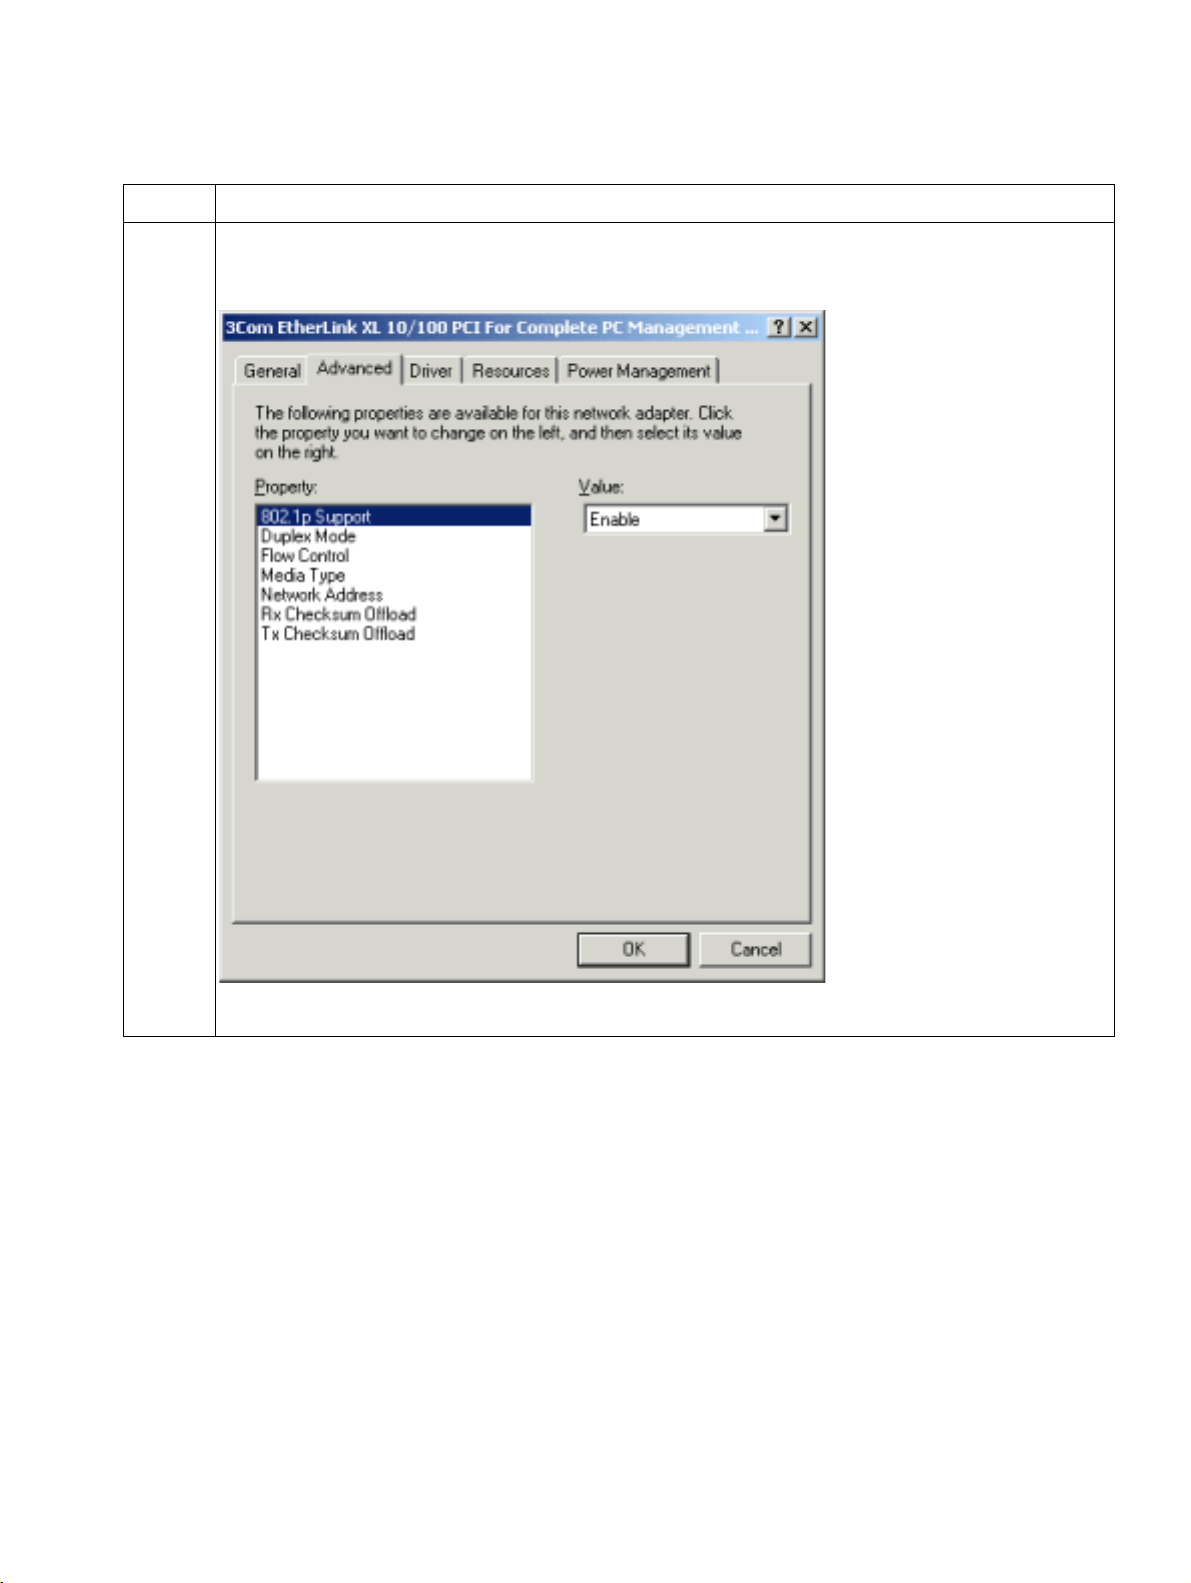
6 Click the Configure button for network card connection configuration. The properties
dialog for the installed network card appears. Click the Advanced Settings tab.
A31003-G2540-A100-3-76A9, 04/2003
2-6 optiClient 130 V4.0, User Manual
Page 26
2install.fm
Nur für den internen Gebrauch
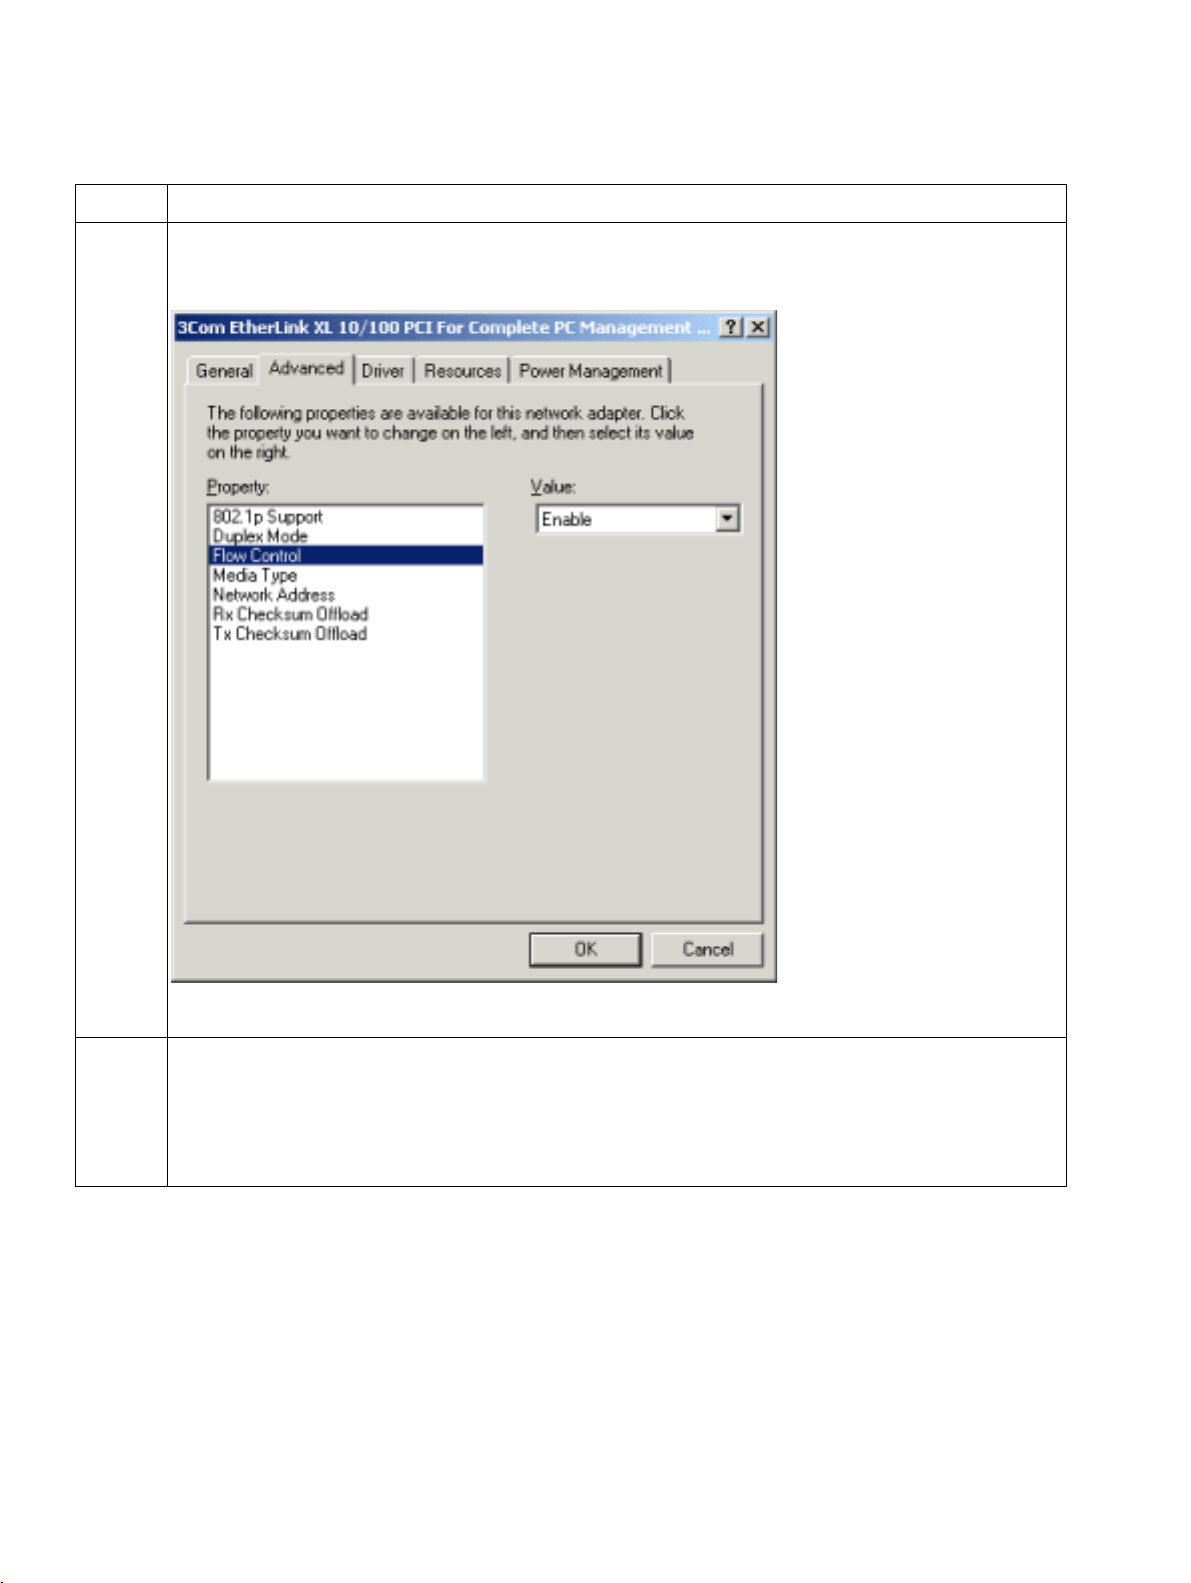
Step Procedure
7Select Enable for the 802.1p Support property:
Display
Installation
Configuring/installing Quality of Service
A31003-G2540-A100-3-76A9, 04/2003
optiClient 130 V4.0, User Manual
2-7
Page 27
2install.fm
Installation Nur für den internen Gebrauch
Configuring/installing Quality of Service
Step Procedure
8Select Enable for Flow Control:
Display
9 ● Click OK to confirm.
● You return to the Local Area Connection Properties dialog as in Step 3, which
you can also exit by clicking OK.
● Finally, close the Network and Dial-up Connections dialog.
This completes the installation/configuration of QoS on the client PC.
A31003-G2540-A100-3-76A9, 04/2003
2-8 optiClient 130 V4.0, User Manual
Page 28
2install.fm
Nur für den internen Gebrauch
Installation
Configuring/installing Quality of Service
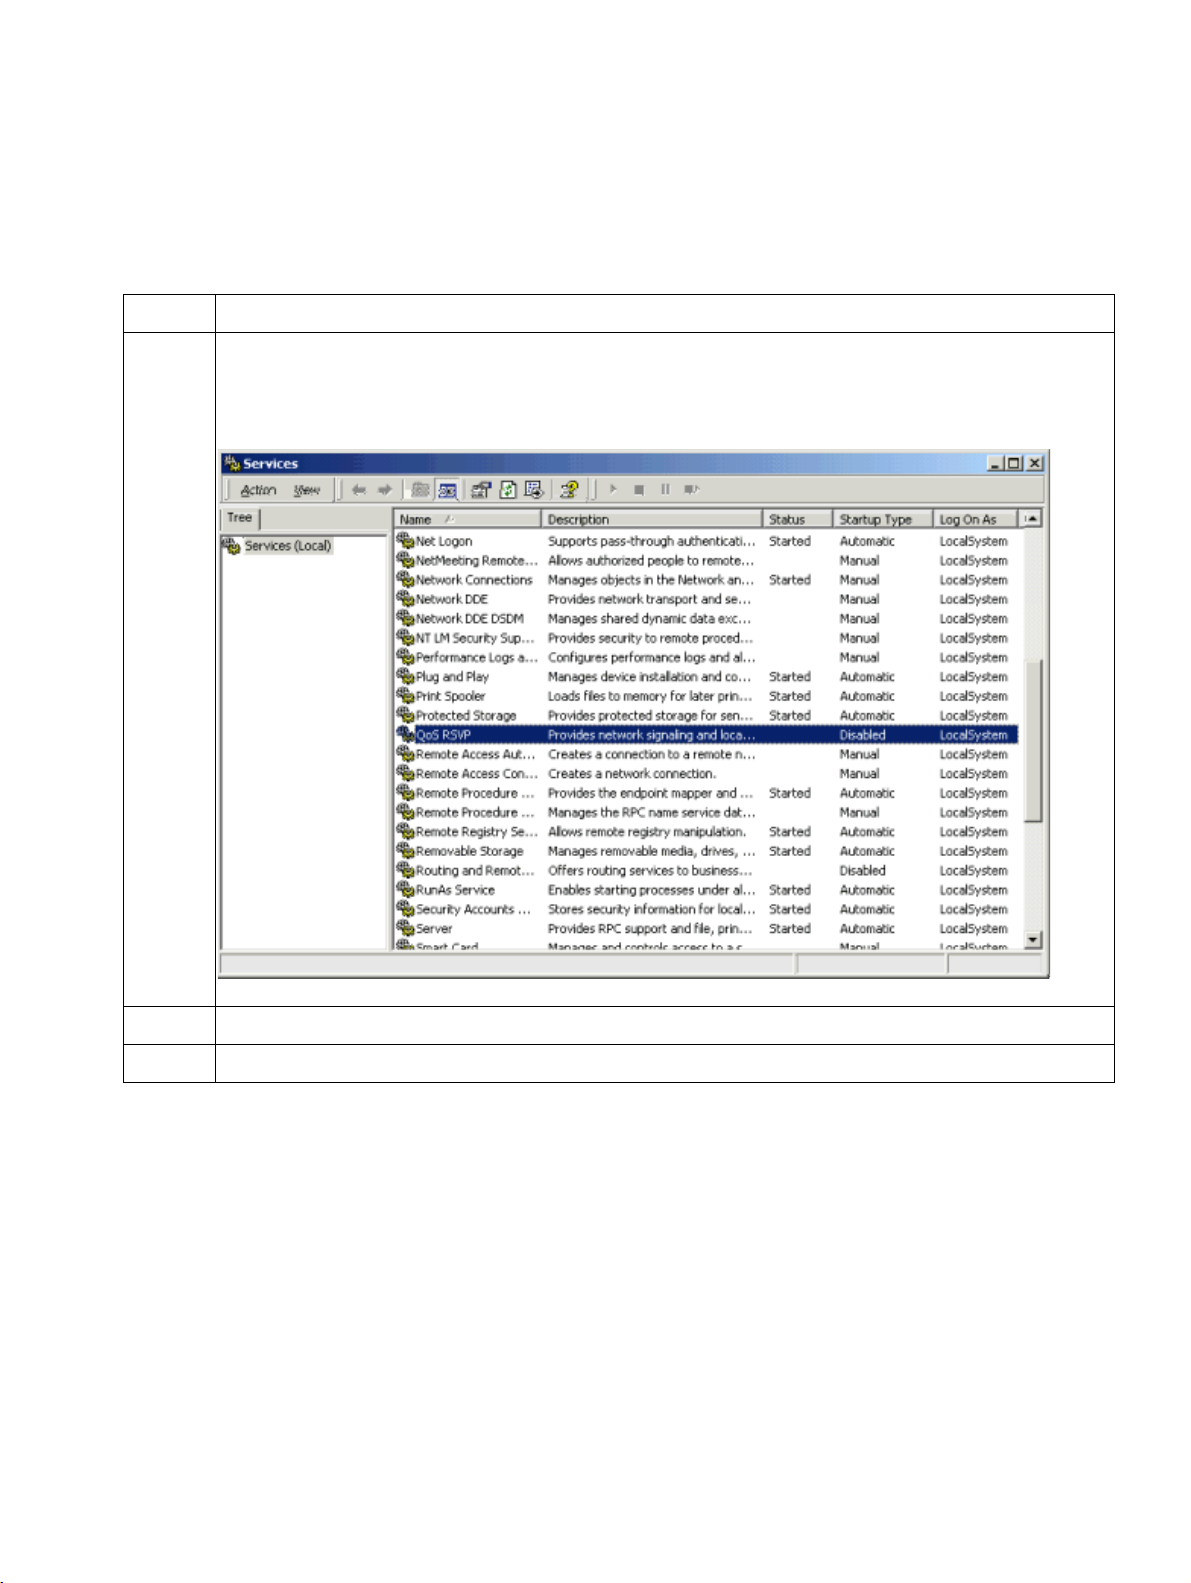
QoS RSVP service deactivation
The service that manages the QoS RSVP (Resource Reservation Protocol) must now be deactivated to ensure that the system runs correctly:
Step Procedure
1 Start the service administration tool in Windows 2000 by selecting
Settings - Control
Panel - Administrative Tools - Services.
Display
2 Open the context menu for the entry QoS RSVP and select Stop.
3 Close the service administration tool.
A31003-G2540-A100-3-76A9, 04/2003
optiClient 130 V4.0, User Manual
2-9
Page 29
2install.fm
Installation Nur für den internen Gebrauch
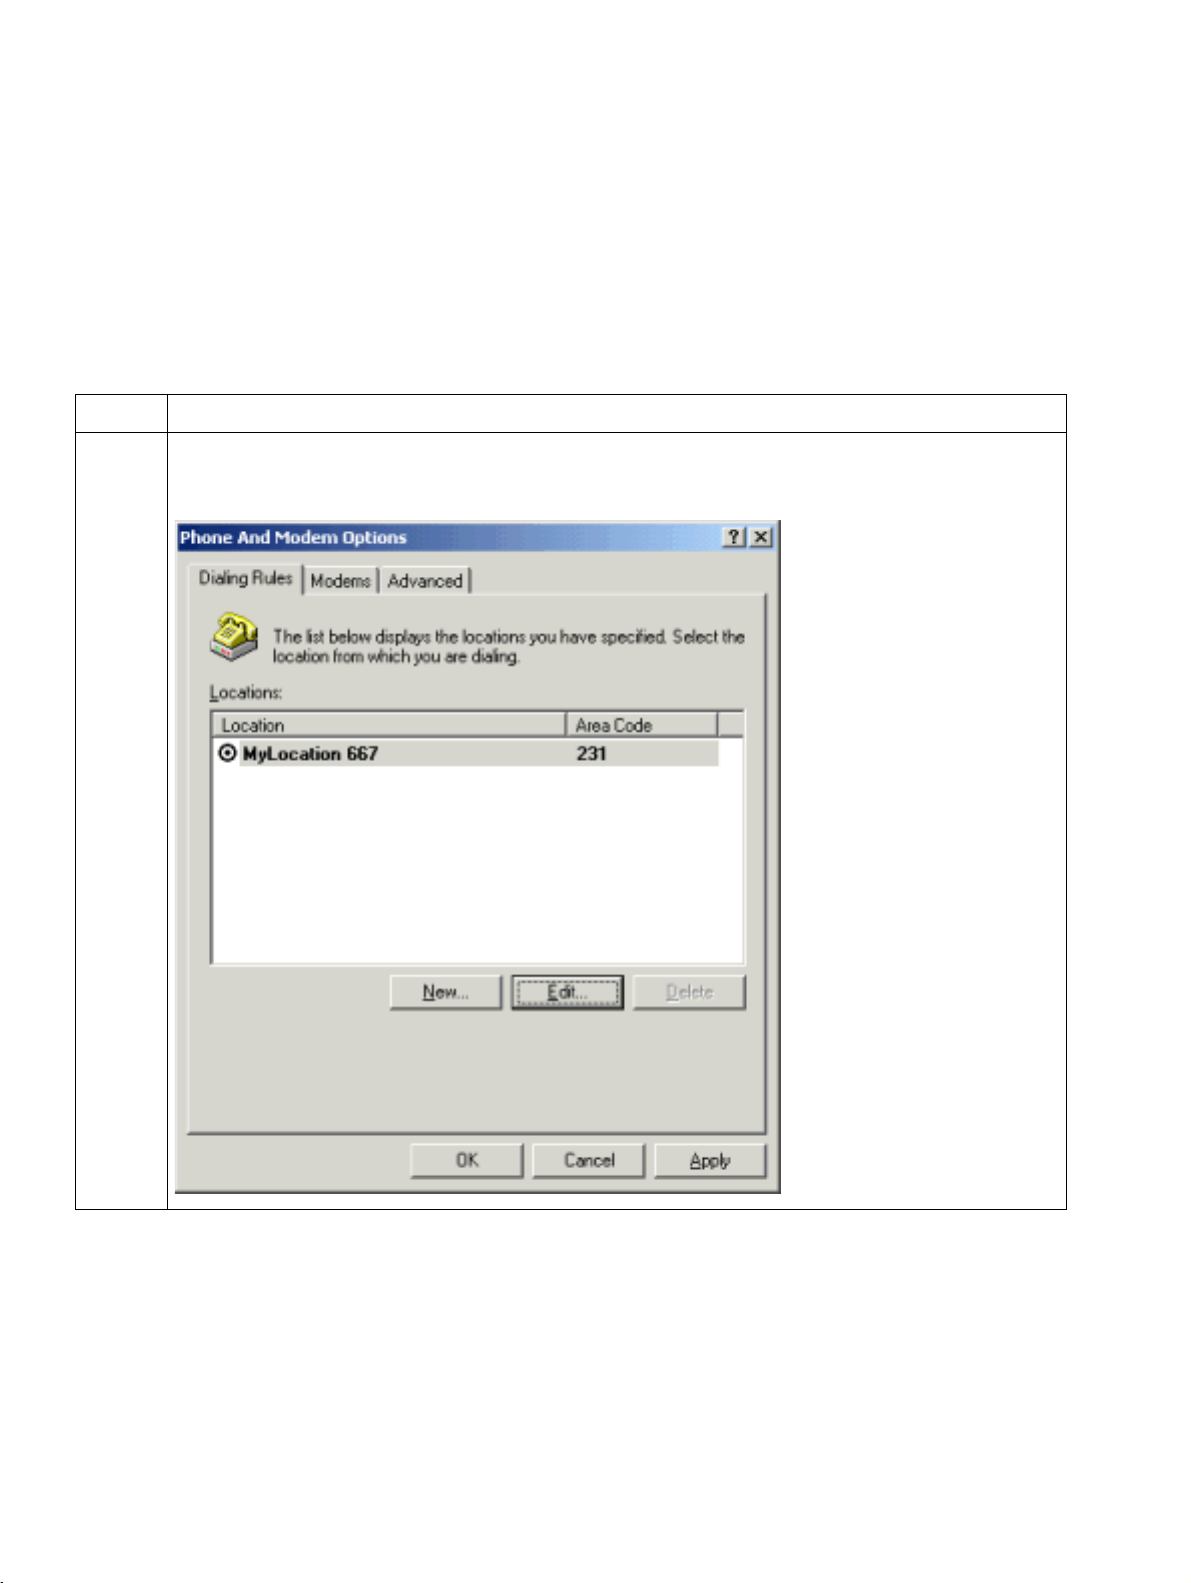
Configuring Location Information
2.3 Configuring Location Information
General Information
In order to run the optiClient 130 correctly, all your personal location information must be entered accurately. If these options are missing or have errors, you will not be able to correctly dial
any entries from the phone book or call lists.
Step Procedure
1 ● Select
Display
Start - Settings - Control Panel - Phone and Modem Options:
A31003-G2540-A100-3-76A9, 04/2003
2-10 optiClient 130 V4.0, User Manual
Page 30

2install.fm
A31003-G2540-A100-3-76A9, 04/2003
optiClient 130 V4.0, User Manual
Page 31

2install.fm
Installation Nur für den internen Gebrauch
optiClient Installation Procedure
2.4 optiClient Installation Procedure
You can install the latest version of the optiClient 130 using the convenient InstallShield installation program.
Step Procedure
1 Insert the installation CD into the CD-ROM drive. The installation program starts au-
tomatically.
If the inserted CD does not start automatically because of the settings in the control
panel, start the installation program under <
2 A browser window appears. Select the optiClient 130 V4 installieren/Install opti-
Client 130 V4 option.
A Welcome dialog appears. Click Next > to confirm.
3 If you accept the conditions of the displayed license agreement, click the corre-
sponding option and continue with Next.
CD-ROM Drive
>:\setup.exe.
4 You are then required to enter the user information (Name/Organization) and the
License key. You find the license key on the back of your CD package.
Activate the required option under This application is installed for.
Then click Continue.
5 Select the language(s) in which the application should be installed in the dialog that
appears. The following languages are available:
● English (will always be installed)
● German
● Dutch
● Italian
● Spanish
● Portuguese
● French
Click Next > to confirm your selection.
6 Select the type of setup for the installation:
● For the complete installation, the optiClient is installed in the default installation
folder C:\Program Files\Siemens\optiClient 130 V4.
● For a custom installation, you can select a different installation folder. Ensure
that an "optiClient 130 V4" subfolder is always created in the selected folder.
Additional optiClient installation folders to which all the necessary files are copied, are created in this folder.
7 A dialog is displayed indicating that you are ready to install. Confirm by clicking In-
stall. The progress of the installation is displayed in a progress bar.
8 After the installation is finished, a corresponding message appears, which you can
confirm by clicking Finish. You return to the Browser window (see step 2) which you
can close by clicking Exit.
A31003-G2540-A100-3-76A9, 04/2003
2-12 optiClient 130 V4.0, User Manual
Page 32

2install.fm
Nur für den internen Gebrauch
Installation
optiClient Installation Procedure
Shortcuts on the Desktop
One desktop icon each is created for optiClient phone, optiClient office, and optiClient easyCom.
If you do not want to keep the desktop shortcuts, you can remove them. The programs are still
available via the Start menu.
A31003-G2540-A100-3-76A9, 04/2003
optiClient 130 V4.0, User Manual
2-13
Page 33

2install.fm
Installation Nur für den internen Gebrauch
optiClient Installation Procedure
A31003-G2540-A100-3-76A9, 04/2003
2-14 optiClient 130 V4.0, User Manual
Page 34

3benkonf.fm
Nur für den internen Gebrauch First Steps and User Configuration
3 First Steps and User Configuration
This section contains the following information:
● General
● Working with the Administration Tool
● Starting the Program
● Logging on
● Logging on with a new telephone number
● Changing the User Password
● Exiting optiClient phone / office / easyCom
A31003-G2540-A100-3-76A9, 04/2003
optiClient 130 V4.0, User Manual
3-1
Page 35

3benkonf.fm
First Steps and User Configuration Nur für den internen Gebrauch
General
3.1 General
Profile File
The optiClient 130 works with a profile file, from which the phone number configuration paramaters needed for proper functionality are read at login. If you log on with a phone number that
is not recognized by the profile file, you can configure the parameters required for it during the
login procedure. On completing the login procedure successfully, the specified information is
automatically entered in the profile file.
Default Settings in the Profile File
In addition to the individual phone number configuration parameters, you can define default parameters to be used when logging in with new phone numbers. The default parameters are configured with the administration tool optiClient Admin and are also saved in the profile file. If no
default parameters are defined, you will need to configure the phone number’s parameters
when you log in with that number for the first time.
Central Access to the Profile File
The profile file is saved on the user’s local PC by default. It could, however, also be saved in a
directory that is accessable to all users. This would enable users to work from any workstation
with the same phone number parameters, which only need to be configured once. The configuration of the profile folder is also handled with the optiClient Admin administration tool.
PC Performance
As well as connection parameters and user parameters, various standard settings, for example,
for PC performance and Client PC QoS (Quality of Service) are performed. These settings will
be performed using the optiClient Admin tool, which is installed on the client PC.
License information
The current license number can be displayed in the optiClient Admin administration tool and
can be updated with a new license number if required.
Personal phone book
The database with the personal telephone directory of a phone number is saved on the user’s
local PC by default. This database could likewise be saved in a directory that is available to all
users, thus enabling them to access their personal phone books from any workstation. The configuration of the database folder is also handled via the optiClient Admin administration tool.
A31003-G2540-A100-3-76A9, 04/2003
3-2 optiClient 130 V4.0, User Manual
Page 36

3benkonf.fm
Nur für den internen Gebrauch
First Steps and User Configuration
Working with the Administration Tool
3.2 Working with the Administration Tool
This section contains the following information:
● Configuring PC settings
● Configuring Setup information (License information)
● Configuring Parameters for PC Performance
● Configuring Parameters for Quality of Service
General
Starting the administration tool is only necessary when
● PC settings, e.g.
– Default settings
– Profile file path
– Personal telephone directory path
● Licence specifications
● Parameters for PC performance
need to changed. The administration tool optiClient Admin is included in the optiClient 130 installation package.
Starting the administration tool:
Start the application optiClientAdmin.exe, which is located in the program directory of the
optiClient 130 (the default directory is
C:\Program Files\Siemens\optiClient 130 V4\Client).
A31003-G2540-A100-3-76A9, 04/2003
optiClient 130 V4.0, User Manual
3-3
Page 37

3benkonf.fm
First Steps and User Configuration Nur für den internen Gebrauch
Working with the Administration Tool
3.2.1 Configuring PC settings
To configure the parameters for the PC settings, proceed as follows:
1. After starting the administration tool, select the PC settings tab.
Display
2. The current folder where the ’local’ profile file is saved is displayed under Profile folder in
the Path field. If the users always work at the same workstation, then it is not necessary to
change the default directory shown in the example. If the users use their phone number on
a number of different workstations, a network directory that is accessible from all workstations must be specified. The profile file is saved in the specified directory under the name
profile.cfg.
3. If users with new phone numbers should be able to change their phone number’s specified
default settings individually, enable the option Allow individual setting changes on this
PC with optiClient 130 V4. If this option is not enabled, the default settings for new phone
numbers are used and cannot be changed by the user under the Option Settings.
A31003-G2540-A100-3-76A9, 04/2003
3-4 optiClient 130 V4.0, User Manual
Page 38

3benkonf.fm
Nur für den internen Gebrauch
First Steps and User Configuration
Working with the Administration Tool
4. To edit the default settings, click on Change default in the profile folder. This opens the
Default values dialog box in which you can configure the following default parameters:
– General parameters (default)
– eee Firctormyl par(metpr)1884(s)587( G)-7.2df(ault))]TJ/F2 1 Tf0 -1.17 TD0.0034 Tc-0.0014 Tw[(The)9.4( p)9.4(a)9.4(r)16.4(am)6.4(ete)9.4(r)-3.6(s )10(to )10(be )10(ent)11.4(er)6.4(ed)9.4( as )10(def)41.4(au)9.4(lt)11.4( v)23.4(a)9.4(l and nera)6eh(er)6.4(d)9.4(ha)2dtThes(a)9.4mhesil andgnecnced a
une endeaewthic23.1hu cndnd (i)5.1nhe A130.1dnncedi
undter6941 Tddd-06(clt)11.4orm pa-06((r)16.4(a-06(mr)6.4(d)9.4t(er)6.4sc)3.4, wl andha-06(il and(c)3.4hu cnd)941 be end)9.4t(er)6.4(d)9.4d (i)541(n)-064(tThe)9.4( )-02 A13041dnnced
ogboxi wioogoing(in)-5g witin numbn
i (i)5-5(al)5.8(d)981gnbdx G69.8(w)5.8thedging(i)5.8(n)9.8((w)5.8(i)5.8lt)3.8(hpa)9.8 pwhnmr
– aa p8069aametersa (teau-lt-
– rel parameters ((f(ault))]TJ/F2 1 Tf0 -1.67 TD0.0034 Tc-0.0014 Tw[(The)9.4( p)9.4(a)9.4(r)16.4(am)6.4(ete)9.4(r)-3.6(s )10(to )10(be )10(ent)11.4(er)6.4(ed)9.4( as )10(def)41.4(au)9.4(lt)11.4( v)23.4(a)9.4(l and nera)6eh(er)6.4(d)9.4(ha)2)9.4 vdtThes(a)9.4mhesil andgnecnced a
o-1884(s)-4.8be nteanswthinthoin-1884(s)-4.8( (pa)85.8lm)25.8(d)85.8go12.2
x G6968(w)5-1hendlwgngn il a61 ther
x G6968(w)5-1hendlwgngn il a61 ther
Un08do102eu01rr71
A31003-G2540-A100-3-76A9, 04/2003
optiClient 130 V4.0, User Manual
3-5
Page 39

3benkonf.fm
First Steps and User Configuration Nur für den internen Gebrauch
Working with the Administration Tool
3.2.2 Configuring Setup information (License information)
To configure Setup information, proceed as follows:
1. If the license must be changed after installation, activate the Setup information tab in the
administration tool.
Display
2. The current License key is read out and displayed from the Windows registry. If a new license is to be entered, enter this in the input field. Click Save to store the new license key
immediately and directly in the Windows registry. You do not have to exit the dialog to do
this. Click Reload to read the license key stored in the Windows registry and to display it
in the input field.
3. Click OK or Cancel to exit the administration tool.
The Save button must always be activated in the dialog to save a new license
>
3-6 optiClient 130 V4.0, User Manual
key.
A31003-G2540-A100-3-76A9, 04/2003
Page 40

3benkonf.fm
Nur für den internen Gebrauch
First Steps and User Configuration
Working with the Administration Tool
3.2.3 Configuring Parameters for PC Performance
To configure PC parameters, proceed as follows:
1. Activate the PC Performance tab in the administration tool:
Display
2. The entries under Global settings for logged on user are global Windows settings which
are valid for users logged on system-wide, i.e. outside optiClient 130 V4.0.
● Specify the Menu show delay in milliseconds. The default value is 400 ms.
● In the timer field below, enter the wait time (in seconds) which should elapse after the
last user input before an application controlled in the foreground is actually brought to
the top. This standard Windows timer is generally only used for applications that do not
by default allow the foreground windows of other applications to run at the same time.
The standard value is 200 s.
● Click Save to store your input immediately and directly in the Windows registry.
● Click Defaults to display Windows default settings. The values are displayed in the in-
put fields.
A31003-G2540-A100-3-76A9, 04/2003
optiClient 130 V4.0, User Manual
3-7
Page 41

3benkonf.fm
First Steps and User Configuration Nur für den internen Gebrauch
Working with the Administration Tool
3. Click OK or Cancel to exit the administration tool.
Press Save each time to store your input in the dialog.
>
A31003-G2540-A100-3-76A9, 04/2003
3-8 optiClient 130 V4.0, User Manual
Page 42

3benkonf.fm
Nur für den internen Gebrauch
First Steps and User Configuration
Working with the Administration Tool
3.2.4 Configuring Parameters for Quality of Service
Proceed as follows to configure parameters for Quality of Service:
1. Activate the Quality of Service tab in the Administration Tool.
Display
2. Enter the global Windows settings for the current PC under Global settings for this PC.
● Use the Enable QoS under Windows 2000 option to activate or deactivate the option to
use Quality of Service (QoS) under Windows 2000. This option must be activated for optimized voice quality which is also primarily dependent on the infrastructure in the network
(see also section Configuring/installing Quality of Service).
This option is irrelevant for operation under Windows XP because QoS is always available
under Windows XP.
● Click Defaults to display the default values for HiPath networks. The values are displayed
in the input fields.
● Click Save to save your entries immediately and directly to the Windows registry.
A31003-G2540-A100-3-76A9, 04/2003
optiClient 130 V4.0, User Manual
3-9
Page 43

3benkonf.fm
First Steps and User Configuration Nur für den internen Gebrauch
Working with the Administration Tool
Layer 2: User Priority acc. to IEEE802.1p
The values are entered in the three bits of the IEEE802.1p field for the "Call Signalling"
and "Voice Payload" traffic types.
Layer 3: Priority classes (Codepoint acc. to DiffServ)
The values are entered in the six bits of the DiffServ Codepoint (DSCP) field in the
Type of Service (TOS) byte for the "Call Signalling" and "Voice Payload" traffic types.
3. Under Settings for optiClient 130, activate or deactivate if optiClient data is intended for
the "Call Signalling" and "Voice Payload" traffic types on the respective layer (Mark Layer
2 packages/Mark Layer 3 packages) with the values set above.
4. Click OK to quit the Administration Tool.
You must always activate the Save button to save your entries in the dialog.
>
A31003-G2540-A100-3-76A9, 04/2003
3-10 optiClient 130 V4.0, User Manual
Page 44

3benkonf.fm
Nur für den internen Gebrauch
First Steps and User Configuration
Starting the Program
3.3 Starting the Program
General
Following the installation, three versions of the optiClient 130 with three different user interfaces
are available. If you are logging on with a phone number for the first time, either the default settings will be used (if configured), or you must supply the necessary information after the program starts. In addition to these settings there are also additional workstation-specific settings,
which can be configured later (see section Option Settings for the optiClient phone or Option
Settings for the optiClient office).
Starting the Program
You can start the program by:
● double-clicking one of the shortcuts on the desktop
● selecting
tiClient easyCom
Start - Programs - optiClient 130 V4 - optiClient office or optiClient phone or op-
A31003-G2540-A100-3-76A9, 04/2003
optiClient 130 V4.0, User Manual
3-11
Page 45

3benkonf.fm
First Steps and User Configuration Nur für den internen Gebrauch
Logging on
3.4 Logging on
On starting the program, the appropriate configuration data is loaded, and you are presented
with the logon dialog:
When logging on, enter the following data:
Parameter Meaning
Call number Client telephone number
Password Appropriate password
Language Select the language for the optiClient 130 user interface. Chose
from the languages installed.
Remote Access This option must be activated when Remote Access.
The telephone number and the Password are assigned by a systems engineer when
>
> Confirm your entries with OK.
configuring HiPath 3000/5000 V4.0.
The Remote Access option must only be activated if optiClient is logged onto a
HG1500.
When the optiClient 130 is started for a phone number that is already known, the parameters saved for that phone number are read in from the profile file. When starting with a
phone number that is unknown, either the default settings in the profile file are used (if
available), or the settings must be configured immediately at logon by clicking on the Ad-
vanced button (see also the section on Extended Options parameters for details).
A31003-G2540-A100-3-76A9, 04/2003
3-12 optiClient 130 V4.0, User Manual
Page 46

3benkonf.fm
Nur für den internen Gebrauch
First Steps and User Configuration
Logging on
3.4.1 Logging on with a new telephone number
When a user logs on with a new phone number without existing default values for the first time,
the individual user and connection parameters for that number are not yet known. Consequently, after the logon, a corresponding message is displayed to indicate that the system settings
could not be found. You now have the following options:
Display
> If the IP address of the system at which the phone number is configured is known, select
the option HiPath HG 1500 IP Address and enter the IP address of the HG 1500 of that
system in the input field.
> If a profile file containing the required connection and user parameters already exists,
select the option Configuration File and enter the full path name of that file directly in the
input field or click the Browse button ( ... ) and specify the appropriate folder / file name.
> Click OK to confirm your selection. The logon is executed, and a connection to the system
is established.
Following a successful logon, the appropriate parameters for the phone number are copied to
the (locally) saved profile file.
A sample configuration file can be found in the folder \misc\profile on the Instal-
>
lation CD.
3.4.2 Extended Options parameters
Instead of loading the user parameters when you log on (for the first time), they can also be
entered by clicking on Advanced in the logon dialog:
A31003-G2540-A100-3-76A9, 04/2003
optiClient 130 V4.0, User Manual
3-13
Page 47

3benkonf.fm
First Steps and User Configuration Nur für den internen Gebrauch
Logging on
– General parameters
– Audio parameters
– Telephone Directory parameters
– Update parameters
– Server parameters
3.4.2.1 General parameters
1. Select the General tab in the extended options dialog.
Display (example for optiClient office)
Enter the following parameters:
Parameters Meaning
Enable voice compression during local operation
These options reduce the data volume and thus the bandwidth
requirement on the line. They are automatically activated if the
teleworking option was activated when logging on to the system.
Suppress periodic control message during local operation
A31003-G2540-A100-3-76A9, 04/2003
3-14 optiClient 130 V4.0, User Manual
Page 48

3benkonf.fm
Nur für den internen Gebrauch
Support system feature
"automatic line seizure"
In addition to lowering data volumes/bandwidth requirement across the line, ac-
>
tivated voice compression reduces voice transmission quality.
This option must only be activated if optiClient is logged onto a HG1500.
First Steps and User Configuration
Logging on
If the parameter Support system feature "automatic line sei-
zure" was activated on the connected system, this parameter
must be activated in optiClient office. This causes optiClient office to behave as a normal telephone, i.e., the trunk access number must be dialed for external numbers, and internal stations
can be reached directly.
The behavior of the optiClient phone is analogous to that of the
system. The parameter Support system feature "automatic
line seizure" need not be explicitly selected in the optiClient
phone, since the optiClient phone behaves like an optiPoint terminal, which means that no trunk access code must be dialed for
external numbers. Internal stations can be reached via the automatically generated internal key.
To check whether the network path and/or the communication server (HG1500)
>
2. You can now configure further parameters or click OK. This returns you to the Logon
dialog.
is available, optiClient sends a control message every minute to which the communication server must respond. If this response message fails to appear, optiClient displays an advisory message and the display information is deleted.
Every five minutes, optiClient tries to determine whether the network path and/
or communication server is available again by sending control messages. Once
a response is received, the optiClient automatically logs on to the communication server again.
A31003-G2540-A100-3-76A9, 04/2003
optiClient 130 V4.0, User Manual
3-15
Page 49

3benkonf.fm
First Steps and User Configuration Nur für den internen Gebrauch
Logging on
3.4.2.2 Audio parameters
1. Switch to the Audio tab in the extended options dialog.
Display
2. Enter the following parameters:
Parameters Meaning
Handset Under Handset select the handset for the optiClient. All devices/
drivers installed are offered in the drop-down list.
Mixer Components located on the PC/sound card for the Mixer.
If this designation is identical to the designation of the Audio
playback and Audio recording components, you must only carry
out the selection here. The designation will be automatically assigned to the other components.
If the names for Mixer, Audio playback, and Audio recording are
not identical, they must be selected individually. Please ensure
that components from the same sound card are selected.
Audio playback Components located on the PC/sound card for the Audio play-
back. Ensure you enter a component from the same sound card
in all three fields.
Audio recording Components located on the PC/sound card for recording. En-
sure you enter a component from the same sound card in all
three fields.
A31003-G2540-A100-3-76A9, 04/2003
3-16 optiClient 130 V4.0, User Manual
Page 50

3benkonf.fm
Nur für den internen Gebrauch
Parameters Meaning
Play back sounds only
via PC speaker (not via
sound card)
Play back sounds via
sound card and PC
speaker
To ensure proper functionality, it is important to note that if you are using the op-
>
tiPoint handset, you should select USB Audio Device as sound card compo-
nents for Mixer, Audio playback, and Audio recording.
First Steps and User Configuration
Logging on
If the option is activated, sounds are output only via the PC
speaker.
If this option is activated on a PC running under Windows 98SE,
sounds are not signalled by a modulated tone but, depending on
the operating system, by a default system beep.
This option can only be activated if the option Play back sounds
via PC speaker is not activated.
When this option is activated, all sounds (e.g. alert characters for
inbound calls) are played back via the sound card and the PC
speaker. Tones, e.g. busy signals, are only played back via the
sound card.
Activating the options under Sounds is only useful if the PC has an internal
>
3. You can now configure further parameters or click on OK. This returns you to the Logon
dialog.
speaker available.
A31003-G2540-A100-3-76A9, 04/2003
optiClient 130 V4.0, User Manual
3-17
Page 51

3benkonf.fm
First Steps and User Configuration Nur für den internen Gebrauch
Logging on
3.4.2.3 Telephone Directory parameters
1. Switch to the Telephone directory tab in the extended options dialog.
Display
2. The parameters correspond to those which can also be used when setting the options in
the optiClient (see Option Settings for the optiClient phone and Option Settings for the optiClient office).
3. You can now configure further parameters or click on OK. This returns you to the Logon
dialog.
A31003-G2540-A100-3-76A9, 04/2003
3-18 optiClient 130 V4.0, User Manual
Page 52

3benkonf.fm
Nur für den internen Gebrauch
3.4.2.4 Update parameters
1. Switch to the Update tab in the extended options dialog.
Display
First Steps and User Configuration
Logging on
2. You can activate the Update Server here and specify the folder in which software updates
are made available under the field Server share name on which update versions are
stored. Whenever optiClient is started, this folder will then be checked to determine whether a new software update exists.
3. If the parameter Search periodically for an updated version on the server is activated,
the check for new software updates will also be performed when the system is running.
4. You can now configure further parameters or click on OK. This returns you to the Logon
dialog.
The set Update folder corresponds to the setup folder on the Installation CD (and
>
not the root folder on the CD).
A31003-G2540-A100-3-76A9, 04/2003
optiClient 130 V4.0, User Manual
3-19
Page 53

3benkonf.fm
First Steps and User Configuration Nur für den internen Gebrauch
Logging on
3.4.2.5 Server parameters
1. Switch to the Server tab in the extended options dialog.
Display
2. Enter the following parameters:
Parameter Meaning
IP address IP address of the HG1500 where the user number is configured.
3. You can now configure further parameters or click on OK. This returns you to the Logon
dialog.
A31003-G2540-A100-3-76A9, 04/2003
3-20 optiClient 130 V4.0, User Manual
Page 54

3benkonf.fm
Nur für den internen Gebrauch
First Steps and User Configuration
Changing the User Password
3.5 Changing the User Password
Every HiPath 3000 user can change his/her login password for the optiClient as follows:
1. Click on the menu key in optiClient phone or open the context menu in optiClient office.
2. Then select Change password.
3. Enter the old and the new password in the ensuing dialog. Enter the new password again
to confirm it.
If the old password is correct and the two new password entries are identical, the changes
take effect immediately. In other words, if a client with the same extension were to log on
from a teleworking station after the password has been changed, for example, the new
password would apply.
A31003-G2540-A100-3-76A9, 04/2003
optiClient 130 V4.0, User Manual
3-21
Page 55

3benkonf.fm
First Steps and User Configuration Nur für den internen Gebrauch
Exiting optiClient phone / office / easyCom
3.6 Exiting optiClient phone / office / easyCom
● You can exit optiClient office by clicking on the menu bar and selecting the Exit command
from the menu.
● You can exit optiClient phone and optiClient easyCom as usual in Windows by clicking
the Close button in the upper right corner of the user interface.
A note appears while the optiClient phone / office / easyCom is closing.
A31003-G2540-A100-3-76A9, 04/2003
3-22 optiClient 130 V4.0, User Manual
Page 56

4bof.fm
Nur für den internen Gebrauch optiClient phone User Interface
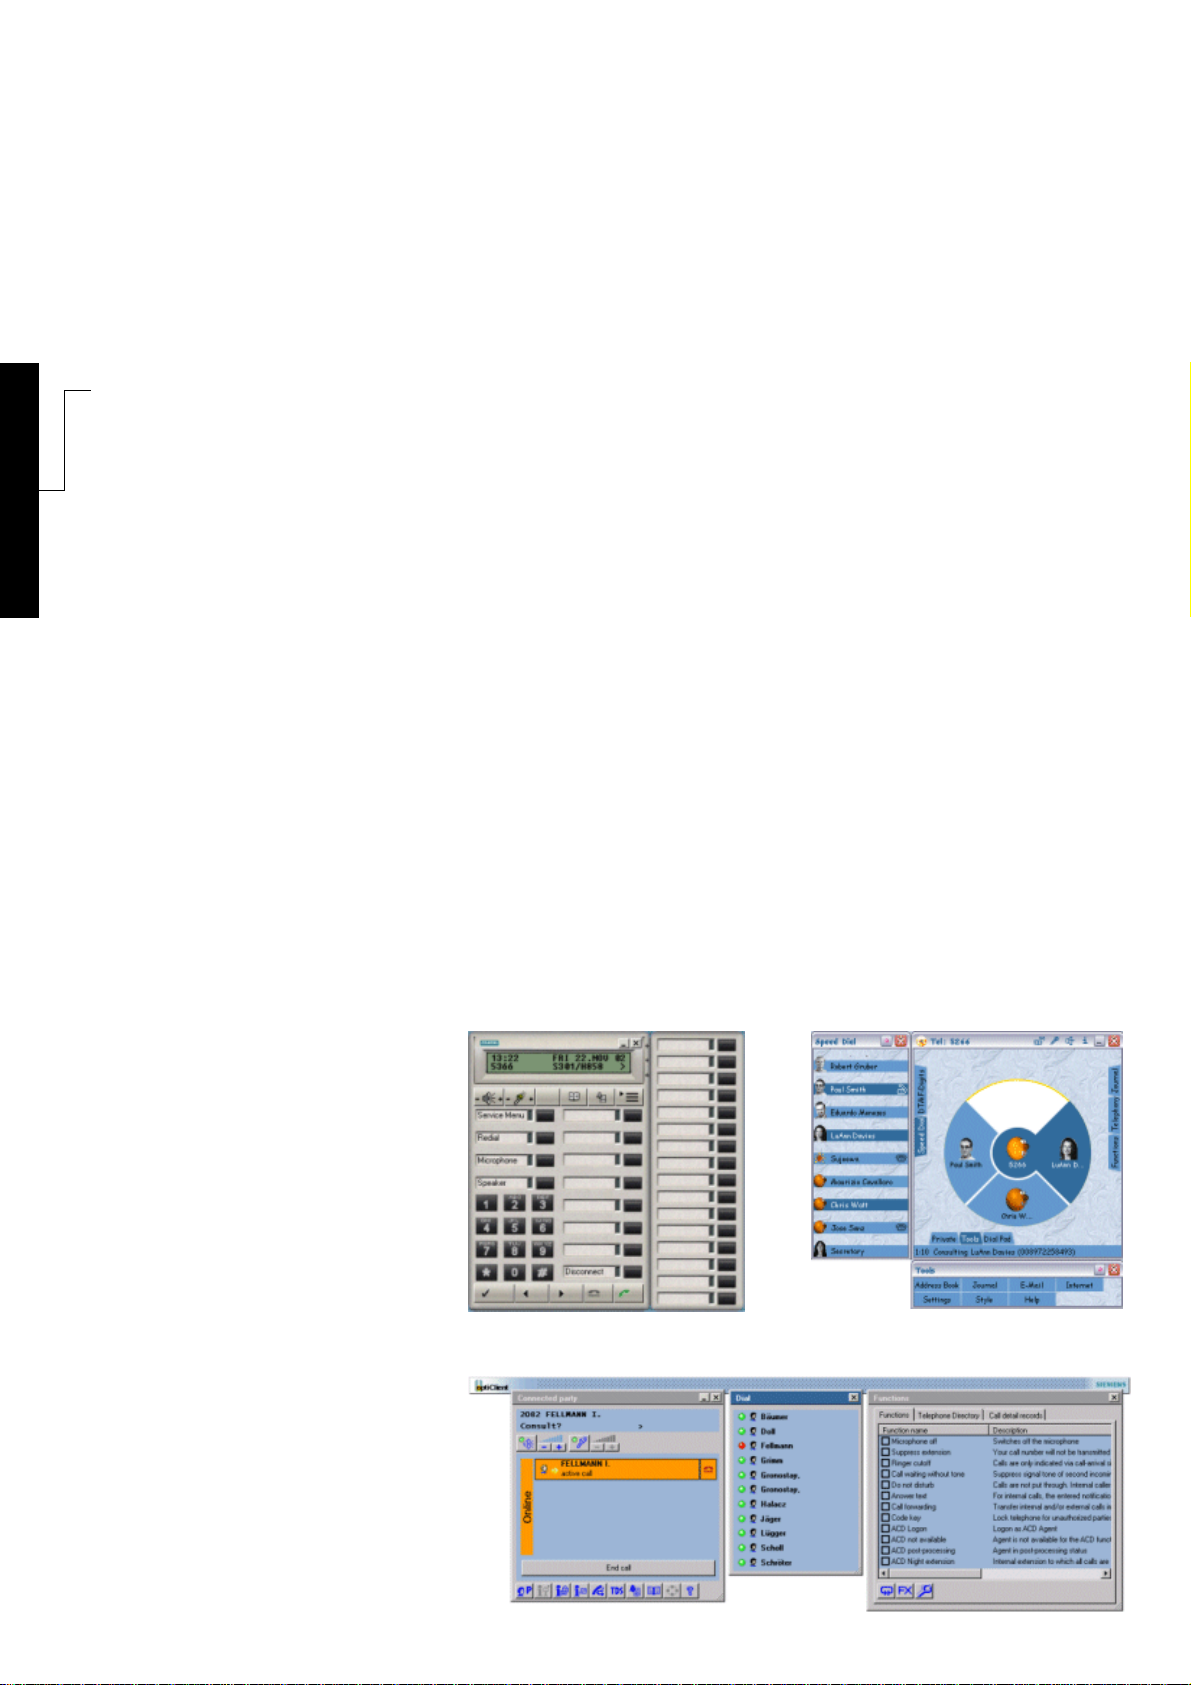
4 optiClient phone User Interface
● The optiClient phone user interface simulates the optiPoint advance plus phone and gen-
erally functions in the same way as such a telephone. Consequently, only the PC-specific
operations and features are described in this document.
This section contains the following information:
– Layout of the optiClient phone User Interface
– General Operation
– Information on the optiClient phone
– Manual Update Check for the optiClient phone
– Option Settings for the optiClient phone
– View Settings for the optiClient phone
– Online Help
It is not possible to use different user interfaces simultaneously!
>
A31003-G2540-A100-3-76A9, 04/2003
optiClient 130 V4.0, User Manual
4-1
Page 57

4bof.fm
optiClient phone User Interface Nur für den internen Gebrauch
Layout of the optiClient phone User Interface
4.1 Layout of the optiClient phone User Interface
Minimize optiClient phone window
Display
Phone book key
Loudspeaker key
Microphon key
Headset key
Fixed
function keys
Keypad
Confirm function
optiClient phone
Close window
Key module
(De-)Activate
Call list key
Menu key
Programmable
function keys
Browse functions
Accept a call (Answer)
Terminating Calls (Ending
Calls)
Overview of the optiClient phone user interface elements:
Element Meaning
Minimize window Minimize optiClient
Close window Exit optiClient phone
Display When the system is idle, the date, time, and personal telephone
number are displayed. When functions are activated, functionspecific information is displayed here.
Activate/deactivate key
Open/close the configured key module, see Key Modules.
module
Speaker key Speaker volume control
Microphone key Microphone volume control
Headset key Activate/deactivate the headset (if it is available).
A31003-G2540-A100-3-76A9, 04/2003
4-2 optiClient 130 V4.0, User Manual
Page 58

4bof.fm
Nur für den internen Gebrauch
optiClient phone User Interface
Layout of the optiClient phone User Interface
Element Meaning
Phone book key Opens the phone book manager, see Electronic Telephone Direc-
tory.
Call list key Opens the call list manager, see Call List Management.
Menu key Opens the optiClient phone menu.
Function key 1 Preset with "Service Menu"
Function key 2 Preset with "Redial"
Function key 3 Preset with "Microphone" or changes to "internal" in the case of
automatic line seizure.
Function key 4 Preset with "Speaker"
The first time you log in with a new telephone number, the text of the function keys
>
is preset and stored as it was set when the system was logged into. When logging
in with the same telephone number and with other languages, text is not reloaded.
Changes, for example, in text in a different language are then only manually possible.
Elements of the user interface that are not covered here, e.g., digits or function keys, correspond to those from the optiPoint and can be looked up in its operating instructions.
Minimizing / Restoring optiClient phone as an icon in the Taskbar
If you temporarily do not need the user interface of the optiClient phone, you can reduce the
program to an icon in the system tray of the taskbar (next to the time/date display):
● You can minimize the optiClient phone by choosing the Minimize command from the sys-
tem menu.
optiClient phone in the system tray of the taskbar
To restore the optiClient phone user interface double-click the optiClient icon in the system tray
or its button on the taskbar.
A31003-G2540-A100-3-76A9, 04/2003
optiClient 130 V4.0, User Manual
4-3
Page 59

4bof.fm
optiClient phone User Interface Nur für den internen Gebrauch
General Operation
4.2 General Operation
General Information
● To press a button in the optiClient phone user interface, simply click the key with your
mouse.
● Generally, input is possible through the keys in the optiClient phone user interface and
the PC keyboard.
● The function of the Minimize and Close buttons in the upper section of the user interface
correspond with the Windows standard.
● You can move phone numbers from other applications to the display window of the optiCli-
ent phone by using a drag and drop operation (see also Extended Dialing Functions Using
Drag & Drop).
● The optiClient phone user interface can be moved around the desktop like a normal win-
dow.
This section contains the following information:
– Using the PC keyboard
– Setting the speaker and microphone volume
– Headset
– Telephone Directory Management
– Call lists
–Key Modules
– Key Captions
– Accepting / Terminating a Call
A31003-G2540-A100-3-76A9, 04/2003
4-4 optiClient 130 V4.0, User Manual
Page 60

4bof.fm
Nur für den internen Gebrauch
optiClient phone User Interface
4.2.1 Using the PC keyboard
The following applies when using optiClient with the PC keyboard:
Procedure Key/key combination
Accept call s
End call (hang up) _
Scroll functions X or Z
Confirm function =
Volume control + or - on the dial pad
Dial directly from the clipboard; a dial prefix is not
added to the clipboard contents.
Dial directly from the clipboard; the dial prefix set
for the location is automatically inserted first (see
also Configuring Location Information).
< + +
Ì + v
General Operation
4.2.2 Setting the speaker and microphone volume
Setting the speaker volume
Key Procedure
The speaker key is used for speaker volume control.
You can change the speaker volume during an active call by clicking on the "+" or "-"
symbol, respectively. The optiClient phone changes the volume accordingly and also
shows the setting in the display.
Setting the microphone volume
Key Procedure
The speaker key is used for microphone volume control.
You can change the microphone volume during an active call by clicking on the "+" or
"-" symbol, respectively. The optiClient phone changes the volume accordingly and
also shows the setting in the display.
A31003-G2540-A100-3-76A9, 04/2003
optiClient 130 V4.0, User Manual
4-5
Page 61

4bof.fm
optiClient phone User Interface Nur für den internen Gebrauch
General Operation
4.2.3 Special Tone Settings
Besides the speaker and microphone volumes, you can also change the "ring volume", "ring
tone" and the "attention ring volume". You can make these settings when you are not conducting a call.
Key Procedure
Click on the "+" or "-" symbol of the speaker key.The following appears on
the display:
Telephone Settings
Ring volume?
You can use the arrow keys that appear in the display to scroll between the
tone settings for the ring volume, ring tone or the attention ring
volume. To confirm your selection, click the confirmation key (check mark)
in the display
You can then click on the "+" or "-" symbol of the speaker key again to
change the corresponding setting. The current setting is saved on clicking
the confirmation key.
4.2.4 Headset
Activating / Deactivating the headset
Key Procedure
Click on the headset key to activate/deactivate a headset. The headset key informs
you whether the headset is active (connector closed) or inactive (connector open).
If no headset has been configured for use with the optiClient, the headset key will
>
not appear.
A31003-G2540-A100-3-76A9, 04/2003
4-6 optiClient 130 V4.0, User Manual
Page 62

4bof.fm
Nur für den internen Gebrauch
4.2.5 Telephone Directory Management
Opening Telephone Directory Management
Key Procedure
To open telephone directory management, click on the Phone Book key.
A detailed description of telephone directory management can be found in the section Electronic Telephone Directory.
4.2.6 Call lists
Opening Call List Management
Key Procedure
optiClient phone User Interface
General Operation
To open call list management, click on the Call List key.
The following call lists are managed by the optiClient:
● Lost calls
● Received calls
● Extensions not reached
● Extensions reached
● Conducted calls
A detailed description of phone book management can be found in the Call List Management
section.
A31003-G2540-A100-3-76A9, 04/2003
optiClient 130 V4.0, User Manual
4-7
Page 63

4bof.fm
optiClient phone User Interface Nur für den internen Gebrauch
General Operation
4.2.7 Key Modules
As with the optiphone, 1 to 4 key modules, each with 16 freely-programmable keys, can be added to the basic module of the optiClient phone.
● To open the key module click on
the Activate button:
● To close the key module click on
the Activate button again:
>
The maximum number of key modules possible per user can be set up in the user
configuration. HiPath 3750 and HiPath 3550 allow100 key modules per system; HiPath 3350 / HiPath 3250 / HiPath 3150 allow 30 key modules per system. The key
modules of the optiClient phone are counted as key module extensions for the optiPoint.
A31003-G2540-A100-3-76A9, 04/2003
4-8 optiClient 130 V4.0, User Manual
Page 64

4bof.fm
Nur für den internen Gebrauch
optiClient phone User Interface
General Operation
4.2.8 Key Captions
You can label the keys in the main module and in all key modules in any way you want:
Step Procedure
1 Double-click the caption field on the key.
● In the dialog that appears, you will see the current caption for the key and a sec-
ond field, in which you can enter the desired (new) caption.
2 Click OK to confirm.
● The key caption on the third preprogrammed function key is labelled Micro-
>
phone on/off.
● If automatic line seizure is configured, the "Initiate Internal Call" function is pro-
grammed on this key. In this case, you need to manually change the key caption
to Internal Calls.
● When programming keys that are initiated with *91 by default, the correspond-
ing phone number / key function entry appears in a line of the display. You can
apply the text in the display to the key caption. To do this, open the context menu
for the key that you wish to add a caption to and select Captions from 1st dis-
play line.
● In the case of a phone number entry, only the phone number will be applied as
a caption by default. If you wish to assign the displayed name as a caption instead of the phone number, hold down the < key during the operation.
4.2.9 Accepting / Terminating a Call
Key Description
To answer a call, click the Accept a call key or the s key on the PC keyboard.
To terminate a call, click the End Call key or the _ key on the PC keyboard.
A31003-G2540-A100-3-76A9, 04/2003
optiClient 130 V4.0, User Manual
4-9
Page 65

4bof.fm
optiClient phone User Interface Nur für den internen Gebrauch
Information on the optiClient phone
4.3 Information on the optiClient phone
You can obtain further information regarding version, copyright, connected hardware, personal
phone number, etc. in the following manner:
Step Procedure
1 Click the menu key. The optiClient phone menu appears.
2 Select Information...
● The Info dialog appears:
A31003-G2540-A100-3-76A9, 04/2003
4-10 optiClient 130 V4.0, User Manual
Page 66

4bof.fm
Nur für den internen Gebrauch
optiClient phone User Interface
Manual Update Check for the optiClient phone
4.4 Manual Update Check for the optiClient phone
In addition to the automatic update function, which checks for new update versions of the optiClient 130 about every 15 minutes, the optiClient 130 can also be updated manually.
Step Procedure
1 Click the menu key.
● The optiClient phone menu appears.
2 Select Update...
● The optiClient 130 checks if a new version of the program is available on the
update server for installation.
No new program version available...
3 ● If no new program version is available on the update server, a corresponding
message appears. If no update server has been configured, an error message
appears. The update server is set up in the user configuration.
New program version available...
3 ● If a new program version is available on the update server, the following dialog
appears:
4 Choose one of the available options:
● On immediate installation, the optiClient is first closed, and the update version
is then installed. The optiClient phone must then be restarted manually.
● If you delay the update until the next logon, the periodic update will be deferred
to the next time you log on and will no longer performed during the current session.
● If you choose the final option, the update version will not be installed. The peri-
odic update check, if configured, is deactivated.
A31003-G2540-A100-3-76A9, 04/2003
optiClient 130 V4.0, User Manual
4-11
Page 67

4bof.fm
optiClient phone User Interface Nur für den internen Gebrauch
Manual Update Check for the optiClient phone
Step Procedure
5 If you select Cancel, the update version will not be installed. The current settings for
periodic update checks remain unchanged.
After setting up the desired options, confirm your selection with OK.
Local administration rights are required for manual (or automatic) optiClient update.
>
A31003-G2540-A100-3-76A9, 04/2003
4-12 optiClient 130 V4.0, User Manual
Page 68

4bof.fm
Nur für den internen Gebrauch
optiClient phone User Interface
Option Settings for the optiClient phone
4.5 Option Settings for the optiClient phone
General Information
To ensure proper functionality of the optiClient 130, you need to configure various user-specific
parameters.
Step Procedure
1 Click the menu key.
● The optiClient phone menu appears.
2 Select Options...
● The Options dialog appears.
You may configure the following parameters:
– General Options
– Display Options
– Telephone Directory Options
– Telephony Options
A31003-G2540-A100-3-76A9, 04/2003
optiClient 130 V4.0, User Manual
4-13
Page 69

4bof.fm
optiClient phone User Interface Nur für den internen Gebrauch
Option Settings for the optiClient phone
4.5.1 General Options
Set the maximum number of key modules possible for the current user in the General tab. Ac-
ceptable entries are from 0 to 4.
Display
The maximum possible number of key modules depends on the connected
>
>
The parameters in other tabs can now be changed. To save the settings and to exit the dialog
click on OK.
HiPath system (see also section General Operation). If the logged-on user has already opened the maximum number of key modules, they cannot activate any more;
the key modules are inactive (gray) even if the individually-configured maximum
number for the user has not yet been reached.
After the number of user key modules has been reduced, the modules already used
once can be completely removed only in HiPath 3000 Manager E.
A31003-G2540-A100-3-76A9, 04/2003
4-14 optiClient 130 V4.0, User Manual
Page 70

4bof.fm
Nur für den internen Gebrauch
Option Settings for the optiClient phone
optiClient phone User Interface
4.5.2 Display Options
Under the Display mode tab you can activate/deactivate the following options:
Display
> Phone always on top
The optiClient phone user interface always remains in the foreground.
> Move phone to top on incoming call
If the user interface is not set up to always be on top (i.e. in the foreground), you can
configure the user interface here to have it brought to the foreground on receiving incoming
calls.
The option to move the optiClient phone to the top under Windows 98SE / 2000 / XP
>
> Maximize phone on incoming call
> Hide phone on minimized status
depends on the currently running application, which may prevent this from occurring
(see also information on setting PC parameters in the section Working with the Administration Tool).
If this option is enabled, the user interface is restored from its minimised state on the
taskbar and displayed in the foreground on receiving an incoming call.
The optiClient phone is always reduced to the system tray; it can also be reduced to the
taskbar if the corresponding option is enabled.
Key modules that are detached from the user interface are not minimized
>
A31003-G2540-A100-3-76A9, 04/2003
optiClient 130 V4.0, User Manual
4-15
Page 71

4bof.fm
optiClient phone User Interface Nur für den internen Gebrauch
Option Settings for the optiClient phone
> Minimize phone after a period of time
Activate this option if the user interface should be minimized after a specified amount of
time. This should be entered as a number of minutes. Use the Hide phone on minimized
status option to decide whether the user interface is to be minimised in the system tray or
on the taskbar.
The parameters in other tabs can now be changed. To save the settings and to exit the dialog
click on OK.
A31003-G2540-A100-3-76A9, 04/2003
4-16 optiClient 130 V4.0, User Manual
Page 72

4bof.fm
Nur für den internen Gebrauch
optiClient phone User Interface
Option Settings for the optiClient phone
4.5.3 Telephone Directory Options
Under the Telephone directory tab you can edit the following parameters:
Display
> If you are working with a telephone directory server (LDAP), activate this option. Then enter
the IP address or Name of the LDAP server.
> In order to access and display the desired LDAP entries in optiClient, a number of settings
need to be made. To do this, click on LDAP extensions (see also the section on Telephone
Directory Options - LDAP Settings).
If no LDAP telephone directory server is available, users can only use their personal phone
books.
> The parameters in other tabs can now be changed. To save the settings and to exit the
dialog, click on OK.
4.5.3.1 Telephone Directory Options - LDAP Settings
Apart from the name and IP address of the LDAP server, you will also need to configure some
parameters for Extended LDAP Settings if a central LDAP directory is to be used in the optiClient phone.
> To configure these settings, select the Telephone dir. tab in the Options dialog (see also
Option Settings for the optiClient phone) and then click on the LDAP extensions button.
A dialog box to configure the LDAP settings appears.
A31003-G2540-A100-3-76A9, 04/2003
optiClient 130 V4.0, User Manual
4-17
Page 73

4bof.fm
optiClient phone User Interface Nur für den internen Gebrauch
Option Settings for the optiClient phone
Display
The complete LDAP directory is stored in a hierarchical structure. In some cases, only a
subsection of this directory structure may be appropriate for individual users as the base
directory name (Base DN) to be searched and displayed. In addition, you will also need to
specify under which field names of the LDAP directory the details expected in the optiClient
130 are stored on the LDAP server.
> In the Base DN field you define a certain base directory name as the root LDAP directory
of the optiClient, i.e., the starting point from which entries can be searched and dispolayed.
This entry can be optionally made in two formats:
–
<Level_desig.3>=<Name>, <Level_desig.2>=<Name>, <Level_desig.1>=<Name>
–or
<Level_desig.1>=<Name>/<Level_desig.2>=<Name>/<Level_desig.3>=<Name>
A31003-G2540-A100-3-76A9, 04/2003
4-18 optiClient 130 V4.0, User Manual
Page 74

4bof.fm
Nur für den internen Gebrauch
Option Settings for the optiClient phone
The examples below apply to an LDAP directory with the following elements:
>
If no restricted base directory is specified for the search here, the entire LDAP directory is
used as the the base directory.
> In order to correctly map the LDAP entries in the optiClient, the field names of the LDAP
directory to be displayed in the column information of the optiClient must be entered under
LDAP field names. The Name and First name fields are mandatory and must be filled
with corresponding field names in the LDAP directory.
– Level designation 1: c (e.g., for "country")
– Name of an entry at this level: DE
– Level designation 2: o (e.g., for "organization“)
– Name of an entry at this level: SIEMENS
– Level designation 3: ou (e.g., for "organization unit“)
– Name of an entry at this level: ICN
To define these details as the base directory name in optiClient, the following
entries must be made in the Base DN field:
– ou=ICN, o=SIEMENS, c=DE
– or alternatively:
c=DE/o=SIEMENS/ou=ICN
optiClient phone User Interface
The level designations, the names of entries within the levels of an LDAP direc-
>
> Click on OK to save your entries. This returns you to the Options dialog.
tory, and the field names in the directory can be obtained from the administrator
of the LDAP server / directory.
A31003-G2540-A100-3-76A9, 04/2003
optiClient 130 V4.0, User Manual
4-19
Page 75

4bof.fm
optiClient phone User Interface Nur für den internen Gebrauch
Option Settings for the optiClient phone
4.5.4 Telephony Options
Under the Telephony tab you can edit the following parameters:
Display
> If the phone numbers of incoming calls are to be transferred to an external application,
activate the External Interface option and enter the directory / name of the external
application. A typical example of this feature would be searching for customer data in a
database.
The parameters in other tabs can now be changed. To save the settings and to exit the dialog
click on OK.
A31003-G2540-A100-3-76A9, 04/2003
4-20 optiClient 130 V4.0, User Manual
Page 76

4bof.fm
Nur für den internen Gebrauch
optiClient phone User Interface
View Settings for the optiClient phone
4.6 View Settings for the optiClient phone
You can choose one of the three available views for the optiClient phone as follows:
Step Procedure
1 Click the menu key.
● The optiClient phone menu appears.
2 Select View. You now have the following options:
●
Normal view:
The user interface is fully displayed with the dial pad and the function keys.
●
Without dial pad
The user interface is displayed with the function keys, but without the dial pad.
●
Without dial pad and function keys
The user interface is displayed without the dial pad or the function keys.
The view of the key modules remains unchanged, regardless of the settings selected here.
A31003-G2540-A100-3-76A9, 04/2003
optiClient 130 V4.0, User Manual
4-21
Page 77

4bof.fm
optiClient phone User Interface Nur für den internen Gebrauch
Online Help
4.7 Online Help
To start the online help for the optiClient phone, proceed as follows:
Step Procedure
1 Click the menu key.
● The optiClient phone menu appears.
2 Select Help. The online help is started.
A31003-G2540-A100-3-76A9, 04/2003
4-22 optiClient 130 V4.0, User Manual
Page 78

42bof.fm
Nur für den internen Gebrauch optiClient office User Interface
Layout of the optiClient office User Interface
5 optiClient office User Interface
The optiClient office graphical user interface (GUI) consists of a system bar with several
(tabbed) dialogs, from which certain functions can be chosen, options can be selected and the
status of current calls can be determined.
5.1 Layout of the optiClient office User Interface
The optiClient office user interface has the following layout:
Window bar
Telephone directory / Call list/
Functions window
Close optiClient office
Minimize
Dial Window
Close window
Connecting parties window
A31003-G2540-A100-3-76A9, 04/2003
optiClient 130 V4.0, User Manual
5-1
Page 79

42bof.fm
optiClient office User Interface Nur für den internen Gebrauch
Layout of the optiClient office User Interface
Overview of the available Windows:
Window Description
Functions / Telephone directory / Caller- and call records
● Functions:
Settings for available phone number functions. The functions actually available will depend on the phone number
configuration on the HiPath system and may differ from the
range of functions depicted here.
● Telephone directory:
Managing the Telephone Directory (see also section Electronic Telephone Directory).
● Caller- and call records (see also section Call List Manage-
ment) for:
– Lost calls
– Received calls
– Extensions not reached
– Extensions reached
– Conducted calls
Speed-dialing keys Configuration and display of freely-definable speed-dial keys
Connection parties ● Display of current calls and conversations
● Function icon can be initiated via the various call functions.
● Current client status display as well as input request and
function display.
● Activate/deactivate keys and the keys for speaker, micro-
phone and headset (if available) volume control.
● ACD status display
A31003-G2540-A100-3-76A9, 04/2003
5-2 optiClient 130 V4.0, User Manual
Page 80

42bof.fm
Nur für den internen Gebrauch
optiClient office User Interface
General Operation
5.2 General Operation
● The Office bar can be moved around the desktop along with any attached windows.
● Open windows can be closed by clicking the Close Window button.
● Open windows can be removed from the bar and individually moved and positioned on the
desktop.
● You can change the size of the individual windows.
If you have inadvertently made a window too large or moved it to a position in
>
● You can move phone numbers from other applications to the display window of the optiCli-
ent office via a drag and drop operation (see also Extended Dialing Functions per Drag &
Drop).
which some parts of the window are no longer visible, you can make the window
visible again by double-clicking in the title bar.
● A maximum of 4 windows are available for Speed-dial keys / Dialing. One of these windows
can be moved to the side of the desktop and then be positioned as a bar for speed dialing
keys.
This section contains information on:
– Opening and Closing Windows
– Minimizing optiClient office
– Changing your Code Key (PIN)
– Setting the speaker and microphone volume
– Headset
– Telephone Directory Management
– Call List Management
– Programming the Function Keys
A31003-G2540-A100-3-76A9, 04/2003
optiClient 130 V4.0, User Manual
5-3
Page 81

42bof.fm
optiClient office User Interface Nur für den internen Gebrauch
General Operation
5.2.1 Opening and Closing Windows
Step Procedure
1 Open the optiClient office context menu:
● All available windows are listed in the upper panel of the optiClient office menu.
A31003-G2540-A100-3-76A9, 04/2003
5-4 optiClient 130 V4.0, User Manual
Page 82

42bof.fm
Nur für den internen Gebrauch
optiClient office User Interface
General Operation
5.2.2 Minimizing optiClient office
If you temporarily do not need the user interface of the optiClient office, you can reduce the program to an icon in the system tray of the taskbar (next to the time/date display):
optiClient office in the status area of the taskbar
To minimize the optiClient user interface, proceed as follows:
● Choose the command Minimize from the context menu or the system menu of the Office
bar.
● or select the menu item Minimize in the Office toolbar system menu.
● or click on the reduce button in the title bar of the window Connection Parties.
To restore the optiClient office user interface, double-click the
optiClient office icon in the system tray or its icon on the taskbar.
5.2.3 Changing your Code Key (PIN)
You can change the code key for your phone number as follows:
Step Procedure
1 Open the optiClient office context menu:
2 Select the command Change code key...
3 A small display appears. To change your code, enter your old 5-digit code and click
the Confirm key. When prompted, enter the new security code, click the Confirm key,
and enter the code a second time for confirmation.
The security code is changed, and the display window is closed.
A31003-G2540-A100-3-76A9, 04/2003
optiClient 130 V4.0, User Manual
5-5
Page 83

42bof.fm
optiClient office User Interface Nur für den internen Gebrauch
General Operation
5.2.4 Setting the speaker and microphone volume
Setting the speaker volume
Key Procedure
The speaker key in the Connection Parties window is used to control the
volume of the speaker. To increase or decrease the volume, click on the the
"+" or "-" symbol, respectively. optiClient changes the volume accordingly
and also shows the setting in the display.
Setting the microphone volume
Key Procedure
The microphone key in the Connection Parties window is used to control the
volume of the microphone. You can change the microphone volume during
an active call by clicking on the "+" or "-" symbol, respectively. optiClient
changes the volume accordingly and also shows the setting in the display.
A31003-G2540-A100-3-76A9, 04/2003
5-6 optiClient 130 V4.0, User Manual
Page 84

42bof.fm
Nur für den internen Gebrauch
optiClient office User Interface
General Operation
5.2.5 Special Tone Settings
Besides the speaker and microphone volumes, you can also change the "ring volume", "ring
tone" and the "attention ring volume". You can make these settings when you are not conducting a call.
Key Procedure
Click on the "+" or "-" symbol of the speaker key in the Connection Parties
window. The following appears on the display:
Telephone Settings
Ring volume?
> You can use the arrow keys that appear in the display to scroll between the tone settings
for the ring volume, ring tone or the attention ring volume. To confirm your
selection, click the confirmation key (check mark) in the display.
> You can then click on the "+" or "-" symbol of the speaker key again to change the
corresponding setting. The current setting is saved on clicking the confirmation key.
5.2.6 Headset
Key Description
To activate/deactivate a headset, click on the headset key in the Connection
Parties window. The headset key informs you whether the headset is active
(connector closed) or inactive (connector open).
● The decision to make a call via the headset or handset can only be made in the
>
idle state (i.e., before initiating the call), since the headset key can only be operated when no call is active.
● If no headset has been configured for use with the optiClient, the headset key
does not function.
● When a headset is connected, the volume control does not control the speaker/
microphone, but rather the headset volume.
A31003-G2540-A100-3-76A9, 04/2003
optiClient 130 V4.0, User Manual
5-7
Page 85

42bof.fm
optiClient office User Interface Nur für den internen Gebrauch
General Operation
5.2.7 Telephone Directory Management
To open Telephone Directory management, click on the Telephone directory tab in the Func-
tions/Telephone directory/Caller- and call records window.
You can find a detailed description of the optiClient phone book in section Electronic Telephone
Directory.
5.2.8 Call List Management
Call lists for the following types of calls are available for the optiClient 130
● Lost calls
● Received calls
● Extensions not reached
● Extensions reached
● Calls made
To open Call List Management, click on the Caller- and call records tab in the Functions/
Telephone directory/Caller- and call records window.
A detailed description of the optiClient call list management can be found in section Call List
Management.
A31003-G2540-A100-3-76A9, 04/2003
5-8 optiClient 130 V4.0, User Manual
Page 86

42bof.fm
Nur für den internen Gebrauch
optiClient office User Interface
General Operation
5.2.9 Programming the Function Keys
The function keys B to L on the keyboard can be programmed with specific functions for
the optiClient. The A function key is programmed for Help, and cannot be changed.
To program the function keys, proceed as follows:
Step Procedure
1 Open the optiClient office context menu:
2 Choose the command Program Function Keys...
● The current function key assignments appear:
3 To assign or change a function key, click on the desired function key in the window:
A31003-G2540-A100-3-76A9, 04/2003
optiClient 130 V4.0, User Manual
5-9
Page 87

42bof.fm
optiClient office User Interface Nur für den internen Gebrauch
General Operation
Step Procedure
4 Choose the desired function from the list box.
You have a choice of the following functions:
● Microphone off
● Suppress caller ID
● Night service
● Do not disturb feature
● Call waiting without tone
● Hunting group
● Do Not Disturb feature
● Answer text
● Call Forwarding
● Code key
● ACD Logon
● ACD not available
● ACD post-processing
● ACD destination
● Accept a parked call
and the setting for no assignment
● No function programmed
You can find more information on these functions in section Using the optiClient office.
5 Press OK to confirm your selection. The function key will now initiate the selected
function in the optiClient.
A31003-G2540-A100-3-76A9, 04/2003
5-10 optiClient 130 V4.0, User Manual
Page 88

42bof.fm
Nur für den internen Gebrauch
optiClient office User Interface
Information on the optiClient office
5.3 Information on the optiClient office
You can obtain further information regarding version, copyright, connected hardware, personal
phone number, etc., as follows:
Step Procedure
1 Open the optiClient office context menu:
2 Select Information...
● The Info dialog appears:
A31003-G2540-A100-3-76A9, 04/2003
optiClient 130 V4.0, User Manual
5-11
Page 89

42bof.fm
optiClient office User Interface Nur für den internen Gebrauch
Manual Update Check for optiClient office
5.4 Manual Update Check for optiClient office
In addition to the automatic update function, which checks for new update versions of the optiClient about every 15 minutes, the optiClient 130 can also be updated manually.
Step Procedure
1 Open the optiClient office context menu:
2 Select Update...
● The optiClient 130 checks if a new version of the program is available on the
update server for installation.
No new program version available...
3 ● If no new program version is available on the update server, a corresponding
message appears. If no update server has been configured, an error message
appears. The update server is set up in the user configuration.
New program version available...
3 ● If a new program version is available on the update server, the following dialog
appears:
4 Choose one of the available options:
● On immediate installation, the optiClient is first closed, and the update version
is then installed. The optiClient office must then be restarted manually.
● If you delay the update until the next logon, the periodic update will be deferred
to the next time you log on and will no longer performed during the current session.
● If you choose the final option, the update version will not be installed. The peri-
odic update check, if configured, is deactivated.
5 If you select Cancel, the update version will not be installed. The current settings for
periodic update checks remain unchanged.
After setting up the desired options, confirm your selection with OK.
Local administration rights are required for manual/automatic optiClient update.
>
A31003-G2540-A100-3-76A9, 04/2003
5-12 optiClient 130 V4.0, User Manual
Page 90

42bof.fm
Nur für den internen Gebrauch
optiClient office User Interface
Option Settings for the optiClient office
5.5 Option Settings for the optiClient office
General Information
To ensure proper functionality of the optiClient 130, you need to configure various user-specific
parameters. Although the necessary parameters for connecting to the switch were defined the
first time the program was started, they can be edited here in addition to the general user parameters.
> Open the optiClient office context menu and choose Options...
>or Click on the Options icon in the launchpad.
You can set the following options:
– General Options
– Display Options
– Telephone directory options
– Telephone directory options - LDAP Settings
A31003-G2540-A100-3-76A9, 04/2003
optiClient 130 V4.0, User Manual
5-13
Page 91

42bof.fm
optiClient office User Interface Nur für den internen Gebrauch
Option Settings for the optiClient office
5.5.1 General Options
Under the General tab you can define the following options:
Display
● Activate the corresponding option if you want the ACD status to be displayed in the Con-
nection Parties window. The appropriate colors are then displayed, depending on the
ACD status.
● You can define the width of speed-dial keys in pixels in the Speed-dial keys window.
The parameters in other tabs can now be changed. To save the settings and to exit the dialog
click on OK.
A31003-G2540-A100-3-76A9, 04/2003
5-14 optiClient 130 V4.0, User Manual
Page 92

42bof.fm
Nur für den internen Gebrauch
optiClient office User Interface
Option Settings for the optiClient office
5.5.2 Display Options
Under the Display mode tab you can activate/deactivate the following options:
Display
> Phone always on top
The optiClient phone user interface always remains in the foreground.
> Move phone to top on incoming call
If the user interface is not set up to always be on top (i.e. in the foreground), you can
configure the user interface here to have it brought to the foreground on receiving incoming
calls.
The option to move the optiClient office to the top under Windows 98SE / 2000
>
> Maximize phone on incoming call
If this option is enabled, the user interface is restored from its minimised state on the
taskbar and displayed in the foreground on receiving an incoming call.
> Hide phone on minimized status
The optiClient phone is always reduced to the system tray; it can also be reduced to the
taskbar if the corresponding option is enabled.
> Minimize phone after a period of time
Activate this option if the user interface should be minimized after a specified amount of
time. This should be entered as a number of minutes. Use the Hide phone on minimized
status option to decide whether the user interface is to be minimised in the system tray or
on the taskbar.
/ XP depends on the currently running application, which may prevent this from
occurring (see also information on setting PC parameters in the section Working
with the Administration Tool).
The parameters in other tabs can now be changed. To save the settings and to exit the dialog
click on OK.
A31003-G2540-A100-3-76A9, 04/2003
optiClient 130 V4.0, User Manual
5-15
Page 93

42bof.fm
optiClient office User Interface Nur für den internen Gebrauch
Option Settings for the optiClient office
5.5.3 Telephone directory options
Under the Telephone directory tab you can edit the following parameters:
Display
> If you are working with a telephone directory server (LDAP), activate this option. Then enter
the IP address or Name of the LDAP server.
> In order to access and display the desired LDAP entries in optiClient, a number of settings
need to be made. To do this, click on LDAP extensions (see also the section on Telephone
directory options - LDAP Settings).
If no LDAP telephone directory server is available, users can only use their personal phone
books.
> The parameters in other tabs can now be changed. To save the settings and to exit the
dialog, click on OK.
5.5.3.1 Telephone directory options - LDAP Settings
Apart from the name and IP address of the LDAP server, you will also need to configure some
parameters for Extended LDAP Settings if a central LDAP directory is to be used in optiClient
office.
> To configure these settings, select the Telephone dir. tab in the Options dialog (see also
Option Settings for the optiClient office) and then click on the LDAP extensions button.
A dialog box to configure the LDAP settings appears.
A31003-G2540-A100-3-76A9, 04/2003
5-16 optiClient 130 V4.0, User Manual
Page 94

42bof.fm
Nur für den internen Gebrauch
Display
optiClient office User Interface
Option Settings for the optiClient office
The complete LDAP directory is stored in a hierarchical structure. In some cases, only a
subsection of this directory structure may be appropriate for individual users as the base
directory name (Base DN) to be searched and displayed. In addition, you will also need to
specify under which field names of the LDAP directory the details expected in the optiClient
130 are stored on the LDAP server.
> In the Base DN field you define a certain base directory name as the root LDAP directory
of the optiClient, i.e., the starting point from which entries can be searched and dispolayed.
This entry can be optionally made in two formats:
–
<Level_desig.3>=<Name>, <Level_desig.2>=<Name>, <Level_desig.1>=<Name>
or
–
<Level_desig.1>=<Name>/<Level_desig.2>=<Name>/<Level_desig.3>=<Name>
A31003-G2540-A100-3-76A9, 04/2003
optiClient 130 V4.0, User Manual
5-17
Page 95

42bof.fm
optiClient office User Interface Nur für den internen Gebrauch
Option Settings for the optiClient office
The examples below apply to an LDAP directory with the following elements:
>
If no restricted base directory is specified for the search here, the entire LDAP directory is
used as the the base directory.
– Level designation 1: c (e.g., for "country")
– Name of an entry at this level: DE
– Level designation 2: o (e.g., for "organization“)
– Name of an entry at this level: SIEMENS
– Level designation 3: ou (e.g., for "organization unit“)
– Name of an entry at this level: ICN
To define these details as the base directory name in optiClient, the following entries must be made in the Base DN field:
– ou=ICN, o=SIEMENS, c=DE
– or alternatively:
c=DE/o=SIEMENS/ou=ICN
> In order to correctly map the LDAP entries in the optiClient, the field names of the LDAP
directory to be displayed in the column information of the optiClient must be entered under
LDAP field names. The Name and First name fields are mandatory and must be filled
with corresponding field names in the LDAP directory.
The level designations, the names of entries within the levels of an LDAP direc-
>
> Click on OK to save your entries. This returns you to the Options dialog.
tory, and the field names in the directory can be obtained from the administrator
of the LDAP server / directory.
A31003-G2540-A100-3-76A9, 04/2003
5-18 optiClient 130 V4.0, User Manual
Page 96

42bof.fm
Nur für den internen Gebrauch
optiClient office User Interface
Option Settings for the optiClient office
5.5.4 Telephony Options
Under the Telephony tab you can edit the following parameters:
> If the phone numbers of incoming calls are to be transferred to an external application,
activate the External Interface option and enter the directory / name of the external
application. A typical example of this feature would be searching for customer data in a
database.
The parameters in other tabs can now be changed. To save the settings and to exit the dialog
click on OK.
A31003-G2540-A100-3-76A9, 04/2003
optiClient 130 V4.0, User Manual
5-19
Page 97

42bof.fm
optiClient office User Interface Nur für den internen Gebrauch
Option Settings for the optiClient office
5.5.5 Speed-dial Keys
You can call defined speed-dial numbers directly via speed-dial keys. The speed-dial keys are
located in the Speed-dial keys/Dial windows (max. four). Open the window in which you want
to configure the speed-dial keys, and select the Speed-dial keys tab. A maximum of 218
speed-dial keys can be configured for each user. A dial window can be deleted, moved or
docked from the optiClient office toolbar by dragging the mouse over the upper/lower/right/left
edge of the desktop.
View for dialing the speed-dial keys
The speed-dial keys can be displayed in the old view with the handset symbols or in the new
view with the heads/bright dots and arrows.
> To select the desired view, open the context menu of the Dial window and select Layout
V. 4 for the speed dial icons of Version 4.0 or Layout V.2 for the speed dial icons of Version
2.0.
Speed-dial Key Icons
For internal speed-dial numbers administered at the system at which the opticlient is logged on,
the current status of the corresponding speed-dial extensions is displayed with the handset
icon. There is no icon for speed-dial keys with external extensions:
Symbol
Version 2
Symbol
Version 4
Meaning
The party’s extension is idle.
(for internal speed-dial numbers only)
The party’s extension is busy.
(for internal speed-dial numbers only)
The party is receiving a call. (In this state, the call from another caller
can be answered.)
(for internal speed-dial numbers only)
Adding a New Speed-Dial Key
Step Procedure
1 Open the context menu of the Speed-dial keys window and select Add Entry...
A31003-G2540-A100-3-76A9, 04/2003
5-20 optiClient 130 V4.0, User Manual
Page 98

42bof.fm
Nur für den internen Gebrauch
optiClient office User Interface
Option Settings for the optiClient office
Step Procedure
2 In the following dialog, enter the key captions and the corresponding phone number
(internal or external). Press the OK dialog key to confirm your selection.
3 The speed-dial keys are displayed in the window.
Changing the Caption or Phone Number of a Speed-Dial Key
Step Procedure
1 Open the context menu of the speed-dial key that you wish to change, and select
Change data....
2 In the dialog that follows, change the caption or phone number (internal or external)
and save your changes by clicking OK.
Deleting a Speed-Dial Key
Step Procedure
1 Open the context menu of the speed-dial key that you wish to change and select De-
lete entered data.
2 Confirm your selection by clicking OK. The speed-dial key is deleted, and you return
to the Speed-dial key window.
You can skip confirming your selection on deletion by holding down the < key
>
while selecting the entry from the context menu.
Sorting Speed-dial Keys in the Speed-dial Key Window
Step Procedure
1 Open the context menu in the speed-dial keys window.
A31003-G2540-A100-3-76A9, 04/2003
optiClient 130 V4.0, User Manual
5-21
Page 99

42bof.fm
optiClient office User Interface Nur für den internen Gebrauch
Option Settings for the optiClient office
Step Procedure
2 You have the following options for sorting:
– by name (speed-dialing key caption)
– by the type of phone number (internal or external) stored on the speed-dial
key
You can optionally sort in either
– ascending or
– descending
order.
Select the desired option by clicking on it; a check mark means the option has been
selected.
Dialing via a Speed-Dial Key
● Double-click on the speed-dial key or
● Open the context menu of the desired speed-dial key and select Dial....
A31003-G2540-A100-3-76A9, 04/2003
5-22 optiClient 130 V4.0, User Manual
Page 100

42bof.fm
Nur für den internen Gebrauch
optiClient office User Interface
Functions
5.6 Functions
General Information
As a user, a number of general and special telephony functions are available for your personal
phone number, which correspond with the configuration of the HiPath system.
General telephony functions
These functions can be activated in the Functions/Telephone directory/Call detail records
window.
Display
Function options
Function toolbar
A31003-G2540-A100-3-76A9, 04/2003
optiClient 130 V4.0, User Manual
5-23
 Loading...