


SL910H
Congratulations
By purchasing a Gigaset, you have chosen a brand that is fully committed to
sustainability.
This product’s packaging is eco-friendly!
To learn more, visit www.gigaset.com.

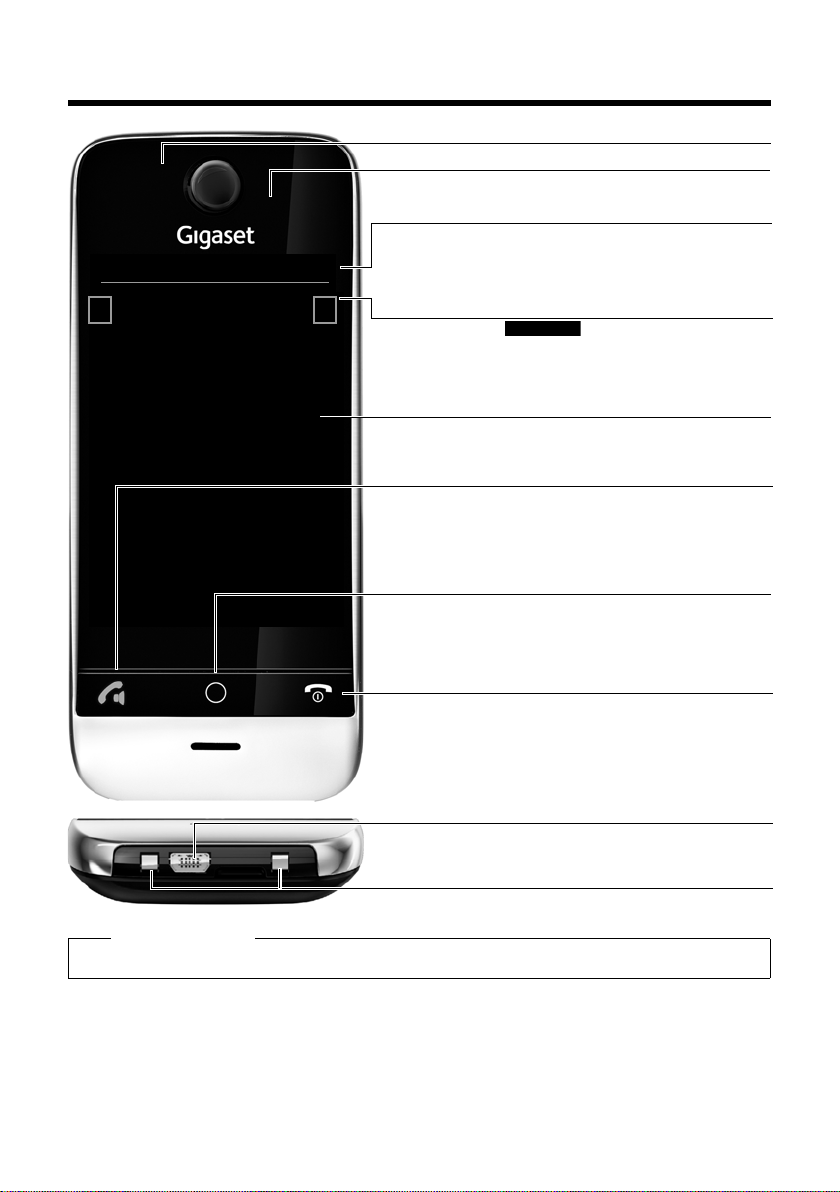
Gigaset SL910H – with the special "touch"
Ð
òôó¼ 06:00
V
<
Å Å Å
>
Status bar (£ page 12)
Icons (£page38) show the telephone’s current settings and oper-
ating status. Touch the status bar to open the
£ status page,
page 12.
v Menu key
Press briefly: open main menus (£ page 12)
Press and hold: activate/deactivate (
£ page 13) keypad and dis-
play lock
a End call/end key
Press briefly: end call/paging, reject internal call, switch off ring ton e
for external call, return to idle status
Press and hold: switch handset on/off
Touchscreen/display
Message LED (£ page 10)
Proximity sensor (
£ page 13)
Navigation area
Page p osition marker ,
Change page
ê/ë.
Å Ä Ä
Handset keys
c Tal k ke y
Press briefly: Dial displayed number, accept call, switch between
earpiece and handsfree mode, open the redial list
Press and hold: assign a line
Mini USB connection socket
Connect wire-bound headset or handset to your PC
(Gigaset QuickSync)
Charging contacts
Idle displays or menu (
£ page 8)
Gigaset SL910H – with the special "touch"
Please note
To change the display language, proceed as described on page page 20.
de en fr it nl 1

Contents
Contents
Gigaset SL910H – with the special "touch" . . . . . . . . . . . . . . . . . . . . . . . . . . . . . . . . . . . . . . . . . . . . . . . . . . . . . . . . . . . . . 1
Safety precautions . . . . . . . . . . . . . . . . . . . . . . . . . . . . . . . . . . . . . . . . . . . . . . . . . . . . . . . . . . . . . . . . . . . . . . . . . . . . . . . . . . . . 3
Getting started . . . . . . . . . . . . . . . . . . . . . . . . . . . . . . . . . . . . . . . . . . . . . . . . . . . . . . . . . . . . . . . . . . . . . . . . . . . . . . . . . . . . . . . 4
Display pages . . . . . . . . . . . . . . . . . . . . . . . . . . . . . . . . . . . . . . . . . . . . . . . . . . . . . . . . . . . . . . . . . . . . . . . . . . . . . . . . . . . . . . . . . 8
Using the telephone . . . . . . . . . . . . . . . . . . . . . . . . . . . . . . . . . . . . . . . . . . . . . . . . . . . . . . . . . . . . . . . . . . . . . . . . . . . . . . . . . 13
Making calls . . . . . . . . . . . . . . . . . . . . . . . . . . . . . . . . . . . . . . . . . . . . . . . . . . . . . . . . . . . . . . . . . . . . . . . . . . . . . . . . . . . . . . . . . 17
Changing phone settings . . . . . . . . . . . . . . . . . . . . . . . . . . . . . . . . . . . . . . . . . . . . . . . . . . . . . . . . . . . . . . . . . . . . . . . . . . . . 20
ECO DECT . . . . . . . . . . . . . . . . . . . . . . . . . . . . . . . . . . . . . . . . . . . . . . . . . . . . . . . . . . . . . . . . . . . . . . . . . . . . . . . . . . . . . . . . . . 23
Network mailbox . . . . . . . . . . . . . . . . . . . . . . . . . . . . . . . . . . . . . . . . . . . . . . . . . . . . . . . . . . . . . . . . . . . . . . . . . . . . . . . . . . . . 23
Multiple handsets . . . . . . . . . . . . . . . . . . . . . . . . . . . . . . . . . . . . . . . . . . . . . . . . . . . . . . . . . . . . . . . . . . . . . . . . . . . . . . . . . . . . 24
Bluetooth devices . . . . . . . . . . . . . . . . . . . . . . . . . . . . . . . . . . . . . . . . . . . . . . . . . . . . . . . . . . . . . . . . . . . . . . . . . . . . . . . . . . . . 25
Contacts (address book) . . . . . . . . . . . . . . . . . . . . . . . . . . . . . . . . . . . . . . . . . . . . . . . . . . . . . . . . . . . . . . . . . . . . . . . . . . . . . 27
Calls list (dependent on base) . . . . . . . . . . . . . . . . . . . . . . . . . . . . . . . . . . . . . . . . . . . . . . . . . . . . . . . . . . . . . . . . . . . . . . . . 31
Calendar . . . . . . . . . . . . . . . . . . . . . . . . . . . . . . . . . . . . . . . . . . . . . . . . . . . . . . . . . . . . . . . . . . . . . . . . . . . . . . . . . . . . . . . . . . . . . 32
Alarm . . . . . . . . . . . . . . . . . . . . . . . . . . . . . . . . . . . . . . . . . . . . . . . . . . . . . . . . . . . . . . . . . . . . . . . . . . . . . . . . . . . . . . . . . . . . . . . 33
Baby phone call . . . . . . . . . . . . . . . . . . . . . . . . . . . . . . . . . . . . . . . . . . . . . . . . . . . . . . . . . . . . . . . . . . . . . . . . . . . . . . . . . . . . . . 34
Screensaver, caller pictures and sounds . . . . . . . . . . . . . . . . . . . . . . . . . . . . . . . . . . . . . . . . . . . . . . . . . . . . . . . . . . . . . . . 35
Synchronising with your PC (Gigaset QuickSync) . . . . . . . . . . . . . . . . . . . . . . . . . . . . . . . . . . . . . . . . . . . . . . . . . . . . . . 36
Display icons . . . . . . . . . . . . . . . . . . . . . . . . . . . . . . . . . . . . . . . . . . . . . . . . . . . . . . . . . . . . . . . . . . . . . . . . . . . . . . . . . . . . . . . . 37
Customer Service & Assistance . . . . . . . . . . . . . . . . . . . . . . . . . . . . . . . . . . . . . . . . . . . . . . . . . . . . . . . . . . . . . . . . . . . . . . . 39
Environment . . . . . . . . . . . . . . . . . . . . . . . . . . . . . . . . . . . . . . . . . . . . . . . . . . . . . . . . . . . . . . . . . . . . . . . . . . . . . . . . . . . . . . . . . 43
Appendix . . . . . . . . . . . . . . . . . . . . . . . . . . . . . . . . . . . . . . . . . . . . . . . . . . . . . . . . . . . . . . . . . . . . . . . . . . . . . . . . . . . . . . . . . . . . 44
Open Source software . . . . . . . . . . . . . . . . . . . . . . . . . . . . . . . . . . . . . . . . . . . . . . . . . . . . . . . . . . . . . . . . . . . . . . . . . . . . . . . 45
Index . . . . . . . . . . . . . . . . . . . . . . . . . . . . . . . . . . . . . . . . . . . . . . . . . . . . . . . . . . . . . . . . . . . . . . . . . . . . . . . . . . . . . . . . . . . . . . . . 54
2 de en fr it nl

Safety precautions
Warn ing
Read the safety precautions and the user guide before use.
Explain their content and the potential hazards associated with using the device to your children.
Use only the power adapter indicated on the device.
Use only rechargeable batteries that correspond to the specification (see "Specifications"). Never use a
conventional (non-rechargeable) battery or other battery types as this could result in significant health risks
and personal injury. Rechargeable batteries, which are noticeably damaged, must be replaced.
Using your telephone may affect nearby medical equipment. Be aware of the technical conditions in your
particular environment, e.g. doctor's surgery.
If you use a medical device (e.g. a pacemaker), please contact the device manufacturer. They will be able to
advise you regarding the susceptibility of the device to external sources of high frequency energy (for the
specifications of your Gigaset product see "Specifications").
Do not hold the rear of the handset to your ear when it is ringing or when speaker mode is activated.
Otherwise you risk serious and permanent damage to your hearing.
Your Gigaset is compatible with the majority of digital hearing aids o n the market. However, perfect function
with all hearing aids cannot be guaranteed.
The phone may cause interference in analogue hearing aids (humming or whistling) or cause them to
overload. If you require assistance, please contact the hearing aid supplier.
The devices are not splashproof. For this reason do not install them in a damp environment such as
bathrooms or shower rooms.
Safety precautions
Do not use the devices in environments with a potential explosion hazard (e.g. paint shops).
If you give your Gigaset to a third party, make sure you also give them the user guide.
Remove faulty devices from use or have them repaired by our Service team, as these could interfere with
other wireless services.
The phone display is made of glass or plastic which can break if the device falls onto a hard surface or if it is
given a hard blow. Do not use the device if the display is cracked or broken. Broken glass or plastic can cause
injury to hands and face. Send the device to our Service department to be repaired.
To prevent loss of hearing, avoid listening at high volume over long periods of time.
Please note
u
The device cannot be used in the event of a power failure. It is also not possible to transmit emergency calls.
u Emergency numbers cannot be dialled if the keypad/display lock is activated!
de en fr it nl 3
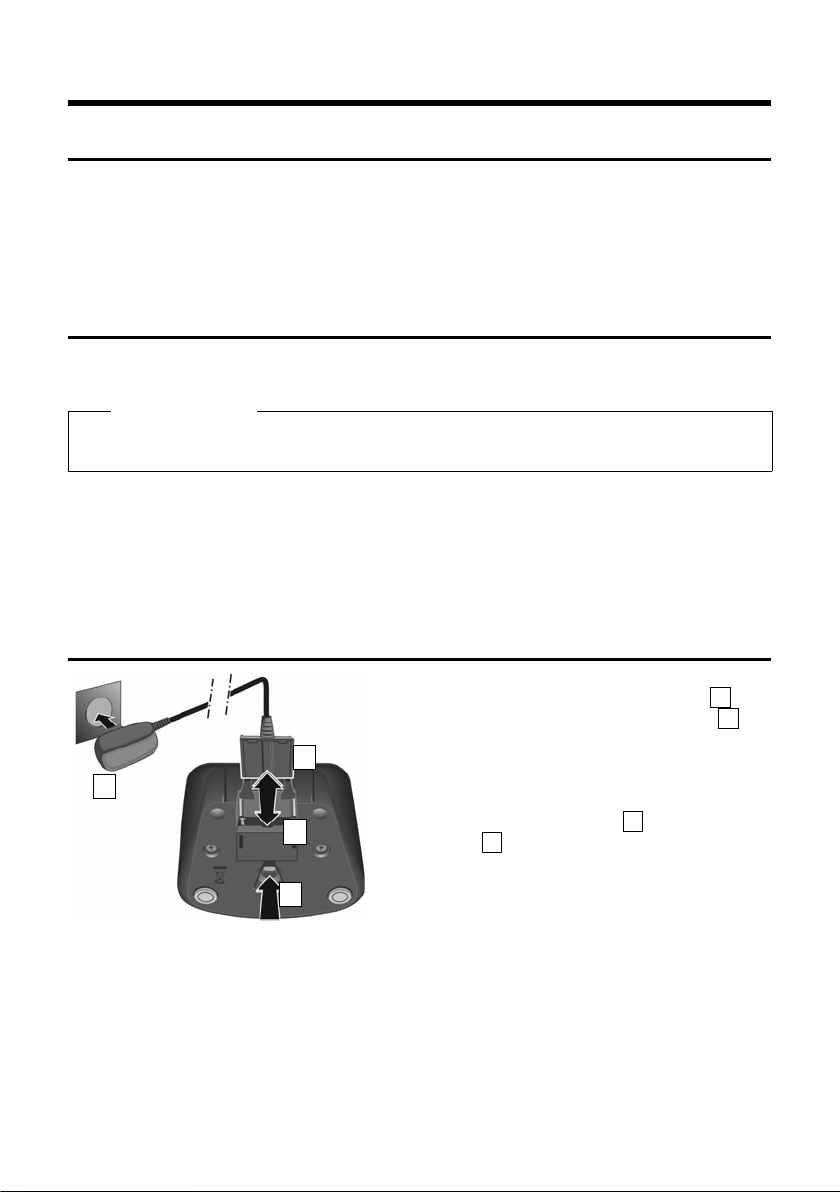
Getting started
2
1
3
4
¤ Connect the flat plug to the power adapter .
¤ Plug the power adapter into the plug socket .
If you have to remove the plug from the charger cradle
again:
¤ First disconnect the power adapter from the mains
power supply.
¤ Then press the release button and disconnect
the plug .
123
4
Getting started
Checking the package contents
u One Gigaset handset
u One battery cover (rear cover for the handset)
u One battery
u One charger cradle
u One power adapter for the charger cradle
u One user guide
charger cradle
The charger cradle is designed for use in dry rooms in a temperature range of +5°C to +45°C.
¤ Set up the charger cradle on a flat, non-slip surface.
Please note
Pay attention to the range of the base. In buildings this is up to 50 m, outdoors up to 300 m. The range
is reduced when ECO DECT (
The phone’s feet do not usually leave any marks on surfaces. However, due to the multitude of different varnishes and polishes used on today's furnishings, the occurrence of marks on the surfaces cannot be completely ruled out.
Please note:
u Never expose the telephone to the effects of heat sources, direct sunlight or other electrical devices.
u Protect your Gigaset from moisture, dust, corrosive liquids and fumes.
£ page 23) is activated.
Connecting the charger cradle
4 de en fr it nl
Getting started
1
2
1
2
Setting up the handset for use
The handset’s display and keys are covered with a protective film. Please remove the protective film.
Caution
Please do not use any touchscreen styli to operate the handset.
Do not use protective cover/film from other manufacturers. This can restrict operability of your handset.
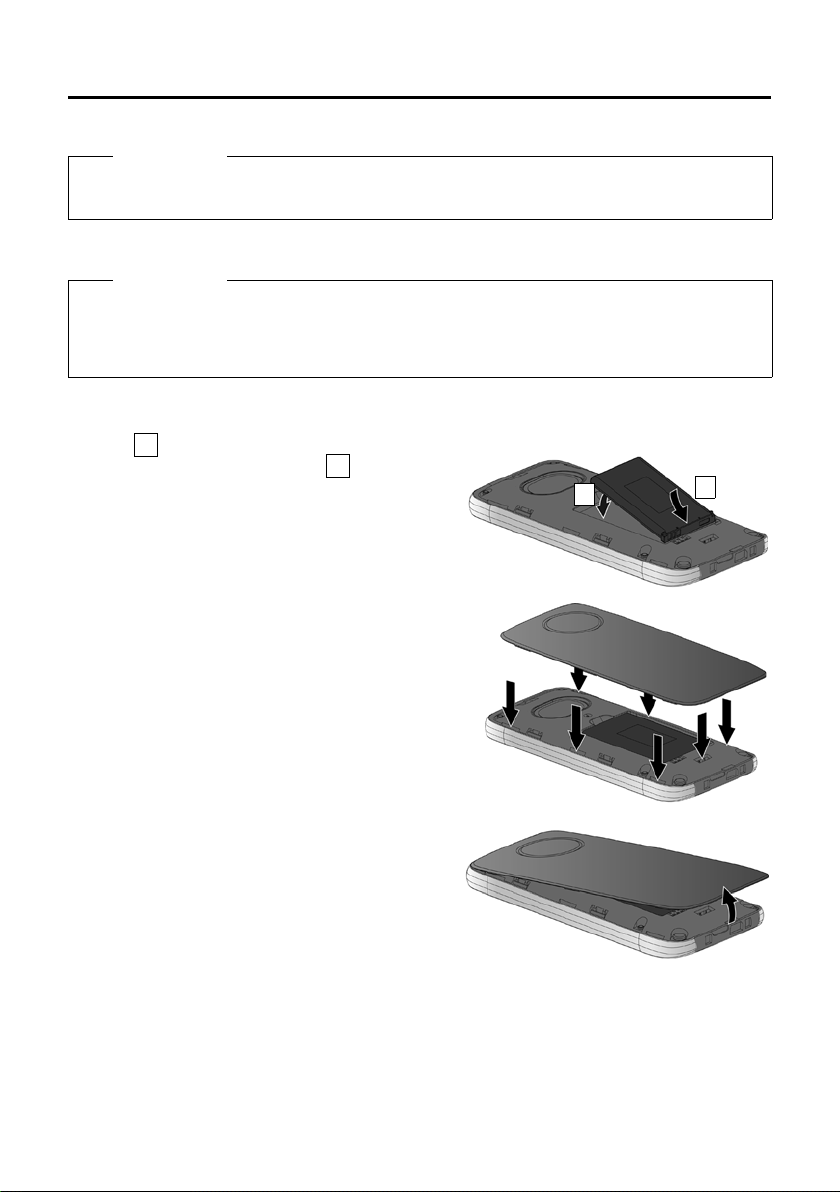
Inserting the battery and closing the battery cover
Caution
Use only rechargeable batteries (
doing otherwise could result in significant health risks and personal injury. For example, the outer casing of the battery could be destroyed or the battery could explode. The phone could also malfunction
or be damaged as a result of using batteries that are not of the recommended type.
£ page 44) recommended by Gigaset Communications GmbH, as
¤ First, insert battery with the contact surface facing
down .
¤ Then press the battery downwards until it clicks
into place.
¤ First, align the protrusions on the side of the battery
cover with the notches on the inside of the casing.
¤ Then press the cover until it clicks into place.
To reopen the battery cover to replace the battery:
¤ Insert your fingernail into the notch on the bottom of
the battery cover and pull the battery cover upwards.
de en fr it nl 5
Getting started
5 h
˜
Call List
Â
Contacts
Apr
26
Thursday
¹
V
<
Ä Å Ä
>
Handset not registered
to any base
Register
+
±
Ø
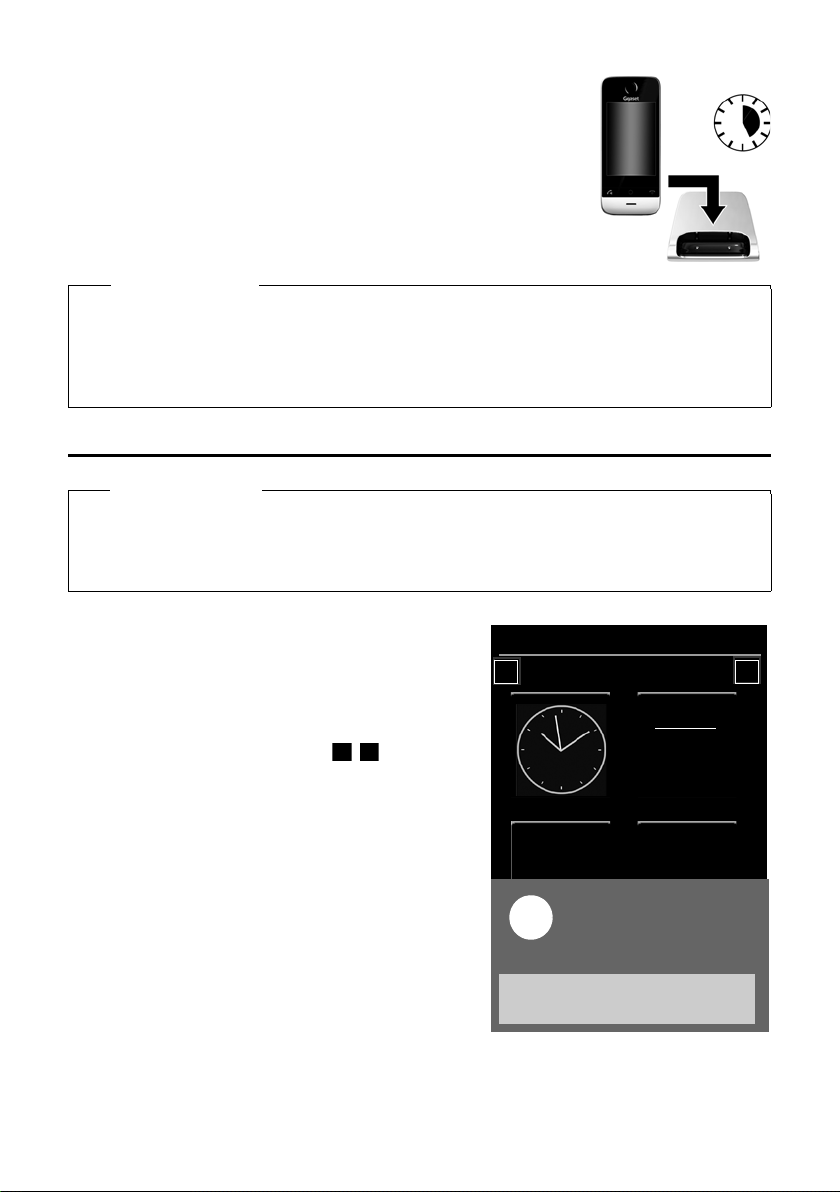
Charging the battery
The battery is supplied with a partial charge. Please charge it completely
before use.
¤ Charge the handset in the charger cradle for 5 hours.
Please note
u The handset must only be placed in the designated charger cradle.
u The battery is also charged if the handset is connected via a USB connection to a PC with a power
supply of 500 mA
u The battery may heat up during charging. This is not dangerous.
u After a time, the charge capacity of the battery will decrease for technical reasons.
Registering the handset
Please note
The best way to achieve all of the features of the Gigaset SL910H is to register the device to the corresponding base of the Gigaset SL910 or Gigaset SL910A.
If you use the Gigaset SL910H on a different base, features such as the answering machine or call lists
are not available.
When your handset has sufficient charge the registration process starts. The registration screen is displayed.
Changing the display language:
¤ Menu key v ¤Menu page Settings ¤[ °Language +
Location].
¤ To uc h ’ next to Display Language.
¤ Next to the desired language, touch ( = selected).
¤Confirm with è. ¤Back with ‘.
Registering the handset:
On the base:
¤ Press and hold the registration/paging key
(min. 3 seconds).
On the handset within a minute:
¤ To uc h Register.
Or, if the handset is already registered to a base:
¤ Menu key v ¤Menu page Settings
¤[ É Handsets + Base].
¤Tou ch Register.
The message "Searching for a base which is in registration
mode" appears in the display.
This creates a connection to the base, but it may take some time.
¤If necessary, enter the system PIN of the base (default: 0000). ¤Confirm PIN with è.
The display shows Handset is registering.
6 de en fr it nl

Getting started
x
UPDATE INFORMATION
Functionality restricted update base firmware
Update
Firmw are
Use with
restric tions
After successful registration, the "
wizard. If applicable, the values set on the base for the date, time, country, country code and local area code
are displayed.
The installation wizard is described in the user guide for the base.
Exception:
The handset is registered to a base for a Gigaset SL910/SL910A
from an earlier series.
After successful registration, the following message is shown
in the display.
‰ Handset registered" message appears. This will start the installation
¤ Connect the base to the Internet (see user guide for the
base).
¤ On the handset, touch Update Firmware.
The firmware update can take up to sixminutes, depending on
the quality of your DSL connection.
Caution
If you select the Use with restrictions option, important functions on your phone will not be available.
If you want to complete the firmware update at a later date, you must first reset the base; this action will
reset all the base settings and all handsets will be de-registered.
To reset the base:
on the base and at the same time reconnect the power cable to the base
tion/paging key until it begins to flash (approx. 10 seconds).
Once the handset has been registered again successfully, the message above is displayed again.
¤Remove the power cable from the base ¤Press and hold the registration/paging key
¤Press and hold the registra-
de en fr it nl 7
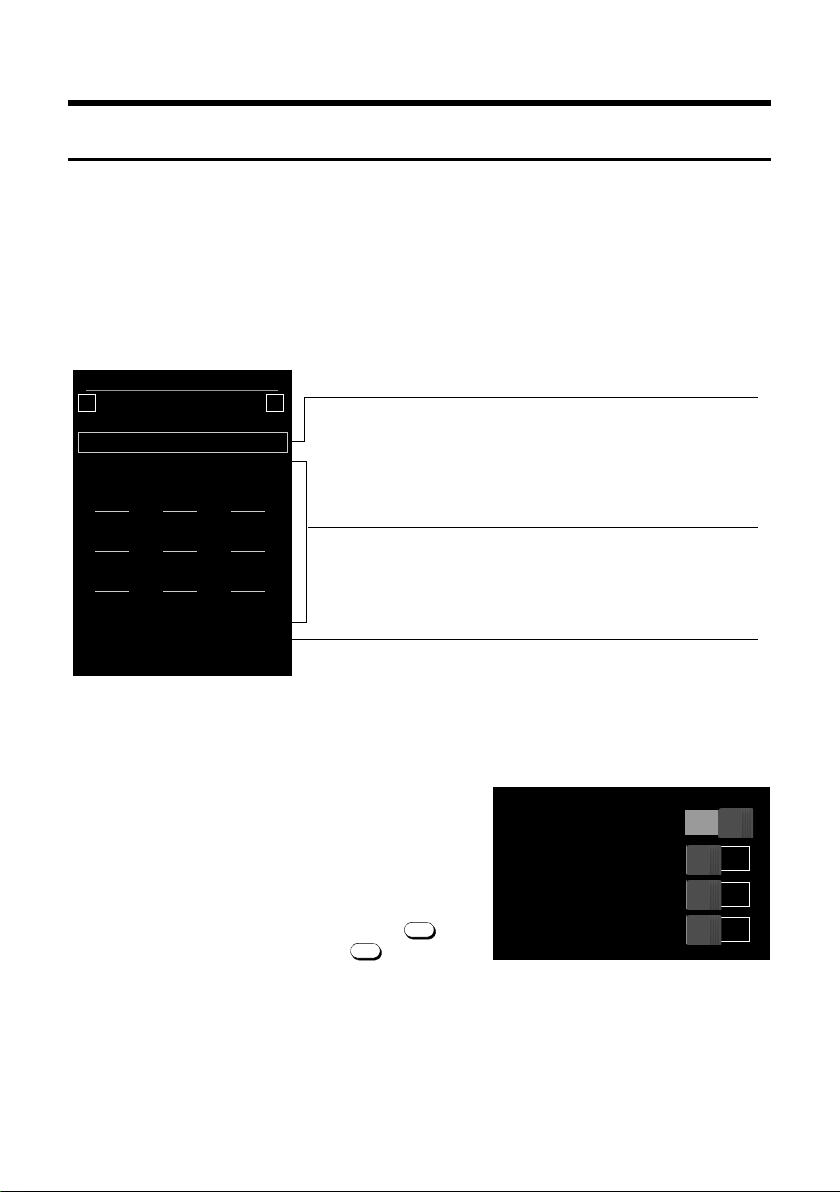
Display pages
Number field
Displays the numbers entered.
Tou ch
ç briefly: delete the last number entered
Press and hold
ç: delete all numbers
Options bar (
£ page 14)
To di al f rom c all list s, Co nta cts a nd speed dial list, as well as internal calls.
Keypad
Numerical keypad for entering phone numbers. When you
touch a number, it is displayed in the number field.
Ð
ò ô ó ¼ 06:00
V
<
Å Å Å
>
|
ç
1 2 3
ABC DEF
4 5 6
GHI JKL MNO
7 8 9
PQRS TUV WXYZ
* 0 #
˜Â í
å
Calls Contacts QuickDial Internal
[ gDisplay and Keypad] submenu:
Keypad
Key Tones
Key Vibration
Keypad with R/P
Keypad w. Letters
on
off
off
off
#
R
*
P
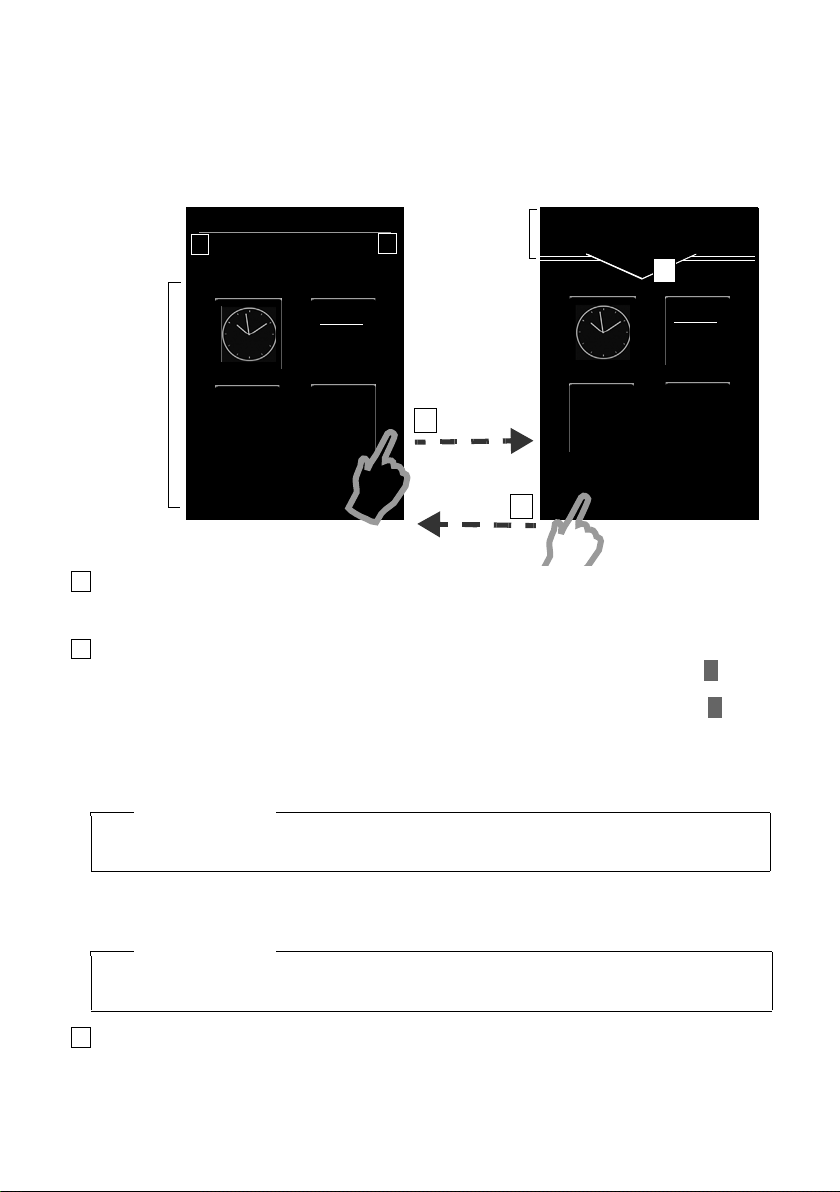
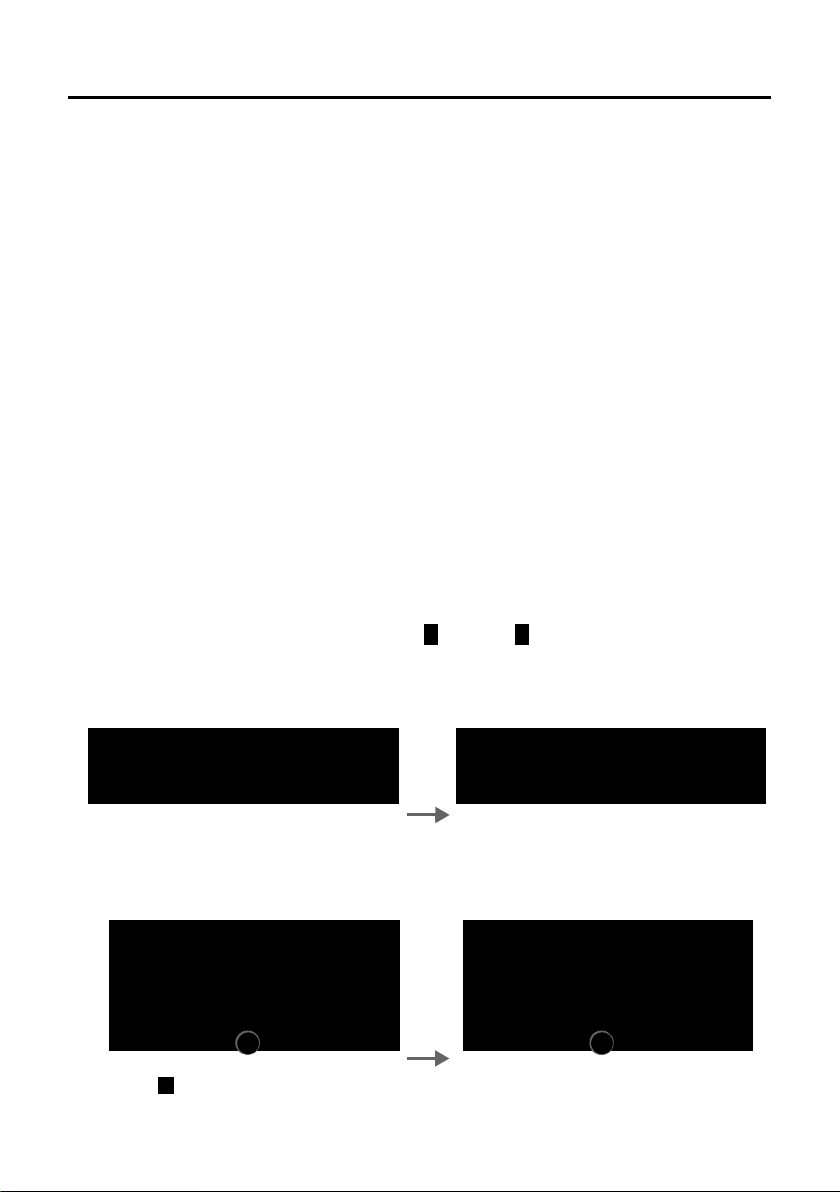
Display pages
Idle display
The idle display comprises three pages:
u The dial page (see below)
u The configurable page (
u The messages page (
Switch between the menu pages:
u Drag your finger horizontally across the display or
u In the navigation area, touch
Dial page
£ page 9)
£ page 10)
ë or ê.
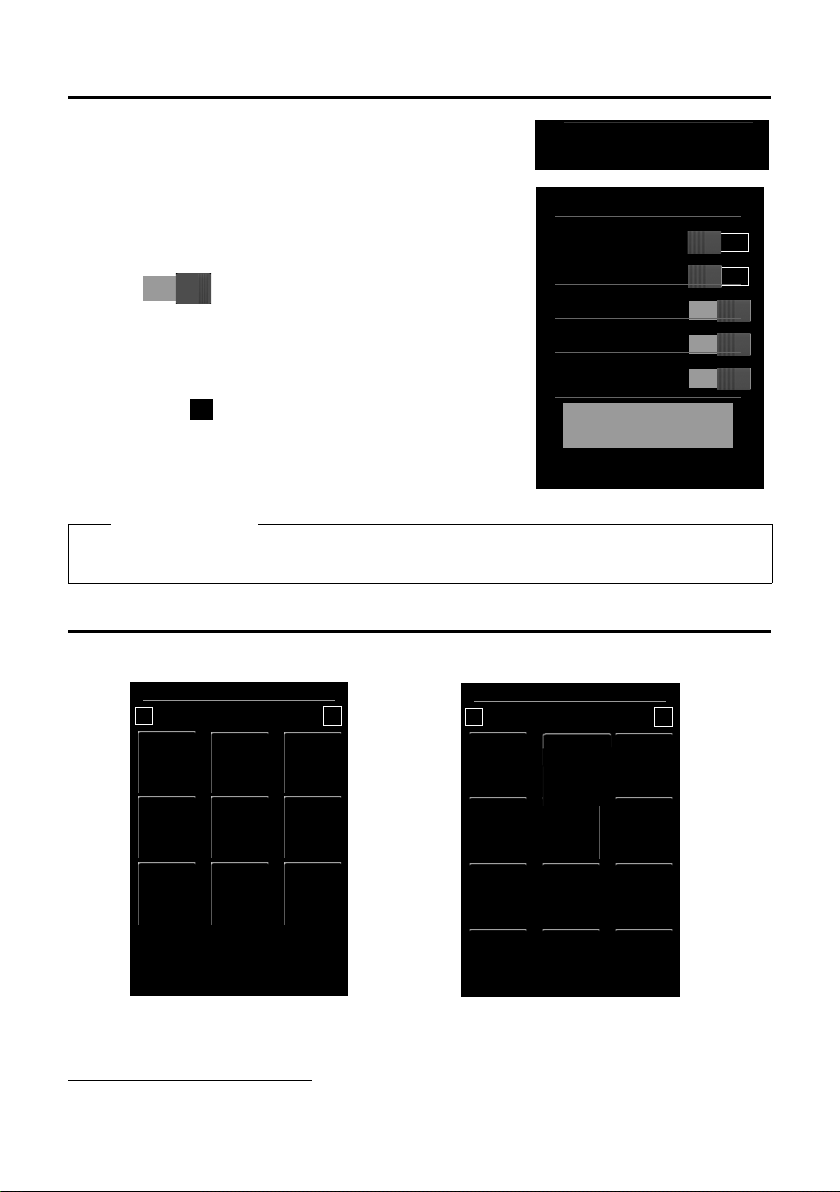
Configuring the keyboard/keypad individually
You can change the appearance and behaviour of the keypad shown in the display according to your needs.
The settings do not correspond to the handset keys (cva).
¤ Menu key v ¤Menu page Settings ¤[ gDisplay and Key-
pad]
¤Scroll to Keypad.
You can configure the following:
u Key Tones: Every time you touch a digit, a confirmation
tone is audible.
u Key Vibration: Every time you touch a digit on the keypad,
the handset vibrates.
u Keypad with R/P: To insert
- a line interruption (flash, R): Press and hold .
- a dialling pause (P): Press and hold .
u Keypad w. Letters: For dialling with letters — sometimes
used for entering service numbers, for example.
¤ You can use the switch on the right to activate or deactivate the relevant function directly. Change (acti-
vate/deactivate) switching: Briefly touch the switch.
8 de en fr it nl
Ð
ò ô ó ¼ 06:00
V
<
Å Å Å
>
Apr
26
Thursday
Contacts
Â
Call List
˜
Configuration mode
Idle status
Configurable
Section
for max. 18
elements
Press and hold
Apr
26
Thursday
Contacts
Â
Call List
˜
Ù
Alarm
2
QuickDial
Á
Room Monitor
Selection
bar
>
1
2
Press and hold
3
1
2
>
>
3
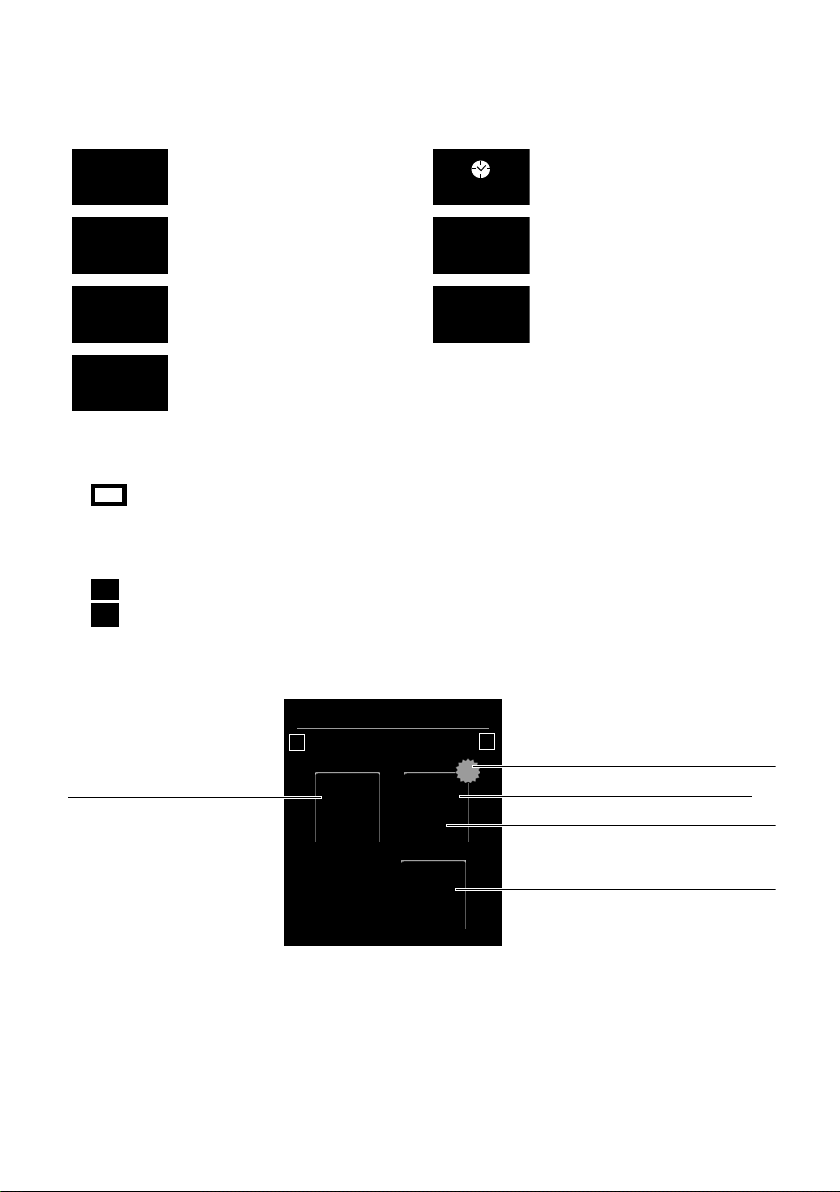
Display pages
Configurable (personal) page
You can customise the configurable page to suit your needs. Bring together the important applications
and numbers, which you can start up or call directly from idle status with a single touch. By default, the date
and time are displayed and quick access to call lists and contacts is possible.
Starting the configuration process
¤ Switch to the configurable page.
¤ Press and hold (approx. 2 seconds) any position on the configurable area on the display.
Compile application/function
A pick list with the available functions/applications is displayed at the top edge of the display. The (arrow)
icon to the right of the pick list shows that you can move the pick list horizontally to display additional selection options. To do this, place a finger on the pick list and move it in the opposite direction to the arrow.
Additional functions are displayed.
¤ Insert application/func tion: Drag the function/application using drag&drop from the selection list into
the configurable area.
Please note
With the exception of QuickDial, each function can exist in the configurable area only once. You can
collate a maximum of 18 functions, applications or QuickDials.
¤ Remove application/func tion: Drag the icon for the application/function back to the selection list using
drag&drop.
Please note
A QuickDial is deleted. The related entry in Contacts remains unchanged. The settings for all other
functions (e.g., wake-up time) remain unchanged.
Completing the configuration process
¤ Press and hold any position on the configurable area on the display, or
¤ Press a briefly.
The settings are saved.
de en fr it nl 9
Display pages
Calendar
Time
˜
Call List
Á
Room Monitor
Ù
Alarm
Â
Contacts
2
QuickDial
Ã
™
á
Ð
ò ô ó ¼ 06:00
V
<
ÅÅÅ
>
4
19
™
2
á
Number of new messages
Missed calls
Number of old messages
Network mailbox
Missed appointments/birthdays
1
You can now start/select your desired applications/telephone numbers by briefly touching the corresponding icon.
Selectable applications and functions
Date display
Open calendar (
£ page 32)
Time display
Set time
Open call lists (
Set alarm clock (
Speed dial (
Dialling a number
£ page 31) Set baby phone call (£ page 34)
£ page 33) Open Contacts (£ page 27)
£ page 30):
Messages page
You can use the messages page to access the following message lists:
u Answering machine list (dependent on base)
5 Network mailbox, if your network provider supports this function and the number of the network
u
mailbox is stored in your telephone
u · Incoming message list (dependent on base)
u Missed calls list (
u Missed appointments list (
Messages page (example)
£ Calls list (dependent on base), page 31)
£ page 33)
The list of missed calls is always displayed. The icon for the network mailbox is displayed, provided the number is stored in the telephone. The other lists are only displayed if they contain messages.
¤ Touch an icon to open the corresponding list.
10 de en fr it nl
Exception: If you touch the icon for the network mailbox, your telephone will dial the number for the
network mailbox (
£ page 25). No list will open on the display.
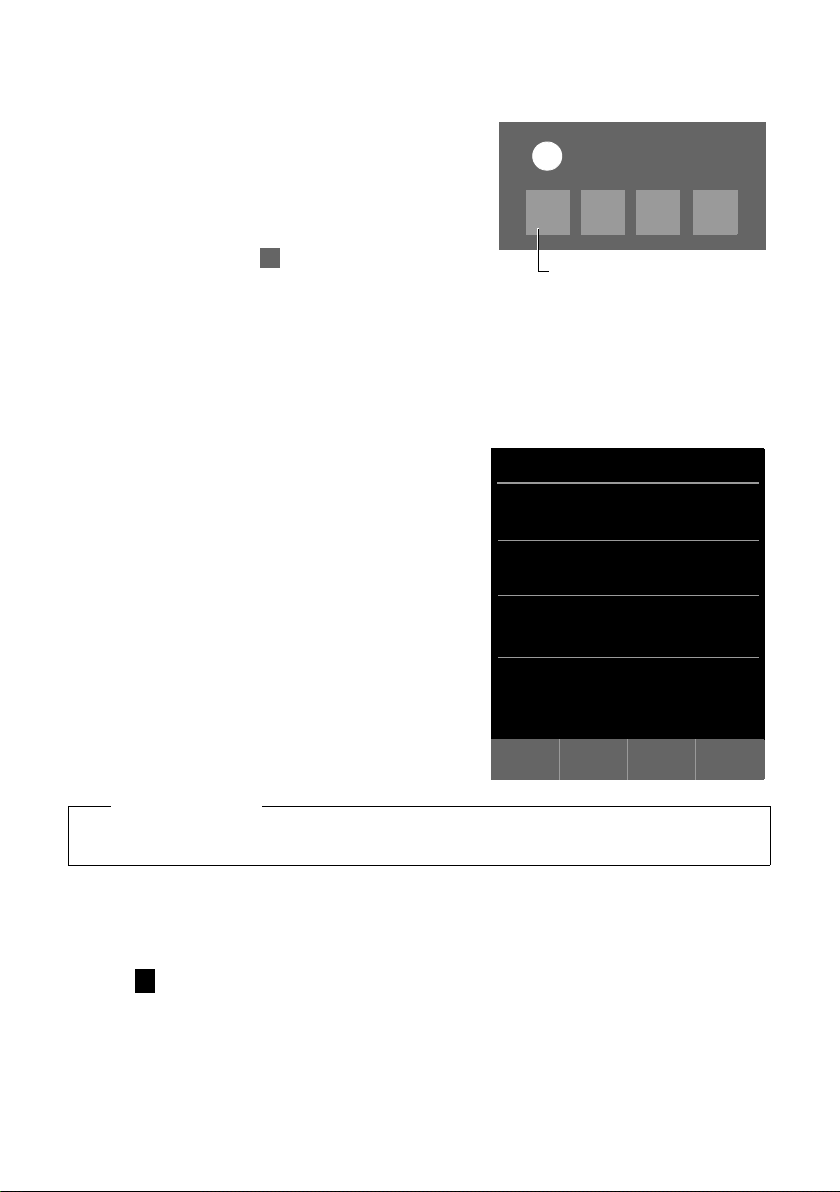
Message pop-up
Messages pop-up (example):
x
You re ceived
+
Ã1™
1
·
1
á
1
Answering machine (depending on
the base) and/or network mailbox
x
Call list (example):
L
Call List
ý
Josephine Foster M
š 16:00, Home
Josephine Foster M
™[2] 14:20, Mobile
089 666777888 M
› Yesterday, 14:20
Martin Grotte M
™13.06, 16:10, Office
˜
All
™
Missed›AcceptedšOutgoing
ü
An advisory tone sounds as soon as a new entry arrives in a list.
If activated (see the base user guide) the message LED on the
left next to the earpiece also flashes and the message pop-up
is displayed. The pop-up may partly conceal the dial page and
the configurable page. New messages are displayed on the
message page as described above.
The number of new messages in each list is displayed beneath
the icons.
¤ Close the pop-up: Touc h (top r igh t).
¤ Open the list: Touch the corresponding list icon.
If there are more new messages in other lists, the display will
show the message page (but not the pop-up) when you return
to the idle display.
The messages LED flashes (if activated, see base user guide)
until you have opened all new messages.
List entry (depending on the base)
The following information is displayed in the list entries:
u The list type (in the header)
u Icon for the type of entry.
™ (Missed), › (Accepted), š ( Outgoing)The
Call list:
icon is red for new (unread) entries.
u Caller’s number. If the caller's number is stored in Contacts,
the caller’s name and number type (Home, Office, Mobile)
is displayed instead. For missed calls, the number of calls
from this number is also shown in square brackets.
u Date and time of call (if set).
You have the fol low ing o ptio ns:
¤ Call back a caller: Briefly touch the list entry.
¤ Open the detail view: Next to the entry, touch ’.
The display shows all the available information.
In the detail view, you can delete the entry or add the num-
ber of the entry to Contacts (
£ page 30).
Display pages
Please note
If you press the
be dialled immediately.
Deleting lists
You can delete the entire contents of the individual lists:
¤ Menu key v Menu page Settings ¤[ ÊSystem]
¤(Scroll down if necessary) Clean-up List
¤ Touch next to the list to be deleted ¤ Confirm with Ye s .
c key after you have opened a list, the number for the entry marked by a green dot will
de en fr it nl 11
Display pages
Ð
ò ôó¼06:00
V
>
¹
Max. Range
No Radiation
ò
Bluetooth
ó
Do not disturb
Ù
Alarm
6:00
Show Service Info
off
on
off
on
off
on
off
on
off
on
on
<
Settings
<
Å Å
>
á
Date +
Time
i
Display +
Keypad
»
Bluetooth
ã
Select
Services
Æ
Language +
Location
Î
Handsets +
Base
Ï
System
Ì
Answer
Machine
ª
Tele pho ny
Ì
Network
Mailbox
Ë
SMS Service
Centres
Applications
<
Å Å
>
Â
Contacts
¾
Write
Text Me ssa ge
˜
Call List
Õ
Screensavers
Á
Room
Monitor
Calendar
Ù
Alarm
[
Caller
Pictures
×
Sounds
Menu page "Settings"
Menu page "Applications"
ï
Audio
Settings
Status bar and status page
The top line in the idle display is called the status bar. It shows the
phone's current settings and operating state (meaning of the icons,
£ page 38).
Status page
You can use the status page to change the settings of the adjacent
components.
¤ Briefly touch the status bar to open the status page.
¤ Briefly touch the switch next to a component to activate/deacti-
vate it ( = activated).
¤ If you touch a list entry, e.g., Alarm, a page (the submenu) will
open where you can adjust the component's settings.
¤ Touc h th e Show Service Info button to display the service infor-
mation for your handset. You may need the service information
when you contact our hotline.
Press
a or touch in the top display line to return to the idle dis-
play.
Please note
If multiple handsets are registered, the internal number of the handset is displayed in the display status
bar (e.g., INT 1)
Menu pages (dependent on base)
*Please note: Applications/settings that are currently unavailable (e.g., because the handset is outside the range of the
base) will not be displayed.
12 de en fr it nl
*

Using the telephone
Please note
The applications/settings shown here apply to operation with a Gigaset SL910/SL910A base. When
operating with another base, not all applications/settings may be available.
Switching from an idle display to the Applications menu page:
¤ Briefly press the v menu key
Switch between the menu pages:
u Drag your finger horizontally across the display or
u In the navigation area, touch
Returning to the idle display from anywhere in the menu:
ë or ê.
¤ Press the a key briefly.
Using the telephone
Switching the handset on/off
¤ To sw itch off : In idle status, press and hold the end call key a.
¤ To sw itch on:
-Press and hold the end call key
Or:
- Place the handset in the charger cradle. It will switch on after approximately 35 seconds.
Returning to idle status
a.
¤ Briefly press end call key a.
Or:
¤ If you do not press any key and do not touch the display, the display automatically reverts to idle status
after approximately three minutes.
Keypad and display lock
The keypad and display lock prevents the phone being operated unintentionally. If you touch the display
when the lock is activated, nothing happens. A corresponding message will appear if you press a key.
Activating/deactivating the keypad and display lock
When the handset is in idle status:
¤ Press and hold the v menu key to activate or deactivate the lock.
If a call is signalled on the handset, the keypad/display lock automatically deactivates and you can accept
the call. The key and display lock activates again once the call has finished.
Please note
When the keypad lock is active, you cannot call emergency numbers.
Automatic display lock
During a call, the display is automatically locked with the aid of a proximity sensor if you hold the handset
to you r ea r (d isp lay bac kl igh t di sap pea rs) . Th is loc k is dea cti vat ed a gai n wh en you remo ve t he h and se t fro m
your ear.
The sensor is located on the right next to the earpiece (
ger during a call, the display will also be locked.
de en fr it nl 13
£ page 1). If you cover it accidentally with your fin-
Using the telephone
>
>
lY :
New Entry First Name Copy List
><
Y: X
First Name Copy List Memory
><
‹hR
Speaker Mute Volume
QSÂ
Keypad Consultation Contacts
>
‰À Ý
Accept Wait.Call Reject Wait.Call Ringback
Œý Q
Speaker Profiles Record Keypad
x
x
Operating the touchscreen
You operate the handset mainly via the display.
Icons, list entries, switches and selection areas shown on the display are sensitive areas. You can set up and
activate functions, enter or dial phone numbers and navigate between the various display screens (pages)
by touching these areas and dragging them across the display.
Selecting functions/list entries
Touch a list entry or the corresponding icon to select the list item (Contacts, submenu, call lists) or to activate/deactivate a function.
Scrolling in lists and menus (scrolling vertically)
¤ Drag the display in a vertical direction.
If there are more list entries than can be displayed all at once, a drop shadow at the bottom or top edge of
the display indicates the direction in which you have to scroll to view more of the list.
As soon as you scroll in a list, a scroll bar appears on the right side of the display. This shows the size and
position of the visible section of the list.
Scrolling through lists is not continuous, i. e., you have to scroll back to return to the top from the end of the
list.
Options, option slider
Many displays have an options bar at the bottom. This displays all the actions that you can apply in the current context (icons used,
(e.g., during an external call).
£ page 37). There are single-row (e.g., in Contacts) and double-row option sliders
¤ Touch an option to execute the corresponding action.
If there are more options available than can be displayed in an options bar at the same time, these additional options are provided as follows:
u With a one-line options bar, the arrow on the right and/or left next to the options (see image) indi-
cates that further options are available.
¤ Touch the option slider and drag it in the direction of the arrow in order to move the additional
options into the display (scroll horizontally).
u With a two-row option slider, the icon below the option slider indicates that further options are avail-
able.
¤ Touch to display a further option slider that conceals the original option slider.
¤ Touch to hide the additional options again.
14 de en fr it nl
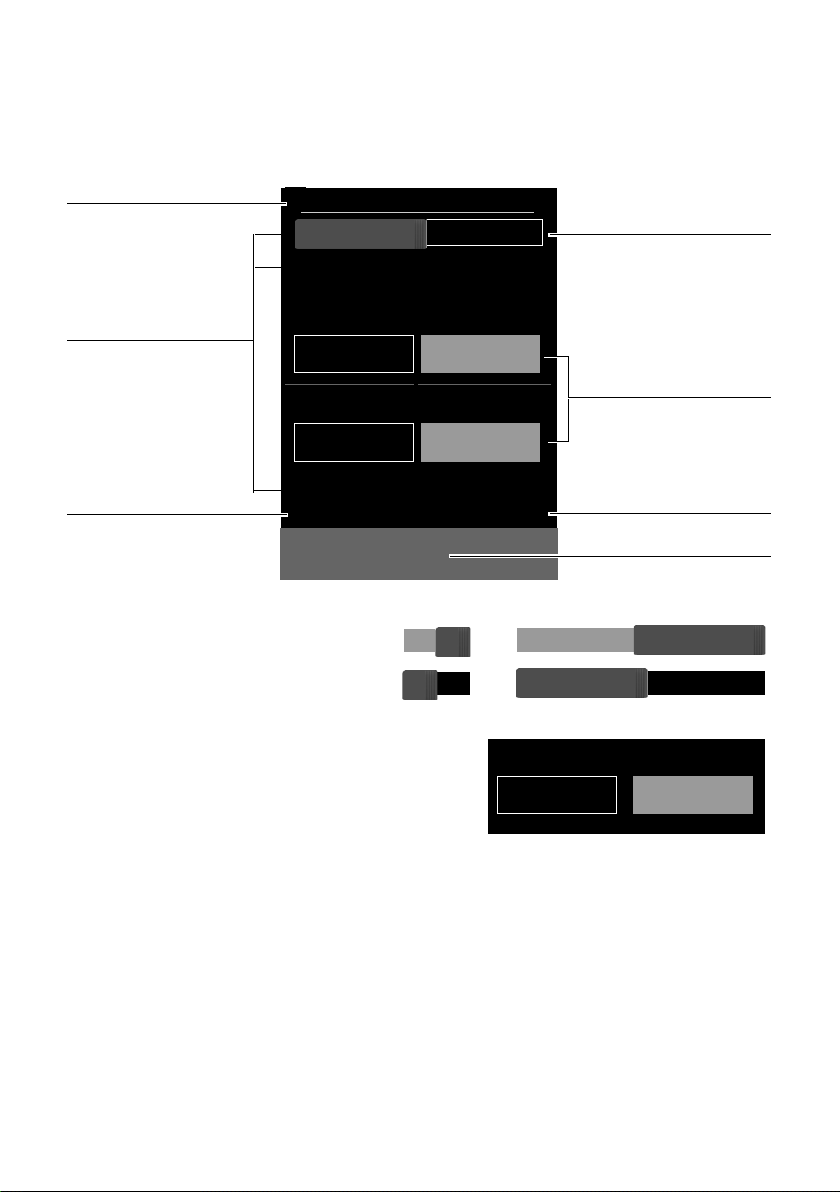
Changing the settings
L
Room Monitor
Off
Sensitivity
k
k
Forward alarm to
Number
1234567890 M
è
Save
Return to the previous display
Low
Internal
Further submenu
Switch: Activate/deactivate
during a call
Current setting
Application parameters
Save changes (optional)
High
External
Selection fields
Off
On
off
on
or
Forward alarm to
Internal External
Touch an icon on one of the menu pages to open the corresponding application/function. The display
shows the configurable parameters and user interface elements as well as their current settings (orange in
the display).
Examples:
Switch: Activating/deactivating functions
¤ Briefly touch the switch to activate/deacti-
vate functions such as babyphone call .
The function is activated/deactivated if the
orange-coloured area (On / on) is visible.
Selection fields
If two or three alternative settings are available for one parameter, these alternatives are displayed in the form of selection
fields. The current setting appears in orange.
¤ To change it, briefly touch the selection field you require.
Opening the submenu to set a parameter
The ’ icon indicates that another submenu is available.
¤ Briefly touch ’ to open this submenu.
Return to the previous display
¤ You go back to the previous display (step by step) by touching ‘ (in the top left of the display).
Entering numbers and text
Touch a character on the display to enlarge it. Keep your finger on the display until you see the desired character enlarged. As soon as you remove your finger from the display, the character is copied to the text field
in which the cursor is blinking.
When numerous number and/or text fields are displayed (e.g., first name and surname in a Contacts entry),
the first field is automatically activated. You need to touch any subsequent fields to activate them. A field is
activated when the flashing cursor appears in the field.
de en fr it nl 15
Using the telephone

Using the telephone
Correcting incorrect entries
Briefly touch $: The last character you entered is deleted.
Press and hold $: The entire content of the number or text field is deleted.
Entering text
¤ Touch (Shift): Switch between lower and upper case.
Upper case is only activated for the next character.
In Contacts, the first letter and each letter following a space is automatically in upper case.
¤ To uc h §123§: Enter a digit/a special character.
¤ To uc h More... to display additional special characters, and touch Back to return to the previous dis-
play
¤ To uc h §abc§ to return to entering normal characters.
¤ You enter special characters (diacritical characters, e.g., umlauts) by pressing and holding the corre-
sponding initial letter and selecting the required character from the list displayed.
Latin (default) character set:
a дбавгжеą c
l ł n ńñ o цутфхшő s ßś u üúùûű
y ÿý z źż
Greek character set:
α ά ε έ η ή ι ίϊΐ ο ό σ ς υ ύϋΰ ω ώ
Cyrillic character set:
е эёєийї г ґ ь ъ
Due to the larger space requirement of the Cyrillic charac ter set, you can also access the following letters
by pressing and holding the bold characters shown below. Touch the required character.
ц й x ъ ж э
çć
e ëéèêę i ïíìî
¤ To uc h ° (if necessary several times): switch character set/keyboard assignment. The options are:
- Latin (default) character set with the keypad layouts QWERTZ, for Central Europe, QU ERTY (American
default) and AZERTY, for the French-speaking area
- Greek character set
- Cyrillic character set
16 de en fr it nl
Making calls
Redial list (example):
L
Redial
ý
Josephine Foster M
Home 1234567
Josephine Foster M
Mobile 0171666777
089 666777888 M
Call list (example)
L
Call List
ý
Josephine Foster M
š 16:00, Home
Josephine Foster M
™[2] 14:20, Mobile
089 666777888 M
› Yesterday, 14:20
™
Making calls
Making an external call
¤ Switch to the dial page ¤Enter the number ¤Briefly press c.
Or:
¤ In idle mode, press and hold c ¤Enter the number.
You can cancel dialling by pressing
Dialling with the redial list
a.
¤ In idle mode, briefly press c to open the redial list.
You have the fol low ing o ptio ns:
¤ Press c. The number with the green dot is dialled.
Or:
¤ Touch an entry in the list. This selects the number dis-
played in the entry.
Or:
¤ Next to an entry, touch ’. The detail view is opened.
- Contacts entry exists:
All numbers for the Contacts entry are displayed:
¤Press c. The preferred number of the Contacts entry
which is marked with a green dot (
dialled.
Or:
£ page 27) is
¤Touch the desired number.
- No Contacts entry exists: Press
Please note
The redial list contains the last twenty numbers dialled with this handset. You can manage them in the
same way as the message lists on your telephone:
c.
¤ Open the detail view: Next to the entry, touch ’. The display shows all the available information.
In the detail view, you can delete the entry or add the number of the entry to Contacts (
£ page 30).
Dialling from a call list
¤ Switch to the message page ¤Touc h .
You have the fol low ing o ptio ns:
¤ Press c. The number of the entry marked with the green
dot is dialled.
Or:
¤ Briefly touch an entry in the list. This selects the number
displayed in the entry.
Or:
de en fr it nl 17

Making calls
Detail view of an entry (example)
L
Call Info
™Missed call from:
Josephine Foster M
Mobile 0171 666777887
Called on:
Monday, 13.08
14:20
¤ Next to an entry, touch ’. The detail view is opened.
¤ Press c. This selects the number displayed in the entry.
Or:
¤ Contacts entry exists: Touch ’. All numbers for the
Contacts entry are displayed. Touch the desired number.
Dialling with Contacts
¤ Open Contacts: On the dial page, touch [ œ Contacts].
The list of Contacts entries is displayed.
¤ Scroll through the list to the desired entry.
You have the fol low ing o ptio ns:
¤ Press c. The preferred number (£ page 27) of the entry marked with the green dot is dialled.
Or:
¤ Touch the name in the entry. The preferred number of the entry is dialled.
Or:
¤ To uc h ’ next to the entry and then touch the required number in the detail view.
Accepting a call
You have the fol low ing o ptio ns
¤ Press c.
¤ If Auto Answer is activated (£ page 21), remove the handset from the charging cradle.
¤ Accept a call on a Bluetooth headset: £page 26
¤ Accept a call on a wire-bound headset: Press the talk key (push-to-talk key) on the headset. The headset
must be connected to the handset (
Accepting/rejecting call waiting
If you receive a call during a conversation, you will hear a call waiting signal and see a corresponding
message on the display. For further information, please refer to your base user guide.
£ page 1).
Call display
For calling line identification
The caller's phone number is displayed. The display will also show the number type and the name of the
caller if the caller’s number is stored in your Contacts. If you have assigned a picture to the caller's number
(
£ page 27), it also appears on the display.
No calling line identification
Instead of name and number, the following is displayed:
u External: No number is transferred.
u Withheld: Caller has withheld calling line identification.
u Unavailable: Caller has not requested calling line identification.
Notes on phone number display (CLIP)
(CLIP = Calling LIne Identification Presentation)
The default setting on your phone is set to display the caller's number, £ page 40 or
¢ www.gigaset.com/service
18 de en fr it nl

Making calls
À
Speaker
If you are going to let someone listen in, you should tell the other party that this is happening.
Activating handsfree mode while dialling
¤ Enter the number, press c twice.
Switching between earpiece and handsfree mode
During a call, when establishing the connection:
¤ Press c or touch [ † Speaker].
Place the handset in the charging cradle during a call:
¤ Press and hold the c key while placing the handset in the charging cradle and hold for a further
2 seconds.
Changing the earpiece, handsfree and headset volume
You adjust the volume for the current mode (handsfree, earpiece, headset) during a call:
¤ To uc h [ R Vo lume ] ¤Adjust the volume with Ô / Ó.
¤ If a headset is connected: To adjust the Microphone Sensitivity touch Ô / Ó in the second row several
times if necessary.
¤ Touch at the bottom of the display to save the settings.
Or: The setting is saved automatically after approximately 2 seconds.
Activating/deactivating the microphone (muting)
If you turn the microphone off during a call, your caller can no longer hear you.
¤ To activate/deactivate the microphone, touch [ –Mute].
Deactivating the ring tone/silent alert for the current call
A call is signalled on the handset:
¤ To uc h [ ” Silence].
Security check
The handset detects unsecured connections to the base, which third parties could use to listen in.
When establishing an external callor during an external call:
¤ Press and hold any position on the status bar.
If Secure connection to base is displayed, the connection is secure.
If No secure connection to base is displayed, you should end the call.
de en fr it nl 19

Changing phone settings
±
Ø
[ gDisplay + Keypad] submenu
Screensaver
Activation
Selection
Analogue Clock
M
on
[ gDisplay + Keypad] submenu
Backlight
In Charger
Out of Charger
Timeou t
2 min.
M
off
on
Changing phone settings
The handset comes with default settings but you can change the settings to suit your individual requirements.
You can change settings either during a call or in idle status via the Settings menu page.
Changing the display language
¤ Menu key v ¤Menu page Settings ¤[ °Language + Location].
¤ Next to Display Language touch ’ ¤Next to the selected language, touch ( = selected) ¤Con-
firm with
Setting the country and your own area code
è ¤Return with ‘.
¤ Menu key v ¤Menu page Settings ¤[ °Language + Location] .
Setting the display
Setting the screensaver/Slideshow
You can define a screensaver for the display's idle status. The options are Analogue Clock/Digital Clock/
Slideshow/pictures. You can load pictures onto your handset using the Gigaset QuickSync (
software.
To show the idle display again, briefly press
a or touch the display.
£ page 36)
¤ Menu key v ¤Menu page Settings ¤[ gDisplay + Keypad].
¤ Use the switch to activate/deactivate the screensaver. ¤Next
to Selection touch ’
the display to scroll through the selection
[ ‰ Select] to select the current display, or touch ‘ to go
back without saving.
Setting the display backlight
The display backlight switches itself on as soon as the handset is
moved or you press a key.
You can specify the period of time in idle status after which the
display backlight is switched off. If no period is set, the display is
permanently dimmed.
¤Drag your finger horizontally across
¤Tou ch
¤ Menu key v ¤Menu page Settings ¤[ gDisplay + Keypad].
¤ Using the switch, activate/deactivate the display backlight in
the charger cradle or outside the charger cradle.
¤ Next to Timeout touch ’ ¤Select the off time. Save and go
back with ‘.
Please note
The handset’s standby time can be significantly reduced if the display backlight is activated.
20 de en fr it nl

Activating/deactivating auto answer
L
Ringtones
Volu me
Ó
R
Ô
Crescendo
Int. Calls
Gigaset
M
Ext. Calls
Gigaset
M
Time Ctrl (Ringer Off)
Off
M
Anon. Call Silenc.
off
off
ó
When auto answer is activated the handset accepts an incoming call as soon as you take it from the charger
cradle.
¤ Menu key v ¤Menu page Settings ¤[ «Te le ph o ny ].
¤ Activate/deactivate the function with the switch next to Auto Answer.
The connection is terminated as soon as you return the handset to the charger cradle, regardless of the Auto
Answer setting. Exception: you press
two more seconds when it is in place.
Setting a speaker profile
You can set various speaker profiles to optimally adapt your phone to your environment. Try them out to
see which profile you prefer.
The default is Profile 1.
During an external call in speaker mode:
¤ In the option slider, touch and then [ ŽSpeaker Profiles] ¤Select a profile. The setting is adjusted
immediately.
Setting ring tones
Setting volume, melody
¤ Menu key v ¤Menu page Settings ¤[
Ring tone volume for all calls
¤ To uc h Ô / Ó, several times if necessary, to adjust the vol-
ume.
Or
¤ Activate/deactivate the crescendo ring tone (increasing vol-
ume) with the switch next to Crescendo.
The activated crescendo only applies to ring tone volume. It
does not affect how a melody is played back.
Setting the ring tone for external/internal calls
¤ Next to Int. Calls / Ext. Calls touch ’ ¤Select a ringer mel-
ody
You can load additional ring tones onto your handset using the
Gigaset QuickSync (
Activating/deactivating silent alert.
¤ Menu key v ¤Menu page Settings ¤[
¤Activate/deactivate silent alert using the switch next to
Silent Alert.
An activated vibration alert signals each internal/external call,
appointment, birthday and each wake-up call, without differentiating between them.
The silent alert is deactivated as long as the handset is in the charger cradle or is connected to your PC via
USB.
Permanently activating/deactivating the ring tone
You can permanently activate/deactivate the ring tone.
¤ Open the status page ¤Activate/deactivate the ring tone with the switch next to Do not disturb. This
setting has no effect on the silent alert.
The icon in the status bar indicates that the ring tone is deactivated.
de en fr it nl 21
¤Save and return with ‘.
£ page 36) software.
Changing phone settings
c when returning the handset to the charger cradle and hold it for
Audio Settings] ¤Ringtones
ì
Audio Settings]
ì

Changing phone settings
In the [
ì
Audio Settings] submenu:
Advisory Tones
Confirmations
Battery Warning
off
on
Activating/deactivating advisory tones
Your handset uses advisory tones to tell you about different activities and statuses. These advisory tones can
be activated/deactivated independently of each other.
¤ Menu key v ¤Menu page Settings ¤[
tings].
You can activate/deactivate the following functions with
the switches to the right:
- Confirmations:
Confirmation/error tone after input; advisory tone on
receipt of a new message.
- Battery Warning:
Warning tone when the battery charge is less than 10% (every 60 seconds). The battery warning tone
does not sound when the baby phone call is activated.
Audio Set-
ì
Protection from undesired calls
Setting time control for external calls
You can specify a time period when you do not want the telephone to ring.
¤ Menu key v ¤Menu page Settings ¤[
Audio Settings] ¤Ringtones
ì
¤ Next to Time Ctrl (Ringer Off) touch ’ ¤To uc h Switch off ringtones from ¤Set the start of the time
¤Save and return with ‘ ¤Repeat the process for until, set the end of this time period ¤Acti-
period
vate/deactivate the time control with the switch next to Activation
Please note
During this period, you will continue to receive calls from numbers to which you have assigned a personalised ring tone in Contacts (VIP).
¤Go back with ‘.
Restoring handset to default settings
You can reset individual changes to the handset.
The following are not affected by the reset:
u Date and time
u Registration of handsets to the base or registration of one handset to multiple bases, and the current
u Entries in the calendar and in Contacts
u Redial list and the content of the media pool
u Stored external and internal destination numbers for the baby phone call (Forward alarm to is reset to
u Destination number for call divert.
Resetting the handset (Handset Reset) deletes your settings for the configurable page (
your audio and display settings.
Resetting the handset
¤ Menu key v ¤Menu page Settings ¤[ ÊSystem].
¤ To uc h Handset Reset .
22 de en fr it nl
base selection,
External)
£ page 9) and

ECO DECT
On Off
Access Number
(Not configured)
M
There are new messages
(if your network provider supports this function)
4
1
4
ECO DECT
ECO DECT indicates low energy consumption and reduced transmission power.
Reducing energy consumption
Your telephone has a power-saving adapter plug and uses less power.
Reducing radiation (dependent on base)
The radiation can only be reduced if your base supports this function.
The telephone's transmission power is automatically reduced depending on the distance to the base.
You can reduce the radiation from the handset and the base even more by doing the following:
u Deactivate Max. Range
u Activate No Radiation.
For further details, please refer to your base user guide.
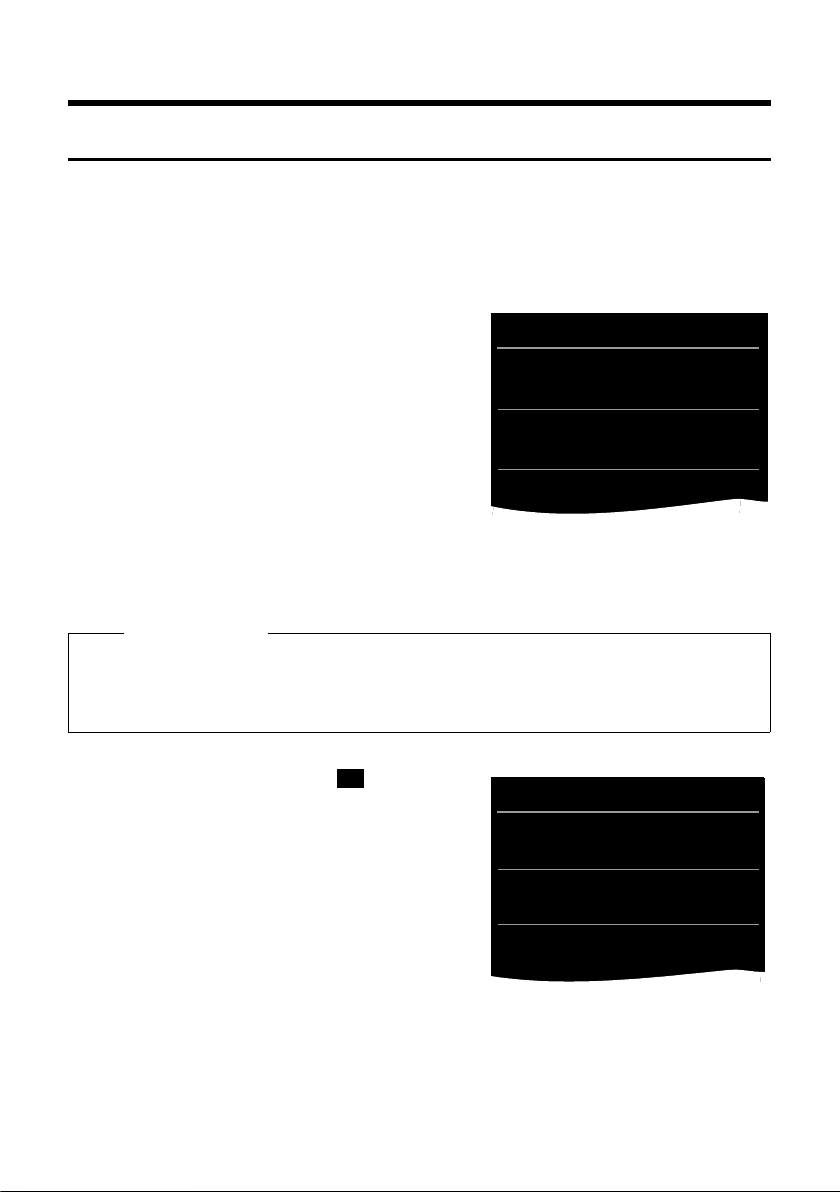
Network mailbox
You can only use the network mailbox if you have requested it from your provider and saved the network
mailbox number in your phone.
¤ Menu key v ¤Menu page Settings ¤[
Network Mailbox].
¶
¤ Enter the network mailbox number: Next to Access Num-
ber touch ’
¤Enter number ¤Confirm and save with è.
¤ Activate/deactivate network mailboxes (if your network
provider supports this function): Touch On/Off
confirmation tone from the telephone network, press
¤After the
a.
After saving the phone number, the following
icon is displayed on the message page:
Playing back network mailbox messages
¤ Switch to the message page ¤Touc h th e ic on.
Your network mailbox is called directly. The handsfree mode is activated on the handset. You can listen to
the messages.
de en fr it nl 23

Multiple handsets
Ø
T
T
Multiple handsets
Using the handset on multiple bases
Your handset can be registered on up to four bases. The active base is the last one your handset was registered with. The other bases are stored in the list of available bases. You can change the allocation to a base
manually at any time. Alternatively, you can set the handset so that it selects the base with the best reception (Best Base) as soon as the connection to the current base is lost.
¤ Menu key v ¤Menu page Settings ¤[ É Handsets + Base].
¤ To uc h Connected to Base ’ ¤Select the desired base or select Best Base (=selected).
Changing the handset name
When you register multiple handsets the names INT 1, INT 2 and so on are automatically assigned. To
change the name:
¤ In the Settings menu, touch [ É Handsets + Base].
¤ To uc h Registered Handsets ’ ¤Select handset.
¤ Delete the old name with $ and enter the new name (max. 10 alphanumerical characters) ¤ Confirm
è.
with
Making internal calls
Internal calls to other handsets registered to the same base are free of charge.
¤ Switch to the dial page ¤To uc h [ ‡Internal] ¤If necessary, select a handset from the list or touch All
Handsets (group call).
After opening the list, press
Internal consultation/internal transfer
You are speaking with an external participant and want to consult an internal participant or transfer the
call to him.
c to initiate a group call to all handsets.
¤ To uc h [ P Consultation] and then Internal.
¤ If more than two handsets are registered to the base, select one handset or All.
Consulting: You consult the internal participant and return to the external call:
¤ To uc h [ P End Consultation].
Transferring the external call: you have two options to transfer the external call:
¤ You wait until the participant answers your call and then you hang up.
a.
Press
or
¤ You hang up before the participant answers your call: Press a.
If the other participant does not answer your call, cancel the consultation call with [ P End Consul-
tation].
Establishing a conference call/call swapping
You are engaged in one conversation whilst another one is on hold. Both participants appear in the display.
¤ Call swapping: On the display, touch the participant with whom you wish to speak.
Or:
¤ Establish a three-way conference call: Touch [ Conference].
¤ End conference call: To uc h [ End Conference]. You return to "call swapping" and are again con-
nected to the participant with whom you initiated the conference.
Each of the callers can end their participation in the conference call by pressing the end call key and terminating the call.
24 de en fr it nl

Bluetooth devices
ò
L
Bluetooth
Own Device
Anna's SL910H
M
Known Devices
Headset 1
M
Activation
Only displayed if Bluetooth is active
Devices found
Headset 2
M
Mobile 1
on
ò
Bluetooth devices
You c an r egis ter u p to five data dev ices (PC , PDA , mo bile phones) and one Bluetooth headset. You must act ivate Bluetooth on the handset, ensure the devices are visible if necessary and then register the handset.
You can exchange entries in Contacts using the data devices and load ring tones and pictures to the handset
using the Gigaset QuickSync software (
Please note
u A headset must have the headset or handsfree profile. The handsfree profile is preferred.
u Establishing a connection to a headset can take up to 5 seconds.
£ page 36).
Activating/deactivating Bluetooth mode
You can activate/deactivate Bluetooth mode using the status page (£ page 12) or as follows:
¤ Menu key v ¤Menu page Settings ¤[ Bluetooth] ¤ Activate/deactivate Bluetooth using the
switch next to Activation.
If Bluetooth is activated:
u is displayed in the status bar (
u The handset can communicate with all devices in the
Known Devices list.
u The handset is visible to Bluetooth devices within its range.
u If the known devices include a headset, the handset estab-
lishes a connection to this headset.
u The handset searches for Bluetooth devices within range.
Finding and registering (trusting) Bluetooth devices
The distance between the handset and the activated Bluetooth device should be a maximum of 10 m.
£ page 37).
Please note
u If you register a headset, any previously registered headset is overwritten.
u If a headset is already registered to another device, please deactivate this connection before start-
ing the registration process.
Starting the search
The search starts as soon as the Bluetooth page is opened and Bluetooth has been activated.
The handset searches for Bluetooth devices within its range. Located devices are added to the Devices
found list.
Pairing the device
¤ Next to the list Devices found touch ’ (see image above).
¤ In the Devices found list, select device ¤Tou ch [ ÿTrust Device] ¤If necessary, enter the PIN of the
device to be registered
PIN for a data device: Enter any PIN on the handset and then also on the data device
(0 – 16 digits).
PIN for a headset: 0000 is generally preset. Therefore, you only need to enter the PIN in exceptional cases.
If Known Devices already contains six entries, the last entry is overwritten.
Exception: a headset only overwrites a headset.
Ending the search
¤ To uc h ‘ to close the submenu Bluetooth, or deactivate Bluetooth.
de en fr it nl 25
— adding the device to the known devices list
¤Confirm with è.

Bluetooth devices
Editing the list of paired (trusted) devices
Opening the list
¤ In the submenu Bluetooth next to Known Devices touch ’.
ô next to the device name in the list indicates a headset and * indicates a data device.
A
De-registering the device
¤ Open Known Devices list ¤Tou ch [ ü Delete] ¤Select one or more devices – next to the relevant
devices, touch
Changing the name of a device
´ ¤Tou ch [ü Delete] ¤To uc h Ye s.
¤ Open the Known Devices list ¤Select device ¤If necessary, delete the previous name with ç ¤Enter
name (max. 16 characters)
Rejecting/accepting an unregistered Bluetooth device
If an unknown Bluetooth device tries to establish a connection, you will be asked to enter the device's PIN
(bonding).
¤Confirm with è.
¤ Reject: To uc h ‘ or press a.
Or:
¤ Accept: Enter the device PIN ¤Confirm with è.
¤ To uc h Yes : Add to the Known Devices list, or
¤ To uc h No: Temporarily use device.
Changing the handset's Bluetooth name
¤ In the Bluetooth submenu, touch Own Device Own Device. Activates Bluetooth if it is deactivated¤If
necessary, delete the previous name with ç
Continuing a handset call on the Bluetooth headset
Prerequisite: Bluetooth is activated; the Bluetooth headset and the handset are connected.
¤Enter the new name ¤Confirm with è.
¤ Press the talk key on the headset.
It may take up to 5 seconds to establish a connection to the handset.
Use [ R Volu me] Headset Volume/Microphone Sensitivity to adjust.
For further details about your headset, see the accompanying user guide.
Please note
If a wire-bound headset and a Bluetooth headset are connected at the same time, you are unable to use
the wire-bound headset.
Accepting a call on a Bluetooth headset
Prerequisite: Bluetooth is activated; the Bluetooth headset and the handset are connected.
Only press the talk key on the headset when the headset rings.
For further details about your headset, see the accompanying user guide.
26 de en fr it nl

Contacts (address book)
L
New Entry
Add
M
Name
Add Number
M
Add Caller Ringtone
M
Add Birthday
M
è
Save
l
+
Ø
±
Contacts (address book)
You can save up to eight numbers, together with the first name and surname, birthdays/anniversaries with
signalling, VIP ring tone and caller picture in each Contacts entry. You can synchronise Contacts with the
Outlook contacts in your PC address book and upload ring tones and pictures to your handset (
You can create a Contacts list (with up to 500 entries) individually for each of your handsets. You can also
send lists/entries to other handsets (
ware (
£ page 36) to compare the Contacts list with your Google and Outlook contacts (£ page 36).
Please note
To quickly access a number from Contacts, you can place the number on the configurable page in the
idle display (
Length of the entries
8 numbers:
First name and surname:
£ page 9).
£ page 29). You can use your PC and the free Gigaset QuickSync soft-
Max. 32 digits each
Max. 16 characters each
Managing entries in Contacts
Opening Contacts
¤ Menu key v ¤[ œ Contacts] or
¤ To uc h [ œ Contacts] on the dial page or during a call.
Creating a new entry
¤ Open Contacts ¤To uch [d New Entry].
¤ Enter the components of each entry via the individual fields
(name, number, VIP ring tone, birthday). To do this, next to
the relevant component, touch ’
component with
To create an entry, you must enter at least one number.
è or [ ‰ Select].
¤If available, confirm a
¤ Add caller picture: Touch . Select picture with ë / ê and
then touch [ ‰ Select].
¤ Define a preferred number for an entry: The preferred num-
ber is automatically selected if you touch the entry in Contacts or press
green).
To change the setting: Press next to the desired number.
Saving a Contacts entry
c in the detail view. It is highlighted (in
¤ To uc h [ èSave].
Viewing an entry (detail view)
¤ Open Contacts ¤Next to the desired entry, touch ’.
All the information relating to the entry is displayed.
£ page 36).
de en fr it nl 27

Contacts (address book)
±
ü
Editing entries
¤ To uc h [ NEdit] in the detail view.
- Change/delete first name, surname, or number:
field
¤Enter/change name/number ¤Confirm with è.
- Add number: Touch ’ next to Add Number
- Assign a VIP ring tone or delete a birthday:
¤Tou ch [ ÷ No Ringtone] / [ þ No Birthday].
- Delete caller picture assignment:
- Change preferred number:
¤Touch the caller picture ¤Touc h [ ^ No Picture].
¤To activate a different preferred number, touch next to this number.
¤Tou ch [ è Save].
Deleting an entry
¤Tou c h ’ ¤If necessary, touch the corresponding
¤Enter the number and confirm with è.
¤Next to Add Caller Ringtone / Add Birthday touch ’
¤ In the detail view: Touch [ ü Delete] ¤Confirm with Ye s .
Delete all entries in Contacts:
¤ Menu key v ¤Menu page Settings ¤[ ÊSystem] ¤(Scroll if necessary)
¤Next to Clean-up List touch ’ ¤Next to Contacts touch ¤Confirm with Ye s .
Displaying the number of entries that are still available in Contacts
¤ Open Contacts ¤To uch [ X Memory].
Defining the order of entries in Contacts
Define whether the entries are to be sorted by first name or surname.
¤ Open Contacts ¤To uch [ Y Surname ] or [ Y First Name]
If an entry does not contain a name, the preferred number (number marked with the green dot
is copied to the surname field. These entries appear at the beginning of the list, regardless of how the
entries are sorted.
The sort order is as follows:
Space | Digits (0–9) | Letters (alphabetical) | Other characters.
£ page 27)
Selecting a Contacts entry, navigating in Contacts
If there are more than seven entries in your Contacts list, a scroll bar appears on the right-hand side. You
have the following options:
u Scroll to the name you are searching for.
u Touch the first letter in the index. The display jumps to the first name that begins with this letter. If nec-
essary, scroll until you reach the desired entry. While you are scrolling, the index is temporarily covered
by a scroll bar.
28 de en fr it nl

Contacts (address book)
Transferring an entry/Contacts to another handset
Prerequisites:
u The sending and receiving handsets must both be registered to the same base.
u The other handset and the base can send and receive Contacts entries.
You can transfer the entire Contacts list, an individual entry or multiple individual entries.
Please note
u An external call will interrupt the transfer.
u Caller pictures and sounds are not transferred. For a birthday, only the date is transferred.
u When transferring an entry between two vCard handsets:
If the recipient does not yet have an entry with that name, a new entry is created.
If there is already an entry with that name, this entry is expanded with the new numbers. Where
there are more than eight numbers in total, a second entry is created with the same name.
u If the recipient is not a vCard handset: an entry is created and sent for each number.
u Your handset receives entries from a non-vCard handset: entries with numbers already saved are
rejected; otherwise a new entry is created.
Transferring individual entries
¤ Open the detail view of the entry (£ page 27) ¤To uc h [ = Copy]
¤Respond to the prompt with Internal Handset ¤Select the recipient handset.
After a successful transfer:
¤ To uc h Yes if another entry should be sent. Otherwise touch No.
Transferring the entire Contacts list
¤ Open Contacts (£ page 27). Touch [ :Copy List] ¤Respond to the prompt with Internal Handset
¤Select the recipient handset.
Cancel transmission
¤ Press a.
Transferring Contacts as a vCard with Bluetooth
¤ Open Contacts (£ page 27).
¤ Send entire Contacts list: Touch [ :Copy List].
Or:
¤ Send entry: Next to the entry, touch ’ and then touch [ =Copy].
¤ In the pop-up that is displayed, touch BluetoothDevice. Bluetooth is activated, if necessary.
¤ Select recipient:
¤ Select the recipient from the list of known devices (£ page 26). The transfer starts. Or:
¤ To uc h [ þ Search] and select the recipient from the Devices found list ¤Enter the recipient's PIN
and touch
Receiving a vCard with Bluetooth
Prerequisite: the handset is in idle status. Bluetooth is activated.
è.
¤ If the sender is in the Known Devices (£ page 26) list, receipt occurs automatically.
¤ If the sender is not in the Known Devices list, enter the sender’s device PIN and touch è. Following the
vCard transfer, state whether the device should be added () to the Known Devices list (Yes ) or not (No).
de en fr it nl 29

Contacts (address book)
Mobile
Anne
Sand
0711
123456789
Caller picture
assigned:
Otherwise:
Adding a displayed number to Contacts
You can copy numbers that are displayed in a list (e.g., call list, redial list) , as well as numbers that you have
just dialled or entered for dialling, to Contacts.
¤ On the dial page or in the detail view of a list entry, touch [ ¬ Cop y Number] ( you ma y have to sc roll
in the options bar).
u Create new entry:
with number type Home
Or:
u Add a number to an existing entry:
¤Tou ch [d New Entry]. The number is transferred as the first number of the entry
¤Extend the entry if necessary ¤To uc h [ è Save].
¤ Select entry ¤Touch the Add switch.
Number is entered with number type Home
è Save].
[
Or:
¤If necessary, extend or change the entry ¤To uc h
¤ Select entry ¤Select the number that you want to overwrite ¤To uc h Ye s
¤If necessary, extend or change the entry ¤Tou ch [ è Save].
Copying a number from Contacts
In certain operating situations you can open the Contacts list to copy a number, e.g., when you are dialling
(even after you have entered a suffix).
¤ Depending on the operating situation, open the Contacts list with [ œ Contacts] or œ.
¤ Touch a Contacts entry to copy its preferred number.
Or:
¤ Next to the entry, touch ’ and then touch the number to be copied.
Configuring QuickDial/QuickDial shortcuts
Prerequisite: There must be at least one number in Contacts.
You can provide numbers from Contacts for the QuickDial (QuickDial) in two ways:
u Create a symbol on the configurable (own) page for each number.
u Transfer a number to the QuickDial shortcuts.
Creating a QuickDial icon on the configurable page
¤ Switch to the configurable page and start the configuration (page 9).
¤ Drag icon 3 for the QuickDial from the pick list to the page ¤Select the Contacts entry ¤The detail
view is displayed for an entry with several numbers: select the telephone number.
You can repeat this process several times with different numbers.
One of the icons on the right is created on the configurable page. The
number is not entered into the QuickDial shortcuts.
Dial number:
able page.
Change QuickDial:
¤Touch the QuickDial shortcut icon on the configur-
¤ Change the number in Contacts. The QuickDial on the configur-
able page changes accordingly.
Or:
¤ Delete the QuickDial on the configurable page and create a new QuickDial icon with the new number.
Delete QuickDial
¤ In configuration mode, drag the QuickDial icon to be deleted into the pick list. The Contacts entry does
not change.
30 de en fr it nl

Calls list (dependent on base)
L
Call List
ý
Josephine Foster M
š 16:00, Home
Josephine Foster M
™[2] 14:20, Mobile
089 666777888 M
› Yesterday, 14:20
Martin Grotte M
™13.06, 16:10, Office
˜
All
™
Missed›AcceptedšOutgoing
™
›
š
Or:
¤ Delete the number in Contacts. The QuickDial icon is automatically removed from the configurable
page.
Transferring the telephone number to the QuickDial shortcuts
You can save up to 7 frequently dialled numbers from Contacts in the QuickDial list so you can access them
quickly.
¤ Switch to the dial page ¤To uc h [ ¥QuickDial] ¤To uc h [dNew Entry] ¤Select the Contacts entry
¤The detail view is displayed for an entry with several numbers: select the telephone number.
Dialling a number:
¤ Switch to the dial page ¤To uc h [ ¥QuickDial] ¤Select entry.
- The number is dialled immediately if the number field on the dial page is empty.
- If the number field already contains characters, the number behind this character is inserted in the
number field.
¤If necessary, change the number in the number field ¤Press c.
Deleting entries:
¤ To uc h [ üDelete] ¤Touch all the entries to be deleted in sequence and then touch [ ü Delete].
Please note
If you change/delete a number from Contacts, the same number is automatically deleted from the
QuickDial list.
Calls list (dependent on base)
Your telephone stores various types of calls:
— All: Full list (Call List) of all calls (missed, outgoing,
u
incoming)
u Missed: List of missed (unaccepted) calls
u Accepted: List of accepted calls (
u Outgoing: List of outgoing calls (dialled numbers)
¤ If you open the call list via the messages page or the mes-
sage pop-up (
£ page 10), the Missed Calls is displayed.
¤ The full list of all calls is displayed when you open the call
list via:
-Menu key
-The option [
— Call List] on the configurable page.
- [
Switching between the lists of the different call types:
¤ At the bottom of the page, touch the icon for the desired
call type.
v ¤[ — Call List],
— Calls] on the dial page
de en fr it nl 31

Calendar
Mo Tu We Th Fr Sa Su
01 02 03 04 05 06 07
08 09 10 11 12 13 14
15 16 17 18 19 20 21
L
6 July 2010
Tex t
Appointment M
Time
22 58
23 59
00 : 00
01 01
02 01
Reminder
0 15 30 1 1 3 1
min. min. min. hour day days week
Sound: On
è
Save
w
L
Reminder Signal
Volu me
Ó
R
Ô
Crescendo
Sound
Gigaset
M
off
Calendar
You can remind yourself of up to 100 appointments. Birthdays
saved in Contacts are transferred to the calendar. The current
day is highlighted in grey in the calendar. Days with appointments are marked with a coloured bar. When you select a day,
it is highlighted in colour.
Saving appointments to the calendar
Prerequisite: The date and time have already been set.
¤ Menu key v ¤[ } Calendar] ¤Tou ch ë / ê to set the
¤Touch the desired day and then touch [ âNew].
month
The following information can be added:
- Tex t : Appointment name (e.g., dentist, cinema with
Anna).
- Time: Time (hour and minutes) for the appointment.
- Reminder: You can also set a reminder in advance of
the actual appointment. Use the slider to set a time
between 15 min. and 1 week.
- Sound: Touch q / ” to activate/deactivate the acoustic signal.
¤ To uc h [ èSave].
Setting the tones and volumes of the reminder signal
¤ Menu key v ¤Menu page Settings ¤
[ìAudio Se ttings] ¤Next to Reminder Signal touch ’.
¤ Set the volume using Ô / Ó or set increasing volume
using the switch next to Crescendo
¤ Next to Sound touch ’ ¤Select a ringer melody ¤Save
and return with ‘.
Signalling appointments and birthdays
An appointment/birthday is displayed in idle status and signalled for 60 seconds.
Deactivating the reminder signal :
¤ To uc h Off to acknowledge and end the reminder signal.
When you are on the phone, an appointment/birthday is indicated on the handset with a single advisory
tone.
Is the ring tone is deactivated, the reminder signal does not sound.
32 de en fr it nl

Number of new entries
Number of old entries
10
á
2
ü
L
Alarm
Time
22 58
23 59
00 : 00
01 01
02 01
Ringtone
04 Zivago
M
è
Save
Off
Mo SuSaFrThWeTu
Displaying unacknowledged appointments/birthdays
The following appointments and birthdays are saved in the Reminders / Events list:
u You have not acknowledged the reminder for this appointment/birthday.
u The appointment/birthday was signalled during a phone call.
u The handset was deactivated at the time of the appointment/birthday.
The last 20 entries are displayed.
The Reminders / Events list is displayed on the
messages page (
to it:
£ page 10) with the icon next
¤ Open list: Switch to the messages page and
â.
touch
Deleting entries
¤ Open list ¤To uc h [ üDelete] ¤To uch all t he
entries to be deleted in sequence and then
touch [ ü Delete].
Deleting all appointments from the list:
¤ Menu key v ¤Menu page Settings ¤[ ÊSystem] ¤Clean-up List (scroll if necessary) ¤Next to All
Past Appointments touch
All expired appointments from the calendar and all entries from the Reminders / Events list are deleted.
Alarm
Prerequisite: The date and time have already been set.
You can activate/deactivate and set the alarm clock using the
status page (
£ page 12) or as follows:
¤Confirm with Ye s.
¤ Menu key v ¤[ Ü Alarm] ¤Activate/deactivate the
alarm clock with the switch at the top of the display.
¤ To uc h [ NEdit] to change the settings for the alarm.
¤ Set the hour and minutes for the wake-up time.
¤ In the following line, touch the weekdays when the alarm
clock should sound (orange = selected).
¤ Next to Ringtone touch ’ ¤Select the ringer melody for
the wake-up call
¤Go back with ‘.
¤ To uc h [ èSave].
A wake-up call is signalled in the display and with the selected
ring tone for a maximum of 180 seconds. During a call, the
wake-up call is only signalled by a short tone.
Deactivating the wake-up call/repeating after a pause (snooze mode)
Prerequisite: A wake-up call sounds on the handset.
¤ Deactivate: Tou ch Off.
Or:
¤ Snooze mode: Touc h Snooze. The wake-up call is repeated after 5 minutes. After the second repetition
de en fr it nl 33
Please note
The wake-up call volume increases over time (fixed setting).
the wake-up call is deactivated for at least 24 hours.
Alarm

Baby phone call
L
Room Monitor
Off
Sensitivity
k
k
Forward alarm to
Number
(Not configured) M
è
Save
Low
Internal
High
External
Baby phone call
When the baby phone is switched on, the stored (internal or external) destination number is called as soon
as a defined noise level is exceeded in the vicinity of the handset.
A baby phone call to an external destination number is cancelled after approximately 90 seconds (= time
for connection to be set up + duration of the connection). The baby phone call to an internal number is cancelled after approx. 3 minutes (depending on the base). During a baby phone call, the accept call and menu
keys of the baby phone call handset are locked and the loudspeaker is deactivated.
Incoming calls are signalled only via the display, the lighting is reduced to 50%. Vibration alarm, ring tones,
advisory tones and paging are switched off.
If you accept an incoming call, the baby phone call mode is suspended for the duration of the call, but the
function remains activated.
The baby phone call is not deactivated by switching the handset off and on again.
Caution
u Always check the function when switching on (noise sensitivity, connection to an external num-
ber). Please note that the baby phone call is only activated 20 seconds after being switched on.
u Place the handset in the ch arger cradle so that the front with the microphone is facing the baby and
the distance between the handset and the baby is no more than 1 to 2 metres.
u No answering machine may be activated at the destination number.
Changing the settings
¤ Menu key v ¤[
Select the sensitivity (High or Low) and destination of the
babyphone call (Internal or External).
Room Monitor] ¤Tou ch [ N Edit] ¤
Ç
¤ Next to Number touch ’ ¤Enter the destination number
or select the internal participant.
¤ Confirm with è ¤To uc h [ è Save].
Activating/deactivating the baby phone call
¤ Switch on: Menu key v ¤[
the key on the right.
Room Monitor]¤Tou ch
Ç
¤ Switch off: On the handset on which the baby phone call
is activated, touch the key on the left.
Cancelling the baby phone call
¤ During a baby phone call, touch a.
Accepting the baby phone call
¤ On the destination phone/handset of the alarm call, press
the pick-up key
Deactivating the baby phone call remotely
Prerequisites: The destination of the baby phone call is an
external number. The recipient’s phone supports tone dialling (MFV).
¤ Accept the baby phone call and touch the 9 ; keys.
The call is ended. The baby phone call is deactivated and the handset is in idle mode.
c or pick up the receiver.
34 de en fr it nl

Screensaver, caller pictures and sounds
Applications
<
Å Å
>
Õ
Screensavers
[
Caller
Pictures
×
Sounds
ü
Screensaver, caller pictures and sounds
Mono/polyphonic sounds/ring tones and pictures are saved on the
handset (and can be selected as screensavers or caller pictures). You
can load additional pictures and sounds onto the handset from your PC
(
£ Gigaset QuickSync, page 36).
On the menu page Applications you will find the media pools Screensavers, Caller Pictures and Sounds, with which you can manage the
pictures and sounds saved on your telephone.
Viewing/deleting pictures
¤ Menu key v ¤[ ÕScreensavers] / [ [ Caller Pictures] ¤Drag your
finger from right to left or left to right over the display to view the individual pictures.
¤ Delete picture: Scroll to the picture ¤To uc h [ Delete] ¤Confirm with Ye s.
Playing back sounds
¤ Menu key v ¤ Tou ch [ î Sounds] ¤Select a sound.
de en fr it nl 35

Synchronising with your PC (Gigaset QuickSync)
Synchronising with your PC (Gigaset QuickSync)
You can:
u Synchronise your handset's Contacts list with your Google contacts online via the cloud
u Synchronise the Contacts on your handset with your PC’s Outlook directory.
u Load caller pictures to the handset from the PC.
u Download pictures as a screensaver from the PC to the handset.
u Download sounds (ring tones) from the PC to the handset.
u Make outgoing calls and accept incoming calls. The display on the handset behaves in the same way as
if the call were being handled directly on the handset.
u Update the firmware of your Gigaset SL910 handset (via USB only).
You can save the following image and sound formats on your handset:
Sound
– Ring tones
– Imported sounds
Format
Internal
WMA, MP3, WAV
Picture
– Caller picture
– Screensaver
Forma t
BMP, JPG, GIF
320 x 225 pixels
320 x 480 pixels
To enable your handset to communicate with a PC, the "Gigaset QuickSync" program (Version 7 or higher)
must be installed on your PC (free download and more information at www.gigaset.com/gigasetSL910
You can use this program to create a connection between PC and handset via Bluetooth (
(
£ page 25).
Please note
u Firmware can only be updated via a USB connection.
u If the USB data cable is plugged in, a Bluetooth connection cannot be established. If it is plugged in
during an existing Bluetooth connection, this is cancelled.
A detailed description can be found in the Gigaset QuickSync help file.
£ page 1) or USB
).
36 de en fr it nl

Display icons
T
:
=
N
Q
X
þ
õ
ü
Y
Options bar icons
The following functions are available in the options bar depending on the operating situation.
Icon Action
†
(orange) (Speaker mode is activated)
†
Ž
–
(orange) Unmute handset microphone
–
”
R Setting the volume
—
œ
¬
ø
‡
d
P Initiating a consultation call:
¥
Skip settings
è
f
?
Activate speaker mode
Deactivate speaker mode
Speaker profile
Mute handset microphone
Deactivating the ring tone
Open call lists
Opening Contacts
Accept number in Contacts
Deregistering the handset
Open list of internal callers/make
internal call
Create new Contacts entry
Initiate/end three-way conference
call
Speed dial
Copy list
Copy entry
Editing entries
Show keypad
Determine free memory in the media
pool
Search
Deleting
Save/select
Enter new appointment
Calendar: Set selected date to To d ay
Change order (sort by last name or
first name)
Icon Action
÷
\
þ
ÿ
ž
Contacts entry:
Delete caller ring tone assignment
Contacts entry:
Delete caller picture assignment
Delete birthday
Trust Bluetooth device found
Initiating ringback
‰ (green) Accepting a waiting call
Please note
The menu icons can be found in the menu
overview on page 39.
Display icons
de en fr it nl 37

Display icons
Ð
White if
Max. Range is on;
green if
Max. Range is off
}
i
Ñ
Ò¹¹
ò
ò ô
ó
¼ 06:00
U
V
e
=
=
=
e
V
U
š
#
b
Ø
w
Ú
Ø
Ù
Ú
Ø
á
Ú
+
-
‰
,
À
Icons in the status bar
The following icons are displayed in the status bar depending on the settings and the operating status of
your telephone:
Icon Meaning
Signal strength (No Radiation off)
76%–100%
51%–75%
26%–50%
1%–25%
Red: no connection to the base
No Radiation activated:
white if Max. Range is on;
green if Max. Range is off
Bluetooth activated
Bluetooth headset/data device
connected
Ring tone deactivated
Alarm switched on and wake-up time set
Signalling display icons
Establishing a connection
(outgoing call)
Connection
established
Icon Meaning
Battery charge status:
White: charged over 66%
White: charged between 34% and 66%
White: charged between 11% and 33%
Red: charged below 11%
Flashing red: battery almost empty
(less than 10 minutes talk time)
Battery charging
(current charge status):
0%–10%
11%–33%
34%–66%
67%–100%
Connection cannot be established/connection terminated
Other display icons
38 de en fr it nl
Internal/external
call
Information
Action complete
(green)
Alarm call Reminder call for appointment/birthday
(Security)
prompt
Warning Action failed
Please wait...
(red)

Customer Service & Assistance
Australia - - - - - - - - - - - - - +61 1300 780 878
Austria - - - - - - - - - - - - - - - -0043 1 311 3046
Bahrain - - - - - - - - - - - - - - - - - - -31 73 11 173
Belgium - - - - - - - - - - - - - - - - - - -07815 6679
Bosnia Herzegovina - - - - - - - - - 033 276 649
Brazil
Grandes Capitais e Regiões Metropolitanas:
- - - - - - - - - - - - - - - - - - - - - - - - - - -4003 3020
(Preço de uma ligação local)
- - - - - - - - - - - - - - - - - - - - Demais localidades:
- - - - - - - - - - - - - - - - - - - - - - - 0800 888 3020
(Gratuito)
Bulgaria - - - - - - - - - - - - - - - +359 2 9710666
Canada - - - - - - - - - - - - - - - - 1-866 247-8758
China - - - - - - 0 21 400 670 6007 (RMB 0.11)
Croatia - - - - - - - - - - - - - - - - - - 01 / 2456 555
Czech Republic- - - - - - - - - - - - - 233 032 727
Denmark - - - - - - - - - - - - - - - +45 43682003
Finland - - - - - - - - - - - - -+358 (0)9725 19734
Franc e- - - - - - - - - - - - - - +33 (0)157 324 522
Germany- - - - - - - - - - - - - - - - 01805 333 222
Greece - - - - - - - - - - - - - - +30 2111 98 1778
Hong Kong - - - - - - - - - - - - - - - - - -2763 0203
- - - - - - - - - - - - - - - - - - - - - - - - - - - -2389 7285
Hungary - - - - - - - - - - - - - - - - - - 01 267 2109
India - - - - - - - - - - - - - - - - Please refer to your
- - - - - - - - - - - - - - - - - - - - -local warranty card
Indonesia - - - - - - - - - - - - - -(62-21) 5673813
- - - - - - - - - - - - - - - - - - - (62-21) 888856000
Ireland - - - - - - - - - - - - - - - - - - 0818 200 033
Italy - - - - - - - - - - - - - -(0039) 02.600.630.45
(il costo della chiamata, è legato al proprio
piano tariffario con l’operatore telefonico (ad
esempio se si ha un piano che prevede una
tariffa FLAT, in questo caso essendo questo un
numero urbano nazionale, non ci sono costi
aggiuntivi per la chiamata)
Jordan - - - - - - - - - - - - 00962 6 5625460/1/2
Kuwait - - - - - - - +965 -22458737/22458738
Lebanon - - - - - - - - - - - - - - - -+9611240259/
- - - - - - - - - - - - - - - - - - - - - - - +9611236110
Luxembourg- - - - - - - - - - (+352) 8002 3811
Malaysia - - - - - - - - - - - - - - +603-8076 9696
Malta- - - - - - - - - - +39 02360 46111 (0,10 €)
Mexico
01800 999 4442738 (01800 999 GIGASET)
Netherlands - - - - - - - - - - - - - 0900-3333102
New Zealand - - - - - - - - - - - - - -0800 780 878
Norway - - - - - - - - - - - - - - - - -+47 2231 0845
Oman - - - - - - - - +968 70928 Ext. 49/21/75
Poland - - - - - - - - - - - - - - - - - - - -801 140 160
Port ugal - - - - - - - - - - - - (+351) 808 788 877
- - - - - - - - - - - (custo de uma chamada local)
Romania - - - - - - - - - - - - - +40 021 204 9130
Russia - - - - - - - - - - - - - - - - - 8-800 333 4956
Serbia - - - - - - - - - - - - - - - - - - -0800 222 111
Singapore - - - - - - - - - - - - - - - - - - 6735 9100
Slovak Republic - - - - - - 044 5567 988 alebo
- - - - - - - - - - - - - - - - - - - - - - - - 02 59682266
Slovenija - - - - - - - - - - - - - - - - - -01 5466 511
South Africa- - - - - - - - - - - - - - 0800 98 08 42
Spain - - - - - - - - - - - - - - - - - - - - - 902 103935
Sweden
- - - - - - - - - - - - - +46 (0)8502 52347
Sw
itzerland - - - - - - - - - - - - - - -0848 212 000
Tai wa n - - - - - - - - - - - - - - - - - - -02 266 24343
Tur key - - - - - - - - - - - - - - -+90 216 223 01 57
Ukraine - - - - - - - - - - - - -+380-44-451-71-72
United Arab Emirates - - - - - +97144458255
- - - - - - - - - - - - - - - - - - - - - - +97144458254
United Kingdom - - - - - - - - - - 084503 18190
USA - - - - - - - - - - - - - - - - - - -1-866 247-8758
- - - - - - - - - - - - - - - - - - - - - - - - - - - - - - tollfree
Customer Service & Assistance
Do you have any questions? As a Gigaset customer, you can find help quickly in this User Manual and in the
service section of our Gigaset online portal www.gigaset.com/service
Please register your phone online right after purchase.
This enables us to provide you with even better service regarding questions or a warranty claim. In order to
contact our customer service via email, please use the email contact form from our Gigaset online portal
after selecting your home country.
Our representatives are also available on the telephone hotlines for consultation.
Please have your record of purchase ready when calling.
Replacement or repair services are not offered in countries where our product is not sold by authorised
dealers.
de en fr it nl 39
.

Customer Service & Assistance
Questions and answers
If you have any queries about the use of the telephone, suggested solutions are available on the Internet at
www.gigaset.com/service
¤FAQ ¤First steps for troubleshooting
The table below also lists steps for troubleshooting.
Registration or connection problems with a Bluetooth headset.
¥ Reset the Bluetooth headset (see the user guide for your headset).
¥ Delete registration data from the handset when de -registering the device (£page 26).
¥ Repeat the registration process (£ page 25).
There is nothing on the display and the display does not react when you touch it.
1. The handset is not activated.
¥ Press and hold a.
2. The battery is flat.
¥ Charge or replace the battery (£ page 5).
3. The keypad and display lock is activated.
¥ Press and hold the menu key v.
"Base connection lost - Searching for base ... " flashes on the display.
1. The handset is outside the range of the base.
¥ Move the handset closer to the base.
2. The base is not activated.
¥ Check the base power adapter.
3. The base’s range is reduced because Eco Mode is activated.
¥ Deactivate Eco Mode (£ page 23) or reduce the distance between the handset and the base.
"Handset not registered to any base" flashes on the display.
The handset has not yet been registered or was de-registered because an additional handset was registered .
¥ Register the handset again (£ page 6).
The handset does not ring.
1. The ring tone is deactivated.
¥ Activate the ring tone (£ page 21).
2. Call divert is set to "All Calls".
¥ Deactivate call divert .
3. The phone does not ring if the caller has withheld his number.
¥ Activate the ring tone for unknown calls.
4. Telephone does not ring in a certain period of time.
¥ Time control for external calls is activated (£ page 22).
The other party cannot hear you.
The handset is "muted".
¥ Unmute the microphone (£ page 19).
The caller's number is not displayed.
1. Calling Line Identification (CLI) is not enabled for the caller.
¥ The caller should ask his network provider to enable Calling Line Identification (CLI).
2. Calling line display (CLIP) is not supported by the network provider or has not been enabled for you.
¥ Have calling line display (CLIP) enabled by your network provider.
3. Your telephone is connected via a PABX or a router with an integrated PABX (gateway) that does not transmit all information.
¥ Reset the system: briefly pull out the power plug. Reinsert the plug and wait until the device restarts.
¥ Check the se ttings on the PABX and activate phone number display, if necessary. To do this, search for terms such
as CLIP, calling line identification, phone number identification, caller ID etc. in the system’s user guide or ask the
system manufacturer.
40 de en fr it nl

Customer Service & Assistance
You hear an error tone when keying an input.
Action has failed/invalid input.
¥ Repeat the process.
Read the display and refer to the user guide if necessary.
You cannot listen to messages on the network mailbox.
Your PABX is set to pulse dialling.
¥ Set your PABX to tone dialling.
Check handset service information
You will need the service information if you call our hotline.
Prerequisite: A call is not in progress.
¤ Briefly touch any point in the status bar and then touch Show Service Info.
Authorisation
This device is intended for use within the European Economic Area and Switzerland. If used in other countries, it must first be approved nationally in the country in question.
Country-specific requirements have been taken into consideration.
We, Gigaset Communications GmbH, declare that this device meets the essential requirements and other
relevant regulations laid down in Directive 1999/5/EC.
A copy of the Declaration of Conformity is available at this Internet address:
www.gigaset.com/docs
Guarantee Certificate United Kingdom
Without prejudice to any claim the user (customer) may have in relation to the dealer or retailer, the customer shall be granted a manufacturer's Guarantee under the conditions set out below:
u In the case of new devices and their components exhibiting defects resulting from manufacturing and/
or material faults within 24 months of purchase, Gigaset Communications shall, at its own option and
free of charge, either replace the device with another device reflecting the current state of the art, or
repair the said device. In respect of parts subject to wear and tear (including but not limited to, batteries,
keypads, casing), this warranty shall be valid for six months from the date of purchase.
u This Guarantee shall be invalid if the device defect is attributable to improper treatment and/or failure
to comply with information contained in the user guides.
u This Guarantee shall not apply to or extend to services performed by the authorised dealer or the cus-
tomer themselves (e. g. installation, configuration, software downloads). User guides and any software
supplied on a separate data medium shall be excluded from the Guarantee.
u The purchase receipt, together with the date of purchase, shall be required as evidence for invoking the
Guarantee. Claims under the Guarantee must be submitted within two months of the Guarantee default
becoming evident.
u Ownership of devices or components replaced by and returned to Gigaset Communications shall vest
in Gigaset Communications.
u This Guarantee shall apply to new devices purchased in the European Union. For Products sold in the
United Kingdom the Guarantee is issued by: Gigaset Communications UK Limited, 2 White Friars, Chester, CH1 1NZ.
de en fr it nl 41

Customer Service & Assistance
u Any other claims resulting out of or in connection with t he d evi ce s hal l be exc lud ed f rom th is G uar ant ee.
Nothing in this Guarantee shall attempt to limit or exclude a Customers Statutory Rights, nor the manufacturer's liability for death or personal injury resulting from its negligence.
u The duration of the Guarantee shall not be extended by services rendered under the terms of the Guar-
antee.
u Insofar as no Guarantee default exists, Gigaset Communications reserves the right to charge the cus-
tomer for replacement or repair.
u The above provisions does not imply a change in the burden of proof to the detriment of the customer.
To invoke this Guarantee, please contact the Gigaset Communications telephone service. The relevant number is to be found in the accompanying user guide.
Guarantee Certificate Ireland
Without prejudice to any claim the user (customer) may have in relation to the dealer or retailer, the customer shall be granted a manufacturer’s Guarantee under the conditions set out below:
u In the case of new devices and their components exhibiting defects resulting from manufacturing and/
or material faults within 24 months of purchase, Gigaset Communications shall, at its own option and
free of charge, either replace the device with another device reflecting the current state of the art, or
repair the said device. In respect of parts subject to wear and tear (including but not limited to, batteries,
keypads, casing), this warranty shall be valid for six months from the date of purchase.
u This Guarantee shall be invalid if the device defect is attributable to improper care or use and/or failure
to comply with information contained in the user manuals. In par ticular claims under the Guarantee can-
not be made if:
u The device is opened (this is classed as third party intervention)
u Repairs or other work done by persons not authorised by Gigaset Communications.
u Components on the printed circuit board are manipulated
u The software is manipulated
u Defects or damage caused by dropping, breaking, lightning or ingress of moisture. This also applies if
defects or damage was caused by mechanical, chemical, radio interference or thermal factors (e.g.:
microwave, sauna etc.)
u Devices fitted with accessories not authorised by Gigaset Communications
u This Guarantee shall not apply to or extend to services performed by the authorised dealer or the cus-
tomer themselves (e.g. installation, configuration, software downloads). User manuals and any software
supplied on a separate data medium shall be excluded from the Guarantee.
u The purchase receipt, together with the date of purchase, shall be required as evidence for invoking the
Guarantee. Claims under the Guarantee must be submitted within two months of the Guarantee default
becoming evident.
u Ownership of devices or components replaced by and returned to Gigaset Communications shall vest
in Gigaset Communications.
u This Guarantee shall apply to new devices purchased in the European Union. For Products sold in the
Republic of Ireland the Guarantee is issued by Gigaset Communications UK Limited, 2 White Friars, Ches-
ter, CH1 1NZ.
u Any other claims resulting out of or in connection with t he d evi ce s hal l be exc lud ed f rom th is G uar ant ee.
Nothing in this Guarantee shall attempt to limit or exclude a Customers Statutory Rights, nor the manu-
facturer’s liability for death or personal injury resulting from its negligence.
u The duration of the Guarantee shall not be extended by services rendered under the terms of the Guar-
antee.
u Insofar as no Guarantee default exists, Gigaset Communications reserves the right to charge the cus-
tomer for replacement or repair.
u The above provisions does not imply a change in the burden of proof to the detriment of the customer.
To invoke this Guarantee, please contact the Gigaset Communications helpdesk. This number is also to be
found in the accompanying user guide.
42 de en fr it nl

Environment
Exclusion of liability
The display on your handset has a resolution of 480x320 pixels, which is achieved with the aid of 460,800
control elements. Each pixel consists of three subpixels (red, green, blue).
It may be the case that a pixel is incorrectly controlled or has a colour deviation. This is normal and no rea-
son for a warranty claim.
The following table shows the number of pixel errors that may occur without leading to a warranty claim.
Description Maximum number of permitted pixel errors
Colour illuminated subpixels 1
Dark subpixels 1
Total number of coloured and dark subpixels 1
Please note
Signs of wear on the display and housing are excluded from the warranty.
Environment
Our environmental statement
We at Gigaset Communications GmbH are aware of our social responsibility. That is why we actively take
steps to create a better world. In all areas of our business – from product planning and production to sales
and waste of disposal – following our environmental conscience in everything we do is of utmost importance to us.
Learn more about our earth-friendly products and processes online at www.gigaset.com
.
Environmental management system
Gigaset Communications GmbH is certified pursuant to the international standards ISO
14001 and ISO 9001.
ISO 14001 (Environment): Certified since September 2007 by TÜV SÜD Management
Service GmbH.
ISO 9001 (Quality): Certified since 17/02/1994 by TÜV SÜD Management Service GmbH.
Disposal
Batteries should not be disposed of in general household waste. Observe the local waste disposal regulations, details of which can be obtained from your local authority.
All electrical and electronic equipment must be disposed of separately from general household waste using
the sites designated by local authorities.
If a product displays this symbol of a crossed-out rubbish bin, the product is subject to
European Directive 2002/96/EC.
The appropriate disposal and separate collection of used equipment serve to prevent
potential harm to the environment and to health. They are a precondition for the re-use
and recycling of used electrical and electronic equipment.
For further information on disposing of your used equipment, please contact your local
authority or your refuse collection service.
de en fr it nl 43

Appendix
!
Appendix
Care
Wipe the device with a damp cloth or an antistatic cloth. Do not use solvents or microfibre cloths.
Never use a dry cloth; this can cause static.
In rare cases, contact with chemical substances can cause changes to the device’s exterior. Due to the wide
variety of chemical products available on the market, it was not possible to test all substances.
Impairments in high-gloss finishes can be carefully removed using display polishes for mobile phones.
Contact with liquid
If the device comes into contact with liquid:
1 Disconnect the power supply.
2 Remove the batteries and leave the battery compartment open.
3 Allow the liquid to drain from the device.
4 Pat all parts dry.
5 Place the device in a dry, warm place for at least 72 hours (not in a microwave, oven etc.)
with the battery compartment open and the keypad facing down (if applicable).
6 Do not switch on the device again until it is completely dry.
When it has fully dried out, you will normally be able to use it again
Specifications
Battery
Technology: Lithium ion (Li-Ion):
Voltage: 3.7 V
Capacity: 1000 mAh
Type: V30145-K1310-X447
Due to the constant progression in battery development, the list of recommended batteries in the FAQ sec-
tion of the Gigaset Customer Care pages is updated regularly:
www.gigaset.com/service
Handset operating times/charging times
The operating time of your Gigaset depends on the capacity and age of the battery and the way it is used.
(All times are maximum possible times.)
Standby time (hours) * 200
Standby time in Eco mode+ (hours) * 130
Talktime (hours) 14
Operating time for 1.5 hours of calls per day (hours) * 106
Operating time in Eco mode+ for 1.5 hours of calls per day (hours) * 75
Charging time in charger cradle (hours) 5
* Without display backlight
44 de en fr it nl

Open Source software
Information about the USB port
u The handset’s battery is charged using a USB connection with a power supply of 500 mA.
u On USB connections with lower charging currents, the consumption of the handset itself may be
greater than the recharging. In this case, the battery charge decreases.
General specifications
DECT
DECT standard Supported
GAP standard Supported
No. of channels 60 duplex channels
Radio frequency range 1880 – 1900 MHz
Duplex method Time division multiplexing, 10 ms frame length
Repeat frequency of the transmission pulse 100 Hz
Length of the transmission pulse 370 μs
Channel grid 1728 kHz
Bit rate 1152 kbit/s
Modulation GFSK
Language code 32 kbit/s
Transmission power 10 mW average power per channel,
Range Up to 50 m in buildings, up to 300 m outdoors
Ambient conditions for operation +5°C to +45°C, 20% to 75% relative humidity
Bluetooth
Radio frequency range 2402–2480 MHz
Transmission power 1 mW pulse power
250 mW pulse power
Open Source software
General
Your Gigaset unit includes, among other things, Open Source software that is subject to various licence conditions. The
gran ting o f right s of us e with regard to the O pen So urce so ftwar e that go beyo nd the operat ion of the uni t in th e form p roduced by Gigaset Communications GmbH is regulated in the relevant licence conditions of the Open Source Software.
Licence and copyright information
Your Gigaset unit includes Open Source software which is subject to the GNU General Public License (GPL) or the GNU
Lesser General Public License (LGPL). The corresponding licence conditions are printed at the end of this chapter in their
original version. You can download the corresponding source code from the Internet at www.gigaset.com/opensource/
Within three years after the product is purchased, the cor responding source code can also be requested from Gigaset Communications GmbH. Please use the contact options specified at www.gigaset.com/service
Licence texts
GNU GENERAL PUBLIC LICENSE
Version 2, June 1991
©
Copyright
1989, 1991 Free Software Foundation, Inc., 51 Franklin Street, Fifth Floor, Boston, MA 02110-1301 USA
Everyone is permitted to copy and distribute verbatim copies of this license document, but changing it is not allowed.
de en fr it nl 45
.
.

Open Source software
Preamble
The licenses for most software are designed to take away your freedom to share and change it. By contrast, the GNU General Public License
is intended to guarantee your freedom to share and change free software--to make sure the software is free for all its users. This General
Public License applies to most of the Free Software Foundation's software and to any other program whose authors commit to using it. (Some
other Free Software Foundation software is covered by the GNU Lesser General Public License instead.) You can apply it to your programs,
too.
When we speak of free software, we are referring to freedom, not price. Our General Public Licenses are designed to make sure that you
have the freedom to distribute copies of free software (and charge for this service if you wish), that you receive source code or can get it if
you want it, that you can change the software or use pieces of it in new free programs; and that you know you can do these things.
To protect your rights, we need to make restrictions that forbid anyone to deny you these rights or to ask you to surrender the rights. These
restrictions translate to certain responsibilities for you if you distribute copies of the software, or if you modify it.
For example, if you distribute copies of such a program, whether gratis or for a fee, you must give the recipients all the rights that you have.
You must make sure that they, too, receive or can get the source code. And you must show them these terms so they know their rights.
We protect your rights with two steps: (1) copyright the software, and (2) offer you this license which gives you legal permission to copy,
distribute and/or modify the software.
Also, for each author's protection and ours, we want to make certain that everyone understands that there is no warranty for this free software.
If the software is modified by someone else and passed on, we want its recipients to know that what they have is not the original, so that any
problems introduced by others will not reflect on the original authors' reputations.
Finally, any free program is threatened constantly by software patents. We wish to avoid the danger that redistributors of a free program will
individually obtain patent licenses, in effect making the program proprietary. To prevent this, we have made it clear that any patent must be
licensed for everyone's free use or not licensed at all.
The precise terms and conditions for copying, distribution and modification follow.
TERMS AND CONDITIONS FOR COPYING, DISTRIBUTION AND MODIFICATION
0. This License applies to any program or other work which contains a notice placed by the copyright holder saying it may be distributed
under the terms of this General Public License. The "Program", below, refers to any such program or work, and a "work based on the Program" means either the Program or any derivative work under copyright law: that is to say, a work containing the Program or a portion of it,
either verbatim or with modifications and/or translated into another language. (Hereinafter, translation is included without limitation in the term
"modification".) Each licensee is addressed as "you".
Activities other than copying, distribution and modification are not covered by this License; they are outside its scope. The act of running the
Program is not restricted, and the output from the Program is covered only if its contents constitute a work based on the Program (independent of having been made by running the Program). Whether that is true depends on what the Program does.
1. You may copy and distribute verbatim copies of the Program's source code as you receive it, in any medium, provided that you conspicu-
nd appropriately publish on each copy an appropriate copyright notice and disclaimer of warranty; keep intact all the no tices that refer
ously a
to this License and to the absence of any warranty; and give any other recipients of the Program a copy of this License along with the Program.
You may charge a fee for the physical act of transferring a copy, and you may at your option offer warranty protection in exchange for a fee.
2. You may modify your copy or copies of the Program or any portion of it, thus forming a work based on the Program, and copy and distribute
such modifications or work under the terms of Section 1 above, provided that you also meet all of these conditions:
a) You must cause the modified files to carry prominent notices stating that you changed the files and the date of any change.
b) You must cause any work that you distribute or publish, that in whole or in part contains or is derived from the Program or any part thereof,
to be licensed as a whole at no charge to all third parties under the terms of this License.
c) If the modified program normally reads commands interactively when run, you must cause it, when started running for such interactive use
in the most ordinary way, to print or display an announcement including an appropriate copyright notice and a notice that there is no warranty
(or else, saying that you provide a warranty) and that users may redistribute the program under these conditions, and telling the user how to
view a copy of this License. (Exception: if the Program itself is interactive but does not normally print such an announcement, your work based
on the Program is not required to print an announcement.)
These requirements apply to the modified work as a whole. If identifiable sections of that work are not derived from the Program, and can be
reasonably considered independent and separate works in themselves, then this License, and its terms, do not apply to those sections when
you distribute them as separate works. But when you distribute the same sections as part of a whole which is a work based on the Program,
the distribution of the whole must be on the terms of this License, whose permissions for other licensees extend to the entire whole, and thus
to each and every part regardless of who wrote it.
Thus, it is not the intent of this section to claim rights or contest your rights to work written entirely by you; rather, the intent is to exercise the
right to control the distribution of derivative or collective works based on the Program.
46 de en fr it nl

Open Source software
In addition, mere aggregation of another work not based on the Program with the Program (or with a work based on the Program) on a volume
of a storage or distribution medium does not bring the other work under the scope of this License.
3. You may copy and distribute the Program (or a work based on it, under Section 2) in object code or executable form under the terms of
Sections 1 and 2 above provided that you also do one of the following:
a) Accompany it with the complete corresponding machine-readable source code, which must be distributed under the terms of Sections 1
and 2 above on a medium customarily used for software interchange; or,
b) Accompany it with a written offer, valid for at least three years, to give any third party, for a charge no more than your cost of physically
performing source distribution, a complete machine-readable copy of the corresponding source code, to be distributed under the terms of
Sections 1 and 2 above on a medium customarily used for software interchange; or,
c) Accompany it with the information you received as to the offer to distribute corresponding source code. (This alternative is allowed only
for noncommercial distribution and only if you received the program in object code or executable form with such an offer, in accord with Subsection b above.)
The source code for a work means the preferred form of the work for making modifications to it. For an executable work, complete source
code means all the source code for all modules it contains, plus any associated interface definition files, plus the scripts used to control compilation and installation of the executable. However, as a special exception, the source code distributed need not include anything that is
normally distributed (in either source or binary form) with the major components (compiler, kernel, and so on) of the operating system on
which the executable runs, unless that component itself accompanies the executable.
If distribution of executable or object code is made by offering access to copy from a designated place, then offering equivalent access to
copy the source code from the same place counts as distribution of the source code, even though third parties are not compelled to copy the
source along with the object code.
4. You may not copy, modify, sublicense, or distribute the Program except as expressly provided under this License. Any attempt otherwise
to copy, modify, sublicense or distribute the Program is void, and will automatically terminate your rights under this License. However, parties
who have received copies, or rights, from you under this License will not have their licenses terminated so long as such parties remain in full
compliance.
5. You are not required to accept this License, since you have not signed it. However, nothing else grants you permission to modify or distribute the Program or its derivative works. These actions are prohibited by law if you do not accept this License. Therefore, by modifying or
distributing the Program (or any work based on the Program), you indicate your acceptance of this License to do so, and all its terms and
conditions for copying, distributing or modifying the Program or works based on it.
6. Each time you redistribute the Program (or any work based on the Program), the recipient automatically receives a license from the original
licensor to copy, distribute or modify the Program subject to these terms and conditions. You may not impose any further restrictions on the
recipients' exercise of the rights granted herein. You are not responsible for enforcing compliance by third parties to this License.
7. If, as a consequence of a court judgment or allegation of patent infringement or for any other reason (not limited to patent issues), conditions are imposed on you (whether by court order
you from the conditions of this License. If you cannot distribute so as to satisfy simultaneously your obligations under this License and any
other pertinent obligations, then as a consequence you may not distribute the Program at all. For example, if a patent license would not permit
royalty-free redistribution of the Program by all those who receive copies directly or indirectly through you, then the only way you could satisfy
both it and this License would be to refrain entirely from distribution of the Program.
If any portion of this section is held invalid or unenforceable under any particular circumstance, the balance of the section i s intended to apply
and the section as a whole is intended to apply in other circumstances.
It is not the purpose of this section to induce you to infringe any patents or other property right claims or to contest validity of any such claims;
this section has the sole purpose of protecting the integrity of the free software distribution system, which is implemented by public license
practices. Many people have made generous contributions to the wide range of software distributed through that system in reliance on consistent application of that system; it is up to the author/donor to decide if he or she is willing to distribute software through any other system
and a licensee cannot impose that choice.
This section is intended to make thoroughly clear what is believed to be a consequence of the rest of this License.
8. If the distribution and/or use of the Program is restricted in certain countries either by patents or by copyrighted interfaces, the original
copyright holder who places the Program under this License may add an explicit geographical distribution limitation excluding those countries,
so that distribution is permitted only in or among countries not thus excluded. In such case, this License incorporates the limitation as if written
in the body of this License.
9. The Free Software Foundation may publish revised and/or new versions of the General Public License from time to time. Such new versions will be similar in spirit to the present version, but may differ in detail to address new problems or concerns.
Each version is given a distinguishing version number. If the Program specifies a version number of this License which applies to it and "any
later version", you have the option of following the terms and conditions either of that version or of any later version published by the Free
Software Foundation. If the Program does not specify a version number of this License, you may choose any version ever published by the
Free Software Foundation.
10. If you wish to incorporate parts of the Program into other free programs whose distribution conditions are different, write to the author to
ask for permission. For software which is copyrighted by the Free Software Foundation, write to the Free Software Foundation; we sometimes
, agreement or otherwise) that contradict the conditions of this License, they do not excuse
de en fr it nl 47

Open Source software
make exceptions for this. Our decision will be guided by the two goals of preserving the free status of all derivatives of our free software and
of promoting the sharing and reuse of software generally.
NO WARRANTY
11. BECAUSE THE PROGRAM IS LICENSED FREE OF CHARGE, THERE IS NO WARRANTY FOR THE PROGRAM, TO THE EXTENT
PERMITTED BY APPLICABLE LAW. EXCEPT WHEN OTHERWISE STATED IN WRITING THE COPYRIGHT HOLDERS AND/OR OTHER
PARTIES PROVIDE THE PROGRAM "AS IS" WITHOUT WARRANTY OF ANY KIND, EITHER EXPRESSED OR IMPLIED, INCLUDING,
BUT NOT LIMITED TO, THE IMPLIED WARRANTIES OF MERCHANTABILITY AND FITNESS FOR A PARTICULAR PURPOSE. THE
ENTIRE RISK AS TO THE QUALITY AND PERFORMANCE OF THE PROGRAM IS WITH YOU. SHOULD THE PROGRAM PROVE
DEFECTIVE, YOU ASSUME THE COST OF ALL NECESSARY SERVICING, REPAIR OR CORRECTION.
12. IN NO EVENT UNLESS REQUIRED BY APPLICABLE LAW OR AGREED TO IN WRITING WILL ANY COPYRIGHT HOLDER, OR ANY
OTHER PARTY WHO MAY MODIFY AND/OR REDISTRIBUTE THE PROGRAM AS PERMITTED ABOVE, BE LIABLE TO YOU FOR DAMAGES, INCLUDING ANY GENERAL, SPECIAL, INCIDENTAL OR CONSEQUENTIAL DAMAGES ARISING OUT OF THE USE OR INABILITY TO USE THE PROGRAM (INCLUDING BUT NOT LIMITED TO LOSS OF DATA OR DATA BEING RENDERED INACCURATE OR
LOSSES SUSTAINED BY YOU OR THIRD PARTIES OR A FAILURE OF THE PROGRAM TO OPERATE WITH ANY OTHER PROGRAMS),
EVEN IF SUCH HOLDER OR OTHER PARTY HAS BEEN ADVISED OF THE POSSIBILITY OF SUCH DAMAGES.
END OF TERMS AND CONDITIONS
How to Apply These Terms to Your New Programs
If you develop a new program, and you want it to be of the greatest possible use to the public, the best way to achieve this is to make it free
software which everyone can redistribute and change under these terms.
To do so, attach the following notices to the program. It is safest to attach them to the start of each source file to most effectively convey the
exclusion of warranty; and each file should have at least the "copyright" line and a pointer to where the full notice is found.
<one line to give the program's name and a brief idea of what it does.>
©
<year> <name of author>
Copyright
This program is free software; you can redistribute it and/or modify it under the terms of the GNU General Public License as pu blished by the
Free Software Foundation; either version 2 of the License, or (at your option) any later version.
This program is distributed in the hope that it will be useful, but WITHOUT ANY WARRANTY; without even the implied warranty of MERCHANTABILITY or FITNESS FOR A PARTICULAR PURPOSE. See the GNU General Public License for more details.
You should have received a copy of the GNU General Public License along with this program; if not, write to the Free Software Foundation,
Inc., 51 Franklin Street, Fifth Floor, Boston, MA 02110-1301 USA.
Also add information on how to contact you by electronic and paper mail.
If the program is interactive, make it output a short notice like this when it starts in an interactive mode:
Gnomovision version 69, Copyright
Gnomovision comes with ABSOLUTELY NO WARRANTY; for details type `show w'.
This is free software, and you are welcome to redistribute it under certain conditions; type `show c' for details.
The hypothetical commands `show w' and `show c' should show the appropriate parts of the General Public License. Of course, the commands you use may be called something other than `show w' and `show c'; they could even be mouse-clicks or menu items--whatever suits
your program.
You should also get your employer (if you work as a programmer) or your school, if any, to sign a "copyright disclaimer" for the program, if
necessary. Here is a sample; alter the names:
Yoyodyne, Inc., hereby disclaims all copyright interest in the program `Gnomovision' (which makes passes at compilers) written by James
Hacker.
<signature of Ty Coon>, 1 April 1989
Ty Coon, President of Vice
This General Public License does not permit incorporating your program into proprietary programs. If your program is a subroutine library,
you may consider it more useful to permit linking proprietary applications with the library. If this is what you want to do, use the GNU Lesser
General Public License instead of this License.
©
year name of author
GNU LESSER GENERAL PUBLIC LICENSE
Version 2.1, February 1999
©
1991, 1999 Free Software Foundation, Inc. 51 Franklin Street, Fifth Floor, Boston, MA 02110-1301 USA
Copyright
Everyone is permitted to copy and distribute verbatim copies of this license document, but changing it is not allowed.
48 de en fr it nl

Open Source software
[This is the first released version of the Lesser GPL. It also counts as the successor of the GNU Library Public License, version 2, hence the
version number 2.1.]
Preamble
The licenses for most software are designed to take away your freedom to share and change it. By contrast, the GNU General Public Licenses
are intended to guarantee your freedom to share and change free software--to make sure the software is free for all its users.
This license, the Lesser General Public License, applies to some specially designated software packages--typically libraries--of the Free Software Foundation and other authors who decide to use it. You can use it too, but we suggest you first think carefully about whether this license
or the ordinary General Public License is the better strategy to use in any particular case, based on the explanations below.
When we speak of free software, we are referring to freedom of use, not price. Our General Public Licenses are designed to make sure that
you have the freedom to distribute copies of free software (and charge for this service if you wish); that you receive source code or can get
it if you want it; that you can change the software and use pieces of it in new free programs; and that you are informed that you can do these
things.
To protect your rights, we need to make restrictions that forbid distributors to deny you these rights or to ask you to surrender these rights.
These restrictions translate to certain responsibilities for you if you distribute copies of the library or if you modify it.
For example, if you distribute copies of the library, whether gratis or for a fee, you must give the recipients all the rights that we gave you.
You must make sure that they, too, receive or can get the source code. If you link other code with the library, you must provide complete
object files to the recipients, so that they can relink them with the library after making changes to the library and recompiling it. And you must
show them these terms so they know their rights.
We protect your rights with a two-step method: (1) we copyright the library, and (2) we offer you this license, which gives you legal permission
to copy, distribute and/or modify the library.
To protect each distributor, we want to make it very clear that there is no warranty for the free library. Also, if the library is modified by someone
else and passed on, the recipients should know that what they have is not the original version, so that the original author's reputation will not
be affected by problems that might be introduced by others.
Finally, software patents pose a constant threat to the existence of any free program. We wish to make sure that a company cannot effectively
restrict the users of a free program by obtaining a restrictive license from a patent holder. Therefore, we insist that any patent license obtained
for a version of the library must be consistent with the full freedom of use specified in this license.
Most GNU software, including some libraries, is covered by the ordinary GNU General Public License. This license, the GNU Lesser General
Public License, applies to certain designated libraries, and is quite different from the ordinary General Public License. We use this l icense for
certain libraries in order to permit linking those libraries into non-free programs.
When a program is linked with a library, whether statically or using a shared library, the combination of the two is legally speaking a combined
work, a derivative of the original library. The ordinary General Public License therefore permits such linking only if the entire combination fits
its criteria of freedom. The Lesser General Pu
We call this license the "Lesser" General Public License because it does Less to protect the user's freedom than the ordinary General Public
License. It also provides other free software developers Less of an advantage over competing non-free programs. These disadvantages are
the reason we use the ordinary General Public License for many libraries. However, the Lesser license provides advantages in certain special
circumstances.
For example, on rare occasions, there may be a special need to encourage the widest possible use of a certain library, so that it becomes a
de-facto standard. To achieve this, non-free programs must be allowed to use the library. A more frequent case is that a free library does the
same job as widely used non-free libraries. In this case, there is little to gain by limiting the free library to free software only, so we use the
Lesser General Public License.
In other cases, permission to use a particular library in non-free programs enables a greater number of people to use a large body of free
software. For example, permission to use the GNU C Library in non-free programs enables many more people to use the whole GNU operating system, as well as its variant, the GNU/Linux operating system.
Although the Lesser General Public License is Less protective of the users' freedom, it does ensure that the user of a program that is linked
with the Library has the freedom and the wherewithal to run that program using a modified version of the Library.
The precise terms and conditions for copying, distribution and modification follow. Pay close attention to the difference between a "work based
on the library" and a "work that uses the library". The former contains code derived from the library, whereas the latter must be combined with
the library in order to run.
blic License permits more lax criteria for linking other code with the library.
TERMS AND CONDITIONS FOR COPYING, DISTRIBUTION AND MODIFICATION
0. This License Agreement applies to any software library or other program which contains a notice placed by the copyright holder or other
authorized party saying it may be distributed under the terms of this Lesser General Public License (also called "this License"). Each licensee
is addressed as "you".
de en fr it nl 49

Open Source software
A "library" means a collection of software functions and/or data prepared so as to be conveniently linked with application programs (which
use some of those functions and data) to form executables.
The "Library", below, refers to any such software library or work which has been distributed under these terms. A "work based on the Library"
means either the Library or any derivative work under copyright law: that is to say, a work containing the Library or a portion of it, either verbatim or with modifications and/or translated straightforwardly into another language. (Hereinafter, translation is included without limitation in
the term "modification".)
"Source code" for a work means the preferred form of the work for making modifications to it. For a library, complete source code means all
the source code for all modules it contains, plus any associated interface definition files, plus the scripts used to control compilation and installation of the library.
Activities other than copying, distribution and modification are not covered by this License; they are outside its scope. The act of running a
program using the Library is not restricted, and output from such a program is covered only if its contents constitute a work based on the
Library (independent of the use of the Library in a tool for writing it). Whether that is true depends on what the Library does and what the
program that uses the Library does.
1. You may copy and distribute verbatim copies of the Library's complete source code as you receive it, in any medium, provided that you
conspicuously and appropriately publish on each copy an appropriate copyright notice and disclaimer of warranty; keep intact all the notices
that refer to this License and to the absence of any warranty; and distribute a copy of this License along with the Library.
You may charge a fee for the physical act of transferring a copy, and you may at your option offer warranty protection in exchange for a fee.
2. You may modify your copy or copies of the Library or any portion of it, thus forming a work based on the Library, and copy and distribute
such modifications or work under the terms of Section 1 above, provided that you also meet all of these conditions:
a) The modified work must itself be a software library.
b) You must cause the files modified to carry prominent notices stating that you changed the files and the date of any change.
c) You must cause the whole of the work to be licensed at no charge to all third parties under the terms of this License.
d) If a facility in the modified Library refers to a function or a table of data to be supplied by an application program that uses the facility, other
than as an argument passed when the facility is invoked, then you must make a good faith effort to ensure that, in the event an application
does not supply such function or table, the facility still operates, and performs whatever part of its purpose remains meaningful.
(For example, a function in a library to compute square roots has a purpose that is entirely well-defined independent of the appli cation. Therefore, Subsection 2d requires that any application-supplied function or table used by this function must be optional: if the application does not
supply it, the square root function must still compute square roots.)
These requirements apply to the modified work as a whole. If identifiable sections of that work are not derived from the Library, and can be
reasonably considered independent and separate works in themselves, then this License, and its terms, do not apply to those sections when
te them as separate works. But when you distribute the same sections as part of a whole which is a work based on the Library,
you distribu
the distribution of the whole must be on the terms of this License, whose permissions for other licensees extend to the entire whole, and thus
to each and every part regardless of who wrote it.
Thus, it is not the intent of this section to claim rights or contest your rights to work written entirely by you; rather, the intent is to exercise the
right to control the distribution of derivative or collective works based on the Library.
In addition, mere aggregation of another work not based on the Library with the Library (or with a work based on the Library) on a volume of
a storage or distribution medium does not bring the other work under the scope of this License.
3. You may opt to apply the terms of the ordinary GNU General Public License instead of this License to a given copy of the Library. To do
this, you must alter all the notices that refer to this License, so that they refer to the ordinary GNU General Public License, version 2, instead
of to this License. (If a newer version than version 2 of the ordinary GNU General Public License has appeared, then you can specify that
version instead if you wish.) Do not make any other change in these notices.
Once this change is made in a given copy, it is irreversible for that copy, so the ordinary GNU General Pub lic License applies to all subsequent
copies and derivative works made from that copy.
This option is useful when you wish to copy part of the code of the Library into a program that is not a library.
4. You may copy and distribute the Library (or a portion or derivative of it, under Section 2) in object code or executable form under the terms
of Sections 1 and 2 above provided that you accompany it with the complete corresponding machine-readable source code, which must be
distributed under the terms of Sections 1 and 2 above on a medium customarily used for software interchange.
If distribution of object code is made by offering access to copy from a designated place, then offering equivalent access to copy the source
code from the same place satisfies the requirement to distribute the source code, even though third parties are not compelled to copy the
source along with the object code.
5. A program that contains no derivative of any portion of the Library, but is designed to work with the Library by being compiled or linked with
it, is called a "work that uses the Library". Such a work, in isolation, is not a derivative work of the Library, and therefore falls outside the scope
of this License.
50 de en fr it nl

Open Source software
However, linking a "work that uses the Library" with the Library creates an executable that is a derivative of the Library (because it contains
portions of the Library), rather than a "work that uses the library". The executable is therefore covered by this License. Section 6 states terms
for distribution of such executables.
When a "work that uses the Library" uses material from a header file that is part of the Library, the object code for the work may be a derivative
work of the Library even though the source code is not. Whether this is true is especially significant if the work can be linked without the
Library, or if the work is itself a library. The threshold for this to be true is not precisely defined by law.
If such an object file uses only numerical parameters, data structure layouts and accessors, and small macros and small inline functions (ten
lines or less in length), then the use of the object file is unrestricted, regardless of whether it is legally a derivative work. (Executables containing this object code plus portions of the Library will still fall under Section 6.)
Otherwise, if the work is a derivative of the Library, you may distribute the object code for the work under the terms of Section 6. Any executables containing that work also fall under Section 6, whether or not they are linked directly with the Library itself.
6. As an exception to the Sections above, you may also combine or link a "work that uses the Library" with the Library to produce a work
containing portions of the Library, and distribute that work under terms of your choice, provided that the terms permit modification of the work
for the customer's own use and reverse engineering for debugging such modifications.
You must give prominent notice with each copy of the work that the Library is used in it and that the Library and its use are covered by this
License. You must supply a copy of this License. If the work during execution displays copyright notices, you must include the copyright notice
for the Library among them, as well as a reference directing the user to the copy of this License. Also, you must do one of these things:
a) Accompany the work with the complete corresponding machine-readable source code for the Library including whatever changes were
used in the work (which must be distributed under Sections 1 and 2 above); and, if the work is an executable linked with the Library, with the
complete machine-readable "work that uses the Library", as object code and/or source code, so that the user can modify the Library and then
relink to produce a modified executable containing the modified Library. (It is understood that the user who changes the contents of definitions
files in the Library will not necessarily be able to recompile the application to use the modified definitions.)
b) Use a suitable shared library mechanism for linking with the Library. A suitable mechanism is one that (1) uses at run time a copy of the
library already present on the user's computer system, rather than copying library functions into the executable, and (2) will operate properly
with a modified version of the library, if the user installs one, as long as the modified version is interface-compatible with the version that the
work was made with.
c) Accompany the work with a written offer, valid for at least three years, to give the same user the materials specified in Subsection 6a,
above, for a charge no more than the cost of performing this distribution.
d) If distribution of the work is made by offering access to copy from a designated place, offer equivalent access to copy the above specified
materials from the same place.
e) Verify that the user has already received a copy of these materials or that you have already sent this user a copy.
For an executable, the required form of th
the executable from it. However, as a special exception, the materials to be distributed need not include anything that is normally distributed
(in either source or binary form) with the major components (compiler, kernel, and so on) of the operating system on which the executable
runs, unless that component itself accompanies the executable.
It may happen that this requirement contradicts the license restrictions of other proprietary libraries that do not normally accompany the operating system. Such a contradiction means you cannot use both them and the Library together in an executable that you distribute.
7. You may place library facilities that are a work based on the Library side-by-side in a single library together with other library facilities not
covered by this License, and distribute such a combined library, provided that the separate distribution of the work based on the Library and
of the other library facilities is otherwise permitted, and provided that you do these two things:
a) Accompany the combined library with a copy of the same work based on the Library, uncombined with any other library facilities. This m ust
be distributed under the terms of the Sections above.
b) Give prominent notice with the combined library of the fact that part of it is a work based on the Library, and explaining where to find the
accompanying uncombined form of the same work.
8. You may not copy, modify, sublicense, link with, or distribute the Library except as expressly provided under this License. Any attempt
otherwise to copy, modify, sublicense, link with, or distribute the Library is void, and will automatically terminate your rights under this License.
However, parties who have received copies, or rights, from you under this License will not have their licenses terminated so long as such
parties remain in full compliance.
9. You are not required to accept this License, since you have not signed it. However, nothing else grants you permission to modify or distribute the Library or its derivative works. These actions are prohibited by law if you do not accept this License. Therefore, by modifying or
distributing the Library (or any work based on the Library), you indicate your acceptance of this License to do so, and all its terms and conditions for copying, distributing or modifying the Library or works based on it.
10. Each time you redistribute the Library (or any work based on the Library), the recipient automatically receives a license from the original
licensor to copy, distribute, link with or modify the Library subject to these terms and conditions. You may not impose any further restrictions
on the recipients' exercise of the rights granted herein. You are not responsible for enforcing compliance by third parties with this License.
e "work that uses the Library" must include any data and utility programs needed for reproducing
de en fr it nl 51

Open Source software
11. If, as a consequence of a court judgment or allegation of patent infringement or for any other reason (not limited to patent issues), conditions are imposed on you (whether by court order, agreement or otherwise) that contradict the conditions of this License, they do not excuse
you from the conditions of this License. If you cannot distribute so as to satisfy simultaneously your obligations under this License and any
other pertinent obligations, then as a consequence you may not distribute the Library at all. For example, if a patent license would not permit
royalty-free redistribution of the Library by all those who receive copies directly or indirectly through you, then the only way you could satisfy
both it and this License would be to refrain entirely from distribution of the Library.
If any portion of this section is held invalid or unenforceable under any particular circumstance, the balance of the section is intended to apply,
and the section as a whole is intended to apply in other circumstances.
It is not the purpose of this section to induce you to infringe any patents or other property right claims or to contest validity of any such claims;
this section has the sole purpose of protecting the integrity of the free software distribution system which is implemented by public license
practices. Many people have made generous contributions to the wide range of software distributed through that system in reliance on consistent application of that system; it is up to the author/donor to decide if he or she is willing to distribute software through any other system
and a licensee cannot impose that choice.
This section is intended to make thoroughly clear what is believed to be a consequence of the rest of this License.
12. If the distribution and/or use of the Library is restricted in certain countries either by patents or by copyrighted interfaces, the original
copyright holder who places the Library under this License may add an explicit geographical distribution limitation excluding those countries,
so that distribution is permitted only in or among countries not thus excluded. In such case, this License incorporates the limitation as if written
in the body of this License.
13. The Free Software Foundation may publish revised and/or new versions of the Lesser General Public License from time to time. Such
new versions will be similar in spirit to the present version, but may differ in detail to address new problems or concerns.
Each version is given a distinguishing version number. If the Library specifies a version number of this License which applies to it and "any
later version", you have the option of following the terms and conditions either of that version or of any later version published by the Free
Software Foundation. If the Library does not specify a license version number, you may choose any version ever published by the Free Software Foundation.
14. If you wish to incorporate parts of the Library into other free programs whose distribution conditions are incompatible with these, write to
the author to ask for permission. For software which is copyrighted by the Free Software Foundation, write to the Free Software Foundation;
we sometimes make exceptions for this. Our decision will be guided by the two goals of preserving the free status of all derivatives of our
free software and of promoting the sharing and reuse of software generally.
NO WARRANTY
15. BECAUSE THE LIBRARY IS LICENSED FREE OF CHARGE, THERE IS NO WARRANTY FOR THE LIBRARY, TO THE EXTENT PERMITTED BY APPLICABLE LAW. EXCEPT WHEN OTHERWISE STATED IN WRITING THE COPYRIGHT HOLDERS AND/OR OTHER
PARTIES PROVIDE THE LIBRARY "AS IS" WITHOUT WARRANTY OF ANY KIND, EITHER EXPRESSED OR IMPLIED, INCLUDING, BUT
NOT LIMITED TO, THE IMPLIED WARRANTIES OF MERCHANTABILITY AND FITNESS FOR A PARTICULAR PURPOSE. THE ENTIRE
RISK AS TO THE QUALITY AND PERFORMANCE OF THE LIBRARY IS WITH YOU. SHOULD THE LIBRARY PROVE DEFECTIVE, YOU
UME THE COST OF ALL NECESSARY SERVICING, REPAIR OR CORRECTION.
ASS
16. IN NO EVENT UNLESS REQUIRED BY APPLICABLE LAW OR AGREED TO IN WRITING WILL ANY COPYRIGHT HOLDER, OR ANY
OTHER PARTY WHO MAY MODIFY AND/OR REDISTRIBUTE THE LIBRARY AS PERMITTED ABOVE, BE LIABLE TO YOU FOR DAMAGES, INCLUDING ANY GENERAL, SPECIAL, INCIDENTAL OR CONSEQUENTIAL DAMAGES ARISING OUT OF THE USE OR INABILITY TO USE THE LIBRARY (INCLUDING BUT NOT LIMITED TO LOSS OF DATA OR DATA BEING RENDERED INACCURATE OR
LOSSES SUSTAINED BY YOU OR THIRD PARTIES OR A FAILURE OF THE LIBRARY TO OPERATE WITH ANY OTHER SOFTWARE),
EVEN IF SUCH HOLDER OR OTHER PARTY HAS BEEN ADVISED OF THE POSSIBILITY OF SUCH DAMAGES.
END OF TERMS AND CONDITIONS
How to Apply These Terms to Your New Libraries
If you develop a new library, and you want it to be of the greatest possible use to the public, we recommend making it free software that
everyone can redistribute and change. You can do so by permitting redistribution under these terms (or, alternatively, under the terms of the
ordinary General Public License).
To apply these terms, attach the following notices to the library. It is safest to attach them to the start of each source file to most effectively
convey the exclusion of warranty; and each file should have at least the "copyright" line and a pointer to where the full notice is found.
<one line to give the library's name and a brief idea of what it does.>
©
<year> <name of author>
Copyright
This library is free software; you can redistribute it and/or modify it under the terms of the GNU Lesser General Public License as published
by the Free Software Foundation; either version 2.1 of the License, or (at your option) any later version.
This library is distributed in the hope that it will be useful, but WITHOUT ANY WARRANTY; without even the implied warranty of MERCHANTABILITY or FITNESS FOR A PARTICULAR PURPOSE. See the GNU Lesser General Public License for more details.
52 de en fr it nl

Open Source software
You should have received a copy of the GNU Lesser General Public License along with this library; if not, write to the Free Software Foundation, Inc., 51 Franklin Street, Fifth Floor, Boston, MA 02110-1301 USA
Also add information on how to contact you by electronic and paper mail.
You should also get your employer (if you work as a programmer) or your school, if any, to sign a "copyright disclaimer" for the library, if
necessary. Here is a sample; alter the names:
Yoyodyne, Inc., hereby disclaims all copyright interest in the library `Frob' (a library for tweaking knobs) written by James Random Hacker.
<signature of Ty Coon>, 1 April 1990
Ty Coon, President of Vice
That's all there is to it!
de en fr it nl 53

Index
Index
A
Activating
alarm clock
Activating/deactivating
function
Activating/deactivating microphone
Activating/deactivating silent alert
Activating/deactivating the crescendo tone
reminder signal
ring tone
Activating/deactivating the key tone
Activating/deactivating the key
Advisory tones
Alarm
Alarm clock
activating/deactivating
Alphanumerical keypad
Anniversary, see Birthday
Answering machine list
Applications
adding to config. page
deleting from config. Page
selectable for config. page
Applications menu
Appointment
deleting missed
displaying missed
setting
Area code
setting own area code
Arrow in option slider
Authorisation
Auto answer
B
Baby phone call. . . . . . . . . . . . . . . . . . . . . . . . . .32
Back function
Backlight timeout, display
Backlight, display
Base
changing
Battery
charging
charging status
inserting
Battery charging status
Battery warning
Best base
. . . . . . . . . . . . . . . . . . . . . . . . . . .33
. . . . . . . . . . . . . . . . . . . . . . . . . . . . . .15
(handset)
. . . . . . . . . . . . . . . . . . . . . . . . . . .19
. . . . . . . . . .21
. . . . . . . . . . . . . . . . . . . . . . . .32
. . . . . . . . . . . . . . . . . . . . . . . . . . . . .21
. . . . . . . . .8
vibration
. . . . . . . . . . . . . . . . . . . . . . . . . . . .8
. . . . . . . . . . . . . . . . . . . . . . . . . .22
. . . . . . . . . . . . . . . . . . . . . . . . . . . . . . . . . .33
. . . . . . . . . . . . . . . . .33
. . . . . . . . . . . . . . . . . . . .8
. . . . . . . . . . . . . . . . . . .10
. . . . . . . . . . . . . . . . . . .9
. . . . . . . . . . . . . . . .9
. . . . . . . . . . . . . . .10
. . . . . . . . . . . . . . . . . . . . . . .13
. . . . . . . . . . . . . . . . . . . . . . .33
. . . . . . . . . . . . . . . . . . . . . .33
. . . . . . . . . . . . . . . . . . . . . . . . . . . . . . .32
. . . . . . . . . . . . . . . . . .20
. . . . . . . . . . . . . . . . . . . . .14
. . . . . . . . . . . . . . . . . . . . . . . . . . .41
. . . . . . . . . . . . . . . . . . . . . . . . . . . .21
. . . . . . . . . . . . . . . . . . . . . . . . . . .15
. . . . . . . . . . . . . . . . .20
. . . . . . . . . . . . . . . . . . . . . . . .20
. . . . . . . . . . . . . . . . . . . . . . . . . . . . .24
. . . . . . . . . . . . . . . . . . . . . . . . . . . . . .6
. . . . . . . . . . . . . . . . . . . . . . . .38
. . . . . . . . . . . . . . . . . . . . . . . . . . . . . .5
. . . . . . . . . . . . . . . . . . .38
. . . . . . . . . . . . . . . . . . . . . . . . .22
. . . . . . . . . . . . . . . . . . . . . . . . . . . . . . .24
. . . . . . . . . . . . . . . . . . . . . . . . . . . . . . . .27
Birthday
deleting missed
displaying missed
missed
saving to Contacts
Bluetooth
accepting call
activating
calling with a headset
changing device name
ending a search
list of known devices
registering devices
starting a search
transferring Contacts (vCard)
transferring vCards
Broken display
. . . . . . . . . . . . . . . . . . . . . . .33
. . . . . . . . . . . . . . . . . . . . . .33
. . . . . . . . . . . . . . . . . . . . . . . . . . . . . . .33
. . . . . . . . . . . . . . . . . . . . .27
. . . . . . . . . . . . . . . . . . . . . . . . .26
. . . . . . . . . . . . . . . . . . . . . . . . . . . .25
. . . . . . . . . . . . . . . . . .26
. . . . . . . . . . . . . . . . . .26
. . . . . . . . . . . . . . . . . . . . . . .25
. . . . . . . . . . . . . . . . . . .26
. . . . . . . . . . . . . . . . . . . . .25
. . . . . . . . . . . . . . . . . . . . . . .25
. . . . . . . . . . . . .29
. . . . . . . . . . . . . . . . . . . . .29
. . . . . . . . . . . . . . . . . . . . . . . . . . . .3
C
Calendar . . . . . . . . . . . . . . . . . . . . . . . . . . . . . . .32
Call
accepting
accepting (Bluetooth)
answering automatically
external
internal
internal transfer (connecting)
protection from undesired
transferring (connecting)
Call list
deleting an entry
deleting entire lists
deleting the entire list
dialling with
Call swapping
internal/external call
Call waiting
external during internal call
internal during external call
Caller picture
Calling
external
internal
Calling Line Identification
Care of the device
Changing device name (Bluetooth)
Changing display page
Changing page
Changing settings
user interface elements
Changing telephone settings
Changing the character set
Changing the keypad layout
. . . . . . . . . . . . . . . . . . . . . . . . . . . .18
. . . . . . . . . . . . . . . . . .26
. . . . . . . . . . . . . . . .21
. . . . . . . . . . . . . . . . . . . . . . . . . . . . . .17
. . . . . . . . . . . . . . . . . . . . . . . . . . . . . .24
. . . . . . . . . . . .24
. . . . . . . . . . . . . . .22
. . . . . . . . . . . . . . . .24
. . . . . . . . . . . . . . . . . . . . . . . . . . . . . .17, 31
. . . . . . . . . . . . . . . . . . . . . .11
. . . . . . . . . . . . . . . . . . . . .11
. . . . . . . . . . . . . . . . . .11
. . . . . . . . . . . . . . . . . . . . . . . . . .17
. . . . . . . . . . . . . . . . . . .24
. . . . . . . . . . . . . .18
. . . . . . . . . . . . . .18
. . . . . . . . . . . . . . . . . . . . . . . . .28, 35
. . . . . . . . . . . . . . . . . . . . . . . . . . . . . .17
. . . . . . . . . . . . . . . . . . . . . . . . . . . . . .24
. . . . . . . . . . . . . . . . .18
. . . . . . . . . . . . . . . . . . . . . . . .44
. . . . . . . . . .26
. . . . . . . . . . . . . . . . . .8, 13
. . . . . . . . . . . . . . . . . . . . . . . .8, 13
. . . . . . . . . . . . . . . . .15
. . . . . . . . . . . . . .20
. . . . . . . . . . . . . . . .16
. . . . . . . . . . . . . . .16
54 de en fr it nl

Index
Changing the settings
Character set
Cyrillic
. . . . . . . . . . . . . . . . . . . . . . . . . . . . . . .16
. . . . . . . . . . . . . . . . . . . . . . . . . . . . . . . .16
Greek
Charger cradle
setting up
Charger cradle (handset)
connecting
Charging contacts
Charging time of handset
Check
data security of DECT connection
Checking service information
CLIP
CLIP picture see caller picture
Cloud synchronisation
Conference
ending
internal/external call
Configurable page (idle display)
configuring
deleting application/function
inserting application/function
selectable applications/functions
Connecting to base
Consultation call
internal
Contact with liquid
Contacts
copying number from text
creating entry
deleting all entries
managing entries
opening
order of entries
saving birthdays
saving entry
sending entry/list to handset
sending to handset
sending vCards with Bluetooth
transferring vCards with Bluetooth
using to enter numbers
Correcting incorrect entries
Customer Care
Customer Service & Assistance
. . . . . . . . . . . . . . . . . . . . . . . . . . . . .4
. . . . . . . . . . . . . . . . . . . . . . . . . . . . . . . . . . .18
. . . . . . . . . . . . . . . . . . . . . . . . . . . . . . .24
. . . . . . . . . . . . . . . . . . . . . . . . . . . . . .24
. . . . . . . . . . . . . . . . . . . . . . . . . . . . . . .27
. . . . . . . . . . . . . . . . . . . . . . . . . . . . . .27
. . . . . . . . . . . . . . . . . . . .20
. . . . . . . . . . . . . . . . . . . . . . . . . . . .4
. . . . . . . . . . . . . . . . . . . . . . . . .1
. . . . . . . . . . . . . . . . . .44
. . . . . . . . .19
. . . . . . . . . . .12, 41
. . . . . . . . . . . . . . . . . . . .36
. . . . . . . . . . . . . . . . . . .24
. . . . . . . . . . . . .9
. . . . . . . . . . . . . . . . . . . . . . . . . . . .9
. . . . . . . . . . . . .9
. . . . . . . . . . . . .9
. . . . . . . . .10
. . . . . . . . . . . . . . . . . . . . . . .24
. . . . . . . . . . . . . . . . . . . . . . .44
. . . . . . . . . . . . . . .30
. . . . . . . . . . . . . . . . . . . . . . . . .27
. . . . . . . . . . . . . . . . . . . . .11
. . . . . . . . . . . . . . . . . . . . . .27
. . . . . . . . . . . . . . . . . . . . . . . .28
. . . . . . . . . . . . . . . . . . . . . . .27
. . . . . . . . . . . . . . . . . . . . . . . . . .27
. . . . . . . . . . . . .29
. . . . . . . . . . . . . . . . . . . . .29
. . . . . . . . . . .29
. . . . . . . . . . . . . . . . .30
. . . . . . . . . . . . . . . .16
. . . . . . . . . . . . . . . . . . . . . . . . . .39
. . . . . . . . . . . . .39
D
Deactivating
alarm clock
baby phone call
Deleting
lists
QuickDial
Destination number (baby phone call)
Dial page (idle display)
. . . . . . . . . . . . . . . . . . . . . . . . . . .33
. . . . . . . . . . . . . . . . . . . . . . .34
. . . . . . . . . . . . . . . . . . . . . . . . . . . . . . . . .11
. . . . . . . . . . . . . . . . . . . . . . . . . . . . .30
. . . . . . . . . . . . . . . . . . . . .8
. . . . . . . .29
. . . . . . .34
Dialling
using the call list
using the redial list
with Contacts
Dialling page (idle display)
Display
backlight
broken
. . . . . . . . . . . . . . . . . . . . . . . . . . . . . . . .3
contacts memory
in idle status
network mailbox message
number (CLI/CLIP)
screensaver
setting
. . . . . . . . . . . . . . . . . . . . . . . . . . . . . . .20
timeout for backlight
Display icons
Display lock
activating/deactivating
automatic
Displaying
missed appointments/birthdays
. . . . . . . . . . . . . . . . . . . . . . . . . . . . . . . .43
Disposal
. . . . . . . . . . . . . . . . . . . . . . .17
. . . . . . . . . . . . . . . . . . . . .17
. . . . . . . . . . . . . . . . . . . . . . . . .18
. . . . . . . . . . . . . . . . .17
. . . . . . . . . . . . . . . . . . . . . . . . . . . . .20
. . . . . . . . . . . . . . . . . . . . . .28
. . . . . . . . . . . . . . . . . . . . . . . . . . .8
. . . . . . . . . . . .10, 23
. . . . . . . . . . . . . . . . . . . . .18
. . . . . . . . . . . . . . . . . . . . . . . . . . .20
. . . . . . . . . . . . . . . . . . .20
. . . . . . . . . . . . . . . . . . . . . . . . . . . .37
. . . . . . . . . . . . . . . . .13
. . . . . . . . . . . . . . . . . . . . . . . . . . . .13
. . . . . . . . . .33
E
Earpiece mode . . . . . . . . . . . . . . . . . . . . . . . . . .19
Earpiece volume
ECO DECT
Emergency numbers
not possible
End call/end key
End key, see End call/end key
Entering diacritical characters
Entering special characters
Entering text
Entering umlauts
Entry in Contacts
Environment
Exclusion of liability
External call
internal transfer (connecting)
External calls
time control for ring tone
. . . . . . . . . . . . . . . . . . . . . . . . .19
. . . . . . . . . . . . . . . . . . . . . . . . . . . . . .23
. . . . . . . . . . . . . . . . . . . . . . . . . . .3
. . . . . . . . . . . . . . . . . . . .1, 13, 17
. . . . . . . . . . . . . .16
. . . . . . . . . . . . . . . .16
. . . . . . . . . . . . . . . . . . . . . . . . . . . .15
. . . . . . . . . . . . . . . . . . . . . . . .16
. . . . . . . . . . . . . . . . . . . . . . . . .27
. . . . . . . . . . . . . . . . . . . . . . . . . . . .43
. . . . . . . . . . . . . . . . . . . . . .43
. . . . . . . . . . . .24
. . . . . . . . . . . . . . . .22
F
Firmware
checking version
updating the handset
(Gigaset QuickSync)
Function
activating/deactivating
selecting
. . . . . . . . . . . . . . . . . . . . . .41
. . . . . . . . . . . . . . . .36
. . . . . . . . . . . . . . . . .15
. . . . . . . . . . . . . . . . . . . . . . . . . . . . .14
de en fr it nl 55

Index
G
Getting started . . . . . . . . . . . . . . . . . . . . . . . . . . .4
Gigaset QuickSync
GNU General Public License (GPL)
English
GNU Lesser General Public License
GPL
Green dot
Group call
Guarantee Certificate
. . . . . . . . . . . . . . . . . . . . . . . . . . . . . . .45
(LGPL), English
. . . . . . . . . . . . . . . . . . . . . . . . . . . . . . . . . . . .45
. . . . . . . . . . . . . . . . . . . . . . .36
. . . . . . . . . . . . . . . . . . . . . .45
. . . . . . . . . . . . . . . . . . . . . . . 11, 17, 18
. . . . . . . . . . . . . . . . . . . . . . . . . . . . . .24
. . . . . . . . . . . . . . . . . . . . .41
H
Handset
activating/deactivating
advisory tones
changing settings
changing to best reception
changing to different base
checking service information
connecting charger cradle
display backlight
display language
earpiece volume
idle display
idle status
in idle status
muting
registering
registering to different base
reset
restoring to default settings
screensaver
setting
setting up
speaker volume
transferring a call
using baby phone call
using multiple
Handset + base
Handset operating time
in baby phone call mode
Handsfree volume
Headset (Bluetooth)
accepting a call
Hearing
prevent loss of
Hearing aids
Help
56 de en fr it nl
. . . . . . . . . . . . . . . . . . . . . . . . . . . .8
. . . . . . . . . . . . . . . . . . . . . . . . . . . .13
. . . . . . . . . . . . . . . . . . . . . . . . . . .8
. . . . . . . . . . . . . . . . . . . . . . . . . . . . . . .19
. . . . . . . . . . . . . . . . . . . . . . . . . . . . .6
. . . . . . . . . . . . . . . . . . . . . . . . . . . . . . . . .22
. . . . . . . . . . . . . . . . . . . . . . . . . . .20
. . . . . . . . . . . . . . . . . . . . . . . . . . . . . . .20
. . . . . . . . . . . . . . . . . . . . . . . . . . . . .5
. . . . . . . . . . . . . . . . . . . . . . . . . . .6
. . . . . . . . . . . . . . . . . . . . . . . . . . . . .3
. . . . . . . . . . . . . . . . . . . . . . . . . . . . . . . . . . .40
. . . . . . . . . . . . . . . . .13
. . . . . . . . . . . . . . . . . . . . . . . .22
. . . . . . . . . . . . . . . . . . . . . .20
. . . . . . . . . . . . . .24
. . . . . . . . . . . . . . .24
. . . . . . . . . . . .12
. . . . . . . . . . . . . . . .4
. . . . . . . . . . . . . . . . . . . . . . .20
. . . . . . . . . . . . . . . . . . . . . .20
. . . . . . . . . . . . . . . . . . . . . . .19
. . . . . . . . . . . . .24
. . . . . . . . . . . . .22
. . . . . . . . . . . . . . . . . . . . . . .19
. . . . . . . . . . . . . . . . . . . . . .24
. . . . . . . . . . . . . . . . . .32
. . . . . . . . . . . . . . . . . . . . . . . . .24
. . . . . . . . . . . . . . . .34
. . . . . . . . . . . . . . . . . . . . . . . .19
. . . . . . . . . . . . . . . . . . . . . .26
. . . . . . . . . . . . . . . . . . . . . . . .26
. . . . . . . . . . . . . . . . . . . . . . . . .3
I
Icons
displaying new messages
options bar
status bar
Idle display
changing page
configurable page
dial page
handset
messages page
Idle status
handset
returning to
Incorrect entry correction
Internal
making calls
Internal call
call waiting
Internal consultation call
. . . . . . . . . . . . . . . . . . . . . . . . . . .37
. . . . . . . . . . . . . . . . . . . . . . . . . . . .38
. . . . . . . . . . . . . . . . . . . . . .8, 13
. . . . . . . . . . . . . . . . . . . . . . . . . . . . . .8
. . . . . . . . . . . . . . . . . . . . . . . . . . . . . . .8
. . . . . . . . . . . . . . . . . . . . . . . .10
. . . . . . . . . . . . . . . . . . . . . . . . . . . . . . .8
. . . . . . . . . . . . . . . . . . . . . . . . . . .13
. . . . . . . . . . . . . . . . . . . . . . . . . .24
. . . . . . . . . . . . . . . . . . . . . . . . . . . . .24
. . . . . . . . . . . . . . . . . . . . . . . . . . .18
. . . . . . . . . . . . . . .11
. . . . . . . . . . . . . . . . . . . . . .9
. . . . . . . . . . . . . . . . .16
. . . . . . . . . . . . . . . . . .24
K
Key lock
automatic
Keypad
alphanumerical
with R / P
Keypad lock
activating/deactivating
Keypad/display lock on/off
Keys
end call/end key
handset
menu key
talk key
. . . . . . . . . . . . . . . . . . . . . . . . . . . .13
. . . . . . . . . . . . . . . . . . . . . . . . .8
. . . . . . . . . . . . . . . . . . . . . . . . . . . . . .8
. . . . . . . . . . . . . . . . .13
. . . . . . . . . . . . . .1, 13
. . . . . . . . . . . . . . . . . . . . .1, 17
. . . . . . . . . . . . . . . . . . . . . . . . . . . . . . .1
. . . . . . . . . . . . . . . . . . . . . . . . . . . . .1
. . . . . . . . . . . . . . . . . . . . . . . . .1, 17, 18
L
Language + region . . . . . . . . . . . . . . . . . . . . . . .20
License
. . . . . . . . . . . . . . . . . . . . . . . . . . . . . . . . .45
GPL
LGPL
. . . . . . . . . . . . . . . . . . . . . . . . . . . . . . . .45
. . . . . . . . . . . . . . . . . . . . . . . . . . . . . . . . . .44
Liquid
List
accepted calls
answering machine
call lists
cleaning up
deleting
known devices (Bluetooth)
missed calls
network mailbox
opening via message pop-up
outgoing calls
scrolling in
selecting entry
SMS incoming list
. . . . . . . . . . . . . . . . . . . . . . . . .31
. . . . . . . . . . . . . . . . . . . .10
. . . . . . . . . . . . . . . . . . . . . . . . . . . . . .31
. . . . . . . . . . . . . . . . . . . . .11, 28, 33
. . . . . . . . . . . . . . . . . . . . . . . . . . . . . .11
. . . . . . . . . . . . . .26
. . . . . . . . . . . . . . . . . . . . . . . . . . .31
. . . . . . . . . . . . . . . . . . . . . .10
. . . . . . . . . . . .11
. . . . . . . . . . . . . . . . . . . . . . . . .31
. . . . . . . . . . . . . . . . . . . . . . . . . . . .14
. . . . . . . . . . . . . . . . . . . . . . . .14
. . . . . . . . . . . . . . . . . . . . . .10

Index
List entry
Lock
Loss of hearing
Lower/upper case
M
Making calls
Media pool
Medical equipment
Melody
Memory space in Contacts
Menu
Menu key
Message LED
Message list
Message page (idle display)
Message pop-up
Messages
Microphone sensitivity
Mini USB connection socket
Missed birthdays/appointments
Missed calls
Muting the handset
N
Navigation area. . . . . . . . . . . . . . . . . . . . . .1, 8, 13
Number
Numbers
O
Opening the submenu . . . . . . . . . . . . . . . . . . . .15
Operating time of handset
Option slider
Options
Options bar
de en fr it nl 57
. . . . . . . . . . . . . . . . . . . . . . . . . . . . . . .11
activating/deactivating
automatic
. . . . . . . . . . . . . . . . . . . . . . . . . . . .13
. . . . . . . . . . . . . . . . .13
. . . . . . . . . . . . . . . . . . . . . . . . . . .3
. . . . . . . . . . . . . . . . . . . . . . . .16
accepting a call
external
internal
. . . . . . . . . . . . . . . . . . . . . . . .18
. . . . . . . . . . . . . . . . . . . . . . . . . . . . . .17
. . . . . . . . . . . . . . . . . . . . . . . . . . . . . .24
. . . . . . . . . . . . . . . . . . . . . . . . . . . . .35
. . . . . . . . . . . . . . . . . . . . . . .3
ring tone for internal/external calls
. . . . . . . . . . . . . . . . .28
applications
changing page
opening
returning to idle status
. . . . . . . . . . . . . . . . . . . . . . . . . .13
. . . . . . . . . . . . . . . . . . . . . .8, 13
. . . . . . . . . . . . . . . . . . . . . . . . . . . . . .13
. . . . . . . . . . . . . . . . . .13
. . . . . . . . . . . . . . . . . . . . . . . . . . . . .1, 13
. . . . . . . . . . . . . . . . . . . . . . . . . .1, 11
opening
. . . . . . . . . . . . . . . . . . . . . . . . . . . . . .10
. . . . . . . . . . . . . . . .10
. . . . . . . . . . . . . . . . . . . . . . . . .11
closing
. . . . . . . . . . . . . . . . . . . . . . . . . . . . . . .11
. . . . . . . . . . . . . . . . . . . . . . . . . . . . . .11
deleting
. . . . . . . . . . . . . . . . . . . .19
. . . . . . . . . . . . . . . . .1
. . . . . . . . . . . .33
. . . . . . . . . . . . . . . . . . . . . . . . . . . . .31
. . . . . . . . . . . . . . . . . . . . . .19
as destination for baby phone call
copying to Contacts
displaying caller's number (CLIP)
entering with Contacts
preferred
saving in Contacts
entering
. . . . . . . . . . . . . . . . . . . . . . . . . . . . .30
. . . . . . . . . . . . . . . . . . . . . . . . . . . . . .15
. . . . . . . . . . . . . . . . . . . .30
. . . . . . . . . .18
. . . . . . . . . . . . . . . . . .30
. . . . . . . . . . . . . . . . . . . . .27
. . . . . . . . . . . . . . . . .44
showing/hiding
. . . . . . . . . . . . . . . . . . . . . . .14
. . . . . . . . . . . . . . . . . . . . . . . . . . . . . . . .14
. . . . . . . . . . . . . . . . . . . . . . . . . . . . .14
. . . . . . . . . . . . . . . . . . . . . . . . . . . . . . . .37
icons
. . . . . . . .21
. . . . . . . .34
Order in Contacts
Own page (idle display)
deleting application/function
inserting application/function
selectable applications/functions
. . . . . . . . . . . . . . . . . . . . . . . .28
. . . . . . . . . . . . .9
. . . . . . . . . . . . .9
. . . . . . . . .10
P
Package contents . . . . . . . . . . . . . . . . . . . . . . . . .4
Parameter
PC Interface
Phone
Phone number display, notes
Picture
Power adapter
Preferred number
Protection from undesired calls
Proximity sensor
. . . . . . . . . . . . . . . . . . . . . . . . . . . . . .15
. . . . . . . . . . . . . . . . . . . . . . . . . . . . .36
operating
restoring to factory settings
setting
. . . . . . . . . . . . . . . . . . . . . . . . . . . .13
. . . . . . . . . . . . .22
. . . . . . . . . . . . . . . . . . . . . . . . . . . . . . .20
. . . . . . . . . . . . . .18
caller
. . . . . . . . . . . . . . . . . . . . . . . . . . . . . . . .35
. . . . . . . . . . . . . . . . . . . . . . . . . . . .3
. . . . . . . . . . . . . . . . . . . . .27, 30
. . . . . . . . . . . . .22
. . . . . . . . . . . . . . . . . . . . . . .1, 13
Q
Questions and answers . . . . . . . . . . . . . . . . . . .40
Quick access
to functions/applications
QuickDial
configuring
QuickDial shortcut
QuickSync
. . . . . . . . . . . . . . . . . . . . . . . . . . .30
. . . . . . . . . . . . . . . . . . . . . . . . . . . . . .36
. . . . . . . . . . . . . . . . .9
. . . . . . . . . . . . . . . . . . . . . . .31
R
Range . . . . . . . . . . . . . . . . . . . . . . . . . . . . . . . . . .4
Redial list
dialling with
Reducing radiation
Reducing transmission power
Registering (handset)
Registering device (Bluetooth)
Reminder signal
activating/deactivating crescendo
setting volume
Reset
handset
Ring tone
activating/deactivating crescendo
changing
melody for internal/external calls
setting volume
time control for external calls
. . . . . . . . . . . . . . . . . . . . . . . . . .17
. . . . . . . . . . . . . . . . . . . . . . .23
. . . . . . . . . . . . . .23
. . . . . . . . . . . . . . . . . . . . . .6
. . . . . . . . . . . . .25
. . . . . . . . . . . . . . . . . . . . . . . . .32
tone
. . . . . . . . . . . . . . . . . . . . . . . . . . . .32
. . . . . . . . . . . . . . . . . . . . . . . .32
. . . . . . . . . . . . . . . . . . . . . . . . . . . . . .22
tone
. . . . . . . . . . . . . . . . . . . . . . . . . . . .21
. . . . . . . . . . . . . . . . . . . . . . . . . . . . .21
. . . . . . . . .21
. . . . . . . . . . . . . . . . . . . . . . . .21
. . . . . . . . . . . .22

Index
S
Safety precautions . . . . . . . . . . . . . . . . . . . . . . . .3
Screensaver
Scrolling
horizontally
in lists
vertical
Searching
Bluetooth devices
in Contacts
Secure connection to base
Security check
handset/base connection
Selecting entry from Contacts
Selection fields
Sending
complete Contacts to handset
Contacts entry to handset
vCards with Bluetooth
Setting the display language
Setting the keypad
Setting up, handset
Settings options
telephone
Signal strength
Signal tone, see Advisory tones
Snooze mode (alarm)
Sound, see Ring tone
Speaker
Speaker profile
Specifications
Speed dial
Speed dial, see QuickDial
Status bar
icons
Status page
opening/closing
Switch
Switching off wireless module
Switching on/off
function
Synchronising Contacts
Synchronising Google contacts
. . . . . . . . . . . . . . . . . . . . . . . . . .20, 35
. . . . . . . . . . . . . . . . . . . . . . . . . . .14
. . . . . . . . . . . . . . . . . . . . . . . . . . . . . . .14
. . . . . . . . . . . . . . . . . . . . . . . . . . . . . . .14
. . . . . . . . . . . . . . . . . . . . . .25
. . . . . . . . . . . . . . . . . . . . . . . . . . .28
. . . . . . . . . . . . . . . . .19
. . . . . . . . . . . . . . .19
. . . . . . . . . . . . . .28
. . . . . . . . . . . . . . . . . . . . . . . . . .15
. . . . . . . . . . . .29
. . . . . . . . . . . . . . .29
. . . . . . . . . . . . . . . . . .29
. . . . . . . . . . . . . . .20
. . . . . . . . . . . . . . . . . . . . . . . .8
. . . . . . . . . . . . . . . . . . . . . . .5
. . . . . . . . . . . . . . . . . . . . . . . . . . . .20
. . . . . . . . . . . . . . . . . . . . . . . . . .38
. . . . . . . . . . . . . . . . . . . . .33
. . . . . . . . . . . . . . . . . . . . . . . . . . . . . . . .19
. . . . . . . . . . . . . . . . . . . . . . . . . .21
. . . . . . . . . . . . . . . . . . . . . . . . . . .44
. . . . . . . . . . . . . . . . . . . . . . . . . . . . . .10
. . . . . . . . . . . . . . . . . . . . . . . . . . . .1, 12
. . . . . . . . . . . . . . . . . . . . . . . . . . . . . . . .38
. . . . . . . . . . . . . . . . . . . . . . . . . . . . .12
. . . . . . . . . . . . . . . . . . . . . . .12
. . . . . . . . . . . . . . . . . . . . . . . . . . . . . . . . .15
. . . . . . . . . . . . . .23
. . . . . . . . . . . . . . . . . . . . . . . . . . . . . .15
. . . . . . . . . . . . . . . . . . .36
. . . . . . . . . . . . .36
T
Talk k ey . . . . . . . . . . . . . . . . . . . . . . . . . . .1, 17, 18
3-way conference
Time control
Timeout for display backlight
Tones + signals
Touchscreen
Transferring (internal)
Trou bleshoo ting
. . . . . . . . . . . . . . . . . . . . . . . . . . . . . . .24
ending
internal/external call
ring tone for external calls
. . . . . . . . . . . . . . . . . . .24
. . . . . . . . . . . . . . .22
. . . . . . . . . . . . . .20
. . . . . . . . . . . . . . . . . . . . . . .21, 22
. . . . . . . . . . . . . . . . . . . . . . . . . . . . .1
operating
external call
general
. . . . . . . . . . . . . . . . . . . . . . . . . . . .14
. . . . . . . . . . . . . . . . . . . . . . . . . . .24
. . . . . . . . . . . . . . . . . . . . . . . . . . . . . .40
U
Unknown. . . . . . . . . . . . . . . . . . . . . . . . . . . . . . .18
Unknown caller
Unprotected connection to base
Upper/lower case
USB connection socket
User interface elements
Using the redial list
. . . . . . . . . . . . . . . . . . . . . . . . . .18
. . . . . . . . . . . .19
. . . . . . . . . . . . . . . . . . . . . . . .16
. . . . . . . . . . . . . . . . . . . . .1
. . . . . . . . . . . . . . . . . . .15
. . . . . . . . . . . . . . . . . . . . . . .17
V
vCard
receiving with Bluetooth
sending with Bluetooth
Vertical scrolling
Vibration, key
Viewing network mailbox message
VIP ring tone
Volu me
handsfree/earpiece volume of
handset
reminder signal
ring tone
. . . . . . . . . . . . . . . . . . . . . . . . .14
. . . . . . . . . . . . . . . . . . . . . . . . . . . .8
. . . . . . . . . . . . . . . . . . . . . . . . .27, 28
. . . . . . . . . . . . . . . . . . . . . . . . . .19
. . . . . . . . . . . . . . . . . . . . . . . . . . . . .21
. . . . . . . . . . . . . . . .29
. . . . . . . . . . . . . . . . .29
. . . . . . .10, 23
. . . . . . . . . . . . . . . . . . . . . . . .32
W
Warning tone, see Advisory tones
All rights reserved. Rights of modification reserved.
58 de en fr it nl

 Loading...