


Congratulations
By purchasing a Gigaset, you have chosen a brand that is fully committed
to sustainability. This product’s packaging is eco-friendly!
To learn more, visit www.gigaset.com.


Brief overview
i à V
INT 1
Oct 2008
07:15
Calls Calendar
Mo Tu We Th Fr Sa Su
01 02 03 04 05
06 07 08 09 10 11 12
13 14 15 16 17 18 19
20 21 22 23 24 25 26
27 28 29 30 31
2
3
5
4
6
7
15
13
11
8
1
14
16
9
10
12
Registration/
Paging key
(
¢page 56)
17
Brief overview
Base
1 Display in idle status
2 Battery charge status (
3 Display keys (
4 Message key (
Access to calls and message lists;
Flashes: new message or new call
5 End call key, On/Off key
End call, cancel function, go back one menu
level (press briefly), back to idle status
(press and hold), activate/deactivate handset
(press and hold in idle status)
6 Hash key
Keypad lock on/off (press and hold in
idle status);
toggles between upper/lower case and digits
7 Call-by-call list key (
Open call-by-call list
8Charging socket
9 Microphone
10 Recall key
- Consultation call (flash)
- Insert a dialling pause (press and hold)
11 Star key
Ring tone on/off (press and hold);
with an open connection: switch between dial
pulsing/touch tone dialling (press briefly);
Text input: Open table of special characters
12 Key 1
Dial answering machine (SL785 only)/Network
mailbox (press and hold)
13 Talk k ey
Accept a call; open redial list (press briefly);
start dialling (press and hold)
When writing an SMS: send SMS
14 Speaker key
Switch between earpiece and speaker mode;
Lights up: speaker activated;
Flashes: incoming call
15 Control key (
16 Signal strength (
17 Answering machine symbol (SL785 only)
Answering machine switched on;
Flashes: Answering machine is recording
a message or is being operated by another
internal party
¢page 19)
¢page 18)
¢page 16)
¢page 35)
¢page 30)
¢page 16)
1

Display symbols
Ø
Ù
Ú
Signalling
External call (¢ page 27)
Ø
ã
Ú ØÃÚ
Internal call (¢page 57)
Answering machine is
recording (
¢ page 46)
i Ãòó ˝ V
Ã02
™ 10
Ë09
n
08
INT 1
¼17:32
Oct 2008
13:28
Calls Calendar
Mo Tu We Th Fr Sa Su
01 02 03 04 05
06 07 08 09 10 11 12
13 14 15 16 17 18 19
20 21 22 23 24 25 26
27 28 29 30 31
ØÜ
Appointment (¢ page 54) / Anniversary (¢ page 34)
ؼÚ
Alarm clock (¢ page 56)
Signal strength (¢ page 16)
or ECO Mode symbol ¼
(¢ page 53)
Answering machine switched on (SL785 only)
Bluetooth activated (
¢ page 62)
or ô/ õ (Bluetooth headset/data device) connected
Ring tone switched off (¢ page 66)
Keypad lock switched on (
¢ page 21)
Battery charging (¢ page 16)
Battery charge status (
¢ page 16)
Number of new messages:
u in the list of received appointments (¢page 55)
u in the SMS list (¢ page 40)
u in the list of missed calls (¢ page 35)
u on the network mailbox (¢ page 16)
Name of the handset (
¢ page 59)
Current month and year (¢page 16)
Alarm switched on and wake-up time (
¢ page 56)
Current time (¢page 16)
Appointment added to the calendar (
¢ page 54)
Current date (
¢ page 16)
Display symbols
The following symbols are displayed independently from the settings and the operating status
of your telephone:
2

Contents
Brief overview . . . . . . . . . . . . . . . . . . . . . . . . . . . . . . . . . . . . . . . . . . . . . . . . . . . . . 1
Display symbols . . . . . . . . . . . . . . . . . . . . . . . . . . . . . . . . . . . . . . . . . . . . . . . . . . . 2
Safety precautions . . . . . . . . . . . . . . . . . . . . . . . . . . . . . . . . . . . . . . . . . . . . . . . . . 6
Gigaset SL780/SL785 – more than just a telephone . . . . . . . . . . . . . . . . . . 7
First steps . . . . . . . . . . . . . . . . . . . . . . . . . . . . . . . . . . . . . . . . . . . . . . . . . . . . . . . . . 8
Check the pack contents . . . . . . . . . . . . . . . . . . . . . . . . . . . . . . . . . . . . . . . . . . . . . . . . . . . . . . 8
Connecting the base . . . . . . . . . . . . . . . . . . . . . . . . . . . . . . . . . . . . . . . . . . . . . . . . . . . . . . . . . . 9
Installing the base and charging cradle . . . . . . . . . . . . . . . . . . . . . . . . . . . . . . . . . . . . . . . 10
Setting up the handset for use . . . . . . . . . . . . . . . . . . . . . . . . . . . . . . . . . . . . . . . . . . . . . . . 11
Setting the date and time . . . . . . . . . . . . . . . . . . . . . . . . . . . . . . . . . . . . . . . . . . . . . . . . . . . . 14
Connecting the USB data cable . . . . . . . . . . . . . . . . . . . . . . . . . . . . . . . . . . . . . . . . . . . . . . . 16
What would you like to do next? . . . . . . . . . . . . . . . . . . . . . . . . . . . . . . . . . . . . . . . . . . . . . . 17
Using the phone . . . . . . . . . . . . . . . . . . . . . . . . . . . . . . . . . . . . . . . . . . . . . . . . . . 18
Control key . . . . . . . . . . . . . . . . . . . . . . . . . . . . . . . . . . . . . . . . . . . . . . . . . . . . . . . . . . . . . . . . . . 18
Display keys . . . . . . . . . . . . . . . . . . . . . . . . . . . . . . . . . . . . . . . . . . . . . . . . . . . . . . . . . . . . . . . . . 19
Keys on the keypad . . . . . . . . . . . . . . . . . . . . . . . . . . . . . . . . . . . . . . . . . . . . . . . . . . . . . . . . . . 19
Correcting incorrect entries . . . . . . . . . . . . . . . . . . . . . . . . . . . . . . . . . . . . . . . . . . . . . . . . . . 19
Menu guidance . . . . . . . . . . . . . . . . . . . . . . . . . . . . . . . . . . . . . . . . . . . . . . . . . . . . . . . . . . . . . . 20
Activating/deactivating the handset . . . . . . . . . . . . . . . . . . . . . . . . . . . . . . . . . . . . . . . . . . 21
Activating/deactivating the keypad lock . . . . . . . . . . . . . . . . . . . . . . . . . . . . . . . . . . . . . . 21
Illustration of operating steps in the user guide . . . . . . . . . . . . . . . . . . . . . . . . . . . . . . . 22
Menu tree . . . . . . . . . . . . . . . . . . . . . . . . . . . . . . . . . . . . . . . . . . . . . . . . . . . . . . . . 24
Making calls . . . . . . . . . . . . . . . . . . . . . . . . . . . . . . . . . . . . . . . . . . . . . . . . . . . . . . 27
Making an external call . . . . . . . . . . . . . . . . . . . . . . . . . . . . . . . . . . . . . . . . . . . . . . . . . . . . . . 27
Ending a call . . . . . . . . . . . . . . . . . . . . . . . . . . . . . . . . . . . . . . . . . . . . . . . . . . . . . . . . . . . . . . . . . 27
Accepting a call . . . . . . . . . . . . . . . . . . . . . . . . . . . . . . . . . . . . . . . . . . . . . . . . . . . . . . . . . . . . . . 27
Calling Line Identification . . . . . . . . . . . . . . . . . . . . . . . . . . . . . . . . . . . . . . . . . . . . . . . . . . . . 27
Speaker talking . . . . . . . . . . . . . . . . . . . . . . . . . . . . . . . . . . . . . . . . . . . . . . . . . . . . . . . . . . . . . . 28
Switch to mute . . . . . . . . . . . . . . . . . . . . . . . . . . . . . . . . . . . . . . . . . . . . . . . . . . . . . . . . . . . . . . 28
Making calls using network services . . . . . . . . . . . . . . . . . . . . . . . . . . . . . . . 29
Using the directory and lists . . . . . . . . . . . . . . . . . . . . . . . . . . . . . . . . . . . . . . . 30
Directory/call-by-call list . . . . . . . . . . . . . . . . . . . . . . . . . . . . . . . . . . . . . . . . . . . . . . . . . . . . . 30
Redial list . . . . . . . . . . . . . . . . . . . . . . . . . . . . . . . . . . . . . . . . . . . . . . . . . . . . . . . . . . . . . . . . . . . . 34
Incoming SMS message list . . . . . . . . . . . . . . . . . . . . . . . . . . . . . . . . . . . . . . . . . . . . . . . . . . 34
Answering machine list (Gigaset SL785 only) . . . . . . . . . . . . . . . . . . . . . . . . . . . . . . . . . . 34
Call lists . . . . . . . . . . . . . . . . . . . . . . . . . . . . . . . . . . . . . . . . . . . . . . . . . . . . . . . . . . . . . . . . . . . . . 34
Opening lists with the message key . . . . . . . . . . . . . . . . . . . . . . . . . . . . . . . . . . . . . . . . . . 35
Contents
3

Contents
Making cost-effective calls . . . . . . . . . . . . . . . . . . . . . . . . . . . . . . . . . . . . . . . . 36
Linking call-by-call numbers with one number . . . . . . . . . . . . . . . . . . . . . . . . . . . . . . . . 36
Automatic network provider code (preselection) . . . . . . . . . . . . . . . . . . . . . . . . . . . . . . 36
SMS (text messages) . . . . . . . . . . . . . . . . . . . . . . . . . . . . . . . . . . . . . . . . . . . . . . 38
Writing/sending an SMS . . . . . . . . . . . . . . . . . . . . . . . . . . . . . . . . . . . . . . . . . . . . . . . . . . . . . 38
Receiving an SMS . . . . . . . . . . . . . . . . . . . . . . . . . . . . . . . . . . . . . . . . . . . . . . . . . . . . . . . . . . . . 40
SMS with vCard . . . . . . . . . . . . . . . . . . . . . . . . . . . . . . . . . . . . . . . . . . . . . . . . . . . . . . . . . . . . . . 42
Notification by SMS . . . . . . . . . . . . . . . . . . . . . . . . . . . . . . . . . . . . . . . . . . . . . . . . . . . . . . . . . . 42
SMS mailboxes . . . . . . . . . . . . . . . . . . . . . . . . . . . . . . . . . . . . . . . . . . . . . . . . . . . . . . . . . . . . . . 42
Setting SMS centres . . . . . . . . . . . . . . . . . . . . . . . . . . . . . . . . . . . . . . . . . . . . . . . . . . . . . . . . . . 43
SMS on a PABX . . . . . . . . . . . . . . . . . . . . . . . . . . . . . . . . . . . . . . . . . . . . . . . . . . . . . . . . . . . . . . . 44
Activating/deactivating first ring tone muting . . . . . . . . . . . . . . . . . . . . . . . . . . . . . . . . 44
Activating/deactivating SMS function . . . . . . . . . . . . . . . . . . . . . . . . . . . . . . . . . . . . . . . . 44
SMS troubleshooting . . . . . . . . . . . . . . . . . . . . . . . . . . . . . . . . . . . . . . . . . . . . . . . . . . . . . . . . 45
Operating the answering machine of the
Gigaset SL785 base . . . . . . . . . . . . . . . . . . . . . . . . . . . . . . . . . . . . . . . . . . . . . . . 46
Operation via the handset . . . . . . . . . . . . . . . . . . . . . . . . . . . . . . . . . . . . . . . . . . . . . . . . . . . . 46
Activating/deactivating call screening . . . . . . . . . . . . . . . . . . . . . . . . . . . . . . . . . . . . . . . . 49
Setting the recording parameters . . . . . . . . . . . . . . . . . . . . . . . . . . . . . . . . . . . . . . . . . . . . 49
Resetting fast access for the answering machine using key 1 . . . . . . . . . . . . . . . . . . 50
Operating when on the move (remote operation) . . . . . . . . . . . . . . . . . . . . . . . . . . . . . 50
Using the network mailbox . . . . . . . . . . . . . . . . . . . . . . . . . . . . . . . . . . . . . . . 52
Configuring fast access for the network mailbox . . . . . . . . . . . . . . . . . . . . . . . . . . . . . . 52
Viewing the network mailbox message . . . . . . . . . . . . . . . . . . . . . . . . . . . . . . . . . . . . . . . 52
ECO DECT . . . . . . . . . . . . . . . . . . . . . . . . . . . . . . . . . . . . . . . . . . . . . . . . . . . . . . . . 53
Setting an appointment (calendar) . . . . . . . . . . . . . . . . . . . . . . . . . . . . . . . . 54
Displaying missed appointments, anniversaries . . . . . . . . . . . . . . . . . . . . . . . . . . . . . . . 55
Setting the alarm clock . . . . . . . . . . . . . . . . . . . . . . . . . . . . . . . . . . . . . . . . . . . 56
Using several handsets . . . . . . . . . . . . . . . . . . . . . . . . . . . . . . . . . . . . . . . . . . . 56
Registering handsets . . . . . . . . . . . . . . . . . . . . . . . . . . . . . . . . . . . . . . . . . . . . . . . . . . . . . . . . . 56
De-registering handsets . . . . . . . . . . . . . . . . . . . . . . . . . . . . . . . . . . . . . . . . . . . . . . . . . . . . . 57
Locating a handset ("paging") . . . . . . . . . . . . . . . . . . . . . . . . . . . . . . . . . . . . . . . . . . . . . . . . 57
Changing the base . . . . . . . . . . . . . . . . . . . . . . . . . . . . . . . . . . . . . . . . . . . . . . . . . . . . . . . . . . . 57
Making internal calls . . . . . . . . . . . . . . . . . . . . . . . . . . . . . . . . . . . . . . . . . . . . . . . . . . . . . . . . . 57
Listening in to an external call . . . . . . . . . . . . . . . . . . . . . . . . . . . . . . . . . . . . . . . . . . . . . . . . 59
Changing the name of a handset . . . . . . . . . . . . . . . . . . . . . . . . . . . . . . . . . . . . . . . . . . . . . 59
Changing a handset's internal number . . . . . . . . . . . . . . . . . . . . . . . . . . . . . . . . . . . . . . . 60
Using a handset as a room monitor . . . . . . . . . . . . . . . . . . . . . . . . . . . . . . . . 60
Using Bluetooth devices . . . . . . . . . . . . . . . . . . . . . . . . . . . . . . . . . . . . . . . . . . 61
4

Contents
Handset settings . . . . . . . . . . . . . . . . . . . . . . . . . . . . . . . . . . . . . . . . . . . . . . . . . 63
Quick access to functions and numbers . . . . . . . . . . . . . . . . . . . . . . . . . . . . . . . . . . . . . . . 63
Changing the display language . . . . . . . . . . . . . . . . . . . . . . . . . . . . . . . . . . . . . . . . . . . . . . 64
Setting the display . . . . . . . . . . . . . . . . . . . . . . . . . . . . . . . . . . . . . . . . . . . . . . . . . . . . . . . . . . . 64
Activating/deactivating auto answer . . . . . . . . . . . . . . . . . . . . . . . . . . . . . . . . . . . . . . . . . 65
Changing the speaker/earpiece volume . . . . . . . . . . . . . . . . . . . . . . . . . . . . . . . . . . . . . . 65
Changing ring tones . . . . . . . . . . . . . . . . . . . . . . . . . . . . . . . . . . . . . . . . . . . . . . . . . . . . . . . . . 66
Resource directory . . . . . . . . . . . . . . . . . . . . . . . . . . . . . . . . . . . . . . . . . . . . . . . . . . . . . . . . . . . 67
Activating/deactivating advisory tones . . . . . . . . . . . . . . . . . . . . . . . . . . . . . . . . . . . . . . . 68
Setting your own area code . . . . . . . . . . . . . . . . . . . . . . . . . . . . . . . . . . . . . . . . . . . . . . . . . . 68
Restoring the handset default settings . . . . . . . . . . . . . . . . . . . . . . . . . . . . . . . . . . . . . . . . 68
Base settings . . . . . . . . . . . . . . . . . . . . . . . . . . . . . . . . . . . . . . . . . . . . . . . . . . . . . 69
Protecting against unauthorised access . . . . . . . . . . . . . . . . . . . . . . . . . . . . . . . . . . . . . . . 69
Activating/deactivating music on hold . . . . . . . . . . . . . . . . . . . . . . . . . . . . . . . . . . . . . . . 69
Repeater support . . . . . . . . . . . . . . . . . . . . . . . . . . . . . . . . . . . . . . . . . . . . . . . . . . . . . . . . . . . . 69
Restoring the base to the factory settings . . . . . . . . . . . . . . . . . . . . . . . . . . . . . . . . . . . . . 69
Connecting the base to the PABX . . . . . . . . . . . . . . . . . . . . . . . . . . . . . . . . . . 70
Recall . . . . . . . . . . . . . . . . . . . . . . . . . . . . . . . . . . . . . . . . . . . . . . . . . . . . . . . . . . . . . . . . . . . . . . . . 70
Saving an access code (outside line code) . . . . . . . . . . . . . . . . . . . . . . . . . . . . . . . . . . . . . 70
Setting pauses . . . . . . . . . . . . . . . . . . . . . . . . . . . . . . . . . . . . . . . . . . . . . . . . . . . . . . . . . . . . . . . 71
Customer service & product warranty – Australia and New Zealand . 72
Questions and answers . . . . . . . . . . . . . . . . . . . . . . . . . . . . . . . . . . . . . . . . . . . . . . . . . . . . . . 74
Environment . . . . . . . . . . . . . . . . . . . . . . . . . . . . . . . . . . . . . . . . . . . . . . . . . . . . . 75
Appendix . . . . . . . . . . . . . . . . . . . . . . . . . . . . . . . . . . . . . . . . . . . . . . . . . . . . . . . . 76
Caring for your telephone . . . . . . . . . . . . . . . . . . . . . . . . . . . . . . . . . . . . . . . . . . . . . . . . . . . . 76
Contact with liquid . . . . . . . . . . . . . . . . . . . . . . . . . . . . . . . . . . . . . . . . . . . . . . . . . . . . . . . . . . 76
Specifications . . . . . . . . . . . . . . . . . . . . . . . . . . . . . . . . . . . . . . . . . . . . . . . . . . . . . . . . . . . . . . . . 76
Writing and editing text . . . . . . . . . . . . . . . . . . . . . . . . . . . . . . . . . . . . . . . . . . . . . . . . . . . . . . 77
Additional functions via the PC interface . . . . . . . . . . . . . . . . . . . . . . . . . . 78
Accessories . . . . . . . . . . . . . . . . . . . . . . . . . . . . . . . . . . . . . . . . . . . . . . . . . . . . . . . 80
Mounting the base to the wall . . . . . . . . . . . . . . . . . . . . . . . . . . . . . . . . . . . . . 82
Index . . . . . . . . . . . . . . . . . . . . . . . . . . . . . . . . . . . . . . . . . . . . . . . . . . . . . . . . . . . . 83
5

Safety precautions
$
ƒ
Safety precautions
Warning
Read the safety precautions and the user guide before use.
Explain their content and the potential hazards associated with using the telephone to your
children.
Only use the mains adapter supplied, as indicated on the underside of the
base station.
Only use the recommended, rechargeable batteries (
erwise result in significant health risks and personal injury.
The operation of medical appliances may be affected. Be aware of the technical conditions in your particular environment, e.g. doctor's surgery.
Do not hold the rear of the handset to your ear when it is ringing or when
the speaker function is activated. Otherwise you risk serious and permanent damage to your hearing.
The handset may cause an unpleasant humming noise in hearing aids.
Do not install the base or charging cradle in bathrooms or shower rooms. The base
and charging cradle are not splashproof (
Do not use your phone in environments with a potential explosion hazard (e.g. paint
shops).
If you give your Gigaset to someone else, make sure you also give them the
user guide.
Please remove faulty bases from use or have them repaired by our Service, as they
could interfere with other wireless services.
¢ page 76).
¢ page 76) as this could oth-
Please note
Not all of the functions described in this user guide are available in all countries.
Warning
This equipment will be rendered inoperable when main power fails.
6

Gigaset SL780/SL785 – more than just a telephone
Gigaset SL780/SL785 – more than just a telephone
Your telephone sets new standards for the way you communicate at home.
The configuration and user interface of the cordless phone are unique, providing
you with first-class voice quality in speaker mode, while the various ports (Bluetooth, USB) offer you high flexibility.
The large TFT display, user-friendly keypad and clearly laid out menu are very simple to use.
It can do a whole lot more:
u You can use Bluetooth™ for wireless communication with other devices
(e.g. headsets) that also use this technology.
u Synchronise your address books on your telephone, mobile phone and PC with
Bluetooth
u You can save appointments and anniversaries in your phone and it will remind
you of them in advance.
u You can designate important people as VIPs so you can identify important calls
from the ring tone.
u If you do not wish to be disturbed, you can simply set up a time control so that
your phone will only ring when it is convenient. VIP calls will still be connected.
u You can programme the keys of your phone with important numbers or fre-
quently used functions. The number is then dialled or the function started by
simply pressing a key.
u Gigaset Green Home – Be environmentally aware when using your phone.
For more information, see www.gigaset.com/service
TM
or via the USB port using the Gigaset QuickSync software.
.
You can find additional information on your telephone at
www.gigaset.com/gigasetsl78h
.
Have fun using your new phone!
7

First steps
2
1
3
5
7
6
8
4
9
J
First steps
Check the pack contents
1 one Gigaset SL780/SL785 base
2 one base cover stand
3 one mains adapter for the base
4 one Gigaset SL78H handset
5 one battery
6 one battery cover
7 one belt clip
8 one charging cradle with mains adapter
9 one phone cord
J one user guide
8

Connecting the base
1
3
2
1
1
4
¤ Connect the mains adapter 1
and phone jack 2 to the base
and place the cables in the
cable recesses.
¤ Place the cover in the notches on the
back of the base and click into place
(not if mounting on the wall).
¤ First connect the phone
jack 4.
¤ Then connect the mains
adapter 3.
First steps
Please note:
u The mains adapter must always be connected, as the phone will not operate
without mains connection.
u Only use the mains adapter and phone cord supplied. Pin connections on tele-
phone cables can vary (pin connections
¢ page 77).
9

First steps
Installing the base and charging cradle
The base and charging cradle are designed for use in enclosed dry rooms with a
temperature range of +5°C to +45°C.
¤ Install the base on a level, non-slip surface in a central location in your house or
flat or mount the base on the wall
Please note
Pay attention to the range of the base. This is up to 300 m in unobstructed outdoor areas and up to 50 m inside buildings.
The range is reduced when Eco Mode (
The phone's feet do not usually leave any marks on surfaces. However, due to the
multitude of different varnishes and polishes used on today's furnishings, the
occurrence of marks on the surfaces cannot be completely ruled out.
Please note:
u Never expose the telephone to the influence of heat sources, direct sunlight or
other electrical devices.
u Protect your Gigaset from moisture, dust, corrosive liquids and vapours.
¢ page 82.
¢ page 53) is activated.
10

Setting up the handset for use
¤ First insert the battery at the top
a.
¤ Then press the battery down-
wards b until it clicks into place.
¤ First, align the protrusions on
the side of the battery cover
with the notches on the inside
of the casing.
¤ Then press the cover until it
clicks into place.
a
b
The display and keypad are protected by a plastic film.
Please remove the protective film!
Inserting the battery and closing the battery cover
Warning
Use only the rechargeable batteries (¢page 76) recommended by
Gigaset Communications GmbH, as this could otherwise result in significant
health risks and damage to property. For example, the outer casing of the batteries could be destroyed or the batteries could explode. The phone could also
malfunction or be damaged as a result of using batteries that are not of the recommended type.
First steps
11

First steps
If you need to reopen the battery cover to connect the USB data cable or change
the battery:
¤ Remove the belt clip (if
attached).
¤ Place your fingernail into the
notch at the bottom of the
casing and pull the battery
cover upwards.
To change the battery, place
your fingernail in the cavity in the
casing and pull the battery
upwards.
12
Attaching/removing the belt clip
The handset has notches on each side to attach the belt clip.
¤ To at tach – press the belt clip
onto the back of the handset so
that the protrusions on the belt
clip engage with the notches.
¤ To re move – using your right
thumb apply pressure to the centre right of the belt clip, push the
fingernail of your left index finger
between the clip and the casing
and lift the clip upwards.
First steps
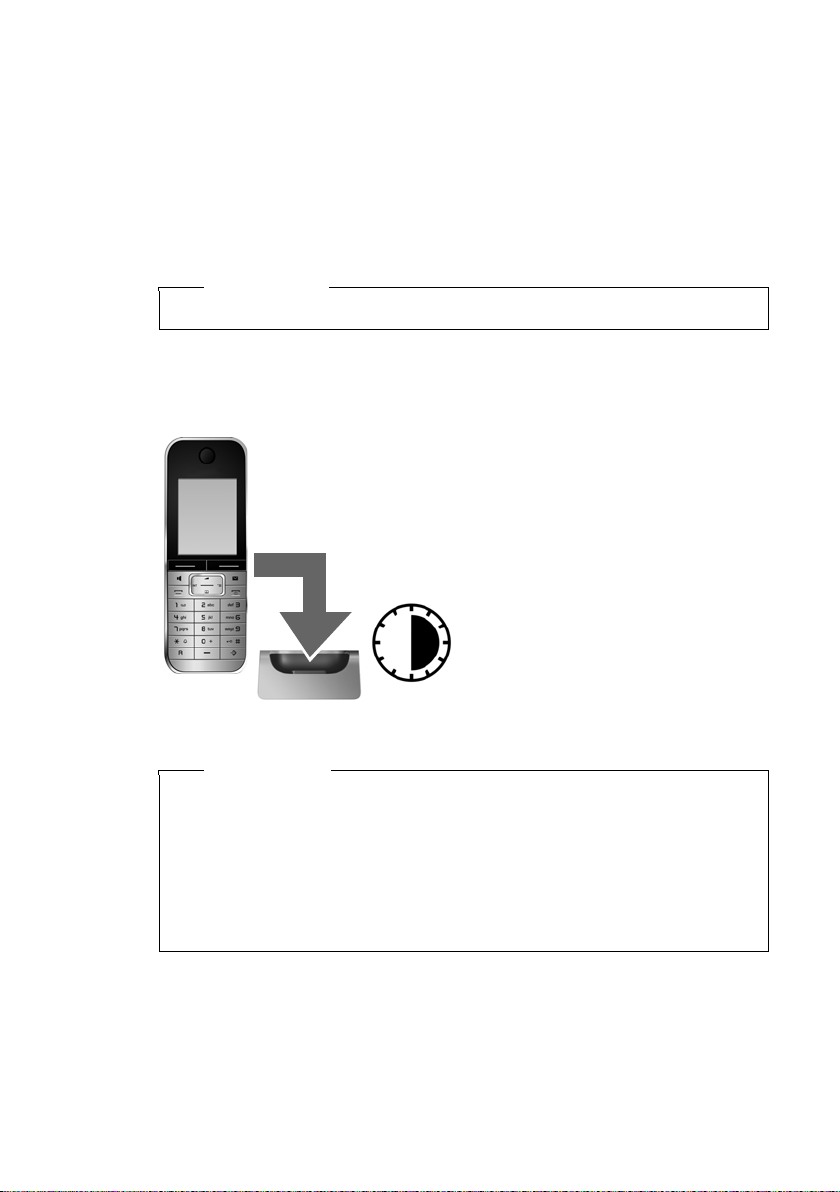
¤ Place the handset in the charging cradle for six
hours.
¤ Once the battery is fully
charged, remove the handset from the charging cradle
and do not put it back again
until the battery is fully discharged.
6 h
Placing the handset in the charging cradle
¤ Insert the mains adapter of the charging cradle into the mains socket.
¤ Place the handset in the charging cradle with its display facing forward.
The handset is registered with the base at the factory. You do not need to complete
a registration. If you wish to use your handset with a different base or use further
handsets with your base, you will have to register the handset manually
¢ page 56.
To charge the battery, leave the handset in the charging cradle.
Please note
Only place the handset in the charging cradle that is intended for it.
First battery charge and discharge
The correct charge status can only be displayed if the battery is first fully charged
and discharged.
Please note
u After the first battery charge and discharge, you may place your handset in
the charging cradle after every call.
u Always repeat the charging and discharging procedure if you remove the
battery from the handset and reinsert it.
u The battery may heat up during charging. This is not dangerous.
u After a time, the charge capacity of the battery will decrease for technical
reasons.
13

First steps
Date/Time
Date:
14.10.2008
Time:
00:00
Back Save
¤ Press the key below §Time§ on the dis-
play screen to open the input field.
(If you have already set the time and
date, open the input field via the menu
¢ page 26.)
The Date/Time submenu is shown on
the display.
¤ The active input position flashes.
Enter day, month and year as an
8-digit number via the keypad,
e.g. 4Q2Q
QN for 14/10/2008.
Date/Time
Date:
14.10.2008
Time:
00:00
Back Save
Time
Press the right or left control key
to change the input position and
correct an entry.
¤ Enter the hours and minutes as
four digit numbers via the keypad,
e.g. QM5 for
07:15 am.
Change the input position with
the control key if necessary.
¤ Press down on the control key to switch
to the time input field.
Setting the date and time
Set the date and time so that the correct date and time can be assigned to incoming
calls, and so that the alarm and the calendar can be used.
14

¤ Press the key below §Save§ on the dis-
play screen to confirm your entry.
The display shows Saved. You will hear a
confirmation tone.
¤ Press the key below §Back§ on the dis-
play screen to return to idle status.
Back Save
Date/Time
Date:
14.10.2008
Time:
07:15
Back Save
Date/Time
‰
Saved
First steps
15

First steps
i à V
INT 1
Oct 2008
07:15
Calls Calendar
Mo Tu We Th Fr Sa Su
01 02 03 04 05
06 07 08 09 10 11 12
13 14 15 16 17 18 19
20 21 22 23 24 25 26
27 28 29 30 31
1
Display in idle status
Once the phone is registered and the time set, the idle
display is shown as in this example. If the answering
machine is activated, the answering machine icon
will be displayed in the header.
The following is displayed after successful registration:
u the strength of the reception signal between base
and handset:
– good to poor: ÐiÑÒ
– no reception: |
u battery charge status:
outside the charger
– U white: charged over 66 %
– V white: charged between 33 % and 66 %
*
– ewhite or red
: charged under 33 %
– =flashes red: battery almost empty (less than 10 minutes talktime)
in the charger
– = e V U white: battery is charging
*
red: older firmware version, please update the handset’s firmware (¢page 78)
Your answering machine is set with a pre-recorded announcement.
Please note
u The range icon is only displayed in idle status if Eco Mode+ (¢page 53) is
deactivated.
u The display of the calendar in idle status can be activated or deactivated
¢ page 54).
(
Ã
Connecting the USB data cable
16
Your phone is now ready for use!
You can connect a standard USB data cable
with a mini-B connector to the back of your
handset to connect the handset to a PC.
To use this function, the Gigaset QuickSync
software must be installed (
¢ page 78).
¤ Remove the belt clip (if attached)
¢ page 12).
(
¤ Remove the battery cover (¢page 12).
¤ Connect the USB data cable to USB socket 1.

What would you like to do next?
g
g
g
g
g
g
g
g
g
g
Now you have successfully started your Gigaset, you will probably want to adapt it
to your personal requirements. Use the following guide to quickly locate the most
important subjects.
If you are unfamiliar with menu-driven devices such as other Gigaset telephones
you should first read the section entitled "Using the phone"
Information on ... ... is located here.
Setting the ring tone and volume page 66
Setting the handset volume page 65
First steps
¢ page 18.
Recording your own announcement for the
answering machine
Setting Eco Mode / Eco Mode+ page 53
Preparing the telephone for SMS reception page 38
Operating the telephone on a PABX page 70
Registering existing Gigaset handsets to a base page 56
Transferring directory entries from existing
Gigaset handsets to the new handset(s)
Using Bluetooth devices page 61
Connecting the phone to the PC page 78
If you have any questions about using your phone, please read the tips
on troubleshooting (
(
¢ page 72).
¢ page 74) or contact our Customer Care team
page 46
page 32
17

Using the phone
Using the phone
Control key
The control key has a number of different functions.
The sides of the control key that you must press for different
operating situations,(top, bottom, right, left, centre), are marked
with a black triangle as indicated in the diagrams below, e.g. v
for "press right on the control key“ or w for "press the centre of
the control key".
When the handset is in idle status
s Open the directory.
v Open the main menu.
u Open the list of handsets.
t Menu for setting the handset's call volume (¢ page 65).
In the main menu, in submenus and lists
t / s Scroll up/down line by line.
In input fields
You can use the control key to move the cursor up t, down s, right v or left
u. Press and hold v or u to move the cursor word by word.
18
During an external call
s Open the directory.
u Initiate an internal consultation call.
t Adjust the loudspeaker volume for earpiece and speaker mode.
Functions when pressing the middle of the control key
Depending on the operating situation, the key has different functions.
u In idle status the key opens the main menu.
u In submenus, selection and input fields the key takes on the function of the dis-
play keys
§OK§, §Yes§, §Save§ or §Change§.
Please note
In these instructions func tions are explained using the right control key and the
display keys. However, if you prefer, you can use the control key as described
above.

Display keys
Back Save
Current display key functions.
Display keys
Options
OK
Û
Back
Save
Þ
The function of the display keys changes depending on the particular operating situation. Example:
Some important display keys:
Open a context-dependent menu.
Confirm selection.
Delete key: Delete character/word by word from right to left.
Go back one menu level or cancel operation.
Store entry.
Open the redial list.
Keys on the keypad
c/ Q/ * etc.
Press the matching key on the handset.
~ Enter digits or letters.
Using the phone
Correcting incorrect entries
You can correct incorrect characters in the input fields by navigating to the incorrect entry using the control key. You can then:
u Delete the character to the left of the cursor with the display key Ñ (press and
hold to delete the word)
u Insert characters to the left of the cursor.
u Overwrite the highlighted (flashing) character, e.g. when entering time and
date.
19

Using the phone
Settings
Ç ò É
Ê
Ë Ì
Í
Î Ï
Back OK
Settings
Date/Time
Audio Settings
Display
Language
Registration
Telephony
Back OK
Menu guidance
Your telephone's functions are accessed using a menu that has a number of levels.
Main menu (first menu level)
¤ When the handset is in idle status press the right v control key to open the
main menu.
The main menu functions are shown in the display with
icons. The selected function is marked by an orange circle around the symbol and the corresponding name is
shown in the display header.
To access a function, i.e. to open the corresponding submenu (next menu level):
¤ Use the control key p to select the required func-
tion and press the display key
Briefly press the display key §Back§ or the end call key
a to revert back to idle status.
Submenus
The functions in the submenus are displayed as lists
(example on the right).
To access a function:
¤ Scroll to the function with the control key q and
§OK§.
press
Briefly press the display key §Back§ or the end call key
a to return to the previous menu level/cancel the
operation.
§OK§.
Reverting to idle status
You c an re vert to i dle stat us fr om an ywhere in t he menu
as follows:
¤ Press and hold the end call key a.
Or:
¤ Do not press any key: after 2 minutes the display will automatically rev ert to i dle
Settings that have not been saved by selecting the display key
20
§Change§ will be lost
An example of the display in idle status is shown on page 16.
status.
§OK§, §Yes§, §Save§ or

Activating/deactivating the handset
a With the phone in idle status, press and hold the end call key
(confirmation tone) to switch off the handset.
Press and hold the end call key again to switch the handset on.
Please note
When the handset is switched on, an animation of a clock will be displayed for
several seconds.
Activating/deactivating the keypad lock
The keypad lock prevents any inadvertent use of the phone.
# Press and hold the hash key in idle status to activate or deactivate the
keypad lock. You will hear the confirmation tone.
When the keypad lock is activated you will see the ˝ icon on the display and a
message when you press a key.
The keypad lock is deactivated automatically if someone calls you. It is reactivated
when the call is finished.
Using the phone
21

Using the phone
¤ Press right on the control key v
to open the main menu.
¤ Use the right, left, down and up
control key p to navigate to
the Settings submenu.
¤ Press the display key §OK§ to confirm
your selection.
¤ Press down on the control key
s
until the Te le ph o ny menu appears
on the display.
¤ Press the display key §OK§ to confirm
your selection.
Settings
Date/Time
Audio Settings
Display
Language
Registration
Telephony
Back OK
Settings
Ç ò É
Ê
Ë Ì
Í
Î Ï
Back OK
Illustration of operating steps in the user guide
The operating steps are shown in abbreviated form.
Example:
The illustration:
v ¢ Settings ¢Tel ep h on y ¢ Auto Answer (³ =on)
means:
22

Changes are effective immediately
and do not have to be confirmed.
The Auto Answer func tion has already
been selected.
¤ Press the display key §Change§ to
activate/deactivate the function.
Telephony
Auto Answer
³
Area Codes
Listening In
´
Preselection
Access Code
Back Change
Telephony
Auto Answer
´
Area Codes
Listening In
´
Preselection
Access Code
Back Change
¤ Press the key below §Back§ on the
display to jump back to the previous
menu level.
or
Press and hold the end call key a to
return to idle status.
Using the phone
23

Menu tree
Menu tree
With the telephone in idle status, press v (open main menu):
Select Services
Ç
Bluetooth
ò
Activation ¢page 62
Search for Headset
Search for DataDevice
Known Devices
Own Device
Additional Features
É
Room Monitor ¢page 60
Resource Directory Screensavers
Call Lists
Ê
All Calls ¢page 34
Outgoing Calls
Accepted Calls
Missed Calls
¢page 62
¢page 62
¢page 62
¢page 63
Caller Pictures
Sounds
Capacity
¢page 34
¢page 34
¢page 34
¢page 67
¢page 67
¢page 67
¢page 67
24

SMS
Ë
You have activated an SMS mailbox (general or private) without a PIN
New SMS
Incoming
Draft
You have activated an SMS mailbox with a PIN or 2-3 mailboxes
Mailbox New SMS
¢page 38
¢page 41
¢page 39
Incoming
Draft
Menu tree
¢page 38
¢page 41
¢page 39
Mailbox 1
Mailbox 2
Mailbox 3
Settings Service Centres
Answering Machine
Ì
Play Messages Network Mailbox ¢page 52
Activation *
Announcements * Record Announcemnt. *
Recordings *
Call Screening *
Network Mailbox
(base without answering
machine only)
Set Key 1 * Network Mailbox
*Only base with answering machine
New SMS
Incoming
Draft
SMS Mailboxes
Notification
Status Report
Answering Machine *
¢page 46
Play Announcement *
Delete Announcemnt. *
Record Advisory Msg. *
Play Advisory Message *
Delete Advisory Msg. *
¢page 49
¢page 49
¢page 52
Answering Machine
¢page 38
¢page 41
¢page 39
¢page 44
¢page 42
¢page 42
¢page 39
¢page 46
¢page 46
¢page 46
¢page 46
¢page 46
¢page 46
¢page 46
¢page 52
¢page 46
25

Menu tree
Organizer
Í
Calendar ¢page 54
Alarm Clock
Missed Alarms
¢page 56
¢page 55
Directory
Î
Settings
Ï
Date/Time ¢page 14
Audio Settings Call Volume
Display Screensaver
Language
Registration Register Handset
Telephony Auto Answer
¢page 30
Ringer Settings
Advisory Tones
Music on hold
Backlight
¢page 64
De-register Handset
Select Base
Area Codes
Listening In
Preselection
Access Code
Recall
¢page 65
¢page 66
¢page 68
¢page 69
¢page 64
¢page 65
¢page 56
¢page 57
¢page 57
¢page 65
¢page 68
¢page 59
¢page 37
¢page 70
¢page 70
System Eco Mode
Reset Handset Reset
26
Eco Mode+
Repeater Mode
System PIN
Base Reset
¢page 53
¢page 53
¢page 69
¢page 69
¢page 68
¢page 69
 Loading...