

Page 1

s
!
*LJDVHW
3070/75
LVGQ
Published by
Information and Communication Mobile Group
Hofmannstr. 51
D-81359 München
© Siemens AG 2001
All rights reserved. Subject to availability.
Right of modification reserved.
Printed in Germany (01/01).
Siemens Aktiengesellschaft
http://www.siemens.com/gigaset
Order. no.: A31008-G3070-B100-3-7619
User Guide
and Safety Precautions
Page 2

Gigaset 3070isdn, GB, A31008-G3070-B100-3-7619
Safety precautions
Sicherheitshinweise
09.01.01
Step
by
Step
Safety precautions
● Install only in covered areas with a temperature range of +5°C to +45°C.
● Do not install in bathrooms or shower rooms.
● Sensitive electronic equipment may be affected.
● When disposing of the base station, the relevant environmental protection
guidelines must be observed.
● This Gigaset device should only be passed on to third parties complete with
the operating instructions.
● Only the plug-in power supply unit provided should be used (see under-
side of base station).
● Do not use the base station or handsets in environments where there is a
risk of explosion (e.g. paint shops).
Installation notes
● A 220/230V~ mains socket and an ISDN telephone socket must be available
at the installation site.
● Install in a central location, e.g. in a hallway.
● The installation site should not be located in the immediate vicinity of other
devices such as stereo systems, televisions, office equipment or microwaves, as this could result in interference.
● The base station is suitable for wall installation. The holes are 91.2 mm apart
and approx. 45 mm from the top. The device is attached using two 5 mm
screws which are not screwed in fully. The base station is then hung onto
these screws.
● The outdoor range between the base station and the handset is
max. 300 m. An indoor range of max. 50 m is supported.
● If wall mounting is not required, simply stand the base station on a level,
non-slip surface. The device feet do not normally leave marks on the installation surface. However, due to the variety of varnishes and polishes in use,
marks could be left at the points of contact.
Contents of packaging
● 1 base station
● 1 mains connection cable with a plug-in power supply unit
● 1 ISDN connection cable
● 1 USB cable
● 1 set of operating instructions
● 1 CD-ROM "talk & surf"
● 1 set of "talk & surf" installation instructions
Gigaset 3075isdn Comfort also includes:
● 1 Gigaset 3000 Comfort telephone
● 1 Gigaset 3000 L telephone charger
II
Page 3

Gigaset 3070isdn, GB, A31008-G3070-B100-3-7619
Brief overview - Gigaset 3000 Comfort handset
The display is protected by a plastic film.
£
This protective film should be removed before use.
Übersicht_U3.fm
09.01.01
Base name
Constant:
–
dial/receive call
Flashing:
–
with base station
End call key
–End call
– Abort function
Handset on/off:
–
Long press
Directory
Call up
Recall key
– For PABXs and Select
Services
– Insert pause:
Long press
ready to
no contact
8
2QcU!
M, +[
Battery level
7
full
empty
Softkeys
See below
Activate menu
Speakerphone
Ta lk ke y
– Accept call
– Dial call number
Keypad protection
On/off:
Long press
3
Page 4

Gigaset 3070isdn, GB, A31008-G3070-B100-3-7619
Softkeys and symbols of the Gigaset 3000 Comfort and
Gigaset 3000 Classic
Softkeys Symbols
- Make an internal call
+
-Hold call
Open redial list
[
1. This symbol appears if
,
<
;
\
=
:
the missed calls list contains new messages or
entries.
2. Press the softkey to call
up new messages or the
missed calls list.
Go to the next menu line or
to the last line
Go to the previous menu
line or to the first line
Return to the previous
menu
- Call a menu command
- Confirm and save entries/
settings
Backspace
Übersicht_U3.fm
Battery run down + warning
µ
tone
Battery charged to 1/3.
Flashes during the charging process.
Battery charged to 2/3.
Flashes during the charging process.
Battery fully charged
Signal quality: none or poor
Signal quality: average
Signal quality: good
³
Lock symbol
09.01.01
Move the cursor to the left No dial tone
Move the cursor to the right Volume setting (e.g. 1)
N
_ _ _ _ _
7*/*(9
%$&.
M
Call up supplementary
menu: this contains important additional functions.
1. Close menu
2. Return to previous menu
Text for function
Move up one menu level
Call up list of network pro-
viders
Ring tone crescendo
Volume of melody
4
Page 5

Gigaset 3070isdn, GB, A31008-G3070-B100-3-7619
giga3070IVZ.fm
09.01.01
Contents
Contents
Safety precautions
Brief overview - Gigaset 3000 Comfort handset . . . . . . . . . . . . . 3
. . . . . . . . . . . . . . . . . . . . . . . . . . . II
Contents. . . . . . . . . . . . . . . . . . . . . . . . . . . . . . . . . . . 1
Getting started
Connecting the base station . . . . . . . . . . . . . . . . . . . . . . . . . . . . 5
Connecting supplementary devices. . . . . . . . . . . . . . . . . . . . . . . 6
Registering handsets . . . . . . . . . . . . . . . . . . . . . . . . . . . . . . . . . . 6
Deregistering devices . . . . . . . . . . . . . . . . . . . . . . . . . . . . . . . . . 7
Connecting a PC to the base station
Representation of file names in Windows Explorer. . . . . . . . . . 11
Updating Gigaset 3070/3075isdn. . . . . . . . . . . . . . . . . . . . . . . . 12
Assigning the COM ports to the devices. . . . . . . . . . . . . . . . . . 13
Operating Gigaset talk&surf with a wireless data device . . . . . 13
Getting into the ISDN world is easy
What is an MSN. . . . . . . . . . . . . . . . . . . . . . . . . . . . . . . . . . . . . 17
Configuring Gigaset 3070/3075isdn and MSNs. . . . . . . . . . . . . 17
Ring delay per MSN. . . . . . . . . . . . . . . . . . . . . . . . . . . . . . . . . . 18
Allocating numbers . . . . . . . . . . . . . . . . . . . . . . . . . . . . . . . . . . 18
. . . . . . . . . . . . . . . . . . . . . . . . . . . . . . 5
. . . . . . . . . . . . . 8
. . . . . . . . . . . . . 17
The Installation Assistant (Comfort handsets only)
Starting the Installation Assistant . . . . . . . . . . . . . . . . . . . . . . . 19
Configuring ISDN call numbers (MSNs)
Other options for configuring MSNs . . . . . . . . . . . . . . . . . . . . . 21
Answering machine (only 3075isdn) . . . . . . . . . . . . . . . . . . . . . 22
Locking/unlocking ISDN features
Conducting a call externally or via a second B-channel . . . . . . . 23
Transferring calls - activating/deactivating ECT
(Explicit Call Transfer) . . . . . . . . . . . . . . . . . . . . . . . . . . . . . . . . 23
Call waiting - activating/deactivating CW . . . . . . . . . . . . . . . . . . 23
Busy on Busy (busy signal when MSN is engaged) . . . . . . . . . 23
Setting external/internal enquiry calls . . . . . . . . . . . . . . . . . . . . 24
Answering machine - activating/deactivating direct call pickup . 24
Rejecting calls for all MSN groups. . . . . . . . . . . . . . . . . . . . . . . 24
. . . . . . . . . 21
. . . . . . . . . . . . . . 23
. 19
1
Page 6

Gigaset 3070isdn, GB, A31008-G3070-B100-3-7619
Contents
giga3070IVZ.fm
09.01.01
System settings
Configuring music-on-hold. . . . . . . . . . . . . . . . . . . . . . . . . . . . . 25
Audio settings . . . . . . . . . . . . . . . . . . . . . . . . . . . . . . . . . . . . . . 25
Entering long-distance codes . . . . . . . . . . . . . . . . . . . . . . . . . . 26
Restoring the factory setting . . . . . . . . . . . . . . . . . . . . . . . . . . . 26
Querying the status . . . . . . . . . . . . . . . . . . . . . . . . . . . . . . . . . . 26
Making comfort calls
Making internal calls free of charge. . . . . . . . . . . . . . . . . . . . . . 27
Collective call/Group call . . . . . . . . . . . . . . . . . . . . . . . . . . . . . . 27
Ring delay . . . . . . . . . . . . . . . . . . . . . . . . . . . . . . . . . . . . . . . . . 28
Conducting calls with more than one subscriber. . . . . . . . . . . . 28
Entering numbers in the telephone directory . . . . . . . . . . . . . . 30
Picking up a call while the answering machine is operating . . . 30
Rejecting calls for all MSN groups. . . . . . . . . . . . . . . . . . . . . . . 30
Missed calls. . . . . . . . . . . . . . . . . . . . . . . . . . . . . . . . . . . . . . . . 31
Internal call forwarding . . . . . . . . . . . . . . . . . . . . . . . . . . . . . . . 32
External call forwarding - CF . . . . . . . . . . . . . . . . . . . . . . . . . . . 32
Switching internal/external call forwarding . . . . . . . . . . . . . . . . 33
Transferring incoming calls - CD (Call Deflection) . . . . . . . . . . . 33
Automatic external callback on busy CCBS. . . . . . . . . . . . . . . . 34
Call waiting - CW . . . . . . . . . . . . . . . . . . . . . . . . . . . . . . . . . . . . 34
Holding calls . . . . . . . . . . . . . . . . . . . . . . . . . . . . . . . . . . . . . . . 35
Parking/continuing calls ("unpark") . . . . . . . . . . . . . . . . . . . . . . . 35
Calling line identification restriction (CLIR) . . . . . . . . . . . . . . . . 36
Automatic call forwarding due to inaccessible handset. . . . . . . 36
Tracing switch . . . . . . . . . . . . . . . . . . . . . . . . . . . . . . . . . . . . . . 37
. . . . . . . . . . . . . . . . . . . . . . . . . . . . . 25
. . . . . . . . . . . . . . . . . . . . . . . . 27
System functions
Missed calls list . . . . . . . . . . . . . . . . . . . . . . . . . . . . . . . . . . . . . 38
Configuring an external destination call number for the room
monitor . . . . . . . . . . . . . . . . . . . . . . . . . . . . . . . . . . . . . . . . . . . 39
Night service . . . . . . . . . . . . . . . . . . . . . . . . . . . . . . . . . . . . . . . 39
Entrance telephone . . . . . . . . . . . . . . . . . . . . . . . . . . . . . . . . . . 40
Displaying call charge and call duration . . . . . . . . . . . . . . . . . . . 40
Call by Call . . . . . . . . . . . . . . . . . . . . . . . . . . . . . . . . . . . . . . . . . 42
Answering machine (3075isdn only)
Access options for the answering machine. . . . . . . . . . . . . . . . 43
Selecting an answering machine. . . . . . . . . . . . . . . . . . . . . . . . 43
Activating/deactivating the answering machine . . . . . . . . . . . . 43
Activating an announcement . . . . . . . . . . . . . . . . . . . . . . . . . . . 43
Recording/modifying announcements. . . . . . . . . . . . . . . . . . . . 44
Playing back/deleting announcements . . . . . . . . . . . . . . . . . . . 44
2
. . . . . . . . . . . . . . . . . . . . . . . . . . . . 38
. . . . . . . . . . . . . . 43
Page 7

Gigaset 3070isdn, GB, A31008-G3070-B100-3-7619
Recording memos . . . . . . . . . . . . . . . . . . . . . . . . . . . . . . . . . . . 44
Listening to messages. . . . . . . . . . . . . . . . . . . . . . . . . . . . . . . . 45
Listening to memos . . . . . . . . . . . . . . . . . . . . . . . . . . . . . . . . . . 45
Deleting messages and memos . . . . . . . . . . . . . . . . . . . . . . . . 45
Modifying settings . . . . . . . . . . . . . . . . . . . . . . . . . . . . . . . . . . . 46
Remote control . . . . . . . . . . . . . . . . . . . . . . . . . . . . . . . . . . . . . 46
Activating an announcement . . . . . . . . . . . . . . . . . . . . . . . . . . . 47
Locking the answering machine . . . . . . . . . . . . . . . . . . . . . . . . 47
Setting a timer . . . . . . . . . . . . . . . . . . . . . . . . . . . . . . . . . . . . . . 48
Picking up a call from an answering machine . . . . . . . . . . . . . . 48
Remote control of the answering machine . . . . . . . . . . . . . . . . 49
giga3070IVZ.fm
09.01.01
Contents
Security settings
Change system PIN . . . . . . . . . . . . . . . . . . . . . . . . . . . . . . . . . . 52
Base lock . . . . . . . . . . . . . . . . . . . . . . . . . . . . . . . . . . . . . . . . . . 52
Accesses . . . . . . . . . . . . . . . . . . . . . . . . . . . . . . . . . . . . . . . . . . 52
Emergency numbers . . . . . . . . . . . . . . . . . . . . . . . . . . . . . . . . . 53
Restoring the factory setting . . . . . . . . . . . . . . . . . . . . . . . . . . . 53
Appendix
Centrex features . . . . . . . . . . . . . . . . . . . . . . . . . . . . . . . . . . . . 54
In conjunction with a PABX . . . . . . . . . . . . . . . . . . . . . . . . . . . . 54
Reserving a line . . . . . . . . . . . . . . . . . . . . . . . . . . . . . . . . . . . . . 55
Dialling procedures. . . . . . . . . . . . . . . . . . . . . . . . . . . . . . . . . . . 55
. . . . . . . . . . . . . . . . . . . . . . . . . . . . . . . . . 54
Operation with other devices
Registering a Gigaset 3000 Classic handset . . . . . . . . . . . . . . . 57
Registering the Gigaset 2000S handset. . . . . . . . . . . . . . . . . . . 57
Normal telephone (POT). . . . . . . . . . . . . . . . . . . . . . . . . . . . . . . 57
Registering third-party GAP handsets . . . . . . . . . . . . . . . . . . . . 57
Activating and deactivating the repeater capability . . . . . . . . . . 57
Registering cordless Gigaset 1000TAE . . . . . . . . . . . . . . . . . . . 58
Registering the Gigaset M101 Data and M105 Data modules . 59
Making calls . . . . . . . . . . . . . . . . . . . . . . . . . . . . . . . . . . . . . . . . 60
Making calls with a corded telephone at the TAE connection . . 62
Operation with the entrance telephone
Configuring the entrance telephone. . . . . . . . . . . . . . . . . . . . . . 66
. . . . . . . . . . . . . . . . . . . . . . . . . . . 52
. . . . . . . . . . . . . . . . . 57
. . . . . . . . . . 66
About your system
Troubleshooting . . . . . . . . . . . . . . . . . . . . . . . . . . . . . . . . . . . . . 69
Technical data . . . . . . . . . . . . . . . . . . . . . . . . . . . . . . . . . . . . . . 69
Contact. . . . . . . . . . . . . . . . . . . . . . . . . . . . . . . . . . . . . . . . . . . . 70
Approval . . . . . . . . . . . . . . . . . . . . . . . . . . . . . . . . . . . . . . . . . . . 70
. . . . . . . . . . . . . . . . . . . . . . . . . . 68
3
Page 8

Gigaset 3070isdn, GB, A31008-G3070-B100-3-7619
Contents
giga3070IVZ.fm
09.01.01
Menu Displays
Comfort handset menu . . . . . . . . . . . . . . . . . . . . . . . . . . . . . . . 71
. . . . . . . . . . . . . . . . . . . . . . . . . . . . . 71
Index. . . . . . . . . . . . . . . . . . . . . . . . . . . . . . . . . . . . . 77
4
Page 9

Gigaset 3070/3075isdn, GB, A31008-G3070-B100-3-7619
giga3070KAP.fm
09.01.01
Getting started
Step
by
Step
Getting started
Connecting the base station
21
22
4.
5.
V socket: insert in the ISDN connection cable until the plug locks into place.
1.
Insert in the ISDN connection cable in the ISDN socket until the plug locks into
2.
place.
In the case of NTBA with self-assembly, insert the cable between the NTBA
3.
and the TAE (old telephone socket) until both plugs lock into place.
4.
5.
socket: insert the mains connection cable securely into the plug and insert
the plug into the socket.
If required, connect the PC via USB cable to the USB bus (only supported with
Windows 98).
1.
2.
3.
Only the plug-in power supply unit provided should be used (see underside of base station).
Power failure:
£
In the event of a power failure, your base station, the handsets which
are registered at it and any corded terminals are not operational. All settings and saved information (messages, directory entries) are retained
for an unlimited period.
Profiset talk&surf:
It is not possible to install Profiset talk&surf and Gigaset talk&surf simultaneously on the same PC. Otherwise, problems will occur as both programs attempt to access the same interface. You must therefore choose either Gigaset
talk&surf or Profiset Talk&surf. When upgrading, the old program version must
first be deinstalled.
5
Page 10

Gigaset 3070/3075isdn, GB, A31008-G3070-B100-3-7619
Getting started
giga3070KAP.fm
09.01.01
Step
by
Step
Connecting supplementary devices
Registering handsets
Registering the new Gigaset 3000 Comfort handset
Switch on the handset with a long press on the¯key.
1.
Confirm "Register?" new handset with [YES] on the handset.
2.
or Existing handset: press →
2.
and select → Register. Confirm with [OK] on the handset.
Enter the system PIN of the base station (factory setting: 0000) and confirm
3.
with [OK].
Press the green illuminated key on the base station, the key flashes steadily.
4.
The base station is only ready for registration as long as the key flashes.
Select an unassigned internal call number (11 - 18) with [
5.
[OK].
Successful registration is confirmed on the display.
Schematic diagram
→ Stations → Station 1 - 4, select a free station
21
Connection for the
corded terminal
with the internal number 21
22
Connection for the
corded terminal
with the internal number 22
The connections are designed for use with most
commercial terminals.
Press this green illuminated key
] and confirm with
6
Page 11

Gigaset 3070/3075isdn, GB, A31008-G3070-B100-3-7619
giga3070KAP.fm
09.01.01
Getting started
Step
by
Step
Registering the Gigaset 3000 Classic handset
Switch on the handset with a long press on the¯key.
1.
Press
2.
3.
4.
5.
6.
® x {
Enter the base station number, generally 1, and confirm with
symbol initially flashes, but then remains steadily lit when the connec-
The
tion to the base station has been established.
Enter the base station PIN (factory setting: 0000) and confirm with [OK].
Press the green illuminated key on the base station, the key flashes steadily.
Select an unassigned internal call number (11 - 18). The handset is then suc-
cessfully registered (the symbol indicating readiness for registration stops
flashing).
in sequence.
1
.
Registering other devices
If you would also like to register other handsets (e.g. Gigaset 2000S, GAP handsets) or cordless devices (e.g. Gigaset 1000 TAE, STA), please select the internal numbers 11 - 15. These devices are not called at the numbers 16 - 18!
It is possible to register a maximum of 8 cordless devices (Gigaset handsets in
the 3000 and 2000 series, Gigaset 1000 TAE, Gigaset M101 Data, Gigaset
M105 Data and GAP handsets from other manufacturers). A Gigaset 1000C behaves at a Gigaset 3070/3075isdn in the same way as a GAP handset.
Please refer to the relevant operating instructions for information on the registration procedures.
A Gigaset repeater for increasing the range of the handsets does not require a
free registration location. You can register up to 6 Gigaset repeaters at a single
base station.
Deregistering devices
When deregistering devices, unlike when registering devices, no further steps
are required on the base station. All devices that remain registered retain their
previous internal call numbers.
A handset/data module can be deregistered from any registered Gigaset 3000
Comfort, as can the Gigaset M101 Data and Gigaset 105 Data.
Press
1.
Select using [
2.
device
This opens a list of internal numbers.
3.
Select using [
Press [OK] to deregister the device with the chosen internal number.
4.
for selection menus.
] and [OK]:
.
]
(desired internal number)
Service Set up
→
.
Settings
→
Set up user → De-reg.
7
Page 12

Gigaset 3070/3075isdn, GB, A31008-G3070-B100-3-7619
Connecting a PC to the base station
giga3070KAP.fm
09.01.01
Step
by
Step
Connecting a PC
to the base station
Gigaset talk&surf is a driver software which prepares your PC for Internet access via Gigaset 3070/75isdn. More information is contained on the CD provided with the program. Gigaset talk&surf requires Windows 98 or higher as its
operating system.
You may be required to make certain settings in the Control
Panel of the operating system in order to adapt the modem
driver. The Modems icon is located under Start > Settings >
Control Panel. The following property settings can be defined
here:
8
Page 13

Gigaset 3070/3075isdn, GB, A31008-G3070-B100-3-7619
Connecting a PC to the base station
giga3070KAP.fm
09.01.01
Step
by
Step
Under Diagnosis you can view the driver assignment to the COM port.
9
Page 14

Gigaset 3070/3075isdn, GB, A31008-G3070-B100-3-7619
Connecting a PC to the base station
giga3070KAP.fm
09.01.01
Step
by
Step
Via the "General" tab and Properties, you can view the default settings for the
COM port.
10
USB function
To connect a PC via the USB interface, you will need Windows 98 or later
or Windows ME. Windows 95 and Windows NT 4.0 do not support USB.
Page 15
Gigaset 3070/3075isdn, GB, A31008-G3070-B100-3-7619
Connecting a PC to the base station
giga3070KAP.fm
09.01.01
Step
by
Step
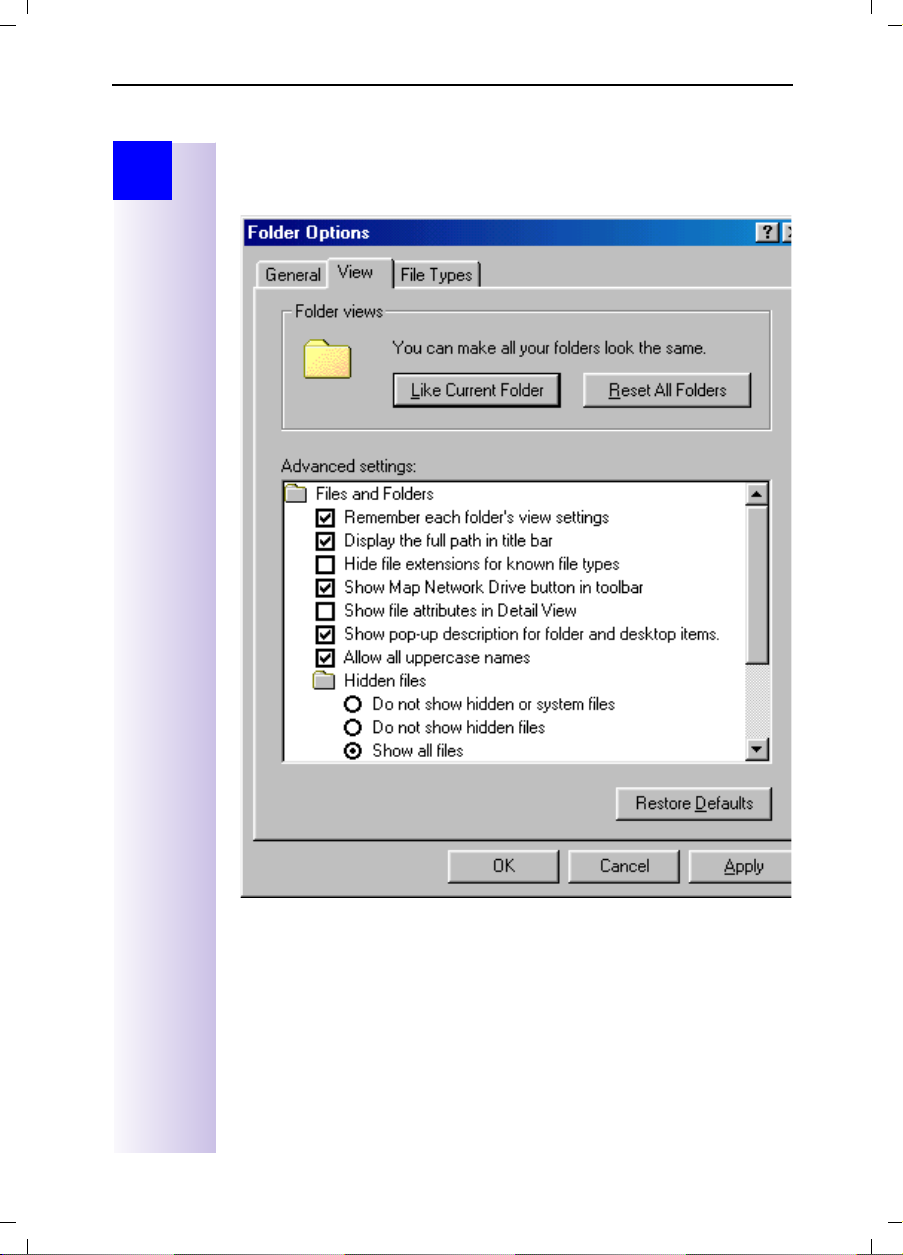
Representation of file names in Windows Explorer
In Explorer you can define the format for displaying files under
> View > Options
.
In these operating instructions it is assumed that a full path name is used, i.e.
with a different configuration, the extension after the dot is not included:
update.exe becomes update.
11
Page 16

Gigaset 3070/3075isdn, GB, A31008-G3070-B100-3-7619
Connecting a PC to the base station
giga3070KAP.fm
09.01.01
Step
by
Step
Updating Gigaset 3070/3075isdn
This section tells you how to download a new version of the firmware for your
Gigaset 3070/75isdn from the Internet and then how to install it in the base station. You can use this function to install new features on your base station as
soon as they become available in the Internet.
Downloading software files from the Siemens Server
The following is the URL for the Siemens Server for the Gigaset product family:
http://www.ic.siemens.com/mySiemens/full/1,1860,3_GIGASET3070ISDN.html
These pages will provide you with the latest information on the Gigaset product
family. You can also find out when a new version of the firmware for
Gigaset 3070/75isdn will be ready to download.
In order to be able to download files from the Siemens Server you will require
an Internet browser and Internet access.
Please note that new versions of the firmware can only be transferred
to the base station via the USB interface and thus with Windows 98
and later.
Start your Internet browser.
1.
Call up the following address
2.
http://www.ic.siemens.com/mySiemens/full/1,1860,3_GIGASET3070ISDN_5_1_0,00.html
and move to the download area on the page for Gigaset 3070/75isdn.
Save the new version of the firmware for Gigaset 3070/75isdn to your hard
3.
disk.
Start the EXE file (which unzips automatically) and then follow the instructions
4.
in the readme.txt file.
Once the update.exe program has started, do not abort it as it involves
transferring sensitive files. An abort could restrict the functionality of
your Gigaset 3070/3075isdn.
*
12
*. If you are following the online instructions (provided on the CD-ROM, file with the ex-
tension PDF) and you see this hand next to an HTML address, simply click your
mouse to go directly to that address. If the address has been changed and a new position created, the system automatically follows the set link. For this purpose, you will
need a browser installed on your system and access to the Internet.
Page 17
Gigaset 3070/3075isdn, GB, A31008-G3070-B100-3-7619
Connecting a PC to the base station
giga3070KAP.fm
09.01.01
Step
by
Step
Assigning the COM ports to the devices
A PC is equipped with a number of different ports to enable it to communicate
with other devices. The most common ports are the following:
The USB port
COM 1 - 2, on the hardware side
COM 3 - etc. virtual, i.e. only on the software side
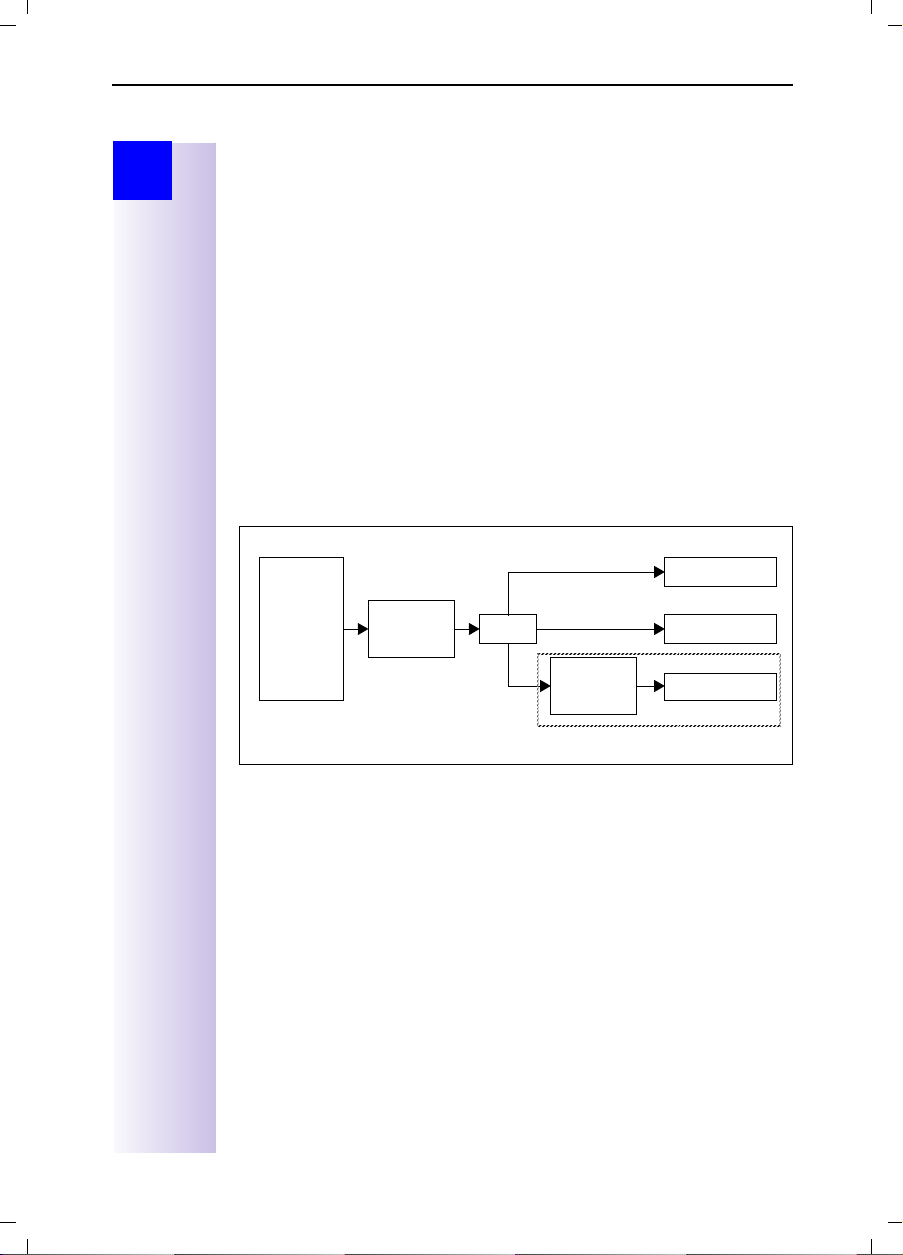
The port layout is described briefly below:
Since there are three different ways in which the connected PC can access
Gigaset 3070/3075isdn (via Gigaset M101 Data, Gigaset M105 Data and the
USB cable), there are also three different configurations. Data from the Internet
(AOL, T-Online, RDT, PPP, X.75) or from another PC is preprocessed by the PC
itself over the relevant drivers and a virtual COM port (3 and higher) and sent
to the TAPI Service Provider (TAPI = Telephony Application Interface). The TAPI
interface then accesses the port that has been appropriately configured. With
a connection via USB cable, this is the USB port itself; with Gigaset M101 Data,
this is COM port 1 or 2 and with Gigaset 105 Data this is a virtual COM port,
which is routed via the USB port.
Overview:
AOL
T-Online
RDT
PPP
X.75
Virtual
COM port
TAP I
Virtual
COM port
COM1 at M101
USB at G3075
USB at M105
Since a virtual COM port is upstream of the Gigaset M105 Data, the port must
be configured as a serial port in this case and not as a USB.
Operating Gigaset talk&surf with a wireless data device
If it is not possible to use the USB port of Gigaset 3070/3075isdn (lengthy or
complex cabling etc.), wireless PC operation at Gigaset 3070/3075isdn devices
is also possible.
For this purpose, you will need either
● Gigaset M101 Data with connection via COM port, or
● Gigaset M105 Data with connection via USB and virtual COM port.
13
Page 18

Gigaset 3070/3075isdn, GB, A31008-G3070-B100-3-7619
Connecting a PC to the base station
giga3070KAP.fm
09.01.01
Step
by
Step
Operating Gigaset talk&surf with Windows 98, Win ME
Registering Gigaset M105 Data at Gigaset 3070/3075isdn
Proceed as follows:
1. Install Gigaset M105 Data
2. Start the Gigaset M105 Data configuration program via
>Gigaset M100 Data >Gigaset Setup
3. Select the window "
4. Check that your Gigaset M105 Data has been set to the type
(default).
5. Set the Gigaset 3070/3075isdn to registration mode (press LED).
6. Click the
0000).
7. Click
Register
OK
. The registration procedure starts and the message "
Local adapter
button and enter the PIN of the partner station (default
.
“, a free registration location is selected.
quired base is ready for registration, the local adapter logs on. Check that
the base is ready for registration.
The two devices are automatically synchronised. An entry now appears in
Registered adapter
the
8. Close the program with
9. Restart your computer.
Once Gigaset M105 Data has been installed, the telephony driver for
your Gigaset 3070/3075isdn has to be updated. You have three options here:
1. You have not yet operated your Gigaset 3070/3075isdn on your PC via
the USB cable:
You must follow the instructions in the sections "PC connection via
USB" and "Installing Talk&surf Software" in the PC installation instructions provided with Gigaset 3070/3075isdn. When asked which port
is to be used for accessing Gigaset 3070/3075isdn, specify the virtual
COM port for Gigaset M105 Data.
2. You have operated Gigaset 3070/3075isdn on your PC via the USB cable before:
Install the talk&surf software again. Start the installation procedure for
the talk&surf software and when asked which port is to be used for
accessing Gigaset 3070/3075isdn, specify the virtual COM port for Gigaset M105 Data
3. You have operated your Gigaset 3070/3075 isdn on your PC via the
USB cable before and you are an experienced PC user:
Reset the telephony driver by selecting the following:
list.
OK
*
and continue with the installation.
tings > Control Panel > Telephony
here. Then select the
Configure
port for Gigaset M105 Data (see footnote on page 15). Confirm twice
with
OK
and then
. Click on
Port
Close
" appears on the screen.
.
. Select the
DECT/ISDN TAPI Service Provider
, then on
.
Serial
and select the virtual COM
> Start > Programs
Portable part
If the re-
> Start > Set-
Telephony Drivers
and click on
tab
14
Page 19

Gigaset 3070/3075isdn, GB, A31008-G3070-B100-3-7619
Connecting a PC to the base station
giga3070KAP.fm
09.01.01
Step
by
Step
* You can find out which is the virtual COM port for Gigaset M105 Data either by starting
the program
a few seconds for this to be displayed correctly) or you could select
> Control Panel > System,
there (COM and LPT). A list of installed ports is displayed. You will recognise the virtual
COM port for Gigaset M105 Data by its name:
Gigaset Setup
and view the COM port in the
then click on the
Device Manager
DECT USB serial Port
Connection
tab. (It may take
> Start > Settings
tab and select the ports
(COM x).
Operating Gigaset talk&surf with Windows 95/NT
Gigaset M101 Data allows for access using Windows 95/NT via the V.24 interface (COM port). If you wish to use this functionality, proceed as follows:
Registering Gigaset M101 Data at Gigaset 3070isdn/3075isdn
Proceed as follows:
1. Gigaset 3070/3075isdn and Gigaset M101 Data are installed.
2. Start the configuration program for Gigaset M101 Data via
> Start > Programs > Gigaset M100 Data > Gigaset Setup
Select the window "Local adapter", a free registration location is selected.
Check that your Gigaset M101 Data has been set to the type
(default). (If it has not, please refer to the electronic operating instructions
on the CD-ROM for information on how to change the station type
> CD-ROM-drive:\M101Data\config\german\M10x.pdf)
3. Switch Gigaset 3070/3075isdn to registration mode (press LED).
Register
4. Click the
button and enter the PIN of the partner station (default:
0000).
OK
5. Click
. The registration procedure starts and the message "
required base is ready for registration, the local adapter logs on. Check
that the base is ready for registration.
“
The two devices are automatically synchronised. An entry now appears in
the
Registered adapter
list.
.
Portable part
.
If the
15
Page 20

Gigaset 3070/3075isdn, GB, A31008-G3070-B100-3-7619
Connecting a PC to the base station
giga3070KAP.fm
09.01.01
Step
by
Step
Updating Gigaset M101 Data for operation with Gigaset 3070/3075
Before you begin, make sure Gigaset M101 is already connected to the PC,
the configuration program is loaded, and the COM port is set correctly.
The firmware version must be ≥ 2.048. This software can be downloaded from
http://www.ic.siemens.com/mySiemens/full/
which appears by pressing the [Firmware Update] button. Proceed as follows:
1. Open the browser, enter the address
lowres/1,1899,3_GIGASETM101DATA_5_0_61,00.html
file onto your hard disk.
2. Start the Explorer and select the directory to which the update file was
downloaded (m101data_xyyy_.exe), where xyyy stands for the version
number.
3. Navigate to m101data_xyyy_.exe under the selected path M101Data and
launch the program by double-clicking on it.
4. Under the new path, open the readme.txt file and read the instructions provided there. Then launch setup.exe by double-clicking on it.
5. In the dialog which appears, start the firmware update by pressing the
[Firmware Update] button.
6. The old and new firmware versions are displayed.
7. A message is output indicating when the update process is complete. If
you wish, you can repeat this procedure for other Gigaset M101 devices. If
two Gigaset M101 devices are interconnected, they must both have either
software version 1.yyy or 2.yyy. Ideally, all Gigaset M101 Data devices
should be updated with the latest software version.
8. When updating from version 1.yyy to 2.yyy, the registration procedure
must be repeated for Gigaset M101 Data on Gigaset M101 Data and the
lines configured accordingly.
. Start the firmware update in the dialog
http://www.ic.siemens.com/mySiemens/
and download the update
16
Page 21

Gigaset 3070/3075isdn, GB, A31008-G3070-B100-3-7619
Getting into the ISDN world is easy
giga3070KAP.fm
09.01.01
Step
by
Step
Getting into the ISDN world is
easy
Programming the various MSNs (your telephone numbers) for your Gigaset
3070/3075isdn is easy.
What is an MSN
MSN stands for multiple subscriber number. You can apply for a maximum of
ten different telephone numbers for the ISDN multiple device connection. An
MSN is one of the telephone numbers assigned to you without the area code;
it consists of a maximum of 8 digits.
Configuring Gigaset 3070/3075isdn and MSNs
Your telephone system in the Gigaset 3070/3075isdn uses the MSN specifically according to your requirements. In this regard, the following distinctions are
made:
– Incoming MSN. This is the number that can also be answered by one of the
three answering machines in the case of incoming calls to specific internal
numbers or in the case of Gigaset 3075isdn.
– Outgoing MSN. This is the number an internal subscriber places before the
number he is dialling when making outgoing calls; it is then also used by the
network provider to calculate charges.
– In addition to the above options you can also set the required MSN for the
next outgoing call on the handset.
Possible internal subscribers are:
11- 18 H a nd s et s
21, 22 Corded analog devices
40
41-48
91-93 Integrated answering machine (AM) 91 = AM 1, 92 = AM 2, 93 =
* The numbers 40 - 48 are assigned automatically
PC via USB port
Cordless PC via Gigaset M101 Data or 105 Data
AM 3 (Gigaset 3075isdn only)
*
*
An example: five MSNs were applied for; two for business use, a fax number
and two for personal use.
Use Incoming
MSN
Busi n ess 11111 11,12, 9 1 1 11111 2 2222
2222 2 11,12, 9 1 1 11111 2 2222
Fax 33333 21 - 33333 --Personal 44444 13, 92 2 44444 ---
55555 14, 92 2 55555 ---
Where
does it ring
Answering
machine
Outgoing
MSN
MSN next
call
17
Page 22

Gigaset 3070/3075isdn, GB, A31008-G3070-B100-3-7619
Getting into the ISDN world is easy
giga3070KAP.fm
09.01.01
Step
by
Step
You can use the
11 and 12 and switch to the MSN 22222 for this dialling procedure in the process. This is not possible for handsets 13 and 14 as an alternative MSN was not
set up.
Answering machine (AM) 1 was allocated to business use and AM 2 to personal use.
MSN next call
feature by allocating two MSNs to the handsets
Ring delay per MSN
Using the ring delay feature you can configure a handset for each individual
MSN to delay response to the call signal. However, during this ring delay time
the handset can accept the call using the "call pickup" function without a call
signal queuing. When this feature is being configured, the time allowed by the
answering machine for recording a message (default: Automatic 2/4) must be
taken into account. When the ring delay that has been set is higher than the
setting on the active AM, there is no call signal as the answering machine accepts the call beforehand. For information on setting the ring delay, please refer
to "Setting ring delay" on page 28
Allocating numbers
When you switch on the device for the first time, the Installation Assistant is
displayed immediately after the handsets have been registered and the service
program has been started. The Assistant makes it very easy to perform the initial configuration. After initial installation you can call up the Installation Assistant again at any time; to skip programming of the feature use the [NO] key and
the next feature will be displayed.
18
Page 23

Gigaset 3070/3075isdn, GB, A31008-G3070-B100-3-7619
The Installation Assistant (Comfort handsets only)
giga3070KAP.fm
09.01.01
Step
by
Step
The Installation Assistant
(Comfort handsets only)
The Installation Assistant can be called up any time to help you set the most
important functions. The following settings can be completed in sequence:
● Date and time
● Own call number (MSN)
● Device type (e.g. telephone, fax)
● Incoming MSN, internal call allocation to MSN (for possible subscriber num-
bers, see page 27) and outgoing MSN (the telephone number assigned to
external calls)
● Exchange code (with installation behind a PABX)
Starting the Installation Assistant
Press for selection menus.
1.
.
<
.
→
Installation
move to
.
9
].
Change call number, Enter
Select using [
2.
Confirm the prompt for starting the Installation Assistant with [YES].
3.
] and [OK]:
Service Set up
Entering the date and time
Confirm the prompt for entering the time with [YES].
1.
Enter the date in the format " - - . - - . - - " (day, month, year) and the time in the
2.
format " - - : - - " (hour, minute) and confirm with [
Select using [
3.
] and [OK]:
Save entry
Programming own call numbers (MSNs)
The MSN supplied by your provider can be programmed here. The first time it
is switched on, the base station attempts independently to determine the
MSNs itself. The result is displayed. You can save up to 10 call numbers.
Confirm the prompt for entering the call number with [YES].
1.
Confirm the prompt for entering the first MSN with [YES].
2.
Enter the name and number and with
3.
call number
Select using [
4.
and confirm with [9].
] and [OK]:
Save entry
19
Page 24

Gigaset 3070/3075isdn, GB, A31008-G3070-B100-3-7619
The Installation Assistant (Comfort handsets only)
giga3070KAP.fm
09.01.01
Step
by
Step
Setting the device type
[ Telephone ] is preset for the analog connections Internal 21 and Internal 22.
You can make and receive calls once a telephone is connected. If you connect
an additional corded device (e.g. fax), the device type must be modified again
accordingly. The entry "No function" blocks any additional input for this device
in the case of MSN and answering machine configurations.
Confirm the prompt for setting the device type for subscribers with [YES].
1.
Confirm the prompt for assignment with [YES].
2.
] and [OK]:
Select using [
3.
The assignments for additional internal subscribers are offered.
(required device)
.
Selecting the incoming MSN
This is the call number used to contact your handset. You can select several
MSNs and corded terminals can also be set via the handset. For possible subscriber numbers see page 27.
Confirm the prompt for incoming MSN references with [YES].
1.
Confirm the prompt for assignment with [YES].
2.
Select using [
3.
The selection is confirmed with .
Quit with [\].
4.
] and [OK]:
(one or more MSN)
.
Selecting the outgoing MSN
You are conducting an outgoing call via this call number. This call number is
transmitted to the called party. The provider calculates the call charges incurred
using this MSN. You can only select one outgoing MSN.
Confirm the prompt for outgoing MSN references with [YES].
1.
Confirm the prompt for assignment with [YES].
2.
Select using [
3.
] and [OK]:
(one MSN)
.
Connecting to a PABX
If you require a PABX connection:
Answer the prompt for the PABX with [YES].
1.
Confirm the prompt for the prefix (exchange code) with [YES].
2.
Enter the exchange code and confirm with [
3.
Select using [
4.
The installation is terminated with the aid of the Installation Assistant.
] and [OK]:
Save entry
9
].
.
20
Page 25

Gigaset 3070/3075isdn, GB, A31008-G3070-B100-3-7619
Configuring ISDN call numbers (MSNs)
giga3070KAP.fm
09.01.01
Step
by
Step
Configuring ISDN call numbers
(MSNs)
You can configure up to 10 own call numbers (MSNs) at your base station. In
this way callers can dial internal subscribers directly. As the costs for each call
number are recorded individually, telephone charges for outgoing connections
can also be calculated separately.
Other options for configuring MSNs
Modifying own call numbers (MSNs)
Each new call number configured is automatically assigned an individual adjustable ring melody.
Press
1.
Select using [
2.
Set up MSN
Select using [
3.
Select using [
4.
In this menu you can also display or delete an MSN, or configure another ring
melody.
Enter new or modified MSN and/or names and confirm with [
5.
Select using [
6.
Assigning call numbers (MSNs)
Specific own call numbers (MSNs) can be assigned to registered devices. In
this way you can define
● the call number under which a registered device will ring (incoming MSN)
● the call number from which an internal subscriber should dial (Send MSN).
Assigning an incoming MSN
A newly registered handset will ring under all configured call numbers. If you
want to assign a specific incoming MSN to the handset:
Press
1.
Select using [
2.
Set up device
Select using [
3.
Select using [
4.
for selection menus.
] and [OK]:
.
] and [9]:
] and [OK]:
] and [OK]:
and
You can set one outgoing MSN for each internal subscriber. This MSN is displayed to the called party and any call charges incurred are assigned to the
appropriate subscriber.
for selection menus.
] and [OK]:
.
] and [9]:
] and [OK]:
Service Set up
(required MSN)
Edit entry
Save entry
Service Set up
(required internal subscriber)
Receive MSN
→
.
.
.
→
→
Settings
→
Settings
→
.
(required MSN)
ISDN settings
9
].
Set up user
.
→
→
21
Page 26

Gigaset 3070/3075isdn, GB, A31008-G3070-B100-3-7619
Configuring ISDN call numbers (MSNs)
giga3070KAP.fm
09.01.01
Step
by
Step
Assigning an outgoing MSN
Press for selection menus.
1.
Select using [
2.
Set up device
Select using [
3.
Select using [
4.
] and [OK]:
.
] and [9]:
] and [OK]:
Service Set up
(required internal subscriber)
Send MSN
→
Settings
→
(required MSN)
→
Set up user
.
.
Answering machine (only 3075isdn)
Gigaset 3075isdn includes an answering machine (AM) which can be used for
three call numbers. Up to three MSNs can be assigned to the answering machine. However, an individual MSN cannot be assigned to more than one answering machine at a time. Only one message can be recorded at a time.
Access options for the answering machine
No MSN configured (default configuration):
– In this case, all connected devices can access the AM. When activated, the
AM takes calls to all MSNs.
One, two or three MSNs have been assigned:
– The relevant AM can only be set and accessed by connected devices with
the same MSN.
– Exception: an answering machine which is the only device in the system to
be assigned to a particular MSN can be operated from all connected devices.
Assigning an incoming MSN to the AM
Press for selection menus.
1.
Select using [
2.
Set up device
Select using [
3.
Int: 93 Intern 93
ured, the following message is displayed:
Select using [
4.
] and [OK]:
.
] and [9]:
for AM 3). If the answering machine has already been config-
] and [OK]:
Service Set up
(Int: 91 Intern 91
Receive MSN
Selecting an answering machine
Press for selection menus.
1.
Select using [
2.
The list of answering machines only contains those answering machines assigned for this handset. If only one answering machine is configured, the selection list is ignored.
] and [OK]:
Service Set up
→
Settings
→
Set up user
for AM 1,
Int: 92 Intern 92
Int 91: AM 1 CN, etc
→
(relevant MSN)
→
Answ. Machine
.)
.
→
(relevant AM)
→
→
for AM 2,
.
22
Page 27

Gigaset 3070/3075isdn, GB, A31008-G3070-B100-3-7619
giga3070KAP.fm
09.01.01
Locking/unlocking ISDN features
Step
by
Step
Locking/unlocking ISDN features
Conducting a call externally or via a second B-channel
With this setting you can define whether enquiry calls are held via the provider
(externally), or in the base station (via a second B-channel)
Press
1.
Select using [
2.
Int. Enq. Call
for selection menus.
] and [OK]:
or
Ext. Enq. Call
Service Set up
→
Settings
Transferring calls - activating/deactivating ECT
(Explicit Call Transfer)
This function is only required for ECT (Explicit Call Transfer) behind PABXs.
Press
1.
Select using [
2.
sition(ECT)
for selection menus.
] and [OK]:
.
Service Set up
→
Settings
Call waiting - activating/deactivating CW
When call waiting is activated, the caller hears the on-hook signal if you are already conducting a call.
If call waiting is deactivated, the caller hears the ring tone if you are already conducting a call and additional devices are assigned to this MSN.
If call waiting is deactivated, the caller hears the busy signal if you are already
conducting a call, and are either the only user assigned this MSN, or if the feature Busy on Busy (see below) has been activated.
Press
1.
Select using [
2.
Set up device → (required internal subscriber)
Call waiting
for selection menus.
] and [OK]:
.
Service Set up
→
Settings
→ [9] →
*
.
→
ISDN settings
→
ISDN settings
→
Set up user
→
→
→
Tr an -
Busy on Busy (busy signal when MSN is engaged)
With this setting, the caller immediately hears the busy tone when a member
of the same MSN group is conducting a call.
Press
1.
Select using [
2.
Busy on Busy
Select using [
3.
The selection is confirmed with .
*. It may not be possible to implement this feature in your country. Either the
feature needs to be activated by the provider (you may be charged for this service), or it is not offered in your country in this form. If in doubt or if you have any
questions about available ISDN features and their activation, contact your service provider.
for selection menus.
] and [OK]:
.
] and [OK].
Service Set up
→
Settings
→
ISDN settings
→
23
Page 28

Gigaset 3070/3075isdn, GB, A31008-G3070-B100-3-7619
Locking/unlocking ISDN features
giga3070KAP.fm
09.01.01
Step
by
Step
Setting external/internal enquiry calls
You can set your telephone so that:
● when conducting an enquiry with an external subscriber arising from an ex-
● when conducting an enquiry with an external subscriber arising from an ex-
The default setting is "Ext. Enq. Call".
Press
1.
Select using [
2.
Int. Enq. Call
or Select using [
2.
Ext. Enq. Call
Confirm with [OK].
3.
Answering machine - activating/deactivating direct call
pickup
By default, direct AM call pickup is activated.
If you deactivate direct call pickup, it is not
from an answering machine connected to Int21 or Int22 (announcement or call
recording active) by pressing the talk key (handset) or by lifting the handset
(corded telephone).
However, it is possible to initiate a new call while the answering machine is active without deactivating the recording process (provided the second line is
free).
Press
1.
Select using [
2.
AM Auto. Pickup
Confirm with [OK].
3.
ternal call, the original caller is held in the central office so that your second
ISDN line remains free
ternal call, the original caller is held in the base station which means that
both ISDN lines are busy
for selection menus.
] and [OK]:
9LQIURQWRIPHQXLWHP
→ (
] and [OK]:
9LQIURQWRIPHQXLWHP
→ (
for selection menus.
] and [OK]:
→ (
Service Set up
Service Set up
Service Set up
→
= ON / no 9 = OFF).
→
= ON / no 9 = OFF).
→
9LQIURQWRIPHQXLWHP
Settings
→
ISDN settings
Settings
→
ISDN settings
possible to pick up a call directly
Settings
→
= ON / no 9 = OFF).
System settings
→
→
→
24
Rejecting calls for all MSN groups
You are conducting a call and a second call arrives at the same MSN. The call
is signalled acoustically and displayed for all members of this MSN group. By
pressing "REJECT", the caller hears the busy signal instead of the ring tone. The
call is no longer signalled for any group member. A displayed call number is entered in the "Missed calls".
Configuring "reject" for all MSN groups
Press for selection menus.
1.
Select using [
2.
Reject All
Select using [
3.
The selection is confirmed with .
.
] and [OK]:
] and [OK].
Service Set up
→
Settings
→
ISDN settings
→
Page 29

Gigaset 3070/3075isdn, GB, A31008-G3070-B100-3-7619
giga3070KAP.fm
09.01.01
System settings
Step
by
Step
System settings
Configuring music-on-hold
The caller hears music-on-hold when put on hold by the base station rather
than the exchange (e.g. in the case of internal transfer). The following settings
can be selected:
Internal Integrated default melody
Off Music-on-hold via connection 21 or 22. This menu item only ap-
Press
1.
Select using [
2.
Music on Hold
Select using [
3.
This feature is also available when a call is held via 2 B-channels, see section
"Conducting a call externally or via a second B-channel" on page 23.
Audio settings
With this setting you can define a ringer melody for each MSN, valid for all
called handsets. Independent of this setting, you can also select a different
ringer melody for the handset for internal calls.
Assigning a ringer melody to an MSN
Each newly assigned MSN is automatically assigned its own ringer melody.
This setting enables you to change the type of melody.
Press
1.
Select using [
2.
Set up MSN
Select using [
3.
Select using [
4.
Select using [
5.
Configuring an internal ringer melody for a handset
Press for selection menus.
1.
Select using [
2.
Select using [
3.
self and played back directly – confirm your selection with [OK].
pears if "Ext. music/hold" is selected when the device type is set
to connection 21 or 22.
for selection menus.
] and [OK]:
.
] and [OK]: required type.
for selection menus.
] and [OK]:
.
] and [9] :
] and [OK] :
] or [ ] one melody from 0 to 9 and confirm with [OK].
] and [OK] :
] or [ ] one melody – this melody is generated in the handset
Service Set up
Service Set up
(required MSN)
Ringer Melody
Settings
→
→
→
.
.
Audio
Settings
Settings
→
Ringer Melody
→
System settings
→
ISDN settings
.
→
→
25
Page 30

Gigaset 3070/3075isdn, GB, A31008-G3070-B100-3-7619
System settings
giga3070KAP.fm
09.01.01
Step
by
Step
Entering long-distance codes
In order to display national and international calls correctly and return them
without problems, you must ensure that long-distance codes are set properly.
By default:
● national = 0
● international = 00
Press
1.
Select using [
2.
Lg.-dist.digits
Select using [
3.
Select using [
4.
Enter the new or changed code and confirm with [
5.
Select using [
6.
Restoring the factory setting
You can choose the settings that are to be restored:
●
●
Press
1.
Select using [
2.
Spec. function → Default Reset
Confirm with [OK].
3.
(QWHUWKHV\VWHP3,1DQGFRQILUPZLWK
4.
Operational
5.
"Settings reset" and wait for the confirmation tone.
or Select using [
5.
$QVZHU>
6.
&RQILUPWKHPHVVDJH$OOUHVHWDQGZDLWIRUWKHFRQILUPDWLRQWRQH
for selection menus.
] and [OK]:
Service Set up
→
Settings
→
ISDN settings
→
.
] and [9]:
] and [OK]:
] and [OK]:
Operational – All MSNs and prefix codes (exchange codes) are deleted. Au-
(national or international)
Change number
Save entry
.
.
.
9
].
thorizations are reset to the default settings.
Reset all – All functions are reset to the default settings (see "Restoring the
factory setting" on page 53). The system PIN is reset to "0000". All entries
(missed calls list, costs) are deleted. Before resetting, you must deactivate
all active call forwarding settings.
for selection menus.
] and [OK]:
Service Set up
→
Settings
→
System settings
→
.
[OK].
is displayed. Confirm with [OK]. Acknowledge the message
]
Reset all
@WRWKHTXHVWLRQ5HVHWIDFWRU\GHIDXOWV"
YES
and confirm with [OK].
26
Querying the status
You can query the status of the following settings:
● Callback
● Anonymous calling and answering
● Call forwarding
Press
1.
Select using [
2.
Press [OK] to open the status list
3.
(9 before an item = system function active).
for selection menus.
] and [OK]:
Service Set up
→
Status
Page 31

Gigaset 3070/3075isdn, GB, A31008-G3070-B100-3-7619
giga3070KAP.fm
Making comfort calls
09.01.01
Step
by
Step
1.
2.
or Press [LIST].
2.
3.
1.
2.
3.
4.
1.
2.
Making comfort calls
The abbreviations in brackets after the titles stand for the corresponding ISDN
feature. Some features can only be used if enabled by the provider (additional
charge).
Making internal calls free of charge
If you have several handsets or supplementary devices, you can make internal
calls free of charge.
Press [INT].
Your internal call number is displayed.
Enter the number of the internal subscriber required.
Possible subscribers include:
11- 18 H an d s et s
21, 22 Corded devices
40
41-48
91-93 Integrated answering machine (Gigaset 3075isdn only)
* This number is set up automatically by the base.
Select using [
The internal subscriber is called.
PC via USB connection
Cordless PC via Gigaset M101 Data or M105 Data
] and [OK]:
Collective call/Group call
You can make a collective call from any handset to all registered internal subscribers.
Configuring internal collective call groups
In the basic configuration, all registered subscribers of the "telephone" device
type (with the exception of fax and answering machine devices) are configured
in the collective call group.
Press
Select using [
Set up device
Select using [
Select using [
Starting a collective call to all internal subscribers
Press the softkeys: [INT] → [LIST].
Select using [
for selection menus.
] and [OK]:
.
] and [9]:
] and [OK]:
] and [OK]:
*
(required internal subscriber)
Service Set up
→
Settings
(required internal subscriber)
Hunt group
Collective call
.
.
.
→
Set up user
.
*
→
or Press the softkeys: [INT].
1.
Press the key
2.
All available internal subscribers are called. You are connected to the first internal subscriber who answers the call.
.
27
Page 32

Gigaset 3070/3075isdn, GB, A31008-G3070-B100-3-7619
Making comfort calls
giga3070KAP.fm
09.01.01
Step
by
Step
Ring delay
Using the ring delay feature you can configure a handset for each individual
MSN to delay the response to the call signal. However, during this ring delay
time the handset can accept the call using the "
signal queuing. When this feature is being configured, the time allowed by the
answering machine for recording a message (default: Automatic 2/4) must be
taken into account. When the ring delay that has been set is higher than the
setting on the active answering machine, there is no call signal as the answering machine accepts the call beforehand.
Setting ring delay
Press for the selection menu.
1.
Select using [
2.
Set up device
Select using [
3.
Select using [
4.
Select using [
5.
Set
6.
No. of Rings
] and [OK]:
.
] and [9]:
] and [OK]:
] and [9]:
using [-], = off.
Picking up calls during ring delay
A call is coming through to the assigned MSN.
1.
Press the # key, the following appears in the display:
2.
<Name>
Press the softkey
3.
or Press the softkey
3.
YES
NO
. You can set up your own external or internal call.
Conducting calls with more than one subscriber
Internal enquiry call
You would like to call an internal subscriber during an external call.
Press [INT] and enter the call number for the second subscriber.
1.
A connection is established with the internal subscriber.
or Press the softkeys: [INT] → [LIST].
1.
or
or
Select using [
2.
A connection is established with the internal subscriber.
If the internal subscriber dialled is busy:
Press [BACK]: You are reconnected with the external caller.
3.
The internal subscriber answers the call:
Toggling: you can switch between call parties with [
3.
Three-way calling: press [CONF.]. A conference circuit is established.
3.
] and [OK]:
Accept?
Service Set up
→
Settings
(required internal subscriber)
Ring delay
(required MSN)
. You can then answer the call.
.
.
(required internal subscriber)
" function without a call
→
Set up user
.
→
Accept? <Number>
.
] and [].
for
28
Page 33

Gigaset 3070/3075isdn, GB, A31008-G3070-B100-3-7619
giga3070KAP.fm
Making comfort calls
09.01.01
Step
by
Step
Toggle
With the toggle feature, you can switch between an active and inactive connection. The active connection is put on hold.
You can switch between called parties with [
1.
Ending an enquiry call/toggle
Press
1.
Select using [
2.
for the menu.
You are reconnected with the subscriber on hold.
Conference circuit
A conference circuit enables you to talk to two parties at the same time. These
can either comprise two external subscribers, or one external and one internal
subscriber.
Setting up three way calling
You are conducting an enquiry call. The first subscriber is put on hold.
Press [CONF.]: a conference circuit is established.
1.
Ending three-way calling
You are conducting three-way calling.
Press [INDIVID]: The conference circuit is terminated.The connection which
1.
was active immediately before three-way calling was set up is reestablished as
the active connection. The other subscriber is put on hold once more.
Setting up an external enquiry call
You would like to contact another external subscriber during an external call. To
enable this feature, see "Conducting a call externally or via a second B-channel"
on page 23:
Press
1.
Select using [
2.
Enter the call number for the second subscriber.
3.
for the menu.
Ending an external enquiry call
You are conducting an enquiry call which you would like to end:
Press
1.
Select using [
2.
for the menu.
Transferring calls on/before answer - ECT (Explicit Call Transfer)
ECT is currently only supported behind PABXs.
To activate/deactivate call transfer, see page 23.
You are conducting an external call which you would like to transfer to another
external subscriber.
Press
1.
Select using [
2.
Enter the call number to which the call is to be transferred.
3.
Replace the handset: press
4.
or Conduct the enquiry call.
4.
Replace the handset: press
5.
for the menu.
] and [OK]:
] and [OK]:
] and [OK]:
] and [OK]:
End
.
Consultation
End
.
Consultation
¯
.
¯
.
] and [].
.
.
29
Page 34

Gigaset 3070/3075isdn, GB, A31008-G3070-B100-3-7619
Making comfort calls
giga3070KAP.fm
09.01.01
Step
by
Step
Entering numbers in the telephone directory
During a call, you can enter the number of the other party in the telephone directory, or add his/her name and then call them from the telephone directory.
Press
1.
Select using [
2.
Press [OK].
3.
for the menu.
] and [OK]:
Directories
→
Copy to Dir.
Picking up a call while the answering machine is operating
Calls can be picked up even while the answering machine connected to Int21/
22 is switched on, playing your announcement or recording a message. Once
you pick up, the recording process is stopped.
Direct call pickup can be deactivated (see page 48) so that you can make outgoing calls even while the answering machine is switched on.
Direct call pickup activated
Press D or V and answer the call.
1.
GHIDXOW
Direct call pickup deactivated
Press D or V and answer the call.
1.
Press [OP.LIST].
2.
Press [ACCEPT] and answer the call.
3.
For call pickup, the answering machine and the internal subscriber called must
Info
be assigned the same incoming MSN and the internal number 21/22 must be
assigned the device type Answ. Machine.
Rejecting calls for all MSN groups
You are conducting a call and a second call arrives at the same MSN. The call
is signalled acoustically and displayed for all members of this MSN group. By
pressing "REJECT", the caller hears the busy signal instead of the ring tone. The
call is no longer signalled for any group member. A displayed call number is entered in the "Missed calls".
Implementing "reject" for all MSN groups
You are conducting a call and receive a second call at the same MSN.
Press the softkey: [REJECT].
1.
Implementing "reject" for a subscriber in the group
You are conducting a call and receive a second call at the same MSN.
Press [REJECT].
1.
The call is only deactivated for this subscriber; it continues to be signalled for
other subscribers in the call group. This function is only available if "reject for all
MSN groups" has not been configured.
30
Page 35

Gigaset 3070/3075isdn, GB, A31008-G3070-B100-3-7619
giga3070KAP.fm
Making comfort calls
09.01.01
Step
by
Step
or Press
Missed calls
Calls which are not answered are automatically entered in the list. This can contain up to 40 entries. Calls which do not include a calling number are not entered in the list. An entry (for each MSN) is displayed to all handsets with the
same MSN assignment and is updated on request.
Display
0123456789(02)
Caller ID
Dialling from the "
If new calls have been entered in the missed calls list, the softkey [,] is only
available when the comfort handset is in standby.
,
Press [
1.
Select using [
2.
Select using [
3.
3.
The call number is dialled.
].
(do not confirm the 9 key first)
D
Dialling from the "
Press for selection menus.
1.
Select using [
2.
Select using [
3.
Select using [
4.
The call number is dialled. If a call is established in this way, the entry is automatically deleted from the "
Dialling from the "
key is pressed (the menu item "
the
D
Copying numbers from the "
Press for selection menus.
1.
Select using [
2.
Select using [
3.
Select using [
4.
Press [9] for the Edit menu.
5.
Select using [
6.
Missed calls
] and [9]:
] and [OK]:
Missed calls
] and [OK]:
] and [9]:
] and [OK]:
Missed calls
] and [OK]:
] and [9]:
] and [OK]:
] and [OK]:
(required call)
Dial Number
Service Set up
(required call)
Dial Number
Missed calls
" list can be implemented either before or after
Missed calls
Service Set up
(required call)
Copy to Dir.
Save entry
Number of call attempts
" list using [,]
.
.
" list via the menus
→
Missed calls
.
.
" list.
Service Set up"
" list to the directory
→
Missed calls
.
.
.
is no longer used).
.
31
Page 36

Gigaset 3070/3075isdn, GB, A31008-G3070-B100-3-7619
S
Making comfort calls
giga3070KAP.fm
09.01.01
Step
by
Step
or
Internal call forwarding
Configuring a forwarding destination
Press for selection menus.
1.
Select using [
2.
(required internal subscriber)
] and [OK]:
Service Set up
.
→
Int.forwarding → Forward. dest.
Only one forwarding destination can be selected for internal call forwarding.
Activating/deactivating internal call forwarding
Internal call forwarding can only be activated if a forwarding destination extension has been configured.
Press
1.
Select using [
2.
for selection menus.
] and [OK]:
Service Set up
→
Int.forwarding → Activate
Deactivate
Defining the number of ring cycles
Ring delay is used to define the number of ring cycles to be completed before
a call is forwarded. Between 0 to 9 ring cycles can be configured.
Press
1.
Select using [
2.
Enter the number of ring cycles and confirm with [OK].
3.
for selection menus.
] and [OK]:
Service Set up
→
Int.forwarding → No. of Rings
External call forwarding - CF
Both telephone lines assigned to your ISDN connection are free during call forwarding. If call forwarding is configured, it is activated at the provider exchange.
The call is not signalled at your telephone. You must pay the connection costs
together with a surcharge. You can define the following conditions for call forwarding:
Immediately — On busy — On no reply
Configuring a new call forwarding destination
Press for selection menus.
1.
Select using [
2.
Select using [] and [9]: (
3.
Select using [
4.
call forwarding should apply)
Enter the required destination call number and confirm with [
5.
Select using [
6.
Confirm the prompt with [YES]: Call forwarding is activated.
7.
Confirm the prompt with [NO]: Call forwarding is not activated.
7.
Activating/deactivating external call forwarding
Press for selection menus.
1.
Select using [
2.
Select using [] and [9]:
3.
Select using [
4.
] and [OK]:
] and [OK]:
] and [OK]:
] and [OK]:
] and [OK]:
Service Set up
required call forwarding)
New entry
→
Immediately, On busy or On no reply
Save entry
Service Set up
(required call forwarding)
→
Ext. Call Forw.
→
(MSN for which
.
→
Ext. Call Forw.
.
.
Activate or Deactivate
9
→
or
.
].
32
Page 37

Gigaset 3070/3075isdn, GB, A31008-G3070-B100-3-7619
giga3070KAP.fm
Making comfort calls
09.01.01
Step
by
Step
or
Modifying entries
Press for selection menus.
1.
Select using [
2.
Select using [] and [9]:
3.
Select using [
4.
Enter the required destination call number and confirm with [
5.
Select using [
6.
Confirm the prompt with [YES]: Call forwarding is activated.
7.
Confirm the prompt with [NO]: Call forwarding is not activated.
7.
] and [OK]:
] and [OK]:
] and [OK]:
Service Set up
→
Ext. Call Forw.
(required call forwarding)
Edit entry
Save entry
→
Immediately, On busy or On no reply
.
.
Deleting external call forwarding
Press for selection menus.
1.
Select using [
2.
Select using [] and [9]:
3.
Select using [
4.
] and [OK]:
] and [OK]:
Service Set up
→
Ext. Call Forw.
(required call forwarding)
Delete entry
.
.
Switching internal/external call forwarding
Calls can be forwarded by the base station (internal) or by the provider (external). In the case of internal call forwarding, the second B- channel is used. You
can only switch to another call forwarding when call forwarding is not active.
Press
1.
Select using [
2.
Int.forwarding
for selection menus.
] and [OK]:
or
Ext. Call Forw.
Service Set up
→
Settings
→
ISDN settings
Transferring incoming calls - CD (Call Deflection)
With CD you can transfer an incoming call to another call number while it is
ringing. You do not need to answer the call. See also page 36.
Transferring incoming external calls manually
You receive an external call.
Press
1.
Select using [
2.
tion)
As well as using a predefined forwarding destination, you can also select a call
number from the directory or enter a new number.
Predefining the forwarding destination
You can define a forwarding destination for incoming calls. This destination call number is offered as a preset in the case of manual transfer.
Press
1.
Select using [
2.
Forward. Dest.
Enter the call number for the call forwarding destination and confirm with [
3.
Select using [
4.
for the menu.
] and [OK]:
.
for selection menus.
] and [OK]:
.
] and [OK]:
Call forwarding → (predefined forwarding destina-
Service Set up
Save entry
→
Settings
→
ISDN settings
.
9
.
].
→
→
9
].
33
Page 38

Gigaset 3070/3075isdn, GB, A31008-G3070-B100-3-7619
Making comfort calls
giga3070KAP.fm
09.01.01
Step
by
Step
Automatic external callback on busy CCBS
You set up an external call. The number you have dialled is busy or the subscriber does not answer and the softkey [CALLBCK] is shown on the display.
Activating callback
To activate callback confirm the softkey [CALLBCK].
1.
Wait for confirmation from the exchange and press
2.
Accepting a callback
The handset rings with a specific ring tone and the callback number is shown
on the display.
Press
1.
: the connection is established.
D
Deleting a callback
The handset rings and the callback number is shown on the display.
Confirm [DELETE]. The callback is deleted.
1.
Checking or deleting the callback number
Press for selection menus.
1.
Select using [
2.
The current callback number is shown on the display.
Confirm [BACK]. The callback remains active.
3.
or Confirm [DELETE]. The callback is deleted.
3.
] and [OK]:
Service Set up
Call waiting - CW
See "Call waiting - activating/deactivating CW" on page 23.
Accepting/rejecting external call waiting
You hear the call waiting tone during your call (internal or external).
Confirm [ACCEPT]. You accept the waiting call and the first call is put on hold.
1.
Both parties are shown on the display, the current party is highlighted.
or Confirm [REJECT]. Reject the waiting call.
1.
Switching to waiting subscribers - toggle:
You can switch between the call parties using [
1.
Ending an active call
Press
1.
Confirm with [OK]:
2.
Forwarding waiting calls internally
You can forward waiting calls internally without taking the call.
Press
1.
Select using [
2.
Continue the active call.
for the menu.
for the menu.
End
.
] and [OK]:
(internal subscriber)
→
Status
] and [].
.
¯
→
.
Callback
.
34
Page 39

Gigaset 3070/3075isdn, GB, A31008-G3070-B100-3-7619
giga3070KAP.fm
Making comfort calls
09.01.01
Step
by
Step
or To end the internal call, press
Holding calls
Putting external subscribers on hold
You are conducting an external call.
Press [INT]: The external subscriber is put on hold.
1.
The waiting external subscriber hears music-on-hold. You can conduct an internal enquiry call.
As soon as the internal subscriber ends the enquiry call, [BACK] appears on the
2.
display for 10 seconds. Pressing [BACK] reconnects you to the external caller.
If this option is not used, the ring tone sounds again after 10 seconds.
2.
[OK]. You are then returned to the external call and the internal subscriber hears
the busy tone.
Putting internal subscribers on hold
You are conducting an internal call.
Press [CONSULT]: The internal subscriber is put on hold.
1.
You can set up an external enquiry call.
To end the external call, press
2.
[OK]. You are then returned to the internal call and the external connection is
closed.
or
To set up a three-party conference, press [CONF.]. This establishes the confer-
2.
ence circuit.
Parking/continuing calls ("unpark")
You are conducting an external call which you would like to transfer to another
telephone at your ISDN connection, for example.
Press
1.
Select using [
2.
Enter a parking number (one or two digits) and confirm with [OK].
3.
Press
4.
Unparking a call before answering
Press for selection menus.
1.
Select using [
2.
Enter the parking number assigned previously and confirm with [OK].
3.
Press D.
4.
Call status is restored.
"Cancel CallPark" after answering a call
Press D.
1.
Press
2.
Select using [
3.
Enter the parking number assigned previously and confirm with [OK].
4.
for the menu.
¯
.
for the menu.
] and [OK]:
] and [OK]:
] and [OK]:
for the menu and select [End] followed by
for the menu and select [End] followed by
Call Park
Service Set up
Cancel CallPark
.
→
Call preparat. → Cancel CallPark
.
.
35
Page 40

Gigaset 3070/3075isdn, GB, A31008-G3070-B100-3-7619
Making comfort calls
giga3070KAP.fm
09.01.01
Step
by
Step
Calling line identification restriction (CLIR)
If you withhold your number from other parties, you can activate the calling line
identification restriction. This can be set on a temporary or permanent basis.
Temporary calling line identification restriction
Press for selection menus.
1.
Select using [
2.
9
in front of "Withhold No." = ON / no 9 = OFF).
(
Confirm with [OK] and dial the desired number.
3.
$IWHUWKHFDOOWKLVUHVWULFWLRQLVOLIWHG<RXUQXPEHUZLOOQRWEHZLWKKHOGIURPWKH
Info
] and [OK]:
Service Set up
→
Call preparat. → Temp. withhold
QH[WSDUW\FDOOHG7KLVDSSOLHVHYHQLI\RXVHOHFWDQXPEHUIURPWKHUHGLDOOLVW
Permanent calling line identification restriction
Press for selection menus.
1.
Select using [
2.
front of "Withhold No." = ON / no
Confirm with [OK] and dial the desired number.
3.
] and [OK]:
Service Set up
9
= OFF).
→
Settings → ISDN settings
Automatic call forwarding due to inaccessible handset
This option can only be used if you have activated the CD service for your connection. Further information can be obtained from your network provider.
For instance, if your handset is outside the base station range, the battery has
run out or the handset is switched off, this feature reroutes all calls to a defined
external number.
Prerequisite
page 21). This MSN must not be assigned to any other device, even on the
ISDN bus.
Enter a number and activating/deactivating automatic call forwarding
Press for selection menus.
1.
Select using [
2.
forwarding
Press [OK]: a list of all MSNs entered is displayed.
3.
Select using [
4.
number.
3UHVV
5.
[9] and select
now activated.
9
(
in front of MSN = automatic call forwarding ON, no
warding OFF).
: You have assigned an exclusive MSN to your handset (see
.
] and [OK]:
] and [OK]
Service Set up
(desired MSN)
Save entry
→
Settings → ISDN settings → Auto
and enter an external destination
followed by [OK]. Automatic call forwarding is
9
= automatic call for-
.
(9 in
36
Page 41

Gigaset 3070/3075isdn, GB, A31008-G3070-B100-3-7619
giga3070KAP.fm
Making comfort calls
09.01.01
Step
by
Step
Tracing switch
If you find yourself the target of malicious callers, it is possible to trace the caller ID from the central office.
This service can only be used if it has been activated for your connection. Further information can be obtained from your network provider.
During or immediately after the call
You have received a malicious call from an anonymous caller. This function can
be initiated either during the call or immediately after the caller has hung up.
Do not hang up.
Press
1.
Select using [
2.
The caller and his/her number are identified in the central office and recorded
together with the date and time at which the call was made. A printout can be
supplied by the network provider at a later point in time.
for selection menus.
]:
Identify caller
and press [OK].
37
Page 42

Gigaset 3070/3075isdn, GB, A31008-G3070-B100-3-7619
System functions
giga3070KAP.fm
09.01.01
Step
by
Step
1.
or Press
1.
2.
Info
1.
2.
3.
1.
2.
or Select using [
2.
or Select using [
2.
3.
4.
System functions
These descriptions apply to the Gigaset 3000 Comfort handset.
See the abbreviated description "Registering a Gigaset 3000 Classic handset"
on page 57.
Missed calls list
The missed calls list contains the telephone numbers (max. 32 digits) of unanswered calls together with the date, time and number of call attempts. In the
case of numbers stored in the telephone directory of the handset, the name of
the caller is also displayed. Calls made with the calling line identification restriction set are not included in the list. New entries in the missed calls list are signalled on the handset by means of the
contain up to 40 entries. When this maximum number is reached, older entries
are deleted one by one as new entries are added to the end of the list. If you
return the call or the calling party manages to reach you later on, the corresponding entry in the missed calls list is deleted.
Dialling a number from the missed calls list
Press the
You are then connected to the caller.
Select using [
→
You are then connected to the caller.
On PABXs: When a number is selected from the missed calls list, the associ-
ated prefix is added automatically.
,VRIWNH\
for selection menus.
Dial Number
.
] and [OK]:
and confirm with [OK] .
Service Set up
Saving a number in the missed calls list to the telephone directory
Press for selection menus.
Select using [
Copy to Dir.
→
] and [OK]:
and confirm with [OK] .
(QWHUDQDPHVHOHFW
Service Set up
[9] →
Save entry
Checking, deleting or modifying numbers in the missed calls list
Press for selection menus.
Select using [
Display entry
→
the date and time of the call are also displayed.
Delete entry
→
Change number
→
Change the number by using the softkeys
rectly.
Press [
9
] →
] and [OK]:
and confirm with [OK]. Together with the telephone number,
] and [OK]:
and confirm with [OK].
] and [OK]:
Save entry
Service Set up
Service Set up
Service Set up
and confirm with [OK].
and confirm with [OK].
symbol. The missed calls list can
,
→
Caller list
→
Caller list
and confirm with [OK].
→
Caller list
→
Caller list
→
Caller list
:
→ (desired number) [9]
→ (desired number) [9]
→ (desired number) [9]
→ (desired number) [9]
→ (desired number) [9]
and by entering digits di-
38
Page 43

Gigaset 3070/3075isdn, GB, A31008-G3070-B100-3-7619
giga3070KAP.fm
System functions
09.01.01
Step
by
Step
or
Copying telephone directory entries
If you have registered two or more Gigaset 2000C/3000 Comfort devices (with
telephone directory entries), you can copy all or part of the telephone directory
from one handset to another. Please refer to the operating instructions for your
Gigaset 2000C/3000 Comfort.
Configuring an external destination call number for the room
monitor
Using the room monitor function, the Gigaset 3000 Comfort handset can automatically activate a call when a particular noise level is exceeded. If you wish
to use an external destination call number instead of an internal user number,
you must also enter the room monitor number 99 on the handset. For more
details, see the Gigaset 3000 Comfort operating instructions. Once an external
room monitor call is activated, the alarm mechanism is disabled for 5 minutes.
Alarms cannot be sent to the external number until this time has elapsed.
for selection menus.
Press
1.
Select using [
2.
] and [OK]:
Ext.room monit. → Dest.Call No.
Enter the number and press [
3.
Select using [
4.
Press
The option "
highlighted.
\
] and [OK]:
to return to the starting menu. You can also press the B key.
Ext.room monit.
Service Set up
→
9
].
Save entry
" in the menu "
→
9
[
] →
.
System settings"
Settings
→
System settings
Change number
Night service
With the night service feature you can configure timed call forwarding, e.g. to
divert calls to a private telephone outside office hours. In the same way as external call forwarding, only MSNs that have the handset configured as an incoming MSN can be forwarded externally. If the night service is already
activated, it must be deactivated again in order to alter the forwarding
destination.
Setting an internal/external Night Service forwarding destination
Press for selection menus.
1.
Select using [
2.
Forward. dest. → Ext. Call Forw., Int.forwarding
→
machines.
The option "Answ. Machine" is only offered with Gigaset 3075isdn. If you select
this option all calls are forwarded to the answering machine.
– Entering an external destination call number:
Enter the external destination call number for night service and press [
3.
Select with [OK]:
4.
– Entering an internal destination call number:
Select using [] and [OK]:
3.
] and [OK]:
Save entry
Service Set up
.
→
Night Service
or one of max. 3 answering
(required internal subscriber)
→
.
.
is now
(required MSN)
9
→
].
39
Page 44

Gigaset 3070/3075isdn, GB, A31008-G3070-B100-3-7619
System functions
giga3070KAP.fm
09.01.01
Step
by
Step
Entering an automatic start/end time for night service
Press for selection menus.
1.
Select using [
2.
(required MSN)
Enter start time or end time (4 digits) and confirm with [
3.
Select using [
4.
] and [OK]:
→
] and [OK]:
Service Set up
Start time
Save entry
or
End time
.
→
Night Service
.
9
→
].
Activating/deactivating all-day night service for Saturday/Sunday
Press for selection menus.
1.
Select using [
2.
→
Sat/Sun all day
] and [OK]:
.
Service Set up
→
Night Service
→
(required MSN)
Activating/deactivating night service
Press for selection menus.
1.
Select using [
2.
Activate or Deactivate
→
] and [OK]:
Service Set up
→
Night Service → (required MSN)
Entrance telephone
See separate section: "Operation with the entrance telephone" on page 66.
Displaying call charge and call duration
Call charge display
You can use call charge display if you have registered with your provider for
"Call charge display during a call".
The units/total charges accumulated and the cost of the last call completed can
(depending on programming) be checked using your comfort handset. The total
cost includes the charges incurred by the handset.
Activating/deactivating call duration display
If this feature is activated, the call duration is displayed for outgoing and incoming calls, for enquiry calls and for three-way calling.
Press
1.
Select using [
2.
Cost/duration
Enter the base PIN and confirm with [OK].
3.
Select using [] and [OK]:
4.
Activating/deactivating unit/charge display
Press
1.
Select using [
2.
Cost/duration
Enter the base PIN and confirm with [OK].
3.
Select using [
4.
for selection menus.
] and [OK]:
.
for selection menus.
] and [OK]:
.
] and [OK]:
Service Set up
→
Settings
Call display → Call Duration
Service Set up
→
Settings
Call display → Units/Costs
→
System settings
.
→
System settings
.
→
→
40
Page 45

Gigaset 3070/3075isdn, GB, A31008-G3070-B100-3-7619
giga3070KAP.fm
System functions
09.01.01
Step
by
Step
Activating/deactivating charge display for the previous call
With Gigaset Comfort/Classic telephones, pressing the D key lets you display the costs/units accumulated for the previous call at the telephone.
Press
1.
Select using [
2.
Cost/duration
Enter the base PIN and confirm with [OK].
3.
Select using [] and [OK]:
4.
for selection menus.
] and [OK]:
.
Service Set up
→
Settings
Last charge, Call Duration
→
System settings
are deactivated.
Configuring determination of costs
Providers today no longer have to transmit call charges in units. They can also
immediately transmit the currency amount. This option will become more
widespread in the near future.
Gigaset 3070/75isdn can detect the changeover on the network side from units
to charges or vice versa. The user is then requested to switch over this option
manually. The available options are: "Units Cent.Off.", "Costs Cent.Off.", "No
Rate", "Rate --.--" and "Rate ----". "Units Cent.Off." is active as standard.
The factor relates to both "Units Cent.Off." and "Costs Cent.Off.". Thus with a
factor of 0.20, when "Units Cent.Off." is set, for example, each unit should cost
0.20 DM. If "Costs Cent.Off." is set, costs should only be assigned the factor
0.2 - in this case this would mean that 80% of the call charges would not be
recorded.
With factors < 1 and the setting "Costs Cent.Off.", the amount displayed does
not cover the call charges.
● Before the charges for each call can be calculated, the currency and price per
unit must be defined.
Entering the price per unit
Press
1.
Select using [
2.
Cost/duration
Enter the PIN and confirm with [OK].
3.
Select using [
4.
Select using [
5.
Rate ----
Enter the basic price and confirm with [
6.
Select using [
7.
If you would like to set an additional currency:
Enter the currency and confirm [9].
8.
Select using [
9.
If [No Rate ] was already set a prompt is displayed.
Confirm the prompt for accounting method with [YES].
10.
All accounts are reset and the option is highlighted.
for selection menus.
] and [OK]:
Service Set up
.
] and [OK]:
] and [9]:
Access type
Rate --.--
(without decimal point).
] and [OK]:
] and [OK]:
Save entry
Save entry
→
Settings
→
.
(with decimal point) or
9
].
.
.
System settings
→
→
41
Page 46

Gigaset 3070/3075isdn, GB, A31008-G3070-B100-3-7619
System functions
giga3070KAP.fm
09.01.01
Step
by
Step
Setting units
Press
1.
Select using [
2.
Cost/duration
Enter the PIN and confirm with [OK].
3.
Select using [] and [OK]:
4.
Select using [
5.
for selection menus.
] and [OK]:
.
] and [OK]:
Service Set up
Access type
Units/Costs
.
.
→
Settings
→
System settings
If the calculation type "Price per unit:" was active when the units were set, a
prompt is displayed.
Confirm the prompt for accounting method with [YES].
6.
All accounts are reset and the option is highlighted.
Displaying a cost overview
Depending on the setting, call or charge units are displayed for each internal
subscriber, for each configured MSN, and for the system as a whole.
Press
1.
Select using [
2.
Cost/duration
Enter the PIN and confirm with [OK].
3.
Select using [] and [OK]:
4.
The accounts for each internal subscriber and for each configured MSN are displayed. The total amount is shown at the start and at the end of the list.
Deleting the cost overview total
You are in the cost overview display:
Select using [
1.
Select using [
2.
Totalled and individual costs must be deleted separately. This means that if you
Info
delete an MSN total for example, the individual charges incurred remain stored
in the handset and must be deleted individually.
for selection menus.
] and [OK]:
.
] and [9]:
] and [OK]:
Service Set up
Cost overview
→
.
Settings
(required cost overview)
Delete amount
.
→
System settings
.
→
→
42
Call by Call
With this procedure you can switch to other providers for individual calls, thus
keeping call costs to a minimum. This simple procedure is explained in more
detail in the operating instructions for Gigaset 3000 Comfort.
Page 47

Gigaset 3070/3075isdn, GB, A31008-G3070-B100-3-7619
Answering machine (3075isdn only)
giga3070KAP.fm
09.01.01
Step
by
Step
Answering machine
(3075isdn only)
Gigaset 3075isdn includes an answering machine (AM) which can be used for
three call numbers. Up to three MSNs can be assigned to the answering machine. This means you can avail of three separate answering machines. However, an individual MSN cannot be assigned to more than one answering machine at a time. Only one message can be recorded at a time.
Access options for the answering machine
No MSN configured (default configuration):
– In this case, all connected devices can access the AM. When activated, the
AM takes calls to all MSNs.
One, two or three MSN have been assigned:
– The relevant AM can only be set and accessed by connected devices with
the same MSN.
– Exception: an answering machine which is the only device in the system to
be assigned to a particular MSN can be operated from all connected devices.
Selecting an answering machine
Press for selection menus.
1.
Select using [
2.
The list of answering machines only contains those answering machines assigned for this handset. If only one answering machine is configured, the selection list is ignored.
] and [OK]:
Service Set up
→
Answ. Machine
→
(required AM)
.
Activating/deactivating the answering machine
Press for selection menus.
1.
Select using [
2.
Activate or Deactivate
→
] and [OK]:
Service Set up
→
Answ. Machine
→
(required AM)
Activating an announcement
You can activate announcement 1 or 2, or the information announcement. If
available, the concluding announcement is automatically activated in connection with announcement 1 or 2.
If you have not recorded an announcement, the factory default announcement
is used.
Press
1.
Select using [
2.
→
Select using [
3.
Select using [
4.
for selection menus.
] and [OK]:
Announcements
] and [9]:
] and [OK]:
Service Set up
.
(required announcement)
Select
.
→
Answ. Machine
→
(required AM)
.
43
Page 48

Gigaset 3070/3075isdn, GB, A31008-G3070-B100-3-7619
Answering machine (3075isdn only)
giga3070KAP.fm
09.01.01
Step
by
Step
Recording/modifying announcements
A total of 4 announcements can be recorded:
● Announcement 1
● Announcement 2
● Announcem. only
● Concl.Announcem
Press
1.
Select using [
2.
→
Select using [
3.
Select using [
4.
Press [START]: start recording.
5.
Record announcement.
6.
Press [STOP]: end recording.
7.
The announcement is played back so that you can check it.
Recording is automatically aborted if:
● you pause for more than 8 seconds while recording the announcement
● the memory is full
● a call is taken.
Playing back/deleting announcements
Checking/deleting announcements
Press for selection menus.
1.
Select using [
2.
→
Select using [
3.
Select using [
4.
or Select using [
4.
When deleting an announcement: confirm prompt with [YES].
5.
for selection menus.
] and [OK]:
Announcements
] and [9]:
] and [OK]:
] and [OK]:
Announcements
] and [9]:
] and [OK]:
] and [OK]:
Service Set up
.
(required announcement)
Record
.
Service Set up
.
(required announcement)
Playback
Delete
.
.
→
Answ. Machine
→
Answ. Machine
→
(required AM)
.
→
(required AM)
.
44
Recording memos
Memos are "spoken messages" which are left for family members, for example.
A memo can be played back like a message, saved and deleted.
Press
1.
Select using [
2.
→
Press [START]: start recording.
3.
Record memo text.
4.
Press [STOP]: end recording.
5.
If the memory is full, recording is automatically aborted.
for selection menus.
] and [OK]:
Memos → Record memo
Service Set up
.
→
Answ. Machine
→
(required AM)
Page 49

Gigaset 3070/3075isdn, GB, A31008-G3070-B100-3-7619
Answering machine (3075isdn only)
giga3070KAP.fm
09.01.01
Step
by
Step
Listening to messages
You can access new messages directly using the letter symbol [,] on the
handset.
You can call up all saved messages as follows:
Press
1.
Select using [
2.
→
Playback begins immediately
You can rewind or fast-forward the message with [
for selection menus.
] and [OK]:
Service Set up
→
Answ. Machine
Messages → New Messages or All Messages
.
→
(required AM)
. Select using [] and [OK]:
] or [].
Listening to memos
Press for selection menus.
1.
Select using [
2.
Memos → New memos or All memos
→
] and [OK]:
begins immediately
You can rewind or fast-forward the memo with [
.
Service Set up
→
Answ. Machine
→
(required AM)
. Select using [] and [OK]:
] or [].
Deleting messages and memos
You can delete messages or memos either individually or together. A message
is considered old (heard) if it has been played back for at least 3 seconds.
Deleting individual messages or memos
Press for selection menus.
1.
Select using [
2.
Messages → All Messages
→
or
→ Memos → All memos
Select using [
3.
Select using [
4.
The current message is deleted.
Deleting all messages or memos
Press for selection menus.
1.
Select using [
2.
Messages → All Messages
→
or
→ Memos → All memos
Press [
3.
Select using [
4.
Confirm prompt with [YES].
5.
] and [OK]:
Service Set up
.
] or [] and [9]:
] and [OK]:
] and [OK]:
(required message or memo)
Delete message or Delete curr.memo
Service Set up
.
9
]: branch to the supplementary menu.
] and [OK]:
All Messages or All memos
→
Answ. Machine
→
Answ. Machine
→
(required AM)
.
.
→
(required AM)
.
Playback
45
Page 50

Gigaset 3070/3075isdn, GB, A31008-G3070-B100-3-7619
Answering machine (3075isdn only)
giga3070KAP.fm
09.01.01
Step
by
Step
Modifying settings
Defining the number of rings
Factory setting: automatic 2/4. In this case the answering machine operates as
follows: if there are no messages, the announcement is activated after 4 ring
cycles; if messages have already been left, the announcement is activated after
2 cycles. When you check your messages remotely, this enables you to tell after 3 ring tones that there are no new messages. If you hang up immediately,
no call charges are incurred.
Press
1.
Select using [
2.
→
Activating/deactivating output of the date and time
If the time stamp is activated, all messages include the day, date and time of
recording.
Press
1.
Select using [
2.
→
Defining recording length
The message can either be 1 minute, 2 minutes or 3 minutes long, or of maximum length.
Press
1.
Select using [
2.
→
length
Setting recording quality
If you set the recording quality to EXTRA-high, this reduces the available recording time. At standard recording quality (which is normally sufficient), the
memory can support 35 minutes, at high quality 12 minutes.
Press
1.
Select using [
2.
→
for selection menus.
Settings
Settings
Settings
Settings
→
No. of Rings
for selection menus.
→
Message/Memo
for selection menus.
→
Message/Memo
).
for selection menus.
→
AM Quality
] and [OK]:
] and [OK]:
] and [OK]:
] and [OK]:
Service Set up
→ (
1-9
) or (
Service Set up
→
Time Stamp
Service Set up
→
Message Length
Service Set up
→
High quality
→
Answ. Machine
Automatic 2/4
→
Answ. Machine
.
→
Answ. Machine
→
Answ. Machine
or
Long recording.
→
).
→
→ (r
→
equired recording
→
(required AM)
(required AM)
(required AM)
(required AM)
46
Remote control
You can also operate your answering machine externally, e.g to play back and
delete messages. To do this you must modify the answering machine PIN
(factory setting: 0000) to ensure maximum security. To ensure full functionality
for this type of operation, remote control and remote delete must be enabled.
Page 51
Gigaset 3070/3075isdn, GB, A31008-G3070-B100-3-7619
Answering machine (3075isdn only)
giga3070KAP.fm
09.01.01
Step
by
Step
Modifying the answering machine PIN
Your Gigaset 3075isdn is delivered with the answering machine PIN 0000.
Press
1.
Select using [
2.
→
Enter the new AM PIN (max. 8 digits) and confirm with [OK].
3.
Repeat the new AM PIN and confirm with [OK].
4.
If you make a mistake when entering the PIN, you can delete the entry us-
Info
ing the
for selection menus.
] and [OK]:
Service Set up
Settings → Change AM-PIN
:
key, and enter the correct PIN.
→
.
Answ. Machine
→
Setting remote functionality
Press for selection menus.
1.
Select using [
2.
→
Settings
] and [OK]:
→
Remote Options → Remote Control
Service Set up
→
Answ. Machine
and/or
Remote Delete
→
Activating automatic pause
When automatic pause is activated, the answering machine switches automatically to pause status after a message or memo has been played back.
Press
1.
Select using [
2.
→
for selection menus.
Settings
→
Automatic Pause
] and [OK]:
Service Set up
.
→
Answ. Machine
→
Activating an announcement
You can activate announcement 1 or 2, or the information announcement. If
available, the concluding announcement is automatically activated in connection with announcement 1 or 2.
If you have not recorded an announcement, the factory default announcement
is used.
Press
1.
Select using [
2.
→
Select using [
3.
Select using [
4.
for selection menus.
] and [OK]:
Announcements
] and [9]:
] and [OK]:
Service Set up
.
(required announcement)
Select
.
→
Answ. Machine
→
.
(required AM)
(required AM)
.
(required AM)
(required AM)
Locking the answering machine
Your answering machine can be protected against third-party intervention with
an individual PIN (Personal Identification Number). The answering machine PIN
is also your access code for remote control of the answering machine.
Activating/deactivating the answering machine
Press for selection menus.
1.
Select using [
2.
Settings → AM Lock
→
The activated option "AM Lock" is highlighted. Confirm the highlighted option
once more to deactivate it.
] and [OK]:
Service Set up
.
→
Answ. Machine
→
(required AM)
47
Page 52
Gigaset 3070/3075isdn, GB, A31008-G3070-B100-3-7619
G
Answering machine (3075isdn only)
giga3070KAP.fm
09.01.01
Step
by
Step
Setting a timer
You can control your answering machine with a timer function. A start time can
be defined for each announcement. You can also implement timed announcement control for weekends and/or weekdays, and select a specific announcement in each case.
Example: A company has an emergency service outside of regular business
hours. However the announcement at weekends must differ from the announcement during the week. The following setting would be appropriate in
this case: Mon - Fri after 07:00 pm until 07:00 am: an announcement specifying
the emergency number. Sat + Sun after 07:00 am until 07:00 am: the second
announcement.
Activating/deactivating the timer
Press for selection menus.
1.
Select using [
2.
Settings → Time Control → Activate
→
Setting the start time (Monday - Friday)
Press for selection menus.
1.
Select using [
2.
Time Control → Mon - Fri → (required announcement)
Enter the start time and press [
3.
Entering a second start time generates the end of the previous one.
Info
Select using [
4.
Setting "Saturday - Sunday" mode
Press for selection menus.
1.
Select using [
2.
Time Control → Sat - Sun → (required announcement)
] and [OK]:
] and [OK]:
] and [OK]:
] and [OK]:
Service Set up
Service Set up
9
].
Save entry
.
Service Set up
→
Answ. Machine
or
Deactivate
→
Answering mach.
→
Answering mach.
→
.
.
(required AM)
→
Settings
→
Settings
→
→
Picking up a call from an answering machine
To pick up a call from an answering machine, you need at least the "Incoming
only" access ("Accesses" on page 52).
Activating/deactivating automatic AM pickup
Press for selection menus.
1.
Select using [
2.
] and [OK]:
Auto. Pickup
Picking up a call
A call is recorded. You answer the call using the D key.
Direct (setting AM Auto. Pickup is active)
press
1.
or Indirect (setting AM Auto. Pickup is not active)
Press
1.
Listen in on the call: press [OP.LIST], this allows you to listen in without the call-
2.
er noticing.
Pick up the call: press [ACCEPT].
3.
48
D
D
.
.
Service Set up
→
Settings
→
System settings → AM
Page 53

Gigaset 3070/3075isdn, GB, A31008-G3070-B100-3-7619
Answering machine (3075isdn only)
giga3070KAP.fm
09.01.01
Step
by
Step
Remote control of the answering machine
You can access and control your Gigaset 3075isdn answering machine from
any external telephone or registered handset. The same procedures apply for
both remote control functions (local and remote), the only difference is the way
in which remote control is activated.
Operating the answering machine on the move
Remote control requires access to a telephone with DTMF (tone dialling). The
AM PIN must be entered immediately while the announcement text is being
played. "Remote Control" ("Setting remote functionality" on page 47) and where
appropriate "Remote Delete", must also be activated.
Dial your own call number.
1.
Once the announcement has commenced, you can enter the AM PIN
2.
immediately.
Controlling the answering machine from the handset (internal)
A voice-controlled help is activated with the query two-key functions:
Comfort and standard handset
Press [INT].
1.
Enter the internal call number for the answering machine: 91 or 92 or 93.
2.
If the answering machine lock is active:
Enter the answering machine PIN.
3.
Third-party handset (GAP mode)
Lift the handset.
1.
An additional key may have to be pressed in order to set up an internal call.
Enter the internal call number for the answering machine: 91 or 92 or 93.
2.
If the answering machine lock is active:
Enter the answering machine PIN.
3.
Cordless telephone adapter and a normal telephone
Automatic line seizure must be deactivated (see page 60). It is activated by de-
Info
fault.
Lift the handset.
1.
Enter the internal call number for the answering machine: 91 or 92 or 93.
2.
If the answering machine lock is active:
Enter the answering machine PIN.
3.
for delete help
for new messages help
for recording help
for setup help
49
Page 54

Gigaset 3070/3075isdn, GB, A31008-G3070-B100-3-7619
Answering machine (3075isdn only)
giga3070KAP.fm
09.01.01
Step
by
Step
Key sequences for remote control
Once you have commenced remote control for the answering machine, each
key has the same function, regardless of the telephone model.
Spec. function Pause/stop Record
Announce-
ment On/off Mode
New Delete Status/Help
Playing back messages and memos
All messages
New messages only
Pause/stop
Continue Playback
End Playback
Skipping messages and memos
To start of message
Previous message
Next message
50
Deleting messages and memos
Individual message during Playback
All messages after Playback
Recording an announcement
Announcement 1
Announcement 2
Information announcement
Concluding announcement
Playing back an announcement
Announcement 1
Announcement 2
Page 55

Gigaset 3070/3075isdn, GB, A31008-G3070-B100-3-7619
Answering machine (3075isdn only)
giga3070KAP.fm
09.01.01
Step
by
Step
Playing back an announcement
Information announcement
Concluding announcement
Selecting an announcement
Announcement 1
Announcement 2
Information announcement
Concluding announcement
Recording internal memos
Begin recording
End recording
Activating/deactivating the answering machine
Activate/deactivate
Help
Query settings
Query single-key functions
Query two-key functions see page 49
End query
51
Page 56

Gigaset 3070/3075isdn, GB, A31008-G3070-B100-3-7619
Security settings
giga3070KAP.fm
09.01.01
Step
by
Step
Security settings
Change system PIN
The base PIN (Personal Identification Number) protects all your system settings
against unauthorized modifications. You Gigaset 3070isdn/3075isdn is delivered with the PIN 0000.
Press
1.
Select using [
2.
Enter the base PIN (factory setting:0000) and confirm with [OK].
3.
Select using [] and [OK]:
4.
Repeat the new base PIN (max. 8 digits) and confirm with [OK].
5.
Repeat the new base PIN and confirm with [OK].
6.
Base lock
Using the base lock, you can "bar" outgoing calls from your Gigaset 3070isdn/
3075isdn base station. Incoming calls can still be taken.
Emergency calls are also possible, even if the base lock is activated.
Activating/deactivating the base lock
Press for selection menus.
1.
Select using [
2.
Enter the PIN and confirm with [OK].
3.
Select using [] and [OK]:
4.
for selection menus.
] and [OK]:
Note the new base PIN carefully. If you forget your PIN, the device will
need to be opened. In this case, contact the Siemens Hotline.
] and [OK]:
Service Set up
Change PIN
Service Set up
Base Lock
→
Settings
→
Security
.
.
→
Settings
→
Security
.
.
52
Accesses
You Gigaset 3070isdn/3075isdn supports three access levels:
● Unrestricted
● Incoming only
● INT only
Emergency calls are possible, regardless of the access level.
Press
1.
Select using [
2.
Enter the base PIN and confirm with [OK].
3.
Select using [
4.
(required access)
for selection menus.
] and [OK]:
] and [OK]:
.
Service Set up
Accesses → (required internal subscriber)
→
Settings
→
Security
.
→ [9] →
Page 57

Gigaset 3070/3075isdn, GB, A31008-G3070-B100-3-7619
giga3070KAP.fm
Security settings
09.01.01
Step
by
Step
Emergency numbers
Two or three emergency numbers (country-specific) are entered at the base
station. Five additional emergency numbers can be added to the following positions. The first position in the list is assigned the Siemens Hotline for your Gigaset 3070isdn/3075isdn as standard. This preset can be overwritten.
Configuring new emergency numbers
Press for selection menus.
1.
→
Settings
→
Security
.
.
.
9
.
9
].
] and [OK]:
] and [OK]:
] and [OK]:
Select using [
2.
Enter the base PIN and confirm with [OK].
3.
Select using [
4.
Confirm [
5.
Select using [
6.
Service Set up
Emergency Nos. → <no entry>
Change number
You can also delete or display an emergency number in this supplementary
menu.
Enter the new emergency number (max. 32 digits) and confirm [
7.
Select using [
8.
] and [OK]:
Save entry
You can also add a number from the directory to this supplementary menu as
an emergency number, or use a provider number (if supported).
Dialling an emergency number with active DSS and/or base/telephone
lock
The [EMERG.] softkey is displayed when DSS/telephone lock is active, see your
handset operating instructions.
Press any key or
1.
Confirm EMERG.
2.
Enter the emergency number.
3.
D
.
].
Restoring the factory setting
You can reset the station to the factory setting. The handsets remain registered.
Press
1.
Select using [
2.
Spec. function
Enter the system PIN of the base station (factory setting: 0000) and confirm
3.
with [OK].
Select using [
4.
Confirm prompt with [YES].
5.
for selection menus.
] and [OK]:
→
Default Reset
] and [OK]:
Service Set up
.
Reset all
.
→
Settings
→
System settings
→
53
Page 58

Gigaset 3070/3075isdn, GB, A31008-G3070-B100-3-7619
Appendix
giga3070KAP.fm
09.01.01
Step
by
Step
Appendix
Centrex features
CENTREX (CTX) is the name of the virtual ISDN PABX. To allow the full range
of features to be used, you can also activate the keypad protocol for switching,
in addition to the standard dialling procedures. CENTREX features can only be
utilised by subscribers in a CENTREX group.
Signalling options
You can use the digit keypad to send keypad information elements for controlling special services. Ask your provider for more details concerning the information and codes which can be sent.
The following features can be used if your Gigaset 3070/3075isdn is connected
to a Centrex system.
Calling Name
Identification
(CNI)
Message Waiting Indication
(MWI)
CENTREX calls CENTREX calls are signalled acoustically like internal calls.
In conjunction with a PABX
Prefixes (access codes)
If your telephone is connected to a PABX, you may initially have to enter a prefix
(access code) for external calls. Please refer to the operating instructions for
your PABX. The prefix can consist of one to four digits.
In the case of incoming calls, the prefix is automatically added to the caller’s
number in the display, in the missed calls list and thus also in the telephone
directory (if copied there from the missed calls list). The number stored can be
dialled directly from the missed calls list (see page 31).
Entering a prefix (access code)
Press
1.
Select using [
2.
Prefix digit
Confirm with [
3.
Select using [
4.
a code
Confirm with [9] and select
3.
:KHQGLDOOLQJPDQXDOO\RUHQWHULQJWHOHSKRQHGLUHFWRU\HPHUJH QF\RU'66QXP
Info
EHUVWKHSUHIL[PXVWEHVSHFLILHGH[SOLFLWO\
for selection menus.
.
In the case of incoming calls from other CENTREX subscribers, the call number and the caller’s name are shown
on the display.
When the comfort handset is in standby, the softkey [
displayed if new calls have been entered to the missed
calls list.
When you call up the missed calls list, the [
deleted.
] and [OK]:
9
] and enter the desired code.
:
Service Set up
] and [OK] whether you wish to delete, change or enter
Save entry
→
Settings
→
followed by [OK].
System settings
,
] softkey is
,
] is
→
54
Page 59

Gigaset 3070/3075isdn, GB, A31008-G3070-B100-3-7619
giga3070KAP.fm
09.01.01
Appendix
Step
by
Step
Activating automatic ECT (Explicit Call Transfer)
With some ISDN systems, the original caller and the party called for enquiry
purposes cannot be connected simply by hanging up.
In this case, you must activating this function.
Please refer also to the operating instructions for your PABX.
Press
1.
Select using [
2.
Transition(ECT)
9
3.
Use [OK] to toggle between ON and OFF.
When this function is activated, "Ext. enq. call" is automatically set (= in the cen-
Info
tral office) (see page 24).
for selection menus.
] and [OK]:
.
before the menu command = ON / no 9 = OFF.
Service Set up
→
Settings
→
ISDN settings
Reserving a line
You cannot make external calls when both external lines are being used by other internal subscribers. In this case you can "reserve a line". When an external
channel becomes available, the system calls you automatically and you can
make external calls again.
Reserving a line
You attempt to set up an external connection but all external lines are busy.
Press [CALLBCK].
1.
Accepting a free line
An external line becomes available. A recall is implemented.
Lift the handset:
1.
A connection is set up to the provider.
Set up the external connection as normal.
2.
Deleting a line reservation
An external line becomes available. A recall is implemented.
Press [DELETE].
1.
The external line reservation is deleted.
pressD.
→
Dialling procedures
If your Gigaset 3070isdn/3075isdn is connected behind a PABX, or the ISDN
CO can be controlled using the KEYPAD protocol, you can send commands to
the master PABX once the keypad function is activated.
Activating/deactivating automatic tone dialling
Automatic tone dialling is activated in the factory setting.
Press
1.
Select using [
2.
Spec. function → Dial properties → Auto Sw.to Tone
The activated tone dialling is highlighted.
for selection menus.
] and [OK]:
Service Set up
→
Settings
→
System settings
.
→
55
Page 60

Gigaset 3070/3075isdn, GB, A31008-G3070-B100-3-7619
Appendix
giga3070KAP.fm
09.01.01
Step
by
Step
Using the keypad protocol
Under CENTREX, the keypad protocol enables additional services from other
providers to be used, e.g voicemail or announcement services.
Contact your provider for more information on keypad control.
Activating/deactivating automatic keypad switchover
Pressing ’*’ and ’#’ automatically switches the system over to the keypad protocol. The following dialling codes are transmitted to the exchange as keypad
character sequences. If automatic keypad switchover is deactivated, dialling ’*’
and ’#’ has no effect.
Press
1.
Select using [
2.
Spec. function → Dial properties → Auto Keypad
for selection menus.
] and [OK]:
Service Set up
→
Settings
.
→
System settings
The activated automatic keypad switchover is highlighted.
Activating the keypad protocol during a call only
This setting only applies to the external call currently in progress.
Press
1.
Select using [
2.
for the menu.
] and [OK]:
Keypad On
The activated keypad function is automatically reset when the call is ended.
Activating the keypad protocol for the current connection
You can switch to the keypad protocol for the duration of the next call.
Press
1.
Select using [
2.
for selection menus.
] and [OK]:
Service Set up
→
Call preparat.
→
Temp . Key pad
Activating/deactivating the dialling of * and #
This function is important for using telecom features, e.g. querying an answering machine in the telecom network.
Press
1.
Select using [
2.
Spec. function → Dial properties → Dial * and #
Activated dialling of * and # is highlighted.
for selection menus.
] and [OK]:
Service Set up
→
Settings
.
→
System settings
→
.
→
56
Page 61

Gigaset 3070/3075isdn, GB, A31008-G3070-B100-3-7619
giga3070KAP.fm
09.01.01
Operation with other devices
Step
by
Step
Operation with other devices
For information on operation and call number assignment, please refer to ”Registering other devices“ on page 7.
Registering a Gigaset 3000 Classic handset
®x{
base station
Registering the Gigaset 2000S handset
Handset
<press green illuminated key on base station>
by the base station
Normal telephone (POT)
This connection must be enabled before a normal telephone (POT) can be put
into service, see "Setting the device type" on page 20.
Registering third-party GAP handsets
Press the green illuminated key on the base station.
1.
Prepare the GAP handset for registration (see the handset operating instruc-
2.
tions). A connection is setup between the base station and the GAP handset.
The GAP handset is assigned the lowest available internal number. An available
internal number cannot be selected via the GAP handset.
The display depends on the GAP handset used, as the base station does not
Info
send display information to GAP handsets.
<Base No.> [OK]<System Code>[OK] <
>, <INT No.>
H
(off), press <Base No> and
)
H
(on) simultaneously,
(
internal number is assigned automatically
press green illuminated key on
System Code
Activating and deactivating the repeater capability
The Gigaset repeater allows you to double the range of your handset and can
be used as an accessory for Gigaset 3070/3075isdn. This function allows you
to activate and deactivate the repeater capability.
Further information can be found in the operating instructions for the Gigaset
repeater.
Press
1.
Select using [
2.
Spec. function → Repeater
Set using [OK]:
3.
7RDFWLYDWHSUHVV
4.
back, press
for selection menus.
] and [OK]:
9EHIRUHWKHPHQXFRPPDQG
[NEXT]. The handset is then temporarily disabled. To switch
[BACK]
Service Set up → Settings
.
= ON / no 9 = OFF
→
System settings
→
57
Page 62

Gigaset 3070/3075isdn, GB, A31008-G3070-B100-3-7619
Operation with other devices
giga3070KAP.fm
09.01.01
Step
by
Step
Registering cordless Gigaset 1000TAE
The cordless Gigaset 1000TAE allows analog terminals e.g. telephones, fax
machines or answering machines to be operated cordlessly from your base station.
The base station system PIN must be set to "0000" before the device is put into
operation, see "Change system PIN" on page 52.
Press the green illuminated key on the base station.
1.
Prepare the 1000TAE for registration (see the Gigaset 1000 TAE operating in-
2.
structions). A connection is setup between the base station and the TAE. The
1000TAE is assigned the lowest available internal number. An available internal
number cannot be selected via the1000TAE.
Setting the device type for cordless TAE
When operating a cordless TAE on Gigaset 3070/3075isdn, you must define
the type of the connected device:
● Telephone = telephone
● Fax = fax, see INFO below
● Modem = modem
● Answering mach. = answering machine (required for AM pickup)
● Neutral = combined device
The default setting is "Telephone".
Press
1.
Select using [
2.
Set up device
This opens a list of internal numbers. Using [
3.
number of the registered cordless TAE.
Press [
3.
Using [] and [OK] select the desired device type. 9 in front of the menu com-
4.
mand = selected.
for selection menus.
] and [OK]:
Service Set up → Settings
.
9
] and select using [] and [OK]:
→
Set up user
] and [OK] select the internal
Device select.
→
58
Fax machines: To ensure that the fax machine can interpret the internal dial
Info
tone, it should be installed behind the PABX. Please refer to the operating instructions for your fax machine.
If you encounter difficulties when connecting to other fax machines, e.g. incorrect ID set at the ISDN remote station, then change the device type to "Neutral".
Combined fax machines: As these machines also include a telephony feature,
they must be set to "Neutral" and installed behind the PABX.
Page 63

Gigaset 3070/3075isdn, GB, A31008-G3070-B100-3-7619
giga3070KAP.fm
09.01.01
Operation with other devices
Step
by
Step
Defining device authorizations
It is possible to set different authorizations for all registered devices:
1.
8QUHVWULFWHG
(Default setting)
All devices can accept incoming calls and make outgoing external/internal
calls.
2.
,QFRPLQJRQO\
The devices can only accept incoming calls. External calls cannot be made,
apart from those to emergency numbers.
3.
,17RQO\
The devices can only accept internal calls and can only make external calls
to emergency numbers.
Press
1.
Select using [
2.
Enter the system PIN and confirm with [OK].
3.
Select using [
4.
(desired authorization,
for selection menus.
] and [OK]:
] and [OK]:
9
Service Set up
Accesses → (desired internal subscriber)
before menu command = ON / no 9 = OFF).
→
Settings
→
Security
.
Registering the Gigaset M101 Data and M105 Data modules
Gigaset M101 Data with its V24 interface and Gigaset M105 Data with its USB
interface enable cordless PC connection to the base station, e.g. for Internet
access.
● For information on operating Gigaset talk&surf with a cordless data module,
see page 13.
→ [9] →
59
Page 64

Gigaset 3070/3075isdn, GB, A31008-G3070-B100-3-7619
Operation with other devices
giga3070KAP.fm
09.01.01
Step
by
Step
Making calls
Activating/deactivating automatic line seizure
With automatic line seizure, the trunk line is seized immediately when the
handset is lifted. Normal internal dialling is thus no longer possible. By pressing
4
] key, however, an internal call can be made by means of an internal en-
the [
quiry. This call is conducted via the trunk.
On Gigaset 3000 Comfort handsets, press
1.
Select using [
2.
Set up device
Select using [
3.
subscriber)
Select using [
4.
] and [OK]:
.
] and [9]:
.
] and [OK]:
Service Set up
(POT subscriber or STA subscriber or GAP handset
Auto. seizure
Making external calls
Autom. line seizure deactivated Autom. line seizure activated
bi bi
Making internal calls
Autom. line seizure deactivated
bi
Making internal calls with GAP handsets
Autom. line seizure deactivated
bi
or
+i
Collective calls to all internal subscribers
Autom. line seizure deactivated
b
/ with GAP poss.
+
for selection menus.
→
Settings
.
→
Set up user
→
60
Call waiting
You hear the call waiting tone during your external call.
d
Call disconnected, wait for call signal
subscriber 1 is put on hold
4c
or
Switching to waiting subscribers - toggle
4c
subscriber 1 is put on hold,
4c
Conducting external enquiry calls in the system
4i
(again 4 switch between the call parties)
Call transfer on/before answer.
4i
(internal)
d4i
bc
subscriber 2 is put on hold, etc.
(internal)
cd
Page 65

Gigaset 3070/3075isdn, GB, A31008-G3070-B100-3-7619
giga3070KAP.fm
09.01.01
Operation with other devices
Step
by
Step
Accepting an entrance telephone call
c4i
(Code) [4] →
[
] d
Conducting external enquiry calls in the exchange
c4i
(call number)
61
Page 66

Gigaset 3070/3075isdn, GB, A31008-G3070-B100-3-7619
Operation with other devices
giga3070KAP.fm
09.01.01
Step
by
Step
Making calls with a corded telephone at the TAE connection
Dialling internal and external numbers
Dialling internal numbers
Lift the handset and dial the internal number. This is possible only if automatic
line seizure is deactivated (see page 60).
The procedure for calling all internal subscribers simultaneously by means of a
collective call is described on page 63.
Dialling external numbers
Lift the handset. If automatic line seizure is deactivated (see page 60), press
>0< to get an external line and then dial the desired number.
(PHUJHQF\QXPEHUV
authorization is set to
Answering calls
/
#
0
Call waiting
If an external call comes in while you are engaged in another external call, the
call waiting tone is signalled on the handset. You can then decide whether you
wish to answer the second call.
#
either ...
can be called at all times, even if the
Lift the handset.
Speak to the caller.
Hang up.
While engaged in a call, you hear the call waiting tone.
,17RQO\
.
V\VWHPORFN
is on and the
62
0
#
RU
4
#
Lift the handset. This ends the first call and answers the
second call.
Speak to the caller.
Press this key. This places the first caller on hold.
Speak to the second caller.
Pressing the R key allows you to toggle between the two
callers.
Page 67

Gigaset 3070/3075isdn, GB, A31008-G3070-B100-3-7619
giga3070KAP.fm
09.01.01
Operation with other devices
Step
by
Step
Internal collective call
If there are several internal subscribers registered at the base station, you can
call all of them simultaneously by means of a collective call. This is possible
only if automatic line seizure is deactivated (see page 60).
/
#
Lift the handset.
All registered handsets are called.
You are connected to the first subscriber that answers the
collective call.
External/internal enquiry
● You can call an
● You can call an
External enquiry
#
4
"
J
#
party during an
H[WHUQDO
party during an
LQWHUQDO
H[WHUQDO
H[WHUQDO
call.
call.
You are engaged in an external call.
Press this key. The external caller is put on hold.
Press this key.
Enter the desired external number.
You are connected to the dialled subscriber. If you wish, you
can use the R key to toggle between the two parties.
Ending the call
;
Internal enquiry
#
4
J
#
4
Hang up to end the current call. You are then recalled to the
first call.
You are engaged in an external call.
Press these keys. The external caller is put on hold.
Enter the desired internal number.
You are connected to the dialled party. If you wish, you can
use the R key to toggle between the two parties
Press this key. This ends the call with the internal subscriber
and reconnects you to the external caller.
If the internal subscriber does not answer, you can return to the
caller on hold by pressing the R key.
63
Page 68

Gigaset 3070/3075isdn, GB, A31008-G3070-B100-3-7619
Operation with other devices
giga3070KAP.fm
09.01.01
Step
by
Step
Toggling between two callers
#
4
While engaged in an external call, you receive a second
external call.
Press this key to toggle between the two callers.
Ending the call
;
Hang up to end the current call. You are then recalled to the
first call.
Call transfer
This function allows you to transfer an external call to an internal subscriber.
#
4
You are engaged in a call.
Press this key.
The external caller is put on hold and hears the internal music-
on-hold.
J
;
If the called subscriber does not answer, you can return to the caller on hold by
Info
Enter the desired internal number.
When the called subscriber answers, hang up.
pressing the R key. An internal call cannot be transferred internally. You can
hang up
the internal subscriber answers. If the internal subscriber does
EHIRUH
not answer within 30 seconds, you will be recalled to the first call.
Picking up a call while the answering machine is operating
Calls can be picked up even while the answering machine connected to the
second analog connection is switched on, playing your announcement or recording a message. Once you pick up, the recording process is stopped.
Automatic call pickup can be deactivated (see page 48) so that you can make
outgoing calls even while the answering machine is switched on.
Automatic call pickup activated
GHIDXOW
Automatic line seizure must be activated
64
/
#
Lift the handset.
Speak to the caller.
Page 69

Gigaset 3070/3075isdn, GB, A31008-G3070-B100-3-7619
giga3070KAP.fm
09.01.01
Operation with other devices
Step
by
Step
Automatic call pickup deactivated
Automatic line seizure must be deactivated
/
|
4
#
For call pickup, the answering machine and the internal subscriber called must
Info
be assigned the same incoming MSN and the internal number of the answering machine must be assigned the device type Answ. Machine.
Lift the handset.
Press this key to listen to the caller.
Press this key to answer the call.
Speak to the caller.
65
Page 70

Gigaset 3070/3075isdn, GB, A31008-G3070-B100-3-7619
Operation with the entrance telephone
giga3070KAP.fm
09.01.01
Step
by
Step
Operation with
the entrance telephone
Configuring the entrance telephone
Press for selection menus.
1.
Select using [
2.
Set up device
Select using [
3.
Select using [
4.
] and [OK]:
.
] and [9]:
] and [OK]:
Assigning internal users to the entrance telephone call group
Press for selection menus.
1.
Select using [
2.
Set up device
Select using [
3.
Select using [
4.
] and [OK]:
.
] and [9]:
] and [OK]: Door call grp..
Forwarding the entrance telephone externally
All entrance telephone calls can be forwarded to an external call number.
Entering/modifying a destination call number for external call forwarding
Press
1.
Select using [
2.
Set up device
Select using [
3.
Select using [
4.
Select using [
5.
If a destination call number has not yet been stored, the entry <blank> is displayed.
Select using [
6.
Enter the new or modified destination call number and confirm with [
7.
Select using [
8.
Deleting a destination call number for external call forwarding
Press
1.
Select using [
2.
Set up device
Select using [
3.
Select using [
4.
Select using [
5.
Select using [
6.
for selection menus.
] and [OK]:
.
] and [9]:
] and [OK]: Forw.entr.tel..
9
]:
] and [OK]: Change number.
] and [OK]: Save entry.
for selection menus.
] and [OK]:
.
] and [9]:
] and [OK]: Forw.entr.tel..
9
]:
] and [OK]: Delete number.
Service Set up
→
Settings
(required internal subscriber 21 or 22)
Device select.
Service Set up
→ Door*.
→
Settings
(required internal subscriber)
Service Set up
→
Settings
(required internal subscriber)
(destination call number)
Service Set up
.
→
Settings
(required internal subscriber)
(delete number)
.
→
Set up user
→
Set up user
.
→
Set up user
.
→
Set up user
.
.
→
→
→
9
].
→
66
*. This configuration is only applicable for entrance telephones in accordance with FTZ
(door opener via ring current). Telephones with DTMF control must be programmed
like normal telephones.
Page 71

Gigaset 3070/3075isdn, GB, A31008-G3070-B100-3-7619
Operation with the entrance telephone
giga3070KAP.fm
09.01.01
Step
by
Step
Activating/deactivating call forwarding
Press
1.
Select using [
2.
Set up device
Select using [
3.
Select using [
4.
Select using [
5.
Select using [
6.
for selection menus.
] and [OK]:
.
] and [9]:
] and [OK]: Forw.entr.tel..
9
]:
(destination call number)
] and [OK]:
Service Set up
→
Settings
(required internal subscriber)
.
Activate or
Deactivate
→
Set up user
.
Doorbell call, doorbell connection
A call at the entrance telephone is signalled (3 short tones). The call is signalled
a total of 5 times and is then automatically ended by the entrance telephone.
Gigaset Comfort
C
Press the talk
1.
message "Int. call from door" is displayed.
Press the softkey
2.
activated for three seconds. The confirmation message "Intern. Door Op." is
displayed for two seconds. The connection to the entrance telephone is
cleared down automatically after the three seconds have elapsed.
Gigaset Classic
Press the talk key
1.
Press the keys
2.
ed for three seconds. The connection to the entrance telephone is cleared
down automatically after the three seconds have elapsed.
Supplementary devices
Lift the handset
1.
Press the keys
2.
ed for three seconds. The connection to the entrance telephone is cleared
down automatically after the three seconds have elapsed.
key. You are connected with the entrance telephone. The
OP DOOR
C
t
>
t
to activate the door opener. The door opener is
. You are connected with the entrance telephone.
, to activate the door opener. The door opener is activat-
. You are connected with the entrance telephone.
, to activate the door opener. The door opener is activat-
→
67
Page 72

Gigaset 3070/3075isdn, GB, A31008-G3070-B100-3-7619
About your system
giga3070KAP.fm
09.01.01
Step
by
Step
About your system
Care
Clean the base station with an antistatic wipe. Never use a dry cloth as this
could cause a build-up of static electricity!
Ambient conditions
● Do not install the base in a damp location, e.g. bathroom or shower.
● Avoid direct contact with heat sources (e.g radiators).
● Do not expose the base to direct sunlight.
Radio transmission
Radio transmission between the base station and handset complies with the
international DECT standard. The base station complies with the relevant European guidelines. Should picture or sound interference occur in the case of
satellite reception devices, contact your specialist dealer who should check
your satellite reception system for inadequate shielding.
Guarantee
● Siemens AG offer a 6 month guarantee (Switzerland: 1 year) for this device
from the date of purchase from the dealer. Retain your receipt as proof of
purchase.
● During the guarantee period, Siemens AG will rectify all material or manu-
facturing defects. Siemens AG reserve the right either to repair or replace
the defective device.
● The warranty does not cover damage caused by incorrect use, wear and
tear, or third party access. The warranty does not cover consumables or defects which only have a minor effect on the value or operability of the device.
● The Siemens product you have purchased conforms with the technical
requirements for connection to the public telephone network.
● Claims relating to the guarantee can be addressed directly to Siemens
Service.
68
Replacement of devices
When device components are replaced, the handset must be re-registered at
the base station.
Disposal
When your device has reached the end of its service life, it should be disposed
of in an environmentally friendly manner in accordance with the relevant legislation.
Page 73

Gigaset 3070/3075isdn, GB, A31008-G3070-B100-3-7619
giga3070KAP.fm
About your system
09.01.01
Step
by
Step
Troubleshooting
Making calls:
Handset "dead"?
/
Charge the batteries (➔see handset operating instructions).
-
Message: "Network section busy"?
/
Public network is overloaded. Try again later.
-
Message: "External lines seized"?
/
Both ISDN lines are already in use. Activate line reservation, see -> page 55.
-
Message: "No Trunk Access"?
/
Set "Unrestricted" access for handset, see "Accesses" on page 52.
-
Accepting calls:
Handset removed from charging unit but not connected?
/
-
Press
tions).
. You may have to activate Auto talk (see handset operating instruc-
D
Technical data
Transmit power Medium range 10 mW
Top performance 250 mW
Range Outdoors approx. 300 m
Indoors approx. 50 m
Power supply Plug-in power supply
ISDN line Euro ISDN multiple device connection IAE
Approved ambient condi-
tions for operation
unit
Temperature +5 °C to +45 °C
Rel. humidity 20% to 75%
220V/230 V ~/50 Hz
69
Page 74

Gigaset 3070/3075isdn, GB, A31008-G3070-B100-3-7619
About your system
giga3070KAP.fm
09.01.01
Step
by
Step
Contact
Should faults develop with the device, contact the Siemens Hotline:
Ireland:
먛
__
+49 1850777277
So that repairs may be carried out under the guarantee, the guarantee card (completed and stamped at
the point of sale) must be provided along with the
faulty device.
If a defect occurs, contact the point of sale responsible
for returning faulty devices to the manufacturer.
Information on new products and updates and support for Gigaset 3070/75isdn
and Gigaset talk&surf is available on the Internet at the following address:
http://www.siemens.com/ic/products/cd/english/index/support/index.html.
Approval
Gigaset 3070/75isdn and Gigaset talk&surf are designed for operation in your
country as indicated on the underside of the unit. Special country-specific features have been taken into consideration. If you have any queries with regard
to differences in public telephone networks, please contact your dealer or operator.
Unit compliance with the basic requirements of the terminal directive is confirmed by the CE symbol.
We, Siemens AG, declare, that the above mentioned product is manufactured
according to our Full Quality Assurance System certified by CET E COM ICT
Services GmbH with the registration number "Q810820M" in compliance with
ANNEX V of the R&TTE-Directive 99/05/EC . The presumption of conformity
with the essential requirements regarding Council Directive 99/05/EC is
ensured.
70
Senior Approvals Manager
Page 75

Gigaset 3070/3075isdn, GB, A31008-G3070-B100-3-7619
menue.fm
09.01.01
Menu Displays
Step
by
Step
Menu Displays
Overview of displays when is pressed
Comfort handset menu
Settings
Step 1 Step 2 Step 3
Audio Ringer Volume
Ringer Melody
Short ring tone
Handset Volume
Loudspeaker
Key beeps
Batt. low beep
Confirm beep
Security Change PIN
(Handset PIN)
Hot Key
Hot Key Number: Save entry
Handset lock (PIN)
Auto Talk
Language Deutsch
English
Français
Italiano
Español
Português
Nederlands
Factory setting Enter PIN:
)
(
)
)
New PIN
Confirm PIN
Net Provider
P Insert Pause
I Insert INT
Cancel
Base stations
Step 1 Step 2 Step 3
Base 1
Base 2 Register
Base 3 Select
9
Base 4 ISDN config.
Best base
Change name
71
Page 76

Gigaset 3070/3075isdn, GB, A31008-G3070-B100-3-7619
Menu Displays
menue.fm
09.01.01
Step
by
Step
Device user options (short cuts) > Selecting
Step 1 Step 2 Step 3
Select device user
options
D
V
9
Start user options
Handset user options (short cuts) > Programming
Step 1 Step 2 Step 3
9
New entry Name
Edit entry Contents 9see
<
below
Handset user options (short cuts) > Contents
Step 4Step 5Step 6Step 7
User options ready
9
9
Example of using device user options for remote replay of a net provider’s AM:
Handset user options>
function>M TempSwitchToTone>Enter
Save entry
Net Provider
Select no.
Insert function C Prompt PIN
N Request No.
Q Acknowledge
P Insert Pause
I INT
E End connection
M TempSwitchTo
Tone
Display function as above
Cancel
>New entry>Name (e.g. AM network)
9
> 9Insert function>P Insert Pause>Insert
personal code
return to 4
=
Explanation
<
> 9>Save entry.
72
Room monitor-Settings
Step 1 Step 2 Step 3
Room monitor setting
Service Set up
Step 1 Step 2 Step 3
Callback
Withhold No.
Call forwarding
Ext.occupations
Room monitor
Room monitor no. INT no. or 99
Set level
=
> Status
=
=
=
=
Display of the numbers with callback
MSN with call forwarding
No. of seized B-channels
Page 77

Gigaset 3070/3075isdn, GB, A31008-G3070-B100-3-7619
menue.fm
09.01.01
Menu Displays
Step
by
Step
Service Set up
> Missed calls
Step 1 Step 2 Step 3 Step 4
Missed calls
=
Phone Number 9Dial Number
Net Provider
Copy to Dir.
Change number
Delete entry
Display entry
Service Set up
> Call preparat.
Step 1 Step 2 Step 3
Temp.withhold
MSN next call
Temp. Key pa d
Cancel CallPark
* This feature is only available if supported by the net provider.
** The handset must be assigned more than one MSN.
Service Set up
=
=
=
=
> Ext. Call Forw.
*
MSN
Park No.
**
Step 1 Step 2 Step 3 Step 4
MSN1 call..
New entry MSN
9
9
Immediately
etc. On busy
On no reply
Activate?
=
Edit entry? Immediately
On busy
On no reply
Delete entry?
=
Service Set up
> Int. Call Forw.
Step 1 Step 2 Step 3 Step 4
Activate?
Forward. dest.
No. of Rings 0 - 9
* Display of all available internal numbers.
** Display only for programmed forward destination.
Service Set up
=
INT11 :Internal11
> Night Service
*
Deactivate? **
=
=
Step 1 Step 2 Step 3 Step 4
MSN1 xy..
9
Activate?
=
Deactivate?
73
Page 78

Gigaset 3070/3075isdn, GB, A31008-G3070-B100-3-7619
Menu Displays
menue.fm
09.01.01
Step
by
Step
Service Set up
> Night Service
Step 1 Step 2 Step 3 Step 4
etc. Forward. dest.? External Dest.Call No.
Internal INT11 :I Internal11
Answ. Machine AM1: AM1 NO.91
AM2: AM2 NO.92
AM3: Internal 93
Start time: HH:MM Save entry
Cancel
End time: HH:MM Save entry
Cancel
=
> Security
Service Set up
Sat/Sun all day
>
Settings
Step 1 Step 2 Step 3 Step 4
Enter PIN: Change PIN New PIN New PIN
Base Lock
Accesses Int11:Unrestricted
=
*
Unrestricted
Incoming only
INT only
Service Set up
Emergency Nos. 117
>
Settings
> Set up user
118
<no entry>
Change number
Delete number
Display number
Step 1 Step 2 Step 3 Step 4
Set up device INT11 : Internal 11
* Name
Send MSN
Receive MSN
MSN next call
Call waiting
Ring delay
9
<=
<=
=
=
<=
MSN yx
No. of Rings
=
=
De-register INT11 : Internal 11
*
Hunt group
Door call grp.
<=
*
74
* Display all available internal numbers
Page 79

Gigaset 3070/3075isdn, GB, A31008-G3070-B100-3-7619
menue.fm
09.01.01
Menu Displays
Step
by
Step
Service Set up
>
Settings
> System settings
Step 1 Step 2 Step 3 Step 4
Music on Hold Internal
OFF
<=
Date/time Set time Day:
Month:
Cost/duration
(Request base
PIN)
Ye a r:
Hour:
Minute:
24 hours
12 hours
Date DD.MM
Datum MM.TT
=
=
=
=
Cost overview Total Amount Delete amount
Access type Units Centr.Off.
Costs Cent.Off.
No Rate
Save entry
Cancel
=
=
=
Rate --.-- CHF Save entry
Rate ---- CHF Insert Euro
£ Insert Pound
$ Insert Dollar
Cancel
Call display Call Duration
Units/Costs
Last charge
=
Access Code Access Code: Save entry
Cancel
AM Auto. Pickup
=
=
=
=
=
Spec. function Default Reset base PIN Display
Operational
Reset all
Auto Sw.to Tone
Dial properties Auto. Sw.to Tone
Auto Keypad
Dial * and #
Repeater Adv.Ann
=
=
=
=
1(;7
Ext.room monit. Dest.Call No. Change number <Number>
75
Page 80

Gigaset 3070/3075isdn, GB, A31008-G3070-B100-3-7619
Menu Displays
menue.fm
09.01.01
Step
by
Step
Service Set up
>
Settings
> ISDN settings
Step 1 Step 2 Step 3 Step 4
Set up MSN MSN x Edit entry <Name>
Ringer Melody Ringer Melody: x
Delete entry
=
Display entry Name
Anonymous Call
=
Forward. Dest. <Number> Save entry
Number from Dir.
Net Provider
Cancel
Lg.-dist. Code National: 0
International: 00
Int. Enq. Call
Ext. Enq. Call
Transition(ECT)
Int. Call Forw.
Ext. Call Forw.
Reject All
Busy on Busy
=
=
=
=
=
=
=
Auto.Forwarding MSN x <Number> Save entry
Number from Dir.
Net Provider
Cancel
9
76
Page 81

Gigaset 3070isdn, GB, A31008-G3070-B100-2-7619
Index
giga3070SIX.fm
09.01.01
Index
A
Access code 54
Access levels 52
All memos 45
All messages 45
Ambient conditions 68
Announcements 44
Answering machine 22, 43
access options 22, 43
activate/deactivate direct call pickup
24
activating an announcement 43
automatic pause 47
call pickup 30, 64
listening to memos 45
listening to messages 45
locking 47
number of ringers 46
recording announcements 44
recording length 46
recording memos 44
recording quality 46
remote control 46
select 22
selecting 43
start time 48
time stamp 46
timer 48
Answering machine lock 47
Approval 70
Authorization 59
Automatic call forwarding due to
inaccessible handset 36
Automatic explicity call transfer
activating 55
Automatic pause 47
C
Call charge display 40
Call forwarding 32
Call Hold 35
Call number
withhold 36
Call preparation 36
Callback 34
Calling line identification restriction
(CLIR) 36
Care 68
CD (Call Deflection) 33
Centrex 54
CF (Call Forwarding) 32
CNI (Calling Name Identification) 54
Collective call 27
COM port 15
Combined device 58
Combined fax machines 58
Conference circuit 29
Connection
base station 5
ISDN 5
supplementary devices 6
USB bus 5
Contact 70
Corded 64
Cordless TAE
connecting 58
CW (Call Waiting) 23, 34
D
Date and time 19
Default setting 26
Device type 20
Dialling procedures 55
Door call group 66
Doorbell call 67
77
Page 82

Gigaset 3070isdn, GB, A31008-G3070-B100-2-7619
Index
giga3070SIX.fm
09.01.01
E
Emergency numbers 53
Emergency operation 5
Enquiry call 28
Entrance telephone 66
Entrance telephone forwarding 67
Explorer 11
External/internal enquiry
set 24
F
Factory setting 26
Factory settings 53
Fax machine 58
File name 11
Firmware 12
Forward.Dest 33
G
GAP handset 57
Gigaset 1000TAE 57, 58
Gigaset M101 Data 15
register 15
Gigaset M105 Data
install 14
register 14
Guarantee 68
H
Handset not accessible 36
Handset telephone directory
copying 39
Holding calls 35
I
Information announcement 43
Installation Assistant 19
Installation site II
Internal call from door 67
K
Keypad protocol 56
M
M101 Data 59
M105 Data 59
Making calls from corded telephones
62
call transfer 64
call waiting 62
dialling internal and external
numbers 62
external/internal enquiry 63
internal collective call 63
toggling 64
Memos 44
Messages 45
Missed calls list 31
changing a number 38
deleting a number 38
dialling a number 38
MSN (Multiple Subscriber Number)
configuring 21
programming 19
Music-on-hold 25
MWI (Message Waiting Indication) 54
N
New memos 45
New messages 45
Night service 39
Normal telephone 57
Number of ringers 46
Numbers
enter in telephone directory 30
P
Parking calls 35
PIN 52
Power failure 5
Prefix (access code) 54
Q
Query two-key functions 49
78
Page 83

Gigaset 3070isdn, GB, A31008-G3070-B100-2-7619
giga3070SIX.fm
09.01.01
Index
R
Radio transmission 68
Range II
Recording length 46
Recording quality 46
Registering at 3070isdn/3075isdn 15
Registering handsets 6
Rejecting calls 30
Remote control 46
Repeater capability
activating/deactivating 57
Reserving a line 55
Ring cycles 32
Room monitor 39
S
Safety precautions II
Service 70
Setting units 42
Siemens Support Server 12
Siemens telephone service 70
Status
query 26
System PIN 52
T
Talk&Surf 8
Telephone directory entries
copying 39
Timer 48
Toggle 29
Tracing switch 37
Troubleshooting 69
Type of connection 20
U
Updating Gigaset 3070/3075 12
Updating Gigaset M101 Data 16
USB interface 10
V
V.24 interface 15
Voice output 46
W
Windows 95 15
Windows 98 14
79
 Loading...