

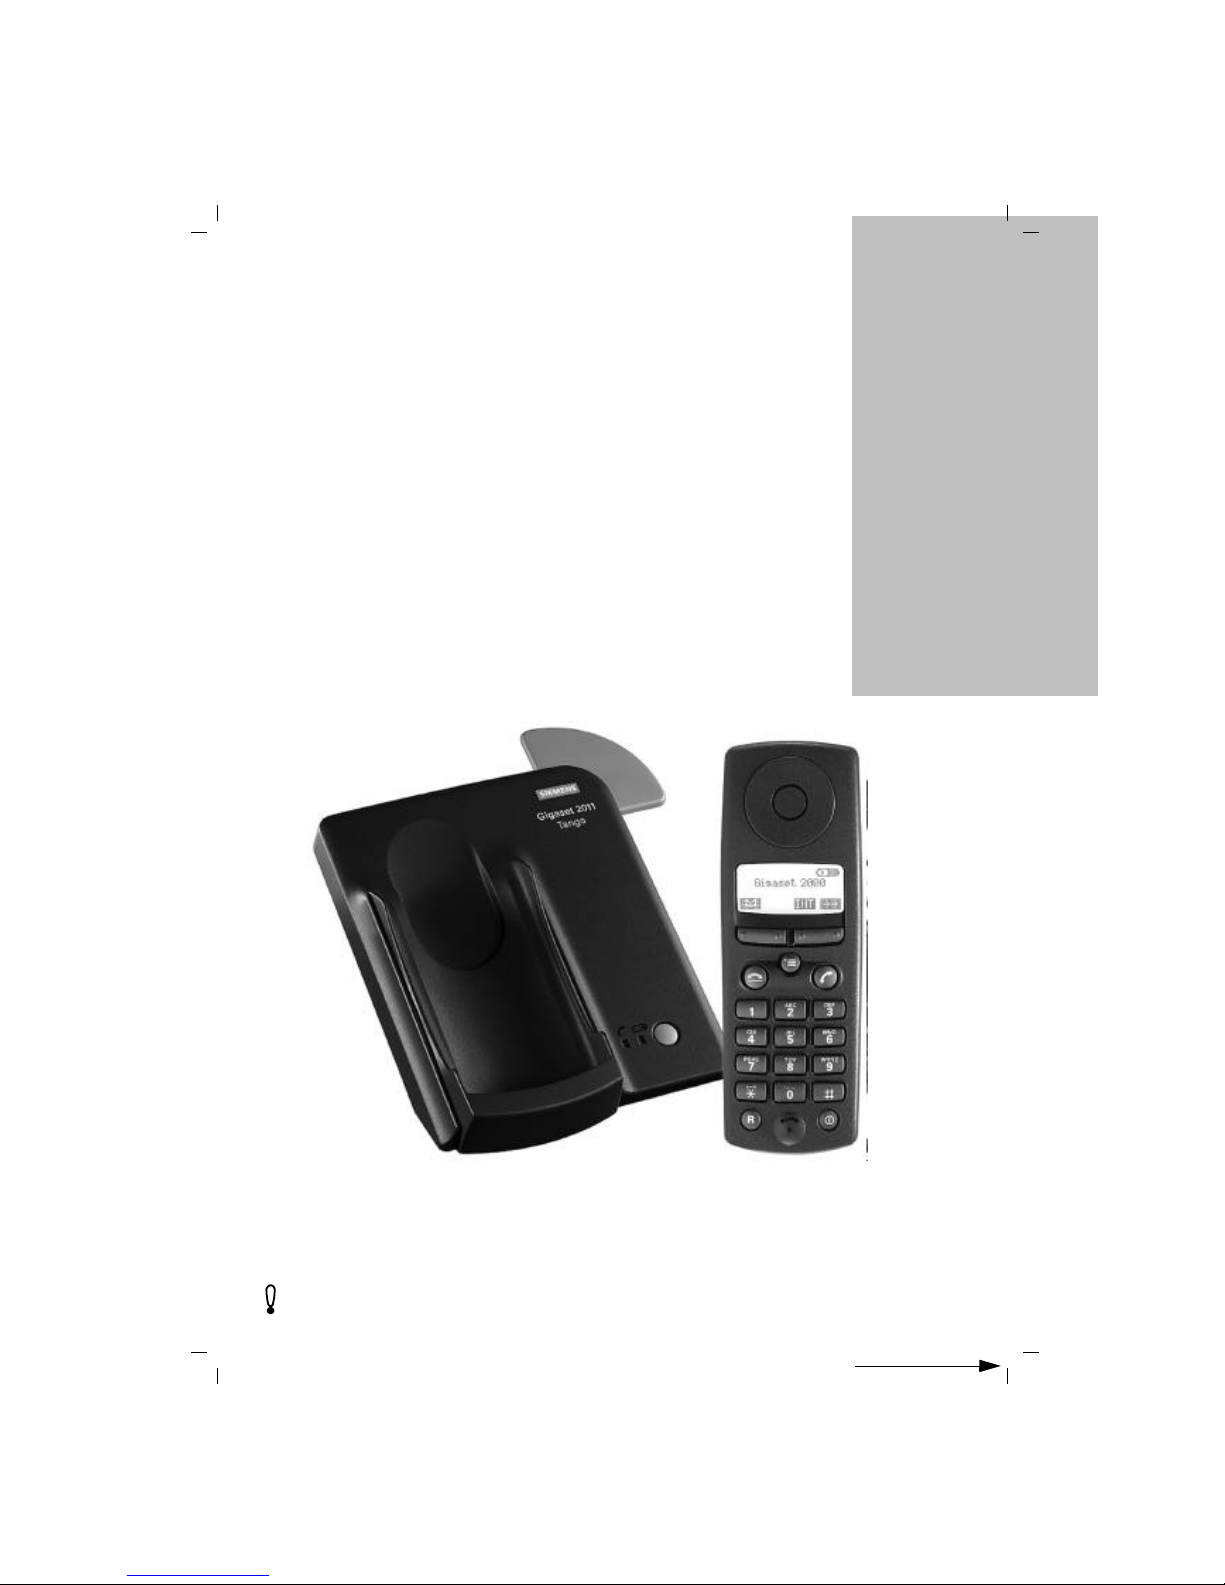
Siemens pocket 2011 Tango, Gigaset 2011 Tango Operating Instructions Manual
BK_FRONT.FM
18.7.99
ACHTUNG! Schnittkante ggf. auf Titelseite U1 nach außen versetzen wg. Falz-Ausklappseite
s
The cordless digital
DECT telephone system
expandable to 6 handsets
Operating instructions
Before starting up the equipment, pease read these
operating instructions with the safety notes!
Gigaset 2011 Tango: A30852-X1106-B307-2-7619
Gigaset 2011
Tango

-II
KAP00.FM5
18.7.99
Gigaset 2011 Tango: A30852-X1106-B307-2-7619
Dear Customer,
By purchasing your Gigaset 2011 Tango, you now own a cordless telephone which combines the ad-
vantages of "cordless telephone use" with the convenience of a high-quality telephone. It is suitable
for private use both at home and in the office.
The device is designed on the basis of state-of-the-art digital technology and according to the new
European standard for cordless telephones (DECT). Among other things, DECT technology offers a
high level of security against unauthorized persons listening in on calls as well as a high level of digital quality. Your Gigaset 2011 Tango can easily be expanded to form a small telephone system in
which you can make both internal and external calls.
The outstanding features of the Gigaset 2011 Tango include:
● Menu-driven operation
● "Telephone directory" containing up to 100 call numbers
● Lock function to prevent unauthorized use
● Ability to expand the phone for the use of up to six handsets at a single base station for private
use and the operation of a handset at several base stations.
Signposts
In addition to these signposts, the table of contents and index at the beginning and end of this manual will provide further help in the optimum use of this device.
Switching the telephone on(➔ page 1).
Making a call (➔ page 10).
Registering new handsets at the base
station (➔ page 48).
Internal calls (➔ page 14).
Making the first call
Using additional handsets
Quick reference guide
(➔ page 68).
The quickest way
U2
-I
KAP00.FM5
18.7.99
Gigaset 2011 Tango: A30852-X1106-B307-2-7619
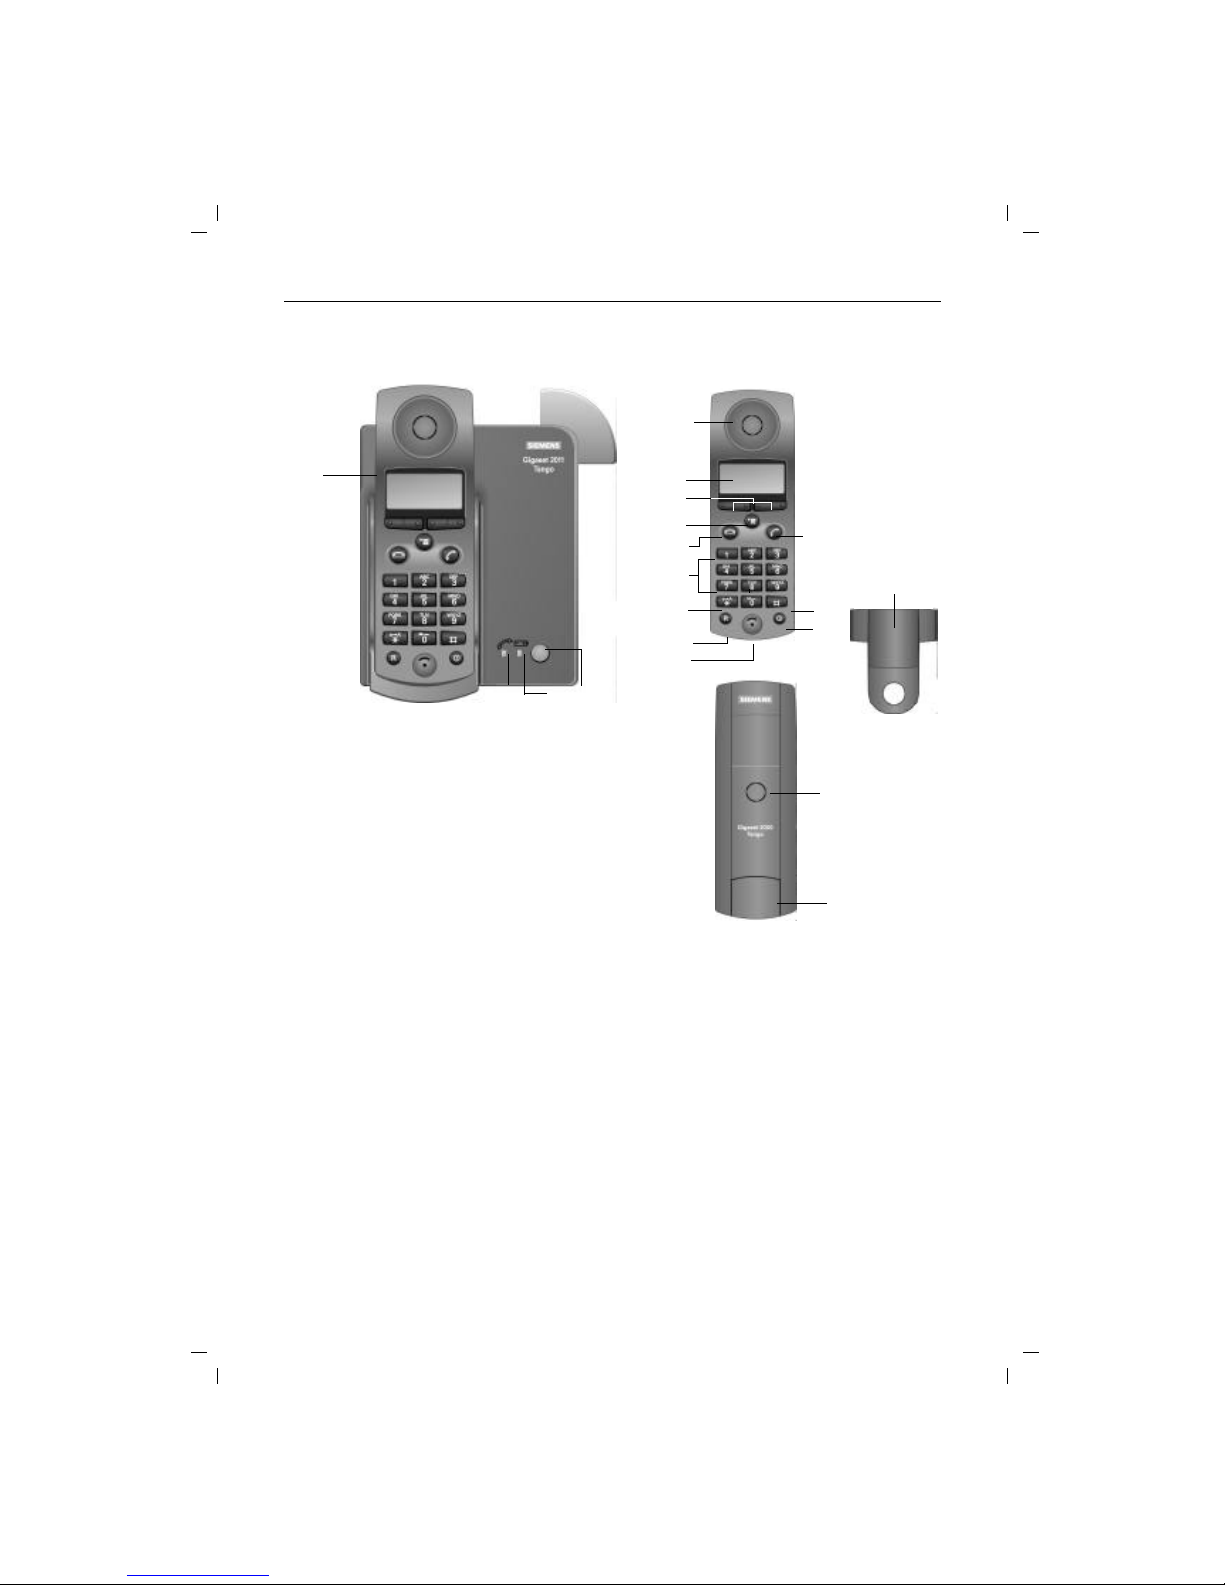
Overview: Gigaset 2011 Tango
1
2
3
4
Charging unit
Paging key (calling handsets)
Left LED for display "Line busy"
Right LED for display "Charge batteries"
5
6
7
8
9
10
11
12
13
14
15
16
17
18
19
Earpiece
Display
Display keys
Menu key
On-hook key
Dialling pad
Star key
Signal key
Microphone
ON/OFF/PROTECTED key
Hash key
Off-hook key
Ringer loudspeaker
Battery compartment/cover
Carrying clip
1
23 4
5
6
7
8
10
11
12
13
15
14
16
17
18
19
9
U3
0
KAP00.FM5
18.7.99
Gigaset 2011 Tango: A30852-X1106-B307-2-7619
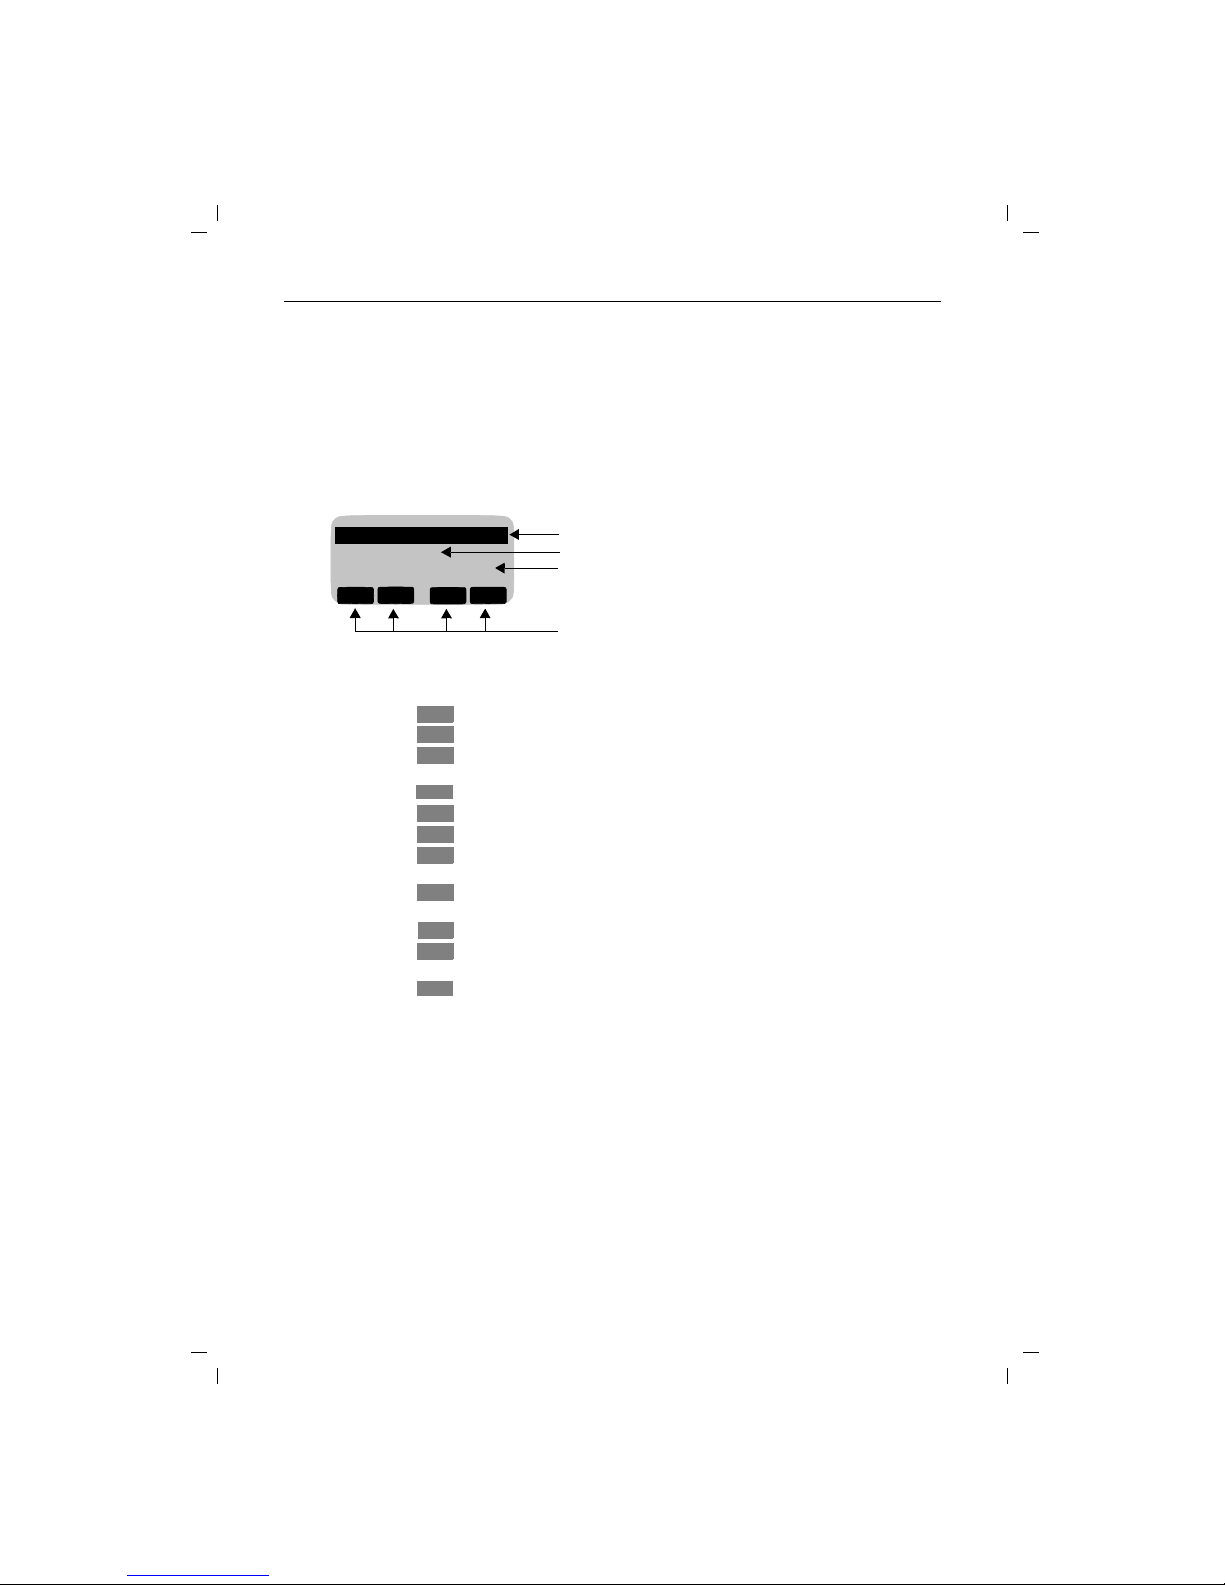
Overview: Key functions and display symbols
Key function
Display
Functions of display keys on handset
Display symbols
.
to call up menu; cancel = return to previous menu or main
menu; end a procedure without saving
Menu items that can be opened with "OK"
Menu items that can be reached with
Z
Menu end (pressZto scroll to 1st menu item or Yto
scroll to the previous menu item)
Current meaning of the display keys
WEITER
Ringer Volume
Ringer Tone
---------------------
OK
Y
Z {
Move to next menu item
Return to previous menu item
Go back and delete during entry (e.g. when entering names/call num-
bers/macros, etc.)
Selecting a menu item; confirmation of the entry/setting to be saved
Access to directory
Go back to previous menu
Go back in stages (input prompt) without deleting; go back to previous
setting (e.g. volume, etc.)
Go forward in stages forward (insertion mark) without deleting; move
on to next setting (e.g. volume, etc.)
Redial
Opening the sub-menu for the menu item (e.g. telephone directory en-
try)
Activate internal connection
l
Lock = ON
n
Ringer = settings
U
Battery 100%
charged
m
Lock = OFF
r
Ringer = OFF
V
Battery 66%
charged
(
Aut. call acceptance
q
Volume/tones = settings
e
Battery 33%
charged
v
Aut. light
T
Range boundary
Z
Y
X
OK
d
{
<
>
z
W
[
U4
I
KAP01.FM5
18.7.99
Gigaset 2011 Tango: A30852-X1106-B307-2-7619
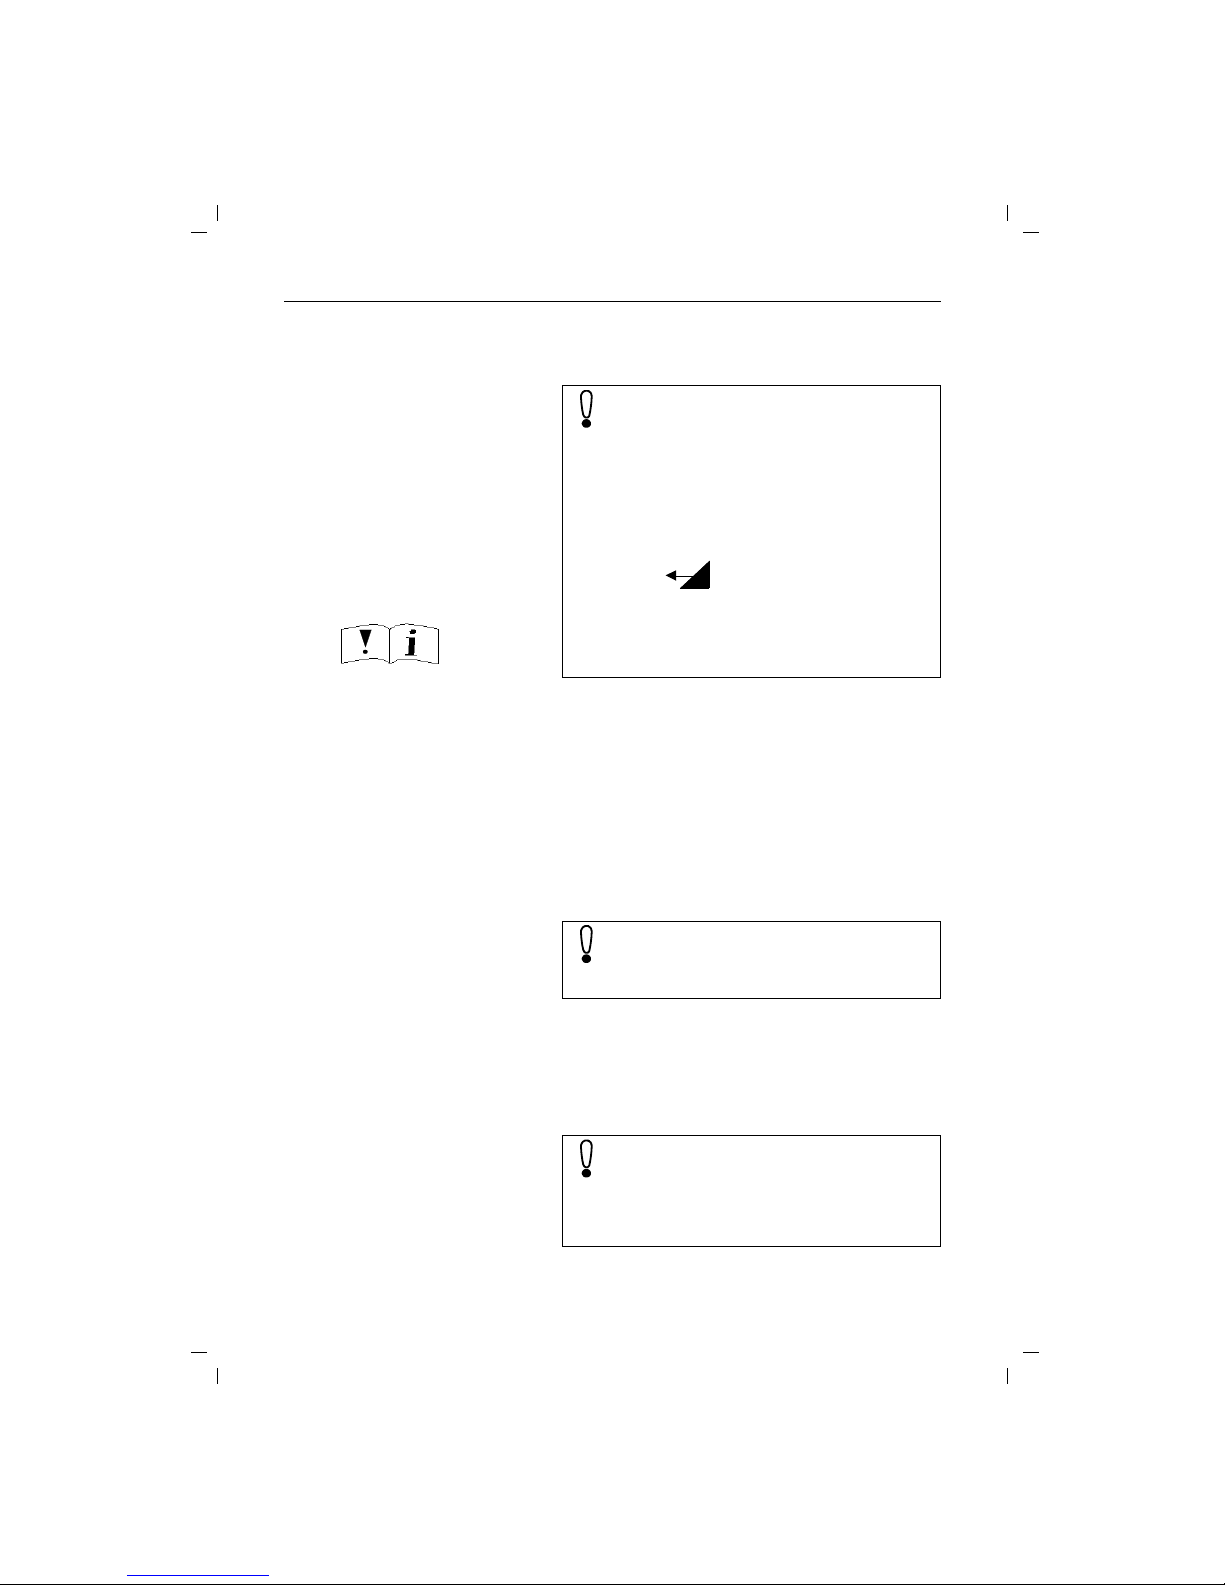
Safety precautions
● Do not submerge batteries in water; do not throw
them into fire.
● Do not dispose of old, defective batteries with normal
household garbage.
● Batteries become warm during charging. This is nor-
mal and not dangerous
● Do not use any third-party charging units. The batter-
ies could be damaged.
● Use only the supplied power adapter number
C39280-Z4-C59 (220/230V version) or
C39280-Z4-C69 (110/120V version).
● Do not confuse the plugs of the base station. Abnor-
mally high voltages could be imposed across the
charging contacts for brief intervals, such as during
thunder storms.
● The handset may not be operated in rooms with ex-
plosion hazards.
Only use approved nickel-cadmium (NiCd) and
nickel-metal-hydride (NiMH) batteries
(➔ page 62)!
Never use other batteries or ordinary (non-rechargeable) batteries! These batteries can short
circuit or destroy the battery unit (dangerous).
The following labels are found on the battery
compartments of the handset and charging unit:
Check that the socket into which you insert the
plug-in power unit has the correct voltage. If
your plug-in power unit does not have the right
voltage, please contact Siemens.
Research has demonstrated that cordless telephones (DECT) which are switched on can interfere with the operation of medial equipment.
When using a mobile telephone in medical institutions, the regulations of the institution in question must be observed.
B
_
+
Only use rechargeable batteries with the poles aligned
as shown!
Type according to instructions

II
KAP01.FM5
18.7.99
Gigaset 2011 Tango: A30852-X1106-B307-2-7619
Certification and CE marking
The Siemens Gigaset2011 Tango meets
the requirements contained in EU guideline:
89/336/EEC "Electromagnetic Compatibility"
The handset of the Siemens Gigaset2000C Tango
carries the "CE" symbol

Contents
III
GIG2011T.IVZ
18.7.99
Gigaset 2011 Tango: A30852-X1106-B307-2-7619
Stepwise startup .......................................................................................................................... 1
Step 1: Observe the safety precautions ......................................................................................... 1
Step 2: Check the contents of the package ................................................................................... 1
Step 3: Connecting the base station .............................................................................................. 1
Step 4: Inserting the batteries into the handset ............................................................................. 2
Step 5: Charging the batteries ....................................................................................................... 3
Step 6: Check signaling method .................................................................................................... 3
Menu-driven operation ................................................................................................................ 4
Operating modes ......................................................................................................................... 6
ON/OFF/PROTECTED modes ........................................................................................................ 6
Signaling method ........................................................................................................................... 7
Incoming calls .............................................................................................................................. 8
Accepting calls ............................................................................................................................... 8
External call-waiting during internal calls ..........................................................................................9
Ending a call ................................................................................................................................... 9
External outgoing calls .............................................................................................................. 10
Calling external subscribers ......................................................................................................... 10
No answer or line busy ................................................................................................................ 11
Redial ........................................................................................................................................... 11
Dialing using the directory ............................................................................................................ 12
Device control using dual-tone multifrequency signaling (DTMF) ..................................................13
Dialing a DSS number from a locked handset .............................................................................. 13
Ending a call ................................................................................................................................. 13
Collective ringing and internal calls ......................................................................................... 14
Making collective calls to all handsets from the base station ...................................................... 14
Making collective calls from one handset to all other handsets ................................................... 14
Making internal calls ..................................................................................................................... 14
Allowing internal parties to listen in on a call ............................................................................... 15
Ending an internal call .................................................................................................................. 15
Switching off the microphone (mute function) ............................................................................. 15
Internal consultation calls and transferring calls ................................................................... 16
Consultation calls ......................................................................................................................... 16
Transferring calls ............................................................................................................................17
Creating and managing the directory ...................................................................................... 18
Entering/copying/editing/deleting call numbers/names ..................................................................19
Delete directory ............................................................................................................................ 21
Available memory ......................................................................................................................... 21
Input function ............................................................................................................................. 22
The input field .............................................................................................................................. 22
Entering letters, special characters, and digits ............................................................................. 24
Base station settings ................................................................................................................. 26
Service function ........................................................................................................................... 26
Switching the base station ringer off and setting the ringer volume ........................................... 26
Setting the base station ringer tone ...............................................................................................27
Singposts
Overviews
Safety precautions

Contents
IV
GIG2011T.IVZ
18.7.99
Gigaset 2011 Tango: A30852-X1106-B307-2-7619
Handset settings ........................................................................................................................ 28
Setting the handset volume ......................................................................................................... 28
Ringer settings ...............................................................................................................................29
Activating/deactivating the call duration display ........................................................................... 29
Selecting a language ......................................................................................................................30
Activating/deactivating automatic backlight ................................................................................. 30
Automatic call acceptance ............................................................................................................ 30
Activating/deactivating notification and warning tones ................................................................ 31
Baby alarm .....................................................................................................................................32
The Gigaset 2011 Tango lock functions .................................................................................... 33
Activating/deactivating the Gigaset 2011 Tango lock for outgoing calls ...................................... 33
Emergency calls when the Gigaset 2011 Tango is locked ........................................................... 33
Barred numbers for handsets ........................................................................................................35
Activating/deactivating the call number lock ..................................................................................37
Setting trunk access for the handsets ............................................................................................38
Lock functions on the handset ................................................................................................. 39
Activating/deactivating the handset lock ...................................................................................... 39
Handset display with active lock ....................................................................................................41
Short cuts ................................................................................................................................... 42
Descriptions with example ........................................................................................................... 42
Short cut menu ............................................................................................................................ 42
New entry ......................................................................................................................................43
Editing an entry ............................................................................................................................ 45
Deleting an entry .......................................................................................................................... 45
Displaying an entry ....................................................................................................................... 45
Deleting all entries .........................................................................................................................46
Available Memory ........................................................................................................................ 46
Starting a short cut ....................................................................................................................... 46
Default short cuts ......................................................................................................................... 47
Operating more than one handset ........................................................................................... 48
Registering/de-registering more than one handsets at the base station ...................................... 48
Registering a Gigaset 2000C Tango handset at a base station .................................................... 48
De-registering a handset from a base station .............................................................................. 49
Ring priority for incoming calls ..................................................................................................... 49
Operating in a telephone system ............................................................................................. 52
Activating/deactivating the automatic attenuation function ......................................................... 52
Possible signaling method settings .............................................................................................. 52
Analog trunks ............................................................................................................................... 53
Operation at more than one base station ............................................................................... 55
Procedure for operating at more than one base station ............................................................... 55
Selecting the best station ............................................................................................................ 55
Setting the preferred station ........................................................................................................ 56
Base station names ........................................................................................................................57
De-registering a base station ....................................................................................................... 57
Code numbers and factory defaults ......................................................................................... 58
Changing the system code, changing the PIN ............................................................................. 58
Resetting the base station to factory defaults ............................................................................. 59
Resetting the Gigaset 2000C Tango handset to factory defaults ................................................... 60

Contents
V
GIG2011T.IVZ
18.7.99
Gigaset 2011 Tango: A30852-X1106-B307-2-7619
Notes on operation .................................................................................................................... 61
Installing the base station ............................................................................................................. 61
Notes on operating the handset ................................................................................................... 61
Technical data ................................................................................................................................64
Connecting the telephone socket ................................................................................................ 65
Maintenance notes ...................................................................................................................... 65
Third party use/disposal ............................................................................................................... 65
Procedure in the case of malfunctions ...........................................................................................66
Overview: signal tones ...................................................................................................................67
Quick reference guide handset Gigaset 2000C Tango ........................................................... 68
Index ............................................................................................................................................ 70
Stepwise startup
1
Kap02.fm5
Gigaset 2011 Tango: A30852-X1106-B307-2-7619
18.7.99
Stepwise startup
Step 1: Observe the safety precautions
Step 2: Check the contents of the package
The factory package contains:
● a Gigaset 2011 Tango base station,
● a Gigaset 2000C Tango handset,
● a phone cord,
● a power cord with RJ-11 plug and plug-in power sup-
ply C39280-Z4-C59 (220/230V) or C39280-Z4-C69
(110/120V),
● cover for handset battery compartment,
● carrying clip for the handset,
● two batteries,
● instructions.
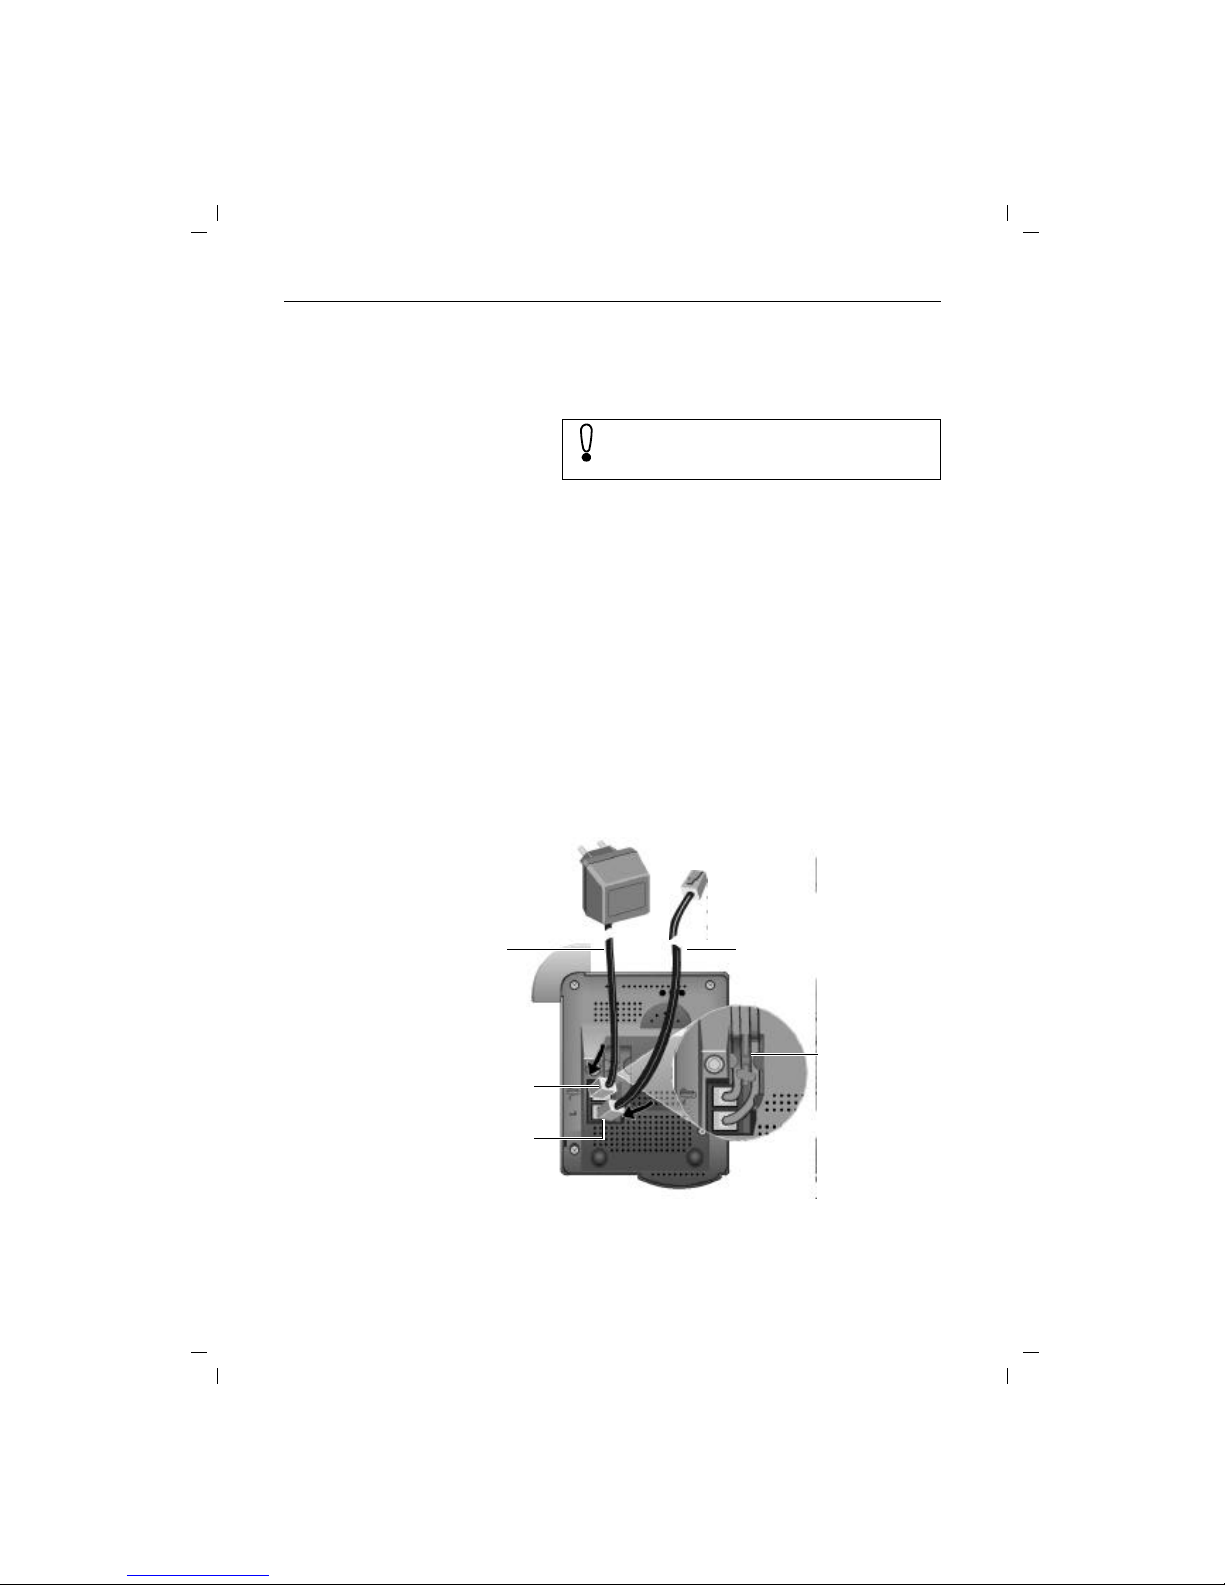
Step 3: Connecting the base station
It is essential that you read the safety precautions at the begining of this manual before startup!
phone cord
phone cord RJ-11 plug
Plug-in power supply and
220/230V or
110/120Vsocket
Underside of base station case
power cord RJ-11 plug
power cord
cord channel for
power and phone
cords
Stepwise startup
2
Kap02.fm5
18.7.99
Gigaset 2011 Tango: A30852-X1106-B307-2-7619
Phone cord
Insert the RJ-11 plug on your phone cord into the base station. The jack on the bottom of the base station is marked
with the symbol.
Insert the phone plug on your phone cord into your phone
socket.
Power cord
Insert the RJ-11 plug on your power cord into the base
station. The jack on the bottom of the base station is
marked with the symbol.
Insert the power cord plug-power supply into a 220/230V
socket (C39280-Z4-C59) or a 110/120V socket (C39280Z4-C69).
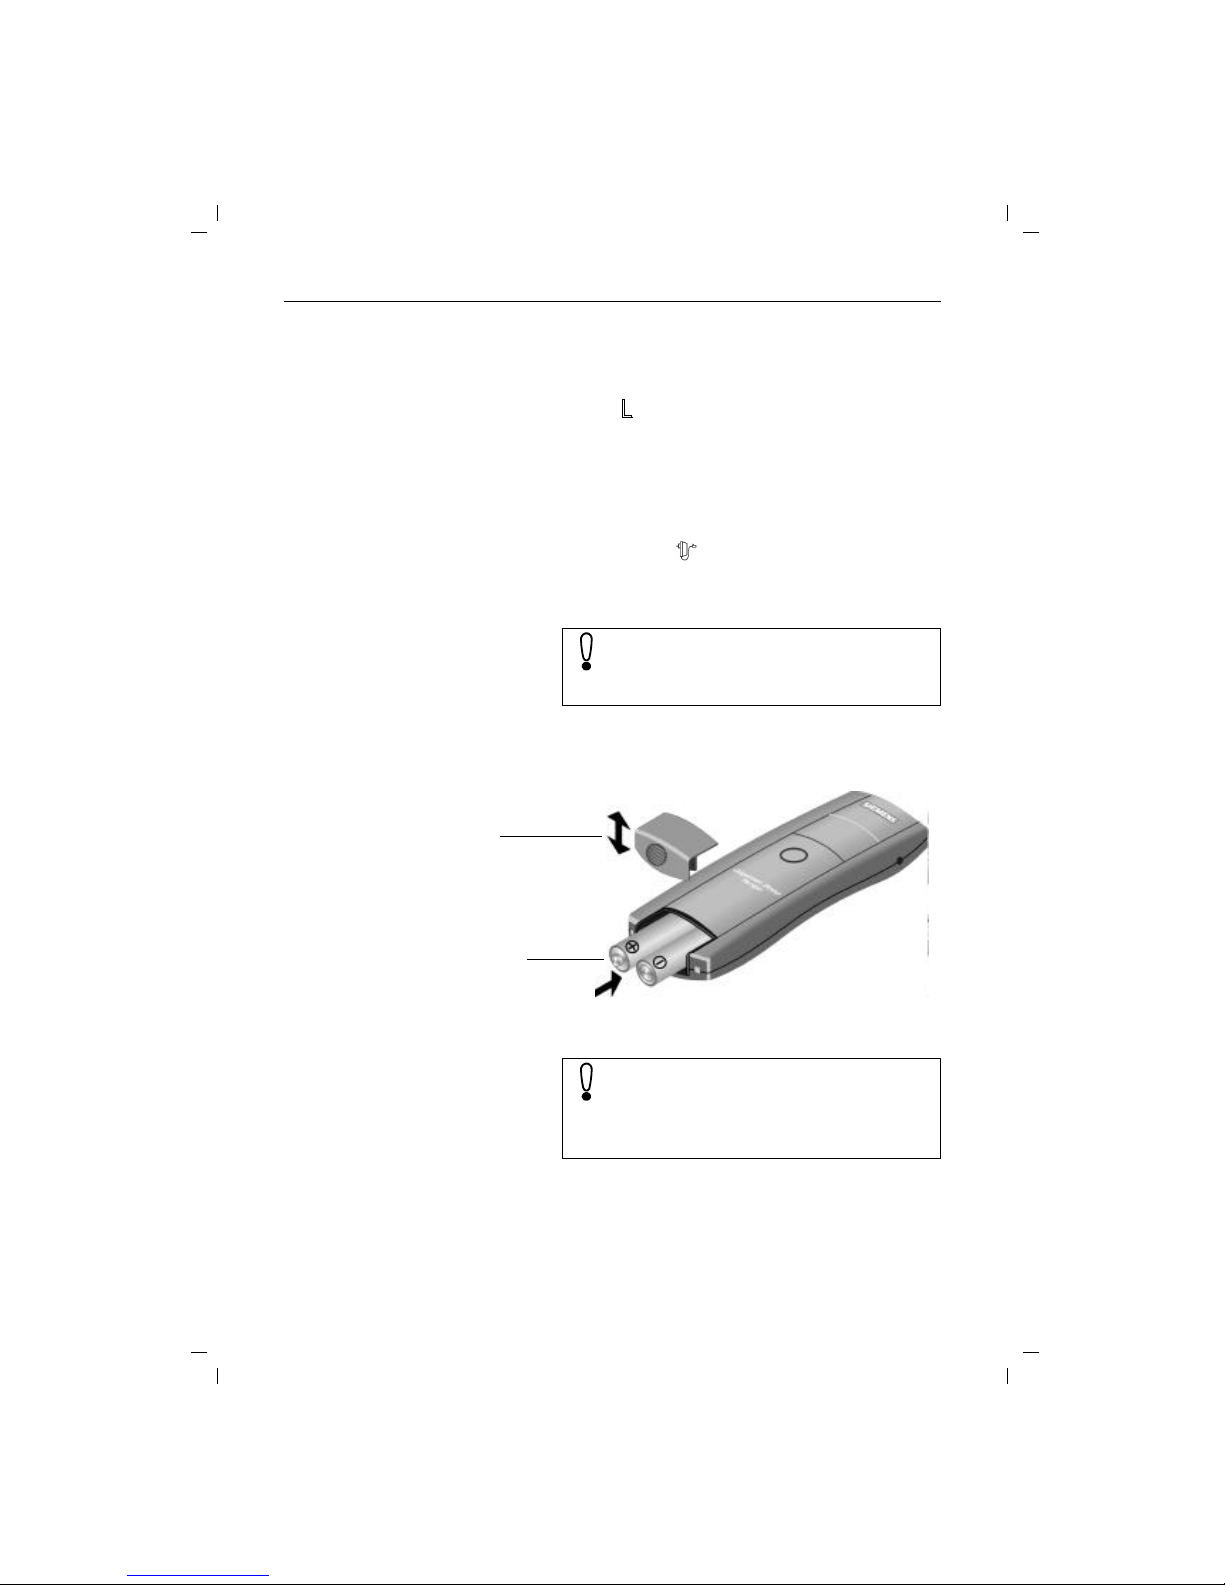
Step 4: Inserting the batteries into the handset
The handset is powered by two batteries.
Hold the handset with the keypad side facing down.
Slot the batteries into the battery compartment.
Slide the cover of the battery compartment from above
into the grooves in the handset and close the compartment.
For safety reasons, the phone must only be operated with the supplied Siemens
C39280-Z4-C59 adaptor for 220/230V voltage or
C39280-Z4-C69 adaptor for 110/120V.
Batt. compartment cover
Batt. comp. and batteries
Make sure that the +/– battery poles are aligned
correctly. The +/– marks on the plate must be
aligned with the +/– marks on the batteries.
The handset will not work if the batteries are incorrectly inserted and it may be damaged.
Stepwise startup
3
Kap02.fm5
Gigaset 2011 Tango: A30852-X1106-B307-2-7619
18.7.99
Step 5: Charging the batteries
To charge the batteries, place the handset in the handset
rest on the base station. The charging contacts on the bottom of the handset must come into contact with the bottom of the base station and its charging contacts. It does
not matter whether the keypad is facing up or down.
If you have correctly inserted the mobile unit for charging,
the LED under the battery symbol on the base station will
light up.
Step 6: Check signaling method
Telephone lines can use the following signaling methods:
● dial pulsing (DP)
● dual-tone multifrequency signaling (DTMF)
The factory default for your Gigaset 2011 Tango is DTMF.
Checking your own telephone’s signalling method
Setting the phone to dial pulsing (DP)
(
t
means: browse using
x
, confirm usingu )
You can now make calls with your Gigaset 2011
Tango.
You must charge the batteries before you can
make any calls or settings. We recommend that
the batteries be charged for 16 hours without interruption, e.g. overnight, for the initial startup.
For more information on the use of the batteries
(➔ page 62).
c
Press the off-hook key (corresponds to picking up the
handset on an ordinary phone). You will hear the dial tone.
o
Press any digit, e.g. 2. If you can still hear the dial tone
you will have to set the signaling method to dial pulsing
(DP).
Z
OK
.
t
Service Select the "Service" menu item.
#1
Start the setting procedure
o
Enter the four-digit base code (factory default:"0000")
(➔ page 7).
u
@33
x
Set dial pulsing (DP).
REDIAL
SET
The other signaling method settings are intended for the operation of the Gigaset 2011 Tango
in telephone systems (➔ page 52 ).
Menu-driven operation
4
4
KAP03A.FM5
18.7.99
Gigaset 2011 Tango: A30852-X1106-B307-2-7619
Menu-driven operation
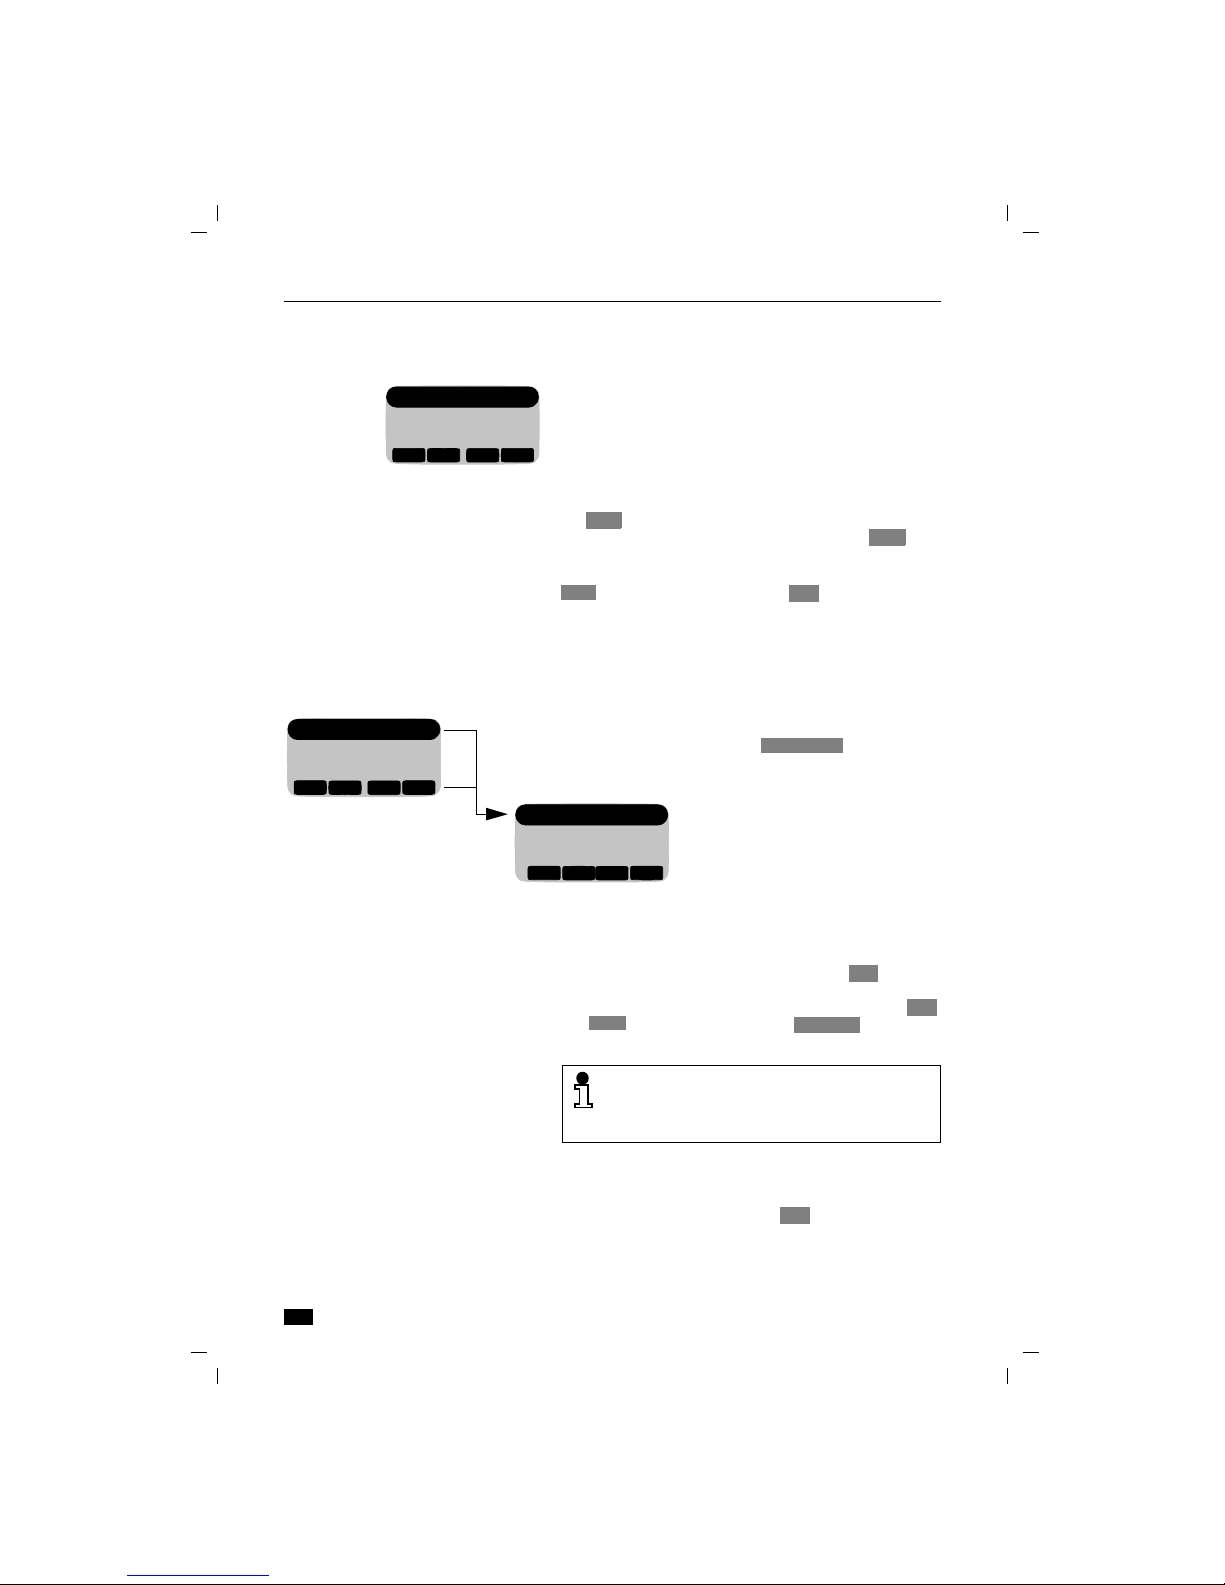
Menu structure
Moving to higher menu levels and leaving a menu
When you are in the top menu level, you can leave the
menu by pressing .. If you are at a lower menu level,
you can move up one level by pressing the display
key without saving any settings made. If you have reached
the end of a menu – indicated by a broken line – the
and display keys become the display key,
which allows you to leave this menu level.
Calling up an additional menu
Some menus, e.g. Redial, have an additional menu which
can be called up by pressing the display key.
By pressing the
.
key, you can call up the local menu of
the Gigaset 2000C Tango Comfort handset.
When the menu has been called up by pressing ., the
first menu level appears. Three lines of available menu
options are shown in the display. The top menu option is
highlighted. This menu option is selected.
You can move down to the next menu item by pressing
the display key. The broken line indicates the end of
the menu. If this line is selected and you press you
will go back to the top of the menu.
Confirm the selection of the menu item by pressing the
display key. By pressing the display key, you
can go back to the menu item, from which you moved to
a submenu. To leave the menu from the top level, press
the . key. The off-line appears.
Handset Lock
Short Cut
Baby Alarm
WEITER
▲
▼
{
OK
Z
Z
OK
{
The menu structure is hierarchical.
If, for example, you select the option in the
top menu, you will access a sub-menu with settings.
Settings
Service
__________
WEITER
▲
▼
{
OK
Handset Volume
Ringer Options
Register
WEITER
▲
▼
{
OK
Settings
You can leave all functions without implementing changes by pressing the on-hook key a
and return to the "off-line display". (Panic function).
{
{
OK
Go Back
W

Menu-driven operation
5
5
KAP03A.FM5
18.7.99
Gigaset 2011 Tango: A30852-X1106-B307-2-7619
Presentation in the user manual
The selection of a function in one of the menus or submenus is depicted using symbols. For example, the following entries must be made to obtain the confirm beep:
Abbreviated presentation
In the descriptions of procedures in this manual, the path
to the "target menu item" is presented in abbreviated
form.
Abbreviated presentation where the menu is called
up using a display key
If, for example, you want to call up "New Entry" in the directory menu using the display key, it is presented
as follows:
Light gray menu items have no significance in the Gigaset
2011 Tango.
.
Press menu key,
x
u
Move down to and confirm.
x u
Move on to and confirm.
x u
Continue down to and confirm.
x u
Then on to and confirm.
x
/
u
Switch the confirm beep on or off by pressing /
and store.
or
u
Leave the menu without making any changes.
Z
OK
Settings
Z
OK
Handset Settings
Z
OK
Beeps
Z
OK
Confirm Beep
ON
OFFOKOFF
ON
{
.
t
Settings
t
Handset SettingstBeeps
t
Confirm beep
x
/
u
Switch the confirm beep on or off by pressing /
and store.
or
u
Leave the menu without implementing any changes.
ON
OFFOKOFF
ON
{
W
u
d
u
W
t
New Entry
Operating modes
6
KAP04.FM5
18.7.99
Gigaset 2011 Tango: A30852-X1106-B307-2-7619
Operating modes
ON/OFF/PROTECTED modes
You can switch your handset to
● protected mode,
● off,
● and on (again).
In protected mode, the keypad is locked to prevent unintended use. Incoming calls are received automatically. If
you want to make an outgoing call, you will have to unlock
the keypad first.
When the handset is switched off, incoming calls are not
signaled.
Switching the handset to protected mode
Switching on the handset
When the handset is in protected mode:
PROTECTED mode is useful, for example, if you
carry your telephone in a bag.
To preserve the batteries, we recommend that
you switch off the handset if you move outside
the base station radio range.
If the handset has been switched on and outside the radio range for a longer period of time,
you can speed up the process of "finding" the
base station again by switching the handset off
for a moment and switching it on again.
h
Press the handset button briefly. You will hear a positive
confirmation beep. In protected mode, the following
message appears on the display:
:
U
Keypad
locked
h
Press the handset key briefly. You will hear the positive
confirmation beep. The following message appears on
the display when the handset is switched on:
:
U
Base 1
d
z
[

Operating modes
7
KAP04.FM5
18.7.99
Gigaset 2011 Tango: A30852-X1106-B307-2-7619
When the handset is switched off:
Switching off the handset
Signaling method
The PTT operates telephone connections with two different signaling methods:
● Dial pulsing (DP)
● Dual-tone multifrequency signaling (DTMF)
The factory default setting for your Gigaset 2011 Tango is
DTMF.
Checking the signaling method of your telephone line
Setting the signaling method
(
t
means: browse using
x
, confirm usingu )
h
Press the handset key briefly. You will hear the positive
confirmation beep. The display flashes. Wait until it stops
flashing. The handset is switched on.
or
Place the handset back into the base station. The message appears on the display. The handset is switched on.
h
Press the handset key until the display message is
cleared. You will hear the positive confirmation beep.
c
Press the off-hook key. You will hear the dial tone.
o
Press any digit, e.g. 2. If you still hear the same dial tone,
you must switch the signaling method to dial pulsing
(DP).
Z
OK
.
t
Service Call up the "Service" menu item.
#1
Start the setting procedure
o
Enter the four-digit base code (factory default: "0000")
(➔ page 7).
u
@33
x
Set to dial pulsing (DP).
or
u
@37
x
Set to DTMF. A flash time of 100ms is set.
REDIAL
SET
REDIAL
SET
Incoming calls
8
KAP05.FM5
18.7.99
Gigaset 2011 Tango: A30852-X1106-B307-2-7619
Incoming calls
Accepting calls
An incoming call is indicated by the ringer (bell symbol).
You will know that it is an external call when you the fol-
lowing message appears on your handset display
You will know that you are receiving an internal call if you
see the following message on your handset display (the
example shows an incoming call from a second handset):
If the handset is in the charging unit:
If the handset is not in the charging unit:
:
u
You can switch off the ring tone. Calls can be accepted as
long as the call symbol is displayed.
External call
RNG OFF
RNG OFF
:
Internal call 2
RNG OFF
Remove the handset from the charging unit. You are connected.
The automatic acceptance of calls by removing
the handset from the charging unit is an adjustable setting (➔ page 30). If you have switched
this function off, you must press the c button
when you have removed the handset from the
charging unit.
c
Press the off-hook key on the handset. You are connected.
Incoming calls
9
KAP05.FM5
18.7.99
Gigaset 2011 Tango: A30852-X1106-B307-2-7619
External call-waiting during internal calls
If you are on an internal call with a second handset and a
external call arrives, this is indicated by the call-waiting
function. Your internal call is terminated when you accept
the external call.
The arrival of the external call is indicated as follows on
the display:
Ending a call
:
u
You accept the call immediately.
or
a
Disconnect the internal call. You will hear the ring tone.
c
Accept the external call.
RUFAUS
EXT. INT.
2
TALK
TALK
Replace the handset in the base station or charging unit.
The line is disconnected.
or
a
Disconnect ("on-hook").
If the handset was in protected mode, it remains in this mode after you press a.
External outgoing calls
10
KAP06.FM5
18.7.99
Gigaset 2011 Tango: A30852-X1100-B301-2-7619
External outgoing calls
Calling external subscribers
You will hear the ring tone.
Dialing with call number checking (en-bloc dialing)
En-bloc dialing allows you to check the external call
number entered before it is dialed and correct it, if necessary, using the display key before the line is seized.
(For instructions on how to edit the call number, "Input
function" ➔ page 22).
(
t
means: browse using
x
, confirm usingu )
The call number is dialed.
You can also leave this additional menu without dialing by
pressing the display key.
c
Press the off-hook key. You will hear the dial tone.
o
Enter the desired call number on the dialling keypad. The
number you have entered is shown on the display, e.g.:
:
RUFAUS
INT
PAUSE
Extern
123456
The maximum length of call numbers that you
can enter is 22 digits.
X
o
Enter the desired call number. The number you have entered is shown on the display, e.g.:
:
You can correct the number entered using the enter function.
c
Press the off-hook key within 30 seconds to seize the
line. The call number is dialed. You will then hear the ring
tone.
or
123456
_
WEITER
<
>
X
W
Z
OK
u
t
Dial
W
{

External outgoing calls
11
KAP06.FM5
18.7.99
Gigaset 2011 Tango: A30852-X1100-B301-2-7619
Manually inserting a pause
If you repeatedly get the busy symbol following automatic
dialing from the telephone directory, e.g. after the country
code, you can enter a pause (three seconds), e.g. between the trunk or country code and the call number:
(
t
means: browse using
x
, confirm usingu )
No answer or line busy
Redial
Repeating the last number dialed
You can call up a list with numbers for redial by pressing
the display key. You will be presented with a list of
the last five different numbers you called, including numbers which were dialed from the directory.
(
t
means: browse using
x
, confirm usingu )
Z
OK
u
t
Pause
W
The dial pause "P" is shown on the display.
:
0043P123456
_
WEITER
▲
▼
X
W
Replace the handset in the base station or charging unit.
The call is disconnected.
or
a
Disconnect call ("on-hook").
You can use the redial function to repeat this
call.
z
x
Select the desired call number.
c
Press the off-hook key. The number is dialled.
or
Z
Z
OK
u
t
Dial number
W
You can enter additional digits while the number
is being dialed.

External outgoing calls
12
KAP06.FM5
18.7.99
Gigaset 2011 Tango: A30852-X1100-B301-2-7619
Dialing using the directory
You can store up to 100 call numbers with corresponding
names in your handset directory (➔ page 19). You can
search for names and dial the numbers directly from the
directory.
(
t
means: browse using
x
, confirm usingu
)
The number is dialed.
You can also leave this additional menu without dialing by
pressing the display key.
x
Call up directory.
:
x
Browse to desired entry.
or
2 … 9
Enter letter
e.g. the letter "B" – press digit key 2 twice.
The directory moves to the first entry starting with the letter "B". If there is no such entry in the directory, it will stay
on the current entry and you will hear the error beep.
c
Press the off-hook key within 30 seconds. The call
number is dialed. You will hear the ring tone.
or
d
ALPHA
BRAVO
CHARLIE
WEITER
▲
▼
{
W
Z
Z
OK
u
t
Dial number
W
{
External outgoing calls
13
KAP06.FM5
18.7.99
Gigaset 2011 Tango: A30852-X1100-B301-2-7619
Device control using dual-tone multifrequency signaling (DTMF)
If your telepone is connected to a line with dial pulsing
(DP), you can switch to dual-tone multifrequency signaling
(DTMF) once the connection has been set up.
Precondition: an external connection exists.
(
t
means: browse using
x
, confirm usingu )
Dialing a DSS number from a locked handset
If the handset has been locked for external calls (➔ page
39) and a DSS number is stored (➔ page 39), it is possible
to dial this direct number despite the lock.
Ending a call
Z
OK
.
t
Switch to Tone
Select and confirm.
When you have switched to DTMF, you can
switch between the two signaling methods during the connection using the R signal key.
When the line is disconnected, the telephone
will automatically return to the original signaling
method.
Any digits or symbols that you enter after
switching signaling methods are not stored in
the memory for redialing.
o
Press any key on the handset. The direct number is dialed.
It is not possible to dial a DSS number from a
locked handset,
● if "unrestricted trunk access or outward re-
stricted trunk access" is set (➔ page 38), or
● if the base station is locked
(➔ page 33).
Replace the handset in the loading unit. The line is disconnected.
or
a
Disconnect (on-hook key).

Collective ringing and internal calls
14
KAP07.FM5
18.7.99
Gigaset 2011 Tango: A30852-X1106-B307-2-7619
Collective ringing and internal calls
Making collective calls to all handsets from the base station
It can be useful to make a collective call from the base station, for example, to locate mislaid handsets. It is not possible to make internal calls during a collective call from the
base station.
End call prematurely
Making collective calls from one handset to all other handsets
If your phone has several handsets, it is possible to make
a collective call from each handset to all the other accessible handsets. The first internal party who accepts the
call is connected to you.
Making internal calls
If your telephone has more than one handset (➔ page 52),
you can call the other handsets free of charge.
Checking your own internal number
?
Press the paging key on the base station. All accessible
handsets will be called for approximately 30 seconds.
?
Press the paging key on the base station.
or
c
Disconnect the line by pressing the on-hook key on the
handset.
x
Press the internal key.
x
You will hear the internal ring tone. All accessible handsets will be called.
[
COLL.CALL
x
Press the internal key.
[
o
Enter the number of the handset you wish to call (1 to 6).
You will hear the internal ring tone. The handset you dialed is being called.
x
Press the internal key.
The internal call number
of the handset from
which you are calling is
shown on the display.
[
RUFAUS
Intern
2
COLL.CALL
SET

Collective ringing and internal calls
15
KAP07.FM5
18.7.99
Gigaset 2011 Tango: A30852-X1106-B307-2-7619
Allowing internal parties to listen in on a call
It is possible to enable an internal party to listen in on a
call with an external party from his/her handset.
Disconnect internal party again
Ending an internal call
Switching off the microphone (mute function)
It is possible to switch the microphone off during external
calls. This allows you to consult other people in the room
while the external party is on hold. The external party cannot hear what you are saying and will hear music.
(
c
An external connection is already set up.
x
Set up an internal connection.
[
1...6
Dial the internal party (1... 6). An external call is under way.
The internal party answers. Hold your conversation.
x
R
The external call is resumed and the internal party can listen in.
SET
x
R
The internal party is disconnected and hears the busy
tone.
or
a
The internal party hangs up by pressing the on-hook key.
SET
Replace the handset in the base station or charging unit.
The line is disconnected.
or
a
Disconnect line ("on-hook").
x
Set up an internal connection.
[
The microphone is switched off. Hold consultation with
people in the room. The external party will hear music.
R
Switch the microphone back on. You are reconnected
with the external party.
Internal consultation calls and transferring calls
16
KAP08.FM5
18.7.99
Gigaset 2011 Tango: A30852-X1106-B307-2-7619
Internal consultation calls and transferring calls
During a external call it is possible to:
● hold a consultation call with an internal party,
● transfer the external call to the internal party.
Consultation calls
When more than one handsets are in operation
If more than one handset is in operation (➔ page 52), you
can make a consultation call to an internal party during a
call with an external party. The external party cannot hear
your conversation with the internal party and will hear music while on hold.
(
End consultation/continue external call
When a telephone system is in operation
You can make a consultation call to a party in your telephone system during an external call. Please check the
operating instructions for the telephone system.
Consultation calls and call transfer are only possible if more than one handset is in operation
(➔ page 52).
x
Set up an internal connection.
[
o
Enter the number of the handset which you wish to call
(1 to 6). You will hear the internal ring tone. The handset
is being called. The external call is held.
R
End the internal consultation call. You are now reconnected to the external party.
R
Set up a consultation call. You will hear the dial tone. The
external call is held.
o
Enter the desired extension number. The relevant party is
called.
R
End the internal consultation call. You will be reconnected
with the external party.
 Loading...