

Page 1

Clinitek AdvantusTM Analyzer
Operator’s Guide
06635252 (133932 Rev. A), 2007-06
Page 2

© 2007 Siemens Medical Solutions Diagnostics. All rights reserved.
No part of this manual or the products it describes may be reproduced
by any means or in any form without prior consent in writing from
Siemens Medical Solutions Diagnostics.
MULTISTIX, MULTISTIX PRO, URO-HEMACOMBISTIX, URO-LABSTIX,
CHEK-STIX, Clinitek, and Clinitek Advantus are trademarks of
Siemens Medical Solutions Diagnostics.
Kimwipes is a trademark of Kimberly-Clark.
Cidex is a trademark of Johnson and Johnson.
Theracide is a trademark of Lafayette Pharmaceuticals.
Amphyl is a trademark of Linden Corporation.
IBM is a trademark of International Business Machines.
Lubriplate Super-Lubrication Prevents Wear and Corrosion is a trademark of
Fiske Brothers Refining Company.
Origin: UK
The information in this manual was correct at the time of printing. However,
Siemens Diagnostics continues to improve products and reserves the right to
change specifications, equipment, and maintenance procedures at any time
without notice.
If the Clinitek Advantus analyzer is used in a manner differently than specified
by Siemens Diagnostics, the protection provided by the equipment may be
impaired. Observe all warning and hazard statements.
2 Clinitek Advantus Operator’s Guide
Page 3

Contents
Using this Guide
Conventions .......................................................................................... 8
1 Overview and Intended Use
Hardware Overview.............................................................................10
User Interface........................................................................................10
Testing and Printing Areas .................................................................... 10
Connections and Power........................................................................ 11
Memory ................................................................................................. 12
Software Overview .............................................................................. 13
Operating Sequence ........................................................................... 15
2 Operating the System
Overview .............................................................................................. 17
Preparing for a Run............................................................................. 17
Select a Reagent Strip ..........................................................................17
Check the Strip Loading Station............................................................ 18
Change the Starting Sequence Number ............................................... 18
Change the Technician Identification ....................................................18
Print Information.................................................................................... 18
Run Controls ......................................................................................... 19
Testing Routine Specimens ............................................................... 19
Testing Without a Specimen ID or Loadlist............................................ 19
Using the Specimen ID Without a Loadlist............................................21
Using Loadlists ................................................................................... 21
Entering a Loadlist from the Display or Computer Keyboard ................ 21
Entering a Loadlist from a Host or Laboratory/Hospital System ........... 22
Performing a STAT Test ........................................................................24
Cancelling a Run................................................................................. 24
Managing Results ............................................................................... 25
End-of-Run Reports .............................................................................. 25
Recalling Results .................................................................................. 27
Printing and Transmitting Results ......................................................... 28
Additional Operating Instructions ..................................................... 30
Using a Form Printer............................................................................. 30
Removing a Jammed Test Strip ............................................................ 30
Thermal Printing.................................................................................... 30
Managing the Printer Paper .................................................................. 30
Clinitek Advantus Operator’s Guide 3
Page 4

Emptying the Waste Bin........................................................................ 30
3 Calibration
Overview .............................................................................................. 31
Confirming a Calibration .................................................................... 31
4 Quality Control
Testing Control Specimens................................................................ 34
Quality Control Errors ........................................................................ 36
5 Maintenance
General Cleaning.................................................................................37
Performing the Daily Cleaning........................................................... 37
Performing a Decontamination .......................................................... 43
Lubricating the Push Bar Slide and Shaft ........................................44
Changing the Paper ............................................................................ 45
Replacing the Printer..........................................................................48
Disconnect the Analyzer ....................................................................... 48
Remove the Cover on the Internal Printer............................................. 48
Remove the Paper Roll......................................................................... 49
Remove the Printer ............................................................................... 50
Install the New Printer........................................................................... 53
Calibrating the Touch Screen ............................................................ 54
6 Troubleshooting
General Information............................................................................ 55
Removing a Jammed Test Strip......................................................... 55
Reinstalling the Fixed Platform ......................................................... 57
Errors and Corrective Actions ........................................................... 57
7 File Management
8 System Configuration
Installation ........................................................................................... 71
Overview ...............................................................................................71
Unpacking the Analyzer ........................................................................71
Installing the Analyzer........................................................................... 74
Installing Connections ........................................................................... 80
Installing the Barcode Reader Bracket.................................................. 81
Installing a Roll of Printer Paper............................................................ 81
Performing the Initial Analyzer Check ................................................... 82
4 Clinitek Advantus Operator’s Guide
Page 5

Setup Information ............................................................................... 84
Setup Menu 1........................................................................................ 84
Setup Menu 2........................................................................................ 88
Setup Menu 3........................................................................................ 91
Setup Menu 4........................................................................................ 92
Setup Menu 5........................................................................................ 95
Setup Menu 6........................................................................................ 98
Setup Menu 7...................................................................................... 100
Setup Menu 8...................................................................................... 103
Setup Menu 9...................................................................................... 108
Completing Setup................................................................................ 110
Appendix A: Safety Information
Protecting Yourself from Biohazards..............................................111
References.......................................................................................... 112
Appendix B: Warranty and Support Information
Legal Information .............................................................................. 113
Siemens Diagnostics Authorized Representative ............................... 113
Warranty Information........................................................................ 113
Installation Details............................................................................... 113
Manufacturer’s Warranty for U.S. Customers Only............................. 113
Disclaimer of Warranties..................................................................... 114
Limitations of Liability .......................................................................... 114
Support Information.......................................................................... 114
Contact Information .......................................................................... 115
Pre-service Checklist........................................................................116
Appendix C: Orderable Supplies
List of Supplies and Optional Equipment ....................................... 119
Siemens Diagnostics Reagent Strips for Urinalysis ............................ 119
CHEK-STIX Positive and Negative Control Strips for Urinalysis......... 119
Clinitek Handheld Barcode Reader.....................................................120
Installing a Barcode Reader Bracket................................................... 120
Clinitek Advantus Waste Bin Liners .................................................... 120
STAR Form Printer.............................................................................. 120
List of Replacement Parts ................................................................ 121
Appendix D: Specifications
System Specifications ...................................................................... 123
Safety Certifications ............................................................................ 123
Electromagnetic Compatibility (EMC) .................................................123
Clinitek Advantus Operator’s Guide 5
Page 6

Analyzer Dimensions ..........................................................................123
Environmental Specifications..........................................................124
Electrical Requirements ......................................................................124
Tables of Results .............................................................................. 125
English and Chinese, Units—Conventional ........................................ 125
English and Chinese, Units—International (SI)................................... 126
English Nordic, Units—Nordic Plus System........................................ 127
Appendix E: Symbols
System and Packaging .....................................................................129
User Interface ....................................................................................132
Appendix F: Barcode Reader
General Information.......................................................................... 137
Installing the Handheld Barcode Reader ........................................137
Testing the Barcode Reader ............................................................ 138
Troubleshooting................................................................................138
Specifications.................................................................................... 139
Barcode Formats................................................................................. 139
Barcode Symbols and Labels ............................................................. 139
Maintenance ...................................................................................... 140
Appendix G: Computer and Printer Interface
General Information.......................................................................... 141
Cable and Pin Specifications – Computer...................................... 141
Pin Assignments for Interface Cable – Serial Port .............................. 141
Hardware Handshaking....................................................................... 142
Cable and Pin Specifications – Printer ........................................... 142
Pin Assignments for Interface Cable –
DB-25 Male Connector...................................................................... 143
Notes................................................................................................... 143
Index
6 Clinitek Advantus Operator’s Guide
Page 7

Using this Guide
The Clinitek Advantus Operator’s Guide provides information for clinical
laboratory professionals who use the Clinitek Advantus system:
The following table describes how this guide is organized.
If you want to . . . Then refer to . . .
learn about the system principles,
the hardware, and the operating
sequence
process samples and manage
sample results
learn about calibration and how to
print the calibration status
process QC samples Section 4, Quality Control
perform maintenance activities Section 5, Maintenance
investigate and correct system
problems
learn about file and data
management
install the system or modify system
parameters
review additional information such
as the glossary or the supplies list
Section 1, Overview and Intended Use
Section 2, Operating the System
Section 3, Calibration
Section 6, Troubleshooting
Section 7, File Management
Section 8, System Configuration
Appendices
Clinitek Advantus Operator’s Guide 7
Page 8
Conventions
The Clinitek Advantus Operator’s Guide uses the following text and symbol
conventions:
Convention Description
Biohazard statements alert you to
BIOHAZARD
WARNING
CAUTION
NOTE:
Bold
Italic Italic type refers to the title of a document or
potentially biohazardous conditions.
Warning statements alert you to conditions
that may cause personal injury.
Caution statements alert you to conditions
that may cause product damage or loss of
data.
Note statements alert you to important
information that requires your attention.
Bold type indicates text or icons on the user
interface. For example, if the word save
appears as Save, it refers to the Save
button on the user interface.
System icons are also indicated by words in
bold type. For example, the words
Next Screen refer to the system icon .
A complete list of system icons and their
equivalents is in Appendix E, Symbols.
a section title in this guide.
8 Clinitek Advantus Operator’s Guide
Page 9
1 Overview and Intended Use
Overview and Intended
The Clinitek AdvantusTM Urinalysis analyzer is a semi-automated, benchtop
analyzer. It is designed to read Siemens Medical Solutions Diagnostics
Reagent Strips for Urinalysis, such as, MULTISTIX®10 SG and Siemens
Diagnostics MULTISTIX PRO
The analyzer is a reflectance spectrophotometer that analyzes the color and
intensity of the light reflected from the reagent area and reports the results in
clinically meaningful units. The analyzer can determine and report the color of
the urine. You can enter clarity for each specimen. You are not required to
make any calculations. Calibration is performed automatically each time a
reagent strip is analyzed.
®
Reagent Strips.
Use
Figure 1 Clinitek Advantus Analyzer
Siemens Diagnostics Reagent Strips contain reagent areas for testing
glucose, bilirubin, ketone (acetoacetic acid), specific gravity, occult blood, pH,
protein, urobilinogen, nitrite, and leukocytes. MULTISTIX PRO Reagent Strips
also contain protein-low and creatinine reagent areas. A single protein result
is reported from the 2 protein tests and this reading is compared to the
creatinine result to provide a protein-to-creatinine ratio.
Clinitek Advantus Operator’s Guide 9
Page 10

Overview and Intended
The Clinitek Advantus system is intended for professional use in a laboratory
environment only. Tests performed using the Clinitek Advantus system are
intended for in vitro diagnostic use. As with all diagnostic tests, a definitive
clinical diagnosis should not be based on the results of a single test, but
should only be made by the physician after all clinical and laboratory findings
have been evaluated.
Use
Hardware Overview
User Interface
By default, interaction with the Clinitek Advantus analyzer is via an integrated
touch screen. Messages, options, and requests for information display, and
responses are made by touching the appropriate key symbol on the screen.
CAUTION
Do not use anything hard or pointed on the touch screen. It may
damage the screen.
You can also use a computer keyboard or a handheld barcode reader to
interact with the analyzer. Some analyzer screens may not accept input from
these devices.
Testing and Printing Areas
All testing takes place on the fixed platform.
The fixed platform consists of 3 sections: the strip loading station, the
incubation/read station, and the waste bin. Strips are placed on the strip
loading station. The push bar moves the strips to the incubation/read station,
where they are tested. When testing is complete, the strips drop into the
waste bin.
10 Clinitek Advantus Operator’s Guide
Page 11
When testing is complete, an internal thermal printer prints the test results.
1
Display
2
Printer
3
Waste bin
4
Fixed platform
5
Incubation/read station
6
Strip loading station
7
Push bar
Overview and Intended
Use
Figure 2 User Interface, Testing and Printing Areas
Connections and Power
The line cord is connected into the line cord receptacle. Turn the analyzer on
by pressing the power switch to the on position. You can connect a computer,
printer, ethernet connection, keyboard, and handheld barcode reader to the
analyzer using the interface connectors.
Clinitek Advantus Operator’s Guide 11
Page 12
Overview and Intended
Memory
The analyzer software is stored in internal flash memory. When necessary,
you can update the software using an electronic memory card located on the
back of the interactive touch display.
The analyzer stores the operating parameters, including those selected by
Use
the user, and up to 500 patient results and 200 quality control results. This
information is in a RAM with a battery backup, and is held in memory
regardless of whether the analyzer power is on or off.
1
Memory card slot
2
Cooling fan
3
Power switch
4
Line cord receptacle
5
Ethernet interface connector
6
Serial interface connector
7
Printer interface connector
8
Keyboard and barcode reader interface connector
Figure 3 Connections, Power, and Memory
12 Clinitek Advantus Operator’s Guide
Page 13
Software Overview
The Clinitek Advantus provides an easy-to-navigate and intuitive user
interface.
Overview and Intended
When the analyzer is not in use, the screen saver or the Ready/Run screen
displays. If the screen saver displays, touch the screen to access the Ready/
Run screen. You can access all tests through the Ready/Run screen. You
can also navigate from this screen to any point in the software.
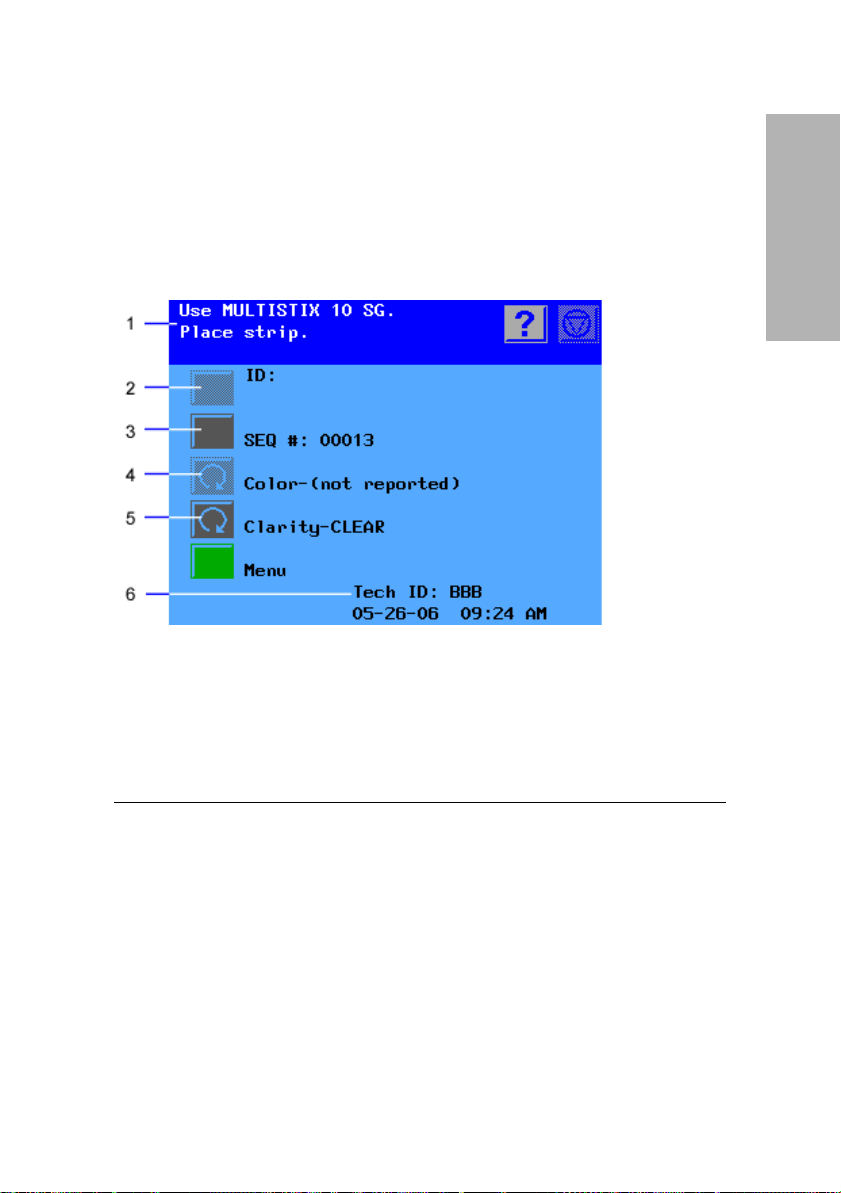
1
Information and instructions area
2
Inactive action key
3
Active action key
4
Inactive cycle key
5
Active cycle key
6
System status area
Use
Figure 4 Ready/Run Screen
The information and instructions area shows system settings or user input,
and provides instructions for the user. The Help, Stop Run, and Return to
Ready/Run keys display in this area.
Many options are next to an Action Key. Select this key to select the option.
Some options are next to a Cycle key. Use the cycle key when several
options are available. Each time you select the key, a different option displays
for the selection.
If an option is active, the key symbol is fully lit. If it is not active, it is dimmed,
and a tone will sound when you touch the key.
Clinitek Advantus Operator’s Guide 13
Page 14
Overview and Intended
The system status area displays only on the Ready/Run screen. It shows the
current date and time, and the Technician ID, if Technician IDs are active on
your system.
Use
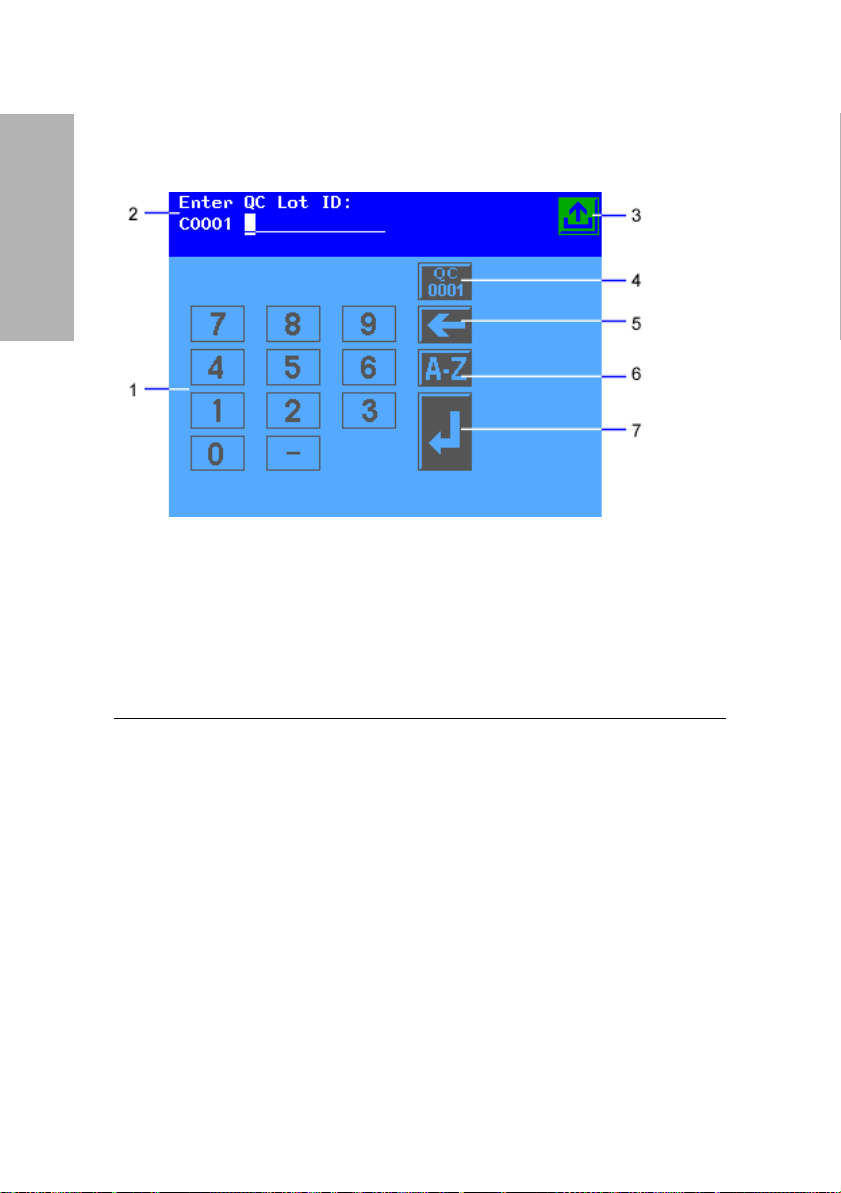
1
Numeric keypad
2
Information and instructions area
3
Return to Ready/Run screen key
4
Reset QC Lot ID key
5
Move Left key
6
Alphabet key
7
Enter key
Figure 5 Input Screen
Some options require that you enter information. If selected, a numeric
keypad will display. If available, you can select the Alphabet key to access an
alphabetic keypad. If a handheld barcode reader or keyboard is connected to
the system, you can scan or enter information for some values. The
instrument will only recognize keyboard input that is equivalent to the
keypads available on the instrument display.
Refer to Appendix E, Symbols for a complete list of key symbols used on the
Clinitek Advantus.
14 Clinitek Advantus Operator’s Guide
Page 15

Operating Sequence
If specimen IDs are not used and color/clarity results are reported and
displayed, the analyzer automatically enters the Run mode when you place a
strip on the fixed platform. A sensor detects the strip's presence and activates
the strip movement and reading cycle.
If the push bar is positioned at the left side of the loading station, the analyzer
is ready to accept placement of a strip. If the bar is positioned to the right, the
analyzer is not ready and ignores any strip placed on the platform.
If the analyzer is already in the Run mode and you place a strip on the
platform, there may be delay of up to 7 seconds before the push bar moves.
The amount of delay depends on the status of the timing cycle for the strips
currently being analyzed.
The push bar moves the strip along the loading station to the read area. The
sequence number increments. A series of pins move the strip across the
platform at a rate of about 1.3 cm (1/2 inch) every 7 seconds.
Two readheads, located inside the read area, scan the length of each reagent
strip at a specific time in the incubation cycle. The first readhead reads the
reagent areas requiring shorter incubation times. The second reads those
requiring longer incubation times.
Each of the 2 readheads contains an incandescent lamp and photodiode
pack. When a strip moves into position under the readhead, the analyzer
performs a calibration cycle. The readhead then scans the entire length of the
strip, measuring the light reflectance of each reagent pad. A portion of the
light striking the pad is reflected back to the photodiode pack. The light
reflected at specific wavelengths from the test pad is dependent upon the
degree of color change in the pad and is directly related to the concentration
of the particular constituent in the urine.
The photodiode pack contains 4 filters, one each at 400 – 510 nm (blue),
510 – 586 nm (green), 586 – 660 nm (red), and 825 – 855 nm (IR). The light
intensity detected by the photodiode pack is converted into electrical
impulses, which are processed by the analyzer’s microprocessor and
converted into clinically meaningful results.
The pins continue to move the strip along the platform until it drops into the
waste bin.
An internal thermal printer prints the test results, if this option is selected. You
can also send the results to a computer and a form or 80-column printer.
Overview and Intended
Use
Clinitek Advantus Operator’s Guide 15
Page 16

Overview and Intended
Use
16 Clinitek Advantus Operator’s Guide
Page 17

2 Operating the System
Leave the Clinitek Advantus analyzer on at all times, except during
maintenance and cleaning procedures.
Overview
You can test without a loadlist or specimen ID. Put a strip on the analyzer. The
analyzer automatically assigns a Sequence Number and begins testing.
You can manually assign specimen IDs to tests. You can enter specimen IDs
immediately prior to testing each specimen.
You can enter a loadlist of up to 200 specimen IDs before starting the run. You
can enter the IDs from the analyzer display, a computer keyboard, a host
computer, or Laboratory or Hospital Information System (LIS/HIS).
You can interrupt processing to run a STAT test when using a loadlist. After the
STAT test the analyzer will continue testing specimens from the loadlist.
If necessary, you can stop a run before all readings are complete.
Results transmit to the printer and computer as soon as all reagent areas on
the strip are read.
Preparing for a Run
When you place the first strip on the fixed platform the analyzer begins a run.
Before starting each run, perform the following procedures.
Operating the System
Select a Reagent Strip
1. Check that the primary and alternative Siemens Diagnostics Reagent
Strips for Urinalysis displayed correspond to the strip types you are using.
CAUTION
Do not use a reagent strip other than the selected primary or
alternative reagent strip. Only use Siemens Diagnostics brand
reagent strips. Use of other strips may cause erroneous results.
2. If required, select the cycle key next to the alternative strip name to use the
alternative strip.
3. If the strip names do not agree, change the selected strips before
beginning testing.
Select the strips through the Setup Routine.
Clinitek Advantus Operator’s Guide 17
Page 18

Operating the System
Check the Strip Loading Station
Ensure that the strip loading station and push bar are clean and in the correct
position. If contaminants are present, remove and clean the push bar, the
platform, and the moving table.
Change the Starting Sequence Number
This number increments with each strip placed onto the analyzer. If necessary,
use this procedure to change the number.
1. Select
SEQ #.
A numeric keypad displays.
2. Enter the new sequence number.
Change individual digits as needed:
a. Select
Move Left or Move Right to move the cursor to the digit to
change.
b. Enter the correct number.
00001 to reset the number.
Select
3. Select
Enter.
Change the Technician Identification
You can activate the Tech ID option during analyzer setup. Refer to Te ch I D‚
page 102 for more information.
1. Select
2. Select
3. Enter an identification number of up to 13 digits.
4. Select
Menu.
Tec h I D.
A numeric keypad displays.
a. Select
b. Select
A-Z to enter alphabetic characters.
Enter to return to the numeric keypad.
Enter to save the Tech ID.
Print Information
1. Select Menu.
2. Select
18 Clinitek Advantus Operator’s Guide
Print to print:
• the ID list if a loadlist exists in memory
• confirmation of the last calibration
• a report of the setup parameters
Page 19

Run Controls
At the Set options menu, select QC to run controls before processing patient
samples. Refer to Section 4, Quality Control, for more information.
Testing Routine Specimens
Testing Without a Specimen ID or Loadlist
BIOHAZARD
Wear personal protective equipment. Use universal precautions.
Refer to Appendix A, Safety Information for recommended
precautions when working with biohazardous materials.
1. Select a reagent strip.
CAUTION
Do not use a reagent strip other than the selected primary or
alternative reagent strip. Only use Siemens Diagnostics brand
reagent strips. Use of other strips may cause erroneous results.
2. If you are entering color or clarity, use the cycle key to set color and clarity
for each specimen.
You can also enter the color and clarity by scanning the barcoded symbols
provided with the handheld barcode reader.
NOTE: If Use default COL/CLA during run is set to on, the default values of
YELLOW and CLEAR display.
Enter the color and clarity of each specimen before dipping the reagent
strip.
You can change the color and clarity until the strip moves.
3. Completely immerse all of the reagent pads on a Siemens Diagnostics
Reagent Strip in fresh, well-mixed, uncentrifuged urine.
4. Immediately remove the reagent strip.
5. While removing the strip, run the edge against the side of the container.
This removes excess liquid.
Operating the System
CAUTION
Do not blot the edge of the strip. This could affect results.
Clinitek Advantus Operator’s Guide 19
Page 20
Operating the System
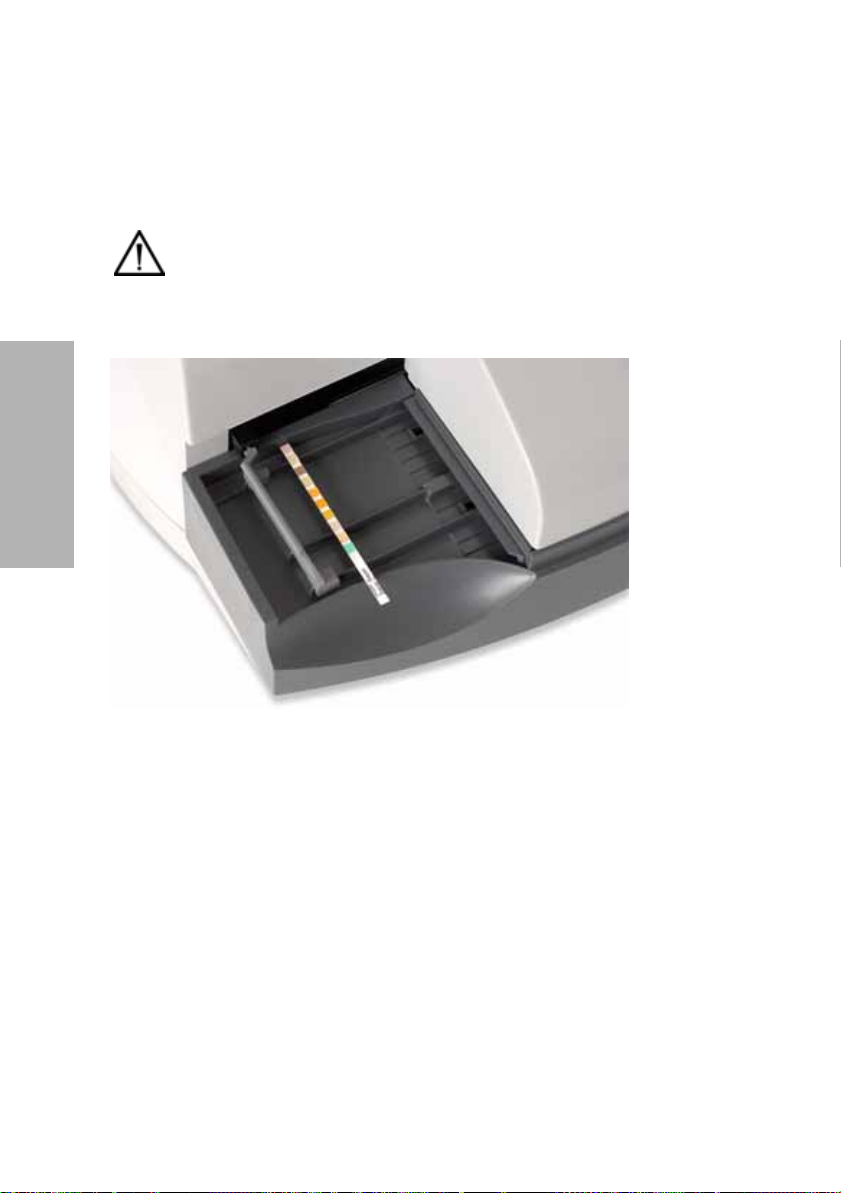
6. Place the reagent strip onto the supports of the strip loading station, with
the reagent pads facing up.
Place the strip to the right of and parallel to the push bar. Ensure that the
end of the strip is against the back wall of the platform and that it is not
touching the bottom of the strip loading station.
CAUTION
Improper placement may cause the analyzer to jam or the strip to
incorrectly align under the readheads.
Figure 6 Placement of Reagent Strip
7. Repeat steps 2 to 6 for each specimen.
When the push bar is to the far left of the platform, you can place a new strip
on the loading station until the previous strip placed enters the waste bin.
When the final strip moves to the waste bin, the run ends, and end of run
reports are processed.
Refer to Printing and Transmitting Results‚ page 28 for information on printing
and transmitting the results.
20 Clinitek Advantus Operator’s Guide
Page 21

Using the Specimen ID Without a Loadlist
You can enter Specimen IDs immediately prior to testing each specimen.
NOTE: You can use this procedure only if Enter Sample IDs is On. Refer to
Enter Sample IDs‚ page 102 for information on this setting.
1. At the Ready/Run screen, select ID.
2. Enter the ID number for the specimen you are about to test.
A-Z to enter alphabetic characters.
Select
You can also enter the ID from a computer keyboard, or scan it from a
barcoded label using the handheld barcode reader.
3. If needed, enter or scan the color and clarity.
4. When this information is correctly entered, select
code from the color or clarity card.
The display changes to allow entry of the next ID number, and the push bar
moves to the left so you can place a strip on the loading station.
5. Dip and place a reagent strip.
NOTE: If another ID is entered without a strip being detected, the analyzer
automatically creates a loadlist.
6. Repeat steps 2 to 5 for each specimen.
Enter or scan the Enter
Using Loadlists
You can enter a loadlist of up to 200 specimen IDs before starting the run. You
can enter the IDs from the analyzer display, a computer keyboard, a host
computer, or Laboratory or Hospital Information System (LIS/HIS).
NOTE: You can use loadlists only if Enter Sample IDs is On. Refer to Enter
Sample IDs‚ page 102 for information on this setting.
Operating the System
Entering a Loadlist from the Display or Computer Keyboard
To report color and clarity, enter initial values at the same time as the ID. You
can edit color and clarity while running the specimens, immediately prior to
dipping each reagent strip.
NOTE: Duplicate ID numbers are allowed by the analyzer.
1. At the Ready/Run screen, select
2. Enter the
Select
You can also enter the ID from a computer keyboard, or scan it from a
barcoded label using the handheld barcode reader.
NOTE: Do not select or scan Enter from the ID entry screen before entering
the color and clarity.
Clinitek Advantus Operator’s Guide 21
ID for the first specimen.
A-Z to enter alphabetic characters.
ID.
Page 22

3. If needed, enter or scan the color and clarity.
4. Select
Enter or scan the Enter code.
5. Repeat steps 2 to 4 for each specimen.
Editing a Loadlist
Use this procedure to make changes to the loadlist when initial entry is
complete.
1. Use
Move Up and Move Down to select the record to edit.
2. Edit the ID number.
NOTE: You cannot change or delete the ID number during Run mode.
Make any changes while the analyzer is in the Ready mode.
3. Select Delete to delete an item from the loadlist.
You can delete only the ID number being displayed or all IDs in memory.
4. Edit the color and clarity.
5. Select
Enter to accept the new number, color, and clarity.
Operating the System
Entering a Loadlist from a Host or Laboratory/Hospital System
You can connect the Clinitek Advantus analyzer to a host computer or
laboratory system. Refer to Appendix G, Computer and Printer Interface, for
more information.
1. Before sending a loadlist from a host or laboratory system, ensure that the
following conditions are true:
• The analyzer is at the Ready/Run screen.
• No IDs from an earlier loadlist are still stored in the analyzer. If a loadlist
was sent but is no longer needed, you can overwrite the unused IDs
with a new loadlist.
• The computer port is set to computer port, ethernet port, or both.
• The computer port options for Baud, Data, and Parity are correct for the
computer or LIS/HIS sending the loadlist. Refer to the specifications
accompanying the computer or Laboratory/Hospital Information System
for information on the required parameters.
• The output format for the computer port is CCS. Refer to Computer Port
Options‚ page 104 for more information on setting the computer port.
NOTE: Loadlist data is only transferred if it is formatted correctly. If a
loadlist is not transferred, refer to Section 6, Troubleshooting, for possible
causes.
22 Clinitek Advantus Operator’s Guide
Page 23

2. Review or delete a loadlisted number and add a color or clarity description.
The loadlist order is indicated by a number to the left of the ID number. The
total number of IDs in the loadlist is shown in the lower right corner of the
display.
a. At the Ready/Run screen, select
b. Use
Move Up and Move Down to display the ID number.
ID.
Use the loadlist order number to locate the proper location.
NOTE: You cannot change or delete an ID number transferred from a
host computer or Laboratory/Hospital Information System.
c. Delete the number from the loadlist by selecting
Delete.
You can delete only the ID number being displayed or all IDs in
memory.
d. If needed, enter or scan the color and clarity.
e. Select
3. Select
4. Select
Enter to accept the new color and clarity.
Print to print the ID list.
Return to Ready/Run to begin testing specimens.
You can also print the ID list from the Ready/Run screen.
a. Select
Menu.
b. Select Print.
c. Select
NOTE: You must make changes to the loadlist before starting testing. To
ID list.
edit remaining IDs in the loadlist, enter a loadlist from the analyzer display
or a computer keyboard and then cancel the run. Add new IDs when the
run is complete.
5. Test each specimen.
The Ready/Run screen displays each ID number and the color/clarity
descriptions in the same order as they were entered into the loadlist.
a. Check that the ID number, color, and clarity descriptions are correct for
the specimen you are about to test.
b. Edit the color and clarity, if necessary.
c. Dip and place a reagent strip.
Operating the System
When the strip for the last loadlisted specimen is moved to the read area, you
are not allowed to place any additional strips on the table. The push bar stays
at the right side and the analyzer completes the run.
Clinitek Advantus Operator’s Guide 23
Page 24

Operating the System
Performing a STAT Test
Use this procedure to run a STAT test when using a loadlist. After the STAT
test the analyzer will continue testing specimens from the loadlist.
1. At the Ready/Run screen, select STAT.
2. Enter an ID for the STAT test.
The SEQ # shown is the next number available after the end of the loadlist.
3. Edit the color and clarity, if necessary.
4. Select a reagent strip.
CAUTION
Do not use a reagent strip other than the selected primary or
alternative reagent strip. Only use Siemens Diagnostics brand
reagent strips. Use of other strips may cause erroneous results.
5. Dip and place a reagent strip.
The result is printed when the STAT test is complete. The analyzer
displays any confirmatory or microscopic flags from the STAT test.
6. Run another STAT test or resume loadlist testing.
The next test is allocated the SEQ # which follows the number used for the
STAT test just completed.
Cancelling a Run
Select Stop Run if you need to stop the run before all readings are complete.
You can cancel the entire run or only the last strip placed on the platform.
If the you cancel the entire run, all strips on the platform are moved
immediately to the waste bin. No results are reported. No SEQ # is assigned
for any strip that was not read at both readheads before Stop Run was
selected. You must retest all the specimens for all cancelled strips.
If only the last strip is cancelled, the run continues and you can test a new strip
using the same SEQ #.
24 Clinitek Advantus Operator’s Guide
Page 25

Managing Results
Results are transmitted to the printer and computer as soon as all reagent
areas on the strip are read. If a record is flagged for a confirmatory report and
Edit flagged results is On, that record is not transmitted until after the end-ofrun reports complete.
End-of-Run Reports
The analyzer may display up to 3 end-of-run reports when the run, or a STAT
test, is completed. These reports display if you have marked any analytes to
flag for confirmatory or microscopic tests, and if Mark positives is On.
To request these reports:
1. Specify 1 or more tests for the Confirmatory Reports A and B or
Microscopy Report.
2. In the Setup routine, select
The Confirmatory and Microscopic Report screens display the
ID of the record, and the abbreviation for each positive analyte marked for
flagging.
Up to 5 records may be displayed on 1 screen.
3. Use
4. Edit these results before exiting the Confirmatory Report. Refer to Editing
5. Select Print to print a report.
6. Select
7. Retest any specimens listed.
Move Up and Move Down to view additional records.
If both the Confirmatory and Microscopic Reports contain records, the
Confirmatory Reports display first.
Results in the Confirmatory Reports‚ page 25.
Return to Ready/Run to exit the report screen.
If an error is reported for 1 or more analytes, a report displays after the
Confirmatory and Microscopic Reports. This report displays last.
On for Edit flagged results.
SEQ # and
Operating the System
Editing Results in the Confirmatory Reports
Use this procedure to edit the results of confirmatory testing.
1. During the end of run review, access the Confirmatory Report screens.
2. Select a record from the Confirmatory Report A screen.
The flagged positive test results display.
Clinitek Advantus Operator’s Guide 25
Page 26

Operating the System
3. Select the cycle key next to the test name to change the displayed result to
the next available reported result.
When the cycle key is selected, the result for that test is printed and stored
with an exclamation point (!) to indicate that it was edited, even if the result
is reset to its original value.
If the selected output format is CCS, an E is transmitted with the results.
4. Select
Previous Screen when editing is complete for that record to return to
the Confirmatory Report.
5. Repeat Steps 2 to 4 above for each record.
6. When all editing is complete, select
Return to Ready/Run to exit
Confirmatory Report A.
When you leave a Report, you are not able to edit the report any further.
Records for Confirmatory Report B display.
7. Repeat Steps 2 to 4 above to edit these records.
8. When all Confirmatory Report editing is complete, select
to exit the Confirmatory Reports.
Run
NOTE: When you leave the Edit routine, you are not able to edit the run any
Return to Ready/
further.
Records in the Microscopic Report display.
After you exit Confirmatory and Microscopic Report screens, results for the
records included in Confirmatory Reports A and B are sent to the printer and
computer, all other records are printed and transmitted as soon as they are
available.
Merging Data from Microscopic Testing
Use this procedure to add the microscopic test results:
This option is only available if you created customized microscopy headings.
1. At the Ready/Run screen, select
2. Select
Enter Microscopics results.
Menu.
3. Search for the correct test results:
a. Enter the patient ID.
b. Select
Enter to start the search.
The patient ID results display with the earliest test displayed first.
c. Use
d. Select
Move Up and Move Down to select the correct test results.
Select Result.
4. Select the heading where you will add results.
5. Enter the microscopic test result for the heading.
26 Clinitek Advantus Operator’s Guide
Page 27

6. Select Enter to enter the data.
7. Repeat this procedure to add all required microscopic test data.
8. Select
Print to print the microscopic result data and the results of the
patient test on the analyzer.
9. Select Merge to store the microscopic data with the analyzer results.
When the test results are recalled, Microscopics displays on the results
display to show that microscopic results are stored with the test results.
Recalling Results
Up to 500 patient records and 200 quality control records are stored in
memory. Use the following procedure to recall 1 or more records:
1. At the Ready/Run screen, select Menu.
2. Select
3. Recall a group of records.
4. If you selected
5. Select
6. Locate the first record to review using the movement keys shown on the
7. Select
Memory.
• all patient records
• all QC records
• the last batch of patient results
• stored results by Patient ID
The number of records in memory displays next to the first 2 options.
The last batch of patient results tests are those tests run between the last
pause in testing and the latest test. If the latest test is a QC test, it is not
recalled.
Search for stored results, enter the patient ID.
Enter to start the search.
The earliest record of the selected group displays. The date and time the
record was stored displays, along with the Technician ID, SEQ #, and ID for
the record. All results are then listed. Positive results are flagged with an
asterisk (*) and edited results with an exclamation point (!).
display.
The next lower- or higher-numbered record in memory is recalled when
Move Up and Move Down are used. The record 10 higher or lower is
recalled when Move Up 10 and Move Down 10 are used.
If microscopic results are merged with the patient test results,
Microscopics displays on the patient record.
Microscopics to view the merged microscopic results.
Operating the System
Clinitek Advantus Operator’s Guide 27
Page 28

Operating the System
Printing and Transmitting Results
Printing Records from Memory
1. Recall a group of results. Refer to Recalling Results‚ page 27.
2. Select
3. Select 1 of the following options:
To... Select...
Print the record displayed,
Specify the beginning and
ending records to print,
Print all records that were
recalled,
Print to print 1 or more records.
Print only this result
The SEQ # and ID of that record continues to
display on the print option menu.
Print a group of results
1. Use the movement keys to specify the start
record to print.
2. Select
Enter to select the end record to print.
This record must have a SEQ # that is higher
than or the same as the start record.
3. Select Enter to begin printing.
All records in the sequential group print.
NOTE: The results tested using a loadlist may
include STAT tests carried out during the loadlist
testing.
Print all patient (control) results
After printing is complete, the screen returns to the earliest record of the
group. If Print a group of results is selected, the display first returns to the
screen from which the group was selected.
4. Select
Previous Screen as needed to return to the first record.
Resending Records from Memory
Use this procedure to resend 1 or more records to a host computer or LIS:
1. Recall a group of results. Refer to Recalling Results‚ page 27.
2. Select Resend.
28 Clinitek Advantus Operator’s Guide
Page 29

3. Select 1 of the following options:
To... Select...
Send the record
displayed,
Send only this result
The SEQ # and ID of that record continues to
display on the sent option menu.
Specify the start and end
records to resend,
Send a group of results
1. Use the movement keys to specify the start
and end records to resend.
2. Select
Enter to begin resending.
All records in the sequential group are sent.
NOTE: The results tested using a loadlist may
include STAT tests carried out during the loadlist
testing.
Send all records that were
Send all patient (control) results
recalled,
After resending is complete, the screen returns to the earliest record of the
group. If Send a group of results is selected, the display first returns to the
screen from which the group was selected.
4. Select Previous Screen as needed to return to the first record.
Deleting Results from Memory
To delete all patient or control results from memory:
1. Recall a group of results. Refer to Recalling Results‚ page 27.
2. Select Delete.
3. Confirm the deletion.
4. Select
Previous Screen to return to the previous menu, or select Return to
Ready/Run
to return to the Ready/Run screen.
Operating the System
Clinitek Advantus Operator’s Guide 29
Page 30

Operating the System
Additional Operating Instructions
Using a Form Printer
While printing results using a form printer, each set of results is stored in
memory until you insert a form into the printer. When the analyzer detects a
form, the next set of results is sent to the printer.
Check each form immediately after it is printed to ensure that all results are
printed and are clearly readable. If the printed form has a problem, immediately
reprint the last report.
NOTE: If you are using the Clinitek
Printer. Do not select
1. Select
2. Insert a new form into the Form Printer.
3. When the report is printed correctly, select
4. Insert a new form to print the next set of results.
Reprint last result.
As long as the checkmark displays in the selection key, the last set of
results are reprinted each time a form is inserted into the printer.
Do not insert the form before selecting
results is lost.
remove the checkmark.
Reprint last result on the analyzer display.
Removing a Jammed Test Strip
Refer to Section 6, Troubleshooting for more information on this procedure.
®
Form Printer, use Reprint on the Form
Reprint last result or the last set of
Reprint last result again to
Thermal Printing
Thermal print from the internal printer fades with time, especially when
exposed to light. The print also fades if covered with transparent tape or when
exposed to extremes in temperature or humidity.
Managing the Printer Paper
The analyzer detects when the internal printer is out of paper and retains the
results until the printer paper roll is replaced. The last meter of paper on the roll
has a pink edge. Change the roll when the pink edge displays. Refer to
Changing the Paper‚ page 45.
Emptying the Waste Bin
Empty the waste bin as it starts to fill. This prevents problems with strips
jamming as they leave the read station.
30 Clinitek Advantus Operator’s Guide
Page 31

3 Calibration
Overview
Calibration is performed at each readhead immediately before each reagent
strip is read. The fixed platform contains 2 white calibration bars, positioned
directly under each readhead. As a strip comes into position under a readhead,
the analyzer reads the calibration bar and calibrates for that scanning cycle.
The analyzer then scans the reagent strip and stores the data in memory.
Confirming a Calibration
Use the following procedure to print a report of the most recent successful
calibration:
1. At the Ready/Run screen, select
2. Select
3. Select
Print.
Calibration confirmation.
The date and time of the latest successful calibration prints.
Menu.
Calibration
Clinitek Advantus Operator’s Guide 31
Page 32

Calibration
32 Clinitek Advantus Operator’s Guide
Page 33

4 Quality Control
Run negative and positive controls on a regular basis to check the Siemens
Diagnostics Reagent Strip performance and analyzer operation. Quality control
(QC) testing provides confidence that the reagent strips are reacting and being
read correctly. It can also detect errors resulting from user techniques. Refer to
your laboratory quality assurance program to ensure quality throughout the
entire testing process. Run controls under the following conditions:
• at the start of the day’s run
• when using a new bottle of reagent strips
• whenever test results are in doubt
• when training new operators
The Clinitek Advantus analyzer can prompt for regular QC testing. You can set
the interval between QC tests from 1 hour to 99 days. You can prevent the
analyzer from being used for testing when a QC test is due. Select the QC
interval and requirement through the Setup routine.
Use CHEK-STIX® Positive and Negative Control Strips for Urinalysis. The
solutions prepared using the control strips provide positive, negative, or
defined concentrations when used with traditional Siemens Diagnostics
Reagent Strips for Urinalysis. You can also use a urine specimen from a
normal, healthy individual as a negative specimen.
NOTE: When using MULTISTIX PRO Reagent Strips, use commercially
available controls that include values for each test on the strip. CHEK-STIX
Control Strips are not suitable for use with these products.
For information about control manufacturers, contact your local technical
support provider.
Clinitek Advantus Operator’s Guide 33
Quality Control
Page 34

Testing Control Specimens
Use the following procedure to test control specimens:
1. Select a reagent strip.
CAUTION
Do not use a reagent strip other than the selected primary or
alternative reagent strip. Only use Siemens Diagnostics brand
reagent strips. Use of other strips may cause erroneous results.
2. Prepare the appropriate control solution(s) by following the directions found
in the package insert or on the bottle label.
3. At the Ready/Run screen, select
4. Select
5. Enter the Lot Identification of the controls.
6. When you are ready to test the control, select
7. Completely immerse all of the reagent pads on a Siemens Diagnostics
8. Immediately remove the reagent strip.
9. While removing the strip, run the edge against the side of the container.
QC.
The display changes to a numeric keypad.
a. Select
b. Select A-Z to enter alphabetic characters.
c. Select
Reagent Strip into the quality control solution.
This removes excess liquid.
QC 0001 to reset the number.
Enter to return to the numeric keypad.
Menu.
Enter.
Quality Control
34 Clinitek Advantus Operator’s Guide
CAUTION
Do not blot the edge of the strip. This could affect results.
Page 35

10. Place the reagent strip onto the supports of the strip loading station, with
the reagent pads facing up.
Place the strip to the right of and parallel to the push bar. Ensure that the
end of the strip is against the back wall of the platform and that it is not
touching the bottom of the strip loading station.
CAUTION
Improper placement may cause the analyzer to jam or the strip to
incorrectly align under the readheads.
Figure 7 Reagent Strip Placement
11. Repeat steps 5 through 10 for each additional control.
The strip automatically advances along the strip loading station, under the
readheads, and into the waste bin.
If the printer is set to On, the results are printed and stored in memory. If
the computer port is set to computer port, ethernet port, or both, and CCS
is selected as the output format, the control results are also transmitted to
the host computer.
12. After all controls are run, select
Return to Ready/Run to exit the quality
control screen.
Clinitek Advantus Operator’s Guide 35
Quality Control
Page 36

Quality Control Errors
If the control results fall outside of the values stated in the product’s package
insert, the following sources of error may have occurred:
Cause Corrective Action
Improper technique
or analyzer setup.
Deterioration of the
reagent strip test
areas due to
exposure to light,
ambient moisture,
or heat.
Deterioration of the
control solution.
Deterioration of the
quality control
product.
Clinitek Advantus
analyzer
malfunction.
Verify that the reagent strip used corresponds to the
reagent strip name given on the top of the Ready/Run
screen.
Carefully repeat the control procedure described above.
Use a fresh bottle of Siemens Diagnostics Reagent
Strips to repeat the quality control procedure.
If fresh reagent strips fail to give results within the
expected values, proceed to the next possible cause.
Use a fresh control solution to repeat the quality control
procedure.
If fresh solution fails to give results within the expected
values, proceed to the next possible cause.
Prepare control solution using a fresh bottle of control
product.
Repeat the quality control procedure.
If the fresh control solution fails to give results within the
expected values, proceed to the next possible cause.
Perform the procedure in Performing the Initial Analyzer
Check‚ page 82.
If you cannot successfully complete the initial analyzer
check or the quality control procedure, an analyzer
malfunction or reagent strip problem may exist. Refer to
Section 6, Troubleshooting for more information, or
contact your local technical support provider for
assistance.
Quality Control
36 Clinitek Advantus Operator’s Guide
Page 37

5 Maintenance
General Cleaning
Keep the exterior of the Clinitek Advantus analyzer free of dust at all times.
Clean the exterior using a damp cloth and a mild detergent.
CAUTION
Do not use any type of solvent, oil, grease, or silicone spray on any
part of the analyzer. Harsh chemicals can damage the platform
components.
Performing the Daily Cleaning
Clean the following parts at least once each day or after running 300 strips,
whichever is more frequent:
• push bar
• fixed platform
• moving table
• reagent strip holddown plate
Clean the display screen once a day if it is used to enter ID, color, or clarity
during the run.
1. Ensure that the run is complete, and the analyzer is at the Ready/Run
screen, before removing components.
In this analyzer state, the moving table is in its lowest position and you
can reinstall the fixed platform.
2. Turn analyzer power off.
Maintenance
Clinitek Advantus Operator’s Guide 37
Page 38

3. Remove the push bar:
a. Tilt the bar slightly upwards.
b. Pull the bar straight out.
Maintenance
Figure 8 Remove the Push Bar
4. Remove the waste bin liner.
5. Discard the used reagent strips into an appropriate container, according
to your standard laboratory procedures.
38 Clinitek Advantus Operator’s Guide
Page 39

6. Remove the fixed platform by pulling the entire assembly towards you.
Figure 9 Remove the Fixed Platform
7. Remove the moving table by pulling the entire assembly towards you.
Maintenance
Figure 10 Remove the Moving Table
Clinitek Advantus Operator’s Guide 39
Page 40
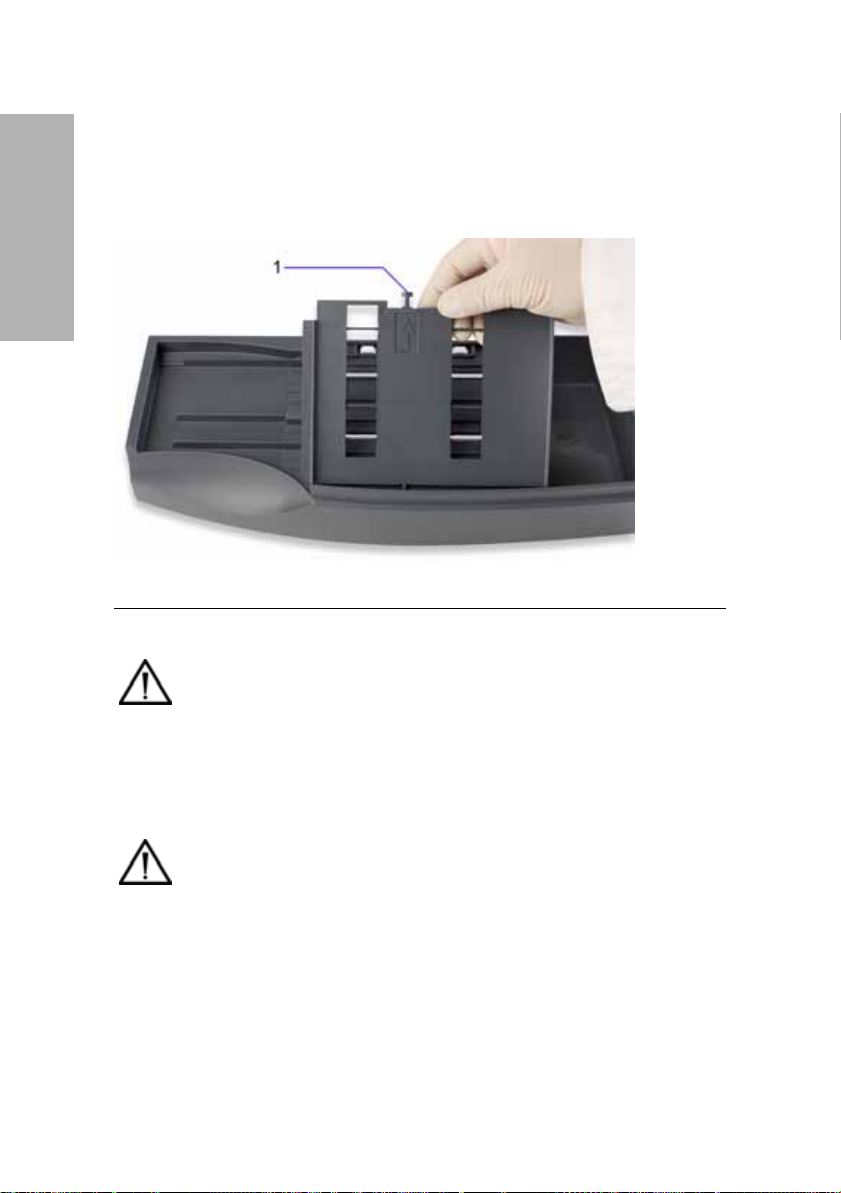
8. Remove the holddown plate from the fixed platform:
a. Press upwards on the tab at the back of the plate.
b. Pull the other end from its retaining hole.
NOTE: You must remove the holddown plate for proper cleaning.
Maintenance
1
Ta b
Figure 11 Remove the Holddown Plate
CAUTION
Do not use any type of solvent to clean the analyzer. Harsh
chemicals can damage the platform components.
9. Clean the push bar, the platform, the holddown plate, and the table with
warm water and mild detergent.
CAUTION
When cleaning the platform, avoid wiping across the 2 white
calibration bars. Use a cotton-tipped swab, wetted with plain water,
to clean the bars. Cleaning solution can damage the calibration
bars.
10. If the holddown plate or push bar is extremely dirty, soak it in warm water
and mild detergent to loosen the dried residue.
11. Rinse each piece thoroughly.
40 Clinitek Advantus Operator’s Guide
Page 41

12. Dry each piece with a paper towel or soft cloth.
Use care when drying around the pins on the moving table.
13. Allow the calibration bars on the platform to air dry.
14. After cleaning, inspect the calibration bars for scratches, marks, or
discoloration.
If you cannot clean the bars, discard the current platform and replace it
with a new one.
15. Disinfect the parts, if required. Refer to Performing a Decontamination‚
page 43.
NOTE: Do not disinfect the liner. Discard it into an appropriate container and
use a new liner.
16. Reinstall the moving table:
a. Hold the table with the small rectangular tab facing to the back.
b. Align the 2 grooves on the bottom of the table with the edges of the
platform on which the table rests.
c. Gently push the table in until you hear the tab latch into the hold
position.
d. Check that the table is secure.
17. Reinstall the holddown plate:
a. Position the holddown plate with the arrow side facing up and the
arrow pointing to the back.
b. Place the pin on the front of the holddown plate into the hole at the
front of the fixed platform.
c. Align the tab at the back of the holddown plate with the slot at the back
of the platform.
d. Snap the holddown plate into place.
e. Ensure that the white calibration bars are visible.
Maintenance
Clinitek Advantus Operator’s Guide 41
Page 42

18. Reinstall the fixed platform:
a. Align the 2 grooves on the bottom of the fixed platform with the arms
extending forward from the analyzer.
The flanges on the sides of the holddown plate align just outside the
read area cover. The top edge of the platform aligns just under the
cover.
b. Gently push the platform in as far as possible.
Maintenance
Push past the ridge to correctly position the platform.
CAUTION
Do not force the platform. Ensure that the moving table is correctly
positioned before you attempt to reinstall the fixed platform. If you
force the platform, you may damage the moving table or fixed
platform.
19. Reinstall the push bar:
a. Hold the push bar at the indented end.
b. With this end slightly upward, insert the peg on the other end of the
bar into the hole in the pusher mechanism.
c. Lower the push bar into place.
20. Place a new liner into the waste bin.
21. Clean the display screen, with a soft, nonabrasive cloth dampened with a
mild glass cleaner.
CAUTION
Do not use bleach to clean the display. Do not spray or pour the
glass cleaner directly onto the screen. Do not use laboratory wipes,
such as Kimwipes, because they may scratch the screen.
22. Turn analyzer power on.
42 Clinitek Advantus Operator’s Guide
Page 43

Performing a Decontamination
Use the following procedure to disinfect the push bar, the holddown plate, the
fixed platform, the moving table, and the display screen. You can also use
this procedure when taking the analyzer out of service.
Refer to the labeling accompanying the disinfection products for complete
instructions on their use.
1. Remove, clean, and dry the push bar, the fixed platform, the holddown
plate, and the moving table. Refer to Performing the Daily Cleaning‚
page 37.
NOTE: Do not disinfect the liner. Discard it into an appropriate container and
use a new liner.
2. Prepare 1 of the following solutions:
• Household Bleach (5% sodium hypochlorite) – use either full strength
or dilute to as much as a 1:20 dilution. To make a 1:20 dilution, add
5 mL of bleach to a container and add 95 mL of water, for a total
volume of 100 mL. To make a 1:10 dilution, combine 10 mL of bleach
and 90 mL of water.
*
• Cidex and Theracide
equivalents, in general disinfection. Prepare and use the solution
according to the directions that come with the product.
NOTE: Repeated or prolonged soaks over a long period of time with
glutaraldehyde solutions may cause a slight fading or discoloration of the
platform and table, and a cloudy appearance to the push bar. These
changes do not affect performance.
– you can use these products, or their
Maintenance
CAUTION
Do not soak analyzer components in solution for more than
10 minutes once a day.
Do not use isopropyl alcohol or any product containing phenol, such
as Amphyl. These cause damage to the calibration bars.
3. Completely immerse the pieces in the solution for no longer than
10 minutes.
4. Rinse each piece thoroughly.
5. Dry each piece with a paper towel or soft cloth.
Use care when drying around the pins on the moving table.
6. Allow the calibration bars on the platform to air dry.
7. Reinstall the pieces. Refer to Performing the Daily Cleaning‚ page 37.
*These products may not be available in all locations.
Clinitek Advantus Operator’s Guide 43
Page 44

8. Disinfect the display screen, if needed.
Use either Cidex or Theracide solution, or their equivalents, only.
CAUTION
Do not use bleach to clean the display. Do not spray or pour the
disinfectant directly onto the screen. Do not use laboratory wipes,
Maintenance
such as Kimwipes, because they may scratch the screen.
a. Wipe the solution on the screen using a soft, nonabrasive cloth.
b. Allow the solution to remain for 10 minutes.
c. Rinse using a clean, soft cloth dampened with water, then dry.
Lubricating the Push Bar Slide and Shaft
Clean and lubricate the push bar shaft:
• when the push bar chatters or moves in a jerky motion
• if you see an increase in skewed strip errors, caused by the vibration of
the push bar movement.
1. Turn analyzer power off.
2. Disconnect the power cord.
3. Remove the push bar, the fixed platform, the holddown plate, and the
moving table. Refer to Performing the Daily Cleaning‚ page 37.
4. Clean the right side of the push bar shaft using ethanol or isopropyl
alcohol on a cotton tipped applicator.
5. Move the slide arm to the right to access the left side of the shaft.
6. Clean the left side of the shaft.
7. Using a cotton tipped applicator, apply a thin film of Lubriplate lubricant to
both sides of the push bar shaft
Do not apply too much or too little lubrication, as this may cause the push
bar to move erratically.
An initial tube of Lubriplate lubricant is supplied with your analyzer. Refer
to Appendix C, Orderable Supplies, for information on obtaining additional
tubes.
8. Move the slide arm several times to spread the lubrication.
9. Reinstall the pieces. Refer to Performing the Daily Cleaning‚ page 37.
10. Reconnect the power cord.
11. Turn analyzer power on.
44 Clinitek Advantus Operator’s Guide
Page 45

Changing the Paper
1. Ensure the analyzer is at the Ready/Run screen.
2. Press the tab on the back of the printer cover.
3. Lift the cover off.
Figure 12 Remove the Printer Cover
WARNING
Be careful when touching the printer. It may be hot.
Maintenance
CAUTION
Do not touch the printer without observing precautions for handling
electrostatic sensitive devices. A risk of electrostatic discharge to
the analyzer exists when touching the printer.
4. Remove the paper roll:
a. Lift up the roll.
b. Tear the paper between the roll and the printer.
c. Remove the core and remaining paper on the roll.
Clinitek Advantus Operator’s Guide 45
Page 46

5. Remove any paper remaining in the printer:
a. Locate the printer paper release lever.
This lever is colored green and is located on the right of the printer
when looking at the front of the analyzer.
b. Push down on the back of the lever to unlock the roller.
c. Pinch and lift the front of the lever to raise the paper guide.
d. Carefully pull paper through the printer in its normal direction of travel.
Maintenance
1
Printer release lever
Figure 13 Printer Release Lever
6. Obtain a new paper roll.
7. Unroll sufficient paper to feed the printer.
8. Hold the roll just above the printer, with the paper unrolling from
underneath.
9. Push the paper gently under the roller at the back of the printer.
The printer automatically pulls the paper into the printer and behind the
paper guide on the top of the printer.
46 Clinitek Advantus Operator’s Guide
Page 47

10. Set the roll of paper into position.
Figure 14 Feed Paper into the Printer
11. If necessary, feed more paper through the printer cover:
a. Carefully pull sufficient paper through the printer to enable you to feed
it through the printer cover.
b. Ensure the edges of the paper are aligned with the edges of the
printer.
c. Return the printer paper release lever to its locked position by
pressing firmly down on the front of the lever.
12. Set the paper into position behind the printer.
13. Place the front tabs of the cover into their slots.
14. Feed the end of the paper through the opening in the cover.
15. Snap the cover into place.
Maintenance
Clinitek Advantus Operator’s Guide 47
Page 48

Replacing the Printer
WARNING
Be careful when touching the printer. It may be hot.
Maintenance
CAUTION
Do not touch the printer without observing precautions for handling
electrostatic sensitive devices. A risk of electrostatic discharge to
the analyzer exists when touching the printer.
Disconnect the Analyzer
1. Turn analyzer power off.
2. Disconnect the power cord.
Remove the Cover on the Internal Printer
1. Ensure the analyzer is at the Ready/Run screen.
2. Press the tab on the back of the printer cover.
3. Lift the cover off.
Figure 15 Remove the Printer Cover
48 Clinitek Advantus Operator’s Guide
Page 49

Remove the Paper Roll
1. Remove the paper roll:
a. Lift up the roll.
b. Tear the paper between the roll and the printer.
c. Remove the core and remaining paper on the roll.
2. Remove any paper remaining in the printer:
a. Locate the printer paper release lever.
This lever is colored green and is located on the right of the printer
when looking at the front of the analyzer.
b. Push down on the back of the lever to unlock the roller.
c. Pinch and lift the front of the lever to raise the paper guide.
d. Carefully pull paper through the printer in its normal direction of travel.
Maintenance
1
Printer release lever
Figure 16 Printer Release Lever
Clinitek Advantus Operator’s Guide 49
Page 50

Remove the Printer
1. Carefully remove the printer shield:
a. Press the bottom of the shield on the right-hand side toward the touch
screen.
b. Lift to release the 2 clips located on either side at the bottom of the
shield.
Maintenance
Figure 17 Remove the Printer Shield
50 Clinitek Advantus Operator’s Guide
Page 51

2. Locate the clip at the front of the printer.
3. Pull the clip towards the front of the analyzer to release the printer.
The printer is held in position at the back by 2 hooks.
4. Pull the printer forward.
5. Raise the printer to release it from the hooks.
Maintenance
1
Clip
2
Hooks
Figure 18 Remove the Printer
The printer is connected to the analyzer through a flat 29-pin interface
cable for transfer of data. The cable slides into a connector that snaps
down to secure the cable into position.
Clinitek Advantus Operator’s Guide 51
Page 52

6. Unsnap the connector by lifting up on both sides of the top plate.
The plate raises by about 2 mm (1/16 in).
7. Gently pull the interface cable from the connector.
You may need to wiggle the cable slightly to loosen it.
Maintenance
Figure 19 Remove the Interface Cable
52 Clinitek Advantus Operator’s Guide
Page 53

Install the New Printer
1. Set the replacement printer partially into position.
2. Slide the interface cable into the narrow slot on the top plate of the
connector with the silver pins on the cable facing towards the front of the
analyzer.
3. Press the cable straight down until it stops again.
4. Ensure both sides of the cable are fully inserted.
5. Press down on both sides of the connector until it snaps shut.
6. Gently pull up on the cable to ensure that it is secured in place.
If it pulls out easily, unsnap the connector and repeat steps 3 to 5.
7. Place the printer fully into position:
a. Lower the back of the printer under the 2 clips.
b. Lower the front of the printer.
c. Press down firmly until it snaps under the clip at the front.
8. Replace the printer shield:
a. Place the front of the shield into the cavity at the front of the printer.
b. Press down firmly until the printer shield snaps into place.
9. Reconnect the power cord.
10. Turn analyzer power on.
11. Replace the roll of paper. Refer to Changing the Paper‚ page 45.
12. Test the new printer.
Print the analyzer setup parameters or perform several reagent strip tests.
NOTE: If you turned the internal printer off prior to replacement, turn it back
on. If Printer Error displays when attempting to print, check for a tight and
proper connection of the interface cable.
Maintenance
Clinitek Advantus Operator’s Guide 53
Page 54

Calibrating the Touch Screen
Calibrate the touch screen if it does not respond correctly when a key is
touched.
1. Turn analyzer power off.
2. Wait several seconds.
3. Turn analyzer power on.
Maintenance
4. When the title screen displays, touch the screen anywhere.
The display prompts Touch the top left corner and an X displays in the
corner.
5. Touch the screen at the center of the
6. Repeat when the prompt changes to Touch the bottom right corner.
When the touch screen is calibrated, the display automatically continues
in the normal sequence of screens.
X.
54 Clinitek Advantus Operator’s Guide
Page 55

6 Troubleshooting
General Information
If an operational or analyzer problem occurs, an error number may display on
the analyzer screen with an explanation of the problem. This section of the
guide lists the various errors and messages, along with probable causes and
corrective actions. If the problem persists, record the error number being
displayed and contact your local technical service provider for assistance.
If you think Siemens Diagnostics Reagent Strips are causing the problem,
consult the product insert that comes with the reagent strips for troubleshooting
information.
If you turn the analyzer off, you must retest all samples in process when the
error occurs. The normal end-of-run reports for samples processed prior to the
error display when the analyzer is turned back on.
With some errors, the analyzer continues to run while the error displays. Select
Return to Ready/Run to return to the Ready/Run screen before attempting to
correct the error. If another error occurs while the previous error is being
displayed, the new error displays in its place.
Removing a Jammed Test Strip
Use this procedure if a strip becomes jammed under the readhead to the
extent that movement of the strips is prevented.
1. Select Stop Run to stop the run and return to the Ready/Run screen.
2. To determine the specimen(s) to retest, record the information provided on
the Results Error Report.
3. Turn analyzer power off.
4. Remove the push bar. Refer to Performing the Daily Cleaning‚ page 37.
Troubleshooting
Clinitek Advantus Operator’s Guide 55
Page 56

5. Remove the fixed platform by pulling the entire assembly towards you.
Troubleshooting
Figure 20 Remove the Fixed Platform
6. Remove the holddown plate from the fixed platform. Refer to Performing
the Daily Cleaning‚ page 37.
7. Remove the jammed strip.
8. Reinstall the holddown plate. Refer to Performing the Daily Cleaning‚
page 37.
9. Reinstall the fixed platform. Refer to Performing the Daily Cleaning‚
page 37.
10. Reinstall the push bar. Refer to Performing the Daily Cleaning‚ page 37.
11. Turn analyzer power on.
12. Rerun the specimen(s) without results.
56 Clinitek Advantus Operator’s Guide
Page 57

Reinstalling the Fixed Platform
If you turn the analyzer off during a run, or at any screen other than the Ready/
Run screen, the moving table may not be in its lowest position. If you then
remove the fixed platform, the moving table is pulled out at the same time. You
cannot reinstall the fixed platform because the pins of the moving table are in
the way.
Use the following procedure to resolve this problem:
1. Turn analyzer power on.
2. Let the analyzer initialize.
An error displays because the fixed platform is not in place, but the moving
table is rotated into the correct position.
3. Turn analyzer power off.
4. Install the fixed platform. Refer to Performing the Daily Cleaning‚ page 37.
5. Turn analyzer power on.
Errors and Corrective Actions
Symptom Possible Cause Remedy
Changes made in
Setup are not
saved
Display is blank No power 1. Listen for the fan.
You did not select
Return to Ready/
Run
after making
changes.
Defective
analyzer
electronics
Always select
after making changes in Setup.
2. If it is not running, turn analyzer
power off.
3. Check that the power cord is
firmly connected to the analyzer
and into a live AC electrical
outlet.
4. Turn analyzer power on.
Contact your local technical support
provider.
Return to Ready/Run
Troubleshooting
Clinitek Advantus Operator’s Guide 57
Page 58

Symptom Possible Cause Remedy
Improperly
inserted memory
card when
updating software
1. Turn analyzer power off.
2. Remove the memory card.
3. Ensure that the label is facing
forward, with the arrows
pointing in and up.
4. Reinsert it firmly.
When properly inserted, the
edge of the card is flush with the
analyzer case.
5. Turn analyzer power on.
Fixed platform
cannot be
installed
The moving table
is not in the
lowest position
1. Turn analyzer power on.
2. Let the analyzer initialize.
3. Ignore the error that displays.
4. Turn analyzer power off.
5. Install the fixed platform.
Troubleshooting
6. Turn analyzer power on.
7. If you are still unable to install
the fixed platform, contact your
local technical support provider.
Printout does not
contain all reports
Push bar does
not move to the
right after a strip
is placed onto the
platform
Missing reports
are flagged for a
Confirmatory
Report, and Edit
flagged results is
On
Other strips are
being moved
along the
platform
Strip sensor
problem
When the run is complete, review
and edit the list of flagged reports.
When you exit the End-of-Run
Report screens, the reports are
printed.
Allow up to 7 seconds to elapse
prior to movement of the push bar.
The time lapse depends upon the
timing cycle for movement of the
strips across the platform.
1. Ensure that the run is complete,
and the analyzer is at the
Ready/Run screen.
2. Turn analyzer power off.
3. Wait several seconds.
4. Turn analyzer power on.
5. If the problem continues,
contact your local technical
support provider.
58 Clinitek Advantus Operator’s Guide
Page 59

Symptom Possible Cause Remedy
Push bar does
not move back to
the left after
moving a strip
Push bar moves
to the right when
a strip has not
been placed on
the platform
The last strip has
been placed in a
loadlisted run, or
the analyzer is
waiting for entry
of an ID
A very dark urine
is being tested.
The strip sensor
is unable to verify
the presence of
the strip until it
reaches the first
readhead
The strip sensor
was accidentally
triggered by a
hand, sleeve, or
other foreign
object
The analyzer is functioning
properly.
Begin a new loadlisted run after the
current run is complete, or enter the
ID number being requested.
Presence of the strip is verified at
the first readhead, requiring an
additional 3 cycles (21 seconds).
The push bar moves back to the
left.
Continue testing in the normal
manner.
The push bar moves back to the left
after 3 cycles (21 seconds).
1. Continue testing in the normal
manner.
2. Do not place your hand or other
objects on the strip loading
station. These can be mistaken
for a reagent strip.
Strip sensor
problem
1. Ensure that the run is complete,
and the analyzer is at the
Ready/Run screen.
2. Ensure that the strip loading
station is clear of all strips and
foreign objects.
3. Turn analyzer power off.
4. Wait several seconds.
5. Turn analyzer power on.
6. If the problem continues,
contact your local technical
support provider.
Test results are
not being printed
Internal printer is
set to off
Set the internal printer to On
through the Setup Routine.
by the internal
printer.
No paper
Install a new roll of paper.
installed in printer
Troubleshooting
Clinitek Advantus Operator’s Guide 59
Page 60

Symptom Possible Cause Remedy
Paper is misfed,
accompanied by
an unusual noise
The print head is
1. Open the printer cover and
check the paper path.
2. Reinstall if necessary.
Latch the printhead.
not latched
correctly
Loose electrical
connection to the
Carefully remove and reinstall the
interface cable to the printer.
printer
Defective printer 1. Run the Printer test.
2. Contact your local technical
support provider if it does not
print correctly.
Touch screen
does not respond
Troubleshooting
correctly
Screen needs
recalibrating
Recalibrate
Defective screen Contact your local technical support
provider.
Loadlist will not
transfer from host
computer or
Laboratory/
The loadlist
contains other
data as well as
IDs
Ensure that the loadlist contains
only IDs.
Hospital
Information
System
The data for
transfer has less
Ensure that the loadlist has at least
1, and no more than 200 IDs.
than 1 ID or more
than 200 IDs
The list contains
an ID that has
Ensure that the loadlist contains no
IDs with more than 13 characters.
more than 13
characters
60 Clinitek Advantus Operator’s Guide
Page 61

Symptom Possible Cause Remedy
The data includes
characters that
Ensure that the loadlist uses only
characters that can be transferred.
cannot be
transferred. The
characters that
can be
transferred are
those within
ASCII code range
0032 to 0126,
with the
exception of
these characters:
& \ ^ |
A run is in
progress or the
analyzer is not
Allow all tests in the current run to
complete and the analyzer to return
to the Ready/Run screen.
displaying the
Ready/Run
screen when the
loadlist is
downloaded
A loadlist has
already been
downloaded and
not all tests have
been run
Complete all tests on the current
loadlist before transferring another
loadlist.
When the problem that caused the
loadlist to fail is removed, send the
loadlist to the analyzer.
Error 01
Error 02
Error 03
Analyzer optical
error
1. Turn analyzer power off.
2. Wait several seconds.
3. Turn analyzer power on.
Error 04
Error 05
Troubleshooting
Clinitek Advantus Operator’s Guide 61
Page 62

Symptom Possible Cause Remedy
Error 06-2 A reagent strip
detected at the
first readhead is
not detected at
the second
readhead
1. Select
Return to Ready/Run to
cancel the run and return to the
Ready/Run screen.
2. Turn analyzer power off.
3. Remove the fixed platform to
locate the strip.
4. Check the pins on the moving
table to ensure that none are
bent or broken.
5. Perform the Performing the
Daily Cleaning‚ page 37.
6. Check your printout of results,
or the Results Error Report to
determine the specimen(s) for
which no results exist.
7. Retest those specimens.
Troubleshooting
Error 07-1 A reagent strip
either is not fully
wetted or is
upside-down on
the platform
1. If the strip is upside-down,
remove and clean the push bar,
the fixed platform, and the
holddown plate.
2. Check your printout of results,
or the Results Error Report, to
determine the specimen(s) for
which no results exist.
3. Retest those specimens.
Ensure that the strip is dipped
completely into the specimen
and is placed onto the platform
with the pads facing up.
62 Clinitek Advantus Operator’s Guide
Page 63

Symptom Possible Cause Remedy
Error 08-n
Error 09-n
A reagent strip
has become
misaligned during
processing
1. Check the right side of the read
station area.
2. Remove any strips that have not
fallen into the waste bin.
3. Check your printout of results,
or the Results Error Report, to
determine the specimen(s) for
which no results exist.
4. Retest those specimens.
5. Ensure that the end of the strips
are placed against the back wall
of the platform, and are not
touching the bottom of the strip
loading station.
6. If the error repeats, remove and
clean the moving table, the fixed
platform, the push bar, and
holddown plate.
7. Check the moving table to
ensure that no pins are bent or
broken.
8. Reinstall the parts.
9. Ensure that the fixed platform is
fully pushed in on both sides.
Error 10-n Analyzer optical
error
1. Turn analyzer power off.
2. Remove and clean the fixed
platform.
Use care when cleaning the
calibration bars.
3. Check your printout of results,
or the Results Error Report, to
determine the specimen(s) for
which no results exist.
4. Retest those specimens.
Error 21 Internal memory
error
1. Turn analyzer power off.
2. Wait several seconds.
3. Turn analyzer power on.
Troubleshooting
Clinitek Advantus Operator’s Guide 63
Page 64

Symptom Possible Cause Remedy
Error 23 Moving table is
misaligned
1. Turn analyzer power off.
2. Remove the push bar, the fixed
platform, and the moving table.
You may have to pull firmly to
remove these items.
3. Turn analyzer power on.
4. Allow the analyzer to reinitialize,
the table mechanism to move to
its lowest position, and another
error displays.
5. Turn analyzer power off.
6. Reinstall the moving table.
7. Ensure it is pushed in
completely.
8. Reinstall the fixed platform, and
push bar.
Troubleshooting
Analyzer
mechanical error
Error 24
Error 25
Fixed platform is
misaligned or
push bar is
misaligned or
upside down
9. Turn analyzer power on.
Contact your local technical support
provider.
1. Turn analyzer power off.
2. Inspect the analyzer for any
obvious signs of misalignment
or incorrect installation of the
push bar, the fixed platform, or
the holddown plate.
3. Remove and reinstall, if needed.
4. Ensure the feet on the push bar
are on the bottom, nearest the
platform.
5. Turn analyzer power on.
Analyzer
mechanical error
Contact your local technical support
provider.
64 Clinitek Advantus Operator’s Guide
Page 65

Symptom Possible Cause Remedy
Error 26 Fixed platform is
missing or not
installed properly
1. Install the moving table and the
fixed platform, if missing.
2. If already installed, carefully
push in on the sides of the
platform to make sure it is fully
engaged.
3. If the error continues, remove
and reinstall the fixed platform.
Error 27 Holddown plate is
improperly
installed or
missing, or is dirty
1. Remove the fixed platform.
2. Install the holddown plate if
missing, or clean it if it appears
dirty.
3. Reinstall the holddown plate.
4. Ensure that it is properly
installed.
5. Reinstall the fixed platform.
6. If the holddown plate appears
damaged or discolored, replace
with a new holddown plate.
7. Check your printout of results,
or the Results Error Report
displayed at the end of the run,
to determine the specimen(s)
for which no results exist.
8. Retest those specimens.
Troubleshooting
Clinitek Advantus Operator’s Guide 65
Page 66

Symptom Possible Cause Remedy
Error 28 A reagent strip
that was detected
as being placed
on the platform
was not detected
at the first
readhead
If a strip was never placed or was
removed after being placed:
1. Check your printout of results,
or the Results Error Report
displayed at the end of the run,
to determine the specimen(s)
for which no results exist.
2. Retest those specimens.
3. Do not place your hand or other
objects on the strip loading
station.
These can be mistaken for a
reagent strip.
If the error occurs repeatedly:
1. Turn analyzer power off.
2. Wait several seconds
Troubleshooting
3. Turn analyzer power on.
This will recalibrate the strip
sensor.
If a strip was present:
1. Remove and clean the moving
table, fixed platform, and the
holddown plate.
Error 29 Shipping foam is
still in place.
This occurs the
first time the
1. Turn analyzer power off.
2. Remove the foam.
3. Turn analyzer power on.
analyzer is
powered on. It is
accompanied by
a loud noise.
Calibration bar
error
1. Turn analyzer power off.
2. Remove the fixed platform.
3. Inspect the calibration bars for
damage or misalignment.
4. Clean the platform and
calibration bars.
5. Reinstall the fixed platform.
6. Turn analyzer power on.
66 Clinitek Advantus Operator’s Guide
Page 67

Symptom Possible Cause Remedy
Error 30
Error 31
Analyzer
mechanical error
Contact your local technical support
provider.
Error 34
Error 36 Both areas of
analyzer memory
where factory
calibration
parameters are
stored are corrupt
Error 37 Touch screen
calibration error
1. Turn analyzer power off.
2. Wait several seconds.
3. Turn analyzer power on.
4. If the error repeats, contact your
local technical support provider.
1. Follow the instructions on the
display to calibrate the touch
screen.
If the error repeats:
1. Turn analyzer power off.
2. Contact your local technical
support provider.
Error 50 Printer Error 1. Ensure that the external printer
is turned on and is online.
2. Verify that both ends of the
interface cable are securely
connected.
3. Check that the printer has
paper.
Error 51
Error 52
Quality control
results memory
(51) or sample
results memory
(52) is almost full
Nearly 200 quality control result
sets or nearly 500 patient result
sets are stored in memory and have
not been transferred to a computer.
1. Ensure that the computer is
turned on.
2. Ensure that the interface cable
is securely connected at both
ends
3. Ensure that the setup
parameters for the computer
interface are correct.
4. Transfer at least some of the
records.
5. If unable to transfer records,
contact your local technical
support provider.
Troubleshooting
Clinitek Advantus Operator’s Guide 67
Page 68

Symptom Possible Cause Remedy
Error 53
Error 54
Quality control
results memory
(53) or sample
results memory
(54) is completely
full
Two hundred quality control result
sets or 500 patient result sets are
stored in memory and have not
been transferred to a computer. No
additional testing can occur until at
least some of the records are
transferred.
1. Ensure that the computer is
turned on.
2. Ensure that the interface cable
is securely connected at both
ends
3. Ensure that the setup
parameters for the computer
interface are correct.
4. Transfer at least some of the
records.
Troubleshooting
5. If unable to transfer records,
contact your local technical
support provider.
Error 55 Both areas of
analyzer memory
where the Setup
parameters are
stored are
corrupt. The
manufacturer’s
defaults were
restored
1. Print a Setup report to view the
default parameters.
2. If you previously printed and
saved a copy of the Setup
report of your customized
selections, compare the 2
reports.
3. Reselect the options that need
to change.
Error 56-n Analyzer error 1. Turn analyzer power off.
2. Wait several seconds.
3. Turn analyzer power on.
4. If the error repeats, contact your
local technical support provider.
68 Clinitek Advantus Operator’s Guide
Page 69

7 File Management
The analyzer stores the operating parameters, including those selected by the
user, and up to 500 patient results and 200 quality control results. The analyzer
automatically overwrites the oldest results when it exceeds capacity.
If you connect the analyzer to a computer, it automatically transfers results at
the end of a run. Refer to Section 8, System Configuration for information on
connecting to a computer.
If your analyzer is connected to a computer, or if you accidentally set Computer
port to Computer port, Ethernet port, or Both, the computer expects an
acknowledgement after it attempts to send results. If it does not receive the
acknowledgement, it continues to hold results in memory instead of overwriting
them. The analyzer generates an error when the memory nears capacity.
Refer to Section 6, Troubleshooting for error message details, and suggested
corrective actions.
File Management
Clinitek Advantus Operator’s Guide 69
Page 70

File Management
70 Clinitek Advantus Operator’s Guide
Page 71

8 System Configuration
Installation
Overview
This section provides detailed installation instructions for the Clinitek Advantus
analyzer. You must follow the installation steps correctly to ensure proper
installation, operation, and service.
CAUTION
Do not drop the analyzer or handle it roughly. This can disturb internal
calibrated optics and electronics or cause other damage. Always
handle the analyzer with care. The Clinitek Advantus analyzer is a
precision instrument and must be handled accordingly.
Place the analyzer where it will not be subjected to extreme temperature
variations. Avoid proximity to open windows, direct sunlight, ovens, hot plates,
open burners, radiators, and dry ice baths.
Do not place it on the same bench as a source of vibration, such as a
centrifuge.
The Clinitek Advantus analyzer should not be used in an explosive
atmosphere.
The bench space should be large enough to allow free air circulation around
the analyzer (7.6 cm/3 inches on all sides).
Unpacking the Analyzer
Your Clinitek Advantus analyzer is delivered in 1 shipping carton.
1. Carefully remove the contents of the shipping carton.
2. Inspect the carton and analyzer for visible signs of damage.
3. If damage to the analyzer exists, immediately file a complaint with the
carrier.
Clinitek Advantus Operator’s Guide 71
System Configuration
Page 72

4. Make sure all items are included with your analyzer, and keep them for
future use.
• Fixed platform and holddown plate
• 2 Push bars
• Moving table
• Quality Package of printed documents
• Box of 5 waste bin liners
• Roll of printer paper
• 2 Power cords
• Operator’s Guide CD
A single-language printed operator’s guide is also available. Contact your local
distributor or supplier for information on obtaining this guide.
System Configuration
1
Fixed platform and holddown plate
2
Push bar
3
Moving table
Figure 21 Instrument Parts
5. Retain the Clinitek Advantus shipping carton and packing for several
weeks.
If you need to ship the analyzer, the shipping carton affords the best
protection against damage.
72 Clinitek Advantus Operator’s Guide
Page 73

6. Place the analyzer on a firm, level work surface in the designated work
area.
7. Ensure that the analyzer is level, and that the back and sides of the
analyzer are at least 7.6 cm (3 in) from any adjacent wall or analyzer.
8. Locate the piece of foam packing that is under the read area cover.
The foam has a red tag attached.
9. Remove the foam by gently pulling the red tag down and forward.
Figure 22 Remove the Foam
Clinitek Advantus Operator’s Guide 73
System Configuration
Page 74

Installing the Analyzer
Record the Warranty Information
1. Locate the serial number.
The serial number is found inside the analyzer near the front left corner.
1
Serial number
Figure 23 Locate the Serial Number
2. Print the Pre-service Checklist‚ page 116, and the Warranty Information‚
page 113.
3. Write the installation date and serial number in the spaces provided in the
Pre-service Checklist‚ page 116, and on the Warranty Information‚
page 113.
4. Contact your Siemens Diagnostics representative for your warranty
information if this page is not included in your guide.
System Configuration
74 Clinitek Advantus Operator’s Guide
Page 75

Install the Moving Table
1. Hold the table with the small rectangular tab facing to the back.
2. Align the 2 grooves on the bottom of the table with the edges of the
platform on which the table rests.
3. Gently push the table in until you hear the tab latch into the hold position.
4. Check that the table is secure.
Figure 24 Install the Moving Table
Clinitek Advantus Operator’s Guide 75
System Configuration
Page 76

Install the Holddown Plate
1. Position the holddown plate with the arrow side facing up and the arrow
pointing to the back.
2. Place the pin on the front of the holddown plate into the hole at the front of
the fixed platform.
3. Align the tab at the back of the holddown plate with the slot at the back of
the platform.
4. Snap the holddown plate into place.
5. Ensure that the white calibration bars are visible.
System Configuration
1
Ta b
Figure 25 Install the Holddown Plate
76 Clinitek Advantus Operator’s Guide
Page 77

Install the Fixed Platform
1. Align the 2 grooves on the bottom of the fixed platform with the arms
extending forward from the analyzer.
The flanges on the sides of the holddown plate align just outside the read
area cover. The top edge of the platform aligns just under the cover.
2. Gently push the platform in as far as possible.
Push past the ridge to correctly position the platform.
CAUTION
Do not force the platform. Ensure that the moving table is correctly
positioned before you attempt to reinstall the fixed platform. If you
force the platform, you may damage the moving table or fixed
platform.
During the initial installation, you may need to use firm pressure to push the
platform the final 1.3 cm (0.5 in). The platform must be seated, and not
even slightly crooked or the strips may jam as they are pushed along the
platform.
Figure 26 Install the Fixed Platform
Clinitek Advantus Operator’s Guide 77
System Configuration
Page 78

Install the Push Bar
1. Hold the push bar at the indented end.
2. With this end slightly upward, insert the peg on the other end of the bar into
the hole in the pusher mechanism.
3. Lower the push bar into place.
Figure 27 Install the Push Bar
System Configuration
78 Clinitek Advantus Operator’s Guide
Page 79

Install the Waste Bin Liner
1. Take a waste bin liner from the pack delivered with the analyzer.
2. Place the liner into the waste bin.
Figure 28 Install the Waste Bin Liner
Clinitek Advantus Operator’s Guide 79
System Configuration
Page 80

Installing Connections
1
Keyboard and barcode reader interface connector
2
Printer interface connector
3
Serial interface connector
4
Ethernet interface connector
5
Line cord receptacle
Figure 29 Analyzer Connections
Connect the Analyzer Power
1. Ensure that the analyzer power switch is in the off position.
2. Select the correct power cord for your use.
Two power cords are packed with the analyzer.
3. Connect the power cord to the analyzer and to an appropriate, grounded
AC electrical outlet.
4. Dispose of the other power cord.
System Configuration
Connect to a Printer
You can use most 80-column, continuous feed printers or the Clinitek Form
Printer with the Clinitek Advantus analyzer.
Some printers include an interface cable that can connect to the printer port on
the back of the analyzer. If not, you need to obtain the cable separately. Refer
to Appendix G, Computer and Printer Interface, for the pin specifications for the
male connector. The requirements for the other end of the cable depend on the
printer. Appropriate cables are available at most retail computer stores.
1. Connect the appropriate end of the interface cable to the 25-pin printer port
on the Clinitek Advantus analyzer.
80 Clinitek Advantus Operator’s Guide
Page 81

2. Connect the other end to the printer.
3. Carefully read the operator’s guide that accompanies the printer and
become familiar with its operation before using.
Connect to a Computer
You can connect the Clinitek Advantus analyzer to a host computer or LIS
(Laboratory Information System) via the serial port and a null modem cable, or
via an ethernet cable. Refer to Appendix G, Computer and Printer Interface for
cable requirements for interfacing to a computer.
Connecting Through the Serial Port
1. Connect the appropriate end of the interface cable to the 9-pin computer
port on the back of the Clinitek Advantus analyzer.
2. Connect the other end of the cable to the appropriate port on the computer,
following the instructions given with the computer.
Connecting Through the Ethernet Port
1. Connect the appropriate end of the interface cable to the ethernet port on
the back of the Clinitek Advantus analyzer.
2. Connect the other end of the cable to the appropriate port on the computer,
following the instructions given with the computer.
Connect to a Computer Keyboard
You can use any US QWERTY keyboard with a PS2 connection with the
Clinitek Advantus analyzer. Connect the appropriate end of the keyboard cable
to the keyboard port.
Connect to a Barcode Reader
A handheld barcode reader is available for use with the Clinitek Advantus
Urinalysis analyzer. Connect it through the PS2 barcode reader port on the
back of the analyzer. Refer to Appendix F, Barcode Reader.
Installing the Barcode Reader Bracket
A barcode reader bracket is supplied with the barcode reader. Refer to
Appendix F, Barcode Reader, for instructions on fixing the bracket to the
analyzer.
Installing a Roll of Printer Paper
Install a roll of printer paper and re-install the printer cover. Refer to Changing
the Paper‚ page 45.
Clinitek Advantus Operator’s Guide 81
System Configuration
Page 82

Performing the Initial Analyzer Check
After the Clinitek Advantus analyzer is properly installed, perform the following
initial analyzer check. If problems occur during this procedure or if an error
message displays, refer to Section 6, Troubleshooting.
1. Turn analyzer power on.
The push bar moves and the display shows the analyzer name and a
series of dots while the analyzer initializes. The title screen then displays,
showing the software version numbers, along with the analyzer name and
copyright information. The analyzer then performs some internal checks
and procedures. Each check and its status displays while the testing is in
progress.
2. Verify that the fan is on by checking for airflow from the analyzer.
The fan is located at the top left at the back of the analyzer.
NOTE: If an error occurs, a message displays that instructs you to turn the
power off and back on after several seconds, or to contact Siemens
Diagnostics Customer Support.
The display changes to the Ready/Run screen.
The screen displays the default setting for the primary reagent strip for use
on the analyzer.
3. Check that the primary Siemens Diagnostics Reagent Strip for Urinalysis
displayed corresponds to the strip type you are using.
4. If the strip types do not agree, change the selected strip type before
beginning testing.
Refer to Strip‚ page 90, for instructions on changing the strip type used on your
analyzer. You can also set an alternative reagent strip type to use in your
laboratory. You can then change to the alternative reagent strip type without
leaving the Ready/Run screen.
.
System Configuration
CAUTION
Do not use a reagent strip other than the selected primary or
alternative reagent strip. Only use Siemens Diagnostics brand
reagent strips. Use of other strips may cause erroneous results.
5. Completely immerse all of the reagent pads on a Siemens Diagnostics
Reagent Strip in negative control solution, such as CHEK-STIX Negative
Control solution.
6. Immediately remove the reagent strip.
82 Clinitek Advantus Operator’s Guide
Page 83

7. While removing the strip, run the edge against the side of the container.
This removes excess liquid.
CAUTION
Do not blot the edge of the strip. This could affect results.
8. Place the reagent strip onto the supports of the strip loading station, with
the reagent pads facing up.
Place the strip to the right of and parallel to the push bar. Ensure that the
end of the strip is against the back wall of the platform and that it is not
touching the bottom of the strip loading station.
CAUTION
Improper placement may cause the analyzer to jam or the strip to
incorrectly align under the readheads.
The push bar moves almost immediately, pushing the strip into the read
area. Most of the keys on the display become inactive.
Figure 30 Placement of Reagent Strip
After the strip is read, the internal printer prints the test results. The
analyzer produces a result for each reagent pad that is within the limits
given in the package insert for the control solution.
Clinitek Advantus Operator’s Guide 83
System Configuration
Page 84

9. If the analyzer does not perform as expected, or if the printed results do not
agree with the expected values, refer to Section 6, Troubleshooting.
With satisfactory completion of the initial analyzer check, the
Clinitek Advantus analyzer is ready for routine testing.
10. Select
11. Select
12. Use the information in Setup Information to customize the software for your
Menu.
Setup.
laboratory.
Setup Information
Use Set Options to customize the analyzer for use in your laboratory.
1. At the Ready/Run screen, select
2. Select
Memory may be erased if a change is made to any of several Setup options.
All results and loadlisted ID numbers stored in memory are deleted when the
change is made. A warning screen displays first, and you are given the option
of not making the change to the Setup option, saving the stored results and
numbers.
Ensure all patient and QC results are printed or transferred and that a loadlist
is not stored in memory before making the changes.
Setup to display the first setup options menu.
Setup Menu 1
Use the first Setup menu to change the date and time, turn the computer port
on or off, set printer options, and adjust the display contrast.
Menu.
System Configuration
Menu Options Default
Date N/A (current)
Time N/A (current)
Computer port Off
Printer Internal: On, 2 blank lines between
patient results
External: Off
Display contrast N/A
Select the key symbol that displays next to the option to change the option.
Each option is described below.
84 Clinitek Advantus Operator’s Guide
Page 85

Date
Use this option to set the current date.
You can change the Date Format and Separator using Setup Menu 3.
1. Select
Date.
The display changes to show the current date and the numeric keypad.
2. Enter the date.
Select the
Move Left and Move Right keys to move the cursor to the digit to
change and enter the correct number.
The message changes as you move from 1 part of the date to the next,
showing the prompts
Enter day, Enter month, or Enter year. Enter the date
in the order shown on the prompts. Enter the leading 0 where needed.
3. Select Enter.
Time
Use this option to set the current time.
You can change the Time Format and Separator using Setup Menu 3.
1. Select Time.
The display changes to show the current time and the numeric keypad.
2. Enter the time.
Select the
Move Left and Move Right keys to move the cursor to the digit to
change and enter the correct number.
The message changes as you move from 1 part of the time to the next,
showing the prompts
Enter hour and Enter minutes. Enter the leading 0
where needed.
3. If the time format is 12 Hour, select the AM/PM cycle key to set the time to
AM or PM.
The AM/PM cycle key is only active if the time format is 12 Hour.
4. Select
Enter.
System Configuration
Clinitek Advantus Operator’s Guide 85
Page 86

Computer Port
Use the
Computer port cycle key to set the computer port.
To... Select...
use no computer,
transfer selected results to a
computer,
Off
Computer port
Ethernet port
Both
The specifications for the computer port are selected using Setup Menu 8.
Printer
Select
Printer to set several printer options.
Internal
The internal printer is used to print patient results.
Use the
Internal cycle key to set the internal printer.
To... Select...
stop the internal printer,
turn the printer on,
Off
On, 2 blank lines between patient
result sets
On, 6 blank lines between patient
result sets
On, 12 blank lines between patient
result sets
System Configuration
NOTE: QC result sets are always separated by 2 blank lines.
Custom Header
Use this procedure to set the custom report header.
If you select 12 blank lines between patient result sets for the internal printer, it
prints a header at the end of each printed report. The default header is
MICROSCOPICS. You can customize the header or set it to contain all blanks
if you do not want a header.
1. Select
Custom header.
2. Enter up to 24 letters and spaces.
Move Left to erase any existing text.
Use
86 Clinitek Advantus Operator’s Guide
Page 87

3. Select Enter.
External
You can attach and configure an external printer. This printer can be a form or
80-column, continuous-page printer.
Use the
External cycle key to set an external printer.
To Use... Select...
No external printer,
80-column printer,
Printer Products Form Printer,
Off
On, 80 column
On, Form printer 1
80-column printer printing single
record on each page,
Clinitek Form Printer*,
Star Form Printer,
On, Form printer 2
On, Form printer 3
*If you are using the Clinitek Form Printer, set the Mode Switches on the
printer to Computer (both DS1-1 and DS1-2 switches down).
If necessary, use this procedure to determine which form printer to select.
1. Print a record using each option.
2. Select the 1 that provides the best placement of the printed results on the
form and that works appropriately with your form printer.
Refer to Appendix G, Computer and Printer Interface, for additional
information on the 3 formats.
3. Select
Enter.
Display Contrast
Use this procedure to adjust the contrast of the analyzer display.
1. Select
2. Use the
3. Select
Display contrast.
+ and - keys to increase or decrease the contrast.
Previous Screen to confirm the setting and return to the first Setup
menu.
System Configuration
Clinitek Advantus Operator’s Guide 87
Page 88

Setup Menu 2
Use the second Setup menu to select the Language, Result Units, and Test
Strips.
1. At the first Setup menu, select
menu.
2. If password protection is set, enter the password.
3. Select
Enter.
Menu Option Default
Language English
Result units Conventional
Plus system Off
Strip
Alternative strip None
Language
Use the
Language cycle key to select the language for the user interface. All
screens display in the language selected.
Key Options
Language English
Next Screen to access the second Setup
MULTISTIX
10 SG
Français
Deutsch
Italiano
Kanji (Japanese)
Español
Português
Chinese
Svenska
System Configuration
The default selection for several other options may change, depending upon
the language selected. For example, the date and time formats, strip and
alternative strip names, and reporting of color.
88 Clinitek Advantus Operator’s Guide
Page 89

Result Units
Several of the languages have options for the units in which results display.
Refer to Tables of Results‚ page 125 for the results that display and print for
each option. As with Language, the default selection for several other options
may change, depending upon the result units selected.
Use the
Result units cycle key to set the Result Units.
Key Options
Result units Conventional
S.I.
Nordic*
JCCLS**
* English and Swedish only
**Japanese only
Plus System
Use the Plus system cycle key to display and print results in the Plus system,
which uses + symbols, rather than in clinical units, such as mg/dL.
Key Options
Plus system Off
On
System Configuration
Clinitek Advantus Operator’s Guide 89
Page 90

Strip
Many configurations of Siemens Diagnostics Reagent Strips are available for
the Clinitek Advantus analyzer. However, not all configurations are available in
every country.
Use the Strip cycle key to select the primary test strip.
Ensure the reagent strip selected agrees with the name of the Siemens
Diagnostics Reagent Strip used as the primary reagent strip on the analyzer.
Key Options
Strip
†
MULTISTIX 10 SG (default)
MULTISTIX 9 SG
MULTISTIX 8 SG
MULTISTIX SG
MULTISTIX SG L
MULTISTIX
N-MULTISTIX
SG
NEPHROSTIX L
URO-HEMACOMBISTIX
URO-LABSTIX
®
SG L
®
SG L
MULTISTIX 9
URO-HEMACOMBISTIX
URO-LABSTIX
LIFESTIX
®
MULTISTIX PRO
11
MULTISTIX PRO 10LB
MULTISTIX PRO 10LS
N-MULTISTIX SG L
MULTISTIX PRO 7G
System Configuration
†
Not all reagent strips are available in all countries
NOTE: The Japanese version of the Clinitek Advantus software includes an
Auto ID setting. When this option is selected, the software automatically
detects URO-HEMACOMBISTIX SG L or MULTISTIX 10 SG
(N-MULTISTIX SG L in Japan) strips. Alternative strip selection is not available
when primary strip selection is set to Auto ID.
90 Clinitek Advantus Operator’s Guide
Page 91

Alternative Strip
When testing patient samples, you can select the alternative reagent strip type
without re-accessing the Setup menu.
Use the
Choose different primary and alternative reagent strips to enable switching
between tests.
Ensure the reagent strip selected agrees with the name of the Siemens
Diagnostics Reagent Strip used as the secondary reagent strip.
Key Options
Alternative strip
†
Alternative strip cycle key to select the alternative reagent strip.
†
Not all reagent strips are available in all countries
None
MULTISTIX 10 SG
MULTISTIX 8 SG
MULTISTIX PRO 11
MULTISTIX PRO 10LB
MULTISTIX PRO 10LS
MULTISTIX PRO 7G
Setup Menu 3
Use the third Setup menu to select the separator and format for the date and
time.
At the second Setup menu, select Next Screen to access the third Setup
menu.
Menu Option Default
Date format Month/Day/Year
Date separator
Time format 12 Hour
Time separator
Clinitek Advantus Operator’s Guide 91
-
:
System Configuration
Page 92

Use the cycle keys next to each item to select an option.
Key Options
Date format Month/Day/Year
Day/Month/Year
Year/Month/Day
Date separator
- (default)
.
/
Time format 12 Hour
24 Hour
Time separator
: (default)
,
.
Setup Menu 4
Use the fourth setup menu to select tests to report and their order, mark
positives, set positive levels for tests, and set normal ranges for SG, pH, and
CRE.
The primary reagent strip you selected determines the options available. The
analyzer uses the same settings for the secondary reagent strip, if they are
relevant to the reagent strip selected.
System Configuration
At the third Setup menu, select
Menu Option Default
Tests to report and their order N/A
Mark positives On
Positive levels for tests N/A
Normal range for SG/pH N/A
Normal range for CRE N/A
92 Clinitek Advantus Operator’s Guide
Next Screen to access the fourth Setup menu.
Page 93

Tests to Report and Order
Use this procedure to select the order in which analytes and physical
parameters are reported. You can choose to not report a test.
These selections apply only to testing with the primary reagent strip. They do
not apply when testing with the secondary reagent strip. Secondary reagent
results are always reported in the default order.
1. Select Tests to report and their order to display a series of cycle keys,
labeled 1 to 12.
To... Then ...
retain the existing tests and
select
Previous Screen.
their order,
change color and clarity, 1. Cycle the last active key to select
CLA.
COL or
2. Select the next key, which is now active,
to add the other test name.
Color and clarity are reported in the last 2
positions if you make no further changes.
NOTE: If English is the selected language
and S.I. is the selected Results units, color is
automatically included as the last test. You
can also add it manually to the end of the list.
You can also choose to include visually
determined clarity as a reported result.
change the order in which tests
are reported,
1. At the first position you want to change,
use the cycle key to select a test.
Any tests not already listed display first.
Then a blank displays and all tests from
that position are erased and must be reentered.
As each test is selected, the next test in
the list is the first test displayed for the
following position.
2. Select a test for each of the remaining
positions
remove a test from the
reporting order,
3. When finished, select
Select the tests to report and leave a blank
description in the final position.
Previous Screen.
System Configuration
Clinitek Advantus Operator’s Guide 93
Page 94

System Configuration
NOTE: If you are using a MULTISTIX PRO Reagent Strip, the analyzer
calculates a protein-to-creatinine (PC) ratio. The PC ratio is always reported
and always displays in the last position of the reported results. You cannot
change its order and, therefore, this test is not displayed.
NOTE: Only 1 protein result is reported from the protein-low and protein-high
tests when using MULTISTIX PRO Reagent Strips.
Mark Positives
The analyzer can mark all positive results with an asterisk (*) in the displayed
and printed report, and in the data transferred to a computer.
Use the
Mark Positives cycle key to set this option.
To... Select...
mark positives,
leave positives unmarked,
NOTE: If Mark Positives is Off, you are unable to set several other options.
On
Off
Positive Levels for Tests
You can select this option only if Mark positives is On.
Use this procedure to set the lowest positive result for each chemistry test. The
analyzer also uses these levels to determine which specimens meet the
criteria for the confirmatory and microscopic reports.
If Mark positives is On, the analyzer marks positive results with an asterisk (*)
in the displayed and printed report and in the data transferred to a host
computer.
1. Select
Positive levels for tests.
The display shows the lowest level considered positive for the tests
selected in Tests to report.
If Protein is selected as a reported test, the first screen displays 2 different
options for Protein. Option 1 is for traditional Siemens Diagnostics Reagent
Strips. Option 2 is for all selectable MULTISTIX PRO strips. The reported
results for protein vary slightly, depending upon which group of reagent
strips is used.
Select the first positive level for each group to change your test strip
without changing the first positive level of the protein test.
Nitrite is not listed, because it has only 1 positive level. Also, the PC ratio is
not listed, because these results already include a description of Normal or
Abnormal.
2. Use the cycle key to set the level for each test.
94 Clinitek Advantus Operator’s Guide
Page 95

3. If necessary, select Next Screen to display an additional screen of tests.
4. When finished, select
Previous Screen.
Normal Range for SG and pH
You can select this option only if Mark positives is On.
Use this procedure to set the lower and upper limits of the normal range for SG
and pH. Set each limit separately. The upper limit must be higher than or equal
to the lower limit.
1. Select Normal range for SG/pH.
2. Select the
+ or - keys next to each limit to raise or lower the limit.
The limit changes by 1 reporting level until it is equal to the opposite limit or
is at the highest or lowest reporting level.
3. Select
Previous Screen.
Normal Range for CRE
You can select this option only if you are using MULTISTIX PRO Reagent
Strips and Mark positives is On.
Use this procedure to select the lower and upper limits of the normal range for
creatinine. The upper limit must be equal to or higher than the lower limit.
1. Select Normal range for CRE.
2. Select the
+ or - keys next to each limit to raise or lower the limit.
The number changes by 1 reporting level until it is equal to the opposite
limit or is at the highest or lowest reporting level.
3. Select Previous Screen.
Setup Menu 5
At the fourth Setup menu, select Next Screen to access the fifth Setup menu.
Menu Option Default
Color Determined by analyzer
Color choices Yellow, Orange, Red, Green, Blue,
Brown, Other
Clarity choices Clear, SL Cloudy, Cloudy, Turbid,
Other
Use default COL/CLA during run On
Clinitek Advantus Operator’s Guide 95
System Configuration
Page 96

Color
System Configuration
Use the
Color cycle key to have the analyzer determine color, or allow visual
determination.
To... Select...
have the analyzer determine color
Determined by analyzer
automatically,
enter the color as part of a manually
Entered by tech
entered loadlist or just before testing
each specimen,
NOTE: The analyzer can only determine color if the Siemens Diagnostics
Reagent Strip used contains the leukocyte test. Results reported by the
analyzer may be different from the color seen visually. This is because of the
inherent differences between the human eye and the optical system of the
analyzer.
Color Choices
If the color option is Entered by tech, you can specify up to 7 specimen colors.
Use this procedure to customize descriptions and remove defaults from the
reporting list.
1. Select
Color choices.
2. Edit the first 4 default colors.
3. Select
Next Screen to display and edit the last 3 default colors.
The default colors are Yellow, Orange, Red, Green, Blue, Brown, and
Other.
4. Remove default options from the reporting list.
The colors included on the list are designated by a check mark.
a. Select the check mark to remove it, and delete the option from the list.
The first option is always selected and cannot be made inactive.
5. Change the color description:
a. Select the word describing the color to change the color.
An alphabetic keypad displays.
b. Use the
Move Left key to erase the existing name.
c. Enter the new name.
You can use up to 15 letters and spaces.
d. Select
6. Select
Enter.
Previous Screen.
96 Clinitek Advantus Operator’s Guide
Page 97

Clarity Choices
Clarity is only determined visually. You can specify up to 5 clarity descriptions.
Use this procedure to customize descriptions and remove defaults from the
reporting list.
1. Select Clarity choices.
The default clarity descriptions are Clear, SL Cloudy, Cloudy, Turbid, and
Other.
2. Remove default options from the reporting list:
The clarity descriptions included on the list are designated by a check
mark.
a. Select the check mark to remove it, and delete the option from the list.
The first option is always selected and cannot be made inactive.
3. Change the clarity description:
a. Select the word describing the clarity to change the description.
An alphabetic keypad displays.
b. Use the
Move Left key to erase the existing name.
c. Enter the new name.
You can use up to 15 letters and spaces.
d. Select Enter.
4. Select
Previous Screen.
Use Default COL/CLA During Run
This option is only available if Color is reported and is Entered by tech, or
Clarity is reported.
Use the Use default COL/CLA during run cycle key to use a default color and
clarity.
To... Select...
display no default value,
set the first listed value for color and
Off
On
clarity as the default,
NOTE: The reported value can be changed prior to testing the specimen.
Clinitek Advantus Operator’s Guide 97
System Configuration
Page 98

Setup Menu 6
At the fifth Setup menu, select Next Screen to access the sixth Setup menu.
Menu Option Default
Positive levels for COL/CLA N/A
Flags for confirmatory test A N/A
Flags for confirmatory test B N/A
Flags for microscopics N/A
Set QC options N/A
Positive Levels for COL/CLA
Use this procedure to set the lowest positive result for color and clarity.
The analyzer uses these levels to determine which specimens meet the criteria
for the confirmatory and microscopic reports.
If Mark positives is On, positive results are marked with an asterisk (*) in the
displayed and printed report and in the data transferred to a host computer.
1. Select
2. For each setting, use the cycle key to set the first level marked as positive.
3. Select
Positive levels for COL/CLA.
The lowest level considered positive for color and clarity displays. The
available choices are those set earlier.
All results later in the list are also marked positive.
Previous Screen.
System Configuration
Flags for Confirmatory Test A
The confirmatory reports list those specimens that may require confirmatory
testing. Mark positives must be On to obtain the reports.
Use this procedure to select up to 5 tests for confirmatory report A.
1. Select
Flags for confirmatory test A to display a list of reported tests.
2. Select the box next to the tests to include in the confirmatory report.
A check mark displays in the box.
Select the box again to remove the check mark.
3. Select
98 Clinitek Advantus Operator’s Guide
Previous Screen.
Page 99

Flags for Confirmatory Test B
Use this procedure to select up to 5 tests for confirmatory report B. Mark
positives must be On to obtain the reports.
1. Select
Flags for confirmatory test B to display the reported tests not
selected for confirmatory report A.
2. Select the box next to the tests to include in the confirmatory report.
A check mark displays in the box.
Select the box again to remove the check mark.
3. Select
Previous Screen.
Flags for Microscopics
The microscopic report lists those specimens that may require a microscopic
examination. Mark positives must be On to obtain the report.
Use this procedure to select up to 5 tests for the microscopics report.
1. Select
Flags for microscopics to display a list of reported tests.
2. Select the box next to the tests to include in the microscopics report.
A check mark displays in the box.
Select the box again to remove the check mark.
3. Select
Previous Screen.
Set QC Options
Use this procedure to set prompting for regular QC testing. You can set the
interval between QC tests from 1 hour to 99 days.
The QC Reminder displays at the end of the selected QC interval when a test
is completed or loadlist testing is complete. You can prevent testing when a
QC test is due.
1. Select
Set QC options.
2. Use the cycle key to select a QC option.
System Configuration
To... Select...
not set a QC interval,
prompt when a QC test is due,
prevent testing of patient samples when
No regular QC test
Prompted regular QC test
Compulsory regular QC test
a QC test is due,
Clinitek Advantus Operator’s Guide 99
Page 100

3. For Prompted regular QC test or Compulsory regular QC test, enter the
interval:
a. Select Set QC interval.
b. Use the cycle key to select Hours or Days.
c. Enter the QC interval.
d. Select
Enter.
Setup Menu 7
At the sixth Setup menu, select Next Screen to access the seventh Setup
menu.
Menu Option Default
Microscopics setup N/A
Edit flagged results Off
Enter sample IDs Off
Tech ID Off
Microscopics Setup
Enable entry of microscopics results.
1. Select
Microscopics setup.
The display shows where to select 5 headings and their associated units.
The sixth selection enables you to enter custom data and units.
System Configuration
100 Clinitek Advantus Operator’s Guide
 Loading...