

Page 1
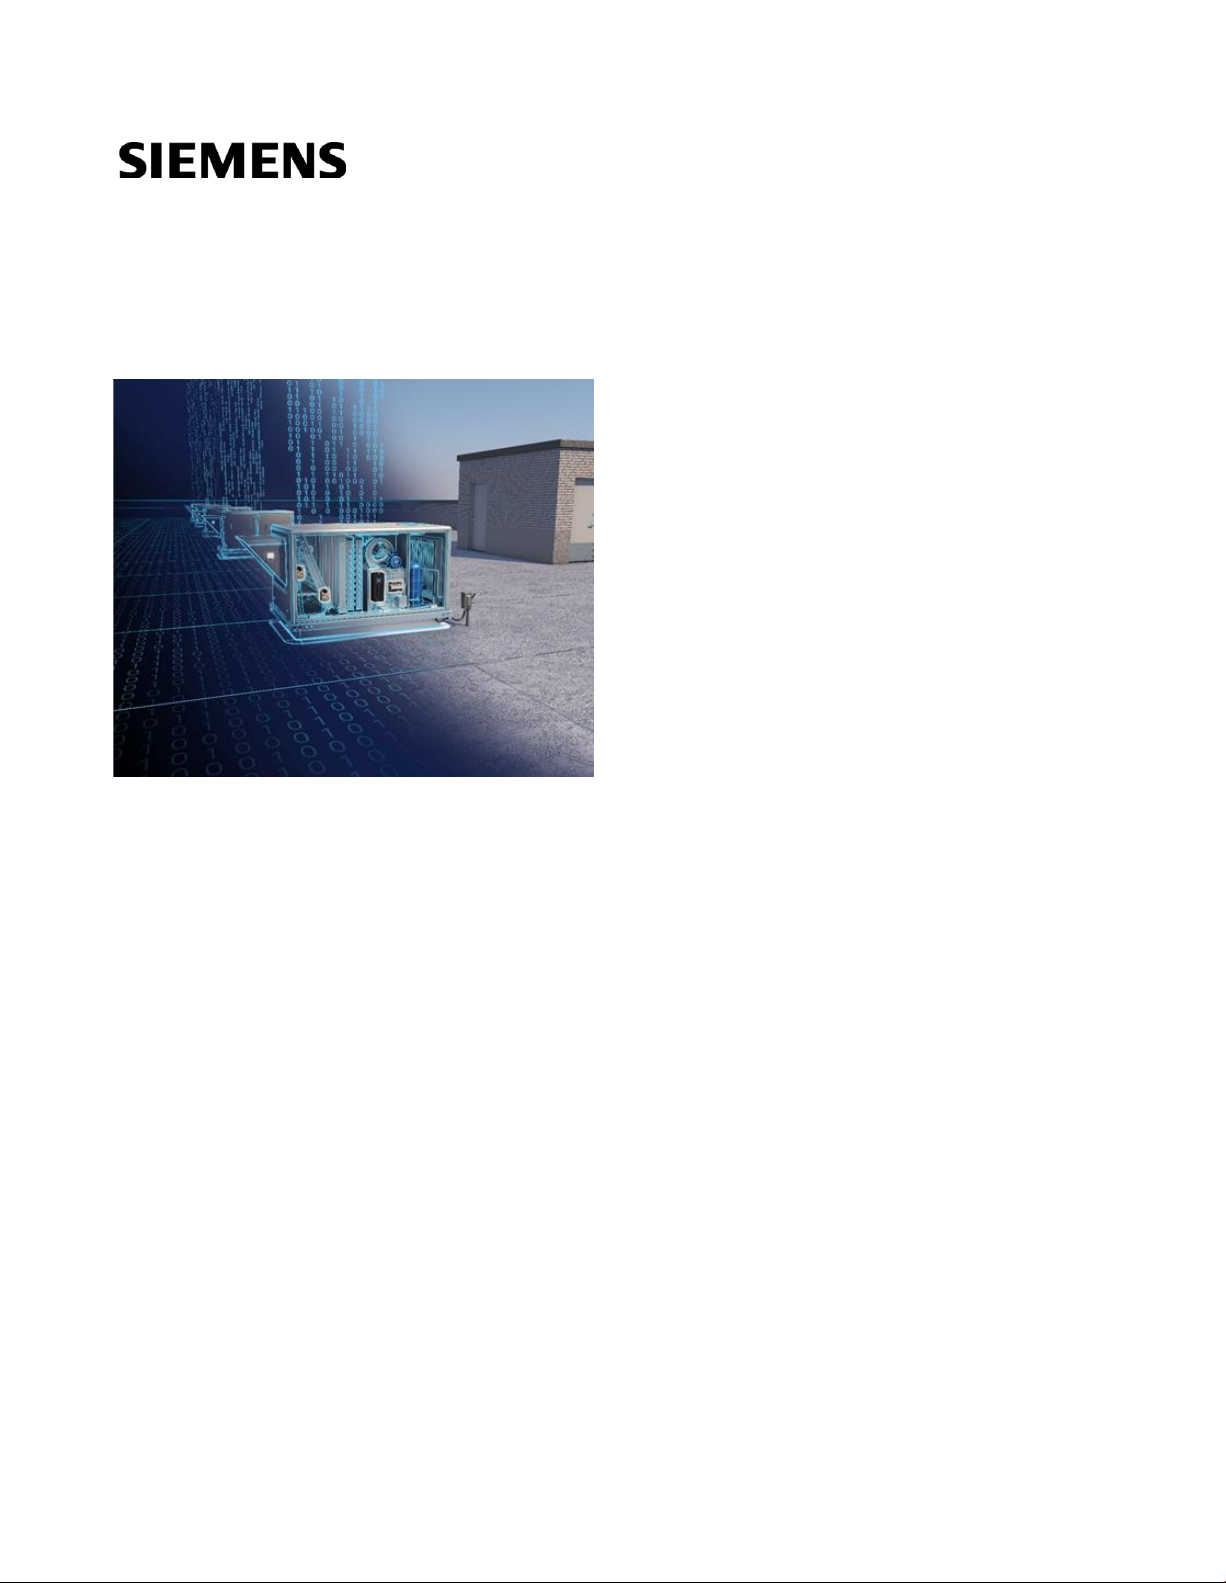
Climatix RT
Remote Monitoring and Intelligent Diagnostics
for Roof Top Unit Controllers
Start-up
A6V12053407 Smart Infrastructure
2021-03-01
Page 2

2 | 49
Table of Contents
Legal note .................................................................................................................................................................... 5
About this document .................................................................................................................................................. 6
Getting to know Climatix RT ......................................................................................................................................... 6
Engineering Guide ...................................................................................................................................................... 7
Overview ....................................................................................................................................................................... 7
Before you start .................................................................................................................................................. 7
Climatix RTU Controller ............................................................................................................................................. 8
Key benefits .................................................................................................................................................................. 8
Topology ....................................................................................................................................................................... 8
Inputs and Outputs ....................................................................................................................................................... 8
Communications ........................................................................................................................................................... 9
Climatix Mobile application ..................................................................................................................................... 10
Key benefits ................................................................................................................................................................ 10
Startup ........................................................................................................................................................................ 10
Zone Monitoring .......................................................................................................................................................... 11
Fan Configuration ....................................................................................................................................................... 12
Cooling ........................................................................................................................................................................ 13
Heating ........................................................................................................................................................................ 14
Configuration............................................................................................................................................................... 14
Sensors .......................................................................................................................................................... 15
Economizer Mode ............................................................................................................................................. 16
Damper Actuator .............................................................................................................................................. 18
Exhaust Fan ..................................................................................................................................................... 19
Demand Control Ventilation.............................................................................................................................. 20
Safeties ....................................................................................................................................................................... 21
Connectivity ................................................................................................................................................................ 22
Configuration Overview and Confirmation .................................................................................................................. 23
Climatix IC, remote monitoring and intelligent diagnostic ................................................................................... 25
Key benefits ................................................................................................................................................................ 25
Key functions .............................................................................................................................................................. 25
Requirements ............................................................................................................................................................ 26
Technical requirements .............................................................................................................................................. 26
Access concept to Climatix IC .......................................................................................................................... 26
Use of Data Matrix Code ............................................................................................................................................ 27
Entering Climatix IC .................................................................................................................................................. 28
Assistance on the start page ...................................................................................................................................... 28
Access methods.......................................................................................................................................................... 30
Sign in ......................................................................................................................................................................... 30
Page 3

3 | 49
Login using a local login ................................................................................................................................... 30
Log in using an external login ........................................................................................................................... 32
Sign up - Register a plant ........................................................................................................................................... 34
Register using a local login .............................................................................................................................. 34
Register using an external login ....................................................................................................................... 35
Using the end user Climatix application ................................................................................................................ 37
Register with the End user Climatix app..................................................................................................................... 37
Log in on the end user Climatix app ........................................................................................................................... 37
Add additional devices ................................................................................................................................................ 37
Climatix IC Portal Security ....................................................................................................................................... 39
Climatix IC .................................................................................................................................................................. 39
Climatix controller ....................................................................................................................................................... 39
Fault Detection and Diagnostics ............................................................................................................................. 40
View FDD Configurations ........................................................................................................................................... 40
User and Plant Roles ................................................................................................................................................ 41
Plant settings .............................................................................................................................................................. 42
Basic data ......................................................................................................................................................... 42
Configure Alarm Notifications ................................................................................................................................. 44
Unit Mode .................................................................................................................................................................. 45
Scheduler .................................................................................................................................................................. 46
Support ...................................................................................................................................................................... 48
Page 4

Page 5
Legal notes
5 | 49
Legal notes
Legal note concept
This guide includes notes that must be followed to prevent damage to property.
Notes dealing only with damage to property use the signal word NOTICE and an exclamation point. They are
depicted as follows:
NOTICE
Type and source of hazard
Consequences in the event the hazard occurs
Measures/prohibitions to prevent the hazard
Qualified personnel
Only qualified personnel may commission the device/system. In this regard, qualified personnel have the training
and experience necessary to recognize and avoid risks when working with this device/system.
Proper use
The device/system described here may only be used on building technical plants and for the described applications
only.
The trouble-free and safe operation of the device/system described here requires proper transportation, correct
warehousing, mounting, installation, commissioning, operation, and maintenance.
You must comply with permissible ambient conditions. You must comply with the information provided in the
Technical Requirements Section and any notes in the associated documentation.
Fuses, switches, wiring and grounding must comply with local safety regulations for electrical installations. Observe
all local and currently valid laws and regulations.
Exemption from liability
The content of this document was reviewed to ensure it matches the hardware and firmware described herein.
Deviations cannot be precluded, however, so that we cannot guarantee that the document matches in full the
actual device/system. The information provided in this document is reviewed on a regular basis and any required
corrections are added to the next edition.
Software used
All open source software components used in this solution/service (including copyright owners and license
agreements) can be viewed at the following link:
● Link to EULA and OSS for Mobile App: http://www.usa.siemens.com/BTCPSEULA
● Link to OSS for Climatix IC: https://www.climatixic.com/Content/OSS_ClimatixIC.htm
Page 6
About this document
Getting to know Climatix RT
6 | 49
About this document
Getting to know Climatix RT
Videos
Videos
Climatix Mobile Application
All pertinent videos are located at: www.usa.siemens.com/rtu
Climatix IC
Getting started
Page 7

Engineering Guide
Overview
7 | 49
Engineering Guide
Overview
This document is intended for Installers and Technicians for the Climatix RT solution.
The instructions in this document will cover how to startup a Climatix RT controller and connect the controller to
Climatix IC.
This connection may reside within a corporate IT network on site.
Before you start
Before you begin the commissioning process, clarify the corporate IT network configuration on site. For example:
Would the controller be connected on the IT network? Is it a physical isolated network zone, or part of the corporate
network zone (Climatix IC and Internet on the same network)?
● Verify that the guidelines for the IP address scheme of network devices can be DHCP
● Verify the controller can directly access the Internet from the corporate IT network on site (without a proxy
server)
Page 8
Climatix RTU Controller
Key benefits
8 | 49
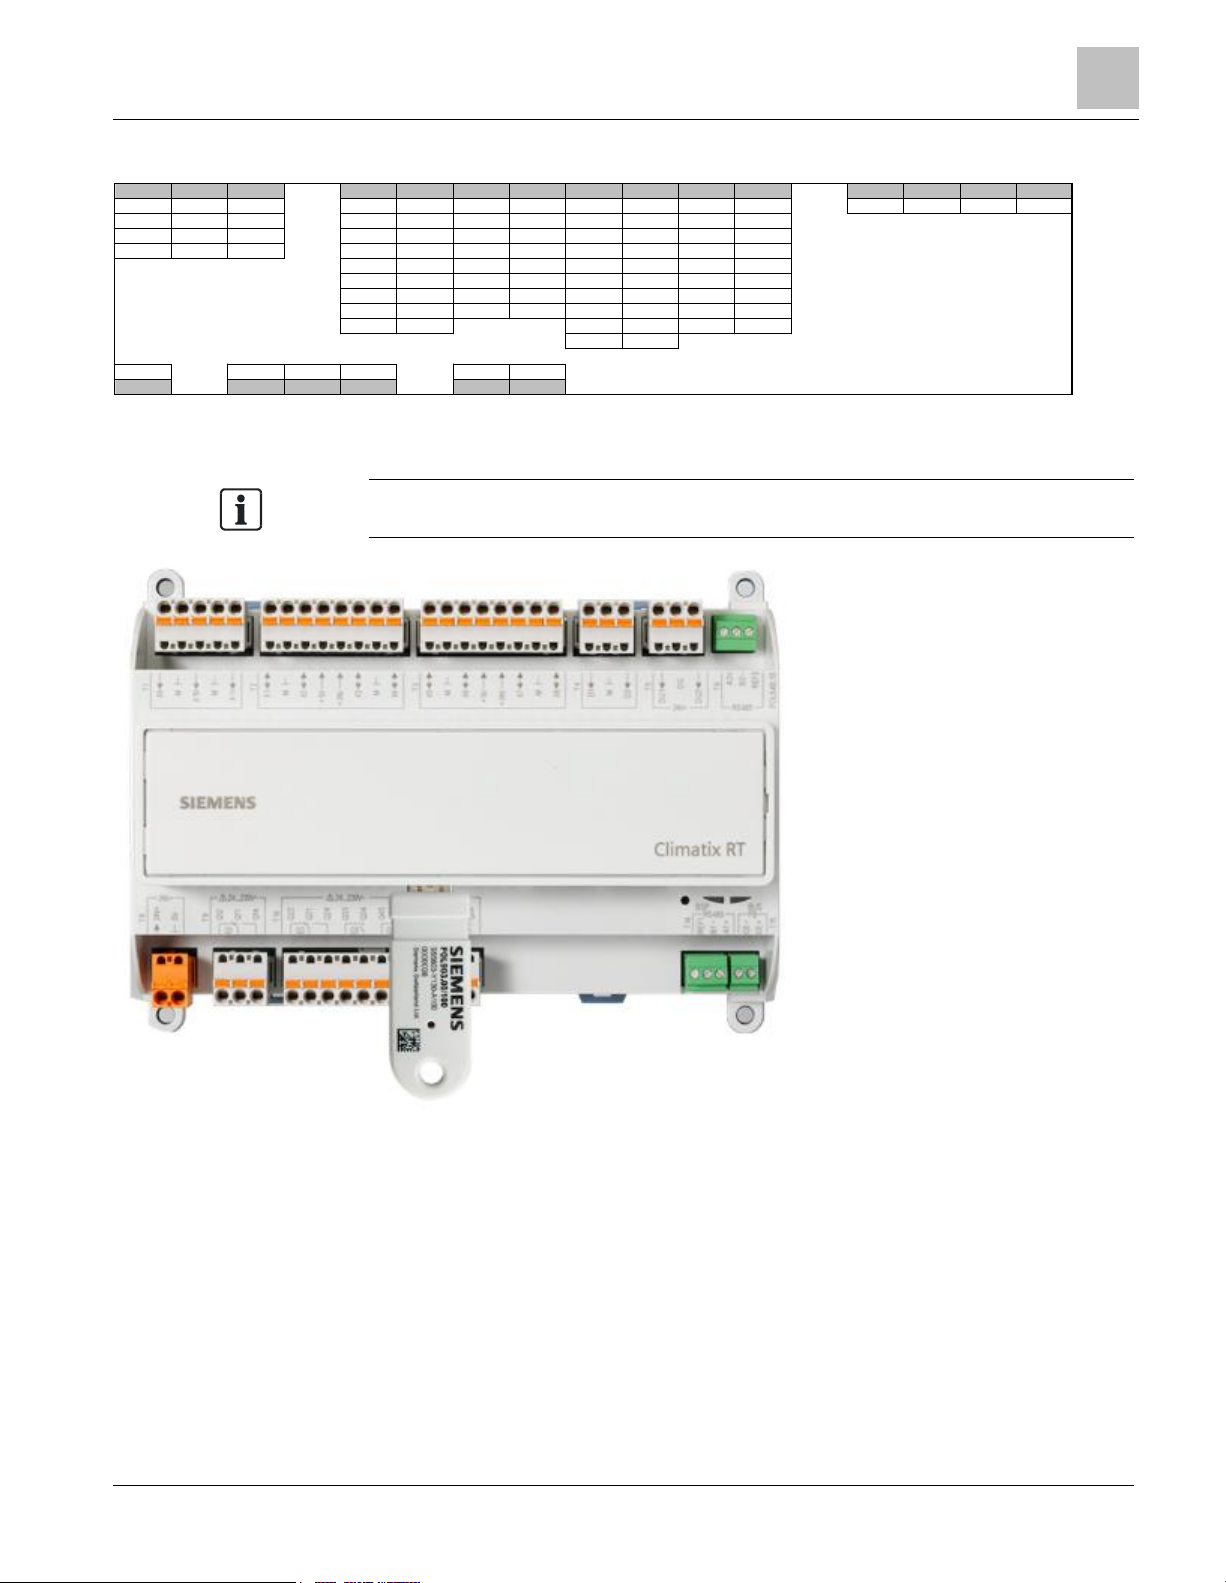
Climatix RTU Controller
The Climatix RT Rooftop Unit Controller is designed for use in rooftop applications (up to 20 tons) and provides a
broad range of control and monitoring functions through Climatix IC. The number and type of I/Os on the controller
are optimized for this application type.
For a detailed description on the sequence of operation, see RTU Retrofit Sequence
of Operation (A6V12053413).
Key benefits
The Climatix RT controller uses a pre-defined application that is configurable for many types of Rooftop Units.
Several defined inputs/outputs (analog or digital) plus configurable I/O for multi-use using the easy-to-use Climatix
mobile application make it possible to control several manufactured Rooftop Units.
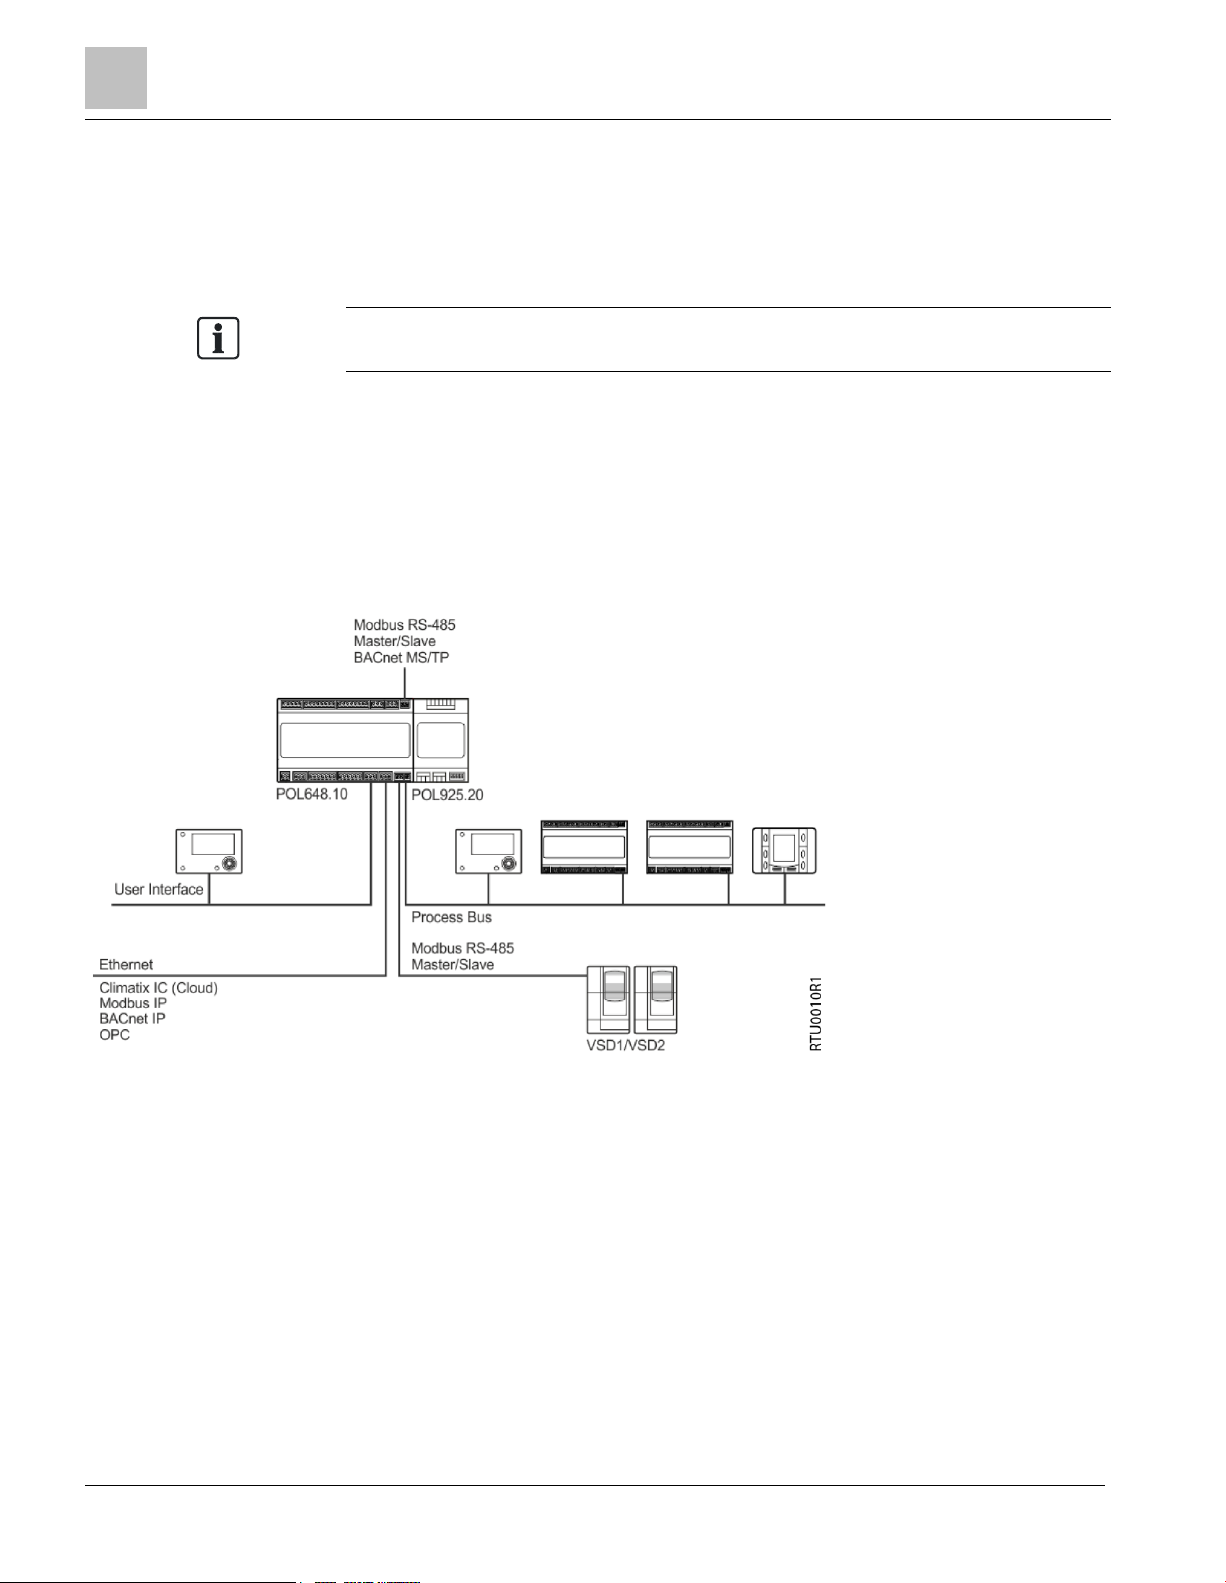
Topology
Fig. 1: Topology.
Inputs and Outputs
There are 21 physical inputs/outputs per controller. These I/O are configured with the Climatix Mobile application
and the Siemens Wi-Fi stick.
Page 9
Climatix RTU Controller
Communications
9 | 49
POL648.10/RTU - Input/output configuration
Fig. 2: POL648.10/RTU - Input/output configuration
See the Climatix RT Data Sheet (A6V12001603) for details on I/O.
Fig. 3:
Communications
The Climatix RT controller has an Ethernet port for Modbus/IP, BACnet/IP, OPC, and Climatix IC. There is an SD
card interface for applications, firmware update, and archiving.
In addition, there is a RS-485 (galvanically separated) interface for Modbus RTU and BACnet MS/TP and a
process bus for networking of Siemens devices.
X9 X10 X11 X1 X2 X3 X4 X5 X6 X7 X8 D1 D2 DU1 DU2
N N N N N N N N N N N DI DIp DG DG
Ni Ni Ni Ni Ni Ni Ni Ni Ni Ni Ni
Pt Pt Pt Pt Pt Pt Pt Pt Pt Pt Pt
DI DI DI R R R R R R R R
V in V in V in V in V in V in V in V in
mA in mA in mA in mA in mA in mA in mA in mA in
DIx DIx DIx DIx DIx DIx DIx DIx
V out V out V out V out V out V out V out V out
mA out mA out DV DV DV DV
VM VM
DS DS DO DO DO DO
Q1 Q2 Q3 Q4 Q5 Q6
Page 10
Climatix Mobile application
Key benefits
10 | 49
Climatix Mobile application
The Climatix Mobile application is a native iOS or Android application used to configure the Climatix RT controller
for each specific use. This easy-to-use application will walk the installer through a short series of steps to ensure
that the corresponding sensors, actuators, thermostats and VFD are terminated properly, with the correct type of
signal.
Key benefits
Climatix Mobile will guide the installer through an intuitive user experience that navigates the inputs, outputs and
setpoints for each Climatix RT.
● Secure connection via point-to-point wi-fi stick and user credentials
● Configuration wizard that steps through each part of the system
● Pre-loaded inputs and outputs ensure the correct termination and signal type
● Automatic discovery of activation key
● Easy-to-read printout of controller configuration
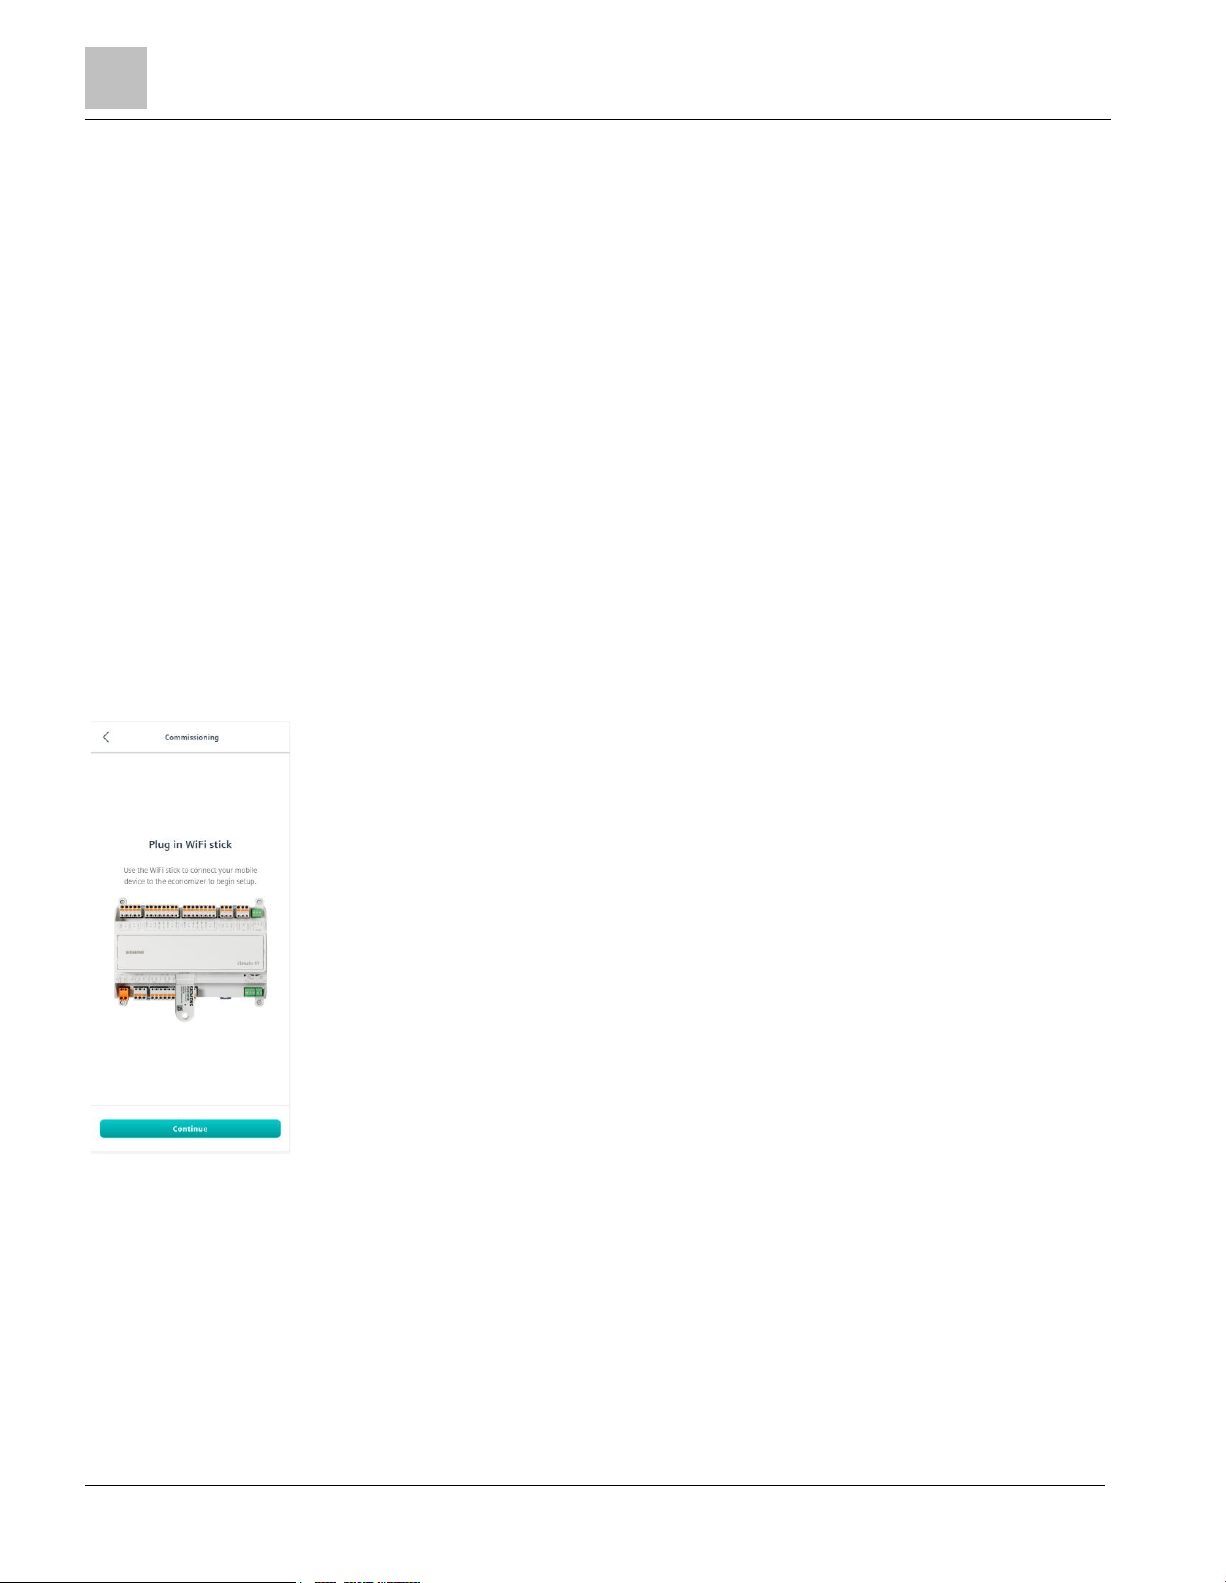
Startup
The Mobile application needs to start with location services enabled to determine your Climate Zone location.
1. Insert the Siemens Wi-Fi stick:
Fig. 4: Insert the Siemens Wi-Fi stick
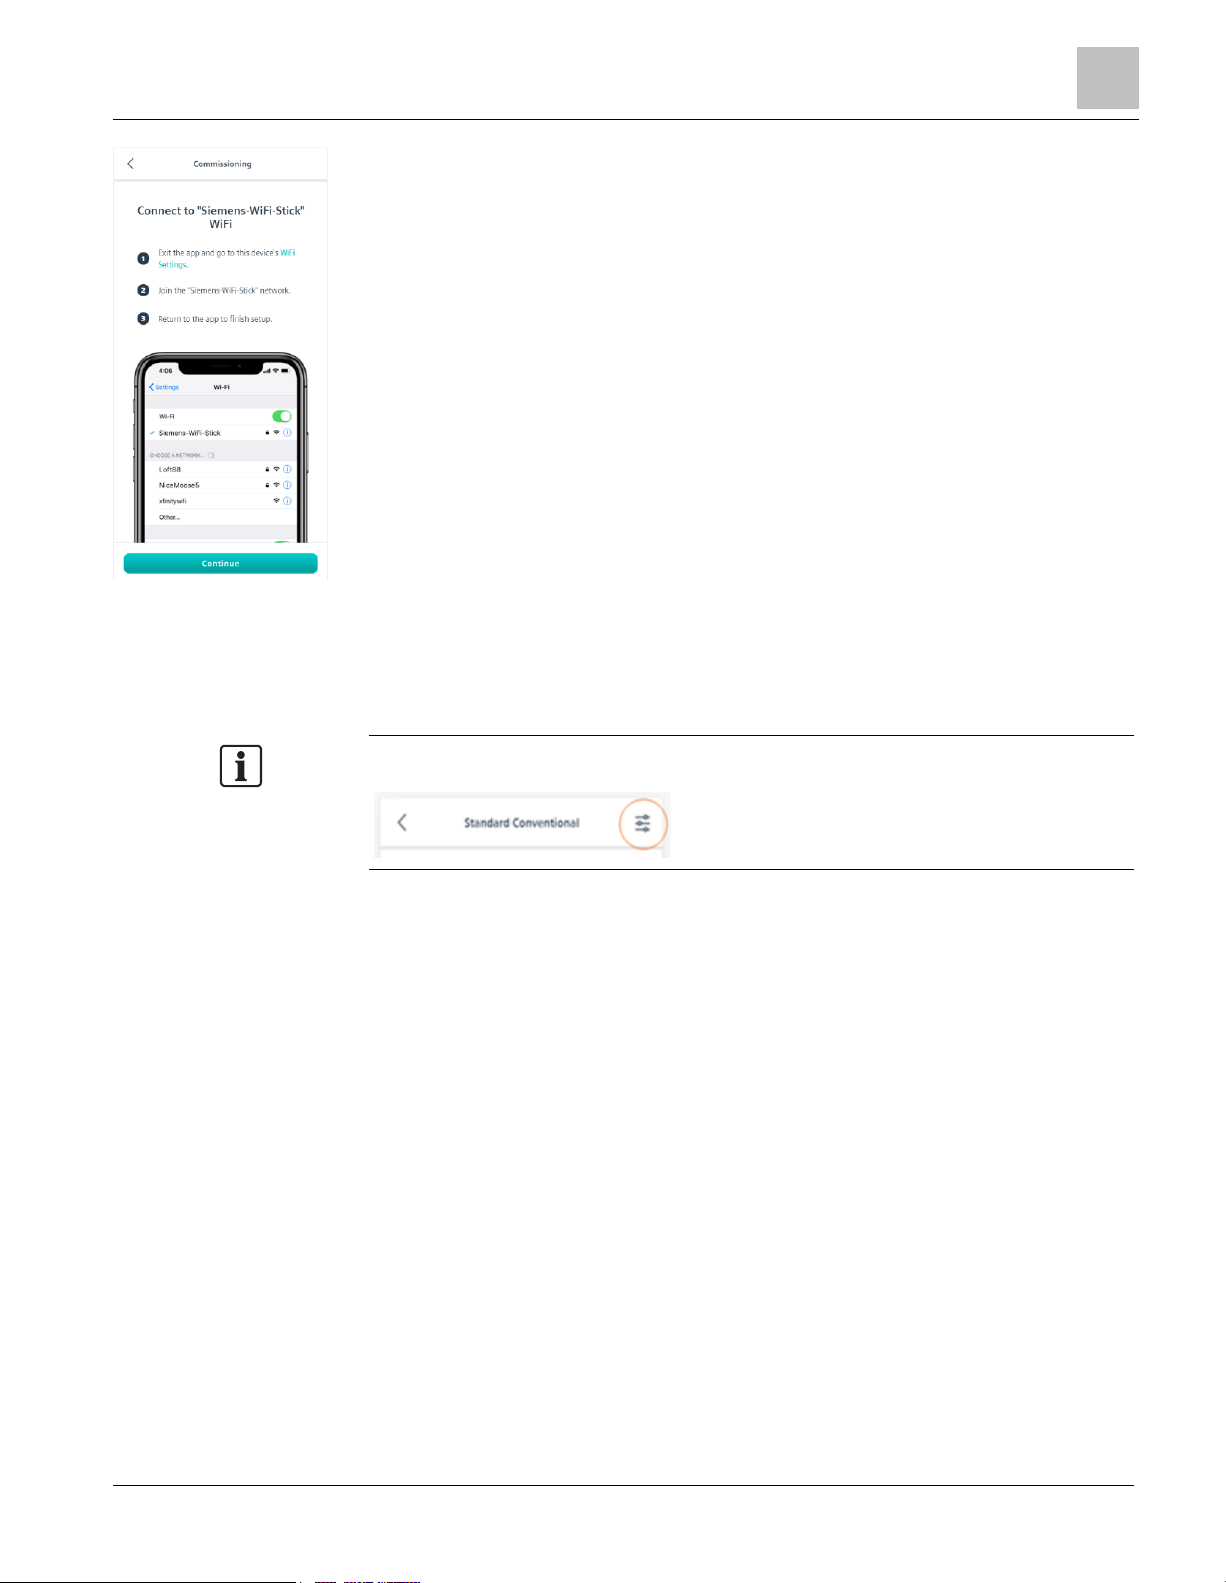
2. Connect to SSID (pw: SIBPAdmin)
Page 11
Climatix Mobile application
Zone Monitoring
11 | 49
Fig. 5: Connect to SSID (pw: SIBPAdmin)
3. You can either load from favorites or configure a new setup.
4. Select your application type: Standard Conventional or Heat Pump.
Be aware of the option for additional settings such as calibration offsets or minimum
and maximum values for points. This displays in the upper right corner, if available.
Zone Monitoring
There are several options for your Zone temperature, humidity and IAQ readings:
● Siemens Room Units – The Room Units are a combination of Temperature, Humidity and CO2 monitoring, with
or without a display.
Page 12

Climatix Mobile application
Fan Configuration
12 | 49
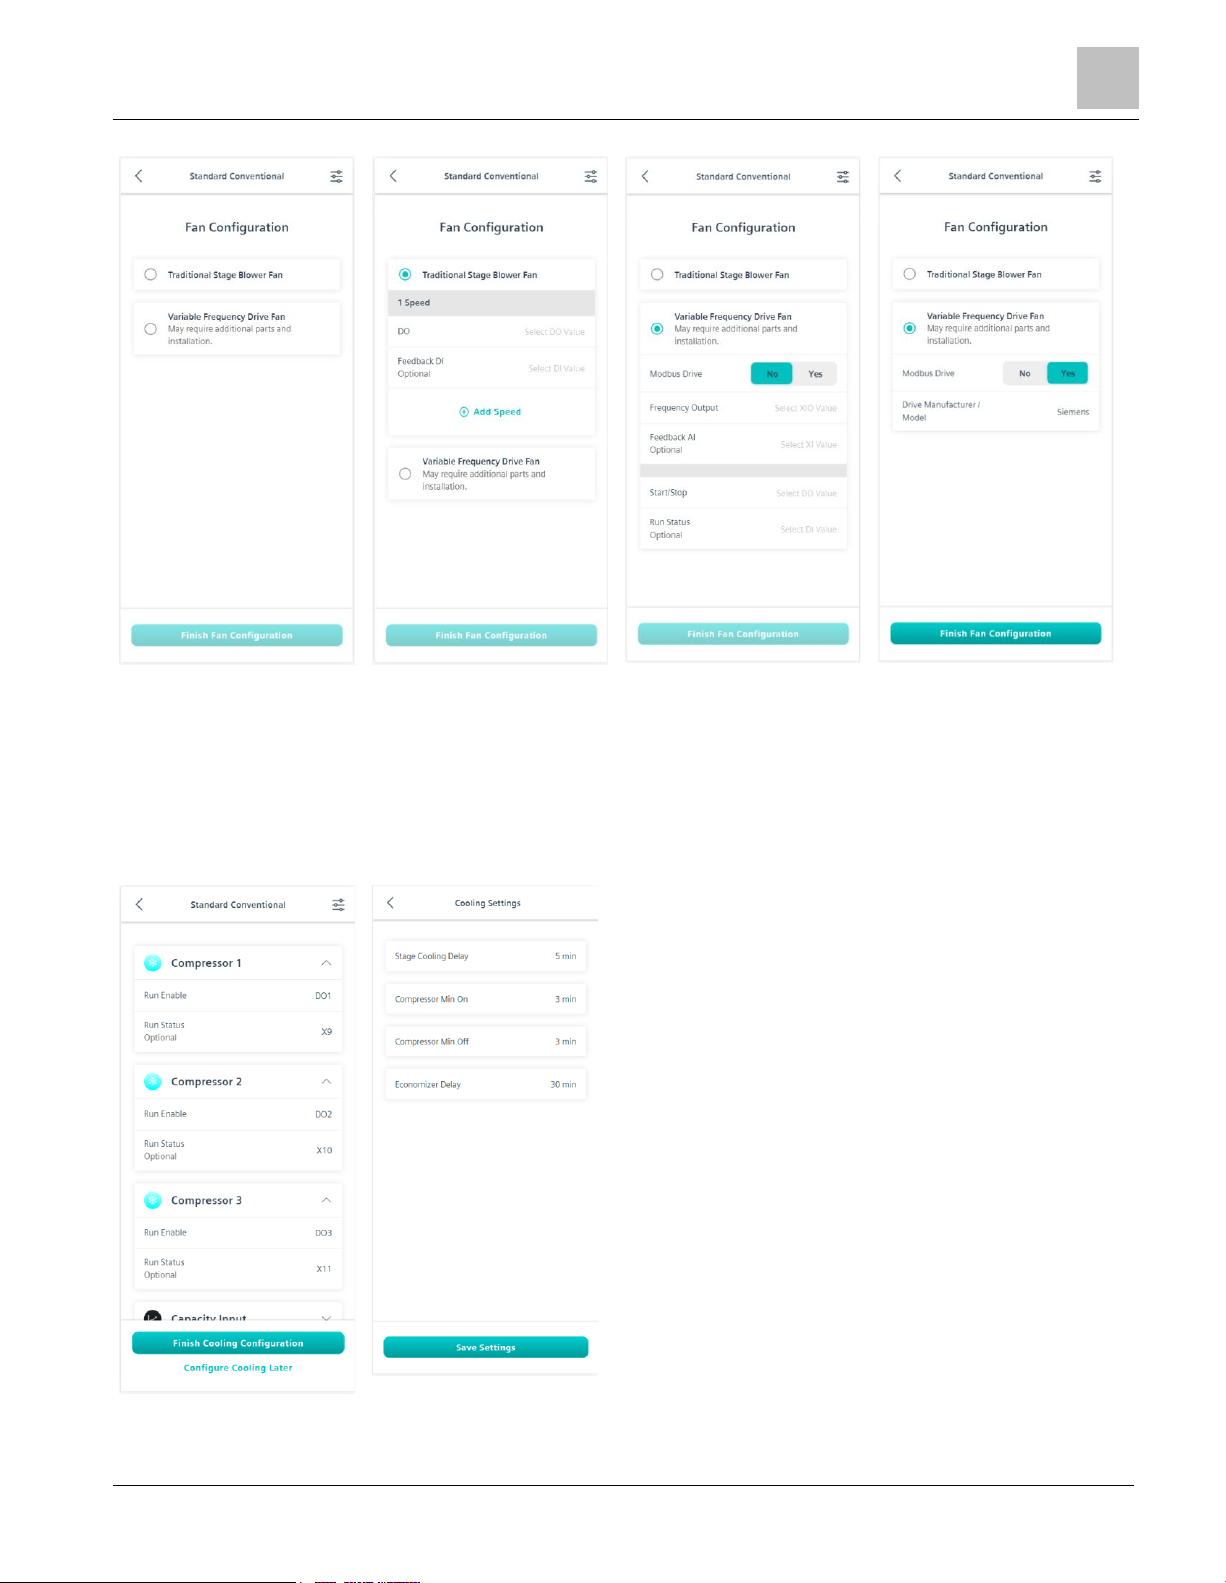
Fan Configuration
You can choose either a traditional stage blower fan or integrate the Climatix VFD for variable speed fan control.
Page 13
Climatix Mobile application
Cooling
13 | 49
If you are using a non-Siemens Climatix RT drive, configure the I/O for Speed Output, Start/Stop and optional
feedback
Cooling
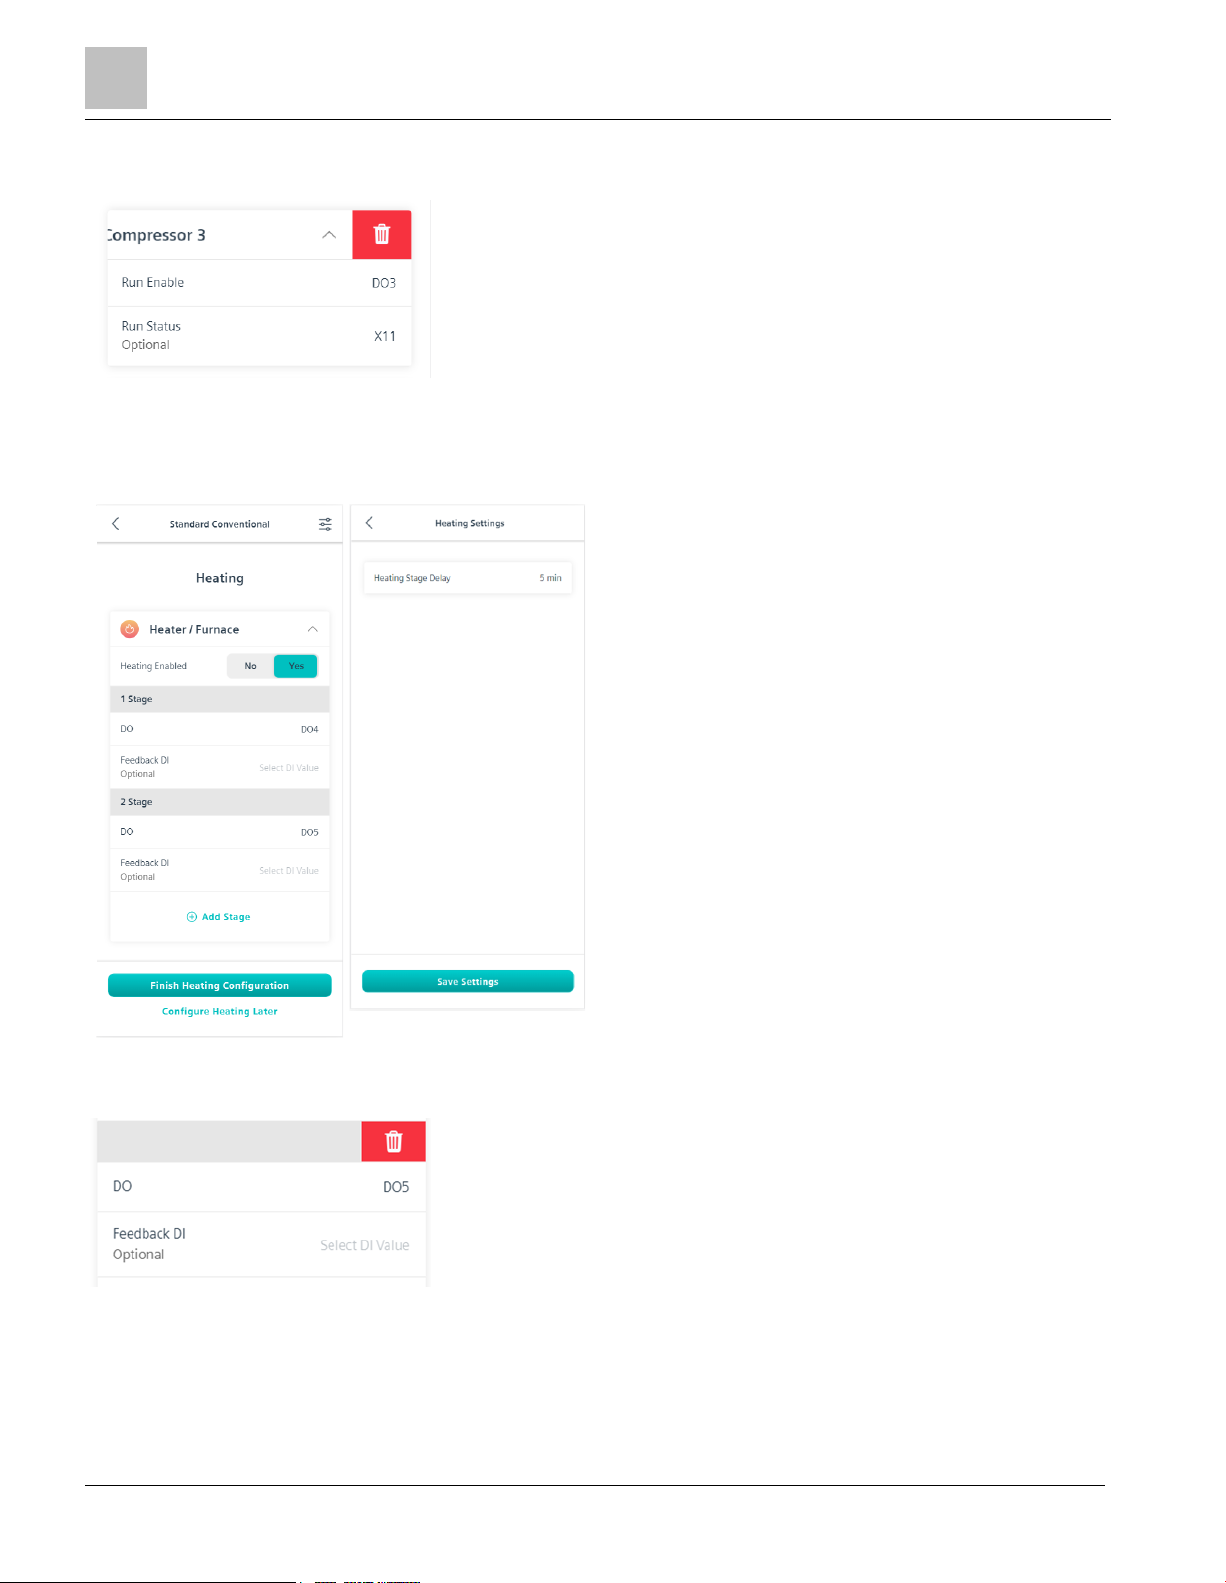
There are three compressors pre-assigned for cooling stages. Configuration of Stage Delay; Minimum On Time,
Minimum Off Time; and Economizer Delay are located in the settings bar.
Page 14
Climatix Mobile application
Heating
14 | 49
You can also delete up to two compressors if they are unused. Swipe left to remove unused compressors. This will
free up the IO for additional use such as safeties.
Heating
There are two pre-assigned Heating stages. Configuration of the Heating Stage delay is located in the settings bar.
You can also delete a heating stage if it is unused. Swipe left to remove unused heating stages. This will free up
the IO for additional use such as safeties.
Configuration
In this section additional Sensors, the Economizer, Damper and Demand Control Ventilation are all pre-assigned.
Page 15

Climatix Mobile application
Configuration
15 | 49
Sensors
Mixed Air Temperature, Discharge Air Temperature, Outside Air Temperature and Outside Humidity are all preassigned and configured according to the RTU product bundle that was purchased. If you would like to replace the
sensor that was provided, the sensor type is configurable and includes: 1K Ni, 10K NTC, 4 to 20 mA and 0 to 10V.
Sensor calibration is located in the settings bar.
Page 16

Climatix Mobile application
Configuration
16 | 49
Economizer Mode
The Economizer Mode defaults to Single Enthalpy in accordance with the Room Unit and Sensors provided in the
corresponding product bundle.
The Economizer Mode is based upon the types of sensors installed for the space.
Page 17

Climatix Mobile application
Configuration
17 | 49
Climatix Mobile can also determine your climate zone and automatically adjust your shutoff setpoints accordingly.
Manual configuration is also available to suit your customers’ needs.
Page 18

Climatix Mobile application
Configuration
18 | 49
Fig. 6:
Damper Actuator
The Damper Actuator can be configured to be either None or Modulating. Damper position configuration is located
in the settings bar.
Page 19

Climatix Mobile application
Configuration
19 | 49
Exhaust Fan
Up to two Exhaust Fans can be configured to work in conjunction with your damper and economizer to keep correct
pressures as well as to help ventilate the space.
Page 20

Climatix Mobile application
Configuration
20 | 49
Exhaust Fan I/O will only be available if you have deleted either compressors or
heating stages.
Demand Control Ventilation
Demand Control Ventilation (DCV) maintains indoor air quality based on occupancy. DCV automatically adjusts the
ventilation rate provided to a space in response to changes in CO2 levels.
DCV is automatically configured to utilize the onboard IAQ sensor of the QMX3.P74
and QMX3.P70 and work in conjunction with the ventilation cycle.
Setpoints and limit configurations are in the settings bar.
Page 21

Climatix Mobile application
Safeties
21 | 49
Safeties
In this section you will find additional auxiliary terminations to configure safeties for your unit.
Page 22

Climatix Mobile application
Connectivity
22 | 49
The Clog Filter Switch is pre-populated according to the RTU product bundle that
was purchased. This termination can be changed or removed.
Connectivity
Connectivity is the final step before downloading the configuration to the device. The Climatix Mobile App will
automatically read the activation key from the controller.
You must input the unique distribution key to be connected to Climatix IC.
The unique distributor key generates when your Climatix IC tenant is established. For
more information on establishing the Climatix IC tenant, please contact your sales
representative.
Page 23

Climatix Mobile application
Configuration Overview and Confirmation
23 | 49
Configuration Overview and Confirmation
Once the steps are completed, you can see an overview of all the points and terminations.
Page 24

Climatix Mobile application
Configuration Overview and Confirmation
24 | 49
The final step is to Confirm and Download the configuration to the controller.
● The default Username is: RTU
● The default Password is: SIBPAdmin
● The default PIN is: 6000
It is highly encouraged to change the defaults in Climatix IC after the controller is
connected.
Page 25

Climatix IC, remote monitoring and intelligent diagnostic
Key benefits
25 | 49
Climatix IC, remote monitoring and intelligent diagnostic
Roof Top Units with Climatix RT controllers can connect to Climatix IC – “Cloud-based solution for remote
monitoring and intelligent diagnostic”.
Climatix IC supports your organization with remote maintenance 24/7, available anywhere to significantly reduce
maintenance costs.
Key benefits
Climatix IC web applications offer:
● Remote access to plant devices worldwide and 24/7
● Plant owners and managers can analyze:
– Current status
– History
– Access to schedules and settings
● Real-time consumption data (currently available as a history export) helps identify "consumption anomalies"
that often point to underlying mechanical problems. This permits preventive maintenance.
● Climatix IC web operation simplifies and modernizes operation at all access levels.
Remote maintenance – at any time from any location
HVAC systems often operate at a considerable distance from OEM production centers, supplier or service
organizations, resulting in high service and travel costs, especially during warranty periods.
Climatix IC facilitates diagnostics, optimization of settings, or system upgrades from any location. Even if a visit to
the plant does prove necessary, the available data enables service engineers to work more efficiently.
Connection – straightforward and effective
Climatix RT controllers are equipped with a built-in IP interface. The controller connects automatically to the
Climatix IC via this interface.
Web-based – always up-to-date
Climatix IC operates with standard web browsers that support HTML5. The Service Engineer logs on using a laptop
and directly accesses the plant. No special software or cables are required.
Key functions
Climatix IC includes the following key functions:
● Collects alarms and routes them to the responsible service organization.
● Upgrades to installed plants: Application and firmware enhancements or saving control parameters to the
cloud. Everything can be scheduled for specific times.
● Process data analysis permits systematic improvements to plant efficiency.
The application can be used by any personal computer or laptop; no additional software is required.
Page 26

Requirements
Technical requirements
26 | 49
Requirements
Technical requirements
The Climatix RT controller is preconfigured to automatically connect to Climatix IC as soon as it is connected to the
Internet. First, review the following system requirements:
Internet access
The Ethernet cable must be connected to the controller's IP connection (T-IP).
● The controller requires a direct connection to the Internet, that is, without proxy.
● Port 443 (https) is open, from the device to the outside on the Internet.
● Broadband Internet is recommended for the controller due to the program size.
● The Internet connection must be stable.
Web browser
The browser must support HTML5.
● The latest versions (as of the publication date) of the following browsers were tested: Google Chrome, Mozilla
Firefox, Microsoft Edge, and Safari (based on iOS) by Apple.
● Internet Explorer is no longer supported.
Access concept to Climatix IC
Systematic security during access
Climatix IC provides two access methods that ensure systematic security.
● A user who already has access to Climatix IC, triggers an invitation e-mail: Access via "Login using a local
login".
● You possess a device activation code. You can simultaneously activate the device and create a user account.
Access via "Sign up - Register a plant".
Integrate external logins
Additionally, Climatix IC follows the trend of integrating external login providers. A user, for example, that often
uses Google tools and is logged onto Google, can also use this login data to log into Climatix IC.
Climatix IC provides the following:
The opportunity to use the login data for a Siemens ID, Google or LinkedIn. In the background and not visible to the
user, the third-party providers are also forwarded through the Siemens ID process.
NOTICE
Reliably delete persistent external login data from the browser.
External login procedures store information in the browser to increase user comfort.
We recommend Private or Incognito mode for personal computers (especially
public). These browser modes reliably delete information when exiting the browser.
Page 27

Requirements
Use of Data Matrix Code
27 | 49
Use of Data Matrix Code
The activation code for your Climatix controller is included in the controller's firmware and will be populated in the
Climatix Mobile application. The activation code is also printed on the actual controller as a DMC.
You can scan the code using a code reader application. The result is a text string.
Example:
1PS55396-C488-A100+31PPOL648.80/STD+S160908Z0000000005+23S00-A0-03-EB-01-04+3CAAAAAA-
BBBBB-CCCCC-DDDDD-EEEEE
The text string is subdivided into code letters:
● 1P: Siemens stock number (SSN); fixed
● 31P: Siemens device type (ASN); fixed
● S: Date (YYMMDD), series, serial number, variable
● 23S: MAC address (hex); variable
● 3C: Climatix IC activation key; unique device ID
Conclusion
Your Climatix supports the automation of your business processes, for example, during sign-up or pre-registration.
You no longer need to connect the controller to get its ID.
The data matrix code on the box includes information such as the Siemens device
type (ASN) and date of manufacture. The activation code is not included on the box.
Frequently asked questions on external logins
The following answers FAQs on external logins:
How does the login with an external login provider work?
● You still need the Climatix IC user account as the starting point.
● The procedures described below an external login account (for example, Google, Siemens ID) connect to your
Climatix IC account.
● After connecting, you can login by clicking External login. It queries your external login data.
● Click External login to return to Climatix IC as long as the login data for the external login is saved in a
browser session.
When is an external login not recommended or what should I look out for?
● Unprotected personal computers without a windows login (for example, private PC or Internet café) are not
suitable, since the login data can remain in the browser.
● We recommend the Incognito mode for your browser.
● Delete the browser data beforehand if you intend to switch the login role and use external logins for both roles
(check the browser's online help on how to do this).
What is the bill of quantity for IC user accounts and external logins?
One external login for one Climatix IC account and vice-versa.
What is considered a secured login and log off?
The terms and conditions of the login provider applies.
Page 28

Entering Climatix IC
Assistance on the start page
28 | 49
Entering Climatix IC
Enter the portal at https://www.climatixic.com.
Assistance on the start page
Accessible documentation
● Support on the start page provides an introduction.
● The comprehensive help for reading is located at the same location after log in.
Page 29

Entering Climatix IC
Assistance on the start page
29 | 49
Information on unsupported browsers
A clear information window indicates when Climatix IC is opened by an unsupported browser.
Central maintenance information from the Climatix IC Operations Team
The Start page prominently displays Maintenance and important improvements.
A color code (green, yellow, red) intuitively indicates the relevance of the information. Once logged in, you can
access the same information at any time using the Info symbol (upper right). The Info symbol flashes for news.
Climatix IC dashboard
You are investigating an event and want to know whether Climatix IC was online at a specific time? The Climatix IC
dashboard provides an objective overview whether services are or were available. You can also subscribe to the
RSS feed for the service.
Page 30

Entering Climatix IC
Access methods
30 | 49
Cookie information
You must confirm the cookie information every 90 days.
Language selection
Set the language in the portal navigation ribbon to the right.
Access methods
Climatix IC for Climatix RT controllers offers (www.climatixic.com), a modern presence and operation using an
"End user Climatix App".
Both access methods have overlapping content and are based on the same technical basic procedures. Your local
Siemens office can advise you on the methods and define a workflow tailored to you.
Basic procedures
Via web access
Via end user
Climatix app
Reference *
Users logged in with the rights Manage plant settings
and Add user, for example, the role of Owner, supply you
with access data to the Cloud.
X
Sign in [➙ 20] [➙ 30]
X
Log in on the End user Climatix
app [➙ 27] [➙ 37]
As a new user you possess a device and have access to
the activation code.
X
Sign up - Register a plant [➙ 24]
[➙ 34]
X
Register with the End user
Climatix app [➙ 26] [➙ 37]
* Web access is further divided into a procedure with a local login and a procedure using an external login provider.
Sign in
Login using a local login
The internal “Login” described here is required when a user account is created.
Afterwards, the user can switch to an external login.
Page 31

Entering Climatix IC
Sign in
31 | 49
Sign in
Fig. 7:
You have received an e-mail with an invitation link and temporary password.
1. Enter the Username (your e-mail address) and (temporary) password and click Sign in.
– You are requested to change the password.
– NOTE: Read the Notice below for permissible Climatix IC passwords.
2. Create a secure password and confirm the new password below it.
3. Click Change password to confirm the change.
– Your individual password is now active.
NOTICE
Climatix IC accepts the following passwords:
A secure password consists of at least 8 characters, and includes at least one of the
four character groups:
● Latin capital letters (A through Z)
● Latin lower-case letters (a through z)
● Digits (0 through 9)
● Non-alphabetic characters (such as: !, ?, $)
Secure sign in and out
Note the following functions for sign in/out:
The connection ends after 30 minutes of inactivity. The web page returns to the sign-in screen.
NOTE: Only the activity on the first tab is registered when working in multiple browser tabs.
● The user account is locked after 5 attempts with the wrong password.
● The user is notified as soon as a new password is set using the Forgot password? function.
● For security reasons, a new sign-in is required after 24 hours of uninterrupted user activity.
Page 32

Entering Climatix IC
Sign in
32 | 49
NOTICE
Protect passwords.
Be selective when sharing your username and password for Climatix IC to a third
party.
Encrypt e-mail that includes the username and password.
Forgotten password
Use the Forgot password function if you have forgotten your password and follow the instructions.
Fig. 8:
For security reasons, this dialog box is hidden when using an external login.
Log in using an external login
NOTICE
What you need to know in advance:
The external login described here requires an internal user account in advance, see
"Login using a local login [➙ 20] [➙ 30]".
Switching to an external login disables the local login using IC login data.
The internal login procedure can be used again once the external login is deleted. An
initial password is resent to the original IC e-mail address.
The following external login providers are supported:
● Google
● LinkedIn
● Siemens ID
The login providers support two-step authentication.
Consult the documentation for the applicable login provider on how to set up twostep authentication.
Page 33

Entering Climatix IC
Sign in
33 | 49
Connect a Climatix IC account with an external login provider
You have a Climatix IC user account and an account that supports external login providers.
1. Log in using your Climatix IC login data.
2. In the header, click Login name > Profile details.
3. Below the profile data, click Add account.
A selection of external login providers is listed.
4. Comply with the login procedures of the external login providers.
The external login is now available as a login procedure and the local IC login is disabled.
Page 34

Entering Climatix IC
Sign up - Register a plant
34 | 49
Sign in
Fig. 9:
You decided in favor of external access using the procedure described above, in other words, you log in using the
login dialog box, enter the e-mail address of the external login and select the External login button.
Sign up - Register a plant
Register using a local login
Fig. 10:
As a rule, you are invited by e-mail the first time you contact Climatix IC, in other words, you follow the workflow as
described under Sign in [➙ 20] [➙ 30].
The optional functionality Tenant-Key is currently unavailable for Climatix RT controllers.
Registration is a process that combines multiple steps:
Page 35

Entering Climatix IC
Sign up - Register a plant
35 | 49
● First time log-in by a new user without an invitation by a higher role
● Plant activation using a valid activation key
● The new user is added to the plant with the user role Owner
● Optional: Direct moving of the plant to a sub-tenant area
Register using an external login
NOTICE
What you need to know in advance:
The registration process using an external login described here does not require an
internal user account.
After successful registration, the external access is listed in the user profile and can
be deleted there.
The internal login procedure can be used again once the external login is deleted. An
initial password is sent.
The following external login providers are supported:
● Google
● LinkedIn
● Siemens ID
The login providers support two-step authentication.
Consult the documentation from applicable login providers on how to set up two-step
authentication.
Register using an external login provider
Fig. 11:
Page 36

Entering Climatix IC
Sign up - Register a plant
36 | 49
● You have an activation code for your controller.
● You have the login data of a supported, external login provider.
1. Enter the e-mail address of the external login, and the activation key.
– (Optional), enter the tenant key.
2. Confirm Attention and... and select External login.
3. Follow the instructions of the external login provider to ID yourself using the provider's login data.
Climatix IC sends a confirmation code to the indicated e-mail address and requests entry.
Fig. 12:
4. Enter the verification code and select Send.
Climatix IC opens with the activated plant. You are entered in the header with the login name.
You decided in favor of external access using the procedure described above, in other words, you log in using the
login dialog box, enter the e-mail address of the external login and select the External login button.
Page 37

Using the end user Climatix application
Register with the End user Climatix app
37 | 49
Using the end user Climatix application
Typical workflow
The typical workflow when using the end user Climatix app:
1. Register with Create Account together with the activation key for your controller.
2. Login using Login.
3. Manage plant data. This is not documented separately for the app.
4. With Add device, installers can add customer controllers or facility managers can add controllers to their
plants.
Requirements
The following requirements apply for using the end user Climatix app:
● Mobile device with Internet connection with an installed End user Climatix app.
● The Climatix RT controller is connected to the Internet; it is now known to the ClimatixIC.com portal.
● You have the activation code for your controller or the customer's controller.
● Another user has not already activated the Climatix RT controller.
Register with the End user Climatix app
1. Open the End user Climatix app on your mobile device.
2. Click Create Account.
3. Enter an email address for the Climatix IC in the log-in dialog box.
4. In the log-in dialog box, enter the activation key for your controller, either
- Manually, or
- Scan the QR code.
You have created your user account and receive an email with a temporary password. Your controller is also
activated in Climatix IC.
Log in on the end user Climatix app
You have set a strong password to replace the temporary password sent to you.
1. Open the End user Climatix app on your mobile device.
2. In the log-in dialog box, enter the email address and password.
3. Click Login.
You are logged in and see your assigned controllers.
Add additional devices
You are already a user of Climatix IC and have the appropriate log-in data.
1. Open the End user Climatix app on your mobile device.
2. Log in.
3. Press and select Devices.
Page 38

Using the end user Climatix application
Add additional devices
38 | 49
4. Click Add device.
5. Enter the activation key for the additional device, either
- Manually, or
- Scan the QR code.
6. Confirm by clicking Add.
The new controller is visible on the device list and can be operated.
Page 39

Climatix IC Portal Security
Climatix IC
39 | 49
Climatix IC Portal Security
Climatix IC
The portal provides thorough security, for example, data security, security data storage, and reliable data
transportation.
All connections are encrypted (HTTPS) to prevent tapping into the line and man-in-the-middle attacks.
● Data security as per EU Data Privacy Chapter 5
● Geo-redundant data storage from northern Europe (primary) to western Europe (secondary).
Virus Scan
Uploaded files are scanned for viruses.
Fig. 13:
Climatix controller
The Climatix controller is not suitable for connecting directly to the Internet; it must be connected using a Firewall.
This type of router typically has a firewall.
The firewall must be configured to permit only outgoing connections. Incoming connections must be suppressed.
Page 40

Fault Detection and Diagnostics
View FDD Configurations
40 | 49
Fault Detection and Diagnostics
There are 18 pre-defined alarms for monitoring the site.
View FDD Configurations
1. Click the Operating tab to navigate to the list of alarms.
2. Select Web access > Main Menu, then scroll down and select FDD.
Page 41

User and Plant Roles
View FDD Configurations
41 | 49
User and Plant Roles
Climatix IC – RTU offers four Plant roles that need to be assigned to individuals for each RTU Controller. Access to
the plant’s Application set is limited to only the Application Administrator. The roles below can only view the
applications; they cannot edit or delete the files.
Plant Role
Description
1
Maintenance
Building occupant/Service personnel
2
Owner
User with the highest level of functional access to the plant
3
Service Coordinator
Service Company management team
4
Technician
Installers, Service Engineers and Building Engineer
Table 1: Plant Roles
To add a user for a specific Climatix controller plant, follow these suggested steps:
Plant Role – Maintenance
STEP 1: Adding User Role for a new user
Click: Administration –> Users –> Create new admin –> Enter the email address of the user and click Save.
Click Roles and select TenantSiteViewer. Click Save.
STEP 2: Adding Plant Role for a user
Under Administration, click API-Plants and chose the specific plant the user is being given access to. Click Add
Plant user.
Page 42

User and Plant Roles
Plant settings
42 | 49
Enter the email address of the user and choose the plant role. Example: Maintenance role shown below. Click
Save.
Repeat Steps 1 and 2 for the user for each of the remaining Plant roles (Owner, Service Coordinator, and
Technician).
Plant settings
Basic data
● Name - Change the default Plant name to your desired Plant name.
● Description - Add a short description about the plant.
● Application set - Select the correct Application Set for upgrades.
● Variant – Select the variant from your defined list.
● Address - Enter the physical address of the Plant where it is being installed.
● Lat/Long – Obtain coordinates to find your plant’s longitude and latitude. If this step is not taken your plants
cannot be displayed on the “Map” (green bubble).
● Phone – (Optional) Enter the Plant owner’s phone number.
● Timezone - Choose the time zone where the plant is located for planned tasks and timestamp for alarms.
● Connection Supervision – Select Connection Supervision to ON. By default, the Connection Supervision
delay is five minutes.
● ICCID – The unique ID for your Sim card. The entry leads to an online symbol with 3G supplement and display
of the ICCID number as a tool tip.
Page 43

User and Plant Roles
Plant settings
43 | 49
● Customer Plant ID – Use this text field for searching and grouping plants under a specific site. Name all plants
the same to group as a single site (for example: John’s Hadware Store).
● Customer settings 1 and 2 – individual string for plant information
Page 44

Configure Alarm Notifications
44 | 49
Configure Alarm Notifications
Notifications can be sent to various users for appearing alarm conditions, disappearing alarm conditions or both.
1. Click the Operating tab to setup notifications.
2. Select Plant settings.
◈
Select Plant notifications.
◈
Select Add notification.
◈
Do the following in the Basic settings dropdown menu:
– Select Alarm for notification type. You can send the notification on either Appearing alarms, Disappearing
alarms or Both.
– Type in a name and recipient(s) for the alarm.
– In the Subject and Message fields, choose from the list of available tokens. These tokens will populate the
alarm email with the appropriate information.
Sample e-mail:
+ 16.10.2020 22:44:35 FrzAlm (FrzAlm-OffNormal): On
Page 45

Unit Mode
45 | 49
Unit Mode
A default set of setpoints are configured during commissioning, however, you can change the parameters of the
heating and cooling setpoints through Climatix IC to more closely fit the customer’s needs.
1. Click the Operating tab to navigate to the setpoints.
2. Select Web access > Main Menu > Unit Mode.
The Cooling and Heating setpoints for the four modes (Off, PreOcc, Occ and Unocc) are configurable according
to the customer’s needs, within the “Heat – Cool Setpoint Separation” (default is 2.0°F).
For example, if the Cooling SP – Occ is set to 72°F, then the Heating SP – Occ can be set to 70°F.
Page 46

Scheduler
46 | 49
Scheduler
A default schedule is loaded into the controller during commissioning, however you can change the schedule
modes and times in Climatix IC to more closely fit the customer’s needs.
1. Click the Operating tab to navigate to the scheduler.
2. Select Scheduler.
You will see the seven days of the week with the default schedule populated. To change the schedule, click within
the day to ender the editor mode.
Once in the editor mode, you can adjust the times for each of the modes by clicking on the desired mode and time.
Page 47

Scheduler
47 | 49
You can also copy schedules across days of the week.
Page 48

Support
48 | 49
Support
Extranet registration
Register for the OEM extranet and access exclusive information and resources:
http://www.siemens.com/buildingtechnologies-oem.
Support on technical problems
Follow this sequence for support issues:
1. Contact the supplier of the device or plant.
2. If unknown, Siemens provides the following tools:
● Own information via the Download Center: http://www.downloads.siemens.com.
● Own information via the Service and Support Portal https://support.industry.siemens.com.
● Submit a support request:
http://www.siemens.com/automation/support-request.
Climatix IC status page
Neutral and objectively reported online state of Climatix IC: https://status.climatixic.com
Page 49

Issued by
Siemens Industry, Inc.
Smart Infrastructure
1000 Deerfield Pkwy
Buffalo Grove IL 60089
+1 847-215-1000
© Siemens Industry, Inc., 2021
Technical specifications and availability subject to change without notice.
 Loading...