

Page 1

SIMATIC
SIMATIC Box PC 620
Operating Manual
C79000ĆZ7076ĆC638Ć04
Page 2

Safety Guidelines
This operating manual contains notices which you should observe to ensure your own personal safety, as
well as to protect the product and connected equipment. These notices are highlighted in the manual by a
warning triangle and are marked as follows according to the level of danger:
Warning
!
!
Correct Usage
indicates that death, severe personal injury or substantial property damage can result if proper precautions
are not taken.
Danger
indicates that minor personal injury or property damage can result if proper precautions are not taken.
Note
draws your attention to particularly important information on the product, handling the product, or to a
particular part of the documentation.
Please observe the following
!
Trademarks
Note
You can set up and operate your programming device in conjunction with the following instructions. You
should only connect external devices and work with memory cards in conjunction with the manu al S IM ATIC
Box PC620. The manual is also available in electronic form on the CD-ROM labeled ”Documentation and
Drivers”.
Only qualified personnel should be allowed to install and work on this equipment using the manual.
Qualified persons are defined as persons who are authorized to commission, to ground, and to tag
equipment, systems, and circuits in accordance with established safety practices and standards.
Warning
This device may only be used for the applications described in the catalog or manual, and only in connection with devices or components from other manufacturers which have been approved or recommended
by Siemens.
This product can only function correctly and safely if it is transported, stored and set up carefully and
correctly, and operated and maintained as recommended.
SIMATICR , SIMATIC NETR and SIMATIC HMIR are registered trademarks of Siemens AG.
Copyright E Siemens AG 2000 All Rights Reserved
The transmission and reproduction of this documentation and the
exploitation and communication of its contents are not allowed, unless
expressly granted. Contraventions are liable to compensation for
damage. All rights reserved, especially in the case of the granting of a
patent or registration by GM.
Siemens AG
Bereich Automatisierungs- und Antriebstechnik
Geschaeftsgebiet Industrie-Automatisierungssysteme
Postfach 4848, D-90327 Nuernberg
Siemens Aktiengesellschaft
Exclusion of Liability
We have checked the content of this publication for compliance with the
described hardĆ and software. However, discrepancies cannot be excluĆ
ded, with the result that we assume no guarantee for total compliance. The
information in this publication is checked regularly, and any necessary
corrections are included in the following editions. We would be grateful for
any suggestions for improvement.
E Siemens AG 2000
Subject to technical change.
C79000ĆZ7076ĆC638
Page 3

Contents
Welcome to your SIMATIC Box PC 620 v. . . . . . . . . . . . . . . . . . . . . . . . . . . . . . . . . . .
Information about this Manual vii. . . . . . . . . . . . . . . . . . . . . . . . . . . . . . . . . . . . . . . . . . . . .
Conventions viii. . . . . . . . . . . . . . . . . . . . . . . . . . . . . . . . . . . . . . . . . . . . . . . . . . . . . . . . . . . .
1 Important Information 1-1. . . . . . . . . . . . . . . . . . . . . . . . . . . . . . . . . . . . . . . . . . . . . . . . . . .
1.1 Safety Instructions 1-1. . . . . . . . . . . . . . . . . . . . . . . . . . . . . . . . . . . . . . . . . . . . . . .
1.2 Certificates, Directives and Declarations 1-5. . . . . . . . . . . . . . . . . . . . . . . . . . . .
1.3 Certification for the USA, Canada and Autralia 1-6. . . . . . . . . . . . . . . . . . . . . .
2 Commissioning the SIMATIC Box PC 620 2-1. . . . . . . . . . . . . . . . . . . . . . . . . . . . . . . .
2.1 Unpacking and Checking the Scope of Delivery 2-1. . . . . . . . . . . . . . . . . . . . .
2.2 Installing the SIMATIC Box PC 620 2-2. . . . . . . . . . . . . . . . . . . . . . . . . . . . . . . .
2.3 Preparing for Operation 2-8. . . . . . . . . . . . . . . . . . . . . . . . . . . . . . . . . . . . . . . . . .
2.4 Transport 2-10. . . . . . . . . . . . . . . . . . . . . . . . . . . . . . . . . . . . . . . . . . . . . . . . . . . . . . .
3 Hardware Components of the SIMATIC Box PC 620 3-1. . . . . . . . . . . . . . . . . . . . . . .
3.1 Right-Hand Side of the Device (Port Side) 3-2. . . . . . . . . . . . . . . . . . . . . . . . . .
3.2 Left-Hand Side of the Device (Drive Side) 3-4. . . . . . . . . . . . . . . . . . . . . . . . . .
3.3 Ports 3-5. . . . . . . . . . . . . . . . . . . . . . . . . . . . . . . . . . . . . . . . . . . . . . . . . . . . . . . . . .
3.4 PC Card Port 3-8. . . . . . . . . . . . . . . . . . . . . . . . . . . . . . . . . . . . . . . . . . . . . . . . . . .
3.5 Drives 3-10. . . . . . . . . . . . . . . . . . . . . . . . . . . . . . . . . . . . . . . . . . . . . . . . . . . . . . . . .
3.5.1 Disk Drive (Depending on the Device Equipment) 3-10. . . . . . . . . . . . . . . . . . . .
3.5.2 LS 120 Drive (Depending on the Device Equipment) 3-11. . . . . . . . . . . . . . . . .
3.5.3 Hard Disk Drive 3-14. . . . . . . . . . . . . . . . . . . . . . . . . . . . . . . . . . . . . . . . . . . . . . . . .
3.5.4 CD-ROM Drive (depending on the device equipment) 3-14. . . . . . . . . . . . . . . .
3.6 Backup Battery 3-17. . . . . . . . . . . . . . . . . . . . . . . . . . . . . . . . . . . . . . . . . . . . . . . . .
4 Connection of System Expansions and External Devices 4-1. . . . . . . . . . . . . . . . . .
4.1 Connecting Peripheral Devices 4-1. . . . . . . . . . . . . . . . . . . . . . . . . . . . . . . . . . . .
5 Setting up the SIMATIC Box PC 620 5-1. . . . . . . . . . . . . . . . . . . . . . . . . . . . . . . . . . . . . .
5.1 Preparing for Start Up 5-2. . . . . . . . . . . . . . . . . . . . . . . . . . . . . . . . . . . . . . . . . . . .
5.2 Initial Start of the SIMATIC Box PC 620 5-2. . . . . . . . . . . . . . . . . . . . . . . . . . . .
5.3 Complete Restart of the SIMATIC Box PC 620 5-4. . . . . . . . . . . . . . . . . . . . . .
5.4 Electronic Manuals 5-4. . . . . . . . . . . . . . . . . . . . . . . . . . . . . . . . . . . . . . . . . . . . . .
SIMATIC Box PC 620 Operating Manual
C79000-Z7076-C638-04
iii
Page 4

Contents
6 Error Diagnosis and Reinstallation 6-1. . . . . . . . . . . . . . . . . . . . . . . . . . . . . . . . . . . . . . .
6.1 Problems When Using Modules from Other Manufacturers 6-2. . . . . . . . . . . .
6.2 The Monitor Remains Dark 6-3. . . . . . . . . . . . . . . . . . . . . . . . . . . . . . . . . . . . . . .
6.3 The Screen Display Does not Appear or Drifts 6-4. . . . . . . . . . . . . . . . . . . . . . .
6.4 No Mouse Pointer Appears on the Screen 6-4. . . . . . . . . . . . . . . . . . . . . . . . . .
6.5 The Clock Time and/or the Date in Your PC Is Incorrect 6-5. . . . . . . . . . . . . .
6.6 An Error Message Appears on the Screen 6-5. . . . . . . . . . . . . . . . . . . . . . . . . .
6.7 No Connection via COM1/TTY Possible 6-6. . . . . . . . . . . . . . . . . . . . . . . . . . . .
6.8 Diagnostic Messages (Port 80) 6-7. . . . . . . . . . . . . . . . . . . . . . . . . . . . . . . . . . . .
6.9 Restoring the Hard Disk 6-11. . . . . . . . . . . . . . . . . . . . . . . . . . . . . . . . . . . . . . . . . .
6.9.1 Creating Partitions unter Microsoft Windows 98 6-11. . . . . . . . . . . . . . . . . . . . .
6.9.2 Creating Partitions unter Microsoft Windows 2000 6-12. . . . . . . . . . . . . . . . . . .
6.9.3 Creating Partitions under Windows NT 6-13. . . . . . . . . . . . . . . . . . . . . . . . . . . . .
6.10 Installation of the Windows Operating System 6-15. . . . . . . . . . . . . . . . . . . . . . .
6.10.1 Installing the Microsoft Windows NT Operating System 6-15. . . . . . . . . . . . . . .
6.10.2 Installing the Microsoft Windows 98 Operating System 6-16. . . . . . . . . . . . . . .
6.10.3 Installing the Recovery CD for Microsoft Windows 2000 6-18. . . . . . . . . . . . . .
6.11 Installing Drivers and Software 6-20. . . . . . . . . . . . . . . . . . . . . . . . . . . . . . . . . . . .
7 Technical Specifications 7-1. . . . . . . . . . . . . . . . . . . . . . . . . . . . . . . . . . . . . . . . . . . . . . . .
7.1 Technical Specifications of the SIMATIC Box PC 620 7-2. . . . . . . . . . . . . . . . .
8 Hotline Services 8-1. . . . . . . . . . . . . . . . . . . . . . . . . . . . . . . . . . . . . . . . . . . . . . . . . . . . . . . .
8.1 SIMATIC Customer Support Hotline 8-1. . . . . . . . . . . . . . . . . . . . . . . . . . . . . . . .
8.2 SIMATIC Customer Support Online Services 8-2. . . . . . . . . . . . . . . . . . . . . . . .
8.3 Regional Repair Centers 8-2. . . . . . . . . . . . . . . . . . . . . . . . . . . . . . . . . . . . . . . . .
iv
SIMATIC Box PC 620 Operating Manual
C79000-Z7076-C638-04
Page 5

Welcome to your SIMATIC Box PC 620
Overview
The SIMATIC Box PC 620 serves as an entry-level system for PC-based
automation, a basic component for PC-based HMI devices (Panel PC), a basic
component for PC-based machine control panels (OP031, OP032S, OP032L) and
in special configurations as a basis for devices with a customised construction.
The SIMATIC Box PC 620 is intended for use in the industrial sector as well as in
residential and commercial areas and small businesses. In addition to the industrial
applications, it can also be used in building services automation or in facilities open
to the public.
Features
The SIMATIC Box PC 620 is a compact box computer with Pentium II mobile
technology.
The SIMATIC Box PC 620 is a particularly powerful industrial PC for installation as
a box system. It is flat, ruggedized and designed for continuous operation. On
account of its low dimensions, it can be fitted into areas where little space is
available.
Quality
The SIMATIC Box PC 620 has a high quality standard. For example:
• Extensive climate, vibration and shock tests to guarantee industrial
compatibility;
• Electromagnetic compatibility according to CE and FCC;
• UL/CSA approval;
• Hotline, Service, spare parts;
• Quality assurance in accordance with ISO 9001.
SIMATIC Box PC 620 Operating Manual
C79000-Z7076-C638-04
v
Page 6

Welcome to your SIMATIC Box PC 620
Range of Application
The SIMATIC Box PC 620 is a basic device for high performance automation
solutions. It meets the highest requirements through:
• compliance with the requirements for a fire enclosure to UL1950/EN60950
(device with AC power supply), i.e. it may be used without an additional fire
enclosure;
• extremely compact dimensions;
• suitability for continuous 24 hour operation;
• serviceability in a wide ambient temperature range;
• high robustness;
• a design which is easy to service and maintain.
Fitting Option
The SIMATIC Box PC 620 can be installed in all the usual positions.
Functions
There are anchorage points on both of the long sides for securing the unit.
Mounting brackets can be screwed on to these anchorage points.
The SIMATIC Box PC 620 is equipped with software that allows it to be used
universally. The following software packages are available:
• Operating system Windows NT;
or
• Operating system Windows 2000
or
• Operating system Windows 98
Due to its hardware, the SIMATIC Box PC 620 additionally allows the use of:
• SIMATIC supplementary software
• Software from the entire world of automation
• Software from the PC world
Further Areas of Application:
The SIMATIC Box PC 620 can also be used in other areas of automation
(SIMATIC HMI, SIMATIC NET, TELEPERM-M, SINUMERIK / SIMODRIVE, etc.).
vi
SIMATIC Box PC 620 Operating Manual
C79000-Z7076-C638-04
Page 7

Consignment/Assessories
• Basic unit with preinstalled operating system
• Power cord for AC supply or connector for DC supply (depending on device
configuration)
• Installation material (depending on device configuration)
• Microsoft Windows manual, required Product Key (on the manual or the
device), and Recovery CD
• CD “Documentation and Drivers” with electronic manuals (German, English)
and drivers for Windows NT, Windows 98 and Windows 2000
• Operating manual
• Gender changer for COM1 port
• Product information depending on device configuration
Information about this Manual
Welcome to your SIMATIC Box PC 620
This manual will introduce you to the technical features of your
SIMATIC Box PC 620, so it doesn’t matter whether or not you have industrial PC
experience or not. We’ll show you the most important components and procedures
by means of task-oriented sections giving you information to start with practically
any chapter.
It would be helpful if you already know how to use a mouse, windows and
pull-down menus etc..
SIMATIC Box PC 620 Operating Manual
C79000-Z7076-C638-04
vii
Page 8

Welcome to your SIMATIC Box PC 620
Using the Manual
You can work with the operating manual in various ways. Either go through the
chapters in turn or, depending on the initial situation, read the overview at the
beginning of the chapter to find the desired topic.
The following table serves as a guideline:
Initial Situation Corresponding Chapter
You have no experience with industrial PCs Chapter 1 Important Notes
Chapter 2 Commissioning the
SIMATIC Box PC 620
Chapter 3 Hardware Components of the
SIMATIC Box PC 620
Y ou want to prepare the PC for programming Chapter 5 Setting up the SIMATIC Box PC 620
You want to install additional drivers Section 6.11 Installation of drivers
You have to reinstall the software Chapter 6 Error Diagnosis and Reinstallion
You need exact information about the hardware Chapter 7 Technical specifications
You need support Chapter 8 Hotline Services
You want to install additional hardware
components.
You need more information from the electronic
manuals
Chapter 4 Connecting of System Expansions
and External Devices
Section 5.4 Electronic manuals
Conventions
There are different modes to complete your tasks under Microsoft Windows
software. To make it easier for you, we explain how to fulfill your tasks by means of
the menus. Apart from that, the following conventions are used:
Convention Meaning
Command <subcommand > Specifies a menu command
“ Inverted Comma” Specifies the name of screen element ( e.g. a
menu or a command button )
Double-click A rapid and fast double-click on the standard
mouse key (in general the left mouse key).
Other Documentation for the SIMATIC Box PC 620
Electronic manual (Acrobat Reader) on the “Documentation and Drivers” CD.
viii
SIMATIC Box PC 620 Operating Manual
C79000-Z7076-C638-04
Page 9

Important Information
1.1 Safety Instructions
Caution
!
Installation
The safety instructions given on the reverse of the title page of this manual must
be observed. Before adding to the SIMATIC Box PC 620’s functionality by
expanding the hardware configuration (see Section 4.1) refer to the electronic
manual on the Backup CD supplied with your SIMATIC Box PC 620 and observe
the relevant safety instructions.
This device corresponds to the relevant safety measures according to IEC, EN,
VDE, UL, and CSA. If you have questions about the permissibility of the installation
in the designated environment, please contact our service representative.
1
Condensation can occur if the device is transported from a cold environment into
the operating area. The device must be dry prior to startup. You must allow for an
acclimatization time of at least four hours.
Please observe the notes on ambient conditions in Chapter 7 Technical
Specifications and the installation notes in Section 2.2 of this manual when
installing and operating the device. The device is to be installed so that there is no
danger of it falling or of causing damage to itself or others.
Be sure the fan ventilation slots are open so that a sufficient amount of air can be
drawn in to cool the housing interior.
Warning
!
Take not of the permissible fitting positions without fail when installing the systems
(see Section 2.2).
If the systems are installed in a non-permissible fitting position, the approvals
pursuant to UL 1950 and EN60950 are no longer valid!
SIMATIC Box PC 620 Operating Manual
C79000-Z7076-C638-04
1-1
Page 10

Important Information
Power Connection
The device is intended for service in grounded electricity supply systems
(TN systems to VDE 0100, part 300, or IEC 364–3).
Service in non-grounded or impedance-grounded supply systems (IT systems) is
not intended.
The power cord should meet the respective local safety requirements.
Check whether the device’s set supply voltage is the same as the local supply
voltage.
This device is equipped with a safety-tested power supply cable. You may connect
this device only to a grounding outlet with a grounding contact.
Make certain that the socket outlet on the device or the grounding contact for the
building wiring system is freely accessible and as near to the device as possible.
The mains switch does not separate the device from the power system. To
establish a complete power separation, you must disconnect the power plug (inlet
connector on the back of the device). This location must be accessible. A central
isolating switch must be present for cabinet mounting.
Install the cables so that no one can step on them or trip over them. When you
connect the device, adhere to the relevant instructions in chapter 2 of this manual.
Do not connect or disconnect power supply cables and data transmission lines
during thunderstorms.
In emergency situations (for example, damaged housing, damaged operator
elements, a damaged power supply cable, ingress of liquids or foreign particles),
switch off the device. Disconnect the power plug and inform the responsible
service personnel.
The SIMATIC Box PC 620 must be switched off when you connect or disconnect
I/O devices (keyboard, mouse, printer, etc.). You can damage the PC if you do not
adhere to these instructions.
1-2
SIMATIC Box PC 620 Operating Manual
C79000-Z7076-C638-04
Page 11

Country-Specific Information
For the United States and Canada:
In the United States and Canada USA, a CSA or UL-listed power supply cable
must be used.
The male plug is a 5-15 style.
For operation with 120 V:
Use a UL Listed, CSA Labelles Cord Set, consisting of a min. 18 AWG. Type SVT
or STJ three conductor flexible cord, max. 4.5 m (15 feet) in length and a parallel
blade grounding type attachment plug rated 15 A, min 125 V.
For operation with 240 V:
Use a UL Listed, CSA Labelled Cord Set, consisting od a min. 18 AWG. Type SVT
or SJT three conductor flexible cord, max. 4.5 m (15 feet) in length and a tandem
blade grounding type attachment plug, rated 15 A, 250 V.
For operation with 230 V (outside of USA and Canada)
Important Information
Repairs
Use a Cord Set consisting of a min 18 AWG cord and grounding type attachment
plug rated 15 A, 250 V. The cord set should have the approviate safety approvals
for the country in which the equipment will be installed and marked.
Only authorized personnel are permitted to repair the SIMATIC Box PC 620.
Unauthorized opening and improper repairs on the device can result in significant
danger to the user.
Before you open the device, first switch it off and then disconnect the power plug.
Install only system expansion devices provided for this computer. If you install
other expansion devices, you can damage the system or violate the safety
requirements and regulations for radio interference suppression. Contact your
technical support team or where you purchased your PC to find out which system
expansion devices may safely be installed.
If you install or exchange system expansions and damage your
SIMATIC Box PC 620, the warranty becomes void.
The power supply may only be dismantled or exchanged by authorized technical
personnel.
SIMATIC Box PC 620 Operating Manual
C79000-Z7076-C638-04
1-3
Page 12
Important Information
Battery
There is a battery on the motherboard in this device. Batteries may only be
exchanged by technical personnel.
Observe the local regulations on disposal of special waste when disposing of dead
batteries.
Note
!
There is the danger of an explosion, if the battery is not exchanged as directed.
Replace only with the same type or an equivalent type recommended by the
manufacturer. Dispose of used batteries in accordance with the manufacturer’s
instructions.
Notes on Inserting and Removing Modules
Modules containing electrostatically sensitive devices (ESDs) can be identified by
the following label:
Please observe and carefully follow the guidelines mentioned below when handling
modules equipped with electrostatically sensitive devices:
• Always discharge your body before handling modules equipped with ESDs (for
example by touching a grounded object).
• Devices and tools must be free of static electricity.
• Always pull the power plug and disconnect the battery before connecting or
disconnecting modules (containing ESDs).
• Touch modules fitted with ESDs by their edges only.
1-4
• Never touch wiring posts or printed conductors on modules (containg ESDs).
SIMATIC Box PC 620 Operating Manual
C79000-Z7076-C638-04
Page 13
1.2 Certificates, Directives and Declarations
Notes on the CE Symbol
The following applies to the SIMATIC product described in this
operating instruction:
EMC Directive
This product fulfils the requirements for the EC directive 89/336/EEC on
“electromagnetic compatibility” and the following fields of application apply
according to this CE symbol:
Field of Application Requirement For
Emitted Interference Noise Immunity
Residential and commercial areas
and small businesses.
EN 50081-1: 1992 EN 50082-1: 1992
Important Information
Industry EN 50081-2: 1993 EN 50082-2: 1995
The product is also compliant with the Standards EN 61000-3-2:1995 (Harmonic
currents) and EN 61000-3-3:1995 (Voltage fluctuation and flicker).
Low Voltage Directive
This product fulfils the requirements for the EC directive 73/23/EEC on “low
voltage” and was tested to EN60950
Declaration of Conformity
The EC declarations of conformity and the documentation relating to this are
available to the authorities concerned, according to the above EC directive, from:
Siemens AG
Bereich Automation & Drives
A&D AS E 4
Frau Zisler
Postfach 1963
D-92209 Amberg
Tel.: +49 (9621) 80-3283
Fax: +49 (9621) 80-3278
Observing the Setup Guidelines
The setup guidelines and notes on safety given in the manual must be observed
on startup and during operation.
SIMATIC Box PC 620 Operating Manual
C79000-Z7076-C638-04
1-5
Page 14

Important Information
ISO 9001 Certificate
The quality assurance system for the whole product process (development,
production, and marketing) fulfills the requirements of ISO 9001 (corresponds to
EN29001: 1987).
This has been certified by the German society for the certification of quality
management systems (DQS).
EQĆNet certificate no.: 1323Ć01
Software License Agreement
The SIMATIC Box PC 620 is shipped with the software already installed. Please
observe the relevant license agreements.
1.3 Certification for the USA, Canada and Autralia
Security
C
C US
NRTL
One of the following markings on a device is indicative of the corresponding
approval:
Underwriters Laboratories (UL) to the UL 1950 standard (I.T.E)
or to the UL508 (IND.CONT.EQ)
Underwriters Laboratories (UL) to the Canadian Standard C22.2 No. 950
(I.T.E) or to the C22.2 No. 142 (IND.CONT.EQ)
Underwriters Laboratories (UL) to Standard UL 1950, Report E11 5352 and to
the Canadian Standard C 22.2 No.950 (I.T.E)
or to the UL508 and C22.2 No. 142 (IND.CONT.EQ)or to the UL508 and C22.2 No. 142 (IND.CONT.EQ)
UL-Recognition-Mark
Canadian Standard Association (CSA) to standard C22.2. No. 950
(LR 81690) or to C22.2 No. 142 (LR 63533)
Canadian Standard Association (CSA) to the American Standard UL 1950
(LR 81690) or to the UL 508 (LR 63533)
1-6
SIMATIC Box PC 620 Operating Manual
C79000-Z7076-C638-04
Page 15

EMC
USA
Important Information
Federal Communications Commission
Radio Frequency Interference Statement
This equipment has been tested and found to comply with the limits for a Class A digital
device, pursuant to Part 15 of the FCC Rules. These limits are designed to provide
reasonable protection against harmful interference when the equipment is operated in a
commercial environment. This equipment generates, uses, and can radiate radio
frequency energy and, if not installed and used in accordance with the instruction manual,
may cause harmful interference to radio communications. Operation of this equipment in a
residential area is likely to cause harmful interference in which case the user will be
required to correct the interference at his own expense.
Shielded Cables
Shielded cables must be used with this equipment to maintain compliance with FCC regulations.
Canada
Modifications
Changes or modifications not expressly approved by the manufacturer could void the
user’s authority to operate the equipment.
Conditions of Operations
This device complies with Part 15 of the FCC Rules. Operation is subject to the following
two conditions: (1) this device may not cause harmful interference, and (2) this device must
accept any interference received, including interference that may cause undesired
operation.
Canadian Notice
This Class B digital apparatus complies with Canadian ICES-003.
Avis Canadien
Cet appareil numérique de la classe B est conforme à la norme NMB-003 du Canada.
Australia
This product meets the requirements of the AS/NZS 3548 Norm.
SIMATIC Box PC 620 Operating Manual
C79000-Z7076-C638-04
1-7
Page 16

Important Information
1-8
SIMATIC Box PC 620 Operating Manual
C79000-Z7076-C638-04
Page 17

Commissioning the SIMATIC Box PC 620
2.1 Unpacking and Checking the Scope of Delivery
Unpacking the SIMATIC Box PC 620
Unpack your SIMATIC Box PC 620 programming device as follows:
1. Remove the packing.
2. Do not throw the original packing away. Keep it in case you have to transport
the unit again sometime in the future.
3. Please keep the documentation in a safe place. It is required during the initial
start–up of the PC (see Section 5.2) and are part of the devicet.
4. Check the packing and its contents for any shipping or transport damage.
5. Check with the packing list to make sure no components are missing. Also
check the accessory parts, which you can order separately.
6. Please inform your local dealer of any shipping or transport damages and of
outstanding items indicated on the packing list.
2
Recording the Serial Number
7. Your PC is identified by a serial number (F-Nr.). Enter this number in the table
below.
If a PC is stolen and subsequently submitted for repair, the repair center will be
able to identify it by the F-Nr..
Enter the Microsoft Windows “Product Key” from the “Certificate of
Authenticity”
8. Enter the Microsoft Windows “Product Key” from the “Certificate of Authenticity”
(COA) in the table. You will find the “Product Key” on the Windows manual or
the device. You need the Windows “Product Key” if you want to reinstall the
operating system.
F-Nr.
Order No.
Microsoft Windows Product Key
SIMATIC Box PC 620 Operating Manual
C79000-Z7076-C638-04
2-1
Page 18

Commissioning the SIMATIC Box PC 620
2.2 Installing the SIMATIC Box PC 620
The SIMATIC Box PC 620 can be operated in all the usual fitting positions. It is
particularly suitable for fitting in consoles, switch boards and control panels.
The SIMATIC Box PC 620 with AC power supply meets the requirements for a
fire enclosure to EN60950. it can therefore be fitted without an additional fire
enclosure.
The SIMATIC Box PC 620 with DC power supply is an open device (right device
side); therefore the mounting must meet the requirements of a fire enclosure.
Please note the following points when installing the PC:
• Avoid extreme ambient conditions as far as possible. Protect your PC from
dust, moisture, and heat.
• Keep the PC out of direct sunlight.
• Mount the PC as safely as possible to prevent any danger (for example, by
falling over).
• The clearance around the housing must be at least 100 mm at the front and
rear, so that the PC is sufficiently ventilated.
• Make certain that the ventilation slots for the housing are not covered.
• Observe the permissible fitting positions without fail when installing the
systems.
Warning
!
If the systems are installed in a non-permissible fitting position, the approvals
pursuant to UL 1950, UL 508 and EN60950 are no longer valid!
2-2
SIMATIC Box PC 620 Operating Manual
C79000-Z7076-C638-04
Page 19
Commissioning the SIMATIC Box PC 620
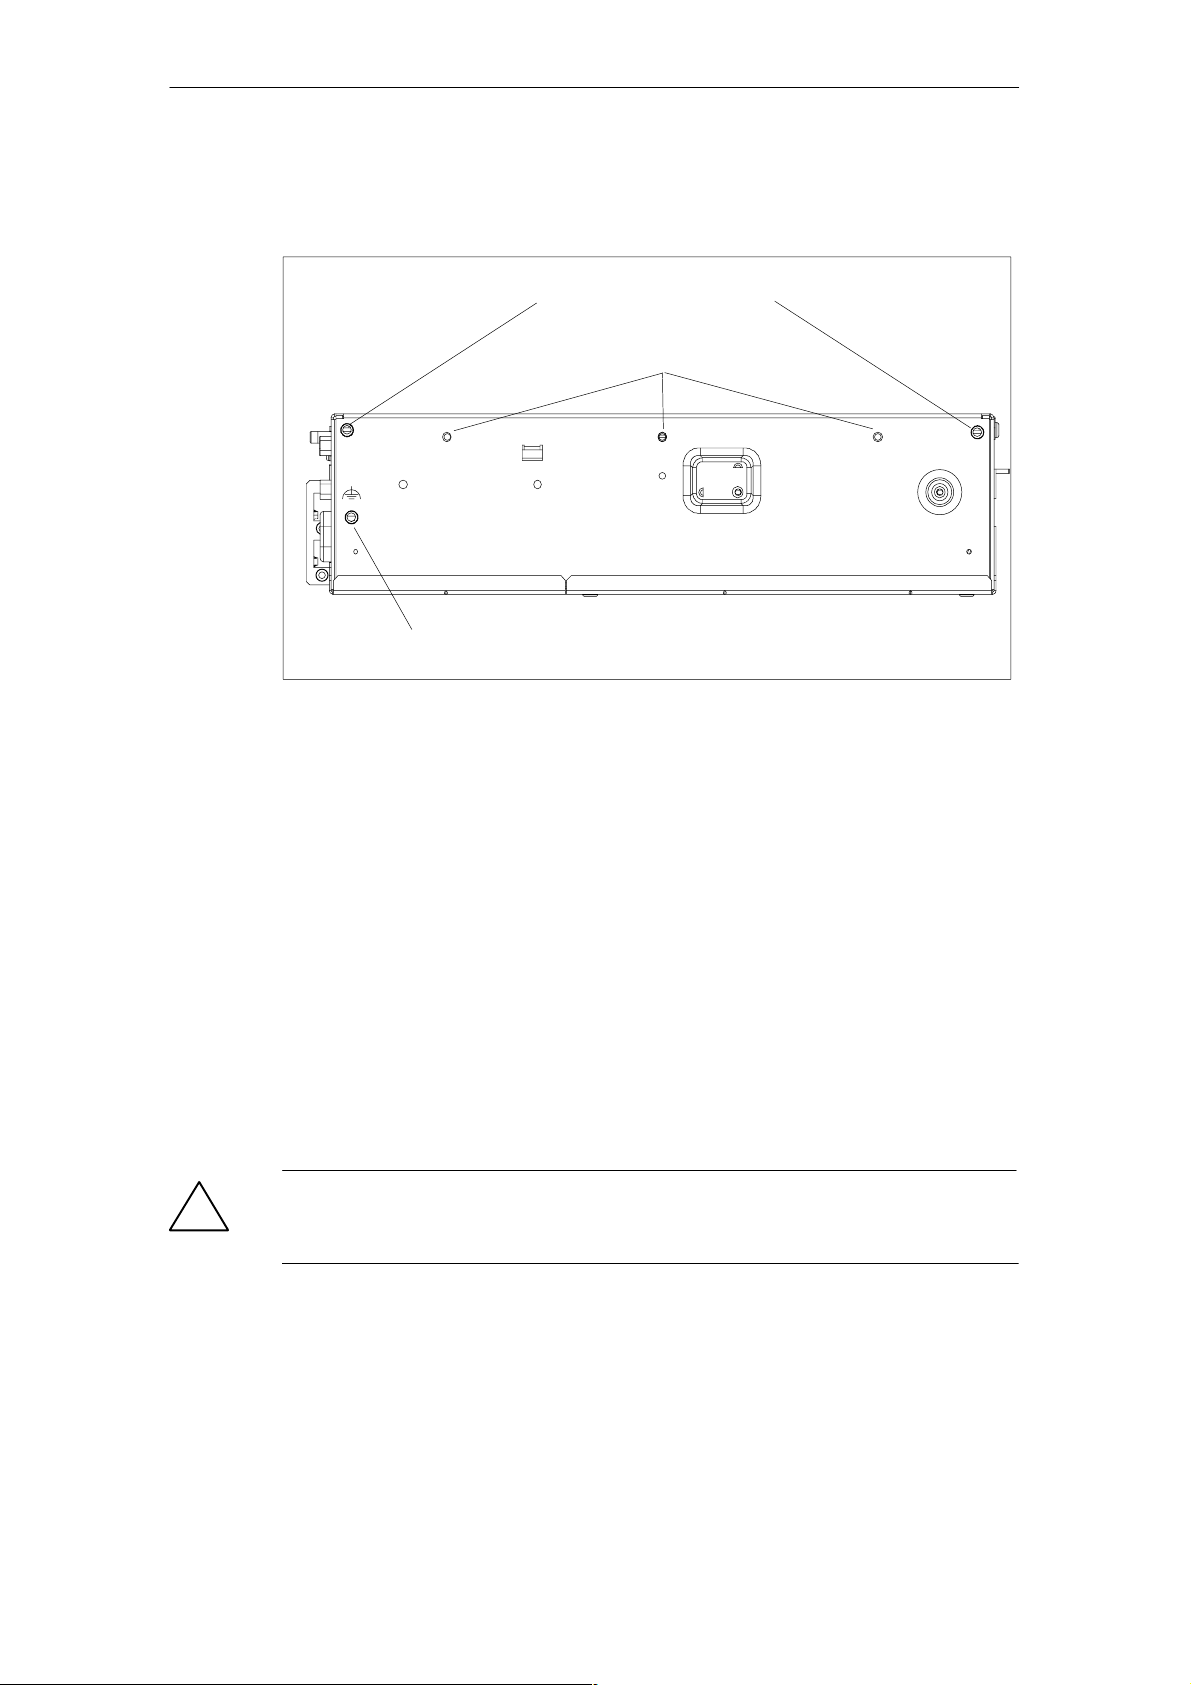
Depending on the configuration of the device, two mounting brackets are included
in the scope of delivery. You can attach these to the housing with 6 screws (M3x6).
M4 thread, max. depth of engagement 5 mm
M3 thread, max. depth of engagement 5 mm
Equipotential grounding connection
Figure 2-1 Screw Connection Points for Mounting Brackets (Cover Side Downwards)
Instructions for wall and ceiling mounting
To install the SIMATIC Box PC 620 in a concrete wall or ceiling proceed as follows:
1. Fix the mounting brackets at the housing of the PC.
2. Drill four holes of 8 mm diameter and 60 mm depth into the wall or ceiling. You
will find the required dimension drawings on the following pages.
3. Insert the concrete plugs (8 mm diameter and 50 mm long) into the drill holes.
4. Fix the PC with four screws (4 mm diameter and 50 mm long).
In a plasterboard wall or ceiling (min. 13 mm thick), drill holes of 14 mm diameter
and fasten the PC with four anchors (4 mm diameter and 50 mm long).
In a metal sheet wall or eiling (min. 2 mm thick), drill holes of 5 mm diameter and
fasten the PC with four screws (4 mm diameter and min. 15 mm long).
Warning
!
The installer must verify that the wall or ceiling can support four times the full load
of the SIMATIC Box PC 620 (with mounting brackets and Add-On-Cards).
SIMATIC Box PC 620 Operating Manual
C79000-Z7076-C638-04
2-3
Page 20

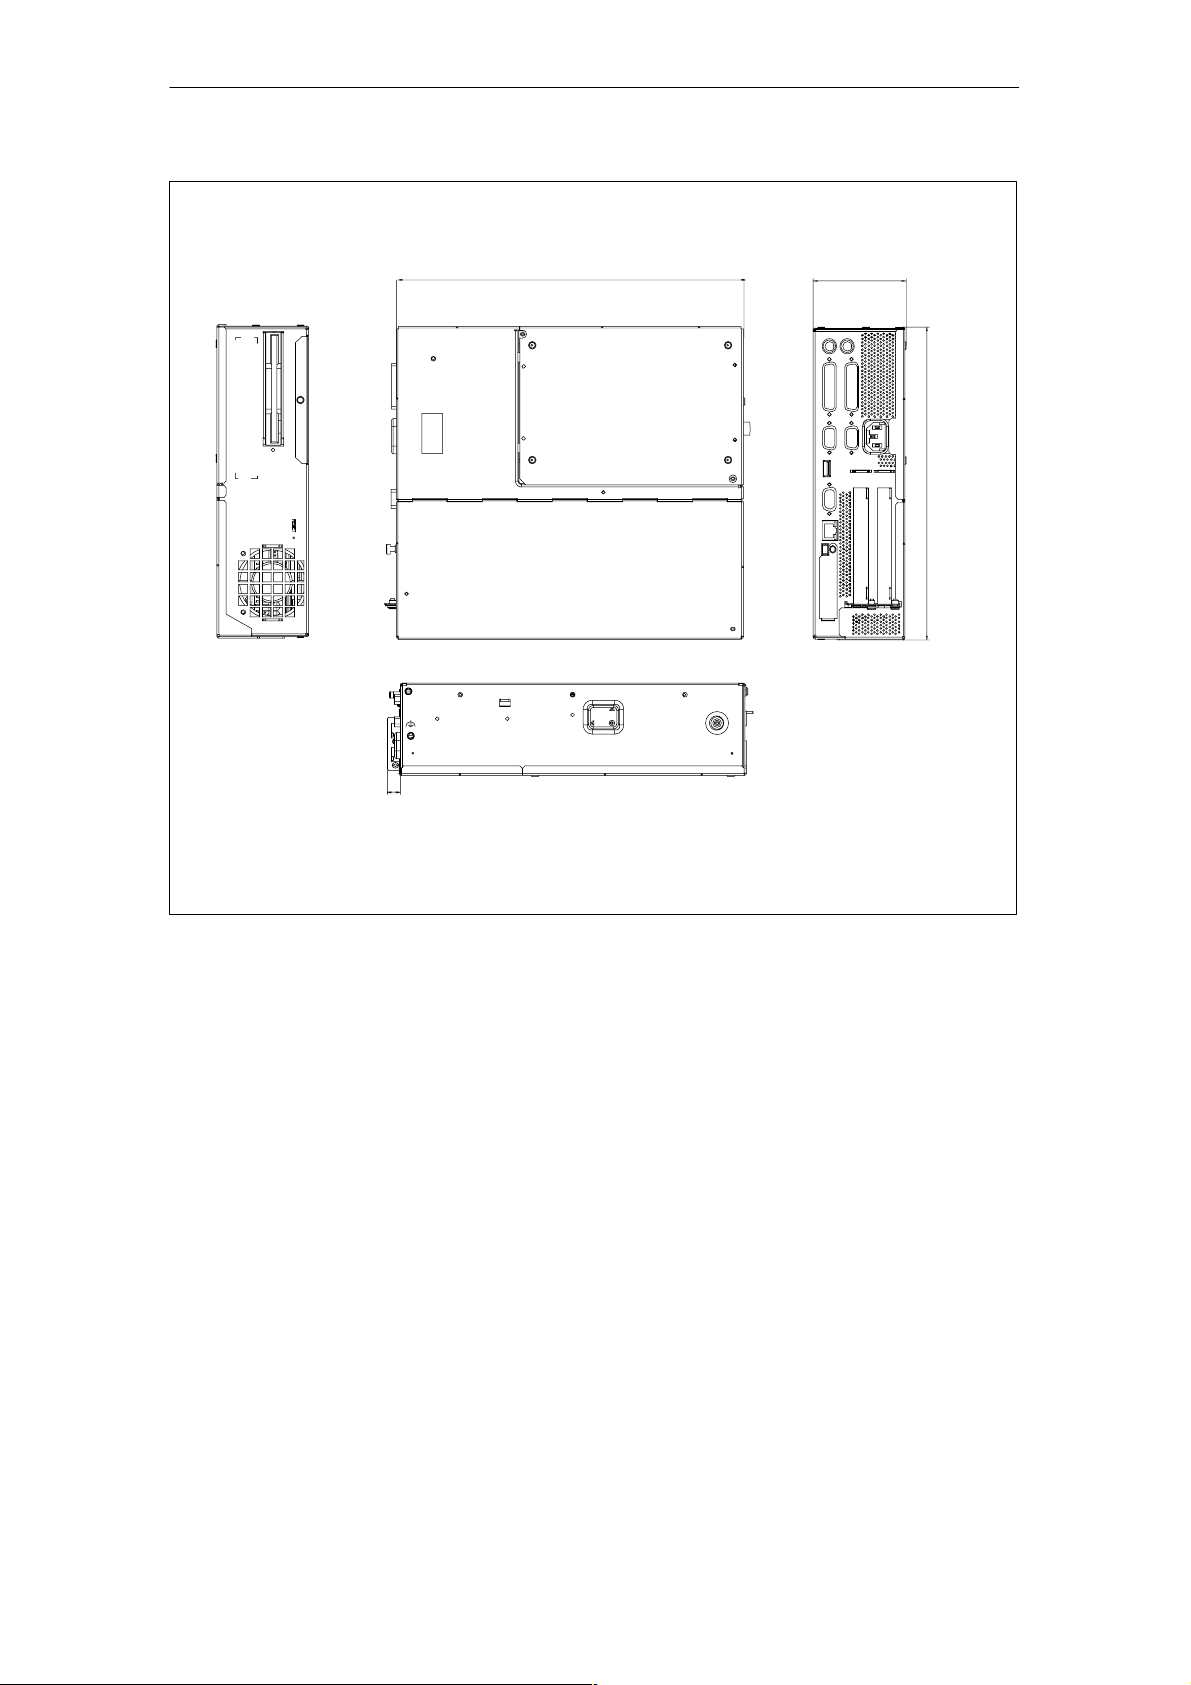
Commissioning the SIMATIC Box PC 620
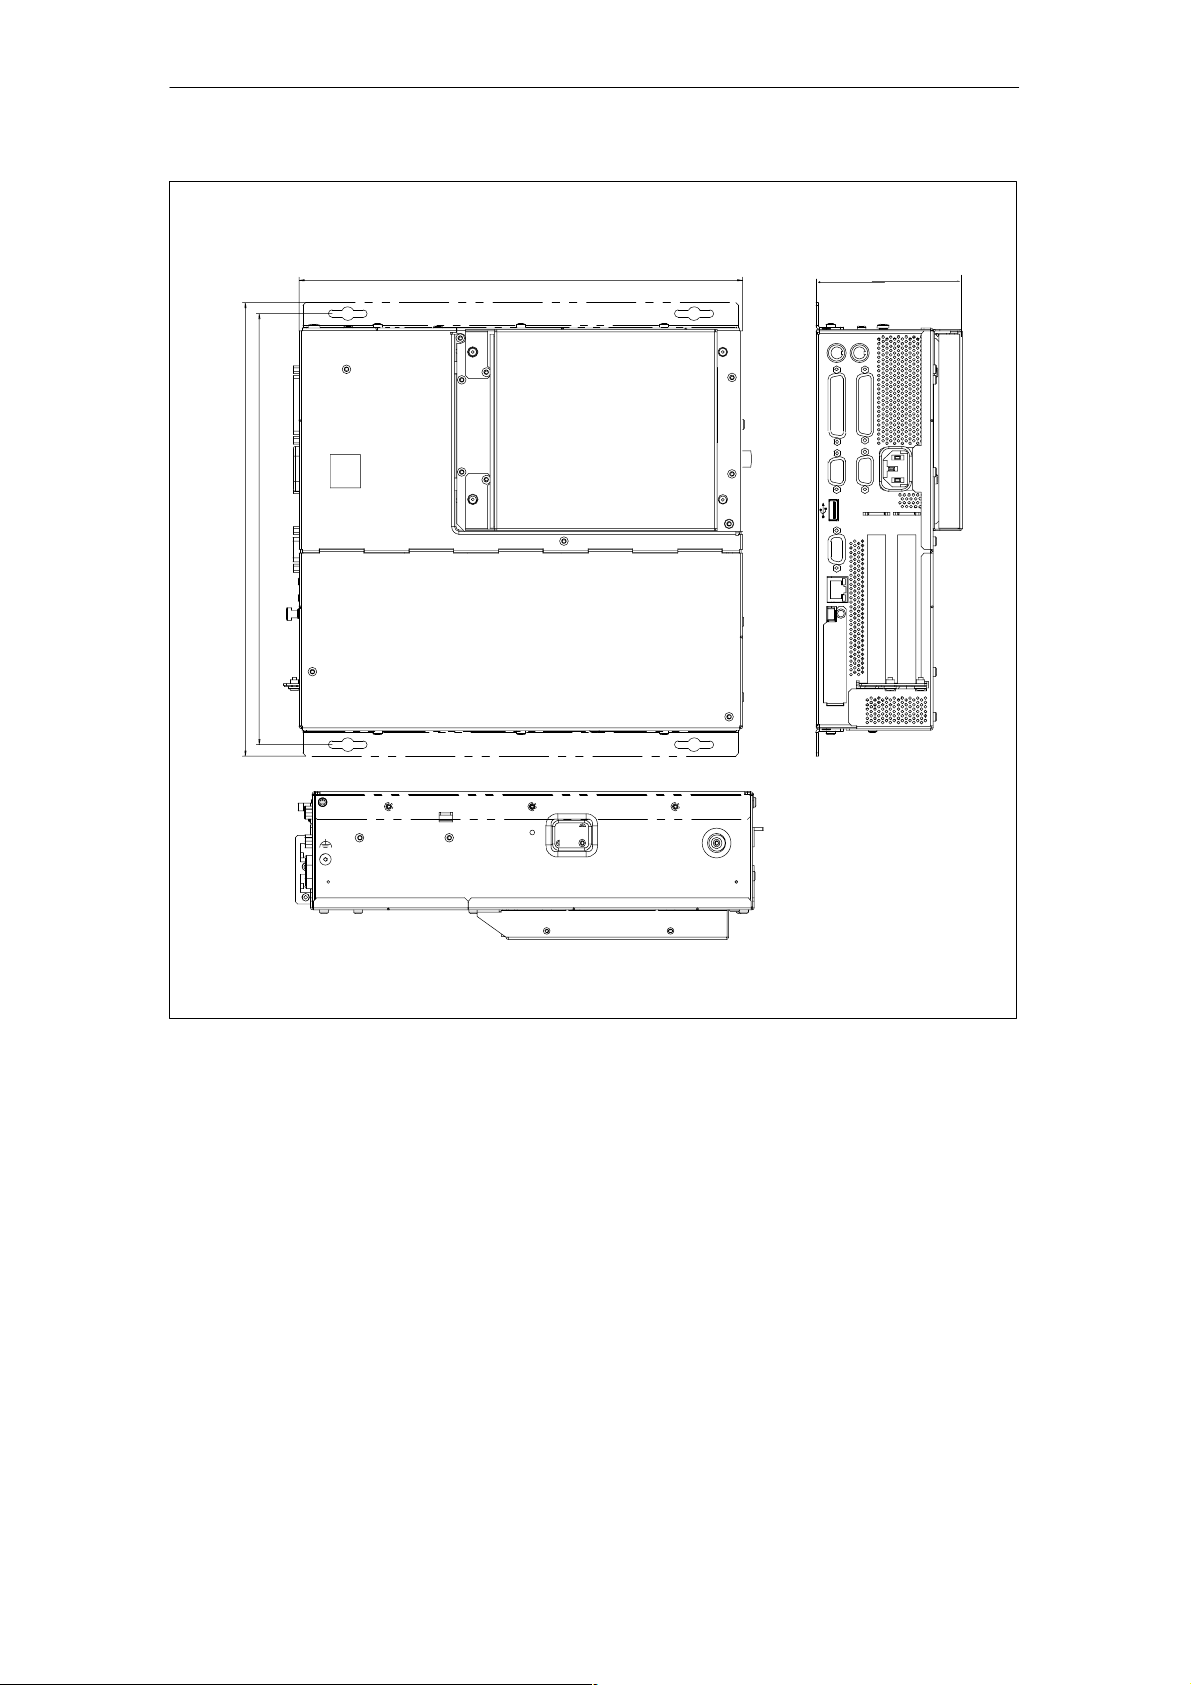
301 mm
11.85 “
5 mm
297.2 mm
11.701 ”
286 mm
0.197 “
232 mm
9.134 “
26 mm
1.024 “
79.5 mm
3.13 “
267 mm
11.26 “
10.512 “
11,2 mm
0.441 “
Figure 2-2 Dimension Drawings for Fitting in Control Panel with Installation Angle (Device without
CD-ROM Drive)
2-4
SIMATIC Box PC 620 Operating Manual
C79000-Z7076-C638-04
Page 21
Commissioning the SIMATIC Box PC 620
301 mm
11.85 “
297.2 mm
11.701 ”
100 mm
3.94 “
Figure 2-3 Dimension Drawings for Fitting in Control Panel (Device with CD-ROM Drive)
SIMATIC Box PC 620 Operating Manual
C79000-Z7076-C638-04
2-5
Page 22
Commissioning the SIMATIC Box PC 620
11.2 m m
0.441 “
267.2 mm
10.52 “
79.5 mm
3.13 “
267 mm
10.512 “
Figure 2-4 Dimension Drawings for Fitting in Control Panel without Installation Angle
SIMATIC Box PC 620 Operating Manual
2-6
C79000-Z7076-C638-04
Page 23

Commissioning the SIMATIC Box PC 620
Permissible Fitting Positions of the PC with Floppy Disk Drive
An inclined position of + 20_ is allowed in each of the permissible fitting positions.
Fan
Interfaces
FDD
Interfaces
This fitting position is permissible in devices without an FDD
FDD
Fan
FDD
Fan
Interfaces
Fan
Interfaces
FDD
Figure 2-5 Permissible Fitting Positions of the PC with Floppy Disk Drive
Permissible Fitting Positions of the PC with LS120
An inclined position of $15_ is allowed in each of the permissible fitting positions.
FDD
Interfaces
Fan
Fan
FDD
Preferred position
Interfaces
Interfaces
LS120
Interfaces
LS120
Interfaces
Fan
Fan
LS120
LS120
Fan
Interfaces
Fan
This fitting position is permissible in devices with LS120
Figure 2-6 Permissible Fitting Positions of the PC with LS120
LS120
Interfaces
Fan
Fan
Interfaces
LS120
Preferred position
SIMATIC Box PC 620 Operating Manual
C79000-Z7076-C638-04
2-7
Page 24

Commissioning the SIMATIC Box PC 620
2.3 Preparing for Operation
Connection to the Power Supply Unit
Note
The SIMATIC Box PC 620 is equipped with a safety-tested mains cable and may
only be connected to a grounded grounding outlet.
Make sure that the socket on the device or the grounding outlet of the building
installation is easily accessible and as near as possible to the device.
The SIMATIC Box PC 620 has no mains switch. The mains plug must be pulled
out for complete mains separation. This point must be easily accessible.
If the PC is installed in a cabinet, there must be a central mains disconnector.
The standard power supply unit of the SIMATIC Box PC 620 is designed for
115/230 V systems.
The power supply unit has automatic mains voltage changeover. It is not
necessary to adjust the voltage span.
Equipotential Measures
Low-impedance ground connections ensure that faults arising from external power
supply cables, signalling cables or cables to peripheral units are diverted.
Therefore connect the equipotential grounding connection on the system housing
to the central earth terminal of the cabinet or the unit, into which the computer is
fitted, in such a way that it has low impedance (large surface area, large contacts).
The minimum cross section should not be less than 5 mm2.
The connection is on the side of the device and is identified.by the symbol:
2-8
SIMATIC Box PC 620 Operating Manual
C79000-Z7076-C638-04
Page 25

Commissioning the SIMATIC Box PC 620
Connecting and Switching on the SIMATIC Box PC 620
Before you connect the SIMATIC Box PC 620 to the mains, the keyboard, mouse
and display or monitor must be connected.
1. Insert the connector cable of these peripheral units into the corresponding
sockets on the port side of the SIMATIC Box PC 620 (see Section 3.1.)
2. Once the peripheral units have been connected, the device is ready for
operation from the power supply. Connect the device to the mains. The
SIMATIC Box PC 620 is now in service.
PS/2 mouse
Keyboard VGA port for monitor
Figure 2-7 Connecting and Switching on the SIMATIC Box PC 620
Device socket for non-heating appliances with
AC supply or terminal screw with DC supply
Switching off the SIMATIC Box PC 620
The SIMATIC Box PC 620 has no mains switch and is switched off after only
disconnection from the mains.
SIMATIC Box PC 620 Operating Manual
C79000-Z7076-C638-04
2-9
Page 26

Commissioning the SIMATIC Box PC 620
2.4 Transport
Transporting
Despite the fact that the SIMATIC Box PC 620 is of rugged design, its internal
components are sensitive to severe vibrations or shock. You must therefore protect
your PC from severe mechanical stress when transporting it. Use the original
packing material if you have to ship the programming device from one location to
another.
Use the original packing material if you have to ship the SIMATIC Box PC 620
from one location to another.
Caution
!
Risk of damage!
When transporting the PC cold weather, when it may be submitted to extreme
variations in temperature, make sure that there is no moisture (condensation) on
or in the PC.
The PC must be allowed to reach room temperature slowly before you switch it on.
If condensation has formed, you should wait approximately 4 hours before
switching on the PC.
2-10
SIMATIC Box PC 620 Operating Manual
C79000-Z7076-C638-04
Page 27

Hardware Components of the SIMATIC Box PC 620
3
This chapter provides you with information on hardware components and their
functions, such as:
• Right- and left-hand side panel of the device
• Connectors and ports
• PC-Cards
• Drives
• Backup battery
SIMATIC Box PC 620 Operating Manual
C79000-Z7076-C638-04
3-1
Page 28

Hardware Components of the SIMATIC Box PC 620
3.1 Right-Hand Side of the Device (Port Side)
1
Mouse COM1/V24/AG COM2 PCI slot PCI/ISA slot
Keyboard EthernetMPI/DPUSBVGALPT1/Printer
*
2
*
PC Card
Figure 3-1 Right-Hand Side of the Device with Ports
*1Without TTY for the basic variant of the Box PC
*2Not available for the basic variant of the Box PC
Note
Ensure that you use shielded cables and metal plugs to connect the peripheral
units; if this is not done, the approval for operation will be invalid! Screw down the
plugs of the interface cables to the PC housing by means of a screwdriver. You
thereby improve the electrical shielding.
3-2
SIMATIC Box PC 620 Operating Manual
C79000-Z7076-C638-04
Page 29

Hardware Components of the SIMATIC Box PC 620
Connections Function
VGA VGA port for connecting an external monitor, 15 pins,
subminiature Cannon connector, sockets
COM1/V24/AG*3 Serial port 1 (V24, via BIOS-Setup can be switched to TTY),
25 pins, subminiature Cannon connector, sockets
COM2 Serial port 2 (V24) 9 pins, subminiature Cannon connector, pins
Mouse PS/2 mouse connector
Keyboard *1 PS/2 keyboard connector
LPT1/Printer Parallel port, connection for devices with parallel interface (e.g.
printer), 25 pins, subminiature Cannon connector, sockets
MPI/DP
(RS 485) *2
Ethernet Connection for local network (LAN), RJ45
USB Connection for Universal Serial Bus
PC card Connection for PC cards Type I/II/III
PCI slot Internal slot for expansion modules
PCI/ISA slot Internal slot for expansion modules
Device socket for
non-heating
appliances with AC
supply or terminal
screw with DC supply
Connection of an S7 programmable controller, 9 pins,
subminiature Cannon connector, socket
Power suppply
If expansion modules have been inserted in the PC, there are additional ports.
Please refer to the description of the respective module for their purpose.
*1Keyboards with an integrated track ball (e.g. PG 720 or PG 740) can be
connected.
*2Electrical isolation through an extra-low voltage safety circuit (SELV).
MPI/DP is not available for the basic variant of the Box PC
*3You change the connection into a male connector by attaching the gender
changer (constituent part of the source material package).
Without TTY for the basic variant of the Box PC
SIMATIC Box PC 620 Operating Manual
C79000-Z7076-C638-04
3-3
Page 30

Hardware Components of the SIMATIC Box PC 620
3.2 Left-Hand Side of the Device (Drive Side)
Fan
Reset button
Figure 3-2 Left-Hand Side of the Device
Connections Function
Device fan Cooling
Floppy disk drive with
ejector
( LS120 as an
alternative)
Front ports Connection of front elements
Reset button Reset of the SIMATIC Box PC 620 (cold start)
Processing of 3.5” disks
Name plate
Cover for front ports Plastic rivet
Floppy disk drive
Reset Button
The reset button can be actuated with a pointed object (e.g. an opened up paper
clip).
If you actuate, the button, a hardware reset is triggered. The PC restarts.
Caution
!
3-4
Data loss is possible with a hardware reset.
SIMATIC Box PC 620 Operating Manual
C79000-Z7076-C638-04
Page 31

3.3 Ports
Front Ports
The front ports are located behind the cover below the floppy disk drive. They are
used for connection of the following front elements:
• I/O port for the connection of front components
• LVDS display port
• CMOS display port
The front ports can be accessed as follows:
1. Undo the plastic rivet on the cover below the floppy disk drive with a flat
screwdriver.
2. Pull the cover out of the guide. The front ports are now accessible.
The CMOS display port is only accessible after removal of the floppy disk drive.
Hardware Components of the SIMATIC Box PC 620
VGA Port
Note
Keep the cover and the plastic rivet for reuse.
Please read the note referring to the operation of LC displays and external
monitors.
Note
The default setting of the display provides the simultaneous operation of a LC display
and an external monitor. The screen display is then optimized to a format of
640 x 480 pixels. Modes with a lower resolution and text modes are expanded to this
format.
To optimize the screen display for an external monitor, select “Hardware Options”
under Setup and set “CRT/LCD selection: CRT enabled”. A resolution of
1024*768 pixels with a higher refresh rate can then be set.
SIMATIC Box PC 620 Operating Manual
C79000-Z7076-C638-04
3-5
Page 32

Hardware Components of the SIMATIC Box PC 620
Connecting USB Devices
You can connect peripheral devices with USB interfaces to the USB port.
• Plug the USB cable into the port
The device connected in this way is available as soon as it has been registered
by the Plug and Play operating system (e.g. Windows 98).
A USB keyboard can be used to manipulate the Bios setup.
USB port
Figure 3-3 Connection of USB Devices
Note
Operating systems which do not support Plug and Play (e.g. Windows NT 4.0), do
not in general allow the operation of USB devices.
3-6
SIMATIC Box PC 620 Operating Manual
C79000-Z7076-C638-04
Page 33

Connect Ethernet
The drivers for the Ethernet interface are pre-installed. A wait period of approximately 30 results if no Ethernet cable in inserted or no active node is found during the
startup of the operating systems Windows 98 or Windows NT.
Note
A class 5 Ethernet cable is necessary for interface operation at 100 Mbit/s.
If you do not want to use the Ethernet interface, you can turn it off in the BIOS
setup (setting disabled). This results in no waiting period.
In the BIOS setup, the following settings are possible for the Ethernet interface:
Note
Disabled: Ethernet deactivated.
Hardware Components of the SIMATIC Box PC 620
The Ethernet interface hardware is turned off. It is not possible to
operate the interface within the operating system.
Enabled: Ethernet activated.
It is possible to plug in and operate the network cable at any time later
during operation (hot plug).
If no cable is plugged in when the system starts up, the device checks
whether or not an Ethernet cable is inserted for about 30 seconds when
it first boots. If there is an active network connection, there are no noticeable delays.
SIMATIC Box PC 620 Operating Manual
C79000-Z7076-C638-04
3-7
Page 34

Hardware Components of the SIMATIC Box PC 620
3.4 PC Card Port
Cardbus cards and PCMCIA cards can be operated through the PC card port of
the SIMATIC Box PC 620.
Figure 3-4 PC Card Port
PC card port Type I/II/III
The following is to be observed when working with cardbus/PC cards:
1. Open the port cover on the left-hand side of the device by undoing the plastic
rivet with a flat screwdriver.
2. Pull the cover out of the guide.
3. Insert the desired PCMCIA card or cardbus card.
Caution
!
!
Before inserting PC-Cards please make sure that the PC-Card Ejector is
completely pressed otherwise the cards e.g. Flash Memory Cards could get stuck
in the slot. The PC-Cards can not be inserted correctly.
Always insert the PC card with the label toward the rear of the programming
device.
Do not remove the PC card while data transfer is in progress (risk of data loss and
system crash).
Caution
Always discharge your body’s charge of static electricity by briefly touching a
grounded object before inserting or removing a PC card (see ESD Guideline in
Section 1.1 or electronic manual).
Otherwise damage could occur.
3-8
SIMATIC Box PC 620 Operating Manual
C79000-Z7076-C638-04
Page 35

Note
Peak currents of 650 mA at 5 V based on 3 s are permitted!
Examples of PCMCIA cards connected to PC card interface for
Installing PC Cards
Note the following when installing these cards:
Hardware Components of the SIMATIC Box PC 620
Hard Disk 330 mA read/write
(Maxtor MXL-131-III) 640 mA spin up 2 s. . . . .
110 mA idle. . . . . . . . . . . . . . . . . . . . . . . .
Fax/modem 60 mA idle. . . . . . . . . . . . .
(Dr. Neuhaus) 140 mA transfer. . . . . . . . . . .
Ethernet
(XIRCOM) 150 mA. . . . . . . . . . . . . .
Note
Depending on the configuration of the SIMATIC Box PC 620, there may not be any
free interrupts available for operating PC Cards. You have to reserve the necessary
PC card interrupts in the BIOPS setup menu as follows:
Set the necessary interrupt via Advanced > PCI-Configuration >
PCI/PNP ISA IRQ Resource Exclusion to “reserved” (default: available).
SIMATIC Box PC 620 Operating Manual
C79000-Z7076-C638-04
3-9
Page 36

Hardware Components of the SIMATIC Box PC 620
3.5 Drives
The SIMATIC Box PC 620 is equipped as standard with a 3.5” disk drive or an
LS 120 drive and a 3.5” hard disk drive.
3.5.1 Disk Drive (Depending on the Device Configuration)
You can store programs and data on diskettes with the disk drive and load them
from diskettes into the SIMATIC Box PC 620.
Types of Diskette
You can use following diskettes:
double sided high density diskette double sided double density diskette
3.5 in. 3.5 in.
1.44 Mbytes (135 TPI) 720 Kbytes
Handling Diskettes with the Floppy Disk Drive
The diskette is inserted in the disk drive as shown below:
Access LED
Figure 3-5 Handling Floppy Disks
When the floppy disk drive is being accessed, the access indicator light is lit.
Caution
!
Risk of loss of data!
Ejector
Access LED
3-10
When the green access LED of the floppy disk drive is lit, the ejector may not be
actuated.
SIMATIC Box PC 620 Operating Manual
C79000-Z7076-C638-04
Page 37

Hardware Components of the SIMATIC Box PC 620
3.5.2 LS120-Drive (Depending on the Device Configuration)
The SIMATIC Box PC 620 can be equipped with an LS120 drive as an alternative
to a floppy disk drive.
Larger volumes of data can be stored on LS120 data carriers than on a
1.44 MB floppy disk drive. The LS120 has the following features:
– The LS120 is compatible with a 1.44 MB floppy disk drive i.e. 1.44 Mbyte
disks can also be processed·
– An LS120 data carrier has a maximum data volume of 120 Mbytes.
– The LS120 is connected via an ATAPI(IDE) port.
Handling Disks with the LS120-Drive
Depending on the fitting position, the disks are inserted into the disk drive as
illustrated below:
Hole for emergency ejection (only LS120)
Ejector
Access LED
Figure 3-6 Handling Disks
Ejector
Access LED
When the LS120-drive is being accessed, the access indicator light is lit.
Emergency ejection is carried out in the same way with the LS120 as in the
CD–ROM drive. See Section 3.4.4. for details.
Caution
!
Risk of loss of data!
When the green access LED of the LS120-drive is lit, the ejector may not be
actuated.
LS120-drives are very sensitive to shocks of a non-permissible level. Shocks
during operation can lead to damage to the drive or the data carrier. You can find
the permissible values in the technical data in Section 7.1.
SIMATIC Box PC 620 Operating Manual
C79000-Z7076-C638-04
3-11
Page 38

Hardware Components of the SIMATIC Box PC 620
Information on the LS120-disk drive
Restrictions
P Tools under STEP 5
Data cannot be edited in PCP/M format on the LS120-drive using P Tools under
STEP 5.
Authorization with Authors Vx.x
In order to authorize STEP 5 and other SIMATIC components, use AuthorsW.
When using PCs start the taskbar under Start > Simatic > AuthorsW.
Settings in Setup
In order to put the LS120-drive into operation the following settings are valid.
These are the default settings for the device.
To open the Setup menu, press function key F2 during the boot sequence. Make
the following settings in Setup:
1. In the “Main” menu, set Diskette A: to “Disable”.
2. In the “Main” menu under Boot Options:
Set the boot sequence as follows:
1 Removable Devices
2 Hard Drive
3 ATAPI CD-ROM Drive
4 Diskette Drive
3. In the “Advanced” menu, set Floppy-Disk-Controller to “Disable”.
4. Boot the device with “Save Changes & Exit”.
With these settings the LS120-drive can be addressed in the same way as the
1,44 Mbyte floppy-disk drive previously installed.
Usage notes for LS 120 Superdisks
In Floppy disks up to 1.44 Mbytes as well as Superdisks up to 120 Mbytes can be
used in LS120-drives.
Track density for Superdisks is 10 mm compared with the 120 mm of conventional
disks.
The LS120 recognizes when a Superdisk is in the drive and switches to the higher
capacity. With conventional disks, a capacity of 1.44 Mbytes or 720 Kbytes can be
reached.
3-12
Due to their higher storage capacity, Superdisks are more sensitive to dirt, temperature and shock than conventional diskettes.
SIMATIC Box PC 620 Operating Manual
C79000-Z7076-C638-04
Page 39

Hardware Components of the SIMATIC Box PC 620
Note
In order to achieve a reliable operation and high data security, please note the
following during use:
• Store and transport the Superdisk in the protective cassette included. Doing
this will keep dust and dirt from the disk.
• Remove Superdisk from the drive when it is not being read or written to keep
dirt particles away from the disk. Do not expose the disk to unnecessarily high
operating temperatures.
Note
If possible avoid vibration of the device, when using Superdisks.Superdisks are
more sensitive to vibration as a result of their high track density.
Emergency removal:
By inserting a pen (or a paper clip) while the device is switched off, you can force
the disk out of the drive.
Recommended Superdisks:
The Superdisks available commercially vary in quality. The best results in our qualification tests achieved the third generation disks from the company IMATION.
External identification features: blue housing and silver-colored sliding cover.
These Superdisks can be obtained from the following address:
IMATION corp. IMATION Europe BV IMATION Deutschland GmbH
1 Imation Place 1119 PH Schipol-RIJK Hammfelddamm 11
Oakdale, MN 55128-3414 41460 Neuss
USA Netherland Germany
Phone (888) 466-3456 Tel +31 (0) 20 654 2100 Tel +49 (0) 2131 226 01
E-mail info@imation.com Fax +31 (0) 20 654 2222 Fax +49 (0) 2131 226 100
SIMATIC Box PC 620 Operating Manual
C79000-Z7076-C638-04
3-13
Page 40

Hardware Components of the SIMATIC Box PC 620
3.5.3 Hard Disk Drive
The hard disk drive is used for the storage of large quantities of data. it is fitted in a
mounting which is easily exchangeable and damped against vibration.
Caution
!
Risk of loss of data and damage to the drive!
Drives are sensitive to vibrations and shock. Any vibrations occurring during
operation can lead to the loss of data or damage to the drive.
If you intend transporting the unit, switch it off, and wait until the drive has come to
rest (about 20 seconds) before you move it.
3.5.4 CD-ROM Drive (depending on the device equipment)
Depending on the device equipment, a CD-ROM drive is fitted in the SIMATIC Box
PC 620. The fitting depth of the SIMATIC PC is increased by 20 mm as a result.
The CD-ROM drive allows you to read CDs.
Opening the Drawer
By briefly pressing the eject button, the drawer springs out slightly. Now pull the
drawer out until it clicks into position.
Inserting / Removing CDs
Now insert the CD in the drawer with the labeling face up, and press it firmly down
into the center of the turntable. To remove the CD, hold it by the edges and pull
upwards.
Caution
!
To avoid too much pressure on the open drawer, always hold the drawer at the
front with one hand when inserting or removing a CD.
3-14
SIMATIC Box PC 620 Operating Manual
C79000-Z7076-C638-04
Page 41

Closing the Drawer
Push in the drawer until it closes completely. Do not press the eject button.
Note
The EJECT function offered by various applications for opening the
CD-ROM drawer does not work with this drive.
After the drawer has been closed, the CD is tested and the access display light on
the drive starts to flash:
– If the display flashes continually, the CD is faulty but can still be read,
– If the display flashes several times and then remains lit, the CD you have
inserted is defective and cannot be read.
– the access indicator light is normally lit when the CD is being read.
Hardware Components of the SIMATIC Box PC 620
SIMATIC Box PC 620 Operating Manual
C79000-Z7076-C638-04
3-15
Page 42

Hardware Components of the SIMATIC Box PC 620
CD-ROM Front
Access LEDDrawer Eject button Emergency eject
Figure 3-7 CD-ROM Front
Caution
!
Risk of data loss and damage to the drive!
CD-ROM drives are sensitive to vibrations and shock. Any vibrations occuring
during operation can lead to damage to the drive or CD. You can find the
permissible values in the technical data in Section 7.1.
Emergency Eject
The procedure described bellow can used to remove a disc from the
CD-ROM reader if the Open/Close button is disabled by software or a power failure
occurs. In this case the CD tray cannot be opened automatically.
1. Turn off the power to the CD-ROM reader (switch off your device if necessary).
2. Insert a steel rod or a stiff paper clip (with a maximum diameter of 1.3 mm and a
mimimum of 55 mm) into the emergency eject hole at the front of the drive an push
lightly. The CD tray is ejected by about 10 mm. Pull it all the way open by hand and
lift the disc out carefully.
Figure 3-8 Emergency Ejection
at least 55 mm (2.1654”) in length
3-16
SIMATIC Box PC 620 Operating Manual
C79000-Z7076-C638-04
Page 43

3.6 Backup Battery
A backup battery (3.6 V lithium battery) powers the hardware clock even after the
programming device is switched off.
There is a battery on the motherboard in this device. Batteries may only be
exchanged by technical personnel. Note the information in the CPU module
documentation! Observe the local regulations on disposal of special waste when
disposing of dead batteries.
Caution
!
There is the danger of an explosion if the battery is not exchanged as directed.
Replace only with the same type or an equivalent type recommended by the
manufacturer. Dispose of used batteries in accordance with the manufacturer’s
instructions.
Hardware Components of the SIMATIC Box PC 620
Warning
!
Risk of severe personal injury or property damage, danger of release of harmful
substances.
There may be a danger of explosion if the battery is not handled properly.
Incorrect disposal of used batteries can cause the release of harmful substances.
Do not throw a new or discharged lithium battery into an open fire, do not solder
onto the cell container. Do not recharge the battery, do not open the battery by
force.
The correct lithium battery is available from Siemens (order-no.: W79084-E1003-B1).
Return used batteries to the manufacturer/recycler or dispose of them according to
local regulations.
SIMATIC Box PC 620 Operating Manual
C79000-Z7076-C638-04
3-17
Page 44

Hardware Components of the SIMATIC Box PC 620
3-18
SIMATIC Box PC 620 Operating Manual
C79000-Z7076-C638-04
Page 45

Connection of System Expansions and External Devices
4.1 Connecting Peripheral Devices
It is possible to expand the SIMATIC Box PC 620’s functionality by installing additional
modules. Due to the rugged design and the high functionality the device is easy and
economical to service. For information on how to proceed please refer to chapter 5
Setting up the SIMATIC Box PC 620 of the electronic manual. Please observe and
follow the Safety Instructions given in the manual.
Note
When fitting system expansions (e.g. expansion modules or PC cards) and
connecting external devices (mouse, keyboard, printer, etc.), ensure that the
components have industrial capability.
4
SIMATIC Box PC 620 Operating Manual
C79000-Z7076-C638-04
4-1
Page 46

Connection of System Expansions and External Devices
4-2
SIMATIC Box PC 620 Operating Manual
C79000-Z7076-C638-04
Page 47

Setting up the SIMATIC Box PC 620
5
SIMATIC Box PC 620 Operating Manual
C79000-Z7076-C638-04
5-1
Page 48

Setting up the SIMATIC Box PC 620
5.1 Preparing for Start Up
Powering Up the SIMATIC Box PC 620
Both the operating system and system software supplied with the
SIMATIC Box PC 620 are preinstalled on the hard disk and are set up by the time
you power up your PG for the first time. The operating system is either
Windows 98 or Windows NT or Wondows 2000.
When powering up the device you have to distinguish between the following:
– Initial start and
– Complete restart
5.2 Initial Start of the SIMATIC Box PC 620
Installing the Operating System
When powering up the SIMATIC Box PC 620 for the first time the operating
system is set up automatically (depending on the version delivered: Windows 98 or
Windows NT or Windows 2000). Please proceed as follows:
1. Switch on the SIMATIC Box PC 620.
2. The PG executes a self-test. During self-test the following message appears on
the screen:
Press <F2> to enter SETUP
Wait until the message disappears and follow the instructions displayed on the
screen.
3. Enter the user information (name,company)
4. Enter your product key. The product key can be found on the device or on the
Windows manual in the line “Product Key” of the “Certificate of Authenticity”.
Note
Never switch off your SIMATIC PC before software installation has been
completed in order to avoid the loss of any software components which are
essential for a regular operation of the SIMATIC Box PC 620.
Do not change the BIOS default values.
5-2
SIMATIC Box PC 620 Operating Manual
C79000-Z7076-C638-04
Page 49

Startup under Windows 98
The operating system is set up once you have entered the requisite information.
The Welcome to Windows 98 screen helps you to get familiar with the Desktop
user interface.
Now the user interface is displayed following system startup every time you power
up or reset the PC.
You can find information for the installation, login, password entry and registration
in the manual “Getting Started Microsoft Windows 98” in Chapter 2
“Windows 98 Installation”.
Startup under Windows NT
You can start Windows NT by simultaneously pressing Ctrl + Alt + Del after you
have entered the requisite information and the operating system has been set up.
You can find information for the installation, login, administrator account, password
entry, creation of an emergency disk and startup of Windows NT in the manual
“Microsoft Windows NT” in part 2 “Installation“.
The operating system is set up once you have entered the requisite information.
The Welcome to Windows 98 screen helps you to get familiar with the Desktop
user interface.
Setting up the SIMATIC Box PC 620
Now the user interface is displayed following system startup every time you power
up or reset the PC.
Startup under Windows 2000
After you have entered the requisite information and the operating system has
been set up, the PC will be restarted.
Via the “Getting Started with Windows 2000” program you can get acquainted with
Windows 2000.
You can find information on setting up Windows 2000 Professional or a user
account, and on configuring the computer as well as information about Windows
2000 Professional in the manual “Microsoft Windows 2000 Professional”.
Your device is set to English menus and dialogs and a US keyboard when
delivered. You can set another language and keyboard via the control panel with
the dialog Start > Settings > Control Panel > Regional Options > tab
”General”, box ”Menus and dialogs”> tab ”Input locales”, box ”Input
language”.
SIMATIC Box PC 620 Operating Manual
C79000-Z7076-C638-04
5-3
Page 50

Setting up the SIMATIC Box PC 620
5.3 Complete Restart of the SIMATIC Box PC 620
Overview
Once the SIMATIC Box PC 620’s operating system is set up, the user interface of
the operating system is displayed following system startup every time you switch
on or reset the PG.
5.4 Electronic Manuals
Overview
The PC comes with different electronic manuals. You can find:
• The appliance description of the SIMATIC Box PC 620 is on the
“Documentation and Drivers” CD in the directory “\English\Manual\BoxPC620”
The Adobe Acrobat Reader
To read or to print out these manuals you need the Adobe Acrobat Reader. The
Adobe software is located in the following directory:
C:\Acrobat3\
is preinstalled and is set up and activated by double-clicking on any electronic
manual.
Reading the manuals
To read the manuals, start the program “Start.exe” on your CD “Documentation
and Drivers”.
Note
It is recommended to print out the PC’s product information and keep it together
with the operating instructions for future reference.
5-4
SIMATIC Box PC 620 Operating Manual
C79000-Z7076-C638-04
Page 51

Error Diagnosis and Reinstallation
Chapter Overview
This chapter provides you with tips on how to localize and troubleshoot frequently
occurring problems.
• Please look up the meaning of operating system error messages in your
operating system documentation.
• You will find error messages which occur during the self-test (intermittent tones,
screen messages) in Section 6.6 and 6.8 of this manual.
Note
Follow the safety information in Chapters 1 and 2 when you disconnect or connect
leads.
6
SIMATIC Box PC 620 Operating Manual
C79000-Z7076-C638-04
6-1
Page 52

Error Diagnosis and Reinstallation
6.1 Problems When Using Modules from Other Manufacturers
Error Display
The PC crashes during power up.
Cause
The following causes are possible:
– Double assignment of I/O addresses
– Double assignment of hardware interrupts and/or DMA channels
– Signal frequencies or signal levels are not met
– Different connector assignments
Remedy
Check your computer configuration:
• If the computer configuration is the same as when your PC was delivered,
please contact your technical support team (Chapter 8).
• If the computer configuration has changed, re-establish the configuration you
had when your PC was delivered. Remove any modules from other
manufacturers. Perform a complete restart on your PC.
– If the PC still crashes, you must contact your technical support team.
– If the error no longer occurs, the module you used from another
manufacturer was the cause of the fault. Replace this module with a
Siemens module, or contact the module supplier.
6-2
SIMATIC Box PC 620 Operating Manual
C79000-Z7076-C638-04
Page 53

6.2 The Monitor Remains Dark
Cause and Remedy
The following causes are possible:
The monitor has been switched off.
• Switch on the monitor.
The monitor is in “powersave” mode.
• Press any key on the keyboard.
The brightness button has been set to dark.
• Set the screen’s brightness button to obtain more light. Refer to the operator’s
guide for the monitor for more detailed information.
The power supply cable or the screen cable is not connected.
• Switch off the monitor and the system unit.
Error Diagnosis and Reinstallation
• Check whether the power supply cable has been connected correctly to the
monitor and to the system unit or to the grounding outlet.
• Check whether the monitor cable has been connected correctly to the system
unit and to the screen (if a connector is present).
• Switch on the monitor and the system unit.
Note
If the monitor screen still remains dark after these checks and measures have
been carried out, please contact your technical support team (Chapter 8).
SIMATIC Box PC 620 Operating Manual
C79000-Z7076-C638-04
6-3
Page 54

Error Diagnosis and Reinstallation
6.3 The Screen Display Does not Appear or Drifts
Cause and Remedy
Either the incorrect line frequency and/or the incorrect resolution is set for the
screen or for the user program.
• Stop the user program. If the error still occurs after you have ended the
program, switch off the monitor. After at least three seconds, switch on the
monitor again.
• Adjust the relevant entries for the monitor in the CONFIG.SYS file (on the hard
drive).
• Correct the settings for the monitor and graphics in your user program.
• Select the correct screen driver for your user program.
6.4 No Mouse Pointer Appears on the Screen
Cause and Remedy
The mouse pointer may not appear for the following reasons:
The mouse driver is not loaded
• Check whether the mouse driver is correctly installed. Check whether the
mouse pointer is present when you start your user program. Refer to the
manuals for the mouse and user program to obtain detailed information about
the mouse driver.
The mouse is not connected
• Switch off your PC.
• Check whether the mouse cable is connected to the system unit correctly. If
you use an adapter or an extension cord for the mouse cable, also check their
plug-in connections.
• Switch on your PC.
Note
If the mouse pointer still does not appear on the screen after you have performed
these checks and measures, please contact your technical support team
(Chapter 8).
6-4
SIMATIC Box PC 620 Operating Manual
C79000-Z7076-C638-04
Page 55

Error Diagnosis and Reinstallation
6.5 The Clock Time and/or the Date in Your PC Is Incorrect
Remedy
Set the clock time and the date in the setup menu.
Press <F2> to call setup when booting the computer.
Note
The battery is dead if the clock time and the date are still incorrect after you switch
off your PC and switch it back on again. In this case, please contact your technical
support team (Chapter 8).
6.6 An Error Message Appears on the Screen
Error Messages
The following table describes the error messages that the BIOS system outputs.
Error messages the operating system or program outputs are described in the
manuals for these programs.
Press <F2> to call Setup when booting the computer.
Error Message on the Screen Meaning/Suggestion
Address conflict Plug and Play Problem
Contact your technical support team.
Combination not supported Plug and Play Problem
Contact your technical support team
IO device IRQ conflict Plug and Play Problem
Contact your technical support team
Invalid System Configuration
Data
Allocation Error for ... Plug and Play Problem
System battery is dead
Replace and run SETUP
System CMOS checksum bad
Run SETUP
Incorrect Drive A type
Run SETUP
Plug and Play Problem
Please set the option RESET CONFIGURATION.DATA in the
Advanced Setup menu.
Contact your technical support team
Please undo the last hardware change.
Contact your technical support team
The battery on the CPU module is defective or dead.
Contact your technical support team
Call up SETUP, adjust settings and save. If this message appears
during each power up, contact your technical support team.
Check the SETUP entries for drive A.
SIMATIC Box PC 620 Operating Manual
C79000-Z7076-C638-04
6-5
Page 56

Error Diagnosis and Reinstallation
Error Message on the Screen Meaning/Suggestion
Incorrect Drive B type
Run SETUP
Diskette drive A error Error accessing drive A.
Diskette drive B error Error accessing drive B.
Failure Fixed Disk Error accessing the hard drive.
Keyboard error Check whether the keyboard is connected correctly.
Stuck Key Check whether a key on the keyboard is stuck.
System RAM Failed at offset: Memory error
Shadow RAM Failed at offset: Memory error
Extended RAM Failed at offset: Memory error
Failing Bits: Memory error
Operating system not found Possible causes:
Previous boot incomplete
Default configuration used
System cache error
Cache disabled
Monitor type does not match
CMOS
Run SETUP
System timer error Hardware error
Real time clock error Clock chip error
Keyboard controller error Keyboard error
Check the SETUP entries for drive B.
Contact your technical support team.
Contact your technical support team.
Check the SETUP settings
Contact your technical support team.
Contact your technical support team.
Contact your technical support team
Contact your technical support team
Contact your technical support team
No operating system present
Incorrect drive addressed (diskette in drive A/B)
Incorrect active boot partition
Incorrect entries in SETUP for the BOOT drive
Abort of the previous BOOT procedure, for example, due to a power
failure. Check the hardware settings and the SETUP.
Error in the CPU’s cache module.
Contact your technical support team.
The monitor does not match the SETUP entries.
Adapt the SETUP entries to the monitor.
Contact your technical support team.
Contact your technical support team.
Contact your technical support team.
6.7 No Connection via COM1/TTY Possible
Cause and Remedy
The COM1 interface is set to the V24 mode. In the Setup menu Advanced >
COM/LPT Configuration set the parameter COM1 TTY to enabled.
6-6
SIMATIC Box PC 620 Operating Manual
C79000-Z7076-C638-04
Page 57

6.8 Diagnostic Messages (Port 80)
When the SIMATIC PC is powered up, it runs a self-test (POST = Power On
Self-Test). If the POST detects a fault, it outputs the sequence of beeps (beep
code) assigned for the fault. Each beep code consists of 2 x 2 sequences.
In addition, the individual self-test steps are output at I/O port 80h.
Conversion table for the beep codes to hexadecimal representation:
Beeps Hex-Code
B B 0
B BB 1
B BBB 2
B BBBB 3
BB B 4
BB BB 5
BB BBB 6
BB BBBB 7
BBB B 8
BBB BB 9
BBB BBB A
BBB BBBB B
BBBB B C
BBBB BB D
BBBB BBB E
BBBB BBBB F
Error Diagnosis and Reinstallation
Example:
B BBBB BBB BBB Beeps
3 6 Hexadecimal code
Check shutdown code Meaning
SIMATIC Box PC 620 Operating Manual
C79000-Z7076-C638-04
6-7
Page 58

Error Diagnosis and Reinstallation
The POST codes in order of occurrence:
Display
(hex)
02 TP_VERIFY_REAL Test whether the CPU is in real mode
1C TP_RESET_PIC Reset the interrupt controller
12 TP_RESTORE_CRO Restore the controller register
13 TP_PCI_BM_RESET Reset the PCI bus master
36 TP_CHK_SUTDOWN Check the shutdown code
24 TP_SET_HUGE_ES Switch the ES to special mode
03 TP_DISABLE_NMI Switch off the NMI
0A TP_CPU_INIT Initialize the CPU
04 TP_GET_CPU_TYPE Determine the CPU type
AE TP_CLEAR_BOOT Edit the boot flag
06 TP_HW_INIT Initialize the main hardware
18 TP_TIMER_INIT Initialize the timer
08 TP_CS_INIT Initialize the chip set
C4 TP_PEM_SIZER_INIT Reset system error
0E TP_IO_INIT Initialize IO
0C TP_CACHE_INIT Initialize the cache
16 TP_CHECKSUM EPROM checksum test
28 TP_SIZE_RAM Determine the RAM size
3A TP_CACHE_AUTO Determine the cache size
2A TP_ZERO_BASE Set 512k base RAM to 0
2C TP_ADDR_TEST Test the base RAM address cables
2E TP_BASERAML Check the 1.64k base RAM
38 TP_SYS_SHADOW BIOS-shadow
20 TP_REFRESH Refresh circuit test
29 TP_PMM_INIT Initialize the post memory manager
33 TP_PDM_INIT Initialize the dispatch manager
C1 TP_7xx_INIT Initialize the PG 7xx I/Os
09 TP_SET_IN_POST Start power ON self-test
0A TP_CPU_INIT Initialize the CPU
0B TP_CPU_CACHE_ON Switch on the cache
0F TP_FDISK_INIT Initialize the hard disk
10 TP_PM_INIT Initialize the power management
14 TP_8742_INIT Initialize the 8742 circuit
1A TP_DMA_INIT Initialize the DMA circuits
1C TP_RESET_PIC Reset the interrupt controller
32 TP_COMPUTE_SPEED Determine the clock pulse speed
Meaning Description
6-8
SIMATIC Box PC 620 Operating Manual
C79000-Z7076-C638-04
Page 59

Error Diagnosis and Reinstallation
Display
(hex)
C1 TP_740_INIT Initialize the PG 740 I/Os
34 TP_CMOS_TEST Test the CMOS RAM
3C TP_ADV_CS_CONFIG Configure the advanced chip set
42 TP_VECTOR_INIT Initialize the interrupt vectors
46 TP_COPYRIGHT Test the copyright
49 TP_PCI_INIT Initialize the PCI interface
48 TP_CONFIG Check the configuration
4A TP_VIDEO Initialize the video interface
4C TP_VID_SHADOW Copy the video BIOS to RAM
24 TP_SET_HUGE_ES Switch the ES to special mode
22 TP_8742_TEST Test circuit 8742
52 TP_KB_TEST Keyboard available?
54 TP_KEY_CLICK Switch the keyboard click on/off
76 TP_KEYBOARD Check the keyboard
58 TP_HOT_INT Test for unexpected interrupts
4B TP_QUIETBOOT_START Switch off any boot messages
4E TP_CR_DISPLAY Display the copyright notice
50 TP_CPU_DISPLAY Display the CPU type
5A TP_DISPLAY_F2 Display the F2 message for “SETUP”
5B TP_CPU_CACHE_OFF Switch off the cache if applicable (SETUP
setting)
5C TP_MEMORY_TEST Test the system memory
60 TP_EXT_MEMORY Test the extended memory
62 TP_EXT_ADDR Test the A20 address line
64 TP_USERPATCH1 Area for own initializations
66 TP_CACHE_ADVNCD Determine and enable the cache size
68 TP_CACHE_CONFIG Configure and test the cache
6A TP_DISP_CACHE Display the cache configuration
6C TP_DISP_SHADOWS Configuration and size of the shadow
Display RAM
6E TP_DISP_NONDISP Display non-disposable segment
70 TP_ERROR_MSGS Display post error
72 TP_TEST_CONFIG Check SETUP irregularities
7C TP_HW_INTS Set the IRQ vectors
7E TP_COPROC Check whether the CO processor is
present
96 TP_CLEAR_HUGE_ES Switch the ES back
80 TP_IO_BEFORE Disable IO circuits
DescriptionMeaning
SIMATIC Box PC 620 Operating Manual
C79000-Z7076-C638-04
6-9
Page 60

Error Diagnosis and Reinstallation
Display
(hex)
88 TP_BIOS_INIT Various initialisations
8A TP_INIT_EXT_BDA Initialize the external BIOS data area
85 TP_PCI_PCC Determine the PCI circuits
82 TP_RS232 Determine the serial interfaces
84 TP_LPT Determine the parallel interface
86 TP_IO_AFTER Re-enable the IO circuits
83 TP_FDISK_CFG_IDE_CTRLR Configure the IDE controller
89 TP_ENABLE_NMI Enable the NMI
8C TP_FLOPPY Initialize the floppy controller
90 TP_FDISK Initialize the hard disk controller
8B TP_MOUSE Test the internal mouse interface
95 TP_CD Test the CP
92 TP_USERPATCH2 Area for own initializations
98 TP_ROM_SCAN Search for BIOS expansions
69 TP_PM_SETUP Initialize the power management
9E TP_IRQS Enable the hardware IRQ
A0 TP_TIME_OF_DAY Set the clock time and date
A2 TP_KEYLOCK_TEST Preset the keylock
C2 TP_PEM_LOCK Stop the error manager
C3 TP_PEM_DISPLAY Display any possible errors
A8 TP_ERASE_F2 Delete the F2 message
AA TP_SCAN_FOR_F2 Was F2 printed?
AC TP_SETUP_CHEK Output any F1/F2 message
AE TP_CLEAR_BOOT Cancel the self-test flag
B0 TP_ERROR_CHECK Check for any possible errors
B2 TP_POST_DONE End of the self-test
BE TP_CLEAR_SCREEN Clear the screen
B6 TP_PASSWORD Password query (option)
BC TP_PARITY Cancel the parity memory bit
BD TP_BOOT_MENU Display the boot menu (option)
B9 TP_PREPARE_BOOT Prepare the boot
C0 TP_INT19 Boot via Interrupt 19
00 Message after startup is complete
DescriptionMeaning
6-10
SIMATIC Box PC 620 Operating Manual
C79000-Z7076-C638-04
Page 61

Error Diagnosis and Reinstallation
6.9 Restoring the Hard Disk
6.9.1 Creating Partitions unter Microsoft Windows 98
After installing a new hard disk it is necessary to create partitions with the program
“FDisk” when the partitions have errors or need to be changed.
Note
By deleting or creating partitions or logical DOS-hard drives all saved data is lost
on the hard disk. All drives on the hard disk will be erased.
The hard disk is delivered with the following installed:
– a partition of Typ PRI DOS, System FAT 16,
– a apartition of Typ EXT DOS, System FAT 32.
To restore the partitions to their original condition, please do the following:
Primary Partition
1. To boot from the Recovery CD proceed as follows: When the message
Press <F2> to enter Setup
appears on the screen press the ESC key. After intialization a boot menu to
select the boot options is displayed.
2. Select “4. ATAPI CD-ROM Drive”.
3. When “Microsoft Windows 98-Startup Menu” is displayed, select
“2. Start Windows 98 Setup from CD ROM”.
4. In the “Microsoft Windows 98-Start Menu” select
“2. Start Windows 98 Setup from CD ROM”.
5. Start the Microsoft Windows 98 hard disk configuration program with
”A:\>FDisk” .
Select the dialog box for enable large disk support (Y/N)...? [ N ] ” for No.
6. Create a primary DOS-Partition of 2045 MB for a FAT 16 file system. Answer
the question “Do you wish to use the maximum available size...” for a 2045 MB
FAT16 partition with [Y] for Yes.
7. In order to continue with the next step “Create a Save to Disk Partition” the primary partition needs to be formatted.
Use the Recovery CD to boot as described in steps 1 to 3 above and then format drive C: with the program “Format”.
Type: ”A:\>Format C:”.
SIMATIC Box PC 620 Operating Manual
C79000-Z7076-C638-04
6-11
Page 62

Error Diagnosis and Reinstallation
Creating an Extended Partition
In order to create an extended partition, you have to first boot from the Windows
98 CD as described in steps 1 to 4 above.
Using ”A:\>FDisk” start the Recovery CD hard disk configuration program.
Select the dialog box for large disk support. “Do you wish to enable large disk
support (Y/N)...? [Y] for Yes.
Create an extended DOS partition for the rest of the disk space.
6.9.2 Creating Partitions unter Microsoft Windows 2000
After installing a new hard disk it is necessary to create partitions when the
partitions have errors or need to be changed.
Note
By deleting or creating partitions or logical DOS-hard drives all saved data is lost
on the hard disk. All drives on the hard disk will be erased.
The hard disk is delivered with the following installed:
– a partition of with the FAT file system,
– a partition of with NTFS file system.
To restore the partition to its delivery state, proceed as follows:
Primary Partition, FAT32 File System
1. Boot from the Recovery CD and press ESC when the BIOS message
Press <F2> to enter Setup
appears. After initialization, select the boot options in the boot menu.
2. Select ”ATAPI CD-ROM Drive”.
3. Select ”2. Boot for FDISK, FORMAT or Windows 98 Setup” in the ”Microsoft
Windows Startup Menu” screen form.
4. Start the Microsoft Windows hard disk configuration program with ”A:\>FDisk”.
In the screen form select “Do you wish to enable large disk support (Y/N)...?
[ Y ]” for Yes to support data media with large memory capacity.
6-12
5. Create a primary DOS partition with 4090 MB. Enter [N] for “No” for the question ”Do you want to use the maximum memory size available for the primary
DOS partition and do you want to activate this partition?” and set the partition
size to 6100 MB.
6. Set this partition as an active partition.
SIMATIC Box PC 620 Operating Manual
C79000-Z7076-C638-04
Page 63

7. To format the partition from the Recovery CD, as described above in steps 1 to
3, reboot and then format drive C: with the “Format” program. Enter:
”A:\>Format C:”
(A: is the CD-ROM drive).
Creating an Extended FAT 32 Partition
In order to create an extended partition you have to boot from the Recovery CD as
described above in steps 1 to 4.
Create an extended DOS partition for the rest of the disk space.
In the Windows 2000 setup or under Windows 2000 the FAT 32 file system can be
converted to an NTFS file system with the “Format” function.
6.9.3 Creating Partitions under Windows NT
After installing a new hard disk it is necessary to create partitions when they partitions have errors or need to be changed.
Error Diagnosis and Reinstallation
Note
By deleting or creating partitions or logical DOS hard drives all saved data is lost
on the hard disk. All drives on the hard disk will be erased.
The hard disk is delivered with the following installed (only for versions delivered
with Windows NT):
– a partition of with the FAT16 file system with 2045 Mbytes,
– a partition of with the NTFS file system.
SIMATIC Box PC 620 Operating Manual
C79000-Z7076-C638-04
6-13
Page 64

Error Diagnosis and Reinstallation
To restore the partitions to their original condition, please do the following:
Primary Partition
1. To boot from the Recovery CD proceed as follows: When the message
Press <F2> to enter Setup
appears on the screen press the ESC key. After initialization a boot menu to
select the boot options is displayed.
2. Select “ATAPI CD-ROM Drive”.
3. When “Microsoft Windows 98 Startup Menu” is displayed, select
“2. Boot for FDISK, FORMAT or Windows NT Setup”.
4. Start the Microsoft Windows 98 hard disk configuration program with
”A:\>FDisk” (A is the CD-ROM drive).
Select the dialog box for enable large disk support for installing a FAT16 partition “activate support (Y/N)...? [ N ] ” for No.
5. Create a primary DOS-Partition of 2045 MB for a FAT 16 file system. Answer
the question “Do you wish to use the maximum available size...” for a 2045 MB
FAT16 partition with [Y] for Yes.
6. In order to continue with the next step “Create a Save to Disk Partition” the primary partition needs to be formatted.
Use the Recovery CD to boot as described in steps 1 to 3 above and then format drive C: with the program “Format”.
Type: ”A:\>Format C:”.
The creation of NTFS partitions is done under the Windows NT setup program.
Starting the Windows NT setup is described in chapter 6.10.1.
6-14
SIMATIC Box PC 620 Operating Manual
C79000-Z7076-C638-04
Page 65

Error Diagnosis and Reinstallation
6.10 Installation of the Windows Operating System
Dependent on the device model, different operating system CDs are shipped:
Microsoft Windows NT or Recovery Microsoft Windows NT,
Microsoft Windows 98 SE or Recovery Microsoft Windows 98 SE,
Recovery Microsoft Windows 2000.
6.10.1 Installing the Microsoft Windows NT Operating System
Install the operating system directly from the operating system CD supplied.
Proceed as follows:
1. Insert the CD.
2. Reboot the system hold the ESC key down.
The boot menu appears on the monitor.
3. Select ”ATAPI CD-ROM Drive”.
Windows will be installed from the CD.
4. Follow the installation program instructions on the screen.
Installation of the Recovery CD in Microsoft Windows NT
This CD contains encoded data which can only be transferred onto a SIEMENS
SIMATIC PC.
Data transfer is carried out with the OEMSETUP.EXE program on the CD-ROM or,
after booting, from the CD-ROM with the Recovery function.
After transferring the required data to the hard disk, the operating system can be
installed using the Windows NT setup program.
Windows NT Installation Sequence
If a Windows operating system is already installed or if the PC has been started
with a user created bootdisk, the transfer of the data takes place using the
program OEMSETUP.EXE. To do this, start the program OEMSETUP.EXE on the
recovery CD and continue the sequence as of point 5.
If there is no operating system installed, then please do the following:
1. Insert the Recovery CD and reboot the system.
2. To boot from the CD proceed as follows: When the message
Press <F2> to enter Setup
appears on the screen press the ESC key. After intialization a boot menu to select
the boot options is displayed.
3. Select ”ATAPI CD-ROM Drive”.
SIMATIC Box PC 620 Operating Manual
C79000-Z7076-C638-04
6-15
Page 66

Error Diagnosis and Reinstallation
4. When “Microsoft Windows 98-Startup Menu” is displayed, select
“1. Boot for CD-Recovery”.
5. You have to acknowledge the “SIEMENS End User License Agreement” with
the F8 function key. Pressing ESC allows you to decline the agreement and
cancels the installation.
6. In the next screens you can select the components which are to be copied from
the CD to the hard disk. Transfer of at least the folder “I386” is necessary for
the Windows NT installation or setup.
7. Select the drive for data transfer. You can use the selected drive as the installation drive for Windows. For the Windows setup, you need an available disk
space of approximately 300 MB on the installation drive for Windows.
Note
By default, drive C: is used for the data transfer (Recovery).
Ensure that there is an available disk space of approximately 300 MB left on drive
C: after the selected recovery data have been copied.
8. Confirm the end massage box.
9. Start the Windows setup program
LW:\I386\Winnt.exe b/
LW is the drive where the recovery data have been copied.
You can find the information on installation of Windows NT on the Recovery CD in
the folder SUPPORT\BOOKS\.
Note
If you want to become an expert user of Microsoft Windows NT Workstation, see
the “Windows NT Workstation Resource Kit” Version 4.0 (is not included in the
package). It contains specific information for administrators who are responsible
for installing, managing, and integrating Windows NT Workstation in a network or
multiuser environment.
6.10.2 Installing the Microsoft Windows 98 Operating System
You should only follow these steps when you wish to upgrade from Windows NT to
Windows 98 or install Windows 98.
1. Insert the CD-ROM Microsoft Windows 98 in the CD-ROM drive and switch on
the PLC.
6-16
2. To boot from the Windows 98 CD proceed as follows: When the message
Press <F2> to enter Setup
appears on the screen press the ESC key. After intialization a boot menu to select
the boot options is displayed.
3. Select “ATAPI CD-ROM Drive”.
SIMATIC Box PC 620 Operating Manual
C79000-Z7076-C638-04
Page 67

4. When “Microsoft Windows 98-Startup Menu” is displayed, select
“2. Boot from CD-ROM”.
5. In the “Microsoft Windows 98-Start Menu” select
“1. Start Windows 98 Setup from CD-ROM” .
Installation of the Recovery CD in Microsoft Windows 98
This CD contains encoded data which can only be transferred onto a SIEMENS
SIMATIC PC.
Data transfer is carried out with the OEMSETUP.EXE program on the CD-ROM or,
after booting, from the CD-ROM with the Recovery function.
After transferring the required data to the hard disk, the operating system can be
installed using the Windows 98 setup program.
Windows 98 Installation Sequence
If a Windows operating system is already installed or if the PC has been started
with a user created bootdisk, the transfer of the data takes place using the
program OEMSETUP.EXE. To do this, start the program OEMSETUP.EXE on the
recovery CD and continue the sequence as of point 5.
Error Diagnosis and Reinstallation
If there is no operating system installed, then please do the following:
1. Insert the Recovery CD in the CD-ROM drive and reboot the system.
2. To boot from the Windows 98 CD proceed as follows: When the message
Press <F2> to enter Setup
appears on the screen press the ESC key. After intialization a boot menu to select the boot options is displayed.
3. Select ”ATAPI CD-ROM Drive”.
4. When “Microsoft Windows 98-Startup Menu” is displayed, select
“1. Boot for CD-Recovery”.
5. You have to acknowledge the “SIEMENS End User License Agreement” with
the F8 function key. Pressing ESC allows you to decline the agreement and
cancels the installation.
6. In the next screens you can select the components which are to be copied from
the CD to the hard disk. Transfer of at least the folder “Win98” is necessary for
the Windows 98 installation or setup.
7. Select the drive for data transfer. You can use the selected drive as the installation drive for Windows. For the Windows setup, you need an available disk
space of approximately 250 MB on the installation drive for Windows.
Note
By default, drive C: is used for the data transfer (Recovery).
Ensure that there is an available disk space of approximately 250 MB left on drive
C: after the selected recovery data have been copied.
SIMATIC Box PC 620 Operating Manual
C79000-Z7076-C638-04
6-17
Page 68

Error Diagnosis and Reinstallation
8. Confirm the end massage box.
9. Start the Windows setup program
LW:\IWIN98\SETUP.exe
LW is the drive where the recovery data have been copied.
10.After starting the setup.exe please follow the screen instructions.
6.10.3 Installing the Recovery CD for Microsoft Windows 2000
This CD contains encoded files which can only be transferred to a SIEMENS
SIMATIC PC.
The transfer of information is made with the program OEMSETUP.EXE on the
CD-ROM, or after booting from the CD–ROM with the recovery function.
After transferring the required data to the hard disk, the operating system can be
installed using the Windows 2000 setup program.
Windows 2000 Installation Sequence
If a Windows operating system is already installed or if the PC has been started
with a user created bootdisk, the transfer of the data takes place using the
program OEMSETUP.EXE. To do this, start the program OEMSETUP.EXE on the
recovery CD and continue the sequence as of point 5.
If there is no operating system installed, then please do the following:
1. Insert the Recovery CD in the CD-ROM drive and reboot the system.
2. To boot from the Windows 98 CD proceed as follows: When the message
Press <F2> to enter Setup
appears on the screen press the ESC key. After intialization a boot menu to select the boot options is displayed.
3. Select ”ATAPI CD-ROM Drive”.
4. When “Microsoft Windows 98-Startup Menu” is displayed, select
“1. Boot for CD-Recovery”.
5. You have to acknowledge the “SIEMENS End User License Agreement” with
the F8 function key. Pressing ESC allows you to decline the agreement and
cancels the installation.
6. In the next screens you can select the components which are to be copied from
the CD to the hard disk. Transfer of at least the folder “I386” is necessary for
the Windows 2000 installation or setup.
6-18
7. Select the drive for data transfer. You can use the selected drive as the installation drive for Windows. For the Windows setup, you need an available disk
space of approximately 500 MB on the installation drive for Windows.
SIMATIC Box PC 620 Operating Manual
C79000-Z7076-C638-04
Page 69

Note
By default, drive C: is used for the data transfer (Recovery).
Ensure that there is an available disk space of approximately 500 MB left on drive
C: after the selected recovery data have been copied.
8. Confirm the end massage box.
9. Start the Windows setup program
LW:\I386\Winnt.exe
LW is the drive where the recovery data have been copied.
10.Now follow the screen instructions.
Setting the Language Selection for Windows 2000
The Multilanguage User Interface (MUI) allows you to set the Windows 2000 menus and dialogs to another language.
Error Diagnosis and Reinstallation
In order to install the MUI, run the program MUISETUP.EXE in the
CD_DRIVE:\MUI folder on the Recovery CD and follow the screen dialog to install
the desired languages.
The desired language for Windows 2000 menus and dialogs, as well as the keyboard layout can be set via the control panel with the dialog Start > Settings > Con-
trol Panel > Regional Options > tab “General” > box “Menus and dialogs”
and in the tab “Inputs”, box “Keyboard layout” .
In addition to the language for menus and dialogs, you can also set via Regional
Options the standard for the region with Set Default.
Your device is set to English menus and dialogs and a US keyboard when delivered. You can set another language and keyboard via the control panel with the dialog Start >Settings > Control Panel > Regional Options > tab ”General”, box
”Menus and dialogs”> tab ”Input locales”, box ”Input language”.
SIMATIC Box PC 620 Operating Manual
C79000-Z7076-C638-04
6-19
Page 70

Error Diagnosis and Reinstallation
6.11 Installing Drivers and Software
To install the drivers and software from the “Documentation and Drivers” CD
supplied, proceed as follows:
1. Place the “Documentation and Drivers” CD in the CD ROM drive.
2. Start the Start programm on the CD. The Acrobat Reader will be installed if necessary.
3. Navigate to the driver list (language, operating system and device dependent).
4. Please install the corresponding driver according to driver list.
Note
When reinstalling Windows 2000, make sure to install the chip set driver prior to
the other drivers.
When reinstalling Windows NT, the Windows NT Service Pack has to be installed
prior to all the other drivers. The Service Pack has to be reinstalled after a driver
installation.
6-20
SIMATIC Box PC 620 Operating Manual
C79000-Z7076-C638-04
Page 71

Technical Specifications
7
SIMATIC Box PC 620 Operating Manual
C79000-Z7076-C638-04
7-1
Page 72

Technical Specifications
7.1 Technical Specifications of the SIMATIC Box PC 620
General
Order nos. See order documentation
Dimensions (w x h x d) 295x265x80 mm, without CD-ROM drive
295x265x100 mm, with CD-ROM drive
Weight approx. 6kg (13.5 lbs.)
Supply voltage (UN) 120 V (85 V to 132 V (AC),
or 230 V (170 V to 264 V) AC (autorange)
alternative: 24 V (DC)
Line voltage frequency 50/60 Hz (47 to 63 Hz)
Brief voltage interruption acc. to Namur max. 20 ms at O.85 U
(max. 10 times per hour; min. recovery time 1 s)
max. power consumption 120W
max. current output (DC) +5V/10A
3.3V/4.2A
+12V/1.7A
+18V/0.08A
-12/0.2A
-5V/0.1A
(in total max. 84W)
Noise emission < 55dB(A) to DIN 45635
Enclosure IP20
Safety
Protection class Protection class I pursuant IEC 60536
Safety specifications IEC 60950 corresponds to DIN VDE 0805
Electromagnetic compatibility (EMC)
Emitted interference EN 55011 Class A (requirement for industrial sector)
Noise immunity:
Mains borne disturbance variables on supply
lines
Noise immunity on signal lines ± 1 kV (IEC 61000-4-4; Burst; length < 3m)
Noise immunity to discharges of static electricity ± 6 kV Contact discharge (to IEC 61000-4-2)
Immunity to RF interference 10 V/m 80-1000 MHz, 80% AM (to IEC 61000-4-3)
Magnetic field 30 A/m 50Hz (to IEC 61000-4-8)
± 2 kV (to IEC 61000-4-4; Burst)
± 1 kV (to IEC 61000-4-5; Surge symm)
± 2 kV (to IEC 61000-4-5; Surge unsymm)
± 2 kV (IEC 61000-4-4; Burst; length > 3m)
± 1 kV (IEC 61000-4-4; Surge symm;
length > 20 m)
± 2 kV (to IEC 61000-4-4:1995; Surge unsymm;
length > 20 m)
± 8 kV Air discharge (to IEC 61000-4-2)
10 V/m 900 MHz and 1,89 GHz, 50% ED
(to IEC 61000-4-3)
10 V 9KHz- 80MHz (to IEC 61000-4-6)
N
7-2
SIMATIC Box PC 620 Operating Manual
C79000-Z7076-C638-04
Page 73

Technical Specifications
Ambient Conditions
Temperature
– operation
– storage/transport
– gradient
Relative humidity
– operation
– storage/transport
– gradient
Mechanical Specifications
Vibration *)
– operation
– storage/transport
Shock
– operation
– storage/transport
Special Features
Quality assurance to ISO 9001
Motherboard
Processor Intel Mobile Pentium II / III / Celeron (type: MMC2),
Internal processor cache 2x 16KB first level, 128/256 KB second level,
Main memory maximum 512 MB SDRAM,
2. Level Cache Processor internal
Free expansion slots 1 shared ISA/PCI (max 175 mm long),
– max. permissible current input per ISA slot
– max. permissible current input per PCI slot
– in total (all slots)
Drives
Floppy disk drive / LS 120 3,5” (1.44 MB) / 3.5” (120 MB or 1.44 MB)
Hard disk drive 3,5” , EIDE, UDMA33, hard disk capacity (see order
Graphics
Graphic controller XGA LCD controller on the AGP bus
Graphic store 2 MB SDRAM, integrated in the graphic controller
Resolutions/frequencies/colors CRT: up to 1024x768/75 Hz / 65535 colors or
*) Restrictions for LS 120 and CD ROM
LS 120 with120 MB data carrier 10 to 58 Hz: 0.015 mm, 58 to 500 Hz: 2 m/s
CD-ROM 10 to 58 Hz: 0.019 mm, 58 to 500 Hz: 2.5 m/s
tested to DIN EN 60068-2-2:1994,
DIN IEC 60068-2-1,DIN IEC 60068-2-14,
+ 5°C to +45°C
- 20°C to +60°C
(Max. speed of temperature change 10
o
C/h (50
o
condensation not permitted)
tested to DIN IEC 60068-2-3, DIN IEC 60068-2-30,DIN
IEC 60068-2-56
5% to 80% at 25°C (no condensation)
5% to 95% at 25°C (no condensation)
(Max. speed of temperature change 10
o
C/h (50
o
condensation not permitted)
tested to DIN IEC 60068-2-6
10 to 58 Hz: 0.075 mm, 58 to 500 Hz: 9.8 m/s
5 to 9 Hz: 3.5 mm, 9 to 500 Hz: 9.8 m/s
2
2
tested to DIN IEC 60068-2-29
50 m/s2, 30 ms,
250 m/s2, 6 ms,
(see order documentation)
dependent on the processor used
memory configuration (see order documentation)
1 PCI (max 265mm long)
5V 2A, 12V 0.3A, -12V 0.1A
5V 2A, 12V 0.3A, -12V 0.1A
5V 3A, 12V 0.6A, -12V 0.15A may not be exceeded
documentation)
up to 1280x1024/75 Hz / 256 colors
F/h)
F/h)
2
2
SIMATIC Box PC 620 Operating Manual
C79000-Z7076-C638-04
7-3
Page 74

Technical Specifications
Ports
COM1 *
COM2 Serial port 2 (V.24), 9 pin subminiature Cannon
LPT1 Parallel port (standard, EPP and ECP mode)
VGA VGA port, connection for external monitor
Keyboard PS/2 keyboard connection (combined interface with
Mouse PS/2 mouse connection
USB 2 channels (1x internal, 1x external)
Card bus 1 port (max. type III)
DP12 port, potentially isolated *
• Transfer rate
• Operating mode
• Physical interface
• Memory address area
• Interrupts
Ethernet Ethernet port (RJ45)
Function Indicators (LEDs) on the Device
SIMATIC Box PC 620 FD/LS120 access (on FD/LS120 drive on the side of
1
2
Serial port 1 (V.24 / TTY), 25 pin subminiature Cannon
connector
connector
Connection for printer with parallel port
track ball signals
9 pin subminiature Cannon socket, screw locking
• 9,6 kBaud to 12 Mbaud, configurable by SW
• potentially isolated*:
- data lines A,B
- control lines RTS AS, RTS_PG
- 5V supply voltage (max. 90 mA)
• connected to ground:
- shield of the DP12 connecting line
• RS485, potentially isolated*
• 0CC000h ...0CC7FFh or 0DC000h ...0DC7FFh
• IRQ5, 10, 11 or 15 configurable by SW
the computer box)
CD ROM access (on the CD ROM drive, if fitted)
*1Without TTY for the basic variant of the Box PC
*2Not available for the basic variant of the Box PC
7-4
SIMATIC Box PC 620 Operating Manual
C79000-Z7076-C638-04
Page 75

Hotline Services
8.1 Customer Support, Technical Support
Open round the clock, worldwide:
Nuremberg
Johnson City
Singapore
8
SIMATIC Hotline
Worldwide (Nuremberg)
T echnical Support
(FreeContact)
Local time: Mon.-Fri. 7:00 to 17:00
Phone: +49 (180) 5050-222
Fax: +49 (180) 5050-223
E-Mail: techsupport@
ad.siemens.de
GMT: +1:00
Europe / Africa (Nuremberg)
Authorization
Local time: Mon.-Fri. 7:00 to 17:00
Phone: +49 (911) 895-7200
Fax: +49 (911) 895-7201
E-Mail: authorization@
nbgm.siemens.de
GMT: +1:00
The languages of the SIMATIC Hotlines are generally German and English, in addition, French, Italian and Spanish are
spoken on the authorization hotline.
Worldwide (Nuremberg)
T echnical Support
(fee based, only with
SIMATIC Card)
Local time: Mon.-Fri. 0:00 to 24:00
Phone: +49 (911) 895-7777
Fax: +49 (911) 895-7001
GMT: +01:00
America (Johnson City)
Technical Support and
Authorization
Local time: Mon.-Fri. 8:00 to 19:00
Phone: +1 423 461-2522
Fax: +1 423 461-2289
E-Mail: simatic.hotline@
sea.siemens.com
GMT: –5:00
Asia / Australia (Singapore)
Technical Support and
Authorization
Local time: Mon.-Fri. 8:30 to 17:30
Phone: +65 740-7000
Fax: +65 740-7001
E-Mail: simatic.hotline@
sae.siemens.com.sg
GMT: +8:00
SIMATIC Box PC 620 Operating Manual
C79000-Z7076-C638-04
8-1
Page 76

Hotline Services
8.2 SIMATIC Customer Support Online Services
Further Support
If you have questions related to the use of the products which are not answered in
this manual, please consult your Siemens representative in your local agency.
http://www.ad.siemens.de/partner
Training Center
Siemens offers a number of training courses to familiarize you with the SIMATIC
S7 automation system. Please contact your regional training center or our central
training center in D 90327 Nuremberg, Germany for details:
Telephone: +49 (911) 895-3200
http://www.sitrain.com/
SIMATIC Documentation on the Internet
You will find the documentation on the internet at:
http://www.ad.siemens.de/support
Use the Knowledge Manager to find the documentation you need quickly. If you
have any questions or suggestions concerning the documentation you can use the
”Documentation” conference in the internet forum.
Service & Support on the Internet
In addition to our documentation, we offer our Know-how online on the internet at:
http://www.ad.siemens.de/support
where you will find the following:
• Current Product Information leaflets, FAQs (Frequently Asked Questions),
Downloads, Tips and Tricks.
• A newsletter giving you the most up-to-date information on our products.
• The Knowledge Manager helps you find the documents you need.
• Users and specialists from all over the world share information in the forum.
• Your local customer service representative for Automation & Drives in our
customer service representative data bank.
8-2
• Information on field service, repairs, spare parts and more under ”Services”.
SIMATIC Box PC 620 Operating Manual
C79000-Z7076-C638-04
Page 77

8.3 Regional Repair Centers
Region Phone Fax
Augsburg +49 (821)2595 599 +49 (821)2595 546
Berlin +49 (30)386 34926 +49 (30)386 34933
Bielefeld +49 (521)291 323 +49 (521)291 538
Bremen +49 (421)364 2093 +49 (421)364 2107
Chemnitz +49 (371)475 3860 +49 (371)475 3888
Erlangen +49 (9131)7 31048 +49 (9131)7 35263
Essen +49 (201)816 1580 +49 (201)816 1522
Frankfurt +49 (69)797 7358 +49 (69)797 7131
Hamburg +49 (40)2889 4230 +49 (40)2889 4430
Hannover-Laatzen +49 (511)877 2241 +49 (511)877 1320
Karlsruhe +49 (721)595 4183 +49 (721)595 6667
Cologne-Ossendorf +49 (221)576 6633 +49 (221)576 6630
Langen +49 (69)797 5608 +49 (69)797 5567
Leipzig +49 (341)210 2049 +49 (341)210 2049
Hotline Services
Mannheim +49 (621)456 1328 +49 (621)456 1460
Munich +49 (89)9221 6213 +49 (89)9221 6201
Nuremberg +49 (911)654 6127 +49 (911)654 7630
Saarbrücken +49 (681)386 2598 +49 (681)386 2397
Stuttgart Weilimdorf +49 (711)137 6001 +49 (711)137 6210
SIMATIC Box PC 620 Operating Manual
C79000-Z7076-C638-04
8-3
Page 78

Hotline Services
Country Phone Fax
Argentina +54 (1) 3408400 +54 (1) 3408400 3163
Australia +61 (3) 9420 7274 +54 (3) 9420 7500
Belgium +32 (2) 536 2905 +32 (2) 536 2880
Brazil +55 (11) 7947 1999 ext.
China +86 (21) 6213 2050 ext.
Denmark +45 (7640) 5151 +45 (7640) 5143
Finland +358 (9) 5105 3303 +358 (9) 5105 3661
France +33 (1) 49 22 31 60 +33 (1) 49 22 29 42
Great Britain +44 (161) 446 5760 +44 (161) 446 5772
India +91 22 7577115 +91 22 7577106
Italy +39 (02) 6676 3490
Japan +81 (3) 5423 8502 +81 (3) 5423 8737
Mexico +52 (5) 328 2456 +52 (5) 328 2058
Netherlands +31 (70) 333 3858 +31 (70) 333 3878
Austria +43 (1) 1707 29886 +43 (1) 1707 53730
Poland +48 (22) 670 9166 +48 (22) 670 9169
Portugal +351 (1) 75 73234 +351 (1) 75 89333
Schweden +46 (8) 728 1462 +46 (8) 728 1703
Switzerland +41 (1) 749 1304 +41 (1) 749 1284
Singapur +65 (740) 7150 +65 (740) 7196
Spain +34 (91) 514 8400 +34 (91) 514 9217
South Africa +27 (12) 309 0149 +27 (12) 309 0142
South Korea +82 (2) 3420 4880 +82 (2) 3420 4889
Taiwan +886 (2) 2376 1849 +886 (2) 2378 8958
Thailand +66 (2) 716 4609 +66 (2) 716 4601
USA +1 (423) 461 2497 +1 (423) 461 2094
+55 (11) 7947 1888
3013
+86 (21) 6213 5538
301
8-4
Note
In countries not listed above, please contact your local service representative. He
will arrange for your repairs to be carried out.
SIMATIC Box PC 620 Operating Manual
C79000-Z7076-C638-04
 Loading...