

Page 1
MODEL
UX-41/UX-61/FO-51/FO-71
FACSIMILE
OPERATION MANUAL
1. Installation
2. Sending Faxes
3. Receiving Faxes
4. Making Copies
5. Making Telephone Calls
6. Answering Machine Connection
7. Special Functions
8. Printing Lists
9. Maintenance
10. Troubleshooting
Page 2

Introduction
Welcome, and thank you for
choosing a Sharp facsimile!
The features and
specifications of your new
Sharp fax are shown below.
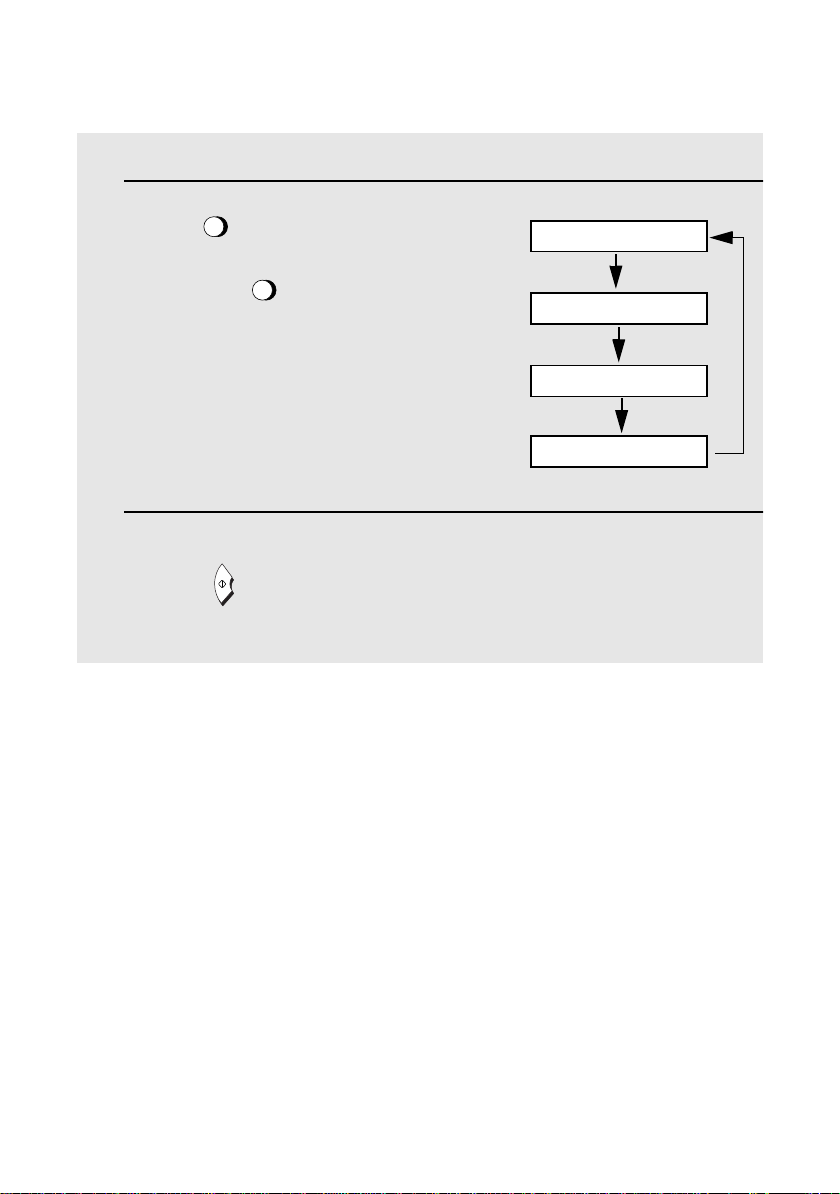
Automatic dialling Rapid Key Dialling: 5 numbers
Speed Dialling: 35 numbers
Fax paper Initial starter roll (included with machine):
10 m
Replacement roll (not included):
FO-20PR 30 m (12.7 mm core)
Paper cutting method UX-41/FO-51: Tear off by hand
UX-61/FO-71: Automatic cutter
Memory size* 448 KB (approx. 17 average pages)
Modem speed 9,600 bps with automatic fallback to lower
speeds.
Transmission time* Approx. 15 seconds
Resolution Horizontal: 8 pels/mm
Vertical:
Standard: 3.85 lines/mm
Fine /Halftone: 7.7 lines/mm
Super fine: 15.4 lines/mm
Automatic document
feeder
Recording system Thermal recording
Halftone (grayscale) 64 levels
Compression scheme MR, MH, H2
*Based on Sharp Standard No.1 Chart at standard resolution is Sharp special mode,
excluding time for protocol signals (i.e., ITU-T phase C time only).
5 pages max. (Letter/A4, 80 g/m
2
paper)
1
Page 3

Display 16-digit LCD display
Applicable telephone line Public switched telephone network
Compatibility ITU-T (CCITT) G3 mode
Input document size Automatic feeding:
Width: 148 to 216 mm
Length: 140 to 297 mm
Manual feeding:
Width: 148 to 216 mm
Length: 140 to 600 mm
Effective scanning width 210 mm max.
Effective printing width 210 mm max.
Contrast control Automatic/Dark selectable
Reception modes TEL/FAX, TEL, FAX, A.M. (Note: A.M. mode
is for connecting an answering machine)
Copy function Ye s
Telephone function Yes (cannot be used if power fails)
Power requirements 220-240 V AC, 50/60 Hz
Operating temperature 5 - 35°C
Humidity 30 - 85% RH
Power consumption Standby: 4.0 W
Maximum: 115 W
Dimensions Width: 304 mm
Depth: 236mm
Height: 122 mm
Weight Approx. 2.6 kg
As a part of our policy of continuous improvement, SHARP reserves the right to make design
and specification changes for product improvement without prior notice. The performance
specification figures indicated are nominal values of production units. There may be some
deviations from these values in individual units.
2
Page 4

Important safety information
Do not disassemble this machine or attempt any procedures not described in this manual.
Refer all servicing to qualified service personnel.
Do not install or use the machine near water, or when you are wet. For example, do not use the
machine near a bath tub, wash bowl, kitchen sink or laundry tub, in a wet basement, or near a
swimming pool. Take care not to spill any liquids on the machine.
Unplug the machine from the telephone socket and then the power outlet and consult a
qualified service representative if any of the following situations occur:
- Liquid has been spilled into the machine or the machine has been
exposed to rain or water.
- The machine produces odors, smoke, or unusual noises.
- The power cord is frayed or damaged.
- The machine has been dropped or the housing damaged.
Do not allow anything to rest on the power cord, and do not install the machine where people
may walk on the power cord.
This machine must only be connected to a 220 - 240 V, 50/60 Hz, earthed (2-prong) outlet.
Connecting it to any other kind of outlet will damage the machine and invalidate the warranty.
Never insert objects of any kind into slots or openings on the machine. This could create a risk
of fire or electric shock. If an object falls into the machine that you cannot remove, unplug the
machine and consult a qualified service representative.
Do not place this machine on an unstable cart, stand or table. The machine could be seriously
damaged if it falls.
Never install telephone wiring during a lightning storm.
Never install telephone sockets in wet locations unless the socket is specifically designed for
wet locations.
Never touch uninsulated telephone wires or terminals unless the telephone line has been
disconnected at the network interface.
Use caution when installing or modifying telephone lines.
Avoid using a telephone (other than a cordless type) during an electrical storm. There may be
a remote risk of electric shock from lightning.
Do not use a telephone to report a gas leak in the vicinity of the leak.
The power outlet must be installed near the equipment and must be easily accessible.
3
Page 5

Table of Contents
A Look at the Operation Panel 6
1. Installation 8
Unpacking Checklist . . . . . . . . . . . . . . . . . . . . . . . . . . . . . . . . . . . . . . 8
Connections . . . . . . . . . . . . . . . . . . . . . . . . . . . . . . . . . . . . . . . . . . . . 9
Loading the Thermal Paper . . . . . . . . . . . . . . . . . . . . . . . . . . . . . . . 13
Entering Your Name and Fax Number . . . . . . . . . . . . . . . . . . . . . . . 16
Setting the Date and Time . . . . . . . . . . . . . . . . . . . . . . . . . . . . . . . . 18
Setting the Reception Mode . . . . . . . . . . . . . . . . . . . . . . . . . . . . . . . 20
Volume Adjustment . . . . . . . . . . . . . . . . . . . . . . . . . . . . . . . . . . . . . 21
2. Sending Faxes 23
Transmittable Documents. . . . . . . . . . . . . . . . . . . . . . . . . . . . . . . . . 23
Loading the Document . . . . . . . . . . . . . . . . . . . . . . . . . . . . . . . . . . . 24
Adjusting the Resolution and Contrast . . . . . . . . . . . . . . . . . . . . . . . 26
Sending a Fax by Normal Dialling . . . . . . . . . . . . . . . . . . . . . . . . . . 28
Sending a Fax by Automatic Dialling . . . . . . . . . . . . . . . . . . . . . . . . 29
3. Receiving Faxes 38
Using TEL/FAX Mode. . . . . . . . . . . . . . . . . . . . . . . . . . . . . . . . . . . . 38
Using A.M. Mode . . . . . . . . . . . . . . . . . . . . . . . . . . . . . . . . . . . . . . . 39
Using FAX Mode . . . . . . . . . . . . . . . . . . . . . . . . . . . . . . . . . . . . . . . 39
Using TEL Mode. . . . . . . . . . . . . . . . . . . . . . . . . . . . . . . . . . . . . . . . 41
Optional Reception Settings . . . . . . . . . . . . . . . . . . . . . . . . . . . . . . . 43
Substitute Reception to Memory . . . . . . . . . . . . . . . . . . . . . . . . . . . 44
4. Making Copies 45
5. Making Telephone Calls 46
4
Page 6

Table of Contents
6. Answering Machine Connection 48
Connecting an Answering Machine . . . . . . . . . . . . . . . . . . . . . . . . . 48
Using the Answering Machine Connection . . . . . . . . . . . . . . . . . . . . 49
Optional A.M. Mode Settings . . . . . . . . . . . . . . . . . . . . . . . . . . . . . . 51
7. Special Functions 54
Blocking Reception of Unwanted Faxes . . . . . . . . . . . . . . . . . . . . . . 54
Polling (Requesting a Fax Transmission) . . . . . . . . . . . . . . . . . . . . . 55
8. Printing Lists 57
9. Maintenance 60
10. Troubleshooting 62
Problems and Solutions . . . . . . . . . . . . . . . . . . . . . . . . . . . . . . . . . . 62
Messages and Signals . . . . . . . . . . . . . . . . . . . . . . . . . . . . . . . . . . . 67
Clearing Paper Jams . . . . . . . . . . . . . . . . . . . . . . . . . . . . . . . . . . . . 69
Quick Reference Guide 72
Guide de référence rapide 73
Index 74
5
Page 7
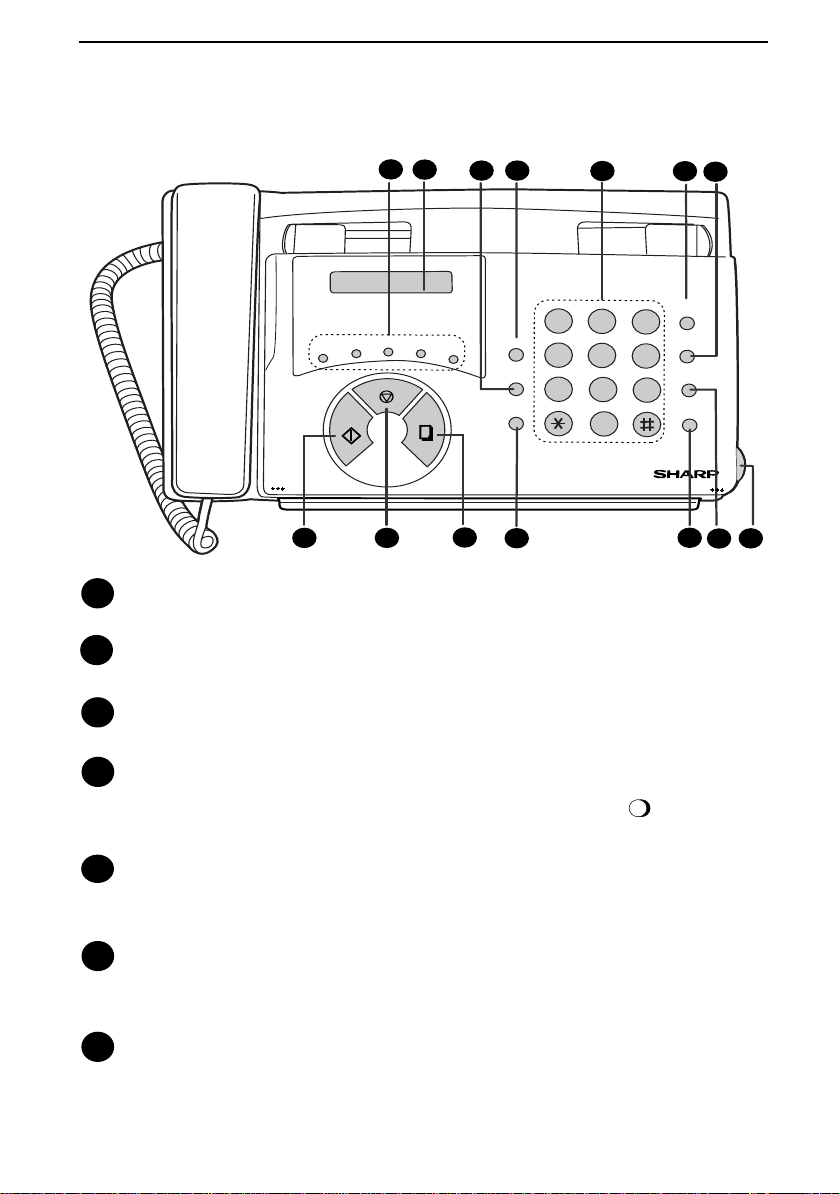
A Look at the Operation Panel
2
GHI
PQRS
START
1
TEL FAX
A.M.
DEF
ABC
A
JKL
TUV
MNO
WXYZ
C
B
STOP
RECEPTION
TEL FAX
TEL/FAX A.M.
SPEED DIAL
D
E/
REDIAL
HOLD/SEARCH
SPEAKER
3
MODE
DOWN VOLUME UP
POLL
COPY/
RECEPTION MODE
HELP
4
RESOLUTION FUNCTION
VOLUME
01
02
03
04
PQRS
FUNCTION
06
05
RESOLUTION/
08
07
09
10/POLL
ABC
1
JKL
GHI
4
TUV
7
5
DEF
2
2 3
MNO
COPY/HELP
WXYZ
8
START
0
65
9
STOP
6
SPEED
DIAL
REDIAL
HOLD/
SEARCH
SPEAKER
7
10
11
Rapid Dial keys
1
8 9
Press one of these keys to dial a fax number automatically.
Display
2
Displays messages to help you operate the machine.
FUNCTION key
3
Press this key to select various special functions.
VOLUME key
4
Press this key to adjust the volume of the speaker when the has been
SPEAKER
pressed, or the volume of the ringer at all other times.
Number keys
5
Use these keys to dial numbers, and enter numbers and letters when storing
auto-dial numbers.
SPEED DIAL key
6
Press this key to dial a fax or voice number using an abbreviated 2-digit
Speed Dial number.
REDIAL key
7
Press this key to automatically redial the last number dialed.
12
14
13
6
Page 8

8
START key
Press this key to begin transmission when using Speed Dialling, Direct
Keypad Dialling, or Normal Dialling.
STOP key
9
Press this key to cancel an operation before it is completed.
COPY/HELP key
10
When a document is in the feeder, press this key to make a copy. At any other
time, press this key to print out the Help List, a quick reference guide to the
operation of your fax machine.
RESOLUTION / RECEPTION MODE key
11
When a document is in the feeder, press this key to adjust the resolution for
faxing or copying. At any other time, press this key to select the reception
mode (an arrow in the display will point to the currently selected reception
mode).
SPEAKER key
12
Press this key to listen to the line and fax tones through the speaker when
faxing a document.
Note: This is not a speakerphone. You must pick up the handset to talk with
the other party.
HOLD/SEARCH key
13
Press this key to search for an auto-dial number, or, during a phone
conversation, press this key to put the other party on hold.
Panel release
14
Grasp this finger hold and pull toward you to open the operation panel.
7
Page 9
1. Installation
Unpacking Checklist
Before setting up,
make sure you
have all of the
following items.
Handset
Fax paper
(Sample roll)
Original document
support
Paper shaft
Handset
cord
Paper roll
shims
Points to keep in mind when setting up
If any are missing,
contact your
dealer or retailer.
Operation
manual
Telephone
line cord
Do not place the
machine in direct
sunlight.
About condensation
If the machine is moved from a cold to a warm place, it is possible that
condensation may form on the scanning glass, preventing proper scanning of
documents for transmission. To remove the condensation, turn on the power
and wait approximately two hours before using the machine.
Do not place the
machine near
heaters or air
conditioners.
Keep dust away from
the machine.
Keep the area
around the
machine clear.
8
Page 10
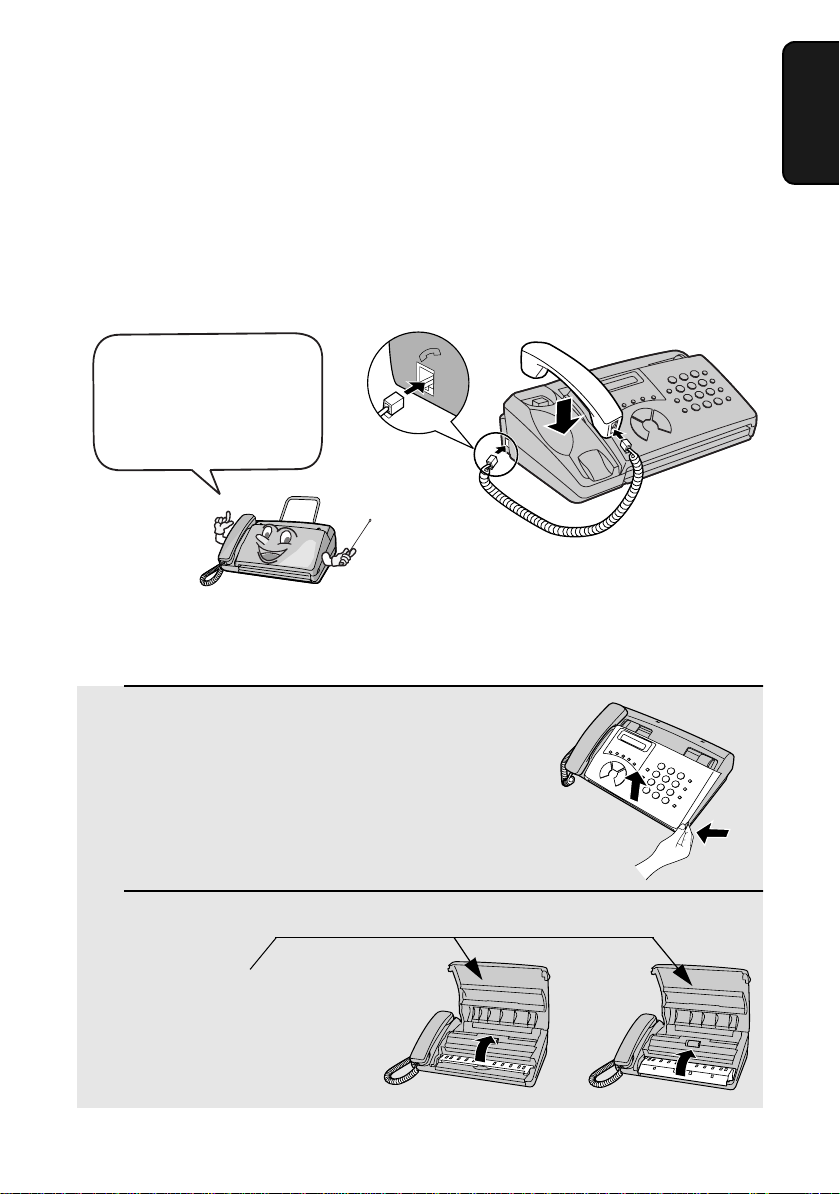
Connections
Connections
Connecting the handset
Connect the handset as shown and place it on the handset rest.
♦ The ends of the handset cord are identical, so they will go into either
socket.
Make sure the handset
cord goes into the
socket marked with a
handset symbol on the
side of the machine!
Use the handset to make ordinary
phone calls, or to transmit and receive
faxes manually.
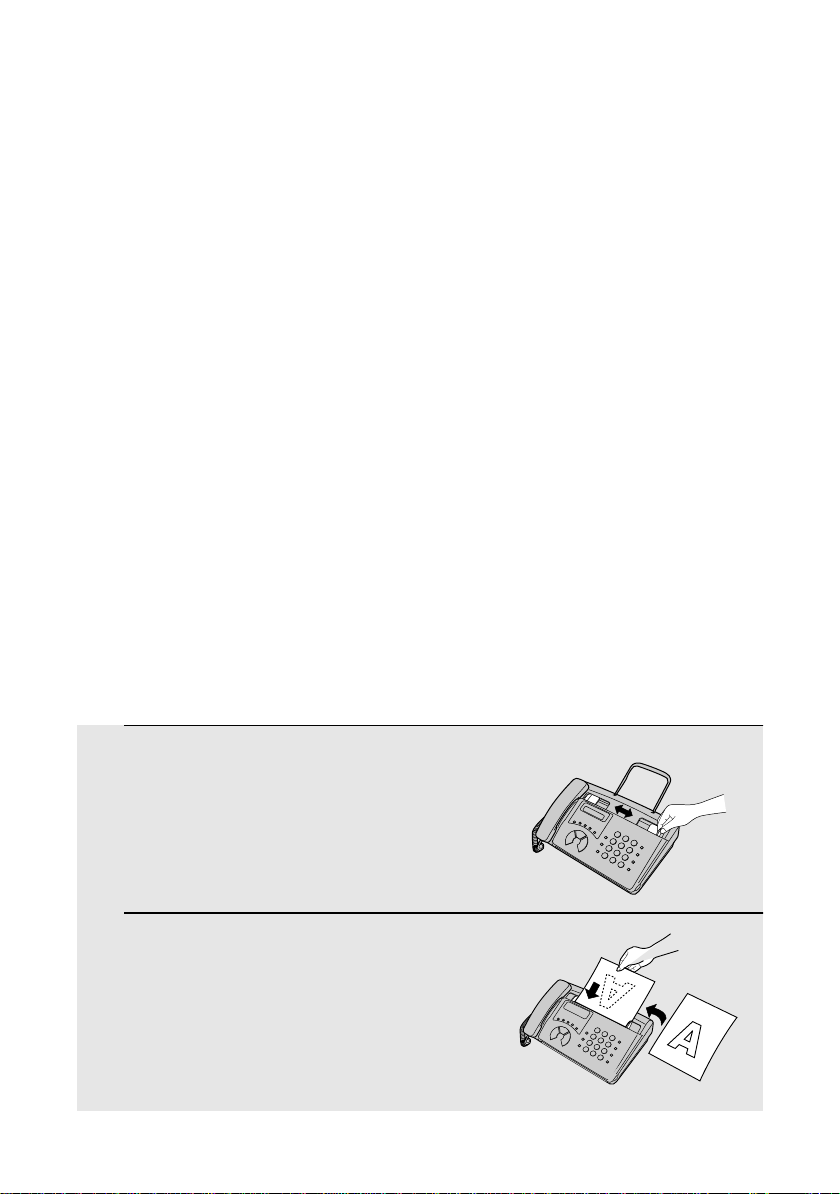
Removing the packing paper
1 Grasp the finger hold and open the
operation panel.
1. Installation
2 Flip up the front paper guide .
Note: Do not
peel off or
bend this
strip of film.
UX-41
FO-51
UX-61
FO-71
9
Page 11
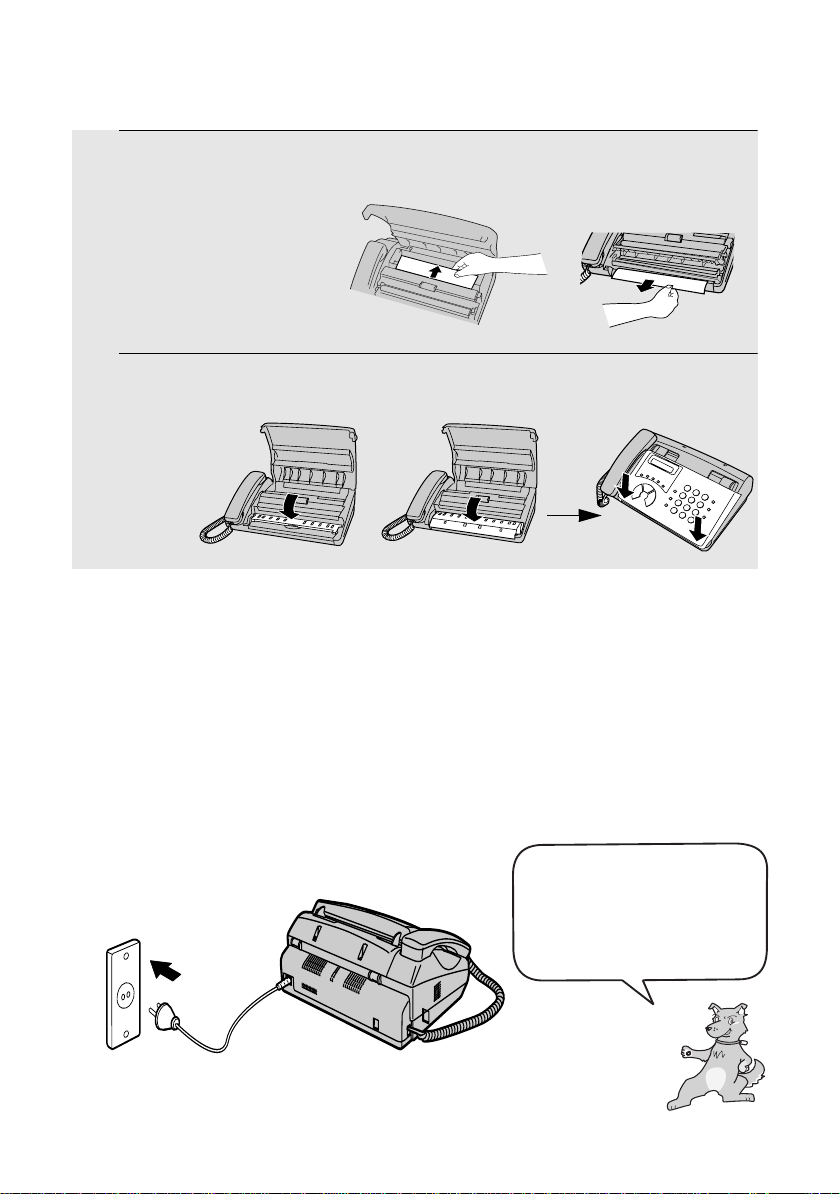
3 Remove the packing paper.
UX-41
FO-51
UX-61
FO-71
4 Flip down the front paper guide and then close the operation panel.
UX-41
FO-51
Connecting the power cord
Plug the power cord into a 220 - 240 V, 50/60 Hz, earthed AC (2-prong) outlet.
♦ When disconnecting the fax, unplug the telephone line cord before
unplugging the power cord.
♦ Caution:
Do not plug the power cord into any other kind of outlet. This will damage
the machine and is not covered under the warranty.
UX-61
FO-71
10
The machine does not have a
power on/off switch, so the
power is turned on and off by
simply plugging in or
unplugging the power cord.
Page 12
Connecting the telephone line cord
TEL.
SET
Insert one end of the line cord into the socket on the back of the machine
marked TEL. LINE. Insert the other end into a wall telephone socket.
Dial mode:
The fax machine is set for tone
dialling. If you are on a pulse dial
line, you must set the fax
machine for pulse dialling. Press
the keys on the operation panel
as follows:
TEL.
LINE
Connections
1. Installation
1 Press once and once.
FUNCTION
4
2 Press 4 times.
3 Select the dial mode:
TONE: PULSE (GROUP 1):
PULSE (GROUP 2):
• Group 1 countries: Iran, Saudi Arabia, Egypt,
• Group 2 countries: Qatar, Bahrain,
1
3
Yemen, Kuwait, West Africa, India, Philippines,
Israel
Oman, UAE, Tunisia, Morroco, Jordan
STOP
4 Press to exit.
Comments:
Display:
OPTION SETTING
DIAL MODE
2
♦ The fax machine is not designed for use on a line which has call waiting,
call forwarding, or certain other special services offered by your telephone
company. If you attempt to use the fax machine in conjunction with any of
these services, you may experience errors during transmission and
reception of facsimile messages.
11
Page 13
Connections
♦ The fax machine is not compatible with digital telephone systems.
♦ If your area experiences a high incidence of lightning or power surges, we
recommend that you install surge protectors for the power and telephone
lines. Surge protectors can be purchased from your dealer or at most
telephone specialty stores.
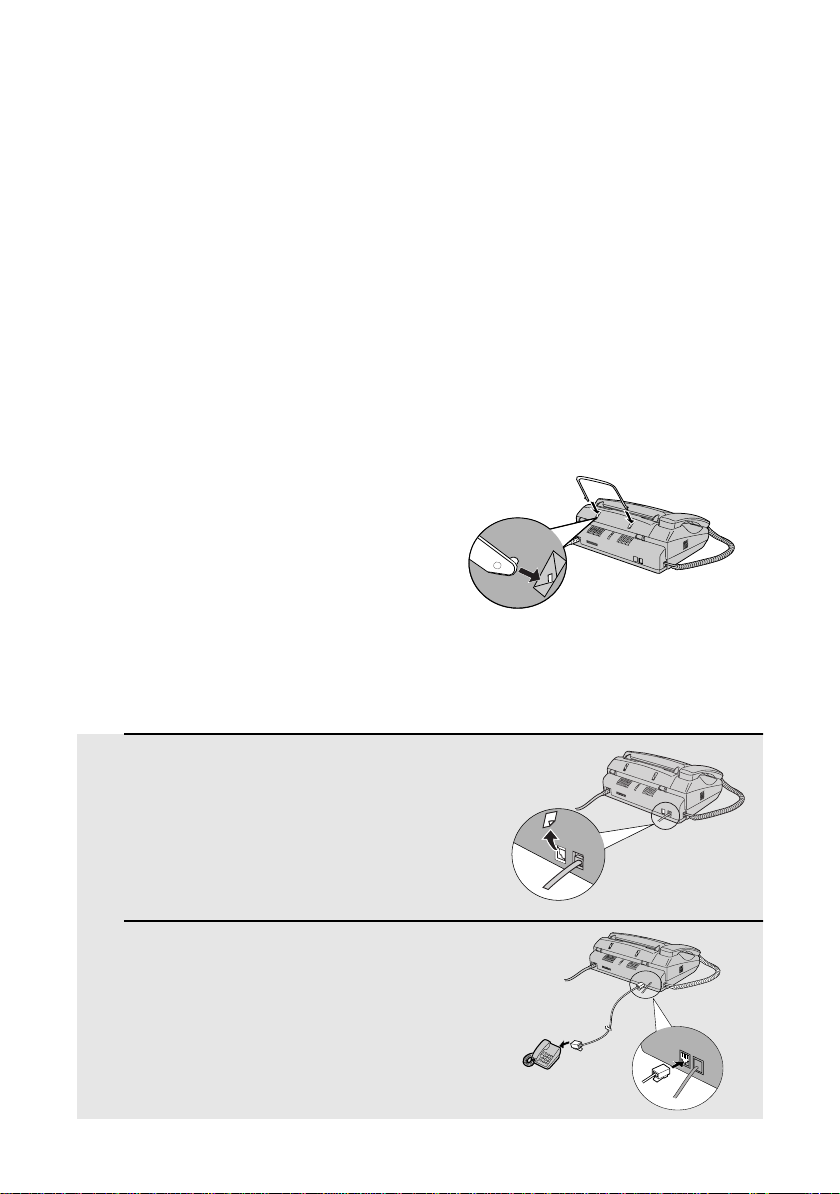
Moving your fax and reconnecting
If it is necessary to move your fax to a new location, first disconnect the
telephone line cord before disconnecting the power cord. When reconnecting,
it is necessary to connect the power cord before connecting the telephone line
cord.
Attaching the original document support
Attach the original document support as shown below.
Extension phone (optional)
If desired, you can connect an extension phone to the TEL. SET socket on the
fax.
♦ To connect an answering machine to your fax, see page 48.
1 Remove the seal covering the TEL. SET
socket.
2 Connect the extension phone line to
the TEL. SET socket.
12
TEL.
SET
TEL.
LINE
Page 14
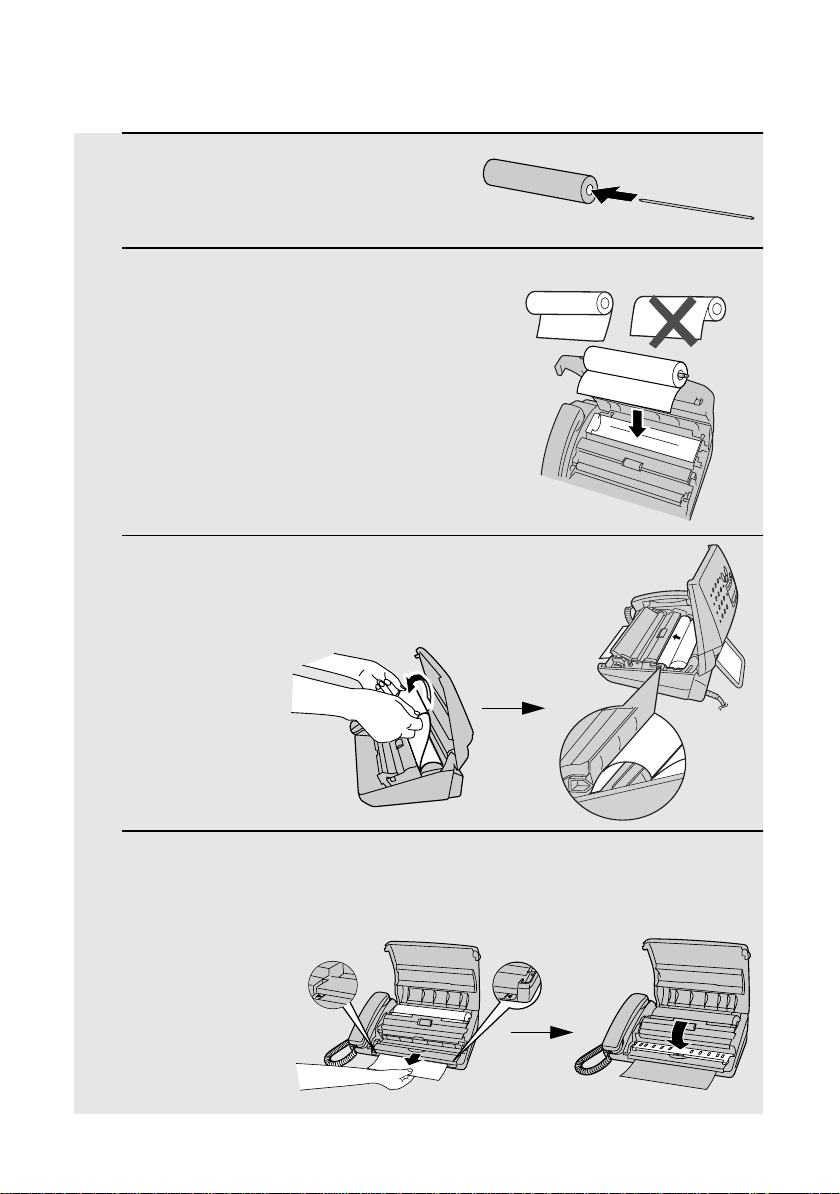
Loading the Thermal Paper
Loading the Thermal Paper
Your fax machine prints
incoming faxes on a
special kind of paper
called thermal paper.
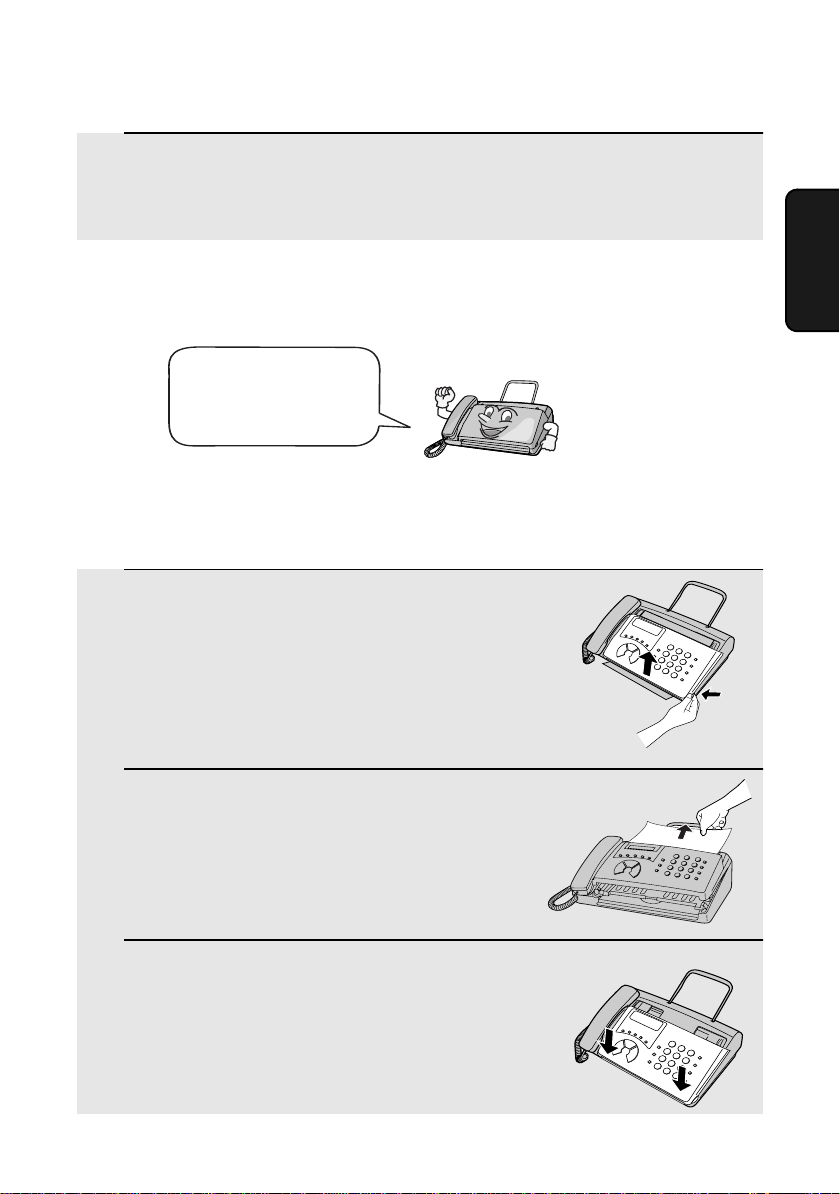
1 Grasp the finger hold as shown and
pull up to open the operation panel.
2 Flip up the front paper guide.
UX-41
FO-51
1. Installation
The fax machine’s print
head creates text and
images by applying heat
to the thermal paper.
UX-61
FO-71
Press the knob to
make sure the front
side of the metal
guide is down.
3 If you are loading paper that is 210 mm
in width, place the paper roll shims on
each side of the paper compartment.
(Note that Sharp recommended paper,
including the initial roll, is 216 mm in
width.)
• The ribbed side of the shims should
face in (toward each other).
13
Page 15
Loading the Thermal Paper
4 Unwrap the roll of thermal paper and
insert the paper shaft.
5 Place the roll of thermal paper in the
compartment, making sure the ends of
the paper shaft fit into the notches on
each side of the compartment.
• Important: The roll must be placed so
that the leading edge of the paper
unrolls as shown. (The paper is only
coated on one side for printing. If the roll
is placed backwards, the paper will
come out blank after printing.)
6 Insert the leading edge of the paper
into the slot as shown. Continue to
push the paper through the slot until it
comes out the opening in the front of
the machine.
YES
NO!
7 Make sure the paper comes out
straight, and then flip down the paper
guide.
UX-41
FO-51
14
Page 16
Loading the Thermal Paper
UX-61
FO-71
8 Close the operation panel, making sure
it clicks into place.
• UX-41/FO-51: A short length of the
paper will feed out. Grasp the paper by
the edge and pull upward to tear it off.
• UX-61/FO-71: A short length of the
paper will be cut off.
Replacing the thermal paper
When the paper runs out, OUT OF PAPER will appear in the display. Reception and
copying will no longer be possible. To replace the paper, first take out the old roll,
then load the new roll as described above.
To assure a long life for your fax and obtain the best reproduction quality, we
recommend that you use the following Sharp thermal paper, which is available from
your dealer or retailer:
Click
1. Installation
FO-20PR THERMAL PAPER (30 m roll)
The use of any other paper may result in poor copy quality and excessive build-up
of residue on the head.
Handling thermal paper
Do not unpack the paper until you are ready to use it. It may become discoloured if:
♦It is stored at high humidity or high temperature.
♦It is exposed to direct sunlight.
♦It comes in contact with glue, thinner, or a freshly copied blueprint.
♦A rubber eraser or adhesive tape is used on it, or it is scratched.
15
Page 17
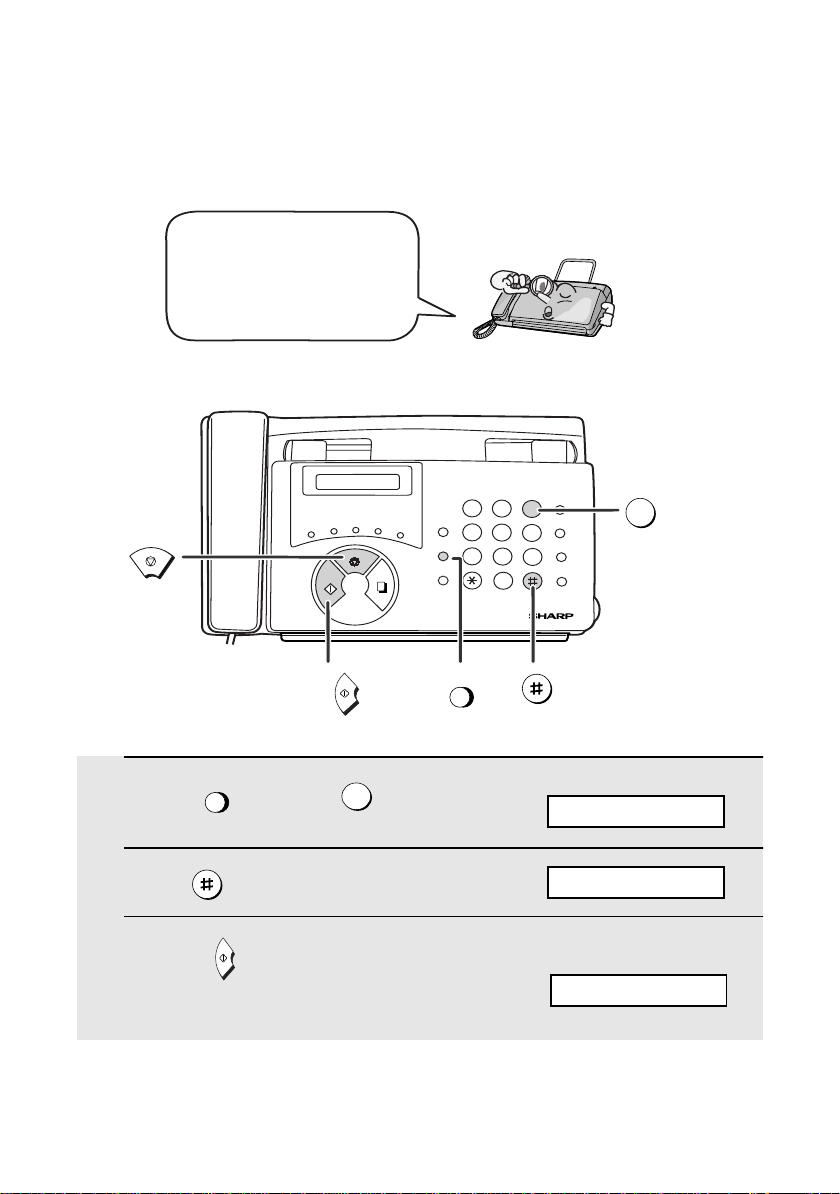
Entering Your Name and Fax Number
Entering Your Name and Fax Number
Before you can begin
sending faxes, you must
enter your name and fax
(telephone) number. You
also need to set the date
and time.
TEL FAX
TEL/FAX A.M.
C
D
B
A
STOP
START
START
1 Press once and once.
FUNCTION
E/
STOP
3
POLL
COPY/
HELP
GHI
VOLUME
PQRS
FUNCTION
RESOLUTION/
RECEPTION MODE
FUNCTION
1
4
7
ABC
DEF
23
JKL
MNO
65
WXYZ
TUV
8
9
0
Display:
ENTRY MODE
Once you enter this
information, it will
automatically appear
at the top of each fax
page you send.
SPEED
DIAL
REDIAL
HOLD/
SEARCH
SPEAKER
3
2 Press twice.
3 Press once.
START
OWN NUMBER SET
ENTER FAX #
4 Enter your fax number by pressing the number keys (max. 20 digits).
• To insert a space between digits, press . To enter a “+”, press .
SPEED
• To clear a mistake, press .
16
DIAL
Page 18
Entering Your Name and Fax Number
5 Press to enter the fax number in memory.
START
6 Enter your name by pressing number keys for each letter as shown in
the chart below. Up to 24 characters can be entered.
Example: SHARP = 77777 444 22 7777 77
SPACE =
A =
B =
C =
D =
E =
F =
G =
H =
I =
J =
K =
L =
M =
N =
O =
P =
Q =
R =
S =
♦ To enter two letters in succession that require the same key, press
after entering the first letter. ( moves the cursor forward, and
moves the cursor backward. )
SPEAKER
SPEAKER
W =
T =
U =
V =
X =
Y =
Z =
SPEAKER
HOLD/
SEARCH
1. Installation
SPEED
♦ To clear a mistake, press .
♦ To change case, press . To enter one of the following symbols, press
DIAL
REDIAL
or repeatedly: . / ! " # $ % & ’ ( ) + + , - : ; < = > ? @ [ ¥ ] ^ _ ' { | }
) (
7 Press
START
STOP
DATE & T IME SET
8 Press to return to the date and time display.
17
Page 19
Setting the Date and Time
Setting the Date and Time
The date and time appear
in the display and are
printed at the top of every
page you fax. Set the date
and time as shown below.
TEL FAX
TEL/FAX A.M.
C
D
STOP
START
B
A
STOP
E/
POLL
COPY/
HELP
VOLUME
FUNCTION
RESOLUTION/
RECEPTION MODE
DEF
23
MNO
65
WXYZ
8
9
0
SPEED
DIAL
REDIAL
HOLD/
SEARCH
SPEAKER
3
ABC
1
JKL
GHI
4
PQRS
TUV
7
START
1 Press once and once.
FUNCTION
3
2 Press 3 times.
3 Press once.
18
START
FUNCTION
Display:
ENTRY MODE
DATE & TIME SET
The currently set date
appears (example):
DATE 15-08-2002
Page 20
Setting the Date and Time
4 Enter a two-digit number for the day (“01” to “31”).
th
Example: the 5
• To correct a mistake, press to move the cursor back to the mistake
and then enter the correct number.
0 5
SPEED
DIAL
DATE 05-08-2002
5 Enter a two-digit number for the month (“01” for January, “02” for
February, “12” for December, etc.).
Example: January
0 1
6 Enter the year (four digits).
Example: 2002
2
0 0
2
DATE 05-01-2002
The currently set time
appears (example):
TIME 12:19
7 Enter a two-digit number for the hour (“00” to “23”) and a two-digit
number for the minute (“00” to “59”).
Example: 9:25
0 9
2
5
05-JAN 09:25
1. Installation
8 Press to start the clock.
START
STOP
9 Press to return to the date and time display.
STORE JUNK #
19
Page 21
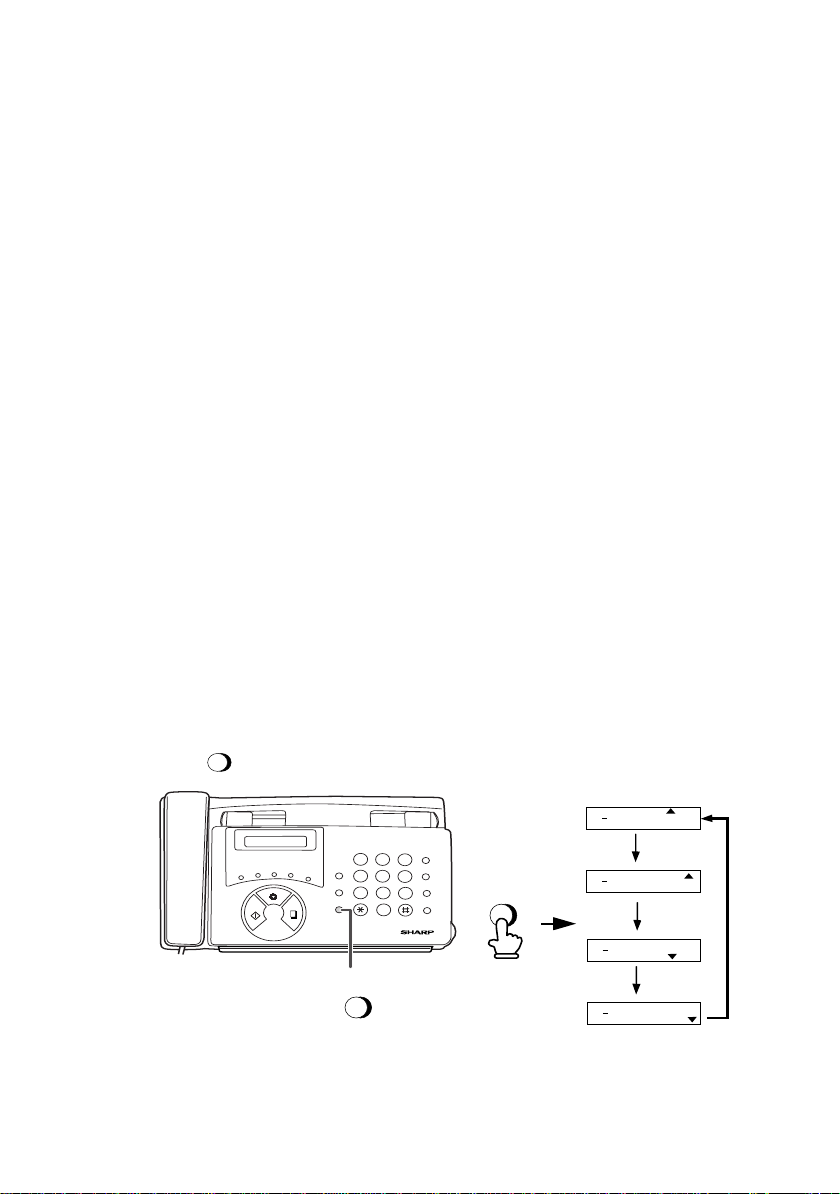
Setting the Reception Mode
Setting the Reception Mode
Your fax has four modes for receiving incoming faxes:
TEL mode:
This mode is the most convenient for receiving phone calls. Faxes can also be
received; however, all calls must first be answered by picking up the fax's
handset or an extension phone connected to the same line.
FAX mode:
Select this mode when you only want to receive faxes on your line. The fax
machine will automatically answer all calls and receive incoming faxes.
TEL/FAX mode:
This mode is convenient for receiving both faxes and voice calls. When a call
comes in, the fax will detect whether it is a voice call (including manually
dialled faxes), or an automatically dialled fax. If it is a voice call, the fax will
make a special ringing sound to alert you to answer. If it is an automatically
dialled fax, reception will begin automatically.
A.M. mode:
Use this mode only if you have connected an answering machine to the fax
(see Chapter 6). Select this mode when you go out to receive voice messages
in your answering machine and faxes on your fax machine.
Setting the reception mode
Make sure a document is not loaded in the document feeder, and then
RESOLUTION/
RECEPTION MODE
press until the arrow in the display points to the desired mode.
TEL FAX
TEL/FAX A.M.
C
D
B
A
STOP
START
1
GHI
VOLUME
POLL
E/
4
PQRS
FUNCTION
7
RESOLUTION/
COPY/
RECEPTION MODE
HELP
RESOLUTION/
RECEPTION MODE
ABC
23
JKL
TUV
8
0
SPEED
DEF
DIAL
MNO
REDIAL
65
HOLD/
WXYZ
SEARCH
9
SPEAKER
RESOLUTION/
RECEPTION MODE
For more information on receiving faxes in FAX, TEL, and TEL/FAX modes,
see Chapter 3, Receiving Faxes (page 38). For more information on using
A.M. mode, see Chapter 6.
20
05 NOV 10:30
05 NOV 10:30
05 NOV 10:30
05 NOV 10:30
TEL/FAX
TEL
TEL/FAX
TEL/FAX
TEL/FAX
FAX
TEL
A.M.
FAX
A.M.
FAX
TEL
A.M.
FAX
TEL
A.M.
Page 22
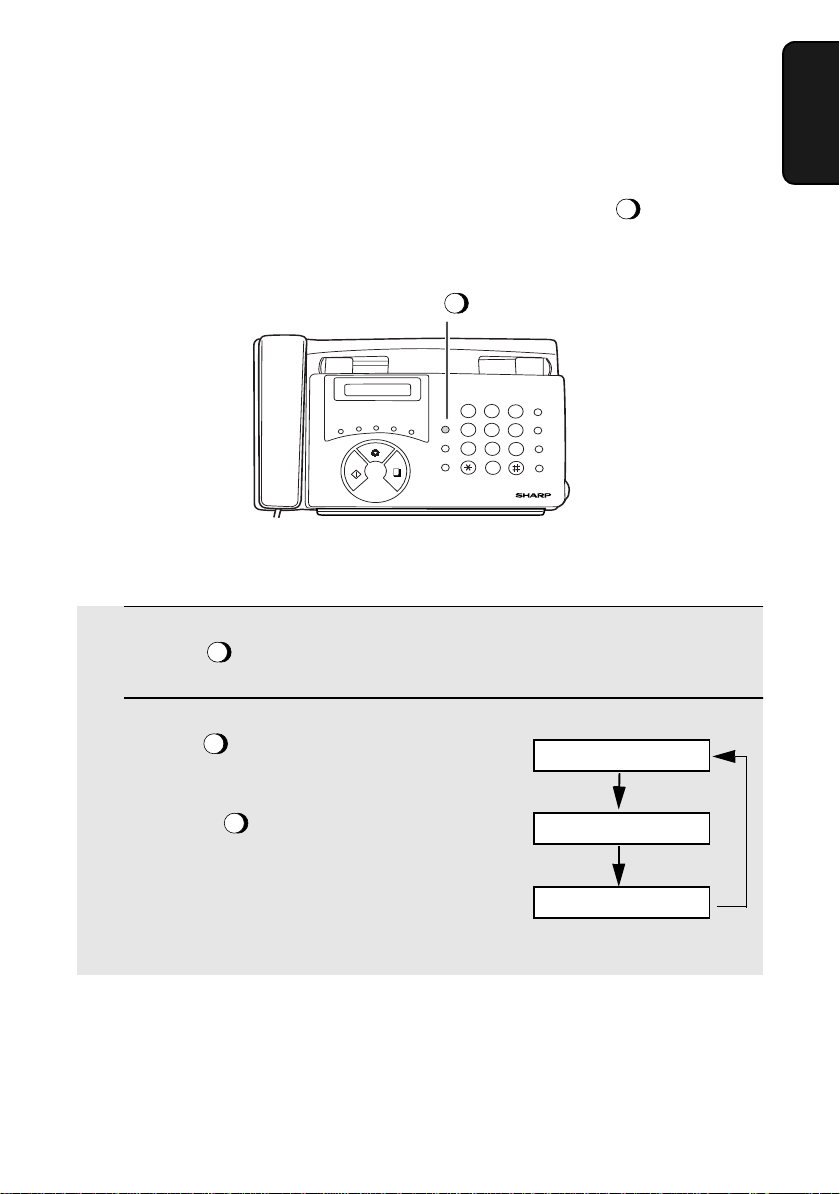
Volume Adjustment
You can adjust the volume of the speaker and ringer using .
VOLUME
TEL FAX
Speaker
TEL/FAX A.M.
C
D
B
POLL
A
START
E/
STOP
COPY/
HELP
VOLUME
PQRS
FUNCTION
RESOLUTION/
RECEPTION MODE
ABC
DEF
1
23
JKL
GHI
MNO
65
4
WXYZ
TUV
8
7
9
0
SPEED
DIAL
REDIAL
HOLD/
SEARCH
SPEAKER
Volume Adjustment
1. Installation
VOLUME
1 Press
2 Press one or more times to
SPEAKER
VOLUME
select the desired level.
• Press again to turn off the
SPEAKER
speaker.
Display:
SPEAKER: MIDDLE
SPEAKER: HIGH
SPEAKER: LOW
21
Page 23
Volume Adjustment
Ringer
1 Press to select the desired
VOLUME
volume.
(Make sure has not been
pressed and the handset is not lifted.)
SPEAKER
• The ringer will ring once at the selected
level, then the date and time will
reappear in the display.
2 If you selected RINGER: OFF OK ?,
START
press .
Display:
RINGER: LOW
RINGER: MIDDLE
RINGER: HIGH
RINGER: OFF OK ?
22
Page 24

2. Sending Faxes
Transmittable Documents
Size and weight
The size and weight of documents that you can load in the document feeder
depend on whether you load one page at a time or several pages at once.
Loading one page at a time:
Minimum size
148 mm
140 mm
Maximum size
216 mm
600 mm
Minimum weight Maximum weight
52 g/m²
157 g/m²
Loading up to 5 pages at once:
Minimum size Maximum size
148 mm
140 mm
216 mm
Minimum weight Maximum weight
52 g/m²
80 g/m²
Note: Letters or graphics on the edges of a document will not be scanned.
Faxes
2. Sending
297 mm
3 mm
5 mm
5 mm
Letters in the
shaded area will
not be scanned.
3 mm
23
Page 25
Loading the Document
Other restrictions
♦ The scanner cannot recognise yellow, greenish yellow, or light blue ink.
♦ Ink, glue, and correcting fluid on documents must be dry before they pass
through the document feeder.
♦ All clips, staples, and pins must be removed from documents before loading
in the feeder. If these are not removed, they may damage the machine.
♦ Documents which are patched, taped, torn, smaller than the minimum size,
carbon backed, easily smudged, or have a slippery coated surface should
be photocopied, and the copy loaded in the feeder.
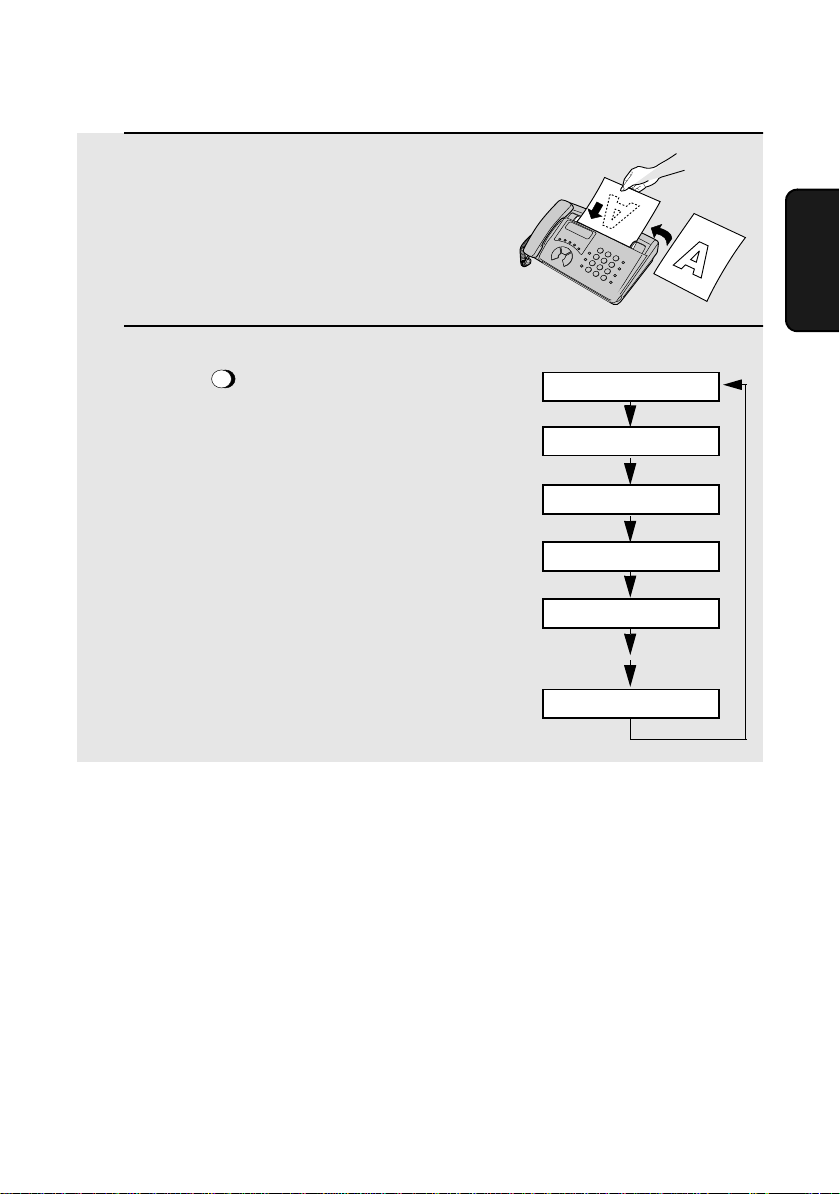
Loading the Document
Up to 5 pages can be placed in the feeder at one time. The pages will
automatically feed into the machine starting from the bottom page.
♦ If you need to send or copy more than 5 pages, place the additional pages
gently and carefully in the feeder just before the last page is scanned. Do
not try to force them in, as this may cause double-feeding or jamming.
♦ If your document consists of several large or thick pages which must be
loaded one at a time, insert each page into the feeder as the previous page
is being scanned. Insert gently to prevent double-feeding.
1 Adjust the document guides to the
width of your document.
2 Insert the document face down in the
document feeder. The top edge of the
document should enter the feeder first.
• READY TO SEND will appear in the
display.
24
Page 26
Loading the Document
3 Adjust the resolution and/or contrast settings as explained in
Resolution and Contrast below, then dial the receiving machine as
explained on page 28.
Removing a document from the feeder
If you need to remove
a document from the
feeder, open the
operation panel.
Important!
Do not try to remove a document without first releasing it as explained below. This
may damage the feeder mechanism.
1 Grasp the finger hold and pull up to
open the operation panel.
Faxes
2. Sending
2 Remove the document.
• If you can not remove the document,
see Clearing a jammed document on
page 69.
3 Close the operation panel.
• Press down on both front corners of the
panel to make sure it clicks into place.
25
Page 27
Adjusting the Resolution and Contrast
Adjusting the Resolution and Contrast
If desired, you can adjust the resolution and contrast before sending a
document.
The default resolution
setting is STANDARD
and the default contrast
setting is AUTO.
Note: The resolution and contrast settings are only effective for sending a
document. They are not effective for receiving a document.
You must adjust the
settings each time
you don’t want to use
the default settings.
Resolution settings
STANDARD Use STANDARD for ordinary documents. This
FINE Use FINE for documents containing small letters
SUPER FINE Use SUPER FINE for documents containing
HALF TONE Use HALF TONE for photographs and
setting gives you the fastest and most
economical transmission.
or fine drawings.
very small letters or very fine drawings.
illustrations. The original will be reproduced in
64 shades of gray.
Contrast settings
AUTO Use AUTO for normal documents.
DARK Use DARK for faint documents.
26
Page 28
1 Load the document(s).
• The document must be loaded before
the resolution and contrast can be
adjusted.
Adjusting the Resolution and Contrast
Faxes
2. Sending
RESOLUTION/
2 Press one or more times until
RECEPTION MODE
the desired resolution and contrast
settings appear in the display.
• The first time you move through the list
of resolution settings, the contrast
setting AUTO will appear next to each
resolution setting. The second time you
move through the list, the contrast
setting DARK will appear.
Note: In order to transmit in SUPER FINE resolution, the receiving fax machine
must also have that resolution. If it doesn’t, your machine will automatically step
down to the next best available setting.
Display:
STANDARD :AUTO
FINE :AUTO
SUPER FINE :AUTO
HALF TONE :AUTO
STANDARD :DARK
HALF TONE :DARK
27
Page 29
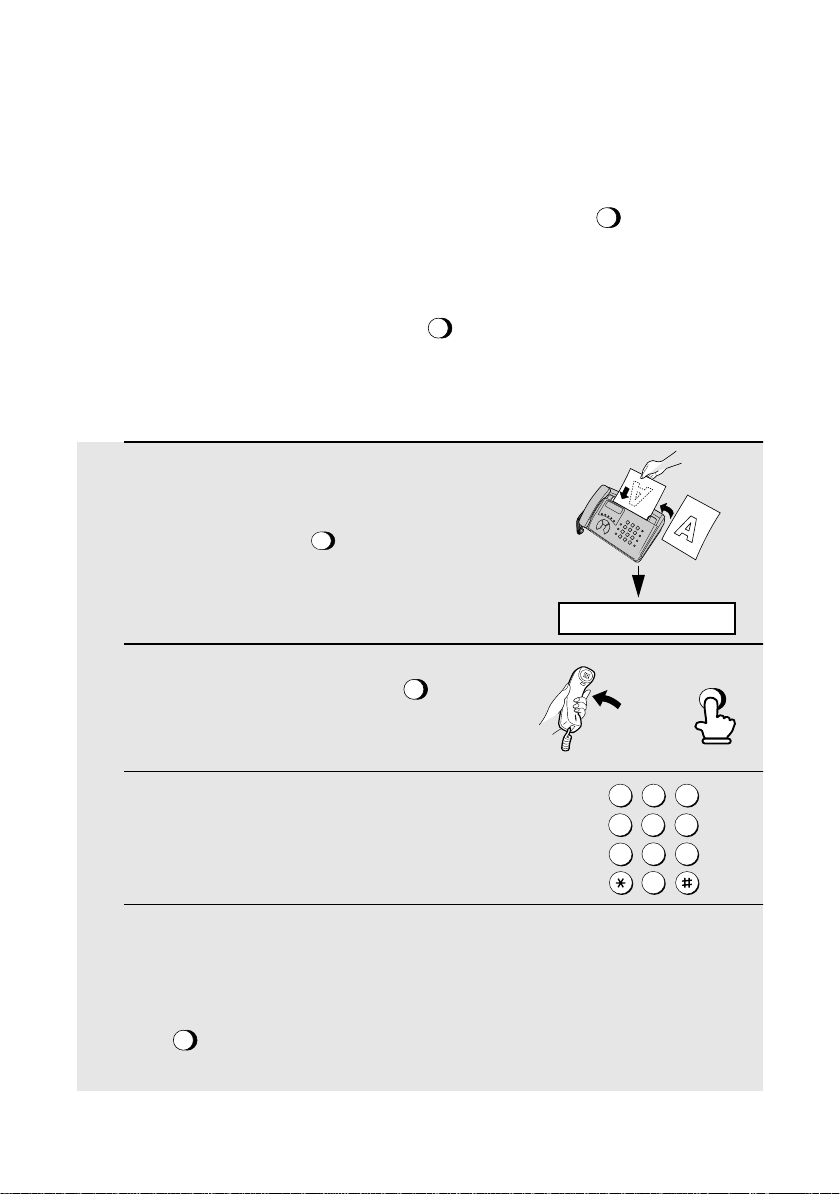
Sending a Fax by Normal Dialling
Sending a Fax by Normal Dialling
With Normal Dialling, you pick up the handset (or press ) and dial by
SPEAKER
pressing the number keys.
♦ If a person answers, you can talk with them through the handset before
sending the fax. (If you pressed , you must pick up the handset to
talk.)
SPEAKER
♦ Normal Dialling allows you to listen to the line and make sure the other fax
machine is responding.
1 Load the document(s).
RESOLUTION/
• If desired, press to set the
resolution and/or contrast.
2 Pick up the handset or press .
Listen for the dial tone.
3 Dial the number of the receiving
machine by pressing the number keys.
RECEPTION MODE
SPEAKER
READY TO SEND
or
ABC1DEF
2 3
GHI
JKL
4
5
TUV
PQRS
8
7
0
SPEAKER
MNO
6
WXYZ
9
4 Wait for the connection. Depending on the setting of the receiving
machine, you will either hear a fax tone or the other person will answer.
• If the other party answers, ask them to press their Start key (if you pressed
SPEAKER
, pick up the handset to speak with them). This causes the receiving
machine to issue a fax tone.
28
Page 30
Sending a Fax by Automatic Dialling
5 When you hear the fax tone, press . Replace the handset if you
START
used it.
• When transmission is completed, the fax will beep once.
Sending a Fax by Automatic Dialling
You can dial a fax or telephone number by simply pressing a Rapid Key, or by
SPEED
pressing the and entering a two-digit number.
♦ To use Automatic Dialling, you must first store the full fax or telephone
number in your fax machine
♦ When you store a fax or telephone number, you select a two-digit Speed
Dial number for it. 40 Speed Dial numbers are available.
Speed Dial numbers
01 through 05 are for
Rapid Key (one-touch)
Dialling.
Speed Dial numbers
06 through 40 are for
dialling with the
SPEED DIAL key.
DIAL
A
SPEED
DIAL
START
6
0
Faxes
2. Sending
Rapid Keys
TEL FAX
TEL/FAX A.M.
C
B
D
A
STOP
START
E/POLL
COPY/
HELP
GHI
VOLUME
PQRS
FUNCTION
RESOLUTION/
RECEPTION MODE
1
4
7
ABC
23
JKL
TUV
8
0
DEF
MNO
65
WXYZ
9
SPEED
DIAL
SPEED
DIAL
REDIAL
HOLD/
SEARCH
SPEAKER
29
Page 31

Sending a Fax by Automatic Dialling
Storing fax and phone numbers for automatic dialling
1 Press once and once.
FUNCTION
3
2 Press once.
3 Press to select SET.
1
Display:
ENTRY MODE
FAX/TEL # MODE
4 Enter a two-digit Speed Dial number by pressing the number keys (01 to
05 for Rapid Key Dialling, 06 to 40 for Speed Dialling).
1
(Example)
0
5 Enter the fax or voice number by pressing the number keys. Up to 32
digits can be entered. (Note: A space cannot be entered.)
SPEED
• To clear a mistake, press .
• If a pause is required between any of the digits to access a special service
or an outside line, press . The pause appears as a hyphen (two
seconds per pause). Several pauses can be entered in a row.
DIAL
REDIAL
6 Press
30
START
Page 32

Sending a Fax by Automatic Dialling
7 Enter a name by pressing number keys for each letter as shown in the
chart below. Up to 15 characters can be entered. (If you do not wish to
enter a name, go directly to Step 8.)
♦ Example: SHARP = 77777 444 22 7777 77
SPACE =
A =
B =
C =
D =
E =
F =
G =
H =
I =
J =
K =
L =
M =
N =
O =
P =
Q =
R =
S =
♦ To enter two letters in succession that require the same key, press
SPEAKER
T =
U =
V =
W =
X =
Y =
Z =
SPEAKER
after entering the first letter.
♦ To change case, press . To enter one of the following symbols, press
REDIAL
or repeatedly: . / ! " # $ % & ’ ( ) + + , - : ; < = > ? @ [ ¥ ] ^ _ ' { | }
) (
8 Press
START
STOP
9 Return to Step 4 to store another number, or press to return to
the date and time display.
Faxes
2. Sending
Making changes
To make changes in a number previously stored, repeat the programming
procedure. Select the Rapid Key or Speed Dial number for which you want to
make changes in Step 4, and then change the number and/or name when
they appear in the display in Steps 5 and 7.
Note: The fax machine uses a lithium battery to keep automatic dialling numbers
and other programmed information in memory when the power is turned off.
Battery power is consumed primarily when the power is off. With the power kept
continuously off, the life of the battery is about 5 years. If the battery dies, have
your dealer or retailer replace it. Do not try to replace it yourself.
31
Page 33

Sending a Fax by Automatic Dialling
Clearing auto-dial numbers
If you need to clear a number, follow these steps:
1 Press once and once.
FUNCTION
3
Display:
ENTRY MODE
2 Press once.
3 Press to select CLEAR.
2
4 Enter the Speed Dial number that you want to clear by pressing the
number keys.
START
5 Press
STOP
6 Return to Step 4 to clear another number, or press to return to the
date and time display.
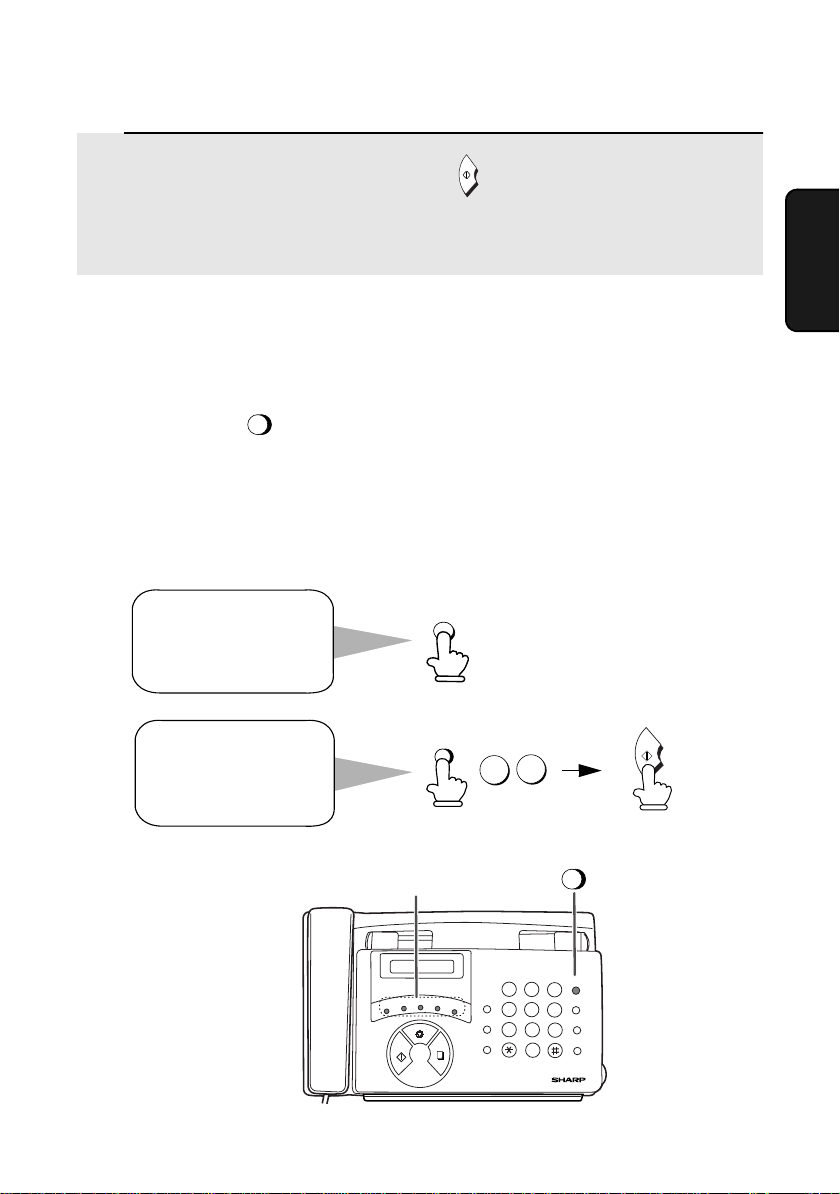
Chain Dialling for area and access codes
You can also store an area code or access code in a Rapid Key or Speed Dial
number. To use this number to dial, see Chain Dialling in Chapter 5, Making
Telephone Calls.
Note: An area code or access code stored in a Rapid Key or Speed Dial
number can only be used if the handset is lifted or the key is pressed
before dialling.
32
SPEAKER
Page 34

Sending a Fax by Automatic Dialling
Sending a fax by Rapid Key Dialling
If the number you want to dial has been stored for Automatic Dialling as a
Speed Dial number from 01 to 05, you can dial it by pressing the
corresponding Rapid Key.
1 If you are sending a fax, load the
document(s).
RESOLUTION/
• If desired, press to set the
resolution and/or contrast.
RECEPTION MODE
READY TO SEND
2 Press the Rapid Key for the desired Speed Dial number as follows:
Speed Dial 01: Rapid Key A
Speed Dial 02: Rapid Key B
Speed Dial 03: Rapid Key C
Speed Dial 04: Rapid Key D
Speed Dial 05: Rapid Key E
• The name of the receiving party will appear in the display. If no name was
stored, the fax number will appear. (If the name or number is incorrect,
STOP
press .)
• The document will be automatically transmitted once the connection is
established.
A
Example:
To dial Speed Dial
number 01, press
Rapid Key A.
Faxes
2. Sending
33
Page 35

Sending a Fax by Automatic Dialling
Sending a fax by Speed Dialling
Speed Dialling can be used to dial any number that has been stored for
Automatic Dialling.
1 Load the document(s).
RESOLUTION/
• If desired, press to set the
resolution and/or contrast.
SPEED
2 Press and then enter the Speed Dial number by pressing the
numeric keys.
DIAL
• To enter numbers 1 through 9, first
enter 0 and then the number.
RECEPTION MODE
READY TO SEND
SPEED
DIAL
0 8
(Example)
3 Check the display. If the name or number shown is correct, press .
STOP
(If not, press and then repeat Step 2.)
START
34
Page 36

Sending a Fax by Automatic Dialling
Sending a fax by Direct Keypad Dialling
You can also enter a full number with the number keys and then press
to begin dialling. You can use this method to dial a full number when you don't
need to speak to the other party before faxing.
START
1 Load the document(s).
RESOLUTION/
• If desired, press to set the
resolution and/or contrast.
RECEPTION MODE
READY TO SEND
2 Enter the number of the receiving machine by pressing the number
keys.
• If a pause is required between any of the digits to access a special service
or an outside line, press . The pause will appear as a hyphen (two
seconds per pause). Several pauses can be entered in a row.
REDIAL
3 Check the display. If the number of the receiving machine shown is
correct, press .
START
Faxes
2. Sending
STOP
• If the number is not correct, press to backspace and clear one digit
at a time, and then re-enter the correct digit(s).
35
Page 37

Searching for an auto-dial number
If you don’t remember the Rapid Key or Speed Dial number in which you have
programmed a particular fax number, you can search for the number by following
the steps below. Once you have found the number, you can dial and transmit the
loaded document by simply pressing .
START
1 Load the document(s).
RESOLUTION/
• If desired, press to set the
resolution and/or contrast.
HOLD/
2 Press .
SEARCH
RECEPTION MODE
READY TO SEND
3 Enter the first letter of the stored name by pressing the appropriate
number key (the key below the marked letter) one or more times until the
letter appears in the display. If the name begins with a special character
or number, press .
1
• If you don’t remember the first letter, go to Step 4 (you will scroll through the
list from the beginning).
• If a name wasn’t stored for the number, press . This will cause
numbers, not names, to appear when you scroll.
0
4 Press or to scroll through the names (numbers if you pressed
0). Stop when the desired name appears in the display.
5 Press . The document will be automatically transmitted once the
36
START
connection is established.
Page 38

Using the REDIAL key
Sending a Fax by Automatic Dialling
You can press to redial the last number dialed. To send a document,
START
press when you hear the fax tone after the connection is made. Note
that the speaker is automatically activated when you press .
REDIAL
REDIAL
Automatic redialling
If you use automatic dialling (including Direct Keypad Dialling) to send a fax
and the line is busy, the fax machine will automatically redial the number. The
fax machine will make 2 redial attempts at an interval of 5 minutes. To stop
automatic redialling, press .
STOP
Faxes
2. Sending
37
Page 39

3. Receiving Faxes
Using TEL/FAX Mode
To select TEL/FAX mode, press
RESOLUTION/
RECEPTION MODE
display points to TEL/FAX.
When the reception mode is set to TEL/FAX, your fax machine automatically
answers all calls on two rings. After answering, your fax monitors the line for
about five seconds to see if a fax tone is being sent.
♦ If your fax machine detects a fax tone (this means that the call is an
automatically dialled fax), it will automatically begin reception of the
incoming document.
until the arrow in the
RESOLUTION/
RECEPTION MODE
TEL
TEL/FAX
FAX
A.M.
♦ If your fax machine doesn't detect a fax tone (this means that the call is a
voice call or manually dialled fax), it will make a ringing sound (called
pseudo ringing) for 30 seconds to alert you to answer. If you don't answer
within this time, your fax will send a fax tone to the other machine to allow
the calling party to send a fax manually if they desire.
Note: Only the fax will alert you to voice calls or manually dialled faxes by
pseudo ringing. An extension phone connected to the same line will not ring
after the connection has been established.
38
Page 40

Using A.M. Mode
Using A.M. Mode
RESOLUTION/
To select A.M. mode, press until the arrow in the display points to
RECEPTION MODE
A.M.
RESOLUTION/
RECEPTION MODE
TEL
TEL/FAX
FAX
A.M.
In A.M. mode, your fax will automatically receive voice and fax messages if
you have connected an answering machine to the fax machine. See Chapter 6
for more details.
Using FAX Mode
To select FAX mode,
RESOLUTION/
RECEPTION MODE
press until
the arrow in the
display points to FAX.
RESOLUTION/
RECEPTION MODE
TEL
TEL/FAX
Faxes
3. Receiving
FAX
A.M.
When the reception mode is set to FAX, the fax machine will automatically
answer all calls on two rings and receive incoming faxes.
2 rings Fax reception
♦ If you pick up the handset before the machine answers, you can talk to the
other party and/or receive a fax as explained in Using TEL Mode on page
41.
39
Page 41

Using FAX Mode
Changing the number of rings
If desired, you can change the number of rings on which the fax machine
answers incoming calls in FAX and TEL/FAX mode. Any number from 2 to 5
can be selected.
1 Press once and once.
FUNCTION
4
2 Press once.
3 Enter the desired number of rings (any
number from 2 to 5).
Example: 3 rings
STOP
3
4 Press to return to the date and time display.
Display:
OPTION SETTING
NUMBER OF RINGS
40
Page 42

Using TEL Mode
When the reception mode is set to TEL, you must answer all calls by picking
up the fax machine’s handset or an extension phone connected to the same
line.
To select TEL mode, press
RESOLUTION/
RECEPTION MODE
display points to TEL.
until the arrow in the
Using TEL Mode
RESOLUTION/
RECEPTION MODE
Answering with the fax’s handset
1 When the fax machine rings, pick up
the handset.
2 If you hear a fax tone, wait until the
display shows RECEIVING and then
replace the handset.
Note: If you have set the Fax Signal Receive setting
(page 43) to NO, press to begin reception.
3 If the other party first speaks with you
and then wants to send a fax, press
START
after speaking. (Press before the
sender presses their Start key.)
START
Beep
START
FAX
TEL
TEL/FAX
RECEIVING
RECEIVING
Faxes
3. Receiving
A.M.
• When RECEIVING appears in the
display, hang up.
41
Page 43

Using TEL Mode
Answering on an extension phone
1 Answer the extension phone when it
rings.
2 If you hear a soft fax tone, wait until your fax responds (the extension
phone will go dead), then hang up.
Beep
Phone goes dead
3 If the fax doesn't respond, or if the other party first talks to you and then
wants to send a fax, press once and twice on the extension
phone (only on a tone dial phone). This signals the fax to begin
reception. Hang up.
5
• The above step is necessary if you have set the Fax Signal Receive setting
(page 43) to NO.
• Your fax will not accept the signal to begin reception (5**) if a document is
loaded in its feeder.
42
Page 44

Optional Reception Settings
Optional Reception Settings
Fax Signal Receive
Your fax will automatically begin reception if you hear a soft fax tone after
answering a call on your fax or an extension phone. If you use a computer fax
modem to send documents on the same line, you must turn this function off in
order to prevent your fax from mistakenly attempting to receive documents
from the computer fax modem. Follow the steps below to change the setting.
1 Press once and once.
FUNCTION
4
2 Press twice.
3 Press to turn on the function, or
1
to turn it off.
2
STOP
4 Press to return to the date and time display.
Display:
OPTION SETTING
FAX SIGNAL RX
Faxes
3. Receiving
43
Page 45

Substitute Reception to Memory
Changing the number for remote fax activation
If desired, you can use a number other than 5 to activate fax reception from an
extension telephone. You can select any number from 0 to 9.
1 Press once and once.
FUNCTION
4
2 Press twice.
Display:
OPTION SETTING
TEL/FAX REMOTE #
3 Enter the desired number (any number
from 0 to 9).
Example: 3
3
STOP
4 Press to return to the date and time display.
Substitute Reception to Memory
In situations where printing is not possible, such as when your fax runs out of
paper or the paper jams, incoming faxes will be received to memory.
When you have received a document in memory, FAX RX IN MEMORY will
appear in the display, alternating with OUT OF PAPER or PAPER JAMMED.
When you add paper or clear the jam, the stored documents will automatically
print out.
Caution!
When documents are stored in memory, do not turn the power off. This will
erase all of the contents.
44
Page 46

4. Making Copies
Your fax machine can also be used to make copies.
1 Load the document(s) face down.
(Maximum of 5 pages.)
RESOLUTION/
• If desired, press to set the
resolution and/or contrast.
(The default resolution setting for
copying is FINE.)
2 When you are ready to begin copying, press .
RECEPTION MODE
COPY/
HELP
READY TO SEND
Copies
4. Making
45
Page 47

5. Making Telephone Calls
Your fax machine can be used like a regular telephone to make and receive
voice calls.
♦ To make or receive a voice call, the power must be on.
1 Pick up the handset or press .
Listen for the dial tone.
SPEAKER
2 Dial the number using one of the
following methods:
• Normal Dialling: Enter the full
telephone number with the numeric
keys.
• Rapid Key Dialling: Press the
appropriate Rapid Key.
SPEED
• Speed Dialling: Press , and enter
the 2-digit Speed Dial number with the
numeric keys.
DIAL
3 Speak with the other party when they
answer.
• If you pressed , pick up the
handset to talk.
SPEAKER
SPEAKER
or
A
Example: Press
Rapid Key A
46
Page 48

Making Telephone Calls
Chain Dialling
After lifting the handset, you can dial any combination of Normal Dialling,
Rapid Key Dialling and Speed Dialling numbers. For example, if you have
stored an area code or an access code for a special service in a Rapid Key,
you can press the Rapid Key for that area code or access code, then dial the
remainder of the number by pressing a Rapid Key, pressing number keys, or
SPEED
pressing and entering a two-digit Speed Dial number.
DIAL
Searching for an auto-dial number
HOLD/
You can use to search for a Rapid Key or Speed Dial number. First
SEARCH
search for the number as described in Searching for an auto-dial number in
Sending a Fax by Automatic Dialling in Chapter 2, then pick up the handset or
SPEAKER
press . The number will be dialed automatically (do not press ).
Redial
START
The last number dialed can be redialed by pressing (it is not necessary
to pick up the handset or press ). When the other party answers, pick
SPEAKER
REDIAL
up the handset to talk.
Hold
You can put the other party on hold during a conversation by pressing .
When this is done, they cannot hear you. You can put the handset back in the
cradle without breaking the connection. When you are ready to speak with
them again, pick up the handset. If you did not put the handset back in the
HOLD/
cradle, press again to resume conversation.
SEARCH
HOLD/
SEARCH
47
5. Making
Phone Calls
Page 49

6. Answering Machine Connection
Connecting an Answering Machine
If desired, you can connect an answering machine to your fax machine's TEL.
SET socket. This will allow you to receive both voice messages and faxes
when you are out.
♦ Important: If the answering machine is not connected to the TEL. SET
socket on the fax as shown, the setup will not operate properly.
1 Remove the seal covering the TEL. SET
socket.
2 Connect the answering machine's
telephone line plug to the TEL. SET
socket.
48
TEL.
SET
TEL.
LINE
To answering machine's
telephone line socket.
Page 50

Using the Answering Machine Connection
Changing the outgoing message
The outgoing message (OGM) of your answering machine should be changed
to inform callers who want to send a fax to press their Start key. For example,
your message might go as follows:
"Hello. You've reached the ABC company. No one is available to take your call
right now. Please leave a message after the beep or press your facsimile Start
key to send a fax. Thank you for calling."
♦ It is advisable to keep the length of the message under 10 seconds. If it is
too long, you may have difficulty receiving faxes sent by automatic dialling.
♦ If your outgoing message must be longer than 10 seconds, leave a pause
of about four seconds at the beginning of the message. This will give your
fax a chance to detect fax tones sent when automatic dialling is used.
Using the Answering Machine Connection
1 Set the reception mode to A.M.
RESOLUTION/
RECEPTION MODE
TEL/FAX
2 Set your answering machine to auto
answer.
♦ Your answering machine must be set to answer on a maximum of two rings.
If not, you may not be able to receive faxes sent by automatic dialling.
♦ If your answering machine has a toll saver function, make sure that it will
answer by the fourth ring.
Note: If your answering machine has a remote retrieval function, make sure
the code used to activate remote retrieval is different from the code used to
activate fax reception with an extension telephone (see Chapter 3, Receiving
Faxes). If they are the same, entering the code from an outside telephone to
retrieve messages will cause the fax machine to be activated.
TEL
FAX
A.M.
Machine
6. Answering
49
Page 51

Using the Answering Machine Connection
How answering machine mode operates
While you are out, all of your incoming calls will be answered by your
answering machine and its outgoing message will play. Voice callers can
leave a message. During this time, your fax will quietly monitor the line. If your
fax detects a fax tone or a duration of silence greater than four seconds, it will
take over the line and begin reception.
♦ If the connection is not good or there is noise on the line, the answering
machine and/or fax machine may not respond properly.
♦ The call counter on your answering machine may indicate that voice
messages were received, when only fax messages were received.
♦ To prevent the fax from taking over the line and beginning reception if you
call in from an external phone or answer on an extension phone, press any
three keys (other than the code to activate fax reception, "5", "*", and "*")
on the dial pad of the phone. This can only be performed from a phone
capable of tone dialling.
When you return and turn off
your answering machine, be
sure to change the reception
mode back to TEL/FAX, FAX,
or TEL!
50
Page 52

Optional A.M. Mode Settings
Optional A.M. Mode Settings
If necessary, you can use the following settings to improve the response of the
answering machine connection to incoming calls.
Quiet Detect Time
This function causes the fax machine to take over the line and begin reception
if a certain duration of silence is detected after the answering machine
answers.
Time selections for the period of silence are 1 to 10 seconds. Quiet Detect
Time has been set to 4 seconds at the factory. This gives the best
performance with most answering machines; however, you may need to adjust
this setting depending on the disconnect time of your answering machine.
Some answering machines may have unusually fast disconnect times (equal
to or very slightly less than 4 seconds), which means that the answering
machine may disconnect the line before fax reception can begin. In this case,
try a Quiet Detect Time setting of about 3 seconds.
If the fax machine is interrupting callers before they can leave a message, try a
longer Quiet Detect Time setting. If your outgoing message includes a period
of silence, make sure that the setting is longer than that period of silence, or
re-record your outgoing message to shorten the silence.
Note: Quiet Detect Time can be turned off by entering "00" for the time. Note,
however, that the fax machine will not be able to receive faxes sent manually by
Normal Dialling.
To change the setting, follow the steps below.
1 Press once and once.
FUNCTION
4
2 Press 5 times.
Display:
OPTION SETTING
QUIET DETECT TM.
Machine
6. Answering
51
Page 53

Optional A.M. Mode Settings
3 Enter a number from 01 to 10, or enter
00 to turn off the function.
Example: 3 seconds
STOP
3
0
4 Press to return to the date and time display.
Quiet Detect Start Time
This setting can be used to delay the start of the Quiet Detect Time function.
For example, if you want to insert a pause at the beginning of your answering
machine’s outgoing message to ensure clear detection of fax signals, you can
use this setting to delay the start of silence detection so that the pause will not
cause the fax to take over the line.
Quiet Detect Start Timing has been set to five seconds at the factory. You can
change this setting by entering a 2-digit number equal to the desired number
of seconds of the delay, or turn the function off by enttering 00. As general
guide, the delay time should be slightly longer than the pause before the
outgoing message.
1 Press once and once.
FUNCTION
4
2 Press 6 times.
3 Enter a 2-digit number (from 01 to 15)
for the number of seconds of the delay,
or enter 00 to turn off the function.
Example: 5 seconds
STOP
0 5
4 Press to return to the date and time display.
52
Display:
OPTION SETTING
QUIET START TIIME
Page 54

Optional A.M. Mode Settings
On A.M. Failure
When this function is turned on, your fax will answer the call after 5 rings if the
answering machine for some reason fails to answer before that time. This
ensures that you will receive fax messages even if the answering machine’s
tape fills up or the answering machine is not turned on.
This function has been turned off at the factory. If you want to turn it on, follow
the steps below:
Note: When this function is turned on, make sure that the answering machine
is set to answer on 4 rings or less. If it isn’t, the fax will always answer first,
preventing callers from leaving voice messages.
1 Press once and once.
FUNCTION
4
Display:
2 Press 3 times.
3 Press to turn on the function, or
1
to turn it off.
2
STOP
4 Press to return to the date and time display.
OPTION SETTING
FAX RX A.M. FAILS
Machine
6. Answering
53
Page 55

7. Special Functions
Blocking Reception of Unwanted Faxes
The Anti Junk Fax function allows you to block reception of faxes from a party
that you specify. This saves paper by not printing out unwanted "junk" faxes.
To use this function, enter the fax numbers from which you do not want to
receive faxes as shown below.
♦ Up to five numbers can be entered in the Anti Junk Number List. To clear a
number from the Anti Junk Number List, you need to know the 1-digit
number which identifies it. If you have forgotten this number, print out the
Anti Junk Number List as explained in Chapter 8.
1 Press once and once.
FUNCTION
3
2 Press once.
3 Press to store an Anti Junk number, or to clear a previously
stored number.
1
Display:
ENTRY MODE
STORE JUNK #
2
4 Entering: Enter a 1-digit number from “1” to “5” with the numeric keys.
This number identifies the fax number that you will enter in the next
step.
Clearing: Enter the 1-digit number that identifies the fax number you
want to clear, and go to step 6.
(Example)
1
5 Enter the fax number by pressing the number keys (max. 20 digits).
6 Press .
START
7 Return to Step 4 to enter (or clear) another fax number, or press
to return to the date and time display.
54
STOP
Page 56

Polling (Requesting a Fax Transmission)
Polling (Requesting a Fax Transmission)
Polling allows you to call another fax machine and have it send a document
(previously loaded in its feeder) to your machine without operator assistance.
In other words, the receiving fax machine, not the transmitting fax machine,
initiates the transmission.
To use the polling function, you must first set Rapid Key E/POLL for use as a
polling key.
♦ When Rapid Key E/POLL is set as a polling key, it cannot be used for Rapid
Key dialling.
1 Press once and once.
FUNCTION
4
2 Press once.
3 Press (YES) to turn on the
function.
(To turn off the function, press )
1
2
STOP
4 Press to return to the date and time display.
Display:
OPTION SETTING
POLLING
Functions
7. Special
55
Page 57

Polling (Requesting a Fax Transmission)
Requesting transmission
1 Dial the fax machine you want to poll using one of the following
methods:
• Pick up the handset (or press )
and press a Rapid Key. Wait for the fax
answerback tone.
SPEED
• Press and enter a 2-digit Speed
DIAL
Dial number.
• Enter the full number using the numeric
keys.
SPEAKER
PQRS
ABC
DEF
3
2
1
JKL
GHI
4
7
MNO
6
5
TUV
WXYZ
9
8
2 Press .
E/POLL
• If you used the handset, replace it when
POLLING appears in the display.
Reception will begin.
56
E/POLL
Page 58

8. Printing Lists
You can print lists showing settings and information entered in the fax
machine. The lists are described below. To print a list, follow these steps.
1 Press once and once.
FUNCTION
2
Display:
2 Press to select the Anti Junk
Number List, or to select the
Telephone Number List.
3 Press to print the list.
Telephone Number List
Anti Junk Number List
START
This list shows the fax and phone numbers that have been stored for
automatic dialling.
LISTING MODE
This list shows the numbers from which reception is not allowed.
Lists
8. Printing
57
Page 59

Printing Lists
Transaction Report
This report is printed out automatically after an operation is completed to
allow you to check the result. Your fax machine is set at the factory to print out
the report only when an error occurs.
♦ The Transaction report cannot be printed on demand.
Headings in Transaction Report
SENDER/
RECEIVER
START The time at which transmission/reception started.
TX/RX TIME Total time taken for transmission/reception.
PAG E S Number of pages transmitted/received.
NOTE (One of the following notes will appear under NOTE in the
The name or fax number of the other machine involved in the
transaction. If that machine does not have an ID function, the
communication mode will appear (for example, "G3").
report to indicate whether the transaction was successful,
and if not, the reason for the failure.)
OK - Transmission/reception was successful.
P. FA I L - A power failure prevented the transaction.
JAM - The printing paper or document jammed, preventing
the transaction.
BUSY - The fax was not sent because the line was busy.
COM.E-0 to COM.E-7 - A telephone line error prevented the
transaction. See Line error on page 62.
CANCEL - The transaction was cancelled because the
STOP key was pressed, no document was in the feeder, or
the other machine requested transmission using a function
which your fax machine does not have. If you were
attempting to fax, make sure a document is in the feeder. If
you were receiving, contact the faxing party to see how they
are trying to send to you.
58
Page 60

Transaction Report print condition
You can change the condition under which a Transaction Report is printed out.
Follow the steps below.
Printing Lists
1 Press once and once.
FUNCTION
4
2 Press 3 times.
3 Press a number from to to select the condition for printing.
ALWAYS PRINT A report will be printed after each
1
ERROR PRINT A report will be printed only when an error
2
SEND ONLY A report will be printed after each
3
NEVER PRINT A report will never be printed.
4
STOP
1
4
transmission, reception, or error.
occurs.
transmission.
Display:
OPTION SETTING
TRANSACTION LIST
4 Press to return to the date and time display.
59
Lists
8. Printing
Page 61

9. Maintenance
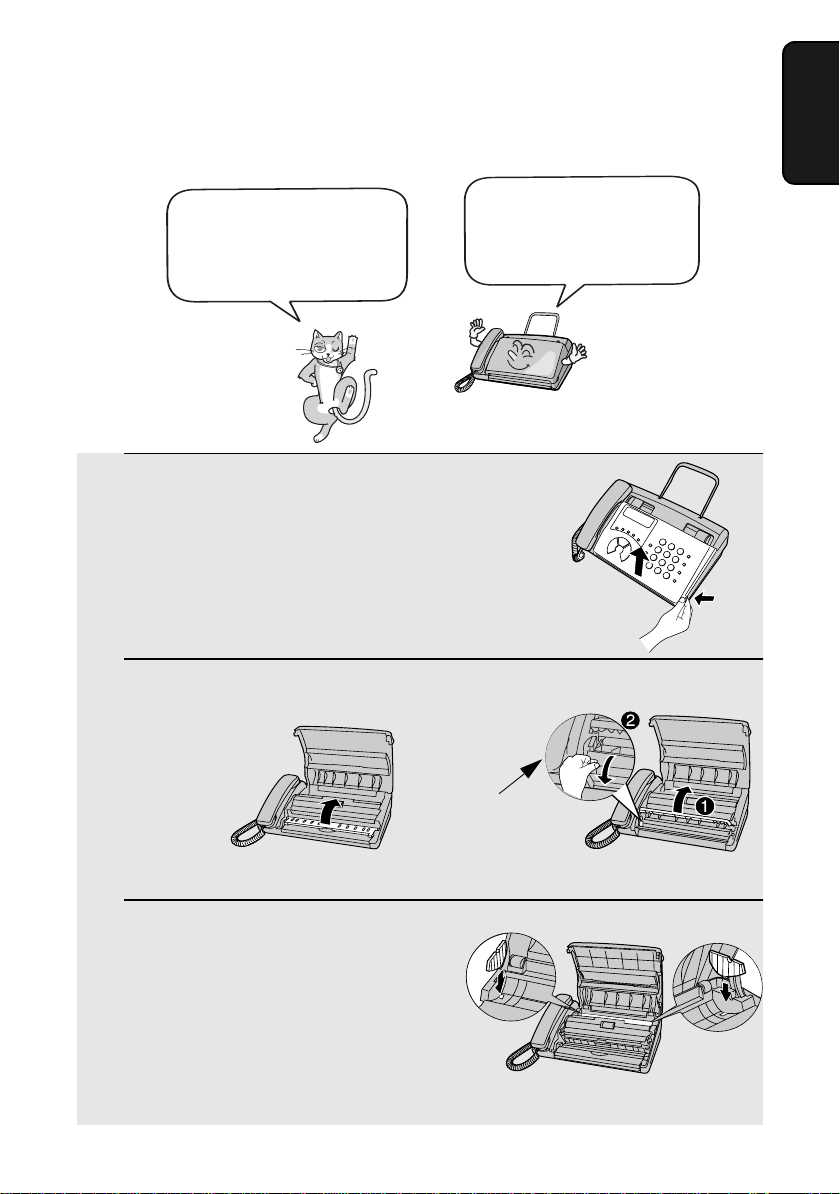
Cleaning the scanning glass and rollers
Clean the scanning glass and rollers frequently to ensure the quality of your
transmitted images and copies.
1 Grasp the finger hold and pull up to
open the operation panel.
2 Flip up the green levers on each side of
the white roller.
3 Wipe the scanning glass and rollers
with a cotton pad.
• Make sure that all dirt and stains (such
as correcting fluid) are removed, as dirt
will cause vertical lines on transmitted
images and copies. (If necessary, wipe
with denatured alcohol.)
• Adhesive cellophane tape is useful for
removal of debris from the rollers.
60
Scanning glass
Page 62

Maintenance
4 Flip down the green levers on each
side of the white roller.
5 Flip up the front paper guide and wipe
the roller under it.
6 Flip down the front paper guide.
7 Close the operation pane.
9. Maintenance
• Press down on both front corners of the
panel to make sure it clicks into place.
Cleaning the housing
Wipe the external parts and surface of the machine with a dry cloth.
Caution!
• Do not use benzene or thinner. These solvents may damage or discolor the
machine.
61
Page 63

10. Troubleshooting
Problems and Solutions
Line error
Problem Solution
LINE ERROR appears in
the display.
Try the transaction again. If the error persists, check
the following:
• Check the connection. The cord from the TEL.
LINE socket to the wall socket should be no longer
than two meters.
• Make sure there are no modem devices sharing the
same telephone line.
• Check with the other party to make sure their fax
machine is functioning properly.
• Have your telephone line checked for line noise.
• Try connecting the fax machine to a different
telephone line.
• If the problem still occurs, your fax machine may
need service.
62
Page 64

Dialling and transmission problems
Problem Solution
Problems and Solutions
No dial tone when you
pick up the handset or
press the SPEAKER key.
Dialling is not possible. • Make sure the power cord is properly plugged into
The power is on, but no
transmission takes place.
• Make sure the handset cord is connected to the
correct socket. See Connecting the handset on
page 9.
a power outlet.
• Make sure that the telephone line is properly
connected to both the TEL. LINE socket and the
wall socket.
• Make sure that the fax machine is set to the correct
dialling mode for your telephone line. See Dial
mode on page 11.
• Make sure that the receiving machine has paper.
• Make sure that the telephone line cord is plugged
into the TEL. LINE socket, and not the TEL. SET
socket.
• If the receiving machine is in manual mode with no
attendant, reception will not be possible.
• Check the display for error messages.
• Pick up the handset and check for a dial tone.
10. Trouble-
shooting
Nothing is printed at the
receiving end.
A distorted image is
received at the other end.
• Make sure that the document for transmission is
placed face down in the feeder.
• Noise on the telephone line may cause distortion.
Try sending the document again.
• Make a copy of the document on your fax machine.
If the copy is also distorted, your fax machine may
need service.
63
Page 65

Problems and Solutions
Reception and copying problems
Problem Solution
The power is on, but no
reception takes place.
The printing paper comes
out blank when you try to
receive a document.
The received document is
faint.
Received images are
distorted.
• Make sure that the telephone line cord is plugged
into the TEL. LINE socket, and not the TEL. SET
socket.
• Make sure that the document is loaded properly in
the feeder of the transmitting machine. Make a
copy or print a report to confirm the printing ability
of your machine.
• Make sure that the thermal paper is properly
loaded in your fax machine. (If the roll has been
loaded backwards, nothing will be printed.)
• Ask the other party to send higher contrast
documents. If the contrast is still too low, your fax
machine may need service. Make a copy or print a
report to check your machine’s printing ability.
• Make sure you are using the recommended
thermal paper. See Loading the Thermal Paper in
Chapter 1.
• Noise on the telephone line may cause distortion.
Have the other party try sending the document
again.
• Make a copy or print a report on your fax machine.
If the copy or report is also distorted, your fax
machine may need service.
A received document or
copy prints out in strips.
The quality of copies is
poor and/or dark vertical
lines appear.
Reception/copying is
interrupted.
64
• Make sure the operation panel is completely closed
(press down on both sides of the panel).
• Any dirt or material on the scanning glass will
cause spots to appear on copies and transmitted
faxes. Clean the scanning glass as explained on
page 60.
• If reception or copying takes place continuously for
a long time, the print head may overheat. Turn off
the power and let it cool down.
Page 66

Answering machine connection
Problem Solution
Problems and Solutions
The answering machine
connection does not
operate properly.
General problems
Problem Solution
Voice calls taken on an
extension phone are
interrupted by the fax.
• Make sure your fax machine's reception mode is
set to A.M.
• Make sure your fax machine's TEL. LINE socket is
connected to the wall socket. Make sure your fax
machine's TEL. SET socket is connected to your
answering machine's telephone line socket (not the
answering machine's extension phone socket).
• Make sure your answering machine's outgoing
message is under 10 seconds.
• Make sure that the Quiet Detect Time setting is set
to three or four seconds (see page 51).
• The fax may interrupt during a voice call if the
reception mode is set to A.M.. To prevent
interruption on a tone dial extension phone, press
any three keys on the extension phone after
answering. (Note: Do not enter the code to activate
fax reception.)
10. Trouble-
shooting
No reception occurs when
polling is attempted.
• Make sure you have not run out of paper.
• Make sure the transmitting machine is in automatic
reception mode.
• If the transmitting machine has polling security,
make sure that your fax number has been entered
both in your machine and in the transmitting
machine.
65
Page 67

Problems and Solutions
Nothing appears in the
display.
The machine does not
respond when you press
any of its keys.
Automatic document
feeding does not work for
transmission or copying.
• Make sure the power cord is properly plugged into
a power outlet.
• Connect another electrical appliance to the outlet to
see if it has power.
• If a beep sound is not made when you press the
keys, unplug the power cord and then plug it in
again several seconds later.
• Check the size and weight of the document (see
Transmittable Documents on page 23).
66
Page 68

Messages and Signals
Display messages
Messages and Signals
CHECK PAPER The thermal paper is jammed or isn’t loaded properly.
Remove and reload the paper. (See the following
section, Clearing Paper Jams.)
COVER OPEN The operation panel is open. Close it.
DOCUMENT JAMMED The original document is jammed. See the following
section, Clearing Paper Jams.
FUNCTION MODE The FUNCTION key has been pressed.
HOLD The HOLD/SEARCH key has been pressed to put
the other party on hold during a phone conversation.
Press the HOLD/SEARCH key again to take the
other party off hold.
LINE BUSY This appears if you attempt to send a fax by
automatic dialling and the line is busy or the receiving
fax machine doesn’t answer. Press the STOP key to
clear the message.
LINE ERROR Transmission or reception was not successful. Press
the STOP key to clear the message and then try
again. If the error persists, see Line Error on page 62.
MEMORY IS FULL The memory is full. This may occur during fax
reception if too much data is received before the
pages can be printed out. If faxes have been received
to memory because printing is not possible, resolve
the problem so that printing can continue, see
Substitute Reception to Memory on page 44.
shooting
10. Trouble-
NO DATA This appears if you attempt to search for an auto-dial
number when none have been stored.
NO # STORED You have tried to dial or clear a Rapid Key or Speed
Dial number that hasn’t been programmed (a full
number hasn’t been assigned to it).
67
Page 69

Messages and Signals
OFF HOOK This appears if you forgot to replace the handset after
ON HOOK DIAL The SPEAKER key has been pressed and the fax
OUT OF PAPER You have run out of thermal paper. Load a new roll of
OVER HEAT The print head has overheated. Operation can be
PAPER JAMMED The printing paper is jammed. See the following
PRINT HEAD FAIL/
YOU NEED SERVICE
(alternating messages)
READY TO SEND A document has been loaded and the fax machine is
RECALLING This appears if you attempt to send a fax by
using it to dial and send a fax. Replace the handset or
press the STOP key to clear the message.
machine is waiting for you to dial.
thermal paper as explained in Loading the Thermal
Paper in Chapter 1.
continued after it cools.
section, Clearing Paper Jams.
The print head has failed and requires service.
waiting for you to begin faxing or copying.
automatic dialling and the line is busy or the receiving
fax machine does not answer. Your fax machine will
automatically reattempt the call. (See Automatic
redialling on page 37.)
Audible signals
Continuous tone 3 seconds Indicates the end of transmission,
Intermittent tone
(3 beeps)
Rapid intermittent
tone
5 seconds
(1 second on, 1
second off)
Continuous
(0.7 seconds on,
0.3 seconds off)
68
reception, or copying.
Indicates incomplete transmission,
reception, or copying.
Indicates that the handset is off hook.
Page 70

Clearing Paper Jams
Clearing Paper Jams
Clearing a jammed document
If the original document doesn’t feed properly during transmission or copying,
or DOCUMENT JAMMED appears in the display, first try pressing .
If the document doesn't feed out, remove it as explained below.
Important:
Do not try to remove a jammed document without releasing it as explained
below. This may damage the feeder mechanism.
1 Grasp the finger hold and pull up to
open the operation panel.
TAR T
shooting
10. Trouble-
2 Flip up the green levers on each side of
the white roller.
3 Remove the document.
69
Page 71

Clearing Paper Jams
4 Flip down the green levers on each
side of the white roller.
5 Close the operation panel, making sure
it clicks into place.
• Press down on both front corners of the
panel to make sure it clicks into place.
Clearing jammed printing paper
1 Grasp the finger hold and pull up to
open the operation panel.
2 Flip up the front paper guide
UX-41
FO-51
70
UX-61
FO-71
Press the knob to make sure the front
side of the metal guide is down.
Page 72

3 Remove the paper roll.
• For UX-61/FO-71 only: Remove any
cut pieces of paper from the paper
compartment.
4 Cut off the wrinkled part of the paper.
5 Reload the paper.
• Jammed paper is often caused by
improper loading. Be sure to carefully
follow the instructions for paper loading
given in Loading the Thermal Paper in
Chapter 1.
Clearing Paper Jams
shooting
10. Trouble-
71
Page 73

Quick Reference Guide
Sending Faxes
Place your document
(up to 5 pages) face
down in the
document feeder.
Normal Dialling
1. Lift the handset or press .
2. Dial the fax number.
3. Wait for the reception tone (if a person
answers, ask them to press their Start
key).
4. Press .
START
Rapid Key Dialling
Press the appropriate Rapid Key.
Transmission will begin automatically.
Speed Dialling
SPEED
1. Press .
DIAL
2. Enter 2-digit Speed Dial number.
2. Press .
START
SPEAKER
Receiving Faxes
RESOLUTION/
Press the until the arrow in the
display points to the desired reception
mode (make sure the document feeder is
empty).
TEL mode: Answer all calls (even faxes)
by picking up the handset. To begin fax
reception, press .
FAX mode: The fax machine automatically
answers and receives faxes.
TEL/FAX mode: The fax machine
automatically answers and receives faxes.
Voice calls (including manually dialled fax
transmissions) are signalled by a special
ringing sound.
A.M. mode: Select this mode when an
answering machine is connected to the fax
and the answering machine is turned on.
RECEPTION MODE
RESOLUTION/
RECEPTION MODE
05 NOV 10:30
05 NOV 10:30
05 NOV 10:30
05 NOV 10:30
START
TEL
TEL/FAX
TEL
TEL/FAX
TEL
TEL/FAX
TEL
TEL/FAX
FAX
A.M.
FAX
A.M.
FAX
A.M.
FAX
A.M.
Direct Keypad Dialling
1. Dial the fax number.
2. Press .
START
72
Page 74

Guide de référence rapide
Envoi de télécopies
Placer le document
(pouvant compter
jusqu'à 5 pages) face
imprimée vers le bas
dans le chargeur de
documents.
Numérotation normale
1. Décrocher le combiné
ou presser la touche.
2. Introduire le numéro de télécopie.
3. Attendre la tonalité de réception (si une
personne décroche, lui demander de
presser sur la touche Star t de son
appareil)
4. Presser la touche .
Numérotation Express
Appuyer sur la touche express
appropriée. La transmission débute alors
automatiquement.
SPEAKER
START
Réception de télécopies
RESOLUTION/
Presser la touche jusqu'à ce que
la flèche pointe le type de réception
souhaité (s'assurer que le chargeur de
documents est vide).
RESOLUTION/
RECEPTION MODE
Mode TEL : Répondre à tous les appels
(y compris les télécopies) en décrochant
simplement le combiné. Pour lancer la
réception de télécopies, presser la
START
touche .
Mode FAX : Le télécopieur répondra et
recevra les télécopies automatiquement.
RECEPTION MODE
05 NOV 10:30
05 NOV 10:30
05 NOV 10:30
05 NOV 10:30
TEL
TEL/FAX
TEL
TEL/FAX
TEL
TEL/FAX
TEL
TEL/FAX
FAX
A.M.
FAX
A.M.
FAX
A.M.
FAX
A.M.
Numérotation abrégée
SPEED
1. Presser la touche .
DIAL
2. Entrer le numéro de numérotation
abrégée en deux chiffres.
3. Presser la touche .
START
Numérotation rapide au clavier
1. Introduire le numéro de télécopie.
2. Presser la touche .
START
Mode TEL/FAX : Le télécopieur répondra
et recevra les télécopies automatiquement.
Les appels vocaux (y compris les
transmissions de télécopie effectuées
manuellement) seront signalées par une
sonnerie particulière.
Mode A.M. : Sélectionner ce type de
réponse lorsqu'un répondeur automatique
est connecté au télécopieur et que ce
répondeur est activé.
73
Page 75

Index
A
A.M. reception mode, 20, 39, 49
Answering machine connection
Activating, 49
Connecting, 48
On A.M. Failure, 53
Quiet Detect Start Time, 52
Quiet Detect Time, 51
Troubleshooting, 65
Anti Junk Number List, 57
Audible signals, 68
Auto-dial numbers storing, 30
C
Chain Dialling, 32, 47
Contrast, 26
Copies, 45
D
Date, setting, 18
Dial mode, 11
Dialling
Chain, 32, 47
Direct Keypad, 35
Normal, 28, 46
Rapid Key, 33, 46
Speed, 34, 46
Direct Keypad Dialling, 35
Display messages, 67
Document feeder, 24
Document guides, 24
Document restrictions, 24
Document sizes, 23
Document, maximum scanning size, 23
E
Extension telephone
Connecting, 12
Using, 42
F
FAX reception mode, 20, 39
Fax Signal Receive, 43
H
Halftone setting, 26
Handset, 9
Hold, 47
Housing, cleaning, 61
J
Jams, clearing, 69-71
L
Letters, entering, 17, 31
Line error, 62
Loading paper, 13-15
Loading the document, 24
M
Memory, substitute reception to, 44
N
Normal Dialling, 28, 46
Number of rings in FAX reception mode,
40
P
Paper jams, clearing, 69-71
Paper, thermal, 13-15
Power cord, 10
R
Rapid Key Dialling, 33, 46
Reception mode
A.M. mode, 20, 39, 49
FAX mode, 20, 39
TEL mode, 20, 41
74
Page 76

TEL/FAX mode, 20, 38
Redialling, 47
Removing original document, 25
Resolution, 26
Ringer volume, 22
S
Scanning glass, cleaning, 60
Search Dial, 36, 47
Sender’s name and number, entering, 16-17
Speaker volume, 21
Speed Dialling, 34, 46
T
TEL reception mode, 20, 41
TEL. LINE socket, 11
TEL. SET socket, 12, 48
TEL/FAX reception mode, 20, 38
Tel/Fax Remote Number, 44
Telephone line cord, 11
Telephone Number List, 57
Thermal paper, 13-15
Time, setting, 18
Transaction Report, 58-59
Index
75
Page 77

Page 78

Page 79

Page 80

زﺎﻬﺟ ﻢآرﺎﻴﺘﺧﻻ ًاﺮﻜﺷو ،ًﺎﺒﺣﺮﻣ
برﺎﺷ ﺲآﺎﻓ !ﻲﻠﻳ ﺎﻤﻴﻓ ضﺮﻋ
ﺲآﺎﻓ زﺎﻬﺟ تﺎﻔﺻاﻮﻣو ﺎﻳاﺰﻤﻟ
ﺪﻳﺪﺠﻟا برﺎﺷ.
ﻣﺪﻘﻤﻟاﺔ
ﻊﻳﺮﺴﻟا لﺎﺼﺗﻻا حﺎﺘﻔﻣ ماﺪﺨﺘﺳﺎﺑ لﺎﺼﺗﻻا:
٥مﺎﻗرأ
٣٥ًﺎ ﻤ ﻗ ر
ﻊﻳﺮﺴﻟا لﺎﺼﺗﻻا:
ﻲﻟوﻷا ﻞﻴﻐﺸﺘﻟا ةﺮﻜﺑ ) زﺎﻬﺠﻟا ﻊﻣ ﺔﻘﻓﺮﻣ:(
رﺎﺘﻣ
١٠أ
ﺔﻴﻃﺎﻴﺘﺣا ةﺮﻜﺑ) ﺮﻴﻏزﺎﻬﺠﻟا ﻊﻣ ﺔﻘﻓﺮﻣ:(
FO-20PR
٣٠ ًا ﺮ ﺘ ﻣ )١٢٫٧ ﻢﻣ core(
: ﻟﺎﺑ ﻊﻄﻗﺪﻴ
UX-41/FO-51
: ﻲﻜﻴﺗﺎﻣﻮﺗوأ ﻊﻃﺎﻗ
UX-61/FO-71
،٨٠ﻢﺟ /م٢( ﺔﻴﺋﺎﻘﻠﺘﻟا ﺔﻳﺬﻐﺘﻟا ةﺪﺣو
Letter/A4
يراﺮﺤﻟا ﻞﻴﺠﺴﺘﻟا ﻞﻴﺠﺴﺘﻟا مﺎﻈﻧ
ﻂﻐﻀﻟا مﺎﻈﻧ
H2
ﻂﻘﻓ.(
٤٤٨ﺖﻳﺎﺑﻮﻠﻴآ ) ﻘﺗ ًﺎﺒﻳﺮ١٧ﻂﺳﻮﺘﻤﻟا ﻢﺠﺤﻟا ﻦﻣ ﺔﺤﻔﺻ ( ةﺮآاﺬﻟا ﻢﺠﺣ
٩٫٦٠٠ تﺎﻋﺮﺴﻠﻟ ﻲﺋﺎﻘﻠﺗ عﺎﺟﺮﺘﺳا ﻊﻣ ﺔﻴﻧﺎﺜﻟا ﻲﻓ ﺖﺑ
ﺔﺌﻴﻄﺒﻟا.
١٥ًﺎﺒﻳﺮﻘﺗ ﺔﻴﻧﺎﺛ لﺎﺳرﻹا ﺖﻗو
ﻲﻘﻓأ: ٨ﻞﺑ / ﻢﻣ
ﻲﺳأر
:
ﺔﺟرد ﻲﻔﺼﻨﻟا نﻮﻠﻟا)يدﺎﻣﺮﻟا جرﺪﺗ(
و
MH
ﺔﻠﺣﺮﻤﻟا
C
ﻲﺳﺎﻴﻗ :٣٫٨٥ﻂﺧ /ﻢﻣ
دﻖﻴﻗ/ﻲﻔﺼﻧ نﻮﻟ :٧٫٧ﻂﺧ /ﻢﻣ
ﺔﻗﺪﻟا ﻖﺋﺎﻓ :١٥٫٤ﻂﺧ /ﻢﻣ
٥ ﻰﺼﻗأ ﺪﺤآ تﺎﺤﻔﺻ ) قرو
٦٤
و
MR
ITU-T
لﻮآﻮﺗوﺮﺒﻟا تارﺎﺷﻹ ﺐﻠﻄﺘﻤﻟا ﺖﻗﻮﻟا ﻚﻟذ) يأ
ﻲﺋﺎﻘﻠﺘﻟا لﺎﺼﺗﻻا
ﺲآﺎﻔﻟا قرو
قرﻮﻟا ﻊﻄﻗ ﺔﻘﻳﺮﻃ
*
مدﻮﻤﻟا ﺔﻋﺮﺳ
*
ﺔﻗﺪﻟا
تاﺪﻨﺘﺴﻤﻟﺎﺑ
ﻢﻗر برﺎﺷ ﺮﻴﻳﺎﻌﻣ قﺎﺜﻴﻣ ﻰﻠﻋ ءﺎﻨﺑو١ﻴﻓ ﻞﻤﺸﻳ ﻻو برﺎﺷ ﺔآﺮﺸﺑ ﺎًﺻﺎﺧ ﺎًﻌﺿو اﺬه ﺮﺒﺘﻌﻴﻓ ﺔﻴﺳﺎﻴﻘﻟا ﺔﻗﺪﻟﺎﺑ ﻖﻠﻌﺘﻳ ﺎﻤ
*
١
Page 81

ﺔﻳرﻮﻠﻠﺑ ضﺮﻋ ﺔﺷﺎﺷ١٦ًﺎ ﻤ ﻗ ر ضﺮﻌﻟا ﺔﺷﺎﺷ
ﺔﻣﺎﻌﻟا ًﺔ ﻟ ّﻮ ﺤ ﻤ ﻟ ا ﻒﺗاﻮﻬﻟا ﺔﻜﺒﺷ بﻮﻠﻄﻤﻟا ﻒﺗﺎﻬﻟا ﻂﺧ
FAX
ﻊﺿو
ITU-T (CCITT) G3 ﻖﻓاﻮﺘﻟا
:
ﻊﺿو
ﺔﻳﺬﻐﺘﻟاﺔﻴﺋﺎﻘﻠﺘﻟا
لﺎﺧدﻹا تاﺪﻨﺘﺴﻣ سﺎﻘﻣ
ضﺮﻌﻟا :١٤٨ ﻰﻟإ ٢١٦ﻢﻣ
لﻮﻄﻟا :١٤٠ ﻰﻟإ ٢٩٧ﻢﻣ
ﺔﻳوﺪﻴﻟا ﺔﻳﺬﻐﺘﻟا
:
ضﺮﻌﻟا :١٤٨ ﻰﻟإ ٢١٦ﻢﻣ
.
ﻰﺼﻗأ ﺪﺤآ ﻢﻣ ﺔﻋﺎﺒﻄﻠﻟ لﺎﻌﻔﻟا ضﺮﻌﻟا
لﻮﻄﻟا :١٤٠ ﻰﻟإ ٦٠٠ﻢﻣ
٢١٠
ﻰﺼﻗأ ﺪﺤآ ﻢﻣ ﻲﺋﻮﻀﻟا ﺢﺴﻤﻠﻟ لﺎﻌﻔﻟا ضﺮﻌﻟا
٢١٠
ﻲﺋﺎﻘﻠﺗ /ﺪﻳﺪﺤﺘﻠﻟ ﻞﺑﺎﻗ ﻦآاد ﻜﺤﺘﻟاﻦﻳﺎﺒﺘﻟا ﻲﻓ ﻢ
لﺎﺒﻘﺘﺳﻻا عﺎﺿوأ
) ﻲﺋﺎﻘﻠﺘﻟا دﺮﻟا زﺎﻬﺟ( )ﺔﻈﺣﻼﻣ:
A.M.
) ﻒﺗﺎه/ﺲآﺎﻓ (،و
TEL/FAX
)ﺲآﺎﻓ (،و
A.M.ﻲﺋﺎﻘﻠﺘﻟا دﺮﻟا زﺎﻬﺟ ﻞﺻﻮﻟ بﻮﻠﻄﻣ (
)ﻒﺗﺎه (،و
TEL
ﻢﻌﻧ ﺦﺴﻨﻟا ﺔﻔﻴﻇو
ﻢﻌﻧ)رﺎﻴﺘﻟا عﺎﻄﻘﻧا ﺔﻟﺎﺣ ﻲﻓ ﺎﻬﻣاﺪﺨﺘﺳا ﻦﻜﻤﻳ ﻻ( ﻒﺗﺎﻬﻟا ﺔﻔﻴﻇو
ﺮﺘﻣ رﺎﻴﺗ ﺖﻟﻮﻓ ،دد٥٠/٦٠ﺰﺗﺮه ﺔﻗﺎﻄﻟا تﺎﺒﻠﻄﺘﻣ
٢٢٠-٢٤٠
٥ – ٣٥) ﺔﻳﻮﺌﻣ ﺔﺟرد( ﻞﻴﻐﺸﺘﻟا ةراﺮﺣ ﺔﺟرد
ﺔﻴﺒﺴﻧ ﺔﺑﻮﻃر ﺔﺑﻮﻃﺮﻟا
٣٠ - ٨٥%
ﻢﻴﻘﻟا ﻒﻠﺘﺨﺗ
داﺪﻌﺘﺳﻻا ﻊﺿو :٤٫٠طاو
ﺔﻗﺎﻄﻟا كﻼﻬﺘﺳا
ﻰﺼﻗﻷا ﺪﺤﻟا :١١٥طاو
ضﺮﻌﻟا :٣٠٤ﻢﻣ
دﺎﻌﺑﻷا
ﻖﻤﻌﻟا :٢٣٦ﻢﻣ
عﺎﻔﺗرﻻا :١٢٢ﻢﻣ
ﻲﻟاﻮﺣ٢٫٦ ماﺮﺟ ﻮﻠﻴآ ًﺎﺒﻳﺮﻘﺗ نزﻮﻟا
ءﺰﺠآو تﺎﻔﺻاﻮﻤﻟا وأ ﻢﻴﻤﺼﺘﻟﺎﺑ ﺔﺻﺎﺧ تاﺮﻴﻴﻐﺗ ﺔﻳأ ءاﺮﺟإ ﻖﺤﺑ برﺎﺷ ﺔآﺮﺷ ﻆﻔﺘﺤﺗ ،ﺮﻤﺘﺴﻤﻟا ﺮﻳﻮﻄﺘﻟا ﺔﺳﺎﻴﺳ ﻦﻣ
رﺎﻌﺷإ ﻖﺑﺎﺳ نوﺪﺑ ﺞﺘﻨﻤﻟا ﺮﻳﻮﻄﺘﻟ .جﺎﺘﻧﻹا تاﺪﺣﻮﻟ ﺔﻴﻤﺳا ًﺎ ﻤ ﻴ ﻗ ةدراﻮﻟا ءادﻷا تﺎﻔﺻاﻮﻣ مﺎﻗرأ ﺮﺒﺘﻌﺗو،
ﺮﺧﺁو زﺎﻬﺟ ﻦﻴﺑ ﺔﻴﻠﻌﻔﻟا.
٢
Page 82

ﺔﻣﺎه نﺎﻣأ تﺎﻣﻮﻠﻌﻣ
ﻞهﺆﻤﻟا ﺔﻣﺪﺨﻟا ﻖﻳﺮﻓ ﻰﻟإ ﺔﻣﺪﺨﻟﺎﺑ
.
ًﻼﺘﺒﻣ نﻮﻜﺗ ﺎﻣﺪﻨﻋ وأ ،ءﺎﻤﻟا ﻦﻣ بﺮﻘﻟﺎﺑ زﺎﻬﺠﻟا ماﺪﺨﺘﺳا وأ ﺐﻴآﺮﺘﺑ ﻢﻘﺗ ﻻ . ماﺪﺨﺘﺳا مﺪﻋ ﺐﺠﻳ ،لﺎﺜﻤﻟا ﻞﻴﺒﺳ ﻰﻠﻋ
مﺎﻤﺤﺘﺳﻻا ضﻮﺣ ﻦﻣ بﺮﻘﻟﺎﺑ زﺎﻬﺠﻟا/ وأ ﺔﺒﻃر ﺔﻓﺮﻏ يأ ﻲﻓ وأ ﺲﺑﻼﻤﻟا ﻞﺴﻏ نﺎﻜﻣ وأ ﺦﺒﻄﻤﻟا ضﻮﺣ وأ لﺎﺴﺘﻏﻻا
زﺎﻬﺠﻟا ﻰﻠﻋ ﻞﺋاﻮﺳ ﺔﻳأ ﺐﻜﺳ مﺪﻋ ةﺎﻋاﺮﻣ ﻊﻣ ،ﺔﺣﺎﺒﺳ مﺎﻤﺣ ﻦﻣ بﺮﻘﻟﺎﺑ
.
ﻲﺗﻵا ثوﺪﺣ ﺔﻟﺎﺣ ﻲﻓ ﻞهﺆﻣ ﺔﻣﺪﺧ ﻲﻨﻓ ﺮﺸﺘﺳاو رﺎﻴﺘﻟا ﺬﺧﺄﻣ ﻦﻣ ﻢﺛ ﻒﺗﺎﻬﻟا ﺲﺒﻘﻣ ﻦﻣ زﺎﻬﺠﻟا ﻞﺼﻔﺑ ﻢﻗ
:
.
.
.
ددﺮﺘﻣ رﺎﻴﺗ ﺬﺧﺄﻤﺑ زﺎﻬﺠﻟا اﺬه ﻞﻴﺻﻮﺗ ﺐﺠﻳ٢٢٠-٢٤٠ ،ﺖﻟﻮﻓ ٥٠/٦٠ ﻲﺿرﺄﺑ ﻞّﺻﻮﻣ ﺰﺗﺮه )ﻦﻴﻓﺮﻃ .( ﻞﻴﺻﻮﺘﻓ
نﺎﻤﻀﻟا نﻼﻄﺑو ﻪﻓﻼﺗإ ﻲﻓ ﺐﺒﺴﺘﻴﺳ ﺬﺧﺂﻤﻟا ﻦﻣ ﺮﺧﺁ عﻮﻧ يﺄﺑ زﺎﻬﺠﻟا
.
وأ ﻖﻳﺮﺣ ﻲﻓ اﺬه ﺐﺒﺴﺘﻳ نأ ﻦﻜﻤﻤﻟا ﻦﻤﻓ
زﺎﻬﺠﻟا ﻰﻠﻋ ةدﻮﺟﻮﻤﻟا تﺎﺤﺘﻔﻟا ﻲﻓ مﺎﺴﺟﻷا ﻦﻣ عﻮﻧ يأ لﺎﺧدﺈﺑ ﻢﻘﺗ ﻻ.
ﺮﺧإ ﻚﻨﻜﻤﻳ ﻻو زﺎﻬﺠﻟا ﻞﺧاد ﻢﺴﺟ يأ طﻮﻘﺳ ﺔﻟﺎﺣ ﻲﻓو ﺔﻣﺪﺧ ﻲﻨﻓ ﺮﺸﺘﺳاو زﺎﻬﺠﻟا ﻞﺼﻓا ،ﻪﺟا
ﺔﺘﺑﺎﺛ ﺮﻴﻏ ةﺪﻀﻨﻣ وأ ﻞﻣﺎﺣ وأ ﺪﻨﺴﻣ ﻰﻠﻋ زﺎﻬﺠﻟا ﺬه ﻊﻀﺗ ﻻ . ﻒﻠﺗ ثاﺪﺣإ ﻲﻓ زﺎﻬﺠﻟا طﻮﻘﺳ ﺐﺒﺴﺘﻳ نأ ﻦﻜﻤﻤﻟا ﻦﻤﻓ
قﺮﺑ ﺔﻔﺻﺎﻋ ءﺎﻨﺛأ ﻒﺗﺎﻬﻟا كﻼﺳأ ﺐﻴآﺮﺘﺑ ًا ﺪ ﺑ أ ﻢﻘﺗ ﻻ
.
ﻦآﺎﻣﻷا ﻲﻓ ﻒﺗﺎﻬﻟا ﺲﺑﺎﻘﻣ ﺐﻴآﺮﺘﺑ ًا ﺪ ﺑ أ ﻢﻘﺗ ﻻﺔﻠﺘﺒﻤﻟااذإ ﻻإ ﻚﻟﺬﻟ ًﺎﺼﻴﺼﺧ ﺔﻤﺼﺼﻣ ﺲﺑﺎﻘﻤﻟا ﺖﻧﺎآ .
ﺔﻴﻨﻴﺒﻟا ﺔﻠﺻﻮﻟا ﻦﻣ ﻒﺗﺎﻬﻟا ﻂﺧ ﻞﺼﻓ ﺔﻟﺎﺣ ﻲﻓ ﻻإ ﺔﻳرﺎﻌﻟا فاﺮﻃﻷا وأ ﻒﺗﺎﻬﻟا كﻼﺳأ ﺲﻤﻠﺑ ًا ﺪ ﺑ أ ﻢﻘﺗ ﻻﺔﻜﺒﺸﻠﻟ.
ﺎﻬﻠﻳﺪﻌﺗ وأ ﻒﺗﺎﻬﻟا طﻮﻄﺧ ﺐﻴآﺮﺗ ﺪﻨﻋ رﺬﺤﻟا ﻰﺧﻮﺗ
.
قﺮﺒﻟا ﻦﻣ ﺔﻴﺑﺮﻬآ ﺔﻣﺪﺻ
.
بﺮﺴﺘﻟا ﺔﻘﻄﻨﻣ ﻦﻣ ﺐﻳﺮﻗ ﺖﻧأو زﺎﻐﻟا بﺮﺴﺗ ﻦﻋ غﻼﺑﻺﻟ ﻒﺗﺎﻬﻟا مﺪﺨﺘﺴﺗ ﻻ
.
ﻪﻴﻟإ لﻮﺻﻮﻟا ﺔﻟﻮﻬﺳ ﻊﻣ زﺎﻬﺠﻟا ﻦﻣ بﺮﻘﻟﺎﺑ رﺎﻴﺘﻟا ﺬﺧﺄﻣ نﻮﻜﻳ نأ ﺐﺠﻳ.
اﺬه ﻚﻔﺑ ﻢﻘﺗ ﻻﻞﻴﻟﺪﻟا اﺬه ﻲﻓ ﻩﺮآذ دﺮﻳ ﻢﻟ ءاﺮﺟإ يﺄﺑ مﺎﻴﻘﻟا ﺔﻟوﺎﺤﻣ وأ زﺎﻬﺠﻟا . ﻖﻠﻌﺘﺗ ﻲﺘﻟا رﻮﻣﻷا ﻞآ ﻲﻓ ﻊﺟرا
-وأ ﺮﻄﻤﻠﻟ ﻪﺿﺮﻌﺗ وأ زﺎﻬﺠﻟا ﻰﻠﻋ ﻞﺋﺎﺳ ﺐﻜﺳ ءﺎﻤﻟا
-ﺔﺒﻳﺮﻏ ءﺎﺿﻮﺿ وأ نﺎﺧد وأ ﺢﺋاور ثﺎﻌﺒﻧا
-رﺎﻴﺘﻟا ﻚﻠﺳ ﻒﻠﺗ وأ ﻚﻜﻔﺗ
- ﻲﻗاﻮﻟا رﺎﻃﻹا ﻒﻠﺗ وأ زﺎﻬﺠﻟا طﻮﻘﺳ.
ﺊﺷ يأ عﺪﺗ ﻻﻠﻋ ﺰﻜﺗﺮﻳﻰﻚﻠﺴﻟا ﻰﻠﻋ ﺾﻌﺒﻟا ﻪﻴﻓ ﺮﻤﻳ ﺪﻗ نﺎﻜﻣ ﻲﻓ زﺎﻬﺠﻟا ﺐﻴآﺮﺘﺑ ﻢﻘﺗ ﻻو ،رﺎﻴﺘﻟا ﻚﻠﺳ .
ﺔﻴﺑﺮﻬآ ﺔﻣﺪﺻ.
ﻞهﺆﻣ.
.
ﻪﺑ ﻎﻟﺎﺑ
ﻒﺗﺎﻬﻟا ماﺪﺨﺘﺳا ﺐﻨﺠﺗ)ﻲﻜﻠﺳﻼﻟا ﻒﺗﺎﻬﻟا اﺪﻋ (قﺮﺑ ﺔﻔﺻﺎﻋ ءﺎﻨﺛأ .ﻜﻳ نأ ﻦﻜﻤﻤﻟا ﻦﻤﻓ ثوﺪﺤﻟ ﺪﻴﻌﺑ لﺎﻤﺘﺣا كﺎﻨه نﻮ
٣
Page 83

تﺎﻳﻮﺘﺤﻤﻟا لوﺪﺟ
ﻞﻴﻐﺸﺘﻟا ﺔﺣﻮﻟ ﻰﻠﻋ ﺔﻟﻼﻃإ ٦
ةﻮﺒﻌﻟا تﺎﻳﻮﺘﺤﻣ ﺔﻤﺋﺎﻗ...........................................................................٨
تﻼﺻﻮﻟا........................................................................................٩
يراﺮﺤﻟا قرﻮﻟا ﻞﻴﻤﺤﺗ........................................................................١٣
ﺲآﺎﻔﻟا ﻢﻗرو ﻚﻤﺳا لﺎﺧدإ.....................................................................١٦
ﺖﻗﻮﻟاو ﺦﻳرﺎﺘﻟا ﻂﺒﺿ..........................................................................١٨
لﺎﺒﻘﺘﺳﻻا ﻊﺿو ﻂﺒﺿ.........................................................................٢٠
تﻮﺼﻟا ىﻮﺘﺴﻣ ﻂﺒﺿ.........................................................................٢١
لﺎﺳرﻺﻟ ﺔﻠﺑﺎﻘﻟا تاﺪﻨﺘﺴﻤﻟا.....................................................................٢٣
ﺪﻨﺘﺴﻤﻟا ﻞﻴﻤﺤﺗ..................................................................................٢٤
ﻦﻳﺎﺒﺘﻟاو ﺔﻗﺪﻟا ﻂﺒﺿ............................................................................٢٦
يدﺎﻌﻟا لﺎﺼﺗﻻﺎﺑ ﺲآﺎﻓ لﺎﺳرإ................................................................٢٨
ﻲﺋﺎﻘﻠﺘﻟا لﺎﺼﺗﻻﺎﺑ ﺲآﺎﻓ لﺎﺳرإ...............................................................٢٩
ﻊﺿو ماﺪﺨﺘﺳاTEL/FAX )ﻒﺗﺎه/ﺲآﺎﻓ(...................................................٣٨
ﻊﺿو ماﺪﺨﺘﺳا.
A.M )ﻲﻟﺁ دﺮﻟا زﺎﻬﺟ(.......................................................٣٩
ﻊﺿو ماﺪﺨﺘﺳاFAX
)ﺲآﺎﻓ(.................................................................٣٩
ﻊﺿو ماﺪﺨﺘﺳاTEL )ﻒﺗﺎه(.................................................................٤١
ﺔﻳرﺎﻴﺘﺧﻻا لﺎﺒﻘﺘﺳﻻا ﻂﺑاﻮﺿ..................................................................٤٣
ةﺮآاﺬﻟا ﻲﻓ ﻞﻳﺪﺒﻟا لﺎﺒﻘﺘﺳﻻا....................................................................٤٤
١. ﻟاﺐﻴآﺮﺘ ٨
٢. تﺎﺴآﺎﻔﻟا لﺎﺳرإ ٢٣
٣. تﺎﺴآﺎﻔﻟا لﺎﺒﻘﺘﺳا ٣٨
٤. ﺦﺴﻨﻟا ٤٥
٥. ﺔﻴﻔﺗﺎﻬﻟا تﺎﻤﻟﺎﻜﻤﻟا ءاﺮﺟإ ٤٦
٤
Page 84

تﺎﻳﻮﺘﺤﻤﻟا لوﺪﺟ
٦. ﻲﻟﻵا دﺮﻟا زﺎﻬﺟ ﻞﻴﺻﻮﺗ ٤٨
ﻲﻟﻵا دﺮﻟا زﺎﻬﺟ ﻞﻴﺻﻮﺗ......................................................................٤٨
ﻲﻟﻵا دﺮﻟا زﺎﻬﺟ لﺎﺼﺗا ماﺪﺨﺘﺳا..............................................................٤٩
ﻊﺿو ﻂﺑاﻮﺿ
A.M.) ﻲﻟﻵا دﺮﻟا زﺎﻬﺟ (ﺔﻳرﺎﻴﺘﺧﻻا.........................................٥١
٧. ﺔﺻﺎﺧ ﻒﺋﺎﻇو ٥٤
ﺔﺑﻮﻏﺮﻤﻟا ﺮﻴﻏ تﺎﺴآﺎﻔﻟا لﺎﺒﻘﺘﺳا ﻊﻨﻣ.........................................................٥٤
ا ءﺎﻋﺪﺘﺳﻻ)ﺲآﺎﻓ لﺎﺳرإ ﺐﻠﻃ(...............................................................٥٥
٨. ﺔﻋﺎﺒﻃﻟا ﻢﺋاﻮﻘ ٥٧
٩. ﺔﻧﺎﻴﺼﻟا ٦٠
١٠. فﺎﺸﻜﺘﺳاﻟاو ﻞآﺎﺸﻤإﺎﻬﺣﻼﺻ ٦٢
ﻟاو ﻞآﺎﺸﻤﻟالﻮﻠﺤ...............................................................................٦٢
تارﺎﺷﻹاو ﻞﺋﺎﺳﺮﻟا............................................................................٦٧
ﺔﻟازإقرﻮﻟا رﺎﺸﺤﻧا ...........................................................................٦٩
ﻟا ﻞﻴﻟﺪﻟاﻌﺟﺮﻤﻲ ﻟاﻊﻳﺮﺴ ٧٢
سﺮﻬﻔﻟا ٧٣
٥
Page 85

ﻞﻴﻐﺸﺘﻟا ﺔﺣﻮﻟ ﻰﻠﻋ ﺔﻟﻼﻃإ
ﻊﻳﺮﺴﻟا لﺎﺼﺗﻻا حﺎﺘﻔﻣ
ًﺎﻴﺋﺎﻘﻠﺗ ﺲآﺎﻓ ﻢﻗﺮﺑ لﺎﺼﺗﻼﻟ رارزﻷا ﻩﺬه ﺪﺣأ ﻰﻠﻋ ﻂﻐﺿا.
ضﺮﻌﻟا ﺔﺷﺎﺷ
زﺎﻬﺠﻟا ﻞﻴﻐﺸﺗ ﻲﻓ ﻚﺗﺪﻋﺎﺴﻤﻟ ﻞﺋﺎﺳر ضﺮﻌﺗ.
FUNCTION
) ﺔﻔﻴﻇو(
.
،
ﺣ ﺪﻨﻋ فﺮﺣﻷاو مﺎﻗرﻷا لﺎﺧدإو ،مﺎﻗرﻷﺎﺑ لﺎﺼﺗﻼﻟ ﺢﻴﺗﺎﻔﻤﻟا ﻩﺬه مﺪﺨﺘﺳاﻲﺋﺎﻘﻠﺗ لﺎﺼﺗا مﺎﻗرأ ﻆﻔ.
ﻦﻣ نﻮﻜﻣ ﺮﺼﺘﺨﻣ ﻊﻳﺮﺳ لﺎﺼﺗا ﻢﻗر ماﺪﺨﺘﺳﺎﺑ ﻒﺗﺎه وأ ﺲآﺎﻓ ﻢﻗﺮﺑ لﺎﺼﺗﻼﻟ حﺎﺘﻔﻤﻟا اﺬه ﻂﻐﺿا
ﺔﻴﺟرﺎﺨﻟا ﺔﻋﺎﻤﺴﻟا تﻮﺻ ىﻮﺘﺴﻣ ﻂﺒﻀﻟ حﺎﺘﻔﻤﻟا اﺬه ﻂﻐﺿا . حﺎﺘﻔﻤﻟا ﻰﻠﻋ ﻂﻐﻀﻟا ﺪﻨﻋو
ىﺮﺧﻷا تﺎﻗوﻷا ﻞآ ﻲﻓ سﺮﺠﻟا تﻮﺻ ىﻮﺘﺴﻣ
ﻪﺑ لﺎﺼﺗﻻا ﻢﺗ ﻢﻗر ﺮﺧﺂﺑ ًﺎﻴﺋﺎﻘﻠﺗ لﺎﺼﺗﻻا ةدﺎﻋﻹ حﺎﺘﻔﻤﻟا اﺬه ﻂﻐﺿا.
ﺪﻳﺪﺤﺘﻟ حﺎﺘﻔﻤﻟا اﺬه ﻂﻐﺿاﺔﻔﻠﺘﺨﻣ ﺔﺻﺎﺧ ﻒﺋﺎﻇو
VOLUME
)تﻮﺼﻟا ىﻮﺘﺴﻣ(
حﺎﺘﻔﻣ
حﺎﺘﻔﻤﻟا
مﺎﻗرﻷا ﺢﻴﺗﺎﻔﻣ
ﺢﻴﺗﺎﻔﻣSPEED DIAL) ﻊﻳﺮﺴﻟا لﺎﺼﺗﻻا(
ﻦﻴﺘﻧﺎﺧ.
حﺎﺘﻔﻤﻟاREDIAL) لﺎﺼﺗﻻا ةدﺎﻋإ(
٦
Page 86

حﺎﺘﻔﻤﻟاSTART) ءﺪﺑ(
ﺔﺣﻮﻟ ﻦﻣ ﺮﺷﺎﺒﻤﻟا لﺎﺼﺗﻻا وأ ،ﻊﻳﺮﺴﻟا لﺎﺼﺗﻻا ماﺪﺨﺘﺳا ﺪﻨﻋ لﺎﺳرﻹا ءﺪﺒﻟ حﺎﺘﻔﻤﻟا اﺬه ﻂﻐﺿا
يدﺎﻌﻟا لﺎﺼﺗﻻا وأ ،ﺢﻴﺗﺎﻔﻤﻟا.
حﺎﺘﻔﻤﻟاSTOP) فﺎﻘﻳإ(
ﺎﻬﻟﺎﻤﺘآا ﻞﺒﻗ تﺎﻴﻠﻤﻌﻟا ىﺪﺣإ ءﺎﻐﻟﻹ حﺎﺘﻔﻤﻟا اﺬه ﻂﻐﺿا.
حﺎﺘﻔﻤﻟاCOPY/HELP) ﺦﺴﻧ/تﺎﻤﻴﻠﻌﺗ(
ﻂﻐﺿا ،ﺮﺧﺁ ﺖﻗو يأ ﻲﻓ
ﻳﺬﻐﺘﻟا ةﺪﺣو ﻲﻓ ﺪﻨﺘﺴﻤﻟاوﺪﻨﺘﺴﻤﻟا ﻦﻣ ﺔﺨﺴﻧ ﻞﻤﻌﻟ حﺎﺘﻔﻤﻟا اﺬه ﻂﻐﺿا ،ﺔ.
ﻊﺒﻄﻟ حﺎﺘﻔﻤﻟا اﺬه"تﺎﻤﻴﻠﻌﺘﻟا ﺔﻤﺋﺎﻗ"ﺲآﺎﻔﻟا ﻞﻴﻐﺸﺘﻟ ﻊﻳﺮﺳ ﻲﻌﺟﺮﻣ ﻞﻴﻟﺪآ ،.
حﺎﺘﻔﻤﻟاRESOLUTION / RECEPTION MODE) ﺔﻗﺪﻟا/لﺎﺒﻘﺘﺳﻻا ﻊﺿو(
يأ ﻲﻓ
لﺎﺳرإ ﺔﻴﻠﻤﻌﻟ ﺔﻗﺪﻟا ﻂﺒﻀﻟ حﺎﺘﻔﻤﻟا اﺬه ﻂﻐﺿا ،ﺔﻳﺬﻐﺘﻟا ةﺪﺣو ﻲﻓ ﺪﻨﺘﺴﻤﻟاو تﺎﺴآﺎﻔﻟاﺴﻨﻟا وأﺦ.
لﺎﺒﻘﺘﺳﻻا ﻊﺿو ﺪﻳﺪﺤﺘﻟ حﺎﺘﻔﻤﻟا اﺬه ﻂﻐﺿا ،ﺮﺧﺁ ﺖﻗو) ﻊﺿو ﻰﻟإ ضﺮﻌﻟا ﺔﺷﺎﺷ ﻲﻓ ﻢﻬﺳ ﺮﻴﺸﻴﺳ
ًﺎ ﻴ ﻟ ﺎ ﺣ دﺪﺤﻤﻟا لﺎﺒﻘﺘﺳﻻا.(
حﺎﺘﻔﻤﻟاSPEAKER) ﺔﻴﺟرﺎﺨﻟا ﺔﻋﺎﻤﺴﻟا(
ﺪﻨﺘﺴﻣ لﺎﺳرإ ﺪﻨﻋ ﺔﻴﺟرﺎﺨﻟا ﺔﻋﺎﻤﺴﻟا لﻼﺧ ﻦﻣ ﻂﺨﻟاو ﺲآﺎﻔﻟا تﺎﻤﻐﻧ عﺎﻤﺴﻟ حﺎﺘﻔﻤﻟا اﺬه ﻂﻐﺿا
آﺎﻔﻟﺎﺑﺲ.
ﺮﺧﻵا فﺮﻄﻟا ﻊﻣ ثﺪﺤﺘﻠﻟ ﺔﻋﺎﻤﺴﻟا ﻊﻓر ﺐﺠﻳ.
ﻒﺗﺎﻬﻟا اﺬﻬﺑ ﺔﻴﺟرﺎﺧ ﺔﻋﺎﻤﺳ ﺪﺟﻮﺗ ﻻ.
ﺔﻈﺣﻼﻣ:
حﺎﺘﻔﻤﻟاHOLD/SEARCH) ﻖﻴﻠﻌﺗ/ﺚﺤﺑ(
ﺪﻴﻗ ﺮﺧﻵا فﺮﻄﻟا ﻊﺿﻮﻟ حﺎﺘﻔﻤﻟا اﺬه ﻂﻐﺿا وأ ،ﻲﺋﺎﻘﻠﺗ لﺎﺼﺗا ﻢﻗر ﻦﻋ ﺚﺤﺒﻠﻟ حﺎﺘﻔﻤﻟا اﺬه ﻂﻐﺿا
دﺎﺤﻣ ءﺎﻨﺛأ ﻖﻴﻠﻌﺘﻟاﺛﺔﻴﻔﺗﺎه ﺔ.
ﺔﺣﻮﻠﻟا ﺢﺘﻓ
ا ﻒﻳﻮﺠﺘﺑ ﻚﺴﻣاﺎﻬﺤﺘﻔﻟ ﻚهﺎﺠﺗ ﻞﻴﻐﺸﺘﻟا ﺔﺣﻮﻟ ﺐﺤﺳاو ﻊﺒﺻﻹ.
٧
Page 87

)
(
ﻣ
ﺗ
ةﻮﺒﻌﻟا تﺎﻳﻮﺘﺤﻣ ﺔﻤﺋﺎﻗ
١. ﺘﻟاﺐﻴآﺮ
ًادﻮﻘﻔﻣ ًﺎﺌﻴﺷ كﺎﻨه نﺎآ اذإ
عزﻮﻤﻟﺎﺑ ﻞﺼﺗا ،ﻲﻠﻳ ﺎﻤ
ﺔﺋﺰﺠﺘﻟا ﺮﺟﺎﺗ وأ.
ﺔﻋﺎﻤﺴﻟا
ﺲآﺎﻔﻟا قرو
ﺔﻨﻴﻋ ةﺮﻜﺑ
داﺪﻋﻹا ﺔﻴﻠﻤﻋ ﻲﻓ ءﺪﺒﻟا ﺪﻨﻋ رﺎﺒﺘﻋﻻا ﻲﻓ ﺎهﺬﺧأ ﺐﺠﻳ طﺎﻘﻧ
ﺪﻨﺘﺴﻤﻟا ﺔﻣﺎﻋد
ﻲﻠﺻﻷا
قرﻮﻟا ﺎﺼﻋ
ﻚﻠﺳﺔﻋﺎﻤﺴﻟا
ةﺮﻜﺑ ﻲﺘﻘﻴﻗر
قرﻮﻟا
ﺮﺻﺎﻨﻌﻟا دﻮﺟو ﻦﻣ ﺪآﺄ
ﻲﻓ ءﺪﺒﻟا ﻞﺒﻗ ﺔﻓﺎآ ﺔﻴﻟﺎﺘﻟا
داﺪﻋﻹا ﺔﻴﻠﻤﻋ.
ﻞﻴﻐﺸﺘﻟا ﻞﻴﻟد
ﻒﺗﺎﻬﻟا ﻂﺧ ﻚﻠﺳ
ﺔﻄﻴﺤﻤﻟا ﺔﻘﻄﻨﻤﻟا كﺮﺗا
ﺔﻴﻟﺎﺧ زﺎﻬﺠﻟﺎﺑ.
ﺢﺳﺎﻤﻟا جﺎﺟز ﻰﻠﻋ ﺔﺑﻮﻃﺮﻠﻟ ﻒﻴﺜﻜﺗ ثﺪﺤﻳ ﺪﻗ ،ﺊﻓاد ﺮﺧﺁ ﻰﻟإ درﺎﺑ نﺎﻜﻣ ﻦﻣ زﺎﻬﺠﻟا ﻞﻘﻧ ﺔﻟﺎﺣ ﻲﻓ
ﻦﻋ ًا ﺪ ﻴ ﻌ ﺑ زﺎﻬﺠﻟا ﻊﺿ
ﻢﻗ ،ﻒﻴﺜﻜﺘﻟا ﻦﻣ ﺺﻠﺨﺘﻠﻟو
ﺎﻬﻟﺎﺳرإ داﺮﻤﻟا تاﺪﻨﺘﺴﻤﻠﻟ ﻢﻴﻠﺴﻟا ﻲﺋﻮﻀﻟا ﺢﺴﻤﻟا قﻮﻌﻳ ﺎﻤﻣ ﻲﺋﻮﻀﻟا.
ماﺪﺨﺘﺳا ﻞﺒﻗ ﻦﻴﺘﻋﺎﺳ ﻦﻣ بﺮﻘﻳ ﺎﻣ ﺮﻈﺘﻧاو ﻲﺑﺮﻬﻜﻟا رﺎﻴﺘﻟا ﻞﻴﻐﺸﺘﺑزﺎﻬﺠﻟا
.
بﺮﻘﻟﺎﺑ زﺎﻬﺠﻟا ﻊﻀﺗ ﻻ
رﺎﺒﻐﻟا.
وأ ﺔﺌﻓﺪﺘﻟا ةﺰﻬﺟأ ﻦﻣ
ﻲﻓ زﺎﻬﺠﻟا ﻊﻀﺗ ﻻ
ءﻮﺿ ﺲﻤﺸﻟا
.
ءاﻮﻬﻟا تﺎﻔﻴﻜﻣ.
ﻒﻴﺜﻜﺘﻟا لﻮﺣ
ﺮﺷﺎﺒﻤﻟا
٨
Page 88

ﺐﻴآﺮﺘﻟا
١.
تﻼﺻﻮﻟا
ﺔﻋﺎﻤﺴﻟا ﻞﻴﺻﻮﺗ
ﺎﻬﻟ ﺺﺼﺨﻤﻟا ﻞﻣﺎﺤﻟا ﻰﻠﻋ ﺎﻬﻌﺿو ﺢﺿﻮﻣ ﻮه ﺎﻤآ ﺔﻋﺎﻤﺴﻟا ﻞﺻ.
ﺎﻓﺮﻃﻚﻠﺳ نﻼﺛﺎﻤﺘﻣ ﺔﻋﺎﻤﺴﻟا ًﺎﻣﺎﻤﺗ ﻦﻜﻤﻳ اﺬﻟ ،ﻤﻬﻨﻣ يأ ﻞﻴﺻﻮﺗ ﺎ ﻲﻓ ﻦﻣ يأﻦﻴﺴﺒﻘﻟا.
♦
ﻦﻣ ﺪآﺄﺗ ﻞﻴﺻﻮﺗﺔﻋﺎﻤﺴﻟا ﻚﻠﺳ
ﺑ ﺲﺒﻘﻤﻟﺎ يﺬـﻟا ﻪﻴﻠﻋ ﺪﺟﻮﻳ
ﺔﻋﺎﻤﺴﻟا ﺰﻣر دﻮﺟﻮﻤﻟاو ﻰﻠﻋ
ﺐﻧﺎﺟزﺎﻬﺠﻟا!
ﻟاتﻼﺻﻮ
ﺔﻴﻔﺗﺎﻬﻟا تﺎﻤﻟﺎﻜﻤﻟا ءاﺮﺟﻹ ﺔﻋﺎﻤﺴﻟا مﺪﺨﺘﺳا
وأ ،ﺔﻳدﺎﻌﻟاﻹًﺎﻳ و ﺪ ﻳ تﺎﺴآﺎﻔﻟا لﺎﺒﻘﺘﺳاو لﺎﺳر.
٩
UX-61
FO-71
ﻒﻴﻠﻐﺘﻟا قرو ﺔﻟازإ
ﻞﻴﻐﺸﺘﻟا ﺔﺣﻮﻟ ﺢﺘﻓاو ﻊﺒﺻﻹا ﻒﻳﻮﺠﺘﺑ ﻚﺴﻣا.
UX-41
FO-51
ﻰﻠﻋﻷ ﻲﻣﺎﻣﻷا قرﻮﻟا ﻪﺟﻮﻣ ﺐﻠﻗا.
ﺔﻈﺣﻼﻣ: ﺮﺸﻘﺗ ﻻ
ﻂﻳﺮﺷ يﻮﻄﺗ وأ
ﻢﻠﻴﻔﻟا.
١
٢
Page 89

تﻼﺻﻮﻟا
UX-61
FO-71
UX-41
FO-51
ﻞﻴﻐﺸﺘﻟا ﺔﺣﻮﻟ ﻖﻠﻏأو ﻞﻔﺳﻷ قرﻮﻟا ﻪﺟﻮﻣ ﺐﻠﻗا.
UX-61
FO-71
UX-41
FO-51
ﻒﻴﻠﻐﺘﻟا قرو ﺔﻟازﺈﺑ ﻢﻗ.
٣
٤
ﻚﻠﺳ ﻞﻴﺻﻮﺗرﺎﻴﺘﻟا
ﻚﻠﺳ ﻞﺻ ددﺮﺘﻣ رﺎﻴﺗ ﺬﺧﺄﻤﺑ رﺎﻴﺘﻟا٢٢٠-٢٤٠ ،ﺖﻟﻮﻓ ٥٠/٦٠ ﻲﺿرﺄﺑ ﻞّﺻﻮﻣ ﺰﺗﺮه )ﻦﻴﻓﺮﻃ.(
♦ رﺎﻴﺘﻟا ﻚﻠﺳ ﻞﺼﻓ ﻞﺒﻗ ﻒﺗﺎﻬﻟا ﻂﺧ ﻚﻠﺳ ﻞﺼﻓا ،ﺲآﺎﻔﻟا ﻞﺼﻓ ﺪﻨﻋ.
حﺎﺘﻔﻤﺑ دوﺰﻣ ﺮﻴﻏ زﺎﻬﺠﻟا اﺬه
ﻞﻴﻐﺸﺗ/ ﻢﺘﻳ ﻪﻧﺈﻓ اﺬﻟ ،ﺔﻗﺎﻄﻠﻟ فﺎﻘﻳإ
ﻖﻳﺮﻃ ﻦﻋ ﻪﻠﺼﻓو رﺎﻴﺘﻟا ﻞﻴﻐﺸﺗ
ﻪﻠﺼﻓو رﺎﻴﺘﻟا ﻚﻠﺳ ﻞﻴﺻﻮﺗ.
♦
ﺮﻳﺬﺤﺗ:
ﺖﺤﺗ اﺬه ﻊﻘﻳ ﻻو زﺎﻬﺠﻟا ﻒﻠﺗ ﻲﻓ ﻚﻟذ ﺐﺒﺴﺘﻴﺴﻓ
ىﺮﺧﻷا ﺬﺧﺂﻤﻟا ﻦﻣ عﻮﻧ يﺄﺑ رﺎﻴﺘﻟا ﻚﻠﺳ ﻞﺼﺗ ﻻ.
نﺎﻤﻀﻟا ﺔﻠﻈﻣ.
١٠
Page 90

ﺐﻴآﺮﺘﻟا
ﻼﺻﻮﻟات
١.
ﺔﻣﻼﻋ ﻪﻴﻠﻋ دﻮﺟﻮﻤﻟاو زﺎﻬﺠﻟا ةﺮﺧﺆﻤﺑ دﻮﺟﻮﻤﻟا ﺲﺒﻘﻤﻟا ﻲﻓ ﻒﺗﺎﻬﻟا ﻚﻠﺳ ﻲﻓﺮﻃ ﺪﺣأ ﻞﺧدأ
ﻂﺋﺎﺤﻟﺎﺑ ﻒﺗﺎﻬﻟا ﺲﺒﻘﻣ ﻲﻓ ﺮﺧﻵا فﺮﻄﻟا ﻞﺧدأ.
ﻊﺿو ﻰﻠﻋ ﺲآﺎﻔﻟا زﺎﻬﺟ ﻂﺒﺿ ﻢﺗ
مﺎﻈﻨﺑ ﻞﻤﻌﻳ ﻒﺗﺎه ﻂﺧ مﺪﺨﺘﺴﺗ ﺖﻨآ
OPTION SETTING
DIAL MODE
ﺔﺷﺎﺸﻟا:
ةﺪﺣاو ةﺮﻣ.
ﻒﺗﺎﻬﻟا ﻂﺧ ﻚﻠﺳ ﻞﻴﺻﻮﺗ
مﺎﻈﻨﺑ ﻞﻤﻌﻠﻟ ﺲآﺎﻔﻟا زﺎﻬﺟ ﻂﺒﺿ
ﻲﻠﻳ ﺎﻤآ ﻞﻴﻐﺸﺘﻟا ﺔﺣﻮﻟ ﻲﻓ:
PULSE (GROUP 1)
) ﺾﺒﻨﻟﺎﺑ لﺎﺼﺗا
TEL. LINE
) ﻒﺗﺎﻬﻟا ﻂﺧ(
tone dialing ) ﺔﻤﻐﻨﻟﺎﺑ لﺎﺼﺗﻻا( اذإ
pulse dial) ﺾﺒﻨﻟﺎﺑ لﺎﺼﺗﻻا( ﺐﺠﻳ ،
ﺾﺒﻨﻟﺎﺑ لﺎﺼﺗﻻا.
ﺢﻴﺗﺎﻔﻤﻟا ﻰﻠﻋ ﻂﻐﺿا
ﺼﺗﻻا ﻊﺿو ﺮﺘﺧالﺎ:
ﻊﺿولﺎﺼﺗﻻا :
ﻂﻐﺿاﺮﻣ ﻊﺑرأ تا.
TONE
) ﺔﻤﻐﻨﻟﺎﺑ لﺎﺼﺗا:(
ﺿاﻂﻐ و ةﺪﺣاو ةﺮﻣ
١
٢
٣
) ﺔﻋﻮﻤﺠﻣ١:(
ﻟﺎﺑﺾﺒﻨ ) ﺔﻋﻮﻤﺠﻤﻟا٢(:
،ﺔﻳدﻮﻌﺴﻟا ﺔﻴﺑﺮﻌﻟا ﺔﻜﻠﻤﻤﻟا ،ناﺮﻳإ
ﺖﻳﻮﻜﻟا ،ﻦﻤﻴﻟا ،ﺮﺼﻣﻦﻴﺒﻴﻠﻔﻟا ،ﺪﻨﻬﻟا ،ﺎﻴﻘﻳﺮﻓإ بﺮﻏ ،.
ﺔﻋﻮﻤﺠﻤﻟا لود٢: تارﺎﻣﻹا ،نﺎﻤﻋ ،ﻦﻳﺮﺤﺒﻟا ،ﺮﻄﻗ
ندرﻷا ،بﺮﻐﻤﻟا ،ﺲﻧﻮﺗ ،ةﺪﺤﺘﻤﻟا ﺔﻴﺑﺮﻌﻟا
ﻞﻣﺎﻌﺘﺗ ﻲﺘﻟا ﻒﺗﺎﻬﻟا ﺔآﺮﺷ ﺎهﺮﻓﻮﺗ ﻲﺘﻟا ىﺮﺧﻷا ﺔﺻﺎﺨﻟا تﺎﻣﺪﺨﻟا ﻦﻣ ﺎهﺮﻴﻏ ﻊﻣ وأ تﺎﻤﻟﺎﻜﻤﻟا
ﺎﻬﻟﺎﺒﻘﺘﺳاو ﺲآﺎﻔﻟا ﻞﺋﺎﺳر لﺎﺳرإ.
١١
• ﺔﻋﻮﻤﺠﻤﻟا لود١:
•
٤
ﻂﻐﺿا جوﺮﺨﻠﻟ.
تﺎﻘﻴﻠﻌﺗ:
♦ ﻞﻳﻮﺤﺗ وأ تﺎﻤﻟﺎﻜﻤﻟا رﺎﻈﺘﻧا ﺔﻴﺻﺎﺨﺑ دوﺰﻣ ﻒﺗﺎه ﻂﺧ ﻰﻠﻋ ماﺪﺨﺘﺳﻼﻟ ﻢﻤﺼﻣ ﺮﻴﻏ ﺲآﺎﻔﻟا زﺎﻬﺟ
تﺎﻣﺪﺨﻟا ﻩﺬه ىﺪﺣإ ﻊﻣ ﺲآﺎﻔﻟا زﺎﻬﺟ ماﺪﺨﺘﺳا ﺖﻟوﺎﺣ اذإو ءﺎﻨﺛأ ﻞآﺎﺸﻤﻟا ﺾﻌﺑ ﻪﺟاﻮﺗ ﺪﻘﻓ ،
ﺎﻬﻌﻣ.
Page 91

ﻬﻟا طﻮﻄﺧو ﻲﺑﺮﻬﻜﻟا رﺎﻴﺘﻟا ﻲﻓ ﺊﺟﺎﻔﻤﻟا ﺮﻴﻐﺘﻟا ﺪﺿ ﺔﻳﺎﻤﺣ ةﺰﻬﺟأ ﺐﻴآﺮﺘﺑﻒﺗﺎ. ةﺰﻬﺟأ ءاﺮﺷ ﻦﻜﻤﻳ
ﻊﻴﺑ ﻲﻓ ﺔﺼﺼﺨﺘﻤﻟا تﻼﺤﻤﻟا ﻦﻣ وأ ﺪﻤﺘﻌﻤﻟا عزﻮﻤﻟا ﻦﻣ رﺎﻴﺘﻟا ﻲﻓ ﺊﺟﺎﻔﻤﻟا ﺮﻴﻐﺘﻟا ﺪﺿ ﺔﻳﺎﻤﺤﻟا
ﻒﺗاﻮﻬﻟا تﺎﻣﺰﻠﺘﺴﻣ.
،ﺪﻳﺪﺟ ﻊﻗﻮﻣ ﻰﻟإ ﺲآﺎﻔﻟا ﻞﻘﻧ يروﺮﻀﻟا ﻦﻣ نﺎآ اذإﻓ ﻒﺗﺎﻬﻟا ﻂﺧ ﻚﻠﺳ ﻞﺼﻓﺎًﻻ و أ ﻚﻠﺳ ﻞﺼﻓ ﻞﺒﻗ ،
ةدﺎﻋإ ﺪﻨﻋوﻒﺗﺎﻬﻟا ﻂﺧ ﻚﻠﺳ ﻞﻴﺻﻮﺗ ﻞﺒﻗ رﺎﻴﺘﻟا ﻚﻠﺳ ﻞﻴﺻﻮﺗ يروﺮﻀﻟا ﻦﻤﻓ ،ﻞﻴﺻﻮﺘﻟا.
ﻲﻠﺻﻷا ﺪﻨﺘﺴﻤﻟا ﺔﻣﺎﻋد ﺐﻴآﺮﺗ
ﻩﺎﻧدأ ﺢﺿﻮﻣ ﻮه ﺎﻤآ ﻲﻠﺻﻷا ﺪﻨﺘﺴﻤﻟا ﺔﻣﺎﻋد ﺐﻴآﺮﺘﺑ ﻢﻗ.
تﻼﺻﻮﻟا
♦ ﺔﻴﻤﻗﺮﻟا ﻒﺗاﻮﻬﻟا ﺔﻤﻈﻧأ ﻊﻣ ﻖﻓاﻮﺘﻣ ﺮﻴﻏ ﺲآﺎﻔﻟا زﺎﻬﺟ.
♦ ﺢﺼﻨﻧ ﺎﻨﻧﺈﻓ ،ﻲﺑﺮﻬﻜﻟا رﺎﻴﺘﻟا ﻲﻓ ﺔﻴﺋﺎﺠﻓ تاﺮﻴﻐﺗ وأ قﺮﺒﻠﻟ اﺮﻴﺜآ ضﺮﻌﺘﺗ ﻚﺘﻘﻄﻨﻣ ﺖﻧﺎآ اذإ
ﻞﻘﻧﻠﻴﺻﻮﺗ ةدﺎﻋإو ﺲآﺎﻔﻟا زﺎﻬﺟﻪ
رﺎﻴﺘﻟا.
ﻟاﻒﺗﺎﻬﻟا ﻲﻋﺮﻔ) يرﺎﻴﺘﺧا(
ةﺮﺧﺆﻤﺑﺲآﺎﻔﻟا.
TEL. SET
TEL. SET
.
TEL. SET
.
ﻒﺗﺎه ﻞﻴﺻﻮﺗ ﻚﻨﻜﻤﻳ ،ﺖﺒﻏر اذإﺲﺒﻘﻣ ﻲﻓ ﻲﻋﺮﻓ
ﻲﻄﻐﻳ يﺬﻟا ءﺎﻄﻐﻟا عﺰﻧا
ﺲﺒﻘﻣ
♦ ﺔﺤﻔﺻ ﺮﻈﻧا ،ﺲآﺎﻔﻟا زﺎﻬﺠﺑ ﻲﻟﺁ در زﺎﻬﺟ ﻞﻴﺻﻮﺘﻟ٤٨.
١
ﻞﺻ ﺲﺒﻘﻤﺑ ﻲﻋﺮﻔﻟا ﻒﺗﺎﻬﻟا ﻂﺧ
٢
١٢
Page 92

ﺐﻴآﺮﺘﻟا
ﻲ
١.
ﻞﻴﻤﺤﺗ يراﺮﺤﻟا قرﻮﻟا
ﻞﻴﻤﺤﺗيراﺮﺤﻟا قرﻮﻟا
ﺲآﺎﻔﻟا زﺎﻬﺟ ﺔﻋﺎﺒﻃ سأر ﻊﺒﻄﻳ
ﻦﻋ رﻮﺼﻟاو صﻮﺼﻨﻟا ﻦﻣ ًﻼ آ
ﻰﻠﻋ ةراﺮﺤﻟا ﻖﻴﺒﻄﺗ ﻖﻳﺮﻃ
UX-61
FO-71
تﺎﺴآﺎﻔﻟا ﺲآﺎﻔﻟا زﺎﻬﺟ ﻊﺒﻄﻳ
ﻦﻣ صﺎﺧ عﻮﻧ ﻰﻠﻋ ةدراﻮﻟا
يراﺮﺤﻟا قرﻮﻟا ﻰﻤﺴﻳ قرﻮﻟا.
يراﺮﺤﻟا قرﻮﻟا.
ﻷ ﻞﻴﻐﺸﺘﻟا ﺔﺣﻮﻟ ﺐﺤﺳاو ﻊﺒﺻﻹا ﻒﻳﻮﺠﺘﺑ ﻚﺴﻣا ﻰﻠﻋ
ﻰﻠﻋﻷ ﻲﻣﺎﻣﻷا قرﻮﻟا ﻪﺟﻮﻣ ﺐﻠﻗا.
UX-41
FO-51
١
ﺎﻬﺤﺘﻔﻟ.
٢
نأ ﺪآﺄﺘﻠﻟ ةﺪﻘﻌﻟا ﻂﻐﺿا
ﻪﺟﻮﻤﻠﻟ ﻲﻣﺎﻣﻷا ﺐﻧﺎﺠﻟا
١٣
ﻸﻟ ًﺎ ﻬ ﺠ ﺘ ﻣ
ﻧﺪﻌﻤﻟاﻞﻔﺳ.
ﻢﺠﺣ يذ قرو ﻞﻴﻤﺤﺘﺑ مﻮﻘﺗ ﺖﻨآ اذإ٢١٠ﻲﻓ ﻢﻣ
ﻦﻣ ﻞآ ﻰﻠﻋ قرﻮﻟا ةﺮﻜﺑ ﻲﺘﻘﻴﻗر ﻊﺿ ،ﻪﺿﺮﻋ
قرﻮﻟا ةﺪﺣو ﻲﺒﻧﺎﺟ . ) ﻰﺻﻮﻤﻟا قرﻮﻟا نأ ﻆﺣﻻ
ﺔآﺮﺷ ﻞﺒﻗ ﻦﻣ ﻪﺑرﺎﺷب ةﺮﻜﺑ ﻚﻟذ ﻲﻓ ﺎﻤﺑ ،
ﻮه ،ﻲﻟوﻷا ﻞﻴﻐﺸﺘﻟا٢١٦ضﺮﻌﻟا ﻲﻓ ﻢﻣ .(
ﻦﻣ ﻦﻴﻌﻠﻀﻤﻟا ﻦﻴﺒﻧﺎﺠﻟا نﻮﻜﻳ نأ ﺐﺠﻳ
ﻦﻴﻠﺑﺎﻘﺘﻣ ﻦﻴﺘﻘﻴﻗﺮﻟا)ﺾﻌﺒﻟا ﺎﻤﻬﻀﻌﺑ ﻩﺎﺠﺗ.(
٣
•
Page 93

ﺗ
يراﺮﺤﻟا قرﻮﻟا
ﻞﻴﻤﺤ
ﺎﺼﻋ ﻞﺧدأ ﻢﺛ يراﺮﺤﻟا قرﻮﻟا ةﺮﻜﺑ فﺎﻔﺘﻟا ﻚﻓ
ﻊﻣ ،قرﻮﻟا ةﺪﺣو ﻲﻓ يراﺮﺤﻟا قرﻮﻟا ةﺮﻜﺑ ﻊﺿ
ﻘﺘﺴﻣ قرﻮﻟا ﺎﺼﻋ ﻲﻓﺮﻃ نأ ﺪآﺄﺘﻟاتﺎﺤﺘﻔﻟا ﻲﻓ ةﺮ
قرﻮﻟا ةﺪﺣو ﻲﺒﻧﺎﺟ ﻼآ ﻰﻠﻋ.
ﺔﻓﺎﺤﻟا ﻚﻔﻨﺗ ﺚﻴﺤﺑ ةﺮﻜﺒﻟا ﻊﺿو ﺐﺠﻳ
ﺢﺿﻮﻣ ﻮه ﺎﻤآ ﺔﻴﻣﺎﻣﻷا. قرﻮﻟا نﻮﻜﻳو
جﺮﺨﻴﺳ ،ﻲﺴﻜﻌﻟا ﻩﺎﺠﺗﻻا ﻲﻓ ﻚﻔﻨﺗ ﺚﻴﺤﺑ ةﺮﻜﺒﻟا
ﺔﻴﻣﺎﻣﻷا ﺔﻬﺠﻟا ﻲﻓ ةدﻮﺟﻮﻤﻟا ﺔﺤﺘﻔﻟا ﻦﻣ جﺮﺨﻳ
ﺔﻋﺎﺒﻄﻠﻟ ﺪﺣاو ﺐﻧﺎﺟ ﻦﻣ كﻮﺴﻤﻣ. ﺖﻌﺿو اذإو
ﺔﻋﺎﺒﻄﻟا ﺔﻴﻠﻤﻋ ﺪﻌﺑ ًﺎ ﻏ ر ﺎ ﻓ قرﻮﻟا(.
قرﻮﻠﻟ ﺔﻴﻣﺎﻣﻷا ﺔﻓﺎﺤﻟا ﻞﺧدأ ﻮه ﺎﻤآ ﺔﺤﺘﻔﻟا ﻲﻓ
٤
قرﻮﻟا.
٥
•
مﺎه:
٦
ﺢﺿﻮﻣ. ﻰﺘﺣ ﺔﺤﺘﻔﻟا ﻞﺧاد قرﻮﻟا ﻊﻓد ﻲﻓ ﺮﻤﺘﺳا
زﺎﻬﺠﻠﻟ.
ﻞﻔﺳﻸﻟ قرﻮﻟا ﻪﺟﻮﻣ ﺐﻠﻗا ﻢﺛ ،ٍوﺎﺴﺘﻣ جﺮﺨﻳ قرﻮﻟا نأ ﺪآﺄﺗ.
UX-41
FO-51
٧
١٤
Page 94

ﺐﻴآﺮﺘﻟا
ﻞﻴﻤﺤﺗيراﺮﺤﻟا قرﻮﻟا
١.
UX-61
FO-71
ﺎﻬﻧﺎﻜﻣ ﻲﻓ ﺎهراﺮﻘﺘﺳا ﻦﻣ ﺪآﺄﺘﻟا ﻊﻣ ،ﻞﻴﻐﺸﺘﻟا ﺔﺣﻮﻟ ﻖﻠﻏأ.
: ﻗ ءﺰﺟ جﺮﺨﻴﺳقرﻮﻟا ﻦﻣ ﺮﻴﺼ.
UX-41/FO-51
•
ﻪﻌﻄﻘﻟ ﻰﻠﻋﻸﻟ ﻪﺒﺤﺳا ﻢﺛ فاﻮﺤﻟا ﻦﻣ قرﻮﻟﺎﺑ ﻚﺴﻣأ.
•
ﺔﻘﻄﻘﻃ
: ﺘﻳﻢقرﻮﻟا ﻦﻣ ﺮﻴﺼﻗ ءﺰﺟ ﻊﻄﻗ .
UX-61/FO-71
يراﺮﺤﻟا قرﻮﻟا لاﺪﺒﺘﺳا
ءاﺮﺟإ نﺎﻜﻣﻹﺎﺑ ﺪﻌﻳ ﻦﻟ
ﻦﻣ ﻲﻟﺎﺘﻟا عﻮﻨﻟا ماﺪﺨﺘﺳﺎﺑ ﺢﺼﻨﻧ ،ﻪﻨﻋ ﺞﺘﻨﻳ ﺎﻤﻟ ةدﻮﺟ ﻞﻀﻓأ ﻰﻠﻋ لﻮﺼﺤﻟاو ﺲآﺎﻔﻟا زﺎﻬﺠﻟ لﻮﻃأ ﺮﻤﻋ نﺎﻤﻀﻟو
ﺔﻋﺎﺒﻄﻟا سأر ﻰﻠﻋ تﻼﻀﻔﻠﻟ ﺪﺋاز ﻊﻤﺠﺗو ﺔﺌﻳدر ﺦﺴﻧ ةدﻮﺟ ﻪﻨﻋ ﺞﺘﻨﻳ نأ ﻦﻜﻤﻳ قرﻮﻟا ﻦﻣ ﺮﺧﺁ عﻮﻧ يأ ماﺪﺨﺘﺳاو.
) قرﻮﻟا دﺎﻔﻧ (ضﺮﻌﻟا ﺔﺷﺎﺷ ﻰﻠﻋ.
OUT OF PAPER
ﺔﻟﺎﺳﺮﻟا ﺮﻬﻈﺘﺳ ،قرﻮﻟا دﺎﻔﻧ ﺪﻨﻋ
ﺳﻻ ﻮه ﺎﻤآ ةﺪﻳﺪﺠﻟا ةﺮﻜﺒﻟا ﻞﻴﻤﺤﺘﺑ ﻢﻗ ﻢﺛ ،ًﻻوأ ﺔﻤﻳﺪﻘﻟا ةﺮﻜﺒﻟا جﺮﺧأ ،قرﻮﻟا لاﺪﺒﺘ
تﺎﺴآﺎﻔﻠﻟ ﺦﺴﻨﻟاو لﺎﺒﻘﺘﺳﻻا ﺔﻴﻠﻤﻋ.
ﻩﻼﻋأ ﺢﺿﻮﻣ.
:)٣٠ةﺮﻜﺑ ﻢﻣ (
FO-20PR THERMAL PAPER
يراﺮﺤﻟا قرﻮﻟا ﺔﺠﻟﺎﻌﻣ
٨
قروبرﺎﺷﺔﺋﺰﺠﺘﻟا ﻊﺋﺎﺑ وأ عزﻮﻤﻟا ﻦﻣ ﻪﻴﻠﻋ لﻮﺼﺤﻟا ﻦﻜﻤﻳ يﺬﻟاو ،يراﺮﺤﻟا :
١٥
اذإ قرﻮﻟا ناﻮﻟأ ﻩﻮﺸﺘﺗ ﺪﻘﻓ:
ﺷﺪﺧ ﻢﺗ مأ ،ﻪﻴﻠﻋ ﻖﺻﻻ ﻂﻳﺮﺷ وأ ﺔﻴﻃﺎﻄﻣ ةﺎﺤﻤﻣ ماﺪﺨﺘﺳا ﻢﺗﻪ.
ﻪﻣاﺪﺨﺘﺳﻻ ًا ﺪ ﻌ ﺘ ﺴ ﻣ ﺖﻨآ اذإ ﻻإ قرﻮﻟا ةﻮﺒﻋ ﻚﻔﺗ ﻻ.
♦ ﺔﺟرد وأ ﺔﻴﻟﺎﻋ ﺔﺑﻮﻃر ﻲﻓ ﻪﻈﻔﺣ ﻢﺗﺔﻌﻔﺗﺮﻣ ةراﺮﺣ.
♦ ﺮﺷﺎﺒﻤﻟا ﺲﻤﺸﻟا ءﻮﻀﻟ ضﺮﻌﺗ.
♦ ًﺎﺜﻳﺪﺣ ﺔﺧﻮﺴﻨﻣ ءﺎﻗرز ﺔﺨﺴﻧ وأ ،تﺎﻔﻔﺨﻣ وأ ،ًﺎﻐﻤﺻ ﺲﻣﻻ.
♦
Page 95

ﺲآﺎﻔﻟا ﻢﻗرو ﻚﻤﺳا لﺎﺧدإ
لﺎﺧدإ ﻚﻤﺳاﺲآﺎﻔﻟا ﻢﻗرو
ﻩﺬه لﺎﺧدإ دﺮﺠﻤﺑو
ًﺎﻴﺋﺎﻘﻠﺗ ﺮﻬﻈﺘﺳ ،تﺎﻧﺎﻴﺒﻟا
ﻦﻣ ﺔﺤﻔﺻ ﻞآ ﻰﻠﻋأ
مﻮﻘﺗ ﻲﺘﻟا تﺎﺴآﺎﻔﻟا
ﺎﻬﻟﺎﺳرﺈﺑ.
ENTRY MODE
لﺎﺳرإ ﻲﻓ ءﺪﺒﻟا نﺎﻜﻣإ ﻞﺒﻗ
ﻚﻤﺳا لﺎﺧدإ ﺐﺠﻳ ،تﺎﺴآﺎﻔﻟا
ﺲآﺎﻔﻟا ﻢﻗرو)ﻒﺗﺎﻬﻟا (
ﻚﺑ صﺎﺨﻟا.
ﻰﻟإ ﺎﻀﻳأ جﺎﺘﺤﺗ
ﺖﻗﻮﻟاو ﺦﻳرﺎﺘﻟا لﺎﺧدإ.
ﺔﺷﺎﺸﻟا:
ةﺪﺣاو.
ةﺪﺣاووةﺮﻣ
١
ﻂﻐﺿا ةﺮﻣ
OWN NUMBER SET
ENTER FAX #
٢
ﻂﻐﺿا ﺮﻣ ﻦﻴﺗ.
٣
.
مﺎﻗرﻷا ﺢﻴﺗﺎﻔﻣ ﻰﻠﻋ ﻂﻐﻀﻟﺎﺑ ﺲآﺎﻔﻟا ﻢﻗر ﻞﺧدأ) ﻰﺼﻗأ ﺪﺤﺑ٢٠ًﺎ ﻤ ﻗ ر .(
ﻂﻐﺿا ،مﺎﻗرﻷا ﻦﻴﺑ ﺔﻓﺎﺴﻣ لﺎﺧدﻹ ،و لﺎﺧدﻹ"+"ﻂﻐﺿا .
ﻂﻐﺿا ،ﺄﻄﺧ ﺢﺴﻤﻟ .
ﻂﻐﺿا ةﺪﺣاو ةﺮﻣ
٤
•
•
١٦
Page 96

ﺲآﺎﻔﻟا ﻢﻗرو ﻚﻤﺳا لﺎﺧدإ
ﺐﻴآﺮﺘﻟا
١.
لﺎﺧدإ ﻦﻜﻤﻳ
٥
ﻂﻐﺿا ةﺮآاﺬﻟا ﻲﻓ ﺲآﺎﻔﻟا ﻢﻗر لﺎﺧدﻹ .
ﻲﻟﺎﺘﻟا ﻞﻜﺸﻟا ﻲﻓ ﺢﺿﻮﻣ ﻮه ﺎﻤآ فﺮﺣ ﻞﻜﻟ مﺎﻗرﻷا ﺢﻴﺗﺎﻔﻣ ﻰﻠﻋ ﻂﻐﻀﻟﺎﺑ ﻚﻤﺳا ﻞﺧدأ.
٦
ﻰﺘﺣ٢٤ﺎﻓﺮﺣ .
ﻣلﺎﺜ :SHARP =77777 444 22 7777 77
كﺮﺤﻳ
DATE&TIME SET
١٧
حﺎﺘﻔﻤﻟا
رﺮﻜﺘﻣ: " ! / $ # % & ’ ( )
ﻂﻐﺿا .
ﻂﻐﺿا ﺖﻗﻮﻟاو ﺦﻳرﺎﺘﻟا ضﺮﻋ ﻰﻟإ ةدﻮﻌﻠﻟ .
♦ ﻂﻐﺿا ،حﺎﺘﻔﻤﻟا ﺲﻔﻧ نﺎﺒﻠﻄﺘﻳ ﻦﻴﻴﻟﺎﺘﺘﻣ ﻦﻴﻓﺮﺣ لﺎﺧدﻹ
♦ ﻂﻐﺿا ،ﺄﻄﺧ ﺢﺴﻤﻟ
♦ ﺮﻴﻴﻐﺘﻟ ﺔﻟﺎﺣ ﻂﻐﺿا ، فﺮﺣﻷا
٧
٨
لﺎﺧدإ ﺪﻌﺑ فﺮﺤﻟالوﻷا.)
ﻒﻠﺨﻠﻟ .(
.
. ﻂﻐﺿا ،ﺔﻴﻟﺎﺘﻟا زﻮﻣﺮﻟا ﺪﺣأ لﺎﺧدﻹ وأ ﻞﻜﺸﺑ
✱
+ , - : ; > = @ ؟ < ] [ } ' _ ^ { |
حﺎﺘﻔﻤﻟا ﻪآﺮﺤﻳ ﺎﻤﻨﻴﺑ ،مﺎﻣﻸﻟ ﺮﺷﺆﻤﻟا
Page 97

ﻂﺒﺿ ﺖﻗﻮﻟاو ﺦﻳرﺎﺘﻟا
ﻂﺒﺿﺖﻗﻮﻟاو ﺦﻳرﺎﺘﻟا
ﺔﺷﺎﺷ ﻲﻓ ﺖﻗﻮﻟاو ﺦﻳرﺎﺘﻟا ﺮﻬﻈﻳ
ﻞآ ﻰﻠﻋأ نﺎﻌﺒﻄُﻳو ضﺮﻌﻟا
ه ﺎﻤآ ﺖﻗﻮﻟاو ﺦﻳرﺎﺘﻟا ﻂﺒﺿا ﻮ
ﺔﺤﻔﺻ ﺲآﺎﻓﺎﻬﻟﺎﺳرﺈﺑ مﻮﻘﺗ.
ﻩﺎﻧدأ ﺢﺿﻮﻣ:
ﺔﺷﺎﺸﻟا:
ENTRY MODE
DATE&TIME SET
ﺎًﻴﻟﺎﺣ طﻮﺒﻀﻤﻟا ﺦﻳرﺎﺘﻟا ﺮﻬﻈﻳ
DATE 15-08-2002
ةﺪﺣاو.
ةﺪﺣاووةﺮﻣ
ﻂﻐﺿا ةﺮﻣ
١
٢
ﻂﻐﺿا تاﺮﻣ ثﻼﺛ.
٣
.
)لﺎﺜﻣ:(
ﻂﻐﺿاةﺪﺣاو ةﺮﻣ
١٨
Page 98

ﺐﻴآﺮﺘﻟا
ﻂﺒﺿﺖﻗﻮﻟاو ﺦﻳرﺎﺘﻟا
١.
31
.("
01
" ﻰﻟإ"
مﻮﻴﻟا ﻞﺜﻤﻴﻟ ﻦﻴﻤﻗر ﻦﻣ ًﺎ ﻧ ﻮ ﻜ ﻣ ًادﺪﻋ ﻞﺧدأ) ﻦﻣ"
٤
DATE 05-08-2002
12
"اﺬﻜهو ﺮﺒﻤﺴﻳﺪﻟ.(
DATE 05-01-2002
TIME 12:19
05-JAN 09:25
STORE JUNK #
.
02
"و ﺮﻳاﺮﺒﻔﻟ"
ﺮﻬﻈﻳﺖﻗﻮﻟا طﻮﺒﻀﻤﻟا
ﺎًﻴﻟﺎﺣ)لﺎﺜﻣ:(
23
(" ﻞﺜﻤﻴﻟ ﻦﻴﻤﻗر ﻦﻣ ﺎﻧﻮﻜﻣ ادﺪﻋو
01
"و ﺮﻳﺎﻨﻴﻟ"
00
" ﻰﻟإ"
ﺔﻋﺎﺴﻟا ﻞﺜﻤﻴﻟ ﻦﻴﻤﻗر ﻦﻣ ﺎًﻧﻮﻜﻣ اًدﺪﻋ ﻞﺧدأ) ﻦﻣ"
ر ﻦﻣ ﺎﻧﻮﻜﻣ ادﺪﻋ ﻞﺧدأ ﺮﻬﺸﻟا ﻞﺜﻤﻴﻟ ﻦﻴﻤﻗ")
59
00
" ﻰﻟإ"
.("
لﺎﺜﻣ :ﺲﻣﺎﺨﻟا
ﺢﻴﺤﺼﺘﻟﻂﻐﺿا ،ﺄﻄﺧ ﺢﻴﺤﺼﻟا ﻢﻗﺮﻟا ﻞﺧدأ ﻢﺛ ﺄﻄﺨﻟا نﺎﻜﻤﻟ ﻒﻠﺨﻠﻟ ﺮﺷﺆﻤﻟا ﻚﻳﺮﺤﺘﻟ .
•
٥
لﺎﺜﻣ :ﺮﻳﺎﻨﻳ
مﺎﻌﻟا ﻞﺧدأ)٤مﺎﻗرأ .(
٦
لﺎﺜﻣ :2002
٧
ﻖﺋﺎﻗﺪﻟا) ﻦﻣ"
ﺜﻣلﺎ :9:25
ﻂﻐﺿا ءﺪﺒﻟﻞﻴﻐﺸﺗ ﺔﻋﺎﺴﻟا .
٨
٩
ﻂﻐﺿا ﺖﻗﻮﻟاو ﺦﻳرﺎﺘﻟا ضﺮﻋ ﻰﻟإ ةدﻮﻌﻠﻟ .
١٩
Page 99

ﺿ
لﺎﺒﻘﺘﺳﻻا ﻊﺿو
ﻂﺒ
ﻂﺒﺿلﺎﺒﻘﺘﺳﻻا ﻊﺿو
ةدراﻮﻟا تﺎﺴآﺎﻔﻟا لﺎﺒﻘﺘﺳﻻ عﺎﺿوأ ﺔﻌﺑرأ ﺲآﺎﻔﻟﺎﺑ ﺪﺟﻮﻳ:
ﺎًﺴآﺎﻓ
ﻬﺟ ﻰﻠﻋ تﺎﺴآﺎﻔﻟا لﺎﺒﻘﺘﺳاو ﻲﻟﻵا دﺮﻟا زﺎﻬﺟ ﻲﻓ ﺔﻴﺗﻮﺼﻟا ﻞﺋﺎﺳﺮﻟا لﺎﺒﻘﺘﺳﻻ ﻚﻟذو جوﺮﺨﻟا ﺪﻨﻋ زﺎ
:
(
ﻒﺗﺎه
ﺔﻴﻔﺗﺎﻬﻟا تﺎﻤﻟﺎﻜﻤﻟا لﺎﺒﻘﺘﺳﻻ ﺐﺴﻧﻷا ﻊﺿﻮﻟا ﻮه اﺬه . ﺐﺠﻳ ﻦﻜﻟو ،تﺎﺴآﺎﻔﻟا لﺎﺒﻘﺘﺳا ﺎﻀﻳأ نﺎﻜﻣﻹﺎﺑو
ﺑ ﻞﺼﺘﻣ ﻲﻋﺮﻓ ﻒﺗﺎه وأ ﺲآﺎﻔﻟا زﺎﻬﺟ ﺔﻋﺎﻤﺳ ﻊﻓر ﻖﻳﺮﻃ ﻦﻋ تﺎﻤﻟﺎﻜﻤﻟا ﻊﻴﻤﺟ ﻰﻠﻋ ًﻻ و أ دﺮﻟا ﺲﻔﻨ
ﻚﺑ صﺎﺨﻟا ﻒﺗﺎﻬﻟا ﻂﺧ ﻰﻠﻋ ﻂﻘﻓ تﺎﺴآﺎﻔﻟا لﺎﺒﻘﺘﺳا ﺪﻳﺮﺗ ﺎﻣﺪﻨﻋ ﻊﺿﻮﻟا اﺬه ﺮﺘﺧا . زﺎﻬﺟ مﻮﻘﻴﺳ
ةدراﻮﻟا تﺎﺴآﺎﻔﻟا لﺎﺒﻘﺘﺳاو تﺎﻤﻟﺎﻜﻤﻟا ﻞآ ﻰﻠﻋ دﺮﻟﺎﺑ ًﺎﻴﺋﺎﻘﻠﺗ ﺲآﺎﻔﻟا.
TEL/FAX
)ﻒﺗﺎه/ﺲآﺎﻓ(:
تﺎﻤﻟﺎﻜﻤﻟاو تﺎﺴآﺎﻔﻟا ﻦﻣ ﻞآ لﺎﺒﻘﺘﺳا ﻊﺿﻮﻟا اﺬه ﺐﺳﺎﻨﻳﻴﻔﺗﺎﻬﻟا مﻮﻘﻴﻓ ،ﺔ لﺎﺒﻘﺘﺳا ﺪﻨﻋ ﺲآﺎﻔﻟا زﺎﻬﺟ
ﻲﺋﺎﻘﻠﺘﻟا لﺎﺼﺗﻻﺎﺑ ﻚﻴﻟإ ﻪﻟﺎﺳرإ ﻢﺘﻳ .ﻓ ،ﺔﻴﺗﻮﺻ ﺔﻤﻟﺎﻜﻣ ﺖﻧﺎآ اذﺈﻳ ﺲآﺎﻔﻟا زﺎﻬﺟ رﺪﺼﺔﻤﻐﻧ ةﺰﻴﻤﻣ
ﺎًﺴآﺎﻓإ ﻢﺘﻳﻲﺋﺎﻘﻠﺘﻟا لﺎﺼﺗﻻﺎﺑ ﻚﻴﻟإ ﻪﻟﺎﺳر ، أﺪﺒﻴﺴﻓﻻالﺎﺒﻘﺘﺳًﺎﻴﺋﺎﻘﻠﺗ .
ﺮﺘﺧا ﻊﺿﻮﻟا اﺬه
ﺲآﺎﻔﻟﺎﺑ ﻲﻟﺁ در زﺎﻬﺟ ﻞﻴﺻﻮﺘﺑ ﺖﻤﻗ اذإ ﻂﻘﻓ ﻊﺿﻮﻟا اﺬه مﺪﺨﺘﺳا) ﻞﺼﻔﻟا ﺮﻈﻧا٦.(
ّد ﺮ ﺗ ﻰﺘﺣ ﻚﻬﻴﺒﻨﺘﻟ .ﻧﺎآ اذإ ﺎﻣأﺖ
)ﺲآﺎﻓ(:
) ﻲﻟﻵا دﺮﻟا زﺎﻬﺟ(:
TEL)
FAX
A.M.
ﻊﺿو
ﻂﺨﻟا.
ﻊﺿو
ﻊﺿو
ﺔﻤﻟﺎﻜﻣفﺎﺸﻜﺘﺳﺎﺑ ﺎﻣ اذإ ﺔﻴﺗﻮﺻ ﺔﻤﻟﺎﻜﻣ ﺖﻧﺎآ)ﻲﻓ ﺎﻤﺑ ﻚﻟذ ًﺎ ﻳ و ﺪ ﻳ ﺔﻠﺳﺮﻤﻟا تﺎﺴآﺎﻔﻟا ( ﺎﻬﻧأ وأ
ﻊﺿو
ﺲآﺎﻔﻟا.
ﻂﺒﺿلﺎﺒﻘﺘﺳﻻا ﻊﺿو
ﻪﻧأ ﺪآﺄﺗﺔﻳﺬﻐﺘﻟا ةﺪﺣو ﻲﻓ ﺪﻨﺘﺴﻣ ﻞﻴﻤﺤﺗ ﻢﺘﻳ ﻢﻟ ﻂﻐﺿا ﻢﺛ ، ﺔﺷﺎﺷ ﻲﻓ ﻢﻬﺴﻟا ﺮﻴﺸﻳ ﻰﺘﺣ
بﻮﻠﻄﻤﻟا ﻊﺿﻮﻟا ﻰﻟإ ضﺮﻌﻟا.
ﻊﺿو ﻲﻓ تﺎﺴآﺎﻔﻟا لﺎﺒﻘﺘﺳا لﻮﺣ تﺎﻣﻮﻠﻌﻤﻟا ﻦﻣ ﺪﻳﺰﻤﻟ
FAX) ﺲآﺎﻓ (وTEL) ﻒﺗﺎه ( و
ﻊﺿو ماﺪﺨﺘﺳا لﻮﺣ
A.M.) ﻲﻟﻵا دﺮﻟا زﺎﻬﺟ( ﻞﺼﻔﻟا ﺮﻈﻧا ،٦.
TEL/FAX)ﻒﺗﺎه/ﺲآﺎﻓ( ﻞﺼﻔﻟا ﺮﻈﻧا ،٣ تﺎﺴآﺎﻔﻟا لﺎﺒﻘﺘﺳا ،) ﺔﺤﻔﺻ٣٨.( تﺎﻣﻮﻠﻌﻤﻟا ﻦﻣ ﺪﻳﺰﻤﻟو
٢٠
Page 100

تﻮﺼﻟا ىﻮﺘﺴﻣ ﻂﺒﺿ
ﺐﻴآﺮﺘﻟا
١.
تﻮﺼﻟا ىﻮﺘﺴﻣ ﻂﺒﺿ
ﺔﻋﺎﻤﺴﻟا تﻮﺻ ىﻮﺘﺴﻣ ﻂﺒﺿ ﻚﻨﻜﻤﻳ ماﺪﺨﺘﺳﺎﺑ سﺮﺠﻟاو ﺔﻴﺟرﺎﺨﻟا.
SPEAKER: MIDDLE
SPEAKER: HIGH
SPEAKER: LOW
ﺔﻴﺟرﺎﺨﻟا
ﺔﺷﺎﺸﻟا:
ىﺮﺧأ ةﺮﻣ ﺔﻋﺎﻤﺴﻟا ﻞﻴﻐﺸﺗ فﺎﻘﻳﻹ
ﻂﻐﺿا
.
ﺔﻴﺟرﺎﺨﻟا
ﺔﻋﺎﻤﺴﻟا
s
ﻂﻐﺿا
ﻂﻐﺿابﻮﻠﻄﻤﻟا ىﻮﺘﺴﻤﻟا ﺪﻳﺪﺤﺘﻟ ﺮﺜآأ وأ ةﺮﻣ .
•
١
٢
٢١
 Loading...