

Page 1
A39566,Russia R347H O/M,RU
VBRHJDJKZJDFY GTXM
Herjdjlcndj gj ärcgkefnfwbb
Z
R-347H
CJLTHÖFZBT
Bzajhvfwby j cthnbabrfwbb ghjlerwbb
Ufhfznbqzsq nfkjz zf bpltkbt SHARP
Vths ghtljcnjhjözjcnb ..................................................... 1
Jcj<st erfpfzby ................................................................... 2
Bzcnherwby gj ecnfzjdrt .................................................... 3
J<obq dbl gtxb ................................................................... 3
Hf<jnf c ctzcjhzjq gfztkm+ eghfdktzby ........................ 4
Lbcgktq gfztkb eghfdktzby ............................................ 4
Ctzcjhzfy gfztkm eghfdktzby ......................................... 4
Zfxfkj hf<jns .................................................................... 5
Ecnfzjdrf xfcjd .................................................................. 5
Cnjg/C<hjc ........................................................................... 5
Lky jnvtzs ghjuhfvvs dj dhtvy ghbujnjdktzby ........ 5
Jcj<st erfpfzby ................................................................... 6
Ghbujnjdktzbt ghb gjvjob nfqvthf ............................ 6
Ghbujnjdktzbt gentv pflfzby gjcktljdfntkmzjcntq .... 7
>scnhjt ghbujnjdktzbt ..................................................... 7
Edtkbxtzbt dhtvtzb d ghjwtcct dsgjkztzby
ghjuhfvvs ghbujnjdktzby ................................................ 8
Russia R347H O/M,Ru,Cover 03.7.4, 5:24 PM1
Fdnjvfnbxtcrbt jgthfwbb ................................................... 9
Pfvtxfzby jnzjcbntkmzj fdnjvfnbxtcrbü jgthfwbq .... 9
>scnhjt ltqcndbt ............................................................... 9
Herjdjlcndj gj vtz+ <scnhjuj ltqcndby ................... 10
>scnhfy hfpvjhjprf ......................................................... 12
Herjdjlcndj gj vtz+ <scnhfy hfpvjhjprf .................. 13
Ghjcnfy hfpvjhjprf ......................................................... 14
Herjdjlcndj gj vtz+ ghjcnfy hfpvjhjprf .................. 15
Lheubt elj<zst aezrwbb .................................................. 16
Aezrwby ”vtzmit-<jkmit“ ............................................ 16
Nfqvth ................................................................................ 17
>kjrbhjdrf jn ltntq ....................................................... 17
Htöbv ltvjzcnhfwbb ...................................................... 17
Cbuzfkbpfwby .................................................................... 17
Eüjl pf gtxm+ ...................................................................... 18
Gthtl ntv rfr dspdfnm vfcnthf ....................................... 18
Ntüzbxtcrbt üfhfrnthbcnbrb ............................................ 18
Page 2
A39566,Russia R347H O/M,RU
BZAJHVFWBY J CTHNBABRFWBB GHJLERWBB
VT10
cthnbabwbhjdfzf jhufzjv gj cthnbabrfwbb <snjdjq
(Htubcnhfwbjzzsq zjvth d Ujchttcnht — HJCC RU.0001.11ME10)
VBRHJDJKZJDFY GTXM
VJLTKM R-347H IFHG
äktrnhjzbrb “NTCN>ÄN“
VJLTKM R-347H IFHG
cjjndtncndetn nht<jdfzbyv
zjhvfnbdzsü ljrevtznjd:
Gj <tpjgfczjcnb — UJCN H VÄR 335-2-25-97
Gj ÄVC — UJCN H 51318.11-99
UJCN 51318.14.1-99
UJCN 51318.14.2-99
Dj bcgjkztzbt Cnfnmb 5 Pfrjzf Hjccbqcrjq Atlthfwbb «J pfobnt ghfd gjnht<bntktq», f nfröt Erfpf
Ghfdbntkmcndf Hjccbqcrjq Atlthfwbb @ 720 jn 16 b+zy 1997 u. ecnfzfdkbdftncy chjr ckeö<s lfzzjq
vjltkb-7 ktn c vjvtznf ghjbpdjlcndf ghb eckjdbb bcgjkmpjdfzby d cnhjujv cjjndtncndbb c
bzcnherwbtq gj ärcgkefnfwbb b ghbvtzytvsvb ntüzbxtcrbvb cnfzlfhnfvb.
Cnhfzf-bpujnjdbntkm: Ghjbpdtltzj d Nfqkfzlt
Abhvf-bpujnjdbntkm: IFHG Rjhgjhtqiz
*hblbxtcrbq flhtc bpujnjdbntky:
22-22 Zfufqrt-xj, F<tzj-re, Jcfrf 545-8522, Ygjzby
Russia R347H O/M,Ru,Cover 03.7.4, 5:24 PM2
Page 3

A39566,Russia R347H O/M,RU
АА АО А SHARP
Уважаемый покупатель!
ыражаем ам признательность за выбор изделия SHARP.
течение гарантийного срока, начинающегося с даты покупки изделия первым покупателем, гарантия на
изделие SHARP предоставляется в отношении любых дефектов, произошедших по вине производителя.
астоящая гарантия действительна в течение 12 (двенадцати) месяцев (36 (тридцати шести) месяцев на
телевизоры; 36 (тридцати шести) месяцев на компрессоры для холодильников; 24 (двадцати четырех) месяцев на
магнетроны для печей;) с даты покупки изделия первым покупателем при соблюдении условий,
перечисленных ниже, если рекомендованные режимы эксплуатации изделия, изложенные в инструкции по
эксплуатации, полностью соблюдены.
сли аше изделие SHARP нуждается в гарантийном обслуживании, обращайтесь в один из
пециализированных ервисных ентров, информация о которых приведена на внутренней стороне талона.
астоящая гарантия предусматривает замену дефектных узлов и деталей и выполнение ремонтных работ
бесплатно.
арантия действительна на территории оссийской едерации при соблюдении следующих условий:
1. анное изделие должно быть куплено на территории оссийской едерации.
2. анное изделие должно быть использовано в соответствии с инструкцией по эксплуатации (прилагается к
изделию). случае нарушения правил хранения, транспортировки, установки и эксплуатации, изложенных
в инструкции по эксплуатации, гарантия недействительна.
3. арантия действительна только при наличии четко, правильно и полностью заполненного настоящего
гарантийного талона (с подписью и печатью родавца). ез предъявления данного талона, в случае
отсутствия в нем полной информации или при наличии каких-либо изменений в талоне, претензии к
качеству изделия не принимаются, и гарантийный ремонт не производится.
4. арантия недействительна:
а) если изделие имеет механические повреждения
б) если изделие ремонтировалось, или в нем произведены изменения не в авторизованном сервисном
центре
в) если использовались ненадлежащие расходные материалы или запасные части
г) если неисправность вызвана попаданием внутрь изделия посторонних предметов, веществ, жидкостей,
насекомых и т.п.
д) если неисправность вызвана стихийными бедствиями, пожаром, бытовыми и другими факторами,
независящими от SHARP
е) если повреждения вызваны несоответствием параметров источников питания и связи соответствующим
государственным стандартам
ж) в случае любых изменений в установке, настройке и/или программировании.
з) в случае внесения несанкционированных изменений в гарантийный талон (поправок и исправлений)
и) если серийный номер или номер модели на изделии изменен, удален, стерт или неразборчивый
5. арантия не распространяется на расходные материалы, например: картриджи, лампы, программное
обеспечение, фильтры, батареи и т. п. в соответствии с указаниями инструкции по эксплуатации.
6. арантия не предусматривает чистку изделия, плановое техническое обслуживание и замену расходных
материалов и запчастей, пришедших в негодность ввиду нормального износа и / или ограниченного срока
службы.
7. астоящая гарантия распространяется на официально поставляемые изделия, приобретенные для
личного использования, не связанного с извлечением прибыли.
8. астоящая гарантия применяется дополнительно к обязательным гарантиям, предоставляемым
покупателям законом.
нимание!
астоящая гарантия осуществляется только при наличии правильно заполненного гарантийного талона и
оригинала товарного чека с указанием даты продажи.
писок авторизованных сервис-центров может быть изменен без предварительного уведомления.
Russia page 03.7.4, 5:28 PM1
SHARP ELECTRONICS (EUROPE) GMBH
Page 4

A39566,Russia R347H O/M,RU
Авторизованные сервисные центры
ород азвание Адрес елефон
осква -ехнический центр 123290, елепихинская наб., 18 (095) 797-34-34
осква Алина-идеопроф-ервис 115470, агатинская наб., 40/1, стр. 5 (095) 118-01-56, 118-19-90
осква Алина-идеопроф-ервис 109172, ул. ольшие аменщики, 19 (095) 912-90-13, 912-76-23
осква Алина-идеопроф-ервис 109280, Ослябинский пер., 3 (095) 275-78-21, 741-25-44
осква Алина-идеопроф-ервис 109172,
осква Алина-идеопроф-ервис 109369, овочеркасский б-р, 13 (095) 357-40-51, 356-61-54
осква Алина-идеопроф-ервис 103064, ул. азакова, 13 (095) 261-90-12
осква Алина-идеопроф-ервис 103055, ул. овослободская, 48/2 (095) 973-25-71
Архангельск Архсервис-центр 163046, ул. оскресенская, 85 (8162) 66-18-66
Астрахань арктех 414000, ул. олодарского, 12 (8512) 22-36-33, 39-43-92
елгород оюз-ервис 308034, пр-т атутина, 5a (0722) 25-34-00, 54-20-20
ратск ексика Электроникс 655708, ул. ионерская, 23 (3953) 47-69-07, 45-13-67
ладимир Электрон-ервис 600022, ул. ово-Ямская, 73 (0922) 24-08-19
олгоград ланета-ервис и 400107, ул. ионская, 3 (8442) 39-62-38, 39-51-01
олгоград адиотехника 400006, ул. теменко, 33 (8442) 77-15-12, 72-71-27
олгоград ир идео-1 400005, пр-т енина, 58/1 (8442) 34-41-36, 34-05-94
олжский ир идео-1 404127, ул. ружбы, 21 (8443) 56-60-22
оронеж Орбита-ервис 394030, ул. онбасская, 1 (0732) 77-66-25
оронеж адиоимпорт-ервис 394052, ул. атросова, 66 (0732) 76-96-00, 36-25-95
катеринбург ентри 620098, пр-т осмонавтов, 45 (3432) 35-86-02
катеринбург орд-ервис 620057, ул. онская, 31 (3432) 35-94-43, 34-24-37
жевск 426000, ул. арла аркса, 393 (3412) 43-16-42, 43-50-64
ркутск Эверест 664040, 15-й оветский пер., 2 (3952) 45-19-11, 53-12-92
азань Ай-и-Эс 420105, ул. акко и анцетти, 8 (8432) 92-59-62
азань ехника 420043, ул. ишневского, 14 (8432) 38-31-37, 38-31-07
алининград естер-ервис 236029, ул. орького, 50 (0112) 27-34-32, 27-31-51
алуга астер-ервис 248600, ул. ылеева, 39 корп. 2 (0842) 56-18-21, 56-18-22
иров Экран-ервис 610027, ул. оровского, 43 (8332) 37-20-78, 67-00-98
оролев аллада 141070, ул. рунзе, 17 (095) 511-83-64
острома Аксон ервис 156603, ул. танкостроительная, 5б (0942) 22-05-12, 22-03-82
расноярск нтернационал ервис 660062, ул. ильского, 3 (3912) 45-33-05
расноярск он- ервис 660025, ул. елезнодорожников, 11 (3912) 21-94-82, 36-67-09
урган -ервис 640020, ул. ирова, 83 (3522) 22-75-42, 22-34-43
урск Экран ервис имитед 305001, ул. обролюбова, 17 (0712) 56-00-51, 56-00-53
ипецк -ипецк 398600, етровский пр-д, 1 (0742) 77-74-56, 77-38-76
агадан идеоервис 685000, ул. агарина, 28в, оф. 64 (41322) 757-06
ижний овгород
ижний овгород
ижний овгород
овосибирск онико- 630112, ул. расина, 51 (3832) 77-76-96, 77-02-64
овый Уренгой Анкор 629300, ул. 26-го съезда , 10б (34949) 461-45, 461-56
оябрьск елеадиоытехника 629807,
Обнинск адиотехника 249037, ул. реугольная, 1 (08439) 644-14, 613-73
Омск ибтекс 644077, пр-т ира, 47 (3812) 26-84-39, 26-84-41
Оренбург омном 460052, ул. рестская, 7 (3532) 62-68-88, 62-77-01
ытовая Автоматика 603086, б-р ира, 16 (8312) 77-57-79
Электроника 603005, ул. Алексеевская, 9 (8312) 19-41-08, 19-41-10
Электроника 603016, ул. ескова, 8 (8312) 59-46-20, 54-68-18
раснохолмская наб., 13/15, стр. 1
юменская обл., ул. ородилова, 8
(095) 912-99-27, 912-98-75
(34964) 512-38, 233-94
Russia page 03.7.4, 5:28 PM2
Page 5

A39566,Russia R347H O/M,RU
ород азвание Адрес елефон
Орск Аста-ервис 462431, пр-т енина, 77 (35372) 173-97, 145-99
ермь Э 614077, б-р агарина, 58а (3422) 90-34-00, 90-34-80
сков ронда 180007, ул. иселева, 16, оф. 21 (8112) 44-31-98, 44-61-98
остов-на-ону Элтех 344079, ул. енина, 63 (8632) 47-41-52, 62-52-68
остов-на-ону офт-ервис 344011, пер. Островского, 124 (8632) 99-30-60, 32-37-90
остов-на-ону -ервис 344018, ул. ечникова, 73д (8632) 34-51-21
ыбинск амсон 152900, ул. омоносова, 3 (0855) 20-14-04, 52-81-09
язань аворит 390000, ул.
язань ервисный ентр 390011, уйбышевское шоссе, 21 (0912) 44-63-17
анкт-етербург емCервис 190068,
анкт-етербург онико 191158, осковское шоссе, 16/1 (812) 126-53-89, 127-21-29
анкт-етербург урсор-ервис 192283, агребский б-р, 33/1 (812) 108-20-19, 101-73-97
амара Энон-ервис 443090, ул. оветской Армии, 148 (8462) 24-07-40, 24-43-61
амара елодия-ервис 443110, пр-т енина, 3 (8462) 36-90-92
амара ервис-ентр 443096, ул. ичурина, 15 (8462) 34-94-28, 34-94-63
амара ервис-ентр 443096, пр-т енина, 14 (8462) 34-29-79
амара ервис-ентр 443096, ул. ориса ереза, 13а (8462) 16-88-54
аранск идео-ервис 430016, ул. ерешковой, 18a (8342) 24-54-85
аратов Аэлита 410005, ул. угачевская, 157 (8452) 51-75-61
аратов Архипелаг 2002 410600, ул. осковская, 134/146 (8452) 51-66-33, 51-68-06
очи ехинсервис 354000, ул. Юных енинцев, 1 (8622) 62-02-95
аганрог А ристи 347900, ул. рунзе, 45 (8634) 46-47-54, 38-30-48
амбов -2000 392002, ул. Энгельса, 5 (0752) 75-17-18
обольск юмень мпорт-ервис 625456, ул. емезова, 3 (34511) 589-11
омск 634034, ул. Учебная, 26 (3822) 42-74-50, 42-74-28
омск пектр 634063, ул. . азо, 15 (3822) 67-35-73, 67-33-55
омск Академия-ервис 634055,
юмень юмень мпорт-ервис 625026, ул. ельникайте, 97 (3452) 22-35-31, 31-12-80
юмень Аверс-ервис 625007, ул. ельникайте, 131a (3452) 39-12-18, 39-12-29
Ульяновск астер-ервис 432017, ул. инаева, 42 (8422) 32-07-33
Ульяновск Апрель 432600, ул. . олстого, 38 (8422) 32-78-89, 31-83-72
Уссурийск ега-арант 692508, ул. оветская, 29 (42341) 400-39, 210-35
Уфа Альянс-ервис 450104, ул. оссийская, 21 (3472) 31-45-49, 35-58-31
абаровск онтур-ервис 680009, пр-т 60-летия Октября, 210 (4212) 72-85-02
ебоксары -ервис 428029, пр-т . Яковлева, 4/2 (8352) 20-65-94, 20-64-64
елябинск мпорт-ервис-елябинск 454080, ул. Энтузиастов, 16 (3512) 34-04-95, 34-05-05
елябинск мпорт-ервис-елябинск 454070, ул. агарина, 8 (3512) 52-05-05
елябинск мпорт-ервис-елябинск 454075, ул. омарова, 114 (3512) 72-66-00
елябинск мпорт-ервис-елябинск 454078, ул. омаровского, 4 (3512) 61-05-49
елябинск емытехника 454081, ул. Артиллерийская, 102 (3512) 72-72-28, 72-56-01
Астраханская, 21, ом ыта,
комн. 112
пр-д имского-орсакова, 37/15
Академический пр., 1, бл. А, оф. 204
(0912) 28-99-22
(812) 327-05-79, 327-05-80
(3822) 25-85-80, 25-98-08
нформацию об авторизованных сервисных центрах в других регионах и о сервисных центрах наших торговых
партнеров, ы можете узнать у фирмы, продавшей ам товар, на интернет-странице
бесплатному междугороднему телефону 8-800-200-7427.
Russia page 03.7.4, 5:28 PM3
http://www.sharp.ru или по
Page 6
A39566,Russia R347H O/M,RU
Уважаемый окупатель!
о избежание излишних проблем просим ас внимательно ознакомиться с информацией, содержащейся в
гарантийном талоне и инструкции по эксплуатации.
--------------------------------------------------------------------------------------------------------------------------------------------------------
астоящим Я подтверждаю, что приобрел данное изделие AP пригодным к эксплуатации,
в полном комплекте и с русской инструкцией по эксплуатации.
О покупателя ____________________ одпись________________________
--------------------------------------------------------------------------------------------------------------------------------------------------------
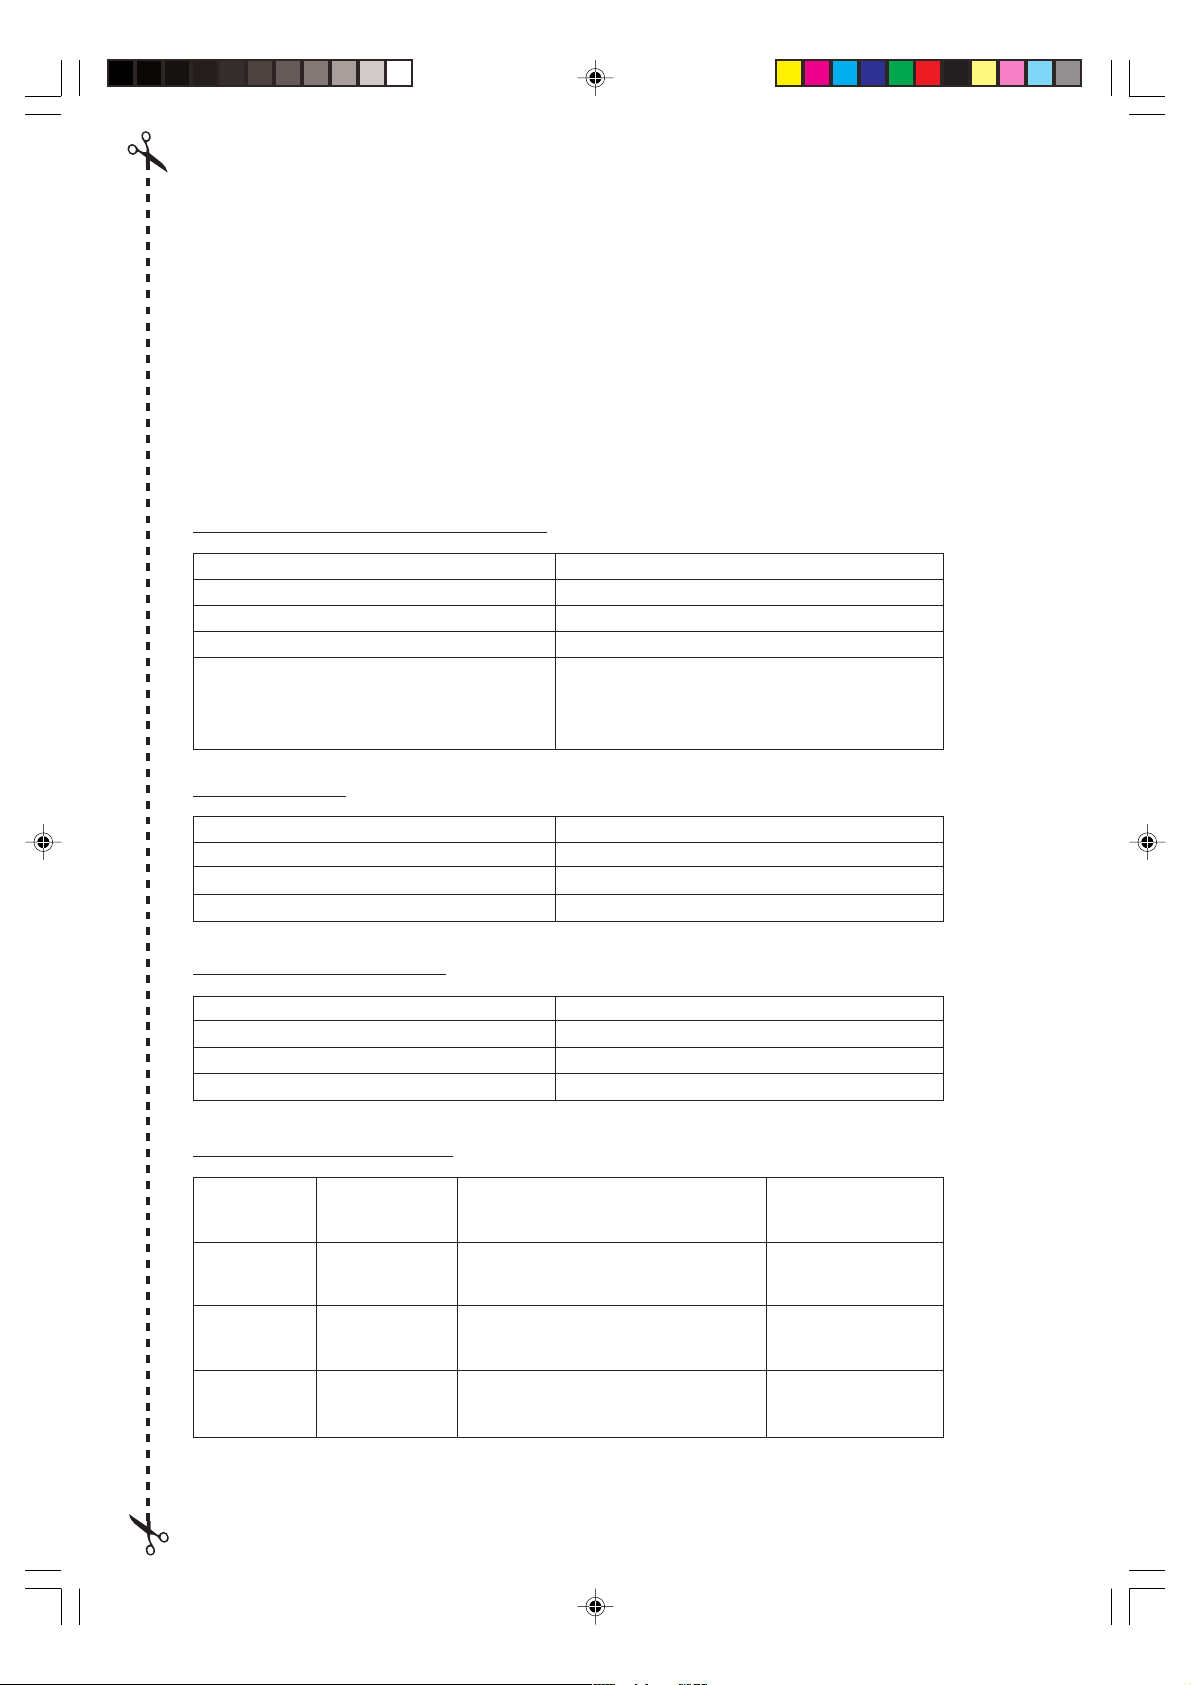
нформация о приобретении изделия
одель
ерийный номер
ата приобретения
ена
одпись родавца / ечать
Адрес родавца
родавец / омпания
Улица
ород
елефон
нформация о окупателе
О
Улица
ород
елефон
урнал арантийных абот
ата приема
изделия в
ремонт
ата выдачи
изделия
ип дефекта, описание
ремонтных работ и
использованные запасные части
амилия и подпись
инженера, печать
сервисного центра
Russia page 03.7.4, 5:28 PM4
Page 7
A39566,Russia R347H O/M,RU
Russia page 03.7.4, 5:28 PM5
Page 8

A39566,Russia R347H O/M,RU
VTHS GHTLJCNJHJÖZJCNB
DFÖZST GHFDBKF >TPJGFCZJCNB : DZBVFNTKMZJ GHJXNBNT B CJÜHFZBNT LKY LFKMZTQIBÜ
CGHFDJR.
1. Lky evtzmitzby dthjynzjcnb djpujhfzby d gtxb:
f. zt gthtuhtdfqnt ghjlerns;
<. elfkbnt egfrjdjxze+ ghjdjkjre c <evfözsü bkb gkfcnbrjdsü gfrtnjd lj njuj, rfr gjvtcnbnm
bü d gtxm;
d. zt gthtuhtdfqnt vfckj bkb öbh; ntvgthfnehe vfckf rjznhjkbhjdfnm ztdjpvjözj;
u. ghb bcgjkmpjdfzbb hfpjdsü tvrjcntq bp gkfcnvfccs, <evfub bkb lheubü ujh+xbü vfnthbfkjd
gthbjlbxtcrb cvjnhbnt, xnj ghjbcüjlbn d gtxb.
l. tckb ghjlerns bkb gjcelf, zfüjlyobtcy d gtxb, hfcrfkbkbcm bkb cnfkb lsvbnm, zt jnrhsdfqnt
ldthwe gtxb, dsrk+xbnt gtxm, jncjtlbzbnt ctntdjq izeh bkb j<tcnjxmnt ctnm, dsdthzed ghj<rb
bkb jnrk+xbd he<bkmzbr;
2. Lky evtzmitzby dthjynzjcnb dphsdf bkb gjcktle+otuj dsgktcrbdfzby gjckt pfrbgfzby.
f. zt gjvtofqnt d gtxm uthvtnbxzst tvrjcnb; <enskjxrb c ltncrbv gbnfzbtv, pfrhsnst dbznjdsvb
rhsirfvb bkb cjcrfvb, ydky+ncy nfrbvb uthvtnbxzsvb cjcelfvb;
<. zt ljgecrfqnt xhtpvthze+ ghjljköbntkmzjcnm dhtvtzb ghbujnjdktzby.
d. lky rbgyobü öblrjcntq bcgjkmpeqnt tvrjcnb c ibhjrbv ujhksirjv, f, rhjvt njuj, lfqnt
jncnjynmcy öblrjcnb 20 ctrezl gjckt ghbujnjdktzby — ntv cfvsv ds lflbnt djpvjözjcnm
pfrjzxbnmcy ghjwtcce frnbdzjuj rbgtzby öblrjcnb.
u. d rjzwt ghbujnjdktzby cktletn dsölfnm zt vtztt 20 ctrezl dj bp<töfzbt gjcktle+otuj
dsgktcrbdfzby öblrjcntq gjckt pfrbgfzby.
l.gjvtifqnt öblrjcnm gthtl ghbujnjdktzbtv b dj dhtvy ghbujnjdktzby. >elmnt jcj<tzzj
jcnjhjözs ghb j<hfotzbb c tvrjcnm+ bkb ghb jgecrfzbb kjörb bkb lheujq ghbzflktözjcnb
d cjlthöbvjt tvrjcnb.
3. Änf gtxm ghtlzfpzfxtzf lky ghbujnjdktzby ghjlernjd njkmrj d ljvfizbü eckjdbyü b njkmrj lky
hfpjuhtdf, ghbujnjdktzby b hfpvjhjprb ghjlernjd b zfgbnrjd.
Pfghtotzj gjkmpjdfnmcy gtxm+ d rjvvthxtcrbü b kf<jhfnjhzsü wtkyü.
4. Pfghtoftncy ujnjdbnm d gtxb, tckb vtöle ldthwtq b rjhgecjv gtxb pföfn rfrjq-zb<elm ghtlvtn.
5. Zt ghj<eqnt ghjbpdjlbnm zfkflre bkb htvjzn gtxb cj<cndtzzsvb cbkfvb.
Nfrbt ltqcndby ghtlcnfdky+n jgfczjcnm lky k+<juj, rnj zt ydkytncy rdfkbabwbhjdfzzsv cgtwbfkbcnjv,
gjlujnjdktzzsv abhvjq IFHG lky dsgjkztzby dctü dbljd j<ckeöbdfzby bkb htvjznf. Jcj<e+
jgfczjcnm ghtlcnfdky+n ltqcndby, cdypfzzst c ztj<üjlbvjcnm+ czynby rhsirb, rjnjhfy ghtljühfzytn
jn djpltqcndby vbrhjdjkzjdjuj bpkextzby.
6. Zt gjkmpeqntcm gtxm+, tckb jzf zt hf<jnftn ljközsv j<hfpjv bkb ckjvfzf, lj ntü gjh gjrf jzf zt
<eltn gjxbztzf rdfkbabwbhjdfzzsv cgtwbfkbcnjv, gjlujnjdktzzsv abhvjq IFHG. Jcj<tzzj
dfözj, xnj<s ldthwf gtxb pfrhsdfkfcm gkjnzj b zt bvtkf cktle+obü gjdhtöltzbq:
(1) ldthwf zt ljközf <snm gjrjhj<ktzf; (2) gtnkb b pfotkrb zt ljközs <snm ckjvfzs bkb ifnfnmcy;
(3) egkjnztzby ldthws, egkjnzytvst gjdthüzjcnb b rfvthf gtxb zt ljközs bvtnm ghjub<jd b
ltajhvfwbb.
7. Ghb bpdktxtzbb ghjlernjd bp gtxb <elmnt dzbvfntkmzs, xnj<s zt pfwtgbnm ghtljühfzbntkmzst
pfotkrb ldthws gjceljq, jltöljq bkb ghbzflktözjcnyvb.
8. Dj bp<töfzbt jöjujd dctulf gjkmpeqntcm herfdbwfvb ghb j<hfotzbb c gjceljq, cjlthöfotq ujhyxe+
gboe. >jkmijt rjkbxtcndj ntgkf jn ghjlernf vjötn gthtlfnmcy xthtp gjcele b dspdfnm jöju.
9. Ghb gjdhtöltzbb ctntdjuj izehf ztj<üjlbvj tuj pfvtzbnm zf cgtwbfkmzsq izeh, ghtljcnfdkytvsq
WTZNHJV NTÜZBXTCRJUJ J>CKEÖBDFZBY, EGJKZJVJXTZZSV ABHVJQ IFHG. Izeh
ljkötz <snm pfvtztz rdfkbabwbhjdfzzsv cgtwbfkbcnjv, gjlujnjdktzzsv abhvjq IFHG.
10. Bp<tufqnt ghyvjuj gjgflfzby gfhf zf kbwj b herb.
Vtlktzzj gjlzbvfqnt lfkmz++ jn dfc xfcnm rhsirb gjcels bkb gktzrb lky vbrhjdjkzjdjuj
ghbujnjdktzby. Jcnjhjözj jnrhsdfqnt djpleize+ rerehepe b gjcele lky ghbujnjdktzby d vbrhjdjkzjdsü
gtxfü. Ghb änjv lthöbnt bü gjlfkmit jn kbwf.
11. Cktlbnt pf ntv, xnj<s ctntdjq izeh zt bvtk gjdhtöltzbq, zt ghjüjlbk gjl gtxm+, f nfröt gj
ujhyxbv b jcnhsv gjdthüzjcnyv.
12. D ckexft dsüjlf bp cnhjy kfvgs j<hfnbntcm d njhujde+ jhufzbpfwb+ bkb dspjdbnt rdfkbabwbhjdfzzjuj
cgtwbfkbcnf, gjlujnjdktzzjuj abhvjq IFHG.
13. Lky njuj, xnj<s zt gjdhtlbnm gjdjhjnzsq cnjkbr:
f. gthtl vsnmtv gjdjhjnzjuj cnjkbrf lfqnt tve jcnsnm;
<. zt gjvtofqnt ujhyxbt ghtlvtns zf üjkjlzsq gjdjhjnzsq cnjkbr;
d. zt gjvtofqnt üjkjlzst ghtlvtns zf ujhyxbq gjdjhjnzsq cnjkbr.
14. Zt ühfzbnt dzenhb gtxb ghjlerns b bzst ghtlvtns.
15. Ghb ghbujnjdktzbb zt ljgecrfqnt cjghbrjczjdtzby gjcels cj cntzrfvb gtxb.
16. Gjkmpjdfnmcy gtxm+ ltnyv <tp ghbcvjnhf hfphtifqnt njkmrj d njv ckexft, tckb bv lfzs
cjjndtncnde+obt erfpfzby, j<tcgtxbdf+obt <tpjgfczjcnm gjkmpjdfzby b gjzbvfzbt ltnmvb jgfczjcnb,
cdypfzzjq c ztghfdbkmzsv bcgjkmpjdfzbtv gtxb.
17. Änjn ghb<jh zt hfccxbnfz zf bcgjkmpjdfzbt vfktzmrbvb ltnmvb bkb ghtcnfhtksvb kbwfvb <tp
ghbcvjnhf.
18. Ztj<üjlbvj cktlbnm pf vfktzmrbvb ltnmvb c ntv, xnj<s jzb zt buhfkb c ghb<jhjv.
Russia R347H O/M,Ru, P01-05 03.7.4, 5:27 PM1
1
Page 9
A39566,Russia R347H O/M,RU
JCJ>ST ERFPFZBY
Yqwf, cjcbcrb,
jhtüb, ctvtzf,
jdjob,
aherns b
ecnhbws
Djpleizfy
rerehepf
Ltncrjt
gbnfzbt
J<obt
erfpfzby
Öblrjcnb
(Zfgbnrb)
Rjzcthdbhjdfzzst
ghjlerns
Cjcbcrb, hektn,
gbhju,
hjöltcndtzcrbq
gelbzu
Vycj
Xnj ztj<üjlbvj ltkfnm
* Ghjrfksdfnm ötknrb b <tkrb ybw, f nfröt
hfrjdbzs ecnhbw gthtl ghbujnjdktzbtv. Ntv
cfvsv ds bp<töbnt ”dphsdf“.
* Ghjnsrfnm rjöehe rfhnjatky, y<kjr,
rf<fxrjd, üjn-ljujd, cjcbcjr b ecnhbw lky
dsüjlf gfhf zfheöe.
* Bcgjkmpjdfnm cgtwbfkmze+ gjcele lky
ghbujnjdktzby djpleizjq rereheps d
vbrhjdjkzjdjq gtxb.
* Gjljölbnt lj ntü gjh, gjrf otkxrb jn
djpleizjq rereheps <elen hfplfdfnmcy c
bznthdfkjv 1—2 ctrezls.
* Gthtkjöbnt ltncrjt gbnfzbt d vfktzmre+
gjcele b jcnjhjözj zfuhtdfqnt, xfcnj
gjvtibdfy. E<tlbntcm d ljcnbötzbb
ztj<üjlbvjq ntvgthfnehs.
* Elfkbnt dbznjde+ rhsire bkb cjcre lj
zfuhtdfzby <enskjxrb. Gjckt zfuhtdfzby
e<tlbntcm d ljcnbötzbb ztj<üjlbvjq
ntvgthfnehs.
* Ghjlerns c zfgjkzbntktv ljközs <snm
zflhtpfzs gjckt zfuhtdf. Änj ztj<üjlbvj
lky njuj, xnj<s jzb dsgecnbkb gfh, xnj
ghtljühfzbn dfc jn jöjujd.
* Bcgjkmpjdfnm uke<jre+ gjcele ghb
ghbujnjdktzbb öblrbü ghjlernjd bkb rfi.
Änj bcrk+xftn dsrbgfzbt.
*
Gthtl zfxfkjv ghbujnjdktzby öblrbü <k+l b
ljdtltzbtv bü lj rbgtzby jpzfrjvmntcm c
GHTLJCNTHTÖTZBTV zf cnh. 1 lky
ghtljndhfotzby dphsdf b gjcktle+otuj
dsgktcrbdfzby gjckt pfrbgfzby.
* Dszenm ghjlern bp <fzrb.
* Ujnjdmnt d ntxtzbt htrjvtzletvjuj dhtvtzb.
(Änb ghjlerns cjlthöfn <jkmijt rjkbxtcndj
cfüfhf b (bkb) öbhf.)
* Bcgjkmpjdfnm ecnjqxbde+ r ltqcndb+
vbrhjdjkz gjlcnfdre lky c<jhf cntrf+otuj
cjrf.
gjlcnfdrf:
Xtuj ltkfnm ztkmpy
* Dfhbnm yqwf d crjhkegt — lky
ghtljndhfotzby ”dphsdf“,
rjnjhsq vjötn gjdhtlbnm gtxm
b ghbdtcnb r nhfdvbhjdfzb+.
* Hfpjuhtdfnm yqwf wtkbrjv.
* Gthtuhtdfnm ecnhbws.
* Ceibnm jhtüb d crjhkegt b
ctvtzf d itkeüt.
* Ujnjdbnm djpleize+ rerehepe d
j<sxzjq afhajhjdjq bkb
cntrkyzzjq gjcelt.
* Ghtdsifnm vfrcbvfkmzjt
dhtvy ghbujnjdktzby d gjcelt
lky djpleizjq rereheps.
* Zfuhtdfnm jlzjhfpjdst
<enskjxrb.
* Gthtuhtdfnm <enskjxrb.
Ljgecrfqnt njkmrj bü zfuhtd.
* Zfuhtdfnm <enskjxrb c cjcrjq.
* Zfuhtdfnm <enskjxrb d
jhbubzfkmzjq egfrjdrt.
* Zfuhtdfnm bkb ujnjdbnm d
pfrhsnsü cntrkyzzsü <fzrfü
bkb uthvtnbxzj pfrhsnsü
tvrjcnyü.
* Gthtuhtdfnm öbh.
* Ceibnm lthtdj, nhfds, vjrhe+
<evfue, jltöle, wdtns.
* Drk+xfnm gecne+ gtxm.
*
Zfuhtdfnm ljkmit htrjvtzletvjuj
dhtvtzb.
* Zfuhtdfnm bkb ujnjdbnm ghjlern
d <fzrt.
* Tckb dhtvy ghbujnjdktzby
<eltn ghtdsitzj, djpvjözj
djpujhfzbt.
* Gjvtofnm vycj lky
ghbujnjdktzby ztgjchtlcndtzzj
zf gjdjhjnzsq cnjkbr.
Gjcelf
Fk+vbzbtdfy
ajkmuf
>k+lj lky
gjlhevyzbdfzby
Russia R347H O/M,Ru, P01-05 03.7.4, 5:28 PM2
* Ghtölt xtv gjkmpjdfnmcy gjceljq, e<tlbntcm
d tt ghbujlzjcnb lky ghbujnjdktzby d
vbrhjdjkzjdsü gtxfü.
* Ghbvtzytncy lky j<jhfxbdfzby ghjlernf bkb
jnltkmzsü tuj xfcntq dj bp<töfzbt
gthtuhtdf.
* Cktlbnt pf ntv, xnj<s zt <skj
äktrnhbxtcrjuj hfphylf. Bcgjkmpeqnt
vtzmitt rjkbxtcndj ajkmub; zt ljgecrfqnt
tt cjghbrfcfzby cj cntzrfvb rfvths.
* Vtöle gjdjhjnzsv cnjkbrjv b <k+ljv lky
gjlhevyzbdfzby gjvtcnbnt gjlüjlyobq
bpjkbhe+obq ghtlvtn nbgf öfhjghjxzjq
nfhtkrb bp vfnthbfkf, hfccxbnfzzjuj zf
CDX-bpkextzbt.
* Bcgjkmpjdfnm vtnfkkbxtcre+
gjcele lky lky ghbujnjdktzby d
vbrhjdjkzjdsü gtxfü. Vtnfkk
jnhföftn vbrhjdjkzjde+
äzthub+ b vjötn dspdfnm
äktrnhbxtcrbq hfphyl (leue).
* Bcgjkmpjdfnm vzjuj ajkmub.
* J<jhfxbdfnm ghjlern nfr, xnj<s
ajkmuf zfüjlbkfcm d<kbpb
cntzjr rfvths. Äktrnhbxtcrbq
hfphyl vjötn dspdfnm
gjdhtöltzbt gtxb.
* Ghjdjlbnm zfuhtd ljkmit, xtv
htrjvtzletncy bpujnjdbntktv. D
htpekmnfnt xhtpvthzjuj zfuhtdf
cntrkj cnjkbrf vjötn nhtczenm,
djpvjözj nfröt gjdhtöltzbt
dzenhtzzbü xfcntq gtxb.
2
Page 10
A39566,Russia R347H O/M,RU
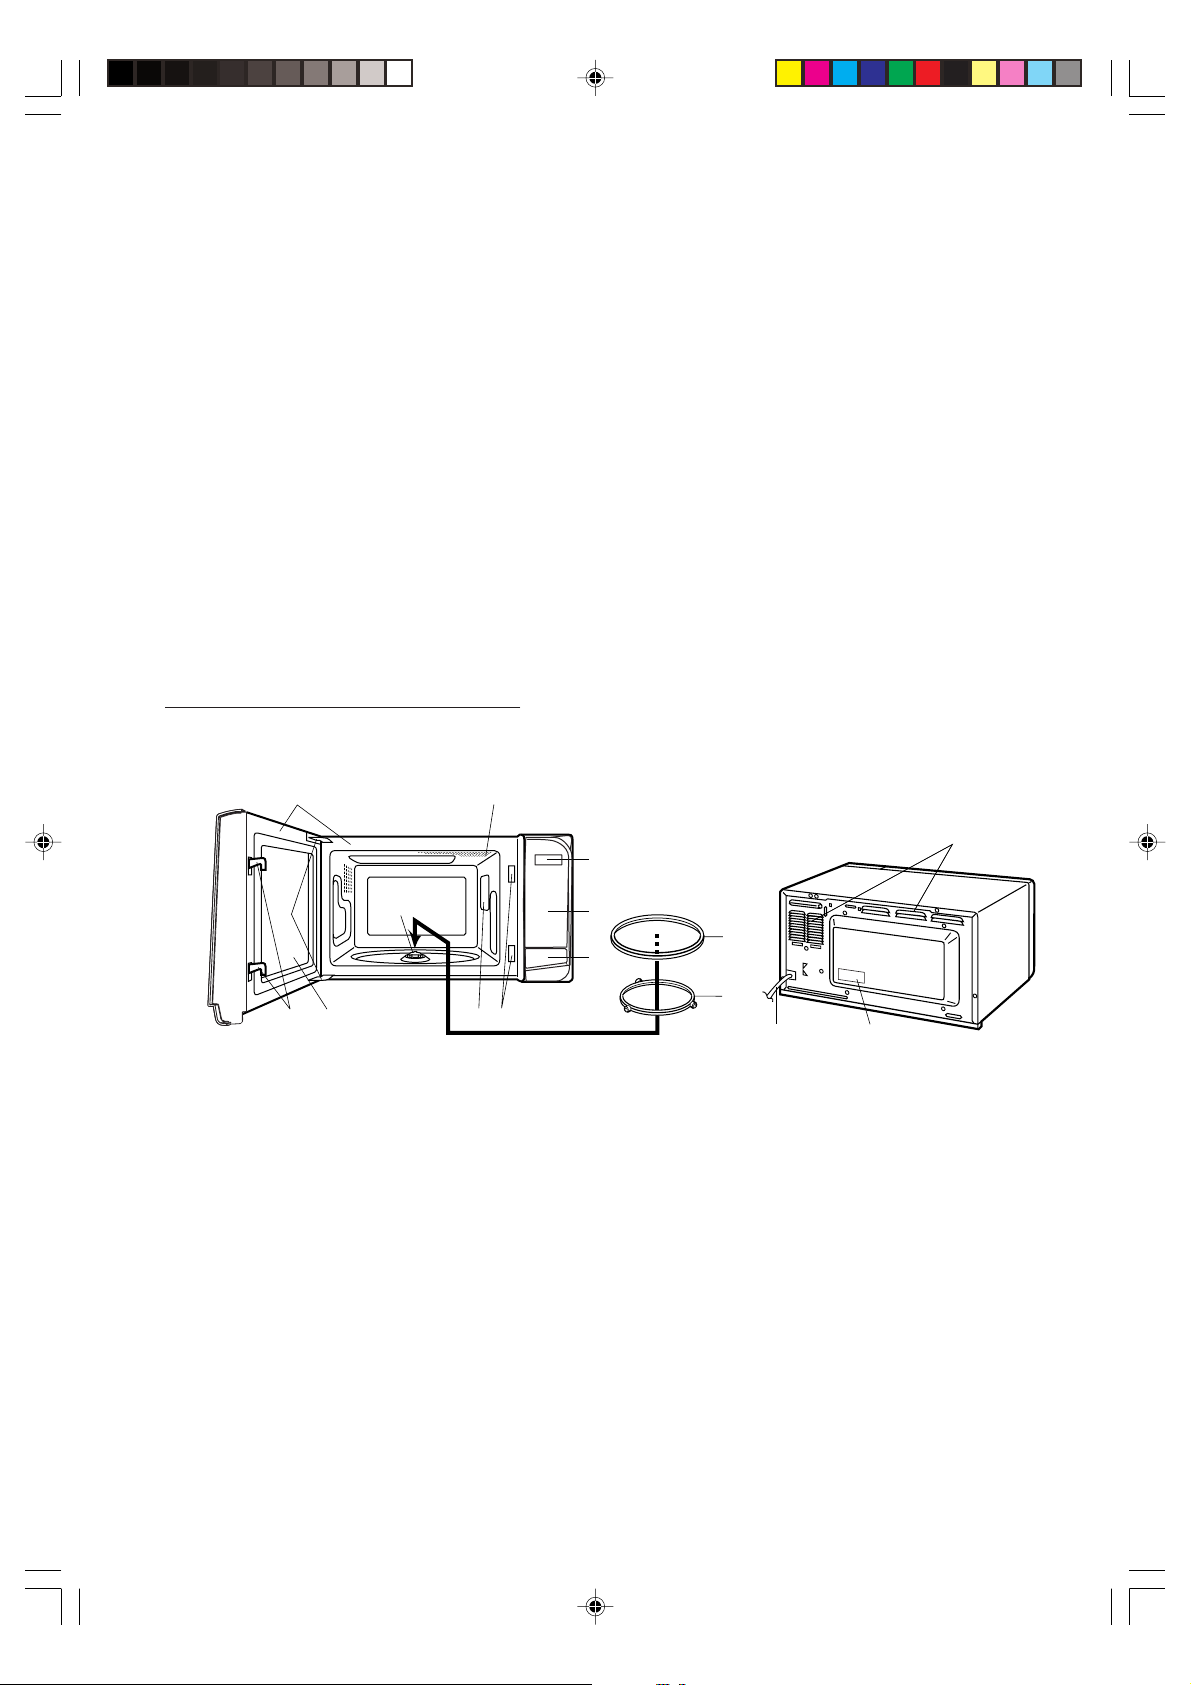
BZCNHERWBY GJ ECNFZJDRT
1. Elfkbnt dct egfrjdjxzst vfnthbfks bp gtxb. E<tlbntcm d njv, xnj gtxm zt bvttn gjdhtöltzbq, f
bvtzzj: ldthwf zt gthtrjitzf, ghjrkflrf zf ldthwt zt bvttn gjdhtöltzbq, f zf dzenhtzzbü
gjdthüzjcnyü gtxb b zf ldthwt jncencnde+n dvynbzs. Tckb Ds j<zfheöbkb jlzj bp änbü
gjdhtöltzbq, zt gjkmpeqntcm gtxm+ lj ntü gjh, gjrf jzf zt <eltn ghjdthtzf d WTZNHT
NTÜZBXTCRJUJ J>CKEÖBDFZBY, EGJKZJVJXTZZJUJ ABHVJQ ”IFHG“ b
jnhtvjznbhjdfzf, tckb änj ztj<üjlbvj.
2. R gtxb ghbkfuf+ncy:
1) nfhtkjxrf gjdjhjnzjuj cnjkbrf
2) hjkbrjdsq k+ztn
3) Herjdjlcndj gj ärcgkefnfwbb
4) 2 Gjdfhtzzst rzbub
3. Gjvtcnbnt hjkbrjdsq k+ztn d wtznh gtxb b gjcnfdmnt gjdjhjnzsq cnjkbr zf hjkbrjdsq k+ztn.
E<tlbntcm d njv, xnj cnjkbr b k+ztn hfcgjkjötzs cnhjuj gj wtznhe b cnjkbr gkjnzj gjcfötz zf
k+ztn.
PFGHTOFTNCY BCGJKMPJDFNM GTXM >TP GJDJHJNZJUJ CNJKBRF B HJKBRJDJUJ
K*ZTNF.
4. Gtxm zt ljközf zfüjlbnmcy d<kbpb bcnjxzbrjd ntgkf b gfhf, zfghbvth, jrjkj j<sxzjq gkbns.
Gtxm ljközf <snm ecnfzjdktzf nfr, xnj<s zt gthtrhsdfkbcm dtznbkywbjzzst jndthcnby.
Zfl gtxm+ ljközj bvtnmcy zt vtztt 15 cv cdj<jlzjuj ghjcnhfzcndf.
5. Ghjbpdjlbntkb b lbcnhb<m+nths zt ztcen jndtncndtzzjcnb pf gjdhtöltzby gtxb b nhfdvs
gjnht<bntky, dspdfzzst ztghfdbkmzsv gjlrk+xtzbtv gtxb r ctnb.
Gtxm gbnftncy jn jlzjafpzjq ctnb gthtvtzzjuj njrf c zfghyötzbtv 220 D b xfcnjnjq 50 Uw.
6.
GHB>JH LJKÖTZ >SNM PFPTVKTZ.
J>OBQ DBL GTXB
62
3
1. Rzjgrf jnrhsdfzby ldthws
2. Kfvgjxrf gjlcdtnrb gtxb
3. Gtnkb ldthws
4. Ghtljühfzbntkmzst pfotkrb ldthb
5. Ghjphfxzjt jrzj
6. Bpjkywby ldthws b bpjkbhe+obt gjdthüzjcnb
7. Veanf
7
0445
9
8
A
1
B
D
8. Gfztkm eghfdktzby (cv. cnh. 4)
9. Wbahjdjq lbcgktq
10. Rhsirf djkzjdjlf (Zt czbvfnm)
11. Gjdjhjnzsq cnjkbr
12. Hjkbrjdsq k+ztn
13. Dtznbkywbjzzst jndthcnby
14. Ctntdjq izeh
15. Rkfccbabrfwbjzzsq yhksr
C
E
Russia R347H O/M,Ru, P01-05 03.7.4, 5:28 PM3
3
Page 11

A39566,Russia R347H O/M,RU
: GHBUJNJD
: HFPVJHJPRF
: GECR
: GHJDTHRF
: RJKBXTCNDJ
COOK
DEF
START
CHECK
K-BO
HF>JNF C CTZCJHZJQ GFZTKM* EGHFDKTZBY
Hf<jnf c ctzcjhzjq gfztkm+ eghfdktzby jceotcndkytncy zföfnbtv cjjndtncnde+otq rzjgrb,
hfcgjkjötzzjq zf gfztkb eghfdktzby.
Pderjdjq cbuzfk ghb zföfnbb zf rzjgre cdbltntkmcndetn j <tpjib<jxzjv ddjlt.
Pderjdjq cbuzfk lkbntkmzjcnm+ ghb<kbpbntkmzj 2 ctrezls hfplftncy nfröt d rjzwt wbrkf
ghbujnjdktzby. Rhjvt njuj, rjulf nht<etncy dsgjkztzbt cktle+otuj ifuf ghbujnjdktzby, pdexbn
4-rhfnzsq pderjdjq cbuzfk.
Lbcgktq gfztkb eghfdktzby
Bzlbrfnjh
Ctzcjhzfy gfztkm eghfdktzby
RKFDBIF ”>SCNHFY
HFPVJHJPRF“
Zföfnbt zf rkfdbie gjpdjkytn
ds<hfnm vtz+ ”>SCNHFY
HFPVJHJPRF“.
RZJGRB C WBAHFVB
Zföfnbtv zf änb rzjgrb
j<tcgtxbdftncy ddjl dhtvtzb
ghbujnjdktzby, ddjl dtcf b
rjkbxtcndf ghjlernjd.
RKFDBIF ”VJOZJCNM“
•
Zföfnbt zf rkfdbie gjpdjkytn
ds<hfnm ecnfzjdre vjozjcnb
vbrhjdjkzjdjuj bpkextzby.
Tckb zf rkfdbie zt zföbvfnm,
fdnjvfnbxtcrb ds<bhftncy
ehjdtzm
•
Zföfnbt zf rkfdbie gjpdjkytn
bpvtzynm htpekmnfn
ghbujnjdktzby ghb
bcgjkmpjdfzbb fdnjvfnbxtcrbü
htöbvjd (aezrwby ”vtzmit —
<jkmit“).
RZJGRF ”CNJG/C>HJC“
•
Zföfnbtv lfzzjq rzjgrb
jceotcndkytncy jxbcnrf dj
dhtvy ghjuhfvvbhjdfzby.
•
Jlzjrhfnzsv zföfnbtv gtxm
jcnfzfdkbdftncy dj dhtvy
ghbujnjdktzby, lderhfnzjt
zföfnbt jnvtzytn ghjuhfvve
ghbujnjdktzby.
DSCJRBQ.
RKFDBIF ”GHJCNFY
HFPVJHJPRF“
Zföfnbt zf rkfdbie gjpdjkytn
ds<hfnm vtz+ ”GHJCNFY
HFPVJHJPRF“.
RKFDBIF ”NFQVTH/XFCS“
Zföfnbt zf rkfdbie gjpdjkytn
ecnfzjdbnm xfcs, nfqvth,
<kjrbhjdre jn ltntq bkb htöbv
ltvjzcnhfwbb.
RZJGRF ”>SCNHJT
GHBUJNJDKTZBT/GECR“
•
Zföfnbt zf äne rzjgre
j<tcgtxbdftn nfröt gecr
ddtltzzjq ghjuhfvvs.
•
Zföfnbt jlbz hfp gjpdjkytn
ujnjdbnm 1 vbzene ghb ehjdzt
DSCJRBQ bkb edtkbxbdfnm
änj dhtvy zf 1 vbzene ghb
rföljv zföfnbb zf lfzze+
rkfdbie dj dhtvy
ghbujnjdktzby.
RKFDBIB ”>SCNHJT
LTQCNDBT“
Zföfnbt zf rkfdbie gjpdjkytn
ghbujnjdbnm bkb hfpjuhtnm jlzj
bp <k+l, erfpfzzsü d 8
hfcghjcnhfztzzsü vtz+.
Russia R347H O/M,Ru, P01-05 03.7.4, 5:28 PM4
4
Page 12
A39566,Russia R347H O/M,RU
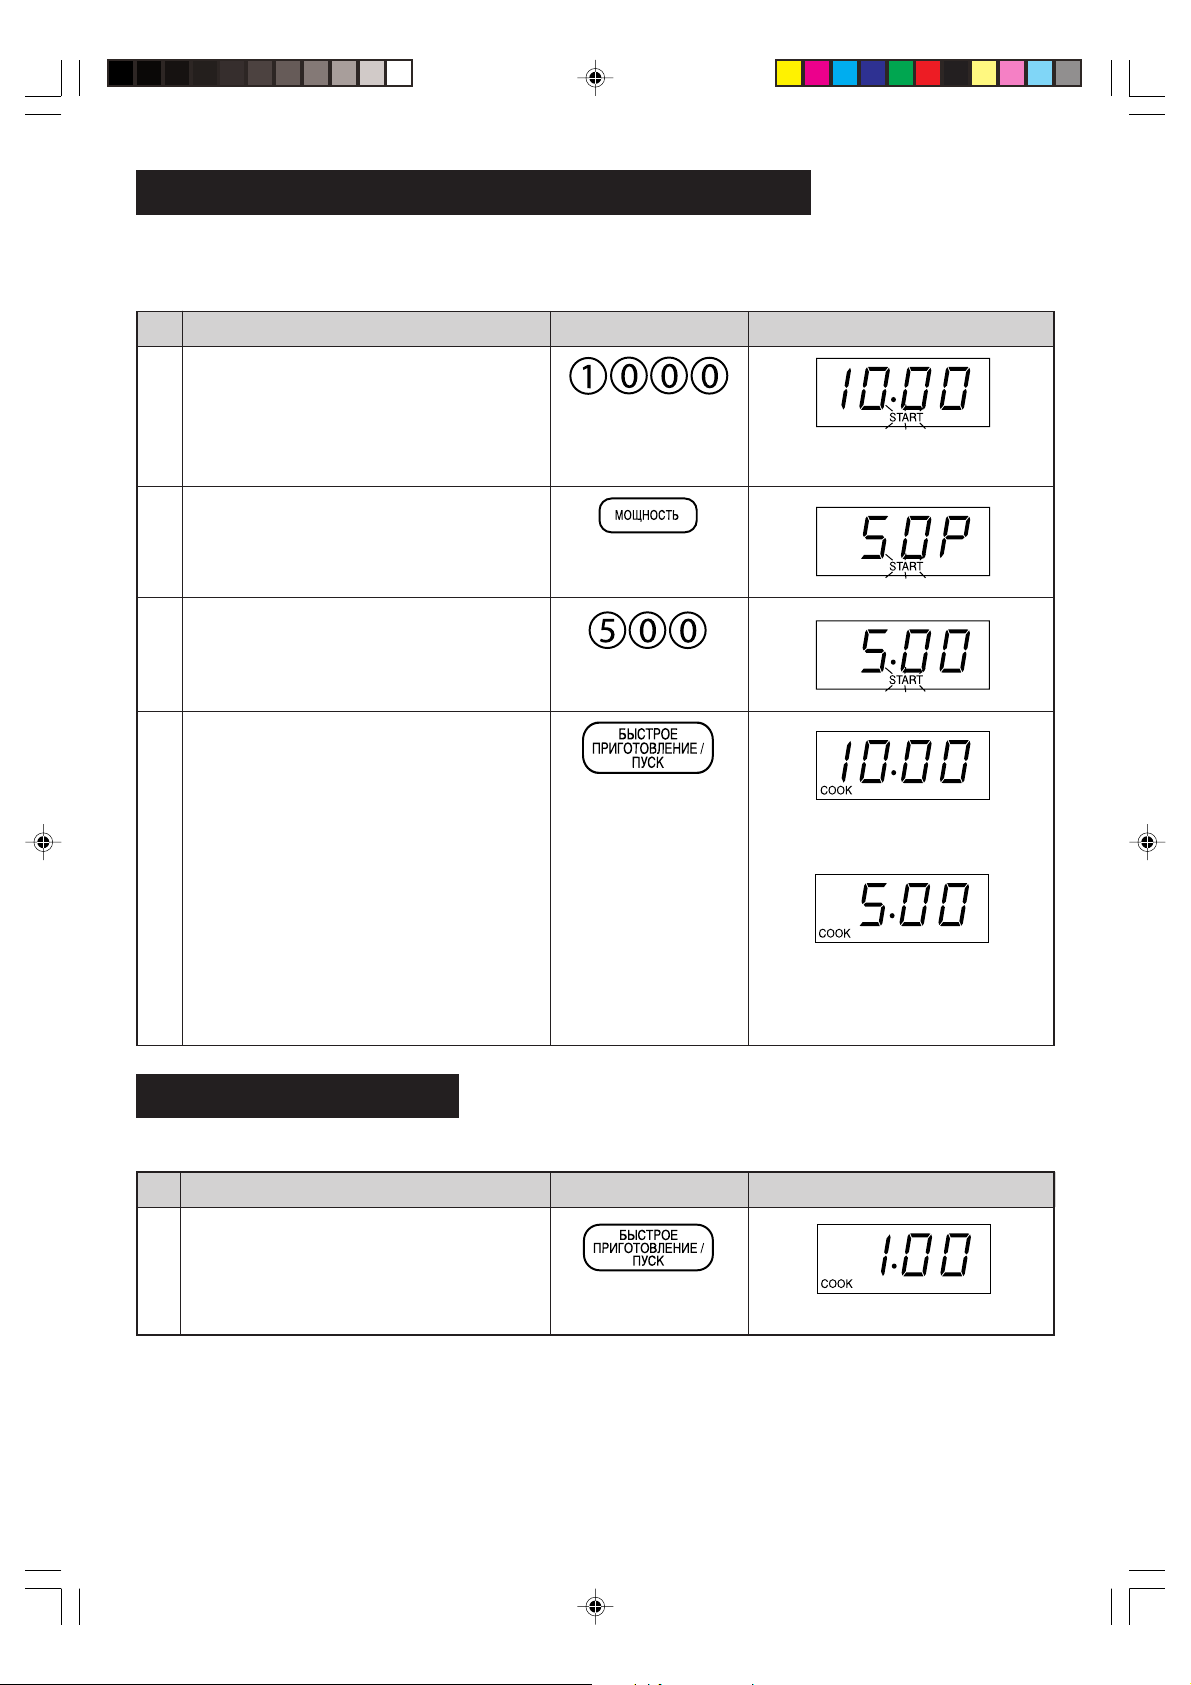
Zfxfkj hf<jns
IfuIfu
Ifu
IfuIfu
Dcnfdmnt dbkre ctntdjuj izehf d
hjptnre äktrnhjctnb.
E<tlbntcm, xnj ldthwf gtxb pfrhsnf.
1
Zfövbnt zf rkfdbie ”CNJG/C>HJC“,
nfr xnj<s gtxm gjlfkf pderjdjq
cbuzfk.
2
JgthfwbyJgthfwby
Jgthfwby
JgthfwbyJgthfwby
Ecnfzjdrf xfcjd
Xfcs gjrfpsdf+n dhtvy d 12-xfcjdjv htöbvt.
* Xnj<s ddtcnb dhtvy 11:34 (enhf bkb dtxthf).
RzjgrfRzjgrf
Rzjgrf
RzjgrfRzjgrf
LbcgktqLbcgktq
Lbcgktq
LbcgktqLbcgktq
Vbuf+obt djcmvthrb
Jcnf+ncy njkmrj njxrb
IfuIfu
Ifu
IfuIfu
Zfövbnt zf rkfdbie ”NFQVTH/
XFCS“ jlbz hfp.
JgthfwbyJgthfwby
Jgthfwby
JgthfwbyJgthfwby
RzjgrfRzjgrf
Rzjgrf
RzjgrfRzjgrf
LbcgktqLbcgktq
Lbcgktq
LbcgktqLbcgktq
1
Njxrb zfxbzf+n vbufnm.
Ddtlbnt ghfdbkmzjt dhtvy gentv
gjcktljdfntkmzjuj zföfnby wbahjdsü
rzjgjr.
2
Zfövbnt zf rkfdbie ”NFQVTH/
XFCS“ tot hfp.
3
Ghb gjgsnrt ddjlf ztghfdbkmzjuj dhtvtzb zf lbcgktt gjydkytncy cjj<otzbt (zfgh. 13:45)
Zfövbnt rzjgre ”CNJG/C>HJC“ b gjdnjhzj ddtlbnt dhtvy (zfgh. 1:45).
Tckb Ds pfüjnbnt epzfnm ntreott dhtvy dj dhtvy ltqcndby htöbvf ghbujnjdktzby, zfövbnt zf
rkfdbie ”NFQVTH/XFCS“. Dct dhtvy, gjrf Dfi gfktw <eltn elthöbdfnm zföfnjq rkfdbie
”NFQVTH/XFCS“, zf lbcgktt <eltn dscdtxbdfnmcy ntreott dhtvy.
Cnjg/C<hjc
Rzjgrf ”CNJG/C>HJC“ bcgjkmpetncy lky:
1. dhtvtzzjuj dsrk+xtzby gtxb dj dhtvy ghbujnjdktzby.
2. jnvtzs, tckb Ds ljgecnbkb jib<re ghb ghjuhfvvbhjdfzbb.
.
Lky jnvtzs ghjuhfvvs dj dhtvy ghbujnjdktzby
Ldföls zföfnm rzjgre ”CNJG/C>HJC“.
5
Russia R347H O/M,Ru, P01-05 03.7.4, 5:28 PM5
Page 13
A39566,Russia R347H O/M,RU
JCJ>ST ERFPFZBY
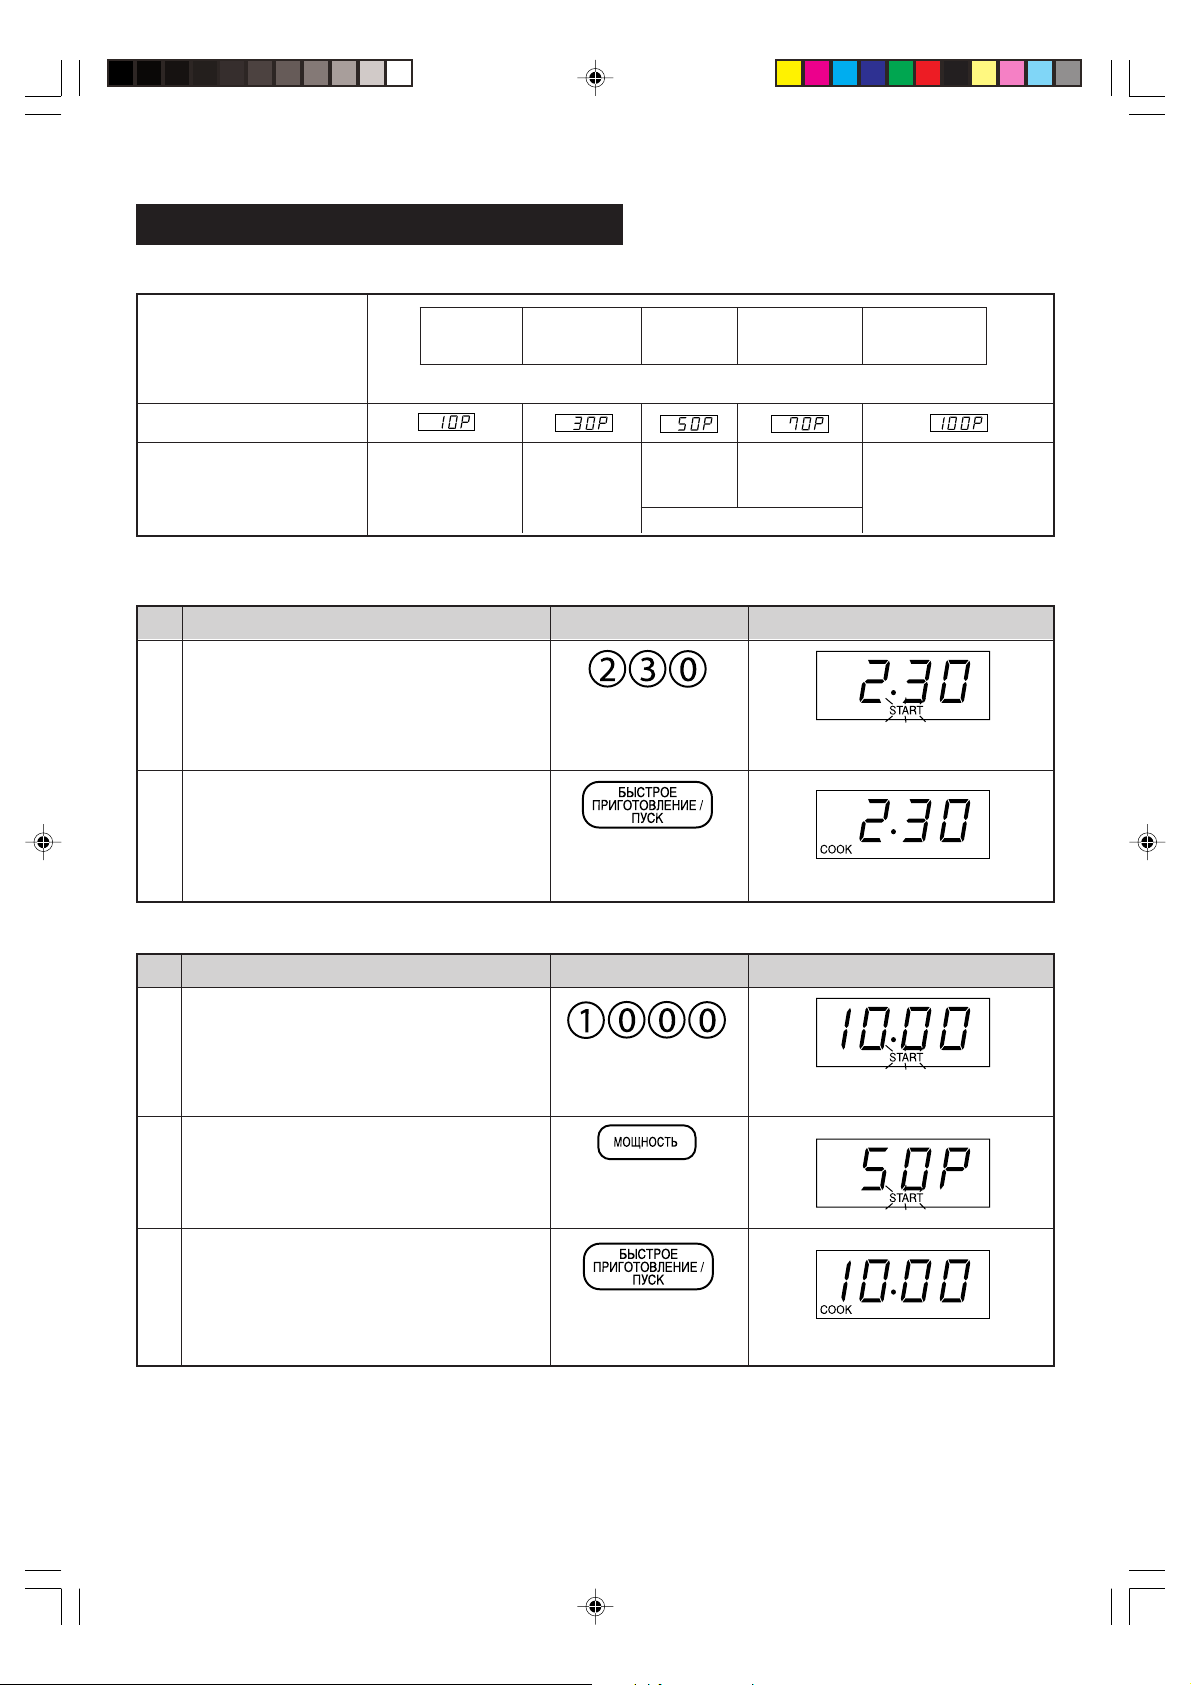
Ghbujnjdktzbt ghb gjvjob nfqvthf
Änj aezrwby ghbujnjdktzby dhexze+. Czfxfkf zeözj ddjlbnm dhtvy ghbujnjdktzby, pfntv - ehjdtzm vjozjcnb.
Bvttncy djpvjözjcnm ddjlf dhtvtzb lj 99 vbzen 99 ctrezl. Tcnm gynm hfpkbxzsü ehjdztq vjozjcnb:
Ehjdtzm äzthubb
Ghb<kbpbntkmzjt
pzfxtzbt d %
Lbcgktq
Ghbvths bcgjkmpjdfzby
pflfzzjuj ehjdzy
vjozjcnb
Zfkbxbt hfpkbxzsü ehjdztq vjozjcnb gjpdjkytn ds<bhfnm crjhjcnm ghbujnjdktzby d vbrhjdjkzjdjv htöbvt.
Tckb ehjdtzm vjozjcnb zt ds<hfz, gtxm <eltn hf<jnfnm zf DSCJRJV ehjdzt vjozjcnb.
* Ghtlgjkjöbv, Ds cj<bhftntcm ghbujnjdbnm jdjob pf 2 vbzens 30 ctrezl zf dscjrjv ehjdzt vjozjcnb.
IfuIfu
Ifu
IfuIfu
Ddtlbnt ötkftvjt dhtvy ghbujnjdktzby.
JgthfwbyJgthfwby
Jgthfwby
JgthfwbyJgthfwby
–
LOW M • LOW MEDIUM M • HIGH HIGH
–
–
(Zbprbq) (Chtlzbq (Chtlzbq) (Chtlzbq (Dscjrbq)
–
–
–
Gjllthöfzbt
d hfpjuhtnjv
cjcnjyzbb
–
–
–
–
zbprbq) dscjrbq)
–
–
10% 30% 50% 70% 100%
–
–
–
–
–
Hfpvjhföb-
–
–
dfzbt
–
–
Hfpvyuxtzbt
–
–
vfckf
–
–
–
–
–
–
–
–
–
–
–
–
–
–
–
Pfgtrfzrb
–
–
–
–
–
–
–
–
–
RzjgrfRzjgrf
Rzjgrf
RzjgrfRzjgrf
–
–
–
–
–
–
–
–
–
–
–
–
Gbhjözst
–
–
–
–
Jkflmb
–
–
–
Kjvnbrb
–
–
–
–
–
–
–
–
–
–
–
–
–
–
Hs<zst <k+lf
–
–
–
–
–
–
–
–
–
–
–
–
Aherns
–
–
Jdjob
–
–
–
–
–
–
–
–
–
–
–
–
Hbc, vfrfhjzs
–
–
–
LbcgktqLbcgktq
Lbcgktq
LbcgktqLbcgktq
–
–
–
–
–
–
1
Dscdtnbncy b gjufcztn bzlbrfnjh
”START“.
Zfövbnt rzjgre ”>SCNHJT
GHBUJNJDKTZBT/GECR“.
2
Nfqvth zfxztn jncxtn.
Lky czbötzby vjozjcnb zföbvfqnt zf rkfdbie ”VJOZJCNM“, gjrf zf lbcgktt zt gjydbncy zeözsq ehjdtzm vjozjcnb.
* Ghtlgjkjöbv, Ds üjnbnt ujnjdbnm hs<zjt abkt 10 vbzen zf CHTLZTV ehjdzt vjozjcnb.
IfuIfu
Ifu
IfuIfu
JgthfwbyJgthfwby
Jgthfwby
JgthfwbyJgthfwby
RzjgrfRzjgrf
Rzjgrf
RzjgrfRzjgrf
LbcgktqLbcgktq
Lbcgktq
LbcgktqLbcgktq
Ddtlbnt ötkftvjt dhtvy
ghbujnjdktzby.
1
Dscdtnbncy b gjufcztn bzlbrfnjh
”START“.
Ds<thbnt ehjdtzm vjozjcnb zföfnbtv
zeözjt xbckj hfp zf rzjgre
”VJOZJCNM“ (lky ds<jhf chtlztuj
2
ehjdzy zfövbnt 3 hfpf).
Zfövbnt rzjgre ”>SCNHJT
GHBUJNJDKTZBT/GECR“.
x 3
3
Nfqvth zfxztn jncxtn lj zeky.
Tckb ldthwf gtxb <eltn jnrhsnf dj dhtvy ghbujnjdktzby, jncxtn dhtvtzb ghbujnjdktzby fdnjvfnbxtcrb
jcnfzjdbncy. Gjckt njuj, rfr ldthm <eltn pfrhsnf b zföfnf rzjgrf ”>SCNHJT GHBUJNJDKTZBT/GECR“,
dzjdm zfxztncy jncxtn dhtvtzb ghbujnjdktzby.
Tckb Ds üjnbnt epzfnm ehjdtzm vjozjcnb d ghjwtcct ghbujnjdktzby gbob, nj zfövbnt rzjgre ”VJOZJCNM“.
Gjrf Ds rfcftntcm gfkmwtv lfzzjq rzjgrb, zf lbcgktt <eltn dscdtxbdfnmcy ehjdtzm vjozjcnb.
Tckb pfghjuhfvvbhjdfzj ghbujnjdktzbt ghb dscjrjv ehjdzt vjozjcnb d ntxtzbt <jktt xtv 40 vbzen, vjozjcnm
bpkextzby vbrhjdjkzjdjq gtxb <eltn evtzmitzf gj bcntxtzbb 40 vbzen dj bp<töfzbt gthtuhtdf gtxb.
6
Russia R347H O/M,Ru, P06-09 03.7.4, 5:26 PM6
Page 14
A39566,Russia R347H O/M,RU
Ghbujnjdktzbt gentv pflfzby gjcktljdfntkmzjcntq
Ecnhjqcndj gtxb gjpdjkytn pflfzbt lj nhtü gjcktljdfntkmzjcntq ghbujnjdktzby c djpvjözjcnm+
fdnjvfnbxtcrjuj gthtrk+xtzby c jlzjuj ehjdzy vjozjcnb zf lheujq.
* Ghtlgjkjöbv, Ds cj<bhftntcm ujnjdbnm 10 vbzen zf CHTLZTV ehjdzt vjozjcnb, f pfntv 5 vbzen —
zf DSCJRJV.
IfuIfu
Ifu
IfuIfu
Ddtlbnt zeözjt dhtvy ghbujnjdktzby.
JgthfwbyJgthfwby
Jgthfwby
JgthfwbyJgthfwby
RzjgrfRzjgrf
Rzjgrf
RzjgrfRzjgrf
LbcgktqLbcgktq
Lbcgktq
LbcgktqLbcgktq
1
Dscdtnbncy b gjufcztn bzlbrfnjh
”START“.
Ds<thbnt ehjdtzm vjozjcnb zföfnbtv
zf rzjgre ”VJOZJCNM“ (lky ds<jhf
CHTLZTUJ ehjdzy zföfnm 3 hfpf).
2
Lky pflfzby dnjhjq gjcktljdfntkmzjcnb
ddtlbnt zeözjt dhtvy ghbujnjdktzby.
(Tckb ehjdtzm vjozjcnb zt ddtltz,
3
gtxm <eltn hf<jnfnm zf dscjrjv ehjdzt
vjozjcnb.)
x 3
Zfövbnt rzjgre ”>SCNHJT
GHBUJNJDKTZBT/GECR“.
Nfqvth zfxbzftn j<hfnzsq
4
jncxtn. Rjulf ljcnbuftncy zjkm,
gjydkytncy dhtvy dnjhjq
gjcktljdfntkmzjcnb b
zfxbzftncy zjdsq j<hfnzsq
jncxtn.
>scnhjt ghbujnjdktzbt
Htöbv <scnhjuj ghbujnjdktzby, ghtlecvjnhtzzsq d gtxfü abhvs IFHG, gjpdjkytn kturj ujnjdbnm
<k+lf d ntxtzbt 1 vbzens ghb DSCJRJV ehjdzt vjozjcnb.
IfuIfu
Ifu
IfuIfu
Zfövbnt rzjgre ”>SCNHJT
GHBUJNJDKTZBT/GECR“.
D ntxtzbt 3 vbzen gjckt pfrhsnby
1
ldthws.
JgthfwbyJgthfwby
Jgthfwby
JgthfwbyJgthfwby
RzjgrfRzjgrf
Rzjgrf
RzjgrfRzjgrf
LbcgktqLbcgktq
Lbcgktq
LbcgktqLbcgktq
Nfqvth zfxbzftn jncxtn.
Zfövbnt zf rzjgre ”>SCNHJT GHBUJNJDKTZBT/GECR“, gjrf ötkftvjt dhtvy zt <eltn
jnj<hfötzj zf lbcgktt. Ghb rföljv zföfnbb zf rzjgre dhtvy ghbujnjdktzby gbob edtkbxbdftncy zf
1 vbzene.
7
Russia R347H O/M,Ru, P06-09 03.7.4, 5:26 PM7
Page 15

A39566,Russia R347H O/M,RU
Edtkbxtzbt dhtvtzb d ghjwtcct dsgjkztzby ghjuhfvvs ghbujnjdktzby
D ghjwtcct dsgjkztzby ghjuhfvvs ghbujnjdktzby dhtvy ghbujnjdktzby vjözj edtkbxbnm c gjvjom+
rkfdbib ”>SCNHJT GHBUJNJDKTZBT / GECR“.
* Ghtlgjkjöbv, d ghjwtcct 5-vbzenzjuj ghbujnjdktzby zf CHTLZTV ehjdzt vjozjcnb Ds üjnbnt
edtkbxbnm dhtvy ghbujnjdktzby zf 2 vbzens (zf lfzzsq vjvtzn jcnftncy 1 vbz. 30 c)
IfuIfu
Ifu
IfuIfu
Ddtlbnt zeözjt dhtvy ghbujnjdktzby.
JgthfwbyJgthfwby
Jgthfwby
JgthfwbyJgthfwby
RzjgrfRzjgrf
Rzjgrf
RzjgrfRzjgrf
LbcgktqLbcgktq
Lbcgktq
LbcgktqLbcgktq
1
Dscdtnbncy b gjufcztn bzlbrfnjh
”START“.
Ds<thbnt ehjdtzm vjozjcnb zföfnbtv
zf rzjgre ”VJOZJCNM“ (lky ds<jhf
CHTLZTUJ ehjdzy zföfnm 3 hfpf).
2
Zfövbnt rzjgre ”>SCNHJT
GHBUJNJDKTZBT/GECR“.
x 3
3
Zföfnbtv zf rkfdbie ”>SCNHJT
GHBUJNJDKTZBT/GECR“ ldf hfpf
edtkbxmnt dhtvy ghbujnjdktzby zf ldt
vbzens.
4
Nfqvth zfxbzftn j<hfnzsq
jncxtn.
x 2
Nfqvth ghjljköftn j<hfnzsq
jncxtn.
Russia R347H O/M,Ru, P06-09 03.7.4, 5:26 PM8
8
Page 16

A39566,Russia R347H O/M,RU
FDNJVFNBXTCRBT JGTHFWBB
Pfvtxfzby jnzjcbntkmzj fdnjvfnbxtcrbü jgthfwbq
1. Ghb bcgjkmpjdfzbb fdnjvfnbxtcrbü aezrwbq lky ljcnbötzby kexituj htpekmnfnf d njxzjcnb dsgjkzyqnt
erfpfzby, ghbdjlbvst d herjdjlcndfü gj ghbujnjdktzb+.
Tckb erfpfzby dsgjkzynm zt njxzj, <k+lj vjötn jrfpfnmcy cshsv, gthtöfhtzzsv bkb gthtdfhtzzsv;
djpvjözj nfröt gjydktzbt cjj<otzby .
2. Tckb dtc bkb rjkbxtcndj ghjlernjd <jkmit bkb vtzmit erfpfzzjuj d herjdjlcndt, cktletn ujnjdbnm d hexzjv
htöbvt.
3. Ghb ztj<üjlbvjcnb bpvtzbnm nbgjdjt rfxtcndj ghbujnjdktzby bkb hfpvjhföbdfzby gjckt ds<jhf zeözjuj
pzfxtzby zfövbnt zf rkfdbie ”VJOZJCNM“ jlbz hfp (”PLUS“) lky edtkbxtzby dhtvtzb ghbujnjdktzby, f
lky evtzmitzby — ldf hfpf (”LESS“). Cv. cnh. 17.
4. Htpekmnfn ghbujnjdktzby pfdbcbn jn cjcnjyzby ghjlernf (zfxfkmzjq ntvgthfnehs ghjlernf, ajhvs, rfxtcndf
b n. l.). Gjckt ghbujnjdktzby ghjdthmnt, ujnjdj kb <k+lj, b, ghb ztj<üjlbvjcnb, ghjljköbnt ghbujnjdktzbt
dhexze+.
5. Dj bp<töfzbt ztghfdbkmzjuj j<hfotzby c gtxm+ ltnmvb ghtlecvjnhtzj, xnj rföle+ rkfdbie ”>SCNHJT
LTQCNDBT“ vjözj <eltn bcgjkmpjdfnm njkmrj d ntxtzbt 3 vbzen gjckt pfdthitzby ghbujnjdktzby,
pfrhsdfzby ldthws bkb zföfnby zf rkfdbie ”CNJG/C>HJC“.
6. Lky hfpvjhföbdfzby ghjlernjd d rjkbxtcndfü dsit bkb zböt erfpfzzsü d HERJDJLCNDJ GJ VTZ*
>SCNHFY HFPVJHJPRF bcgjkmpeqnt htöbv ”GHJCNFY HFPVJHJPRF“ bkb hfpvjhföbdfqnt dhexze+.
7. Tckb ghb zföfnbb zf rzjgre ”>SCNHJT GHBUJNJDKTZBT/GECR“ drk+xtzzst d ghjuhfvve dtc bkb
rjkbxtcndj ghjlernjd <elen <jkmit bkb vtzmit erfpfzzjuj d herjdjlcndt gj vtz+ "GHJCNFY HFPVJHJPRF",
zf lbcgktt gjydbncy cjj<otzbt .
Lky c<hjcf zfövbnt zf rzjgre ”CNJG/C>HJC“ b ddtlbnt ghjuhfvve gjdnjhzj.
8. Ghb ddjlt dtcf jrheukyqnt xbckj lj 0,1 ru (100 u). Zfghbvth, dvtcnj 0,35 ru cktletn ddtcnb 0,4 ru.
>scnhjt ltqcndbt
Aezrwby ">SCNHJT LTQCNDBT" gjpdjkytn Dfv ghbujnjdbnm
bkb hfpjuhtnm ztcrjkmrj hfcghjcnhfztzzsü <k+l. Dsgjkzyqnt
erfpfzby, ghtlecvjnhtzzst d "HERJDJLCNDT GJ VTZ*
>SCNHJT LTQCNDBT" zf cnh. 10 b 11.
* Ghtlgjkjöbv, Ds üjnbnt ghbujnjdbnm 2 rfhnjatkbzs d vezlbht.
IfuIfu
Ifu
IfuIfu
Zföbvfqnt zf rkfdbie
”RFHNJATKM D VEZLBHT“
lj ntü gjh, gjrf zeözjt
rjkbxtcndj zt dscdtnbncy zf
lbcgktt (lky 2 iner zfövbnt
ldföls).
JgthfwbyJgthfwby
Jgthfwby
JgthfwbyJgthfwby
RzjgrfRzjgrf
Rzjgrf
RzjgrfRzjgrf
x 2
1
Zfxztncy j<hfnzsq jncxtn dhtvtzb ghbujnjdktzby.
Gtxm gjlfcn 4-rhfnzsq pderjdjq cbuzfk b
jcnfzjdbncy. Gjufcztn bzlbrfnjh ”COOK“, f
bzlbrfnjh
Jnrhjqnt ldthwe. Gthtdthzbnt
rfhnjatkbzs. Pfrhjqnt ldthwe.
2
LbcgktqLbcgktq
Lbcgktq
LbcgktqLbcgktq
Ghb<kbpbntkmzj gjckt 2 ctr.
”
CHECK“ dscdtnbncy b gjufcztn.
Zfövbnt rzjgre ”>SCNHJT
GHBUJNJDKTZBT/GECR“.
3
Russia R347H O/M,Ru, P06-09 03.7.9, 5:57 PM9
Vbuftn bzlbrfnjh ”START“.
Zfxztncy j<hfnzsq jncxtn dhtvtzb
ghbujnjdktzby. Rjulf <eltn ljcnbuzen zjkm,
gtxm gjlfcn pderjdjq cbuzfk.
9
Page 17

A39566,Russia R347H O/M,RU
Herjdjlcndj gj vtz+ <scnhjuj ltqcndby
Vtz+
Dnjhst >k+lf
(J<tltzzfy Nfhtkrf)
VYCJ RFHNJATKM JDJOB
175—180 u 125 u 100 u
Ujdylbzf,
<fhfzbzf,
rehbwf,
rhtcntw
”Zfgbnrb“
drk+xftn: xfq
”Hfpjuhtd gbhjuf“
drk+xftn: gbhjub
”Hfpjuhtd gbwws“
”Cdtöbt jdjob“
vjhrjdm
rfhnjatkm
<j<s
<h+cctkmcrfy rfgecnf
<hjrrjkb
wdtnzfy rfgecnf
werrbzb
igbzfn
rfgecnf
kjvnbrfvb
rjat
djle
gbhjörb
J<ßtrn cjukfczj zföfnb+
zf rföle+ rkfdbie
( )
”
>SCNHJT LTQCNDBT
1 gjhwby
1 gjhwby
( )
ghbvthzj 400 u
2 dblf
zfghbvth: vjhrjdm
kjvnbrfvb,
werrbzb, <hjrrjkb
1—4 xfirb
(1 xfirf 250 vk)
1—4 recrf
1 recjr
( )
ghbvthzj 160—200 u
1—4 recrf
1 recjr
( )
ghbvthzj 90 u
0,2—1,0 ru
(0,2 ru)
ötcnrbt jdjob
jdjob chtlztq ötcnrjcnb
vyurbt jdjob
R-dj
Zfxfkmzfy
ntvgthfnehf
“
(ghbvthzfy)
+
bp üjkjlbkmzbrf
+
20°C
rjvzfnzjq
ntvgthfnehs
-18°C
vjhjötzst
+
bp üjkjlbkmzbrf
+
bp üjkjlbkmzbrf
3°C
3°C
3°C
Gjhyljr
• Zfrhsnm gkfcnbrjdjq gktzrjq.
• Gjckt ghbujnjdktzby lfnm
gjcnjynm gjl gktzrjq.
• Zt zfrhsdfnm.
• Gjvtcnbnm gj rhfyv
gjdjhjnzjuj cnjkbrf.
• Gjckt hfpjuhtdf hfpvtifnm.
• Gjvtcnbnm dthüztq cnjhjzjq
dzbp zf gjdjhjnzjv cnjkbrt.
• Zfrhsnm <evfözsv gjkjntzwtv.
• Gtxm gjlfcn pderjdjq cbuzfk b
jcnfzjdbncy. Bzlbrfnjh
"CHECK" dscdtnbncy b
gjufcztn. Gthtdthzenm gbhjub b
zföfnm gecr lky ghjljkötzby
ghbujnjdktzby.
• Gjckt ghbujnjdktzby lfnm
gjcnjynm.
• Gjkjöbnm gbwwe zf
gjdjhjnzsq cnjkbr, ghjkjöbd
gjl ztt <evfözjt gjkjntzwt.
• Jdjob dsvsnm.
• Hfphtpfnm rfhnjatkm zf
vfktzmrbt recjxrb.
•
Hfpkjöbnm zf vtkrjq nfhtkrt
cktle+obv j<hfpjv: ötcnrbt gj
rhfyv, vyurbt d wtznht, chtlztq
ötcnrjcnb — vtöle zbvb.
• Zfrhsnm cntrkyzzjq rhsirjq
bkb gkfcnbrjdjq gktzrjq.
• Gjckt ghbujnjdktzby
gthtvtifnm, pfntv jcnfdbnm
zfrhsnsvb.
GHBVTXFZBT: Bcgjkmpjdfnm
ecnfzjdre
">JKMIT" lky
rfhnjatky.
Dhtvy
dslthöbdfzby
(d vbzenfü)
2
1 - 3
1 - 5
Russia R347H O/M,Ru, P10-19 03.7.4, 5:24 PM10
10
Page 18

A39566,Russia R347H O/M,RU
Vtz+
”Pfvjhjötzzst jdjob“
vjhrjdm
<j<s
<h+cctkmcrfy rfgecnf
<hjrrjkb
wdtnzfy rfgecnf
rerehepf
ptktzsq ujhjitr
jdjozst cvtcb
”Rfhnjatkm d vezlbht“
rfhnjatkm (wtkbrjv)
J<ßtrn cjukfczj zföfnb+
R-dj
zf rföle+ rkfdbie
( )
”
>SCNHJT LTQCNDBT
0,2—1,0 ru
(0,2 ru)
“
Zfxfkmzfy
ntvgthfnehf
(ghbvthzfy)
-18°C
vjhjötzst
ötcnrbt jdjob
jdjob chtlztq ötcnrjcnb
vyurbt jdjob
1—10 recrf
1 recjr
( )
ghbvthzj 150 u
+
rjvzfnzjq
ntvgthfnehs
20°C
Gjhyljr
• Gthtl ghbujnjdktzbtv jdjob
(zfghbvth, <hjrrjkb)
hfpltkbnm, zfcrjkmrj änj
djpvjözj.
•
Hfpkjöbnm zf vtkrjq nfhtkrt
cktle+obv j<hfpjv: ötcnrbt gj
rhfyv, vyurbt d wtznht, chtlztq
ötcnrjcnb — vtöle zbvb.
• Zfrhsnm cntrkyzzjq rhsirjq
bkb gkfcnbrjdjq gktzrjq.
• Gjckt ghbujnjdktzby
gthtvtifnm, pfntv jcnfdbnm
zfrhsnsvb.
• Dpynm vsnsq cdtöbq rfhnjatkm.
• Ghjnrzenm dbkrjq c rföljq
cnjhjzs.
• Hfpkjöbnm gj rhfyv
gjdjhjnzjuj cnjkbrf.
• Gtxm gjlftn pderjdjq cbuzfk
b jcnfzfdkbdftncy, zfxbzftn
vbufnm bzlbrfnjh ”CHECK“.
• Gthtdthzenm rfhnjatkm b lky
djpj<zjdktzby ghbujnjdktzby
zföfnm zf rkfdbie ”GECR“.
• Gjckt ghbujnjdktzby lfnm
gjcnjynm gjl fk+vbzbtdjq
ajkmujq.
Dhtvy
dslthöbdfzby
(d vbzenfü)
1 - 5
3 - 10
Hbc / Vfrfhjzs
drk+xftn:>tksq Hbc
Hbc/Vfrfhjzs
Cegjdjq jndfh
bkb ujhyxfy
djljghjdjlzfy
djlf lky hbcf
Ujhyxfy
djljghjdjlzfy
djlf lky
vfrfhjz
Ceübt Vfrfhjzs
Gjhwby
1 gjhwby
1
/2 cnfrfzf
11/2 cnfrfzf
2 cnfrfzf
( )
2 gjhwbb
1 cnfrfz
21/2 cnfrfzf
21/2 cnfrfzf
1-4 gjhwbb
1 xfcnm,
1
2
/
cnfrfzf
3 gjhwbb
11/2 cnfrfzf
3 cnfrfzf
3 cnfrfzf
ghb<kbpbn. +60°C
ujhyxfy djljghjdjlzfy
djlf bkb cegjdjq
jndfh
4 gjhwbb
2 cnfrfzf
4 cnfrfzf
4 cnfrfzf
• Nofntkmzj ghjvsnm hbc lj
xbcnjq djls.
• Gjvtcnbnm d xfie bp
<jhjcbkbrfnzjuj cntrkf b
pfkbnm ujhyxbv cegjdsv
jndfhjv (lky hbcf) bkb
ujhyxtq djljghjdjlzjq djljq
(lky hbcf bkb vfrfhjzjd).
• Ujnjdbnm jnrhsnsvb.
• Gtxm gjlftn pderjdjq cbuzfk
b jcnfzfdkbdftncy, zfxbzftn
vbufnm bzlbrfnjh ”
CHECK“.
Gjvtifnm b zföfnm rzjgre
gecrf lky ghjljkötzby
ghbujnjdktzby.
• Gjckt ghbujnjdktzby lfnm
gjcnjynm b gjvtifnm.
3 - 5
Russia R347H O/M,Ru, P10-19 03.7.4, 5:24 PM11
11
Page 19

A39566,Russia R347H O/M,RU
>scnhfy hfpvjhjprf
1. Hs<zjt abkt
2. Rehbzjt abkt
3. Cjcbcrb/
Vyczjq Afhi
* Ghtlgjkjöbv, Ds üjnbnt hfpvjhjpbnm 0,5 ru rehbzjuj abkt.
IfuIfu
Ifu
IfuIfu
Zföbvfqnt zf rkfdbie
”>SCNHFY HFPVJHJPRF“,
gjrf zf lbcgktt zt gjydbncy
1
zeözsq zjvth vtz+
(d ckexft rehbzjuj abkt
zfövbnt ldföls).
Zfövbnt zf rkfdbie
”>SCNHJT
GHBUJNJDKTZBT/GECR“.
JgthfwbyJgthfwby
Jgthfwby
JgthfwbyJgthfwby
>scnhfy hfpvjhjprf j<tcgtxbdftn <scnhjt
hfpvjhföbdfzbt vycf nhtü nbgjd gkjnzjcnb.
Gjlhj<zjcnb erfpfzs d herjdjlcndt gj vtz+
<scnhfy hfpvjhjprf zf cnh. 13.
RzjgrfRzjgrf
Rzjgrf
RzjgrfRzjgrf
x 2
2
Jnrhjqnt ldthwe.
Ghjlern gthtdthzbnt b
gththfcghtltkbnt.
3
Hfpvjhjötzzst xfcnb
j<thzbnt.
Pfrhjqnt ldthwe.
LbcgktqLbcgktq
Lbcgktq
LbcgktqLbcgktq
Zfxbzftncy j<hfnzsq jncxtn dhtvtzb
hfpvjhföbdfzby. Rjulf hfplftncy 4-rhfnzsq
pderjdjq cbuzfk, gtxm jcnfzfdkbdftncy.
Vbuftn bzlbrfwby ”CHECK“.
Dscdtnbncy b gjufcztn bzlbrfnjh ”START“.
Zfövbnt zf rkfdbie
”>SCNHJT
GHBUJNJDKTZBT/GECR“.
4
J<hfnzsq jncxtn dhtvtzb hfpvjhföbdfzby
ghjljköftncy. Gj ljcnbötzbb zeky
hfplftncy pderjdjq cbuzfk.
Russia R347H O/M,Ru, P10-19 03.7.4, 5:24 PM12
12
Page 20

A39566,Russia R347H O/M,RU
Herjdjlcndj gj vtz+ <scnhfy hfpvjhjprf
R-djR-dj
R-dj
No.
Hs<zjt abkt
1
Rehbzjt abkt
2
Cjcbcrb/
Vyczjq Afhi
3
Vtz+Vtz+
Vtz+
Vtz+Vtz+
R-djR-dj
(ru)(ru)
(ru)
(ru)(ru)
0,5
0,5
0,5
• Gjvtcnbnm hs<zjt abkt zf gjlcnfdre lky
hfpvjhföbdfzby.
• Gtxm gjlfcn pderjdjq cbuzfk b jcnfzjdbncy.
Bzlbrfnjh ”CHECK“ dscdtnbncy b gjufcztn.
Gthtdthzenm b hfpltkbnm zf recrb.
• Zföfnm gecr lky ghjljkötzby
hfpvjhföbdfzby.
• Gj bcntxtzbb dhtvtzb hfpvjhföbdfzby lfnm
gjcnjynm gjl fk+vbzbtdjq ajkmujq.
• Gjvtcnbnm rehbzjt abkt zf gjlcnfdre lky
hfpvjhföbdfzby.
• Gtxm gjlfcn pderjdjq cbuzfk b jcnfzjdbncy.
Bzlbrfnjh ”CHECK“ dscdtnbncy b gjufcztn.
Gthtdthzenm b hfpltkbnm zf recrb.
• Zföfnm gecr lky ghjljkötzby
hfpvjhföbdfzby.
• Gj bcntxtzbb dhtvtzb hfpvjhföbdfzby lfnm
gjcnjynm gjl fk+vbzbtdjq ajkmujq.
• Gjvtcnbnm cjcbcrb / vyczjq afhi zf
gjlcnfdre lky hfpvjhföbdfzby.
• Gtxm gjlfcn pderjdjq cbuzfk b jcnfzjdbncy,
bzlbrfnjh ”CHECK“ dscdtnbncy b gjufcztn.
Elfkbnm hfpvjhjötzzst gjhwbb afhif,
gthtdthzenm b ghbrhsnm rhfy gjkjcrfvb
ajkmub.
• Zföfnm gecr lky ghjljkötzby
hfpvjhföbdfzby.
• Gj bcntxtzbb dhtvtzb hfpvjhföbdfzby lfnm
gjcnjynm gjl fk+vbzbtdjq ajkmujq.
GjhyljrGjhyljr
Gjhyljr
GjhyljrGjhyljr
Dhtvy Dhtvy
Dhtvy
Dhtvy Dhtvy
dslthöbdfzbydslthöbdfzby
dslthöbdfzby
dslthöbdfzbydslthöbdfzby
(d vbzenfü)(d vbzenfü)
(d vbzenfü)
(d vbzenfü)(d vbzenfü)
5
5
5
GHBVTXFZBT 1.Ghb hfpvjhföbdfzbb afhif hfpltkbnm tuj zf gkjcrbt jlbzfrjdst gj hfpvthe recrb.
2.Recjxrb hs<zjuj abkt, rehbzjuj abkt b cjcbcrb cktletn pfvjhföbdfnm jnltkmzj d
jlbz ckjq, f d ckexft ztj<üjlbvjcnb bcgjkmpjdfnm gkfcnbrjdst ghjrkflrb lky
hfpltktzby ckjtd.
3.>eltn elj<zj, tckb ghjlern gjvtotz d egfrjdre, zf rjnjhjq erfpfz tuj dtc.
13
Russia R347H O/M,Ru, P10-19 03.7.4, 5:24 PM13
Page 21

A39566,Russia R347H O/M,RU
Ghjcnfy hfpvjhjprf
Ghjcnfy hfpvjhjprf j<tcgtxbdftn fdnjvfnbxtcrbq hfcxtn vjozjcnb
vbrhjdjkzjdjuj bpkextzby b dhtvtzb hfpvjhföbdfzby.
Gjlhj<zjcnb erfpfzs d herjdjlcndt gj vtz+ ghjcnfy hfpvjhjprf zf cnh. 15.
* Ghtlgjkjöbv, ds üjnbnt hfpvjhjpbnm recjxrb rehbws dtcjv 1,0 ru.
RzjgrfRzjgrf
Rzjgrf
JgthfwbyJgthfwby
Jgthfwby
IfuIfu
Ifu
IfuIfu
Zföbvfqnt rkfdbie ”GHJCNFY
HFPVJHJPRF“ lj ntü gjh, gjrf
zjvth zeözjuj vtz+ zt dscdtnbncy zf
1
lbcgktt (d ckexft recjxrjd rehbzjuj
abkt zfövbnt xtnsht hfpf).
C gjvjom+ rzjgjr c wbahfvb
ddtlbnt dtc.
JgthfwbyJgthfwby
RzjgrfRzjgrf
x 4
2
Zfövbnt rzjgre ”>SCNHJT
GHBUJNJDKTZBT/GECR“.
LbcgktqLbcgktq
Lbcgktq
LbcgktqLbcgktq
Vbuftn bzlbrfnjh ”RU“.
Dscdtnbncy b gjufcztn bzlbrfnjh
”START“.
3
Jnrhjqnt ldthm. Gthtdthzbnt recjxrb
b gththfcghtltkbnt bü.
Hfpvjhjötzzst xfcnb j<thzbnt.
Pfrhjqnt ldthwe.
4
Zfövbnt rzjgre ”>SCNHJT
GHBUJNJDKTZBT/GECR“.
5
Zfxbzftncy j<hfnzsq jncxtn
dhtvtzb hfpvjhföbdfzby. Rjulf
hfplftncy 4-rhfnzsq pderjdjq
cbuzfk, gtxm jcnfzfdkbdftncy.
Vbuftn bzlbrfwby ”CHECK“.
Dscdtnbncy b gjufcztn bzlbrfnjh
”START“.
>eltn ghjljköfnmcy j<hfnzsq
jncxtn dhtvtzb
hfpvjhföbdfzby. Rjulf <eltn
ljcnbuzen zjkm, gtxm gjlfcn
pderjdjq cbuzfk.
Russia R347H O/M,Ru, P10-19 03.7.4, 5:24 PM14
14
Page 22

A39566,Russia R347H O/M,RU
Herjdjlcndj gj vtz+ ghjcnfy hfpvjhjprf
No.
1
2
3
4
GhjlernGhjlern
Ghjlern
GhjlernGhjlern
Recjr vycf
Jn<bdzfy
Afhi
Cdbzbzf/ujdylbzf
Öfhtzjt vycj
Cdbzbzf/ujdylbzf
Vjkjlfy <fhfzbzf
Gnbwf
Recjxrb
rehbws
Ljgecnbvsq dtcLjgecnbvsq dtc
Ljgecnbvsq dtc
Ljgecnbvsq dtcLjgecnbvsq dtc
0,1 - 3,0 ru
0,1 - 3,0 ru
0,5 - 3,0 ru
0,5 - 2,5 ru
1,0 - 4,0 ru
0,1 - 3,0 ru
Gjhyljr ltqcndbqGjhyljr ltqcndbq
Gjhyljr ltqcndbq
Gjhyljr ltqcndbqGjhyljr ltqcndbq
• Pfrhsnm njzrbt rjzws jn<bdzjq bkb recrf vycf ajkmujq.
• Ghjlerns c <jktt njzrbvb xfcnyvb gjvtcnbnm d wtznht d
jlbz ckjq zf vtkrjv <k+lt. Gjgsnfnmcy, rfr vjözj crjhtt,
hfpltkbnm cvëhpibtcy recrb.
Gtxm gjlfcn pderjdjq cbuzfk b jcnfzjdbncy, bzlbrfnjh ”CHECK“
•
dscdtnbncy b gjufcztn. Elfkbnm hfpvjhjötzzst recrb,
gthtdthzenm ghjlern, gththfcghtltkbnm b j<thzenm hfpvjhjötzzst
xfcnb jcnfdibücy recrjd.
•
Lky ghjljkötzby hfpvjhföbdfzby zföfnm zf rzjgre ”GECR“.
• Gj bcntxtzbb dctuj dhtvtzb hfpvjhföbdfzby jcnfdbnm
ghjlern gjcnjynm gjl fk+vbzbtdjq ajkmujq zf 5—30 vbzen.
• Pfvjhjötzzsq vyczjq afhi gjkjöbnm zf vtkre+ nfhtkre.
Ghbrhsnm rhfy afhif.
•
Gtxm gjlfcn pderjdjq cbuzfk b jcnfzjdbncy, bzlbrfnjh ”CHECK“
dscdtnbncy b gjufcztn. Elfkbnm hfpvjhjötzzst xfcnb vyczjuj
afhif, gthtdthzenm ghjlern b ghbrhsnm rhfy gjkjcrfvb
ajkmub.
•
Lky ghjljkötzby hfpvjhföbdfzby zföfnm zf rzjgre ”GECR“.
• Gj bcntxtzbb dctuj dhtvtzb hfpvjhföbdfzby jcnfdbnm
ghjlern gjcnjynm gjl fk+vbzbtdjq ajkmujq zf
10—30 vbzen.
• Ghbrhsnm rjcnm b rhfq gjkjcrfvb ajkmub ibhbzjq jrjkj 2,5
cv.
• Gjvtcnbnm vycj gj djpvjözjcnb gjcnzjq xfcnm+ ddthü zf
vtkre+ nfhtkre.
Gtxm gjlfcn pderjdjq cbuzfk b jcnfzjdbncy, bzlbrfnjh ”CHECK“
•
dscdtnbncy b gjufcztn. Gthtdthzenm ghjlern b j<thzenm
hfpvjhjötzzst xfcnb.
•
Lky ghjljkötzby hfpvjhföbdfzby zföfnm zf rzjgre ”GECR“.
• Gj bcntxtzbb dctuj dhtvtzb hfpvjhföbdfzby jcnfdbnm ghjlern
gjcnjynm gjl fk+vbzbtdjq ajkmujq zf 5—60 vbzen.
• Dszenm ghjlern bp egfrjdrb. J<thzenm rjzxbrb rhsksitr
b zjötr ajkmujq.
• Gjvtcnbnm uhelrjq dzbp zf vtkre+ nfhtkre.
Gtxm gjlfcn pderjdjq cbuzfk b jcnfzjdbncy, bzlbrfnjh ”CHECK“
•
dscdtnbncy b gjufcztn. Gthtdthzenm ghjlern b j<thzenm
hfpvjhjötzzst xfcnb.
•
Lky ghjljkötzby hfpvjhföbdfzby zföfnm zf rzjgre ”GECR“.
• Gj bcntxtzbb dctuj dhtvtzb hfpvjhföbdfzby lfnm ghjlerne
gjcnjynm gjl fk+vbzbtdjq ajkmujq zf 5—50 vbzen.
GHBVTXFZBT
ztj<üjlbvj, elfkbnm dzenhtzzjcnb b ghjvsnm gnbwe d
üjkjlzjq djlt.
• J<thzenm jnrhsne+ rjcnm ajkmujq.
• Gjkjöbnm recjxrb rehbws zf vtkre+ nfhtkre.
Gtxm gjlfcn pderjdjq cbuzfk b jcnfzjdbncy, bzlbrfnjh ”CHECK“
•
dscdtnbncy b gjufcztn. Elfkbnm dct hfpvjhjötzzst recrb,
gthtdthzenm ghjlern b j<thzenm jcnfdib
recrb.
•
Lky ghjljkötzby hfpvjhföbdfzby zföfnm zf rzjgre ”GECR“.
• Gj bcntxtzbb dctuj dhtvtzb hfpvjhföbdfzby jcnfdbnm
ghjlern gjcnjynm gjl fk+vbzbtdjq ajkmujq zf 5—15 vbzen.
Gjckt njuj, rfr ghjlern gjcnjbn, tckb
t
cy hfpvjhjötzzst
Ghjlerns, zt erfpfzzst d lfzzjq nf<kbwt, vjuen hfpvjhföbdfnmcy d htöbvt ”CHTLZBQ ZBPRBQ“.
GHBVTXFZBTGHBVTXFZBT
GHBVTXFZBT 1.Ghb hfpvjhföbdfzbb afhif hfpltkbnm tuj zf gkjcrbt jlbzfrjdst gj hfpvthe recrb.
GHBVTXFZBTGHBVTXFZBT
Russia R347H O/M,Ru, P10-19 03.7.4, 5:24 PM15
2.Recjxrb rehbws, vycf b jn<bdzst pfvjhföbdfnm jnltkmzj lheu jn lheuf d jlbz ckjq. Tckb
ztj<üjlbvj, bcgjkmpeqnt gkfcnbrjdst ghjrkflrb lky hfpltktzby ckjtd. Änj ufhfznbhetn
hfdzjvthzjt hfpvjhföbdfzbt.
3.>eltn elj<zj, tckb ghjlern gjvtotz d egfrjdre, zf rjnjhjq erfpfz tuj dtc.
15
Page 23

A39566,Russia R347H O/M,RU
LHEUBT ELJ>ZST AEZRWBB
Aezrwby ”vtzmit-<jkmit“
Dhtvy ghbujnjdktzby d vtz+ fdnjvfnbxtcrjuj ghbujnjdktzby hfccxbnfzj zf zfb<jktt hfcghjcnhfztzzsq
drec. Lky bpvtztzby dhtvtzb ghbujnjdktzby d cjjndtncndbb c bzlbdblefkmzsvb ghtlgjxntzbyvb
ljcnfnjxzj zföfnm zf rkfdbie ”VJOZJCNM“. Lky edtkbxtzby dhtvtzb ghbujnjdktzby zfövbnt jlbz hfp
(”PLUS“), f lky evtzmitzby — ldf hfpf (”LESS“).
C gjvjom+ aezrwbb ”vtzmit — <jkmit“ dhtvy ghbujnjdktzby htuekbhetncy ghb bcgjkmpjdfzbb cktle+obü
aezrwbq:
—>SCNHJT LTQCNDBT
—>SCNHFY HFPVJHJPRF
—GHJCNFY HFPVJHJPRF
(1) >SCNHJT LTQCNDBT
* Ghtlgjkjöbv, Ds üjnbnt hfpjuhtnm 1 cnfrfz zfgbnrf pf dhtvy, vtzmitt, xtv ghb cnfzlfhnzjq ecnfzjdrt.
IfuIfu
Ifu
IfuIfu
Zfövbnt zf rkfdbie ”ZFGBNRB“ jlbz
hfp.
1
JgthfwbyJgthfwby
Jgthfwby
JgthfwbyJgthfwby
RzjgrfRzjgrf
Rzjgrf
RzjgrfRzjgrf
x 1
LbcgktqLbcgktq
Lbcgktq
LbcgktqLbcgktq
Zt gjpöt xtv xthtp 2 ctrezls zfövbnt
zf rkfdbie ”VJOZJCNM“ ldf hfpf.
2
(2) >SCNHFY HFPVJHJPRF, GHJCNFY HFPVJHJPRF
* Ghtlgjkjöbv, Ds cj<bhftntcm hfpvjhjpbnm 1,0 ru rehbws recjxrfvb (”GHJCNFY HFPVJHJPRF“) pf
dhtvy, <jkmitt xtv ghb cnfzlfhnzjv htöbvt.
JgthfwbyJgthfwby
Jgthfwby
IfuIfu
Ifu
IfuIfu
Zfövbnt zf rkfdbie ”GHJCNFY
HFPVJHJPRF“ xtnsht hfpf d ckexft
1
recjxrjd rehbzjuj abkt.
C gjvjom+ rzjgjr c wbahfvb
ddtlbnt dtc.
JgthfwbyJgthfwby
RzjgrfRzjgrf
Rzjgrf
RzjgrfRzjgrf
x 2
x 4
LbcgktqLbcgktq
Lbcgktq
LbcgktqLbcgktq
2
Zfövbnt zf rkfdbie ”VJOZJCNM“
jlbz hfp.
3
Zfövbnt zf rzjgre ”>SCNHJT
GHBUJNJDKTZBT/GECR“.
x 1
4
D ckexft ds<jhf vtz+ aezrwbb ”>SCNHFY HFPVJHJPRF“, bcgjkmpeqnt rkfdbie ”>SCNHFY
HFPVJHJPRF
lj gezrnf 3.
Russia R347H O/M,Ru, P10-19 03.7.4, 5:24 PM16
“
dvtcnj rkfdbib ”GHJCNFY HFPVJHJPRF“ d gezrnt 1 b dsgjkzyqnt ltqcndby
16
Page 24

A39566,Russia R347H O/M,RU
Nfqvth
Änf aezrwby bcgjkmpetncy d j<obü wtkyü, zfghbvth:
lky rjznhjky pf dhtvtztv ghbujnjdktzby ybw drhene+ zf ufpjdjq bkb äktrnhbxtcrjq gkbnt gj
xfcfv;
lky rjznhjky pf dhtvtztv dslthörb ujnjdyotujcy <k+lf d cjjndtncndbb c htrjvtzlfwbyvb.
Bvttncy djpvjözjcnm ddjlf k+<juj dhtvtzb lj 99 vbzen 99 ctrezl. Lky c<hjcf gjrfpfzbq nfqvthf dj
dhtvy j<hfnzjuj jncxtnf ljcnfnjxzj zföfnm rzjgre ”CNJG/C>HJC“, b zf lbcgktt dzjdm gjydbncy
ntreott dhtvy.
* Ghtlgjkjöbv, Ds üjnbnt dscnfdbnm nfqvth zf 3 vbzens lky dfhrb ybw zf gkbnt.
RzjgrfRzjgrf
Rzjgrf
IfuIfu
Ifu
IfuIfu
Ddtlbnt zeözjt dhtvy.
JgthfwbyJgthfwby
Jgthfwby
JgthfwbyJgthfwby
RzjgrfRzjgrf
LbcgktqLbcgktq
Lbcgktq
LbcgktqLbcgktq
1
Rjulf djlf d rfcnh+kt c yqwjv pfrbgbn, vjözj drk+xfnm nfqvth.
Zfövbnt zf rkfdbie ”NFQVTH/
XFCS“.
2
Nfqvth zfxbzftn j<hfnzsq
jncxtn. Ghb ljcnbötzbb
zektdjuj pzfxtzby hfplftncy
pderjdjq cbuzfk.
>kjrbhjdrf jn ltntq
Tckb gtxm <eltn ckexfqzj drk+xtzf ghb jncencndbb ghjlernjd/öblrjcnb dj dzenhtzztq gjkjcnb, jzf vjötn
gjkexbnm gjdhtöltzbt.
Lky ghtljndhfotzby ckexfqzjcntq gjlj<zsü änjq, lky Dfitq gtxb ghtlecvjnhtzf aezrwby ”>KJRBHJDRF
JN LTNTQ“, rjnjhe+ vjözj ecnfzjdbnm, rjulf gtxm zt bcgjkmpetncy.
Lky ecnfzjdrb aezrwbb ”>KJRBHJDRF JN LTNTQ“ zfövbnt rkfdbie NFQVTH/XFCS“,
rkfdbie ”>SCNHJT GHBUJNJDKTZBT/GECR“, b elthöbdfqnt d ntxtzbt 3 ctrezl. Zf lbcgktt gjydbncy
cjj<otzbt
D änjn vjvtzn <eltn pf<kjrbhjdfzf GFZTKM EGHFDKTZBY, b rfölsq hfp ghb zföfnbb k+<jq rkfdbib
zf lbcgktt <eltn dscdtxbdfnmcy cjj<otzbt ”SAFE“.
Lky czynby <kjrbhjdrb c gfztkb eghfdktzby zfövbnt rkfdbie ”NFQVTH/XFCS“,
C>HJC“. Zf lbcgktt <eltn dscdtxbdfnmcy ntreott dhtvy, f gtxm <eltn ujnjdf r bcgjkmpjdfzb+.
.
b rkfdbie ”CNJG/
Htöbv ltvjzcnhfwbb
Lfzzfy aezrwby ghtlzfpzfxtzf ukfdzsv j<hfpjv lky bcgjkmpjdfzby d njhujdsü njxrfü, f nfröt jzf
gjpdjkbn Dfv gjghfrnbrjdfnmcy d dsgjkztzbb rk+xtdsü ltqcndbq.
Lky ltvjzcnhfwbb zfövbnt rkfdbie ”NFQVTH/XFCS“,
GHBUJNJDKTZBT/GECR“, b elthöbdfqnt d ntxtzbt 3 ctrezl. Zf lbcgktt gjydbncy cjj<otzbt
Ltqcndby gj ghbujnjdktzb+ d änjn vjvtzn vjuen <snm ghjltvjzcnhbhjdfzs <tp drk+xtzby gbnfzby gtxb.
Zfghbvth, zfövbnt rkfdbie ”>SCNHJT GHBUJNJDKTZBT/GECR“ b zf lbcgktt <elen dscdtxbdfnmcy
bzlbrfwby
nfqvth ljcnbuztn zeky, zf lbcgktt gjydbncy cjj<otzbt
Lky jnvtzs zfövbnt rkfdbie ”NFQVTH/XFCS“ b rkfdbie ”CNJG/C>HJC“.
b j<hfnzsq jncxtn lj zeky cj crjhjcnm+ d ltcynm hfp ghtdsif+otq zfcnjyoe+. Rjulf
b zfövbnt rkfdbie ”>SCNHJT
.
b zfövbnt
.
Cbuzfkbpfwby
Gtxm jczfotzf aezrwbtq cbuzfkbpfwbb. Tckb ghjlerns gjckt ghbujnjdktzby jcnfdbnm d gtxb, xthtp
2 vbzens hfplfcncy 3-rhfnzsq pderjdjq cbuzfk.
Tckb ghjlerns zt dszenm b gjckt änjuj, nj 3-rhfnzsq pderjdjq cbuzfk hfplfcncy xthtp 4 b xthtp 6 vbzen.
17
Russia R347H O/M,Ru, P10-19 03.7.4, 5:24 PM17
Page 25

A39566,Russia R347H O/M,RU
EÜJL PF GTXM*
Gthtl ntv, rfr ghbcnegbnm r jxbcnrt gtxb, jncjtlbzbnt izeh gbnfzby b, gj djpvjözjcnb, jcnfdmnt ldthwe
jnrhsnjq c ntv, xnj<s zf änj dhtvy bcrk+xbnm djpvjözjcnm drk+xtzby gtxb.
XBCNBNT GTXM C HTUEKYHZSVB BZNTHDFKFVB - Lthöbnt gtxm xbcnjq bkb vjötn bvtnm vtcnj
gjdhtöltzbt tt gjdthüzjcnb. Änj vjötn jrfpfnm zt<kfujghbynzjt ltqcndbt zf ljkujdtxzjcnm ghb<jhf b
vjötn ghbdtcnb d htpekmnfnt r jgfczjq cbnefwbb.
Dztizyy cnjhjzf:Dztizyy cnjhjzf:
Dztizyy cnjhjzf:
Dztizyy cnjhjzf:Dztizyy cnjhjzf:
Dztizbq rjöeü rjhgecf cktletn vsnm ntgkjq djljq c vyurbv vskjv, f pfntv dsnbhfnm zfceüj nrfzm+.
Bp<tufqnt bcgjkmpjdfzby ötcnrbü f<hfpbdzsü vj+obü chtlcnd.
Ldthwf:Ldthwf:
Ldthwf:
Ldthwf:Ldthwf:
Lky elfktzby gyntz b <hspu xfcnj ghjnbhfqnt dkfözjq nrfzm+ ldthwe b jrzj c j<tbü cnjhjz, egkjnztzby
ldthws b ghbktuf+obt xfcnb. Zt ghbvtzyqnt f<hfpbdzst xbcnyobt chtlcndf.
Gfztkm eghfdktzby:Gfztkm eghfdktzby:
Gfztkm eghfdktzby:
Gfztkm eghfdktzby:Gfztkm eghfdktzby:
Ghjnbhfqnt gfztkm vyurjq nrfzm+, ckturf cvjxtzzjq djljq.
Zt bcgjkmpeqnt lky xbcnrb otnrb b übvbxtcrbt xbcnyobt chtlcndf. Zt bcgjkmpeqnt lky xbcnrb <jkmijt
rjkbxtcndj djls.
Dzenhtzzbt cntzrb:Dzenhtzzbt cntzrb:
Dzenhtzzbt cntzrb:
Dzenhtzzbt cntzrb:Dzenhtzzbt cntzrb:
Lky jxbcnrb dzenhtzzbü gjdthüzjcntq ghjnbhfqnt bü vyurjq nrfzm+, cvjxtzzjq ntgkjq djljq gj
ububtzbxtcrbv cjj<hfötzbyv. Gjckt hf<jns gtxb lky elfktzby <hspu jn ghjlernjd zf rhsirt djkzjdjlf
ghjnbhfqnt tt vyurjq dkfözjq nrfzm+. Djpvjötz gthtuhtd <hspu zf rhsirt c gjcktle+obv gjydktzbtv
lsvf b djcgkfvtztzbtv. Rhsire djkzjdjlf zt czbvfqnt. ZT GHB>TUFQNT R JXBCNRT RFRJQ-KB>J
XFCNB VBRHJDJKZJDJQ GTXB GHJVSIKTZZSVB CHTLCNDFVB LKY JXBCNRB GTXTQ,
F>HFPBDZSVB B UHE>SVB XBCNYOBVB CHTLCNDFVB, F NFRÖT VTNFKKBXTCRBVB
VJXFKRFVB. PFGHTOFTNCY ZFZJCBNM XBCNYOBT CHTLCNDF LKY VBRHJDJKZJDSÜ GTXTQ
BP >FKKJZXBRF ZTGJCHTLCNDTZZJ ZF GTXM. Zt bcgjkmpeqnt ckbirjv <jkmijt rjkbxtcndj djls.
Gjckt jxbcnrb gtxb j<ypfntkmzj elfkbnt dc+ djle vyurjq nrfzm+.
Gjdjhjnzsq cnjkbr, hjkbrjdsq k+ztn:Gjdjhjnzsq cnjkbr, hjkbrjdsq k+ztn:
Gjdjhjnzsq cnjkbr, hjkbrjdsq k+ztn:
Gjdjhjnzsq cnjkbr, hjkbrjdsq k+ztn:Gjdjhjnzsq cnjkbr, hjkbrjdsq k+ztn:
Dsvjqnt ckf<sv vskmzsv hfcndjhjv, f pfntv dsnhbnt zfceüj.
GTHTL NTV RFR DSPDFNM VFCNTHF
Ghjdtlbnt cktle+oe+ ghjdthre:
1. Ujhbn kb lbcgktq£
2. Drk+xftncy kb kfvgf gtxb ghb jnrhsnbb ldthws£
3. Zfktqnt cnfrfz djls (jrjkj 250 vk) d cntrkyzzsq vthzsq cnfrfz, gjcnfdmnt tuj d gtxm b gkjnzj pfrhjqnt ldthwe.
Tckb ldthwf pfrhsnf gkjnzj, kfvgjxrf gjufcztn.
Dscnfdbnt gtxm zf 1 vbzene hf<jns zf dscjrjv ehjdzt vjozjcnb. Xnj ghjbcüjlbn d änj dhtvy£
f. Ujhbn kb kfvgjxrf d gtxb£ LF
<. Hf<jnftn kb dtznbkynjh£ LF ZTN
(Gjlthöbnt here zfl dtznbkywbjzzsv jndthcnbtv.)
d. Dhfoftncy kb gjdjhjnzsq cnjkbr£ LF
(Cnjkbr vjötn dhfofnmcy rfr gj xfcjdjq cnhtkrt, nfr b ghjnbd.)
u. Dscdtxbdftncy kb bzlbrfnjh
l. >sk kb cksitz pderjdjq cbuzfk b gjufc kb bzlbrfnjh ”COOK
cgecny jlze vbzene£ LF ZTN
t. >sk kb cksitz pderjdjq cbuzfk cgecny jlze vbzene£ LF ZTN
Tckb üjny <s zf jlbz bp änbü djghjcjd <sk jndtn ”ZTN“, ghjdthmnt hjptnre b ghj<rb d rdfhnbht.
Tckb b hjptnrf, b ghj<rb bcghfdzs, cdyöbntcm c <kböfqibv wtznhjv ntüzbxtcrjuj j<ckeöbdfzby abhvs ”Ifhg“.
GHBVTXFZBT.
1. Tckb jncxtn dhtvtzb zf lbcgktt bltn jxtzm <scnhj, ghjdthmnt ltvjzcnhfwbjzzsq htöbv. (Gjlhj<zjcnb cv. zf cnh. 17.)
2.
Tckb Ds <eltnt ujnjdbn gboe d ntxtzbt <jktt 40 vbzen ghb dscjrjq vjozjcnb HIGH, vjozjcnm bpkextzby
vbrhjdjkz evtzmibncy fdnjvfnbxtcrb lky njuj, xnj<s bp<töfnm gthtdfhbdfzby.
”
COOK“£LFZTN
“
LF ZTN
LF ZTN
ZTN
ZTN
NTÜZBXTCRBT ÜFHFRNTHBCNBRB
Zfghyötzbt gthtvtzzjuj njrf: jlbzjxzfy afpf, 220 D, 50 Uw
Gjnht<kytvfy vjozjcnm gthtvtzzjuj njrf 1,6 rDn
Dsüjlzfy vjozjcnm 1100 Dn*
Cdthüdscjrfy xfcnjnf: 2450 VUw
Uf<fhbnzst hfpvths: 520 vv (ibhbzf) x 302 vv (dscjnf) x 440 vv (uke<bzf)
Hfpvths öfhjxzjuj irfaf:
373 vv (ibhbzf) x 205 vv (dscjnf) x 398 vv (uke<bzf)$$$
Tvrjcnm gtxb: 30 kbnhjd (1.1 aen
Hfdzjvthzjcnm ghbujnjdktzby: j<tcgtxbdftncy
Vfccf: ghb<kbpbntkmzj 17 ru
*
Änj pzfxtzbt gjkextzj gj vtnjlbrt Vtölezfhjlzjq äktrnhjntüzbxtcrjq rjvbccbb lky bpvthtzby dsüjlzjq vjozjcnb.
**
Änj rkfccbabrfwby j<jheljdfzby ISM (ghjvsiktzzjuj, zfexzjuj b vtlbwbzcrjuj), jgbcfzbt rjnjhjuj ghbdjlbncy d
vtölezfhjlzjv cnfzlfhnt CISPR11.
***
Dzenhtzzbq j<ßtv gtxb dsxbckytncy bpvthtzbtv dscjns, uke<bzs b ibhbzs gtxb.
Ltqcndbntkmzsq j<ßtv ghbujnjdkytvsü ghjlernjd vtzmit.
(Gjhyljr ghjdtltzby bcgsnfzby VÄR)
** (Rkfcc D, Uheggf 2)
3
)***
ghbvtztzbtv gjdjhjnzjuj cnjkbrf (ø335 vv)
18
Russia R347H O/M,Ru, P10-19 03.7.4, 5:24 PM18
Page 26

A39566,Russia R347H O/M,RU
SHARP CORPORATION OSAKA, JAPAN
Russia R347H O/M,Ru, P10-19 03.7.4, 5:24 PM19
19
TINSRA006WRRZ-Z31
Page 27

A39566,Russia R347H O/M,EN
WARNING
IMPORTANT SAFETY INSTRUCTIONS: READ CAREFULLY AND KEEP FOR FUTURE REFERENCE.
1. To reduce the risk of fire in the oven cavity:
a.Do not overcook food.
b.Remove wire twist-ties from paper or plastic bags before placing bag in the oven.
c. Do not heat oil or fat for deep frying. The temperature of the oil cannot be controlled.
d.Look at the oven from time to time when food is heated in disposable containers made of plastic, paper
or other combustible materials for signs of smoke or burning.
e.If materials inside the oven should ignite, or smoke is observed, keep oven door closed, turn oven
off, and disconnect the power cord, or shut off power at the fuse or circuit breaker panel.
2. To reduce the risk of an explosion or delayed eruptive boiling:
a.Do not place sealed containers in the oven. Babies bottles fitted with a screw cap or teat are
considered to be sealed containers.
b.Do not use excessive amount of time.
c. When boiling liquids in the oven, use a wide-mouthed container.
d.Stand at least for 20 seconds at the end of cooking to avoid delayed eruptive boiling of liquids.
e.Stir the liquid before and during cooking. Use extreme care when handling the container or inserting
a spoon or other utensil into the container.
3. This oven is for home food preparation only and should only be used for heating, cooking and defrosting
food and beverage.
It is not suitable for commercial, or laboratory use.
4. Never operate the oven whilst any object is caught or jammed between the door and the oven.
5. Do not try to adjust or repair the oven yourself.
It is hazardous for anyone other than a qualified service technician trained by SHARP to carry out any
service or repair operation. Especially those which involve the removal of a cover which gives protection
against exposure to microwave energy are very hazardous.
6. Do not operate the oven if it is not working correctly or damaged until it has been repaired by a qualified
service technician trained by SHARP. It is particularly important that the oven door closes properly and
that there is no damage to:
(1) Door (warped), (2) Hinges and Latches (broken or loosened), (3) Door Seals, Sealing Surfaces and
oven cavity (buckled or deformed).
7. Do not catch the utensil, your clothes or accessories on the door safety latches when you take out the
food from the oven.
8. Always use oven mittens to prevent burns when handling utensils that are in contact with hot food. Enough
heat from the food can transfer through utensils to cause skin burns.
9. Should the supply cord become damaged, it must be replaced with a special cord supplied by a SERVICE
CENTRE APPROVED BY SHARP. And it must be replaced by a qualified service technician trained by
SHARP.
10.Avoid steam burns by directing steam away from the face and hands.
Slowly lift the furthest edge of a dish's cover and microwave plastic wrap and carefully open popcorn and
oven cooking bags away from the face.
11.Make sure that the power supply cord is undamaged, and that it does not run under the oven or over any
hot surfaces or sharp edges.
12.If the oven lamp fails please consult your dealer or a qualified service technician trained by SHARP.
13.To prevent the turntable from breaking:
a.Before cleaning the turntable with water, leave the turntable to cool.
b.Do not place anything hot on a cold turntable.
c.Do not place anything cold on a hot turntable.
14.Do not store food or any other items inside the oven.
15.Make sure the utensil does not touch the interior walls during cooking.
16.Only allow children to use the oven without supervision when adequate instructions have been given so that
the child is able to use the oven in a safe way and understands the hazards of improper use.
17.This appliance is not intended for use by young children or infirm persons without supervision.
18.Young children should be supervised to ensure that they do not play with the appliance.
Russia R347H,En,P01-03 03.10.23, 4:33 PM1
E – 1
Page 28

A39566,Russia R347H O/M,EN
SPECIAL NOTES
DO DON’T
Eggs, fruits,
nuts, seeds,
vegetables,
sausages and
oysters
Popcorn
Baby food
General
Liquids
(Beverages)
* Puncture egg yolks and whites and
oysters before cooking to prevent
"explosion".
* Pierce skins of potatoes, apples,
squash, hot dogs, sausages and
oysters so that steam escapes.
* Use specially bagged popcorn for the
microwave oven.
* Listen while popping corn for the
popping to slow to 1-2 seconds.
* Transfer baby food to small dish and
heat carefully, stirring often. Check for
suitable temperature.
* Remove the screw cap and teat
before warming baby bottles. After
warming shake thoroughly. Check for
suitable temperature.
* Food with filling should be cut after
heating, to release steam and avoid
burns.
* Use a deep bowl when cooking liquids
or cereals to prevent boiling over.
* For boiling or cooking liquids see
WARNING on page E-1 to prevent the
explosion and delayed eruptive
boiling.
* Cook eggs in shells to prevent
"explosion". which may damage the
oven or injure yourself.
* Reheat whole eggs.
* Overcook oysters.
* Dry nuts or seeds in shells.
* Pop popcorn in regular brown bags or
glass bowls.
* Exceed maximum time on popcorn
package.
* Heat disposable bottles.
* Overheat baby bottles.
Only heat until warm.
* Heat bottles with nipples on.
* Heat baby food in original jars.
* Heat or cook in closed glass jars or
airtight containers.
* Deep fat fry.
* Dry wood, herbs, wet papers, clothes or
flowers.
* Operate the oven empty.
* Heat for longer than recommended time.
Canned foods
Sausage rolls,
Pies, Christmas
pudding
Meats
Utensils
Aluminium foil
Browning dish
* Remove food from can.
* Cook for the recommended time.
(These foods have high sugar and/ or
fat contents.)
* For microwave cooking, use a
microwave proof roasting rack to
collect drained juices.
Roasting rack:
* Check the utensils are suitable for
MICROWAVE cooking before you use
them.
* Use to shield food to prevent over
cooking.
* Watch for sparking. Reduce foil or
keep clear of cavity walls.
* Place a suitable insulator such as
microwave and heat proof dinner plate
between the turntable and the
browning dish.
E – 2
* Heat or cook food while in cans.
* Overcook as they may catch fire.
* Place meat directly on the turntable for
cooking.
* Use metal utensils for MICROWAVE
cooking. Metal reflects microwave
energy and may cause an electrical
discharge known as arcing.
* Use too much.
* Shield food close to cavity walls.
Sparking can damage the cavity.
* Exceed the preheating time recom-
mended by the manufacturer. Exces-
sive preheating can cause the glass
turntable to shatter and/or damage
internal parts of the oven.
Russia R347H,En,P01-03 03.10.23, 4:33 PM2
Page 29

A39566,Russia R347H O/M,EN
INSTALLATION INSTRUCTIONS
1. Remove all packing materials from the oven cavity . Check the unit for any damage, such as a
misaligned door, damaged gaskets around the door or dents inside the oven cavity or on the door.
If there is any damage, please do not operate the oven until it has been checked by a SERVICE CENTRE
APPROVED BY SHARP and repaired, if necessary.
2. Accessories provided
1) Turntable tray
2) Roller stay
3) Operation manual
4) 2 Cook books
3. Locate the roller stay in the centre of the oven, then fit the turntable on the roller stay. Make sure the
turntable and roller stay are centrally located and locked together. NEVER OPERATE THE OVEN
WITHOUT THE ROLLER STAY AND TURNTABLE.
4. The oven should not be installed in any area where excessive heat and steam are generated, for
example, next to a conventional oven unit. The oven should be installed so as not to block ventilation
openings.
Allow at least 15 cm on the top of the oven for free air space.
5. Neither the manufacturer nor the distributors can accept any liability for damage to the machine or
personal injury for failure to observe the correct electrical connecting procedure.
The A.C. voltage must be single phase 220V, 50Hz.
6. THIS APPLIANCE MUST BE EARTHED.
OVEN DIAGRAM
62
3
1. Door open button
2. Oven lamp
3. Door hinges
4. Door safety latches
5. See through door
6. Door seals and sealing surfaces
7. Coupling
7
C
9
8
A
1
B
0445
D
8. Control panel (See page E-4)
9. Digital readout
10. Waveguide cover (Do not remove)
11. Turntable
12. Roller stay
13. Ventilation openings
14. Power supply cord
15. Rating label
E
Russia R347H,En,P01-03 03.10.23, 4:33 PM3
E – 3
Page 30

A39566,Russia R347H O/M,EN
OPERATION OF TOUCH CONTROL PANEL
The operation of the oven is controlled by pressing the appropriate pads arranged on the surface of the control
panel.
An entry signal tone should be heard each time you press the control panel to make a correct entry.
In addition the oven will beep for approximately 2 seconds at the end of the cooking cycle, or 4 times when a
cooking procedure is required.
Control Panel Display
Indicators
Touch Control Panel Layout
EXPRESS DEFROST PAD
Press to select the
Express Defrost menu.
NUMBER PADS
Press to enter cooking
times, clock time, weight
or quanity of food.
POWER LEVEL PAD
•Press to select micro-
wave power setting.
If not pressed, HIGH
POWER is automatically
selected.
•Press to alter the
cooking result for
automatic operations.
(less/more setting)
STOP/CLEAR PAD
•Press to clear during
programming.
•Press once to stop
operation of oven
during cooking; Press
twice to cancel cooking
programme.
EASY DEFROST PAD
Press to select the Easy
Defrost menu.
TIMER/CLOCK PAD
Press to set clock, timer,
child lock or demonstration mode.
INSTANT COOK/START
PAD
•Press to start oven after
setting programmes.
•Press once to cook for 1
minute at HIGH POWER
or increase by 1 minute
multiples each time this
pad is pressed during
cooking.
INSTANT ACTION PADS
Press to cook or reheat 8
popular menus.
Russia R347H,En,P04-08 03.10.23, 4:34 PM4
E – 4
Page 31

A39566,Russia R347H O/M,EN
Getting Started
Step
Plug the oven into a power point.
Ensure the oven door is closed.
Procedure Pad Order Display
1
Press the STOP/CLEAR pad so that the
oven beeps.
2
Clock Setting
This is a 12 hour clock.
* To enter the present time of day 11:34 (AM or PM).
Step
Press the TIMER/CLOCK pad once.
Procedure Pad Order Display
1
Enter the correct time of day by pressing
the numbers in sequence.
2
Flashing eights
Only the dots will remain.
The dots (:) will flash on
and off.
Press the TIMER/CLOCK pad again.
3
If you attempt to enter an incorrect clock time (Ex. 13:45),
Press the STOP/CLEAR pad and re-enter the time of day (Ex. 1:45).
If you wish to know the time of day during the cooking mode, press the TIMER/CLOCK pad. As long as
your finger is pressed the TIMER/CLOCK pad, the time of day will be displayed.
Stop/Clear
Press the STOP/CLEAR pad once to:
1. Stop the oven temporarily during cooking.
2. Clear if you make a mistake during programming.
To Cancel a Programme During Cooking
Press the STOP/CLEAR pad twice.
E – 5
will appear in the display.
Russia R347H,En,P04-08 03.10.23, 4:34 PM5
Page 32

A39566,Russia R347H O/M,EN
MANUAL OPERATIONS
Microwave Time Cooking
This is a manual cooking feature, first enter the cooking time then the power level.
You can programme up to 99 minutes, 99 seconds. There are five different power levels.
Power level
Approximate percentage
of microwave power
Display
Examples of foods typically cooked on microwave oven power level
This variable cooking control allows you to select the rate of microwave cooking.
If a power level is not selected, then HIGH power is automatically used.
*Suppose you want to cook vegetables for 2 minutes 30 seconds on HIGH power.
Step
–
–
–
–
–
–
LOW HIGHMEDIUM
–
–
10% 30% 50% 70% 100%
Keeping food
warm
–
–
–
–
–
–
–
–
–
–
–
–
–
–
–
–
–
–
––
–
–
–
–
–
–
–
Seafood
–
–
–
–
–
M•LOW M•HIGH
–
–
–
–
–
–
–
–
–
Defrost
–
–
Softening
–
––
butter
––
––
––
––
Pad Order DisplayProcedure
–
–
–
–
–
–
–
–
–
–
–
–
–
–
Casseroles
–
–
–
––
––
–
–
––
––
–
Cakes
Muffins
Slices
–
–
–
–
–
–
–
–
–
–
–
–
–
–
–
–
–
–
Fruit
–
–
Vegetable
–
––
Rice/Pasta
––
–
–
–
–
–
–
–
–
––
––
–
–
–
–
–
Enter desired cooking time.
1
START will flash on and off.
Press the INSTANT COOK/START
pad.
2
The timer begins to count down.
To lower the power press the POWER LEVEL pad until desired power level is displayed.
* Suppose you want to cook Fish Fillets for 10 minutes on MEDIUM power.
Step
Enter desired cooking time.
Procedure
Pad Order
Display
1
START will flash on and off.
Select power level by pressing the
POWER LEVEL pad as required
2
(for MEDIUM press three times).
x 3
Press the INSTANT COOK/START
pad.
3
The timer begins to count down.
If the door is opened during cooking process, the cooking time in the readout automatically stops. The cooking
time starts to count down again when the door is closed and the INSTANT COOK/START pad is pressed.
If you wish to know the power level during cooking, press the POWER LEVEL pad. As long as your finger
is touching the POWER LEVEL pad, the power level will be displayed.
If more than 40 minutes on HIGH power is entered,the microwave power will be reduced after 40 minutes
to avoid overheating.
Russia R347H,En,P04-08 03.10.23, 4:34 PM6
E – 6
Page 33

A39566,Russia R347H O/M,EN
Sequence Cooking
Your oven can be programmed for up to 3 automatic cooking sequences, switching from one variable
power setting to another automatically.
* Suppose you want to cook for 10 minutes on MEDIUM power followed by 5 minutes on HIGH power.
Step
Enter desired cooking time.
Procedure
1
Select power level by pressing the
POWER LEVEL pad.
(for MEDIUM press three times)
2
For second sequence, enter desired
cooking time.
(If power is not selected the oven will
3
operate at HIGH power).
Press the INSTANT COOK/START pad.
4
Pad Order
x 3
Display
START will flash on and off.
The timer begins to count
down.
When it reaches zero,
the second sequence will
appear and the timer will
begin to count down
again.
Instant Cook™
For your convenience Sharp’s Instant Cook allows you to easily cook for one minute on HIGH power.
Step
Press the INSTANT COOK/START pad.
(Within 3 minutes of closing the door.)
Procedure
Pad Order
Display
1
The timer begins to count
down.
Press the INSTANT COOK/START pad until desired time is displayed.
Each time the pad is pressed, the cooking time is increased by 1 minute.
E – 7
Russia R347H,En,P04-08 03.10.23, 4:34 PM7
Page 34

A39566,Russia R347H O/M,EN
Increasing Time During the Cooking Programme
Cooking time can be added during a cooking programme using the INSTANT COOK/START pad.
* Suppose you want to increase the cooking time by 2 minutes during 5 minutes on MEDIUM power.
(at the moment the remaining cooking time is 1 min. 30 sec.)
Step
Enter desired cooking time.
Procedure
1
Select power level by pressing the
POWER LEVEL pad.
(for MEDIUM press three times)
2
Press the INSTANT COOK/START pad.
3
Press the INSTANT COOK/START pad
twice to increase the cooking time by
two minutes.
4
DisplayPad Order
START will flash on and off.
x 3
The timer starts to count
down.
x 2
E – 8
The timer keeps on
counting down.
Russia R347H,En,P04-08 03.10.23, 4:34 PM8
Page 35

A39566,Russia R347H O/M,EN
AUTOMATIC OPERATIONS
Notes for Automatic Operations
1. When using the automatic features, carefully follow the details provided in each Menu Guide to
achieve the best result.
If the details are not followed carefully, the food may be overcooked or undercooked or
displayed.
2. Food weighing more or less than the quantity or weight listed in each Menu Guide, cook manually.
3. To change the final cooking or defrosting result from the standard setting, press the POWER LEVEL
pad once (PLUS) for more cooking time or twice (LESS) for less cooking time after selecting desired
setting. Refer to page E-17.
4. The final cooking result will vary according to the food condition (e.g.initial temperature, shape,
quality). Check the food after cooking and if necessary continue cooking manually.
5. To avoid children's misuse, each INSTANT ACTION pad can be used only within 3 minutes after
cooking completion, closing the door or pressing the STOP/CLEAR pad.
6. To defrost foods above or below the weights allowed on the EXPRESS DEFROST MENU GUIDE, use
EASY DEFROST or defrost manually.
7.
8. When entering the weight of the food, round off the weight to the nearest 0.1kg(100g). For example,
will be displayed if more or less than weight or quantity of foods suggested in EASY DEFROST
Menu Guide is programmed when the INSTANT COOK/START pad is pressed. To clear, press the
STOP/CLEAR pad and reprogramme.
0.35kg would become 0.4kg.
may be
Instant Action
The Instant Action allows you to cook or reheat several
popular foods.
Follow the details provided in INSTANT ACTION MENU
GUIDE on page E-10 and E-11.
* Suppose you want to cook 2 Jacket Potatoes.
Step
Press the JACKET POTATO pad until
desired quantity is displayed (for 2
pieces press twice).
Procedure Display
1
Pad Order
x 2
After about 2 sec.
The cooking time will begin counting
down. The oven will "beep" 4 times
and stop. COOK indicator will go off
and CHECK will flash on and off.
Open the door. Turn over potatoes.
Close the door.
2
Press the INSTANT COOK/START pad.
3
Russia R347H,En,P09-18 03.10.23, 4:35 PM9
START will flash on and off.
The cooking time will begin counting
down. When it reaches zero, the oven
will "beep".
E – 9
Page 36

A39566,Russia R347H O/M,EN
Instant Action Menu Guide
Quantity
Menu
Dinner Plate 1 serve
MEAT POTATO VEGETABLES
175-180g 125g 100g
Beef, Lamb sliced 2 varieties
Chicken, T-Bone eg. sliced Carrot, Zucchini
Beverage
includes: Tea
Coffee
Water
Reheat Pie
includes: Pies
Pasties
Reheat Pizza
Fresh Vegetables
Carrots
Potato
Beans
Brussels Sprouts
Broccoli
Cauliflower
Zucchini
Spinach
Cabbage
Unit per pressing each
( )
INSTANT ACTION pad
1 serve,
( )
approx. 400 g
Broccoli
1–4 cups
(1 cup, 250 ml)
1–4 pieces
1 piece,
( )
approx. 160–200 g
1–4 pieces
1 piece,
( )
approx. 90 g
0.2–1.0 kg
(0.2 kg)
hard vegetables
medium vegetables
soft vegetables
Temperature
Initial
(approx.)
+ 3°C
Refrigerated
+ 20°C
Room
temperature
– 18°C
Frozen
+ 3°C
Refrigerated
+ 3°C
Refrigerated
Procedure
• Cover with plastic wrap.
• After cooking, stand covered.
• No cover
• Place on the outside of turntable.
• After reheating, stir.
• Place upside down on the
turntable.
• Cover with paper towel.
• The oven will "beep" and stop.
CHECK will flash on and off.
Turn pies over and press start to
continue cooking.
• After cooking, stand.
• Place pizza on paper towel on
the turntable.
• Wash the vegetables.
• Cut potatoes into small pieces.
• Arrange the vegetables in a
shallow dish in the following way:
hard vegetables around the
outside, soft vegetables in the
centre, medium vegetables inbetween.
• Cover with glass lid or plastic
wrap.
• After cooking, stir then stand
covered.
NOTE: Use MORE setting for
potato.
Standing
Time
(minutes)
2
1 - 3
1 - 5
Russia R347H,En,P09-18 03.10.23, 4:35 PM10
E – 10
Page 37

A39566,Russia R347H O/M,EN
Menu
Frozen Vegetables
Carrots
Beans
Brussels Sprouts
Broccoli
Cauliflower
Corn
Green Peas
Mixed Vegetables
Jacket Potato
Potato (whole)
Rice / Pasta
includes: White Rice
Rice/Pasta
Soup stock or
Hot tap water
for Rice
Hot tap water
for Pasta
Serve
Dry Pasta
1 serve
1
/2 cup
11/2 cups
2 cups
Quantity
Unit per pressing each
( )
INSTANT ACTION pad
0.2–1.0 kg
(0.2 kg)
hard vegetables
medium vegetables
soft vegetables
1–10 pieces
1 piece,
( )
approx. 150 g
1–4 serves
1 piece,
( )
1
/2 cup
2 serves
21/2 cups
21/2 cups
1 cup
3 serves
11/2 cups
3 cups
3 cups
4 serves
2 cups
4 cups
4 cups
Temperature
(approx.)
– 18°C
Frozen
+ 20°C
Room
temperature
approx. +60°C
hot tap water
or soup stock
Initial
Procedure
• Before cooking, separate
vegetables eg. broccoli as much
as possible.
• Arrange the vegetables in a
shallow dish in the following way :
hard vegetables around the
outside, soft vegetables in the
centre, medium vegetables inbetween.
• Cover with a glass lid or plastic
wrap.
• After cooking, stir then stand
covered.
• Use washed new potatoes.
• Pierce twice with fork on each
side.
• Place on outside of turntable.
• The oven will "beep" and stop.
CHECK will flash on and off.
Turn potatoes over and press
start to continue cooking.
• After cooking, stand, covered with
aluminium foil.
•Wash rice thoroughly until water
runs clear.
• Place into a Pyrex® bowl and
cover with hot soup stock (for
rice) or with hot tap water (for rice
or pasta).
• Cook uncovered.
• The oven will "beep" and stop.
CHECK will flash on and off.
Stir and press start to continue
cooking.
• After cooking, stand and stir.
Standing
Time
(minutes)
1 - 5
3 - 10
3 - 5
Russia R347H,En,P09-18 03.10.23, 4:35 PM11
E – 11
Page 38

A39566,Russia R347H O/M,EN
Express Defrost
1.Fish Fillets
2.Chicken Fillets
3.Sausages /
Minced Meat
* Suppose you want to defrost 0.5 kg of Chicken fillets.
Step
Press the EXPRESS
DEFROST pad until the
desired menu number is
1
displayed (for Chicken
Fillets press twice).
Press the INSTANT COOK/
START pad.
Procedure Pad Order Display
EXPRESS DEFROST rapidly defrosts 3 types of meat in
specific weights.
Follow the details provided in Express Defrost Menu
Guide on page E-13.
x 2
2
Open the door. Turn over
and rearrange. Shield the
defrosted portions.
3
Close the door.
Press the INSTANT COOK/
START pad.
START will flash on and off.
The defrosting time will begin counting
down. When a 4 times "beep" sound is
heard, the oven stops. CHECK will flash
on and off.
START will flash on and off.
4
The defrosting time will continue
counting down. When it reaches zero,
the oven will "beep".
E – 12
Russia R347H,En,P09-18 03.10.23, 4:35 PM12
Page 39

A39566,Russia R347H O/M,EN
Express Defrost Menu Guide
No.
Menu
Fish Fillets
1
Chicken Fillets
2
Sausages / Minced Meat
3
NOTE 1. When freezing minced meat, shape it into flat even sizes.
2. For fish fillets, chicken fillets and sausages, freeze separately in single flat layers and if
necessary interleave with freezer plastic to separate layers. This will ensure even
defrosting.
3. It is also a good idea to label the packs with the correct weights.
Quantity
(kg's)
0.5
0.5
0.5
Procedure
• Place fish fillets on a defrost rack.
• The oven will "beep" and stop, CHECK will
flash on and off. Turn over and separate into
pieces.
• Press start to continue defrosting.
• After defrost time, stand covered with
aluminium foil.
• Place chicken fillets on a defrost rack.
• The oven will "beep" and stop, CHECK will
flash on and off. Turn over and separate into
pieces.
• Press start to continue defrosting.
• After defrost time, stand covered with
aluminium foil.
• Place sausages / minced meat on a defrost
rack.
• The oven will "beep" and stop, CHECK will
flash on and off. Remove defrosted portions
of mince, turn over and shield edges with foil
strips.
• Press start to continue defrosting.
• After defrost time, stand covered with
aluminium foil.
Standing
Time
(minutes)
5
5
5
Russia R347H,En,P09-18 03.10.23, 4:35 PM13
E – 13
Page 40

A39566,Russia R347H O/M,EN
Easy Defrost
EASY DEFROST will automatically compute the microwave power and
defrosting time.
Follow the details provided in Easy Defrost Menu Guide on page E-15.
* Suppose you want to defrost 1.0 kg of Chicken Pieces.
Step
Press the EASY DEFROST pad until the
desired menu number is displayed (for
Chicken Pieces press four times).
1
Press the number pads to enter weight.
Procedure Pad Order Display
2
Press the INSTANT COOK/START pad.
3
Open the door. Turn over and rearrange.
Shield the defrosted portions.
Close the door.
4
x 4
KG will flash on and off.
START will flash on and
off.
The defrosting time will
begin counting down.
When a 4 times "beep"
sound is heard, the oven
stops. CHECK wil flash
on and off.
Press the INSTANT COOK/START pad.
5
START will flash on and
off.
The defrosting time will
continue counting down.
When it reaches zero, the
oven will "beep".
E – 14
Russia R347H,En,P09-18 03.10.23, 4:35 PM14
Page 41

A39566,Russia R347H O/M,EN
Easy Defrost Menu Guide
NO.
MENU
Steaks
Chops
1
Minced Meat
Beef/Pork
Roast Meat
Beef/Pork
Lamb
2
Poultry
3
Chicken Pieces
4
Food not listed in the Guide can be defrosted manually using M. LOW power level.
QUANTITY
(MIN. – MAX.)
0.1 - 3.0 kg
0.1 - 3.0 kg
0.5 - 3.0 kg
0.5 - 2.5 kg
1.0 - 4.0 kg
0.1 - 3.0 kg
PROCEDURE
• Shield thin end of chops or steaks with foil.
• Position the food with thinner parts in the centre
in a single layer on a shallow dish.
If pieces are stuck together, try to separate as
soon as possible.
• The oven will "beep" and stop, CHECK will flash
on and off. Remove defrosted pieces, turn over,
rearrange and shield the warm portions of
remaining pieces.
• Press start to continue defrosting.
• After defrost time, stand covered with
aluminium foil for 5-30 minutes.
• Place frozen minced meat on a shallow dish.
Shield edges.
• The oven will "beep" and stop, CHECK will flash
on and off. Remove defrosted portions of mince,
turn over and shield edges with foil strips.
• Press start to continue defrosting.
• After defrost time, stand covered with
aluminium foil for 10-30 minutes.
• Shield the bone and the edge with foil strips
about 2.5cm wide.
• Place joint with lean side face upwards (if
possible) on a shallow dish.
• The oven will "beep" and stop, CHECK will flash
on and off. Turn over and shield the warm
portions.
• Press start to continue defrosting.
• After defrost time, stand covered with
aluminium foil for 5-60 minutes.
• Remove from original wrapper. Shield wing and
leg tips with foil.
• Place breast side down on a shallow dish.
• The oven will "beep" and stop, CHECK will flash
on and off. Turn over and shield the warm
portions.
• Press start to continue defrosting.
• After defrost time, stand covered with
aluminium foil for 5-50 minutes.
NOTE After standing run under cold water to
remove giblets if necessary.
• Shield the exposed bone with foil.
• Place chicken pieces on a shallow dish.
• The oven will "beep" and stop, CHECK will flash
on and off. Remove any defrosted pieces, turn
over and shield the warm portions of remaining
pieces.
• Press start to continue defrosting.
• After defrost time, stand covered with
aluminium foil for 5-15 minutes.
NOTE 1. When freezing minced meat, shape it into flat even sizes.
2. For chicken pieces, steaks and chops, freeze separately in single flat layers and if necessary
interleave with freezer plastic to separate layers. This will ensure even defrosting.
3. It is also a good idea to label the packs with the correct weights.
Russia R347H,En,P09-18 03.10.23, 4:35 PM15
E – 15
Page 42

A39566,Russia R347H O/M,EN
OTHER CONVENIENT FEATURES
Less/More Setting
The cooking times programmed into the automatic menus are tailored to the most popular tastes. To
adjust the cooking time to individual preference, simply press the POWER LEVEL pad as adjustment.
Press once (PLUS) for more cooking or twice (LESS) for less cooking.
The Less/More setting can be used to adjust the cooking time of the following features:—
– INSTANT ACTION
– EXPRESS DEFROST
– EASY DEFROST
(1) INSTANT ACTION
* Suppose you want to reheat 1 cup of Beverage for less time than the standard setting.
Step
Press the BEVERAGE pad
once.
1
Procedure Pad Order Display
x 1
Press the POWER LEVEL
pad twice within 2
2
seconds.
(2) EXPRESS DEFROST, EASY DEFROST
* Suppose you want to defrost 1.0kg of Chicken Pieces (EASY DEFROST) for more time than the standard setting.
Step Procedure Pad Order Display
Press the EASY DEFROST
pad four times for Chicken
1
Pieces.
Press the number pads to
enter weight.
2
Press the POWER LEVEL
pad once.
3
Press the INSTANT COOK/
START pad.
4
x 2
x 4
x 1
For EXPRESS DEFROST select the menu using the EXPRESS DEFROST pad instead of the EASY
DEFROST pad in step 1 and go to step 3.
E – 16
Russia R347H,En,P09-18 03.10.23, 4:35 PM16
Page 43

A39566,Russia R347H O/M,EN
Timer
Use this feature as a general purpose timer. Example include:
timing boiled eggs cooked on the stove top.
timing the recommended standing time of food.
You can enter any time up to 99 minutes, 99 seconds. If you want to cancel the timer during the count
down phase simply press STOP/CLEAR pad and the display will return to showing time of day.
* Suppose you want to set the timer to 3 minutes for boiling an egg on the stove top.
Step
Enter desired time.
Procedure Pad Order
Display
1
Once the egg has come to the boil in the saucepan you can start the timer.
Press the TIMER/CLOCK pad.
2
Child Lock
If the oven is accidentally started with no food/liquid in the cavity, the oven could be damaged.
To prevent accidents like this, your oven has a "Child Lock" feature that you can set when the oven is not
in use.
To set the Child Lock, press the TIMER/CLOCK pad,
hold for 3 seconds. will appear in the display.
The Control Panel is now locked, each time a pad is pressed, the display will show "SAFE".
To unlock the control panel, press the TIMER/CLOCK pad,
is displayed and the oven is ready to use.
and press the INSTANT COOK/START pad and
and the STOP/CLEAR pad. The time of day
The timer begins to count
down. When the timer
reaches zero, the oven
will "beep".
Demonstration Mode
This feature is mainly for use by retail outlets, and also allows you to practice the key operation.
To demonstrate, press the TIMER/CLOCK pad ,
for 3 seconds. will appear in the display.
Cooking operations can now be demonstrated with no power in the oven. For example, press INSTANT
COOK/START pad, and the display will show and count down to zero at ten times the speed.
When the timer reaches zero, will appear in the display.
To cancel, press the TIMER/CLOCK pad,
and press the INSTANT COOK/START pad and hold
and the STOP/CLEAR pad.
Alarm
Your oven has an alarm function. If you leave food in the oven after cooking, the oven will "beep" 3 times
after 2 minutes.
If you do not remove the food at that time, the oven will "beep" 3 times after 4 minutes and 6 minutes.
E – 17
Russia R347H,En,P09-18 03.10.23, 4:35 PM17
Page 44

A39566,Russia R347H O/M,EN
CARE AND CLEANING
Disconnect the power supply cord before cleaning or leave the door open to inactivate the oven
during cleaning.
CLEAN THE OVEN AT REGULAR INTERVALS - Keep the oven clean, or it could lead to deterioration of the
surface. This could adversely affect the life of the appliance and possibly result in a hazardous situation.
Exterior:
The outside may be cleaned with mild soap and warm water, wipe clean with a damp cloth. Avoid the
use of harsh abrasive cleaners.
Door:
Wipe the door and window on both sides, the door seals and adjacent parts frequently with a damp cloth
to remove any spills or spatters. Do not use abrasive cleaner.
Control Panel:
Wipe the panel with a cloth dampened slightly with water only.
Do not scrub or use any sort of chemical cleaners. Avoid the use of excess water.
Interior walls:
To clean the interior surfaces, wipe with a soft cloth and warm water for hygienic reasons. After use
wipe the waveguide cover in the oven with a soft damp cloth to remove any food splashes. Builtup splashes may overheat and begin to smoke or catch fire. Do not remove the waveguide cover. DO
NOT USE A COMMERCIAL OVEN CLEANER, ABRASIVE OR HARSH CLEANERS AND SCOURING
PADS ON ANY PART OF YOUR MICROWAVE OVEN. NEVER SPRAY OVEN CLEANERS DIRECTLY
ONTO ANY PART OF YOUR OVEN.
Avoid using excess water. After cleaning the oven, ensure any water is removed with a soft cloth.
Turntable/Roller Stay:
Wash with mild soapy water and dry thoroughly.
SERVICE CALL CHECK
Check the following before calling service:
1. Does the display light? YES _______ NO _______
2. When the door is opened, does the oven lamp come on? YES _______ NO _______
3. Place one cup of water (approx. 250 ml) in a glass measuring cup in the oven and close the door
securely. Oven lamp should go off if door is closed properly.
Programme the oven for one minute on HIGH. At this moment:
A. Does the oven lamp light? YES _______ NO _______
B. Does the cooling fan work? YES _______ NO _______
(Put your hand over the rear ventilation openings.)
C. Does the turntable rotate? YES _______ NO _______
(The turntable can rotate clockwise or counterclockwise. This is quite normal.)
D Does COOK indicator light? YES _______ NO _______
E. After one minute, did an audible signal sound and COOK
indicator go off? YES _______ NO _______
F. Is the water inside the oven hot? YES _______ NO _______
If “NO” is the answer to any of the above questions, please check your wall socket and the fuse in your meter box.
If both the wall socket and the fuse are functioning properly, CONTACT YOUR NEAREST SERVICE
CENTER APPROVED BY SHARP.
NOTE: 1. If time in the display is counting down rapidly, check Demonstration Mode.
(Please see page E-17 for detail.)
2. If you cook the food over 40 minutes on HIGH power, the microwave power will be
automatically reduced to avoid overcooking.
SPECIFICATIONS
AC Line Voltage : Single phase 220V, 50Hz
AC Power Required : 1.6 kW
Output Power : 1100 W* (IEC test procedure)
Microwave Frequency : 2450 MHz** (class B/Group 2)
Outside Dimensions : 520mm(W) x 302mm(H) x 440mm(D)
Cavity Dimensions : 373mm(W) x 205mm(H) x 398mm(D)***
Oven Capacity : 30 liters (1.1 cu.ft)***
Cooking Uniformity : Turntable (ø335mm tray) system
Weight : Approx. 17 kg
* This measurement is based on the International Electrotechnical Commission’s standardised
method for measuring output power.
** This is the classification of ISM (Industrial, Scientific and Medical) equipment described in the
International Standard CISPR11.
*** Internal capacity is calculated by measuring maximum width, depth and height.
Actual capacity for holding food is less.
SHARP CORPORATION OSAKA, JAPAN
Russia R347H,En,P09-18 03.10.23, 4:35 PM18
E – 18
TINSRA006WRRZ-Z31
 Loading...